


AV Pre-Amplifier
Owner’s Manual
• This unit is a product for enjoying video and music at home.
• This manual explains preparations and operations for everyday users of the unit.
• Read the supplied booklet “Quick Start Guide” before using the unit.
EN

CONTENTS
Introduction 5
Accessories................................................................................... 5
About this book ............................................................................ 5
About remote control .................................................................... 6
Batteries ......................................................................................................................................................... 6
Operating range of the remote control......................................................................................................... 6
FEATURES 7
What you can do with the unit ........................................................ 7
AV CONTROLLER........................................................................................................................................... 12
MusicCast CONTROLLER.............................................................................................................................. 12
Part names and functions .............................................................13
Front panel ................................................................................................................................................... 13
Front display (indicators) ............................................................................................................................ 15
Rear panel..................................................................................................................................................... 16
Remote control ............................................................................................................................................ 18
PREPARATIONS 19
General setup procedure ..............................................................19
1 Placing speakers ........................................................................20
Basic speaker configuration ........................................................................................................................ 21
Input/output jacks and cables .................................................................................................................... 28
2 Connecting the power amplifier and subwoofers ..........................30
Connecting a power amplifier ..................................................................................................................... 30
Connecting subwoofers ............................................................................................................................... 31
3 Connecting a TV and playback devices .........................................33
Connecting a TV ............................................................................................................................................33
Connecting video devices (such as BD/DVD players).................................................................................. 34
Connecting audio devices (such as CD players) ..........................................................................................36
Connecting to the jacks on the front panel .................................................................................................37
4 Connecting the radio antennas.................................................... 38
FM/AM antennas (except Australia, U.K., Europe, Middle East and Russia models) .................................38
DAB/FM antenna (Australia, U.K., Europe, Middle East and Russia models only) .....................................38
5 Connecting a network cable or preparing the wireless antenna .....39
Connecting the network cable .....................................................................................................................39
Preparing the wireless antenna ...................................................................................................................39
6 Connecting other devices............................................................40
Connecting a device with analog multichannel output .............................................................................40
Connecting a device compatible with the trigger function ........................................................................40
7 Connecting the power cable........................................................41
8 Selecting an on-screen menu language ........................................42
9 Configuring the necessary speaker settings.................................. 43
10 Optimizing the speaker settings automatically (YPAO) ................44
Multi Measure................................................................................................................................................ 46
Angle/Height Measure ..................................................................................................................................47
Measuring at one listening position (single measure) ................................................................................47
Measuring at multiple listening positions (multi measure)........................................................................ 50
Checking the measurement results .............................................................................................................53
Reloading the previous YPAO adjustments .................................................................................................53
Error messages ............................................................................................................................................. 54
Warning messages ........................................................................................................................................55
11 Connecting to a network device wirelessly .................................56
Connecting with a wireless router (access point) .......................................................................................56
Connecting the unit to a wireless network..................................................................................................57
12 Connecting to the MusicCast network ........................................62
MusicCast CONTROLLER .............................................................................................................................. 62
Adding the unit to the MusicCast network ..................................................................................................62
En 2

PLAYBACK 63
Basic playback procedure .............................................................63
Selecting an HDMI output jack .................................................................................................................... 63
Selecting the input source and favorite settings with one touch
(SCENE) ......................................................................................64
Registering a scene ...................................................................................................................................... 64
Selecting the sound mode.............................................................65
Playing back with surround effects optimized for the scene (SURROUND:AI).......................................... 66
Enjoying stereoscopic sound fields (CINEMA DSP HD
Enjoying unprocessed playback.................................................................................................................. 70
Enjoying pure high fidelity sound (Pure Direct).......................................................................................... 71
Playing back digitally compressed formats (such as MP3, etc.) with enriched sound
(Compressed Music Enhancer) .................................................................................................................... 71
Listening to FM/AM radio (except Australia, U.K., Europe,
Middle East and Russia models) ....................................................72
Setting the frequency steps......................................................................................................................... 72
Selecting a frequency for reception ............................................................................................................ 73
Registering favorite radio stations (presets) .............................................................................................. 73
Listening to DAB radio (Australia, U.K., Europe, Middle East and
Russia models only) .....................................................................75
Preparing the DAB tuning ............................................................................................................................ 76
Selecting a DAB radio station for reception................................................................................................ 76
Registering favorite DAB radio stations (presets)....................................................................................... 77
Displaying the DAB information .................................................................................................................. 78
Checking reception strength of each DAB channel label ...........................................................................79
Listening to FM radio (Australia, U.K., Europe, Middle East and
Russia models only) .....................................................................81
Selecting a frequency for reception ............................................................................................................ 81
Registering favorite FM radio stations (presets)......................................................................................... 82
Radio Data System tuning ........................................................................................................................... 84
Playing back music via Bluetooth ..................................................85
Playing back Bluetooth device music on the unit ...................................................................................... 85
Playing back music stored on a USB storage device.........................86
Connecting a USB storage device ............................................................................................................... 86
Playback of USB storage device contents .................................................................................................. 87
3
) ............................................................................. 66
Playing back music stored on media servers (PCs/NAS) ...................90
Media sharing setup .....................................................................................................................................90
Playback of PC music contents ....................................................................................................................91
Listening to Internet radio ............................................................94
Playback of Internet radio............................................................................................................................ 94
Registering favorite Internet radio stations (Favorites) .............................................................................96
Playing back iTunes/iPod music with AirPlay..................................97
Playback of iTunes/iPod music contents ....................................................................................................97
Playing back videos/audio in multiple rooms (multi-zone) ..............99
Multi-zone configuration examples .............................................................................................................99
Preparing the multi zone system ...............................................................................................................100
Controlling Zone2, Zone3 or Zone4 ...........................................................................................................103
Registering favorite items (shortcut)........................................... 105
Registering an item.....................................................................................................................................105
Recalling a registered item.........................................................................................................................105
Viewing the current status.......................................................... 106
Switching information on the front display ..............................................................................................106
Viewing the status information on the TV .................................................................................................107
Configuring playback settings for different playback sources
(Option menu)........................................................................... 108
Option menu items .....................................................................................................................................109
En 3

CONFIGURATIONS 115
APPENDIX 153
Configuring various functions (Setup menu) ................................115
Setup menu items ...................................................................................................................................... 116
Speaker....................................................................................................................................................... 121
Sound.......................................................................................................................................................... 125
Scene .......................................................................................................................................................... 131
Video/HDMI................................................................................................................................................. 132
Network ...................................................................................................................................................... 135
Bluetooth.................................................................................................................................................... 138
Multi Zone................................................................................................................................................... 139
System ........................................................................................................................................................ 141
Configuring the system settings (ADVANCED SETUP menu)............147
ADVANCED SETUP menu items ................................................................................................................. 148
Turning on/off the remote control sensor (REMOTE SENSOR)................................................................ 148
Selecting the remote control ID (REMOTE ID)........................................................................................... 148
Changing the FM/AM tuning frequency setting (TUNER FRQ STEP) ........................................................ 148
Switching the video signal type (TV FORMAT) .......................................................................................... 149
Removing the limitation on HDMI video output (MONITOR CHECK)....................................................... 149
Selecting the HDMI 4K signal format (4K MODE) ...................................................................................... 149
Switching the DTS format notification setting (DTS MODE) .................................................................... 150
Backing up/recovering the settings (BACKUP/RESTORE)........................................................................ 150
Restoring the default settings (INITIALIZE)............................................................................................... 150
Updating the firmware (FIRM. UPDATE).................................................................................................... 151
Checking the firmware version (VERSION) ............................................................................................... 151
Updating the unit’s firmware via the network .............................. 152
Updating the unit’s firmware .................................................................................................................... 152
Additional Features.................................................................... 153
Playing back audio from the unit on Bluetooth®-enabled speakers/headphones .................................153
Using wireless surround speakers (MusicCast Surround function) .........................................................155
Frequently asked questions ........................................................ 156
Troubleshooting ........................................................................ 157
First, check the following: ..........................................................................................................................157
Power, system and remote control ........................................................................................................... 157
Audio ...........................................................................................................................................................158
Video............................................................................................................................................................160
FM/AM radio (AM radio feature is not available for the Australia, U.K., Europe, Middle East and
Russia models)............................................................................................................................................ 161
DAB radio (Australia, U.K., Europe, Middle East and Russia models only) ..............................................161
Bluetooth ....................................................................................................................................................162
USB and network ........................................................................................................................................163
Error indications on the front display .......................................... 165
Glossary.................................................................................... 166
Audio information (audio decoding format) .............................................................................................166
Audio Information (Others) ........................................................................................................................168
HDMI and video information ......................................................................................................................168
Network information ..................................................................................................................................169
Yamaha technologies .................................................................................................................................169
Supported devices and file formats ............................................. 170
Supported devices...................................................................................................................................... 170
File formats .................................................................................................................................................170
Video signal flow........................................................................ 171
Video conversion table ...............................................................................................................................171
Multi-zone output ...................................................................... 172
Information on HDMI.................................................................. 172
HDMI Control............................................................................................................................................... 172
Audio Return Channel (ARC) ...................................................................................................................... 174
HDMI signal compatibility ..........................................................................................................................174
Trademarks............................................................................... 175
Specifications............................................................................ 176
En 4
Introduction
Accessories
Check that the following accessories are supplied with the product.
AM antenna
#
(except Australia, U.K., Europe, Middle
East and Russia models)
FM antenna
#
(except Australia, U.K., Europe, Middle
East and Russia models)
DAB/FM antenna
#
(Australia, U.K., Europe, Middle East
and Russia models only)
YPAO microphone
#
Microphone base
#
Pole
Power cable
#
Remote control
#
Batteries (AAA, LR03, UM-4) (x2)
#
Quick Start Guide
#
About this book
The illustrations of the mai n unit used in this manual are of the CX-A5200 (U.S.A. model), unless
otherwise specified.
In this manual, illustrations of English menu screens are used as examples.
Some features are not available in certain regions.
Due to product improvements, specifications and appearance are subject to change without
notice.
This manual explains operations using the supplied remote control.
This manual describes all the “iPod touch”, “iPhone” and “iPad” as the “iPod”. “iPod” refers to
“iPod touch”, “iPhone” and “iPad”, unless otherwise specified.
Icons used in this manual
Y
indicates precautions for use of the unit and its feature limitations.
X
indicates supplementary explanations for better use.
* (Except Australia, U.K., Europe, Middle East and Russia models)
One of the above FM antennas is supplied depending on the region of purchase.
* The microphone base and pole are used for angle/height measurement during YPAO.
* The supplied power cable varies depending on the region of purchase.
En 5
About remote control
30° 30°
Within
6 m (20 ft)
This section explains how to use the supplied remote control.
Batteries
Insert the batteries the right way round.
Operating range of the remote control
Point the remote control at the remote control sensor on the unit and remain within the
operating range shown below.
En 6

FEATURES
HDMI Control
TV audio
Video from external
device
What you can do with the unit
The unit is equipped with the various useful features.
Playing back TV audio in surround
sound with a single HDMI cable
connection (Audio Return Channel:
ARC) (p.33)
When using an ARC-compatible TV, you only need one HDMI
cable to enable video output to the TV, audio input from the
TV, and the transmission of HDMI Control signals.
More advanced ENTERTAINMENT
sound programs (p.67)
By processing front left and front right sound fields
individually, the ENTERTAINMENT sound programs are
further improved in acoustic positioning and sound
transition. These programs allow you to enjoy clearer vocal
and instrumental sounds, distinct narrations, and more
dynamic sound effects.
Providing a realistic feel and
surround effect optimized for the
scene of the content
(SURROUND:AI) (p.66)
The AI incorporated in the DSP analyzes the scene of the
content and creates the optimal surround effect for it.
This AI instantaneously analyzes scenes by focusing on
sound elements such as “dialogue”, “background music”,
“ambient sounds” and “sound effects” as well as optimizes
the surround effect in real time.
This creates a compelling sense of realism with expressive
power beyond conventional sound field effects.
Various wireless connection
methods (p.56)
The unit supports the Wi-Fi feature that allows the unit to
connect to your wireless router (access point) without a
network cable connection.
Home Audio Network with
MusicCast (p.62)
The unit supports the MusicCast feature that allows you to
link a MusicCast compatible device to another device in a
different room and play them back simultaneously, or
control all MusicCast compatible devices with the dedicated
application “MusicCast CONTROLLER”.
Backlit remote control (p.18)
This unit’s backlit remote control provides excellent
visibility, making it easy to use, even in a dark room.
Additional Features (p.66)
This unit is equipped with a function for connecting speakers
wirelessly. Content being played back by this unit can be
sent to a Bluetooth device (speakers, headphones, etc.)
(p.153).
In addition, if a device that supports the MusicCast Surround
function is used, the surround speakers and subwoofer can
also be wireless. (p.155)
En 7

CINEMA DSP
CINEMA DSP HD
3
Level
CINEMA DSP 3D
Time
The excitement of a concert hall and the powerful sense of being inside a movie - we all want to enjoy these experiences in our own living room. Yamaha has pursued the fulfillment of these desires
for more than 30 years, and this fulfillment has now taken shape as the Yamaha AV receivers.
What is a sound field?
We perceive sound from a voice or an instrument not only as the sounds that are heard directly
but also as the “reflected” or “reverberant” sound that has been reflected by the walls or
ceiling of the building. The character of the reflected and reverberant sound is affected by the
shape, size, and material of the building, and all of these sounds taken together are what give
us the auditory sensation of being in that specific place.
This unique acoustical character of a specific space is what we call the “sound field”.
Conceptual diagram of a concert hall’s sound field
Conceptual diagram of a sound field created by the unit
CINEMA DSP
Yamaha has accumulated a massive amount of acoustical data by analyzing the actual sound
fields of concert halls and performance spaces around the world. “CINEMA DSP” allows this
data to be applied to create sound fields. This unit contains a wide variety of sound programs
using CINEMA DSP.
By selecting a sound program that is appropriate to the content of the playback source such as
movies, music, or games, you can maximize the acoustical effectiveness of that specific
content. (For example, a sound program designed for movies can give you the sensation of
actually being in that scene.)
CINEMA DSP HD
“CINEMA DSP HD3” is Yamaha’s flagship 3D sound field playback technology that takes full
advantage of the massive amount of acoustic reflection data included in the sound field data.
It delivers more than twice as much capability for generating acoustic reflections as
conventional CINEMA DSP 3D, in addition to high-frequency playback capability, delivering an
utterly natural and powerful spatial sound field.
Capability for reproducing reflections
(when the sound program “Hall in Munich” is selected)
3
En 8

YPAO
Compensation
Time
Level
YPAO Volume OFF
YPAO Volume ON
FrequencyLow High
Level
High
YPAO is Yamaha original automatic calibration system to optimizing your sound and surround environment by using microphone measurement. It can be create ideal listening environment for
maximizing high sound quality contents playback by adjusting various speakers setting and the sound field automatically.
YPAO-R.S.C.
In typical home, the sound has problems such as a blurred low-frequency range or a smearing
of the acoustical sound image caused by undesirable sound reflection from the walls or ceiling.
“YPAO-R.S.C.” is technology that reduces only the unwanted reflections and produces the
acoustic perfection for your listening environment.
YPAO Volume
YPAO Volume automatically adjusts the high and low frequency levels at any volume level so
that you hear natural sounds even at low volume.
YPAO 3D measurement
The direction (angle) of front, surround and presence speakers, and the height of presence
speakers as seen from the listening position is measured, and compensation is applied to
maximize the 3D sound field effectiveness of the CINEMA DSP.
En 9

Unrivaled audio and video quality
Frequency
Loudness
Playback bandwidth of a 44.1/48 kHz
signal (such as a CD)
Frequency
Loudness
Playback bandwidth of a
88.2/96 kHz signal
You can enjoy unrivaled high-quality audio and videos with the unit.
High-resolution music enhancer
Hi-bit high-sampling extension up to 96 kHz / 24-bit can be applied to lossless 44.1/48 kHz
content such as from a CD (2-channel PCM) or a FLAC file for further heightening of the
musicality in the original content (p.111).
Before processing
After processing
High-quality video processing
From low-quality digital video to BD (Blu-ray disc) images, any content can be played back as
a high-quality image (p.132).
• Motion adaptive and edge adaptive deinterlacing
• Multi-cadence (including 3-2 pull-down) detection
• Up to 6 presets that can be applied separately to each input source
You can also apply fine touches such as detail enhancement and edge enhancement.
En 10
Expandable to meet diverse needs
Power amplifier
Living room (main zone)
Study room
(such as Zone2)
Living room (main zone)
Kitchen
(such as Zone4)
The unit provides excellent expandability which is applicable to all uses.
The best expandability in Yamaha
You can enjoy the highest peak of CINEMA DSP - an 11.2-channel 3-dimensional sound field.
• Flexible connectivity (ready for balanced and unbalanced connections)
• High-quality audio transmission (XLR balanced pre-out)
• XLR balanced input jacks for connecting a high-end such as CD player
Multi-zone function
The multi-zone function (p.99) allows you to play back different input sources in the room
where the unit is installed (main zone) and in other rooms (such as Zone2).
(The following shows examples of use.)
Enjoying music using speakers in another room
While enjoying multichannel playback in your living room, you can listen to music through the
speakers of a different room.
Enjoying videos using a TV in another room (HDMI connection)
While enjoying multichannel playback in your living room, you can enjoy videos and music
being input via HDMI on a TV in a different room.
En 11

Useful applications
The following applications provide you the flexibility to control the unit or assist you with the cable connections.
AV CONTROLLER
“AV CONTROLLER” will turn your smartphone/tablet into a Wi-Fi enabled remote control for
your Yamaha network products. This application provides you the flexibility to control the
available inputs, volume, mute, power commands and playback source.
Functions
• Power on/off and volume adjustment
• Input, scene and sound mode selection
• DSP Parameter adjustment
• Playback control (including music selection for some sources)
X
For details, search for “AV CONTROLLER” on the App Store or Google Play.
MusicCast CONTROLLER
“MusicCast CONTROLLER” is an application that allows you to link a MusicCast compatible
device to other MusicCast compatible devices in other rooms and play them back
simultaneously. This app lets you use your smartphone or other mobile device instead of the
remote control to easily select music to play back as well as configure the unit and MusicCast
compatible devices.
Functions
• Selecting and playing back various content
– Play back music from your mobile device
– Select an Internet radio station
– Play back music files stored on media servers (PCs/NAS)
– Play back music files stored on a USB storage device
• Operating and configuring the unit
– Select the input source, adjust the volume and mute the audio output
– Select from a wide variety of sound processing features
X
For details, search for “MusicCast CONTROLLER” on the App Store or Google Play.
En 12
Part names and functions
ENTER
OPTION
SETUP
HELPRETURN
YPAO MIC
PHONES
USB
SILENT CINEMA
AI
STRAIGHT
PROGRAM
MULTI ZONE
AUX
ZONE 2
ZONE 3
ZONE 4
ZONE CONTROL
5V
1A
SCENE
1234
RL AUDIO
INFO (WPS
)
MEMORY
FM AM
TUNING
PRESET
INPUT
MAIN ZONE
VOLUME
PURE DIRECT
(
CONNECT
)
e fb cda
g
i
h
This section explains the functions of the parts of the unit.
Front panel
a MAIN ZONE z key
Turns on/off (standby) the main zone.
Y
Zone2, Zone3 and Zone4 can be turned on/off individual ly (p.103).
b Standby indicator
Lights up when the unit is in standby mode under any of the
following conditions.
• HDMI Control is enabled (p.134)
• HDMI Standby Through is enabled (p.134)
• Network Standby is enabled (p.136)
• Bluetooth Standby is enabled (p.139)
c AI indicator
Lights up when the SURROUND:AI is enabled (p.66)
d Front display
Displays information (p.15).
e Remote control sensor
Receives remote control signals (p.6).
f PURE DIRECT key
Enables/disables Pure Direct (p.71).
g INPUT knob
Opening the front panel door
To use controls or jacks behind the front panel door, gently
press the bottom of the door to open it. Keep the door closed
when not using controls or jacks behind the front panel door.
(Be careful not to trap your fingers.)
Selects an input source.
h Front panel door
For protecting controls and jacks (p.14).
i VOLUME knob
Adjusts the volume.
En 13
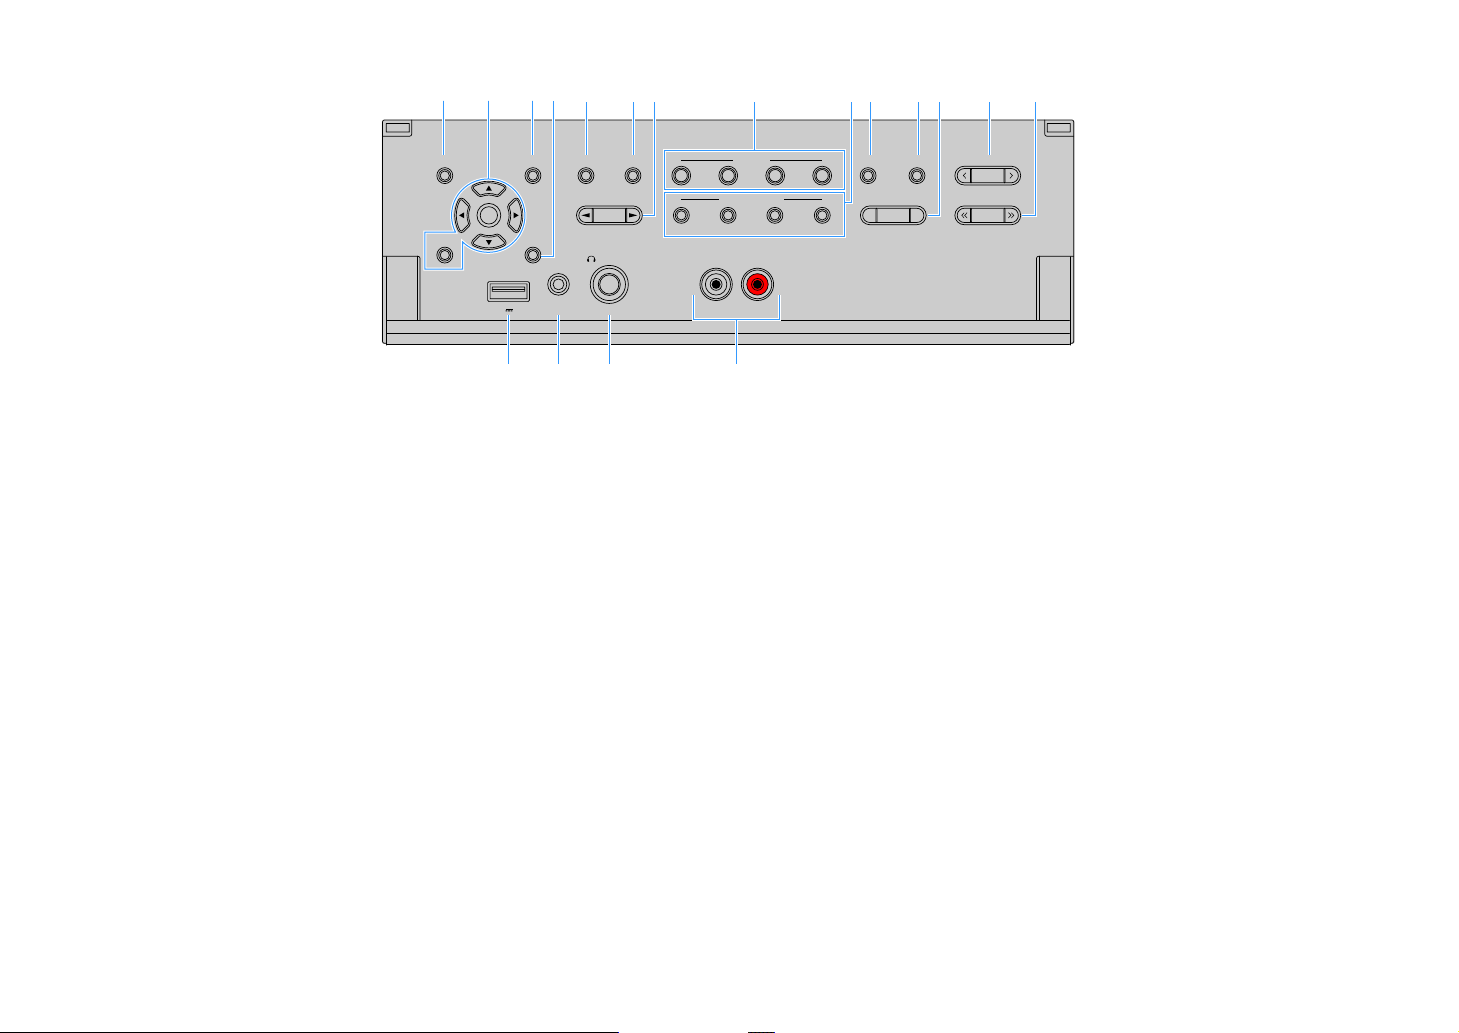
■ Inside of the front panel door
ENTER
OPTION
SETUP
HELPRETURN
YPAO MIC
PHONES
USB
SILENT CINEMA
AI
STRAIGHT
PROGRAM
MULTI ZONE
AUX
ZONE 2
ZONE 3
ZONE 4
ZONE CONTROL
5V
1A
SCENE
1234
RL AUDIO
INFO (WPS
)
MEMORY
FM AM
TUNING
PRESET
(
CONNECT
)
op q r
(U.S.A. model)
dg lnacef jkmbhi
a SETUP key
Displays the Setup menu on the TV.
b Menu operations keys
Cursor keys: Select a menu or a parameter.
ENTER: Confirms a selected item.
RETURN: Returns to the previous screen.
c OPTION key
Displays the option menu (p.108).
d HELP key
In the on-screen menu, the description of a term in the cursor
position appears on the TV. This key is enabled when the “?” icon
is displayed on the on-screen menu.
e AI key
Turns on/off the SURROUND:AI mode (p.66).
f STRAIGHT (CONNECT) key
Enables/disables the straight decode mode (p.70).
Enters MusicCast CONTROLLER re gistration by holding down for 5
g PROGRAM keys
seconds (p.62).
Select a sound program or a surround decoder (p.65).
h SCENE keys
Select the assigned input source (including the selected radio
station or content when it is assigned), sound program, and
various settings with one touch. Also, turns on the unit when it is
in standby mode (p.64).
i MULTI ZONE keys
ZONE 2-4: Enables/disables the audio output to each zone
(p.103).
ZONE CONTROL: Changes the zone that is controlled by the keys
and knobs on the front panel (p.103).
j INFO (WPS) key
Selects the information displayed on the front display (p.106).
Enters the wireless network connection setup (WPS push button
configuration) by holding down for 3 seconds (p.58).
k MEMORY key
Registers FM/AM/DAB radio stations as preset stations (p.73, p.77,
p.82).
Registers USB/network contents o r Bluetooth input source as
shortcuts (p.105).
l FM and AM keys (except Australia, U.K., Europe,
Middle East and Russia models)
FM and DAB keys (Australia, U.K., Europe, Middle East
and Russia models only)
Switch between FM and DAB (p.76, p.73).
m PRESET keys
Select a preset FM/DAB radio station (p.77, p.83) (Australia, U.K.,
Europe, Middle East and Russia models) or a preset FM/AM radio
station (p.74) (other models).
Selects a USB/network content from shortcuts (p.105).
n TUNING keys
Select the radio frequency (p.73).
o USB jack
For connecting a USB storage device (p.86).
p YPAO MIC jack
For connecting the supplied YPAO microphone (p.44).
q PHONES jack
For connecting headphones.
r AUX jacks
For connecting devices, such as CD players (p.37).
Switch between FM and AM (p.73).
En 14
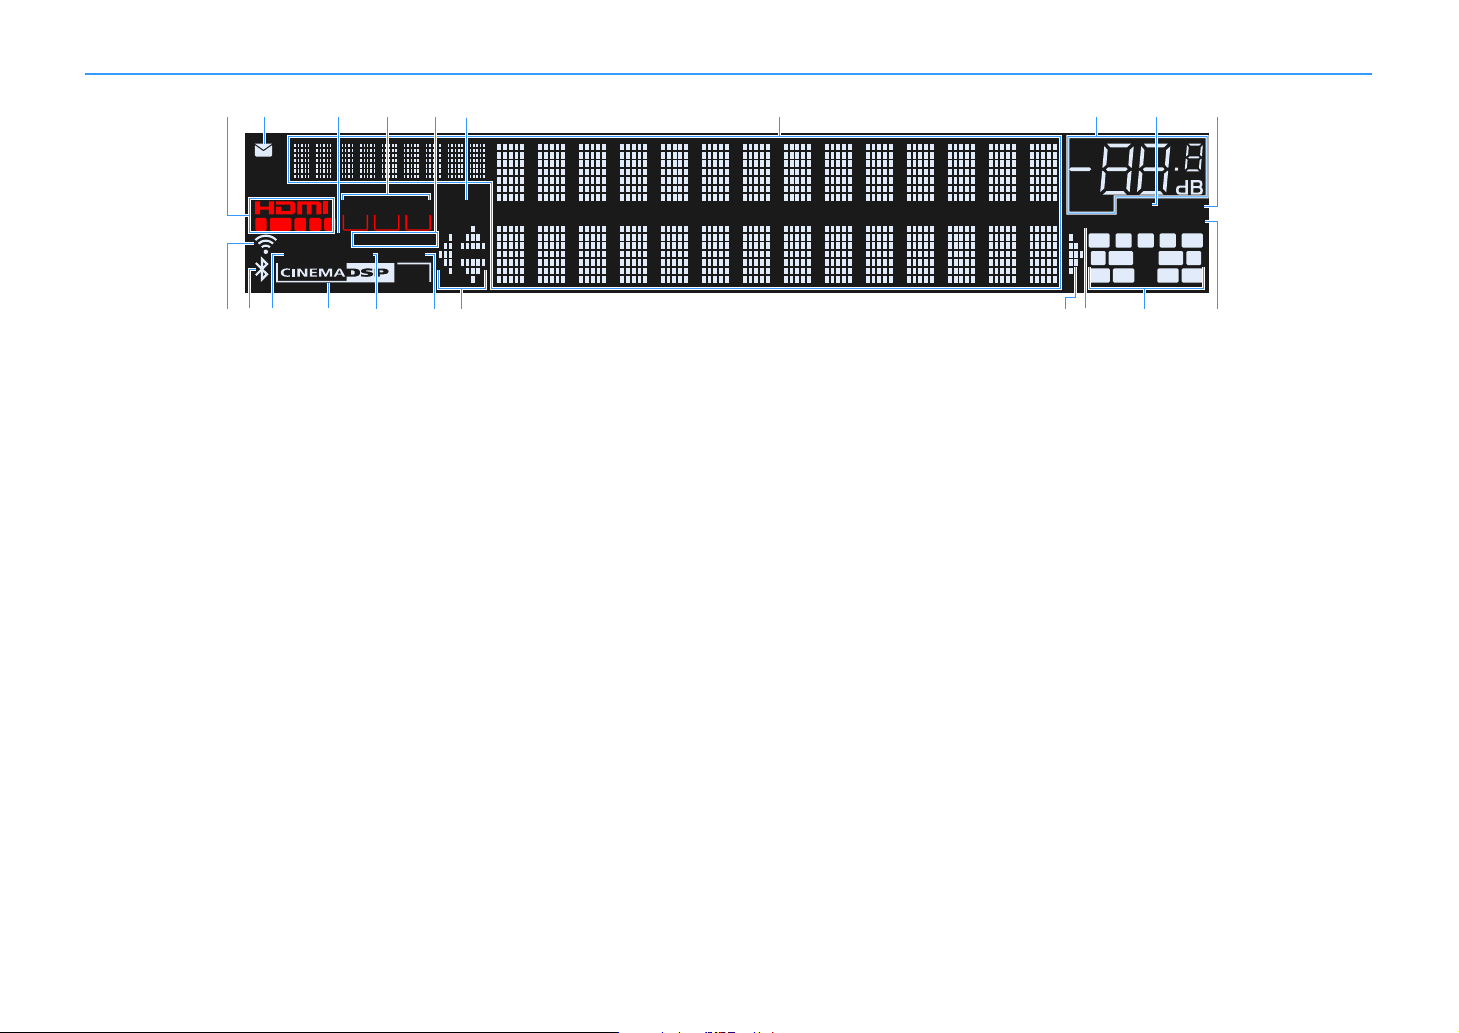
Front display (indicators)
OUT 21
IN
A-DRC
VOL.
VIRTUAL
YPAO VOL.
3
ZONE
2
SBL SBR
SL SR
FPL
CL R
FPR
ENHANCER
SLEEP
STEREO TUNED
PA RT Y
MUTE
HD
ZONE ZONE
43
SW1 SW2
RPL RPR
Hi-Res
LINK MASTER
3
ed
i
jh
nk q tsqpo
a
g
fb
c
rl m
a HDMI
Lights up when HDMI signals are being input or output.
IN
Lights up when HDMI signals are being input.
OUT1/OUT2/OUT3
Indicates the HDMI OUT jacks currently outputting an HDMI signal.
b Firmware update indicator
Lights up when a firmware update is available via the network
(p.152)
c LINK MASTER
Lights up when the unit is the master device of the MusicCast
network.
d ZONE indicators
Lights up when Zone2, Zone3 or Zone4 is enabled (p.103).
e STEREO
Lights up when the unit is receiving a stereo FM radio signal.
TUNED
Lights up when the unit is receiving an FM radio station signal
(Australia, U.K., Europe, Middle East and Russia models) or an
FM/AM radio station signal (other models).
f PARTY
Lights up when the unit is in the party mode (p.104).
g Information display
Displays the current status (such as input name and sound mode
name). You can switch the information by pressing INFO (p.106).
h Volume indicator
Indicates the current volume.
i MUTE
Blinks when audio is temporarily muted.
j A-DRC
Lights up when Adaptive DRC (p.110) is working.
k Wireless LAN indicator
Light up while the unit is connected to a wireless network (p.56).
Y
This indicator may light up when the unit is added to the MusicCast
network. For details, see “Adding the unit to the MusicCast network”
(p.62).
l Bluetooth indicator
Lights up when the unit is connecting to a Bluetooth device (p.85).
m Hi-Res
Lights up when the high-resolution mode (p.111) is working.
n CINEMA DSP indicator
“CINEMA DSP HD” lights up when CINEMA DSP (p.66) is working.
“CINEMA DSP !” lights up when CINEMA DSP HD
o ENHANCER
Lights up when Compressed Music Enhancer (p.71) is working.
3
is activated.
p SLEEP
Lights up when the sleep timer is on.
q Cursor indicators
Indicate the remote control cursor keys currently operational.
En 15
r VIRTUAL
Lights up when the Virtual Presence Speaker (VPS) or Virtual
Surround Back Speaker (VSBS) (p.66), or the virtual surround
processing (p.69) is working.
s Channel indicators
Indicate channels (PRE OUT jacks) from which signals are output.
A Front (L)
S Front (R)
D Center
F Surround (L)
G Surround (R)
H Surround back (L)
J Surround back (R)
B Front presence (L)
N Front presence (R)
M Rear presence (L)
< Rear presence (R)
C Subwoofer (1)
V Subwoofer (2)
t YPAO VOL.
Lights up when YPAO Volume is enabled (p.110).
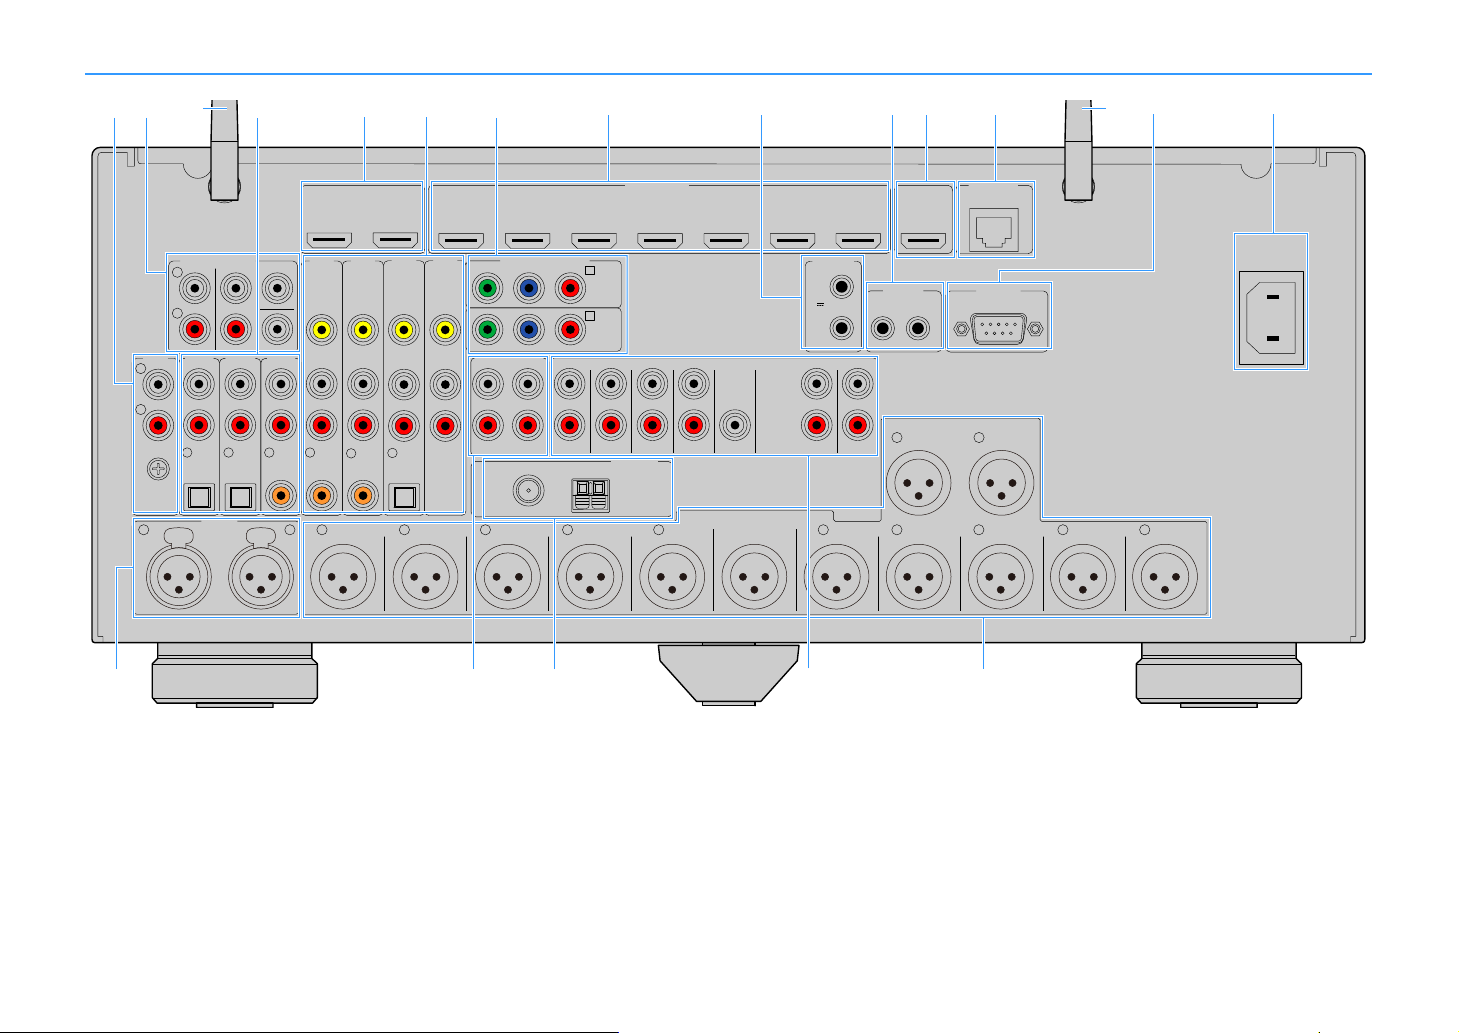
Rear panel
HDMI OUT
ARC
1
2 3
HDMI
(1 MOVIE) (5 STB) (6 GAME)
AV 1 AV 2 AV 3 AV 4
(HDCP2.2)
AV 5 AV 6 AV 7
IN OUT
REMOTE
R
R R R
L
R
L
L L
AV 1 AV 2 AV 3 AV 4
AUDIO 1 AUDIO 2 AUDIO 3
(7 TV) (3 MUSIC)
(1 MOVIE) (5 STB) (6 GAME)
OPTICAL
4
OPTICAL
3
COAXIAL COAXIAL
2
COAXIAL
1
PHONO
SURROUND SUR BACK SUBWOOFER
CENTER
MULTI CH INPUT
GND
AC IN
REAR
PRESENCE
R
SURROUND
BACK
SURROUND
BACK
FRONT
PRESENCE
REAR
PRESENCE
R
SURROUND
R
FRONT FRONT
(REAR) (FRONT)
21
L L L
SURROUNDCENTER
PRE OUT
FRONT
PRESENCE
AUDIO 4
OPTICAL
1
2
ZONE OUT
ZONE 2 ZONE 3
5
6
R L
FM
75ȍ
ANTENNA
(
2 RADIO
)
AM
PRE OUT
(REAR)
SUBWOOFER
FRONT
PRESENCE
REAR
PRESENCE
CENTER
SUBWOOFER
FRONT
SURROUND
SURROUND
BACK
(FRONT)
RS-232C
TRIGGER
OUT
1
2
12V 0.1A
MAX. TOTAL
NETWORK
HDMI OUT
(4
NET
)
(8 SERVER)
(HDCP2.2)
(ZONE OUT)
YPRPB
YPRPB
COMPONENT VIDEO
AV 2
(5 STB)
B
AV 1
(1 MOVIE)
A
(HDCP2.2)
L
a e k lg nj mccb ihd f
so q rp
(U.S.A. model)
* The area around the video/audio output jacks is marked in white on the actual product to prevent improper
connections.
En 16

a PHONO jacks
For connecting to a turntable (p.36).
b MULTI CH INPUT jacks
For connecting to a device that supports multichannel output and inputting audio signals (p.40)
c Wireless antenna
For a wireless (Wi-Fi) connection to a network (p.56) and a Bluetooth connection (p.85).
d AUDIO 1-3 jacks
For connecting to audio playback devices and inputting audio signals (p.36).
e HDMI OUT 1-2 jacks
For connecting to an HDMI-compatible TV and outputting video/audio signals (p.33). When using ARC, TV
audio signal can also be input through the HDMI OUT 1 jack.
f AV 1-4 jacks
For connecting to video/audio playback devices and inputting video/audio signals (p.34).
g COMPONENT VIDEO (AV 1-2) jacks
For connecting to video playback devices that support component video and inputting video signals
(p.35).
h HDMI (AV 1-7) jacks
For connecting to HDMI-compatible playback devices and inputting video/audio signals (p.34).
i TRIGGER OUT 1-2 jacks
For connecting to devices that support the trigger function (p.40).
j REMOTE IN/OUT jacks
For connecting to an infrared signal receiver/emitter that allows you to operate the unit and other
devices from another room (p.102).
k HDMI OUT 3 (ZONE OUT) jack
For connecting to an HDMI-compatible device used in Zone2 or Zone4 (p.101).
l NETWORK jack
For connecting to a network with a network cable (p.39).
m RS-232C terminal
This is a control expansion terminal for custom installation. Consult your dealer for details.
n AC IN jack
For connecting the supplied power cable (p.41).
o AUDIO 4 (XLR) jacks
For connecting to an audio playback device and inputting audio signals (p.36).
p ZONE OUT jacks
For connecting to an external amplifier used in Zone2 or Zone3 and outputting audio (p.100).
q ANTENNA jacks
For connecting to radio antennas (p.38).
r PRE OUT (RCA) jacks
For connecting to a subwoofer with built-in amplifier (p.32) or to a power amplifier (p.31).
s PRE OUT (XLR) jacks
For connecting to a subwoofer with built-in amplifier (p.31) or a power amplifier (p.30).
En 17
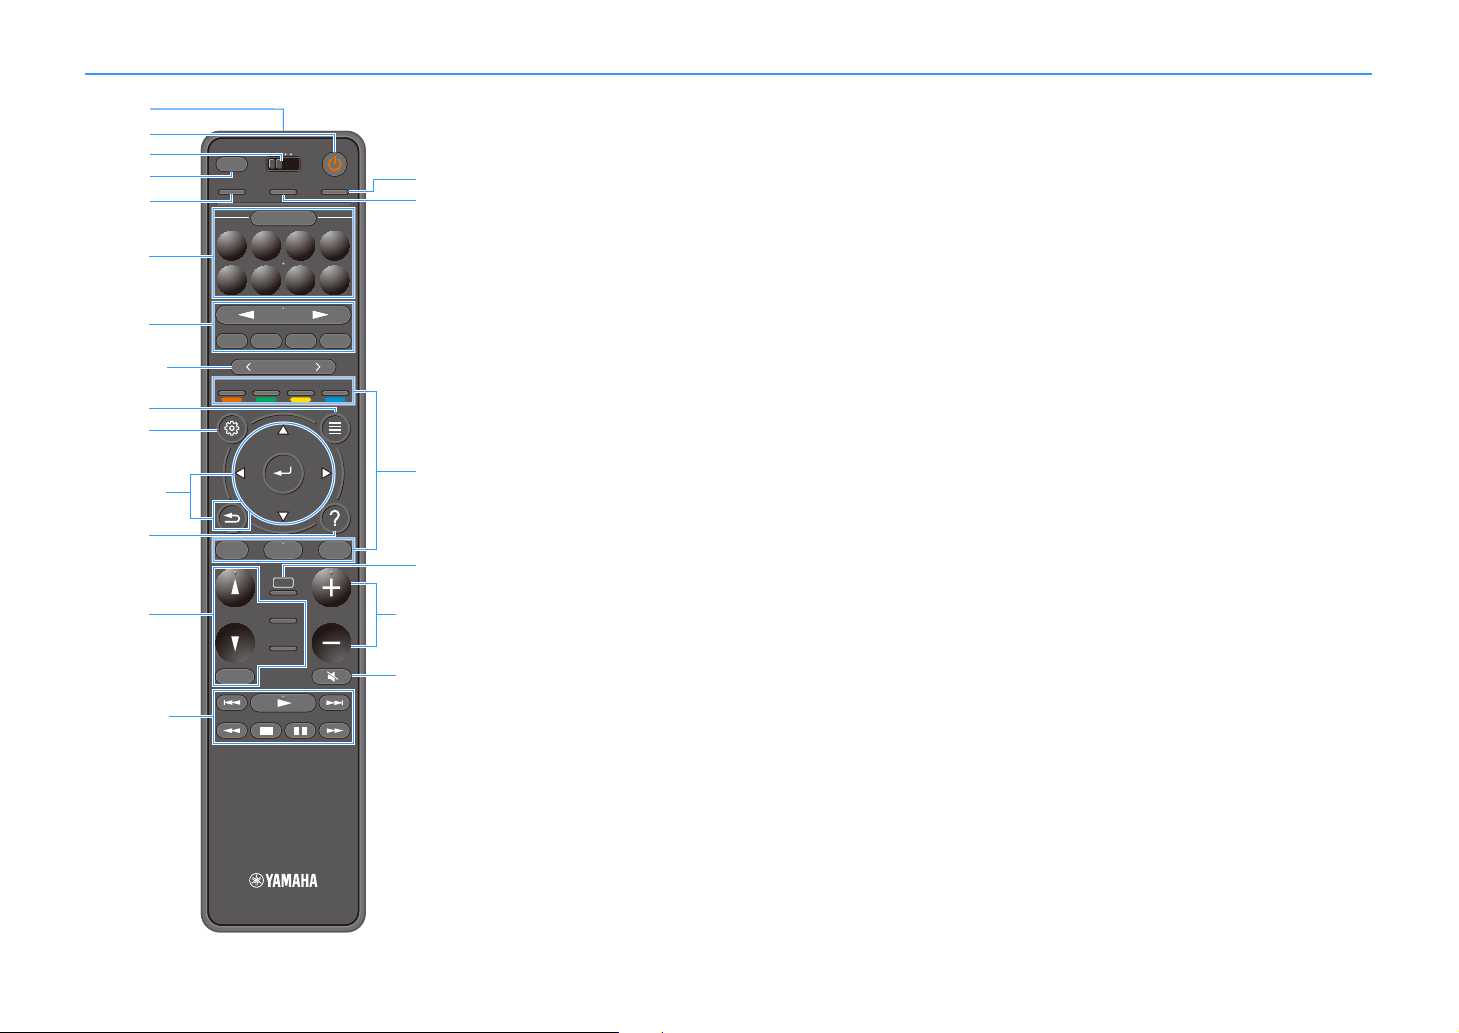
Remote control
TUNINGBANDTUNING
MEMORY
STRAIGHT
VOLUME
ENHANCER
SUR. DECODE
AI
PROGRAM
POP-UP
/MENU
HOME
TOP
MENU
BLUE
YELLOW
GREENRED
PRESET
BLUETOOTH
NET USBTUNER
INPUT
8765
4321
SCENE
HDMI OUTPURE DIRECT
PARTY
MAIN 2 3 4
ZONE
SLEEP
c
b
d
e
h
q
f
i
l
j
g
m
a
n
q
kq
q
sq
tq
o
p
r
a Remote control signal transmitter
Transmits infrared signals.
b z (receiver power) key
Turns on/off (standby) the zone selected with the MAIN/ZONE
switch.
c MAIN/ZONE switch
Changes the zone that is controlled by the remote control (p.103).
d SLEEP key
Pressing this key repeatedly will specify the time (120 min, 90 min,
60 min, 30 min, off), in which the unit switches to the standby mode.
e PARTY key
Turns on/off the party mode (p.104).
f SCENE keys
Switch with one touch between multiple settings set using the
SCENE function. Also, turn on the unit when it is in standby mode
(p.64).
g Input selection keys
Select an input source for playback.
Y
Presses NET repeatedly to select a desired network source.
h PRESET keys
Select a preset FM/AM radio station (p.73).
Recall USB, Bluetooth, or network content that is registered
as a shortcut (p.105).
i OPTION key
Displays the option menu (p.108).
j SETUP key
Displays the setup menu (p.115)
k Menu operation keys
Operates the menu.
l HELP key
In the on-screen menu, the description of a term in the cursor
position appears on the TV. This key is enabled when the “?” icon
is displayed on the on-screen menu.
m Sound mode keys
Select a sound mode (p.65).
n Playback operation keys
Controls playback of the external device.
o HDMI OUT key
Selects HDMI OUT jacks to be used for video/audio output (p.63).
p PURE DIRECT key
Enables/disables the Pure Direct (p.71).
q External device operation keys
Let you perform playback operations when “Bluetooth”, “USB” or
“NET”is selected as the input source, or control playback of the
HDMI Control-compatible playback device.
Y
The playback devices must support HDMI Control. Some HDMI
Control-compatible devices cannot be used.
r AI key
Turns on/off the SURROUND:AI mode (p.66).
s VOLUME keys
Adjust the volume.
t MUTE key
Mutes the audio output.
En 18

PREPARATIONS
General setup procedure
1
Placing speakers. . . . . . . . . . . . . . . . . . . . . . . . . . . . . . . . . . . . . . . . . . . . . . . . . . . . . . . . . . . . . . . . . . . . . . . . . . . . . . . (p.20)
2 Connecting the power amplifier and subwoofers. . . . . . . . . . . . . . . . . . . . . . . . . . . . . . . . . . . . . . . . . . . . . . . . . . . . (p.30)
3 Connecting a TV and playback devices. . . . . . . . . . . . . . . . . . . . . . . . . . . . . . . . . . . . . . . . . . . . . . . . . . . . . . . . . . . . . (p.33)
4 Connecting the radio antennas. . . . . . . . . . . . . . . . . . . . . . . . . . . . . . . . . . . . . . . . . . . . . . . . . . . . . . . . . . . . . . . . . . . (p.38)
5 Connecting a network cable or preparing the wireless antenna . . . . . . . . . . . . . . . . . . . . . . . . . . . . . . . . . . . . . . . (p.39)
6 Connecting other devices . . . . . . . . . . . . . . . . . . . . . . . . . . . . . . . . . . . . . . . . . . . . . . . . . . . . . . . . . . . . . . . . . . . . . . . (p.40)
7 Connecting the power cable . . . . . . . . . . . . . . . . . . . . . . . . . . . . . . . . . . . . . . . . . . . . . . . . . . . . . . . . . . . . . . . . . . . . .(p.41)
8 Selecting an on-screen menu language . . . . . . . . . . . . . . . . . . . . . . . . . . . . . . . . . . . . . . . . . . . . . . . . . . . . . . . . . . . . (p.42)
9 Configuring the necessary speaker settings . . . . . . . . . . . . . . . . . . . . . . . . . . . . . . . . . . . . . . . . . . . . . . . . . . . . . . . . (p.43)
10 Optimizing the speaker settings automatically (YPAO) . . . . . . . . . . . . . . . . . . . . . . . . . . . . . . . . . . . . . . . . . . . . . . (p.44)
11 Connecting to a network device wirelessly. . . . . . . . . . . . . . . . . . . . . . . . . . . . . . . . . . . . . . . . . . . . . . . . . . . . . . . . . (p.56)
12 Connecting to the MusicCast network . . . . . . . . . . . . . . . . . . . . . . . . . . . . . . . . . . . . . . . . . . . . . . . . . . . . . . . . . . . . .(p.62)
This completes all the preparations. Enjoy playing movies, music, radio and other content with the unit!
En 19
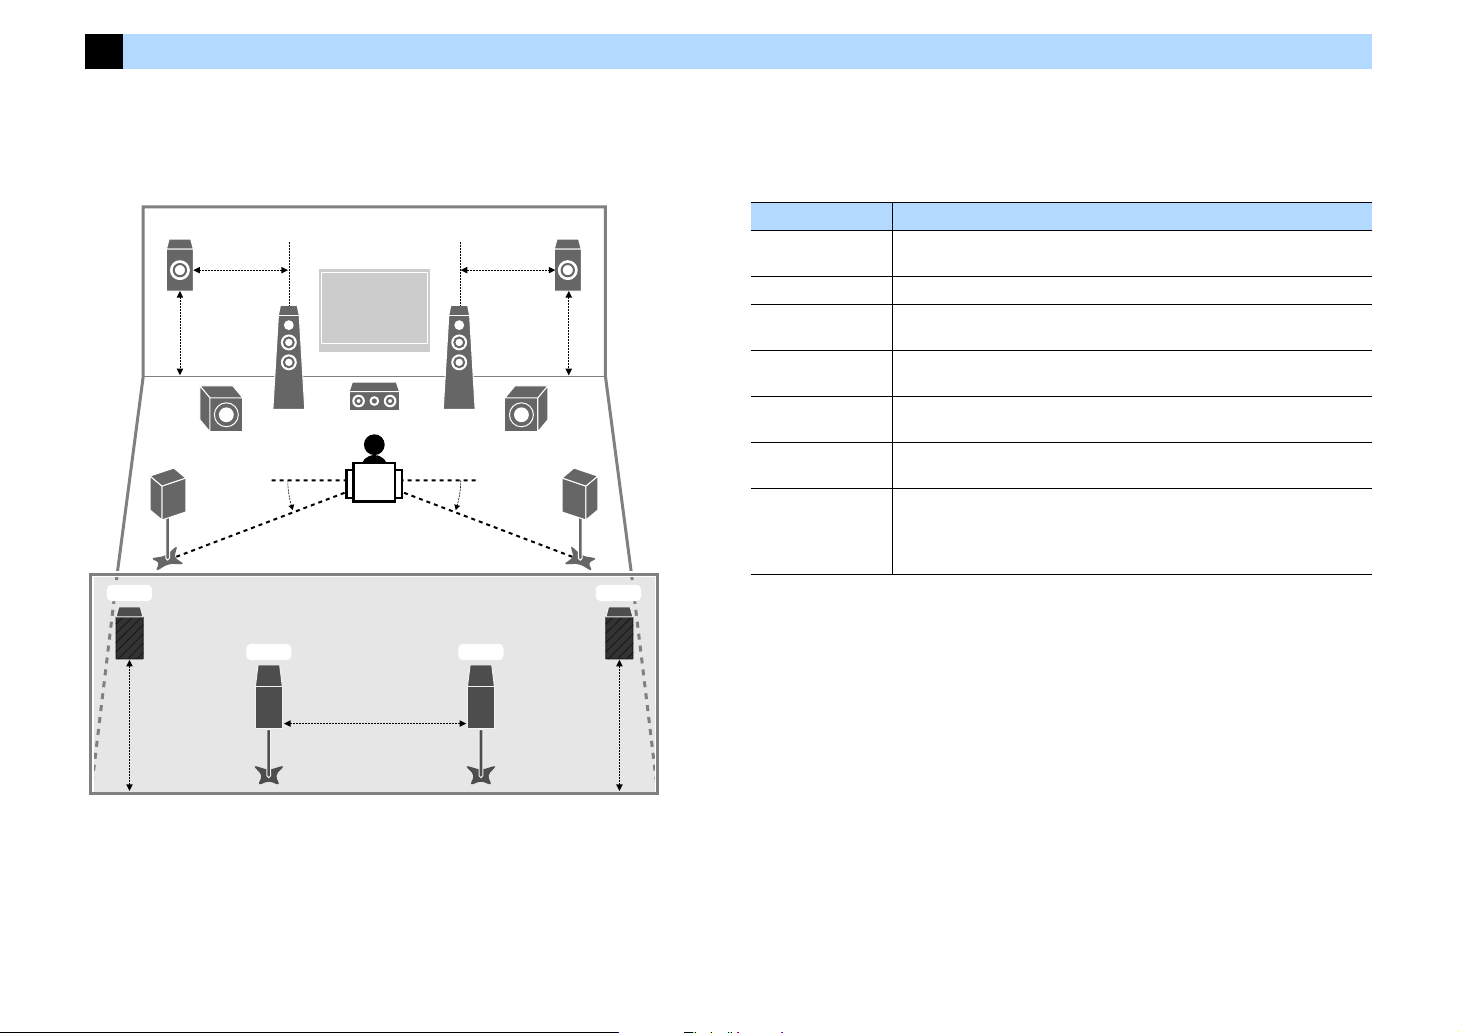
1 Placing speakers
E
12
39
4
6
T Y
5
9
R
7
0.3 m (1 ft) or more
1.8 m
(5.9 ft)
0.5 to 1 m
(1.6 to 3.3 ft)
1.8 m
(5.9 ft)
0.5 to 1 m
(1.6 to 3.3 ft)
10°~30°10°~30°
1.8 m
(5.9 ft)
1.8 m
(5.9 ft)
The unit has 11.2-channel pre-amplifiers. You can connect 2 to 11 channel speakers (via a power amplifier) and up to 2 subwoofers to create the favorite acoustic space in your room.
You can also apply multi-zone configurations to enhance your system (p.99).
Ideal speaker layout Functions of each speaker
Speaker type Function
Front (L/R)
1 2
Center 3 Produces center channel sounds (such as movie dialogues and vocals).
Surround (L/R)
4 5
Surround back (L/R)
6 7
Front presence (L/R)
E R
Rear presence (L/R)
TY
Subwoofer 9
Produce front left/right channel sounds (stereo sounds).
Produce surround left/right channel sounds. Surround speakers also produce
surround back channel sounds when no surround back speakers are connected.
Produce surround back left/right channel sounds.
Produce CINEMA DSP effect sounds or heights channel sounds of Dolby Atmos
and DTS:X contents.
Produce CINEMA DSP effect sounds or heights channel sounds of Dolby Atmos
and DTS:X contents.
Produces LFE (low-frequency effect) channel sounds and reinforces bass parts of
other channels.
This channel is counted as “0.1”. You can connect 2 subwoofers to the unit and
place them on the left/right (or front/rear) sides of the room.
X
• Use “Ideal speaker layout” (diagram on the left) as reference. You do not need to exactly adjust the speaker
layout to this diagram since the YPAO function of the unit will automatically optimize the speaker settings (such
as distances) to suit the speaker layout.
• The unit creates front Virtual Presence Speaker (VPS) using the front, center, and surroun d speakers to produce
3-dimensional sound fields even when no front presence speakers are connected. However, we recommend
using front presence speakers in order to experience the full effect of the sound fields (and rear presence
speakers for further spatial sounds).
• The unit creates rear Virtual Presence Speaker (VPS) using the front, center, a nd surround speakers to produce
natural 3-dimensional sound fields when front presence speakers are connected but no rear presence
speakers.
En 20
Basic speaker configuration
E
9
R
12
39
45
6 7
T Y
If you do not multi-zone configurations, follow the procedure below to place the speakers in your room and connect them to the unit.
■ Placing speakers in your room
Depending on the number of speakers, place the speakers and subwoofer in your room. This
section describes the representative speaker layout examples.
X
• To have a full effect of Dolby Atmos contents, we recommend using a speaker system with a S mark. However,
you can also play back Dolby Atmos contents with the 7.1 system (using surround back speakers).
• To have a full effect of DTS:X contents, we recommend usin g a speaker system with a
• (About the number of channels) For example, “5.1.2” denotes “standard 5.1-channel plus 2 for overhead
speaker channels”. For details on how to place overhead speakers (presence speakers), see “Presence speaker
layout” (p.26).
S mark.
11.2-channel system [S7.2.4]
(using both surround back and rear presence speakers)
This speaker system brings out the full performance of the unit and allows you to enjoy a
highly-natural 3-dimensional sound field with any contents.
X
• When Zone3 output i s enabled (p.103), the rear presence left/right channel output is not available in the main
zone.
• When using front presen ce and rear presence speakers installed to the ceiling or when using the Dolby Enabled
speakers as the presence speakers, configure the “Layout (Front Presence/Rear Presence)” setting in the
“Setup” menu before performing YPAO (p.43).
En 21
9.2-channel system [S5.2.4] (using rear presence speakers)
E
9
R
12
39
45
T Y
21
39
45
9
67
ER
This speaker system uses the front and rear presence speakers to produce a highly-natural
3-dimensional sound field, and also creates Virtual Surround Back Speaker (VSBS) using the
surround speakers to add a sense of depth to the rear sound field. This system is suited for
enjoying not only 5.1-channel but also for 7.1-channel contents.
X
• When Zone3 output is enabled (p.103), the rear pres ence right/left channel output is not available in the main
zone.
• When using front presence and rear presence speakers installed to the ceiling or when using the Dolby Enabled
speakers as the presence speakers, configure the “Layout (Front Presence/Rear Presence)” setting in the
“Setup” menu before performing YPAO (p.43).
9.2-channel system [S7.2.2] (using surround back speakers)
This speaker system uses the front presence speakers to produce a natural 3-dimensional
sound field, and also allows you to enjoy extended surround sounds using the surround back
speakers.
X
• When using front presence speakers installed to the ceiling or when using the Dolby Enabled speakers as the
presence speakers, configure the “Layout (Front Presence)” setting in the “Setup” menu before performing
YPAO (p.43).
• This speaker system creates rear Virtual Presence Speaker (VPS) using the front, center and surround speakers
to produce a natural 3-dimensional sound field.
En 22
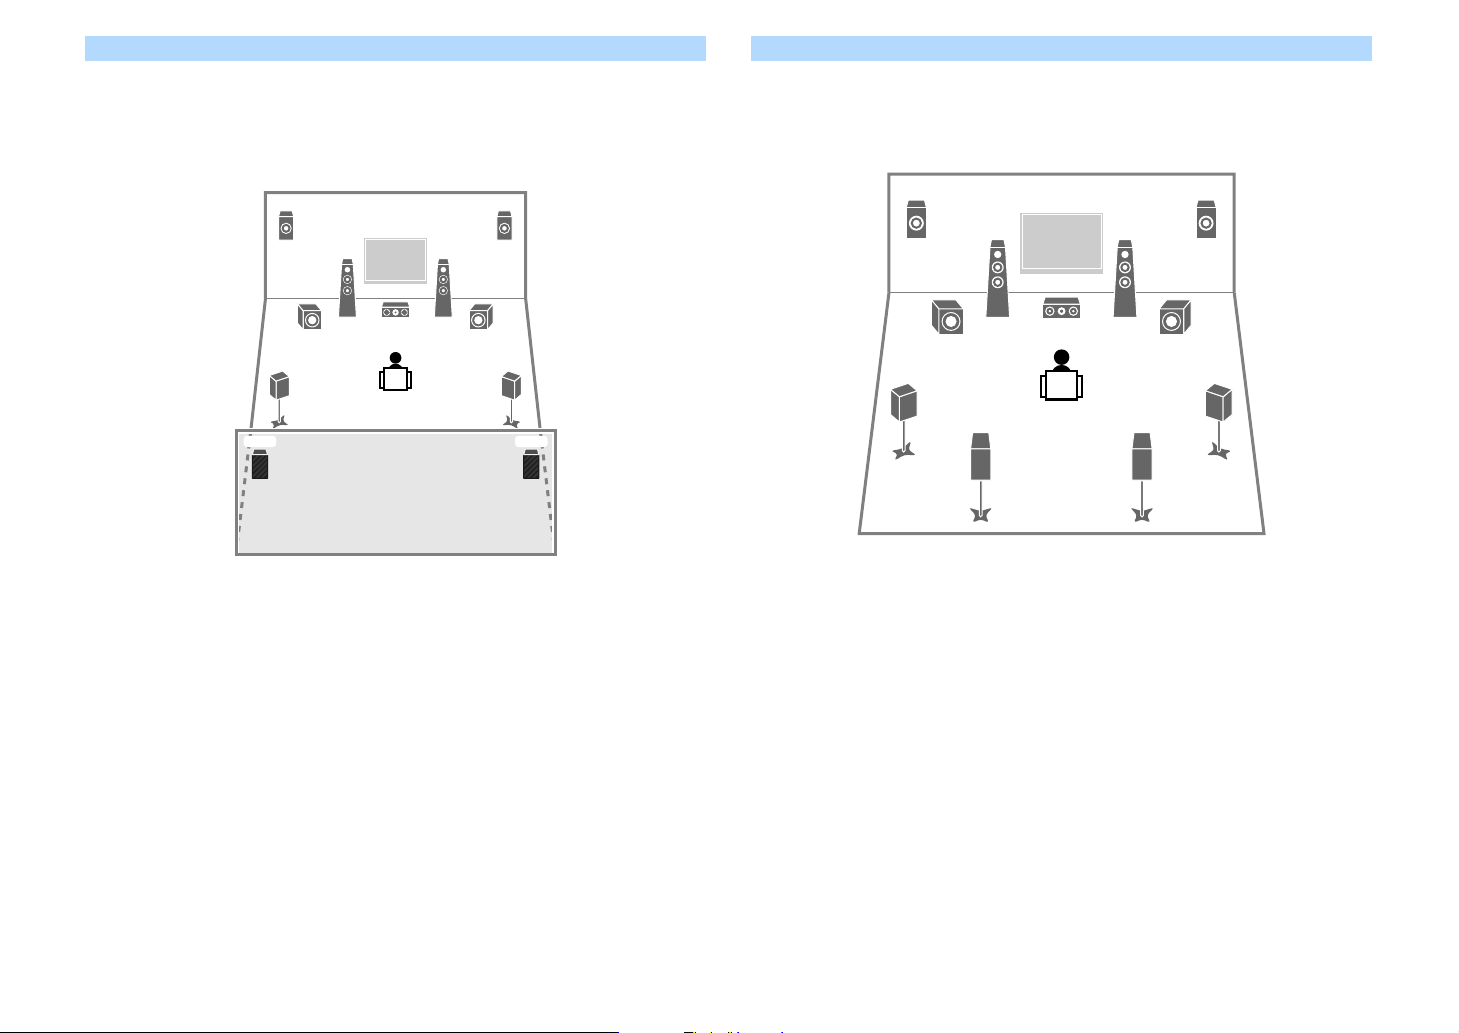
7.1-channel system [S5.1.2] (using front presence speakers)
This speaker system uses the front presence speakers to produce a natural 3-dimensional
sound field, and also creates Virtual Surround Back Speaker (VSBS) using the surround
speakers to add a sense of depth to the rear sound field. This system is suited for enjoying not
only 5.1-channel but also for 7.1-channel contents.
X
• When using front presence speakers installed to the ceiling or when using the Dolby Enabled speakers as the
presence speakers, configure the “Layout (Front Presence)” setting in the “Setup” menu before performing
YPAO (p.43).
• This speaker system creates rear Virtual Presence Speaker (VPS) using the front, center and surround speakers
to produce a natural 3-dimensional sound field.
7.1-channel system [S7.1.0] (using surround back speakers)
This speaker system creates front Virtual Presence Speaker (VPS) using the front, center and
surround speakers to produce a 3-dimensional sound field, and also allows you to enjoy
extended surround sounds using the surround back speakers.
En 23
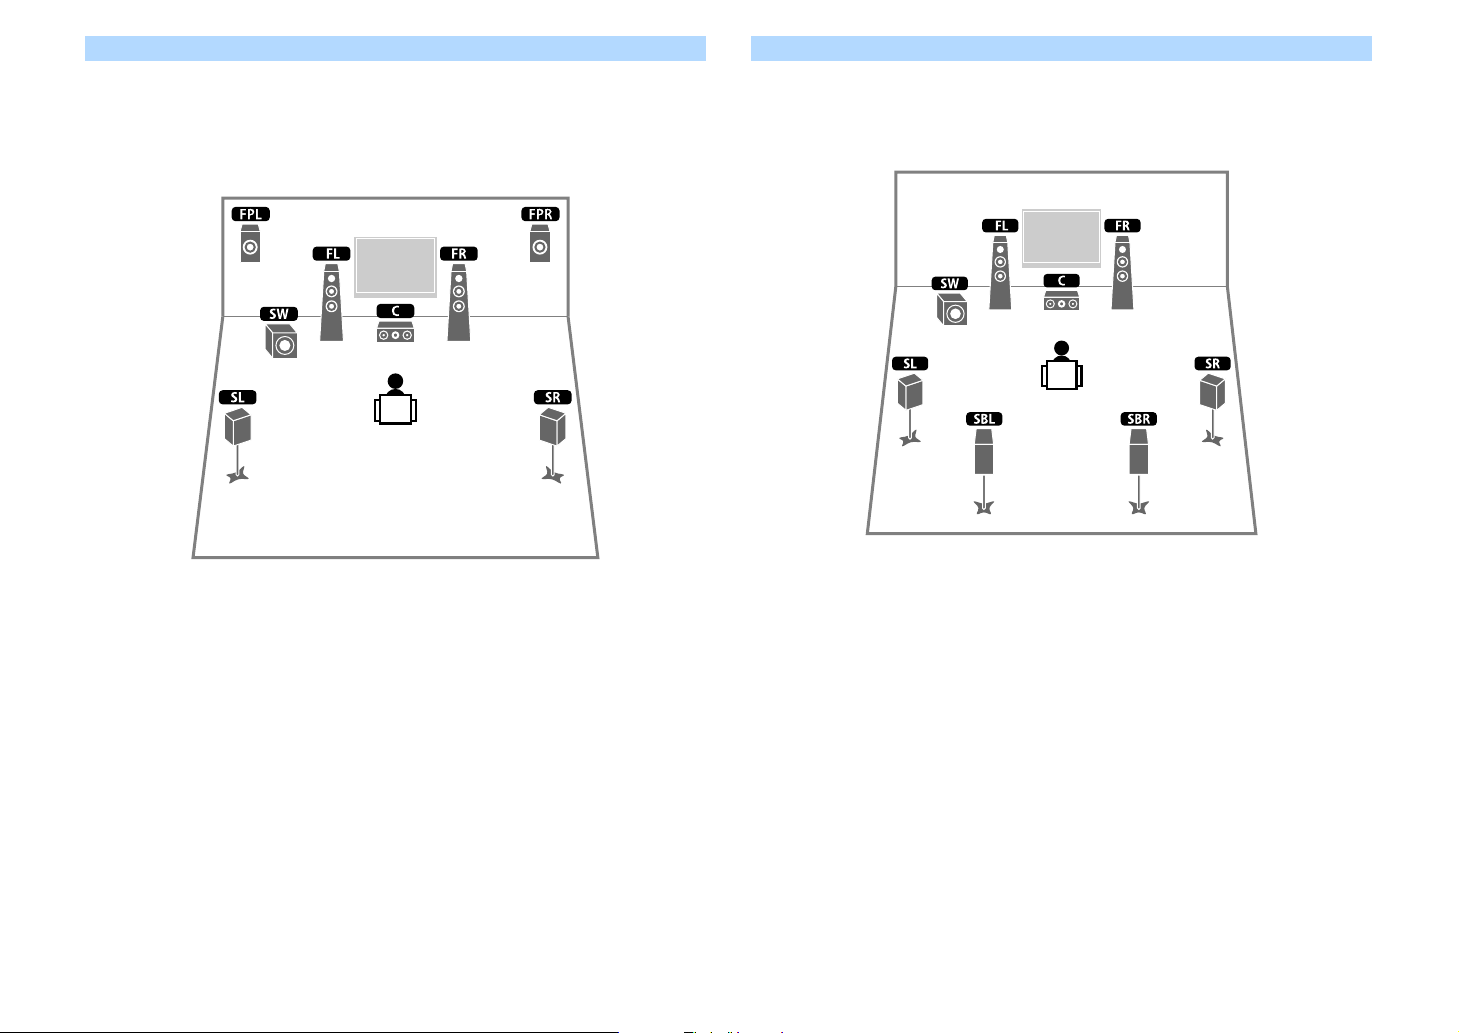
5.1-channel system
45
12
39
This speaker system creates Virtual Presence Speaker (VPS) using the front, center and
surround speakers to produce a 3-dimensional sound field, and also creates Virtual Surround
Back Speaker (VSBS) using the surround speakers to add a sense of depth to the rear sound
field. This system is suited for enjoying not only 5.1-channel but also for 7.1-channel contents.
Front 5.1-channel system (using surround speakers)
Even when surround speakers are placed in the front side, the unit creates the virtual surround
speakers in the rear side to allow you to enjoy multichannel surround sound (Virtual CINEMA
FRONT) when “Layout (Surround)” (p.122) in the “Setup” menu is set to “Front”.
X
You can enjoy surround sound even without the center speaker (front 4.1-channel system).
En 24
Front 5.1-channel system (using front presence speakers)
1
2
39
ER
This speaker system uses the front presence speakers to produce a natural 3-dimensional
sound field, and creates the virtual surround speakers using the front speakers to allow you to
enjoy multichannel surround sound (Virtual CINEMA DSP).
2.1-channel system
Even when no surround speakers are connected, the unit creates the virtual surround speakers
using the front speakers to allow you to enjoy multichannel surround sound (Virtual CINEMA
DSP).
X
When using front presence speakers installed to the ceiling or when using the Dolby Enabled speakers as the
presence speakers, configure the “Layout (Front Presence)” setting in the “Setup” menu before performing YPAO
(p.43).
X
Add the center speaker to configure a 3.1 system.
En 25
Presence speaker layout
The unit provides three layout patterns for presence speakers (Front Height/Rear Height,
Overhead and Dolby Enabled SP). Choose a layout pattern that suits your listening
environment (p.122).
X
• You can enjoy Dolby Atmos, DTS:X or Cinema DSP HD3 with any layout pattern.
• You can configure the placement patterns for front presence and rear presence speakers separately (p.122).
Front Height/Rear Height
Install the presence speakers on the front/rear side wall.
It delivers a natural sound field with excellent linkage of left, right, top and bottom sound
spaces, and sound extensity effectively.
Overhead
Install the presence speakers to the ceiling above the listening position.
It delivers realistic overhead sound effects and sound field with excellent linkage of front and
rear sound spaces effectively.
Dolby Enabled SP
Use the Dolby Enabled speakers as the presence speakers.
It utilizes sounds reflected from ceiling and lets you enjoy overhead sounds only from speakers
that are placed at the same level as traditional speakers.
X
Place the Dolby Enabled speakers on top of or near the traditional front speakers. A Dolby Enabled speaker unit
may be integrated into a traditional speaker. For details, refer to the instruction manual of the Dolby Enabled
speakers.
Notes on installation of ceiling speakers
When installing presence speakers to a ceiling, use the following illustration as a reference.
When using two presence speakers
Y
For details on the installation position of ceiling speakers, see “Notes on installation of ceiling speakers” (p.26).
En 26
Installation position
Just above the listening position, or the ceiling between extensions of front speakers and
listening position
When using four presence speakers
Installation position
Front presence speakers:
the ceiling between the extensions of the front speakers and listening position
Rear presence speakers:
the ceiling between the extensions of the listening position and surround (or surround back)
speakers
Caution
Be sure to use speakers that are made for ceiling use and take anti-drop measures. Ask a qualified
contractor or dealer personnel for installation works.
En 27
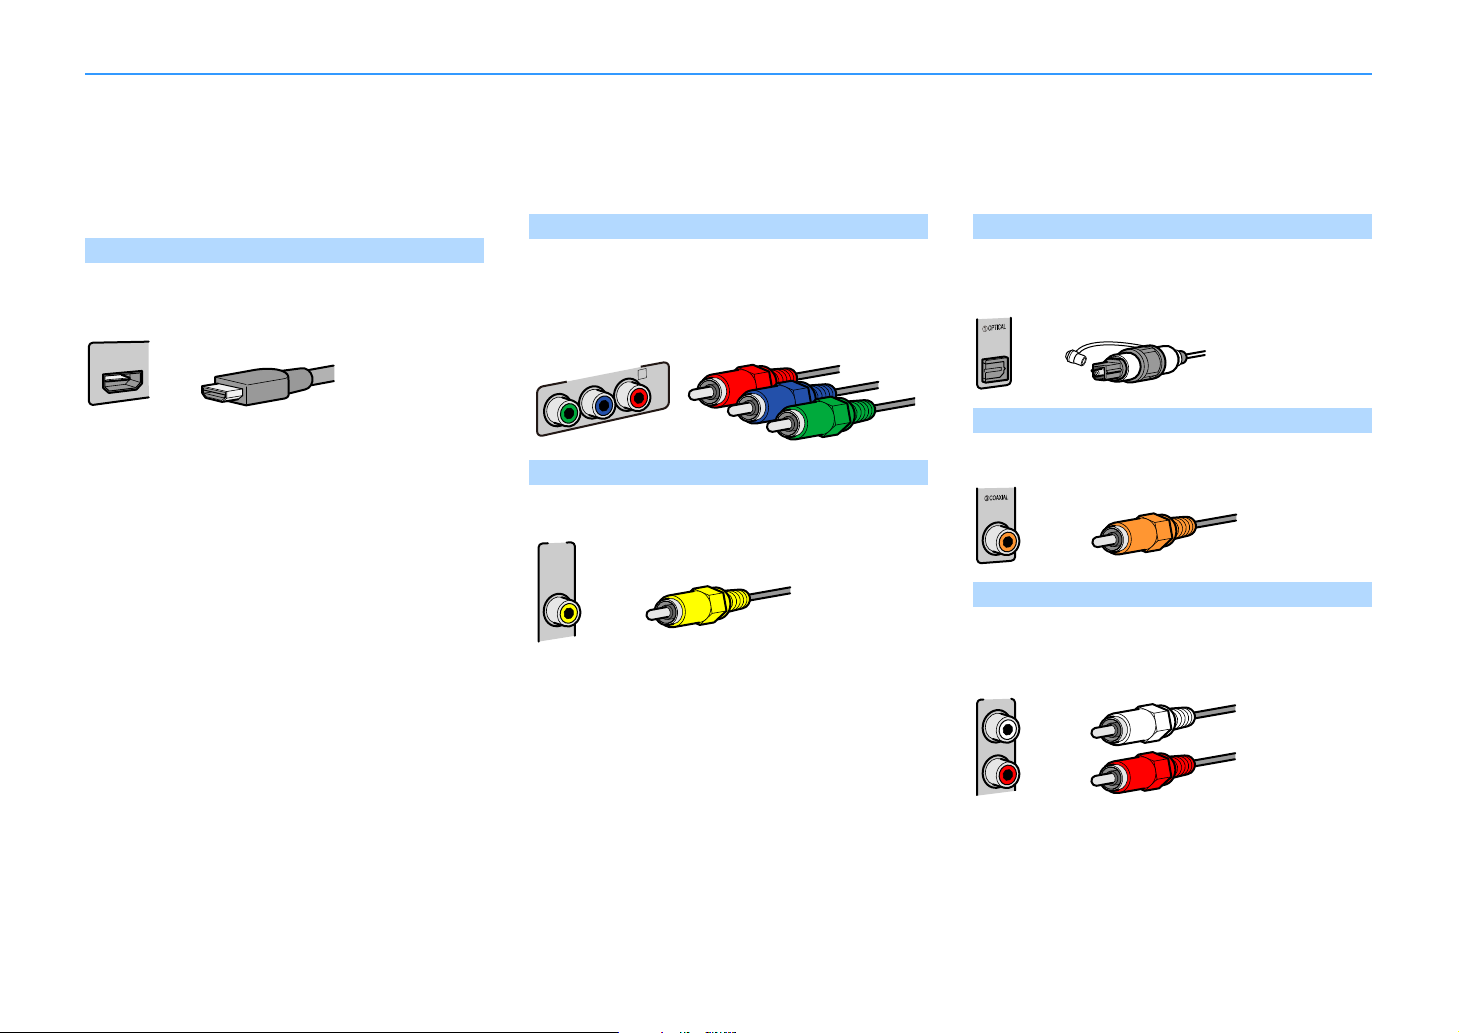
Input/output jacks and cables
AV 1
(1 MOVIE)
HDMI cable
Y
P
R
P
B
AV 1
(1 MOVIE)
COMPONENT VIDEO
A
Component video cable
AV 1
VIDEO
(1 MOVIE)
Video pin cable
Digital optical cable
Digital coaxial cable
AUDIO3
Stereo pin cable
The unit is equipped with the following input/output jacks. Prepare the cables that match the jacks on your devices.
■ Video/audio jacks
To input/output video and audio signals, use the following
jacks.
HDMI jacks
Transmit digital video and digital sound through a single
jack. Use an HDMI cable.
Y
Use a 19-pin HDMI cable with the HDMI logo. We recommend using as
short a cable as possible to prevent signal quality degradation.
X
• The unit’s HDMI jacks support the HDMI Control, Audio Return Channel
(ARC), and 3D and 4K Ultra HD video transmission features.
• Use high speed HDMI cables to enjoy 3D or 4K Ultra HD videos.
■ Video jacks
To input only video signals, use the following jacks.
COMPONENT VIDEO jacks
Transmit video signals separated into three components:
luminance (Y), chrominance blue (Pb), and chrominance red
(Pr). Use a component video cable with three plugs.
VIDEO jacks
Transmit analog video signals. Use a video pin cable.
■ Audio jacks
To input/output only audio signals, use the following jacks.
OPTICAL jacks
Transmit digital audio signals. Use a digital optical cable.
Remove the tip protector (if available) before using the cable.
COAXIAL jacks
Transmit digital audio signals. Use a digital coaxial cable.
AUDIO jacks
Transmit analog stereo audio signals. Use a stereo pin cable
(RCA cable).
En 28
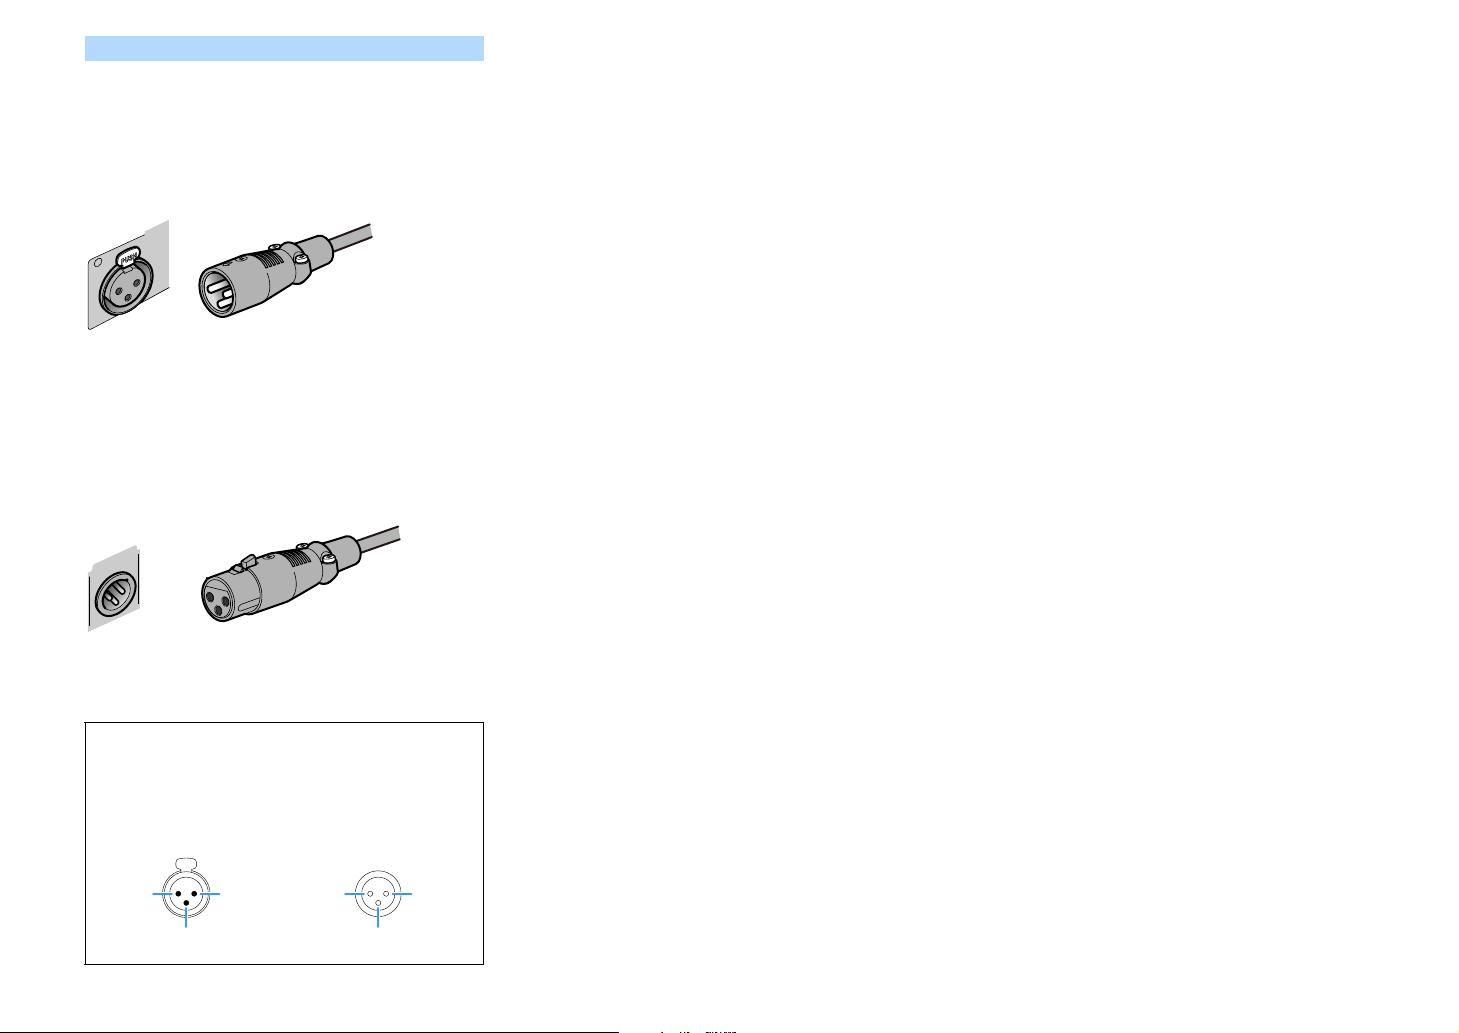
XLR jacks
AUDIO 4
R
XLR balanced cable (male)
CENTER
PRE OUT
XLR balanced cable (female)
2. HOT 1. GND
3. COLD
XLR input jacks XLR output jacks
1. GND 2. HOT
3. COLD
Transmit analog audio signals. Use an XLR balanced cable.
XLR input jacks
Match the pins and insert the “male” connector of the XLR
balanced cable until you hear a click.
X
When disconnecting the cable from the unit, hold down the PUSH button
on the unit and then pull the connector out.
XLR output jacks
Match the pins and insert the “female” connector of the XLR
balanced cable until you hear a click.
X
When disconnecting the cable from the unit, hold down the lever of the
connector and then pull it out.
About the XLR jacks
• The pin assignments for the XLR jacks of the unit are shown
below. Before connecting an XLR balanced cable, refer to the
instruction manual of your device and verify that its XLR jacks
are compatible with the pin assignments.
En 29
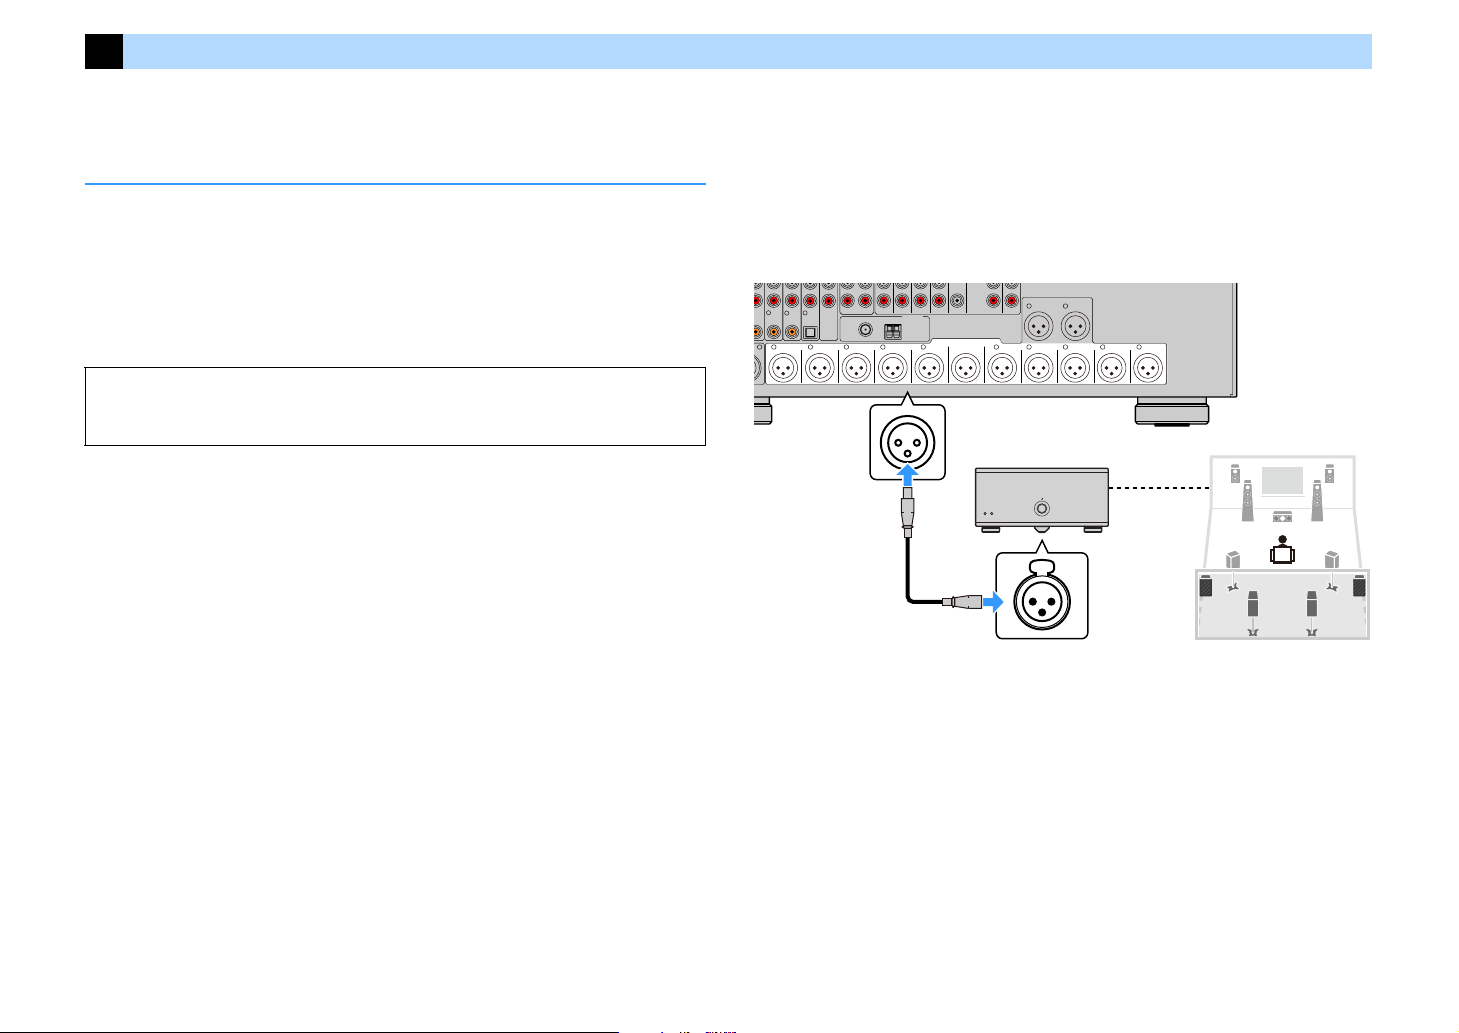
2 Connecting the power amplifier and subwoofers
R R
L L
4
COAXIAL COAXIAL
C
REAR
PRESENCE
R
SURROUND
BACK
SURROUND
BACK
FRONT
PRESENCE
REAR
PRESENCE
R
SURROUNDRFRONT FRONT
(REAR) (FRONT)
21
L L L L
SURROUNDCENTER
PRE OUT
FRONT
PRESENCE
OPTICAL
2
ZONE 2 ZONE 3
5
6
R L
FM
75ȍ
ANTENNA
(
2 RADIO
)
AM
(REAR)
SUBWOOFER
FRONT
PRESENCE
REAR
PRESENCE
CENTER
SUBWOOFER
FRONT
SURROUND
SURROUND
BACK
XLR
XLR
PRE OUT
(XLR) jacks
(Female connector)
Power amplifier
(Male connector)
Main input (XLR)
Speaker
connections
The unit (rear)
Connect the power amplifier and subwoofer (with built-in amplifier) to the unit.
Connecting a power amplifier
Connect the input jacks of your power amplifier to the PRE OUT jacks of the unit so that the
audio source selected on the unit can be output to the power amplifier for playback.
Select a balanced (XLR) or an unbalanced (RCA) connection for each channel depending on the
input jacks available on your power amplifier.
X
The XLR jacks and RCA jacks for each channel output the same signals.
Caution
To prevent the generation of loud noises or abnormal sounds, make sure you remove the power cable
of the unit and turn off the power amplifier before making connections.
■ Balanced connection
Depending on the speaker system you want to use, connect the corresponding PRE OUT (XLR)
jacks of the unit to the amplifier with XLR balanced cables.
Y
• Before connecting XLR balanced cables, refer to the instruction manual of your power amplifier and verify that
its XLR jacks are compatible wit h the pin assignments of the unit (p.29).
• We recommend using a power ampl ifier with volume control bypass (or without volume control circuit).
OAXIAL
En 30

■ Unbalanced connection
HDMI
(1 MOVIE) (5 STB) (6 GAME)
AV 1 AV 2 AV 3 AV 4
(HDCP2.2)
AV 5 AV 6 AV 7
IN
E
L
AV 4
R
SURROUND
BACK
R
SURROUNDRFRONT FRONT
L
CENTER
PRE OUT
1
2
ZONE OUT
ZONE 2 ZONE 3
R
FM
75ȍ
ANTENNA
(
2 RADIO
)
AM
PRE OUT
(REAR)
SUBWOOFER
FRONT
PRESENCE
REAR
PRESENCE
CENTER
FRONT
SURROUND
SURROUND
BACK
(FRONT)
TRIGGER
OUT
1
2
12V 0.1A
MAX. TOTAL
YPRPB
YPRPB
COMPONENT VIDEO
AV 2
(5 STB)
B
AV 1
(1 MOVIE)
A
Power amplifier
Main input (RCA)
Speaker
connections
The unit (rear)
PRE OUT
(RCA) jacks
IN OUT
REMOTE
REAR
PRESENCE
FRONT
PRESENCEBACK
SURROUND
SUBWOOFER
2
(REAR)1(FRONT)
SURROUND
RS-232C
L L L L
LR
99
SUBWOOFER
2
(REAR)
1
(FRONT)
LR
XLR
XLR
XLR
XLR
The unit (rear)
(Male connector)
(Female connector)
XLR input XLR input
SUBWOOFER PREOUT
(XLR) 1–2 jacks
Depending on the speaker system you want to use, connect the corresponding PRE OUT (RCA)
jacks of the unit to the amplifier with audio pin cables (RCA unbalanced cables).
Y
We recommend using a power amplifier with volume control bypass (or without volume control circuit).
R
NT
SENCE
Connecting subwoofers
Connect the subwoofers (with built-in amplifier) to the PRE OUT jacks of the unit.
Select a balanced (XLR) or an unbalanced (RCA) connection depending on the input jacks
available on your subwoofer.
X
• The XLR jacks and RCA jacks output the same si gnals.
• You can also connect up to 2 subwoofers (with built-in amplifier) to the unit. When using 2 subwoofers,
configure the “Layout (Subwoofer)” setting (p.123) in the “Setup” menu after connecting the power cable to an
AC wall outlet.
Caution
To prevent the generation of loud noises or abnormal sounds, make sure you remove the power cable
of the unit and turn off the subwoofer before making connections.
■ Balanced connection
Connect the subwoofers (with built-in amplifier) to the SUBWOOFER PREOUT (XLR) 1–2 jacks
of the unit with XLR balanced cables.
Y
Before connecting XLR balanced cables, refer to the instruction manual of your subwoofer and verify that its XLR
jacks are compatible with the pin assignments of the unit (p.29).
En 31
AR
ENCE

■ Unbalanced connection
ARC
1
HDMI
(1 MOVIE) (5 STB) (6 GAME)
AV 1 AV 2 AV 3 AV 4
(HDCP2.2)
AV 5
R
AV 3 AV 4
(6 GAME)
R
SURROUND
BACK
R
SURROUNDRFRONT
CENTER
PRE OUT
FRONT
PRESENCE
OPTICAL
1
2
ZONE OUT
ZONE 2 ZONE 3
6
FM
75ȍ
ANTENNA
(
2 RADIO
)
AM
PRE OUT
(REAR)
SUBWOOFER
CENTER
FRONT
SURROUND
SURROUND
BACK
(FRONT)
YP
RPB
YP
RPB
COMPONENT VIDEO
AV 2
(5 STB)
B
AV 1
(1 MOVIE)
A
99
The unit (rear)
Connect the subwoofers (with built-in amplifier) to the SUBWOOFER PREOUT (RCA) 1–2 jacks
of the unit with audio pin cables (RCA unbalanced cables).
En 32

3 Connecting a TV and playback devices
HDMI OUT
ARC
1
2
(1 MOVIE) (5 STB)
G
AV 1 AV 2
A
R
R R R
L
R
L
L
AV 1 AV 2 AV 3 AV 4
AUDIO 1 AUDIO 2 AUDIO 3
(7 TV) (3 MUSIC)
(1 MOVIE) (5 STB) (6 GAME)
OPTICAL4OPTICAL
3
COAXIAL COAXIAL
2
COAXIAL
1
PHONO
SURROUND SUR BACK SUBWOOFER
CENTER
MULTI CH INPUT
GND
REAR
PRESENCE
R
SURROUND
BACK
R
R
FRONT
PRESENCE
AUDIO 4
OPTICAL
ZONE OUT
ZONE 2 ZONE 3
5
6
FM
75ȍ
A
FRONT
YPRPB
YPRPB
B
1
A
(HDCP2.2)
HDMI
OPTICAL
1
AUDIO
OPTICAL
R
L
AUDIO 1
(7 TV)
ARC
12
HDMI OUT
(HDCP2.2)
HDMI
HDMI
OO
R
L L
R
The unit
(rear)
HDMI OUT jack
AUDIO 1
(OPTICAL or AUDIO) jacks
Audio output
(digital optical or analog stereo)
TV
HDMI input
The unit is equipped with a variety of input jacks including HDMI input jacks to allow you to connect different types of playback devices.
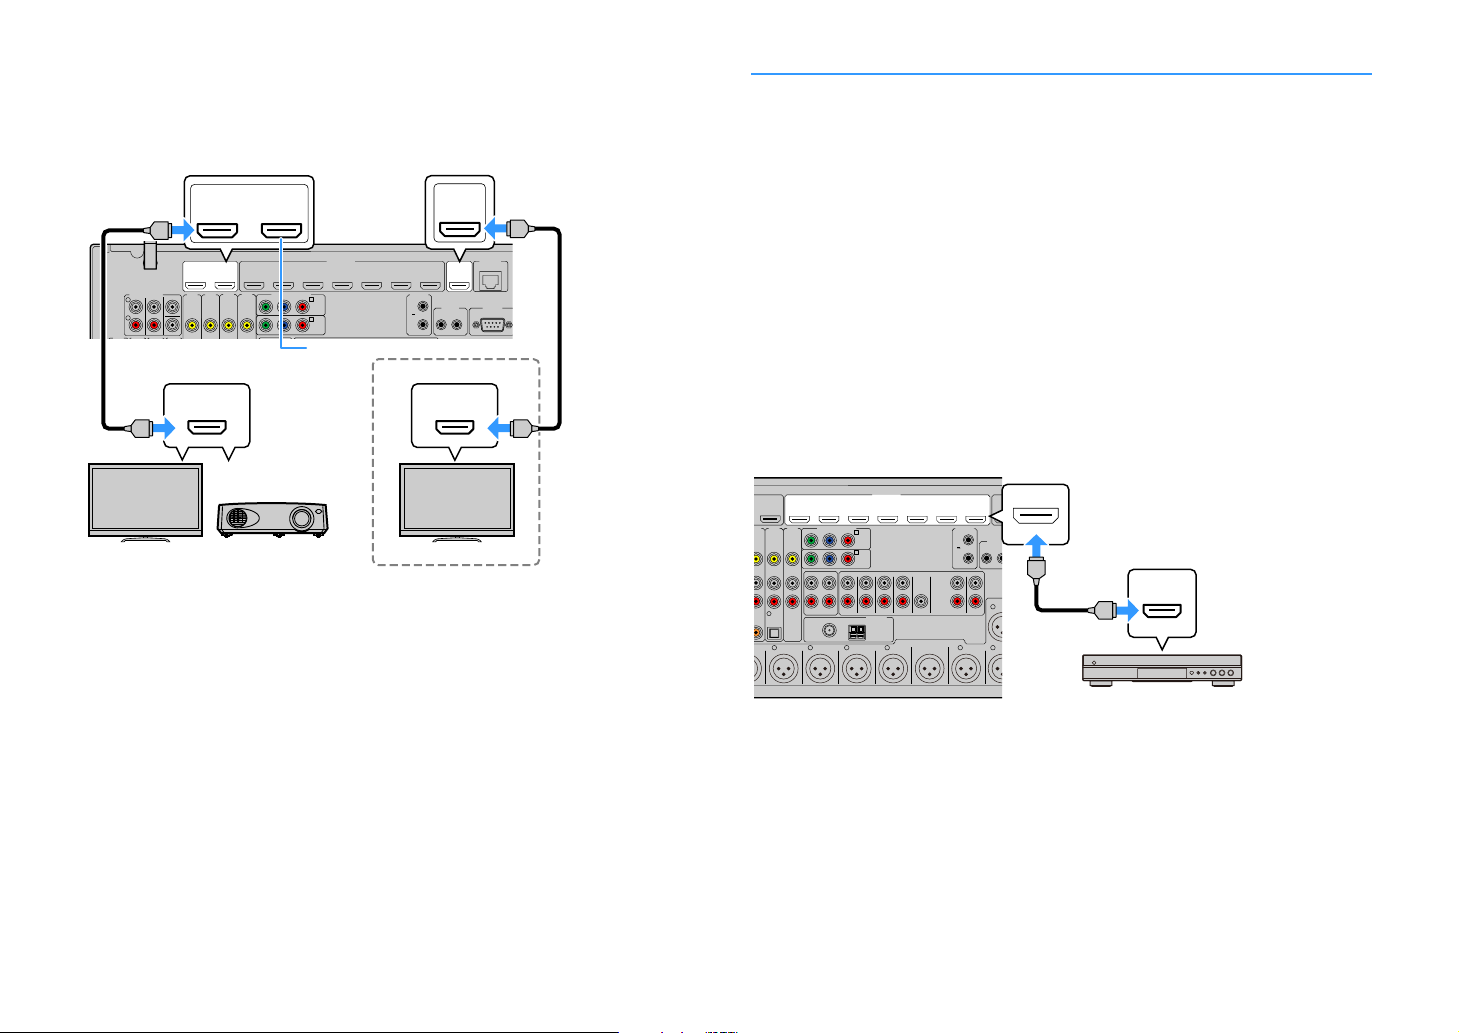
Connecting a TV
Connect a TV to the unit so that video input to the unit can be output to the TV.
You can also enjoy playback of TV audio on the unit.
■ HDMI connection
Connect the TV to the unit with an HDMI cable and an audio cable (digital optical or stereo pin
cable).
Y
You can connect another TV or a projector by using the HDMI OUT 2 jack (p.34).
COMPONENT VIDEO
(6
(
SU
X
• You do not make an audio cable connection between the TV and the unit in the following cases:
– If your TV sup ports Audio Return Channel (ARC)
– If you will receive TV broadcasts only from the set-top box
• If you connect a TV that supports HDMI Control to the unit with an HDMI cable, you can control the unit’s power
and volume with the TV’s remote control.
To use HDMI Control and ARC, you need to configure the HDMI settings on the unit. For details
on the settings, see “Information on HDMI” (p.172).
About Audio Return Channel (ARC)
• ARC allows audio signals to travel both ways. If you connect a TV that supports ARC to the unit with a
single HDMI cable, you can output video/audio to the TV or input TV audio to the unit.
• When using ARC, connect a TV with an HDMI cable that supports ARC.
En 33
■ Connecting another TV or a projector
HDMI OUT
ARC
1
2 3
HDMI
(1 MOVIE) (5 STB) (6 GAME)
AV 1 AV 2 AV 3 AV 4
(HDCP2.2)
AV 5 AV 6 AV 7
IN OUT
REMOTE
R
L
AV 1 AV 2 AV 3 AV 4
(1 MOVIE) (5 STB) (6 GAME)
SURROUND SUR BACK SUBWOOFER
CENTER
MULTI CH INPUT
RS-232C
TRIGGER
OUT
1
2
12V 0.1A
MAX. TOTAL
NETWORK
HDMI OUT
(4
NET
)
(8 SERVER)
(HDCP2.2)
(ZONE OUT)
YPRPB
YPRPB
COMPONENT VIDEO
AV 2
(5 STB)
B
AV 1
(1 MOVIE)
A
(HDCP2.2)
HDMI HDMI
3
(ZONE OUT)
HDMI OUT
(HDCP2.2)
ARC
12
HDMI OUT
(HDCP2.2)
HDMI
HDMI
HDMI
HDMI
The unit (rear)
HDMI OUT 2 jack
HDMI input
Projector
TV (already connected)
TV
TV
HDMI input
HDMI OUT 3 jack
Zone 2/4
ARC
1
HDMI
(1 MOVIE) (5 STB) (6 GAME)
AV 1 AV 2 AV 3 AV 4
(HDCP2.2)
AV 5 AV 6 AV 7
IN
U
E
R
L
AV 3 AV 4
(6 GAME)
C
R
SURROUND
BACK
R
SURROUNDRFRONT FRONT
E
L
R
CENTER
PRE OUT
FRONT
PRESENCE
OPTICAL
1
2
ZONE OUT
ZONE 2 ZONE 3
6
R
FM
75ȍ
ANTENNA
(
2 RADIO
)
AM
PRE OUT
(REAR)
SUBWOOFER
FRONT
PRESENCE
REAR
PRESENCE
CENTER
FRONT
SURROUND
SURROUND
BACK
(FRONT)
TRIGGER
OUT
1
2
12V 0.1A
MAX. TOTAL
M
D
N
YPRPB
YPRPB
COMPONENT VIDEO
AV 2
(5 STB)
B
AV 1
(1 MOVIE)
A
C
HDMI
HDMI
HDMI
The unit (rear)
HDMI output
Video device
HDMI (AV 1-7) jacks
If a second TV or projector is connected to the HDMI OUT 2 jack, you can use the remo te control
to switch the TV (or projector) to be used for watching video (p.63). In addition, a TV, etc.,
placed in Zone 2 can be connected to the HDMI OUT 3 (ZONE OUT) jack on the unit (p.101).
Connecting video devices (such as BD/DVD players)
Connect video devices such as BD/DVD players, set-top boxes (STBs) and game consoles to the
unit. Depending on the video/audio output jacks available on your video device, choose one of
the following connections. We recommend using an HDMI connection if the video device has
an HDMI output jack.
Y
The following explanation is based on the assumption that you have not changed the “Input Assignment” setting
(p.142) in the “Setup” menu. As necessary, you can assign the COMPONENT VIDEO (A, B), COAXIAL (3, 4, 5)
and OPTICAL (
1, 2, 6) jacks to another input source.
X
If you make more than one audio connection for one input source, an audio signal played back on the uni t will be
determined according to the “Audio Select” setting (p.112) in the “Option” menu.
■ HDMI connection
Connect a video device to the unit with an HDMI cable.
Y
• HDMI Control is n ot available on the HDMI OUT 2 and 3 jack.
• You can connect a video monitor in Zone2 or Zone4 to the HDMI OUT 3 jack in order to enjoy video and audio.
The zone to be used can be selected with “HDMI ZONE OUT Assign” (p.135) in the “Setup” menu.
En 34
I OUT
P2.2)
V 2
STB)
OAXIAL
CE
HD
(H
(ZO
REMOT
O
(R
SU

■ Component video connection
HDMI OUT
ARC
1
2
HDMI
(1 MOVIE) (5 STB) (6 GAME)
AV 1 AV 2 AV 3 AV 4
(HDCP2.2)
AV 5
6
R
R R R
L
R
L
L
AV 1 AV 2 AV 3 AV 4
AUDIO 1 AUDIO 2 AUDIO 3
(7 TV) (3 MUSIC)
(1 MOVIE) (5 STB) (6 GAME)
OPTICAL4OPTICAL3COAXIAL COAXIAL
2
COAXIAL
1
PHONO
SURROUND SUR BACK SUBWOOFER
CENTER
MULTI CH INPUT
GND
REAR
PRESENCE
R
SURROUND
BACK
R
SURROUNDRFRONT CENTER
PRE OUT
FRONT
PRESENCE
AUDIO 4
OPTICAL
1
2
ZONE OUT
ZONE 2 ZONE 3
5
6
FM
75ȍ
ANTENNA
(
2 RADIO
)
AM
PRE OUT
(REAR)
SUBWOOFER
CENTER
FRONT
SURROUND
SURROUND
BACK
(FRONT)
YPRPB
YPRPB
COMPONENT VIDEO
AV 2
(5 STB)
B
AV 1
(1 MOVIE)
A
(HDCP2.2)
YPBP
R
YPBP
R
R
L
COAXIAL
L
R
L
R
P
R
P
B
Y
Y
BP
RP
CC
The unit (rear)
AV 1-2 (COMPONENT VIDEO)
jacks
Video output
(component video)
Video device
Audio output
(digital coaxial or analog stereo)
AV 1-2 (COAXIAL) or
AV 1-2 (AUDIO) jacks
HDMI OUT
ARC
1
2
(1 MOVIE)
AV 1
R
R R R
L
R
L
L
AV 1 AV 2 AV 3 AV 4
AUDIO 1 AUDIO 2 AUDIO 3
(7 TV) (3 MUSIC)
(1 MOVIE) (5 STB) (6 GAME)
OPTICAL4OPTICAL3COAXIAL COAXIAL
2
COAXIAL
1
PHONO
SURROUND SUR BACK SUBWOOFER
CENTER
MULTI CH INPUT
GND
REAR
PRESENCE
R
A
FRONT
PRESENCE
AUDIO 4
OPTICAL
ZONE 2
5
6
ȍ
Y
Y
C
(HDCP2.2)
R
L
COAXIAL
OPTICAL
VIDEO
L
R
L
R
OO
C C
V
V
The unit (rear)
AV 1-4 (VIDEO)
jacks
Video output
(composite video)
Video device
Audio output
(any of digital coaxial, digital optical,
analog stereo)
Any of AV 1-2 (COAXIAL),
AV 3 (OPTICAL),
AV 1-4 (AUDIO) jacks
Connect a video device to the unit with a component video cable and an audio cable (digital
coaxial or stereo pin cable).
Output jacks on video device
Video Audio
Component video
Digital coaxial AV 1-2 (COMPONENT VIDEO + COAXIAL)
Analog stereo AV 1-2 (COMPONENT VIDEO + AUDIO)
AV
Input jacks on the unit
■ Composite video connection
Connect a video device to the unit with a video pin cable and an audio cable (digital coaxial,
digital optical, or stereo pin cable). Choose a set of input jacks (on the unit) depending on the
audio output jacks available on your video device.
Output jacks on video device
Video Audio
Composite video
Digital coaxial AV 1-2 (VIDEO + COAXIAL)
Digital optical AV 3 (VIDEO + OPTICAL)
Analog stereo AV 1-4 (VIDEO + AUDIO)
ZON
75
SU
B
Input jacks on the unit
X
To connect a video device to the unit with a component video cable and a digital optical cable, use “Input
Assignment” (p.142) in the “Setup” menu to assign the COMPONENT VIDEO and OPTICAL jacks to the same input
source.
En 35

Connecting audio devices (such as CD players)
HDMI OUT
ARC
1
2
(1 MOVIE) (5 STB)
G
AV 1 AV 2
A
R
R R R
L
R
L
L
AV 1 AV 2 AV 3 AV 4
AUDIO 1 AUDIO 2 AUDIO 3
(7 TV) (3 MUSIC)
(1 MOVIE) (5 STB) (6 GAME)
OPTICAL4OPTICAL3COAXIAL COAXIAL
2
COAXIAL
1
PHONO
SURROUND SUR BACK SUBWOOFER
CENTER
MULTI CH INPUT
GND
REAR
PRESENCE
R
SURROUND
BACK
R
R
FRONT
PRESENCE
AUDIO 4
OPTICAL
ZONE OUT
ZONE 2 ZONE 3
5
6
FM
75ȍ
A
FRONT
YP
RPB
YP
RPB
B
A
(HDCP2.2)
R
L
PHONO
GND
R
L
COAXIAL
OPTICAL
R
L
PHONO
GND
C C
L
R
L
R
O O
L
R
L
R
XLR
XLR
XLR
XLR
Audio output
(any of digital coaxial, digital optical,
analog stereo)
Any of AV 1–4, AUDIO 1–4 (COAXIAL,
OPTICAL, AUDIO [RCA], AUDIO [XLR])
jacks
The unit (rear)
Audio device
PHONO jacks
Audio output
(PHONO)
Turntable
Ground lead
Connect audio devices such as CD players and a turntable to the unit. Depending on the audio
output jacks available on your audio device, choose one of the following connections.
Y
• The following explanation is based on the assumption that you have not changed the “Input Assignment”
• Before connecting XLR balanced cables, refer to the instruction manual of your audio device and verify that its
X
If you make mor e than on e audio c onnectio n for one input so urce, an audio sig nal play ed back o n the uni t will be
determined according to the “Audio Select” setting (p.112) in the “Option” menu.
Digital coaxial
Digital optical
Analog stereo (RCA)
Analog stereo (XLR) AUDIO 4 (AUDIO [XLR])
Turntable (PHONO) PHONO
setting (p.142) in the “Setup” menu. As necessary, you can assign the COAXIAL (3, 4, 5) and OPTICAL (1, 2,
6) jacks to another input source.
XLR jacks are compatible with the pin assignments of the unit (p.29).
Audio output jacks on audio device Audio input jacks on the unit
AV 1-2 (COAXIAL)
AUDIO 3 (COAXIAL)
AV 3 (OPTICAL)
AUDIO 1-2 (OPTICAL)
AV 1–4 (AUDIO [RCA])
AUDIO 1–3 (AUDIO [RCA])
(6
COMPONENT VIDEO
(
SU
When connecting a turntable
• The PHONO jack of the unit is compatible with an MM cartridge. To connect a turntable with a
low-output MC cartridge, use a boosting transformer.
• Connecting the turntable to the GND terminal of the unit may reduce noise in the signal.
En 36

Connecting to the jacks on the front panel
ENTER
HELPRETURN
YPAO MIC
PHONES
USB
SILENT CINEMA
AUX
ZONE 2
ZONE 3
ZONE 4
ZONE CONTROL
5V
1A
RL AUDIO
RL
Audio device
The unit (front)
The AUX jacks are convenient for temporarily connecting an audio playback device.
Use stereo pin cables to connect an audio device (such as a CD player) to the unit.
For details on connecting a USB device to the USB jack, see “Connecting a USB storage device”
(p.86).
X
Before making connections, stop playback on the device, and turn down the volume of the unit sufficiently.
En 37

4 Connecting the radio antennas
HDMI OUT
ARC
1
2
HDMI
(1 MOVIE) (5 STB) (6 GAME)
AV 1 AV 2 AV 3 AV 4
(HDCP2.2)
AV 5 AV 6 AV 7
IN
R
R
R R R
L
R
L
L L
AV 1 AV 2 AV 3 AV 4
AUDIO 1 AUDIO 2 AUDIO 3
(7 TV) (3 MUSIC)
(1 MOVIE) (5 STB) (6 GAME)
OPTICAL4OPTICAL3COAXIAL COAXIAL
2
COAXIAL
1
PHONO
SURROUND SUR BACK SUBWOOFER
CENTER
MULTI CH INPUT
GND
REAR
PRESENCE
R
SURROUND
BACK
R
SURROUNDRFRONT FRONTCENTER
PRE OUT
FRONT
PRESENCE
AUDIO 4
OPTICAL
1
2
ZONE OUT
ZONE 2 ZONE 3
5
6
FM
75ȍ
ANTENNA
(
2 RADIO
)
AM
PRE OUT
(REAR)
SUBWOOFER
FRONT
PRESENCE
REAR
PRESENCE
CENTER
FRONT
SURROUND
SURROUND
BACK
(FRONT)
TRIGGER
OUT
1
2
12V 0.1A
MAX. TOTAL
YPRPB
YPRPB
COMPONENT VIDEO
AV 2
(5 STB)
B
AV 1
(1 MOVIE)
A
(HDCP2.2)
FM antenna AM antenna
The unit (rear)
Hold down Insert Release
IN
E
R
R R R
L
R
L
L L
AV 1AV 2AV 3AV 4
AUDIO 1 AUDIO 2 AUDIO 3
(7 TV) (3 MUSIC)
(1 MOVIE) (5 STB) (6 GAME)
OPTICAL4OPTICAL3COAXIAL COAXIAL
2
COAXIAL
1
PHONO
SURROUND SUR BACK SUBWOOFER
CENTER
MULTI CH INPUT
GND
REAR
PRESENCE
R
SURROUND
BACK
R
SURROUNDRFRONT FRONTCENTER
PRE OUT
FRONT
PRESENCE
AUDIO 4
OPTICAL
1
2
ZONE OUT
ZONE 2 ZONE 3
5
6
R
FM
75ȍ
ANTENNA
(
2 RADIO
)
AM
PRE OUT
(REAR)
SUBWOOFER
FRONT
PRESENCE
REAR
PRESENCE
CENTER
FRONT
SURROUND
SURROUND
BACK
(FRONT)
OUT
1
2
12V 0.1A
MAX. TOTAL
YPRPB
YPRPB
COMPONENT VIDEO
AV 2
(5 STB)
B
AV 1
(1 MOVIE)
A
75ȍ
DAB/FM
ANTENNA
(2 RADIO)
DAB/FM antenna
The unit (rear)
Connect the supplied radio antenna to the unit.
FM/AM antennas (except Australia, U.K., Europe, Middle East and Russia models)
Connect the supplied FM/AM antennas to the unit.
Fix the end of the FM antenna to a wall, and place the AM antenna on a flat surface.
Assembling the AM antenna
Connecting the AM antenna
X
• Unwind only the length of cable ne eded from the AM antenna unit.
• The wires of the AM antenna have no polarity.
DAB/FM antenna (Australia, U.K., Europe, Middle East and Russia models only)
Connect the supplied DAB/FM antenna to the unit and fix the antenna ends to a wall.
TRIGGER
R
Y
• The antenna should be stretched out horizontally.
En 38
• If you cannot obtain good reception on the radio, adjust the height, direction or placement of the DAB/FM
antenna.

5 Connecting a network cable or preparing the wireless antenna
3
AV 6
AV 7
IN OUT
REMOTE
AC IN
RS-232C
TRIGGER
OUT
1
2
12V 0.1A
MAX. TOTAL
NETWORK
HDMI OUT
(4
NET
)
(8 SERVER)
(HDCP2.2)
(ZONE OUT)
LAN
WAN
Network Attached Storage
(NAS)
Internet
Modem
Router
Network cable
PC
The unit (rear)
Mobile device
Connect the unit to a router (access point) with a network cable, or prepare the wireless
antenna for establishing a wireless network connection.
You can enjoy Internet radio or music files stored on media servers, such as PCs and Network
Attached Storage (NAS), on the unit.
Connecting the network cable
Connect the unit to your router with a commercially-available STP network cable (CAT-5 or
higher straight cable).
X
• If you want to use a wired (network cable) connection when a wireless connection has been made, set “Network
Connection” (p.136) in the “Setup” menu to “Wired”.
• If you are using a router that supports DHCP, you do not need to configure any network settings for the unit, as
the network parameters (such as the IP address) will be assigned automatically to it. You only need to configure
the network settings if your router does not su pport DHCP or i f you want to configure the network parameters
manually (p.136).
• You can check whether the network parameters (such as IP address) are properly assigned to the unit in
“Information” (p.125) in the “Network” menu.
Y
• Some security software installed on your PC or the firewall settings of network devices (such as a router) may
block the access of the unit to the network devices or the Internet. In these cases, configure the security
software or firewall settings appropriately.
• Each server must be connected to the same subnet as the unit.
• To use the service via the Internet, broadband connection is strongly recommended.
Preparing the wireless antenna
If you want to establish a wireless network connection and Bluetooth connection, stand the
wireless antenna up straight.
For information on how to connect the unit to a network device wirelessly, see “Connecting to
a network device wirelessly” (p.56).
Y
Do not apply excessive force on the antenna. Doing so may damage it.
En 39

6 Connecting other devices
HDMI OUT
ARC
1
2
V
1
R
R R R
L
R
L
L
AV 1 AV 2 AV 3 AV 4
AUDIO 1 AUDIO 2 AUDIO 3
(7 TV) (3 MUSIC)
(1 MOVIE) (5 STB) (6 GAME)
OPTICAL4OPTICAL
3
COAXIAL COAXIAL
2
COAXIAL
1
PHONO
SURROUND SUR BACK SUBWOOFER
CENTER
MULTI CH INPUT
GND
REAR
PRESENCE
FRONT
PRESENCE
AUDIO 4
OPTICAL
5
6
(HDCP2.2)
AUDIO 3
MULTI CH INPUT
SUBWOOFER
CENTER
SURROUND SUR BACK
R
L
L
L
R
L
R
The unit (rear)
MULTI CH INPUT
jacks
Channel output
(Center)
(Subwoofer)
(Surround
back)
(Surround)
(Front)
AUDIO 3
(AUDIO) jacks
Device with analog
multichannel output
3
AV 4
(HDCP2.2)
AV 5 AV 6 AV 7
IN OUT
REMOTE
L
SURROUND
BACK
FRONT
C
R
FRONT FRONT
(REAR) (FRONT)
21
L L L
SURROUNDCENTER
PRE OUT
1
2
R L
)
(REAR)
SUBWOOFER
FRONT
PRESENCE
REAR
PRESENCE
CENTER
SUBWOOFER
BACK
(FRONT)
RS-232C
TRIGGER
OUT
1
2
12V 0.1A
MAX. TOTAL
NETWORK
HDMI OUT
(4
NET
)
(8 SERVER)
(HDCP2.2)
(ZONE OUT)
TRIGGER
OUT
1
2
12V 0.1A
MAX. TOTAL
The unit (rear)
TRIGGER OUT 1-2 jacks
System
connector
jack
Yamaha
subwoofer
Power amplifier
Trigger In
(+12V)
Connections with other devices are as shown below.
Connecting a device with analog multichannel output
You can connect an analog multichannel output device such as a DVD player and an SACD
player to the MULTI CH INPUT jacks.
X
The front channel output should be connecte d to the AUDIO 3 (AUDIO) jacks of the unit.
AV
(1 MO
R
X
• You can select a video source to be displayed when “MULTI CH” is selected as the input source using “Video
Out” (p.113) in the “Option” menu. When connecting a video device (such as a DVD player) to the MULTI CH
INPUT jacks, use the input jack specified in “Video Out” for the video connection.
• Since the unit does not r edirect signals input to the MULTI CH INPUT jacks to accommodate for missing
speakers, make appropriate settings on the external device (such as a DVD player) that suit to the speaker
configuration.
• When “MULTI CH” is selected as the input source, sound mode selection and tone control adjustment are not
available.
En 40
Connecting a device compatible with the trigger function
The trigger function can control an external device in conjunction with operating the unit (such
as powering on/off and input selection). If you have a power amplifier or a Yamaha subwoofer
that supports a system connection or a device with a trigger input jack, you can use the trigger
function by connecting the external device to one of the TRIGGER OUT jacks with a monaural
mini-plug cable.
MI
URROUND
NA
IO
PRESEN
X
You can configure the trigger function settings in “Trigger Output1” and “Trigger Output2” (p.145) in the “Setup”
menu.

7 Connecting the power cable
3
OUT
AC IN
SURROUND
BACK
FRONT
PRESENCE
REAR
PRESENCE
(REAR)
(FRONT)
21
L L L
L
SUBWOOFER
RS-232C
NETWORK
DMI OUT
(4
NET
)
(8 SERVER)
HDCP2.2)
ZONE OUT)
To an AC wall outlet
The unit (rear)
After all the connections are complete, connect the supplied power cable to the unit and then
to an AC wall outlet.
En 41

8 Selecting an on-screen menu language
G
BAND
G
MEMO
S
VOL
U
E
R
S
E
AI
P
M
/
/MENU
E
MENU
B
LUEYELLOWGREENRED
PRESE
T
B
HNE
T
U
S
B
TUNE
R
I
N
4
SC
HDMI
O
UTPU
R
E D
IR
C
TPART
Y
MAIN
234
ZO
S
Cursor keys
SLEEP
LEEP
PARTY
TOP
TOP
MENU
PROGRAM
ROGRA
STRAIGHT
TRAIGHT
TUNIN
MAIN 2 3 4
ZONE
NE
SCENE
INPUT
NET USBTUNER
PRESET
GREENRED
HOME
HOM
SUR. DECODE
UR. DECOD
ENHANCER
NHANCE
MEMORY
HDMI OUTPURE DIRECT
E
ENE
PUT
BLUETOOTH
YELLOW
AI
VOLUME
RY
4321
8765
LUETOOT
BLUE
POP-UP
POP-UP
/MENU
ME
TUNINGBANDTUNING
TUNIN
z
SETUP
ENTER
RETURN
Select the desired on-screen menu language from English, Japanese,
French, German, Spanish, Russian, Italian and Chinese.
Press z (receiver power) to turn on the unit.
1
Turn on the TV and switch the TV input to display video
2
from the unit.
X
If you turn on the unit for the first time, the message regarding the network
setup appears. For now, press RETURN and proceed to Step 3.
Press SETUP.
3
Use the cursor keys to select “System” and press ENTER.
4
Use the cursor keys to select “Language” and press
5
ENTER.
Use the cursor keys to select the desired language.
6
To exit from the menu, press SETUP.
7
X
The information on the front display is provided in English only.
En 42

9 Configuring the necessary speaker settings
G
BAND
G
MEMO
S
V
OLU
M
E
R
S
E
AI
P
ROG
M
/
/MENU
E
MENU
UOG
PRESE
T
B
HNE
T
U
S
B
TUNE
R
I
N
4
SC
HDMI
O
UTPU
R
E D
IR
C
TPART
Y
MAIN
234
ZO
S
RETURN
SETUP
ENTER
z
Cursor keys
SLEEP
LEEP
PARTY
TOP
TOP
MENU
PROGRAM
RA
STRAIGHT
TRAIGHT
TUNIN
MAIN 2 3 4
ZONE
NE
SCENE
INPUT
NET USBTUNER
PRESET
GREENRED
HOME
HOM
SUR. DECODE
UR. DECOD
ENHANCER
NHANCE
MEMORY
HDMI OUTPURE DIRECT
E
ENE
PUT
BLUETOOTH
YELLOW
AI
VOLUME
RY
4321
8765
LUETOOT
BLUE
POP-UP
POP-UP
/MENU
TUNINGBANDTUNING
TUNIN
If you use any of the following speaker configurations, follow the
Configure the corresponding speaker settings.
procedure below to configure the corresponding speaker settings
manually before performing YPAO.
• Using the surround speakers for front 5.1-channel system (Virtual
CINEMA FRONT) (p.24)
• Using the presence speakers for Dolby Atmos or DTS:X playback (p.26)
6
• When using the surround speakers for front 5.1-channel system
(Virtual CINEMA FRONT), select “Configuration” ! “Surround” !
“Layout” (p.122), then select “Front”.
• When using the presence speakers for Dolby Atmos or DTS:X
playback, select “Configuration” ! “Front Presence” !
Press z (receiver power) to turn on the unit.
1
“Layout” (p.122), then select your front presence speaker layout.
If you are using the rear presence speakers, also select its layout
Turn on the TV and switch the TV input to display video
2
in “Rear Presence”.
from the unit (HDMI OUT jack).
To exit from the menu, press SETUP.
7
X
If you turn on the unit for the first time, the message regarding the network
setup appears. For now, press RETURN and proceed to Step 3.
Press SETUP.
3
E
Use the cursor keys to select “Speaker” and press ENTER.
4
Use the cursor keys to select “Configuration” and press
5
ENTER.
En 43

10 Optimizing the speaker settings automatically (YPAO)
VOLUME HIGH CUT
CROSSOVER/
MIN MAXMIN MAX
9
12
3
45
YPAO MIC
The unit (front)
YPAO
microphone
Ear height
YPAO MIC
jack
G
BAND
G
MEMO
S
V
OLU
M
E
R
S
E
AI
P
ROG
M
/
/MENU
E
MENU
UOG
PRESE
T
B
HNE
T
U
S
B
TUNE
R
I
N
4
SC
HDMI
O
UTPU
R
E D
IR
C
TPART
Y
MAIN
234
ZO
S
RETURN
z
MAIN 2 3 4
ZONE
NE
SLEEP
LEEP
PARTY
SCENE
INPUT
NET USBTUNER
PRESET
GREENRED
TOP
TOP
HOME
HOM
MENU
SUR. DECODE
UR. DECOD
PROGRAM
RA
ENHANCER
NHANCE
STRAIGHT
TRAIGHT
MEMORY
TUNIN
ENE
PUT
AI
E
YELLOW
RY
HDMI OUTPURE DIRECT
4321
8765
BLUETOOTH
LUETOOT
BLUE
POP-UP
POP-UP
/MENU
VOLUME
TUNINGBANDTUNING
TUNIN
The Yamaha Parametric room Acoustic Optimizer (YPAO) function
Place the YPAO microphone at your listening position and
detects speaker connections, measures the distances from them to your
listening position(s), and then automatically optimizes the speaker
settings, such as volume balance and acoustic parameters, to suit your
room.
X
The YPAO function of the unit adopts the YPAO-R.S.C. (Reflected Sound Control)
5
connect it to the YPAO MIC jack on the front panel.
X
Place the YPAO microphone at your listening position (same height as your
ears). We recommend the use of a tripod as a microphone stand. You can use the
tripod screws to stabilize the microphone.
technology that enables to create natural sound fields like a room specifically designed
for acoustic perfection.
Y
Note the following regarding YPAO measurement.
– Test tones are output at high volume and may surprise or frighten s mall children.
– Test tone volume cannot be adj usted.
– Keep the room as quiet as possible.
– Stay in a corner of the room behind the listening position so that you do not become
an obstacle between speakers and the YPAO microphone.
– Do not connec t headphones.
Press z (receiver power) to turn on the unit.
E
1
Turn on the power amplifier.
2
Turn on the TV and switch the TV input to display video
3
from the unit.
ER
X
If you turn on the unit for the first time, the message regarding the network
setup appears. For now, press RETURN and proceed to Step 3.
Turn on the subwoofer and set the volume to half. If the
4
crossover frequency is adjustable, set it to maximum.
The following screen appears on the TV.
9
X
To cancel the operation, disconnect the YPAO microphone before starting the
measurement.
En 44

SLEEP
G
BAND
G
MEMO
S
V
OLU
M
E
R
S
E
AI
P
ROG
M
/
/MENU
E
MENU
UOG
PRESE
T
B
HNE
T
U
S
B
TUNE
R
I
N
4
SC
HDMI
O
UTPU
R
E D
IR
C
TPART
Y
MAIN
234
ZO
S
ENTER
Cursor keys
LEEP
PARTY
ZONE
NE
NET USBTUNER
GREENRED
MAIN 2 3 4
SCENE
INPUT
PRESET
ENE
PUT
E
YELLOW
HDMI OUTPURE DIRECT
4321
8765
BLUETOOTH
LUETOOT
BLUE
If desired, select the measuring options.
6
Use the cursor keys to select “Multi Measure” (p.46) or
“Angle/Height Measure” (p.47) and press ENTER.
This completes the preparations. See the following page to start the
measurement.
When “Measuring option” is set to “Multi Measure”:
“Measuring at multiple listening positions” (p.50)
When “Measuring option” is not set to “Multi Measure”:
“Measuring at one listening position (single measure)” (p.47)
HOME
HOM
AI
SUR. DECODE
UR. DECOD
ENHANCER
NHANCE
MEMORY
RY
POP-UP
POP-UP
/MENU
VOLUME
TUNINGBANDTUNING
TUNIN
E
TOP
TOP
MENU
PROGRAM
RA
STRAIGHT
TRAIGHT
TUNIN
En 45

Multi Measure
a b
a
a
b
cde
c
d
de
bac
Multi measure
(5 listening positions)
Multi measure
(2 listening positions +
front/back)
Multi measure
(1 listening position +
front/back/left/right)
Single measure
Selects multi measure or single measure.
Measuring method
Select this option if you will have several listening positions or if you want others
Checked
Unchecked (default)
to enjoy surround sound. You can take measurements at up to 8 different
positions in the room. The speaker settings will be optimized to suit the area
defined by those positions (multi measure).
Select this option if your listening position will always be fixed. Take the
measurements at only one position . The speaker settings will be optimized to suit
that position (single measure).
X
• If you perform the multi measure, the speaker settings will be optimized for you to enjoy surround sound in a
wider space.
• If you perform the multi measure, first place the YPAO microphone at the listening position you will be seated
most frequently.
En 46

SLEEP
G
BAND
G
MEMO
S
V
OLU
M
E
R
S
E
AI
P
ROG
M
/
/MENU
E
MENU
UOG
PRESE
T
B
HNE
T
U
S
B
TUNE
R
I
N
4
SC
HDMI
O
UTPU
R
E D
IR
C
TPART
Y
MAIN
234
ZO
S
RETURN
ENTER
Cursor keys
LEEP
PARTY
TOP
TOP
MENU
PROGRAM
RA
STRAIGHT
TRAIGHT
TUNIN
MAIN 2 3 4
ZONE
NE
SCENE
INPUT
NET USBTUNER
PRESET
GREENRED
HOME
HOM
SUR. DECODE
UR. DECOD
ENHANCER
NHANCE
MEMORY
HDMI OUTPURE DIRECT
E
ENE
PUT
BLUETOOTH
YELLOW
AI
VOLUME
RY
4321
8765
LUETOOT
BLUE
POP-UP
POP-UP
/MENU
TUNINGBANDTUNING
TUNIN
Angle/Height Measure
Enables/disables the angle/height measurement.
Measuring at one listening position (single measure)
Follow the procedure below to take a measurement when the “Multi
Measure” box is unchecked. It takes about 5 minutes to perform the
measurement.
Y
• If any error message (such as ERROR 1) or warning message (such as WARNING 1)
appears, see “Error messages” (p.54) or “Warning messages” (p.55).
• Do not use the microphone base until the corresponding message appear on the TV.
Measuring method
Enables the angle/height measurement. The unit will
measure angle of each speaker and height of the presence
Checked
speakers at the listening position, and correct the speaker
parameters so that CINEMA DSP can create more effective
sound fields.
Unchecked
(default)
E
Disables the angle/height measurement.
To start the measurement, use the cursor keys to select
1
“Start” and press ENTER.
The measurement will start in 10 seconds. Press ENTER again to
start the measurement immediately.
X
To cancel the measurement temporarily, press RETURN or VOLUME keys.
The following screen appears on the TV when the measurement
finishes.
(when angle/height measurement is disabled)
Proceed to Step 3.
En 47

Microphone base
Pole
Microphone
base
SLEEP
G
BAND
G
MEMO
S
VOL
U
E
R
S
E
AI
P
M
/
/MENU
E
MENU
B
LUEYELLOWGREENRED
PRESE
T
B
HNE
T
U
S
B
TUNE
R
I
N
4
SC
HDMI
O
UTPU
R
E D
IR
C
TPART
Y
MAIN
234
ZO
S
LEEP
PARTY
ZONE
NE
NET USBTUNER
GREENRED
MAIN 2 3 4
SCENE
INPUT
PRESET
ENE
PUT
E
YELLOW
HDMI OUTPURE DIRECT
4321
8765
BLUETOOTH
LUETOOT
BLUE
ENTER
(when angle/height measurement is enabled)
Proceed to Step 2.
Perform the angle/height measurement.
2
Attach the supplied pole to the center of the microphone base.
1
Place the microphone base at the listening position and set the
2
YPAO microphone to the position “1”.
TOP
TOP
MENU
PROGRAM
ROGRA
STRAIGHT
TRAIGHT
TUNIN
HOME
HOM
AI
SUR. DECODE
UR. DECOD
ENHANCER
NHANCE
MEMORY
RY
POP-UP
POP-UP
/MENU
VOLUME
TUNINGBANDTUNING
TUNIN
Y
ME
En 48
• We recommend using a tripod to place the microphone base at ear height.
Use the tripod screws to fix the microphone base in place.
• Do not move the microphone base until the fourth angle measurement
finishes.
Press ENTER to start the first angle measurement.
3
In the same way, perform the angle measurement for the
4
positions “2” and “3”.

SLEEP
G
BAND
G
MEMO
S
V
OLU
E
R
S
E
AI
P
ROG
M
/
/MENU
E
MENU
B
LUEYELLOWGREENRED
PRESE
T
B
H
NET
U
S
B
TUNE
R
I
N
4
SC
HDMI
O
UTPU
R
E D
IR
C
TPART
Y
MAIN
234
ZO
S
ENTER
Cursor keys
LEEP
PARTY
TOP
TOP
MENU
PROGRAM
RA
STRAIGHT
TRAIGHT
TUNIN
MAIN 2 3 4
ZONE
NE
SCENE
INPUT
NET USBTUNER
PRESET
GREENRED
HOME
HOM
SUR. DECODE
UR. DECOD
ENHANCER
NHANCE
MEMORY
HDMI OUTPURE DIRECT
E
ENE
PUT
BLUETOOTH
YELLOW
AI
VOLUME
RY
4321
8765
LUETOOT
BLUE
POP-UP
POP-UP
/MENU
ME
TUNINGBANDTUNING
TUNIN
Set the YPAO microphone at the top of the pole and perform the
5
fourth angle measurement.
The following screen appears on the TV when the fourth angle
measurement finishes.
To check the measurement results, use the cursor keys to
3
select “Measurement result” and press ENTER.
After confirming the result, press RETURN to return to the
“Measurement Finished” screen.
X
For details, see “Checking the measurement results” (p.53).
To save the measurement results, use the cursor keys to
4
select “Save” and press ENTER.
The adjusted speaker settings are applied.
X
To finish the measurement without saving the result, select “Cancel”.
Disconnect the YPAO microphone from the unit.
5
This completes optimization of the speaker settings.
Caution
The YPAO microphone is sensitive to heat, so should not be placed anywhere
where it could be exposed to direct sunlight or high temperatures (such as on
top of AV equipment).
En 49

SLEEP
G
BAND
G
MEMO
S
V
OLU
E
R
S
E
AI
P
ROG
M
/
/MENU
E
MENU
B
LUEYELLOWGREENRED
PRESE
T
B
H
NET
U
S
B
TUNE
R
I
N
4
SC
HDMI
O
UTPU
R
E D
IR
C
TPART
Y
MAIN
234
ZO
S
RETURN
ENTER
Cursor keys
LEEP
PARTY
ZONE
NE
NET USBTUNER
GREENRED
MAIN 2 3 4
SCENE
INPUT
PRESET
ENE
PUT
E
YELLOW
HDMI OUTPURE DIRECT
4321
8765
BLUETOOTH
LUETOOT
BLUE
Measuring at multiple listening positions (multi measure)
Follow the procedure below to take a measurement when the “Multi
Measure” box is checked. It takes about 15 minutes to measure 8
listening positions.
Y
• If any error message (such as ERROR 1) or warning message (such as WARNING 1)
appears, see “Error messages” (p.54) or “Warning messages” (p.55).
• Do not use the microphone base until the corresponding message appear on the TV.
To start the measurement, use the cursor keys to select
1
“Start” and press ENTER.
The measurement will start in 10 seconds. Press ENTER again to
start the measurement immediately.
When the measurements at the positions you want to
3
measure are completed, use the cursor keys to select
“Skip” and press ENTER.
When you have taken measurements at 8 listening positions, the
following screen appears automatically.
(when angle/height measurement is disabled)
Proceed to Step 5.
TOP
TOP
MENU
PROGRAM
RA
STRAIGHT
TRAIGHT
TUNIN
HOME
HOM
AI
SUR. DECODE
UR. DECOD
ENHANCER
NHANCE
MEMORY
RY
POP-UP
POP-UP
/MENU
VOLUME
TUNINGBANDTUNING
TUNIN
X
To cancel the measuremen t temporarily, press RETURN or VOLUME keys.
The following screen appears on the TV when the measurement at
ME
the first position finishes.
Move the YPAO microphone to the next listening position
2
(when angle/height measurement is enabled)
Proceed to Step 4.
and press ENTER.
Repeat step 2 until measurements at all listening positions (up to
8) have been taken.
En 50

Microphone base
Pole
Microphone
base
SLEEP
G
BAND
G
MEMO
S
V
OLU
E
R
S
E
AI
P
ROG
M
/
/MENU
E
MENU
B
LUEYELLOWGREENRED
PRESE
T
B
H
NET
U
S
B
TUNE
R
I
N
4
SC
HDMI
O
UTPU
R
E D
IR
C
TPART
Y
MAIN
234
ZO
S
ENTER
LEEP
PARTY
ZONE
NE
NET USBTUNER
GREENRED
MAIN 2 3 4
SCENE
INPUT
PRESET
ENE
PUT
E
YELLOW
HDMI OUTPURE DIRECT
4321
8765
BLUETOOTH
LUETOOT
BLUE
Perform the angle/height measurement.
4
Attach the supplied pole to the center of the microphone base.
1
Place the microphone base at the listening position you will be
2
seated most frequently and set the YPAO microphone to the
position “1”.
Press ENTER to start the first angle measurement.
3
The following screen appears on the TV when the first angle
measurement finishes.
In the same way, perform the angle measurement for the
4
positions “2” and “3”.
Set the YPAO microphone at the top of the pole and perform the
5
fourth angle measurement.
TOP
TOP
MENU
PROGRAM
RA
STRAIGHT
TRAIGHT
TUNIN
HOME
HOM
AI
SUR. DECODE
UR. DECOD
ENHANCER
NHANCE
MEMORY
RY
POP-UP
POP-UP
/MENU
VOLUME
TUNINGBANDTUNING
TUNIN
ME
The following screen appears on the TV when the fourth angle
measurement finishes.
Y
• We recommend using a tripod to place the microphone base at ear height.
Use the tripod screws to fix the microphone base in place.
• Do not move the microphone base until the fourth angle measurement
finishes.
En 51

SLEEP
G
BAND
G
MEMO
S
V
OLU
E
R
S
E
AI
P
ROG
M
/
/MENU
E
MENU
B
LUEYELLOWGREENRED
PRESE
T
B
H
NET
U
S
B
TUNE
R
I
N
4
SC
HDMI
O
UTPU
R
E D
IR
C
TPART
Y
MAIN
234
ZO
S
ENTER
Cursor keys
LEEP
PARTY
TOP
TOP
MENU
PROGRAM
RA
STRAIGHT
TRAIGHT
TUNIN
MAIN 2 3 4
ZONE
NE
SCENE
INPUT
NET USBTUNER
PRESET
GREENRED
HOME
HOM
SUR. DECODE
UR. DECOD
ENHANCER
NHANCE
MEMORY
HDMI OUTPURE DIRECT
E
ENE
PUT
BLUETOOTH
YELLOW
AI
VOLUME
RY
4321
8765
LUETOOT
BLUE
POP-UP
POP-UP
/MENU
ME
TUNINGBANDTUNING
TUNIN
To check the measurement results, use the cursor keys to
5
select “Measurement result” and press ENTER.
X
For details, see “Checking the measurement results” (p.53).
To save the measurement result, use the cursor keys to
6
select “Save” and press ENTER.
The adjusted speaker settings are applied.
X
To finish the measurement without saving the result, select “Cancel”.
Disconnect the YPAO microphone from the unit.
7
This completes optimization of the speaker settings.
Caution
The YPAO microphone is sensitive to heat, so should not be placed anywhere
where it could be exposed to direct sunlight or high temperatures (such as on
top of AV equipment).
En 52

a
b
c
SLEEP
G
BAND
G
MEMO
S
V
OLU
E
R
S
E
AI
P
ROG
M
/
/MENU
E
MENU
B
LUEYELLOWGREENRED
PRESE
T
B
H
NET
U
S
B
TUNE
R
I
N
4
SC
HDMI
O
UTPU
R
E D
IR
C
TPART
Y
MAIN
234
ZO
S
RETURN
SETUP
ENTER
Cursor keys
LEEP
PARTY
ZONE
NE
NET USBTUNER
GREENRED
MAIN 2 3 4
SCENE
INPUT
PRESET
ENE
PUT
E
YELLOW
HDMI OUTPURE DIRECT
4321
8765
BLUETOOTH
LUETOOT
BLUE
Checking the measurement results
You can check the YPAO measurement results.
After the measurement, use the cursor keys to select
1
“Measurement result” and press ENTER.
X
You can also select “YPAO Result” (p.125) from “Speaker” (p.121) in the “Setup”
menu, which displays the previous measurement results.
The following screen appears.
Angle
(horizontal)
Height
Horizontal angle of each speaker at the listening position
Height of the presence speakers above the level of the
listening position
X
• “Angle (horizontal)” and “Height” show the results whe n angle/height
measurement is performed.
• If there are speakers that cannot be detected, check the power amplifier
settings and connections.
To finish checking the results and return to the previous
3
screen, press RETURN.
Reloading the previous YPAO adjustments
When the speaker settings you have configured manually are not
suitable, follow the procedure below to discard the manual settings and
HOME
HOM
AI
SUR. DECODE
UR. DECOD
ENHANCER
NHANCE
MEMORY
RY
POP-UP
POP-UP
/MENU
VOLUME
TUNINGBANDTUNING
TUNIN
reload the previous YPAO adjustments.
a Measurement result items
In the “Setup” menu, select “Speaker” and then “YPAO
ME
b Measurement result details
c The number of measured positions (when multi measure is
1
Result” (p.125).
performed)
Use the cursor keys to select “Setup Reload” and press
2
Use the cursor keys to select an item.
2
Polarity of each speaker
Wiring
Reverse: The speaker cable may be connected with the
reverse polarity (+/-).
Size of each speaker (cross-over frequency of the
subwoofer)
Size
Large: The speaker can reproduce low-frequency signals
effectively.
Small: The speaker cannot reproduce low-frequency
signals effectively.
Distance Distance from the listening position to each speaker
Level Output level adjustment for each speaker
ENTER.
To exit from the menu, press SETUP.
3
TOP
TOP
MENU
PROGRAM
RA
STRAIGHT
TRAIGHT
TUNIN
En 53

Error messages
If any error message is displayed during the measurement, resolve the problem and perform
YPAO again.
Error message Remedy
ERROR 1
Front speakers are not
detected.
ERROR 2
One of the surround speakers
cannot be detected.
ERROR 3
One of the front presence
speakers cannot be detected.
ERROR 4
One of the surround back
speakers cannot be detected.
ERROR 5
The noise is too loud.
ERROR 6
Surround back speakers are
connected, but no surround
speakers are connected.
ERROR 7
The YPAO microphone has
been removed.
ERROR 8
The YPAO microphone cannot
detect test tones.
ERROR 9
Canceled by user operation
ERROR 10
An internal error has occurred.
ERROR 11
One of the rear presence
speakers cannot be detected.
Follow the on-screen instructions to exit YPAO, turn off the unit and
power amplifier, and then check the power amplifier connections (to
the unit or to the corresponding speakers).
(This error message will be also displayed if you perform YPAO when the
power amplifier is turned off.)
Keep the room quiet and follow the on-screen instructions to start the
measurement again. If you select “Proceed”, YPAO takes the
measurement again and ignores any noise detected.
Surround speakers need to be connected in order to use surround back
speakers. Follow the on-screen instructions to exit YPAO, turn off the
unit and power amplifier, and then reconnect the speakers.
Connect the YPAO microphone to the YPAO MIC jack firmly and follow
the on-screen instructions to start the measurement again.
Connect the YPAO microphone to the YPAO MIC jack firmly and follow
the on-screen instructions to start the measurement again. If this error
occurs repeatedly, contact the nearest authorized Yamaha dealer or
service center.
Follow the on-screen instructions to start the measurement again. To
cancel the measurement, select “Quit”.
Follow the on-screen instructions to exit YPAO, turn off and on the unit.
If this error occurs repeatedly, contact the nearest authorized Yamaha
dealer or service center.
Follow the on-screen instructions to exit YPAO, turn off the unit and
power amplifier, and then check the power amplifier connections (to
the unit or to the rear presence speakers).
En 54

Warning messages
If a warning message is displayed after the measurement, you can still save the measurement
results by following on-screen instructions.
However, we recommend you perform YPAO again in order to use the unit with the optimal
speaker settings.
Warning message Remedy
Select “Wiring” in “Measurement result” (p.53) and check the cable
connections (+/-) of the speaker identified by “Reverse”.
WARNING 1
A speaker cable may be
connected with the reverse
polarity (+/-).
WARNING 2
A speaker is placed more than
24 m (80 ft) from the listening
position.
WARNING 3
There are significant volume
differences between the
speakers.
If the speaker is connected incorrectly:
Turn off the unit and power amplifier and then reconnect the speaker
cable.
If the speaker is connected correctly:
Depending on the type of speakers or room environment, this message
may appear even if the speakers are connected correctly. In this case,
you can ignore the message.
Select “Distance” in “Measurement result” (p.53) and move the speaker
identified by “>24.00m (>80.0ft)” within 24 m (80 ft) of the listening
position.
Turn off the unit and power amplifier, and then install the
corresponding speaker within 24 m of the listening position.
Select “Level” in “Measurement result” (p.53) and check the speaker
identified by “Over ±10.0dB”, then check the usage environment and
cable connections (+/-) of each speaker, and the volume of the
subwoofer. If there is a problem, exit YPAO, turn off the unit and power
amplifier, and then correct the connections and arrangement of the
speakers. We recommend using the same speakers or speakers with
specifications that are as similar as possible.
En 55

11 Connecting to a network device wirelessly
The unit
Wireless router
Mobile device
(such as iPhone)
Internet
Modem
Connect the unit to a wireless router (access point) or a mobile device by establishing a
wireless connection.
Connecting with a wireless router (access point)
Connect the unit to a wireless router (access point).
You can enjoy Internet radio, AirPlay, or music files stored on media servers (PC/NAS) on the
unit.
For details on connection, see “Connecting the unit to a wireless network” (p.57).
En 56

SLEEP
G
BAND
G
MEMO
S
VOLUM
E
R
S
E
AI
M
/
/MENU
E
MENU
B
LUEYELLOWGREENRED
PRESE
T
B
HNE
T
U
S
B
TUNE
R
I
N
4
SC
HDMI
O
UTPU
R
E D
IR
C
TPART
Y
MAIN
234
ZO
S
SETUP
ENTER
z
Cursor keys
LEEP
PARTY
TOP
TOP
MENU
PROGRAM
PROGRA
STRAIGHT
TRAIGHT
TUNIN
MAIN 2 3 4
ZONE
NE
SCENE
INPUT
NET USBTUNER
PRESET
GREENRED
HOME
HOM
SUR. DECODE
UR. DECOD
ENHANCER
NHANCE
MEMORY
HDMI OUTPURE DIRECT
E
ENE
PUT
BLUETOOTH
YELLOW
AI
VOLUME
RY
4321
8765
LUETOOT
BLUE
POP-UP
POP-UP
/MENU
TUNINGBANDTUNING
TUNIN
Connecting the unit to a wireless network
Use the cursor keys to select “Network”.
4
There are several methods to connect the unit to a wireless network.
Use the cursor keys to select “Network Connection” and
Select a connection method according to your environment.
• Using MusicCast CONTROLLER (p.62)
• Sharing the iOS device setting (p.57)
• Using the WPS push button configuration (p.58)
5
press ENTER.
Use the cursor keys and ENTER to check “Wireless (Wi-Fi)”
6
and select “OK”.
• Using other connection methods (p.59)
■ Sharing the iOS device setting
You can easily set up a wireless connection by applying the connection
settings on iOS devices (iPhone/iPad/iPod touch).
Before proceeding, confirm that your iOS device is connected to a
wireless router.
Y
If you set up a wireless connection with this method, the following settings will be
initialized.
– Network settings
E
– Bluetooth settings
– USB and network items registered as shortcuts
– Internet radio stations register to “Favorites”
– Account informa tion for the network services
X
The checkmark indicates the current setting.
Use the cursor keys and ENTER to check “Share Wi-Fi
7
Settings (iOS)” and select “NEXT”.
X
• You need i OS device with iOS 7 or later. (The following procedure is a setup example
for iOS 8.)
• This configuratio n does not work if the security method of your wireless router
(access point) is WEP. In this case, use other connection method.
Press z (receiver power) to turn on the unit.
1
Turn on the TV and switch the TV input to display video
2
from the unit (HDMI OUT jack).
Y
Operations with TV screen are available only when your TV is connected to the
unit via HDMI.
Press SETUP.
3
En 57

The name of the unit
Tap here to start setup
The network currently selected
SLEEP
G
BAND
G
MEMO
S
V
OLU
E
R
S
E
AI
P
ROG
M
/
/MENU
E
MENU
B
LUEYELLOWGREENRED
PRESE
T
B
H
NET
U
S
B
TUNE
R
I
N
4
SC
HDMI
O
UTPU
R
E D
IR
C
TPART
Y
MAIN
234
ZO
S
ENTER
z
Cursor keys
LEEP
PARTY
TOP
TOP
MENU
PROGRAM
RA
STRAIGHT
TRAIGHT
TUNIN
MAIN 2 3 4
ZONE
NE
SCENE
INPUT
NET USBTUNER
PRESET
GREENRED
HOME
HOM
SUR. DECODE
UR. DECOD
ENHANCER
NHANCE
MEMORY
HDMI OUTPURE DIRECT
E
ENE
PUT
BLUETOOTH
YELLOW
AI
VOLUME
RY
4321
8765
LUETOOT
BLUE
POP-UP
POP-UP
/MENU
ME
TUNINGBANDTUNING
TUNIN
After checking the on-screen message, use the cursor
8
keys and ENTER to select “NEXT”.
On the iOS device, select the unit as the AirPlay speaker in
9
the Wi-Fi screen.
Check the network currently selected and tap “Next”.
10
■ Using the WPS push button configuration
You can easily set up a wireless connection with one push of the WPS
button.
Y
This configuration does not work if the secur ity method of your wireless router (access
point) is WEP. In this case, use other connection method.
Press z (receiver power) to turn on the unit.
1
Hold down INFO (WPS) on the front panel for 3 seconds.
2
“Press WPS button on Access Point” appears on the front display.
Push the WPS button on the wireless router (access
3
point).
When the connection process finishes, “Completed” appears on
the front display.
If “Not connected” appears, repeat from Step 1 or try another
connection method.
About WPS
WPS (Wi-Fi Protected Setup) is a standard established by the Wi-Fi Alliance,
which allows easy establishment of a wireless home network.
When the sharing process finishes, the unit is automatically connected to
the selected network (access point).
En 58

SLEEP
G
BAND
G
MEMO
S
V
OLU
E
R
S
E
AI
P
ROG
M
/
/MENU
E
MENU
B
LUEYELLOWGREENRED
PRESE
T
B
H
NET
U
S
B
TUNE
R
I
N
4
SC
HDMI
O
UTPU
R
E D
IR
C
TPART
Y
MAIN
234
ZO
S
SETUP
ENTER
z
Cursor keys
LEEP
PARTY
TOP
TOP
MENU
PROGRAM
RA
STRAIGHT
TRAIGHT
TUNIN
MAIN 2 3 4
ZONE
NE
SCENE
INPUT
NET USBTUNER
PRESET
GREENRED
HOME
HOM
SUR. DECODE
UR. DECOD
ENHANCER
NHANCE
MEMORY
HDMI OUTPURE DIRECT
E
ENE
PUT
BLUETOOTH
YELLOW
AI
VOLUME
RY
4321
8765
LUETOOT
BLUE
POP-UP
POP-UP
/MENU
ME
TUNINGBANDTUNING
TUNIN
■ Using other connection methods
If your wireless router (access point) does not support WPS push button
configuration method, follow the procedure below to configure the
wireless network settings.
Press z (receiver power) to turn on the unit.
1
Turn on the TV and switch the TV input to display video
2
from the unit (HDMI OUT jack).
Y
Operations with TV screen are available only when your TV is connected to the
unit via HDMI.
Press SETUP.
3
Use the cursor keys to select “Network” and press ENTER.
4
Use the cursor keys to select “Network Connection” and
5
press ENTER.
Use the cursor keys and ENTER to check “Wireless (Wi-Fi)”
6
and select “OK”.
Use the cursor keys and ENTER to select the desired
7
connection method and select “NEXT”.
The following connection methods are available.
WPS Button
Share Wi-Fi
Settings (iOS)
Access Point Scan
Manual Setting
PIN Code
You can set up a wireless connection with the WPS button
while viewing the TV screen. Follow the instructions
displayed on the TV screen.
See “Sharing the iOS device setting” (p.57).
You can set up a wireless connection by searching for an
access point. For details on settings, see “Searching for an
access point” (p.60).
You can set up a wireless connection by entering the
required information (such as SSID) manually.
For details on settings, see “Setting up the wireless
connection manually” (p.60).
You can set up a wireless c onnection by entering the unit’s
PIN code into the wireless router (access point). The
method is available if the wireless router (access point)
supports the WPS PIN code method. For details on settings,
see “Using the PIN code” (p.61).
X
The checkmark indicates the current setting.
En 59

SLEEP
G
BAND
G
MEMO
S
V
OLU
E
R
S
E
AI
P
ROG
M
/
/MENU
E
MENU
B
LUEYELLOWGREENRED
PRESE
T
B
H
NET
U
S
B
TUNE
R
I
N
4
SC
HDMI
O
UTPU
R
E D
IR
C
TPART
Y
MAIN
234
ZO
S
SETUP
ENTER
Cursor keys
LEEP
PARTY
ZONE
NE
NET USBTUNER
GREENRED
MAIN 2 3 4
SCENE
INPUT
PRESET
E
ENE
PUT
YELLOW
HDMI OUTPURE DIRECT
4321
8765
BLUETOOTH
LUETOOT
BLUE
Searching for an access point
If you select “Access Point Scan” as the connection method, the unit
starts searching for access points. After a while, the list of available
access points appears on the TV screen.
Use the cursor keys and ENTER to check the desired
1
access point and select “NEXT”.
The wireless connection setting screen appears on the TV.
Use the cursor keys and ENTER to enter the security key
2
and select “NEXT”.
Setting up the wireless connection manually
If you select “Manual Setting” as the connection method, the wireless
connection setting screen appears on the TV.
You need to setup the SSID (network name), encryption method and
security key for your network.
Use the cursor keys and ENTER to enter the SSID of the
1
access point and select “NEXT”.
HOME
HOM
AI
SUR. DECODE
UR. DECOD
ENHANCER
NHANCE
MEMORY
RY
POP-UP
POP-UP
/MENU
VOLUME
TUNINGBANDTUNING
TUNIN
Use the cursor keys and ENTER to check the security
2
method of the access point and select “NEXT”.
ME
Use the cursor keys to select “CONNECT” and press
3
ENTER to start the connection process.
When the connection process finishes, “Completed” appears on
the TV screen.
TOP
TOP
MENU
PROGRAM
RA
STRAIGHT
TRAIGHT
TUNIN
If “Not connected” appears, repeat from Step 1 or try another
connection method.
To exit from the menu, press SETUP.
4
En 60
Settings
None, WEP, WPA2-PSK (AES), Mixed Mode

SLEEP
G
BAND
G
MEMO
S
V
OLU
E
R
S
E
AI
P
ROG
M
/
/MENU
E
MENU
B
LUEYELLOWGREENRED
PRESE
T
B
H
NET
U
S
B
TUNE
R
I
N
4
SC
HDMI
O
UTPU
R
E D
IR
C
TPART
Y
MAIN
234
ZO
S
SETUP
ENTER
Cursor keys
LEEP
PARTY
TOP
TOP
MENU
PROGRAM
RA
STRAIGHT
TRAIGHT
TUNIN
MAIN 2 3 4
ZONE
NE
SCENE
INPUT
NET USBTUNER
PRESET
GREENRED
HOME
HOM
SUR. DECODE
UR. DECOD
ENHANCER
NHANCE
MEMORY
HDMI OUTPURE DIRECT
E
ENE
PUT
BLUETOOTH
YELLOW
AI
VOLUME
RY
4321
8765
LUETOOT
BLUE
POP-UP
POP-UP
/MENU
ME
TUNINGBANDTUNING
TUNIN
Use the cursor keys and ENTER to enter the security key
3
and select “NEXT”.
If you select “None” in Step 2, this setting is not available. Proceed
to Step 4.
If you select “WEP”, enter either 5 or 13 character string, or 10 or 26
hexadecimal digits.
If you select other method, enter either 8 to 63 character string, or
64 hexadecimal digits.
Use the cursor keys to select “CONNECT” and press
4
ENTER to start the connection process.
When the connection process finishes, “Completed” appears on
the TV screen.
If “Not connected” appears, check that all the information is
entered correctly, and repeat from Step 1.
Using the PIN code
If you select “PIN Code” as the connection method, the list of available
access points appears on the TV screen.
Use the cursor keys and ENTER to check the desired
1
access point and select “NEXT”.
The PIN code of the unit appears on the TV screen.
Enter the unit’s PIN code into the wireless router (access
2
point).
For details on settings, refer to the instruction manual of the
wireless router (access point).
Use the cursor keys to select “CONNECT” and press
3
ENTER to start the connection process.
When the connection process finishes, “Completed” appears on
the TV screen.
If “Not connected” appears, repeat from Step 1 or try another
connection method.
To exit from the menu, press SETUP.
4
To exit from the menu, press SETUP.
5
En 61

12 Connecting to the MusicCast network
CONNECT
TUNINGBANDTUNING
MEMORY
STRAIGHT
VOLUME
ENHANCER
SUR. DECODE
AI
PROGRAM
POP-UP
/MENU
HOME
TOP
MENU
BLUE
YELLOW
GREENRED
PRESET
BLUETOOTH
NET USBTUNER
INPUT
8765
4321
SCENE
HDMI OUTPURE DIRECT
PARTY
MAIN 2 3 4
ZONE
SLEEP
G
BAND
G
MEMO
S
V
OLU
M
E
R
S
E
AI
P
ROG
M
/
/MENU
E
MENU
UOG
PRESE
T
B
HNE
T
U
S
B
TUNE
R
I
N
4
SC
OUPU
C
PARTY
MAIN
234
ZO
S
z
LEEP
TOP
RA
TRAIGHT
TUNIN
NE
ENE
PUT
HOM
UR. DECOD
NHANCE
MusicCast is a brand new wireless musical solution from Yamaha,
Press z (receiver power) to turn on the unit.
E
allowing you to share music among all of your rooms with a variety of
devices. You can enjoy music from your smartphone, PC, NAS drive and
music streaming service anywhere in your house with one easy-to-use
application. For more details and a lineup of MusicCast compatible
1
Tap the “MusicCast CONTROLLER” application icon on
2
your mobile device and tap “Setup”.
products, visit the Yamaha website.
X
If you have already connected other MusicCast compatible devices to the
network, tap “Settings” and then “Add New Device”.
Operate the “MusicCast CONTROLLER” application
3
following the on screen instructions, then hold down
CONNECT on the front panel of the unit for 5 seconds.
LUETOOT
• Seamlessly control all MusicCast compatible devices with the
dedicated application “MusicCast CONTROLLER”.
• Link a MusicCast compatible device to another device in a different
room and play them back simultaneously.
• Play back music from music streaming services. (The compatible music
streaming services may differ depending on your region and product.)
MusicCast CONTROLLER
POP-UP
E
Operate the “MusicCast CONTROLLER” application
4
RY
TUNIN
To use the network features on the MusicCast compatible device, you
need the dedicated application “MusicCast CONTROLLER” for the
operation. Search for the free application “MusicCast CONTROLLER” on
the App Store or Google Play and install it to your device.
following the onscreen instructions to set up the network.
Operate the “MusicCast CONTROLLER” application to
5
playback.
Y
Adding the unit to the MusicCast network
Follow the procedure below to add the unit to the MusicCast network.
You can also configure the unit’s wireless settings at once.
Y
• The SSID and security key for your network will be needed.
• If your router supports multiple SSID’s (network names), connect the mobile device
to the first access point (“SSID 1”, etc.).
• AirPlay and DSD audio cannot be delivered.
• When Pure Direct is enabled, input sources other than the network sources and USB
cannot be delivered.
• If you configure the unit’s wireless settings with this method, th e Wireless LAN
indicator of the front display lights up when the unit is connecting to a network (even
if a wired connection is used).
• You can interlock the power of MusicCast devices with the power of the unit
(MusicCast master). For details, see “MusicCast Link Power Interlock” (p.138) in the
“Setup” menu.
En 62

OUT 1+2
HDMI OUT Sel.
SBL SBR
SL SR
CL R
VOL.
SW1
SLEEP
G
BAND
G
MEMO
S
E
R
S
E
AI
P
M
/
/MENU
E
MENU
B
LUEYELLOWGREENRED
PRESE
T
4
SC
PU
R
E D
IR
C
TPART
Y
S
MUTE
VOLUME
HDMI OUT
MAIN/ZONE
Input selection keys
LEEP
PARTY
TOP
TOP
MENU
PROGRAM
ROGRA
STRAIGHT
TRAIGHT
TUNIN
MAIN 2 3 4
ZONE
E
SCENE
ENE
INPUT
NET USBTUNER
PRESET
YELLOW
GREENRED
HOME
HOM
AI
SUR. DECODE
UR. DECOD
VOLUME
ENHANCER
NHANCE
MEMORY
RY
HDMI OUTPURE DIRECT
4321
8765
BLUETOOTH
BLUE
POP-UP
POP-UP
/MENU
TUNINGBANDTUNING
TUNIN
PLAYBACK
Basic playback procedure
Turn on the external devices (such as a TV or BD/DVD
1
player) connected to the unit.
Use the input selection keys to select an input source.
2
Start playback on the external device or select a radio
3
station.
Refer to the instruction manual for the external device.
For details on the following operations, see the corresponding
pages.
• Listening to FM/AM radio (except Australia, U.K., Europe, Middle
East and Russia models) (p.72)
• Listening to DAB radio (Australia, U.K., Europe, Middle East and
Russia models only) (p.75)
• Listening to FM radio (Australia, U.K., Europe, Middle East and
Russia models only) (p.81)
• Playing back music via Bluetooth (p.85)
• Playing back music stored on a USB storage device (p.86)
• Playing back music stored on media servers (PCs/NAS) (p.90)
• Listening to Internet radio (p.94)
• Playing back iTunes/iPod music with AirPlay (p.97)
Selecting an HDMI output jack
Press HDMI OUT to select an HDMI OUT jack.
1
Each time you press the key, the HDMI OUT jack to be used for
signal output changes.
OUT 1+2
OUT 1
OUT 2
Off Does not output the signals at the HDMI OUT jacks.
Outputs the same signal at both the HDMI OUT 1 and
HDMI OUT 2 jacks.
Output the signals at the selected HDMI OUT jack.
X
• You can also select an HDMI output jack by selecting a scene (p.64).
• When “OUT 1+2” is selected, the unit outputs video signals at the highest resolution
supported by both TVs (or projectors) connected to the unit. (For example, if you have
connected a 1080p TV to the HDMI OUT 1 jack and a 720p TV to the HDMI OUT 2 jack,
the unit outputs 720p video signals.)
• When the MAIN/ZONE switch on the remote control is set to “ZONE2” or “ZONE4”,
pressing the HDMI OUT key can enable (OUT 3) or disable (OFF) the HDMI OUT3 jack
output.
Press VOLUME to adjust the volume.
4
X
• To mute the audio output, press MUTE. Press MUTE again to unmute.
• To adjust the treble/bass settings, use the “Option” menu.
En 63

Selecting the input source and favorite settings with one touch (SCENE)
123
4
567
8
567
8
SBL SBR
SL SR
CL R
VOL.
SW1
G
D
G
MEMO
S
VOL
U
E
R
S
E
AI
P
M
/
/MENU
E
MENU
B
LUEYELLOWGREENRED
PRESE
T
B
H
USUN
I
N
HDMI
O
UTPU
R
E D
IR
C
TPART
Y
MAIN
234
ZO
S
RETURN
ENTER
SCENE
SLEEP
LEEP
PARTY
TOP
TOP
MENU
PROGRAM
ROGRA
STRAIGHT
TRAIGHT
TUNIN
MAIN 2 3 4
ZONE
NE
SCENE
INPUT
NET USBTUNER
PRESET
GREENRED
HOME
HOM
SUR. DECODE
UR. DECOD
ENHANCER
NHANCE
MEMORY
PUT
AI
E
YELLOW
RY
BAN
HDMI OUTPURE DIRECT
4321
8765
BLUETOOTH
LUETOOT
BLUE
POP-UP
POP-UP
/MENU
VOLUME
TUNINGBANDTUNING
TUNIN
The SCENE function allows you to select the assigned input source,
sound program, HDMI output and various settings with just one touch.
You can use up to 8 scenes to register your favorite settings and switch
them depending on a playback source.
Press numbered key (1 to 8), and then the input source
1
and settings registered to the corresponding scene are
directly selected. The unit turns on automatically when it
is in standby mode.
Alternatively, you can also select a registered scene by
pressing SCENE repeatedly.
The SCENE name appears on the front display and on the TV.
To select a desired SCENE name, press ENTER.
2
Y
• To cancel the operation of selecting a reg istered scene, press RETURN.
ME
• The operation is canceled automatically when you have not operated the unit
for the 30 seconds.
By default, the following input settings are registered for each scene.
Main Zone, Zone2 and Zone3
Zone4
SCENE
Input AV1 AV2 AV3 AV4
SCENE
Input AV5 AV6 AV7 AV1
1 2 3 4
X
• You can check the detailed settings of each scene from the “Scene Setting” screen
(p.131) in the “Setup” menu.
• You can al so register and recall SCENE 1-4 with the SCENE key on the unit’s front
panel.
Registering a scene
Set the unit to the condition (such as input source and
1
sound program) that you want to assign to a scene.
Hold down the desired numbered key (1-8) until “SET
2
Complete (Setting Complete)” appears on the front
SCENE
display and on the TV.
Input AV1 TUNER AUDIO2 NET RADIO
SCENE1
SET Complete
SCENE
Input AV2 AV3 AUDIO 1 SERVER
En 64
X
• You can configure more detailed scene assignments in “Scene Setting” in the “Setup”
menu. For details, see “Scene Setting” (p.131).
• You can change the SCENE name displayed on the front display or on the TV. For
details, see “Scene Rename” (p.132).

Selecting the sound mode
G
G
MEMO
V
OLU
M
/
/MENU
E
MENU
B
LUEYELLOWGREENRED
PRESE
T
B
HNE
T
U
S
B
TUNE
R
I
N
4
SC
HDMI
O
U
TPART
Y
MAIN
234
ZO
S
STRAIGHT
ENHANCER
SUR. DECODE
AI
PROGRAM
PURE DIRECT
SLEEP
LEEP
PARTY
TOP
TOP
MENU
PROGRAM
STRAIGHT
TUNIN
MAIN 2 3 4
ZONE
NE
SCENE
INPUT
NET USBTUNER
PRESET
GREENRED
HOME
HOM
SUR. DECODE
ENHANCER
MEMORY
ENE
PUT
AI
YELLOW
RY
AN
HDMI OUTPURE DIRECT
4321
8765
BLUETOOTH
LUETOOT
BLUE
POP-UP
POP-UP
/MENU
VOLUME
TUNINGBANDTUNING
TUNIN
The unit is equipped with a variety of sound programs and surround
decoders that allow you to enjoy playback sources with your favorite
sound mode (such as sound field effect or stereo playback).
X
• You can change the settings of the surround programs and surround decoders in the
“Sound” menu (p.125).
• The sound mode can be applied separately to each input sour ce.
Enabling SURROUND:AI.
• Press AI.
This mode lets you enjoy the optimum surround effect according to AI
analysis as well as a compelling sense of realism (p.66).
Selecting a sound program suitable for movies and music
• Press PROGRAM repeatedly.
This mode lets you enjoy sound field effects optimized for viewing
video sources, such as movies and games, as well as for listening to
music sources or for stereo playback.
Selecting a surround decoder
• You can check which channels are currently outputting sound by looking at the
Channel indicators on the unit’s front panel (p.15) or at the “Information” s creen in
the “Sound” menu (p.125).
• A sound program or surround decoder cannot be used with the signal from an analog
multichannel input.
Precaution for enjoying Dolby Atmos®
• Dolby Atmos contents are decoded as Dolby TrueHD or Dolby Digital Plus in
the following situations. (Dolby Atmos PCM format is always decoded as
Dolby Atmos.)
– Neither surround back nor presence speakers are used.
– Headphones are used (2-channel playback).
• When the Dolby Atmos decod er is working, virtual surround processing (such
as Virtual CINEMA FRONT) (p.69) does not work.
• Press SUR. DECODE repeatedly.
E
This mode lets you enjoy unprocessed multichannel playback from
2-channel sources (p.70).
Switching to the straight decode mode
• Press STRAIGHT.
Precaution for enjoying DTS:X™
• When DTS:X contents are played back, you can adjust the volume of dialogue
sounds in “DTS Dialogue Control” (p.111) in the “Option” menu.
• When the DTS:X decoder is working, virtual surround processing (such as
Virtual CINEMA FRONT) (p.69) does not work.
This mode lets you enjoy unprocessed sounds in original channels
(p.70).
Enabling Pure Direct
• Press PURE DIRECT.
This mode lets you enjoy pure high fidelity sound by reducing the
electrical noise from other circuitry (p.71).
Enabling Compressed Music Enhancer
• Press ENHANCER.
This mode lets you enjoy compressed music with additional depth and
breadth (p.71).
En 65

MUSIC
Hall in Vienna
CLASSICAL
SL SR
CL R
VOL.
FPL FPR
3
HD
SW1
“CINEMA DSP !” lights up
Sound program category
Sound program
SLEEP
G
BAND
G
MEMO
S
VOLUM
E
R
S
E
P
M
/
/MENU
E
MENU
B
LUEYELLOWGREENRED
PRESE
T
B
HNE
T
U
S
B
TUNE
R
I
N
4
SC
HDMI
O
UTPU
R
E D
IR
C
TPART
Y
MAIN
234
ZO
S
AI
LEEP
PARTY
TOP
TOP
MENU
PROGRAM
ROGRA
STRAIGHT
TRAIGHT
TUNIN
MAIN 2 3 4
ZONE
NE
SCENE
INPUT
NET USBTUNER
PRESET
GREENRED
HOME
HOM
SUR. DECODE
UR. DECOD
ENHANCER
NHANCE
MEMORY
ENE
PUT
AI
E
YELLOW
RY
HDMI OUTPURE DIRECT
4321
8765
BLUETOOTH
LUETOOT
BLUE
POP-UP
POP-UP
/MENU
VOLUME
TUNINGBANDTUNING
TUNIN
Playing back with surround effects optimized for the scene (SURROUND:AI)
With SURROUND:AI, the AI incorporated in the DSP creates the optimal
Enjoying stereoscopic sound fields
(CINEMA DSP HD3)
surround effect for the scene of the content.
Scenes are instantaneously analyzed with a focus on sound elements
such as “dialogue”, “background music”, “ambient sounds” and “sound
effects” as well as optimized in real time to create a compelling sense of
realism.
Press AI.
1
The unit is equipped with a variety of sound programs that utilize
3
Yamaha’s original DSP technology (CINEMA DSP HD
). It allows you to
easily create sound fields like actual movie theaters or concert halls in
your room and enjoy natural stereoscopic sound fields.
Each time you press the key, SURROUND:AI is enabled or disabled.
Y
• When PURE DIRECT is enabled, SURROUND:AI is not available.
• When SURROUND:AI is enabled, the straight decode mode, PROGRAM key and the
surround decoders are not available.
• When “MULTI CH” is selected as the input source, SURROUND:AI is not available.
E
X
• The unit creates front Virtual Presence Speaker (VPS) using the front, center, and
surround speakers to produce 3-dimensional sound fields even when no front
presence speakers are connected. However, we recommend using front presence
speakers in order to experience the full effect of the sound fields (and rear presence
speakers for further spatial sounds) (p.130).
• The unit creates rear Virtual Presence Speaker (VPS) using the front, center, and
surround speakers to produce natural 3-dimensional sound fields when front
presence speakers are connected but no rear presence speakers (p.130 ).
• If a multichannel source (6.1 channels or more) is input when no surround back
speakers are connected, the unit creates Virtual Surround Back Speaker (VSBS) using
the surround speakers to add a sense of depth to the rear sound field (p.130).
• When VPS or VSBS is working, “VIRTUAL” lights up in the front display.
• When “MULTI CH” is selected as the input source, CINEM A DSP is not available.
En 66

■ Sound programs suitable for movies (MOVIE)
The following sound programs are optimized for viewing video sources, such as movies, TV
programs, and games.
MOVIE THEATER
This program creates a sound field that emphasizes the surround feeling without
Standard
Spectacle
Sci-Fi
Adventure
Drama
Mono Movie
Enhanced
disturbing the original acoustic positioning of multichannel audio. Its design is
based on the concept of the ideal movie theater, in which the audience is
surrounded by beautiful reverberations from the left, right, and rear.
This program delivers the scale and grandeur of spectacular movie productions.
It delivers an expansive sound space to match the cinemascope wide-screen, and
boasts a broad dynamic range, providing everything from small delicate sounds
to powerful loud booms.
This program clearly reproduces t he finely elaborated sound design of the latest
Sci-Fi and SFX movies. You can enjoy a variety of cinematographically created
virtual spaces reproduced with clear separation between dialogue, sound effects,
and background music.
This program is ideal for reproducing the sound design of action and adventure
movies precisely. The sound field restrains reverberations, but puts emphasis on
reproducing a sensation of expansiveness on both sides, powerful space
expanded widely to the left and right. The restrained depth creates a clear and
powerful space, while also maintaining the articulation of the sounds and the
separation of the channels.
This program features stable reverberations that match a wide range of movie
genres, from serious dramas to musicals and comedies. The reverberations are
modest, but suitably stereophonic. The sound effects and background music are
reproduced with a gentle echo that does not impinge on the articulation of the
dialogue. You’ll never get tired listening for long periods.
This program reproduces monaural video sources, such as classic movies, in an
atmosphere of a good old movie theater. The program creates a pleasant space
with depth, by adding breadth and the appropriate reverberation to the original
audio.
This program creates a sound field that emphasizes the dynamic sound transition
of 3D object audio. Its design is based on the concept of a movie theater with
multi-top speakers, in which the audience is overwhelmed by the natural and
powerful sound effects.
ENTERTAINMENT
Sports
Action Game
Roleplaying Game
Music Video
Recital/Opera
Pavilion
Disco
This program allows listeners to enjoy the rich vividness of sport broadcasts and
light entertainment programs. In sports broadcasts, the commentators’ voices
are positioned clearly at the center, while the atmosphere inside the stadium is
realistically conveyed by the peripheral delivery of the sounds of the fans in a
suitable space.
This program is suitable for action games, such as car racing and fighting games.
The reality of, and emphasis on, various effects makes the player feel like they are
right in the middle of the action, allowing for greater concentration. Use this
program in combination with Compressed Music Enhancer for a more dynamic
and strong sound field.
This program is suitable for role-playing and adventure games. This program adds
depth to the sound field for natural and realistic reproduction of background
music, special effects, and dialogue from a wide variety of scenes. Use this
program in combination with Compressed Music Enhancer for a clearer and more
spatial sound field.
This program allows you to enjoy videos of pop, rock, and jazz concerts, as if you
were there yourself. Immerse yourself in the hot concert atmosphere thanks to
the vividness of the singers and solos on stage, a presence sound field that
emphasizes the beat of rhythm instruments, and a surround sound field that
reproduces the space of a big live hall.
This program controls the amount of reverberations at an optimum level and
emphasizes the depth and clarity of human voices to offer the reverberations of
an orchestra box in front the listener at the same time as providing the acoustic
positioning and feeling of presence on the stage. The surround sound field is
relatively moderate, but the data for concert hall effects are used to represent the
inherent beauty of music. The listener will not be fatigued even after long hours of
opera entertainment.
This program reproduces vocals clearly, letting you feel the spaciousness of a
pavilion. Reverberation, which is somewhat delayed, reproduces the live
acoustics unique to a pavilion, and helps to make concert scenes more exciting.
This program recreates the acoustic environment of a lively disco in the heart of a
big city. The sound is dense and highly concentrated. It is also characterized by
high-energy, “immediate” sound.
En 67

■ Sound programs suitable for music/stereo playback
(MUSIC)
The following sound programs are optimized for listening to music sources.
You can also select stereo playback.
CLASSICAL
This sound field simulates a concert hall with approximately 2,500 seats in
Hall in Munich A
Hall in Munich B
Hall in Frankfurt
Hall in Stuttgart
Hall in Vienna
Hall in Amsterdam
Hall in USA A
Hall in USA B
Church in Tokyo
Church in Freiburg
Munich, using stylish wood for the interior finishing as normal standards for
European concert halls. Fine, beautiful reverberations spread richly, creating a
calming atmosphere. The listener’s virtual seat is at the center left of the arena.
This hall is frequently used for recording orchestral music, and is a shoe-box type
concert hall with around 1,300 seats. The hall is constructed from marble,
resulting in relatively flat resonance. Further, the high ceiling causes sound to
reverberate for longer than usual.
This is a large shoe-box type concert hall with around 2,400 seats located in
Frankfurt. This hall has a very solid, powerful sound. The listener’s virtual seat is
in the center-right section on the first floor.
This is a large asymmetrical concert hall with around 2,000 seats located in
downtown Stuttgart. Sound reflected off the concrete wall located to the left of
listeners has a powerful presence.
This program simulates a 1,700-seat, middle-sized concert hall with a shoebox
shape that is traditional in Vienna. Pillars and ornate carvings create extremely
complex reverberations from all around the audience, producing a very full, rich
sound.
The large, shoe box shaped hall seats about 2,200 around the circle stage.
Reflections are rich and pleasing while the sound travels freely.
This is a large 2,600 seat concert hall in the United States which features a fairly
traditional European design. The interior is relatively simple, in the American
style. The middle and high frequencies are richly and beautifully reinforced.
This spacious arch-shaped hall has a dome ceiling and can seat 2,600. The ample
resonance apparent in the sound is a feature brought about by longer than
average period of reverberation. In addition to this, the reflector suspended
above the stage allows listeners to experience rich sound from the direction of the
stage.
The acoustic environment of an ordinary church with moderate
reverberations. The reverberation lasts 2.5 seconds. This is ideal for
reproducing church organ and choral music.
Located in the south of Germany, this grand, stone-built church has a pointed
tower at 120 meters in height. Its long and narrow shape and the high ceiling
enable the elongated reverberation time and limited initial reflection time. Thus,
the rich reverberation rather than the sound itself reproduces the atmosphere of
the church.
Church in
Royaumont
Chamber
This program features the sound field created by the refectory (dining hall) of a
beautiful medieval Gothic monastery located in Royaumont on the outskirts of
Paris.
This program creates a relatively wide space with a high ceiling, like an audience
hall in a palace. It offers pleasant reverberations that are suitable for courtly
music and chamber music.
LIVE/CLUB
Village Gate
Village Vanguard
Warehouse Loft
Cellar Club
The Roxy Theatre
The Bottom Line
Arena
This is the sound field at a jazz club that was in New York. It is in a basement and
has a relatively spacious floor area. The listener’s virtual seat is at the center left
of the hall.
The Jazz club is on 7th Avenue, New York. This small club with the low ceiling
makes the powerful reflections converge toward the stage located in the center.
The warehouse resembles some lofts in Soho. Sound reflects off the concrete
walls clearly with a lot of energy.
This program simulates an intimate concert venue with a low ceiling and homey
atmosphere. A realistic, live sound field delivers powerful sounds that make you
feel as if you are sitting in the front row in front of a small stage.
This program creates the sound field of a 460-seat rock music concert venue in Los
Angeles. The listener’s virtual seat is at the center left of the hall.
This program creates the sound field at stage front in The Bottom Line, a famous
New York jazz club once. The floor can seat 300 people to the left and right in a
sound field offering real and vibrant sound.
This program gives you long delays between direct sounds and effect sounds,
with the extraordinarily spacious feel of a large arena.
STEREO
2ch Stereo
11ch Stereo
Use this program to mix down multichannel sources to 2 channels. When
multichannel signals are input, they are down mixed to 2 channels and output
from the front speakers (this program does not utilize CINEMA DSP).
Use this program to output sound from all speakers. When you play back
multichannel sources, the unit mixes down the source to 2 channels, and then
outputs the sound from all speakers. This program creates a larger sound field
and is ideal for background music at parties.
Y
CINEMA DSP HD3 (p.66) and Virtual CINEMA DSP (p.69) do not work when “2ch Stereo” or “11ch Stereo” is
selected.
En 68

■ Enjoying sound field effects without surround speakers
(Virtual CINEMA DSP)
If you select one of the sound programs (except 2ch Stereo and 11ch Stereo) when no surround
speakers are connected, the unit utilizes Yamaha’s original virtual surround technology to
reproduce up to 7-channel surround sound and enable you to enjoy the well-oriented sound
field only with the front-side speakers. We recommend using presence speakers in order to
enjoy more effective stereoscopic sound field.
X
When Virtual CINEMA DSP is working, “VIRTUAL” lights up in the front display.
■ Enjoying surround sound with 5 speakers placed in
front (Virtual CINEMA FRONT)
If you have surround speakers but there is no space to place them in the rear of your room, you
can place them in the front (p.24) and enjoy multichannel surround sound using Virtual
CINEMA FRONT.
When “Layout (Surround)” (p.122) in the “Setup” menu is set to “Front”, the unit creates the
virtual surround speakers in the rear side to allow you to enjoy multichannel surround sound
with the 5 speakers placed in the front.
X
When Virtual CINEMA FRONT is working, “VIRTUAL” lights up in the front display.
■ Enjoying surround sound with headphones
(SILENT CINEMA)
You can enjoy surround or sound field effects, like a multichannel speaker system, with stereo
headphones by connecting the headphones to the PHONES jack and selecting a sound
program or a surround decoder.
En 69

SBL SBR
SL SR
CL R
VOL.
SW1
†‡ Dsur
SUR. DECODE
SBL SBR
SL SR
CL R
VOL.
SW1
SLEEP
G
BAND
G
V
OLU
M
E
E
R
AI
P
ROG
M
/
/MENU
E
MENU
B
LUEYELLOWGREENRED
PRESE
T
B
HNE
T
U
S
B
TUNE
R
I
N
4
SC
HDMI
O
UTPU
R
E D
IR
C
TPART
Y
MAIN
234
ZO
S
LEEP
PARTY
TOP
TOP
MENU
PROGRAM
RA
STRAIGHT
TUNIN
MAIN 2 3 4
ZONE
NE
SCENE
INPUT
NET USBTUNER
PRESET
GREENRED
HOME
HOM
SUR. DECODE
ENHANCER
NHANCE
MEMORY
MEMORY
ENE
PUT
AI
E
YELLOW
HDMI OUTPURE DIRECT
4321
8765
BLUETOOTH
LUETOOT
BLUE
POP-UP
POP-UP
/MENU
VOLUME
TUNINGBANDTUNING
TUNIN
SUR. DECODE
STRAIGHT
Enjoying unprocessed playback
You can play back input sources without any sound field effect
processing.
■ Playing back in original channels
(straight decode)
When the straight decode mode is enabled, the unit produces stereo
sound from the front speakers for 2-channel sources such as CDs, and
produces unprocessed multichannel sounds for multichannel sources.
Press STRAIGHT.
1
Each time you press the key, the straight decode mode is enabled
or disabled.
STRAIGHT
Y
• To enable 6.1/ 7.1-channel playback from 5.1-channel sources when surround back
speakers are used, select a surround decoder (p.70).
• If “Layout (Surround)” (p.122) in the “Setup” menu is set to “Front”, Virtual CINEMA
FRONT (p.69) works when multichannel source is played back.
■ Playing back in extended multichannel
(surround decoder)
The surround decoder enables unprocessed multichannel playback from
2-channel or multichannel sources.
X
• We recommend Dolby Surround while network s treaming is Dolby contents.
• Speakers that produce sounds will change depending on your speaker system and
the selected decode type (p.126).
• For details on each decoder, see “Glossary” (p.166).
• When “MULTI CH” is selected as the input source, Surr ound Decoder is not available.
Press SUR. DECODE to select a surround decoder.
1
Each time you press the key, the surround decoder changes.
Uses the decoder automatically selected by input
Auto
source. The DTS Neural:X decoder is selected for DTS
sources and the Dolby Surround decoder is selected
for other sources.
Dolby Surround decoder. Expands the sound using a
method optimized for the layout of the installed
speakers. It produces the extended surround sound
bDsur
optimized for your speaker system. A real acoustic
space (including overhead) will be created especially
when objectbased audio (such as Dolby Atmos
content) is played.
DTS Neural:X decoder. Expands the sound using a
method optimized for the layout of the installed
speakers. It produces the extended surround sound
Neural:X
optimized for your speaker system. A real acoustic
space (including overhead) will be created especially
when objectbased audio (such as DTS:X content) is
played.
Uses the DTS Neo:6 decoder (or DTS-ES Matrix
Neo:6 Cinema
decoder) suitable for movies. Sounds will be output
from the surround/surround back speakers.
Uses the DTS Neo:6 decoder (or DTS-ES Matrix
Neo:6 Music
decoder) suitable for music. Sounds will be output
from the surround/surround back speakers.
Y
• When the Dolby Surround or Neural:X decoder is selected, virtual surround
processing (such as Virtual CINEMA FRONT) (p.69) does not work.
• T he Neura l:X deco der does not work w ith Dolb y Digita l Plus or Dolby Tr ueHD sign als.
Select “Auto” or “
bDsur” for these signals.
En 70

PURE DIRECT
L R
VOL.
Enhancer On
SBL SBR
SL SR
CL R
VOL.
ENHANCER
SW1
Hi-Res
“ENHANCER” lights up
SLEEP
G
D
G
MEMO
S
VOL
U
S
E
AI
P
M
/
/MENU
E
MENU
B
LUEYELLOWGREENRED
PRESE
T
B
H
USUN
I
N
4
SC
HDMI
O
U
TPART
Y
MAIN
234
ZO
S
ENHANCER
PURE DIRECT
LEEP
PARTY
TOP
TOP
MENU
PROGRAM
ROGRA
STRAIGHT
TRAIGHT
TUNIN
MAIN 2 3 4
ZONE
NE
SCENE
INPUT
NET USBTUNER
PRESET
GREENRED
HOME
HOM
SUR. DECODE
UR. DECOD
ENHANCER
MEMORY
ENE
PUT
AI
YELLOW
RY
BAN
HDMI OUTPURE DIRECT
4321
8765
BLUETOOTH
LUETOOT
BLUE
POP-UP
POP-UP
/MENU
VOLUME
TUNINGBANDTUNING
TUNIN
Enjoying pure high fidelity sound (Pure Direct)
When Pure Direct is enabled, the unit plays back the selecte d source with
Playing back digitally compressed formats (such as MP3, etc.) with enriched sound (Compressed Music Enhancer)
the least circuitry in order to reduce the electrical noise from other
circuitry (such as the front display). It allows you to enjoy Hi-Fi sound
quality.
Press PURE DIRECT.
1
Each time you press the key, Pure Direct is enabled or disabled.
Compressed Music Enhancer adds depth and breadth to the sound,
allowing you to enjoy a dynamic sound close to the original sound before
it was compressed. This function can be used along with any other sound
modes.
In addition, Compressed Music Enhancer enhances the quality of
uncompressed digital audio (such as 2-channel PCM and FLAC) when
“Hi-Res Mode” (p.111) in the “Option” menu is set to “On” (default).
Y
When Pure Direct is enabled, the following functi ons are not available.
– Selecting sound programs
– Operating the “Setup” menu and “Option” menu
– Using the multi-zone function
– Viewing informati on on the front display (when not in operation)
ME
Press ENHANCER.
1
Each time you press the key, Compressed Music Enhancer is
enabled or disabled.
Y
Compressed Music Enhancer does not work on the fo llowing audio sources.
–Signals whose sampling frequency is over 48 kHz
–DSD audio
X
• You can also use “Enhancer” (p.111) in the “Option” menu to enable/disable
Compressed Music Enhancer.
• W hen “MULTI CH” is sel ected as the inpu t source, Compressed Music Enhancer is not
available.
En 71

Listening to FM/AM radio (except Australia, U.K., Europe, Middle East and Russia models)
MAIN ZONE z STRAIGHT
PROGRAM
You can tune into a radio station by specifying its frequency or selecting from registered radio
stations.
Y
• The radio frequencies differ depending on the country or region where the unit is being used.
• If you cannot obtain good reception on the radio, adjust the directio n of the FM/AM antennas.
Setting the frequency steps
(Brazil, Asia and General models only)
At the factory, the frequency step setting is set to 50 kHz for FM and 9 kHz for AM. Depending
on your country or region, set the frequency steps to 100 kHz for FM and 10 kHz for AM.
Set the unit to standby mode.
1
When holding down STRAIGHT on the front panel, press MAIN ZONE z.
2
Press PROGRAM repeatedly to select “TUNER FRQ STEP”.
3
TUNER FRQ STEP
FM50/AM9
Press STRAIGHT to select “FM100/AM10”.
4
En 72
Press MAIN ZONE z to set the unit to standby mode and turn it on again.
5

VOL.
VOL.
SBL SBR
SL SR
CL R
STEREO TUNED
SW1
01:FM 98.50MHz
Preset OK
Preset
VOL.
SBL SBR
SL SR
CL R
STEREO TUNED
SW1
Preset number
01:Empty
Preset
VOL.
SBL SBR
SL SR
CL R
STEREO TUNED
SW1
“Empty” (not in use) or the frequency currently registered
SLEEP
S
VOL
U
E
R
S
E
AI
P
M
/
/MENU
E
MENU
B
LUEYELLOWGREENRED
B
H
U
S
I
N
4
SC
HDMI
O
UTPU
R
E D
IR
C
TPART
Y
MAIN
234
ZO
S
BAND
TUNING
MEMORY
PRESET
TUNER
LEEP
PARTY
TOP
TOP
MENU
PROGRAM
ROGRA
STRAIGHT
TRAIGHT
MAIN 2 3 4
ZONE
NE
SCENE
INPUT
NET USBTUNER
PRESET
GREENRED
HOME
HOM
SUR. DECODE
UR. DECOD
ENHANCER
NHANCE
MEMORY
ENE
PUT
AI
E
YELLOW
HDMI OUTPURE DIRECT
4321
8765
BLUETOOTH
LUETOOT
BLUE
POP-UP
POP-UP
/MENU
VOLUME
TUNINGBANDTUNING
Selecting a frequency for reception
Registering favorite radio stations (presets)
Press TUNER to select “TUNER” as the input source.
1
Press BAND to select a band (FM or AM).
2
FM 87.50MHz
Press TUNING to set a frequency.
3
Hold down the key for about a second to search stations
automatically.
FM 98.50MHz
“TUNED” lights up when a signal is received from a radio station.
“STEREO” also lights up when a stereo signal is received.
X
ME
• You can switch between “Stereo” and “Monaural” for FM radio reception in “FM
Mode” (p.113) in the “Option” menu. When the signal reception for an FM radio
station is unstable, switching to monaural may improve it.
• You can watch videos input from external devices while listening to radio. For details
see “Video Out” (p.113).
You can register up to 40 radio stations as presets. Once you have
registered stations, you can easily tune into them by selecting their
preset numbers.
X
You can automatically register FM radio stations that h ave strong signals by using “FM
Auto Preset” (p.82).
■ Registering a radio station manually
Select a radio station manually and register it to a preset number.
Follow “Selecting a frequency for reception” (p.73) to
1
tune into the desired radio station.
Hold down MEMORY for seconds.
2
The first time that you do register a station, the selected radio
station will be registered to the preset number “01”. Thereafter,
each radio station you select will be registered to the next empty
(unused) preset number after the most recently registered
number.
X
To select a preset number for registering, press MEMORY once after tuning into
the desired radio station, press PRESET to select a preset number, and then
press MEMORY again.
FM 98.50MHz
En 73

01:FM 98.50MHz
Preset
VOL.
SBL SBR
SL SR
CL R
STEREO TUNED
SW1
SLEEP
G
D
G
MEMO
S
VOL
U
E
R
S
E
AI
P
M
/
/MENU
E
MENU
B
LUEYELLOWGREENRED
B
H
U
S
I
N
4
SC
HDMI
O
UTPU
R
E D
IR
C
TPART
Y
MAIN
234
ZO
S
RETURN
OPTION
ENTER
PRESET
TUNER
Cursor keys
LEEP
PARTY
TOP
TOP
MENU
PROGRAM
ROGRA
STRAIGHT
TRAIGHT
TUNIN
MAIN 2 3 4
ZONE
NE
SCENE
INPUT
NET USBTUNER
PRESET
GREENRED
HOME
HOM
SUR. DECODE
UR. DECOD
ENHANCER
NHANCE
MEMORY
HDMI OUTPURE DIRECT
E
ENE
PUT
BLUETOOTH
YELLOW
AI
VOLUME
RY
BAN
4321
8765
LUETOOT
BLUE
POP-UP
POP-UP
/MENU
ME
TUNINGBANDTUNING
TUNIN
■ Registering radio stations automatically
(FM Auto Preset)
Automatically register FM radio stations with strong signals.
Press TUNER to select “TUNER” as the input source.
1
Press OPTION.
2
Use the cursor keys to select “Preset” and press ENTER.
3
X
To specify the preset number from which to start the registration, press cursor
keys or PRESET to select a preset number.
To start the Auto Preset process, press ENTER.
4
Y
To cancel the Auto Preset process, press RETURN.
When the Auto Preset process finishes, “Finished” appears at the
“Preset” screen and the “Option” menu closes automatically.
■ Selecting a preset station
Tune into a registered radio station by selecting its preset number.
Press TUNER to select “TUNER” as the input source.
1
Press PRESET repeatedly to select the desired radio
2
station.
Y
“No Presets” appears when no radio stations are registered.
■ Clearing preset stations
Clear radio stations registered to the preset numbers.
Press TUNER to select “TUNER” as the input source.
1
“TUNER” is selected as the input source and the frequency
currently selected is displayed on the front display.
Press OPTION.
2
Use the cursor keys to select “Preset” and press ENTER.
3
Use the cursor keys to select “Clear Preset”.
4
Use the cursor keys to select a preset station to be cleared
5
and press ENTER.
If the preset station is cleared, “Cleared” appears and then the next
in-use preset number is displayed.
To exit from the menu, press OPTION.
6
En 74

SLEEP
G
D
G
MEMO
S
VOL
U
E
R
S
E
AI
P
M
/
/MENU
E
MENU
B
LUEYELLOWGREENRED
PRESE
T
B
H
U
S
I
N
4
SC
HDMI
O
UTPU
R
E D
IR
C
TPART
Y
MAIN
234
ZO
S
OPTION
ENTER
TUNER
Cursor keys
LEEP
PARTY
TOP
TOP
MENU
PROGRAM
ROGRA
STRAIGHT
TRAIGHT
TUNIN
MAIN 2 3 4
ZONE
NE
SCENE
INPUT
NET USBTUNER
PRESET
GREENRED
HOME
HOM
SUR. DECODE
UR. DECOD
ENHANCER
NHANCE
MEMORY
HDMI OUTPURE DIRECT
E
ENE
PUT
BLUETOOTH
YELLOW
AI
VOLUME
RY
BAN
4321
8765
LUETOOT
BLUE
POP-UP
POP-UP
/MENU
ME
TUNINGBANDTUNING
TUNIN
■ Clearing all preset stations
Clear all the radio stations registered to the preset numbers.
Press TUNER to select “TUNER” as the input source.
1
“TUNER” is selected as the input source and the frequency
currently selected is displayed on the front display.
Press OPTION.
2
Use the cursor keys to select “Preset” and press ENTER.
3
Use the cursor keys to select “Clear All Preset”.
4
Use the cursor keys to select “Execute” and press ENTER.
5
If all the preset stations are cleared, “CLEAR ALL” appears and the
“Option” menu closes automatically.
Listening to DAB radio (Australia, U.K., Europe, Middle East and Russia models only)
DAB (Digital Audio Broadcasting) uses digital signals for clearer sound
and more stable reception compared to analog signals. The unit can also
receive DAB+ (an upgraded version of DAB) that allows for more stations
using MPEG-4 audio codec (AAC+), which has a more efficient
transmission method.
Y
• The unit supports Band III (174 to 240 MHz) only.
• Be sure to check the DAB coverage in your area in that not all areas are currently being
covered. For a list of nationwide DAB statuses and worldwide DAB frequencies, check
WorldDAB online at http://www.worlddab.org/.
X
For details on the antenna connection, see “Connecting the radio antennas” (p.38).
En 75

Preparing the DAB tuning
Press
[ENTER]
Init Scan
VOL.
VOL.
BBC Radio 4
DAB
VOL.
SBL SBR
SL SR
CL R
SW1
DAB
VOL.
SBL SBR
SL SR
CL R
SW1
BBC National
DAB 2
VOL.
SBL SBR
SL SR
CL R
SW1
Secondary station
MEMO
S
VOL
U
E
R
S
E
AI
P
M
/
/MENU
E
MENU
B
LUEYELLOWGREENRED
PRESE
T
B
H
U
S
I
N
4
SC
HDMI
O
UTPU
R
E D
IR
C
TPART
Y
MAIN
234
ZO
S
BAND
TUNING
ENTER
TUNER
Selecting a DAB radio station for reception
SLEEP
LEEP
PARTY
TOP
TOP
MENU
PROGRAM
ROGRA
STRAIGHT
TRAIGHT
MAIN 2 3 4
ZONE
NE
SCENE
INPUT
NET USBTUNER
PRESET
GREENRED
HOME
HOM
SUR. DECODE
UR. DECOD
ENHANCER
NHANCE
MEMORY
ENE
PUT
AI
E
YELLOW
RY
HDMI OUTPURE DIRECT
4321
8765
BLUETOOTH
LUETOOT
BLUE
POP-UP
POP-UP
/MENU
VOLUME
TUNINGBANDTUNING
Before tuning into DAB radio stations, follow the procedure below to
perform an initial scan.
Press TUNER to select “TUNER” as the input source.
1
Press BAND to select the DAB band.
2
You can select a DAB radio station from the stations stored by the initial
scan.
Press TUNER to select “TUNER” as the input source.
1
Press BAND to select the DAB band.
2
The following message appears on the front panel if you have not
Press TUNING repeatedly to select a DAB radio station.
performed an initial scan yet.
3
BBC Radio 4
Daily Service
Y
Press ENTER to start an initial scan.
3
Init Scan
>>>------- 30%
When the initial scan finishes, the unit automatically tunes into the
ME
first DAB radio station as stored in station order.
• “Off Air” appears when the selected DAB radio station is currently not
available.
• When the unit is receiving a secondary station, “2” appears next to “DAB”.
X
You can watch videos input from external devices while listening to radio by
X
• If no DAB radio stations are found by an initial scan, the message in Step 1
appears again. Press ENTER to start an initial scan again.
• You can check reception strength of each DAB channel label (p.79).
• To perform an initial scan again after some DAB radio stations are stored,
select “Init Scan” (p.109) in the “Option” menu. If you perfor m an initial scan
again, the DAB radio stations currently registered to the preset numbers will
be cleared.
selecting the video input jack in “Video Out” (p.113) in the “Option” menu.
En 76

01:BBC Radio 4
Preset
VOL.
SBL SBR
SL SR
CL R
SW1
Preset number
02:Empty
Preset
VOL.
SBL SBR
SL SR
CL R
SW1
“Empty” (not in use) or “Overwrite?” (in use)
VOL.
SBL SBR
SL SR
CL R
SW1
SLEEP
G
G
S
VOL
U
E
R
S
E
AI
P
M
/
/MENU
E
MENU
B
LUEYELLOWGREENRED
B
H
U
S
I
N
4
SC
HDMI
O
UTPU
R
E D
IR
C
TPART
Y
MAIN
234
ZO
S
BAND
MEMORY
OPTION
ENTER
PRESET
TUNER
Cursor keys
LEEP
PARTY
ZONE
NE
NET USBTUNER
GREENRED
MAIN 2 3 4
SCENE
INPUT
PRESET
ENE
PUT
E
YELLOW
HDMI OUTPURE DIRECT
4321
8765
BLUETOOTH
LUETOOT
BLUE
Registering favorite DAB radio stations (presets)
You can register up to 40 DAB radio stations as presets. Once you have
registered stations, you can easily tune into them by selecting their
preset numbers.
X
You can register up to 40 favorite radio stations each for DAB and FM bands.
■ Registering a DAB radio station as presets
Select a DAB radio station and register it to a preset number.
■ Selecting a preset DAB radio station
Tune into a registered DAB radio station by selecting its preset number.
Press TUNER to select “TUNER” as the input source.
1
Press BAND to select the DAB band.
2
Press PRESET repeatedly to select the desired DAB radio
3
station.
PRESET:01
TOP
TOP
MENU
PROGRAM
ROGRA
STRAIGHT
TRAIGHT
TUNIN
HOME
HOM
AI
SUR. DECODE
UR. DECOD
ENHANCER
NHANCE
MEMORY
POP-UP
POP-UP
/MENU
VOLUME
TUNINGBANDTUNING
TUNIN
Follow “Selecting a DAB radio station for reception”
1
(p.76) to tune into the desired DAB radio station.
Hold down MEMORY for seconds.
2
The first time that you do register a station, the selected radio
station will be registered to the preset number “01”. Thereafter,
ME
each radio station you select will be registered to the next empty
(unused) preset number after the most recently registered
number.
Preset OK
X
To select a preset number for registering, press MEMORY once after tuning into
the desired DAB radio station, press PRESET to select a preset number, and then
press MEMORY again.
Y
“No Presets” appears when no DAB radio stations are registered.
■ Clearing preset DAB radio stations
Clear DAB radio stations registered to the preset numbers.
Press TUNER to select “TUNER” as the input source.
1
“TUNER” is selected as the input source and the frequency
currently selected is displayed on the front display.
Press OPTION.
2
Use the cursor keys to select “Preset” and press ENTER.
3
Use the cursor keys to select a preset DAB radio station to
4
be cleared and press ENTER.
If the preset station is cleared, “Cleared” appears and then the next
in-use preset number is displayed.
To exit from the menu, press OPTION.
5
BBC Radio 4
En 77

Program Type
VOL.
SBL SBR
SL SR
CL R
SW1
Item name
Classic Music
VOL.
SBL SBR
SL SR
CL R
SW1
Information
SLEEP
G
D
G
MEMO
S
V
OLU
E
R
S
E
AI
P
ROG
M
/
/MENU
E
MENU
B
LUEYELLOWGREENRED
PRESE
T
B
OO
THNET
U
S
B
I
N
4
SC
HDMI
O
UTPU
R
E D
IR
C
TPART
Y
MAIN
234
ZO
S
OPTION
ENTER
TUNER
Cursor keys
LEEP
PARTY
TOP
TOP
MENU
PROGRAM
RA
STRAIGHT
TRAIGHT
TUNIN
MAIN 2 3 4
ZONE
NE
SCENE
INPUT
NET USBTUNER
PRESET
GREENRED
HOME
HOM
SUR. DECODE
UR. DECOD
ENHANCER
NHANCE
MEMORY
HDMI OUTPURE DIRECT
E
ENE
PUT
BLUETOOTH
YELLOW
AI
VOLUME
RY
BAN
4321
8765
LUET
BLUE
POP-UP
POP-UP
/MENU
ME
TUNINGBANDTUNING
TUNIN
■ Clearing all preset DAB radio stations
Clear all the DAB radio stations registered to the preset numbers.
Press TUNER to select “TUNER” as the input source.
1
“TUNER” is selected as the input source and the frequency
currently selected is displayed on the front display.
Press OPTION.
2
Use the cursor keys to select “Preset” and press ENTER.
3
Use the cursor keys to select “Clear All Preset”.
4
Use the cursor keys to select “Execute” and press ENTER.
5
If all the preset stations are cleared, “CLEAR ALL” appears and the
“Option” menu closes automatically.
Displaying the DAB information
The unit can receive various types of DAB information when it is tuned
into a DAB radio station.
Tune into the desired DAB radio station.
1
Press INFO on the front panel.
2
Each time you press the key, the displayed item changes.
Info
About 3 seconds later, the corresponding information for the
displayed item appears.
DAB
DLS
(Dynamic Label
Segment)
Ensemble Label Ensemble name
Program Type Station genre
Date And Time Current date and time
Audio Mode Audio mode (monaural/stereo) and bit rate
CH Label/Freq. Channel label and frequency
Signal Quality Signal reception quality (0 [none] to 100 [best])
DSP Program Sound mode name
Audio Decoder Decoder name
Classic FM
Information on the current station
X
Some information may not be available depending on the selected DAB radio
station.
En 78
Tune AID
12B Level: 80
VOL.
SBL SBR
SL SR
CL R
SW1
DAB channel label Reception strength
SLEEP
G
G
MEMO
S
VOL
U
E
R
S
E
AI
P
M
/
/MENU
E
MENU
B
LUEYELLOWGREENRED
PRESE
T
B
H
U
S
I
N
4
SC
HDMI
O
UTPU
R
E D
IR
C
TPART
Y
MAIN
234
ZO
S
BAND
RETURN
OPTION
ENTER
TUNER
Cursor keys
LEEP
PARTY
TOP
TOP
MENU
PROGRAM
ROGRA
STRAIGHT
TRAIGHT
TUNIN
MAIN 2 3 4
ZONE
NE
SCENE
INPUT
NET USBTUNER
PRESET
GREENRED
HOME
HOM
SUR. DECODE
UR. DECOD
ENHANCER
NHANCE
MEMORY
HDMI OUTPURE DIRECT
E
ENE
PUT
BLUETOOTH
YELLOW
AI
VOLUME
RY
4321
8765
LUETOOT
BLUE
POP-UP
POP-UP
/MENU
ME
TUNINGBANDTUNING
TUNIN
Checking reception strength of each DAB channel label
You can check reception strength of each DAB channel label (0 [none] to
100 [best]).
Press TUNER to select “TUNER” as the input source.
1
Press BAND to select the DAB band.
2
Press OPTION.
3
Use the cursor keys to select “Tune AID” and press ENTER.
4
Use the cursor keys to select the desired DAB channel
5
label.
To exit from the menu, press RETURN.
6
En 79

■ DAB frequency information
The unit supports Band III (174 to 240 MHz) only.
Frequency Channel label
174.928 MHz 5A
176.640 MHz 5B
178.352 MHz 5C
180.064 MHz 5D
181.936 MHz 6A
183.648 MHz 6B
185.360 MHz 6C
187.072 MHz 6D
188.928 MHz 7A
190.640 MHz 7B
192.352 MHz 7C
194.064 MHz 7D
195.936 MHz 8A
197.648 MHz 8B
199.360 MHz 8C
201.072 MHz 8D
202.928 MHz 9A
204.640 MHz 9B
206.352 MHz 9C
208.064 MHz 9D
209.936 MHz 10A
211.648 MHz 10B
213.360 MHz 10C
215.072 MHz 10D
216.928 MHz 11A
218.640 MHz 11B
220.352 MHz 11C
222.064 MHz 11D
223.936 MHz 12A
Frequency Channel label
225.648 MHz 12B
227.360 MHz 12C
229.072 MHz 12D
230.784 MHz 13A
232.496 MHz 13B
234.208 MHz 13C
235.776 MHz 13D
237.488 MHz 13E
239.200 MHz 13F
En 80

VOL.
VOL.
SBL SBR
SL SR
CL R
STEREO TUNED
SW1
SLEEP
MEMO
S
VOL
U
E
R
S
E
AI
P
M
/
/MENU
E
MENU
B
LUEYELLOWGREENRED
PRESE
T
B
H
U
S
I
N
4
SC
HDMI
O
UTPU
R
E D
IR
C
TPART
Y
MAIN
234
ZO
S
BAND
TUNING
TUNER
LEEP
PARTY
ZONE
NE
NET USBTUNER
GREENRED
MAIN 2 3 4
SCENE
INPUT
PRESET
ENE
PUT
E
YELLOW
HDMI OUTPURE DIRECT
4321
8765
BLUETOOTH
LUETOOT
BLUE
Listening to FM radio (Australia, U.K., Europe, Middle East and Russia models only)
You can tune into a radio station by specifying its frequency or selecting
from registered radio stations.
Y
If you cannot obtain good reception on the radio, adjust the direction of the DAB/FM
antennas.
Selecting a frequency for reception
Press TUNER to select “TUNER” as the input source.
1
Press BAND to select the FM band.
2
FM 87.50MHz
TOP
TOP
MENU
PROGRAM
ROGRA
STRAIGHT
TRAIGHT
HOME
HOM
AI
SUR. DECODE
UR. DECOD
ENHANCER
NHANCE
MEMORY
RY
POP-UP
POP-UP
/MENU
VOLUME
TUNINGBANDTUNING
Press TUNING to set a frequency.
3
Hold down the key for about a second to search stations
automatically.
FM 98.50MHz
ME
“TUNED” lights up when a signal is received from a radio station.
“STEREO” also lights up when a stereo signal is received.
X
• You can switch between “Stereo” and “Mona ural” for FM radio reception in “FM
Mode” (p.113) in the “Option” menu. When the signal reception for an FM radio
station is unstable, switching to monaural may improve it.
• You can watch videos input from external de vices while listening to radio. For details
see “Video Out” (p.113).
En 81

01:FM 98.50MHz
Preset
VOL.
SBL SBR
SL SR
CL R
STEREO TUNED
SW1
Preset number
01:Empty
Preset
VOL.
SBL SBR
SL SR
CL R
STEREO TUNED
SW1
“Empty” (not in use) or the frequency currently registered
TUNINGBANDTUNING
MEMORY
STRAIGHT
VOLUME
ENHANCER
SUR. DECODE
AI
PROGRAM
POP-UP
/MENU
HOME
TOP
MENU
BLUE
YELLOW
GREENRED
PRESET
BLUETOOTH
NET USBTUNER
INPUT
8765
4321
SCENE
HDMI OUTPURE DIRECT
PARTY
MAIN 2 3 4
ZONE
SLEEP
G
D
G
S
VOLUM
E
R
S
E
AI
M
/
/MENU
E
MENU
B
LUEYELLOWGREENRED
B
HNE
T
U
S
B
I
N
4
SC
HDMI
O
UTPU
R
E D
IR
C
TPART
Y
MAIN
234
ZO
S
MEMORY
RETURN
OPTION
SETUP
ENTER
PRESET
TUNER
Cursor keys
LEEP
TOP
PROGRA
TRAIGHT
TUNIN
NE
ENE
PUT
HOM
UR. DECOD
NHANCE
E
BAN
LUETOOT
POP-UP
TUNIN
Registering favorite FM radio stations (presets)
■ Registering radio stations automatically
(FM Auto Preset)
Automatically register FM radio stations with strong signals.
E
You can register up to 40 FM radio stations as presets. Once you have
registered stations, you can easily tune into them by selecting their
preset numbers.
X
You can automatically register FM radio stations that have strong signals by using “FM
Auto Preset” (p.74).
■ Registering a radio station manually
Select a radio station manually and register it to a preset number.
Follow “Selecting a frequency for reception” (p.81) to
1
tune into the desired radio station.
Hold down MEMORY for seconds.
2
The first time that you do register a station, the selected radio
station will be registered to the preset number “01”. Thereafter,
each radio station you select will be registered to the next empty
(unused) preset number after the most recently registered
number.
X
(U.K., Europe, Russia and Middle East models only)
Only Radio Data System broadcasting stations are stored automatically by “FM Auto
Preset”.
Press TUNER to select “TUNER” as the input source.
1
Press OPTION.
2
Use the cursor keys to select “Preset” and press ENTER.
3
X
To specify the preset number from which to start the registration, press cursor
keys or PRESET to select a preset number.
To start the Auto Preset process, press ENTER.
4
Y
To cancel the Auto Preset process, press RETURN.
When the Auto Preset process finishes, “Finished” appears at the
“Preset” screen and the “Option” menu closes automatically.
Preset OK
X
To select a preset number for registering, press MEMORY once after tuning into
the desired radio station, press PRESET to select a preset number, and then
press MEMORY again.
FM 98.50MHz
En 82

Preset
VOL.
SBL SBR
SL SR
CL R
STEREO TUNED
SW1
SLEEP
G
G
MEMO
S
VOLUM
E
R
S
E
AI
P
M
/
/MENU
E
MENU
B
LUEYELLOWGREENRED
B
HNE
T
U
S
B
I
N
4
SC
HDMI
O
UTPU
R
E D
IR
C
TPART
Y
MAIN
234
ZO
S
BAND
OPTION
ENTER
PRESET
TUNER
Cursor keys
LEEP
PARTY
TOP
TOP
MENU
PROGRAM
ROGRA
STRAIGHT
TRAIGHT
TUNIN
MAIN 2 3 4
ZONE
NE
SCENE
INPUT
NET USBTUNER
PRESET
GREENRED
HOME
HOM
SUR. DECODE
UR. DECOD
ENHANCER
NHANCE
MEMORY
HDMI OUTPURE DIRECT
E
ENE
PUT
BLUETOOTH
YELLOW
AI
VOLUME
RY
4321
8765
LUETOOT
BLUE
POP-UP
POP-UP
/MENU
TUNINGBANDTUNING
TUNIN
■ Selecting a preset station
Tune into a registered radio station by selecting its preset number.
Press TUNER to select “TUNER” as the input source.
1
■ Clearing all preset stations
Clear all the radio stations registered to the preset numbers.
Press TUNER to select “TUNER” as the input source.
1
“TUNER” is selected as the input source and the frequency
Press BAND to select the FM band
2
Press PRESET repeatedly to select the desired radio
3
currently selected is displayed on the front display.
Press OPTION.
2
station.
Use the cursor keys to select “Preset” and press ENTER.
01:FM 98.50MHz
3
Use the cursor keys to select “Clear All Preset”.
4
Y
“No Presets” appears when no radio stations are registered.
■ Clearing preset stations
Clear radio stations registered to the preset numbers.
Press TUNER to select “TUNER” as the input source.
E
1
“TUNER” is selected as the input source and the frequency
currently selected is displayed on the front display.
Press OPTION.
2
Use the cursor keys to select “Preset” and press ENTER.
3
Use the cursor keys to select “Execute” and press ENTER.
5
If all the preset stations are cleared, “CLEAR ALL” appears and the
“Option” menu closes automatically.
Use the cursor keys to select “Clear Preset”.
4
Use the cursor keys to select a preset station to be cleared
5
and press ENTER.
If the preset station is cleared, “Cleared” appears and then the next
in-use preset number is displayed.
To exit from the menu, press OPTION.
6
En 83

Radio Data System tuning
Program Type
SBL SBR
SL SR
CL R
VOL.
STEREO TUNED
SW1
Item name
FM 98.50MHz
CLASSICS
SBL SBR
SL SR
CL R
VOL.
STEREO TUNED
SW1
Information
Frequency (always displayed)
(U.K., Europe, Middle East and Russia models only)
Radio Data System is a data transmission system used by FM stations in many countries. The
unit can receive various types of Radio Data System data, such as “Program Service”, “Program
Type”, “Radio Text” and “Clock Time”, when it is tuned into a Radio Data System broadcasting
station.
Program Service Program service name
Program Type Current program type
Radio Text Information on the current program
Clock Time Current time
DSP Program Sound mode name
Audio Decoder Decoder name
■ Displaying the Radio Data System information
Tune into the desired Radio Data System broadcasting station.
1
X
We recommend using “FM Auto Preset” to tune into the Radio Data System broadcasting stations (p.82).
Press INFO on the front panel.
2
Each time you press the key, the displayed item changes.
Info
About 3 seconds later, the corresponding information for the displayed item appears.
Y
“Program Service”, “Program Type”, “Radio Text”, and “Clock Time” are not displayed if the radio station
does not provide the Radio Data System service.
En 84

Playing back music via Bluetooth
The unit
Bluetooth device
(such as smartphones)
S
VOL
U
E
R
S
E
AI
P
M
/
/MENU
E
MENU
B
LUEYELLOWGREENRED
PRESE
T
USUN
I
N
4
SC
HDMI
O
UTPU
R
E D
IR
C
TPART
Y
MAIN
234
ZO
S
BLUETOOTH
Playback operation
keys
SLEEP
LEEP
PARTY
TOP
TOP
MENU
PROGRAM
ROGRA
STRAIGHT
TRAIGHT
MAIN 2 3 4
ZONE
NE
E
SCENE
ENE
INPUT
PUT
NET USBTUNER
PRESET
YELLOW
GREENRED
HOME
HOM
AI
SUR. DECODE
UR. DECOD
ENHANCER
NHANCE
MEMORY
HDMI OUTPURE DIRECT
4321
8765
BLUETOOTH
BLUE
POP-UP
POP-UP
/MENU
VOLUME
TUNINGBANDTUNING
You can play back music files stored on a Bluetooth device (such as
smartphones) on the unit.
Playing back Bluetooth device music on the unit
Follow the procedure below to establish a Bluetooth connection
between a Bluetooth device (such as smartphones) and the unit, and
play back music stored the Bluetooth device on the unit.
Y
Y
• To use the Bluetooth function, set “Bluetooth” (p.138) in the “Setup” menu to “On”.
• Stand the wireless antenna upright for connecting to a Bluetooth device wirelessly.
For details, see “Preparing the wireless antenna” (p.39).
X
For details on supported Bluetooth devices, see “Supported devices and file formats”
(p.170).
ME
The unit does not support video playback via Bluetooth.
Press BLUETOOTH to select “Bluetooth” as the input
1
source.
On the Bluetooth device, select the unit (network name of
2
the unit) from the available device list.
A connection between the Bluetooth device and the unit will be
made.
If the pass key is required, enter the number “0000”.
On the Bluetooth device, select a song and start playback.
3
The playback screen (artist name, album name and song title) is
displayed on the TV.
X
• If the unit detects the Bluetooth device previously connected, the unit automatically
connects to the Bluetooth device after Step 1. To establish another Bluetooth
connection, first terminate the current Bluetooth connection.
• To terminate the Bluetooth connection, perfor m one of the following operations.
– Perform the disconnect operation on the Bluetooth device.
– Select an input source other than “Bluetooth” on the unit.
– Select “Disconnect” in “Bluetooth” (p.138) in the “Setup” menu.
• You can use the playback operat ion keys (
control to control playback.
a, s, d, f, g) on the remote
En 85

Playing back music stored on a USB storage device
ENTER
OPTION
SETUP
HELPRETURN
YPAO MIC
PHONES
USB
SILENT CINEMA
AI
STRAIGHT
PROGRAM
5V
1A
(
CONNECT
)
The unit (front)
USB storage device
Connected
USB
SBL SBR
SL SR
CL R
VOL.
SW1
You can play back music files stored on a USB storage device on the unit.
The unit supports USB mass storage class devices (FAT16 or FAT32 format).
X
For details on playable file formats, see “Supported devices and file formats” (p.170).
Connecting a USB storage device
Connect the USB storage device to the USB jack.
1
X
If t he US B st orag e dev ice cont ains man y fil es, i t ma y tak e time to load the them. In this case, “Loading...” appears
in the front display.
Y
• Stop playback of the USB storage device before disconnect it from the USB jack.
• Connect a USB memory device directly to the USB jack of the unit. Do not use extension cabl es.
• The unit cannot charge USB devices while it is in standby mode.
En 86

SLEEP
G
D
G
MEMO
S
VOL
U
E
R
S
E
AI
P
M
/
/MENU
E
MENU
B
LUEYELLOWGREENRED
PRESE
T
B
H
UN
I
N
4
SC
HDMI
O
UTPU
R
E D
IR
C
TPART
Y
MAIN
234
ZO
S
RETURN
ENTER
USB
Cursor keys
LEEP
PARTY
TOP
TOP
MENU
PROGRAM
ROGRA
STRAIGHT
TRAIGHT
TUNIN
MAIN 2 3 4
ZONE
NE
SCENE
INPUT
NET USBTUNER
PRESET
GREENRED
HOME
HOM
SUR. DECODE
UR. DECOD
ENHANCER
NHANCE
MEMORY
HDMI OUTPURE DIRECT
E
ENE
PUT
BLUETOOTH
YELLOW
AI
VOLUME
RY
BAN
4321
8765
LUETOOT
BLUE
POP-UP
POP-UP
/MENU
ME
TUNINGBANDTUNING
TUNIN
Playback of USB storage device contents
Follow the procedure below to operate the USB storage device contents
and start playback.
You can control the USB memory device with the menu displayed on the
TV screen.
Press USB to select “USB” as the input source.
1
The browse screen is displayed on the TV.
X
If playback is ongoing on your USB storage device, the playback screen is
displayed.
Use the cursor keys to select an item and press ENTER.
2
If a song is selected, playback starts and the playback screen is
displayed.
X
• To return to the previous screen, press RETURN.
• To return to the top screen during menu operation s on the browse screen,
hold down RETURN.
• Files not supported by the unit cannot be selected.
• If the unit detects a series of unsupported files (such as images and hidden
files) during playback, playback stops automatically.
• You can register your favorite items as shortcuts and access them directly by
selecting the shortcut numbers (p.105).
En 87
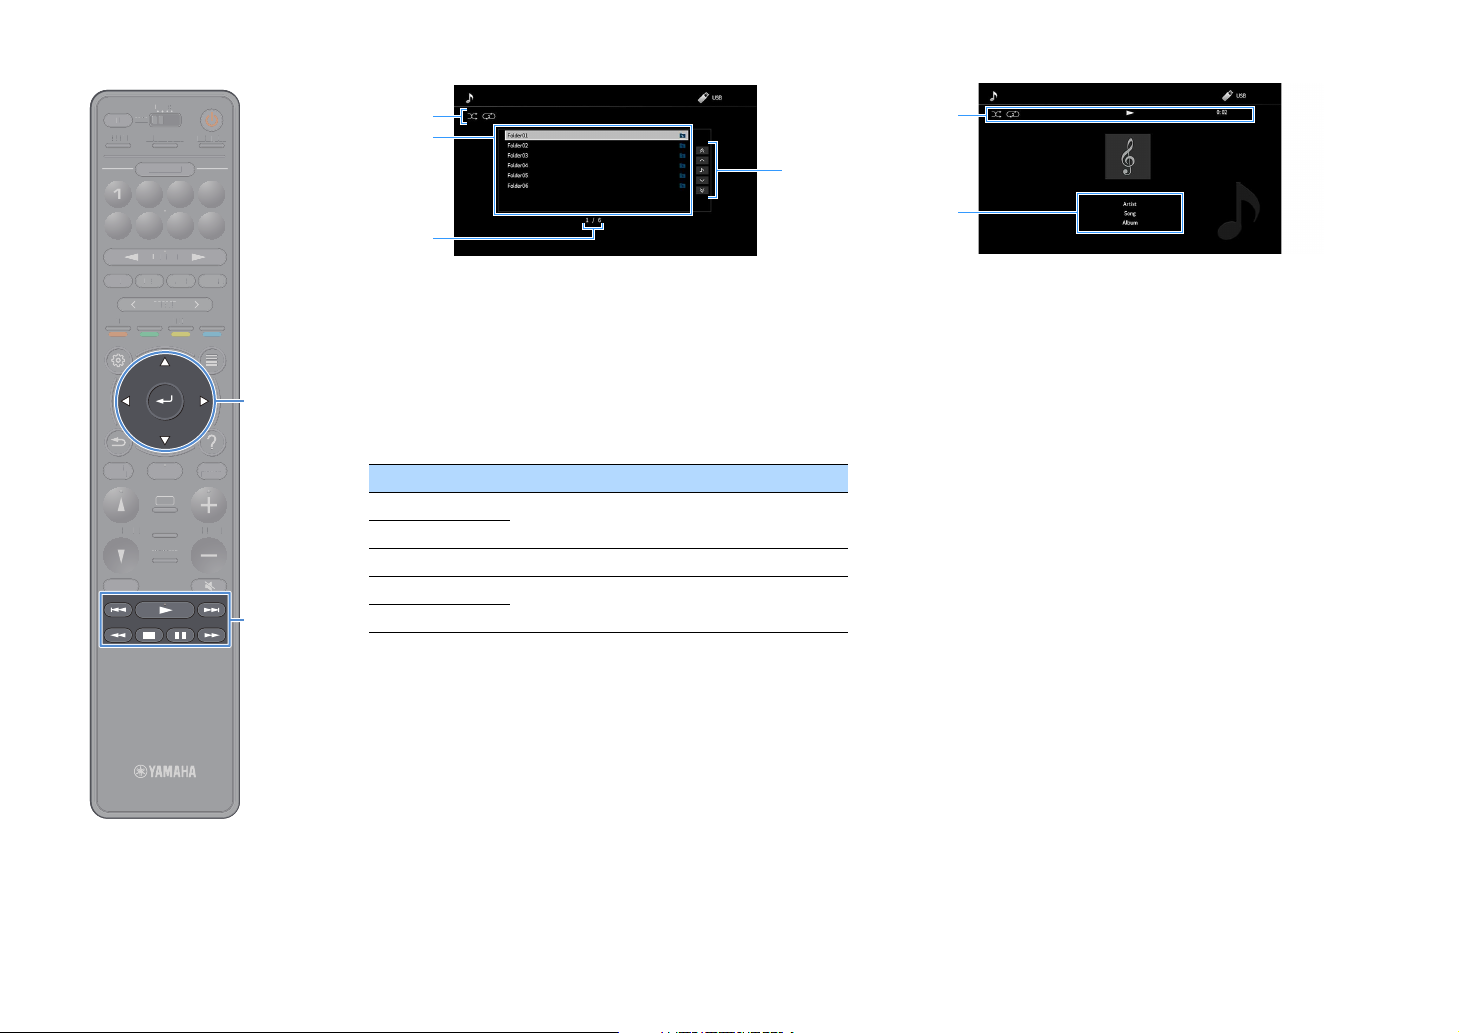
■ Browse screen
a
c
d
b
S
V
OLU
E
R
S
E
AI
P
ROG
M
/
/MENU
E
MENU
B
LUEYELLOWGREENRED
PRESE
T
B
OO
THNET
U
S
B
TUNE
R
I
N
4
SC
HDMI
O
UTPU
R
E D
IR
C
TPART
Y
MAIN
234
ZO
S
ENTER
Cursor keys
Playback operation
keys
■ Playback screen
SLEEP
LEEP
PARTY
TOP
TOP
MENU
PROGRAM
RA
STRAIGHT
TRAIGHT
MAIN 2 3 4
ZONE
NE
E
SCENE
ENE
INPUT
PUT
NET USBTUNER
PRESET
YELLOW
GREENRED
HOME
HOM
AI
SUR. DECODE
UR. DECOD
ENHANCER
NHANCE
MEMORY
HDMI OUTPURE DIRECT
4321
8765
BLUETOOTH
LUET
BLUE
POP-UP
POP-UP
/MENU
VOLUME
TUNINGBANDTUNING
a
b
a Status indicators
Display the current shuffle/repeat settings (p.89).
b Contents list
Displays the list of USB storage device contents. Use the cursor keys to select an
item and press ENTER to confirm the selection.
c Item number/total
d Operation menu
Use the cursor keys to select an item. Press ENTER to confirm the selection.
Menu Function
1 Page Up
ME
1 Page Down
Now Playing Moves to the playback screen.
10 Pages Up
10 Pages Down
Moves to the previous/next page of the list.
Moves 10 pages forward/backward.
a Status indicators
Display the current shuffle/repeat settings (p.89), playback status (such as
play/pause) and elapsed time.
b Playback information
Displays the artist name, album name and song title.
X
You can use the playback operation keys (a, s, d, f, g) on the remote
control to control playback.
X
When “Video Out” in the “Option” menu is set to except “ Off”, you can close the browse
screen by pressing the left cursor key. To display the browse screen again, press any
cursor key. For details on see “Video Out” (p.113).
En 88

SLEEP
G
BAND
G
MEMO
S
VOLUM
E
R
S
E
AI
P
M
/
/MENU
E
MENU
B
LUEYELLOWGREENRED
PRESE
T
B
HNE
T
U
S
B
TUNE
R
I
N
4
SC
HDMI
O
UTPU
R
E D
IR
C
TPART
Y
MAIN
234
ZO
S
RETURN
OPTION
ENTER
Cursor keys
LEEP
PARTY
TOP
TOP
MENU
PROGRAM
ROGRA
STRAIGHT
TRAIGHT
TUNIN
MAIN 2 3 4
ZONE
NE
SCENE
INPUT
NET USBTUNER
PRESET
GREENRED
HOME
HOM
SUR. DECODE
UR. DECOD
ENHANCER
NHANCE
MEMORY
HDMI OUTPURE DIRECT
E
ENE
PUT
BLUETOOTH
YELLOW
AI
VOLUME
RY
4321
8765
LUETOOT
BLUE
POP-UP
POP-UP
/MENU
TUNINGBANDTUNING
TUNIN
■ Shuffle/repeat settings
You can configure the shuffle/repeat settings for playback of USB storage
device contents.
When “USB” is selected as the input source, press
1
OPTION.
Use the cursor keys to select “Shuffle/Repeat” and press
2
ENTER.
X
• To return to the previous screen during menu operations, press RETURN.
• Texts in parentheses denote indicators on the front display.
Use the cursor keys to select “Shuffle” (Shuffle) or
3
“Repeat” (Repeat) and select a setting.
Item Setting Function
Off (Off) Turns off the shuffle function.
Shuffle
E
(Shuffle)
On (On)
Off (Off) Turns off the repeat function.
Repeat
One (One)
(Repeat)
All (All)
Plays back songs in the current album
(folder) in random order.
“x” appears on the TV screen.
Plays back the current song repeate dly.
“c” appears on the TV screen.
Plays back all songs in the current
album (folder) repeatedly.
“v” appears on the TV screen.
To exit from the menu, press OPTION.
4
En 89

Playing back music stored on media servers (PCs/NAS)
You can play back music files stored on your media servers on the unit.
Y
• To use this function, the unit and your PC must be connected to the same router (p.39). You can check whether
the network parameters (such as the IP address) are properly assigned to the unit in “Network” (p.135) in the
“Setup” menu.
• The audio may be interrupted while usin g the wireless network connection. In this case, use the wired network
connection.
X
For details on playable file formats, see “Supported devices and file formats” (p.170).
Media sharing setup
To play back music files stored on your PC or media servers, first you need to configure the
media sharing setting on each music server.
■ For a PC with Windows Media Player installed
The setting procedure may vary depending on the PC and Windows Media Player version (The
following procedure is a setup example for Windows Media Player 12).
Start Windows Media Player 12 on your PC.
1
Select “Stream”, then “Turn on media streaming”.
2
Click “Turn on media streaming”.
3
■ For a PC or a NAS with other media server software
installed
Refer to the instruction manual for the device or software and configure the media sharing
settings.
Select “Allowed” from the drop-down list next to the unit’s model name.
4
Click “OK” to exit.
5
X
For details on media sharing settings, refer to Windows Media Player help.
En 90

SLEEP
G
D
G
MEMO
S
VOL
U
E
R
S
E
AI
P
M
/
/MENU
E
MENU
B
LUEYELLOWGREENRED
PRESE
T
B
H
USUN
I
N
4
SC
HDMI
O
UTPU
R
E D
IR
C
TPART
Y
MAIN
234
ZO
S
RETURN
ENTER
NET
Cursor keys
LEEP
PARTY
TOP
TOP
MENU
PROGRAM
ROGRA
STRAIGHT
TRAIGHT
TUNIN
MAIN 2 3 4
ZONE
NE
SCENE
INPUT
NET USBTUNER
PRESET
GREENRED
HOME
HOM
SUR. DECODE
UR. DECOD
ENHANCER
NHANCE
MEMORY
HDMI OUTPURE DIRECT
E
ENE
PUT
BLUETOOTH
YELLOW
AI
VOLUME
RY
BAN
4321
8765
LUETOOT
BLUE
POP-UP
POP-UP
/MENU
ME
TUNINGBANDTUNING
TUNIN
Playback of PC music contents
Follow the procedure below to operate the PC music contents and start
playback.
You can control the PC/NAS with the menu displayed on the TV screen.
Press NET repeatedly to select “SERVER” as the input
1
source.
The browse screen is displayed on the TV.
X
If playback of a music file selected from the unit is ongoing on your PC, the
playback screen is displayed.
Use the cursor keys to select a music server and press
2
ENTER.
Use the cursor keys to select an item and press ENTER.
3
If a song is selected, playback starts and the playback screen is
displayed.
X
• To return to the previous screen, press RETURN.
• To return to the top screen during menu operations on the browse screen, hold down
RETURN.
• Files not supported by the unit cannot be selected.
• If the unit detects a series of unsupported files (such as images and hidden files)
during playback, playback stops automatically.
•You can register your favorite items as shortcuts and access them directly by
selecting the shortcut numbers (p.105).
En 91

■ Browse screen
S
VOLUM
E
R
S
E
AI
P
M
/
/MENU
E
MENU
B
LUEYELLOWGREENRED
PRESE
T
B
HNE
T
U
S
B
TUNE
R
I
N
4
SC
HDMI
O
UTPU
R
E D
IR
C
TPART
Y
MAIN
234
ZO
S
ENTER
Cursor keys
Playback operation
keys
■ Playback screen
SLEEP
LEEP
PARTY
TOP
TOP
MENU
PROGRAM
ROGRA
STRAIGHT
TRAIGHT
MAIN 2 3 4
ZONE
NE
E
SCENE
ENE
INPUT
PUT
NET USBTUNER
PRESET
YELLOW
GREENRED
HOME
HOM
AI
SUR. DECODE
UR. DECOD
ENHANCER
NHANCE
MEMORY
HDMI OUTPURE DIRECT
4321
8765
BLUETOOTH
LUETOOT
BLUE
POP-UP
POP-UP
/MENU
VOLUME
TUNINGBANDTUNING
a
b
a
d
b
c
a Status indicators
Display the current shuffle/repeat settings (p.93).
b Contents list
Displays the list of PC content. Use the cursor keys to select an item and press
ENTER to confirm the selection.
c Item number/total
d Operation menu
Use the cursor keys to select an item. Press ENTER to confirm the selection.
Menu Function
1 Page Up
E
1 Page Down
Now Playing Moves to the playback screen.
10 Pages Up
10 Pages Down
Moves to the previous/next page of the list.
Moves 10 pages forward/backward.
a Status indicators
Display the current shuffle/repeat settings (p.93), playback status (such as
play/pause) and elapsed time.
b Playback information
Displays the artist name, album name and song title.
X
You can use the playback operation keys (a, s, d, f, g) on the remote
control to control playback.
X
When “Video Out” in the “Option” menu is set to except “ Off”, you can close the browse
screen by pressing the left cursor key. To display the browse screen again, press any
cursor key. For details on see “Video Out” (p.113).
En 92

SLEEP
G
D
G
MEMO
S
VOL
U
E
R
S
E
AI
P
M
/
/MENU
E
MENU
B
LUEYELLOWGREENRED
PRESE
T
B
H
USUN
I
N
4
SC
HDMI
O
UTPU
R
E D
IR
C
TPART
Y
MAIN
234
ZO
S
RETURN
OPTION
ENTER
Cursor keys
LEEP
PARTY
TOP
TOP
MENU
PROGRAM
ROGRA
STRAIGHT
TRAIGHT
TUNIN
MAIN 2 3 4
ZONE
NE
SCENE
INPUT
NET USBTUNER
PRESET
GREENRED
HOME
HOM
SUR. DECODE
UR. DECOD
ENHANCER
NHANCE
MEMORY
HDMI OUTPURE DIRECT
E
ENE
PUT
BLUETOOTH
YELLOW
AI
VOLUME
RY
BAN
4321
8765
LUETOOT
BLUE
POP-UP
POP-UP
/MENU
ME
TUNINGBANDTUNING
TUNIN
■ Shuffle/repeat settings
You can configure the shuffle/repeat settings for the playback of PC
music content.
When “SERVER” is selected as the input source, press
1
OPTION.
Use the cursor keys to select “Shuffle/Repeat” and press
2
ENTER.
X
• To return to the previous screen during menu operations, press RETURN.
• Text in parentheses denotes indicators on the front display.
Use the cursor keys to select “Shuffle” (Shuffle) or
3
“Repeat” (Repeat) and select a setting.
Item Setting Function
Off (Off) Turns off the shuffle function.
Shuffle
(Shuffle)
Repeat
(Repeat)
On (On)
Off (Off) Turns off the repeat function.
One (One)
All (All)
Plays back songs in the current album
(folder) in random order.
“x” appears on the TV screen.
Plays back the current song repeate dly.
“c” appears on the TV screen.
Plays back all songs in the current
album (folder) repeatedly.
“v” appears on the TV screen.
To exit from the menu, press OPTION.
4
En 93

Listening to Internet radio
G
D
G
MEMO
S
VOL
U
E
R
S
E
AI
P
M
/
/MENU
E
MENU
B
LUEYELLOWGREENRED
PRESE
T
B
H
USUN
I
N
4
SC
HDMI
O
UTPU
R
E D
IR
C
TPART
Y
MAIN
234
ZO
S
RETURN
ENTER
NET
Cursor keys
SLEEP
LEEP
PARTY
TOP
TOP
MENU
PROGRAM
ROGRA
STRAIGHT
TRAIGHT
TUNIN
MAIN 2 3 4
ZONE
NE
SCENE
INPUT
NET USBTUNER
PRESET
GREENRED
HOME
HOM
SUR. DECODE
UR. DECOD
ENHANCER
NHANCE
MEMORY
HDMI OUTPURE DIRECT
E
ENE
PUT
BLUETOOTH
YELLOW
AI
VOLUME
RY
BAN
4321
8765
LUETOOT
BLUE
POP-UP
POP-UP
/MENU
ME
TUNINGBANDTUNING
TUNIN
You can listen to Internet radio stations from all over the world.
Y
• To use this function, the unit must be connected to the Internet (p.39). You can check
whether the network parameters (such as the IP address) are properly assigned to
the unit in “Information” (p.135) in the “Network” menu.
• You may not be able to receive some Internet radio stations.
• The unit uses the airable.Radio ser vice. airable is a service of Tune In GmbH.
• This service may be discontinued without notice.
• Folder names are different depending on the language.
Playback of Internet radio
Press NET repeatedly to select “NET RADIO” as the input
1
source.
The browse screen is displayed on the TV.
Use the cursor keys to select an item and press ENTER.
2
If an Internet radio station is selected, playback starts and the
playback screen is displayed.
X
• To return to the previous screen, press RETURN.
•You can register your favorite items as shortcuts and access them directly by
selecting the shortcut numbers (p.105).
En 94
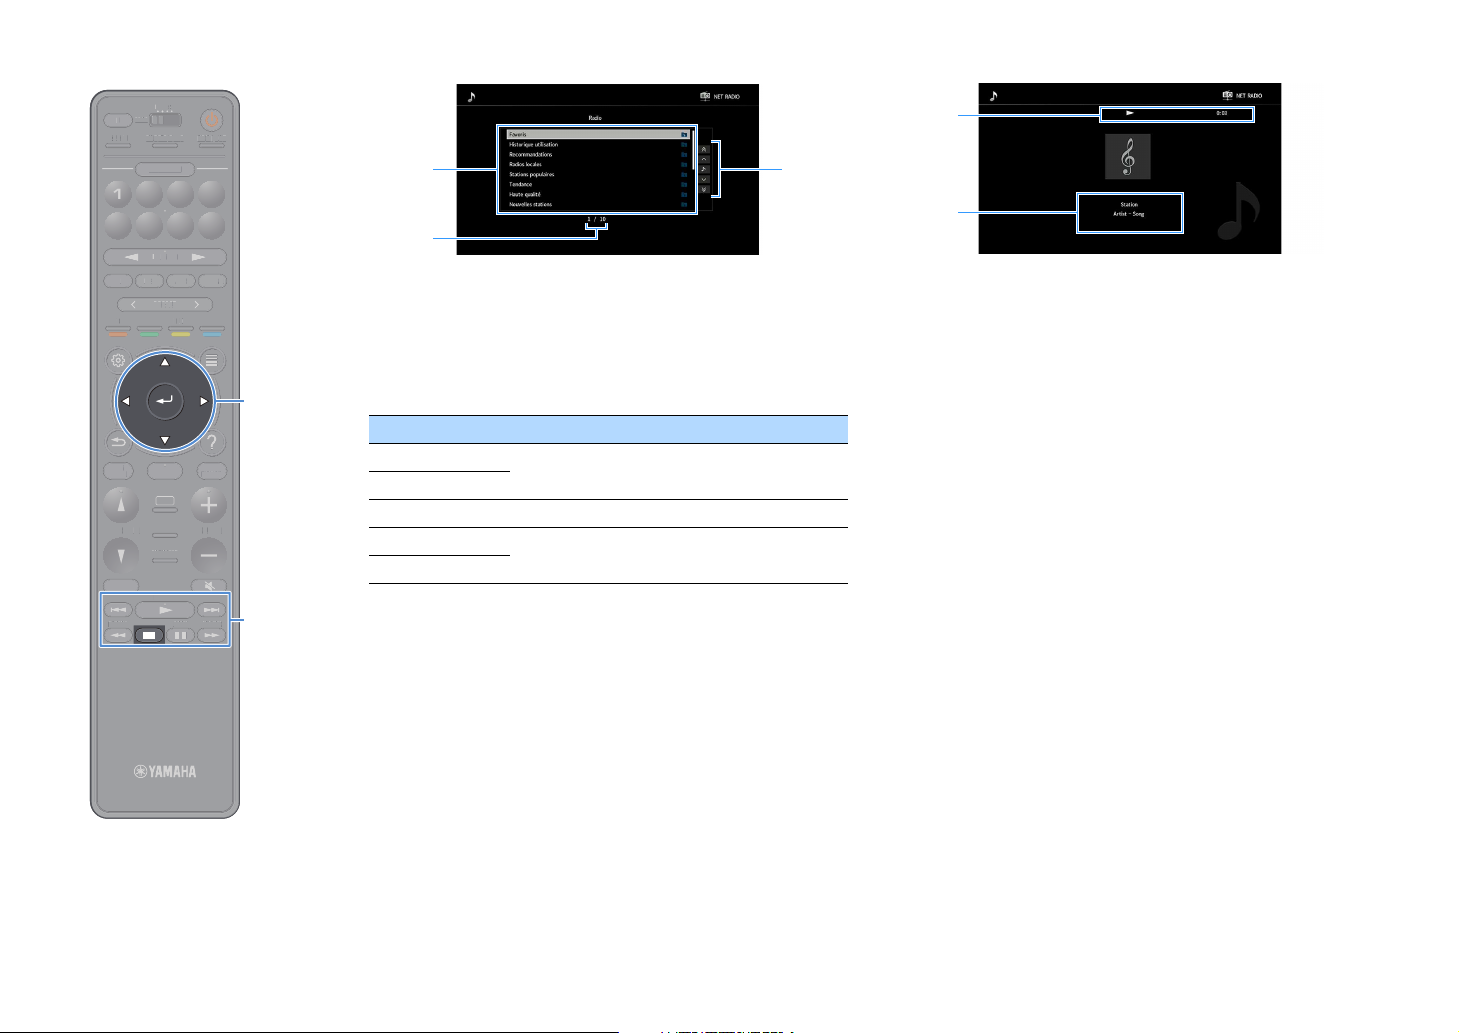
■ Browse screen
G
BAND
G
MEMO
S
VOLUM
E
R
S
E
AI
P
M
/
/MENU
E
MENU
B
LUEYELLOWGREENRED
PRESE
T
B
HNE
T
U
S
B
TUNE
R
I
N
4
SC
HDMI
O
UTPU
R
E D
IR
C
TPART
Y
MAIN
234
ZO
S
ENTER
Cursor keys
Playback operation
keys
■ Playback screen
SLEEP
LEEP
PARTY
TOP
TOP
MENU
PROGRAM
ROGRA
STRAIGHT
TRAIGHT
TUNIN
MAIN 2 3 4
ZONE
NE
E
SCENE
ENE
INPUT
PUT
NET USBTUNER
PRESET
YELLOW
GREENRED
HOME
HOM
AI
SUR. DECODE
UR. DECOD
ENHANCER
NHANCE
MEMORY
RY
HDMI OUTPURE DIRECT
4321
8765
BLUETOOTH
LUETOOT
BLUE
POP-UP
POP-UP
/MENU
VOLUME
TUNINGBANDTUNING
TUNIN
a
a
c
b
b
a Contents list
Displays the list of Internet radio content. Use the cursor keys to select an item
and press ENTER to confirm the selection.
b Item number/total
c Operation menu
Use the cursor keys to select an item. Press ENTER to confirm the selection.
Menu Function
1 Page Up
1 Page Down
Now Playing Moves to the playback screen.
E
10 Pages Up
10 Pages Down
Moves to the previous/next page of the list.
Moves 10 pages forward/backward.
a Playback indicator
Displays the elapsed time.
b Playback information
Displays the station name, album name and song title.
X
• You can us e the playback operation key (s) on the remote control to stop playback.
• Some information may not be available depending on the station.
X
When “Video Out” in the “Option” menu is set to except “ Off”, you can close the browse
screen by pressing the left cursor key. To display the browse screen again, press any
cursor key. For details on see “Video Out” (p.113).
En 95

Registering favorite Internet radio stations (Favorites)
G
D
G
MEMO
S
VOL
U
E
R
S
E
AI
P
M
/
/MENU
E
MENU
B
LUEYELLOWGREENRED
PRESE
T
B
H
USUN
I
N
4
SC
HDMI
O
UTPU
R
E D
IR
C
TPART
Y
MAIN
234
ZO
S
OPTION
ENTER
Cursor keys
SLEEP
LEEP
PARTY
TOP
TOP
MENU
PROGRAM
ROGRA
STRAIGHT
TRAIGHT
TUNIN
MAIN 2 3 4
ZONE
NE
SCENE
INPUT
NET USBTUNER
PRESET
GREENRED
HOME
HOM
SUR. DECODE
UR. DECOD
ENHANCER
NHANCE
MEMORY
HDMI OUTPURE DIRECT
E
ENE
PUT
BLUETOOTH
YELLOW
AI
VOLUME
RY
BAN
4321
8765
LUETOOT
BLUE
POP-UP
POP-UP
/MENU
ME
TUNINGBANDTUNING
TUNIN
By registering your favorite Internet radio stations to “Favorites”, you
can quickly access to them from the “Favorites” folder in the browse
screen.
X
You can also register up to 40 favorite USB and network contents or Bluetooth input
source as shortcuts (p.105).
■ Registering the station on the
browse/playback screen
Select the desired Internet radio station in the browse
1
screen or start playback of it to display the playback
screen.
Press OPTION.
2
Use the cursor key to select “Add to favorites” and press
3
ENTER.
The selected station is added to the “Favorites” folder.
Radio stations registered to favorites are displayed with “S”.
Browse screen
X
To remove a station that is registered to favorites, select the station and then select
“Remove from favorites”.
En 96

Playing back iTunes/iPod music with AirPlay
PC
iTunes
iPhone/iPad/iPod touch
Router
(wired or wireless)
The unit
(wired or wireless)
iTunes (example) iOS (example)
The AirPlay function allows you to play back iTunes/iPod music on the unit via network.
Y
• To use this function, the un it and your PC or iPod must be connected to the same router. You can check whether
the network parameters (such as the IP address) are properly assigned to the unit in “Information” (p.135) in
the “Setup” menu.
• When using a multiple SSID router, access to the unit might be restricted depending on the SSID to connect.
Connect the iPod to the SSID which can access the unit.
X
For details on supported iPod devices, see “Supported devices and file formats” (p.170).
Playback of iTunes/iPod music contents
Follow the procedure below to play back iTunes/iPod music contents on the unit.
Turn on the unit, and start iTunes on the PC or display the playback screen
1
on the iPod.
If the iTunes/iPod recognizes the unit, the AirPlay icon appears.
Y
If the icon does not appear, check whether the unit and PC/iPod are connected to the router properly.
On the iTunes/iPod, click (tap) the AirPlay icon and select the unit (network
2
name of the unit) as the audio output device.
Select a song and start playback.
3
The unit automatically selects “AirPlay” as the input source and starts playback.
The playback screen is displayed on the TV.
X
• You can turn on the unit automatically wh en starting playba ck o n iTu nes o r iP od by set ting “Net wor k Sta ndby ”
(p.136) in the “Setup” menu to “On”.
• You can edit the network name (the unit’s name on the network) displayed on iTunes/iPod in “Network Name”
(p.138) in the “Setup” menu.
• You can adjust the unit’s volume from the iTunes/iPod during playback. To disable volume controls from
iTunes/iPod, set “AirPlay Volume Interlock” (p.137) in the “Network” menu to “Off”.
Caution
When you use iTunes/iPod controls to adjust volume, the volume may be unexpectedly loud. This could
result in damage to the power amplifier or speakers. If the volume suddenly increases during playback,
stop playback on the iTunes/iPod immediately.
En 97

■ Playback screen
S
VOLUM
E
R
S
E
AI
M
/
/MENU
E
MENU
B
LUEYELLOWGREENRED
PRESE
T
B
HNE
T
U
S
B
TUNE
R
I
N
4
SC
HDMI
O
UTPU
R
E D
IR
C
TPART
Y
MAIN
234
ZO
S
Playback operation
keys
SLEEP
L
EP
PARTY
TOP
TOP
MENU
PROGRAM
PROGRA
STRAIGHT
TRAIGHT
MAIN 2 3 4
ZONE
NE
SCENE
INPUT
NET USBTUNER
PRESET
GREENRED
HOME
HOM
SUR. DECODE
UR. DECOD
ENHANCER
NHANCE
MEMORY
ENE
PUT
AI
E
YELLOW
HDMI OUTPURE DIRECT
4321
8765
BLUETOOTH
LUETOOT
BLUE
POP-UP
POP-UP
/MENU
VOLUME
TUNINGBANDTUNING
a
b
a Playback indicator
Displays the elapsed/remaining time.
b Playback information
Displays the artist name, album name and song title.
X
You can use the playback operation keys (a, s, d, f, g) on the remote
control to control playback.
E
En 98

Playing back videos/audio in multiple rooms (multi-zone)
Living room (main zone)
Study room
(Zone2 and/or Zone3)
Audio (ZONE OUT)
Living room (main zone)
Guest room
(Zone2)
Audio (ZONE OUT)
Video (HDMI)
Living room (main zone)
Kitchen
(Zone2 or Zone4)
Video/audio (HDMI)
The multi-zone function allows you to play back different input sources in the room where the
unit is installed (main zone) and in other rooms (Zone2, Zone3 and Zone4).
For example, while you are watching TV in the living room (main zone), another person can
listen to PC music in the study room (Zone2), and another can listen to radio in the guest room
(Zone3) and play DVD in the kitchen (Zone4).
• Aud io signals that can b e output to each zon e vary depending on how you connect the device in each
zone to the unit’s output jacks. For details, see “Multi-zone output” (p.172).
Multi-zone configuration examples
Since there are many possible ways to use the unit in a multi-zone configuration, we
recommend that you consult with your nearest authorized Yamaha dealer or service center
about the multi-zone connections that best meet your requirements.
■ Enjoying music in other rooms
You can enjoy music using speakers placed in other rooms.
■ Enjoying videos/music in other rooms
You can enjoy videos/music using TVs placed in other rooms.
Enjoying videos/music using a TV and speakers
Connections
TV: p.101
Speakers (using an ext ernal amplifier): p.100
Enjoying videos/music using only a TV
Connections
Speakers (using an external amplifier): p.100
Connection
TV: p.101
En 99

Preparing the multi zone system
HDMI OUT
ARC
1
2
HDMI
(1 MOVIE) (5 STB) (6 GAME)
AV 1 AV 2 AV 3 AV 4
)
R R
L
AV 1 AV 2 AV 3 AV 4
AUDIO 2 AUDIO 3
(3 MUSIC)
(1 MOVIE) (5 STB) (6 GAME)
OPTICAL43COAXIAL COAXIAL
2
COAXIAL
SUBWOOFER
CENTER
REAR
PRESENCE
R
SURROUND
BACK
R
SURROUND
R
N
FRONT
PRESENCE
OPTICAL
ZONE OUT
ZONE 2 ZONE 3
5
6
FM
75ȍ
ANTENNA
(
2 RADIO
)
AM
PRE OUT
R
B
FRONT
SURROUND
SURROUND
BACK
R
YPRPB
YPRPB
COMPONENT VIDEO
AV 2
(5 STB)
B
AV 1
(1 MOVIE)
A
(HDCP2.2)
ZONE OUT
ZONE 2
ZONE 3
L
R
L
R
AUDIO
The unit (rear)
ZONE OUT
(ZONE 2 or ZONE 3) jacks
Zone2 or Zone3
Main zone
External amplifier
Audio input
(analog stereo)
Connect the device that will be used in other rooms to the unit.
Caution
• Remove the unit’s power cable from the AC wall outlet before connecting an external amplifier.
■ Connecting speakers to play back audio
Connect the external amplifier placed in Zone2 or Zone3 to the unit with a stereo pin cable and
connect speakers to the external amplifier.
(HDCP2.2
INPUT
SUR BACK
IO 4
(F
(
SU
FRO
X
You can adjust the volume for Zone2 and Zone3 output with the unit. When using an external amplifier with
volume control, set “Volume” (p.139) in the “Setup” menu to “Fixed”.
En 100
 Loading...