

Page 1

SG
OWNER'S MANUAL
4 STROKE MOTOR OIL
20W40
4
nger Engine Life
wer Maintenance Cost
wer Exhaust Smoke
duces Wear and Tear
PRINTED IN INDIA
1Y15(OM-01)278-10-06-E/H
24 MONTHS / 30,000 KMS
(8 FREE SERVICES)
5KA-F8199-E2
5KA8
Page 2
WARNING
PLEASE READ THIS MANUAL CAREFULLY AND COMPLETELY BEFORE OPERATING THIS MOTORCYCLE.
CRUX
OWNER'S MANUAL
YAMAHA MOTOR INDIA SALES PVT. LIMITED
All rights reserved. Any reprinting or
unauthorised use without the
written permission of
YAMAHA MOTOR INDIA SALES PVT. LIMITED
is expressly prohibited.
TAKE NECESSARY PRECAUTIONS DURING RUNNING-IN PERIOD.
PG1_55.pmd 10/15/2006, 9:15 AM2
Page 3
INTRODUCTION
Congratulations on your purchase of the CRUX This motorcycle has been produced using the
latest technology in our modern plant, to provide you a happy, enjoyable and safe riding for
many thousand kilometers and years. It represents the high degree of craftsmanship and
reliability that have made YMI a leader in these fields.
This Owner’s Manual will give you an understanding of the operation, inspection and basic
maintenance of this Motorcycle as recommended in this Owner’s manual. Always demand
only YMI Genuine Spare Parts and Yamalube oil. If you have any queries regarding the operation
or maintenance of your Motorcycle, please consult your YMIS DEALER who will be too
happy to help you.
This Owner’s Manual also includes the GREEN BOOK containing Guidelines, DO’s and
DON’Ts to be followed by the Owner/User of the Motorcycle for keeping Environment Clean
and Green. You are requested to please read the GREEN BOOK carefully.
We provide,
YAMAHA MOTOR INDIA SALES PVT. LTD.
A-3, Industrial Area, Noida Dadri Road
Surajpur - 201 306 UP (India)
PG1_55.pmd 10/15/2006, 9:15 AM3
Page 4

,d ifjp;,d ifjp;
,d ifjp;
,d ifjp;,d ifjp;
^ØDl^ dks [kjhnus ij vkidks c/kkbZ;k¡A vkidks dbZ gt+kj fdyksehVj vkSj dbZ o"kksZa rd ,d izlUu]
vkjke&nk;d rFkk lqjf{kr lokjh iznku djus ds fy,] bl eksVjlkbfdy dk mRiknu gekjs vk/kqfud IykaV esa
uohure izkS|kSfxdh ds vuqlkj fd;k x;k gSA ;g izfrfuf/kRo djrh gS] mPp Js.kh dh nLrdkjh rFkk fo'oluh;rk
dk ftlus okbZñ ,eñ vkbZñ dks bu {ks=kksa esa vxz.kh cuk fn;k gSA
;g vkulZ eSuqvy vkidks eksVjlkbZfdy ds dk;Z fujh{k.k rFkk vk/kkjh; j[kj[kko ¼esaVhusal½ ls voxr djk,xkA
yacs nks"kjfgr ijQkjesal ¼iz;ksx½ dks ns[krs gq, Ñi;k vkulZ eSuqvy ds vuqlkj gh viuh eksVjlkbZfdy dh
lqjf{kr /;ku j[ksa vkSj lgh j[kj[kko ¼esaVhusal½ lqfuf'pr djsaA
ges'kk dsoy okbZñ ,eñ vkbZñ ds Li;sj ikV~Zl rFkk ;kekY;wc rsy dh gh ekax djsaA ;fn vki eksVjlkbZfdy ds
vkWijs'ku ¼dk;Z½ vFkok j[kj[kko ls lacaf/kr dksbZ tkudkjh pkgrs gSa rks okbZ±ñ ,eñ vkbZñ ,lñ Mhyj ls ijke'kZ
ysa] og [kq'kh&[kq'kh vkidh lgk;rk djsxkA
^vkulZ eSuqvy* ds lkFk ekxZ&n'kkZus ds fy, xzhu cqd ¼iqfLrdk½ Hkh nh xbZ gSA okrkoj.k dks LoPN rFkk gjk&Hkjk
cukus ds fy, ^djuk* ;k ^u djuk* dk vuqlj.k eksVjlkbZfdy ds ekfyd vFkok mls iz;ksx djus okys dks djuk
pkfg,A vkils izkFkZuk gS fd Ñi;k ^gjh iqfLrdk* dks /;ku ls i<saA
ge gSa &
;kekgk eksVj bf.M;k lsYl izkbZosV fyfeVsM
A-3 baMLVªh;y ,fj;k] uks,Mk nknjh jksM
lwjtiqj & 201 306 ¼Hkkjr½
PG1_55.pmd 10/15/2006, 9:15 AM4
Page 5
eSuqvy dh egÙoiw.kZ tkudkjh
IMPORTANT MANUAL INFORMATION
Particularly important information is distinguished in this manual by the following notations:
bl eSuqvy esa fuEufyf[kr ladsrks }kjk vko';d funsZ'kksa dks vyx&vyx fd;k x;k gS%
The Safety Alert Symbol means ATTENTION! BECOME ALERT! YOUR SAFETY IS
INVOLVED!
lqj{kk ls lacaf/kr fpUg dk vFkZ gS lko/kku ! pkSdUus gks tk,a ! ;g vkidh lqj{kk ls lacaf/kr gSA
Failure to follow WARNING instructions could result in severe injury to the Motorcycle
operator, a bystander or a person inspecting or repairing the Motorcycle.
WARNING
CAUTION :
psrkouh funsZ'kksa dh ikyuk u djus ij eksVjlkkbfdy pkyd] vklikl [kM+s yksxksa vFkok fujh{k.k vFkok
ejEer djus okys O;fDr;ksa dks xgjh pksV yx ldrh gSA
A CAUTION indicates special precautions that must be taken to avoid damage to the
Motorcycle.
;g fo'ks"k lko/kkfu;ka n'kkZrh gSa] eksVjlkbZfdy dks uqdlku ls cpkus ds fy, budk /;ku djuk pkfg,A
NOTE :
PG1_55.pmd 10/15/2006, 9:15 AM5
A NOTE provides key information to make procedures easier or clearer.
izfØ;k dks vklku vFkok Li"V cukus ds fy, ß,d uksVÞ lw{e lwpuk;sa iznku djrk gSA
Page 6

eSuqvy dh egÙoiw.kZ tkudkjh
IMPORTANT MANUAL INFORMATION
NOTE:
• This manual should be considered a permanent part of this Motorcycle and should remain with it even
of the Motorcycle is subsequently sold.
• YAMAHA continually seeks advancements in product design and quality. Therefore, while this manual
contains the most current product information available at the time of printing, there may be minor
discrepancies between your Motorcycle and this manual. If there is any question concerning this manual,
Please consult your YAMAHA dealer.
uksV %
• bl ^eSuqvy* dks eksVjlkbZfdy dk LFkkbZ fgLlk le>uk pkfg, vkSj blds ckn ;fn eksVjlkbfdy csp Hkh nh tk, rks Hkh
;g eksVjlkbZfdy ds lkFk jguh pkfg,A
• ;kekgk ^izkWMDV fMt+kbu* djus vkSj xq.koÙkk esa fujarj vkxs c<+us ds fy, izfrc) gSA vr% ;g eSuqvy NikbZ ¼¯iz¯Vx½
ds le; rd miyC/k mRikn dh uohure lwpuk crkrk gSA blls vkidh eksVjlkbfdy vkSj eSuqvy ds chp esa ekewyh
varj ¼Hksn½ gks ldrs gSaA ;fn eSuqvy ls lacaf/kr dksbZ iz'u gS rks Ñi;k vius ;kekgk Mhyj ls laidZ djsaA
PG1_55.pmd 10/15/2006, 9:15 AM6
Page 7

fo"k; & lwph
TABLE OF CONTENTS
1 ROAD SAFETY TIPS............................... 1-1
lM+d lqj{kk ds ladsr
2 DESCRIPTION........................................ 2-1
fooj.k
Left view.................................................. 2-1
ck¡bZa vkÑfr
Right view................................................ 2-2
nk¡bZa vkÑfr
Controls/Instruments................................ 2-3
fu;a=k.k vkSj ;a
3 INSTRUMENT AND CONTROL
FUNCTIONS............................................ 3-1
=k
;a=k vkSj fu;a=k.k mi;ksx ¼QaD'kaUl½
Main switch cum steering lock................. 3-1
eq[; cVu ¼esu fLop½ de LVs;¯jx ykWd
Speedometer............................................3-2
LihMksehVj
Indicator Lights........................................ 3-2
bafMdsVj ykbV~l
Handlebar switches.................................. 3-3
gSaMyckj fLop ¼cVu½
Clutch lever............................................. 3-3
Dyp yhoj
Shift pedal............................................. 3-4
f'k¶V iSMy
Front brake lever..................................... 3-4
vxys czsd dk yhoj
Rear brake pedal.................................... 3-4
fiNys czsd dk yhoj
Fuel tank cap......................................... 3-5
b±/ku VSad dk <Ddu
Fuel...................................................... 3-5
b±/ku
Fuel cock.............................................. 3-6
b±/ku dh VksaVh ¼dkWd½
Starter Lever .......................................... 3-7
LVkVZj yhoj
KIck Starter............................................ 3-7
fdd LVkVZj
Seat...................................................... 3-8
lhV
Storage compartment............................ 3-9
laxzg ¼LVksjst daikVZesaV½
Rear Shocker 3-9
fj;j 'kkWdj
Handle Seat (Luggage Carrier).................3-10
gSaMy lhV ¼yXxst dSfj;j½
PG1_55.pmd 10/15/2006, 9:15 AM7
Page 8

fo"k; & lwph
TABLE OF CONTENTS
4 PRE-OPERATION CHECKS.................... 4-1
vkWijs'ku ¼dk;Z½ ls iwoZ tk¡p
Pre-operation check list........................... 4-1
vkWijs'ku iwoZ tk¡p lwph
5 OPERATION AND IMPORTANT RIDING
POINTS................................................. 5-1
dk;Z rFkk lokjh ls tqM+s vko';d ckrsa
Starting and warming up a
cold engine............................................. 5-1
BaMs batu dks pkyw djuk vkSj FkksM+k xeZ djuk
Starting a warm engine............................ 5-2
xeZ batu dks pkyw djuk
Shifting.................................................. 5-2
f'¯¶Vx
Tips for reducing fuel consumption............ 5-4
b±/ku dh [kir dks de djus ds rjhds
Running-in.............................................. 5-4
fujarj :i ¼j¯ux bu½
Parking.................................................. 5-5
ik²dx
6 PERIODIC MAINTENANCE AND MINOR
REPAIR................................................. 6-1
lkef;d j[kj[kko rFkk ekewyh fjis;j
Tool kit................................................... 6-1
Vwy fdV
Preventive maintenance schedule............. 6-3
izfrca/kd ¼fizosafVo½ j[kj[kko dk 'ksM~;wy
Panel removal and installation.................. 6-7
iSuy dks gVkuk rFkk LFkkfir djuk ¼yxkuk½
Spark plug and installation....................... 6-9
LikdZ Iyx dh tk¡p
Engine oil............................................... 6-11
b±tu vkW;y
Air filter................................................... 6-14
,vj fQYVj
Carburetor adjustment............................. 6-16
dkWjC;wjsVj dks lsV djuk ¼,sM~tLVesaV½
Idle speed adjustment.............................. 6-16
vkbZMy LihM ,sM~tLVesaV
Throttle cable free play adjustment............ 6-18
FkzkWVy dscy dh Ýh Iys ,sM~tLVesaV
Valve clearance adjustment...................... 6-18
okYo fDy;jsal dh ,sM~tLVesaV
Tyres...................................................... 6-18
Vk;j
Wheels.................................................. 6-21
ifg,
PG1_55.pmd 10/15/2006, 9:15 AM8
Page 9

fo"k; & lwph
TABLE OF CONTENTS
Clutch lever free play adjustment..............6-22
Dyp yhoj dh Ýh Iys ,sM~tLVesaV
Front brake adjustment................... ...... 6-22
vxyh czsd dh ,sM~tLVesaV
Rear brake adjustment............................6-23
fiNyh cszd dh ,sM~tLVesaV
Brake light switch adjustment..................6-24
czsd ykbV cVu ¼fLop½ dh ,sM~tLVesaV
Checking the brake shoes.......................6-24
czsd 'kwt dh tk¡p
Drive chain slack check...........................6-25
MªkbZo pSu dh <hysiu dh tk¡p
Drive chain slack adjustment.................. 6-26
MªkbZo pSu dh <hysiu dh ,sM~tLVesaV
Drive chain lubrication.............................6-28
MªkbZo pSu dh Y;wczhds'ku
Cable inspection and lubrication.............. 6-29
dscy dh tk¡p rFkk Y;wczhds'ku
Throttle cable and grip lubrication........... 6-29
FkzkWVy dscy vkSj fxzi&Y;wczhds'ku
Brake and shift pedal lubrication............. 6-30
czsd rFkk f'k¶V iSMy dk Y;wczhds'ku
Brake and clutch lever lubrication........... 6-30
czsd rFkk Dyp&yhoj dk Y;wczhds'ku
Center stand lubrication ............................ 6-30
lsaVj LVsaM dk Y;wczhds'ku
Front fork inspection ................................... 6-31
vxys QksdZ dh tk¡p
Steering inspection ..................................... 6-32
LVs;¯jx dh tk¡p
Wheel bearings .......................................... 6-33
ifg, dh cs;¯jx
Battery ....................................................... 6-33
cSV~jh
Fuse replacement....................................... 6-36
¶;wt+ dks cnyuk
Headlight bulb replacement ........................ 6-37
gSM ykbV ds cYc dk cnyuk
Turn signal and taillight bulb replacement... 6-39
eqM+us okys ¼VuZ½ flXuy rFkk ihNs dh ykbV ds cYc dks
cnyuk
Front wheel removal.................................... 6-40
vxys ifg, dks gVkuk
Front wheel installaion ................................ 6-41
vxys ifg, dks yxkuk
Rear wheel removal .................................... 6-42
fiNys ifg, dks gVkuk
Rear wheel installation ............................... 6-44
fiNys ifg, dks yxkuk
PG1_55.pmd 10/15/2006, 9:15 AM9
Page 10
fo"k; & lwph
TABLE OF CONTENTS
Troubleshooting ............................................. 6-45
leL;k lek/kku ¼Vªcy'kw¯Vx½
Troubleshooting chart............................... .. 6-46
rhoz leL;k lek/kku dk pkVZ
7 CLEANING AND STORAGE .......................... 7-1
lQkbZ rFkk HkaMkj.k
A. Cleaning ....................................................7-1
¼,½ lQkbZ
B. Storage ..................................................... 7-3
¼ch½ HkaMkj.k ¼LVksjst+½
8 SPECIFICATIONS ......................................... 8-1
fooj.k9 9 .........................................................
9 CUSTOMER INFORMATION .........................9-1
xzkgd lwpuk
Key identification number ..............................9-1
pkWch dk igpku uañ
Frame serial number ..................................... 9-1
Ýse dk lhfj;y uacj
Engine serial number .....................................9-1
batu dk lhfj;y uacj
Facts related with Exhaust emission control . 9-2
çokg&fu;a=k.k ls lacf/kr rF;
Safety norms .................................................9-3
lqj{kk&flðk¡r
Warranty 9-5
okjaVh
10 DETACHMENTS
vyxko ¼fMVspesaV½
Fifteenth paid service coupon............... 10-1
iaægok¡ Hkqxrku lfoZl dwiu
Fourteenth paid service coupon............ 10-3
p©ngok¡ Hkqxrku lfoZl dwiu
Thirteenth paid service coupon.............. 10-5
rsjgok¡ Hkqxrku lfoZl dwiu
Twelveth paid service coupon............... 10-7
ckjgok¡ Hkqxrku lfoZl dwiu
Eleventh paid service coupon............... 10-9
X;kjgok¡ Hkqxrku lfoZl dwiu
Tenth bonus free service coupon.......... 10-11
nlok¡ c¨ul&Ýh lfoZl dwiu
Ninth bonus free service coupon........... 10-13
uok¡ c¨ul&Ýh lfoZl dwiu
Eighth paid service coupon................... 10-15
vkBok¡ Hkqxrku lfoZl dwiu
Seventh paid service coupon................ 10-17
lkrok¡ Hkqxrku lfoZl dwiu
Sixth free service coupon......................10-19
NBk eq¶r&lfoZl dwiu
PG1_55.pmd 10/15/2006, 9:15 AM10
Page 11

fo"k; & lwph
TABLE OF CONTENTS
Fifth free service coupon.......................10-21
ik¡pok¡ eq¶r&lfoZl dwiu
Fourth free service coupon.................... 10-23
p©Fkk eq¶r&lfoZl dwiu
Third free service coupon ....................... 10-25
rhljk eq¶r&lfoZl dwiu
Second free service coupon ................... 10-27
nwljk eq¶r&lfoZl dwiu
First free service Coupon ....................... 10-29
igyk eq¶r&lfoZl dwiu
Pre-delivery inspection .......................... 10-31
fMyojh iwoZ&fufj{k.k
Installation ............................................. 10-35
baLVkys'ku
Delivery certificate ................................. 10-37
fMyojh lfVZfQdsV~l ¼çek.k&i=k½
Service record ........................................ 10-39
lfoZl ¼lsok½ fjdkMZ
ALWAYS KEEP THE ENVIRONMENT CLEAN
okrkoj.k d¨ lnk LoPN j[¨A
GREEN BOOK
gjh&iqfLrdk
Address of Area Offices
eq[; dk;Zky;kssa dk irk
PG1_55.pmd 10/15/2006, 9:15 AM11
Page 12

lM+d lqj{kk ds lwpuk;sa
ROAD SAFETY TIPS
SAFE RIDING
lqjf{kr lokjh
1. Before riding, you should learn to ride your motorcycle properly and all the control functions should be
known to you.
lokjh djus ls igys vkidks viuh eksVjlkbZfdy lgh <ax ls pykuk lh[kuk pkfg, vkSj vkidks fu;a=k.k laca/kh iwjh tkudkjh
gksuh pkfg,A
2. Remember that there are no legal “rights” when it comes to survival as far as Motorcyclists are
concerned. The fact that you may be well within your rights is no guarantee that you will avoid a
collision with a bigger vehicle whose driver fails to see you. Always ride defensively and take nothing
on road for granted.
;kn j[¨&e¨VjlkbZfdy pykrs oDr vkidh viuh lqj{kk vkids vius gkFk esa gSSA vkidks ltx g¨dj e¨VjlkbZfdy dks pykuk
gksxk ftlds dkj.k vki mu cM+s okgu¨ dh Vôj ls vius vkid¨ cpk ldsaxs] ftuds Mªkboj vkid¨ ns[k ugh ikrs gSA ges'kk
cpko eqnzk esa ;k=kk djsa] v©j lM+d ij dksbZ [k+rjk u ysaA
3. Develop the ability to react swiftly to any unexpected road hazards or emergencies giving yourself time
to spare for appropriate response.
lM+d ij fdlh ladV vFkok vkikr fLFkfr;¨a esa Lo;a d¨ 'kh?kzrk ls izfrfØ;k djus ds fy, viuh ;¨X;rk d¨ c<+k,¡A
4. Develop the ability to get the most out of your Motorcycle, But at the same time get to know its
capabilities and limitations.
viuh eksVjlkbZfdy ds iw.kZ mi;ksx ds ckjsssa esa viuh n{krk c<+k;sa] ijUrq lkFk&lkFk bldh lkeF;Z vFkok lhekvksa ds ckjsa
esa Hkh tkudkjh çkIr djsaA
PG1_55.pmd 10/15/2006, 9:15 AM12
1.1
Page 13

lM+d lqj{kk ds lwpuk;sa
ROAD SAFETY TIPS
5. Ride thoughtfully, planning your route well in advance.
l¨p&le> dj ;k=kk djsaA viuh ;k=kk ds ekxZ dh ;¨tuk igys ls cuk ysaA
6. Give proper Signals and use Horn and Headlights judiciously.
flxuy lgh rjhds ls nsa rFkk gkuZ ,oe~ gSMykbV dk ç;¨x foosdrk ls djsaA
7. Don’t ride in another motorist’s blind spot.
nwljh xkM+h ds pkyd dks vki ges'kk fn[kkbZ nsus pkfg,A
8. Always make pre-ride safety checks before you start the Engine.
batu LVkVZ ¼pkyw½ djus ls iwoZ okgu pykus ls iwoZ dh tkus okyh lqj{kk tk¡p dj ysaA
SAFE BRAKING
lqjf{kr czs¯dx
Use the basic methods of braking effectively.
czs¯dx ds lgh rjhd¨ dk ç;¨x djsaA
1. Engine Brake : When the Throttle is released, compression backs up and acts as the Engine Brake.
If the riding condition allows, reduce speed by shifting the Gear down.
batu czsd % tc FkzkWVy d¨ N¨M+k tkrk gS] daçs'ku okfil Åij dh vksj vkrk gS rFkk batu dh czsd ds :i esa dk;Z djrk
gSA pykrs oDr vxj gks ldrk gS rks xkM+h d¨ fupys xh;j esa Mkydj xfr d¨ de djssaA
2. Front and Rear Brakes : It is important to apply equal force to the Front and Rear Brakes simultaneously.
vxyh rFkk fiNyh czsd % ;g vko';d gS fd vxyh rFkk fiNyh czsd ij lkFk&lkFk ,d tSlk ncko cuk;k tk,A
PG1_55.pmd 10/15/2006, 9:15 AM13
1.2
Page 14

lM+d lqj{kk ds lwpuk;sa
ROAD SAFETY TIPS
CAUTION :
• Use Front and Rear Brakes simultaneously.
• Be sure not to disengage the clutch while braking.
• While riding downhill always use Engine as a Brake and never ride in Neutral Gear.
• While riding down hill do not switch off ignition while Engine is in gear.
lko/kkuh %
• vxyh rFkk fiNyh czsd dk ç;¨x lkFk&lkFk djsaA
• ;g lqfuf'pr djsa fd czsd yxkrs le; Dyp ls laidZ d¨ u N¨M+k tk,A
• fdlh igkM+h ls uhps dh vksj vkrs le; ges'kk batu d¨ czsd dh rjg ç;¨x djsa rFkk U;wVªy&xh;j esa xkM+h dHkh u
pyk,A
• Å¡pkbZ ls uhps dh rjQ vkrs gq, tc batu xh;j esa g¨ r¨ bXuh'ku ¼Toyu½ ds cVu d¨ can u djsaA
PG1_55.pmd 10/15/2006, 9:15 AM14
1.3
Page 15
CRUX
SALIENT FEATURES
LOCKABLE SIDE
COVER L.H.
• Modern Graphics
• SafeStorage of
- Toolkit
- First aid kit
- Registration paper
LUGGAGE CARRIER &
SAREE GUARD
TRENDY INDICATORS
• Better aesthetics
DOUBLE SADDLE
• Extra long and cushined
• Comfort for rider and pillion
rider
DIGITAL CDI
• Digitally controlled ignition
for optimum combustion at
all speeds.
FUEL TANK
• Modern graphics
• With knee grip
NEW MUFFLER ASSY.
• Meets 2005 Emission
Norms
• Smoother exhaust beats
• With protecor shield (safety)
• Use of Catalyst
TRENDY MIRROR
• 360º swivel to suit rider
preference
ENGINE WITH ADVANCED
TECHNOLOGY
• Power - 7.60 PS @7500 RPM
• Torque - 0.80 mkgf @ 6000 RPM
• Balanced, superior combination of
power and optimum fuel efficiency
thru improved carburetor
• Use of AIS to meet Emission
Norms
1.4
METER PANEL
• User friendly
BIG ROUND HEADLIGHT
• Deep peneration & wider
illumination with multireflector.
• Easily adjustable
• Better aestetics
IMPROVED TFF
• With double lip oil seal
• Comfortable suspension
MUDGUARD
• Chrome Plated
DOUBLE CRADLE
FRAME
•
For absolute
stability and ruggedness.
PG1_55.pmd 10/15/2006, 9:15 AM15
Page 16
çeq[k Ñfr;k¡ ¼QhplZ½
CRUX
ykWd fd;k gqvk lkbM
doj ¼ck¡;k½
• vk/kqfud xzkfQDl
• fuEu ds fy, lqjf{kr LFkku
- jftLVªs'ku isij
- Vwy fdV
- çkFkfed fpfdRlk fdV
yXxst dSfj;j
vkSj lkM+h xkMZ ds lkFk
baMhdsVj
• vf/kd lqnaj
n¨gjh lhV
• vf/kd yach rFkk xísnkj
• pykus okys rFkk ihNs cSBus
okys ds fy, vkjke
fMftVy lhñMhñvkbZñ
• çR;sd xfr ij vf/kdre
ngu ds fy, fu;af=kr
ToyuA
b±/ku dk VSad
• vk/kqfud xzkfQDl
• ?kqVus ds fu;a=k.k lfgr
ubZ eQyj vlsacyh
• 2005 ds iznq"k.k fu;eksa d¨
iwjk djrs gq,
• ,Xt+kLV dh e nqy vkokt+
• lqj{kk dop lfgr
• dsVkfyLV dks iz;ksx
?kqokonkj 'kh'ks
• lokjh dh çkFkfedrkv¨a ds
vuqlkj 360º ij ?kweus okys
• eYVhfjQySDVj ds lkFk nwj
• vklkuh ls ,MtLV g¨us okyh
• T;knk lqanj
mUur ç¨|¨fxd ls lqlfTtr batu
• ikWoj ¼'kfDr½&7.60 ihñ ,lñ ( 7500 pDdj çfr
feuV dh ek=kk ij
• VkdZ &
• lkFk esa mÙke dkc¨ZjsVj ds ek/;e ls 'kfDr dk
• iznq"k.k fu;eksa ds fy;s ,ñvkbZñ,lñ dk iz;ksxA
0.80 fdñxzkñ ehVj Q¨lZ
6000 pDdj çfr feuV dh ek=kk ij
Js"B rkyesy vkSj ekbZystA
1.5
ehVj iSuy
• ç;¨xdrkZ dk
lg;¨xh
cMh x¨y gSMykbV
rd vf/kd ped ds fy;s
mUur Vhñ,Qñ,Qñ
• n¨gjs fdukjs dh vkW;y
lhy ds lkFk
• vkjkenk;d lLisa'ku
eMxkMZ
• Økse IysfVax ds LkkFk
Mcy ØsMy Ýse
• iw.kZ fLFkjrk v©j
etcwrh ds fy,A
PG1_55.pmd 10/15/2006, 9:15 AM16
Page 17

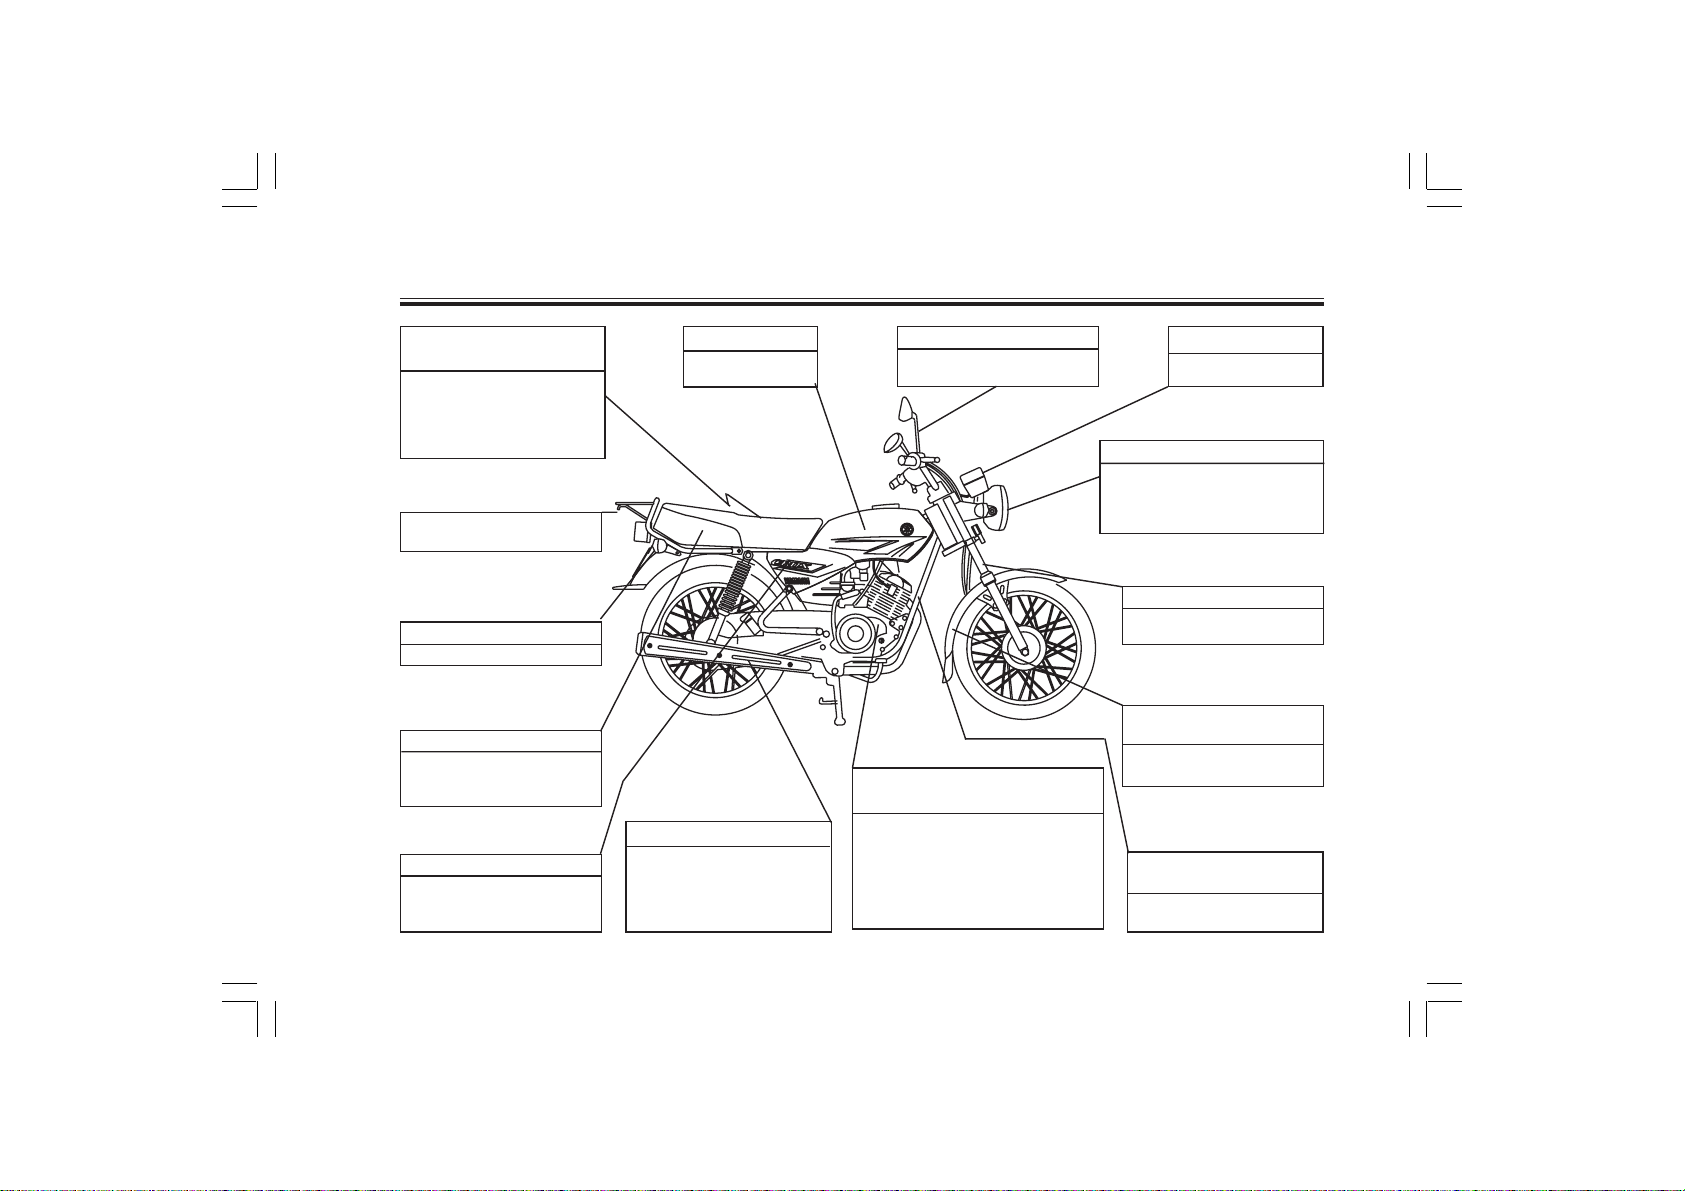
fooj.k
DESCRIPTION
Left view
ewy xkM+h
STANDARD VEHICLE
1. Fuel cock (page 3-6)
b±/ku VSad
2. Choke Lever (page 3-7)
pksd yhoj
3. Fuse (page 6-36)
¶;wt+
4. Battery (page 6-33)
cSV~jh
5. Storage Compartment (page 3-9)
LVksjst dEikVZesaV
ckb± & vkÑfr
1
10
2.1
456 7
23
98
6. Toolkit (page 6-1)
Vwy fdV
7. Handle Seat (Luggage Carrier) (page 3-10)
gSaMy lhV ¼yXxst dSfj;j½
8. Drive chain free play check window (page 6-25)
MªkbZo psu ds <+hysiu dks tk¡p djus
dk LFkku
9. Side panel (L.H.) lock (page 6-7)
lkbM iSuy ¼ck;k¡½
10. Shift pedal (page 3-4)
f'k¶V ykWd iSMy
PG1_55.pmd 10/15/2006, 9:15 AM17
Page 18
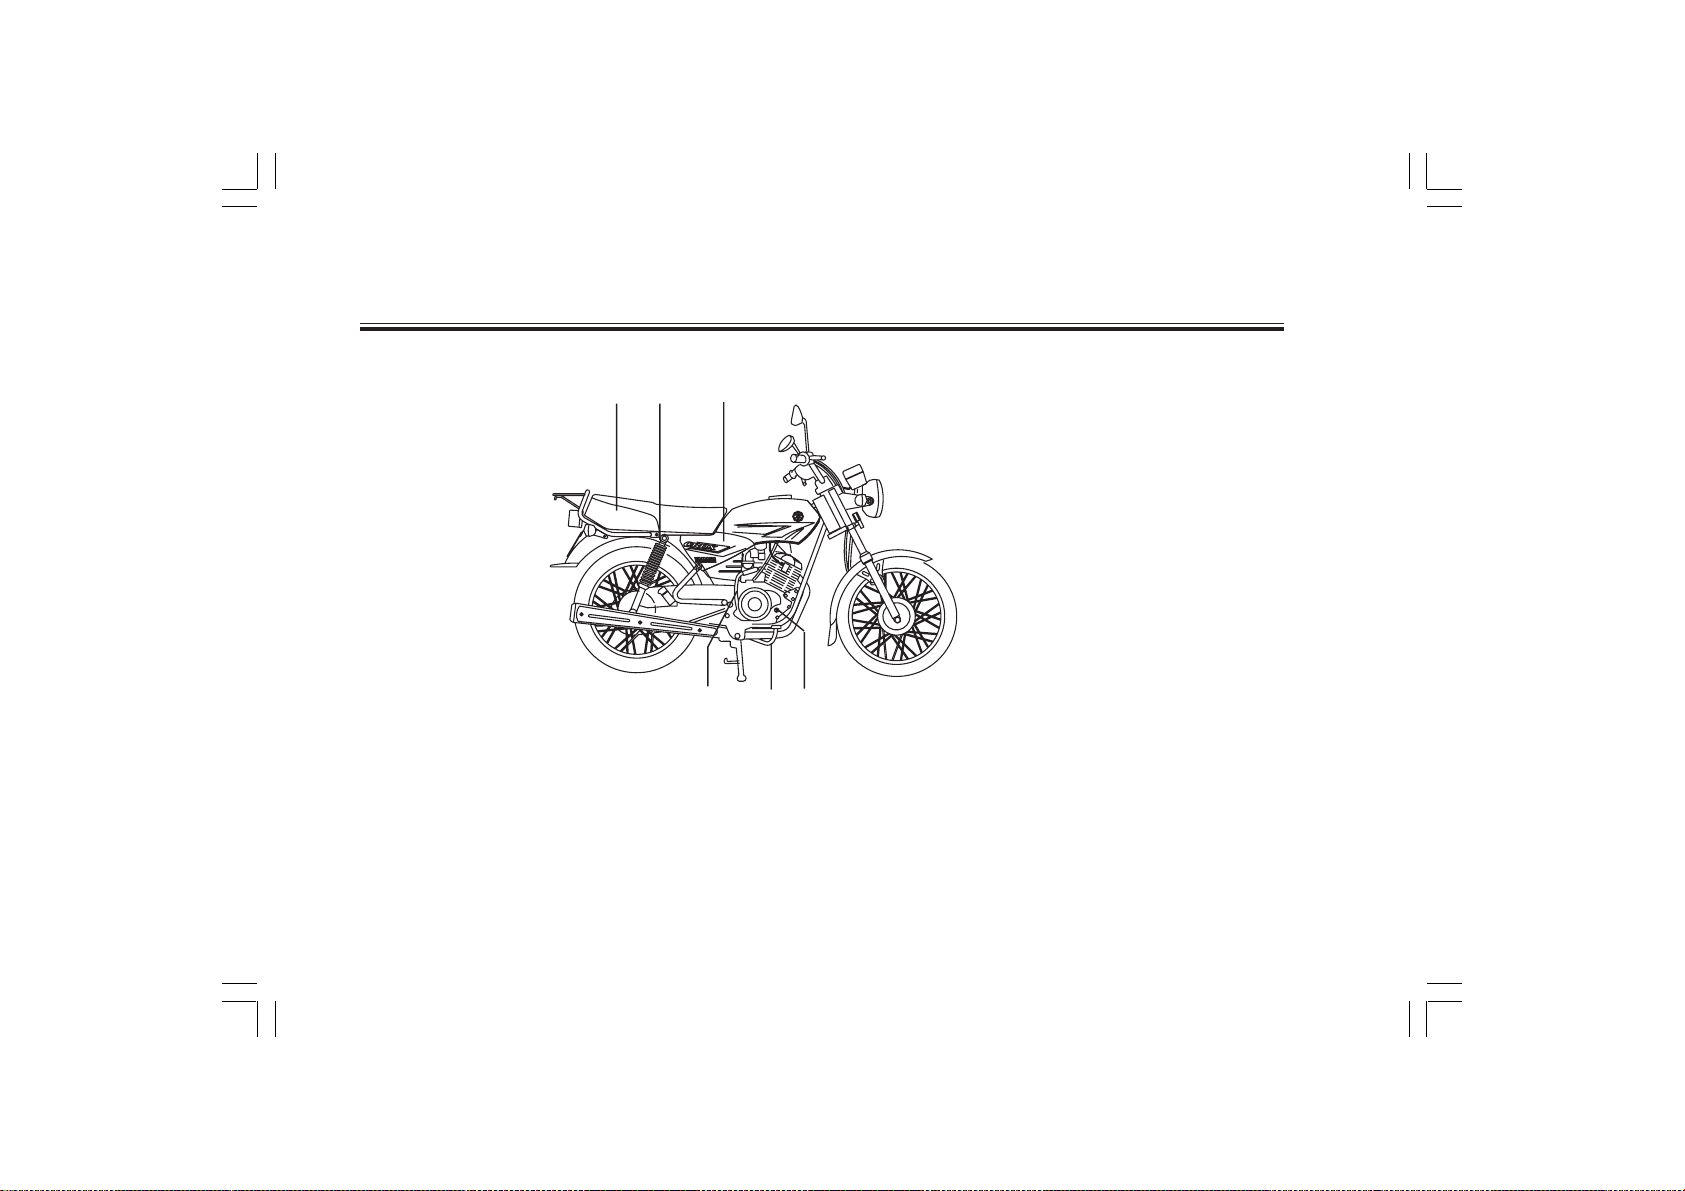
fooj.k
DESCRIPTION
Right view
11
14
12
ewy xkM+h
STANDARD VEHICLE
13 16 15
11. Rear shock absorber (page 3-9)
fiNyk 'kkWd ,Ct+kcZj
12. Air filter (page 6-14)
,;j fQYVj
13. Kick starter (page 3-7)
fdd LVkVZj
nkb± & vkÑfr
14. Seat (page 3-8)
lhV
15. Engine oil filler cap (page 6-11)
batu vkW;y Hkjus ds fy, dSi
16. Rear brake pedal (page 3-4,6-23)
fiNyk czsd iSMy
PG1_55.pmd 10/15/2006, 9:15 AM18
2.2
Page 19
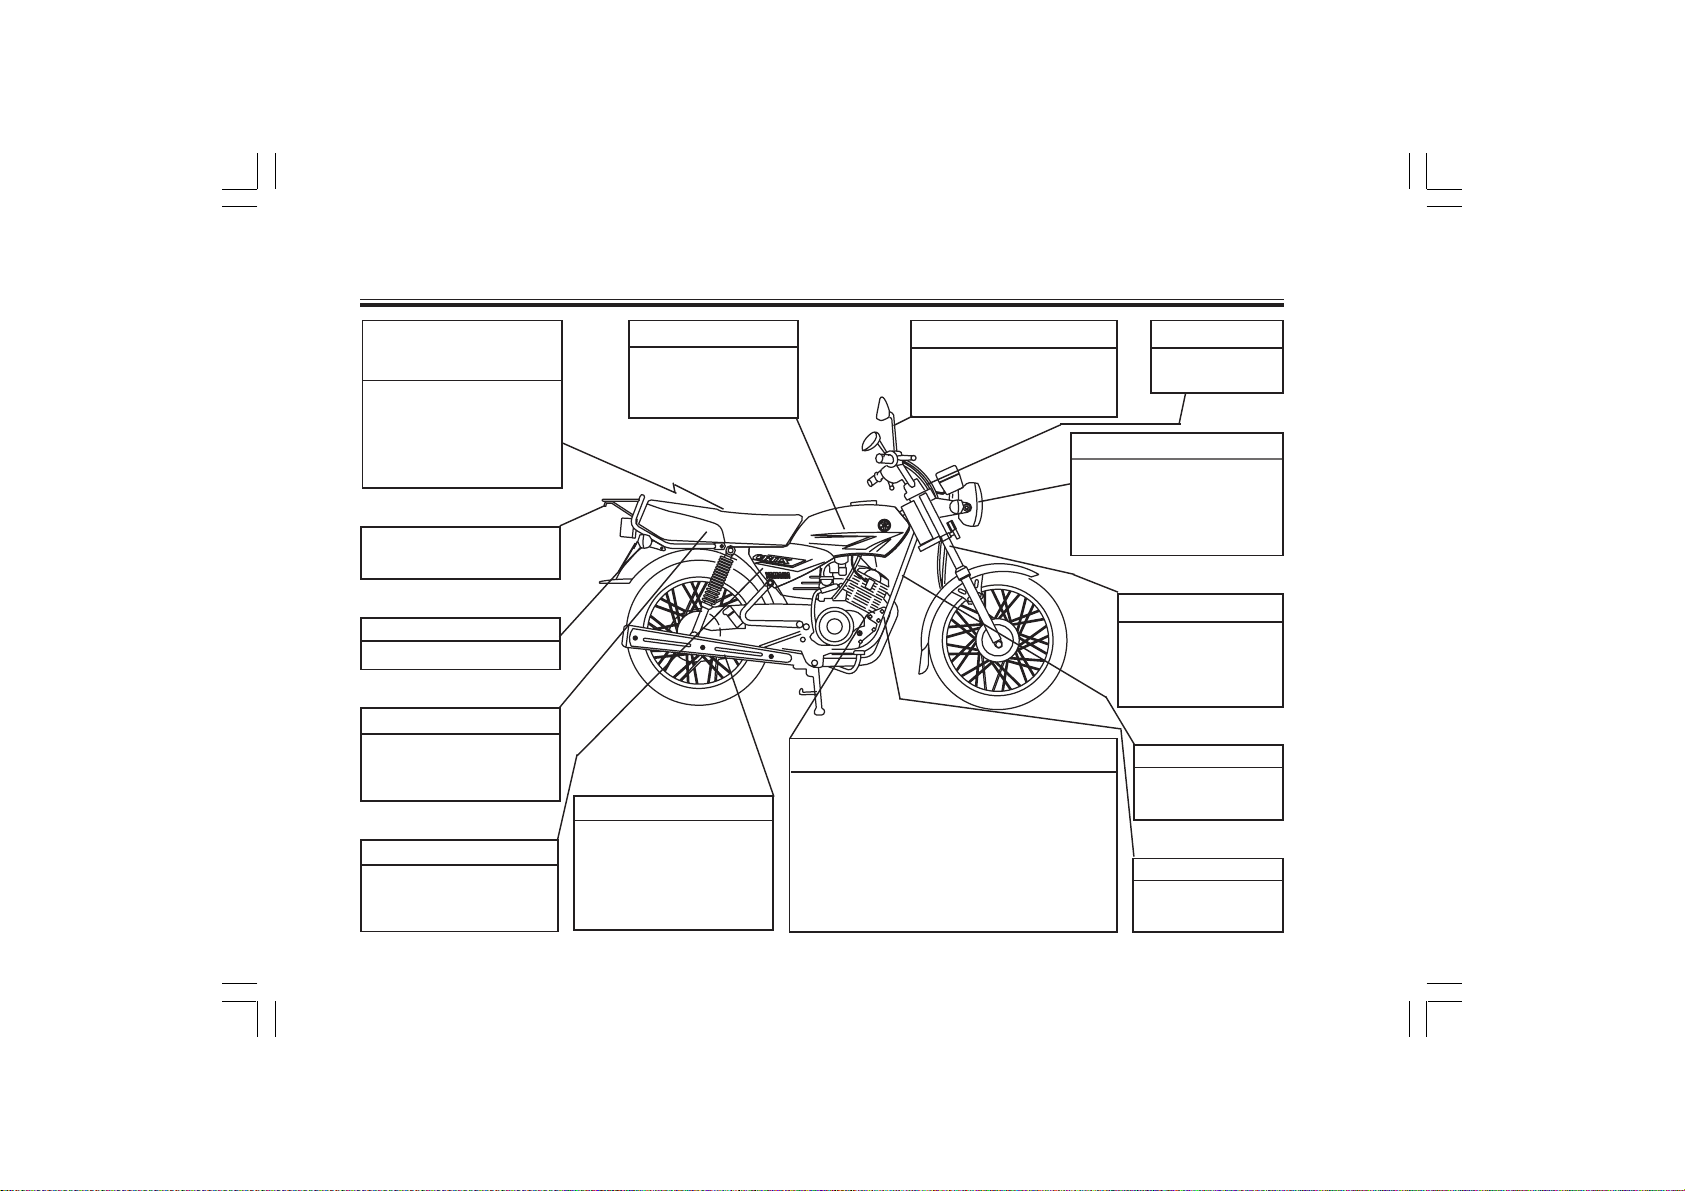
fooj.k
DESCRIPTION
Control / Instruments
19
17
ewy xkM+h
STANDARD VEHICLE
17. Clutch lever (page 3-3)
Dyp yhoj
18. Left handlebar switches (page 3-3)
With Pass Beam
ckb± gS.Myckj ds cVu
19. Speedometer (page 3-2)
LihMksehVj
20. Main switch cum steering lock (page 3-1)
eq[; cVu vFkkZr LVs;¯jx ykWd
18
fu;a=k.k@baLVªwesaV
20 21
23
24
22
25
21. Pilot Indicator (page 3-2, 3-3)
ikbyV~ baMhdsVj
22. Indicator Lights (page 3-2, 3-3)
baMhdsVj ykbV
23. Front brake lever (page 3.4, 6-22)
vxyk czsd yhoj
24. Throttle grip (page 6-17)
FkzkWVy&fxzi
25. Fuel tank cap (page 3-5)
b±/ku VSad dh dSi
PG1_55.pmd 10/17/2006, 9:18 AM19
2.3
Page 20
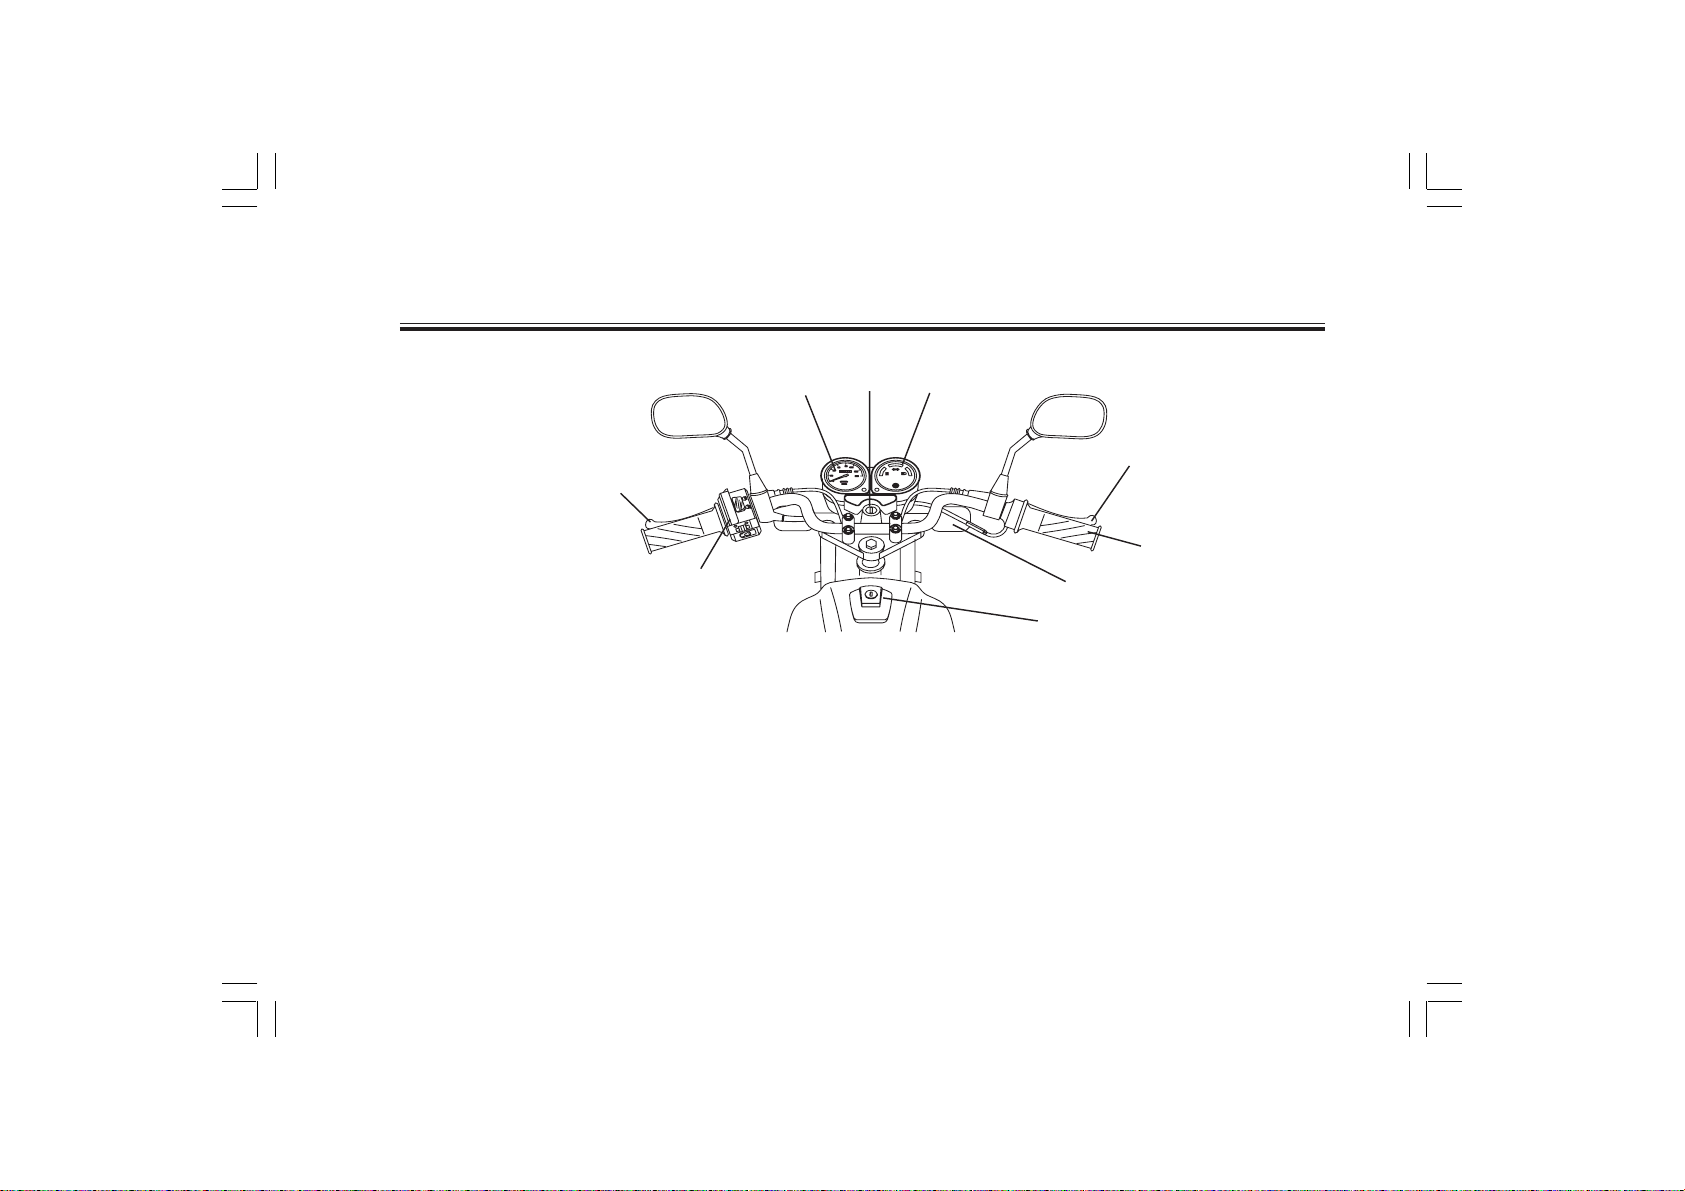
;a=k vkSj fu;a=k.k mi;ksx ¼QaD'kaUl½
INSTRUMENT AND CONTROL FUNCTIONS
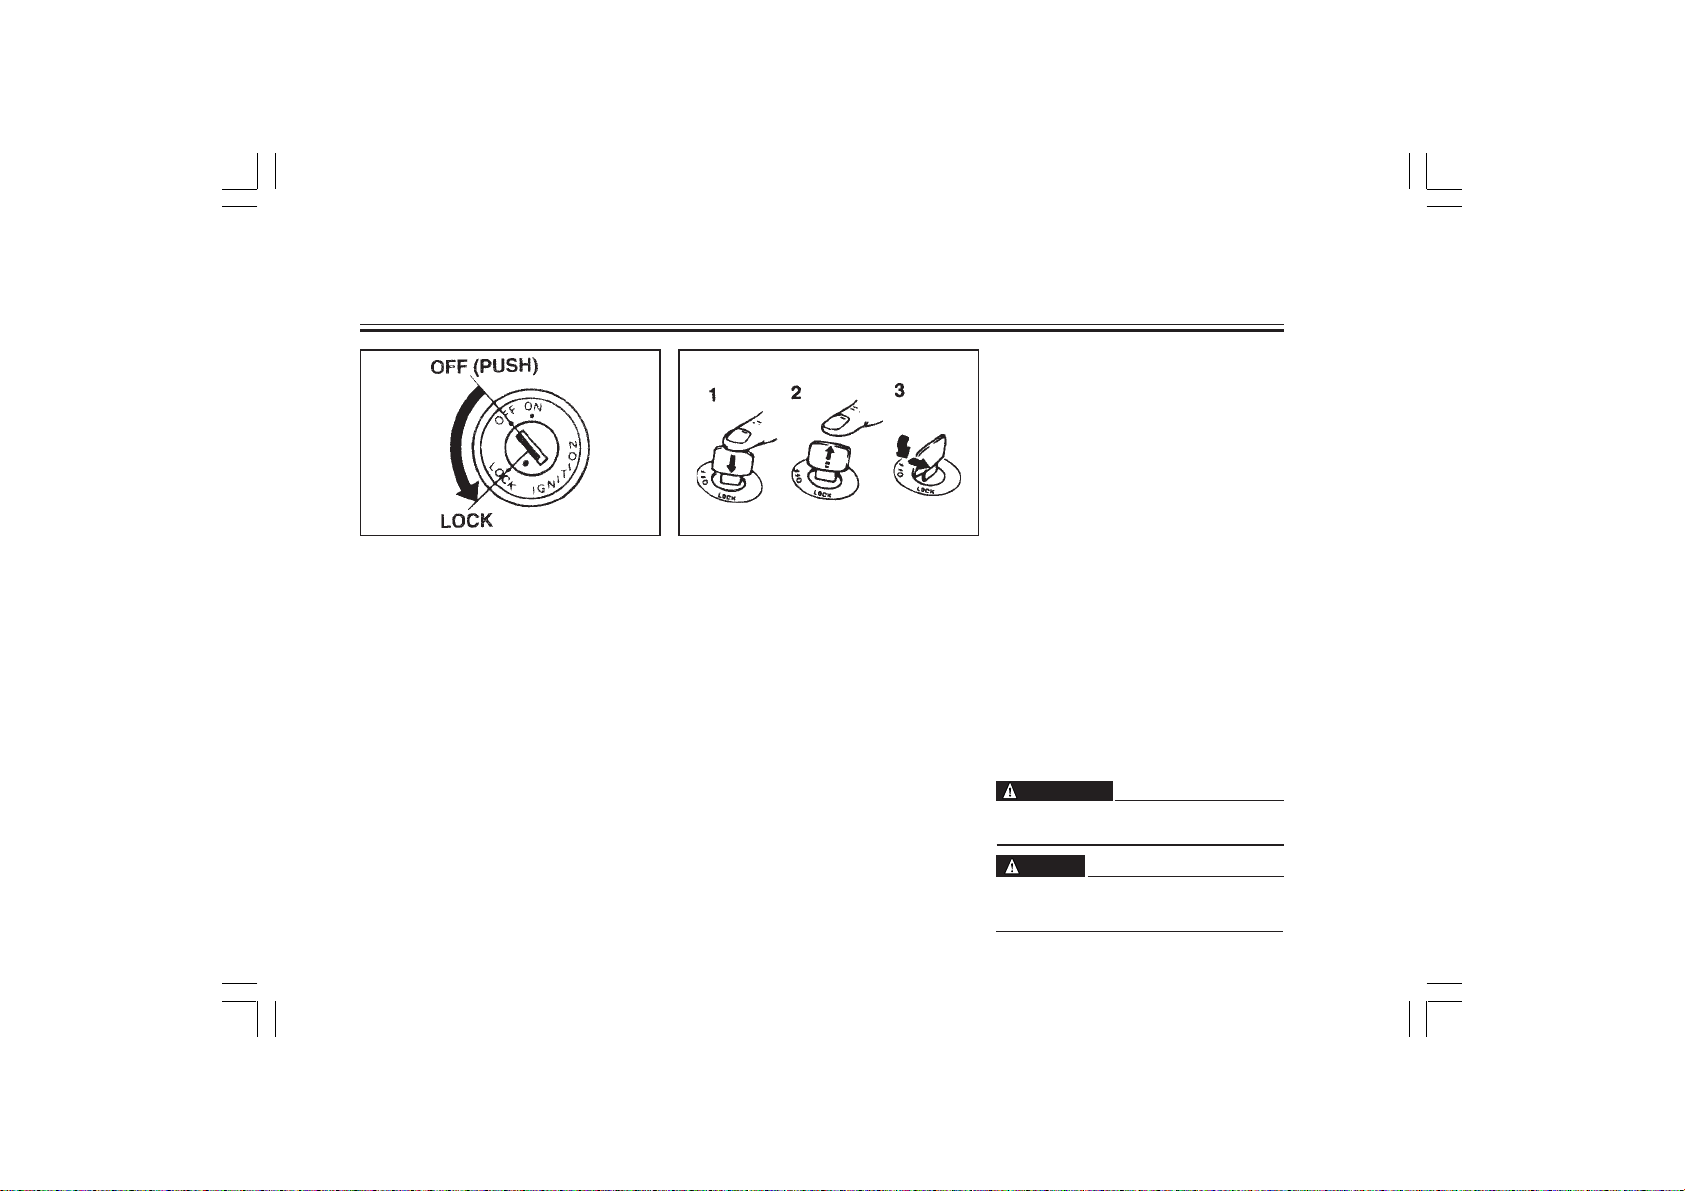
Main switch cum steering lock
eq[; cVu vFkkZr~ LVs;¯jx ykWd%
The main switch controls the ignition
and lighting system. Its operation is
described below.
eq[; cVu ¼fLop½ Toyu rFkk izdk'k dh
iz.kkfy;ksa dks fu;af=kr djrk gSA bldh
izfØ;k uhps nh xbZ gSA
ON pkyw djuk :
Electrical circuit are switched on. The
engine can be started. The key cannot
be removed in this position.
fctyh ds lHkh l£dV pkyw gSaA batu pkyw
fd;k tk ldrk gSA bl gkyr esa pkWch dks
ckgj ugha fudkyk tk ldrk gSA
1. Push nckuk
2. Release NksM+uk
3. Turn ?kqekuk
OFF can djuk :
Engine will be shut off. All electrical
circuits are switched off. The key can
be removed in this position.
batu can gks tk,xkA fctyh ds lHkh
l£dV can gSaA bl gkyr esa pkWch dks
ckgj fudkyk tk ldrk gSA
LOCK ykWd djuk :
The steering is locked in this position
and all electrical circuits are switched
off.
fLV;¯jx bl voLFkk esa ykWd gks tkrk gS vkSj
fctyh ds lHkh l£dV~l can gks tkrs gSaA
The key can be removed in this
position.
bl gkyr esa pkWch dks ckgj fudkyk tk
ldrk gSA
To lock the steering, turn the
handlebars all the way to the left or
right. With the key at “OFF”, push it
into the main switch and release
it,turn it counterclockwise to “LOCK”
and remove it. To release the lock,
turn the key to “OFF”.
fLV;¯jx dks ^ykWd* djus ds fy, ^gS.My&ckj*
dks ges'kk ckb± vFkok nkb± vksj ?kqek,¡A pkWch
dks ^vkWQ* okys LFkku ij ykdj] bls eq[;
cVu dh vksj nck,¡ rFkk NksM+ nsa] rc pkWch
dks nk,¡ ls ck,¡ ?kqekrs gq, ^ykWd* okys LFkku
ij ys tk,¡ vkSj pkWch ckgj fudky ysaA ykWd
[kksyus ds fy, pkWch dks ?kqekdj ^vkWQ* ds
fu'kku ij ys vk,¡A
WARNING
Never turn the key to “LOCK” when
the Motorcycle is moving.
pssrkouh
pyrh gqbZ eksVjlkbfdy esa dHkh Hkh pkWch dks
^ykWd* okys LFkku dh vksj u ?kqek,¡A
3.1
PG1_55.pmd 10/15/2006, 9:15 AM20
Page 21

;a=k vkSj fu;a=k.k mi;ksx ¼QaD'kaUl½
INSTRUMENT AND CONTROL FUNCTIONS
2
1
1. Speedometer LihMksehVj
2. Odometer vkWMksehVj
Speedometer
LihMksehVj
The speedometer shows riding
speed.
LihMksehVj eksVjlkbZdy dh xfr dks n'kkZrk
gSA
This speedometer is equipped with
an odometer.
bl LihMksehVj esa ,d vkWMksehVj Hkh gksrk
gSA
2
1
1. Neutral indicator light “N”
U;wVªy bafMdsVj ykbZV ^,u*
2. Turn indicator light “ ”
eqM+us ¼VuZ½ ds fy, bafMdsVj ykbZV
3. High beam indicator light “ ”
nwjLFk izdk'k ¼gkbZ che½ ds fy, bafMdsVj ykbZV
3
Indicator lights
bafMdsVj ykbZV~l
Neutral indicator light “N”
U;wVªy bafMdsVj ykbZV “N” %
This indicator comes on when the
transmission is in neutral.
Vªkaleh'ku ds rVLFk ¼U;wVªy½ gksus ij ;g
bafMdsVj izn£'kr gksrk gSA
Turn indicator light “ ”
eqM+us ¼VuZ½ ds fy, bafMdsVj ykbZV
The indicator flashes when the turn
switch is moved to the left or right.
tc bafMdsVj ds cVu dks ckb± vFkok nkb±
rjQ ?kqekrs gSa rks bafMdsVj pedrk gSA
High beam indicator light “ ”
rhoz izdk'k ¼gkbZ che½ dh bafMdsVj ykbZV
This indicator comes on when the
headlight high beam is used.
;g bafMdsVj rc pedrk gS tc gsMykbZV dks
rhoz izdk'k ds fy, iz;ksx fd;k tkrk gSA
PG1_55.pmd 10/15/2006, 9:15 AM21
3.2
Page 22
;a=k vkSj fu;a=k.k mi;ksx ¼QaD'kaUl½
INSTRUMENT AND CONTROL FUNCTIONS
2
1
3
4
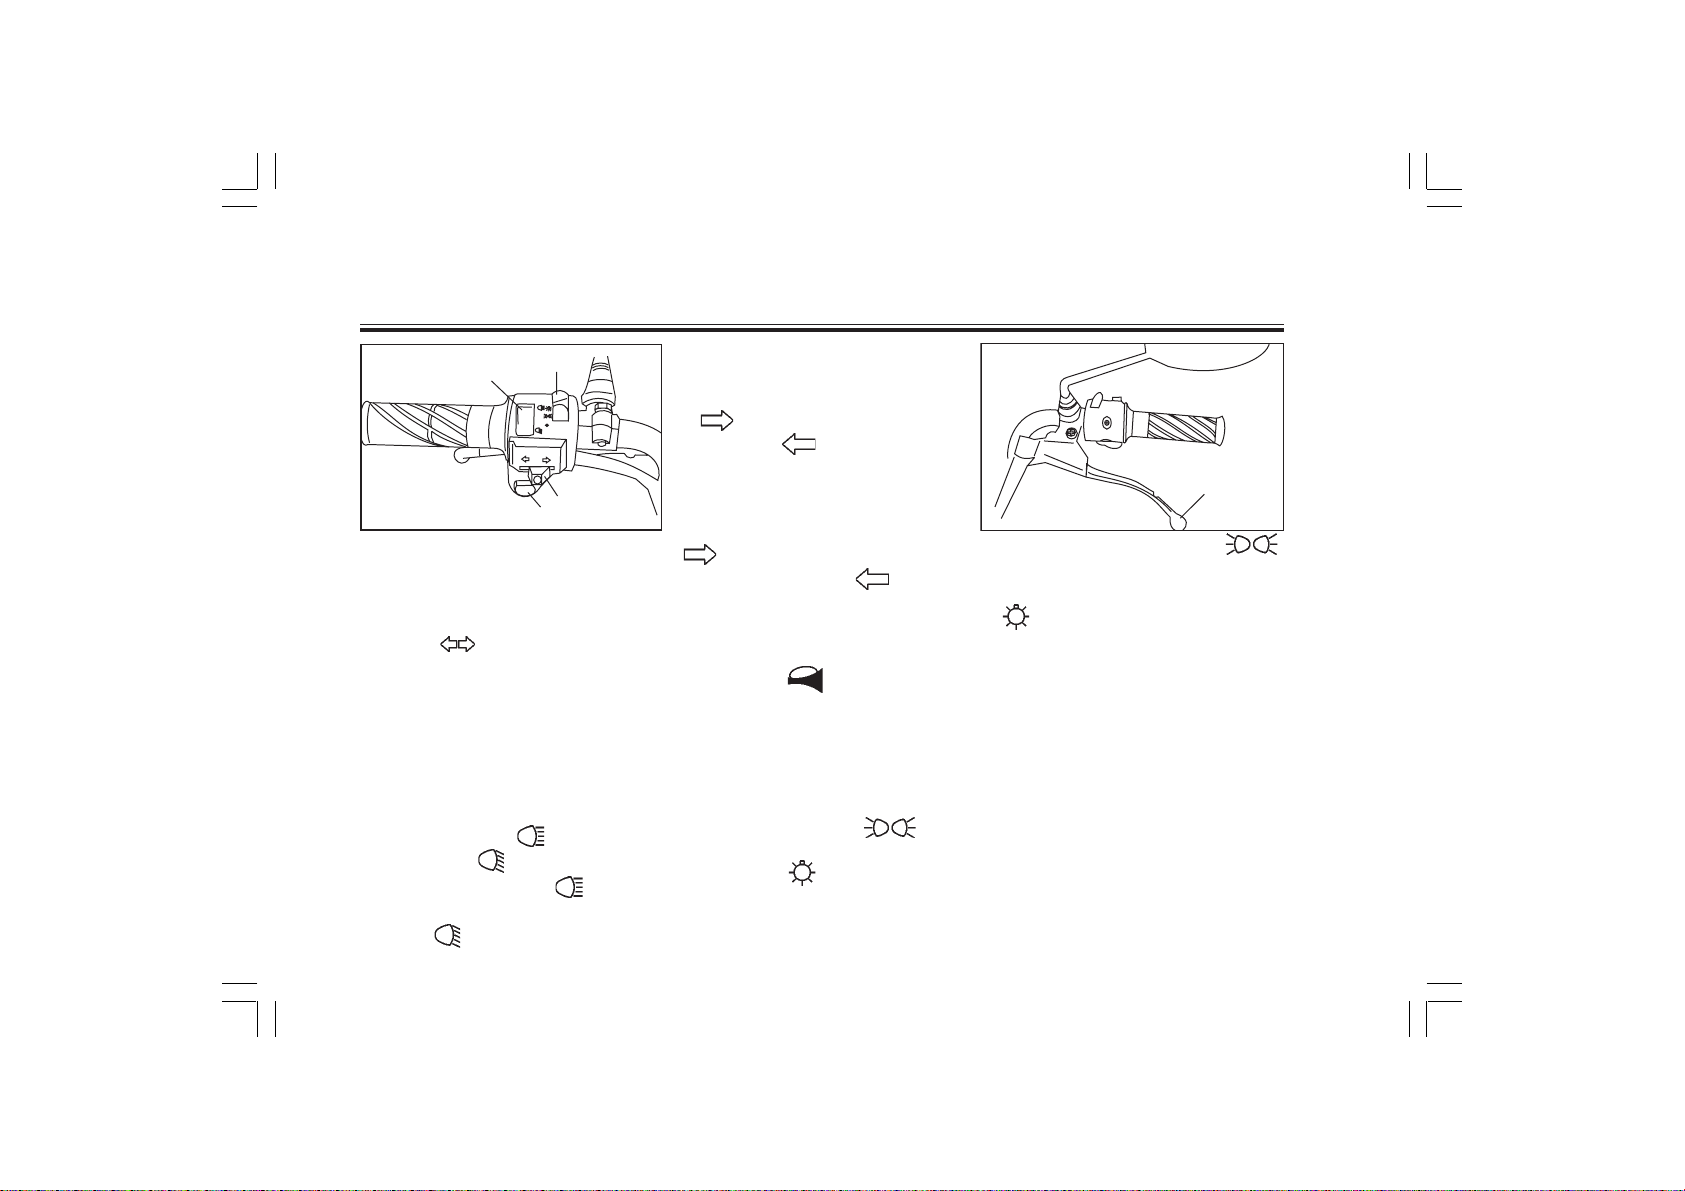
1. Dimmer Switch
fMej&fLop
2. Light switch
ykbZV fLop
3. Turn signal cum cancellation
switch “ ”
flXuy cnyus vFkok dSafly djus dk
cVu ¼fLop½
4. Horn switch
gkWuZ dk cVu
Handlebar switches
gS.Myckj ds cVu
Dimmer switch
fMej fLop %
Turn the switch to “ ” for the high
beam and to “
” for the low beam.
rhoz jks'kuh ds fy, cVu dks “ ”ds fu'kku
ij ys tk,¡A rFkk ßyks cheÞ jks'kuh ds fy,
cVu dks
“ ”ds fu'kkku ij ys tk;saA
Turn signal switch
ladsr ¼flXuy½ cnyus ds cVu
To signal a right-hand turn, push the switch
”. To signal a left-hand turn, push
to “
the switch to “
released it will return to the center position.
To cancel the signal, push the switch in
after it has returned to the center position.
”. Once the switch is
nkb± vksj eqM+us dk ladsr nsus ds fy, cVu dks bl
” fu'kku ij ys tk;sa rFkk ckb± rjQ eqM+us dk
“
ladsr nsus ds fy, cVu dks bl “
” fu'kku ij ys
tk;saA tSls gh cVu dk NksM+saxs cVu vius vki chp esa vk
tk;sxkA flXuy dks dSafly ¼gVkus½ djus ds fy, tc
cVu okfil chp esa vk tk;s] bls nck;saA
Horn switch “ ”
gkWuZ dk cVu
Press the switch to sound the horn.
gkWuZ ctkus ds cVu dks nck,¡A
Lights switch
jks'kuh ds cVu
Turning the light switch to “ ”, turns
on the meter light and taillight. Turning the
light switch to “
on also.
”, turns the headlight
ehVj dh ykbZV rFkk ihNs dh ykbZV tykus
3.3
1
ds fy,] ykbZV ds cVu dks bl “
rjQ ?kqek,asA gsMykbZV~l dks lkFk esa pkyq
djus ds fy, ykbZV ds cVu dks bl fu'kku
” ij ys vk;saA
“
Clutch lever
Dyp yhoj
The clutch lever ¿ is located on the left
handlebar. Pull the clutch lever to the
handlebar to disengage the clutch, and
release the lever to engage the clutch.
The lever should be pulled rapidly and
released slowly for smooth clutch
operation.
Dyp yhoj gSaMyckj ds ckb± rjQ yxk gksrk gSA
Dyp dks vyx djus ds fy,] Dyp yhoj dks
gSaMyckj dh vksj [khapsa rFkk Dyp dks tksM+us ds
fy, yhoj dks NksM+ nsaA Dyp izfØ;k dks lgt
cukus ds fy, yhoj dks rsth ls [khapuk pkfg, vkSj
/khjs&/khjs NksM+uk pkfg,A
”
PG1_55.pmd 10/15/2006, 9:15 AM22
Page 23
;a=k vkSj fu;a=k.k mi;ksx ¼QaD'kaUl½
1
INSTRUMENT AND CONTROL FUNCTIONS
1
1. Shift pedal f'k¶V iSMy
Shift pedal f'k¶V iSMy
The shift pedal is located on the left
side of the engine and is used in
combination with the clutch when
shifting.
f'k¶V iSMy batu ds ckb± rjQ yxk gksrk
gS rFkk f'k¯ ¶Vx ds le; Dyp ds lkFk
bldk iz;ksx fd;k tkrk gSA
Use your toe or heel to shift up and
your toe to shift down.
bls Åij dh vksj mBkus ds fy, viuh ,M+h
vFkok iSj ds vxys fgLls dk iz;ksx djsa rFkk
uhps dh vksj ys tkus ds fy,] dsoy iSj ds
vxys fgLls dk gh iz;ksx djsaA
PG1_55.pmd 10/15/2006, 9:15 AM23
1
1. Front brake lever vxyh czsd dk yhoj
Front brake lever
vxyh czsd dk yhoj
The front brake lever is located on
the right handlebar. Pull it toward the
handlebar to apply the front brake.
vxyh czsd dk yhoj nkb± rjQ dh gSaMyckj
ij yxk gksrk gSA vxyh czsd yxkus ds
fy, bls gSaMyckj dh rjQ gh [khapksA
USE BOTH BRAKES SIMULTANEOUSLY
1. Rear brake pedal fiNyk czsd isMy
Rear brake pedal
fiNyk czsd isMy
The rear brake pedal is on the right
side of the Motorcycle. Press down
on the brake pedal to apply the rear
brake.
fiNyk cszd isMy eksVjlkbZfdy ds nk;ha
rjQ gSA czsd yxkus ds fy;s iSj ls bls
uhps dh rjQ nck;saA
nksuksa cszd dk iz;ksx lkFk&lkFk djsaA
3.4
Page 24
;a=k vkSj fu;a=k.k mi;ksx ¼QaD'kaUl½
1
2
INSTRUMENT AND CONTROL FUNCTIONS
pkWch vanj Mkydj Vadh ds <Ddu ¼dSi½
dks nckvks] pkWch ckgj fudkyus ds fy,
nkb± ls ckb± vksj ?kqekrs gq, bls bldh
lgh txg ij ys vk,aA
NOTE:
This tank cap cannot be closed
unless the key is in the lock. The key
cannot be removed if the cap is not
locked properly.
1. Open [kksyuk
Fuel tank cap
b±/ku dh Vadh dk <Ddu
TO OPEN [kksyus ds fy,
Insert the key and turn it 1/4 turn
clockwise. The lock will be released
and the cap can be opened.
pkWch dks blesa Mkyks vkSj ,d pkSFkkbZ Hkkx
rd] bls ckb± ls nkb± vksj ys tkrs gq,
?kqekvksA rkyk ¼ykWd½ [kqy tk,xk rFkk
<Ddu dks Hkh [kksyk tk ldrk gSA
TO CLOSE can djus ds fy, :
Push the tank cap into position with
the key inserted. To remove the key,
turn it counterclockwise to the original
position.
uksV:
vxj pkch ykWd esa u gks rks Vadh ds
<Ddu dks can ugha fd;k tk ldrkA
;fn <Ddu lgh rjhds ls can ugha fd;k
x;k gks rks] pkWch dks ckgj ugha fudkyk
tk ldrkA
WARNING
Be sure the cap is properly installed
and locked in place before riding
the Motorcycle
psrkouh
eksVj lkbZdy pykus ls igys ;g lqfuf'pr djsa
fd <Ddu ¼dSi½ vius LFkku ij Bhd rjg ls cSB
x;k gS vkSj can ¼ykWd½ gks x;k gSA
1. Filter tube fQYVj V~;wc
2. Fuel level b±/ku dk Lrj ¼ysoy½
Fuel b±/ku
Make sure there is sufficient fuel in
the tank. Fill the fuel tank to the
bottom of the filter tube as shown in
the illustration
lqfuf'pr djsa fd Vadh ds vanj i;kZIr
b±/ku gSA tSlk fd fp=k esa n'kkZ;k x;k gSA
b±/ku VSad dks ^fQYVj V~;wc* ds fupys
fgLls rd HkjsaA
WARNING
Do not overfill the fuel tank, avoid
spilling fuel on the hot engine.
Do not fill fuel tank above the
bottom of the filter tube to avoid its
spillage.
3.5
PG1_55.pmd 10/15/2006, 9:15 AM24
Page 25
;a=k vkSj fu;a=k.k mi;ksx ¼QaD'kaUl½
OFF
ON
INSTRUMENT AND CONTROL FUNCTIONS
psrkouh
b±/ku dh Vadh fQYVj Vadh dh fupyh
lrg ls Åij u Hkjsa] vU;Fkk b±/ku ds xeZ
gksus rFkk ckn esa blds QSyus ij ;g Vadh
ls ckgj vk ldrk gSA cgrsa gq, b±/ku dks
xeZ batu ij fxjus ls cpk,aA
CAUTION :
Always wipe off spilled fuel
immediately with a dry and clean soft
cloth. Fuel may deteriorate painted
surfaces or plastic parts.
lko/kkuh%
Nyds gq,kb±/ku dks rqjar eqyk;e lkQ
diM+s dh lgk;rk ls lkQ djsaA b±/ku
isaV dh gqbZ lrg o IykfLV ds midj.kksa
dks [kjkc dj ldrk gSA
Recommended Fuel ¼vf/kÑr b±/ku½:
Regular gasoline (Petrol)
lkekU; nzO; ¼iSVªksy½
Fuel tank capacity ¼b±/ku Vadh dh ek=kk½:
Total ¼dqy½ : 11.0L
Reserve ¼fjt+oZ½ : 1.4L
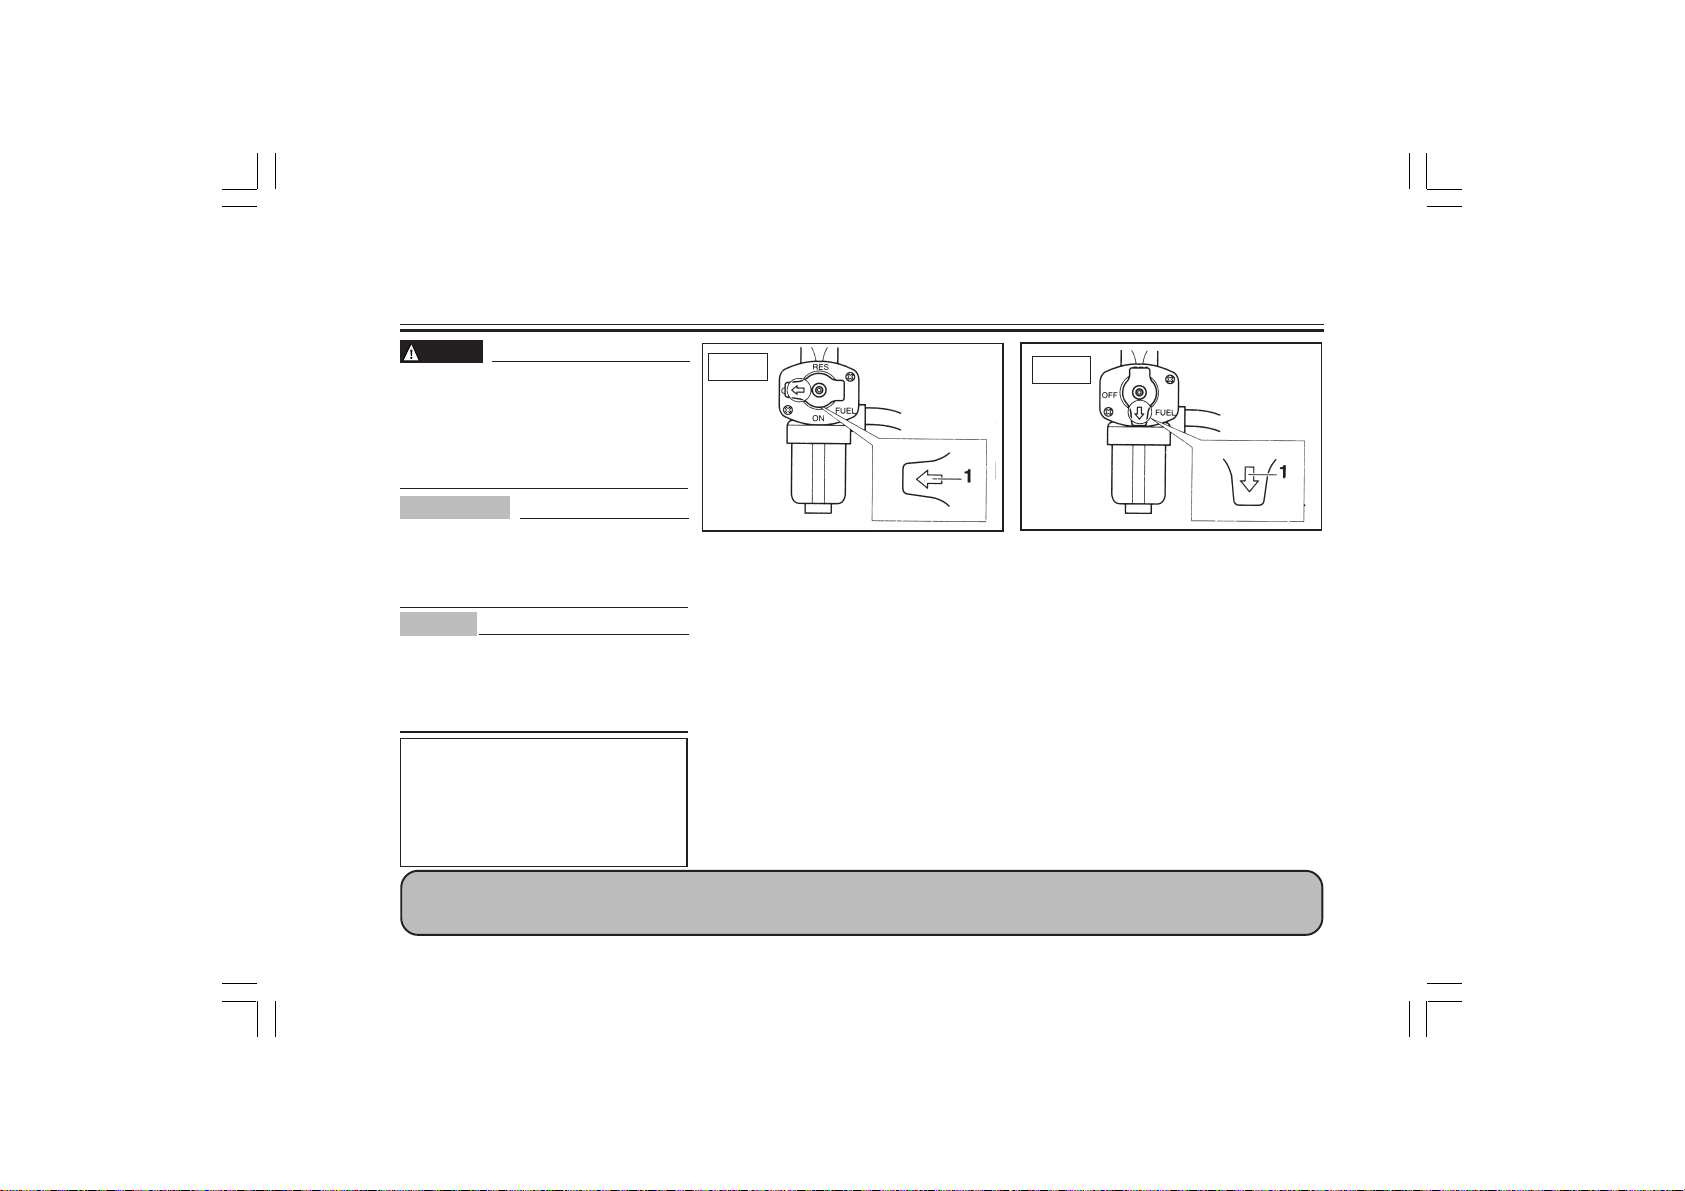
IT IS A GOOD PRACTICE TO RETURN THE FUEL COCK LEVER TO “OFF” POSITION WHEN ENGINE IS NOT RUNNING
1. Arrow mark rhj dk fu'kku
Fuel cock ¶;wy ¼b±/ku½ dkWd
The fuel cock supplies fuel from the
tank to the carburetor while filtering
it also. The fuel cock has three
positions, which should be set as
shown in the illustrations.
^¶;wy dkWd* b±/ku dks Vadh ls dkWjC;wjsVj esa
Hkstus ds lkFk&lkFk bls Nkuus dk dke Hkh
djrh gSA
b±/ku dkWd dh rhu voLFkk,a gSa ftUgsa n'kkZ, x,
fp=kksa ds vuqlkj O;ofLFkr djuk pkfg,A
OFF: With the fuel cock in this
position, fuel will not flow.
Always set the fuel cock to this
position when the engine is not
running.
tc batu pkyw gkyr esa u gks rks ¶;wy dkWd ds yhoj dks okil ^vkWQ* dh fLFkfr esa ykdj j[kuk ,d vPNh vknr gS
1. Arrow mark rhj dk fu'kku
can djuk % ¶;wy dkWd dks ^vkWQ* dh voLFkk
esa ykus ij b±/ku dk vkokxeu :d
tk,xkA tc batu pkyw u gks rks
ges'kk b±/ku ¼¶;wy dkWd½ dks blh
voLFkk esa O;ofLFkr djasA
ON : With the fuel cock in this
position, fuel flows to the
carburettor. Set the fuel cock to
this position when starting the
engine and while riding.
pkyw djuk%
¶;wy dkWd* dks ^vkWu* dh fLFkfr esa
ykus ij b±/ku dkWjC;wjsVj dh rjQ tk,xkA
tc b±tu dks LVkVZ djuk gks;k
eksVjlkbZfdy pykuh gks rks b±/ku ¶;wy
dkWd dks blh voLFkk esa ysdj vk,aA
3.6
PG1_55.pmd 10/15/2006, 9:15 AM25
Page 26
;a=k vkSj fu;a=k.k mi;ksx ¼QaD'kaUl½
RES
INSTRUMENT AND CONTROL FUNCTIONS
1
1. Arrow mark rhj dk fu'kku
RES: This indicates reserve. If you
run out of fuel while riding, set
the fuel cock to this position.
Fill the tank at the first opportunity. Be sue to set the fuel
cock back to “ON” after refueling.
fjt+oZ % ;g ^fjt+oZ* dks n'kkZrk gSA ;fn
eksVjlkbfdy pykrs gq, b±/ku
lekIr gksrk gqvk yxs rks b±/ku dh
dkWd dks ^fjt+oZ* dh voLFkk esa ys
vk,aA igyk ekSdk feyrs gh] Vadh
dks Hkjok ysaaA isVªksy Hkjokus ds
ckn ¶;wYk dkWd dks fQj ls ^vkWu*
ds fu'kku ij yk;saA
NEVER MIX OIL IN PETROL isVªksy esa rsy dHkh u feyk,aA
PG1_55.pmd 10/15/2006, 9:15 AM26
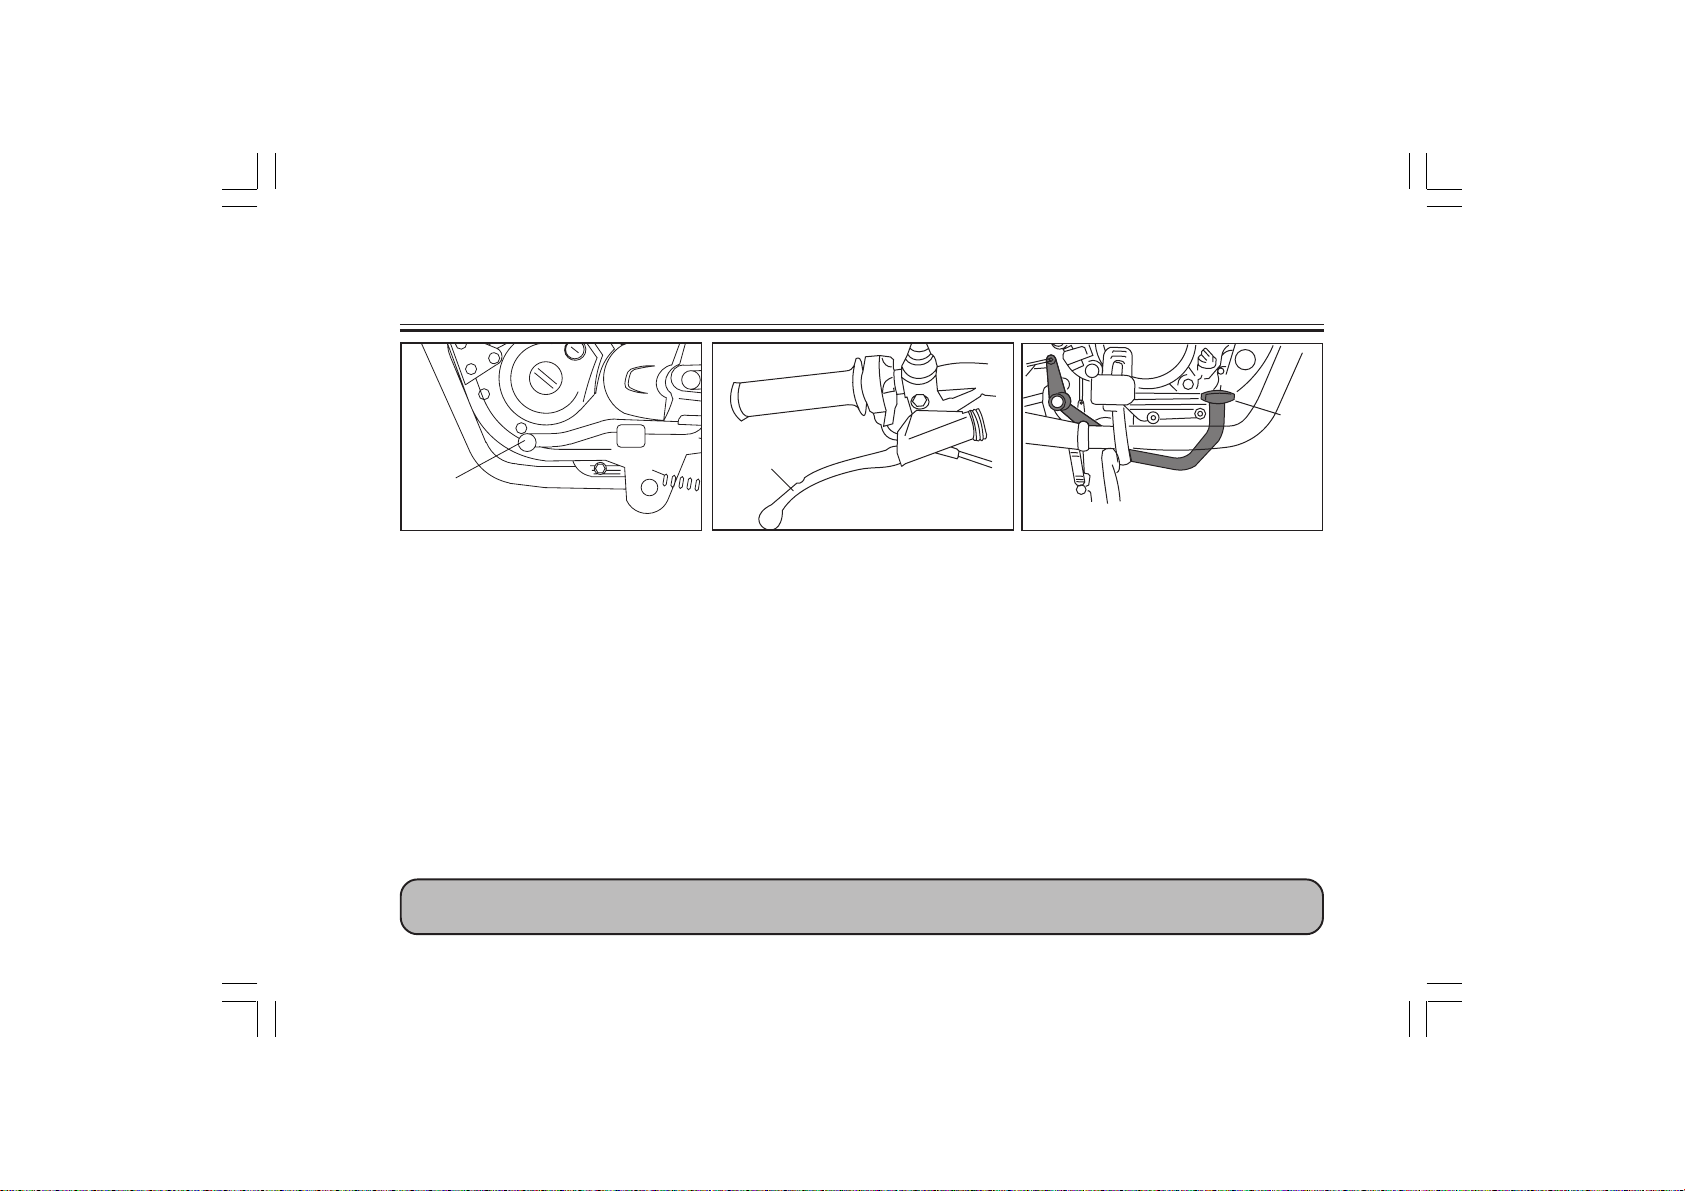
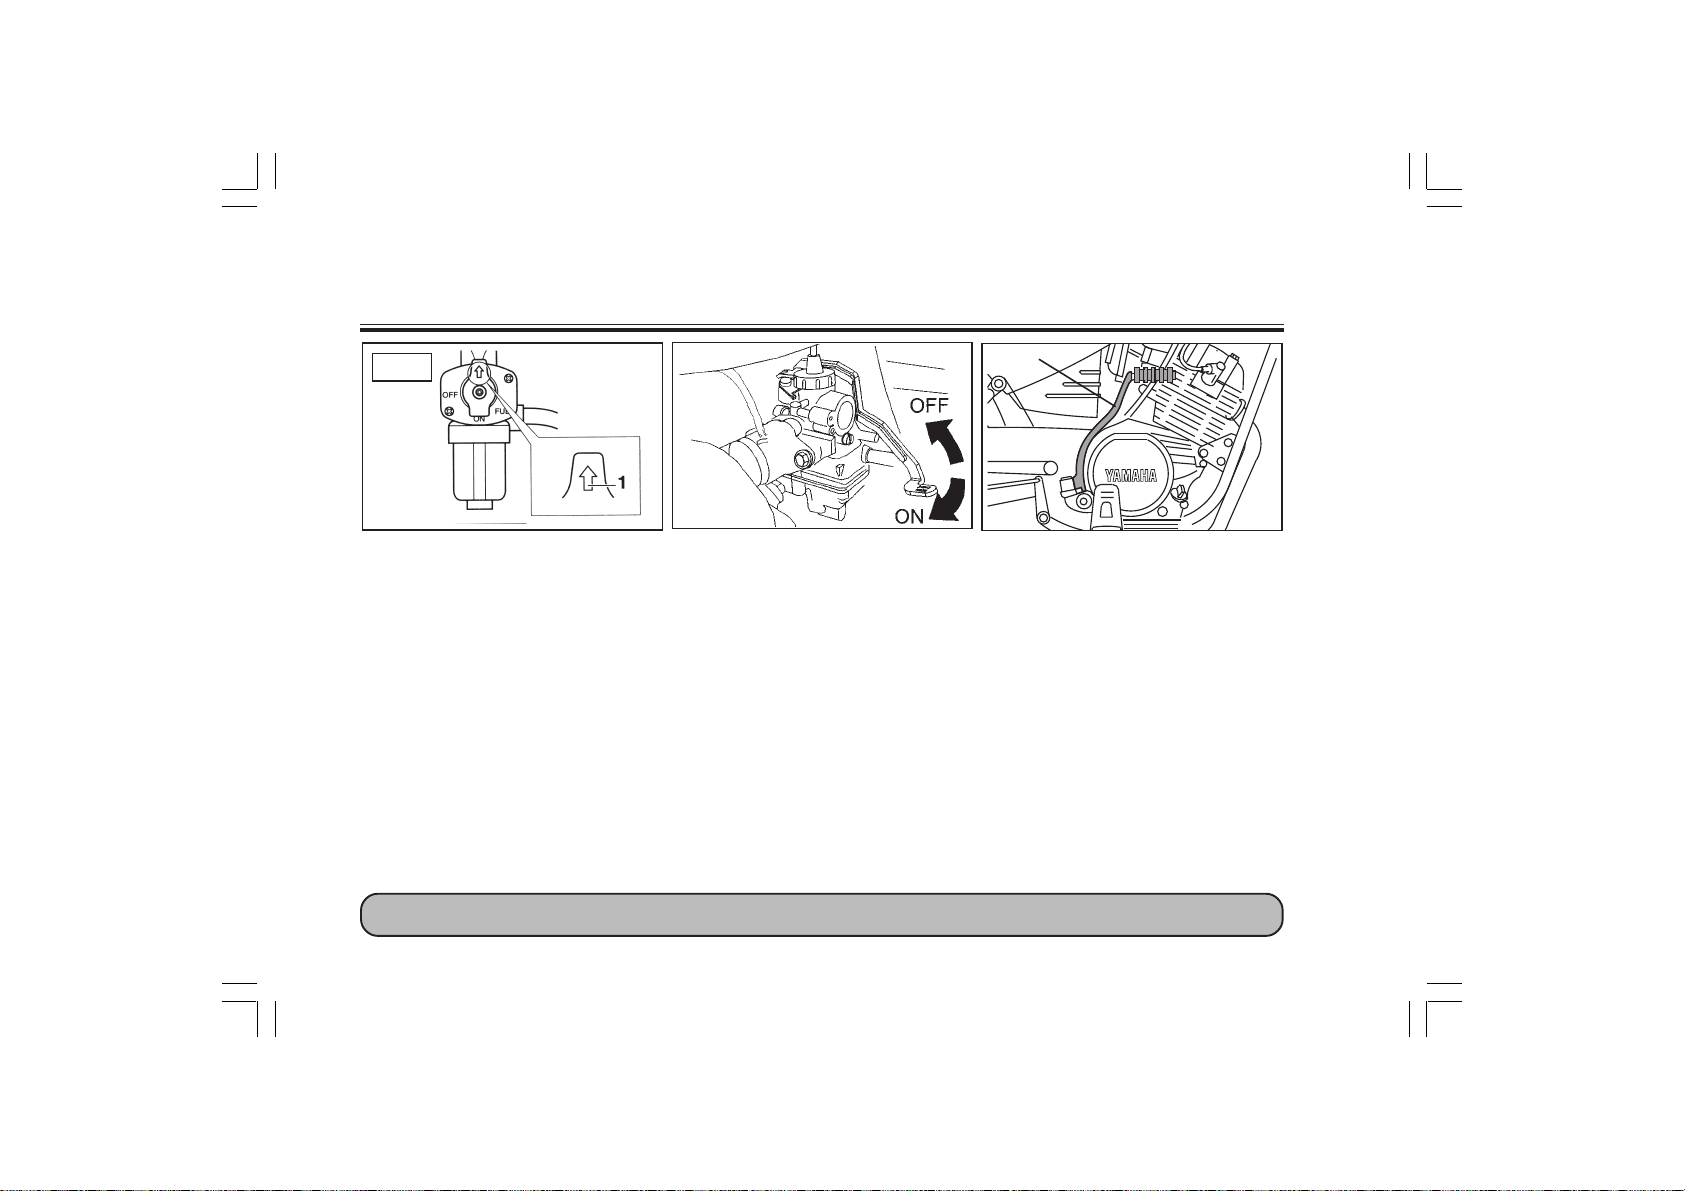
1. Choke lever pkWd yhoj
Choke lever
Starting a cold engine requires a
richer air-fuel mixture. A separate
starter circuit supplies this mixture.
pksd yhoj
BaMs batu dks pkyw ¼LVkVZ½ djus ds fy,
vR;f/kd gok rFkk b±/kUk ds feJ.k dh
vko';drk gksrh gSA vyx ls ,d ^LVkVZj
l£dV* bl feJ.k dk forj.k ¼lIykbZ½
djrk gSA
• Push the Choke Lever in “DOWN”
direction to turn “ON” choke.
^vkWu* dh fLFkfr esa ykus ds fy,&^pkWd*
yhoj dks ^uhps* dh fn'kk esa ykvksA
3.7
1. Kick starter fdd LVkVZj
• Push the Choke Lever in “UP”
direction to turn “OFF” choke.
pksd yhoj dks can ¼vkWQ½ djus ds
fy, bls Åij dh fn'kk esa mBk;saA
Kick-starter fdd LVkVZj
Raise the right footrest, and rotate
the kick starter away from the engine.
Push the kick starter down lightly with
your foot until the gears engage, then
kick smoothly and forcefully to start
the engine. This model has a
primary-coupled kick starter so the
engine can be started in any gear if
the clutch is disengaged. However,
shifting to neutral before starting is
recommended.
Page 27
nkb± rjQ ds QqVjsLV dks Åij dh vksj
1
2
mBk,a rFkk ^fdd LVkVZj* dks batu ls nwj
ysa tk,aA fdd LVkVZj dks ikao ls uhps dh
rjQ nck,a tc rd fd fx;lZ dk vkil
esa leUo; u gks tk,] rc batu dks pkyw
¼LVkVZ½ djus ds fy, ^fdd* dks lgtrk
ls vkSj tksj yxkdj nck,aA bl ekWMy
esa izkFkfed :i ls tqM+k gqvk fdd&LVkVZj
gksrk gS] ftlls batu dks fdlh Hkh xh;j
esa] Dyp ds vyx gksus dh fLFkfr esa Hkh
LVkVZ ¼pkyw½ fd;k tk ldrk gSA tcfd
batu LVkVZ djus ls igys fx;lZ dks
cnydj ^U;wVªy* dh voLFkk esa ykus dh
flQkfj'k dh tkrh gSA
ALWAYS USE A HELMET WHILE RIDING FOR YOUR SAFETY
;k=kk djrs le; viuh lqj{kk ds fy, ges'kk gsyesV dk ç;¨x djsaA
;a=k vkSj fu;a=k.k mi;ksx ¼QaD'kaUl½
INSTRUMENT AND CONTROL FUNCTIONS
2
1. Open [kksysa
2. Open [kksysa
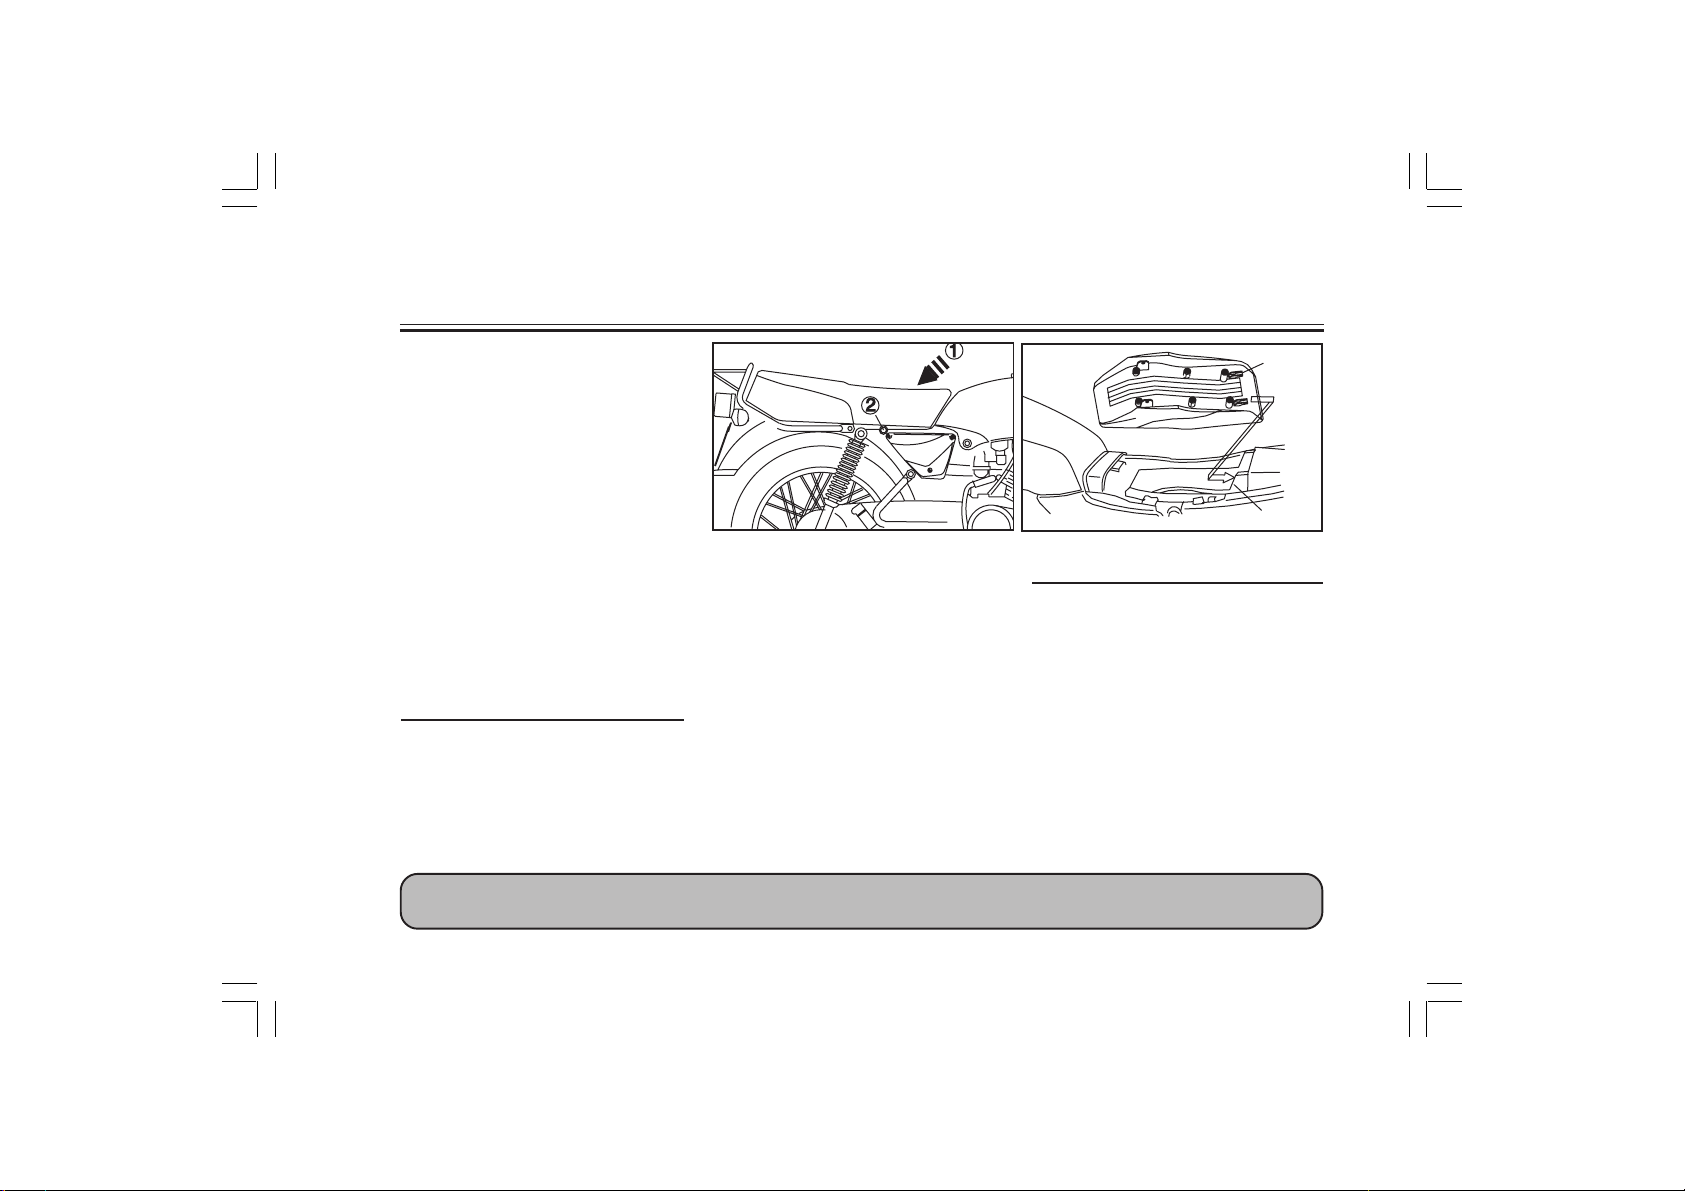
Opening of Seat
lhV dks [kksyuk
To remove gVkus ds fy,
Open side panels as per
instructions on page 6-8.
lhV gVkus ds fy, 6-8 ij fn, x;s
funsZ'kksa ds vuqlkj lkbM&iSuyksa dks [kksysaA
Remove the two bolts 1 and 2 as
shown in figure. Lift the front of the
seat and slide forward to remove.
n'kkZ, x, fp=kuqlkj 1 o 2 uacj ds c¨YV¨
d¨ [k¨ysaA lhV ds vxys fgLls d¨ Åij
dh v¨j mBk,¡ rFkk bls gVkus ds fy,
3.8
1. Seat Holder lhV g¨YMj
2. Projection ç¨tsD'ku
vkxs dh rjQ f[kLdkrs gq, ys tk,¡A
To install lhV d¨ yxkuk
Insert the projection on the rear of
seat in to seat holder. Then push
down on front of the seat and tighten
the bolts on the left and right hand
side of the seat.
ç¨tsD'ku d¨ lhV ds fiNys fgLls ds
Åij lhV g¨YMj esa cSBk,¡A mlds ckn]
lhV d¨ vkxs dh v¨j dh ls uhps dh
rjQ nck,¡ rFkk isap¨a d¨ lhV dh nkb±
rFkk ckb± rjQ ls dl nsaA
PG1_55.pmd 10/15/2006, 9:15 AM27
Page 28

;a=k vkSj fu;a=k.k mi;ksx ¼QaD'kaUl½
INSTRUMENT AND CONTROL FUNCTIONS
1
1
1
1. Storage compartment
HkaMkj.k d{k
Storage compartment
HkaMkj.k d{k
The storage compartment is located
inside the L.H. Side Cover.
HkaMkj.k d{k] ck,¡ lkbM ds doj ds vanj
LFkkfir fd;k x;k gSA
PG1_55.pmd 10/15/2006, 9:15 AM28
1. Rear Shock Absorber
fiNyk‘'kkWd ,ct+kjcj
Rear Shock Absorber
fiNyk‘'kkWd ,ct+kjcj
Fixed Type - No adjustment required.
LFk;h izdkj dk & O;ofLFkr djus dh
vko';drk ugha gSA
3.9
Page 29
1. HandleSeat (Luggage Carrier)
1
gSaMylhV ¼yXxst dSfj;j½
Handle Seat (Luggage Carrier)/
Assist Grip
gSaMylhV ¼yXxst dSfj;j½@vflLV fxzi
Maximum load carrying capacity - 3.0
Kgs.
ot+u <ksus dh vf/kDre {kerk& 3.0 fdñxzkñ
;a=k vkSj fu;a=k.k mi;ksx ¼QaD'kaUl½
INSTRUMENT AND CONTROL FUNCTIONS
3.10
PG1_55.pmd 10/15/2006, 9:15 AM29
Page 30
PRE-OPERATION CHECKS
Owners are personally responsible for their vehicle’s condition. Your Motorcycle’s vital functions can start to deteriorate
quickly and unexpectedly-even if it remains unused (for instance, if it is exposed to the elements). Any damage, fluid
leak or loss of tyre pressure could have serious consequence Therefore’ it is very important that, in addition to a
thorough visual inspection, you check the following points before each ride.
PRE-OPERATION CHECK LIST
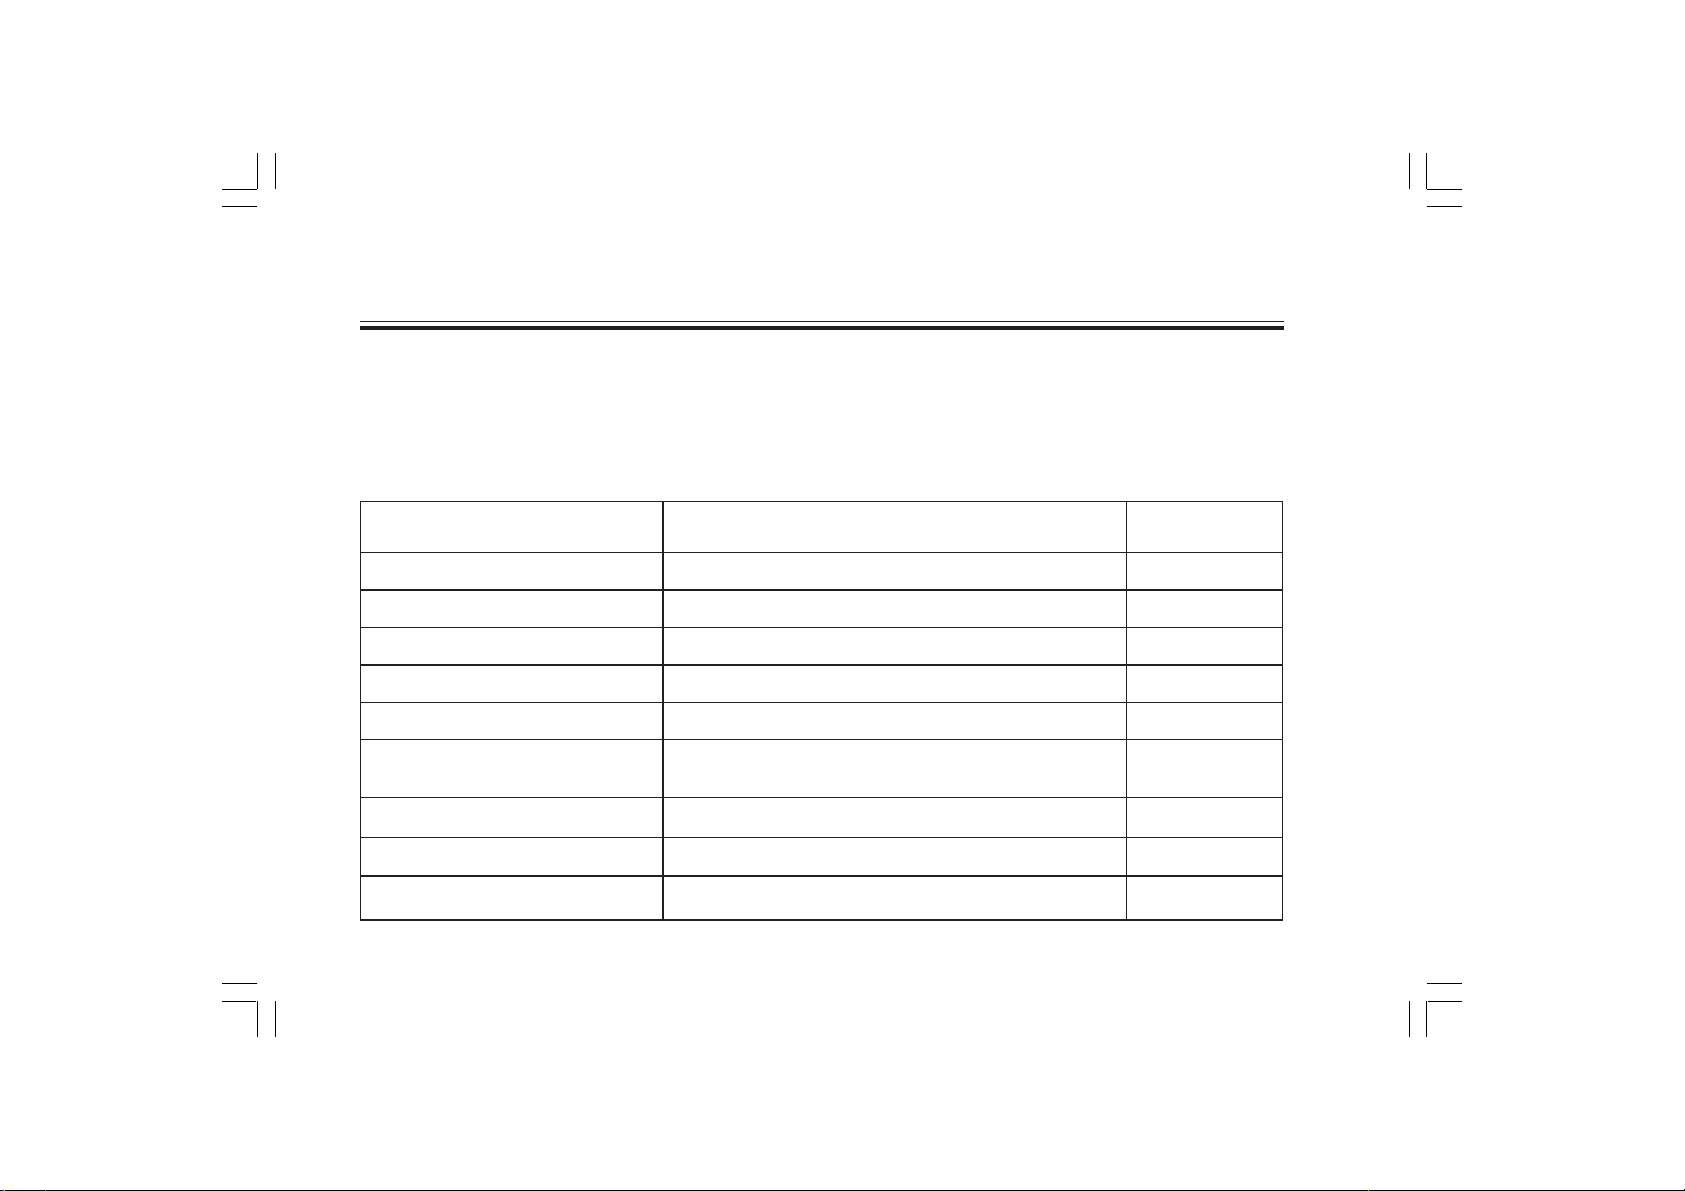
ITEM PAGECHECKS
Front brake
Rear brake
Clutch
Throttle grip and housing
Engine oil
Drive chain
Wheels and tyres
Control and meter cable
Brake and shift pedal shafts
• Check operation, condition and free play.
• Adjust if necessary.
• Check operation, condition and free play.
• Adjust if necessary.
• Check operation, condition and free play.
• Adjust if necessary.
• Check for smooth operation.
• Lubricate if necessary.
• Check oil level.
• Fill with oil if necessary.
• Check chain slack and condition.
• Lubricate if necessary.
• Adjust if necessary.
• Check tyre pressure, wear, damage and spoke tightness.
• Tighten spokes if necessary.
• Check for smooth operation.
• Lubricate if necessary.
• Check for smooth operation.
• Lubricate if necessary.
3-4, 6-22
3-4, 6-23
3-3-, 6-22
6-17, 6-29
6-11, 6-12
6-25, 6-26
6-18 – 6-21
6-29
6-30
PG1_55.pmd 10/15/2006, 9:15 AM30
4.1
Page 31

ITEM PAGECHECKS
PRE-OPERATION CHECKS
Brake and clutch lever pivots
Center stand pivot
Chassis fasteners
Fuel Tank
Lights, signals and switches
Battery
• Check for smooth operation.
• Lubricate if necessary.
• Check for smooth operation.
• Lubricate if necessary.
• Make sure that all nuts, bolts, and screws are properly tightened
• Tighten if necessary.
• Check fuel level.
• Fill with fuel if necessary.
• Check for proper operation.
• Check fluid level.
• Fill with distilled water if necessary.
6-30
6-30
-
3-5, 3.6
3-2, 6-37
6-33 – 6-35
NOTE :
Pre-operator checks should be made each time the Motorcycle is used. Such an inspection can be accomplished
in a very short time; and the added safety it assures is more than worth the time involved.
WARNING
If any item in the Pre-Operation Check is not working properly, have it inspected and repaired before operating
the Motorcycle.
IF WAITING AT TRAFFIC SIGNAL IS FOR LONG, SWITCH OFF THE ENGINE TO PROTECT
THE ENVIRONMENT AND TO LOWER FUEL CONSUMPTION
4.2
PG1_55.pmd 10/15/2006, 9:15 AM31
Page 32

dk;Z&iwoZ tk¡p
okgu ekfyd] vius e¨Vj lkbZdy dh gkyr ds fy, Lo;a gh ftEesnkj gSA ;fn ;g ç;¨x esa Hkh ugh yk;k tkrk gS] rc Hkh
vkidh e¨Vj lkbZdy dh vko';d fØ;kv¨a dk vdLekr~ rFkk rhozrk ls {k; g¨uk 'kq# g¨ ldrk gSA ¼mnkgj.kr% ewy rRo¨ tSls
ikuh] gok rFkk vfXu bR;kfn½ ds laidZ esa vkus ij fdlh Hkh rjg dh {kfr] nzo dk fjluk] Vk;j esa de ncko ds xaHkhj ifj.kke
g¨ ldrs gSA vr% ;g vfrvko;';d gS fd i;kZIr n f"Vxr tk¡p ds lkFk&lkFk çR;sd ;k=kk ls igys] vki fuEufyf[kr ikb±Vksa ij
Hkh /;ku nsaA
oLrq i"Btk¡p
dk;Z&iwoZ tk¡p&fyLV
vxys czsd
fiNys czsd
Dyp
FkzkWVy fxzi rFkk gkm¯lx
batu vkW;y
Mªkbo&psu
ifg, rFkk Vk;j
fu;a=k.k rFkk ehVj dh rkj
czsd rFkk f
PG1_55.pmd 10/15/2006, 9:15 AM32
'k¶V iSMy 'kk¶V
• çfd;k] fLFkfr rFkk Ýh Iys dh tk¡p djsaA
• ;fn vko';d g¨ r¨] ,MtLV djsaA
• çfd;k] fLFkfr rFkk Ýh Iys dh tk¡p djsaA
• ;fn vko';d g¨ r¨] ,MtLV djsaA
• çfd;k] fLFkfr rFkk Ýh Iys dh tk¡p djsaA
• ;fn vko';d g¨ r¨] ,MtLV djsaA
• lgt&fØ;k ds fy, tk¡psA
• vko';d g¨ r¨ yqczhds'ku djsaA
• rsy ds Lrj ¼yscy½ dh tk¡p djsaA
• ;fn vko';d g¨ r¨ blesa rsy bR;kfn MkysaA
• psu dh f'kfFkyrk ,oa fLFkfr dh tk¡p djsaA
• vko';d g¨ r¨ yqczhds'ku djsaA
• ;fn vko';d g¨ r¨] ,MtLV djsaA
• Vk;j ds ncko] f?klko] {kfr rFkk ifg, dh rhfy;¨a ds ncko dh tk¡p djsaA
• ;fn vko';d g¨ r¨ rhfy;¨a d¨ dl nsaA
• lkekU; dk;Z ds fy, tk¡p ysaA
• vko';d g¨ r¨ yqczhdsV djsaA
• lkekU; dk;Z ds fy, tk¡p ysaA
• ;fn vko';d g¨ r¨ rsy&xzhl vkfn ls yqczhdsV djsaA
4.3
3-4, 6-22
3-4, 6-23
3-3-, 6-22
6-17, 6-29
6-11, 6-12
6-25, 6-26
6-18 – 6-21
6-29
6-30
Page 33

dk;Z&iwoZ tk¡p
oLrq i"Btk¡p
czsd rFkk Dyp yhoj ds fioV ¼pwys½
lsaVj LVsaM fioV ¼pwy½
psfll ds uV&c¨YV vkfn
b±/ku dh Vadh
ykbV] flxuy rFkk cVu
cSVjh
• lkekU; fØ;k ds fy, tk¡psA.
• ;fn vko';d g¨ r¨ yqczhdsV djsaA
• lkekU; fØ;k ds fy, tk¡psA.
• ;fn vko';d g¨ r¨ yqczhdsV djsaA
• lqfuf'pr djsa fd gj rjg ds uV] c¨YV] isap lgh rjhds ls dls x, gSA
• ;fn vko';d g¨ r¨ dl nsaA
• b±/ku dk Lrj tk¡p ysaA
• ;fn vko';d g¨ r¨ b±/ku Hkj ysaA
• mfpr fØ;k ds fy, tk¡p ysaA
• nzO; ds Lrj dh tk¡p djsaA
• ;fn vko';d g¨ r¨ ÞfMfLVyM okWVjß ls Hkj nsaA
u¨V %
gj ckj] tc Hkh e¨Vj lkbZfdy ç;¨x djsa] dk;Z&iwoZ tk¡p vo'; djuh pkfg,A bl rjg dh tk¡p cgqr de le; ds vanj
iwjh dh tk ldrh gS rFkk bl rjg dh vfrfjDr lqj{kk le; yxkus dh vis{kk vf/kd fo'oluh; g¨rh gSA
psrkouh
;fn dk;Z iwoZ tk¡p esa d¨bZ pht Bhd rjg ls dke u dj jgh g¨ r¨ e¨VjlkbZfdy pykus ls igys bldk fujh{k.k rFkk
ejEer djok ysaA
6-30
6-30
-
3-5, 3-6
3-2, 6-37
6-33 – 6-35
;fn VªSfQd&flXuy ij T;knk nsj rd #duk iM+ tk;s r¨ okrkoj.k d¨ lqjf{kr cukus rFkk b±/ku dh [kir d¨ de djus
PG1_55.pmd 10/15/2006, 9:15 AM33
ds fy, batu d¨ can dj nsaA
4.4
Page 34

dk;Z rFkk lokjh ls tqM+s vko';d rF;
OPERATION AND IMPORTANT RIDING POINTS
WARNING
1. Before riding this Motorcycle,
become thoroughly familiar with
all operating controls and their
functions. Consult a YMIS dealer
regarding any control or function
that you do not thoroughly
understand.
2. Never start your engine or let it
run for any length of time in a
closed area. The exhaust fumes
are poisonous and can cause
loss of consciousness and
death within a short time.
Always operate you Motorcycle
in an area with adequate
ventilation.
psrkouh
1. bl e¨Vj&lkbZfdy d¨ pykus ls igys
blds lHkh dk;Z&laca/kh fu;a=k.kksa rFkk
muds mi;¨x¨a ls ifjfpr g¨ ysaA fdlh
fu;a=k.k vFkok mi;¨x ds iwjh rjg ls
le> esa u vkus ij bl laca/k esa
okbZñ,eñvkbZñ ,lñ Mhyj ls ijke'kZ djsaA
2. fdlh can {ks=k esa viuh xkM+h ds batu
d¨ u r¨ dHkh LVkVZ djsa vFkok u gh
bls T;knk le; rd pyrk jgus nsaA
batu ls ckgj fudyus okyk /kq¡vk
fo"kSyk g¨rk gS rFkk Fk¨M+s le; esa gh
vopsruk vFkok e R;q dk dkj.k cu
ldrk gSA ges'kk viuh e¨Vj&lkbZfdy
d¨ i;kZIr goknkj txg ij gh LVkVZ
djsaA
Starting and warming up a cold
engine
BaMs batu d¨ LVkVZ djuk rFkk
/khjs&/khjs xeZ djuk
1. Turn the fuel cock to “ON”
b±/ku dh dkWd d¨ *vkWu* ds fu'kku
ij ys vk,¡A
2. Turn the main switch to “ON”
eq[; fLop d¨ *vkWu* ds fu'kku ij
yk,¡A
3. Shift the transmission into neutral.
Vªk¡leh'ku ¼xh;lZ½ d¨ *U;wVªy* esa
ifjofrZr dj ysaA
5.1
NOTE :
When the transmission is in neutral,
the neutral indicator light should be
on. If the light does not come on, ask
a YMIS dealer to inspect it.
u¨V%&
tc Vªk¡leh'ku ÞU;wVªy&voLFkkß esa g¨ r¨
U;wVªy dh baMhdsVj ykbV Hkh tyuh pkfg,A
;fn ykbV ugh tyrh gS r¨ okbZñ,eñvkbZñ
,lñ Mhyj ls bldh tk¡p djus d¨ dgsaA
4. Fully press down Choke Lever and
completely close the throttle grip.
pksd yhoj d¨ Bhd rjg ls uhps dh
v¨j iwjh rjg ls nck,¡ rFkk FkzkWVy&fxzi
d¨ can dj nsaA
5. Kick the kick starter to start the
engine.
batu d¨ LVkVZ djus ds fy,
fdd&LVkVZj ij fdd yxk,¡A
6. Ride your Motorcycle with choke
remaining in “ON” position for
some distance*
Fk¨M+h nwjh rd pkWd d¨ *vkWu* dh voLFkk esa
j[krs gq, viuh e¨Vj&lkbZfdy d¨ pyk,¡A
PG1_55.pmd 10/15/2006, 9:15 AM34
Page 35

dk;Z rFkk lokjh ls tqM+s vko';d rF;
OPERATION AND IMPORTANT RIDING POINTS
(*The distance will vary as per the
climatic conditions of your area.)
¼;g nwjh vkids {ks=k ds okrkoj.k ij
fuHkZj gSA½
7. Lift Choke Level to “OFF” position
immediately after the Engine is
warm.
batu ds xeZ g¨us ds rqjar ckn gh
Þpksd yhojß d¨ *vkWQ* ds fu'kku ij
ys tk;saA
NOTE :
For better engine performance
always warm up the engine. Before
take off. Never open throttle fully
when engine is cold, otherwise
engine tends to stop.
u¨V %&
pyus ls igys] batu dh csgrj dk;Z&{kerk
ds fy, ges'kk bls /khjs&/khjs xeZ djsaA
dHkh Hkh tc batu BaMk g¨ r¨ FkzkWVy d¨
iwjh rjg ls u [k¨ys] vU;Fkk batu can gks
ldrk gSA
NOTE :
The engine is warm when it
responds normally to the throttle with
the Starter Lever in UP direction.
u¨V%&
vxj b±tu LVkZVj yhoj ds can jgus
ij ¼*Åij^ dh fn'kk es½ aFkzkWVy }kjk
lkekU; izfrfØ;k djrk gS rks b±tu xeZ
gSA
Starting a warm engine.
Fk¨M+k xeZ gq, batu dk LVkVZ djukA
The Choke Lever may not be
required when the engine is warm.
tc batu dqN xeZ g¨ r¨ *pksd yhoj^ dh
vko';drk ugh jg tkrh gSA
CAUTION :
See the “Running-in” section prior to
operating the Motorcycle for the first
time.
lko/kkuh %
igyh ckj ç;¨x djus ls igys *jfuax bu^
[kaM ij /;ku nsaA
5.2
4
3
2
N
1
1. Shift pedal f'k¶V&iSMy
2. Neutral U;wVªy
Shifting f'k¯¶Vx
The transmission lets you control
the amount of power you have
available at a given speed for
starting, accelerating, climbing hills,
etc. The use of the shift pedal is
shown in the illustration.
Vªkaleh'ku }kjk 'kfDr dh ml ek=kk ij
vki fu;a=k.k j[krs gS t¨ 'kq# esa] rst xfr
esa rFkk Å¡pkbZ esa p<+us bR;kfn ds le;
,d nh xbZ xfr ij miyC/k g¨rh gSA
f'k¶V&iSMy dk ç;¨x fp=k esa n'kkZ;k
x;k gSA
To shift into neutral, depress the shift
pedal repeatedly until it reaches the
end of its travel, then raise the pedal
slightly.
PG1_55.pmd 10/15/2006, 9:15 AM35
Page 36

dk;Z rFkk lokjh ls tqM+s vko';d rF;
OPERATION AND IMPORTANT RIDING POINTS
xh;j d¨ U;wVªy esa ykus ds fy,
f'k¶V&iSMy d¨ rc rd uhps dh v¨j
nckrs jgs tc rd fd ;g vius vafre
iM+ko rd u igq¡p tk,A mlds ckn
iSMy d¨ Fk¨M+k Åij dh v¨j mBk ysaA
CAUTION :
1. Do not ride down hill with
ignition switch in “OFF” position
and in neutral gear. Always ride
motorcycle with ignition switch
in “ON’ Position & while engine
is in gear.
2. Always use the clutch when
changing gears. The engine,
transmission, and driveline are
not designed to withstand the
shock of forced shifting and
can be damaged by shifting
without using the clutch.
NEVER RIDE MOTORCYCLE WITH CLUTCH PARTIALLY ENGAGED.
*Dyp^ ds vkaf'kd #i ls tqM+s g¨us dh fLFkfr esa e¨Vj&lkbZfdy dHkh u pyk,¡A
lko/kkuh %
1. <yku ij mrjrs le; b±tu dks can
u djsa ¼bXuh'ku Lfop dks vkWQ
ikst+h'ku ij½ o eksVjlkbZdy U;wVªy
esa Hkh u djsaA
<yku ij mrjrs le; ges'kk b±tu
dks pkyw j[ksa ¼bXuh'ku Lfop dks vkWu
ikst+h'ku ij½ o eksVjlkbZdy dks
xh;j esa j[ksaA
2. xh;j cnyrs le; ges'kk Dyp dk
ç;¨x djasA batu] V ªkaleh'ku rFkk
M ªkbo ykbu bl rjg ls fMt+kbu
ugh fd, x, gS fd ;g cnyrs gq,
vR;kf/kd ncko¨a d¨ lgu dj ldus
dh fLFkfr esa g¨rs gS rFkk f'k¯¶Vx
djrs le; Dyp ds ç;¨x u djus
ls ;s {kfrxzLr g¨ ldrs gSA
5.3
PG1_55.pmd 10/15/2006, 9:15 AM36
Page 37

dk;Z rFkk lokjh ls tqM+s vko';d rF;
OPERATION AND IMPORTANT RIDING POINTS
Tips for reducing fuel
consumption
b±/ku dh [kir de djus ds fVIl
Your Motorcycle’s fuel consumption
depends to a large extent on your
riding style.
vkidh e¨Vj&lkbZfdy esa b±/ku dh [k+ir]
vkids pykus ds rjhds ij fuHkZj djrh gSA
The following tips can help reduce fuel
consumption :
uhps fn, x, fVIl ¼fof/k;k¡½ b±/ku dh [k+ir
d¨ de djus esa lgk;d g¨ ldrs gS
1. Warm up the engine before riding.
e¨Vj&lkbZfdy pykus ls igys batu
d¨ FkksM+k xeZ djsaA
2. Lift up the Choke Lever as soon
as possible.
ftruh tYnh laHko g¨ *pkWd yhoj^ d¨
Åij dh rjQ mBk ysaA
3. Shift up swiftly and avoid high
engine speeds during
acceleration.
xh;j rst+h ls cnys vkSj xfr cM+krs
le; batu dks t+:jr ls vf/kd LihM+
u nsaA
:
4. Do not double-clutch or rev the
engine while shifting down and
avoid high engine speeds with
no load on the engine.
xkM+h d¨ fupys xh;j esa ykrs le;
Mcy Dyp dk ç;¨x u djsaA rFkk
batu ij y¨M u g¨us dh fLFkfr esa
batu ds rhoz osx ls cpsaA
5. Turn off the engine instead of
letting it idle for an extended
length of time, i.e. in traffic jams,
at traffic lights or rail-road
crossings.
tc vki T;knk nsj rd [kM+s gks rks
batu dk vkbZMy ij pyrs jgus dh
vis{kk mls can dj nsaA
mnkgj.k% VªSfQd tke esa]yky cÙkh
ij] jsyos Øk£lx ij bR;kfnA
6. Do not drive with excessive load
on the Motorcycle.
vR;kf/kd ot+u ds lkFk
e¨Vj&lkbZfdy u pyk,¡A
7. Plan your route in advance.
vius ;k=kk&ekxZ dh ;¨t+uk igys ls
gh cuk ysaA
5.4
8. Avoid frequent braking.
ckj&ckj czsd yxkus ls cpsaA
9. Always maintain your tyre
pressure as per
recommendation.
tSlk fd çLrkfor ¼flQkfj'k½ fd;k
x;k gS] ges'kk vius Vk;j esa gok ds
ncko d¨ cuk dj j[¨saA
10.Get your motorcycle serviced
periodically after every 2000 kms.
çR;sd 2000 fdñehñ ds varjky esa
lkef;d #i ls e¨Vj&lkbZfdy dh
lfoZl djok,¡A
Running-in jfuax&bu
There is never a more important period
in the life of your Motorcycle than the
period between zero and 1,000 km.
For this reason we ask that you
carefully read the following material.
Because the engine is brand new, you
must not put an excessive load on it
for the first 1,000 km. The various
parts in the engine wear and polish
themselves to the correct operating
clearances. During this period,
prolonged full throttle operation, or any
condition which might result in
excessive heating of the engine, must
be avoided.
PG1_55.pmd 10/15/2006, 9:15 AM37
Page 38

dk;Z rFkk lokjh ls tqM+s vko';d rF;
OPERATION AND IMPORTANT RIDING POINTS
vkids e¨Vj&lkbZfdy ds thou esa
1,000 fdñehñ ds chp dk le; lokZf/kd
0 ls
egRoiw.kZ gSA blh dkj.k gekjk lq>ko gS
fd vki fuEufyf[kr d¨ /;ku ls i<+saA
1,000 fdñehñ rd blds Åij
vkid¨
vR;f/kd ot+u ugh Mkyuk pkfg,A mfpr
vkWijs¯Vx Dyhjsal rd vkus ds fy;s batu
ds fofHké Hkkx bl vo/kh esa Lo;a f?klrs
v©j ikWfy'k g¨ tkrs gSA bl vof/k esa
iw.kZ FkzkWVy vkWijs'ku ¼fØ;k½ vFkok batu
ds vR;kf/kd xeZ g¨us okyh fLFkrh;ksa ls
cpuk pkfg,A
CAUTION :
Be sure to replace the engine oil as
per recommended schedule.
lko/kkuh :
batu ds rsy d¨ çLrkfor f'kM~;wy
¼lwph½ ds vuqlkj cnysaA
IT IS NOT RECOMMENDED TO RIDE THE MOTORCYCLE WITH CONSTANT THROTTLE
1,000 km and below :
Avoid prolonged full-throttle
operation. Vary speed
occasionally.
fdñehñ rFkk mlls de%&
1,000
foLr r laiw.kZ FkzkWVy fØ;k ls cpsaA
volj ds vuqlkj xfr cnyrs jgsaA
CAUTION :
If any engine trouble should occurs
during the “Running-in” period,
consult a YMIS dealer immediately.
lko/kkuh :
;fn jfuax&bu ¼Øfed½ le; ds n©jku
batu esa d¨bZ [k+jkch vkrh gS r¨
okbZñ,eñvkbZñ,lñ Mhyj ls laidZ djsaA
Parking
When parking the Motorcycle, stop
the engine and remove the ignition
key. Turn the fuel cock to “OFF”
whenever stopping the engine.
ik£dax
e¨Vj&lkbZfdy d¨ [kM+k djrs le; bat+u
d¨ can dj nsa rFkk bxuh'ku ¼Toyu½ dh
pkch d¨ ckgj fudky ysaA tc Hkh batu
OPENING FOR VERY LONG DISTANCE
5.5
dks can djuk gk rks] ¶;wy&dkWd d¨
vkWQ ds LFkku ij ys tk;saA
WARNING
The exhaust system is hot. Park
the Motorcycle in a place where
pedestrains or children are not
likely to touch the Motorcycle.Do
not park the Motorcycle on a slope
or soft ground; the Motorcycle may
overturn.
psrkouh
,DtkWLV&flLVe ¼/kq¡vk vkfn ds fudkl
dh ç.kkyh½ xeZ g¨rh gSA e¨VjlkbZfdy
d¨ ,slh txg ij [kM+k djsa tgk¡ ;g
iSny pyus oky¨a vFkok cPp¨ ds laidZ
esa u vkus ik,A e¨Vj&lkbZfdy d¨
<yku okyh vFkok uje txg ij [kM+k
u djss vU;Fkk ;g myV ldrh gSA
PG1_55.pmd 10/15/2006, 9:15 AM38
Page 39

lkef;d j[kj[kko rFkk ekewyh ejEer
PERIODIC MAINTENANCE AND MINOR REPAIR
Periodic inspection, adjustment and
lubrication will keep your Motorcycle
in the safest and most efficient
condition possible. Safety is an
obligation of the Motorcycle owner.
The maintenance and lubrication
schedule chart should be considered
strictly as a guide to general
maintenance and lubrication
intervals. Y O U M U S T TA K E
INTO CONSIDERATION THAT
WEATHER, TERRAIN,
GEOGRAPHICAL
LOCATIONS, AND A VARIETY
OF INDIVIDUAL USES ALL
TEND TO DEMAND THAT
EACH OWNER ALTER THIS
TIME SCHEDULE TO
SHORTER INTERVALS TO
MATCH THE ENVIRONMENT.
The most important points of
Motorcycle inspection, adjustment,
and lubrication are explained in the
following pages.
le;≤ ij dh xbZ tk¡p] ,WMtLVesaV
¼rkyesay½] rFkk Y;wczhsdss'ku] vkidh
e¨VjlkbZfdy d¨ vfr lqjf{kr rFkk tgk¡
rd laHko g¨] l{ke voLFkk esa j[ksaxhA
e¨VjlkbZfdy ds ekfyd dh viuh
ftEesnkjh gSA j[kj[kko] Y;wczhds'ku lwph
pkVZ d¨ lkekU; esaVhusal rFkk Y;wczhds'ku
O;oLFkk ds fy, xaHkhjrk ls ,d xkbM dh
rjg le>uk pkfg,A vkid¨ ;g ckrsa
/;ku esa j[kuh pkfg, fd e©le] Hkwfe]
Hk©x¨fyd LFkku rFkk O;fDr }kjk fHké rjhds
ls ç;¨x vkfn lHkh ;g ek¡x djrs gS fd
gj ,d e¨Vj&lkbZfdy ekfyd ekg©y d¨
,d tSlk cukus ds fy, le;&lwph d¨
Fk¨M+s ls Fk¨M+s le; ds varj ¼varjky½ esa
ifjo£rr djrk gSA e¨Vj&lkbZfdy dh
tk¡p] ,WMtLVesaV] rFkk Y;wczhsdss'ku ds vfr
egÙoiw.kZ dk;kZ±s dk o.kZu vxys i "B¨a ij
fd;k x;k gSA
WARNING
If you are not familiar with
Motorcycle service, this work
should be done by a YMIS DEALER.
psrkouh
;fn vki e¨Vj&lkbZfdy dh *l£ol^ djus
ds rjhd¨ ls ifjfpr ugh gS r¨ ;g dk;Z
okbZñ,eñvkbZñ,lñ Mhyj d¨ gh djus nsaA
6.1
1
1
1. Tool kit Vwy&fdV
Tool kit Vwy&fdV
The service information included in
this manual is intended to provide
you, the owner, with the necessary
information for completing some of
your own preventive maintenance
and minor repairs. The tools
provided in the owner’s tool kit are to
assist you in the performance of
periodic maintenance. However,
some other tools such as a torque
wrench are also necessary to
perform the maintenance correctly.
bl xzkgd&iqfLrdk ds lkFk l£ol dh
lwpuk g¨us dk vFkZ gS& vkid¨
e¨VjlkbZfdy ds ekfyd d¨ t:jh lwpuk
miyC/k djkuk rkfd ekewyh fjis;j rFkk
dqN fçosafVo esaVhusal ¼çfrca/kd j[kj[kko½
PG1_55.pmd 10/15/2006, 9:15 AM39
Page 40

lkef;d j[kj[kko rFkk ekewyh ejEer
PERIODIC MAINTENANCE AND MINOR REPAIR
ds dk;Z d¨ iwjk fd;k tk ldsA
e¨Vj&lkbZfdy ekfyd dh Vwy&fdV esa
çnku fd, x, v©t+kj vkid¨ le;cð
j[kj[kko d¨ vatke nsus esa lgk;rk djrs
gSA tcfd esaVhusal ¼j[kj[kko½ d¨ lgh
rjhds ls iwjk djus ds fy, ÞVkdZ&jsapß
tSls nwljs v©t+kj g¨uk Hkh t#jh gSA
NOTE :
If you do not have necessary tools
required during a service operation,
take your Motorcycle to a YMIS dealer
for service.
u¨V %
;fn l£ol&dk;Z ds fy, vkids ikl
vko';d v©t+kj ¼;a=k½ ugh gS r¨ vki
e¨Vj&lkbZfdy d¨ okbZñ,eñvkbZñ,lñ Mhyj
ds ikl ys tk,¡A
KEEP YOUR MOTORCYCLE TUNED IN PERFECT CONDITION
viuh e¨Vj&lkbZfdy d¨ gj rjg ls vPNh gkyr esa j[ksaA
WARNING
Modifications to this Motorcycle not
approved by YAMAHA may cause
loss of performance, and render it
unsafe for use. Consult a YMIS dealer
before attempting any changes.
psrkouh
;kekgk dh LohÑfr ds fcuk e¨Vj&lkbZfdy
esa fdlh rjg dk cnyko bldh
dk;Zdq'kyrk ds fy, gkfudkjd g¨ ldrk
gSA fdlh Hkh rjg ds ifjorZu djus ls
igys okbZñ,eñvkbZñ,lñ Mhyj ls ijke'kZ
ysaA
PG1_55.pmd 10/15/2006, 9:15 AM40
6.2
Page 41

PERIODIC MAINTENANCE AND MINOR REPAIR
PREVENTIVE MAINTENANCE SCHEDULE
S.NO. ITEM OPERATION
1. VALVES
2. SPARK PLUG
3. CARBURETOR
4. AIR FILTER*
5. FUEL LINE
6. FUEL FILTER
7. ENGINE OIL
ENGINE OIL
8.
FILTER SCREEN
BRAKE FRONT
9.
& REAR
BRAKE SHOES-
10.
FRONT & REAR
11. CLUTCH
REAR ARM
12.
PIVOT
13. WHEELS
Check valve clearances, adjust if necessary.
Check condition, gap;
Clean and reset if necessary.
Check idle speed, Choke lever operation.
Clean, inspect & lubricate. (Replace if necessary)
Check fuel hose, for cracks or damage.
Replace if necessary.
Check for free flow of petrol, cleanliness of filter bowl,
Replace if necessary.
Replace with recommended oil - Yamalube SG Grade
(Warm engine before draining)
Wash with petrol
Check operation./Adjust if necessary.
Grease the brake cam.
Check for wear, replace if necessary.
Check alignment marks on Push Lever and
Crankcase L.H. Adjust if necessary.
Check Rear Arm assembly for looseness.
Tighten with specified Torque if necessary.
Check runout, spoke tightness, damage;
Correct it, if necessary.
lkef;d j[kj[kko rFkk ekewyh ejEer
I-VI VII-VIII IX-X XI-XV
FREE PAID
SERVICE
BONUS
FREE
••• ••
••• ••
REPLACE EVERY 10,000 km
••• ••
•••
•••
••
••
••• ••
•••
••
••• ••
•••
•••
•••
•••
•••
••
••
••
••
••
PAID
EVERY
2000
KM
PG1_55.pmd 10/15/2006, 9:15 AM41
6.3
Page 42

lkef;d j[kj[kko rFkk ekewyh ejEer
PERIODIC MAINTENANCE AND MINOR REPAIR
PREVENTIVE MAINTENANCE SCHEDULE
S.NO. ITEM OPERATION
14 . WHEEL BEARING
15 . STEERING BEARING
16 . FRONT FORKS
REAR SHOCK
17.
ABSORBER
18 . DRIVE CHAIN
NUTS, BOLTS AND
19.
FASTENERS
Check Bearing assembly for looseness, damage;
Replace if necessary.
Check Bearing assembly for looseness;
Correct if necessary.
Check operation/oil leakage. Repair if necessary.
Check operation/oil leakage. Repair if necessary.
Check chain slack, alignment. Adjust if necessary.
Clean & lubricate periodically.
Check all Chassis fittings and fasteners for looseness
Tighten as per specification.
Replace grease
Replace grease
Replace oil
SERVICE
PAID
EVERY
2000
KM
I-VI VII-VIII IX-X XI-XV
FREE PAID
BONUS
FREE
••• ••
••• ••
EVERY 10,000 km
EVERY 10,000 km
••• ••
EVERY 10,000 km
••• ••
••• ••
••• ••
20.
CENTER STAND
21 . BATTERY
CONTROL CABLES
-THROTTLE
22.
-CLUTCH
-FRONT BRAKE
IT IS RECOMMENDED THAT THE ABOVE BE SERVICED BY AUTHORIZED YMIS DEALER.
*
SERVICE MORE FREQUENTLY WHEN THE VEHICLE IS DRIVEN IN DUSTY AREAS.
PG1_55.pmd 10/15/2006, 9:15 AM42
Check operation and lubricate if necessary.
Check electrolyte level and top it up if necessary.
Check specific gravity and charge if required.
Check breather pipe for blockage and routing.
Check operation, free play, cable damage
Readjust or replace as required.
6.4
••• ••
EVERY MONTH
••• ••
Page 43

Øe
la[;k
oLrq
1. okYo
2. LikdZ Iyx
3. dkc¨ZjsVj
4. ,;j fQYVj *
5. ¶;wy ykbu
6. ¶;wy fQYVj
7. batu vkW;y
batu vkW;y
8.
fQYVj LØhu
fiNyh rFkk
9.
vxyh czsd
vxys ,oa
10.
fiNys czsd 'kwt+
11. Dyp
fiNyh
12.
vkeZ fioV
13. ifg,
lkef;d j[kj[kko rFkk ekewyh ejEer
PERIODIC MAINTENANCE AND MINOR REPAIR
fçosafVo esafVusal ¼çfrca/k j[kj[kko½ lwph
dk;Z ¼vkWijs'ku½
okYo dh Dyh;jsal dh tk¡p djsaA
;fn vko';d g¨ r¨ O;ofLFkr djsaA
fLFkfr ,oa xSi dh tk¡p djsaA
;fn vko';d g¨ r¨ lkQ djsaA
pkWd yhoj dk dk;Z rFkk vkn'kZ xfr dh tk¡p djsaA
;fn vko';d g¨ r¨ lgh djsaA
,;j fQYVj dks tk¡p djsa] lQkbZ djsa o Y;wczhdsV djsa
;fn vko';d g¨ r¨ cny nssaA
¶;wy g©t+ d¨ {kfr rFkk njkj¨a ds fy, tk¡psA
;fn vko';d g¨ r¨ cny nssaA
iSVªksy ds cgko] fQYVj ckWÅy dh lkQkbZ dh tk¡p djsaA
;fn vko';d g¨ r¨ cny nsaaA
çLrkfod rsy ls cny nsaA
¼igys ds rsy d¨ cgkus ls igys bat+u d¨ Fk¨M+k xeZ djsa½
iSVª¨y ls /k¨,¡A
dk;Z dh tk¡p djsaA ;fn vko';d g¨ r¨ O;ofLFkr djsaA
(czsd dh dSe ij xzhl yxk,¡A)
f?klko ds fy, ns[ksaA
;fn vko';d g¨ r¨ cny nssaA
ckb± v¨j ds Ø®d dsl rFkk iq'k yhoj ij i¯Drcð ¼,ykbuesaV½
fpUg¨a dh tk¡p djsaA ;fn vko';d g¨ r¨ O;ofLFkr djsaA
fiNyh rjQ dh ihNs okyh vkeZ vlsacyh ds <hysiu dh tk¡p djsaA
;fn vko';d g¨ r¨ fu£n"V VkdZ ij dl nsaA
ju vkÅV] rhyh;¨a ds dlko rFkk {kfr dh tk¡p djsaA
;fn vko';d g¨ r¨ Bhd djsaA
6.5
lsok,¡
I-VI VII-VIII
eq¶r
Hkqxrku
•• • ••
•• • ••
çR;sd 10,000 fdñehñ ij cny nsa
•• • ••
•• • ••
•• • ••
•• • ••
•• • ••
•• • ••
•• • ••
•• • ••
•• • ••
•• • ••
•• • ••
IX-X XI-XV
c¨ul eq¶r
Hkqxrku
çR;sd
2000
fdñehñ ij
PG1_55.pmd 10/15/2006, 9:15 AM43
Page 44

lkef;d j[kj[kko rFkk ekewyh ejEer
PERIODIC MAINTENANCE AND MINOR REPAIR
fçosafVo esafVusal ¼çfrca/k j[kj[kko½ lwph
Øe
la[;k
14. ifg, ds cS¯jx
15. LVh¯jx ds cS¯jx
16. vxys QkWdZ
17.
fiNys 'kkWd&vCt+kcZj
18. Mªkbo psu
uV] c¨YV rFkk
19.
QkLVulZ
20.
lsaVjLVSaM
cSVjh
21.
fu;a=k.k dsoy
& FkzkWVy
22.
& Dyp
& vxyh czsd
*
oLrq dk;Z ¼vkWijs'ku½
{kfr ,oa <hysiu ds fy, cS¯jx vlsacyh dh tk¡p djsaA
;fn vko';d g¨ r¨ cny djsaA
f'kfFkyrk ds fy, cS¯jx vlsacyh dh tk¡p djsaA
;fn vko';d g¨ r¨ Bhd djsaA
QkWdZ ds dk;Z vFkok rsy ds fjlko dh tk¡p djsaA
;fn vko';d g¨ r¨ bldh ejEer djsaA
'kkWd&vCt+kcZj ds dk;Z vFkok rsy ds fjlko dh tk¡p djsaA
;fn vko';d g¨ r¨ bldh ejEer djsaA
psu dh f'kfFkyrk] iafDrcðrk d¨ tk¡psA
lkQ djsa v©j yqczhdsV djsaA
psfll dh lHkh fQ¯Vx v©j QkLVulZ d¨ f'kfFkyrk ds fy, tk¡psA
ekun.M¨a ds vuqlkj dl nsaA
dk;Z dh tk¡p djsaA
;fn vko';d g¨ r¨ yqczhdsV djsaA
bySDVª¨ykbV ds Lrj ¼ysoy½ dh tk¡p djsaA ;fn vko';d g¨ r¨
bls Åij ds Lrj rd Hkj nsaA vkisf{kr ?kuRo dh tk¡p djsaA;fn
vko';d g¨ r¨ bls pktZ dj ysaA ok;q uyh ¼czhnj ikbi½ dk
#dkoV ,oa lgh ekxZ ds fy, fufj{k.k djsaA
{kfr] Ýh&Iys] ,oa dk;Z dh tk¡p djsaA
ek¡x ds vuq:i djsa vFkok cny MkysaA
;g çLrkfor fd;k tkrk gS fd mij¨Dr lHkh lsok,¡ vf/kÑr okbZñ,eñvkbZñ,lñ Mhyj }kjk gh yh tkuh pkfg;sA
okgu ¼e¨Vj&lkbZfdy½ d¨ jsrhys bykd¨a esa pykus ij vf/kd 'kh?kzrk ls *l£ol^ djk,¡A
6.6
fQj ls xzhl HkjsaA
fQj ls xzhl HkjsaA
rsy cnysaA
lsok,¡
I-VI VII-VIII
eq¶r
Hkqxrku Hkqxrku
IX-X XI-XV
c¨ul eq¶r
••• ••
çR;sd 10,000 fdñehñ ij
••• ••
çR;sd 10,000 fdñehñ ij
••• ••
çR;sd
10,000 fdñehñ ij
••• ••
••• ••
••• ••
••• ••
çR;sd
2000
fdñehñ ij
çR;sd ekl
••• ••
PG1_55.pmd 10/15/2006, 9:15 AM44
Page 45

lkef;d j[kj[kko rFkk ekewyh ejEer
PERIODIC MAINTENANCE AND MINOR REPAIR
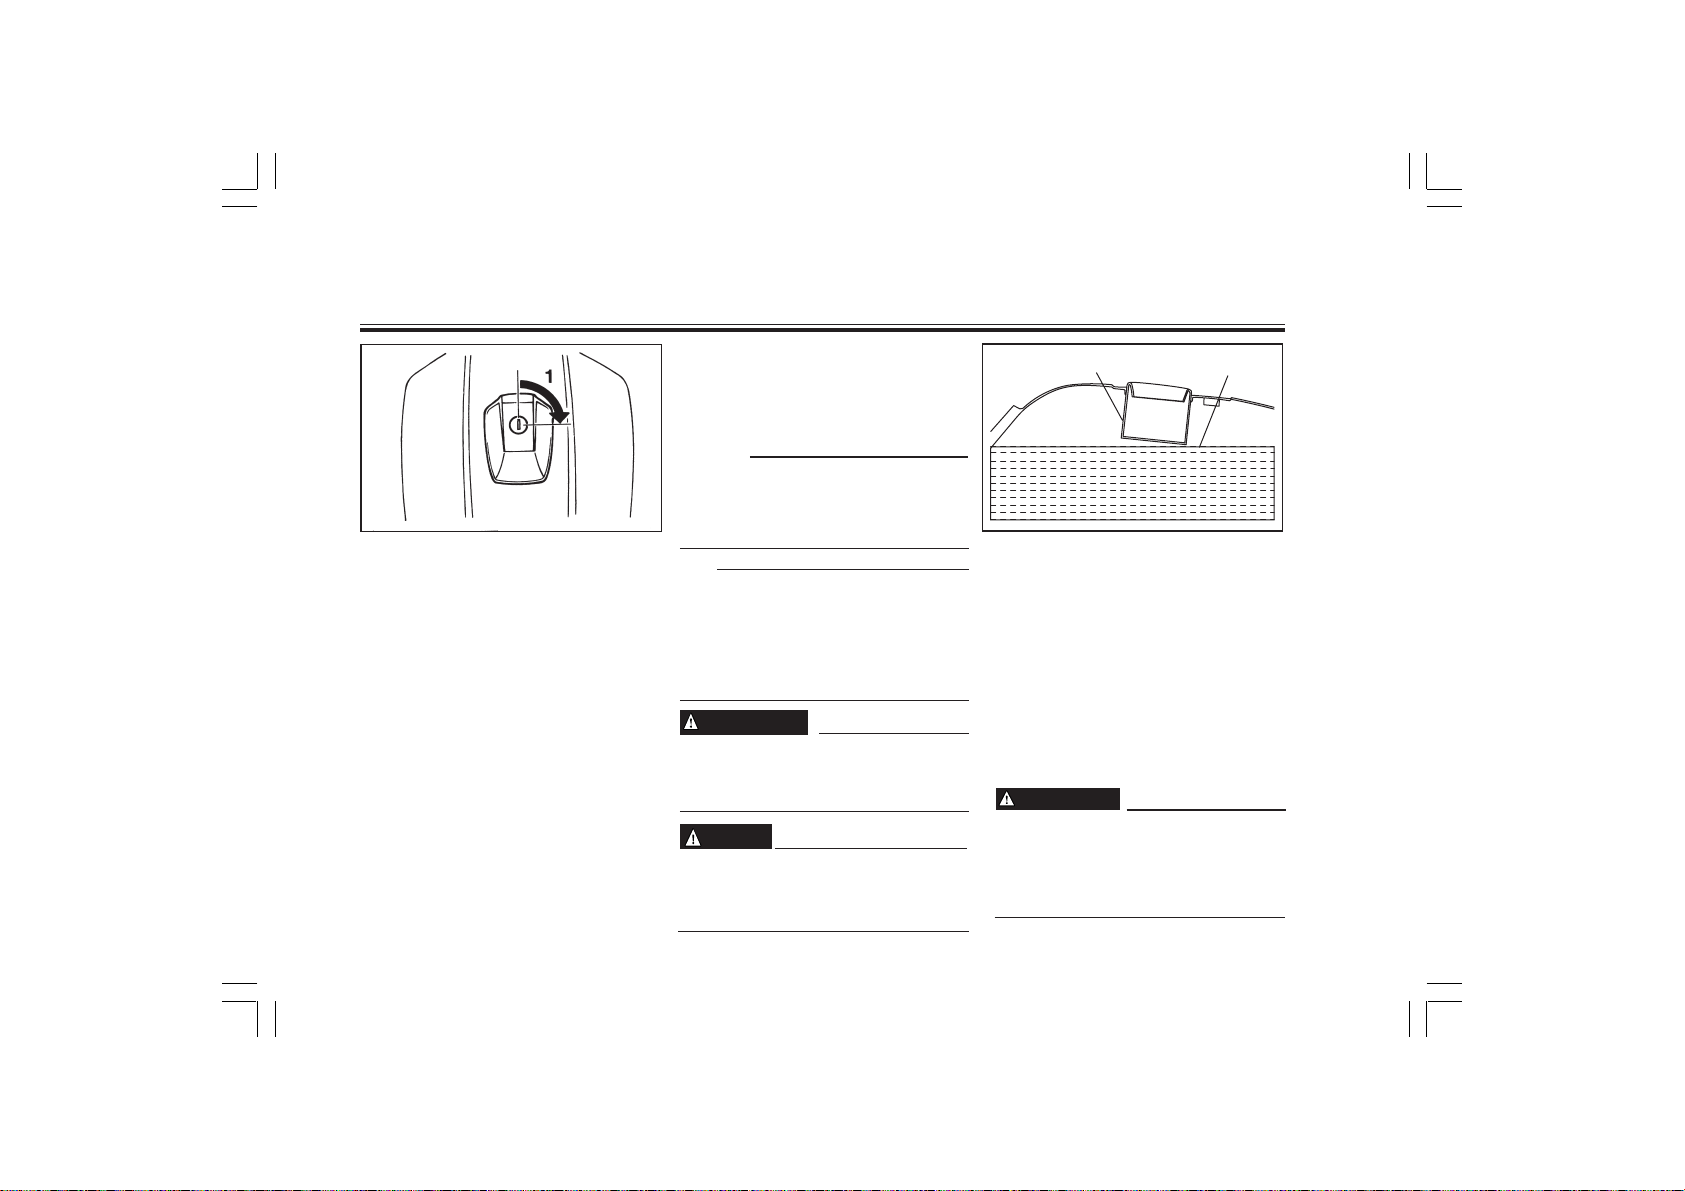
1
1. Panel A iSuy &,
Panel removal and
installation
iSuy d¨ gVkuk rFkk yxkuk
The panels illustrated need to be
removed to perform some of the
maintenance described in this
manual. Refer to this section each
time a panel has to be removed or
reinstalled.
n'kkZ, x, fp=k¨ ds vuqlkj bl
xzkgd&iqfLrdk esa j[kj[kko ds fo"k; esa
t¨ dqN Hkh crk;k x;k gS mlds fy,
iSuy¨a d¨ gVkus dh t#jr iM+rh gSA
tc Hkh iSuy d¨ gVkuk gks rks bl [kaM dh
lgk;rk ysaA
2
1. Panel B iSuy&ch
2
3
1
1. Lug yx
2. Panel A iSuy&,
3. Panel Lock iSuy dk ykWd ¼rkyk½
Removal of Panel A
iSuy *,^ d¨ gVkuk
Unlock the panel.
Pull the lug 1 towards you to remove
it from the fuel tank.
Slide the panel A towards the rear
end of the motorcycle for removing
the lug 2 to free the panel.
iSuy ds ykWd ¼rkys½ d¨ [k¨ysaA isuy dks
b±/ku dh Vadh ls vyx gVkus ds fy, yx
1 d¨ viuh rjQ [khpsaA yx uañ 2
uañ
d¨ gVkus ,oa iSuy d¨ Lora=k :i ls
vyx djus ds fy, iSuy&, d¨
e¨VjlkbZfdy dh fiNyh rjQ f[kldk,¡A
PG1_55.pmd 10/15/2006, 9:15 AM45
6.7
Page 46

lkef;d j[kj[kko rFkk ekewyh ejEer
PERIODIC MAINTENANCE AND MINOR REPAIR
2
1
1
1. Lug yx
2. Panel B iSuy&ch
Removal of Panel B
2
iSuy&ch d¨ gVkuk
Loosen screw and follow the same
procedure as for removing panel A.
isap d¨ <hyk dj ysa rFkk ogh rjhdk
viuk,¡] ftls iSuy ^,^ d¨ gVkus esa ç;qDr
fd;k gSA
2
1
1. Lug yx
2. Lug yx
Installation of Panel A
iSuy *,^ d¨ yxkuk
Slide the panel towards the front of
the motorcycle for inserting the lug
¿ in the slot given in the frame.
Insert and push the lug À in the fuel
tank ensuring proper seating.
After proper seating of the panel A,
lock it.
Ýse esa fn, x, [kk¡psa ¼Ly¨V½ esa yx uañ ¿
d¨ cSBkus ds fy, iSuy d¨ e¨Vj&lkbZfdy
ds lkeus dh v¨j [khapsaA
lgh rjg ls cSBus ds fy, yx À d¨
b ±/ku dh Vadh esa cSBk,¡ v©j uhps dh v¨j
nck bls *ykWd^ dj nsaA
iSuy *,^ ds lgh <ax ls lSV gks tkus ij bls
ykWd dj nsaA
6.8
2
1
1
1. Lug yx
2. Lug yx
Installation of Panel B
iSuy *ch^ d¨ yxkuk
Following the same procedure as
given for installation of panel A and
tighten the screw for locking.
iSuy *,^ d¨ yxkus ds fy, t¨ rjhdk
viuk;k gS] iSuy *ch^ ds fy, mlh rjhds
dks viuk;sa vkSj isp d¨ dl nsaA
PG1_55.pmd 10/15/2006, 9:15 AM46
Page 47

lkef;d j[kj[kko rFkk ekewyh ejEer
PERIODIC MAINTENANCE AND MINOR REPAIR
1. Spark plug gap LikdZ Iyx dk xSi
Spark plug inspection
LikdZ Iyx dk fujh{k.k
The spark plug is an important
engine component and is easy to
inspect. The condition of the spark
plug can indicate the condition of the
engine. The ideal color on the white
insulator around the center electrode
is a medium-to-light tan color for a
Motorcycle that is being ridden
Normally. Do not attempt to diagnose
any problems yourself. Instead, take
the Motorcycle to a YMIS dealer. You
should periodically remove and
inspect the spark plug because heat
and deposits will cause the spark
plug to slowly break down and erode.
If electrode erosion becomes
excessive, or if carbon and other
deposits are excessive, you should
replace the spark plug with the
specified plug.
LikdZ Iyx batu dk egÙoiw.kZ iqtkZ gS
rFkk bldh tk¡p djuk cgqr t#jh gSA
LikdZ Iyx dh fLFkfr ls batu dh gkyr
dk irk yxk;k tk ldrk gSA chp dh
bysDVª¨M ds pkj¨ rjQ lQsn balqysVj ds
Åij vkn'kZ jax] e/;e&gYdk Hkwjk gS t¨
;g n'kkZrk gS fd e¨VjlkbZfdy d¨
lkekU;r% lgh rjhds ls pyk;k tk jgk
gSA fdlh çdkj dh leL;kv¨a dk funku
djus ds fy, Lo;a ç;Ru u djsaA
e¨VjlkbZfdy d¨ okbZñ,eñvkbZñ,lñ Mhyj
ds ikl ys tk,¡A vkid¨ le;≤ ij
Iyx ckgj fudky dj mldh tk¡p djrs
jguk pkfg,] D;¨afd Å"ek rFkk tes gq,
d.k /khjs&/khjs LikdZ Iyx dh dk;Z&izzzzzzzðfr
d¨ [kjkc dj nsrs gS v©j bls u"V dj nsrs
gSA ;fn bysDVª¨M dk fljk
) cgqr T;knk [kjkc g¨ tkrk gS
fgLlk
(Åij dk
vFkok bl ij dkcZu rFkk nwljs tek d.kks
dh vf/kdrk c<+ tkrh gS r¨ vkid¨ bl
*LikdZ Iyx^ d¨ fu£n"V fd, x, Iyx ls
cny nsuk pkfg,A
6.9
Specified spark plug
fu£n"V fd;k x;k LikdZ Iyx %
P-RA7HC (Champion)
Before installing the spark plug,
measure the electrode gap with a
wire thickness gauge; adjust the gap
to specification as necessary.
LikdZ Iyx yxkus ds igys bysDVª¨M ds
(xSi) d¨ ok;j xst }kjk uki yasA tSlk
Hkh vko';d g¨ bl varj d¨ fu£n"Vuqlkj
(o£.kr&fof/k) ls O;ofLFkr djsA
A-Spark plug gap: 0.9mm(-0.2 mm)
,-&LikdZ Iyx dk xsi:0.9feñehñ(-0.2 feñehñ)
When installing the plug, always
clean the gasket surface and use a
new gasket. Wipe off any grime from
the threads and tighten the spark
plug to the specified torque.
Iyx yxkrs le; ges'kk xSlfdV ds ry
d¨ lkQ djs rFkk u;k xSlfdV yxk;saA
(FkzSM~l) ij yxh xanxh d¨ i¨aN Mkysa
pwM+h
v©j bls fu£n"V VkdZ rd dl nsA
PG1_55.pmd 10/15/2006, 9:15 AM47
Page 48

lkef;d j[kj[kko rFkk ekewyh ejEer
PERIODIC MAINTENANCE AND MINOR REPAIR
Tighten torque dlk gqvk VkdZ :
Spark plug LikdZ Iyx :
12 ft-lb (1.75 m-kg)
NOTE :
If a torque wrench is not available
when you are installing a spark plug,
a good estimate of the correct torque
is 1/4 to 1/2 turn past finger using a
box spanner.
u¨V %
LikdZ Iyx yxkrs le; ;fn VkdZ jsap
miyC/k u r¨ gkFk ls iwjk dlus d ckn
ckWDl&Lisuj ls ,d p©FkkbZ ls vk/kh pwM+h
rd ?kqek,¡A
ALWAYS USE ONLY THE STANDARD RECOMMENDED MAKE AND TYPE OF SPARK PLUG.
gess'kk dsoy çLrkfod çekf.kd uke ds cus rFkk vkn'kZ LikdZ Iyx gh ç;¨x djsA
PG1_55.pmd 10/15/2006, 9:15 AM48
6.10
Page 49

1. Engine oil filter cap
batu vkW;y fQYVj dSi
Engine oil
batu dk rsy
1. Oil level measurement
rsy ds Lrj dks ukiukA
a. Place the Motorcycle on the
centerstand. Warm up the engine
for several minutes.
,- e¨VjlkbZfdy d¨ lSaVj LVSaM ij [kM+k
dj nsaA batu d¨ dbZ feuV¨a rd
/khjs&/khjs xeZ djsaA
lkef;d j[kj[kko rFkk ekewyh ejEer
PERIODIC MAINTENANCE AND MINOR REPAIR
NOTE :
Be sure the Motorcycle is positioned
straight up when checking the oil
level. A slight tilt toward the side can
result in false readings.
u¨V %
;g lqfuf'pr djs fd rsy dk Lrj ns[krs
le; e¨Vj&lkbZfdy viuh txg ij lh/kh
[kM+h jgsA ,d rjQ d¨ Fk¨M+k lk Hkh
>qdko jgus ls jh¯Mx xyr g¨ ldrh gSA
1. Maximum level mPpre Lrj
2. Minimum level fuEure Lrj
NOTE :
Wait a few minutes until the oil level
settles before checking.
u¨V %
tk¡p djus ls igys tc rd vWk;y dk
Lrj ¼ysoy½ fLFkj u g¨ tk, rc rd
dqN feuV¨a ds fy, çrh{kk djsA
PG1_55.pmd 10/15/2006, 9:15 AM49
ALWAYS CHANGE ENGINE OIL AT RECOMMENDED INTERVALS
FOR OPTIMUM ENGINE PERFORMANCE AND ENGINE LIFE
6.11
Page 50

lkef;d j[kj[kko rFkk ekewyh ejEer
PERIODIC MAINTENANCE AND MINOR REPAIR
b. Unscrew the dipstick and rest it
on the threads of the oil filler hole.
The oil level should be between
the minimum and maximum
mark on the dipstick. If the level
is low, add oil to raise it to the
specified level.
ch- fMikfLVd d¨ [k¨y ysa v©j bls
fQyj ds Nsn ij fVdk nsaA vkW;y
dk ysoy fMikfLVd ds fuEure o
mPpre fu'kku ds e/; esa g¨uk pkfg,A
;fn ysoy de yxs r¨ bls c<+kus ds
fy, fu£n"V Lrj rd rsy MkysaA
1. Dipstick fMifLVd
2. Engine oil replacement
batu&rsy d¨ cnyuk
a. Warm up the engine for a few
minutes.
dqN feuV¨ ds fy, batu d¨ xeZ
djsaA
b. Stop the engine. Place an oil pan
under the engine and remove
the dipstick.
batu d¨ can dj nsA batu ds uhps
,d vkW;y iSu ¼crZu½ j[k ysa rFkk
fMikfLVd d¨ ckgj fudky ysaA
batu dh vf/kd dk;Z{kerk rFkk nh?kZ thou ds fy, batu&vkW;y d¨ ges'kk çLrkfor
PG1_55.pmd 10/15/2006, 9:15 AM50
varjky¨ ij cnyrs jgsaA
6.12
Page 51

lkef;d j[kj[kko rFkk ekewyh ejEer
PERIODIC MAINTENANCE AND MINOR REPAIR
1
1. Engine oil drain plug batu vkW;y Mªsu Iyx
c. Remove the drain plug and drain
the oil.
Mªsu Iyx dks [kksy dj ckgj fudky
ysa v©j rsy dks fudyus nsaA
d. Reinstall the drain plug and
tighten it to the specified torque.
Mªsu Iyx dks fQj ls yxk nsa v©j bls
fu£n"V VkdZ rd dl nsaaA
ALWAYS CHANGE ENGINE OIL AT RECOMMENDED GRADE OF ENGINE OIL
ges'kk dsoy çLrkfod xzsM dk batu&vkW;y gh ç;ksx djsaA
Tightening torque dlk x;k VkdZ %
Drain plug Mªsu Iyx %
14.5 Lt.-lb (2.0 m-kg)
e. Fill engine with oil and install the
dipstick.
batu dks rsy ls Hkj ysa v©j fMikfLVd
dks mlesa yxk nsaA
Recommended oil:
YAMALUBE 4 stroke motor oil
(20 W 40 type SG) or equivalent.
Oil quantity:
Total amount : 1.2 L
Periodic oil change : 1.0 L
çLrkfod rsy %
;kekY;wc&
20 M~CY;w 40 Vkbi ,l th½ vFkok
¼
4 LVªksd eksVj vkW;y
mlds leku½
rsy dh ek=kk %
dqy ek=kk %
1.2 fyñ
le;≤ ij rsy esa
ifjorZu %
6.13
1.0 fyñ
f. Start the engine and warm up for
a few minutes. While warming
up, check for oil leakage. If oil
leakage is found, stop the engine
immediately and check for the
cause.
batu dks pkyw djsa v©j dqN feuVksa
ds fy, FkksM+k xeZ djrs le; rsy ds
fjlko dh tk¡p dj ysaA ;fn rsy
*yhd^ dj jgk gks rks batu dks rqjar
can dj nsa vkSj dkj.k dh tk¡p djsaA
PG1_55.pmd 10/15/2006, 9:15 AM51
Page 52

lkef;d j[kj[kko rFkk ekewyh ejEer
PERIODIC MAINTENANCE AND MINOR REPAIR
1
2
1
1. Air filter case cover ,;j&fQYVj dsl
2. Screw ( ×3) isap ( ×3)
Air filter ,;j&fQYVj
The air filter should be cleaned at
the specified intervals. It should be
cleaned more frequently when riding
in unusually wet or dusty areas.
,;j&fQYVj dks fu£n"V le;kodk'kksa ij
lkQ djrs jguk pkfg,A jsrhys vFkok
fo'ks"k ueh okys {ks=kks esa ;k=kk ds n©jku bls
ckj&ckj lkQ djuk pkfg,A
1. Remove panel B. (See page 6-8
for removal and installation
procedures.)
iSuy ch dks gVk ysa ¼bls yxkus o
gVkus dh çfd;k ds fy, i "B lañ
6-8 ns[ksaA
PG1_55.pmd 10/17/2006, 8:31 AM52
1. Air filter element ,;j&fQYVj ,yhesaV
2. Remove the air filter case fitting
screws and the air filter case
cover.
,;j&fQYVj dsl esa yxs gq, isapksa
rFkk ,;j&fQYVj ds <Ddu ¼daoj½
dks [kksy dj vyx gVk ysaA
3. Remove the spring wire.
¯Lçx ok;j dks dsl esa ls ckgj fudky
ysaA
4. Remove the air filter from the
case.
,;j&fQYVj dks dsl esa ls ckgj
fudky ysaA
5. Remove the air filter elements
from the frame and clean them
6.14
1. Air filter element ,;j&fQYVj ,yhesaV (×2)
2. Frame
3. Spring Wire ¯Lçx ok;j
Ýse
with solvent (kerosene). After
cleaning, remove the remaining
solvent (kerosene) by squeezing
the elements.
,;j&fQYVj ds ewy fgLlks dks Ýse
ls ckgj fudky ysa v©j mUgs nzkod
¼feêh ds rsy½ ls lkQ dj ysaA lQkbZ
djus ds ckn cps gq, nzkod ¼feêh ds
rsy½ dks ewy fgLlks ls fupksM+ dj
vyx dj ysaA
6. Apply recommended oil to the
entire surface of the each
element and squeeze out the
Page 53

lkef;d j[kj[kko rFkk ekewyh ejEer
PERIODIC MAINTENANCE AND MINOR REPAIR
excess oil. They should be wet
but not dripping.
çR;sd ewy Hkkx dh van#uh lrg ij
çLrkfod rsy gh yxk, v©j Qkyrw
rsy ds fupksM+ ysA os ¼ewy Hkkx½ xhys
gksus pkfg, u fd rsy esa Mwcs gq,A
Recommended oil çLrkfod rsy :
20W40 type SG
7. Pull the air filter elements over
the frame and install the air filter
in the case.
,;j&fQYVj ds ,yhesaV ¼ewy&fgLlksa½
dks Ýse ds Åij ls [khap ys rFkk
,;j&fQYVj dks dsl ds vanj yxk nsaA
8. Install the Spring Wire.
¯Lçx okW;j Hkh yxk,¡A
9. Install the air filter case cover and
panel
,;j&fQYVj dsl ds doj v©j iSuy
dks yxk nsaA
CAUTION :
Do not twist Element Air Cleaner.
lko/kkuh:
,;j&fQYVj ,fyesaV dks u ?kqek;saA
WARNING
Ensure no distortion/proper
positioning of felt seal 1 if damaged
contact YMIS dealer.
psrkouh
QsYV lhy 1 lgh rjg ls yx;sa vxj [kjkc
gks rks okbZñ ,eñ vkbZñ ,lñ ds Mhyj ls laidZ
djsaA
1
CAUTION :
• Make sure the air filter is
properly seated in the air filter
case.
• The engine should never be run
without the air filter installed.
Excessive piston and/or
cylinder wear may result.
• Dirty Element Air Cleaner
causes excessive fuel
consumption and loss of
power.
• Clean Element Air Cleaner after
every 2000 kms.
• The Element Air Cleaner should
be cleaned and lubricated more
frequently (every 1000 km,s), if
Motorcycle is operated in very
dusty (e.g. unpaved, dust laden
roads) conditions.
lko/kkuh %
• ;g lqfufpr djsa fd ,;j&fQYVj
lgh <ax ls ,;j&fQYVj dsl esa cSB
tk,A
PG1_55.pmd 10/17/2006, 8:31 AM53
6.15
Page 54

lkef;d j[kj[kko rFkk ekewyh ejEer
PERIODIC MAINTENANCE AND MINOR REPAIR
• ,;j&fQYVj dks yxk, fcuk batu
dHkh Hkh ugh pykuk pkfg,A blds
dkj.k fiLVu v©j flysaMj dk f?klko
vf/kd gks ldrk gSA
• /kwy feêh ls Hkjs xans Þ,yhesaV ,;j
Dyhujß ls rsy dh [kir cgqr c<+
tkrh gS rFkk 'kfDr ¼ikWoj½ dh {kfr
gksrh gSA
• ,yhesaV ,;j Dyhuj dks çR;sd 2000
fdñehñ ds ckn lkQ djsaA
• ;fn eksVjlkbZfdy dks cgqr /kwy&feêh
;qDr fLFkfr;ksa esa pyk;k tkrk gS rks
,yhesaV ,;j Dyhuj dh lQkbZ rFkk
Y;qczhdsa'ku T;knk 'kh?kzrk ls gksuk
pkfg, ¼çR;sd
Carburetor adjustment
1000 fdñehñ ij½A
dkc¨ZjsVj dks lSV djuk
The carburetor is a vital part of the
engine and requires very
sophisticated adjustments. Most
adjustments should be left to a YMIS
dealer who has the professional
knowledge and experience to do so.
However, the following may be
serviced by the owner as part of
routine maintenance.
dkc¨ZjsVj batu dk ,d egÙoiw.kZ Hkkx
g¨rk gS v©j bldh ,MtLVesaV mPp
rduhd }kjk djuh iM+rh gSA cgqr lh
,MtLVesaVl ¼rky&esy½ d¨
okbZñ,eñvkbZñ,lñ Mhyj ds Åij N¨M+
nsuk pkfg,] ftUgs bl rjg dk dke djus
dk i;kZIr vuqHko rFkk O;olkf;d Kku
gSA tcfd fuEufyf[kr dks e¨VjlkbZfdy
dk ekfyd vke ejEer dh rjg dj
ldrk gSSA
CAUTION :
The carburetor is set at the YMIS
factory after many tests. If the
settings are changed, poor engine
performance and damage may
result.
lko/kkuh:
vusd¨ VsLV djus ds ckn dkc¨ZjsVj d¨
okbZñ,eñvkbZñ,lñ dkj[kkus esa O;ofLFkr
fd;k tkrk gSA ;fn bldh *lS¯Vx^ esa
ifjorZu yk;k tkrk gS r¨ ;g batu dh
rqPN dk;Z{kerk v©j {kfr dk dkj.k cu
ldrh gSA
6.16
Idle speed adjustment
vkn'kZ xfr dh ,MtLVesaV
NOTE :
A diagnostic tachometer must be
used for this procedure.
u¨V :
bl çfd;k ds fy, ,d *Mk;xu¨fLVd
VSd¨ehVj^ dk ç;¨x fd;k tkuk pkfg,A
1. Attach the tachometer. Start the
engine and warm it up for a few
minutes at approximately 1,000
to 1,500 r/min. Occasionally rev
the engine to 4,000 to 5,000 r/
min. The engine is warm when it
quickly responds to the throttle.
VSd¨ehVj yxk;sa] batu d¨ pkyw djsa
v©j dqN feuVks ds fy, xeZ djsa rkfd
bldh xfr
1,000 ls 1,500 pDdj
çfr feuV rd igq¡p tk;saA dHkh&dHkh
bls
4,000 ls 5,000 pDdj çfr
feuV ij Hkh ysa tk;saA tc batu
'kh?kzrk ls FkzkWVy ds vuqdwy dk;Z
djrk gS r¨ ;g xeZ g¨rk gSA
PG1_55.pmd 10/15/2006, 9:15 AM54
Page 55

lkef;d j[kj[kko rFkk ekewyh ejEer
PERIODIC MAINTENANCE AND MINOR REPAIR
1. Throttle stop screw
FkzkWVy d¨ j¨dus dk isp
2. Set the idle to the specified
engine speed by adjusting the
throttle stop screw. Turn the
screw in direction ç to increase
engine speed and in directions
è to decrease engine speed.
FkzkWVy d¨ j¨dus dk isp d¨ O;ofLFkr
djrs gq, batu dh fof'k"V xfr d¨
vkn'kZ fLFkfr esa ysdj vk,¡A batu dh
xfr c<+kus ds fy, isap d¨ , dh fn'kk
esa ?kqek,¡A batu dh xfr ?+kVkus ds fy,
isap d¨ ch dh fn'kk esa ?kqek,¡A
Standard idle speed
LVSaMMZ vkn'kZ xfr :
1,300 ~ 1,500
pDdj çfr feuV
NOTE :
If the specified idle cannot be
obtained by performing the above
adjustment, consult a YMIS dealer.
u¨V %
;fn mij¨Dr vMtLVesaV d¨ dk;Z:i
nsus ij Hkh fof'k"V vkn'kZ xfr çkIr ugh
dh tk ldrh gS r¨ okbZñ,eñvkbZñ,lñ
Mhyj ls laidZ djsaA
Throttle cable free play
adjustment
FkzkWVy dscy dh Ýh Iys ,MtLVesaV
NOTE :
Before checking the throttle cable
free play, the engine idling speed
should be adjusted.
u¨V%
FkzkWVy dscy dh Ýh Iys dh tk¡p djus ls
igys] batu dh vkn'kZ xfr d¨ O;ofLFkr
fd;k tkuk pkfg,A
Adjust the throttle cable by turning the
adjusting nut so that specified free
play at the throttle grip is obtained.
,Mt¯LVx uV d¨ ?kqekdj FkzkWVy dscy
d¨ O;ofLFkr djs] ftlls fd FkzkWVy fxzi
ij fof'k"V Lora=k Iys çkIr fd;k tk
ldsA
Free play Ýh Iys %
3 ~ 7 mm
PG1_55.pmd 10/15/2006, 9:15 AM55
6.17
Page 56

lkef;d j[kj[kko rFkk ekewyh ejEer
PERIODIC MAINTENANCE AND MINOR REPAIR
Valve clearance adjustment:
okYo dh Dyh;jsal dk rkyesy %
The correct valve clearance changes
with use, resulting in improper fuel/
air supply or engine noise. To prevent
this, the valve clearance must be
adjusted regularly. This adjustment
however, should be left to a YMIS
dealer.
1. Free play Ýh Iys
2. Locknut ykWd uV
3. Adjusting nut ,Mt¯LVx uV
1. Loosen the locknut.
ykWd uV dks <hyk djsaA
2. Turn the adjusting nut in direction
ç to increase free play and in
direction è to decrease free play.
Ýh Iys d¨ c<+kus ds fy, ,Mt¯LVx uV
d¨ , dh fn'kk esa ?kqek,¡ rFkk Ýh Iys d¨
de djus ds fy, bls ch fn'kk esa ?kqek,¡A
3. Tighten the locknut.
ykWd uV d¨ dl nsaA
mfpr okYo Dyh;jsal t¨ fd batu ds ç;¨x
ds lkFk cnyrk jgrk gS] vuqfpr b±/ku@gok
dh lIykbZ vFkok batu esa 'k¨j dk dkj.k curk
gSA blds cpus ds fy, okYo ds Dyh;jsal d¨
yxkrkj O;ofLFkr djrs jguk pkfg,A oSls bl
rjg ds ,MtLVesaV ¼ rkyesy½ d¨
okbZñ,eñvkbZñ,lñ Mhyj }kjk gh djok;k tkuk
pkfg,A
1. Tread depth VsªªM MsIFk
2. Side wall lkbM okWy
Tyres Vk;j
To ensure maximum performance, long
service and safe operation, note the
following:
vR;f/kd dk;Z{kerk] nh?kZ l£ol v©j lqjf{kr
dk;Z ds fy, fuEufyf[kr ij /;ku nsa %
1. Tyre air pressure
Always check and correct the tyre
pressure before operating the
Motorcycle.
Vk;j esa gok dk ncko
e¨Vj&lkbZfdy pykus ls igys ges'kk Vk;j
esa gok ds ncko d¨ tk¡p ys v©j bls
O;ofLFkr djasA
KEEP RECOMMENDED TYRE PRESSURE IN BOTH THE TYRES
PG1_55.pmd 10/15/2006, 9:15 AM56
n¨u¨ Vk;j¨a esa vuqe¨fnr ok;q&ncko gh j[ksaA
6.18
Page 57

lkef;d j[kj[kko rFkk ekewyh ejEer
PERIODIC MAINTENANCE AND MINOR REPAIR
WARNING
Tyre inflation pressure should be
checked and adjusted when the
temperature of the tyre equals the
ambient air temperature. Tyre
inflation pressure must be
adjusted according to total weight
of cargo, rider, passenger, and
accessories (fairing, saddlebags,
etc. approved for this model), and
vehicle speed.
psrkouh
tc Vk;j dk rkieku O;kid ¼pkj¨a v¨j½
ds ok;q rkieku ds cjkcj g¨ tk, r¨
Vk;j ds ok;qiw.kZRo ncko dh tk¡p djuh
pkfg,A Vk;j ds ok;qiw.kZRo ncko d¨
e¨Vj&lkbZfdy ij j[ks lkeku]
e¨Vj&lkbZfdy pkyd] e¨Vj&lkbZfdy
lokj rFkk ,lsljht+ ¼Qs;¯jx] xíh ds
cSx bR;kfn t¨ bl ekWMy ds lkFk LohÑr
fd, x, gS½ ds dqy ot+u v¨j
e¨Vj&lkbZfdy dh xfr ds vuqlkj gh
,MtLV djuk pkfg,A
Cold tyre pressure BaMs Vk;j dk ncko:
Front
vxyk fiNyk
25 psi
(1.75kg/cm2)
25 psi
(1.75 kg/cm2)
WARNING
Proper loading of your Motorcycle
is important for several
characteristics of your Motorcycle,
such as handling, braking,
performance and safety. Do not
carry loosely packed items that can
shift. Securely pack your heaviest
items close to the center of the
Motorcycles, and distribute the
weight evenly from side to side.
Check the conditionand pressure of
your tyres. NEVER OVERLOAD YOUR
MOTORCYCLE. Make sure the total
weight of the cargo, rider,
Rear
(2.25 kg/cm2)
32 psi
(2.25 kg/cm2)
32 psi
and accessories (fairing,
saddlebags, etc. approved for this
model) does not exceed the
maximum load of the Motorcycle.
Operation of an overloaded
Motorcycle could cause tyre
damage, an accident, or even injury.
psrkouh
vkidh e¨Vj&lkbZfdy dh vusd¨
fof'k"Vrkv¨a tSls fd gSaM¯yx] czs¯dx]
dk;Z{kerk v©j lqj{kk ds fy, lgh rjhds
ls y¨¯Mx vko';d gSA <hys rjhds ls
cka/kh xbZ ¼iSd dh xbZ½ oLrqv¨a] r¨ fd
b/kj ls m/kj fgyrh jgsa] mUgs
e¨Vj&lkbZfdy ij u ys tk,¡A lqjf{kr
<ax ls iSd dh xbZ Hkkjh&Hkjde oLrqv¨
d¨ e¨Vj&lkbZfdy ds chp esa j[ksa v©j
muds ot+u d¨ e¨Vj&lkbZfdy ds n¨u¨
rjQ lkeku :i ls foHkkftr djsaA viuh
e¨Vj&lkbZfdy ds Vk;j¨ dh fLFkfr ,oa
gok ds ncko dh Hkh tk¡p dj ysaA ÞdHkh
Hkh viuh e¨VjlkbZfdy ij t:jr ls
T;knk ot+u u j[ksaA ;g lqfuf'pr djs
fd lkeku] e¨Vj&lkbZfdy pkyd]
PG1_55.pmd 10/15/2006, 10:48 PM57
6.19
Page 58

lkef;d j[kj[kko rFkk ekewyh ejEer
PERIODIC MAINTENANCE AND MINOR REPAIR
;k=kh ¼lokj½ v©j ,lsljht+ t¨ bl ekWMy
ds fy, LohÑr fd, x, gS] dk dqy
ot+u] e¨Vj&lkbZfdy ds vf/kdre y¨M
ls T;knk u g¨us ik,A e¨Vj&lkbZfdy ds
vf/kdre y¨M ls T;knk u g¨us ik,¡A
e¨Vj&lkbZfdy d¨ *v¨ojy¨M^ dh fLFkfr
esa pykus ij Vk;j d¨ uqdlku g¨ ldrk
gS] nq?kZVuk ?kV ldrh gSA
2. Tyre inspection
Always check the tyres before
operating the Motorcycle. If a tyre
tread shows crosswise lines
(minimum tread depth), if the tyre
has a nail or glass fragments in
it, or if the side wall is cracked,
contact a YMIS dealer
immediately and have the tyre
replaced.
Vk;j dh tk¡p
ges'kk e¨Vj&lkbZfdy pykus ls igys
Vk;j¨a dh tk¡p dj ysA ;fn Vk;j
dh VªsM] ØkWl dh gqbZ ykbusa n'kkZrh
gS ¼U;wure VªsM xgjkbZ½] ;fn Vk;j ds
vanj dhy vFkok 'kh'ks ds VqdMs fn[kkbZ
ns jgs g¨ vFkok Vk;j lkbZM ls
ØSd yx jgh g¨ r¨ rqjar
okbZñ,eñvkbZñ,lñ Mhyj ls laidZ
djs v©j Vk;j d¨ cnyok ysA
Front tyre size vxys Vk;j dk lkbt :
2.50-18” 4PR
Rear tyre size fiNys Vk;j dk lkbt:
2.75-18” 6PR
Minimum tyre tread
depth:
(front and rear)
U;wure Vk;j VªsM xgjkbZ
¼vxyh o fiNyh½
1.0 mm
WARNING
1. It is dangerous to ride with a
worn-out tyre. When a tyre
tread begins to show wear,
have a YMIS dealer replace
the tyre immediately.
psrkouh
1. f?kls gq, Vk;j ds lkFk xkM+h pykuk
[krjukd gSA tc Vk;j esa VªsMl esa
T+;knk f?klko 'kq# g¨ tk, r¨ rqjUr
okbZñ,eñvkbZñ,lñ Mhyj }kjk Vk;j
cny nsasaA
pg56_96.pmd 10/15/2006, 8:53 AM56
6.20
Page 59

lkef;d j[kj[kko rFkk ekewyh ejEer
PERIODIC MAINTENANCE AND MINOR REPAIR
2. iaDpj gqbZ V~;wc ij iS¯px ¼jcM+ ds
VqdMs½ yxkus d¨ çLrkfod ugh fd;k
x;k gSA ;fn ,slk djuk cgqr gh
vko';d g¨ tk,] r¨ csgn lko/kkuh
cjrsa v©j ftruh tYnh laHko g¨ bl
V~;wc d¨ ,d vPNh DokfyVh dh
V~;wc ls cny ysaA
Wheels ifg,
To ensure maximum performance,
long service, and safe operation, note
the following
vR;kf/kd dk;Zdq'kyrk] nh?kZ&thou rFkk
lqjf{kr dk;Z lqfuf'pr djus ds fy,
fuEufyf[kr ckr¨a ij /;ku nsa %
1. Always inspect the wheels
before a ride. Check for cracks,
bends or warpage of the wheel.
Be sure the spokes are tight and
undamaged. If any abnormal
condition exists in a wheel,
consult a YMIS dealer. Do not
attempt even small repairs to the
wheel. If a wheel is deformed or
cracked, it must be replaced.
ges'kk e¨Vj&lkbZfdy pykus ls igys
ifg;¨a dh tk¡p dj ysaA ifg, esa
ØSSDl iM+us] Vs<k&es<k g¨us vFok blds
f?klko dh tk¡p dj ysaA lqfuf'pr
dj ysa fd ifg, dh LiksDl dlh gqbZ
g¨ v©j {kfr xzLr u g¨A ;fn ifg,
esa d¨bZ vlkekU; fLFkfr fn[kkbZ nsrh
gS r¨] okbZñ,eñvkbZñ,lñ Mhyj ls
lykg ysaA ifg, esa ekewyh lh ejEer
dk dk;Z djus dk ç;Ru u djsaA
;fn ifg;k foÑr g¨ x;k gS vFkok
pVd ¼ØSd½ x;k gS r¨ bls cny
nsuk pkfg,A
2. Tyre and wheels should be
balanced whenever either one is
changed or replaced. Failure to
have a wheel balanced can
result in poor performance,
adverse handling
characteristics, and shortened
tyre life.
tc Hkh Vk;j vFkok ifg;¨a esa fdlh
,d d¨ cnyk x;k g¨ r¨ Vk;j v©j
ifg, dk larqfyr g¨uk pkfg,A ifg,
dk ^cSysl^ u g¨uk] rqPN dk;Z {kerk]
foijhr gSaM¯yx fof'k"Vrkv¨a v©j Vk;j
dh fe;kn ¼mez½ de g¨us dk dkj.k
cu ldrk gSA
6.21
3. Ride at moderate speeds after
changing a tyre since the tyre
surface must first be broken in
for it to develop its optimal
characteristics.
Vk;j cnyus ds ckn e¨Vj&lkbZfdy
d¨ gYdh LihM+ ij pykuk pkfg,
ftlls fd Vk;j esa visf{kr fof'k"Vrkv¨a
dk lekos'k g¨us ds fy, fje esa te
tk;saA
pg56_96.pmd 10/15/2006, 8:53 AM57
Page 60

lkef;d j[kj[kko rFkk ekewyh ejEer
PERIODIC MAINTENANCE AND MINOR REPAIR
increase free play or in direction
è to decrease free play.
2
3
1
1. Locknut ykWduV
2. Adjusting Nut ,Mt¯LVx uV
3. Free play Ýh&Iys
Clutch lever free play
adjustment
Dyp&yhoj dh Ýh&Iys dh
,MtLVesaV
The clutch lever free play should
be adjusted to 10 ~ 15 mm. If the
free play is incorrect, adjust as
follows.
Dyp yhoj dh Ýh Iys d¨ 10 ls 15
feñehñ rd ,MtLV djuh pkfg,A ;fn
Ýh&Iys lgh u vk jgh g¨ r¨ bls uhps fn,
x, rjhds ls ,MtLV djsa %
1. Loosen the locknut.
ykWd uV d¨ <hyk dj ysaA
2. Turn the adjusting bolt at the
clutch lever in direction ç to
Ýh&Iys c<+kus ds fy, Dyp yhoj ds
,Mt¯LVx c¨YV d¨ , dh fn'kk esa
?kqek,¡ vFkok Lora=k ¼Ýh½ Iys d¨ ?kVkus
ds fy, yhoj ds c¨YV d¨ ch dh
fn'kk esa ?kqek,¡A
3. Tighten the locknut.
ykWd uV d¨ dl nsaA
NOTE :
If proper adjustment cannot be
obtained or the clutch does not work
correctly, ask a YMIS dealer to inspect
the internal clutch mechanism.
u¨V %
;fn lgh <ax ls ,MtLVesaV ugh g¨ ik
jgh g¨ vFkok Dyp lqpk: rjhds ls dke
u djrk g¨ r¨ okbZñ,eñvkbZñ,lñ Mhyj
ls vkarfjd Dyp eSdsfuTe dh tk¡p djus
d¨ dgsaA
6.22
2
1
1. Locknut ykWduV
2. Adjusting Bolt ,Mt¯LVx c¨YV
3. Free play Ýh&Iys
Front brake adjustment
vxyh czsd dh ,MtLVesaV
The front brake level free play should
be adjusted to 10 ~ 15 mm.
vxys czsd yhoj dh Ýh Iys d¨ 10 ls 15
pg56_96.pmd 10/15/2006, 8:53 AM58
Page 61

feñehñ rd ,MtLV djuk pkfg,A
1. Loosen the locknut
ykWduV d¨ <hyk dj ysaA
2. Turn the adjusting bolt in
direction ç to decrease free play
and direction è to increase free
play.
Ýh&Iys de djus ds fy, ,Mt¯LVx
c¨YV d¨ , dh fn'kk esa ?kqek,¡ rFkk
Ýh&Iys d¨ c<+kus ds fy, bls ch dh
fn'kk esa ?kqek,¡A
3. Tighten the locknut.
ykWd uV d¨ dl nsaA
WARNING
When it is impossible to make the
proper adjustment, ask a YMIS
dealer
psrkouh
;fn lgh rjhds ls ,MtLVesaV djuk
vlaHko yx jgk g¨ r¨ okbZñ,eñvkbZñ,lñ
Mhyj ls ckr djsaA
lkef;d j[kj[kko rFkk ekewyh ejEer
PERIODIC MAINTENANCE AND MINOR REPAIR
1
1. Adjusting Nut ,Mt¯LVx uV
Rear brake adjustment
fiNyh czsd dh ,MtLVesaV
The rear brake pedal free play
should be adjusted to 20 ~ 30 mm
at the brake pedal end. Turn the
adjusting nut in direction ç to
increase free play and in direction
è to decrease free play.
czsd iSMy ds fdukjs ij fiNys czsd iSMy
dh Ýh Iys ¼<hykiu½
rd ,MtLV djuh pkfg,A Ýh Iys
¼<hykiu½ d¨ c<kus ds fy, ,Mt¯LVx
uV d¨ , dh fn'kk esa ?kqek,¡ v©j Ýh Iys
¼<hykiu½ d¨ de djus ds fy, uV d¨
ch dh fn'kk esa ?kqek,¡A
20 ls 30 feñehñ
6.23
a. Freeplay Ýh Iys
WARNING
• When it is impossible to make
the proper adjustment, ask a
YMIS dealer.
• Check the operation of the
brake light after adjusting the
rear brake.
psrkouh
• tc lgh rjhds ls lkaetL;
¼,MtLVesaV½ LFkkfir djuk vlaHko
yx jgk g¨ r¨ okbZñ,eñvkbZñ,lñ Mhyj
ls ijke'kZ djsaA
• fiNyh czsd d¨ ,MtLVesaV djus ds
ckn czsd ykbV dh çfØ;k dh tk¡p
djsaA
pg56_96.pmd 10/15/2006, 8:53 AM59
Page 62

lkef;d j[kj[kko rFkk ekewyh ejEer
PERIODIC MAINTENANCE AND MINOR REPAIR
fiNyh czsd dh ykbV dk fLop ¼cVu½
czsd iSMy ls fØ;kfUor g¨rk gS v©j bl
rjg ls ,MtLV fd;k tkrk gS fd czsd
yxus dk çHkko fn[kus ls igys gh czsd dh
cÙkh ¼ykbV½ ty mBrh gSA fiNyh czsd
ds cVu ¼fLop½ d¨ ,MtLV djus ds fy,
fLop d¨ bl rjg ls idMsa rkfd
,Mt¯LVx uV d¨ [k¨yrs le; fLop ?kwe
1. Brake light switch czsd ykbV dk fLop
2. Adjusting nut ,Mt¯LVx uV
Brake light switch adjustment
czsd ykbV ds fLop dh ,MtLVesaV
The rear brake light switch is
activated by the brake pedal and is
properly adjusted when the brake
light comes on just before braking
takes effect. To adjust the rear brake
light switch, hold the switch body so
it does not rotate while turning the
adjusting nut.
Turn the adjusting nut in direction ç
to make the brake light come on
earlier.
Turn the adjusting nut in direction è
to make the brake light come on later.
u ldsA
czsd ykbV d¨ 'kh?kzrk ls igys tykus ds
fy, ,Mt¯LVx uV d¨ , dh fn'kk esa
?kqek,¡A
czsd ykbV d¨ ckn esa tykus ds fy,
,Mt¯LVx uV d¨ ch dh fn'kk esa ?kqek,¡A
6.24
1. Wear limit line oh;j fyfeV ykbu
2. Wear indicator oh;j baMhdsVj
Checking the brake shoes
czsd 'kwt+ dh tk¡p
A wear indicator is provided on each
brake. This indicator allows
inspection of shoe wear without
disassembling the brake. Apply the
brake and inspect the position of the
indicator reaches to the wear limit
line, ask a YMIS dealer to replace
the shoes.
gj ,d czsd ds fy, ,d oh;j&baMhdsVj
yxk;k x;k gSA ;g bafMdsVj czsd d¨ fcuk
[k¨ys gq,] czsd 'kwW dh tk¡p esa lgk;d g¨rk
gSA czsd yxk,¡ v©j baMhdsVj dh voLFkk
dk fujh{k.k djsaA ;fn baMhdsVj oh;j dh
lhek&js[kk rd igq¡p tkrk gS r¨
okbZñ,eñvkbZñ,lñ Mhyj ls bu 'kwt+ d¨
cnyrs d¨ dgsaA
pg56_96.pmd 10/15/2006, 8:53 AM60
Page 63

1. Wear limit line oh;j fyfeV ykbu
2. Wear indicator oh;j baMhdsVj
lkef;d j[kj[kko rFkk ekewyh ejEer
PERIODIC MAINTENANCE AND MINOR REPAIR
Inspect the drive chain when the
Motorcycle is on the centerstand.
2
1
20~30 mm
a. Free play Ýh Iys
Drive chain slack check
Mªkbo psu dh f'kfFkyrk dk fujh{k.k
NOTE :
Spin the wheel several times and find
the tightest position of the chain.
Check and/or adjust the chain slack
while it’s in this tightest position.
u¨V %
ifg, d¨ dbZ ckj ?kqek,¡ v©j psu d¨
dlh gqbZ gkykr esa ys vk,¡A tc psu
dlh gqbZ voLFkk esa g¨ r¨ bldh f'kfFkyrk
¼<hykiu½ dh tk¡p djsa vFkok bls ,MtLV
dj ysaA
Check the slack at the position
shown in the illustration. Normal
slack is approximately 20 ~ 30 mm.
If the slack exceeds 30 mm, adjust.
Mªkbo psu dh tk¡p rHkh djsa tc
e¨Vj&lkbZfdy lsaVj LVSaM ij [kM+h g¨A
n'kkZ, x, fp=k ds vuqlkj gh psu dh
<hysiu dh tk¡p djsaA lkekU;r% <hykiu
yxHkx 20 ls 30 feñehñ rd g¨rh gSA
;fn ;g 30 feñehñ ls Hkh vf/kd gS r¨ bls
O;ofLFkr djsaA
pg56_96.pmd 10/15/2006, 8:53 AM61
6.25
Page 64

lkef;d j[kj[kko rFkk ekewyh ejEer
PERIODIC MAINTENANCE AND MINOR REPAIR
1. Chain joint psu&t¨M
If the chain is disassembled, be
sure the chain lock is placed in the
correct direction when installing.
;fn psu d¨ [k¨y dj vyx dj fn;k
x;k gS r¨ ;g lqfuf'pr djsa fd bls fQj
ls yxkrs le; psu ykWd d¨ lgh fn'kk esa
yxk;k tk,A
2
3
1
1. Adjusting nut ,Mt¯LVx uV
2. Cotter pin dkWVj fiu
3. Axle nut ,fDly dk uV
Driven chain slack adjustment
Mªkbo&psu dh <hysiu dk lkaetL;
¼,MtLVesaV½
1. Loosen the rear brake pedal
free play adjusting nut.
fiNyh czsd ds iSMy ds Ýh&Iys
,Mt¯LVx uV d¨ <hyk dj ysaA
2. Remove the cotter pin from the
axle nut.
,Dly uV ls dkWVj&fiu d¨ vyx
gVk ysaA
3. Loosen the axle nut.
,Dly uV d¨ <hyk dj ysaA
6.26
a
b
2
1
1. Locknut ykWd uV
2. Adjusting hex screw ,Mt¯LVx gsDl&isap
4. Loosen the chain adjusting
locknuts on each chain puller.
To tighten the chain, turn the
chain adjusting hex screw in
direction(a). To loosen the
chain, turn the chain adjusting
hex screw in direction (B) and
push the wheel forward. Turn
each chain adjusting hex
screw exactly the same amount
to maintain correct axle
alignment. There are marks on
each chain puller. Use these
makes to align the rear wheel.
çR;sd psu&iqyj ij yxs ,Mt¯LVx
ykWd uV¨a ¼isp¨a½ d¨ <hyk dj ysaA
psu d¨ dlus fy,] psu ,Mt¯LVx
pg56_96.pmd 10/15/2006, 8:53 AM62
Page 65

lkef;d j[kj[kko rFkk ekewyh ejEer
PERIODIC MAINTENANCE AND MINOR REPAIR
"kV~&isap ¼gsDl&LØ;w½ d¨ , dh fn'kk
esa ?kqek,¡ rFkk bls <hyk djus] psu
,Mt¯LVx "kV~&isap ¼gsDl&LØ;w½ d¨
ch dh fn'kk esa ?kqek,¡ v©j ifg, ij
vkxs dh v¨j ncko MkysA ,Dly dh
lgh ,ykbuesaV ¼iafDrcðrk½ d¨
çfrikfnr ¼esauVsau½ djus ds fy, çR;sd
psu ,Mt¯LVx "kV&isap ¼gsDl&LØ;ww½
d¨ Bhd rjg ls leku nwjh rd
?kqek,¡A çR;sd psu iqyj ij fu'kku
yxs gq, gSA fiNys ifg, d¨ lgh
rjg ls yxkus ds fy, bu fpUg¨ dk
ç;¨x djsaA
CAUTION :
• Maintain chain slackness
within specified limits as per
specifications.
• To maintain correct axle
alignment, Ensure the notch
on the adjuster is on the same
Mark on Left and Right
Side.
lko/kkuh %
• psu dh f'kfFkyrk d¨ fo'ks"k #i ls
of.kZr fufnZ"V dh xbZ lhekv¨a esa gh
çfrikfnr ¼esauVsau½ djsaA
• ,fDly dh lgh ,ykbuesaV çfrikfnr
djus ds fy, ;g lqfuf'pr djsa fd
,MtLVj ij yxk gqvk fu'kku ckb±
rFkk nkb± v¨j ls ,d gh fpUg ¼fu'kku½
ij feyrh gSA
5. After adjusting, be sure to
tighten each chain adjusting
locknut. Then tighten the axle
nut to the specified torque.
,MtLVesaV djus ds ckn gj ,d psu
,Mt¯LVx ykWd uV d¨ vo'; dl
nsaA rRi'pkr~ ,fDly uV d¨ fu£n"V
VkdZ rd dl nsaA
Tightening torque dlk x;k VkdZ:
Axle nut
65 ft-lb (9.05 m-kg)
,fDly uV %
1. Cotter pin dkWVj fiu
6. Insert a new cotter pin into the axle
nut and bend the end of the cotter
pin as shown. If the notch in the
axle nut and the cotter pin hole do
not match, tighten the nut slightly
to align them.
,fDly ds uV esa ,d u;k dkWVj fiu
yxk,¡] v©j tSlk fd fp=k esa fn[kk;k
x;k gS] dkWVj fiu ds ,d fljs d¨ e¨M+
nsaA ;fn ,fDly uV dh u¨ad ¼ukWp½
rFkk dkWVj&fiu ds uksd ds lkFk fey
ugh ikrh gS r¨ bUgs vkil esa feykus ds
fy, uV d¨ /khjs&/khjs dlsaA
WARNING
Always use a new cotter pin on the
axle nut.
pg56_96.pmd 10/15/2006, 8:53 AM63
6.27
Page 66

lkef;d j[kj[kko rFkk ekewyh ejEer
PERIODIC MAINTENANCE AND MINOR REPAIR
psrkouh
,fDly uV ds fy, ges'kk u, dkWVj fiu
dk gh ç;¨x djsaA
7. Adjust the free play in the brake
pedal.
czsd iSMy ds Ýh Iys d¨ ,MtLV
djsaA
p
WARNING
Check the operation of the brake
light after adjusting the rear brake.
psrkouh
fiNyh czsd d¨ ,MtLV djus ds ckn
czsd dh cÙkh ¼ykbV½ dh çfØ;k d¨ tk¡p
ysaA
Drive chain lubrication
Mªkbo&psu dh Y;wczhds'ku
The chain consists of many parts
which work with each other. If the
chain is not maintained properly, it
will wear out quickly. Therefore, the
chain must be serviced regularly.
This service is especially
necessary when riding in dusty
areas.
psu esa cgqr ls fgLls g¨rs gS t¨ ,d&nwljs
ds fy, dke djrs gSA ;fn psu dh
ns[kHkky lgh rjg ls u dh tk, r¨ ;g
tYnh f?kl tkrh gSA blfy, yxkrkj
bldh l£ol dk /;ku j[kuk pkfg,A
jsrhys bykd¨ esa e¨Vj&lkbZfdy pykrs
le; bl rjg dh l£ol djkuk cgqr
t#jh g¨ tkrk gSA
1. The drive chain should be
lubricated every 5,000 km.
Mªkbo&psu d¨ çR;sd 5,000 fdñehñ
ds ckn Y;wczhdsV dj nsuh pkfg,A
2. To clean the chain thoroughly,
remove it from the Motorcycle,
dip it in solvent, and clean out
as much dirt as possible.
Then, take the chain out of the
solvent to dry it, and then dip
the chain in oil of 20W40.
Remove the chain and hang it
on a peg for a while till the
excess oil drips down
completely. Then using a clean
cloth wipe the chain.
psu d¨ iw.kZr;k lkQ djus ds fy,
bls e¨Vj&lkbZfdy ls mrkj ysa] ækod
¼lkWyosaV½ esa Mqc¨ nsa v©j ftruk T;knk
laHko g¨ /kwy&feêh d¨ lkQ dj ysaA
mlds ckn psu d¨ lq[kkus ds fy,
ækod ls ckgj fudky ysa v©j fQj ls
20W40 czkaM ds ¼vkW;y½ rsy esa iwjh
fHkx¨ nsaA rRi'pkr~ psu d¨ ckgj
fudky dj rc rd [kq¡Vh ij Vk¡x nsa]
tc rd fd Qkyrw rsy blesa ls iwjh
rjg fupqM+ u tk,A rc psu d¨ ,d
lkQ diM+s ls i¨aN ysaA
pg56_96.pmd 10/15/2006, 8:53 AM64
6.28
Page 67

lkef;d j[kj[kko rFkk ekewyh ejEer
PERIODIC MAINTENANCE AND MINOR REPAIR
Cable inspection and
lubrication
dscy dk fujh{k.k ,oa Y;wczhds'ku
WARNING
Damage to the outer housing of
cables may lead to internal
rusting and interfere with the
cable movement. Replace
damaged cables as soon as
possible to prevent unsafe
conditions.
psrkouh
dscy ¼rkj¨a½ dh ckgjh gkůlx ds
{kfrxzLr g¨us ls ;g vanj ls tax idM+
ldrh gS v©j blls dscy d¨ Åij uhps
ewoesaV djus esa eqf'dy vk ldrh gSA
vlqjf{kr fLFkfr;¨a ¼gkykr¨aa½ ls cpus ds
fy, {kfrxzLr rkj¨a ¼dscy½ d¨ ftruh
tYnh g¨ lds cny nsaA
Lubricate the cables and cable
ends with anticorrosive oil . If a
cable does not operate smoothly,
ask a YMIS dealer to replace it.
rkj¨a d¨ tax&çfrj¨/kh rsy rFkk dscy ds
fdukj¨a ls yqczhdsV djsaA ;fn dscy lgh rjhds
ls dke ugh dj jgh g¨ r¨ okbZñ,eñvkbZñ,lñ
Mhyj ls bls cnyrs d¨ dgsaA
Recommended lubricant
çLrkfod yqczhdsVj %
20W40 Type SG
Throttle cable and grip
lubrication
FkzkWVy dscy v©j fxzi Y;wczhdsV
djukA
The throttle twist grip assembly
should be greased at the time that
the cable is lubricated, since the
grip must be removed to get at the
end of the throttle cable. After
removing the screws, hold the end
of the cable up in the air and put in
several drops of lubricant. With the
throttle grip disassembled, coat the
metal surface of the grip assembly
with a suitable all purpose grease.
ftl le; dscy dks Y;wczhdsaV fd;k tkrk
gS mlh le; ^FkzkWVy V~foLV fxzi vlsEcyh*
dh fxzlhax Hkh dh tkuh pkfg,A FkzkWVy dh
dscy ds fljs ds fy, FkzkWVy fxzi dks
[kksysaA isp gVkus ds ckn rkj ¼dscy½ ds
,d fljs ¼fdukjs½ dks gok esa idM+s jgsa
vkSj ml ij Y;wczhdsaV dh cgqr lh cwansa
MkysaA FkzkWVy fxzi dks [kksyus ¼vyx&vyx
djus½ ds lkFk fxzi vlsEcyh dks /kkrq ds
ry ij ;Fkk;ksX;] cgqmís'kh; ¼vkWy ijit+½
xzhl dh dks¯Vx dj nsaA
pg56_96.pmd 10/15/2006, 8:53 AM65
6.29
Page 68

lkef;d j[kj[kko rFkk ekewyh ejEer
PERIODIC MAINTENANCE AND MINOR REPAIR
Brake and shift pedal
Greasing
czsd rFkk f'k¶V&iSMy dh xzhft+ax
Grease the pivoting parts.
vk/kkjh; Hkkxksa dks fpduk ¼xzht+½ djsaA
pg56_96.pmd 10/15/2006, 8:53 AM66
Brake and clutch lever
Greasing
czsd rFkk f'k¶V&iSMy dh xzhft+ax
Grease the pivoting parts.
vk/kkjh; Hkkxksa dks fpduk ¼xzht+½ djsaA
6.30
Center stand Greasing
lsaVj LVSaM dk xzhft+ax
Grease the pivoting and mating
joints.
Check to see that the center stand
move up and down smoothly.
vk/kkjh; vkSj vkil esa feyus okys tksM+ksa
dks xzht+ djsaA
tk¡p djsa fd lsaVj LVS.M Åij vkSj uhps
gks vkjke ls tk,A
Recommended lubricant
izLrkfor xzht+
Multipurpose Grease
cgqmísf'k; xzht+
Page 69

lkef;d j[kj[kko rFkk ekewyh ejEer
PERIODIC MAINTENANCE AND MINOR REPAIR
WARNING
If the center stand does not move
smoothly, consult a YMIS dealer.
psrkouh
;fn eksVjlkbfdy dk lsaVj LVS.M vkjke
ls ¼fcuk fdlh :dkoV ds½ dke ugha
djrk gks rks okbZñ,eñvkbZñ,lñ Mhyj ls
laidZ djsaA
Front fork inspection
ÝaV QksdZ dk fujh{k.k
WARNING
Securely support the Motorcycle
so there is no danger of it falling
over.
psrkouh
lqjf{kr rjhds ls eksVjlkbfdy dks lgkjk
nsa] ftlls blds fxjus dk [krjk u jgssA
1. Visual check
Check for scratches or
damage on the inner tube and
traces if oil leakage from the
front fork.
6.31
n f"Vxr ¼us=kh;½ tk¡p %
vkxs yxs QksdZ esa ls vR;f/kd rsy
fjlko vkSj vanj dh V~;wc ij [kjksapks
rFkk blds {kfrxzLr gksus dh tk¡p
djsaA
2. Operation check
Place the Motorcycle on a level
place.
izfØ;k dh tk¡p %
eksVjlkbfdy dks ,d ysoy fd;s gq,
¼likV½ LFkku ij [kM+k djsaA
a. Hold the Motorcycle in an
upright position and apply the
front brake.
eksVjlkbfdy dks lh/kk Åij mBkdj
j[ksa vkSj vxyh czsd dk mi;ksx djsaA
b. Push down hard on the
handlebars several times and
check if the fork bounds
smoothly.
gSafMyckj dk dbZ ckj tksj ls uhps
dh vksj nck,a vkSj bl ckr dh tk¡p
djsa fd D;k QksdZ vkjke ls ^mNky*
ys ysrk gSA
pg56_96.pmd 10/15/2006, 8:53 AM67
Page 70

lkef;d j[kj[kko rFkk ekewyh ejEer
PERIODIC MAINTENANCE AND MINOR REPAIR
CAUTION :
If any damage or unsmooth
movement is found with the front
fork, consult a YMIS dealer.
lko/kkuh %
;fn vxys QksdZ dks dk;Z djus esa dksbZ
:dkoV vk jgh gS vFkok ;g dgha ls
{kfrxzLr gk x;k gS rks okbZñ,eñvkbZñ,lñ
Mhyj ls ijke'kZ ysaA
Steering inspection
LVs;¯jx dh tk¡p
Periodically inspect the condition
of the steering. Worn out or loose
steering bearings may be
dangerous. Place a stand under
the engine to raise the front wheel
off the ground. Hold the lower end
of the front forks and try to move
them forward and backward. If any
free play can be felt, ask a YMIS
dealer to inspect and adjust the
steering. Inspection is easier if the
front wheel removed.
le;≤ ij LVs;¯jx dh fLFkfr dk
fujh{k.k djrs jgasA LVs;¯jx dh f?klh gqbZ
vFkok <hyh cS¯jx [krjukd gks ldrh gSA
vxys ifg, dks t+ehu ls Åij mBkus ds
6.32
fy, batu ds uhps ,d LVS.M yxk ysaaA
vxys QksdsZa ds fupys fljs dks idM+ dj
j[ksa vkSj mUgsa vkxs rFkk ihNs dh vksj
pykus dk iz;Ru djsaA ;fn fdlh rjg
dk Lora=k ¼Ýh½ Iys eglwl fd;k tk jgk
gks rks okbZñ,eñvkbZñ,lñ Mhyj ls LVs;¯jx
dh tk¡p djus vkSj ^,MtLV* djus dks
dgsaA ;fn vkxs dk ifg;k gVk fn;k tk,
rks tk¡p djuk vklku gks tkrk gSA
WARNING
Securely support the Motorcycle
so there is no danger of it falling
over.
psrkouh
eksVjlkbfdy dks lqjf{kr rjhds ls lgkjk
nsdj j[ksa rkfd blds iyV dj fxjus
dk [krjk u jgsA
pg56_96.pmd 10/15/2006, 8:53 AM68
Page 71

Wheel bearings
ifg, dh cs;¯jx
If there is play in the front or rear
wheel hub or if the wheel does not
turn smoothly, have a YMIS dealer
inspect the wheel bearings.
;fn vxys rFkk fiNys ifg, ds ^gc* esa
fdlh rjg dk ^Iys* gS vFkok ifg;k lgh
rjhds ls ugha ?kwerk gS rks okbZñ,eñvkbZñ,lñ
Mhyj ls ifg, ds cs;¯jXl dh tk¡p djus
dks dgsaA
lkef;d j[kj[kko rFkk ekewyh ejEer
PERIODIC MAINTENANCE AND MINOR REPAIR
1. Maximum level mark
vf/kdre Lrj dk fu'kku
2. Minimum level mark
U;wure Lrj dk fu'kku
Battery cSV~jh
1. Battery is located inside the
L.H. side panel (for removal &
installation of L.H. side panel
please refer page 6-7).
cSV~jh ckb± rjQ ds iSuy esa fLFkr gS
¼ckb± vksj ds iSuy dks gVkus o yxkus
ds fy, Ñi;k i "B la±ñ
2. Open the lid.
^fyM* dks [kksy ysaA
3. Check the level of the battery
electrolyte and make sure that
the terminals are tight.
6.33
6-7 dks ns[ksa½
cSV~jh ds ^bysDVªksykbZV* ds Lrj ¼ysoy½
3.
dh tk¡p djsa vkSj lqfuf'pr djsa dj
ysa fd cSV~jh ds V£euYl vPNh rjg
ls dls gq, gksaA
Top up with distilled water if the
electrolyte level is low.
;fn ^bysDV ªksykbZV* dk Lrj de gks rks
bls Åij rd fMfLVYM okWVj* ls Hkj nsaA
CAUTION :
When inspecting the battery, be
sure the breather hose is routed
correctly. If the breather hose is
positioned in such a way as to cause
battery electrolyte or gas to exit
onto the frame, structural and
cosmetic damage to the
Motorcycle can occur.
lko/kkuh %
cSV~jh dh tk¡p djrs le; ;g lqfuf'pr
dj ysa fd ^czhnj gkst+* lgh ekxZ ij
dke dj jgk gksA ;fn ^czhnj gkst*+ dks
bl rjg ls j[kk x;k gS fd cSV~jh dk
*bysDVªksykbZV* vFkok bldh xSl ckgj
fudydj Ýse ij vk tk,] blls
eksVjlkbfdy dh cukoV rFkk lqanjrk
dk uqdlku gks ldrk gSA
pg56_96.pmd 10/15/2006, 8:53 AM69
Page 72

lkef;d j[kj[kko rFkk ekewyh ejEer
PERIODIC MAINTENANCE AND MINOR REPAIR
WARNING
Battery electrolyte is poisonous
and dangerous, causing severe
burns, etc. It contains sulfuric acid.
Avoid contact with skin, eyes or
clothing.
psrkouh
cSV~jh dk ^bysDV ªksykbZV* fo"kSyk vkSj
[krjukd gksrk gS ftlds laidZ esa vkuss
ij rst tyu bR;kfn gksrh gSA blesa
lY¶;wfjd vEy gksrk gSA bls Ropk]
vk¡[kksa rFkk diM+ksa ds lkFk laidZ gksus ls
cpk,aA
ENSURE THAT BATTERY ELECTROLYTE LEVEL IS MAINTAINED BETWEEN
MAX. AND MIN. MARKS. IF REQUIRED, ADD DISTILLED WATER ONLY
Antidote fo"k uk'kd %
EXTERNAL: Flush with water.
ckgjh ¼okg~;½ % ikuh ls vPNh rjg ls
/kks ysaA
INTERNAL: Drink large quantities
of water or milk. Follow with milk
of magnesia, beaten egg, or
vegetable oil. Call a physician
immediately.
vkarfjd % cgqr vf/kd ek=kk esa ikuh
vFkok nw/k ih ysaA ckn esa lQsn feV~Vh
;qDr nw/k] QsaVk gqvk vaMk vFkok ouLifr
rsy dk lsou djsaA fpfdRld dks rqjar
cqyk ysaA
EYES: Flush with water for 15
minutes and get prompt medical
attention Batteries produce
explosive gases. Keep sparks,
flame, cigarettes etc., away.
Ventilate when charging or using
in an enclosed space. Always
shield your eyes when working
near batteries. KEEP OUT OF
REACH OF CHILDREN.
6.34
vk¡[kas % vk¡[kksa dks 15 feuV rd ikuh ls
vPNh rjg ls /kks,a vkSj tYnh ls MkDVj
dks fn[kk,aA cSV~jh] ls foLQksVd xSsl
fudyrh gS] fpaxkjh vkx dh yiV ¼ykS½
rFkk flxjsV bR;kfn ls bls nwj j[ksaA
can LFkku ij bls pkt+Z djrs le;
vFkok iz;ksx djrs le; gok ds vkus&tkus
ds LFkku dks [kqyk j[ksaA cSV~jh ds ut+nhd
dke djrs le; ges'kk viuh vk¡[kksa dks
<ddj j[ksaA bls cPpksa dh igqap ls nwj
gh j[ksaA
pg56_96.pmd 10/15/2006, 8:53 AM70
Page 73

lkef;d j[kj[kko rFkk ekewyh ejEer
PERIODIC MAINTENANCE AND MINOR REPAIR
Replenishing the battery fluid
cSV~jh esa nzo ¼¶Y;wM½ dks iqu% Hkjuk
A poorly maintained battery will
corrode and discharge quickly. The
battery fluid should be checked at
least once a month. The level
should be between the minimum
level and maximum level marks.
Use only distilled water if refilling
is necessary.
lgh rjg ls ns[kHkky u djus ij cSV~jh
tax idM+ ysrh gS vkSj tYnh fMLpkt+Z gks
tkrh gSA cSV~jh ds nzo dks eghus esa de
ls de ,d ckj vo'; tk¡p ysuk pkfg,A
nzo dk Lrj ¼ysoy½ U;wre rFkk vf/kdre
fpUgksa ds e/; gksuh pkfg,A bls fQj ls
Hkjus ds fy, dsoy fMfLVYM okWVj dk
iz;ksx djsaA
CAUTION :
Normal tap water contains
minerals which are harmful to a
battery; therefore, refill only with
distilled water.
lqfuf'pr djsa fd ^bysDV ªksykbZV* dk Lrj U;wure rFkk vf/kdre fu'kkuksa ds chp esa gh jgsA
;fn t+:jr iM+s rks dsoy ^fMfLVYM okWVj* dk gh iz;ksx djsaA
lko/kkuh %
Vadh ds lk/kkj.k ikuh esa [kfut inkFkZ
gksrs gSaA tks cSV~jh ds fy, gkfudkjd gks
ldrs gSaA blfy, dsoy fMfLVYM okWVj
ls gh bls iqu% HkjsA
WARNING
Take care not to spill battery fluid
on the chain causing shorter chain
life and possibly result in an
accident.
psrkouh
bl ckr dk /;ku j[ksa fd cSV~jh dk nzo
eksVjlkbfdy dh pSu ij u fc[kjus
ik,A cSV~jh dk ¶Y;wM pSu dks det+ksj
dj ldrk gS] ftlls pSu dh dke djus
dh fe;kn de gks ldrh gS vkSj laHkor%
blls dksbZ nq?kZVuk Hkh ?kV ldrh gSA
6.35
pg56_96.pmd 10/15/2006, 8:53 AM71
Page 74

lkef;d j[kj[kko rFkk ekewyh ejEer
PERIODIC MAINTENANCE AND MINOR REPAIR
Battery storage
cSV~jh dk HkaMkj.k ¼LVkssjsst½ %
1. When the Motorcycle will not be
used for a month or longer,
remove the battery, fully charge
it and store it in a cool, dry place.
Completely recharge the battery
before reinstallation.
;fn eksVjlkbfdy dks ,d eghus ;k
mlls vf/kd le; rd iz;ksx ugha
fd;k tk jgk gks rks cSV~jh dks ckgj
fudky ysa] bls iwjh rjg ls pkt+Z djsa
vkSj BaMs rFkk lw[ks LFkku ij ^laHkky*
¼LVksj½ dj j[ksaA iqu% yxkus ls igys
bls iw.kZr;k nqckjk ls pkt+Z djsaA
2. If the battery will be stored for
longer than two months, check
the specific gravity of the fluid
at least once a month and fully
recharge the battery when it is
too low.
;fn cSV~jh dks nks eghus ls vf/kd
le; ls ^LVksj* djds j[kk x;k gks rks
eghus esa de ls de ,d ckj blds
nzo ds vkisf{kd ?kuRo ¼LisfLQd xzsfoVh½
dh tk¡p dj ysaa vkSj ;fn cgqr T;knk
de yxs rks cSV~jh dks iw.kZr;k pkt+Z
djsaA
3. Always make sure the
connections are correct when
putting the battery back in the
motorcycle. Make sure the
breather hose is properly
connected and is not
damaged or obstructed.
tc Hkh cSVjh dks nqckjk yxk;sa ;g
lqfuf'pr dj ysa fd cSV~jh ds dusD'ku
lgh rjhds ls yxs gksaA ;g Hkh
lqfuf'pr djsaa fd czhnj gkst+ dks Bhd
rjhds ls yxk;k ¼dusDV½ x;k gks
vkSj ;g {kfrxzLr vFkok :dk gqvk u
gksA
6.36
2
1. Main fuse eq[; ¶;wt+ ¼eSu&¶;wt+½
Fuse replacement
¶;wt+ dks cnyuk
The fuse is located behind panel
A. (See page 6-7 for panel remove
and installation procedures.)
^¶;wt+* iSuy ^,* ds ihNs yxk gksrk gSA
iSuy dks yxkus vkSj gVkus dh izfØ;k ds
fy, i "B la[;k
If the fuse is blown, turn off the
main switch. Install a new fuse of
proper amperage. Turn on the
switches and see if the electrical
device operates. If the fuse
immediately blows again, consult
a YMIS dealer.
6-7 dks ns[ksa½A
pg56_96.pmd 10/15/2006, 8:53 AM72
Page 75

;fn ¶;wt+ mM+ x;k gks] rks eSu fLop dks
?kqekdj can dj nsa vkSj l£dV dks tk¡p
ds fy, can dj nsaA leqfpr ^,Eih;j* dk
u;k ¶;wt yxk;saA cVuksa dk ?kqek,a vkSj
ns[ksa fd D;k fctyh ds lalk/ku Bhd rjg
ls dke dj jgs gSaA ;fn rqjar ¶;wt+ fQj
ls mM+ tkrk gS rks okbZñ,eñvkbZñ,lñ Mhyj
ls fQj ls lEidZ djsaA
CAUTION :
Do not use fuse of higher
amperage rating than those
recommended. Substitution of a
fuse of improper rating can
cause extensive electrical
system damage and possibly a
fire.
lko/kkuh %
izLrkfor fd;s x;s ¶;wt+ ds vfrfjDr]
dksbZ nwljk mPp ,eih;j ek=kk dk ¶;wt+
iz;ksx u djsaA fodYi ds :i esa vuqfpr
ek=kk dk ¶;wt+ fctyh ds foLr r iz.kkyh
dks uqdlku igqapk ldrk gS vkSj laHkor%
blls vkx Hkh yx ldrh gSA
Specified fuse fufnZ"V fd;k x;k ¶;wt : 10A
+
lkef;d j[kj[kko rFkk ekewyh ejEer
PERIODIC MAINTENANCE AND MINOR REPAIR
1. Bezel cst+y
Headlight bulb replacement
gSM ykbZV ds cYc dks cnyuk
If the headlight bulb burns out,
replace the bulb as follows
;fn gSM ykbZV dk cYc [kjkc gks tkrk gS
rks bls uhps nh xbZ fof/k ls cny nsa %
1. Remove the two screws from
the bezel assy of the headlight.
ct+y vlsEcyh ds nks isapks dks [kksy
dj gVk ysaA
2. Unscrew the bulb holder from
reflector assy.
cYc gksYMj dks fjQysDVj&vlsEcyh
esa ls [kksydj fudky ysaA
6.37
pg56_96.pmd 10/15/2006, 8:53 AM73
Page 76

lkef;d j[kj[kko rFkk ekewyh ejEer
PERIODIC MAINTENANCE AND MINOR REPAIR
1. Bulb holder cYc gksYMj
3. Remove the defective bulb.
[kjkc+ cYc dks ckgj fudky ysaA
1. Bulb cYc
WARNING
Keep flammable products and
your hands away from the bulb
while it is on, as it is hot. Do not
touch the bulb until it cools
down.
psrkouh %
ftl le; cYc ty jgk gks vkSSj xeZ gks
rks Toyu'khy oLrqvksa vkSj vius gkFkksa dks
blls nwj j[ksaA ml oDr rd cYc dks
gkFk u yxk,a tc rd ;g BaMk u gks
tk,A
6.38
4. Put a new bulb into position
and secure it in place with the
bulb holder.
u;s cYc dks mfpr LFkku ij yxk,a
vkSj cYc gksYMj ds lkFk mls lqjf{kr
LFkku ij j[k nsaA
5. Install the Bezel Assy.
ct+y vlsEcyh dks yxk,aA
6. If the headlight beam
adjustment is necessary, ask
a YMIS dealer to make
adjustment.
;fn gSMykbZV dh che dh ,M~tLVesaV
djuk vko';d gks rks
okbZñ,eñvkbZñ,lñ Mhyj ls bls
^,M~tLV* djus dks dgasA
pg56_96.pmd 10/15/2006, 8:53 AM74
Page 77

lkef;d j[kj[kko rFkk ekewyh ejEer
PERIODIC MAINTENANCE AND MINOR REPAIR
1. Indicator Screw (x 2)
baMhdsVj ds isp (x 2)
Turn signal and taillight bulb
replacement
?kqekonkj ladsrd ¼flXuy½ rFkk fiNyh
^ykbV* dss cYc dks cnyukA
1. Remove the screw and the
lense.
isapks vkSj ySal dks [kksydj vyx dj
ysaA
2. Push the bulb inward and turn
it counterclockwise.
cYc dks vanj dh rjQ nck,a vkSj
bls nkb± ls ckb± vksj ?kqek,aA
3. Place a new bulb inward and
turn it clockwise until it
engages into the socket.
pg56_96.pmd 10/15/2006, 8:53 AM75
1. Taillamp Screws (x 2)
ihNs ds ySai ds isap (× 2 )
CAUTION :
Do not overtighten the screws as
the lense may break.
lko/kkuh %
isapks dks t:jr ls T;knk u dls vU;Fkk
ySal VwV ldrk gSA
3. lkWdsV esa u;k cYc yxk nsaaA cYc dks
vanj dh rjQ nck,a vkSj blss ckb± ls
nkb± vksj rc rd ?kqek,a tc rd ;g
lkWdsV ds vanj Bhd rjg ls cSB u
tk,A
4. Install the lense and the
screws.
ySal vkSj ispkas dks fQj ls yxk nsaA
6.39
Page 78

lkef;d j[kj[kko rFkk ekewyh ejEer
PERIODIC MAINTENANCE AND MINOR REPAIR
Front wheel removal
vxys ifg, dks gVkuk
WARNING
• It is advisable to have a YMIS
dealer service the wheel.
• Securely support the
Motorcycle so there is no
danger of it falling over.
psrkouh
• mi;qDr ;gh gS fd okbZñ,eñvkbZñ,lñ
Mhyj ls gh ifg, dh ^l£ol* djkbZ
tk,A
• eksVjlkbfdy dks lqjf{kjr rjhds ls
lgkjk nsa rkfd bls iyV dj fxjus
dk [krjk u jgsA
1. Brake cable adjusting nut
czsd dh rkj dk ,M~t¯LVx uVA
1. Place the Motorcycle on the
centerstand.
eksVjlkbfdy dks chp okys LVS.M ij
yxkdj [kM+k djsaA
2. Fully loosen the brake cable
adjusting nut at the wheel hub
and remove the cable from the
brake cam lever.
ifg, ds gc ij yxs czsd dh rkj ds
,M~t¯LVx uV dks iwjk [kksy ysa vkSj
rkj ¼dscy½ dks cszd ds dSe yhoj esa
ls ckgj fudky ysaA
pg56_96.pmd 10/15/2006, 8:53 AM76
6.40
Page 79

lkef;d j[kj[kko rFkk ekewyh ejEer
PERIODIC MAINTENANCE AND MINOR REPAIR
1. Clip fDyi
2. Speedometer cable LihM+¨ehVj dscy
4. Remove the speedometer
cable from the front wheel side.
First remove the clip and then
pull the cable out.
LihM+¨ehVj dscy d¨ vxys ifg;s
ls gVk;saA igys fDyi d¨ gVk;sa
v©j mlds ckn dscy d¨ [khpsaA
pg56_96.pmd 10/15/2006, 8:53 AM77
1. Cotter pin dkWij fiu
2. Axle nut ,Dly uV
5. Remove the cotter pin and axle
nut.
dkWVj fiu rFkk ,Dly uV dks [kkssydj
ckgj fudky ysaA
6. Remove the wheel axle. Make
sure the Motorcycle is properly
supported.
ifg, ds ,Dly dks ckgj fudky ysaA
lqfuf'pr djsa fd eksVjlkbZfdy dks
mfpr lgkjk feyrk jgsA
6.41
1. Stopper LVkWij
Front wheel installation
vxys ifg, dks yxkuk
When installing the front wheel,
reverse the removal procedure.
tc vxys ifg, dks yxkuk gks rks ifg;k
gVkus dh ^izfØ;k* dks myV nsaA
fuEufyf[kr rF;ksa ij /;ku nsaA
1. Make sure the slot in the brake
shoe plate fits over the stopper
on the front fork outer tube.
;g lqfuf'pr dj ysa fd czsd dh
'kw&IysV esa cuk gqvk LykWV] vxys
QksdZ dh ckgjh V~; c ij yxs LVkWij
ds lkFk ^fQV* ¼Bhd rjg ls cSB tk,½
gks tk,A
Page 80

lkef;d j[kj[kko rFkk ekewyh ejEer
PERIODIC MAINTENANCE AND MINOR REPAIR
2. Make sure the axle nut is
properly torqued and a new
cotter pin is installed.
;g lqfuf'pr djsa fd ,Dly ds uV
dks lgh rjhds ls dlk
gqvk gks vkSj
ml ij u;k dkWVj fiu yxk gksA
WARNING
Always use a new cotter pin.
psrkouh
ges'kk dkWVj fiu dk iz;ksx djsaA
Axle nut torque ,Dly ds uV dk VkdZ %
33 ft.-lb (4.55 m-kg)
3. Adjust the free play in the brake
lever.
czsd yhoj ds Ýh&Iys dks ,M~tLV
djsaA
Rear wheel removal
fiNys ifg, dks gVkuk
WARNING
• It is advisable to service the
wheel by YMIS dealer.
• Securely support the
Motorcycle so there is no
danger of it falling over.
psrkouh
• mi;qDr ;gh gS fd ifg, dh ^l£ol*
okbZñ,eñvkbZñ,lñ Mhyj ls gh djkbZ
tk,A
• eksVjlkbfdy dk lqjf{kr rjhds ls
lgkjk nsdj [kM+k djsaA rkfd bls
iyV dj fxjus dk [krjk u jgsA
6.42
1. Nut uV
2. Cotter pin dkWVj fiu
3. Tension bar Vsa'ku ckj
1. Place the Motorcycle on the
centerstand.
eksVjlkbfdy dks chp ds LVS.M ij
[kM+k djsaA
2. Remove the cotter pin and nut.
Then remove the tension bar
from the brake shoes plate.
dkWVj fiu vkSj uV dks gVk nsaA mlds
ckn 'kw&IysV esa ls ^Vsa'ku&ckj* dks
ckgj fudky ysaA
pg56_96.pmd 10/15/2006, 8:53 AM78
Page 81

lkef;d j[kj[kko rFkk ekewyh ejEer
PERIODIC MAINTENANCE AND MINOR REPAIR
1. Axle nut ,Dly&uV
2. Cotter pin dkWVj fiu
3. Brake rod czsd&jkWM ¼czsd dh NM+½
4. Brake adjusting nut czsd dk ,M~t¯LVx&uV
3. Remove the brake adjusting
nut and brake rod from the
brake cam lever.
czsd ds dSe&yhoj esa ls czsd dk
,M~t¯LVx uV vkSj czsd dh NM+ ¼jkWM½
dks ckgj fudky ysaA
pg56_96.pmd 10/15/2006, 8:53 AM79
1. Rear axle fiNyk ,Dly
4. Remove the axle nut cotter pin
and the axle nut.
,Dly ds uV vkSj ,Dly&uV ds
dkWVj&fiu dks [kksydj ckgj fudky
ysaA
5. Pull out the rear axle.
fiNys ,Dly dks ckgj dh rjQ [khapsA
6. Remove the wheel assembly.
ifg, dh vlsEcyh dks ckgj fudky
ysaA
ALWAYS USE YAMAHA GENUINE SPARE PARTS
ges'kk ^;kekgk* ds vlyh iqtkZsa dk iz;ksx djsaA
6.43
Page 82

lkef;d j[kj[kko rFkk ekewyh ejEer
PERIODIC MAINTENANCE AND MINOR REPAIR
Rear wheel installation
fiNys ifg, dks yxkuk
1. Install the rear wheel and the
axle.
fiNys ifg, vkSj ,Dly dks yxk;saA
2. Install the axle nut.
,Dly ds uV dks yxk;saA
3. Insert the brake rod into the
brake cam lever and install the
brake free play adjusting nut.
czsd dh NM+ dks cszd ds dSe yhoj esa
cSBk,a ¼Mkysa½ vkSj ^czsd Ýh Iys ,M~t¯LVx
uV dks* ogka yxk nsaA
4. Install the tension bar on to the
brake shoe plate and tighten
the tension bar nut to the
specified tightening torque.
czsd 'kw IysV ij Vsa'ku ckWj dks yxk;sa
rFkk dk Vsa'ku ckWj uV dks fu£n"V
VkdZ ij dl nsaA
5. Take the Motorcycle off the
centerstand.
eksVjlkbfdy dks lsaVj LVS.M ls uhps
mrkj nsaA
6. Tighten the axle nut to the
specified tightening torque.
Then install a new cotter pin.
,Dly ds uV dks fu£n"V VkdZ rd ys
tkdj vPNh rjg ls dl nsaA
rRi'pkr~ u;k dkWVj fiu yxk,aA
Specified torque fu£n"V VkdZ %
Tension bar nut Vsa'ku&ckj dk uV %
14 ft-lb (1.9 m•kg)
Axle nut
,Dly uV %
65 ft-lb (9.05 m•kg)
6.44
WARNING
Always use a new cotter pin.
psrkouh
ges'kk u;s dkWVj&fiu dk iz;ksx djsaA
7. Adjust the rear brake pedal free
play. (See page 6-23)
fiNyh czsd&iSMy dh Lora=k ¼Ýh½ Iys
dks ,M~tLV djsaA
¼i "B la[;k
WARNING
Check the operation of the brake
light after adjusting the rear
brake.
6-23 ns[ksaa½
psrkouh
fiNyh czsd dks ,M~tLV djus ds ckn
czsd ykbV dh dk;Z&iz.kkyh dh tk¡p djsaA
pg56_96.pmd 10/15/2006, 8:53 AM80
Page 83

lkef;d j[kj[kko rFkk ekewyh ejEer
PERIODIC MAINTENANCE AND MINOR REPAIR
Troubleshooting
leL;k lek/kku
Although YMIS Motorcycle receive
a rigid inspection before shipment
from the factory, trouble may occur
during operation. Any problem in
the fuel, compression, or ignition
systems can cause poor starting
and loss of power. The
troubleshooting chart describes a
quick, easy procedure for making
checks. If your Motorcycle requires
any repair, bring it to a YMIS dealer.
The skilled technicians at a YMIS
dealership have the tools,
experience, and know-how to
properly service your Motorcycle.
Use only genuine YAMAHA parts
on your Motorcycle. Imitation
parts may look like YAMAHA
parts, but they are often inferior.
Consequently, they have a
shorter service life and can lead
to expensive repair bills.
;|fi eksVjlkbfdy dks ;kekgk ds dkj[kkus
ls ckgj fudyus ls igys dM+h
tk¡p&iM+rky ls xqt+juk iM+rk gS] fQj
Hkh dk;Z ds nkSjku fnDdr vk ldrh gSA
b±/ku] daizs'ku vFkok ngu&iz.kkyh] ¼bXuh'ku
flLVe½ esa vkus okyh leL;k] vuqi;qDr
LVk²Vx vkSj 'kfDr ¼ikWoj½ ds àkl ¼{k;½
dk dkj.k cu ldrh gSA
leL;k&lek/kku pkVZ] lgh rjg ls tk¡p
djus dh rst] o vklku izfØ;k dh O;k[;k
djrk gSA ;fn vkidh eksVjlkbfdy dks
fdlh rjg dh ejEer dh t:jr iMs+ rks
bls okbZñ,eñvkbZñ,lñ Mhyj ds ikl ys
tk,aA okbZñ,eñvkbZñ,lñ Mhyj dh odZ'kki
ds dq'ky VsDukhf'k;uksa ds ikl vkidh
eksVjlkbfdy dh lgh rjhds ls l£ol
djus ds fy, vkSt+kj] vuqHko o tkudkjh
ekStwn jgrh gSA
viuh eksVjlkbfdy ds fy, dsoy ;kekgk
ds vlyh iqtksZa dk iz;ksx djsaA nks"kiw.kZ
iqtsZ ¼ikV~Zl½ ;kekgk iqtksZa dh rjg gh
fn[kkbZ ns ldrs gSa] ijarq izk;% ;g fuEu
DokfyVh ds gksrs gSaA lkFk gh os
+¼iqtsZ@ikV~Zl½ cgqr de le; rd Bhd
ls dke dj ikrs gSa vkSj ekssVjlkbfdy
dh ejEer ¼fjis;¯jx ½ ds fcy dks T;knk
[kphZyk gh cukrs gSaA
6.45
pg56_96.pmd 10/15/2006, 8:53 AM81
Page 84

lkef;d j[kj[kko rFkk ekewyh ejEer
PERIODIC MAINTENANCE AND MINOR REPAIR
Troubleshooting chart - For Starting
WARNING
Never Check the fuel system while smoking or in the vicinity of an open flame.
1. Fuel
Check if there is fuel
in the fuel tank
2. Compression
Use kick starter.
3. Ignition
Remove spark
plug and check
electrode.
pg56_96.pmd 10/15/2006, 8:53 AM82
Enough fuel
No fuel Supply fuel
There is compression
No compression Ask YMIS dealer to inspect.
Wipe clean with dry cloth
Wet
Dry with
Black Soot
and correct spark plug
or replace spark plug.
Go to compression check
Engine doesn’t start, go to
compression check.
Go to Ignition check.
Ask YMIS
dealer to inspect.
6.46
Open the throttle halfway
and start the engine.
If Engine does not start
Contact YMIS dealer.
Page 85

lkef;d j[kj[kko rFkk ekewyh ejEer
PERIODIC MAINTENANCE AND MINOR REPAIR
leL;k&lek/kku pkVZ & 'kq:vkr ds fy,
psrkouh
dHkh Hkh vkx dh ykS ¼¶yse½ ds fudV vFkok flxjsV ihrs le; b±/ku dh iz.kkyh dh tk¡p u djssaA
1. b±/ku
b±/ku dh Vadh esa ekStwn b±/ku
dh tk¡p djssaA
2. daizs'ku
fdd LVkVZj dk iz;ksx
djsaA
3. Toyu ¼bXuh'ku½
LikWdZ Iyx dks ckgj
fudky ysa vkSj
bysDVªksM dh tk¡p djsaaA
pg56_96.pmd 10/15/2006, 8:53 AM83
i;kZIr b±/ku
b±/ku ugha
gSA
daizs'ku gSA
daizs'ku ugh gSA
xhyk gS
dkfyek fy, gq,
'kq"d gSA
vc daizs'ku dh tk¡p djsaA
b±/ku dh
lIykbZ djsaA
lkQ] lw[ks diM+s ls iksaNs vkSj
LikWdZ Iyx dks Bhd djsaA
okbZñ,eñvkbZñ,lñ Mhyj ls
gh tk¡p djus dkss dgsasA
6.47
batu LVkVZ ugha gks jgk gSA daizszs'ku
dh tk¡p djsaA
bXuh'ku Toyu dh tk¡p djsaA
okbZñ,eñvkbZñ,lñ Mhyj ls gh tk¡p
djus dkss dgsasA
FkzkWVy dks vk/kk [kksy ysa vkSj batu
dks LVkVZ djsaA
;fn batu LVkVZ ugha gks jgk
gks rks okbZñ,eñvkbZñ,lñ Mhyj
ls laidZ djsaA
Page 86

lQkbZ rFkk HkaMkj.k
CLEANING AND STORAGE
A. CLEANING lQkbZ
Frequent, thorough cleaning of your
Motorcycle will not only enhance its
appearance but will improve its
general performance and extend the
useful life of many components.
tYnh&tYnh] iwjh rjg lQkbZ u dsoy
vkidh eksVjlkbfdy dks ns[kus esa vPNk
cukrh gS cfYd bldh lk/kkj.k dk;Z{kerk
esa lq/kkj ykrh gS vkSj blls cgqr ls iqtsZ
ds dk;Z&dky esa o f) gksrh gS
CAUTION :
• Improper cleaning can damage
the cowlings, panels and other
plastic parts. Use only a soft,
clean cloth or sponge with mild
detergent and water to clean
plastic.
• Do not use any harsh chemical
products on plastic parts. Be
sure to avoid using cloths or
sponges which have been in
contact with strong or abrasive
cleaning products, solvent or
thinner, fuel (gasoline), rust
removers or inhibitors, brake
fluid, antifreeze or electrolyte.
lko/kkuh %
• xyr rjhds ls dh xbZ lQkbZ ls
eksVjlkbfdy ds dkůyx] iSuy rFkk
vU; IykWfLVd ds iqtsZ [kjkc gks ldrs
gSaA IykWfLVd ds iqtksZa dks lkQ djus
ds fy, eghu fMVtsZaV vkSj ikuh ds
lkFk dsoy lkQ] eqyk;e diM+s dk
gh iz;ksx djsaA
• IykfLVd ds iqtsZ ¼daiksusaV~l½ ds fy,
fdlh rst dsehdYl dk iz;ksx u
djsaA lqfuf'pr djsa fd mu diM+ksa
vFkok Liat ds iz;ksx ls cpk tk, tks
'kfDr'kkyh vFkok ,cjsflo lQkbZ
mRiknksa] nzkod] vFkok fFkuj] b±/ku]
¼xSl½ tax izfrjks/kdksa vFkok
tax&fueZwydksa] cszd ds b±/ku] 'khr
fojks/kh ¼,aVh&Ýht½ vFkok bysDVªksykbV
ds laidZ esa vk tkrs gSaA
7.1
1. Before cleaning the Motorcycle :
eksVjlkbfdy dh lQkbZ djus ls
igys %
a. Block off the end of the exhaust
pipe to prevent water entry; a
plastic bag and string rubber
band may be used.
,XtkWLV ikbZi ¼fudkl&ikbi½ ls ikuh
ds izos'k dks jksdus ds fy, ikbi ds
,d fljs dks IykfLVd cSx vkSj jcj
cSaM dk iz;ksx djds] can fd;k tk
ldrk gSA
b. Make sure the spark plug and all
filler caps are properly installed.
lqfuf'pr djssa fd LikWdZ Iyx vkSj
lHkh fQYyj&dSSIl Bhd rjg ls yxk,
x;s gksaA
2. If the engine case is excessively
greasy, apply degreaser with a
paint brush. Do not apply
degreaser to the chain,
sprockets, or wheel axles.
;fn batu dk dsl vR;kf/kd :i ls
fpduk gS rks isaV czq'k dh lgk;rk ls
bl ij ^fpdukbZ vojks/kd* yxk,aA
psu] LizkWdsV~l vFkok ifg, ds ,Dlyksa
ij fM&xzhlj dk mi;ksx u djsaA
pg56_96.pmd 10/15/2006, 8:53 AM84
Page 87

lQkbZ rFkk HkaMkj.k
CLEANING AND STORAGE
3. Rinse the dirt and degreaser off
with a garden hose. Use only
enough pressure to do the job.
xkMZu&gkSt+ dh enn ls /kwy&feV~Vh
vkSj fM&xzhlj ds O;FkZ ¼vkWQ½ dks Åij
mBk ysaaA bl dk;Z dks djus ds fy,
dsoy i;kZIr ncko dk bLrseky djsaA
CAUTION :
Excessive hose pressure may
cause water seepage and
deterioration of wheel bearings,
front fork, brakes, transmission
seals and electrical parts.
lko/kkuh %
vR;kf/kd ikuh ds ncko ls ifg, dh
cs;¯jx] vxys QksdZ] czsDl] Vªkaleh'ku dh
lhy] vkSj fctyh ds iqtksZa esa ikuh dk
teko gks ldrk gS vkSj os u"V gks ldrs
gSaA
4. After riding on dirty roads, wash
the Motorcycle with cold water
immediately. Do not use warm
water to clean the tyre.
ued ;qDr lM+dksa ij xkM+h pykus ds
4.
ckn eksVjlkbfdy dks rqjar BaMs ikuh
ls /kks,aA Vk;j lkQ djus ds fy;s
xeZ ikuh dk bLrseky u djsaA
5. Once the majority of the dirt has
been hosed off, wash all surfaces
with warm water and mild,
detergent-type soap. An old
toothbrush or bottle brush is
handy for hard-to-get-at places.
,d ckj cgqr lh /kwy gVus ds ckn]
lHkh LFkkuksa dks xquxqus ikuh vkSj eqyk;e
fMVtsZaV dh rjg ds lkcqu ls /kks,aA
eqf'dy ls igqapus okys LFkkuksa dh
lQkbZ ds fy, iqjkus VwFk&czq'k vFkok
cksry&czq'k dk bLrseky djsaA
6. Rinse the Motorcycle off
immediately with clean water
and dry all surfaces with a
chamois, clean towel, or soft
absorbent cloth.
eksVjlkbfdy ij lkQ ikuh Mkydj]
bls rqjar mBkdj [kM+k dj ysa vkSj
lHkh LFkkuksa dks lkQ & rkSfy, vFkok
ueZ diM+s ls lkQ dj lq[kk ysaaA
7.2
7. Dry the chain and lubricate it to
prevent rust.
psu dks lq[kkdj] bls tax ls cpkus ds
fy, bl ij xzhl yxk nsaA
8. Clean the seat with a vinyl
upholstery cleaner to keep the
cover pliable and glossy.
eksVjlkbfdy dh lhV dks yphyk
vkSj pednkj j[kus ds fy, ßfoukby
vi QkLVªh DyhujÞ ls lkQ djsaA
9. Automotive-type wax may be
applied to all painted and
chromeplated surface. Avoid
combination cleaner waxes.
Many contain abrasive which may
mar the paint or protective finish.
When finished, start the engine
and let it idle for several minutes.
lHkh isaV fd, gq, vkSj djkse&IysV
fd, gq, LFkkuksa ds fy,
vkVkseksfVo&Vkbi oSDl dk iz;ksx fd;k
tk ldrk gSA feJ.k&;qDr oSDl
Dyhuj dk iz;ksx djus ls cpsaaA cgqr
ls oSDl esa jcj&d.k ekStwn jgrs gSa
tks isaV fd, gq, vFkok fQfu'k fd,
gq, LFkkuksa dks gkfu igqapk ldrs gSaA
lQkbZ dk dke iwjk gksus ds ckn batu
dks dqN feuVksa rd [kkyh gh pyus
nsaaA
pg56_96.pmd 10/15/2006, 8:53 AM85
Page 88

lQkbZ rFkk HkaMkj.k
CLEANING AND STORAGE
B. STORAGE
ch- Hk.Mkj.k ¼LVksjst½
Long term storage (60 days or more)
of your Motorcycle will require more
preventive procedures to guard
against deterioration. After thoroughly
cleaning the Motorcycle, prepare for
storage as follows:
vkidh eksVjlkbfdy dks yEch vof/k rd
60 fnu ;k mlls Åij½ ^LVksj* djds
¼
j[kus ij bls u"V gksus ls cpkus ds fy,
lko/kkuho'k dqN izfØ;k,a viukuh iM+rh
gSaA eksVjlkbfdy dks iwjh rjg lQkbZ
djus ds ckn] fuEufyf[kr ckrkssa dk vuqlj.k
djds] bls ^LVksj* djus dh rS;kjh djsa %
1. Drain the fuel tank, fuel lines, and
carburetor float bowl.
b±/ku dh Vadh] b±/ku dh ykbZuksa] vkSj
dkjC;wjsVj ds ¶yksV&ckÅy dks [kkyh
djs ysaA
2. Remove the empty fuel tank, pour
a cup of SAE 10W30 or 20W40
motor oil in the tank, shake the
tank to coat the inner surfaces tank
to coat the inner surfaces
thoroughly and drain off the excess
oil. Reinstall the tank.
2. b±/ku dh [kkyh Vadh dks ckgj fudky
ysa] Vadh esa ,d di
20W40
czkaM dk eksVj vkW;y Mkysaa]
SAE 10W30 or
fQj Vadh ds van:uh lrg dh dks¯Vx
djus ds fy, Vadh dks vPNh rjg ls
fgyk,a vkSj Qkyrw rsy dks ckgj fudky
nsaA Vadh dks fQj ls ;FkkLFkku ij
yxk nsaA
3. Remove the spark plug, pour
about one tablespoon of SAE
10W30 or 20W40 motor oil in the
spark plug hole. Reinstall spark
plug. Kick the engine over several
times (with the ignition off) to coat
the cylinder wall with oil.
LikWdZ Iyx dks ckgj fudky ys] SAE
10W30 or 20W40
czkaM dk ,d cM+k
pEep vkW;y LikWdZ Iyx ds Nsn esa
¼gksy½ Mkysa vkSj bls fQj ls okil
yxk nsaA batu dks dqN le; rd
fdd yxkrs jgsa ¼bXuh'u dks can j[krs
gq,½ ftlls flyh.Mj dh fnokjksa dh
vkW;y&dks¯Vx gks tk,A
4. Remove the drive chain.
Thoroughly clean the chain
withsolvent and lubricate it.
Reinstall the chain or store it in a
7.3
plastic bag (tied to frame for
safekeeping).
M ªkbo&pSu dks ckgj fudky ysaA
bls iwjh rjg ls nzkod ¼lkWYosaV½ ls
lkQ djsa vkSj bl ij xzhl bR;kfn
yxk nsaA pSu dks fQj ls yxk nsa
vFkok bls ,d IykWfLVd & cSx esa
^LVksj* djds j[k ysaA ¼lqjf{kr j[kus
ds fy, Ýse ds lkFk cka/k nsa½A
5. Lubricate all control cables.
lHkh daVªksy&dscyksa ¼rkjksa½ dh xzh¯lx
dj ysaA
6. Block up the frame to raise both
wheels off the ground.
nksuksa ifgvksa dks t+ehu ls Åij mBkus
ds fy, Ýse dks jksddj j[ksaA
7. Tie a plastic bag over the
exhaust pipe outlet to prevent
moisture from entering.
ueh dks ^,XtkWLV&ikbi* ¼fudkl&uyh½
ds vanj vkus ls cpkus dss fy, ikbi
dks ckgj ls IykWfLVd cSx ls <d
¼yisV½ nsaA
pg56_96.pmd 10/15/2006, 8:53 AM86
Page 89

lQkbZ rFkk HkaMkj.k
CLEANING AND STORAGE
8. If storing in a humid or salt-air
atmosphere, coat all exposed
parts with anti corrasive chemical
to prevent moisture from
entering.
;fn okrkoj.k esa vf/kd ueh o ued
dh ek=kk vf/kd gS rks /kkrq ds lHkh
egÙoiw.kZ ikVZl ij t+x izrhjks/kh jlk;u
dk bLrseky djsaA
9. Remove the battery and charge
it. Store it in a dry place and
recharge it once a month. Do not
store the battery in an excessively
warm or cold place (less than 0ºC
or more than 30ºC)
9.
cSV~jh dks ckgj fudky ysa vkSj bls
pkt+Z djsaA bls 'kq"d & LFkku ij
laHkkydj j[ksa vkSj eghus esa ,d
ckj fQj ls pkt+Z djsaA cSV~jh dks
vR;kf/kd xeZ vFkok B.Ms LFkku ij u
00 lsaVhxzsM ls uhps vkSj 30
j[ksaA ¼
lsaVhxzsM ls Åij½A
NOTE :
Make any necessary repairs before
storing the Motorcycles.
uksV %
eksVjlkbfdy dks Hk.Mkj.k djus ls igys
gj rjg dh t:jr&ejEer ¼fjis;j½
iwjh dj ysaA
0
pg56_96.pmd 10/15/2006, 8:53 AM87
7.4
Page 90

fo'ks"k fooj.k
SPECIFICATIONS
SPECIFICATIONS
Model
CRUX
Dimensions:
Overall length 2,000 mm
Overall width 735 mm
Overall height 1,075 mm
Seal height 780 mm
Wheelbase 1,260 mm
Ground clearance 160 mm
Minimum turning radius 2,000 mm
Weight : ( With oil & 90% fuel ) 113 kg
Engine :
Engine type Air cooled 4-stroke,
SOHC
Cylinder arrangement Forward inclined
single cylinder
Displacement 105.6 cm
Boer × Stroke 49×56 mm
Compression ratio 9.0 : 1
Starting system Kick starter
Lubrication system Wet sump
Maximum power 7.60 PS(5.59kw) @ 7500 RPM
Maximum torque 0.8 Mkg @ 6000 RPM
3
EngineOil
Type:
YAMALUBE
4-Stroke motor oil (20W40)
Type SG
CAUTION :
Be sure to use motor oils that do not contain
antifriction modifiers. Passenger car motor oils
(often labelled Energy conserving) contain antifriction additives which will cause clutch/or
starter clutch slippage, resulting in reduced
component life and poor engine performance.
Capacity :
Periodic oil change 1.0 L
Total amount 1.2 L
Air filter: Foam type element
Fuel :
Type Regular gasoline
(petrol)
Fuel tank capacity 11.0 Litres
Reserve amount 1.4 Litres
Carburetor:
Type VM17SH
Manufacture MIKUNI
8.1
pg56_96.pmd 10/15/2006, 8:53 AM88
Page 91

fo'ks"k fooj.k
SPECIFICATIONS
fo'ks"k o.kZu %
ekWMy ØDl
Mkbesa'kUl ¼ifjek.k½%
dqy yackbZ
dqy p©MkbZ
dqy Å¡pkbZ
lhV dh Å¡pkbZ
ifg, dk csal
xzkÅaM Dyh;jsal
U;wure V²ux jsfM;l
otu (vkbZy vkSj
90%) bZ/kau 113 fdñxzkñ
batu%&
batu dh fdLe% ,;j&dwyM&
flys.Mj dh O;oLFkk vkxs dh rjQ >qdk gqvk ¯lxy
fMLIyslesaV
c¨j × LVª¨d 49×56 ehñehñ
daçs'ku js'k¨
LVk²Vx&ç.kkyh fdd&LVkVZj
Y;wczhds'ku ç.kkyh vknzZ lai
vf/kdre 'kfDr
vf/kdre VkWdZ
2,000 ehñehñ
735 ehñehñ
1,075 ehñehñ
780 ehñehñ
1,260 ehñehñ
160 ehñehñ
2,000 ehñehñ
4 LVªksd
SOHC
flys.Mj
105.6 lsñehñ
9.0 : 1
7.60 PS (5.59kw) @ 7500
3
pDdj çfr feuV dh ek=kk ij
0.8 Mkg @ 6000 pDdj
çfr feuV dh ek=kk ij
batu dk rsy
fdLe ¼Vkbi½ ;kekgkY;wc
vkW;y
4&LVªksd e¨Vj
(20W40 type SG)
lko/kkuh%
;g lqfuf'pr djsa ,sls e¨Vj vkW;y dk ç;¨x fd;k tk,] t¨
?k"kZ.k çfrj¨/kh lq/kkjd u g¨A ;k=kh&dkj e¨Vj vkW;y] ¼çk;%
ftu ij ÅtkZ laj{k.k dk yscy yxk g¨rk gS½ buesa
?k"kZ.k& foj¨/kh mRçsjd 'kkfey g¨rs gSA ftlls Dyp v©j
LVkVZj Dyp fLyi g¨ tkrs gSA dai¨usaV dh mez de g¨rh gS
v©j batu dh dk;Z&dq'kyrk fuEu&Lrj dh g¨ tkrh gSA
ek=kk%
le;≤ ij rsy ifjorZu
dqy ek=kk
1.0 yhñ
1.2 yhñ
,;j&fQYVj% Qkse fdLe dk ry
¼,yhesaV½
b±/ku%
fdLe% lkekU; xSl¨yhu ¼iSVª¨y½
b±/ku dh Vadh dh {kerk% 11.0 yhñ
fjtoZ ek=kk
1.4 yhñ
dkc¨ZjsVj%
fdLe%
VM17SH
fuekZ.k dÙkkZ% fedwuh
8.2
pg56_96.pmd 10/15/2006, 8:53 AM89
Page 92

fo'ks"k fooj.k
SPECIFICATIONS
Spark plug :
Type/Manufacture P-RA7HC (Champion)
Spark plug gap 0.9 mm (-0.2mm)
Clutch type : Wet, multiple-disk
Transmission :
Primary reduction system Spur gear
Primary reduction ratio 3.722 (67/18)
Secondary reduction system Chain drive
Secondary reduction ratio 3.143 (44/14)
Transmission type Constant mesh 4
speed
Operation Left foot operation
Gear ratio 1st 3.000
2nd 1.688
3rd 1.200
4th 0.875
Chassis:
Frame type Double Cradle
Caster angle 26.4 deg
Tyre with Tube
Size
Front 2.50 ~ 18” 4PR
Rear 2.75 ~ 18” 6PR
Air pressure (cold tyre):
Single Rider
Front 25 psi (1.75 Kgf/cm²)
Rear 32 psi (2.25 Kgf/cm²)
With Pillion and rider
Front 25 psi (1.75 Kgf/cm²)
Rear 32 psi (2.25 Kgf/cm²)
8.3
pg56_96.pmd 10/15/2006, 8:53 AM90
Page 93

fo'ks"k fooj.k
SPECIFICATIONS
LikdZ&Iyx %
fdLe@fuekZ.k dÙkkZ P-RA7HC (psefi;u)
LikdZ&Iyx dk xSi 0.9 ehñehñ(-0.2ehñeh)
Dyp dh fdLe vknzZ] eYVhiy&fMLd
Vªkleh'ku%
çkbejh fjMD'ku ç.kkyh % Lij xh;j
çkbejh fjMD'ku js'k¨
3.722 (67/18)
lSds.Mjh fjMD'ku ç.kkyh% psu&Mªkbo
lSds.Mjh fjMD'ku js'k¨%
3.143 (44/14)
Vªkleh'ku dh fdLe% fLFkr ¼dkWUlVsaV½ eS'k 4 LihM+
vkWijs'ku ¼fØ;k½% ck,¡ ik¡o dh fØ;k
xh;j js'k¨ igyk
3.000
nwljk 1.688
rhljk 1.200
p©Fkk 0.875
psfll
Ýse dh fdLe% Mcy ØsMy
dkLVj d¨.k
26.4 deg
V~;wc ds lkFk
eki
vxyk
fiNyk
gok dk ncko ¼BaMs Vk;j esa½ %
dsoy pkyd ds lkFk
vxyk
fiNyk
pkyd o lokjh ds lkFk
vxyk
fiNyk
8.4
2.50 ~ 18” 4PR
2.75 ~ 18” 6PR
25 psi (1.75 Kgf/cm²)
32 psi (2.25 Kgf/cm²)
25 psi (1.75 Kgf/cm²)
32 psi (2.25 Kgf/cm²)
pg56_96.pmd 10/15/2006, 8:53 AM91
Page 94

fo'ks"k fooj.k
SPECIFICATIONS
Wheels:
Type:
Front Spoke wheel
Rear Spoke wheel
Size: Front 1.60 × 18
Rear 1.60 × 18
Brake:
Front :
Type Drum brake
operation right Hand lever
Rear :
Type Drum brake
Operation Right foot operation
Suspention :
Front Telescopic fork
Rear Swing arm
Shock absorber:
Front Coil spring/oil damper
Rear Coil spring/oil damper
Wheels travel:
Front 110 mm
Rear 70 mm
Electrical:
Ignition system: CDI (Digitally
Controlled)
Generator system:
Type Flywheel magneto
Standard output 12V
Battery:
Type Lead acid
Voltage, capacity 12V 2.5AH
Bulb voltage, Wattage × Quantity:
Headlight 12V 35W/35W × 1
Tail/Brake light 12V 21W/5W × 1
Front flasher light 12V 10W × 2
Rear flasher light 12V 10W × 2
Meter light 12V 2W × 1
Neutral indicator light 12V 3.4W × 1
High beam indicator light 12V 3.4W × 1
Turn indicator light 12V 3.4W × 1
Fuse:
Main 10A
8.5
pg56_96.pmd 10/15/2006, 8:53 AM92
Page 95

fo'ks"k fooj.k
SPECIFICATIONS
ifg, %
fdLe %
vxyk Liksd ds lkFk
fiNyk Liksd ds lkFk
vkdkj %
vxyk
1.60 × 18
fiNyk 1.60 × 18
czsd %
vxyh %
Vkbi Mªe czsd
vkWijs'ku nk¡bZ gkFk dk yhoj
fiNyh%
Vkbi Mªe czsd
vkWijs'ku ¼fØ;k½ nk,¡ ik¡o dh fØ;k
lLisa'ku %
vxyk VsfyLdksi QkWdZ
fiNyk ¯Lox vkeZ
'kkWd ,ctkWcZj
vxyk dkW;y ¯Lçx@rsy MSaij
fiNyk dkW;y ¯Lçx@rsy MSaij
ifg, dk VªSoy %
vxyk 110 mm
fiNyk 70 mm
bysDVªhdy %
Toyu&ç.kkyh % CDI ¼fMftVy
fu;a=k.k½
tujsVj ç.kkyh
Vkbi % ¶ykbZ Oghy eSXusVks
LVSaMMZ vkÅViqV %
cSVjh %
fdLe ySM+ ,flM+
o¨YVst] {kerk 12o¨YV
cYc o¨YVst+] okVst × ek=kk %
gSM ykbV
fiNyh czsd ykbV
vxyh ¶yS'kj&ykbV
fiNyh ¶yS'kj&ykbV
ehVj dh ykbV
U;wVªy baMhdsVj dh ykbV
gkbZ che dh baMhdsVj ykbV
VuZ baMhdsVj dh ykbV
¶;wt+ %
eq[; ¼eSu½
8.6
12o¨YV
2.5AH
12V 35W/35W × 1
12V 21W/5W × 1
12V 10W × 2
12V 10W × 2
12V 2W × 1
12V 3.4W × 1
12V 3.4W × 1
12V 3.4W × 1
10A
pg56_96.pmd 10/15/2006, 8:53 AM93
Page 96

xzkgd lwpuk
CUSTOMER INFORMATION
1. Key identification number
pkch dk igpku uacj
Key identification number
pkch dk igpku uacj
The key identification number is
stamped on the Tag.
Record this number, use it for
reference when obtaining a new key.
pkch dk igpku uacj pkch ds lkFk yxs
Vsx ij g¨rk gSA bl uacj d¨ fjdkMZ dj
ysa v©j tc ubZ pkch çkIr djuh g¨ r¨
blh uacj dh lgk;rk ysaA
pg56_96.pmd 10/15/2006, 8:53 AM94
1. Frame serial number
Ýse dk lhjh;y uacj
Frame serial number
Ýse dk lhjh;y uacj
The frame serial number is
stamped into the steering head pipe
on right hand side.
Ýse dk lhjh;y uacj] LVh;¯jx gSM ikbi
esa nkb± rjQ [kqnk ¼fy[kk½ g¨rk gSA
9.1
1. Engine serial number
batu dk lhjh;y uacj
Engine serial number
batu dk lhjh;y uacj
The engine serial number is
stamped on the right hand
crankcase.
batu dk lhjh;y uacj nkb± rjQ ds
ØSad dsl ij [kqnk ¼fy[kk½ g¨rk gSA
Page 97

çokg&fu;a=k.k ls lacf/kr rF;
FACTS RELATED WITH EXHAUST EMISSION CONTROL
The exhaust gas of an Engine pollutes air with such gases which are very dangerous for mankind. In order to ensure
clean and healthy environment, strict regulations have been enforced to control pollution. As per regulations ‘CO’
emissions by petrol driven Two Wheelers must be less than 3.5% (by volume) during Idling of the Engine.
batu ls ckgj fudyus okyh xSl gok d¨ mu xSl¨ ls çnwf"kr dj nsrk gS t¨ ekuo thou ds fy, cgqr [krjukd gSA blh lanHkZ
esa lkQ v©j LoLFk okrkoj.k d¨ lqfuf'pr djus ds fy, çnw"k.k fu;a=k.k gsrq l[r dkuwu¨ dk çko/kku fd;k x;k gSA bUgh dkuwu¨
ds rgr iSVª¨y ls pyus okys nqifg;k okgu¨ ds batu ds [kkyh pyus dh voLFkk esa lhñv¨ñ dk çokg 3.5% ls de g¨uk pkfg,A
Non Compliance with emission standards is treated as a punishable offence.
çekf.kd çokg ds vuqlkj vlg;¨x djus d¨ n.MkRed vijk/k dh rjg ekuk tkrk gSA
As a Manufacture, YAMAHA MOTOR INDIA PVT. LTD. ensure that your Vehicle meets the exhaust emission
standards before leaving the Factory.
,d fuekZrk ds :i esa ;kekgk e¨Vj bafM;k izkbZosV fyfeVsM ;g lqfuf'pr djrk gS fd vkidh e¨VjlkbZfdy QSDVªh ls ckgj vkus
ls igys fudkl çokg dh çekf.kdrkv¨a d¨ gj rjg ls iwjk djrk gSA
Please note that when new, the Vehicle has a Factory tuned Carburetor, where the Air Screw is optimally adjusted to
meet the requirement of exhaust emission. This screw must not be tampered with as it may cause variation in precontrolled ‘CO’ emission levels. Subsequently, it becomes very important that it should always be within the recommended limit, when checked by a properly calibrated ‘CO’ Measuring Equipment.
ÑI;k /;ku j[ksa] u;h g¨usa ds dkj.k e¨VjlkbZfdy esa QSDVªh esa gh lSV fd;k x;k dkc¨ZjsVj yxk g¨rk gS] tgk¡ ,;j LØ;q dks ,XtkWLV
¼fudkl½&çokg dh vko';drk ds vuqlkj ,MtLV fd;k tkrk gSA dkc¨ZjsVj ds lkFk fdlh rjg dh NsM+&NkM+ ugh dh tkuh
pkfg,] D;¨fd ,slk djus ls iwoZ&fu;a=k.k dkcZu&e¨u¨vkWDlkbM ds çokg ds Lrj¨a esa fHkérk vk ldrh gSA lkFk gh] ;g cgqr
vko';d g¨ tkrk gS fd tc bls lgh rjhds ls dSyhcjsV ¼iM+rky½ fd, x, dkcZu&e¨u¨vkWDlkbM eki&midj.k ls tk¡pk tk,
vkSj ;g ges'kk çLrkfod lhek ds vUnj gh g¨uk pkfg,A
pg56_96.pmd 10/15/2006, 8:53 AM95
9.2
Page 98

lqj{kk&flðk¡r
SAFETY NORMS
If the owner of the Vehicle does not comply with above legal requirement, the Vehicle may be
deregistered or penalty may be imposed by the authorities.
;fn okgu&ekfyd mij¨Dr dkuwuh ek¡x d¨ Lohdkj ugh djrk gS r¨ okgu dk iathdj.k jí g¨ ldrk gS vFkok
ml ij tqekZuk yxk;k tk ldrk gSA
The following points may be checked and suitable corrective action if required, to ensure emission levels to remain
within acceptable limits.
,eh'ku Lrjksa dks Lohdkjh; lhekvksa ds varxZr cuk;s j[kus ds fy, fuEufyf[kr rF;ksa dj tk¡p djsa o vko';d gks rks la'kks/ku
ds yh, dk;Zokgh djsaA
1. Clean and oil Air Filter Element periodically and replace it when required.
le;≤ ij ,;j fQYVj ds ,syhesaV d¨ lkQ djsa v©j blesa rsy Mkyrs jgsa rFkk tc vko';drk iMs+ r¨ bls cny nsaA
2. Clean, inspect and adjust spark Plug Gap periodically.
le;≤ ij LikdZ Iyx dh tk¡p djsa] bls lkQ djsa v©j blds xSi ¼varj½ d¨ ,MtLV djsaA
3. Use only recommended Spark Plug. Replace it as per recommendations.
dsoy çLrkfor LikdZ Iyx dk gh ç;¨x djsaA çLrkfod ekin.M¨ ds vuq:i gh u;k Iyx yxk;saA
4. Use only recommended grade (SG) of genuine engine oil of superior quality.
dsoy mPp DokfyVh dk çLrkfor xzsM ¼SG½ dk vlyh batu rsy gh ç;¨x djsaA
5. Get your Vehicle serviced and tuned periodically as per recommended schedule.
çLrkfor f'kM~;wy ds eqrkfcd le;≤ ij vius okgu dh l£ol v©j V~;w¯ux djkrs jgsaA
6. Use unadulterated Petrol.
feykoV jfgr iSVª¨y dk ç;¨x djsaaA
9.3
pg97_103.pmd 10/17/2006, 8:35 AM97
Page 99

lqj{kk&flðk¡r
SAFETY NORMS
Certain Safety norms have been mandated for the Two Wheelers to prevent accidents. The following items have
been provided in the Vehicle for your safety.
lqj{kk flðkar CMVR fu;e¨a ds vuqlkj] n¨ ifg;k okgu¨ d¨ nq?kZVuk ls cpkus ds fy, fuf'pr lqj{kk flðkar cuk, x, gSA vkidh
lqj{kk ds fy, e¨VjlkbZfdy esa fuEufyf[kr oLrq,¡ çnku dh xbZ gSA
1. Horn
gkuZA
2. Rear View Mirror
ihNs ns[kus ds fy, 'kh'kkA
3. Efficient Front & Rear Brakes (To be applied simultaneously)
vxyh o fiNyh czsds ¼t¨ lkFk&lkFk yxkbZ tkrh gS½A
It is recommended to use a Protective Head Gear (Helmet) conforming to specifications of B.I.S. (Bureau of
Indian Standards).
4. Grip for Pillion Rider
ihNs cSBs gq, O;fDr ds fy, fxziA
5. Head Light/Tail Light
gSM ykbVA ihNs dh ykbVA
6. Indicators
bafMdsVj
;g çLrkfor fd;k tkrk gS fd C;ksjks vkWQ+ bafM;u LVSaMMZ ds }kjk funZsf'kr ekin.M¨ okys gSyeSV dk iz;ksx djsaA
It is recommended to use Saree Guard, when driving with female as a pillion rider.
fiNyh lokjh ds :i esa ,d efgyk ds lkFk *Mªkb¯ox^ djrs gq, ;g çLrkfor fd;k x;k gS fd e¨VjlkbZdy esa *lkM+h xkMZ^ yxk;k
tk,A
In the interest of your own safety you are requested to always keep the above items (and the Vehicle in general) in
good working condition to avoid any Accident.
vkidh lqj{kk ds fgr esa vkils çkFkZuk gS fd mij¨Dr oLrqv¨a d¨ fdlh Hkh nq?kZVuk ls cpkus ds fy, vPNh dk;Z&fLFkfr esa j[ksaA
9.4
pg97_103.pmd 10/17/2006, 8:35 AM98
Page 100

okjaVh
WARRANTY
Yamaha Motor India Sales Private Limited (hereinafter referred to as “YAMAHA”)
thank you for having purchased this YAMAHA Motorcycle. In the unlikely event of
your YAMAHA Motorcycle requiring warranty service please contact the nearest
authorized dealer. We advise that you read instruction manual carefully before
you get in touch with our Authorized Dealer to avoid any inconvenience.
;kekgk eksVj bafM;k lsYl izkbZosV fyfefVM ¼blds ckn ß;kekgk fy[ksaxsa½ ;kekgk dh eksVjlkbZfdy
[kjhnus ij vkidks /kU;okn djrh gSA fdlh Hkh dfBu ifjfLFkfr;ksa esa vxj vkidks ;kekgk dh okjaVh
lsok;sa izkIr djuh gSa rks vius ut+nhd ds vf/kÑr Mhyj ls laidZ djsaA fdlh Hkh izdkj dh vlqfo/kk ls
cpus ds fy, vf/kÑr Mhyj ls laidZ djus ls iwoZ vki bl funsZ"k iqfLrdk dks Hkyh Hkkafr i<+ ysaA
YAMAHA will replace or repair at its Authorised Dealership free of charge, those
parts which may be found on examination to have manufacturing defect, within 2
years from the date of sale of Motorcycle or first 30,000 kilometres of its operation,
whichever occurs first, to the purchaser.
eksVjlkbZfdy dh foØ; frfFk ds nks lky vFkok 30000 fdyksehVj tks Hkh igys laiw.kZ gks tk;s ds
varxZr ;fn fdlh ikVZ esa fuekZ.kk/khu [kjkch ¼eSU;qQSDpfjax [kjkch½ ik;h tkrk gS rks ;kekgk vius xzkgd
dks ml ikVZ dks vius vf/kÑr Mhyjf'ki }kjk eq¶r cnysxh ;k Bhd djok dj nsxhA
YAMAHA warrants the products to be free from manufacturing defects for a period
of two (2) years from the date of sale of the Motorcycle or first 30,000 kilometres
of its operation, whichever occurs first. If during this period of warranty the
Motorcycle proves to be defective due to material or workmanship, YAMAHA through
its Authorised Dealers will repair the Motorcycle without charging the labour or
parts value as per the terms and conditions mentioned below:
VALIDITY OF WARRANTY
This warranty coverage on the Motorcycle shall be valid only if the
customer avails all Free and Paid Services from YAMAHA’S Authorised
Dealer as per Recommended Service Schedule, explained on page
10-39 to 10-42 of this Owner’s Manual and only YAMAHA genuine
Spare parts must be used.
pg97_103.pmd 10/17/2006, 8:35 AM99
The customer shall ensure that each service is availed within 60 days
from the date of previous service or as per recommended service
schedule which ever is earlier.
9.5
 Loading...