

Page 1
ATV Rider Course Manual
SAFETY INSTITUTE
Stephen Galls
Stephen Galls
SAFETY INSTITUTE
Page 2
Foreward
1
This Handbook was produced by Yamaha Motor Australia in conjunction with the Stephen Gall ATV Safety Institute. This manual is adapted
from the ATV Safety Institute in the United States of America for use with
the Australian ATV Rider Course.
The Australian ATV Rider Course is a hands-on course, with particular
emphasis on the safety implications relating to each lesson. The course
also covers protective gear, environmental concerns, local laws, and
safety techniques. The hands-on training includes pre-ride inspections,
starting and stopping, turning (gradual and quick), hills (stopping, turning
around, traversing), emergency stopping and swerving, and riding over
obstacles.
ATVs are fun as well as functional. They are used in all types of offhighway applications such as farming, military, police and surf patrols,
racing, and recreational activities.
Being responsible, using common sense and practising important
skills are all important ingredients in making ATV riding more rewarding.
Your ATV Owners Manual
Take the time to carefully read and understand your owner's manual.
Paying close attention to the manual could save you from severe or even
fatal injury.
Read and comply with all the labels on your ATV. These labels address
warnings about potential hazards. If you are unsure about something,
check your owner's manual or see your Yamaha ATV dealer.
Government and Industry Accredited Training
Stephen Gall’s ATV Safety Institute provides national training to
improve the safety of ATV riders through practical training for the sports,
rural, government and private industry markets. On successful completion of the ATV rider course, students can receive a nationally recognised
‘Statement of Attainment’ to cover industry WorkSafe requirements. To
become a more skilled ATV rider, contact Stephen Galls ATV Safety
Institute on 0755 933340 or email [email protected].
Page 3

Contents
2
Chapter 1
Introduction to Safety Awareness
Safety Alert . . . . . . . . . . . . . . . . . . . . . . . . . . . . . . . . . . . . . . . . . . . . . . . . . . . . . . . . . . . . .3
Risk Awareness . . . . . . . . . . . . . . . . . . . . . . . . . . . . . . . . . . . . . . . . . . . . . . . . . . . . . . . . . .3
Managing Risk. . . . . . . . . . . . . . . . . . . . . . . . . . . . . . . . . . . . . . . . . . . . . . . . . . . . . . . . . . . .3
Chapter 2
Preparing to ride
Dressing Like The Pros . . . . . . . . . . . . . . . . . . . . . . . . . . . . . . . . . . . . . . . . . . . . . . . . . . . . .4
Warming Up. . . . . . . . . . . . . . . . . . . . . . . . . . . . . . . . . . . . . . . . . . . . . . . . . . . . . . . . . . . . .6
Chapter 3
Getting Familiar With Your ATV
Know Your Controls . . . . . . . . . . . . . . . . . . . . . . . . . . . . . . . . . . . . . . . . . . . . . . . . . . . . . . .8
Checking Your ATV . . . . . . . . . . . . . . . . . . . . . . . . . . . . . . . . . . . . . . . . . . . . . . . . . . . . . . . .8
Performing a Pre-ride Inspection . . . . . . . . . . . . . . . . . . . . . . . . . . . . . . . . . . . . . . . . . . . . .9
Chapter 4
Starting Your ATV
Starting Procedures . . . . . . . . . . . . . . . . . . . . . . . . . . . . . . . . . . . . . . . . . . . . . . . . . . . . . .10
Chapter 5
Let's Start Riding
Posture . . . . . . . . . . . . . . . . . . . . . . . . . . . . . . . . . . . . . . . . . . . . . . . . . . . . . . . . . . . . . . . .11
Starting Out . . . . . . . . . . . . . . . . . . . . . . . . . . . . . . . . . . . . . . . . . . . . . . . . . . . . . . . . . . . .11
Shifting Gears . . . . . . . . . . . . . . . . . . . . . . . . . . . . . . . . . . . . . . . . . . . . . . . . . . . . . . . . . . .11
Braking . . . . . . . . . . . . . . . . . . . . . . . . . . . . . . . . . . . . . . . . . . . . . . . . . . . . . . . . . . . . . . . .11
Parking . . . . . . . . . . . . . . . . . . . . . . . . . . . . . . . . . . . . . . . . . . . . . . . . . . . . . . . . . . . . . . . .11
Chapter 6
Turning
Turning Basics . . . . . . . . . . . . . . . . . . . . . . . . . . . . . . . . . . . . . . . . . . . . . . . . . . . . . . . . . .12
Sharp Turns . . . . . . . . . . . . . . . . . . . . . . . . . . . . . . . . . . . . . . . . . . . . . . . . . . . . . . . . . . . .12
Quicker Turns . . . . . . . . . . . . . . . . . . . . . . . . . . . . . . . . . . . . . . . . . . . . . . . . . . . . . . . . . . .12
Chapter 7
Quick Stops and Swerving
Stopping Quickly . . . . . . . . . . . . . . . . . . . . . . . . . . . . . . . . . . . . . . . . . . . . . . . . . . . . . . . .13
Swerving . . . . . . . . . . . . . . . . . . . . . . . . . . . . . . . . . . . . . . . . . . . . . . . . . . . . . . . . . . . . . .13
Chapter 8
Riding Strategies
Reading The Terrain . . . . . . . . . . . . . . . . . . . . . . . . . . . . . . . . . . . . . . . . . . . . . . . . . . . . . .14
Choosing Proper Speeds . . . . . . . . . . . . . . . . . . . . . . . . . . . . . . . . . . . . . . . . . . . . . . . . . .14
Utilising SEE, Practising SEE . . . . . . . . . . . . . . . . . . . . . . . . . . . . . . . . . . . . . . . . . . . . . . .14
Trail Riding, Riding Different Terrains . . . . . . . . . . . . . . . . . . . . . . . . . . . . . . . . . . . . . . . . .15
Loading and Towing . . . . . . . . . . . . . . . . . . . . . . . . . . . . . . . . . . . . . . . . . . . . . . . . . . . . . .16
Effects of Alcohol, Drugs and Fatigue . . . . . . . . . . . . . . . . . . . . . . . . . . . . . . . . . . . . . . . .16
Loading and Unloading Your ATV from another Vehicle . . . . . . . . . . . . . . . . . . . . . . . . . . .17
Chapter 9
Riding Over Obstacles
One Track Obstacles . . . . . . . . . . . . . . . . . . . . . . . . . . . . . . . . . . . . . . . . . . . . . . . . . . . . .18
Two Track Obstacles . . . . . . . . . . . . . . . . . . . . . . . . . . . . . . . . . . . . . . . . . . . . . . . . . . . . .18
Chapter 10
Riding On Hills
Going Up a Hill . . . . . . . . . . . . . . . . . . . . . . . . . . . . . . . . . . . . . . . . . . . . . . . . . . . . . . . . . .19
Getting To The Bottom . . . . . . . . . . . . . . . . . . . . . . . . . . . . . . . . . . . . . . . . . . . . . . . . . . . .19
Traversing . . . . . . . . . . . . . . . . . . . . . . . . . . . . . . . . . . . . . . . . . . . . . . . . . . . . . . . . . . . . . .19
Chapter 11
Safe Riding Practices
Plan Ahead, Survival Kit & First Aid . . . . . . . . . . . . . . . . . . . . . . . . . . . . . . . . . . . . . . . . . .21
Trail Signs, Laws and Regulations, TREAD Lightly . . . . . . . . . . . . . . . . . . . . . . . . . . . . . . .22
You and the Rest of the World, Finding Places to Ride . . . . . . . . . . . . . . . . . . . . . . . . . . . .22
Chapter 12
Conclusion . . . . . . . . . . . . . . . . . . . . . . . . . . . . . . . . . . . . . . . . . . . . . . . . . . . . . . . . . . . . .23
Quiz Answers . . . . . . . . . . . . . . . . . . . . . . . . . . . . . . . . . . . . . . . . . . . . . . . . . . . . . . . . . . .24
This manual is also available on the Yamaha website:
www.yamaha-motor.com.au
Page 4

Introduction to Safety Awareness
Chapter 1
3
So, your are anxious to ride. Before you do, though, be sure you and
your ATV are ready. If you are not, or if your ATV isn't checked out, the
results can range from embarrassment to severe or even fatal injury.
For your safety, understand and follow all the warnings contained in the
Owner's Manual and the labels on your vehicle.
This chapter will introduce you to ideas about safety while operating an
ATV. In turn, this introduction will help prepare you to apply the suggestions contained in the remaining chapters.
Activities involving movement and wheels can result in accidents and
injuries. However an ATV handles differently from other vehicles including
motorcycles and cars. In addition, ATV riding is physically active, another source of risk. You should be aware of these risks in order to manage
them and reduce the possibility of injury.
ATV Safety Alert
An ATV Safety Alert has been published. The most current Alert has
been printed at the end of this manual. Please ensure that you read the
"ATV Safety Alert". It contains important safety information.
Risk Awareness
Knowing the risks and hazards of all-terrain vehicle operation is the first
step in developing safe riding behaviour. When you know and understand
the hazards of ATV operation you can take steps to avoid them. Some of
the hazards can be avoided by using common sense. Riding without a
passenger, and not attempting to do stunts, wheelies or jumps are obvious examples of risk reduction. Also, be sure to follow the age and ATV
size recommendations for younger riders.
ATV Size Recommended Minimum Age
Under 70cc 6 years and older
70-90cc 12 years and older
Over 90cc 16 years and older
Some people fail to identify hazardous situations which should be
obvious. Swimmers who dive into a shallow pond, the driver who does
not slow down in foggy conditions, or the bicyclist who rides against traffic are examples. There are some who think accidents only happen to
other people. They behave as if they will never experience the pain and
inconvenience of an accident. The ATV rider who knows how to manage
risk effectively is putting him or herself at an advantage in ATV riding situations.
The wise ATV rider knows that accidents are not just chance happenings. Most accidents can be prevented with proper planning and responsible behaviour. Some people see accidents as bad luck or focus on a
single cause. Safety experts recognise that rarely is there only one cause
for an accident or mishap. Usually, a combination of circumstances or
events lead up to an accident-producing situation.
Safe ATV riding can depend on your ability to recognise hazardous riding conditions. How well you are able to read the terrain and environment
will play a large part in how safe your ride will be.
Riding safely requires the rider to take responsibility for his or her own
riding abilities, the riding environment, and the capabilities of the ATV.
Riding within personal limits may seem to be simple to do, but many
injuries are caused by riders going beyond their abilities. You should look
at riding as an activity requiring the interaction of three things: personal
ability, ATV capabilities, and environmental or terrain conditions.
Full enjoyment of your ATV requires some of the same kind of precautions associated with other sport and recreational activities. For example,
it is important to always wear proper protective gear when operating an
ATV, just as you would if you were playing football.
For ATV riding, this includes an approved helmet with adequate eye
protection, sturdy over the ankle boots, gloves, long sleeve shirt or jacket and long pants. Depending on the environment in which you ride and
your personal skill level, extra body protection may be a wise choice.
Managing Risk
Managing risks means being a good decision maker. A large number of
accidents are caused by poor riding decisions. You can learn to organise
your thought processes and manage risk by using a thinking strategy to
help you. This thinking strategy forms the acronym SEE: Scan, Evaluate,
Execute.
SEE is a decision making process that helps you manage risks and
enjoy a safe, comfortable ride. Each letter of SEE represents an action for
the rider:
S Scan/search terrain and environment and identify hazards
E Evalute and predict what may happen
E Execute your decision based on your skills and your ATV
Part of the risk associated with ATV riding may be effectively managed
by wearing protective gear, thinking of the consequences of decisions,
and applying the SEE strategy. It is up to you to make the choice to ride
within personal limits, within the capabilities of the ATV, and within the
limits of terrain and environment.
This information provides insight into some of the risks associated with
ATV operation and ways to manage these risks. These topics will be covered in greater details in later chapters.
Chapter 1 - Quiz
1. Most physically demanding activities require special skills and
present certain risks.
True False
2. Learning information in the Owner's Manual will help a rider become
a more safe and responsible ATV Rider.
True False
3. An ATV is not a toy and can be hazardous to operate.
True False
4. A child under 12 years old should never operate and ATV with and
engine size 70cc or greater.
True False
5. An ATV is designed to carry an operator and a passenger.
True False
6. Most accidents are preventable.
True False
7. Riding beyond your limits will not cause accidents if you are a good
rider.
True False
8. Apparel you should wear while riding includes head and eye protec-
tion as well as body protection.
True False
9. Managing risks means being a good decision maker.
True False
10.SEE is a method to help organise your thought process.
True False
Page 5

Preparing To Ride
4
Chapter 2
Personal safety and comfort are enhanced when you wear protective
clothing. Operating without protective clothing increases your chances of
severe injury in the event of an accident. Always wear an approved
motorcycle helmet that fits properly.
Although complete protection is not possible, knowing what to wear
and how to wear it can make you more comfortable when you ride and
reduce the chance of injury in case of a spill.
Dressing Like the Pros
Helmets
The single most important piece of protective gear you can wear is a
helmet. A good helmet can help prevent serious head injuries. Studies
have shown that wearing a helmet does not reduce essential vision or
hearing. Operating without an approved motorcycle helmet will increase
the chance of severe head injury to yourself in the event of an accident.
What to look for in a Helmet
Standards and Testing
Helmets protect your head in two ways: the outer shell resists penetration and abrasion, and the inner liner absorbs shock by slowly collapsing under impact. Both the shell and the liner essentially self-destruct
by spreading the forces of an impact throughout the helmet material. That
is why, in most cases, if a helmet has been damaged in an accident it may
be of little protective value in another mishap.
When you purchase a helmet, look for stickers inside or on the outside
of the helmet, confirming compliance with the standards: Australian
Standards - AS1698.
Each organisation has established procedures to evaluate
helmets for:
• Impact - the shock absorbing capacity of the helmet.
• Penetration - The ability of the helmet to withstand a blow from a
sharp object.
• Retention - the ability of the chinstrap to stay fastened without break-
ing or stretching.
• Peripheral Vision - the helmet must provide a minimum side vision of
120 degrees each side. (Most people’s peripheral vision is between
110 and 115 degrees.
The Right Helmet for You
While colour, design and price may influence your decision about
which helmet to buy, protection should be your first consideration.
The full-faced helmet provides the most protection since it covers more
of your face. Recent design improvements in shell material and interior
ventilation have improved comfort. The next choice in protection is the
three-quarter helmet. It does not offer the face and chin protection that
full-faced helmets do, so if you choose this style, it should be used with
mouth/chin protection.
For a helmet to offer the most protection possible it must fit properly.
Your helmet should fit snugly but comfortably and be securely fastened.
Always fasten you helmet’s chinstrap snugly. A helmet will do you no
good if it comes off during a mishap.
The Right Helmet for Youngsters
A helmet is also the most important piece of protective gear for children. Athletic headgear such as hockey, football or skateboard helmets
ARE NOT ACCEPTABLE for ATV riding. They do not have adequate energy absorption qualities for use while operating a motorised vehicle.
As with any helmet, a child’s helmet must fit properly to be effective.
Do not use an adult-sized helmet that is too large for a youngster.
Helmets are available in Children’s sizes. Check with your ATV dealer.
Replacing Your Helmet
Plan to replace your helmet if it has been involved in an accident. Some
helmet manufacturers will inspect and, when possible, repair a damaged
helmet. If your helmet has been dropped, there may be damage that you
don’t see; you may want to take advantage of this service.
Most helmet manufacturers recommend that, under normal use, you
should replace your helmet every two to four years. If you notice any
signs of damage before then, replace it immediately. As mentioned
above, helmets may crack or break if dropped.
Why replace a helmet every few years if it does not appear damaged?
Its protective qualities may deteriorate over time. The interior padding
compresses, offering less protection. The chinstrap may fray or loosen at
its attaching points and the shell may be chipped or banged. Probably
the best reason, however, is the consistent improvement of design and
protective qualities of helmets.
Since 1980, all helmet manufacturers have been required to stamp the
month and date of production of the helmet. If you cannot remember
when you bought your present helmet, just check the production date. If
there is no date at all, you should definitely replace your helmet now.
Helmet care
Follow the manufacturer’s directions in caring for your helmet. Use only
the mildest soap recommended.
Avoid any petroleum-based cleaning fluids, especially if you own an
injection-molded plastic helmet. Exposure to strong cleaning agents can
cause the plastic helmet and its liners to decompose and lose protective
value.
In Short
There are many considerations when deciding which helmet to buy.
Talk with you local motorcycle and ATV dealer, and consult ATV enthusiast magazines for information to help in you decision.
Full Face Helmet
Open Face Helmet
Knee guards
Boots
Helmet & Goggles
Chest & shoulder
protector
Off road pants
Gloves
Page 6

Preparing To Ride
Chapter 2
5
Eye Protection
Being able to see
clearly will help you ride
more safely. Operating
without eye protection
can result in an accident and increases your
chances of a severe eye
injury in the event of an
accident. An object
such as a rock, branch
or even a bug that hits
you in the face can distract you; but if you are hit in the eyes, you could
be blinded. Regular sunglasses do not provide enough protection when
riding an ATV. A face shield or goggles will help protect you.
They should be:
• Free from scratches, preferably bearing the standard marking
AS1337, or constructed of a hard-coated polycarbonate.
• Securely fastened.
• Tinted for riding on bright days, clear for night riding or yellow for
overcast days.
Gloves
Gloves should be of the quality that will help prevent your hands from
getting sore, tired or cold, as well as offer protection in the event of a
spill. Off-road style gloves, available at motorcycle and ATV dealerships,
provide the best combination of protection and comfort. They are
padded over the knuckles for added protection. Leather gloves should
be avoided as they stretch and become slippery when wet.
Boots
The minimum protective footwear is a pair of strong, over-the-ankle
boots with low heels to help prevent your feet from slipping off the
footrests. Off-road style over-the-calf ATV or motorcycle boots offer the
best protection for feet, ankles and legs.
Clothing
It is important to protect your skin from scratches. A long-sleeved shirt
or jersey and long pants are minimum requirements for rider protection.
Off-road riding gear, (such as jersey; shoulder pads/chest protector; and
off-road pants with knee and shin pads) provide better protection.
Chapter 2 - Quiz
1. Your first consideration when purchasing a helmet should be price.
True False
2. A helmet may not protect the head in a spill if the chinstrap is not
fastened.
True False
3. Operating without eye protection can lead to an accident.
True False
4. A helmet slightly damaged in a minor impact can still offer adequate
protection.
True False
5. Wearing a helmet will reduce normal peripheral (side) vision.
True False
6. Open-faced helmets provide more protection than full-faced
helmets.
True False
7. Athletic headgear is suitable for ATV riding.
True False
8. There are gloves available specially made for off-road riding.
True False
9. Tennis shoes provide adequate protection in off-road riding
situations.
True False
10.Warming up by stretching the muscles will help prevent strains while
riding.
True False
Minimum
recommended
clothing for
riding an ATV
Gloves
Over-ankle Boots
Helmet & eye protection
long-sleeved shirt
or jersey
Long pants
Page 7

Stretching - Lower Body
6
Chapter 2
HAMSTRING: Face the ATV, put your leg up on the footpeg or seat of your
ATV (or handlebar if you are really flexible!) and stretch. Keep your back and
knee straight.
Warming Up
Riding an ATV requires a lot of body movement. Doing warm-ups
before you stretch, will help prevent muscle strain and injury.
Stretching
Remove large and sharp objects from pockets. Do not overexert yourself on warm-up exercises. These are minimal exercises and repetitions
suggested for warming up. As with any strenuous activity, you should
consult your doctor if there is any doubt about you being in shape to ride.
Sore muscles or joints could limit your movement and require you to take
extra precautions when riding.
Stretching Exercises
Possibly one of the areas most neglected by ATV riders these days is that of
injury prevention through stretching. It’s only when you fall off and are flexible enough to avoid injury that you will really reap the benefits of stretching.
The Stretching Routine
Before you proceed with the following stretching exercises, you should
warm-up your muscles by doing a brisk walk or jogging on the spot for
a few minutes.
When stretching, make sure you don’t push too hard too soon –
stretching shouldn’t hurt. Gently stretch each muscle rather than bounce
1. QUADRICEPS: Keep your knee pointed at the ground and hold the
stretch. Hold onto the ATV only for balance.
HIP FLEXOR & UPPER THIGH: Lean forward as shown, putting your weight
on your rear foot but keeping both feet pointing forward.
TORSO & LOWER BACK: Hang onto the handlebars with one hand and the
rear carry rack with the other and twist at the hips. (Repeat other way.)
Page 8

Stretching Upper Body
Chapter 2
7
UPPER FOREARM: With your palm face down with the other hand, bend
your wrists. Keep your elbows and palms of your hands as straight as
possible.
LOWER FOREARM: Very similar to
the upper forearm exercises. Push
forward and bend at the wrist,
keeping your hand straight.
NECK: FORWARD: Pull your chin down to your chest and gently back.
NECK: SIDE: Tilt your head towards
your shoulder to feel the strain
down one side of your neck. Stretch
your neck to the left and right side.
SHOULDER: Pull one elbow across in front of you and then hold it with your
other arm. You will feel the strain across your shoulder.
SHOULDERS #1: Interlock fingers
and stretch your arms out in front
of you, keeping your elbows as
straight as possible.
SHOULDERS #2: This is the same
as the previous exercise except
stretching upwards.
SHOULDERS #3. Clasp your hands together behind your back and pull your
arms upward.
it. Hold for 20 to 30 seconds when you feel a slight stretch, continue
breathing and try to ease into a further stretch and then release.
And remember, not everyone is as flexible as one another, so take it
carefully when you do your stretches.
Page 9

Getting Familiar With Your ATV
8
Chapter 3
Read and study the Owner’s Manual carefully, and look at your ATV to
memorise the location of the controls.
Know Your Controls
The controls shown here are typical - refer to your owners manual as
they may vary from model to model)
Identify these controls (if equipped):
1. Rear brake lever
2. Front brake lever
3. Rear brake lever or pedal
4. Throttle
5. Ignition Switch
6. Fuel supply valve
7. Choke (primer)
8. Clutch (on clutch models)
9. Engine stop switch
10.Gas cap/tank vent
11.Shift lever (on clutch models)
12.Starter (eg. pull, kick, electric)
13.Light on/off switch
14.Light high/low switch
15. Headlight
16. Reverse gear lever
17. Transmission high/low lever
18. Diff lock
Not shown
• Throttle limiter screw
• Steering lock
• Seat release lever
• Suspension adjustments
Mounting your ATV
To mount your ATV correctly:
• Set the parking brake.
• Grasp the handlebar with
your left hand.
• Place your left foot on the footrest - do not step on the shift lever.
• Lean over, grasp the handlebar with your other hand.
• Swing you leg over the seat and place your foot on the other footrest.
• Seat yourself in a comfortable position.
• Keep your feet on the footrests at all time, even when the engine is not
running.
• Practise mounting using the controls until you can operate the controls without looking at them.
Dismounting your ATV
To dismount your ATV correctly:
• Set parking brake.
• Stop engine using engine stop switch.
• Turn off ignition, fuel valve and vent cap (if present).
• Follow the steps for mounting in reverse order.
Checking Your ATV
A pre-ride inspection of your ATV’s mechanical
condition is important to minimalise the chance of
injury or being stranded, as well as to ensure the longterm enjoyment of your ATV. Remember, you can ride
farther in an hour than you can walk in a day. Always
inspect your ATV each time you use it to make sure
the ATV is in safe operating condition. Follow the
inspection and maintenance procedures described in
your owner’s manual. Pay special attention to warnings in your manual and on all labels on the ATV.
Never modify an ATV through improper installation or
use of accessories. All parts and accessories added
to an ATV should be genuine or equivalent components designed for use on that particular ATV, and
should be installed and used properly. If you have
questions, consult an authorised ATV dealer.
Left view of ATV
Right view of ATV
Left Handlebar Controls
Right Handlebar Controls
Handlebars
1
1
8
2
3
9
12
13 14
10
18
11
15
7
4
5
6
16
17
18
Tyre pressure is an important part of
the T-CLOC pre-ride check
Page 10

Getting Familiar With Your ATV
Chapter 3
9
Performing a Pre-ride Inspection
An easy way to remember what to check before riding is the acronym
T-CLOC.
Tyres and wheels 1. Air pressure - Always have the recom-
mended tyre pressure. Be sure front tyres
and both rear tyres are inflated to equal pressure. If the tyre pressure on one side is higher than the other side, the vehicle may pull to
one side.
2. Condition - Check for cuts or gouges that
could cause air leakage.
3. To avoid loss of control or injury, make
sure axle nuts are tightened and secured by
cotter pins. Check these before every ride.
Controls and Cables 1. Controls - Check the location of all the
controls by sitting on the ATV. Make sure
they work properly, and are comfortable to
use.
2. Throttle and other cables - Make sure the
throttle moves smoothly and snaps closed
with the handlebars in any position. An offroad environment is hard on cables.
3. Brakes - Do the controls operate smoothly
and are the controls adjusted according to
the owner’s manual? Are they positioned for
easy reach? Your brakes are a crucial part of
riding and must always be in tip-top
condition.
4. Foot shifter - Is it firmly attached and
positioned for safe operation?
5. Are the controls comfortable to use? Make
adjustments as required.
Lights and Electrics 1. Ignition switch (if equipped) - Check the
condition of the switch and make sure it
works properly by switching it off and on
during your warm-up period
2. Engine stop switch - Does it turn off the
engine?
3. Headlight, stop and taillight (if equipped) Are they working? You could be caught out
after dark.
Oil and Fuel 1. Do not get stranded because you are out
of oil or fuel. Know your ATV’s cruising range.
2. Check oil level with dipstick or sight glass
while the engine is off. Check your owner’s
manual for procedure.
3. Always start your ride with a full fuel tank.
4. Check for fuel or oil leaks.
5. Take off the filter cover and check the
condition of the air filter element. Be sure it is
oiled and clean and not torn or blocked.
Chain and 1. Chain - Inspect, adjust and lubricate the
chain regularly. Your chain is the vital link
from the engine to the wheels. Check for
chain slack or free play so that it is within
specifications as described in your owner’s
manual.
2. Drive shaft - If our ATV is equipped with a
drive shaft rather than a drive chain, check
for oil leaks. Maintain its oil supply as outlined in your owner’s manual.
3. Nuts’n’Bolts - Riding in rough terrain will
loosen parts. Look and feel for loose parts
while the engine is off. Shake handlebars,
footrests etc., before each ride and periodically check fasteners.
4. Check shock absorbers and mounting bolts.
Tool Kit
Emergency situations can arise with any motor vehicle; running out of
fuel, a burned out headlight at night, or unknown hazards on the trail.
These situations are not only inconvenient, but can result in unsafe conditions for ATV riders.
Riding off-road is not like being on a freeway with your car - a tow truck
is not just a phone call away. Since ATVs are for off-road use only, riders
must be prepared by taking the right safety precautions. Fortunately,
most ATV problems can be fixed on the trail if you carry a minimum
assortment of tools and spare parts and know how to use them.
Each ATV comes with a basic set of tools. Along with tools you should
carry an extra spark plug (or two).
On extended rides or long trips, more than the basic tools should be
carried to help make repairs, such as: electrical tape, spare bulbs,
mechanic wire, duct tape, knife, a flashlight if your ride after dark, and a
tow strap or length of rope that can be used if repairs are not possible.
These items should be carried in an addition to a well-stocked survival kit
(page 21).
Following your
owner’s manual
maintenance schedule will help prevent
most breakdowns,
but once in a while
your ATV may fail. If
you are riding kilometres from help,
carrying the above
items could save you
a long walk.
Remember you will
not have your walking
shoes on!
Chapter 3 - Quiz
1. To learn the location of the ATV’s controls, read the owner’s manual.
True False
2. A rider should know the location and function of all the controls on
an ATV before riding. True False
3. Looking at the controls while riding is a safe action.
True False
4. You should keep your feet on the footrests at all times.
True False
5. You should engage the parking brake after safely dismounting your
ATV. True False
6. If you do not inspect your ATV before riding, you decrease your
chances of an accident. True False
7. Improper tyre pressures may affect the operation of an ATV.
True False
8. To remember the pre-ride inspection procedure, use the acronym T-
CLOC.
True False
9. The basic ATV tool kit is enough to carry when going on extended
rides. True False
10.It is best to use genuine replacement parts for your ATV.
True False
T
C
L
O
C
drive shaft chassis
Page 11

Starting The ATV
10
Chapter 4
When you start your ATV you are responsible for controlling it. Read the
owner’s manual section on starting your ATV and use the starting procedure represented in the letters BONE-C. Practising this procedure will
help you start the engine quickly and efficiently.
Starting Procedures
Brakes 1. Set the parking brake or for a fully
automatic transmission ATV put into
park.
On 2. Turn the fuel valve to ON or
RESERVE position, depending on
how much fuel is in the machine.
Turn ignition key on, if equipped.
Neutral or Park 3. Check that the transmission is in
NEUTRAL or park. To make sure it is
in neutral, check the NEUTRAL indicator, if equipped. If necessary,
release the parking brake, rock the
machine back and forth keeping your
feet on the footrests, then reapply the
parking brake. Or for a fully automatic transmission ATV, put into Park.
Engine 4. Check that the engine stop switch
is in the RUN or START position. The
engine stop switch is usually found
by either the left or right hand grip.
Choke 5. If the engine is cold, put the
CHOKE in the ON position. Check
your owner’s manual for choke location.
7. Start the engine according to the
directions in your owner’s manual.
8. Once the machine is warmed up,
return the choke to its normal position. This is very important because if
you do not, the machine will not run
properly.
Chapter 4 - Quiz
1. The correct way to start a particular ATV is in the owner’s manual.
True False
2. A way to remember the engine starting procedure is to use the
acronym T-CLOC. True False
3. Part of the engine starting routine is being sure the parking brake is
set. True False
4. Some ATVs have an “on/off” vent on the fuel cap. True False
5. The engine should be started with the transmission in first gear.
True False
6. The parking brake should be engaged when rocking the ATV to
check for neutral. True False
7. Keep your feet on the footrests when rocking the ATV to check for
neutral. True False
8. The engine stop switch is located in the fuel tank. True False
9. Put the choke in the “on” position when starting a warm engine.
True False
10.The fuel valve should be turned to the “on” or “reserve” position
before starting the engine. True False
B
O
N
E
C
Page 12

Let’s Start Riding
Chapter 5
11
Before starting out, be sure to review your owner’s manual paying special attention to the warnings and procedures. Remember to always wear
the proper protective gear while operating an ATV. Be sure riders under
the age of sixteen are under adult supervision while riding. Bring an experienced rider along to help you if you have problems.
The first step is mastering the basic skills needed by an ATV rider.
These include riding in a straight line, shifting and braking. Learning these
basics is essential in advancing your abilities as an ATV rider.
Posture
The correct riding posture will help you to easily operate the controls
and help you react more quickly when shifting your body weight. Proper
straight line riding posture includes:
• Head and eyes up, looking well ahead.
• Shoulders relaxed, back straight.
• Elbows bent, slightly away from your body and slightly above the
height of the handlebars.
• Hands on the handlebars.
• Knees in toward the tank.
• Feet on the footrests, toes pointing straight ahead.
When you sit forward on the seat the ATV will pivot underneath you.
Always keep both hands on the handlebars and both feet on the footrests
of your ATV during operation. Removing even one hand or foot can
reduce your ability to control the ATV or could cause you to lose your balance and fall off. If you remove a foot from a footrest, your foot or leg may
come into contact with the rear wheels, which could injure you or cause
an accident.
ATVs are rider-active; to enhance the performance capabilities of the
ATV you must shift your body weight. This is especially true in manoveuvres such as turning, negotiating hills, and crossing obstacles. These
operating techniques are covered in more detail in later chapters.
Starting Out
When starting out:
• Make sure the parking brake is set.
• Mount the ATV from the left side.
• Start the ATV using BONE-C.
• Hold the rear brake.
• Shift into first gear. (See your owner’s manual for procedure for your
model ATV.)
• Release the parking brake.
• Release the rear bake and slowly apply the throttle.
• If your machine has a manual clutch, release the clutch slowly, while
gradually increasing the throttle. If the clutch is engaged suddenly the
ATV might move abruptly, causing you to lose control.
• Remember to keep your feet on the footrests at all times!
When riding in a straight line, remember to look well ahead, where you
want to go, not at the controls or immediately in front of the ATV. This will
help you maintain a straight course.
Shifting Gears
Because there are several types of ATV transmissions, you must be
certain you know how to shift the transmission of the ATV you are riding.
• Always release the throttle while shifting to prevent the front wheels
from lifting.
• Learn the sounds of your engine so you know when to shift to keep
the engine speed in the most efficient range.
• If your ATV has a manual clutch, learn where the friction zone is to prevent stalling and allow smooth shifting.
• Some ATVs are equipped with reverse gear. Improperly operating in
reverse could result in serious injury. Follow these recommendations
when operating in reverse.
• Look behind you for obstacles or people.
• When it is safe to proceed, operate slowly.
Braking
Look ahead when braking, not at the ground immediately in front of
you, Following these tips will help you make smooth, controlled stops.
• Release the throttle.
• Shift to a lower gear to use the engine to slow the vehicle.
• Apply both brakes equally (if equipped).
• Avoid excessive braking while cornering. Do most of your braking
before the turn.
• Apply both brakes lightly on slippery surfaces.
• Keep head and eyes up.
• Keep your feet on the footrests at all times.
Parking
• When parking your ATV always try to find flat ground, and:
• Shift into neutral.
• Stop the engine with the engine stop switch, and if equipped, turn off
the ignition switch.
• Set the parking brake, or shift into a low gear if you do not have a
parking brake, to keep the ATV from rolling.
• Turn the fuel off.
Chapter 5 - Quiz
1. When riding an ATV, it is best to wear proper protective gear.
True False
2. Operating an ATV requires that both hands be firmly on the handlebars. True False
3. The brakes should be used when shifting into first gear from neutral.
True False
4. When starting out in first gear, it is safest to look at the controls.
True False
5. Always release the throttle while shifting. True False
6. A rider should learn the sound of the ATV engine for better operation.
True False
7. To make slower speed stops, use only one brake. True False
8. It is best to do most of your braking before entering a turn.
True False
9. It is best to look down at the stopping point when using the brakes.
True False
10.It is proper to shift into a lower gear when coming to a stop.
True False
Page 13
Turning
12
Chapter 6
Handling characteristics for ATVs vary depending upon basic design
and how they are equipped. The turning information in this handbook
applies to most ATVs with one exception: ATVs with unlocked differentials. If your ATV has a differential, be sure to lock the rear axle before
practicing the turning techniques in this handbook. Refer to your Yamaha
owner’s manual for instructions.
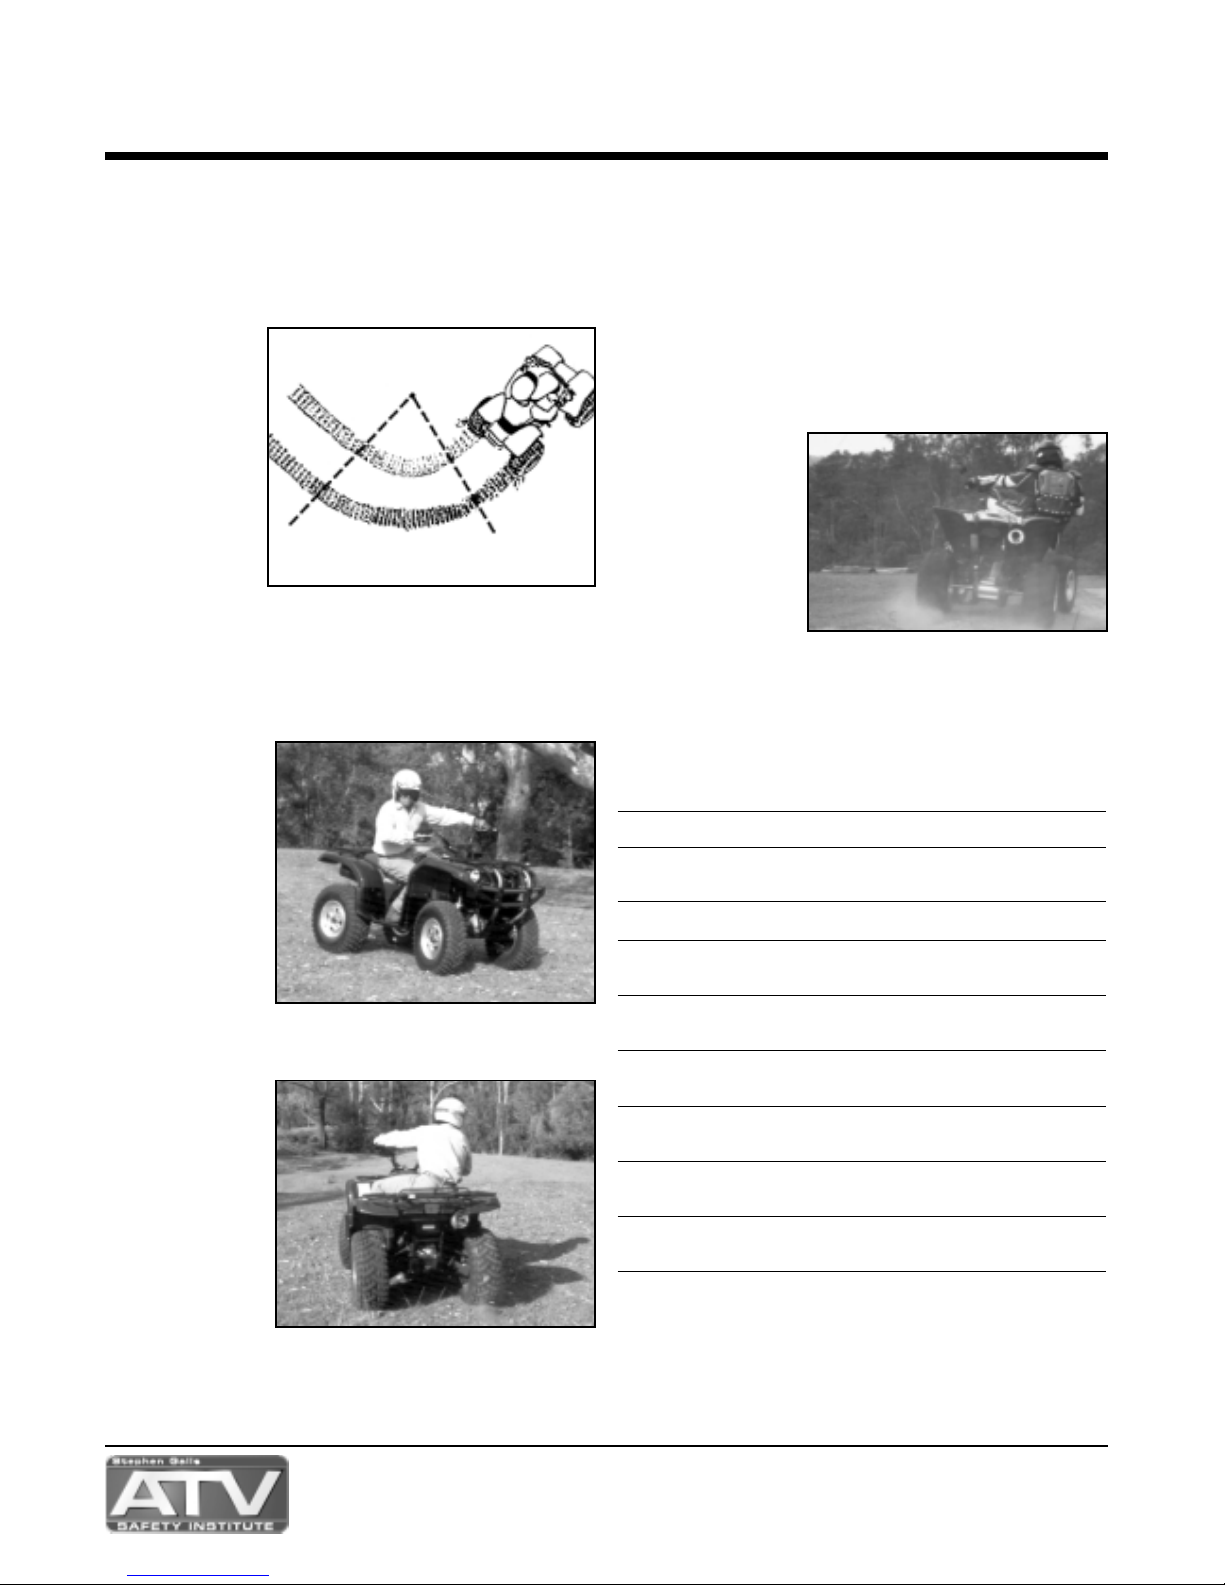
ATVs with solid rear axles, and those with locked differentials, turn both
rear wheels at the same speed. This means when turning, the inside
wheel must “slip”
slightly on the surface (see Figure 1).
ATVs with unlocked
differentials allow the
rear wheels to turn at
different speeds. If a
rear wheel on an ATV
with an unlocked differential leaves the
ground, it will spin
freely. Then when it
touches the ground
again, it my grab and
cause you to lose
some control.
Turning Basics
Always check your owner’s manual for the recommended turning techniques for your ATV. The following basic turning technique applies to
ATVs ridden at low to moderate speeds. Be sure to practice turning at low
speeds before attempting to turn at faster speeds. Do not turn at excessive speed.
At Low Speeds
• Move your body
weight forward
and to the inside of
the turn.
• Turn the handle-
bars while looking
in the direction of
the turn.
As you increase
speed or turn more
sharply, move your
body weight farther
toward the inside of
the turn to maintain
your balance.
If your ATV starts to tip while turning, lean your body farther into the
turn while gradually making the turn wider, if possible.
At Higher Speeds
The method of
turning at a higher
speed is similar to
turning at lower
speed. The difference
is that as speed
increases you must
lean farther forward
toward the inside of
the turn. This is to
counteract the higher
centrifugal forces as
cornering speed
increases.
If your ATV starts to tip toward the outside of the run while turning, lean
your upper body farther into the turn while gradually reducing throttle and
if possible, make the turn wider by straightening the handlebars. Keep
you feet on the footrests.
Sharp Turns
Learning to make sharper turns through practice will help you respond
to crooked trails or obstacles within your path.
Be sure to slow down before the turn. Keep your eyes up, looking
through the turn at your intended path of travel. Watch for terrain irregularities so that you can slow down as necessary. Sharper turns require
more leaning in the direction of the turn. If an error in judgement causes
the ATV to start to tip toward the outside of the turn, straighten the handlebars or lean your upper body more into the turn.
Remember it is important to first practice gradual turns and then
progress toward sharper turns as your riding skills develop. Be patient
and practice basic skills before moving on to more difficult manoeuvres.
Quicker Turns
Quicker turns are
sometimes required to
avoid obstacles in your
path. You should practice
coordinating speed, body
position and weight shift
to help you make quick
directional changes.
Keep your feet on the
footrests to maintain
maximum control for
manoeuvring the ATV.
Quicker turns require quicker weight shifts. It helps to rise off the seat
slightly (not standing up). Quicker turns are sometimes easier to negotiate if you combine a short burst of throttle with the proper weight shift.
Look well ahead and allow the ATV to move underneath you. As with any
turn, if the ATV starts to tip toward the outside of the turn, slow down and
straighten the handlebars and/or lean more to the inside of the turn.
Adjust your speed to match conditions.
Chapter 6 - Quiz
1. Most ATVs are equipped with solid rear axles. True False
2. Improperly turning, particularly at higher speed, can cause an ATV to
tip to the outside of the turn. True False
3. When turning you should lean away from the turn. True False
4. If an inside wheel starts to lift while you are turning, you should
straighten the handlebars or lean farther into the turn. True False
5. To turn an ATV at low speeds it is helpful to shift your body weight to
the rear. True False
6. When preparing to turn, you should slow down before the turn.
True False
7. Gradual turns require more skill than do sharp turns.
True False
8. Quick turns are easiest with your body weight on the back of the
seat. True False
9. The best way to perform a quick turn is to apply equal pressure on
the right and left footrests. True False
10.You should look ahead in your intended path of travel during a turn.
True False
Fig. 1
Page 14
Quick Stops and Swerving
Chapter 7
13
Applying a good riding strategy will decrease the likelihood of having
to make a quick stop. Scan and identify potential hazards several seconds ahead in your path of travel. Practice quick stops in a flat open area
so you can get used to how your ATV responds to your input. Be especially careful on excessively rough, slippery or loose terrain.
This is a more advanced riding skill. Remember, do not exceed your
capabilities.
Stopping Quickly
Because nature is constantly changing, you must be prepared to stop
quickly, slow down or swerve to avoid obstacles, such as fallen trees or
washouts across your trail. An animal may dart out in front of you, or you
may meet another rider as you round a bend. Never ride faster than your
visibility allows.
A quick stop could be necessary at any time, so remember:
• Ride within your ability.
• Use both brakes when stopping. Although the front brake (in the for-
ward direction) does provide the majority of stopping power.
• Slow your ATV when cresting a hill or going through a turn.
• Never ride past your limit of visibility.
• If you accidentally lock the wheels, release the brakes momentarily
and reapply the brakes more gradually.
• Keep your feet on the footrests.
Swerving
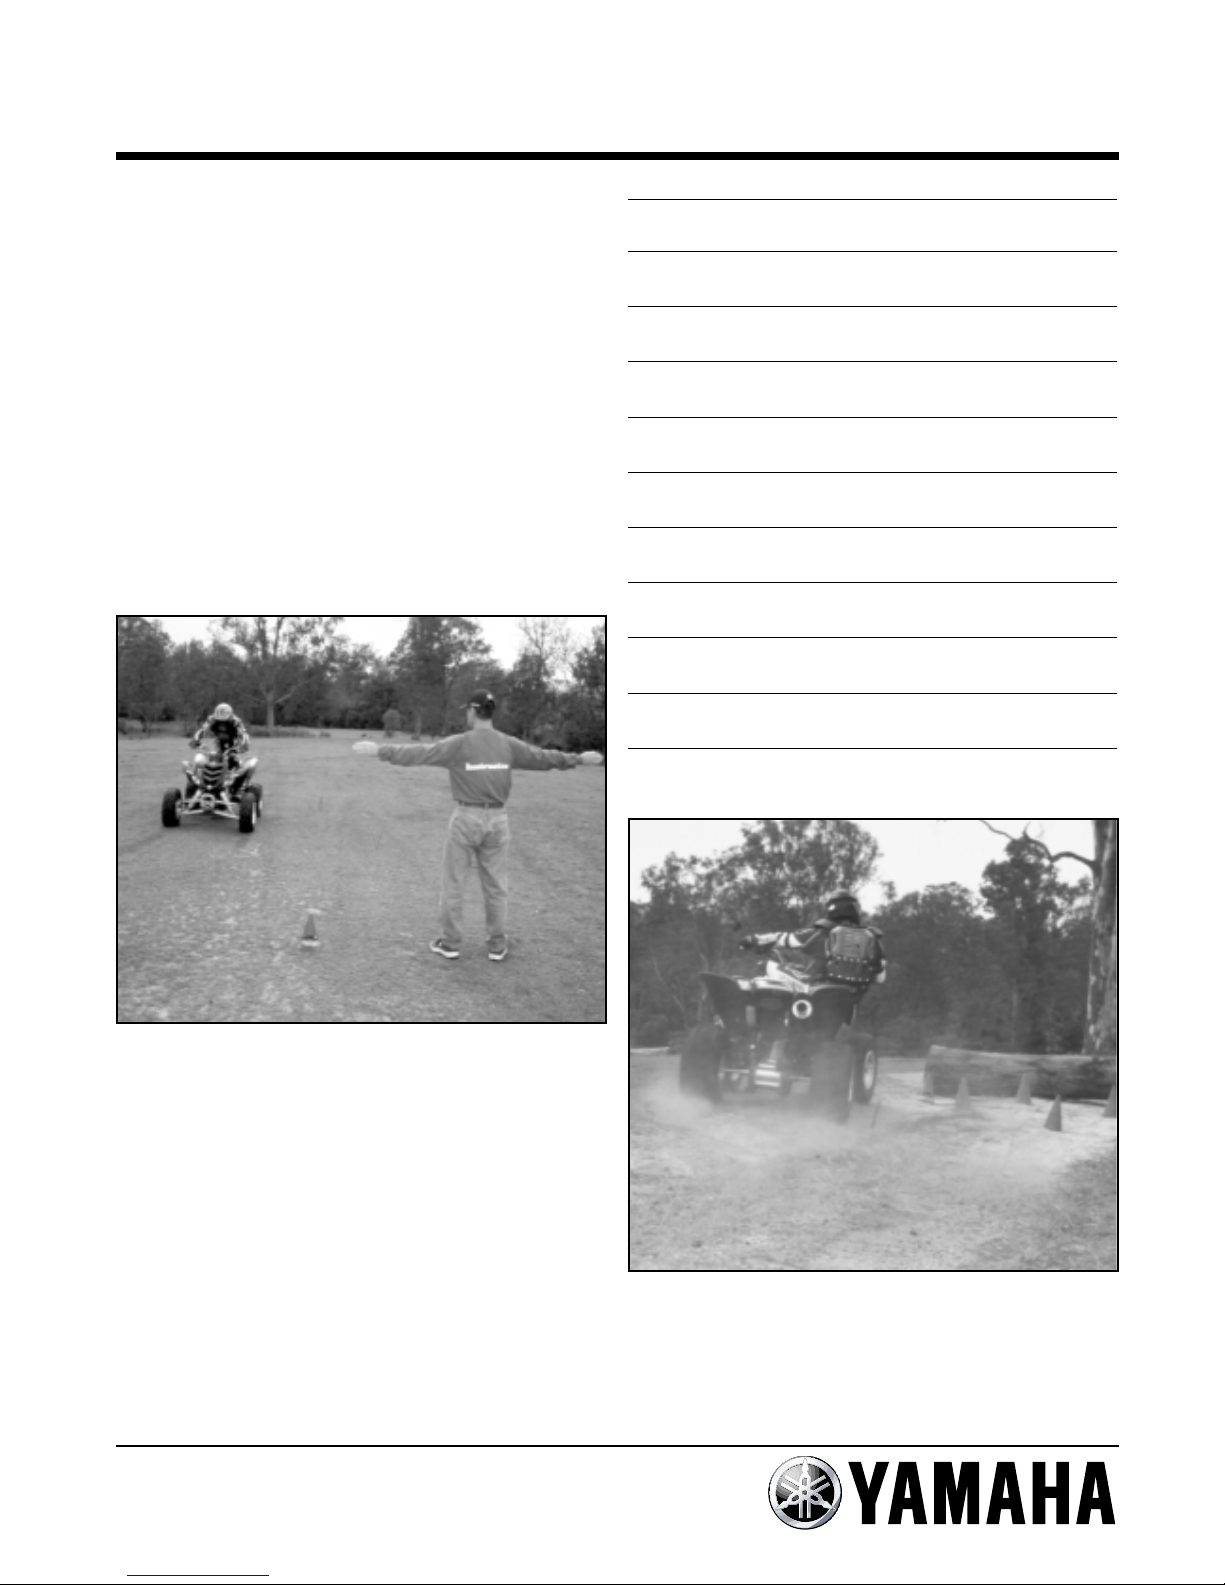
You should be able to make emergency swerves to avoid unexpected
hazards when riding. Follow these guidelines to help prevent mishaps:
• Keep your feet on the footrests.
• Look in the direction of the swerve
• Shift weight to the inside of the turn.
• DO NOT brake while swerving - brake AFTER swerving and only after
the ATV is travelling in a straight line.
• A short burst of throttle will help the ATV to turn.
Chapter 7 - Quiz
1. Using a good riding strategy will decrease the chances of having to
stop quickly. True False
2. Making a quick stop or performing a swerving manoeuvre is easier
at faster speeds than slow speeds. True False
3. You should never ride faster than your visibility allows.
True False
4. The sudden appearance of an animal during a trail ride may require
a rider to perform an emergency manoeuvre. True False
5. A quick stop in a straight line requires more skill than making a quick
stop in a turn. True False
6. You should not brake and swerve at the same time.
True False
7. When swerving, you should look in the direction of the swerve.
True False
8. Braking and swerving at the same time could result in a spill.
True False
9. Stopping quickly or swerving are considered more advanced riding
manoeuvres. True False
10.Your feet should be kept on the footrests during an emergency
manoeuvre. True False
Page 15

You need to know the area in which you are riding and what you and
your ATV can do in order to have a safe, enjoyable ride. Your riding areas
may not have the types of terrain discussed in this chapter, but it is still
wise to know the strategies to ride in them.
Reading the Terrain
Choose places in which you can ride safely. Stay on existing trails. Be
aware of terrain where you do not belong, like steeper slopes, impassable
swamps and other hazardous situations. Keep a watchful eye for sharp
bumps, holes, ruts, obstacles, wildlife, and other trail users.
Reading the terrain means to observe and understand the features and
characteristics of the land on which you are riding. This includes surface
composition, slope or camber of the trail, hills, rocks, tree stumps,
creeks, vegetation, fixed objects etc.
Learn to read the trail as you ride. A wise rider watches well ahead on
the trail. Know what is coming; be ready to react long before you get
there. Be constantly alert for hazards and changing terrain conditions.
Ride within your ability, not beyond your capabilities. Do not operate on
excessively rough, slippery or loose terrain until you have learned and
practiced the skills necessary to control your ATV on such terrain. Adjust
your speed to trail conditions and visibility. A responsible rider stays out
of trouble not simply by handling the machine well, but by riding safely
and avoiding risky situations in the first place.
Choosing Proper Speeds
Always look well ahead and choose a speed that is proper for the terrain, visibility, operating conditions, and your experience.
By scanning far enough down the trail, you will be able to pick the best
“lines” (or safest path of travel) around or over hazards or small obstacles. As you approach a hazard, do not fixate on it, but rather continue to
search for other clues in the environment and adjust speed well in
advance.
Using S.E.E.
There is an acronym to remind you of the procedures for scanning trails
and making riding decisions: “SEE”. Each letter in SEE refers to steps
needed to identify and respond to potential hazards in the lay of the land.
Consider the consequences of possible choices and respond with the
correct manoeuvring skill.
Scan * Keep eyes moving and search the
terrain
* Check overall environment
* Watch several seconds ahead
* Avoid fixating on any one object
* Identify hazards
* Pick out specific problems
* Consider surface composition
* Other trail users and wildlife and
stationary objects
Evaluate * Predict what may happen
* Think of consequences
* Consider riding techniques necessary
* Predict results of choices
* Decide what to do
- Slow down so there is time to react
- Pick the best line or path. Consider
traction, obstacles within skill level,
visibility
- Choose to reduce risk
- Choose to stay well within personal
limits and capabilities of your ATV
Execute your decision * Adjust technique
* Adjust speed
* Adjust path of travel
Practising S.E.E.
An illustration of a rider’s thought process is described in this example.
In real-world ATV operation, the riding terrain constantly changes, requiring a rider to continually process information and make decisions. The
following example shows how SEE can be used in this one “picture”. This
thought process must be seen as only a moment within a changing environment.
How might a rider specifically use SEE? What might he or she think? A
snapshot entering a rider’s eyes and brain is shown here. Let’s eavesdrop
on the thinking strategy.
• SCAN. Open area with path of
travel along hill crest. Narrow,
dry path. Bumpy terrain, shrubs
and obstacles. Drop-off next to
trail’s path. Identify a narrow
trail along ridge. Steep dropoffs on sides. Poor visibility
over crest. Dip in surface
ahead.
• EVALUATE. Predict what may
happen if other riders come
from the other direction resulting in a collision. Riders may be
coming from the sides. Getting
too close to the edge of the trail
could cause you to go over the
road side embankment. May
have to react quickly. Not much
escape area if trouble develops. Decide to slow, stay in
middle of trail. Look for
approaching riders. Stand up
for better visibility and adjust
weight if need for uneven terrain. If path is clear, gain
momentum to get up next hill
area.
• EXECUTE. Release the throttle,
apply both brakes. Weight up
off seat - continuing to scan,
search and think.
Riding Strategies
14
Chapter 8
S
E
E
Page 16

Riding Strategies
Chapter 8
15
Trail Riding
Plan your ride carefully; do not take a trail that requires skill and techniques beyond your abilities or the capabilities of your ATV. Ensure that it
is legal to ride your ATV on trails open to the public or that you have the
owners permission to ride through private land. Be careful going from a
sunny to shaded trail. Ruts or rocks may “hide” in the shade and your
eyes may not adjust quickly enough to see them in time. Gradient lenses
can also help in these conditions. Standing up in the footrests will aid
your ability to take on rough terrain. Remember, be prepared to meet
oncoming traffic as most trails allow two-way travel.
Most properly designed trails are “off-cambered” to allow rain run off.
This means you will need to keep your weight shifted into the slope.
If you must ride at night, be sure both headlight and taillight are working. Never stop just before a turn on the trail; pull well off the trail when
you stop for a break. Be highly visible to other trail-riders. At night if stopping on the trail, turn a light on so that other riders will see you.
Know Where You Are Riding
If you are planning to ride in an unfamiliar area, contact local organizations like a motorcycle club, horse riding club and the local Parks and
Wildlife authorities to ensure you know which areas are ok to ride and
which areas you should stay clear of.
Crossing Roads and Highways
ATVs are designed to be used OFF-ROAD ONLY. But on occasion you
may find it necessary yo cross a road or highway. This is common in
farming areas where ATVs are used for various work purposes. If you do
need to cross public roads ensure that you seek permission from the
relevant authorities. A leading cause of accidents and fatalities to ATV
riders is from riding on or crossing the road illegally or improperly. The
hazards of road crossing cannot be over-emphasized. Your ATV will handle differently on pavement and may be difficult to manoeuvre. Besides
using caution and courtesy, follow your state’s laws to cross a road and
ensure you have the legal permission to do so. If you must cross a road,
use the following guidelines:
• Bring your ATV to a complete stop on the shoulder of the road. If you
are riding in a group, have the first rider (leader) dismount and watch
for traffic as he waves the group across the road. Have the last rider
dismount after crossing and watch traffic for the group leader.
• Yield the right of way to all oncoming traffic. Look both ways.
• Cross the road at a 90 degree angle where there are no obstructions
and your visibility is good.
• Make sure you know your state’s laws and legal procedures before
you cross any road.
• Remember, crossing roads improperly or illegally riding on the road is
a major cause of serious accidents and fatalities to ATV users, so use
extra caution.
Always assume that drivers DO NOT SEE YOU, since most drivers look
for cars, not ATVs.
Riding Different Terrain
Sand Dunes
Dune riding offers great thrills and fun, but certain safety precautions
are necessary to fully enjoy this type of terrain. Make sure your ATV is
equipped with an antenna flag so others can see you better. The safety
flag should be a bright colour and the antenna at least 3 metres from
ground to tip (with the tip lighted at night).
Dunes shift in size and shape. Drop offs can be created in a matter of
hours. NEVER assume that what you rode on yesterday will be the same
today. When the wind blows, the tracks you left ten minutes ago could
vanish; the path you travelled a few hours ago can require a completely
different riding strategy. Assume wet sand is unstable and could be
quicksand. Do not attempt a crossing unless you know it is a safe area.
Avoid riding on vegetation since it helps stabilise the dunes and may also
hide an obstacle or hazard. Be aware of “slip face” dunes which have a
gradual incline on one side (usually the windward side) and nearly a
straight drop-off on the other side (leeward). Be careful of “razorbacks”
which have a steep angle on both sides. When riding up a dune be prepared to make a U-turn if there is a drop-off. Dunes may vary in shape,
size and direction. Learn the characteristics of the dune system in which
you are riding.
Be extra careful when the sun is directly overhead because there are
no shadows to indicate holes, drop-offs or changes in terrain. A three-tofour inch heat haze can appear on top of the sand on warm, sunny days,
creating an illusion that the surface is level where instead large bumps
and holes may exist. A wise rider will travel slower under these conditions. A gradient (dark at top and clear at bottom) or dark lens in your
goggles can help distinguish dips, drops and holes in the sand. Wear only
clear lenses at night. Remember, night riding demands extra caution; it is
best to slow down. When stopping for a rest, day or night, park at the
crest of a dune. You will be more visible and have a better view.
Riding Through Mud and Water
Your ATV is equipped to ride through mud and shallow water, but you
should avoid water crossings where you might cause damage to
streambeds, fish spawning grounds, or where you might cause erosion to
the banks of a stream or creek. This precaution not only adds to your own
personal safety and fun, but it preserves the environment for others to
enjoy as well. If you are riding through mud and water, remember the
footrests may become slippery. Remember, water levels may change
from hour to hour. Safely determine the depth of the water or mud before
riding through it. If in doubt, push a long stick into the water to help you
determine its depth.
Never operate your ATV in fast flowing water or in water deeper than
that specified in your owner’s manual. Check you owner’s manual to find
out the maximum depth your ATV can negotiate safely.
If you cross a stream, or go up and down stream banks, use an established ford or ride where the banks have a gradual incline. This will help
minimise the impact on the stream bank.
Your body position is very important when riding in mud or water. To
maintain proper balance or maximum traction, be prepared to shift your
weight in any direction. You may find it necessary at times to rock the ATV
from side to side to work it out of a hole. Remember to continue to search
and scan as you ride through mud or water; watch carefully for submerged obstacles.
Proceed at a slow steady speed, avoiding obstacles and slippery
rocks. Do not ride through unfamiliar water too quickly. Mud and deep
water may slow the ATV abruptly and could cause a loss of control if you
enter too swiftly.
Use a moderate speed with higher than usual engine speed.
Remember that wet brakes may have reduced stopping ability. Test your
brakes after leaving water. If necessary, apply them several times to let
friction dry out the linings.
After riding in water, be sure to drain any trapped water by removing
the drain screws (if equipped, check your owner’s manual.) Clean your
ATV with fresh water if you have ridden in or near seawater.
To prevent loss of traction in mud or snow, allow the tyres to rotate at
a speed that enables their knobs to “bite”. Do not spin the tyres quickly;
they will only dig a hole, splatter you with mud, and you will not travel any
faster. Watch for mud build up on the engine, chain, and the rest of the
ATV.
Page 17
Riding Strategies
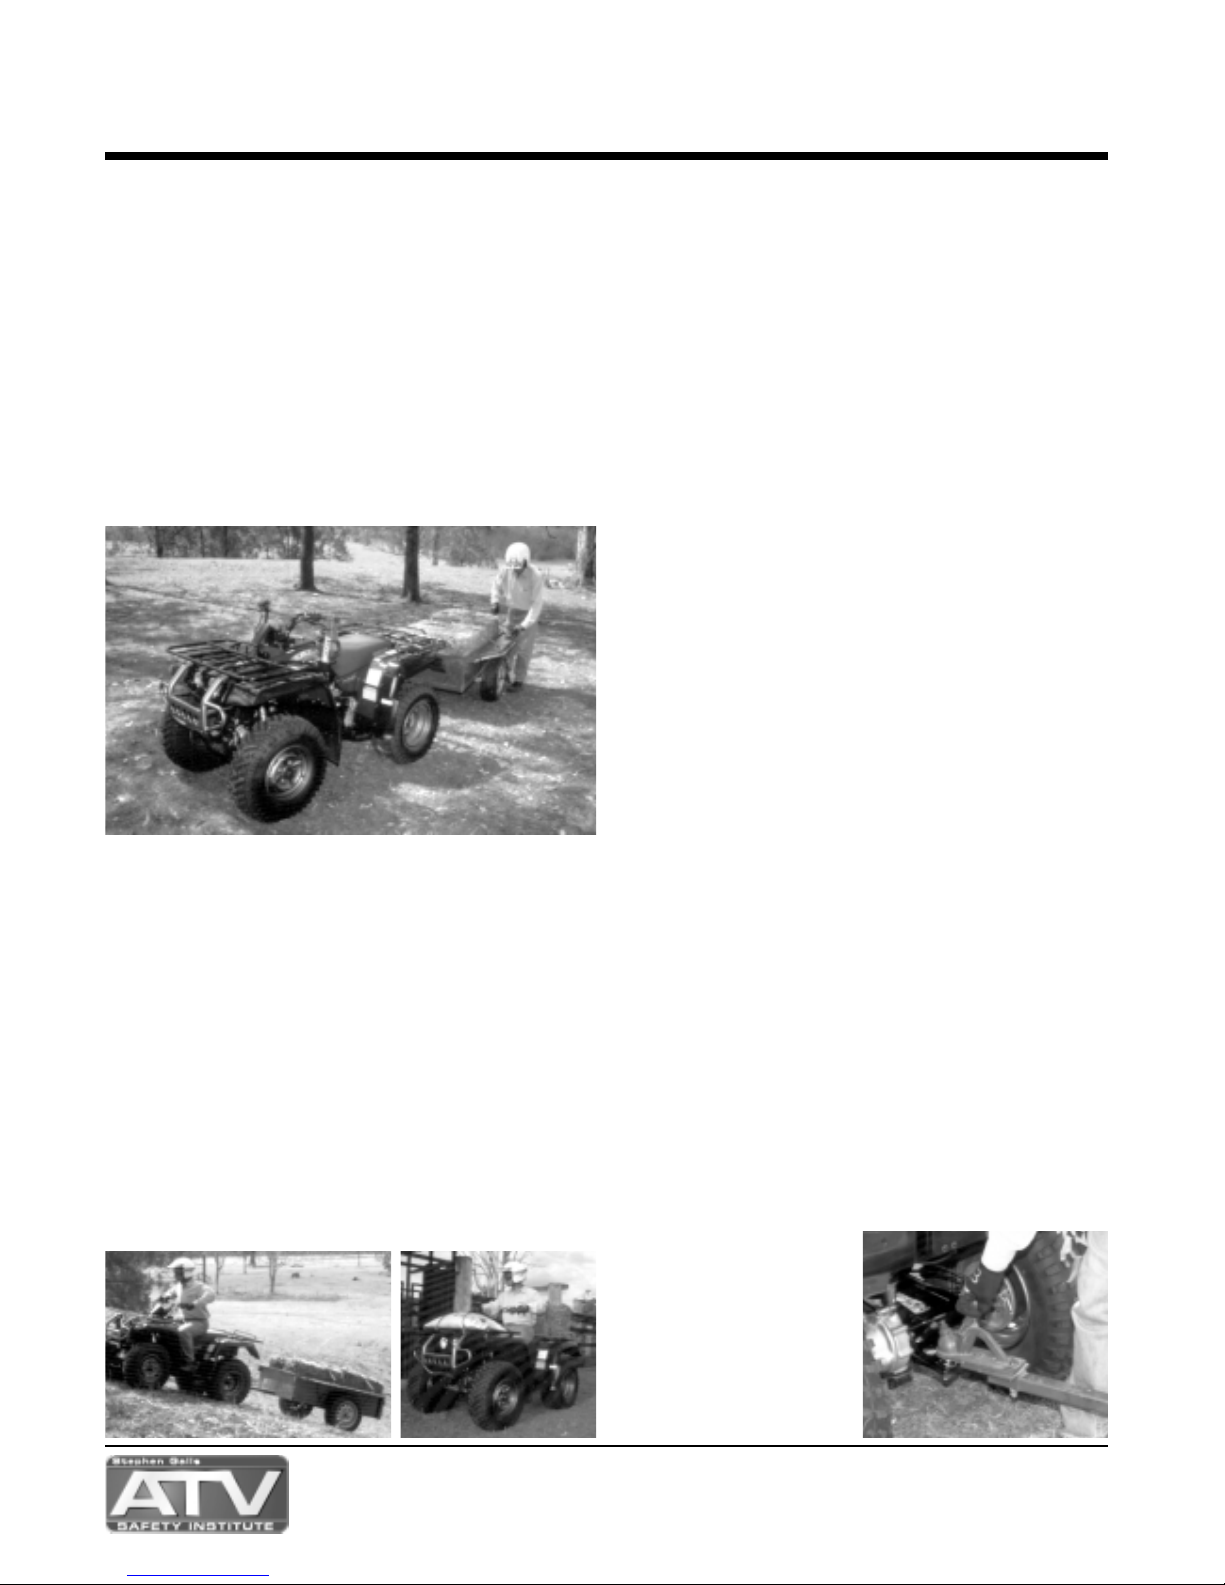
16
Chapter 8
ATV Accessories, Loading & Towing
ATV accessories, heavy loads and towing can affect the handling and
stability of your ATV. Refer to your Yamaha Owners Manual before pur-
chasing or fitting accessories; or before loading or towing with your ATV.
Accessories
Accessories can affect the handling and control of your ATV. When purchasing accessories or operating an ATV with accessories it is important
to keep the following in mind.
1. Choose only accessories designed specifically for your ATV. Your
Yamaha dealer will have a number of genuine accessories available for
your ATV. For other aftermarket accessories available ensure that they
do not exceed your ATV’s load limits and consult your Yamaha dealer.
2. Make sure your accessories are securely mounted. If an accessory
shifts or comes off, it could affect your ability to control the ATV.
3. Do not mount the accessory where it could interfere with your ability
to operate the ATV safely.
4. The ATV will handle differently when accessories are fitted. Use cau-
tion at all times.
Loading & Towing
You must use common sense and good judgement when carrying
cargo or towing a trailer, as a trailer or a load can affect the stability and
handling of your ATV.
Keep the following points in mind:
• Never exceed the maximum load limits specified in your Yamaha own-
ers manual.
• Do not exceed the maximum tongue weight as specified in your manual.
• Load cargo on the carrier as close to the centre of the vehicle as possible.
• Put cargo just forward the centre of the trailer ensuring it does not
exceed tongue weight. Centre the load from side to side.
• Tie down the load securely. If the load shifts it can cause an accident.
• Make sure the load does not interfere with controls or your ability to
see where you are going or shifting body weight.
• Ride more slowly than you would normally. The more weight you carry,
the slower you should go.
• It’s a good idea to use low range whenever you are carrying heavy
loads.
• Allow more braking distance. Heavy loads take longer to stop.
• Avoid making sharp turns unless at very low speeds.
• Choose terrain carefully. Avoid hills and rough terrain.
• Use 4WD if fitted.
Effects of Alcohol, Drugs and Fatigue
Riding an ATV can be more demanding than driving a car. You have to
be in good physical and mental condition to ride safely. Three things that
keep ATV users from being in top shape for riding are alcohol, drugs and
fatigue. Each affects the entire decision-making process of SEE.
Alcohol
Drinking and riding can be fatal. In the USA, the Consumer Product
Safety Commission studies show that thirty percent (30%) of all ATV riders killed in ATV accidents had been drinking. Fourteen percent (14%) of
all reported accidents with injuries indicated alcohol consumption by the
operator. As you can see, ALCOHOL AND ATVS DO NOT MIX.
Losing Control
Alcohol sneaks up on you. Unlike other beverages and foods, alcohol
does not have to be digested. Within minutes, it is absorbed into your
bloodstream and passed to your brain. It quickly causes a slowdown of
your physical and mental reactions. Though you may perform more and
more poorly, the alcohol makes you feel as if you are riding better and
better. In fact, small quantities of alcohol impair your ability to:
• Ride and scan the trail or riding area for multiple hazards.
• Perceive moving objects.
• React quickly and properly.
• Coordinate eye, hand, and foot movements.
• Maintain balance while manoeuvring.
• Make good decisions.
• See clearly at night.
• Stay within capabilities.
A large number of all fatal injury ATV accidents are associated with
alcohol use. In addition to the risk of injury and the resulting medical bills,
repairs to the ATV are expensive. In all states you can get prosecuted for
“riding under the influence”, which can lead to stiff fines and lawyer fees,
not to mention possible jail term. The only safe way is not to drink at all.
Other Drugs
Almost any drug puts an ATV rider at risk. Many over-the-counter prescription and illegal drugs have side effects like alcohol, which affect the
skills you need to ride safely. Tranquillisers and barbiturates, which are
depressants, act like alcohol within your bloodstream. Even cold tablets
and allergy pills can make you feel weak, dizzy and drowsy. They may
also affect your vision, coordination and judgement.
Marijuana decreases your ability to see at night and recover from headlight glare. Marijuana users cannot react as quickly as usual nor operate
the ATV. Amphetamines or cocaine, while they may increase your attentiveness temporarily, bring on extreme fatigue once they wear off.
Furthermore, they produce a mild euphoria, which often causes riders to
take foolish risks. Never consume drugs before or while operating an ATV.
Fatigue
Riding an ATV is more tiring than driving a car. When you plan a long
trip, be mindful that you will tire much sooner than you would in a car.
Remember that fatigue can affect your control of the ATV.
Here are some things you can do to keep from getting too tired:
• Protect yourself from the elements. Wind, cold, rain and heat make
you tire more quickly. Dress appropriately for the conditions.
• Limit your distance and riding time until you know your limits.
• Take frequent rest breaks. Stop and get off the ATV. No one should go
more than one hour without
pulling over, stopping, getting
off the ATV and walking
around.
• Eat food high in carbohydrates
to keep up your fitness and concentration.
• Drinking plenty of water during
the ride will also help your
endurance and concentration.
Page 18

Loading and Unloading and Transport of ATV
An ATV can be loaded on or off a vehicle safely providing the proper
technique is used. Failure to do this can result in serious injury or death.
The most suitable vehicle for transporting your ATV are:
• Trailer - Box, Tilt, bike or car trailer.
• Utility - Tray or flatbed
• Truck
When loading the ATV on to another vehicle please keep the following
points in mind.
• Remove any loads from the ATV.
• Check that the ATV is in first gear low range.
• If using ramps make sure they are secured to the back of the vehicle
or trailer.
• Ensure that the wheels are centred over ramps.
• Do not exceed the ramps specified carrying capacity.
• Make sure the vehicle tray is clear of any obstacles.
• Check that the vehicle being loaded is in gear with the engine off and
park brake on.
• Use 4WD if fitted
Suitability of Loading and Unloading Sites
When loading or unloading your ATV it is essential that you choose a
suitable loading and unloading site to ensure maximum safety.
Securing Your ATV
Once you have successfully loaded your ATV it must be secured correctly to the transport vehicle. Keep the following points in mind.
• Remove any load from the ATV.
• Make sure the the ATV is centred on the vehicle to ensure correct
weight distribution.
• Use only approved straps and harnesses to secure the ATV.
• Ensure that all straps are in good condition and working order.
• Make sure the ATV is secured at both the front and rear of the vehicle.
• Secure straps to approved parts of the transport vehicle.
• Make sure all other objects are secure to ensure that the ATV is not
damaged by shifting loads.
• Mount chain, ropes or tie downs to strong fixture points on your ATV
and transport vehicle.
Chapter 8 - Quiz
1. “Reading the terrain” means to observe and understand the features
and characteristics of the land. True False
2. The best “lines” to pick are those that include obstacles and uneven
terrain. True False
3. ATV riders should consider the consequences of their choices such
as at what speed to travel and what path to take. True False
4. An ATV can easily travel through slippery mud and deep water.
True False
5. Soft snow is more easily negotiated than firm snow.
True False
6. Ice of any thickness will support your weight as well as the ATV’s.
True False
7. Riding on sand or on sand dune terrain requires special considerations. True False
8. ATV riders should make themselves visible to other riders.
True False
9. A danger of crossing the road is that driver’s in traffic fail to see
ATVs. True False
10.The effects of alcohol create a negative influence on each step of
the SEE process. True False
Riding Strategies
Chapter 8
17
Page 19

18
Riding Over Obstacles
Chapter 9
Obstacles should be avoided when possible. Smaller obstacles may
be crossed if proper judgement and skills are utilised. Remember some
obstacles are too large and should be completely avoided, even if it
means turning around and taking a completely different path. Attempting
to cross an obstacle improperly could cause a loss of control or result in
your ATV overturning.
When crossing obstacles, follow the procedures listed in your owner’s
manual for your model ATV. Keep your knees and elbows flexible. Use
your legs and arms as shock absorbers to cross obstacles more comfortably. Keep your elbows bent out slightly and away from your body to
retain a flexible riding posture for uneven terrain.
Mounds and ruts both act as obstacles. Be sure to stand on the
footrests for each. If only the wheel(s) on one side goes over the obstacle (a single-track obstacle), be prepared to shift your weight toward the
obstacle and maintain balance as the ATV moves to one side. If there is
excessive jarring from impact, bend your knees and arms more.
Keep in mind the following tips when crossing obstacles:
• Approach obstacle as close to 90 degrees as possible, while standing
on the footrests.
• Adjust approach speed prior to the obstacle without losing momen-
tum.
• Hold handgrips firmly, with knees and elbows slightly bent and body
weight slightly back as the front wheels rise up and over the obstacle.
• As rear wheels ride over the obstacle move your body weight forward
to centre yourself on the ATV.
For two-track obstacles:
• Concentrate weight on footrests, not on handlebars.
• As the front wheels contact the obstacle apply a small amount of
throttle.
• Lean forward and release the throttle as the front wheels clear the
obstacle.
For single track (offset) obstacles:
• Use momentum to cross obstacles.
• Do not apply throttle.
• Do not pull up on handlebars or attempt to loft the front wheels.
Chapter 9 - Quiz
1. Obstacles should be avoided if possible. True False
2. The larger an obstacle a rider can cross, the better that rider is.
True False
3. The best way to cross an obstacle is to keep your knees and elbows
locked. True False
4. The SEE strategy can be applied in avoiding or crossing obstacles.
True False
5. Mounds and ruts in the terrain are treated similarly to obstacles.
True False
6. The faster an obstacle is crossed, the safer the manoeuvre is.
True False
7. Weight shift is toward the obstacle when crossing a single-track
obstacle. True False
8. Too much throttle could cause an accident when crossing an obsta-
cle. True False
9. It is best to approach an obstacle as close to 90 degrees as possible.
True False
10.You should check your owner’s manual for the correct procedure for
crossing obstacles. True False
Page 20
19
Riding On Hills
Chapter 10
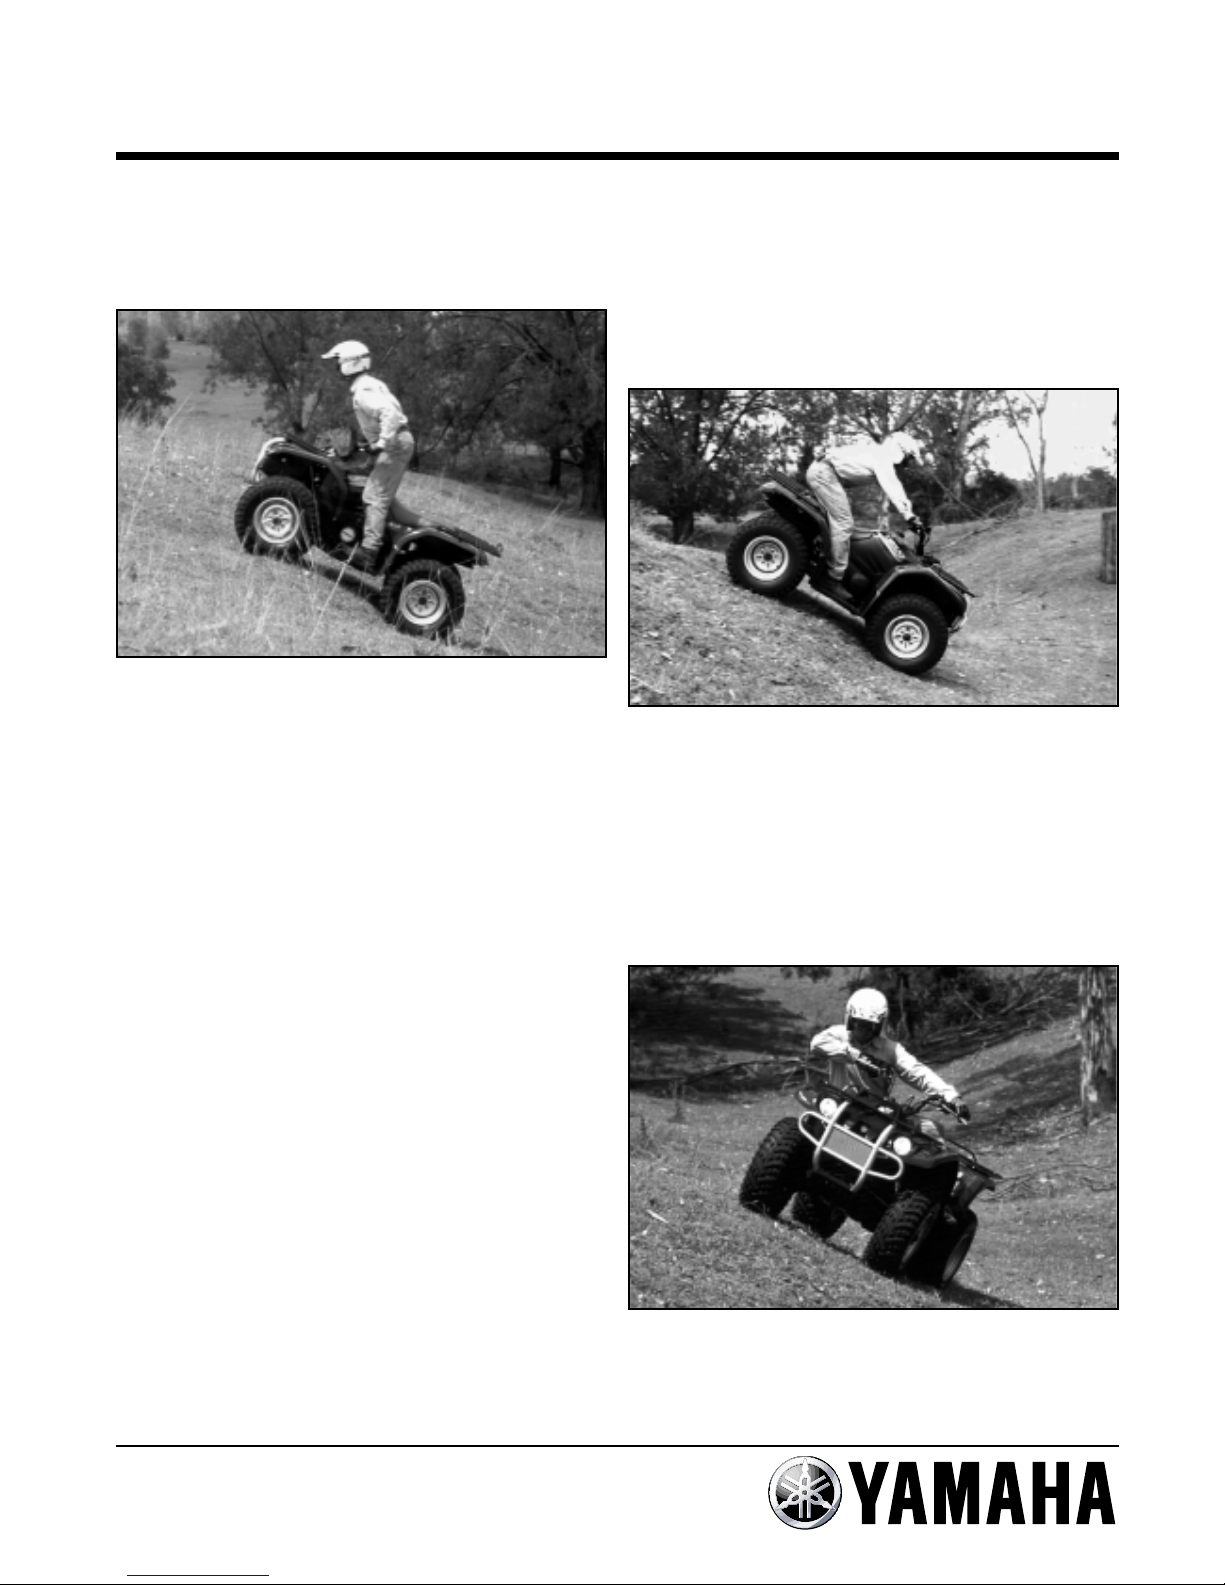
When riding just about anywhere, you will encounter some type of hills.
An ATV can overturn more easily on extremely steep hills than on level
surfaces or small hills. Being prepared and knowing what to do will help
you on your journey. Always be sure to check your parking brake before
riding in hilly areas.
Going Up A Hill
Remember:
• Some hills are too steep for your abilities. Use your common sense. If
the hill looks too steep, it probably is.
• Some hills are just too steep for your ATV regardless of your abilities.
• Never ride past the limit of your visibility - if you cannot see what is on
or over the crest of a hill, slow down until you have a clear view.
• The key to being a good hill rider is to keep your weight uphill at all
times.
Climbing hills improperly could cause loss of control or cause the ATV
to overturn. Always follow the proper procedures for your ATV contained
in the owner’s manual. When approaching an uphill climb you should:
• Keep your feet firmly on the footrests.
• Shift the ATV into a lower gear and speed up BEFORE climbing the hill
so you can maintain momentum.
• When approaching the uphill climb, move way up on the seat and lean
forward, or stand and position you torso over the front wheels.
• As you are climbing, you may need to shift to a lower gear to prevent
lugging the engine or stalling. To shift into a lower gear on a hill
remember:
- Keep your body weight forward as you prepare to shift gears. For
steeper hills, lean forward as much as possible.
- Shift quickly while momentarily releasing the throttle: this will help
keep the front wheels from lifting.
If you do not have enough power to reach the top of the hill, but still
have forward momentum and enough room to turn around safely:
• Keep your weight uphill.
• Make a U-turn before you lose speed.
• Proceed downhill in a lower gear, keeping your weight to the uphill
side.
If you are riding uphill and lose all forward momentum:
• Keep your weight up hill, and apply the brakes and come to a stop.
Never allow the ATV to roll backward.
• Apply the parking brake while keeping your weight uphill.
• Dismount on the uphill side or to a side if pointed straight uphill, and
follow the procedure described in your owner’s manual.
Do not attempt to ride backward down a hill. Should you begin rolling
backward, do not apply the rear brake abruptly. Using the rear brake only
or abruptly could cause the ATV to roll over backward. If you begin rolling
backward:
• Keep your weight uphill, and apply the front brake. If your ATV does
not have a front brake, follow the procedure described in your owner’s
manual.
• When you are fully stopped. Apply the rear brake as well. Apply the
parking brake, dismount on the uphill side or to a side if pointed
straight uphill, and follow the procedure described in your owner’s
manual.
• If the ATV continues to roll backward, dismount to the uphill side
immediately.
Getting to the Bottom
Always check the terrain carefully before you start down any hill.
Choose a path which is as straight downhill as possible with a minimum
of obstacles. Shift your weight to the rear and use a low gear. Follow the
procedures described in you owner’s manual for special braking techniques for descending.
When going downhill:
• Shift your weight to the rear (uphill).
• Keep speed low.
• Use gradual braking.
• Use a lower gear.
• Look ahead.
Traversing
When you go across a slope rather than directly up or down, it is called
traversing. Sometimes when a hill is steep it is necessary to climb it or
descend it by traversing.
Traversing a slope is tricky. Avoid traversing slopes with excessively
slippery, rough or loose surfaces.
Page 21

Riding On Hills
20
Chapter 10
Here are some basic guidelines for traversing:
• Keep both feet firmly on the footrests.
• Lean your upper body uphill.
• When riding on soft terrain, you may need to gently turn your front
wheel(s) uphill to keep the ATV on a straight line across the hill.
• If your ATV begins to tip, turn the front wheels downhill if the terrain
allows. If the terrain does not permit, dismount on the uphill side
immediately.
• Avoid making sudden throttle changes.
Chapter 10 - Quiz
1. You should check your parking brake before riding on hills.
True False
2. No hill is too steep for an ATV. True False
3. Use a high gear to go up and down hills. True False
4. When descending a hill, you should shift your weight to the rear.
True False
5. If a hill is bumpy with ruts, you should stand on the footrests with
your knees and arms slightly bent. True False
6. Hills with slippery surfaces or loose terrain should be avoided.
True False
7. Making sudden throttle adjustments when traversing a hill can be
dangerous. True False
8. If it becomes necessary to stop on a hill, dismount on the downhill
side. True False
9. To find out how to turn around on a hill if you lose momentum, you
should check you owner’s manual. True False
10.Steeper hills require more weight shift than do slight inclines.
True False
Page 22

21
Safe Riding Practices
Chapter 11
You should know safe riding practices and be aware of the environmental concerns shared by responsible riders. Being prepared and knowing how to survive is your best safeguard in case of an emergency like a
breakdown or sudden storm.
Plan Ahead
Good planning, following the recommended maintenance schedule of
your ATV, travelling in the company of others, and practicing safe riding
habits should eliminate most emergencies.
If you decide to ride in areas where a breakdown could threaten your
survival, you should prepare yourself by learning survival techniques. In
many states survival information is available through state departments
or agencies involved in outdoor recreation. Use these and other sources
to gather survival information appropriate to the area you plan to ride.
Before you leave:
• Prepare and secure emergency supplies, tools, first aid kit, and any
other items necessary for your ride.
• Let someone know your route and when you should return.
• Take a two way radio and emergency beacon.
If you are stranded and you determine help is too far away to walk:
• Use good judgement and common sense. When facing an emergency,
remain calm - panic is your worst enemy.
• If you need a fire, select a protected area away from the ATVs and any
overhanging branches containing dry leaves. Start your fire using
small dry sticks and branches, gradually adding larger pieces of wood
as required.
• Before leaving your emergency shelter, make sure all ashes are
smothered. One hot ash from your fire could destroy an entire riding
area. If you have to spend the night, collect enough wood before it
gets dark.
• Whenever you are both stranded and injured, attend to injuries first,
then sit down and think out solutions and possibilities.
• Do not travel on foot in strange areas after dark. Conserve all the ener-
gy you can because it will help keep you warm.
Survival Kit
A survival kit is an absolute necessity when planning a long ride on
your ATV. Whether with a group or just a friend, a survival kit should be
included with your supplies on each ride. Prepare your kit according to
the local conditions. It should easily fit into a can or other small, waterproof container, to store under the seat, in a bum bag or backpack. Just
like the emergency food supply and tool kit, this survival kit applies to all
terrains, from the woods to the desert.
Whenever you plan an extended ride or you are going farther than you
can walk back in a reasonably short period of time, you should carry at
least the following in your bum bag/backpack:
• Trail food
• Water purification tablets
• An area map
• A good, shock-resistant compass
• Lighter or waterproof matches
• Small signal mirror
• Emergency space blanket
• Compact first aid kit
• 15 metres of sturdy rope
• 2 metres of rolled duct tape
• Small flashlight
• Pencil/pen and paper
• Hand axe/brush cutter
• Signal flares
• Two way radio or Satellite phone
• Emergency Beacon
• And always, without exception, CARRY WATER.
Local camping, backpacking or military surplus stores are good
sources for quality, lightweight products that are well suited to the rigors
of trail riding.
First Aid
ATV accidents can cause bodily injury as well as equipment damage.
The most hazardous situation occurs when a person is injured and alone,
kilometres from help. Any injury can be serious if handled carelessly. You
may have to care for your own injuries and someone else’s trauma when
you least expect it.
A first-aid kit is easy to make and should contain at least the following.
Six bandaids, two 50mm crepe bandages, four 100mm crepe bandages, four triangular bandages, one roll of 50mm gauze, one roll of
25mm gauze, and one roll of 25mm adhesive tape.
Select a small waterproof container to store the above items on your
ATV or in your backpack.
Never remove a helmet from an injured rider unless
necessary. Severe injury could result if done improperly.
In case of an emergency, be calm, firm and reassuring to the injured
person. Do as much as you can for them and, if possible, send others for
help.
For your own benefit and that of your friends, you should learn basic
first aid.
Ground to Air Rescue Signals
If you find yourself in a position where you have to communicate with
a plane, use these signals. The markings should be at least 6 metres long
and 1 metre wide so they can be easily read from the air. The markings
can be stamped in the snow, or logs, rocks or branches positioned to
form signals.
v
Below: Universal ground to air distress signal
Page 23

22
Safe Riding Practices
Chapter 11
Trail Signs
When riding your ATV you may encounter different types of trail signs.
The signs are designed to help trail riders by supplying needed information about the area. Standardised trail signs are being developed by
Tread Lightly as shown below. Until they are posted, it is best to follow
the off-highway vehicle signs where applicable and lawful. Below are
some of the signs used by Tread Lightly in Australia
Laws and Regulations
Laws provide an understanding between ATV riders and enforcement
officers concerning the proper way to act while riding off road. These
laws help protect people, property and your sport of ATV riding.
You can encourage other ATV operators to follow local and state laws
by practicing them yourself. In this way ATV riders can set a good, positive example and, to some extent, police themselves on the trails.
Your ATV is an OFF-ROAD VEHICLE and is not designed for street or
highway use. Many states require that you register your ATV through the
Road Transport Authority or other licensing body. ATVs used for agricultural or utility purposes may be subject to different provisions than recreational vehicles.
Above all, check where you can ride your ATV. Check when buying your
ATV from your dealer. He can advise you as to where you can ride or
direct you to the correct sources of information and can often help you
with registration if available. Fines and/or penalties for riding an unregistered ATV can be expensive, and you take the risk of having your ATV
impounded.
Some states use the off-road registration fees for ATV trails and facilities for road use of ATV’s around farm areas. By paying the registration
fee, you are helping to buy more land or maintain the off-road areas in
your state. Each state’s registration requirements vary. Before planning
an out-of-state ride, learn that area’s laws. Contact your local Road
Transport Authority office.
TREAD Lightly
Being a responsible ATV rider means not only protecting yourself
from potential hazards, but protecting the environment where you ride
as well. It is your responsibility to avoid accidents by riding within
your skills at safe speeds and by not performing unsafe manoeuvres.
It is just as important to do all you can to preserve the environment
when you ride and to be aware of the damage to the environment if
you ride irresponsibility.
The best way to protect the environment is to stay on established trails.
Using marked trails limits any potential damage to the recreational area.
Enjoying nature is a big part of ATV riding. Riding off road brings you
close to sights and sounds you would not experience from the highway
or paved road. Protect your right to enjoy nature by riding responsibly
and protecting the environment at all times.
“TREAD Lightly” refers to an education and information program to
reduce vehicle-caused damage to wild lands. Follow these guidelines to
help safeguard the environment for the enjoyment of all by:
• Travelling only where ATV’s are permitted.
• Respecting the rights of hikers, campers and others to enjoy their
activities undisturbed.
• Educating yourself by obtaining travel maps and regulations from
public agencies, complying with signs and barriers, and asking
owner’s permission to cross private property.
• Avoiding streams, lakeshores, meadows muddy roads and trails,
steep hillsides, wildlife and livestock.
• Driving (riding) responsibly to protect the environment and preserve
opportunities to enjoy your vehicle on wild lands.
You and the Rest of the World
There is one fundamental factor that controls your ATV riding - access
to land. Developing and maintaining riding opportunities includes getting
along with private landowners, public land managers and people you
meet on the trails.
Mostly, it takes common courtesy and consideration. Here are a few
hints for getting along with others and keeping your riding areas open:
• Know who owns the land you are using. Get permission to use it
if needed.
• Stay on marked trails if they are provided.
• Keep your ATV quiet. Do not make your exhaust system noisy - there
is nothing that people hate more than a loud off-road vehicle. Keep the
muffler well packed.
• Obey closure signs: the land is posted for a reason.
• Always leave gates and fences as you found them.
• Leave the area as clean or cleaner than you found it. Pick up rubbish
that may be lying about.
• Be courteous when you meet others on the trails. Pull off and give
right of way to horseback riders or hikers. In fact, it is best to shut off
your engine when you meet horseback riders; a panicked horse is a
danger to you and its rider.
• Remember to remove your helmet when talking to a landowner or
someone you meet on the trail. Be friendly and honest with them and
keep your helmet visible so it can make a good impression.
Finding Places to Ride
How do you find good places to ride?
Start by asking your ATV dealer. Where do other customers ride? Who
owns the land? What are the regulations for using the land? ATV clubs
may also provide a way of working with others to find good riding areas.
If you are looking on your own, topographic maps can be a good way to
find open land with trails. Find out who owns the land and whether they
mind you using it. You can develop a network of good riding areas this way.
Some sources for finding places to ride are:
• Your ATV dealer
• ATV clubs or associations
• State maps (topographical and feature)
• Motorcycling Australia
• National Parks and Wildlife
• ‘Tread Lightly’ contact in your area
Page 24

Safe Riding Practices
Chapter 11
23
Chapter 11 - Quiz
1. Carrying a map and compass is not a good riding practice.
True False
2. Good planning can help eliminate emergencies. True False
3. Planning ahead includes letting someone know your route and when
you should return. True False
4. You should always carry some first aid supplies. True False
5. You should always remove the helmet of an injured rider.
True False
6. In an emergency, “panic” is your best friend. True False
7. Part of being a responsible rider is taking basic first aid training.
True False
8. “TREAD Lightly” means only riding small ATVs. True False
9. A responsible ATV rider protects the environment at all times.
True False
10.The basic factor that controls your ATV riding is access to land.
True False
Page 25

24
Conclusion
Chapter 12
In addition to recreation use, ATVs serve agriculture, business,
commercial industry, and government and law enforcement agencies
with in-the-job transportation as well as off-duty recreation
transportation. ATVs are fun and useful machines. By learning to operate
your ATV properly and consistently practicing safe riding techniques, you
can look forward to years of rewarding enjoyment of the sport.
Remember to always follow the safety recommendations provided by
the ATV manufacturers and your riding will not only be safer, but more fun!
Useful Contacts
Use the space below to list useful contact numbers, email & web
addresses.
________________________________________________________________
________________________________________________________________
________________________________________________________________
________________________________________________________________
________________________________________________________________
________________________________________________________________
________________________________________________________________
________________________________________________________________
________________________________________________________________
________________________________________________________________
________________________________________________________________
________________________________________________________________
________________________________________________________________
________________________________________________________________
Government and Industry Accredited Training
Stephen Gall’s ATV Safety Institute provides national training to
improve the safety of ATV riders through practical training for the sports,
rural, government and private industry markets. On successful completion of the ATV rider course, students can receive a nationally recognised
‘Statement of Attainment’ to cover industry WorkSafe requirements. To
become a more skilled ATV rider, contact Stephen Galls ATV Safety
Institute on 0755 933340 or email [email protected].
This manual is also available on the Yamaha website:
www.yamaha-motor.com.au
Chapter 1
1. T
2. T
3. T
4. T
5. F
6. T
7. F
8. T
9. T
10. T
Chapter 2
1. F
2. T
3. T
4. F
5. F
6. F
7. F
8. T
9. F
10. T
Chapter 3
1. T
2. T
3. F
4. T
5. F
6. F
7. T
8. T
9. F
10. T
Chapter 4
1. T
2. F
3. T
4. T
5. F
6. F
7. T
8. F
9. F
10. T
Chapter 5
1. T
2. T
3. T
4. F
5. T
6. T
7. F
8. T
9. F
10. T
Chapter 6
1. T
2. T
3. F
4. T
5. F
6. T
7. F
8. F
9. F
10. T
Chapter 7
1. T
2. F
3. T
4. T
5. F
6. T
7. T
8. T
9. T
10. T
Chapter 8
1. T
2. F
3. T
4. F
5. F
6. F
7. T
8. T
9. T
10. T
Chapter 9
1. T
2. F
3. F
4. T
5. T
6. F
7. T
8. T
9. T
10. T
Chapter 10
1. T
2. F
3. F
4. T
5. T
6. T
7. T
8. F
9. T
10. T
Chapter 11
1. F
2. T
3. T
4. T
5. F
6. F
7. T
8. F
9. T
10. T
Quiz Answers
Page 26

Safety Alert
25
• Many people including children, have died in accidents associated
with ATV’s.
• Collated by Farm Safe Australia, an Australian Government backed
organisation, there were 14 deaths related to ATV operation on
Australian farms during 2002.
• Many people have become severely paralysed or suffered severe
internal injuries as a result of accidents associated with ATV’s
• Every month many people are treated in hospital emergency rooms
for injuries received while riding an ATV.
You should be aware that AN ATV IS NOT A TOY AND CAN BE HAZARDOUS TO OPERATE. An ATV handles differently from other vehicles,
including motorcycles and cars. A collision or rollover can occur quickly,
even during routing manoveuvres such as turning and driving on hills and
over obstacles, if you fail to take proper precautions.
TO AVOID DEATH OR SEVERE PERSONAL INJURY
• ALWAYS READ THE OWNERS MANUAL CAREFULLY AND FOLLOW
THE OPERATING PROCEDURES DESCRIBED. PAY SPECIAL ATTENTION TO THE WARNINGS CONTAINED IN THE MANUAL AND ON
ALL LABELS.
• NEVER OPERATE AN ATV WITHOUT PROPER INSTRUCTION. IT IS
ADVISABLE TO COMPLETE AN ACCREDITTED ATV TRAINING
COURSE.
• ALWAYS FOLLOW THESE AGE RECOMMENDATIONS:
- A CHILD UNDER 12 YEARS OLD SHOULD NEVER OPERATE AN
ATV WITH AN ENGINE SIZE 70CC OR GREATER.
- A CHILD UNDER 16 YEARS OLD SHOULD NEVER OPERATE AN
ATV WITH AN ENGINE SIZE GREATER THAN 90CC.
• NEVER ALLOW A CHILD UNDER 16 YEARS OLD TO OPERATE AN
ATV WITHOUT ADULT SUPERVISION. CHILDREN NEED TO BE
OBSERVED CAREFULLY BECAUSE NOT ALL CHILDREN HAVE THE
STRENGTH, SIZE, SKILLS OR JUDGEMENT NEEDED TO OPERATE
AN ATV SAFELY.
• NEVER CARRY A PASSENGER ON AN ATV. CARRYING A PASSENGER MAY UPSET THE BALANCE OF THE ATV AND MAY CAUSE IT
TO GO OUT OF CONTROL.
• ALWAYS AVOID PAVED SURFACES. ATV’S ARE NOT DESIGNED TO
BE USED ON PAVED SURFACES AND PAVEMENT MAY SERIOUSLY
AFFECT HANDLING AND CONTROL.
• NEVER OPERATE AN ATV ON A PUBLIC ROAD, EVEN A DIRT OR
GRAVEL ONE, BECAUSE YOU MAY NOT BE ABLE TO AVOID COLLIDING WITH OTHER VEHICLES. ALSO, OPERATING AN ATV ON A
PUBLIC ROAD MAY BE AGAINST THE LAW.
• NEVER OPERATE AN ATV WITHOUT AN APPROVED MOTORCYCLE
HELMET, EYE PROTECTION, BOOTS, GLOVES, LONG PANTS AND
LONG SLEEVE SHIRT OR JACKET.
• NEVER CONSUME ALCOHOL OR DRUGS BEFORE OR WHILE
OPERATING AN ATV.
• NEVER OPERATE AN ATV AT EXCESSIVE SPEEDS. GO AT A SPEED
WHICH IS PROPER FOR THE TERRAIN, VISIBILITY CONDITIONS,
AND YOUR EXPERIENCE.
• NEVER ATTEMPT TO DO WHEELIES, JUMPS OR OTHER STUNTS.
• ALWAYS BE CAREFUL WHEN OPERATING AN ATV, ESPECIALLY
WHEN APPROACHING HILLS, TURNS AND OBSTACLES AND
WHEN OPERATING ON UNFAMILIAR OR ROUGH TERRAIN.
• NEVER LEND YOUR ATV TO ANYONE WHO HAS NOT TAKEN A
TRAINING COURSE OR HAS NO PREVIOUS ATV RIDING
EXPERIENCE.
 Loading...