

Page 1
MUSIC SYNTHESIZER
Contents
Reference Manual
Using the MODX+ Manuals........................................2
Basic Structure 3
Functional Blocks ......................................................3
Tone Generator Block................................................4
Tone Generator block ...................................................... 4
A/D Input Block ........................................................10
Sequencer Block ......................................................10
Arpeggio Block.........................................................11
Arpeggio categories....................................................... 11
Sub categories............................................................... 11
Arpeggio Type Name.....................................................12
Arpeggio-related settings............................................... 13
Arpeggio playback types................................................ 14
Creating an Arpeggio..................................................... 16
Motion Sequencer Block .........................................17
Effect Block ..............................................................19
Effect structure............................................................... 19
Effect connection ........................................................... 20
About the Vocoder Effect............................................... 20
Envelope Follower Block.........................................21
Controller Block .......................................................22
Keyboard ....................................................................... 22
Pitch Bend wheel ...........................................................22
Modulation wheel...........................................................22
Assignable Switches...................................................... 22
Knobs and Control Sliders ............................................. 22
Super Knob.................................................................... 22
Internal Memory .......................................................23
Reference 25
Display (touch panel) configuration .......................25
Performance Play (Home) .......................................27
Motion Control..........................................................34
Mixing ....................................................................... 51
Scene........................................................................ 56
Play/Rec ................................................................... 62
Smart Morph ............................................................ 94
DAW Remote function .......................................... 101
Setting up the DAW Remote function ..........................101
Controlling DAW Software from MODX+ .....................102
Normal Part (AWM2) Edit...................................... 104
Element Common Edit (Common) ...............................104
Element Edit (Element) ................................................145
Element All (All Element) .............................................169
Drum Part Edit ....................................................... 172
Key Common Edit (Common) ......................................172
Key Edit (Key) ..............................................................179
Normal Part (FM-X) Edit ........................................ 184
Operator Common Edit (Common) ..............................184
Operator Edit (Operator) ..............................................194
Common/Audio Edit (Common/Audio)................ 198
Category Search.................................................... 215
Performance Category Search.....................................215
Arpeggio Category Search (Arp Category Search) ......219
Waveform Category Search (Waveform Search).........221
Rhythm Pattern ............................................................223
Utility ...................................................................... 226
Live Set................................................................... 255
Live Set ........................................................................255
Live Set Edit (Edit) .......................................................256
Live Set Register (Register).........................................260
Connecting an iPhone or iPad ............................. 261
Connecting External MIDI Instruments ............... 261
Controlling the MODX+ from an external MIDI keyboard or
synthesizer ...................................................................261
Controlling an external MIDI keyboard or synthesizer from
the MODX+ ..................................................................262
Treating an external MIDI keyboard like a built-in keyboard
with USB cable connection ..........................................262
EN
Page 2
Using the MODX+ Manuals
Edit Search Utility Live SetPerformance
Normal Part (AWM2) Drum Part Normal Part (FM-X) Common/Audio
Select the display name tab Select the function
Your MODX6+/MODX7+/MODX8+ synthesizer comes with four different reference guides—the Owner’s Manual, the Reference
Manual (this document), the Synthesizer Parameter Manual, and the Data List. While the Owner’s Manual is packaged together
with the synthesizer as a hardcopy booklet, this Reference Manual, the Synthesizer Parameter Manual, and the Data List are
available for download from our web page as PDF documents.
Owner’s Manual (hardcopy booklet)
Describes how to set up your MODX6+/MODX7+/MODX8+ and how to perform basic operations.
• This manual explains the following operations.
• Selecting Performances
• Playing the Keyboard
• Creating Your Own Live Sets
• Editing the Settings
• Recording and Playback
• Using as a Master Keyboard
• Connecting a Microphone or Audio Equipment
• Making Global System Settings
• Connecting External MIDI Instruments
• Using a Connected Computer
• Saving/Loading Data
Reference Manual (this PDF document)
Describes the internal design of your MODX+ and the various parameters that can be adjusted and set.
Synthesizer Parameter Manual (PDF document)
Explains the Part parameters, effect types, effect parameters, and MIDI messages that are used for synthesizers incorporating
the Yamaha AWM2 and FM-X tone generators. Read the Owner’s Manual and Reference Manual first and then use this
parameter manual, if necessary, to learn more about parameters and terms that relate to Yamaha synthesizers.
Data List (PDF document)
Provides lists such as the Waveform List, Performance List, Effect Type List, Arpeggio Type List, as well as reference materials
such as the MIDI Implementation Chart.
Using the Reference Manual
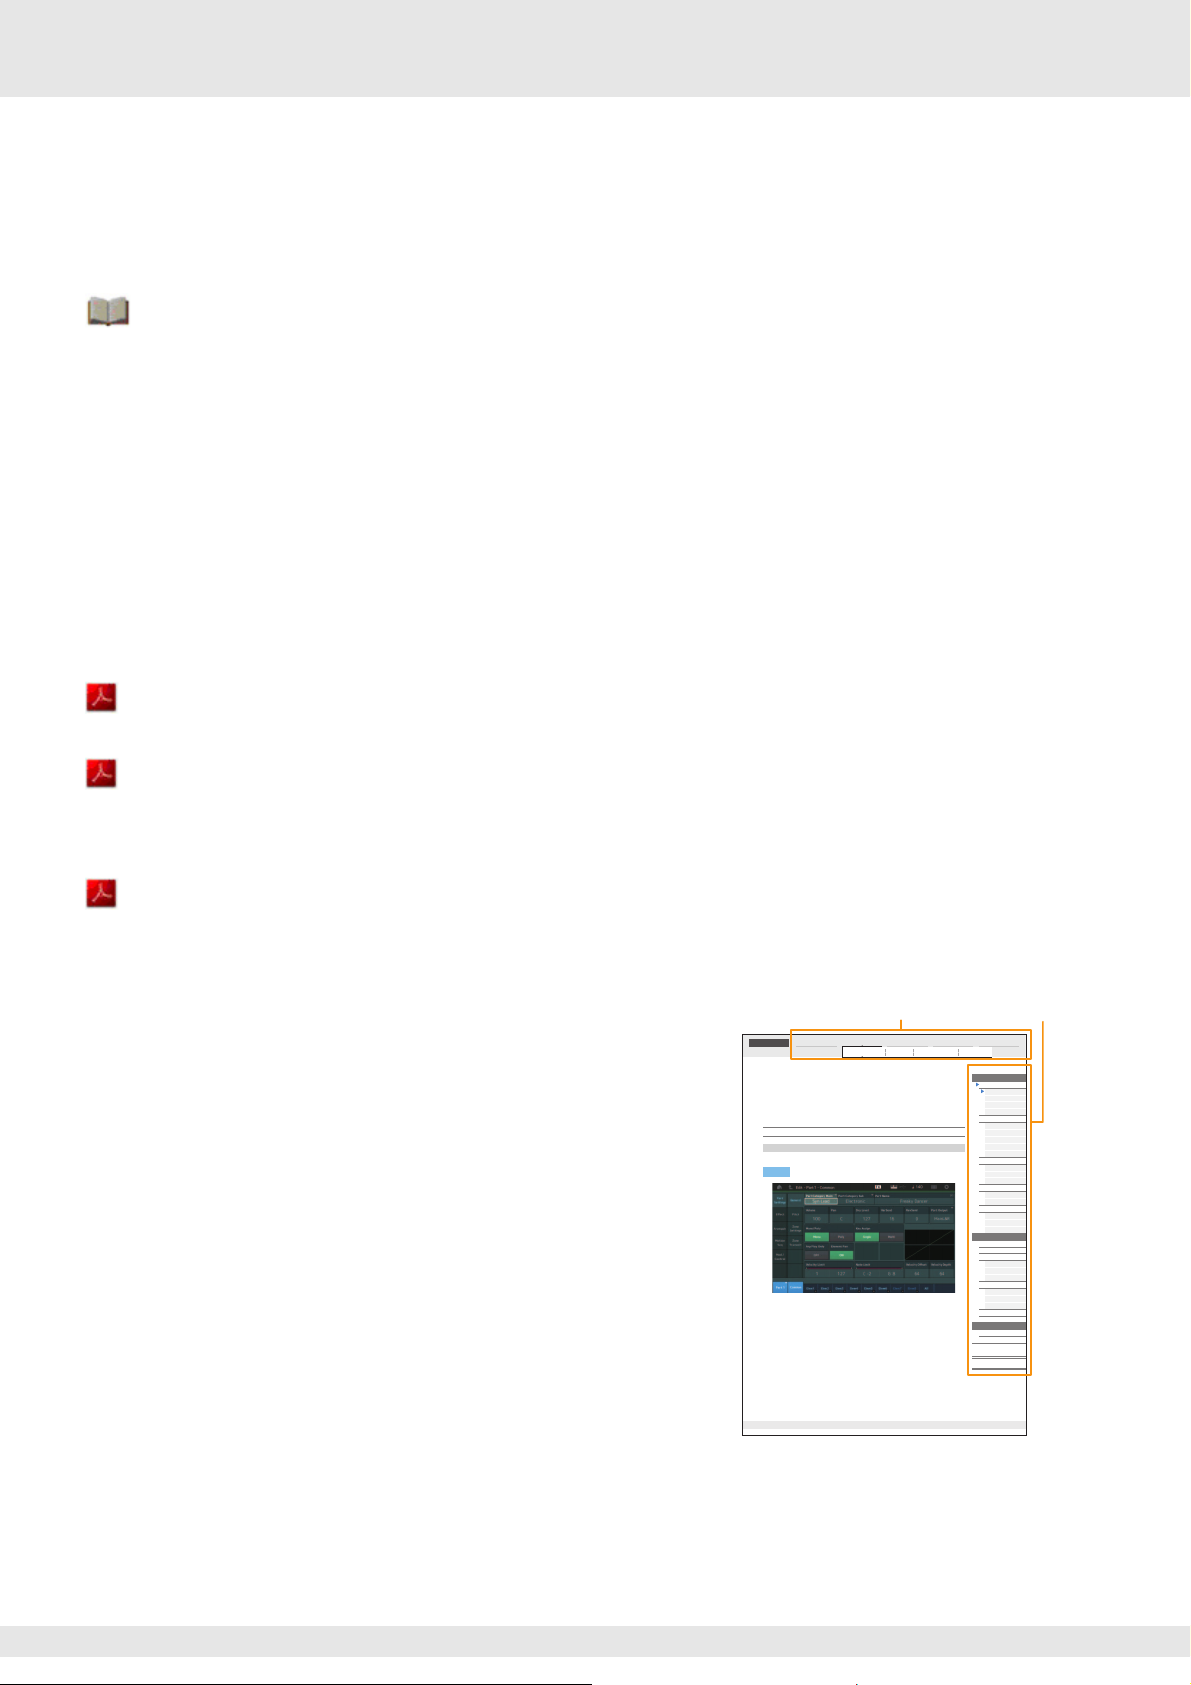
• Using the display name tabs along the upper part of each page from the
Reference section, you can jump to the page for parameter
explanations of the corresponding display.
• You can click on any page number from the Table of Contents or within
descriptive text to jump to the corresponding page.
• You can also click on desired items and topics you want to refer to in the
“Bookmarks” index to the left of the main window, and jump to the
corresponding page. (Click the “Bookmarks” tab to open the index if it is
not displayed.)
• If you want to find information on a specific topic, function or feature,
select “Find” or “Search” from the Adobe Reader “Edit” menu and enter
a key word to locate the related information anywhere in the document.
NOTE The most-recent version of Adobe® Reader® can be downloaded from the
following web page.
http://www.adobe.com/products/reader/
NOTE The names and positions of menu items may vary according to the version
of Adobe Reader being used.
Information
• The illustrations and LCD screens as shown in this manual are for instructional purposes only, and may appear somewhat
different from those on your instrument.
• All other trademarks are the property of their respective holders.
• iPhone, iPad, and Lightning are trademarks of Apple Inc., registered in the U.S. and other countries.
Reference
Normal Part (AWM2) Edit
A Normal Part (AWM2) (having pitched musical instrument sounds) can consist of up to eight Elements.
An Element is the basic, smallest unit for a Part. There are two types of Normal Part (AWM2) Edit displays:
Element Common Edit display, for editing settings common to all eight Elements; and Element Edit display,
for editing individual Elements.
Element Common Edit (Common)
Part Settings
General
From the General display you can set various parameters such as Part Name, Volume, and Pan.
[PERFORMANCE (HOME)] Æ [EDIT] Æ Part selection Æ Element [Common] Æ [PartSettings] Æ
Operation
[General]
Part Category Main (Part Main Category)
Part Category Sub (Part Sub Category)
Determines the Main category and the Sub category for the selected Part.
Settings:See the Data List PDF document.
Part Name
Determines the Part name of the selected Part. Part names can contain up to 20 characters. Touching the
parameter calls up the input character display.
Volume (Part Volume)
Determines the output level of the selected Part.
Settings:0–127
Pan
Determines the stereo pan position of the selected Part.
Settings:L63–C–R6 3
MODX+ Reference Manual
Normal Part (AWM2) Edit
Common
Part Settings
General
Pitch
Zone Settings
Zone Transmit
Effect
Routing
Ins A
Ins B
EQ
Ins Assign
Arpeggio
Common
Individual
Advanced
Motion Seq
Common
Lane
Mod / Control
Part LFO
Control Assign
Receive SW
Element
Osc / Tune
Pitch EG
Filter
Type
Filter EG
Scale
Amplitude
Level / Pan
Amp EG
Scale
Element LFO
Element EQ
All Element
Osc
Balance
Copy or Exchange
Elements
104
MODX+ Reference Manual
2
Page 3
Basic Structure
Controller Block (
page 22
)
Keyboard
Controllers
(such as Super Knob)
Tone Generator (page 4)
AWM2 Tone Generator
FM-X Tone Generator
16 Par ts
Performances
Sequencer Block
(page 10)
16-Track
MIDI Sequencer
Songs
Effects (page 19)
System Effects
13 Insertion Effects
Element EQ
Part EQ
Master Effect
Master EQ
A/D Input
(page 10)
Motion Sequencer Block
(page 17)
Envelope
Follower Block
(page 21)
Arpeggio Block
(page 11)
Arpeggio Playback x 8
Preset Arpeggio
User Arpeggio
Computer
External MIDI equipment
Computer Computer Powered
speakers, etc.
Control Message Flow
Audio Signal Flow
Microphone,
audio equipment,
etc.
Functional Blocks
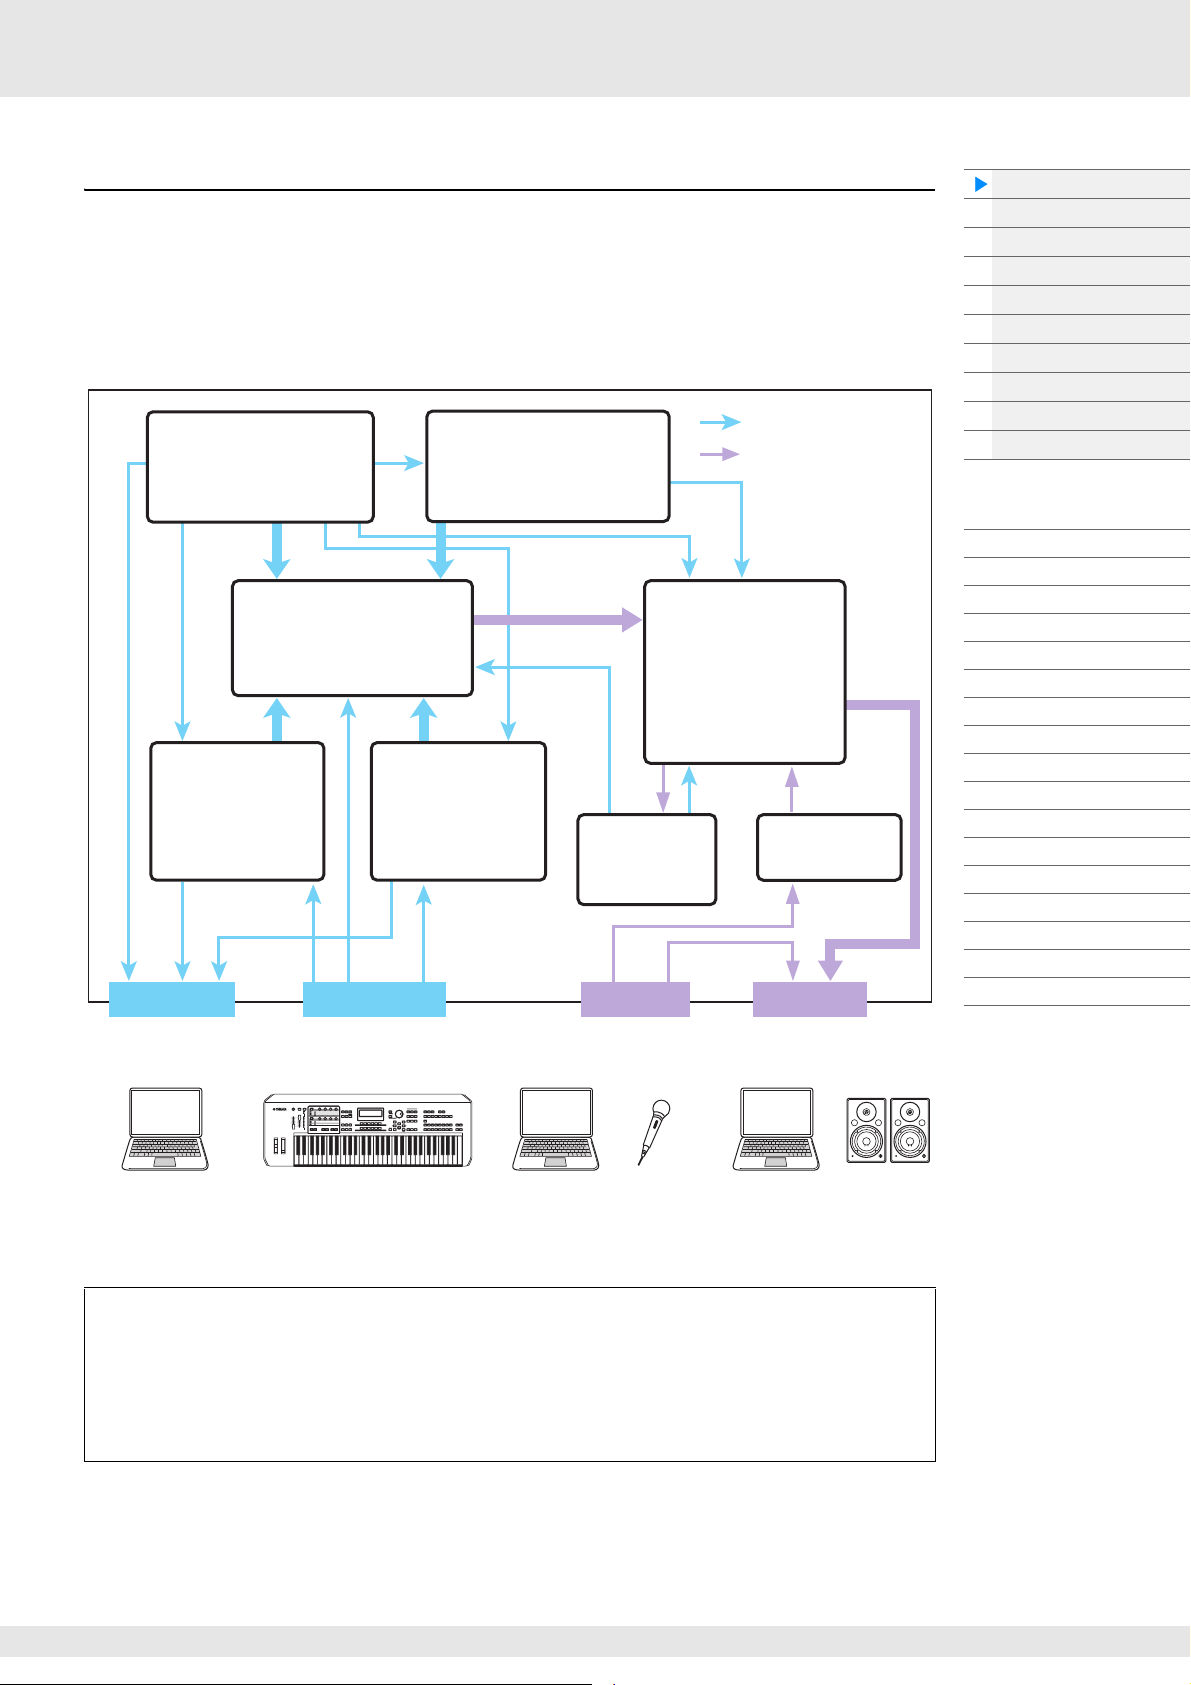
The MODX6+/MODX7+/MODX8+ system consists of eight main functional blocks: Tone Generator, A/D
Input, Sequencer, Motion Sequencer, Arpeggio, Controller, Effect, and Envelope Follower.
[USB TO HOST]
MIDI [OUT]
MIDI IN AUDIO IN AUDIO OUTMIDI OUT
[USB TO HOST]
MIDI [IN]
[USB TO HOST]
A/D INPUT [L/MONO]/[R]
[USB TO HOST]
OUTPUT [L/MONO]/[R]
Basic Structure
Functional blocks
Tone Generator block
A/D Input block
Sequencer block
Arpeggio block
Motion Sequencer block
Effect block
Envelope Follower block
Controller block
Internal Memory
Reference
Display (touch panel) config.
Performance Play (Home)
Motion Control
Mixing
Scene
Play/Rec
Smart Morph
DAW Remote
Normal Part (AWM) Edit
Drum Part Edit
Normal Part (FM-X) Edit
Common/Audio Edit
Category Search
Utility
Live Set
iPhone/iPad connection
External MIDI connection
AWM2 (Advanced Wave Memory 2)
This instrument is equipped with an AWM2 tone generator block. AWM2 (Advanced Wave Memory 2)
is a synthesis system based on sampled waves (sound material), and is used in many Yamaha
synthesizers. For extra realism, each AWM2 Voice uses multiple samples of a real instrument’s
waveform. Furthermore, a wide variety of parameters—envelope generator, filter, modulation, and
others—can be applied.
MODX+ Reference Manual
3
Page 4
FM-X
This synthesizer also features an FM-X tone generator, in addition to the AWM2 block. The
abbreviation “FM” of FM-X stands for “frequency modulation,” which is a special tone generation
system that uses the frequency of one waveform to modulate another waveform, in order to produce a
completely new one. In this synthesizer, there are eight FM Operators and a full 88 different Algorithm
types. By changing the operator combination patterns, controlling the modulation with other
parameters such as levels and envelopes, and using high-quality filters, effects, and EQ commonly
with AWM2, you can create richly textured sounds that change in a highly complex fashion.
Tone Generator Block
The tone generator block is what actually produces sound in response to the MIDI messages received
from the Sequencer block, Controller block, Arpeggio block and from the external MIDI instrument. The
MIDI messages are assigned to sixteen independent channels, and the instrument is capable of
simultaneously playing sixteen separate Parts, via the sixteen MIDI channels. However, the sixteenchannel limit can be overcome by using separate MIDI “ports,” each supporting sixteen channels. The
tone generator block of this instrument can handle MIDI messages over Port 1.
Tone Generator block
Performances
A Performance is a single set of sounds consisting of multiple Parts. You can change sounds as desired by
selecting the appropriate Performance. Each Performance has two types of parameters; parameters
unique to each Part and parameters common to all Parts. You can edit the entire Performance in the
Common/Audio Edit display (page 198).
Part structure of a Performance
A Performance consists of 16 Parts and you can create Performances (in which multiple Parts or Parts are
combined—in a layer, or in other configurations) using the keyboard.
Basic Structure
Functional blocks
Tone Generator block
A/D Input block
Sequencer block
Arpeggio block
Motion Sequencer block
Effect block
Envelope Follower block
Controller block
Internal Memory
Reference
Display (touch panel) config.
Performance Play (Home)
Motion Control
Mixing
Scene
Play/Rec
Smart Morph
DAW Remote
Normal Part (AWM) Edit
Drum Part Edit
Normal Part (FM-X) Edit
Common/Audio Edit
Category Search
Utility
Live Set
iPhone/iPad connection
External MIDI connection
Parts
Internally, there are three Part types: Normal Parts (AWM2), Normal Parts (FM-X), and Drum Parts. Normal
Parts (AWM2) are mainly pitched musical instrument type sounds that can be played over the full range of
the keyboard. Normal Parts (FM-X) are also mainly pitched musical instrument type sounds, using FM
synthesis. Drum Parts are mainly percussion/drum sounds that are assigned to individual notes. A Normal
Part (AWM2) can consist of up to eight Elements, a Normal Part (FM-X) can consist of up to eight
Operators, and a Drum Part can consist of up to 73 Drum Keys.
An Element/Operator/Drum Key is the basic, smallest unit for a Part. By combining multiple Elements/
Operators/Keys, Parts can be created to produce even more realistic sounds or various richly textured
types of sound. Each Part is created by editing parameters unique to each (Element Edit parameters/
Operator Edit parameters/Key Edit parameters) and parameters common to all the Elements/Operators/
Keys (Element Common Edit, Operator Common Edit, and Key Common Edit parameters.)
NOTE For instructions on editing a Normal Part (AWM2), see page 104. For instructions on editing a Normal Part (FM-
X), see page 184. For instructions on editing a Drum Part, see page 172.
MODX+ Reference Manual
4
Page 5
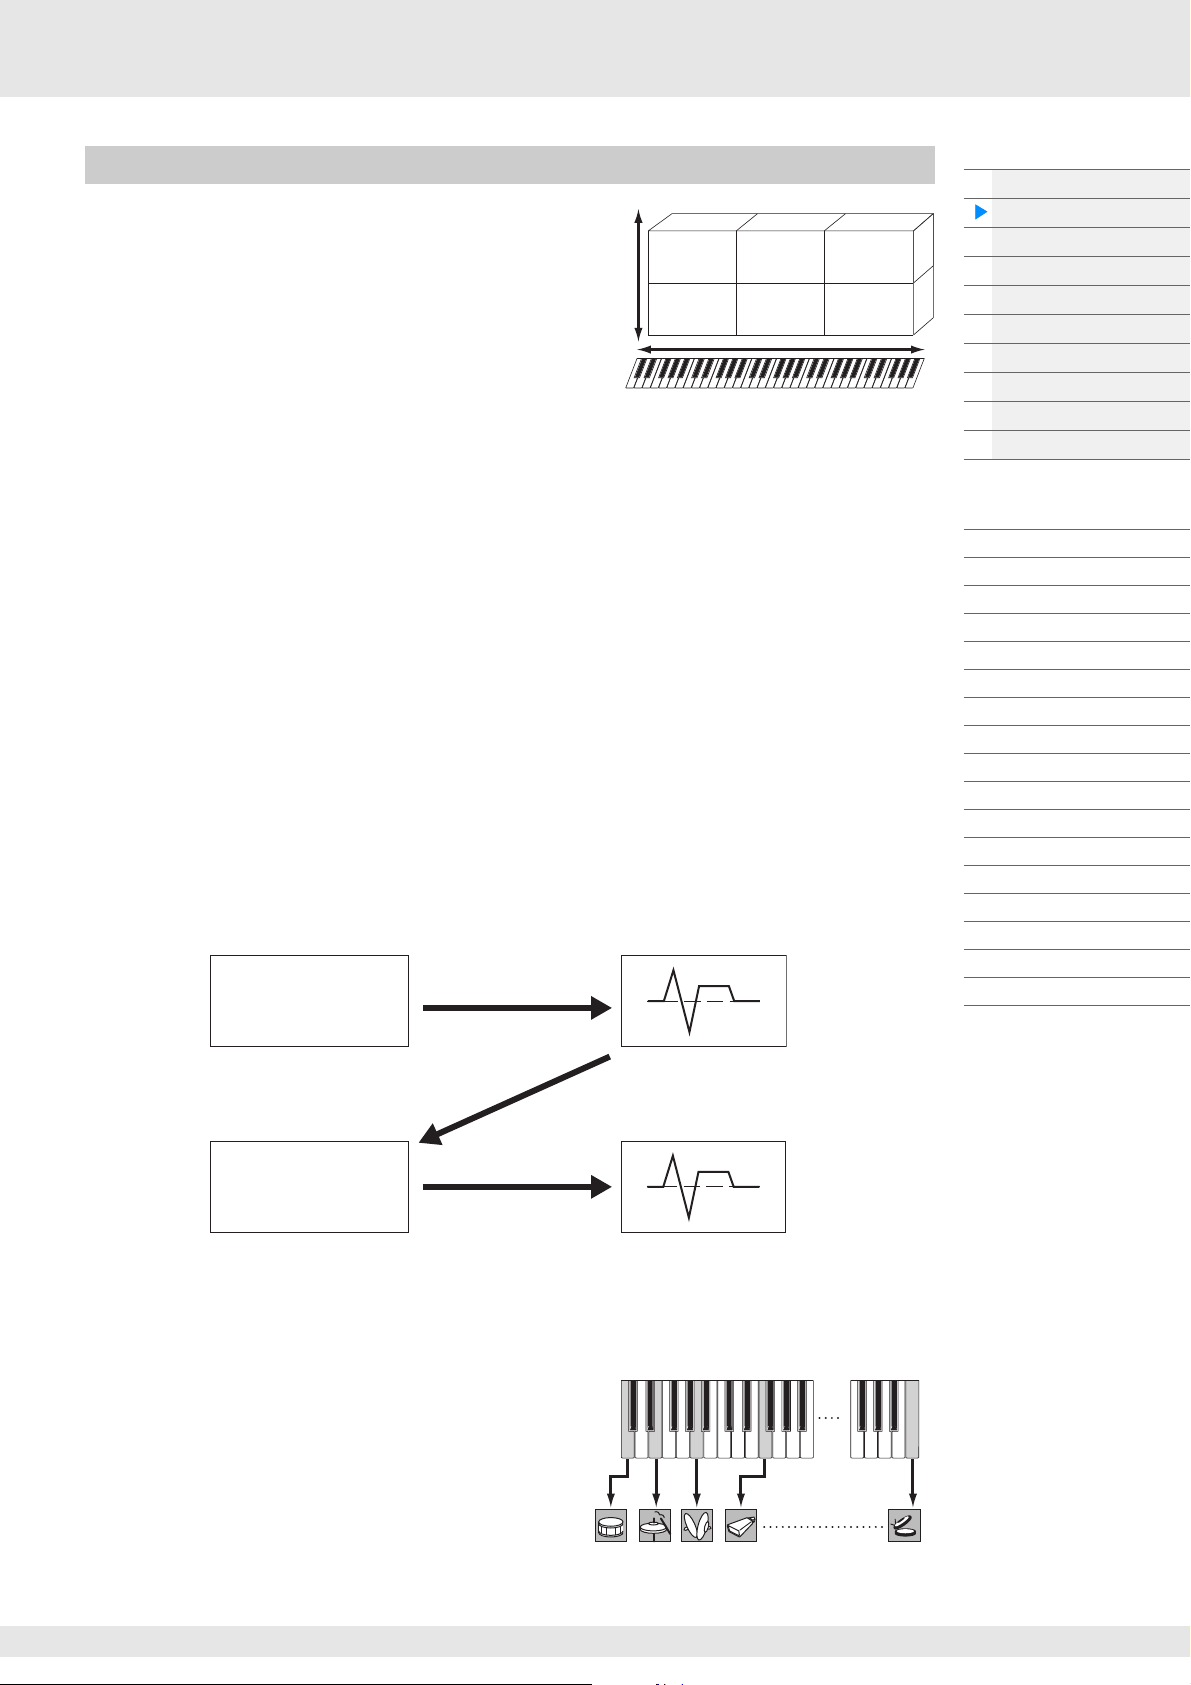
Normal Parts (AWM2), Normal Parts (FM-X), and Drum Parts
Vel oc it y
Element 1
Element 2
Element 3
Element 4
Element 5
Element 6
Modulator OP
Frequency ratio of the
Modulator and the Carrier
determines the base waveform
including specific harmonics by
the Oscillator.
Modulator output level
determines the Cutoff
Frequency of the Filter.
Carrier OP
Modulation
Modulator envelope determines
the Filter envelope.
Carrier frequency determines
the pitch of the Oscillator.
Carrier output level
determines the volume
by using the amplifier.
Carrier envelope determines
the amplifier envelope.
Individual drum
sounds
(different for
each key)
Normal Parts (AWM2)
These Parts are played conventionally from the
keyboard, with standard pitches sounding for each key,
generated by AWM2. A Normal Part consists of up to
eight Elements. Depending on the settings in the Part
Edit, these Elements are sounded simultaneously, or
different Elements are sounded according to the note
range, velocity range and the XA (Expanded
Articulation) settings (page 6).
The illustration shows an example of a Normal Part (AWM2). Since the six Elements here are distributed
across both the note range of the keyboard and the velocity range, a different Element sounds depending
on which note you play and how strongly you play it. In the velocity distribution, Elements 1, 3 and 5 sound
when playing the keyboard softly, while Elements 2, 4 and 6 sound when playing it strongly. In the note
distribution, Elements 1 and 2 sound in the lower range of the keyboard, Elements 3 and 4 sound in the
middle range, and Elements 5 and 6 sound in the higher range. In the velocity distribution, Elements 1, 3
and 5 sound when playing the keyboard softly, while Elements 2, 4 and 6 sound when playing it strongly. In
a practical example of this in use, a piano Part could be composed of six different samples. Elements 1, 3
and 5 would be the sounds of the piano played softly, over the respective note ranges, while Elements 2, 4
and 6 would be strongly played sounds, for each respective note range. Actually, this instrument is even
more flexible than this, since it allows up to eight independent Elements.
Normal Parts (FM-X)
These Parts are also played conventionally from the keyboard, with standard pitches sounding for each
key, generated by FM synthesis. The sound for a Normal Part (FM-X) is created by modulating a frequency
of a fundamental waveform with another waveform. An operator that generates a fundamental waveform is
a “carrier,” and an operator that modulates these waveforms is a “modulator.” The combination of a
number of Operators is called “Algorithm.”
When the waveform output from the Operator is a simple sine wave, no harmonics are included other than
the fundamental tone. However, you can create harmonics by modulating the waveform with other
Operators. How harmonics can be created depends on the Modulators’ output levels and the frequency
rates of Carriers and Modulators. On the other hand, the basic pitch is determined by Carrier’s frequency,
and the output level is determined by the Carrier’s output level. The figure described below shows a basic
way to create FM sound by using an analog synthesizer.
Basic Structure
Functional blocks
Tone Generator block
A/D Input block
Sequencer block
Arpeggio block
Motion Sequencer block
Effect block
Envelope Follower block
Controller block
Internal Memory
Reference
Display (touch panel) config.
Performance Play (Home)
Motion Control
Mixing
Scene
Play/Rec
Smart Morph
DAW Remote
Normal Part (AWM) Edit
Drum Part Edit
Normal Part (FM-X) Edit
Common/Audio Edit
Category Search
Utility
Live Set
iPhone/iPad connection
External MIDI connection
Although the figure described above shows waveforms which are generated by two operators, the MODX+
has eight Operators. The combination of a number of Operators is called an “Algorithm” and this
synthesizer has parameters for setting the Algorithm.
Drum Parts
Drum Parts are mainly percussion/drum sounds
that are assigned to individual notes on the
keyboard (C0 to C6). Unlike Elements, a Drum
key is equivalent to the corresponding note,
meaning that you cannot change its range.
Drum or percussion sounds are assigned to
each Drum Key. You can create various types of
Drum Parts by changing the drum or percussion sound assigned to each key and edit the parameters
such as pitch and EG.
MODX+ Reference Manual
C0
C1 C6
5
Page 6
Expanded Articulation (XA)
Expanded Articulation (XA) is a tone generation system that provides greater performance flexibility and
acoustic realism. This feature allows you to more effectively recreate realistic sound and natural
performance techniques—such as legato and staccato—and provides other unique modes for random
and alternate sound changes as you play.
Realistic legato performance
This instrument more accurately reproduces a legato effect by allowing specific Elements to be sounded
when playing legato and other Elements to be played normally (with the XA Control parameter settings
“Normal” and “Legato”).
Authentic note release sound
The MODX+ reproduces these special, characteristic sounds by setting the XA Control parameter of
certain Elements to “Key Off.”
Subtle sound variations for each note played
The MODX+ more accurately reproduces these subtle sound variations by using the XA Control parameter
settings “Cycle” and “Random.”
Switching among different sounds to recreate the natural performance on an
acoustic instrument
Acoustic instruments have their own unique characteristics—even specific, unique sounds that are
produced only at certain times in a performance. These include the flutter tonguing on a flute or the
playing of high harmonics on an acoustic guitar. The MODX+ recreates these by allowing you to switch
between the sounds while you play—using the [ASSIGN 1]/[ASSIGN 2] buttons and the XA Control
parameter settings, “A.SW1 On,” “A.SW2 On” and “A.SW Off.”
NOTE You can turn the [ASSIGN 1]/[ASSIGN 2] button on or off also by transmitting the Control Change number
specified in the Common/Audio Edit display ([Control] [Control Number]) (page 206) from an external device.
New sounds and new styles of playing
The highly versatile functions above can be applied effectively not only to acoustic sounds but also to
synthesizer and electronic Parts as well. The XA feature opens up enormous potential for realizing
authentic sounds, performing expressively and coming up with creative new styles of playing.
Motion Control System
Basic Structure
Functional blocks
Tone Generator block
A/D Input block
Sequencer block
Arpeggio block
Motion Sequencer block
Effect block
Envelope Follower block
Controller block
Internal Memory
Reference
Display (touch panel) config.
Performance Play (Home)
Motion Control
Mixing
Scene
Play/Rec
Smart Morph
DAW Remote
Normal Part (AWM) Edit
Drum Part Edit
Normal Part (FM-X) Edit
Common/Audio Edit
Category Search
Utility
Live Set
iPhone/iPad connection
External MIDI connection
The Motion Control System is a completely new feature for variably controlling Motions (rhythmical,
multidimensional sound changes) in real time. This amazingly powerful feature dramatically and
dynamically alters the sounds of the instrument in new, never-heard-before ways—changing texturally,
rhythmically with the beats, providing cool, colorful lighting effects, and responding expressively to your
creative passion. The Motion Control System has three main functions:
Super Knob:
For creating multi-dimensional sonic changes, and enhancing those changes with colorful, continually
shifting lighting changes. Multiple parameters can be controlled simultaneously.
Motion Sequencer:
For continually variable sound changes. The powerful Motion Sequencer feature lets you dynamically
change sounds by operating Parameters depending on sequences created in advance. It provides real
time control for changing sounds depending on various sequences such as Tempo, Arpeggio, or the
rhythm of external connected devices.
Envelope Follower:
Envelope Follower is a function for detecting the volume envelope of the input signal waveform and
modifying sounds dynamically.
NOTE Envelope Follower can be controlled not only by the audio signal from an external device, but also by the output
of all Parts.
MODX+ Reference Manual
6
Page 7
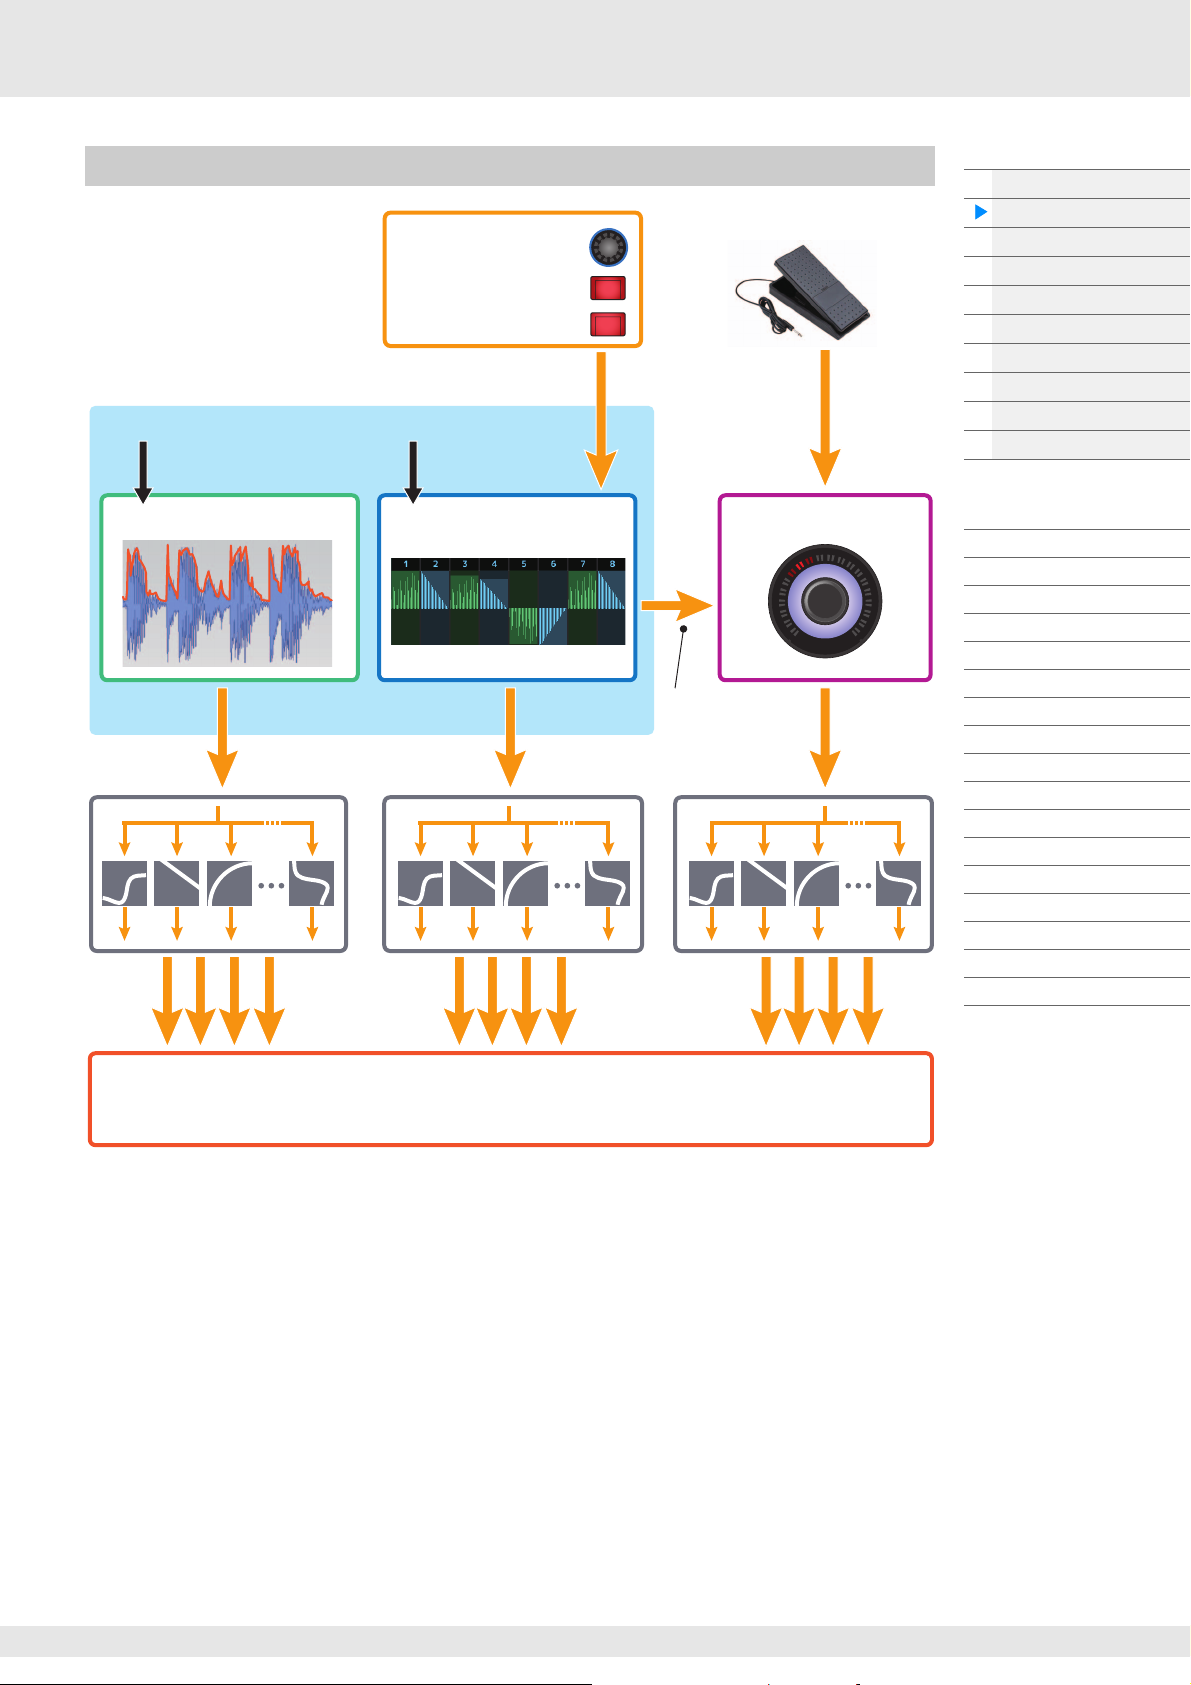
Motion Control System Structure
• Continuous control of
Motion changes
• Switch between Motions
• Trigger, Hold
Control the Motion
Sequencer in real time
AUDIO BEAT
• Part 1–16
• A/D Input Part
• Audio Beat Sync
• External MIDI
• Internal Tempo
Envelope Follower Motion Sequencer
Super Knob
Rhythmic change
Automation
Multi-dimensional
sonic change
Tone generator
Effect
Basic Structure
Functional blocks
Tone Generator block
A/D Input block
Sequencer block
Arpeggio block
Motion Sequencer block
Effect block
Envelope Follower block
Controller block
Internal Memory
Reference
Display (touch panel) config.
Performance Play (Home)
Motion Control
Mixing
Scene
Play/Rec
Smart Morph
DAW Remote
Normal Part (AWM) Edit
Drum Part Edit
Normal Part (FM-X) Edit
Common/Audio Edit
Category Search
Utility
Live Set
iPhone/iPad connection
External MIDI connection
MODX+ Reference Manual
7
Page 8
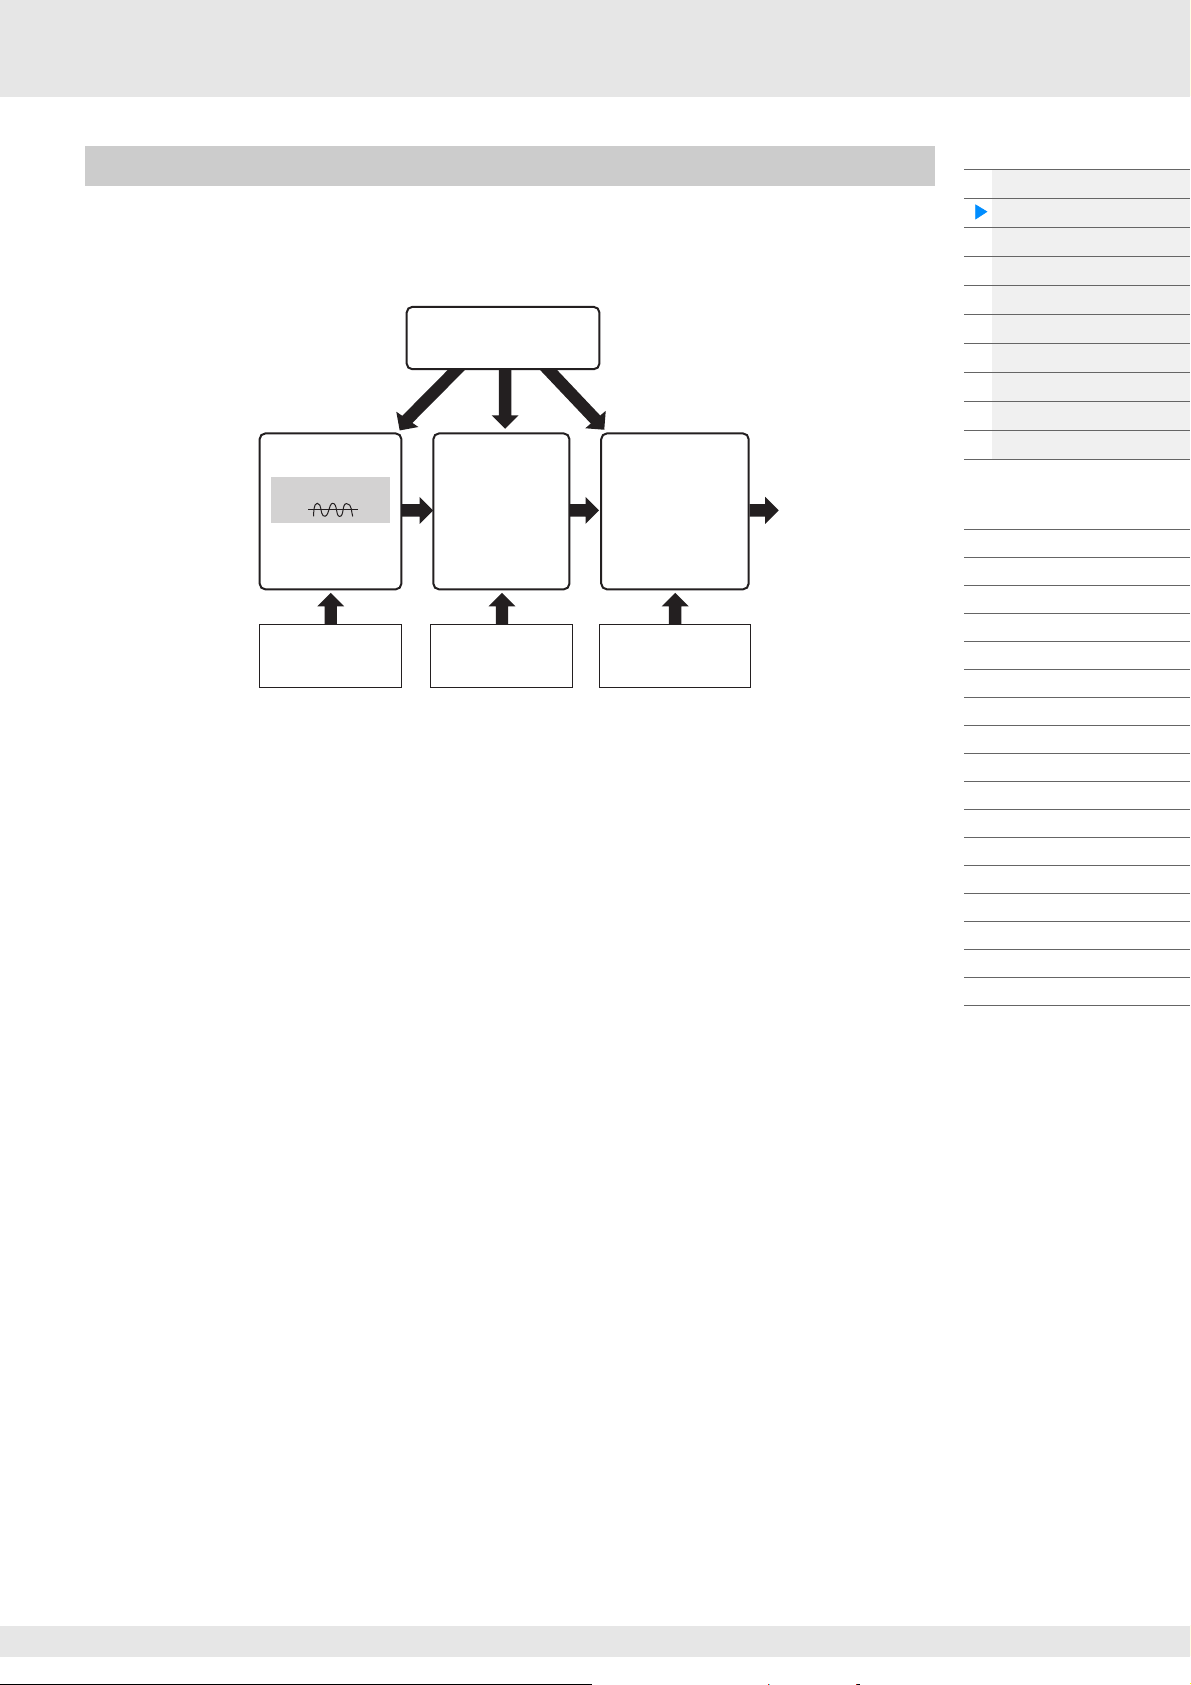
Elements, Drum Keys and Operators
LFO
Low Frequency Oscillator
OSC (Oscillator)
Waveform (AWM2)
PITCH
Controls the pitch of
the sound.
Pitch EG
(Pitch Envelope
Generator)
FILTER
Changes the tonal
quality of the
sound.
AMP
Controls the output
level (amplitude) of
the sound.
Filter EG
(Filter Envelope
Generator)
Amplitude EG
(Amplitude Envelope
Generator)
Elements/Drum Keys/Operators are the smallest “building blocks” in the MODX+ that comprise a Part.
These small sound units can be built, enhanced and processed by a variety of traditional synthesizer
parameters, such as Pitch EG, Filter EG, Amplitude EG, and LFO (shown below).
Oscillator
This unit allows you to assign the waveform (or basic sound material) to each Element/Operator/Key.
Oscillator-related parameters can be set as follows.
• For Normal Parts (AWM2) and Drum Parts
[EDIT] Part selection Element selection [Osc/Tune] (page 145, page 179)
• For Normal Parts (FM-X)
[EDIT] Part selection Operator selection [Form/Freq] (page 194)
Pitch
This unit allows you to control how the pitch changes over time. Pitch-related parameters can be set as
follows.
• For Normal Parts (AWM2) and Drum Parts
[EDIT] Part selection Element selection [Osc/Tune] (page 145, page 179)
• For Normal Parts (FM-X)
[EDIT] Part selection Operator [Common] [Pitch/Filter] (page 187)
Basic Structure
Functional blocks
Tone Generator block
A/D Input block
Sequencer block
Arpeggio block
Motion Sequencer block
Effect block
Envelope Follower block
Controller block
Internal Memory
Reference
Display (touch panel) config.
Performance Play (Home)
Motion Control
Mixing
Scene
Play/Rec
Smart Morph
DAW Remote
Normal Part (AWM) Edit
Drum Part Edit
Normal Part (FM-X) Edit
Common/Audio Edit
Category Search
Utility
Live Set
iPhone/iPad connection
External MIDI connection
Parameters related to Pitch EG can be set as follows.
• For Normal Parts (AWM2)
[EDIT] Part selection Element selection [Pitch EG] (page 150)
• For Normal Parts (FM-X)
[EDIT] Part selection Operator [Common] [Pitch/Filter] (page 187)
Filter
This unit modifies the tone of the sound by cutting the output of a specific frequency portion of the sound.
Also, by setting the FEG (Filter Envelope Generator), you can control how the Cutoff Frequency of the Filter
changes over time. Parameters related to Filter and Filter EG can be set as follows.
• For Normal Parts (AWM2) and Drum Parts
[EDIT] Part selection Element selection [Filter] (page 152, page 181)
• For Normal Parts (FM-X)
[EDIT] Part selection Operator [Common] [Pitch/Filter] (page 187)
MODX+ Reference Manual
8
Page 9
Amplitude
This unit controls the output level (amplitude) of the Element/Drum Key/Operator.
Parameters related to Amplitude and Amplitude EG can be set as follows.
• For Normal Parts (AWM2)
[EDIT] Part selection Element selection [Amplitude] (page 160)
• For Drum Parts
[EDIT] Part selection Element selection [Level/Pan] (page 182)
• For Normal Parts (FM-X)
[EDIT] Part selection Operator selection [Level] (page 196)
LFO (Low Frequency Oscillator)
As its name suggests, the LFO produces a wave of a low frequency.
These waves can be used to vary the pitch, filter or amplitude of each Element/Operator to create effects
such as vibrato, wah and tremolo. There are two LFO types: Part LFO, which is common to all Elements/
Operators, and Element LFO, which is unique for each Element.
Parameters related to Part LFO can be set as follows.
• For Normal Parts (AWM2)
[EDIT] Part selection Element [Common] [Mod/Control] [Part LFO] (page 134)
• For Normal Parts (FM-X)
[EDIT] Part selection Operator [Common] [Mod/Control] [Part LFO] or [2nd LFO] (page 191)
Parameters related to Element LFO can be set as follows.
[EDIT] Part selection Element selection [Element LFO] (page 165)
Maximum Polyphony
Maximum polyphony refers to the highest number of notes that can be sounded simultaneously from
the internal tone generator of the instrument.
The maximum polyphony of this synthesizer is 128 for AWM2 and 128 for FM-X. When the internal
tone generator block receives a number of notes exceeding the maximum polyphony, previously
played notes are cut off. Keep in mind that this may be especially noticeable with Parts not having
decay.
Furthermore, the maximum polyphony applies to the number of Elements/Drum Keys used, not the
number of Parts. When Normal Parts (AWM2) that include up to eight Elements are used, the
maximum number of simultaneous notes may be less than 128.
Basic Structure
Functional blocks
Tone Generator block
A/D Input block
Sequencer block
Arpeggio block
Motion Sequencer block
Effect block
Envelope Follower block
Controller block
Internal Memory
Reference
Display (touch panel) config.
Performance Play (Home)
Motion Control
Mixing
Scene
Play/Rec
Smart Morph
DAW Remote
Normal Part (AWM) Edit
Drum Part Edit
Normal Part (FM-X) Edit
Common/Audio Edit
Category Search
Utility
Live Set
iPhone/iPad connection
External MIDI connection
MODX+ Reference Manual
9
Page 10
A/D Input Block
This block handles the audio signal input from the A/D INPUT [L/MONO]/[R] jacks. Various parameters
such as volume, pan, and effect can be set for the audio signal and the sound is output together with other
Parts. An Insertion Effect, the System Effects, the Master Effects, and the Master EQ can be applied to the
audio signal input via the A/D INPUT [L/MONO]/[R] jacks.
Parameters related to the A/D Input block can be set as follows.
[PERFORMANCE (HOME)] [Mixing] (page 51)
[EDIT] Part [Common] [Audio In] [Mixing] (page 200)
The Effect which is applied to the audio signal input from the A/D INPUT [L/MONO]/[R] jacks can be set as
follows.
[EDIT] Part [Common] [Audio In] [Routing] (page 201)
The gain of the audio signal from the A/D INPUT [L/MONO]/[R] jacks can be adjusted via the A/D INPUT
[GAIN] knob on the panel. Moreover, the on/off setting of the audio signal from the A/D INPUT [L/MONO]/
[R] jacks can be turned on/off via the A/D INPUT [ON/OFF] button.
[UTILITY] [Settings] [Audio I/O] “A/D Input” (page 231)
Sequencer Block
This lets you create Songs by recording and editing your performances as MIDI data (from the controller
block or an external device), allowing you to play the data back with the tone generator block.
Songs
A Song is created by recording your keyboard performance as MIDI sequence data to individual Tracks.
The MODX+ can store up to 128 Songs.
Tracks
This is a memory location on the sequencer where your musical performances are stored. One Part can be
recorded to one track. Since the MODX+ has 16 tracks for one Song, you can record and play back a 16Part performance.
Basic Structure
Functional blocks
Tone Generator block
A/D Input block
Sequencer block
Arpeggio block
Motion Sequencer block
Effect block
Envelope Follower block
Controller block
Internal Memory
Reference
Display (touch panel) config.
Performance Play (Home)
Motion Control
Mixing
Scene
Play/Rec
Smart Morph
DAW Remote
Normal Part (AWM) Edit
Drum Part Edit
Normal Part (FM-X) Edit
Common/Audio Edit
Category Search
Utility
Live Set
iPhone/iPad connection
External MIDI connection
MIDI recording
You can record your keyboard performance to the Song. You can record knob operations, controller
operations and Arpeggio playback as well as your keyboard playing to the specified Track as MIDI events.
Your keyboard performance and controller/knob operations will be recorded to the Track when the
corresponding Keyboard Control Switch for the Part is turned ON.
NOTE The Control Change messages and Parameter Change messages can be recorded by operating the Knobs. For
details on Control Change messages, see the Synthesizer Parameter Manual PDF document.
NOTE For detailed instruction, refer to the Owner’s Manual.
MODX+ Reference Manual
10
Page 11
Arpeggio Block
This block lets you automatically trigger musical and rhythmic phrases by simply pressing a note or notes
on the keyboard. Yamaha’s Arpeggio sequence also changes in response to the actual notes or chords
you play, giving you a wide variety of inspiring musical phrases and ideas—both in composing and
performing.
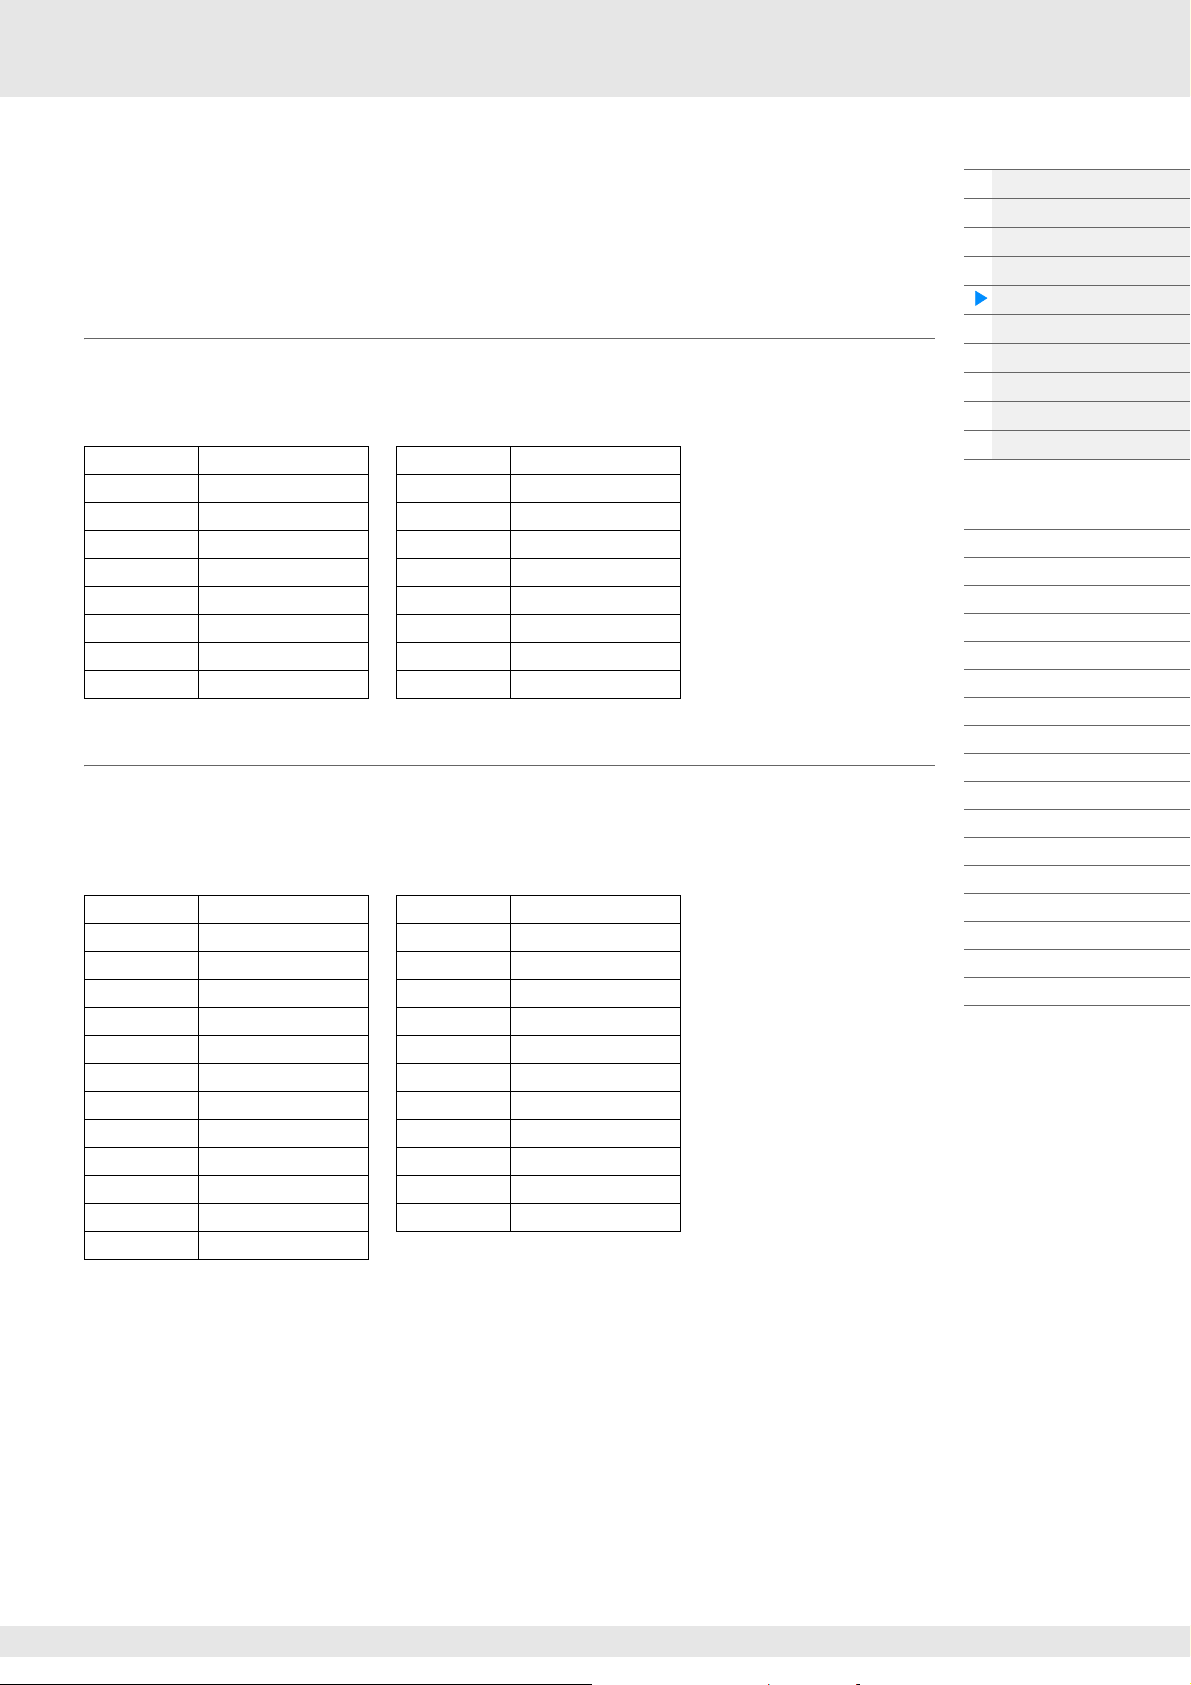
Arpeggio categories
The Arpeggio types are divided into 18 categories (including “No Assign” and “Control/Hybrid Seq”) as
listed below. The categories are based on instrument type.
Arpeggio Type Category List
Piano Piano Pad Pad/Choir
Keys Keyboard SynCp Syn Comp
Organ Organ CPerc Chromatic Perc
Gtr Guitar Dr/Pc Drum/Perc
Bass Bass S.FX Sound FX
Str String M.FX Musical FX
Brass Brass Ethnc Ethnic
WW Woodwind --- No Assign
SynLd Syn Lead Ct/Hb Control / Hybrid Seq
Sub categories
The Arpeggio categories are divided into the sub categories listed below. Because the sub categories are
listed based on the music genre, it is easy to find the sub category appropriate for your desired music
style.
Arpeggio Type Sub Category List
Rock Rock World World
Pop Rock Pop Rock General General
Ballad Ballad No Assign No Assign
Chill Chillout / Ambient Filter Filter *
Hip Hop Hip Hop Exprs Expression *
Funk Funk Pan Pan *
Modern R&B Modern R&B Mod Modulation *
Classic R&B Classic R&B PBend Pitch Bend *
House House / Dance Pop Assign Assign 1/2 *
Techno Techno / Trance Comb Comb *
Jazz Jazz / Swing Zone Zone Velocity *
D&B D&B / Breakbeats Z.Pad Zone Vel for Pad *
Latin Latin
Basic Structure
Functional blocks
Tone Generator block
A/D Input block
Sequencer block
Arpeggio block
Motion Sequencer block
Effect block
Envelope Follower block
Controller block
Internal Memory
Reference
Display (touch panel) config.
Performance Play (Home)
Motion Control
Mixing
Scene
Play/Rec
Smart Morph
DAW Remote
Normal Part (AWM) Edit
Drum Part Edit
Normal Part (FM-X) Edit
Common/Audio Edit
Category Search
Utility
Live Set
iPhone/iPad connection
External MIDI connection
NOTE In the Category Search display, the Sub Categories marked with an asterisk (*) are displayed only when
“Control/Hybrid Seq” is selected as the Category type.
MODX+ Reference Manual
11
Page 12
Arpeggio Type Name
Main
Category
Sub
Category
ARP
No.
ARP Name
Time
Signature
Length
Original
Tempo
Accent
Random
SFX
Sound Type
ApKb Rock 1 MA_70s Rock _ES 4 / 4 2 130 Acoustic Piano
ApKb Rock 2 MB_70s Rock _ES 4 / 4 1 130 :
ApKb Rock 3 MC_70s Rock 4 / 4 2 130
ApKb Rock 4 MD_70s Rock 4 / 4 4 130
ApKb Rock 5 FA_70s Rock 4 / 4 1 130
ApKb Rock 6 FB_70s Rock _ES 4 / 4 1 130
ApKb Rock 7 FC_70s Rock _ES 4 / 4 2 130
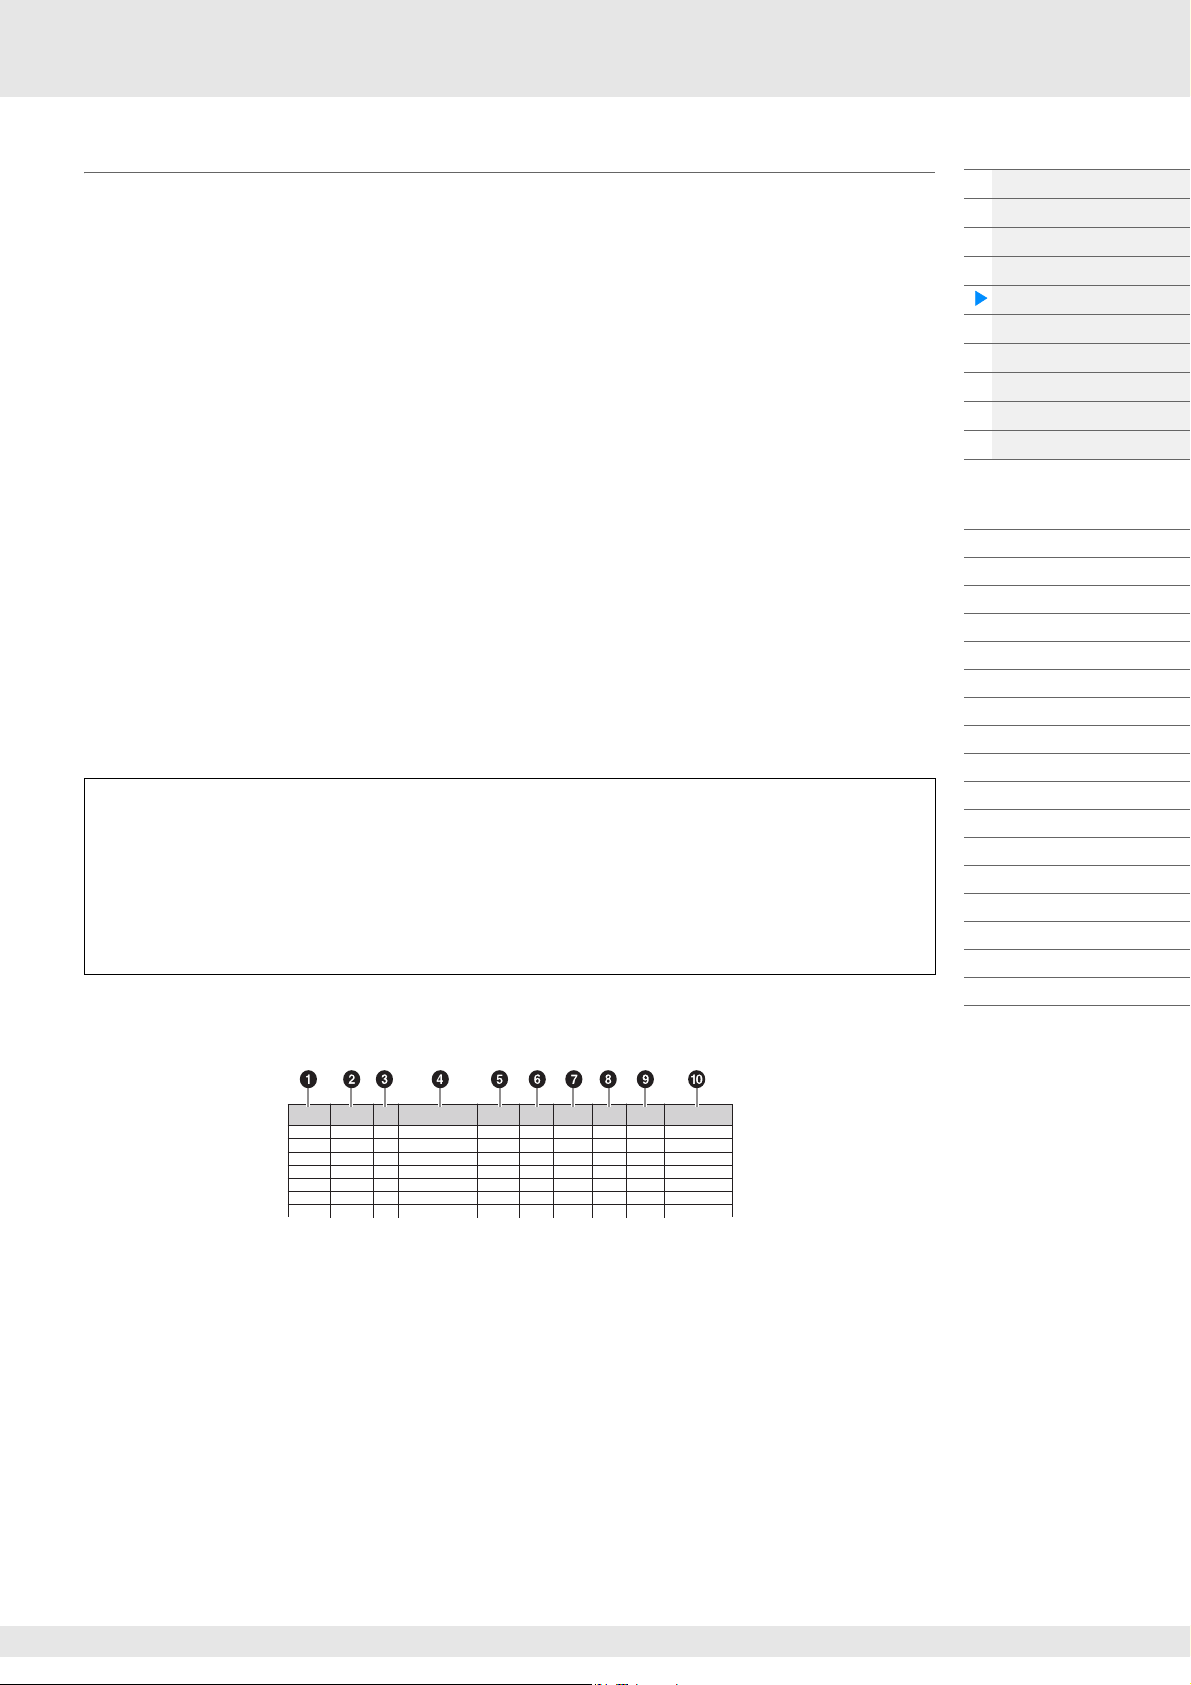
The Arpeggio Types are named according to certain rules and abbreviations. Once you understand these
rules and abbreviations, you’ll find it easy to browse through and select the desired Arpeggio Types.
Arpeggio types with “_N” at the end of the type name (example: HipHop1_N)
These Arpeggios are for using with the Normal Part, and Arpeggios with complex notes can be created
even when triggered by one note (page 14).
Arpeggio types with “_C” at the end of the type name (example: Rock1_C)
These Arpeggios are for using with the Normal Part, and correct Arpeggios can be created corresponding
to the chord you play (page 14).
Arpeggio types with a normal name (example: UpOct1)
In addition to the above types, there are three playback types: the Arpeggios created for use of Normal
Parts and played back using only the played notes and their octave notes (page 14), the Arpeggios
created for use of Drum Parts (page 15), and Arpeggios containing mainly non-note events (page 15).
Arpeggio types with “_AF1”, “_AF2”, or “_AF1&2” at the end of the type name
(example: Electro Pop AF1)
When these Arpeggios are played, both of [ASSIGN 1] and [ASSIGN 2] buttons are automatically turned
ON and the phrase starts playback.
Arpeggio types with [Mg] at the beginning of the type name (example:
[Mg]HardRock1)
These Arpeggios are for using with a Mega Voice.
Mega Voices and Mega Voice Arpeggios
Normal sound uses velocity switching to make the sound quality and/or level of a Part change
according to how strongly or softly you play the keyboard—giving greater authenticity and natural
response to these Parts. However Mega Voices have a very complex structure with many different
layers that are not suitable for playing manually. Mega Voices were developed specifically to be
played by Mega Voice Arpeggios to produce incredibly realistic results. You should always use Mega
Voices with Mega Voice Arpeggios.
Basic Structure
Functional blocks
Tone Generator block
A/D Input block
Sequencer block
Arpeggio block
Motion Sequencer block
Effect block
Envelope Follower block
Controller block
Internal Memory
Reference
Display (touch panel) config.
Performance Play (Home)
Motion Control
Mixing
Scene
Play/Rec
Smart Morph
DAW Remote
Normal Part (AWM) Edit
Drum Part Edit
Normal Part (FM-X) Edit
Common/Audio Edit
Category Search
Utility
Live Set
iPhone/iPad connection
External MIDI connection
The Arpeggio Type List in the Data List PDF document contains the following columns.
NOTE Note that this list is for illustration purposes only. For a complete listing of the Arpeggio Types, see the Data List
PDF document.
1 Main Category
Indicates an Arpeggio Main Category.
2 Sub Category
Indicates an Arpeggio Sub Category.
3 ARP No (Arpeggio Number)
Indicates the Arpeggio type number.
4 ARP Name (Arpeggio Name)
Indicates the Arpeggio Name.
MODX+ Reference Manual
12
Page 13
5 Time Signature
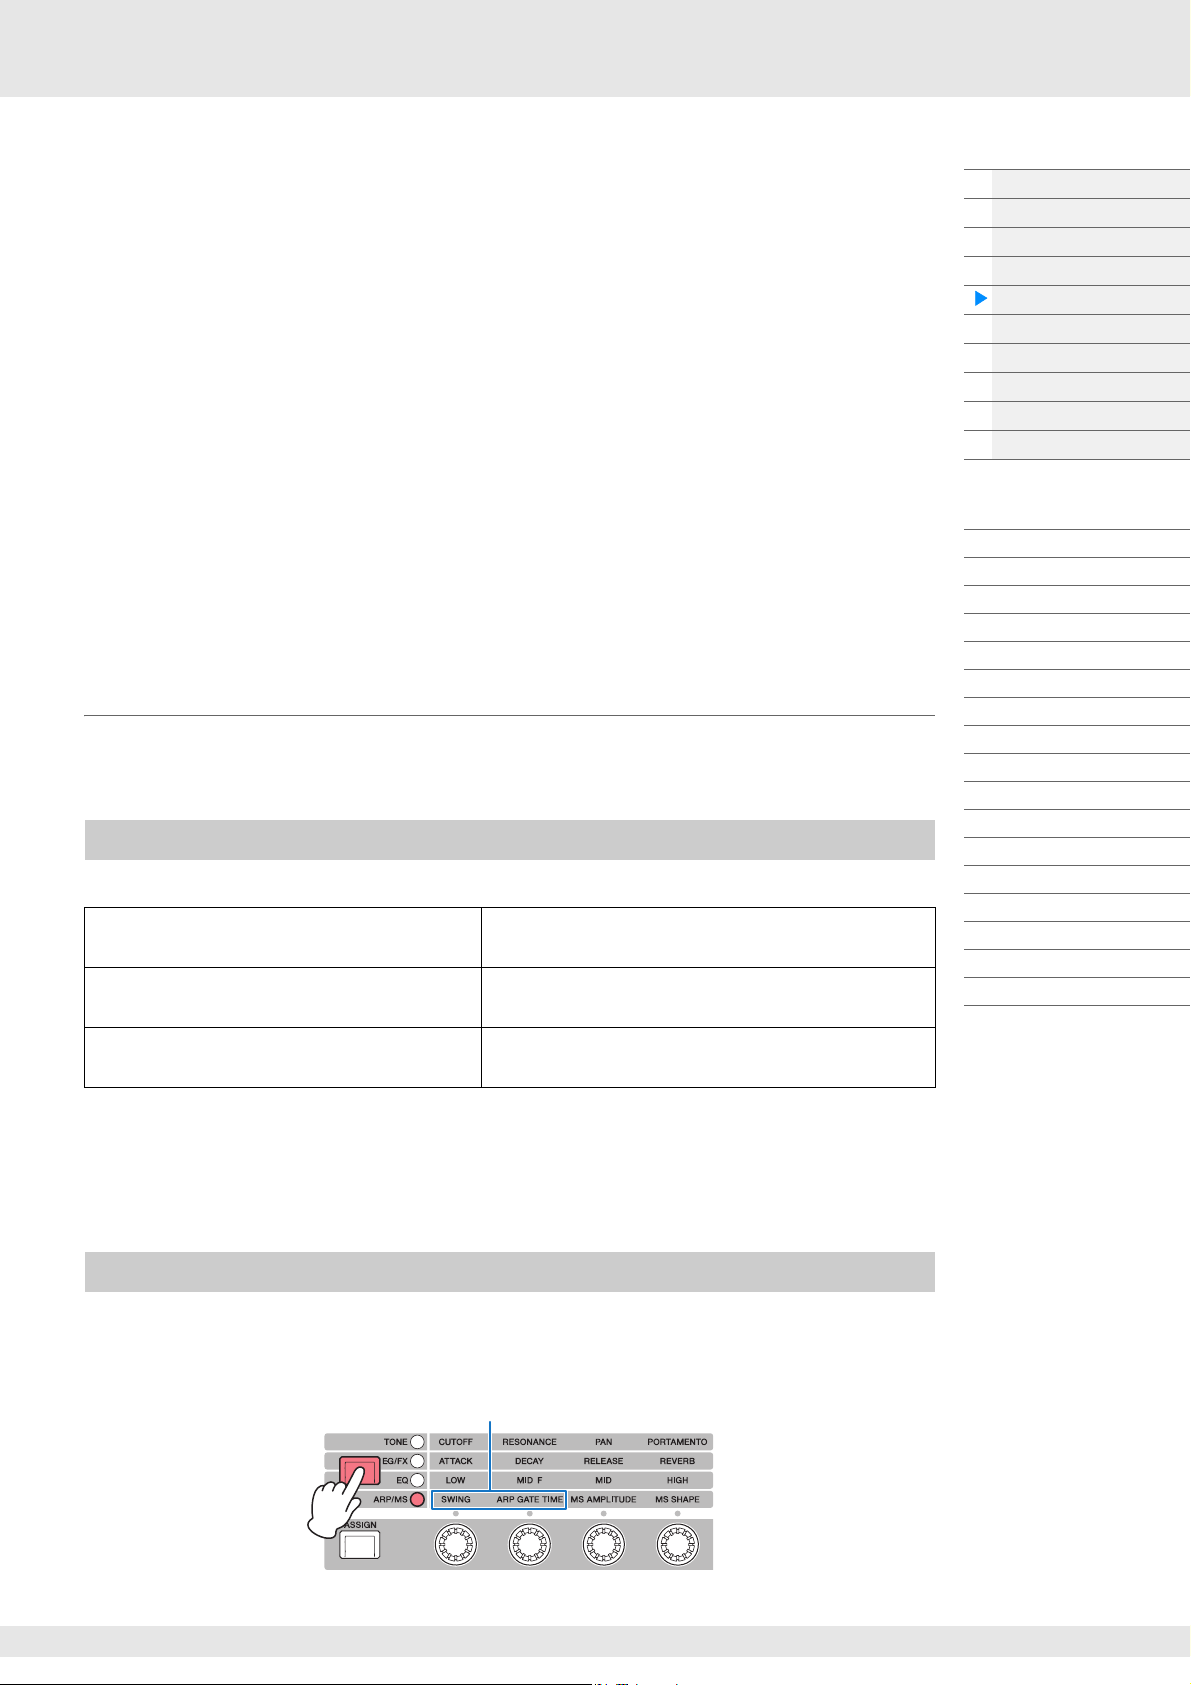
Arpeggio functions which can be controlled by Knob operations
Knob 1 Knob 2 Knob 3 Knob 4
Indicates the time signature or meter of the Arpeggio type.
6 Length
Indicates the data length (amount of measures) of the Arpeggio type. When the Loop parameter*1 is
set to “off,” the Arpeggio plays back for this length and stops.
7 Original Tempo
Indicates the appropriate tempo value of the Arpeggio type. Note that this tempo is not set
automatically when selecting an Arpeggio type.
8 Accent
The circle indicates that the Arpeggio uses the Accent Phrase feature (page 14).
9 Random SFX
The circle indicates that the Arpeggio uses the SFX feature (page 14).
) Sound Type
Indicates the sound type appropriate for the Arpeggio Type.
*1 The Loop parameter is set as follows.
[EDIT] Part Selection Element/Operator [Common] [Arpeggio] [Common] (page 120)
Arpeggio-related settings
There are several methods for triggering and stopping the Arpeggio playback. In addition, you can set
whether or not SFX sounds and special Accent Phrases are triggered along with the normal sequence
data.
Turning Arpeggio playback on/off
The following three settings are available for turning the Arpeggio playback on/off.
To play the Arpeggio only when the note is
pressed:
To continue the Arpeggio even if the note is
released:
Set the “Hold” parameter to “Off” and the “Trigger
Mode” parameter to “Gate.”
Set the “Hold” parameter to “On” and the “Trigger
Mode” parameter to “Gate.”
Basic Structure
Functional blocks
Tone Generator block
A/D Input block
Sequencer block
Arpeggio block
Motion Sequencer block
Effect block
Envelope Follower block
Controller block
Internal Memory
Reference
Display (touch panel) config.
Performance Play (Home)
Motion Control
Mixing
Scene
Play/Rec
Smart Morph
DAW Remote
Normal Part (AWM) Edit
Drum Part Edit
Normal Part (FM-X) Edit
Common/Audio Edit
Category Search
Utility
Live Set
iPhone/iPad connection
External MIDI connection
To toggle the Arpeggio playback on/off
whenever the note is pressed:
NOTE “Hold” is set as follows.
[EDIT] Part Selection Element/Operator [Common] [Arpeggio] [Common] (page 120)
NOTE When receiving a MIDI sustain message (control change #64) with both of “Arp Master” and “Arp Part” set to
“On,” you can obtain the same result by setting “Hold” to “On.”
NOTE “Trigger Mode” is set as follows.
[EDIT] Part Selection Element/Operator [Common] [Arpeggio] [Advanced] (page 125)
Set the “Trigger Mode” parameter to “Toggle.” The
“Hold” parameter can be set to either “On” or “Off.”
Using the Knobs to control Arpeggios
By pressing the Knob Function [TONE]/[EG/FX]/[EQ]/[ARP/MS] button and selecting “ARP/MS,” you can
use the Knobs 1–2 to control Arpeggio playback. Try this out and listen for the changes in the sound. For
details regarding the effect of the Knobs 1–2, see Quick Edit (page 38).
MODX+ Reference Manual
13
Page 14
Accent Phrases
Accent Phrases are composed of sequence data included in some Arpeggio types, sounding only when
you play notes at a velocity higher (stronger) than that specified in the Accent Velocity Threshold
parameter.
If it is hard to play at velocities necessary to trigger the Accent Phrase, set the “Vel Threshold” (Accent
Velocity Threshold) parameter to a lower value.
NOTE “Vel Threshold” (Accent Velocity Threshold) parameter is set as follows.
[EDIT] Part Selection Element/Operator [Common] [Arpeggio] [Advanced] (page 125)
NOTE For information on Arpeggio types that use this function, refer to the “Arpeggio Type List” in the Data List PDF
document.
Random SFX
Basic Structure
Functional blocks
Tone Generator block
A/D Input block
Sequencer block
Arpeggio block
Motion Sequencer block
Effect block
Envelope Follower block
Controller block
Internal Memory
Some Arpeggio types feature a Random SFX function which will trigger special sounds (such as guitar fret
noises) when the note is released. The following parameters affecting Random SFX are provided.
For turning the Random SFX on/off: Random SFX parameter
For setting the volume of the SFX sound: Velocity Offset (Random SFX Velocity Offset)
parameter
For determining whether or not the volume of
Key On Ctrl (Random SFX Key on Control) parameter
the SFX sound is controlled by velocity:
NOTE “Random SFX,” “Velocity Offset,” and “Key On Ctrl” are set as follows.
[EDIT] Part Selection Element/Operator [Common] [Arpeggio] [Advanced] (page 125)
NOTE The Random SFX function is not available for the Arpeggio which stops when the note is released.
NOTE For information on Arpeggio types that use the Random SFX function, refer to the “Arpeggio Type List” in the
Data List PDF document.
Arpeggio playback types
There are three main Arpeggio playback types as described below.
Arpeggios for Normal Parts
Arpeggio types (belonging to all categories except for Drum/Perc and a part of Control/HybridSeq)
created for use of Normal Parts have the following three playback types.
Reference
Display (touch panel) config.
Performance Play (Home)
Motion Control
Mixing
Scene
Play/Rec
Smart Morph
DAW Remote
Normal Part (AWM) Edit
Drum Part Edit
Normal Part (FM-X) Edit
Common/Audio Edit
Category Search
Utility
Live Set
iPhone/iPad connection
External MIDI connection
Playback of played notes only
The Arpeggio is played back using only the played note(s) and octave notes.
Playback of a programmed sequence according to the played notes
These Arpeggio types have the several sequences each of which is suited for a certain chord type. Even if
you press only one note, the Arpeggio is played back using the programmed sequence—meaning that
notes other than the ones you play may be sounded. Pressing another note triggers a transposed
sequence using the pressed note as the new root note. Adding notes to those already held changes the
sequence accordingly. Arpeggios with this playback type have “_N” at the end of the type name.
Playback of a programmed sequence according to the played chord
These Arpeggio types created for use with Normal Parts are played back to match the chord type
determined by detecting the notes you play on the keyboard. Arpeggios with this playback type have “_C”
at the end of the type name.
NOTE When the “Key Mode” parameter is set to “Sort” or “Sort+Drct,” the same sequence is played back no matter
what order you play the notes. When the “Key Mode” parameter is set to “Thru” or “Thru+Drct,” a different
sequence is played back depending on the order you play the notes.
NOTE Since these types are programmed for Normal Parts, using them with Drum Parts may not produce musically
appropriate results.
MODX+ Reference Manual
14
Page 15
Arpeggios for Drum Parts
Arpeggio types in Drum/Perc categories are programmed specifically for use with Drum Parts, giving you
instant access to various rhythm patterns. Three different playback types are available.
Playback of a drum pattern
Pressing any note(s) will trigger the same rhythm pattern.
Playback of a drum pattern, plus additional played notes (assigned drum
instruments)
Pressing any note will trigger the same rhythm pattern. Adding notes to the one already held produces
additional sounds (assigned drum instruments) for the drum pattern.
Playback only of the played notes (assigned drum instruments)
Playing a note or notes will trigger a rhythm pattern using only the notes played (assigned drum
instruments). Keep in mind that even if you play the same notes, the triggered rhythm pattern differs
depending on the order of the notes played. This gives you access to different rhythm patterns using the
same instruments simply by changing the order in which you play the notes, when the “Key Mode”
parameter is set to “Thru” or “Thru+Drct.”
NOTE The three playback types above are not distinguished by category name or type name. You’ll have to actually
play the types and hear the difference.
NOTE Since these types are programmed for Drum Parts, using them with Normal Parts may not produce musically
appropriate results.
Arpeggios containing mainly non-note events
Arpeggio types (in Control/HybridSeq main categories with Filter, Expression, Pan, Modulation, Pitch Bend,
and Assign 1/2 sub categories) are programmed primarily with Control Change and Pitch Bend data. They
are used to change the tone or pitch of the sound, rather than play specific notes.
In fact, some types contain no note data at all. When using a type of this category, set the “Key Mode”
parameter to “Direct,” “Sort+Drct,” or “Thru+Drct.”
NOTE Settings related to Key Mode are set as follows.
[EDIT] Part Selection Element/Operator [Common] [Arpeggio] [Common] (page 120)
Tips for Arpeggio playback
Arpeggios not only provide inspiration and full rhythmic passages over which you can perform, they
give you quality MIDI data you can use in creating Songs, or fully formed backing parts to be used in
your live performances. For instructions on using Arpeggio, see the Owner’s Manual.
Basic Structure
Functional blocks
Tone Generator block
A/D Input block
Sequencer block
Arpeggio block
Motion Sequencer block
Effect block
Envelope Follower block
Controller block
Internal Memory
Reference
Display (touch panel) config.
Performance Play (Home)
Motion Control
Mixing
Scene
Play/Rec
Smart Morph
DAW Remote
Normal Part (AWM) Edit
Drum Part Edit
Normal Part (FM-X) Edit
Common/Audio Edit
Category Search
Utility
Live Set
iPhone/iPad connection
External MIDI connection
MODX+ Reference Manual
15
Page 16
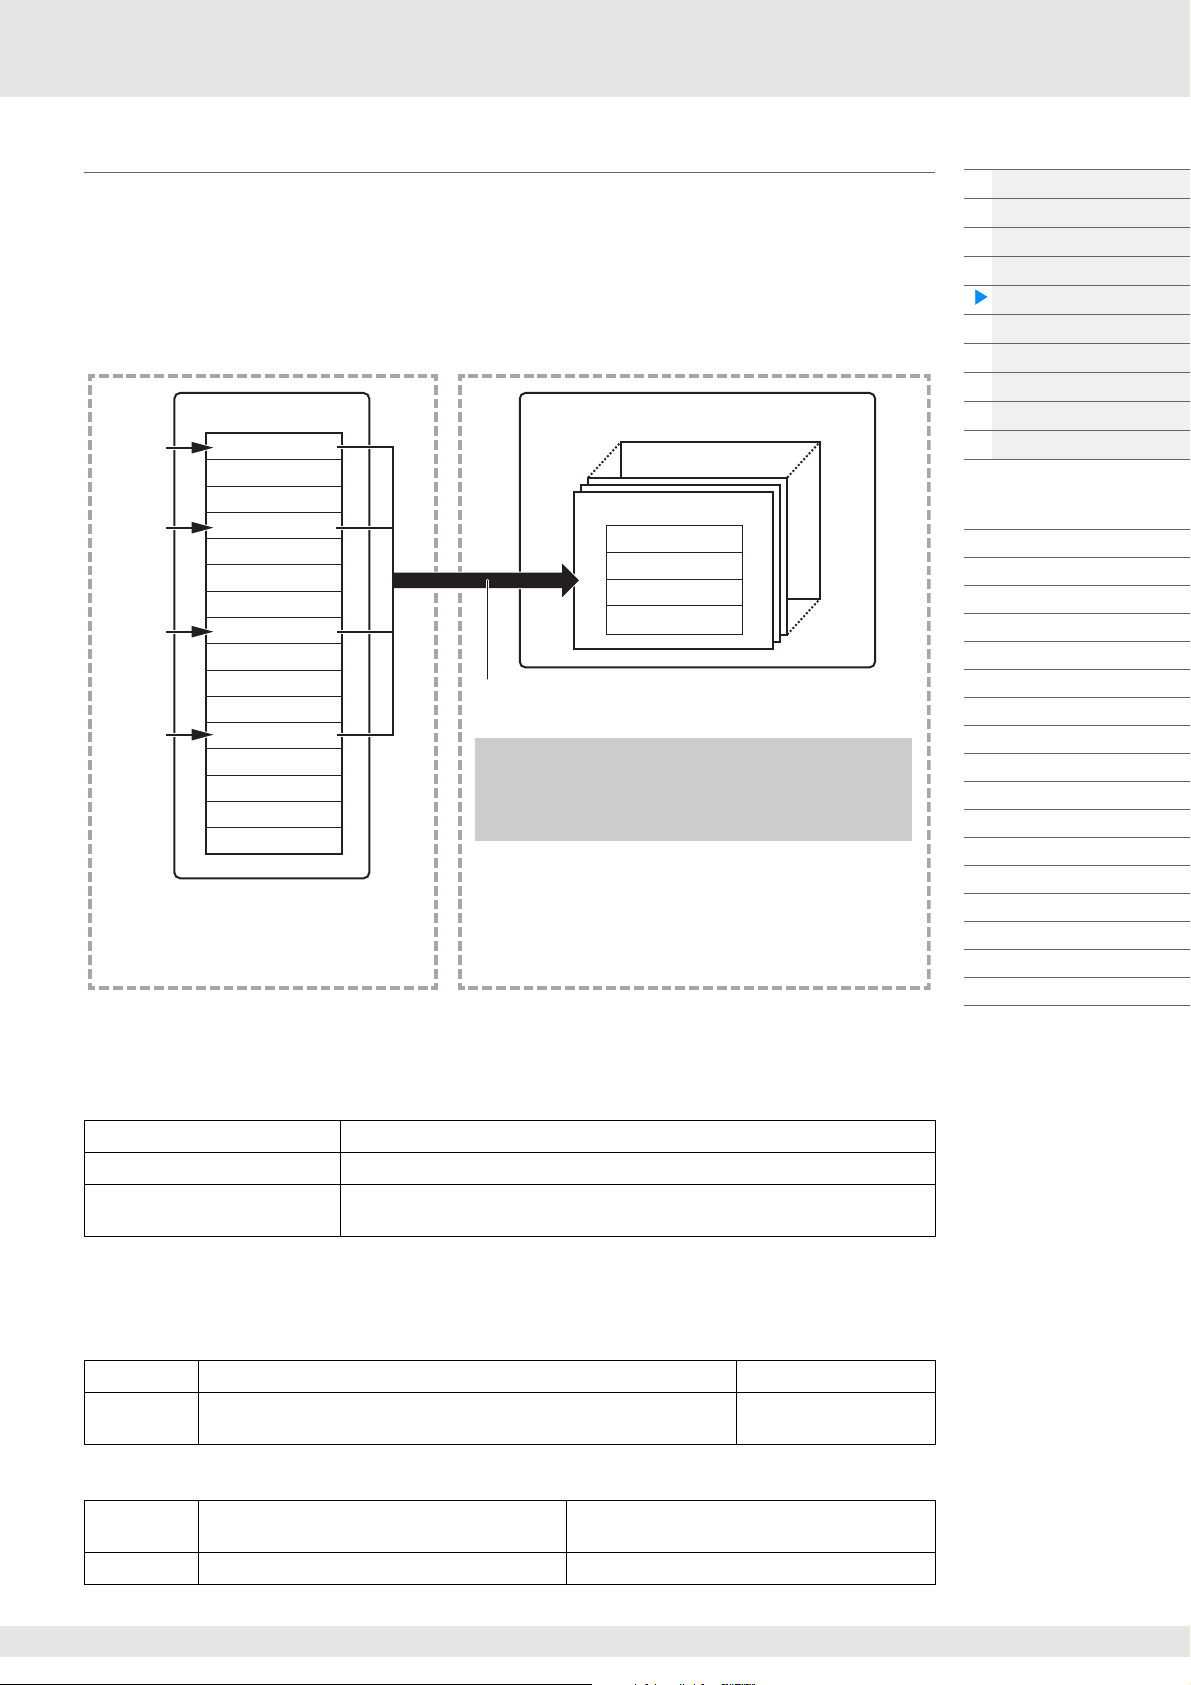
Creating an Arpeggio
Song
Track 1
Track 2
Track 3
Track 4
Track 5
Track 6
Track 7
Track 8
Track 9
Tra c k 1 0
Tra c k 11
Tra c k 1 2
Tra c k 1 3
Tra c k 1 4
Tra c k 1 5
Tra c k 1 6
Recording
Recording
Recording
Recording
Convert
Arpeggio
User Arpeggio 256
User Arpeggio 001
Track 1
Track 2
Track 3
Track 4
After the above procedure, select tracks from the Put Track to
Arpeggio display (page 65) to convert the Song to your own
Arpeggio.
You can record MIDI sequence data for the
Arpeggio to any of the Tracks. After recording,
select four Tracks from all sixteen and convert
them to Arpeggio data.
[SONG] (Play) button
or
[PERFORMANCE (HOME)] [Play/Rec] [MIDI]
Touch the Song Name [User Arp]
In addition to using the preset Arpeggios, you can also create your own original Arpeggio data. First,
record a phrase to Song Tracks (up to a maximum of four). Then, convert the Song (or the MIDI sequence
data) to Arpeggio data from the Put Track to Arpeggio display.
1 Record MIDI sequence data to a Song.
2 Convert the MIDI sequence data (recorded to the Song) to Arpeggio data.
Basic Structure
Functional blocks
Tone Generator block
A/D Input block
Sequencer block
Arpeggio block
Motion Sequencer block
Effect block
Envelope Follower block
Controller block
Internal Memory
Reference
Display (touch panel) config.
Performance Play (Home)
Motion Control
Mixing
Scene
Play/Rec
Smart Morph
DAW Remote
Normal Part (AWM) Edit
Drum Part Edit
Normal Part (FM-X) Edit
Common/Audio Edit
Category Search
Utility
Live Set
iPhone/iPad connection
External MIDI connection
Determining how Song/Pattern data is converted to an Arpeggio – Convert Type
MIDI sequence data (of Song Tracks) can be converted to Arpeggio data in one of three ways, according
to the Convert types below. These types can also be selected independently for each destination Track—
providing enormous flexibility and performance control.
Normal (Normal Arpeggio) The Arpeggio is played back using only the played note and its octave notes.
Fixed Playing any note(s) will trigger the same MIDI sequence data.
OrgNotes (Original Notes) Basically same as “Fixed” with the exception that the Arpeggio playback notes
Record the MIDI sequence data to a Song Track, referring to the previous instructions in this chapter as
needed. The examples listed below are used as reference.
Creating a rhythm pattern (using a Drum Voice)
Track 1 Record a basic rhythm pattern using various drum instruments. Convert via “Fixed.”
Track 2–4 Record a different rhythm pattern using a specific drum instrument to
Creating a bass line (using a Normal Voice)
Track 1 Record a bass line using a specific desired key
Track 2–4 off
MODX+ Reference Manual
each Track.
(root).
differ according to the played chord.
Convert via “OrgNote” after the OrgNotes Root is
set.
Convert via “Normal.”
16
Page 17
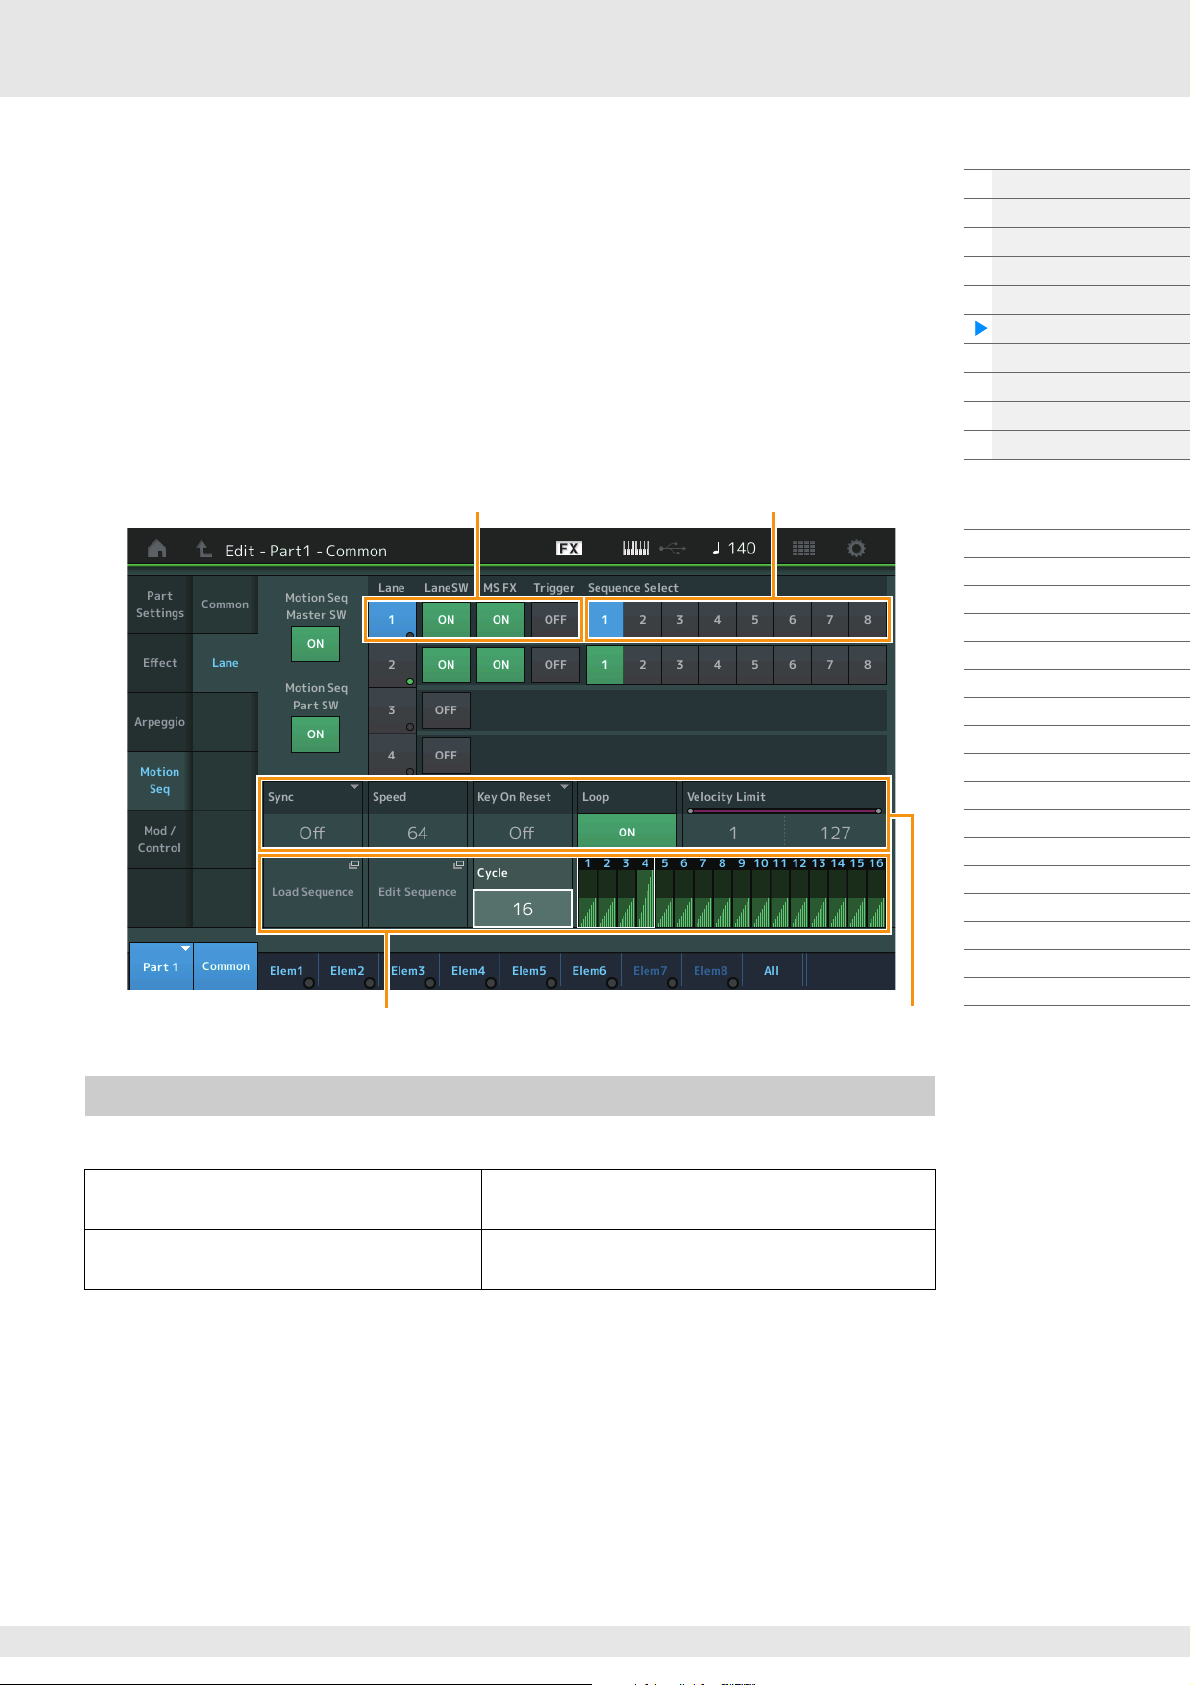
Motion Sequencer Block
Lane setting
Sequence Patterns for the Lane
Selected Sequence setting Lane setting
The powerful Motion Sequencer feature lets you dynamically change sounds by operating Parameters
depending on sequences created in advance.
It provides real time control for changing sounds depending on various sequences such as Tempo,
Arpeggio, or the rhythm of external connected devices.
You can assign up to eight desired Sequence types for one Lane.
You can also set up to four Lanes corresponding to the Motion Sequencer function for one Part. Up to eight
Lanes can be used at the same time for the entire Performance.
The setting status (on or off) the Lanes in the entire Performance will be shown as follows.
[PERFORMANCE (HOME)] [Motion Control] [Motion Seq] (page 45)
Also, the parameters for each Lane are set as follows.
[PERFORMANCE (HOME)] [EDIT] Part selection Element/Operator [Common] [Motion Seq]
[Lane] (page 129)
Basic Structure
Functional blocks
Tone Generator block
A/D Input block
Sequencer block
Arpeggio block
Motion Sequencer block
Effect block
Envelope Follower block
Controller block
Internal Memory
Reference
Display (touch panel) config.
Performance Play (Home)
Motion Control
Mixing
Scene
Play/Rec
Smart Morph
DAW Remote
Normal Part (AWM) Edit
Drum Part Edit
Normal Part (FM-X) Edit
Common/Audio Edit
Category Search
Utility
Live Set
iPhone/iPad connection
External MIDI connection
Turning the Motion Sequencer on/off
The following settings are available for turning the Motion Sequencer playback on/off.
To play the Motion Sequence when the note is
pressed:
To play the Motion Sequence when the
[MOTION SEQ TRIGGER] button is pressed:
NOTE “LaneSW” and “Trigger” are set as follows.
[EDIT] Part selection Element/Operator [Common] [MOTION Seq] [Lane] (page 129)
MODX+ Reference Manual
Set the “LaneSW” parameter to “On,” the “Trigger”
parameter to “Off,” and the” Sync” parameter to “Off.”
Set the “LaneSW” parameter to “On,” the “Trigger”
parameter to “On,” and the “Sync” parameter to “Off.”
17
Page 18
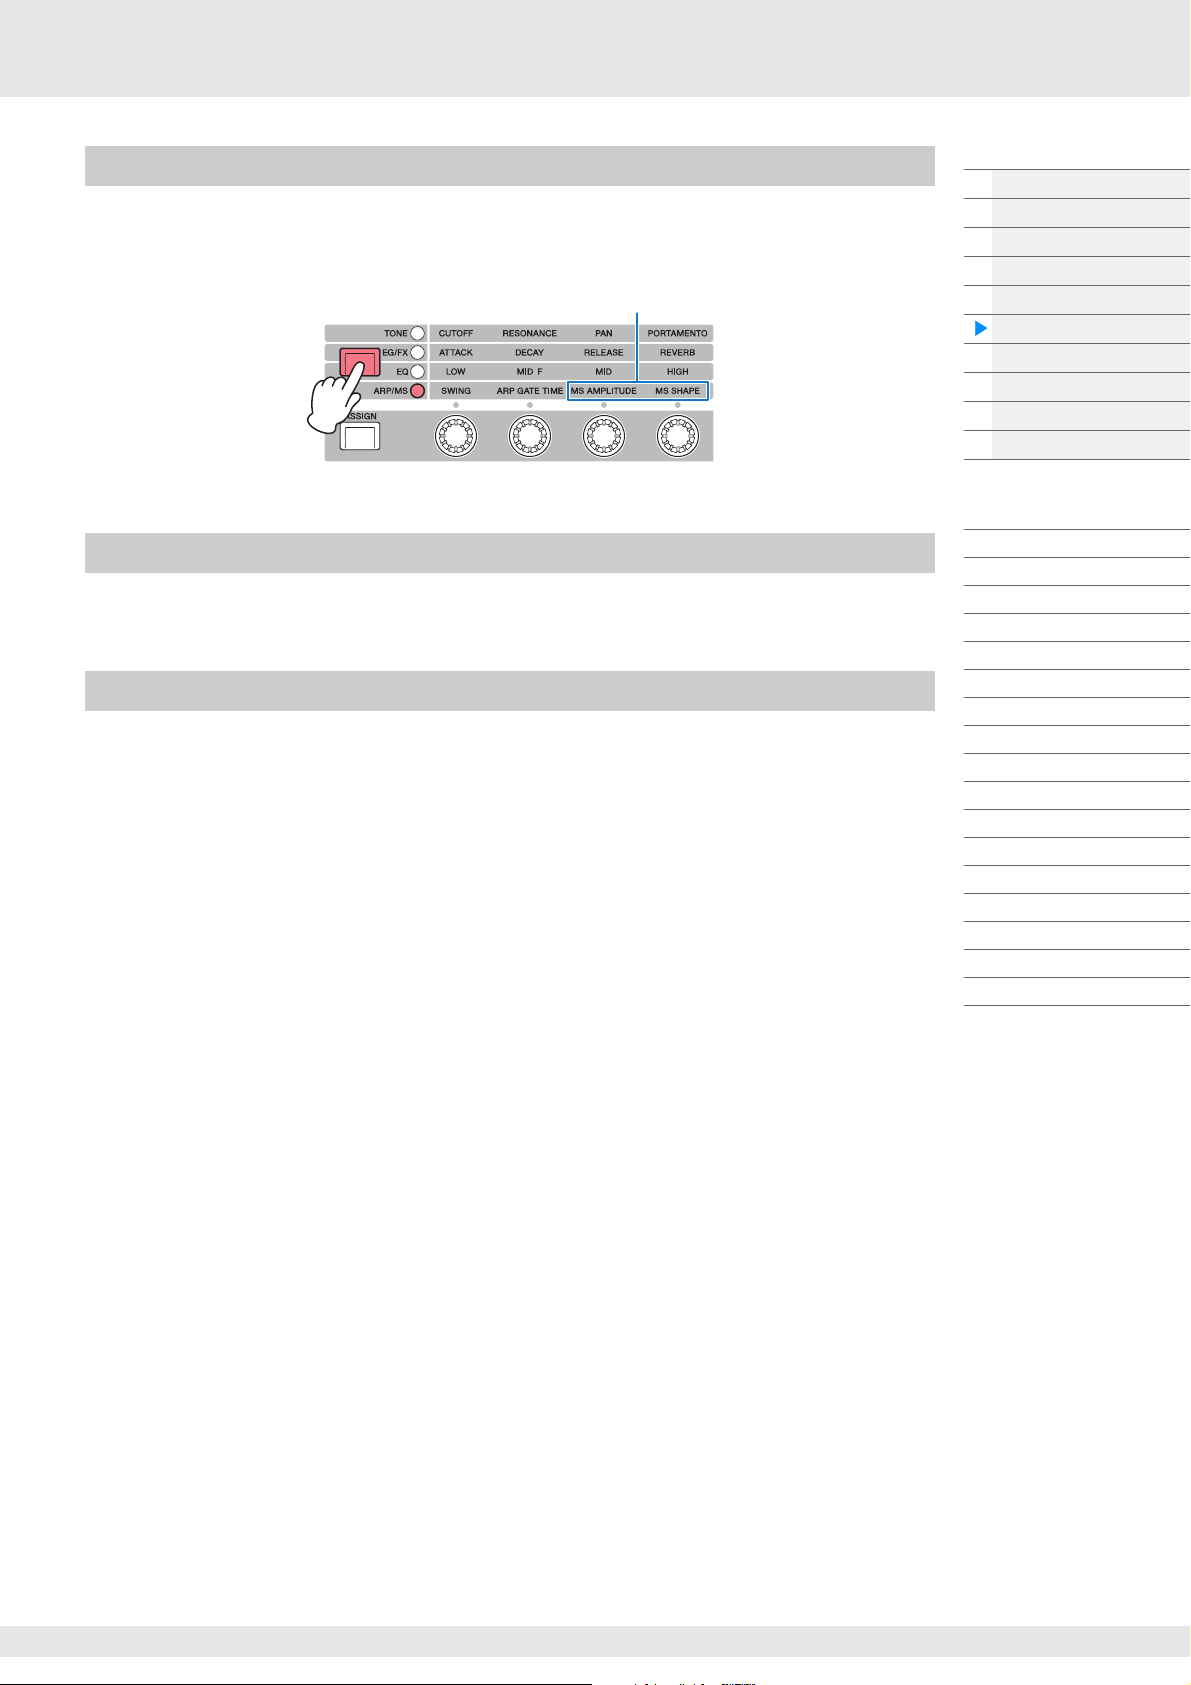
Using the Knobs to control Motion Sequencer
Motion Sequencer functions which can be controlled by Knob operations
Knob 1 Knob 2 Knob 3 Knob 4
By pressing the Knob Function [TONE]/[EG/FX]/[EQ]/[ARP/MS] button and selecting “ARP/MS,” you can
use the Knobs 3–4 to control Motion Sequencer playback. Try this out and listen for the changes in the
sound. For details regarding the effect of the Knobs 3–4, see Quick Edit (page 38).
Editing Motion Sequences
You can create a custom Motion Sequence consisting of up to sixteen steps. For details about Editing, see
page 131.
Parameters related to Motion Sequencer
In this instrument, Motion Sequencer is considered as a virtual controller and can be selectable in the
“Source” parameter. The target parameter you want to control by Motion Sequencer is set in the
“Destination” parameter. For details, see page 138.
Basic Structure
Functional blocks
Tone Generator block
A/D Input block
Sequencer block
Arpeggio block
Motion Sequencer block
Effect block
Envelope Follower block
Controller block
Internal Memory
Reference
Display (touch panel) config.
Performance Play (Home)
Motion Control
Mixing
Scene
Play/Rec
Smart Morph
DAW Remote
Normal Part (AWM) Edit
Drum Part Edit
Normal Part (FM-X) Edit
Common/Audio Edit
Category Search
Utility
Live Set
iPhone/iPad connection
External MIDI connection
MODX+ Reference Manual
18
Page 19
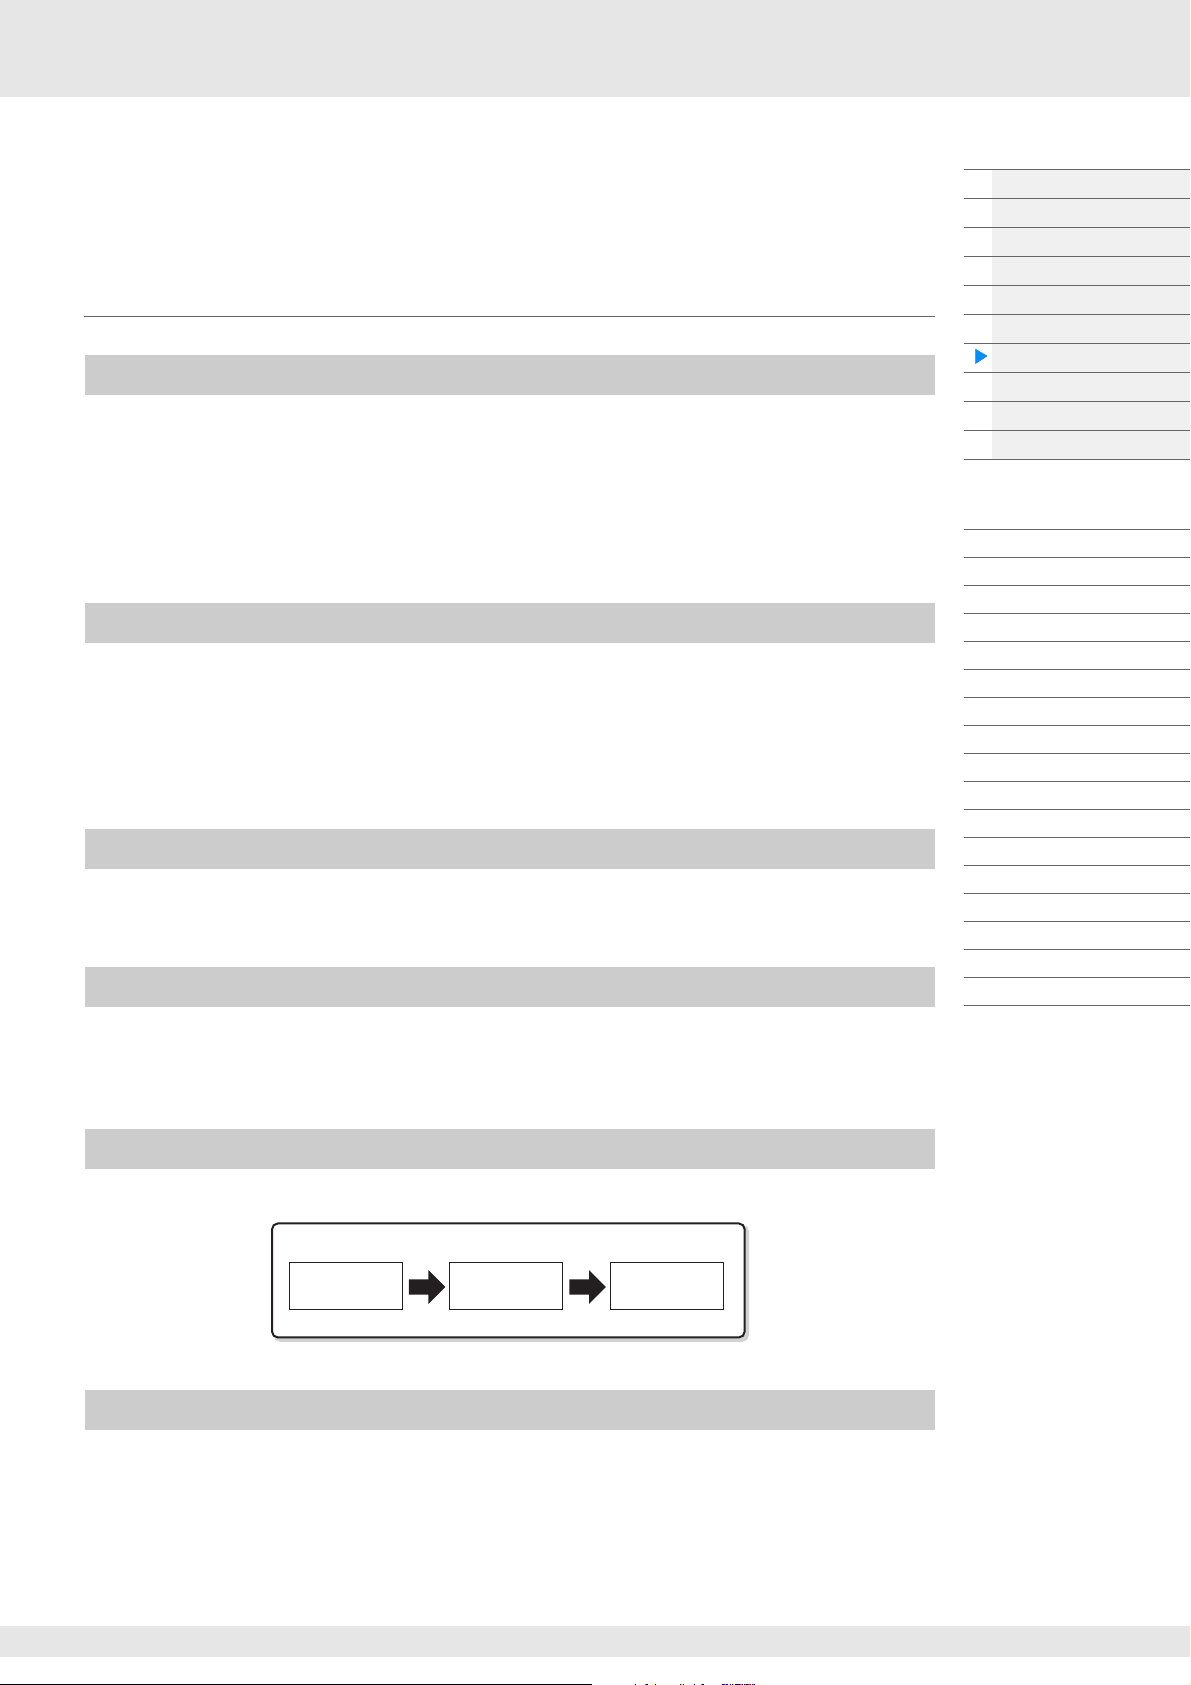
Effect Block
Part
3-band
parametric EQ
2-band
parametric EQ
Insertion Effect
Part EQ Part EQ
This block applies effects to the output of the tone generator block as well as audio input block,
processing and enhancing the sound. Effects are applied in the final stages of editing, letting you change
the sound as desired.
Effect structure
System Effects—Variation and Reverb
System Effects are applied to the overall sound. With System Effects, the sound of each Part is sent to the
effect according to the Effect Send Level for each Part. The processed sound (referred to as “wet”) is sent
back to the mixer according to the Return Level, and output—after being mixed with the unprocessed
“dry” sound. This instrument is equipped with Variation and Reverb as System Effects. In addition, you can
set the Send Level from Variation to Reverb. This parameter is used to apply Reverb to the signals output
from the Variation. You can get a natural effect by applying Reverb depth to the Variation sound with the
same level as that of the dry sound.
Insertion Effects
Insertion Effects can be applied individually to each of specified parts before merging signals of all parts.
It should be used for sounds for which you want to drastically change the character. You can set different
Effect types to the Insertion Effects A and B for each Part. These settings can be made from Part Edit
[Effect] (page 113, page 175, page 189).
This synthesizer features 13 sets of Insertion Effects. They can be applied to Parts1–8 and four of the Parts
9–16 and A/D Input Part.
Master Effect
This block applies effects to the final stereo output signal of the entire sound. Multiple Effect types are
available.
Element EQ
Basic Structure
Functional blocks
Tone Generator block
A/D Input block
Sequencer block
Arpeggio block
Motion Sequencer block
Effect block
Envelope Follower block
Controller block
Internal Memory
Reference
Display (touch panel) config.
Performance Play (Home)
Motion Control
Mixing
Scene
Play/Rec
Smart Morph
DAW Remote
Normal Part (AWM) Edit
Drum Part Edit
Normal Part (FM-X) Edit
Common/Audio Edit
Category Search
Utility
Live Set
iPhone/iPad connection
External MIDI connection
Element EQ is applied to each Element of the Normal Part (AWM2) and each key of the Drum Part. You can
specify one of three different EQ shapes, including shelving and peaking.
NOTE Element EQ does not affect the Input signals from the A/D INPUT [L/MONO]/[R] jacks.
Part EQ
This EQ is applied to a Part before and after the Insertion Effect.
Master EQ
Master EQ is applied to the final (post-effect), overall sound of the instrument. In this EQ, all five bands can
be set to peaking, with shelving being available also for the lowest and highest bands.
MODX+ Reference Manual
19
Page 20
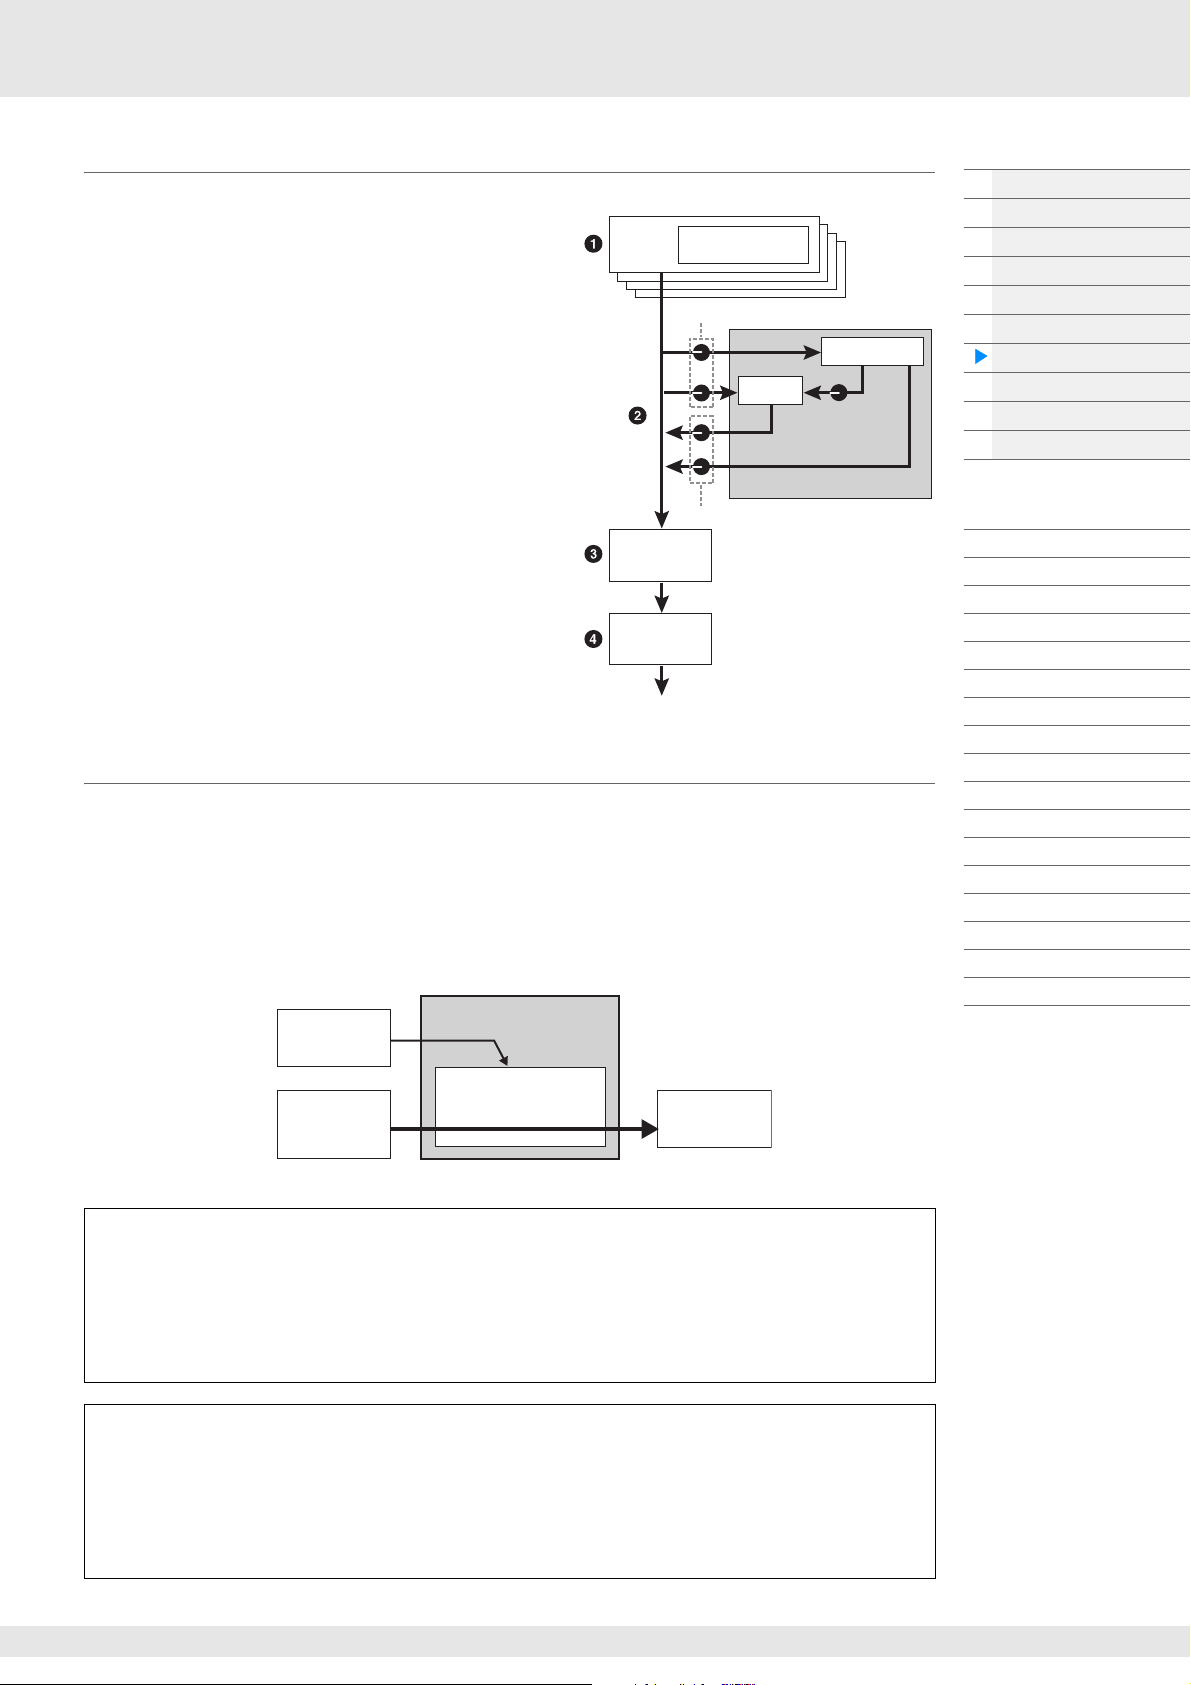
Effect connection
Performance
Par t
Part EQ
Insertion A/B
Send Level
Var iatio n
Reverb
Var iat ion
to Reverb
System Effect
Return Level
Master
Effect
Master EQ
Mic Input or
Part Output
Part Output
(Keyboard
Performance)
Extracting the characteristic
of the input sound
Creating formants
Vocoder
Robot-like
voice
1 Each EQ and Insertion Effect applied to each
Part
2 Variation and Reverb related parameters
Setting: Part Edit [Effect] [Routing] (page 113, page 175,
page 189)
Common/Audio Edit [Effect] [Routing] (page 208)
3 Master Effect related parameters
Setting: Common/Audio Edit [Effect] [Master FX]
(page 211)
4 Master EQ related parameters
Setting: Common/Audio Edit [Effect] [Master EQ]
(page 212)
NOTE Regarding the audio input signal from the A/D INPUT [L/
MONO]/[R] jacks, the effect is set in Common/Audio Edit
[Audio In].
About the Vocoder Effect
MODX+ features a Vocoder effect. Vocoder is a distinctive, “robot voice” effect which extracts the
characteristic of the microphone sound and adds it to the sound via your keyboard performance. The
human voice consists of sounds generated from the vocal cords, and filtered by the throat, nose and
mouth. These resonant sections have specific frequency characteristics and they function effectively as a
filter, creating many formants (harmonic content). The Vocoder effect extracts the filter characteristics of
the voice from the microphone input and recreates the vocal formants by the use of multiple band pass
filters. The machine-like ‘robot’ voice is created by passing the pitched sounds of musical instruments
(such as a synthesizer sound) through the filters.
Basic Structure
Functional blocks
Tone Generator block
A/D Input block
Sequencer block
Arpeggio block
Motion Sequencer block
Effect block
Envelope Follower block
Controller block
Internal Memory
Reference
Display (touch panel) config.
Performance Play (Home)
Motion Control
Mixing
Scene
Play/Rec
Smart Morph
DAW Remote
Normal Part (AWM) Edit
Drum Part Edit
Normal Part (FM-X) Edit
Common/Audio Edit
Category Search
Utility
Live Set
iPhone/iPad connection
External MIDI connection
About Effect categories, Effect types, and Effect parameters
For information regarding the effect categories of this instrument and the effect types contained in
their categories, see the “Effect Type List” in the Data List PDF document. For information on the
effect parameters which can be set in the each effect type, see the “Effect Parameter List” in the Data
List PDF document. For information on the descriptions of each effect category, each effect type, and
each effect parameter, see the Synthesizer Parameters Manual PDF document.
About Preset settings
Preset settings for parameters of each effect type are provided as templates and can be selected in
the Effect Type selection display. To get a desired effect sound, try first selecting one of the Presets
close to your imagined sound, then change the parameters as necessary. Preset settings can be
determined by setting “Preset” in each effect parameter display. For information on each effect type,
see the Data List PDF document.
MODX+ Reference Manual
20
Page 21
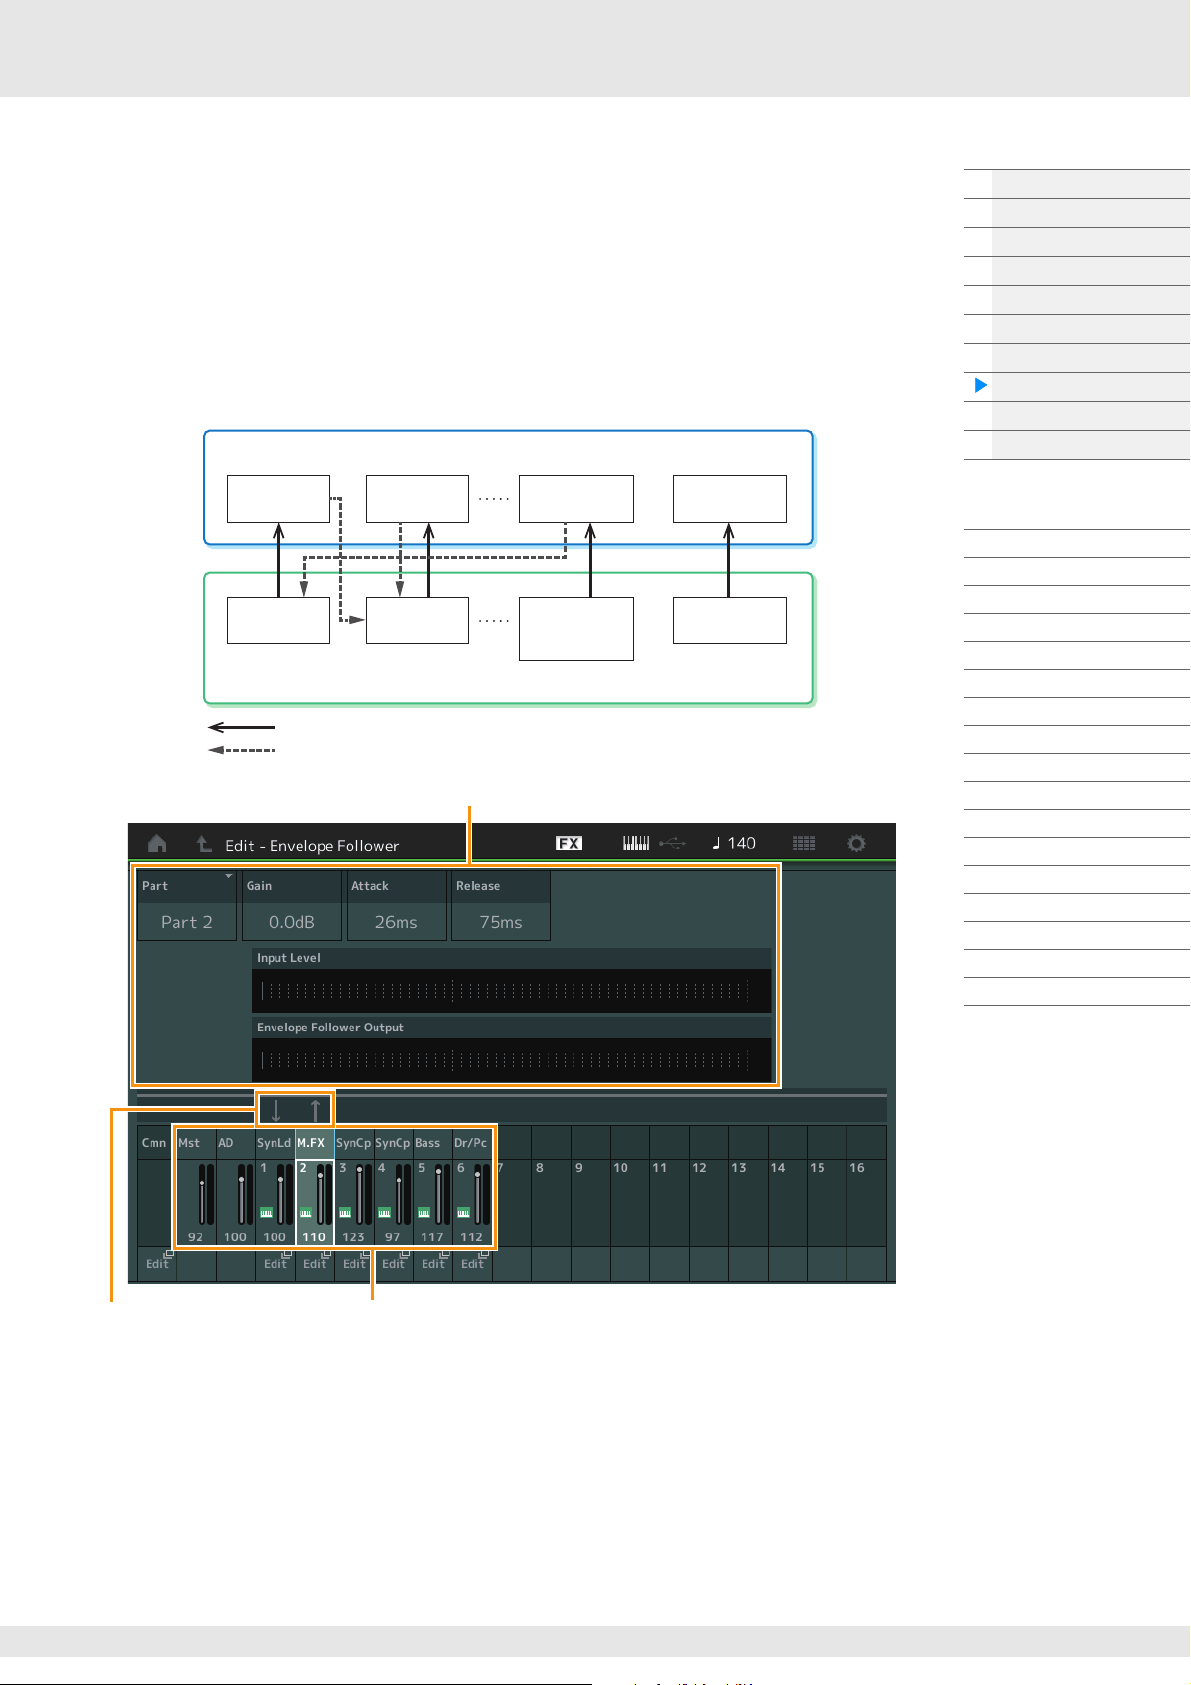
Envelope Follower Block
EnvFollower 1 EnvFollower 2 EnvFollower MST
EnvFollower AD
Input signal to Envelope Follower (Fixed)
Output signal from Envelope Follower (The Destination is flexible)
Each Envelope Follower
Part 1 Part 2
Entire
Performance
(sixteen Parts and
Audio Part)
Audio Part
Each Input source for Envelope Follower
Selected Envelope Follower
Signal flow of
Envelope Follower
Input sources for
Envelope Follower
Envelope Follower is a function for detecting the envelope of the input signal waveform and modifying
sounds dynamically. This function allows you to control not only Part outputs but also input signals from
external devices connected to the A/D INPUT [L/MONO]/[R] jacks.
The Input source of each Envelope Follower is fixed such as Part 1 for EnvFollower 1, Part 2 for
EnvFollower 2, and the Audio Part for EnvFollower AD. However, the signal output from each Envelope
Follower can be another “input source” for any desired destination such as each Part or even the entire
Performance. For example, you can modify the sound of Part 2 by using the Envelope Follower for Part 1
(EnvFollower 1) as the “Source.” The Envelope Follower as the “Source” and the target parameter to be
controlled by the Envelope Follower (which is called “Destination”) are set in the Control Assign display
(page 138).
Basic Structure
Functional blocks
Tone Generator block
A/D Input block
Sequencer block
Arpeggio block
Motion Sequencer block
Effect block
Envelope Follower block
Controller block
Internal Memory
Reference
Display (touch panel) config.
Performance Play (Home)
Motion Control
Mixing
Scene
Play/Rec
Smart Morph
DAW Remote
Normal Part (AWM) Edit
Drum Part Edit
Normal Part (FM-X) Edit
Common/Audio Edit
Category Search
Utility
Live Set
iPhone/iPad connection
External MIDI connection
[EDIT] Common/Audio Edit [Audio In] [Routing] “Envelope Follower” (EnvFollower AD)
[EDIT] Common/Audio Edit [Effect] [Routing] “Envelope Follower” (EnvFollower MST)
[EDIT] Part selection Element/Operator [Common] [Effect] [Routing] “Envelope Follower”
(EnvFollower 1–16)
MODX+ Reference Manual
21
Page 22
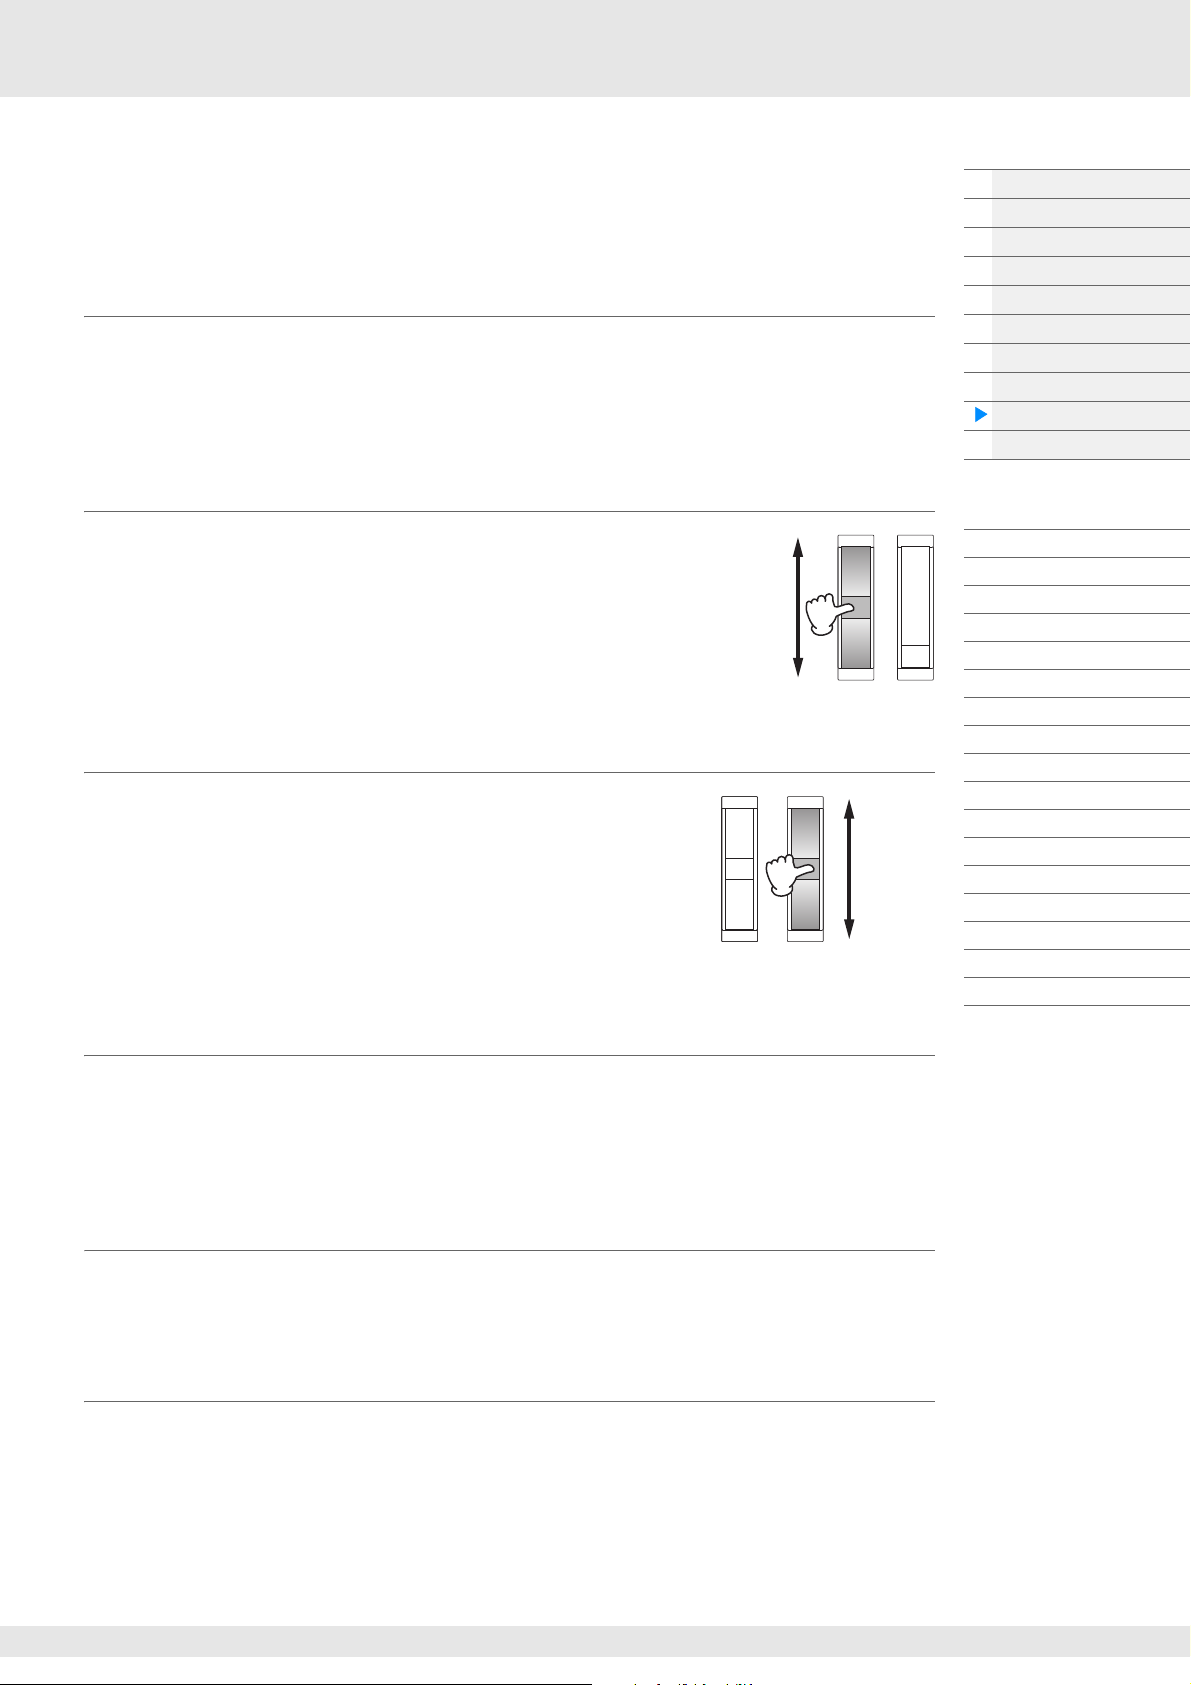
Controller Block
Pitch up
Pitch down
Maximum
Minimum
This block consists of the keyboard, Pitch Bend and Modulation Wheels, Assignable Switches, Knobs,
Control Sliders and Super Knob. By operating these controllers, you can transmit MIDI messages to the
tone generator block to play and modify sounds, or to the DAW software to further control the sounds.
Keyboard
The keyboard transmits the note on/off messages to the Tone Generator Block (for sounding) and
Sequencer Block (for recording). You can change the note range of the keyboard in octaves by using the
OCTAVE [−]/[+] buttons, transpose the notes by using the OCTAVE [−]/[+] buttons while holding down the
[SHIFT] button, and set how the actual velocity is generated according to the strength with which you play
notes.
Basic Structure
Functional blocks
Tone Generator block
A/D Input block
Sequencer block
Arpeggio block
Motion Sequencer block
Effect block
Envelope Follower block
Controller block
Internal Memory
Pitch Bend wheel
Use the Pitch Bend wheel to bend notes up (roll the wheel away from
you) or down (roll the wheel toward you) while playing the keyboard.
Roll the wheel upward/downward to bend the pitch upward/downward.
This wheel is self-centering and will automatically return to normal pitch
when released. The Pitch Bend Range setting can be changed in Part
Edit [Part Settings] [Pitch] (page 106). Functions other than Pitch
Bend can be assigned to the Pitch Bend wheel in the Part Edit
[Mod/Control] [Control Assign] (page 138, page 192).
Modulation wheel
Even though the Modulation wheel is conventionally used to apply
vibrato to the sound, many of the preset Performances have other
functions and effects assigned to the wheel.
The more you move this wheel up, the greater the effect that is applied
to the sound. To avoid accidentally applying effects to the current
Performance, make sure the Modulation wheel is set to minimum
before you start playing. Various functions can be assigned to the
Modulation wheel in Part Edit [Mod/Control] [Control Assign]
(page 138, page 192).
Assignable Switches
Reference
Display (touch panel) config.
Performance Play (Home)
Motion Control
Mixing
Scene
Play/Rec
Smart Morph
DAW Remote
Normal Part (AWM) Edit
Drum Part Edit
Normal Part (FM-X) Edit
Common/Audio Edit
Category Search
Utility
Live Set
iPhone/iPad connection
External MIDI connection
According to the XA (Expanded Articulation) Control settings (page 6) in Element Edit [Osc/Tune]
(page 145), you can call up specific Elements of the current Part by pressing each of these buttons during
your keyboard performance. You can select how the on/off status of these buttons is switched in Common/
Audio Edit [General] (page 198). Furthermore, you can assign various functions (other than calling up
specific Elements) to these buttons in Part Edit [Mod/Control] [Control Assign] (page 138, page 192).
Knobs and Control Sliders
These knobs and sliders let you change various aspects of the Part’s sound in real time—while you play.
For instructions on using the knobs and control sliders, see the Owner’s Manual. For instructions on using
the Knobs 1–4 (5–8), see “Quick Edit” (page 36).
Super Knob
The Super Knob lets you simultaneously control the parameters common to all Parts (Assign 1–8) which
are assigned to the eight knobs. For instructions on using the Super Knob, see the Owner’s Manual. For
the editable setting values for the Super Knob, see the Super Knob display (page 46). Also, for instructions
on setting the Assign 1–8 controls, see the Control Assign display (page 205) for the Common/Audio Edit.
MODX+ Reference Manual
22
Page 23
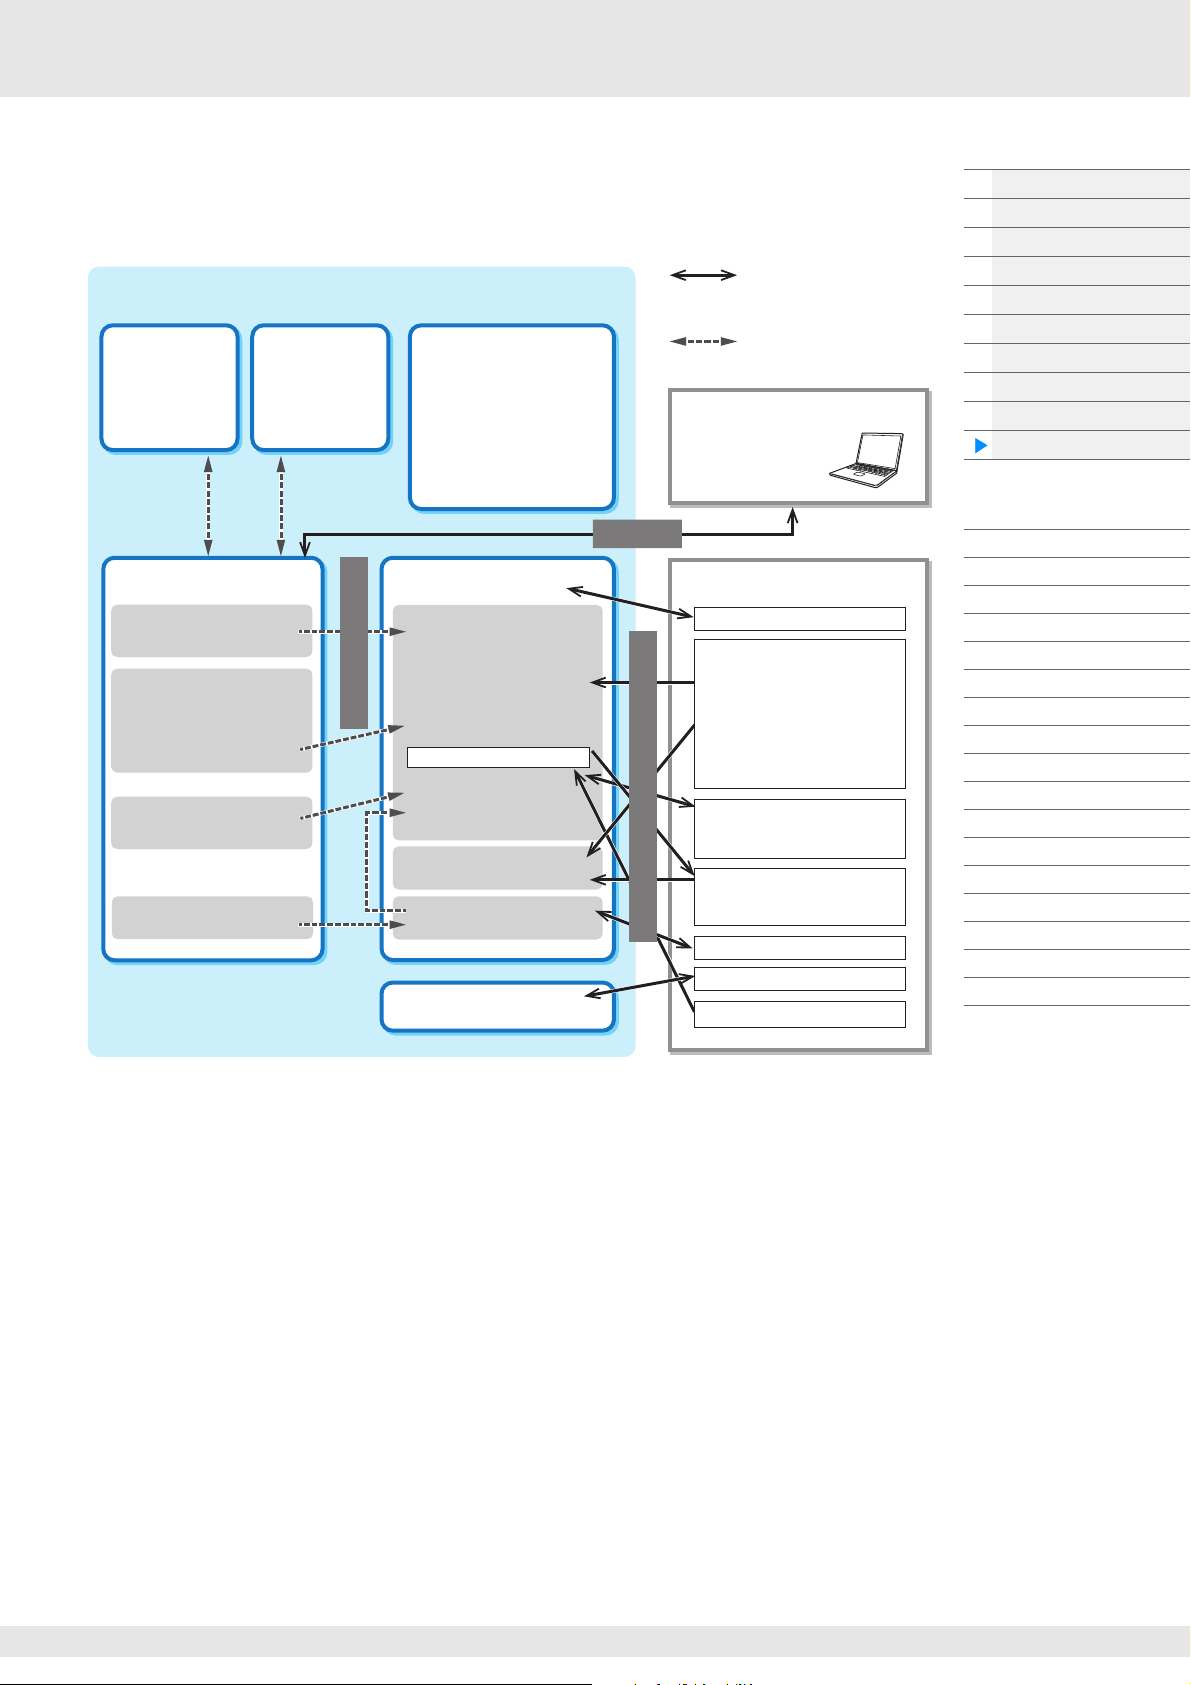
Internal Memory
Internal Memory
Recall
Buffer
Excluding
Master and
Utility settings
Preset Memory
• Preset Performance
• Arpeggio
• Motion Sequence
• Audition Phrase
•Waveform
•Live Set
•Curve
•Micro Tuning
Edit Buffer
• Performance Edit
• Motion Sequence Edit
• User Curve Edit
• Live Set Edit
• User Micro Tuning Edit
•User Waveform Edit
• Utility
• Quick Setup
• Song
User Memory
For User
• User Performance
• User Arpeggio
• User Motion Sequence
•User Curve
•User Live Set
• User Micro Tuning
•User Waveform
•Utility
• Quick Setup
• User Audition Phrase
Store (executed by
using store button)
For Library*
Song
Audio Record/Playback
Data communication
between this synthesizer
and an external device
Internal data communication
MIDI instrument or computer
DAW soft wa re
Bulk Dump
Load/Save
USB flash drive
MOTIF XF format
File extensions “.X3A,” “.X3V,”
“.X3G,” and “.X3W”
MOTIF XS format
File extensions “.X0A,” “.X0V,”
“.X0G,” and “.X0W”
MOXF format
File extensions “.X6A,” “.X6V,”
“.X6G,” and “.X6W”
File extension “.X8U”
MONTAGE format
File extension “.X7U”
File extensions “.MID”
File extensions “.WAV”
File extensions “.WAV” “.AIF”
Compare
Buffer
Excluding
Master and
Utility settings
File extension “.X8A”
File extensions “.X8L”
MONTAGE format
File extension “.X7L”
The MODX+ creates a variety of different kinds of data, including Performances, Live Sets, and Songs.
This section describes how to maintain the various types of data and use the memory devices/media for
storing them.
* Same as the “For User” area except followings: It does not include the Utility settings and the Quick Setup. Also, included Live Set is only
one Bank for each imported file.
Basic Structure
Functional blocks
Tone Generator block
A/D Input block
Sequencer block
Arpeggio block
Motion Sequencer block
Effect block
Envelope Follower block
Controller block
Internal Memory
Reference
Display (touch panel) config.
Performance Play (Home)
Motion Control
Mixing
Scene
Play/Rec
Smart Morph
DAW Remote
Normal Part (AWM) Edit
Drum Part Edit
Normal Part (FM-X) Edit
Common/Audio Edit
Category Search
Utility
Live Set
iPhone/iPad connection
External MIDI connection
Preset Memory
Preset Memory is memory designed specifically for reading out data such as Preset Performance,
Arpeggio, and Audition Phrase. You cannot overwrite the data in Preset Memory.
Edit buffer
The edit buffer is the memory location for edited data of these types: Performance, Live Set, and Song.
Although the edit buffer is designed specifically for data writing and data reading, the data contained in
the edit buffer is lost when the power is turned off. You should always store edited data to User memory
before editing new performance or before turning off the power. Data other than Performance and Motion
Sequence are automatically stored.
User memory
User data edited in the Edit buffer and utility settings for the entire system are stored in the dedicated area
in the User memory. Up to eight Library files (.X8L) read from the USB flash drive are loaded in the
dedicated area in the User memory.
This is read-write memory and the data will be kept even after the power is turned off.
MODX+ Reference Manual
23
Page 24
Recall buffer and Compare buffer
If you’ve selected another Performance without storing the one you were editing, you can recall your
original edits, since the edit buffer’s contents are stored on backup memory, called the Recall buffer. Also,
the instrument has a Compare buffer in which the sound settings prior to editing will temporarily be
reinstated for comparison purposes. You can switch between the just-edited sound and its unedited
condition, and hear how your edits affect the sound. Both of these are read-write memory types. However,
you should make sure to store the sequence data before turning off the power, because any sequence
data you’ve created will be lost when the power is turned off. For instructions on using the Compare
function, see the Owner’s Manual.
Basic Structure
Functional blocks
Tone Generator block
A/D Input block
Sequencer block
Arpeggio block
Motion Sequencer block
Effect block
Envelope Follower block
Controller block
Internal Memory
Reference
Display (touch panel) config.
Performance Play (Home)
Motion Control
Mixing
Scene
Play/Rec
Smart Morph
DAW Remote
Normal Part (AWM) Edit
Drum Part Edit
Normal Part (FM-X) Edit
Common/Audio Edit
Category Search
Utility
Live Set
iPhone/iPad connection
External MIDI connection
MODX+ Reference Manual
24
Page 25
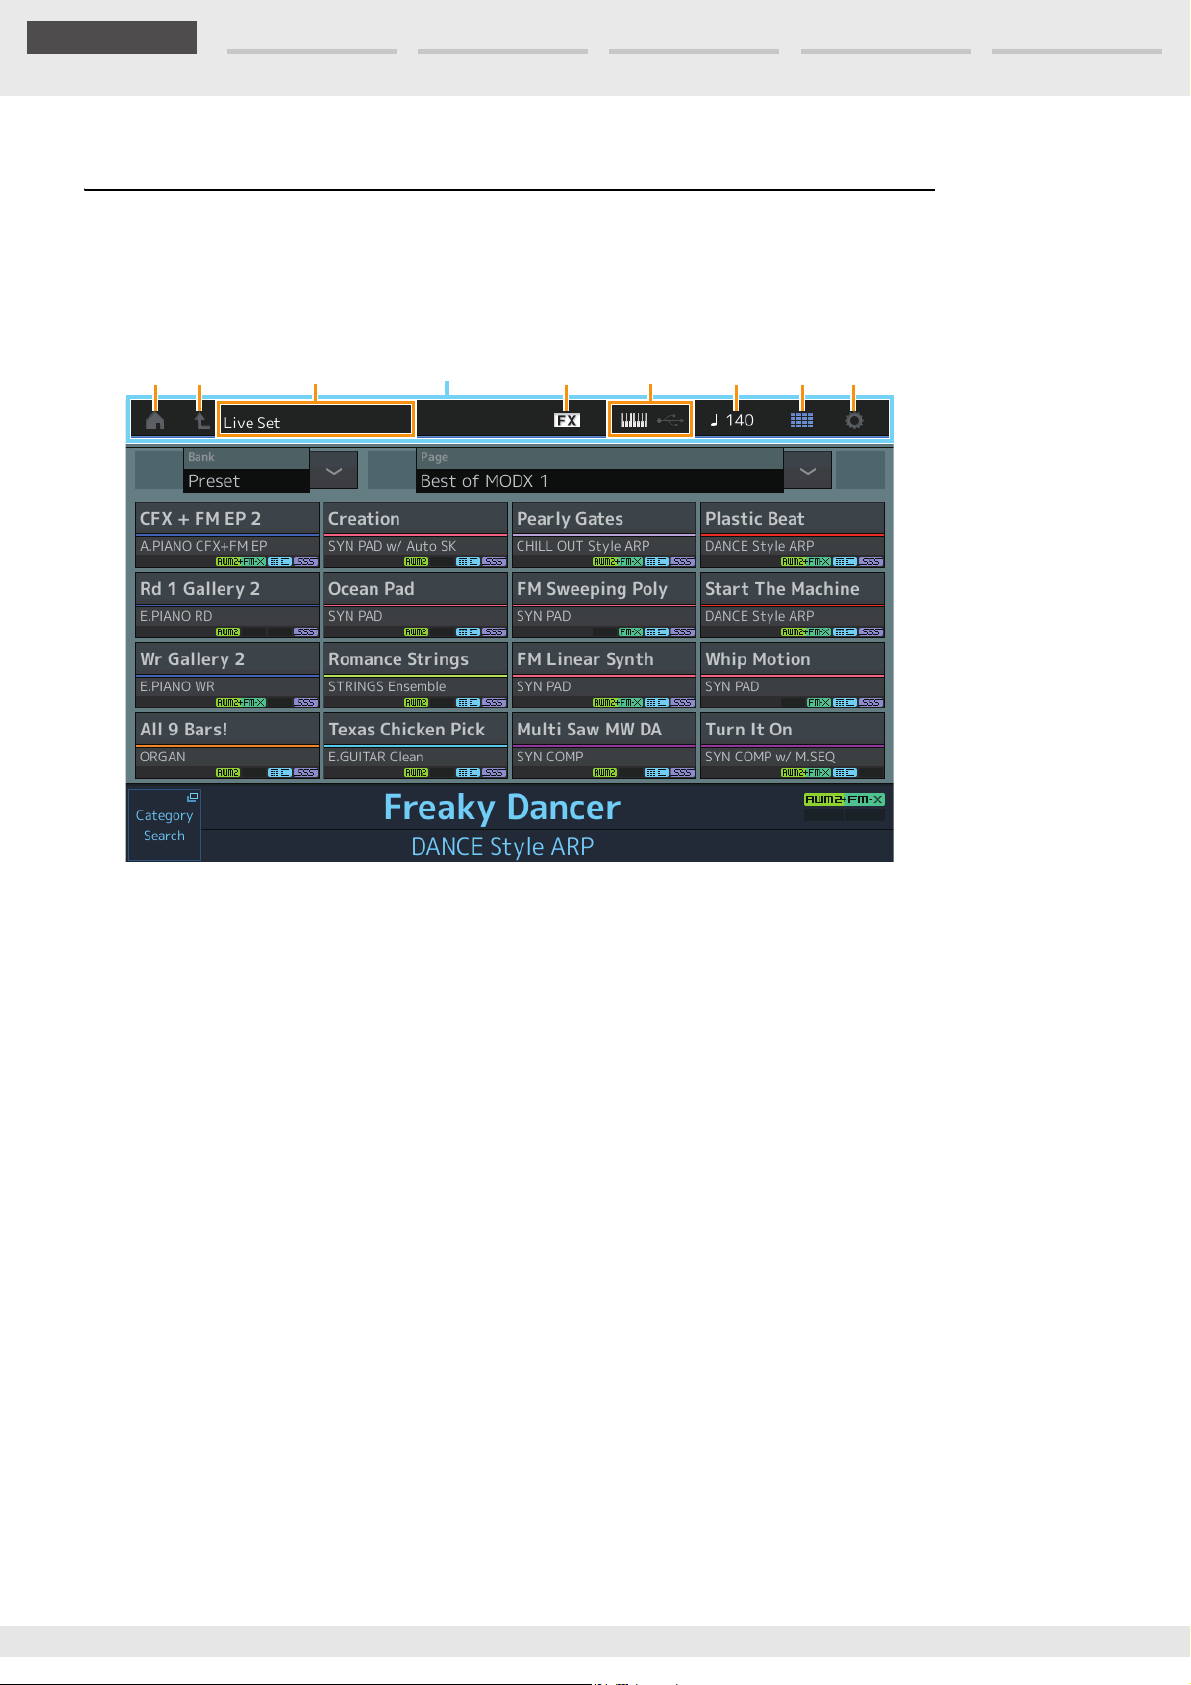
Edit Search Utility Live SetPerformance
Reference
12 4 76835
Navigation bar
Reference
Display (touch panel) configuration
This section explains the navigation bar which is common to all types of displays.
Display (touch panel)
1 HOME icon
Moves to the Performance Play display (page 27).
2 EXIT icon
Functions same as the [EXIT] button on the panel. Press this icon to exit from the current display and
return to the previous level in the hierarchy.
3 [INFORMATION] area
Displays helpful information, including the currently selected display name.
4 EFFECT icon
Touch the icon to call up the Effect Switch display (page 252). The icon turns off when any of the Effect
blocks (Insertion, System or Master) is off.
5 QUICK SETUP icon
Displays the settings of Local Control ON/OFF and MIDI IN/OUT.
The keyboard-shaped icon lights up when Local Control is set to ON and turns off when Local Control
is set to OFF.
When MIDI is set as the MIDI IN/OUT setting, a MIDI connector-shaped icon appears. When USB is set
as the MIDI IN/OUT setting, a USB connector-shaped icon appears. Touch the desired icon to call up
the corresponding Quick Setup display (page 229).
6 TEMPO SETTINGS icon
Displays the tempo of the currently selected Performance. Touch the icon to call up the Tempo Settings
display (page 250).
7 LIVE SET icon
Touch the icon to call up the Live Set display (page 255).
8 UTILITY icon
Touch the icon to call up the last opened display among the Utility displays.
MODX+ Reference Manual
25
Page 26
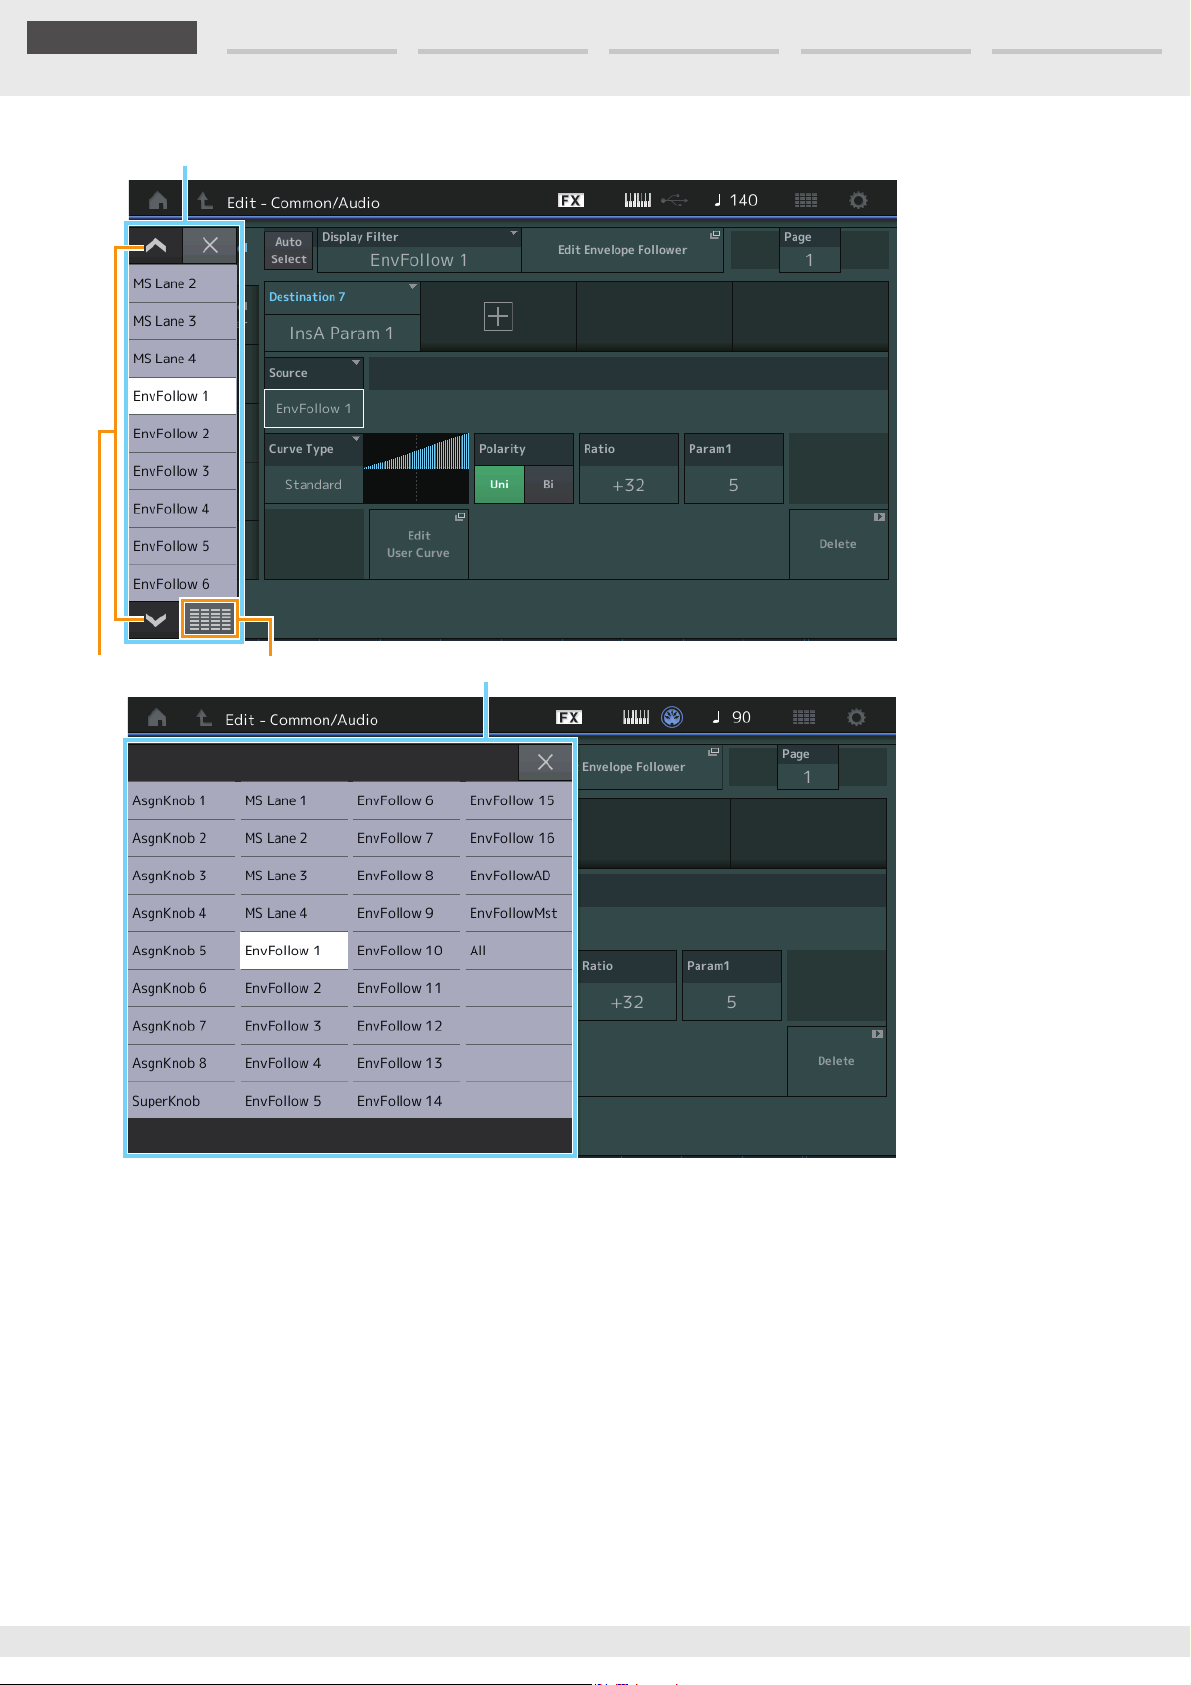
Edit Search Utility Live SetPerformance
Reference
9
Scroll buttons
Display All
Display All button
Display (touch panel)
9 Pop-up List
Displays setting values for parameters. When the setting values are displayed in multiple pages, you
will need to use the Scroll buttons to scroll through the pages or the Display All button to display all of
the setting values.
MODX+ Reference Manual
26
Page 27
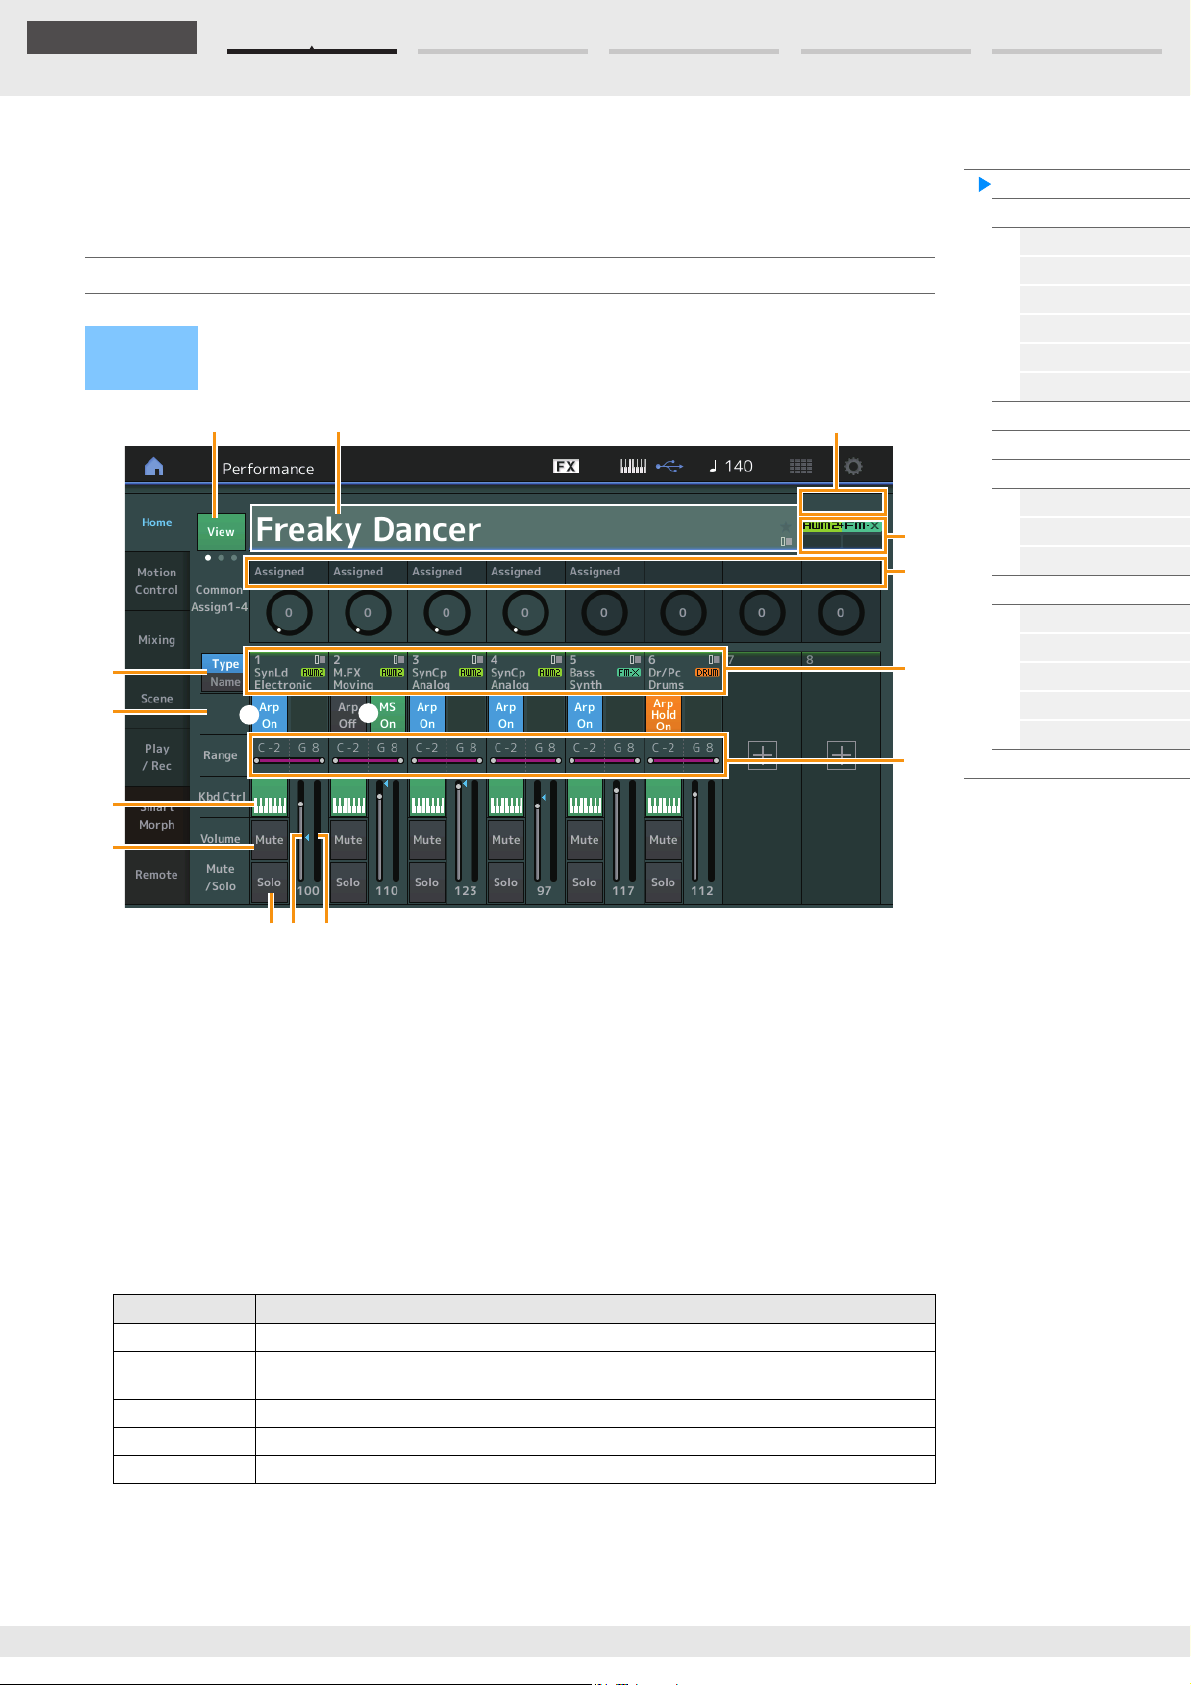
Edit Search Utility Live SetPerformance
Reference
1^ 2
3
4
6
)
5
7
!
@
#$ %
9
8
Performance Play (Home)
From the Performance Play display you can play a selected Performance and edit some of the
Performance-related settings.
Home
Press the [PERFORMANCE (HOME)] button
Operation
or
Touch the [HOME] icon
Performance
Home
Motion Control
Overview
Quick Edit
Arpeggio
Motion Seq
Super Knob
Knob Auto
Mixing
Scene
Play / Rec
MIDI
Audio
Pattern
Smart Morph
Play
Edit
Analyze
Super Knob
Job
Remote
1 Performance name
Indicates the currently selected Performance name. Touching the parameter calls up the menu for
Category Search, Edit, and Recall.
NOTE Once you edit any parameter in the selected Performance, a blue flag icon appears at right in the
Performance Name.
2 Part indicator
When the cursor is on the Performance name or on Parts 1–8, this indicates whether Parts 9–16 are
used or not.
When the cursor is on Parts 9–16, it indicates whether Parts 1–8 are used or not. If Parts 9–16 are not in
use, this indicator is not shown.
3 Flag
Indicates the tone generation attributes of the currently selected Performance. (See chart below.)
Flag Definition
AWM2 Performance comprised only of AWM2 Parts
FM-X Performance comprised only of FM-X Parts
AWM2+FM-X Performance comprised of both AWM2 and FM-X Parts
MC Performance featuring Motion Control
SSS Performance featuring Seamless Sound Switching
(A two-color display indicates that the Performance has Smart Morph data.)
4 Knob functions
Indicates the functions currently assigned to the Knobs 1–4 (5–8).
MODX+ Reference Manual
27
Page 28
Edit Search Utility Live SetPerformance
Reference
5 Type/N a me Switch
Switches between the displays of Part Type/Category and Part Name.
Settings: Ty p e, Nam e
6 Part Types / Par t Names
Indicates the Part types and categories or the Part names.
Touching the parameter calls up the menu for Category Search, Edit, and Copy.
To add another Part, touch the “+” icon.
7 Common Motion Sequencer switch
Determines whether the Motion Sequencer of the Common/AD Parts is on or off. When all Lane
switches of the Common/AD Parts are off, this switch is not shown.
Settings: Off, On
8 Part Arpeggio On/Off switch
Determines whether the Arpeggio of each Part is on or off. When the Arpeggio and the Arpeggio Hold
are set to on, “Arp Hold On” is displayed.
NOTE You can turn the Arpeggio Hold for the Part on or off by simultaneously holding down the [SHIFT] button and
touching this switch.
Settings:
Off, On
9 Part Motion Sequencer switch
Determines whether the Motion Sequencer of each Part is on or off. When all Lane switches of the Part
are off, this switch is not shown.
Settings: Off, On
) Note Limit
Determines the lowest and highest notes in the Part’s note range. For example, setting a Note Limit of
“C5–C4” lets you hear the Part by playing notes in the two ranges of C-2 to C4 and C5 to G8; notes
played between C4 and C5 have no sound. For details about the Note Limit setting, see the Owner’s
Manual.
Settings: C -2 – G8
Performance
Home
Motion Control
Overview
Quick Edit
Arpeggio
Motion Seq
Super Knob
Knob Auto
Mixing
Scene
Play / Rec
MIDI
Audio
Pattern
Smart Morph
Play
Edit
Analyze
Super Knob
Job
Remote
! Keyboard Control switch
Determines whether the Keyboard Control for each Part is on or off. When this switch is set to off, the
Part will not sound even you play the keyboard (unless the Part is selected).
Settings: Off, On
@ Switching Mute on/off for Parts
Determines whether the Mute for each Part is on or off.
Settings: Off, On
# Switching Solo on/off for Parts
Determines whether the Solo for each Part is on or off.
Settings: Off, On
$ Volume of Parts
Determines the Volume for the Part.
Settings: 0–127
NOTE When the triangle marks for the Volume are shown in blue, the volume change created by the control sliders
is not reflected to the overall sound. When the value changed by the control slider reaches the value shown
as a blue triangle, the triangle mark changes to white, and the volume change created by the control sliders
are reflected to the overall sound.
% Meter
Indicates the audio output level of the Part.
MODX+ Reference Manual
28
Page 29
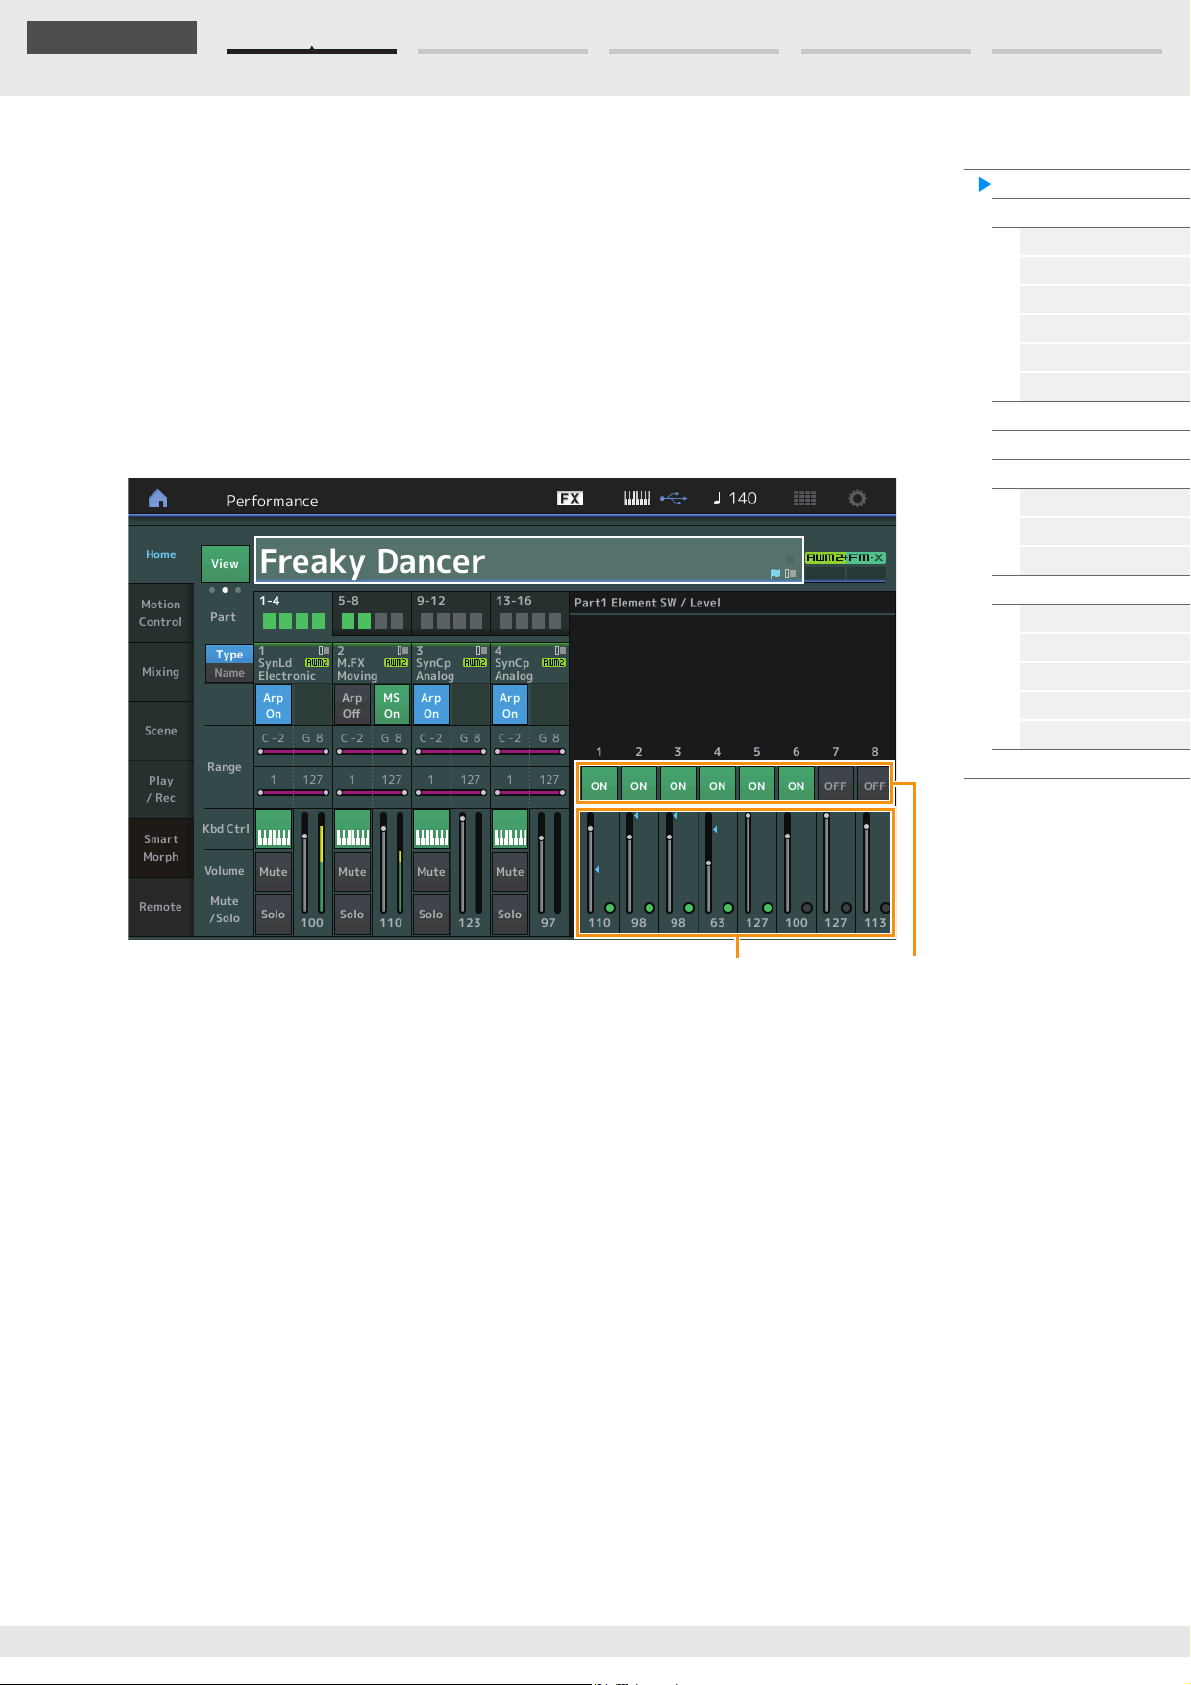
Edit Search Utility Live SetPerformance
Reference
Element SwitchElement Level
^ View
Switches among the following three different View types of Part information: 1 (eight Parts), 2 (four Parts
and various detailed information), 3 (four Parts and Smart Morph map). In View type 2, displayed
information items differs depending on the cursor position or the Control function settings.
Settings: 1–3
NOTE When the cursor is on the Performance name on the Performance Play (Home) display, you can also switch
the information views by pressing the [PERFORMANCE (HOME)] button.
This section explains about the various displays when View is set to 2 (four Parts and various detailed
information).
Element view
This appears only when the currently selected Part is the Normal Part (AWM2), and Motion Control
Overview Slider Function [Elem/Op Control] button is ON.
Performance
Home
Motion Control
Overview
Quick Edit
Arpeggio
Motion Seq
Super Knob
Knob Auto
Mixing
Scene
Play / Rec
MIDI
Audio
Pattern
Smart Morph
Play
Edit
Analyze
Super Knob
Job
Remote
Element SW (Element switch)
Determines whether each Element is active or not.
Settings: Off, On
Element Level
Determines the output level of the Element.
Settings: 0–127
MODX+ Reference Manual
29
Page 30
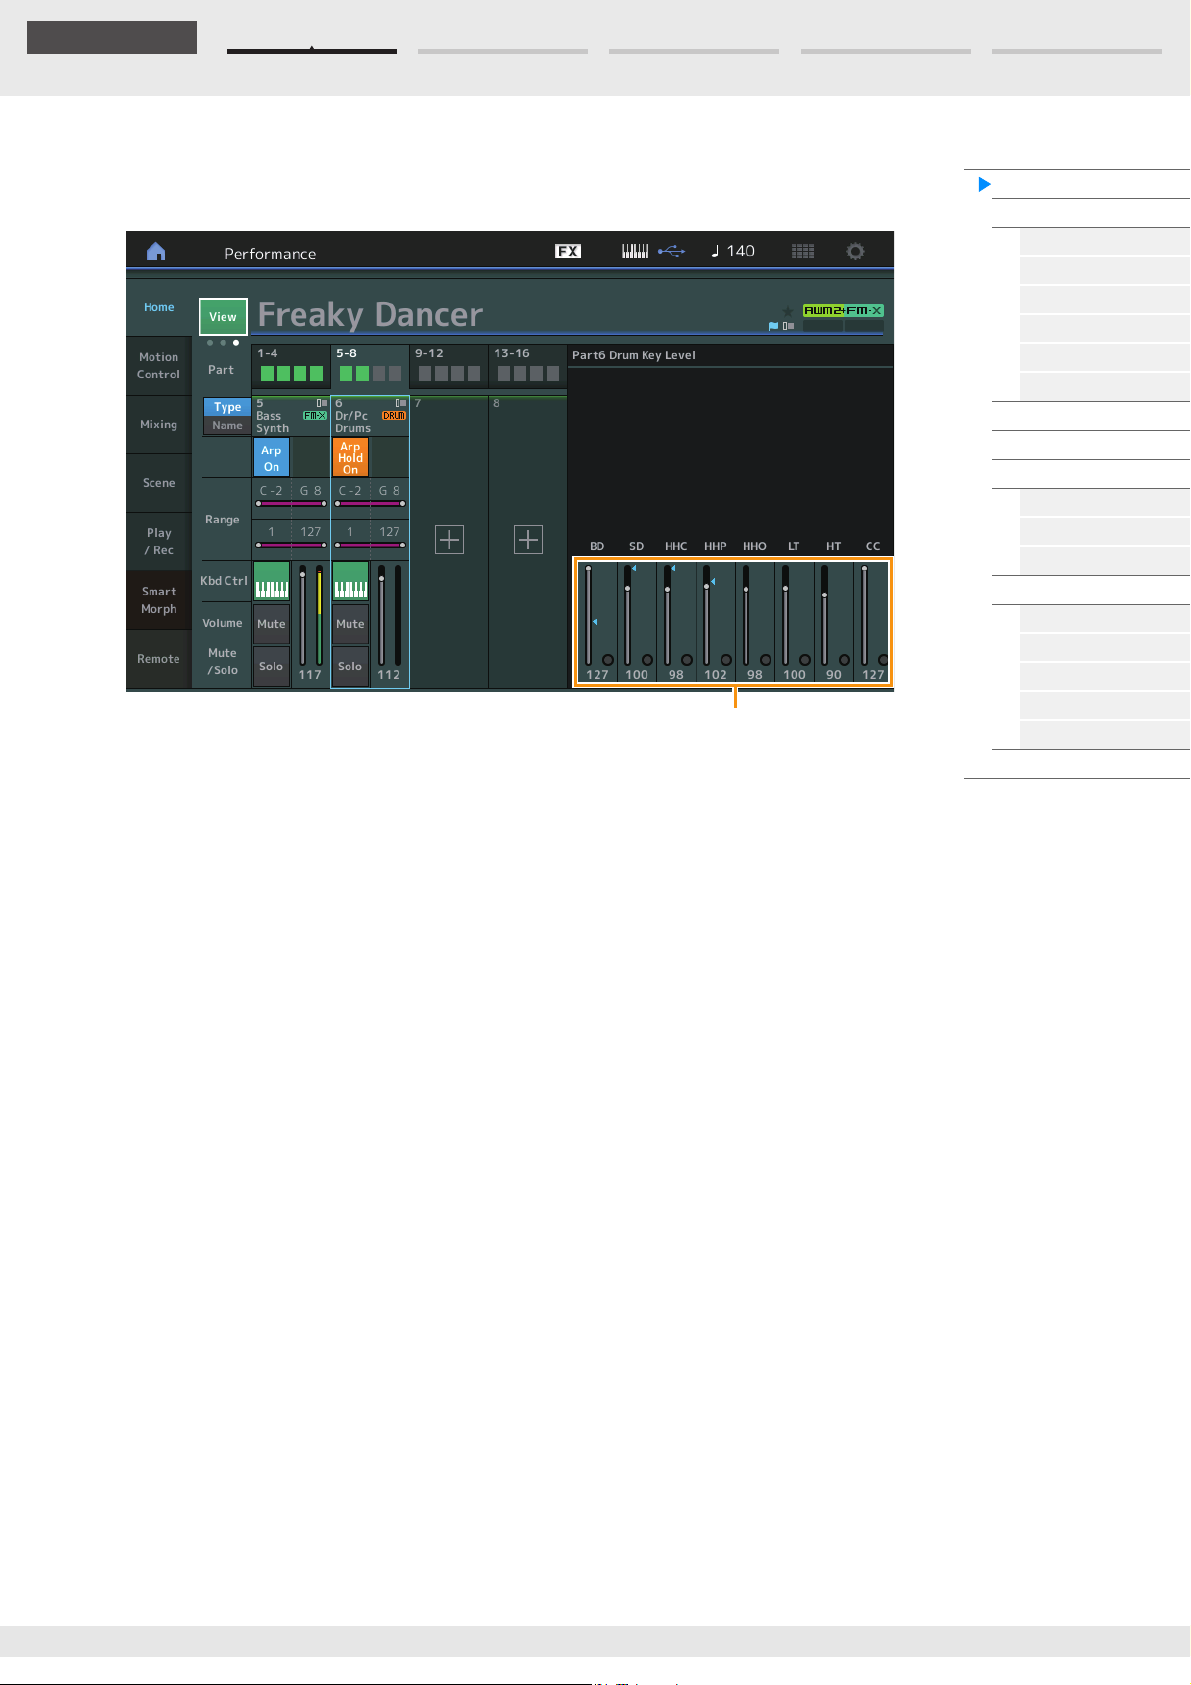
Edit Search Utility Live SetPerformance
Reference
Drum Key Level
Drum Key view
This appears only when the currently selected Part is the Drum Part, and Motion Control Overview
Slider Function [Elem/Op Control] button is ON.
Drum Key Level
Determines the output level of the Drum Key.
Settings: 0–127
Performance
Home
Motion Control
Overview
Quick Edit
Arpeggio
Motion Seq
Super Knob
Knob Auto
Mixing
Scene
Play / Rec
MIDI
Audio
Pattern
Smart Morph
Play
Edit
Analyze
Super Knob
Job
Remote
MODX+ Reference Manual
30
Page 31
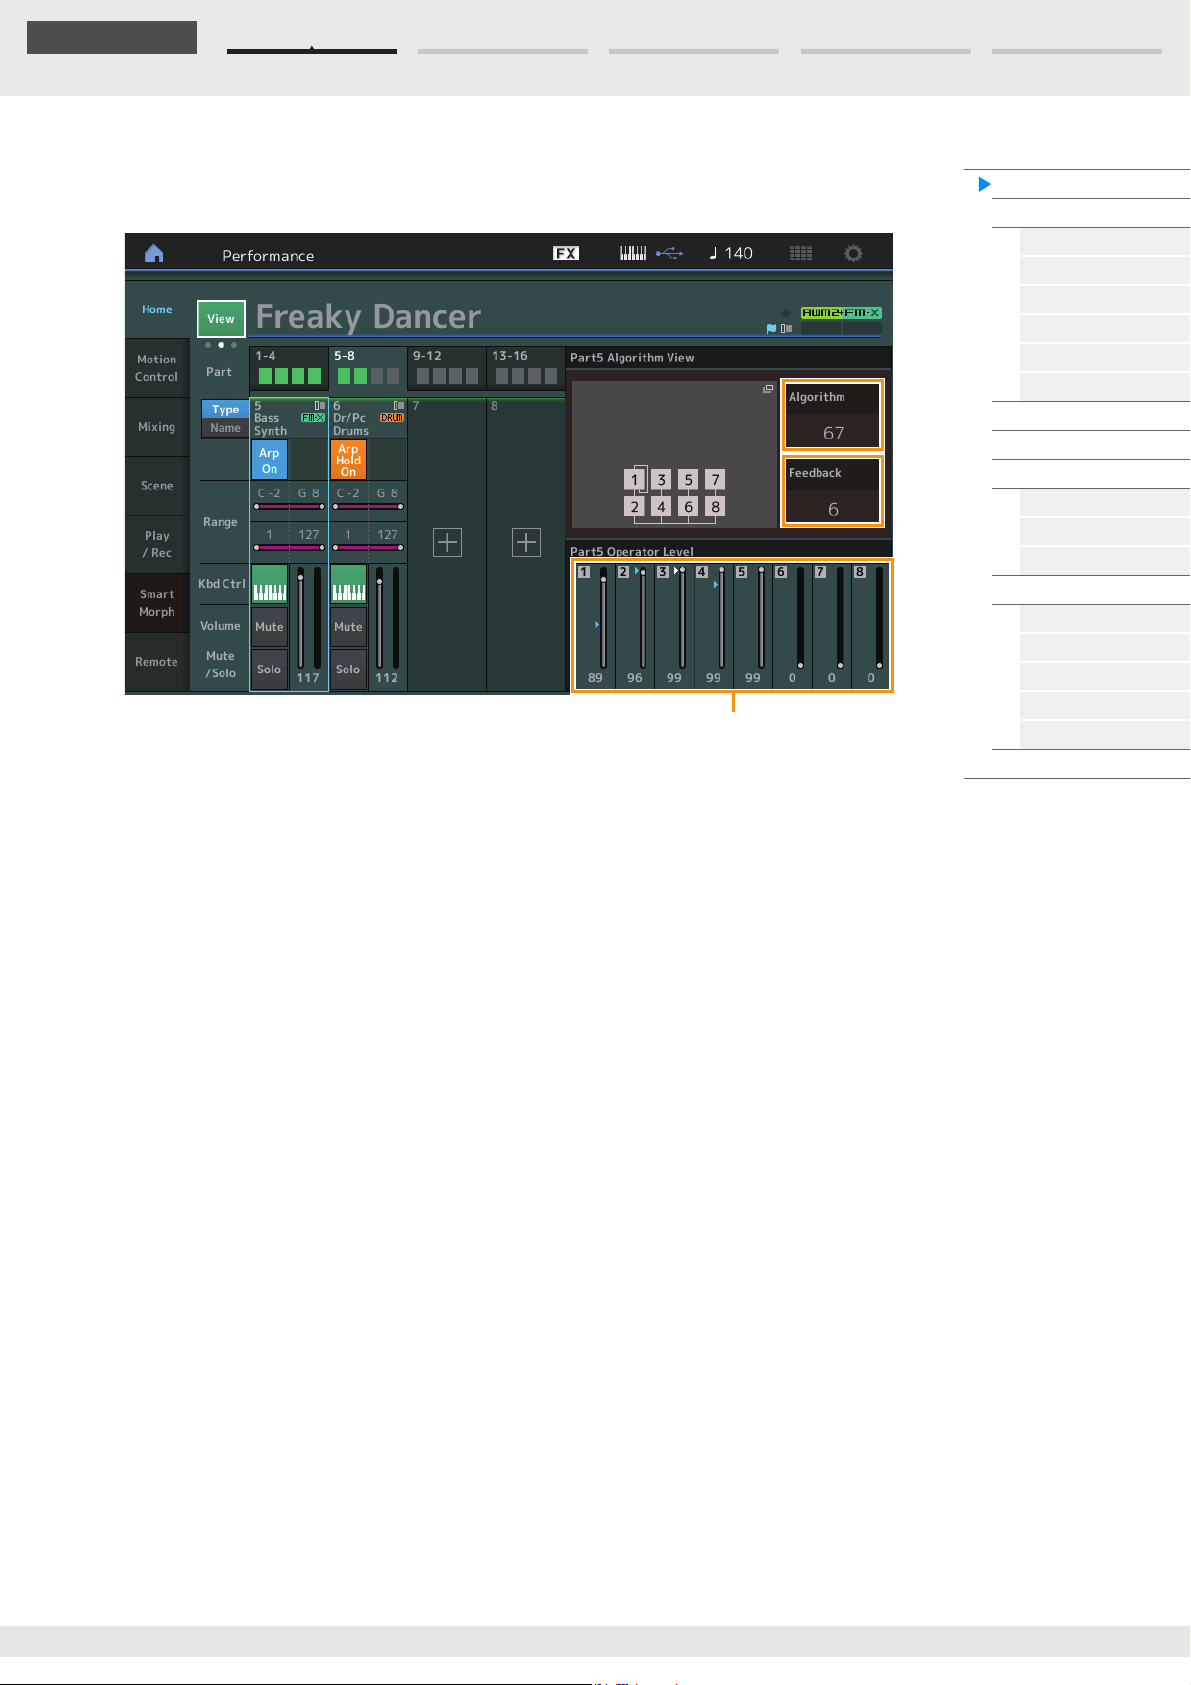
Edit Search Utility Live SetPerformance
Reference
Operator Level
Algorithm view
This appears only when the currently selected Part is the Normal Part (FM-X), and Motion Control
Overview Slider Function [Elem/Op Control] button is ON.
Algorithm (Algorithm Number)
Changes Algorithms.
Settings: See the Data List PDF document.
NOTE Tapping the Algorithm image calls up the Algorithm Search display.
Performance
Home
Motion Control
Overview
Quick Edit
Arpeggio
Motion Seq
Super Knob
Knob Auto
Mixing
Scene
Play / Rec
MIDI
Audio
Pattern
Smart Morph
Play
Edit
Analyze
Super Knob
Job
Remote
Feedback (Feedback Level)
Waveforms can be changed by feeding some of the signal generated by an operator back through that
operator. This allows you to set the feedback level.
Settings: 0–7
Operator Level
Determines the output level of the Operator.
Settings: 0–99
MODX+ Reference Manual
31
Page 32
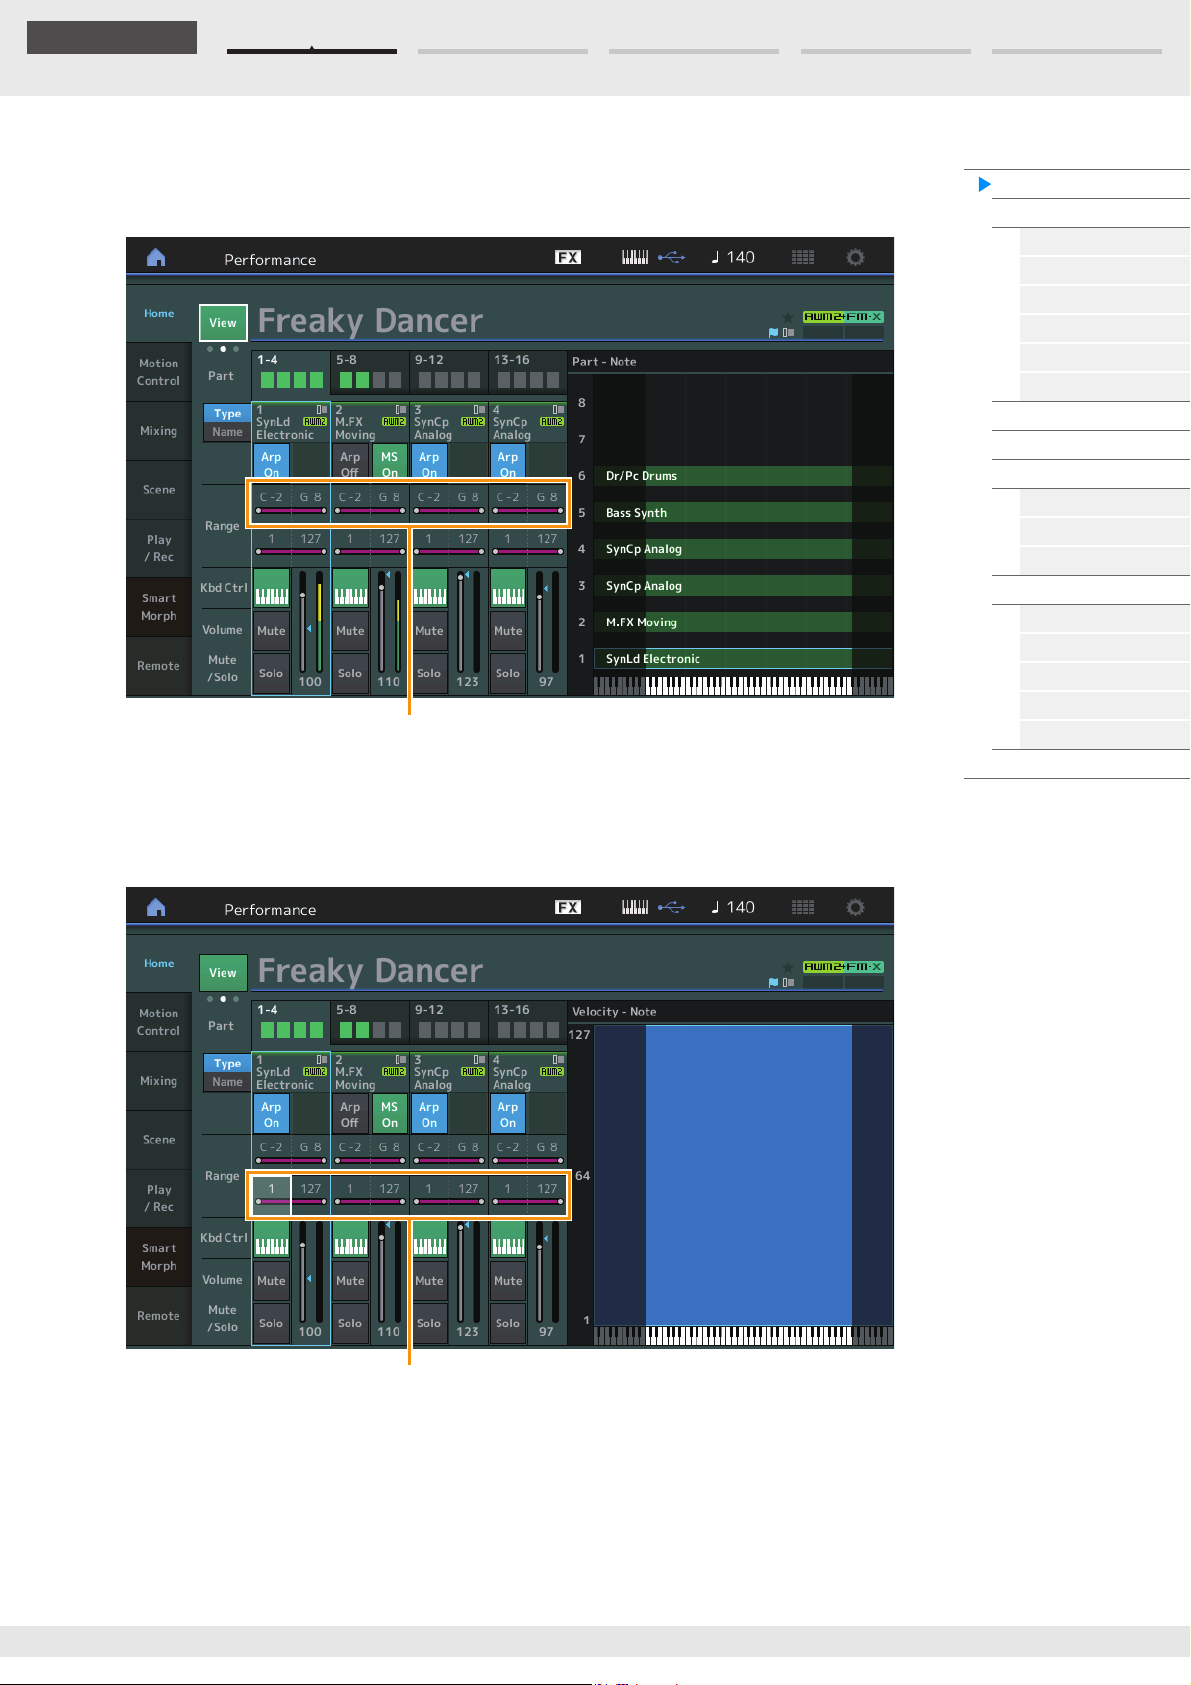
Edit Search Utility Live SetPerformance
Reference
Note Limit
Vel o c i t y L i mit
Part – Note view
This appears only when the [PART CONTROL] button is turned on or the cursor is on the Note Limit. This is
useful for checking the Layer/Split settings among Parts.
Performance
Home
Motion Control
Overview
Quick Edit
Arpeggio
Motion Seq
Super Knob
Knob Auto
Mixing
Scene
Play / Rec
MIDI
Audio
Pattern
Smart Morph
Play
Edit
Analyze
Super Knob
Job
Remote
Velocity – Note view
This appears only when the cursor is on any velocity limit of Parts. This is useful for setting Velocity split
among Parts.
MODX+ Reference Manual
32
Page 33
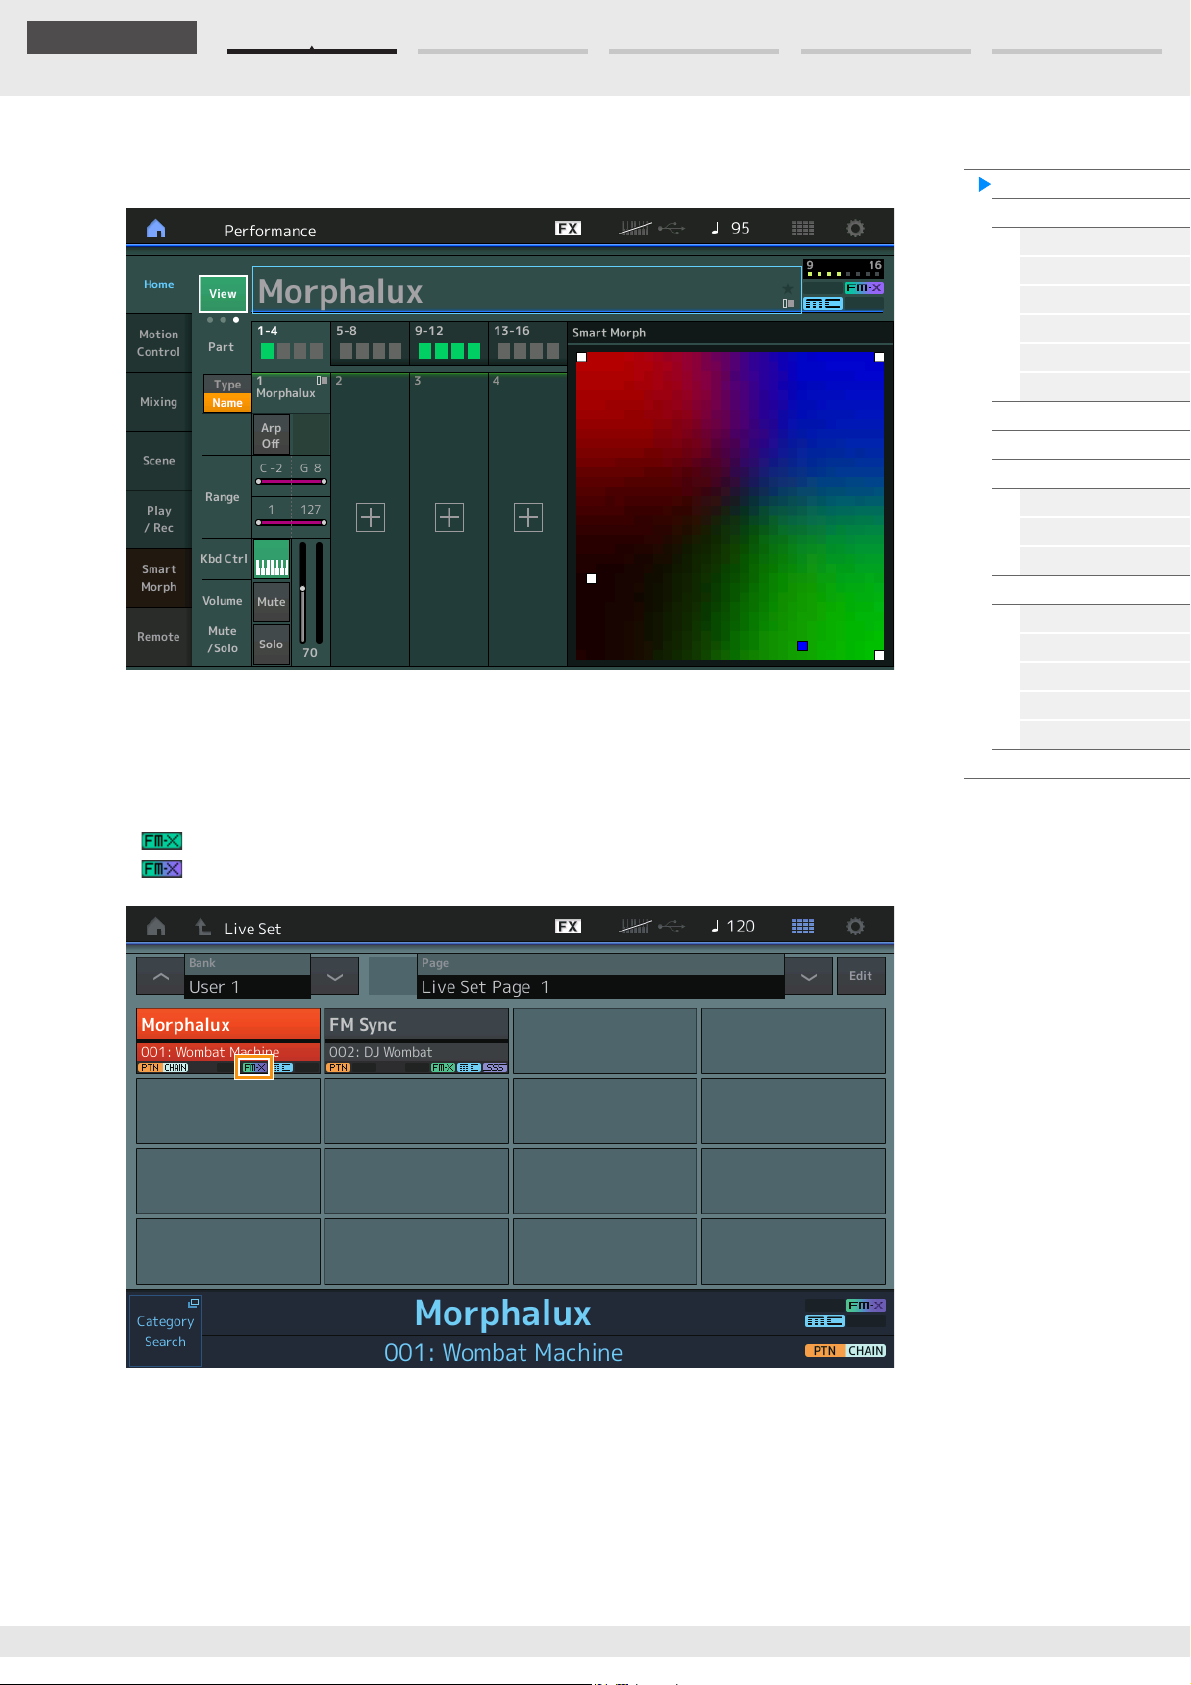
Edit Search Utility Live SetPerformance
Reference
When View is set to 3 (four Parts and Smart Morph map) and the current Performance has Smart Morph
information, the following display is called up.
Touch a position on the map to assign the sound to Part 1.
NOTE When the current Performance does not yet have Smart Morph data, the display is the same as when View is set
to 2.
NOTE On the Live Set display, a special FM-X icon indicates if the assigned Performance has Smart Morph data or
not.
: Displayed for a Performance with an FM-X Part.
: Displayed for a Performance with an FM-X Part and Smart Morph data.
Performance
Home
Motion Control
Overview
Quick Edit
Arpeggio
Motion Seq
Super Knob
Knob Auto
Mixing
Scene
Play / Rec
MIDI
Audio
Pattern
Smart Morph
Play
Edit
Analyze
Super Knob
Job
Remote
MODX+ Reference Manual
33
Page 34
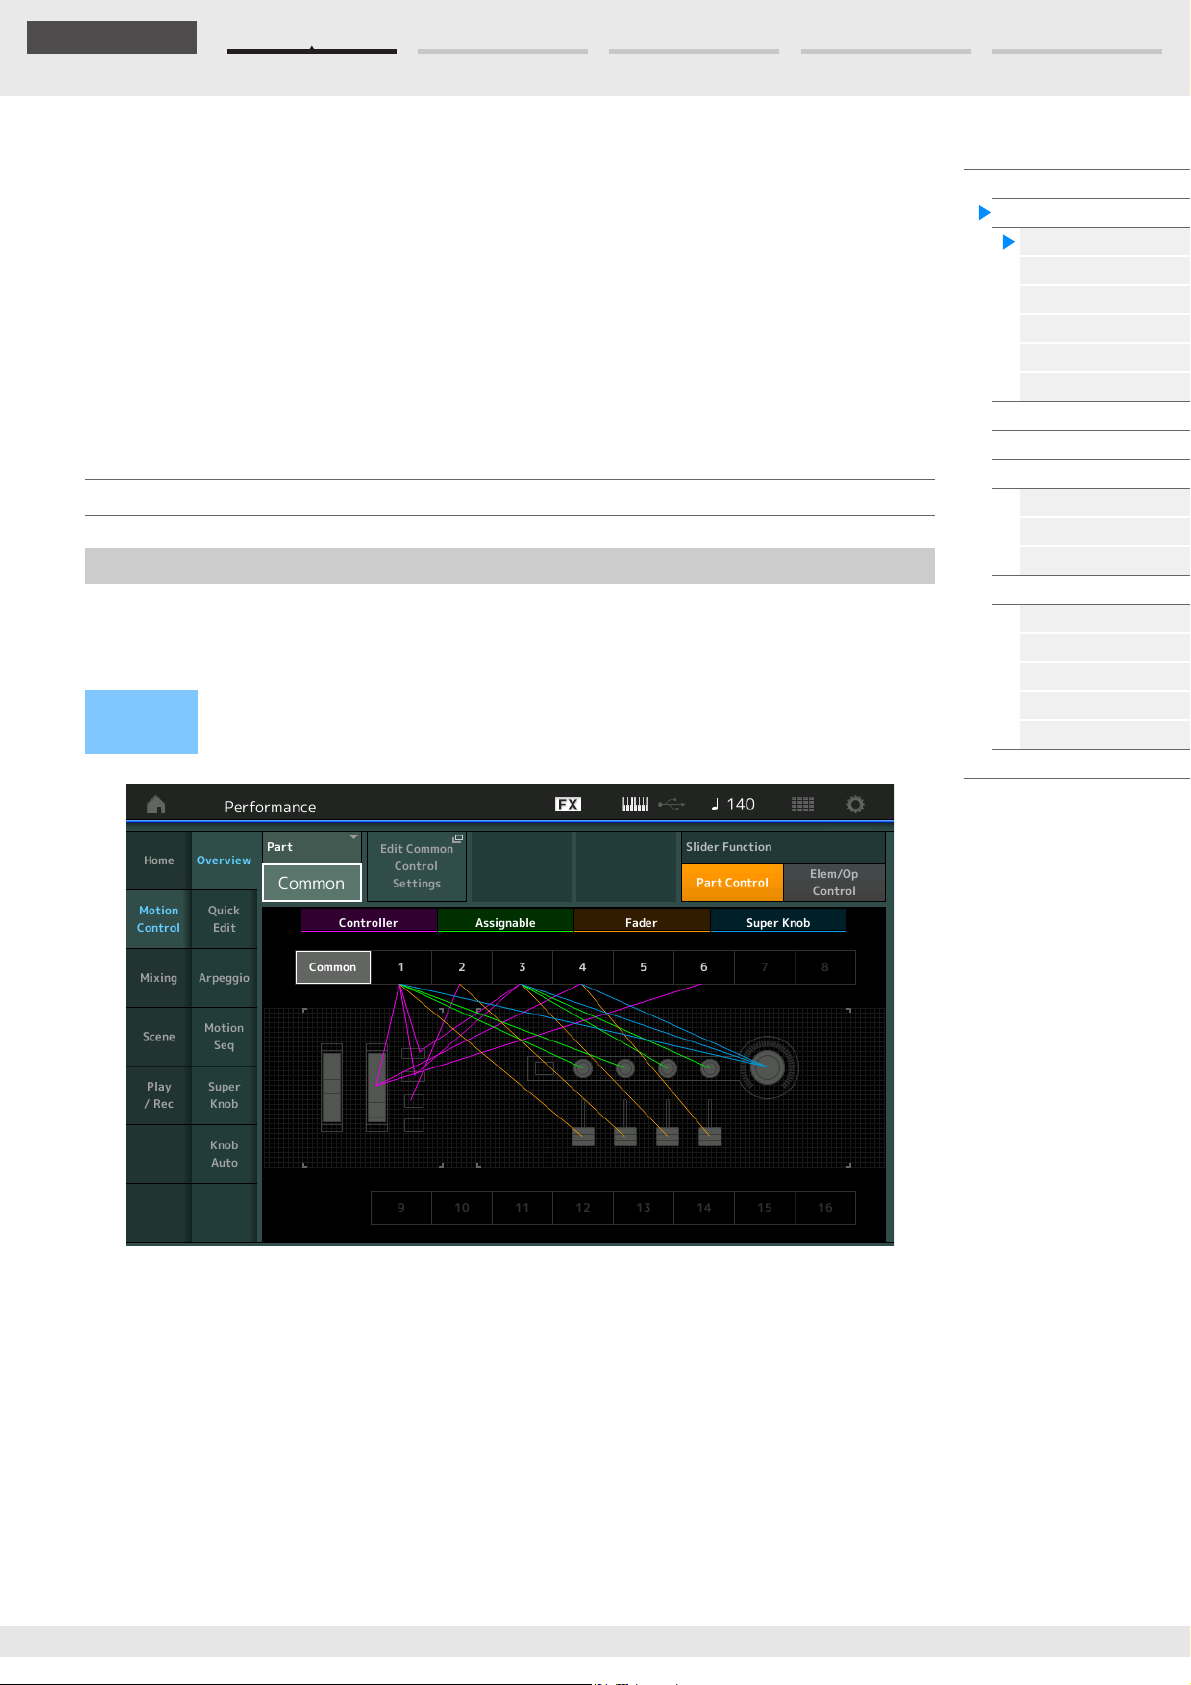
Edit Search Utility Live SetPerformance
Reference
Motion Control
From the Motion Control display you can edit all Motion Control settings, such as general sound settings,
Arpeggio, and the Motion Sequencer of the currently selected Performance.
The Motion Control section contains the following various displays.
• Overview
•Quick Edit
•Arpeggio
• Motion Sequencer
• Super Knob
•Knob Auto
Motion Control
Overview
The Overview display indicates the illustration of the connection between Controllers and Parts. You can
confirm the current settings here.
NOTE Lines between the most recently used controller and Part are shown in bold.
[PERFORMANCE (HOME)] [Motion Control] [Overview]
Operation
or
[SHIFT] + [PERFORMANCE (HOME)]
Performance
Home
Motion Control
Overview
Quick Edit
Arpeggio
Motion Seq
Super Knob
Knob Auto
Mixing
Scene
Play / Rec
MIDI
Audio
Pattern
Smart Morph
Play
Edit
Analyze
Super Knob
Job
Remote
Part
Indicates the currently selected Part. To confirm a Part’s connections, select the Part here.
Settings: Common, Part 1–16
Edit Common Control Settings/Edit Part Control Settings
Calls up the Control Assign display for the selected Part. For “Common,” see page 205. For Part 1–16, see
page 138.
Slider Function
Switches among Performance Control, Part Control, and Element/Operator Control.
Settings: Part Control, Elem/Op Control
NOTE You can store Slider function operations as Performance data.
MODX+ Reference Manual
34
Page 35
Edit Search Utility Live SetPerformance
Reference
Controller
Determines whether or not the illustration of the connection between “Controller” and Part is shown.
The “Controller” here refers to:
• Pitch Bend wheel
• Modulation wheel
• [ASSIGN 1] and [ASSIGN 2] buttons (Assignable switches 1 and 2)
• [MOTION SEQ HOLD] (Motion sequencer Hold) button
• [MOTION SEQ TRIGGER] (Motion sequencer trigger) button
Settings: Off, On
Assignable
Determines whether or not the illustration of the connection between “Assignable” and Part is shown.
The “Assignable” here refers to:
• Assignable Knobs 1–4 (5–8)
Settings: Off, On
Fader
Determines whether or not the illustration of the connection between “Fader” and Part is shown.
The “Fader” here refers to:
• Control sliders 1–4 (5–8 / 9–12 / 13–16)
Settings: Off, On
Super Knob
Determines whether or not the illustration of the connection between “Super Knob” and Part is shown.
The “Super Knob” here refers to:
• Super Knob
Settings: Off, On
Performance
Home
Motion Control
Overview
Quick Edit
Arpeggio
Motion Seq
Super Knob
Knob Auto
Mixing
Scene
Play / Rec
MIDI
Audio
Pattern
Smart Morph
Play
Edit
Analyze
Super Knob
Job
Remote
MODX+ Reference Manual
35
Page 36
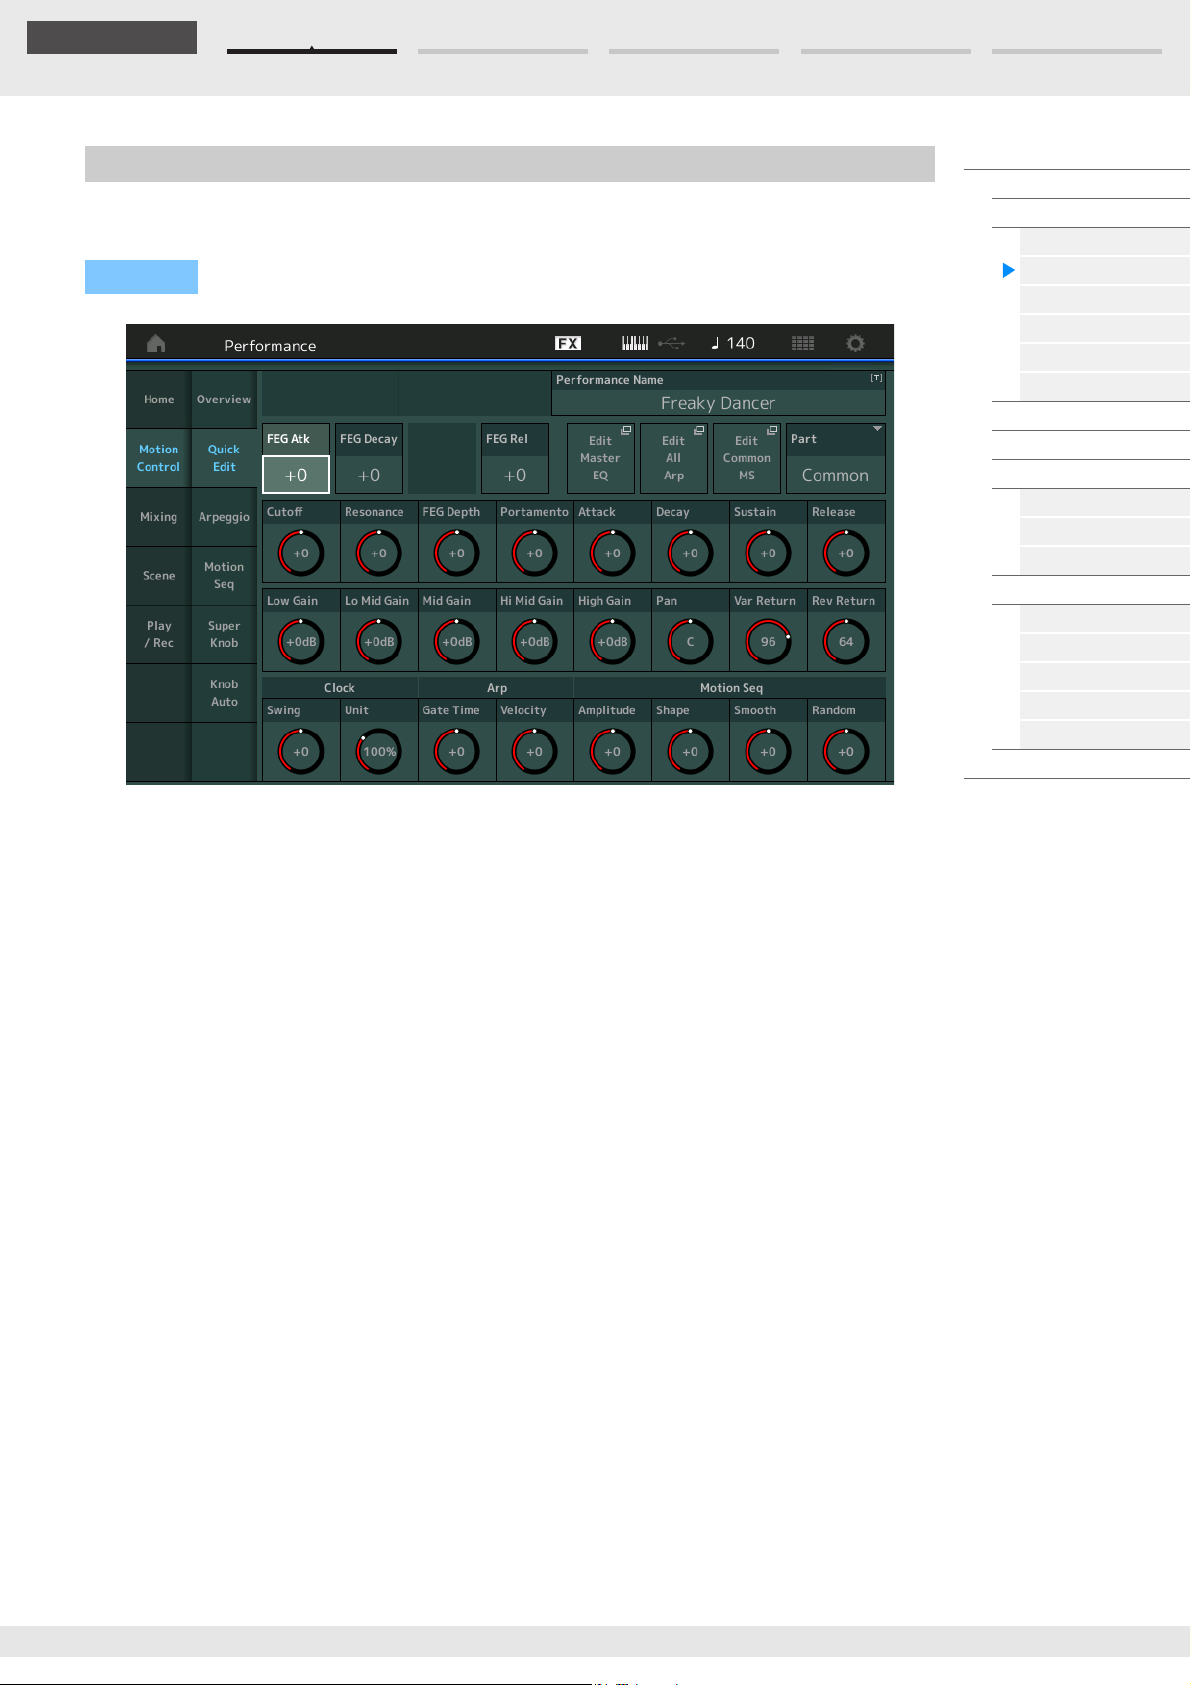
Edit Search Utility Live SetPerformance
Reference
Quick Edit
From the Quick Edit display you can make general sound settings. You can select whether the settings are
commonly applied to all Parts or to only one selected Part.
Operation
[PERFORMANCE (HOME)] [Motion Control] [Quick Edit]
Performance
Home
Motion Control
Overview
Quick Edit
Arpeggio
Motion Seq
Super Knob
Knob Auto
Mixing
Scene
Play / Rec
MIDI
Audio
Pattern
Smart Morph
Play
Edit
Analyze
Super Knob
Job
Remote
Part
Indicates the currently selected Part. Select the Part you want to use Quick Edit with here.
Settings: Common, Part 1–16
When “Part” is set to “Common”
You can edit the parameters commonly applied to all Parts.
Performance Name
Enters the desired name for the Performance. Performance names can contain up to 20 characters.
Touching the parameter calls up the input character display.
FEG Atk (FEG Attack Time)
Determines the speed of filter variation from the time a note is played until the maximum initial level of
the Cutoff Frequency is reached. This parameter determines the offset value of the FEG (page 157) for
the Element/Operator Common.
Settings: -64 – +63
FEG Decay (FEG Decay Time)
Determines how fast the Cutoff Frequency falls from maximum attack level to the sustain level. This
parameter determines the offset value of the FEG parameter (page 157) for the Element/Operator
Common.
Settings: -64 – +63
FEG Rel (FEG Release Time)
Determines how fast the Cutoff Frequency falls from the sustain level to zero when a note is released.
This parameter determines the offset value for the FEG parameter (page 157) of the Element/Operator
Common.
Settings: -64 – +63
Edit Master EQ
Calls up the Master EQ display (page 212) for Common/Audio Edit.
MODX+ Reference Manual
36
Page 37
Edit Search Utility Live SetPerformance
Reference
Edit All Arp (Edit All Arpeggio)
Calls up the Arpeggio display (page 42) for Motion Control.
Edit Common MS (Edit Common Motion Sequencer)
Calls up the Motion Sequencer Lane display (page 204) for Common/Audio Edit.
Cutoff (Cutoff Frequency)
Determines the Cutoff Frequency for the Filter, when the Low Pass Filter is selected, for example, the
larger the value the brighter the decay. This parameter determines the offset value of the Filter Cutoff
Frequency (page 154) for the Element/Drum Key/Operator Common.
Settings: -64 – +63
Resonance
Determines the emphasis given to the Cutoff Frequency. This parameter determines the offset value of
the Filter Resonance (page 155) for the Element/Drum Key/Operator Common.
Settings: -64 – +63
FEG Depth
Determines the range over which the cutoff frequency of the Filter EG changes. This parameter
determines the offset value of the FEG Depth (page 157) for the Element/Operator Common.
Settings: -64 – +63
Portamento (Portamento Time)
Determines the pitch transition time when Portamento is applied. This parameter is synchronized to the
same parameter for the Common/Audio Edit.
Settings: -64 – +63
Attack (AEG Attack Time)
Determines the speed of attack from the time a key is played until the maximum initial level of the AEG
is reached. This parameter determines the offset value of the AEG (page 162, page 182, page 196) for
the Element/Drum Key/Operator.
Settings: -64 – +63
Performance
Home
Motion Control
Overview
Quick Edit
Arpeggio
Motion Seq
Super Knob
Knob Auto
Mixing
Scene
Play / Rec
MIDI
Audio
Pattern
Smart Morph
Play
Edit
Analyze
Super Knob
Job
Remote
Decay (AEG Decay Time)
Determines how fast the volume falls from maximum attack level to the sustain level. This parameter
determines the offset value of the AEG (page 162, page 182, page 196). for the Element/Drum Key/
Operator
Settings: -64 – +63
Sustain (AEG Sustain Level)
Determines the sustain level at which the volume will continue while a note is held, after the initial attack
and decay. This parameter determines the offset value of the AEG (page 162, page 182, page 196) for
the Element/Drum Key/Operator.
Settings: -64 – +63
Release (AEG Release Time)
Determines how fast the volume falls from the sustain level to zero when a note is released. This
parameter determines the offset value of the AEG (page 162, page 182, page 196) for the Element/
Drum Key/Operator.
Settings: -64 – +63
Low Gain (Maser EQ Low Gain)
Determines the level gain of the Master EQ Low band.
Settings: -12dB – +12dB
Lo Mid Gain (Master EQ Low Mid Gain)
Determines the level gain of the Master EQ Low Mid band.
Settings: -12dB – +12dB
Mid Gain (Master EQ Mid Gain)
Determines the level gain of the Master EQ Mid band.
Settings: -12dB – +12dB
MODX+ Reference Manual
37
Page 38
Edit Search Utility Live SetPerformance
Reference
Hi Mid Gain (Master EQ High Mid Gain)
Determines the level gain of the Master EQ High Mid band.
Settings: -12dB – +12dB
High Gain (Master EQ High Gain)
Determines the level gain of the Master EQ High band.
Settings: -12dB – +12dB
Pan (Performance Pan)
Determines the stereo pan position of the selected Performance. This parameter offsets the same
parameter in the Part Edit setting.
Settings: L63–C (center)–R63
Var Return (Variation Return)
Determines the Return level of the Variation Effect.
Settings: 0–127
Rev Return (Reverb Return)
Determines the Return level of the Reverb Effect.
Settings: 0–127
Common Clock Swing (Common Swing)
Determines the Swing of the Arpeggio/Motion Sequencer for the entire Performance. This is the offset
value for the Swing of the Arpeggio/Motion Sequencer for each Part.
Settings: -120 – +120
Common Clock Unit (Common Unit Multiply)
Adjusts the Arpeggio/Motion Sequencer playback time for the entire Performance.
This parameter is applied to the Part when the Unit Multiply parameter for Arpeggio/Motion Sequencer
of the Part is set to “Common.”
By using this parameter, you can create a different Arpeggio/Motion Sequencer type from the original
one.
Settings: 50%–400%
200%: The playback time will be doubled and the tempo is halved.
100%: The normal playback time.
50%: The playback time will be halved and the tempo doubled.
Performance
Home
Motion Control
Overview
Quick Edit
Arpeggio
Motion Seq
Super Knob
Knob Auto
Mixing
Scene
Play / Rec
MIDI
Audio
Pattern
Smart Morph
Play
Edit
Analyze
Super Knob
Job
Remote
Common Arp Gate Time (Common Arpeggio Gate Time)
Determines the Gate Time Rate (length) of the Arpeggio for the entire Performance. This is the offset
value for the Gate Time Rate of the Arpeggio for each Part.
Settings: -100 – +100
Common Arp Velocity (Common Arpeggio Velocity Rate)
Determines the Velocity Rate of the Arpeggio for the entire Performance. This is the offset value for the
Velocity Rate of the Arpeggio for each Part.
Settings: -100 – +100
Common Motion Seq Amplitude (Common Motion Sequencer Amplitude)
Determines the Amplitude of the Motion Sequencer for the entire Performance. “Amplitude” determines
how the entire Motion Sequence changes.
This is the offset value for the Part Motion Seq Amplitude, which is also the offset value for the Lane
Amplitude. This results in that both of the Common and Part MS Amplitudes offset the Amplitude setting
in the Lane (only when “MS FX” is set to on for the Lane).
Settings: -64 – +63
Common Motion Seq Shape (Common Motion Sequencer Pulse Shape)
Determines the Pulse Shape of the Motion Sequencer for the entire Performance. This changes the
step curve shape of the sequence.
This is the offset value for the Part Motion Seq Pulse Shape, which is also the offset value for the Lane
Pulse Shape. This results in that both of the Common and Part MS Pulse Shapes offset the Pulse Shape
setting for the parameter in the Lane (only when “MS FX” is set to on for the Lane and “Control” is set to
on for the parameter).
Settings: -100 – +100
MODX+ Reference Manual
38
Page 39
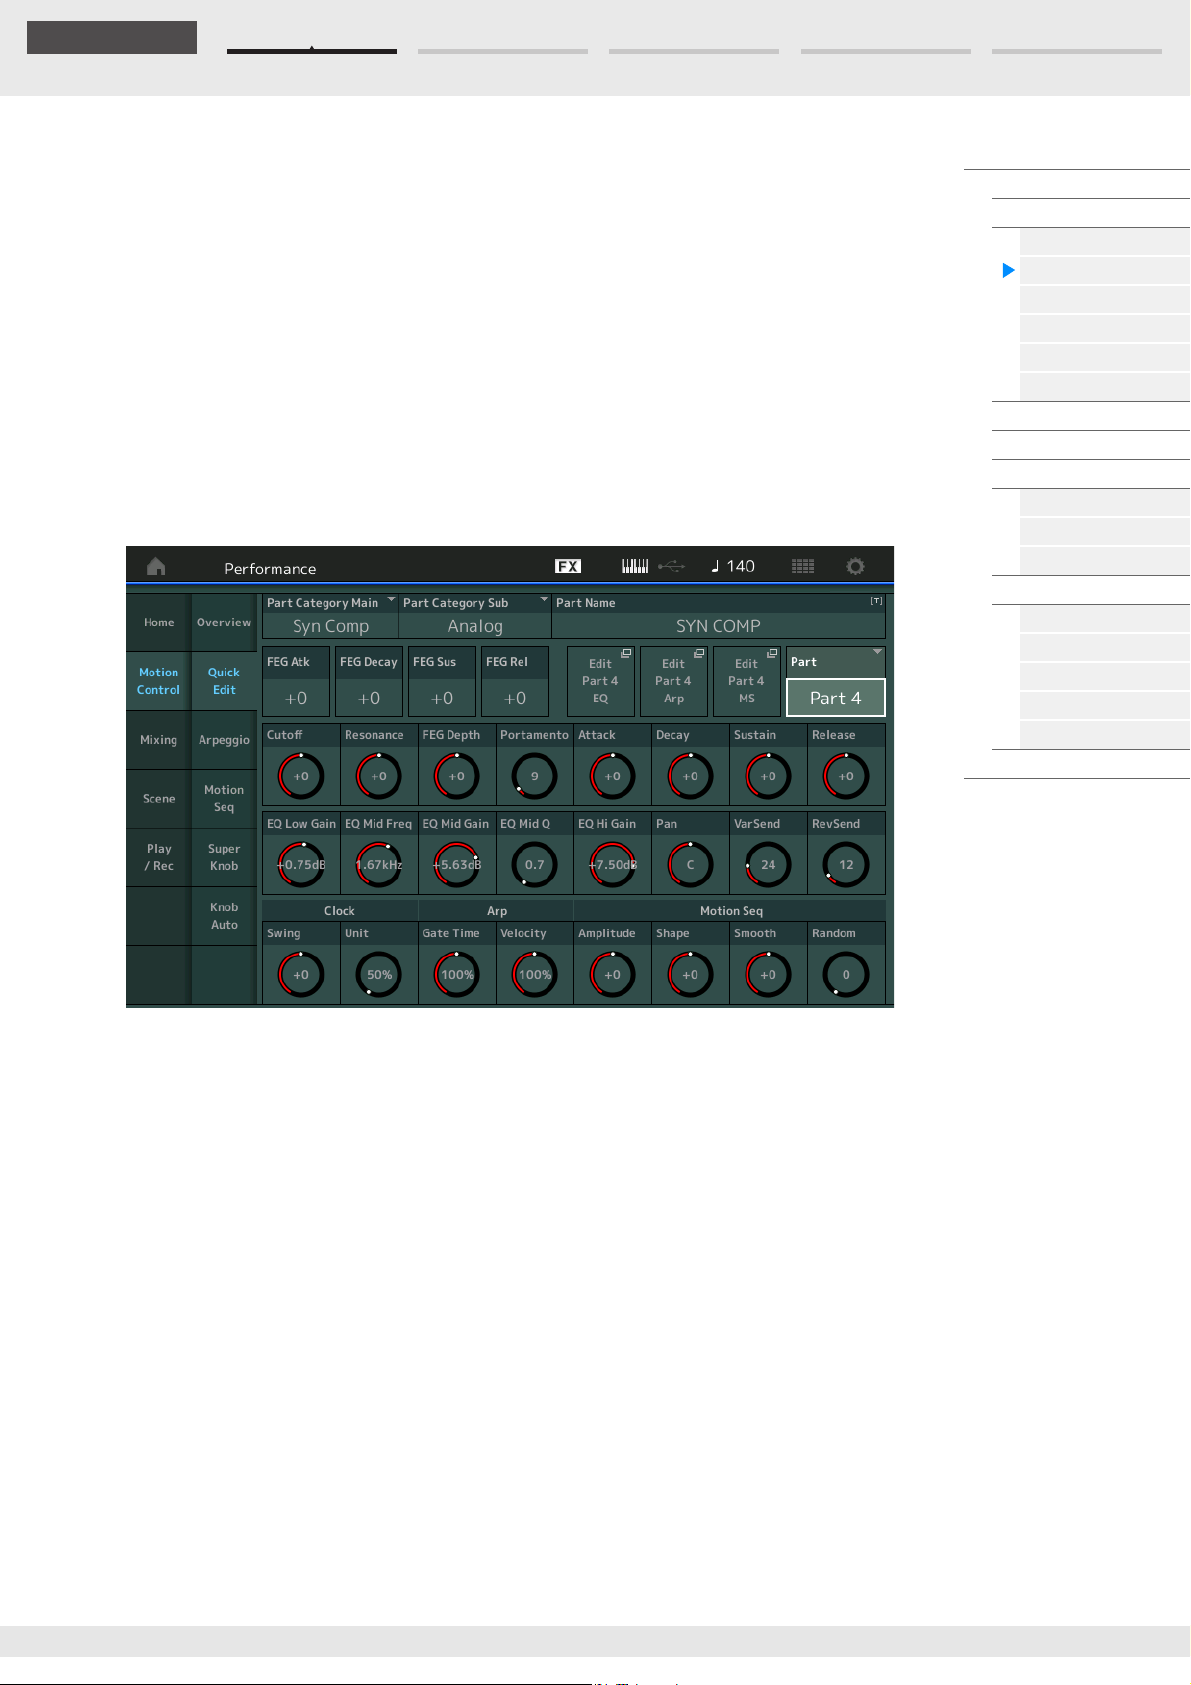
Edit Search Utility Live SetPerformance
Reference
Common Motion Seq Smooth (Common Motion Sequencer Smoothness)
Determines the Smoothness of the Motion Sequencer for the entire Performance. “Smoothness” is the
degree to which the time of the Motion Sequence is smoothly changed.
This is the offset value for the Part Motion Seq Smoothness, which is also the offset value for the Lane
Smoothness. This results in that both of the Common and Part MS Smoothnesses offset the
Smoothness setting for the parameter in the Lane (only when “MS FX” is set to on for the Lane).
Settings: -64 – +63
Common Motion Seq Random (Common Motion Sequencer Random)
Determines the Random of the Motion Sequencer for the entire Performance. “Random” is the degree
to which the Step Value of the Sequence is randomly changed.
This is the offset value for the Part Motion Seq Random when “MS FX” is set to on for the Lane.
Settings: -64 – +63
When “Part” is set to Part 1–16
You can edit the parameters for the selected Part.
Performance
Home
Motion Control
Overview
Quick Edit
Arpeggio
Motion Seq
Super Knob
Knob Auto
Mixing
Scene
Play / Rec
MIDI
Audio
Pattern
Smart Morph
Play
Edit
Analyze
Super Knob
Job
Remote
Part Category Main (Part Main Category)
Part Category Sub (Part Sub Category)
Determines the Main Category and Sub Category of the Part.
The categories are keywords representing the general characteristics of the Parts. Selecting the
appropriate category makes it easy to find the desired Part from the huge variety of Parts available.
There are 17 Main Categories which indicate types of instruments. There are up to nine Sub Categories
for each Main Category, indicating more detailed types of instruments.
Settings: See the Data List PDF document.
MODX+ Reference Manual
39
Page 40
Edit Search Utility Live SetPerformance
Reference
Part Name
Enters the desired name for the Part. Part names can contain up to 20 characters. Touching the
parameter calls up the input character display.
The parameters below are same as the ones when “Part” is set to “Common” (page 36).
• FEG Atk (FEG Attack Time)
• FEG Decay (FEG Decay Time)
• FEG Rel (FEG Release Time)
•Cutoff
• Resonance
• FEG Depth
• Portamento (Portamento Time)
The setting values differ from the ones which “Part” is set to “Common.”
Settings: 0–127
• Attack (AEG Attack Time)
• Decay (AEG Decay Time)
• Sustain (AEG Sustain Level)
• Release (AEG Release Time)
FEG Sus (FEG Sustain Level)
Determines the FEG Sustain Level for the Part. This is the offset value for the FEG Decay2 Level of the
Element/Operator Common (page 157).
Settings: -64 – +63
Edit Part EQ
Calls up the Part EQ display (page 116) for Part Edit.
Edit Part Arp (Edit Part Arpeggio)
Calls up the Arpeggio display (page 120) for Part Edit.
Performance
Home
Motion Control
Overview
Quick Edit
Arpeggio
Motion Seq
Super Knob
Knob Auto
Mixing
Scene
Play / Rec
MIDI
Audio
Pattern
Smart Morph
Play
Edit
Analyze
Super Knob
Job
Remote
Edit Part MS (Edit Part Motion Sequencer)
Calls up the Motion Sequencer Lane display (page 129) for Part Edit.
EQ Low Gain (3 band EQ Low Gain)
Determines the level gain for the Low band.
Settings: -12dB – +12dB
EQ Mid Freq (3 band EQ Mid Frequency)
Determines the frequency for the Mid band.
Settings: 139.7Hz–10.1kHz
EQ Mid Gain (3 band EQ Mid Gain)
Determines the level gain for the Mid band.
Settings: -12dB – +12dB
EQ Mid Q (3 band EQ Mid Q)
Determines the EQ bandwidth of the Mid band.
Settings: 0.7–10.3
EQ High Gain (3 band EQ Hi Gain)
Determines the level gain of the High band.
Settings: -12dB – +12dB
Pan
Determines the stereo pan position of the selected Part.
Settings: L63–C (center)–R63
Var Send (Variation Send)
Determines the Send level of the signal sent to the Variation effect.
Settings: 0–127
MODX+ Reference Manual
40
Page 41
Edit Search Utility Live SetPerformance
Reference
Rev Send (Reverb Send)
Determines the Send level of the signal sent to the Reverb effect.
Settings: 0–127
Part Clock Swing (Part Swing)
Delays notes on even-numbered beats (backbeats) to produce a swing feel.
• +1 and higher: Delay the Arpeggio notes.
• -1 and lower: Advance the Arpeggio notes.
• 0: Exact timing as set by “Arpeggio/Motion Sequencer Grid” Value, resulting in no swing.
Judicious use of this setting lets you create swing rhythms and triplet feels, such as shuffle and
bounce.
Settings: -120 – +120
Part Clock Unit (Part Unit Multiply)
Adjusts the Arpeggio/Motion Sequencer playback time for the selected Part.
Settings: 50%–400%, Common
200%: The playback time will be doubled and the tempo is halved.
100%: The normal playback time.
50%: The playback time will be halved and the tempo doubled.
Common: The value set in the Unit Multiply common to the all Parts will be applied.
Part Arp Gate Time (Part Arpeggio Gate Time)
Determines how much the Gate Time (length) of the Arpeggio notes is offset from the original value.
This is the offset value for the Gate Time Rate (page 124) of each Arpeggio Select setting.
Settings: 0%–200%
Part Arp Velocity (Part Arpeggio Velocity Rate)
Determines how much the velocity of Arpeggio playback is offset from the original value.
This is the offset value for the Velocity Rate (page 123) of each Arpeggio Select setting.
Settings: 0%–200%
Performance
Home
Motion Control
Overview
Quick Edit
Arpeggio
Motion Seq
Super Knob
Knob Auto
Mixing
Scene
Play / Rec
MIDI
Audio
Pattern
Smart Morph
Play
Edit
Analyze
Super Knob
Job
Remote
Part Motion Seq Amplitude (Part Motion Sequencer Amplitude)
Determines the Amplitude (page 131) of the Motion Sequencer for the selected Part.
This is the offset value for the Lane Motion Seq Amplitude when “MS FX” is set to on for the Lane.
Settings: -64 – +63
Part Motion Seq Shape (Part Motion Sequencer Pulse Shape)
Determines the Pulse Shape of the Motion Sequencer for the selected Part.
This is the offset value for the Lane Motion Seq “Step Curve Parameter” (page 132) when “MS FX” is set
to on for the Lane and “Control” is set to on for the parameter.
Settings: -100 – +100
Part Motion Seq Smooth (Part Motion Sequencer Smoothness)
Determines the Smoothness of the Motion Sequencer for the selected Part.
This is the offset value for the Lane Motion Seq Smoothness (page 131) when “MS FX” is set to on for
the Lane.
Settings: -64 – +63
Part Motion Seq Random
Determines the Random of the Motion Sequencer for the selected Part. “Random” is the degree to
which the Step Value of the Sequence is randomly changed.
Settings: 0–127
MODX+ Reference Manual
41
Page 42
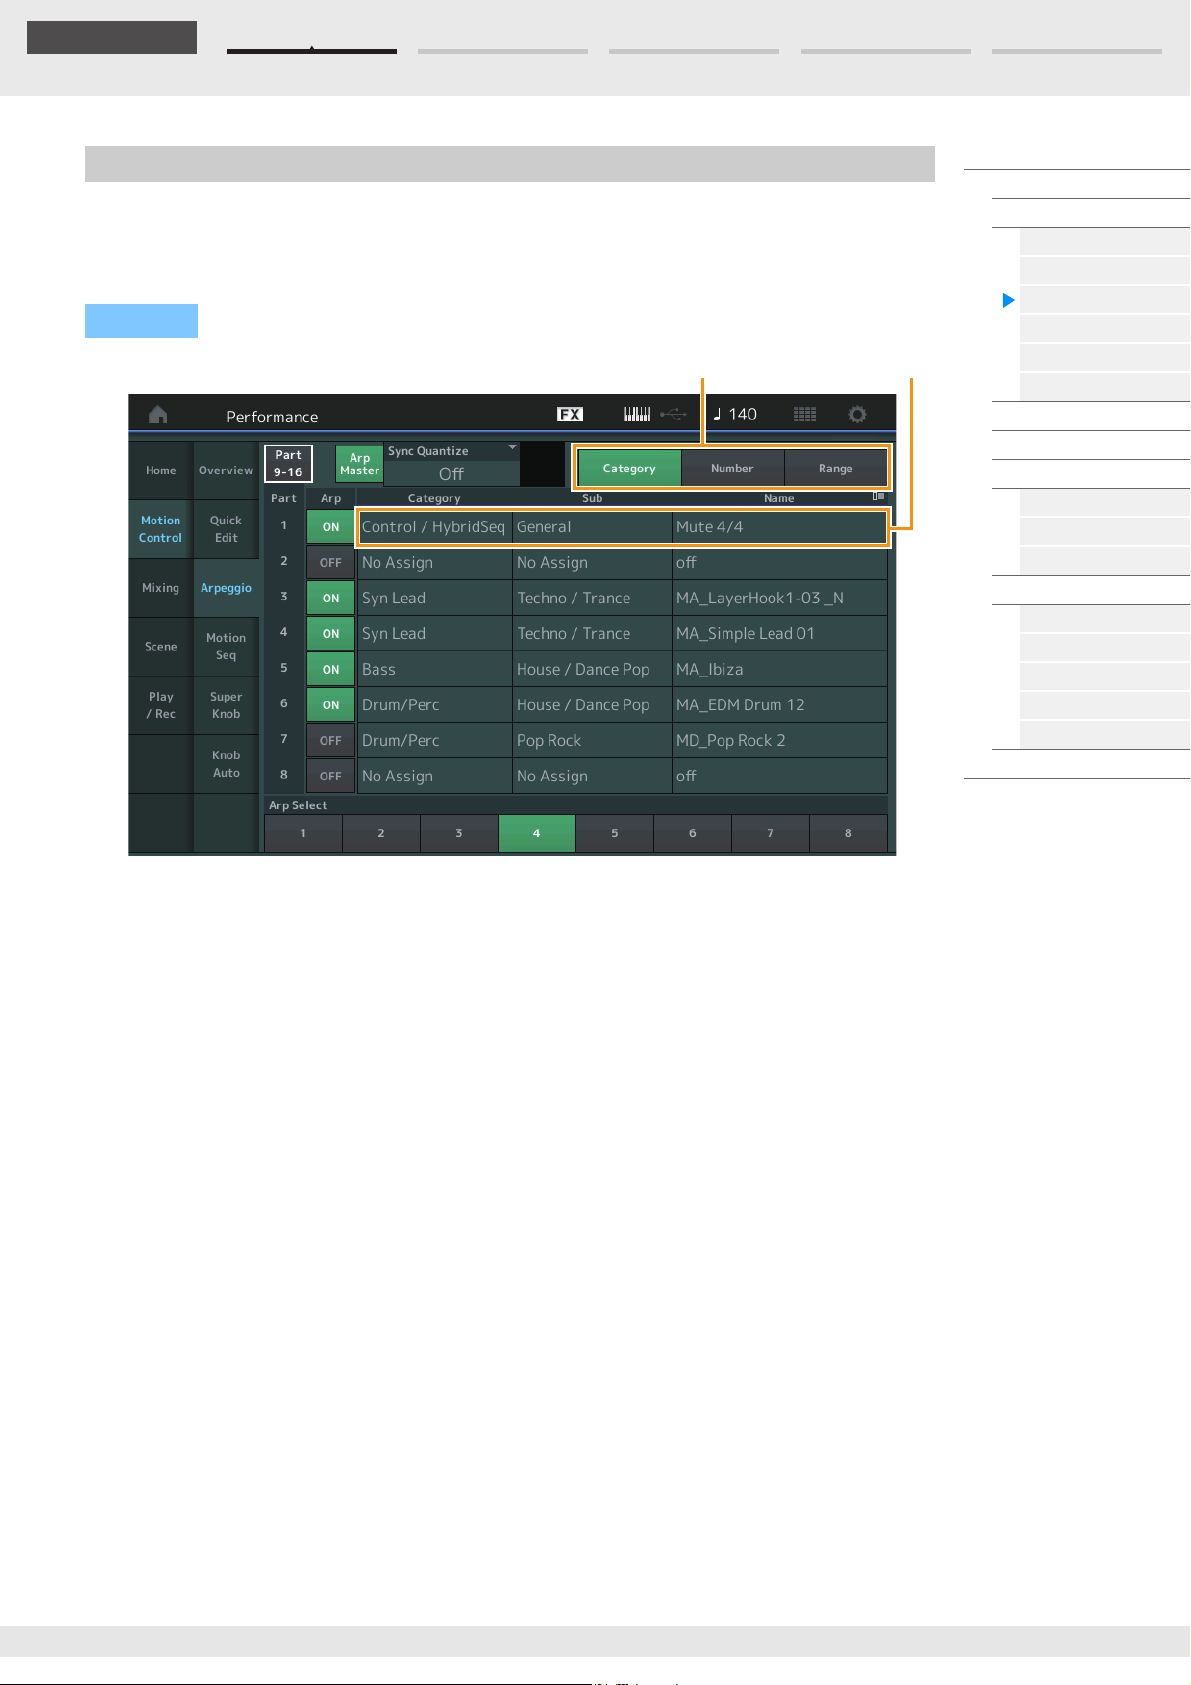
Edit Search Utility Live SetPerformance
Reference
Arpeggio Type
View
Arpeggio
From the Arpeggio display you can set Arpeggio-related parameters for multiple Parts.
Touching the Arpeggio Type name on this display (or pressing the [CATEGORY] button on the panel) calls
up a menu. In the displayed menu, touch [Search] to call up the Arpeggio Category Search display and
touch [Number] to determine the Arpeggio Type by specifying the Arpeggio Number.
Operation
[PERFORMANCE (HOME)] [Motion Control] [Arpeggio]
Performance
Home
Motion Control
Overview
Quick Edit
Arpeggio
Motion Seq
Super Knob
Knob Auto
Mixing
Scene
Play / Rec
MIDI
Audio
Pattern
Smart Morph
Play
Edit
Analyze
Super Knob
Job
Remote
Part 9-16 / Part 1-8
Switches between the displays of Parts 9–16 or the Parts 1–8. In case of the picture above, touch the “Part
9-16” to display the Arpeggio Types for the “Part 9-16.”
Settings: Part 9-16 / Part 1-8
Arp Master (Arpeggio Master Switch)
Determines whether the Arpeggio is on or off for the entire Performance. This setting is applied to the [ARP
ON/OFF] button on the panel.
Settings: Off, On
Sync Quantize (Sync Quantize Value)
Determines the actual timing at which the next Arpeggio playback starts when you trigger it while the
Arpeggio of multiple Parts is playing back. When set to “off,” the next Arpeggio starts as soon as you
trigger it. The number indicates the clock.
Settings: Off, 60 (32nd note), 80 (16th note triplet), 120 (16th note), 160 (8th note triplet), 240 (8th note), 320 (1/4 note triplet),
480 (1/4 note)
Arp (Part Arpeggio Switch)
Determines whether the Arpeggio for each Part is on or off.
Settings: Off, On
Arp Select (Arpeggio Select)
Determines the Arpeggio Types.
By selecting a type and pressing [SHIFT] + [EDIT], you can copy or exchange Arpeggios. For details, see
“Copying or Exchanging Arpeggios” (page 124).
Settings: 1–8
MODX+ Reference Manual
42
Page 43
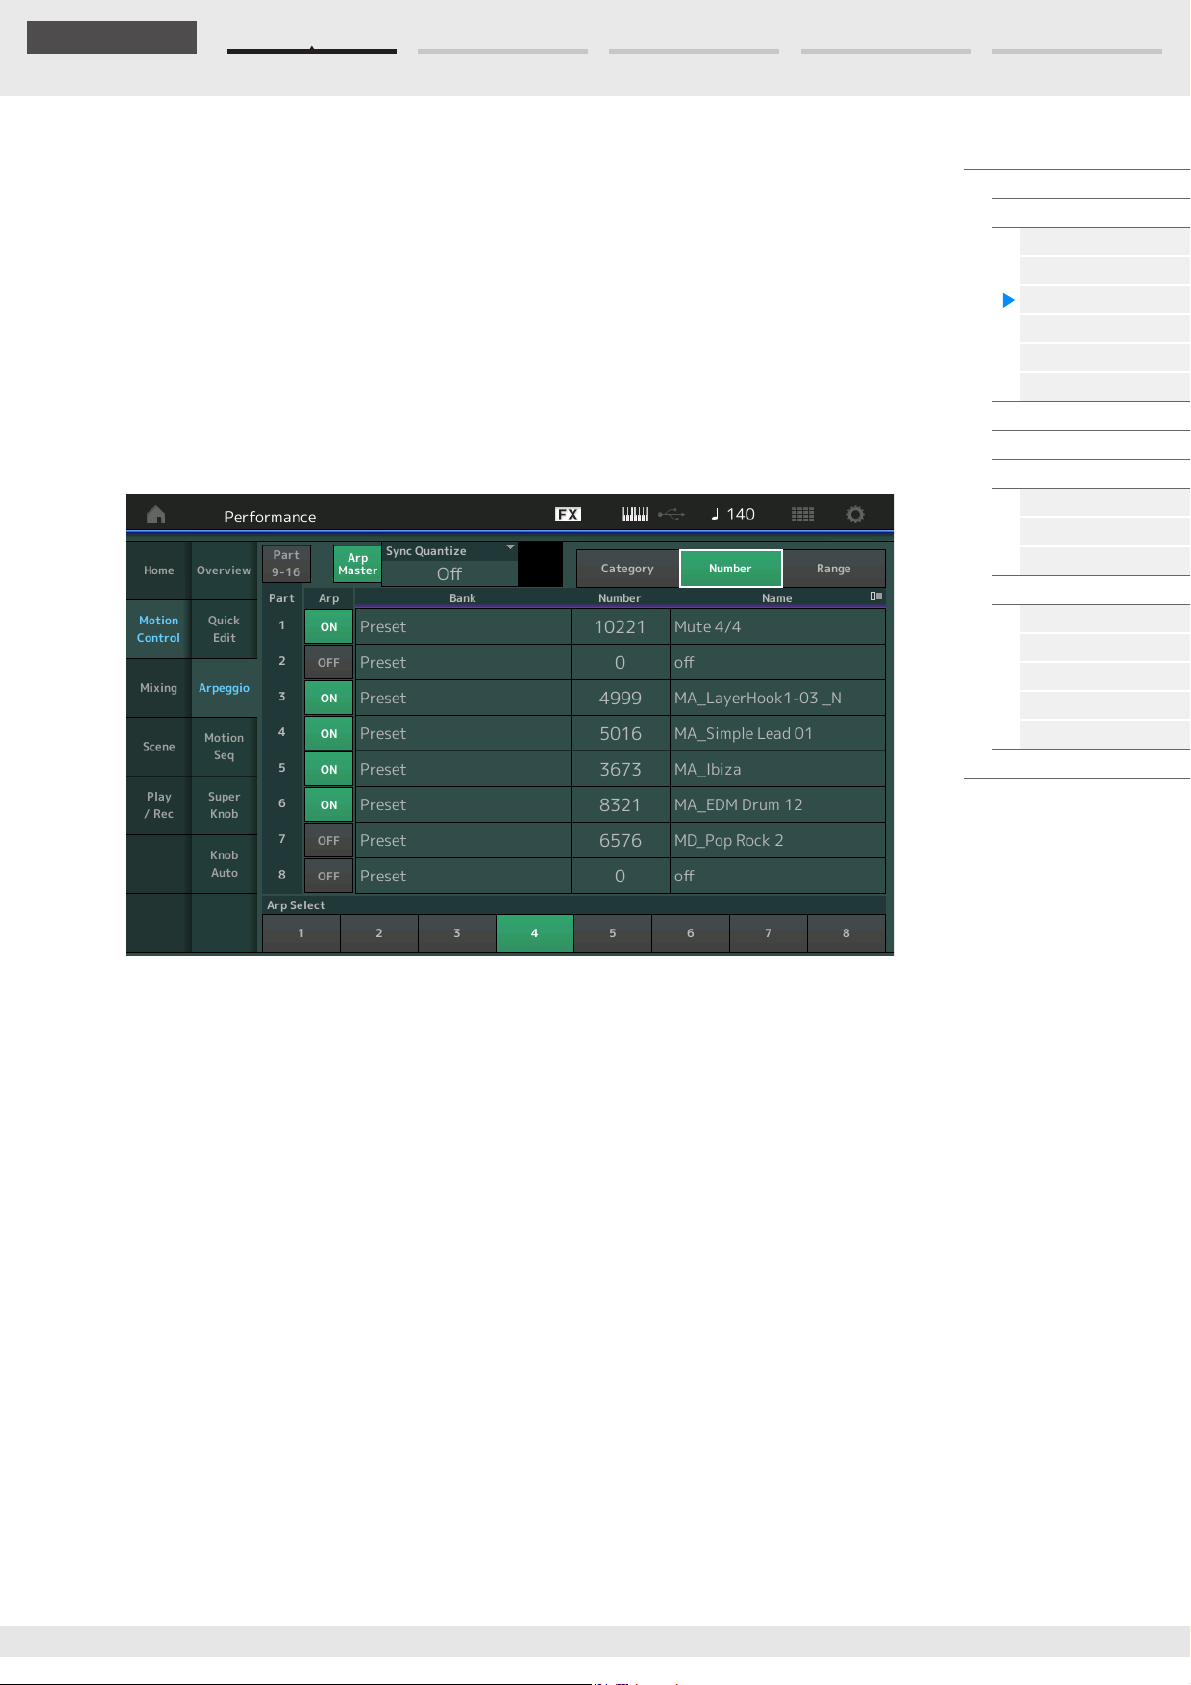
Edit Search Utility Live SetPerformance
Reference
View
Determines which information regarding Arpeggio Type is displayed.
Settings: Category, Number, Range
When “View” is set to “Category”
Category (Arpeggio Category)
Settings: See the Arpeggio category list (page 11).
Sub (Arpeggio Sub Category)
Settings: See the Arpeggio sub category list (page 11).
Name (Arpeggio Name)
Settings: See the Data List PDF document.
When “View” is set to “Number”
Performance
Home
Motion Control
Overview
Quick Edit
Arpeggio
Motion Seq
Super Knob
Knob Auto
Mixing
Scene
Play / Rec
MIDI
Audio
Pattern
Smart Morph
Play
Edit
Analyze
Super Knob
Job
Remote
Bank (Arpeggio Bank)
Settings: Preset, User, Library 1–8
Number (Arpeggio Number)
Settings: See the Data List PDF document.
Name (Arpeggio Name)
Settings: See the Data List PDF document.
MODX+ Reference Manual
43
Page 44
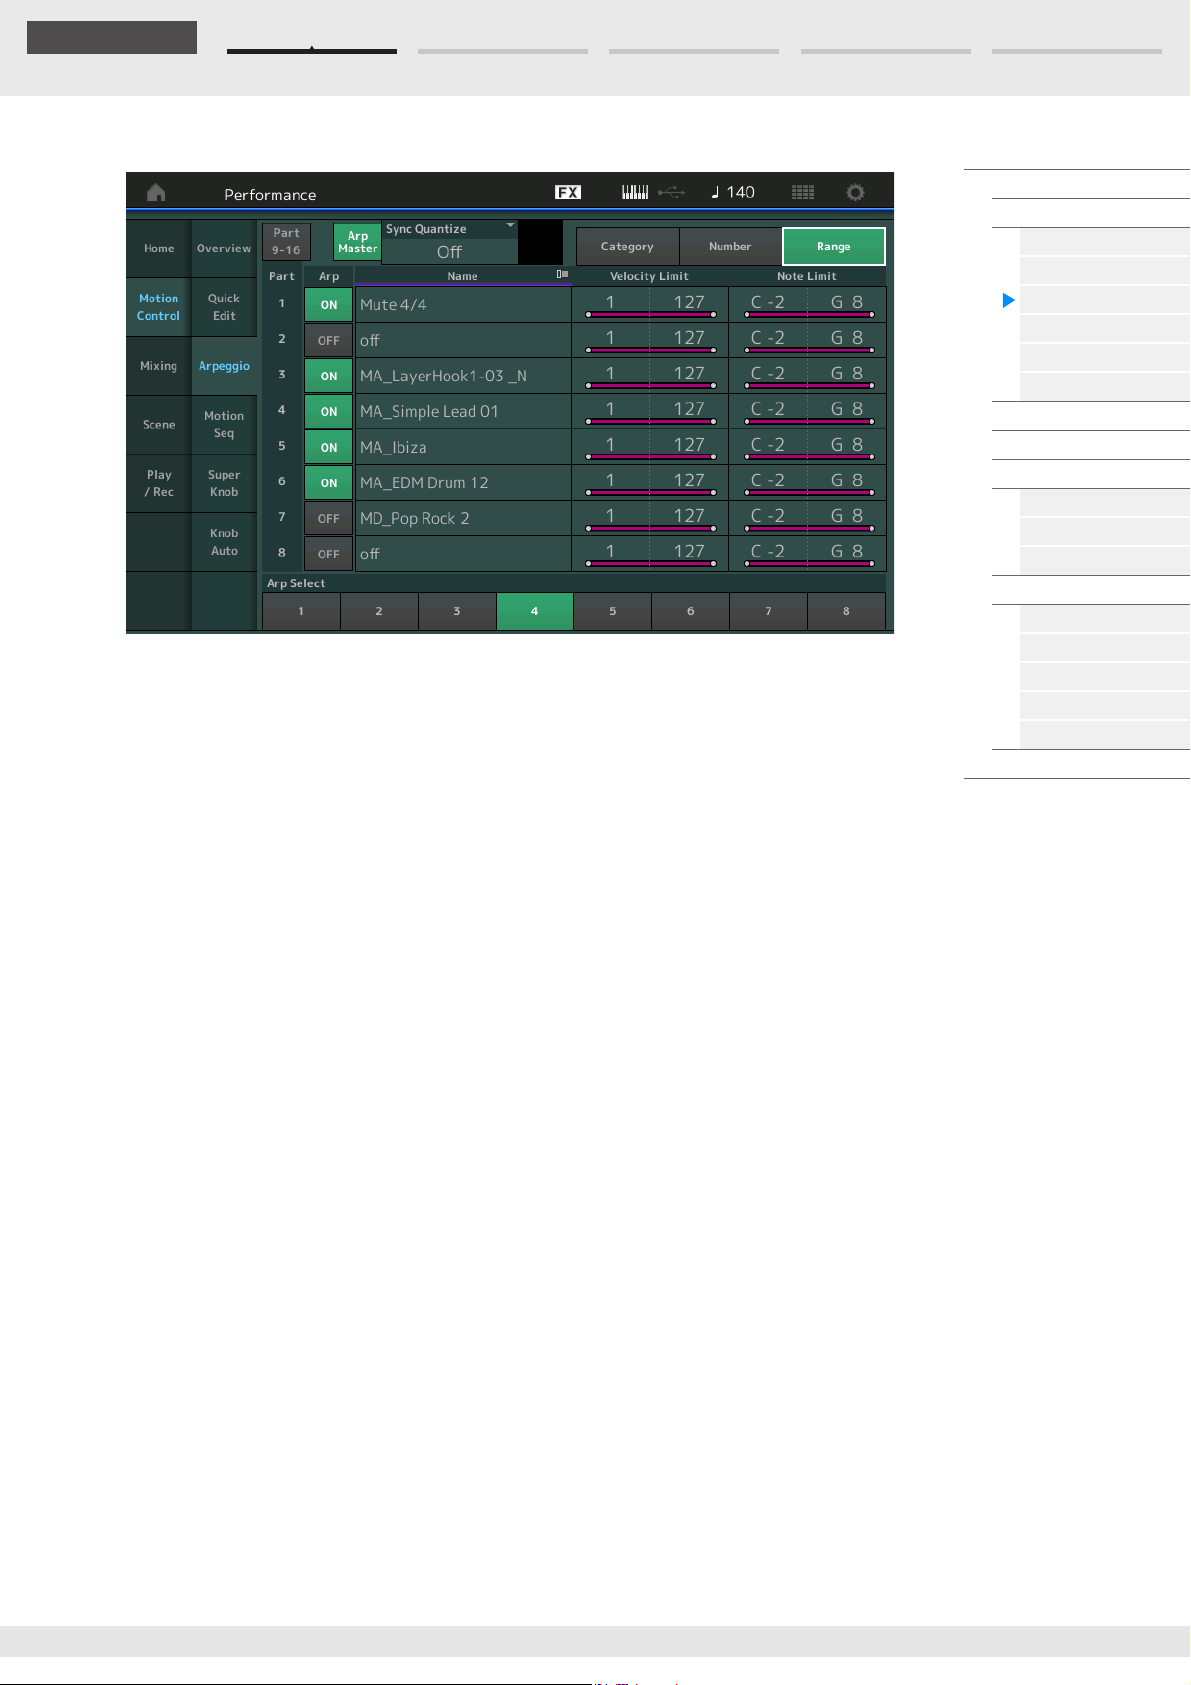
Edit Search Utility Live SetPerformance
Reference
When “View” is set to “Range”
Name (Arpeggio Name)
Settings: See the Data List PDF document.
Velocity Limit (Arpeggio Velocity Limit)
Determines the lowest and highest velocity which can trigger Arpeggio playback. For details on
settings of Velocity Limit, see the Owner’s Manual.
Settings: 1–127
Performance
Home
Motion Control
Overview
Quick Edit
Arpeggio
Motion Seq
Super Knob
Knob Auto
Mixing
Scene
Play / Rec
MIDI
Audio
Pattern
Smart Morph
Play
Edit
Analyze
Super Knob
Job
Remote
Note Limit (Arpeggio Note Limit)
Determines the lowest and highest notes in the Arpeggio’s note range. For details on settings of Note
Limit, see the Owner’s Manual.
Settings: C -2 – G8
MODX+ Reference Manual
44
Page 45
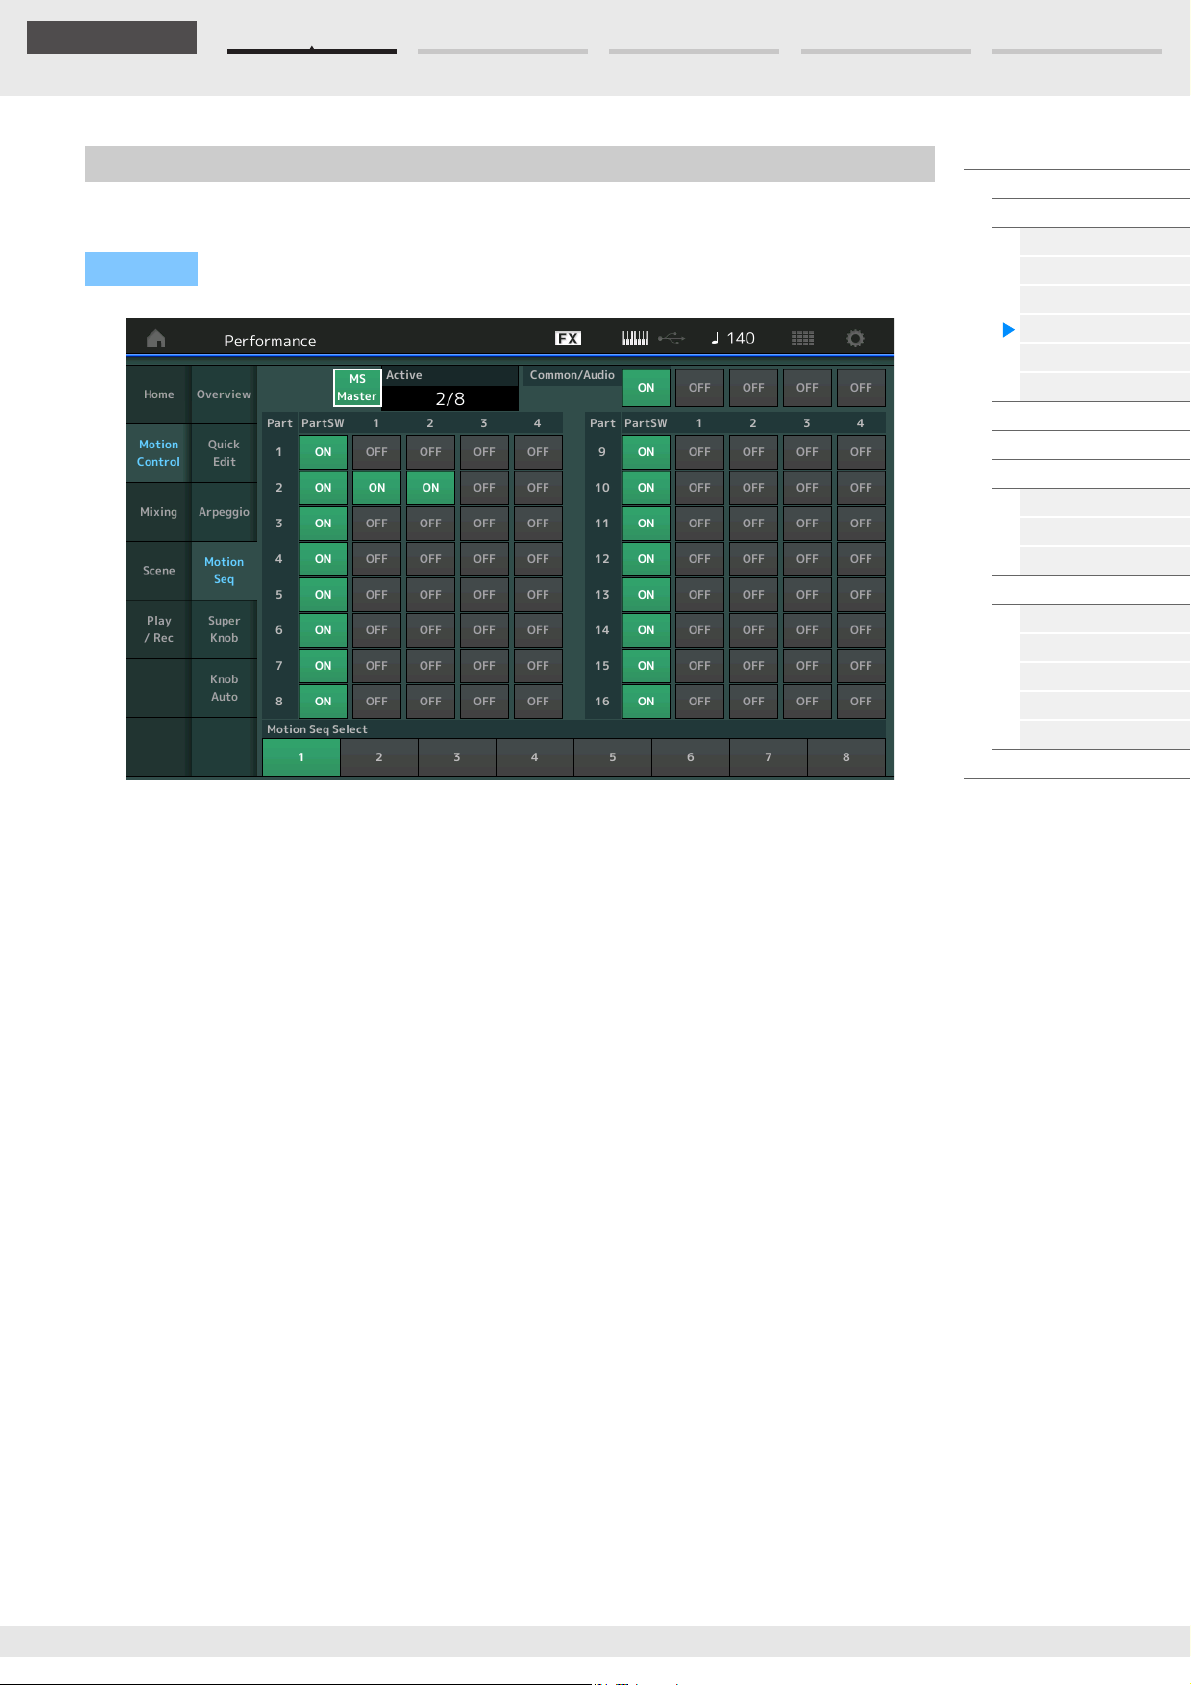
Edit Search Utility Live SetPerformance
Reference
Motion Seq (Motion Sequencer)
From the Motion Sequencer display you can set parameters related to Motion Sequencer for multiple Parts.
Operation
[PERFORMANCE (HOME)] [Motion Control] [Motion Seq]
Performance
Home
Motion Control
Overview
Quick Edit
Arpeggio
Motion Seq
Super Knob
Knob Auto
Mixing
Scene
Play / Rec
MIDI
Audio
Pattern
Smart Morph
Play
Edit
Analyze
Super Knob
Job
Remote
MS Master (Motion Sequencer Master Switch)
Determines whether the Motion Sequencer is on or off for the entire Performance. This setting is applied to
the [MS ON/OFF] button on the panel.
Settings: Off, On
Active (Active Motion Sequencer)
Indicates the number of the active Lane. The number after slash indicates the maximum number of the
Lanes which can be activated simultaneously.
PartSW (Motion Sequencer Part Switch)
Determines whether the Motion Sequencer is on or off for each Part/all Parts.
Settings: Off, On
Lane Switch
Determines whether each Lane is on or off. You can set up to four Lanes corresponding to the Motion
Sequencer function for one Part. Up to eight Lanes can be used at the same time for the entire
Performance.
Settings: Off, On
Motion Seq Select (Motion Sequence Select)
Determines the Motion Sequence Type.
By selecting a type and pressing [SHIFT] + [EDIT], you can copy or exchange Motion Sequences. For
details, see “Copying or Exchanging Motion Sequences” (page 133).
Settings: 1–8
MODX+ Reference Manual
45
Page 46
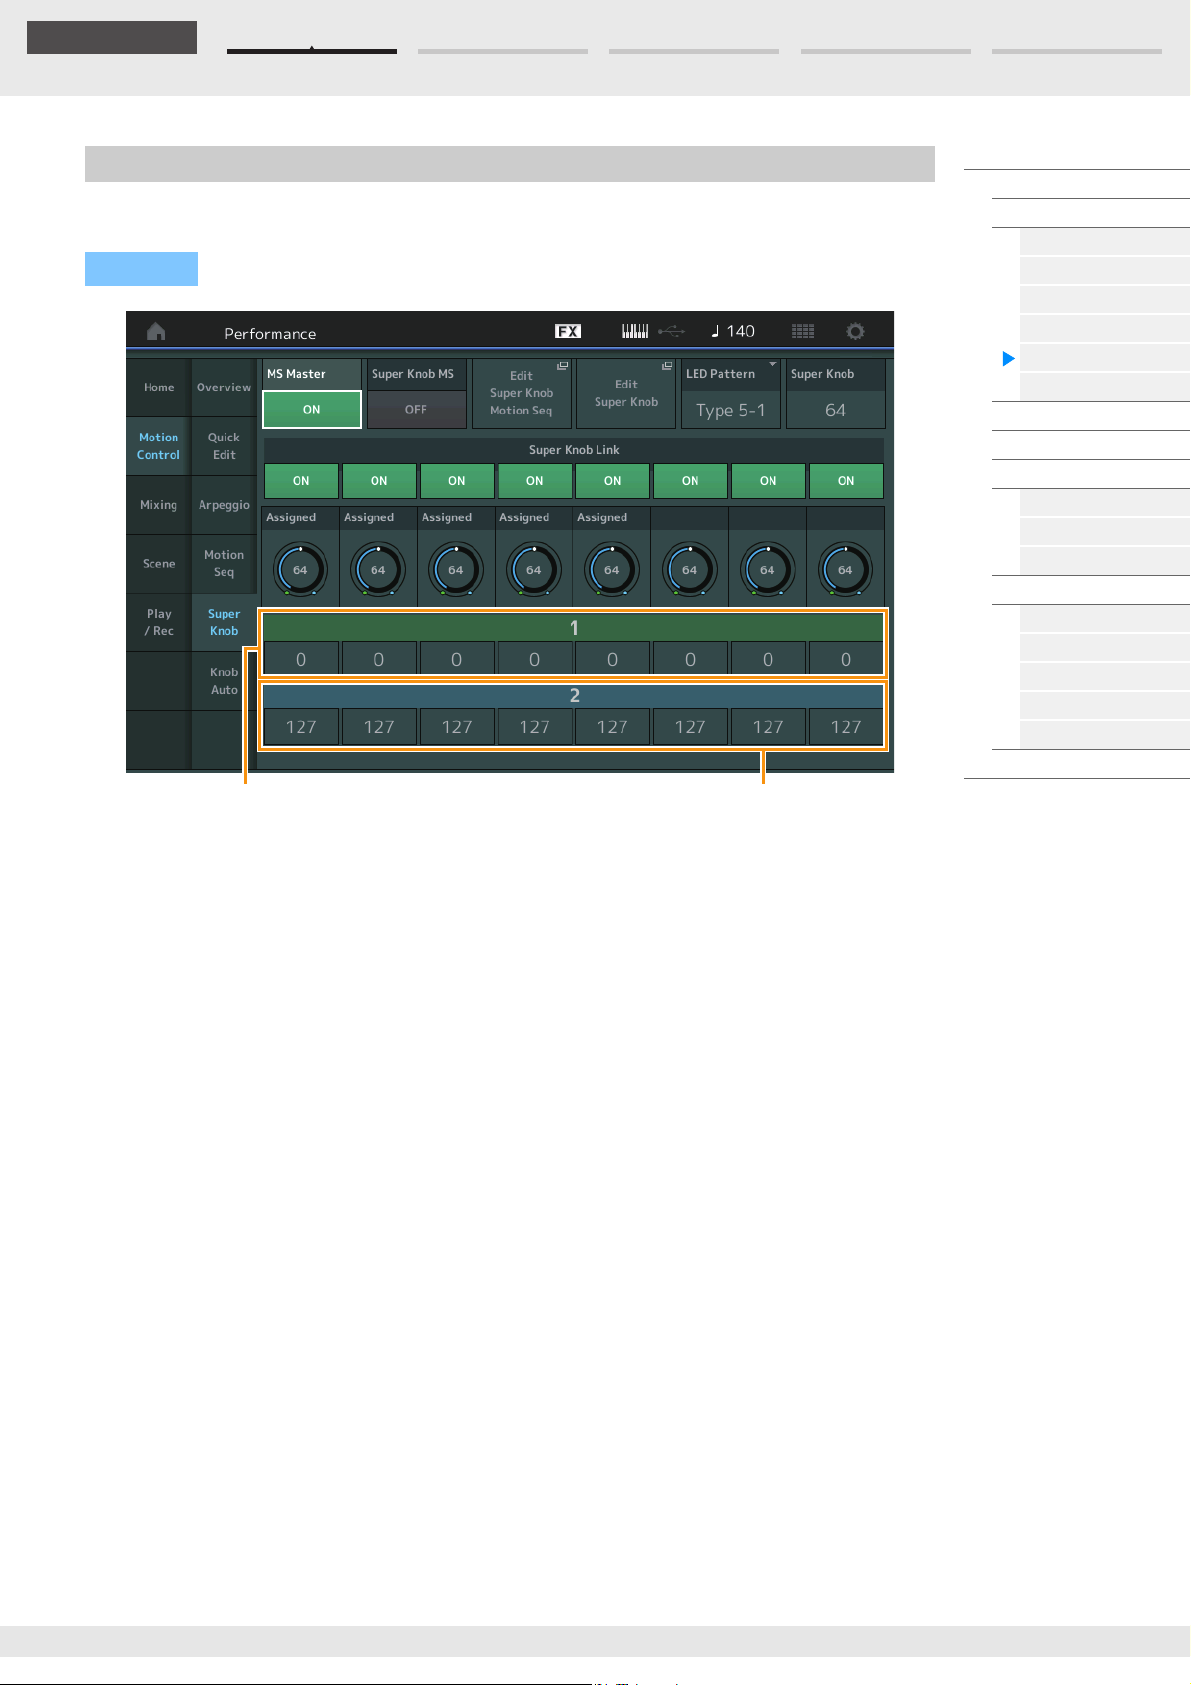
Edit Search Utility Live SetPerformance
Reference
Assignable Knob 1–8 Destination Value 1
Assignable Knob 1–8 Destination Value 2
Super Knob
From the Super Knob display you can set parameters controlled by the Super knob.
Operation
[PERFORMANCE (HOME)] [Motion Control] [Super Knob]
Performance
Home
Motion Control
Overview
Quick Edit
Arpeggio
Motion Seq
Super Knob
Knob Auto
Mixing
Scene
Play / Rec
MIDI
Audio
Pattern
Smart Morph
Play
Edit
Analyze
Super Knob
Job
Remote
MS Master (Motion Sequencer Master Switch)
Turns the Motion Sequencer for the entire Performance on/off. This setting is applied to the [MS ON/OFF]
button on the panel.
Settings: Off, On
Super Knob MS (Super Knob Motion Sequencer Switch)
Turns the Motion Sequencer applied to the Super Knob on/off.
Settings: Off, On
Edit Super Knob Motion Seq
Shows the Knob Auto display, in which you can set the Motion Sequencer for the Super Knob.
Edit Super Knob
Shows the Control Assign display for Common/Audio Edit, in which you can set the parameters to be
controlled by the Super Knob.
LED Pattern (Super Knob LED Pattern)
Determines the lighting pattern of the Super Knob.
Settings: Type 1, Type 2-1, Type 2-2, Type 3-1, Type 3-2, Type 4-1, Type 4-2, Type 5-1, Type 5-2, Type 6, Type 7-1, Type 7-2,
Typ e 8 - 1, Typ e 8 - 2 , Typ e 9 , Ty pe 10 , Ty p e 11, O f f
Super Knob (Super Knob Value)
Determines the value of the Super Knob.
Settings: 0–127
Super Knob Link
Turns the link between the Assignable Knob and the Super Knob on/off. When this is set to off, the function
value assigned to the corresponding knob does not change even if the Super Knob is controlled.
Settings: Off, On
MODX+ Reference Manual
46
Page 47
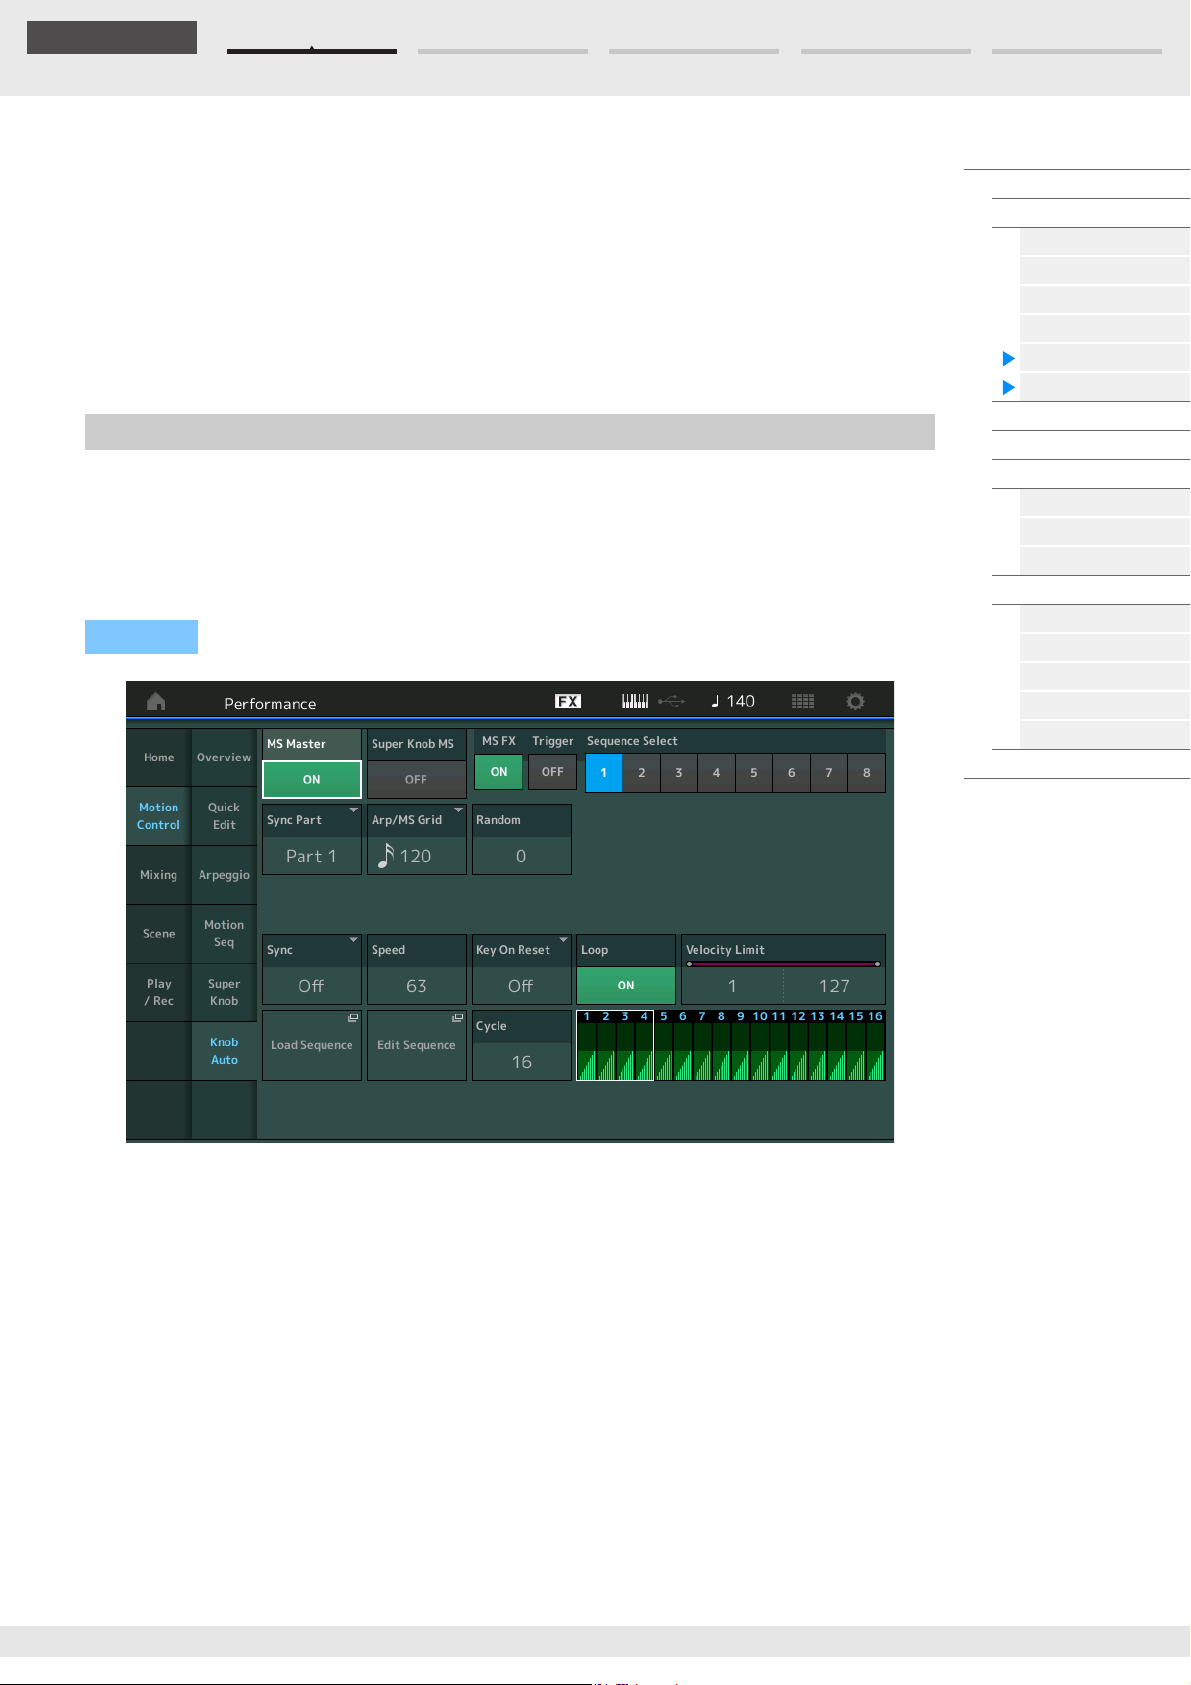
Edit Search Utility Live SetPerformance
Reference
Assignable Knob 1–8 Value
Determines the value for the Assignable Knobs 1–4 (5–8).
Settings: 0–127
Assignable Knob 1–8 Destination Value 1
Assignable Knob 1–8 Destination Value 2
Determines the lowest value (Assignable value 1) and the highest value (Assignable value 2) for the
corresponding Knob.
When you operate the Super Knob, the Assignable Knob value varies within the specified range.
Settings: 0–127
Knob Auto
From the Knob Auto display you can set parameters related to Motion Sequencer applied to the Super
Knob (Super Knob Motion Sequencer.) The parameter value of the Super Knob can be automatically
controlled by the Motion Sequencer.
You can set only one Lane for the Super Knob Motion Sequencer.
NOTE Up to eight Lanes can be used at the same time for the entire Performance. However, the Lane set for the Super
Knob is not included in the eight referred to here.
Operation
[PERFORMANCE (HOME)] [Motion Control] [Knob Auto]
Performance
Home
Motion Control
Overview
Quick Edit
Arpeggio
Motion Seq
Super Knob
Knob Auto
Mixing
Scene
Play / Rec
MIDI
Audio
Pattern
Smart Morph
Play
Edit
Analyze
Super Knob
Job
Remote
MS Master (Motion Sequencer Master Switch)
Turns the Motion Sequencer for the entire Performance on/off. This setting is applied to the [MS ON/OFF]
button on the panel.
Settings: Off, On
Super Knob MS (Super Knob Motion Sequencer Switch)
Turns the Motion Sequencer applied to the Super Knob on/off.
Settings: Off, On
MS FX (Super Knob Motion Sequencer FX Receive)
Determines whether or not the Motion Sequencer is affected by the knob operation when “ARP/MS” is
selected with the Knob Function [TONE]/[EG/FX]/[EQ]/[ARP/MS] button.
Settings: Off, On
MODX+ Reference Manual
47
Page 48
Edit Search Utility Live SetPerformance
Reference
Trigger (Super Knob Motion Sequencer Trigger Receive)
Determines whether the signal from the [MOTION SEQ TRIGGER] button is received or not. When this is
set to on, the Motion Sequence will begin whenever you press the [MOTION SEQ TRIGGER] button.
Settings: Off, On
Sequence Select (Super Knob Motion Sequence Select)
Determines the Motion Sequence Type.
By selecting a type and pressing [SHIFT] + [EDIT], you can copy or exchange Motion Sequences. For
details, see “Copying or Exchanging Motion Sequences” (page 133).
Settings: 1–8
Sync Part (Super Knob Motion Sequencer Sync Part)
Determines which Part is synchronized with the Super Knob Motion Sequencer. This setting is applied to
the Note On Setting and the Arp/Motion Seq Grid setting for the selected Part.
Settings: Part 1 – Part 16
Arp/MS Grid (Arpeggio/Motion Sequencer Grid)
Determines the type of note that serves as the basis for the Quantize or Swing. The parameter value is
displayed in clocks.
For the Motion Sequencer, this parameter value is one step length. This setting is applied to the Part which
is selected as the Sync Part (above).
Settings: 60 (32nd note), 80 (16th note triplet), 120 (16th note), 160 (8th note triplet), 240 (8th note), 320 (1/4 note triplet),
480 (1/4 note)
Random (Super Knob Motion Sequencer Random)
Determines the degree to which the Step Value of the Sequence is randomly changed.
Settings: 0–127
Sync (Super Knob Motion Sequencer Sync)
Determines if the playback of the Motion Sequence applied to the Super Knob is synchronized to the
Tempo, Beat, or Arpeggio of the Performance.
Settings: Off, Tempo, Beat, Arp
Off: Super Knob Motion Sequencer plays back according to its own clock and is not synchronized to an external
clock.
Tempo: Super Knob Motion Sequencer is synchronized with the Performance tempo.
Beat: Super Knob Motion Sequencer is synchronized with the beat.
Arp: Super Knob Motion Sequencer is synchronized with the 1st beat of the measure of the currently playing
Arpeggio.
Performance
Home
Motion Control
Overview
Quick Edit
Arpeggio
Motion Seq
Super Knob
Knob Auto
Mixing
Scene
Play / Rec
MIDI
Audio
Pattern
Smart Morph
Play
Edit
Analyze
Super Knob
Job
Remote
Speed (Super Knob Motion Sequencer Speed)
Determines the speed of the playback of the Motion Sequence.
This parameter is active when the Super Knob Motion Sequencer Sync is “Off.”
Settings: 0–127
Unit Multiply (Super Knob Motion Sequencer Unit Multiply)
Adjusts the Super Knob Motion Sequencer playback time.
This parameter is active when the Super Knob Motion Sequencer Sync is “Off.”
Settings: 50%–6400%, Common
200%: The playback time will be doubled and the tempo is halved.
100% : The normal playback time.
50%: The playback time will be halved and the tempo doubled.
Common: The value set in the Unit Multiply common to the all Parts will be applied.
Key On Reset (Super Knob Motion Sequencer Key On Reset)
Determines whether or not the playback of the Motion Sequence is stopped when you play the keyboard.
This parameter is active when the Super Knob Motion Sequencer Sync is set to something other than
“Arp.”
Also this parameter is not available when “Trigger” is set to “On.”
Settings: Off, Each-On, 1st-On
Each-On: The Sequence resets with each note you play and starts the Sequence from the beginning.
1st-On: The Sequence resets with each note you play and starts the Sequencer from the beginning. If you play a
second note while the first is being held, the Sequence continues cycling according to the same phase as triggered
by the first note—in other words, the Sequence only resets if the first note is released before the second is played.
MODX+ Reference Manual
48
Page 49
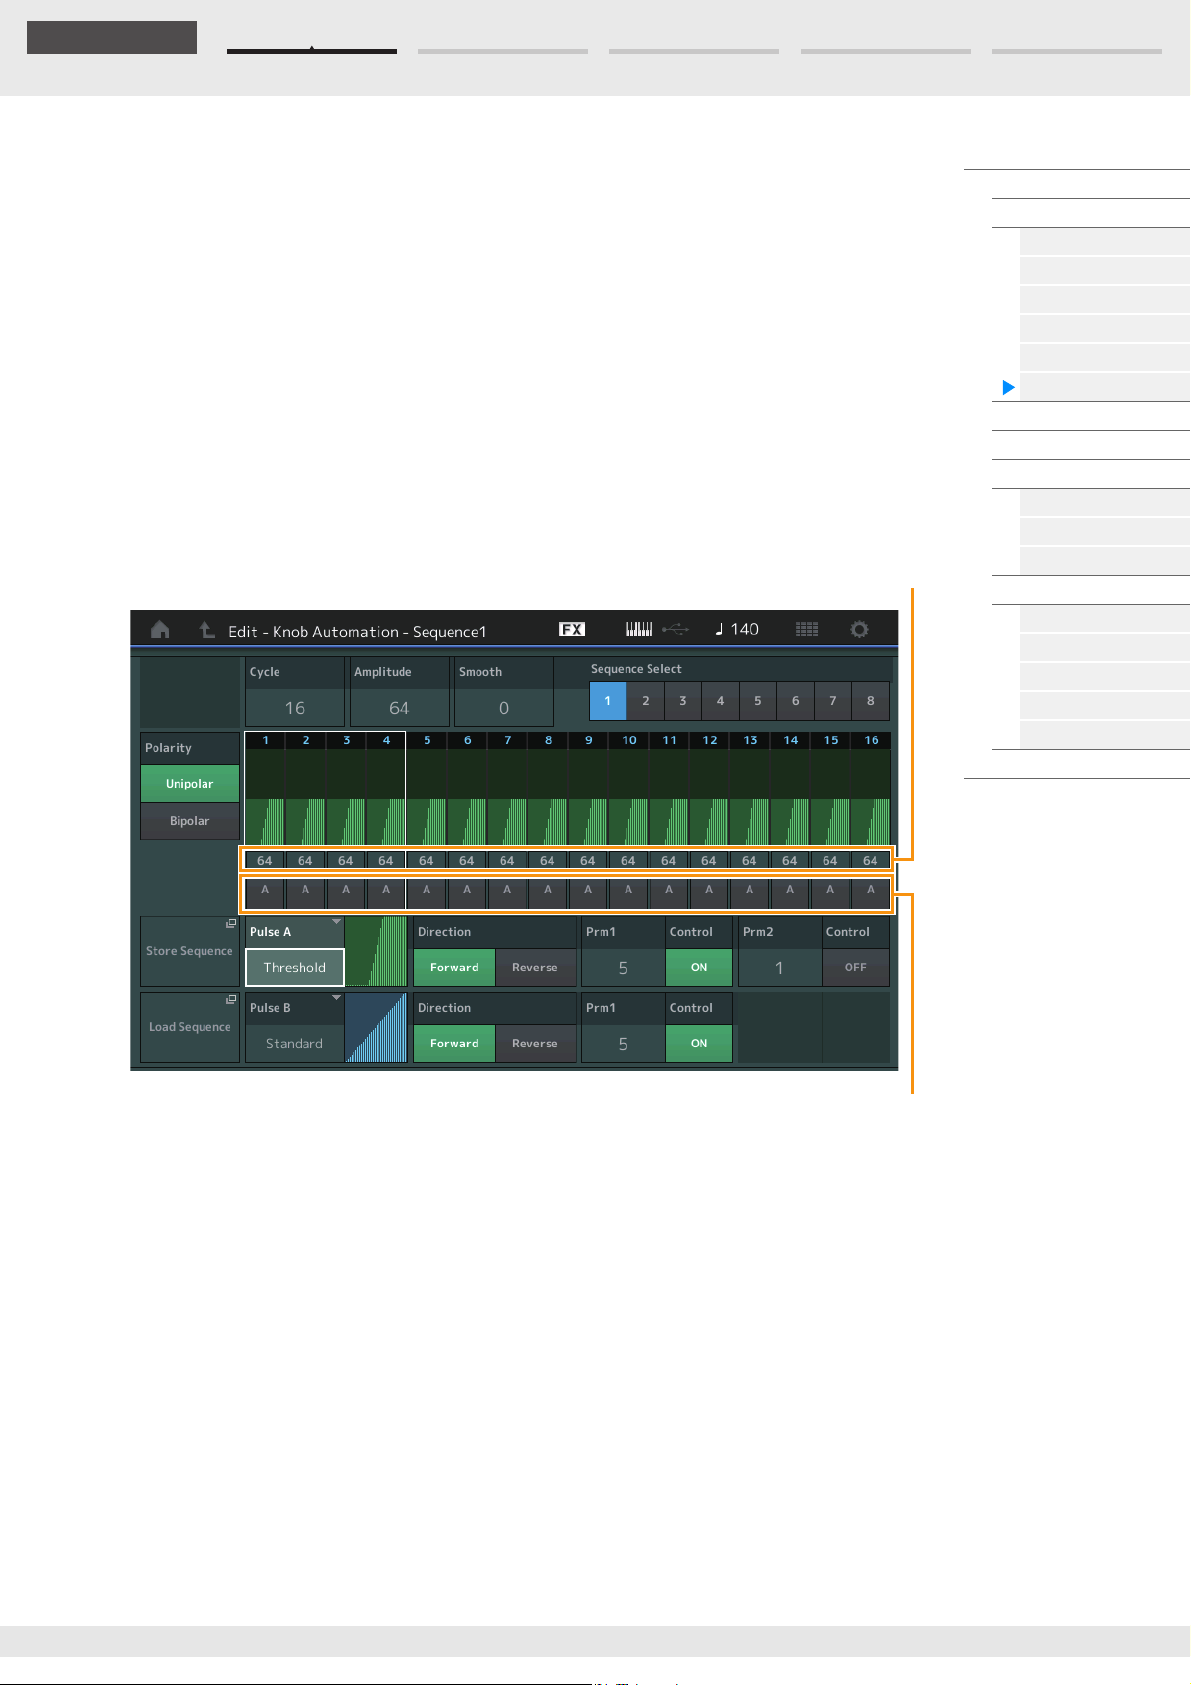
Edit Search Utility Live SetPerformance
Reference
Motion Seq Step Value
Motion Seq Step Type
Loop (Super Knob Motion Sequencer Loop)
Determines whether the Motion Sequence is played only once or repeatedly.
Settings: Off, On
Velocity Limit (Super Knob Motion Sequencer Velocity Limit)
Determines the minimum and maximum Velocity values over which the Motion Sequence responds.
Settings: 1–127
Cycle (Super Knob Motion Sequencer Cycle)
Selects the desired step length for the Motion Sequence.
Settings: 1–16
Load Sequence
Loads Motion Sequence data in the User Memory. For details about Loading, see “Load” (page 240).
Edit Sequence
Calls up the Motion Sequence Setting display. You can create a custom Sequence consisting of up to
sixteen steps.
Performance
Home
Motion Control
Overview
Quick Edit
Arpeggio
Motion Seq
Super Knob
Knob Auto
Mixing
Scene
Play / Rec
MIDI
Audio
Pattern
Smart Morph
Play
Edit
Analyze
Super Knob
Job
Remote
Cycle (Super Knob Motion Sequencer Cycle)
Selects the desired step length for the Motion Sequence.
Settings: 1–16
Amplitude (Super Knob Motion Sequencer Amplitude)
Determines how the entire Motion Sequence changes.
Settings: 0–127
Smooth (Super Knob Motion Sequencer Smoothness)
Determines the smoothness of the time change of the Motion Sequence.
Settings: 0–127
Sequence Select (Super Knob Motion Sequence Select)
Determines the Motion Sequence Type.
By selecting a type and pressing [SHIFT] + [EDIT], you can copy or exchange Motion Sequences. For
details, see “Copying or Exchanging Motion Sequences” (page 133).
Settings: 1–8
MODX+ Reference Manual
49
Page 50
Edit Search Utility Live SetPerformance
Reference
Polarity (Super Knob Motion Sequencer Polarity)
Determines the Sequence Polarity.
Settings: Unipolar, Bipolar
Unipolar: Unipolar changes only in a positive direction from a base parameter value according to the Sequence.
Bipolar: Bipolar changes in both of positive and negative directions from a base parameter value.
Motion Seq Step Value (Super Knob Motion Sequencer Step Value)
Determines the Step Value for the Motion Sequence. You can control the Step Value 1–4, 5–8, 9–12 or 13–
16 by the Control Sliders 1–4 depending on the cursor position on the display.
Settings: 0–127
Motion Seq Step Type (Super Knob Motion Sequencer Step Type)
Determines each Step Type of the Motion Sequence. You can switch between the Step Types A and B for
the Step 1–4, 5–8, 9–12 or 13–16 by the SCENE [1/5]–[4/8] buttons depending on the cursor position on
the display.
Settings: A, B
Pulse A / Pulse B (Super Knob Motion Sequencer Step Curve Type)
Determines the Curve Type of the parameter for each of “Pulse A” and “Pulse B.” “Motion Seq Step Type”
described above determines which curve set here is used for each step. The vertical axis indicates the
step value and the horizontal axis indicates the time. For detail about the curve shapes, see page 140.
Settings: For Preset Bank: Standard, Sigmoid, Threshold, Bell, Dogleg, FM, AM, M, Discrete Saw, Smooth Saw, Triangle,
Square, Trapezoid, Tilt Sine, Bounce, Resonance, Sequence, Hold
For User Bank: User 1–32
When a Library file is read: Curves in Library 1–8
Direction (Super Knob Motion Sequencer Step Curve Direction)
Determines the Direction of the Step Curve for the Motion Sequence.
Settings: Forward, Reverse
Performance
Home
Motion Control
Overview
Quick Edit
Arpeggio
Motion Seq
Super Knob
Knob Auto
Mixing
Scene
Play / Rec
MIDI
Audio
Pattern
Smart Morph
Play
Edit
Analyze
Super Knob
Job
Remote
Prm1 / Prm2 (Super Knob Motion Sequencer Step Curve Parameter)
Adjusts the shape of the Step Curve for the Motion Sequence.
This parameter is not available depending on the Curve Type. Also the range of available parameter
values differs depending on the Curve Type.
Control (Super Knob Motion Sequencer Step Curve Shape Control Switch)
Determines whether or not to control the shape of the Step Curve for the Motion Sequence by operating
Knobs. This parameter is displayed only when “MS FX” is set to on. Also this parameter is not available
depending on the Curve Type.
Settings: Off, On
Store Sequence
Stores the edited Motion Sequence data. For details about storing data, see “Store/Save” (page 244).
MODX+ Reference Manual
50
Page 51
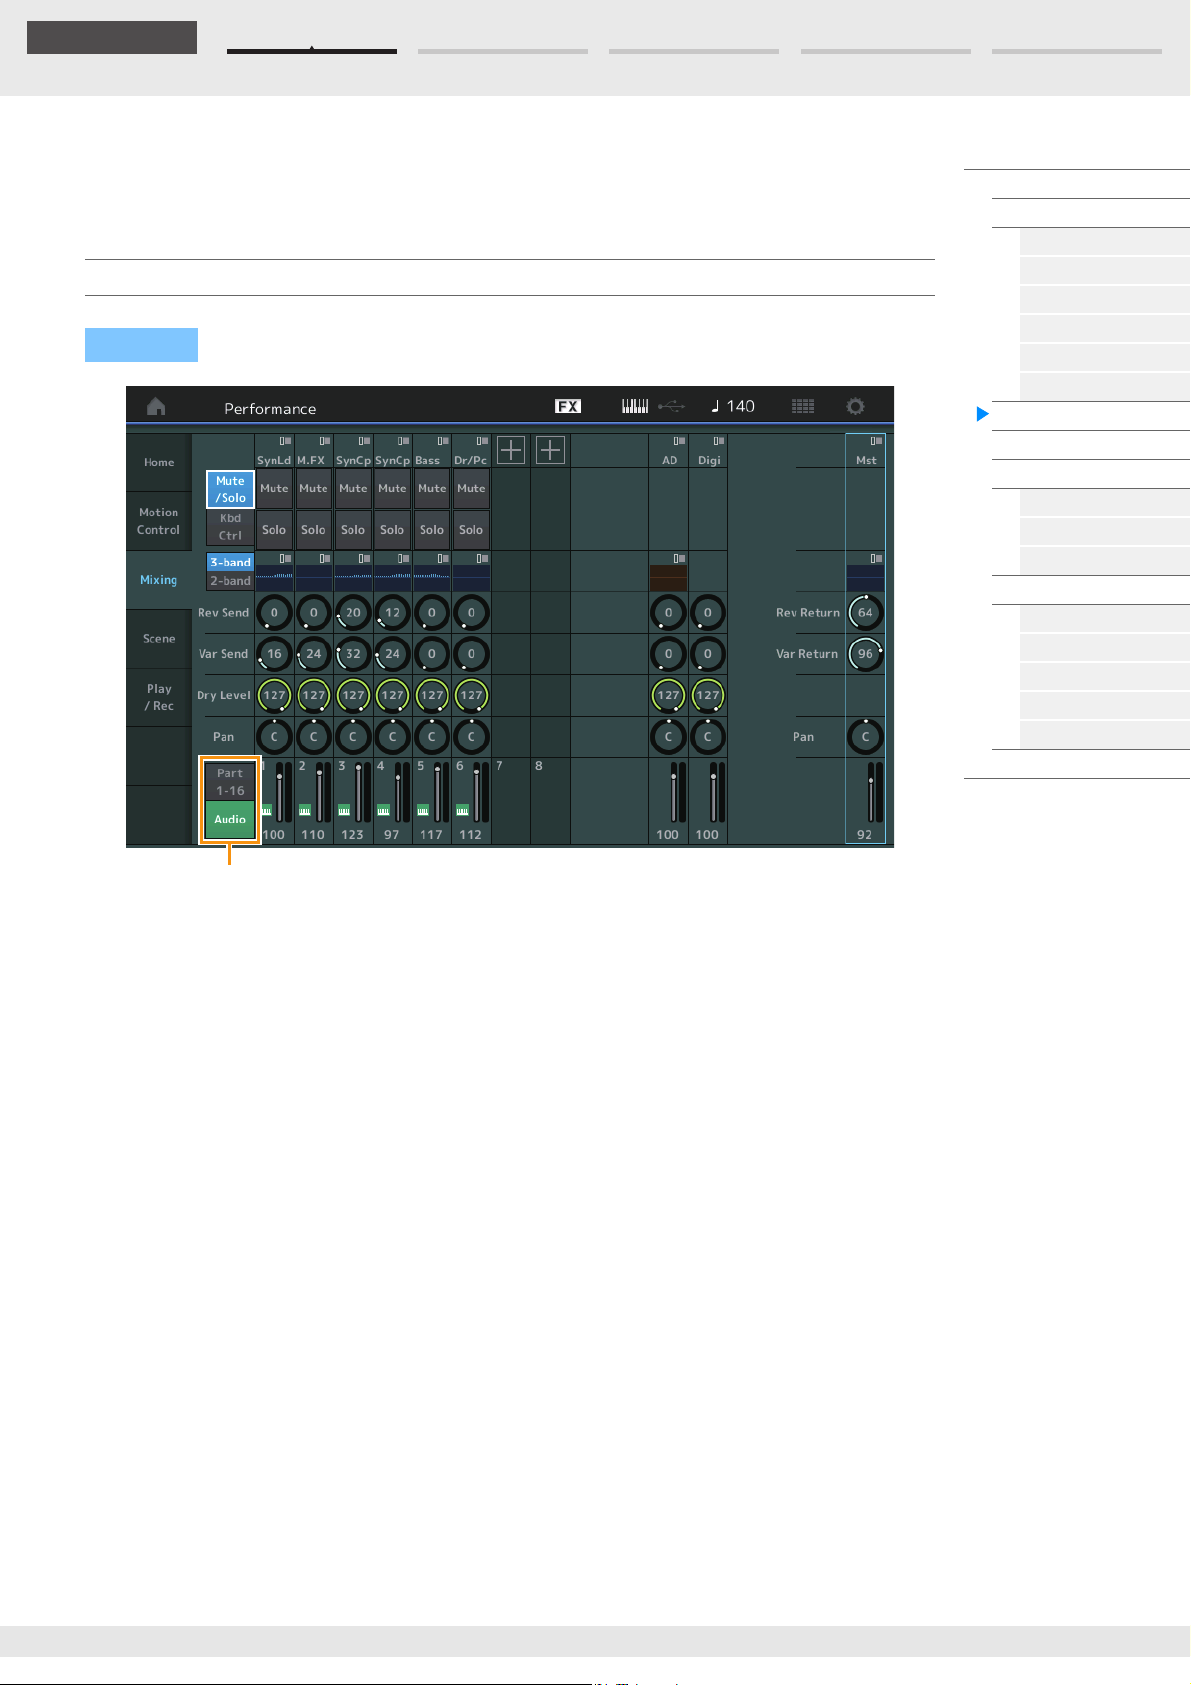
Edit Search Utility Live SetPerformance
Reference
Part 1-16 / Audio Switch
Mixing
From the Mixing display you can adjust the volume and effect settings for each Part.
NOTE The settings in the Mixing display are stored as part of Performance data.
Mixing
Operation
[PERFORMANCE (HOME)] [Mixing]
Performance
Home
Motion Control
Overview
Quick Edit
Arpeggio
Motion Seq
Super Knob
Knob Auto
Mixing
Scene
Play / Rec
MIDI
Audio
Pattern
Smart Morph
Play
Edit
Analyze
Super Knob
Job
Remote
Part 1-16 / Audio Switch
Switches between the displays of the Mixing settings for Parts 1–16 or the Mixing settings for Parts 1–8, the
Audio Part, the Digital Part, and the Master.
Settings: Part 1-16, Audio
MODX+ Reference Manual
51
Page 52
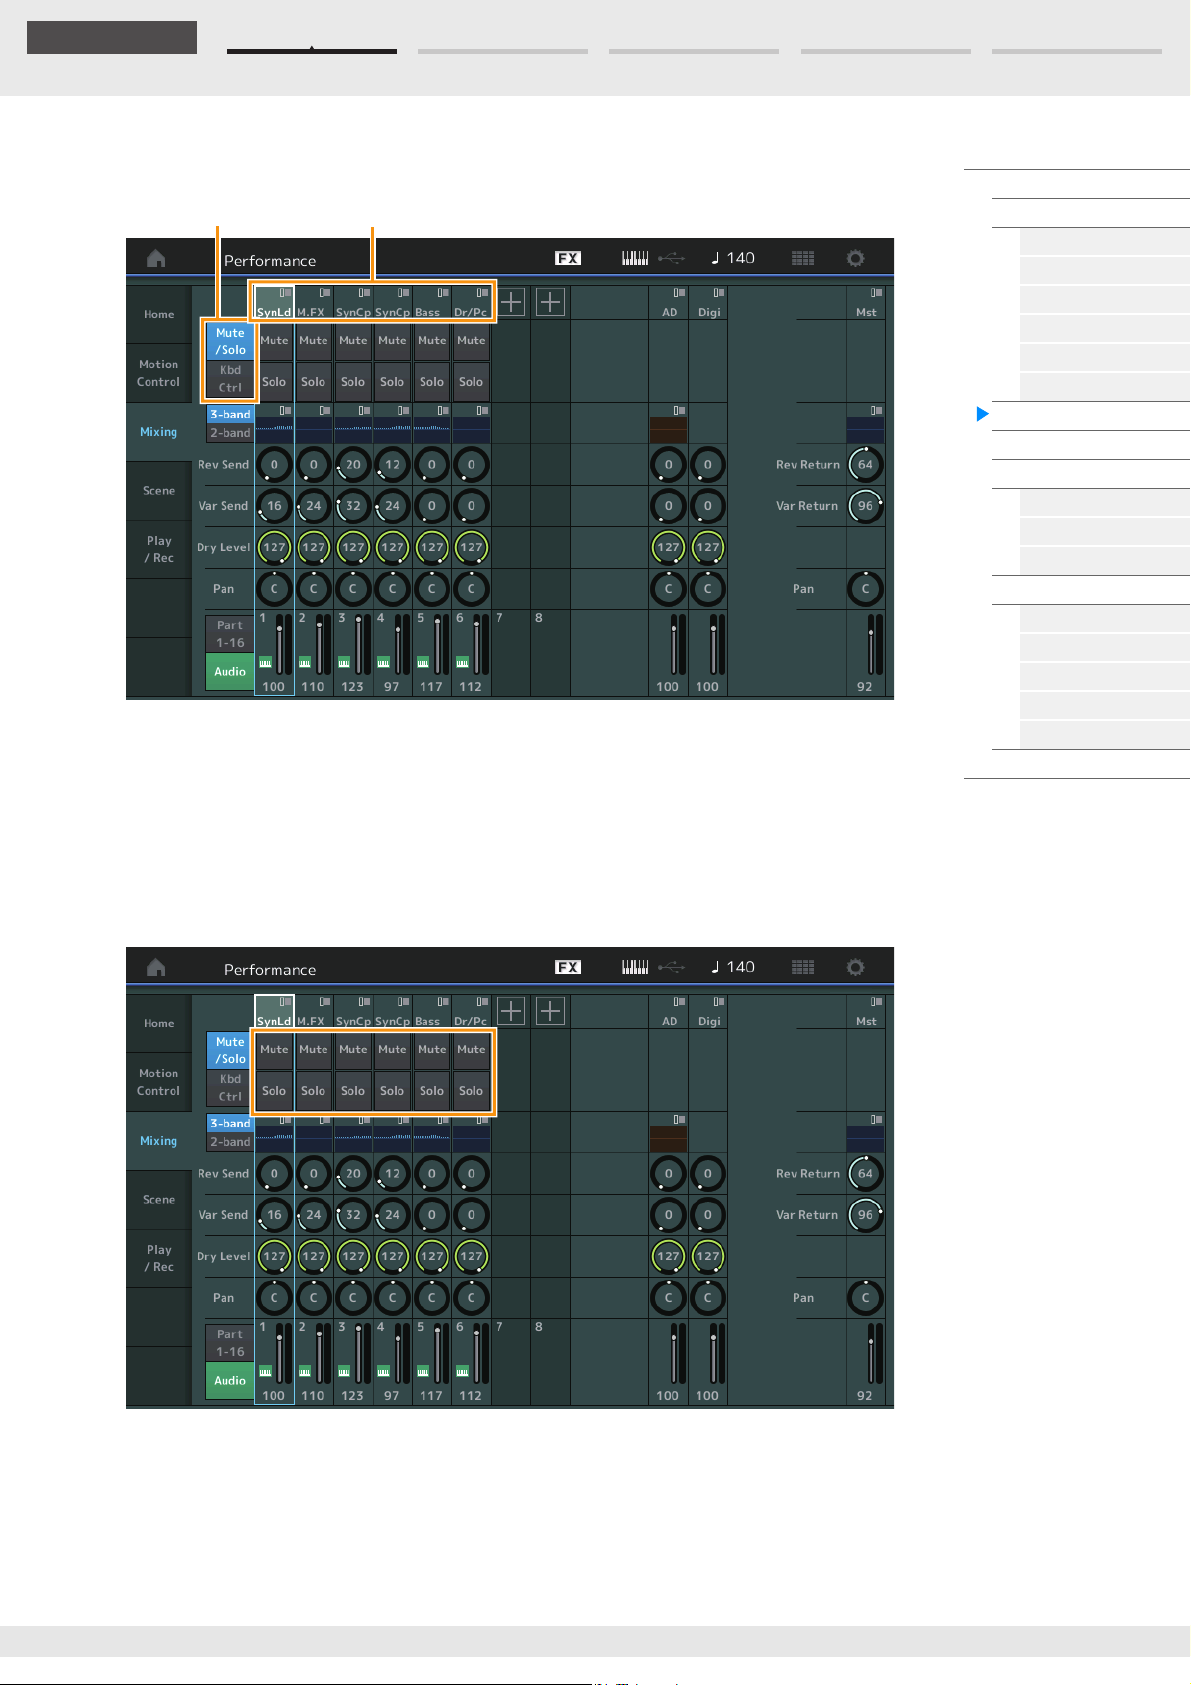
Edit Search Utility Live SetPerformance
Reference
Function Switch Part Category
When one of Parts 1–16 is selected
Determines the Mixing setting for each Part 1–16.
Part Category
Indicates the Main category for the Part.
Settings: See the Data List PDF document.
Performance
Home
Motion Control
Overview
Quick Edit
Arpeggio
Motion Seq
Super Knob
Knob Auto
Mixing
Scene
Play / Rec
MIDI
Audio
Pattern
Smart Morph
Play
Edit
Analyze
Super Knob
Job
Remote
Function Switch
Determines the Mute/Solo setting and the Keyboard Control settings for the selected Part 1–16.
Settings: Mute/Solo, Kbd Ctrl
• When “Mute/Solo” is selected
Mute/Solo (Part Mute/Solo)
Turns the Mute/Solo function on/off for the selected Part 1–16. When the function is on, this button
lights.
Settings: Off, On
MODX+ Reference Manual
52
Page 53
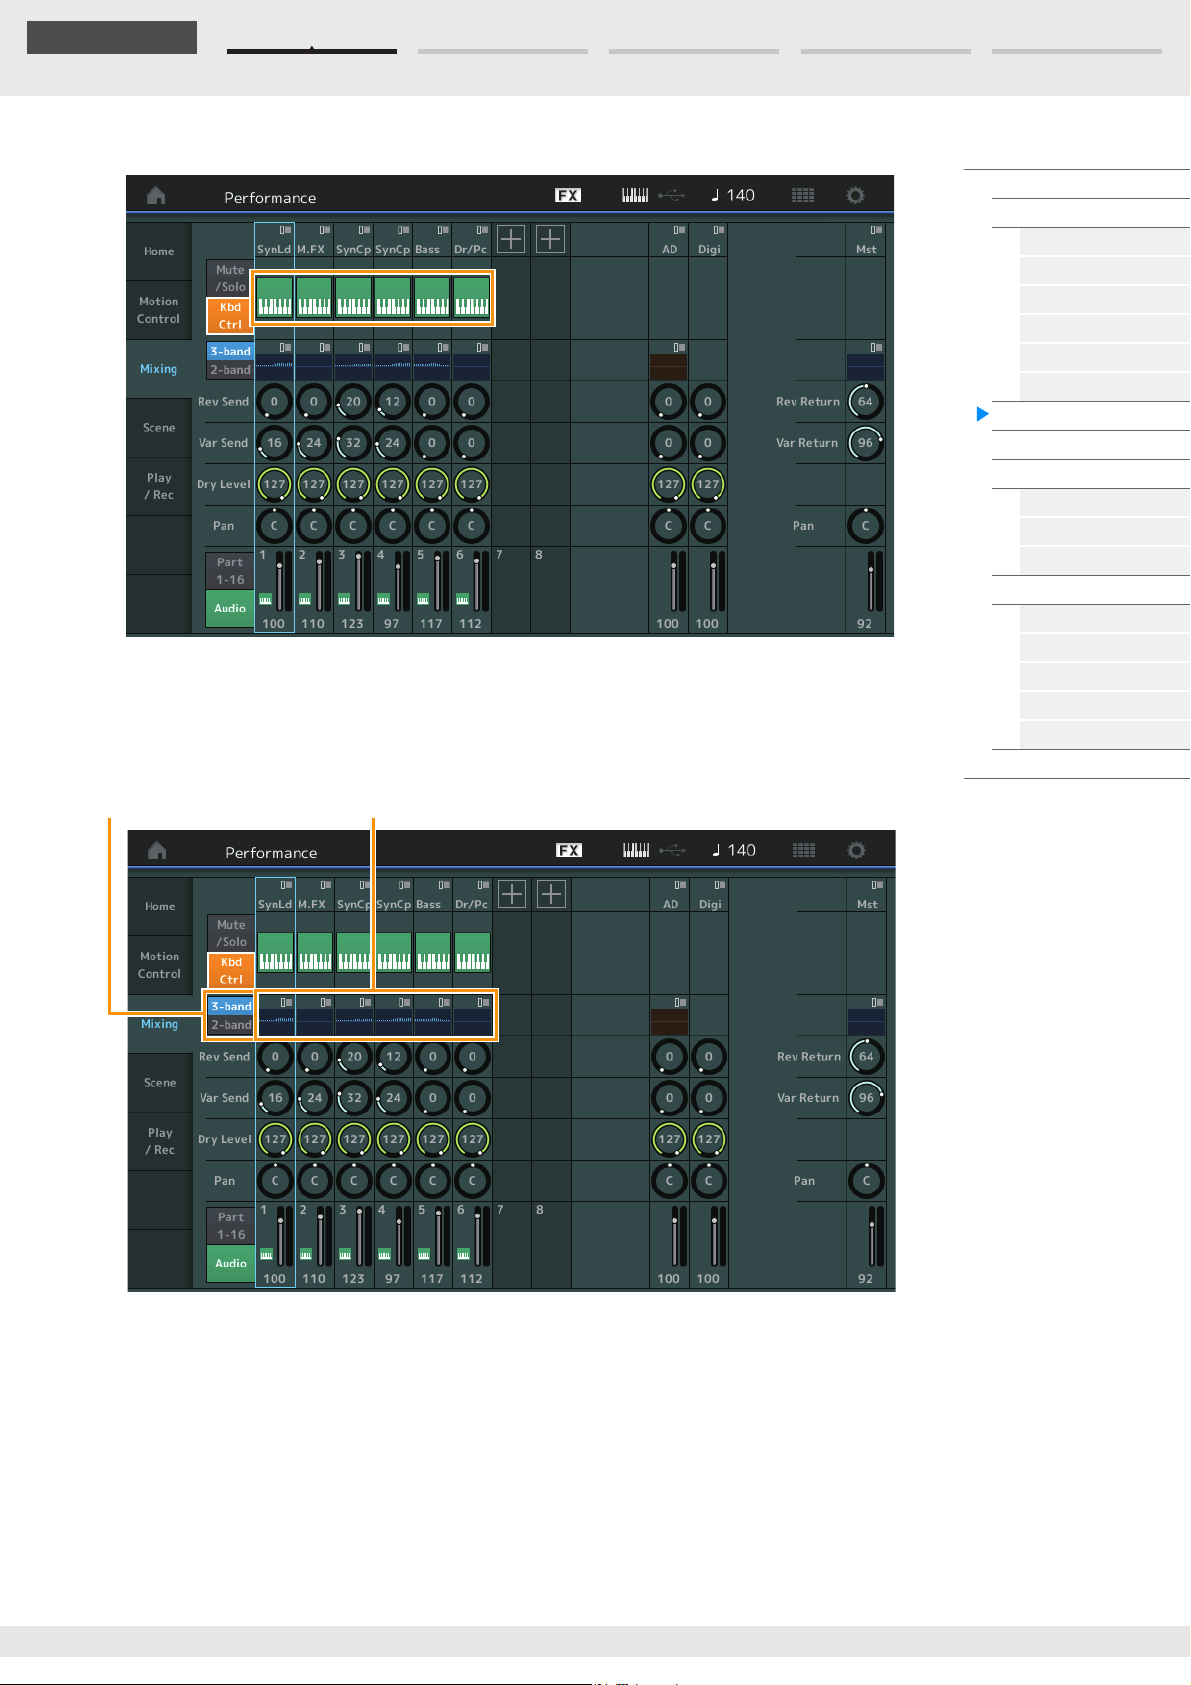
Edit Search Utility Live SetPerformance
Reference
3-band/2-band Switch
EQ
• When “Kbd Ctrl” is selected
Kbd Ctrl (Keyboard Control)
Turns the Keyboard Control function on/off for the selected Part 1–8. When the function is on, this
button lights.
Settings: Off, On
Performance
Home
Motion Control
Overview
Quick Edit
Arpeggio
Motion Seq
Super Knob
Knob Auto
Mixing
Scene
Play / Rec
MIDI
Audio
Pattern
Smart Morph
Play
Edit
Analyze
Super Knob
Job
Remote
3-band/2-band Switch (3-band EQ/2-band EQ Switch)
Switches between the displays of the 3-band EQ or the 2-band EQ for Parts 1–16.
Settings: 3-band, 2-band
EQ (Equalizer)
Displays the 3-band EQ or the 2-band EQ depending on the “3-band/2-band” setting.
Touching the button calls up the menu of Part EQ Edit.
Rev Send (Reverb Send)
Adjusts the Reverb send level of the selected Part 1–16.
Settings: 0–127
MODX+ Reference Manual
53
Page 54
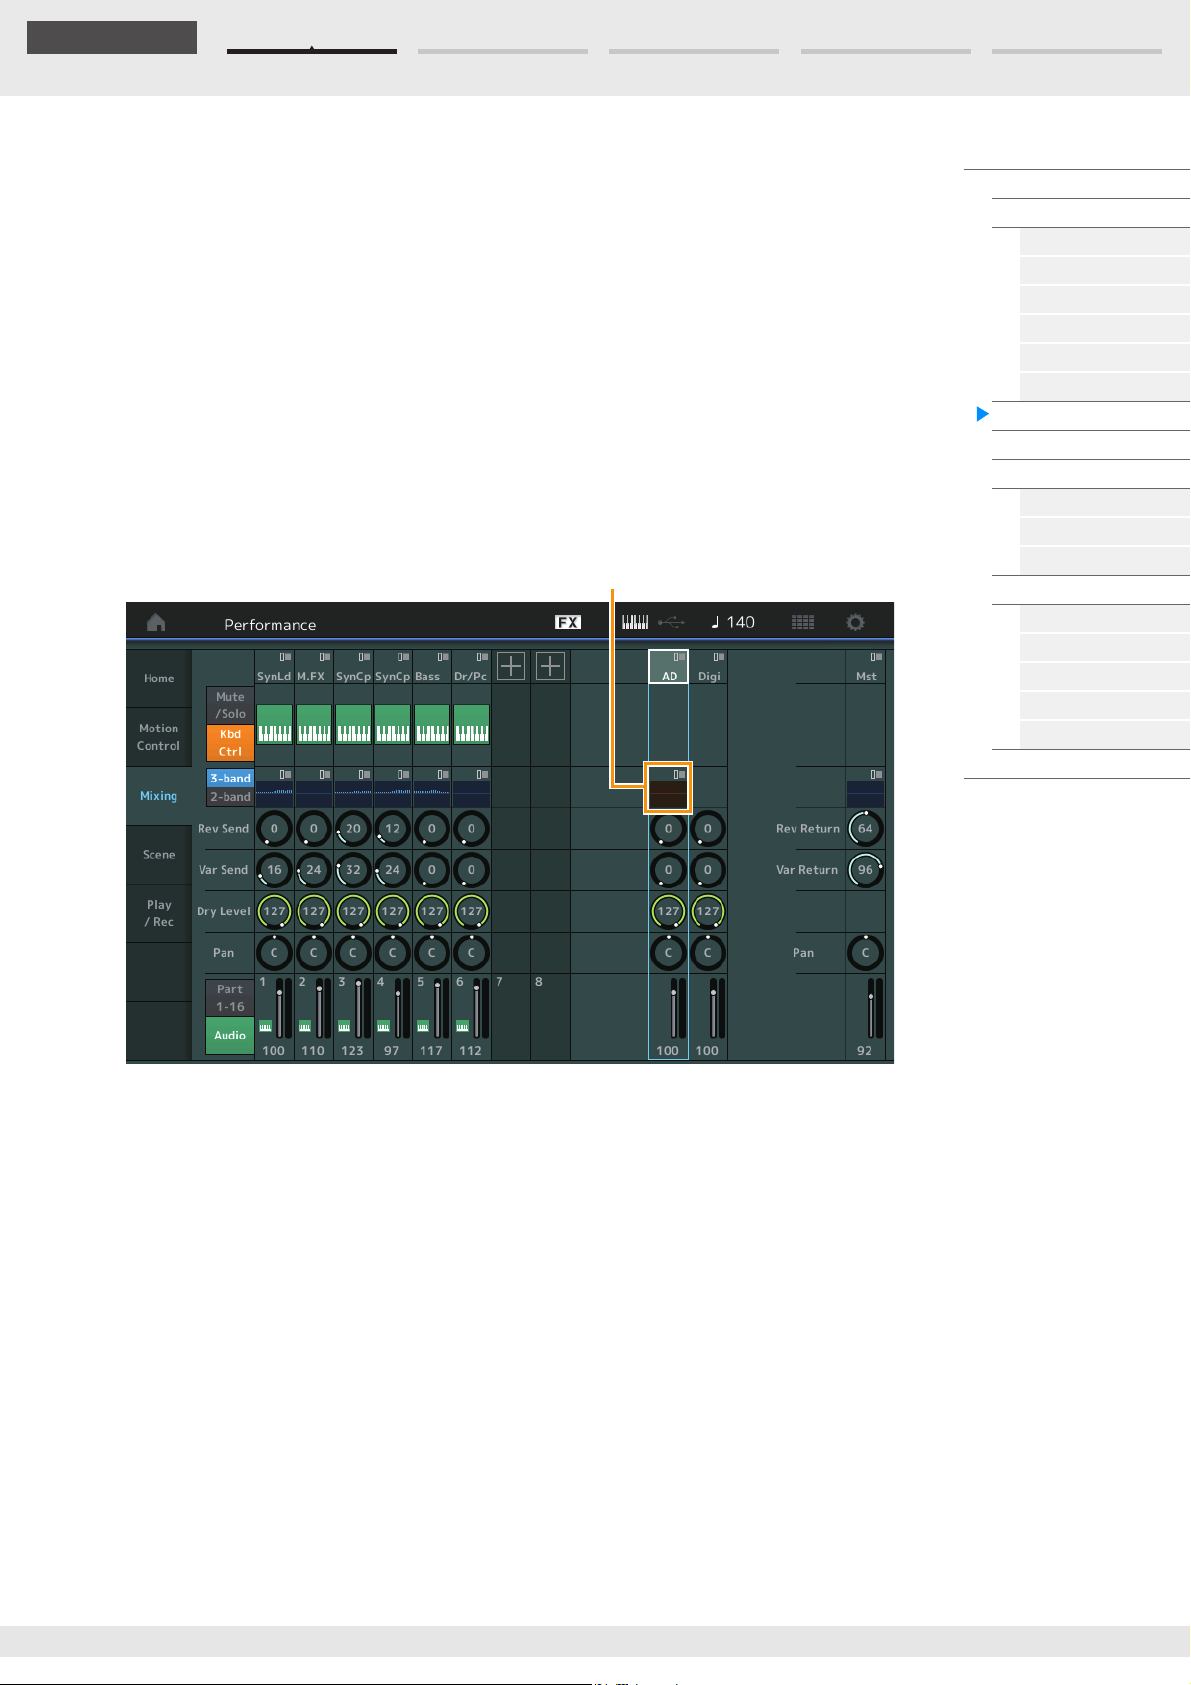
Edit Search Utility Live SetPerformance
Reference
A/D Part EQ
Var Send (Variation Send)
Adjusts the Variation send level of the selected Part 1–16.
Settings: 0–127
Dry Level
Determines the level of the unprocessed (dry) sound of the selected Part 1–16.
Settings: 0–127
Pan
Determines the stereo pan position of the selected Part 1–16.
Settings: L63–C–R63
Volume (Part Volume)
Determines the output level of the selected Part 1–16.
Settings: 0–127
When “AD” Audio Part or “Digi” Digital Part is selected
Determines the Mixing setting of the Audio/Digital Part.
Performance
Home
Motion Control
Overview
Quick Edit
Arpeggio
Motion Seq
Super Knob
Knob Auto
Mixing
Scene
Play / Rec
MIDI
Audio
Pattern
Smart Morph
Play
Edit
Analyze
Super Knob
Job
Remote
A/D Part EQ (Audio Part Equalizer)
Displays the 2-band parametric EQ.
Touching the button calls up the menu of Common/Audio Part EQ Edit.
A/D Part Rev Send (Audio Part Reverb Send)
Digital Part Rev Send (Digital Part Reverb Send)
Adjusts the Reverb send level of the Audio Part/Digital Part.
Settings: 0–127
A/D Part Var Send (Audio Part Variation Send)
Digital Part Var Send (Digital Part Variation Send)
Adjusts the Variation send level of the Audio Part/Digital Part.
Settings: 0–127
A/D Part Dry Level (Audio Part Dry Level)
Digital Part Dry Level
Determines the level of the unprocessed (dry) sound of the Audio Part/Digital Part.
Settings: 0–127
MODX+ Reference Manual
54
Page 55
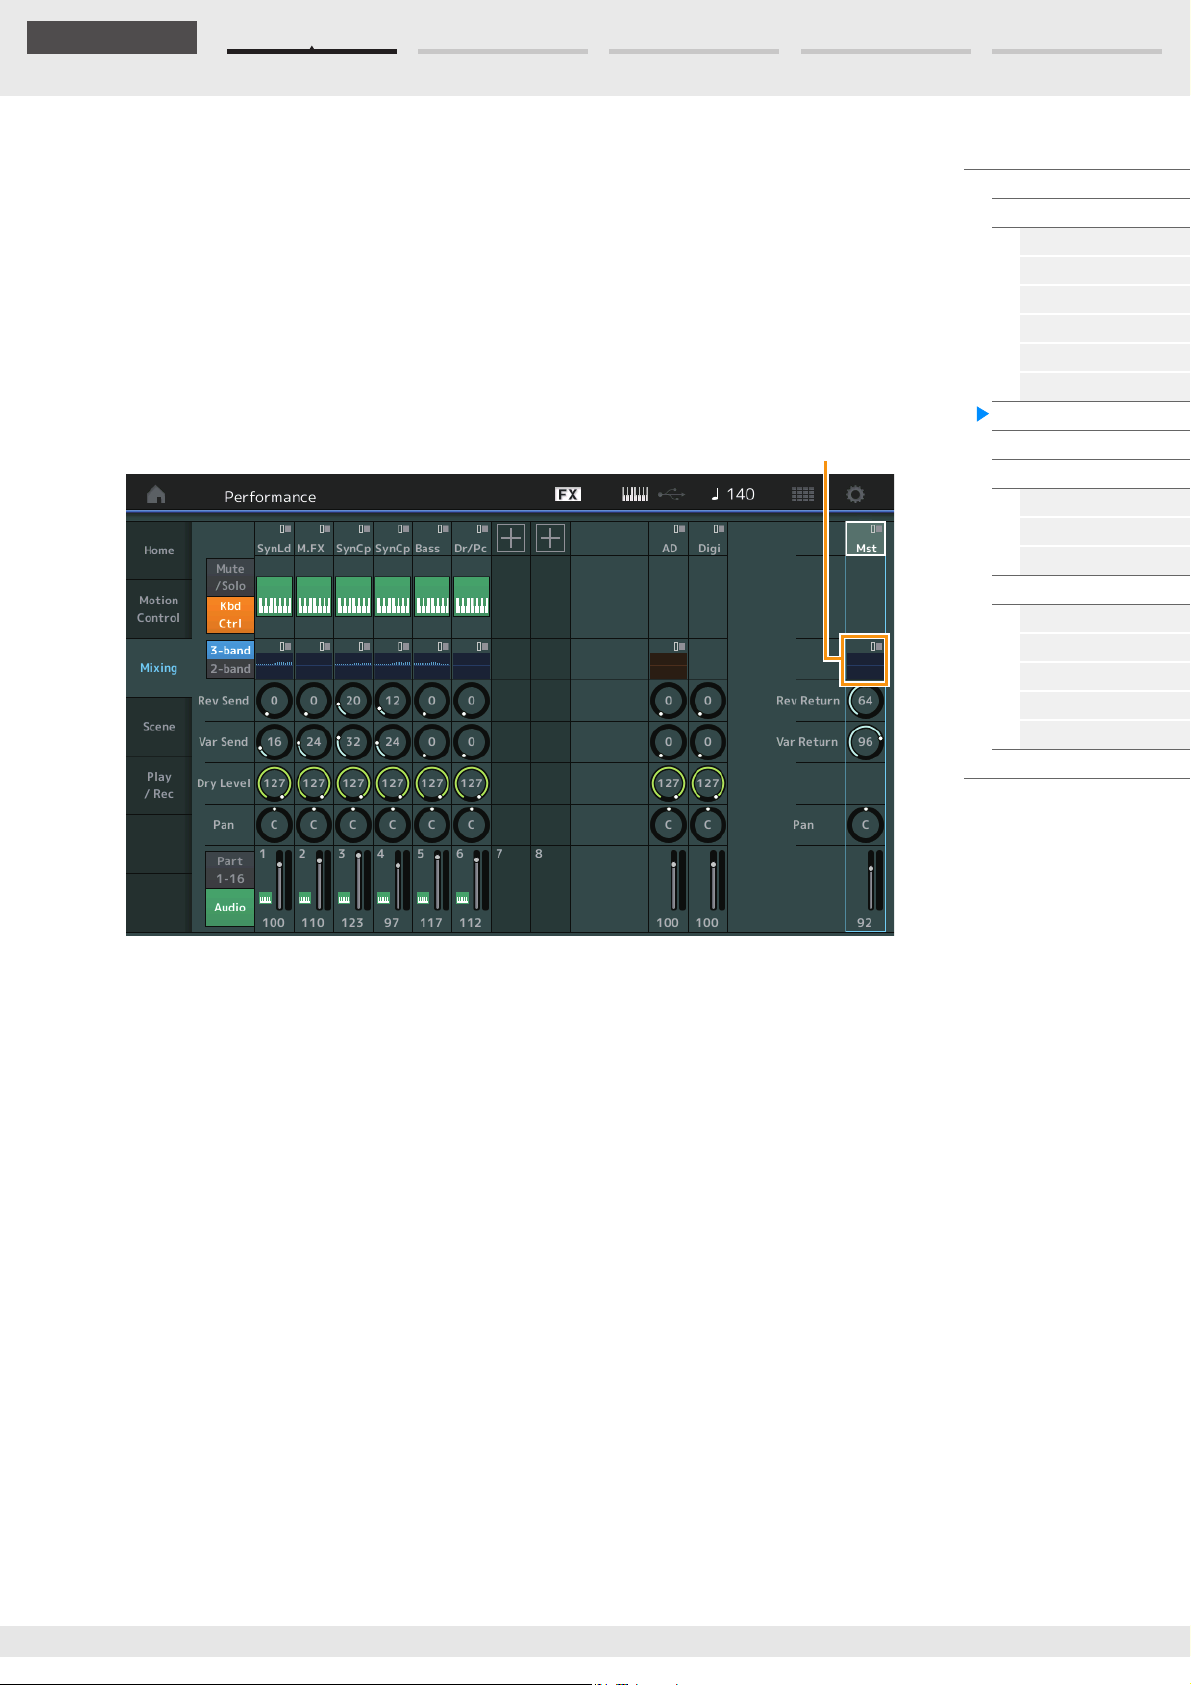
Edit Search Utility Live SetPerformance
Reference
Master EQ
A/D Part Pan (Audio Part Pan)
Digital Part Pan
Determines the stereo pan position of the Audio Part/Digital Part.
Settings: L63–C–R63
A/D Volume (Audio Part Volume)
Digital Part Volume
Determines the output level of the Audio Part/Digital Part.
Settings: 0–127
When “Mst” (Master Part) is selected
Determines the Master Mixing settings.
Performance
Home
Motion Control
Overview
Quick Edit
Arpeggio
Motion Seq
Super Knob
Knob Auto
Mixing
Scene
Play / Rec
MIDI
Audio
Pattern
Smart Morph
Play
Edit
Analyze
Super Knob
Job
Remote
Master EQ (Master Equalizer)
Displays the 5-band parametric EQ.
Touching the button calls up the menu of Master EQ Edit.
Rev Return (Reverb Return)
Var Return (Variation Return)
Determines the return level of the Reverb/Variation effect.
Settings: 0–127
Pan (Performance Pan)
Determines the stereo pan position of the entire Performance. This parameter offsets the same
parameter in the Part Edit setting.
Settings: L63–C–R63
Performance Volume
Determines the output level of the entire Performance.
Settings: 0–127
MODX+ Reference Manual
55
Page 56
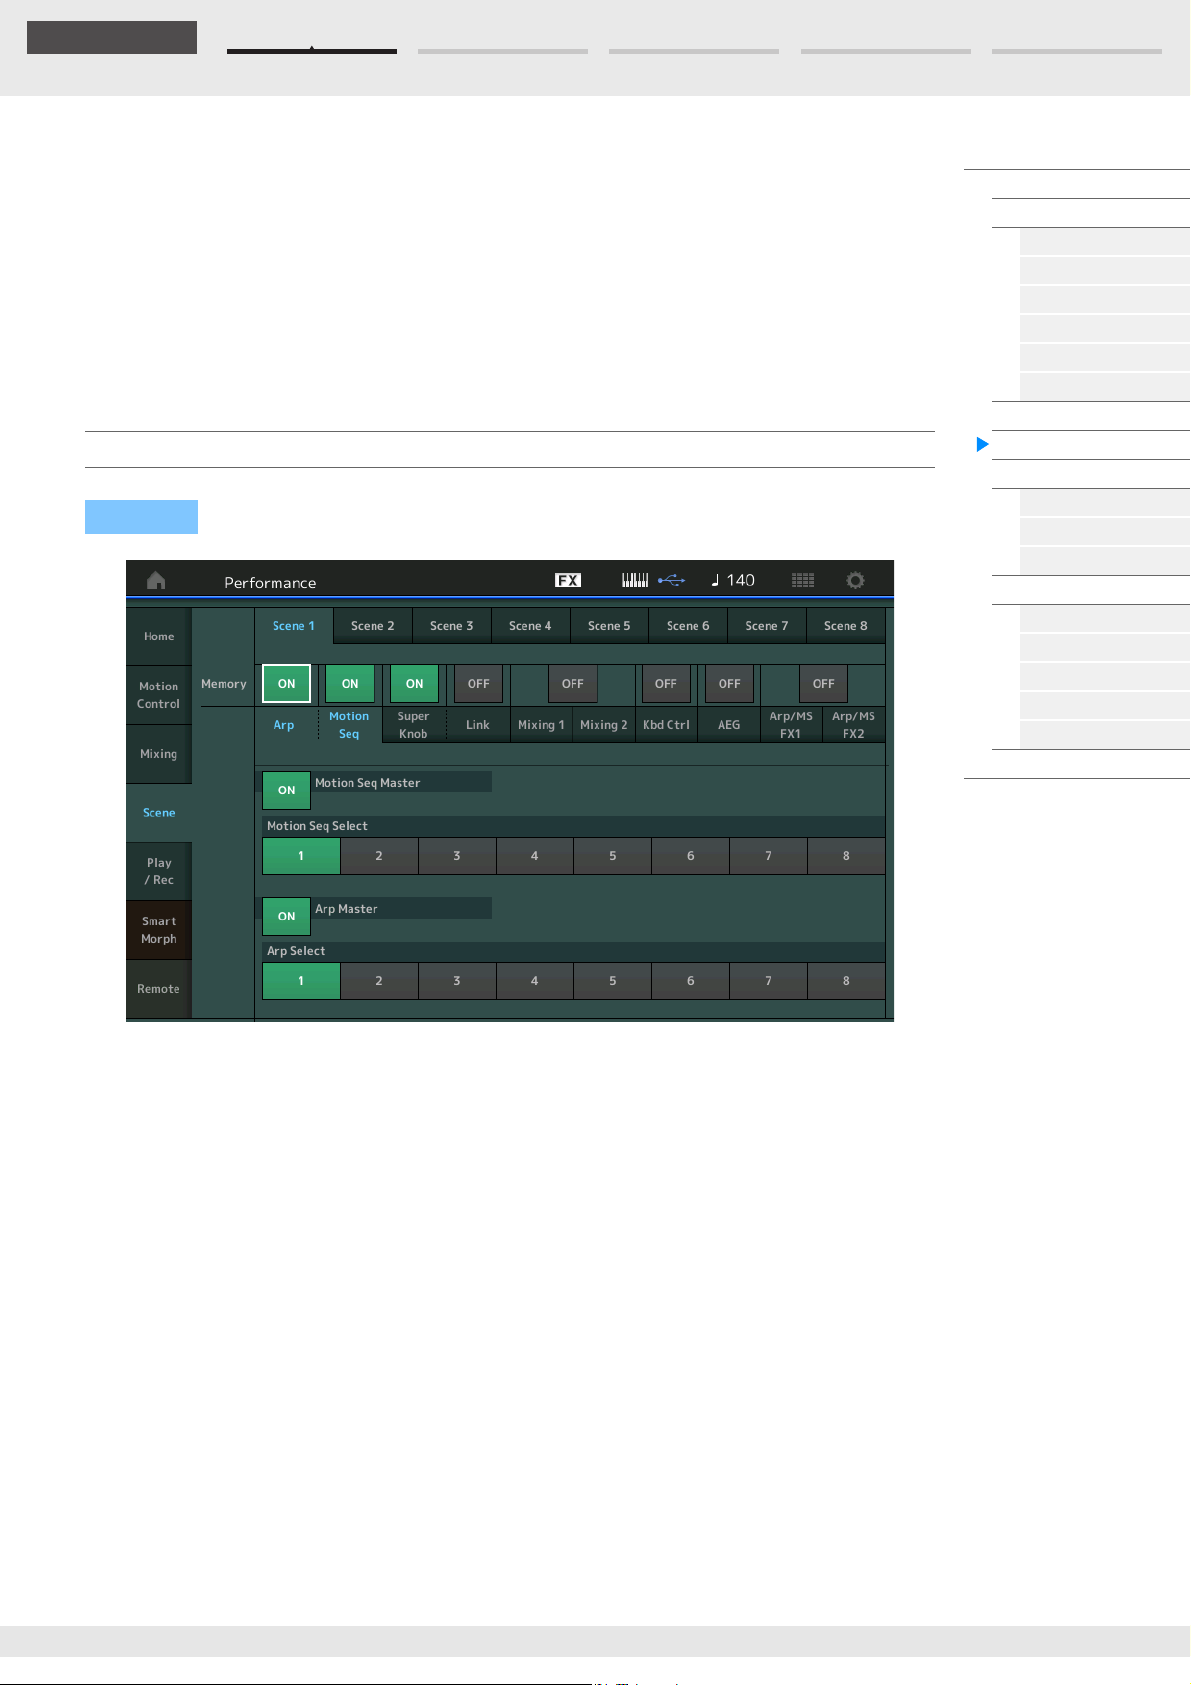
Edit Search Utility Live SetPerformance
Reference
Scene
With the Scene function, you can store all parameter settings such as Arpeggio type, Motion Sequencer
type, and the Part parameter values together as a “Scene.” There are eight Scenes and you can select
them by pressing the [SCENE] button. From the Scene display you can edit parameters related to the
Scene function.
When [Memory] is turned on for the function, the Motion Sequencer type, or the Arpeggio type, the
corresponding function information is automatically memorized to the currently selected [SCENE] button.
For information on how to use the Scene function, see the Owner’s Manual.
NOTE You can also change Scene Settings from any other operation displays. To do this, set the parameter value
available for the Scene by operating the corresponding Knob or Control Slider, and press one of the SCENE [1/
5]–[4/8] buttons while holding down the [SHIFT] button. Scenes 1 to 8 are assigned to each button.
Scene
Operation
[PERFORMANCE (HOME)] [Scene]
Performance
Home
Motion Control
Overview
Quick Edit
Arpeggio
Motion Seq
Super Knob
Knob Auto
Mixing
Scene
Play / Rec
MIDI
Audio
Pattern
Smart Morph
Play
Edit
Analyze
Super Knob
Job
Remote
Scene Select
Switches Scenes by selecting tabs. This setting is applied to the SCENE [1/5]–[4/8] buttons on the panel.
Settings: 1–8
Memory (Memorize Switch)
Determines whether or not to memorize each parameter (such as Arpeggio, Motion Sequencer, Super
Knob, Super Knob Link, Mixing, Amplitude EG, and Arp/MS FX) as a Scene. When this is off, the parameter
is not displayed even when the corresponding tab is selected.
Settings: Off, On
When the “Arp/Motion Seq” tab is selected and both Memorize Switches for “Arp” and
“Motion Seq” are set to ON
Motion Seq Master (Motion Sequencer Master Switch)
Determines whether Motion Sequencer is set to ON or OFF for the entire Performance in the selected
Scene.
Settings: Off, On
Motion Seq Select (Motion Sequence Select)
Determines the Motion Sequence type for the selected Scene.
By selecting a type and pressing [SHIFT] + [EDIT], you can copy or exchange Motion Sequences. For
details, see “Copying or Exchanging Motion Sequences” (page 133).
Settings: 1–8
MODX+ Reference Manual
56
Page 57
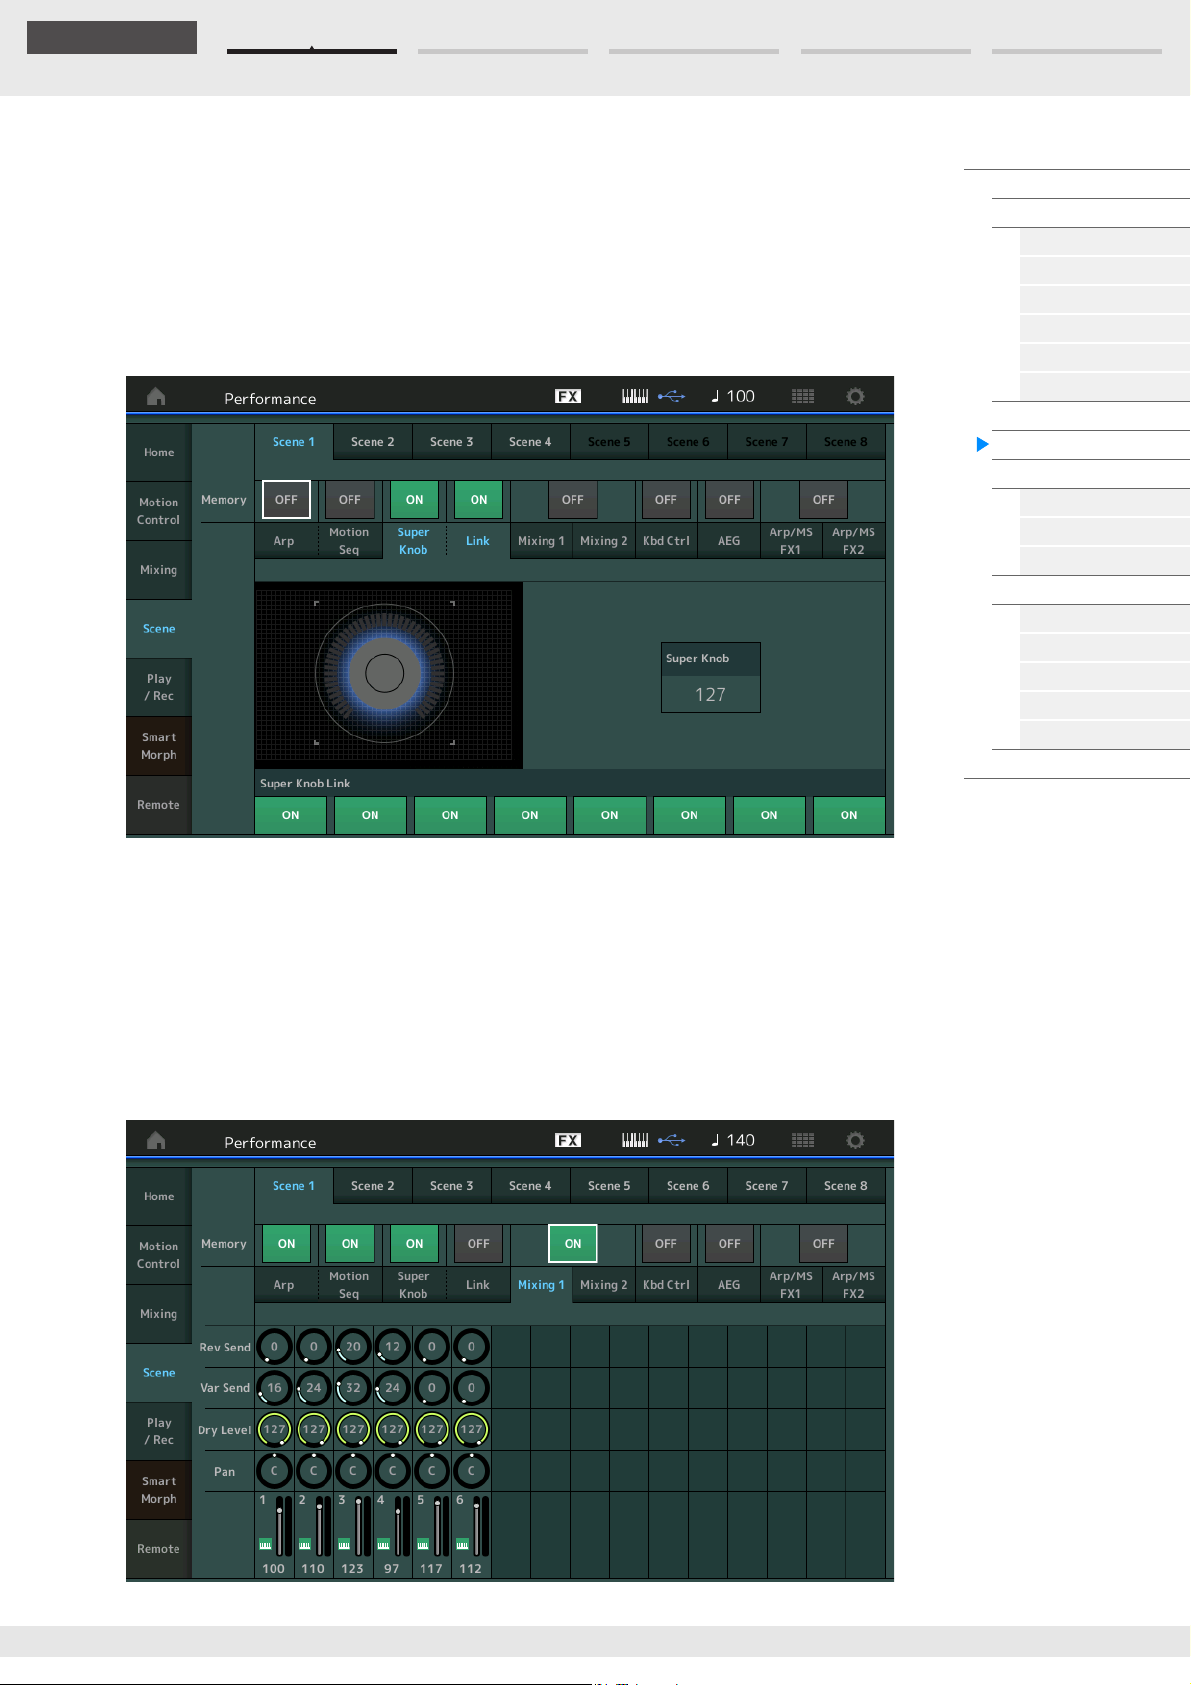
Edit Search Utility Live SetPerformance
Reference
Arp Master (Arpeggio Master Switch)
Determines whether Arpeggio is set to ON or OFF for the entire Performance in the selected Scene.
Settings: Off, On
Arp Select (Arpeggio Select)
Determines the Arpeggio type for the selected Scene.
Settings: 1–8
When the “Super Knob/Link” tab is selected and both Memorize Switches for “Super
Knob” and “Link” are set to ON
Performance
Home
Motion Control
Overview
Quick Edit
Arpeggio
Motion Seq
Super Knob
Knob Auto
Mixing
Scene
Play / Rec
MIDI
Audio
Pattern
Smart Morph
Play
Edit
Analyze
Super Knob
Job
Remote
Super Knob (Super Knob Value)
Determines the Super Knob Value for the selected Scene.
Settings: 0–127
Super Knob Link
Determines whether the Assignable Knobs 1-8 on the selected Scene are affected by Super Knob
operations or not. Assignable Knobs set to Off are not affected by Super Knob operations.
Settings: Off, On
When the “Mixing 1” tab is selected and the corresponding Memorize Switch is set to
ON
MODX+ Reference Manual
57
Page 58
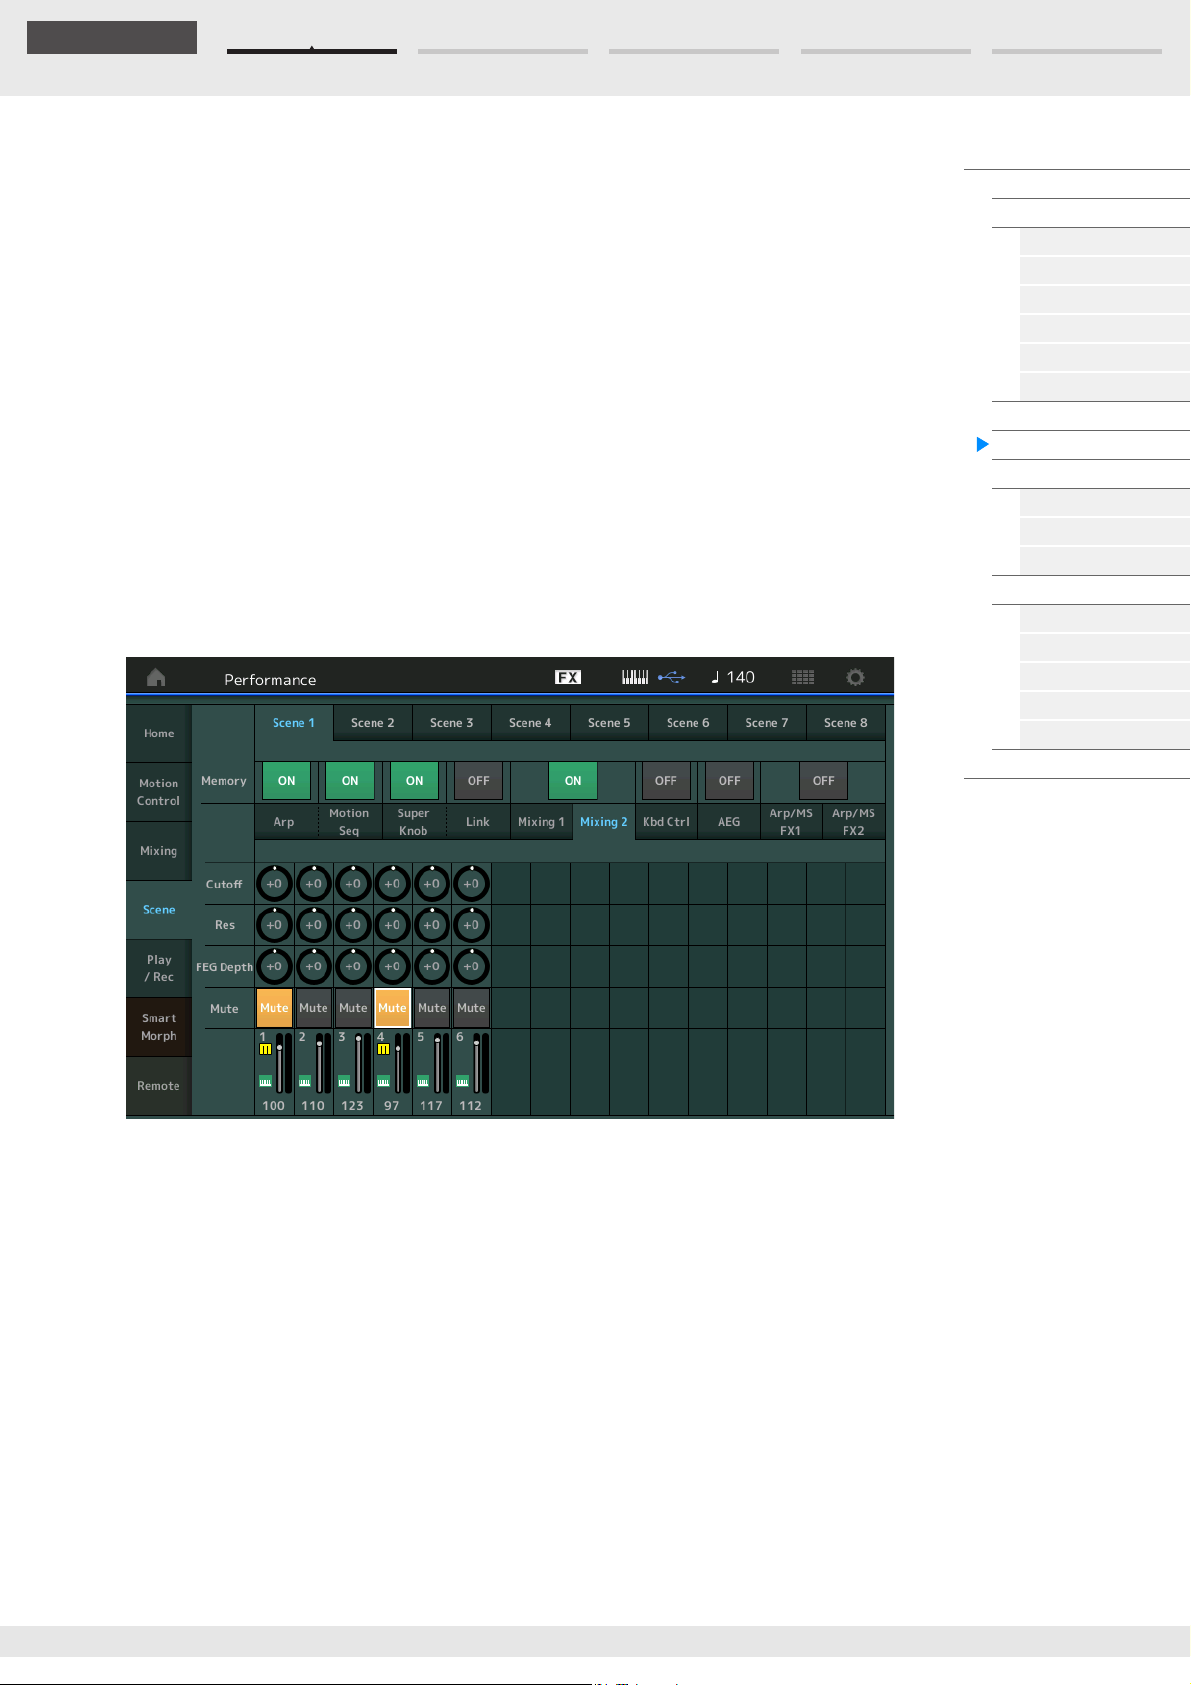
Edit Search Utility Live SetPerformance
Reference
Rev Send (Reverb Send)
Adjusts the Reverb Send level of each Part in the selected Scene.
Settings: 0–127
Var Send (Variation Send)
Adjusts the Variation Send level of each Part in the selected Scene.
Settings: 0–127
Dry Level
Determines the level of the unprocessed (dry) sound for each Part in the selected Scene.
Settings: 0–127
Pan
Determines the stereo pan position for each Part in the selected Scene.
Settings: L63–C–R63
Volume (Part Volume)
Determines the volumes of each Part in the selected Scene.
Settings: 0–127
When the “Mixing 2” tab is selected and the corresponding Memorize Switch is set to
ON
Performance
Home
Motion Control
Overview
Quick Edit
Arpeggio
Motion Seq
Super Knob
Knob Auto
Mixing
Scene
Play / Rec
MIDI
Audio
Pattern
Smart Morph
Play
Edit
Analyze
Super Knob
Job
Remote
Cutoff
Determines the Cutoff frequency for each Part in the selected Scene.
Settings: -64 – +63
Res (Resonance)
Determines the resonance for each Part in the selected Scene.
Settings: -64 – +63
FEG Depth
Determines the Filter Envelope Generator depth (amount of Cutoff Frequency) for each Part in the
selected Scene.
Settings: -64 – +63
Mute (Part Mute)
Determines the Mute setting for each Part in the selected Scene.
Settings: Off, On
MODX+ Reference Manual
58
Page 59
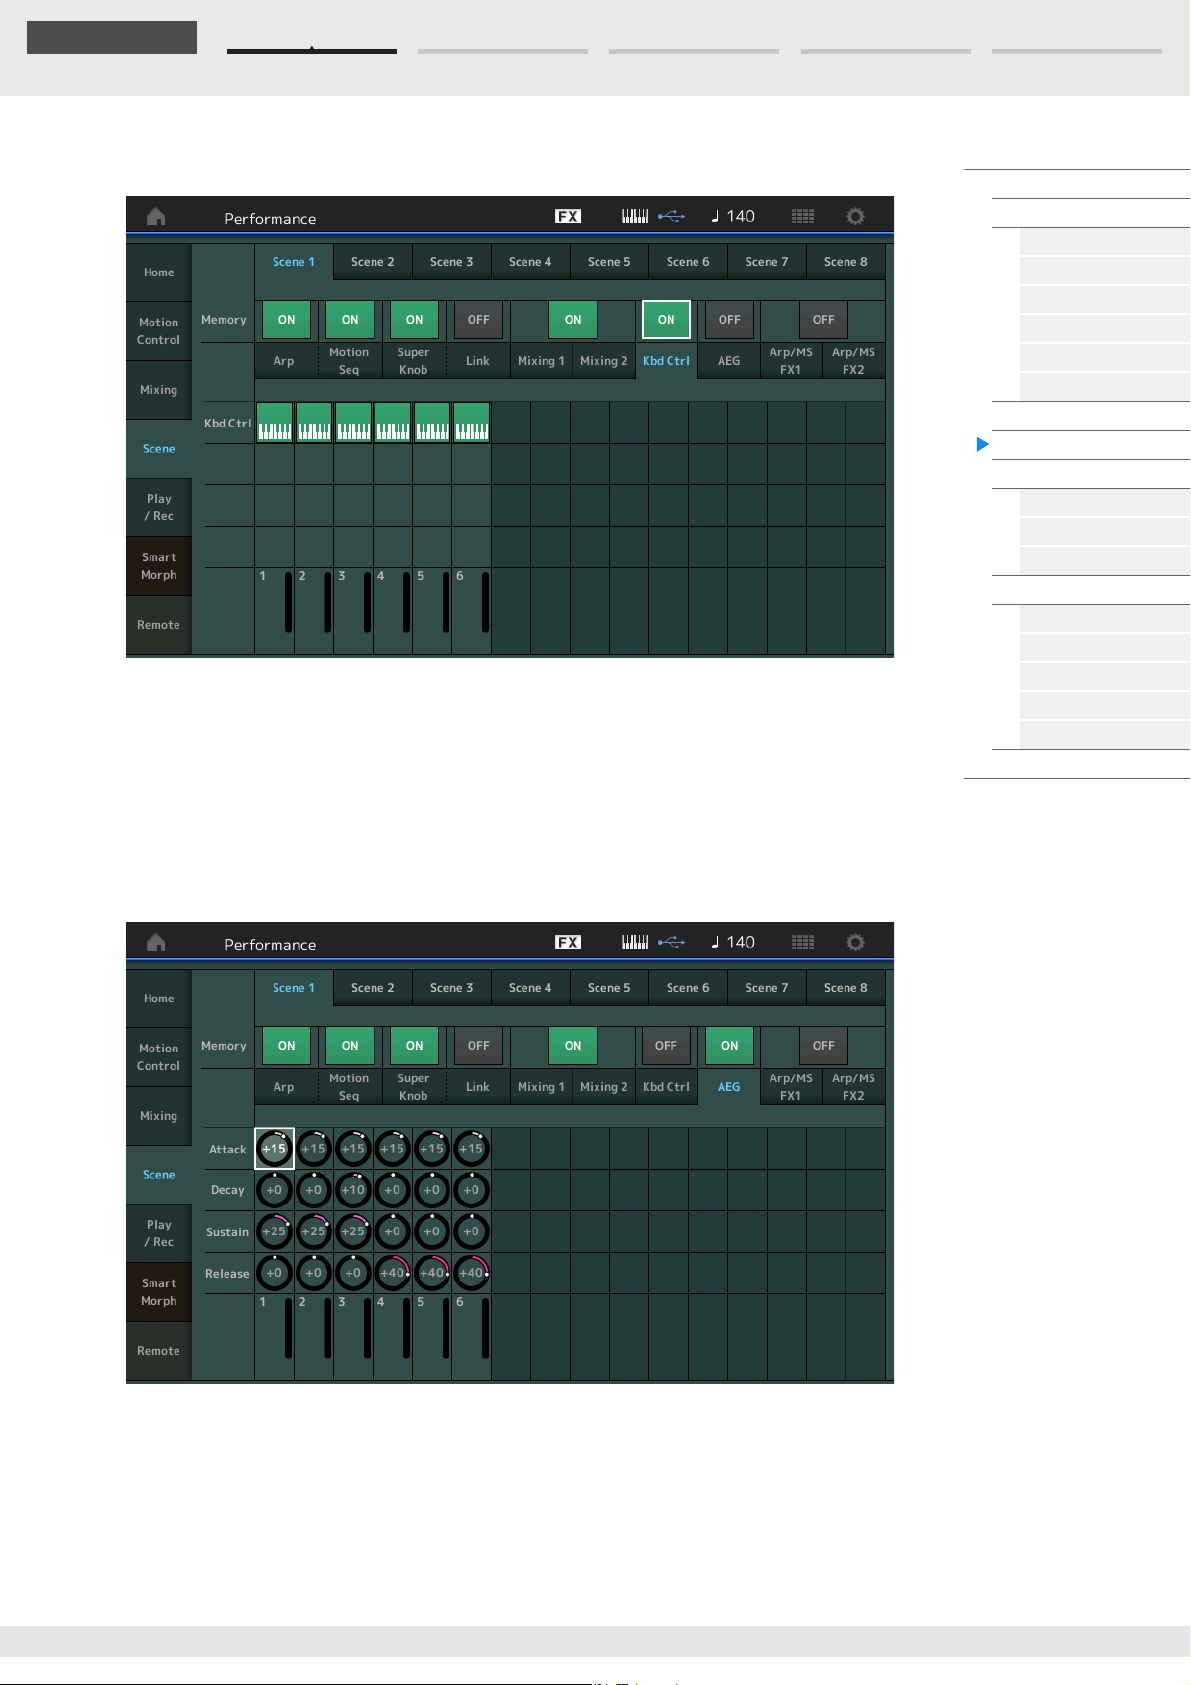
Edit Search Utility Live SetPerformance
Reference
When the “Kbd Ctrl” tab is selected and the corresponding Memorize Switch is set to
ON
Kbd Ctrl (Keyboard Control Memorize Switch)
Determines whether Keyboard Control operations are memorized in a Scene or not.
Settings: Off, On
Kbd Ctrl (Keyboard Control)
Determines the Keyboard Control Switch on each Part on the selected Scene. Parts set to Off are not
affected by playing the keyboard.
Settings: Off (gray), On (green)
Performance
Home
Motion Control
Overview
Quick Edit
Arpeggio
Motion Seq
Super Knob
Knob Auto
Mixing
Scene
Play / Rec
MIDI
Audio
Pattern
Smart Morph
Play
Edit
Analyze
Super Knob
Job
Remote
When the “AEG” tab is selected and the corresponding Memorize Switch is set to ON
Attack (AEG Attack Time)
Determines the AEG Attack Time for each Part in the selected Scene.
Settings: -64 – +63
Decay (AEG Decay Time)
Determines the AEG Decay Time for each Part in the selected Scene.
Settings: -64 – +63
MODX+ Reference Manual
59
Page 60
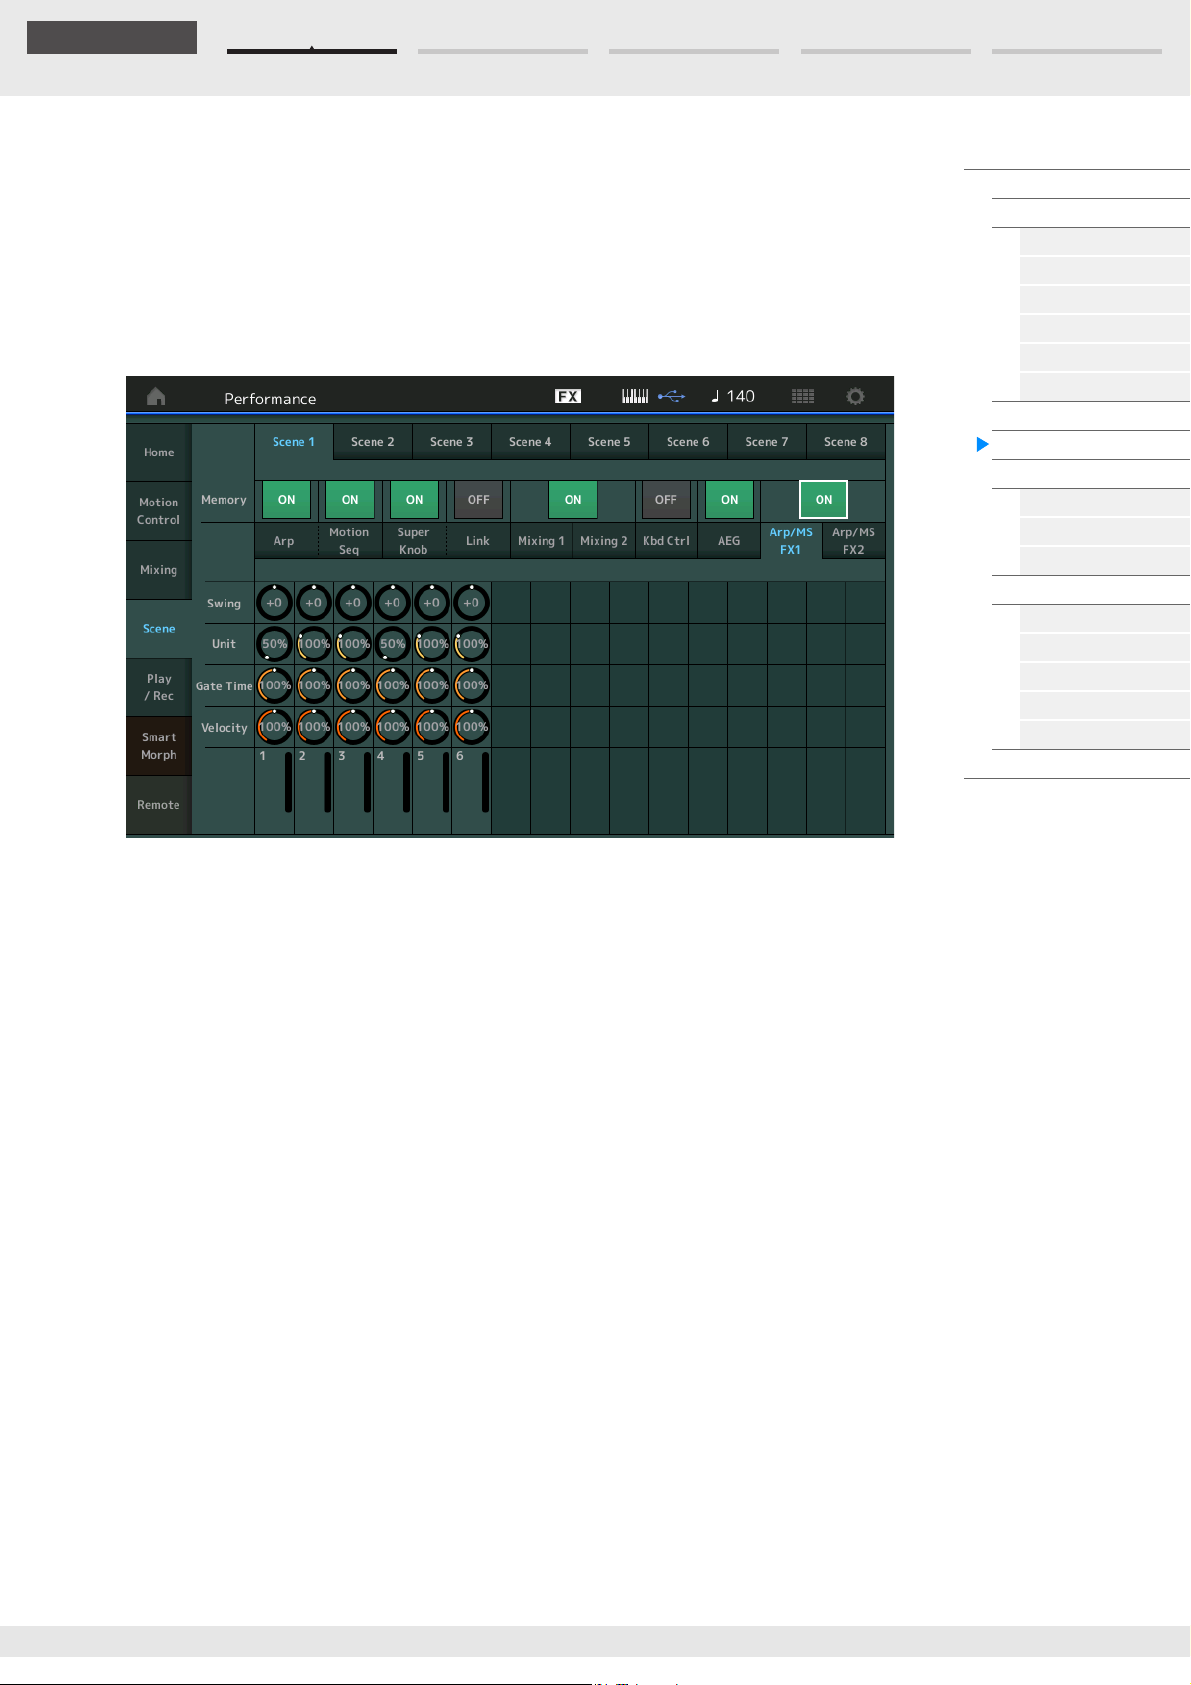
Edit Search Utility Live SetPerformance
Reference
Sustain (AEG Sustain Level)
Determines the AEG Sustain Level for each Part in the selected Scene.
Settings: -64 – +63
Release (AEG Release Time)
Determines the AEG Release Time for each Part in the selected Scene.
Settings: -64 – +63
When the “Arp/MS FX 1” tab is selected and the corresponding Memorize Switch is set
to ON
Performance
Home
Motion Control
Overview
Quick Edit
Arpeggio
Motion Seq
Super Knob
Knob Auto
Mixing
Scene
Play / Rec
MIDI
Audio
Pattern
Smart Morph
Play
Edit
Analyze
Super Knob
Job
Remote
Swing
Determines the Swing setting of Arpeggio and Motion Sequencer for each Part in the selected Scene.
For details about Swing, see “Quick Edit” (page 41).
Settings: -120 – +120
Unit (Part Unit Multiply)
Determines the Unit Multiply setting of Arpeggio and Motion Sequencer for each Part in the selected
Scene.
Settings: 50%–400%, Common
200%: The playback time will be doubled and the tempo is halved.
100%: The normal playback time.
50%: The playback time will be halved and the tempo doubled.
Common: The value set in the Unit Multiply common to the all Parts will be applied.
Gate Time (Gate Time Rate)
Determines the Gate Time Rate of Arpeggio for each Part in the selected Scene.
Settings: 0%–200%
Velocity (Velocity Rate)
Determines the Velocity Rate of Arpeggio for each Part in the selected Scene.
Settings: 0%–200%
MODX+ Reference Manual
60
Page 61
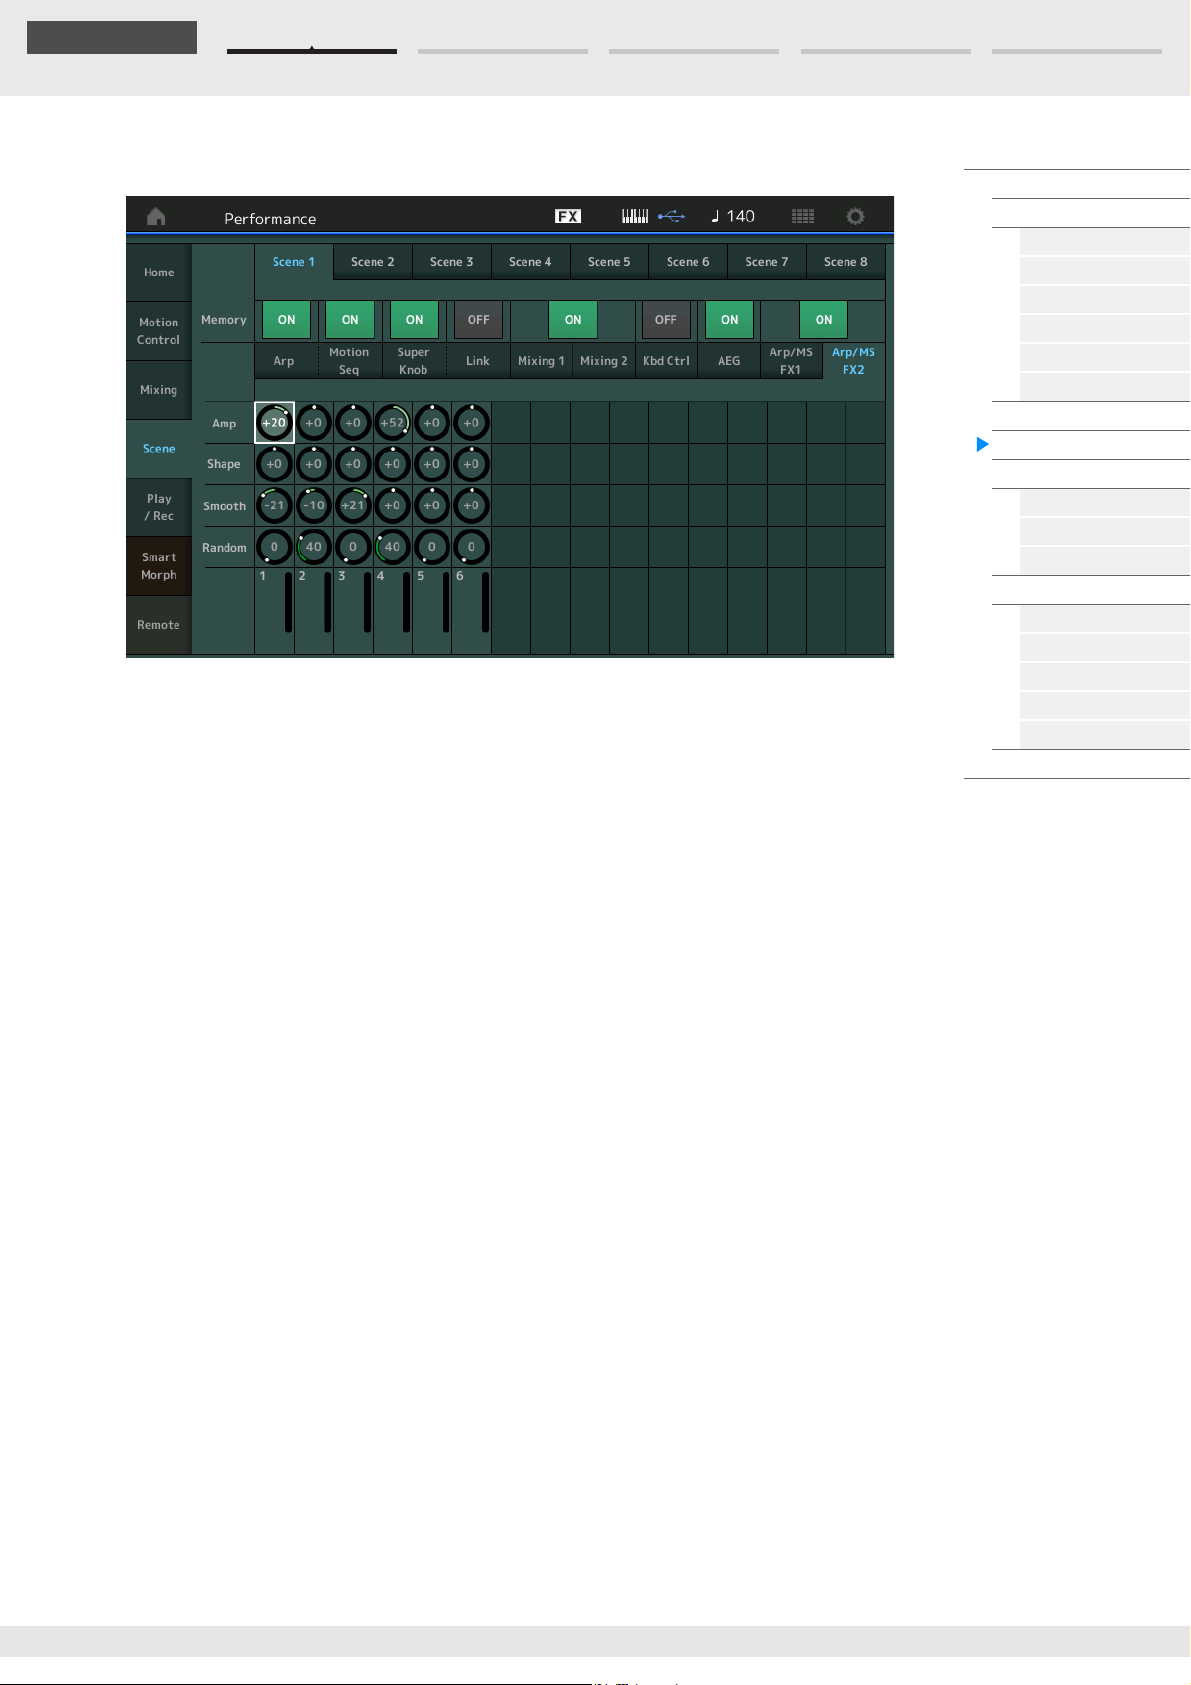
Edit Search Utility Live SetPerformance
Reference
When the “Arp/MS FX 2” tab is selected and the corresponding Memorize Switch is set
to ON
Amp (Motion Sequencer Amplitude)
Determines the Amplitude of Motion Sequencer for each Part in the selected Scene. For details about
Amplitude, see “Quick Edit” (page 38).
Settings: -64 – +63
Performance
Home
Motion Control
Overview
Quick Edit
Arpeggio
Motion Seq
Super Knob
Knob Auto
Mixing
Scene
Play / Rec
MIDI
Audio
Pattern
Smart Morph
Play
Edit
Analyze
Super Knob
Job
Remote
Shape (Motion Sequencer Pulse Shape)
Determines the Pulse Shape of Motion Sequencer for each Part in the selected Scene. For details
about Pulse Shape, see “Quick Edit” (page 38).
Settings: -100 – +100
Smooth (Motion Sequencer Smoothness)
Determines the Smoothness of Motion Sequencer for each Part in the selected Scene. For details
about Smoothness, see “Quick Edit” (page 39).
Settings: -64 – +63
Random (Motion Sequencer Random)
Determines the “Random” of Motion Sequence for each Part in the selected Scene. For details about
Random, see “Quick Edit” (page 39).
Settings: 0–127
MODX+ Reference Manual
61
Page 62
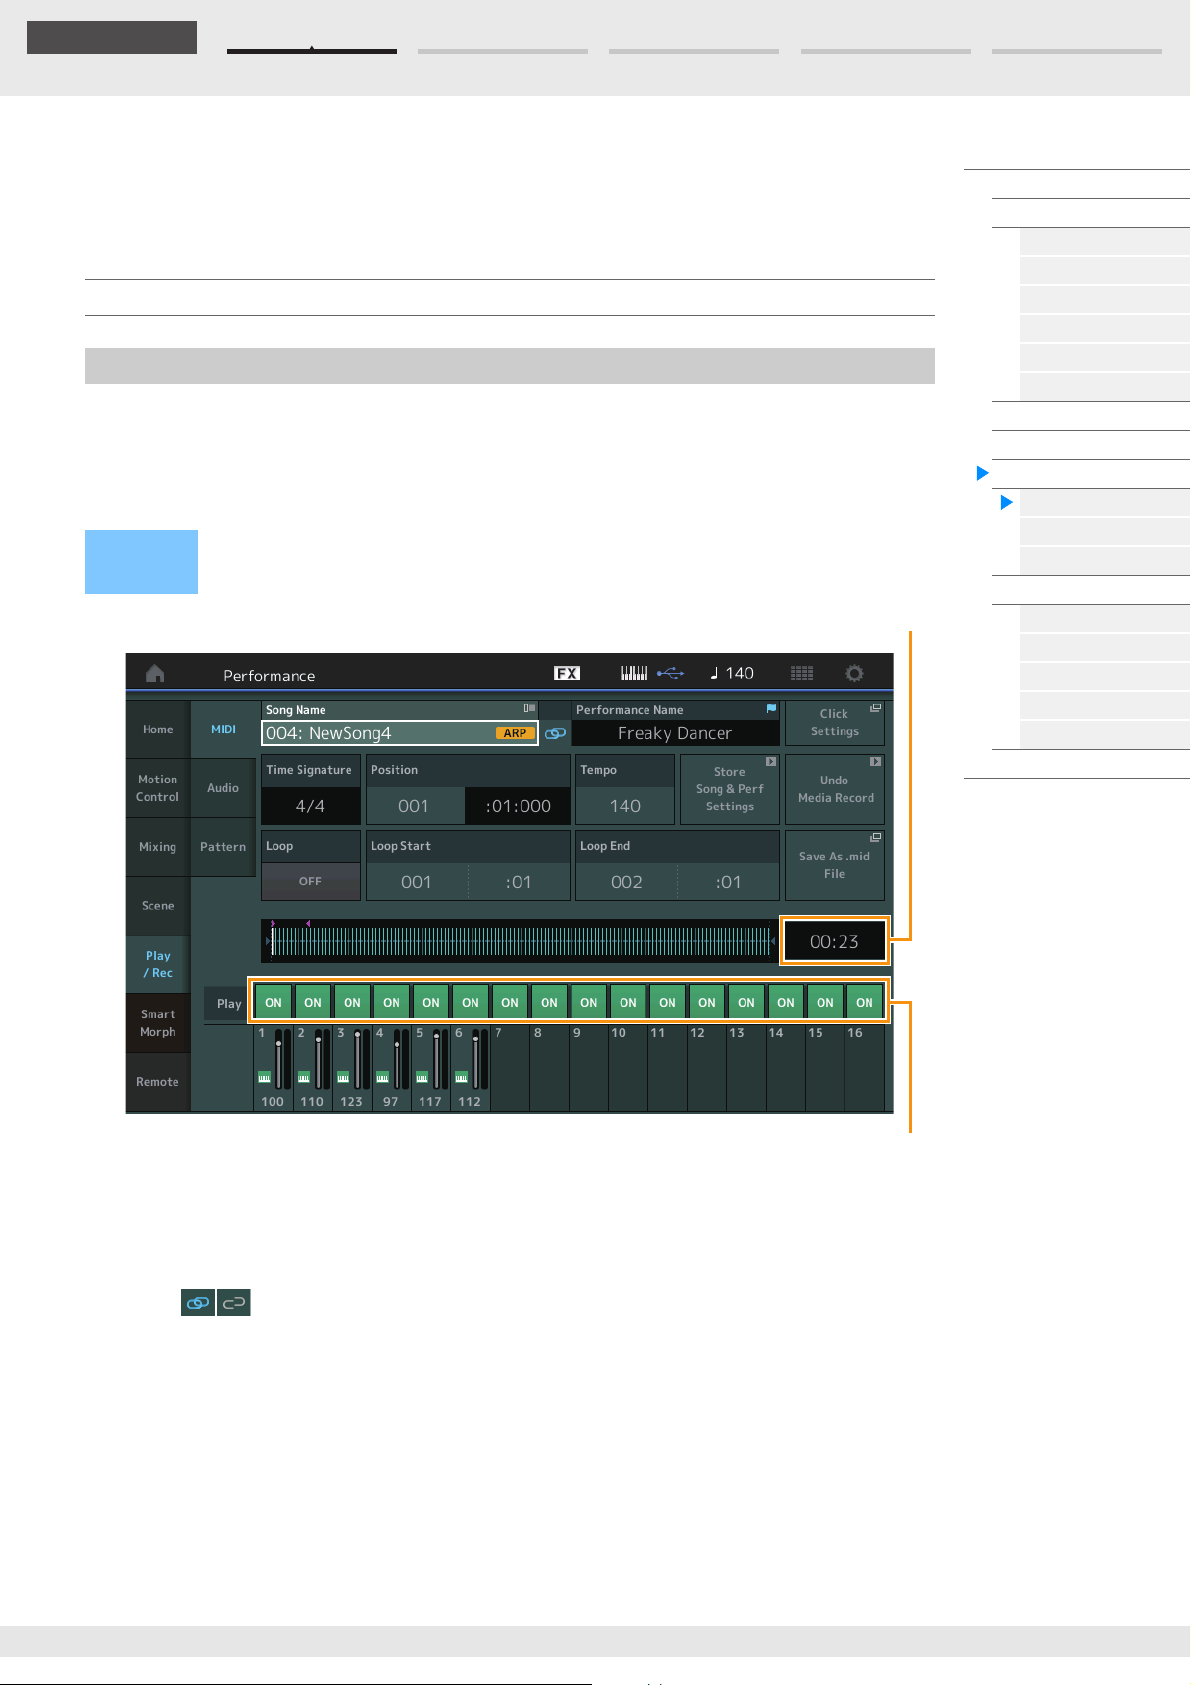
Edit Search Utility Live SetPerformance
Reference
Song Length
Tra c k Pl a y Sw i tc h
Play/Rec
You can playback/record MIDI data as Songs on this instrument itself or playback/record your
performance (audio data) on a USB flash drive.
Play/Rec
MIDI
From the MIDI display you can playback/record your keyboard performance with using the selected
Performance to the Song. You can playback/record knob operations, controller operations and Arpeggio
playback as well as your keyboard playing to the specified Track as MIDI events.
Playback and Playback Standby
Press the [R] (Play) button
Operation
or
[PERFORMANCE (HOME)] [Play/Rec] [MIDI]
Performance
Home
Motion Control
Overview
Quick Edit
Arpeggio
Motion Seq
Super Knob
Knob Auto
Mixing
Scene
Play / Rec
MIDI
Audio
Pattern
Smart Morph
Play
Edit
Analyze
Super Knob
Job
Remote
Song Name
Indicates the number and name of the selected Song. Touching the Song Name calls up a menu for
selecting Load, Rename, New Song and User Arpeggio. Also, you can select a Song with the [INC/YES]
and [DEC/NO] buttons while this is highlighted.
Link icon
Indicates that the Song data and Performance data contained in the Pattern data match.
When the Song data and Performance data contained in the Pattern data do not match, a broken Link icon
is shown.
Performance Name
Indicates the selected Performance Name.
Click Settings
Shows the Tempo settings display.
Time Signature
Indicates the meter of the Song.
MODX+ Reference Manual
62
Page 63
Edit Search Utility Live SetPerformance
Reference
Position (Song Position)
Determines the starting position of Recording/Playback. The indicator also shows the current position
during playback.
The measure’s number is in the left cell and the beat number and clocks are in the right cell.
Tem po
Determines the Song tempo.
Settings: 5–300
NOTE The tempo can be set as follows.
[PERFORMANCE (HOME)] [UTILITY] [Tempo Settings] (page 250)
Store Song & Perf Settings
Changes the Song tempo, Loop settings, and the Performance called back along with the Song to the
current settings.
This parameter is not available during:
• New recording (No previously recorded Song data.)
• Playback
• Recording Standby
• Recording
Loop
Determines whether the Song plays through a single time or continuously. When this is set to on, the Song
is repeatedly played back between the “Loop Start” and “Loop End” points (below).
Settings: Off, On
Loop Start / End
Determines the start position and the end position of Loop playback. The measure number is in the left cell
and the beat number is in the right cell. This is not available when “Loop” is set to off.
Performance
Home
Motion Control
Overview
Quick Edit
Arpeggio
Motion Seq
Super Knob
Knob Auto
Mixing
Scene
Play / Rec
MIDI
Audio
Pattern
Smart Morph
Play
Edit
Analyze
Super Knob
Job
Remote
Save As .mid File
Calls up the Store/Save display to save the Song as a file.
This button is not available during:
• New recording (No previously recorded Song data.)
• Playback
• Recording Standby
• Recording
• An external memory such as a USB flash drive is not connected.
Song Length
Indicates the length of the entire sequence.
Track Play Switch
Switches the playback for each track on/off.
Settings: Off, On
MODX+ Reference Manual
63
Page 64
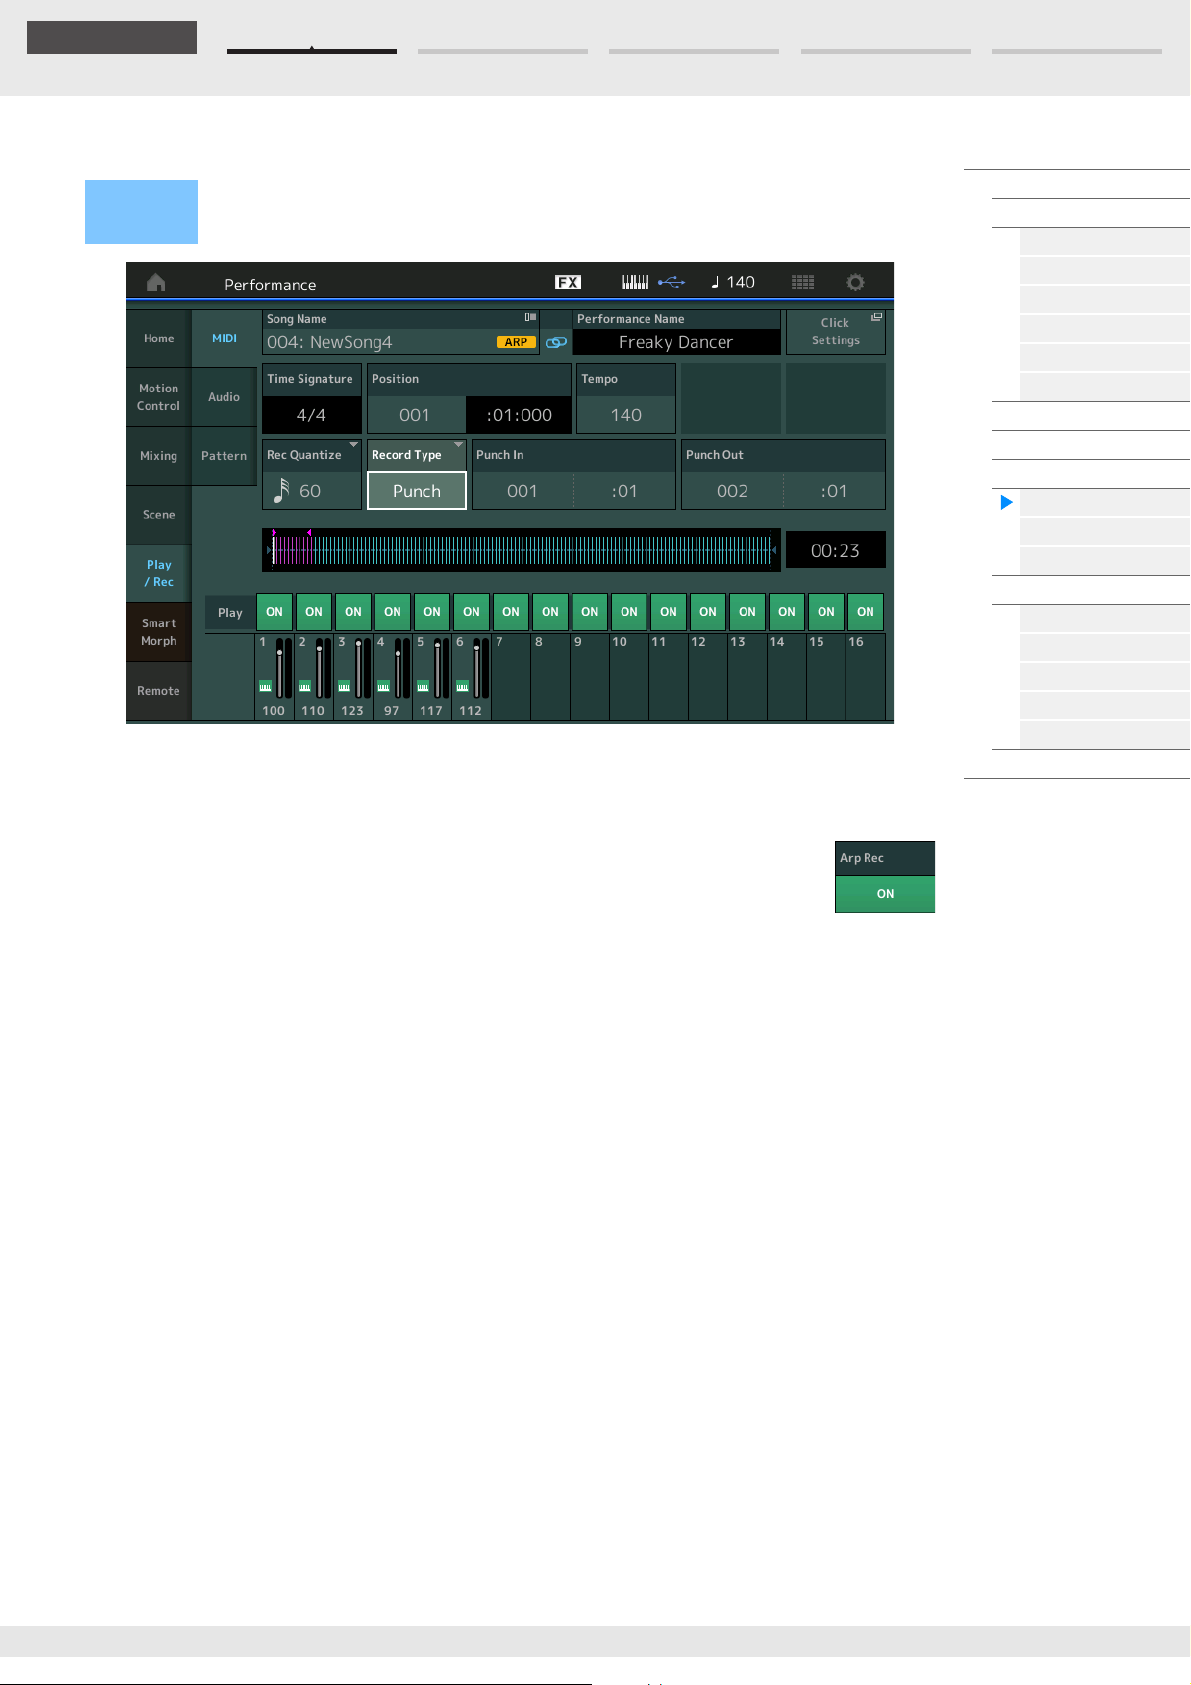
Edit Search Utility Live SetPerformance
Reference
Record and Record Standby
Press the [I] (Record) button
Operation
Time Signature
Determines the meter of the Song.
Settings: 1/16–16/16, 1/8–16/8, 1/4–8/4
or
[PERFORMANCE (HOME)] [Play/Rec] [MIDI] [I] (Record) button
Performance
Home
Motion Control
Overview
Quick Edit
Arpeggio
Motion Seq
Super Knob
Knob Auto
Mixing
Scene
Play / Rec
MIDI
Audio
Pattern
Smart Morph
Play
Edit
Analyze
Super Knob
Job
Remote
Arp Rec (Arpeggio Rec)
When this is set to on, the Arpeggiator output is recorded. When this is set to off, only the
keyboard performance is recorded.
This can only be set when recording a new song. Also, the setting cannot be changed after
the first recording.
When re-recording to previously recorded Songs with this set to off, the Record Type can only be set to
Replace.
Settings: Off, On
NOTE Songs recorded with this set to off can be played back with a different Arpeggio from the one recorded by
changing to another Arpeggio in the Performance.
Rec Quantize (Record Quantize)
Quantization is the process of adjusting the timing of note events by moving them closer to the nearest
exact beat. You can use this feature, for example, to improve the timing of a performance recorded in real
time. Record quantize aligns the timing of notes automatically, as you record.
Settings: 60 (32nd note), 80 (16th note triplet), 120 (16th note), 160 (8th note triplet), 240 (8th note), 320 (1/4 note triplet),
480 (1/4 note), Off
Record Type
Determines the Recording Type. This parameter is not available for the first recording.
Settings: Replace, Overdub, Punch
Replace: You can use this method when you want to overwrite an already recorded Track with new data in real time.
The original data will be erased.
Overdub: You can use this method when you want to add more data to a Track that already contains data.
Previously recorded data will be maintained*.
Punch: You can use this method when you want to overwrite data to a specified range of a Track that already
contains data. It allows you to overwrite the already recorded data from the starting point to the ending point
(measure/beat) that was specified before recording.
* When using Overdub with controller events that exist in the original recording, the existing controller events are
disabled and deleted, and then newly recorded, over the range from when the controller is first operated to when
recording is stopped.
MODX+ Reference Manual
64
Page 65
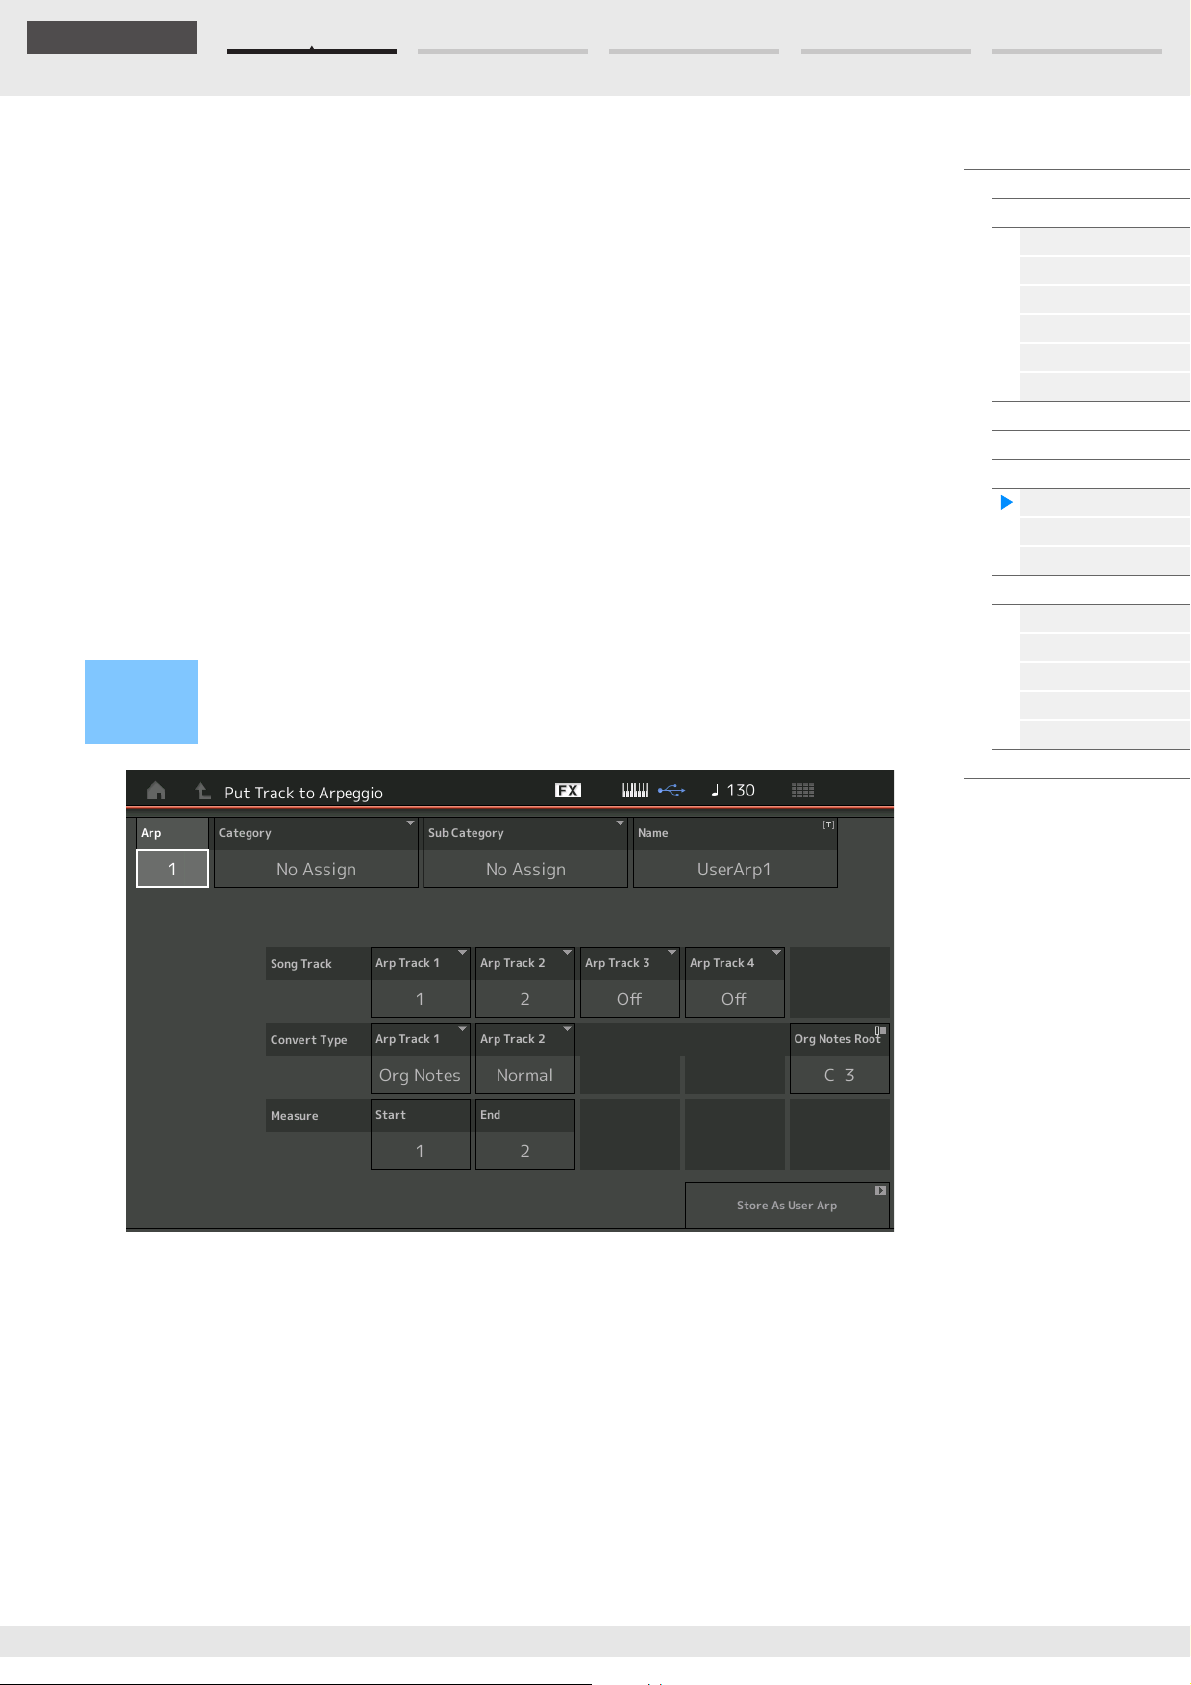
Edit Search Utility Live SetPerformance
Reference
Punch In
Determines the starting point (measure and beat) for recording. This parameter is available only when
“punch” is selected for “Record Type.”
Punch Out
Determines the ending point (measure and beat) for recording. This parameter is available only when
“punch” is selected for “Record Type.”
NOTE For details about the Punch In/Out setting, see the Owner’s Manual.
Undo
The Undo Job cancels the changes you made in your most recent recording session, restoring the data to
its previous state.
Redo
Redo is available only after using Undo, and lets you restore the changes you made before undoing them.
Put Track to Arpeggio
This function copies data in the specified measures of a track for creating Arpeggio data. Up to 16 unique
note numbers can be recorded to the Arpeggio track. If more than 16 different note numbers have been
recorded to the MIDI sequence data, the Convert operation reduces the notes in excess of the limit.
Because of this, be careful to record only up to 16 different notes when you create an Arpeggio, especially
when using multiple tracks.
[R] (PLAY) button
Operation
or
[PERFORMANCE (HOME)] [Play/Rec] [MIDI] Touch the Song Name to call up the menu
[User Arp] in the menu
Performance
Home
Motion Control
Overview
Quick Edit
Arpeggio
Motion Seq
Super Knob
Knob Auto
Mixing
Scene
Play / Rec
MIDI
Audio
Pattern
Smart Morph
Play
Edit
Analyze
Super Knob
Job
Remote
Arp (Arpeggio Number)
Determines the User Arpeggio number. One of the numbers currently not in use is automatically assigned
by default. When a number already in use is selected, the previous Arpeggio data in the selected number
will be overwritten.
Settings: 1–256
Category (Arpeggio Category)
Determines the Category setting (Main Category and Sub Category) for the created Arpeggio data.
Settings: Refer to the Arpeggio Type Category List in the Reference Manual PDF document.
Name (Arpeggio Name)
Determines the User Arpeggio name. The Arpeggio name can contain up to 20 characters.
MODX+ Reference Manual
65
Page 66
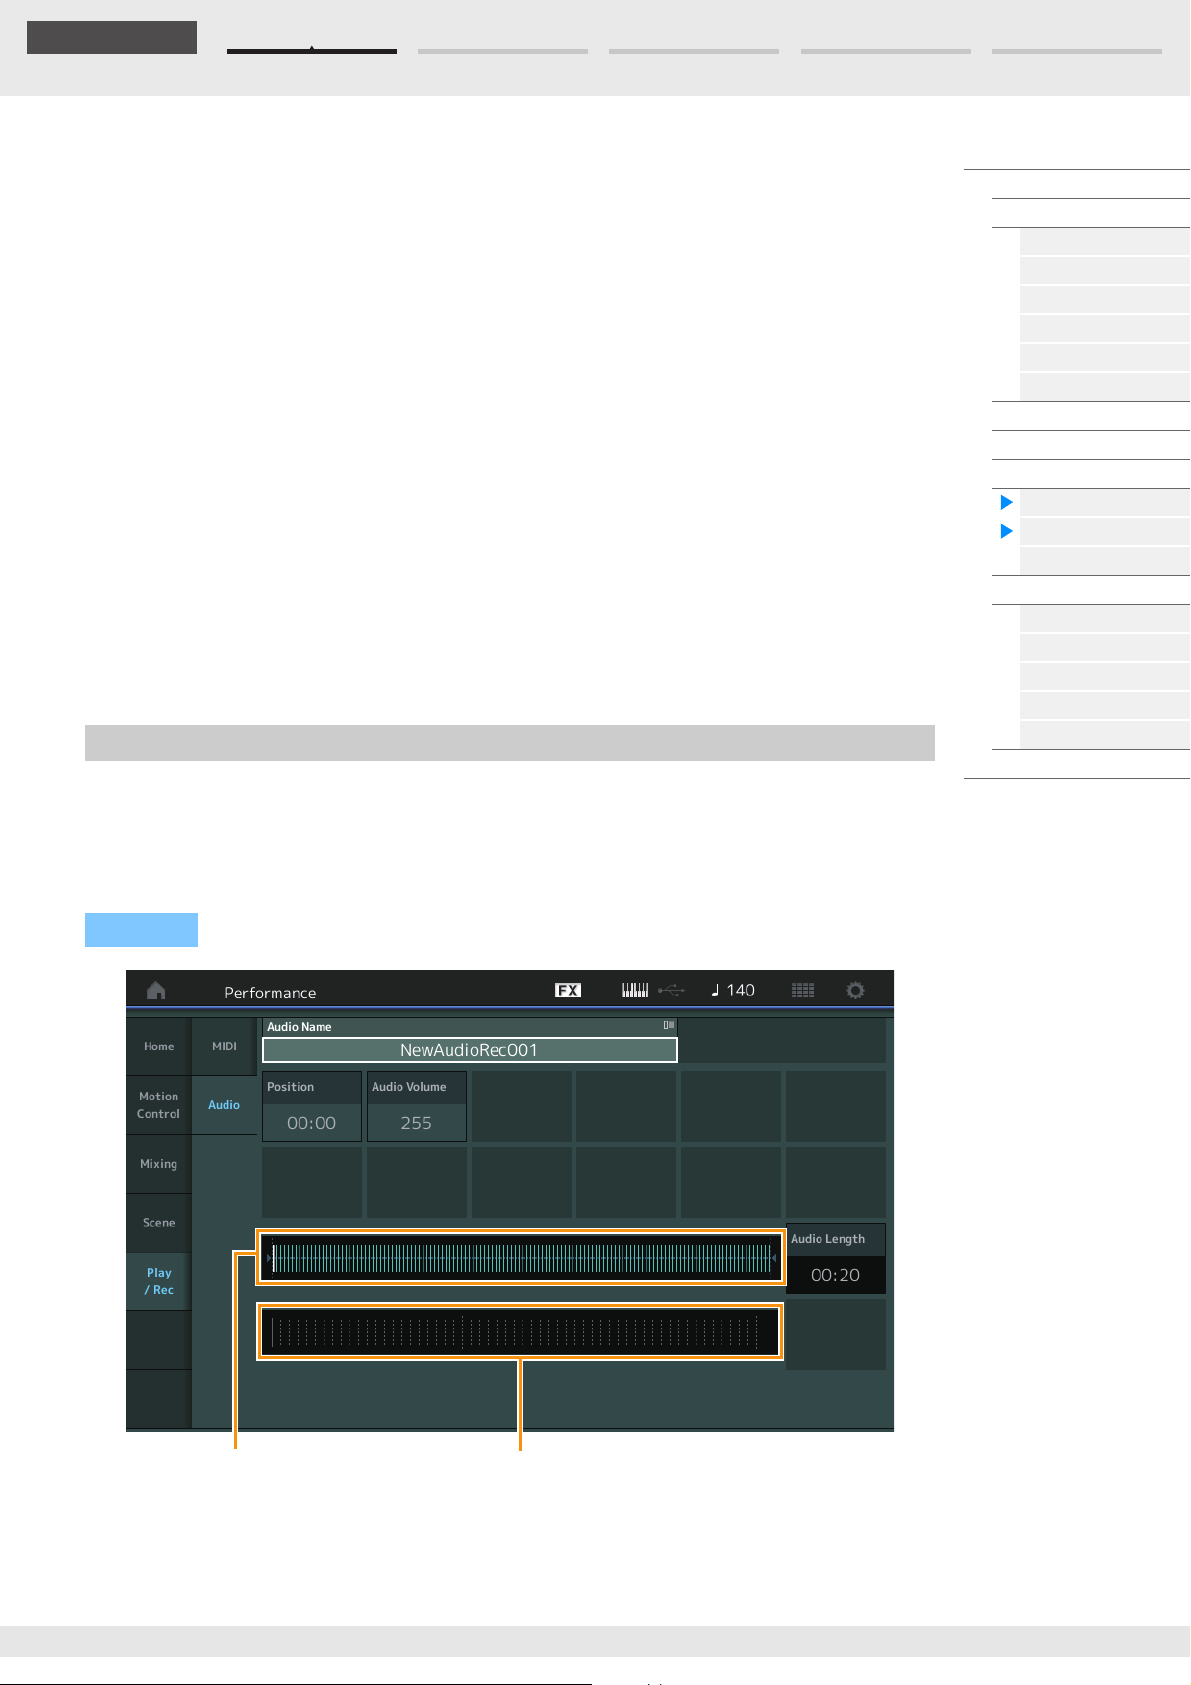
Edit Search Utility Live SetPerformance
Reference
Current play position in the
entire audio data
Level meter
Song Track
Determines the track of the source Song for each Arpeggio track.
Convert Type
Determines how the MIDI sequence data (of Song tracks) will be converted to Arpeggio data from the
three ways below. This parameter can be set for each track.
Settings: Normal, Fixed, Org Notes
Normal: The Arpeggio is played back using only the played note and its octave notes.
Fixed: Playing any note(s) will trigger the same MIDI sequence data.
Org Notes
according to the played chord.
(original notes): Basically same as “Fixed” with the exception that the Arpeggio playback notes differ
Original Notes Root
Determines the root note when the Convert Type of any track is set to “Org Notes.” This is available only
when any track is set to “Org Notes.”
Settings: C-2 – G8
Measure
Determines the range of measures to be copied to the Arpeggio data.
Settings: 001–999
Store As User Arp (Store As User Arpeggio)
Stores as User Arpeggio following all settings made in this display. This is not available when all tracks are
set to off.
Audio
From the Audio display you can record your performance on the instrument as WAV format (44.1-kHz,
24-bit, stereo) audio files to a USB flash drive. It is possible to record continuously for up to 74 minutes
(assuming that the USB storage device has sufficient free memory).
Performance
Home
Motion Control
Overview
Quick Edit
Arpeggio
Motion Seq
Super Knob
Knob Auto
Mixing
Scene
Play / Rec
MIDI
Audio
Pattern
Smart Morph
Play
Edit
Analyze
Super Knob
Job
Remote
Playback and Playback Standby
Operation
[PERFORMANCE (HOME)] [Play/Rec] [Audio]
Audio Name
Indicates the name of the selected Audio file.
MODX+ Reference Manual
66
Page 67
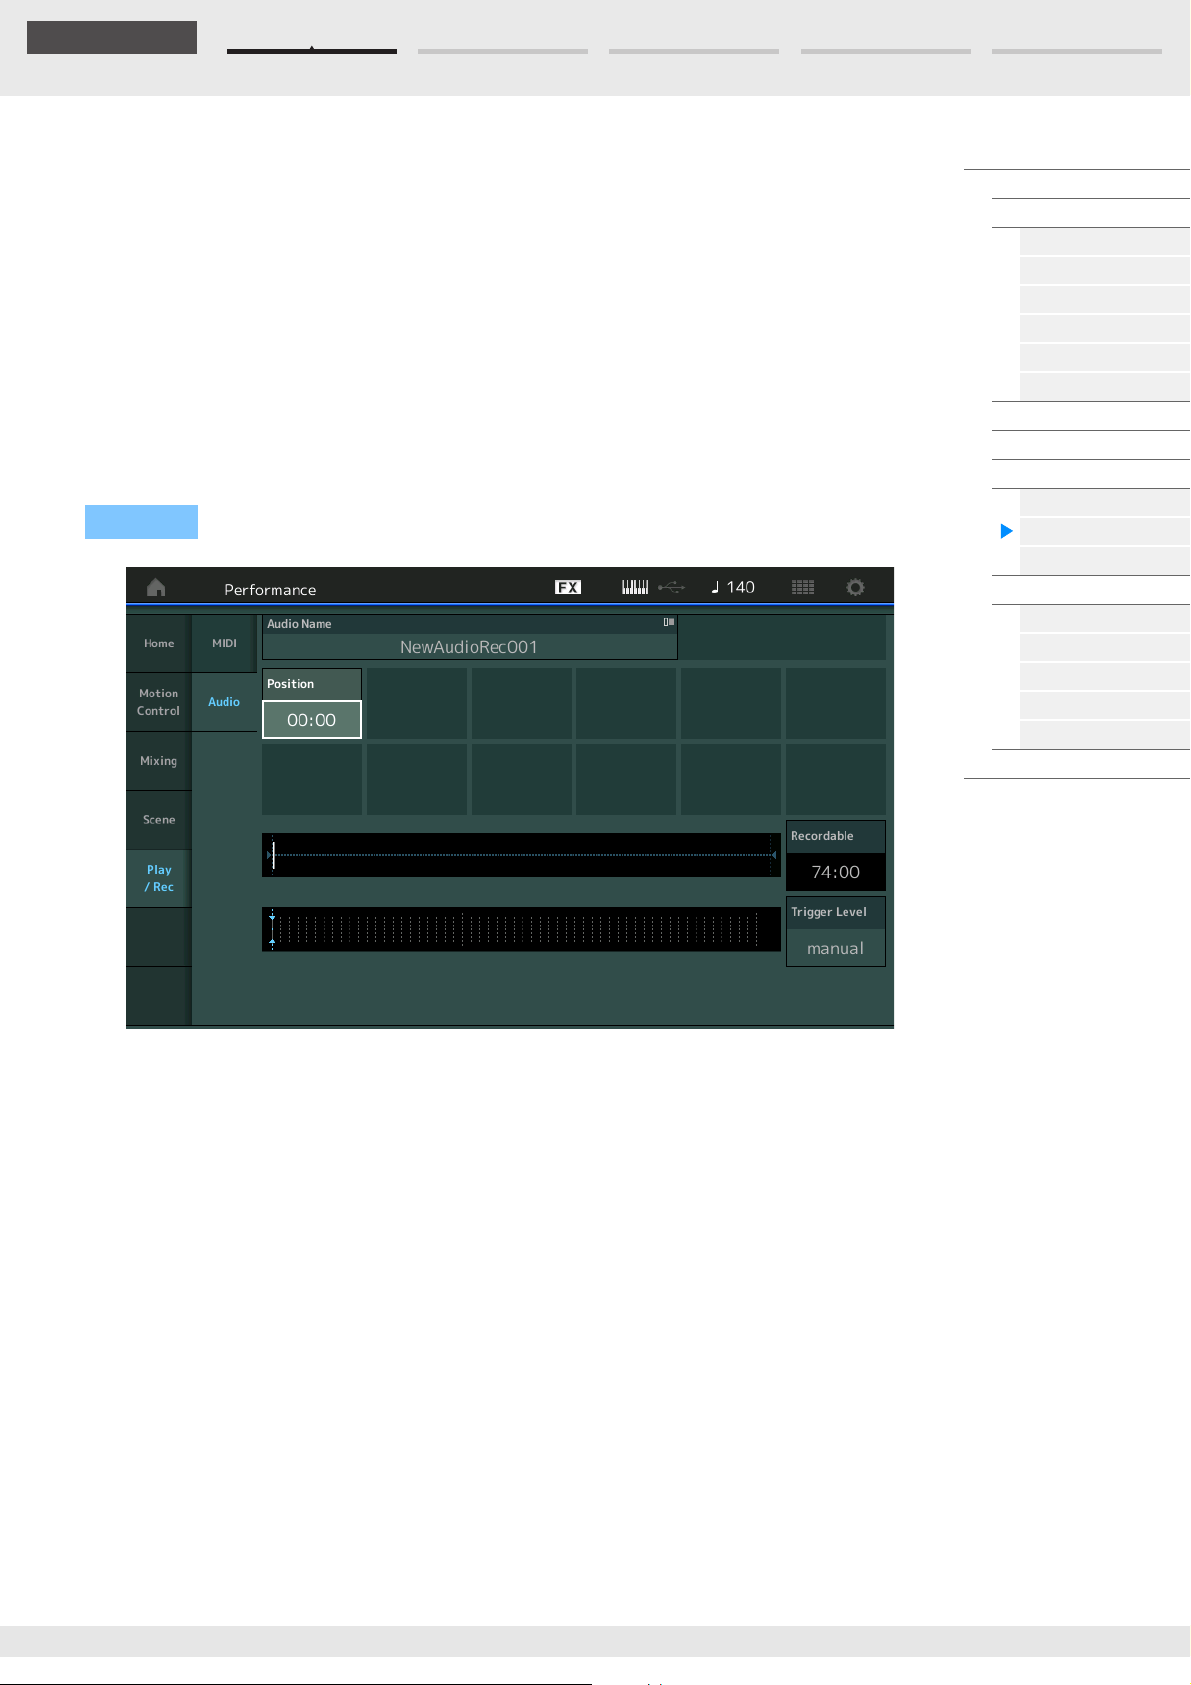
Edit Search Utility Live SetPerformance
Reference
Position (Audio Position)
Determines the starting position of Playback. The indicator also shows the current position during
playback.
Audio Volume
Determines the volume of the Audio Playback. This parameter cannot be changed during recording.
Settings: 0–255
Audio Length
Indicates the length of the entire audio data.
Level Meter
Indicates the Audio Input/Output level.
Record and Record Standby
Operation
[PERFORMANCE (HOME)] [Play/Rec] [Audio] [I] (Record) button
Performance
Home
Motion Control
Overview
Quick Edit
Arpeggio
Motion Seq
Super Knob
Knob Auto
Mixing
Scene
Play / Rec
MIDI
Audio
Pattern
Smart Morph
Play
Edit
Analyze
Super Knob
Job
Remote
Recordable (Audio Recordable Time)
Indicates available recording time. This parameter is displayed only during recording standby.
Tri gger Level
Determines the method of starting recording. This parameter is displayed only during recording standby.
If you set the trigger level to “manual,” recording will begin whenever you press the [R] (Play) button.
Alternatively, if you set a value between 1 and 127, recording will begin automatically whenever the [R]
(Play) button is pressed and the playback volume exceeds that level. The level set here will be indicated
by blue triangles in the level meter. For best results, set this parameter as low as possible to capture the
entire signal, but not so low as to record unwanted noise.
Settings: manual, 1–127
MODX+ Reference Manual
67
Page 68
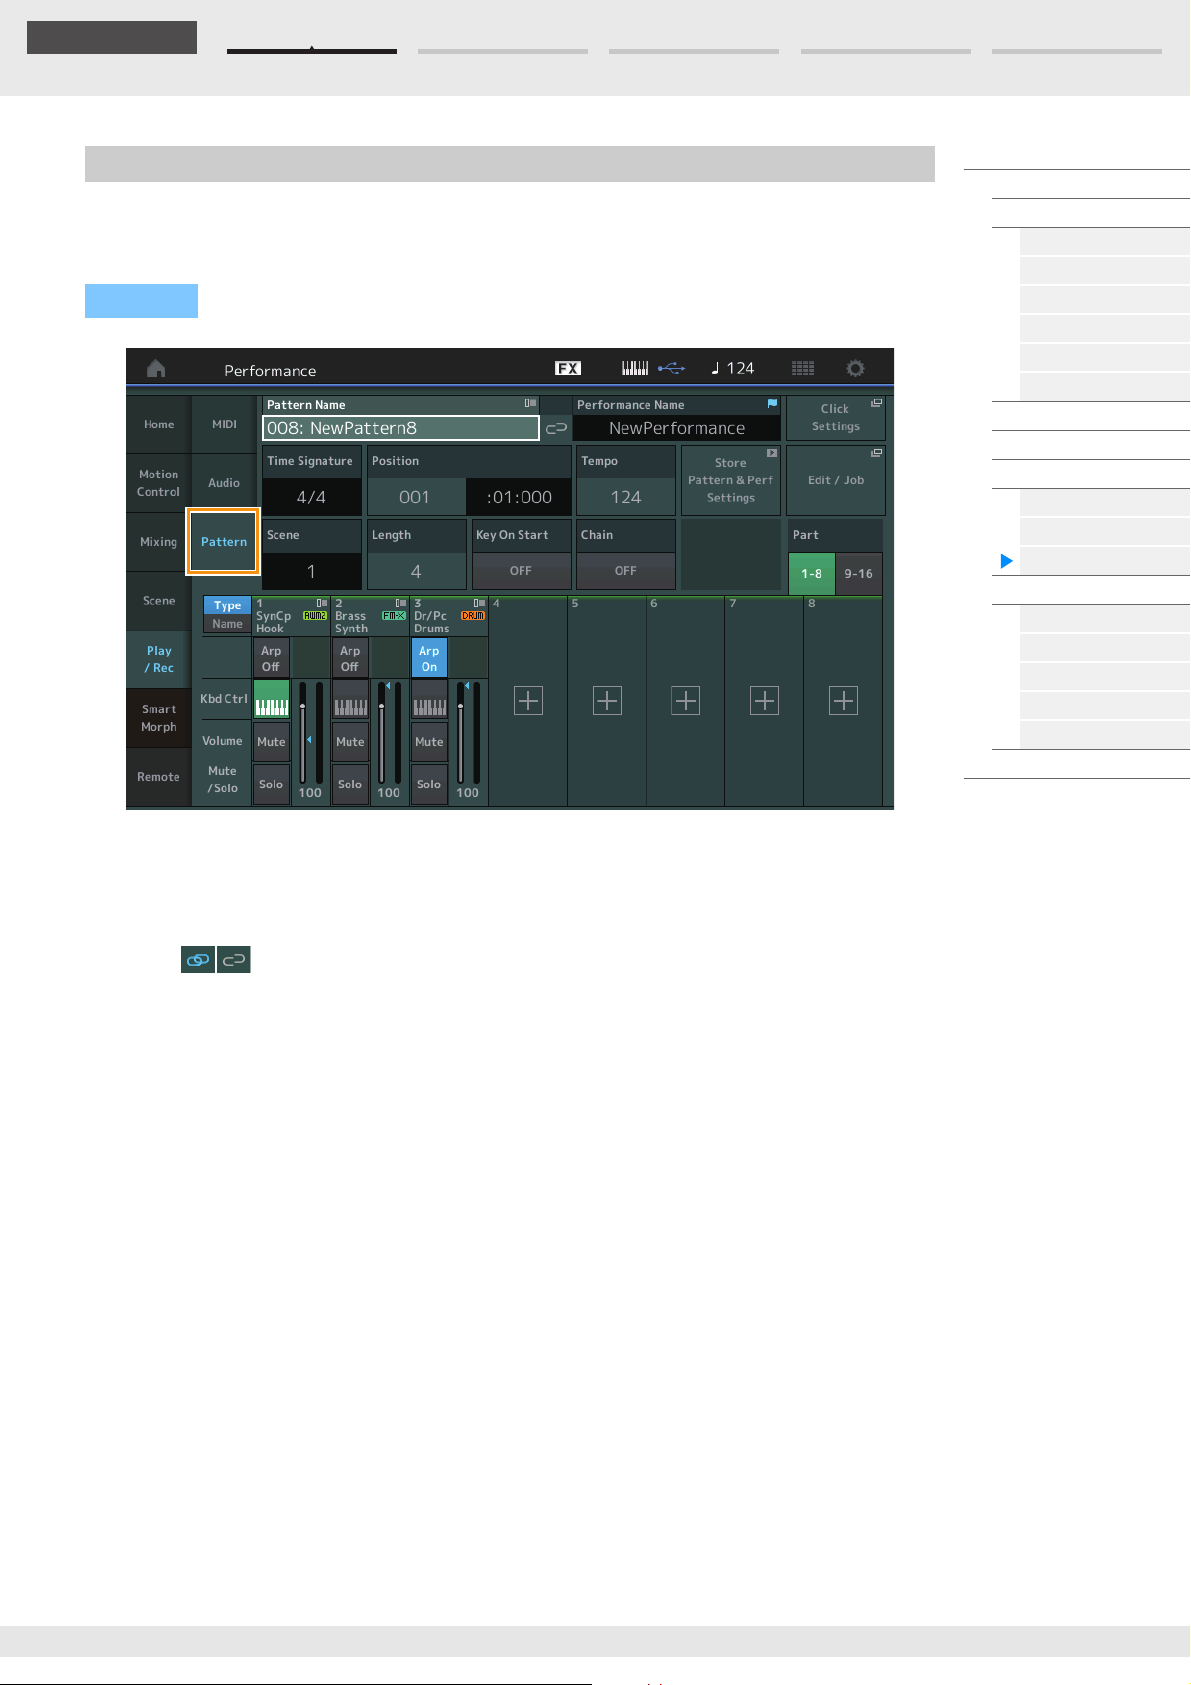
Edit Search Utility Live SetPerformance
Reference
Pattern
The Pattern display allows you to create your own Pattern data, by recording sequences for each Scene.
Playback/Waiting for Playback
Operation
[PERFORMANCE (HOME)] [Play/Rec] [Pattern]
Performance
Home
Motion Control
Overview
Quick Edit
Arpeggio
Motion Seq
Super Knob
Knob Auto
Mixing
Scene
Play / Rec
MIDI
Audio
Pattern
Smart Morph
Play
Edit
Analyze
Super Knob
Job
Remote
Pattern Name
Indicates the selected pattern name. Touching the parameter calls up the menu to Load, Rename and
create a New Pattern. Also, you can select a Pattern with the [INC/YES] and [DEC/NO] buttons while this is
highlighted.
Link icon
Indicates that the Pattern data and Performance data contained in the Pattern data match.
When the Pattern data and Performance data contained in the Pattern data do not match, a broken Link
icon is shown.
Performance Name
Indicates the selected performance name.
NOTE When you change the parameters in Performance, a blue flag indication appears at the right side of the
Performance Name.
Time Signature
Indicates the meter of the Pattern.
Position
Determines the starting position of Recording/Playback. The indicator also shows the current position
during playback.
The measure number is in the left cell and the beat number and clock value are in the right cell.
Tem po
Determines the tempo to playback the Pattern.
Range: 5–300
Click Settings
Opens the Tempo Settings display.
Scene
Indicates the selected scene number.
MODX+ Reference Manual
68
Page 69
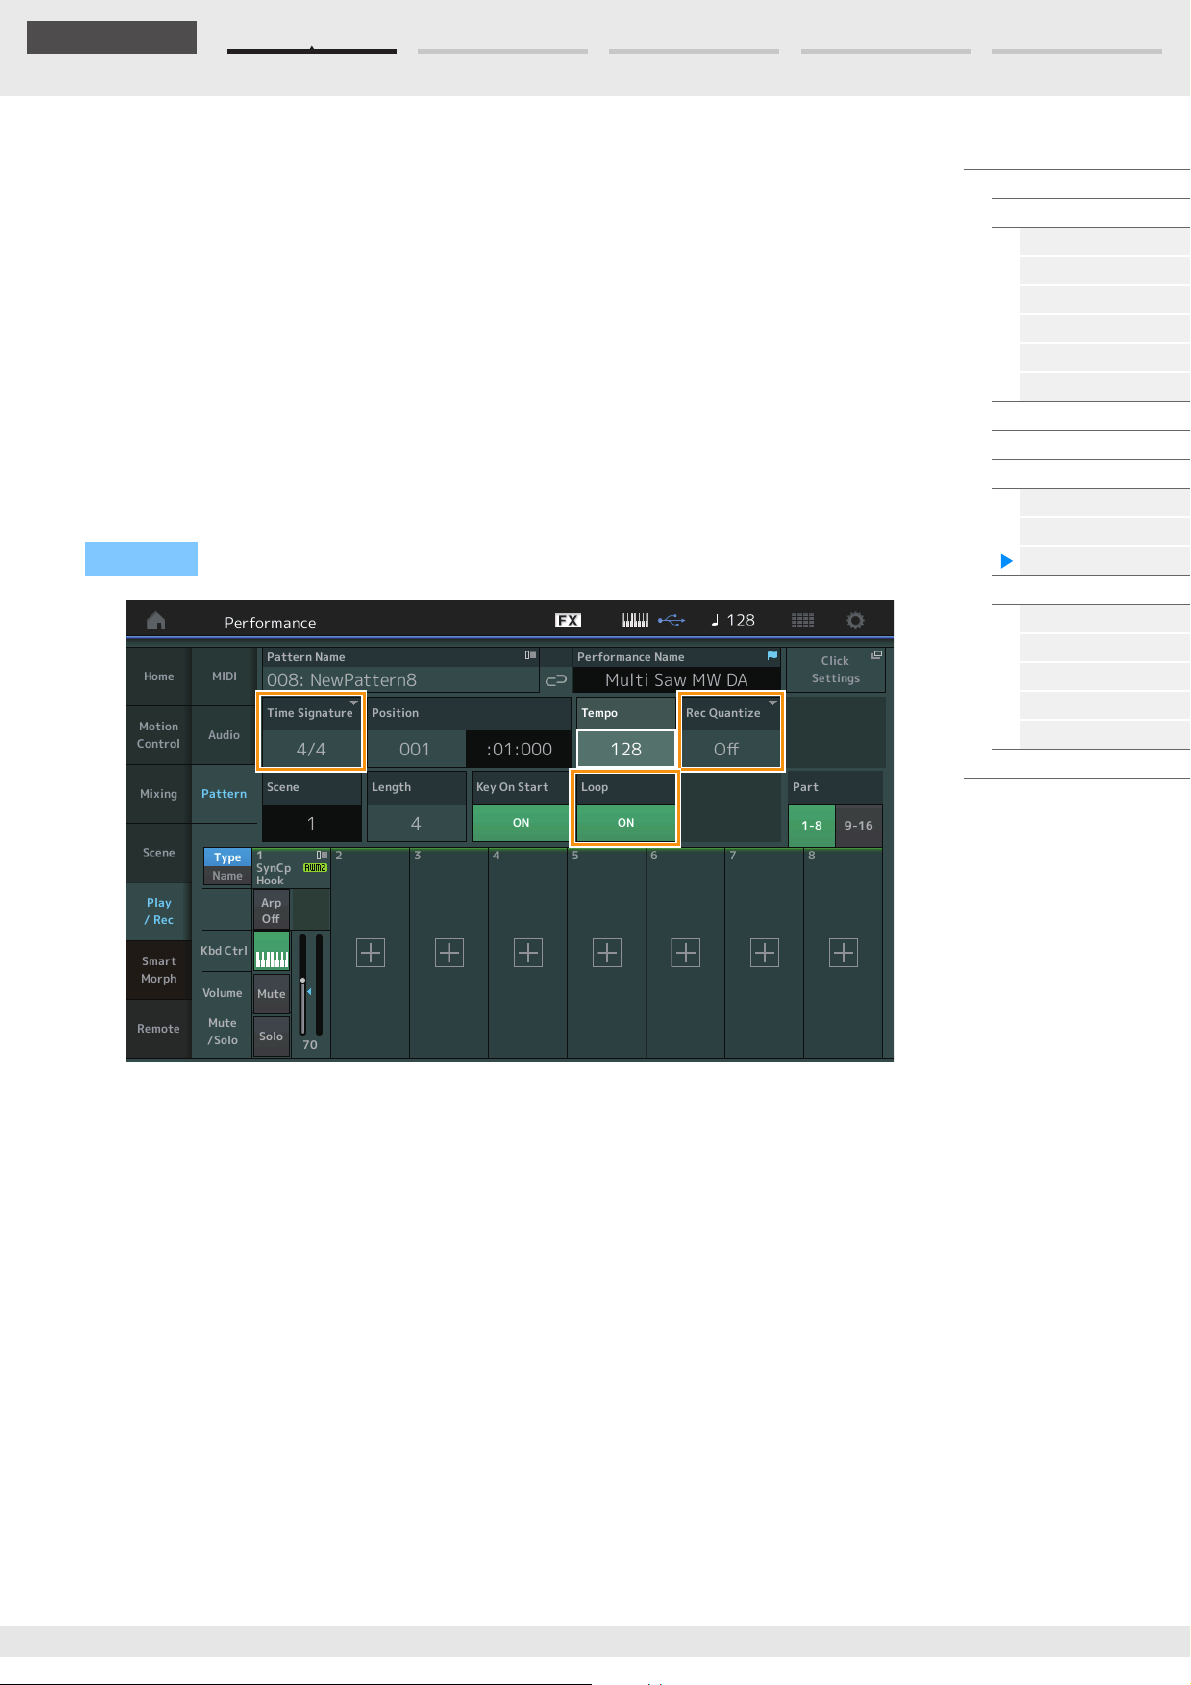
Edit Search Utility Live SetPerformance
Reference
Length
Determines the length of the entire sequence in the selected Scene.
Range: 1–256
Key On Start
Determines whether or not recording or playback of the Pattern starts when you play the keyboard.
Settings: Off, On
Store Pattern & Perf Settings
Stores the edited pattern data and the link to the selected Performance.
NOTE After you’ve edited parameters in the Performance, you will need to Store the Performance data.
Edit/Job
Opens the display for editing the pattern and related jobs.
Waiting for New Recording
Operation
[PERFORMANCE (HOME)] [Play/Rec] [Pattern] [I] (Record) button
Performance
Home
Motion Control
Overview
Quick Edit
Arpeggio
Motion Seq
Super Knob
Knob Auto
Mixing
Scene
Play / Rec
MIDI
Audio
Pattern
Smart Morph
Play
Edit
Analyze
Super Knob
Job
Remote
Time Signature
Determines the meter/time signature of the Scene.
Settings: 1/16–16/16, 1/8–16/8, 1/4–8/4
Rec Quantize
Quantization is the process of adjusting the timing of note events by moving them closer to the nearest
exact beat. You can use this feature, for example, to improve the timing of a performance recorded in real
time. Record quantize aligns the timing of notes automatically, as you record.
Settings: Off, 60 (32nd note), 80 (16th note triplet), 120 (16th note), 160 (8th note triplet), 240 (8th note), 320 (1/4 note triplet),
480 (1/4 note)
Loop
When Loop is set to On, recording does not stop at the end of the Pattern, but continues in a “loop” by
returning to the top of the pattern.
Settings: Off, On
NOTE To temporarily disengage the record mode and enter the Rehearsal mode, simply press the [I] (Record) button
during realtime recording. The [I] (Record) indicator flashes and playback will continue uninterrupted, but no
data will be recorded. This convenient Rehearsal mode feature lets you easily and temporarily disable recording
in order to practice a Part or try out various ideas (while listening to the other tracks) without actually recording.
To return to the record mode press the [I] (Record) button again so that the [I] (Record) indicator lights
continuously.
MODX+ Reference Manual
69
Page 70
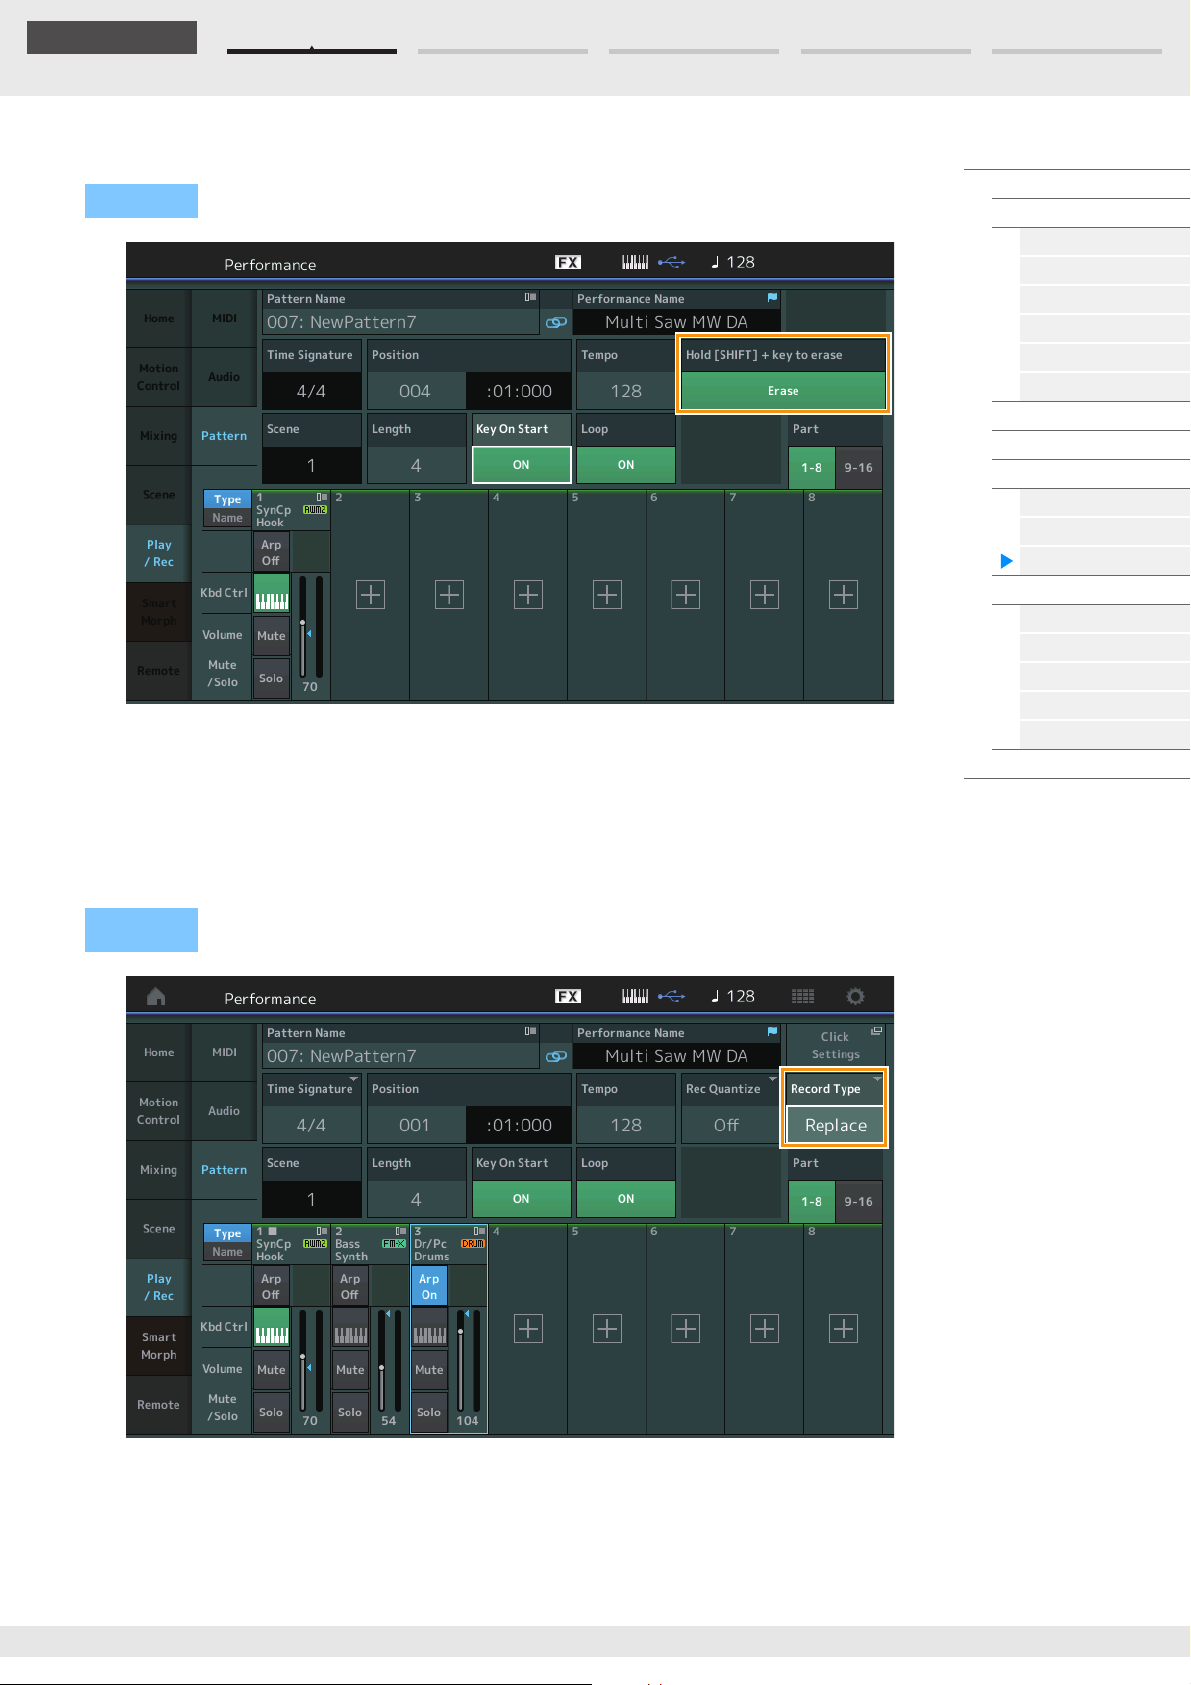
Edit Search Utility Live SetPerformance
Reference
Recording
Operation
Hold [SHIFT] + key to erase
You can delete specific note events by pressing the [SHIFT] button and playing the keys corresponding to
the notes you want to delete.
NOTE You can change the sound via the Part Category Search display even while recording, by touching the Part
name and then selecting [Category Search].
[PERFORMANCE (HOME)] [Play/Rec] [Pattern] [I] (Record) button [R] (Play) button
Performance
Home
Motion Control
Overview
Quick Edit
Arpeggio
Motion Seq
Super Knob
Knob Auto
Mixing
Scene
Play / Rec
MIDI
Audio
Pattern
Smart Morph
Play
Edit
Analyze
Super Knob
Job
Remote
Re-recording
Operation
[PERFORMANCE (HOME)] [Play/Rec] [Pattern] (indicated Pattern has been recorded
already) [I] (Record) button [R](Play) button
Record Type
Determines whether a pattern will be replaced or overdubbed when recording.
Settings: Replace, Overdub
NOTE When this is set to Overdub, recording of controller events is handled differently. Existing controller events are
disabled and deleted, and then newly recorded, over the range from when the controller is first operated to
when recording is stopped.
MODX+ Reference Manual
70
Page 71
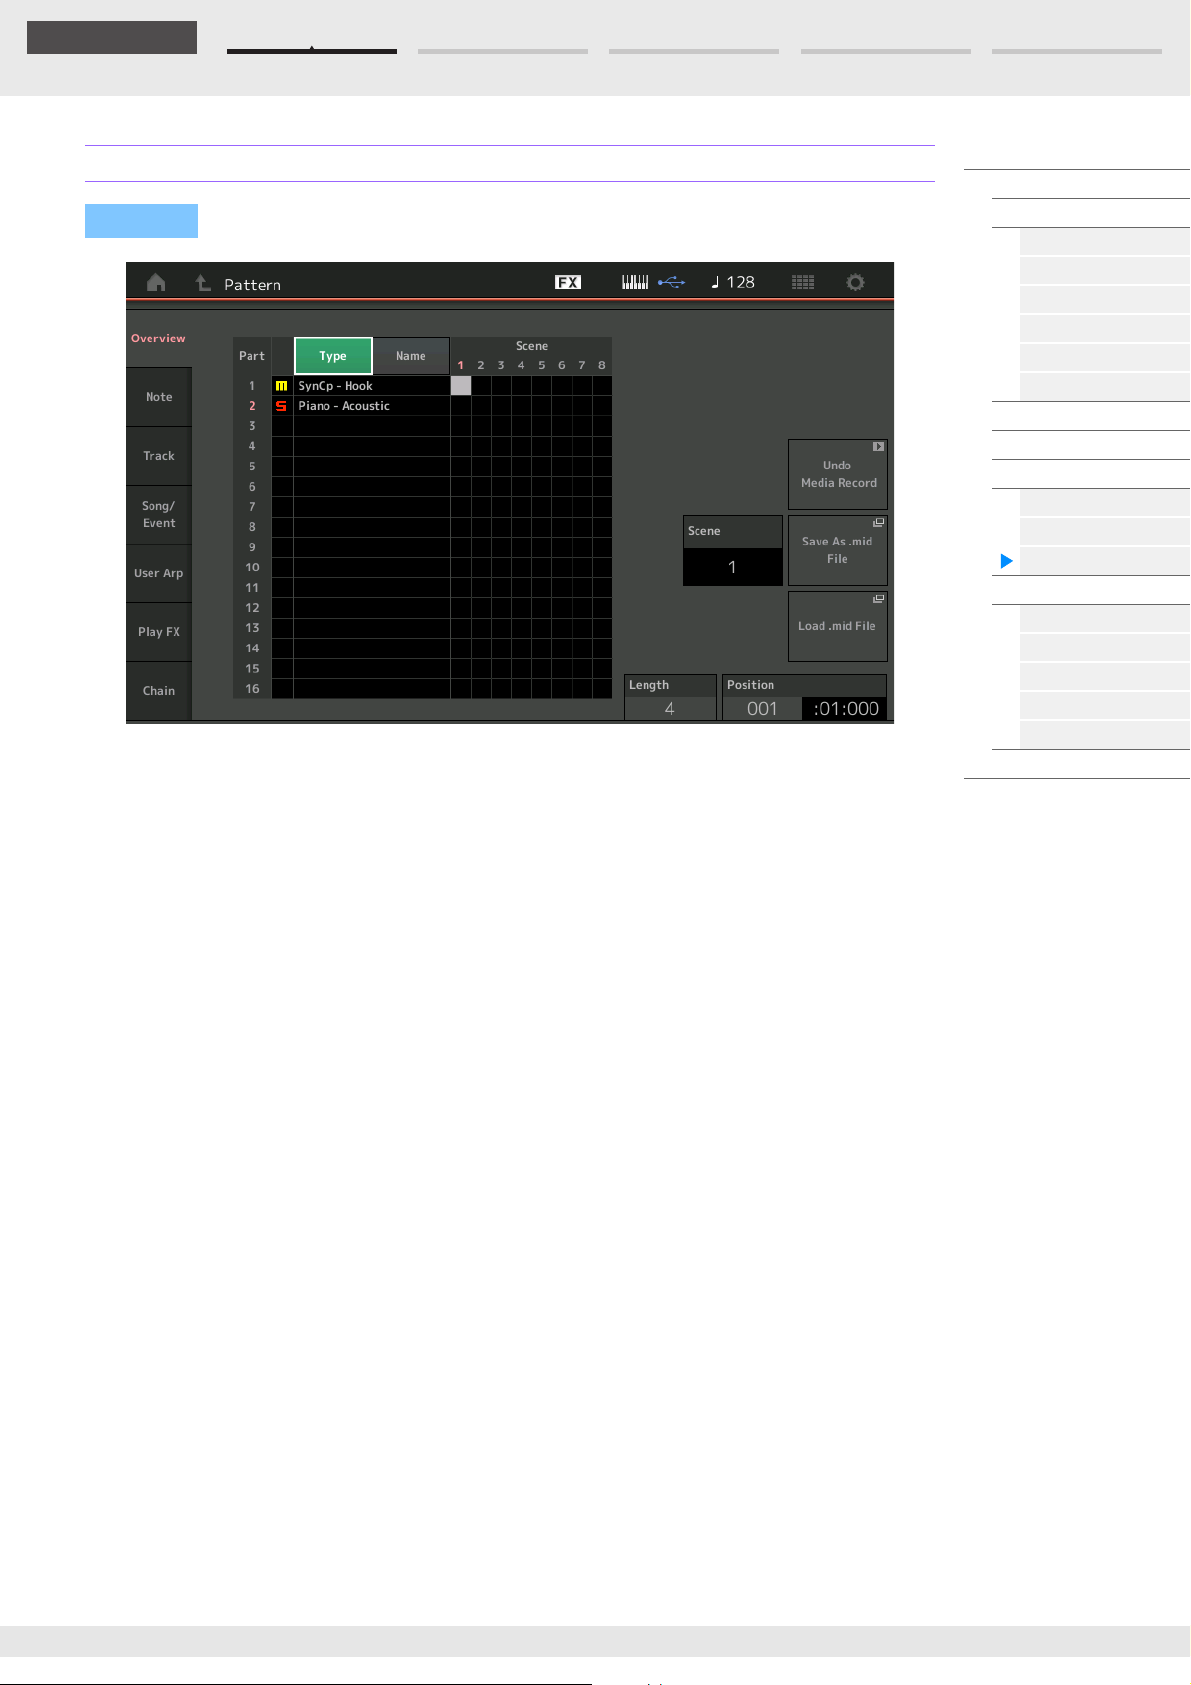
Edit Search Utility Live SetPerformance
Reference
Overview
Operation
Typ e
Touching this button changes the Part’s displayed text to Main Category and Sub Category.
This button is synchronized with the corresponding button on the Play/Rec display. Changing one changes
the other.
[R] (Play) button or [PERFORMANCE (HOME)] [Play/Rec] [Pattern] [Edit/Job]
Performance
Home
Motion Control
Overview
Quick Edit
Arpeggio
Motion Seq
Super Knob
Knob Auto
Mixing
Scene
Play / Rec
MIDI
Audio
Pattern
Smart Morph
Play
Edit
Analyze
Super Knob
Job
Remote
Name
Touching this button changes the Part’s displayed text to Part Name.
This button is synchronized with the corresponding button on the Play/Rec display. Changing one changes
the other.
Scene
Indicates the selected scene number.
Undo
Cancels the most recently made changes and restores to the state prior to the last changes. This job is
available only when a recorded sequence already exists and you have performed some job on the
sequence data.
Redo
Restores the changes performed by Undo. Redo is available only after using Undo.
Save As .mid File
Opens the Store/Save display. You can save the selected Scene’s sequence as a MIDI file.
Load .mid File
Opens the Load display for loading MIDI files. You can select the Pattern and Scene to load after you have
selected a MIDI file.
Length
Indicates the length of the entire sequence in the selected Scene.
Position
Shows the current position during Scene playback, and lets you set the starting position of playback.
Range: 001–256
MODX+ Reference Manual
71
Page 72
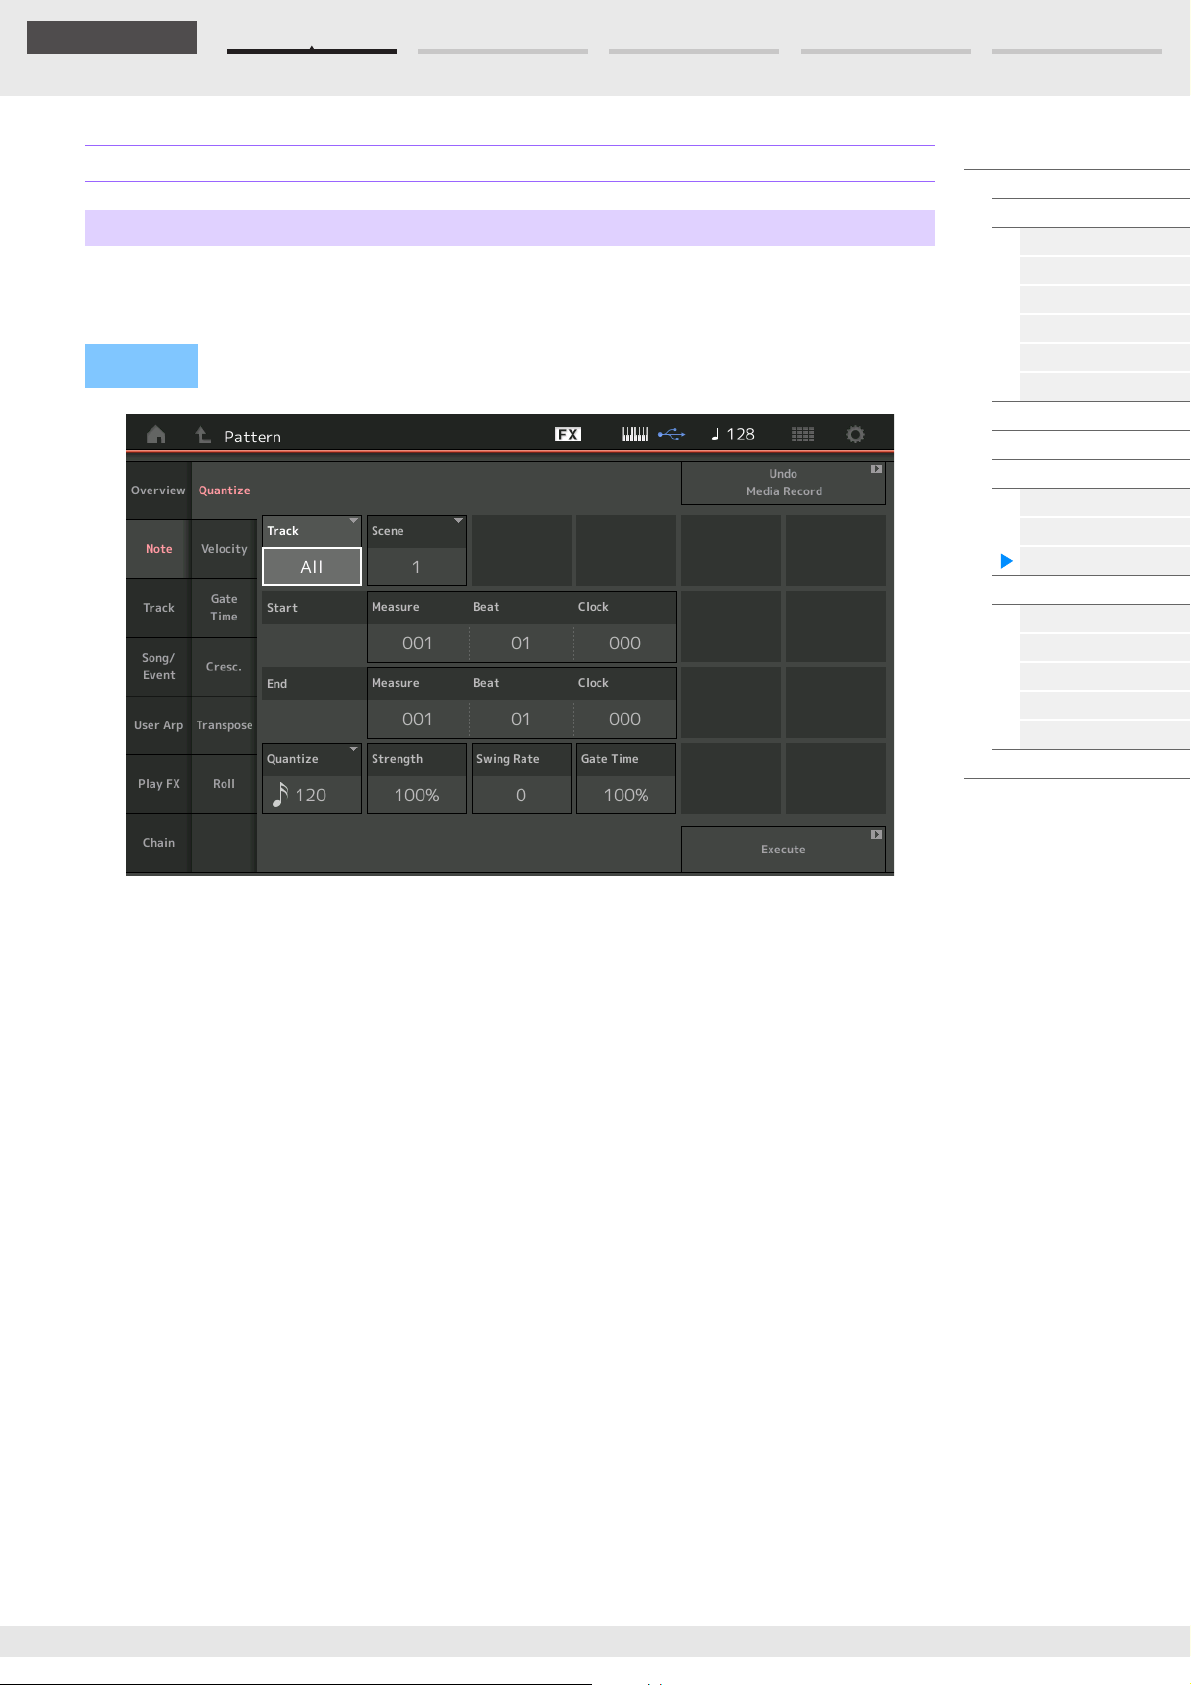
Edit Search Utility Live SetPerformance
Reference
Note
Quantize
Quantization is the process of adjusting the timing of note events by moving them closer to the nearest
exact beat.
You can use this feature, for example, to improve the timing of a performance recorded in real time.
Operation
[R](Play) button or [PERFORMANCE (HOME)] [Play/Rec] [Pattern] [Edit/Job] [Note]
[Quantize]
Performance
Home
Motion Control
Overview
Quick Edit
Arpeggio
Motion Seq
Super Knob
Knob Auto
Mixing
Scene
Play / Rec
MIDI
Audio
Pattern
Smart Morph
Play
Edit
Analyze
Super Knob
Job
Remote
Track
Determines the track to which the Job is applied.
Scene
Determines the scene to which the Job is applied.
Start Measure
Determines the starting measure position at which the Job is applied.
Range: 001–257
Start Beat
Determines the starting beat position at which the Job is applied.
Settings: Depends on selected Time Signature
Start Clock
Determines the starting Clock position at which the Job is applied.
Settings: Depends on selected Time Signature
End Measure
Determines the ending measure position at which the Job is applied.
Range: 001–257
End Beat
Determines the ending beat position at which the Job is applied.
Settings: Depends on selected Time Signature
End Clock
Determines the ending Clock position at which the Job is applied.
Settings: Depends on selected Time Signature
MODX+ Reference Manual
72
Page 73
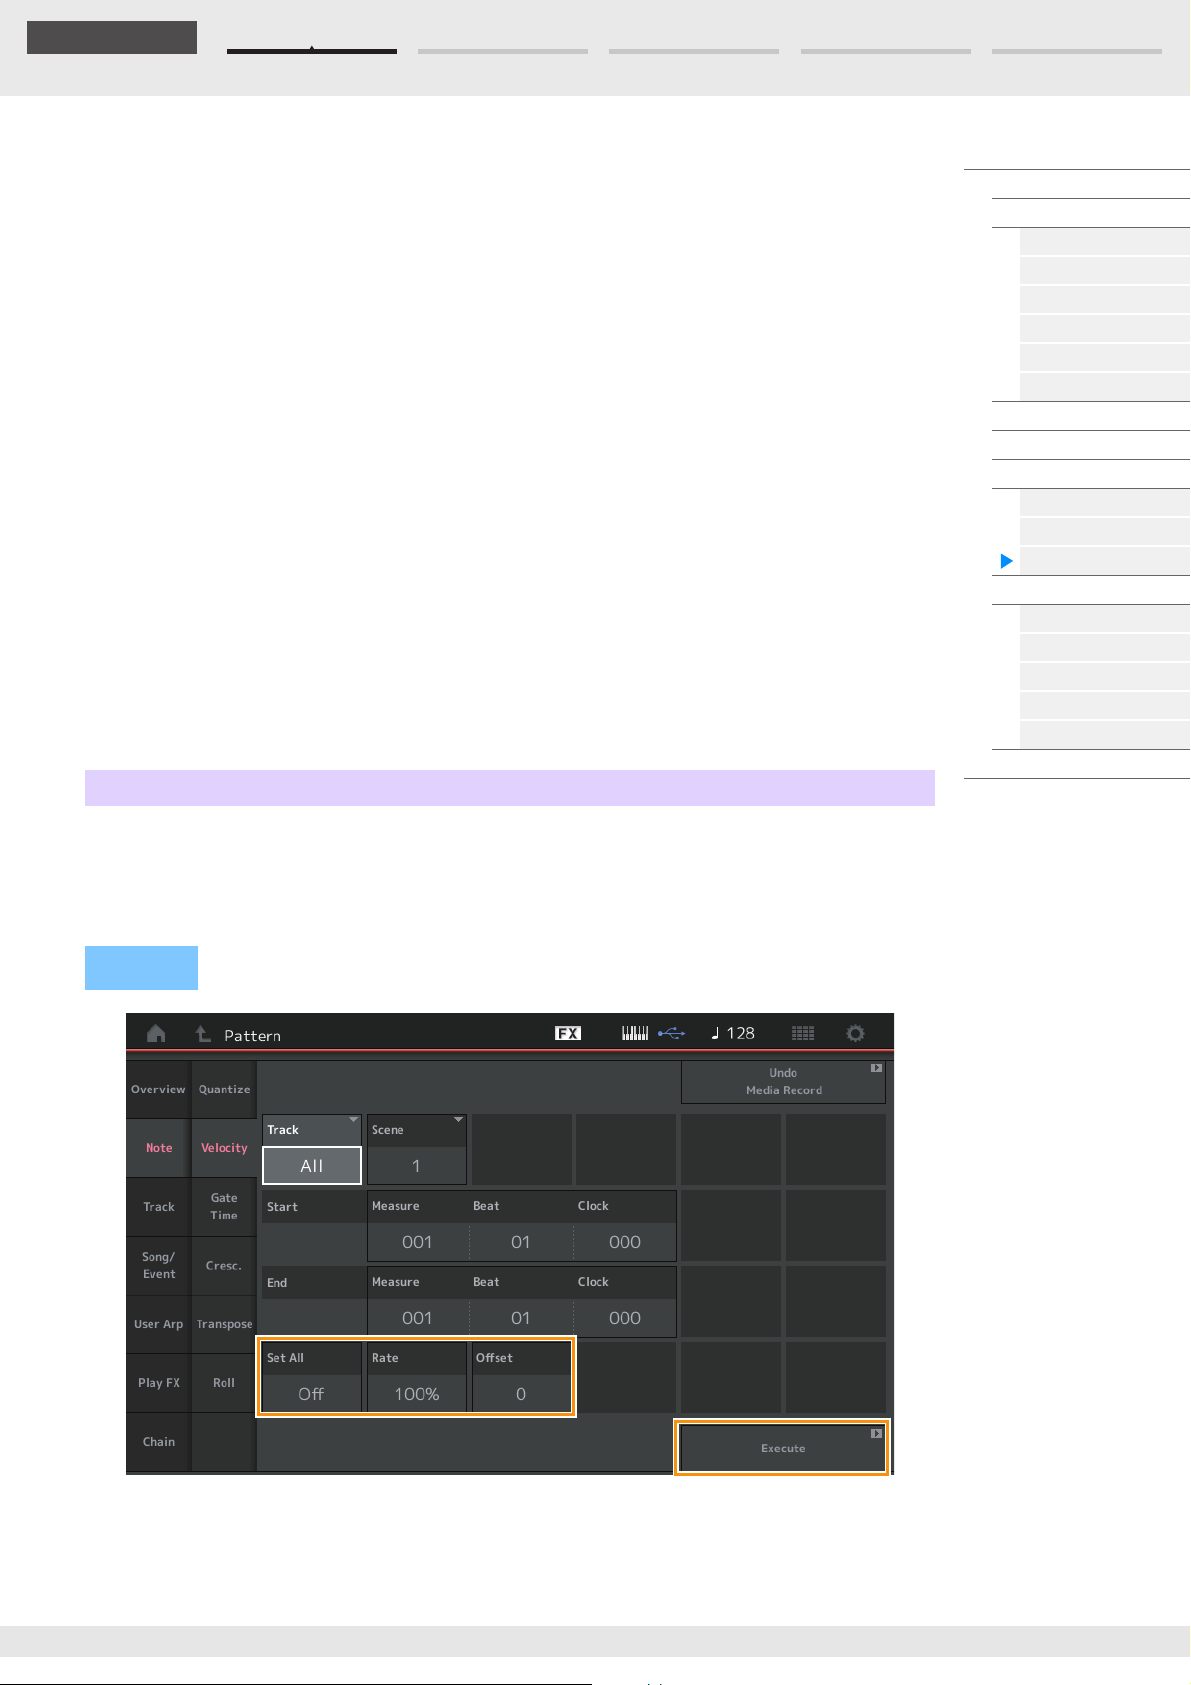
Edit Search Utility Live SetPerformance
Reference
Quantize (Resolution)
Determines to what beats the note data in the specified track will be aligned.
Settings: 32nd note, 16th note triplet, 16th note, 8th note triplet, 8th note, 1/4 note triplet, 1/4 note, 16th note + 16th note triplet,
8th note + 8th note triplet
Strength
Sets the degree or “magnetic strength” to which Quantize is applied. A setting of 100% produces exact
timing. A setting of 0% results in no quantization.
Range: 0%–100%
Swing Rate
This selectively delays the notes on even-numbered beats (backbeats) to produce a swing feel. For
example, if the meter is 4/4 and the Quantize value is quarter notes, the 2nd and 4th beats of the measure
will be delayed.
Settings: Depends on specified Quantize value
If the Quantize value is 1/4 note, 8th note, 16th note, 32nd note: 0 – half of the triplet grid
If the Quantize value is 1/4 note triplet, 8th note triplet, 16th note triplet: 0 – half of the triplet grid
If the Quantize value is 8th note + 8th note triplet, 16th note + 16th note triplet: 0 – half of the triplet grid
Gate Time
Determines the gate time (the length of time a note sounds) of the even-numbered backbeat notes for
enhancing the swing feel.
Range: 0%–200%
Execute
Executes the Job on the MIDI sequence data.
Velocity
Performance
Home
Motion Control
Overview
Quick Edit
Arpeggio
Motion Seq
Super Knob
Knob Auto
Mixing
Scene
Play / Rec
MIDI
Audio
Pattern
Smart Morph
Play
Edit
Analyze
Super Knob
Job
Remote
This Job alters the velocity values of a specified range of notes, letting you selectively boost or cut the
volume of those notes.
NOTE Velocity changes are calculated as follows
Adjusted Velocity = (Original Velocity x Rate) + Offset
If the result is 0 or less, the value is set to 1. If the result is higher than 127, the value is set to 127.
Operation
[R] (Play) button or [PERFORMANCE (HOME)] [Play/Rec] [Pattern] [Edit/Job] [Note]
[Velocity]
Set All
Sets the velocities of all target notes to the same fixed value. When set to “Off,” the Set All parameter has
no effect. When set to a value other than “Off,” the Rate and Offset parameters are unavailable.
Range: Off, 001–127
MODX+ Reference Manual
73
Page 74
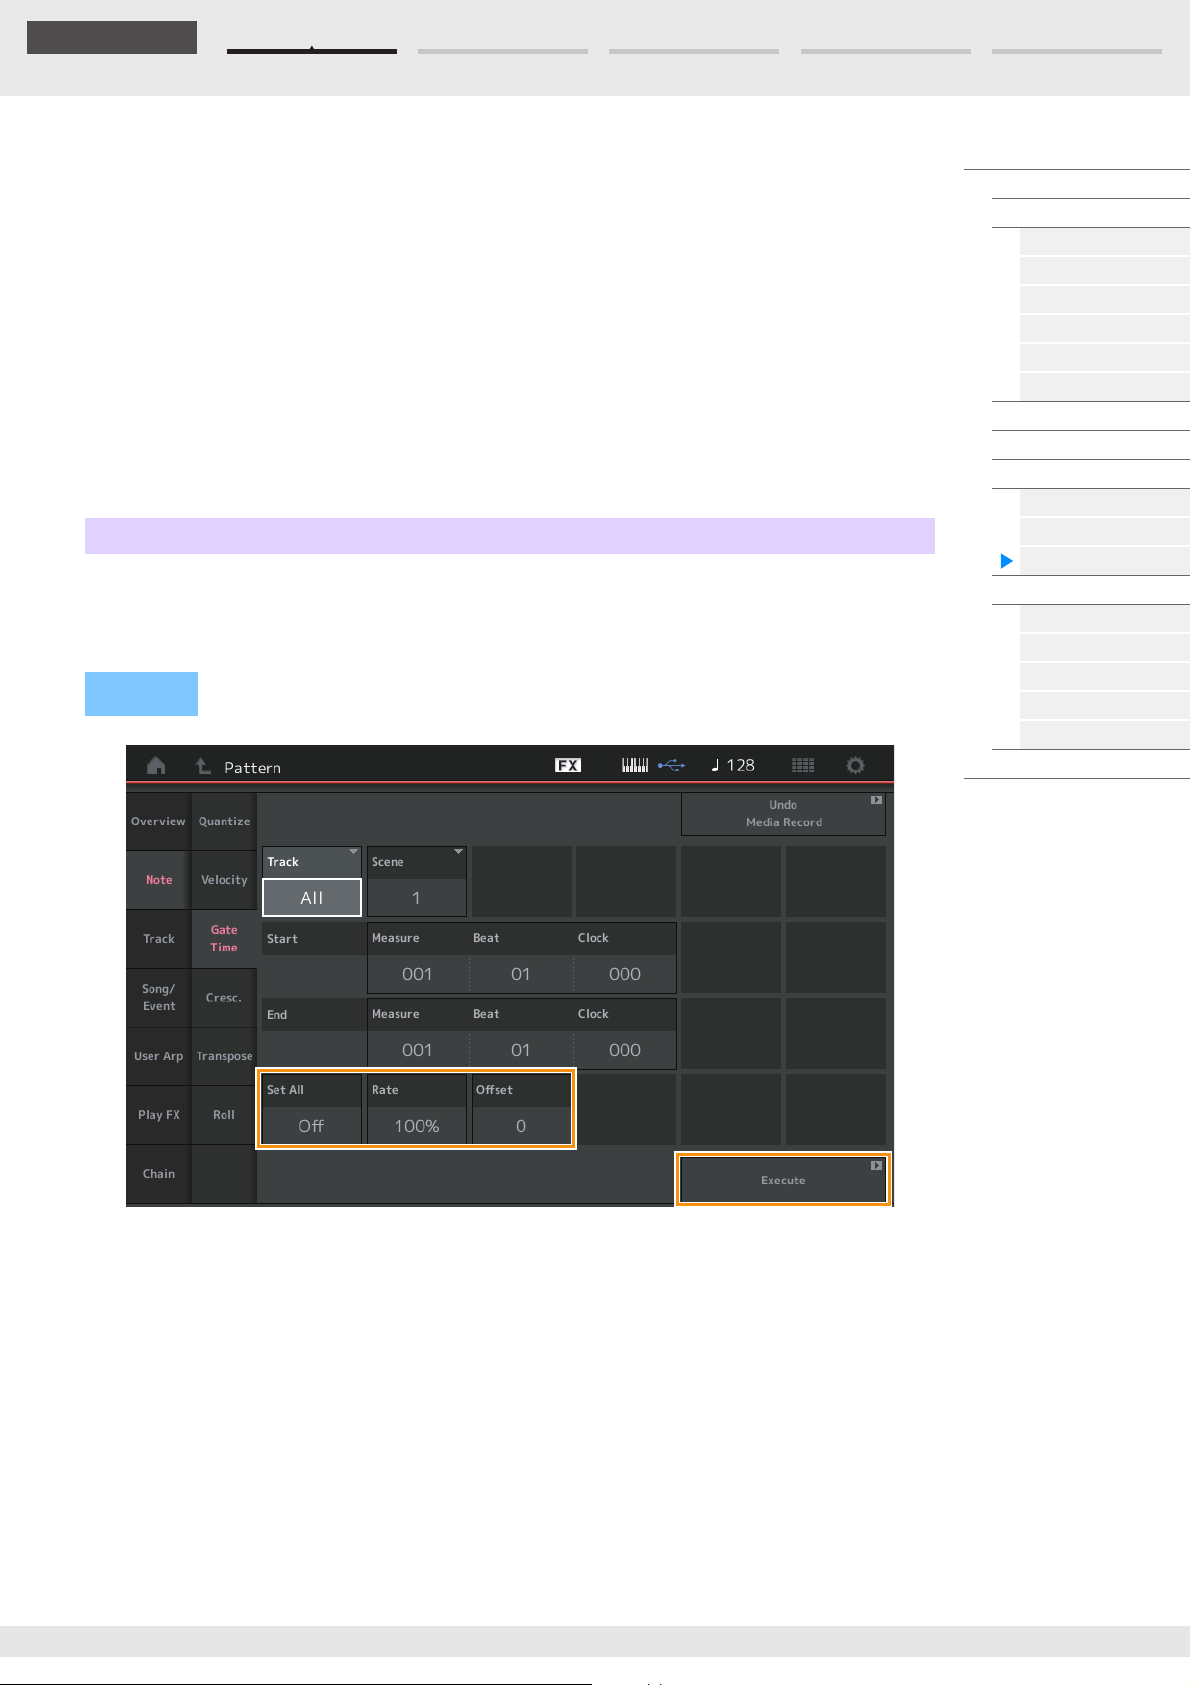
Edit Search Utility Live SetPerformance
Reference
Rate
Determines the percentage by which the target notes will be shifted from their original velocities. Range
below 100% reduce the velocities, and Range above 100% increase the velocities proportionately. When
the Set All parameter is set to something other than “Off,” this parameter cannot be changed.
Range: 0%–200%
Offset
Adds a fixed value to the Rate-adjusted velocity values. A setting of 0 produces no change. Range below
0 reduce the velocities, and Range above 0 increase the velocities. When the Set All parameter is set to
something other than “Off,” this parameter cannot be changed.
Range: -127 – +127
Execute
Executes the Job to the MIDI sequence data.
Gate Time
This Job alters the gate times of a specified range of notes.
NOTE Gate time changes are calculated as follows:
Adjusted Gate Time = (Original Gate Time x Rate) + Offset
If the result is 0 or less, the value is rounded off to 1.
Operation
[R] (Play) button or [PERFORMANCE (HOME)] [Play/Rec] [Pattern] [Edit/Job] [Note]
[Gate Time]
Performance
Home
Motion Control
Overview
Quick Edit
Arpeggio
Motion Seq
Super Knob
Knob Auto
Mixing
Scene
Play / Rec
MIDI
Audio
Pattern
Smart Morph
Play
Edit
Analyze
Super Knob
Job
Remote
Set All
Sets the gate times of all target notes to the same fixed value. When set to “Off,” the Set All parameter has
no effect. When set to a value other than “Off,” the Rate and Offset parameters are unavailable.
Range: Off (0), 001–9999
Rate
Determines the percentage by which the gate time of the target notes will be changed. Range below 100%
shorten the notes, and Range above 100% lengthen the notes proportionately. When the Set All parameter
is set to something other than “Off,” this parameter cannot be changed.
Range: 0%–200%
MODX+ Reference Manual
74
Page 75
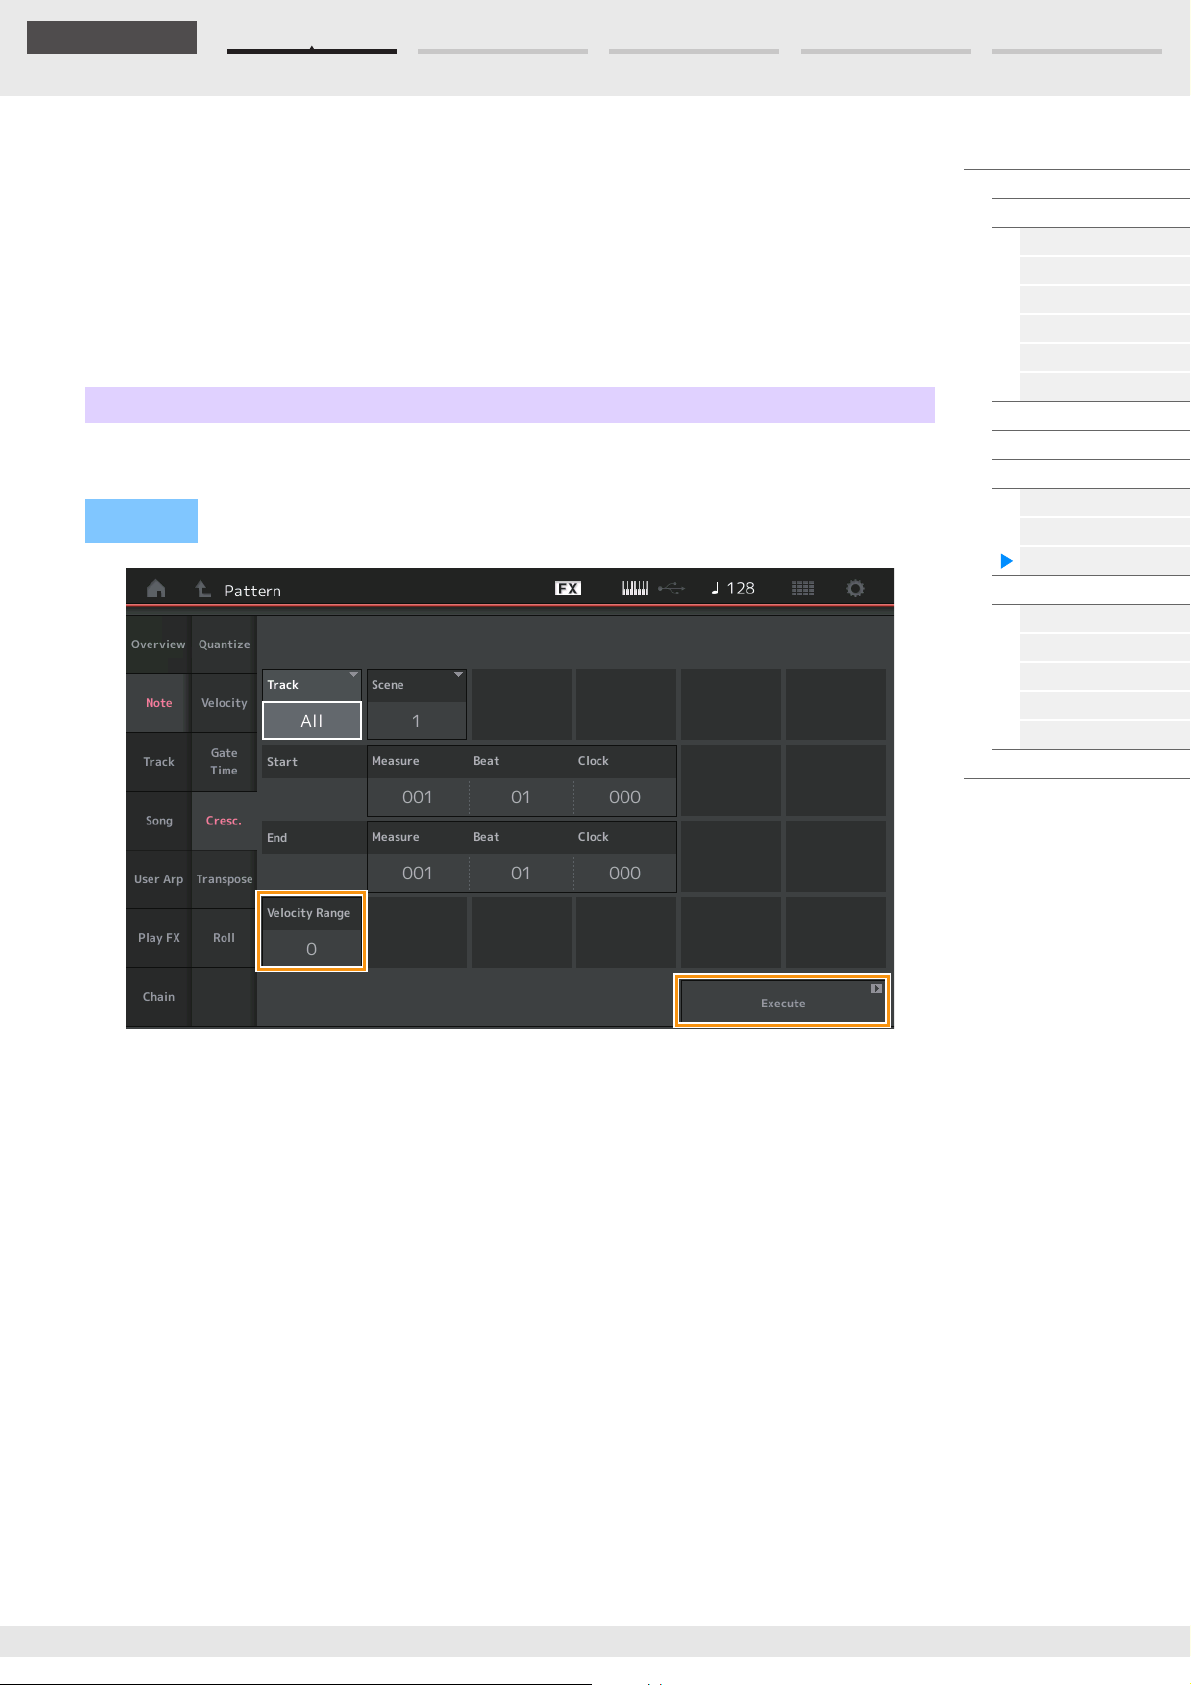
Edit Search Utility Live SetPerformance
Reference
Offset
Adds a fixed value to the Rate-adjusted gate time values. A setting of 0 produces no change. Range below
0 shorten the gate time, and Range above 0 lengthen the gate time. When the Set All parameter is set to
something other than “Off,” this parameter cannot be changed.
Range: -9999 – +9999
Execute
Executes the Job to the MIDI sequence data.
Cresc. (Crescendo)
This Job lets you create a crescendo or decrescendo over a specified range of notes. (Crescendo is a
gradual increase in volume, and decrescendo is a gradual decrease.)
Operation
[R] (Play) button or [PERFORMANCE (HOME)] [Play/Rec] [Pattern] [Edit/Job] [Note]
[Cresc.]
Performance
Home
Motion Control
Overview
Quick Edit
Arpeggio
Motion Seq
Super Knob
Knob Auto
Mixing
Scene
Play / Rec
MIDI
Audio
Pattern
Smart Morph
Play
Edit
Analyze
Super Knob
Job
Remote
Velocity Range
Determines the intensity of the crescendo or decrescendo. The velocity values of the notes in the specified
range are gradually increased or decreased starting at the first note in the range. The velocity of the last
note in the range becomes the original velocity of the note plus the Velocity Range value. If the resultant
velocity is outside the 1–127 range, it is set to 1 or 127 accordingly. Range greater than 0 produce a
crescendo, and Range less than 0 produce a decrescendo. A setting of 0 produces no effect.
Range: -127 – +127
Execute
Executes the Job to the MIDI sequence data.
MODX+ Reference Manual
75
Page 76
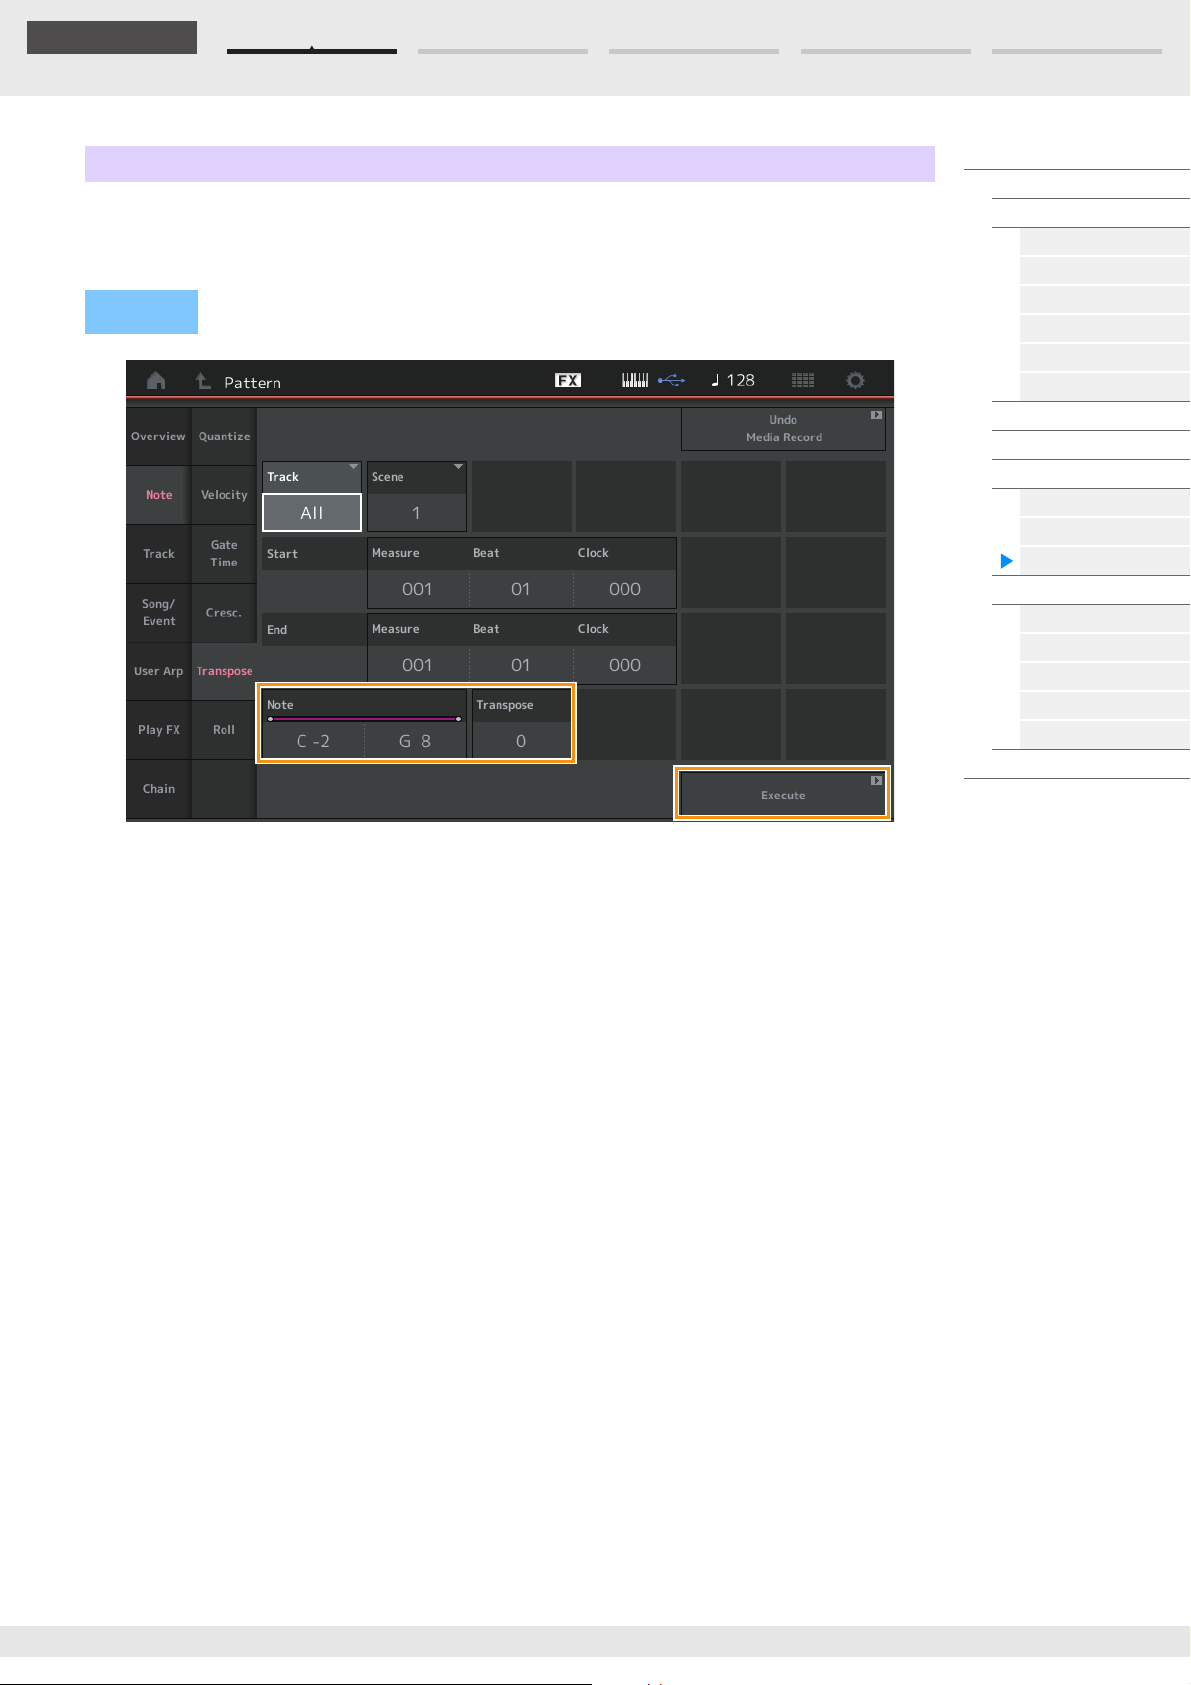
Edit Search Utility Live SetPerformance
Reference
Transpose
This Job lets you change the key or pitch of the notes in the specified range.
NOTE When you execute this Job and change notes outside the allowed range of C-2 – G8, the notes are
automatically set to the octave below (or above).
Operation
[R] (Play) button or [PERFORMANCE (HOME)] [Play/Rec] [Pattern] [Edit/Job] [Note]
[Transpose]
Performance
Home
Motion Control
Overview
Quick Edit
Arpeggio
Motion Seq
Super Knob
Knob Auto
Mixing
Scene
Play / Rec
MIDI
Audio
Pattern
Smart Morph
Play
Edit
Analyze
Super Knob
Job
Remote
Note
Determines the range of notes over which the Job is applied. You can set the Note directly from the
Keyboard by touching the [Keyboard] button.
Range: C -2 – G8
Transpose
Transposes notes in the specified range (in semitones). A setting of +12 transposes up one octave, while a
setting of -12 transposes down an octave. A setting of 0 produces no change.
Range: -127 – +127
Execute
Executes the Job on the MIDI sequence data.
MODX+ Reference Manual
76
Page 77
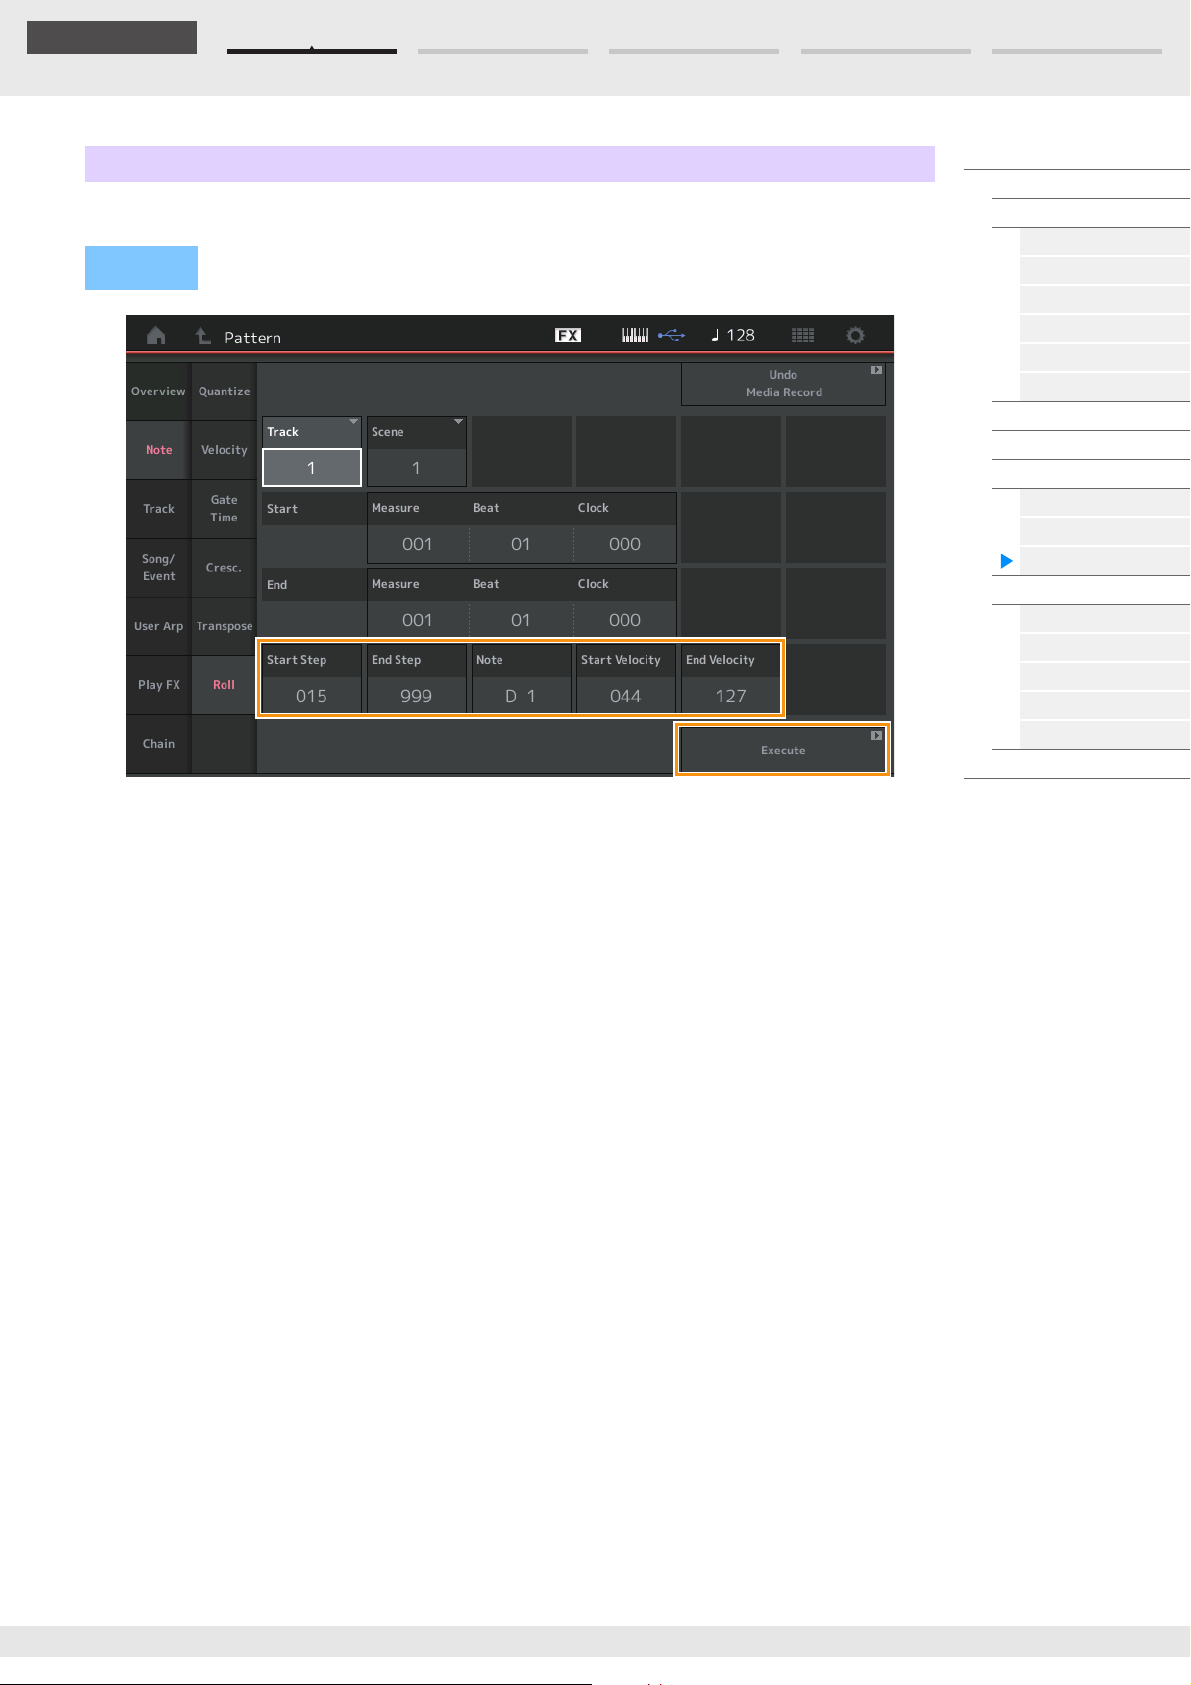
Edit Search Utility Live SetPerformance
Reference
Roll
This Job creates a series of repeated notes (like a drum roll) over the specified range.
Operation
[R] (Play) button or [PERFORMANCE (HOME)] [Play/Rec] [Pattern] [Edit/Job] [Note]
[Roll]
Performance
Home
Motion Control
Overview
Quick Edit
Arpeggio
Motion Seq
Super Knob
Knob Auto
Mixing
Scene
Play / Rec
MIDI
Audio
Pattern
Smart Morph
Play
Edit
Analyze
Super Knob
Job
Remote
Start Step
Determines the size of the step (i.e., the number of clocks) between each note in the roll. You can create
subdivided rolls by setting small values between Start Step and End Step. This corresponds to the first
clock value in the range that you specified.
Range: 015–999
End Step
Determines the size of the step (i.e. the number of clocks) between each note in the roll. You can create
subdivided rolls by setting small values between Start Step and End Step. This corresponds to the last
clock value in the range that you specified.
Range: 015–999
Note
Determines the notes for which the Job is applied. You can set the Note directly from the Keyboard by
touching the [Keyboard] button.
Range: C -2 – G8
Start Velocity
Determines the velocity of the notes in the roll. This is the first Velocity value in the range that you specified.
Range: 001–127
End Velocity
Determines the velocity of the notes in the roll. This is the last Velocity value in the range that you specified.
Settings: 001–127
NOTE Determining the Start Velocity and End Velocity lets you create rolls that gradually increase or decrease in
volume (crescendo/decrescendo).
Execute
Executes the Job on the MIDI sequence data.
MODX+ Reference Manual
77
Page 78
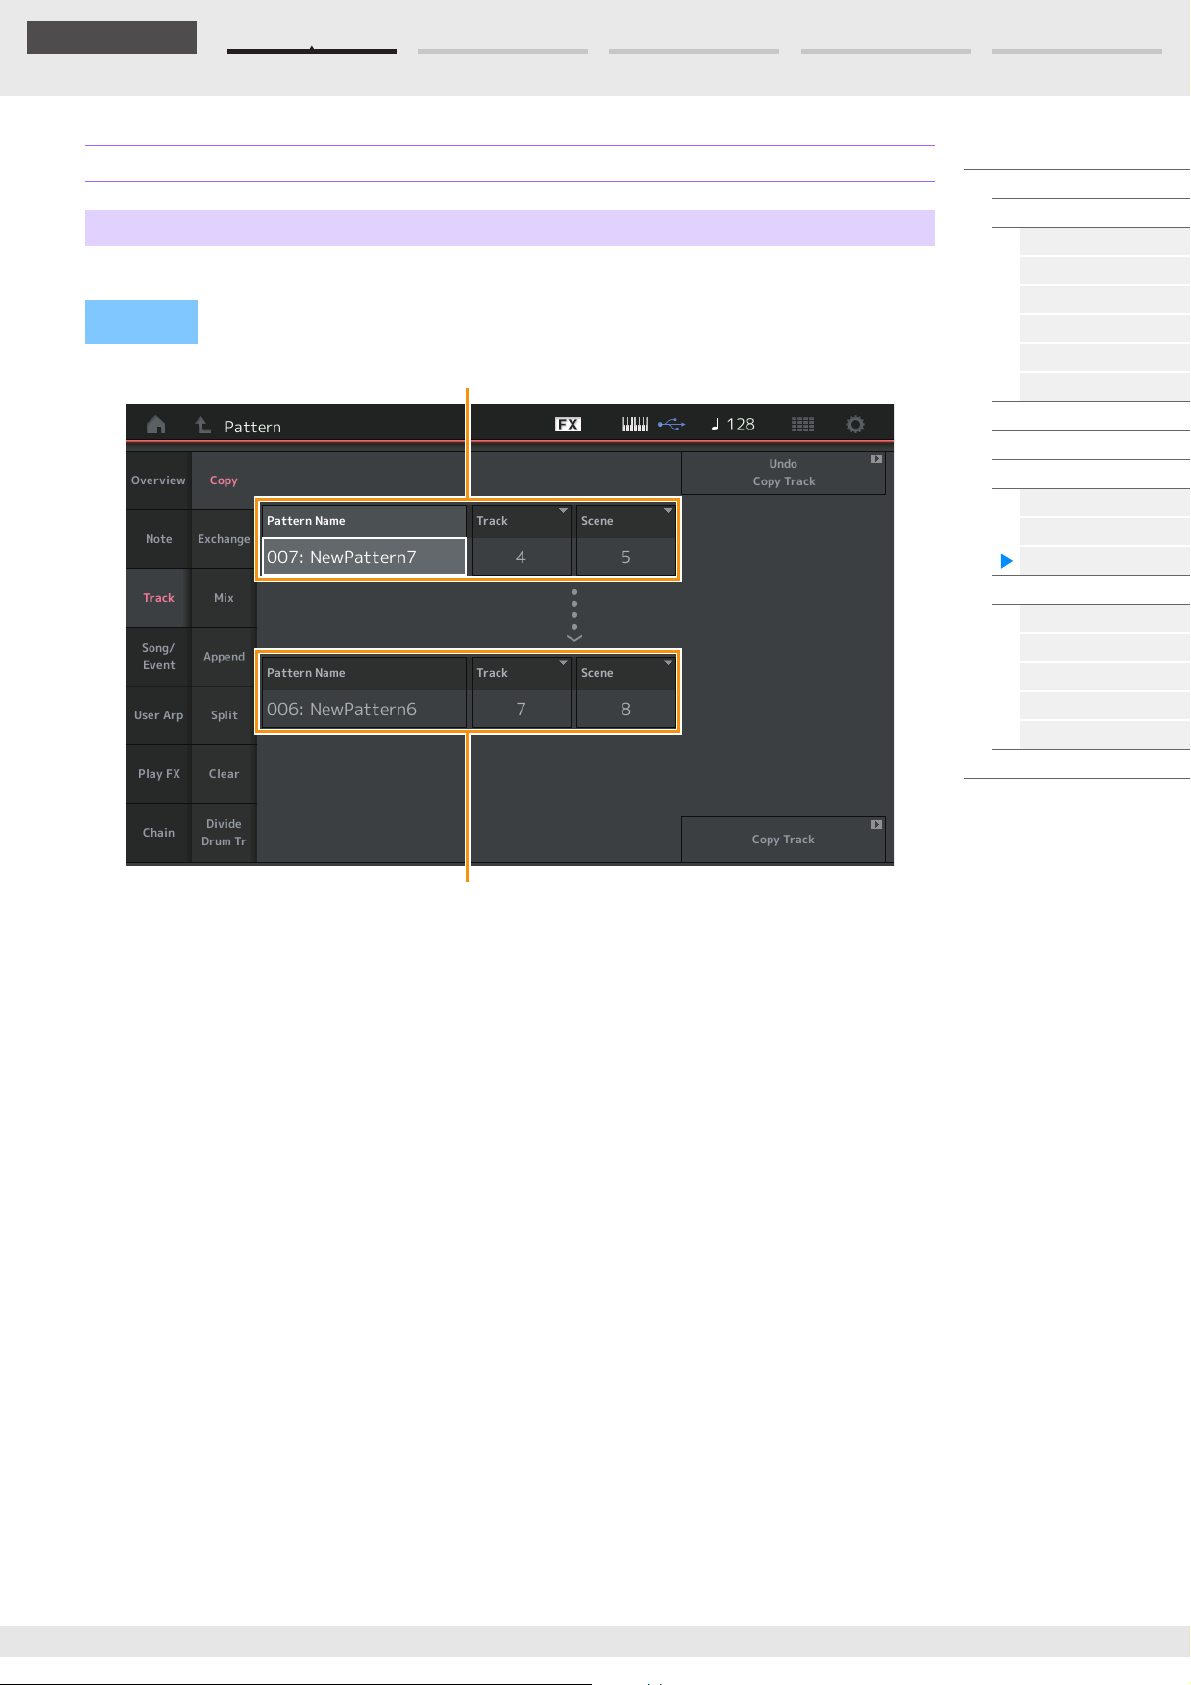
Edit Search Utility Live SetPerformance
Reference
*1 Source
*2 Destination
Track
Copy
This Job copies all data from a specified source track to the specified destination track.
Operation
[R] (Play) button or [PERFORMANCE (HOME)] [Play/Rec] [Pattern] [Edit/Job] [Track]
[Copy]
Performance
Home
Motion Control
Overview
Quick Edit
Arpeggio
Motion Seq
Super Knob
Knob Auto
Mixing
Scene
Play / Rec
MIDI
Audio
Pattern
Smart Morph
Play
Edit
Analyze
Super Knob
Job
Remote
Pattern Name
*1 Source
Determines the source Pattern.
*1 Source
Track
Determines the source Track.
Scene
*1 Source
Determines the source Scene.
Pattern Name
*2 Destination
Determines the destination Pattern.
*2 Destination
Track
Determines the destination Track.
Scene
*2 Destination
Determines the destination Scene.
Copy Track
Executes the Copy Job.
NOTE When you execute Copy Track with Track set to All and Scene set to All, Chain data (page 92) is copied
automatically.
MODX+ Reference Manual
78
Page 79
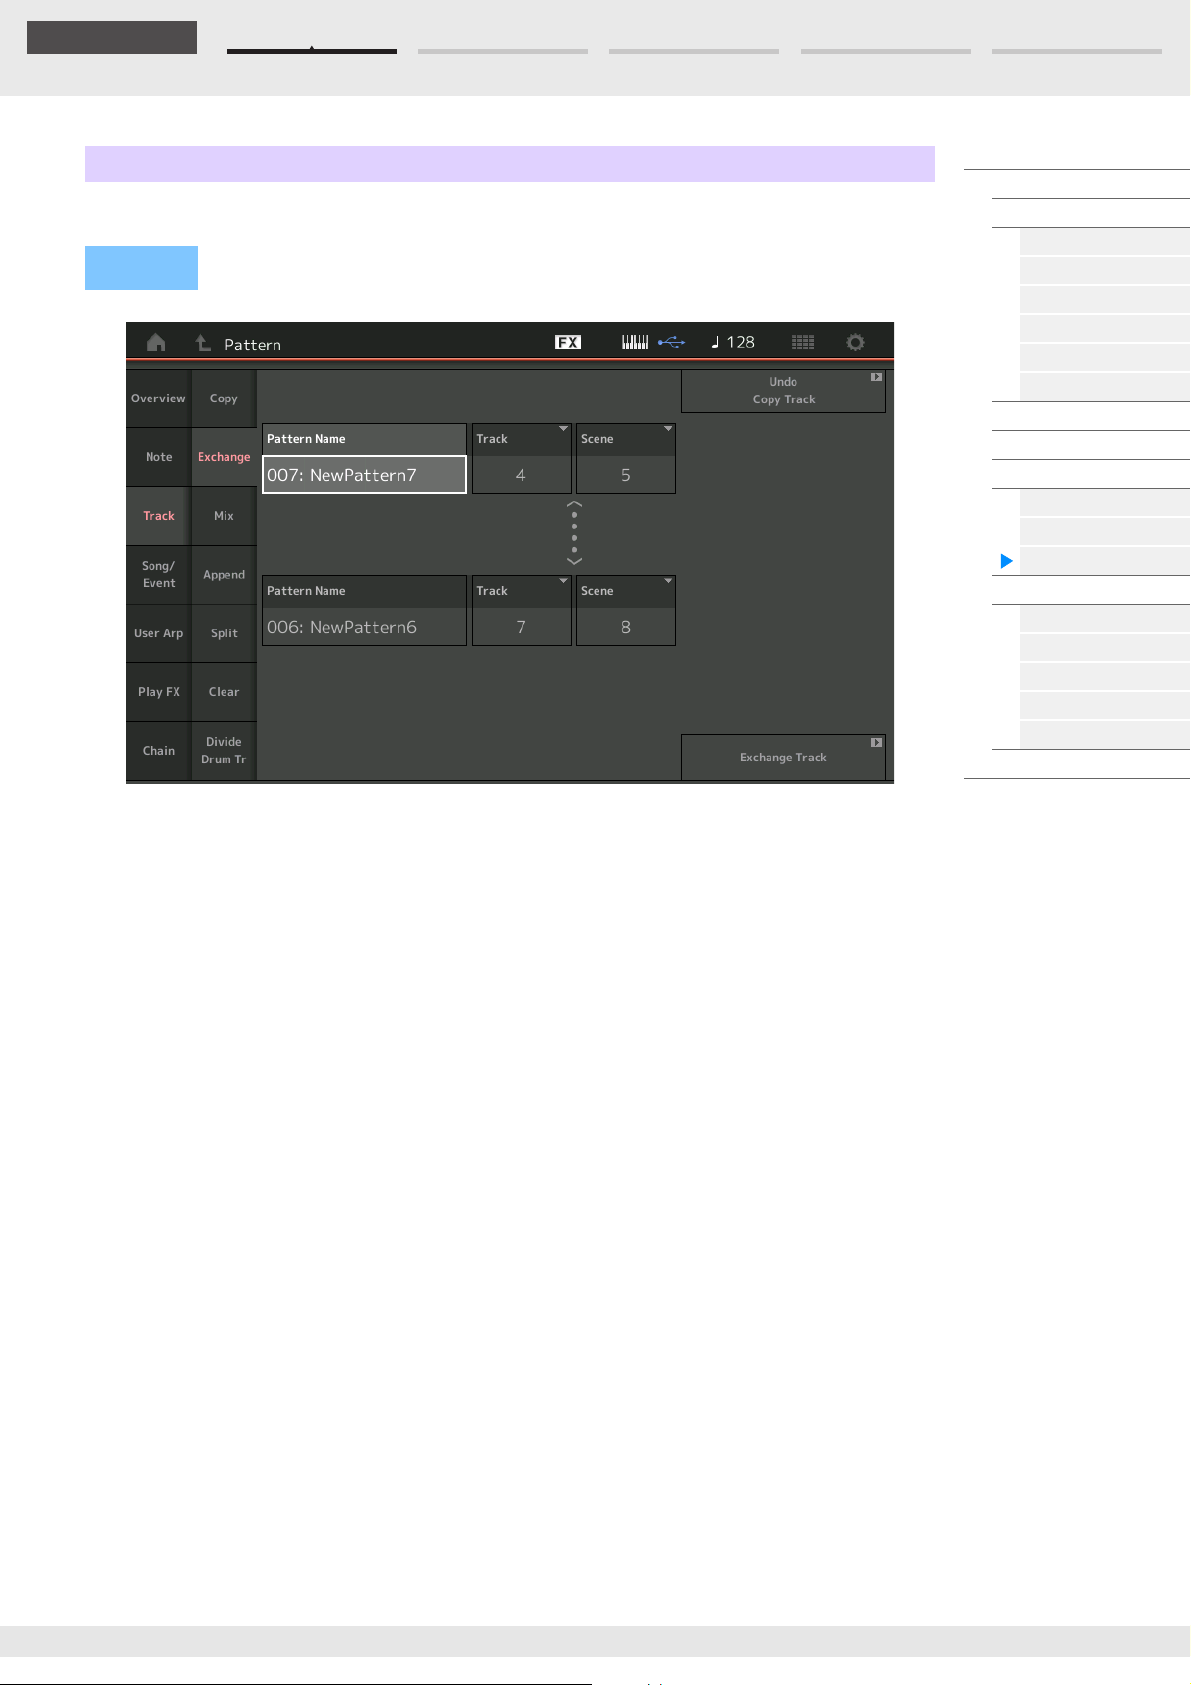
Edit Search Utility Live SetPerformance
Reference
Exchange
This Job swaps all data from specified track to another.
Operation
[R] (Play) button or [PERFORMANCE (HOME)] [Play/Rec] [Pattern] [Edit/Job] [Track]
[Exchange]
Performance
Home
Motion Control
Overview
Quick Edit
Arpeggio
Motion Seq
Super Knob
Knob Auto
Mixing
Scene
Play / Rec
MIDI
Audio
Pattern
Smart Morph
Play
Edit
Analyze
Super Knob
Job
Remote
Pattern Name
Determines one of the Patterns for data exchange.
Track
Determines the Track to exchange.
Scene
Determines the Scene to exchange.
Pattern Name
Determines the other Pattern for data exchange.
Track
Determines the Track to exchange.
Scene
Determines the Scene to exchange.
Exchange Track
Executes the exchange job.
NOTE When you execute Exchange Track with Track set to All and Scene set to All, Chain data (page 92) is copied
automatically.
MODX+ Reference Manual
79
Page 80
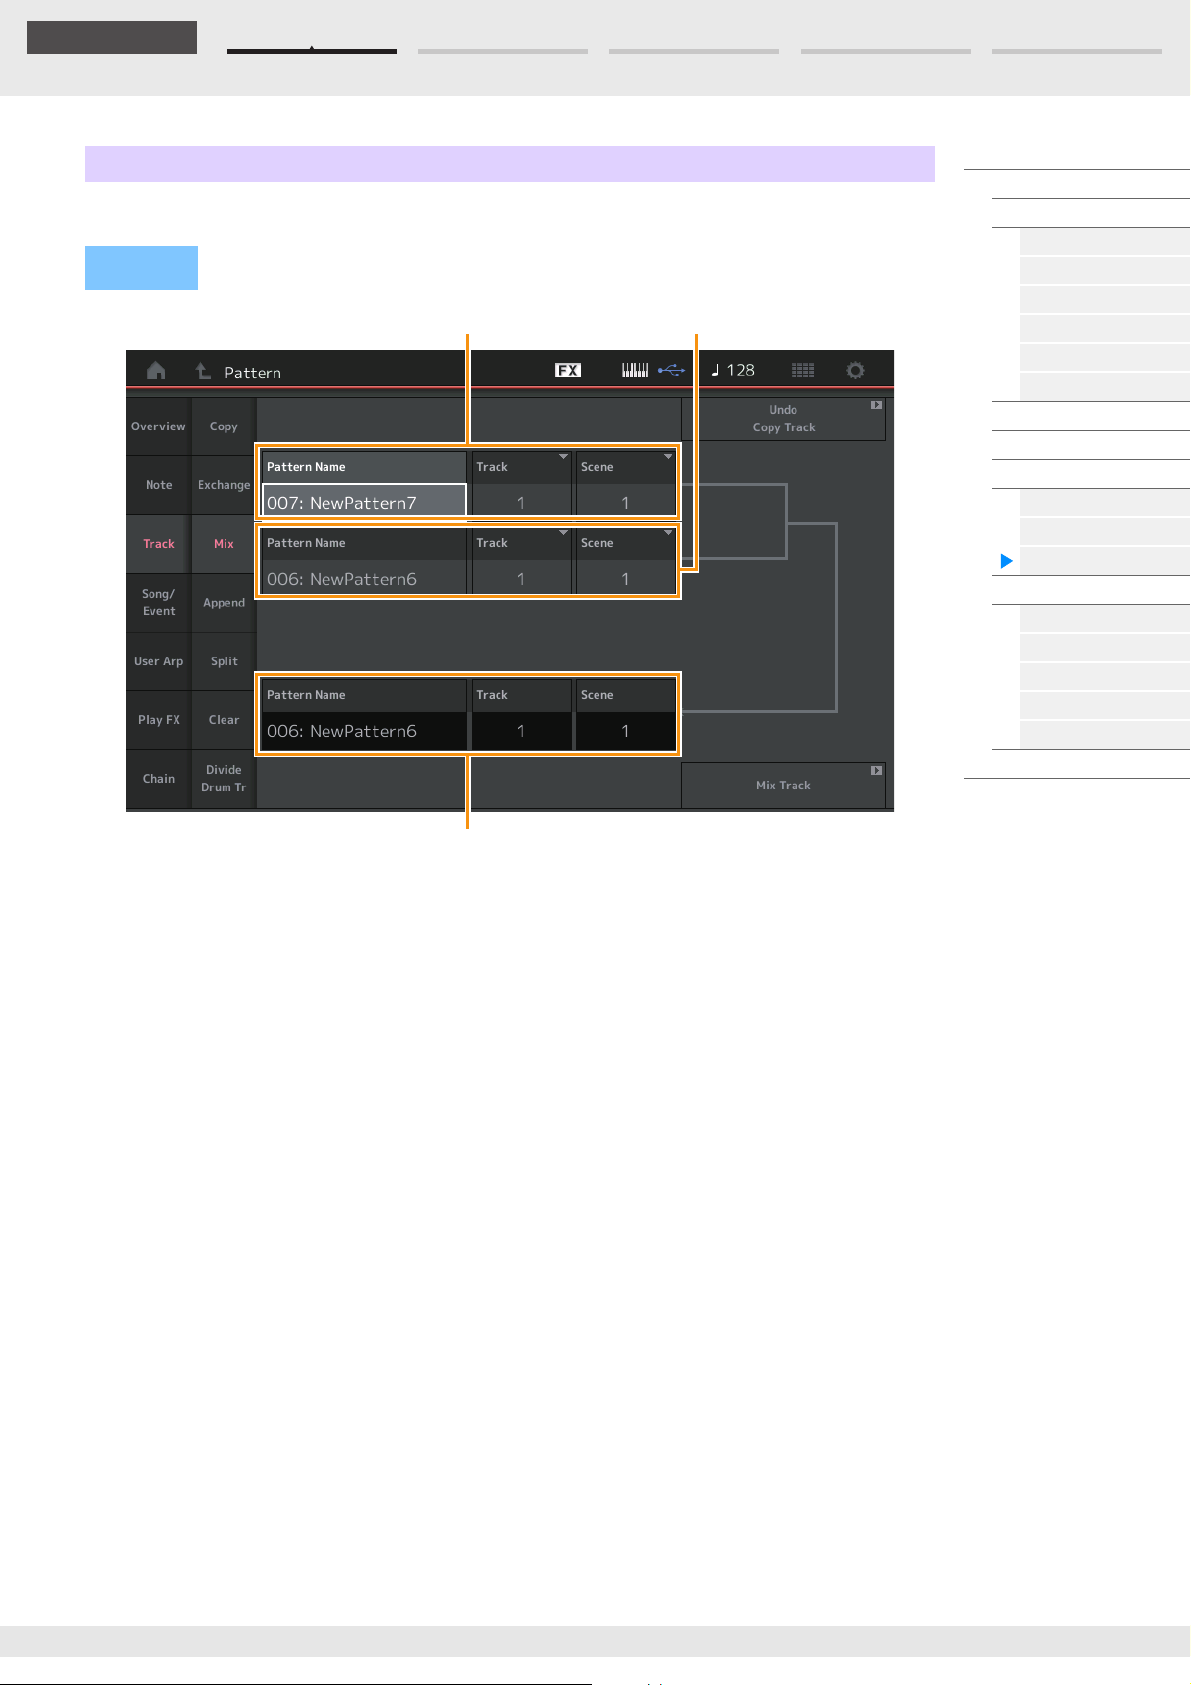
Edit Search Utility Live SetPerformance
Reference
*3 Destination B
*1 Source A
*2 Source B
Mix
This Job mixes all data from two selected tracks (“A” and “B”), and places the result in track B.
Operation
[R] (Play) button or [PERFORMANCE (HOME)] [Play/Rec] [Pattern] [Edit/Job] [Track]
[Mix]
Performance
Home
Motion Control
Overview
Quick Edit
Arpeggio
Motion Seq
Super Knob
Knob Auto
Mixing
Scene
Play / Rec
MIDI
Audio
Pattern
Smart Morph
Play
Edit
Analyze
Super Knob
Job
Remote
Pattern Name
*1 Source A
Determines the source for Pattern A.
*1 Source A
Track
Determines the Track to mix.
Scene
*1 Source A
Determines the Scene to mix.
Pattern Name
*2 Source B
Determines the source for Pattern B.
Track
*2 Source B
Determines the Track to mix.
Scene
*2 Source B
Determines the Scene to mix.
Pattern Name
*3 Destination B
Indicates the destination Pattern.
*3 Destination B
Track
Indicates the destination Track.
Scene
*3 Destination B
Indicates the destination Scene.
Mix Track
Executes the mix job.
MODX+ Reference Manual
80
Page 81
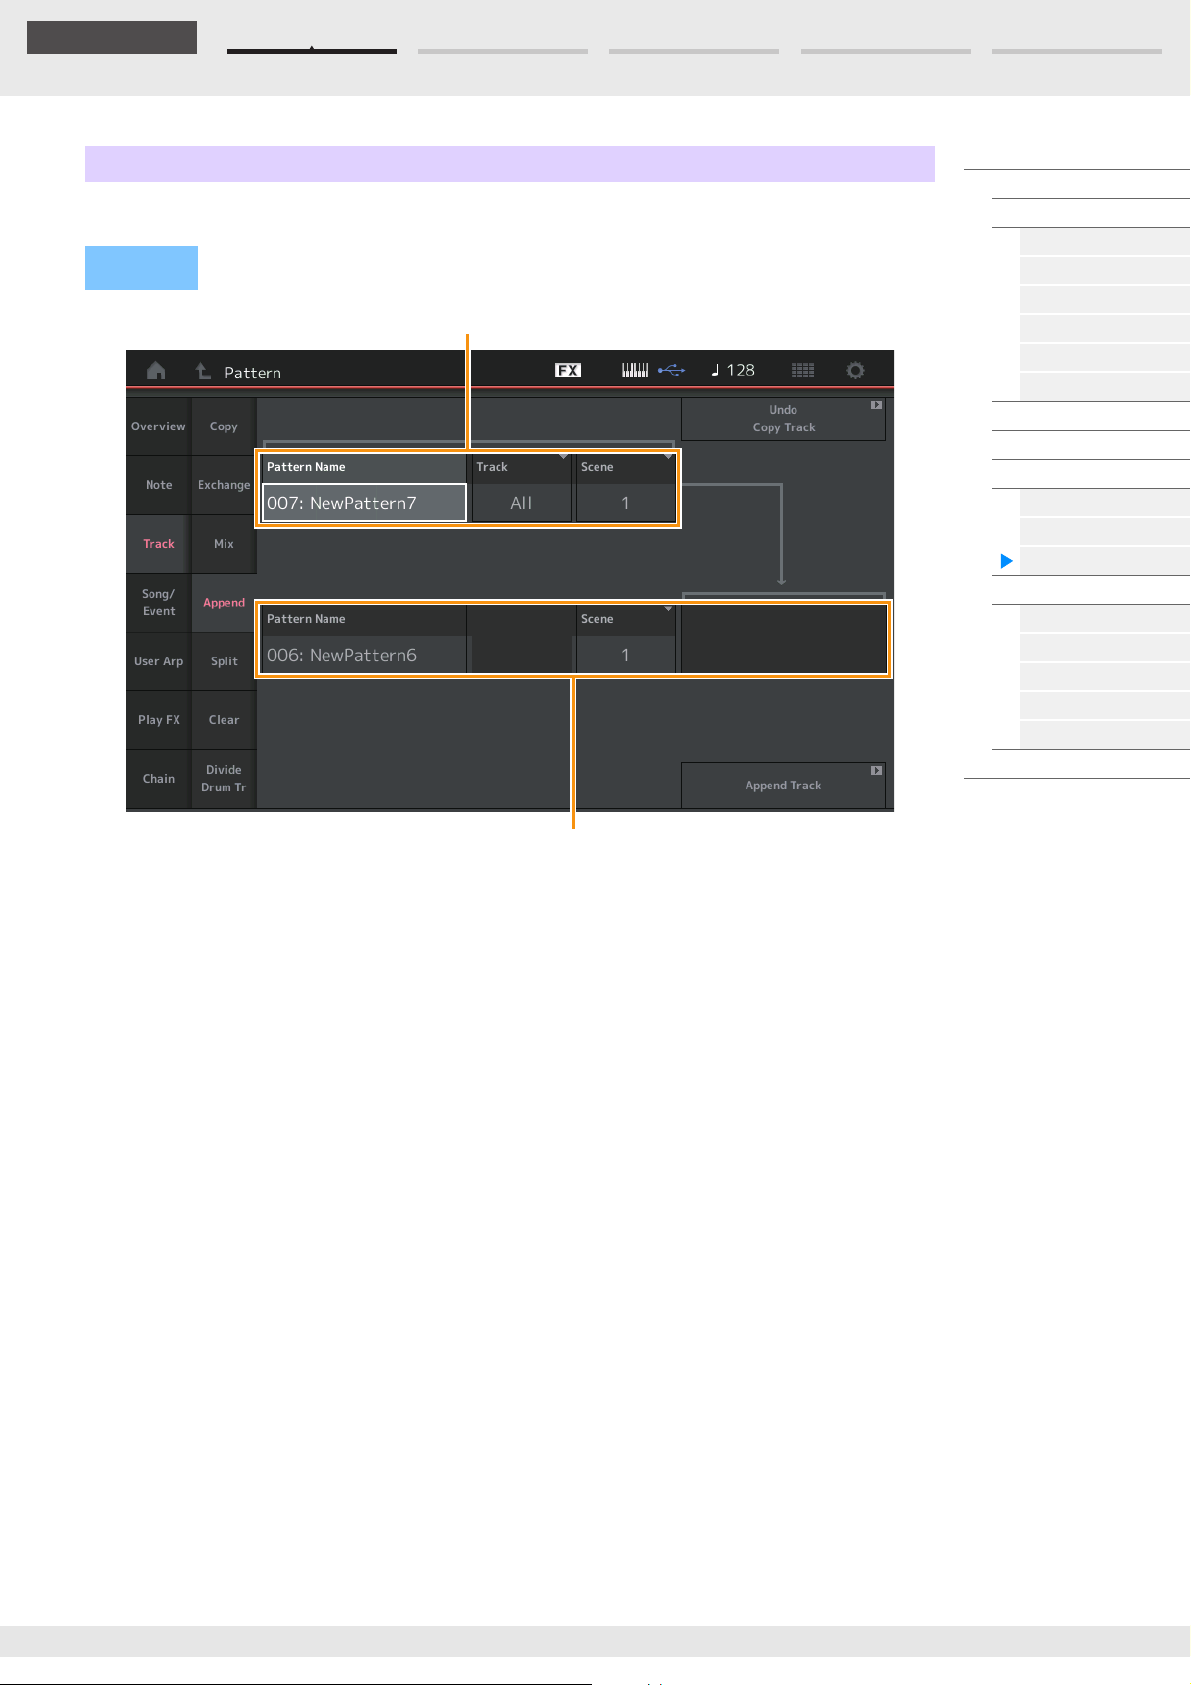
Edit Search Utility Live SetPerformance
Reference
*1 Source
*2 Destination
Append
This Job adds all data from a specified source track to the end of a specified destination track.
Operation
[R] (Play) button or [PERFORMANCE (HOME)] [Play/Rec] [Pattern] [Edit/Job] [Track]
[Append]
Performance
Home
Motion Control
Overview
Quick Edit
Arpeggio
Motion Seq
Super Knob
Knob Auto
Mixing
Scene
Play / Rec
MIDI
Audio
Pattern
Smart Morph
Play
Edit
Analyze
Super Knob
Job
Remote
Pattern Name
*1 Source
Determines the source Pattern.
*1 Source
Track
Determines the source Track.
Scene
*1 Source
Determines the source Scene.
Pattern Name
*2 Destination
Determines the destination Pattern.
Track
*2 Destination
Determines the destination Track.
Scene
*2 Destination
Determines the destination Scene.
Append Track
Executes the append job.
MODX+ Reference Manual
81
Page 82
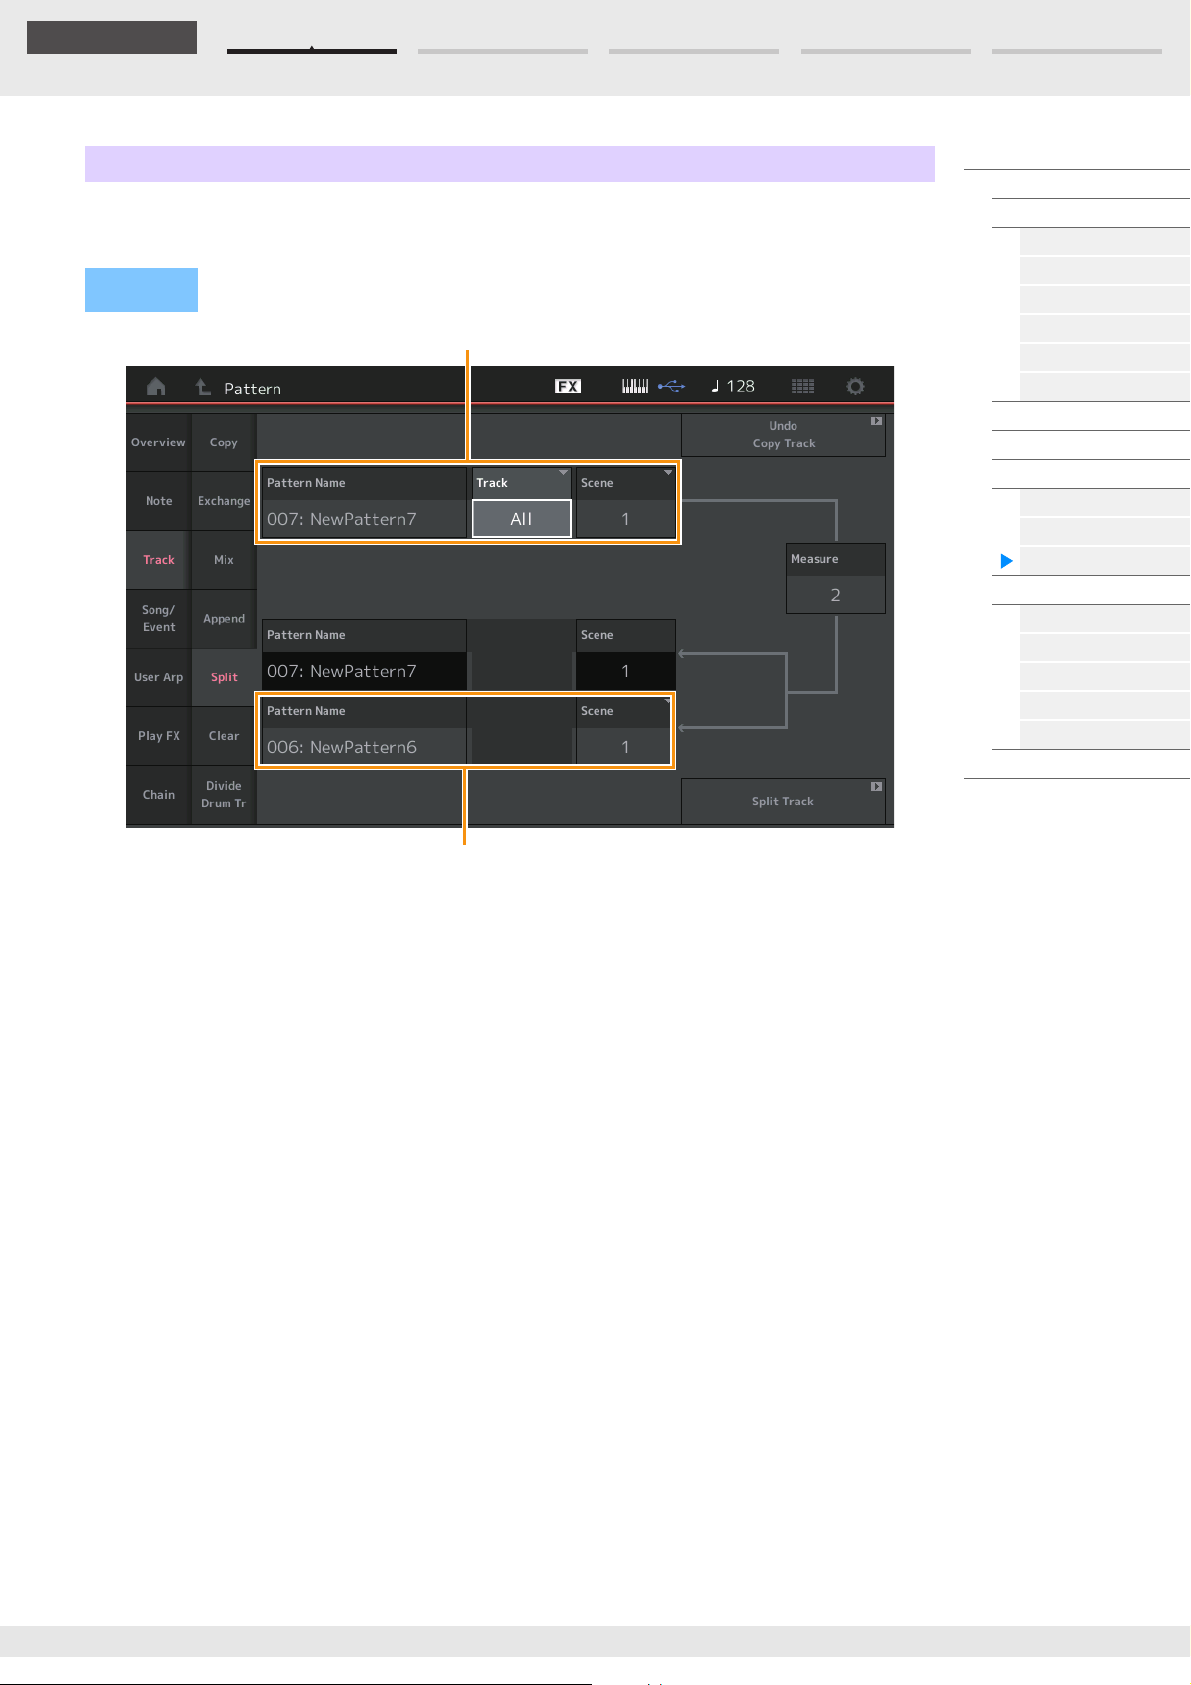
Edit Search Utility Live SetPerformance
Reference
*1 Source
*2 Destination
Split
This Job moves the latter half of data divided at a specified measure from a specified source track to the
specified destination track.
Operation
[R] (Play) button or [PERFORMANCE (HOME)] [Play/Rec] [Pattern] [Edit/Job] [Track]
[Split]
Performance
Home
Motion Control
Overview
Quick Edit
Arpeggio
Motion Seq
Super Knob
Knob Auto
Mixing
Scene
Play / Rec
MIDI
Audio
Pattern
Smart Morph
Play
Edit
Analyze
Super Knob
Job
Remote
Pattern Name
*1 Source
Determines the source Pattern.
*1 Source
Track
Determines the source Track.
Scene
*1 Source
Determines the source Scene.
Measure
*1 Source
Determines the measure at which the data is divided.
Pattern Name
Indicates the destination Pattern.
Tra ck
Indicates the destination Track.
Scene
Indicates the destination Scene.
Pattern Name
Determines the destination Pattern.
*2 Destination
Track
Determines the destination Track.
*2 Destination
Scene
*2 Destination
Determines the destination Scene.
Split Track
Executes the split job.
MODX+ Reference Manual
82
Page 83
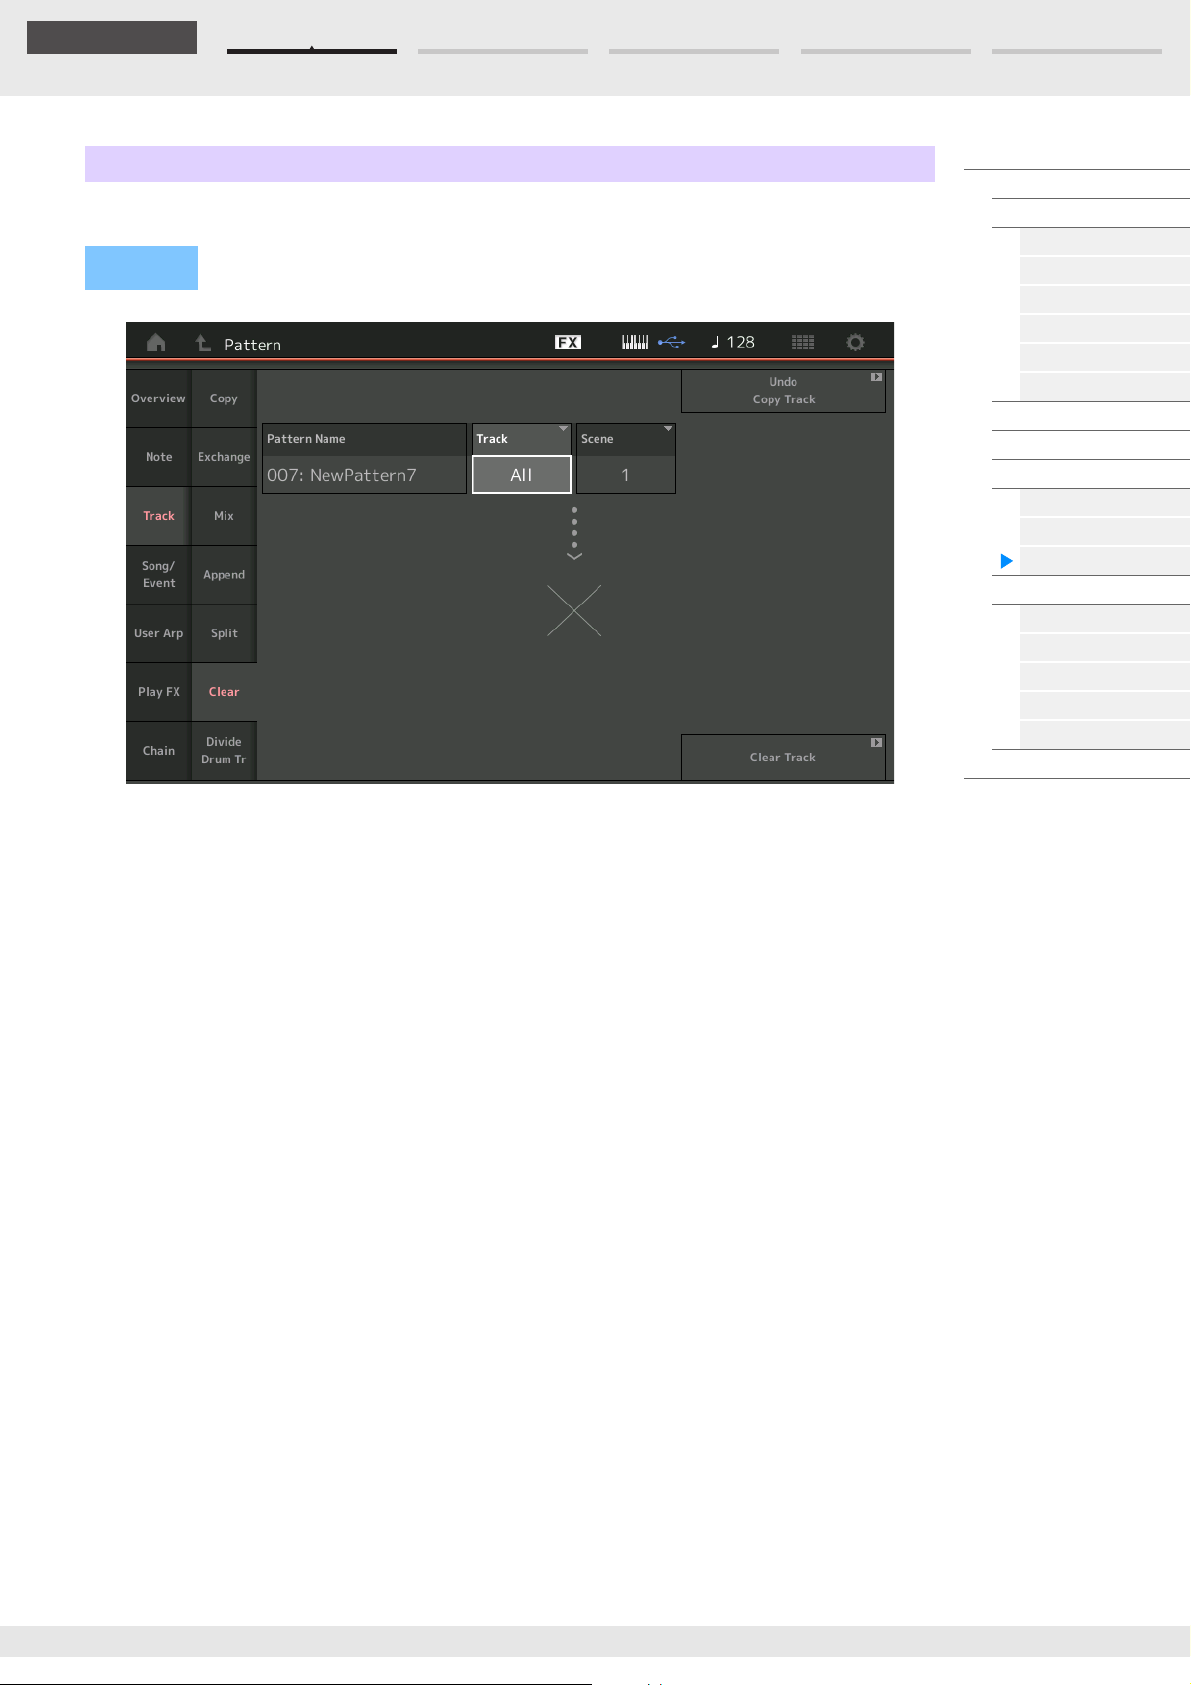
Edit Search Utility Live SetPerformance
Reference
Clear
This Job clears all data from a specified track.
Operation
[R] (Play) button or [PERFORMANCE (HOME)] [Play/Rec] [Pattern] [Edit/Job] [Track]
[Clear]
Performance
Home
Motion Control
Overview
Quick Edit
Arpeggio
Motion Seq
Super Knob
Knob Auto
Mixing
Scene
Play / Rec
MIDI
Audio
Pattern
Smart Morph
Play
Edit
Analyze
Super Knob
Job
Remote
Pattern Name
Determines the Pattern to clear.
Track
Determines the Track to clear.
Scene
Determines the Scene to clear.
Clear Track
Executes the Clear job.
NOTE When you execute Clear Track with Track set to All and Scene set to All, Chain data (page 92) is deleted too.
MODX+ Reference Manual
83
Page 84
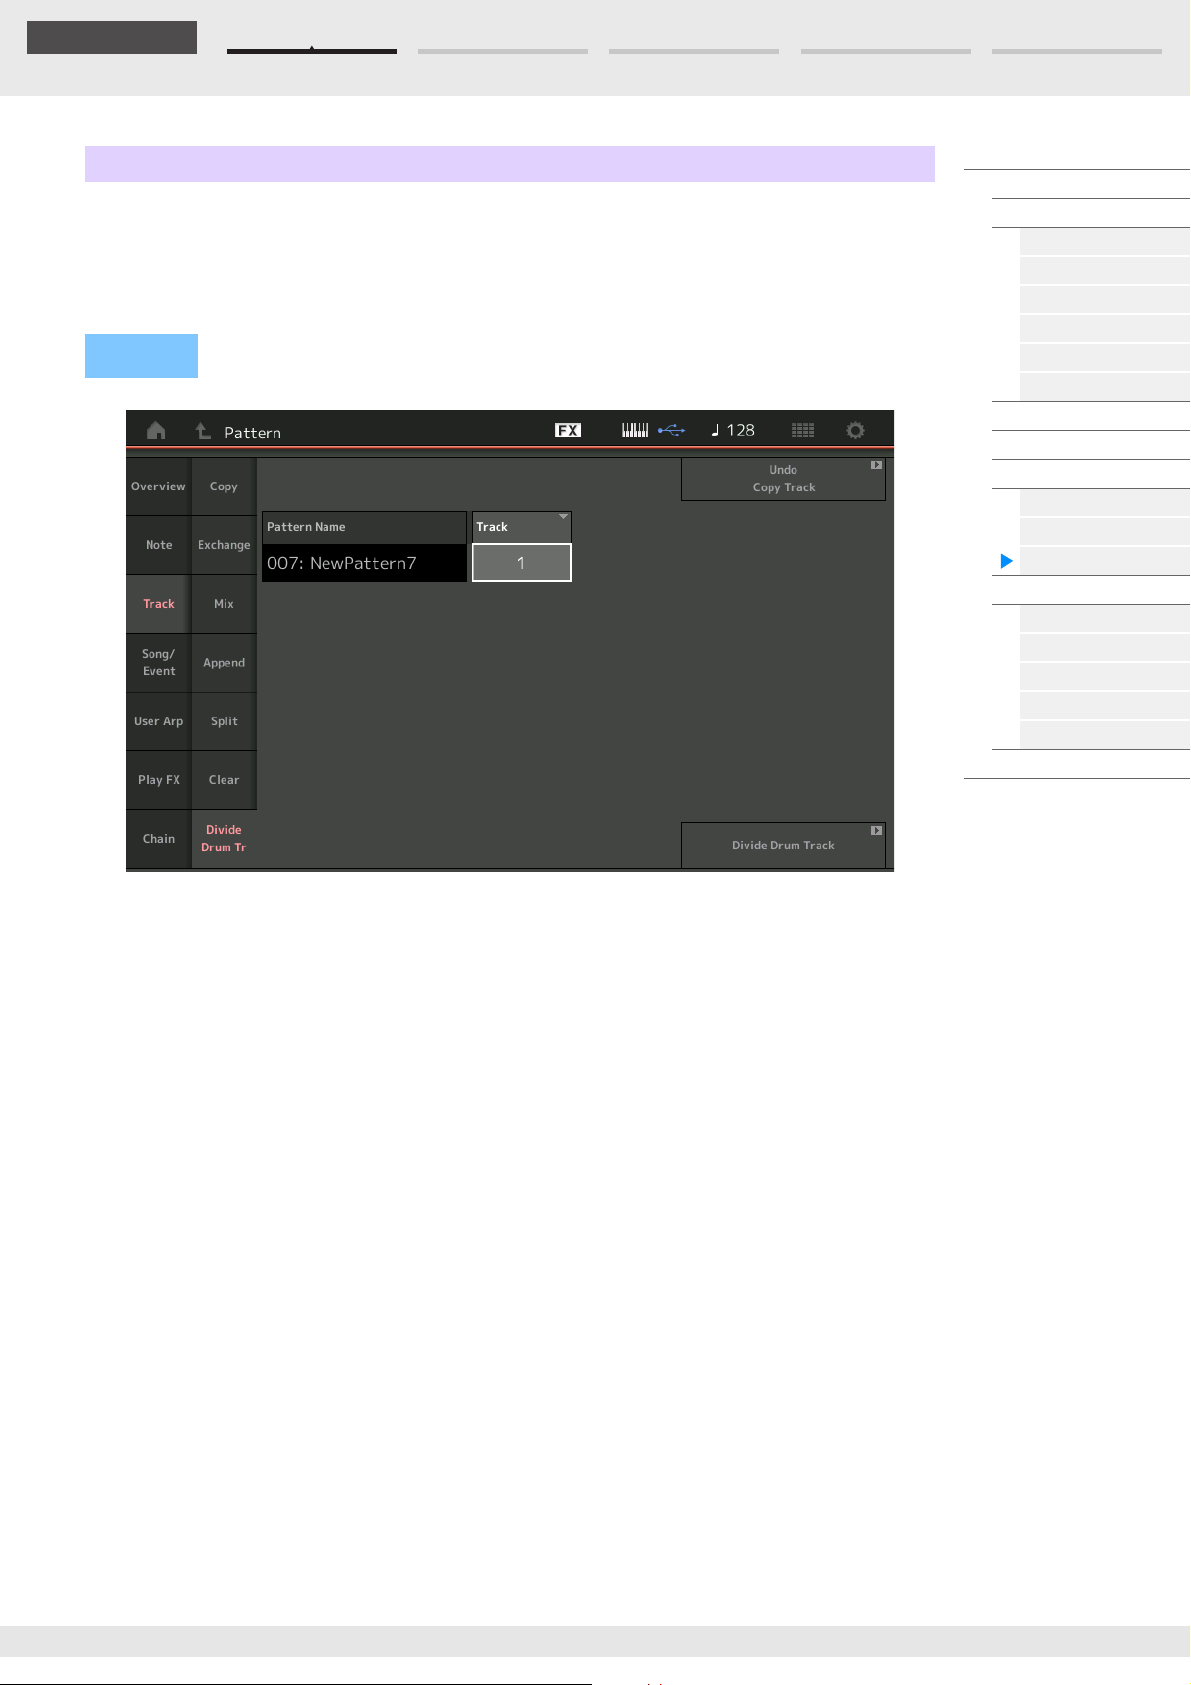
Edit Search Utility Live SetPerformance
Reference
Divide Drum Tr (Divide Drum Track)
This Job allows you to separate drum note data from a specified track.
This separates the note events in a drum track assigned to a specified track, and places the notes
corresponding to different drum instruments in separate tracks (Tracks 9–16).
NOTE The data previously existing on Tracks 9–16 and Parts 9–16 are replaced when you execute Divide Drum Tr. You
cannot Undo this edit.
Operation
[R] (Play) button or [PERFORMANCE (HOME)] [Play/Rec] [Pattern] [Edit/Job] [Track]
[Divide Drum Tr]
Performance
Home
Motion Control
Overview
Quick Edit
Arpeggio
Motion Seq
Super Knob
Knob Auto
Mixing
Scene
Play / Rec
MIDI
Audio
Pattern
Smart Morph
Play
Edit
Analyze
Super Knob
Job
Remote
Pattern Name
Determines the Pattern containing the drum track to be divided.
Track
Determines the Track for which the drum note data will be separated.
Divide Drum Track
Executes the Divide Job.
MODX+ Reference Manual
84
Page 85
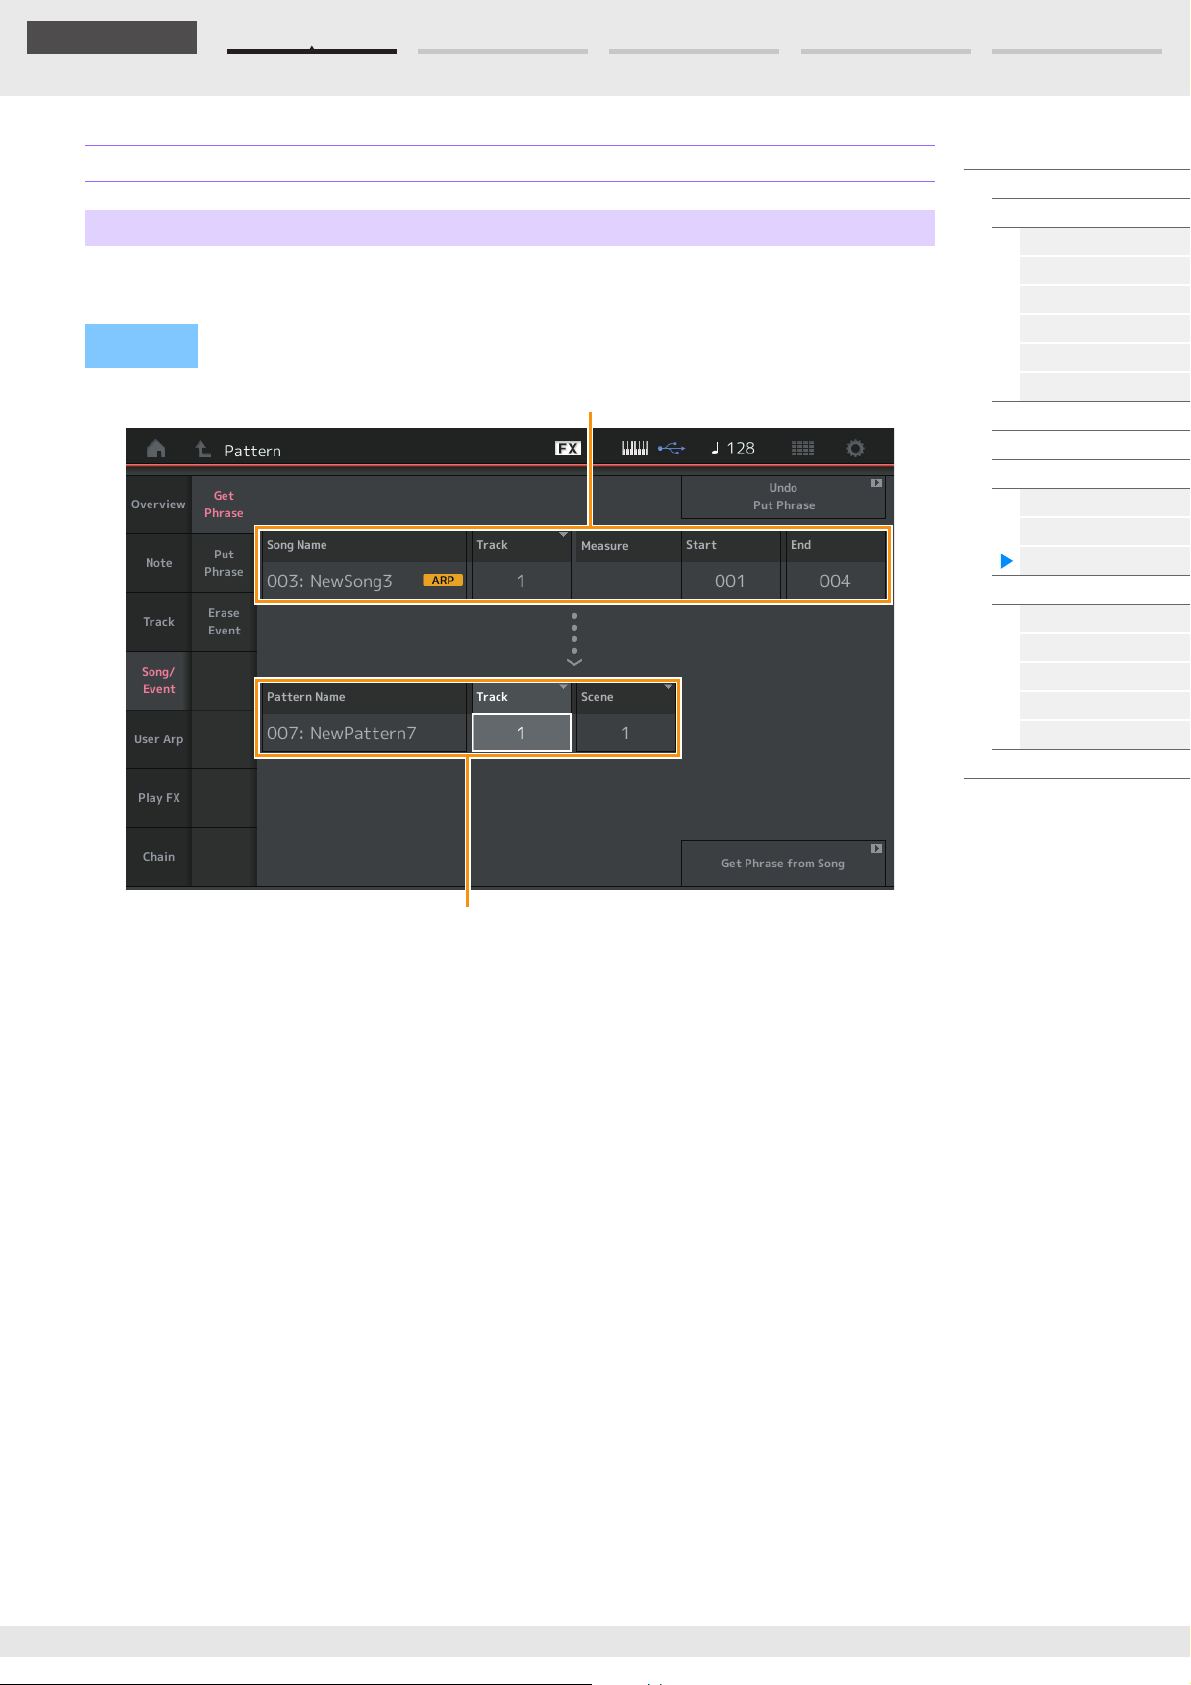
Edit Search Utility Live SetPerformance
Reference
*1 Source
*2 Destination
Song/Event
Get Phrase
This Job copies specified data from a specified source Song to a specified destination track.
NOTE The data previously existing on the specified destination track is replaced when you execute Get Phrase.
Operation
[R] (Play) button or [PERFORMANCE (HOME)] [Play/Rec] [Pattern] [Edit/Job] [Song/
Event] [Get Phrase]
Performance
Home
Motion Control
Overview
Quick Edit
Arpeggio
Motion Seq
Super Knob
Knob Auto
Mixing
Scene
Play / Rec
MIDI
Audio
Pattern
Smart Morph
Play
Edit
Analyze
Super Knob
Job
Remote
Song Name
Determines the source Song.
*1 Source
Track
Determines the source track. You can also specify “All.”
Start Measure
Determines the starting measure position at which the Job is applied.
Range: 001–998
End Measure
Determines the ending measure position at which the Job is applied.
Range: 002–999
Pattern Name
Determines the destination Pattern.
*2 Destination
Track
Determines the destination Track. You can also specify “All.”
Scene
Determines the destination Scene.
Get Phrase from Song
Executes the copy job.
MODX+ Reference Manual
85
Page 86
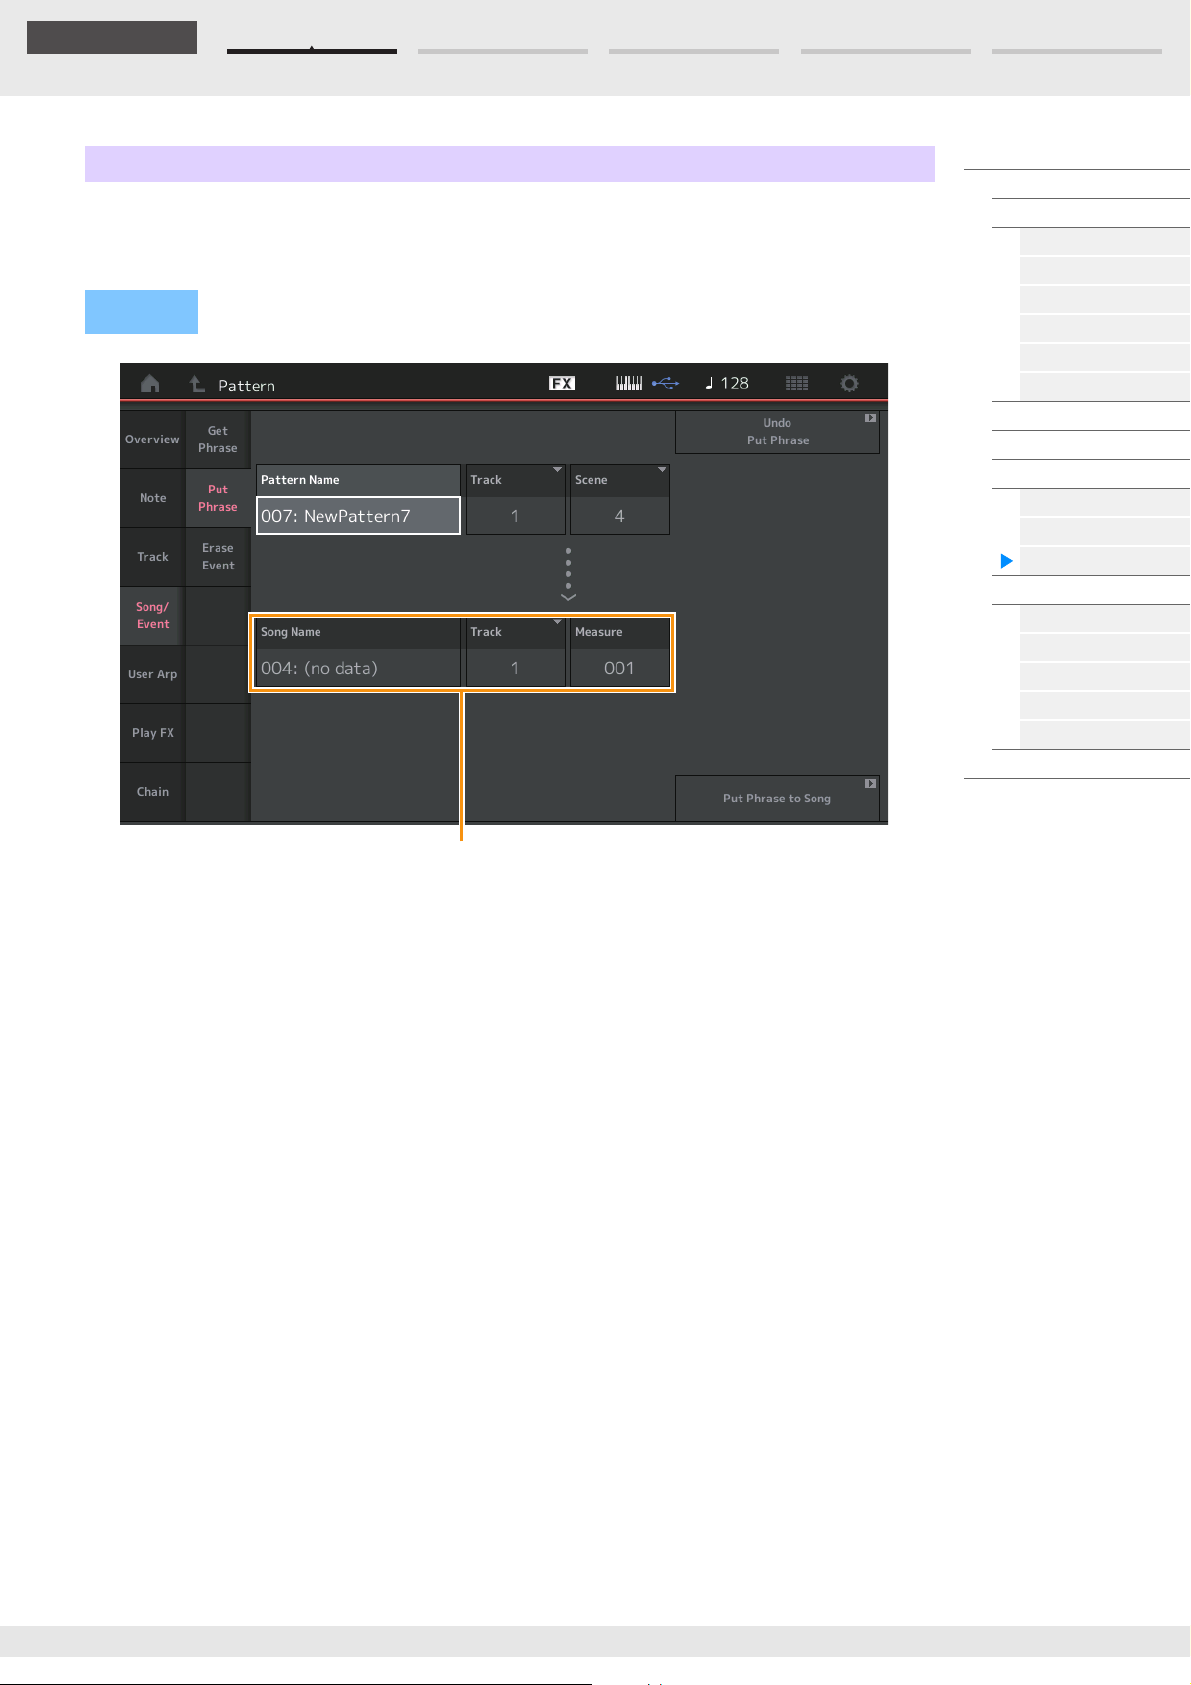
Edit Search Utility Live SetPerformance
Reference
Destination
Put Phrase
This Job copies all data from a specified source Pattern to a specified measure on the destination Song.
NOTE The specified source Pattern is merged into previously existing data on the specified destination Song when
you execute Put Phrase.
Operation
[R] (Play) button or [PERFORMANCE (HOME)] [Play/Rec] [Pattern] [Edit/Job] [Song/
Event] [Put Phrase]
Performance
Home
Motion Control
Overview
Quick Edit
Arpeggio
Motion Seq
Super Knob
Knob Auto
Mixing
Scene
Play / Rec
MIDI
Audio
Pattern
Smart Morph
Play
Edit
Analyze
Super Knob
Job
Remote
Pattern Name
Determines the source Pattern.
Track
Determines the source track.
Scene
Determines the source Scene.
Song Name
Determines the destination Pattern.
*Destination
Track
Determines the destination track.
Measure
Determines the measure position at which the Job is applied.
Range: 001–999
Put Phrase to Song
Executes the Copy Job.
MODX+ Reference Manual
86
Page 87
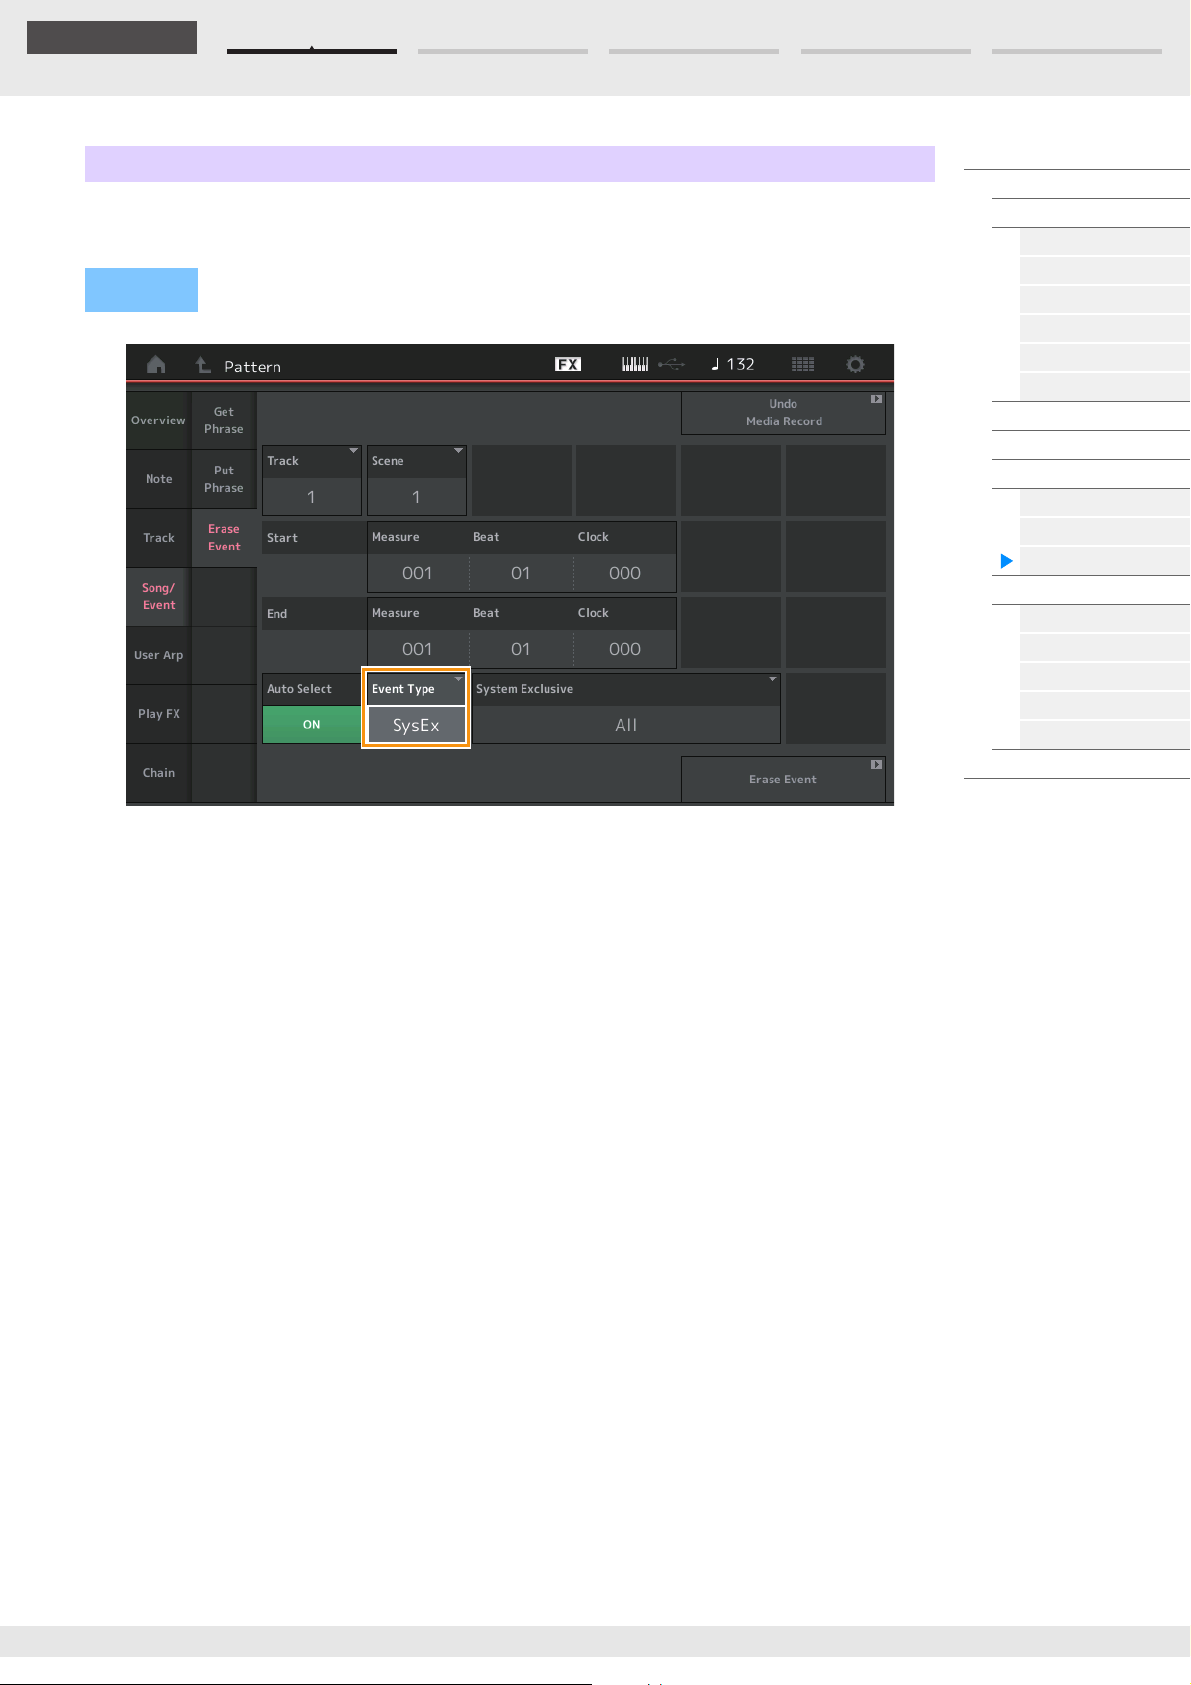
Edit Search Utility Live SetPerformance
Reference
Erase Event
You can delete MIDI events in a Pattern according to event type along with specifying the range (Measure,
Beat and Clock).
Operation
[R] (Play) button or [PERFORMANCE] [Play/Rec] [Pattern] [Edit/Job] [Song/Event]
[Erase Event]
Performance
Home
Motion Control
Overview
Quick Edit
Arpeggio
Motion Seq
Super Knob
Knob Auto
Mixing
Scene
Play / Rec
MIDI
Audio
Pattern
Smart Morph
Play
Edit
Analyze
Super Knob
Job
Remote
Tra ck
Determines the Track to be erased.
Scene
Determines the Scene to be erased.
Start Measure
Determines the starting measure position at which the Job is applied.
Range: 001–257
Start Beat
Determines the starting beat position at which the Job is applied.
Settings: Depends on selected Time Signature
Start Clock
Determines the starting clock position at which the Job is applied.
Settings: Depends on selected Time Signature
End Measure
Determines the ending measure position at which the Job is applied.
Range: 001–257
End Beat
Determines the ending beat position at which the Job is applied.
Settings: Depends on selected Time Signature
End Clock
Determines the ending clock position at which the Job is applied.
Settings: Depends on selected Time Signature
MODX+ Reference Manual
87
Page 88
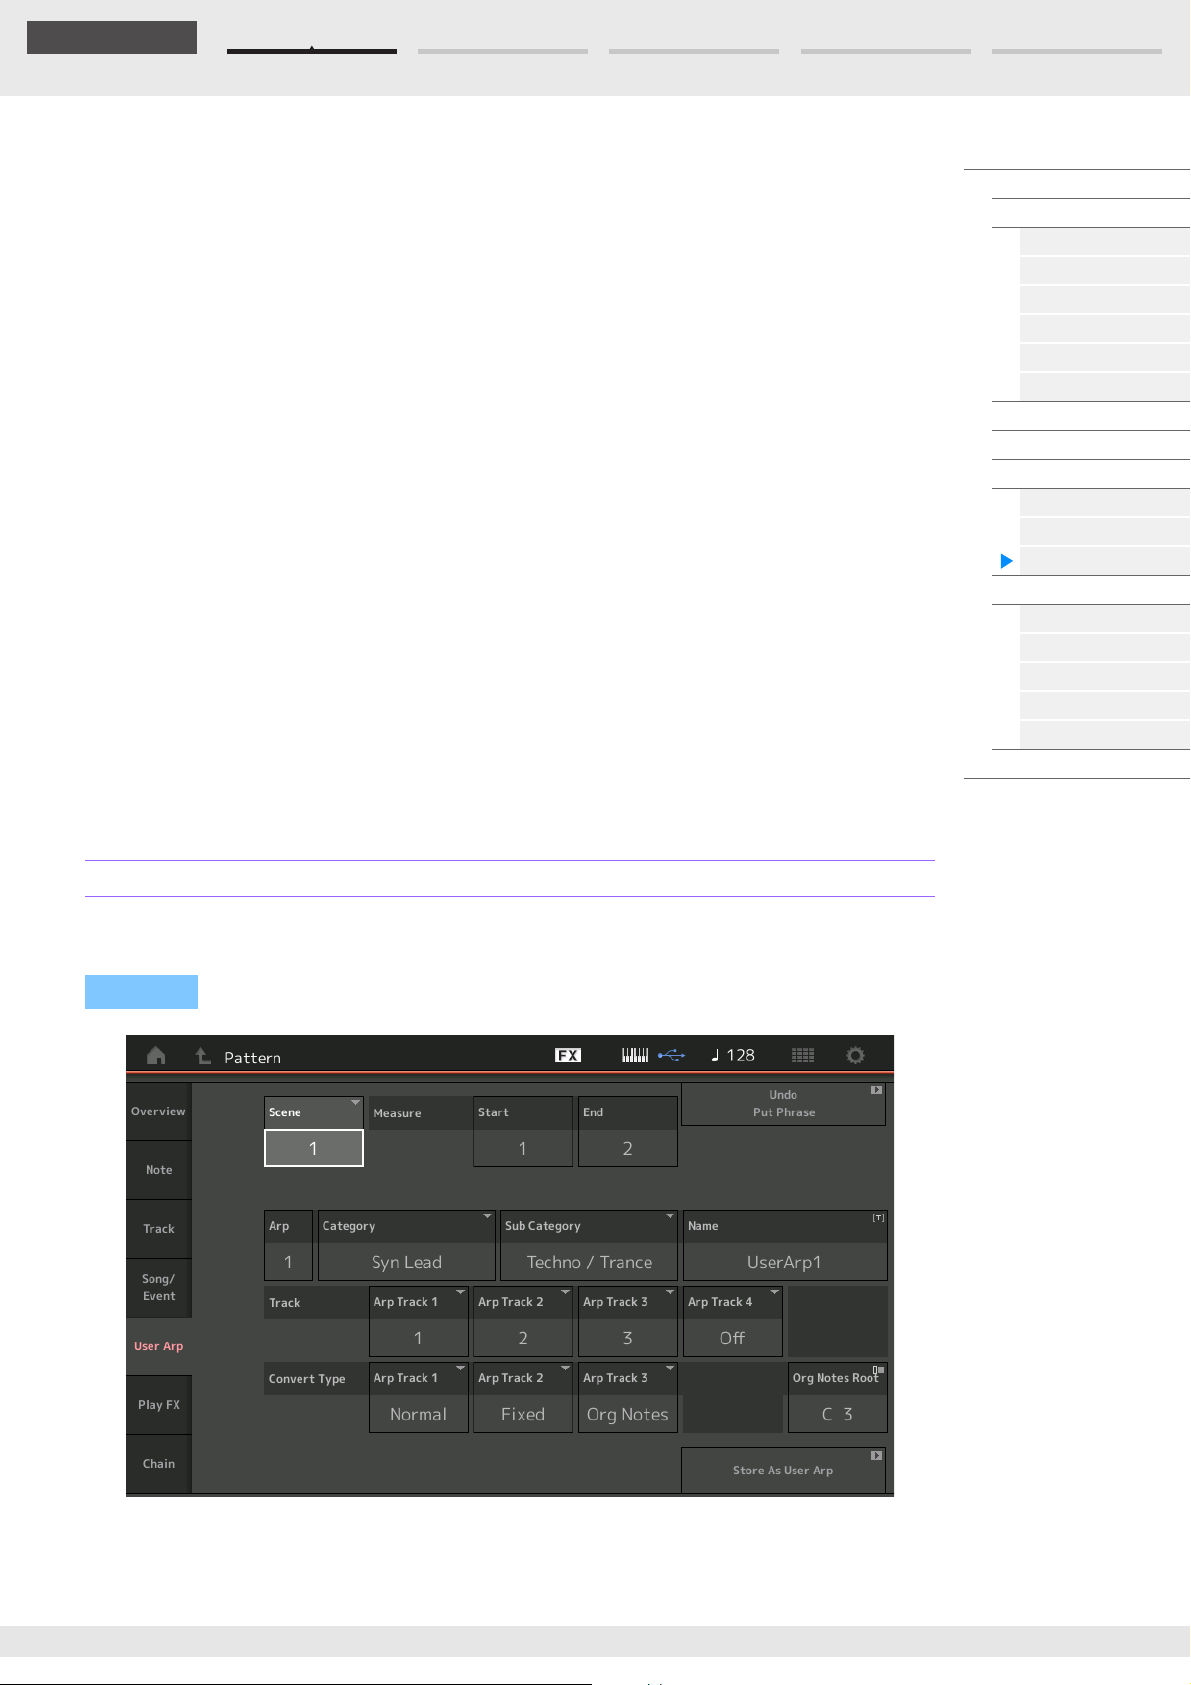
Edit Search Utility Live SetPerformance
Reference
Auto Select
When turned on, this enables you to determine the type of Event to be erased using panel controls, such
as the Pitch Bend wheel or Knob.
Settings: Off, On
Event Type
Determines the type of Event to be erased.
Settings: Note, Poly, CC, NRPN, RPN, PC, AfterTouch, PitchBend, SysEx, All
CC Number (Control Change Number)
Displayed when the Event type is set to CC. Determines the Control Change Number to be erased.
Range: Range: All, 1–127
System Exclusive
Displayed when the Event type is set to SysEx. Determines the System Exclusive to be erased.
Settings: All, Common Cutoff, Common Resonance, Common FEG Depth, Common Portamento, Common Attack Time,
Common Decay Time, Common Sustain Level, Common Release Time, Common EQ Low Gain, Common EQ Lo Mid
Gain, Common EQ Mid Gain, Common EQ Mid Freq, Common EQ Hi Mid Gain, Common EQ High Gain, Common
Pan, Common Var Return, Common Rev Return, Common Swing, Common Unit Multiply, Common Gate Time,
Common Velocity, Common MS Amplitude, Common MS Shape, Common MS Smooth, Common MS Random,
Common Assign Knob 1, Common Assign Knob 2, Common Assign Knob 3, Common Assign Knob 4, Common
Assign Knob 5, Common Assign Knob 6, Common Assign Knob 7, Common Assign Knob 8, Common Super Knob,
Part FEG Depth, Part Sustain Level, Part EQ Low Gain, Part EQ Mid Freq, Part EQ Mid Gain, Part EQ Mid Q, Part EQ
High Gain, Part Swing, Part Unit Multiply, Part Gate Time, Part Velocity, Part MS Amplitude, Part MS Shape, Part MS
Smooth, Part MS Random, Element 1 Level, Element 2 Level, Element 3 Level, Element 4 Level, Element 5 Level,
Element 6 Level, Element 7 Level, Element 8 Level, Operator 1 Level, Operator 2 Level, Operator 3 Level, Operator 4
Level, Operator 5 Level, Operator 6 Level, Operator 7 Level, Operator 8 Level, Drum BD Level, Drum SD Level, Drum
HH Close Level, Drum HH Pedal Level, Drum HH Open Level, Drum Low Tom Level, Drum High Tom Level, Drum
Crash Level
NOTE When Common parameters and Super Knob are specified, the System Exclusive is deleted irrespective of the
Track settings.
Performance
Home
Motion Control
Overview
Quick Edit
Arpeggio
Motion Seq
Super Knob
Knob Auto
Mixing
Scene
Play / Rec
MIDI
Audio
Pattern
Smart Morph
Play
Edit
Analyze
Super Knob
Job
Remote
User Arp (User Arpeggio)
This Job copies data in the specified measures of a track for creating Arpeggio data.
NOTE The previously existing data on the specified destination track is replaced when you execute User Arp.
Operation
[R] (Play) button or [PERFORMANCE (HOME)] [Play/Rec] [Pattern] [Edit/Job] [User Arp]
Scene
Determines the source Scene.
Range: 1–8
MODX+ Reference Manual
88
Page 89
Edit Search Utility Live SetPerformance
Reference
Start Measure
Determines the starting measure position at which the Job is applied.
Range: 1–256
End Measure
Determines the ending measure position at which the Job is applied.
Range: 2–257
Arp (Arpeggio Number)
Indicates the number of the Arpeggio Type.
Category
Indicates the Main Category that the selected Arpeggio Type will be assigned to.
Settings: For the Arpeggio Type Category list, refer to the Reference Manual.
Sub Category
Indicates the Sub Category that the selected Arpeggio Type will be assigned to.
Settings: For the Arpeggio Type Sub Category list, refer to the Reference Manual.
Name
Determines the Arpeggio Type name.
Track
Determines the source Track number for each Arpeggio Track.
Convert Type
Determines how the MIDI sequence data will be converted to Arpeggio data from one of the three ways
below. This parameter can be set for each track.
Settings: Normal, Fixed, Org Notes
Normal: The Arpeggio is played back using only the played note and its octave notes.
Fixed: Playing any note(s) will trigger the same MIDI sequence data.
Org Notes (Original Notes): Basically same as “Fixed” with the exception that the Arpeggio playback notes differ
according to the played chord.
Performance
Home
Motion Control
Overview
Quick Edit
Arpeggio
Motion Seq
Super Knob
Knob Auto
Mixing
Scene
Play / Rec
MIDI
Audio
Pattern
Smart Morph
Play
Edit
Analyze
Super Knob
Job
Remote
Store As User Arp
Executes the Store Job.
MODX+ Reference Manual
89
Page 90
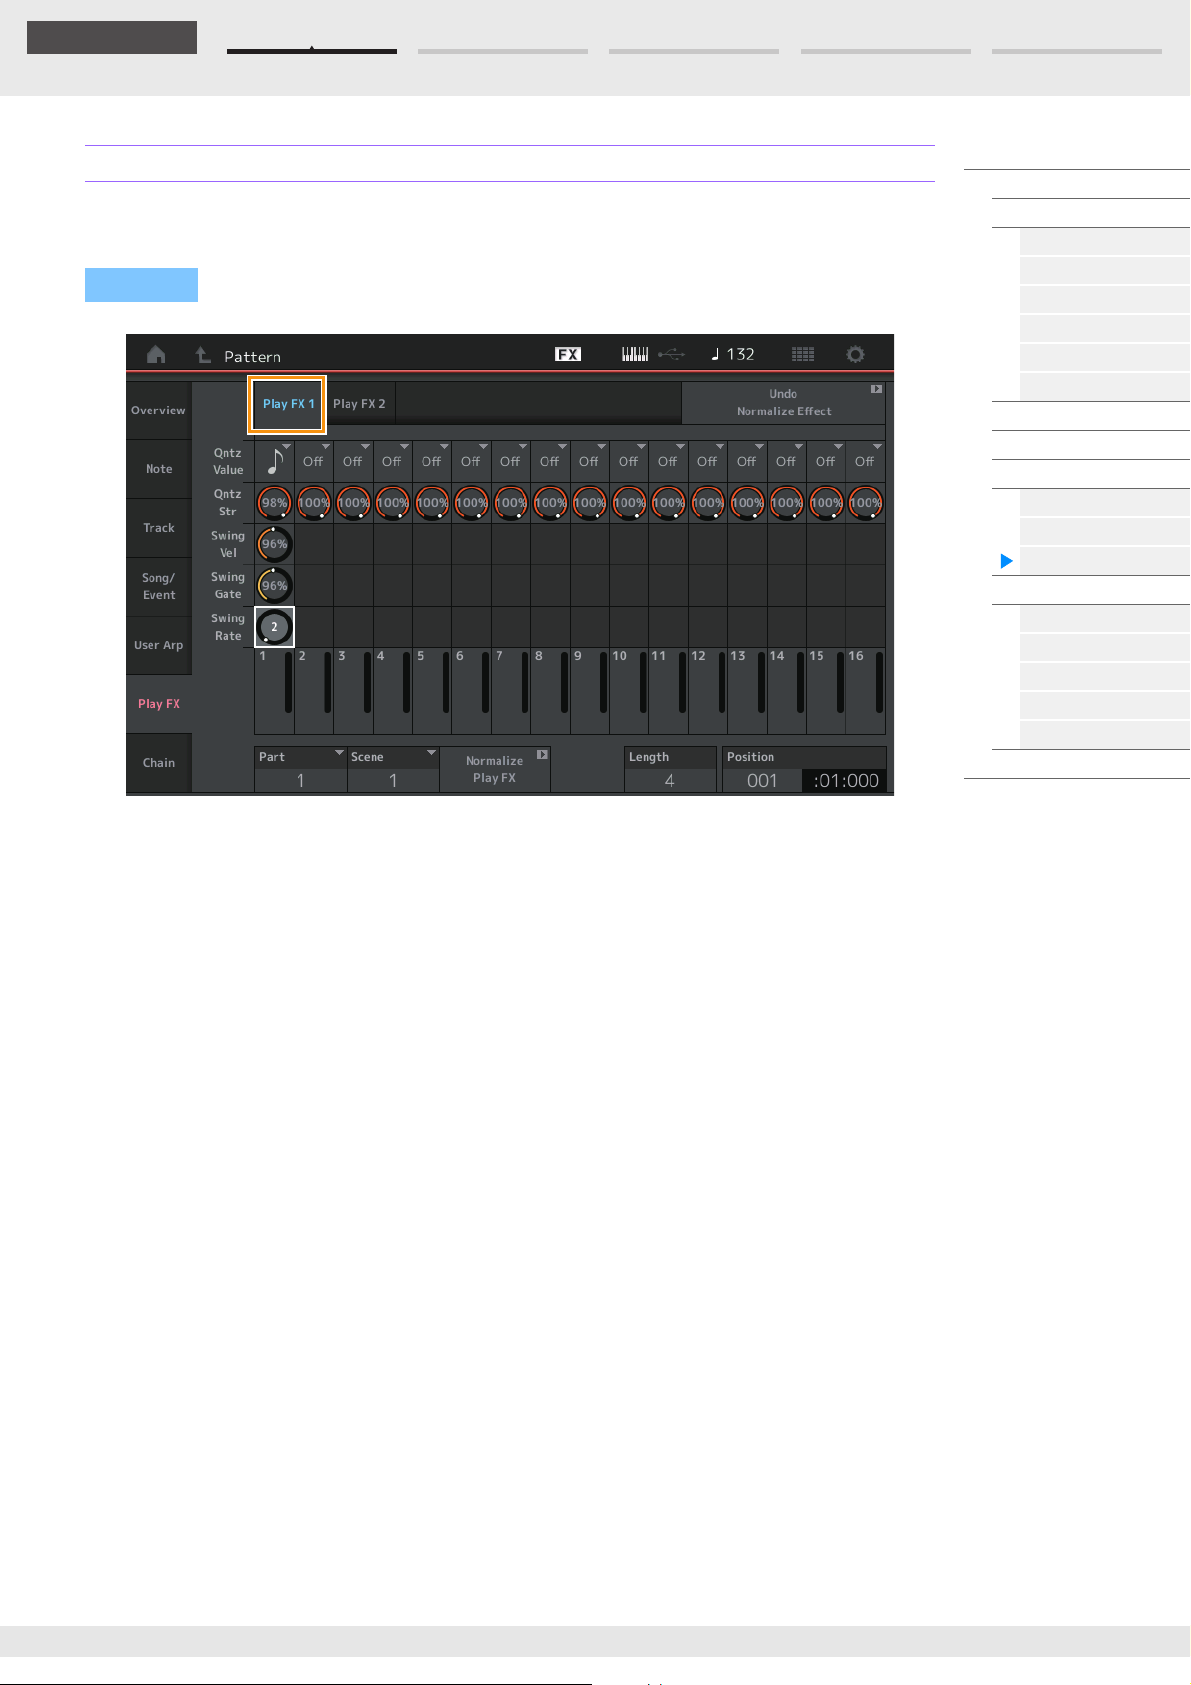
Edit Search Utility Live SetPerformance
Reference
Play FX (Play Effect)
This Job adds effects to the MIDI sequence data in a Pattern when it is played back. You can determine
the range and strength for each parameter on the Track you’ve specified.
Operation
[R] (Play) button or [PERFORMANCE (HOME)] [Play/Rec] [Pattern] [Edit/Job] [Play FX]
Performance
Home
Motion Control
Overview
Quick Edit
Arpeggio
Motion Seq
Super Knob
Knob Auto
Mixing
Scene
Play / Rec
MIDI
Audio
Pattern
Smart Morph
Play
Edit
Analyze
Super Knob
Job
Remote
Play FX1
Operates the Qntz Value, Qntz Str, Swing Vel, Swing Gate and Swing Rate parameter.
Qntz Value (Quantize Value)
Determines to what beats the note data in the sequence data will be aligned.
Settings: Off, 60 (32nd note), 80 (16th note triplet), 120 (16th note), 160 (8th note triplet), 240 (8th note), 320 (1/4 note trip-
let), 480 (1/4 note)
Qntz Str (Quantize Strength)
Sets the degree or “magnetic strength” to which Quantize is applied. A setting of 100% produces exact
timing. A setting of 0% results in no quantization.
Range: 0%–100%
Swing Vel (Swing Velocity)
Adjusts the velocity of the corresponding notes to accentuate the swing rhythmic feel.
Range: 0%–200%
Swing Gate
Adjusts the gate time of the corresponding notes to accentuate the swing rhythmic feel.
Range: 0%–200%
Swing Rate
This selectively delays the notes on even-numbered beats (backbeats) to produce a swing feel.
Settings: Depends on specified Qntz Value
If the Quantize value is 1/4 note, 8th note, 16th note, 32nd note: 0 – half of the grid
If the Quantize value is 1/4 note triplet, 8th note triplet, 16th note triplet: 0 – half of the grid
MODX+ Reference Manual
90
Page 91
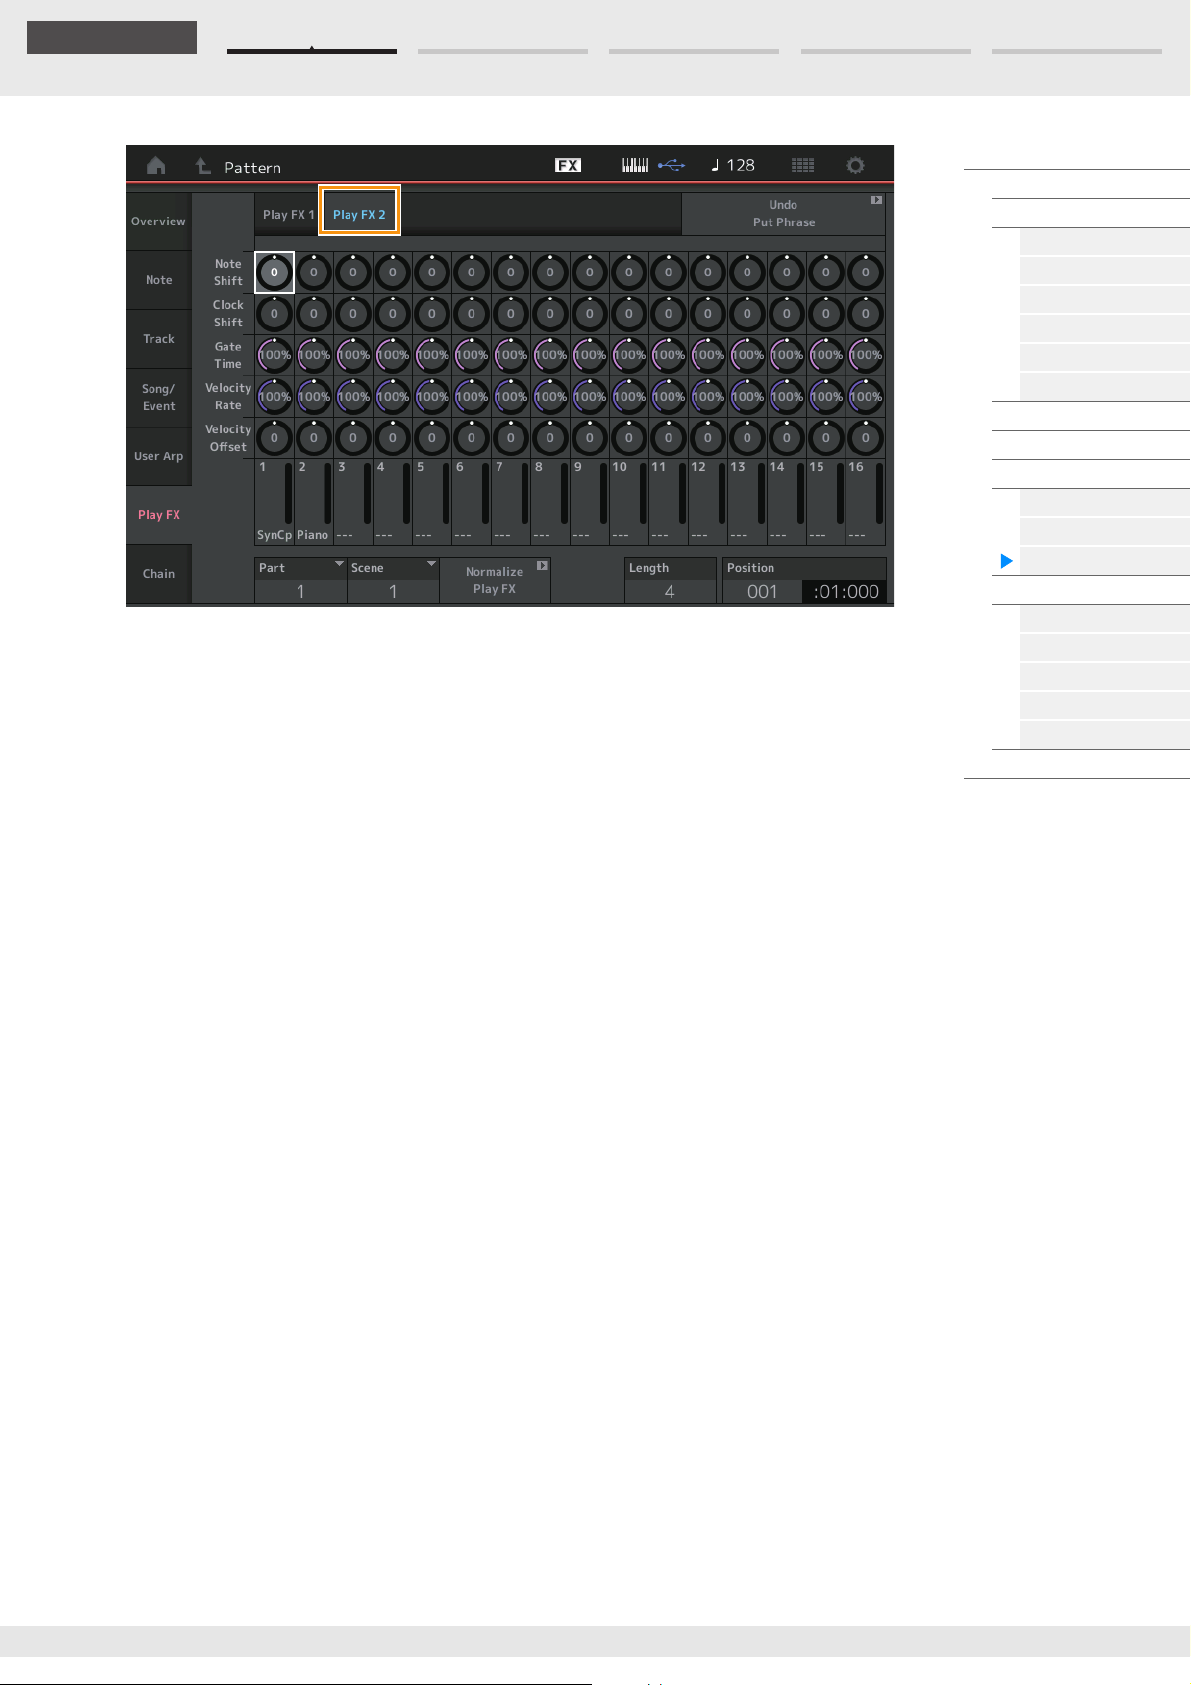
Edit Search Utility Live SetPerformance
Reference
Play FX2
Operates the Note Shift, Clock Shift, Gate Time, Velocity Rate and Velocity Offset parameters.
Note Shift
Raises or lowers the pitch of all notes in the selected track in semitones.
Range: -99 – +99
Performance
Home
Motion Control
Overview
Quick Edit
Arpeggio
Motion Seq
Super Knob
Knob Auto
Mixing
Scene
Play / Rec
MIDI
Audio
Pattern
Smart Morph
Play
Edit
Analyze
Super Knob
Job
Remote
Clock Shift
Shifts the timing of all notes in the selected track forward or backward in clock increments.
Range: -120 – +120
Gate Time
Raises the gate time of all notes in the selected track.
Range: 0%–200%
Velocity Rate
Alters the velocity of notes by the specified percentage.
Range: 0%–200%
Velocity Offset
Increases or decreases the velocity of notes by the specified offset value.
Range: -99 – +99
Normalize Play FX
Applies the effects set in Play FX to the MIDI data.
Part
Determines the destination Part of “Normalize Play FX.”
Range: All, 1–16
Scene
Determines the destination Scene of “Normalize Play FX.”
Range: All, 1–8
Length
Indicates the length of the entire sequence in the selected Scene.
Position
Shows the current position during Scene playback, and lets you set the starting position of playback.
Range: 001–256
MODX+ Reference Manual
91
Page 92
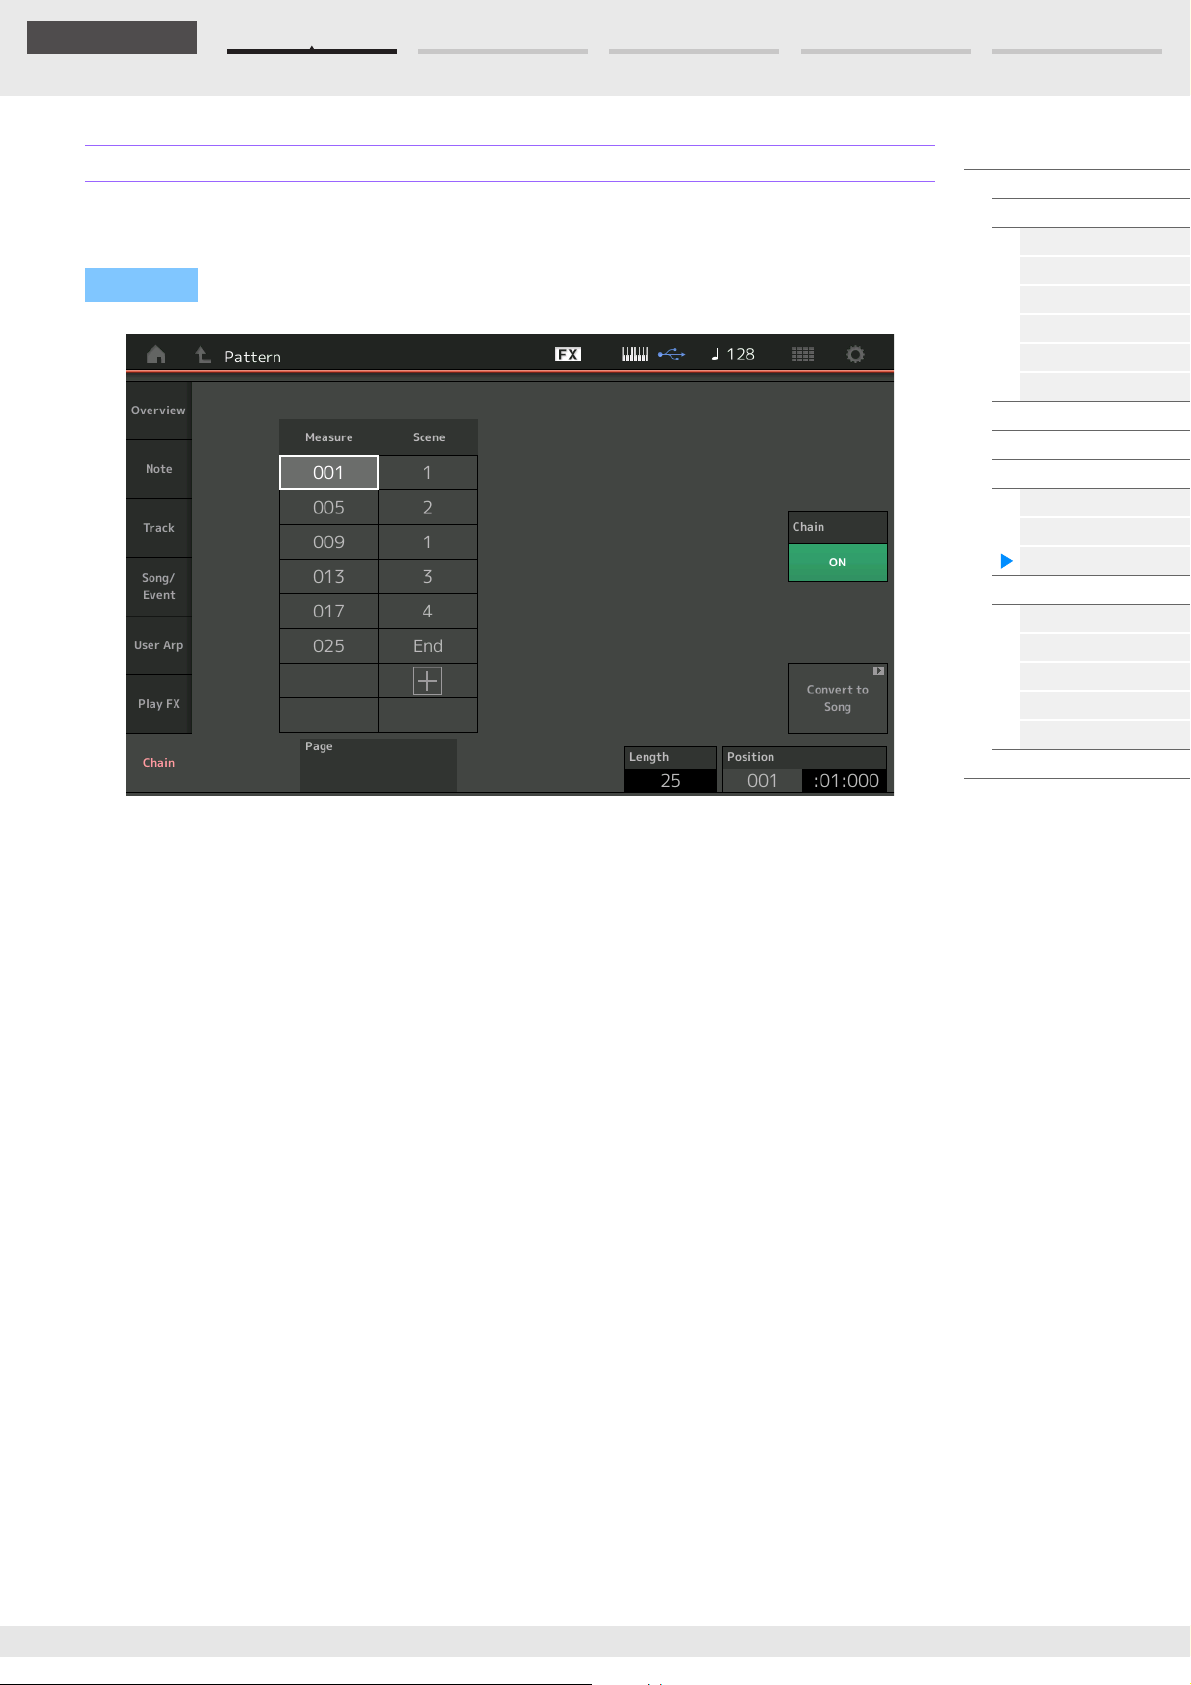
Edit Search Utility Live SetPerformance
Reference
Chain
This Job chains Scenes and playback chained Scenes. Chain playback settings are stored to each
Pattern. In addition, an icon is displayed next to the Scene being played.
Operation
[R] (Play) button or [PERFORMANCE (HOME)] [Play/Rec] [Pattern] [Edit/Job] [Chain]
Performance
Home
Motion Control
Overview
Quick Edit
Arpeggio
Motion Seq
Super Knob
Knob Auto
Mixing
Scene
Play / Rec
MIDI
Audio
Pattern
Smart Morph
Play
Edit
Analyze
Super Knob
Job
Remote
Measure
Determines the measure position from which the Scene is played back.
Range: 001–999
Scene
Determines the Scene that is played back from the specified measure position.
Range: 1–8, End
Page
Indicated by the up and down buttons, when the Measure & Scene exceed 8 lines. Touching this button
calls up the next/previous page.
Convert to Song
Stores the Chain as a Song.
Length
Indicates the length of the entire sequence.
Position
Shows the current position during Chain playback, and lets you set the starting position of playback.
Range: 001–999
Chain
Determines whether the Pattern data is played back with the chained Scenes while displays other than the
Chain display are called up.
Settings: Off, On
MODX+ Reference Manual
92
Page 93
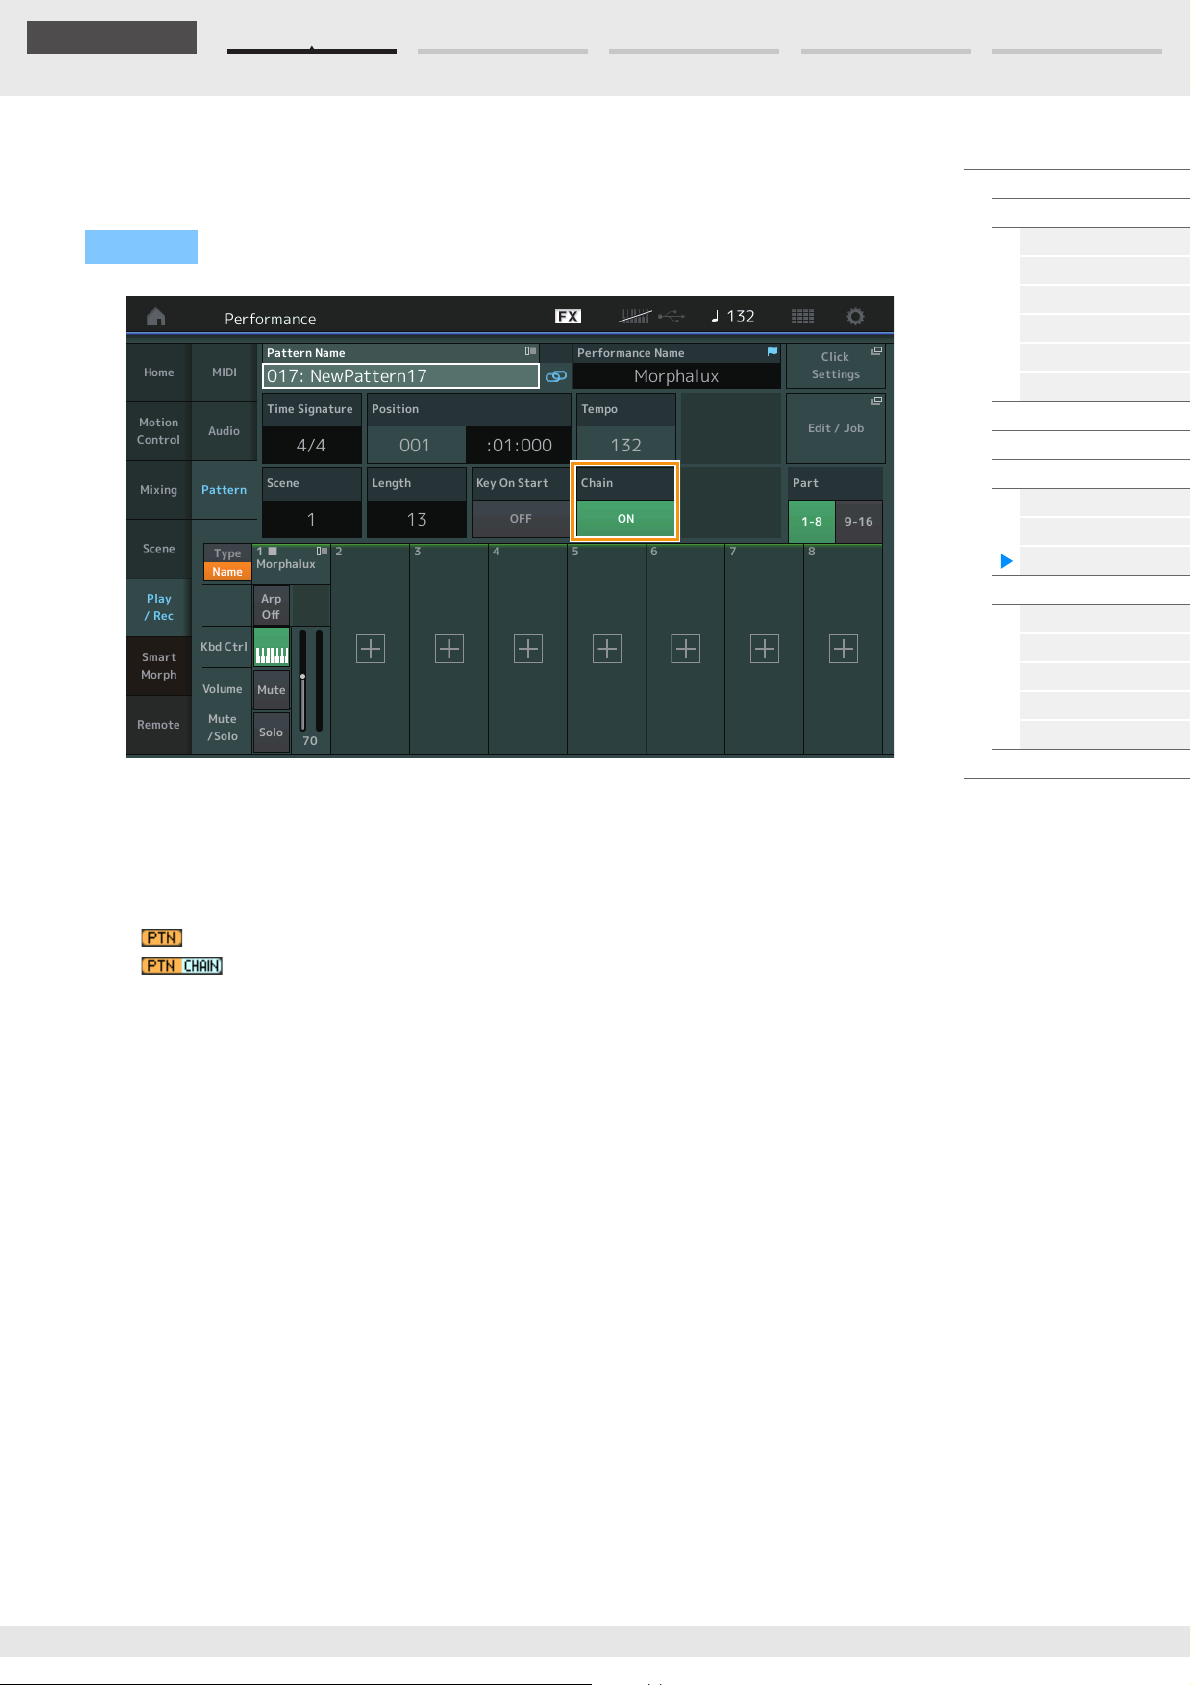
Edit Search Utility Live SetPerformance
Reference
Setting Pattern Chain switch
On the Pattern display, you can set whether the Pattern data is played back with the chained Scenes while
displays other than the Chain display are called up.
Operation
[R] (Play) button or [PERFORMANCE (HOME)] [Play/Rec] [Pattern]
Chain
Determines whether the Pattern data is played back with the chained Scenes while displays other than the
Chain display are called up.
Settings: Off, On
NOTE On the Live Set display, if the Pattern with chain playback setting enabled is assigned to a Slot, the icon will
change as shown below.
: Appears in the Slot to which the Pattern (without Chain playback) is assigned.
: Appears in the Slot to which the Pattern to be played in the Chain is assigned.
Performance
Home
Motion Control
Overview
Quick Edit
Arpeggio
Motion Seq
Super Knob
Knob Auto
Mixing
Scene
Play / Rec
MIDI
Audio
Pattern
Smart Morph
Play
Edit
Analyze
Super Knob
Job
Remote
MODX+ Reference Manual
93
Page 94
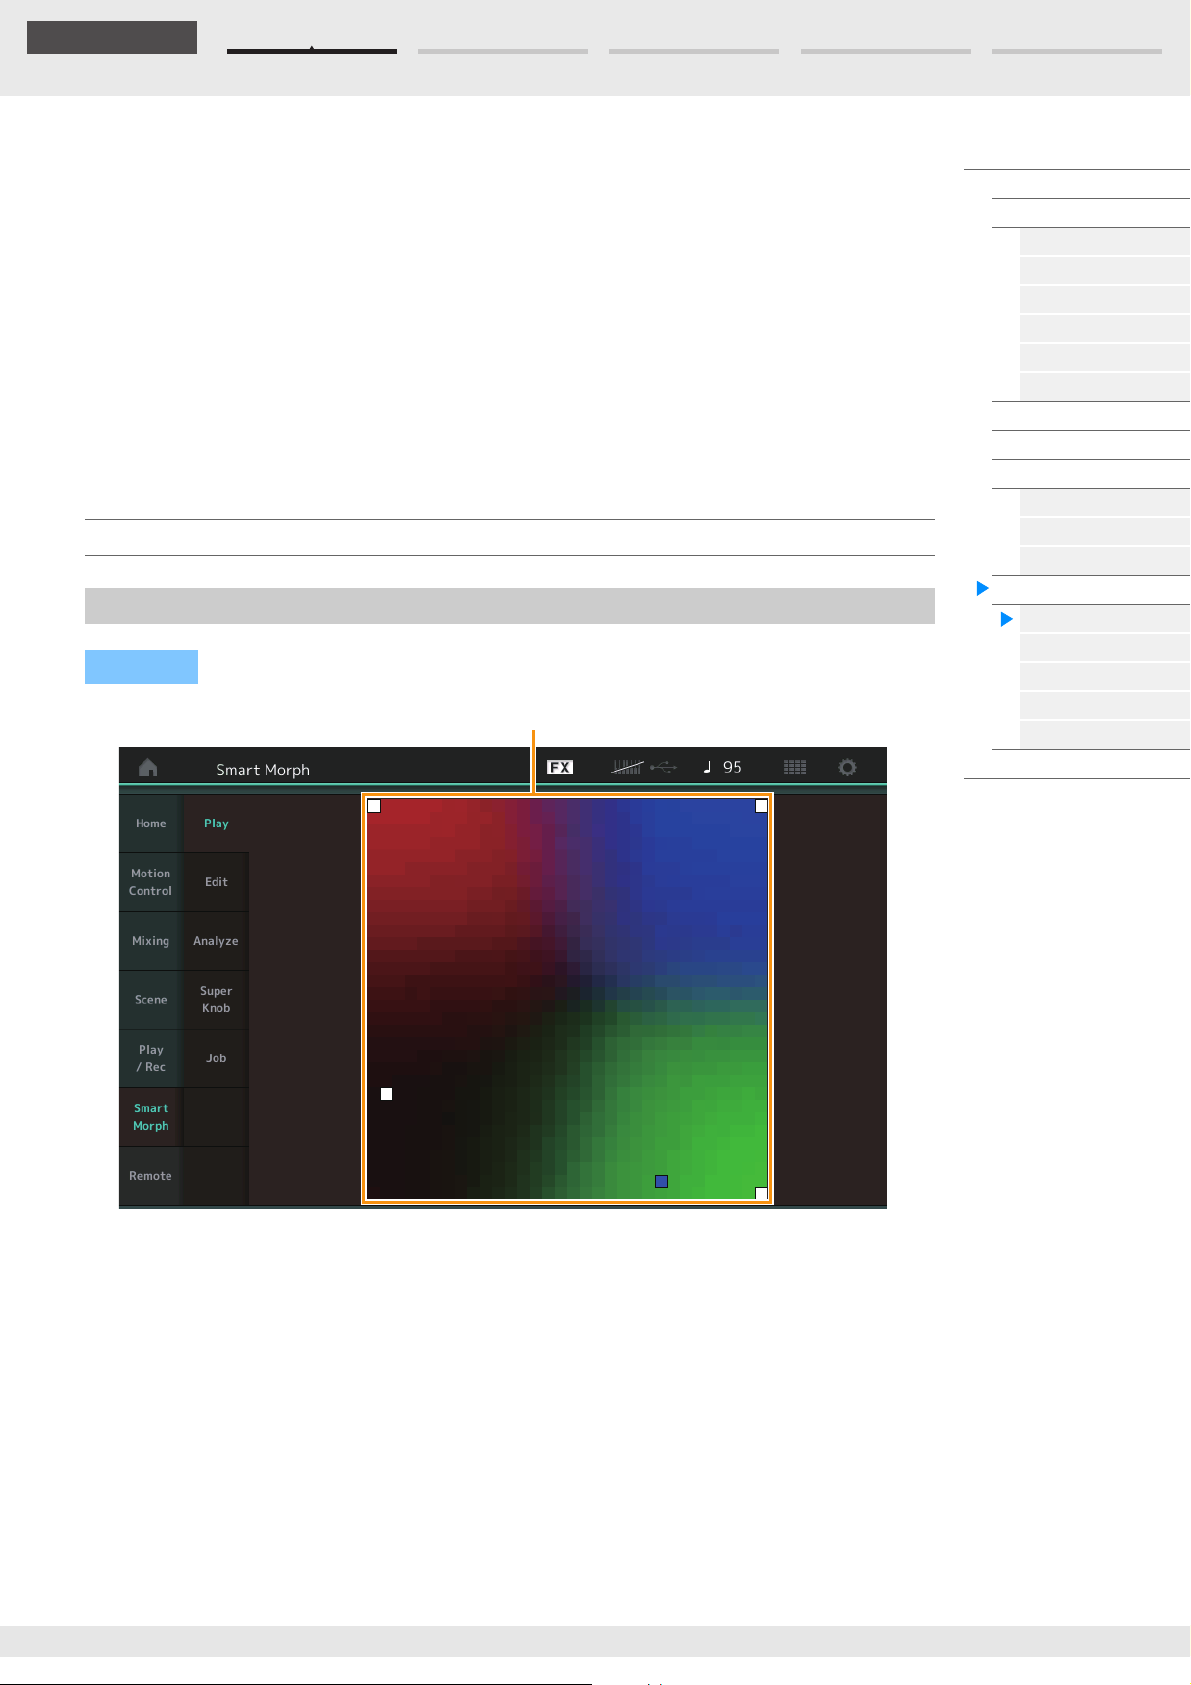
Edit Search Utility Live SetPerformance
Reference
Map
Smart Morph
Smart Morph is a function that morphs FM-X sounds using machine learning.
MODX+ learns two or more sounds assigned to Parts 9 to 16 by sophisticated logic, and then plots each
sound as a point on the Map. The distance between these points represents similarity of the sounds. This
function automatically creates interpolated FM-X sounds by filling the gaps of the plotted sounds on the
Map.
Touching a position on the Map results in assigning the corresponding sound to Part 1.
By selecting points you like in this way and saving the results, you can use this as a powerful tool for
creating new FM-X sounds.
You can also drag points on the map, or assign the transition between any two points to the Super Knob—
giving you unprecedented real-time control for expressively morphing the FM-X sound as you perform.
Smart Morph
Play
Operation
[PERFORMANCE] [Smart Morph] [Play]
Performance
Home
Motion Control
Overview
Quick Edit
Arpeggio
Motion Seq
Super Knob
Knob Auto
Mixing
Scene
Play / Rec
MIDI
Audio
Pattern
Smart Morph
Play
Edit
Analyze
Super Knob
Job
Remote
On this display, tap the Smart Morph map to change the FM-X sound for Part 1.
MODX+ Reference Manual
94
Page 95
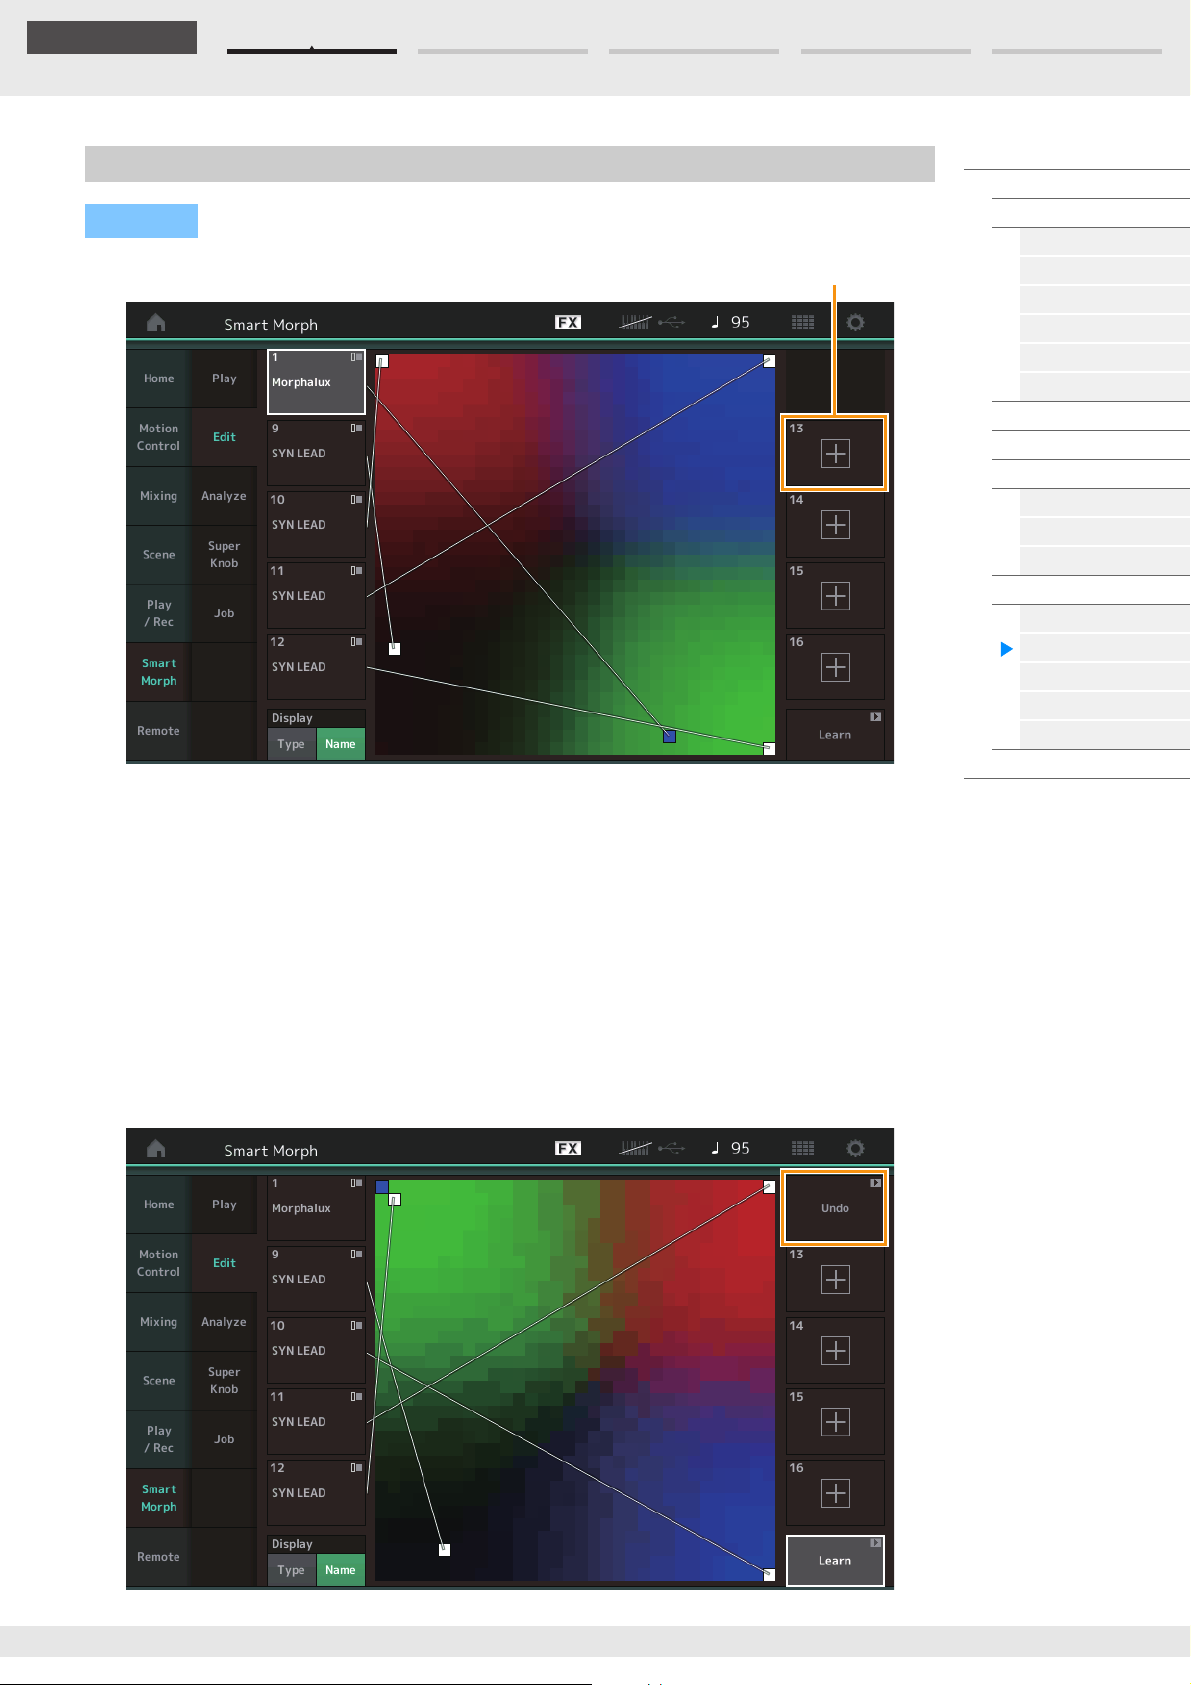
Edit Search Utility Live SetPerformance
Reference
Part not in use
Edit
Operation
[PERFORMANCE] [Smart Morph] [Edit]
Performance
Home
Motion Control
Overview
Quick Edit
Arpeggio
Motion Seq
Super Knob
Knob Auto
Mixing
Scene
Play / Rec
MIDI
Audio
Pattern
Smart Morph
Play
Edit
Analyze
Super Knob
Job
Remote
Part not in use
Calls up the Part Category Search display for selecting an FM-X sound when you tap one of the plus (+)
buttons.
Part in use
Calls up the context menu (Category Search, Edit, Copy, Delete) when you tap this.
Display
Determines whether each Part is indicated by its Main Category or by its Part Name.
Learn
Begins learning (map creation) by tapping. During processing, some interface operations are disabled
and the [Cancel] button is shown in place of [Learn]. If you cancel processing, the map will return to its
status before learning. You can also play the instrument during the learning operation.
MODX+ Reference Manual
95
Page 96
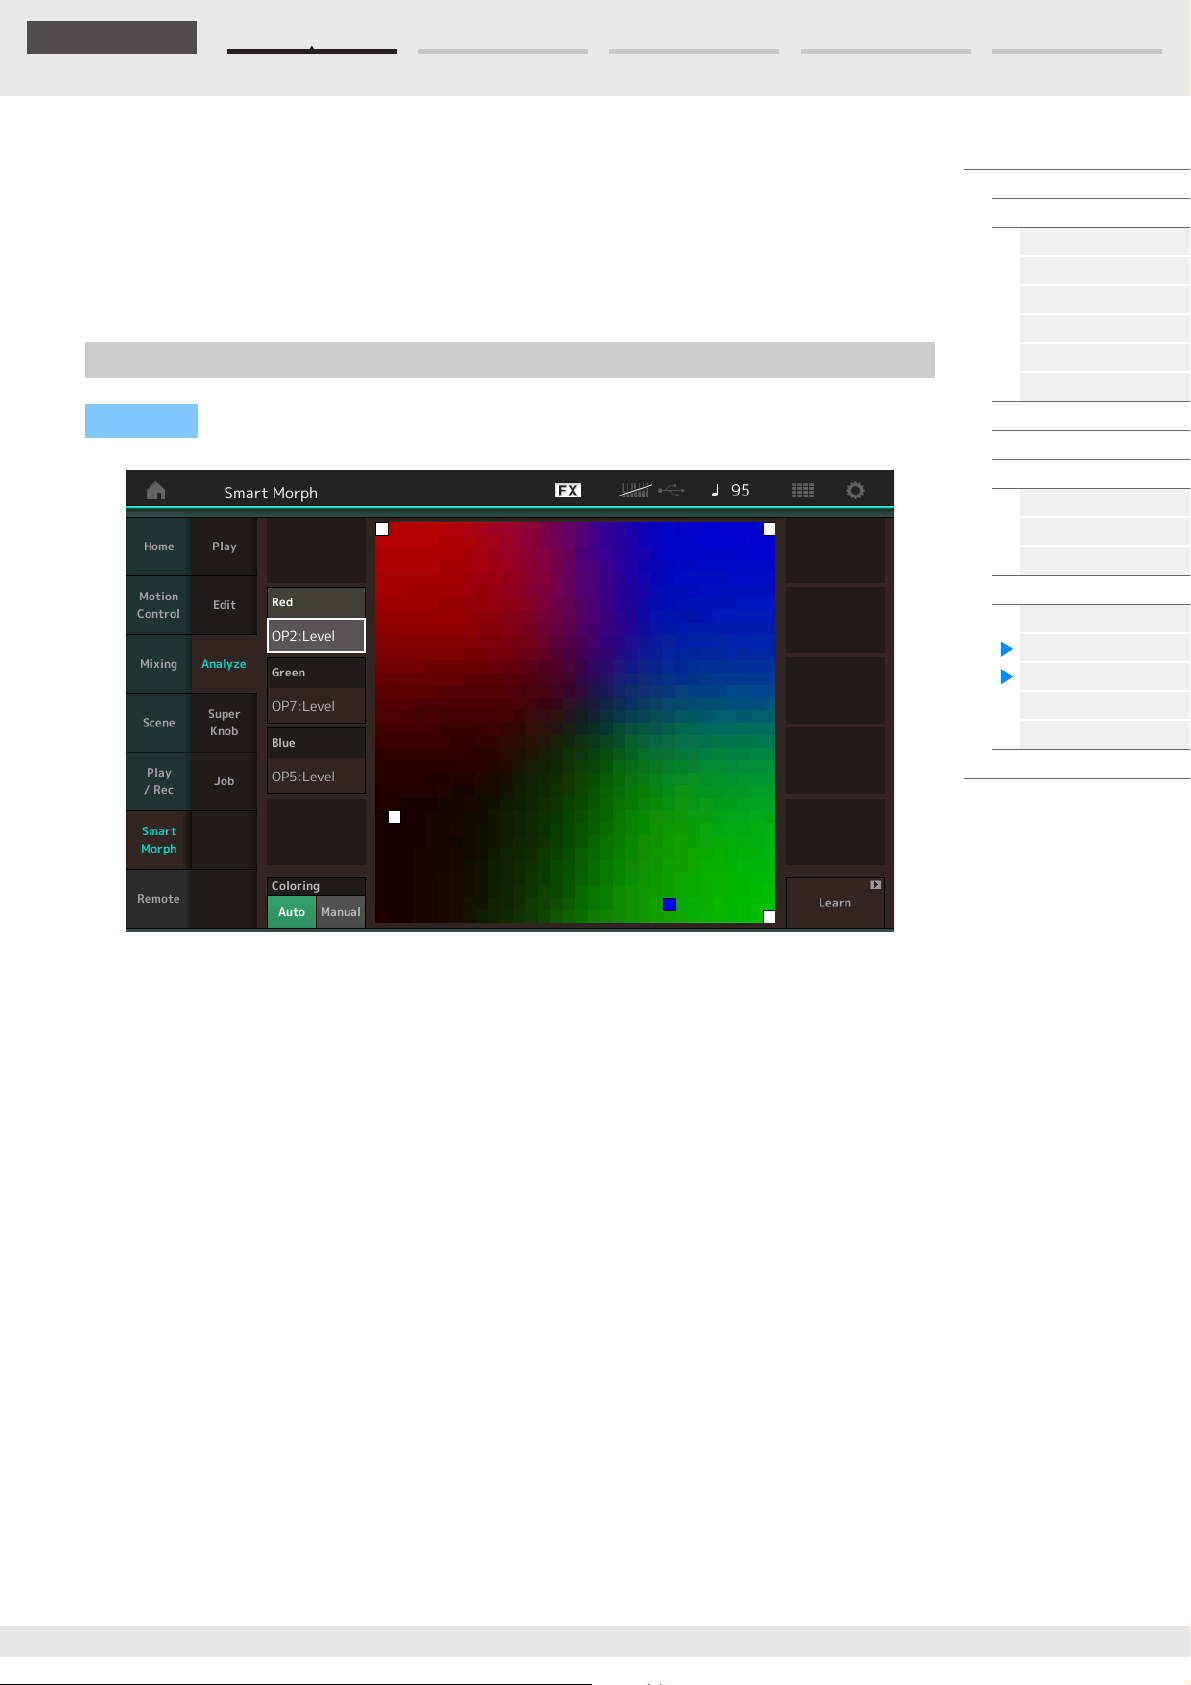
Edit Search Utility Live SetPerformance
Reference
ETA (Estimated Time of Action)
Displays the estimated time remaining for the learning operation.
Undo/Redo
After operating the learning function, the [Undo] button is shown at the upper right. Press Undo to cancel
your edits and return the map to its pre-learning state. After you use Undo, [Redo] is shown, letting you
restore the edits you’ve made.
Analyze
Operation
[PERFORMANCE] [Smart Morph] [Analyze]
Performance
Home
Motion Control
Overview
Quick Edit
Arpeggio
Motion Seq
Super Knob
Knob Auto
Mixing
Scene
Play / Rec
MIDI
Audio
Pattern
Smart Morph
Play
Edit
Analyze
Super Knob
Job
Remote
Red
Displays the size of the value for the selected parameter as a shade of red. For setting values, refer to
“Parameters that can be set for Red, Green, and Blue” (page 97).
Green
Displays the size of the value for the selected parameter as a shade of green. For setting values, refer to
“Parameters that can be set for Red, Green, and Blue” (page 97).
Blue
Displays the size of the value for the selected parameter as a shade of blue. For setting values, refer to
“Parameters that can be set for Red, Green, and Blue” (page 97).
ETA (Estimated Time of Action)
Displays the estimated time remaining for the learning operation.
Coloring
Resets Red, Green, and Blue automatically when Learn is executed, if this is set to Auto. If this is set to
Manual, then Red, Green, and Blue are not automatically reset when Learn is executed.
Settings: Auto, Manual
Learn
Begins learning (map creation) when you tap this. During processing, some interface operations are
disabled and the [Cancel] button is shown in place of [Learn]. If you cancel processing, the map will return
to the pre-learning status.
MODX+ Reference Manual
96
Page 97
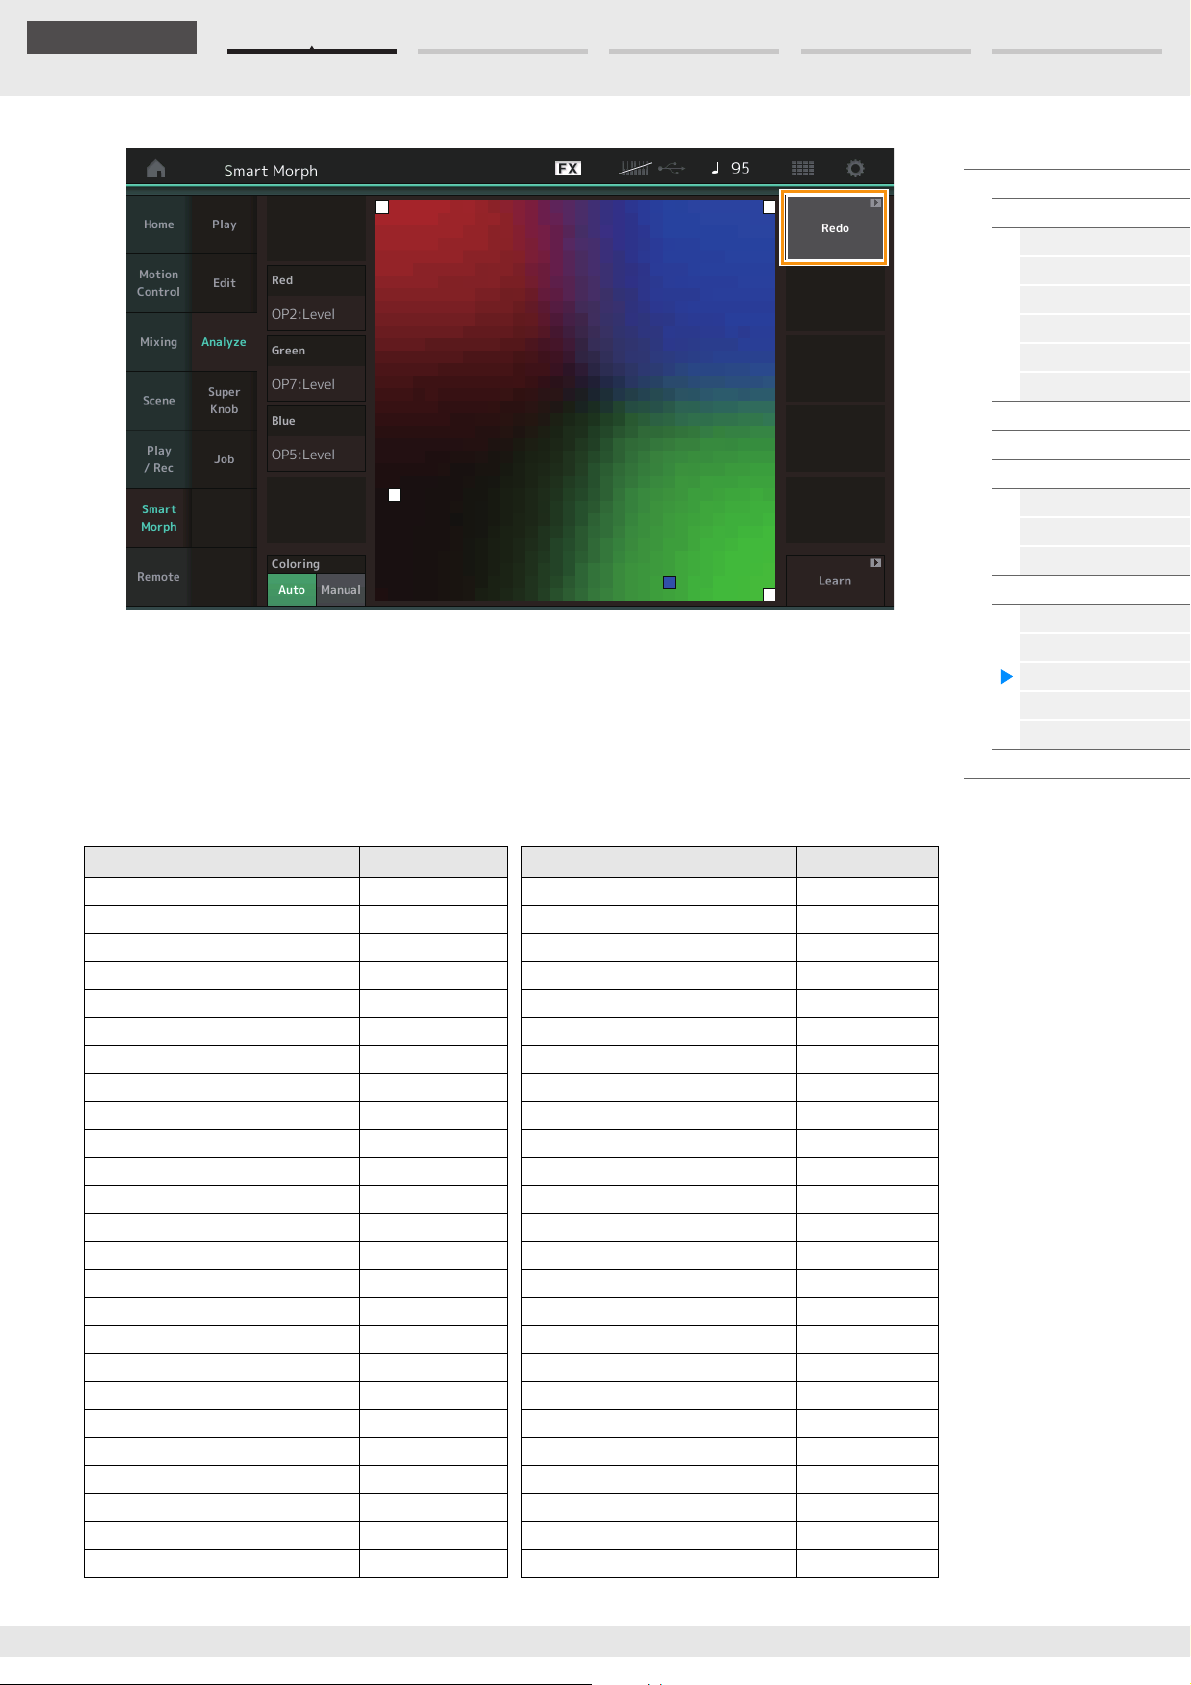
Edit Search Utility Live SetPerformance
Reference
Undo/Redo
After operating the learning function, the [Undo] button is shown at the upper right. Press Undo to cancel
your edits and return the map to its pre-learning state. After you use Undo, [Redo] is shown, letting you
restore the edits you’ve made.
Parameters that can be set for Red, Green, and Blue
Performance
Home
Motion Control
Overview
Quick Edit
Arpeggio
Motion Seq
Super Knob
Knob Auto
Mixing
Scene
Play / Rec
MIDI
Audio
Pattern
Smart Morph
Play
Edit
Analyze
Super Knob
Job
Remote
FM Common
Parameter Name Display Name Parameter Name Display Name
Random Pan Depth Random Pan Filter Cutoff Key Follow Sensitivity Flt Cutoff/Key
Alternate Pan Depth Alternate Pan Filter Cutoff Scaling Break Point 1 Flt Break Point 1
Scaling Pan Depth Scaling Pan Filter Cutoff Scaling Break Point 2 Flt Break Point 2
Key On Delay Time Length Delay Length Filter Cutoff Scaling Break Point 3 Flt Break Point 3
Key On Delay Tempo Sync Switch KeyOnDly Sync Filter Cutoff Scaling Break Point 4 Flt Break Point 4
Key On Delay Note Length Delay Length Filter Cutoff Scaling Offset 1 Flt Cutoff Offset 1
Pitch Velocity Sensitivity Pitch/Vel Filter Cutoff Scaling Offset 2 Flt Cutoff Offset 2
Random Pitch Depth Random Pitch Filter Cutoff Scaling Offset 3 Flt Cutoff Offset 3
Pitch Key Follow Sensitivity Pitch/Key Filter Cutoff Scaling Offset 4 Flt Cutoff Offset 4
Pitch Key Follow Sensitivity Center Note Pitch/Key Center HPF Cutoff Key Follow Sensitivity HPF Cutoff/Key
Filter Type Filter Type PEG Attack Time PEG Attack Tm
Filter Cutoff Frequency Cutoff PEG Decay 1 Time PEG Decay 1 Tm
Filter Cutoff Velocity Sensitivity Cutoff/Vel PEG Decay 2 Time PEG Decay 2 Tm
Filter Resonance/Width Resonance/ Width PEG Release Time PEG Release Tm
Filter Resonance Velocity Sensitivity Res/Vel PEG Initial Level PEG Initial Lvl
HPF Cutoff Frequency HPF Cutoff PEG Attack Level PEG Attack Lvl
Distance Distance PEG Decay 1 Level PEG Decay 1 Lvl
Filter Gain Filter Gain PEG Decay 2 Level PEG Decay 2 Lvl
FEG Hold Time FEG Hold Tm PEG Release Level PEG Release Lvl
FEG Attack Time FEG Attack Tm PEG Depth Velocity Sensitivity PEG Depth/Vel
FEG Decay 1 Time FEG Decay 1 Tm PEG Depth PEG Depth
FEG Decay 2 Time FEG Decay 2 Tm PEG Time Key Follow Sensitivity PEG Time/Key
FEG Release Time FEG Release Tm 2nd LFO Wave LFO Wave
FEG Hold Level FEG Hold Lvl 2nd LFO Speed LFO Speed
FEG Attack Level FEG Attack Lvl 2nd LFO Phase LFO Phase
MODX+ Reference Manual
97
Page 98
Edit Search Utility Live SetPerformance
Reference
Parameter Name Display Name Parameter Name Display Name
FEG Decay 1 Level FEG Decay 1 Lvl 2nd LFO Delay Time LFO Delay
FEG Decay 2 Level FEG Decay 2 Lvl 2nd LFO Key On Reset LFO Key On Reset
FEG Release Level FEG Release Lvl 2nd LFO Pitch Modulation Depth LFO Pitch Mod
FEG Depth FEG Depth 2nd LFO Amplitude Modulation Depth LFO Amp Mod
FEG Time Velocity Sensitivity Segment FEG Segment 2nd LFO Filter Modulation Depth LFO Filter Mod
FEG Time Velocity Sensitivity FEG Time/Vel Algorithm Number Algorithm
FEG Depth Velocity Sensitivity FEG Depth/Vel Feedback Level Feedback
FEG Depth Velocity Sensitivity Curve FEG Curve LFO Speed Range Extended LFO
FEG Time Key Follow Sensitivity FEG Time/Key LFO Extended Speed LFO Ex Speed
FEG Time Key Follow Sensitivity Center
Note
FEG Center
FM Operator (op1– op8)
Parameter Name Display Name Parameter Name Display Name
Oscillator Key On Reset Key On Reset AEG Release Time AEG Release Tm
Oscillator Frequency Mode Freq Mode AEG Attack Level AEG Attack Lvl
Tune Coarse Coarse AEG Decay 1 Level AEG Decay 1 Lvl
Tune Fine Fine AEG Decay 2 Level AEG Decay 2 Lvl
Detune Detune AEG Release(Hold) Level AEG Release Lvl
Pitch Key Follow Sensitivity Pitch/Key AEG Time Key Follow Sensitivity AEG Time/Key
Pitch Velocity Sensitivity Pitch/Vel Operator Level Level
Spectral Form Spectral Level Scaling Break Point Lvl Break Point
Spectral Skirt Skirt Level Scaling Low Depth Lvl/Key Lo
Spectral Resonance Resonance Level Scaling High Depth Lvl/Key Hi
PEG Initial Level PEG Initial Lvl Level Scaling Low Curve Curve Lo
PEG Attack Level PEG Attack Lvl Level Scaling High Curve Curve Hi
PEG Attack Time PEG Attack Tm Level Velocity Sensitivity Level/Vel
PEG Decay Time PEG Decay Tm 2nd LFO Pitch Modulation Depth Offset LFO PM Depth
AEG Hold Time AEG Hold Tm 2nd LFO Amplitude Modulation Depth
Offset
AEG Attack Time AEG Attack Tm Pitch Controller Sensitivity Pitch/Ctrl
AEG Decay 1 Time AEG Decay 1 Tm Level Controller Sensitivity Level/Ctrl
AEG Decay 2 Time AEG Decay 2 Tm
LFO AM Depth
Performance
Home
Motion Control
Overview
Quick Edit
Arpeggio
Motion Seq
Super Knob
Knob Auto
Mixing
Scene
Play / Rec
MIDI
Audio
Pattern
Smart Morph
Play
Edit
Analyze
Super Knob
Job
Remote
MODX+ Reference Manual
98
Page 99
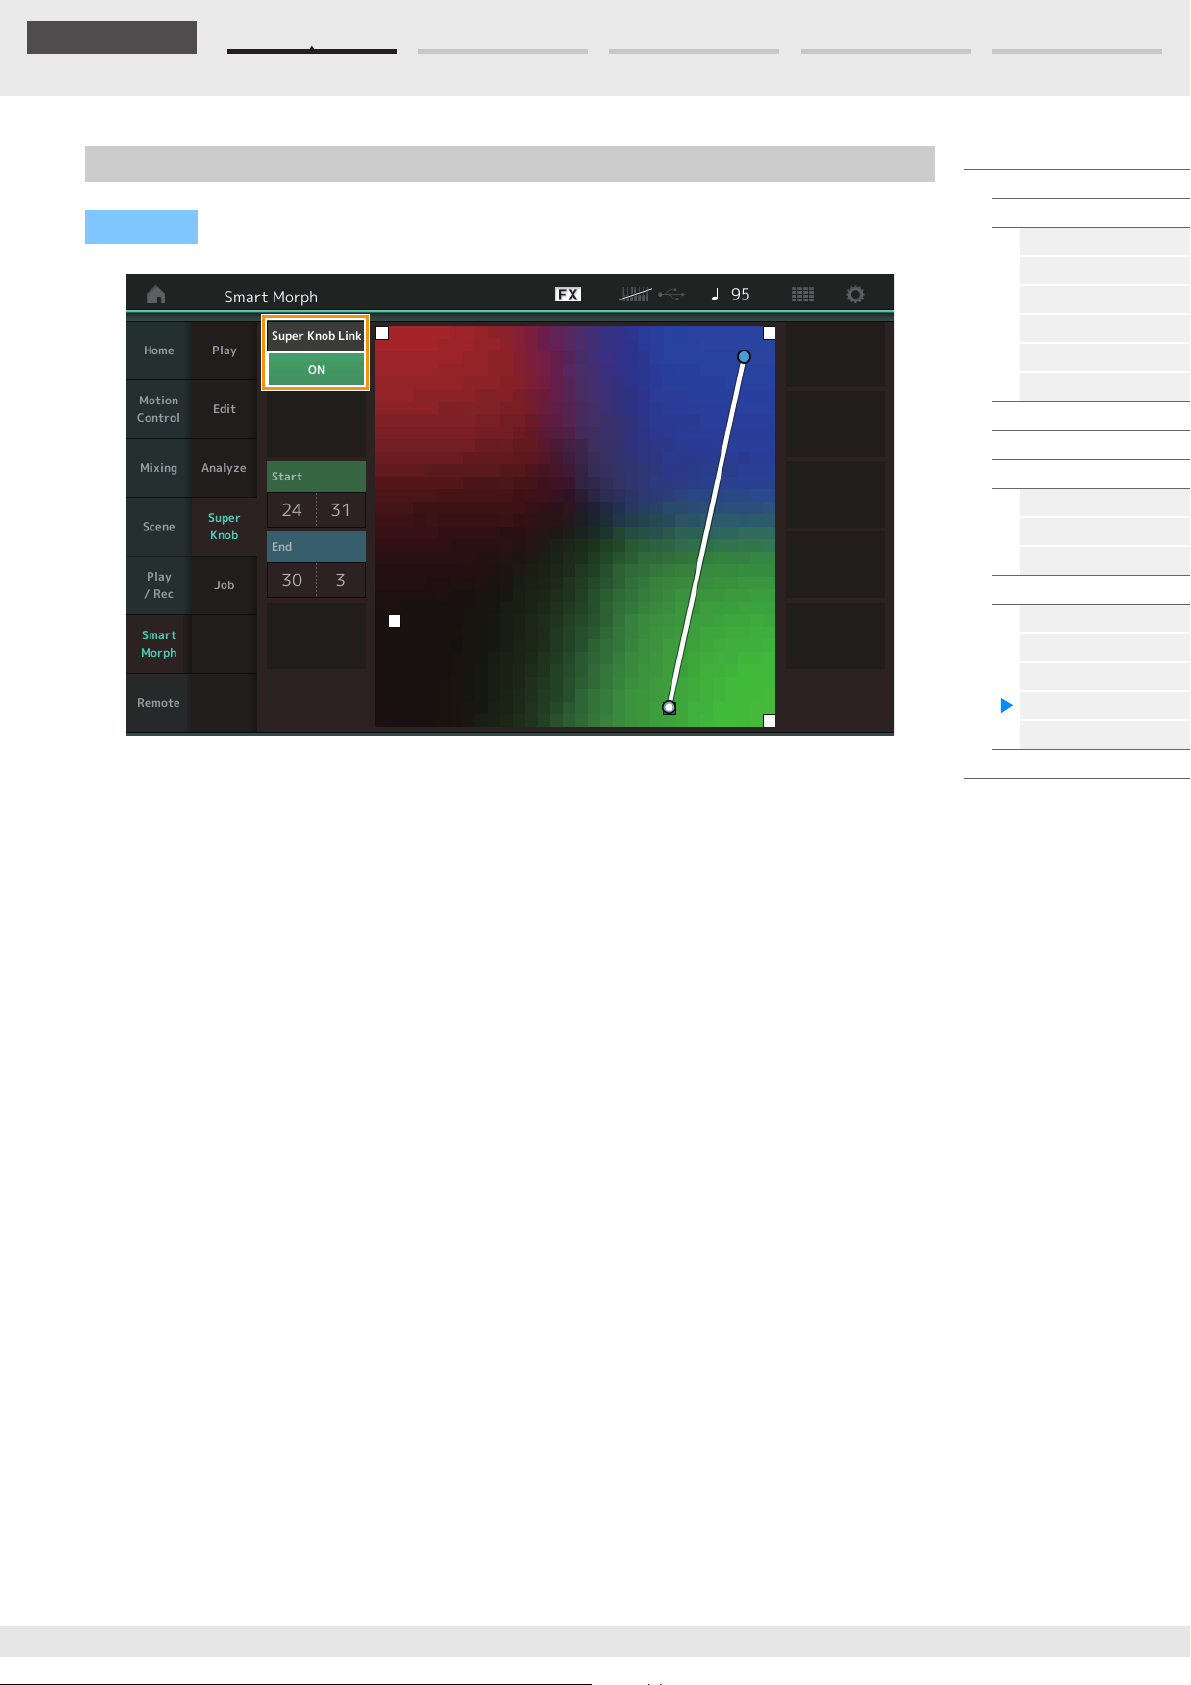
Edit Search Utility Live SetPerformance
Reference
Super Knob
Operation
Super Knob Link
Adds an effect to the Super Knob from start to end when this is set to ON.
Settings: On, Off
[PERFORMANCE] [Smart Morph] [Super Knob]
Performance
Home
Motion Control
Overview
Quick Edit
Arpeggio
Motion Seq
Super Knob
Knob Auto
Mixing
Scene
Play / Rec
MIDI
Audio
Pattern
Smart Morph
Play
Edit
Analyze
Super Knob
Job
Remote
Start
Determines the position on the map corresponding to the minimum value of the Super Knob. With the
cursor on Start, touch the map to set the start position.
End
Determines the position on the map corresponding to the maximum value of the Super Knob. With the
cursor on End, touch the map to set the end position.
MODX+ Reference Manual
99
Page 100
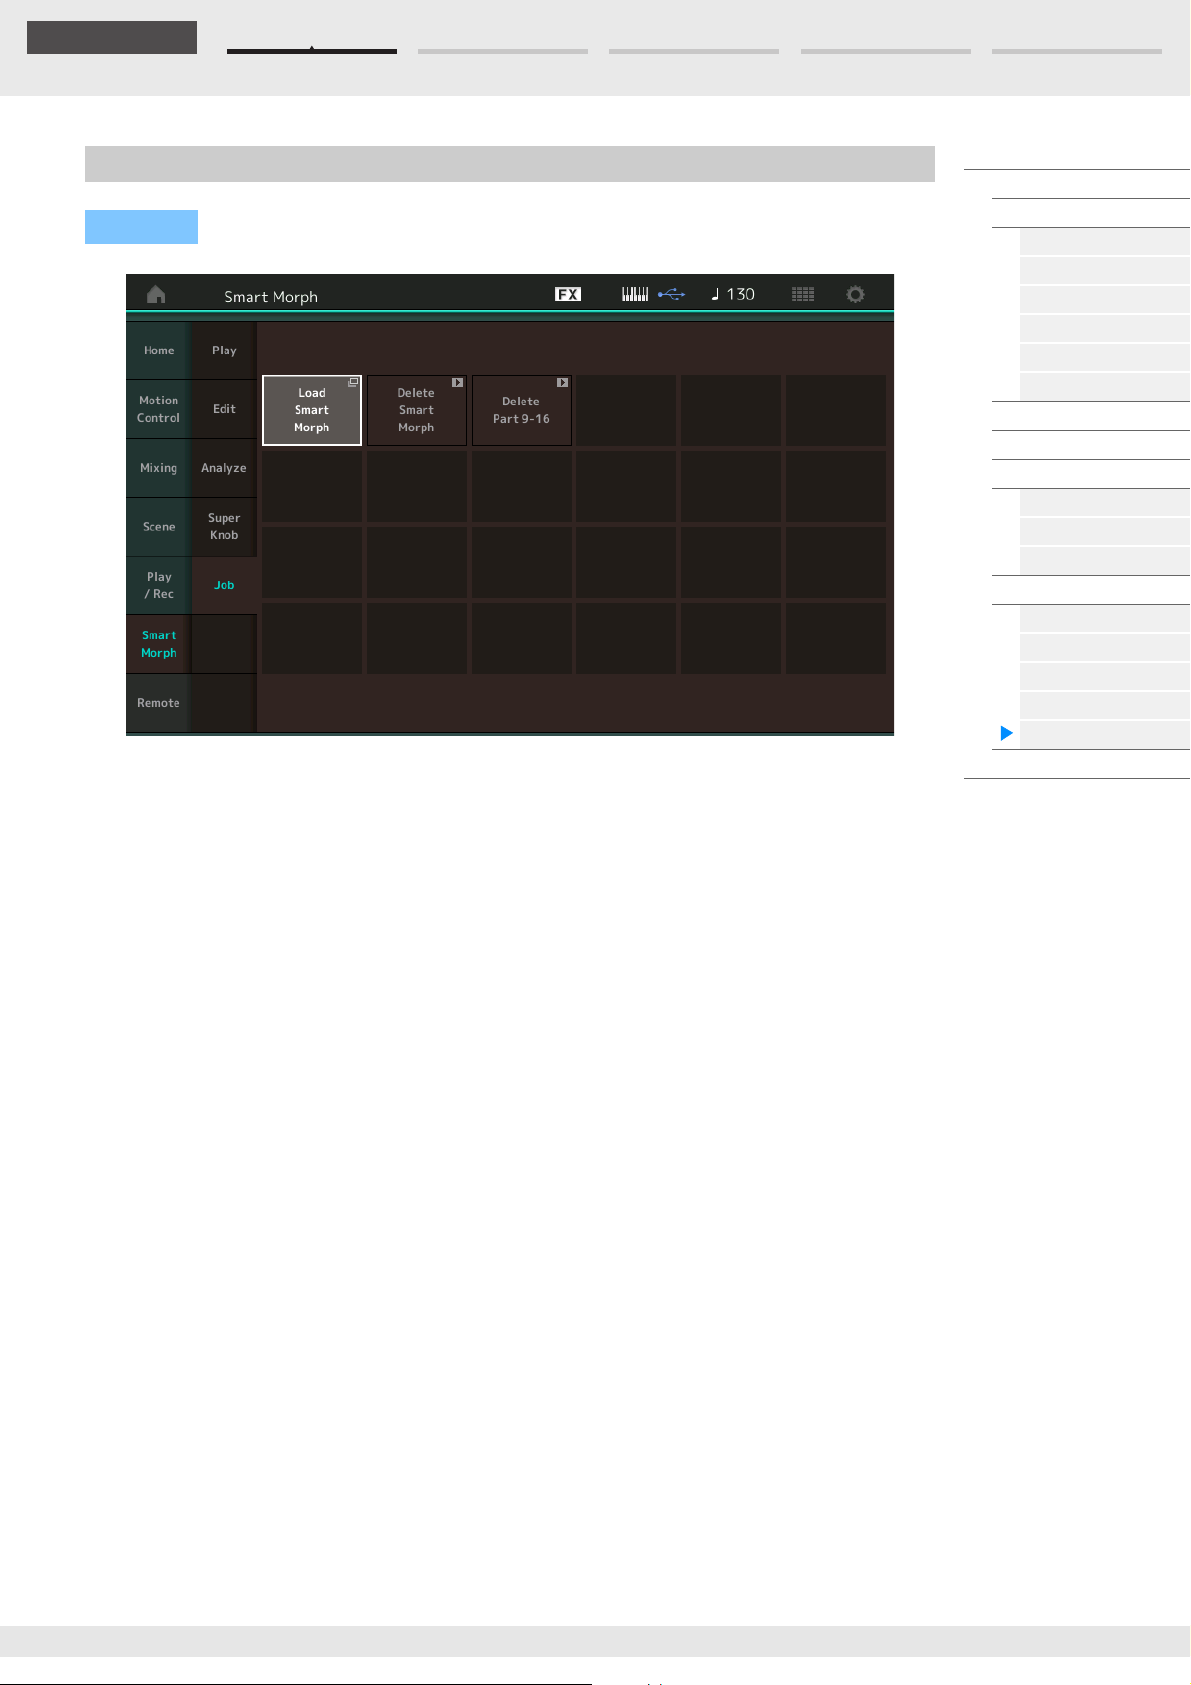
Edit Search Utility Live SetPerformance
Reference
Job
Operation
Load Smart Morph
Opens the Load display. Select another Performance on the Load display to load the Smart Morph data
contained in that Performance to the current Performance.
[PERFORMANCE] [Smart Morph] [Job]
Performance
Home
Motion Control
Overview
Quick Edit
Arpeggio
Motion Seq
Super Knob
Knob Auto
Mixing
Scene
Play / Rec
MIDI
Audio
Pattern
Smart Morph
Play
Edit
Analyze
Super Knob
Job
Remote
Delete Smart Morph
Deletes the Smart Morph data contained in the current Performance.
Delete Part 9–16
Sets Part 9 to Part 16 to unused status all at once.
When Parts 5 –16 are set to unused status, SSS is enabled.
Smart Morph uses Parts 9 –16 for making a map. However, deleting Parts 9 –16 has no effect on the sound
of Part 1, making it unnecessary to edit the map again.
MODX+ Reference Manual
100
 Loading...