


Safety Warning
This product has been manufactured to comply with international safety standards.
Please read the following safety precautions carefully.
Safety instructions and Precautions
1. MAINS SUPPLY
••••
Operate this product only from the type of power supply indicated on the marking label.
••••
Disconnect the product from the mains before you start any maintenance or installation procedures.
2. OVER LOADING
••••
Do not overload a wall outlet, extension cord or adapter as this may result in electronic fire or shock
3. LIQUIDS
••••
The product should not be exposed to liquid of any kind. In addition, no objects filled with liquid
should be placed on the product.
4. CLEANING
••••
Disconnect the product from the wall outlet before cleaning. Use a light damp cloth (no solvents) to
dust the product.
5. VENTILATION
••••
The slots on rear of the product must be left uncovered to allow proper airflow into the unit.
••••
Do not stack electronic equipments on top of the product.
6. ATTACHMENTS
••••
Do not use any unsupported attachments as these may be hazardous or cause damage to the
product.
7. CONNECTION TO THE TV
••••
Disconnect the product from the mains before connecting or disconnecting the cable from the TV.
Failure to do so can damage the TV.
8. LOCATION
••••
Place the product indoors to avoid exposing it to lightning, rain or sun. Do not place it near a
radiator or heat register.
9. REPLACEMENTS OF PARTS
••••
When replacement of parts is required, be sure the service technician uses replacement parts
specified by the manufacturer or those that have the same characteristics as the original part.
Unauthorized substitution may result in additional damage to the unit.

CONTENTS
1 Before using the product 4
1.1 Package Contents 4
1.2 Front and Top Panel 5
1.3 Rear Panel 6
1.4 Remote Control 7
2 Connections
2.1 Connecting the Antenna 10
2.2 Connecting a VCR 11
2.3 Connecting a DVD player 11
2.4 Connecting a Camcorder 11
2.5 Connecting the TV 11
2.6 Connecting the audio system 11
2.7 Connecting a PC
10
11
3 Operations
3.1 Browser Menu 12
3.2 Browsing All 12
3.3 Movie Playback 12
3.4 Music Playback 13
3.5 Viewing Photos 14
4 Installation (Searching for the channels)
4.1 Automatic Search 15
4.2 Manual Search 16
12
15

5 Recording
5.1 Instant Recording
5.2 Reservation Recording
5.3 DTV EPG (Electronic Program Guide) 19
5.4 Recorded Program 20
5.5 Time Shifted Recording 21
6 File Manager
6.1 Copy or Move 22
6.2 Delete 23
7 Network Setup
7.1 Wired Setup 24
17
17
18
22
24
8
7.2 Browsing via Network
7.3 Using Internet Radio
7.4 FTP Program 27
Setup
9
Firmware Update
10
Appendix
10.1 Trouble shooting
10.2 Specification
25
26
28
35
36
-
4 -
1. Before using this product
This chapter provides detailed instructions on the product and its accessories.
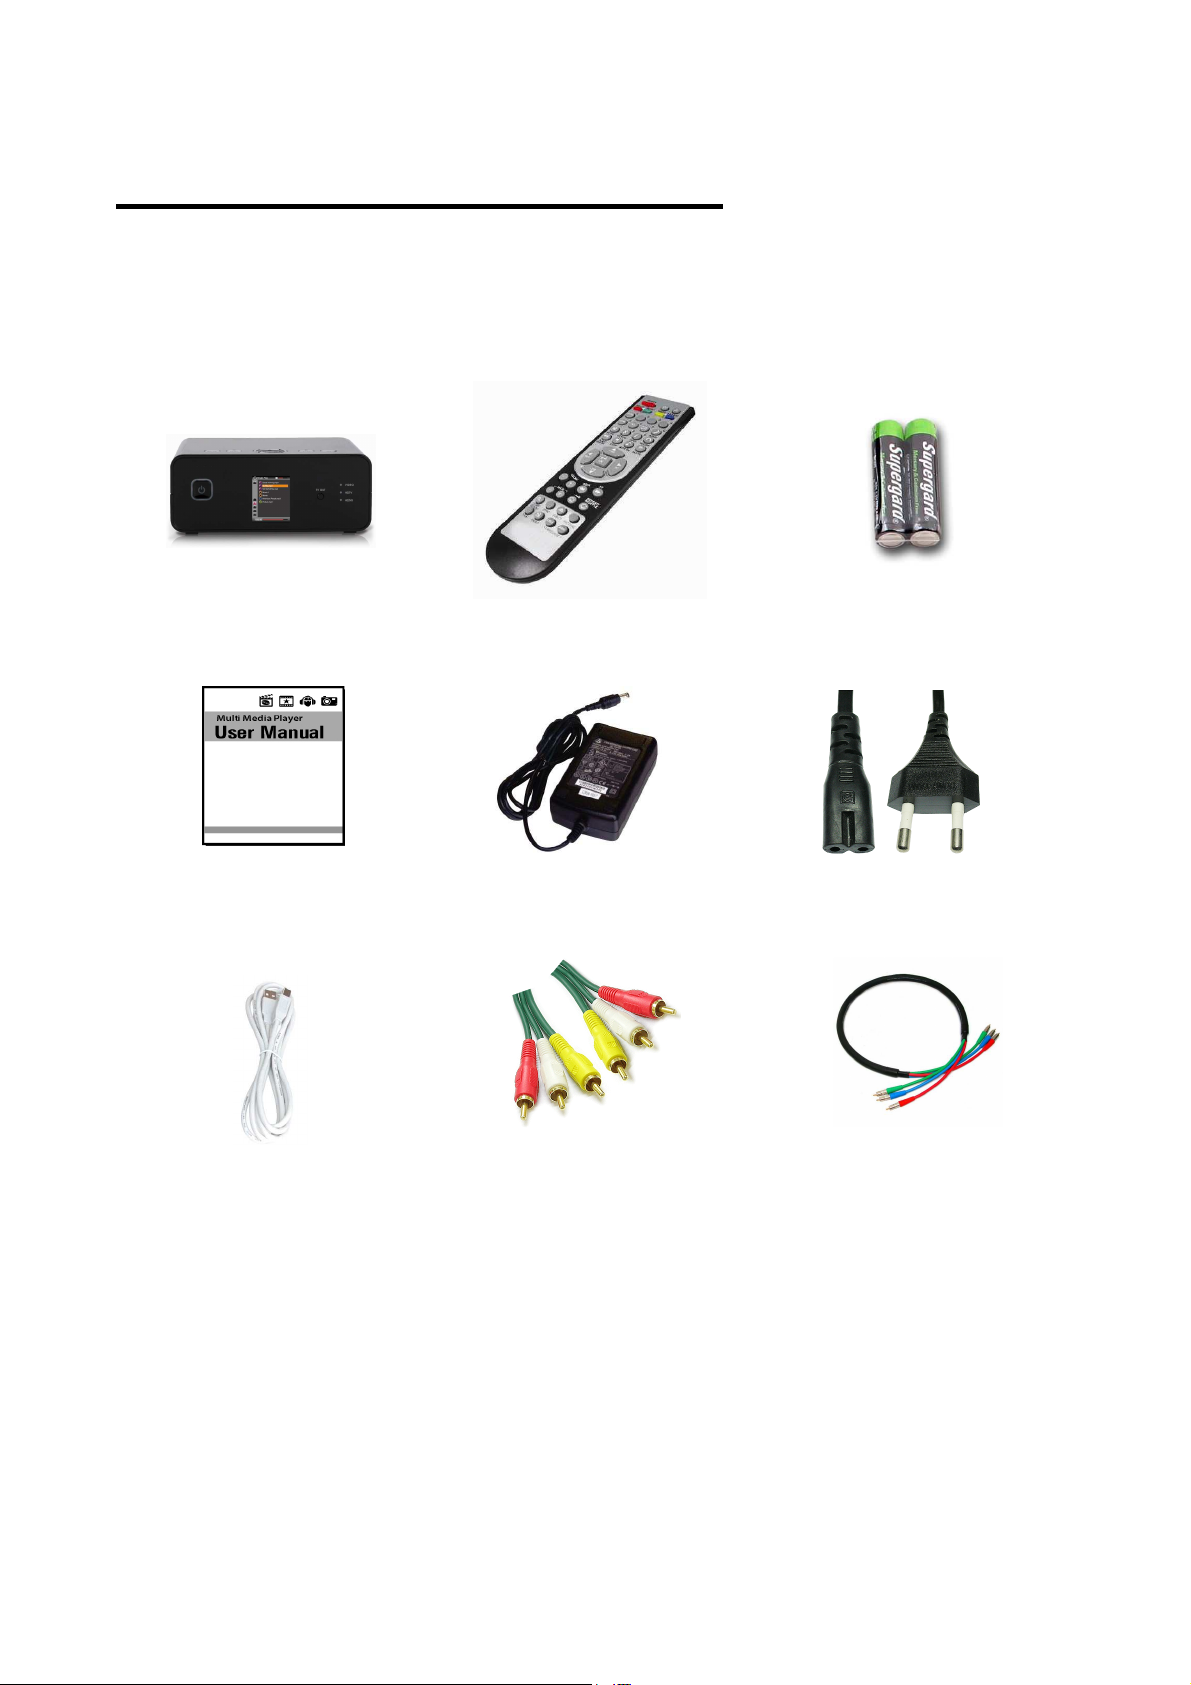
1.1 Package Contents
Please check all the package contents before using the product.
Recorder Remote Control Batteries
Users’ Manual AC adapter Power Cord
USB Cable AV Cable Component Cable
NOTE
Product contents may be subject to change.
Cables not specified above must be purchased separately.

5
1.2 Top and Front Panel
1. SETUP
Press go to SETUP Menu
2. STOP
Press to stop playing of a file
3. NAVIGATION
Press to go to next step or return to
the previous step
4. PLAY
Press to play the selected file.
5. OK
Press to select a desired item
1. POWER BUTTON
Switches the product on/off.
2. TV OUT BUTTON
Press to change the TV OUT mode without remote control
3. LED
LED indicates TV OUT mode is currently selected.
4. Infrared receiver
Receives signals from the remote control.
5. LCD screen
On the LCD screen, you can check the simple information about the operation(main
menu, music playing)

6
1.3 Rear Panel
1. DC12V
2. USB(PC) Target Port
3. USB HOST Port
4. AV-OUT(Component and Composite)
5. Stereo Audio Out
6. DV-In (Digital Video IEEE 1394)
7. OPTICAL Out
8. HDMI Out
9. LAN(Ethernet 100Base-Tx/10Base-T)
10. ANTENNA-IN for TV Tuner(DVB-T)
11. ANTENNA-OUT for TV Tuner(DVB-T)
12. FAN
13. EURO SCART-IN
14. AV-IN
7
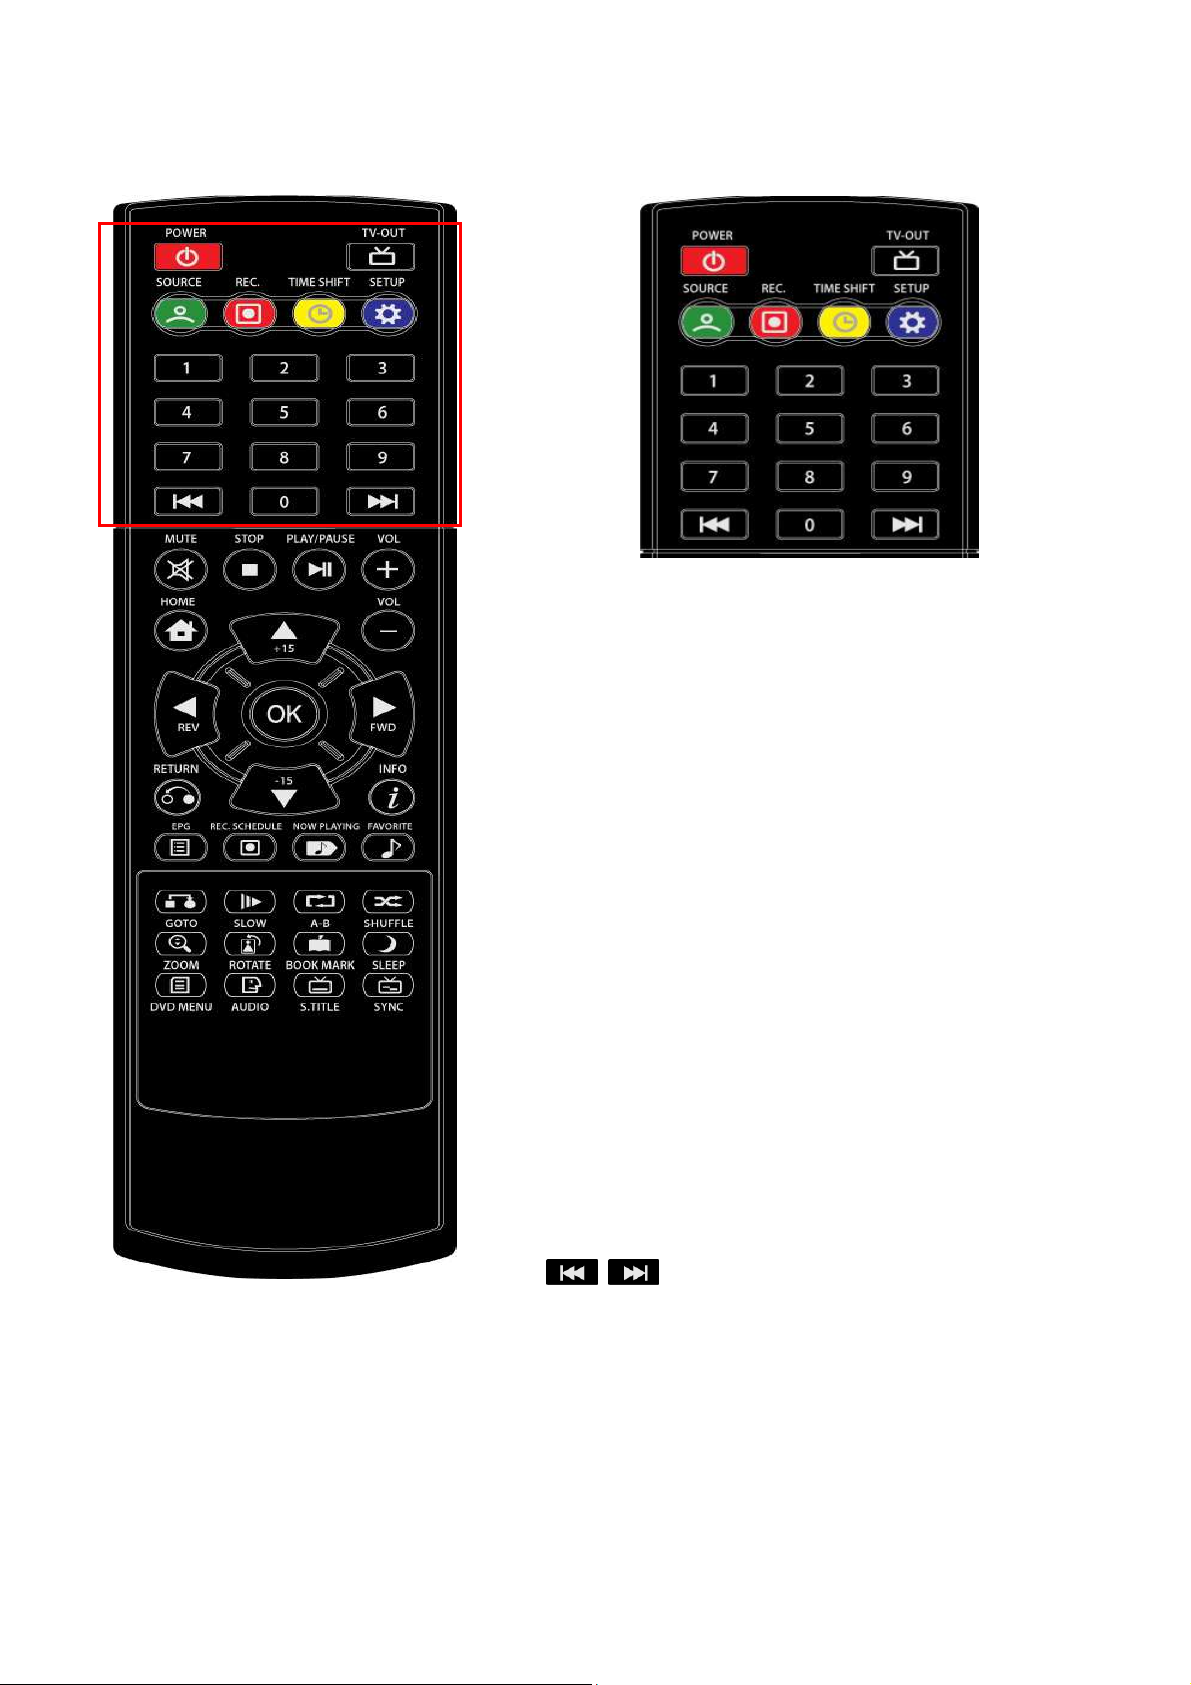
1.4 Remote Control
1. POWER Turns the product on/off.
2. TV OUT Switch TV OUT mode.
3. SOURCE Press the button to change the input signal
SOURCE.
4. REC.
-. Press the button to begin recording
-. Press the button to resume recording
-. Press the button to use instant recording function
5. TIME SHIFT
Press the button to use Time Shift function
6. SETUP
Press the button to go directly to SETUP Menu
7. Number button
-. Press to change the channel.
-. Press to enter numeric changing settings.
8.
-. Press the button to move to next or previous file
8
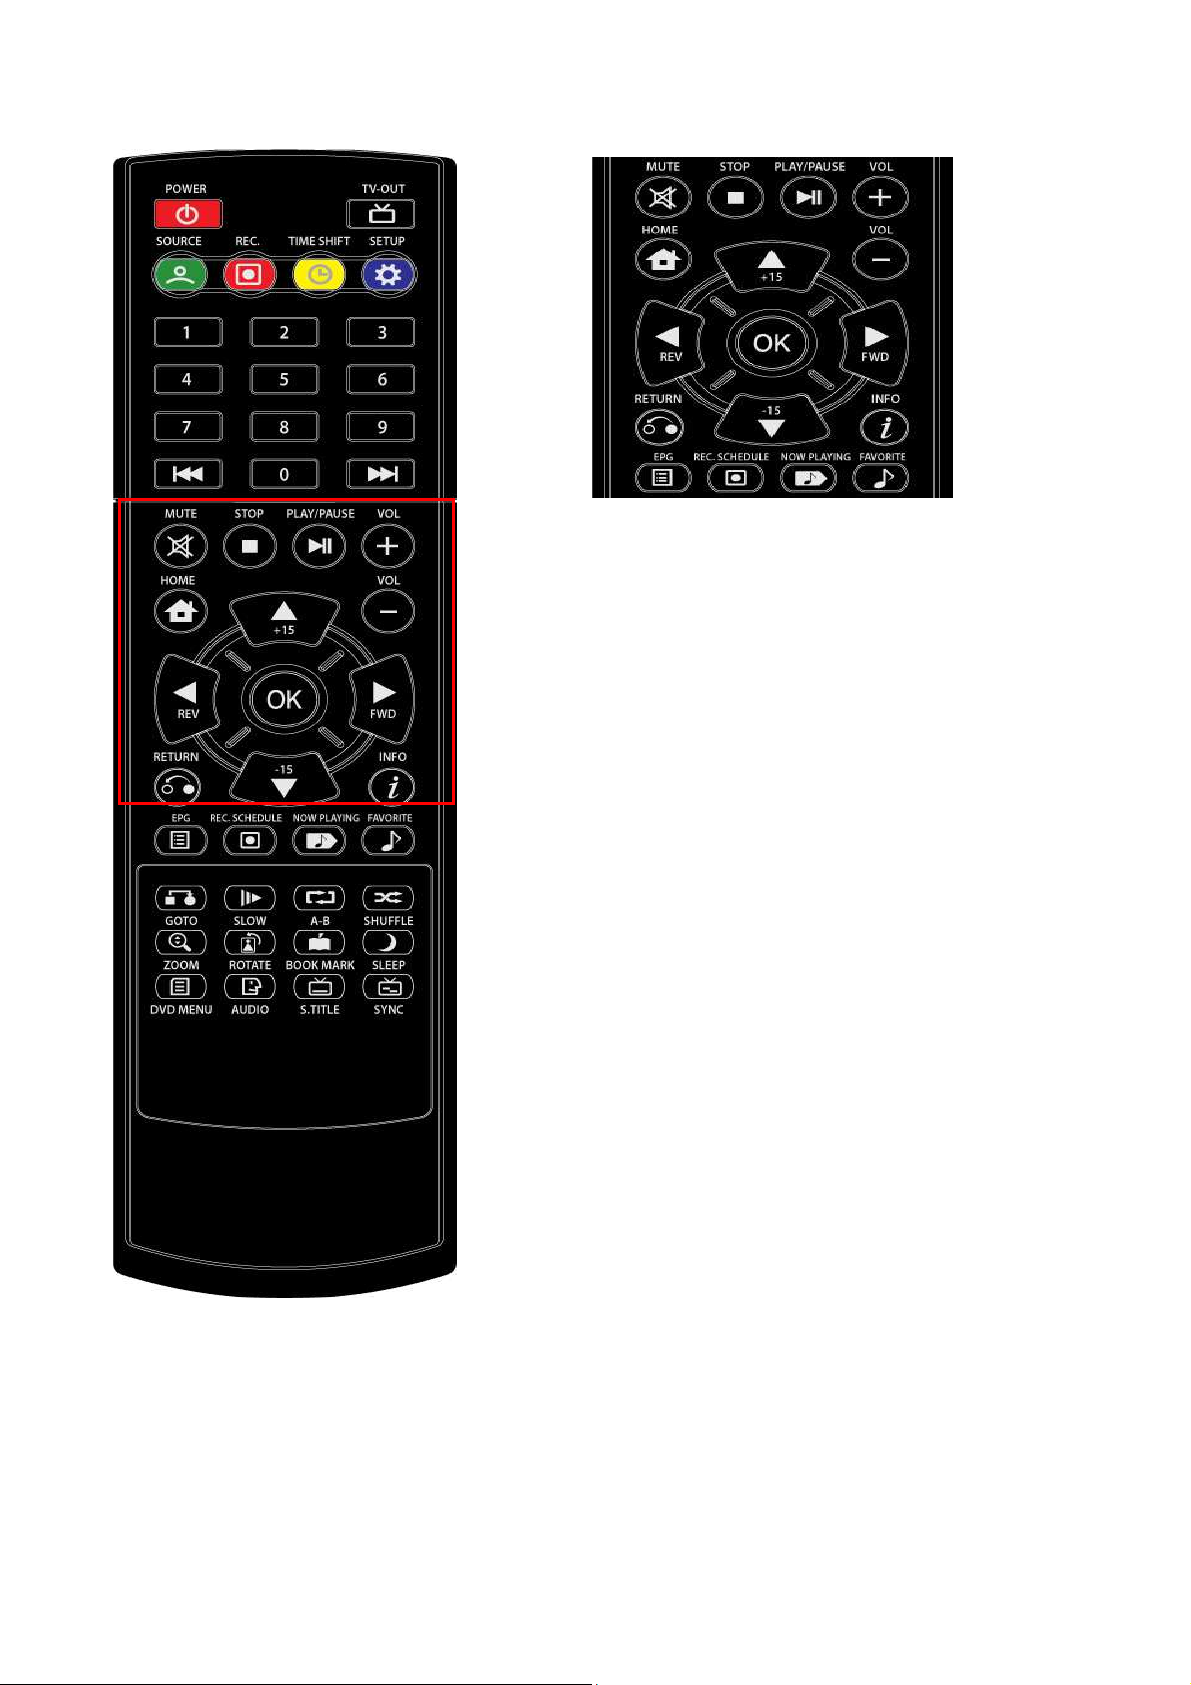
9. MUTE Mute the audio temporarily.
10. STOP Press to stop playing a file
11. PLAY/PAUSE
-. Press the button to play a file
-. Press the button again to stop the current file
-. Press the button to resume playback of this file.
12. VOL + / - Adjusts the audio volume.
13. HOME Press the button to go directly to the Home menu.
14. ARROW Press the buttons to navigate the menus.
15. OK Press the button to select a menu or confirm the
user’s action.
16. REW / FF
-. Press the buttons to rewind/forward the playback of recorded file.
-. Whenever you press, the playback speed increase by 5 steps.
17. RETURN
-. Press the button to return to the previous screen
-. Press the button to cancel user’s action.
18. INFO
19. EPG Press the button to display the Electronic Program
20. REC.SCHEDULE
Press the button to display the reservation recording
Press the button to display the information of
recording.
Guide.
9
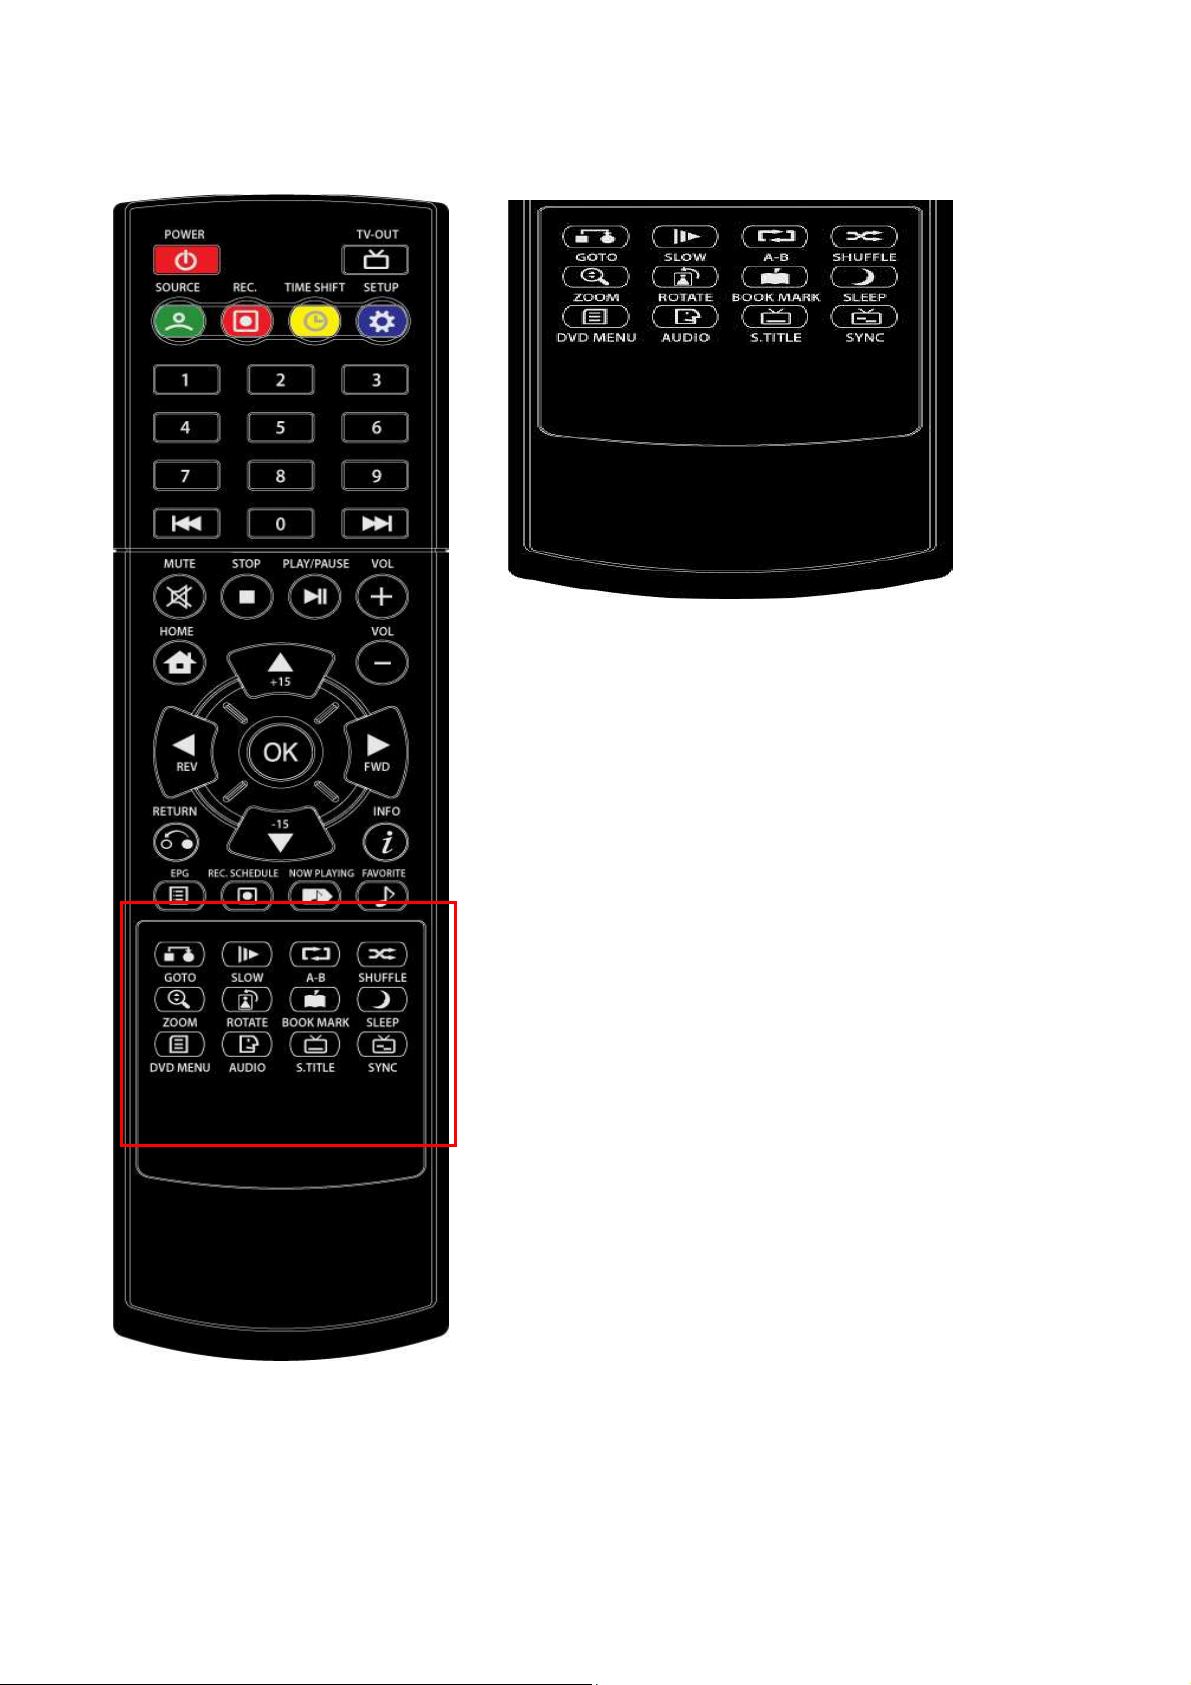
Press the button to set the beginning and end points of a section to
21. GOTO Press the button to go to a specific point.
22. SLOW
Press the button to change the playback speed into the slow motion
mode.
23. A - B
repeat
24. SHUFFLE
Press the button to switch random and sequential playback.
25. ZOOM
Press the button to zoom in/out the screen during watching a file.
26. ROTATE Press the button to rotate a picture by 4 angles.
27. BOOK MARK
Press the button to add or delete the current position as a bookmark.
28. SLEEP Press the button to set the timing to turn the product off
automatically.
29. DVD MENU Press the button to display DVD menu.
30. AUDIO Press the button to view the audio track.
31. S. TITLE Press the button to set subtitle options.
32. SYNC
Press the button to synchronize the video and audio
-
10 -
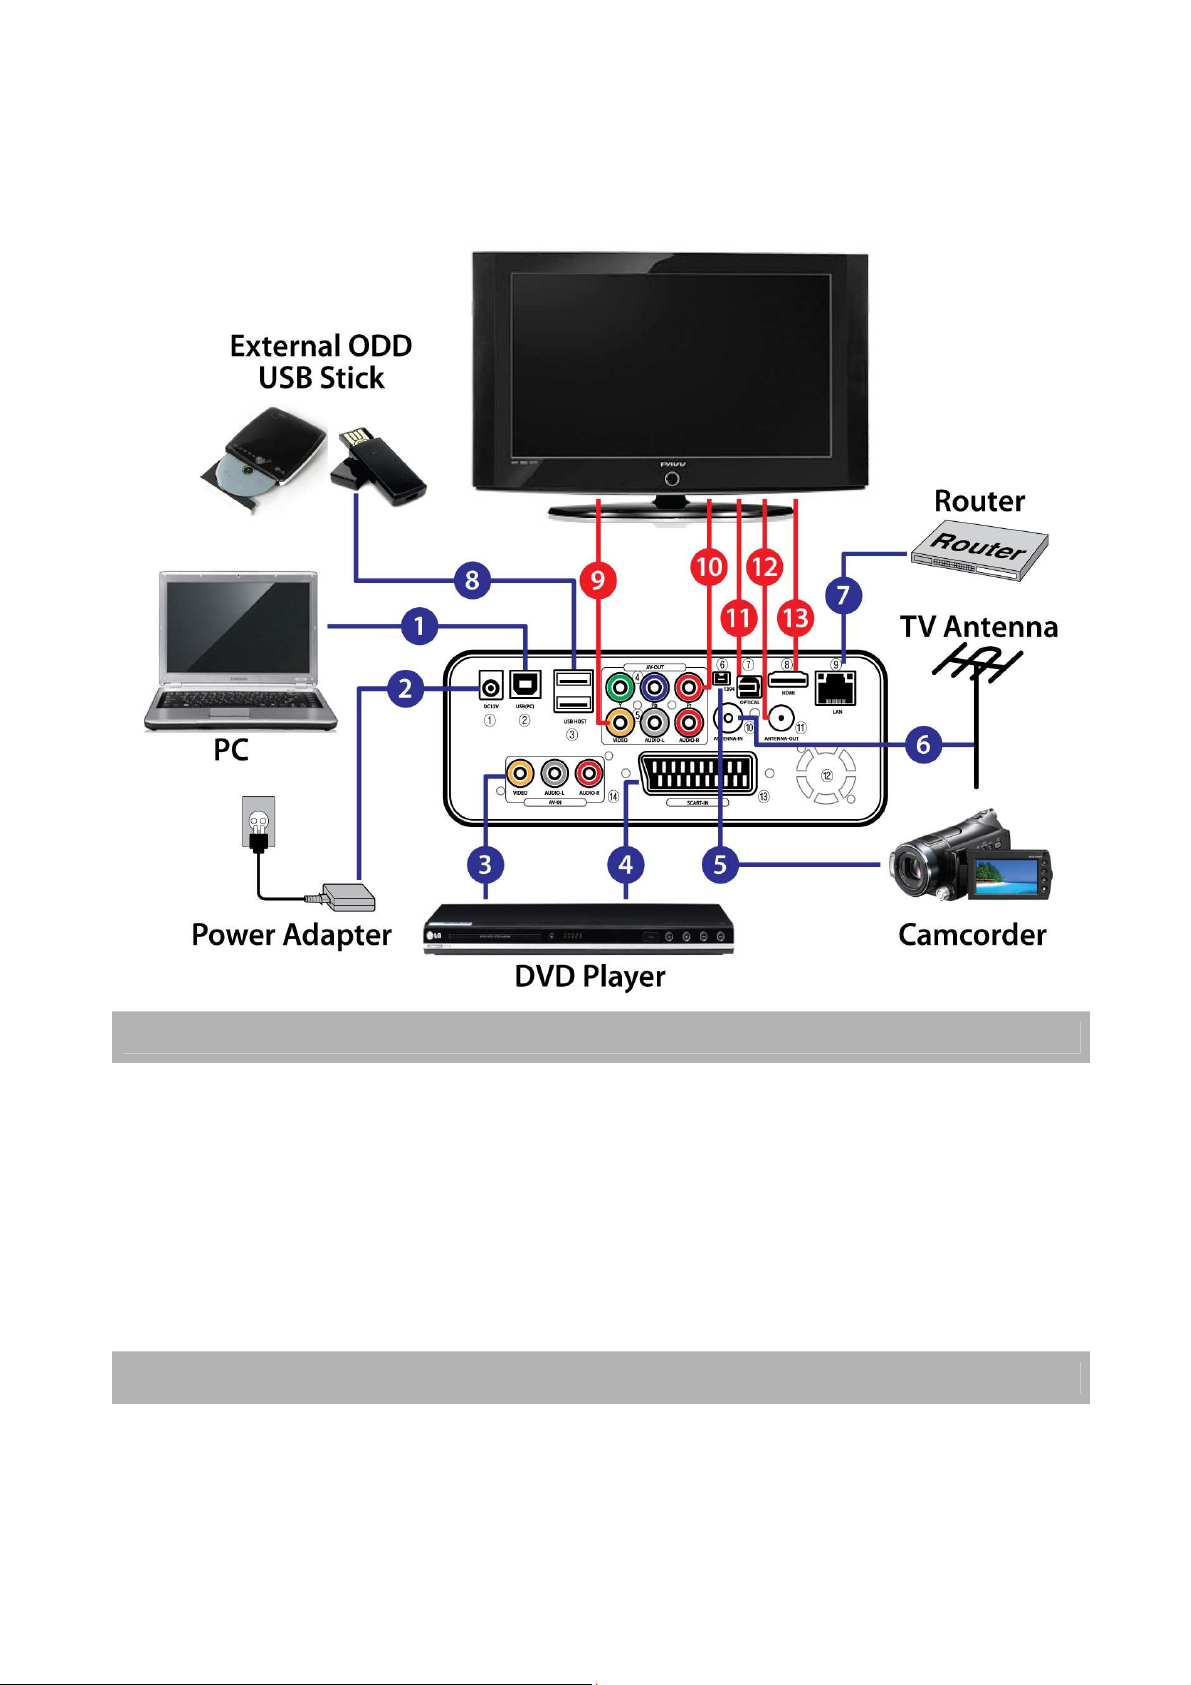
2. Connections
TV using an
2.1 Connecting the Antenna
1. Connect your aerial to ANTENNA-IN (Line ⑥)
2. Connect the ANTENNA-OUT of the product and the aerial input of the
RF cable (Line ⑫)
2.2 Connecting a VCR

-
11 -
Use the SCART cable when connecting to a VCR and other audiovisual equipment
(Line ④)
2.3 Connecting a DVD player
Use the composite or SCART cable when connecting to a DVD player and other
audiovisual equipment (Line ③ or ④)
2.4 Connecting a Camcorder
Use the IEEE 1394 port when connecting to a camcorder (Line ⑤)
2.5 Connecting the TV
Select the most appropriate procedure for your convenience.
• Connect the product and TV using a RCA cable (Line ⑨)
• Connect the product and TV using a Component cable (Line ⑩)
• Connect the product and TV using a HDMI cable (Line ⑬)
2.6 Connecting the audio system
Select the most appropriate procedure for your convenience.
• Connect the product and the audio system using a RCA cable(Line ⑨)
• Connect the product and the audio system using a coaxial cable(Line ⑪)
-
12 -
• Connect the product and the audio system using a HDMI cable(Line ⑬)
2.7 Connecting a PC
Use USB cable to connect a PC(Line ①)
3. Basic Operation
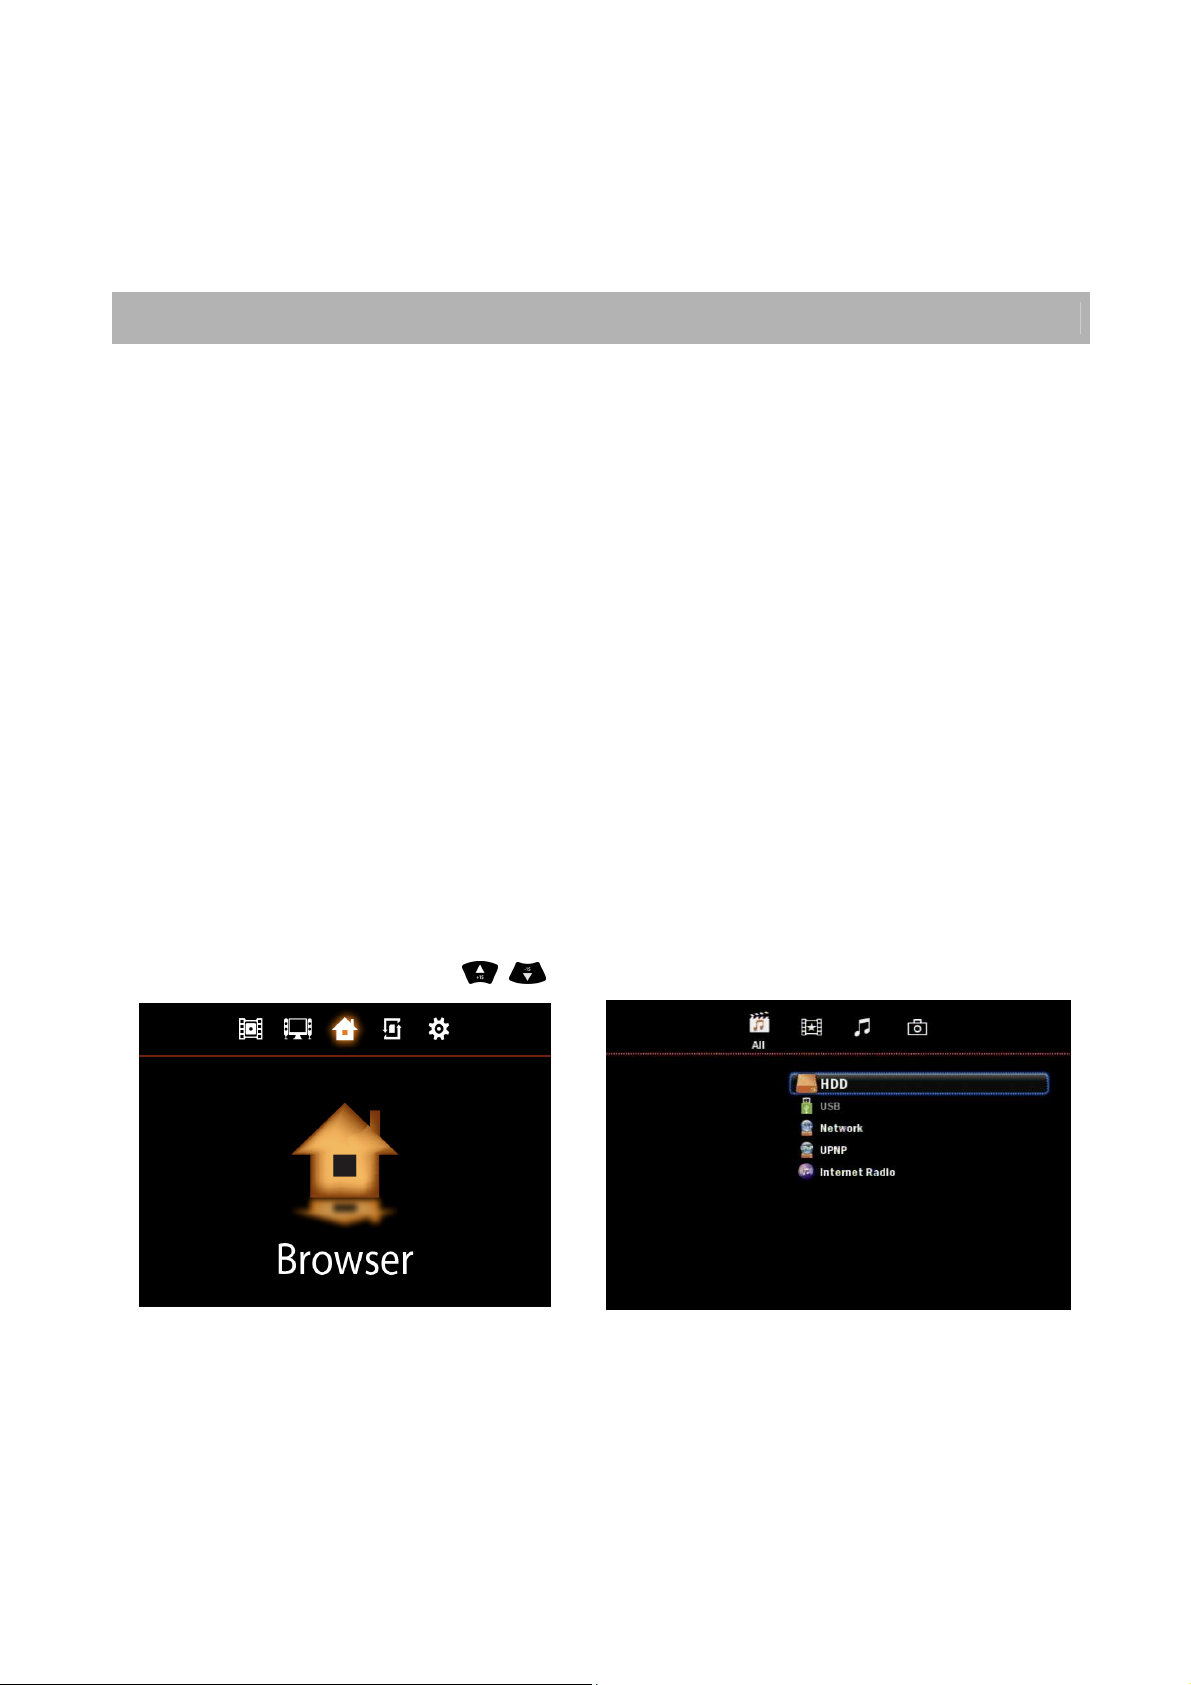
3.1 Browser Menu
The Browser menu allows you to browse and play movie, music and photo files stored on a hard
drive, an external USB device, Memory card and Network. Select “Browser” to enter the menu.
3.2 Browsing All
Select “All” tab to view all the directories and contents.
Move to the desired item using
and press the OK to browse the file.
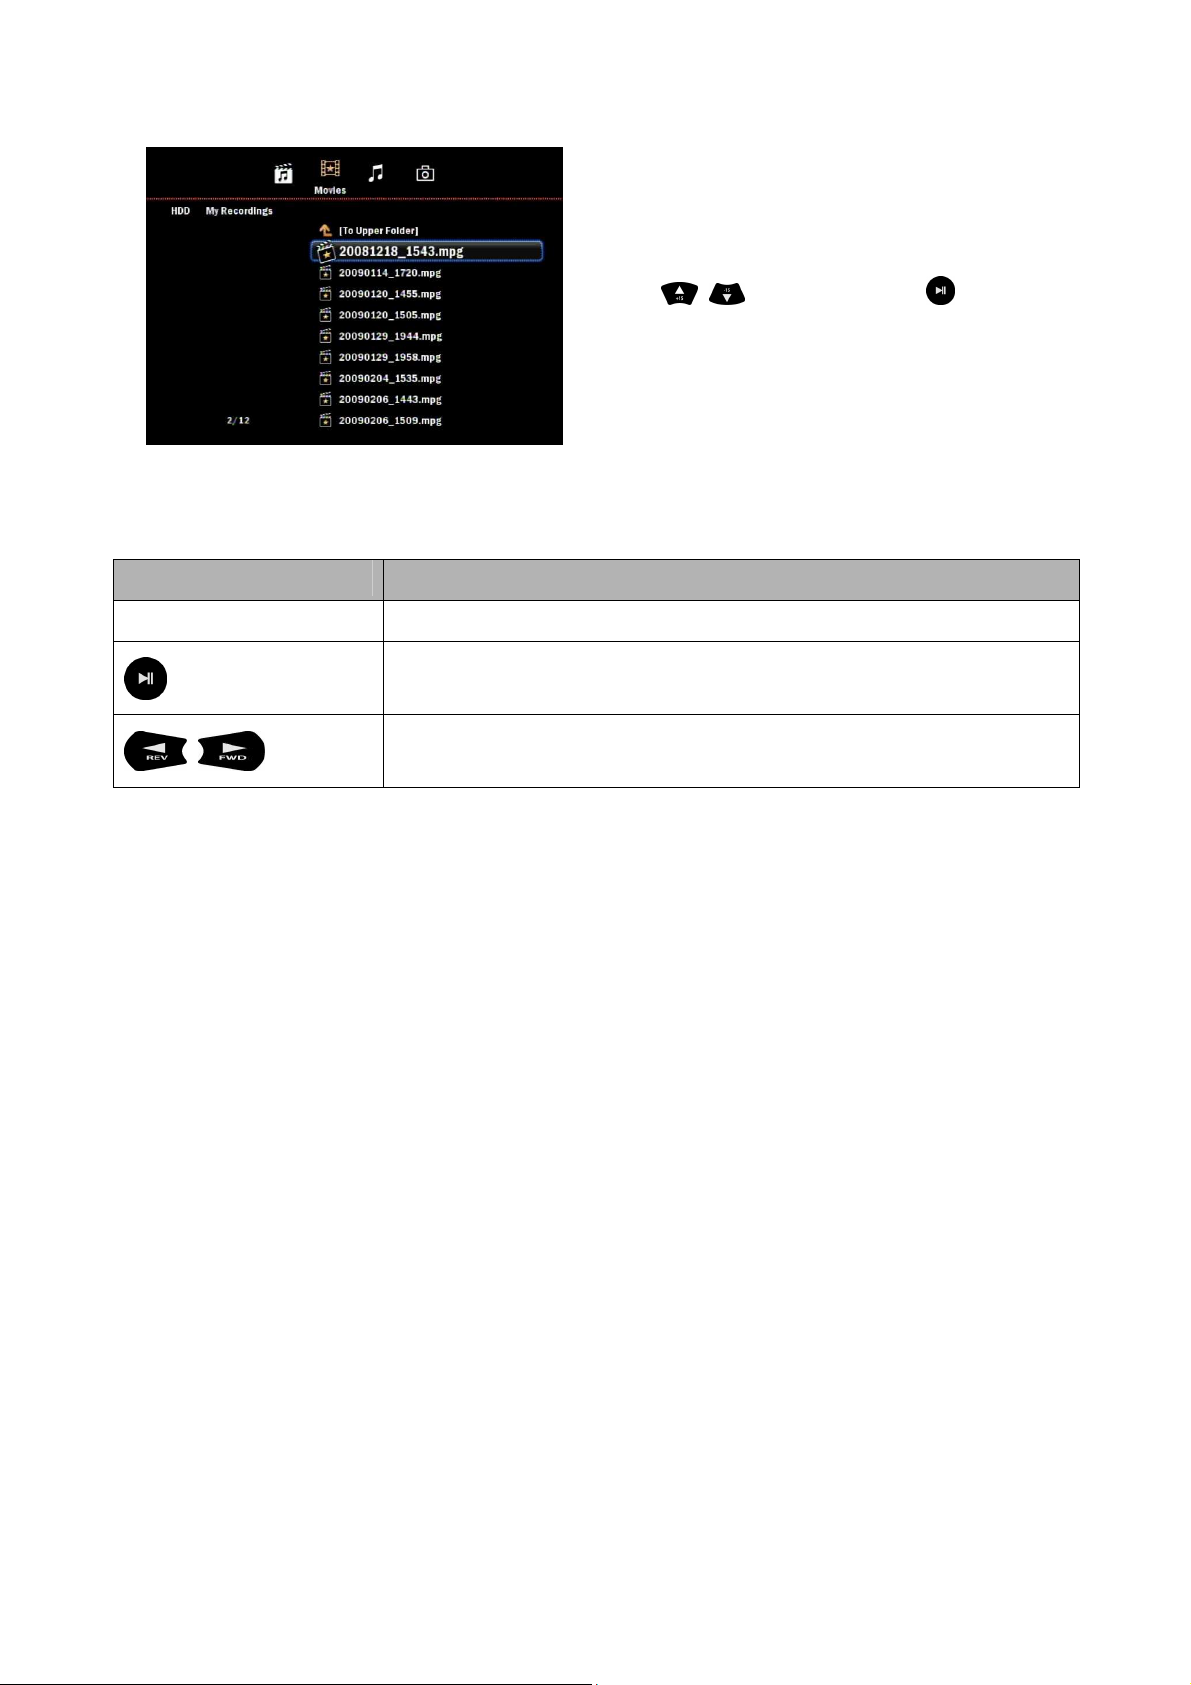
3.3 Movie Playback
-
13 -
1. Select Movies icon using SORT button on
RC.
2. Select the movie file you want to play
using
3. While playing a movie in full screen mode,
you can press to zoom out/in this movie.
Video Play Controls
Use these buttons on the remote control to control video playback.
Button Function
STOP Discontinues video playback
Pause or resume video playback
Using Video Repeat
Resume playback on the selected position(video scan)
Scan video (press repeatedly to select the scan speed)
and then press button.
Use this option to repeat the video currently playing
To set the video repeat mode :
1. During video playback, press SHUFFLE. The option appears on the top of the screen.
2. Press repeatedly until the repeat mode you want is displayed. Options include :
••••
OFF – The video file(series file) will be just repeated once.
••••
Repeat One – The current video is played repeatedly until you press STOP
••••
Repeat All – All the files in the current video folder are played in sequence, and
repeatedly, until you press STOP
3.4 Music Playback
 Loading...