

Page 1
smart
Living
Keyless Connected
Smart Door Lock Manual
Please read the intructions before fitting and using the
Keyless Connected Smart Door Lock.
The functions and design of this product can be changed
without prior notice for performance and quality improvements.
The smarter way to protect your home
•
YD-01-CON-UG REV2
Page 2
2
smart
Living
Hereby, ASSA ABLOY Ltd, School Street, WV13 3PW declares that the Keyless
Connected Smart Door Lock is in compliance with Directive 2014/53/EU.
The full text of the EU declaration of conformity is available at the following
internet address: www.yale.co.uk/declaration-of-conformity
Page 3
Contents
3
Safety Precautions 4
Product Features 5
Getting to Know Your Lock 6
Opening the Lock with a PIN Code/
Key Card/Tag or Remote Fob 7
Set/Change Master Code 8
Set a User Code 9
Delete a User Code 10
Set/Delete One Day Code 11
Adding a Key Card/Tag 12
Delete a Key Card/Tag 13
Register a Remote Fob 14
Delete Previously Paired Remote Fob 15
Change PIN and Remote Re-lock Time 16
Auto Re-lock On/Off 17
Volume Settings 18
Lock Modules 19
Connecting to a Home Automation System 20
Disconnecting from a Home Automation
System
Intrusion Alarm 22
Incorrect PIN Lockout 23
Emergency Power 24
Resetting the Lock 25
Specifications 26
Guarantee 27
User Code Log 28
User Key Card/ Tag Log 29
Remote Fob Log 30
Customer Service 31
Getting Started
Introduction
Smart Home
Security Features
Guarantee
User Log
21
Help
Specifications
Page 4
4
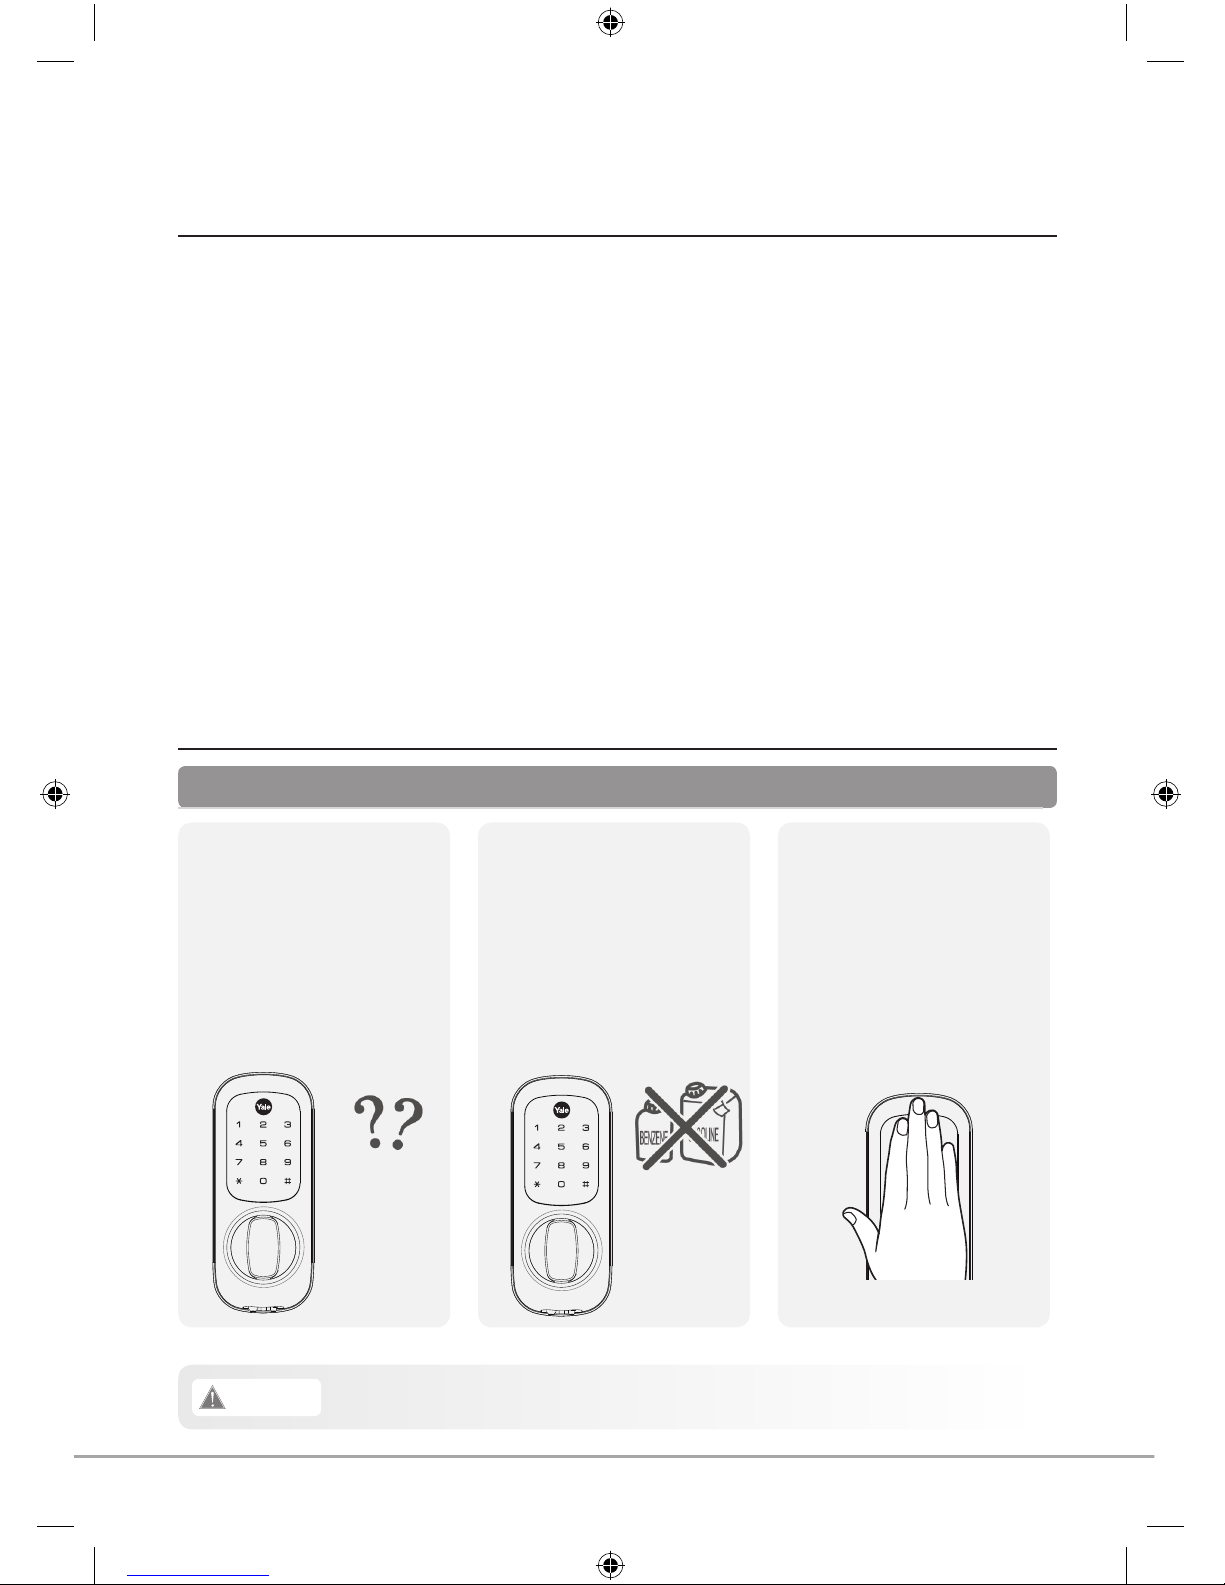
Make sure to follow the above instructions to avoid any injuries or damage to the product.
Caution
• To maintain the high quality
finish, clean regularly with
a soft damp cloth taking care
not to scratch the finish
• Do not use any chemicals
when cleaning as this may
affect your warranty
Safety Precautions
• Be careful not to let any
unauthorised user discover
your PIN code
• Please keep your PIN code
safe
• The Yale Keyless Connected
Smart Door Lock requires
you to place your palm on
the touch screen
• This is a safety feature so
finger prints showing the PIN
code are wiped
Please read this carefully
Introduction
Thank you for choosing the Yale Keyless Connected Smart Door Lock.
This new Smart Lock uses the latest technology to make your life easier.
This user manual enables you to operate the product safely and to its full potential.
Please ensure you read it completely before using the Yale Keyless Connected Smart Door
Lock.
Page 5
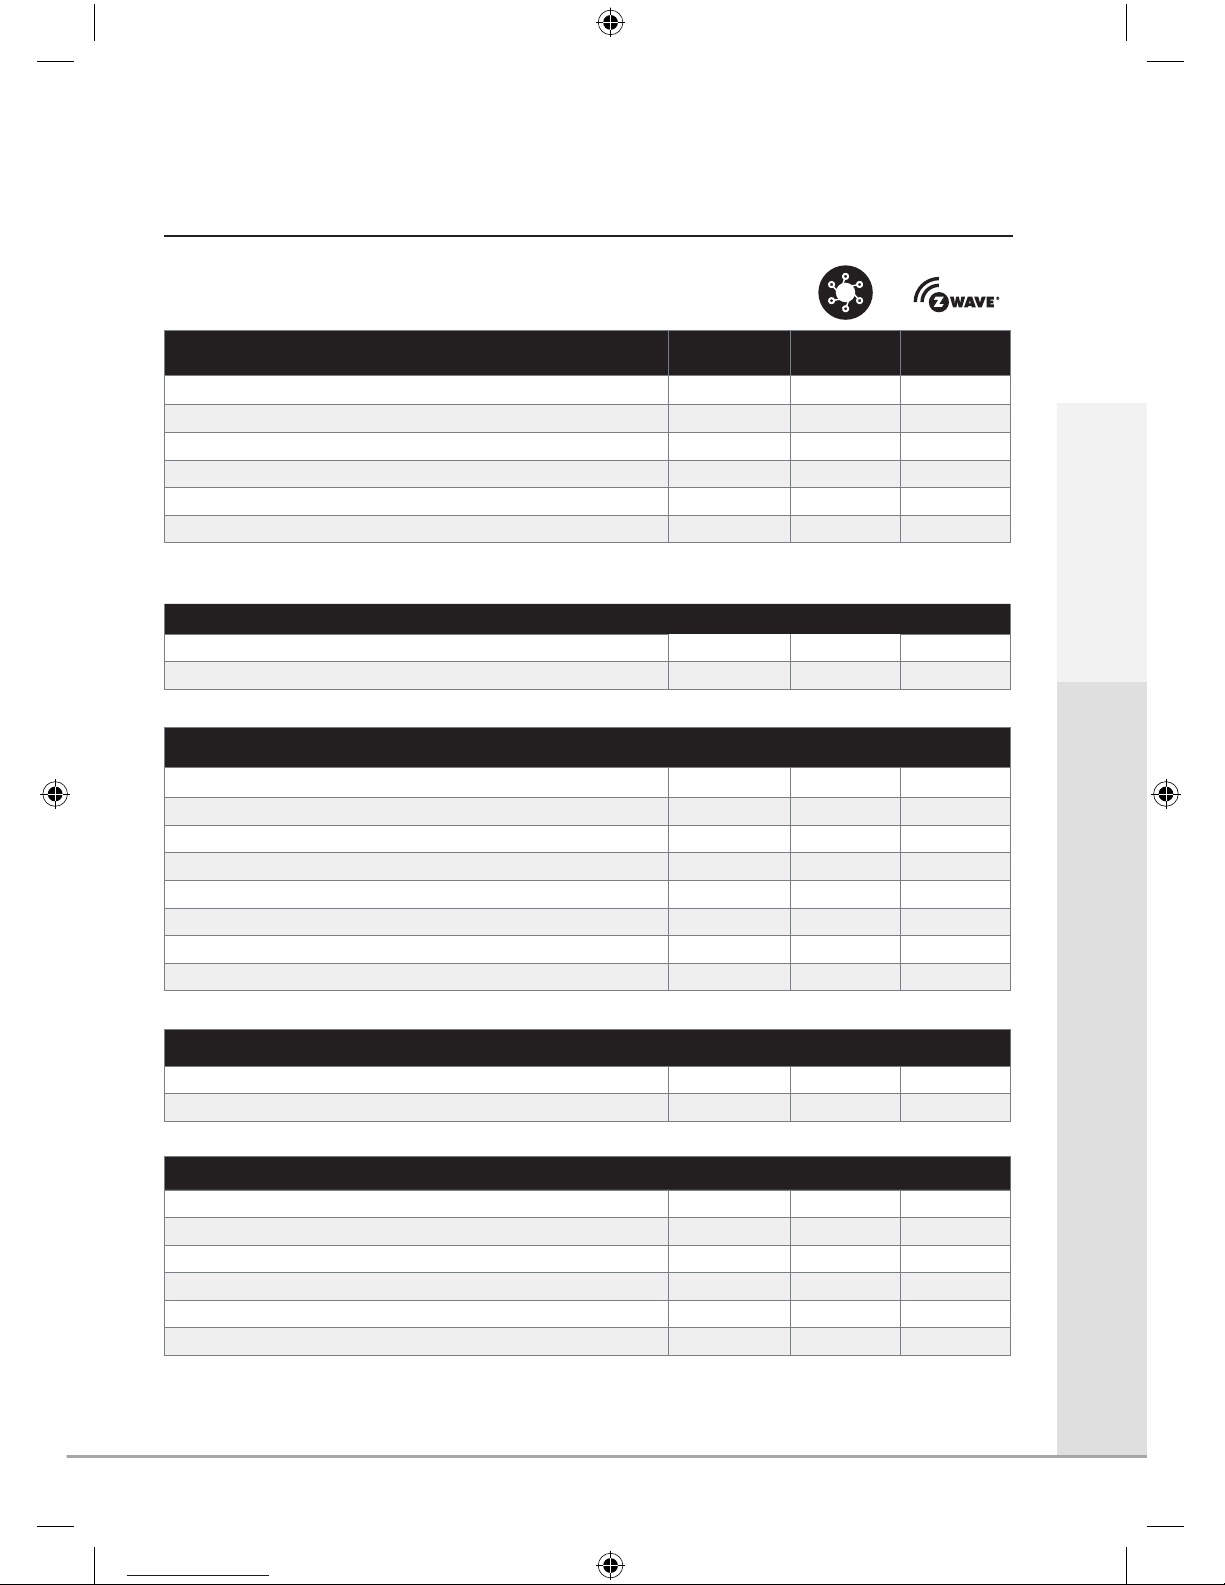
Product Features
5
How To Open The Lock
Connected
Ready
Yale
®
Module
Z-Wave
®
Module
4 - 10 digit PIN code
a a a
24 hour PIN code for visitors
a a a
Key Card (includes one Card)
a a a
Key Tag (includes one Tag)
a a a
Control with Yale® app (when linked to Yale
®
alarm or CCTV)
-
a
-
Open through third party app
- -
a
You can use a mix of up to 20 PIN codes, Key Tags, Key Cards and Remote Fobs plus app control (model dependant).
Security
3 minute lock out if code is entered incorrectly 5 times
a a a
Tamper alarm
a a a
Features
Replaces existing rim cylinder used on a 60mm backset nightlatch
a a a
Touchscreen with backlit Keypad
a a a
Battery operated
a a a
Low battery indicator with emergency battery connection
a a a
User codes and settings remain if batteries are replaced
a a a
Remotely add user user credentials
- -
a
User schedules
- -
a
Audit trails
- -
a
Connectivity
Connects to Yale® Alarm and CCTV range
-
a
-
Connects to Z-Wave® compatible smart home systems
- -
a
Optional Accessories
Remote Fob Module (includes one Fob)
a
- -
Additional Remote Fobs
a
- -
Yale® Module
a
-
a
Z-Wave® Module
a a
-
Key Card
a a a
Key Tag
a a a
Y
Introduction
Page 6

6
Getting to Know Your Lock
Front
(Front Body installed on the outside of the door)
7
7
Low Battery Indicator
Back
(Back Body, installed on the inside of the door)
Keypad (10-key)
Button
Thumbturn
Reset Button
Button
Emergency 9V power
supply terminal
Low Battery Indicator
7
Low Battery Indicator
Battery Pack Cover
Button
1.5V AA Alkaline Batteries
Fixing Plate
Cover Release Button: Press
Both Simultaneously to
Release
Remote Module Slot
R
Low Battery Indicator
R
R
7
7
Low Battery Indicator
9V Emergency Battery
(Not Included)
Page 7
7
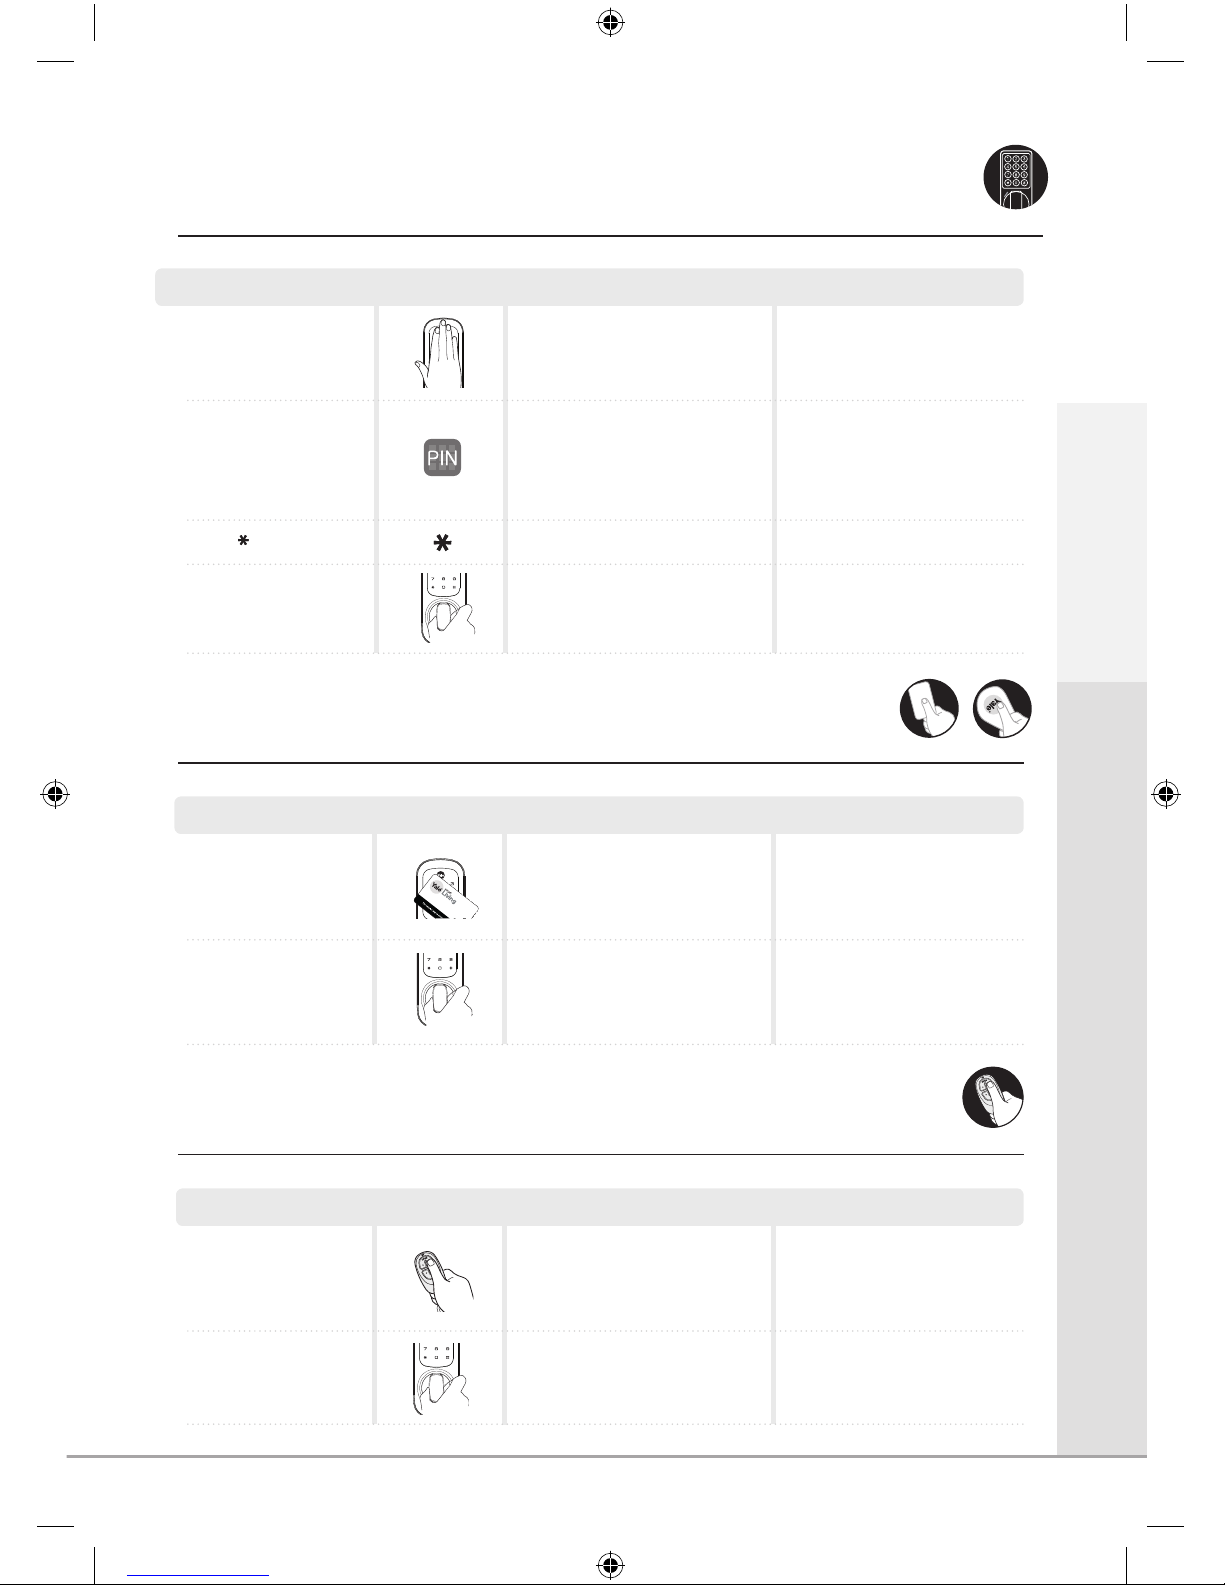
Opening the Lock with a PIN Code
Enter a valid user code
Default code is ‘123456’
Touch the keypad with
the palm of your hand
Touch the keypad to begin
Turn the thumbturn to
open the door
Step Icon Expected Feedback Description
3 tone ascending beep
Keypad will illuminate
followed by 2 tone beep
Opening the Lock with a Key Card/Tag
Turn the thumbturn to
open the door
Turn the Thumbturn to
open the door
Present a valid Key
Card or Tag to the lock
To add key cards and keytags
follow instructions on page 12.
3 tone ascending beep
Turn the thumbturn
to open the door
Turn the Thumbturn to
open the door
Press any button on a
registered Remote Fob
To add and remove fob
follow instrcutions on page 14.
3 tone ascending beep
Opening the Lock with a Remote Fob
Key Card
Key Tag
Remote fob
Press key
3 tone ascending beep
PIN Code
Getting Started
Step Icon Expected Feedback Description
Step Icon Expected Feedback Description
Page 8
8
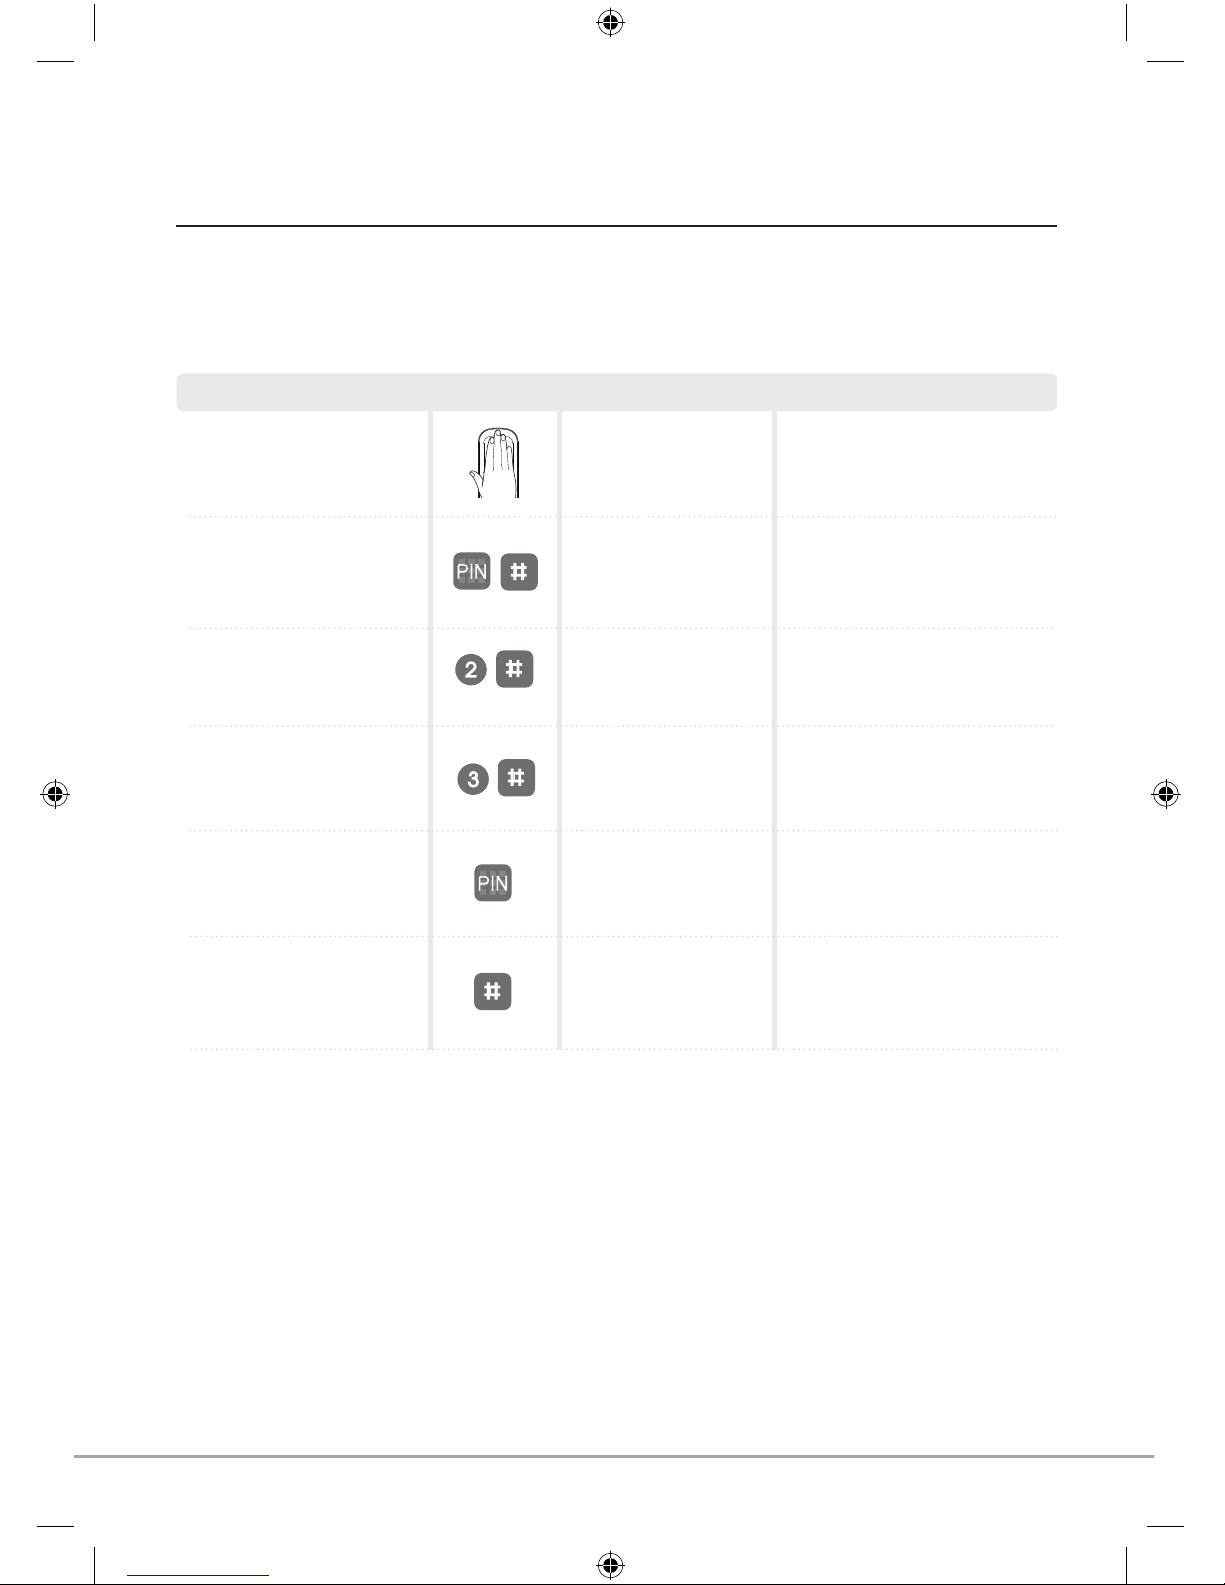
Set/Change Master Code
The master code is the main password to the lock. As well as allowing entry through the door, it is also used to
configure the lock including adding and removing users.
Registration
Keypad will illuminate
followed by 2 tone beep
2 tone beep after each
button pressed
3 tone ascending beep
followed by your new
code being illuminated
Touch the keypad to
begin
Touch the keypad with
the palm of your hand
Enter the master code,
followed by # key
Select the [1] button
followed by # key
Enter a new master code
Press # to complete
2 tone beep
If you are setting the code
for the first time the default
code is 123456
You are now in the lock’s
menu, choose option number
[1] to change the master code
The master code must be
6 digits
This completes the master
code setup
Step Icon Expected Feedback Description
Page 9
9
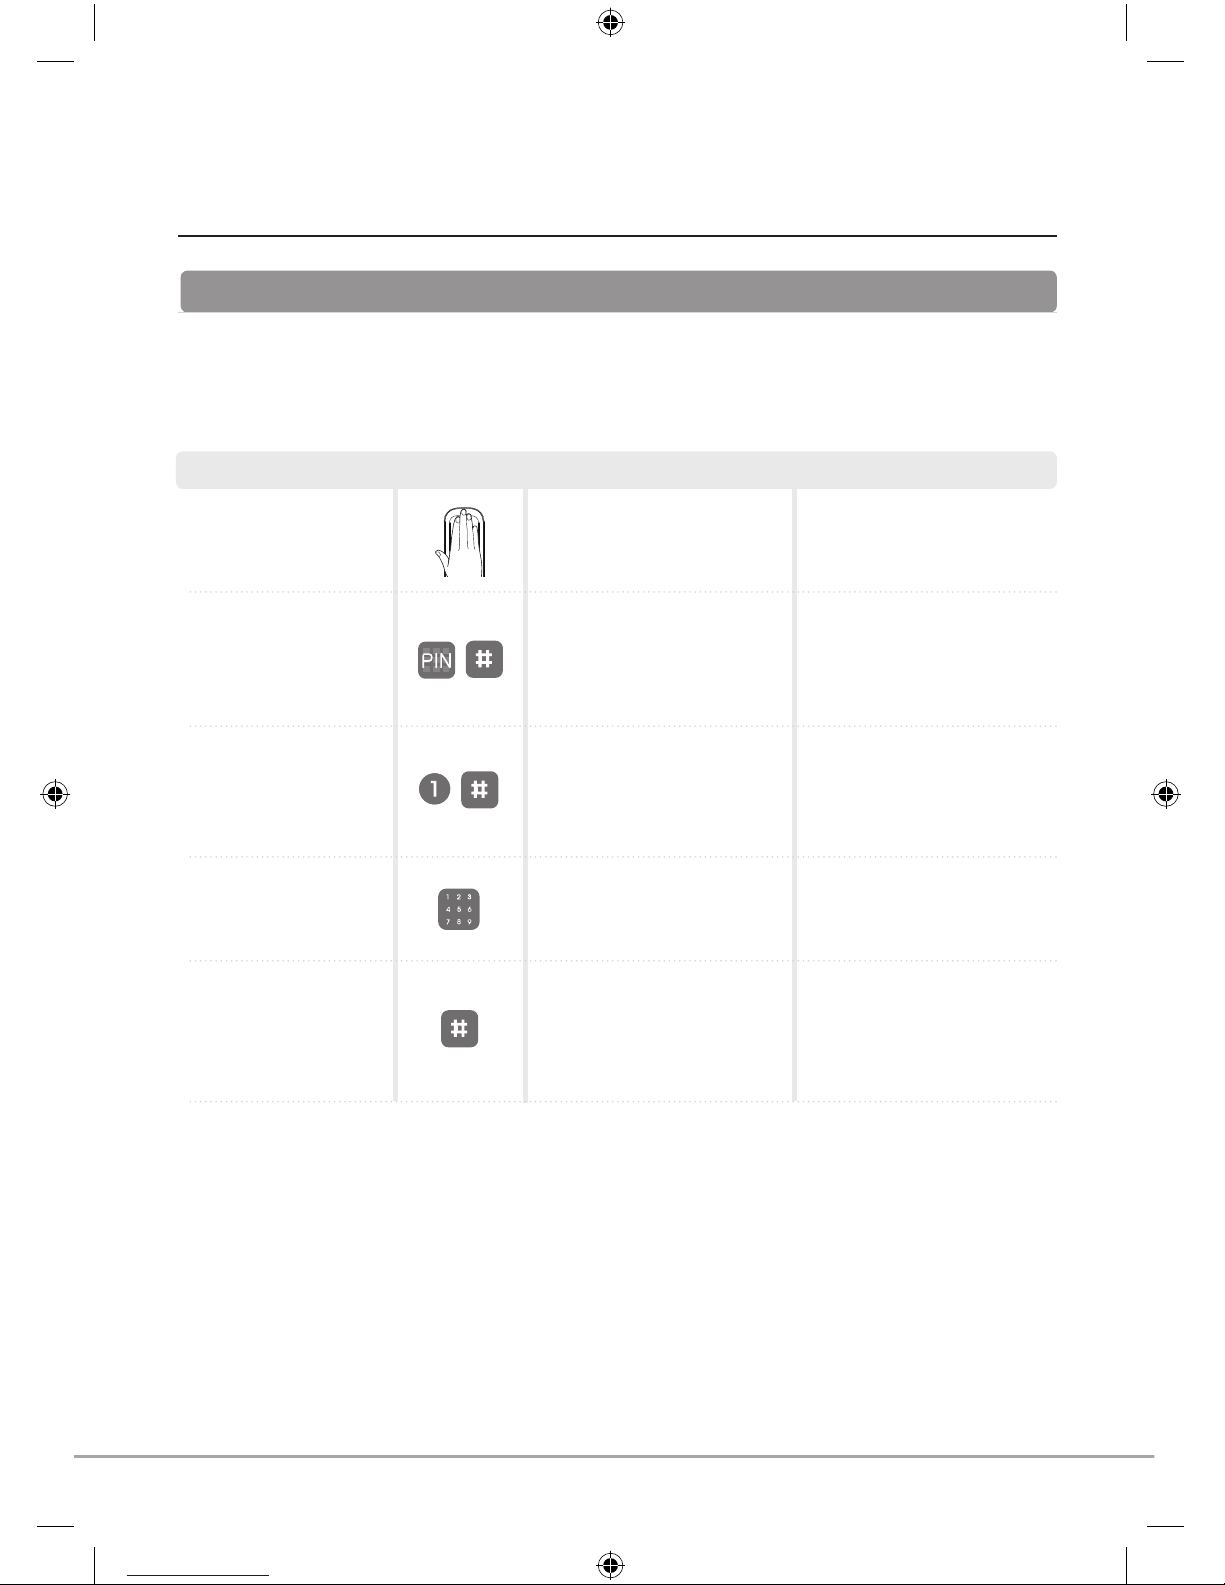
Set a User Code
Enter the master code,
followed by # key
You are now in the lock’s menu,
choose option number 2 to select
the user code setup
If you have forgotten the master code
please see the ‘Resetting the Lock’
section of the manual (Page 25)
Touch the keypad with
the palm of your hand
Touch the keypad to begin
Select the [2] button
followed by # key
Option number [1] adds or modifies
a user code
Press the [1] button
and then #
This is the number of the slot in
memory where the code will be
saved (1-20)
The lock can hold up to 20 unique user codes, each one has a slot in the locks memory from 1 to 20. If a new
code is written to a slot that already holds a code it will overwrite it. To save overwriting someone’s code it is
important to record who’s codes are stored in each slot. Please use the User Code Log section in the back of
the book to record this.
2 tone beep
2 tone beep after each
button pressed
Enter the slot number for
the user code followed by
# key
The user code can be between
4-10 digits
Enter the new user code
Keypad will illuminate
followed by 2 tone beep
2 tone beep after each
button pressed
3 tone ascending beep
2 tone beep
Getting Started
Step Icon Expected Feedback Description
The new user code will now be
added to the lock
Press the # button to
complete
3 tone ascending beep
followed by your new
code being illuminated
Page 10
10
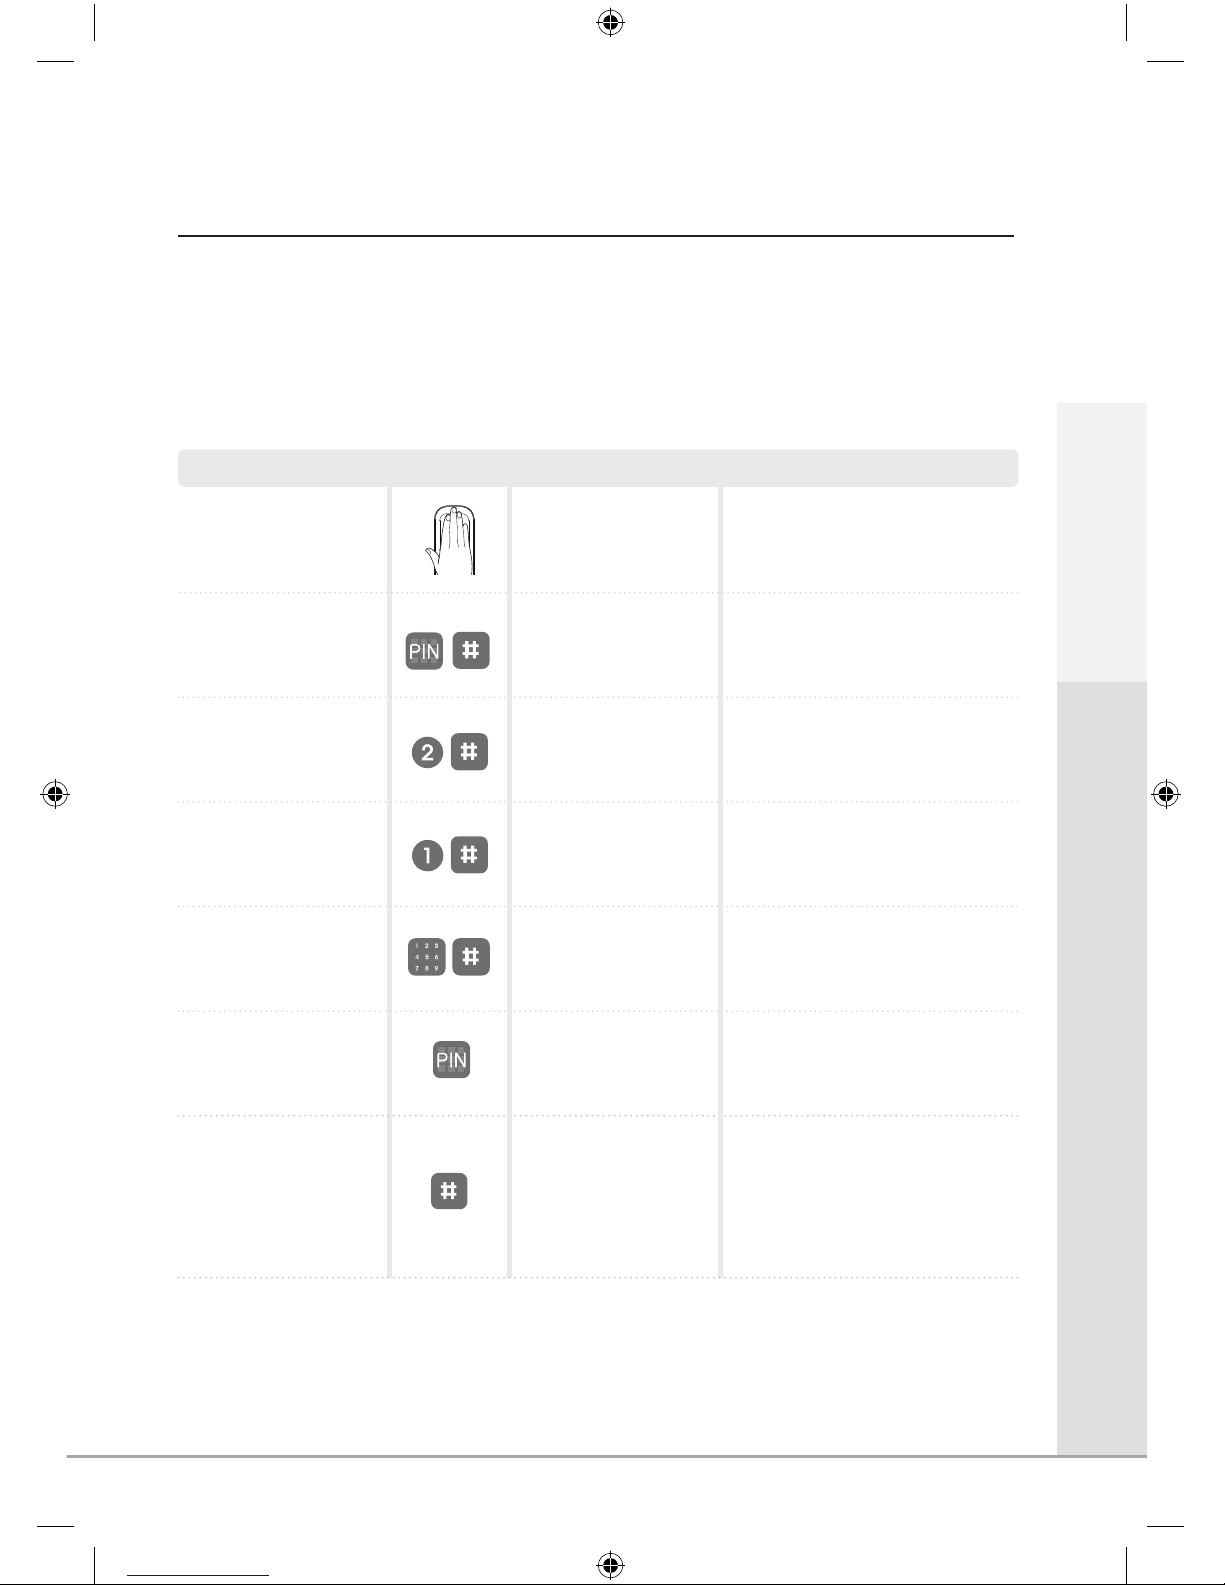
Delete a User Code
Enter the master code,
followed by # key
You are now in the lock’s menu,
choose option number [2] to
select the user code setup
If you have forgotten the master
code please see the resetting
the lock section of the manual
(Page 25)
Touch the keypad with the
palm of your hand
Touch the keypad to begin
Select the [2] button followed
by # key
Option number [3] deletes
a user code
Press the [3] button and
then #
This is the number of the slot in
memory where the code will be
saved (1-20)
To stop a user having access their code will need to be deleted. Before doing this you will first need to know which slot
in the locks memory their code is in. Please see the User Code Log at the back of the guide.
Step Icon Expected Feedback Description
2 tone beep
2 tone beep after each
button pressed
Enter the slot number for the
user code
2 tone beep after each
button pressed
3 tone ascending beep
Keypad will illuminate
followed by 2 tone beep
Press # to complete
3 tone ascending beep
The user code will now be
deleted from the lock
Page 11

Getting Started
11
Set a One Day Code
The one day code is a code that will automatically expire after 24 hours. This allows short term access to be
granted to someone.
Enter the master code,
followed by # key
You are now in the lock’s menu,
choose option number [5] to
enter the one day code settings
If you have forgotten the master
code please see the resetting
the lock section of the manual
(Page 25)
Touch the keypad with
the palm of your hand
Touch the keypad to begin
Select the [5] button
followed by # key
The user code must be 4 digits
Enter the new user code
The code will now be active for
24 hours
2 tone beep
2 tone beep after each
button pressed
Press # to complete
2 tone beep
3 tone ascending beep
followed by your new
code being illuminated
Keypad will illuminate
followed by 2 tone beep
Delete a One Day Code
A one day code can be deleted if it is no longer wanted. If not, it will automatically expire at the end of the 24 hour period.
Enter the master code,
followed by # key
You are now in the lock’s menu,
choose option number [5] to
enter the one day code settings
If you have forgotten the master
code please see the resetting
the lock section of the manual
(Page 25)
Touch the keypad with
the palm of your hand
Press any button on the
keypad to begin
Select the [5] button
followed by # key
Press the # to confirm code
deletion
Press # to complete
2 tone beep
2 tone beep after each
button pressed
3 tone ascending beep
Keypad will illuminate
followed by 2 tone beep
Step Icon Expected Feedback Description
Step Icon Expected Feedback Description
Page 12
12
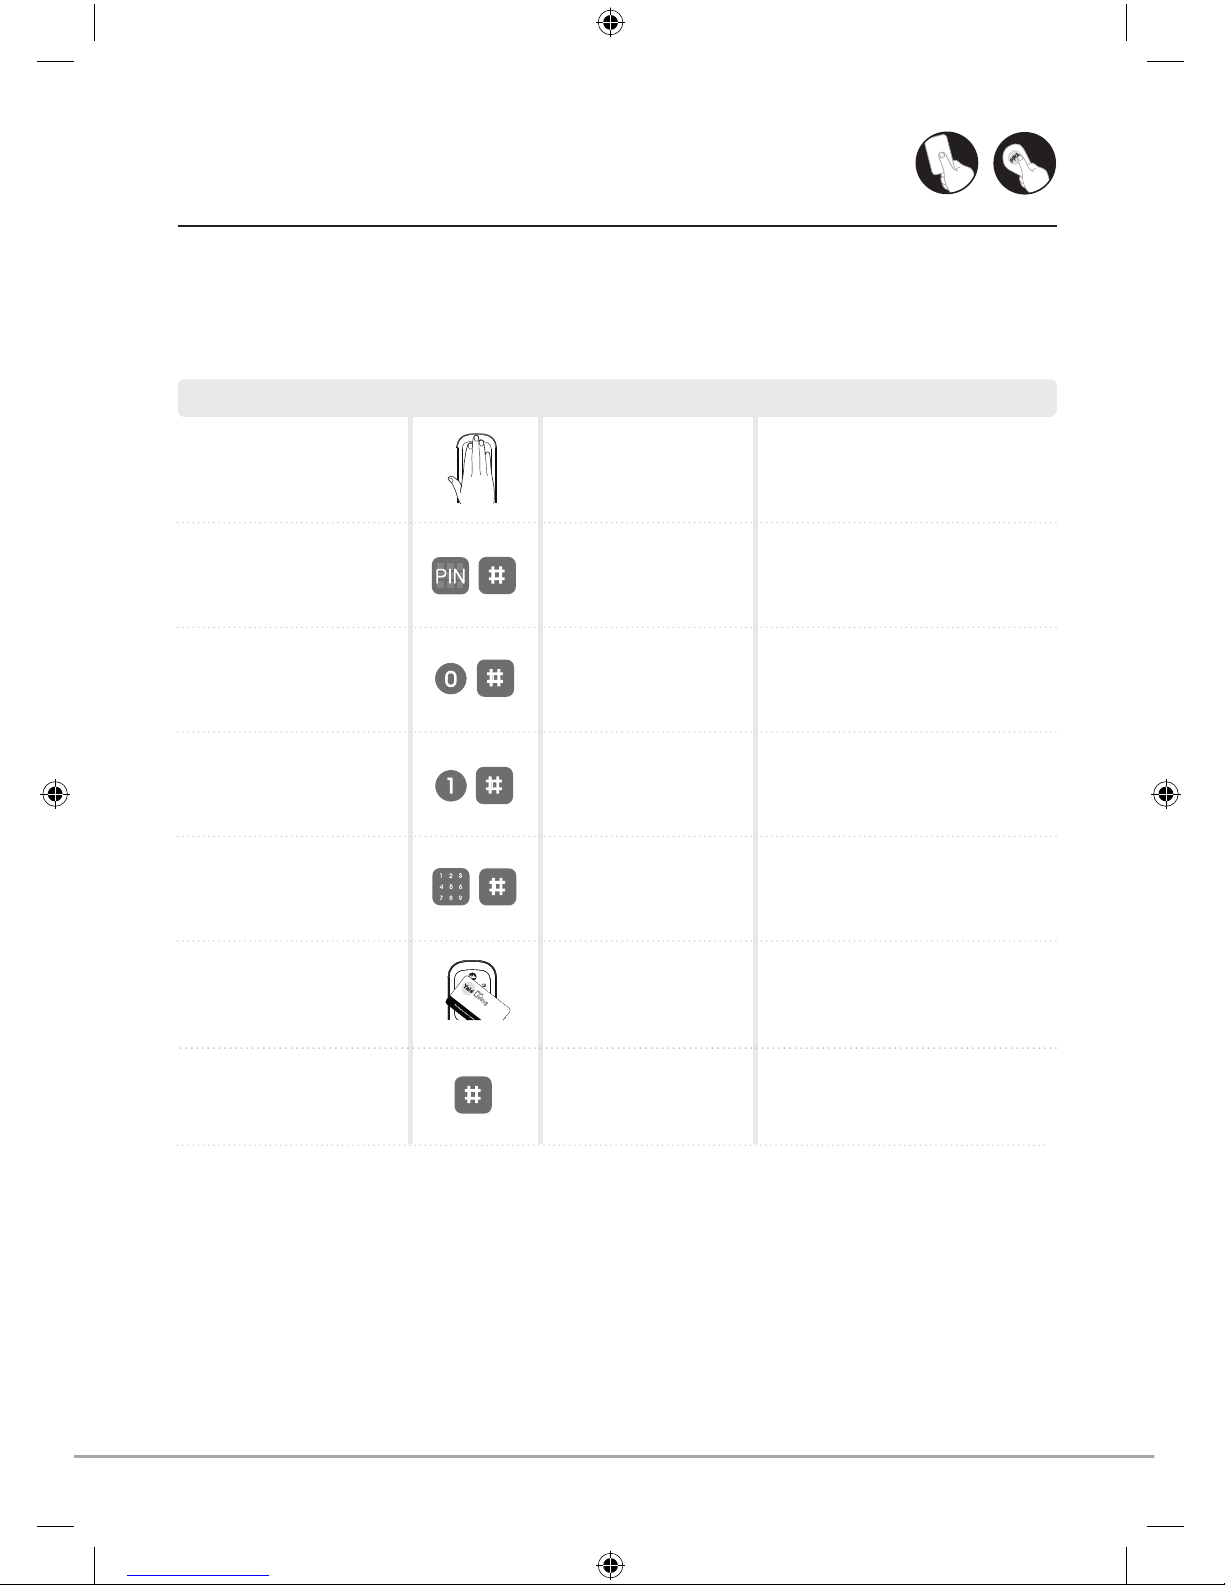
Adding a Key Card/Tag
The lock can hold up to 20 Key Cards/Tags, each one has a slot in the locks memory from 1 to 20. If you try to
add a Card or Tag to a slot that aready holds one it will sound an error beep. It will also sound an error beep if you try
to add a Card/Tag that has already been added. Because of this it is important to record which Cards/Tags are stored
in each slot. Please use the section in the back of the manual to record this.
You are now in the lock’s menu,
choose option number [0] to select
the Key Card/Tag menu
Touch the Keypad with
the palm of your hand
Touch the keypad to begin
Select the [0] button
followed by # key
This is the number of the slot in
memory where the Card/Tag will
be saved (1-20)
Enter the slot number for the
user code followed by # key
Hold an Key Card or Tag against
the Keypad until you hear the beep
2 tone beep after each
button pressed
Present the Key Card/
Tag to to lock
2 tone beep
Single tone beep
followed by slot
number illuminating
Enter the master code,
followed by # key
If you have forgotten the master code
please see the resetting the lock
section of the manual (Page 25)
2 tone beep
3 tone ascending beep
Press the [1] button and
then #
2 tone beep after each
button pressed
Option number [1] adds an Key
Card or Tag
Press # to complete
The Card or Tag is now added
and will unlock the door
Keypad will illuminate
followed by 2 tone beep
Key Card
Key Tag
Step Icon Expected Feedback Description
Page 13

Delete a Key Card/Tag
You are now in the lock’s menu,
choose option number [0] to
select the Key Card/Tag menu
Touch the keypad with
the palm of your hand
Touch the keypad to begin
Select the [0] button
followed by # key
This is the number of the slot
in memory where the code will
be saved (1-20)
Enter the slot number for the
user code followed by # key
Step Icon Expected Feedback Description
2 tone beep after each
button pressed
2 tone beep
Enter the master code,
followed by # key
If you have forgotten the master
code please see the resetting the
lock section of the manual
(Page 25)
2 tone beep
3 tone ascending beep
Press the [3] button and
then #
2 tone beep after each
button pressed
Option number 3 removes
an RFID Card or Tag
Press # to complete
The Card or Tag is now deleted
and will no longer unlock the door
Keypad will illuminate
followed by 2 tone beep
13
Key Card
Key Tag
To stop a user having access, their Key Card/Tag will need to be deleted. Before doing this you will first need
to know which slot in the locks memory their Key Card/Tag is in. Please see the user Key Card/Tag log at the
back of the guide.
Getting Started
Page 14

14
Register a Remote Keyfob
You are now in the lock’s menu,
option [3] contains the Remote Fob
settings
Touch the keypad with the
palm of your hand
Touch the keypad to begin
Select the [3] button
followed by # key
Press both button on the
Remote Fob as shown in
diagram (left)
Yale Remote Fobs allow you to open the lock at a distance of up to 15 metres. This requires both the Yale Remote
Fob and the corresponding black Remote Module to work. Up to 5 Remote Fobs can be registered on one lock, and
like the user codes they each have their unique slot in the lock memory. Adding a new Fob into a slot that already
contains a Fob will override it.
Step Icon Expected Feedback Description
2 tone beep after each
button pressed
Push both unlock buttons
on Remote Fob
Single beep
Enter the master code,
followed by # key
If you have forgotten the master
code please see the resetting the
lock section of the manual
(Page 25)
2 tone beep
3 tone ascending beep
Select the number of the slot in
memory where the Fob will be
saved (1-5)
Enter the slot number for
the Fob followed by #
2 tone beep
Select the [1] button followed
by # key
2 tone beep after each
button pressed
This puts the lock into
Remote Fob add mode
Press # to complete
The Fob will now unlock the lock
Keypad will illuminate
followed by 2 tone beep
Remote fob
Page 15

15
Delete Previously Paired Remote Fob
Enter the master code,
followed by # key
If you have forgotten the master
code please see the resetting
the lock section of the manual
(Page 25)
Touch the keypad with the
palm of your hand
Touch the keypad to begin
Select the number of the slot
in memory where the Fob is
saved (1-5)
Enter the slot number for
the Fob
If a Remote Fob is lost or stolen it can be removed from the lock so that it can no longer be used to open it.
Step Icon Expected Feedback Description
2 tone beep
2 tone beep, then 3 tone
ascending beep
You are now in the lock’s
menu, option [3] contains the
Remote Fob settings
Select the [3] button followed
by # key
2 tone beep after each
button pressed
This puts the lock into Remote
Fob delete mode
Press the [3] button followed
by # key
2 tone beep after each
button pressed
Keypad will illuminate
followed by 2 tone beep
3 tone ascending beep
Press # to complete
The Fob will now not unlock
the lock
Getting Started
Page 16
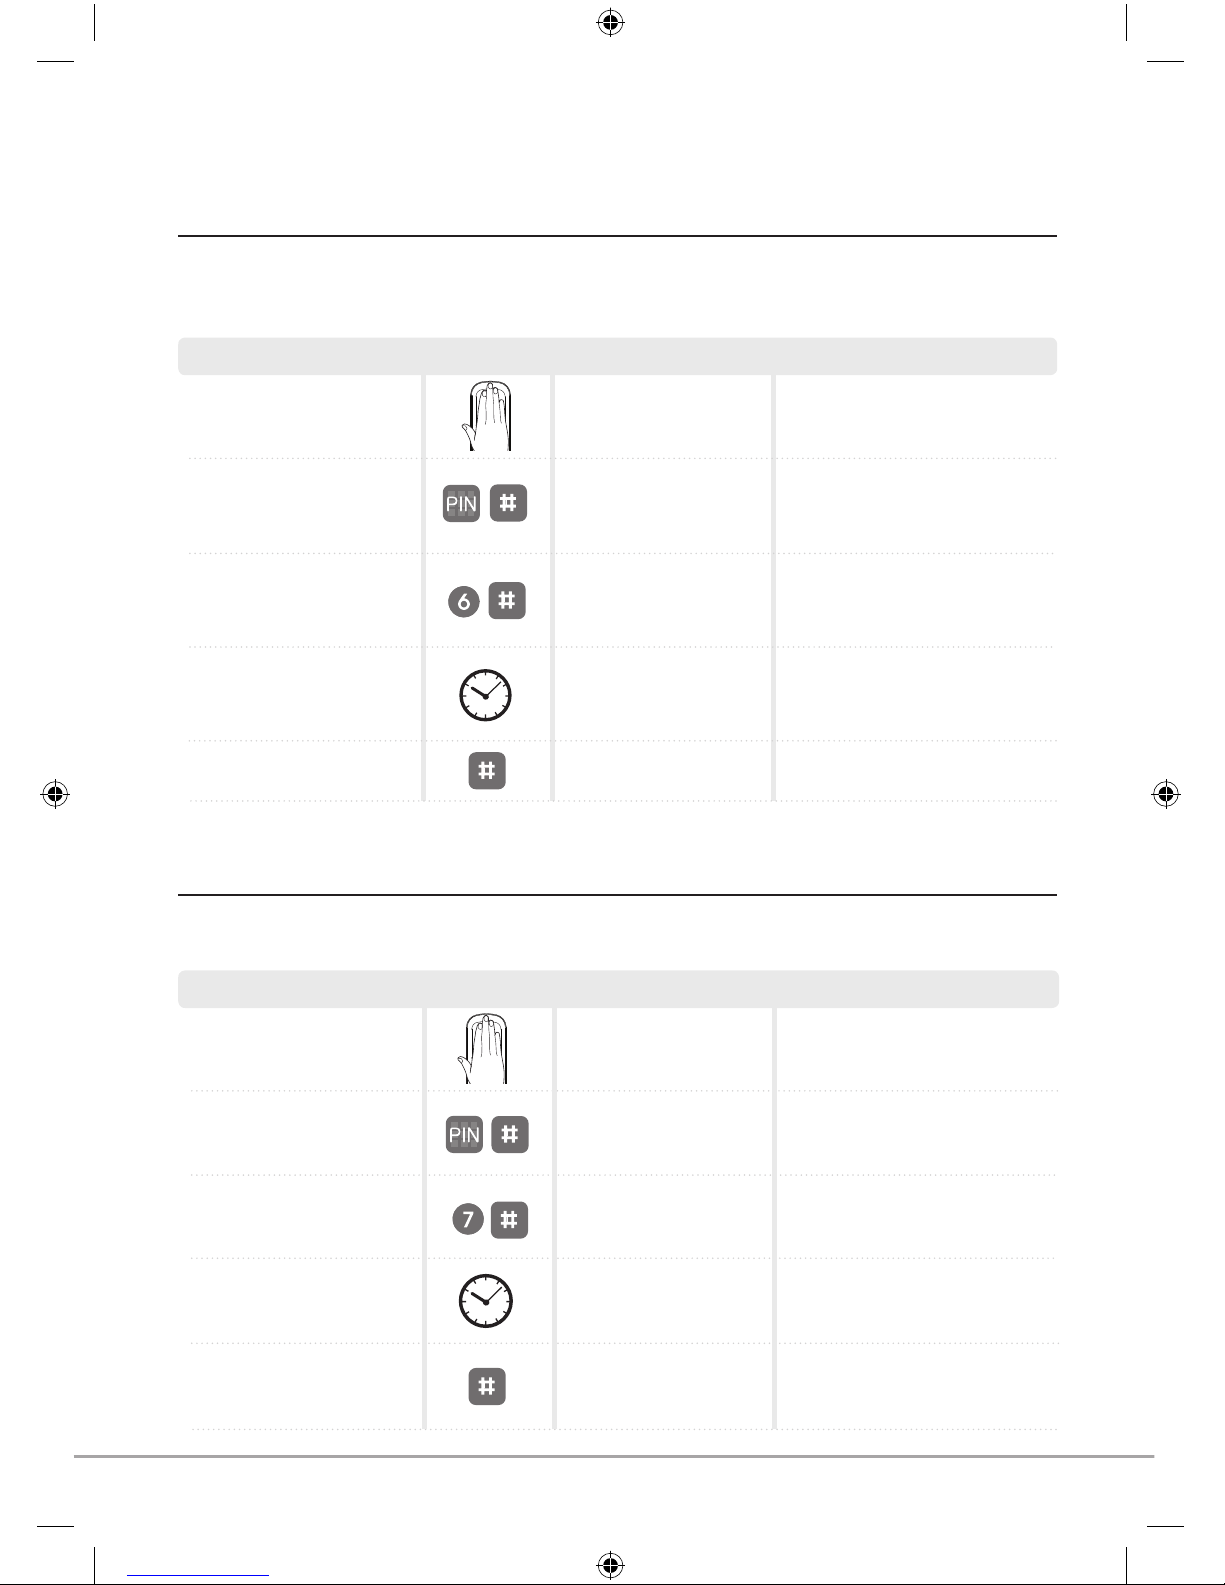
16
Change PIN Relock Time
Enter the master code,
followed by # key
You are now in the lock’s menu,
option [6] contains the PIN Relock
Time settings
If you have forgotten the master
code please see the resetting the
lock section of the manual (Page 25)
Touch the keypad with the
palm of your hand
Touch the keypad to begin
Select the [6] button
followed by # key
The relock time can be between
7 and 60 seconds. ie. 50 = 50
seconds
Input the relock time (7-60)
The relock time will now be set
The relock time is the amount of time it takes for the Keyless Connected Lock to relock after it has been unlocked
with a correct PIN, Card or Fob. The default is 7 seconds.
Step Icon Expected Feedback Description
2 tone beep
2 tone beep
Press # to complete
3 tone ascending beep
Enter the master code,
followed by # key
You are now in the lock’s menu,
option [7] contains the remote
relock settings
If you have forgotten the master
code please see the resetting the
lock section of the manual (Page 25)
Touch the keypad with the
palm of your hand
Press any button on the keypad
to begin
Select the [7] button
followed by # key
The relock time can be between
10 and 90 seconds. ie. 50 = 50
seconds
Input the relock time (10-90)
The relock time will now be set
The lock can be set to unlock for longer periods of time unlocked remotely by a Remote Fob or a home automation
system.
Step Icon Expected Feedback Description
Keypad will illuminate
followed by 2 tone beep
2 tone beep
Press # to complete
2 tone beep after each
button pressed
3 tone ascending beep
Keypad will illuminate
followed by 2 tone beep
Change Remote Relock Time
2 tone beep after each
button pressed
2 tone beep
Page 17
17
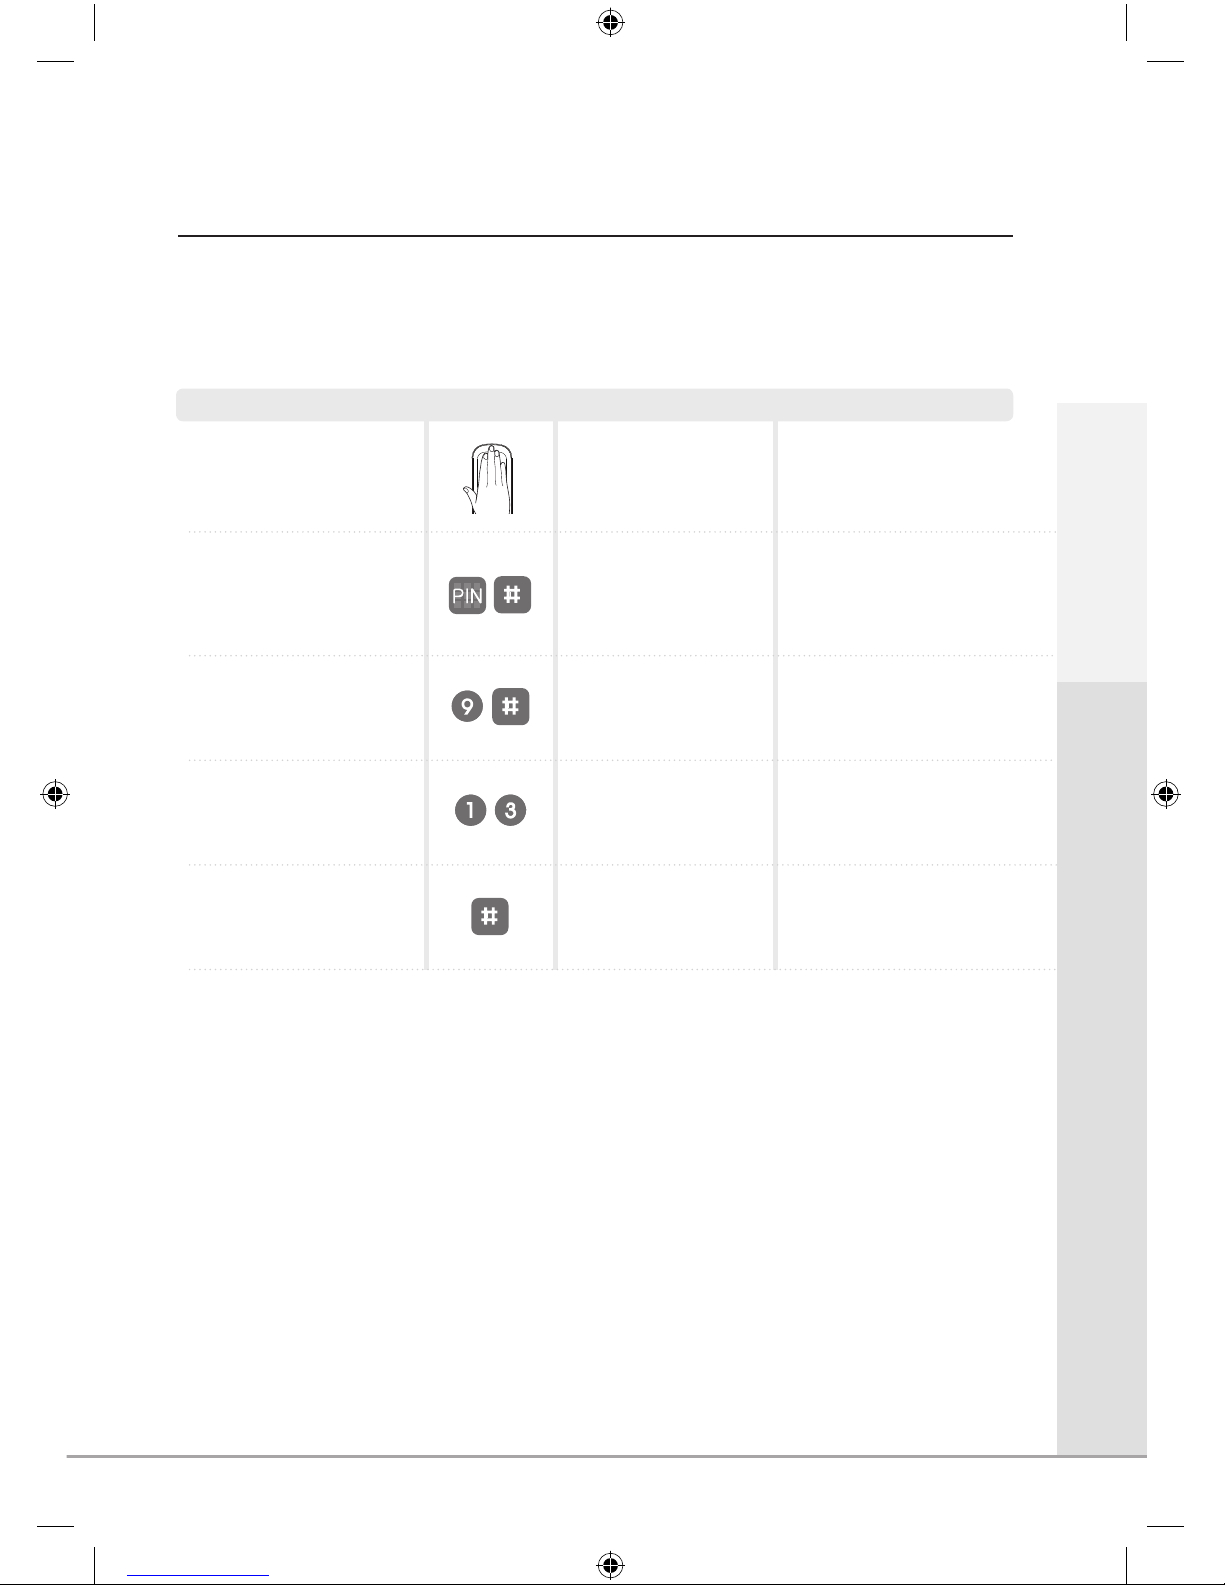
Auto Re-lock On/Off
Enter the master code,
followed by # key
If you have forgotten the
master code please see the
resetting the lock section
of the manual (Page 25)
Touch the keypad with the
palm of your hand
Touch the keypad to begin
Press # to complete
The lock can be toggled between two modes. With auto re-lock mode on the lock will automatically re-lock after
the configured time. With auto re-lock mode off the lock will not re-lock until you touch the Keypad with the palm
of your hand.
Step Icon Expected Feedback Description
2 tone beep
3 tone ascending beep
[9] contains auto relock
configuration settings
Select the [9] button followed
by # key
2 tone beep after each
button pressed
Select between the two
modes
Press [1] for auto re-lock on,
or [3] for auto re-lock off.
2 tone beep
Keypad will illuminate
followed by 2 tone beep
Getting Started
Page 18

18
Volume Settings
Enter the master code,
followed by # key
You are now in the lock’s menu,
option [8] contains the volume
mode settings
If you have forgotten the master
code please see the resetting
the lock section of the manual
(Page 25)
Touch the keypad with
the palm of your hand
Touch the keypad to begin
Select the [8] button
followed by # key
Select between the three modes
Press [1] to for silent mode,
[2] for quiet mode, or [3]
for loud mode
The lock can be switched between three volume modes. In silent mode only programming beeps will be heard.
In quiet mode the keypad beeps will be quieter, in loud mode they will be loud.
Step Icon Expected Feedback Description
2 tone beep
2 tone beep after each
button pressed
Press # to complete
2 tone beep
3 tone ascending beep
Keypad will illuminate
followed by 2 tone beep
Page 19

19
Lock Modules
The Yale Keyless Connected Smart Door Lock can have Z-Wave® and Yale modules added to
allow easy integration to smart home systems.
• Z-Wave® Module: Using the Z-Wave® module, the Keyless Connected Smart Door Lock can be
compatible with Z-Wave
®
technology, allowing connection to approved third party smart home
products such as Samsung SmartThings
• Yale Module: The Keyless Connected Smart Door Lock can be connected to the YaleEcoSystem and
CCTV range, allowing you to open your door using the Yale Alarm or CCTV app. For more information and
instructions on connecting to other Yale devices, please go to www.yale.co.uk/YaleEcoSystem
• Remote Fob Module: The Keyless Connected Lock can be opened using a Remote Fob
Please note: If you connect your Smart Door Lock to a smart home system detailed above you will not be able to use the Remote
Fob. For more information on the compatibility of the lock modules visit: www.yale.co.uk/smart-living
Smart Home
Remove a battery from
the lock
The module is situated in the top left corner above
the batteries. It can be unplugged by pulling it out
Remove any of the batteries to cut power to the lock
Remove inside cover
Press the two release buttons on the side of the battery
pack and remove cover
Remove the module
Step Icon Description
R
R
R
Inserting a Module
Remove a battery from
the lock
The module has 8 pins that are plugged into the small
black connector above the batteries on the top left of
the lock
Remove any of the batteries to cut power to the lock
Remove inside cover
Press the two release buttons on the side of the
battery pack and remove cover
Insert the module
R
R
R
Removing the module
Smart Home
Step Icon Description
Insert all batteries
Reinsert all batteries into the lock
Page 20

20
Connecting to a Home Automation System
Enter the master code,
followed by # key
You are now in the lock’s menu,
option [4] contains the home
automation settings
If you have forgotten the master
code please see the resetting
the lock section of the manual
(Page 25)
Touch the keypad with the
palm of your hand
Touch the keypad to begin
Press the [4] button
followed by # key
This will make the lock look for
a compatible system. If the lock
makes an error beep it may need
disconnecting first. Follow steps
on Page 21
Press the [1] button
followed by the # key
The lock will now be linked to the
home automation system
For more information on how to connect your smart door lock to a Yale system go to
www.yale.co.uk/YaleEcoSystem.
For other home automation systems please follow their instructions on adding a lock and when prompted follow the
instructions below.
Step Icon Expected Feedback Description
2 tone beep
2 tone beep after each
button pressed
Please wait up to 60 seconds
2 tone beep after each
button pressed
3 tone ascending beep
Smart Home
Keypad will illuminate
followed by 2 tone beep
Page 21

21
Disconnecting from a Home Automation System
For security reasons a lock will not connect to a new home automation system if it is linked to another. If you
have changed your home automation system please remove the device from the old system before adding it on
to the new one.
Enter the master code,
followed by # key
You are now in the lock’s
menu, option [4] contains the
home automation settings
If you have forgotten the
master code please see the
resetting the lock section of
the manual (Page 25)
Touch the keypad with the
palm of your hand
Touch the keypad to begin
Press the [4] button
followed by # key
The home automation
system may also need to
be in exclude mode in order
to disconnect
Press the [3] button
followed by the # key
Smart Home
2 tone beep
2 tone beep after each
button pressed
3 tone ascending beep
Keypad will illuminate
Touch the Keypad to begin
followed by 2 tone beep
Smart Home
Step Icon Expected Feedback Description
Page 22

22
Security Features
Damage Alarm:
If the handle is attacked an 80db alarm will sound.
Intrusion Alarm
Page 23

23
Security Features
Security Features
Method
For security, if the wrong PIN is entered 5 consecutive times the lock will lockout for 3 minutes.
This is indicated by the number [3] on the keypad flashing.
To Release Lockout
Incorrect PIN Lockout
1
2
Present valid Key Card or Fob
Press any button on the remote fob
Page 24

Emergency Power
If the batteries in the lock have completely failed emergency power can be provided by a 9V battery on the front
body.
To Supply Emergency Power
Expiry Period
The product uses four 1.5V (LR6) alkaline AA batteries. The batteries will last approximately 1 year based
on the lock being used 10 times a day. (Users are advised to use authentic alkaline batteries.)
Low Battery Alarm
You must replace all 4 batteries for the following cases:
* The Low Battery indicator on the front of the lock illuminates
* The Host connected system indicates a low battery in the lock
RISK OF EXPLOSION IF BATTERY IS REPLACED BY AN
INCORRECT TYPE. DISPOSE OF USED BATTERIES ACCORDING
TO THE WASTE BATTERIES REGULATIONS.
The battery life varies according to ambient temperature, humidity, frequency of use and the quality of the
battery. Do not use rechareable batteries. Only alkaline batteries are recommended.
Contact the 9V battery
Touch the Keypad with
the palm of your hand
Enter PIN code
Enter the registered PIN code in the Keypad
Press * key
Press button to unlock the Keyless Connected Lock
Place 9V battery onto the emergency power supply terminal
Emergency Power Supply for Discharged Batteries
24
Step Icon Description
Page 25

Security Features
25
Resetting the Lock
In the event of losing the master code to the lock, the lock will need to be reset back to factory default settings.
This will result in the master code being set to the factory default which is ‘123456’.
Remove a battery from inside
the lock. Then remove the
module
Continue holding these buttons until the ready sound is heard
Take out any battery to remove the power from the lock
Remove inside cover
Press the two release buttons to remove the
cover of the lock on the inside of the door
The lock will beep 12
times followed by a 3 tone
ascending beep
Step Icon Description
Wait for 10 seconds, a two
tone sound will be heard
Press and hold the [R] button.
Continue holding the button
and insert battery
R
R
R
The master code is now set to 123456 and all codes,
Cards/Tags and Fobs are deleted
Page 26

26
Parts Specifications
Remarks
Specifications
Operating Temperature
-15˚C - 55˚C (5-131˚ F)
Lasts appoximately 1 year
(when lock is used 10
times a day)
Operating Temperature
-15˚C - 55˚C (5-131˚ F)
64mm(W)x 153mm(H) x 51mm(D)
Zinc die-casting
68mm(W)x 120mm(H) x 21mm(D)
PC/ABS
Zinc die-casting
4EA 1.5V AA alkaline batteries
(Operating voltage 4.5~ 6V)
Front (Front Body)
Back (Main Body)
Lever
Battery
* Battery life may vary depending on temperature, moisture levels
frequency of use and the quality of the batteries.
Page 27
27
Guarantee
This product is guaranteed for consumers against faulty workmanship, materials and function for a period
of 2 years from the date of purchase providing the full installation and maintenance instructions are followed.
Please keep your proof of purchase safe, this must be submitted when making a claim under this guarantee.
Please note that it is a condition of this guarantee that your Yale product:
• Has been correctly installed and maintained in accordance with theYale installation and maintenance
instructions provided to you at the time of purchase
• Has not been modified or damaged in any way
• Has nor been subject to any unauthorised repairs
Yale installation and maintenance instructions provided to you at the time of purchase.Yale are responsible
under this guarantee for repairing the product or replacing the product as we deem necessary. If there is
fault with the product, please visit www.yale.co.uk/help, complete the webform to make a claim under this
guarantee.
Please do not carry out any repairs without our authority or by using an unauthorised expert. Any repairs or
other works carried out without our authorisation or by using an authorised expert will not be covered under
this guarantee.
This guarantee is non transferable and applies to products purchased in the United Kingdom only. This
guarantee does not apply to normal wear and tear. This does not affect your statutory rights. A full copy
of this guarantee is available upon request by writing to Yale UK, School Street, Willenhall, West Midlands.
WV13 3PW or by visiting our website www.yale.co.uk.
2 Year Guarantee
Statement
www.yale.co.uk/RegisterYourProduct
Register Your Guarantee Online
Page 28

User Code Log
Slot Number Name
Pin Code
(Optional)
1
2
3
5
6
7
8
9
10
11
12
13
14
15
16
17
18
19
20
28
Page 29

29
User Key Card/Tag Log
Slot Number Name
1
2
3
5
6
7
8
9
10
11
12
13
14
15
16
17
18
19
20
Page 30

30
Remote Fob Log
Slot Number Name
1
2
3
4
5
Page 31

31
Customer Service
At Yale, we know the importance of providing security products that are easy
to install and use.
However, should you have any questions or experience a problem with your
purchase, please visit the help section on our website:
www.yale.co.uk/help
Page 32

YaleUK YaleSecurity YaleSecurityUK
The smarter way to protect your home
•
smart
Living
Customer Services:
Yale UK
School Street
Willenhall
WV13 3PW
 Loading...