

Page 1
t
g
y
d
b
OPERATION, SERVICE & PARTS MANUAL
Before installing hoist, fill in the
information below. Refer to the Hois
and Motor data plates.
Model No. __________________
Serial No. __________________
Purchase Date __________________
Voltage __________________
Rated Load __________________
GLOBAL KING
TM
WIRE ROPE HOISTS
RATED THRU 10 METRIC TONNE
Follow all instructions and warnings
for inspectin
operating this hoist. The use of an
hoist presents some risk of personal
injury or property damage. That risk is
greatly increased if proper instructions
and warnings are not followed. Before
using this hoist, each operator shoul
ecome thoroughly familiar with all
warnings, instructions, and recommendations in this manual. Retain this
manual for future reference and use.
Forward this manual to operator.
Failure to operate equipment as
directed in manual may cause
injury.
, maintaining, and
®
LIFT-TECH INTERNATI ONAL, Di vision of
®
COLUMBUS McKI NNON CORPORATI ON
MUSKEGON, MI 49443-0769
JANUARY, 2002 COPYRIGHT 2001, LIFT-TECH INTERNATIONAL, INC. PARTNO. 11353395D
PRINTED IN U.S.A.
Page 2

FORWARD
This book contains important information to help you install, operate, maintain and service your
new Yale electric hoist. We recommend that you study its contents thoroughly before putting the
hoist into use. Read HST 4M performance standard and ANSI B30.16 safety standard for hoists.
Then, through proper installation, application of correct operating procedures, and by practicing
the recommended maintenance suggestions you can expect maximum lifting service from the
hoist.
It will likely be a long time before parts information found in Section IX is needed. Therefore, after
the hoist is installed and you have completely familiarized yourself with operation and
preventative maintenance procedures, we suggest that this book be carefully filed for future
reference.
When ordering replacement parts from this book, it will be necessary that you include with your
order: the Hoist Serial Number and Model Number that are found on the nameplate attached to
the motor end of hoist (Figure 4-1). For your convenience, a space has been provided on the
front cover of this Manual for entering this information. We recommend that you fill it out
immediately so it is readily at hand when needed.
The contents of this manual are of necessity, general in nature and may cover features not
incorporated on your hoist; or, you may have ordered features not covered by this manual.
Therefore, the user must exercise care in applying instructions given in this manual. If specific
information not in this manual is required, contact the factory.
THE INFORMATION CONTAINED IN THIS BOOK IS FOR INFORMATIONAL PURPOSES
ONLY AND LIFT-TECH DOES NOT WARRANT OR OTHERWISE GUARANTEE (IMPLIEDLY
OR EXPRESSLY) ANYTHING OTHER THAN THE COMPONENTS THAT LIFT-TECH
MANUFACTURERS AND ASSUMES NO LEGAL RESPONSIBILITY (INCLUDING, BUT NOT
LIMITED TO, CONSEQUENTIAL DAMAGES) FOR INFORMATION CONTAINED IN THIS
MANUAL.
No part of this document may be reproduced in any form, in an electronic retrieval system or
otherwise, without prior written permission of the publisher.
NOTICE: Information contained in this book is subject to change without notice.
2
Page 3

NOTICE: Information contained in this book is subject to change without notice.
INDEX
SECTION I GENERAL DESCRIPTION PAGE
Paragraph 1-1 General ………………………………………………………………………………………………. 4
Paragraph 1-2 Basic Construction …………………………………………………………………………………. 4
SECTION II INSTALLATION
Paragraph 2-1 General ………………………………………………………………………………………………. 4
Paragraph 2-2 Suspending Hoist …………………………………………………………………………………… 4
Paragraph 2-3 Connecting Hoist to Electrical Service …………………………………………………………… 5
Paragraph 2-4 Pre-Operation Checks ……………………………………………………………………………… 5
.
SECTION III OPERATION
Paragraph 3-1 General ………………………………………………………………………………………………. 6
Paragraph 3-2 Push Button Operation ……………………………………………………….……………………. 6
Paragraph 3-3 Operating Precautions ……………………………………………………………………………… 7
SECTION IV LUBRICATION
Paragraph 4-1 General ……………………………………………………………………………………………… 8
Paragraph 4-2 Changing Gearcase Oil …………………………………………………………………………… 8
Paragraph 4-3 Lubrication of Hoist Cable ……………………………………………………………………… 9
Paragraph 4-4 Lubrication of Geared Limit Switch ……………………………………………………………… 9
Paragraph 4-5 Lubrication of Geared Trolley Wheel ……………………………………………………………. 9
Paragraph 4-6 Lubrication of Rope Guide ……………………………………………………………………… 9
Paragraph 4-7 Lubricant Specifications …………………………………………………………………………… 10
SECTION V INSPECTION AND PREVENTATIVE MAINTENANCE
Paragraph 5-1 General ……………………………………………………………………………………………… 11
Paragraph 5-2 Inspection of Lower Block ………………………………………………………………………… 14
Paragraph 5-3 Inspection of Upper Block …………………………………………………………………………. 14
Paragraph 5-4 Inspection of Electrical Controls ………………………………………………………………… 14
Paragraph 5-5 Inspection of Rope Guide …………………………………………………………………………. 15
Paragraph 5-6 Rope Inspection, Replacement & Maintenance ………………………………………………… 15
Paragraph 5-7 Rope Reeving ………………………………………………………………………………………. 16
Paragraph 5-8 Inspection of Rope Drum & Shaft ………………………………………………………………… 18
Paragraph 5-9 Inspection of Hoist Gearing ……………………………………………………………………… 18
Paragraph 5-10 Inspection of Motor Brake and Actuating Mechanism ………………………………………… 20
Paragraph 5-11 Inspection of Traverse Drive …………………………………………………………………….. 22
Paragraph 5-12 Inspection of Block Operated Limit Switch …………………………………………………….. 22
Paragraph 5-13 Testing Hoist ……………………………………………………………………………………… 23
SECTION VI TROUBLESHOOTING CHART …………………………………………………………………………. 24
SECTION VII ADJUSTMENTS
Paragraph 7-1 Motor Brake Adjustment …………………………………………………………………………… 25
Paragraph 7-2 Block Operated Limit Switch Adjustment ………………………………………………………… 25
Paragraph 7-3 Geared Rotary Limit Switch Adjustment ………………………………………………………… 25
Paragraph 7-4 Shortening of Push Button Cable ………………………………………………………………… 26
SECTION VIII WIRING DIAGRAMS ……………………………………………………………………………………. 26
SECTION IX PARTS LIST
Paragraph 9-1 General ……………………………………………………………………………………………… 29
Paragraph 9-2 List of Parts Illustrations. …………………………………………………………………………. 29
No part of this document may be reproduced in any form, in an electronic retrieval system or otherwise, without
prior written permission of the publisher.
3
Page 4
SECTION I – GENERAL DESCRIPTION
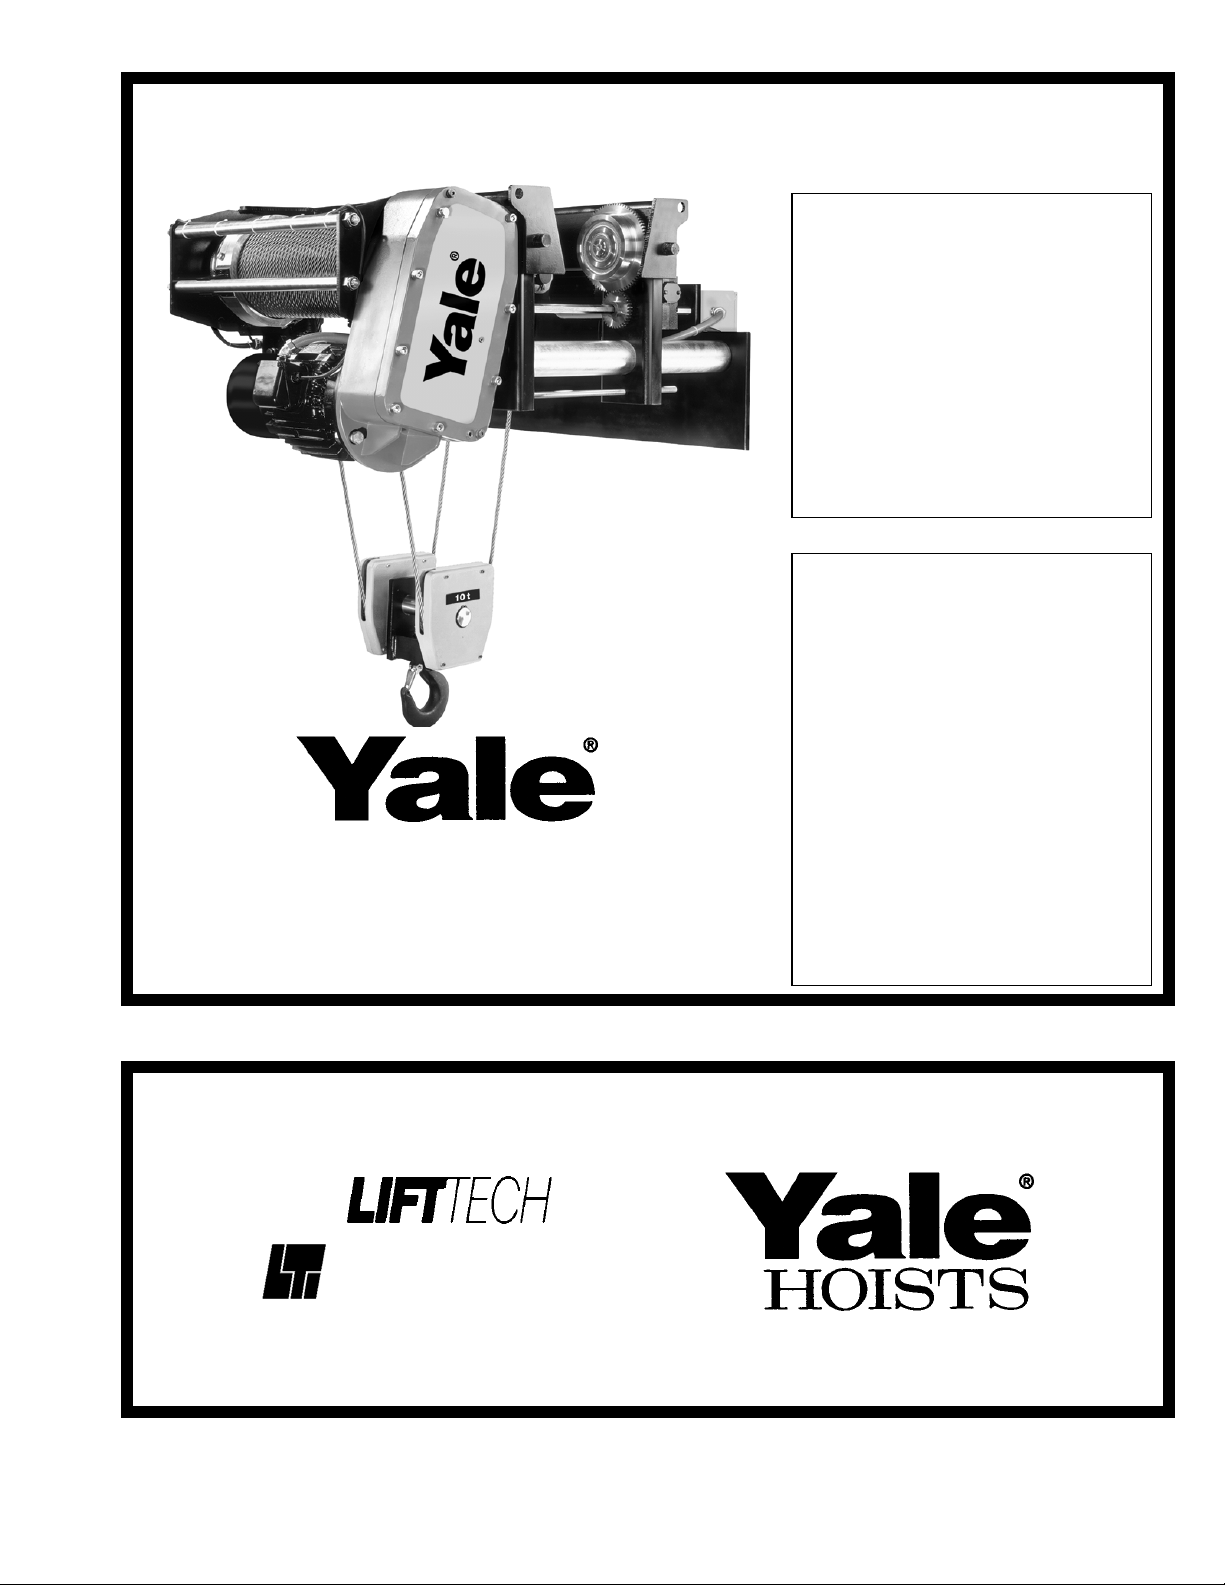
1-1. GENERAL. Yale “Global King” electric hoists
are wire rope and drum type hoists that are
manufactured with an integral trolley. These hoists
are all low headroom models with the drum and
upper block (or dead-end anchor depending on the
reeving type) on opposite sides of the beam
suspending the trolley. There are two basic frame
sizes each with two standard lifts: the “B” Frame
handles capacities up to 5 tonne; and the “C” Frame
handles capacities up to 10 tonne. The “B” Frame
has an integral trolley with two different flange width
ranges available: 4-5/8” through 14” or 14-1/8”
through 20” wide with a maximum flange thickness
of 1-3/4”. The “C” Frame integral trolley has a flange
range of 4 5/8” through 20” with a maximum flange
thickness of 2”. The hoist motor is 2-speed with a 6:1
ratio between high and low speeds as standard. The
Motor Driven trolley has two available speeds with 1speed, 2-speed, or Variable Frequency control.
Throughout this manual you will see references to
the “B” or “C” frame hoists. If you are unsure about
which frame size you have, see Section IV,
Paragraph 4-2 for a simple gearcase measurement
to easily determine the size of your hoist.
1-2. BASIC CONSTRUCTION. Yale “Global King”
hoists consist of a rugged steel frame which houses
a lifting drum and serves as the suspension for
carrying the entire hoist load. An aluminum
gearcase, attached to one end of the drum frame,
houses a triple-reduction gear train. The first two
reductions are helical with the third being spur.
Attached to the gearcase is a 2-speed hoisting
motor with a 6:1 ratio between the high and low
speeds. A 200% torque DC motor brake is attached
to the motor. A single NEMA 4/12 control enclosure
contains both the hoist and trolley electrical system
controls. Hoisting cable and a covered lower block
assembly are used for lifting loads. A rotary geared
limit switch is used to limit travel both up and down.
A secondary block operated limit switch is used to
limit the travel of the lower block when raising. A
push button control station (purchased separately)
for operating the hoist is suspended on a wire strain
cable attached to the hoist.
SECTION II – INSTALLATION
WARNING
Only qualified personnel properly
supervised shall mount the hoist and
trolley on the monorail and perform final
pre-operation inspection.
2-1. GENERAL. Yale “Global King” electric hoists
are lubricated and tested before being shipped from
the factory. To place a hoist in service, adjust
appropriately for the beam flange width (Paragraph
2-2), connect to electrical service (Paragraph 2-3)
and perform pre-operation tests and checks
(Paragraph 2-4).
WARNING
Working in or near exposed energized
electrical equipment presents the danger
of electric shock.
TO AVOID INJURY:
DISCONNECT POWER AND IMPLEMENT
LOCKOUT/TAGOUT PROCEDURE BEFORE
REMOVING COVER OR SERVICING THIS
EQUIPMENT.
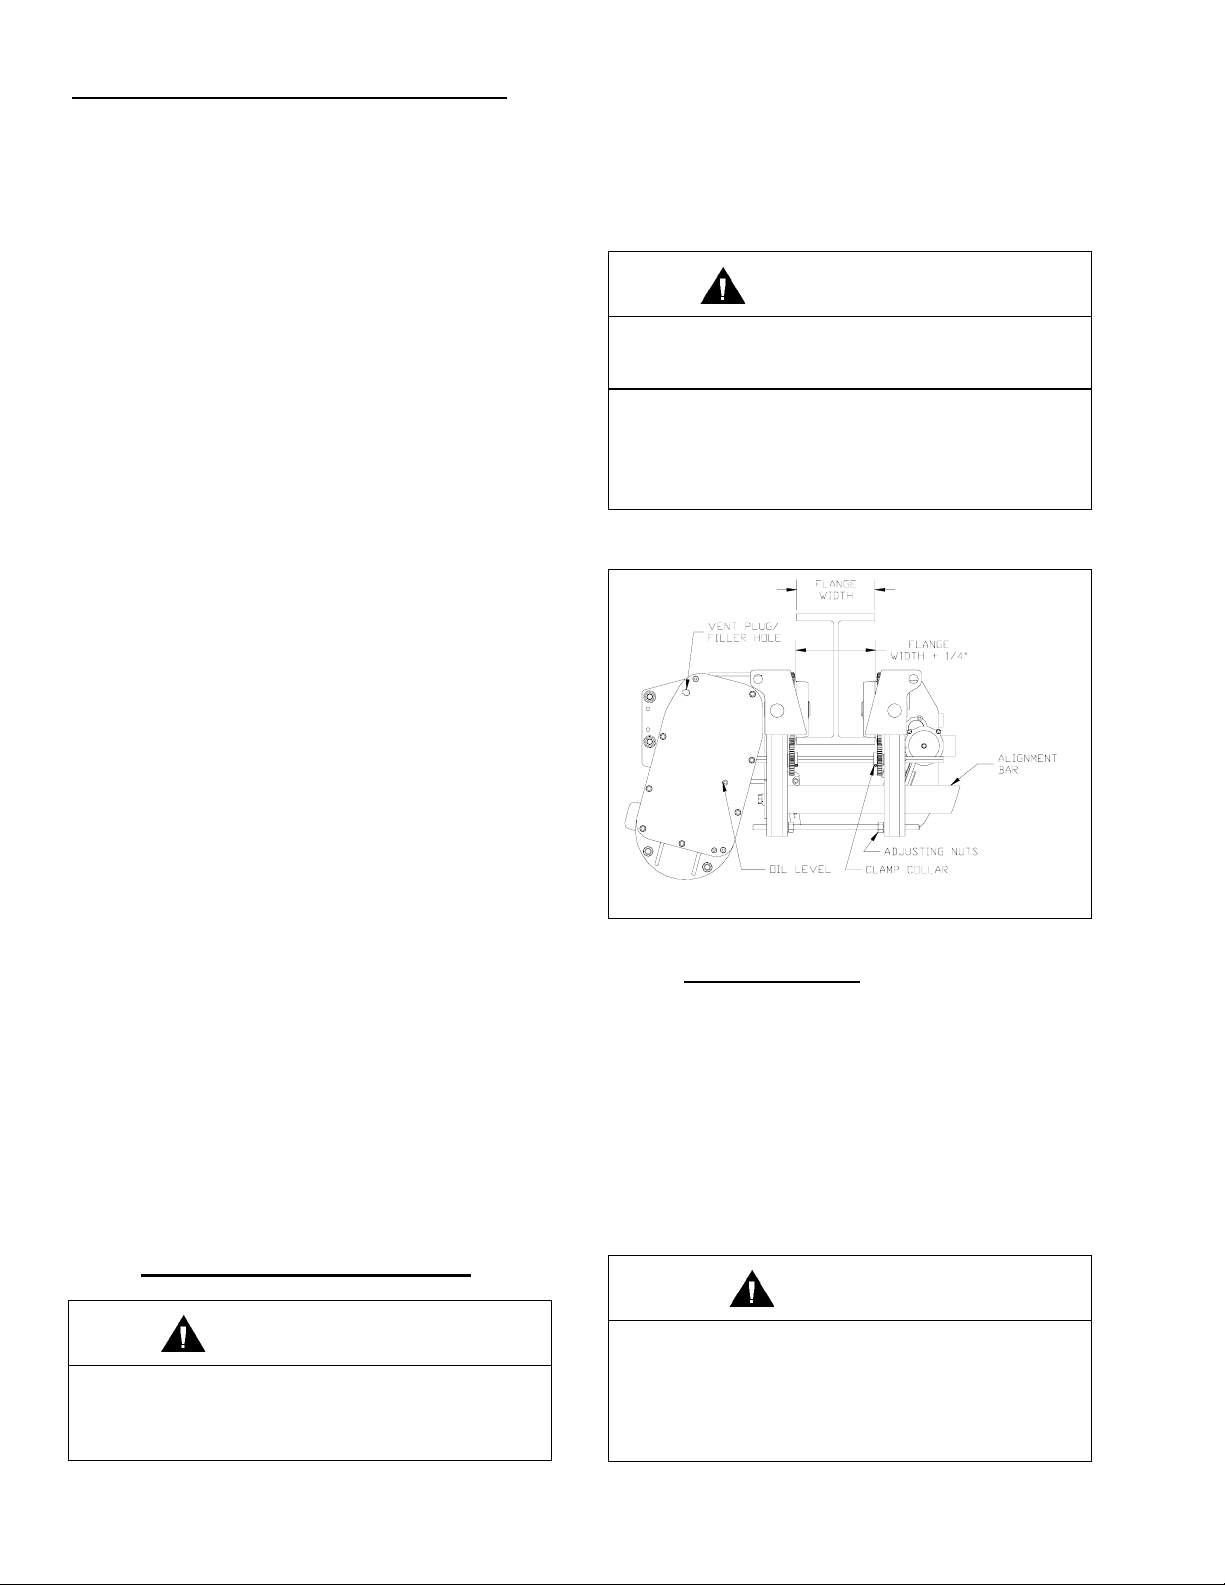
2-2. SUSPENDING HOIST.
FIGURE 2-1. Trolley Wheel Spacing.
a) OPEN-END BEAM: If the trolley can be
installed directly from the end of the
supporting beam, adjust the spacing
between the trolley wheel flanges to be
3/16”-1/4” greater than the exact width of the
beam flange (See Figure 2-1). Before
adjusting the width of the trolley frame be
sure to loosen the clamp collar nearest the
traverse drive on the hex traverse drive
shaft. Also, the electrical conduit/cable must
not be constrained when attempting to
adjust the trolley sides in or out.
NOTICE
Loosen all electrical cable or conduit
attached to the frame and alignment bars
before adjusting trolley width. Ensure
that the electrical cable is not stretched,
pinched, twisted or otherwise damaged
when adjusting trolley width.
4
Page 5
The trolley width shall be adjusted by
loosening the jam nuts on the traverse drive
side of the threaded rods at each end of the
hoist. If necessary, lubricate the frame
alignment bars with penetrating oil before
attempting to adjust trolley width. The trolley
side may then be pushed or driven into
position by turning the adjusting nuts on the
treaded rods. Adjust nuts on each side of
the hoist simultaneously to avoid binding.
After adjusting the trolley to the proper
width, tighten all adjusting nuts and the
clamp collar, and re-secure the electrical
conduit/cable. Verify that the geared wheels
mesh properly with the traverse drive
pinions. Using proper equipment, carefully
lift the trolley and hoist and install on the end
of the beam. Lubricate the wheel gear and
pinion (WG, Section IV, Paragraph 4-3).
b) CLOSED-END BEAM
are to be mounted along the span of a beam
not having open ends, the trolley must be
adjusted in the same manner as described
above to a width that allows clearance
between the axles and the beam flange.
Using proper lifting equipment, the trolley
and hoist must then be lifted to the beam
where it is to be installed. Once in position,
adjust the spacing between the trolley wheel
flanges to be 3/16”-1/4”” greater than the
exact width of the beam flange (See Figure
2-1). After tightening all adjusting bolts, the
clamp collar, and all electrical conduit/cable
clamps, carefully set the trolley on the beam.
Lubricate the wheel gear and pinion (WG,
Section IV, Paragraph 4-3).
2-3. CONNECTING HOIST TO ELECTRICAL
SERVICE. Electrical service to the hoist may be
power cable or a guarded system having sliding
shoe or wheel type collectors.
: For trolleys which
WARNING
Be certain that electrical power supply is
OFF and locked in the open position
before attempting any electrical
connections to the hoist. This equipment
must be effectively grounded according
to the National Electric Code ANSI/NFPA
70, or other applicable codes. If the
grounding method used is through the
trolley wheels, then each section of track
must be grounded by metal-to-metal
connection to the building ground.
Certain environments may prevent
proper grounding by this means. In this
case a separate grounding conductor
should be provided.
a) Follow ANSI/NFPA 70, state, and local
electrical codes including the grounding
provisions thereof when providing electrical
service to the hoist.
b) Make electrical connections using the
appropriate wiring diagrams furnished with
the hoist. All electrical connections
connections to collectors or power cord shall
be made only by qualified journeyman
electricians.
, including
CAUTION
Power supply to hoist and trolley must
be the same voltage, frequency, and
phase that are specified on the hoist and
trolley nameplate.
2-4. PRE-OPERATION CHECKS.
a) Check Oil Level.
has been filled with oil to the proper level.
However this should be re-checked before
operating the hoist.
Check oil level by removing the plug
indicated in Figure 2-1. When properly filled,
oil should be level with the bottom of the
tapped hole. Fill to this level with oil as
specified in Paragraph 4-2.e.
b) Check Push Button Operation and Phasing.
To properly check the phase of the hoist,
follow these steps:
(1) With “POWER OFF” operate all the push
buttons and determine that they do not
bind or stick in any position.
(Figure 2-1) The gearcase
WARNING
If any push button binds or sticks in any
position – DO NOT TURN POWER ON –
determine the cause and correct the
malfunction before operating.
(2) Connect hoist to power source.
WARNING
On three phase hoists it is possible to
have “Reverse Phasing” causing the
block to lower when the “UP” button is
depressed. When this condition exists
the automatic limit switch is inoperative
and hoist operation will be dangerous.
5
Page 6

(3) Operate “UP” button briefly to determine
direction of hook travel.
(4) If hook raises when “UP” button is
depressed, phasing is correct.
(5) If hook lowers when “UP” button is
depressed, hoist is “Reverse Phased.”
TURN AND LOCK POWER OFF and
check the pushbutton wiring. If the
pushbutton was wired properly, correct the
problem by interchanging any two leads at
power source
internal wiring of hoist.
c) Check Limit Switch Operation.
(1) A block operated upper limit stop is
furnished as standard equipment on all
Yale “Global King” hoists. This limit stop is
factory set to stop the lower block at the
safest high position, guarding against over
travel and possible damage to hoist. No
adjustment can be made. However, the
hoist should be tested by jogging the lower
block against the limit weight to be sure
the limit switch is functioning properly.
When lower block lifts the limit weight, the
hoist will automatically stop. If lower block
coasts through the limit switch when lifting
a reversing switch will automatically close
and reverse direction of motion to
lowering.
connection. Do not change
WARNING
Damage to the hoist, a dropped load, and
injury may result if limit switches fail due
to improper use.
TO AVOID INJURY:
UNDER NORMAL OPERATING CONDITIONS,
STOP HOIST TRAVEL BEFORE ENGAGING
LIMIT SWITCHES. LIMIT SWITCHES ARE
SAFETY DEVICES AND SHOULD NOT BE
USED AS NORMAL OPERATING CONTROL.
WARNING
Some hoists may be shipped with the
electrical controls loose (disconnected)
and will not have the upper and lower
limit switches connected. DO NOT
OPERATE HOIST UNTIL LIMIT SWITCHES ARE PROPERLY CONNECTED AND
ADJUSTED. Failure to do so may allow
hoist to be operated beyond proper travel
limits, which can cause load to drop,
resulting in damage to equipment or
injury.
6
(2) A geared rotary type upper and lower limit
switch is also provided as standard. This
switch is adjustable and although roughly
preset by the factory, it should be adjusted
at time of installation to the desired high
and low limits of lower block travel. Refer
to SECTION VII, Paragraph 7-3.
d) Check Lower Block and Hoisting Cable.
Depress “DOWN” push button and run lower
block to its lowest position. No less than two
wraps shall remain on the drum with the
loaded hook in its lowest position. Also
check to see that the lower block and rope
do not twist excessively. If it does twist to
the extent that two ropes rub against each
other, disengage the swaged rope end from
the frame anchor and twist the rope four or
five turns in a direction opposite to that
which the block turns. Reconnect rope to the
frame anchor, holding firmly to eliminate
rope twisting back to its original position.
Operate hoist up and down a few times. If
lower block still rotates excessively repeat
process until twisting is corrected.
e) Lubricate Hoisting Cable.
life, it is recommended that the cable be
lubricated at time of installation by applying
a heavy coating of lubricant CL (Paragraph
4-7) as outlined in SECTION IV, Paragraph
4-3.
f) When first using the hoist and trolley,
operate with lighter loads through full travel
before applying maximum load.
For longer cable
SECTION III – OPERATION
3-1. GENERAL. Operation of Yale “Global King”
hoists is controlled by a convenient pendant push
button station. With it, the hoist can be controlled to
give fast lifting and lowering; or controlled to lift or
lower the load in small increments, providing
accurate spotting. The push button station has a
built-in interlock to prevent depressing opposing
buttons simultaneously.
When first using the hoist, break in by operating
under lighter loads to full travel before applying
maximum load.
3-2. PUSH BUTTON OPERATION.
a) Depress push button marked “UP” to raise
load.
b) Depress push button marked “DOWN” to
lower load.
c) Depress push button marked “RIGHT” to
traverse one direction.
Page 7
d) Depress push button marked “LEFT” to
traverse in the opposite direction.
CAUTION
Excessive “jogging” will cause
premature burning of contact tips, motor
overheating, and premature brake wear.
e) On two-speed hoist or trolley motions, partial
depression of a button operates hoist or
trolley at slow speed; depressing button
completely operates hoist or trolley at full
speed.
3-3. OPERATING PRECAUTIONS. Safe operation
of an overhead hoist is the operator’s responsibility.
Listed below are some basic rules that can make an
operator aware of dangerous practices to avoid and
precautions to take for his own safety and the safety
of others. Observance of these rules in addition to
frequent examinations and periodic inspection of the
equipment may save injury to personnel and
damage to equipment.
WARNING
Equipment covered herein is not
designed or suitable as a power source
for lifting or lowering persons.
a) DO read ASME B30.16 Safety Standard for
Overhead Hoists and the Operation, Service
and Parts Manual.
b) DO be familiar with hoist operating controls,
procedures, and warnings.
c) DO make sure hook travel is in the same
direction as shown on the controls. If
opposite direction occurs, see Pre-Operation
Checks, Section II, Paragraph 2-4.b.
d) DO make sure hoist limit switches function
properly.
e) DO maintain firm footing when operating
hoist.
f) DO make sure that the load slings or other
approved single attachments are properly
sized and seated in the hook saddle.
g) DO make sure that the hook latch is closed
and not supporting the load.
h) DO make sure that load is free to move and
will clear all obstructions.
i) DO take up slack carefully, check load
balance, lift a few inches and check load’s
holding action before continuing.
j) DO avoid swinging of load or load hook.
k) DO make sure that all persons stay clear of
the suspended load.
l) DO warn personnel of an approaching load.
m) DO protect wire rope from weld splatter or
other damaging contaminants.
n) DO promptly report any malfunction,
unusual performance, or damage of the
hoist.
o) DO inspect hoist regularly, replace damaged
or worn parts, and keep appropriate records
of maintenance.
p) DO use the hoist manufacturer’s recom-
mended parts when repairing a hoist.
q) DO use hook latches.
r) DO apply lubricant to the wire rope as
recommended.
s) DO NOT lift more than rated load.
t) DO NOT use the hoist load-limiting device to
measure the load.
u) DO NOT use damaged hoist or hoist that is
not working properly.
v) DO NOT use the hoist with twisted, kinked,
damaged, or worn wire rope.
w) DO NOT lift a load unless wire rope is
properly seated in its groove(s).
x) DO NOT use wire rope as a sling or wrap
rope around the load.
y) DO NOT lift a load if any binding prevents
equal loading on all supporting ropes.
z) DO NOT apply the load to the tip of the
hook.
aa) DO NOT operate unless load is centered
under hoist.
bb) DO NOT allow your attention to be diverted
from operating the hoist.
cc) DO NOT operate the hoist beyond limits of
wire rope travel.
7
Page 8

dd) DO NOT use limit switches as routine
operating stops unless recommended. They
are emergency devices only.
ee) DO NOT use hoist to lift, support, or
transport people.
ff) DO NOT lift loads over people.
gg) DO NOT leave a suspended load un-
attended unless specific precautions have
been taken.
hh) DO NOT allow sharp contact between two
hoists or between hoist and obstructions.
ii) DO NOT allow the rope or hook to be used
as a ground for welding.
jj) DO NOT allow the rope or hook to be
touched by a live welding electrode.
kk) DO NOT remove or obscure the warnings
on the hoist.
ll) DO NOT adjust or repair a hoist unless
qualified to perform hoist maintenance.
mm) DO NOT attempt to lengthen the wire rope
or repair damaged wire rope.
nn) Personnel not physically fit or properly
qualified, shall not operate hoist.
oo) DO NOT operate hoists unless hook moves
in the same direction as indicated on the
push button. If opposite direction occurs,
see pre-operation checks, Section II
Paragraph 2-4.b.
pp) DO NOT operate hoist unless limit switch is
operating properly.
qq) DO avoid operating hoist when hook is not
centered under hoist. Avoid side pulls and
swinging of load or load hook when traveling
hoist.
rr) DO operate hoist within recommended duty
cycle and do not “jog” unnecessarily.
ss) DO conduct regular visual inspections for
signs of damage and wear.
tt) DO NOT operate hoist with hooks that have
opened up. See Section V, Paragraph 5-2.f.
uu) DO provide supporting structure that has an
appropriate design factor based on the load
rating and dead weight of the hoist. If in
8
4-1. GENERAL. The lubrication services outlined in
Paragraphs 4-3 thru 4-6 should be performed before
initial operation of the hoist. The lubrication services
outlined in Paragraphs 4-2 thru 4-6 should be
performed at regular intervals at least every six (6)
months, coinciding with spring and fall seasons is
recommended. The reason for this is that on hoists
installed outside or in unheated areas a “cold test” oil
is required in such (below freezing) climates making
seasonal changes necessary.
4-2. CHANGING GEARCASE OIL.
doubt of the supporting structure’s strength,
consult a structural engineer.
WARNING
DO NOT operate hoist with the hoisting
rope out of the drum grooves. Such
operation may result in damage to the
rope and/or the rope breaking. This may
result in dropping the load that can
cause damage to equipment and injury to
operator or other personnel. Hoist rope
will remain in the drum grooves during
operation under normal operating conditions, however, slack or kinked rope,
excessive side pulls, swinging or jerking
of load, or similar abuse, may cause the
rope to leave the grooves.
vv) DO NOT use hoist in location that will not
allow operator movement to be free of the
load.
ww) DO, when starting to lift, move the load a
few inches at which time the hoist should be
checked for proper load holding action. The
operation shall be continued only after the
operator is assured that the hoist is
operating properly and that the load is
supported in the center of the
base/bowl/saddle of the hook.
xx) DO Observe recommended inspection and
maintenance procedures.
yy) DO Use common sense and best judgment
whenever operating a hoist.
SECTION IV – LUBRICATION
a) Add 5% solution of Mobilsol A (or
equivalent) to the oil and run for a short
time. This will clean components and hold
particles in suspension for draining.
Page 9
e) Refill through filler hole to proper level
(bottom of oil level plug hole) using GCOH
(Paragraph 4-7). The amount of oil required
depends on overall size of gearcase; two
sizes are used for “Global King” hoists. To
determine size and amount of oil to add,
measure width of hoist gearcase (see Figure
4-2). The “B” Frame measures 11-3/4” and
requires approximately 6 quarts of oil. The
“C” Frame’s width is 14-1/2” and requires
approximately12 quarts of oil.
FIGURE 4-1. View of Hoist Showing Location of
Name Plates and Oil Plugs.
b) Remove oil drain plug from bottom of
gearcase and drain oil out. Dispose of oil in
accordance with local environmental codes.
WARNING
Avoid skin contact with Mobilsol A. In
case of skin contact: dry wipe the skin,
cleanse the area with a waterless hand
cleaner and follow by washing
thoroughly with soap and water.
c) Reinstall drain plug.
d) Remove oil level plug from front of gearcase
cover.
FIGURE 4-2. Gearcase Width Illustration.
4-3. LUBRICATION OF HOISTING CABLE. Hoists
are shipped from the factory without an exterior
coating of grease on hoisting cable. It is
recommended, where conditions permit, that the
cable be thoroughly coated at installation and kept
well lubricated with CL (Paragraph 4-7).
4-4. LUBRICATION OF LIMIT SWITCH. Provide a
light film of grease MPG (Paragraph 4-7) on bevel
gear of rotary geared limit switch.
4-5. LUBRICATION OF GEARED TROLLEY
WHEELS AND PINIONS. At installation and
periodically apply grease WG (Paragraph 4-7) to the
traverse drive pinions and the gears of the trolley
wheels.
4-6. LUBRICATION OF ROPE GUIDE
a) Maintenance
following actions are required:
(1) Periodically re-grease with MPG
(Paragraph 4-7) using the grease fitting
provided (Figure 5-3, Item 6).
(2) Every 6 months the rope guide should be
removed per Section V, Paragraph 5-5,
cleaned and inspected. When the rope
guide is reassembled, the rope guide
should be thoroughly greased with MPG
(Paragraph 4-7) and the hoist run up and
down to lubricate both the drum and the
wire rope.
. Once properly installed the
NOTES
___________________________________________________________________________
___________________________________________________________________________
___________________________________________________________________________
___________________________________________________________________________
___________________________________________________________________________
___________________________________________________________________________
___________________________________________________________________________
___________________________________________________________________________
___________________________________________________________________________
___________________________________________________________________________
9
Page 10

4-7. LUBRICANT SPECIFICATIONS. AMBIENT TEMPERATURE
GCOH
Gear Case Oil.
Hoist Gear Case.
SG
Spline Grease
WG
Wheel Gear and
Pinion Grease
CL
Cable Lubricant.
Wire Rope
Lubricant
GO
General Oil.
General Oiling to
Prevent Rusting
and Provide
Limited Lubrication
for Points Not
Considered Normal
Wear Points.
MPG
Multipurpose
Grease.
Grease Lubricated
Wear Points
Provided with
Fittings and Grid or
Gear Type Flexible
Couplings.
AGMA Lubricant No. 6 No. 7 EP No. 7
Viscosity @ 100° F
Viscosity Index 154 95 158
Pour Point
Mobil
Oil Corp. Mobil
Shell
Oil Co. Omala RL 320 Omala
Texaco
ASTM D217 Worked
Dropping Point
Base Lithium
Mobil
Viscosity @ 100° F
Mobil Oil Corp. ---------------------------Mobiltac 375 NC--------------------------
Texaco Inc. ---------------------------------Crater H --------------------------------
Amoco Oil Co. ----------------------------Amovis 5-X ----------------------------Mobil Oil Corp. -------------------------Mobilarma 798---------------------------Sun Oil Co. -------------------Sunoco Wire Rope Lubricant----------------Texaco
Viscosity @ 100° F
Viscosity Index 60 Min. 60 Min.
Pour Point
Amoco Oil Co. Rykon Oil 46 American Industrial Oil
Mobil Oil Corp. ----------------------Mobil DTE Oil Heavy-------------------------
Shell Oil Co. Rotella 10W Rotella 10W-30
Sun Oil Co. Sunvis 932 Sunvis 968
Texaco
6ASTM Worked
Penetration
Dropping Point
Base Lithium Lithium
Amoco Oil Co. Amolith Grease 1 EP Amolith Grease No. 2 EP
Mobil Oil Corp. Mobilith AW 1 Mobilith AW 2
Shell Oil Co.
Sun Oil Co. Prestige 741 EP Sunoco Multipurpose 2 EP
Texaco
Inc. Pinnacle 320 Meropa 460 Pinnacle 460
NLGI Grease No. 1
Penetration
Oil Corp. ---------------------------Mobilux EP 111--------------------------
No Specification
Inc. Crater A Texclad 2
AGMA Lubricant No. 1 No. 2
Inc. Rando Oil 46 Rando Oil 68
NLGI Grease No. 1 No. 2
Inc. Multifak EP 1 Multifak EP 2
-20° to 50°F 50° to 125°F 125° to 250°F
(-29° to +10°C) (10° to 52°C) (52° to 121°C)
1335 - 1632 SUS 1919 - 2346 SUS 1919 - 2346 SUS
-40°F 20°F -37°F
SHC 632 Mobilgear 634 Mobil SHC 634
460 Omala RL 460
310 - 340
320°F (160°C)
25,000 SUS (contains diluent)
193 - 235 SUS 284 - 347 SUS
-20°F (-29°C) 10°F (-12°C)
68
310 - 340 265 – 295
360°F (182°C) 360°F (182°C)
-------------------------Retinax LC-----------------------------------
10
Page 11
4-7. LUBRICANT SPECIFICATIONS
CONT’D.
GCOT
Gear Case
Oil.
Traverse
Gear Case.
AGMA Lubricant No. 5S No. 8 Compounded
ISO Viscosity Grade 220 680
American Lubricants
Mobil Oil Corp. Mobil SHC
Shell Oil Co. Omala RL
Fiske Brothers
Texaco
Inc. Pinnacle
-20° to 50°F 50° to 100°F 100° to 250°F
(-29° to
+10°C)
SHC 90W AGMA #8 Gear Oil
630
220
SPO-MG SPO-288
220
SECTION V – INSPECTION AND
PREVENTATIVE MAINTENANCE
5-1. GENERAL. All Yale “Global King” hoists are
inspected and tested at the factory. Regular inservice inspection and preventative maintenance
programs not only help reduce overall maintenance
costs but may also prevent service shutdowns by
forewarning of problems that could cause these
shutdowns. Regular inspections, periodic minor
adjustments, regular cleaning and lubrication and
replacement of worn parts can help preserve good
performance and operation of your hoist.
Many factors influence the inspection and
preventative maintenance program required for your
hoist. Frequency and severity of service and material
handled, local environmental conditions and various
applicable codes are some of the factors that the
user must consider to adjust inspection and
maintenance program outlined in this section to
meet his specific conditions.
The inspection and maintenance services outlined in
this section are considered minimum.
Recommended in the schedule are minimum
inspection and maintenance intervals based on
average daily use in a normal environment. Average
daily use is based on 1000 total operational hours
per year maximum and intermittent operation of the
hoist eight hours per day, five days per week with a
maximum 50 percent “on” time and the average
loading not exceeding 65 percent of rated load. For
more details regarding hoist duty cycles, please
reference ANSI/ASTM HST-4.
Environmental conditions in which the hoist operates
are also important considerations for the user when
adjusting hoist inspection and maintenance
programs to local conditions. Frequency of
inspection and maintenance must be increased if
hoist is subjected to severe atmospheric
AMBIENT TEMPERATURE
(10° to 38°C) (38° to 121°C)
Refer to Yale Hoist
Field Service
Department for
Extra Hecla Super
Valvata J 680
Vanguard 680
environmental conditions, such as corrosive vapors,
extreme heat or cold, cement or dust and other
airborne contaminants. The user should carefully
consider all environmental conditions and adjust
frequency and degree of maintenance for his local
conditions. Consult the factory’s Field Service
Department for advice regarding unusual environmental conditions.
Various codes also regulate inspection and
maintenance programs. Attention must be given to
applicable federal standards, OSHA regulations,
national standards, state and local codes which may
include mandatory rules relating to hoist inspection
and maintenance. The user should become familiar
with all applicable codes for his area and be guided
accordingly.
Listed on the Recommended Inspection and
Maintenance Schedule are inspection frequencies
and requirements. Perform these inspections
regularly as scheduled and additional inspections as
may be required for activity, service, and environment of your hoist. The hoist operator must be
responsible for determining the operating conditions
and severity of service.
Inspection Schedule and Maintenance Report Form.
Shown on page 13 of this manual is a recommended
Inspection Schedule and Maintenance Report form
that lists various components of the hoist. The form
also includes trolley components, runway components, and miscellaneous items. This form is
suggested as a guide for written inspection reports.
Inspections are recommended each month and
should be performed thoroughly enough to inform
the hoist user of deficiencies for any item listed. This
form does not supersede the Inspection and
Maintenance Schedule listed on page 12 of this
manual but may be used to record scheduled
inspection and maintenance services required.
Gearcase Operating
Temperatures above
200°F.
11
Page 12

The user should revise the inspection interval, add
additional units or provide a similar form to suit
particular conditions that may exist. However,
written, dated and signed inspection reports should
be maintained particularly on critical items such as
hoist hooks, hoisting rope, sheaves, drums and
brakes. Periodic review of old inspection reports can
point out service life of hoist components,
forecasting need for adjustment, repair or
replacement of these components.
As a matter of expedience, appointed maintenance
personnel inspecting hoist can also take care of
minor adjustments, repairs and cleaning, where
required. Note column on Inspection Schedule and
Maintenance Report form headed Corrective Action
and Notes. When corrective action is made during
inspection, note condition of part or unit as inspected
in appropriate Condition
(`). Note “during inspection” corrective action taken
and date in space provided. In this manner, items
requiring further attention will be checked (`)
without showing corrective action. This will advise
the designated person responsible for hoist
operation and safety, who reviews the reports that
deficiencies exist. The designated person will check
all deficiencies as listed and re-examine or otherwise
determine whether they constitute
column with a check mark
a safety hazard.
WARNING
Deficiencies may be hazardous to
personnel and equipment. Do not operate
a hoist having deficiencies unless a
designated qualified person has
determined that these deficiencies DO
NOT constitute a safety hazard.
Written, dated and signed inspection reports for
many items are mandatory under OSHA regulations,
and many state safety codes. It is strongly
recommended that the Inspection Schedule and
Maintenance Report, shown herein, be completed by
a qualified person designated with the responsibility
for hoist operation and safety or an inspector
appointed by this person.
Inspection records can point out the service life of
hoist components and help forecast the need for
adjustments, repairs, and ordering of replacement
parts. File and review these reports after each
inspection.
RECOMMENDED INSPECTION AND MAINTENANCE SCHEDULE
TIME INTERVAL INSPECTION OR MAINTENANCE
Daily or start of
each shift (visual)
1 Month * HOIST CABLE – Inspect per Paragraph 5-6 and lubricate per Paragraph 4-3.
1-3 Months * ELECTRICAL CONTROLS – Inspect per Paragraph 5-4. Check hoist gearcase oil level
6 Months * LOWER BLOCK –Inspect per Paragraph 5-2.
6 Months or 500750 hours “on”
time
Annually * Motor brake and actuating mechanisms. Inspect and adjust per Paragraph 5-10.
5 years elapsed
time or 5000
hours “on” time
* Check operation of all functional mechanisms including limit switch operation, brakes
and control. Check hoist cable for kinks, abrasions, corrosion or broken wires or
evidence of improper spooling on drum. Inspect hooks, upper and lower blocks, and all
load bearing components for damage.
– add oil as required per Paragraph 4-2.e.
* UPPER BLOCK –Inspect per Paragraph 5-3.
* ROPE GUIDE-Inspect per Paragraph 5-5.
* BLOCK OPERATED LIMIT SWITCH-Inspect per Paragraph 5-12.
* Inspect electrical controls per Paragraph 5-4. Change hoist gearcase oil – Fill with oil
per Paragraph 4-2.e. Lubricate hoist cable per Paragraph 4-3. Lubricate upper and
lower hook block. Lubricate limit stop lever per Paragraph 4-4. Add a light film of MPG
grease (Paragraph 4-7) to the bevel gear in the screw type limit switch.
Inspect hooks with crack detecting procedures per Paragraph 5-2. Drain and refill hoist
gearcase per Paragraph 4-2.
* Complete inspection, disassembly, and maintenance required. It is recommended that
your Yale repair Station be contacted for this service.
12
Page 13
INSPECTION SCHEDULE AND MAINTENANCE REPORT
_
_
_
HOIST SERIAL NO. (Manufacturer's) ___________________
RATED LOAD ____________________ LOCATION IN PLANT
TYPE ___________________________ THIS INSPECTION IS: MONTHLY
VOLTAGE _______________________ SEMI-ANNUAL
*Recom-
COMPONENT, UNIT OR PART
and location
COMPONENT,
UNIT OR PART
Motor
Motor Br ake
Couplings
Gears, Shafts, & Bearings
Upper Block
Lower Block
Hook & Throat Opening
HOIST
Hoist Rope
Rope Drum
Rope Guide
Guards
Limit Switches
Pushbutton
mended
Inspection
Interval
MONTHLY
SEMI-ANNUAL
(Check column best indicating condition when part or
unit is inspected. Use note column to the right if
condition is not listed below.)
GOOD
ANNUAL
X
REQUIRED
ADJUSTMENT
REPAIR REQUIRED
CUSTOMER CRANE IDENTITY NO. __________________________
INSPECTED BY:_____________________________
CONDITION
CORRECTIVE ACTION NOTES
(Indicate corrective action taken during inspection and
note date. For corrective action to be done after
inspection, a designated person must determine that
the existing deficiency does not constitute a safety
hazard before allowing unit to operate. W hen
REQUIRED
REPLACEMENT
(Loose Parts or Wires)
REQUIRED
LUBRICATION
Rust or Corrosion)
(Worn or Damaged)
(Low Oil or Grease,
corrective action is completed, describe and note date
CLEANING OR
in this column.)
PAINTING REQUIRED
Record Hook Throat Opening:
ANNUAL
DATE:_________
DATE
CONTROL
STATION OR
PUSHBUTTON
Wiring
Motor
Brake (when so equipped)
Couplings
Gears, Shafts, & Bearings
Frame
Wheel s
TROLLEY
Bumpers
Guards
Conductors
Collectors
Hoist
Trolley
RESISTORS
Monorail Joints
Monorail
Main Conductors
RUNWAYSMISC. LOCATION
Main Collectors
General Condition
Load Attachment Chains
Rope Slings & Connections
Change Gearcase Lubricant
Grounding Faults
* See text for DAILY & WEEKLY REQUIREMENTS.
INSPECTION INTERVAL.
Typical Inspection Schedule and Maintenance Report form. 12375gwr
User must adjust Inspection Interval and components to suit his individual conditions and usage.
SIGNED & DATED REPORT - OSHA.
X MAGNETIC PARTICLE OR EQUIVALENT EXAMINATION REQUIRED.
13
Page 14

WARNING
Do not operate a hoist having unusual
vibrations, sounds, or with anything
wrong or apparently wrong. Danger may
be present that the hoist operator
cannot see. Determine and correct the
cause of unusual conditions and make
certain hoist can be operated safely.
5-2. INSPECTION OF LOWER BLOCK.
a) Check lubrication of all parts. Also lubricate
the shank of the hook that passes through
the crosshead. If the thrust bearing is
removed, apply MPG grease (Section IV,
Para. 4-7).
b) Check each sheave to insure rope groove
is smooth and free from burrs, or other
surface defects.
c) Check each sheave for freedom of rotation;
replace bearings if defective.
d) Make certain that the spring pin holding the
hook nut to the hook is securely in position.
e) If hook is equipped with a hook latch or
rotational lock, check to determine that they
are in good operating condition.
f) Check throat opening of the hook. (Refer to
Figure 5-2.) It is recommended that upon
receipt of the hoist, a measurement be
made and recorded of the hook throat
opening. OSHA regulations require that the
hook be replaced if the throat opening
exceeds 15 percent of the original opening,
or if the hook is twisted more than 10
degrees from the unbent plane. We
suggest that a gage block properly
identified to the hoist, similar to the one
shown in Figure 5-2, be made for each
hook for use in these measurements.
g) Hooks showing signs of cracks must be
replaced. Hooks should be inspected at
least once per year using dye penetrants,
magnetic particle, or other suitable nondestructive test methods.
h) Check wear of the hook, especially at the
saddle and replace if worn more than 10%
of original dimensions.
5-3. INSPECTION OF UPPER BLOCK.
a) Check upper block sheaves (when hoist is
so equipped) for wear, damage and
freedom of rotation.
If sheaves do not rotate freely, disassemble
block and inspect bearings. Replace worn
or damaged bearings, washers, pins, or
sheaves.
b) Make certain that all sheaves, bearing and
hanger pins are free of foreign material.
Bearings without grease fittings are
lubricated for the life of the bearing and
require no further lubrication.
c) Make certain that the rope retention bolts
are not bent, loose or otherwise distorted;
bolts must have close clearance to sheave
flange to keep rope in sheave grooves.
5-4. INSPECTION OF ELECTRICAL CONTROLS.
Arrangement of electrical control equipment varies
with the type of control, physical space and the
optional control features ordered with the hoist.
Note the location in the electrical enclosure of the
control circuit fuse, transformer, limit stop switches
and the hoist contactors. Trolley contactors and
optional hoist and trolley fuses are also located in
this enclosure.
Use wiring diagrams furnished with hoist to
determine electrical components on your hoist; then
determine component location and identity on your
hoist.
14
WARNING
Be certain that main power switch is
locked in open position (OFF) before
opening hinged control enclosure cover
mounted to the counterweight.
FIGURE 5-2 Gage Block.
a) Open hinged control panel enclosure cover
mounted to the counterweight and inspect
wiring and terminals. Terminals should be
Page 15
securely crimped to wires and insulation
sound. Terminal screws should be tight.
b) Check condition of contactor assembly,
transformer, and upper limit switches.
WARNING
Check to be certain main power switch
is locked in open position (OFF) before
removing brake cover.
5-5. INSPECTION OF ROPE GUIDE.
a) General
prevent the rope from “back-winding” and to
hold the rope in the proper groove. Side pulling
and excessive load swing will severely damage
the rope guide and must be avoided.
. The rope guide is intended to help
WARNING
Side pulling and excessive load swing
will severely damage the rope and rope
guide. Failure of these components may
result in injury.
b) Disassembly
assistance in locating components refer to the
parts list in Section IX.
(1) Remove socket head cap screws and lock
washers (Items 8 and 9). Take off mounting
clip (Item 7).
(2) Remove shoulder bolts (Item 4) and
compression springs (Item 5). The two
halves of the rope guide body (Item 1) can
now be pulled off the drum separately.
When reassembling be sure that the half
with the rope slot is on the top half of the
drum.
Once shoulder bolts are removed, the
halves will separate and, if not properly
supported, the halves could fall.
(3) Carefully unhook the rope tensioning spring
(Item 3), which is under tension.
The rope tensioning spring is under
considerable tension; use caution when
unhooking to avoid injury.
(4) Remove the split plastic shroud (Item 2)
from the drum. When reassembling the
rope guide be sure the plastic shroud (Item
2) fits snugly in the rope guide body
groove.
(5) Thoroughly clean and inspect all
components.
(6) Follow steps in reverse to reassemble. Be
sure to re-grease the rope guide with MPG
(Paragraph 4-7) after assembling.
5-6. ROPE INSPECTION, MAINTENANCE AND
REPLACEMENT.
. Refer to Figure 5-3. For further
WARNING
WARNING
Figure 5-3. Rope Guide Assembly.
WARNING
Wire Rope improperly handled or
abused can create a SAFETY HAZARD.
Read and comply with inspection,
maintenance and replacement
information given herein.
a) Inspection.
of the most important components requiring
frequent inspection and maintenance. All
Wire rope on your hoist is one
15
Page 16

wire ropes will eventually deteriorate to a
point where they are not safe and will
require replacement. Wire rope should be
thoroughly inspected at regular monthly
intervals by an authorized person and a
determination made when further use of the
rope would constitute a safety hazard.
Each inspection should include a written
dated and signed report of rope condition.
Reports should be filed and reviewed each
month and any rope deterioration carefully
noted. Inspections revealing but not limited
to the following conditions should cause
inspector to question remaining strength of
rope and consider replacement:
(1) Twelve randomly distributed broken wires
in one rope lay or four broken wires in
one strand. (See Figure 5-4.)
Figure 5-4. Description of One Rope Lay.
(2) Wear of one-third of the original diameter
of outside individual wires.
(3) Kinking, crushing, or birdcaging.
(4) Heat damage from any cause.
(5) Reductions from nominal diameter of
more than 1/32” for 7/16” diameter rope
or 3/64” for 9/16” rope. See Figure 5-5 for
proper measurement techniques.
Figure 5-5. Correct Method of Measuring Rope.
(6) Rope corrosion, internal or external.
(7) Effects from improper lubrication.
(8) Rope being idle for one month or more
due to shutdown or inactivity.
Special attention should be exercised when
inspecting rope normally hidden during
inspecting procedures.
Please refer to the Wire Rope Users Manual
–for illustrations and definitions when
following the above guidelines for rope
inspection. This manual may be obtained
from:
WRTB Fulfillment
609 North Second Street
St. Joseph, MO 64502
Or by calling: 1-888-BUY-WRTB (289-9782).
b) Maintenance.
help reduce internal friction and prevent
corrosion. Lubricant, as described in
Paragraph 4-3, should be applied as a part
of the regular maintenance program.
Special attention is required to lubricate
sections of rope over equalizing sheaves
and other hidden areas.
Avoid dragging ropes in dirt or around
sharp objects that will scrape, nick, crush,
or induce sharp bends in the rope.
Keep rope well lubricated to
WARNING
Use only factory-approved rope with
swaged wire rope socket.
c) Replacement.
authorized inspector, the rope should be
replaced. Replacement rope assemblies
are shipped from the factory carefully
coiled to prevent damage by kinking. Care
must be taken to avoid twisting or kinking
when uncoiling and handling during
reeving.
Before replacing rope, check condition of
grooves in sheaves and drums to
determine if they are excessively worn.
When first using hoist after rope
replacement, break in rope by operating
under lighter loads to full travel before
applying maximum load.
5-7. ROPE REEVING.
a) General.
through the center of reel so rope can be
pulled straight out with reel rotating.
When recommended by an
Place reel on stand with shaft
16
Page 17

CAUTION
It is imperative that rope reel or coil
rotates as rope unwinds. If coil or reel
does not rotate the wire will be twisted
as it is uncoiled and kinking will result.
A kinked rope may be damaged and
unsafe for maximum service.
b) Before removing the old rope, refer to
reeving diagram, Figure 5-6. To assist with
re-reeving your hoist, refer to the reeving
diagram and corresponding paragraph that
describes the reeving procedure.
c) Removing old rope
Section IX Parts lists to assist in locating
components referred to in the following
paragraphs.
(1) Lower the lower block to a scaffold 6 to 7
feet below hoist to relieve tension on wire
rope. (Lower block may be lowered to the
floor if desired; however, to handle less
weight and for ease of reeving, adequate
scaffold below the hoist is
recommended.)
. Please, refer to the
(4) Remove outer lower block sheave
covers.
(5) Remove lower block sheaves and wire
rope.
(6) Remove two (2) rope retention bolts and
nuts from upper block yoke.
(7) Remove two (2) bolts and key plate to
allow removal of upper block sheave pin.
(8) Securely grasp the upper block sheave
before carefully sliding the sheave pin
out. Note that two spacers will also be
released as the pin is removed.
(9) Remove wire rope from sheave.
(10) Remove retaining rings or cotter pins
from dead end anchor pin. Securely
grasp the swaged wire rope and, in some
cases, spacers before removing the pin.
(11) Remove Rope Guide.
(12) Make certain all personnel are clear of
hoist and operate hoist “DOWN” to
completely unwind all wire rope from
drum. Stop hoist so all (3) rope clamps
are accessible. Remove rope clamps and
wire rope from drum.
FIGURE 5-6. Reeving Diagram – 4 Part
Single-Reeved. (Note: Arrow on Drum
Indicates Direction of Drum when
Lowering.)
CAUTION
Be certain all personnel are clear of
hoist as components, hardware, and
wire rope are removed from hoist.
(2) Remove block operated limit switch
weight from rope.
(3) Remove retaining rings from lower block
sheave pin.
WARNING
Winding rope on rope drums with power
can be hazardous. Keep hands safe
distance from drum; wear gloves and
use extreme care when winding rope.
d) Installing new rope.
(1) Thread rope to drum from trolley frame
side then secure with rope clamps as
follows:
(a) Make sure that the rope clamp
groove size utilized as marked
directly above the groove matches
the rope size for your hoist (7/16” on
the “B” Frame and 9/16” on the “C”
Frame).
(b) With the rope lying in the bottom of
the drum groove, begin tightening the
rope clamp at the tail end of the rope.
Torque to 50 ft-lbs.
(c) With tension on the rope keeping it
properly seated in the drum groove,
17
Page 18

torque the remaining two (2) rope
clamps in sequence to 50 ft-lbs.
(2) With all personnel clear of hoist – TURN
ON POWER.
(3) Operate hoist “UP” guiding six (6) wraps
of new rope into drum grooves with
gloved hand.
(3) Re-install rope guide over rope in rope
drum grooves as shown in Figure 5-3.
and outlined in Section V, Paragraph 5-6.
Continue lubricating as rope is spooled
onto the drum until about 28’-0” remain
unwound.
(7) With outer lower block covers removed,
thread the wire rope through the sheaves
of the upper and lower block as shown in
Figure 5-6.
(8) Attach swaged rope end to the dead end
anchor pin fastening cotter pins or
retaining rings as required.
(9) Replace the lower block sheave covers.
(10) Lubricate cable per Paragraph 4-3.
See Figure 9-5 (“B” Frame components) for
lower block parts with 7/16” diameter wire
rope.
See Figure 9-5 (“C” Frame components) for
lower block parts with 9/16” diameter wire
rope.
c) Checking for and removal of rope twisting.
(1) To remove rope twist in four part single
reeved hoists:
(a) Observe direction block tends to
rotate.
(b) Lower the block to a low position
and TURN OFF (lock out) POWER.
(c) Remove swaged fitting from anchor
pin and rotate rope several turns in
a direction tending to correct block
rotation.
(d) TURN ON POWER; raise and
lower the block several times to
feed the correcting twist in the rope
through the reeving.
5-8. INSPECTION OF ROPE DRUM AND SHAFT.
a) To remove the rope drum, remove the rope
guide and hoisting cable, as outlined in Section
V, Paragraphs 5-5 and 5-7.c. respectively.
18
WARNING
The hoist must be removed from service
and placed on the ground for any
maintenance that requires removal of
the output shaft assembly or drum.
Figure 5-7. Drum Frame & Geared Limit Switch.
b) Remove the Geared Limit Switch or disconnect
the wires so that the electrical cable will not
inhibit removal of the drum. (See Figure 5-7).
c) Remove the unit from service, place it on the
ground, and provide adequate means to
support the drum before removing the frame
rod nuts at the outboard drum frame end
(Figure 5-7). The hardware attaching the drum
frame to the hoist and trolley frame may then
be removed.
d) Keeping the drum level, remove the drum from
the splined output shaft at the gear case end.
5-9. INSPECTION OF HOIST GEARING.
Figure 5-8. Hoist Gear Case Assembly.
a) General
reduction splash lubricated vertically split
cast aluminum case and cover. The first
two high-speed reductions are helical and
the third low speed output reduction is
. The hoist gear case is a triple
Page 19

spur. The gear shafts are supported with
ball bearings housed in the back of the
case and in the cover. The input helical
pinion is cut directly into the motor shaft. An
oil seal housed in the gear case at the
motor input seals the motor shaft as it
passes into the gear case. Since the entire
motor shaft is submerged in oil, anytime the
motor is removed, the oil must be drained
from the gear case. All pinions are integral
with their shafts while the gears are keyed
and pressed onto their shafts. The output
shaft passes through an oil seal in the back
of the gear case and drives the drum by
means of a crowned spline. One end of the
rope drum is supported on this output shaft.
b) Inspection and Disassembly
Gearcase. (See Figure 5-8.)
(1) Lower hook block to the floor and relieve all
load from ropes.
(2) Make sure power to hoist is off and locked
out.
.
WARNING
Before disassembly, prevent rope drum
from free spinning by wedging drum in
place with a block of wood, and resting
lower block on work surface so all
weight is off rope drum. Rope may also
be removed from hoist drum.
(3) Drain the oil from the gear case per
Section IV, Paragraph 4-2.
(4) Provide adequate means to support the
gear case cover. Once the cover is
supported, remove the two (2) shoulder
bolts, seven (7) socket head cap screws,
and nine (9) lock washers holding the
cover to the gear case. Carefully draw
the cover directly away from the gear
case, as damage to this surface will
prevent the gasket from sealing properly.
As the cover is removed, ensure that all
gear and shaft assemblies remain in the
case.
WARNING
If output shaft assembly is pulled out of
the gear case with the cover, it will
disengage from the drum allowing the
drum to drop. Be certain all shaft
assemblies stay in the case.
(5) If it is necessary to remove the output
shaft assembly from the gear case, the
rope drum must first be removed from the
hoist. See Section V, Paragraph 5-7.
WARNING
The hoist must be removed from service
and repaired on the ground for any
maintenance that requires removal of
the output shaft assembly or drum.
Only once the output shaft is free of the
rope drum, can the output shaft assembly
be safely removed from the gear case.
Provide an adequate means to support
this shaft and gear assembly before
removing, as it weighs approximately 80
lbs. (“C” Frame Hoist).
(6) The pinion shaft and gear assemblies
may be removed as necessary.
(7) Inspect all gears, pinions, bearings, and
the output shaft spline for wear, pitting, or
mechanical damage. Replace as
necessary. See Section IX, Figure 9-2 for
replacement parts. It is recommended
that gears and pinions only be replaced
as sets. Thoroughly clean the output
shaft external spline teeth before
reassembly.
(8) Assembly is opposite of removal. Use a
new gasket. Do not attempt to assemble
the cover to the gear case without a
gasket, as the spacing between bearings
will be reduced. Severe damage to the
hoist will occur if no gasket or the wrong
gasket is used. Refill gear case with new
lubricant per Section IV, Paragraph 4-2
before use. Using SG (Paragraph 4-7),
grease the spline teeth on the output
shaft before reinstalling rope drum.
(9) Test hoist per Section V, Paragraph 5-13
to ensure proper lubrication.
Hoist Motor.
(1) Lower hook block to the floor and relieve all
load from ropes.
(2) Make sure power to hoist is off and locked
out.
(3) Drain the oil from the gear case per
Section IV, Paragraph 4-2.
19
Page 20

(4) Disconnect the wiring and conduit from
the motor junction box.
(5) Provide a means to support the hoist
motor. The hoist motor weighs approximately 250 lbs. And must be held level
while removing and installing.
(6) Once the motor is properly supported,
remove the hardware fastening it to the
gear case. Carefully withdraw the motor
horizontally straight out from the gear
case. Do not tip or move the motor from
side to side.
(7) Replace the motor shaft seal using an
appropriate seal driver. It is
recommended that a new seal be
installed each time the motor is removed
from the case.
IMPORTANT!
(8) Before installing the motor, pack the gear
teeth with MPG grease (Paragraph 4-7)
and wrap the gear teeth with a number of
layers of Teflon tape to protect the seal
lip from being damaged by the gear
teeth. Coat the seal lip and the motor
shaft with MPG grease.
NOTICE
Failure to use a factory replacement seal
will cause premature seal failure due to
specific lip material requirements that
must be met.
(9) Install the motor to the gear case. The
motor shaft must be in line with the seal
bore and perpendicular to the mounting
surface before attempting to insert the
shaft through the seal. The motor shaft
must remain horizontal and not rock up
and down or side-to-side while installing
the motor or seal damage will occur. It
may be necessary to rotate the rope
drum slightly to align the gear teeth to
mesh with the teeth on the motor shaft.
Ensure that the motor seats properly into
the rabbet fit machined in the gear case.
Fasten the motor to the gear case.
(10) Reconnect the conduit and power
leads to the motor. See Section VIII
and refer to the specific wiring
diagrams shipped with your hoist.
(11) Refill gear case with lubricant per
Section IV, Paragraph 4-2.
20
(12) Test hoist to ensure proper operation
per Section V, Paragraph 5-13.
5-10. INSPECTION OF MOTOR BRAKE AND
ACTUATING MECHANISM.
a) General Operation
electro-magnetically released, spring set nonadjustable brake. Torque is generated by
compressing a friction disk between the
stationary motor end bell and the spring loaded
brake armature. The friction disk is fixed to the
motor shaft and rotates with the motor shaft.
When the magnet coil is energized, the
armature plate is pulled across the air gap. The
friction disk is carried by a splined hub that
permits axial movement when the brake is
released. This axial movement releases both
sides of the friction disk from their mating
stationary surfaces and allows the friction disk
to rotate freely when the brake is energized.
When power is removed from the magnetic
coil, the compression springs push the
armature against the friction disk and the other
side of the friction disk against the motor end
bell generating the torque necessary to stop
the hoist machinery and hold the load.
It will be necessary to compensate for the
friction disk wear when a greater amount of
hook movement (drift) is noticed when
stopping. There is no torque adjustment of the
brake. Friction disk wear can only be
compensated for by resetting air gap.
Figure 5-9. Motor Brake.
b) Friction Disk Inspection and Air Gap
Adjustment.
(1) Lower hook block to the floor and relieve
all load from ropes.
. The hoist brake is an
Page 21

(2) Make sure power to the hoist is off and
locked out.
(3) Remove the four (4) bolts attaching the
fan shroud to the motor and remove the
fan shroud. See Figure 5-9.
(4) Carefully roll the large O-ring from the
groove over the air gap back toward the
magnet body. Do not excessively stretch
this O-ring.
(5) Measure the air gap using feeler gages.
If the air gap exceeds the maximum
value shown in Table 5-1, the air gap
must be reset.
(6) To measure the thickness of the friction
disk, it is necessary to remove the brake
body from the motor end bell. Remove
the three (3) brake mounting bolts and
draw the brake body away from the
friction disk. Carefully set the brake body
down on the motor shaft directly in front
of the fan. Draw the friction disk away
from the end bell and measure the
thickness over the friction surfaces. If the
friction disk thickness is less than the
minimum shown in Table 1, it must be
replaced. See Section IX, Figure 9-10. If
the friction disk thickness is within the
allowable, reassemble the brake body to
the motor end bell and torque the
mounting bolts to the value shown in
Table 5-1. Whenever the friction disk is
replaced, it is necessary to reset the air
gap.
Hoist "B" Frame "C" Frame
Mounting Bolt
Torque
Nominal Air Gap
Maximum Air Gap
Minimum Brake
Disk Thickness
Table 5-1. Motor Brake Data.
(7) To reset the air gap, begin by releasing
the (3) mounting bolts 1/2 turn. Turn the
hollow spacer bolts into the magnet body
approximately 1/4 turn. Retighten all
three mounting screws. Measure the air
gap at a minimum of three places around
the circumference. Threading the hollow
spacer bolts into the magnet body will
decrease the air gap while backing these
spacer bolts out of the magnet body will
increase the air gap. Repeat this step as
necessary until the required air gap is
18 ft-lbs. 18 ft-lbs.
0.016 in. 0.016 in.
0.031 in. 0.035 in.
0.453 in. 0.472 in.
achieved. The air gap must be the same
all the way around the brake. Once the
air gap is correct, torque the mounting
bolts to the value shown in Table 5-1.
(8) Replace the large O-ring over the air gap
and reassemble the fan shroud to the
motor.
(9) Test hoist per Section V, Paragraph 5-13
to ensure proper brake operation.
c) Brake Disassembly
(1) Lower hook block to the floor and relieve
all load from ropes.
(2) Make sure power to the hoist is off and
locked out.
(3) Remove the four (4) bolts attaching the
fan shroud to the motor and remove the
fan shroud. See Figure 5-9.
(4) Remove the snap ring behind the plastic
fan. Carefully remove the fan from the
motor shaft. Remove the snap ring in
front of where the fan was mounted.
(5) Disconnect the two wires from the
terminal block on the magnetic body.
(6) Remove the three mounting bolts that
attach the brake body to the motor end
bell and remove the brake body from the
motor. Remove the friction disk from the
motor shaft.
(7) Clean and inspect all components and
working surfaces. Replace all damaged
or worn components as necessary.
Measure friction disk thickness and
replace if less than the minimum
thickness shown in Table 5-1.
d) Brake Re-assembly
(1) Install the friction disk on the splined hub.
The friction disk must slide on the splined
hub and seat against the end bell of the
motor.
(2) Install the brake body to the motor end
bell using the three (3) mounting bolts.
The air gap must be reset as described in
Section V, Paragraph 5-10.b. Torque the
mounting bolts to the values shown in
Table 5-1. Install the large O-ring in the
groove over the air gap. Ensure this Oring is not pinched in the air gap.
.
.
21
Page 22

(3) Connect the brake leads to the terminal
block on the brake body.
(4) Install the forward fan mounting retaining
ring and install the fan. Install the rear
retaining ring. Install the fan shroud and
bolts.
(5) Test hoist per Section V, Paragraph 5-13.
5-11. INSPECTION OF HOIST TRAVERSE
DRIVE.
Figure 5-10. Traverse Drive Arrangement.
a) General.
single flange wheels, two on each side of
the beam, carried directly by the hoist
frame. These wheels rotate on sealed ball
bearings supported by fixed pins. Pinions
drive two opposing wheels with gear teeth
cut into the flange. Both pinions are
mounted on a hexagonal drive shaft
supported by sealed ball bearings at each
hoist side. The pinions are held in place by
means of clamp collars. The drive shaft
passes through one hoist side and is driven
by a single reduction hollow shaft gear
reducer.
b) Ensure that the hoist is properly fitted to the
beam. The hoist must be centered on the
beam with clearance between the sides of
the bottom of the beam flange and the
inside faces of the wheel flanges. Proper
clearance must exist along the entire length
of beam that the hoist can traverse. An
amount of 3/32 to 1/8 inch clearance per
side is recommended for a total of 3/16 to
1/4 inch wider than the beam flange. If too
little or too much clearance is determined,
adjust trolley per Section II, Paragraph 2-2.
c) Inspect wheel treads, flanges, and gear
teeth for wear. Check for adequate
lubrication (WG, Section IV, Paragraph 4-7)
on the wheel gear and pinion mesh. Check
wheel bearings for any signs of wear,
including rough rotation and signs of
lubricant leakage. Replace all damaged or
22
The traverse drive consists of four
missing items. Wheels must always be
changed in opposing pairs and drive
wheels should be changed when the drive
pinions are replaced.
CAUTION
Ensure that the cross shaft is properly
positioned and locked into place by
means of the clamp collars. Failure to
do so may allow the drive shaft to
contact the rope on the rope drum (B
frame) or the hoist gearcase (C frame
hoist).
d) Examine the drive pinions, cross shaft, and
cross shaft bearings. Check pinions for
gear tooth wear and proper alignment with
wheel gear. A spacer washer between the
cross shaft bearings and the pinion aligns
the gear mesh. Clamp collars hold the
pinions and spacer washers tight against
the bearings. Verify that the clamp collars
are tight on the cross shaft. If it is
necessary to adjust or reset the clamp
collars, verify that the hex shaft surface is
free of mechanical damage and oil before
tightening the clamp collars. Drive pinions
must be replaced as sets and should be
replaced along with the drive wheels. The
cross shaft bearings are sealed for life and
should be replaced at any sign of
mechanical wear or lubricant leakage.
e) Inspect the traverse gearbox and motor.
Look for signs of rough operation,
mechanical damage or lubricant leaks.
Inspect the hollow bore and hexagonal
drive shaft for wear. Verify that the four
bolts that hold the gearbox to the trolley
frame and the four bolts that hold traverse
motor to the gearbox are all present and
tight. Replace and tighten as necessary.
The factory recommends complete
replacement of the traverse gearbox.
However, gearbox service may be
available from you local authorized Yale
repair center.
5-12. TESTING BLOCK OPERATED LIMIT
SWITCH.
a) General.
a secondary upper limit switch actuated
when the lower block contacts the limit
switch weight. The rotary geared limit
switch (screw type limit switch) is the
primary upper limit switch and must be
temporarily disconnected to allow the block
operated limit switch to be tested.
The block operated limit switch is
Page 23

b) Procedure. Remove load from the hook. To
disconnect the geared limit switch refer to
Figure 7-2. Remove the limit switch cover
then loosen the two (2) screws holding the
locking plate in place. Allow the locking
plate to slide down and disengage from the
adjustment discs. Do not rotate the
adjustment discs.
CAUTION
Damage to the hoist may occur if the
block operated limit switch fails during
testing.
Damage can be avoided by immediately
releasing the pushbutton once the lower
block has traveled through the limit
switch weight.
The block operated limit switch may now be
tested by slowly and carefully raising the
hook until the limit switch weight contacts
the lower block. If the hook does not stop
when the limit switch weight is lifted,
immediately release the pushbutton before
damage to your hoist occurs. If the block
operated switch functions properly, proceed
by testing in the same manner with rated
load on the hook.
Once it has been determined that the block
operated limit switch is functioning properly,
the geared limit switch must be
reconnected and tested.
Position the lower block three inches (3”)
below the point where the block operated
limit switch is activated. The geared limit
switch shall be reconnected by sliding the
locking plate back into position ensuring
slots on adjustment discs are fully engaged
and tightening locking plate screws to 4 inlbs. (See Figure 7-2). The geared limit
switch must then be tested.
Test the geared limit switch by raising the
lower block until it stops. Ensure that the
geared limit switch stopped the hoist before
the block operated limit switch was
activated. If this is not the case see Section
VII, Paragraph 7-3 for adjusting the geared
limit switch. Replace geared limit switch
cover when testing and adjusting is
complete.
WARNING
Check limit switch operation carefully,
without load, before placing hoist in
service. If misadjusted, SEVERE
DAMAGE AND/OR A DROPPED LOAD
COULD RESULT. Allow 3” for hook drift
in both directions. Never allow less than
two (2) complete wraps of rope on drum
with hook in lowest position.
5-13. TESTING HOIST.
a) General.
accordance with ANSI B30.16-2 and this
manual. Before placing hoist in service,
hoist should be tested to insure safe
operation when hoist has been
disassembled and reassembled. To test,
suspend hoist from an overhead supporting
member of sufficient strength to support the
weight of the hoist and the rated load.
Connect hoist to power supply as shown on
hoist nameplate and perform the checks
listed in b) and c) below.
b) Check hoist as outlined in PRE-
OPERATION CHECKS, SECTION II,
Paragraph 2-4.
c) Check hoist with rated load.
(1) Attach rated load to lower hook.
(2) Depress “UP” push button and raise
(3) Depress “DOWN” push button, lower
If load drifts downward slowly in step 2 or 3 above,
motor brake requires adjustment – see Motor Brake
Adjustment – SECTION VII, Paragraph 7-1.
Testing shall be performed in
load. When push button is released,
hoist should stop immediately and hold
load at that level.
load a short distance and release
button. Hoist should stop immediately
and hold load at that level.
NOTE:
23
Page 24

SECTION VI – TROUBLE SHOOTING
6-1. GENERAL. This section contains possible
causes and solutions to common hoist problems.
Please attempt to remedy your hoist problems by
following these steps before contacting the factory.
Whenever servicing electrical components be sure
to shut off and lock out power following proper
lockout/tagout procedures.
SECTION VI – TROUBLE SHOOTING
TROUBLE PROBABLE CAUSE REMEDY
6-1 Hoist Will Not
Operate.
6-2 Hook Moves in
Wrong Direction.
6-3 Hook Will Raise
But Not Lower.
a. No power to hoist.
b. Wrong Voltage.
c. Loose or broken wire
connections in hoist electrical
system.
d. Contactor assembly not
functioning.
e. No control voltage.
f. Motor burned out.
a. Reverse phasing on three-
phase hoists.
b. Hoist wired incorrectly.
a. Lower electrical circuit open.
b. Contactor assembly not
functioning
c. Down, push button is
inoperative.
WARNING
Working in or near exposed energized
electrical equipment presents the
danger of electric shock.
TO AVOID INJURY:
DISCONNECT POWER AND IMPLEMENT
LOCKOUT/TAGOUT PROCEDURE BEFORE
REMOVING COVER OR SERVICING THIS
EQUIPMENT.
a. Check switches, circuit breakers or fuses and
connections in power supply lines. Check power
collectors.
b. Check voltage required on motor data plate
against power supply.
c. Shut off and lock out power supply; remove
electrical cover on hoist and check wiring
connections. Also check connections in push
button station and limit switches.
d. See that necessary jumper wires are properly
installed. Verify that the contactor armatures are
free to move. If binding occurs, replace
contactor. Check for burned out contactor coils.
e. Check transformer fuse. If blown, check for
grounding and/or shorts in the push button
station. Check the transformer coil for signs of
overheating. Replace transformer if burned out.
Verify the transformer secondary is the same
voltage as the coils to which it is connected.
f. Replace motor. Check input power supply.
Check hoist motor connections.
a. Interchange any two power supply line leads.
Refer to Section II, Paragraph 4.b.
b. Check wiring connections with appropriate
wiring diagram.
a. Check for loose connections. See that necessary
jumper wires are properly installed on contactor.
b. See that necessary jumper wires are properly
installed. Verify that the contactor armatures are
free to move. If binding occurs, replace contactor.
Check for burned out contactor coils.
c. Check push button contacts and wires.
24
Page 25

SECTION VI – TROUBLE SHOOTING
TROUBLE PROBABLE CAUSE REMEDY
6-4 Hook Will Lower,
But Not Raise.
6-5 Hoist Will Not
Lift Rated Load.
6-6 Hoist Motor
Overheats.
6-7 Load Drifts
Excessively
When Hoist is
Stopped.
6-8 Hoist Operates
Intermittently.
a. Excessive load.
b. Hoist electrical circuit open.
c. Contactor assembly not
functioning.
d. Up, down button inoperative.
a. Low voltage.
a. Excessive load.
b. Excessive duty-cycle.
c. Wrong voltage or frequency.
d. Defective motor or worn
bearings in hoist frame.
e. Brake not adjusted correctly.
a. Excessive Load.
b. Motor brake not holding.
a. Collectors make poor contact.
Loose connections.
b.
a. Reduce loading to rated load of hoist as shown on
nameplate.
b. Check for loose connections. See that necessary
jumper wires are properly installed on contactor.
c. See that necessary jumper wires are properly
installed. Verify that the contactor armatures are
free to move. If binding occurs, replace contactor.
Check for burned out contactor coils.
d. Check push button contacts and wires.
a. See that the power supply current is the same
voltage listed on motor data plate. Check hoist
motor connections. Check size of power supply
lines.
a. Reduce loading to rated load as shown on
nameplate.
b. Reduce frequency of lifts or amount of jogging.
c. Check current rating on motor data plate against
power supply. Check hoist and inspect for
defective, worn or damaged parts.
d. Disassemble hoist and inspect for defective, worn
or damaged parts.
e. Adjust brake per Section VII, Paragraph 7-1.
a. Reduce loading to rated load as shown on
nameplate.
b. With No Load, check hoist for drift. If drifting is
excessive, inspect motor brake (Section V,
Paragraph 5-10) and adjust as outlined in Section
VII, Paragraph 7-1.
a. Check collectors for free movement of spring arm,
weak spring or electrical connections.
b. Check all wiring for loose connections.
SECTION VII – ADJUSTMENTS
7-1. MOTOR BRAKE ADJUSTMENT. These
brakes are designed so that adjustment is seldom
required. If, after a period of service, the load hook
“drifts” downward more than usual for your hoist
before coming to a stop, the motor brake may
require adjustment to compensate for brake disc
wear.
WARNING
Check to be certain main power switch
is locked in open position (OFF) before
removing brake cover.
Refer to Figure 5-9 and proceed as outlined in
Section V, Paragraph 5-10.
7-2. BLOCK OPERATED LIMIT SWITCH. The
block operated limit stop, furnished as standard
equipment, is non-adjustable and designed to stop
the lower block at the safest high point of travel to
eliminate any possibility of double-blocking. When
the safest high point is reached, the limit switch
automatically stops hook travel.
7-3. GEARED ROTARY LIMIT SWITCH
ADJUSTMENT. The geared rotary type limit switch
is standard equipment and is located on the drum
end opposite the gearcase end.
25
Page 26

This limit switch has a rotary screw driven by a gear
reduction that is coupled to the end of the drum
shaft. Adjustment discs operate the contacts of
separate switches, one for the hoisting circuit and
one for the lowering circuit. The switch assembly
must be wired in accordance with the appropriate
wiring diagram, which is shipped with the hoist.
Instructions for adjusting limit switch are inside
cover and are repeated below (see Figure 7-2).
SWITCH LOCKING ADJUSTMENT SWITCH
PLATE DISC
Figure 7-2. Screw-Type Limit Switch Adjustment
(Wires Not Shown For Clarity.)
WARNING
Be certain that electrical power supply
is OFF and locked in the open position
before removing limit switch cover.
a) Remove four screws and lift off switch
cover.
b) Loosen locking plate screws. Slide locking
plate away from adjustment disc.
c) Turn proper adjustment disc (right for up,
left for down) toward switch to reduce hook
travel or away from switch to increase hook
travel.
d) Slide locking plate back into position
ensuring slots on adjustment discs are fully
engaged, tighten locking plate screws to 4
in-lbs.
e) Replace cover.
f) Carefully check limit switch operation
without load before placing hoist in service.
If misadjusted, repeat steps above. Allow 3”
for hook drift in both directions. Never allow
less than two (2) complete wraps of rope
on drum with hook in lowest position.
WARNING
Check limit switch operation carefully,
without load, before placing hoist in
service. If misadjusted, SEVERE
DAMAGE AND/OR A DROPPED LOAD
COULD RESULT. Allow 3” for hook drift
in both directions. Never allow less than
two (2) complete wraps of rope on drum
with hook in lowest position.
Provide a light film of MPG grease (Paragraph 4-7)
on gear of both limit switches.
7-4. SHORTENING OF PUSHBUTTON CABLE.
WARNING
Be certain that electrical power supply
is OFF and locked in the open position
before attempting shortening of push
button cable.
a) Loosen screws at cable connectors and
clamps at top of cable.
b) Adjust steel support cable to proper length
and tighten screws.
c) Loosen upper cable grip and pull excess
cable into connection box at hoist.
d) Tighten cable grip and cut off excess cable.
e) Strip cable sheath and connect wires with
the same type of terminals previously
furnished (care must be taken to match
previous wire color coding with wire
markers in accordance with wiring diagram
furnished with hoist.)
SECTION VIII – WIRING DIAGRAMS
8-1. GENERAL. Comprehensive wiring diagrams for
Yale electric hoists have been omitted from this
book because of the many possible variations. This
is due to different currents and types of electrical
components used in their construction. Figures 8-1
and 8-2 are examples of typical two-speed hoist
and trolley wiring diagrams respectively. However,
please consult the exact wiring diagrams for your
hoist. A print of the correct wiring diagram for each
hoist is furnished as a separate insert and shipped
with the hoist. We suggest you carefully file the
wiring diagram with this book for future reference.
26
Page 27

Figure 8-1. Elementary Wiring Diagram for a Two-Speed Hoist and Two-Speed Trolley with TAS, Hoist
Block Operated Limit Switch, Geared Upper & Lower Limit Switches, and Optional Fuses.
27
Page 28

Figure 8-2. Component Diagram for a Two-Speed Hoist and Two-Speed Trolley with TAS, Hoist Block
Operated Limit Switch, Geared Upper & Lower Limit Switches, and Optional Fuses.
28
Page 29

SECTION IX – PARTS LIST
9-1. GENERAL. The parts lists and illustrations in
this section of the manual cover parts for models of
Yale “Global King” Electric hoists. A typical hoist is
shown as the basis for the exploded parts
illustrations; therefore, certain variations may occur
from the information given. For this reason, always
give the Hoist Serial Number, Catalog Number,
Motor Horsepower, Voltage, Phase, Frequency and
Capacity of Hoist when ordering parts.
Yale “Global King” Hoists are built in two basic
frame sizes, “B” Frame and “C” Frame. To
determine the size of your hoist, measure the width
of the gearcase (see Figure 4-2.) The “B” Frame’s
gearcase has a width of 11 3/4” and the “C” Frame
has a gearcase width of 14 1/2”.
Certain parts of your hoist will, in time, require
replacement under normal wear conditions. It is
suggested that these parts be purchased for your
hoist as spares for future use. These parts are
indicated by a (†) symbol at the side of the parts
reference numbers.
The numbers assigned to parts of our
various assemblies in our parts list are not
the part numbers used in manufacturing the
part. They are identification numbers, that
when given with the model number, permit
us to identify, select or manufacture, and
ship the correct part needed.
WHEN ORDERING PARTS OR INFORMATION
ON THIS EQUIPMENT, ALWAYS INCLUDE
MODEL AND SERIAL NUMBER ON ORDER.
WARNING
Using “Commercial” or other manufacturer’s parts to repair Global King
Hoists may cause load loss.
TO AVOID INJURY:
Use only Yale Hoist supplied parts. Parts
may look alike but Yale Hoist parts are
made of specific materials or processed to
achieve specific properties
LIST OF PART ILLUSTRATIONS
TITLE FIGURE No. PAGE No.
Hoist Drum, Drum Frame, Gearcase, Motor, Rope Guide, and Limit Switch 9-1 30
Hoist Gearing 9-2 32
Motor Driven Trolley Frame and Drive 9-3 34
Lower Block Assembly 9-4 36
Upper Block Assembly 9-5 38
“B” Frame Rope and Dead End Assembly 9-6 39
“C” Frame Rope and Dead End Assembly 9-7 40
Block Operated Limit Switch Assembly 9-8 40
Rope Guide Assembly 9-9 42
Hoist Motor Brake 9-10 43, 44
“B” Trolley Drive Gear Reducer 9-11 45
“C” Trolley Drive Gear Reducer 9-12 46
29
Page 30

FIGURE 9-1. Hoist Drum, Drum Frame, Gearcase, Motor, Rope Guide, and Screw Type Limit Switch.
“B” Frame: Hoist Components for Figure 9-1.
Ref.
No.
1 -
GHB-101A
GHB-101B
GHB-101C
2 GHB-102
3 GHB-103
4 GHB-104
5 GHB-105
6 GHB-106
7 GHB-107
8 GHB-108
9 GHB-109
10 GHB-110
11 GHB-111
12 GHB-112
13 GHB-113
14 GHB-114
15 GHB-115
16 GHB-116
17 GHB-117
18 GHB-118
19 GHB-119
20 GHB-120
21 GHB-121
22 GHB-122
23 GHB-123
24 GHB-124
25 -
GHB-125A
GHB-125B
26 GHB-900
27 GHB-127
Part
Number Description
7 ½ HP Hoist Motor (2-Speed with Brake and Fan) Note: See Figure 9-10 for Parts. 1
230 volt, 3-phase, 60 Hertz
460 volt, 3-phase, 60 Hertz
575 volt, 3-phase, 60 Hertz
Heavy Hex Nut (1/2-13) 2
Lockwasher (1/2) 2
High Strength Hex Head Bolt – ASTM A325 (1/2-13 x 2 1/2) 2
Self-Locking Nut, ESNA (3/4-10) 6
High Strength Hex Head Bolt – Grade 5 (3/4-10 x 2 1/2) 6
Heavy Hex Self-Locking Nut (5/8-11) 4
Gearcase 1
Gearcase Gasket 1
Gearcase Cover 1
Lockwasher, Hi-Collar (1/2) 9
Socket Head Cap Screw (1/2-13 x 2 1/4) 7
Hex Shoulder Bolt (3/8-16 x 2 Long, 1/2 shoulder) 2
Vent Plug with Sealant (1/2-14 NPT) 1
Pipe Plug (1/2-14 NPT) 2
Heavy Hex Lock Nut (1/2-13) 2
Hardened Flat Washer (1/2) 2
Gearcase End Drum Frame 1
Hex Head, Grade 5 Bolt (1/2-13 x 1 1/4) 4
Hardened Flat Washer (5/8) 4
Thin Hex Self-Locking Nut – Grade 5 (5/8-18) 4
Socket Head Cap Screw, Plated (7/16-14 x 1 1/4) 3
Lockwasher, Hi-Collar (7/16) 3
Rope Clamp 3
Drum 1
Drum 25’ Lift
Drum 40’ Lift
Rope Guide (See Figure 9-9 for Rope Guide and its components.) 1
Flange Mounted Ball Bearing 1
Qty.
Req’d.
30
Page 31

“B” Frame: Hoist Components for Figure 9-1.
Ref.
No.
28 GHB-128
29 GHB-129
30 GHB-130
31
32
33
34
35
36
Ref.
No.
1
2 GHC-102 Heavy Hex Nut (3/4-10) 2
3 GHC-103 Lockwasher (3/4) 2
4 GHC-104 High Strength Hex Head Bolt – Grade 5 (3/4-10 x 3 1/4) 2
5 GHC-105 Self-Locking Nut, ESNA (1-8) 6
6 GHC-106A Socket Head Cap Screw (1-8 x 3) 2
6 GHC-106B Socket Head Cap Screw (1-8 x 4) 2
7 GHC-107 Heavy Hex Self-Locking Nut (7/8-9) 4
8 GHC-108 Gearcase 1
9 GHC-109 Gearcase Gasket 1
10 GHC-110 Gearcase Cover 1
11 GHC-111 Lockwasher, Hi-Collar (5/8) 9
12 GHC-112 Socket Head Cap Screw (5/8-11 x 2 3/4) 7
13 GHC-113 Hex Shoulder Bolt (1/2-13 x 2 1/4 Long, 5/8 shoulder) 2
14 GHC-114 Vent Plug with Sealant (1/2-14 NPT) 1
15 GHC-115 Pipe Plug (1/2-14 NPT) 2
16 GHC-116 Heavy Hex Self-Locking Nut (3/4-10) 2
17 GHC-117 Hardened Flat Washer (3/4) 2
18 GHC-118 Gearcase End Drum Frame 1
20 GHC-117 Hardened Flat Washer (3/4) 4
21 GHC-121 Thin Hex Self-Locking Nut – Grade 5 (3/4-16) 4
22 GHC-122 Socket Head Cap Screw, Plated (7/16-14 x 1 1/4) 3
23 GHC-123 Lockwasher, Hi-Collar (7/16) 3
24 GHC-124 Rope Clamp 3
25 - Drum 1
GHC-125A Drum, 25’ Lift
26 GHC-900 Rope Guide (See Figure 9-9 for Rope Guide and its components.) 1
27 GHC-127 Flange Mounted Ball Bearing 1
28 GHC-128 Lockwasher, Hi-Collar (5/8) 4
29 GHC-129 Hex Head Bolt – Grade 5 (5/8-11 x 2 1/4) *Includes Ref. No. 30* 4
31 GHC-131 Outboard End Drum Frame 1
32 GHC-132 Limit Switch Bracket 1
33 GHC-133 Retaining Ring 1
34 GHC-134 Drum Shaft Insert for Geared Limit Switch 1
35 GHC-135 Geared Limit Switch 1
36
Part
Number Description
Lockwasher (7/16) 4
High Strength Hex Head Bolt – Grade 5 (7/16-14 x 1 1/2) 2
High Strength Hex Head Bolt – Grade 5 (7/16-14 x 1 3/4) 2
GHB-131 Outboard End Drum Frame 1
GHB-132 Limit Switch Bracket 1
GHB-133 Retaining Ring 1
GHB-134 Drum Shaft Insert for Geared Limit Switch 1
GHB-135 Geared Limit Switch 1
- Drum Frame Rod
GHB-136A Drum Frame Rod, 25’ Lift 2
GHB-136B Drum Frame Rod, 40’ Lift 2
“C” Frame: Hoist Components for Figure 9-1.
Part
Number Description
-
GHC-101A 230 volt, 3-phase, 60 Hertz
GHC-101B 460 volt, 3-phase, 60 Hertz
GHC-101C 575 volt, 3-phase, 60 Hertz
GHC-125B Drum, 40’ Lift
- Drum Frame Rod
GHC-136A Drum Frame Rod, 25’ Lift 2
GHC-136B Drum Frame Rod, 40’ Lift 2
15 HP Hoist Motor (2-Speed with Brake and Fan) Note: See Figure 9-10 for Parts. 1
Qty.
Req’d.
Qty.
Req’d.
31
Page 32

Figure 9-2. Hoist Gearing.
“B” Frame: Hoist Gearing for Figure 9-2.
Ref.
No.
GHB-200 Complete Hoist Gearcase Ass’y. - 94.4:1 Ratio (Incl. Ref Nos. 1-19+)
1 GHB-201 Oil Seal 1
2 GHB-202 Oil Seal 1
3 GHB-203 Stud 4
4 GHB-204 Nut - Hex (5/8-18) 4
5 GHB-205 Washer - Hardened (5/8) 8
6 GHB-206 Lock Nut - Hex, Thin, Grade 5 (5/8-18) 4
7 GHB-207 Ball Bearing 2
8 GHB-208 Motor Gear - 56 Teeth 1
9 GHB-209 Intermediate Pinion Shaft 1
10 GHB-210 Key - Chamfered 1
11 GHB-211 Ball Bearing 1
12 GHB-212 Drum Pinion Shaft 1
13 GHB-213 Intermediate Gear 1
14 GHB-214 Retaining Ring 1
15 GHB-215 Key - Hardened, Chamfered 2
16 GHB-216 Ball Bearing 1
17 GHB-217 Ball Bearing 1
18 GHB-218 Output Shaft and Drum Gear Assembly 1
19 GHB-216 Ball Bearing 1
Ref.
No.
GHC-200A Complete 10t Hoist Gearcase Ass’y. – 124.5:1 Ratio (Incl. Ref Nos. 1-19+)
GHC-200B Complete 7.5t Hoist Gearcase Ass’y. – 104.6:1 Ratio (Incl. Ref Nos. 1-19+)
1 GHC-201 Oil Seal 1
2 GHC-202 Oil Seal 1
3 GHC-203 Stud 4
4 GHC-204 Nut - Hex (3/4-16) 4
Part
Number Description
“C” Frame: Hoist Gearing for Figure 9-2.
Part
Number Description
Qty.
Req’d.
Qty.
Req’d.
32
Page 33

“C” Frame: Hoist Gearing for Figure 9-2.
Ref.
No.
5 GHC-205 Washer - Hardened (3/4) 8
6 GHC-206 Lock Nut - Hex, Thin, Grade 5 (3/4-16) 4
7 GHC-207 Ball Bearing 2
8 GHC-208 Motor Gear - 64 Teeth 1
9 - Intermediate Pinion Shaft 1
GHC-209A 10t Hoist - Intermediate Pinion Shaft
GHC-209B 7 1/2t Hoist – Intermediate Pinion Shaft
10 GHC-210 Key - Chamfered 1
11 GHC-211 Ball Bearing 1
12 - Drum Pinion and Gear Assembly 1
GHC-212A 10t Drum Pinion and Gear Assembly (Includes Ref. Nos. 12-15)
GHC-212B 7 1/2t Drum Pinion and Gear Assembly (Includes Ref. Nos. 12-15)
16 GHC-216 Ball Bearing 1
17 GHC-217 Ball Bearing 1
18 GHC-218 Output Shaft and Drum Gear Assembly 1
19 GHC-219 Ball Bearing 1
Part
Number Description
NOTES
Qty.
Req’d.
__________________________________________________________________________________
__________________________________________________________________________________
__________________________________________________________________________________
__________________________________________________________________________________
__________________________________________________________________________________
__________________________________________________________________________________
__________________________________________________________________________________
__________________________________________________________________________________
__________________________________________________________________________________
__________________________________________________________________________________
__________________________________________________________________________________
__________________________________________________________________________________
__________________________________________________________________________________
__________________________________________________________________________________
__________________________________________________________________________________
__________________________________________________________________________________
__________________________________________________________________________________
__________________________________________________________________________________
__________________________________________________________________________________
__________________________________________________________________________________
__________________________________________________________________________________
__________________________________________________________________________________
__________________________________________________________________________________
__________________________________________________________________________________
__________________________________________________________________________________
__________________________________________________________________________________
__________________________________________________________________________________
__________________________________________________________________________________
__________________________________________________________________________________
__________________________________________________________________________________
33
Page 34

Figure 9-3. Motor Driven Trolley Frame and Drive (“B” Frame Shown).
“B” Frame: Trolley Frame and Drive Components for Figure 9-3.
Ref.
No.
1 - Side Plate 1
GHB-301A Drum Side – 25’ Lift Frame
GHB-301B Drum Side – 40’ Lift Frame
2 - Side Plate 1
GHB-302A Drive Side – 25’ Lift Frame
GHB-302B Drive Side – 40’ Lift Frame
3 - Counterweight 1
GHB-303A Counterweight, 25’ Lift Frame
GHB-303B Counterweight, 40’ Lift Frame
4 GHB-304 Lockwasher (5/8) 2
5 GHB-305 Hex Head Bolt, Grade 5 (5/8-11 x 1 1/2) 2
6 - Alignment Bar 2
GHB-306A Alignment Bar, 4” Thru 14” Trolley Beam Flange Width
GHB-306B Alignment Bar, 14 1/8” Thru 20” Trolley Beam Flange Width
7 - Hex Cross Shaft 1
GHB-307A Hex Cross Shaft, 4” Thru 14” Trolley Beam Flange Width
GHB-307B Hex Cross Shaft, 14 1/8” Thru 20” Trolley Beam Flange Width
8 GHB-308 Motor (Specify HP, Phase, Voltage, Frequency, & Number of Speeds) 1
9 - Traverse Gear Reducer (See Figure 9-11 for Components) 1
GHB-309A 50 FPM
GHB-309B 75 FPM
10 GHB-310 Hex Head Bolt, Grade 5 (3/8-16 x 1) 4
11 GHB-311 Lockwasher (3/8) 4
12 GHB-312 Hex Head Bolt, Grade 5 (5/16-18 x 7/8) 4
Part
Number Description
Req’d
Qty.
34
Page 35

“B” Frame: Trolley Frame and Drive Components for Figure 9-3.
Ref.
No.
13 GHB-313 Lockwasher, (5/16) 4
14 - Threaded Rod 2
GHB-314A Threaded Rod, 4” Thru 14” Trolley Beam Flange Width
GHB-314B Threaded Rod, 14 1/8” Thru 20” Trolley Beam Flange Width
15 GHB-315 Heavy Hex Nut (3/4-10) 12
16 GHB-316 Flat Washer (3/4) 8
17 GHB-317 Hex Clamp Collar 2
18 GHB-318 Cross Shaft Pinion 2
19 GHB-319 Flat Washer 4
20 GHB-320 Hex Bore Ball Bearing 2
21 GHB-321 Driver Wheel (6 1/2” Diameter Tread) 2
22 GHB-322 Trailer Wheel (6 1/2” Diameter Tread) 2
23 GHB-323 External Retaining Ring 4
24 GHB-324 Ball Bearing 8
25 GHB-325 Internal Retaining Ring 4
26 GHB-326 Axle 4
27 GHB-327 External Retaining Ring 4
Ref.
No.
1 - Side Plate 1
GHC-301A Drum Side – 25’ Lift Frame
GHC-301B Drum Side – 40’ Lift Frame
2 - Side Plate 1
GHC-302A Drive Side – 25’ Lift Frame
GHC-302B Drive Side – 40’ Lift Frame
3 Counterweight 1
GHC-303A Counterweight, 25’ Lift Frame
GHC-303B Counterweight, 40’ Lift Frame
* GHC-303C Counterweight Mounting Cap *(Not Shown) 4
4 GHC-304 Lockwasher (3/4) 4
5 GHC-305 Hex Head Bolt, Grade 5 (3/4-10 x 2) 2
6 GHC-306 Alignment Bar 2
7 GHC-307 Hex Cross Shaft 1
8 GHC-308 Motor (Specify HP, Phase, Voltage, Frequency, & Number of Speeds) 1
9 - Traverse Gear Reducer (See Figure 9-12 for Components) 1
GHC-309A 50 FPM
GHC-309B 75 FPM
10 GHC-310 Hex Head Bolt, Grade 5 (3/8-16 x 1) 4
11 GHC-311 Lockwasher (3/8) 4
12 GHC-312 Socket Head Cap Screw (5/16-18 x 1) 4
13 GHC-313 Lockwasher, (5/16) 4
14 GHC-314 Threaded Rod 2
15 GHC-315 Heavy Hex Nut (3/4-10) 12
16 GHC-316 Flat Washer (3/4) 8
17 GHC-317 Hex Clamp Collar 2
18 GHC-318 Cross Shaft Pinion 2
19 GHC-319 Flat Washer 4
20 GHC-320 Hex Bore Ball Bearing 2
21 GHC-321 Driver Wheel (8” Diameter Tread) 2
22 GHC-322 Trailer Wheel (8” Diameter Tread) 2
23 GHC-323 External Retaining Ring 4
24 GHC-324 Ball Bearing 8
25 GHC-325 Internal Retaining Ring 4
26 GHC-326 Axle 4
27 GHC-327 External Retaining Ring 4
Part
Number Description
“C” Frame: Trolley Frame and Drive Components for Figure 9-3.
Part
Number Description
Req’d
Req’d
Qty.
Qty.
35
Page 36

Figure 9-4. Lower Block Assembly.
“B” Frame: Lower Block Components for Figure 9-4.
Ref.
No.
GHB-400Y Lower Block Assembly (Includes Ref. Nos. 1-17) 1
1 GHB-401 Lower Block Frame – Hook Beam 1
2 GHB-402 Hook 1
3 GHB-403 Thrust Bearing 1
4 GHB-404 Castle Nut 1
5 GHB-405 Spring Pin 1
6 GHB-406Y Sheave Covers - Yellow 4
7 GHB-407 Flat Head Socket Cap Screws (1/4-20 x 1/2) 4
8 GHB-408 Sheave Pin 1
9 GHB-409 Sheaves 2
10 GHB-410 Ball Bearings 2
11 GHB-411 Internal Retaining Rings 2
12 GHB-412 External Retaining Rings 2
13 GHB-413 Socket Head Cap Screws (1/4-20 x 2 3/4 Long) 8
14 GHB-414 Hi-Collar Lockwashers (1/4) 8
15 GHB-415 Self-Locking Nuts (1/4-20) 8
16 GHB-416 Capacity Plates 2
17 GHB-417 Hex Washer Head Self-Tapping Screws (5/16-18 x 1 1/2) 4
Ref.
No.
GHC-400Y10 10t Lower Block Assembly (Includes Ref. Nos. 1-17) 1
GHC-400Y7.5 7 1/2t Lower Block Assembly (Includes Ref. Nos. 1-17) 1
1 GHC-401 Lower Block Frame – Hook Beam 1
2 GHC-402 Hook 1
3 GHC-403 Thrust Bearing 1
4 GHC-404 Castle Nut 1
5 GHC-405 Spring Pin 1
6 GHC-406Y Sheave Covers 4
Part
Number Description
“C” Frame: Lower Block Components for Figure 9-4.
Part
Number Description
Req’d
Req’d
Qty.
Qty.
36
Page 37

“C” Frame: Lower Block Components for Figure 9-4.
Ref.
No.
7 GHC-407 Flat Head Socket Cap Screws (1/4-20 x 1/2) 4
8 GHC-408 Sheave Pin 1
9 GHC-409 Sheaves 2
10 GHC-410 Ball Bearings 2
11 GHC-411 Internal Retaining Rings 2
12 GHC-412 External Retaining Rings 2
13 GHC-413 Socket Head Cap Screws (1/4-20 x 3 1/4 Long) 8
14 GHC-414 Hi-Collar Lockwashers (1/4) 8
15 GHC-415 Self-Locking Nuts (1/4-20) 8
16 - Capacity Plates 2
GHC-416A 10t Capacity Plates
GHC-416B 7 1/2t Capacity Plates
17 GHC-417 Hex Washer Head Self-Tapping Screws (5/16-18 x 1/2) 4
Part
Number Description
NOTES
Qty.
Req’d
__________________________________________________________________________________
__________________________________________________________________________________
__________________________________________________________________________________
__________________________________________________________________________________
__________________________________________________________________________________
__________________________________________________________________________________
__________________________________________________________________________________
__________________________________________________________________________________
__________________________________________________________________________________
__________________________________________________________________________________
__________________________________________________________________________________
__________________________________________________________________________________
__________________________________________________________________________________
__________________________________________________________________________________
__________________________________________________________________________________
__________________________________________________________________________________
__________________________________________________________________________________
__________________________________________________________________________________
__________________________________________________________________________________
__________________________________________________________________________________
__________________________________________________________________________________
__________________________________________________________________________________
__________________________________________________________________________________
__________________________________________________________________________________
__________________________________________________________________________________
__________________________________________________________________________________
__________________________________________________________________________________
__________________________________________________________________________________
__________________________________________________________________________________
__________________________________________________________________________________
__________________________________________________________________________________
__________________________________________________________________________________
37
Page 38

Figure 9-5. Upper Block Assembly.
“B” Frame: Upper Block Components for Figure 9-5.
Ref.
No.
1 GHB-501 Upper Block Yoke 1
2 GHB-502 Key Plate 1
3 GHB-503 Hex Head Bolt (3/8-16 x 5/8) 2
4 GHB-504 Sheave Pin 1
5 GHB-505 Lockwasher (3/8) 4
6 GHB-506 Hex Head Bolt, Grade 5 (3/8-16 x 3) 2
7 GHB-507 Spacer Washer 2
8 GHB-508 Sheave 1
9 GHB-509 Ball Bearing 1
10 GHB-510 Internal Retaining Ring 1
11 GHB-511 Spacer Washer 6
12 GHB-512 Self-Locking Nut (3/8) 2
13 GHB-513 Yoke Pin 1
14 GHB-514 Cotter Pin 2
15 GHB-515 Flanged Bushing 1
Ref.
No.
1 GHC-501 Upper Block Yoke 1
2 GHC-502 Key Plate 1
3 GHC-503 Socket Head Cap Screw (3/8-16 x 3/4) 2
4 GHC-504 Sheave Pin 1
5 GHC-505 Lockwasher (3/8) 4
6 GHC-506 Socket Head Cap Screw (3/8-16 x 4) 2
7 GHC-507 Spacer Washer 2
8 GHC-508 Sheave 1
9 GHC-509 Ball Bearing 1
Part
Number Description
GHB-500 “B” Frame Hoist Upper Block Assembly (Includes Ref. Nos. 1-10) 1
“C” Frame: Upper Block Components for Figure 9-5.
Part
Number
GHC-500 “C” Frame Hoist Upper Block Assembly (Includes Ref. Nos. 1-10) 1
Description
Qty.
Req’d
Qty.
Req’d
38
Page 39

“C” Frame: Upper Block Components for Figure 9-5.
Ref.
No.
10 GHC-510 Internal Retaining Ring 1
11 GHC-511 Spacer Washer 4
12 GHC-512 Self-Locking Nut (3/8) 2
13 GHC-513 Yoke Pin 1
14 GHC-514 Cotter Pin 2
Part
Number Description
NOTES
Qty.
Req’d
__________________________________________________________________________________
__________________________________________________________________________________
__________________________________________________________________________________
__________________________________________________________________________________
__________________________________________________________________________________
Figure 9-6. “B” Frame Rope and Dead End Assembly.
“B” Frame: Rope and Dead End Assembly Components for Figure 9-6.
Ref.
No.
1 GHB-601 Dead End Yoke 1
2 GHB-602 Washer (1” Diameter, #18 Gauge) 4
3 GHB-603 External Retaining Ring 2
4 GHB-604 Dead End Swage Socket Pin 1
5 - Wire Rope and Swaged End Assembly 1
GHB-605A Rope Assembly for 25’ lift
GHB-605B Rope Assembly for 40’ Lift
6 GHB-606 Dead End Pin 1
7 GHB-607 Key Plate 1
8 GHB-608 Socket Head Cap Screw (5/16-18 x 3/4) 1
9 GHB-609 Lockwasher (5/16) 1
Part
Number Description
GHB-600 “B” Frame Hoist Rope and Dead End Assembly
Req’d
Qty.
39
Page 40

Figure 9-7. “C” Frame: Rope and Dead End Assembly.
“C” Frame: Rope and Dead End Assembly Components for Figure 9-7.
Ref.
No.
1 GHC-701 Cotter Pin 2
2 GHC-702 Dead End Swaged Socket Pin 1
3 GHC-703 Flanged Bushing 2
4 GHC-704 Washer (1 1/2" Diameter, #10 Gauge) 2
5 - Wire Rope and Swaged End Assembly 1
GHC-705A Rope Assembly for 25’ lift
GHC-705B Rope Assembly for 40’ Lift
Part
Number Description
GHC-700 “C” Frame Hoist Rope and Dead End Assembly
Qty.
Req’d
40
Figure 9-8. Block Operated Limit Switch Assembly (“B” Frame shown).
Page 41

“B” Frame Block Operated Limit Switch Components for figure 9-8.
Ref.
No.
1 GHB-801 Limit Switch 1
2 GHB-802 Pan Head Machine Screw, Phillips (#10-32 x 1 1/4 Long) 2
3 GHB-803 Lockwasher (#10) 2
4 GHB-804 Limit Switch Bracket 1
5 GHB-805 Limit Switch Rod 1
6 GHB-806 Dowel Pin (3/16 Diameter x 1/2 Long) 1
7 GHB-807 S-Hook (1/2 Eye) 1
8 GHB-808 Coil Chain 1
9 GHB-809 Hex Head Bolt (1/4-20 x 1 3/4) 2
10 GHB-810 1/4 Diameter Flat Washer 2
11 GHB-811 Limit Switch Weight Half 2
12 GHB-812 Self-Locking Nut (1/4-20) 2
13 GHB-813 Hex Socket Head Cap Screw (#10-32) 2
14 GHB-814 Limit Switch Hub 1
15 GHB-815 Hex Head Bolt (1/4-20 x 1 1/4) 2
16 GHB-812 Self-Locking Nut (1/4-20) 2
Part
Number
GHB-800 “B” Frame Hoist Limit Switch Assembly (Includes Ref. Nos. 1-16)
Description
“C” Frame Block Operated Limit Switch Components for Figure 9-8.
Ref.
No.
1 GHC-801 Limit Switch 1
2 GHC-802 Pan Head Machine Screw, Phillips (#10-32 x 1 1/4 Long) 2
3 GHC-803 Lockwasher (#10) 2
4 GHC-804 Limit Switch Bracket 1
5 GHC-805 Limit Switch Rod 1
6 GHB-806 Dowel Pin (3/16 Diameter x 1/2 Long) 1
7 GHB-807 S-Hook (1/2 Eye) 1
8 GHB-808 Coil Chain 1
9 GHB-809 Hex Head Bolt (1/4-20 x 1 3/4) 2
10 GHB-810 1/4 Diameter Flat Washer 2
11 GHB-811 Limit Switch Weight Half 2
12 GHB-812 Self-Locking Nut (1/4-20) 2
13 GHB-813 Hex Socket Head Cap Screw (#10-32) 2
14 GHB-814 Limit Switch Hub 1
15 GHC-815 Hex Head Bolt (1/2-13 x 2) 2
16 GHC-816 Self-Locking Nut (1/2-13) 2
17 GHC-817 Lockwasher (1/2) *Not Shown* 2
18 GHC-818 Flat Washer (1/2) *Not Shown* 2
Part
Number
GHC-800 “B” Frame Hoist Limit Switch Assembly (Includes Ref. Nos. 1-16)
Description
Qty.
Req’d
Qty.
Req’d
41
Page 42

Figure 9-9. Rope Guide Assembly
“B” Frame Rope Guide Components for Figure 9-9.
Ref.
No.
GHB-900 “B” Frame Rope Guide Assembly (Includes Ref. Nos. 1-9) 1
1 GHB-901 Rope Guide Frame (Machined) 1
2 GHB-902 Plastic Shroud 1
3 GHB-903 Extension Spring 1
4 GHB-904 Shoulder Bolt (1/4-20 x 1 1/2 Long, 5/16 Shoulder) 2
5 GHB-905 Compression Spring 2
6 GHB-906 Grease Fitting 1
7 GHB-907 Anti-Rotation Clip 1
8 GHB-908 Lockwasher (1/4) 4
9 GHB-909 Socket Head Cap Screw (1/4-20 x 3/4) 4
Part
Number
Description
“C” Frame Rope Guide Components for Figure 9-9.
Ref.
No.
GHC-900
1 GHC-901 Rope Guide Frame (Machined) 1
2 GHC-902 Plastic Shroud 1
3 GHC-903 Extension Spring 1
4 GHC-904 Shoulder Bolt (5/16-18 x 1 1/2 Long, 3/8 Shoulder) 2
5 GHC-905 Compression Spring 2
6 GHC-906 Grease Fitting 1
7 GHC-907 Anti-Rotation Clip 1
8 GHC-908 Lockwasher (1/4) 4
9 GHC-909 Socket Head Cap Screw (1/4-20 x 3/4) 4
Part
Number
Description
“C” Frame Rope Guide Assembly (Includes Ref. Nos. 1-9) 1
Qty.
Req’d
Qty.
Req’d.
42
Page 43

Figure 9-10. Hoist Motor Brake.
“B” Frame: Hoist Brake Components for Figure 9-10.
Ref.
No.
Part
Number Description
Req’d.
Qty.
1 GHB-1001† Brake Disc 1
GHB-1002* Brake Fan Kit (Includes items 2 thru 7) 1
2 Fan 1
3 External Retaining Rings (Fan) 2
4 External Retaining Ring (Fan Hub) 1
5 Fan Hub 1
6 Key (Hub) 1
7 Key (Fan) 1
GHB-1008* Brake Hub Kit (Includes items 8 thru 11) 1
8
9
10
11
External Retaining Ring (Brake Hub) 1
Spacer 1
Key (Brake Hub) 1
Brake Hub 1
GHB-1012* Brake Hardware Kit (Includes items 12 thru 15) 1
12
13
14
Hollow Core Bolts 3
O-Ring 1
Bolts (Brake Mounting) 3
15 Springs 3
16 GHB-1016 Magnet Body (Includes GHB-1012 Hardware Kit) 1
GHB-1017* Fan Shroud Kit Includes items 17 and 18) 1
17 Fan Shroud 4
18 Bolt (Brake and Fan Shroud) 1
19 GHB-1019 Brake End Bell Assembly for 7.5/1.25 HP Motor 1
20 GHB-1020 Gearcase End Bell Assembly for 7.5/1.25 Motor (Not Shown) 1
21 Rotor Assembly for 7.5/1.25 HP Motor (Not Shown) 1
GHB-1021A
GHB-1021B
GHB-1021C
230 volt, 3-phase, 60 Hertz
460 volt, 3-phase, 60 Hertz
575 volt, 3-phase, 60 Hertz
22 Stator Assembly for 7.5/1.25 HP Motor (Not Shown) 1
GHB-1022A
GHB-1022B
GHB-1022C
230 volt, 3-phase, 60 Hertz
460 volt, 3-phase, 60 Hertz
575 volt, 3-phase, 60 Hertz
† Recommended Spare Part
*Duplicate part numbers indicate parts only sold together as a kit.
43
Page 44

Figure 9-10. Hoist Motor Brake.
“C” Frame: Hoist Brake Components for Figure 9-10.
Ref.
No.
Part
Number Description
Req’d.
Qty.
1 GHC-1001† Brake Disc 1
GHC-1002* Brake Fan Kit (Includes items 2,4 & 7) 1
2 Fan 1
3 N/A
4 External Retaining Ring (Fan Hub) 1
5 N/A
6 N/A
7 Key (Fan) 1
GHC-1008* Brake Hub Kit (Includes items 8 thru 11) 1
8
9
10
11
External Retaining Ring (Brake Hub) 1
Spacer 1
Key (Brake Hub) 1
Brake Hub 1
GHC-1012* Brake Hardware Kit (Includes items 12 thru 15) 1
12
13
14
Hollow Core Bolts 3
O-Ring 1
Bolts (Brake Mounting) 3
15 Springs 3
16 GHC-1016 Magnet Body (Includes GHC-1012 Hardware Kit) 1
GHC-1017* Fan Shroud Kit Includes items 17 and 18) 1
17 Fan Shroud 4
18 Bolt (Brake and Fan Shroud) 1
19 GHC-1019 Brake End Bell Assembly for 15 HP Motor 1
20 GHC-1020 Gearcase End Bell Assembly for 15 HP Motor (Not Shown) 1
21 Rotor Assembly for 15 HP Motor (Not Shown) 1
GHC-1021A
GHC-1021B
GHC-1021C
230 volt, 3-phase, 60 Hertz
460 volt, 3-phase, 60 Hertz
575 volt, 3-phase, 60 Hertz
22 Stator Assembly for 15 HP Motor (Not Shown) 1
GHC-1022A
GHC-1022B
GHC-1022C
230 volt, 3-phase, 60 Hertz
460 volt, 3-phase, 60 Hertz
575 volt, 3-phase, 60 Hertz
† Recommended Spare Part
* Duplicate part numbers indicate parts only sold together as a kit.
44
Page 45

Figure 9-11. “B” Frame Trolley Drive Gear Reducer.
“B” Frame Trolley Drive Gear Reducer Components for Figure 9-11.
Ref.
No.
GHB-309B “B” Gear Reducer, 20:1 Ratio – 75 FPM (Includes Ref. Nos. 1-25) 1
1 GHB-1101 Housing 1
2 GHB-1102 High Speed Bearing 1
3 GHB-1103 Slow Speed Bearing – Cone 2
4 GHB-1104 Slow Speed Bearing – Cup 2
5 GHB-1105 High Speed Spacer 1
6 GHB-1106 High Speed Ring 1
7 GHB-1107 High Speed Retaining Ring 1
8 GHB-1108 High Speed Cap (Closed) 1
9 GHB-1109 High Speed Gasket 2
10 GHB-1110 Slow Speed Gasket 2
11 GHB-1111 Slow Speed Key 1
12 GHB-1112 Pipe Plug, Socket Head, Coated and Plated 1/8-27 NPTF 6
13 GHB-1113 Vent Shield 1
14 GHB-1114 Drive Pin (#4 x 3/16 Stainless Steel) 2
15 GHB-1115 Slow Speed Cover (Standard) 1
16 GHB-1116 Slow Speed Cover (Special) 4
17 GHB-1117 Hex Head Cap Screw 5/16-18 x 7/8 Long Coated with Polylock 12
18 GHB-1118 High Speed Seal 1
19 GHB-1119 Slow Speed Seal 2
20 GHB-1120 Motor Adapter 1
21 GHB-1121 Hex Head Cap Screw 5/16-18 x 1 1/4 Long Coated with Polylock 4
22 GHB-1122 Hollow Slow Speed Shaft with Hex 1
23 Slow Speed Gear 1
GHB-1123A Slow Speed Gear for 20:1 Ratio
GHB-1123B Slow Speed Gear for 30:1 Ratio
24 High Speed Worm on Shaft 1
GHB-1124A High Speed Worm on Shaft for 20:1 Ratio
GHB-1124B High Speed Worm on Shaft for 30:1 Ratio
25 GHB-1125 Nameplate 1
Part
Number
GHB-309A “B” Gear Reducer, 30:1 Ratio – 50 FPM (Includes Ref. Nos. 1-25) 1
Description
Req’d
Qty.
45
Page 46

Figure 9-12. “C” Frame Trolley Drive Gear Reducer.
“C” Frame Trolley Drive Gear Reducer Components for Figure 9-12.
Ref.
No.
GHC-309A “C” Gear Reducer, 30:1 Ratio – 50 FPM (Includes Ref. Nos. 1-25) 1
GHC-309B “C” Gear Reducer, 20:1 Ratio – 75 FPM (Includes Ref. Nos. 1-25) 1
1 GHC-1201 Housing 1
2 GHC-1202 High Speed Bearing 1
3 GHC-1203 Slow Speed Bearing – Cone 2
4 GHC-1204 Slow Speed Bearing – Cup 2
5 GHC-1205 High Speed Spacer 1
6 GHC-1206 High Speed Ring 1
7 GHC-1207 High Speed Retaining Ring 1
8 GHC-1208 High Speed Cap Closed 1
9 GHC-1209 High Speed Gasket 2
10 GHC-1210 Slow Speed Gasket 2
11 GHC-1211 Slow Speed Key 1
12 GHC-1212 Pipe Plug, Socket Head, Coated and Plated 1/8-27 NPTF 6
13 GHC-1213 Vent Shield 1
14 GHC-1214 Drive Pin (#4 x 3/16 Stainless Steel) 2
15 GHC-1215 Slow Speed Cover (Standard) 1
16 GHC-1216 Slow Speed Cover (Special) 4
17 GHC-1217 Hex Head Cap Screw 5/16-18 x 7/8 Long Coated with Polylock 12
18 GHC-1218 High Speed Seal 1
19 GHC-1219 Slow Speed Seal 2
20 GHC-1220 Motor Adapter 1
21 GHC-1221 Hex Head Cap Screw 5/16-18 x 1 1/4 Long Coated with Polylock 4
22 GHC-1222 Hollow Slow Speed Shaft with Hex 1
23 Slow Speed Gear 1
GHC-1223A Slow Speed Gear for 20:1 Ratio
GHC-1223B Slow Speed Gear for 30:1 Ratio
24 High Speed Worm on Shaft 1
GHC-1224A High Speed Worm on Shaft for 20:1 Ratio
GHC-1224B High Speed Worm on Shaft for 30:1 Ratio
25 GHC-1225 Nameplate 1
Part
Number Description
Req’d.
Qty.
46
Page 47

NOTES
__________________________________________________________________________
__________________________________________________________________________
__________________________________________________________________________
__________________________________________________________________________
__________________________________________________________________________
__________________________________________________________________________
__________________________________________________________________________
__________________________________________________________________________
__________________________________________________________________________
__________________________________________________________________________
__________________________________________________________________________
__________________________________________________________________________
__________________________________________________________________________
__________________________________________________________________________
__________________________________________________________________________
__________________________________________________________________________
__________________________________________________________________________
__________________________________________________________________________
__________________________________________________________________________
__________________________________________________________________________
__________________________________________________________________________
__________________________________________________________________________
__________________________________________________________________________
__________________________________________________________________________
__________________________________________________________________________
__________________________________________________________________________
__________________________________________________________________________
__________________________________________________________________________
__________________________________________________________________________
__________________________________________________________________________
__________________________________________________________________________
__________________________________________________________________________
__________________________________________________________________________
__________________________________________________________________________
__________________________________________________________________________
__________________________________________________________________________
__________________________________________________________________________
__________________________________________________________________________
__________________________________________________________________________
__________________________________________________________________________
__________________________________________________________________________
__________________________________________________________________________
__________________________________________________________________________
__________________________________________________________________________
__________________________________________________________________________
__________________________________________________________________________
__________________________________________________________________________
__________________________________________________________________________
__________________________________________________________________________
47
Page 48

Recommended Spare Parts
Certain Parts of your hoist will, in time, require replacement under normal wear conditions. It is suggested that the
following parts be purchased for your hoist as spares for future use.
One Brake Friction Disc
One Brake Module
One Set of Contactors
One Transformer
One Wire Rope Assembly
Note: When ordering parts always furnish Hoist Serial Number, Catalog Number, Motor Horsepower, Voltage,
Phase, Frequency and Rated Load of Hoist on which the parts are to be used.
Parts for your hoist are available from your local authorized Yale repair station. For the location of your nearest
repair station, write:
Muskegon, Michigan 49443-0769
WARRANTY
WARRANTY AND LIMITATION OF REMEDY AND LIABILITY
A. Seller warrants that its products and parts, when shipped,
and its work (including installation, construction and start-up),
when performed, will meet applicable specifications, will be of
good quality and will be free from defects in material and
workmanship. All claims for defective products or parts under
this warranty must be made in writing immediately upon
discovery and, in any event, within two (2) years (or as otherwise
provided) from shipment of the applicable item unless Seller
specifically assumes installation, construction or start-up
responsibility. All claims for defective products or parts when
Seller specifically assumes installation, construction or start-up
responsibility, and all claims for defective work must be made in
writing immediately upon discovery and, in any event, within two
(2) years (or as otherwise provided) from completion of the
applicable work by Seller, provided, however, all claims for
defective products and parts must be made in writing no later
than thirty (30) months after shipment. Defective items must be
held for Seller’s inspection and returned to the original f.o.b.
point upon request. THE FOREGOING IS EXPRESSLY IN
LIEU OF ALL OTHER WARRANTIES WHATSOEVER,
EXPRESS, IMPLIED AND STATUTORY, INCLUDING,
WITHOUT LIMITATION, THE IMPLIED WARRANTIES OF
MERCHANTABILITY AND FITNESS.
414 West Broadway Avenue
P.O. Box 0769
Phone: (800) 999-6318
Fax: (800) 766-0223
B. Upon Buyer’s submission of a claim as provided above and its
substantiation, Seller shall, at its option, either (i) repair or replace its
product, part or work at either the original f.o.b. point of delivery or at
Seller’s authorized service station nearest Buyer or (ii) refund an
equitable portion of the purchase price.
C. This warranty is contingent upon Buyer’s proper maintenance and
care of Seller’s products, and does not extend to normal wear and tear.
Seller reserves the right to void warranty in event of Buyer’s use of
inappropriate materials in the course of repair or maintenance, or if
Seller’s products have been dismantled prior to submission to Seller for
warranty inspection.
D. The foregoing is Seller’s only obligation and Buyer’s exclusive
remedy for breach of warranty, and is Buyer’s exclusive remedy
hereunder by way of breach of contract, tort, strict liability or
otherwise. In no event shall Buyer be entitled to or Seller liable for
incidental or consequential damages. Any action for breach of this
warranty must be commenced within two (2) years (or as otherwise
provided) after the cause of action has accrued.
48
 Loading...