

Yakumo ALPHA GPS User manual

Yakumo alpha GPS
PDA with GPS function
Manual

Trademarks
All brand and product names are trademarks or registered trademarks of their
respective companies.
Note
The information in this manual is subject to change without notice.


Table of Contents
Preface ........................................................................................................v
Welcome..................................................................................................... iv
About this Manual....................................................................................... iv
Where to Find Information ........................................................................... v
1 Getting Started ..................................................................................... 1
1.1 Expanding Your Yakumo alpha GPS ................................................10
Using an SD/MMC Card .....................................................................10
2 Basic Skills ......................................................................................... 11
2.1 Using the Stylus .................................................................................11
2.2 Using the Navigation Stick.................................................................12
2.3 Today Screen ....................................................................................12
Status Icons........................................................................................13
2.4 Navigation Bar and Command Bar ....................................................14
2.5 Executing A Program .........................................................................15
A.1 Pop-up Menus ...................................................................................16
A.2 Notifications .......................................................................................16
2.6 Entering Information ..........................................................................17
Entering Text Using the Input Panel...................................................17
Writing on the Screen .........................................................................19
Drawing on the Screen .......................................................................22
Recording a Message ........................................................................24
Using My Text.....................................................................................26
3 Managing Your Yakumo alpha GPS................................................. 27
3.1 Power Management...........................................................................27
Low Battery Signals and Actions........................................................27
Power-Saving Tips .............................................................................29
3.2 Managing Memory .............................................................................30
Storage and Program Memory ...........................................................30
Additional Memory..............................................................................30
3.3 Customizing Your Yakumo alpha GPS..............................................31
i

Setting a Password............................................................................ 32
3.4 Finding and Organizing Information.................................................. 33
3.5 Backing Up Data ............................................................................... 34
3.6 Adding or Removing Programs......................................................... 34
Adding Programs ............................................................................... 34
Removing Programs .......................................................................... 36
4 Microsoft Pocket Outlook ................................................................. 37
4.1 Calendar: Scheduling Appointments and Meetings.......................... 37
Creating An Appointment .................................................................. 38
Using the Summary Screen............................................................... 39
Creating Meeting Requests ............................................................... 39
4.2 Contacts: Tracking Friends and Colleagues..................................... 40
Creating a Contact............................................................................. 41
Finding a Contact............................................................................... 42
Using the Summary Screen............................................................... 42
4.3 Tasks: Keeping a To Do List............................................................. 43
Creating a Task ................................................................................. 44
Using the Summary Screen............................................................... 45
4.4 Notes: Capturing Thoughts and Ideas .............................................. 46
Creating a Note.................................................................................. 46
4.5 Inbox: Sending and Receiving E-mail Messages ............................. 48
Synchronizing E-mail Messages ....................................................... 48
Connecting Directly to an E-mail Server ........................................... 49
Using the Message List ..................................................................... 50
Composing and Sending Messages.................................................. 52
Managing E-mail Messages and Folders .......................................... 53
5 Additional Programs ......................................................................... 55
5.1 Microsoft ActiveSync......................................................................... 55
Microsoft ActiveSync ......................................................................... 55
Ways of Connecting to Your Desktop Computer............................... 56
Synchronizing Data ........................................................................... 56
5.2 Pocket Word ..................................................................................... 59
Creating a Document......................................................................... 59
Working with Pocket Word Documents ............................................. 61
5.3 Pocket Excel ..................................................................................... 63
Working with Pocket Excel Workbooks ............................................. 64
5.4 MSN Messenger ............................................................................... 65
Setting Up to Use MSN Messenger................................................... 66
Working with Contacts ....................................................................... 66
Chatting with Contacts....................................................................... 67
5.5 Windows Media Player for Pocket PC .............................................. 68
5.6 Microsoft Reader............................................................................... 69
ii

Getting Books for Your Yakumo alpha GPS ......................................69
Using the Library ................................................................................70
Reading a Book ..................................................................................70
Using Reader Features ......................................................................71
Removing a Book ...............................................................................72
5.7 Additional Programs ..........................................................................73
Backup Restore ..................................................................................73
6 Getting Connected............................................................................. 75
6.1 Connection Settings...........................................................................75
Modem Connection ............................................................................75
Network (Ethernet) Card Connection .................................................76
Wireless Network Connection (WLAN) ..............................................77
Starting and Ending a Wireless Network Connection ........................79
6.2 Transferring Items Using Infrared......................................................79
Sending Information ...........................................................................79
Receiving Information.........................................................................80
6.3 Using Microsoft Pocket Internet Explorer ..........................................81
Viewing Mobile Favorites and Channels ............................................81
Browsing the Internet..........................................................................82
The Mobile Favorites Folder...............................................................82
7 Troubleshooting and Maintenance ................................................. 85
7.1 Resetting Your Yakumo alpha GPS ..................................................85
7.2 Remove the SD/MMC card (if installed). ...........................................86
7.3 Power Problems ................................................................................87
7.4 Memory Problems..............................................................................87
7.5 Screen Problems ...............................................................................89
7.6 Connection Problems ........................................................................90
Problems with the Docking Station Connection (optional) .................90
Infrared Connection Problems............................................................91
Modem Connection Problems ............................................................91
7.7 Taking Care of Your Yakumo alpha GPS ..........................................92
General Information ............................................................................92
Travel Guidelines................................................................................93
Service.......................................................................................................94
A.3 Safety Precautions.............................................................................95
About Charging...................................................................................95
About the AC Adapter ........................................................................95
About the Battery ................................................................................95
About the Infrared LED.......................................................................96
About the Electrostatic Discharge ......................................................96
iii

Preface
Welcome
• Congratulations on purchasing this Windows® Powered Yakumo alpha GPS
Pocket PC. Thanks to the size and capabilities of the device, you can keep
your most important business and personal information up-to-date and close
at hand. Microsoft
GPS by allowing you to synchronize the information on your desktop or
Microsoft Exchange Server with your Yakumo alpha GPS.
®
ActiveSync® increases the power of your Yakumo alpha
About this Manual
This manual contains comprehensive information of your Yakumo alpha GPS to
help you operate the device.
Throughout the manual, the following conventions are used to distinguish
elements of text.
NOTE: provides additional hints or information that requires special attention.
Caution: identifies important information which, if not followed, may result in loss of data
or damage to your device.
Any name of menu, command, icon or button that you can see on the screen is
shown in a bold typeset. For example:
On the
Start menu, tap Settings.
iv

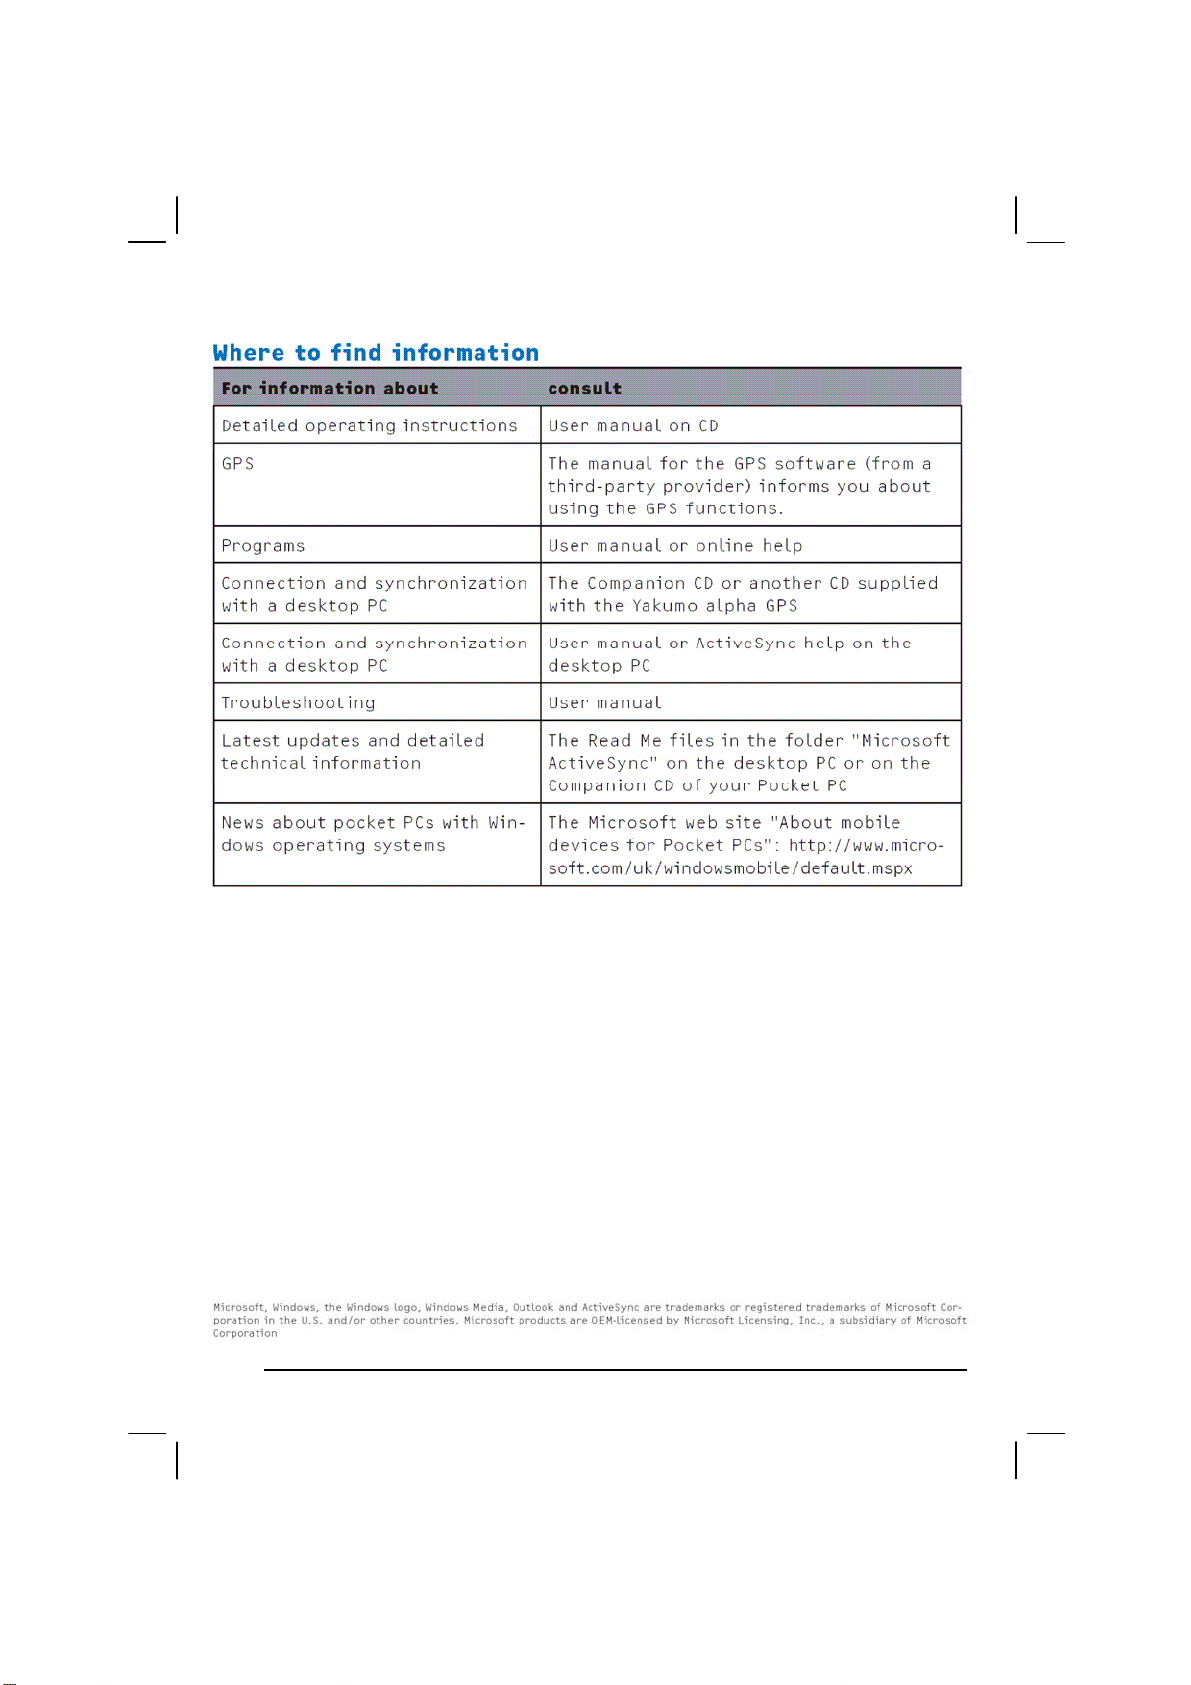
Where to Find Information
For information on See this source
First time startup Quick Start Guide
GPS operation The manual supplied with the GPS software (a
third-party software)
Programs on your Yakumo alpha
GPS
Connecting to and synchronizing
with a desktop computer
Connecting to and synchronizing
with a desktop computer
Troubleshooting Manual
Last-minute updates and detailed
technical information
The latest on Windows Powered
Yakumo alpha GPS
This User’s Manual or online Help on your
Yakumo alpha GPS
Companion CD or other CD(s) supplied with
your Yakumo alpha GPS
Manual or ActiveSync Help on your desktop
computer
The Read Me files in the “Microsoft
ActiveSync” folder on your desktop computer or
the Yakumo alpha GPS Companion CD.
The Microsoft Mobile Devices Web site:
www.pocketpc.com
v


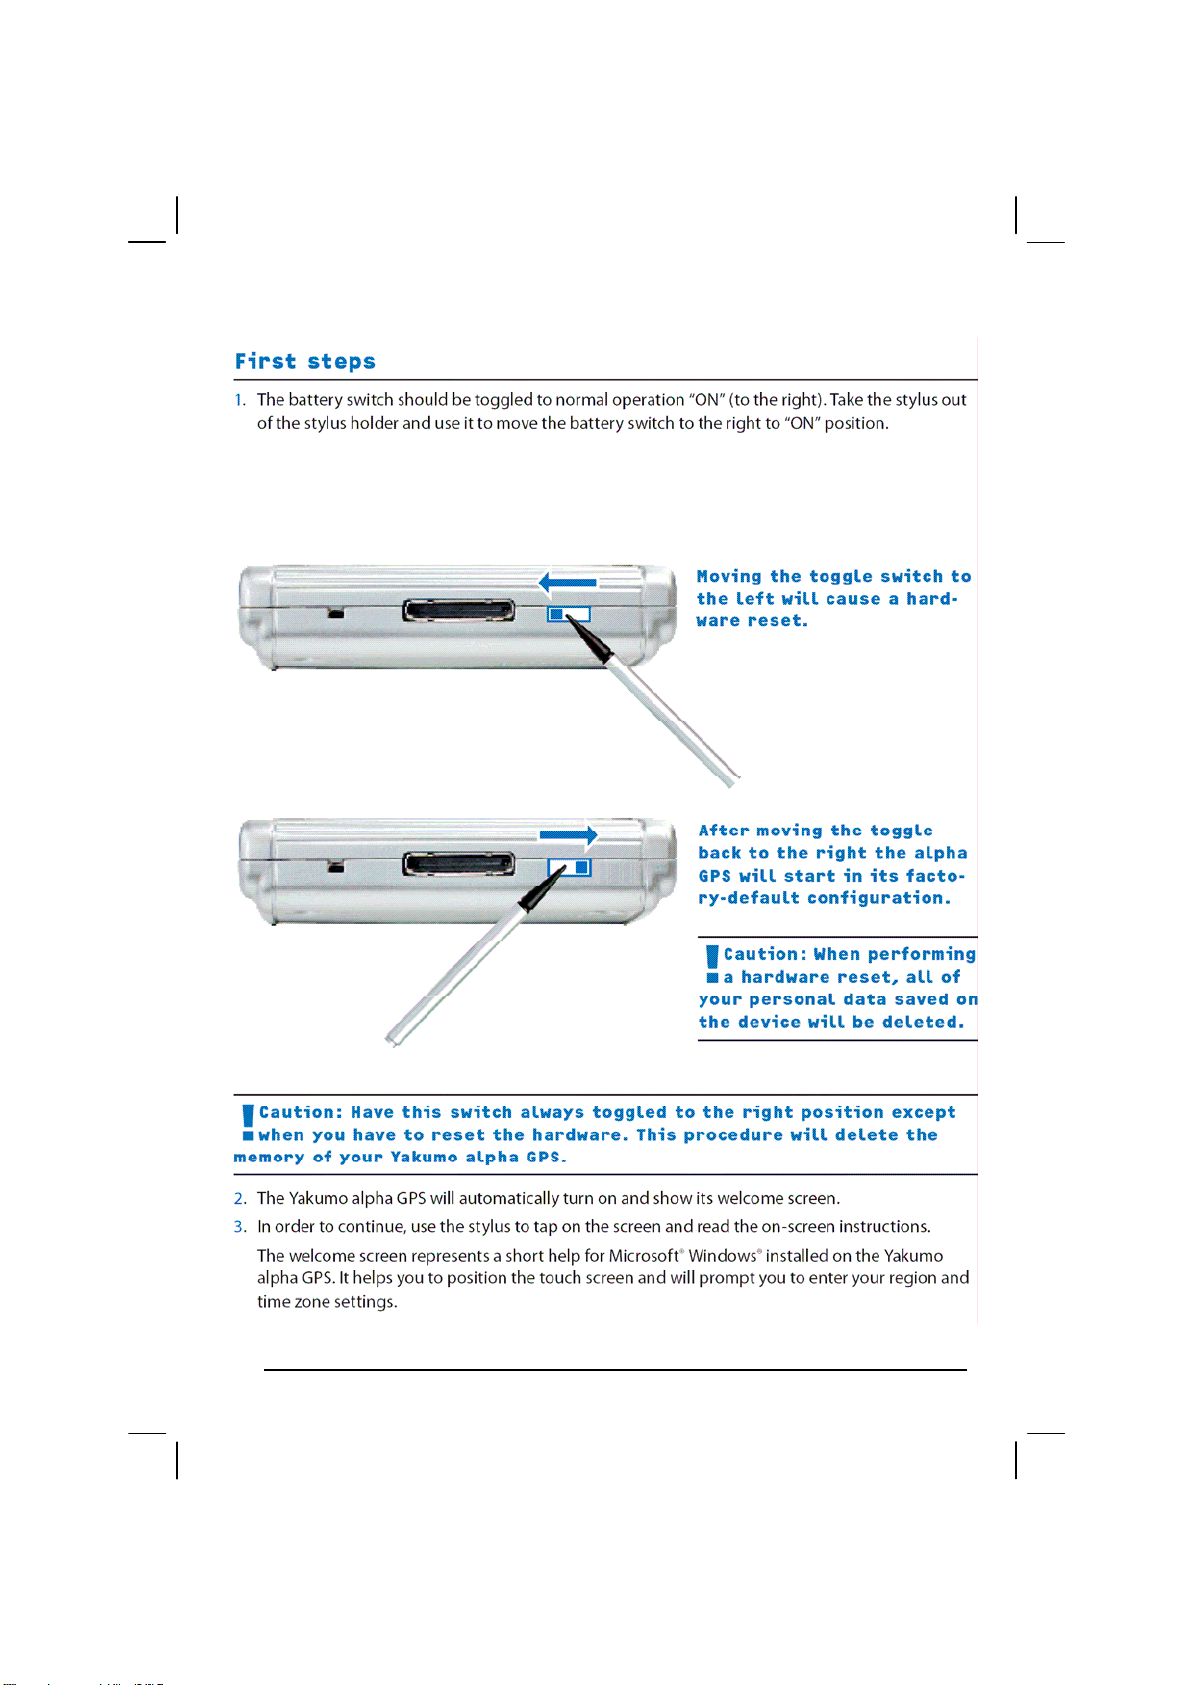
1 Getting Started
This chapter introduces you to the external components of your Yakumo alpha
GPS and guides you through the process of setting up your Yakumo alpha GPS for
use.
1
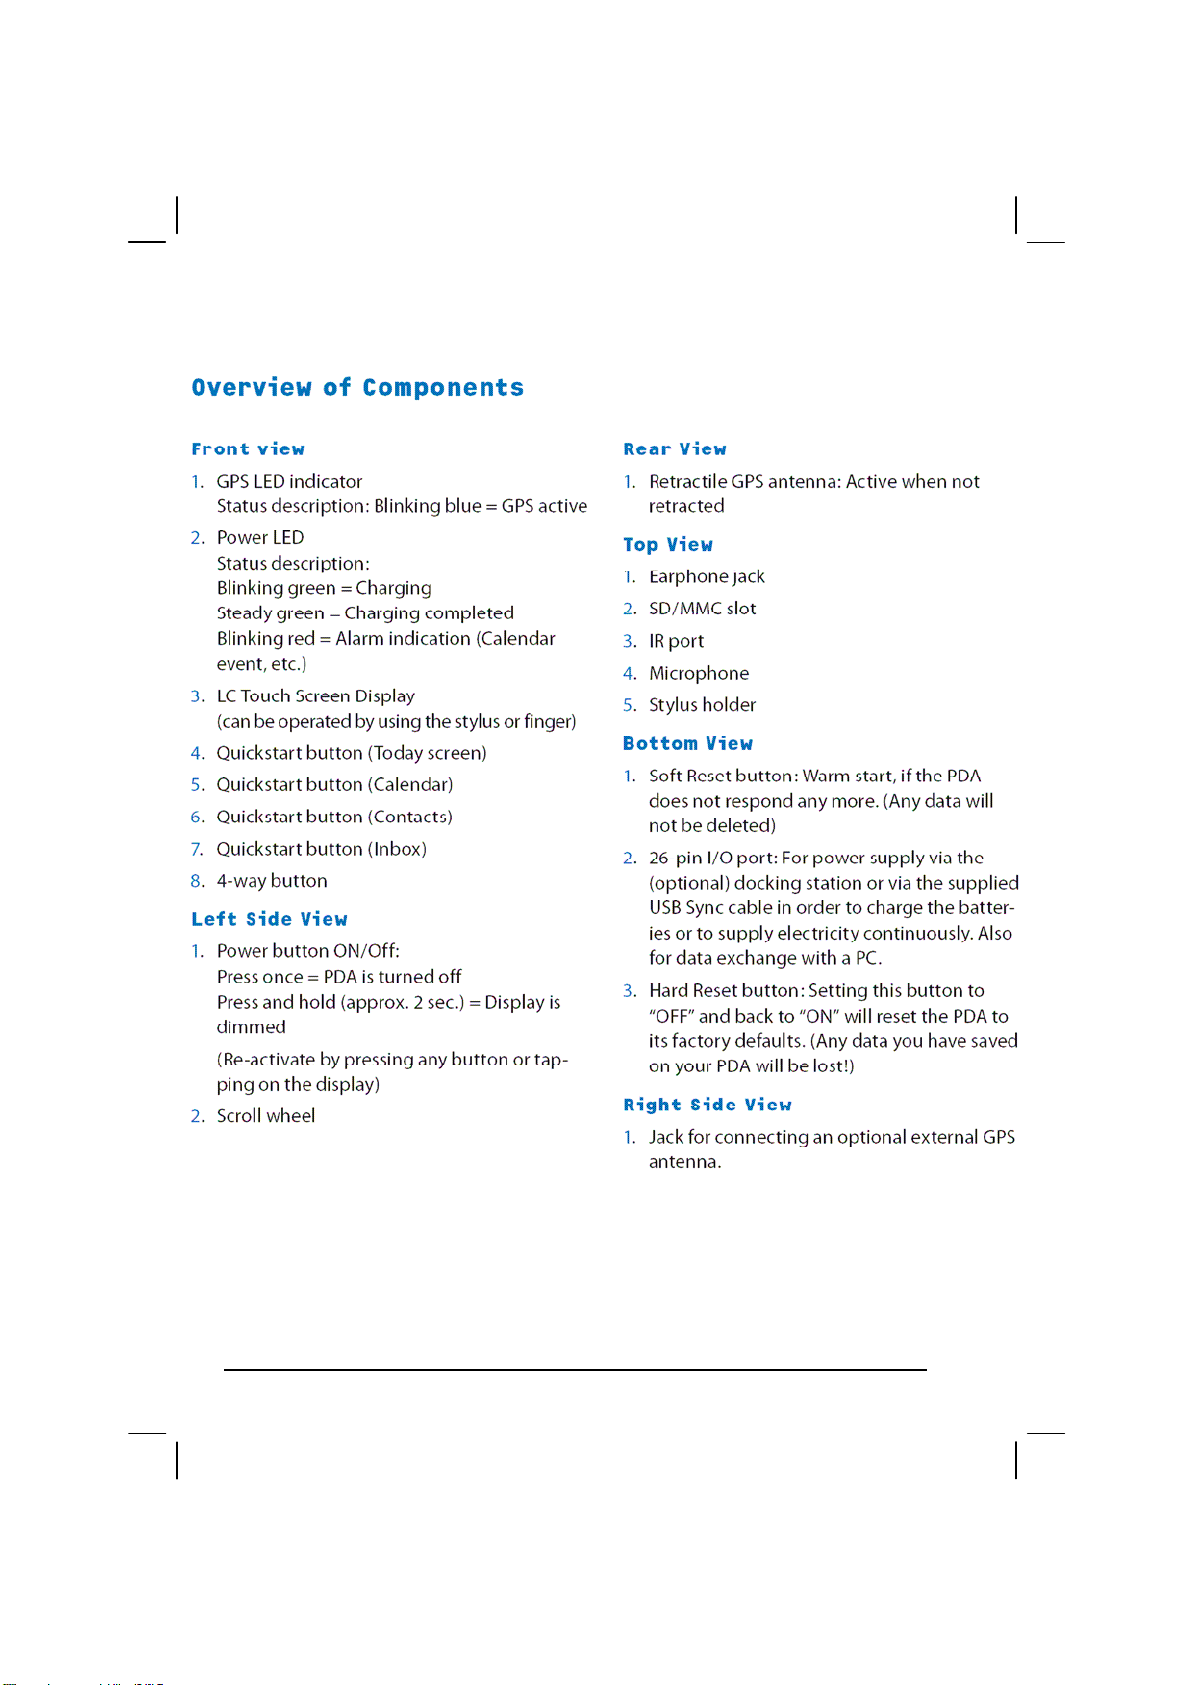
2
3

4
5
6
7
8
9

1.1 Expanding Your Yakumo alpha GPS
Using an SD/MMC Card
Your Yakumo alpha GPS has an SD/MMC slot where you can insert an optional
Secure Digital or Multimedia Card storage card. With the removable memory, you
can store or backup your data and exchange data with other devices.
NOTE:
Do not insert any foreign objects into the card slot.
Keep the SD or MMC card in a well-protected box to avoid
dust and humidity when you are not using it.
To use an SD/MMC card, insert it into the slot, with the
connector pointing to the slot and its label facing the front
of the Yakumo alpha GPS. Follow the instructions supplied
with the card for more information.
To remove a card, first make sure that no application is
accessing the card, then slightly push the top edge of the
card to release it and pull it out of the slot.
10
2 Basic Skills
This chapter familiarizes you with the basic operations of your Yakumo alpha
GPS such as using the stylus, navigation stick, Today screen, menus and
programs. You will also get to know how to enter information.
2.1 Using the Stylus
The stylus serves as a mouse for computers. You use it to navigate and select
objects on the screen.
Pull the stylus out of the slot and extend it for ease of use. Store it in the slot when
not in use.
Tap
Touch the screen once with the stylus to open
items and select options.
Drag
Hold the stylus on the screen and drag across the
screen to select text and images. Drag in a list to
select multiple items.
Tap and hold
Tap and hold the stylus on an item to see a list of
actions available for that item. On the pop-up
menu that appears, tap the action you want to
perform.
11

2.2 Using the Navigation Stick
With the navigation stick, you can move up, down, left
and right within a menu. This is particularly useful for
one-handed operation.
To move in a direction, simply push the button toward
Left
Up
Right
the corresponding direction.
Down
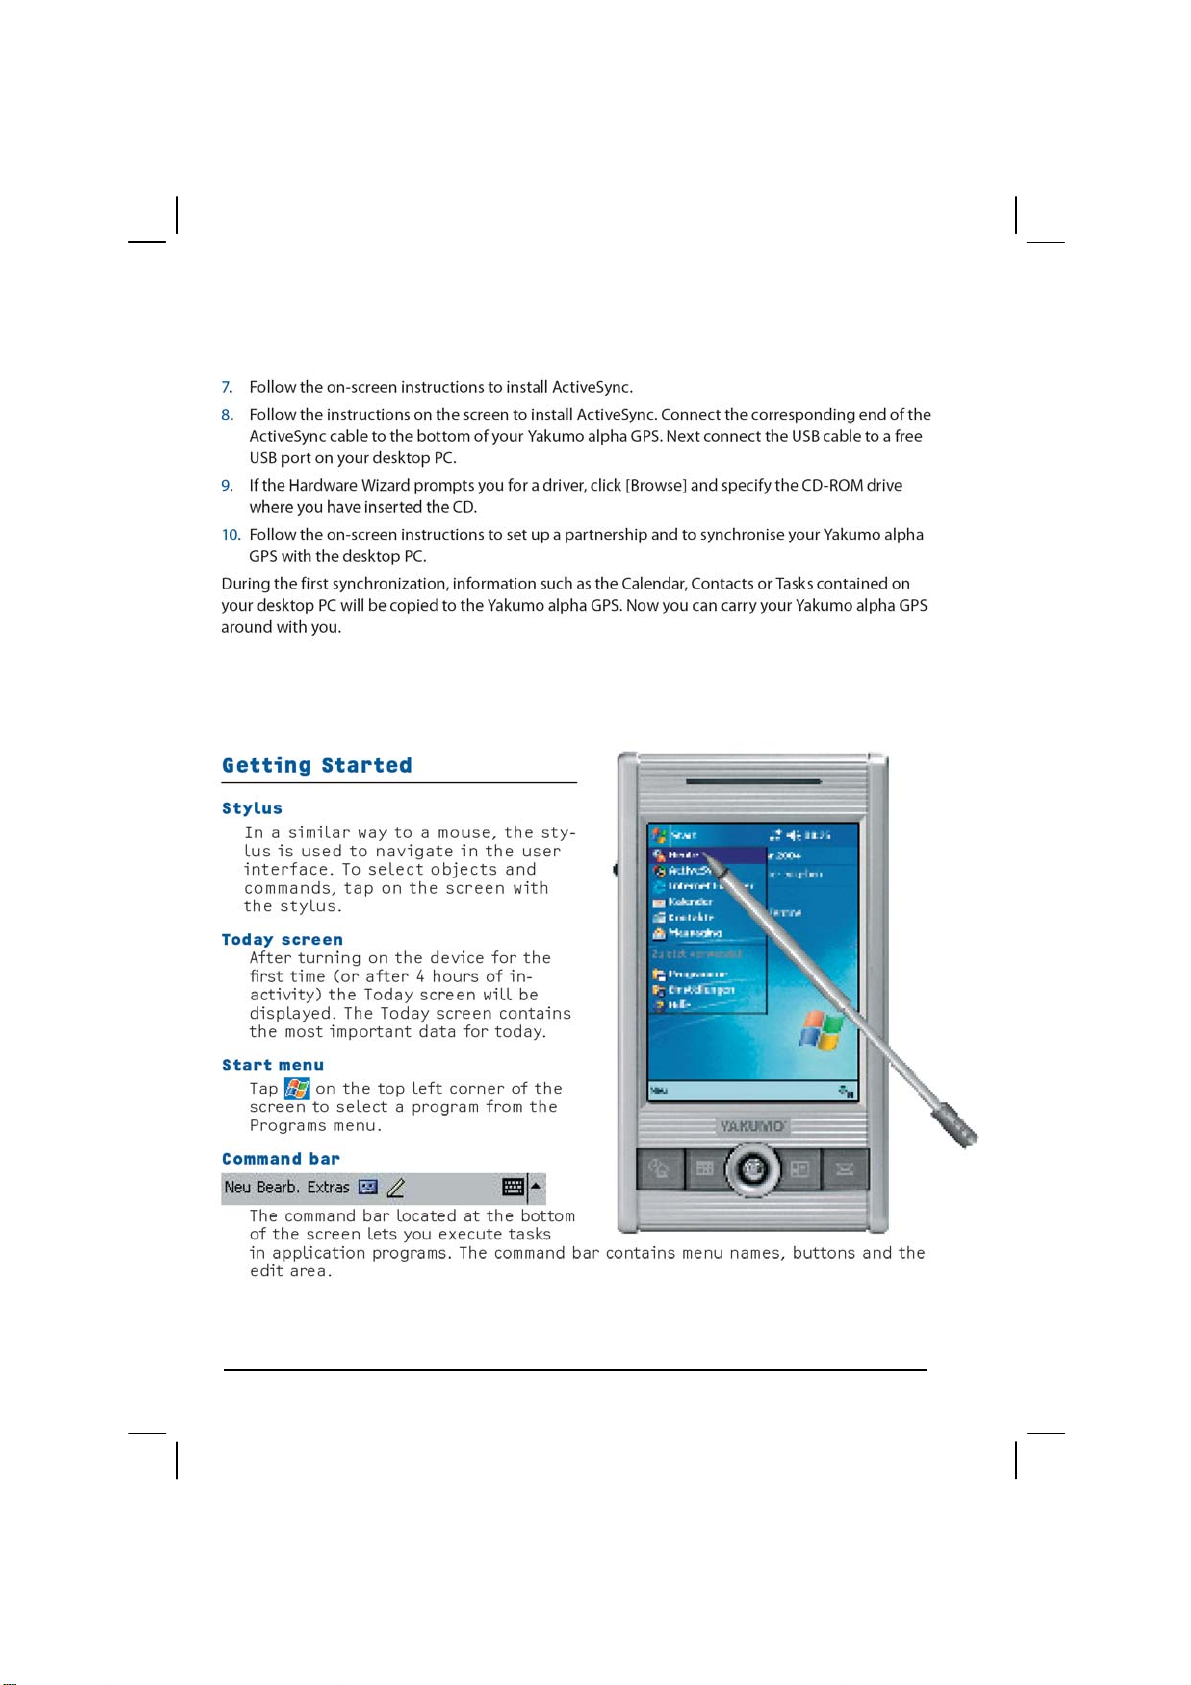
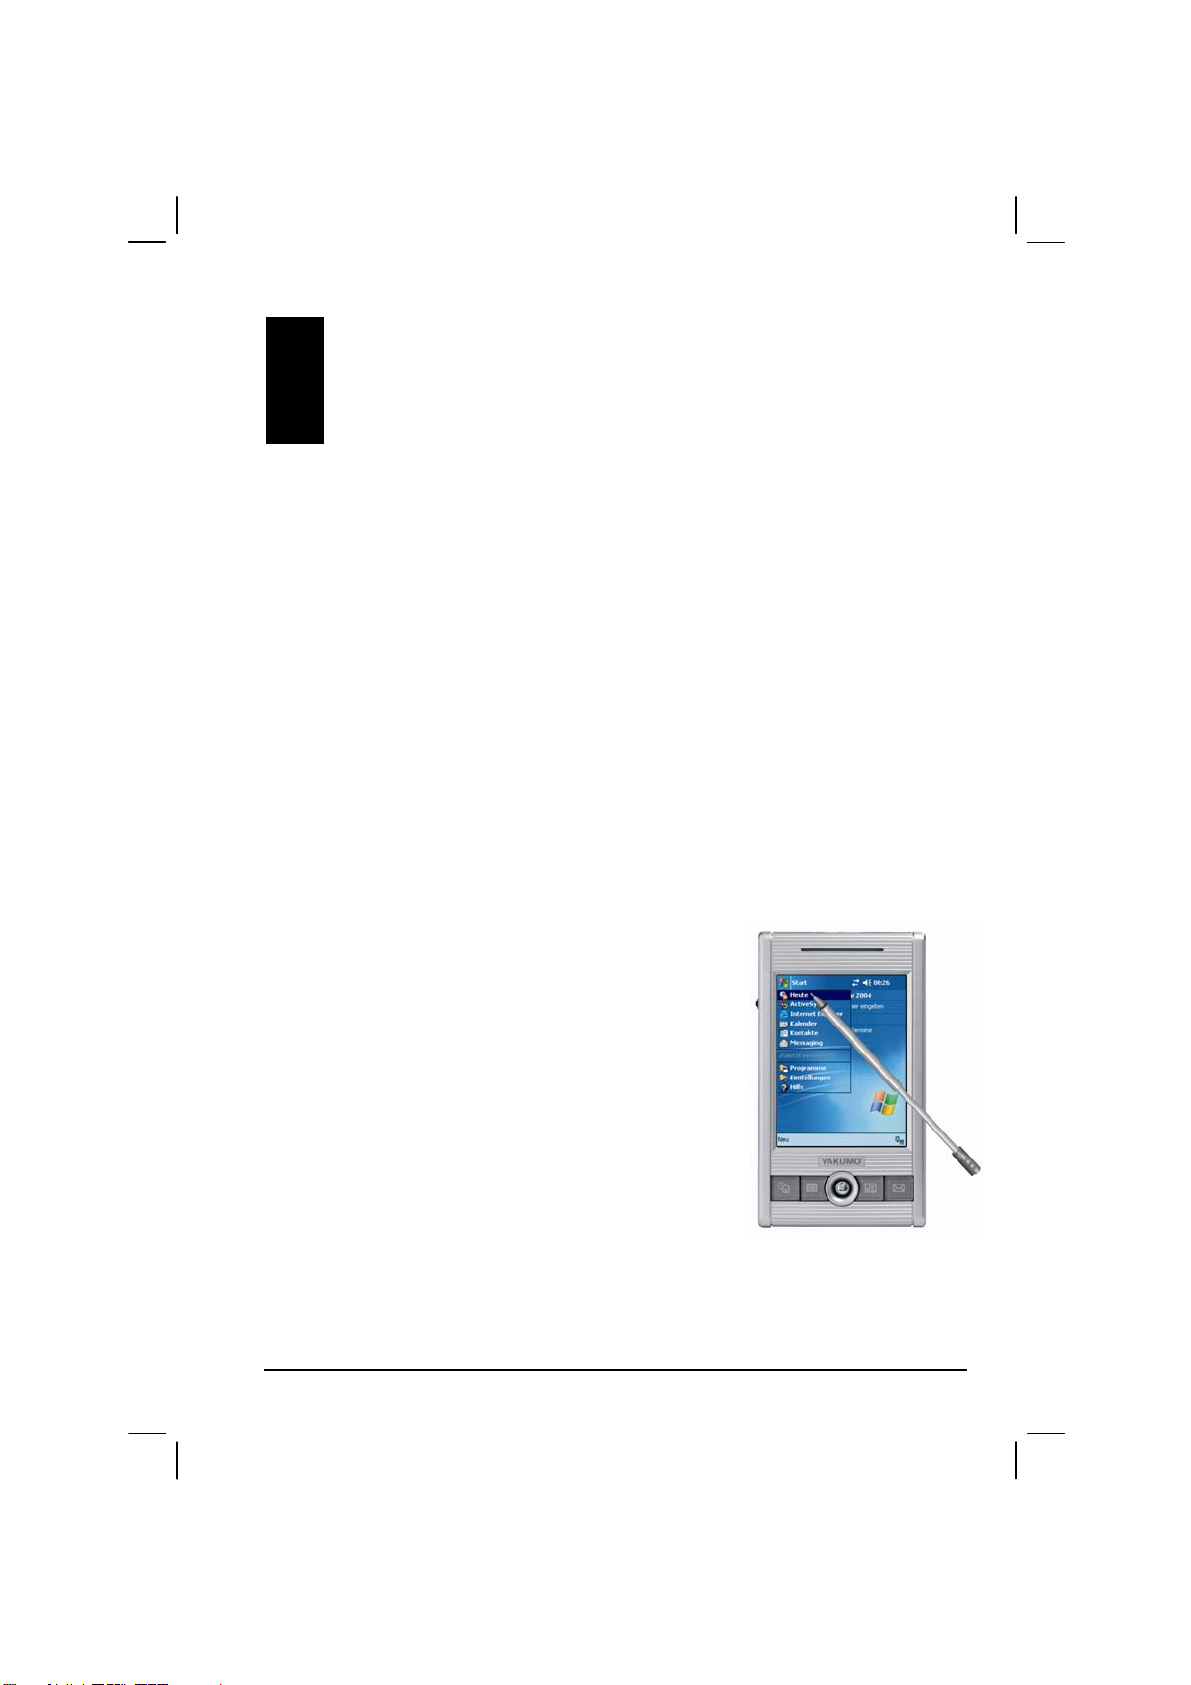
2.3 Today Screen
When you turn on your Yakumo alpha GPS for the first time each day (or after 4
hours of inactivity), you will see the Today screen. You can also display it by
tapping
and then
important information for the day.
Tap to switch to a
Today. On the Today screen, you can see at a glance
program.
Tap to change volume or mute all sounds.
Tap to change date and time.
Your day at a glance.
Tap an item to access
associated program so that
you can view or change
information.
Tap to create a new
item.
Tap to view connection status.
NOTE: You can customize what is displayed on the Today screen by tapping
Settings Personal tab Today icon.
12

Status Icons
When the Today screen is displayed, you may see the following status icons on the
Command bar or Navigation bar. In most cases, you can tap a status icon to
display the associated control panel or more information related to the item. For
example, tap a battery status icon to open the Power control panel.
Icon Meaning
Speaker is on.
Speaker is off.
Battery is charging. Battery is low.
Battery is low.
Battery is very low.
Battery is fully charged.
Connection is active.
Synchronization
Connection is not active. One or more e-mail messages were
More icons to be displayed than there is room to display them. Tap
the icon to view all status icons.
13
2.4 Navigation Bar and Command Bar
The Navigation bar is located at the top of the screen. It displays the active
program and current time and allows you to switch programs and close screens.
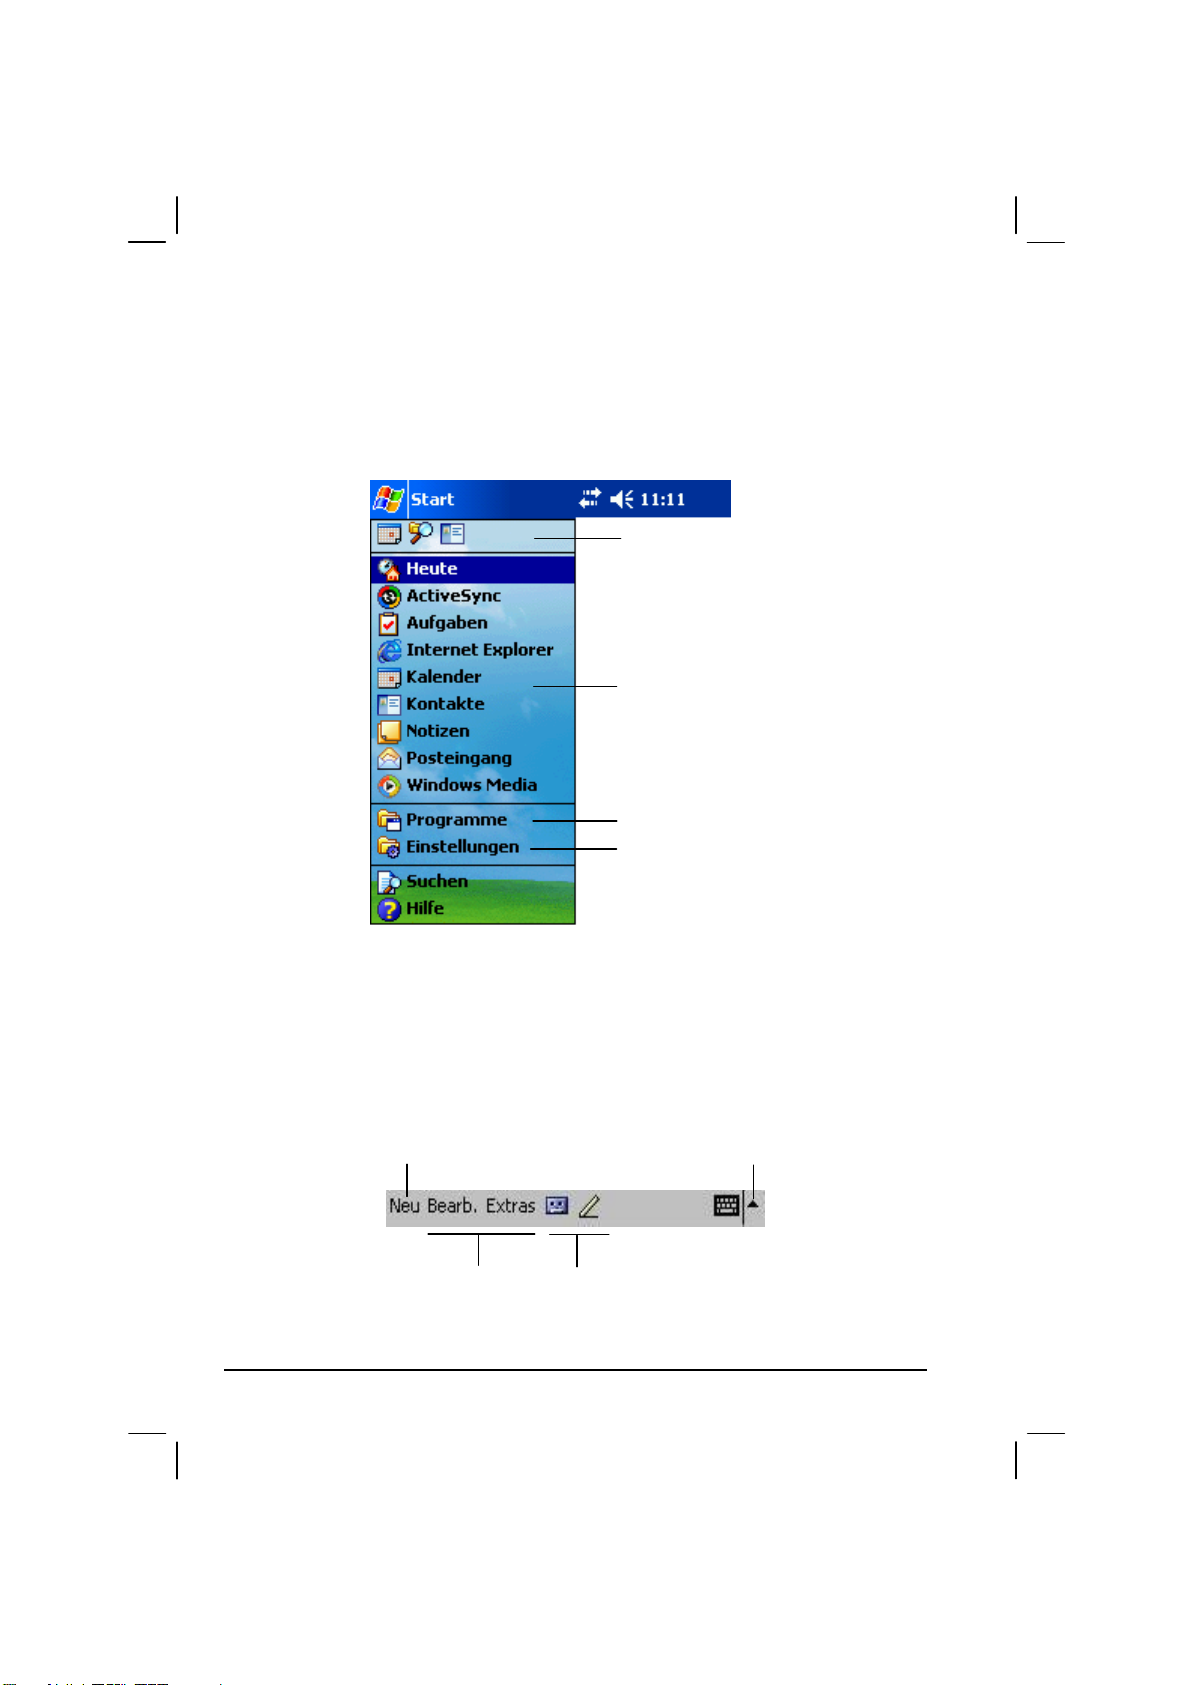
The Navigation bar and Start menu:
Tap to quickly select a program you have
recently used.
Tap to select a program.
Tap to see additional programs.
Tap to customize the Yakumo alpha GPS.
Use the Command bar at the bottom of the screen to perform tasks in programs.
The Command bar includes menu names, buttons and the Input panel button. To
create a new item in the current program, tap
New. To see the name of a button, tap
and hold the stylus on the button. Drag the stylus off the button so that the
command is not carried out.
The Command bar:
New button.
Input panel button.
14
Menu names.
Button.
2.5 Executing A Program
You can switch from one program to another without closing any program. To
switch to a program, you can:
Tap
in the top left corner of the screen and select from the Start menu.
(To customize which programs you see on the Start menu, tap
Settings Personal tab Menu icon.)
Tap
and then tap
Programs to access additional programs. Tap the
program icon to run a program.
Press a program button on the front of your Yakumo alpha GPS. The icons on
the buttons identify the default programs they are associated with. (To
customize which programs are associated with the buttons, tap
Settings Personal tab Button icon.)
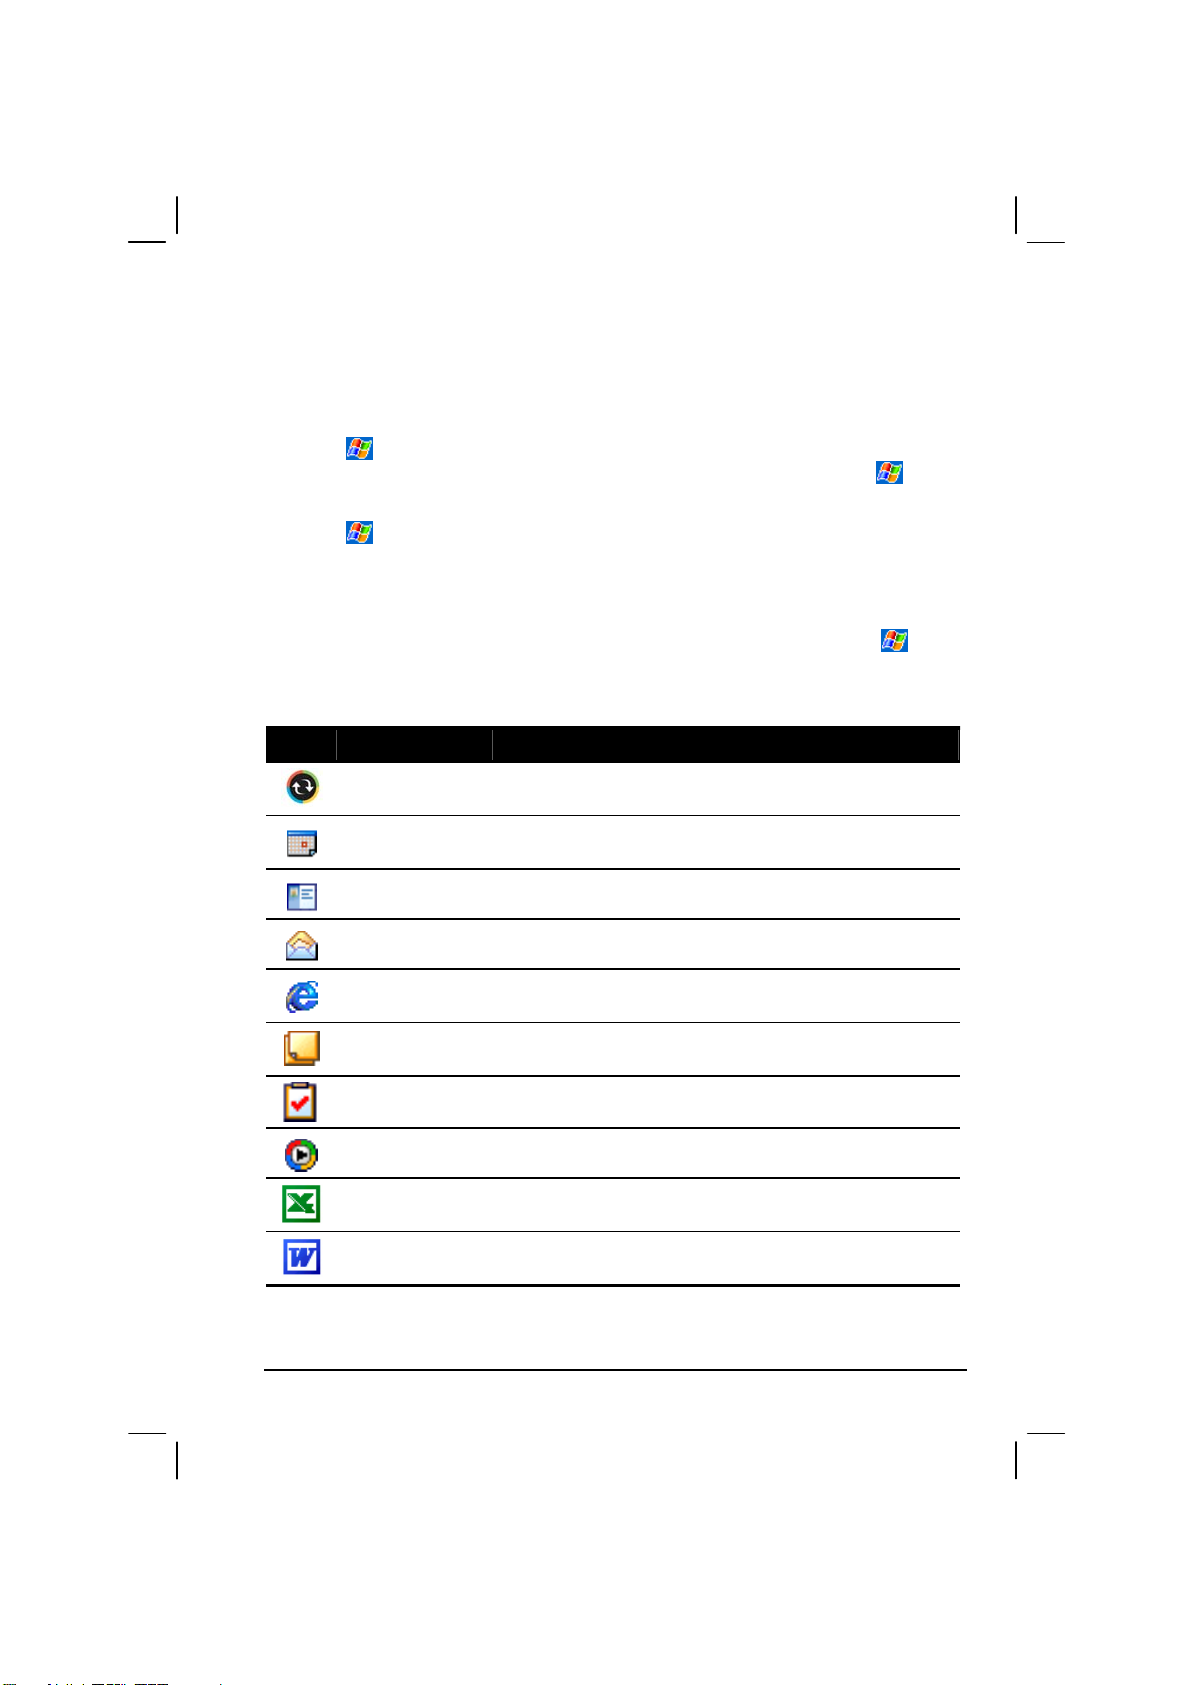
The table below contains a partial list of the programs and their icons.
Icon Program Descriptions
ActiveSync
Calendar
Contacts Keep track of your friends and colleagues.
Inbox Send and receive e-mail messages.
Pocket Internet
Explorer
Notes
Synchronize information between your Yakumo alpha
GPS and desktop computer.
Keep track of your appointments and create meeting
requests.
Browse Web and WAP sites and download new
programs and files from the Internet.
Create handwritten or typed notes, drawings and
recordings.
Tasks Keep track of your tasks.
Windows Media Play digital audio and video files.
Pocket Excel
Pocket Word
Create new workbooks or view and edit Excel
workbooks created on your desktop computer.
Create new documents or view and edit Word
documents created on your desktop computer.
15
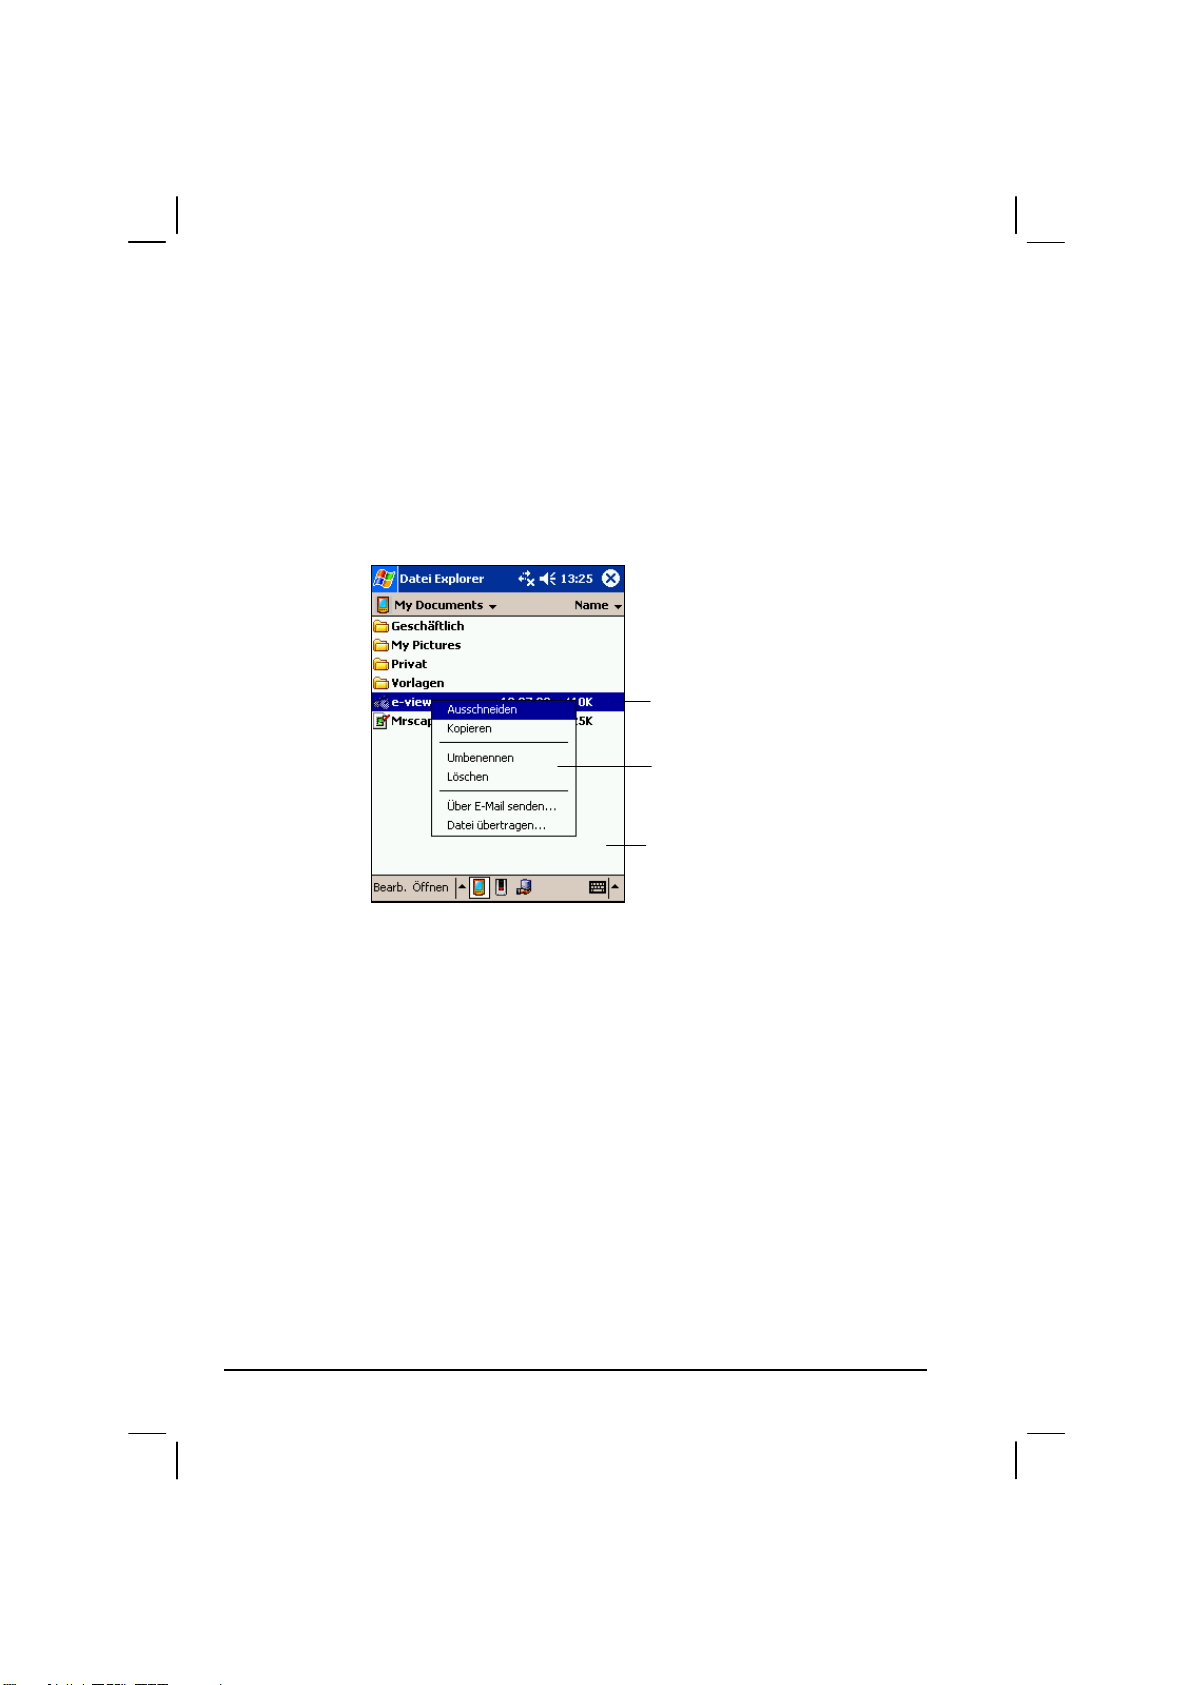
A.1 Pop-up Menus
With pop-up menus, you can quickly choose an action for an item. For example,
you can use the pop-up menu in the contact list to quickly delete a contact, make a
copy of a contact or send an e-mail message to a contact. The actions in the popup menus vary from program to program. To access a pop-up menu, tap and hold
the stylus on the name of the item that you want to perform the action on. When
the menu appears, lift the stylus and tap the action you want to perform. Or tap
anywhere outside the menu to close the menu without performing an action.
Tap and hold to show the popup menu.
Lift the stylus up and tap the
desired command.
Tap outside the menu to close it without
executing any command.
A.2 Notifications
Your Yakumo alpha GPS reminds you in a variety of ways when you have
something to do. For example, if you have set up an appointment in Calendar, a
task with a due date in Tasks or an alarm in Clock, you will be notified in any of
the following ways:
A message appears on the screen.
A sound, which you can specify, is played.
The notification indicator flashes in red.
16
To choose reminder types and sounds for your Yakumo alpha GPS, tap
Settings Personal tab Sounds & Notifications icon.
2.6 Entering Information
You have several options for entering new information:
Use the Input panel to enter typed text, either by using the soft keyboard or
other input methods.
Write directly on the screen.
Draw pictures on the screen.
Speak into the microphone to record a message.
Entering Text Using the Input Panel
Use the Input panel to enter information in any program on your Yakumo alpha
GPS. You can either type using the soft keyboard or write using the soft keyboard,
Block Recognizer, Letter Recognizer or Transcriber. In any case, the characters
appear as typed text on the screen.
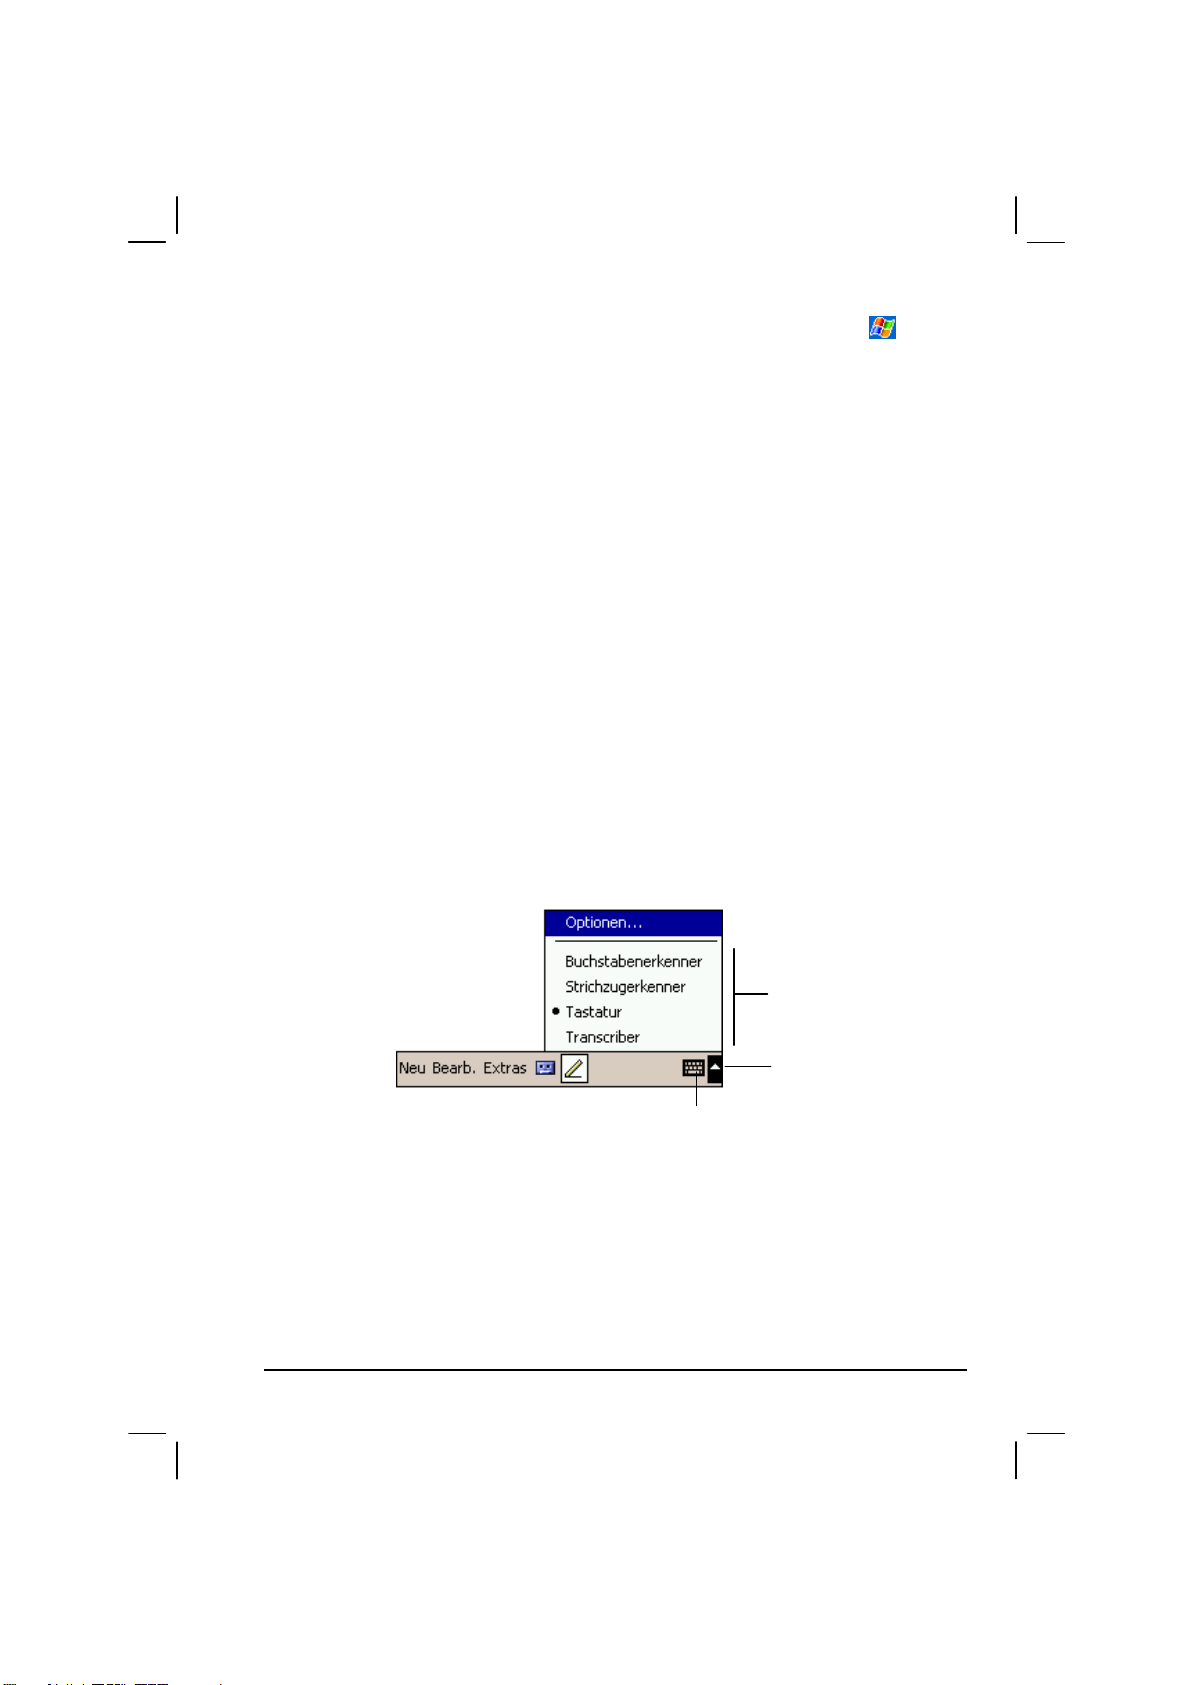
To show or hide the Input panel, tap the
the Input panel button to see your choices.
Input panel button. Tap the arrow next to
Select an input
method.
Input panel button.
Tap to view the options.
When you use the Input panel, your Yakumo alpha GPS anticipates the word you
are typing or writing and displays it above the Input panel. When you tap the
displayed word, it is inserted into your text at the insertion point. The more you
use your Yakumo alpha GPS, the more words it learns to anticipate.
17
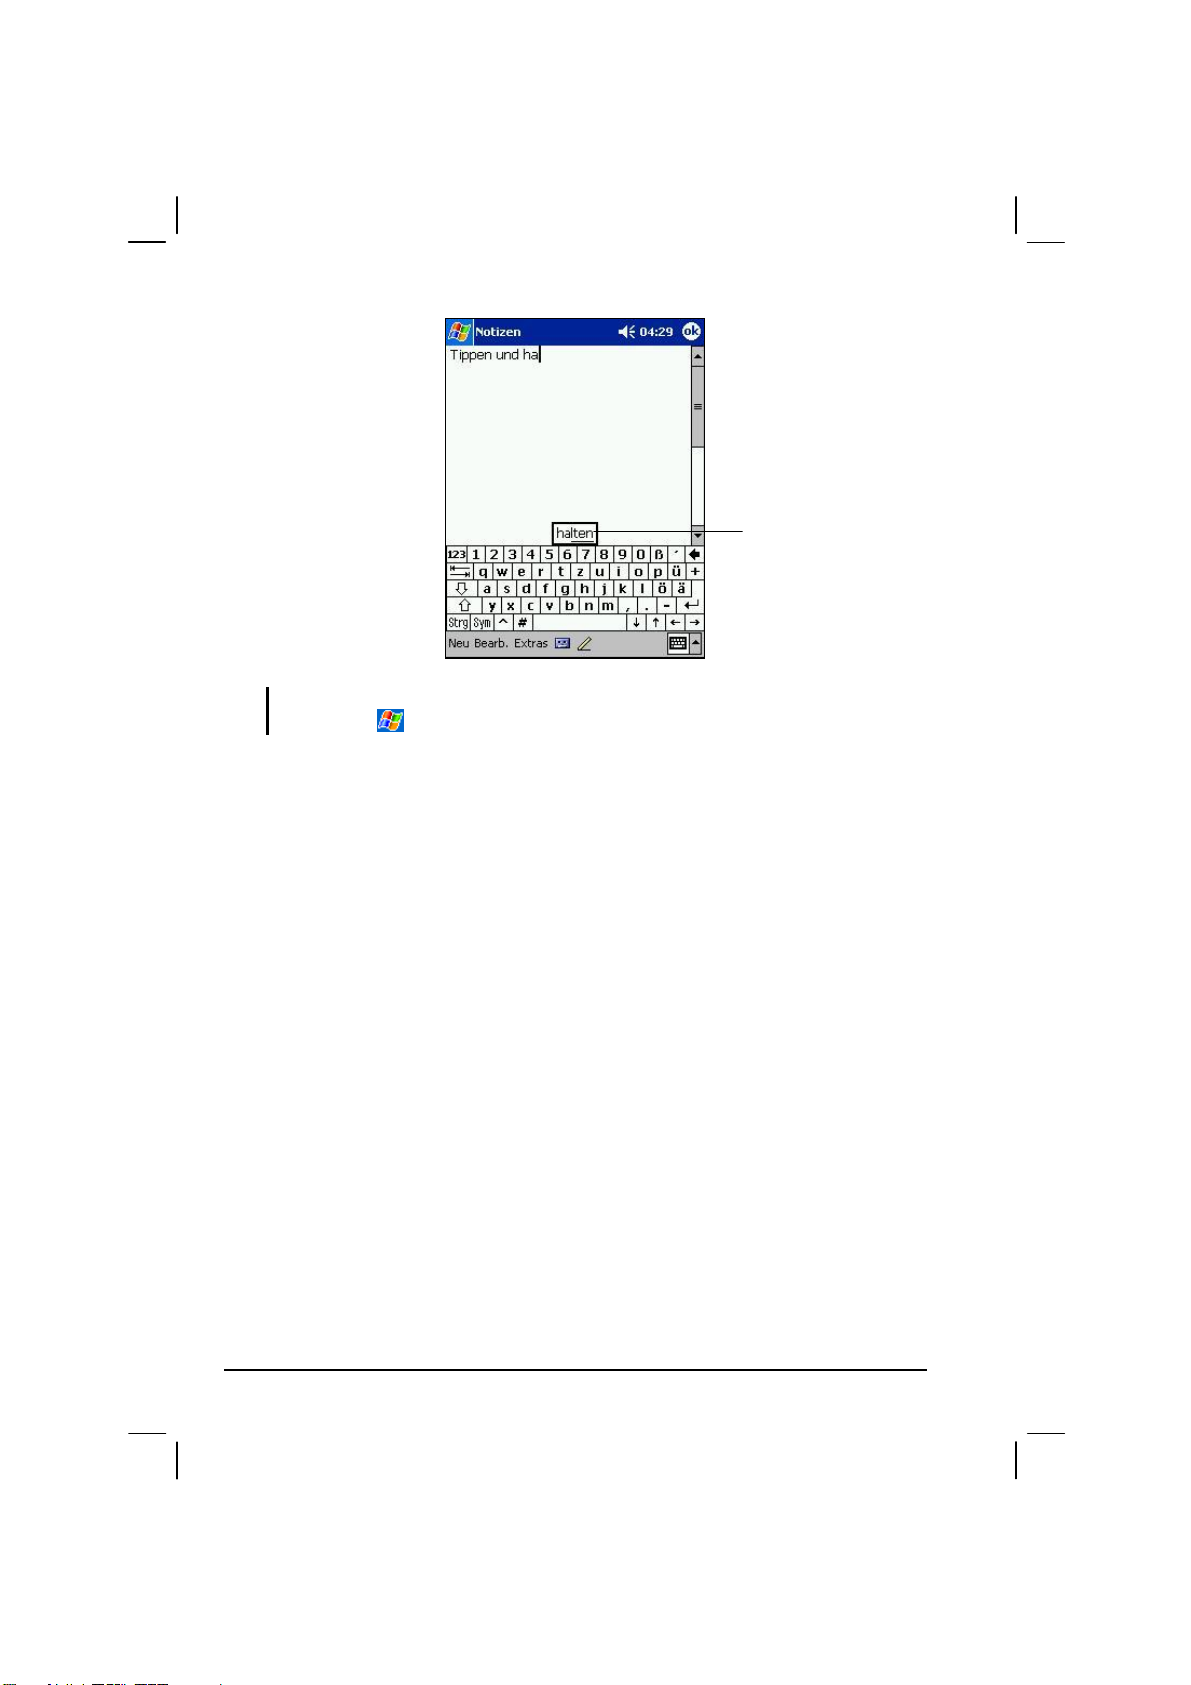
Tap here if this is the
right word.
NOTE: To change word suggestion options, such as the number of words suggested at
one time, tap
Settings Personal tab Input icon Word Completion tab.
Block Recognizer
With Block Recognizer, you can use the stylus to input characters using strokes
that are similar to the Palm™ Graffiti® method.
To type with Block Recognizer:
Tap the arrow next to the Input panel button and then tap
Block Recognizer.
Write a letter in the box.
When you write a letter, it is converted to typed text that appears on the screen.
For specific instructions on using Block Recognizer, open Block Recognizer and
then tap the question mark next to the writing area.
Letter Recognizer
With Letter Recognizer, you can write letters using the stylus just as you would
use a pen on paper.
To type with Letter Recognizer:
1. Tap the arrow next to the
Input panel button and then tap Letter Recognizer.
18

2. Write a letter in the box.
When you write a letter, it is converted to typed text that appears on the screen.
For specific instructions on using Letter Recognizer, open Letter Recognizer and
then tap the question mark next to the writing area.
Transcriber
With Transcriber you can write anywhere on the screen using the stylus just as
you would on paper. Unlike Letter Recognizer and Block Recognizer, you can
write a sentence or more of information; then, you pause and let Transcriber
change the written characters to typed characters.
To type with Transcriber:
1. Tap the arrow next to the Input panel button then tap
2. Write anywhere on the screen.
For specific instructions on using Transcriber, open Transcriber and then tap the
question mark in the lower-right corner of the screen.
Transcriber.
Writing on the Screen
In any program that accepts writing—such as the Notes program and the Notes tab
in Calendar, Contacts and Tasks—you can use your stylus to write directly on the
screen. Write the way you do on paper. You can edit and format what you have
written and convert the information to text later.
Writing
To write on the screen, tap the Pen button to switch to writing mode. This action
displays lines on the screen to help you write.
19

Tap the Pen button and use the stylus for writing.
NOTE: Some programs that accept writing may not have the Pen button. See the
documentation for that program to find out how to switch to writing mode.
Editing Your Writing
If you want to edit or format writing, you must first select the writing and then edit
it.
To Select Your Writing:
1. Tap and hold the stylus next to the text you want to select until the insertion
point appears. Without lifting, drag the stylus across the text you want to
select.
You can also select text by tapping the
dragging the stylus across the screen.
2. Tap and hold the selected words and then tap an editing command (cut, copy or
paste) on the pop-up menu or tap the command on the
If you accidentally write on the screen, tap
Pen button to deselect it and then
Edit menu.
Tools Undo and try again.
20
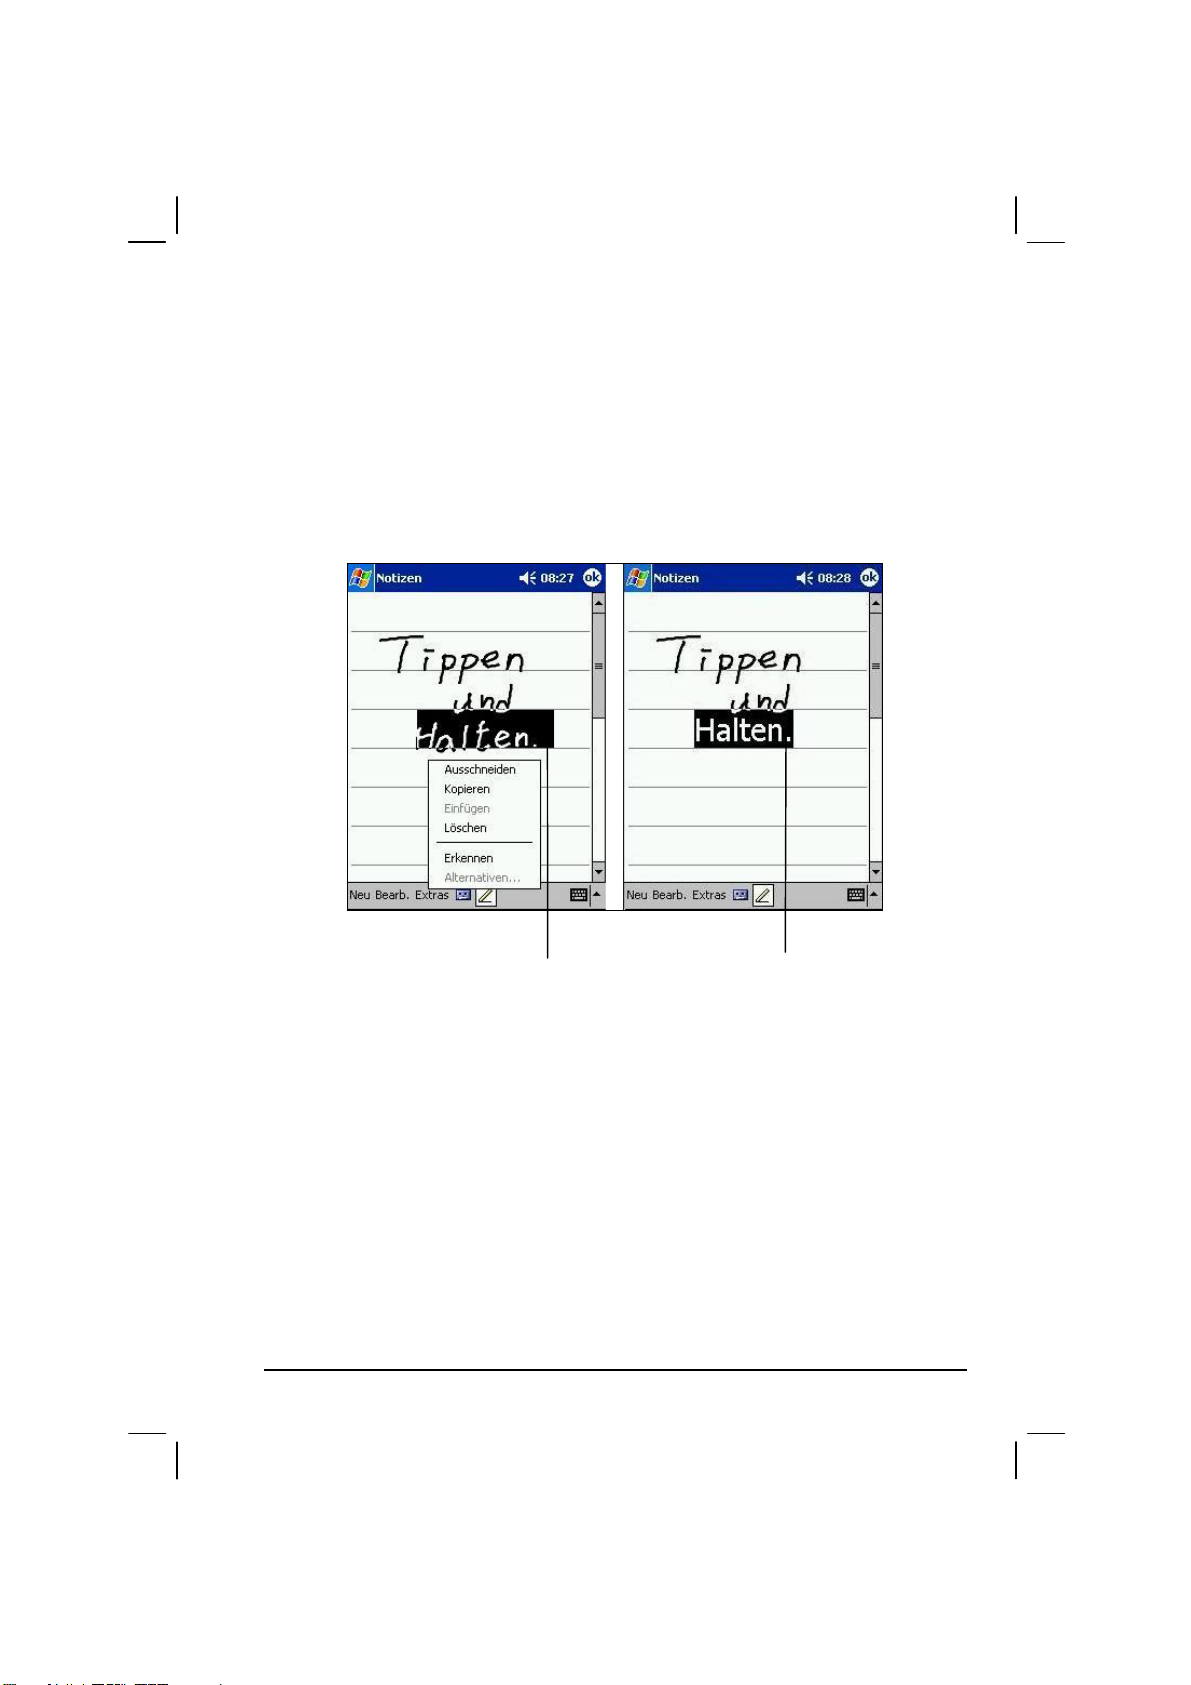
Converting Your Writing to Text
1 If you want to convert only certain words, select them before going to the next
step.
2. To convert writing to text, tap
words and then tap
Recognize on the pop-up menu. Your writing is turned into
Tools Recognize or tap and hold the selected
text.
If a word is not recognized, it is left as writing.
Select the text to convert and tap
Recognize from the pop-up menu.
The writing
becomes text.
If the conversion is incorrect, you can select different words from a list of
alternates or return to the original writing.
1. Tap and hold the incorrect word (tap one word at a time).
2. On the pop-up menu, tap
Alternates. A menu with a list of alternate words
appears.
3. Tap the word you want to use or tap the writing at the top of the menu to return
to the original writing.
21
 Loading...