

Page 1

Round Bar &
Square Bar
Load
Crossbar
Spread*
Limits
16" (41cm) spread =
30 lbs. (13.6kg) / bike
1 or 2
bikes
Type of
Rack
DO NOT EXCEED RACK WEIGHT LIMITS!
HEX KEY (1X)
SNAP
AROUND (1X)
CARRIAGE
BOLT (1X)
LOCKING
SKEWER (1X)
END CAP (1X)
WHEELSTRAP (1X)
VIPER (1X)
16" - 42"
41cm - 107cm
18" - 42"
46cm - 107cm
3 or more
bikes
18" (46cm) spread =
40 lbs. (18.1) / bike
THIS HIDDEN SWITCH
ENABLES SAFE
MOUNTING OUTSIDE
THE TOWERS.
*CROSSBAR SPREAD
Your crossbar
spread is the
distance between
the crossbars.
Forks with
Safety Tabs
DESIGNED FOR FORKS
WITH SAFETY TABS.
OFF-ROAD DRIVING IS
NOT RECOMMENDED.
Page 2
1033576B-2/15
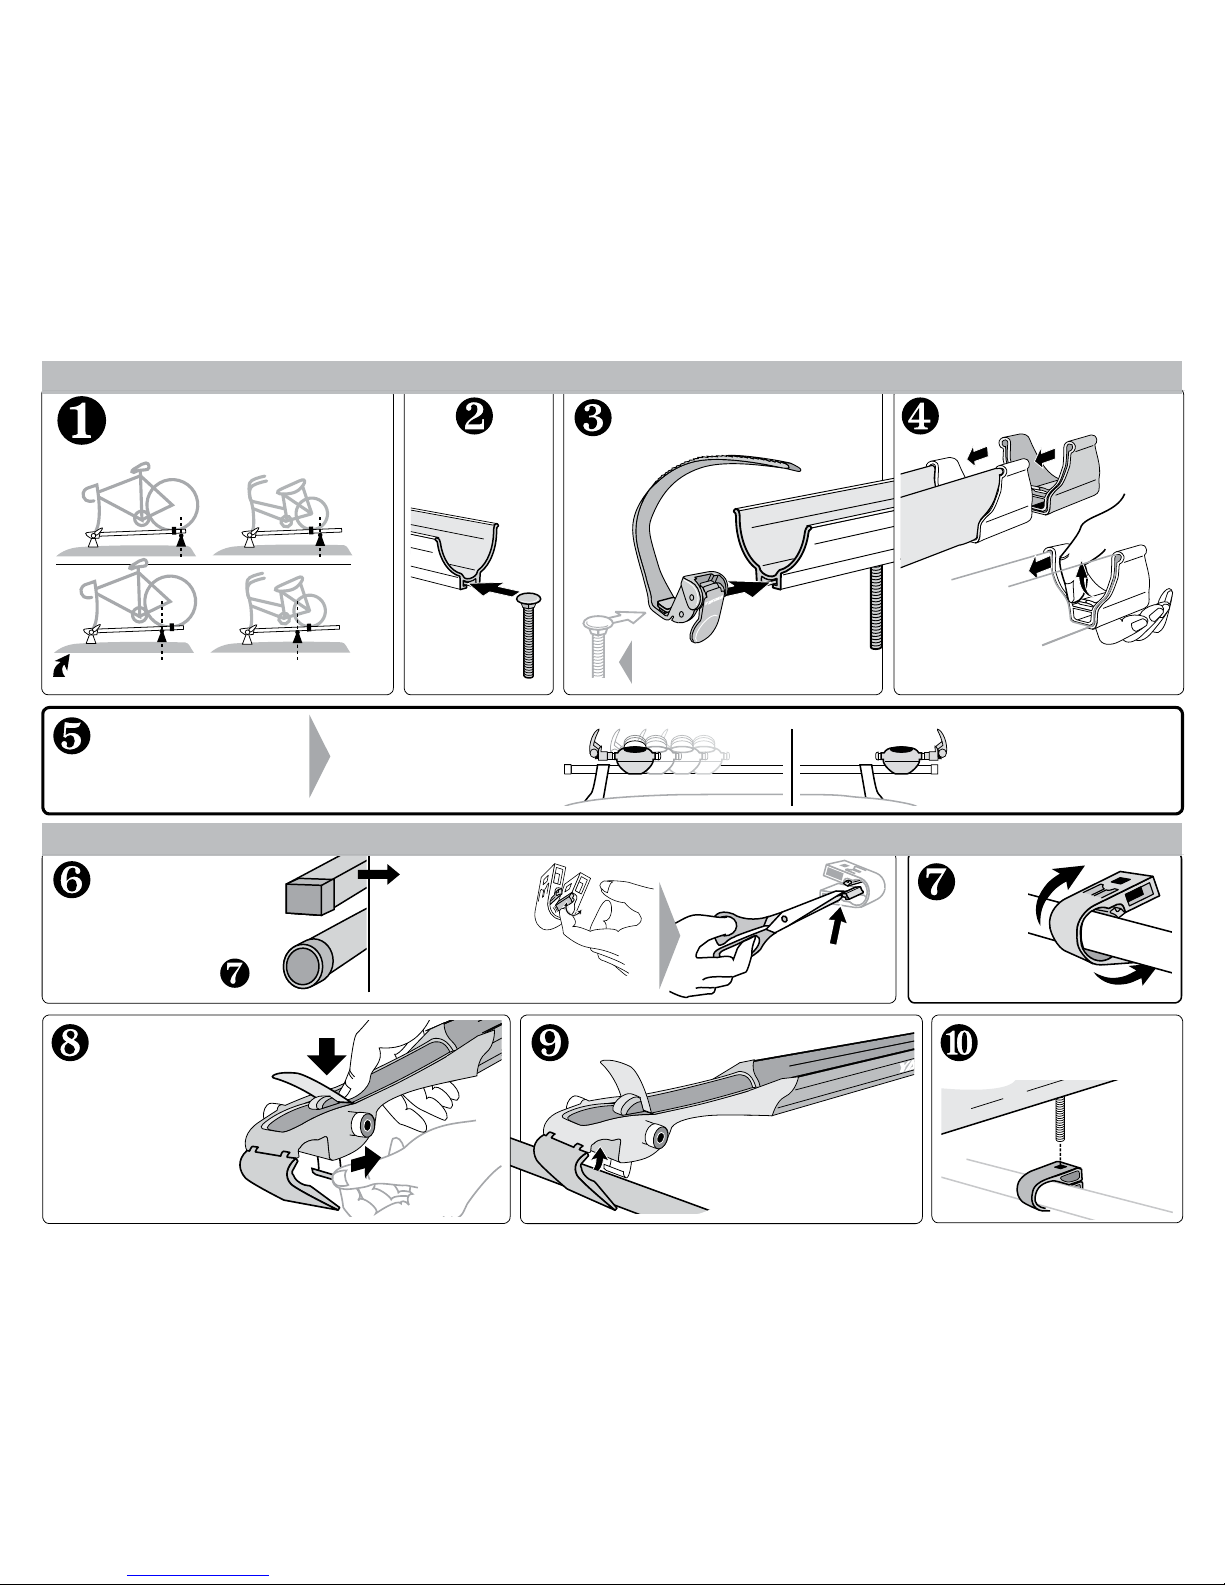
BETWEEN THE TOWERS
Viper can slide along the bar for
easy repositioning, even when
locked and loaded.
Install tray bolt, wheel strap and end cap.
Secure opposite end.
Insert bolt head
into slot in tray.
If you have
SQUARE BARS,
loosen the tabs
by bending them
repeatedly.
Remove the tabs with
scissors or pliers.
Install the wheel strap with
the red button toward you.
Short bikes or wide crossbar
spreads may require the strap to
go on before the bolt.
Attach
SnapAround
to opposite
bar.
Attach the tray cap.
Lift the tab while
pushing.
Push until the tab
goes into the hole.
IF ROUND, continue to
Do you have
round or square
crossbars?
(The strap may need to go on first
depending on the bike-to-bar fit.)
Set opened Viper onto the crossbars.
Allow the cover to remain
open on the bar.
Align the bolt to the
SnapAround and insert
into the square hole.
• Press open the
red cover.
• Pull silver hook
outward until bottom
plate opens.
Decide where
you will position
the Viper along
your crossbars.
OUTSIDE THE TOWERS
Viper can be in a fixed location
for optimum security when
mounted outside the towers.
(Large bikes, or short crossbar spreads)
Page 3

A
B
1033576B-3/15
Close the lower
plate, then press
the silver hook.
CLOSE THE RED COVER.
It should close with firm
resistance.
If not, repeat the previous
step, being sure to press
the silver hook.
ATTACH THE
HEX KEY AND
TIGHTEN
COMPLETELY.
CHOOSE YOUR MOUNTING OPTION (Read A & B below).
TO REARRANGE THE VIPER AFTER INSTALLATION:
• Lift the red cover, loosen the hex key.
• Reposition.
• Close the red cover, tighten the hex key.
CONVENIENT
REPOSITIONING:
Viper can slide along the bar for
easy repositioning, even when
locked and loaded.
The red cover cannot be opened
unless the skewer is unlocked and
removed from the Viper’s head.
SEPARATE THE
SKEWER’S SHAFT
FROM ITS HANDLE.
FIXED POSITION:
Viper can be in a fixed location for
optimum security when mounted
outside the towers.
Hold the switch DOWN and
insert the skewer.
Hold the switch UP and
insert the skewer.
Do not install the Viper outside
the tower if the switch is in the
DOWN position.
The switch is behind
the Viper's head.
Always install the Viper
outside the tower with the
switch in the UP position.
DOWN
The switch is behind
the Viper's head.
UP
Open lever. Hold the
adjustment knob. Turn
handle clockwise to
remove the shaft.
Place the Viper onto the bars.
Install the skewer from either side (consider access to the quick-release lever).
Page 4

1033576B-4/15
Use extra caution when
installing, or removing bikes
with CARBON FIBER FORKS.
Fork tips can crack, or bend if
bike is not loaded vertically.
Remove the front wheel, and load the bike.
Secure the rear wheel.Lock the Viper.
ATTACH THE SHAFT TO THE LEVER.
If you have purchased
a lock, follow lock
core instructions to
install the lock.
Pull the strap
through wheel
spokes.
SOME BIKE WHEELS MAY
PREVENT A TIGHT FIT.
• Insert the strap
end behind the
red tab.
• TIGHTEN the strap
by repeatedly
lifting the red tab.
Slide the strap
in the tray until
it rests against
the rim.
TIGHTEN
AGAIN.
Prevent damage to
your forks!
SET THE BICYCLE FORKS
VERTICALLY ONTO THE SKEWER.
If the wheel is still loose in the tray —
CLOSE THE STRAP.
DO NOT OVERTIGHTEN
THE STRAP!
Do not let the strap push
against the valve stem.
DO NOT OVERTIGHTEN THE STRAP!
Hold the shaft at the far end. Join
the handle with the shaft, turn the
shaft clockwise.
NOTE: Adjustment knob will turn with shaft.
CLOSE THE LEVER.
It should close with FIRM
RESISTANCE against the forks.
TEST YOUR INSTALLATION! If forks
can move in the mount, open the lever
and tighten the adjustment knob more.
Your bike’s forks are secure ONLY after
the lever closes with SOLID RESISTANCE.
With lever
open, tighten
adjustment
knob clockwise until
the lever closes with
FIRM resistance.
NOTE: Shaft will turn
with adjustment knob.
Page 5

1033576B-5/15
ATTACHMENT
HARDWARE CAN
LOOSEN OVER TIME.
CHECK AND TIGHTEN
IF NECESSARY, BEFORE
EACH USE.
MAINTENANCE
The Viper has a
self-lubricating internal
mechanism.
It is not necessary to add
lubrication.
DO NOT TRANSPORT
BICYCLES WITH
attached baby seats,
panniers, wheel covers,
or full bike covers.
Test bike stability by
Tugging on fork leg.
K E E P T H E S E I N S T R U C T I O N S !
BEFORE DRIVING AWAY:
• Check the security of the forks; close the lever completely.
• Close the wheel strap tightly against the rear wheel.
• Tighten the hex key on the rear crossbar.
• If Viper is mounted between the towers, and has been repositioned along the
crossbar, remember to close the red cover, and tighten the hex key again.
• Don't forget your front wheel!
If forks move out of the skewer:
Open the lever and tighten the
adjustment knob more.
THE LEVER should close with firm
resistance against the forks.
Refer to
CHECK THE
REAR WHEEL.
Tighten the strap
if needed.
To release the
strap, push the
red button.
OFF-ROAD
DRIVING
is not
recommended
and could
result in
damage to
your vehicle
or your bike.
 Loading...