

Page 1
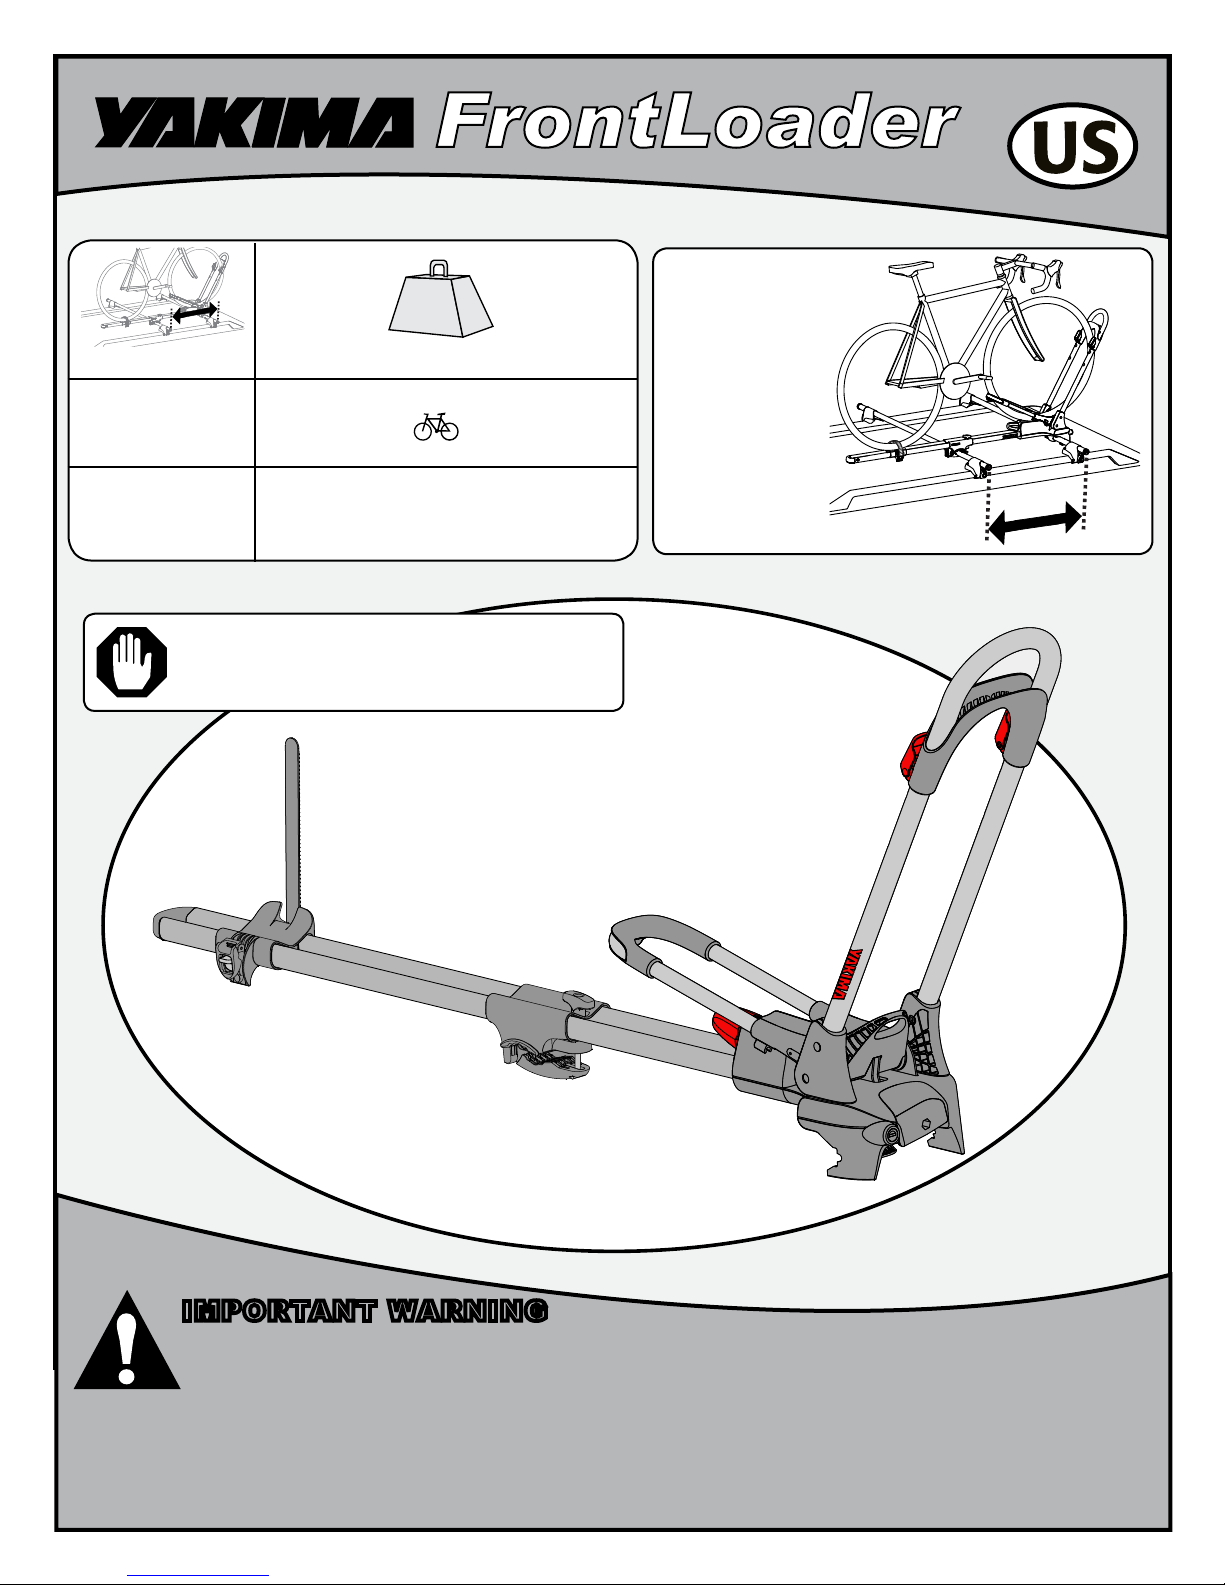
*CROSSBAR SPREAD
Crossbar Spread
16" - 18”
41cm - 46cm
18" - 48"
46cm - 122cm
If you have factory crossbars, be sure you have
at least 1-1/2” (3.8 cm) of clearance between
the bottom of the crossbar and the vehicle roof.
Weight Limit
30 lbs. (13.6kg)/bike
2x
DO NOT EXCEED RACK WEIGHT LIMITS!
40 lbs. (18.1kg)/bike
DO NOT EXCEED RACK WEIGHT LIMITS!
max.
FRONTLOADER (1X)
Your crossbar
spread is
the distance
between the
crossbars.
CROSSBAR SPREAD
IMPORTANT WARNING
IT IS CRITICAL THAT ALL YAKIMA RACKS AND ACCESSORIES BE PROPERLY AND SECURELY ATTACHED TO YOUR VEHICLE. IMPROPER
ATTACHMENT COULD RESULT IN AN AUTOMOBILE ACCIDENT, AND COULD CAUSE SERIOUS BODILY INJURY OR DEATH TO YOU OR
TO OTHERS. YOU ARE RESPONSIBLE FOR SECURING THE RACKS AND ACCESSORIES TO YOUR CAR, CHECKING THE ATTACHMENTS
PRIOR TO USE, AND PERIODICALLY INSPECTING THE PRODUCTS FOR ADJUSTMENT, WEAR, AND DAMAGE. THEREFORE, YOU MUST READ AND
UNDERSTAND ALL OF THE INSTRUCTIONS AND CAUTIONS SUPPLIED WITH YOUR YAKIMA PRODUCT PRIOR TO INSTALLATION OR USE. IF YOU
DO NOT UNDERSTAND ALL OF THE INSTRUCTIONS AND CAUTIONS, OR IF YOU HAVE NO MECHANICAL EXPERIENCE AND ARE NOT THOROUGHLY
FAMILIAR WITH THE INSTALLATION PROCEDURES, YOU SHOULD HAVE THE PRODUCT INSTALLED BY A PROFESSIONAL INSTALLER.
1033644B-1/18
Part #1033644 Rev.B
Page 2
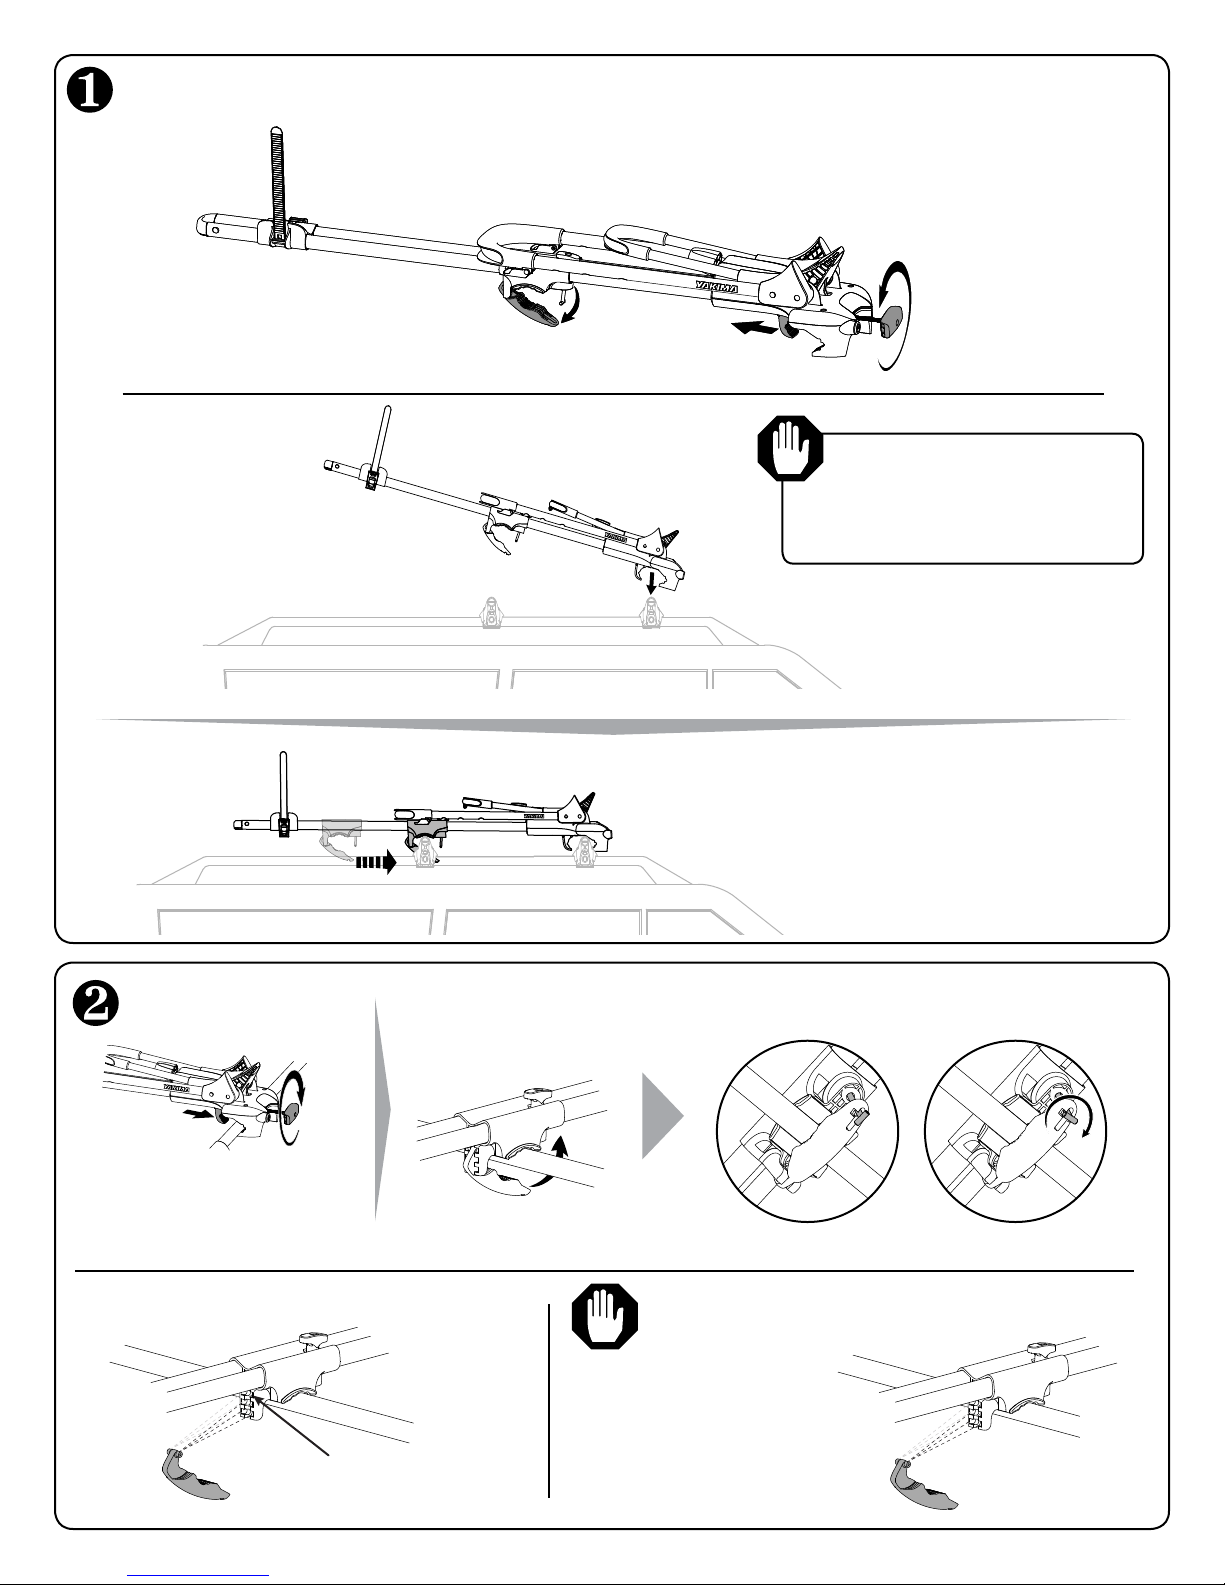
Place FrontLoader onto crossbars.
Open the rear clamp.
It may be necessary to turn the t-bolt to allow
it to pass through the slot in the clamp.
Lower the front
clamp into place
over front crossbar.
Open the front clamp. Turn the
front knob counter clockwise
to open the front the clamp.
Use caution to avoid damaging
roof’s finish. A towel placed
on the roof prior to installation
can help avoid scratches.
Tighten clamps.
Tighten the front clamp.
Turn the knob clockwise to
completely tighten the front
clamp around crossbar.
Adjust clamp if necessary.
Tighten the rear clamp.
Close rear clamp
around rear crossbar.
Turn the knob clockwise to completely tighten the rear clamp.
Slide the jaw of the
rear clamp under
rear crossbar.
Pass the t-bolt through the opening in bail.
Rotate t-bolt to rest in slot in bail.
90°
If you don’t get a secure grip with
your factory bars adjust your clamp.
Upper notch for round
and square bars.
1033644B-2/18
For factory bars
choose the best
position for most
secure grip.
Page 3
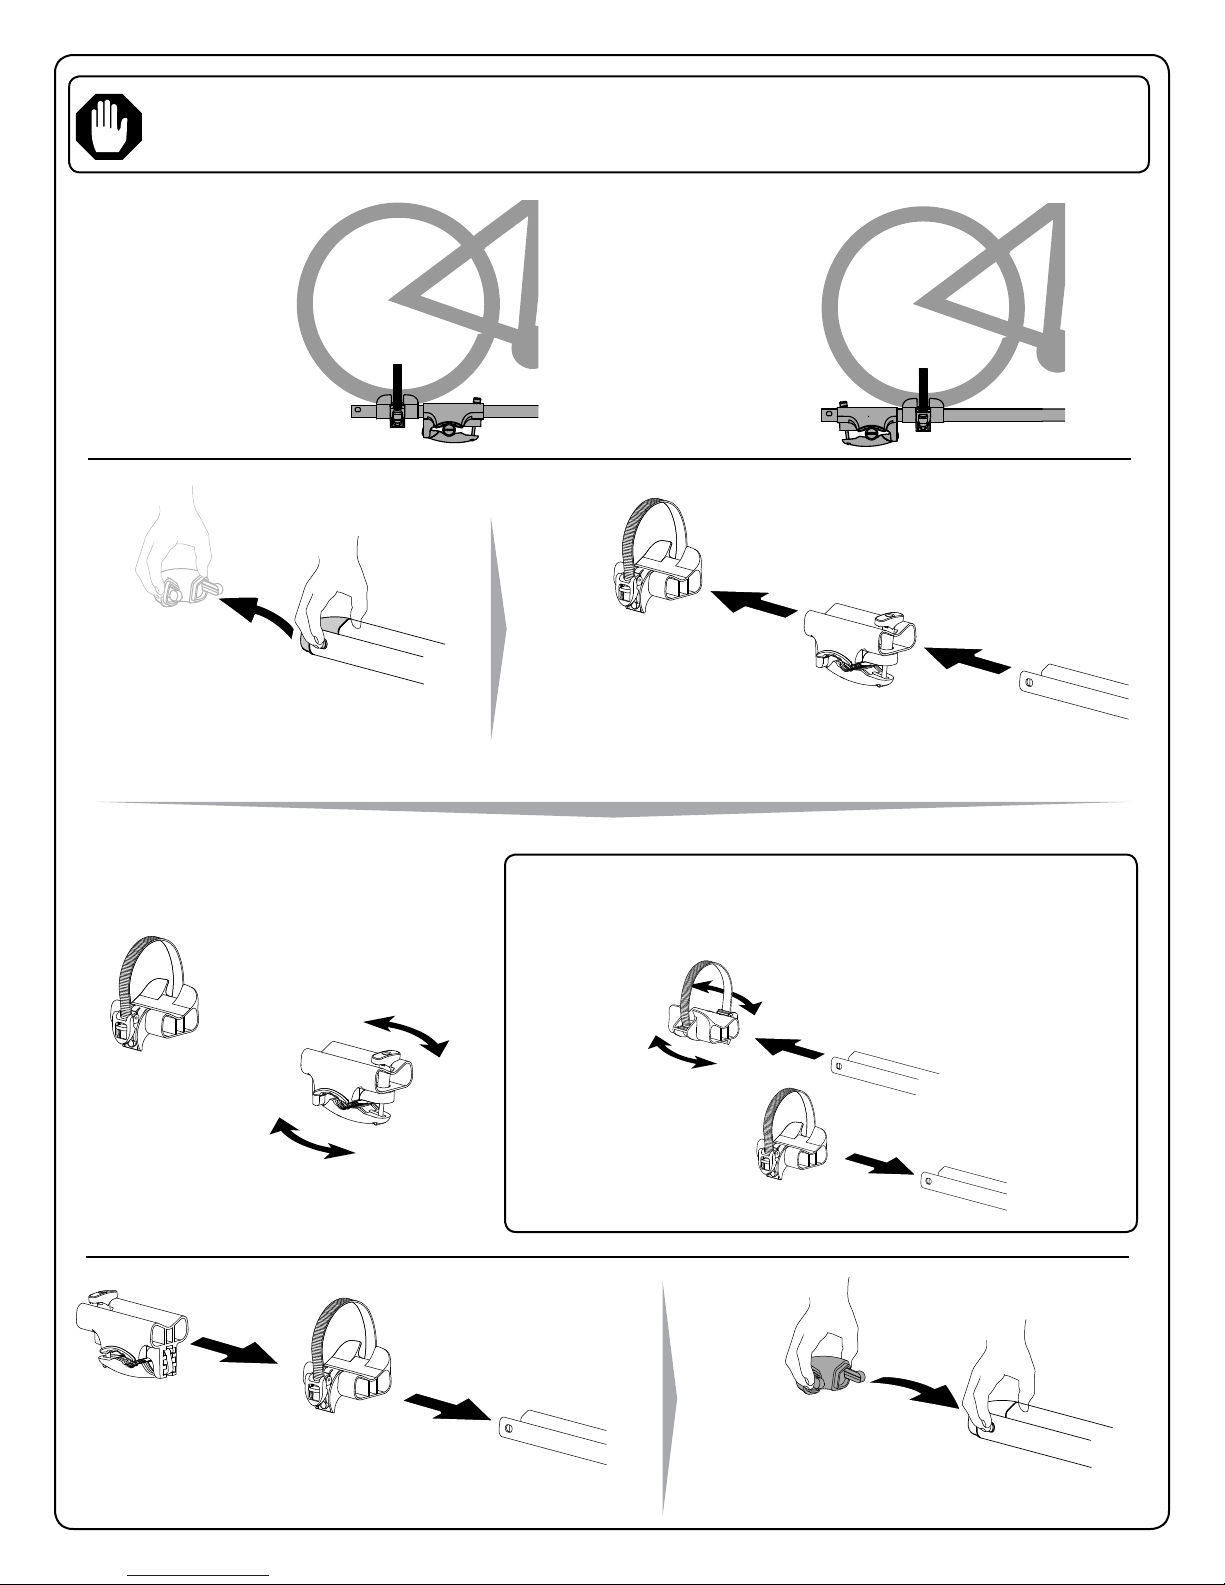
The rear clamp is configured for typical installations. In some situations adjustment may be necessary
if the wheel makes contact with the rear knob, or if the wheeltray cannot reach the wheel.
OPTION A
Wheel behind
rear crossbar.
Press the release
tabs on the end
cap and remove it.
OPTION B
Wheel ahead of
rear crossbar.
Remove wheeltray
and rear clamp.
Flip orientation of
rear clamp 180˚.
NOTE: You can flip the wheeltray or rear clamp independently
as needed. For instance if you needed the buckle on the
opposite side you could flip the wheeltray as shown.
Slide wheeltray and rear
clamp back onto forks.
1033644B-3/18
Install endcap.
Page 4
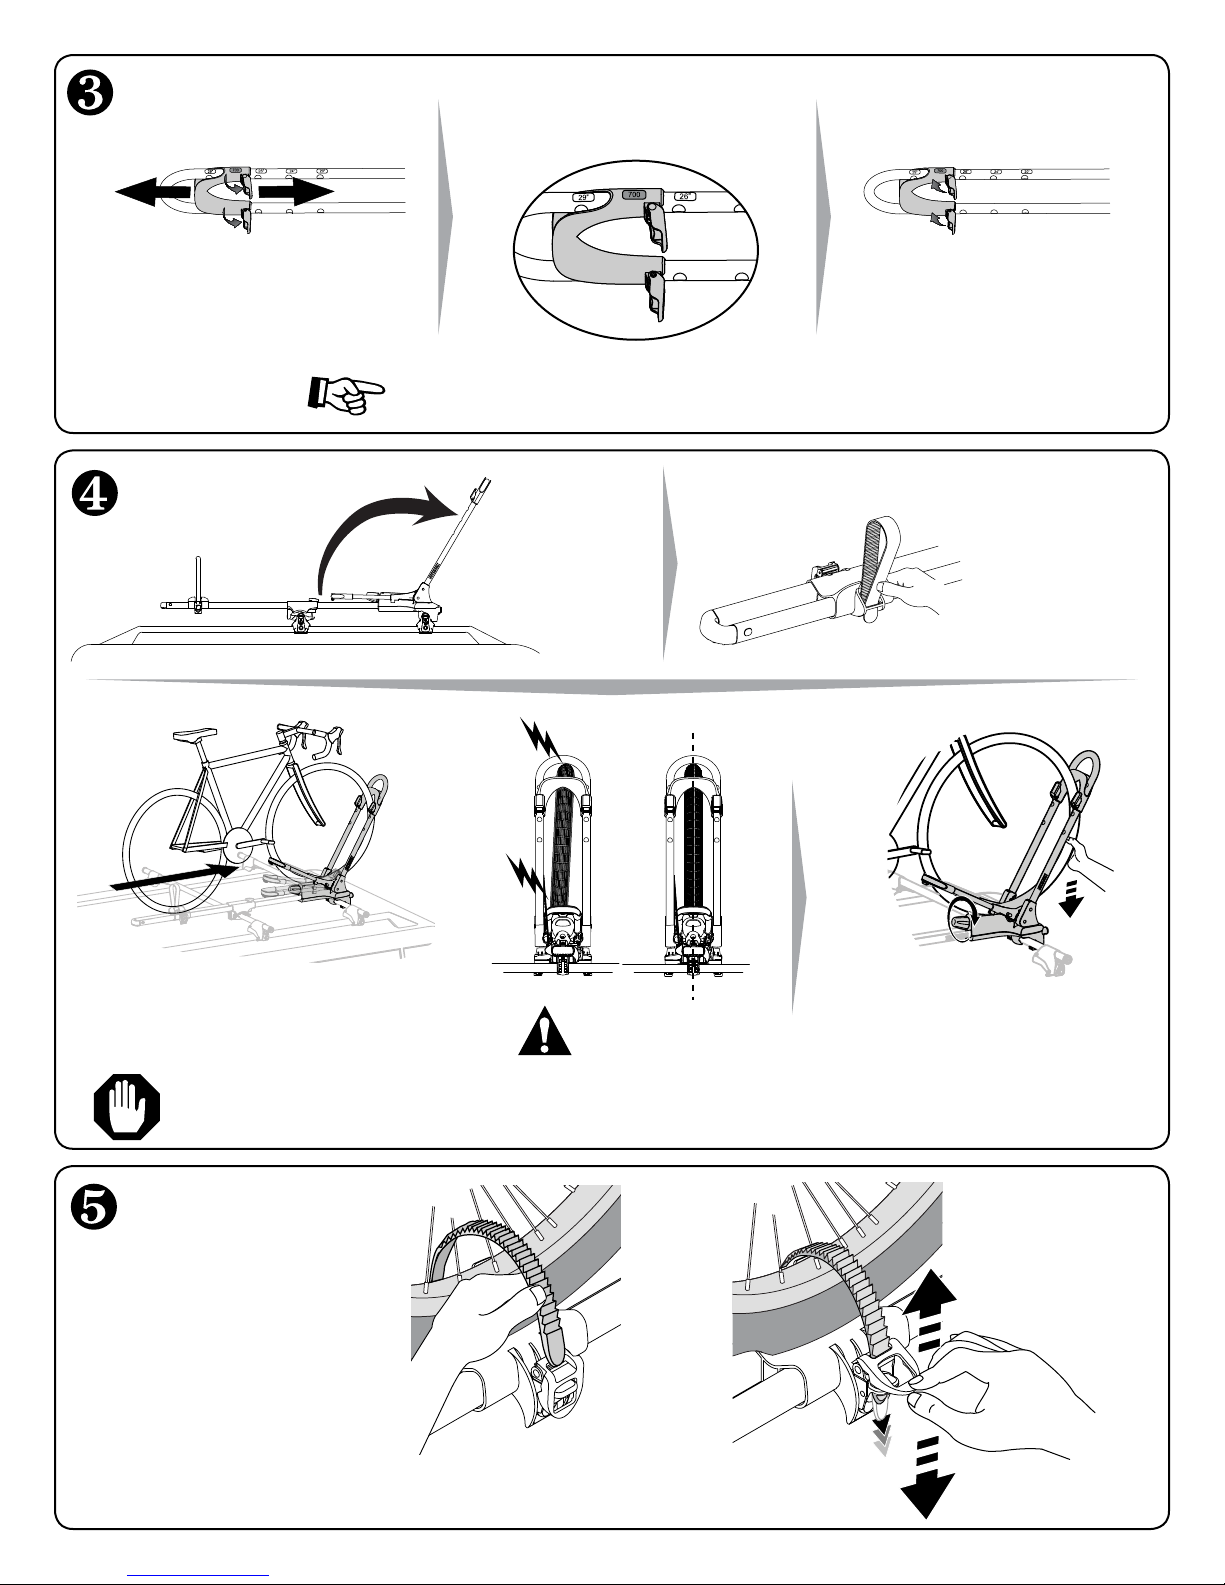
Wheel Setting
Slide the wheel grip until the
number matching your wheel size
is visible through the window.
Look at your bike’s tire to find
your wheel size. Open the red
levers on the wheel hoop to
adjust wheel grip height.
Load bike.
CLOSE RED
LEVERS.
IMPORTANT: Make sure to check your bike tire sidewall for your tire size. The
larger tire size settings have markings for both road and mountain bike tire size
ranges. Always use the size range setting that corresponds with your tire size.
Tuck wheelstrap
Open wheel hoop.
into the slot to
make way for
the tire.
Lift your bike up and align front wheel
with hoop while rolling forward. The
small hoop will lever up.
Do not use this product If your bike has fenders that
prevent the hoops from direct contact with the tire.
Secure rear wheel.
Pull strap through
wheel spokes.
Do not let strap push
against valve stem.
Insert strap end into buckle.
1033644B-4/18
CENTER TIRE IN
WHEELGRIP
Pull down on wheel while
turning the knob clockwise
to tighten hoop.
Move the
ratchet tab up
and down to
tighten strap.
Page 5

Lock your bike.
INSTALL OPTIONAL LOCK CORES (sold separately).
If you have purchased locks, follow your lock core instructions to
install. To purchase lock cores (Yakima Part Number 8007202) (2-pack)
visit www.yakima.com or visit your local Yakima dealer.
Follow the
instructions that
came with your lock
cores to remove the
lock plug and install
your lock cores.
Follow the instructions that
came with your lock cores
to remove the lock plug and
install your lock cores.
Access the built-in lock
cable on either side of the
small hoop. Store cable
here when not in use.
NOTE: Front knob
must be in horizontal
position to lock.
HORIZONTAL
Thread the cable
through your bike
frame, and insert silver
post into lock housing.
Turn the key
counter-clockwise
to lock.
NOTE: For bikes with a slack head tube angle, long-travel suspension fork, and a large frame size/long wheelbase, the
FrontLoader’s lock cable may not reach all the way around the down tube of the frame. For the vast majority of bikes, this
is NOT an issue. If your cable doesn’t reach, then adjust the front wheel hoop to the 29” wheel. The 29” wheel setting is
also useful for bikes with higher volume tires 2.35 and up.
BEFORE DRIVING AWAY
• CHECK REAR WHEEL.
Tighten the strap if needed.
• PERIODICALLY CHECK THAT KNOBS
ARE ADEQUATELY TIGHTENED.
•
CHECK THAT FRONT
WHEEL IS SECURE.
1033644B-5/18
Continued on next page...
Page 6
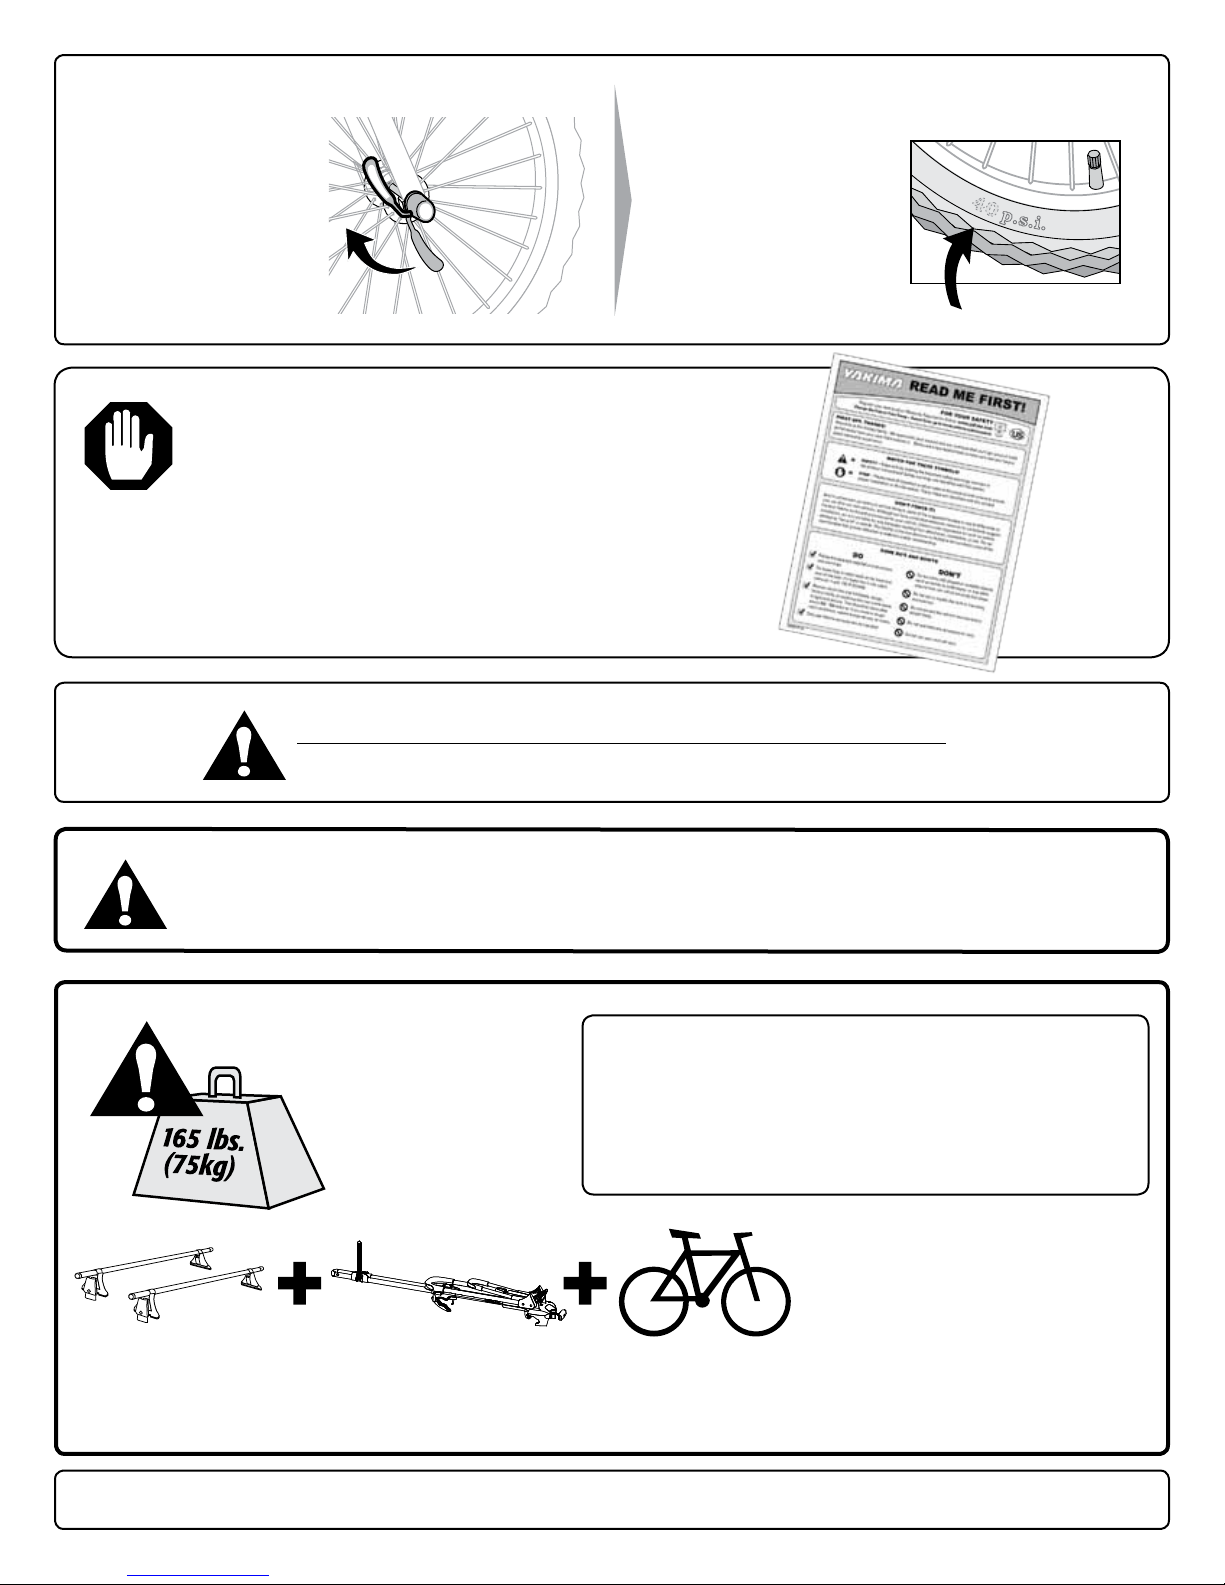
...before driving away.
CHECK FRONT WHEEL
ATTACHMENT TO
BICYCLE FRAME.
insert accompanying these instructions!
MAKE SURE YOUR
TIRES ARE FILLED
TO RECOMMENDED
PRESSURE FOUND ON
THE TIRE.
Be sure to read all the warnings and
warranty information contained in the
IF YOU REMOVE CARRIER, FOLLOW INSTRUCTIONS TO REINSTALL.
Follow safety checks after every installation.
WARNING: BE SURE ALL HARDWARE IS SECURED ACCORDING TO INSTRUCTIONS. ATTACHMENT
HARDWARE CAN LOOSEN OVER TIME. CHECK BEFORE EACH USE, AND TIGHTEN IF NECESSARY.
WEIGHT LIMITS
Follow the YAKIMA Fit List or check
online at Yakima.com for your rack’s
weight limit. Do not exceed the weight
limit of your vehicle’s rack.
Not more than 165
lbs. (75 kg) unless
=
otherwise noted.
RACK
THIS PRODUCT
(13 lbs. / 5.9 kg)
(40 lb / 18 kg maximum)
LOAD
K E E P T H E S E I N S T R U C T I O N S !
1033644B-6/18
*(Some vehicles will be rated lower than 165 lbs. (75 kg))
Page 7

Distance entre les
barres transversales*
41cm - 46cm
46cm - 122cm
Si le montage se fait sur les barres transversales
d'origine, vérifier que l'on dispose d'au moins 3,8 cm
(1 ½ po) entre le dessous des barres et le toit.
Limit
13.6kg/vélo
x2 max.
NE PAS DÉPASSER LA LIMITE DE CHARGE DU PORTE-BAGAGE !
18.1kg/vélo
NE PAS DÉPASSER LA LIMITE DE CHARGE DU PORTE-BAGAGE !
*DISTANCE ENTRE
LES BARRES
TRANSVERSALES
La distance
entre les barres
transversales
c’est… la
distance entre
les barres
transversales !
CROSSBAR SPREAD
FRONTLOADER (X1)
AVERTISSEMENT IMPORTANT
IL EST IMPÉRATIF QUE LES PORTE-BAGAGES ET LES ACCESSOIRES YAKIMA SOIENT CORRECTEMENT ET SOLIDEMENT FIXÉS AU
VÉHICULE. UN MONTAGE MAL RÉALISÉ POURRAIT PROVOQUER UN ACCIDENT D’AUTOMOBILE, QUI POURRAIT ENTRAÎNER DES
BLESSURES GRAVES OU MÊME LA MORT, À VOUS OU À D’AUTRES PERSONNES. VOUS ÊTES RESPONSABLE DE L’INSTALLATION DU
PORTE-BAGAGES ET DES ACCESSOIRES SUR VOTRE VÉHICULE, D’EN VÉRIFIER LA SOLIDITÉ AVANT DE PRENDRE LA ROUTE ET DE
LES INSPECTER RÉGULIÈREMENT POUR EN CONTRÔLER L’ÉTAT, L’AJUSTEMENT ET L’USURE. VOUS DEVEZ DONC LIRE ATTENTIVEMENT TOUTES LES
INSTRUCTIONS ET TOUS LES AVERTISSEMENTS ACCOMPAGNANT VOTRE PRODUIT YAKIMA AVANT DE L’INSTALLER ET DE L’UTILISER. SI VOUS NE
COMPRENEZ PAS TOUTES LES INSTRUCTIONS ET TOUS LES AVERTISSEMENTS, OU SI VOUS N’AVEZ PAS DE COMPÉTENCES EN MÉCANIQUE ET NE
COMPRENEZ PAS PARFAITEMENT LA MÉTHODE DE MONTAGE, VOUS DEVRIEZ FAIRE INSTALLER LE PRODUIT PAR UN PROFESSIONNEL, COMME UN
MÉCANICIEN OU UN CARROSSIER COMPÉTENT.
1033644B-7/18
Page 8

Déposer le porte-vélo FrontLoader sur les barres transversales.
Ouvrir la mâchoire arrière.
Il faudra peut-être tourner le boulon
en T pour qu’il passe à travers
l’ouverture dans la mâchoire.
Abaisser la
mâchoire avant sur
la barre avant.
Ouvrir la mâchoire avant.
Tourner le bouton avant
vers la gauche pour ouvrir
la mâchoire avant.
Faire attention de ne pas
abîmer le fini du toit. Placer
une serviette sur le toit pour
éviter les égratignures.
Serrer les mâchoires.
Serre la mâchoire arrière.
Fermer la pince arrière
sur la barre.
Serrer la mâchoire avant.
Tourner le bouton vers la droite
pour bien serrer la mâchoire
contre la barre avant.
Régler la position de la mâchoire si nécessaire.
Faire glisser la
mâchoire arrière
sous la barre
arrière.
Enfiler le boulon en T dans l’ouverture de la
mâchoire. Le tourner pour le caler dans la fente.
90°
Tourner le bouton vers la droite pour bien serrer
la mâchoire contre la barre arrière.
Si la mâchoire n’accroche pas bien sur
la barre d’origine, régler la mâchoire.
Encoche du haut pour les
barres rondes et carrées.
1033644B-8/18
Pour les barres d’origine, régler
la mâchoire dans l’encoche qui
offre la meilleure prise.
Page 9

La pince arrière est placée pour le montage le plus courant. Dans certains cas, il faudra l’inverser
si la roue entre en contact avec le bouton arrière ou si la roue ne rejoint pas la sangle.
OPTION A
Roue derrière la
barre arrière.
Appuyer sur les pattes
et enlever la garniture
d’extrémité du profilé.
OPTION B
Roue devant la
barre arrière.
Enlever la sangle
et la pince arrière.
Retourner la pince
arrière de 180°.
Réenfiler la sangle et la
pince arrière sur le profilé.
REMARQUE : on peut retourner la sangle ou la pince arrière
séparément au besoin. Par exemple, si l’on veut la boucle de
la sangle de l’autre côté, on peut la retourner tel qu’illustré.
Remettre en place la
garniture d’extrémité
du profilé.
1033644B-9/18
Page 10

Régler l’arceau en
fonction de la roue.
Regarder sur le pneu du vélo pour
trouver la taille de la roue. Ouvrir
les leviers rouges sur l’arceau
pour régler la hauteur de la butée.
Contrôlez la paroi du pneu de votre vélo pour déterminer sa taille. Les réglages de la taille du
pneu le plus large sont équipés de marquages pour une gamme de pneu de vélo de route et de
montagne. Utilisez toujours le réglage qui correspond le mieux à la taille de votre pneu.
Charger le vélo.
Faire coulisser la butée jusqu’à ce que
le chiffre correspondant à la taille de la
roue du vélo apparaisse dans la fenêtre.
Relever l’arceau.
FERMER LES LEVIERS ROUGES.
Caler la sangle
dans la fente pour
qu’elle ne gêne
pas la roue.
Soulever le vélo et aligner la roue avant dans
l’arceau tout en faisant rouler le vélo vers
l’avant. Le petit arceau basculera vers le haut.
Ne pas employer ce produit si le vélo est muni d’une aile qui
empêche l’arceau de faire contact directement avec le pneu.
Immobiliser la roue arrière.
Passer la sangle
entre les rayons.
Ne pas appuyer la
sangle contre la tige
de la valve.
sangle dans la boucle.
1033644B-10/18
Enfiler le bout de la
CENTRER LE PNEU
DANS LES ARCEAUX
Tirer la roue vers le bas tout en
tournant le bouton vers la droite
pour serrer l’arceau.
Serrer la
sangle en
actionnant
le levier
plusieurs fois.
Page 11

Verrouiller le vélo.
POSER LES SERRURES OPTIONNELLES (vendues à part).
Si l’on a acheté des serrures, suivre les instructions qui les accompagnent pour
les poser. Pour acheter des serrures (article Yakima n° 8007202 – emballage de
deux) consulter le site www.yakima.com ou votre revendeur Yakima.
Suivre les
instructions qui
accompagnent
les serrures pour
enlever le bouchon
et poser la serrure.
Suivre les instructions qui
accompagnent les serrures
pour enlever le bouchon et
poser la serrure.
Sortir le câble de
verrouillage incorporé de
chaque côté du petit arceau.
On peut y ranger le câble
quand il ne sert pas.
REMARQUE : le
bouton avant doit
être en position
horizontale pour
être verrouillé.
HORIZONTALE
Passer le câble dans le
cadre et engager l’ergot
argenté dans la serrure.
Pour verrouiller,
tourner la clé vers la
gauche.
REMARQUE : Pour les vélos dont l’angle du tube de direction est faible, qui ont une fourche à grand débattement et un
grand cadre et/ou un grand empattement, le câble de verrouillage ne fera peut-être pas complètement le tour du tube
diagonal du cadre. Cela ne touche PAS la vaste majorité des vélos. Si le câble est trop court, régler l’arceau de la roue
avant à 29 po. Ce réglage de 29 po est aussi utile pour les vélos qui ont de gros pneus (2,35 et plus).
AVANT DE PRENDRE LA ROUTE
• VÉRIFIER LA ROUE ARRIÈRE
Serrer la sangle au besoin.
• VÉRIFIER RÉGULIÈREMENT QUE LES
BOUTONS SONT BIEN SERRÉS.
•
VÉRIFIER LA SOLIDITÉ
DU MONTAGE DE LA
ROUE AVANT.
1033644B-11/18
Suite page suivante…
Page 12

… avant de prendre la route.
VÉRIFIER QUE LA ROUE
AVANT EST SOLIDEMENT
FIXÉE À LA FOURCHE.
S’assurer de lire les avertissements et les
renseignements sur la garantie figurant sur le
feuillet qui accompagne ces instructions !
S’ASSURER QUE LES
PNEUS SONT GONFLÉS
À LA PRESSION
RECOMMANDÉE SUR
LEUR FLANC.
SI L’ON ENLÈVE LE PORTE-VÉLO, SUIVRE LES
INSTRUCTIONS POUR LE REMETTRE EN PLACE.
Effectuer les vérifications de sécurité après toute réinstallation.
AVERTISSEMENT: S’assurer que le montage est solide et conforme aux
instructions. Les dispositifs de fixation peuvent se desserrer à la longue. Les
inspecter avant chaque utilisation et les resserrer au besoin.
LIMITE DE
CHARGEMENT
Consulter la liste de compatibilité
YAKIMA (“Fit list”) ou le site Yakima.
com pour connaître la limite de
chargement du porte-bagages. Ne pas
dépasser la limite de chargement xée
pour le porte-bagages d’origine.
Sur certains véhicules,
la charge maximale est
=
inférieure à 75 kg (165 lb)
PORTE-BAGAGES CE PRODUIT
(5,9 kg / 13 lb)
C O N S E R V E R C E S I N S T R U C T I O N S !
1033644B-12/18
LA CHARGE
(18 kg / 40 lb maxi)
*(Some vehicles will be rated lower than 165 lbs. (75 kg))
Page 13

*SEPARACIÓN ENTRE
TRAVESAÑOS
Separación entre
travesaños*
41cm - 46cm
46cm - 122cm
Si usted tiene barras transversales de origen,
asegúrese de dejar una separación de por lo
menos 1 1/2"(3,8 cm) entre la parte inferior de la
barra y el techo del vehículo.
Límites
13.6kg/vélo
2x max.
¡NO EXCEDA LOS LÍMITES DE CARGA DEL PORTABICICLETA!
18.1kg/vélo
¡NO EXCEDA LOS LÍMITES DE CARGA DEL PORTABICICLETA!
FRONTLOADER (1X)
La separación
entre
travesaños es
la distancia
entre las barras
transversales.
CROSSBAR SPREAD
AVISO IMPORTANTE:
ES FUNDAMENTAL QUE TODAS LAS PARRILLAS Y ACCESORIOS YAKIMA ESTÉN BIEN COLOCADOS Y ASEGURADOS AL
VEHÍCULO. UNA INSTALACIÓN DEFICIENTE PODRÍA RESULTAR EN ACCIDENTE AUTOMOVILÍSTICO Y PROVOCAR HERIDAS
GRAVES O MUERTE A USTED O A TERCEROS. USTED ES RESPONSABLE DE ASEGURAR LAS PARRILLAS Y ACCESORIOS AL
VEHÍCULO, VERIFICANDO UNIONES Y AMARRES ANTES DE USAR E INSPECCIONANDO EL AJUSTE DE LOS PRODUCTOS, SU DESGASTE
Y POSIBLES DAÑOS. POR ELLO DEBE LEER Y COMPRENDER TODAS LAS INSTRUCCIONES Y ADVERTENCIAS QUE VIENEN CON LOS
PRODUCTOS YAKIMA ANTES DE INSTALARLOS O USARLOS. SI NO ENTIENDE TODAS LAS INSTRUCCIONES Y ADVERTENCIAS, O NO
TIENE EXPERIENCIA EN MECÁNICA O NO ESTÁ FAMILIARIZADO CON LOS PROCEDIMIENTOS DE INSTALACIÓN, HAGA INSTALAR EL
PRODUCTO POR UN PROFESIONAL EN UN GARAGE CONOCIDO O EN UN TALLER DE CARROCERÍA.
1033644B-13/18
Page 14

Coloque el FrontLoader sobre las barras transversales.
Abra la mordaza trasera.
Es posible que deba girar el tornillo
en T para permitir que pase a través
de la ranura de la mordaza.
Baje la mordaza delantera
hasta que abrace la barra
transversal de adelante.
Abra la mordaza delantera.
Gire la perilla frontal en
sentido antihorario para
abrir la mordaza delantera.
Tenga cuidado de no dañar el
acabado del techo. Coloque
un paño sobre el techo antes
de realizar la instalación para
evitar rayarlo.
Apriete las mordazas.
Apriete la mordaza delantera.
Gire la perilla en sentido horario
hasta que la mordaza delantera
quede fijada firmemente
alrededor de la barra transversal.
Ajuste las mordazas si es necesario.
Apriete la mordaza trasera.
Cierre la mordaza trasera
alrededor de la barra
transversal posterior.
Haga deslizar la
mordaza trasera hasta
que abrace la barra
transversal de atrás.
Pase el tornillo en T por la abertura de la
mordaza. Gire el tornillo en T para que quede
en la ranura de la mordaza.
90°
Gire la perilla en sentido horario hasta que la
mordaza trasera quede totalmente apretada.
Si no logra un agarre seguro con sus
travesaños de origen, ajuste la mordaza.
Ranura superior para las barras
transversales redondas y cuadradas.
1033644B-14/18
Para los travesaños
de origen, elija la
mejor posición que
garantice un agarre
más seguro.
Page 15

La abrazadera trasera está configurada para las instalaciones típicas. En ciertos
casos, puede ser necesario un ajuste, como cuando la rueda toca la perilla
trasera o cuando el soporte de rueda no llega a la rueda.
OPCIÓN A
Rueda detrás del
travesaño trasero.
Presione las
lengüetas del
capuchón terminal
y retírelo.
OPCIÓN B
Rueda delante del
travesaño trasero.
Retire el soporte
de rueda y la
abrazadera trasera.
Cambie la orientación
de la abrazadera
trasera 180˚.
Deslice el soporte de rueda primero y la
abrazadera trasera después en el FrontLoader.
NOTA: En caso que sea necesario, es posible retirar
el soporte de rueda o la abrazadera trasera en forma
independiente. Por ejemplo, si se necesita que la hebilla
quede del lado opuesto, es posible
rotar el soporte de rueda, tal
como se muestra.
Vuelva a instalar el
capuchón terminal.
1033644B-15/18
Page 16

Ajuste la rueda.
Busque la medida de la rueda de su
bicicleta que aparece en el neumático.
Abra las palancas rojas del sujetador de
rueda para ajustar la altura de sujeción.
Asegúrese de confirmar el perfil de la rueda de la bicicleta para el tamaño de su rueda. Los ajustes para
ruedas de tamaño más grande tienen marcas tanto para rangos de tamaño de rueda de bicicleta de pista
como de montaña. Siempre utilice el ajuste de rango de tamaño que corresponde con el tamaño de su rueda.
Cargue la bicicleta.
Abra el portarrueda.
Deslice el sujetador de rueda
hasta que el número coincida con
la medida del neumático visible a
través de la abertura.
CIERRE LAS
PALANCAS ROJAS.
Inserte la correa de
rueda en la ranura
para facilitar el
posicionamiento
del neumático.
Suba la bicicleta, alinee la rueda delantera
con el portarrueda y empújela hacia adelante.
El portarrueda pequeño se levantará solo.
No emplear este producto si la bicicleta tiene una aleta que impide
que los portarruedas hacen contacto directo con el neumático.
Asegure la rueda trasera.
Tire de la correa a
través de los rayos de
la rueda.
Evite que la correa
empuje la válvula.
1033644B-16/18
CENTRE EL
NEUMÁTICO EN EL
AGARRE DE RUEDA.
Inserte el extremo de
la correa en la hebilla.
Tire hacia abajo de la rueda mientras
que gira la perilla en sentido horario
para apretar el portarrueda.
Mueva la lengüeta
del trinquete
hacia arriba y
hacia abajo para
apretar la correa.
Page 17

Trabe la bicicleta.
INSTALE LAS CERRADURAS LOCK CORE OPCIONALES (vendidas por separado).
Si ha comprado una cerradura Lock Core, siga las instrucciones que vienen
con la misma para instalarla. Para comprar esas cerraduras (pieza número
8007202 de Yakima) (2 por paquete), visite www.yakima.com o contacte un
distribuidor local de Yakima.
Siga las
instrucciones que
vienen con las
cerraduras Lock
Core para retirar el
tambor e instalar el
de su cerradura.
Siga las instrucciones que
vienen con las cerraduras Lock
Core para retirar el tambor e
instalar el de su cerradura.
Busque el cable de seguridad
que está incorporado al
portarrueda pequeño. Guarde
el cable aquí cuando no lo use.
NOTA: La perilla
delantera debe
estar en posición
horizontal para trabar
la cerradura.
HORIZONTAL
Pase el cable a través del
cuadro de la bicicleta e
inserte la clavija plateada
en el portaclavija de la
cerradura.
Gire la llave en
sentido antihorario
para bloquear.
NOTA: Para las bicicletas que tienen un ángulo del tubo de dirección pequeño, una horquilla con suspensión de largo
recorrido y una relación tamaño del cuadro/distancia entre ejes muy grande, es posible que el cable de cierre del
portabicicleta FrontLoader no alcance a dar toda la vuelta alrededor del tubo inferior del cuadro. Para la mayoría de las
bicicletas, esto NO es un problema. Si el cable no alcanza, entonces ajuste el sujetador de la rueda delantera para una de
29”. El ajuste para una rueda de 29” también es útil para las bicicletas con neumáticos cuyo volumen es 2.35 y más alto.
ANTES DE PARTIR
• VERIFIQUE LA RUEDA
TRASERA.
Ajuste la correa si es necesario.
• VERIFIQUE PERIÓDICAMENTE QUE
LAS PERILLAS ESTÁN APRETADAS
ADECUADAMENTE.
•
VERIFIQUE QUE LA RUEDA
DELANTERA ESTÁ BIEN
ASEGURADA.
1033644B-17/18
Continua en la página siguiente…
Page 18

… antes de partir.
VERIFIQUE QUE LA
RUEDA DELANTERA
ESTÁ BIEN FIJADA
AL CUADRO DE LA
BICICLETA.
¡Asegúrese de leer toda la información
sobre precauciones y garantías que
ASEGÚRESE DE QUE
LOS NEUMÁTICOS
ESTÁN INFLADOS
CON LA PRESIÓN
INDICADA EN LOS
MISMOS.
acompañan estas instrucciones!
SI QUITA EL PORTABICICLETA, SIGA LAS
INSTRUCCIONES PARA VOLVER A INSTALARLO.
Respete las consignas de seguridad después de cada instalación.
ATENCIÓN: CERCIÓRESE DE QUE TODO EL EQUIPO ESTÁ ASEGURADO SEGÚN
LAS INSTRUCCIONES. LAS PIEZAS DE MONTAJE PUEDEN AFLOJARSE CON EL
TIEMPO. VERIFIQUE ANTES DE CADA USO Y AJUSTE SI ES NECESARIO.
LÍMITES DEL
PESO
Respete la lista de compatibilidad de
Yakima, o visite el sitio Yakima.com
para conocer el límite de peso de su
portaequipaje. No exceda el límite de peso
de los portaequipajes para su vehículo.
No más de 165 lb
(75 kg), a menos
=
que se indique lo
PORTAEQUIPAJE ESTE PRODUCTO
(13 lb/5,9 kg)
¡ C O N S E R V E E S T A S I N S T R U C C I O N E S !
1033644B-18/18
CARGA
(40 lb/18 kg máximo)
*(Ciertos vehículos están clasificados para menos de 165 lb (75 kg)).
contrario.
 Loading...