

Page 1
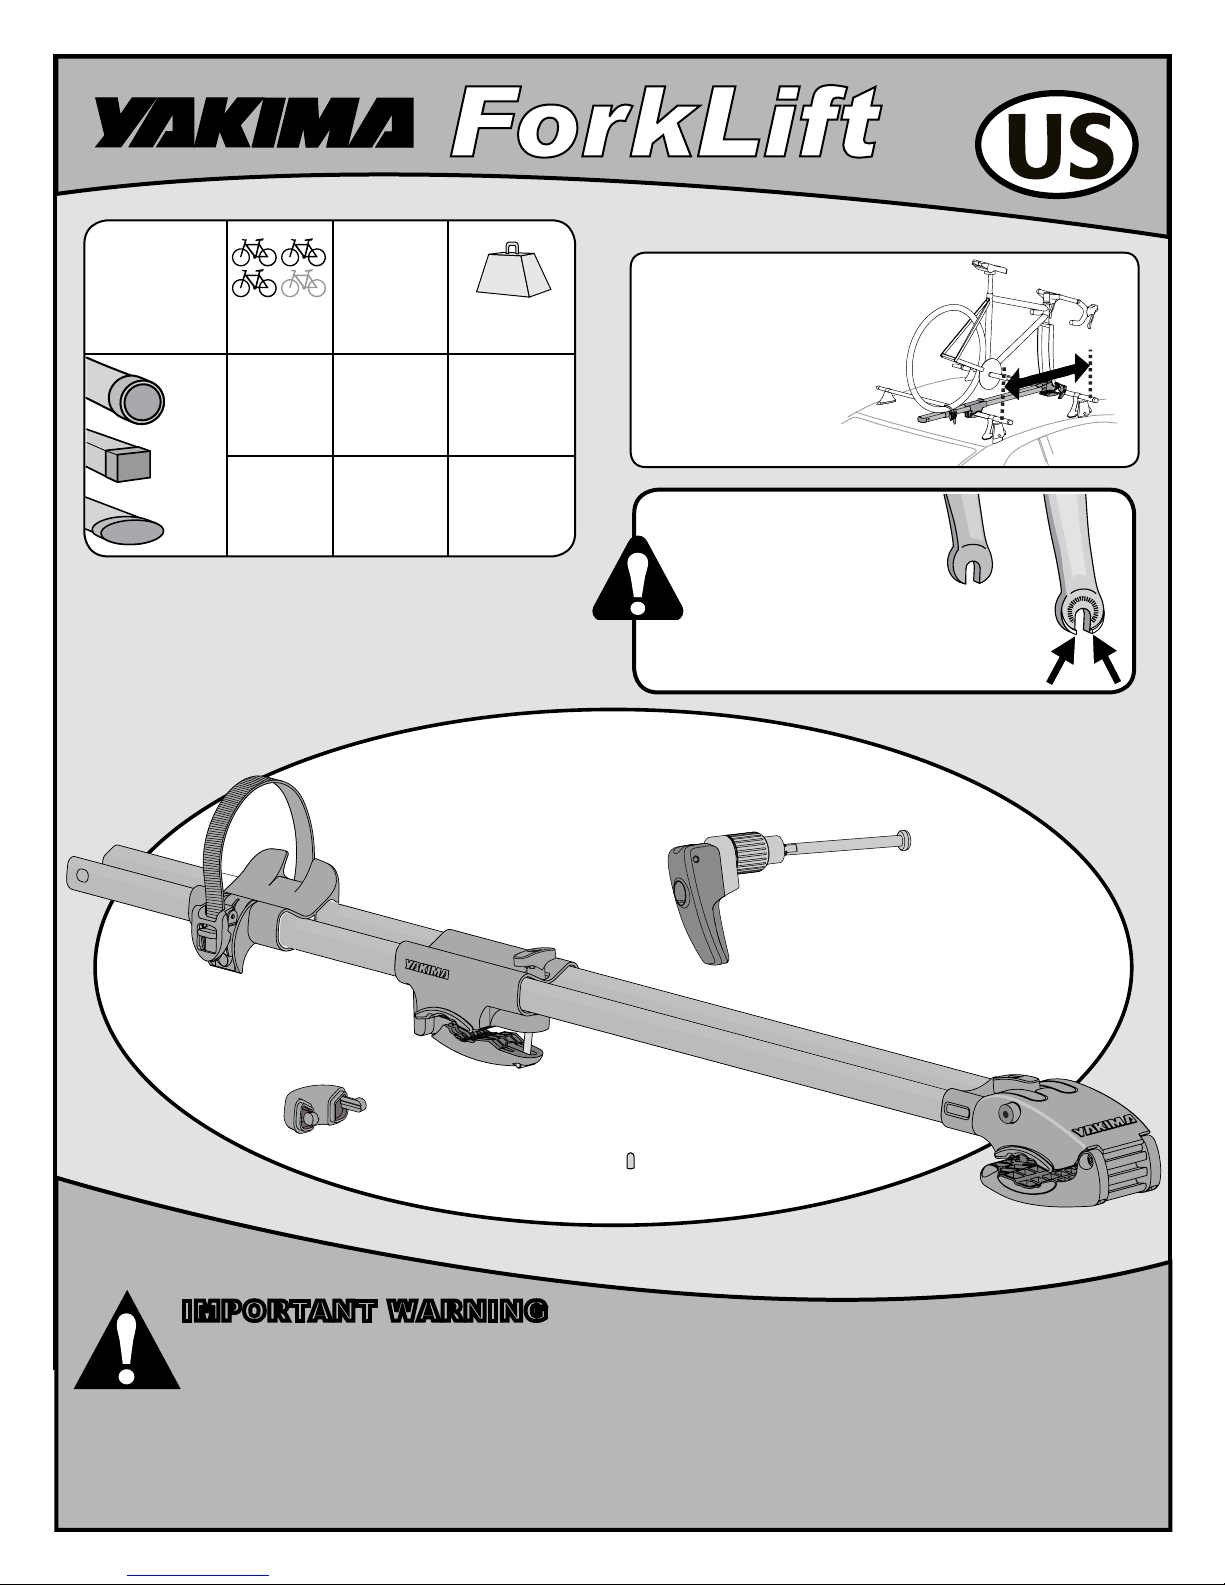
Min. and
Type of
Rack
Round
Bar
Load
1 or more
bikes
Max.
Crossbar
Spread*
16" - 42"
41cm - 107cm
Square
Bar
Factory
Bar
3 or more
bikes
18" - 42"
46cm - 107cm
DO NOT EXCEED RACK WEIGHT LIMITS!
Limits
16” spread =
35 lbs. / bike
41cm spread
15.9Kg / bike
18” spread =
40 lbs. / bike
46cm spread
15.9Kg / bike
*CROSSBAR SPREAD
Your crossbar
spread is
the distance
between the
crossbars.
DESIGNED FOR FORKS
WITH SAFETY TABS.
CROSSBAR SPREAD
Forks with
Safety Tabs
END CAP (1X)
IMPORTANT WARNING
IT IS CRITICAL THAT ALL YAKIMA RACKS AND ACCESSORIES BE PROPERLY AND SECURELY ATTACHED TO YOUR VEHICLE. IMPROPER
ATTACHMENT COULD RESULT IN AN AUTOMOBILE ACCIDENT, AND COULD CAUSE SERIOUS BODILY INJURY OR DEATH TO YOU OR
TO OTHERS. YOU ARE RESPONSIBLE FOR SECURING THE RACKS AND ACCESSORIES TO YOUR CAR, CHECKING THE ATTACHMENTS
PRIOR TO USE, AND PERIODICALLY INSPECTING THE PRODUCTS FOR ADJUSTMENT, WEAR, AND DAMAGE. THEREFORE, YOU MUST READ AND
UNDERSTAND ALL OF THE INSTRUCTIONS AND CAUTIONS SUPPLIED WITH YOUR YAKIMA PRODUCT PRIOR TO INSTALLATION OR USE. IF YOU
DO NOT UNDERSTAND ALL OF THE INSTRUCTIONS AND CAUTIONS, OR IF YOU HAVE NO MECHANICAL EXPERIENCE AND ARE NOT THOROUGHLY
FAMILIAR WITH THE INSTALLATION PROCEDURES, YOU SHOULD HAVE THE PRODUCT INSTALLED BY A PROFESSIONAL INSTALLER.
1033615B-1/24
LOCKING SKEWER (1X)
FORKLIFT (1X)
VINYL CAP (1X)
Part #1033615 Rev.B
Page 2

90°
Open locking slider, loosen knob, open jaw.
Loosen knob.
B
Open slider.
A
Attach ForkLift jaws to front crossbar.
Use caution to avoid hardware damaging
roof’s finish. A towel placed on the roof prior
to installation can help avoid scratches.
Close jaws around crossbar.
Open jaws.
C
For low clearance crossbars:
Hold ForkLift at an angle
while positioning jaw around
crossbar to avoid any contact
with your vehicle’s roof.
Pass the t-bolt through the opening in lower
jaw. Rotate t-bolt to rest in slot.
Tighten the knob, but don’t tighten all the
way. Final tightening will occur after rear
clamp has been installed.
1033615B-2/24
Adjust jaw if necessary.
If you don’t get a secure grip with
your factory bars adjust jaw.
For factory bars choose the best
position for most secure grip.
(Upper notch for round
and square bars.)
Page 3
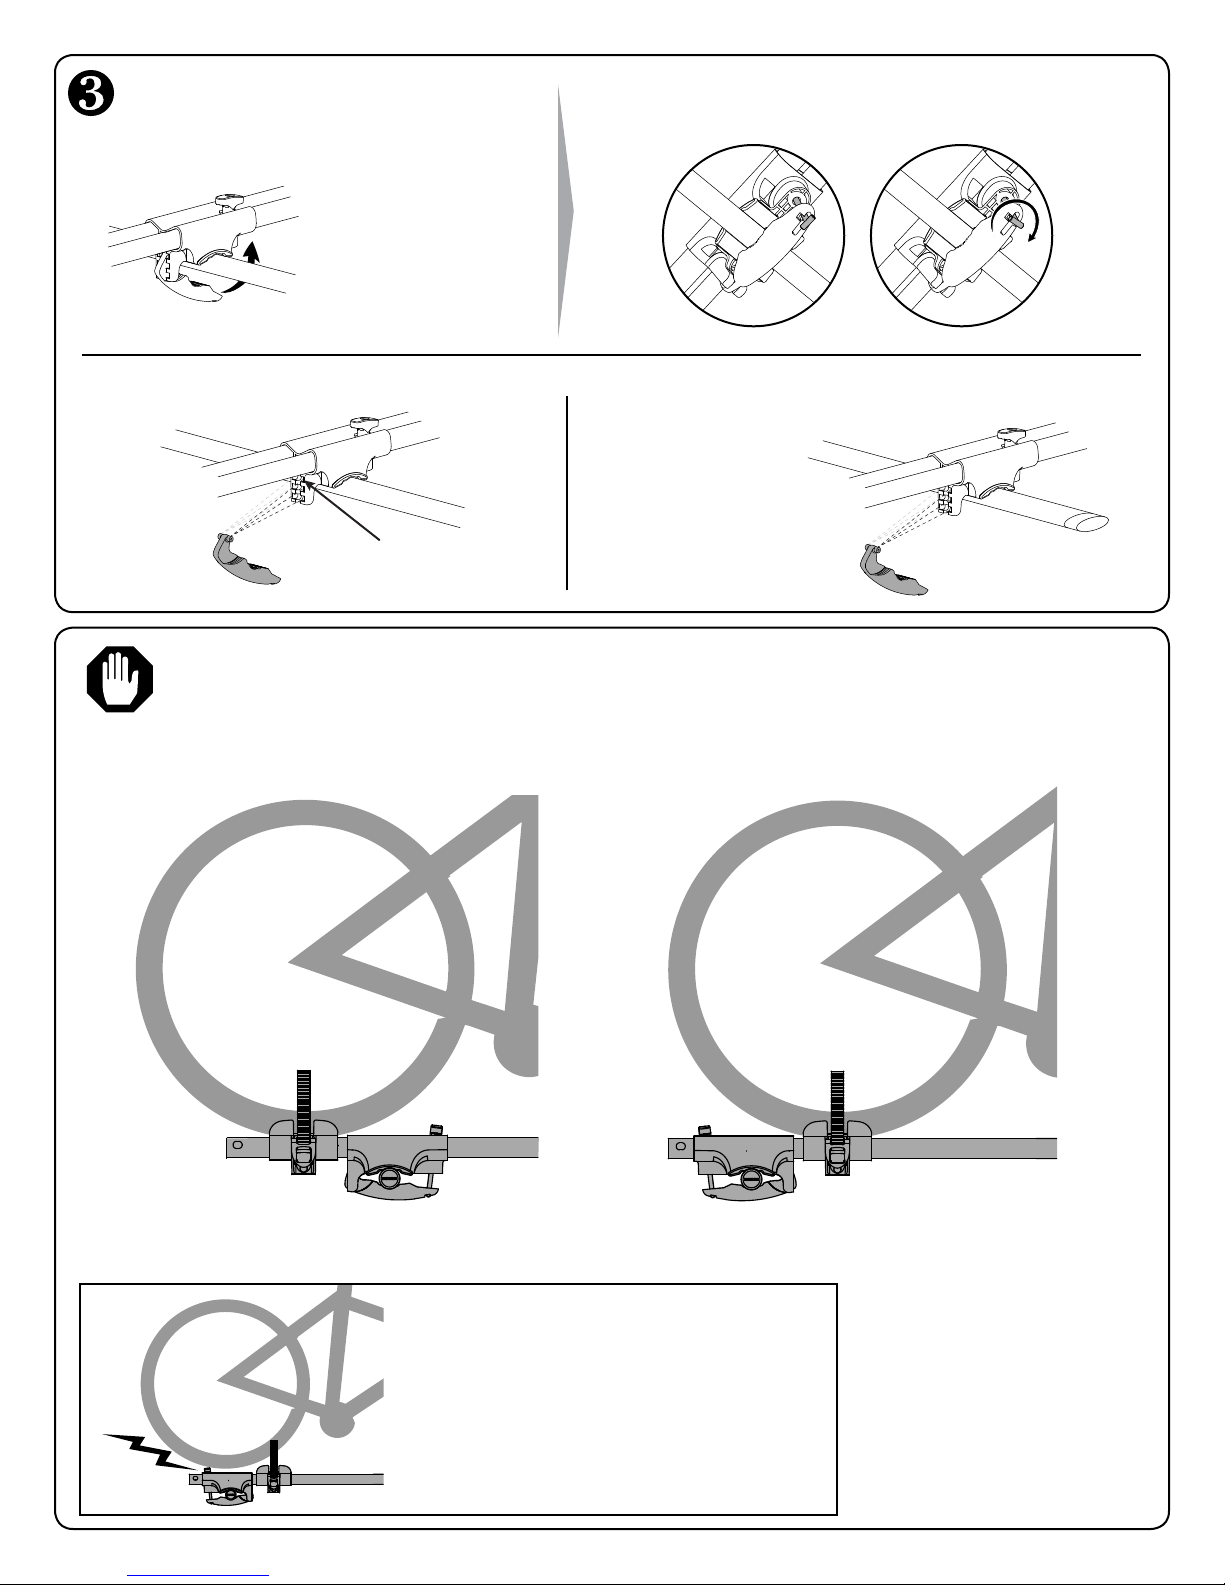
Secure rear clamp.
Pass the t-bolt through the opening in bail.
Rotate t-bolt to rest in slot in bail.
Close rear clamp
around crossbar.
90°
Adjust clamp if necessary.
The rear clamp is configured for typical installations. In some situations adjustment may be
necessary if the wheel makes contact with the rear knob, or if the wheeltray cannot reach the wheel.
OPTION A OPTION B
Upper notch for round
and square bars.
If you don’t get a secure grip with
your factory bars adjust your clamp.
For factory bars
choose the best
position for most
secure grip.
Wheel behind rear crossbar.
1033615B-3/24
Wheel ahead of rear crossbar.
If changing the orientation of the rear
clamp still results in the rear wheel
contacting the knob, please contact our
customer service team (888-925-4621)
for a free, corrective adapter.
See next page for how-to.
Page 4
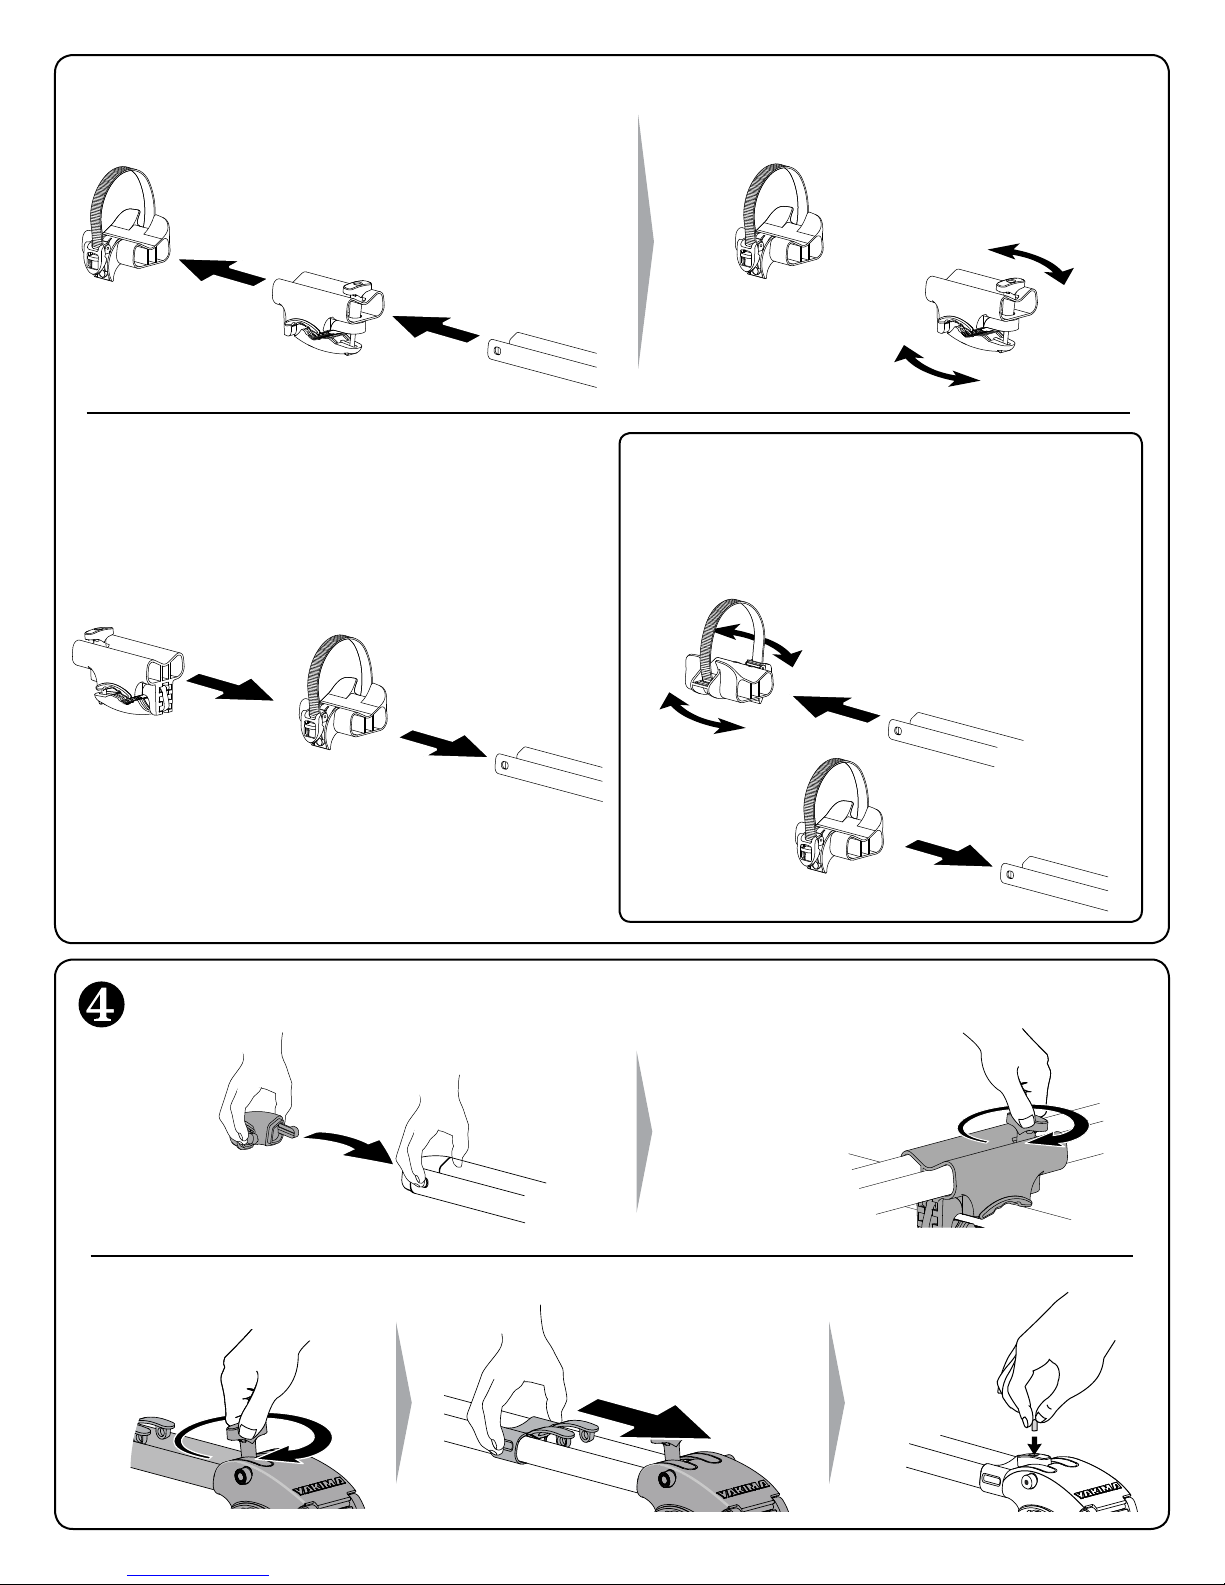
Continued from previous page...
Remove wheeltray and rear clamp.
Slide wheeltray and rear
clamp back onto forks.
Flip orientation of rear clamp 180˚.
NOTE: You can flip the wheeltray or rear clamp
independently as needed. For instance if you
needed the buckle on the opposite side you
could flip the wheeltray as shown.
TIGHTEN DOWN KNOBS, close locking slider.
Install endcap.
Fully tighten the front knob.
1033615B-4/24
Close locking
slider.
Fully tighten
the rear knob.
Install vinyl
cap.
Page 5
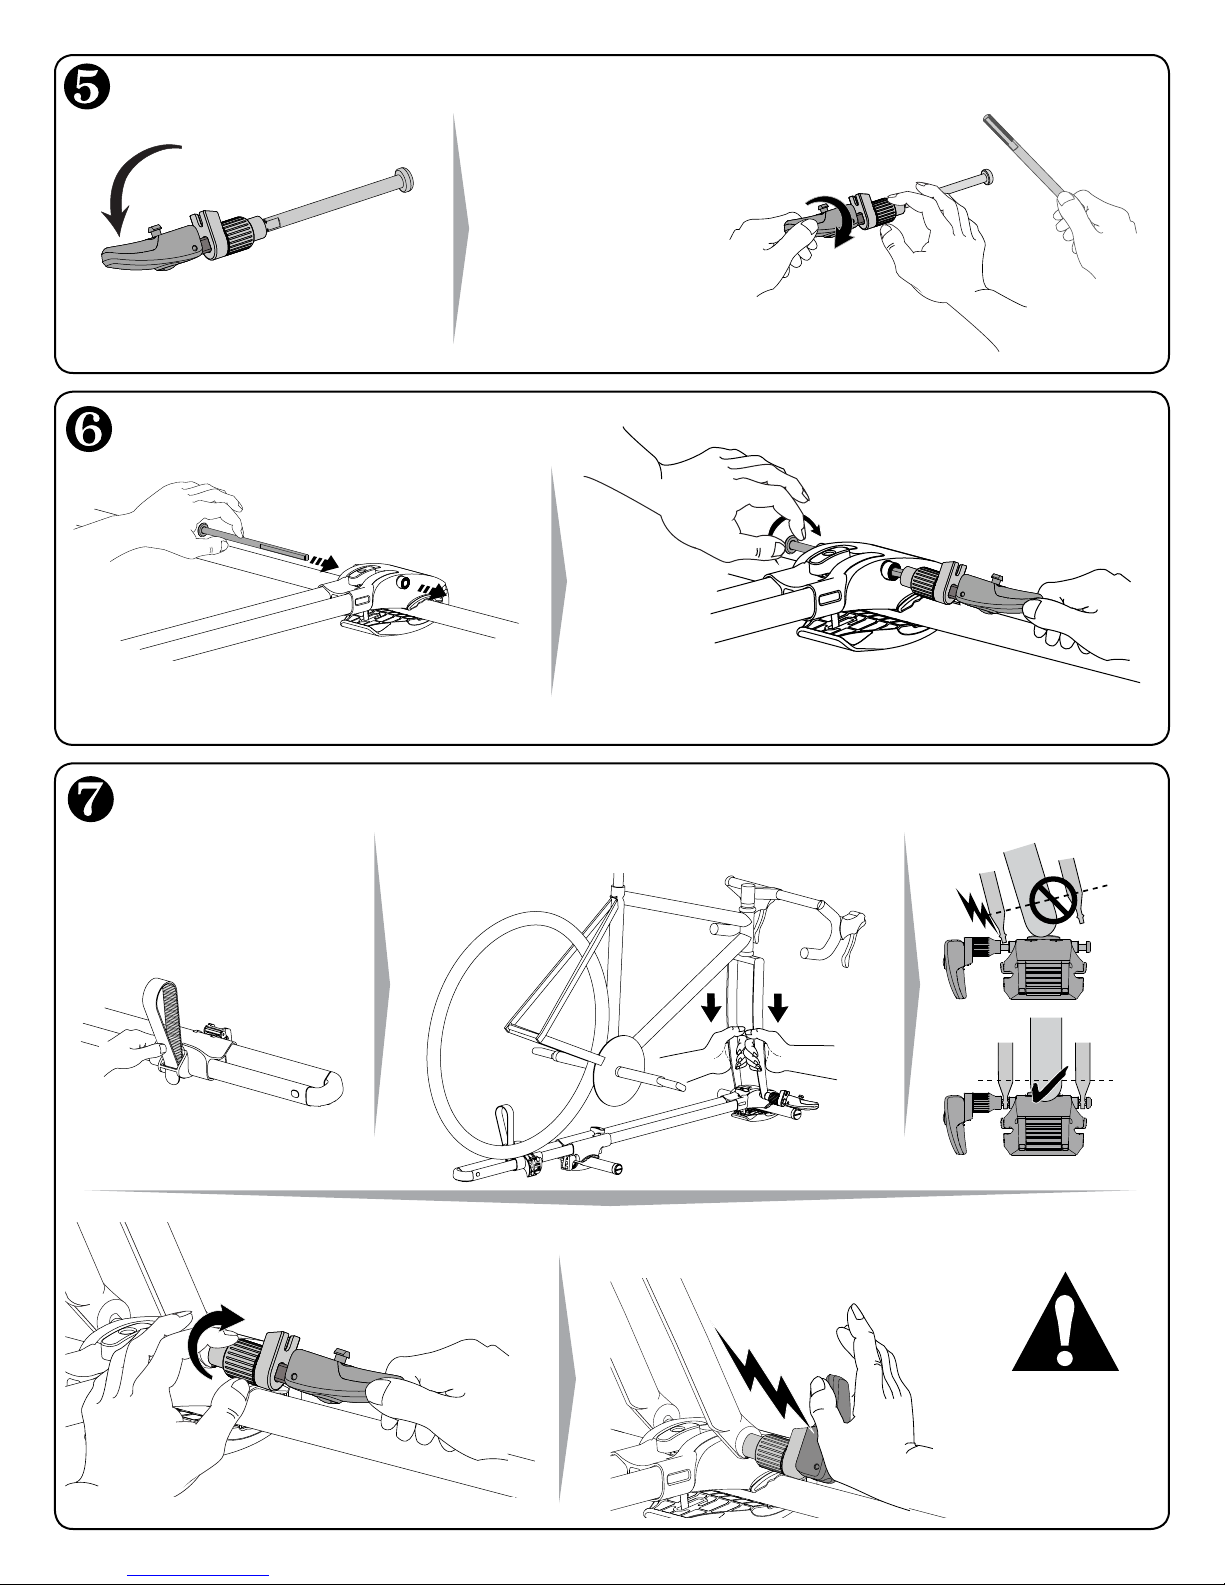
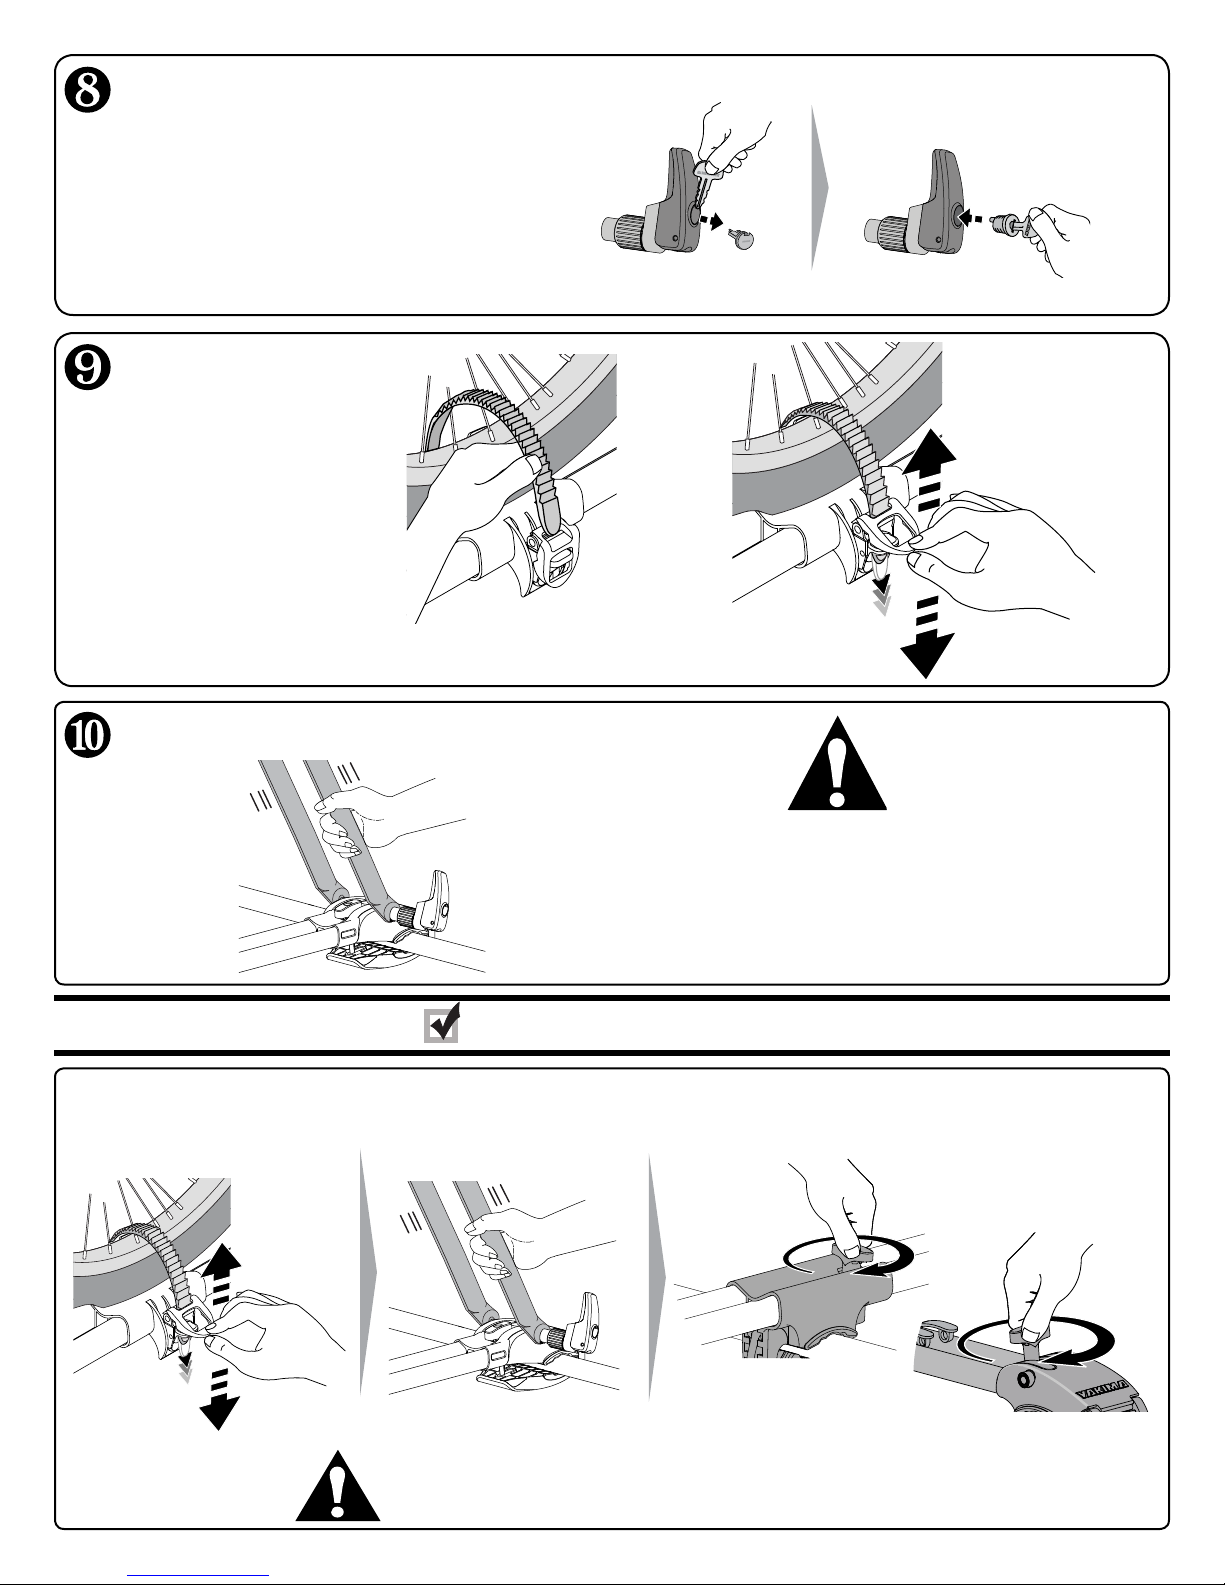
SEPARATE THE SKEWER’S SHAFT FROM ITS HANDLE.
Open handle. Hold the adjustment knob.
Turn handle clockwise to
remove the shaft.
INSTALL SKEWER.
Gently push and
wiggle skewer
through ForkLift head.
Skewer direction is your choice:
Consider lock access.
Remove front wheel and load your bike.
Set bicycle forks vertically onto skewer.
BE SURE FORKS ARE FULLY SEATED!
Tuck wheelstrap into the
slot to make way for the tire.
Hold the shaft at the far
end. Join the handle with
the shaft, turn the shaft
counter-clockwise.
NOTE: Adjustment knob will turn with shaft.
Prevent damage
to your forks!
With lever open, tighten
adjustment knob clockwise
until the lever closes with
FIRM resistance.
NOTE: Shaft will turn with adjustment knob.
1033615B-5/24
CLOSE THE LEVER.
FIRM RESISTANCE against the forks.
It should close with
Your bike’s forks
are secure ONLY
after the lever
closes with SOLID
RESISTANCE.
Page 6
Install lock core.
If you have purchased a lock, follow
lock core instructions to install.
Secure rear wheel.
Pull strap through
wheel spokes.
Do not let strap push
against valve stem.
Insert strap end into buckle.
Check to make sure bike is secure.
Tug on bike fork.
Move the
ratchet tab up
and down to
tighten strap.
TEST YOUR
INSTALLATION! If forks
can move in the mount,
open the lever and
tighten the adjustment
knob more.
• CHECK REAR WHEEL.
Tighten the strap if needed.
1033615B-6/24
•
NOTE: Always check your base system to ensure crossbar stability!
BEFORE DRIVING AWAY
CHECK THAT BIKE
FORK IS SECURE.
• PERIODICALLY CHECK THAT KNOBS
ARE ADEQUATELY TIGHTENED.
Page 7
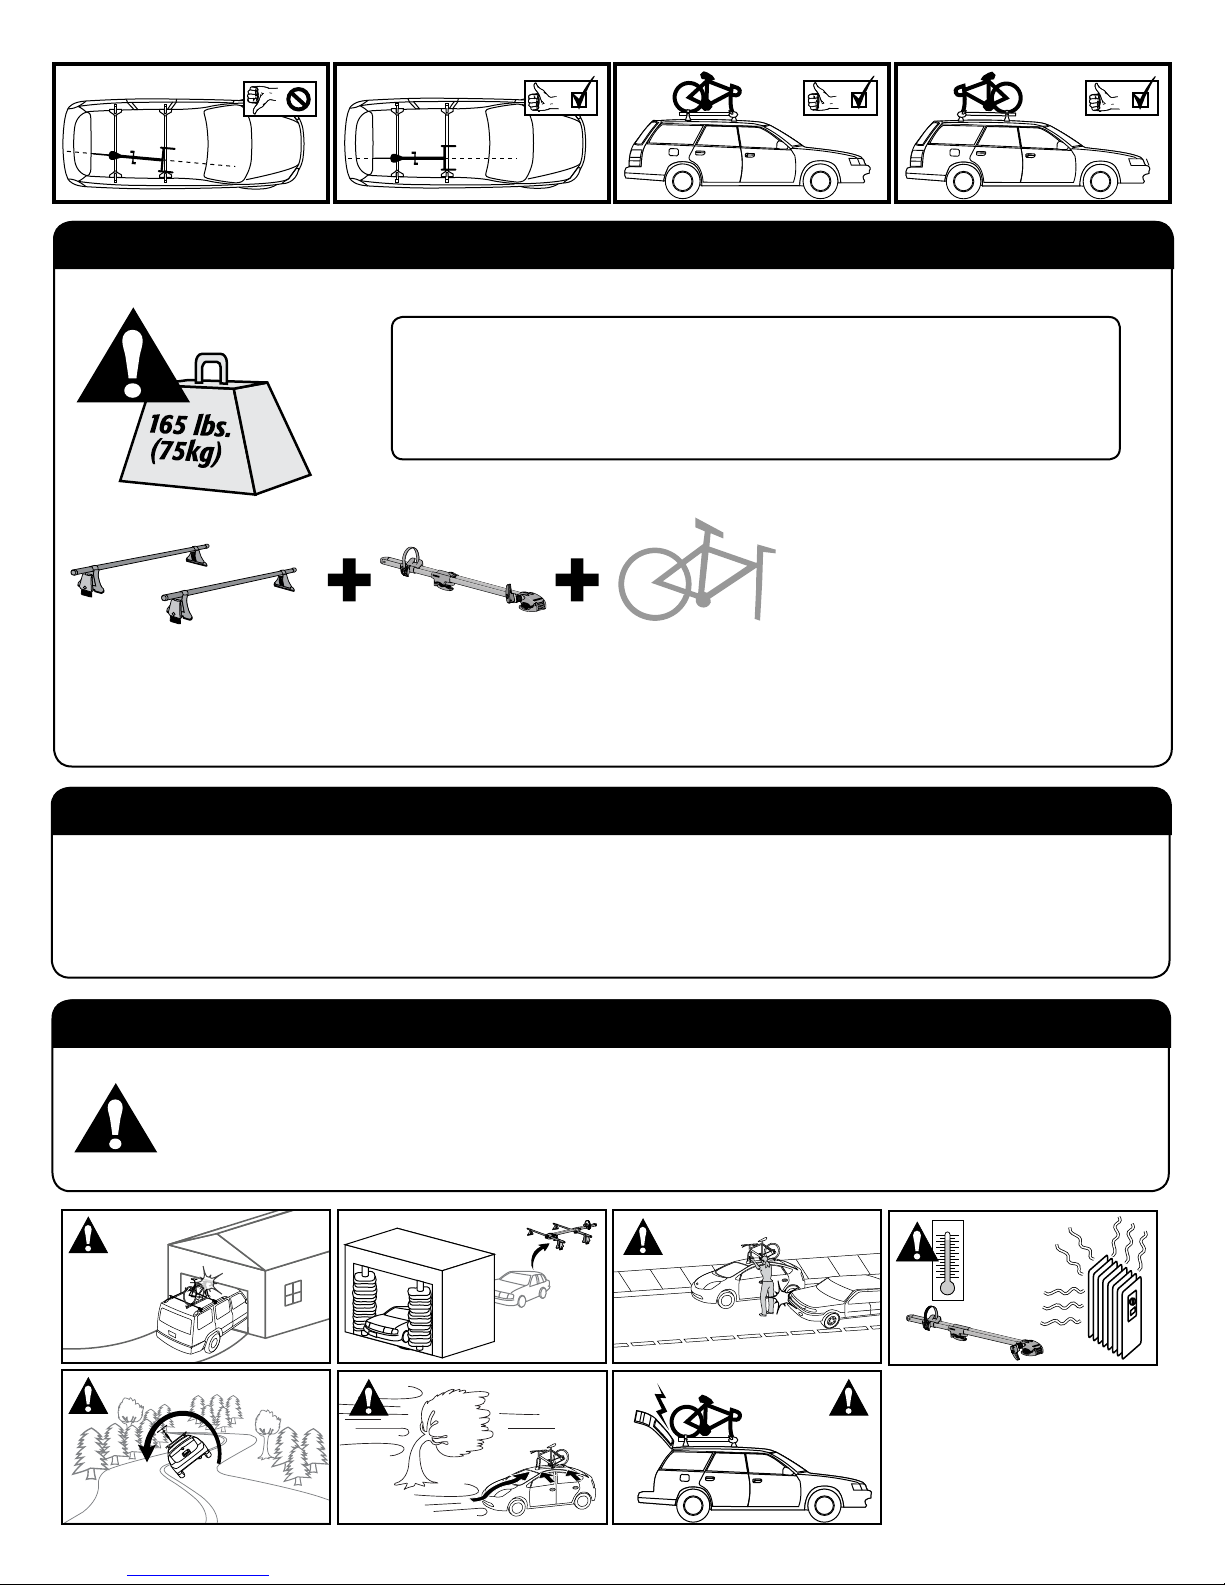
RACK
LOAD LIMIT
Follow the YAKIMA Fit List or check online at
Yakima.com for your rack’s weight limit. Do not
exceed the weight limit of your vehicle’s rack.
Not more than 165
lbs. (75 kg) unless
=
otherwise noted.
THIS PRODUCT
(7 lbs. / 3.2 kg)
MAINTENANCE
LOAD
(40 lbs./ 18.1Kg maximum)
*(Some vehicles will be rated lower than 165 lbs. (75 kg))
Use non-water soluble lubricant on screws. Use a soft cloth
with water and mild detergent to clean plastic parts.
WARNING
BE SURE ALL HARDWARE IS SECURED ACCORDING TO
INSTRUCTIONS. ATTACHMENT HARDWARE CAN LOOSEN OVER
TIME. CHECK BEFORE EACH USE, AND TIGHTEN IF NECESSARY.
ºC ºF
R8A9N1D
1033615B-7/24
Page 8
READ THESE WARNINGS:
• This bike carrier is designed for bikes that use standard 100mm x 9mm quick release front hubs. Do
not carry bikes with other hub standards (qr15, all thru-axles, maverick, lefty, etc.) Without approved
adapters.
• Bicycle fork must be equipped with safety tabs. Removal or alteration of safety tabs will void warranty
when used with this carrier.
• Failure to properly install, adjust, use, and maintain the quick release mechanism on this carrier may
result in damage to the vehicle and bike as well as serious personal injury.
• Any modification to bike dropouts can cause insufficient fork mount clamping pressure and may result
in damage or loss of bike.
• Do not carry bikes with disk wheels, wheels covers, baby seats, panniers, bike covers or motors.
• Do not carry tandem or recumbent bicycles.
• Off-road driving is not recommended.
• Not all forks are compatible with Yakima mounts. If your fork has a unique feature or design that
prevents the mount from being used in accordance with these instructions, do not use it.
REINSTALLATION
If you remove carrier, follow instructions to reinstall.
FOLLOW SAFETY CHECKS AFTER EVERY INSTALLATION.
REPLACEMENT PARTS
TECHNICAL ASSISTANCE OR REPLACEMENT PARTS
Contact your dealer, or visit www.yakima.com, or call
(888)925-4621 Monday through Friday, 7:00 AM to 5:00 PM, PST
LIMITED LIFETIME WARRANTY
This product is covered by YAKIMA’s “Love It Till You
Leave It” Limited Lifetime Warranty To obtain a copy of
this warranty, go online to www.yakima.com or email us
at yakwarranty@yakima.com or call (888) 925-4621
K E E P T H E S E I N S T R U C T I O N S !
1033615B-8/24
Page 9

Type de
porte-
bagage
Charge
carrées, Barres d’origine
Barres rondes, Barres
1 ou 2
vélos
transversales*
Distance
mini – maxi
entre barres
16" - 42"
41cm - 107cm
Limites
distance de 41 cm =
35 lb/vélo
15,9 kg/vélo
*DISTANCE ENTRE LES
BARRES TRANSVERSALES
La distance
entre les barres
transversales
c’est… la distance
entre les barres
transversales !
CROSSBAR SPREAD
3 vélos
ou plus
NE PAS DÉPASSER LA LIMITE DE CHARGE DU PORTE-BAGAGE !
18" - 42"
46cm - 107cm
distance de 46 cm =
40 lb/vélo
18,1 kg/vélo
AXE À SERRAGE RAPIDE
VERROUILLABLE (X 1)
CONÇU POUR LES
FOURCHES MUNIES
D’ERGOTS DE SÉCURITÉ.
Fourche
avec ergots
de sécurité
PORTE-VÉLO FORKLIFT (X 1)
GARNITURE
D’EXTRÉMITÉ (X 1)
AVERTISSEMENT IMPORTANT:
IL EST IMPÉRATIF QUE LES PORTE-BAGAGES ET LES ACCESSOIRES YAKIMA SOIENT CORRECTEMENT ET SOLIDEMENT FIXÉS AU
VÉHICULE. UN MONTAGE MAL RÉALISÉ POURRAIT PROVOQUER UN ACCIDENT D’AUTOMOBILE, QUI POURRAIT ENTRAÎNER DES
BLESSURES GRAVES OU MÊME LA MORT, À VOUS OU À D’AUTRES PERSONNES. VOUS ÊTES RESPONSABLE DE L’INSTALLATION DU
PORTE-BAGAGES ET DES ACCESSOIRES SUR VOTRE VÉHICULE, D’EN VÉRIFIER LA SOLIDITÉ AVANT DE PRENDRE LA ROUTE ET DE LES INSPECTER
RÉGULIÈREMENT POUR EN CONTRÔLER L’ÉTAT, L’AJUSTEMENT ET L’USURE. VOUS DEVEZ DONC LIRE ATTENTIVEMENT TOUTES LES INSTRUCTIONS
ET TOUS LES AVERTISSEMENTS ACCOMPAGNANT VOTRE PRODUIT YAKIMA AVANT DE L’INSTALLER ET DE L’UTILISER. SI VOUS NE COMPRENEZ PAS
TOUTES LES INSTRUCTIONS ET TOUS LES AVERTISSEMENTS, OU SI VOUS N’AVEZ PAS DE COMPÉTENCES EN MÉCANIQUE ET NE COMPRENEZ PAS
PARFAITEMENT LA MÉTHODE DE MONTAGE, VOUS DEVRIEZ FAIRE INSTALLER LE PRODUIT PAR UN PROFESSIONNEL.
1033615B-9/24
CAPUCHON DE
VINYLE (X 1)
Page 10

90°
Éloigner la fourchette de verrouillage, desserrer le bouton et ouvrir la mâchoire.
Desserrer le bouton.
B
Éloigner la fourchette
A
de verrouillage.
Accrocher la mâchoire à la barre avant.
Faire attention de ne pas abîmer le fini du
toit. Placer une serviette sur le toit pour
éviter les égratignures.
Fermer la mâchoire sur la barre.
Ouvrir la mâchoire.
C
Si la barre est près du
toit :Relever le profilé du
porte-vélo pendant que l’on
accroche la mâchoire à la
barre avant pour éviter le
contact avec le toit.
Enfiler le boulon en T dans l’ouverture de la
mâchoire. Le tourner pour le caler dans la fente.
Serrer le bouton, mais pas complètement
: on terminera le serrage une fois que la
pince arrière sera installée.
1033615B-10/24
Régler la position de la mâchoire si nécessaire.
Si la mâchoire n’accroche pas bien sur
la barre d’origine, régler la mâchoire.
Pour les barres d’origine, régler la
mâchoire dans l’encoche qui offre
la meilleure prise.
(Encoche du haut pour les
barres rondes et carrées.)
Page 11

Accrocher la pince arrière.
Fermer la pince
arrière sur la barre.
Enfiler le boulon en T dans l’ouverture de la
mâchoire. Le tourner pour le caler dans la fente.
90°
Régler la position de la mâchoire si nécessaire.
Encoche du haut pour les
barres rondes et carrées.
La pince arrière est placée pour le montage le plus courant. Dans certains cas, il faudra l’inverser
si la roue entre en contact avec le bouton arrière ou si la roue ne rejoint pas la sangle.
OPTION A OPTION B
Si la mâchoire n’accroche pas bien sur la barre
d’origine, régler la mâchoire
Pour les barres d’origine,
régler la mâchoire dans
l’encoche qui offre la
meilleure prise.
1033615B-11/24
Roue devant la barre arrière.Roue derrière la barre arrière.
Si la roue arrière touche tout de
même au bouton même si on a
inversé la pince arrière, prière de
contacter notre service à la clientèle
(au 888-925-4621) pour recevoir
gratuitement un adaptateur spécial.
On explique comment
faire à la page suivante.
Page 12

Suite de la page précédente…
Enlever la garniture
d’extrémité du profilé.
Enlever la sangle et la
pince arrière.
Réenfiler la sangle et la
pince arrière sur le profilé.
Retourner la pince arrière de 180°.
Remarque : on peut retourner la sangle ou
la pince arrière séparément au besoin. Par
exemple, si l’on veut la boucle de la sangle de
l’autre côté, on peut la retourner tel qu’illustré.
SERRER LES BOUTONS, ramener la fourchette de verrouillage.
Remettre en place la garniture
d’extrémité du profilé.
Serrer complètement le
bouton avant.
1033615B-12/24
Serrer complètement
le bouton arrière.
Ramener la fourchette
de verrouillage.
Poser le
capuchon de
vinyle.
Page 13

SÉPARER L’AXE DE SON LEVIER.
Ouvrir le levier.
Tenir la molette de réglage.
Tourner la poignée vers la
droite pour enlever l’axe.
INSTALL SKEWER.
Enfiler doucement l’axe
dans la tête en tournant.
On peut poser l’axe dans un sens ou dans
l’autre ; tenir compte de l’accès à la serrure.
Enlever la roue avant et charger le vélo.
Déposer la fourche du vélo verticalement sur l’axe.
S’ASSURER QUE LA FOURCHE EST BIEN EN PLACE !
Caler la sangle dans la fente
pour qu’elle ne gêne pas la roue.
Tenir l’axe par le bout.
Réunir la poignée et
l’axe en tournant l’axe
vers la gauche.
REMARQUE : la molette de réglage tournera avec l’axe.
Attention de ne pas
endommager la fourche!
Avec le levier en position ouverte,
serrer la molette vers la droite
jusqu’à ce que le levier se rabatte
avec une BONNE résistance.
REMARQUE : l’axe tournera
avec la molette de réglage.
1033615B-13/24
RABATTRE LE LEVIER. Il devrait de fermer avec
une BONNE RÉSISTANCE contre la fourche.
La fourche du
vélo n’est bien
retenue QUE SI
le levier se rabat
avec une BONNE
RÉSISTANCE.
Page 14

Poser la serrure. (Est vendu à part.)
Si l’on a acheté une serrure, suivre les
instructions qui l’accompagnent pour la poser.
Immobiliser la roue arrière.
Passer la sangle
entre les rayons.
Ne pas appuyer la
sangle contre la tige
de la valve.
Serrer la sangle en actionnant le
levier plusieurs fois.
Vérifier la solidité du montage de la fourche.
Tirer sur la fourche.
• VÉRIFIER LA ROUE ARRIÈRE
Serrer la sangle au besoin.
TESTER L’INSTALLATION
! Si la fourche peut
bouger dans le bloc,
ouvrir le levier et serrer
la molette un peu plus.
AVANT DE PRENDRE LA ROUTE
VÉRIFIER LA SOLIDITÉ
•
DU MONTAGE DE LA
FOURCHE.
• VÉRIFIER RÉGULIÈREMENT QUE LES
BOUTONS SONT BIEN SERRÉS.
REMARQUE : toujours vérifier la solidité du porte-bagages pour
s’assurer que les barres transversales sont bien stables !
1033615B-14/24
Page 15

LIMITE DE CHARGEMENT
Consulter la liste de compatibilité YAKIMA (“Fit list”)
ou le site Yakima.com pour connaître la limite de
chargement. Ne pas dépasser la limite de chargement
xée pour le porte-bagages d’origine.
Pas plus de 75 kg
Porte-bagages
=
(165 lb) à moins
d’indication
Ce produit
(3,2 kg / 7 lb)
*(Sur certains véhicules, la charge maximale est inférieure à 75 kg (165 lb)
ENTRETIEN
Lubrifier les boulons avec un lubrifiant non soluble à l’eau. Nettoyer
les pièces en plastique avec un chiffon, de l’eau et un savon doux.
AVERTISSEMENT
S’assurer que le montage est solide et conforme aux instructions.
Les dispositifs de fixation peuvent se desserrer à la longue. Les
inspecter avant chaque utilisation et les resserrer au besoin.
La charge
(18.1 Kg maximum)
contraire
R8A9N1D
1033615B-15/24
ºC ºF
Page 16

AVERTISSEMENT
• Ce porte-vélo est conçu pour des vélos qui emploient un moyeu avant standard avec axe à serrage
rapide de 100 x 9 mm. Ne pas transporter de vélos munis de moyeux d’une autre dimension (qr15, 20
mm “thru”, lefty, 24 mm “thru”, 25 mm “thru”, etc) sans adaptateur approuvé.
• La fourche du vélo doit obligatoirement être munie d’ergots de sécurité. Le fait d’enlever ou de
modifier les ergots de sécurité annulera la garantie de ce porte-vélo.
• Il est important d’installer, de régler, d’employer et d’entretenir correctement le mécanisme de serrage
rapide de ce porte-vélo, sous peine de risquer de provoquer des dommages au véhicule et au vélo, en
plus de blessures graves.
• Toute modification des pattes de la fourche pourrait rendre la pression de serrage sur la fourche
insuffisante et entraîner des dommages au vélo ou sa perte.
• Ne pas transporter de bicyclettes munies de roues pleines, de housses de roues, d’un siège de bébé,
de sacoches, d’une housse de vélo complète ou d’un moteur.
• Ne pas transporter de tandems ou de vélos surbaissés (“recumbent”).
• La conduite hors route n’est pas recommandée.
• Les fourches ne sont pas toutes compatibles avec les porte-vélos yakima. Si la fourche présente
des caractéristiques ou est d’une conception qui ne permet pas de l’installer sur ce porte-vélo en
respectant les présentes instructions, ne pas employer ce porte-vélo.
RÉINSTALLATION
SI L’ON ENLÈVE LE PORTE-VÉLO, SUIVRE LES INSTRUCTIONS POUR LE REMETTRE EN PLACE.
Effectuer les vérifications de sécurité après toute réinstallation.
PIÈCES DE RECHANGE
RENSEIGNEMENTS TECHNIQUES OU PIÈCES DE RECHANGE, prière de
contacter votre dépositaire, de consulter le site yakima.com ou d’appeler au
(888) 925-4621, du lundi au vendredi entre 7h et 17h, heure du Pacifique.
GARANTIE
Ce produit est couvert par la garantie limitée « Tant que
durera notre histoire d’amour » YAKIMA. Pour se procurer
une copie de cette garantie, aller en ligne à www.yakima.com
ou nous envoyer un courriel à yakwarranty@yakima.com ou
C O N S E R V E R C E S I N S T R U C T I O N S !
1033615B-16/24
appeler au (888) 925-4621.
Page 17

Tipo de
portabicicleta
cuadrada, Barra de
origen
Separación
travesaños
Carga
Barra redonda, Barra
1 o 2
bicicletas
mín. y máx.*
41cm - 107cm
entre
16" - 42"
Límites
Separación de
16” (41cm) =
35 lb/bicicleta
15,9 kg/bicicleta
*SEPARACIÓN ENTRE
TRAVESAÑOS
La separación entre
travesaños es la
distancia entre las
barras transversales.
CROSSBAR SPREAD
3 o más
bicicletas
¡NO EXCEDA LOS LÍMITES DE CARGA DEL PORTABICICLETA!
18" - 42”
46cm - 107cm
Separación de
18” (46cm) =
40 lbs./bicicleta
18,1 kg/bicicleta
BROQUETA DE
BLOQUEO (1X)
DISEÑADO PARA
HORQUILLAS CON
OREJETAS DE SEGURIDAD.
Horquillas con
orejetas de
seguridad
FORKLIFT (1X)
CAPUCHÓN
TERMINAL (1X)
AVISO IMPORTANTE
ES FUNDAMENTAL QUE TODOS LOS PORTAEQUIPAJES Y ACCESORIOS YAKIMA ESTÉN FIJADOS DE MANERA CORRECTA
Y SEGURA AL VEHÍCULO. UNA INSTALACIÓN DEFICIENTE PODRÍA CAUSAR UN ACCIDENTE AUTOMOVILÍSTICO Y
PROVOCAR HERIDAS GRAVES O LA MUERTE A USTED O A TERCEROS. USTED ES RESPONSABLE DE LA FIJACIÓN
SEGURA DE LOS PORTAEQUIPAJES Y ACCESORIOS AL VEHÍCULO. VERIFICANDO LAS UNIONES Y AMARRES ANTES
DE UTILIZARLOS E INSPECCIONANDO PERIÓDICAMENTE EL AJUSTE DE LOS PRODUCTOS, SU DESGASTE Y POSIBLES DAÑOS. POR
ELLO, DEBE LEER Y COMPRENDER TODAS LAS INSTRUCCIONES Y ADVERTENCIAS QUE VIENEN CON LOS PRODUCTOS YAKIMA
ANTES DE INSTALARLOS O USARLOS. SI NO ENTIENDE TODAS LAS INSTRUCCIONES Y ADVERTENCIAS, O NO TIENE EXPERIENCIA
EN MECÁNICA O NO ESTÁ FAMILIARIZADO CON LOS PROCEDIMIENTOS DE INSTALACIÓN, HAGA INSTALAR EL PRODUCTO POR UN
INSTALDOR PROFESIONAL.
1033615B-17/24
CAPUCHÓN DE
VINILO (1X)
Page 18

90°
Aleje la corredera de bloqueo, afloje la perilla y abra la mordaza.
Afloje la perilla.
B
Aleje la corredera.
A
Fije las mordazas del ForkLift al travesaño delantero.
Tenga cuidado de no dañar el acabado del
techo. Coloque un paño sobre el techo antes
de realizar la instalación para evitar rayarlo.
Cierre las mordazas
alrededor del travesaño.
Abra las mordazas.
C
Para los travesaños con poca
separación:
Sostenga el ForkLift con un
cierto ángulo mientras coloca
la mordaza alrededor del
travesaño para evitar todo
contacto con el techo del
vehículo.
Pase el tornillo en T a través de la abertura de
la mordaza más baja. Gire el tornillo en T para
que quede en la ranura.
Apriete la perilla, pero no hasta el tope. El
ajuste final se hará después de instalar la
abrazadera trasera.
1033615B-18/24
Ajuste la mordaza si es necesario.
Si no logra un agarre seguro con sus
travesaños de origen, ajuste la mordaza.
Para los travesaños de origen,
elija la mejor posición que
garantice un agarre más seguro.
(Ranura superior para los travesaños
cilíndricos y cuadrados.)
Page 19

Asegure la abrazadera trasera.
Cierre la abrazadera
trasera alrededor
del travesaño.
Pase el tornillo en T por la abertura de la mordaza. Gire el
tornillo en T para que quede en la ranura de la mordaza.
90°
Ajuste la abrazadera si es necesario.
Ranura superior
para los travesaños
cilíndricos y cuadrados.
La abrazadera trasera está configurada para las instalaciones típicas. En ciertos casos, puede
ser necesario un ajuste, como cuando la rueda toca la perilla trasera o cuando el soporte de
rueda no llega a la rueda.
OPCIÓN A OPCIÓN B
Si no logra un agarre seguro con
sus travesaños de origen, ajuste la
mordaza.
Para los travesaños de
origen, elija la mejor
posición que garantice un
agarre más seguro.
Rueda detrás del travesaño trasero.
1033615B-19/24
Rueda delante del travesaño trasero.
Si cambiando la orientación de la
abrazadera, la rueda trasera aún sigue
tocando la perilla, por favor póngase en
contacto con nuestro equipo de servicio
al cliente (888-925-4621) para recibir
gratuitamente un adaptador.
Pase a la página siguiente
para saber cómo proceder.
Page 20

Viene de la página anterior…
Retire el capuchón terminal. Retire el
soporte de rueda y la abrazadera trasera.
Deslice el soporte de rueda primero y la
abrazadera trasera después en el ForkLift.
Cambie la orientación de la
abrazadera trasera 180˚.
NOTA: En caso que sea necesario, es posible
retirar el soporte de rueda o la abrazadera en
forma independiente. Por ejemplo si se necesita
que la hebilla quede del lado opuesto, es posible
rotar el soporte de rueda, tal como se muestra.
APRIETE LAS PERILLAS, acerque la corredera de bloqueo.
Instalar el capuchón terminal.
Apriete completamente la
perilla delantera.
1033615B-20/24
Apriete
completamente
la perilla trasera.
Acerque la
corredera de
bloqueo.
Instale el
capuchón de
vinilo.
Page 21

SEPARE EL EJE DE LA BROQUETA DE LA MANIJA.
Sostenga la perilla de ajuste. Gire la manija
en sentido horario para retirar el eje.
Abra la manija.
INSTALE LA BROQUETA
Empuje y mueva suavemente
la broqueta dentro del
cabezal del ForkLift.
Usted puede elegir de qué lado
instalar la broqueta. Tenga en cuenta
el acceso a la cerradura.
Saque la rueda delantera y cargue la bicicleta.
Inserte verticalmente la horquilla de la bicicleta en la
broqueta.¡ASEGÚRESE QUE LA HORQUILLA QUEDE
Meta la correa de rueda en
la ranura para poder apoyar
el neumático.
COMPLETAMENTE ASENTADA!
Sostenga el eje del
extremo alejado. Junte la
manija con el eje y gire el
eje en sentido antihorario.
NOTA: La perilla de ajuste girará con el eje.
¡Evite dañar la
horquilla!
Con la palanca abierta, apriete la perilla
de ajuste en sentido horario hasta que la
palanca quede ajustada ofreciendo una
FUERTE resistencia.
NOTA: El eje girará con la perilla de ajuste.
1033615B-21/24
CIERRE LA MANIJA.
La manija debe quedar cerrada con una FUERTE
RESISTENCIA contra la horquilla.
La horquilla de la
bicicleta quedará
asegurada SOLAMENTE
si la palanca queda
cerrada ofreciendo una
FUERTE RESISTENCIA.
Page 22

Instale el cerrojo. (Vendido por separado.)
Si compró un cerrojo, siga las
instrucciones para instalarlo.
Asegure la rueda trasera.
Tire de la correa a
través de los rayos de
la rueda.
Evite que la correa
empuje la válvula.
Inserte el extremo de la
correa en la hebilla.
Verifique que la bicicleta quedó bien asegurada.
Tire con fuerza
de los brazos de
la horquilla de la
bicicleta.
Mueva la lengüeta
del trinquete hacia
arriba y hacia
abajo para apretar
la correa.
¡VERIFIQUE EL
MONTAJE! Si una vez
montada, la horquilla aún
se puede mover, abra la
manija y apriete la perilla
de ajuste otra vez.
• VERIFIQUE LA RUEDA
TRASERA.
Ajuste la correa si es necesario.
1033615B-22/24
VERIFIQUE QUE LA
•
HORQUILLA ESTÁ
ASEGURADA.
NOTA: ¡Verifique siempre su sistema para
asegurarse de la estabilidad de los travesaños!
ANTES DE PARTIR
• VERIFIQUE PERIÓDICAMENTE QUE
LAS PERILLAS ESTÁN APRETADAS
ADECUADAMENTE.
Page 23

PORTAEQUIPAJE
LÍMITES DE PESO
Respete la lista de compatibilidad de Yakima, o visite
el sitio Yakima.com para conocer el límite de peso de
su portaequipaje. No exceda el límite de peso de los
ESTE PRODUCTO
(7 lbs. / 3,2 kg)
*(Ciertos vehículos están clasificados para menos de 165 lbs. (75 kg)).
MANTENIMIENTO
portaequipajes para su vehículo.
No más de 165 lbs
(75 kg), a menos
=
CARGA
(18.1Kg máximo)
que se indique lo
contrario.
Para los tornillos utilice un lubricante no soluble en agua. Para limpiar las
piezas de plástico, emplee un paño blando con agua y detergente suave.
ADVERTENCIA
CERCIÓRESE DE QUE TODO EL EQUIPO ESTÁ ASEGURADO SEGÚN LAS
INSTRUCCIONES. LAS PIEZAS DE MONTAJE PUEDEN AFLOJARSE CON EL
TIEMPO. VERIFIQUE ANTES DE CADA USO Y AJUSTE SI ES NECESARIO.
ºC ºF
R8A9N1D
1033615B-23/24
Page 24

ATENCIÓN
• Este portabicicleta está diseñado para las bicicletas que cuentan con cubos delanteros de desmontaje
rápido de 100 mm x 9 mm. No transporte bicicletas que tengan otros tipos de cubos (QR15, 20 mm thru, Lefty,
24 mm thru, 25 mm thru, etc.) sin los adaptadores aprobados.
• La horquilla de la bicicleta debe estar equipada con lengüetas de seguridad. Si estas lengüetas se retiran o
modifican, la garantía caduca cuando la horquilla se utiliza con este portabicicleta.
• La instalación, ajuste, uso y mantenimiento incorrectos del mecanismo de desmontaje rápido en este
portabicicleta, puede provocar serios daños al vehículo y a la bicicleta, así como graves heridas corporales.
• La fuerza de fijación de la horquilla puede resultar insuficiente si se modifica el portacubo de la bicicleta. En
ese caso, se pueden provocar daños o la pérdida de la bicicleta.
• No transporte bicicletas con ruedas de disco, guardabarros, asientos para bebés, cestas, cubrebicicletas o
bicicletas con motor.
• No transporte bicicletas en tándem o plegables.
• Se recomienda no conducir fuera de las carreteras.
• No todas las horquillas son compatibles con los portabicicletas Yakima. No utilice horquillas cuyas
características o diseño no permiten un montaje que se ajusta a estas instrucciones.
REINSTALLATION
SI QUITA EL PORTABICICLETAS, SIGA LAS INSTRUCCIONES PARA VOLVER A INSTALARLO.
Respete las consignas de seguridad después de cada instalación.
REPLACEMENT PARTS
SI NECESITA ASISTENCIA TÉCNICA O REPUESTOS
Contacte un vendedor, visite el sitio www.yakima.com o llame al (888)925-4621.
De lunes a viernes, de 7:00 AM a 5:00 PM, hora del Pacífico.
GARANTÍA
Este producto está cubierto por la garantía limitada a vida
“mientras dure el romance” de Yakima.
Para obtener una copia de esta garantía, visítenos en
www.yakima.com, envíenos un correo electrónico a
yakwarranty@yakima.com o llámenos al (888) 925-4621.
¡ C O N S E R V E E S T A S I N S T R U C C I O N E S !
1033615B-24/24
 Loading...