

Page 1

15.4 KEY BEEP
This selection is used to select the beep tone volume level when a key is
pressed.
]
[
1.
2. Rotate the DIAL/ENT knob to select the desired level.
The beep level can be set from “1” to “7”, or “OFF”
(“4” is default).
3. Press the [ENTER] soft key to store the selected level.
4. Press the CLEAR key to return to radio operation.
“SETUP” “CONFIGURATION” “KEY BEEP”
15.5 FOG ALERT TONE FREQUENCY
The function allows the radio to be setup to send the proper fog frequency
which is dependent on vessel size, shown below:
70 - 200Hz: Vessel that are 660 feet (200 meters) or more in length
130 - 350Hz: Vessel that are 247.5 feet (75 meters) or more but less than
660 feet (200 meters) in length
250 - 700Hz: Vessel that are 66 feet (20 meters) or more but less than
247.5 feet (75 meters) in length
250 - 700Hz: Vessel that are 39.6 feet (12 meters) or more but less than
66 feet (20 meters) in length
[
]
1.
“SETUP” “CONFIGURATION” “FOG FREQUENCY”
2. Rotate the DIAL/ENT knob to select the desired
level. The frequency level can be set from “200Hz”
to “850Hz” (“400Hz” is default).
3. Press the [ENTER] soft key to store the selected
setting.
4. Press the CLEAR key to return to radio operation.
NOTE
By default, the radio Fog frequency is set to 400 Hz. In most cases
this frequency should not be changed unless the vessel is very large.
15.6 LISTEN BACK
While in PA, FOG HORN, or HORN mode, toggle the listen back function
between ON and OFF.
]
[
1.
Page 106
“SETUP” “CONFIGURATION” “LISTEN BACK”
GX6000
Page 2
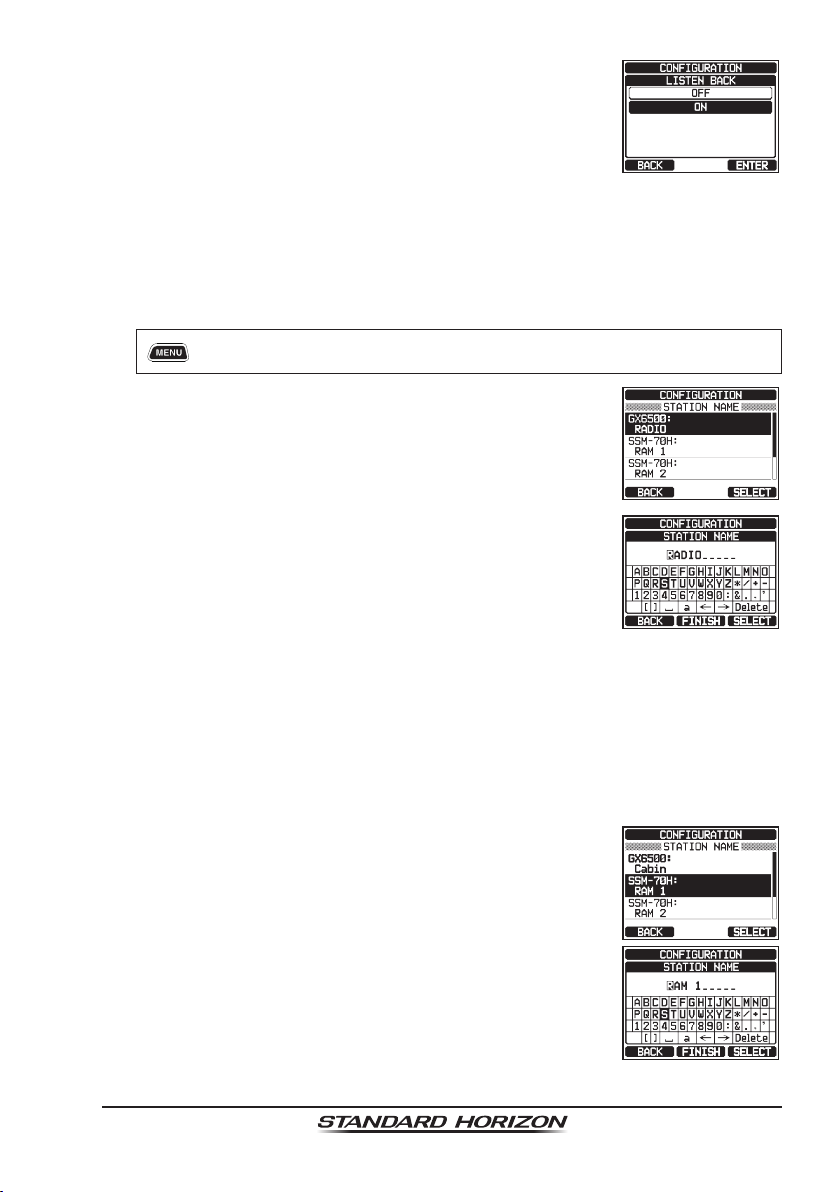
2. Rotate the DIAL/ENT knob to select “OFF” or “ON”
(“ON” is default).
3. Press the [ENTER] soft key to store the selected
setting.
4. Press the CLEAR key to return to radio operation.
15.7 STATION NAME
This function allows you to change the name of the radio or second station
microphone.
Example: “Radio - Cabin”, “RAM 1 - Flybridge”
]
[
1.
2. With the second station microphone connected, rotate
the DIAL/ENT knob to select the unit to be named,
then press the [SELECT] soft key.
3. Rotate the DIAL/ENT knob to select to scroll through
the rst letter of the new station name.
4. Press the [SELECT] soft key to store the rst letter
in the name and step to the next letter to the right.
5. Repeat steps 3 and 4 until the name is complete. The
name can consist of up to ten characters, and if you
do not use all ten characters, select “→” to move to
the next space. This method can also be used to enter
a blank space in the name.
If a mistake was made entering in the station name, rotate the DIAL/ENT
knob to select “←” or “→”, press the [SELECT] soft key until the wrong
character is selected, then perform steps 3 and 4.
6. When nished entering the station name (using ten characters or less),
press the [FINISH] soft key to advance to the second station name entry.
7. Rotate the DIAL/ENT knob to select “SSM-70H”, then
press the [SELECT] soft key.
8. Rotate the DIAL/ENT knob to select to scroll through
the rst letter of the new station name.
“SETUP” “CONFIGURATION” “STATION NAME”
9. Press the [SELECT] soft key to store the rst letter
in the name and step to the next letter to the right.
GX6000
Page 107
Page 3
10. Repeat steps 8 and 9 until the name is complete. The name can consist
of up to ten characters, and if you do not use all ten characters, select “→”
to move to the next space. This method can also be used to enter a blank
space in the name.
If a mistake was made entering in the station name, rotate the DIAL/ENT
knob to select “←” or “→”, press the [SELECT] soft key until the wrong
character is selected, then perform steps 8 and 9.
11. When nished entering the station name (using ten characters or less),
press the [FINISH] soft key.
12. Press the CLEAR key to return to radio operation.
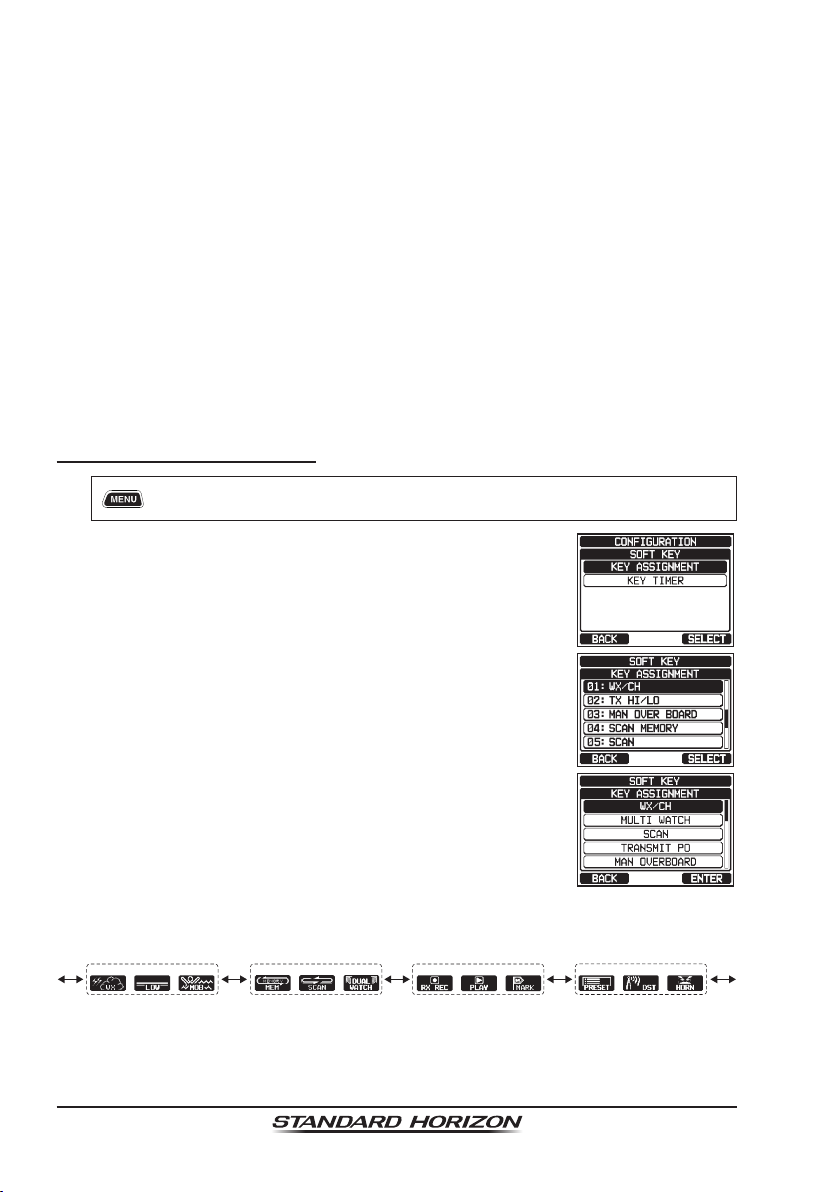
15.8 SOFT KEYS
From this menu, you can assign desired functions to each soft key from numbers
01 to 12. You can also set how long the soft key icon will be displayed after the
corresponding soft key is pressed.
15.8.1 Key Assignment
]
[
1.
2. Rotate the DIAL/ENT knob to select “KEY ASSIGN-
MENT”, then press the [SELECT] soft key.
“SETUP” “CONFIGURATION” “SOFT KEY”
3. Rotate the DIAL/ENT knob to select the key number
to be programmed, and press the [SELECT] soft key.
4. Rotate the DIAL/ENT knob to select a new function to
be assigned, and press the [ENTER] soft key. Avail-
able functions are listed below. By selecting “NONE”
the soft key assignment is removed.
5. Repeat steps 3 and 4 to program other soft keys.
The VHF radio's functions can be assigned to the maximum of 12 soft keys.
Pressing the ►/◄ key each time shows three different soft keys.
10
11
04
05
01
02
03
06
07 08 09
(The illustration above is the default setting.)
12
6. Press the CLEAR key to return to radio operation.
Page 108
GX6000
Page 4
DISPLAY FUNCTION
NONE − −
TX HI/LO
WX/CH
SCAN
DUAL WATCH
MARK POSITION
SCAN MEMORY
PRESET
MAN OVERBOARD
NOISE CANCEL
CH NAME
STROBE*
SCRAMBLER
COMPASS
WAYPOINT
FOG HORN
INTERCOM
GPS LOGGER
AIS DISPLAY
HORN BUTTON
PUBLIC ADDRESS
RX RECORD
RX SENSE
PLAY
Selects transmit power
Switches channels between weather and marine
Turns on or off scanning function
Starts and stops dual watch scan
Marks the current position for a “Waypoint”
Add or remove channels from memory channel scan
Programs or deletes the preset memory channel
Marks the position where a person falls overboard
Enables the noise canceling settings display
Edit channel names
Turns on or off the strobe light LED
Congures the secret communication settings
Enables the “Compass” display
Enables the “Waypoint” or “Route” navigation display
Select FOG HORN mode
Activates intercom between radio and RAM4 mic
(optional SSM-70H (RAM4) or SSM-71H (RAM4W)
required)
Starts and stops logging position data
Shows the “AIS” display
Activates the Fog Horn function
Activates the PA function
Records received voices
Toggles between LOCAL and DISTANCE
Plays recorded voices
SOFT KEY NUMBERS
ASSIGNED AS DEFAULT
(See the previous page.)
02
01
05
06
09
04
10
03
12
07
11
08
(*: SSM-70H (RAM4) and SSM-71H (RAM4W) only)
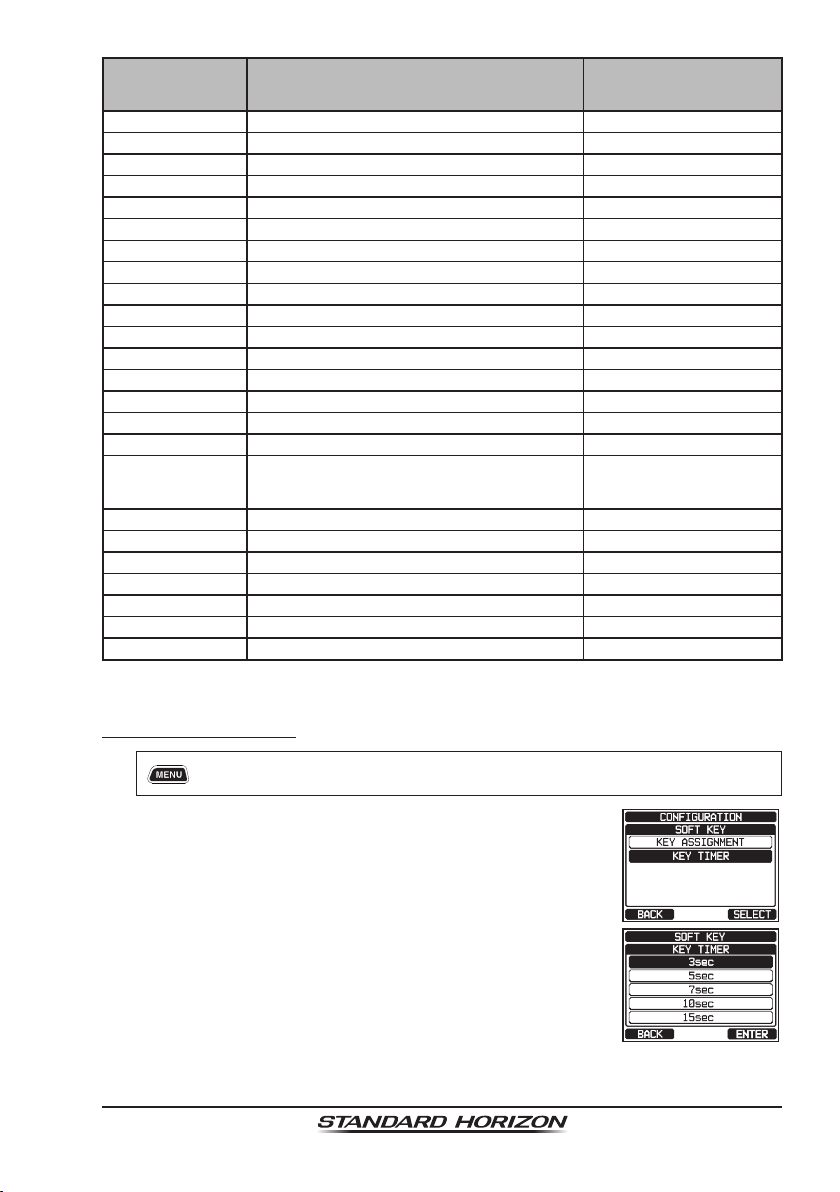
15.8.2 Key Timer
]
[
1.
2. Rotate the DIAL/ENT knob to select “KEY TIMER”,
then press the [SELECT] soft key.
3. Rotate the DIAL/ENT knob to select the desired time.
4. Press the [ENTER] soft key to store the selected
setting.
5. Press the CLEAR key to return to radio operation.
GX6000
“SETUP” “CONFIGURATION” “KEY TIMER”
Page 109
Page 5
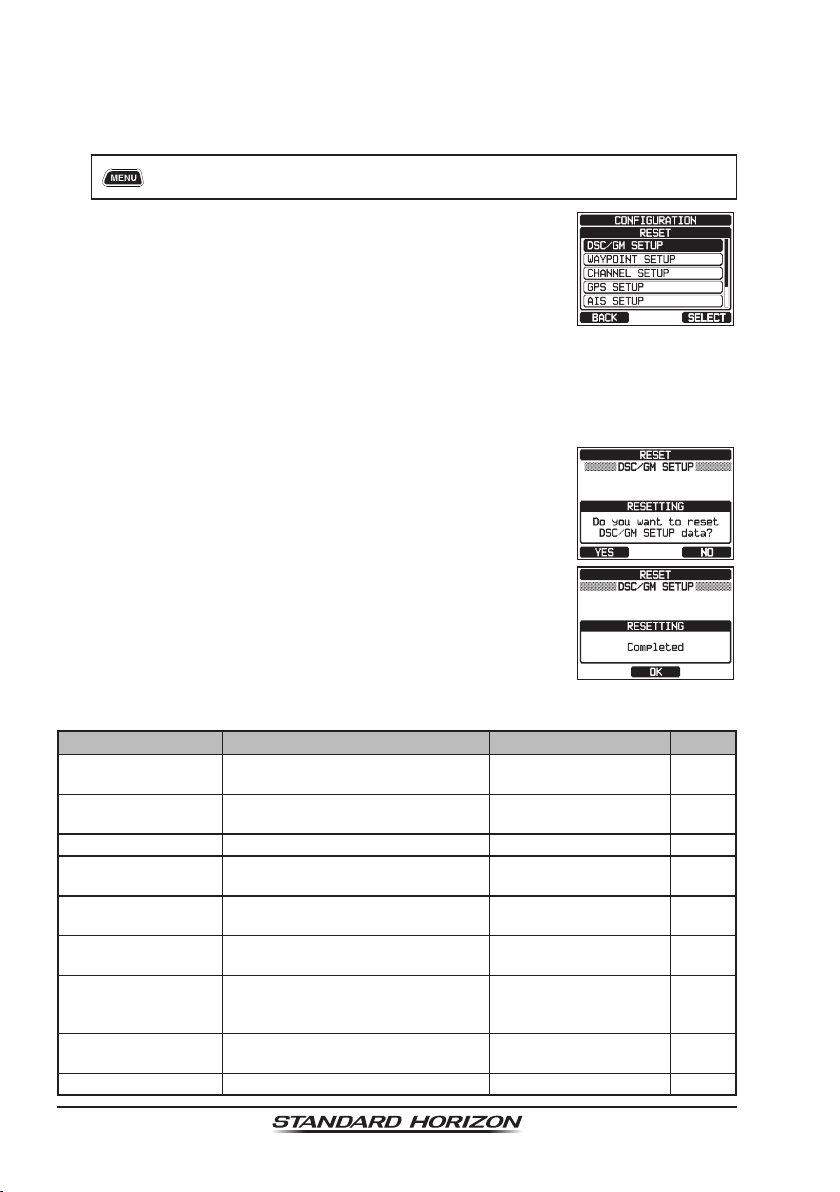
15.9 RESET
You may reset the memory and settings of the setup categories independently
or return the transceiver to the original factory setting.
[
]
1.
2. Rotate the DIAL/ENT knob to select the desired
category. You can select one from “DSC/GM SETUP”,
“WAYPOINT SETUP”, “CHANNEL SETUP”, “GPS
SETUP”, “AIS SETUP”, “CONFIGURATION”, or
“FACTORY” (all settings* except the “MMSI” and
“Vessel Information” will be initialized).
(*: The Individual Directory and the GPS Log also
3. Press the [SELECT] soft key.
4. Press the [YES] soft key. (To cancel, press the [NO]
soft key.)
5. Press the [OK] soft key.
6. Press the CLEAR key to return to radio operation.
“SETUP” “CONFIGURATION” “RESET”
eliminated.)
15.10 SUMMARY OF THE CONFIGURATION SETUP
Item Description Default Value Page
DISPLAY MODE Toggles LCD display mode between
daytime and nighttime mode
DIMMER Adjusts the backlight level of the
LCD and keypad
CONTRAST Adjusts the contrast of the LCD 15 105
KEY BEEP Adjusts the volume of beep tone
when a key is pressed
FOG FREQUENCY Sets the tone frequency when
transmitting FOG
LISTEN BACK Turns on or off of listen back func-
tion
STATION NAME Sets the names of the radio and
external devices
SOFT KEY Sets the assignment and display
time of the soft keys
RESET Initializes the memories and settings − 110
Page 110
DAY MODE 105
DAY MODE: 7
NIGHT MODE: 4
4 106
400Hz 106
ON 106
RADIO
RAM 1
RAM 2
10 sec 108
GX6000
105
107
Page 6
16 CHANNEL FUNCTION SETUP
16.1 CHANNEL GROUP
This menu item allows you to select a channel group from USA, Canada, and
International.
Refer to section “8.7 USA, INTERNATIONAL, AND CANADA MODE” for details.
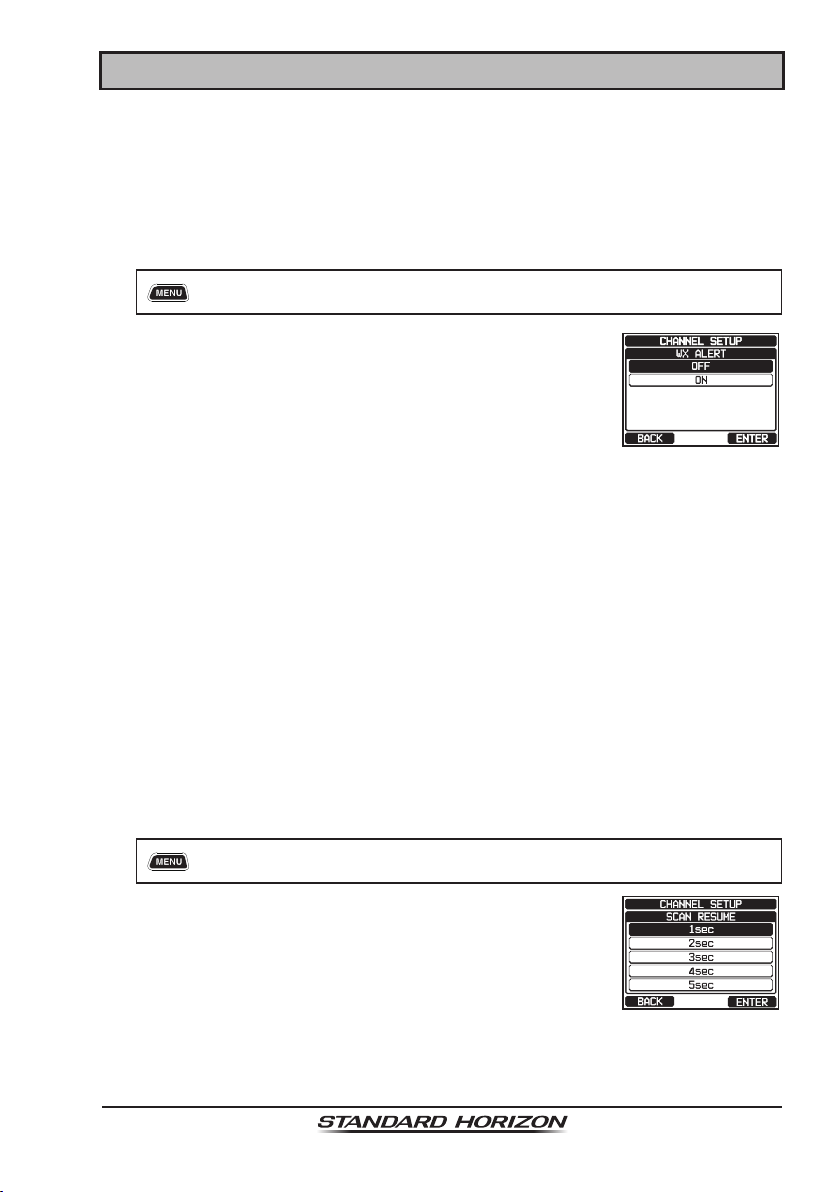
16.2 WEATHER ALERT
Enables/disables the NOAA Weather Alert function. The default setting is “ON”.
[
]
1.
2. Rotate the DIAL/ENT knob to select “ON” or “OFF”.
3. Press the [ENTER] soft key to store the selected
setting.
4. Press the CLEAR key to return to radio operation.
16.3 SCAN MEMORY
To be able to scan channels the radio must be programmed. This section allows
channels to be stored in scan memory.
Refer to section “8.10.2 Programming Scan Memory” for details.
16.4 SCAN TYPE
This selection is used to select the scan mode between “MEMORY” and
“PRIORITY”. The default setting is “PRIORITY”.
Refer to section “8.10.1 Selecting the Scan Type” for details.
“SETUP” “CHANNEL SETUP” “WEATHER ALERT”
16.5 SCAN RESUME
This selection is used to select the time the GX6000 waits after a transmission
ends before the radio starts to scan channels again. The default setting is 2
seconds.
]
[
1.
2. Rotate the DIAL/ENT knob to select the desired
resume time, default is 2 seconds. The resume time
can be set to “1sec” through “5sec”.
3. Press the [ENTER] soft key to store the new setting.
4. Press the CLEAR key to return to radio operation.
GX6000
“SETUP” “CHANNEL SETUP” “SCAN RESUME”
Page 111
Page 7

16.6 MULTI WATCH
This selection is used to select the watch type between “DUAL” and “TRIPLE”.
The default setting is “DUAL”.
Refer to section “8.9 MULTI WATCH (TO PRIORITY CHANNEL)” for details.
16.7 PRIORITY CHANNEL
This procedure allows the radio to use a different priority channel used when
priority scanning. By default, the radio priority channel is set to Channel 16.
[
]
1.
“SETUP” “CHANNEL SETUP” “PRIORITY CHANNEL”
2. Rotate the DIAL/ENT knob to select the desired chan-
nel to be a priority.
3. Press the [ENTER] soft key to store the new setting.
4. Press the CLEAR key to return to radio operation.
16.8 SUB CHANNEL
By default, the sub channel is set to Channel 9. This procedure allows the radio
to assign a different sub channel for instant access.
[
]
1.
2. Rotate the DIAL/ENT knob to select the desired channel to be a sub channel.
3. Press the [ENTER] soft key to store the new setting.
4. Press the CLEAR key to return to radio operation.
“SETUP” “CHANNEL SETUP” “SUB CHANNEL”
16.9 CHANNEL NAME
When the radio (“Normal”) mode is selected, the display will show a name under
the channel number. This name describes the use of the channel. The radio
has the capability to customize the name by the procedure below.
Example: CH69 PLEASURE to HOOKUP
[
]
1.
2. Rotate the DIAL/ENT knob to select the channel to
be named, then press the [SELECT] soft key.
3. Rotate the DIAL/ENT knob to scroll through the rst
letter of the new channel name.
Page 112
“SETUP” “CHANNEL SETUP” “CHANNEL NAME”
GX6000
Page 8

4. Press the [SELECT] soft key to store the rst letter
in the name and step to the next letter to the right.
5. Repeat step 3 and 4 until the name is complete. The
name can consist of up to 16 characters, if you do
not use all 16 characters, select “→” to move to the
next space. This method can also be used to enter a
blank space in the name.
If a mistake was made entering in the channel name, rotate the DIAL/ENT
knob to select “←” or “→”, press the [SELECT] soft key until the wrong
character is selected, then perform steps 3 and 4.
6. When nished entering the channel name (using
fteen characters or less), press the [FINISH] soft
key to save the name.
7. If you want to enter the name of another channel,
repeat the steps 2 through 6.
8. Press the CLEAR key to return to radio operation.
NOTE
When “CHANNEL NAME” is assigned to the soft key, you can show
the channel name input display directly by pressing the [NAME] soft
key during radio operation.
16.10 NOISE CANCELLATION
Enables/disables the Noise-canceling function of the transmitter and receiver
independently.
[
]
1.
“SETUP” “CHANNEL SETUP” “NOISE CANCEL”
2. Rotate the DIAL/ENT knob to select “TX MODE”, then
press the [SELECT] soft key.
3. Rotate the DIAL/ENT knob to select “ON” or “OFF”,
then press the [ENTER] soft key.
GX6000
Page 113
Page 9

4. Rotate the DIAL/ENT knob to select “RX MODE”, then
press the [SELECT] soft key.
5. Rotate the DIAL/ENT knob to select the noise level
from “LEVEL1” through “LEVEL4” or “OFF”, then
press the [ENTER] soft key.
6. Press the CLEAR key to return to radio operation.
16.11 AUDIO FILTER OPERATION
This menu item allows you to select operation of the internal audio lter for
the best acoustics in noisy environments. The default setting is “NORMAL”.
]
[
1.
2. Rotate the DIAL/ENT knob to select the desired lter
operation.
3. Press the [ENTER] soft key to store the new setting.
4. Press the CLEAR key to return to radio operation.
“SETUP” “CHANNEL SETUP” “AF PITCH CONTROL”
16.12 RX RECORDER
Congure settings of the function for recording received voices.
16.12.1 RX Recorder Function ON/OFF
Enable/disable the RX Recorder function. The default setting is “OFF”.
]
[
1.
2. Rotate the DIAL/ENT knob to select “ACTIVATION”,
then press the [SELECT] soft key.
3. Rotate the DIAL/ENT knob to select “ON” or “OFF”,
then press the [ENTER] soft key to store the new
setting.
4. Press the CLEAR key to return to radio operation.
“SETUP” “CHANNEL SETUP” “RX RECORDER”
16.12.2 Setting for Recording Delay Time
Set the time interval until recording stops after the end of voice reception. The
default setting is 3 seconds.
]
[
1.
Page 114
“SETUP” “CHANNEL SETUP” “RX RECORDER”
GX6000
Page 10

2. Rotate the DIAL/ENT knob to select “RECORDING
DELAY TIME”, then press the [SELECT] soft key.
3. Rotate the DIAL/ENT knob to select the desired delay
time. The delay time can be set to “1sec” through
“5sec”.
4. Press the [ENTER] soft key to store the new setting.
5. Press the CLEAR key to return to radio operation.
16.12.3 Setting for End of Tone
Enable/disable the tone function that indicates the end of recording when
recording stops. The default setting is “ON”.
[
]
1.
2. Rotate the DIAL/ENT knob to select “END OF TONE”,
then press the [SELECT] soft key.
3. Rotate the DIAL/ENT knob to select “OFF” or “ON”,
then press the [ENTER] soft key to store the new
setting.
4. Press the CLEAR key to return to radio operation.
“SETUP” “CHANNEL SETUP” “RX RECORDER”
16.12.4 Data Erase
Delete recorded voice data.
[
]
1.
2. Rotate the DIAL/ENT knob to select “DATA ERASE”,
then press the [SELECT] soft key.
GX6000
“SETUP” “CHANNEL SETUP” “RX RECORDER”
Page 115
Page 11

3. Press the [YES] soft key. (To cancel, press the [NO]
soft key.)
4. Press the [OK] soft key.
5. Press the CLEAR key to return to radio operation.
16.13 SCRAMBLER SETUP
Congure the voice scrambler setting. Two types of voice scrambler functions
are available: the 4-code type (CVS2500A compatible) and the 32-code type
(FVP-42 compatible for Furuno Electric FM-4721) (This function is not available for CH16 and CH70).
[
]
1.
2. Rotate the DIAL/ENT knob to select “TYPE”, then
press the [SELECT] soft key.
3. Rotate the DIAL/ENT knob to select “CVS2500” or
“FVP-42”, then press the [ENTER] soft key.
Note: Changing this setting will delete all scrambler
codes set for each channel.
“SETUP” “CHANNEL SETUP” “SCRAMBLER”
4. Rotate the DIAL/ENT knob to select “CODE”, then
press the [SELECT] soft key.
5. Rotate the DIAL/ENT knob to select the channel to
be scrambled, then press the [SELECT] soft key.
Note: CH16 and CH70 cannot be used.
Page 116
GX6000
Page 12

6. Rotate the DIAL/ENT knob to select the scrambler
code. The scrambler code can be set from “00” to
“03” or “OFF” (While FVP-42 is selected in step 6,
the scrambler code can be set from “00” to “31” or
“OFF”). When “OFF” is selected the voice scrambler
is disabled.
7. Press the [ENTER] soft key to store the selected code.
8. Repeat steps 5 through 7 to set other channels.
9. Press the CLEAR key to return to radio operation.
16.14 SUMMARY OF THE CANNEL FUNCTION SETUP
Item Description Default Value Page
CHANNEL GROUP Selects the channel group USA: USA 35
WEATHER ALERT Turns on or off the Weather Alert
function
SCAN MEMORY Add or remove a channel to Scan
Memory
SCAN TYPE Select priority scan or memory
scan
SCAN RESUME Sets the resume time of scanning 2sec 111
MULTI WATCH Selects Dual Watch or Triple
Watch
PRIORITY CHANNEL Selects a priority channel CH16 11 2
SUB CHANNEL Selects a Sub Channel CH09 11 2
CHANNEL NAME Edit the name of memory chan-
nels
NOISE CANCEL Turns on or off of noise cancelling
function (independently available
for transmission and reception)
AF PITCH CONTROL Selects the audio lter operation NORMAL 114
RX RECORDER Congures settings of the func-
tion for recording received voices
SCRAMBLER Congures the secret communi-
cation settings
OFF 111
− 38
PRIORITY 38
DUAL 37
− 112
OFF 11 3
ACTIVATION: OFF
RECORDING DELAY
TIME: 3sec
END OF TONE: ON
DATA ERASE: −
TYPE: CVS2500
CORD: −
114
116
GX6000
Page 117
Page 13

17 DSC SETUP
17.1 INDIVIDUAL DIRECTORY
The GX6000 has a DSC directory that allows you to store a vessel or person’s
name and the associated MMSI you wish to contact via individual calls, position
requests and position report transmissions.
To transmit an individual call you program this directory with information of the
vessel you wish to contact, similar to a cellular phone's telephone directory.
Refer to section “10.4.1 Setting up the Individual / Position Call Directory”
for details.
17.2 INDIVIDUAL REPLY
This menu item sets up the radio to automatically (default setting) or manually
respond to a DSC Individual call requesting you to switch to a working channel
for voice communications. When “MANUAL” is selected the MMSI of the calling
vessel is shown allowing you to see who is calling. This function is similar to
caller id on a cellular phone.
Refer to section “10.4.2 Setting up the Individual Call Reply” for details.
17.3 INDIVIDUAL ACKNOWLEDGMENT
The radio can be setup to transmit a reply automatically (default) or set so the
radio will not reply to an individual call.
Refer to section “10.4.3 Enabling the Individual Call Acknowledgment” for
details.
17.4 INDIVIDUAL RINGER
The radio can be setup to ring like a telephone to alert you the radio received
a DSC individual call. The default setting is 2 minutes, however this can be
changed to 5, 10 or 15 seconds with the procedure below.
Refer to section “10.4.6 Setting up the Individual Call Ringer” for details.
17.5 GROUP DIRECTORY
For this function to operate, the same group MMSI must be programmed into all
the DSC VHF radios within the group of vessels that will be using this feature.
Refer to section “10.5.1 Setting up a Group Call” for details.
Page 118
GX6000
Page 14

17.6 POSITION REPLY
The GX6000 can be set up to automatically (default setting) or manually send
your position when requested by another vessel. This selection is important if
you are concerned about someone polling the position of your vessel that you
may not want to. In the manual mode you will see the MMSI (Maritime Mobile
Service Identity Number) or persons name shown on the display allowing you
to choose to send your position to the requesting vessel.
Refer to section “10.6.1 Setting up a Position Request Reply” for details.
17.7 AUTO POSITION POLLING
The GX6000 has the capability to automatically track seven vessels programmed
into the individual directory.
Refer to section “10.9 AUTO POSITION POLLING” for details.
17.8 AUTO POSITION INTERVAL
The GX6000 has the capability to automatically track seven vessels programmed
into the individual directory.
Selecting the auto position polling time interval between position request transmissions to be setup.
Refer to section “10.9.2 Setting up the Polling Time Interval” for details.
17.9 AUTO CHANNEL CHANGE
When a DSC distress or an all ships (urgency or safety) call is received, the
GX6000 will automatically switch to Channel 16.
This menu selection allows the automatic switch time to be changed. The
default selection is 30 seconds.
[
]
1.
“SETUP” “DSC SETUP” “AUTO CHANNEL CHANGE”
2. Rotate the DIAL/ENT knob to select the desired time,
then press the [ENTER] soft key.
3. Press the CLEAR key to return to radio operation.
When the “OFF” is selected, “[C]” icon will light up on
the screen.
GX6000
Page 119
Page 15

17.10 NO ACTION TIMER
If no key is pressed during the “MENU” or “DSC CALL” screen, the GX6000
will automatically return to radio operation.
The default selection is 15 minutes.
[
]
1.
“SETUP” “DSC SETUP” “NO ACTION TIMER”
2. Rotate the DIAL/ENT knob to select the desired time,
then press the [ENTER] soft key.
3. Press the CLEAR key to return to radio operation.
17.11 WAIT TIME FOR POSITION FIX
This menu allows you to select the maximum wait time till obtaining position
information when receiving a distress call, POS Report call, or acknowledgement to POS request call.
The default selection is 15 seconds.
[
]
1.
2. Rotate the DIAL/ENT knob to select the desired time,
then press the [ENTER] soft key.
3. Press the CLEAR key to return to radio operation.
“SETUP” “DSC SETUP” “POS UNFIX WAITING TIME”
17.12 DSC BEEP
This feature allows the alarm beeps to be turned on or off when a DSC call
is received. The DSC calls that can be customized are: individual, group, all
ships, position request, position report, geographical, polling, and DSC test.
Refer to section “10.5.4 Setting up the Group Call Ringer” for details.
17.13 SUMMARY OF THE DSC SETUP MENU
Item Description Default Value Page
INDIVIDUAL
DIRECTORY
INDIVIDUAL REPLY Selects a reply to individual call MANUAL 57
INDIVIDUAL ACK. Selects the message to be sent
INDIVIDUAL RING Selects the ringing time when
Page 120
Enter or edit addresses used for
individual call
automatically as an individual call
acknowledgement
an individual call or a position
request is received
− 56
ABLE 57
2 min 61
GX6000
Page 16

Item Description Default Value Page
GROUP DIRECTORY Enter or edit addresses used for
POSITION REPLY Selects reply mode when receiv-
AUTO POSITION
POLLING
AUTO POS INTERVAL Selects the transmission interval
AUTO CHANNEL
CHANGE
NO ACTION TIMER Selects the delay time to return
POS UNFIX WAITING
TIME
DSC BEEP Turns on or off the audible alarm
group call
ing a position call
Selects the AUTO POSITION
POLLING operation type
of AUTO POSITION POLLING
signal
Selects the delay time to move to
the requested channel automati-
cally after receiving a distress
call, All Ship call, or group call
to radio operation automatically
after no key press
Sets the maximum wait time to
obtain position information when
receiving a distress call, POS
Report call, or acknowledgement
to POS request call
when receiving a DSC call
− 62
AUTO 67
AUTO POS REQUEST 77
30 sec 77
30 sec 119
15 min 120
15 sec 120
INDIVIDUAL CALL
GROUP CALL: ON
ALL SHIPS: ON
POS REQUEST: OFF
POS REPORT: ON
GEOGRAPHICAL
POLLING CALL: OFF
DSC TEST CALL: OFF
: ON
: ON
120
GX6000
Page 121
Page 17

18 GPS SETUP
The “GPS Setup” mode allows the parameters for the NMEA2000 or the NMEA
-0183 or the optional SCU-31 external GPS antenna to be customized for your
operating requirements.
18.1 ORDER OF PRIORITY
Specify the order of priority of the connection devices to be used when obtaining location information.
[
]
1.
2. Rotate the DIAL/ENT knob to select “NMEA2000”
or “NMEA-0183” then press the [ENTER] soft key to
save the new setting.
3. Press the CLEAR key to return to radio operation.
The SUC-31 external GPS antenna is always set as the lowest priority.
18.2 COMPASS DIRECTION
This menu item selects the compass direction to be shown on the GX6000
display. The default setting is “COURSE-UP”.
“SETUP” “GPS SETUP” “ORDER OF PRIORITY”
NOTE
[
]
1.
2. Rotate the DIAL/ENT knob to select the desired direc-
tion from “COURSE-UP” and “NORTH-UP”.
3. Press the [ENTER] soft key to save the new setting.
4. Press the CLEAR key to return to radio operation.
“SETUP” “GPS SETUP” “COMPASS DIRECTION”
18.3 LOCATION FORMAT
This menu item selects the coordinate system to be shown on the GX6000
display. The default setting is “ddd°mm.mmmm”.
[
]
1.
Page 122
“SETUP” “GPS SETUP” “LOCATION FORMAT”
GX6000
Page 18

2. Rotate the DIAL/ENT knob to select the desired coor-
dinate system. The location format can be selected
from “ddd°mm.mmmm” and “ddd°mm’ss””.
3. Press the [ENTER] soft key to save the new setting.
4. Press the CLEAR key to return to radio operation.
18.4 TIME OFFSET
Sets the local time offset between UTC (Universal Time Coordinated) and local
time shown on the display. The offset is added or subtracted from the time
received from the GPS.
Refer to section “7.8.1 Changing the GPS Time” for details.
18.5 TIME AREA
This menu selection allows the radio to show UTC time or local time with the offset.
Refer to section “7.8.2 Changing the Time Area” for details.
18.6 TIME FORMAT
This menu selection allows the radio to show time in 12-hour or 24-hour format.
Refer to section “7.8.3 Changing the Time Format” for details.
18.7 UNITS OF MEASURE
This section allows you to set the speed, distance and altitude units.
[
]
1.
2. Rotate the DIAL/ENT knob to select the item you want
to set.
3. Press the [SELECT] soft key.
“SETUP” “GPS SETUP” “UNIT OF MEASURE”
4. Rotate the DIAL/ENT knob to select the unit.
5. Press the [ENTER] soft key to store the new setting.
6. Press the CLEAR key to return to radio operation.
18.8 MAGNETIC VARIATION
This selection allows customizing the GPS COG (Course Over Ground) indication on the normal and compass pages and BRG on the waypoint and AIS pages.
Refer to section “7.8.4 Changing COG to True or Magnetic” for details.
NOTE
Setting to “ON” is effective only when the RMC sentences with magnetic
data are input from external devices such as a GPS chart plotter.
GX6000
Page 123
 Loading...