

Page 1

VX-1700
Vertex Standard Co., Ltd.
FCC ID: K6610511070/IC ID: 511B-10511070
Operating Manual
VERTEX STANDARD CO., LTD.
4-8-8 Nakameguro, Meguro-Ku, Tokyo 153-8644, Japan
VERTEX STANDARD
US Headquarters
10900 Walker Street, Cypress, CA 90630, U.S.A.
YAESU EUROPE B.V.
P.O. Box 75525, 1118 ZN Schiphol, The Netherlands
YAESU UK LTD.
Unit 12, Sun Valley Business Park, Winnall Close
Winchester, Hampshire, SO23 0LB, U.K.
VERTEX STANDARD HK LTD.
Unit 5, 20/F., Seaview Centre, 139-141 Hoi Bun Road,
Kwun Tong, Kowloon, Hong Kong
Page 2

Tabel of Contents
Vertex Standard Co., Ltd.
FCC ID: K6610511070/IC ID: 511B-10511070
General ......................................................................... 1
Front Panel Control & Switches ................................ 2
Rear Panel Connections .............................................. 4
Installation.................................................................... 5
Safety Precautions ................................................... 5
Power Connections .................................................. 5
Grounding for Electrical Safety ............................... 5
Electrical Shock Prevention .................................... 5
Antenna Precautions ................................................ 5
Heat and Ventilation ................................................ 5
Electromagnetic Compatibility and RF Exposure ... 6
Preliminary Inspection ............................................. 6
Power Requirements and Basic Installation ............ 7
DC Power Connections ...................................... 7
Mobile Mounting ..................................................... 8
Mobile Antenna Considerations ......................... 8
Mobile Station Grounding .................................. 9
Base Station Installation ........................................ 10
DC Power Connections .................................... 10
Base Station Antenna Considerations ............... 11
Base Station Grounding .................................... 12
Operation.................................................................... 14
Startup Procedures ................................................. 14
Reception ............................................................... 14
Frequency and Channel Selection ......................... 15
VFO Mode........................................................ 15
Memory Channel Mode .................................... 16
ITU Marine Channel ........................................ 16
2.182 MHz Emergency Channel Mode ............ 16
Front Panel Locking ................................... 16
Transmission.......................................................... 17
Antenna Tuning Procedures ............................. 17
Dual Watch ............................................................ 18
Encrypted Transmission/Reception ....................... 19
Selcall/Telcall Operation ........................................... 20
SelCall ................................................................... 20
Message Call ......................................................... 21
Position Request Call ............................................ 22
Position Send Call ................................................. 22
Beacon Request Call ............................................. 23
Telcall .................................................................... 23
ALE Operation .......................................................... 24
Sending an ALE Call ............................................. 24
Sending an ALE Call with an Imbedded Message ... 24
Memory Channel Storage ......................................... 25
Programmable Function (PF) Keys ......................... 26
SUPPLIED ACCESSORIES
MH-31A8J Hand Microphone
DC Power Cord T9023725
Spare Fuse (25 A Blade Type) Q0000074
Switch Label Sheet RA0696400
Operation Manual
Warranty Card
AVAILABLE OPTION
VL-1000/VP-1000 Linear Amplifier/AC Power Supply
FP-1030A AC Power Supply
MD-200A8X Desktop Microphone
FC-30 Antenna Tuner (Coaxial Lines)
FC-40 Antenna Tuner (Wire/Whip Antennas)
ALE-1 Automatic Link Establishment Unit
MLS-100 External Speaker
YA-30 Broadband HF Antenna
YA-007FG HF Multi-Band Mobile Antenna
MMB-89 One-Touch Mobile Bracket
MHG-1 Carrying Handle
CT-118 Control Cable (for the VL-1000 Linear Amplifier)
CE77Win PC Programming Software
CT-62 PC Programming Cable
Page 3
GENERAL
Vertex Standard Co., Ltd.
FCC ID: K6610511070/IC ID: 511B-10511070
The Vertex Standard VX-1700 is a low-cost, integrated HF
communications transceiver designed for the worldwide
Marine, Land Mobile, and Government markets.
The Vertex Standard VX-1700 provides continuous receiver
coverage from 30 kHz to 29.99999 MHz, and transmitter
coverage as appropriate for the user’s application. Operating modes provided include J2B (USB or LSB), J3E (USB
or LSB), A1A, A3E, and H3E (only on 2182 kHz in the
Marine version), making the VX-1700 ideal for a wide
variety of voice, telegraphy, and many data communication applications.
Advanced features of the Vertex Standard VX-1700 include
200 memory channels (arranged in five banks), keyboard
frequency entry with frequency resolution to 10 Hz (100
Hz in Memory mode), and Alpha-Numeric labeling of
Memory channels. Ease in programming fleet systems is
provided. And the Selcall feature allows paging of a single
transceiver or groups of transceivers by a dispatch center.
Available options include the VL-1000/VP-1000 1 kW
Linear Amplifier/Power Supply, FP-1030A AC Power
Supply, FC-30 Automatic External Antenna Tuner (for
50 Ohm unbalanced antenna feedlines), FC-40 Automatic
External Antenna Tuner (for an end-fed random-length
wire or long whip antenna), YA-30 Broadband Dipole
Antenna, YA-007FG Mobile Antenna, MD-200A8X Desk
Microphone, MLS-100 External Speaker, and the ALE-
1 Automatic Link Establishment Unit which automatically
selects the channel with the best LQA (Link Quality Analysis) score from the programmed channels.
This manual includes installation, configuration, interfacing, and operating instructions for the Vertex Standard
VX-1700. We encourage you to read this manual thoroughly before installing or operating this transceiver.
SAFETY/WARNING INFORMATION
The antenna(s) used for this transmitter must be fixed-mounted on outdoor permanent structures with a separation
distance of at least 2.3 m from all persons during normal operation and must not exceed an antenna gain of 0 dBd.
This device must be restricted to work related operations in an Occupational/Controlled RF exposure Environment, not exceeding a maximum transmitting duty factor of 50%. The antenna(s) used with this device must satisfy
the antenna co-location requirements of 47 C.F.R. 1.1307(b)(3).
Do not modify this repeater for any reason.
Refer service of this repeater to qualified technicians only.
When the repeater become abnormal, such as the overheating, smoke smell of burning, etc., turn the main
power switch off and disconnect the Main Power Source connector from the rear of the VX-1700 immediately. Also disconnect any backup power source you may have connected to the rear of the VX-1700.
Do not place any combustible material near the repeater.
Do not spray any liquid over the repeater.
Ensure that the power and antenna connections are securely made, using cables with excess capacity for the
power being utilized.
NOTICE!
Page 1VX-1700 OPERATING MANUAL
Page 4
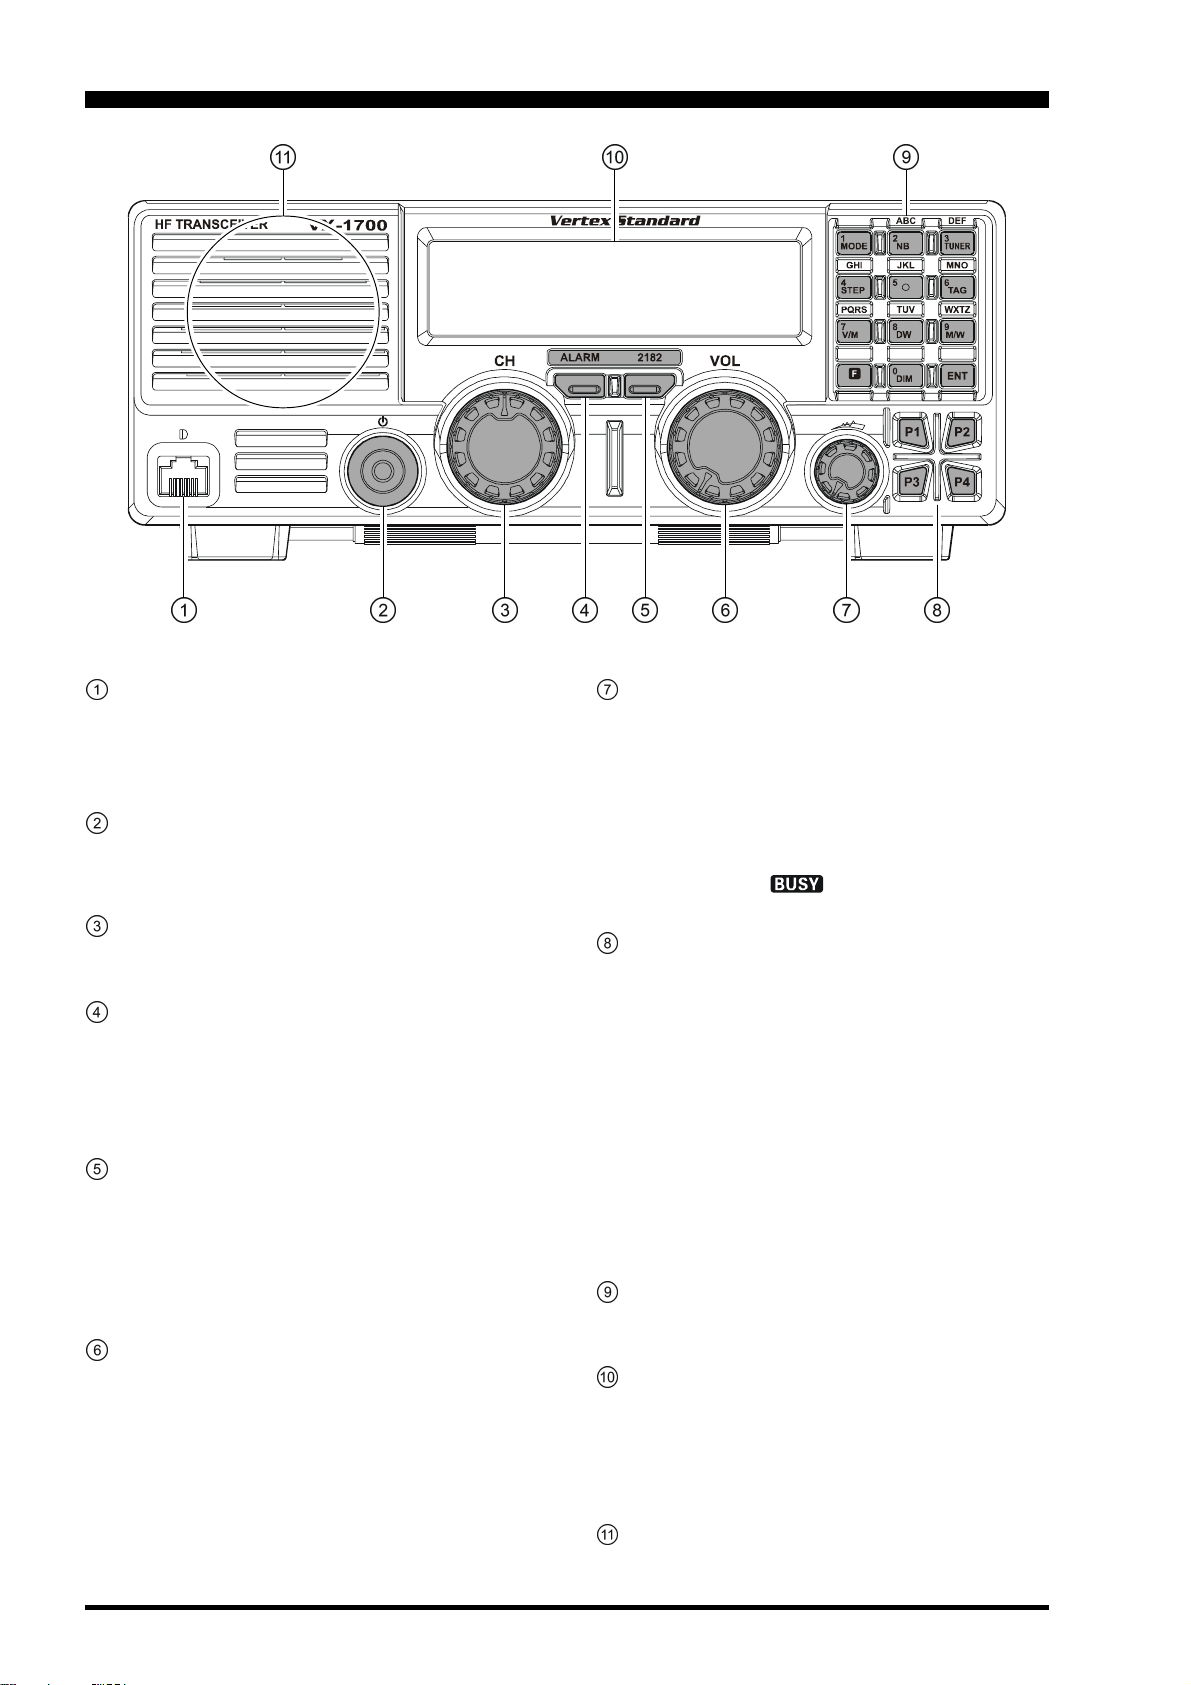
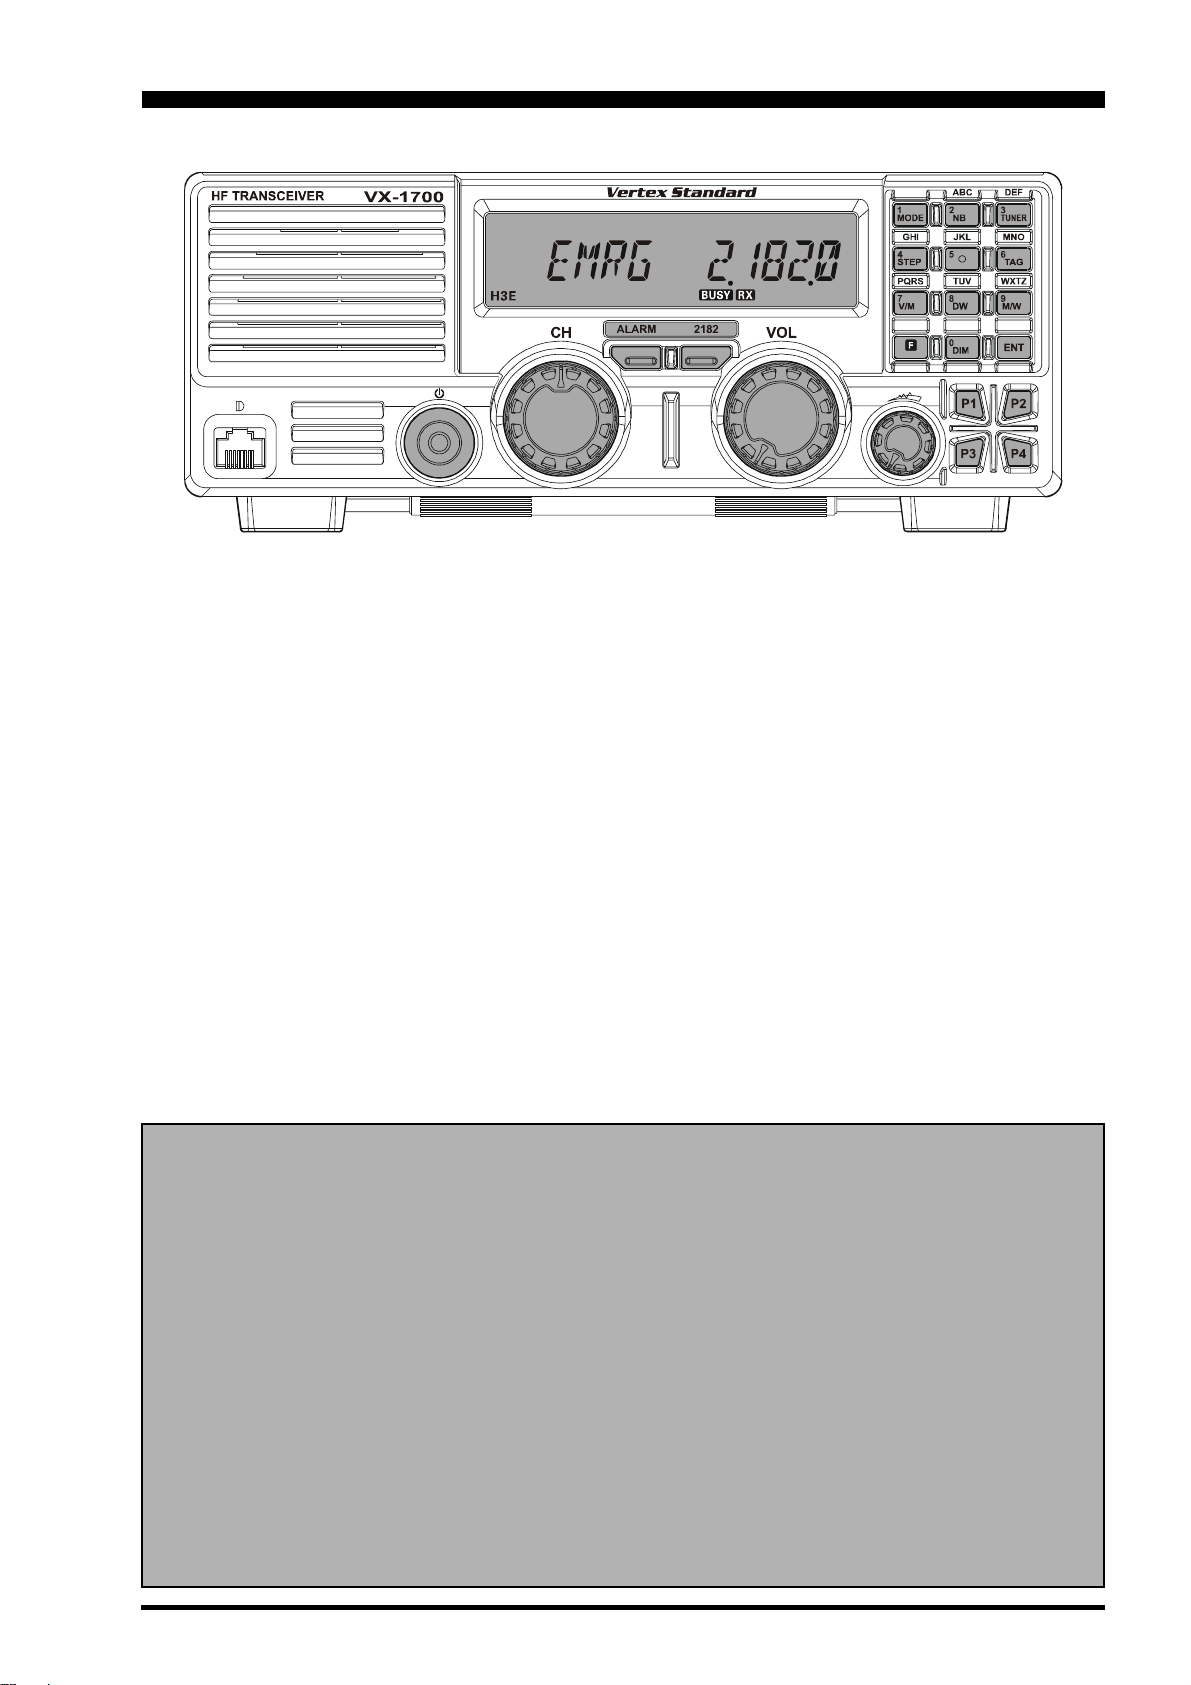
FRONT PANEL CONTROL & SWITCHES
Vertex Standard Co., Ltd.
FCC ID: K6610511070/IC ID: 511B-10511070
MIC Jack
This modular jack accepts microphone voice input,
as well as scanning and PTT (Push To Talk) control
from the microphone. Specified microphone impedance is 500 - 600 Ohms.
POWER Switch
This is the main on/off switch for the VX-1700. Press
and hold this switch for one second to toggle the
transceiver’s power on and off.
CH (Channel) Selector Knob
The Channel selector knob selects memory channels,
and tunes the VFO at a rate of 30 steps per revolution.
ALARM Button
Pressing this button activates the alarm generator, with
the alarm tone emanating from the speaker (receiver
audio is muted, and no transmission occurs). To trans-
mit the alarm tone, press both the [ALARM] and the
[
2182] button (described next).
2182 Button
Pressing this button places the VX-1700 in the “Emergency Channel” mode, with the following results:
(A) The transceiver is instantly set to 2182 kHz in the
H3E mode,
(B) The “EMRG” notation appears on the LCD dis-
play, indicating Emergency Channel Operation.
VOL Knob
This control adjusts the receiver audio volume from
the speaker. Clockwise rotation of this control increases the volume level.
SQL Knob
This control may be used silence the receiver when
no signals are being received. Clockwise rotation of
this control cause the receiver to respond only to progressively stronger signals; conversely, counter-clockwise rotation of this control allows progressively
weaker signals to be heard.
When a signal or noise breaks through the squelch
“threshold,” the “ ” icon on the display will be
illuminated.
P1 - P4 Keys
These four keys functions can be customized, via programming by your Vertex Standard dealer. The factory defaults are shown below.
P1 Key: Press this key to tune the receiver frequency
downward without changing the transmit
frequency (Clarifier function).
P2 Key: Toggles the Key Lockout feature “on” and
“off.”
P3 Key: Press this key to tune the receiver frequency
upward without changing the transmit frequency (Clarifier function).
P4 Key: Turns the internal speaker (or external
speaker, if used) “on” and “off.”
(
PROGRAMMABLE FUNCTION KEYS
Keypad
These 12 keys are used for both frequency entry and/
or certain operational commands.
LCD Display
This multi function LCD (Liquid Crystal Display) includes frequency readout or Alpha/Numeric “Tag”
labeling of the channel in use, plus a Signal Strength/
Power Output meter, and icons which provide visual
confirmation of transceiver status.
)
Speaker
The internal speaker is located here.
Page 2 VX-1700 OPERATING MANUAL
Page 5

FRONT PANEL CONTROL & SWITCHES
Vertex Standard Co., Ltd.
FCC ID: K6610511070/IC ID: 511B-10511070
Key Primary Function (Press Key)
Selects the Operating Mode.
Toggles the Noise Blanker “on” and “off.”
Activates the Antenna Tuning Process.
Changes the synthesizer step in the VFO mode.
None
Indicates the memory channel with the channel
frequency and channel’s Alpha/numeric Tag alternately
when the channel display format is set to the “Alpha/
numeric Display” mode.
Selects the frequency control method among “VFO
mode,” “ITU mode,” and “Memory mode.”
Activates the “Dual Watch” feature.
Activates the “Memory Write” mode (for memory
channel storage).
Toggles the Display intensity between “High” and “Low.”
Activates the “Secondary” key function.
Activetes the “Alternate” key function.
KEYPAD FUNCTIONS
Toggles the IF Bandpass Filter between “WIDE” and
“NARROW” in the J2B and A1A modes (only).
Toggles the Noise Blanker “on” and “off.”
Activates the Antenna Tuning Process to the all Memory
Channels in the current Memory Bank.
Changes the synthesizer step in the VFO mode.
None
Indicates the memory channel with the channel
frequency and channel’s Alpha/numeric Tag alternately
when the channel display format is set to the “Alpha/
numeric Display” mode.
Selects the frequency control method among “VFO
mode,” “ITU mode,” and “Memory mode.”
Selects the Scan Resume mode.
Activates the “Memory Write” mode (for memory
channel storage).
Engages the Set (Menu) mode.
Disables the “Secondary” key function.
Disables the “Alternate” key function.
Secondary Function (Press +
)
Page 3VX-1700 OPERATING MANUAL
Page 6
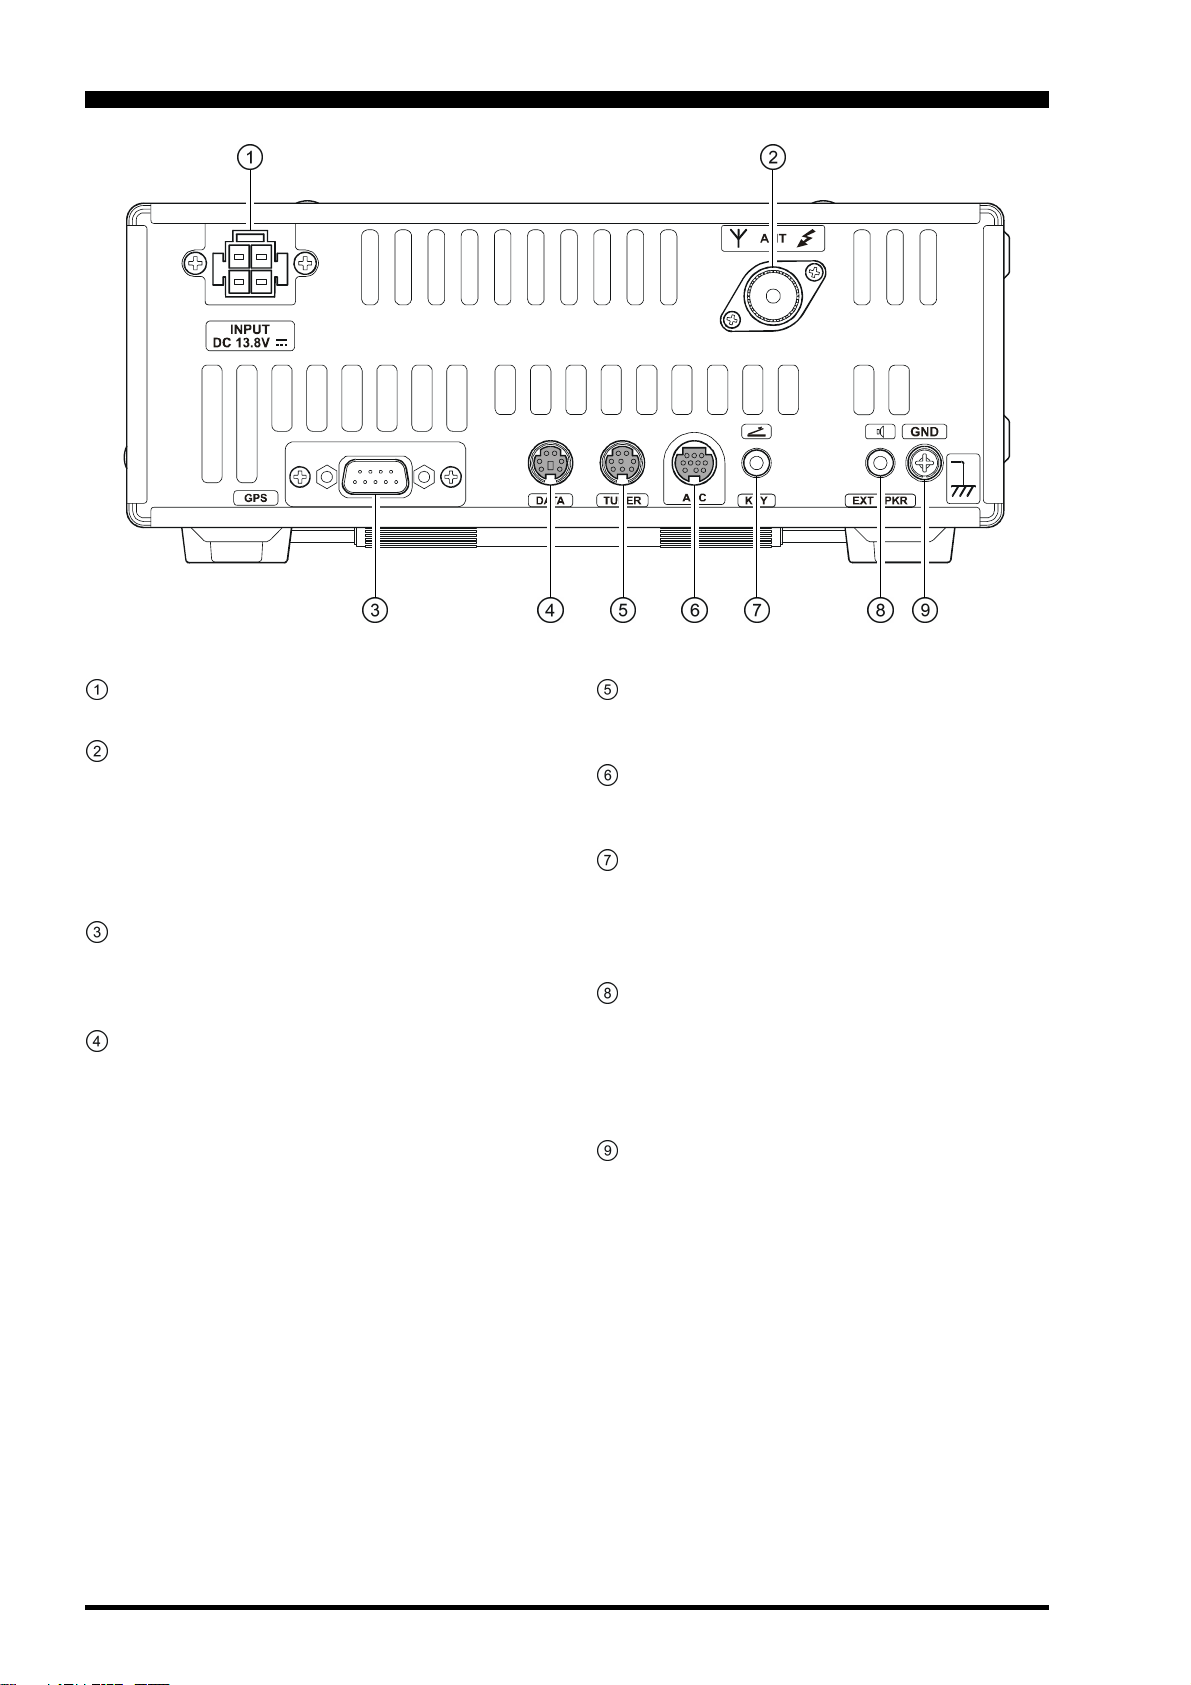
REAR PANEL CONNECTIONS
Vertex Standard Co., Ltd.
FCC ID: K6610511070/IC ID: 511B-10511070
INPUT (13.8 V
This is the main DC power input jack for the VX-1700.
)
ANT Jack
This PL-259 (“M” Type) connector is used for connection of the coaxial feedline from the antenna. When
the optional FC-30 or FC-40 External Antenna Tuner
is used, the RF interconnection cable from the FC-30
or FC-40 connects here, while the antenna wire or
whip connects to the FC-30 or FC-40.
GPS Jack
This 9-pin serial DB-9 jack is for interconnection to a
GPS receiver (not supplied) capable of supplying
NMEA-0183 data.
DATA Jack
This 6-pin mini-DIN jack is for interconnection to a
TNC (Terminal Node Controller) or other data transmission/reception modem device (such as a
WeatherFax demodulator).
TUNER Jack
This 8-pin mini-DIN jack is for interconnection to the
optional FC-30 or FC-40 External Antenna Tuner.
ACC Jack
This 10-pin mini-DIN jack is for interconnection to
the optional VL-1000 Linear Amplifier.
KEY Jack
This 3.5-mm miniature phone jack accepts a CW
(Morse Code) key or output from an electronic CW
keyer unit. Key up voltage is + 5.0 V, and key-down
current is 1.2 mA.
EXT SPKR Jack
This 3.5-mm miniature phone jack provides receiver
audio output for an external speaker. Available audio
output is 2.2 Watts, and the permitted impedance is 4
to 16 Ohms. Inserting a plug into this jack automatically disables the internal speaker.
GND Terminal Post
Use this terminal to connect the transceiver to a good
earth ground bus, for safety and optimum performance.
Use a large diameter, short braided cable.
Page 4 VX-1700 OPERATING MANUAL
Page 7

INSTALLATION
Vertex Standard Co., Ltd.
FCC ID: K6610511070/IC ID: 511B-10511070
Safety Precautions
Before proceeding with installation of the VX-1700 transceiver, please read and observe all safety and operating
instructions. Consult with qualified installation or service
personnel should any questions arise regarding these important safety tips.
Power Connections
The power connector for the VX-1700 must only be connected to a DC source providing 13.8 Volts DC (±15 %),
and capable of at least 20 Amperes of current. Do not connect this apparatus to any other DC voltage, and never
connect the DC power cable to an AC source of any kind.
Always observe proper polarity when making DC connections. Our Limited Warranty does not cover damage caused
by improper power connections.
Note that other manufacturers may use the same type of
DC power connector as does your VX-1700 transceiver,
but the wiring configuration of the other manufacturer’s
plug may be different from that specified for your transceiver. Serious damage can be caused if improper DC connections are made; consult with a qualified service technician when in doubt.
Grounding for Electrical Safety
Connect the rear panel ground lug to a good earth ground.
For best performance, such a ground should consist of one
or more ground rods 2.6 m (8 feet) long, connected to the
transceiver via a low-inductance cable such as a heavy
braided wire (the shield from surplus/discarded RG-213
type cable is ideal). The lead-in cable should be as short
as possible.
Do not use gas lines as a ground connection!
Electrical Shock Prevention
Be certain that all station wiring is properly insulated so
as to prevent short-circuits which could damage this transceiver and/or accessories connected to it. Be sure to protect power cables from damage due to abrasion by ensuring that they cannot be walked upon nor crushed under
rolling chairs, etc. Never route power cables near sharp
metallic edges which might cut through protective insulation.
Antenna Precautions
Always locate antennas such that they can never come in
contact with outdoor power lines in the event of a catastrophic antenna support or power line support structure
failure. Ground the support structure adequately, so as to
dissipate energy absorbed during a lightning strike. Install
appropriate lightning arrestors in the antenna lead-in and
rotator cable (if used) according to the arrestor’s instructions.
In the event of an approaching electrical storm, disconnect all antenna lead-in, rotator cables, and power cables
completely from your station if the storm is not immediately in your area. Do not allow disconnected cables to
touch the case of your VX-1700 transceiver or accessories, as lightning can easily jump from the cable to the
circuitry of your transceiver via the case, causing irreparable damage. If a lightning storm is in progress in your
immediate area, do not attempt to disconnect the cables,
as you could be killed instantly if lightning should strike
your antenna structure or a nearby power line.
If a vertical antenna is utilized, be certain that humans and/
or pets and farm animals are kept away both from the radiating element (to prevent electrical shock and RF exposure danger) and the ground system, in the event of an
electrical storm. The buried radials of a ground-mounted
vertical antenna can carry lethal voltages outward from
the center of the antenna in the event of a direct lightning
strike.
Heat and Ventilation
To ensure long life of the components, be certain to provide adequate ventilation around the cabinet of the VX-
1700. The cooling system of the transceiver must be free
to draw cool air in from the bottom of the transceiver and
expel warm air from the rear of the transceiver.
Do not install the transceiver on top of another heat-generating device (such as a linear amplifier), and do not place
equipment, books, or papers on top of the transceiver. Place
the transceiver on a hard, flat, stable surface. Avoid heating vents and window locations that could expose the transceiver to excessive direct sunlight, especially in hot climates.
Never spill liquids into this transceiver, and do not drop
metallic objects into the transceiver enclosure. Electrical
shock may result when you attempt to remove the object.
Unsupervised children should be kept away from any electrical apparatus such as the VX-1700 Transceiver and its
accessories.
Page 5VX-1700 OPERATING MANUAL
Page 8

INSTALLATION
Vertex Standard Co., Ltd.
FCC ID: K6610511070/IC ID: 511B-10511070
Electromagnetic Compatibility
and RF Exposure
If this transceiver is used with or in the vicinity of a computer or computer-driven accessories, you may need to
experiment with grounding and/or radio frequency interference (RFI) suppression devices (such as ferrite cores)
to minimize interference to your communications caused
by energy leakage from the computer.
Although there is negligible radio frequency (RF) leakage
from the VX-1700 transceiver itself, its antenna system
should be located as far away from humans and animals as
practicable, so as to avoid the possibility of shock due to
accidental contact with the antenna or excessive long-term
exposure to RF energy.
Preliminary Inspection
Inspect the transceiver visually immediately upon opening the packing carton. Confirm that all controls and
switches work freely, and inspect the cabinet for any damage. Gently shake the transceiver to verify that no internal
components have been shaken loose due to rough handling during shipping.
If any evidence of damage is discovered, document it thoroughly and contact the shipping company (or your local
dealer, if the unit was purchased over-the-counter) so as to
get instructions regarding the prompt resolution of the
damage situation. Be certain to save the shipping carton,
especially if there are any punctures or other evidence of
damage incurred during shipping; if it is necessary to return the unit for service or replacement, use the original
packing materials but put the entire package inside another packing carton, so as to preserve the evidence of
shipping damage for insurance purposes.
Page 6 VX-1700 OPERATING MANUAL
Page 9

INSTALLATION
Vertex Standard Co., Ltd.
FCC ID: K6610511070/IC ID: 511B-10511070
POWER REQUIREMENTS AND BASIC INSTALLATION
DC Power Connections
The VX-1700 transceiver is designed for operation from
13.8 Volts DC, negative ground, with the DC source being
capable of providing 20 Amperes of continuous current.
For mobile applications, the fused (25-A) DC cable supplied with this transceiver may be used for making the
power connections. Be absolutely certain to observe the
proper polarity when making power connections:
The RED DC power lead connects to the Positive (+) DC
terminal; and
The BLACK DC power lead connects to the Negative (–)
DC terminal.
To minimize noise pickup, and to provide the best input
voltage stability for your transceiver, we recommend you
connect the DC cable directly to the vehicle battery, rather
than to the ignition or accessory circuitry. Route the DC
cable as far away from ignition cables as possible, and cut
off any extra cable (from the battery end) to minimize voltage drop. If the DC cable is not long enough, use #12 AWG
(minimum) stranded, insulated wire to extend it. Be absolutely certain to solder the connections at the splice securely, and provide ample insulation for the soldered splice
(heat shrink tubing plus black electrical tape work well).
Use the following procedure to connect the DC cable:
Before connecting the DC cable to the battery, mea-
sure the voltage across the battery terminals with the
engine running fast enough to show a charge. If the
voltage is above 15 Volts, the vehicle’s voltage regula-
tor should be adjusted to reduce the charging voltage
below 14 Volts.
With the radio end of the cable disconnected, connect
the RED cable lead to the POSITIVE battery termi-
nal, and the BLACK cable lead to the NEGATIVE bat-
tery terminal. Make certain that the battery terminal
connections are tight, and remember to check them pe-
riodically for signs of loosening and/or corrosion.
Make sure the POWER switch on the VX-1700 trans-
ceiver is off, and plug the DC cable into the INPUT
jack on the rear panel of the transceiver.
CAUTION! In mobile installations, check to ensure that the
transceiver POWER switch is turned off whenever starting or stopping the engine, to avoid potential damage from
switching transients.
VX-1700
FUSE: 25A
Cigarette Lighter Plug
Fuse Box
12V Battery
RED
BLACK
Page 7VX-1700 OPERATING MANUAL
Page 10
INSTALLATION
Vertex Standard Co., Ltd.
FCC ID: K6610511070/IC ID: 511B-10511070
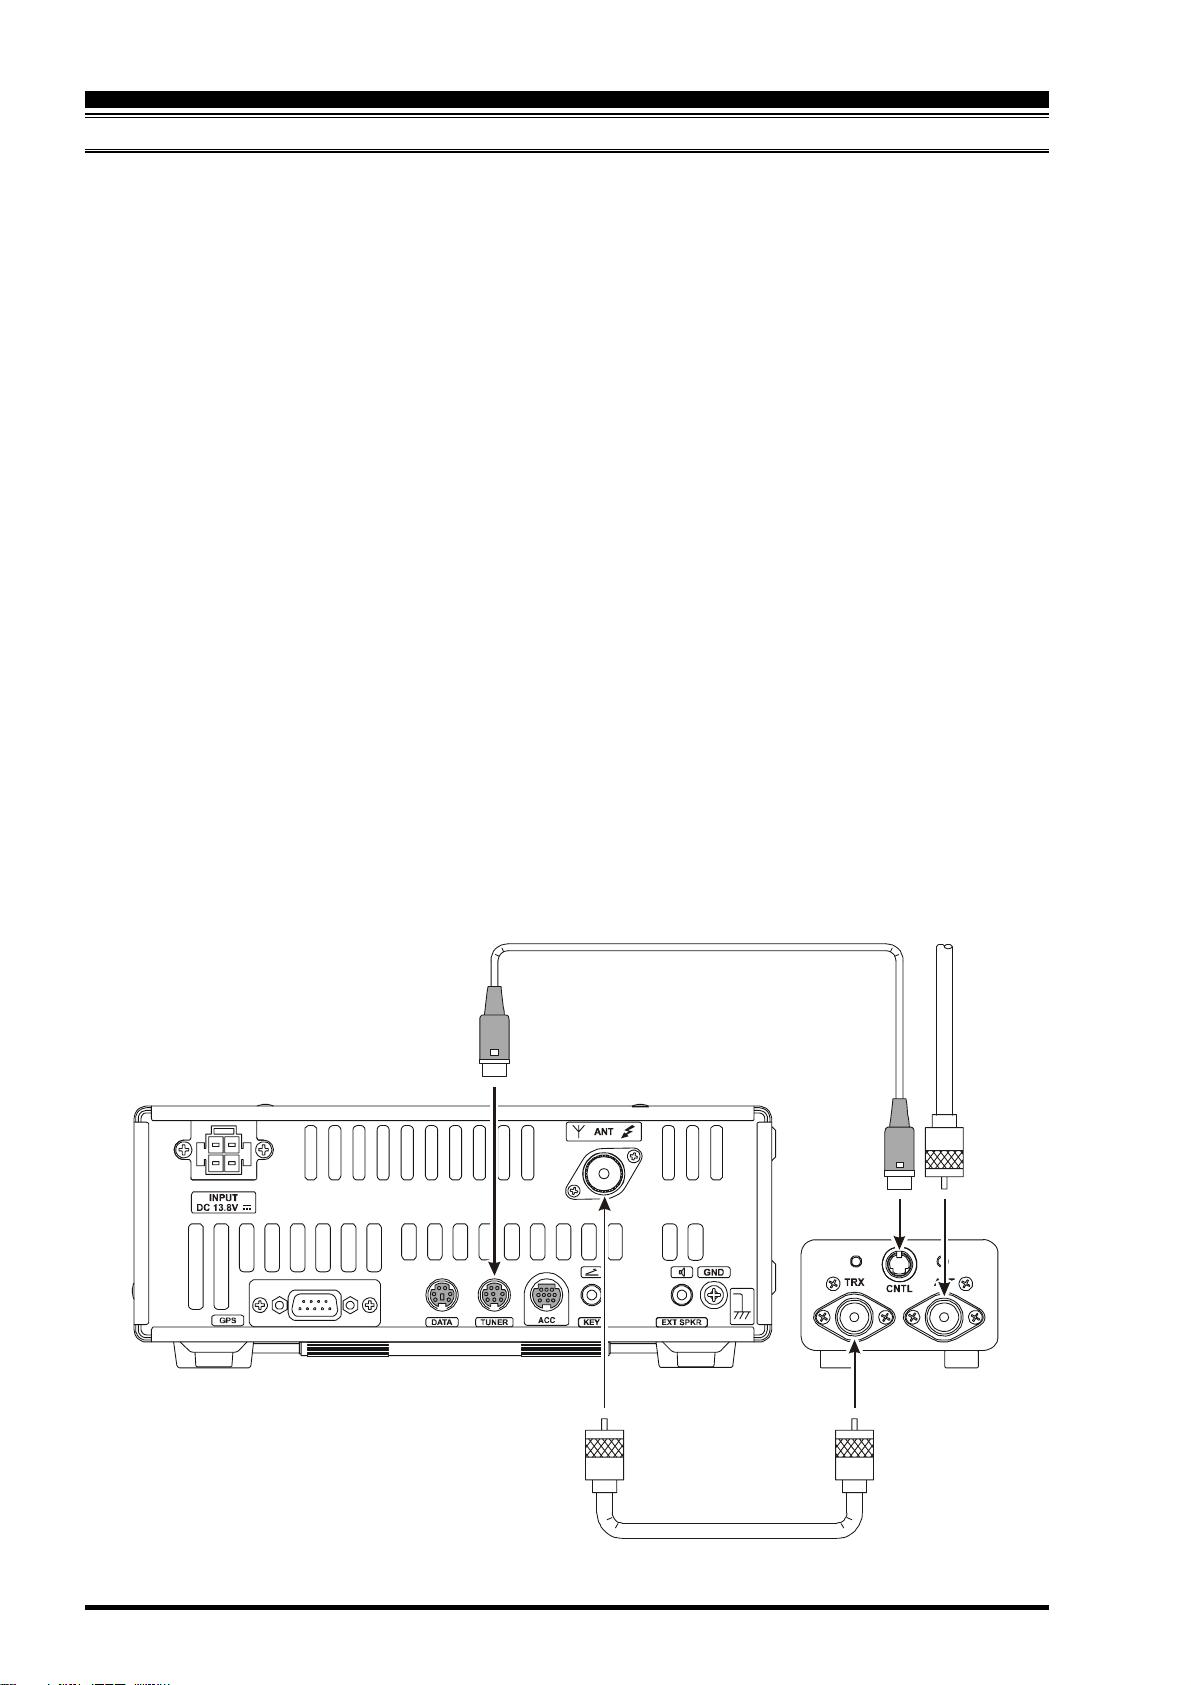
MOBILE MOUNTING
The optional MMB-89 Mobile Mounting Bracket allows
quick insertion and removal of the VX-1700 transceiver
from the vehicle. Complete installation instructions are
provided with the bracket.
Mobile Antenna Considerations
The VX-1700 transceiver is designed for use with any
antenna system providing a 50-Ohm resistive impedance
at the desired operating frequency. While minor excursions
from the 50-Ohm specification are of no consequence, the
power amplifier’s protection circuitry will begin to reduce
the power output if there is more than a 50% divergence
from the specified impedance (less than 25 Ohms or greater
than 100 Ohms, corresponding to a Standing Wave Ratio
(SWR) of 2.0:1). Compliance with this specification critically depends on the range of frequencies on which operation will take place, and the design of the antenna(s) in
use.
If your mobile or marine operation requires wide frequency
coverage, the Yaesu YA-007FG or similar mobile whip
antenna may be used in conjunction with the Yaesu FC-
40 External Antenna Tuner. The FC-40 is designed to ac-
commodate a wide variety of whip impedances at the operating frequency, converting these to the desired 50 ohm
impedance via a sophisticated microprocessor-controlled
impedance matching circuit. The FC-40 and VX-1700 pro-
vide memory of antenna matching settings sufficient for
all channels on Memory Bank 1. In marine applications,
the FC-40 is also ideal for the use with a “backstay” antenna or marine mobile whip.
The FC-40 should be located at or near the base of the
antenna, so as to minimize losses and stray radiation. The
short lead-in wire from the whip must be securely bonded
both to the FC-40 and the antenna (whip or wire), and the
FC-40 must be securely bonded to the vehicle or vessel
ground system, which will act as a counterpoise for the
FC-40 and antenna radiating element. Be sure to weatherproof all outdoor connections thoroughly, especially in
maritime environments.
Complete the installation by connecting the RF coaxial
cable and FC-40 control cable as shown in the pictorial
below. Complete installation instructions are found in the
FC-40 Instruction Manual; follow the manufacturer’s installation instructions when using a whip antenna other
than the YA-007FG.
For extending the operating frequency range of an antenna
fed with coaxial cable, the Yaesu model FC-30 Antenna
Tuner may also be used. The impedance matching range
of the FC-30 is from 17 Ohms to 150 Ohms. Interconnection guidelines may be found in the Operating Manual for
the FC-30.
VX-1700
FC-30
Page 8 VX-1700 OPERATING MANUAL
Page 11

MOBILE MOUNTING
Vertex Standard Co., Ltd.
FCC ID: K6610511070/IC ID: 511B-10511070
INSTALLATION
Mobile Station Grounding
Although satisfactory grounding in most installations will
be achieved via the DC cable’s negative lead and the antenna system’s coaxial cable shield, it may be necessary,
in some installations, to provide a direct ground connection at the mounting location of the transceiver. Due to
unexpected resonances which may naturally occur in any
location, improper communication system performance
may result from insufficient grounding. These symptoms
may include: RF feedback (resulting in distortion of your
transmitted signal), unintended scanning, blinking or blanking of the frequency display, or loss of memory.
Note that these conditions may occur in any communications installation. The VX-1700 includes extensive filtering designed to minimize the chance of such problems;
however, random currents set up by insufficient RF grounding can nullify such filtering. Bonding the rear panel GND
terminal of the VX-1700 transceiver to the vehicle or
vessel’s ground system should clear up any such difficulties.
Vertex Standard does not recommend the use of “on glass”
mobile antennas unless the shield of the coaxial cable is
securely grounded near the feedpoint of the antenna. Such
antennas frequently are responsible for the ground-related
difficulties described above.
Page 9VX-1700 OPERATING MANUAL
Page 12

INSTALLATION
Vertex Standard Co., Ltd.
FCC ID: K6610511070/IC ID: 511B-10511070
BASE STATION INSTALLATION
DC Power Connections
For base station installations, Yaesu recommends the use
of the Model FP-1030A AC Power Supply. The FP-
1030A provides a regulated 13.8 V DC supply at up to
25-Ampere.
Other models of DC power supplies may be used with the
VX-1700, but the 13.8 V DC input voltage, 20-Ampere
current capability, and DC cable polarity guidelines described previously must be strictly followed.
If you are connecting the FP-1030A with the VX-1700
for the first time, before connecting power check the
label in the rear of the FP-1030A which indicates the
VX-1700
AC mains voltage for which the supply is currently
set.
AUTION! Permanent damage can result if improper sup-
C
ply voltage is applied to this transceiver. Your warranty
does not cover damage caused by application of AC, reversed polarity DC, or DC outside of the specified range
of 13.8 V ±15%. If using a power supply other than the
FP-1030A, ensure that the DC supply connector to the
transceiver matches the VX-1700 wiring configuration.
Other manufacturers may utilize power supplies with a
physically matched connector that is wired differently; this
will cause serious damage to the VX-1700 transceiver!
FP-1030A
005510 2015 3020 40
POWER
ON
OFF
VA
CONTINUOUS CURRENT 25A
OVERLOAD
Supplied DC Cable
FUSE: 25A
RED BLACK
Page 10 VX-1700 OPERATING MANUAL
Page 13

BASE STATION INSTALLATION
Vertex Standard Co., Ltd.
FCC ID: K6610511070/IC ID: 511B-10511070
INSTALLATION
Base Station Antenna Considerations
As with mobile or maritime installations, antenna performance is critical to base station communications system
effectiveness. Every effort must be made to ensure that
the impedance of the antenna system utilized with the VX-
1700 is as close as practicable to the specified 50-Ohm
impedance value, and that mechanical and electrical component integrity are maintained at all times.
For wide frequency range applications, Vertex Standard’s
Model YA-30 Broadband Dipole Antenna may be ideal
for your communication requirements. Covering an operating frequency range of 2-30 MHz, the YA-30 eliminates
the need for multiple antennas which might otherwise be
required for equivalent frequency coverage.
The type of antenna required for a particular communications distance will vary. A complete discussion of this topic
is beyond the range of this manual; however, a few general guidelines will be offered herewith.
Any antenna to be installed should be free of nearby obstructions which might interfere with its radiation pattern.
The antenna, its support structure, and its cables must never
be installed in such a manner that would allow them to
contact with power or telephone lines in the event of a
catastrophic windstorm or other cause of major failure.
An adequate safety is usually provided by keeping the
antenna and its support structure 1.5 times the height of
the support plus the length of any antenna or guy wires
attached to the support.
When installing a balanced antenna such as a dipole, remember that the VX-1700 transceiver is designed for use
with an (unbalanced) coaxial feedline. Always use a balun
or other balancing device so as to ensure proper antenna
system performance.
Vertical antennas usually provide excellent coverage beyond about 1000 km (600 miles), but very poor coverage
at closer distances. Horizontal antennas are frequently
better for shorter distances, but they may require a stout
support structure such as a tower. The height of the horizontal antenna, and the nature of the ground below it, have
a profound impact on the favored launch angle for the main
radiation lobe from the antenna at a particular frequency.
For example, at 6 MHz a horizontal dipole 10 meters high
(33 feet) will provide excellent local coverage out to about
500 km (300 miles); however, at the same frequency the
dipole would have to be much higher (perhaps 50 meters
or 165 feet) for satisfactory communication over a range
of 3000 km (1800 miles). On the other hand, at 26 MHz
the same dipole at a height of 10 meters could, ionospheric
propagation conditions permitting, be expected to provide
outstanding performance over the same 3000 km distance.
90° 80°80° 60 °60°
1.0 1.002.0 2.0
90° 80°80° 60°60°
1.0 1.002.0 2.0
50°50° 70°70°
h=10m
50°50° 70°70°
h=50m
40°40°
30°30°
20°20°
10°10°
40°40°
30°30°
20°20°
10°10°
VX-1700
Install the ferrite core as
close to connector as
possible.
FC-40
Wrap the ends of the
waterproof cap with
sealing tape to protect
against moisture
ingress.
Page 11VX-1700 OPERATING MANUAL
Page 14

INSTALLATION
Vertex Standard Co., Ltd.
FCC ID: K6610511070/IC ID: 511B-10511070
BASE STATION INSTALLATION
Excellent reference texts and computer software are available for the design and optimization of HF antennas. Your
dealer or installer should be able to assist you with all aspects of your antenna installation.
Use high-quality coaxial cable for the lead-in to your VX-
1700 transceiver. All efforts at providing an efficient antenna system will be wasted if poor quality, lossy coaxial
cable is used. Losses in coaxial lines increase as the frequency increases, so a coaxial line with 0.5 dB of loss at 6
MHz may have 2 dB of loss at 26 MHz (1 dB is a justperceptible decrease in signal strength). As a general rule,
smaller-diameter coaxial cables tend to have higher losses
than larger-diameter cables, although the precise differences depend critically on the cable construction, materials, and the quality of the connectors used on the cable.
See the cable manufacturers’ specifications for details.
For reference, the chart below shows approximate loss figures for typically-available coaxial cables frequently used
in HF installations.
Loss in dB per 30 m (100 ft)
For Selected 50 Ohms Coaxial Cables
(Assumes 50 Ohms Input/Output Terminations)
CABLE TYPE
RG-58A
RG-58 Form
RG-8X
RG-8A, RG-213
RG-8 Form
Belden® 9923
RG-17A
Loss figures are approximate; consult cable manufac-
tures’ catalog for complete specifications.
Loss figures can increase significantly if high SWR is
present on the transmission line.
2 MHz
0.55
0.54
0.39
0.27
0.22
0.18
0.08
LOSS
15 MHz
1.75
1.50
1.07
0.85
0.65
0.50
0.30
28 MHz
2.60
2.00
1.85
1.25
0.88
0.69
0.46
Base Station Grounding
The VX-1700 HF transceiver, like any other HF communications apparatus, requires an effective ground system
for maximum electrical safety and best communications
effectiveness. A good ground system can contribute to station efficiency in a number of ways.
It can minimize the possibility of electrical shock to
the operator.
It can minimize RF currents flowing on the shield of
the coaxial cable and the chassis of the transceiver
which may cause interference to nearby home entertainment devices or laboratory test equipment.
It can minimize the possibility of erratic transceiver
operation caused by RF feedback or improper current
flow through logic devices.
An effective earth ground system may take several forms;
for a more complete discussion, see an appropriate RF
engineering text. The information presented below is intended only as a guideline.
Typically, the ground connection consists of one or more
2.4m (8’) copper-clad steel rods, driven into the ground.
If multiple ground rods are used, they should be configured in a “V” configuration, and bonded together at the
apex of the V which is nearest the station location. Use a
heavy, braided cable (such as the discarded shield from
type RG-213 coaxial cable) and strong cable clamps to
secure the braided cables to the ground rods. Be sure to
weatherproof the connections to ensure many years of reliable service. Use the same type of heavy, braided cable
for the connections to the station ground bus (described
below).
Inside the station, a common ground bus consisting of a
solid copper pipe of at least 25mm (1”) diameter should be
used. Another ideal ground bus may consist of a wide copper plate (single-sided circuit board material is ideal) secured to the bottom of the operating desk. Grounding connections from individual devices such as transceivers, power
supplies, and data communications devices should be made
directly to the ground bus using a heavy, braided cable.
Do not make ground connections from one electrical device to another, and thence to the ground bus. This socalled “Daisy Chain” grounding technique may nullify any
attempt at effective radio frequency grounding. See the
drawings below for examples of proper and improper
ground connections.
Inspect the ground system - inside the station as well as
outside - on a regular basis so as to ensure maximum performance and safety.
Transceiver
PROPER GROUND CONNECTION IMPROPER GROUND CONNECTION
Linear
Amplifier
Power
Supply
Transceiver Linear
Amplifier
"Daisy Chain"
Powe r
Supply
Page 12 VX-1700 OPERATING MANUAL
Page 15

NOTE
Vertex Standard Co., Ltd.
FCC ID: K6610511070/IC ID: 511B-10511070
INSTALLATION
Page 13VX-1700 OPERATING MANUAL
Page 16

OPERATION
Vertex Standard Co., Ltd.
FCC ID: K6610511070/IC ID: 511B-10511070
STARTUP PROCEDURES
Be certain that all power supply, antenna, ground, mi-
crophone, and other accessory connections have been
properly accomplished.
Rotate the VOL and SQL knobs fully counter-clock-
wise.
Turn on the transceiver by press and holding in the
POWER Switch. The LCD display will become illuminated.
RECEPTION
Rotate the VOL knob for a comfortable listening level
on the incoming signals or noise present on the speaker.
When no signal is present on the channel, rotate the
SQL knob clockwise until the background noise is just
silenced. Unless you are responsible for listening for
very weak signals (very near the background noise),
silencing the receiver using the circuitry is usually preferable in most application.
When a signal strong enough to override the squelch
threshold is received, the incoming signal will be heard
in the speaker, and “ ” icon will be illuminated.
When the incoming signal is disappeared, the “ ”
icon will disappear, although the “ ” icon will still
be illuminated.
When a signal is being received, the S/PO meter will
become illuminated according to the incoming signal
strength. You may use this S/PO meter reading to compare communications path effectiveness on different
channels, or to assist with optimum antenna rotation,
if a directional antenna is being used.
When receive the impulse noise, such as that from a
power line or a vehicle, press the keypad’s [2(NB
(Noise Blanker) key to reduce the noise level. When
the noise blanker is activated, the “ ” icon will be
illuminated. Press the [2(NB)] key again to disable the
noise blanker.
If the station you are listening to should drift or other-
wise be unclear (the voice may sound too high-pitched
or too low-pitched), pressing the [P1] or [P3] key may
improve the sound of the incoming signal. The [P1]/
[P3]
key function does not affect your transmission
frequency; only the receive frequency is being adjusted.
When the receiving frequency is higher than displayed
frequency, the “” icon will appear to the right of the
frequency display. Similarly, when the receiving frequency is lower than displayed frequency, the “” icon
will appear to the right of the frequency display. Press
and hold in both [P1] and [P3] keys for one second to
reset the offset.
If the LCD display is too bright, press the keypad’s
[0(
DIM)] key to reduce the display brightness. Press
the [0(DIM)] key again return to the LCD display to
nominal brightness level.
To turn the internal speaker (or external speaker, if used)
off, press the [P4] key. Press the [P4] key again to
restore the speaker audio.
)]
Page 14 VX-1700 OPERATING MANUAL
Page 17

FREQUENCY AND CHANNEL SELECTION
Vertex Standard Co., Ltd.
FCC ID: K6610511070/IC ID: 511B-10511070
OPERATION
The VX-1700 includes the following frequency selection
capabilities:
A VFO (Variable Frequency Oscillator) System
ITU Marine Channel
Memory Channel
A one-touch (2.182 MHz) Emergency Channel
Memory, which places the transceiver on 2.182
MHz (in transceivers configured for Marine use).
In the VFO mode, the frequency is displayed on the
right side, with the operating mode icon being displayed
at the left edge of the display. On the left side of the
display, the current synthesizer step size is displayed.
In the ITU mode, the frequency and operating mode
are displayed as they are during VFO operation; however, the left side of the display indicates the ITU Marine Channel designator.
In the Memory Channel Mode, the memory channel
number is displayed on the left side of the display (for
example, 1-005). The digit to the left of the hyhen is
the Memory Bank Number, while the digits to the right
are the Channel Numbers within that bank. Therefore,
in the example below, the display is indicating Channel #5 on Memory Bank #1.
In the Emergency Mode, the frequency “2.182.0” is
displayed on the right side, with the special Alpha Tag
“EMRG.”
VFO Mode
Rotate the CH Selector knob to select the operating
frequency.
If the tuning rate is too slow or too fast, the frequency
synthesizer steps may be changed by pressing the
keypad’s [4(STEP)] key. Available step sizes are 10
Hz, 100 Hz, and 1 kHz.
The microphone’s [UP] or [DWN] button may also be
used to select the operating frequency. Pressing the UP
or DWN button momentarily will cause the operating
frequency to increment or decrement one step, respectively. Pressing and holding the [UP] or [DWN] button in for 1/2 second will initiate upward or downward
scanning, respectively. Releasing the [UP] or [DWN
button halts the scan.
The VFO frequency may be entered directly from the
keypad.
Press the keypad’s [ENT] key momentarily, then
enter six digits of the desired operating frequency
(the “10s of Hz” digit can not be entered, even if
10 Hz steps are selected; this is a time saving feature). If you make a mistake during frequency entry, rotate the Channel Selector knob so as to cause
the erroneous digit of the frequency to blink; now,
press the correct number on the key pad, and continue with the remainder of the frequency entry process.
If you require split-frequency operation (different
transmit/receive frequencies), press the [ENT] key
momentarily, then enter the six digits of the desired
transmit frequency; otherwise (to transmit and receive on the same frequency), skip to the next step.
Press and hold in the [ENT] key for 1/2 second to
finalize the entry of the VFO frequency (frequencies).
If you need to change the operating mode, press the
keypad’s [1(MODE)] key. Available operating modes
are J3E(USB), J3E(LSB), J2B (USB), A1A(CW), and
A3E(AM).
]
Frequency and channel selection are very simple on the
VX-1700:
Select the desired channel grouping (VFO, ITU, and
Memory Channel) by repeatedly pressing the keypad’s
[7(
V/M)] key. The circulation of channel groups is VFO
Memory Bank 1 Memory Bank 2
Memory Bank 3 Memory Bank 4 Memory
Bank 4 ITU VFO
…..
Page 15VX-1700 OPERATING MANUAL
Page 18

OPERATION
Vertex Standard Co., Ltd.
FCC ID: K6610511070/IC ID: 511B-10511070
FREQUENCY AND CHANNEL SELECTION
Memory Channel Mode
Rotate the CH Selector knob to select the desired
Memory Channel within the selected Memory Bank.
Remember that there are a total of five Memory Banks,
so if you do not find a particular channel, it may have
been stored in a different Memory Bank.
The microphone [UP] and [DWN] buttons may also
be used to select the Memory Channel. Pressing the
[UP]
or [DWN] button momentarily will cause the
Memory Channel to increment or decrement one step,
respectively. Pressing and holding the [UP] or [DWN
button in for 1/2 second will initiate upward or downward scanning on the Memory Channels, respectively.
Releasing the [UP] or [DWN] button halts the scan.
ITU Marine Channel
Rotate the CH Selector knob to select the desired ITU
Memory Channel within the standard ITU Marine
Channel Bank provided. The operating mode is automatically selected, and can not be changed.
The microphone [UP] and [DWN] buttons may also
be used to select the ITU Memory Channel. Pressing
the [UP] or [DWN] button momentarily will cause the
ITU Memory Channel to increment or decrement one
step, respectively. Pressing and holding the [UP] or
[
DWN] button in for 1/2 second will initiate upward
or downward scanning on the ITU Memory Channels,
respectively. Releasing the [UP] or [DWN] button halts
the scan.
2.182 MHz Emergency Channel Mode
A special Emergency Channel feature of the VX-1700 provides several important operational benefits for the owner.
Pressing the [2182] button automatically switches the
transceiver to the Marine Distress Channel, 2182 kHz
(2.182 MHz), and also places the transceiver in the
H3E (Single-Sideband AM) mode. On the display, the
frequency “2.182.0” will be displayed, as well as a
special Alpha Tag “EMRG,” designating this as the
Emergency Channel.
]
If desired, the operating mode may be changed to
J3E(USB) by pressing the keypad’s [1(MODE)] key.
The [ALARM] button may be used for sending a dis-
tress signal. To test the alarm, just press the [ALARM
button momentarily. After one second, an audible alarm
will be heard, although no transmission occurs. Press
the [ALARM] button again to stop the test alarm.
In an Emergency, press the [2182] button while press-
ing and holding in the [ALARM] button. This VX-1700
will transmit the international marine distress signal
(alternating 1300 Hz and 2200 Hz tones) for 35 seconds. Press the [ALARM] button (not the [2182] button) to cancel the transmitted distress signal.
Press the [2182] button again to exit the 2.182 MHz
Emergency Channel Mode.
Be certain your operators and crew understand the func-
tion of the 2182 Alarm feature, and make sure they
understand that it is only to be used in case of a true
emergency situation.
Front Panel Locking
To prevent inadvertent changing of the channel frequency or other front panel parameters, press the [P2
key on the front panel. All keys, and the Channel Selector knob, will locked out of the operational command capability except for the POWER switch, the
[
ALARM] and [2182] buttons, and the [P2] key it-
self. The “ ” icon will appear on the display.
]
]
Press the [P2] key again to release the front panel to
normal operation.
Page 16 VX-1700 OPERATING MANUAL
Page 19

TRANSMISSION
Vertex Standard Co., Ltd.
FCC ID: K6610511070/IC ID: 511B-10511070
OPERATION
For Voice transmission, close the PTT (Push To Talk)
switch on the microphone; the transmitter will now be
activated (note that the “ ” icon will be illuminated
on the LCD display). Hold the microphone about 1
inch (25 mm) from your mouth, and speak into the front
of the microphone in a normal voice level. Release the
PTT switch to return to the receive mode (the “ ”
icon will be again illuminated, and the “ ” icon will
go out).
For CW (Morse Code telegraphy) in the A1A mode,
begin sending using your telegraph key or electronic
keyer. The VX-1700 will automatically be placed in
the transmit mode when you start to send, and will revert to the receive mode when you stop sending. As
you send, a “Sidetone” audio generator allows you to
monitor your sending.
For Data transmission (including Morse Code telegra-
phy using a TNC (Terminal Node Controller) and keyboard, or similar computer-driven data transmission
devices), transmit/receive control is exercised by the
software which accompanies the data transmission
equipment in use. See the User’s Manual for your terminal equipment for operating instructions. Remember to follow the maximum power output guidelines
during continuous-duty operation such as RTTY (Radio Teletype) in the J2B mode. Adjust the TX Audio
level from the TNC for a maximum of 50 Watts of
power output (5 or 6 segments illuminated on the Power
Output Bar Graph) if long periods of continuous transmission are anticipated.
Antenna Tuning Procedures
When the optional FC-30 or FC-40 External Antenna
Tuner is installed, it is activated on each channel automatically.
If the “ ” icon will appears at the upper right corner on
the LCD display while transmitting, the antenna system
may require retuning. Use the following procedure.
Be certain that all connections to the FC-30/-40 have
been properly made.
With the appropriate channel selected via the Main
Dial, press the keypad’s [3(TUNER)] key. The
“ ” icon on the LCD Display will blink, and
the VX-1700 will transmit for a short time. Thereafter,
the transceiver will return to the receive mode, and the
“ ” icon will now be illuminated constantly.
The FC-30/-40’s microprocessor-based circuitry in-
cludes memory sufficient to retain 100 (for FC-30, 200
for FC-40) antenna tuning settings in memory. This
will greatly reduce frequency change time. If you utilize more than 100 or 200 operating channels that are
widely removed in frequency, the new tuning settings
will be over-written on a first-in, first-out basis.
Page 17VX-1700 OPERATING MANUAL
Page 20

OPERATION
Vertex Standard Co., Ltd.
FCC ID: K6610511070/IC ID: 511B-10511070
DUAL WATCH
The Dual Watch feature allows the user or dispatcher to
operate on one channel while periodically making a brief
check of Memory Channel “1-001” (Memory Bank #1,
Channel #1). The Dual Watch feature can be engaged so
long as there is frequency and mode data written into
memory channel “1-001.”
Every four seconds, the transceiver will automatically
switch over to memory channel “1-001.” If a station is
transmitting on memory channel “1-001,” one of two things
will happen:
If the VX-1700 is in the “Carrier Drop” mode, the trans-
ceiver will hold on memory channel “1-001” until the
transmission ceases. The transceiver will continue to
hold for ten seconds after the transmission ends, in case
the other station decides to resume transmitting. After
the three second delay, Dual Watch will resume, with
your original operating channel (not memory channel
“1-001”) being restored to the Main Display.
If the VX-1700 is set to the “Time Delay” mode, the
transceiver will hold on memory channel “1-001” for
five seconds, then Dual watch operation will resume
(irrespective of the transmit/receive status of any stations on memory channel “1-001”).
Dual Watch operation is simple to use.
Follow these steps:
First, set the desired “Resume” mode for Dual Watch.
Usually, this will be “Carrier Drop,” which will not
allow the transceiver to move off memory channel 101 if someone is still transmitting. To do this, press the
[F]
key followed by the [8(DW)] key, then rotate the
CH Selector knob until “CARR” is shown in the LCD
display. If you prefer the “Time Delay” mode, rotate
the CH Selector knob until “TIME” is displayed. Now
press the [8(DW)] key again to return to the normal
display.
Adjust the SQL control so that the “ ” icon dis-
appears and the receiver is silenced.
Press the [8(DW)] key to activate Dual Watch. After
four seconds, the transceiver will switch over to
memory channel “1-001,” and will stay there for 1/2
seconds, thereafter returning to your original channel.
If a call is received on memory channel “1-001” dur-
ing Dual Watch operation, the transceiver will lock onto
that channel, then resume in accordance with the “Resume” mode selected previously.
Press the [8(DW)] key again to disable the Dual Watch
feature. Operation will revert to your original operating frequency.
Note that your main operating channel can be changed
during Dual Watch operation, but you cannot change
channels while memory channel “1-001” is being
checked for activity.
Page 18 VX-1700 OPERATING MANUAL
Page 21

OPERATION
Vertex Standard Co., Ltd.
FCC ID: K6610511070/IC ID: 511B-10511070
ENCRYPTED TRANSMISSION/RECEPTION
If the transceivers you (and others in your communi-
cation group) are using are equipped with the aftermarket Encryption Module, the Encryption mode may
be activated by pressing the [ENCR] key. The
“ ” icon will become illuminated.
To de-activate encryption, press the [ENCR] key again.
If the signals of all the other stations in your communi-
cations group have a severely distorted or “scrambled”
sound, you may have accidentally de-activated your
transceiver’s encryption mode. Pressing the [ENCR
key may allow recovery. However, if only one station
in your communications group sounds distorted or
“scrambled,” it is possible that the encryption mode of
that transceiver may have been accidentally turned off.
Either the dispatcher or you may advise the other station by switching your encryption off and calling the
other station in the non-encrypted mode. Remember
that your transmissions will be sent in a non-encrypted
format, and will thus not be secure; limit your discussion to a brief advisory regarding the [ENCR] key on
the other station’s transceiver, then revert to encrypted
operation immediately by pressing the [ENCR] key
on your transceiver.
]
(
R
EQUIRES AFTER-MARKETING ENCRYPTION MODULE
)
Page 19VX-1700 OPERATING MANUAL
Page 22

SELCALL/TELCALL OPERATION
Vertex Standard Co., Ltd.
FCC ID: K6610511070/IC ID: 511B-10511070
The VX-1700’s Selcall feature provides six calling modes:
Selcall
The Selcall mode allows you to make an individual/
group call using the individual ID (Identification)
number assigned for each transceiver.
Message Call
The Message Call mode allows you to send a text
message (up to 64 characters of text) to another
station.
Position Request Call
The Position Request Call mode allows you to request the position information of another station.
Position Send Call
The Position Send Call mode allows you to send
your own position information to another station.
Beacon Request Call
The Beacon Request Call mode allows you to inquire as to the signal quality between your transceiver and another specific transceiver (before
making an individual/group call).
TelCall
The TelCall mode allows you to make a telephone
call through a telephone interconnect service provider.
SELCALL
The Selcall mode allows you to make an individual/group
call using an individual ID (Identification) assigned to each
transceiver in your group or fleet.
Preparation
Rotate the CH Selector knob to select the channel to
be used for Selcall.
Disable the VOX and Clarifire features, if necessary.
Press the [SELCALL] key momentarily to activate the
Selcall system. The “
nated on the LCD display.
Sending a Selcall
Rotate the CH Selector knob to select the ID number
of the station to be called using Selcall. Available IDs
are: the last-received ID, ten pre-programmed IDs, and
“Auxiliary,” whereby you enter the desired ID using
the keypad. To enter the desired ID, rotate the CH Selector knob to “AUX,” press the keypad’s [ENT] key,
then enter the 4-digit ID number from the keypad; finally press the [ENT] key again.
Press the [CALL] key momentarily to enter the Call
Menu.
Rotate the CH Selector knob to select “SELCALL.”
Press the [CALL] key again to transmit the Selcall.
” icon will be illumi-
Receiving a Selcall
When the VX-1700 receives a Selcall matching your
individual ID, a bell alarm will be heard, and the LCD
will display the received (calling station’s) ID number.
Press the PTT switch momentarily to cancel the Selcall,
then press and hold in the PTT switch and speak into
the microphone in the usual fashion to reply to the
Selcall.
Press the [SELCALL] key again to re-activate the
Selcall system.
Page 20 VX-1700 OPERATING MANUAL
Page 23

SELCALL/TELCALL OPERATION
Vertex Standard Co., Ltd.
FCC ID: K6610511070/IC ID: 511B-10511070
MESSAGE CALL
The Message Call mode allows you to send a text message (up to 64 characters of text) to a specific station.
Preparation
Rotate the CH Selector knob to select the channel to
be used for Message Call.
Disable the VOX and Clarifire features, if necessary.
Press the [SELCALL] key momentarily to activate the
Selcall system. The “
nated on the LCD display.
” icon will be illumi-
Sending a Message Call
Rotate the Channel Selector knob to select the ID of
the station to which you wish to send the Message Call.
Available IDs are: the last-received ID, ten pre-programmed IDs, and “Auxiliary,” whereby you may enter the desired ID using the keypad. To enter the desired ID, rotate the CH Selector knob to “AUX,” press
the keypad’s [ENT] key, then enter the 4-digit ID number from the keypad; finally press the [ENT] key again.
Press the [CALL] key momentarily to enter the Call
Menu.
Rotate the CH Selector knob to select “MESSAGE.”
Press the [CALL] key again to display the last trans-
mitted message. If you wish to edit the message:
Press the [ENT] key again, then press the keypad
to select the first digit of the message.
Example 1: Press the [1(MODE)] key repeatedly
to select the character “1” and any of the 27 available characters.
Example 2: Press the [2(NB)] key repeatedly to
toggle among the available characters associated
with that key: 2 A B C 2
Example 3: Press the [0(DIM)] key to toggle the
characters “0” and “space.”
Rotate the CH Selector knob one click clockwise
to move the next character.
If you make a mistake, press the [1(MODE)] key
to back-space the cursor, then re-enter the correct
letter, number, or symbol.
Repeat the above steps to program the remaining
letters or numbers of the desired message. A total
of 64 characters may be used in the message.
Press and hold the [1(MODE)] key to delete the
previously-stored data after the cursor.
Press the keypad’s [ENT] key to terminate the mes-
sage.
Press the [CALL] key again to transmit the Message
Call.
…
Receiving a Message Call
When the VX-1700 receives a Message Call matching
your individual ID, a bell alarm will be heard, and the
“ ” icon will appear at the top center on the LCD,
and the received (called station’s) ID number and the
message will scroll across the display.
Press the PTT switch momentarily to cancel the Mes-
sage Call mode, then press and hold in the PTT switch
and speak into the microphone in the usual fashion to
reply to the Message Call.
Press the [SELCALL] key again to re-activate the
Selcall system.
Page 21VX-1700 OPERATING MANUAL
Page 24

SELCALL/TELCALL OPERATION
Vertex Standard Co., Ltd.
FCC ID: K6610511070/IC ID: 511B-10511070
POSITION REQUEST CALL
The Position Request Call mode allows you to request
position information from a specific station.
Preparation
Rotate the CH Selector knob to select the channel to
be used for the Position Request Call.
Disable the VOX and Clarifire features, if necessary.
Press the [SELCALL] key momentarily to activate the
Selcall system. The “ ” icon will be illuminated on the LCD display.
Sending a Position Request Call
Rotate the CH Selector knob to select the ID of the
station from which you wish to receive the position
information. Available IDs are: the last-received ID,
ten pre-programmed IDs, and “Auxiliary,” whereby you
may enter the desired ID using the keypad. To enter
the desired ID, rotate the CH Selector knob to “AUX,”
press the keypad’s [ENT] key, then enter the 4-digit
ID number from the keypad; finally press the [ENT
key again.
Press the [CALL] key momentarily to enter the Call
Menu.
Rotate the CHSelector knob to select “PoS REQ.”
Press the [CALL] key again to transmit the Position
Request Call.
Receiving a Position Request Call
When the VX-1700 receives a Position Request Call
matching your individual ID, the LCD will display the
received (calling station’s) ID number; your radio will
transmit your current position (Latitude/Longitude)
automatically.
Press the PTT switch momentarily to cancel the Posi-
tion Request Call, if desired, press the PTT switch and
speak into the microphone in the usual fashion while
press and holding the PTT switch to reply to the Position Request Call.
Press the [SELCALL] key again to activate the Selcall
system.
Note: A suitable GPS receiver capable of supplying
NMEA-0183 data must be connected to the rear panel’s
GPS jack in order to transmit your current position.
POSITION SEND CALL
The Position Send Call mode allows you to send your own
position information to the intended ID station.
Note: A suitable GPS receiver capable of supplying
NMEA-0183 data must be connected to the rear panel’s
GPS jack in order to transmit your current position.
Preparation
Rotate the CH Selector knob to select the channel to
be used for the Position Send Call.
Disable the VOX and Clarifire features, if necessary.
Press the [SELCALL] key momentarily to activate the
Selcall system. The “ ” icon will be illuminated on the LCD display.
Sending a Position Send Call
Rotate the CH Selector knob to select the ID number
of the station to which you wish to send your position
data. Available IDs are: the last-received ID, ten pre-
]
programmed IDs, and “Auxiliary,” whereby you may
enter the desired ID using the keypad. To enter the
desired ID, rotate the CH Selector knob to “AUX,”
press the keypad’s [ENT] key then enter the 4-digit ID
number from the keypad, finally press the [ENT] key
again.
Press the [CALL] key momentarily to enter the Call
Menu.
Rotate the CH Selector knob to select “PoS SND.”
Press the [CALL] key again to transmit the Position
Send Call.
Receiving a Position Send Call
When the VX-1700 receives a Position Send Call
matching your individual ID, a bell alarm will be heard,
and the received (calling station’s) ID number, position (Latitude/Longitude), and time will scroll across
the LCD.
Press the PTT switch momentarily to cancel the Posi-
tion Send Call, then press and hold in the PTT switch
and speak into the microphone in the usual fashion to
reply to the Position Send Call.
Press the [SELCALL] key again to activate the Selcall
system.
Page 22 VX-1700 OPERATING MANUAL
Page 25

SELCALL/TELCALL OPERATION
Vertex Standard Co., Ltd.
FCC ID: K6610511070/IC ID: 511B-10511070
BEACON REQUEST CALL
The Beacon Request Call mode allows you to inquire as
to the signal quality between your transceiver and another
specific transceiver (before placing an individual/group
call).
Preparation
Rotate the CH Selector knob to select the channel to
be used for the Beacon Request Call.
Disable the VOX and Clarifire features, if necessary.
Press the [SELCALL] key momentarily to activate the
Selcall system. The “ ” icon will be illuminated on the LCD display.
Sending a Beacon Request Call
Rotate the CH Selector knob to select the intended ID
to be Position Send Call. Available IDs are: the lastreceived ID, ten pre-programmed IDs, and “Auxiliary,”
whereby you may enter the desired ID using the keypad. To enter the desired ID, rotate the CH Selector
knob to “AUX,” press the keypad’s [ENT] key then
enter the 4-digit ID number from the keypad, finally
press the [ENT] key again.
Press the [CALL] key momentarily to enter the Call
Menu.
Rotate the CH Selector knob to select “BCN REQ.”
Press the [CALL] key again to transmit the Beacon
Request Call.
If the Beacon Request call is successful, the “Answer”
signal from the called station will be heard.
TELCALL
The Telcall mode allows you to make a telephone call
through a telephone interconnect service provider.
Preparation
Rotate the CH Selector knob to select the channel for
Tel Call.
Disable the VOX and Clarifire features, if necessary.
Press the [SELCALL] key momentarily to activate the
Selcall system. The “ ” icon will be illuminated on the LCD display.
Sending a TelCall
Press the [TELCALL] key momentarily to enter the
TelCall Menu.
Rotate the CH Selector knob to select the Telephone
Number to be used for Telcall. Available numbers are:
the last-received number, ten pre-programmed numbers, and “Auxiliary,” whereby you may enter the desired Telephone Number using the keypad. To enter
the desired Telephone Number, rotate the CH Selector
knob to “AUX,” press the keypad’s [ENT] key, then
enter the desired Telephone Number (up to 16 digits)
from the keypad; finally press the [ENT] key again.
Press the [TELCALL] key again to transmit the TelCall.
When the communication is finished, press the
[
TELCALL] key while holding in the PTT switch to
send the “Hang-up” signal.
Page 23VX-1700 OPERATING MANUAL
Page 26

ALE OPERATION
Vertex Standard Co., Ltd.
FCC ID: K6610511070/IC ID: 511B-10511070
(
REQUIRES OPTIONAL ALE-1 UNIT
)
The VX-1700’s ALE (Automatic Link Establishment) feature allows you to select the channel with the best LQA
(Link Quality Analysis) score from the programmed channels automatically.
Sending an ALE Call
Press the [7(V/M)] key, as needed, to select the Memory
Channel mode.
Press the [AEL] key momentarily to activate the ALE
feature. The VX-1700 will display the last-activated
network. After five seconds from the initial pressing
of the [AEL] key, the VX-1700 will initiate the ALE
scanner.
If you wish to change the current ALE network, rotate
the CH Selector knob to select the desired network.
Press the [CALL] key momentarily to open the station
list.
Rotate the CH Selector knob to select the station name
to which you wish to direct an ALE Call. Available
stations are: the last-received station, 100 pre-programmed stations, and ALL CALL, which is a broadcast message which your radio uses to establish a connection with all other stations simultaneously.
Press the [CALL] key again to transmit the ALE Call.
Sending an ALE Call
with an Imbedded Message
Press the [7(V/M)] key, as needed, to select the Memory
Channel mode.
Press the [ALE] key momentarily to activate the ALE
feature. The VX-1700 will display the last-activated
network. After five seconds from the initial pressing
of the [ALE] key, the VX-1700 will initiate the ALE
scanner.
If you wish to change the current ALE network, rotate
the CH Selector knob to select the desired network.
Press the [CALL] key momentarily to open the station
list.
Rotate the CH Selector knob to select the station name
to which you wish to direct the ALE Call. Available
stations are: the last-received station, 100 pre-programmed stations, and ALL CALL, which is a broadcast message which your radio uses to establish a connection with all other stations simultaneously.
Press the keypad’s [F] key, then press the [CALL] key
to display the ten pre-programmed messages.
Rotate the CH Selector knob to select the desired mes-
sage. If you wish to edit the message:
Press the [ENT] key again, then press the keypad
to select the first digit of the message.
Example 1: Press the [1(MODE)] key repeatedly
to select the character “1” and any of the 27 available characters.
Example 2: Press the [2(NB)] key repeatedly to
toggle among the available characters associated
with that key: 2 A B C 2
Example 3: Press the [0(DIM)] key to toggle the
characters “0” and “space.”
Rotate the CH Selector knob one click clockwise
to move the next character.
If you make a mistake, press the [1(MODE)] key
to back-space the cursor, then re-enter the correct
letter, number, or symbol.
Repeat the above steps to program the remaining
letters or numbers of the desired message. A total
of 90 characters may be used in the message.
Press and hold the [1(MODE)] key to delete the
previously-stored data after the cursor.
Press the keypad’s [ENT] key to terminate the mes-
sage.
If you select the “None” option, you may send just the
ALE Call instead of the ALE Call with the imbedded
message.
Press the [CALL] key again to transmit the ALE Call
with the imbedded message.
…
Page 24 VX-1700 OPERATING MANUAL
Page 27

MEMORY CHANNEL STORAGE
Vertex Standard Co., Ltd.
FCC ID: K6610511070/IC ID: 511B-10511070
Press the [7(V/M)] key, as needed, to select the Memory
Channel mode.
Press the [9(M/W)] key; on the LCD, you will see a
blinking memory channel number.
Rotate the CH Selector knob to select the Memory
channel onto which you wish to store new frequency
information. If you select a channel on which data is
already stored, entering new data will cause you to overwrite the data previously stored.
Press the keypad’s [ENT] key, then enter six digits of
the desired operating frequency (the “10s of Hz digit”
can not be entered, even if 10 Hz steps are selected, as
frequency resolution during memory operation is to
the nearest 100 Hz step). If you make a mistake during
frequency entry, rotate the CH Selector knob so as to
cause the erroneous digit of the frequency to blink;
now, press the correct number on the key pad, and continue with the remainder of the frequency entry process.
Press the [ENT] key momentarily, then press the
keypad’s [1(MODE)] key to select the desired operating mode. Available operating modes are J3E(USB),
J3E(LSB), J2B(USB/LSB), A1A(CW), and A3E(AM).
Press the [ENT] key momentarily. If your radio assign
the CLAR (+)/CLAR(–) functions to the Programmable
Function (P1 ~ P4) Keys, set the clarifier offset frequency by pressing the to the [CLAR(+)]/[CLAR(–
key. Otherwise, skip to the next step.
Press the [ENT] key momentarily, then enter six digits
of the desired transmit frequency (only if you wish to
store independent transmit and receive frequencies on
the same channel). Otherwise, skip to the next step.
If you wish to append an Alpha/numeric “Tag” to this
channel, press the [ENT] key momentarily, then enter
the desired name “Tag” using the CH Selector knob
and keypad. Otherwise, skip to the next step.
Rotate the CH Selector knob to select the first digit
of the label.
Press the keypad to select the desired character.
Example 1: Press the [1(MODE)] key repeatedly
to select the character “1” and any of the 27 available characters.
Example 2: Press the [2(NB)] key repeatedly to
toggle among the available characters associated
with that key: 2 A B C 2
Example 3: Press the [0(DIM)] key to toggle the
characters “0” and “space.”
Press the [ENT] key momentarily to lock the fre-
quencies, mode, and “Tag” into the memory.
…
)]
Page 25VX-1700 OPERATING MANUAL
Page 28

PROGRAMMABLE FUNCTION (PF) KEYS
Vertex Standard Co., Ltd.
FCC ID: K6610511070/IC ID: 511B-10511070
The VX-1700 includes four Programmable Function (P1
~ P4) Keys. The Programmable Function button functions
can be customized, via programming by your VERTEX
STANDARD dealer, to meet your communications/network requirements. Some features may require the purchase and installation of optional internal accessories. The
possible Programmable Function button programming features are illustrated below, and these functions are explained follow.
For further details, contact your VERTEX STANDARD
dealer. For future reference, check the box next to the function that has been assigned to each Programmable Function button on your particular radio, and keep it handy.
FUNCTION
CH 1
CH 2
CH 3
CH 4
1 MHz UP
1 MHz Down
CLAR (+
CLAR
DW
ENCRIPTION
LOCK
PRI
SCAN
SPKR OFF
RF PWR SEL
VOX
ALE
CALL
MONI
RCV MSG
SELCALL
TEL
AUX TOGGLE
AUX PRS TO H
AUX PRS TO L
)
(–)
P1 P2 P3 P4
CH 1 - CH 4
Press the assigned programmable key to recall the Dealer
pre-programmed channel directly while operating in the
Memory Channel mode.
1 MHz UP
Press the assigned programmable key to tune the VFO frequency upward in 1 MHz steps while operating in the VFO
mode.
1 MHz Down
Press the assigned programmable key to tune the VFO frequency downward in 1 MHz steps while operating in the
VFO mode.
CLAR (+
Press the assigned programmable key to tune the receiver
frequency upward without changing the transmit frequency
(Clarifier function).
CLAR
Press the assigned programmable key to tune the receiver
frequency downward without changing the transmit frequency (Clarifier function).
)
(–)
DW
Press the assigned programmable key to activate the Dual
Watch feature.
ENCRYPTION
Press the assigned programmable key to toggle the Encryption feature “on” and “off.”
LOCK
Press the assigned programmable key to toggle the Key
Lockout feature “on” and “off.”
The “ ” icon will appear on the display when the Key
Lockout feature is activated.
PRI
Press the assigned programmable key to activate the Priority Scan.
SCAN
Press the assigned programmable key to activate scanning.
SPKR OFF
Press the assigned programmable key to turn the internal
speaker (or external speaker, if used) “on” and “off.”
The “ ” icon will appear on the display when the speaker
is set to “on.”
RF PWR SEL
Press the assigned programmable key to select the transmit power output level (“Low,” “Medium,” and “High”).
The “ ” icon will appear at the bottom of the display
while operating on the “Low Power” and “Medium Power”
settings.
Page 26 VX-1700 OPERATING MANUAL
Page 29

PROGRAMMABLE FUNCTION (PF) KEYS
Vertex Standard Co., Ltd.
FCC ID: K6610511070/IC ID: 511B-10511070
VOX
Press the assigned programmable key to toggle the VOX
feature “on” and “off.”
The “ ” icon will appear on the display when the VOX
feature is activated.
ALE
Press the assigned programmable key to toggle the ALE
(Automatic Link Establishment) feature “on” and “off.”
CALL
Press the assigned programmable key to transmit a Selcall
(or ALE) while operating in the Selcall (or ALE) mode.
MONI
Press the assigned programmable key to disable the noise
squelch action (hear background noise); the “ ” icon
will appear in the LCD. Press again this key to activate the
noise squelch (quiet the noise).
RCV MSG
Press the assigned programmable key to recall the lastreceived Selcall or ALE Message.
SELCALL
Press the assigned programmable key to toggle the
SELCALL feature “on” and “off.”
TELCALL
Press the assigned programmable key to transmit a Telcall
while operating in the Selcall.
AUX TOGGLE
Press the assigned programmable key to toggle the optional accessory port “3” “on” and “off.”
AUX PRS TO H
Press the assigned programmable key to turn the optional
accessory port “2” to “High.”
AUX PRS TO L
Press the assigned programmable key to turn the optional
accessory port “1” to “Low.”
Page 27VX-1700 OPERATING MANUAL
Page 30

NOTE
Vertex Standard Co., Ltd.
FCC ID: K6610511070/IC ID: 511B-10511070
Page 28 VX-1700 OPERATING MANUAL
Page 31

Part 15.21: Changes or modifications to this device not expressly approved
Vertex Standard Co., Ltd.
FCC ID: K6610511070/IC ID: 511B-10511070
by Vertex Standard could void the user’s authorization to operate this device.
Page 32

Copyright 2005
Vertex Standard Co., Ltd.
FCC ID: K6610511070/IC ID: 511B-10511070
VERTEX STANDARD CO., LTD.
All rights reserved
No portion of this manual
may be reproduced without
the permission of
VERTEX STANDARD CO., LTD.
Printed in Japan.
0508j-BE
EC051H100
 Loading...