

Page 1
“BH-1A” Bluetooth® Head Set
When the optional BU-1 Bluetooth® Adapter Unit is installed, you may use the optional BH-1A Bluetooth
Headset as a wireless link to send and receive audio to the Transceiver*.
* Check with your Vertex Standard Dealer or Catalog for applicable models.
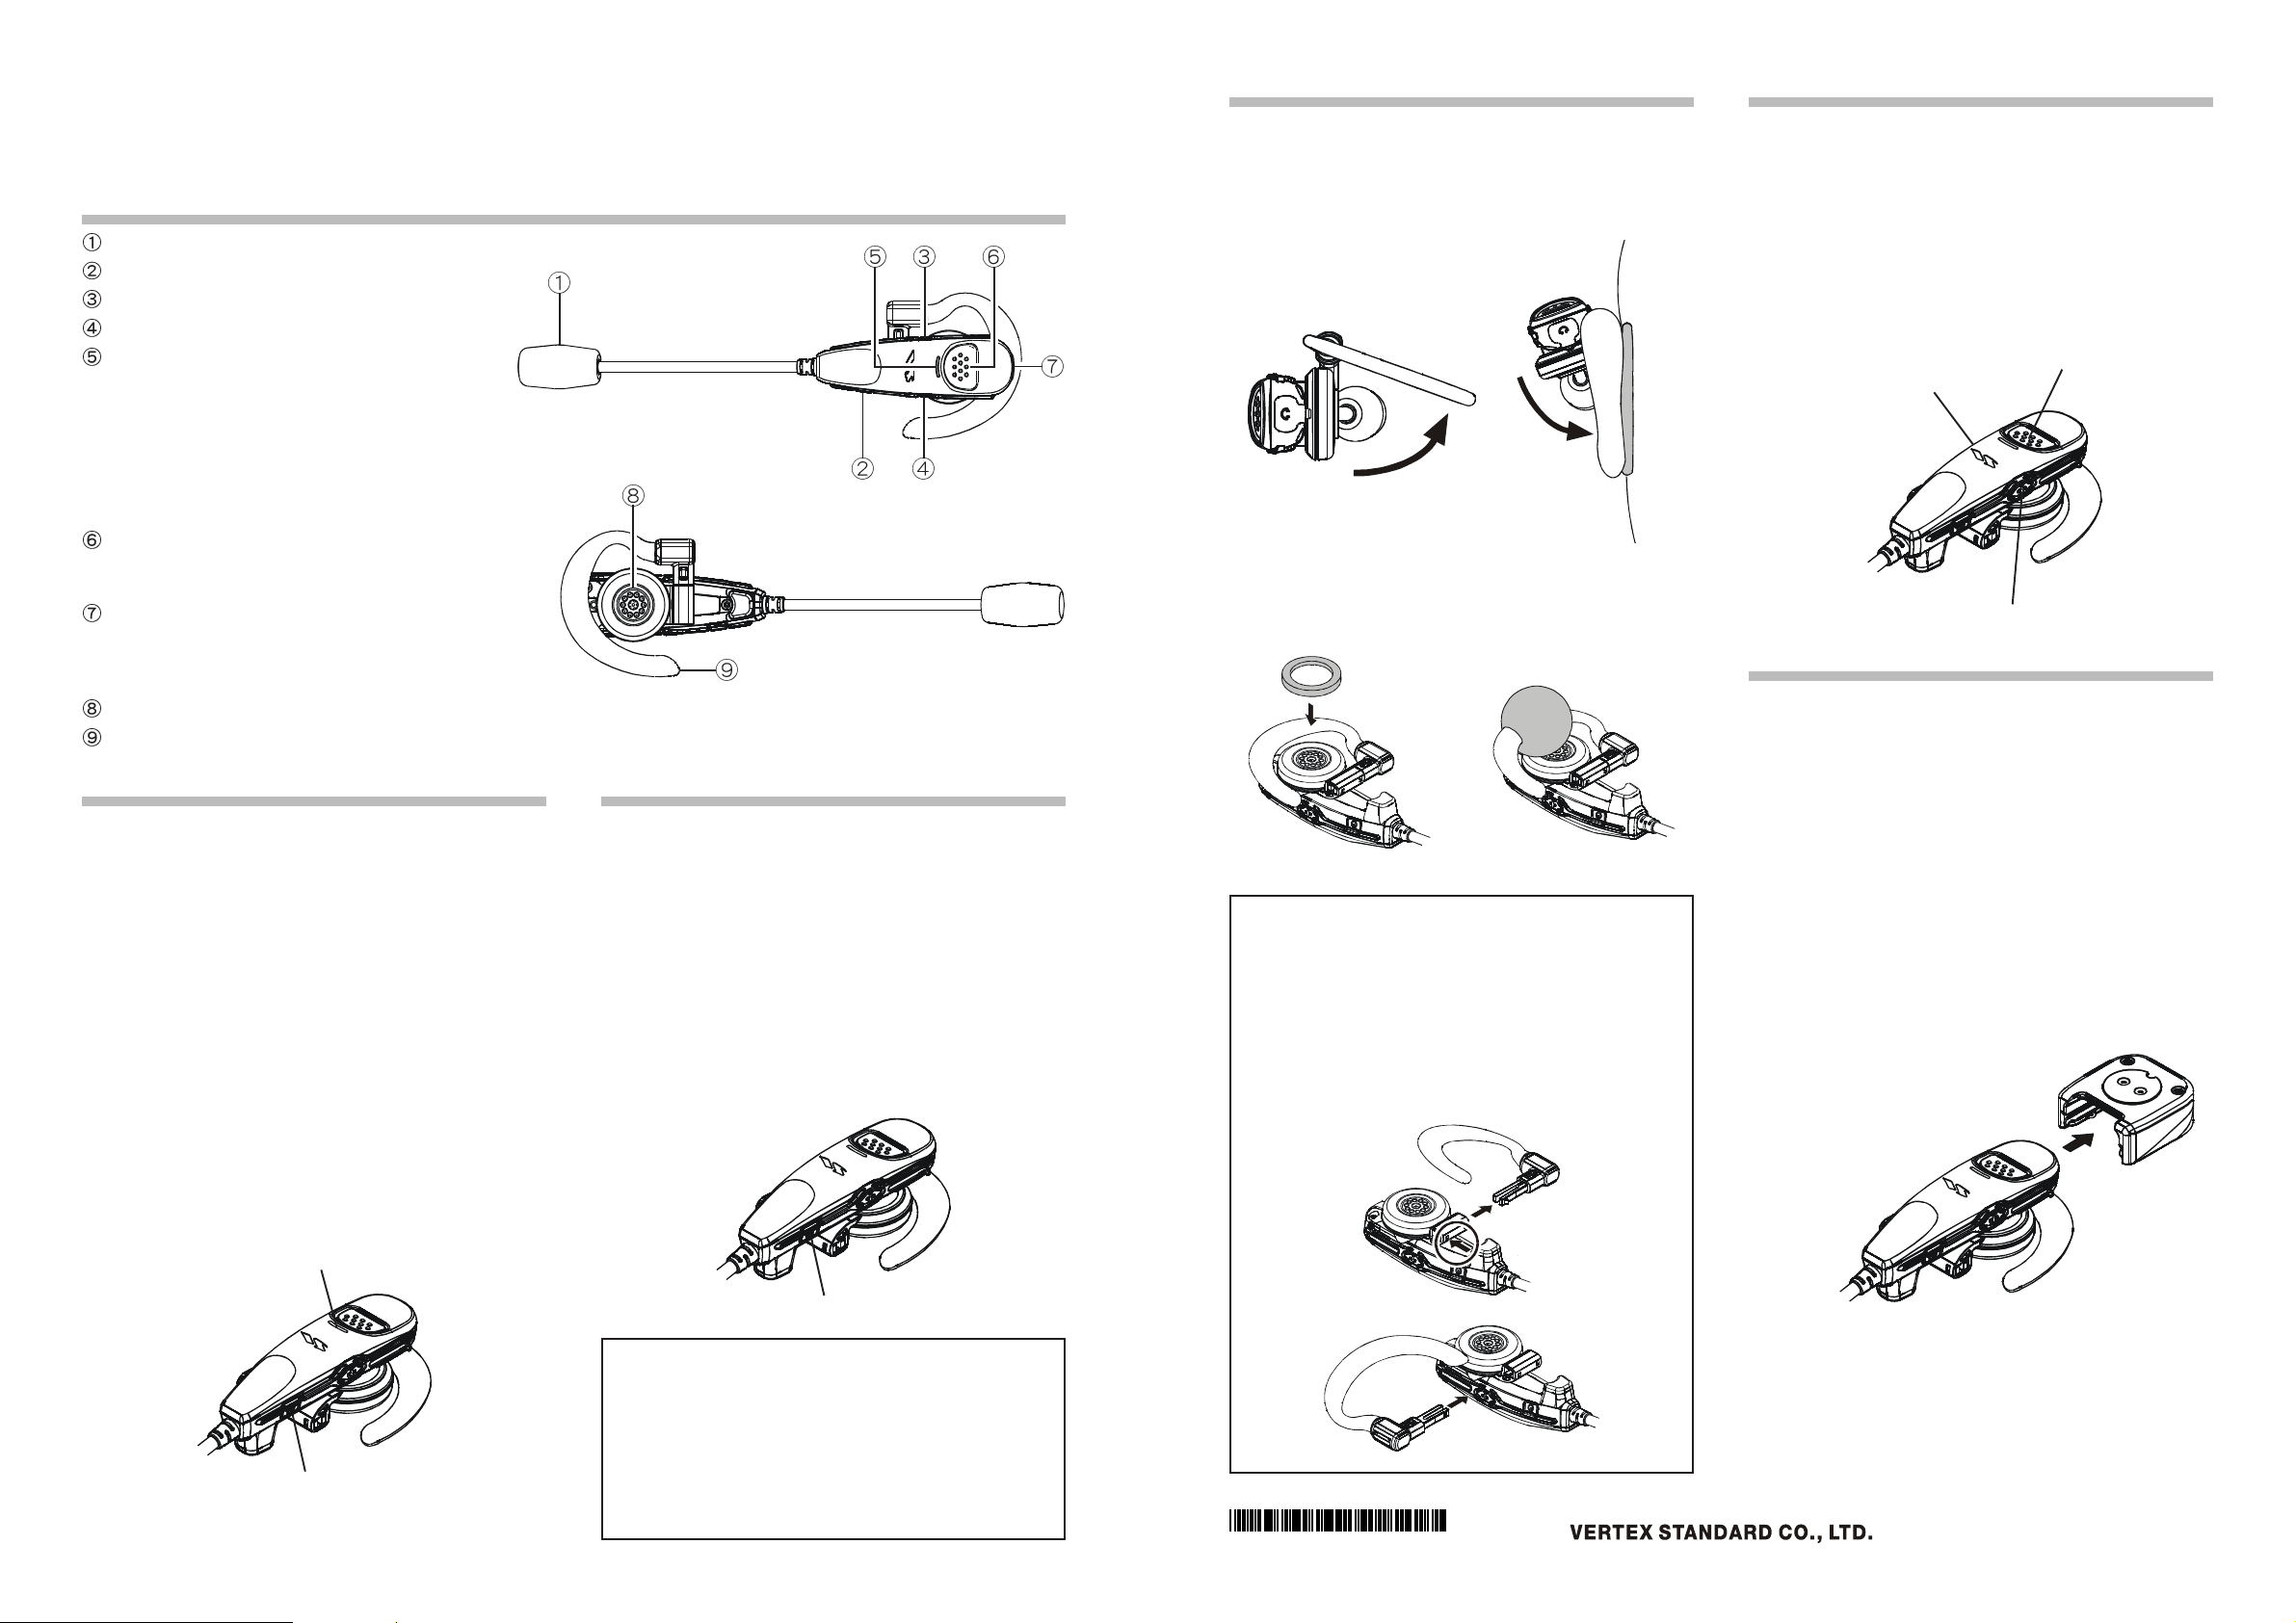
Controls & Connections
Microphone
POWER switch
VOLUME
VOLUME
LED Indicator
Blinking Blue: When the BH-1A Bluetooth
Blinking Red: When the BH-1A Bluetooth
Blinking Red/Blue: Battery Voltage is Low.
PTT switch
Press this key to transmit. Release this key to return to
receive (Depends on transceiver settings).
Earphone jack
This jack accepts the optional FEP-4 Earphone.
You may listen to FM broadcast stereo with the optional FEP-4 Earphone connected to this jack.
SPEAKER
Earhook
You can wear the BH-1A on your left or right ear.
Pairing
Before you can use your BH-1A for the first time, the BH-1A
and the transceiver must be paired.
Refer to the Transceiver’s Operating Manual for Pairing
instructions.
P Please bring the BH-1A and the Transceiver close together
when doing Pairing.
1. Make sure that the BH-1A is off.
2. Press and hold the POWER switch for five seconds, until
the LED indicator blinks red/blue alternately.
When the BH-1A is correctly recognized (Requires a 20 to
30 seconds) by the transceiver, the LED indicator will blink
blue.
(–)
switch
(+)
switch
Headset is correctly recognized by
the transceiver.
Headset is not correctly recognized by the transceiver.
®
®
BH-1A is not designed to attach to a motorcycle helmet.
Specifications are subject to change without notice.
Turning ON and OFF
TT
o turn the o turn the
T
o turn the BH-1A
TT
o turn the o turn the
Press and hold the POWER switch for three seconds, until
the BH-1A’s LED indicator glows red, and the beeper
sounds a high pitch tone.
When the BH-1A is correctly recognized by the transceiver,
the LED indicator will blink blue.
PWhen the BH-1A is not correctly recognized by the trans-
ceiver, the LED indicator will blink red.
TT
o turn the o turn the
T
o turn the BH-1A
TT
o turn the o turn the
Press and hold the POWER switch for five seconds, until
the BH-1A’s red LED indicator blinks rapidly, the beeper
sounds two brief tones, and the BH-1A turns off.
ON ON
ON
ON ON
OFF OFF
OFF
OFF OFF
Wearing the BH-1A
®
1. Open the earhook.
2. Loop the earhook over your ear.
3. Press the BH-1A to your ear.
4. Adjust the flexible boom microphone by bending the boom
towards your mouth.
Operation
TT
ransmissionransmission
T
ransmission
TT
ransmissionransmission
Press the PTT switch to transmit, and release the switch
to return to receive (Depends on transceiver settings).
Adjusting the VAdjusting the V
Adjusting the V
Adjusting the VAdjusting the V
Adjust the receiver audio level, using the VOLUME (–)
or (+) switch.
VOLUME (+): Adjusts the receiver audio level upward.
VOLUME (–): Adjusts the receiver audio level downward.
olume levelolume level
olume level
olume levelolume level
PTT Switch
VOLUME (–) Switch
For more comfort when wearing the BH-1A, affix the supplied sponge on the speaker and insert the supplied sponge
ball into the earhook, and adjust as necessary.
VOLUME (+) Switch
Battery
When the battery voltage becomes low, the BH-1A’s LED
indicator will blink red/blue alternately, and the beeper
sounds a low pitch tone.
If the battery has never been used, or its charge is depleted,
it may be charged by connecting to the CAB-1 Charger
Sleeve, as shown in the illustration.
1. Attach the CAB-1 to the transceiver.
Please refer to the transceiver’s manual for installation of
CAB-1.
2. Insert the BH-1A into the CAB-1.
NoteNote
Note
: The BH-1A is automatically turned off when it is
The BH-1A comes ready to fit the left ear. You may change
the BH-1A to fit the right ear in the following procedure.
P When listening to FM broadcast stereo, wear the
BH-1A on your left ear to hear the left channel, and
the FEP-4 in you right ear to hear the right channel.
1. The Earhook is removed by pushing it out with a pointed
object.
2. Removed Earhook is inserted from the other side.
NoteNote
inserted into the CAB-1 charger.
3. If the BH-1A is inserted correctly, the LED indicator will
glow Red. A fully discharged battery will be charged completely in 3 hours. When charging is finished, the LED
indicator will glow blue.
LED indicator
POWER Switch
POWER Switch
Effective Communications Range
The communications range between the BH-1A and the
Transceiver is around 10m (33 ft).
Obstacles between the BH-1A and the Transceiver may
shorten the communications distance.
If you move out of range, the beeper sounds a low pitch
tone. If you move back into range, the beeper sounds a
high pitch tone.
EAF44U700
Battery saverBattery saver
Battery saver
Battery saverBattery saver
If there has been no signal or key activity for 20 seconds,
the Battery Save automatically puts the BH-1A to “sleep”,
to conserve battery life.
When a signal is received or the PTT key is pressed the
BH-1A will be active again.
Page 2

“BH-1A” Bluetooth® Head Set
The “BH-1A” is a Bluetooth® Head Set for Vertex Standard Transceivers*. When the Bluetooth
Head Set “BH-1A” is used with the “BU-1” Adapter, you can enjoy comfortable hands free
operation.
*: Please refer to the Vertex Standard catalog for the correct “BH-1A” Head Set for the radio you are using.
This device complies with Part 15 of the FCC Rules. Operation is subject to the following two
conditions: (1) this device may not cause harmful interference, and (2) this device must accept any
interference received, including interference that may cause undesired operation.
Part 15.21: Changes or modifications to this device not expressly approved by Vertex Standard
could void the user’s authorization to operate this device.
CAUTION: This device and its antenna(s) must not be co-located or operated in conjunction with
any other antenna or transmitter. End users cannot modify this transmitter device. Any unauthorized modification could void the user’s authority to operate this device.
To comply with FCC RF exposure compliance requirements, This equipment complies with FCC
radiation exposure limits set forth for an uncontrolled environment. End users must follow the
specific operating instructions for satisfying RF exposure compliance. This transmitter must not
be co-located or operating in conjunction with any other antenna or transmitter.
The term “IC” before the radio certification number only signifies that Industry Canada technical
specifications were met.
This device complies with RSS 210 of industry Canada “IC”.
“Operation is subject to the following two conditions:
(1) this device may not cause interference, and
(2) this device must accept any interference, including interference that may cause undesired
operation of the device.”
L’ utilisation de ce dispositif est autorisée seulement aux conditions suivantes : (1) il ne doit pas
produire de brouillage et (2) l’ utilisateur du dispositif doit étre prêt à accepter tout brouillage
radioélectrique reçu, même si ce brouillage est susceptible de compromettre le fonctionnement
du dispositif.
“The installer of this radio equipment must ensure that the antenna is located or pointed such
that it does not emit RF field in excess of Health Canada limits for the general population; consult
Safety Code 6, obtainable from Health Canada’s website www.hc-sc.ca/rpb”
®
Declaration of Conformity
We, Yaesu UK Ltd. declare under our sole responsibility that the following equipment complies with the essential requirements of the Directive 1999/5/EC.
Type of Equipment: Bluetooth Headset
Brand Name: VERTEX STANDARD
Model Number: BH-1A
Manufacturer: Vertex Standard Co., Ltd.
Address of Manufacturer: 4-8-8 Nakameguro Meguro-Ku, Tokyo 153-8644, Japan
Applicable Standards:
This equipment is tested and conforms to the essential requirements of directive, as
included in following standards.
EN 300 328 V1,7,1
Radio Standard:
EN 301 489-17 V1.2.1
EMC Standard:
EN 60950-1: 2006
Safety Standard:
The technical documentation as required by the Conformity Assessment procedures is
kept at the following address:
Company: Yaesu UK Ltd.
Address: Unit 12, Sun Valley Business Park, Winnall Close,
Winchester, Hampshire, SO23 0LB, U.K.
EAF44U561
Page 3

 Loading...