

Page 1
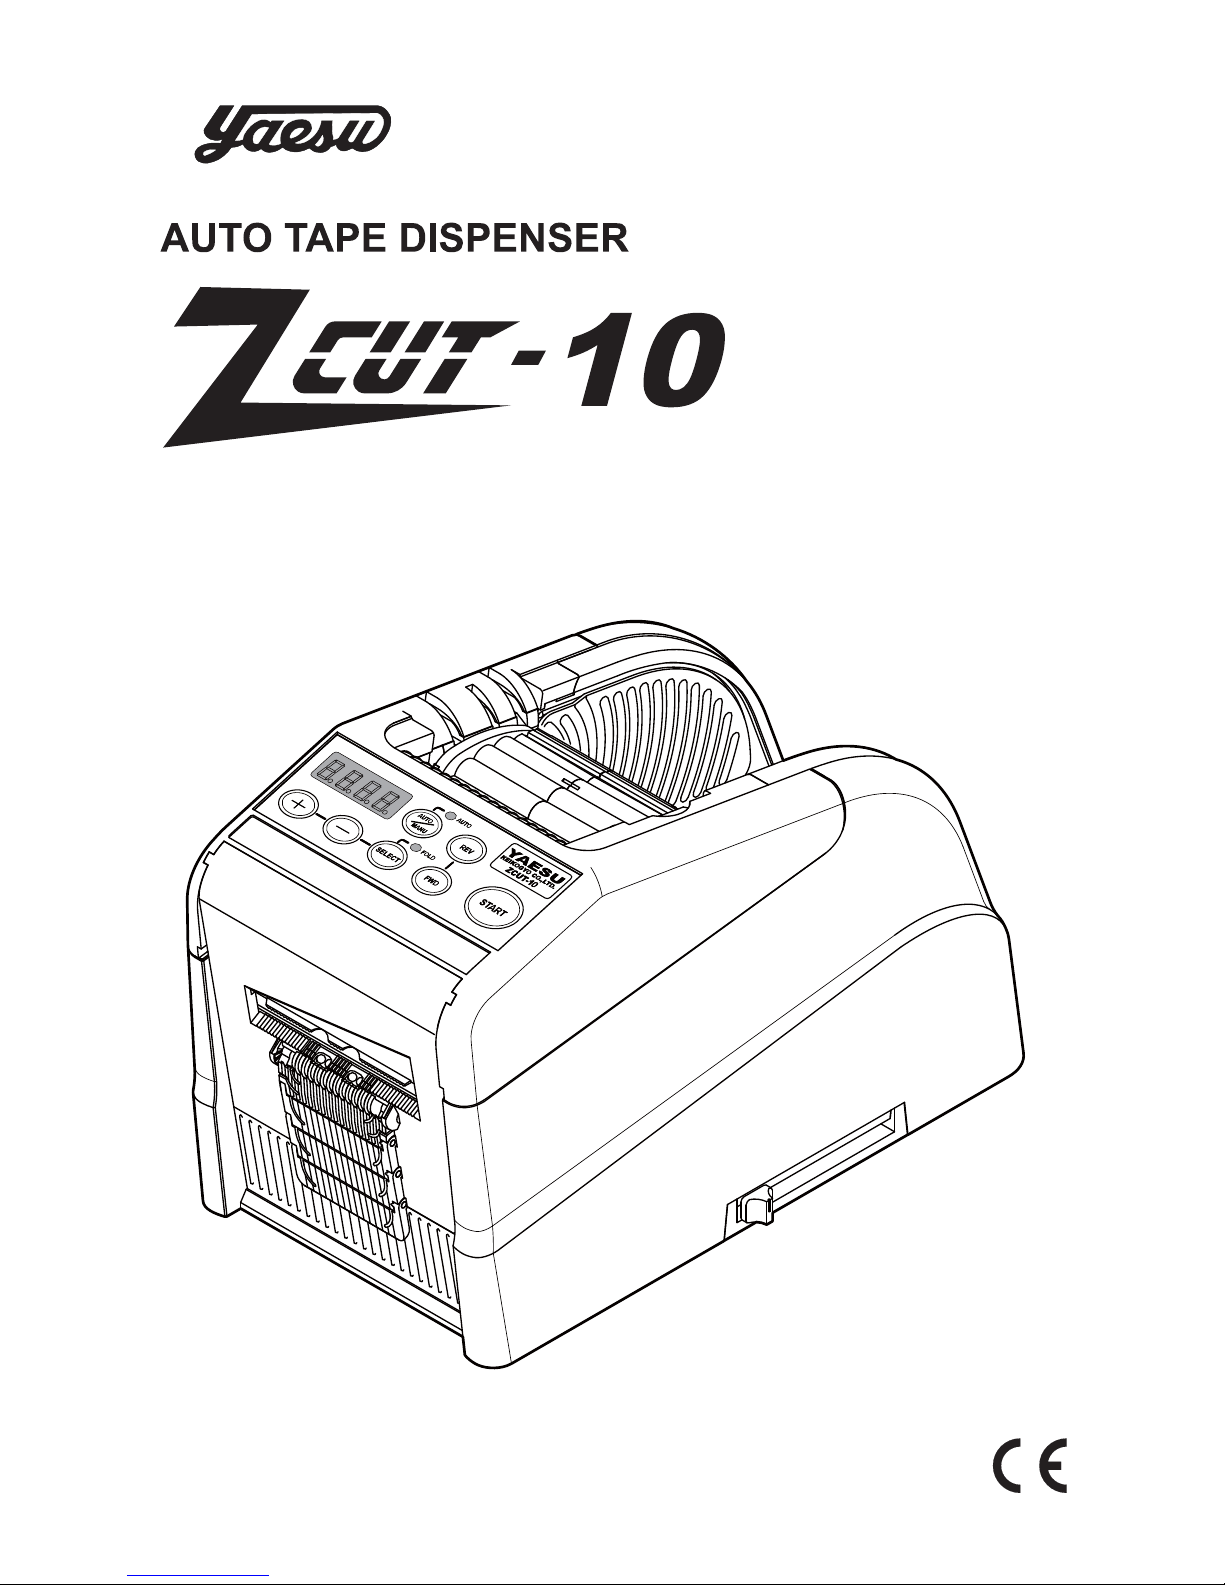
INSTRUCTION MANUAL
Page 2

2
Contents
Thank you very much for purchasing our tape dispenser ZCUT-10.
Most of the function is the same as ZCUT-9GR, but the function to
fold the tape edge is added.
This is most effective feature to remove a tape very easily in production process required or end customers removing a tape.
Please read this instruction manual carefully in order to use this
machine properly.
After that, please keep this manual in your file and read it again as
need arises.
Please read before use
P2
P3
P3
P4
P5-6
P7
P8
P8
P9
P9
P10
P10
P10
P11
P11
P12
P12-13
P14
P14
P15
Read Before Use
Safety Instructions
Definition of Warning and Caution Symbols
Warning
Identification of Parts
Load the Tape
Set the Tape Length
Mode Setting
Programing Function
Folding Mode
How to Manage a Curling Tape
Use Narrow Tape / Use Two Rolls in a Same Time
Other Functions
Replace the Blade Unit
Maintenance
When tape jammed is happened
Error Messages
Trouble Shooting
Specifications
Warranty
Page 3
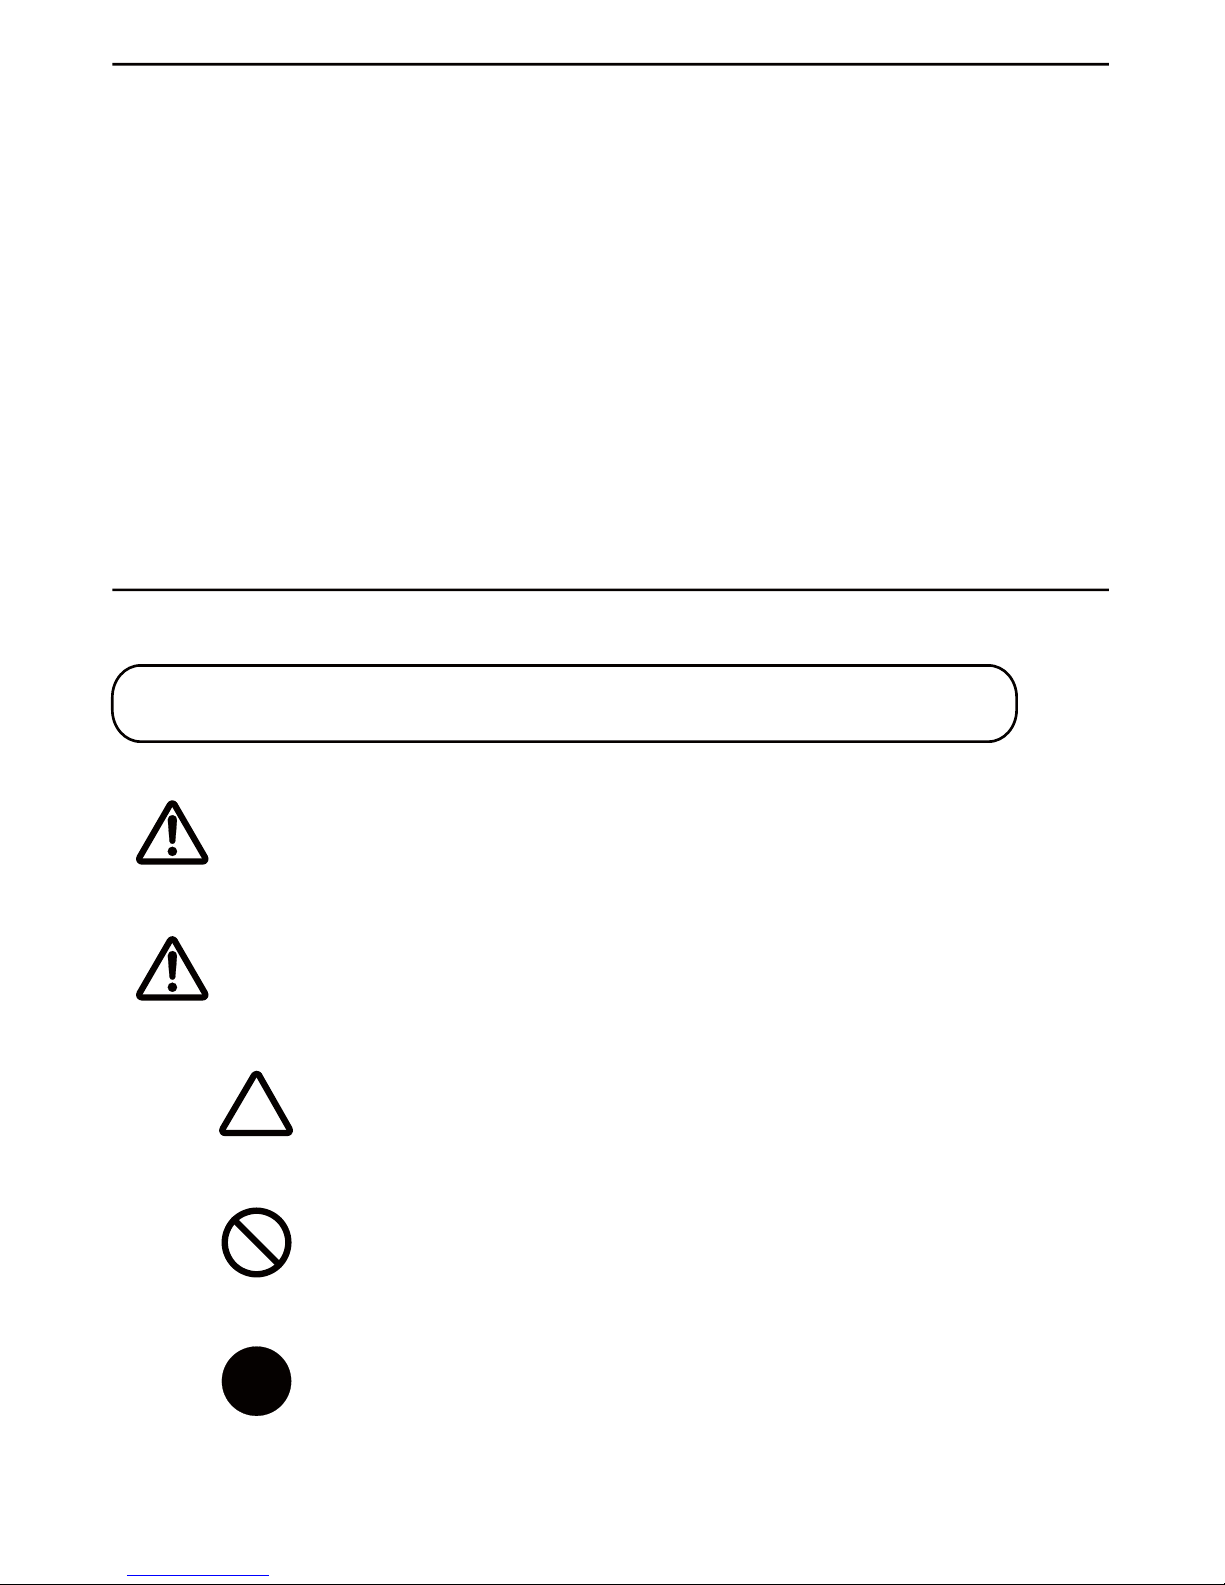
Indicates a potentially hazardous situation which if not
avoided, could result in death or serious injury.
Indicate that miss-handing may result in danger and
that the operator is at risk of injury, or the machine is
at risk of damage.
Indicates Caution
A symbol within the triangle, or the description, will indicate
a specific hazard.
A Prohibited Action
A symbol within the circle, or the description, will indicate
prohibited action.
A Required Action
A symbol within the circle, or the description, will indicate
the required action.
Definition of Warning and Caution Symbols
3
Warning
Caution
The safety guidelines in this Instruction Manual must be observed in
order to prevent damage to the machine or injury to the operator or
other persons.
The safety guidelines presciribed "Warning " and "Caution" describe
possible injury or damage that may be suffered from operating or
maintaining the machine in a manner other than as described in this
Instruction Manual.
Read and follow the safety precautions carefully before reading the
Instruction Manual.
Safety Instructions
Page 4
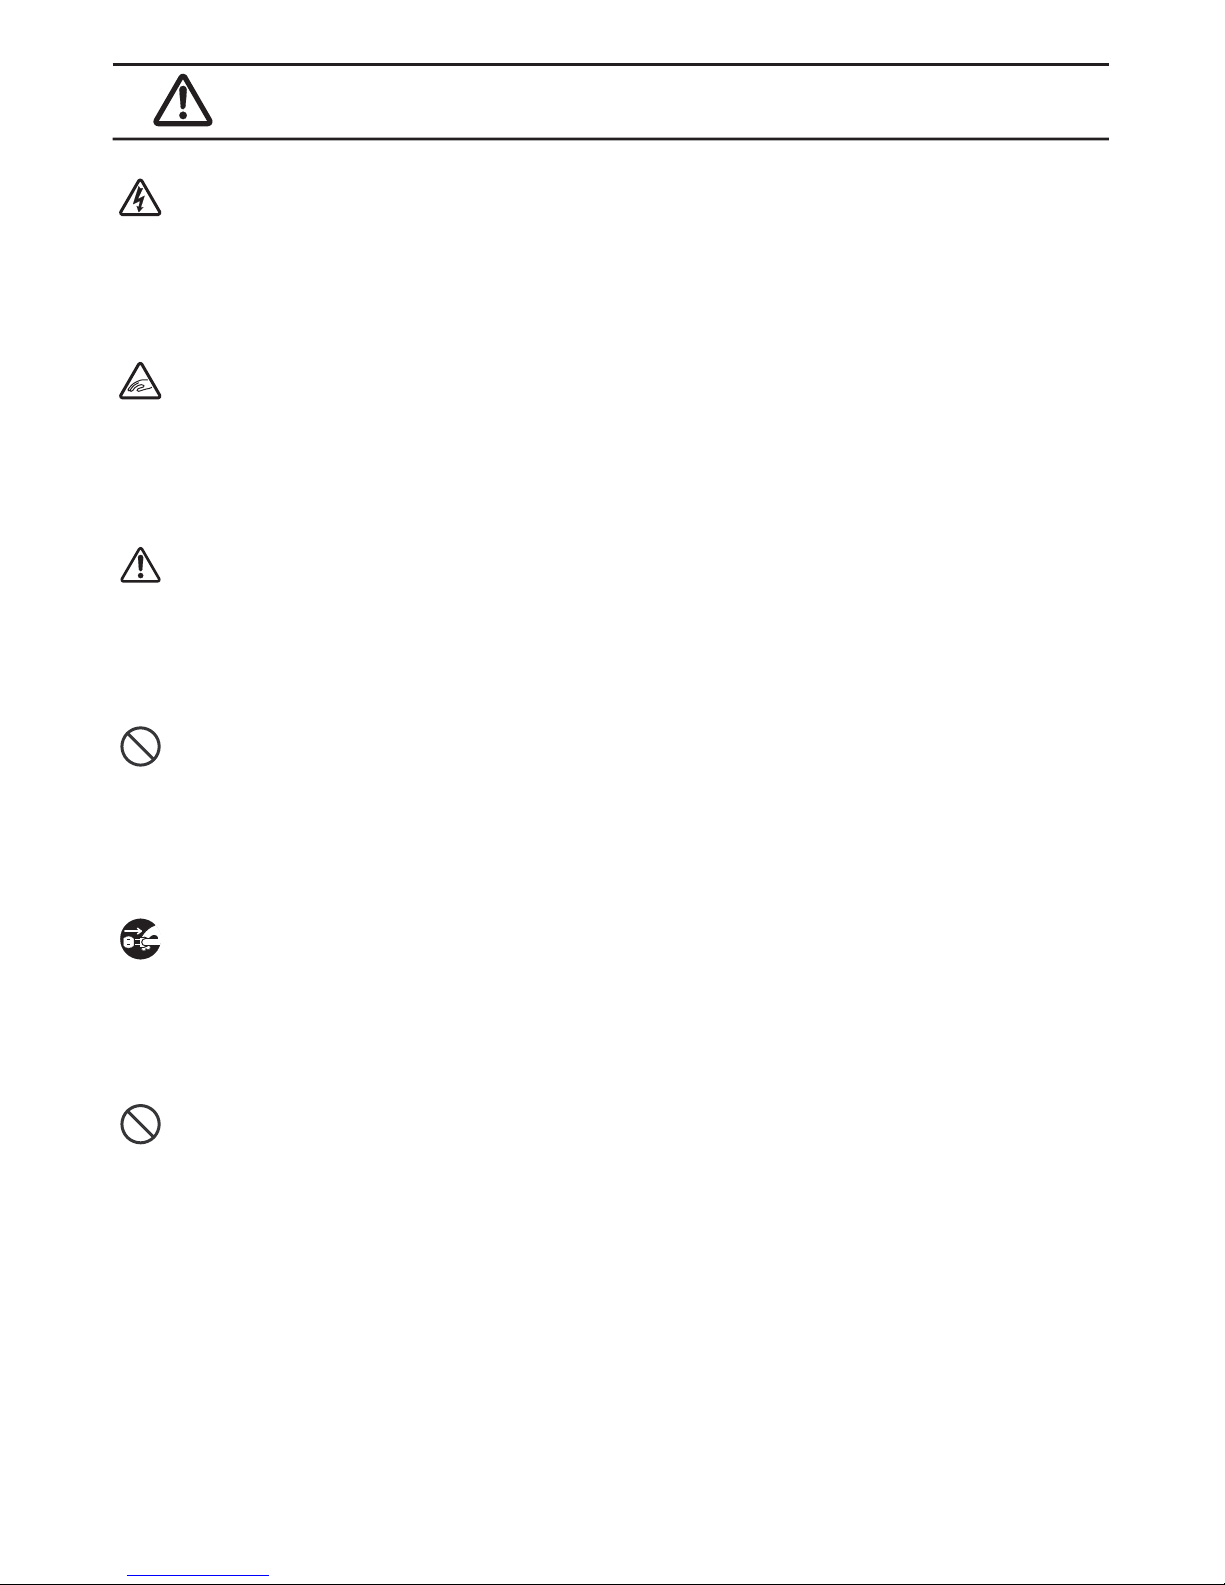
Warning
Do not plug in, unplug the cord, or operate the machine with wet
hands.
Failure to observe this may result in injury due to electric shock.
Never insert your finger, or any other body part, or any foreign
object into the machine.
Failure to observe this may result in injury.
Keep hair or loose clothing away from the machine while it is
operating.
Failure to observe this may result in injury.
This machine is intended for industrial use only.
Do not allow untrained operators or children to operate the machine.
Failure to observe this may result in injury.
Turn off the power switch and unplug the machine prior to replacing
the blade unit or peforming any maintenance on the machine.
Failure to observe this may result in serious injury.
Do not use this machine for anything other than its specified
applications.
Use of the machine for any unintended applications can cause injury
to the operator or failure of the machine.
4
Page 5
5
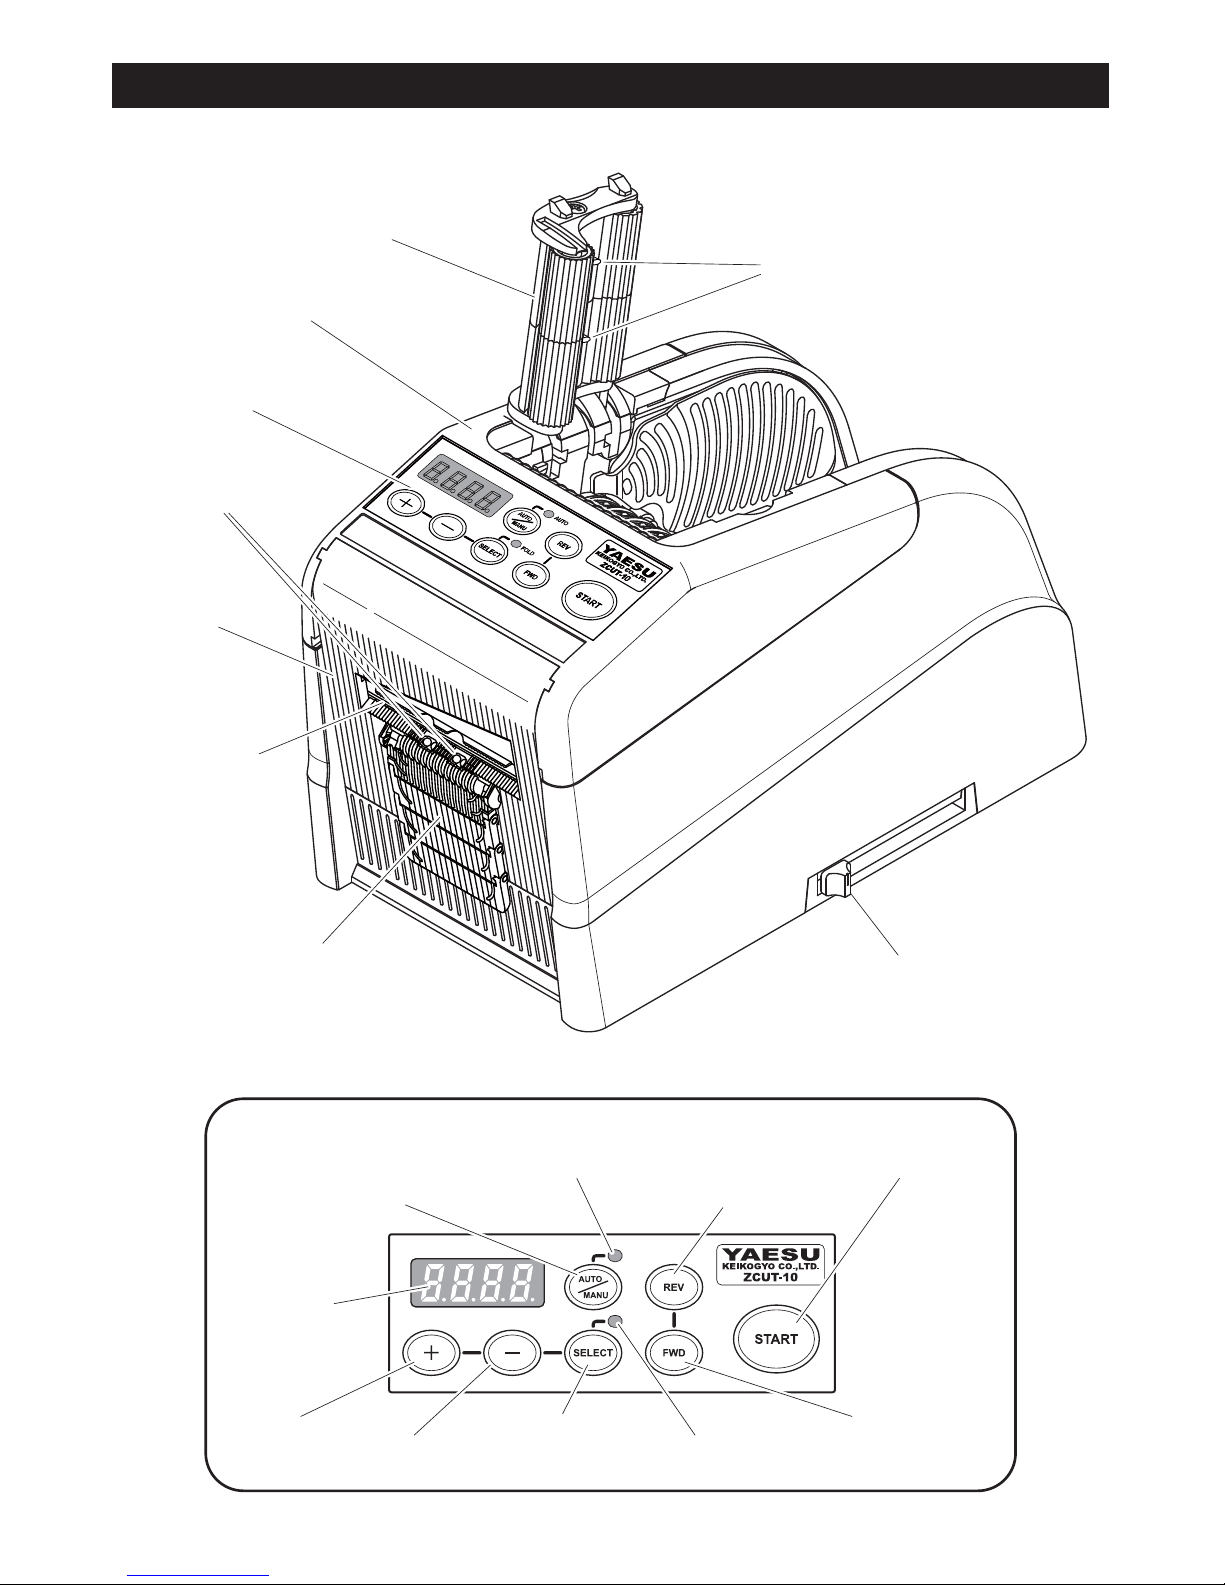
SENSOR
BLADE UNIT
FLEXIBLE TAPE SUPPORT
TAPE HOLDER ADJUST LEVER
CONTROL PANEL
Identification Of Parts
UPPER CASE
AUTO / MANUAL MODE
BUTTON
LED (Blue LED)
LED(Green LED)
REV BUTTON
START BUTTON
FWD BUTTON
SELECT BUTTON
+BUTTON
-BUTTON
DISPLAY
CONTROL PANEL
HOLD DOWN ROLLER UNIT
ROLLER LOCK LEVER
TAPE OUTLET
Page 6
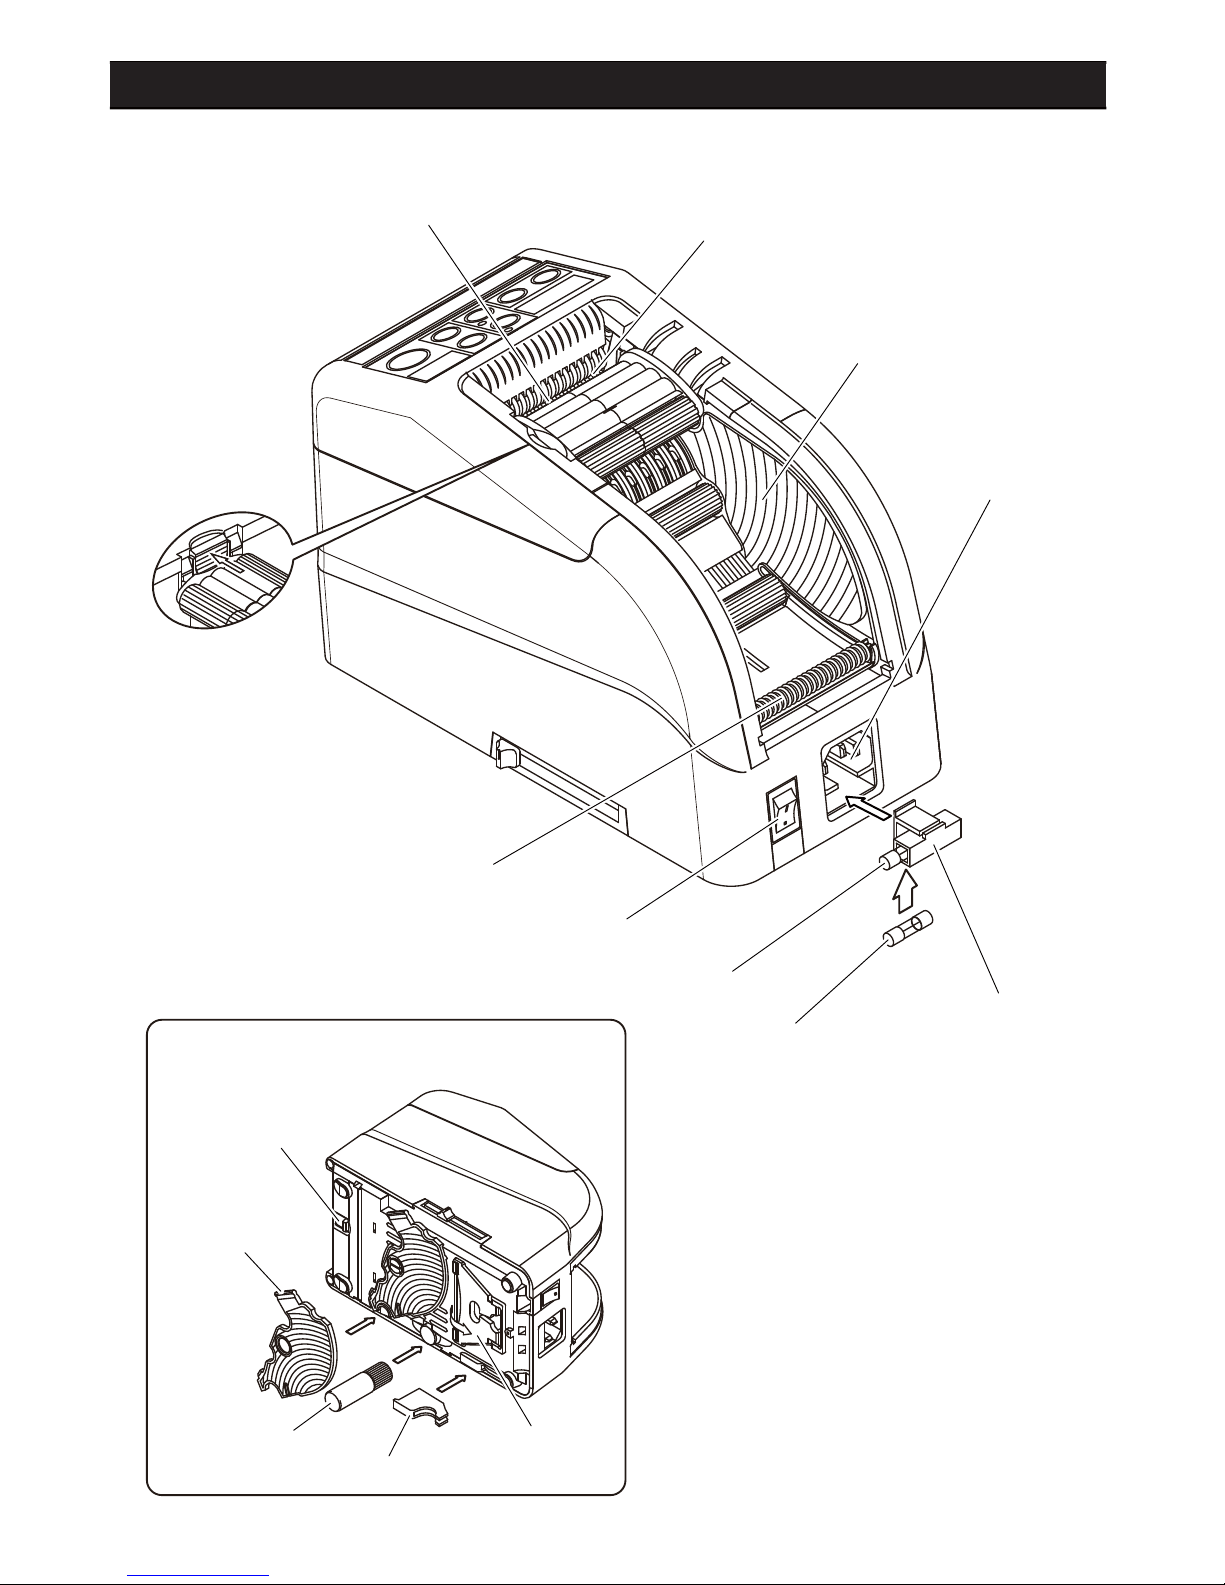
BLADE UNIT
RELEASE LEVER
BOTTOM OF BODY
SEPARATOR
BLADE OIL
ASSIST STAND
GUIDE PLATE
6
FUSE HOLDER
FUSE
SPARE FUSE
POWER SWITCH
LOWER TAPE HOLDER
TAPE FEED ROLLER
TAPE INLET
HOLD DOWN
ROLLER RELEASE BUTTON
TAPE HOLDER
AC CORD INLET
Identification Of Parts
Page 7
7
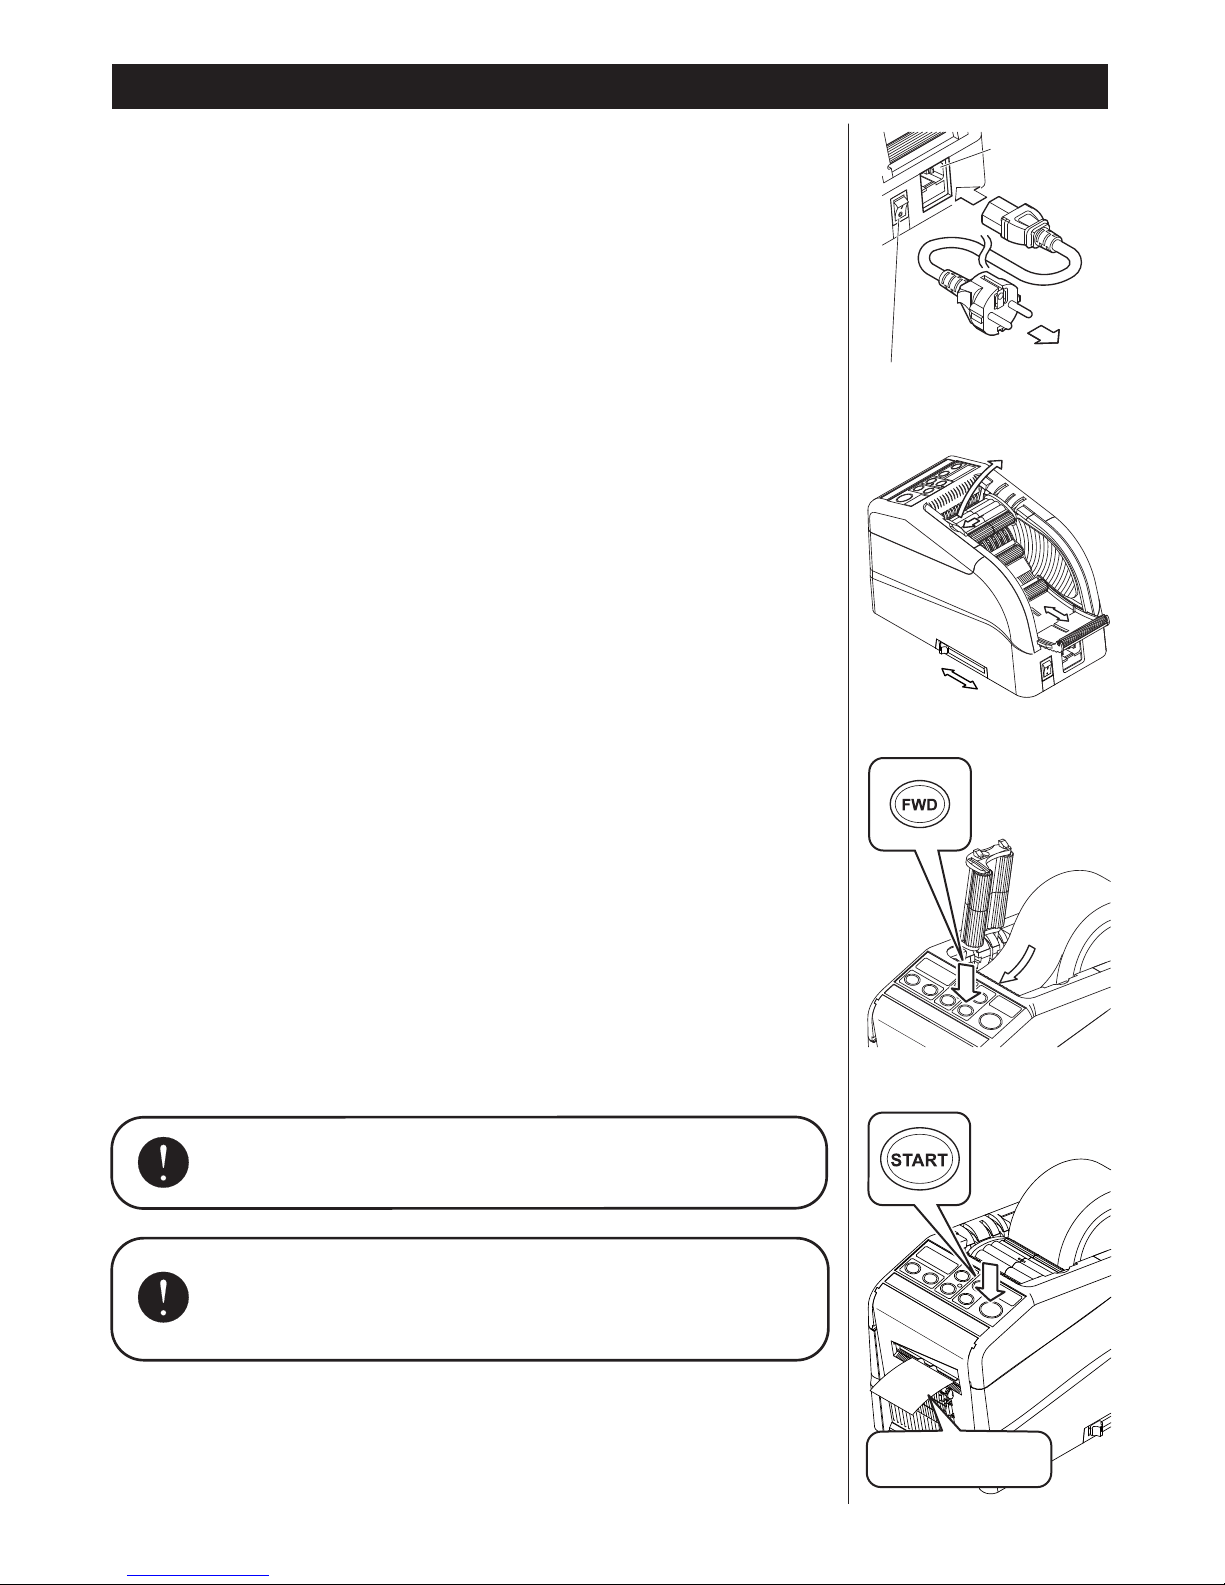
◆Plug in the AC CORD to the AC CORD INLET.
◆Make sure the POWER SWITCH is off then plug into an appropriate
grounded AC outlet.
◆Turn the POWER SWITCH on.
When the POWER SWITCH is turned on, a buzzer will has a sound.
At this moment, the mode is set to MANUAL.
◆Press the HOLD DOWN ROLLER RELEASE BUTTON.
◆Place a roll of tape in the machine.
◆Hold the tape by adjusting the TAPE HOLDERS.
Adjust the TAPE HOLDERS to a proper width, slide the TAPE HOLDER
ADJUST LEVER from the front to the rear of the machin then close it.
The TAPE HOLDERS should hold the roll lightly in the center of the cavity
of the machine.
This is very important because it keeps the tape in the center.
The tape passes over the SENSOR in front of the BLADE UNIT.
To support a larger roll of tape, pull the LOWER HOLDER out.
◆Put the tape on the TAPE FEED ROLLER.
◆Press the FWD BUTTON until the tape comes out from the TAPE OUTLET.
When using a strong sticky adhesive tape, pull a little bit tape out in
positioning into the TAPE INLET.
Press the FWD BUTTON continuously for a few seconds, also help the
tape in positioning in the TAPE INLET.
◆After the tape is loaded and the TAPE HOLDERS are adjusted, close the
HOLD DOWN ROLLER UNIT.
◆Press the START BUTTON.
Remove the first piece of tape and discard it.
Always use Tweezers to remove tape.
Whenever set the tape, make sure that
adhesive side of tape is always faced down.
◆When you take the roll of tape out from the machine, pull the tape
backward and pressing REV BUTTON.
Load the Tape
POWER SWITCH
OUTLET
AC CORD
INLET
remove the tape
Page 8
8
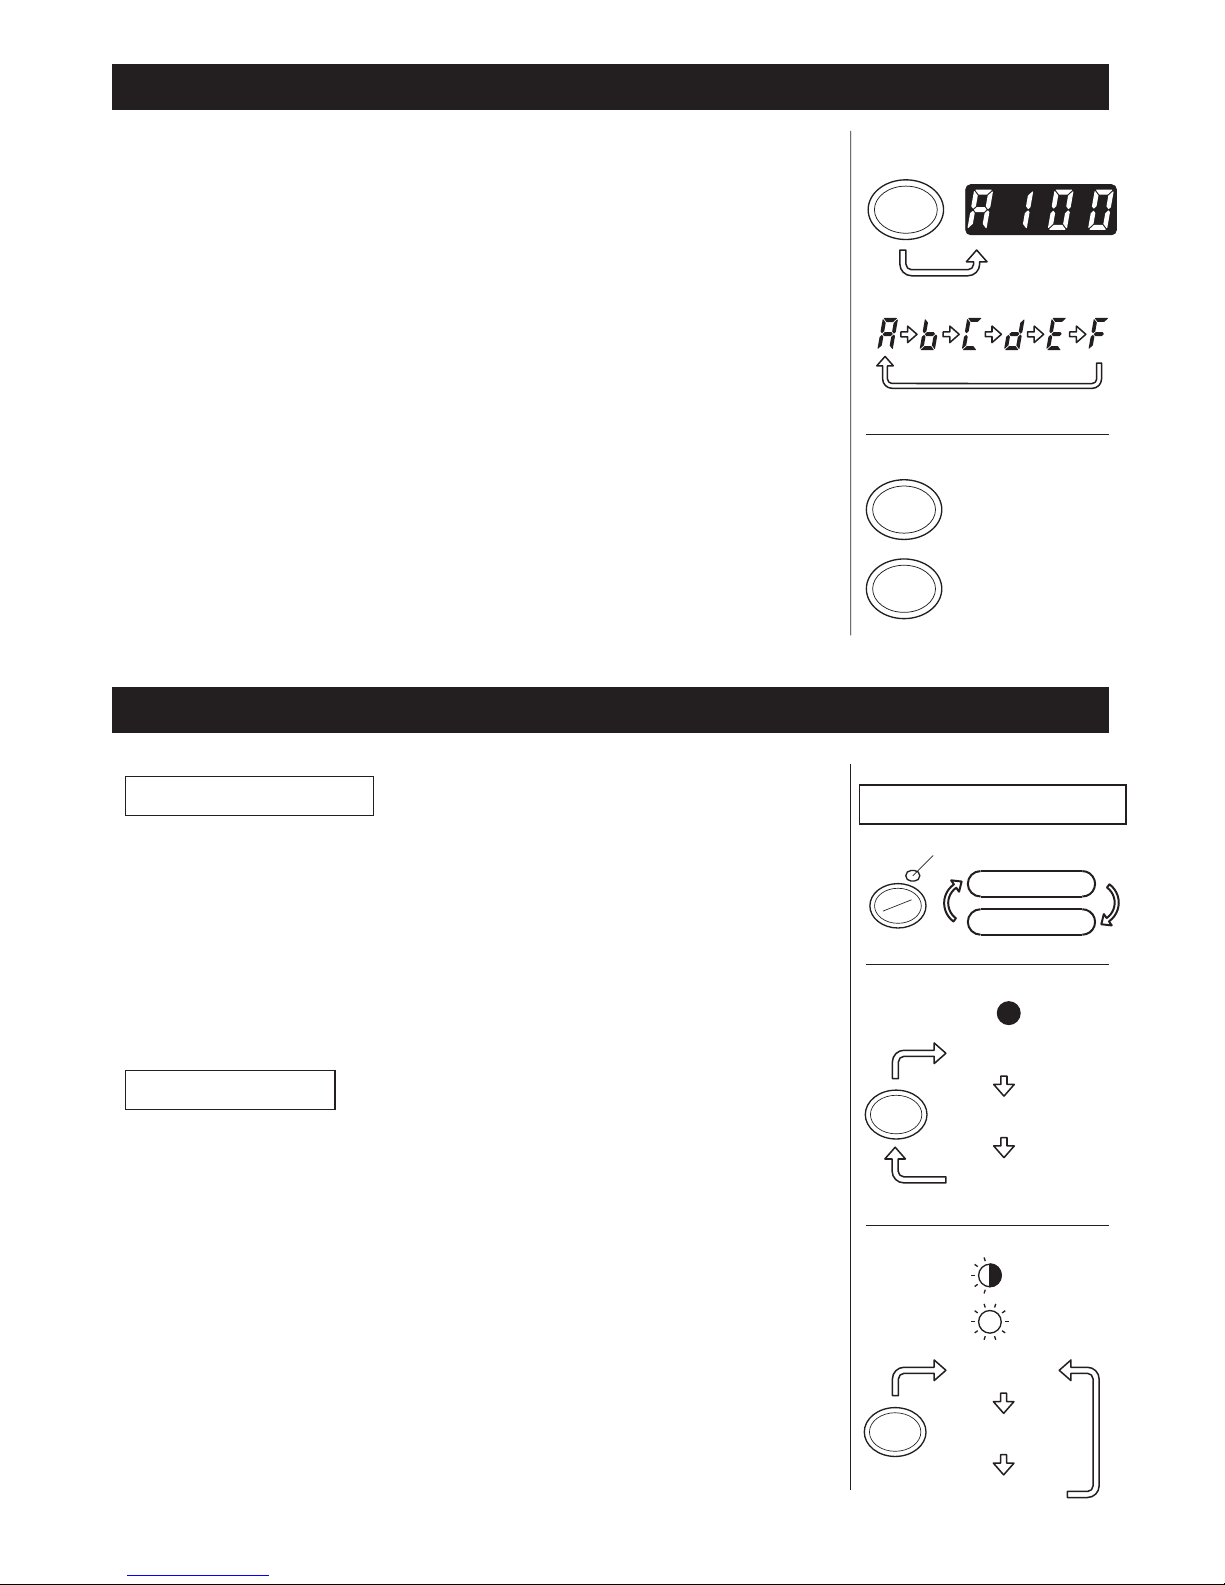
◆Make sure that Blue LED is off.
When the LED LAMP is flashing or turned on, press AUTO/MANUAL
MODE and turn off the LED LAMP.
◆Press the START BUTTON once, the machine will feed-in a piece of tape
then cut it out based on your set length.
◆To cut another piece, press START BUTTON again.
◆Make sure that the Blue LED is flashing.
When the LED LAMP's lights are off, press AUTO/MANUAL BUTTON
and let the LED LAMP to flash.
◆Press the START BUTTON once, the machine will feed-in a piece of tape
then cut it out based on your set length.
When that piece of tape is removed, the machine will feed-in another
piece then cut it out.
The machine will feed-in and cut a new piece of tape once the piece of
tape is remomved.
AUTO MODE
MANUAL MODE
◆Make sure that DISPLAY indicating <cutting length>.
The cutting length is always indicates in some alphabets like A,b,C,d,E,F.
◆Set the cutting length.
Set your needed length by using +/- BUTTON.
The cutting length is adjustable in between 5 mm to 999 mm.
Can set six different length by using SELECT BUTTON.
If you press +/- BUTTON in a short while, the length in changed to 1 mm.
And if you press +/- BUTTON longer, if shows fast foraward.
Caution
The actual length is differ from the displayed length
depends on the type
of the tape and its condition.
When cutting short length of tape, the length may not cut consistently
or tape is jammed.
Try several test cuts to insure proper operation.
If pressing -BUTTON for setting from b to F, you will be able to set ZERO.
However, machine will not start while alarming even though pressing
START BUTTON.
Mode Setting
Set the Tape Length
START
START
CUT and STAND BY
CUT and STAND BY
REMOVE THE TAPE
REMOVE THE TAPE
TAPE FEED
TAPE FEED
FLASHING
LIGHT ON
INDICATE CUTTING LENGTH
SET THE CUTTING LENGTH
INCREASE NUMBER
DECREASE NUMBER
SET AUTO / MANUAL
SELECT
+
-
A~F
AUTO
MANU
LIGHT OFF
BLUE LED LAMP
MANUAL MODE
MANUAL MODE
AUTO MODE
AUTO MODE
Page 9
順送りカット機能
順送りカット機能
SELECT
9
START
START
Green LED
Programing Function
Folding Mode
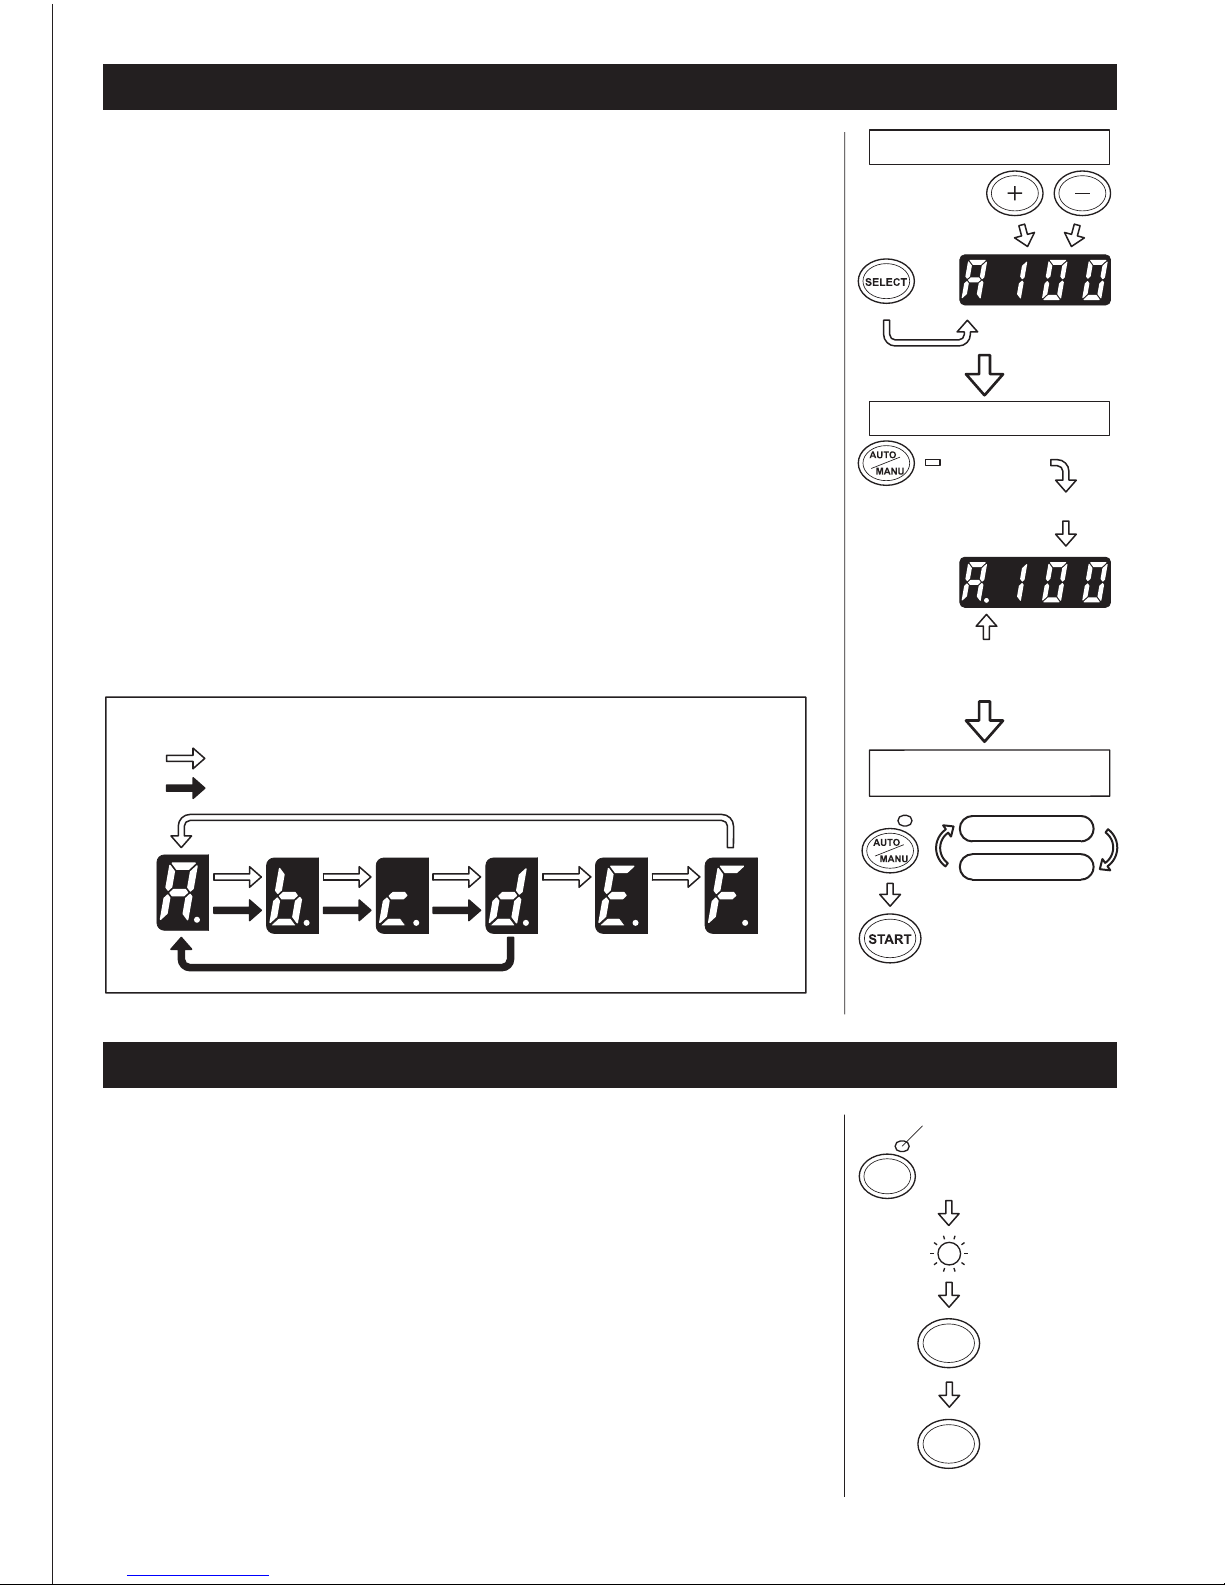
Function that cuts the material registered from A to F accordingly.
As refer to the following figure, operation will keep working.
This function may apply every mode.
◆Please follow the instruction on page 7.
◆Set the cutting length from A to F as you prefer.
◆Please set the cutting length in ZERO for between B to F if not necessary.
Then skip the position registered with ZERO accordingly and operate
repeatedly.
◆Apply the cutting length to your first cutting.
◆Press AUTO/MANUAL BUTTON more than 1 second.
Then [ . ] will appear on the lower right of Alphabet.
◆Press AUTO/MANUAL button and select AUTO MODE or MANUAL MODE.
◆Press START BUTTON and tape is ready to take.
When setting MANUAL MODE, the next cutting length will be desplayed.
When setting AUTO MODE, the next cutting tape is ready to take with
displaying the cutting length.
◆When discontinuing Program Function, please press AUTO/MANUAL
BUTTON longer and make sure that [ . ] is eliminated.
Operating Example
in the case of 6 different cut length setting
in the case of zero setting for E. F.
A~u
:A 100mm
Set a cutting length
Programing Function setting
Press more
than 1 second
Press more
than 1 second
Buzzer sound
Buzzer sound
Setting
example
AUTO/MANUAL setting
MANUAL MODE
AUTO MODE
Confirm [ . ] description
Display the first cutting length
This mode is to fold the tape edge.
This mode can be used with other function.
◆Press SELECT BUTTON more than 1 second.
Green LED will be flashing if pressing SELECT BUTTON more than 1
second. If setting is completed and press START BUTTON, a piece of
tape with folding the edge as set the cutting length will be ready to take
after pressing START BUTTON again.
◆Set other mode as depends on your requirement.
◆In the case of folding mode, minimum cutting length is 15mm.
The folding length is fixed by 7mm.
◆When cancelling folding mode, please press SELECT BUTTON more
than 1 second. Please make sure that green LED is off.
Green LED Flassing
Feed a tape without
folding the edge
Feed a tape with
folding the edge
Page 10
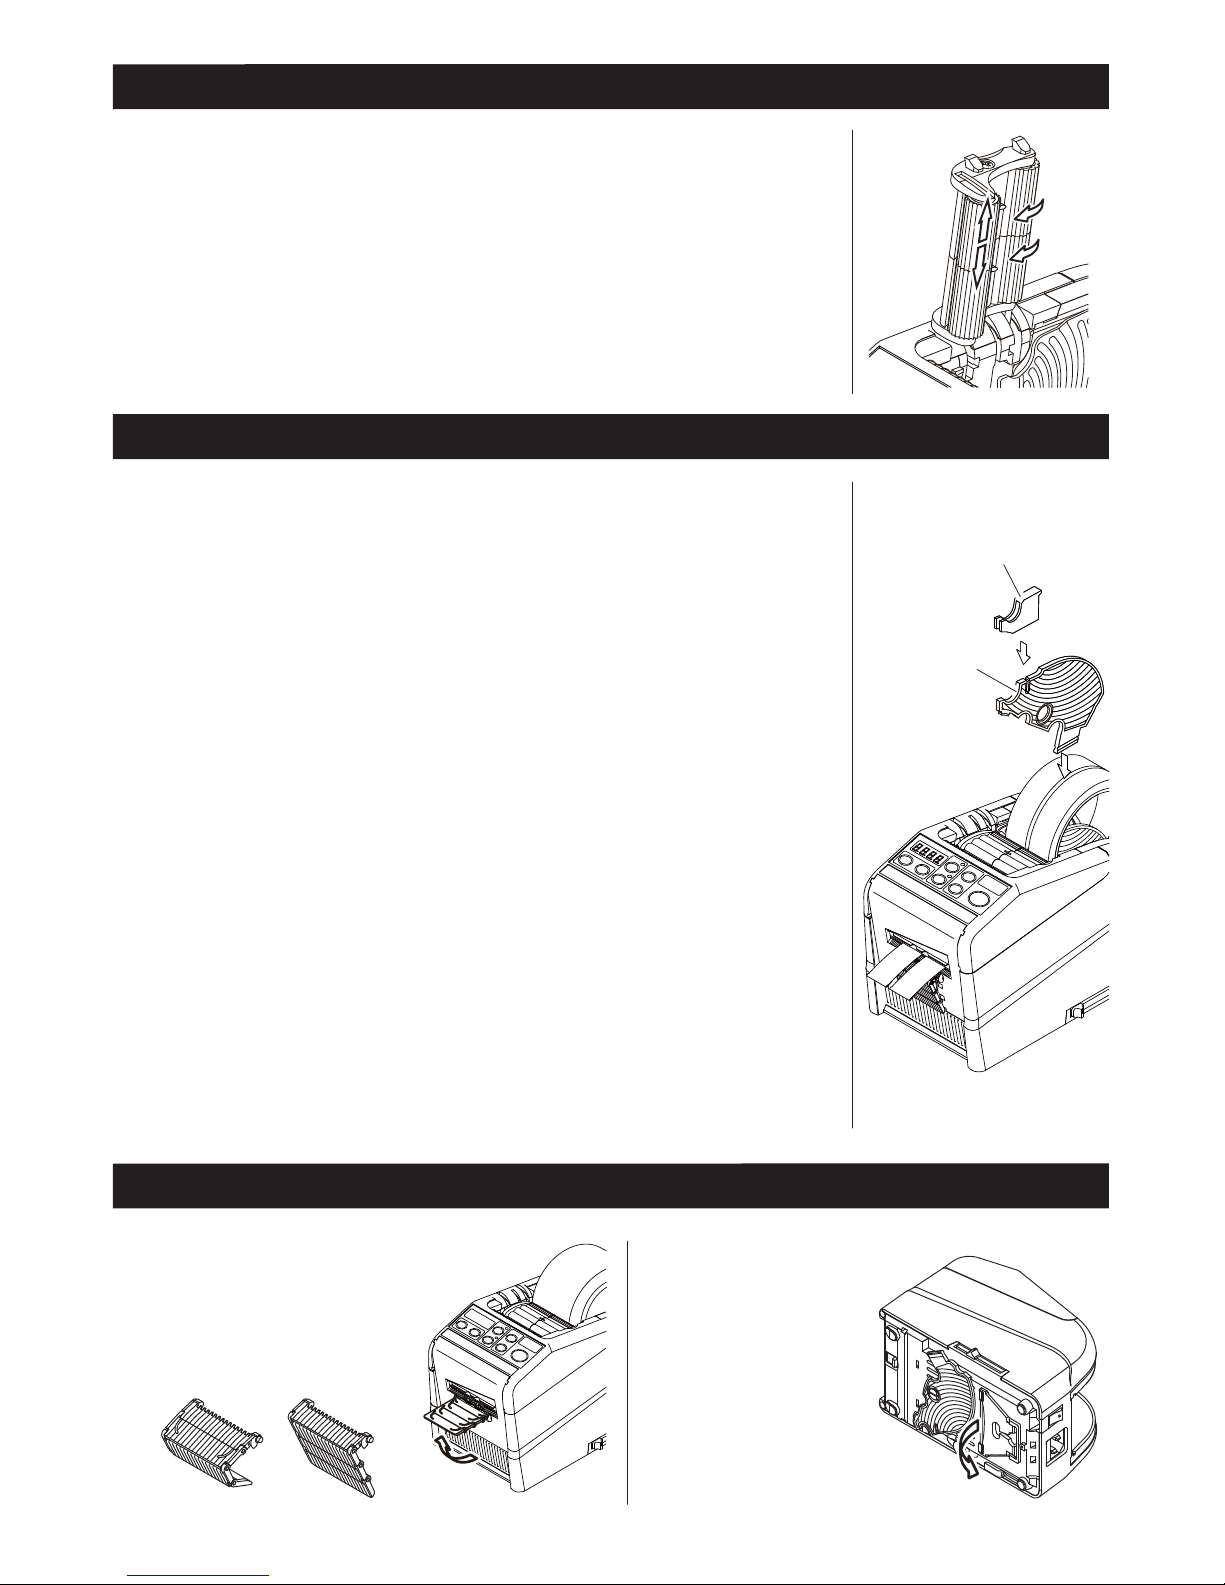
How to Manage a Curling Tape
Use Narrow Tape / Use Two Rolls in a Same Time
Other Functions
◆Press the HOLD DOWN ROLLER RELEASE BUTTON in order to open
the HOLD DOWN ROLLER UNIT.
◆Extend the ROLLER LOCK LEVER so that the roller will not turn.
◆Close the HOLD DOWN ROLLER UNIT.
With the rollers locked, the tension may cause the length to vary.
Cut several test pieces in order to adjust the length if needed..
If the tape is lesser than 25 mm width or you want to dispense two rolls in a
same time, use the SEPARATOR.
Cut lesser than 10 mm width of tape, put the GUIDE PLATE on the SEPARATOR.
◆Remove the SEPARATOR from the bottom of body.
◆Open the HOLD DOWN ROLLER UNIT.
◆Insert the SEPARATOR into the body by slotting in to the bottom of the cavity.
◆When you cut the tape lesser than 10 mm, put the GUIDE PLATE onto the
Separator.
◆Place one roll of the tape or either side by inserting a SEPARATOR for
loading tape.
◆To hold the tape by adjusting TAPE HOLDERS, it is unnecessary to push
the SEPARATOR out of position.
When dispensing two roll of tapes in a same time, it is a must to feed-in
both of its' length in a same time.
◆Remove the first piece of tape.
◆When the second piece of the tape is removed, both side
of tapes are also
dispensed.
FLEXIBLE TAPE SUPPORT
When you cut the tape longer or cut
non-adhesive tape / film, use FLEXIBLE TAPE SUPPORT in order to
avoid the tape fall down.
10
ASSIST STAND
Based on the tape material
or workpiece purpose, use
the ASSIST STAND in order
to let the body of machine
towards a lower level.
SEPARATOR
GUIDE PLATE
Page 11
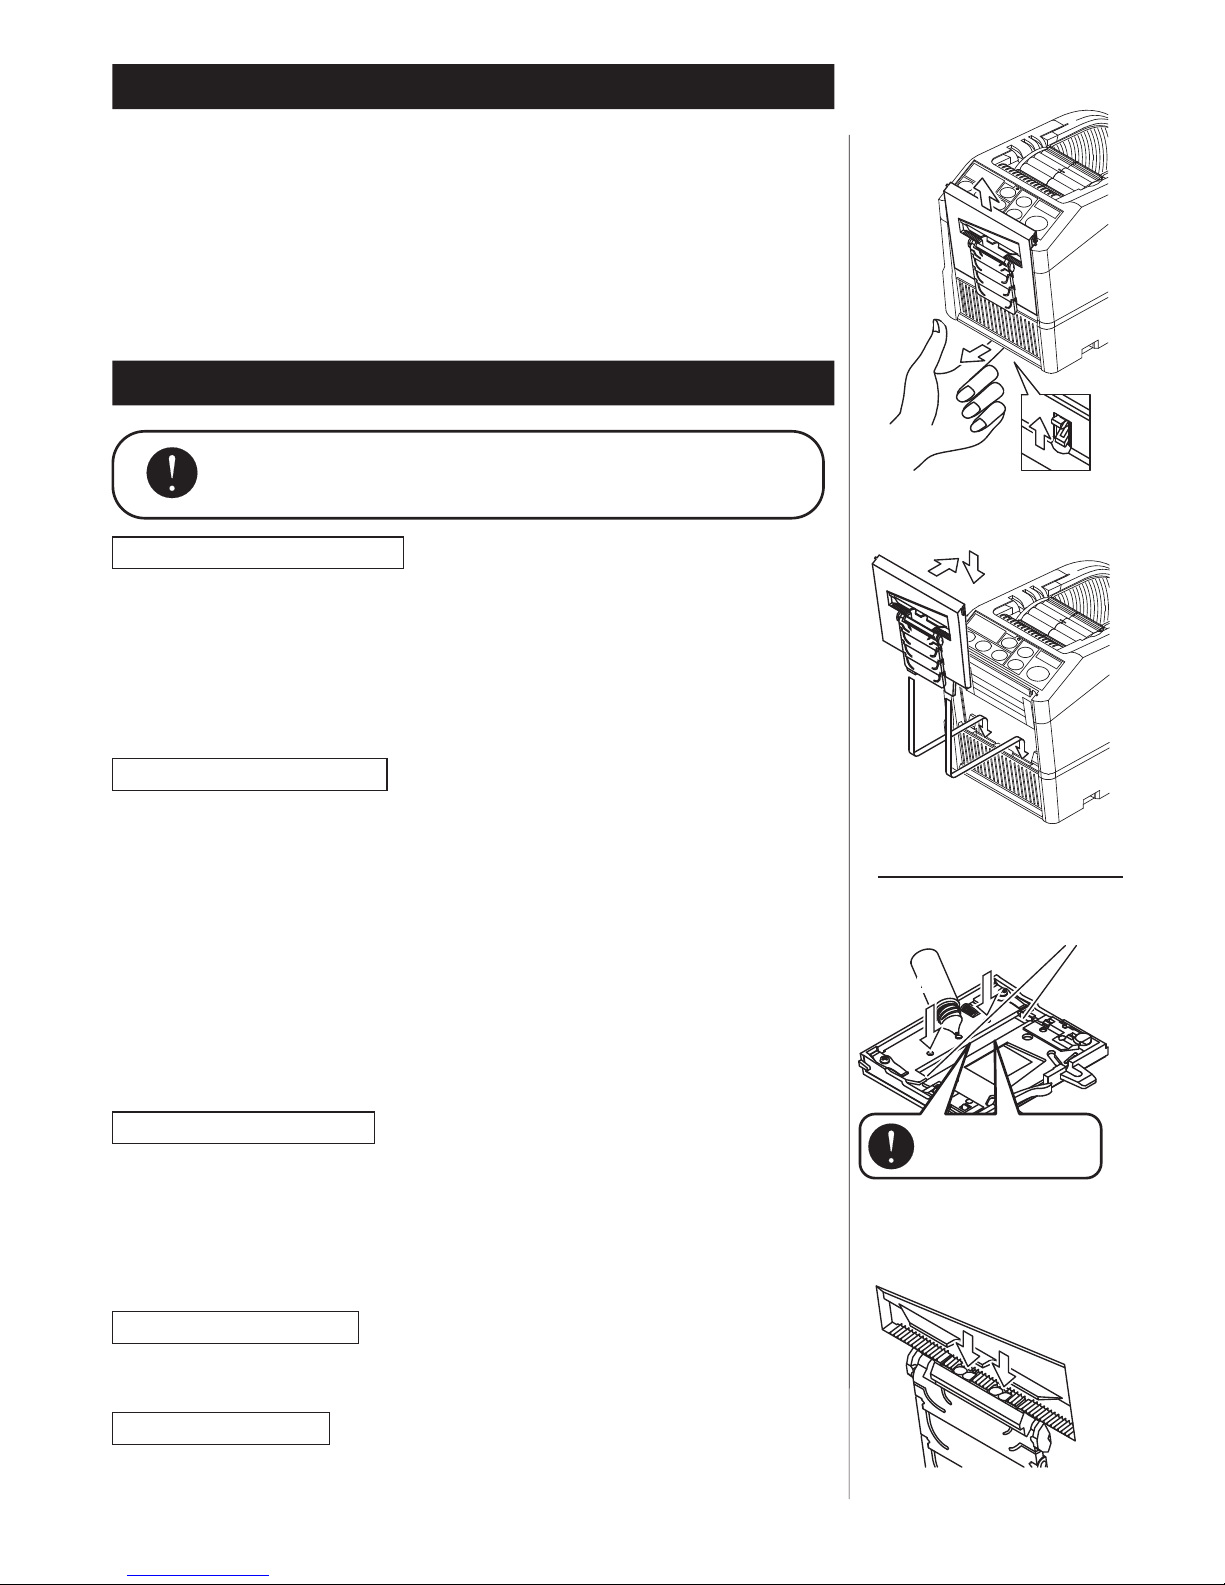
11
②
③
①
Whenever you clean or replace the BLADE UNIT,
do not touch the sharp edge of the blade.
Only Blade is not accepted to be replaced.
It needs to change with the whole Blade Unit.
◆Turn the POWER SWITCH off.
◆Remove the BLADE UNIT by releasing the BLADE UNIT RELEASE LEVER.
◆Install the new BLADE UNIT into the body.
◆Push down on the housing firmly until it is locked.
Make sure that the lower blade is positioned properly, turn the BLADE
UNIT over and take a look the bottom edge of the lower blade.
Clean the Blade Unit
When cutting tapes with heavy adhesive, the residue will remain on the
blade gradually.
It is necessary to remove the BLADE UNIT for cleaning.
◆Turn the POWER SWITCH off.
◆Remove the BLADE UNIT by releasing BLADE UNIT RELEASE LEVER.
◆Put some alcohol on a clean dry cloth, or use a swab to remove the residue.
◆Replace the BLADE UNIT.
Lubricate the Blade
Lubricate the blade in order to prevent residue stick on the blade.
◆Turn the POWER SWITCH off.
◆Remove the BLADE UNIT from the body.
◆Locate three oil holes on the back side of the top blade.
◆Drip one drop of BLADE OIL into each hole.
◆Also lubricate LOWER BLADE GUIDE.
◆Do not lubricate over and over again.
Wipe the spare oil away by using cotton cloth.
◆Replace the BLADE UNIT into the body.
◆Turn the POWER SWITCH on.
Make several test cuts in order to make sure the tape will not fall down
from the TAPE OUTLET.
Clean the Sensors
There are two pairs of SENSORS below the TAPE OUTLET.
If the opening is covered by tape residue or debris, the SENSORS will
not detect the presence tape.
Always keep clean around the SENSORS.
To protect the SENSOR, clean the openings after removed the BLADE
UNIT carefully.
Replace the Blade Unit
Maintenance
BE CAREFUL TO HANDLE
THE SENSORS
REMOVE BLADE UNIT
INSTALL BLADE UNIT
LOWER BLADE GUIDE
EXTREME CARE
OF BLADE
OIL HOLESOIL HOLES
Clean the Body
Put neutral detergent on a damp cloth to clean the body.
Do not use alcohol or solvent to clean the plastic parts.
Clean the Rollers
When waste of tape glue is found, please refer to page 12 and follow
the procedure for cleaning the inside of the machine.
Page 12
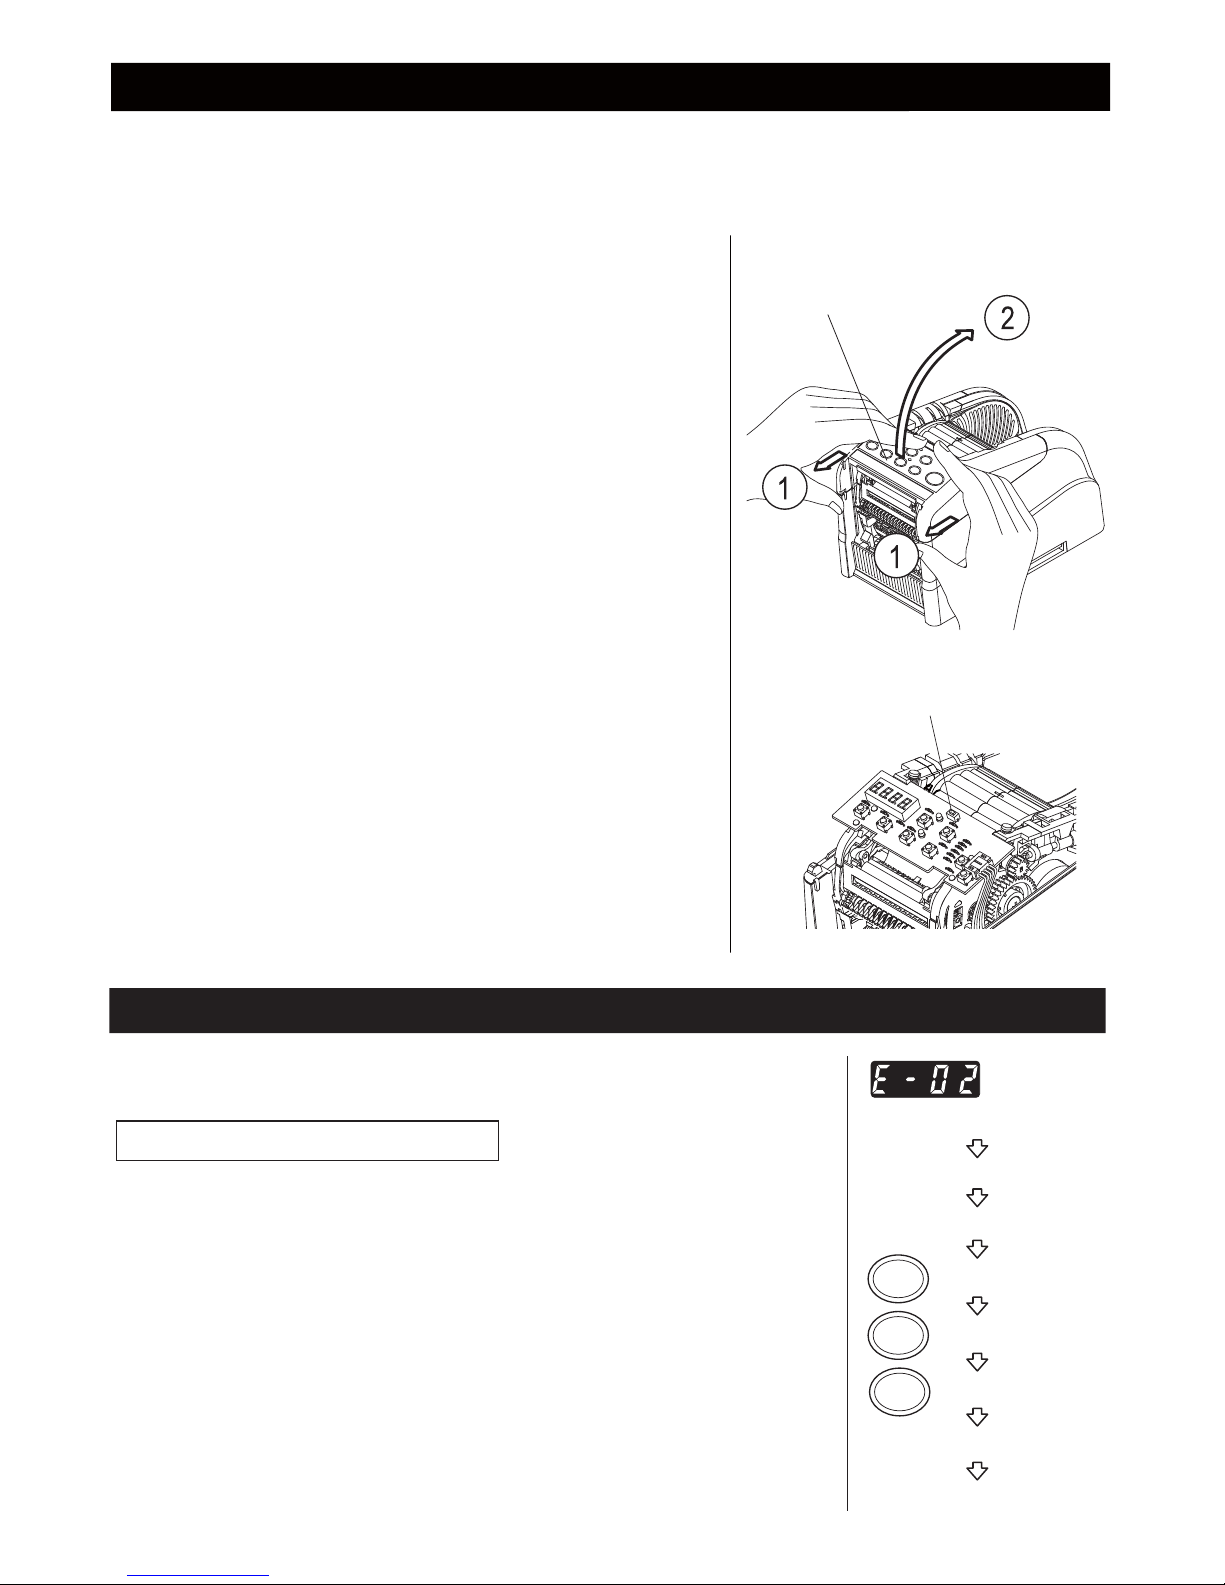
FOLDING OPERATION CHECK SWITCH
APPER CASE
When tape jammed is happened
12
1) When operating by manual mode, tape doesn’t come properly even if pressing START BUTTON.
2) When operating by auto mode, the next tape doesn’t come even if taking the tape ready.
3) Tape doesn’t come even if you hear the sound of motor working.
Please take the following procedure when you find the problems as mentioned above.
◆Open HOLD DOWN ROLLER UNIT.
◆While pressing REV BUTTON, please pull the tape out backward.
◆Remove BLADE UNIT after switching off and removing power
cord from the machine.
Then check the inside of the machine and remove something if
you find some waste of tapes on the ROLLERS or BLADE UNIT.
◆Install BLADE UNIT into the body.
◆Connect POWER CORD to machine and switch on.
◆Take a proper procedure and set your tape accordingly.
In the operation procedure as mentioned above, please take
the following steps if you can’t pull a tape from machine.
◆Open UPPER CASE.
1) Pull Upper Case backward (2mm).
2) Lift UPPER CASE up while pulling it.
◆Connect POWER CORD to machine and switch on.
(When opening UPPER CASE, operating board for folding
function can move only for operation check.)
◆Press FOLDING OPERATION CHECK SWITCH more than 1 sec.
(Stop automatically to the maximum tape outlet position.)
◆Remove the waste of tape jammed by using tweezers.
◆Press FOLDING OPERATION CHECK SWITCH once again
more than 1 sec.
(Stop automatically to the original position.)
◆Close UPPER CASE and install BLADE UNIT into the body.
◆Take a proper procedure and set your tape accordingly.
The buzzer will has a sound then a message will flash and show on the
DISPLAY.
E-02 Blade is Out of Position
A signal shows that the blade is not installed well or machine stops because
of the thickness or hardness of the tape.
◆Turn the POWER SWITCH off.
◆Remove the BLADE UNIT by releasing the BLADE UNIT RELEASING
LEVER then lift the assembly out of the body.
◆Turn the POWER SWITCH on.
◆Press the FWD BUTTON and feed -in the
tape once, cut the tape in between
the TAPE OUTLET and the BLADE UNIT by scissor.
◆Press the REV BUTTON to remove the tape.
◆Clean the BLADE UNIT and lubricate the LOWER BLADE GUIDE.
◆Check the lower blade position and replace the BLADE UNIT.
POWER SWITCH IS OFF
POWER SWITCH IS ON
REMOVE BLADE UNIT
CLEAR THE ERROR
CLEAR THE BLADE
FEED THE TAPE
REMOVE THE TAPE
SET THE TAPE
FWD
REV
START
Error Messages
Page 13
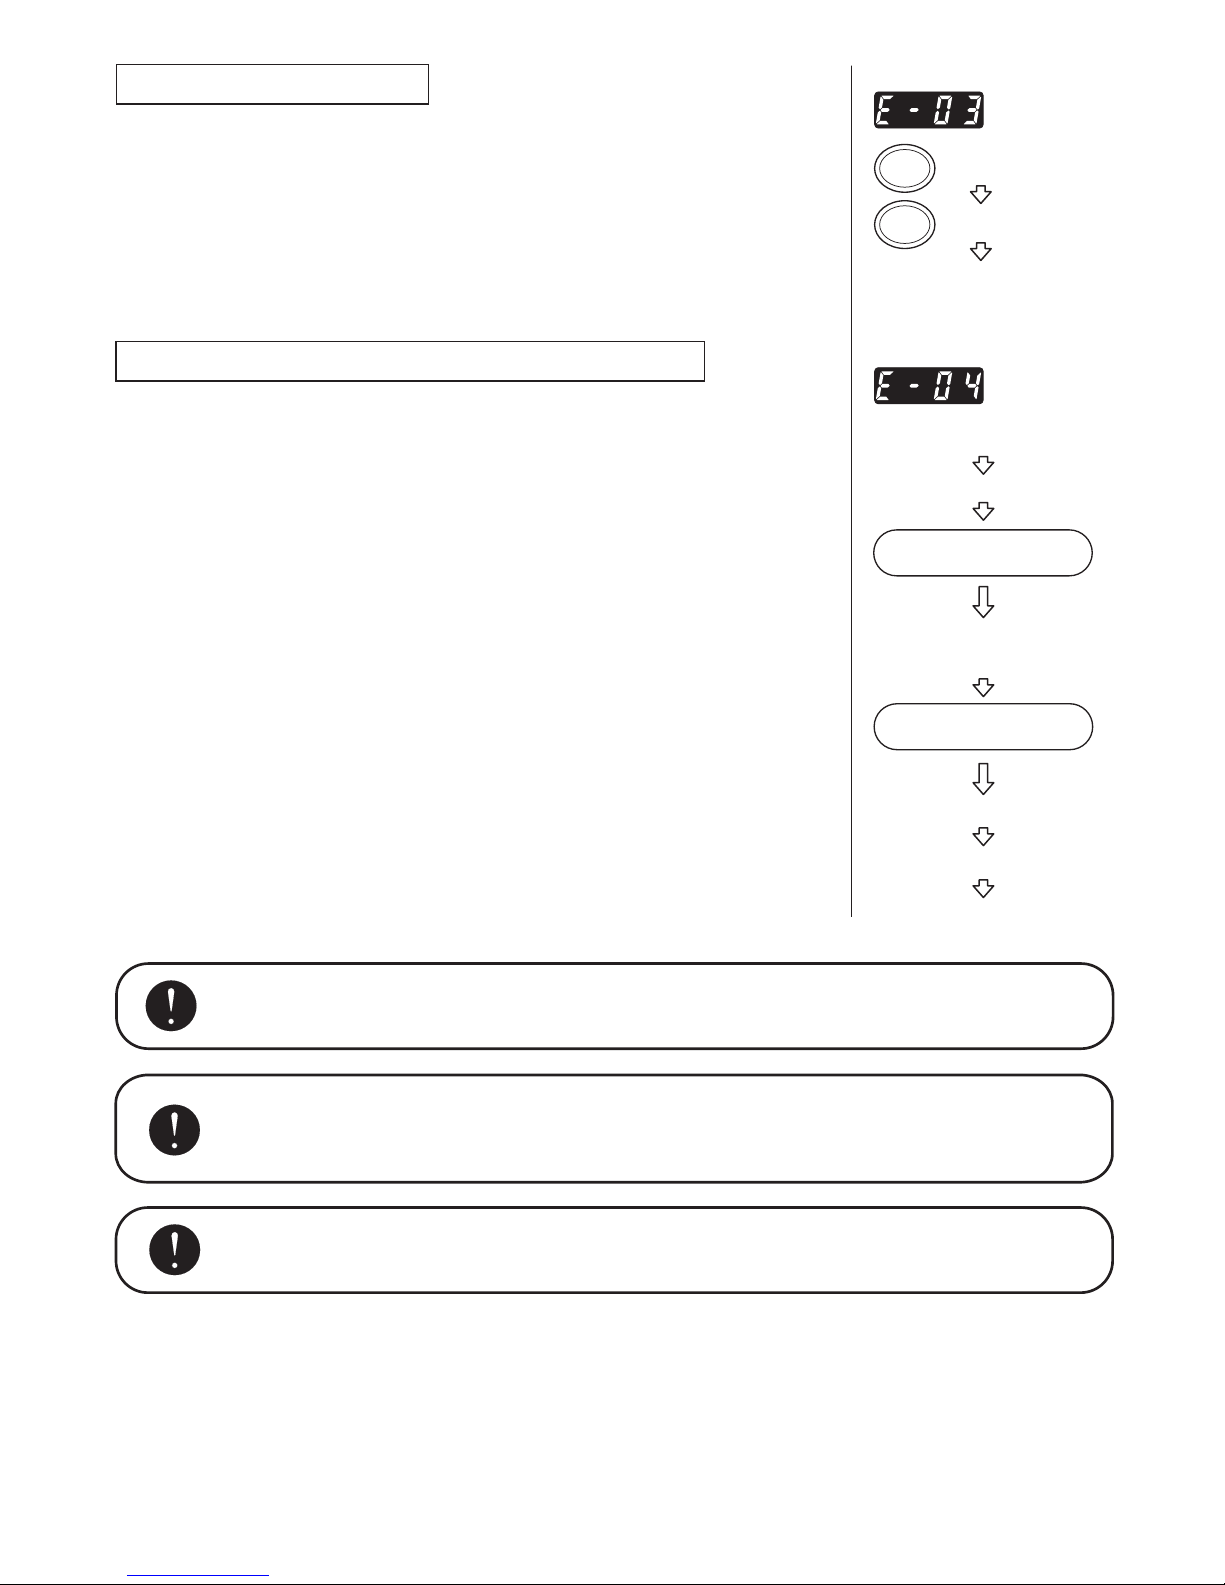
E-03 Motor is Stopped
Indicates that the motor is stopped because of overload.
◆Press the START BUTTON to clear the error message.
◆Press the REV BUTTON to remove the tape.
◆Turn the POWER SWITCH off.
◆Check the BLADE UNIT and TAPE OUTLET carefully.
◆Clear and take away the spare tape waste or sticky residue by using
tweezers.(Clean ROLLER UNIT as depens on the condition.)
E-04 Motor Position Error for Folding Function
This is likely to happen when motor is overloaded and stopped.
◆Remove BLADE UNIT.
◆Switch off and remove POWER CORD from the machine.
(When tape is jammed, please refer to “When tape jammed is happened”
and open UPPER CASE.)
◆Push POWER CORD into machine and switch on.
(In the case of opening UPPER CASE, FOLDING OPERATION CHECK
SWITCH is only moved.)
◆Press FOLDING OPERATION CHECK SWITCH more than 1 sec.
(Stop automatically to the maximum tape outlet position.)
◆Remove the waste of tape jammed by using tweezers.
◆Press FOLDING OPERATION CHECK SWITCH once again more than 1 sec.
(Stop automatically to the original position.)
◆Close UPPER CASE.
(Operating board turns on electricity and resumes operating.)
◆Pull your tape backward while pressing REV BUTTON.
◆Install BLADE UNIT into the body.
◆Take a proper procedure and set your tape accordingly.
Do not use the tape if static electricity generates over 1000V.
It may cause failure to the machine.
Do not touch the Blade when you are correcting an error under POWER SWITCH
is on.
Turn off the POWER SWITCH and stop using the machine.
If the machine cannot work normally after correcting the error.
It seems that nothing wrong without any error messages.
13
CLEAR THE ERROR
REMOVE THE TAPE
SET THE TAPE
START
REV
REMOVE THE WASTE
OF TAPE JAMMED
REMOVING BLADE UNIT
SET A TAPE
FOLDING OPERATION
CHECK SWITCH
FOLDING OPERATION
CHECK SWITCH
Pressing more
than 1 second
Pressing more
than 1 second
OPEN UPPER CASE
CLOSE UPPER CASE
INSTALL BLADE UNIT
Page 14
14
Before returning the machine for repair, please check the followings.
Trouble Shooting
If the machine still can not operate properly, stop using the machine
immediately and contact vendor for repair authorization.
Digital is not displayed even
though switching on.
UPPER CASE may not be closed
properly.
BLADE UNIT may not be installed
correctly.
Close UPPER CASE properly.
The tape length is different
from the setting length.
Display E-02 after installing
BLADE UNIT.
The adhesive is too strong.
The tape is slipping.
The tape is elastic.
Correct the setting after cutting several test pieces.
Refer to E-02 Error Message on P12 and install
BLADE UNIT once again.
In the case of auto mode,
the next tape doesn’t
dispense properly.
Some objects may be found on the
sensor.
The tape has extremely low reflectance.
Sensor is exposed to an intense
light and error is happened.
Not go through the sensor.
Remove the objects.
Some types of tape may not be used under AUTO
mode.
The machine should be placed to another position.
Use SEPARATOR when using the tape width less
than 25mm.
The POWER SWITCH is
on, but the machine can
not run.
The FUSE has been blown.
The AC CORD is loosen.
Check whether the AC CORD plug in the outlet firmly.
Replace new FUSE.
Stop using the machine immediately even though
the FUSE is blown again after replacing.
Power Requirement 100 - 240VAC 50/60Hz
Input Voltage Range ±5%
Wattage 25W
Dimensions 116mm(W) x 148mm(H) x 222mm(D)
Weight 1.83 KG.
Body Material ABS
Tape Length 5mm - 999mm (Folding Function-OFF)
15mm - 999mm (Folding Function-ON)
Tape Width 6mm - 60mm
Feeding Speed 200mm/sec. (craft tape)
53pcs/min. (in the case of cutting craft tape 100mm length)
43pcs/min. (in the case of cutting craft tape 100mm length
with folding the edge)
Max. Outside Dia. of Roll 300 mm
Accessories Power Cord
2A Fuse [Built-In Inlet]
Separator / Guide Plate / Blade Oil
Specifications
Remarks ◆The specifications are subject to change without prior notice.
◆The length of the tape may differ from the set length depending upon the type of the tape or its condition.
◆Some types of tape available with the machine may not be cut depending upon conditions.
Page 15

15
We warrant to the original purchaser of the product that will be free
form defects in material or workmanship for as long as the original
purchaser owns the product, when given normal wear and proper
usage.
The limited warranty for the machine shall be for a period of 180 days
form the date of purchase.
The spare parts such as Cutting Blades, Rollers, are not covered
under the warranty period as they are considered as "wear parts".
This warranty is only valid if the product:
◆Was not damaged while being installed.
◆Was operated in accordance with products's specifications,
instructions and any technical support directions.
◆Was not modified or damaged by tempering, user error, accident,
disaster, abuse, misuse, power supply, power application,
alternation, repair, modification, a fix or replacement by someone
other than the original product.
Warranty
Page 16

YAESU KEIKOGYO CO., LTD.
39-8, Senju Motomachi, Adachi-Ku,
Tokyo, 120-0041, Japan
Phone 81-3-3888-8751
Fax 81-3-3888-1592
PLEASE VISIT OUR WEB SITE
http://www.yaesu1965.com/
14L08
 Loading...