

Page 1
DR-2X/XE
Installation Instructions for
the DR-2X/XE RX-UNIT and DSP rmware
Attention !
This rmware is not compatible with the DR-1X/XE.
YAESU MUSEN CO., LTD.
Page 2

How to check the rmware version of the DR-2X/XE Repeater
1. Turn the DR-2X/XE power ON.
2. Touch [A SETUP] or [B SETUP] on the DR-2X/XE LCD screen.
The rmware version will be displayed at the screen.
3. After conrming the rmware version, turn the DR-2X/XE power OFF.
SETUP RXx.xx TX .x
4
8
PANELx.wwwDSP . LAN . .
4
3
CAUTION!
Be sure to conrm the model and the version of your repeater before starting the installation.
Writing incorrect rmware to the repeater may cause abnormal operation or failure.
Operating System and Equipment Required for Firmware Installation
Notes: In order to use this program, a personal computer (PC) with one of the following Windows operating
systems, and an SCU-20 PC connection cable are required.
Supported Operating Systems
The rmware installation programmer requires one of the following operating system environments:
• Microsoft® Windows® 10 (32 bit / 64 bit)
• Microsoft® Windows® 8.1 (32 bit / 64 bit)
• Microsoft® Windows® 7 (Service Pack 1 or later)
CPU
The CPU performance must satisfy the operating system requirements.
RAM (System Memory)
The RAM (system memory) must be more than sufcient to satisfy the operating system requirements.
HDD (Hard Disk Drive)
The HDD capacity must exceed the operating system requirements.
In addition to the required operating system memory space, about 50 MB of additional memory space is required to run the rmware installation program.
Necessary PC peripheral interfaces
An available USB interface (USB Port)
Cable
SCU-20 PC connection cable (Supplied with the DR-2X/XE)
2
Page 3

Important Notes
• All responsibility for the use of this software lies with the customer. YAESU MUSEN CO., LTD cannot be
held liable in any way for damages or losses, which may be incurred by the customer as a result of using
this software.
• Copyrights and all other intellectual property rights for the software, as well as the software manual, are the
property of YAESU MUSEN CO., LTD.
• Revision, modication, reverse engineering, or decompiling of this software is prohibited. Redistribution,
transfer, or resale of downloaded les, is also prohibited.
• Downloaded les are for personal use only, any commercial use is prohibited.
• If you cannot perform the rmware installation yourself, please consult with one of our sales sites or service
centers for assistance.
Company and product names described in this manual are trademarks or registered trademarks.
Microsoft®, Windows®, Windows® 7, Windows® 8, Windows® 8.1, Windows® 10 are registered trademarks
of Microsoft Corporation in the United States and other countries.
Install / Uninstall Procedure
Installation procedure
Please visit Yaesu website (http://www.yaesu.com/) and download the Firmware les (see below).
• RX-UNIT: DR-2X_MAIN_vRxxxx
• DSP: PCTOOLe_vxxxx
(* “xxxx” refers to the version number.)
Uninstall procedure
Delete the folder opened by the program.
The operation will end if the opened folder is deleted since no data will be written to the registry and system
folder.
3
Page 4
Using the Programmer
Before attempting to update the rmware, use the SCU-20 PC Connection Cable and install the
driver software.
Then go to the website (http://www.yaesu.com) to download and install the SCU-20 driver.
When the programmer is opened on the computer, press the [Update] button to display the preparation procedure screen, which explains the rmware installation process. Follow the procedure below.
Installation of the RX-UNIT (MAIN) rmware
1. Turn the DR-2X/XE [POWER] switch to the “O” (OFF) position.
Disconnect the AC or DC power cord from the DR-2X (The DC power cord from the DR-2XE).
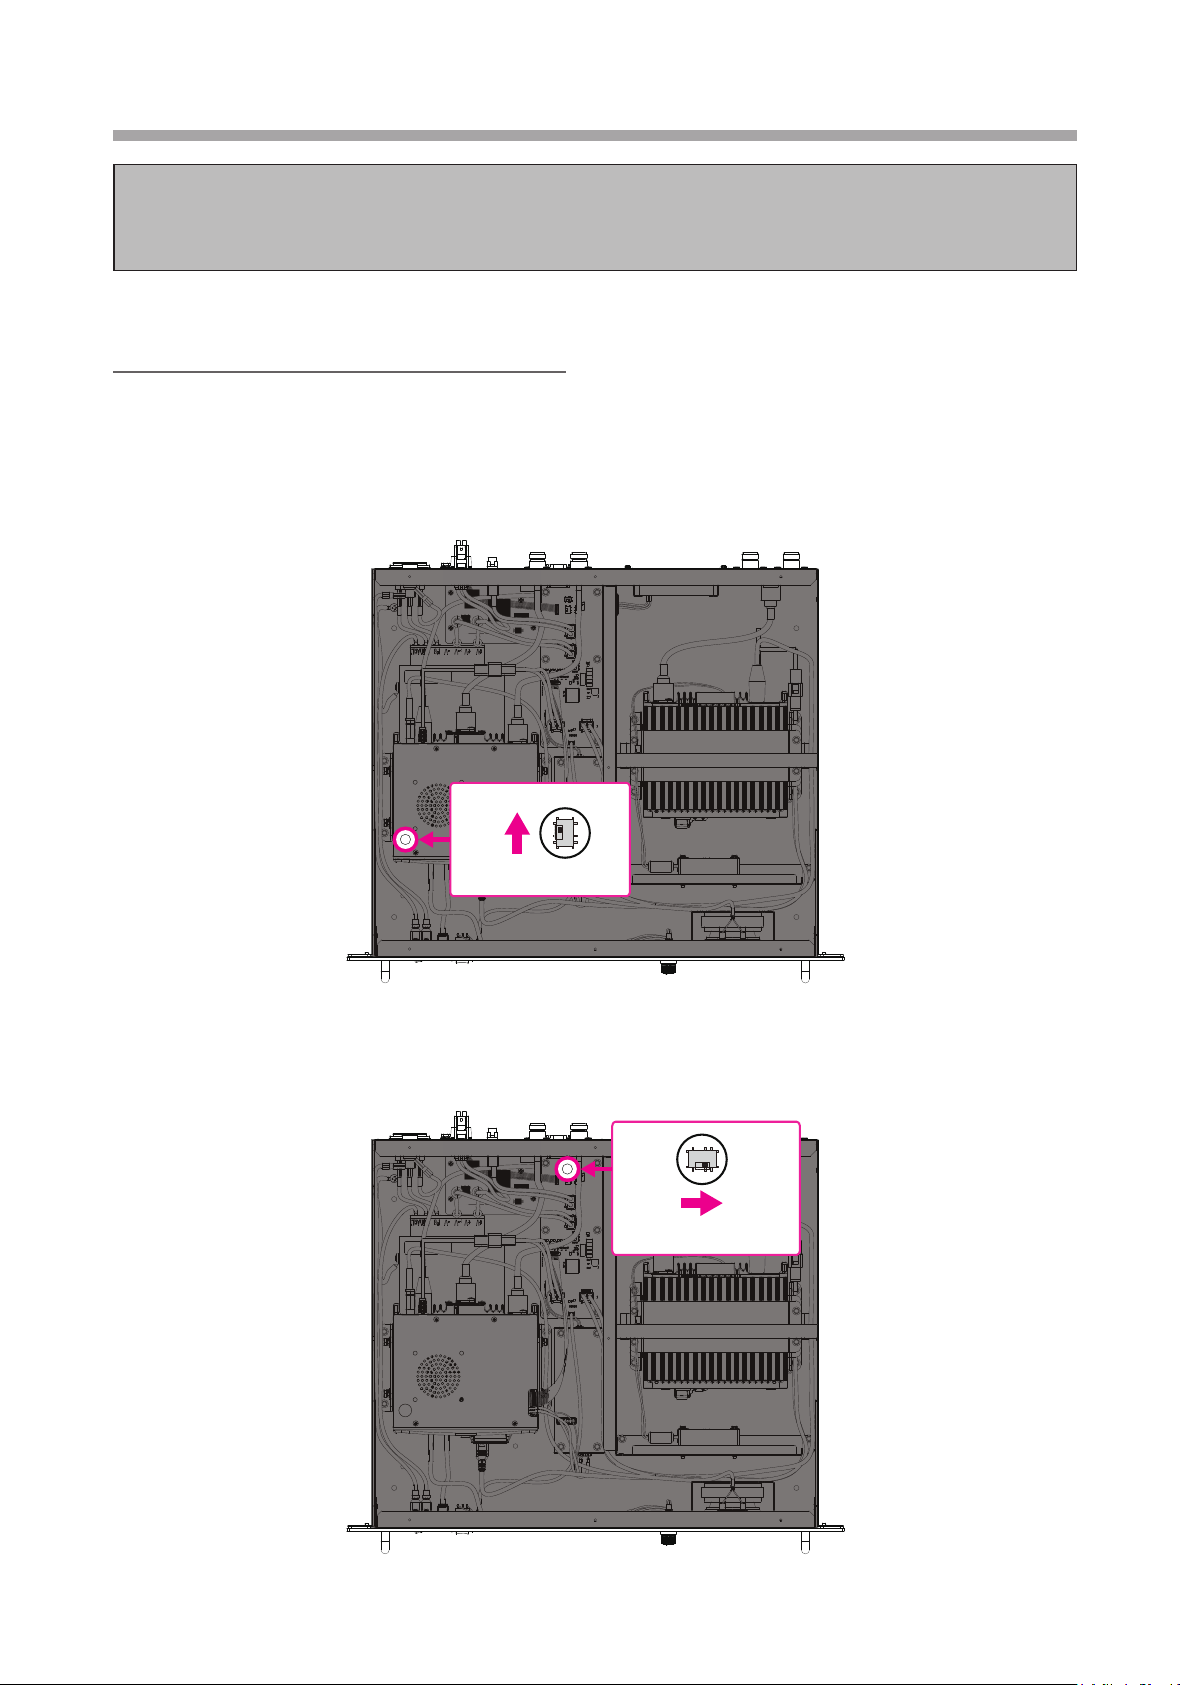
2. Remove the rubber cap from the forward left of the top case.
3. Through the hole in the top case, move the RX-UNIT firmware-writing switch to the “BOOT” position
(rearward).
BOOT
Firmware writing switch
4. If the LAN-UNIT is not being used, proceed to step 6.
Remove the rubber cap at the rear of the top case.
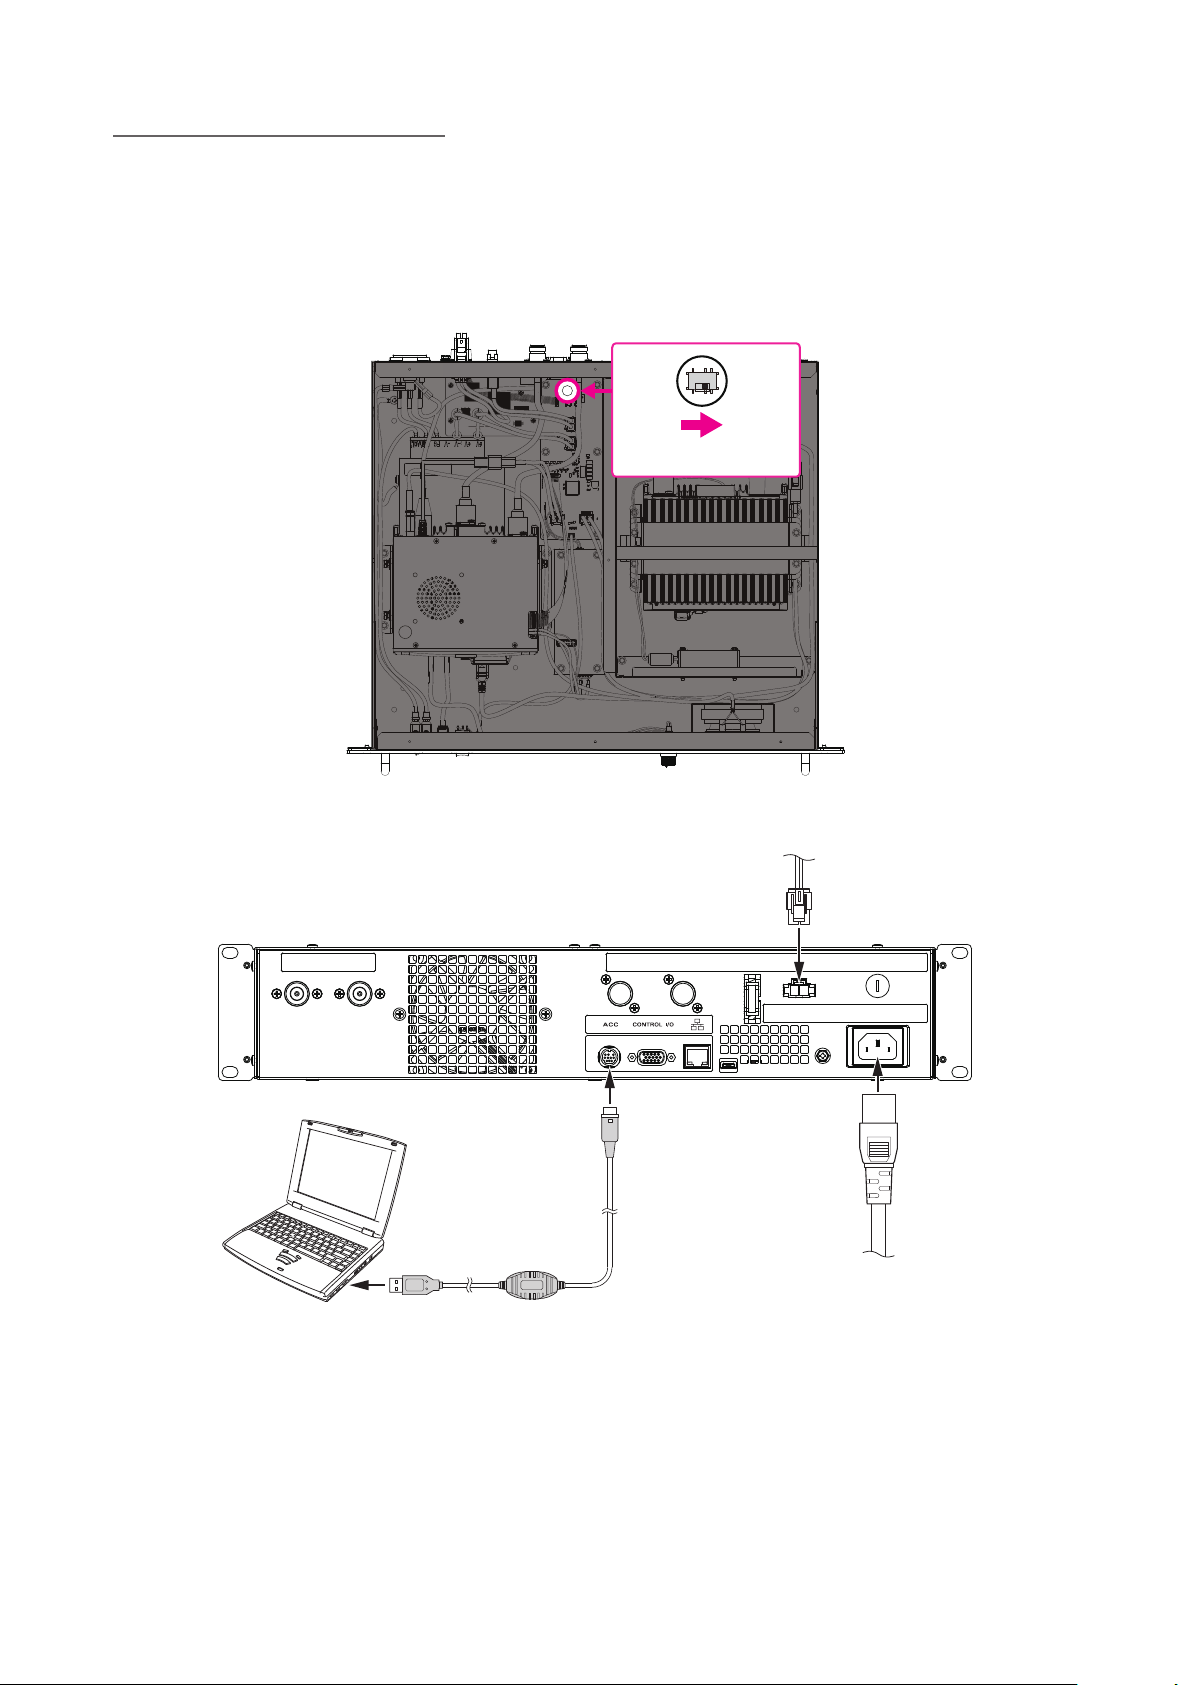
5. Through the hole at the rear of the top case, move the slide switch (S6013) toward the “NORMAL” side
(“Right” side as shown in gure).
NORMAL
Switch (S6013)
4
Page 5
6.
DC 12 V - 15 V (EU)
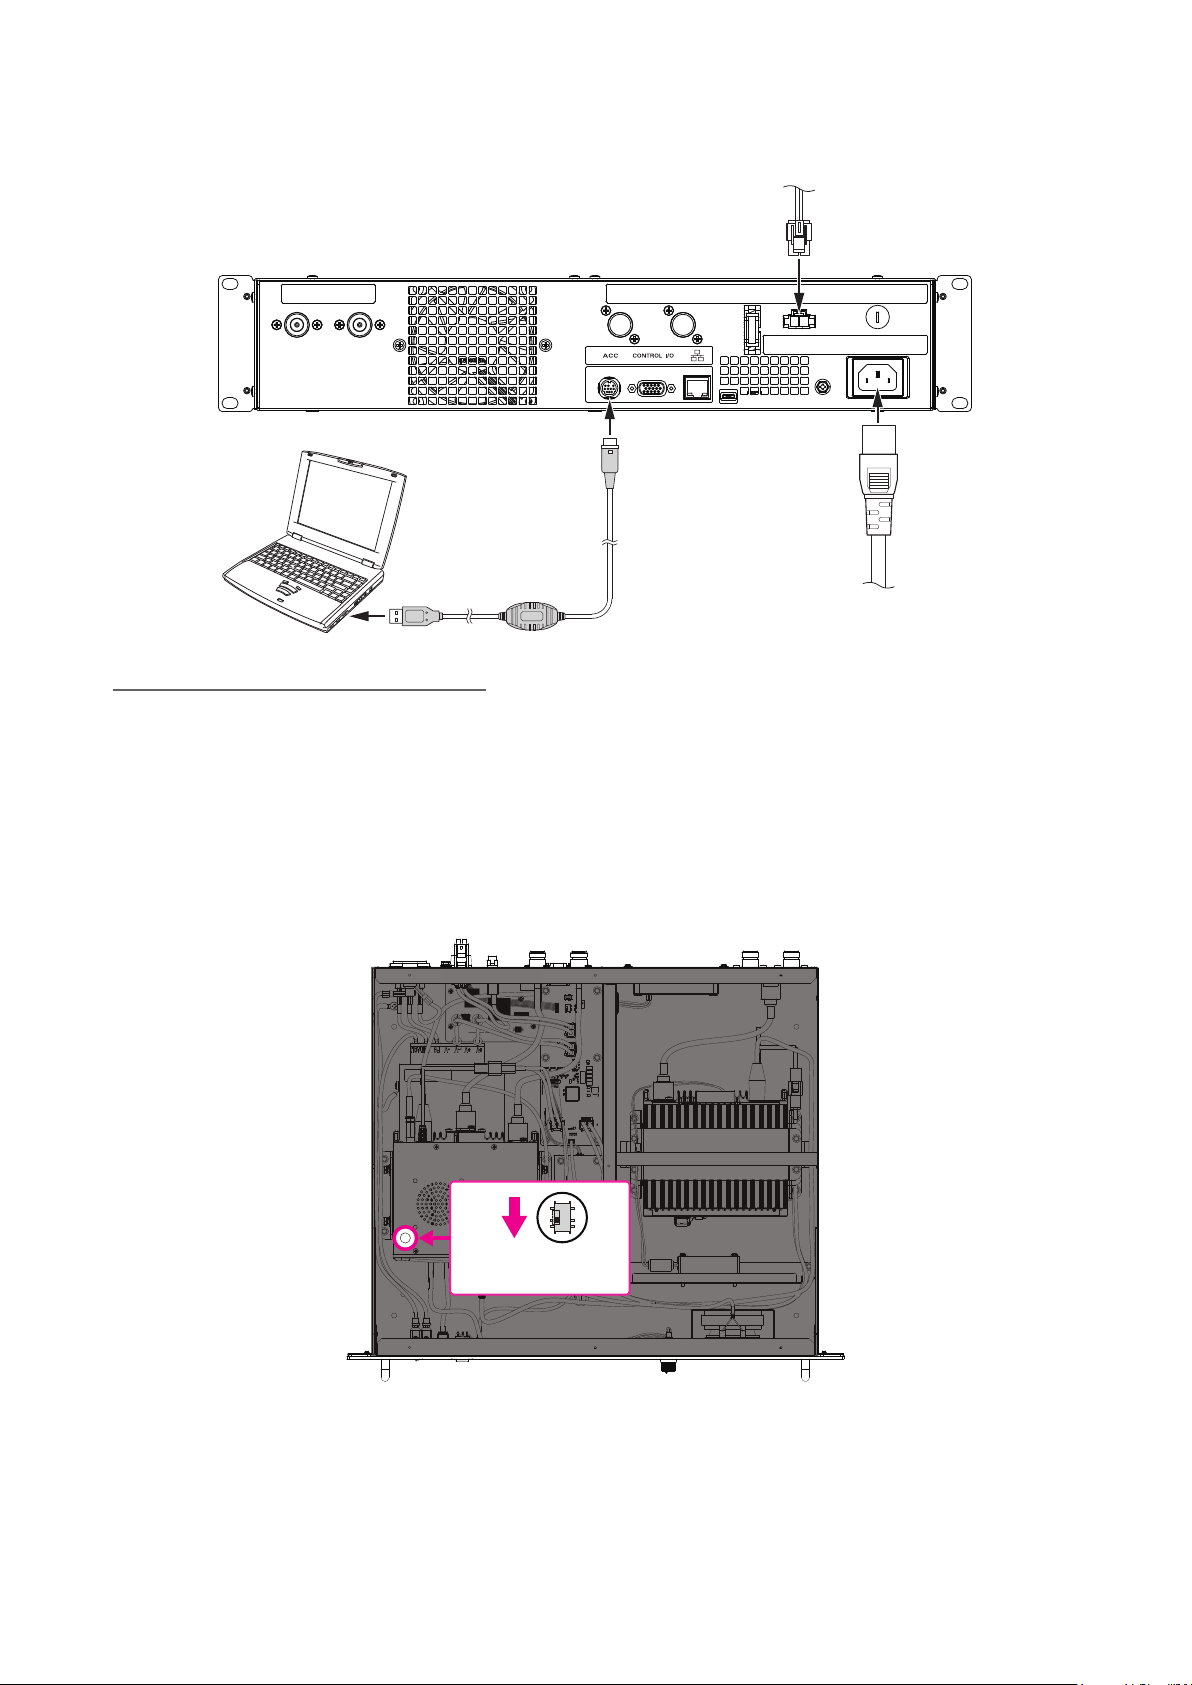
Connect the SCU-20 PC connection cable to the ACC jack, and connect the AC or DC power cord to DR-2X
(The DC power cord to DR-2XE).
SCU-20
AC 100 V - 240 V
(USA, EXP, AUS, CHN)
Install the RX-UNIT (MAIN) rmware
1. Turn the DR-2X/XE [POWER] switch to the “” (ON) position.
The cooling fan will operate, but nothing will appear on the LCD screen.
2. Open the “DR-2X_MAIN_vRxxx” folder on the personal computer, and then Double-click the “DR-2X_
MAIN_vRxxxx(xxx).exe” le that is saved on the PC to execute the program.
3. Follow the on-screen instructions on the PC to install the DR-2X/XE rmware.
4. Select the COM Port number that was assigned when the SCU-20 was installed, and press “Update”.
5. After the installation completes, turn the DR-2X/XE power OFF, and then through the hole at the forward
left of the top case, set the RX-UNIT rmware writing switch inside to the original position (forward).
NORMAL
Firmware writing switch
6. Connect the AC or DC power cord to DR-2X (DC power cord to DR-2XE).
7. Turn the DR-2X/XE power ON, and then touch [A SETUP] or [B SETUP] on the LCD, to display the rm-
ware version at the top of the screen. If the RX-UNIT (RX) rmware version has been updated, the rmware update was successfully completed.
Turn the DR-2X/XE power OFF.
5
Page 6
8. Replace the rubber cap to the forward left of the top case.
9. To continue installing DSP Firmware, proceed to step 4 of “Installation of the DSP rmware” on the
next page.
10. If not using the LAN-UNIT for IMRS (Internet-linked Multi-site Repeater System) function, this completes
the RX-UNIT rmware installation process.
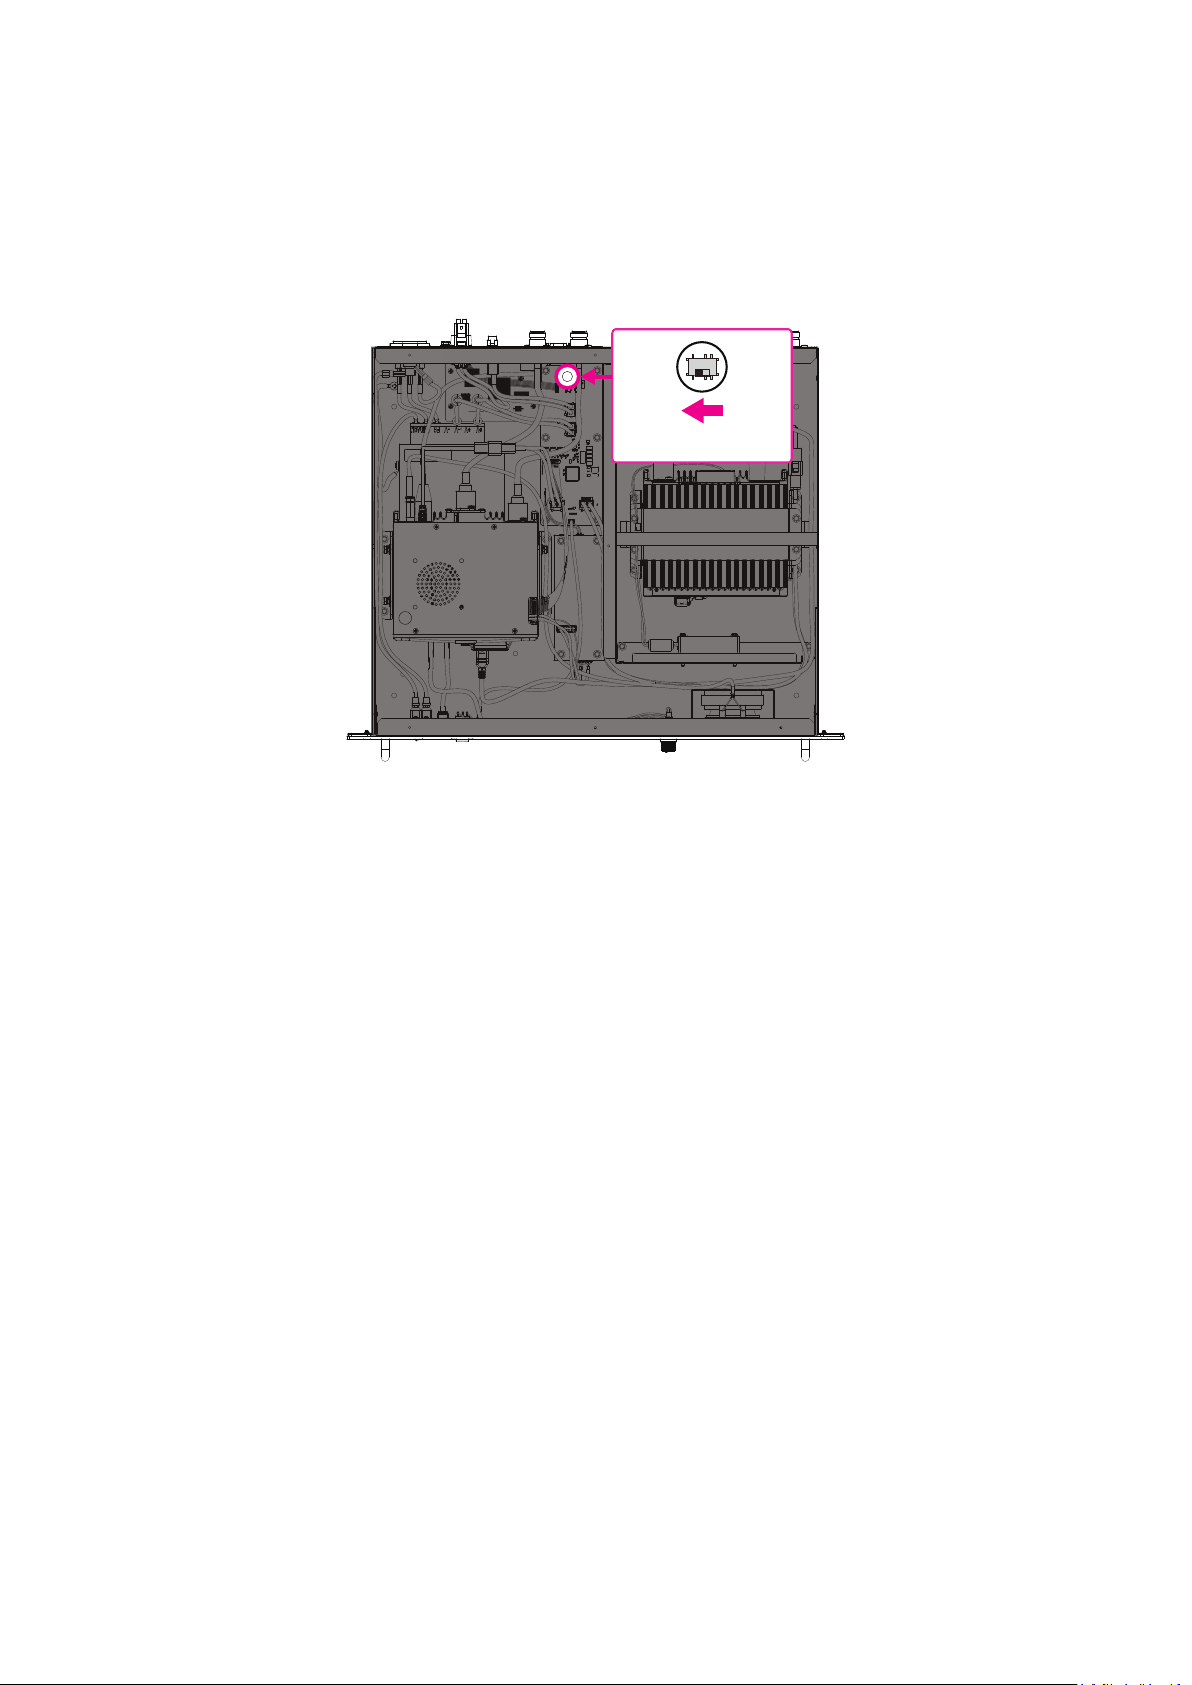
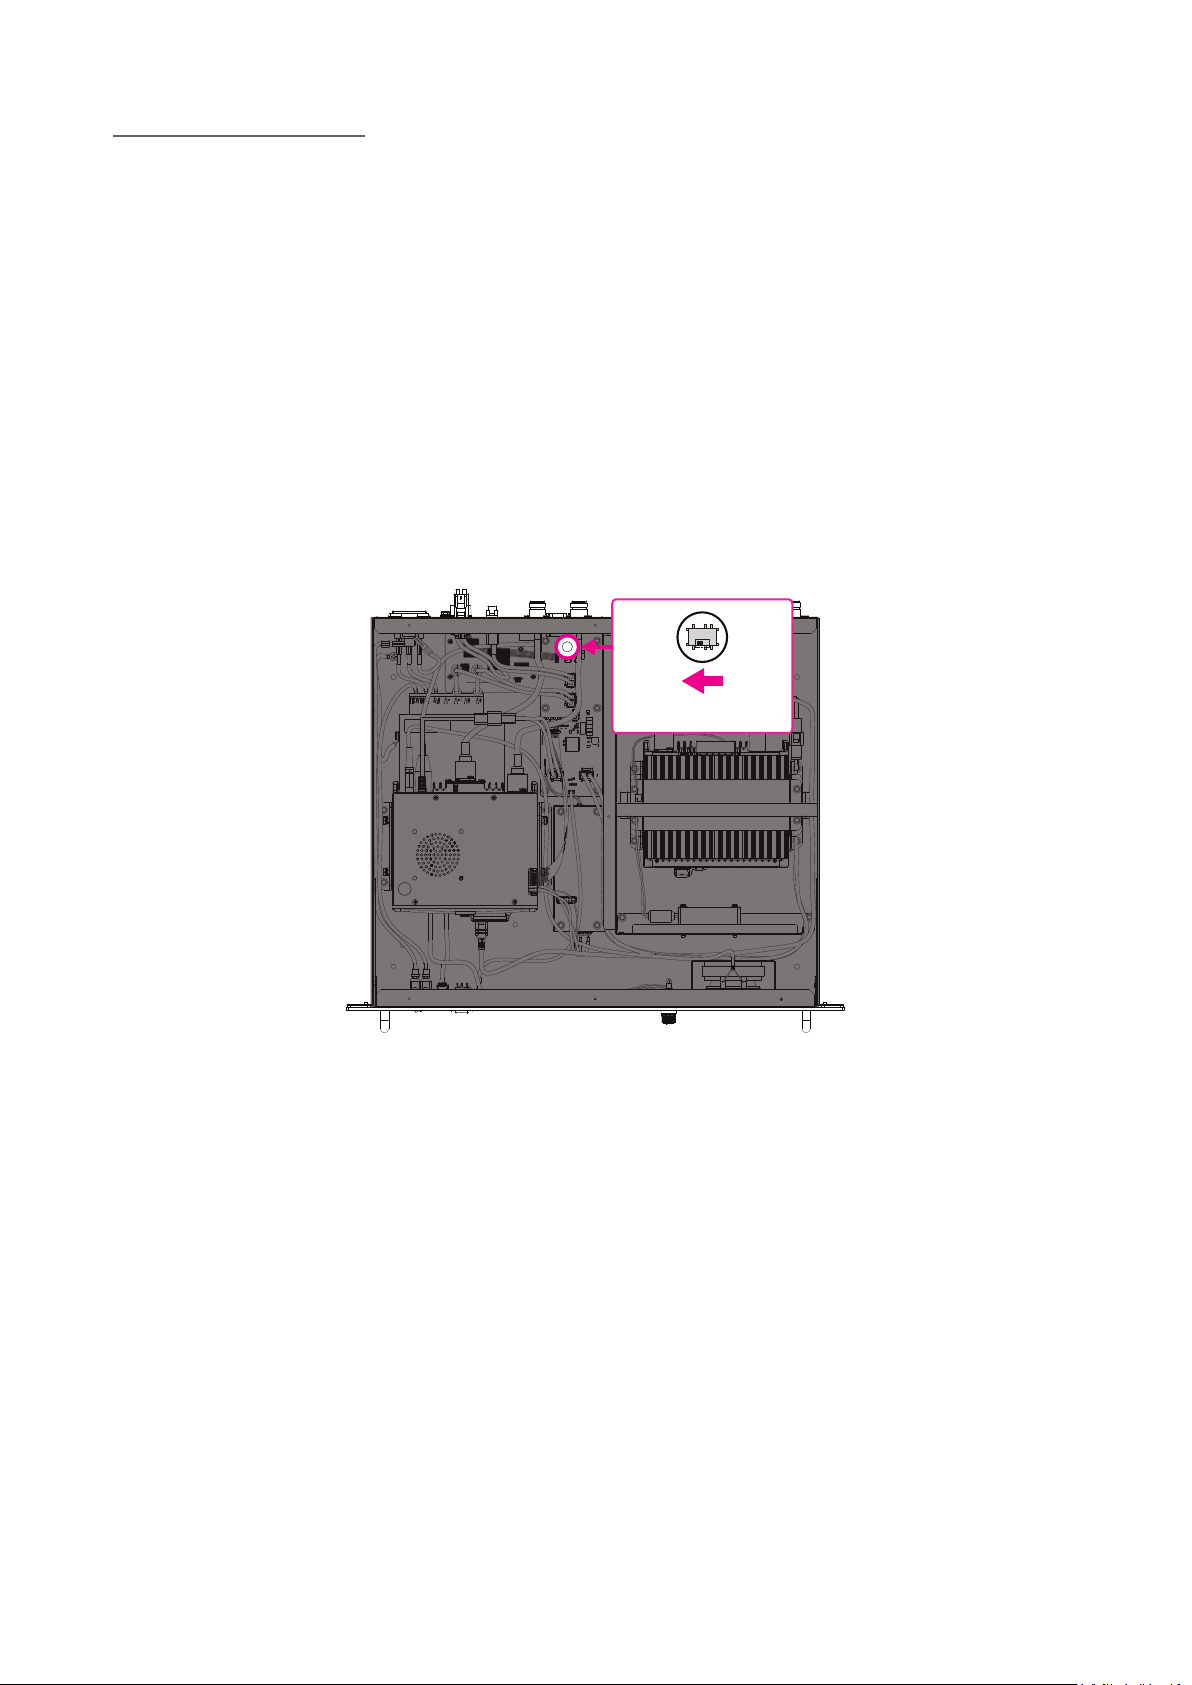
11. Through the hole at the rear of the top case, move the slide switch (S6013) toward to the “LAN” side (“Left”
side as shown in gure).
LAN
Switch (S6013)
12. Replace the rubber cap at the rear of the top case.
This completes the RX-UNIT rmware installation process.
6
Page 7
Installation of the DSP rmware
DC 12 V - 15 V (EU)
Note: Install the RX-UNIT rmware before attempting to Install the DSP rmware.
1. Turn the DR-2X/XE [POWER] switch to the “O” (OFF) position.
2. If the LAN-UNIT is not being used, proceed to step 4.
Remove the rubber cap at the rear of the top case.
3. Through the hole at the rear of the top case, move the slide switch (S6013) toward the “NORMAL” side
(“Right” side as shown in gure).
NORMAL
Switch (S6013)
4. Connect the SCU-20 PC connection cable to the ACC jack on the DR-2X/XE rear panel.
SCU-20
AC 100 V - 240 V
(USA, EXP, AUS, CHN)
5. Touch and hold the DR-2X/XE LCD screen while turning the DR-2X/XE ON.
6. Press the [SETUP] switch button, (although “PUSH SETUP” message is displayed on the screen).
"DSP
COM" will appear on the display.
7
Page 8
Install the DSP rmware
1. Open the “PCTOOLe_vxxxx” folder on the personal computer, and then Double-click the “PCTOOLe_
vxxx.exe” le that is saved on the PC, to execute the rmware installation program.
2. Select the COM Port number that was assigned when the SCU-20 programming cable was installed, and
then press “OK”.
3. When the pop-up screen is displayed, press the “OK” button
4. After the rmware installation completes, press “OK”.
5. Turn the DR-2X/XE power OFF.
6. Disconnect the SCU-20 programming cable.
7. Turn the DR-2X/XE power ON, and then touch [A SETUP] or [B SETUP] on the LCD, to display the rm-
ware version at the center of the screen. If the DSP Version No. has been updated, the rmware update
was successfully completed.
Turn the DR-2X/XE power OFF.
8. If the LAN-UNIT is not being used, this completes the DSP rmware installation process.
Through the hole at the rear of the top case, move the slide switch (S6013) toward the “LAN” side (“Left”
side as shown in gure).
LAN
9. Replace the rubber cap at the rear of the top case.
This completes the DSP rmware installation process.
Switch (S6013)
8
Page 9
 Loading...