

Page 1

V1.2
P 1
da Vinci 1.1 Plus User Manual
ENG
Page 2

V1.2
P 2
The purpose of this user manual is to help users understand and use the da Vinci 1.1 Plus 3D printer
correctly. It contains the operating instructions, maintenance information and application skills of the
da Vinci 1.1 Plus 3D printer. To learn more about the latest news of the da Vinci 1.1 Plus 3D printer,
please contact local dealers or visit the ofcial website of XYZprinting: http://www.xyzprinting.com
Trademarks
All trademarks and registered trademarks are the property of their respective owners.
Printing History
New editions of this manual incorporate new and changed material since the previous edition. Minor
corrections and updates may be incorporated into reprints of the current edition without releasing
additional announcements or documents regarding the updated version. The User Manual is for the user's
reference only. If you need to obtain the latest information, you are welcome to visit XYZprinting website:
www.xyzprinting.com
Warranty and Service Plan
After purchasing da Vinci 1.1 Plus, you may obtain the related warranty and service plans that we provide.
You can contact the dealer or get the latest information from our ofcial website.
V1.2
Doc Edition Month Year
Apr 2015
Page 3

V1.2
P 3
Chapter 1 Important Safety Instruction ..................................................................................................4
Chapter 2 Unpacking and Setup.............................................................................................................5
Chapter 3 Product Overview / Accessory Checklist................................................................................6
Chapter 4 Connect the Cable ................................................................................................................7
Chapter 5 Opening Settings ..................................................................................................................8
Chapter 6 Home Menu Display and Change Cartridge...........................................................................9
Home Menu......................................................................................................9
Load Filament................................................................................................10
Unload Filament...........................................................................................................11
Filament troubleshooting.....................................................................................................11
Chapter 7 Print Menu Display...............................................................................................................12
Print from USB.....................................................................................................................13
My Gallery............................................................................................................................14
Print Sample........................................................................................................................15
Cloud Gallery.......................................................................................................................16
Print From A Mobile Application...........................................................................................17
Chapter 8 Printing Steps......................................................................................................................19
Auto Feed Gear Cleaning Instruction...................................................................................20
Chapter 9 Settings................................................................................................................................21
Setting Menu............................................................................................................21
Printer Setting Menu...........................................................................................................21
Maintenance Menu..............................................................................................................21
Jog Mode.............................................................................................................................22
Camera.........................................................................................................22
Print Bed Calibration............................................................................................................23
Clean Nozzle.......................................................................................................................24
System Setting Menu...........................................................................................................25
About...................................................................................................................................26
Chapter 10 Support Details..................................................................................................................27
Table of Content
Page 4
V1.2
P 4
Please read this manual carefully before operating the printer. The following warnings and attention
notices are a best effort attempt to cover all scenarios; unfortunately it is not possible to do so. In
the case of performing maintenance procedures that are not described in this manual the burden of
safety falls to the customer side.
For basic safety and precautions adhere to the following:
Chapter 1 Important Safety Instruction
● Do not let children operate this device without adult supervision. Electric shock hazard. Moving parts can
cause serious injury.
● Do not place the printer on an unbalanced or unstable surface. Printer may fall or tumble causing harm
and/or injury.
● Do not place any objects on top of the printer. Liquids and objects that fall into the printer can lead to
printer damage or safety risks.
● Do not use ammable chemicals or alcohol wipes to clean this device.
● Do not disassemble or replace the printer cover with none XYZprinter covers.
● Do not touch heated surfaces during or after operation. Heated surfaces can cause severe burns.
● Insert and secure the power cord firmly for proper usage and to avoid potential electricity and fire
dangers.
● Do not attempt to service the printer beyond the instructions specied in this document. In the case of
irrecoverable problem, contact XYZprinting service center or your sales representative.
● Please place and use the printer in a well ventilated area. The process of heating the filament will
produce a small amount of non-toxic odor. Having a well ventilated area will ensure a more comfortable
environment.
● This printer is only to be used with lament specied by XYZprinting.
● Make sure to set the power switch to the off position and remove the power cord before transporting the
device.
● Some components of the printer are moving during operation. Do not attempt to touch or change anything
inside before power off the printer.
Page 5
V1.2
P 5
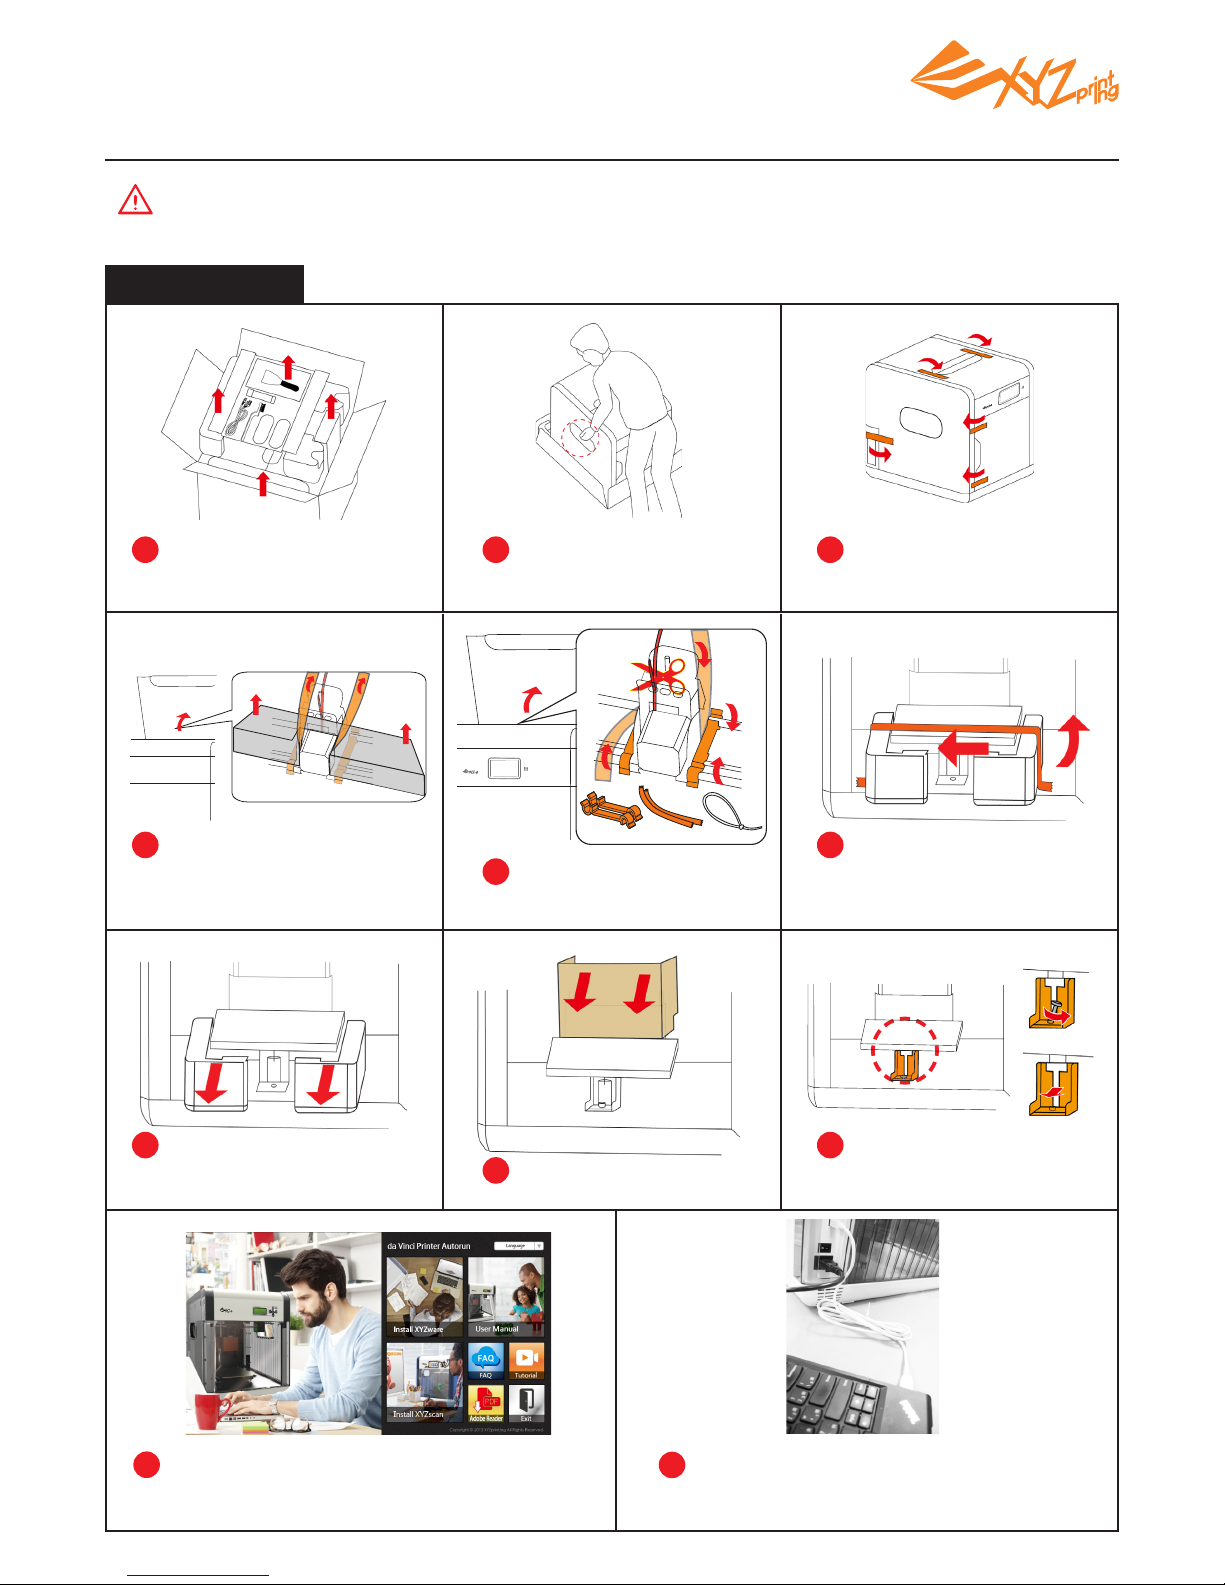
Chapter 2 Unpacking and Setup
1 2 3
8
9
10
11
Open the box and remove
the accessories and the
cushion.
Take out the printer by the
grip holds.
Note: All packaging materials should be removed before powering up the printer.
Remove plastic bag and
all tapes.
Open the top cover, and
remove the cushions by the
extruder
Remove the tape on the
print bed.
Remove the packaging
supports and tapes from
inside.
Remove the cardboard.
Remove the cushions by
the print bed.
Remove the bottom screw
and plastic piece under
print bed.
Insert the USB ash drive to install XYZware
for printing.
Use the USB cable to connect the printer to
PC. Connect the power cord to the printer
then turn on the power switch.
4 6
5
7
Open the box
Packing support x2
Cable tie
x1
Tape x2
Page 6
V1.2
P 6
Maintenance Tools
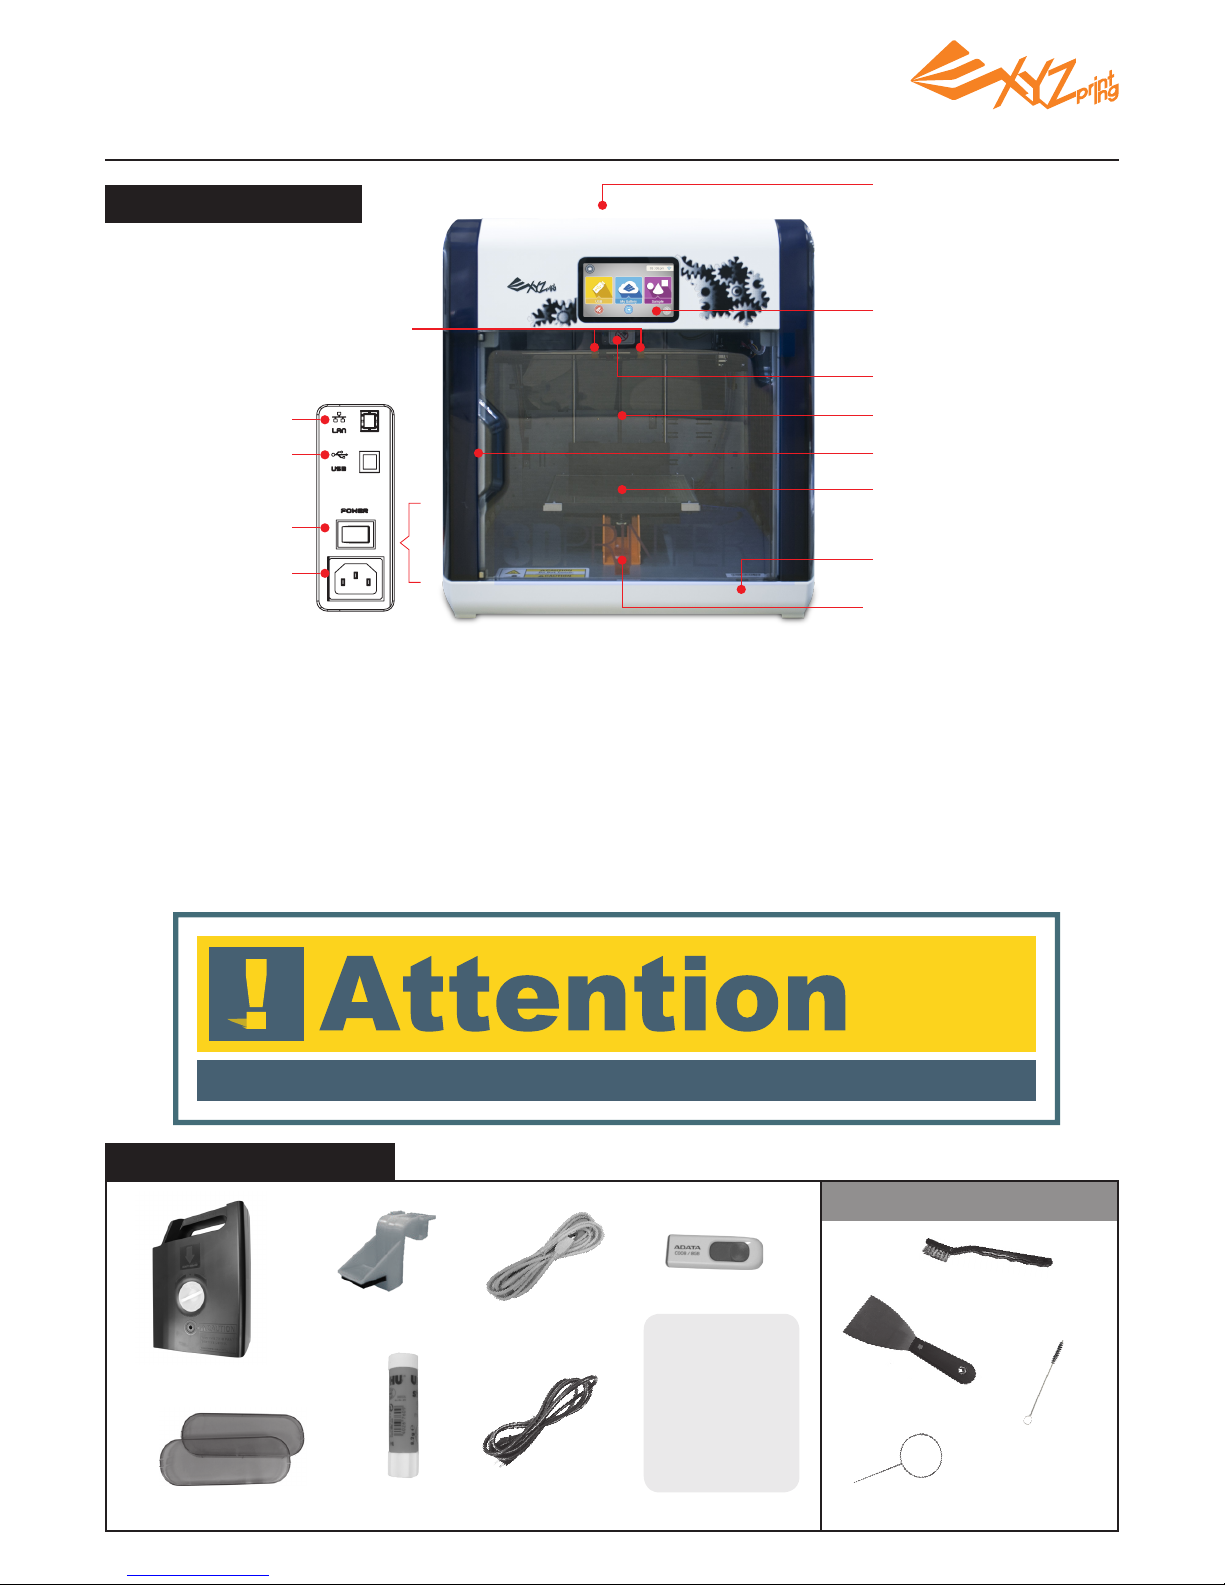
Control Panel: used to operate functions in the printer.
Extruder Module: used for printing 3D objects.
Z-Axis Rod: used to lift heated bed module during printing.
Front Door: open to get printing sample or for maintenance.
Print bed: provides a at surface to lay the 3D model.
Cartridge Slot: space for placing the lament cartridge.
LAN Port: used for connecting the Network cable.
USB Port: used for connecting the USB cable.
Power switch: this switch turns on/off the power of the printer.
Power Connector: used to connect the power cord.
Cartridge Slot
Control Panel
Extruder Module
Z-Axis
Front Door
Print Bed
USB Flash Disk Slot
Remove the print bed
xing screws and printing
module xers
Remove the
packaging supports
Product Overview
USB Port
LAN Port
Power Switch
Power Connector
Accessory Checklist
.
Side Cover Plate
x2
.
Glue Stick
.
Filament Cartridge
.
Cartridge Locker
.
USB Cable
.
Power Cord
Chapter 3 Product Overview / Accessory Checklist
Once the 3D printer is turned off, wait at least 3 seconds before turning it on again.
.
Cleaning Wire
.
Copper Brush
.
Scraper
.
Cleaning Brush
USB Content:
-Quick Guide
-Important Notice
-User Manual
-XYZware Manual
-Software
-Print Sample
.
USB Flash Drive
Page 7
V1.2
P 7
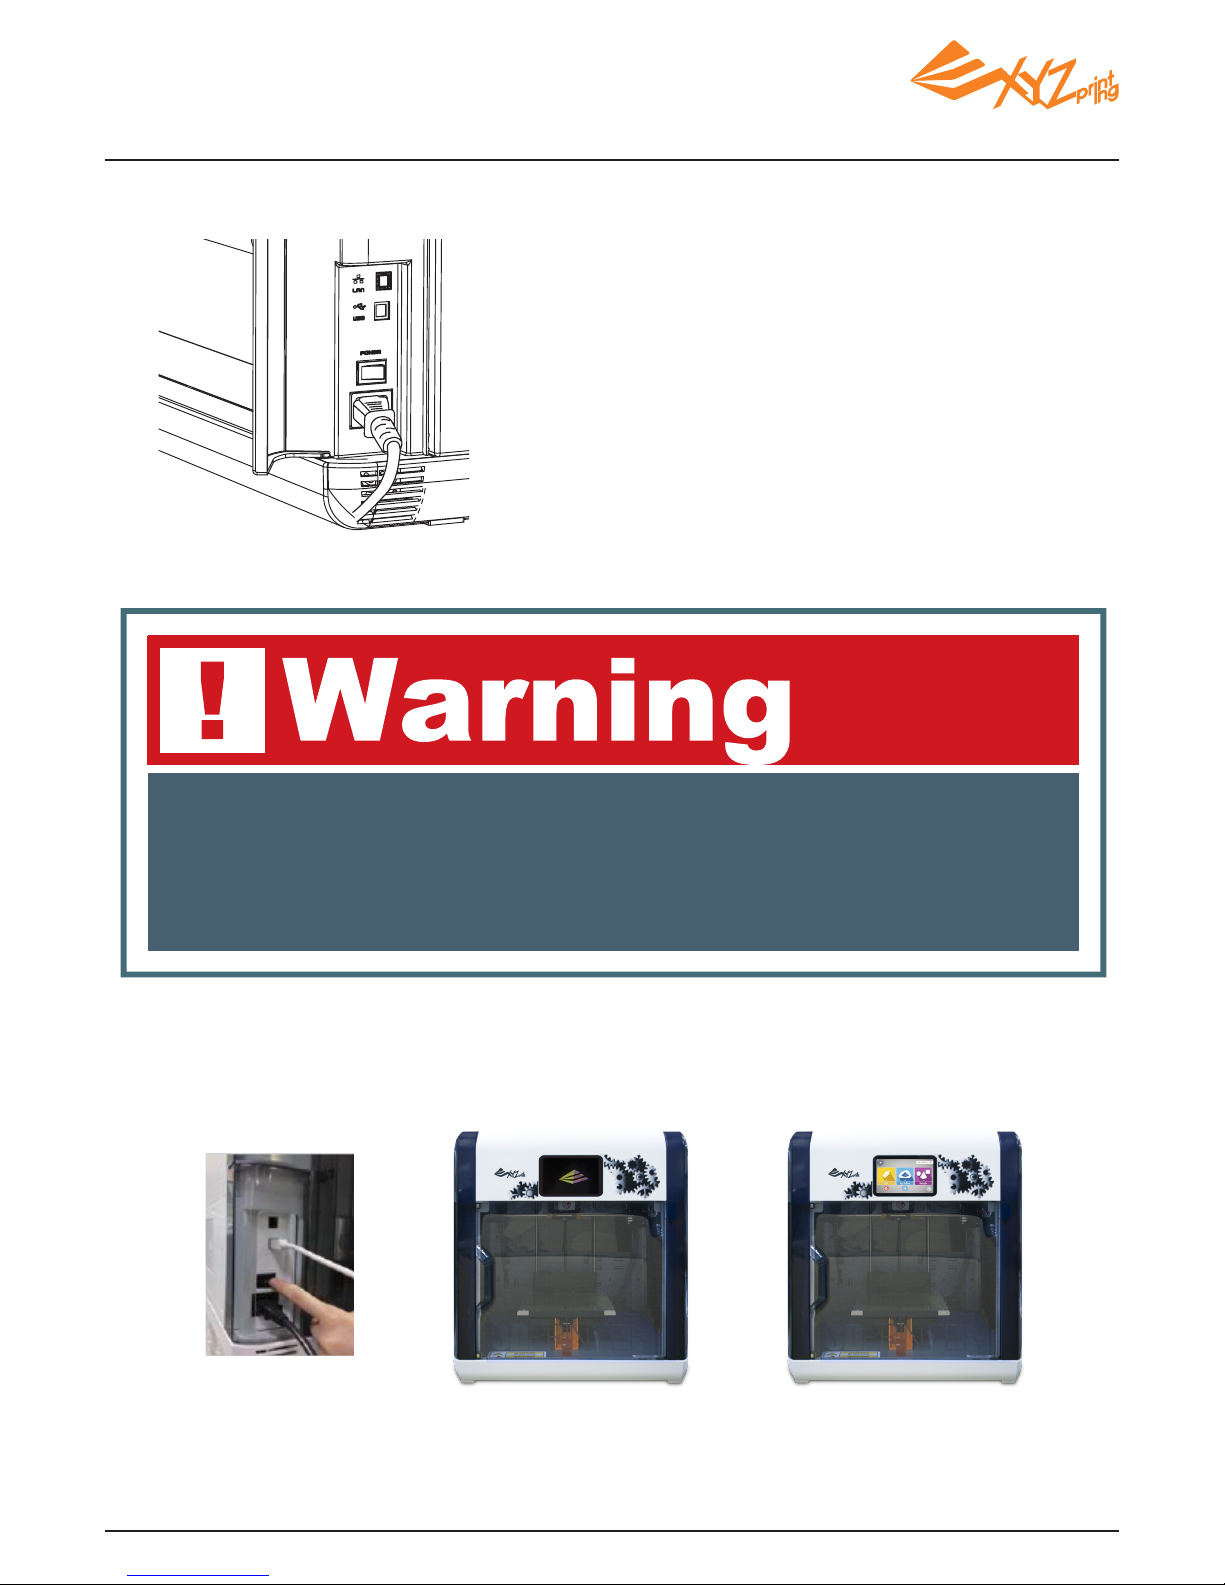
A. LAN Port:
Make sure the printer is connected with Internet and
plug the cable tightly.
Please use RJ-45 Network cable.
B. USB Port:
Make sure USB cable is connected with computer.
C. Power Outlet:
Make sure power cord is properly connected.
Turn on the power
Press the power switch | Power up the printer, until the screen loading screen disappears, you can
begin to manipulate printer.
A
B
C
Press the power button
behind the printer.
Loading, please wait.
Boot completed.
Chapter 4 Connect the Cable
● Make sure to set the power switch to the “off ” position before inserting the power cord.
● Make sure the power cord is properly connected. Incorrect use may cause damage to the printer.
● Make sure to remove the power cord from printer if you are storing or not using the printer for an extended period of
time.
● Make sure to avoid power strips to power the printer . Use a wall outlet.
Page 8
V1.2
P 8
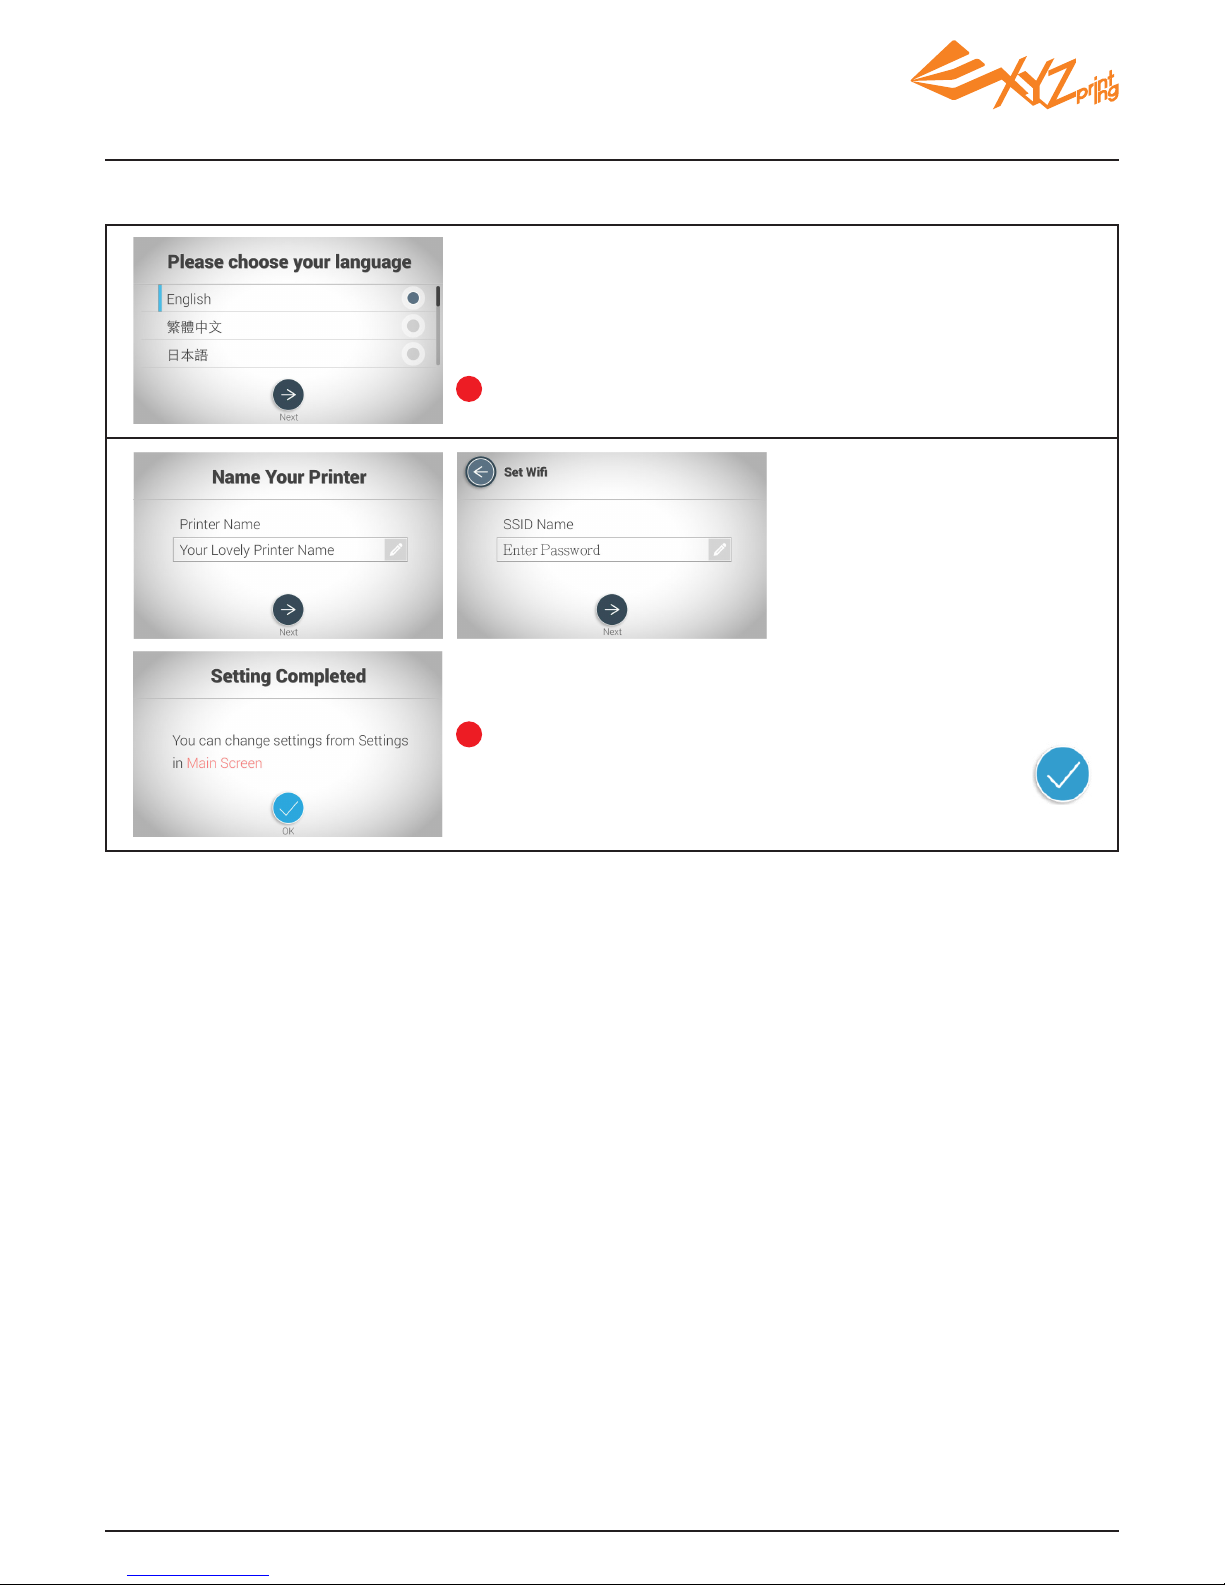
After choosing the language, display language on the screen
will switch to the language you selected.
Complete the basic settings of the printer after turning it on for the rst time and follow the prompts
on the screen to set the printer.
Follow the prompts on the screen and complete the settings
of the printer name, date, time and Wi-Fi*. Then click
and enjoy the fun of 3D printing.
1
2
* Skip the Wi-Fi setting if it is not necessary.
Chapter 5 Opening Settings
Page 9
V1.2
P 9
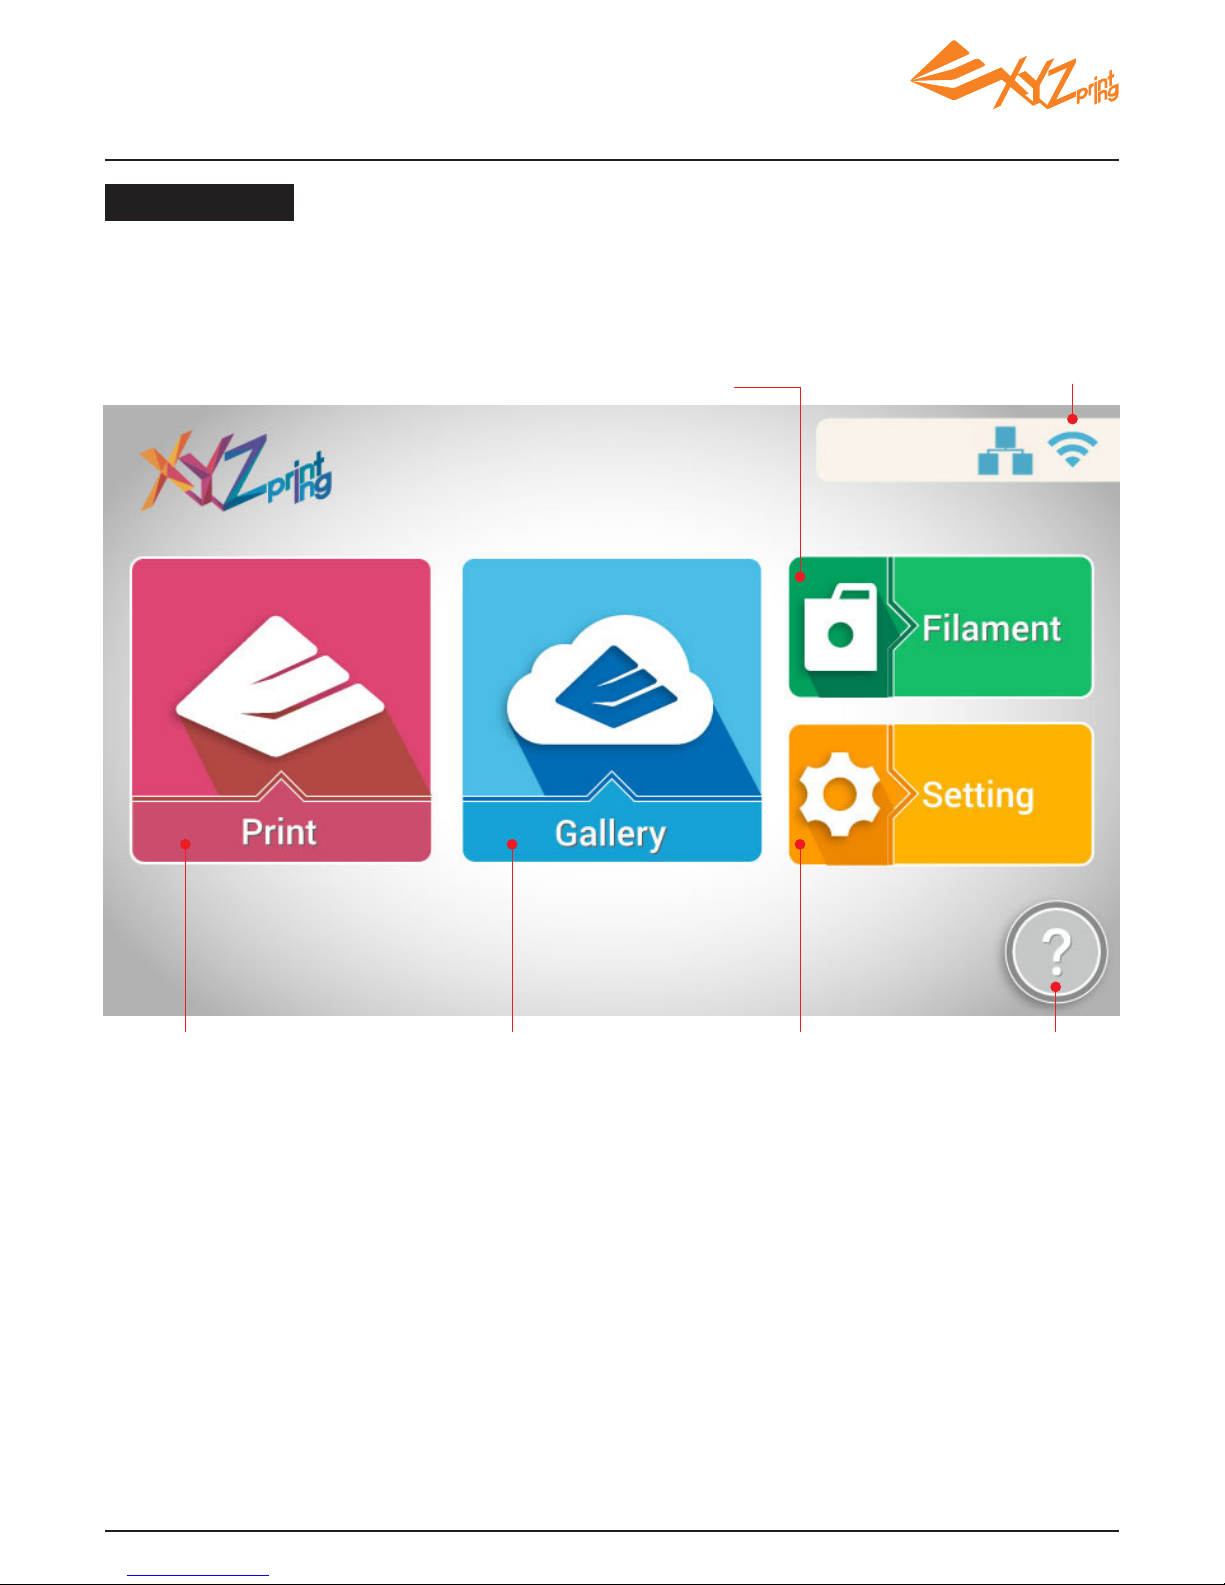
Home Menu
Filament
Load, unload lament and view the
information about the lament.
Network Status
Display online status of Wi-Fi
or Ethernet network.
Settings
View the printer
status and system
settings.
Function
Guidelines
Home menu
basic operation
introduction.
Print from the cloud
gallery
Browse the content of
XYZprinting gallery and
select for printing.
Browse the le for
printing
Print from USB ash drive*,
"My Gallery" and sample
folder.
*Please export .stl les into .3w format via XYZware before printing.
Chapter 6 Home Menu Display and Change Cartridge
Page 10
V1.2
P 10
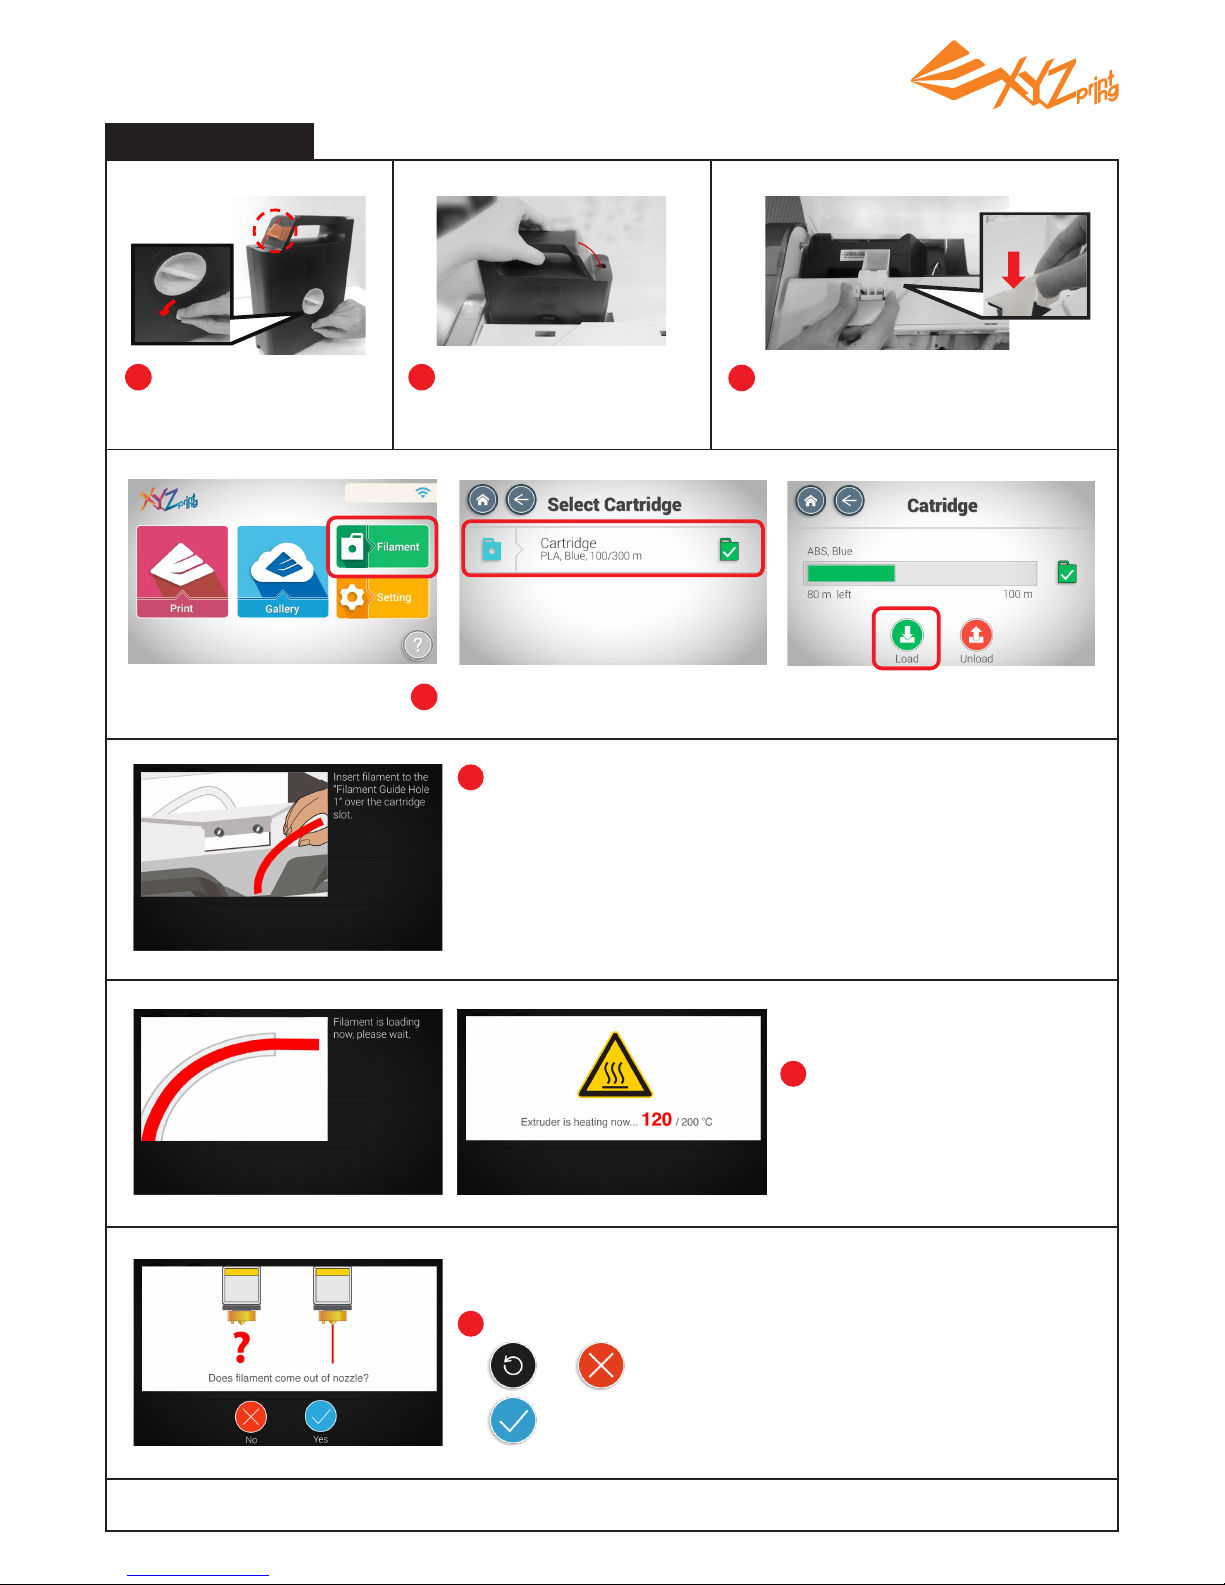
Load Filament
5
6
7
Insert lament into the guide hole until the printer starts to load
lament.
(When the loading begins, you will hear the sound of motor and
can see lament is pulled into the printer.)
Note : Before pushing the lament into the guide hole, avoid bending
the lament while loading lament and cut the tip of the lament off
at a 45° angle with a cutting pliers, lament loading will be easier.
Wait for the printer to install
lament and heating extruder.
If filament doesn't come out from the nozzle,please press
or . When filament is dripping off the nozzle, tap
to nish.
1
Remove the lament
stopper and tape.
2
Install the new lament cartridge
into the empty slot.
3
Place and push to click the cartridge.
4 Select "Filament" > "Cartridge " > "Load".
Page 11
V1.2
P 11
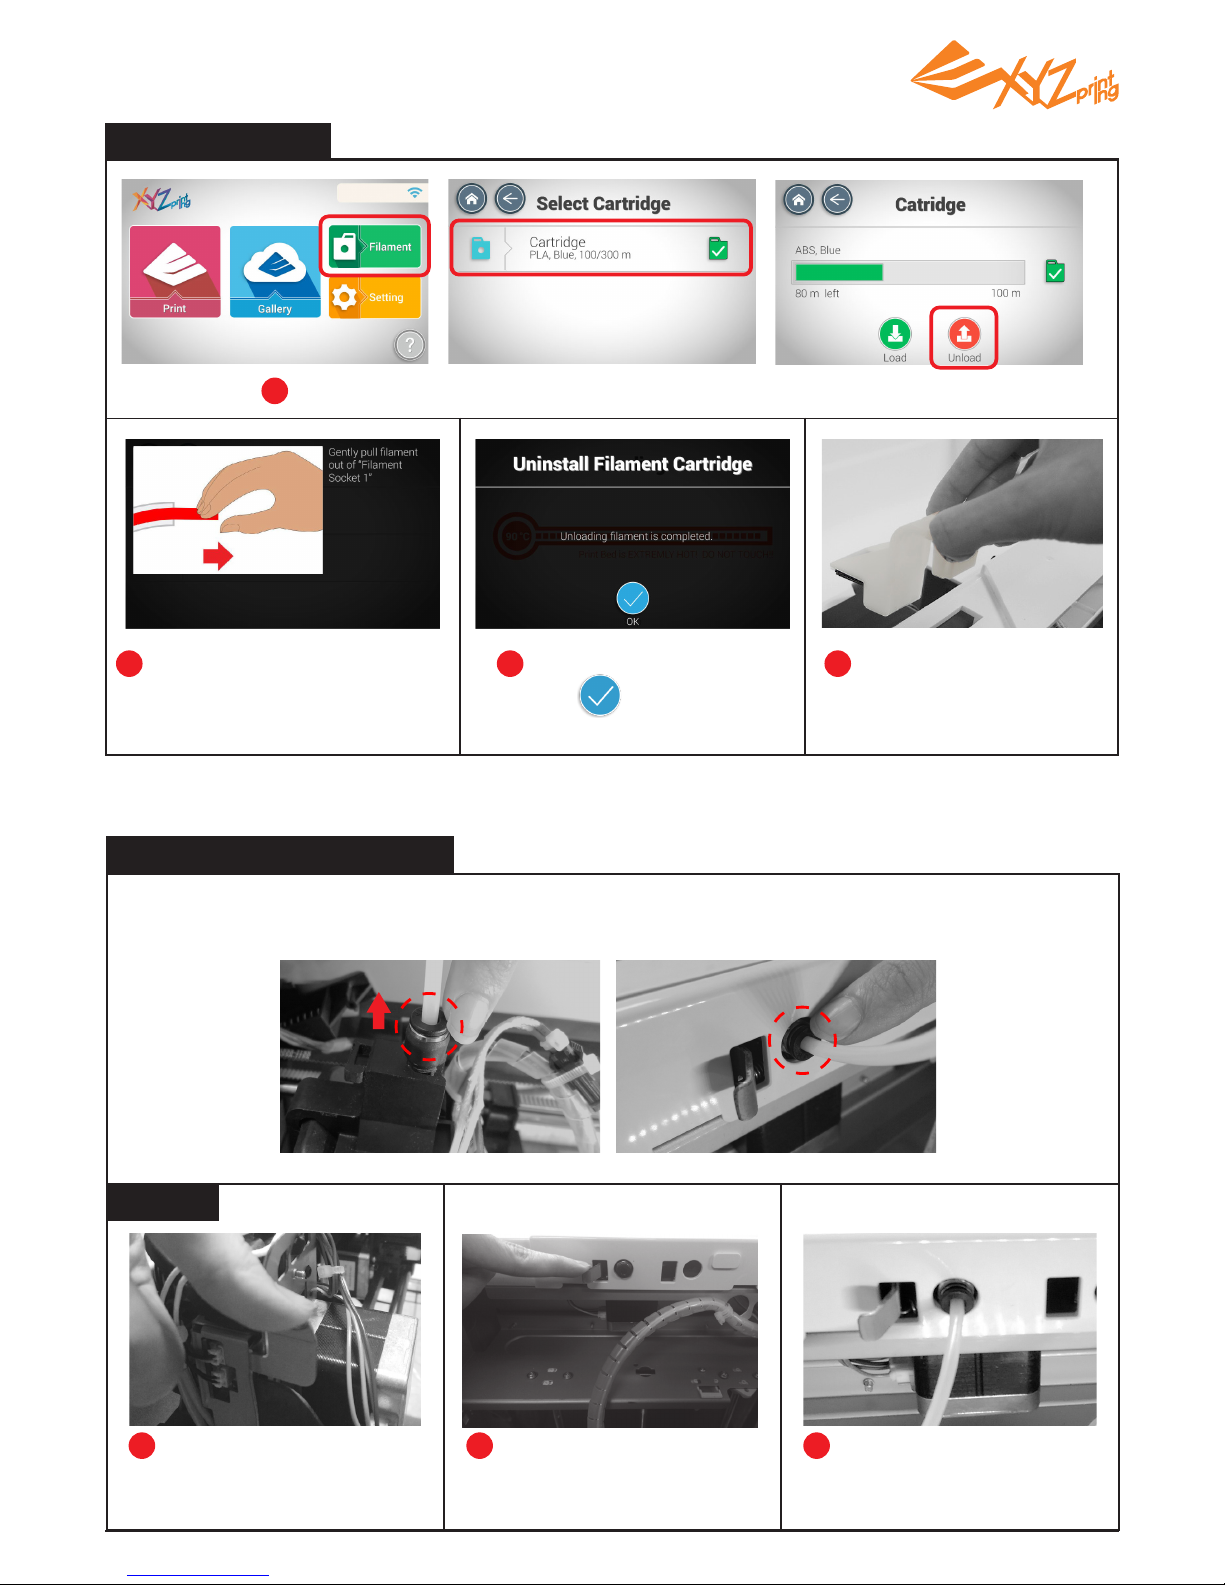
Unload lament
Note: Always "UNLOAD FILAMENT" as described below
before changing the cartridge. Do not cut the lament off.
2 3 4Filament is unloaded from
extruder automatically. Gently pull
lament out from the guide hole
when prompted.
When lament is pulled out,
press .
Remove cartridge locker
and the catridge.
1 Select "Filament" > "Cartridge" > "Unload" on the screen
Filament troubleshooting
When the lament is loaded automatically or is stuck in the extruder module, please rst unload lament by following
the steps above. And then press on the black rubber xers on either ends of the lament tube. You may also follow the
instructions on the screen for troubleshooting.
After removing the lament, plug
the lament tube directly back to
its original position to complete the
re-installation.
If the lament is stuck in the
extruder module, press the release
arm on the side of the extruder
module to extract the stuck
lament.
If the lament is stuck at the
entrance of the guide tube,
please press the release arm by
the entrance to extract the stuck
lament.
1 2
Status
3
Page 12
V1.2
P 12
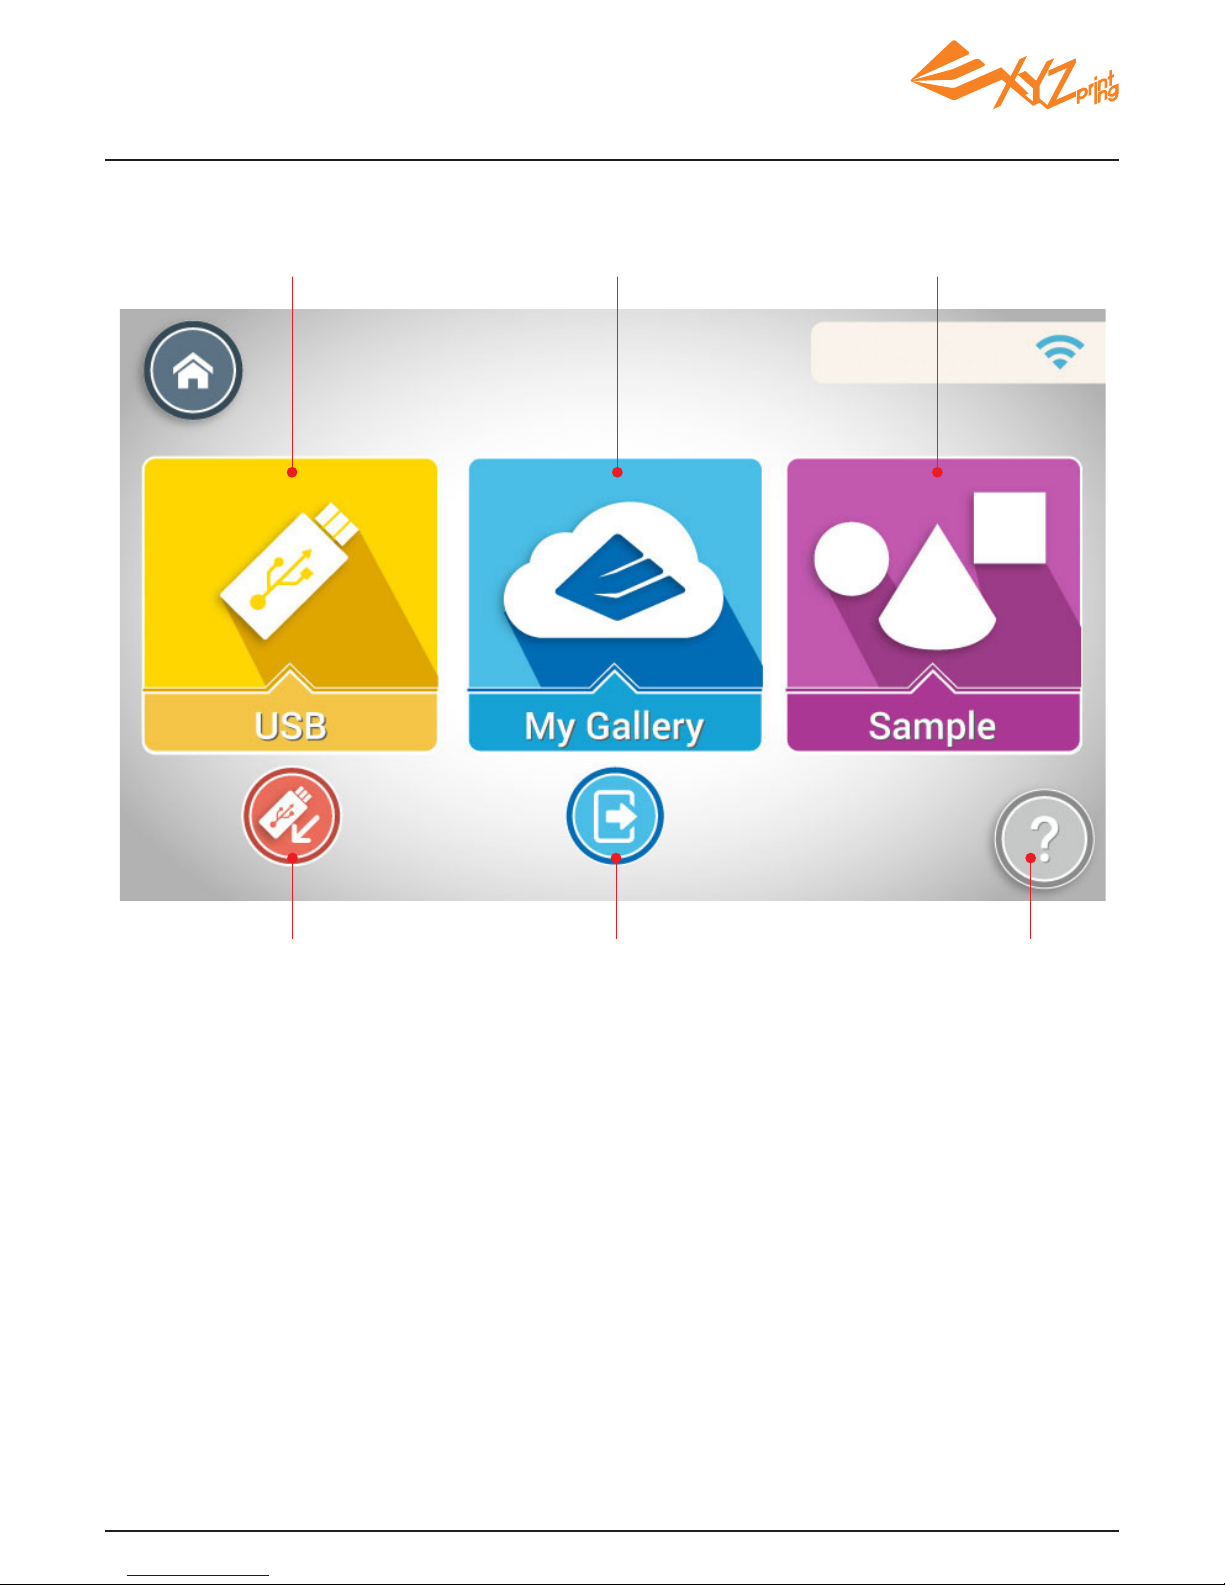
Choose the les for
printing from Sample that
come with the printer.
Basic operation
introduction of the
printing menu.
Log out from the
gallery.
Remove the USB
ash drive securely.
Choose the le for
printing from My
Gallery.
Choose the le for
printing from the USB
ash drive.
Chapter 7 Print Menu Display
Page 13
V1.2
P 13
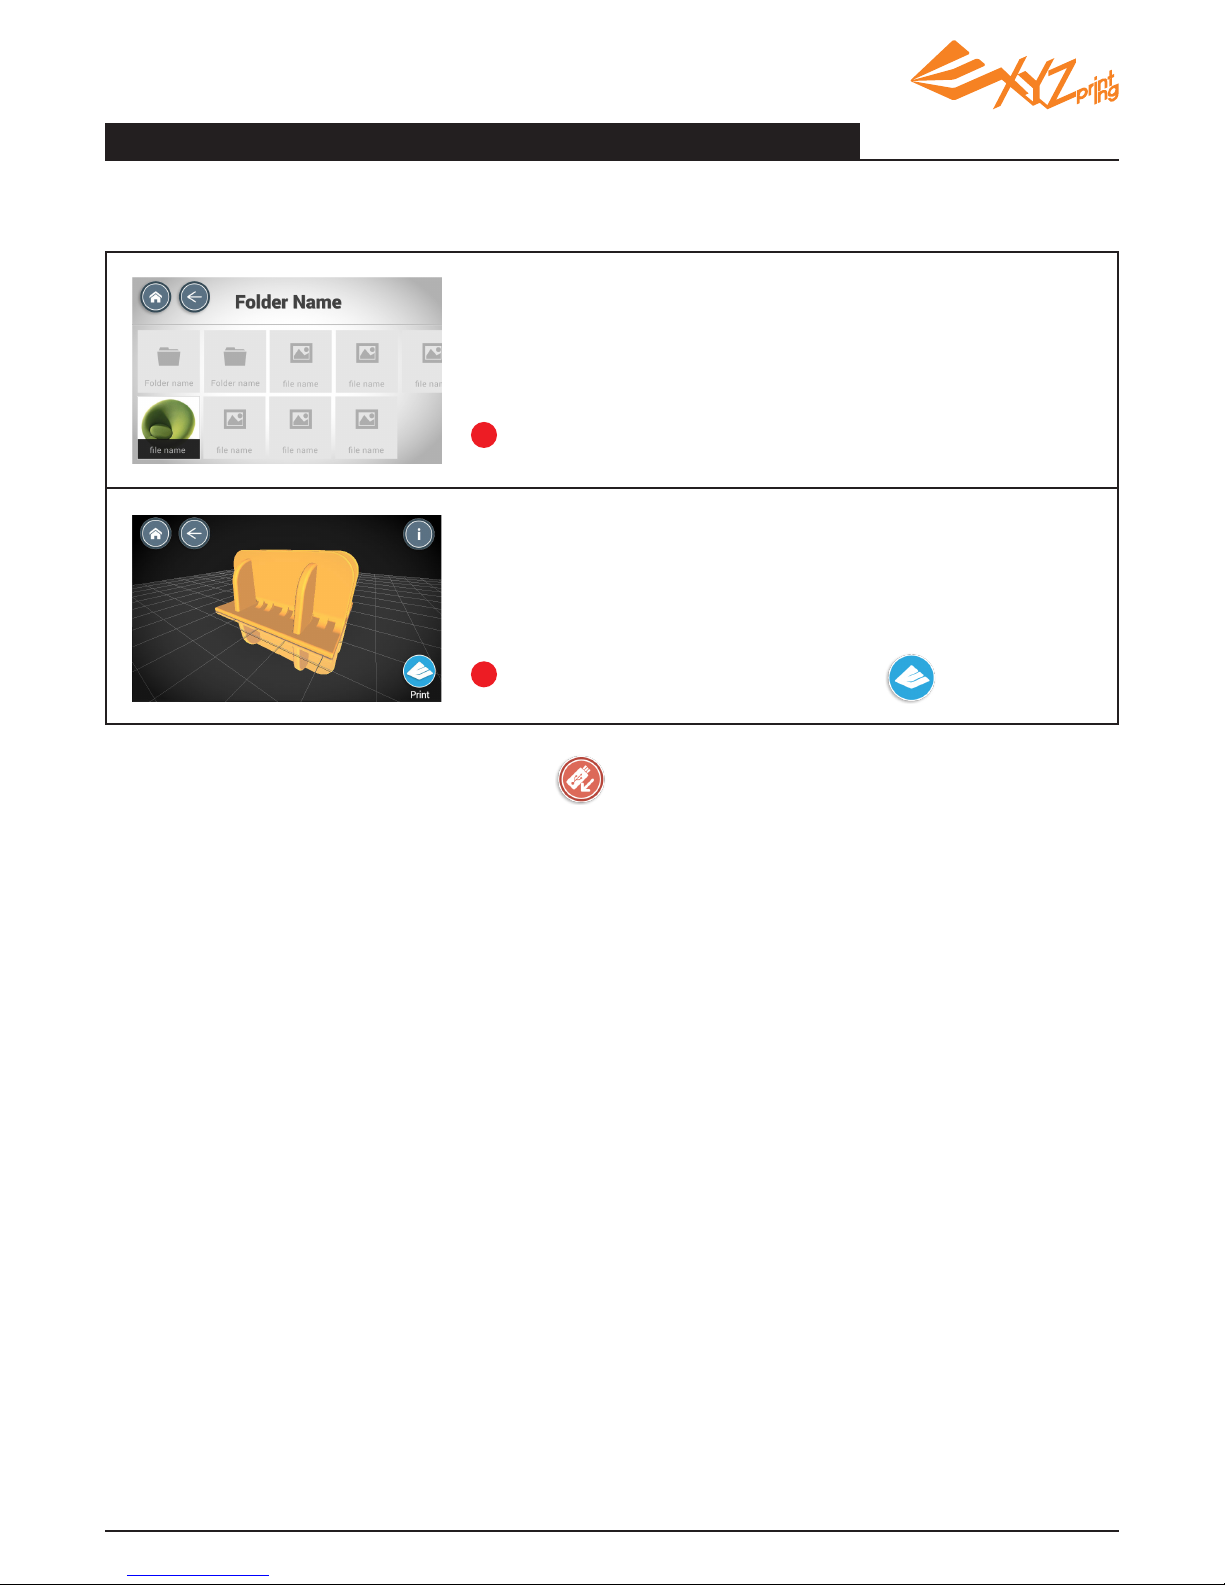
USB ash drive: Choose .3w les from the USB ash drive
The .3w le is generated by XYZware and contains slicing information. Before choosing the le from
the USB ash drive, you must use XYZware to save as a 3D le.
Choose the le to be printed and click to start printing.
To remove the USB ash drive security, click to remove it securely.
Browse the content in the USB ash drive and choose the
le to be printed.
1
2
Page 14
V1.2
P 14
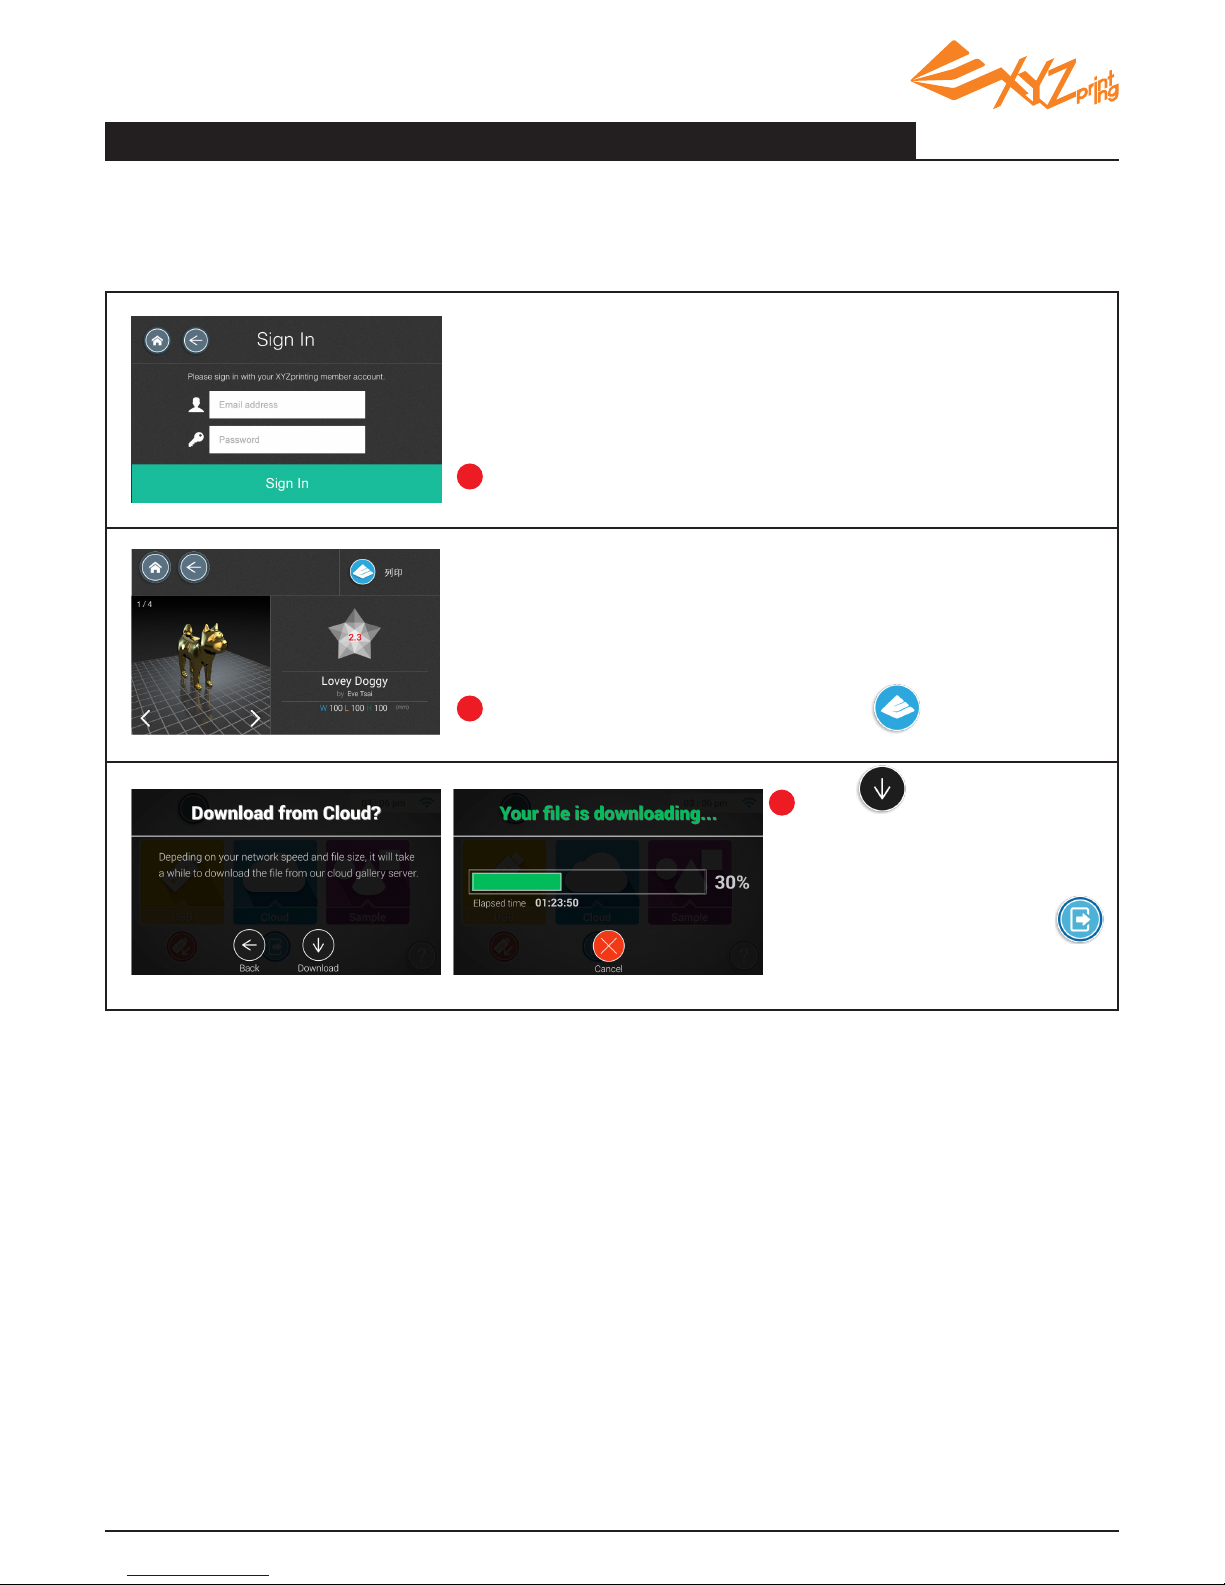
You may register an account on the XYZprinting ofcial website and upload your 3D creations. After
uploading your works, you may download it for printing directly on the printer.
Enter your e-mail address and password to log in My Gallery.
Choosing Steps:
Choose the le to be printed and click .
Click to conrm the le to
be downloaded and the printer
will start to download the le.
The le will be printed right
after the download. Click
to log out from My Gallery.
Note: Please connect the printer to the network and log your XYZprinting account to use this function.
1
2
3
My Gallery: Choose 3D models from private XYZprinting gallery
Page 15
V1.2
P 15
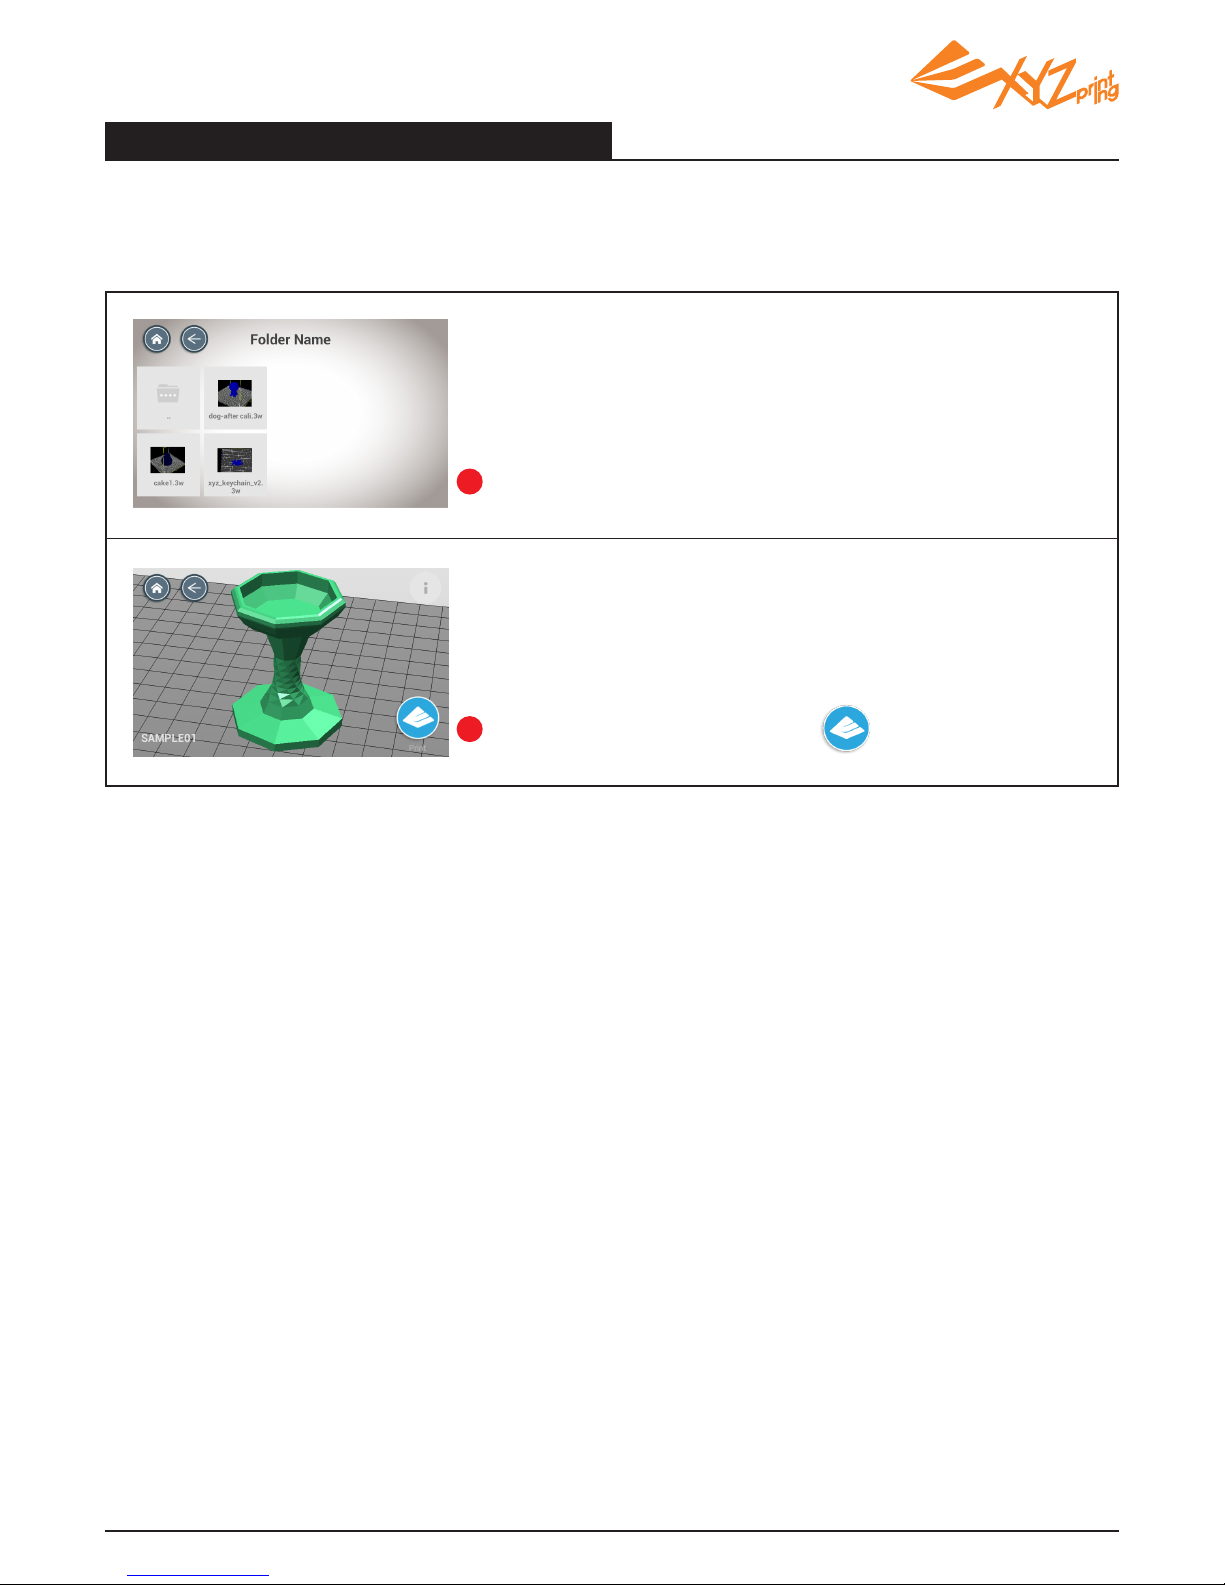
Sample: Print from the built in samples
There are 3 single color 3D model stored in the printer. You can start printing without the need to
select any settings.
Browse the sample in Build Sample.
Select a sample to print, and tap to print.
To select a sample:
1
2
Page 16
V1.2
P 16
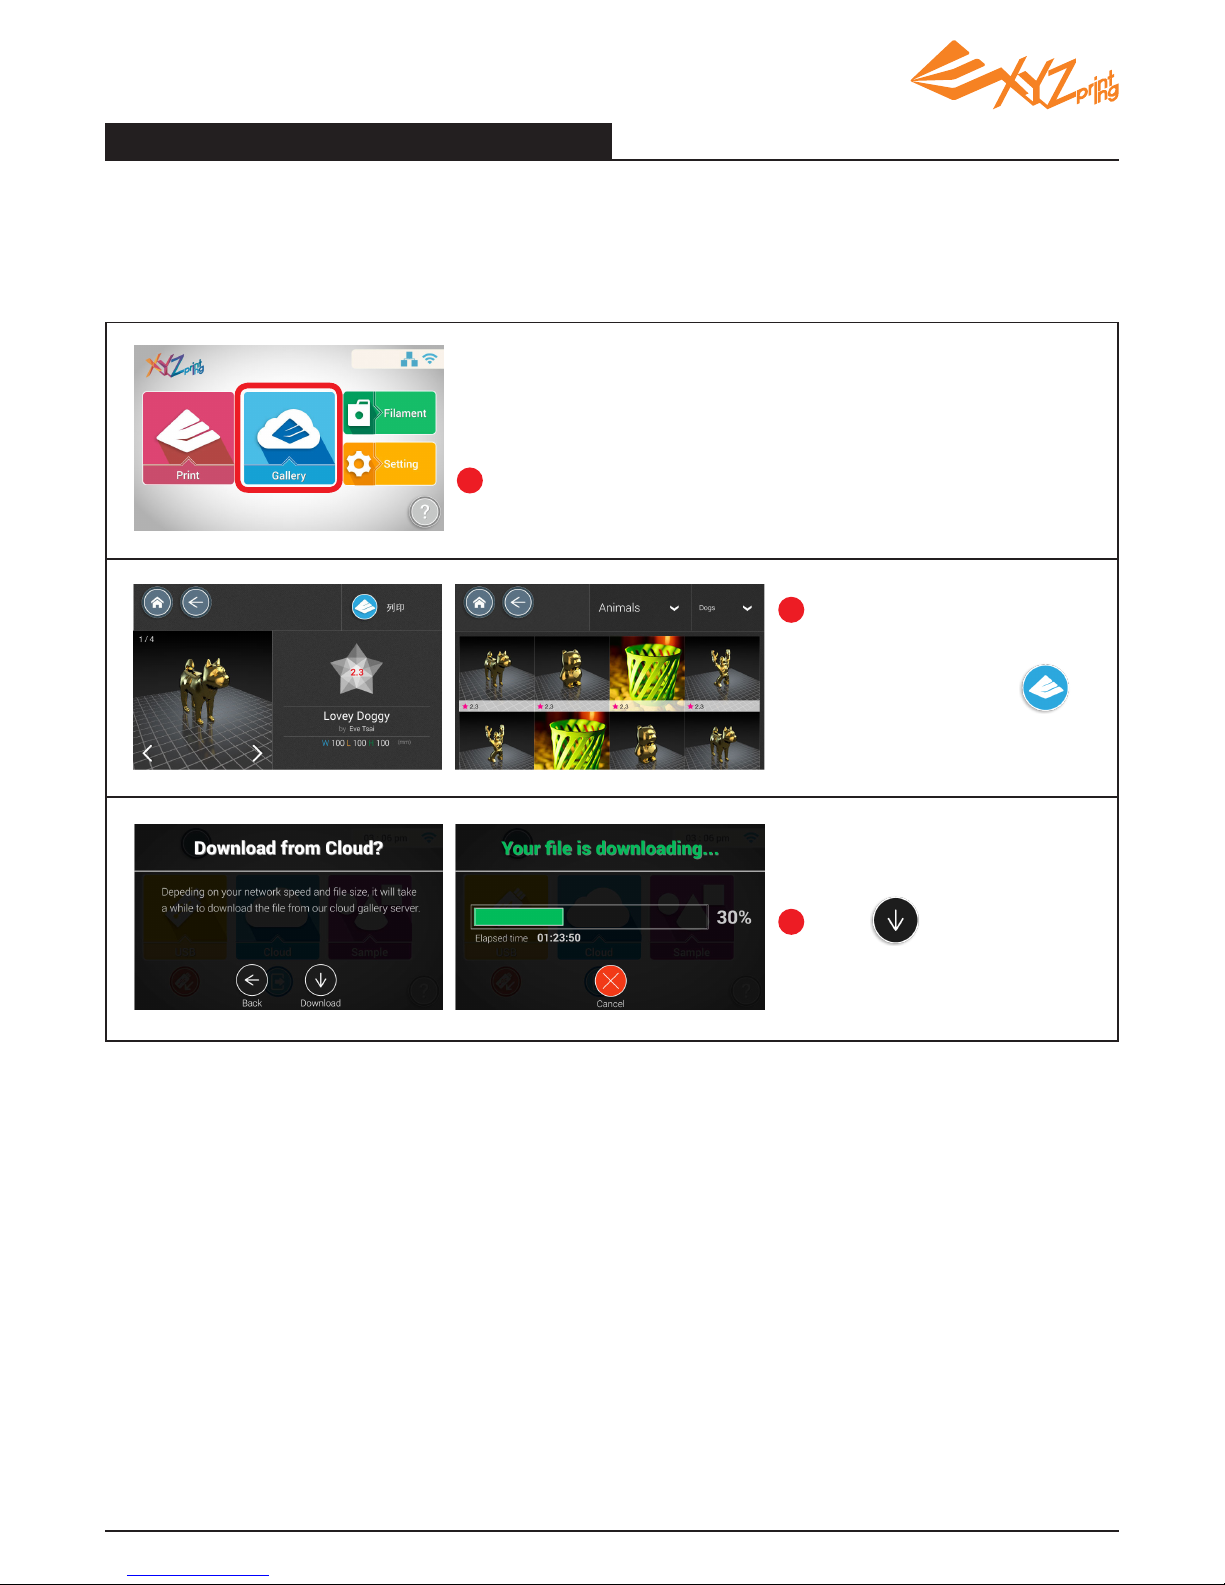
Cloud Gallery: Print from cloud gallery
XYZprinting provides a wealth of free 3D models in the cloud gallery. You can download and print
through the Internet directly without logging in.
Browse the Gallery and switch
among different categories; To
preview the model,tap .
Caution:
Make sure printer is connected to Internet.
Press to download,
and wait for the download to
complete.
Downloading Steps:
2
3
Once the printer is connected to the Internet, select "Gallery"
to go to XYZprinting cloud gallery.
1
Page 17
V1.2
P 17
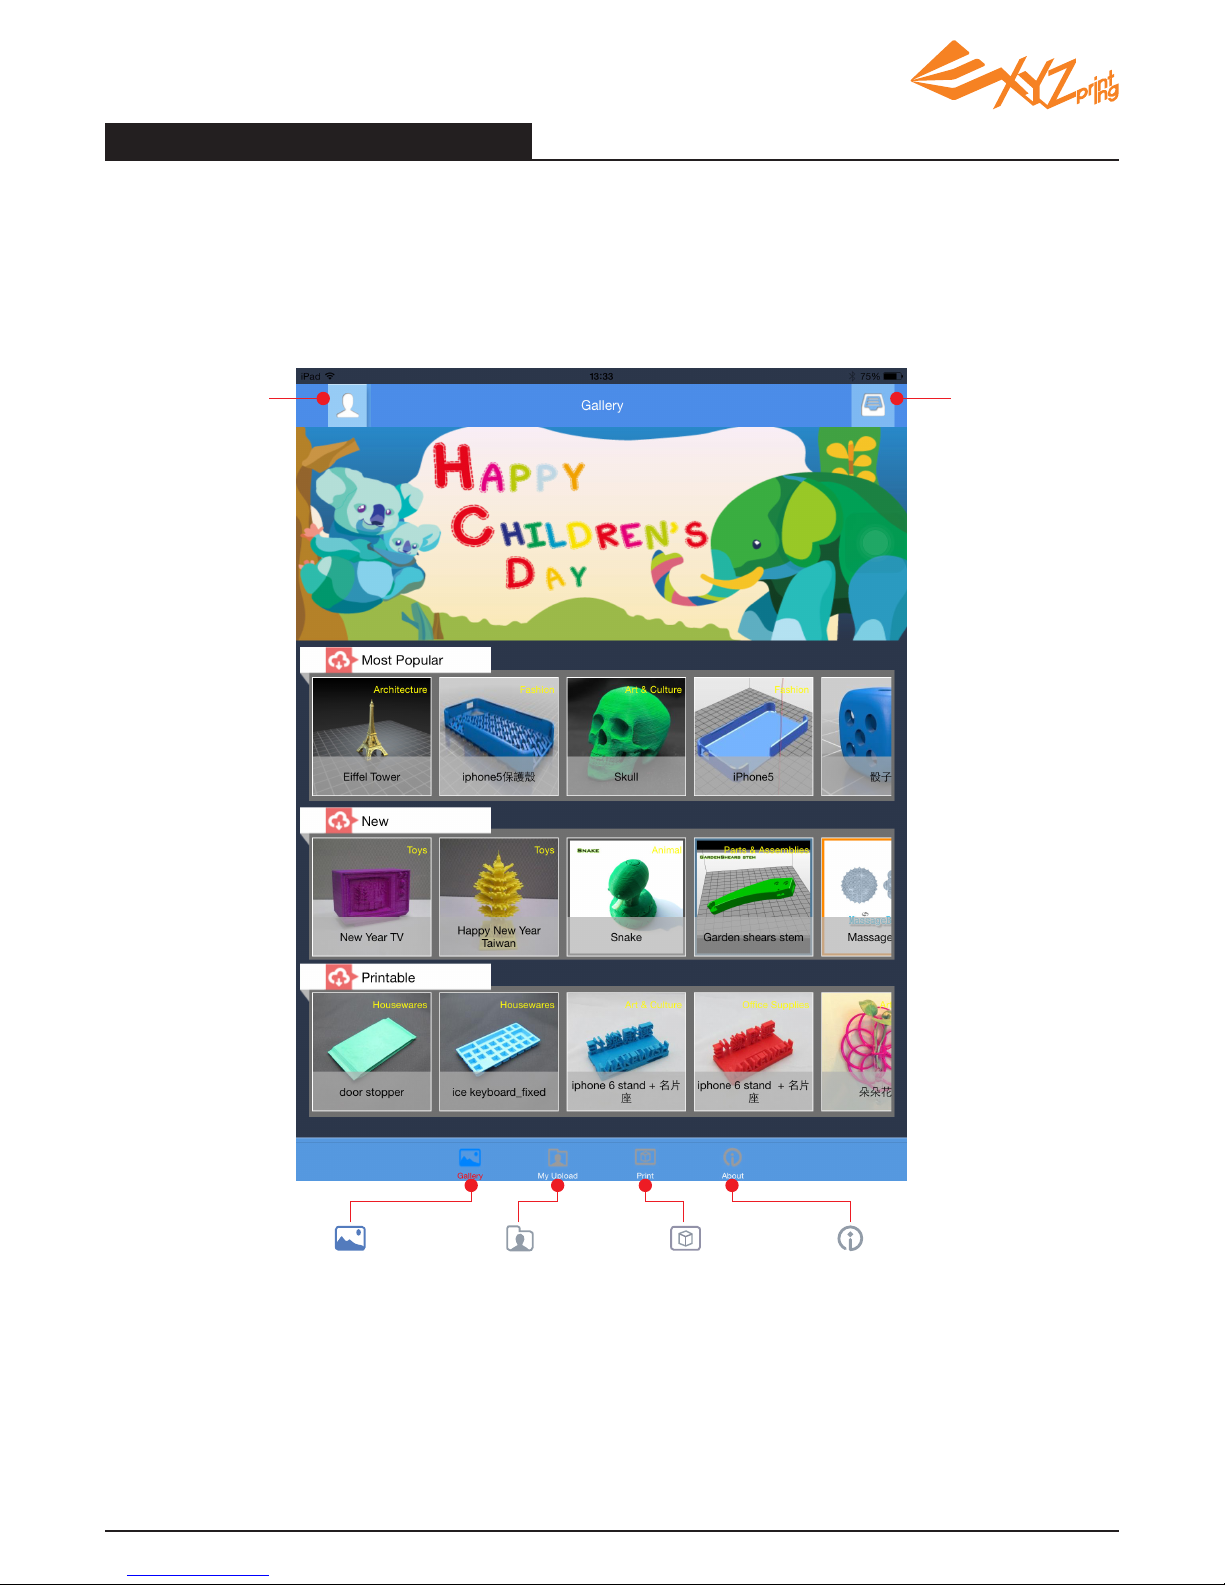
Print From A Mobile Application
1.The mobile device needs to support wireless printing.
2.Install XYZprinting App from Android or iOS system.
Category
User
Information
Gallery
Main screen
My Upload
Upload the
item and
printable le
Printer
To remote
control
printer
About
Printer
information
and copyright
Page 18
V1.2
P 18
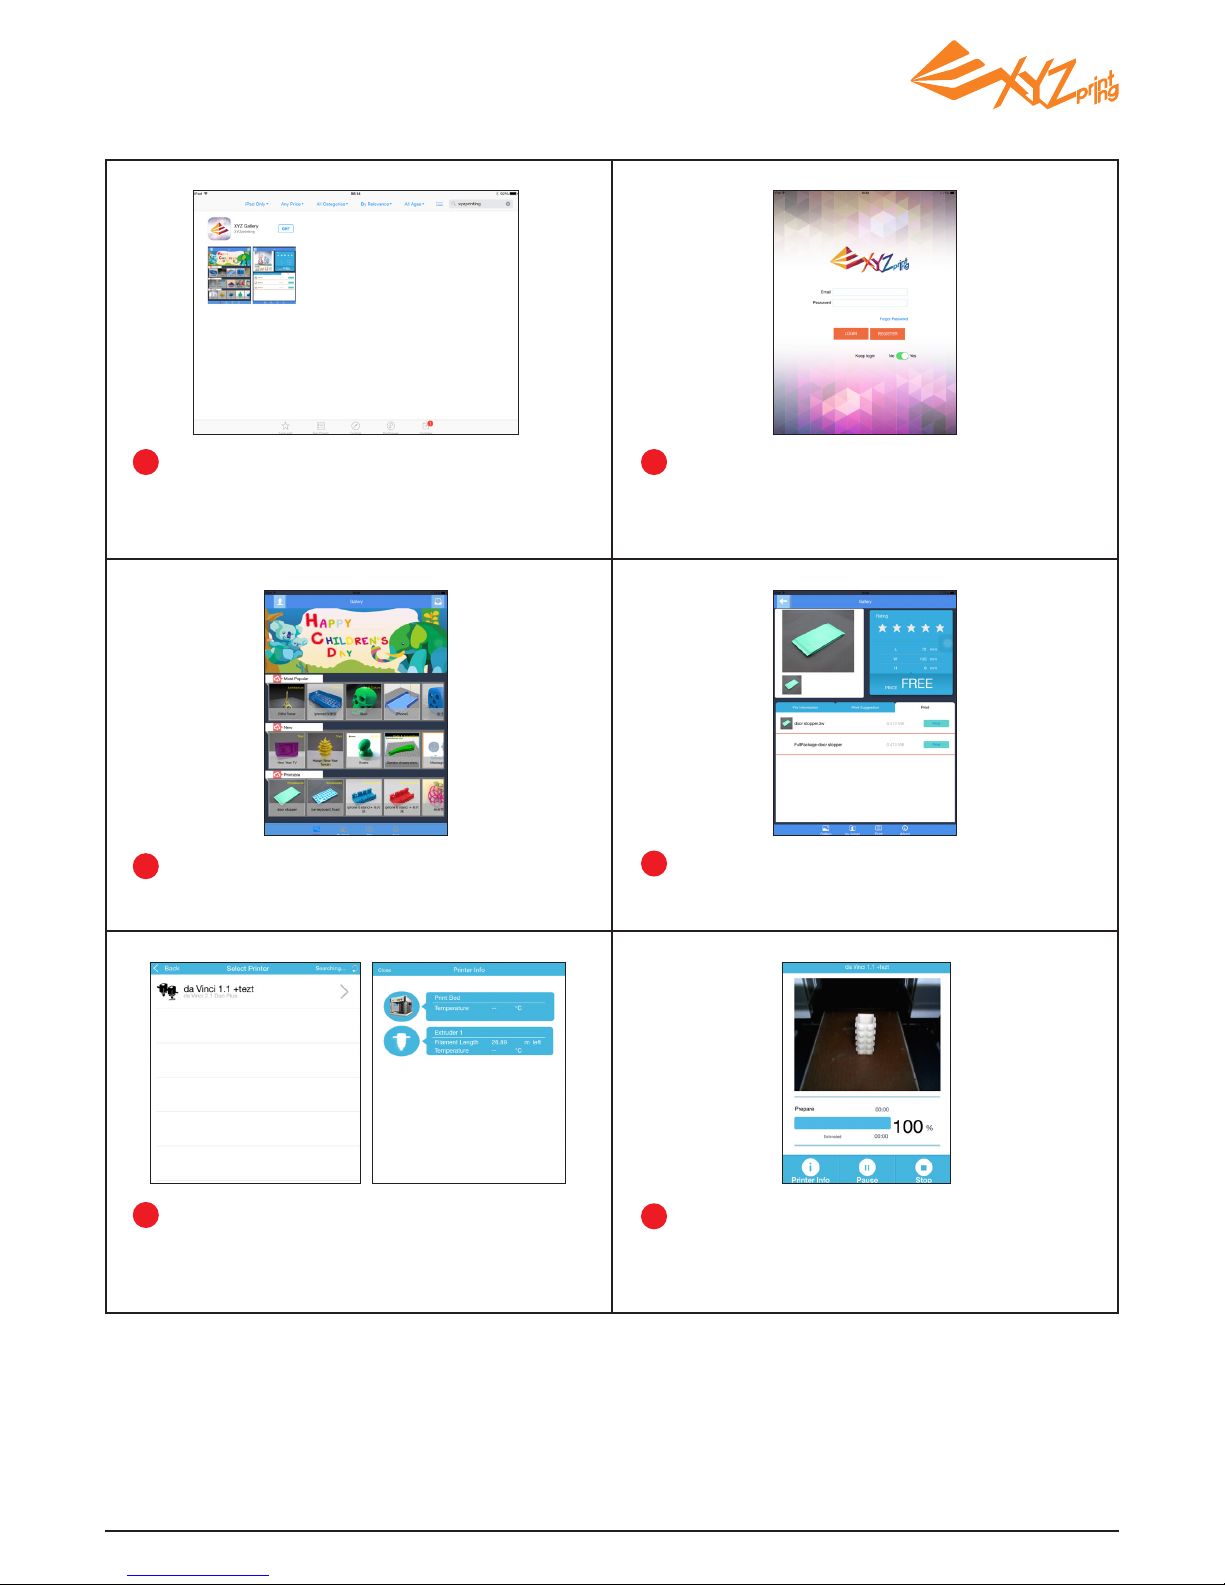
Please register an account at XYZprinting ofcial
website before logging in.
After log in, you will see ” most popular”, “new”
and “printable*” three folders for you to choose.
Open the Play Store from your Android
browser or App store of iOS system to search
“XYZprinting” and download the application to
your device.
1
3
Select the printer and confirm the printer
information, tap “Conrm to print”, the le will be
sent to the printer and ready to print.
You may remote control the printing status.
Select the object you want to print.
4
5
6
2
*The printable le is .3w format which can print from App directly. Some prints are.stl les that need to export
into .3w format via XYZware before printing. If the le requires payment, please follow the payment instruction.
Note:
1.Ensure the mobile device and the printer are connected on the same wireless network.
2.Transferring a print le over a wireless network may take more time than transferring a print le from a
USB mass storage device.
Page 19
V1.2
P 19
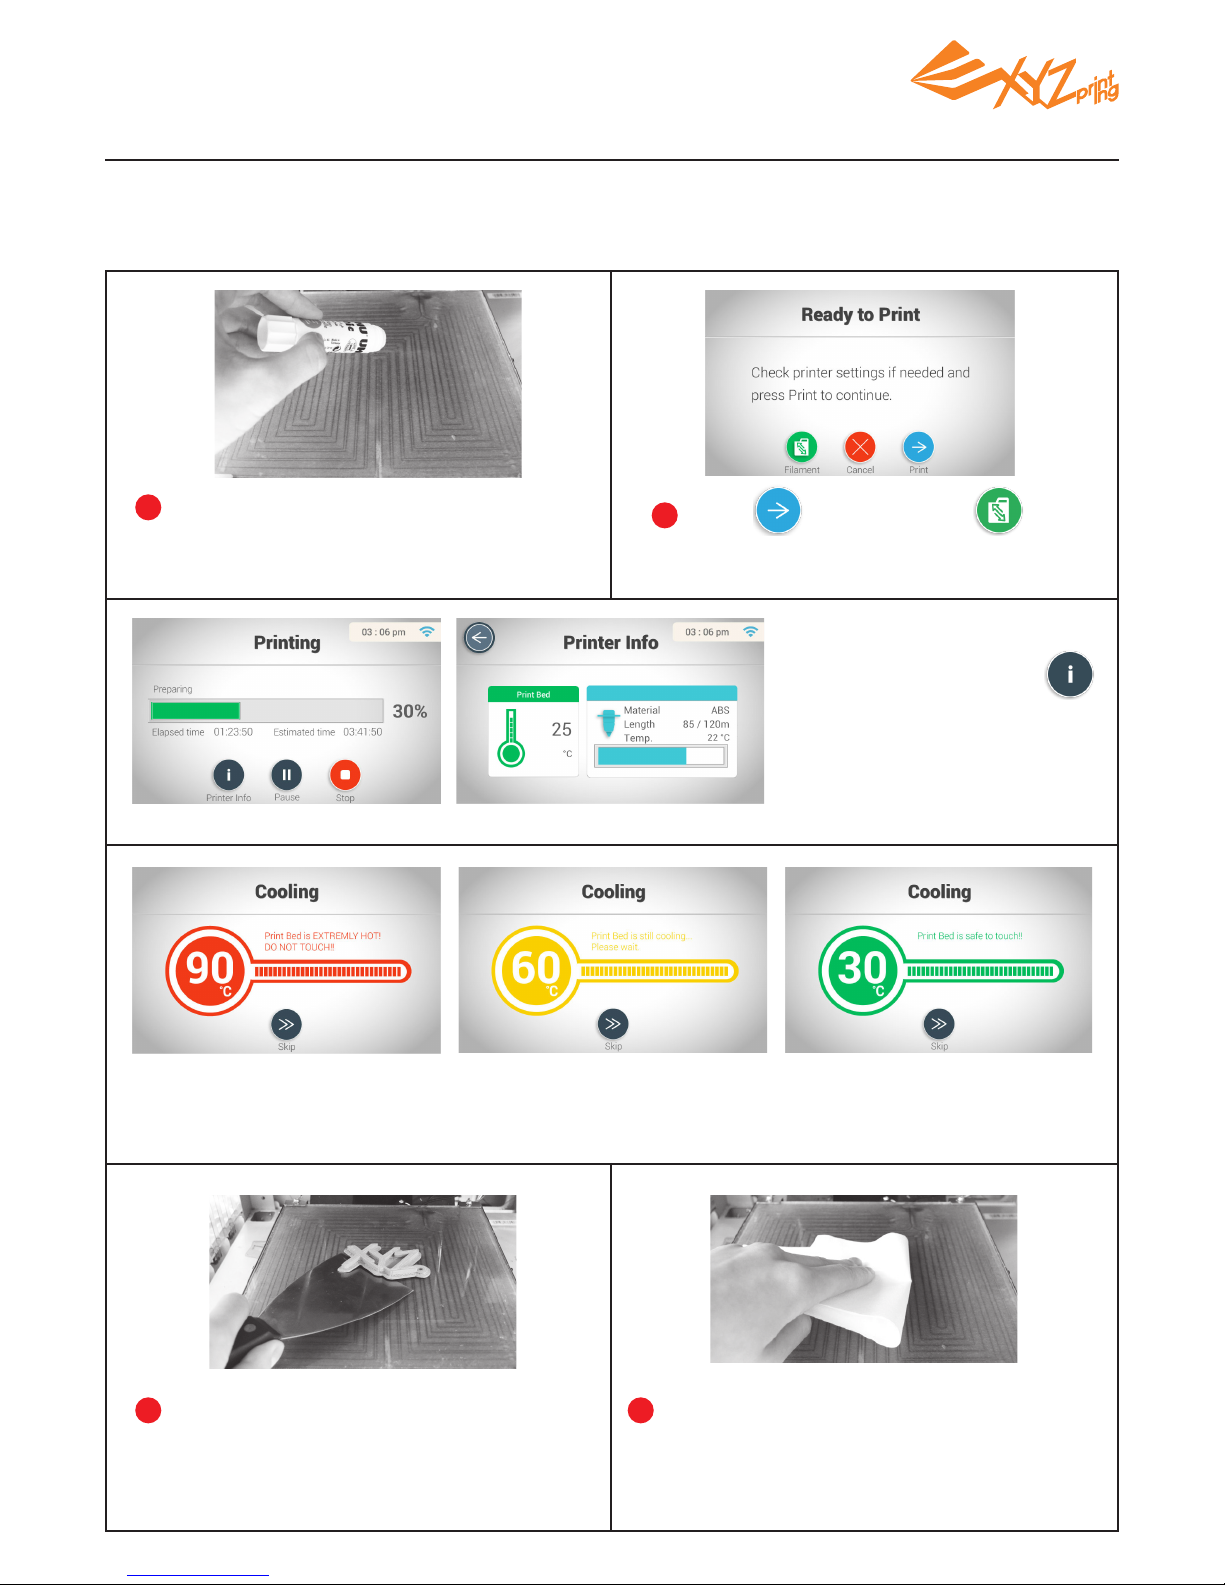
After choosing the les from the USB ash drive, My Gallery, Sample or Cloud Gallery, or transmitting
the les to the printer from XYZware…
Apply glue stick gently and evenly to the
print bed base on the size of the printing
object previewed on screen.
Remove the printed object when the
print bed has descended.
After the printing, the screen will show the temperature of the print bed. Take out the printed object
after the temperature of the print bed is cooling down to the room temperature.
Printing process is shown on
the screen. You may click
for Printer info during printing
and tap cancel or pause to stop
printing .
Press to print or press to
change lament.
Cover a damp cloth on the cold print
bed for 2-3 minutes, and wipe the
glue off gently (Scrape off the glue if
necessary).
1
3
2
4
Chapter 8 Printing Steps
Page 20
V1.2
P 20
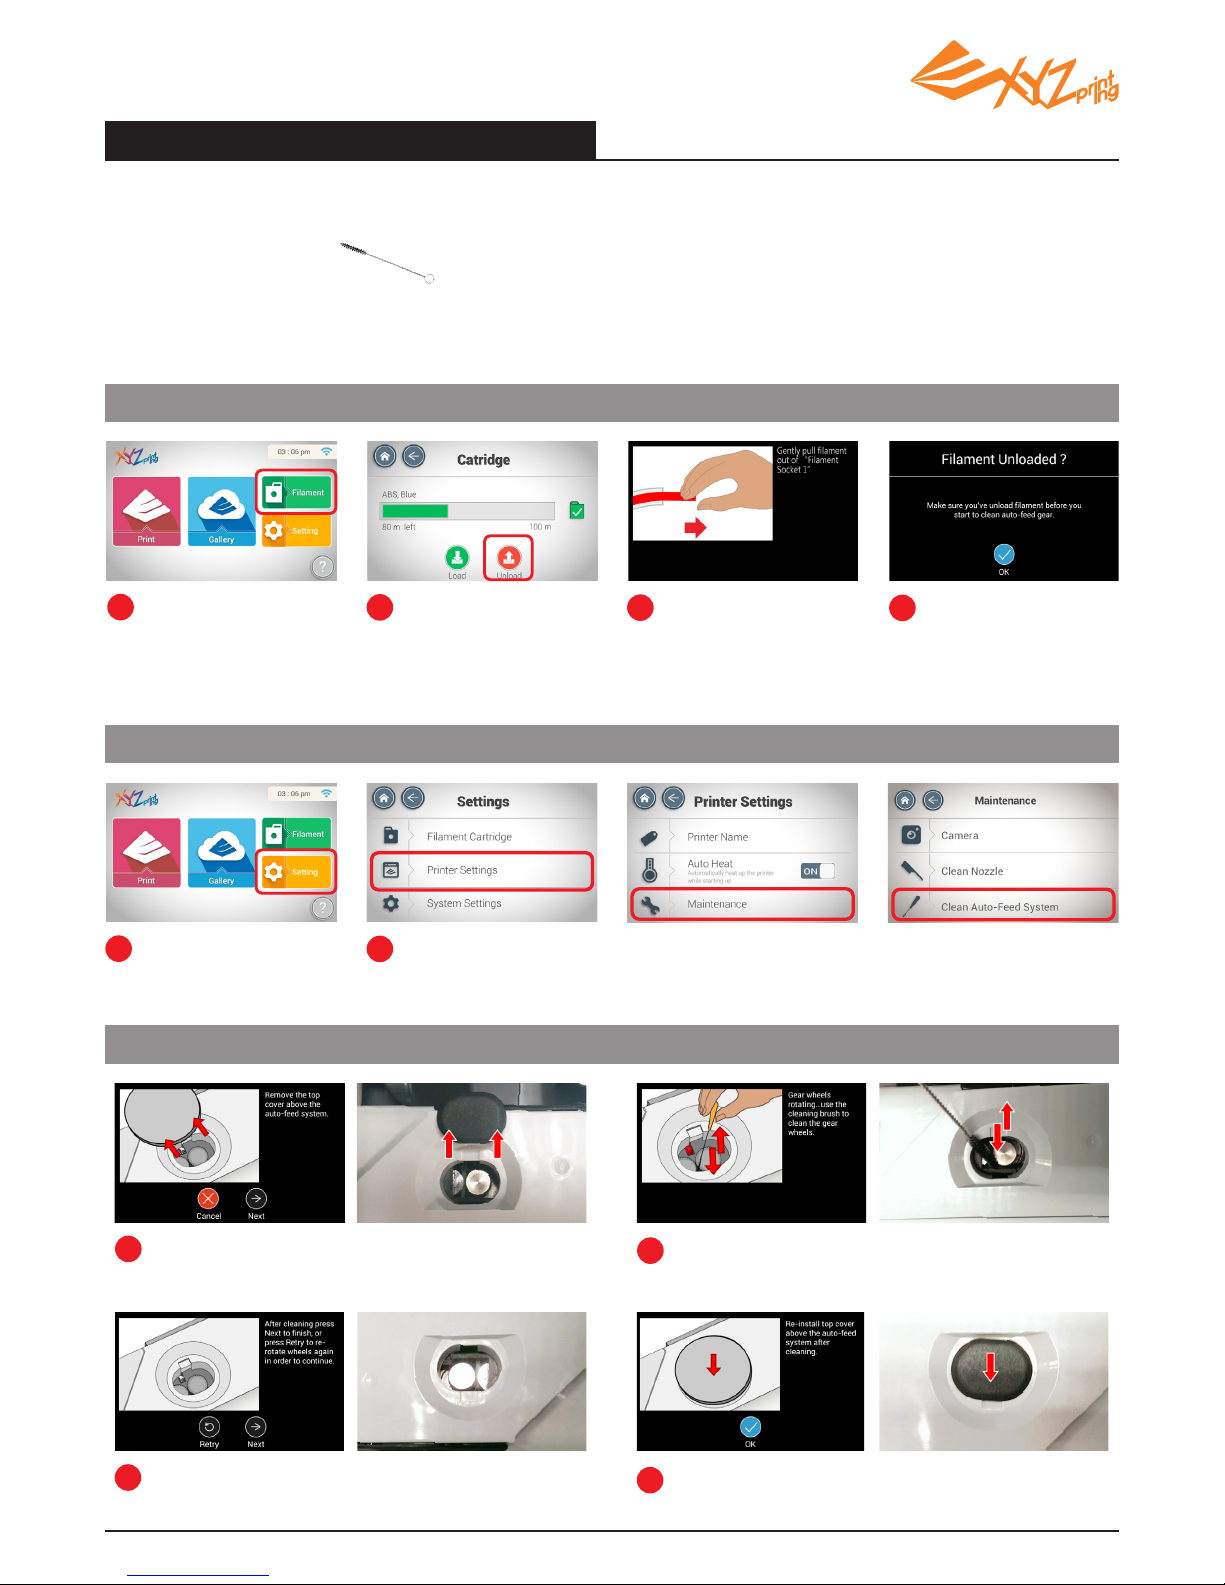
Auto Feed Gear Cleaning Instruction
Step 1. Unload Filament
1
1
1
2
2
2
3
3
Please always complete
the procedure for "
Unload Filament "
before cleaning
auto-feed system.
Remove the top cover above the auto-feed system.
Enter "Setting" section.
Select "Filament" >
"Cartridge" > "Unload"
on the screen.
Gear wheels rotating…use the cleaning brush back and
forth to clean debris and particles in the gear wheels.
Select "Printer Settings" > "Printer Maintenance" > "Clean Auto-Feed System" on
the screen.
Gently pull filament out
from the guide hole
when prompted.
After cleaning, press Next to finish or retry to re-rotate
wheels again in order to continue.
Make sure the filament
is pull out from the
printer and star to
active cleaning auto
feed system.
Replace the top cover on the printer after the cleaning
is completed .Press OK to return Maintenance screen.
4
4
Step 2. Active Cleaning Auto Feed System Function
Step 3. Start to Clean Auto Feed System
When the machine’s auto-feeder / ejector has encountered any abnormal situations, use the gear
cleaning brush to clear away the remained filament and particles from the gears.
Preparation of Tools: Cleaning brush that comes with the printer.
Note: The cleaning brush shall only be used to clean the specified parts of the machine and
should not be used for the cleaning of other parts to prevent damaging the machine.
Page 21
V1.2
P 21
Chapter 9 Settings
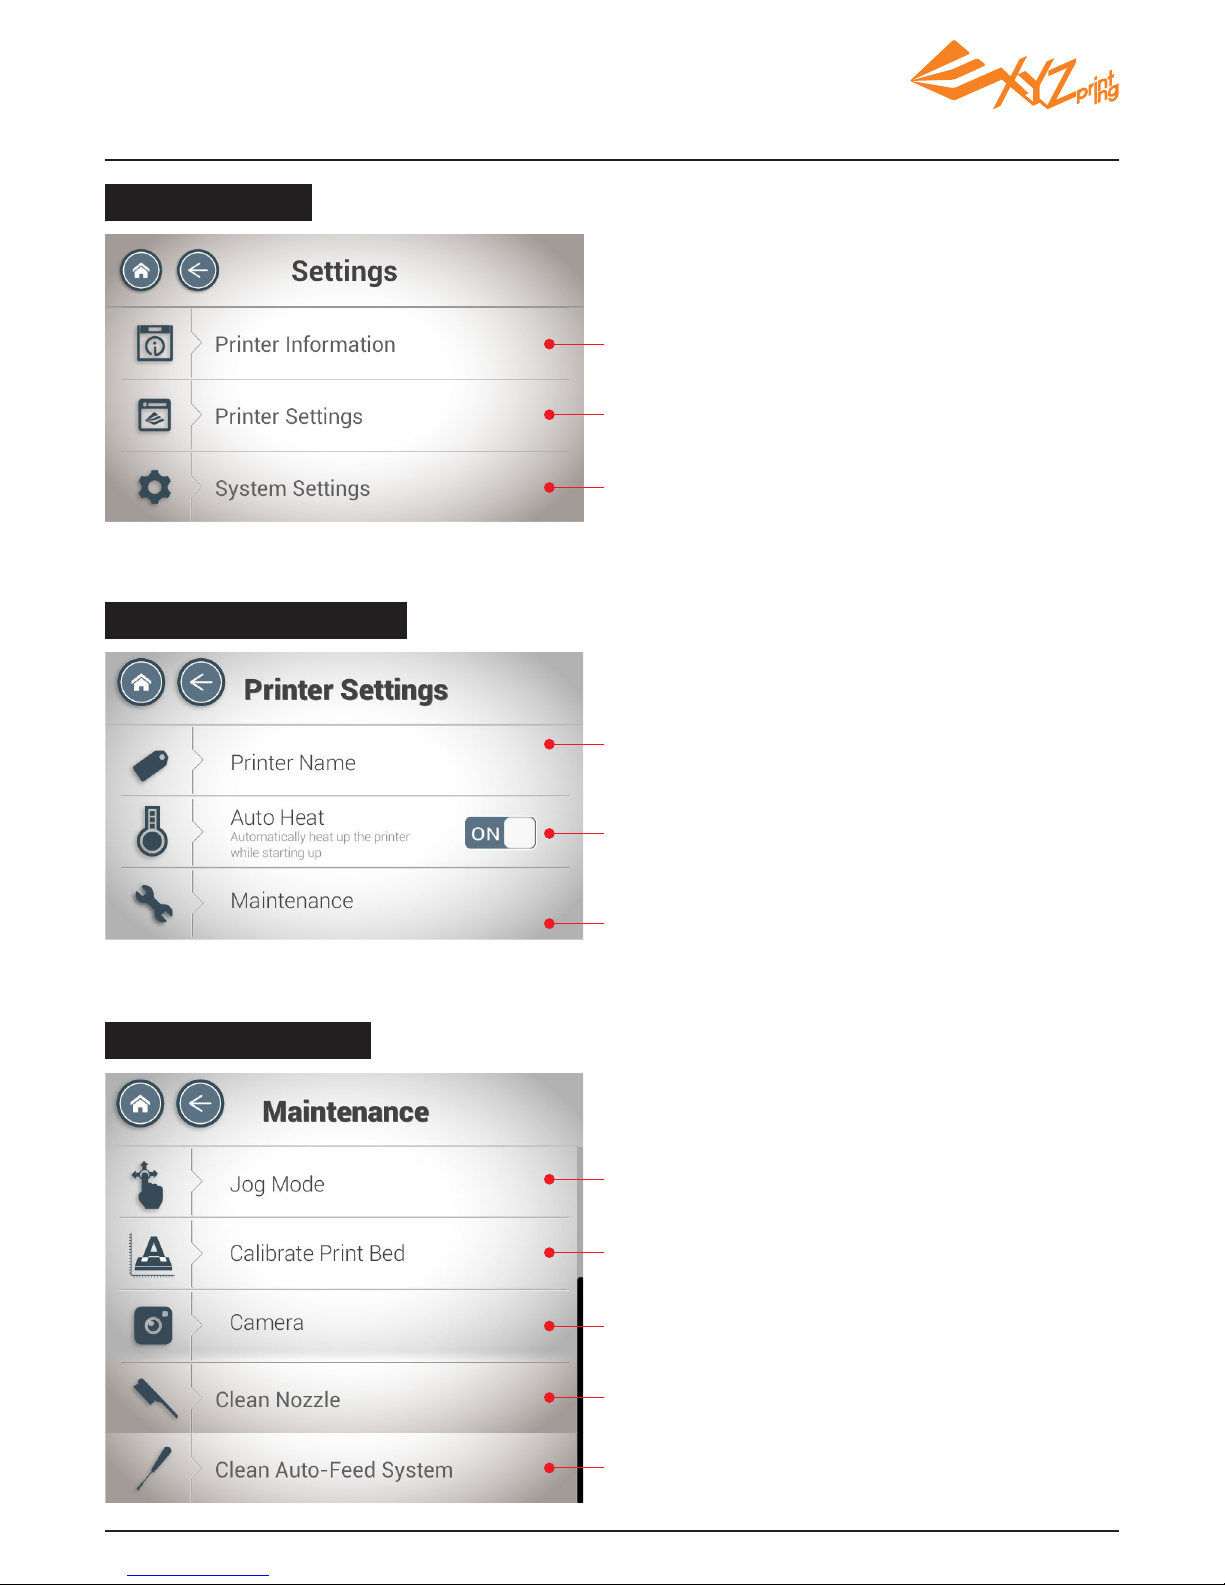
Setting Menu
Check the temperature of the printer and the
information of the lament cartridge.
Change the printer settings and operate the
printer maintenance functions.
Change the settings of the network, LCD
display, sound, language, date and time, and
check the system information.
Printer Setting Menu
Printer Name: Change the printer name (Max
24 characters).
Auto Heat: The printer heats up automatically
while starting up. When this function is
activated, the operation temperature of the
printer can be kept during the work. The
printer will start printing once receiving the le.
Maintenance: Printer maintenance functions
such as operating the jogging mode,
calibrating the print bed and camera.
Maintenance Menu
Manually control the location of the
printing module and print bed.
Detect the horizontal level of the print bed.
(Refer to P22 for more information).
Use the camera to check the printing
progress.
Clean the nozzle and detecting pin (Refer to
P23 for more information)
.
When encountering any abnormal
situations,use cleaning brush to clear away
the lament debris from the gear.
Page 22
V1.2
P 22
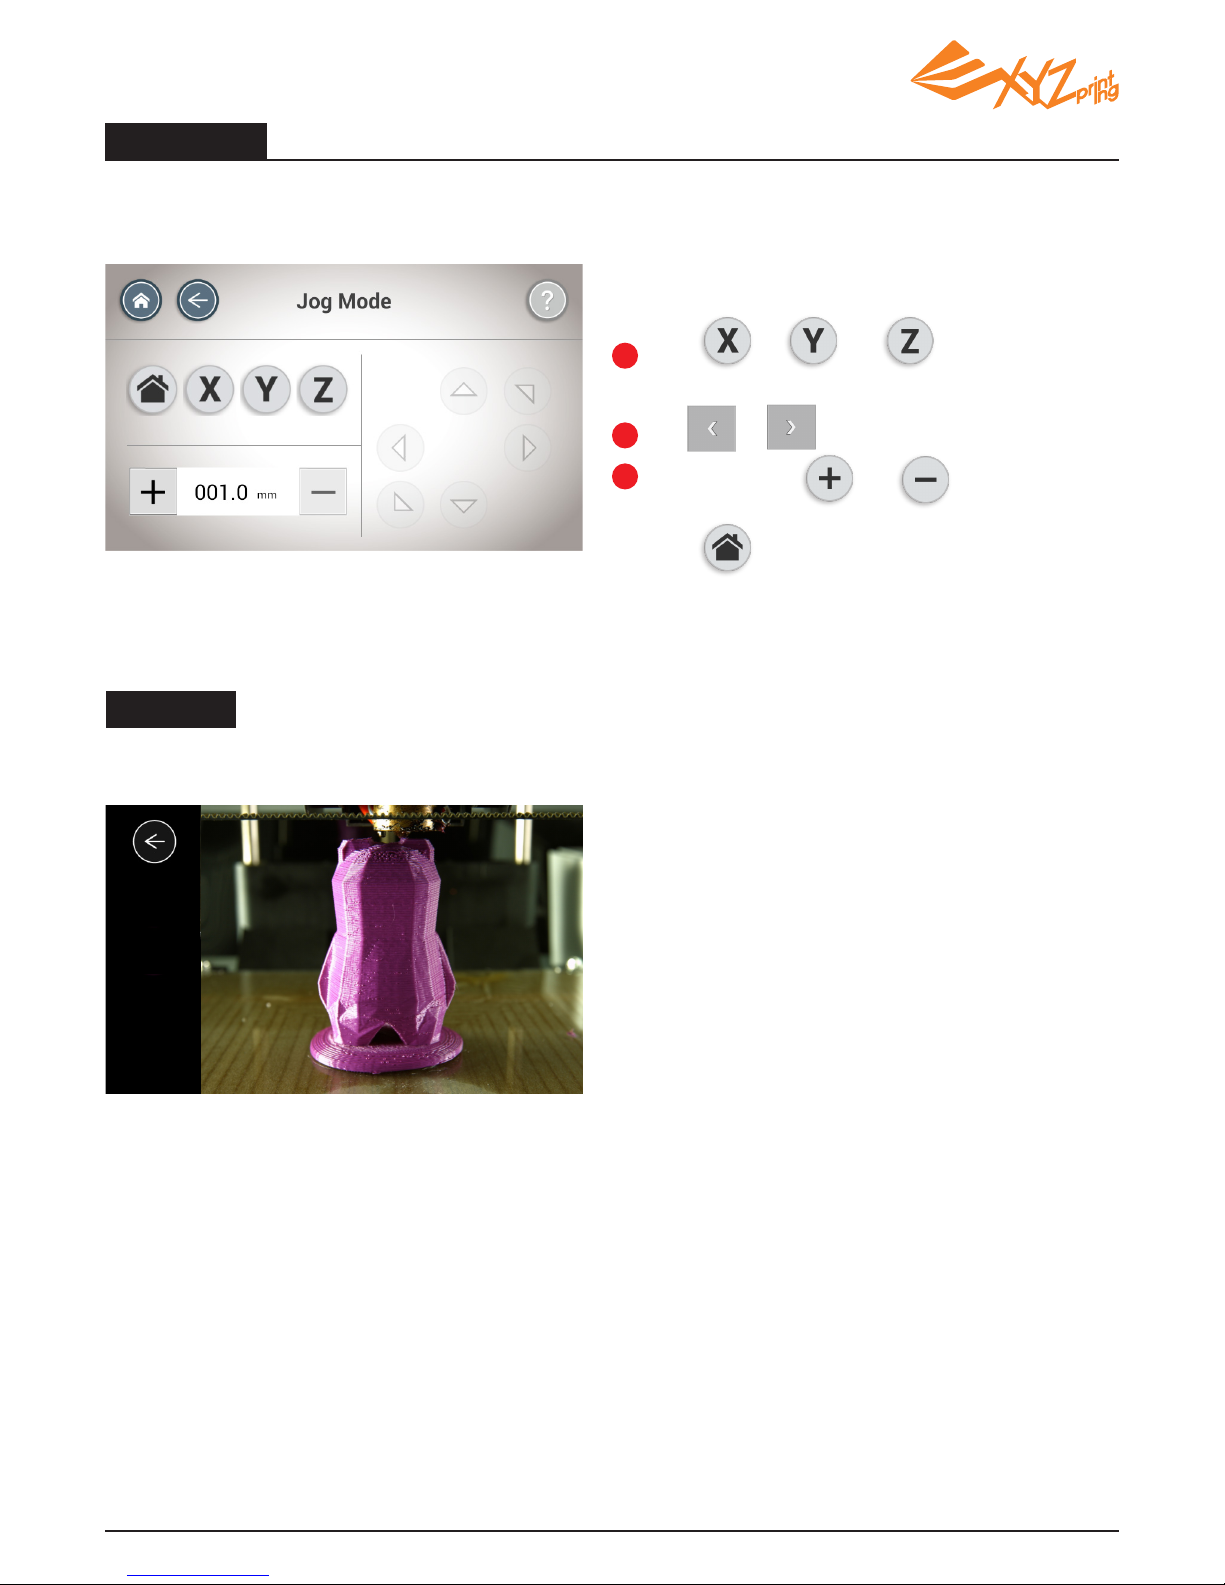
Jog Mode
When manually adjusting the location of the printing module and the print bed is needed or the print
head needs to be returned to its original position, use this function to manually adjust the location of
the X, Y and Z axes.
Use the camera to check the printing progress and status.
To adjust the location of the X-axis, Y-axis
and Z-axis:
Click
、
or to choose the
desired direction axis to be moved.
Use or to change the job space
Press and hold or to adjust the
location.
Click to move the print head to its
original position.
1
2
3
Camera
Page 23
V1.2
P 23
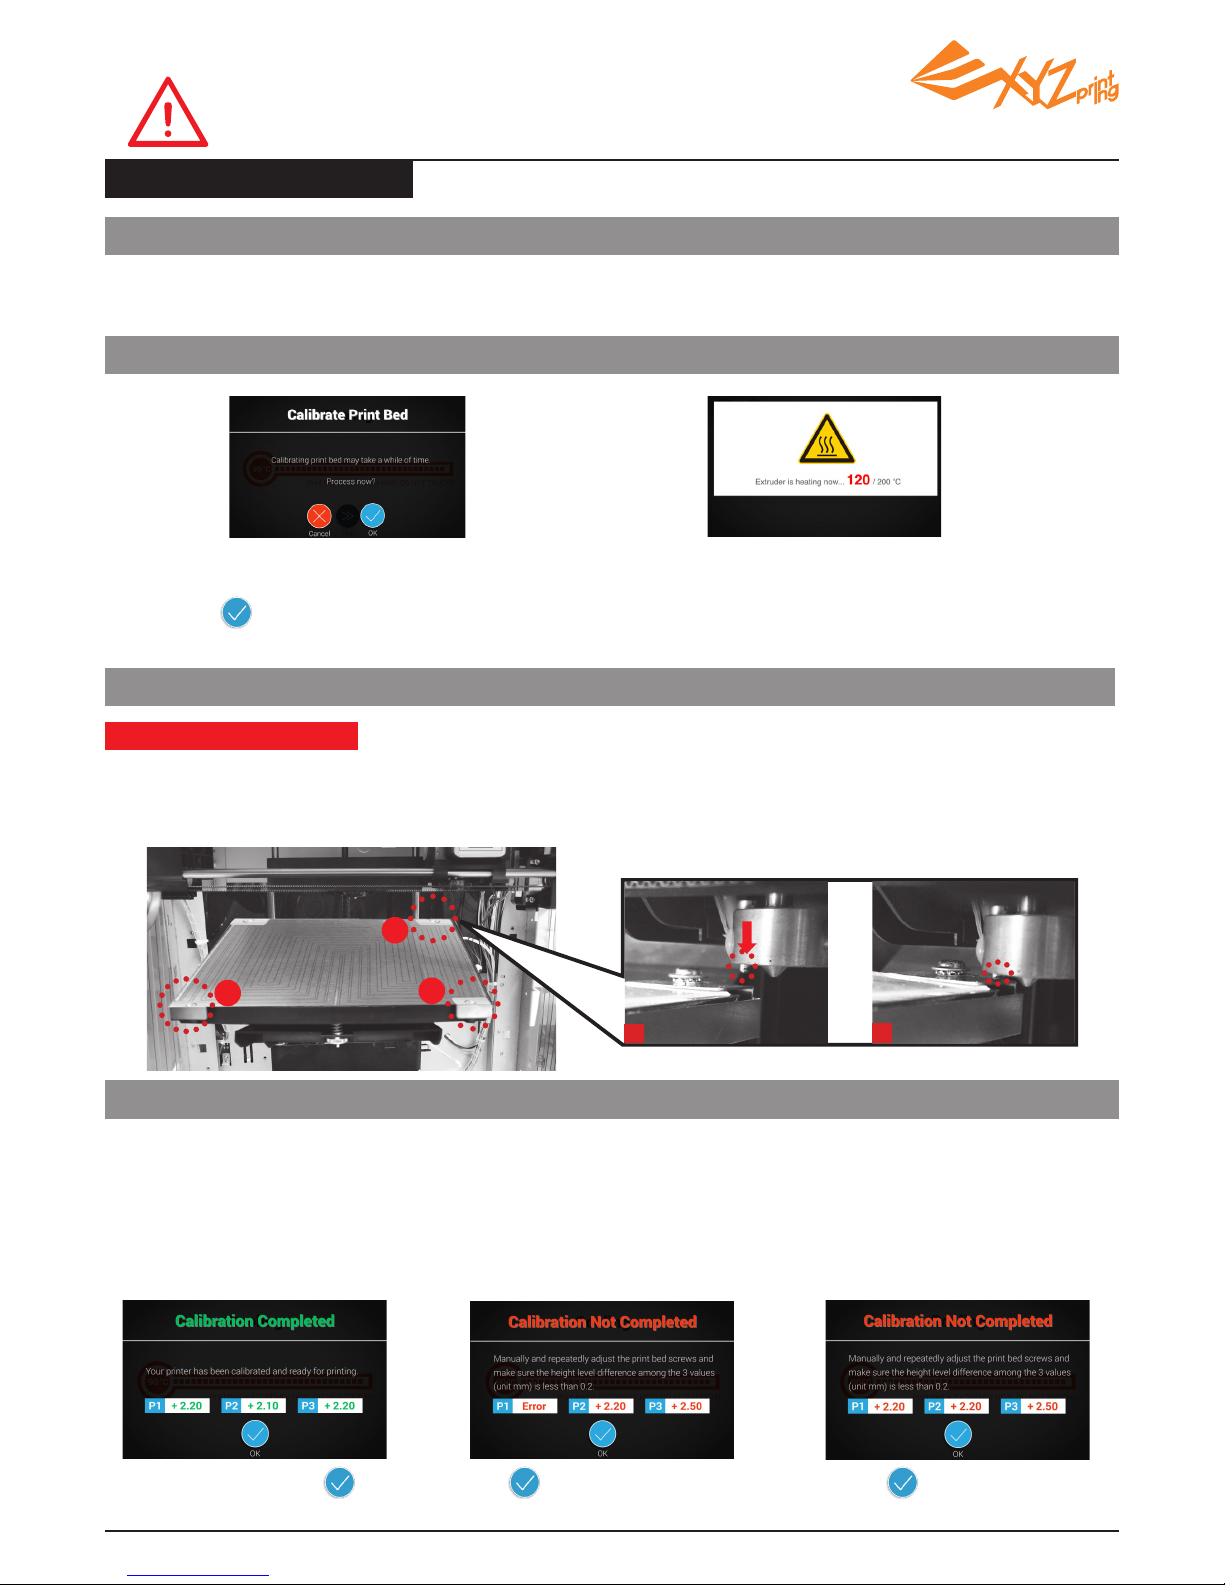
Select "Setting">"Printer Settings">
"Maintenance" >"Calibrate Print Bed" and
press to perform calibration.
The printer starts automatic measurement.
Wait for 2~3 minutes and verify the data shown.
Note: During the measurement process, the print bed
and extruder module will be heated.
Care should be taken during operation!
The print bed is leveled;
adjustment to the print bed is
not required.
Skip step 5 & 6, and press to nish. Press and proceed step 5 and 6.
1."Calibration Completed”
- ready to print
2."Calibration Not Completed”
and "Error" is shown - cleaning &
leveling is required
3."Calibration Not Completed”
- leveling is required
The detecting point is too high/
low for detection or the pin/
measurement point is
covered by molten plastic.
Unleveled print bed may affect
printout quality. Please level the
printbed based on the value of
P1, P2 and P3.
Press and proceed step 6.
In XYZware, select “About” > “Firmware Update”.
This print bed has been calibrated by our professional technician
before shipment. Do not adjust the platform yourself unless
necessary, or contact the customer service center.
1.Check for rmware update
3.Wait for detecting
2.Activate Calibration
Print Bed Calibration
The printer measures the distance between the detecting pin and 3 measurement points at the corners of the print
bed to check if the platform is leveled. When the height of the 3 points are no more than ±0.2 from each other, the
print bed is leveled.
What does “detecting” do:
4.Check the detecting result on the display
1
3
2
B
A
Page 24
V1.2
P 24
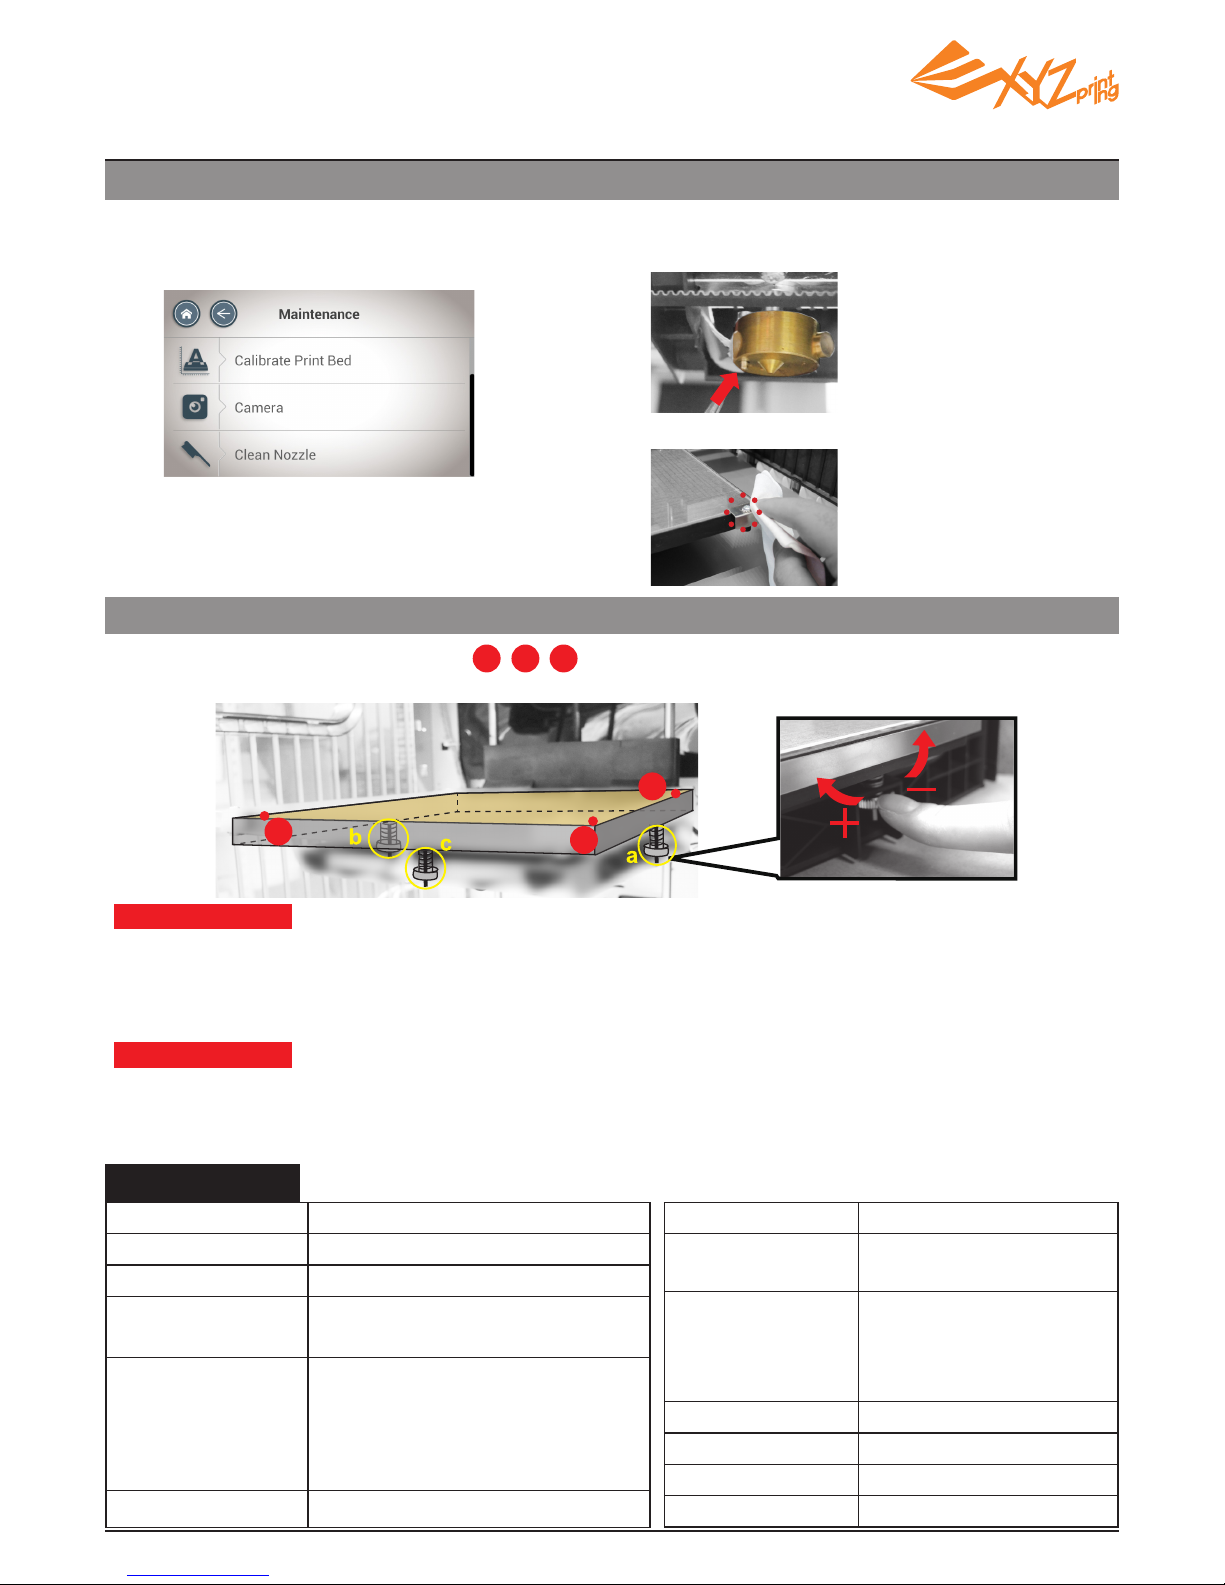
Activate " Setting" > "Printer Settings" >
"Maintenance" > "Clean Nozzle".
Select “Clean Nozzle” function, and brush the molten lament and dust from the detecting pin while the extruder is
heated up.
Clean the detecting pin with the copper brush
• Turn clockwise to raise, turn counterclockwise to lower.
• Adjust screw a and b may offset the diagonal. (e.g. Left turn screw b will lead to the descendant of point 2.)
• Tuning the screw for a full circle will change the value by 0.5. A single push to the screw will change the
value by 0.2 to 0.25.
• Adjust the values to the 2.3-2.6 range.
• 3 values should be no more than ±0.2 from each other.
1.The value indicates the height of point P1, P2, P3; greater value indicates the higher the detected point is.
2. Turn the 3 turning screws at location "a", "b", "c" under the print bed to level the platform.
5.Clean the detecting pin
6.Level the print bed
When nishing the adjustment, repeat the calibration from step 2 until it shows "Calibration Completed".
Clean the 3 measurement points
How to adjust :
Thumb of rules:
Specications
P2
P3
P1
Model Name da Vinci 1.1 Plus 3D Printer
Print Technology Fused Filament Fabrication(FFF)
Print Head Single Head
Build Volume
(W x D x H)
20 x 20 x 20 cm
Layer Resolution
Setting
Standard 200 microns
Speed 300 microns
Ultra fast 400 microns
Custom 100-400 microns
Filament Diameter 1.75mm
Nozzle Diameter 0.4mm
AC Input
100-127V~ 4.0A 50/60Hz
200-240V~ 2.0A 50/60Hz
Connectivity
USB 2.0
WiFi
LAN
USB Flash Drive
Display 5" TFT LCD
Control Method Touch Panel
Indicator Speaker
Weight 27 Kg
Page 25
V1.2
P 25
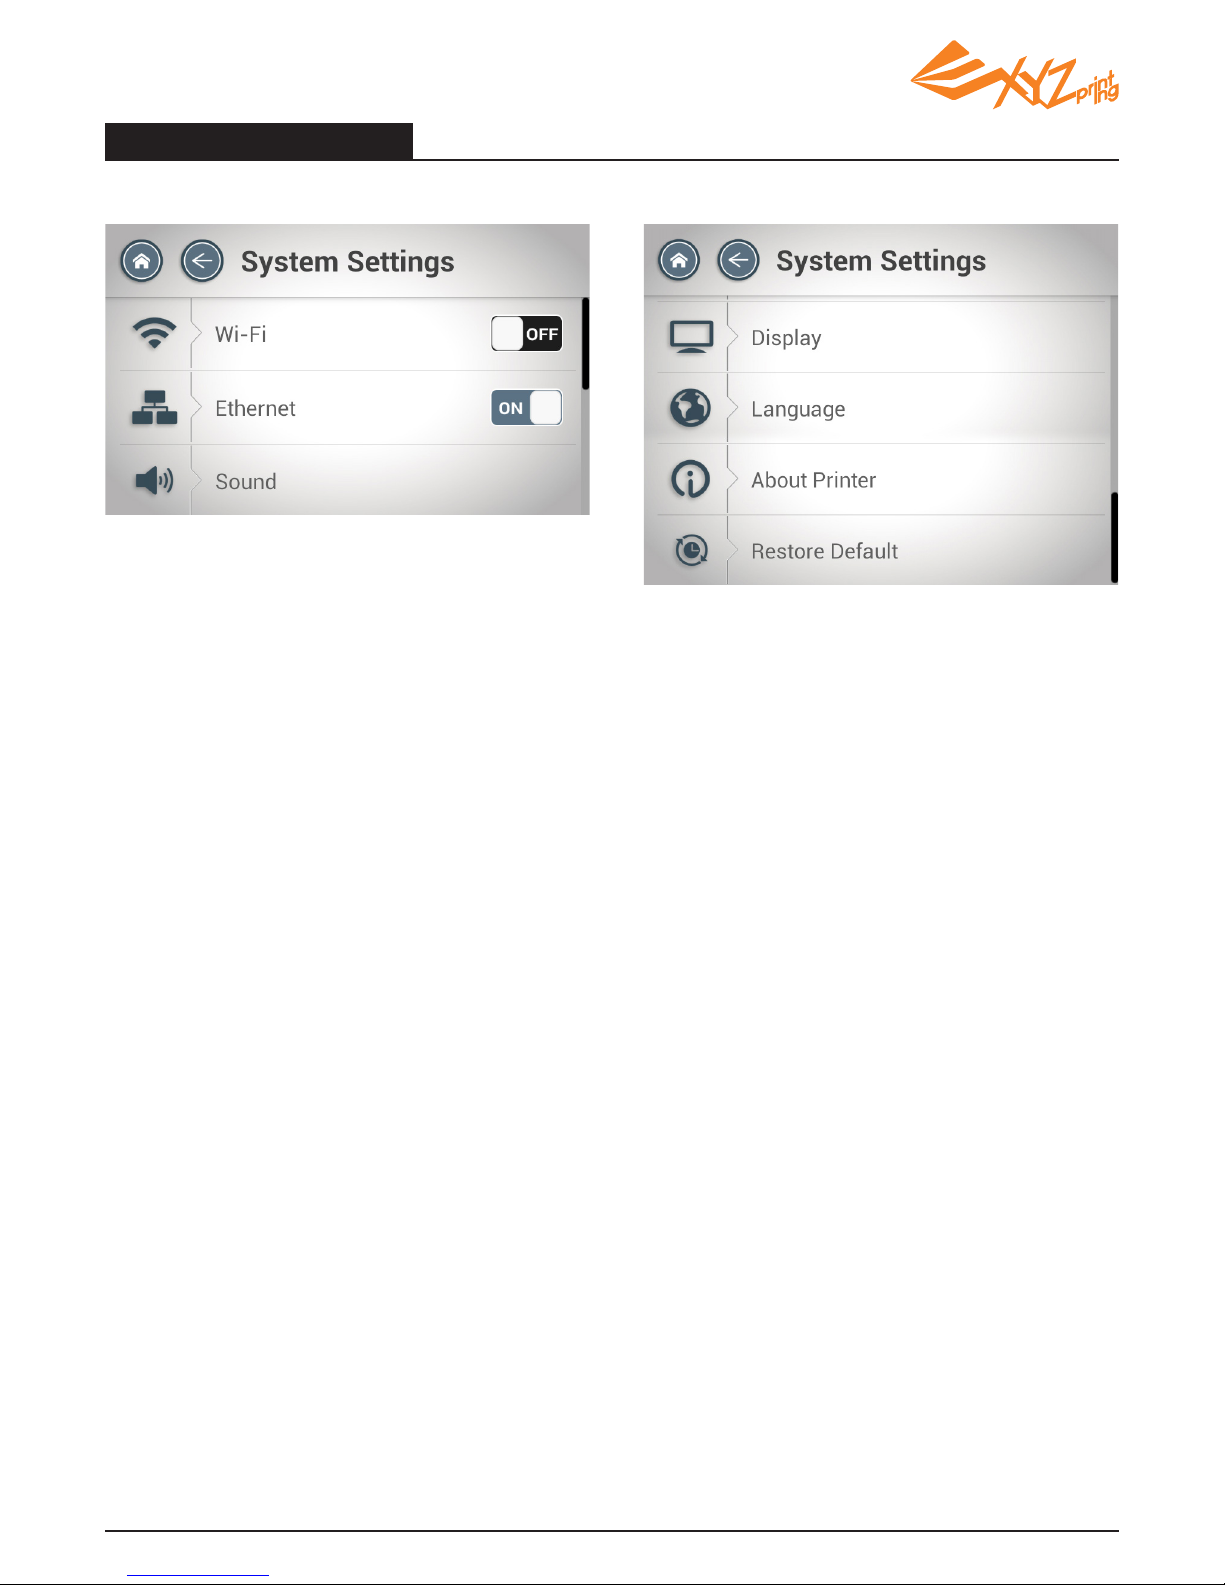
System Setting Menu
The operation system of the printer can be setup manually if necessary.
Follow the instructions on the screen to change the settings of the network, display, sound, and
language. Then check the printer information and return to the default value.
Page 26
V1.2
P 26
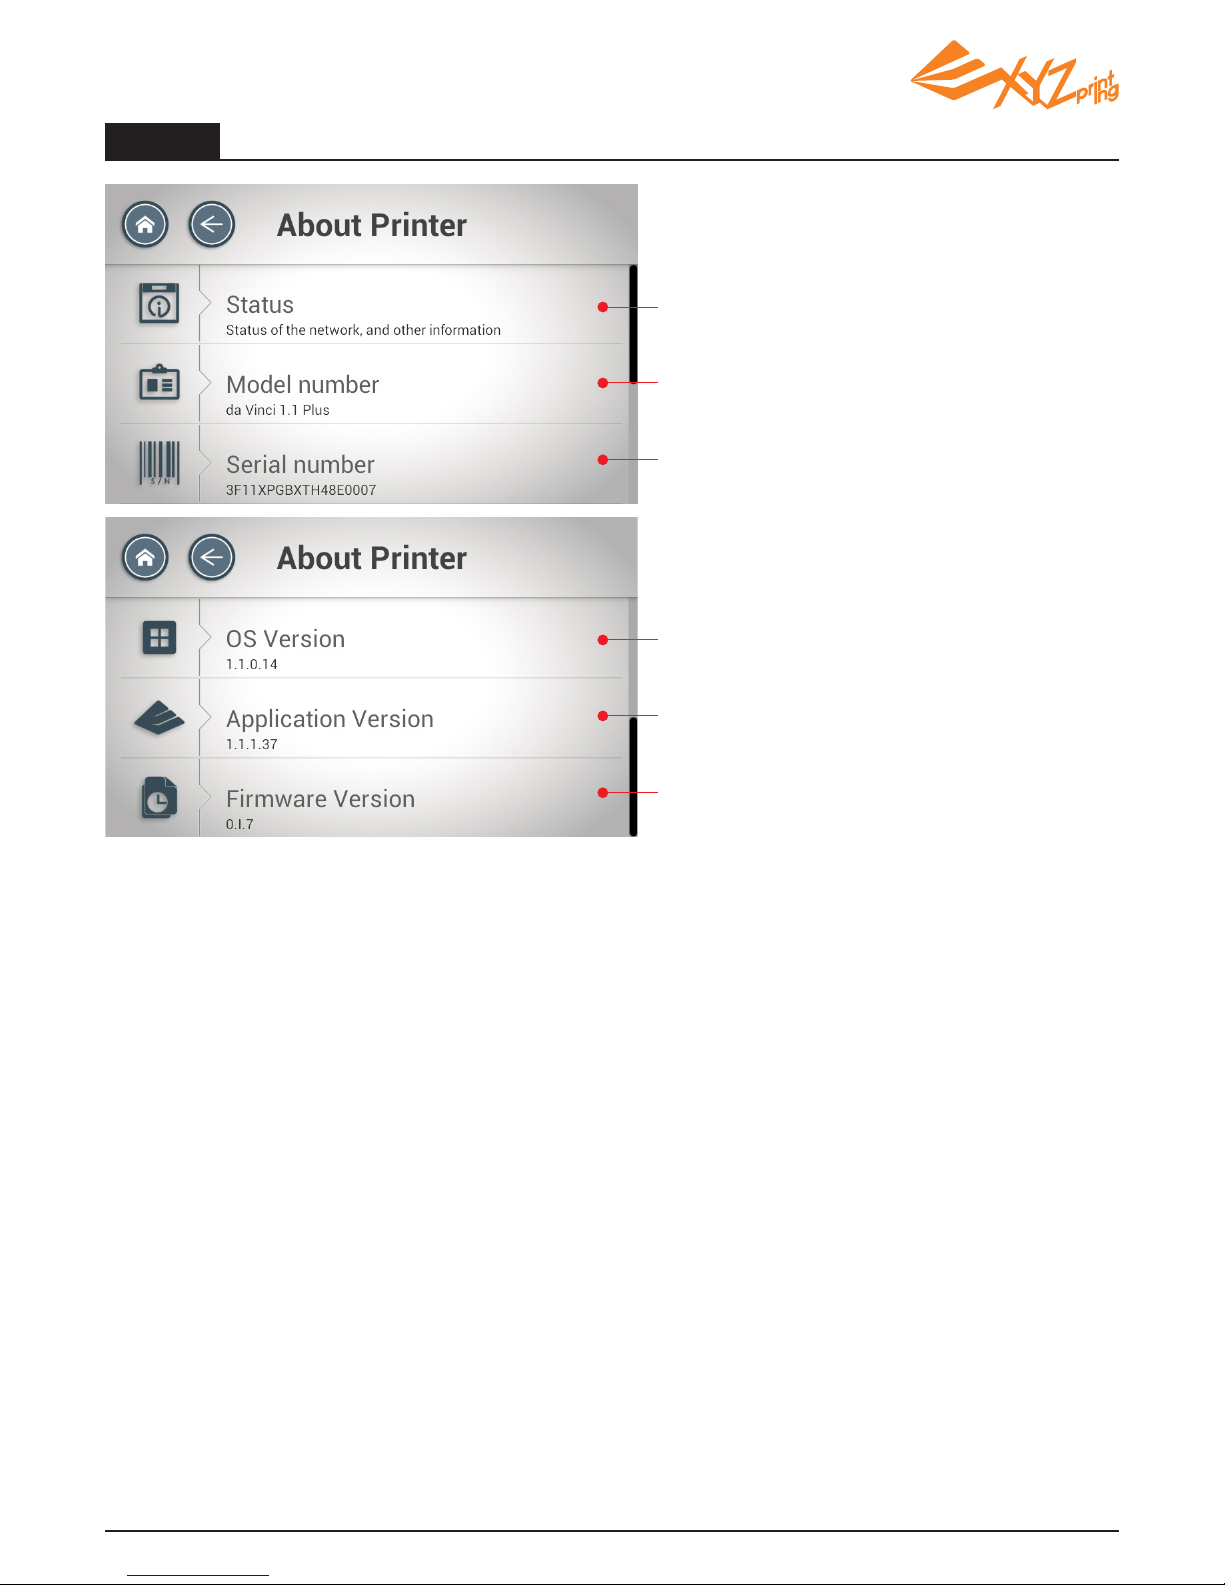
About
Check the information about the connection
of the printer to the network and its operation
time.
The version information of the underlying
operation system.
Check the model number.
The version information of the on-screen
applications.
Check the serial number.
The function of the "rmware" is to control the
movement of the printer. It is recommended
to update the printer rmware to enhance the
stability of the printer
Update the system, program and rmware versions via XYZware. After XYZware is connected to the
printer, you will be informed when the software is checking the latest version. You only need to follow
the XYZware instructions to update the printer easily.
Page 27
V1.2
P 27
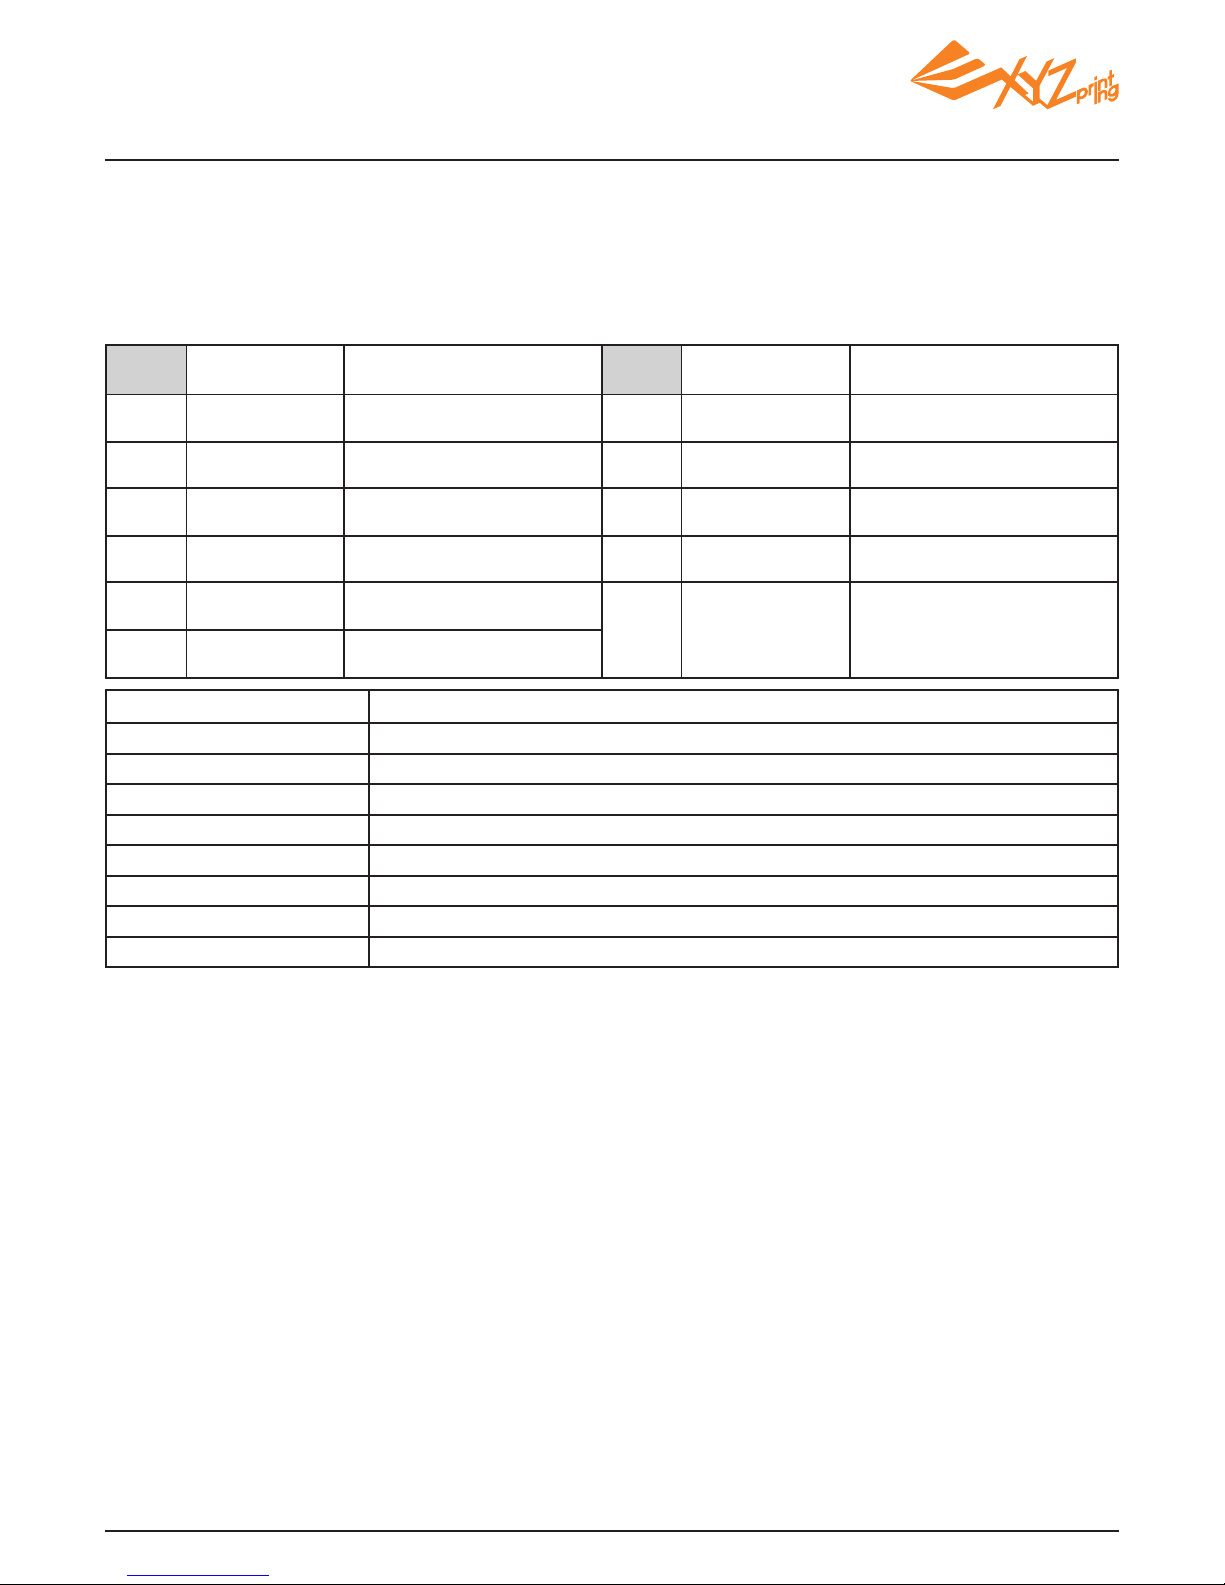
The troubleshooting instruction may guide you to fix the problem. If any error persists, please contact customer
service center for support.
Customer Support Center:http://support.xyzprinting.com
Technical Support (US):[email protected]
Technical Support (EU):[email protected]
Other Region:[email protected]
X-axis movement
abnormalities
Y-axis movement
abnormalities
The printer is handling other task
Unable to update printer rmware
Filament 1 jammed
Filament 1 loading problem
Filament 1 installation problem
Top cover open
Filament 1 level low: 5m left
Filament 1 level low: 30m left
Check Internet connectivity/Update rmware again later.
Unload and reload cartridge 1 and clean the nozzle.
Unload and reload cartridge 1.
Reinstall the cartridge 1 or change a new cartridge.
Close the top cover.
Replace cartridge 1 when necessary.
Replace cartridge 1 immediately.
Try again after all tasks are completed. Also check the information shown on printer display.
Error message
Check motor/sensor connections.
Check sensor position.
Check motor/sensor connections.
Check sensor position.
0 0 3 0
0 0 3 1
Service
Code
Service
Code
Symptom SymptomAction Action
Action
Federal Communications Commission (FCC) Statement
You are cautioned that changes or modications not expressly approved by the part responsible for compliance could void the user’s
authority to operate the equipment.
This equipment has been tested and found to comply with the limits for a Class B digital device, pursuant to part 15 of the FCC rules.
These limits are designed to provide reasonable protection against harmful interference in a residential installation. This equipment
generates, uses and can radiate radio frequency energy and, if not installed and used in accordance with the instructions, may cause
harmful interference to radio communications. However, there is no guarantee that interference will not occur in a particular installation.
If this equipment does cause harmful interference to radio or television reception, which can be determined by turning the equipment off
and on, the user is encouraged to try to correct the interference by one or more of the following measures:
● Reorient or relocate the receiving antenna.
● Increase the separation between the equipment and receiver.
● Connect the equipment into an outlet on a circuit different from that to which the receiver is connected.
● Consult the dealer or an experienced radio/TV technician for help.
XYZprinting is not responsible for any radio or television interference caused by using other than recommended cables and connectors
or by unauthorized changes or modications to this equipment. Unauthorized changes or modications could void the user's authority
to operate the equipment.
This device complies with Part 15 of the FCC Rules. Operation is subject to the following two conditions: (1) this device may not cause
harmful interference, and (2) this device must accept any interference received, including interference that may cause undesired
operation.
This device complies with FCC radiation exposure limits set forth for an uncontrolled environment and it also complies with Part 15 of
the FCC RF Rules. This equipment must be installed and operated in accordance with provided instructions and the antenna(s) used
for this transmitter must be installed to provide a separation distance of at least 20 cm from all persons and must not be co-located
or operating in conjunction with any other antenna or transmitter. End-users and installers must be provided with antenna installation
instructions and consider removing the no-collocation statement.
Chapter 10 Support Details
Print bed heating
problem
Print bed heating
problem
Extruder 1 heating
problem
Extruder 1 heating
problem
Check connections, reboot the
pr i nter.
Check connections, reboot the
pr i nter.
Check connections, reboot the
pr i nter.
Check connections, reboot the
pr i nter.
0 0 1 0
0 0 1 1
0 0 1 3
0 0 1 4
Memory error
Internal
communication error
Internal storage error
Z-axis movement
abnormalities
Connection error
between PC and printer
Reboot the printer.
Reboot the printer.
Check motor/sensor connections.
Check sensor position.
Reconnect PC to printer, or
hotplug the cable between printer
and PC.
Check if SD card is inserted
co r rectly.
0 0 5 0
0 0 6 0
0 0 4 0
0 0 3 2
0 2 0 1
 Loading...