

Page 1

4115T
15” Light Duty Industrial PC
© 2005 XYCOM AUTOMATION, INC. Printed in the United States of America
Page 2

Revision Record
Revision Description Date
A Manual Released 7/05
Part Number 143926 (A)
Trademark Information
Brand or product names are registered trademarks of their respective owners. Windows is a registered trademark of
Microsoft Corp. in the United States and other countries.
Copyright Information
This document is copyrighted by Xycom Automation Incorporated (Xycom Automation) and shall not be reproduced or
copied without expressed written authorization from Xycom Automation.
The information contained within this document is subject to change without notice. Xycom Automation does not
guarantee the accuracy of the information.
United States FCC Part 15, Subpart B, Class A EMI Compliance Statement:
NOTE: This equipment has been tested and found to comply with the limits for a Class A digital device, pursuant to
part 15 of the FCC Rules. These limits are designed to provide reasonable protection against harmful interference
when the equipment is operated in a commercial environment. This equipment generates, uses, and can radiate radio
frequency energy and, if not installed and used in accordance with the instruction manual, may cause harmful
interference to radio communications. Operation of this equipment in a residential area is likely to cause harmful
interference in which case the user will be required to correct the interference at his or her own expense.
For European Users - WARNING:
This is a Class A product. In a domestic environment this product may cause radio interference in which case the
user may be required to take adequate measures.
INSTALLATION: Electromagnetic Compatibility WARNING:
The connection of non-shielded equipment interface cables to this equipment will invalidate FCC EMI and European
Union EMC compliance and may result in electromagnetic interference and/or susceptibility levels which are in
violation of regulations applying to the legal operation of this device. It is the responsibility of the system integrator
and/or user to apply the following directions relating to installation and configuration:
All interface cables must include shielded cables. Braid/foil type shields are recommended. Communication cable
connectors must be metal, ideally zinc die-cast backshell types, and provide 360-degree protection about the
interface wires. The cable shield braid must be terminated directly to the metal connector shell, ground drain wires
alone are not adequate.
Protective measures for power and interface cables as described within this manual must be applied. Do not leave
cables connected to unused interfaces or disconnected at one end. Changes or modifications to this device not
expressly approved by the manufacturer could void the user’s authority to operate the equipment.
EMC compliance is, in part, a function of PCB design. Third party add-on AT/XT peripheral PCB assemblies installed
within this apparatus may void EMC compliance. FCC/CE compliant PCB assemblies should always be used where
possible. XYCOM AUTOMATION can accept no responsibility for the EMC performance of this apparatus after
system integrator/user installation of PCB assemblies not manufactured and/or expressly tested and approved for
compliance by XYCOM AUTOMATION. It is the responsibility of the system integrator/user to ensure that installation
and operation of such devices does not void EMC compliance.
143926(A)
Page 3

Table of Contents
CHAPTER 1 – INTRODUCTION ...................................................................................................................................1
GENERAL INFORMATION.................................................................................................................................................1
Standard Features .................................................................................................................................................1
LCD Display...........................................................................................................................................................1
Touch Screen.........................................................................................................................................................2
I/O PANEL....................................................................................................................................................................2
BACK PANEL ................................................................................................................................................................3
FRONT AND SIDE PANELS ..............................................................................................................................................4
UNPACKING THE SYSTEM...............................................................................................................................................5
QUICK STARTUP ...........................................................................................................................................................5
CHAPTER 2 — INSTALLATION...................................................................................................................................6
INSTALLATION OVERVIEW...............................................................................................................................................6
MECHANICAL DIMENSIONS .............................................................................................................................................8
MOUNTING OPTIONS .....................................................................................................................................................9
Panel Mounting......................................................................................................................................................9
Wall Mounting ......................................................................................................................................................11
Arm Mounting.......................................................................................................................................................13
CHAPTER 3 – POS-478 CPU BOARD AND AMI BIOS SETUP.................................................................................14
POS-478E CPU BOARD ............................................................................................................................................14
Product Overview.................................................................................................................................................14
Specifications.......................................................................................................................................................14
POS-478E CPU BOARD LAYOUT ................................................................................................................................15
Jumper Settings...................................................................................................................................................16
Connector Pin Outs..............................................................................................................................................21
AMI BIOS SETUP.......................................................................................................................................................31
Starting Setup ......................................................................................................................................................31
Using Setup..........................................................................................................................................................32
Getting Help.........................................................................................................................................................32
Main Menu ...........................................................................................................................................................33
STANDARD CMOS SETUP ...........................................................................................................................................34
Advanced CMOS Setup.......................................................................................................................................36
ADVANCED CHIPSET SETUP.........................................................................................................................................39
POWER MANAGEMENT SETUP......................................................................................................................................41
PCI / PLUG AND PLAY SETUP.......................................................................................................................................42
PERIPHERAL SETUP ....................................................................................................................................................43
Hardware Monitor Setup......................................................................................................................................44
CHAPTER 4 – MAINTENANCE...................................................................................................................................46
GENERAL PREVENTIVE MAINTENANCE ..........................................................................................................................46
Fuse Replacement...............................................................................................................................................46
RECOMMENDED HARD DRIVE PREVENTIVE MAINTENANCE ..............................................................................................46
PRODUCT REPAIR PROGRAM / RETURNING A UNIT TO XYCOM AUTOMATION .....................................................................47
CHAPTER 5 – TROUBLESHOOTING.........................................................................................................................48
DIAGNOSTIC TESTING..................................................................................................................................................48
RUNNING THE TESTS...................................................................................................................................................50
REINSTALLING OPERATING SYSTEMS............................................................................................................................51
Windows® 2000 Reinstallation.............................................................................................................................51
Windows XP® Reinstallation.................................................................................................................................51
INSTALLING DRIVERS...................................................................................................................................................52
Video Drivers........................................................................................................................................................52
Touch Screen Drivers ..........................................................................................................................................52
Miscellaneous Drivers..........................................................................................................................................53
i 143926(A)
Page 4

4115T Light Duty Industrial PC Table of Contents
APPENDIX A TECHNICAL SPECIFICATIONS ...........................................................................................................54
HARDWARE SPECIFICATIONS........................................................................................................................................54
ENVIRONMENTAL SPECIFICATIONS................................................................................................................................55
APPENDIX B – WATCHDOG TIMER..........................................................................................................................56
APPENDIX C – POWER-ON SELF-TEST MESSAGES..............................................................................................58
POST MESSAGES ......................................................................................................................................................58
POST BEEP ..............................................................................................................................................................58
ERROR MESSAGES .....................................................................................................................................................58
APPENDIX D – DMA, IRQ AND 1ST MB MEMORY.....................................................................................................61
DMA CHANNEL ASSIGNMENTS.....................................................................................................................................61
IRQ MAPPING CHART .................................................................................................................................................61
ST
1
MB MEMORY ADDRESS MAP ..................................................................................................................................62
I/O ADDRESSES..........................................................................................................................................................62
APPENDIX E – HOW TO USE THE WAKE-UP FUNCTION.......................................................................................63
WAKE-UP ON MODEM (RING)......................................................................................................................................63
WAKE-UP ON LAN.....................................................................................................................................................63
APPENDIX F – HOW TO UPGRADE A NEW BIOS....................................................................................................64
BIOS UPDATE PROCEDURE.........................................................................................................................................64
RECOVERING YOUR OLD BIOS....................................................................................................................................65
ii 143926(A)
Page 5

Chapter 1 – Introduction
General Information
The 4115T 15" LCD TFT Panel PC, takes advantage of a modern flat-panel display,
POS-478E CPU board, drive spaces and a power supply for minimum size. It is an
IBM PC/AT® compatible computer specially designed to meet the applications for
industrial environments.
Standard Features
The 4115T comes standard with the following features:
• POS-478E CPU board equipped with a high performance socket Pentium
2.0GHz CPU with 533 MHz front system bus and 512 KB cache
• 10/100Mbps Ethernet
• LCD/CRT interface
• 15” flat panel TFT XGA (1024 x 768) LCD
• 100-240 VAC, 50-60 Hz power supply
• Analog resistive touch screen
• Internal 40GB hard disk drive
• 1.44 MB floppy disk drive
• Slim line CD-ROM drive
• DDR 266, 256MB SDRAM DIMM
• Windows 2000 Operating System
Optional Features:
• DDR 266 512MB -1G SDRAM DIMM
• CD-R/W
• DVD-ROM
• DVD +/-RW with CD-R/W
• Windows XP
®
4
LCD Display
Table 1-1 identifies the features of the 4115T LCD display.
Table 1-1. 4115T LCD Display Specifications
Display Model NEC
Display Type 15” TFT color
Resolution 1024x768
Maximum colors 24 bits
Brightness 250 cd/m
Backlight MTBF 50,000 hrs
1 143926(A)
2
Page 6
4115T Light Duty Industrial PC Chapter 1 – Introduction
Touch Screen
Table 1-2 identifies important specifications of the 4115T touch screen.
Table 1-2. 4115T Touch Screen Specifications
Touch Screen Model Description
Screen Type Eight wire analog resistive touch screen
Resolution Continuous
Light Transmission Typical value 75%
Surface Hardness 4H (Test condition: ASTM D3363-92A)
Support Driver Supports Windows 2000/XP
The figures on the next several pages show the internal and external components on
the front and back panels of the unit to help you locate features relevant to
installation.
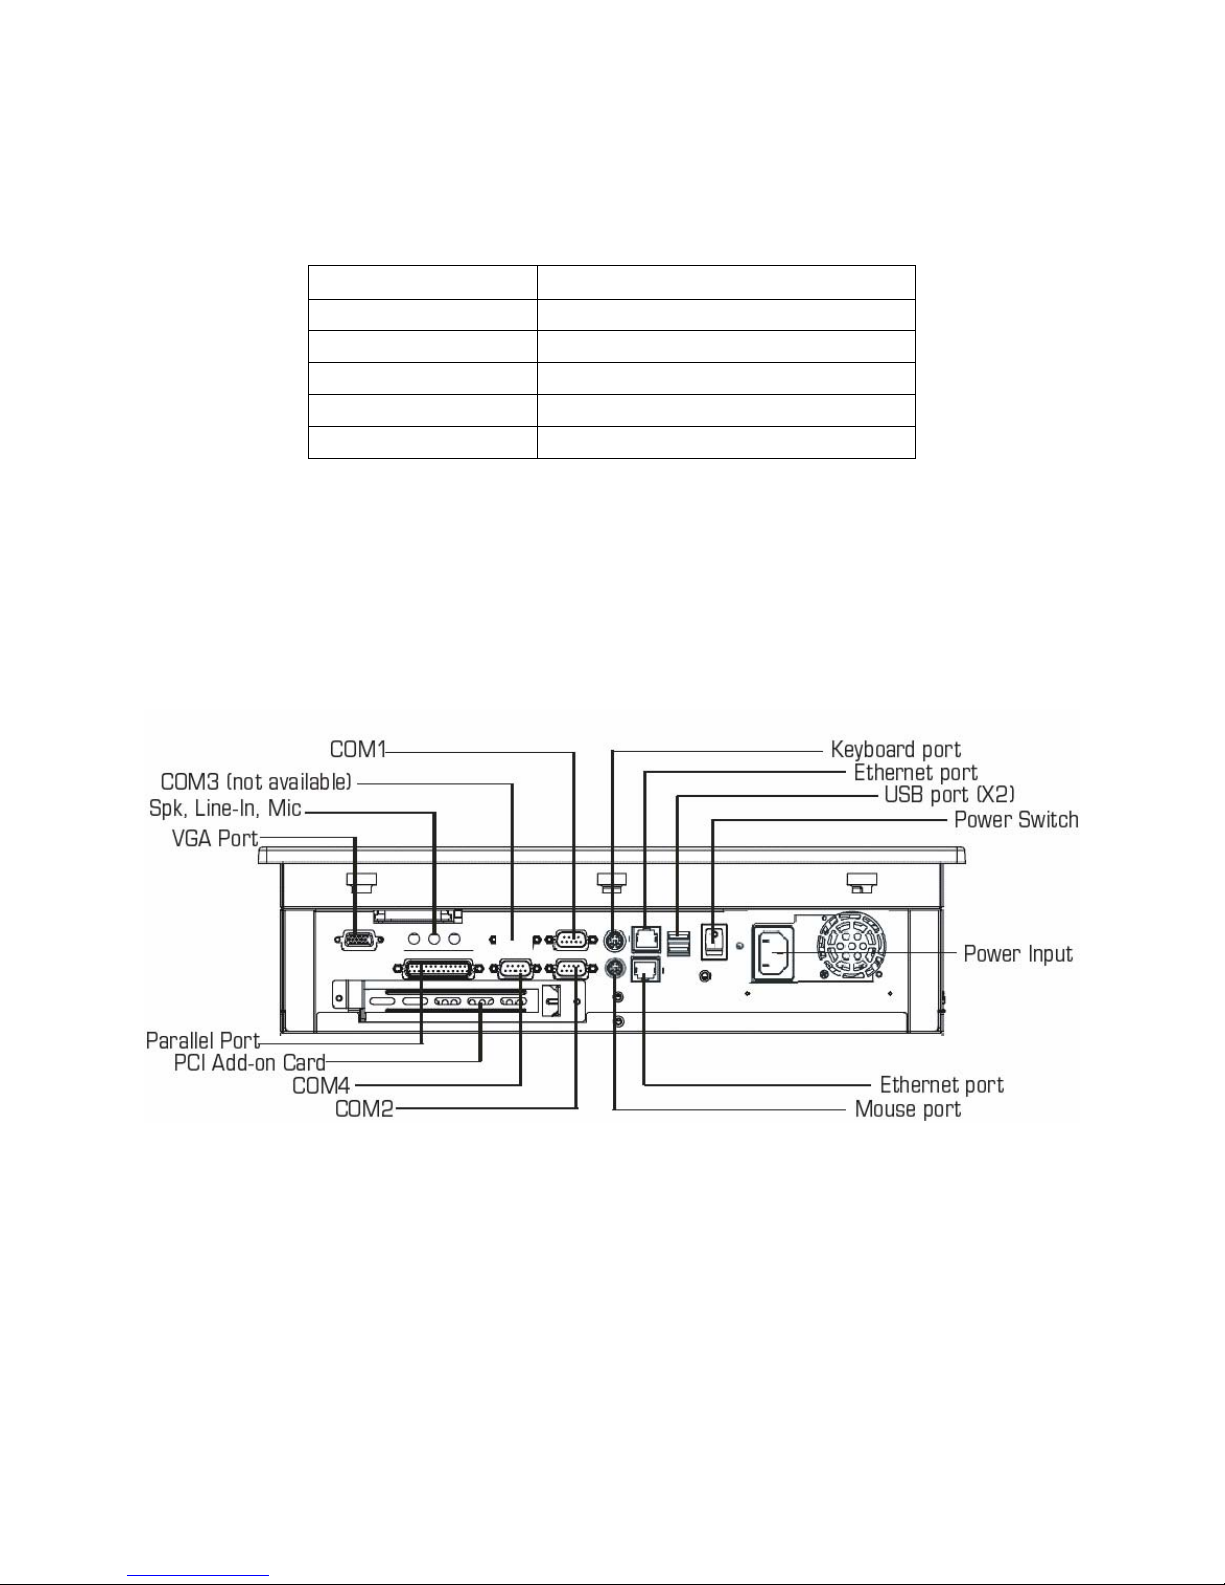
I/O Panel
The figure below shows the I/O panel of the 4115T.
Figure 1-1. I/O Panel
Note: There is only one Ethernet port available
2 143926(A)
Page 7
4115T Light Duty Industrial PC Chapter 1 – Introduction
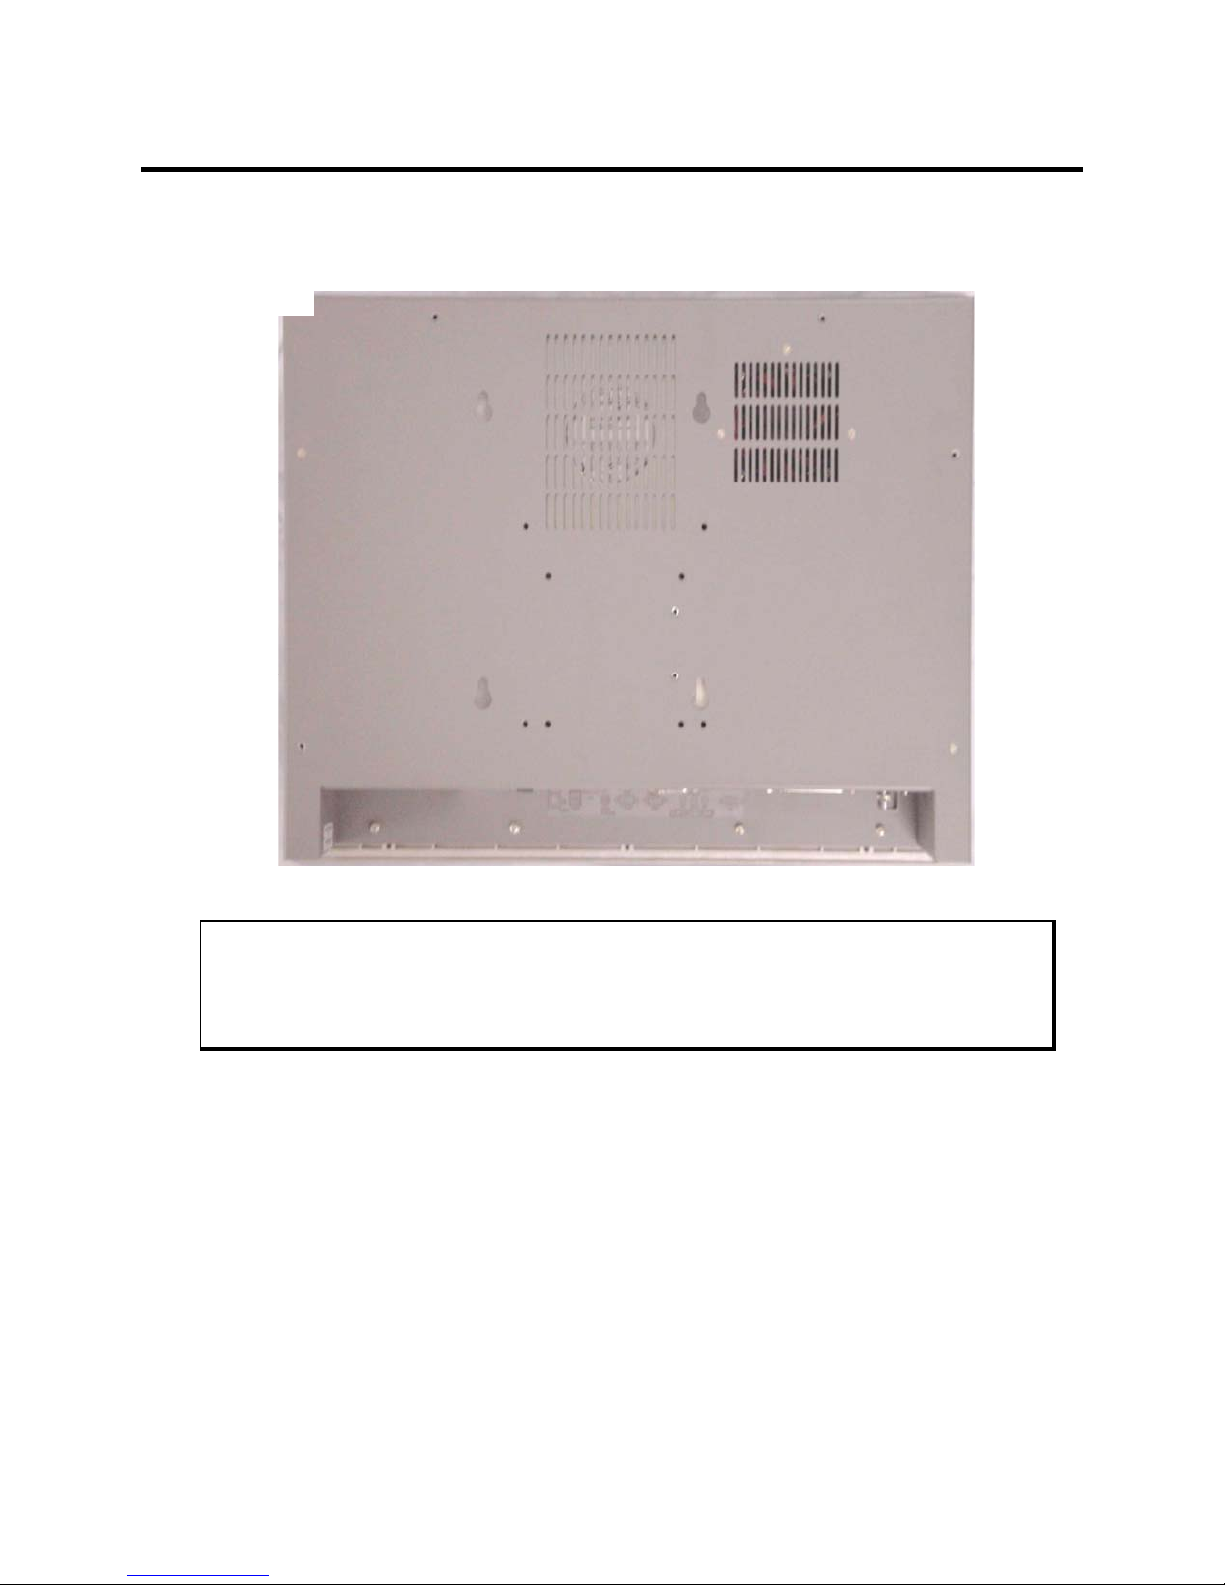
Back Panel
The diagram below shows the back panel of the 4115T. For maintenance, installation
or upgrade, first remove the back cover by unfastening seven screws as shown in the
diagram below.
Figure 1-2. System Back Panel
Caution
Before any installation or un-installation, please take precautions to prevent damage
to the components due to static electricity.
3 143926(A)
Page 8
4115T Light Duty Industrial PC Chapter 1 – Introduction
Front and Side Panels
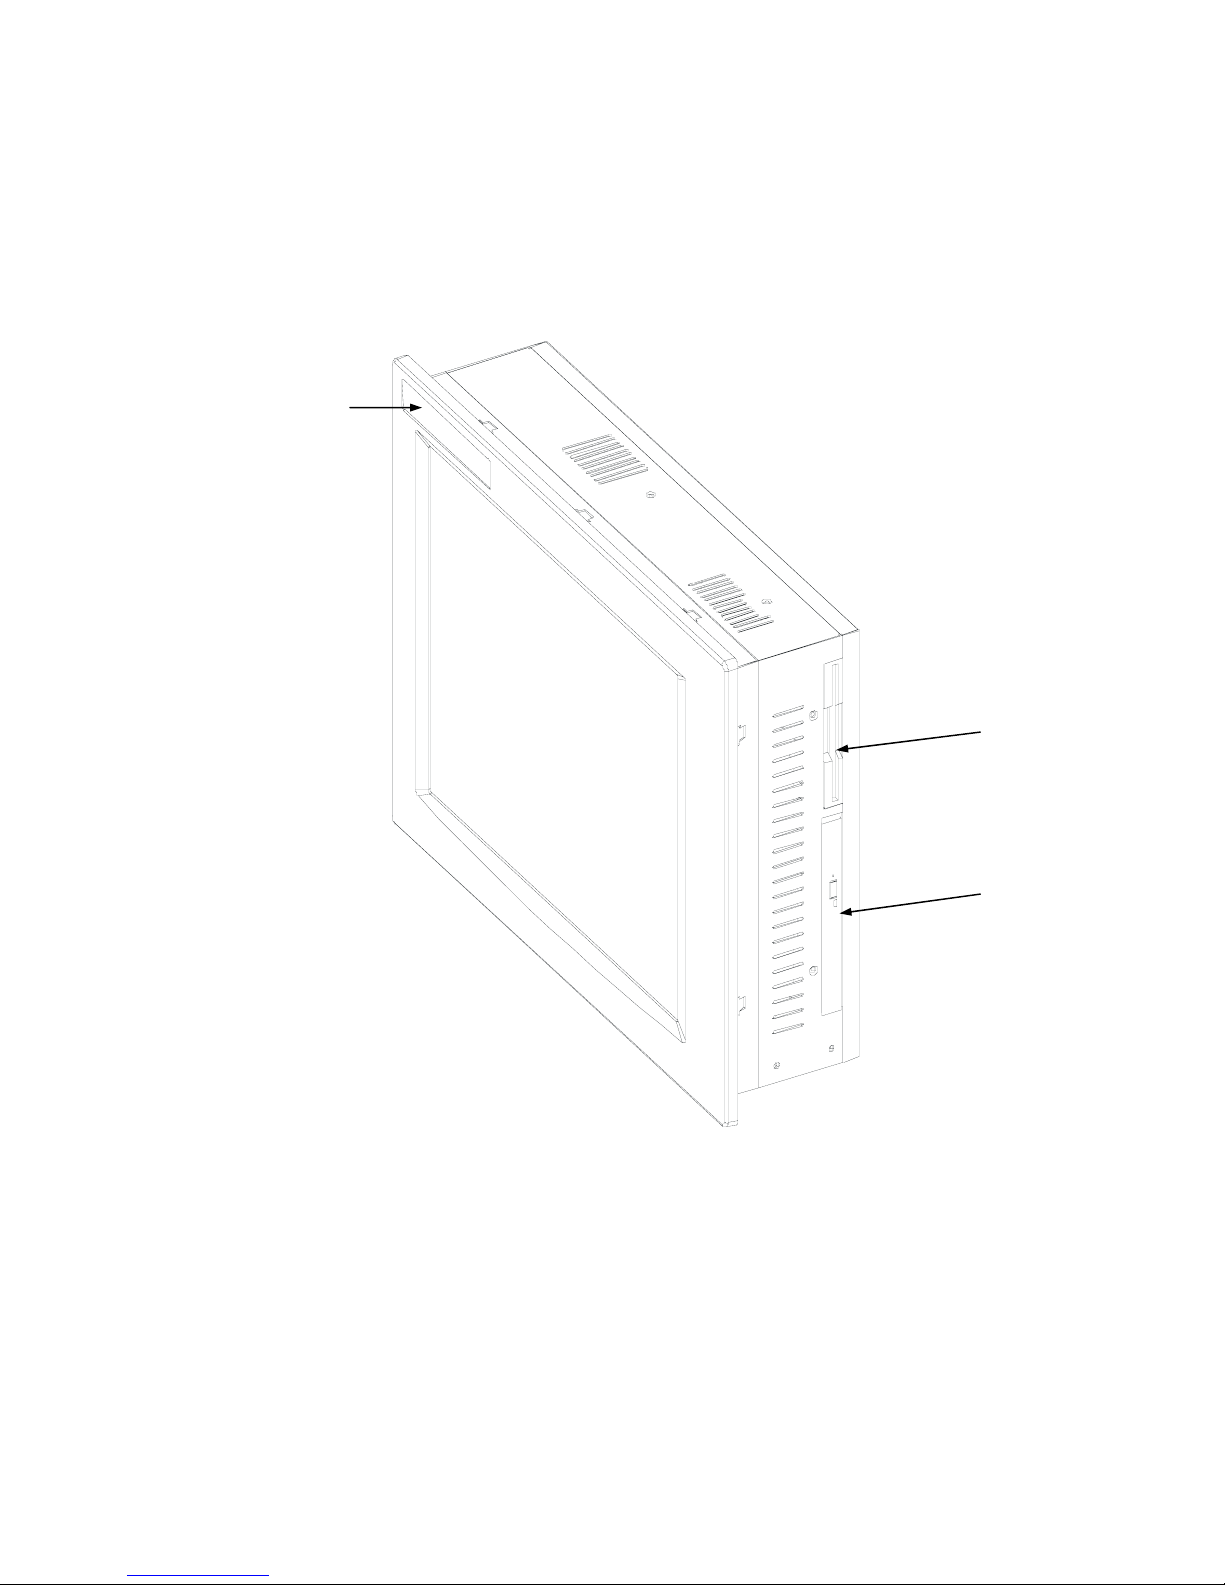
One Floppy Disk Drive and CD-ROM are accessible from the side of the chassis.
Logo
Figure 1-3. Front and Side Panel Views
Floppy Disk
Drive
CD-ROM
Drive
4 143926(A)
Page 9

4115T Light Duty Industrial PC Chapter 1 – Introduction
Unpacking the System
When you remove the system from its shipping container, verify that you have the
parts listed below. Save the box and inner wrapping in the event you need to reship
the unit.
• 4115T Unit
• Documentation kit, which includes:
Power cable
Twelve 10-32 hex nuts
Documentation and Support Library CD-ROM
Operating System Recovery Media or retail operating system (CD-ROM)
Quick Startup
This section gives you the steps to get the system up and running without explaining
the capabilities and options.
Warning
Remove power from the unit and disconnect the power cord before making any
adjustments to the inside or outside of the computer.
To prepare the system for use, perform the following steps.
1. Attach optional keyboard to the keyboard port, and optional mouse to the mouse
port.
2. Confirm that the 100-240 VAC selector switch on the power supply is set
appropriately.
3. Attach the power cord from the power receptacle to a properly grounded 100-240
VAC, 50-60 Hz outlet.
4. Turn on power to the unit (via an outlet power switch if applicable). The system
will boot up into the operating system.
5. Install application software via the floppy, the CD-ROM, or the network.
5 143926(A)
Page 10

Chapter 2 — Installation
Installation Overview
The rugged design of the 4115T unit allows it to be installed in most industrial
environments. The system is generally placed in a NEMA 4/4X/12 enclosure to
protect against contaminants such as dust, and moisture. Metal enclosures also help
minimize the effects of electromagnetic radiation that nearby equipment can generate.
Read the following sections carefully to be sure that you are complying with all the
safety requirements.
1. Select a NEMA rated enclosure and place the unit to allow easy access to the
system ports (see other sections in this chapter and Appendix A).
To assure a NEMA 4 seal choose an approved enclosure that has a 14-
gauge (0.075 in/1.9 mm thick steel or 0.125 in/3.2 mm thick aluminum)
front face.
Be sure to account for the unit’s depth when choosing the depth of the
enclosure.
2. Create a cutout in the enclosure (see Figure 2-2).
Be sure to place the unit at a comfortable working level
Make sure the area around the cutout is clean and free from metal burrs
3. Mount the unit in an upright position and properly secure the unit into the panel.
Tighten the ten #10 nuts to 25 inch-pounds (2.8 Newton-meters / 28Kgf
cm).
4. Attach one end of the power cord to the power receptacle on the unit and the
other end to a properly grounded 100-240 VAC, 50-60 Hz outlet.
5. Turn on power to the system. The system will boot up the installed operating
system.
6. Install the application software via a floppy drive, CD-ROM, or the network.
Additional aspects to take into account when mounting your 4115T unit:
• Consider locations of accessories such as AC power outlets and lighting (interior
lighting and windows) for installation and maintenance convenience
• Prevent condensation by installing a thermostat-controlled heater or air
conditioner
• To allow for maximum cooling, avoid obstructing the airflow
6 143926(A)
Page 11

4115T Light Duty Industrial PC Chapter 2 – Installation
• Place any fans or blowers close to the heat generating devices. If using a fan,
make sure that outside air is not brought into the enclosure unless a fabric or
other reliable filter is used. This filtration prevents conductive particles and other
harmful contaminants from entering the enclosure.
• Do not select a location near equipment that generates excessive electromagnetic
interference (EMI) or radio frequency interface (RFI). Examples of these types of
equipment are: high power welding machines; induction heating equipment; and
large motor starters.
• Place incoming power line devices (such as isolation or constant voltage
transformers, local power disconnects, and surge suppressers) away from the
system. The proper location of incoming line devices keeps power wire runs as
short as possible and minimizes electrical noise transmitted to the unit.
• Make sure the location does not exceed the unit’s shock, vibration, and
temperature specifications
• Install the unit in the rack or panel in such a way as to ensure that it does not
cause a hazard from uneven mechanical loading
• Incorporate a readily-accessible disconnect device in the fixed wiring on
permanently connected equipment
• Avoid circuit overloading of the supply circuit
7 143926(A)
Page 12
4115T Light Duty Industrial PC Chapter 2 – Installation
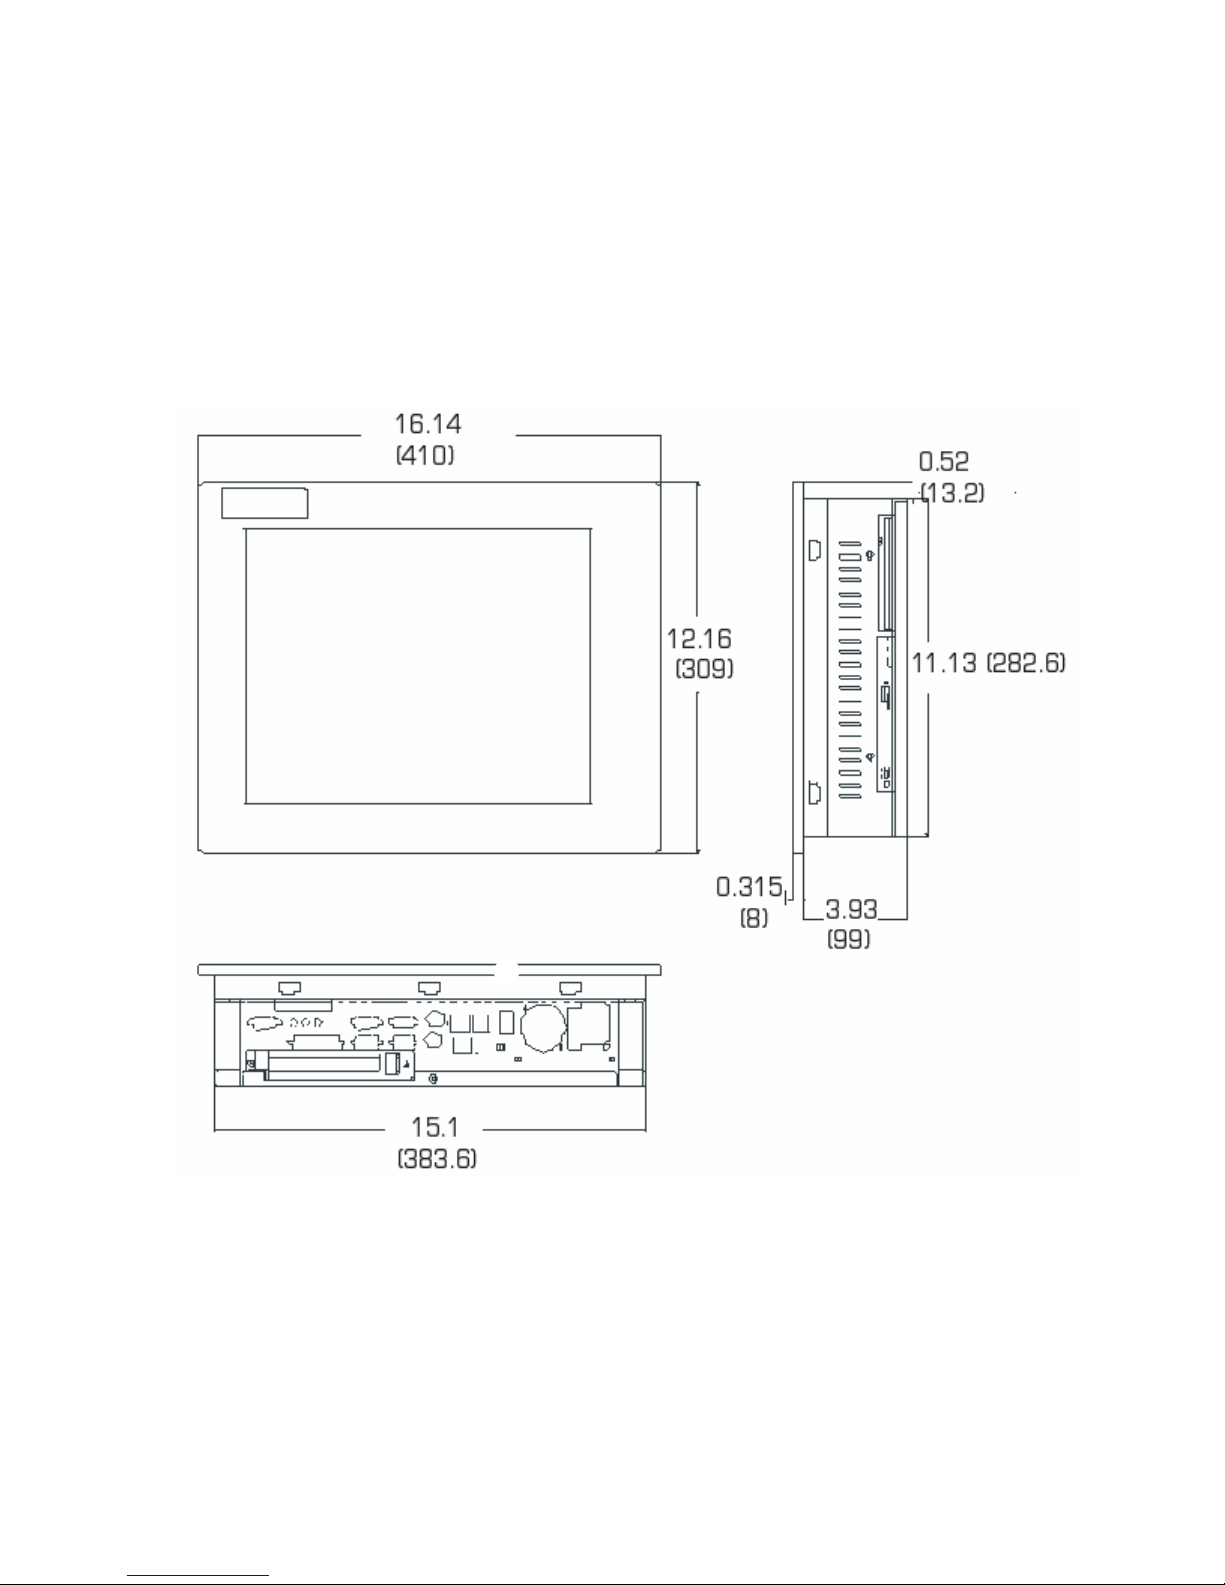
Mechanical Dimensions
Front Panel: 16.14” (410 mm) x 12.16” (309 mm) x 0.315” (8 mm) (WxHxD)
Cabinet: 15.1” (383.6 mm) x 11.13” (282.6 mm) x 3.93” (99.9 mm) (WxHxD)
Note: All dimensions in inches (mm)
Figure 2-1. Unit Dimensions
8 143926(A)
Page 13
4115T Thin Line Industrial Flat Panel PC Chapter 2 –
Installation
Mounting Options
The 4115T can be mounted to a panel, to the wall, or to an arm. The following
sections describe each mounting option for the 4115T.
Panel Mounting
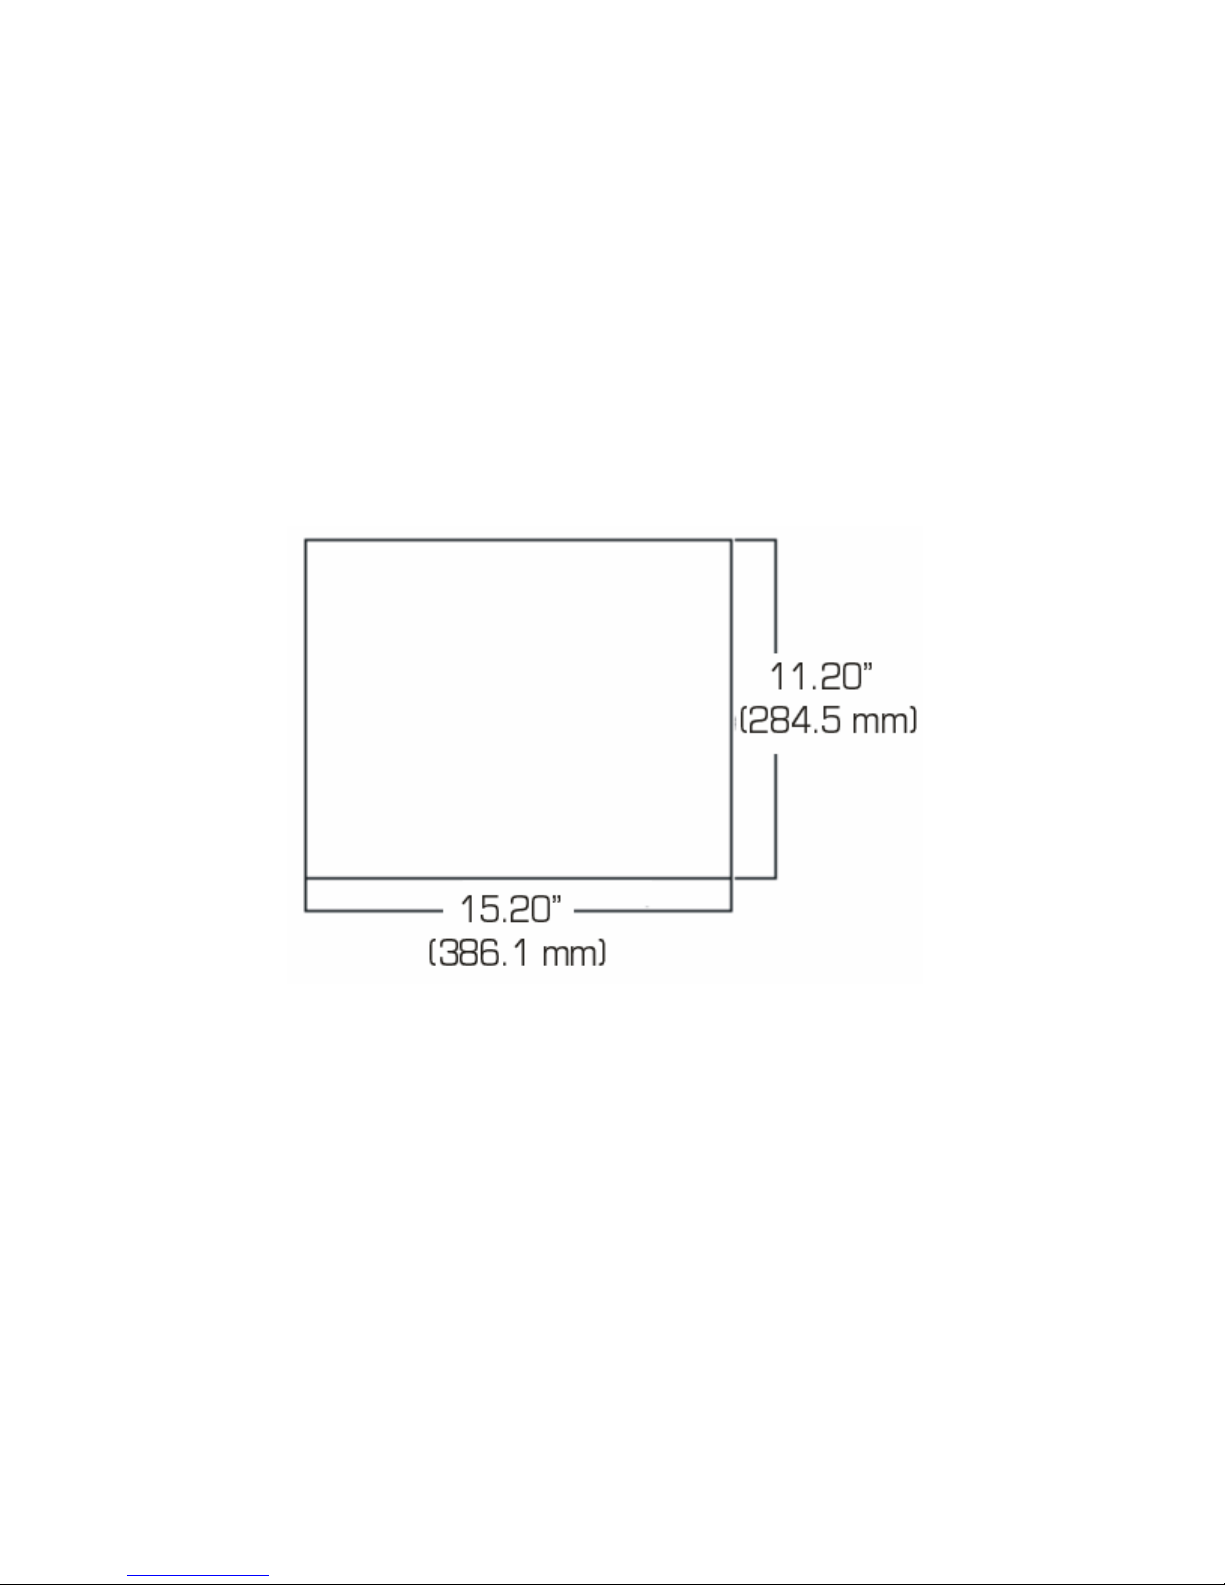
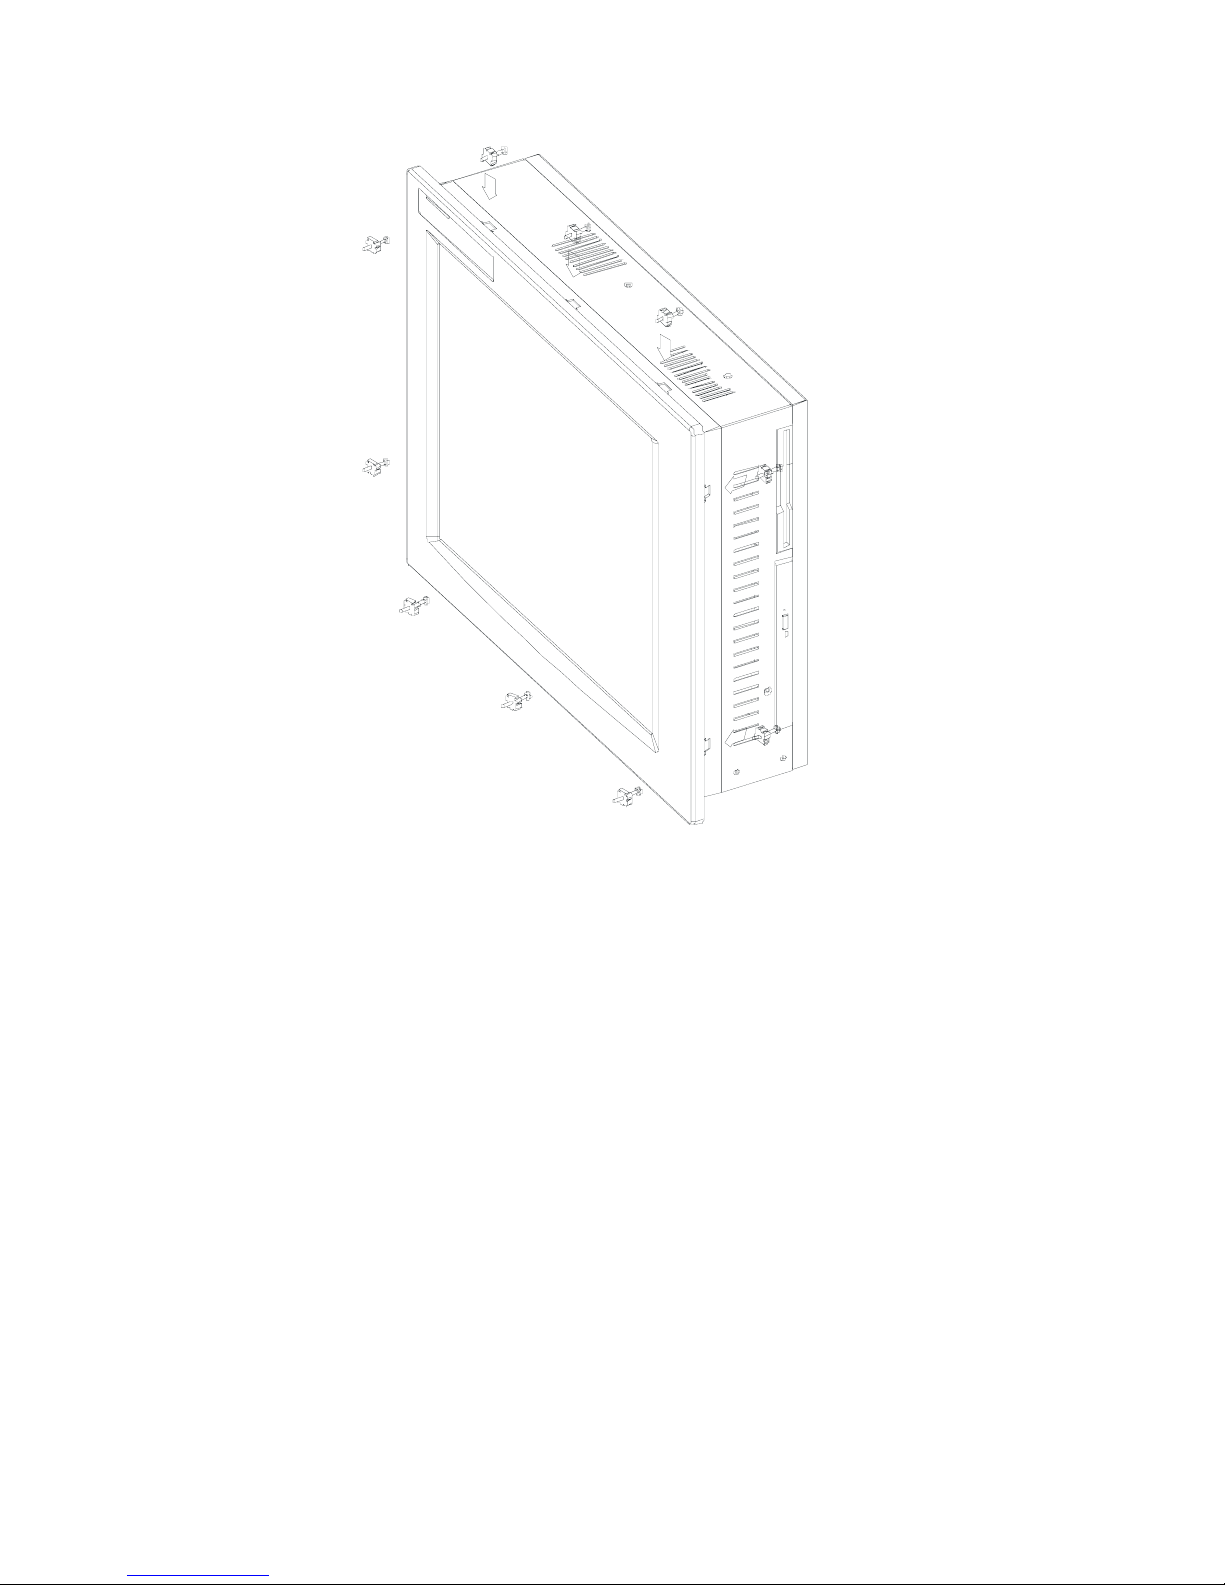
The 4115T is designed for panel mounting. Before mounting the 4115T to the panel,
check the cut out dimensions as shown in Figure 2-2. Then, mount it to the panel
using ten supporters, as shown in the Figure 2-3 (see next page).
Figure 2-2. Panel Cutout Dimensions
9 143926(A)
Page 14
4115T Thin Line Industrial Flat Panel PC Chapter 2 –
Installation
Figure 2-3. Panel Mounting Diagram
10 143926(A)
Page 15
4115T Thin Line Industrial Flat Panel PC Chapter 2 –
Installation
Wall Mounting
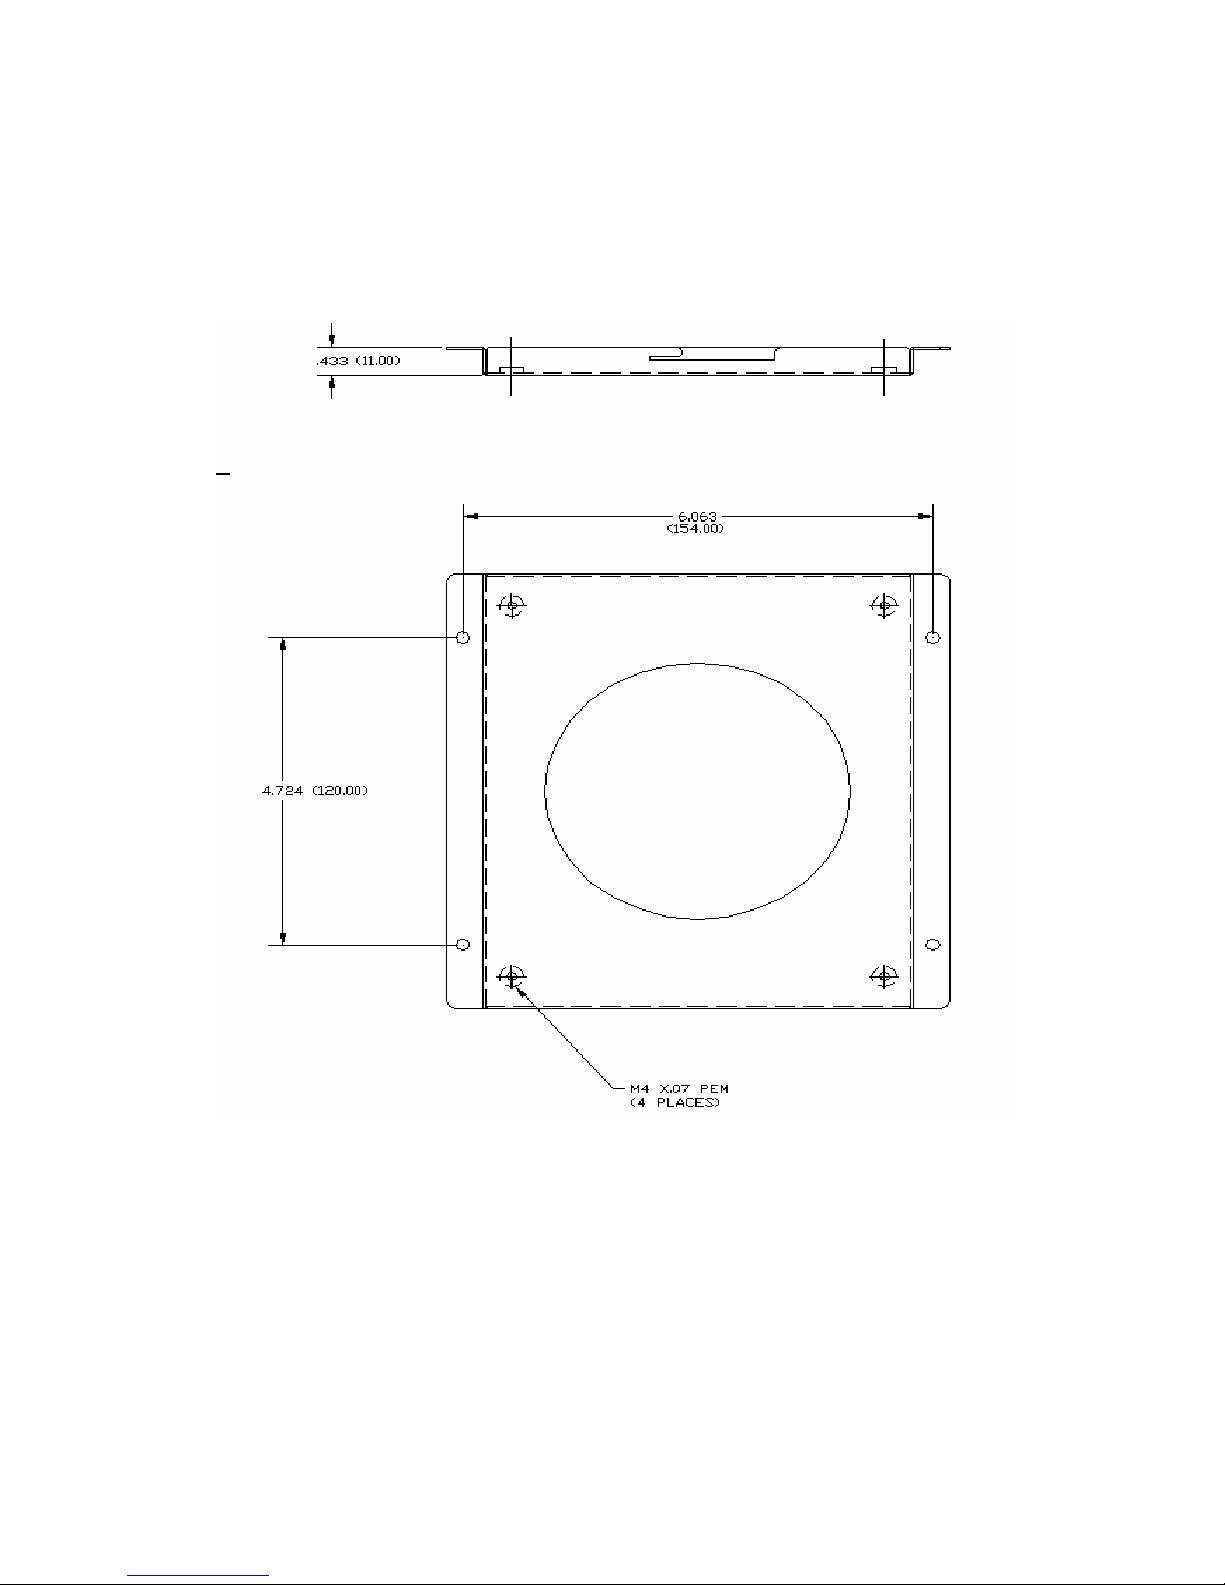
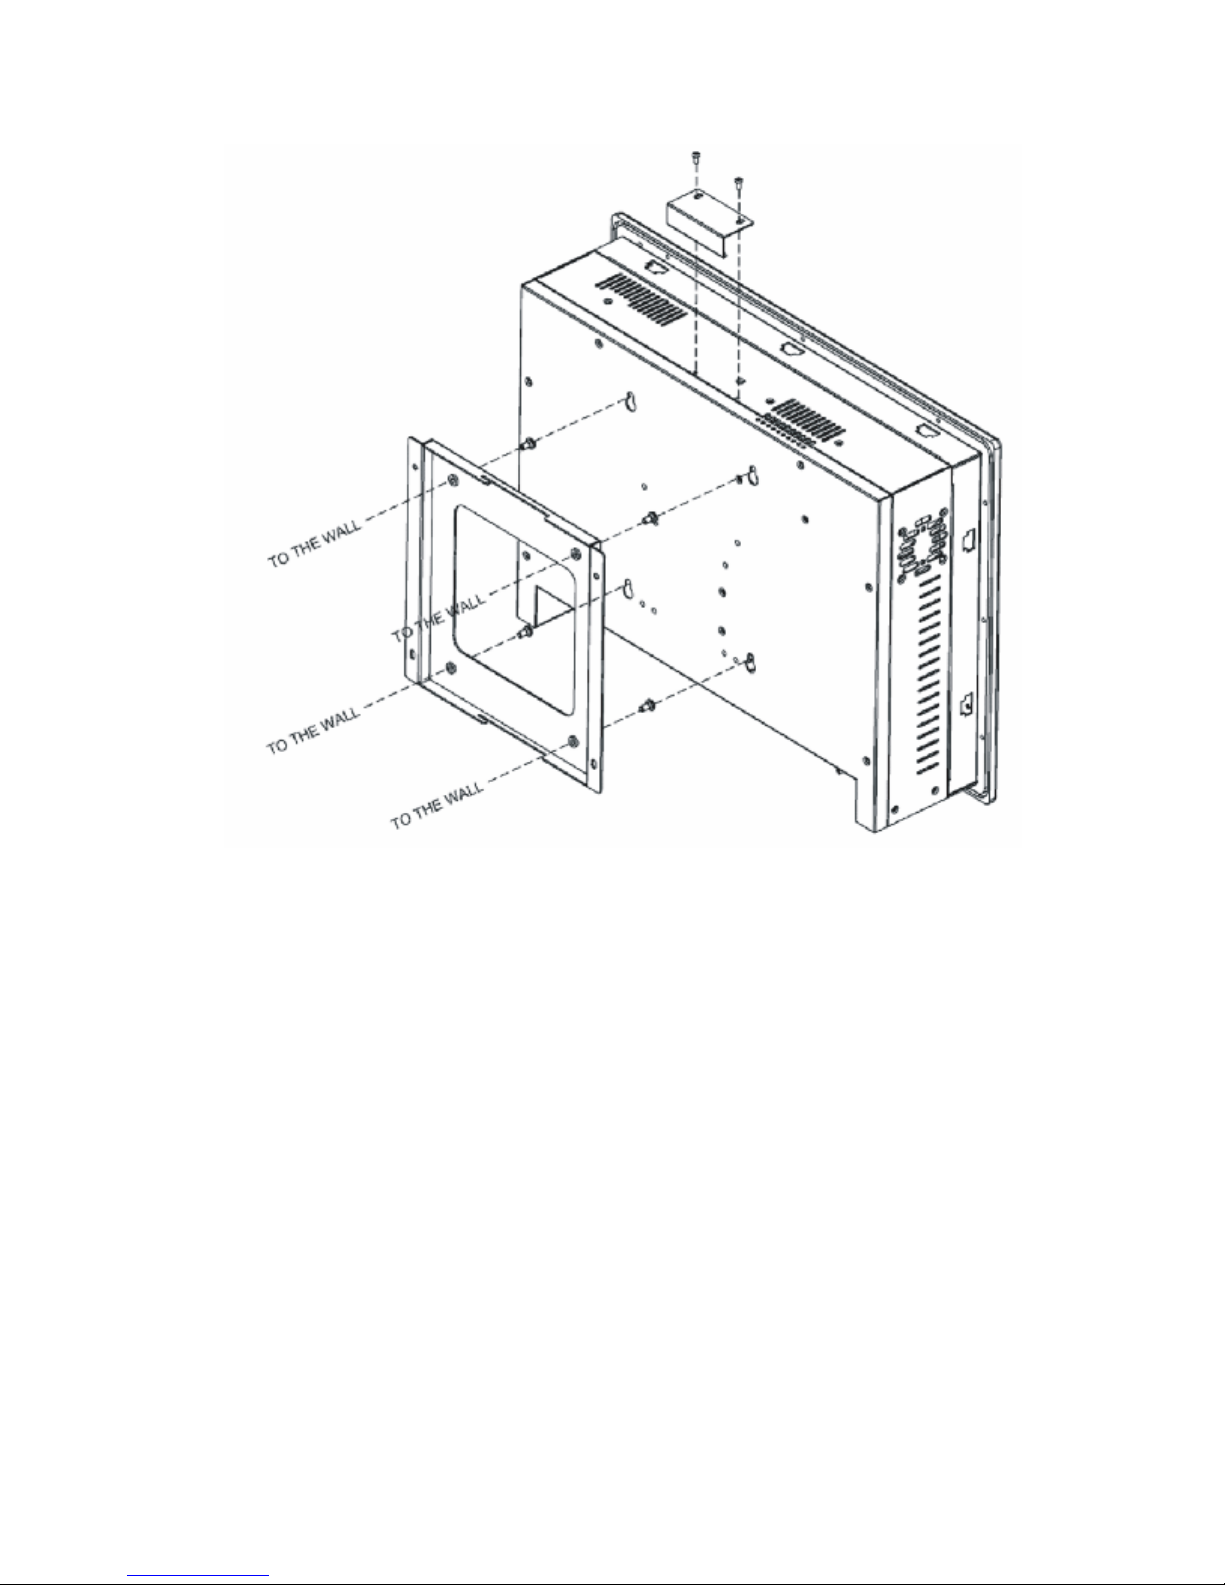
The 4115T is suitable for wall mount using the included brackets and hardware. See
Figure 2-4 for wall mounting dimensions. See Figure 2-5 for a wall-mounting
diagram.
All dimensions in inches (mm)
Figure 2-4. Wall Mounting Dimensions
11 143926(A)
Page 16
4115T Thin Line Industrial Flat Panel PC Chapter 2 –
Installation
Figure 2-5. Wall Mounting Diagram
12 143926(A)
Page 17
4115T Thin Line Industrial Flat Panel PC Chapter 2 –
Installation
Arm Mounting
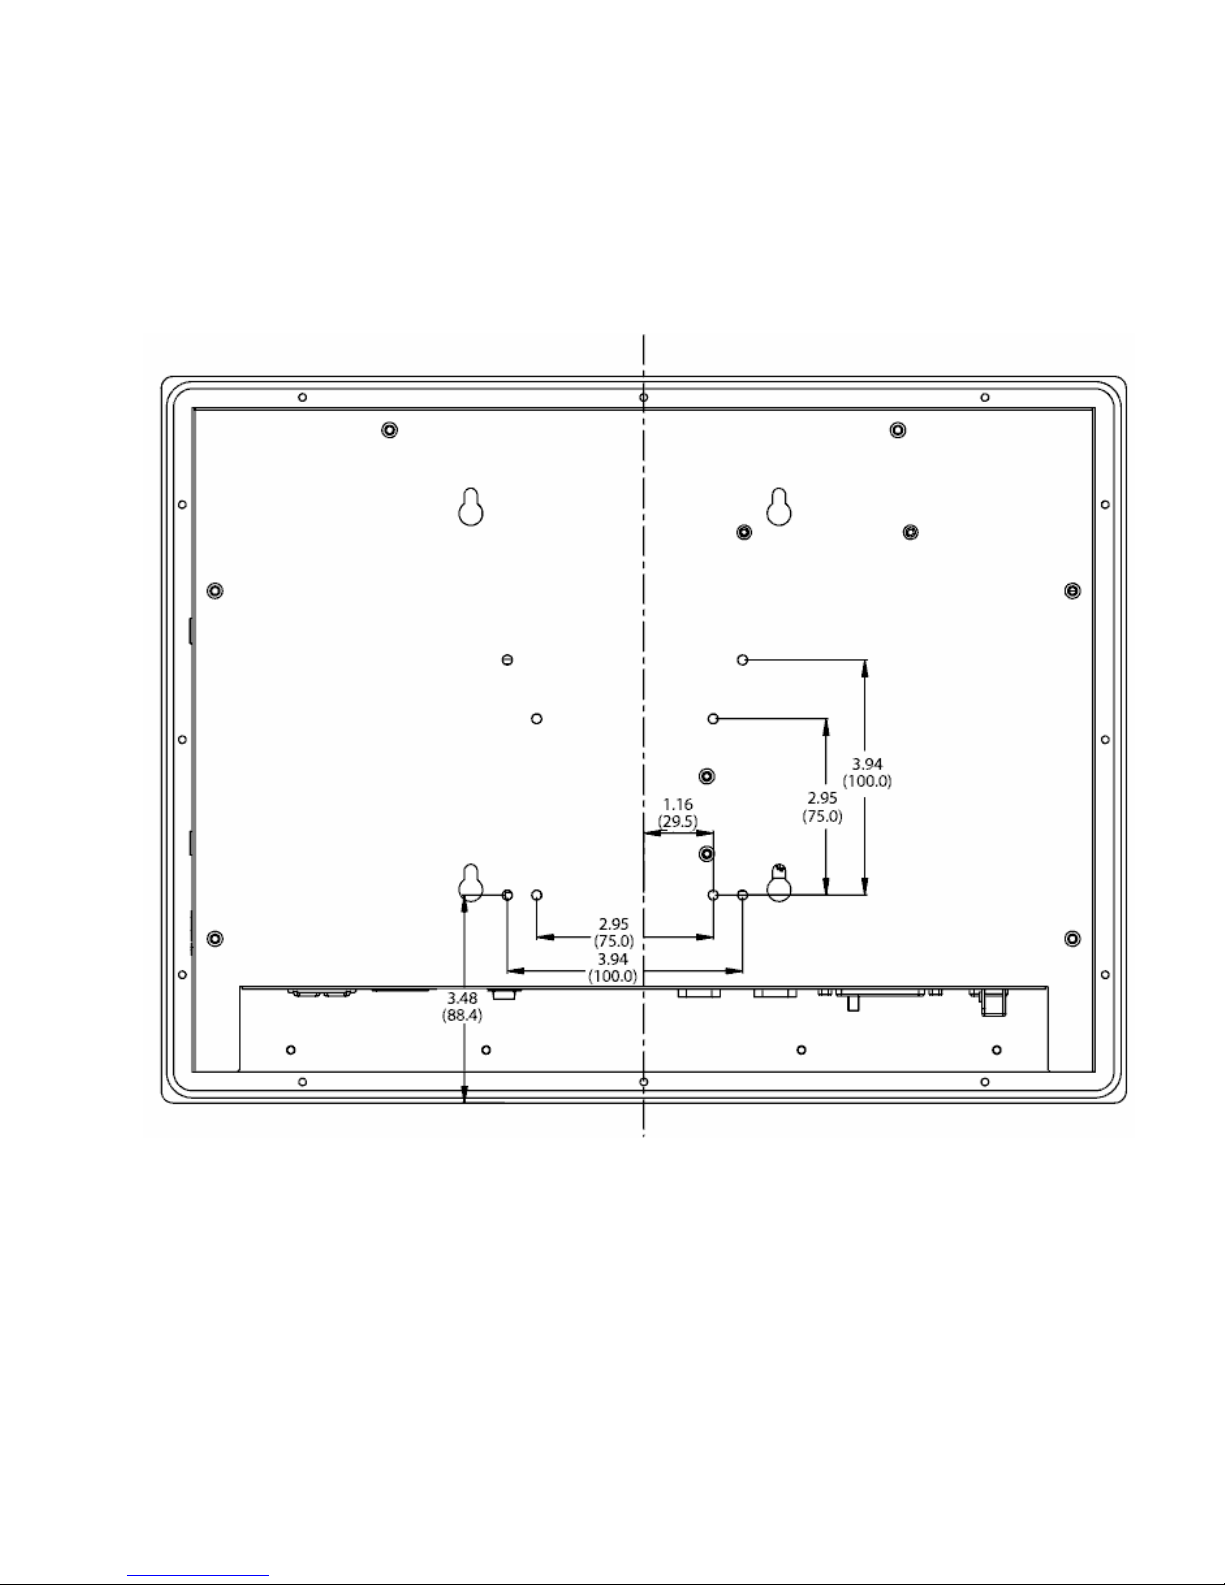
The 4115T also accommodates 75/100 mm interface pads for arm mounting. Figure
2–6 gives the dimensions for arm mounting.
All dimensions in inches (mm)
Figure 2-6. Arm Mounting Dimensions
13 143926(A)
Page 18

Chapter 3 – POS-478 CPU Board and AMI BIOS
Setup
POS-478E CPU Board
Product Overview
The 4115T is equipped with a POS-478E Socket 478 Pentium 4 with CPU control
board. It is equipped with a high-performance processor and advanced high
performance multi-mode I/O.
This board has a built-in AGP4X VGA (Intel 845GV) VGA controller, which shares
8MB or more of system DDR-SDRAM. The on-chip UARTs are compatible with the
NS16C550. The parallel port and IDE interface are compatible with IBM PC/AT
architecture. The POS-478E also has one 10/100 Fast Ethernet LAN built-in (ICH4).
Specifications
• CPU: Supports Intel Pentium 4 processor, and 400/533MHz FSB.
• Expansion Bus: PCI bus, expansion to support PCI bus signal
• DMA channels: 7
• Interrupt levels: 15
• Chipset: Intel 845GV (GMCH); Intel 82801DB (ICH4) real-time clock
• RAM: Two 184-pin DIMM sockets support DDR 200/266 SDRAM, up to 2GB.
• Built-in AGP2.0 4X 3D graphics engine, which shares system DDR SDRAM 8M or
more as needed.
• Up to four PCI enhanced ATA/100 IDE hard drives, which can handle data transfers
of up to 100MB/s and are compatible with existing ATA-2 IDE specifications
• Supports up to two floppy disk drives, 5.25” (360KB and 1.2MB) and/or 3.5”
(720KB, 1.44MB, and 2.88MB)
• Four serial ports: 16C550 UART (or compatible) with 16-byte FIFO buffer, support
up to 115.2Kbps (three ports total external to the 4115T, as one is used for the touch
screen)
• Bi-directional parallel port
• Two USB 2.0 ports
• Watchdog timer: Can be set to 1 minute (minimal) or above period.
14 143926(A)
Page 19
4115T Light Duty Industrial PC Chapter 3 – POS-478 CPU Control Board and BIOS Setup
• AC’97 Audio CODEC
• Compact Flash operates with a passive adapter (True IDE Mode) in a Type I/II
Socket
• Wake-Up Function: Supports Wake-On-Lan and Wake-On-Ring.
• Mouse & Keyboard PS/2 Connectors
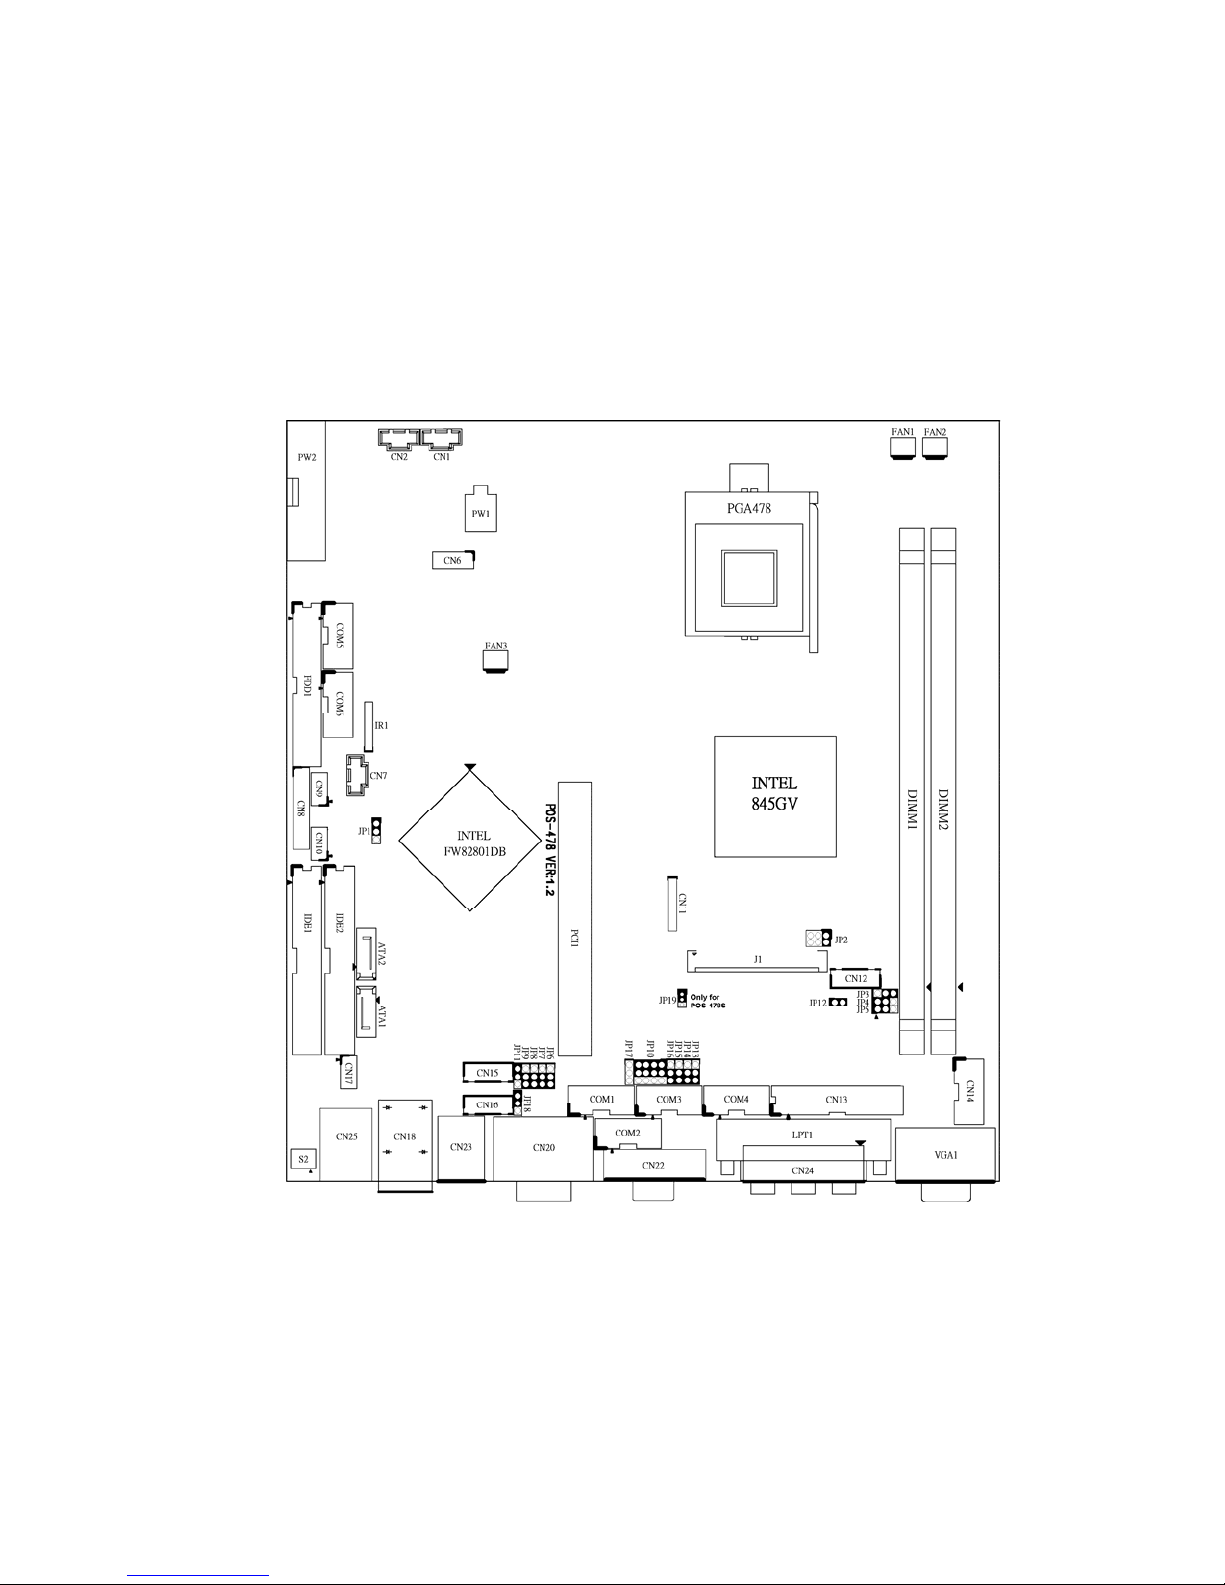
POS-478E CPU Board Layout
Note: JP17 is not populated on the POS-478 motherboard.
Figure 3-1. POS-478E Board Layout
15 143926(A)
Page 20

4115T Light Duty Industrial PC Chapter 3 – POS-478 CPU Control Board and BIOS Setup
Caution
Some components on POS-478E are very sensitive to static discharges. To protect
it from unintended damage, be sure to follow these precautions:
1. Ground yourself to remove any static charge before touching your POS-478E.
You can do it by using a grounded wrist strap at all times or by frequently touching
any conducting materials that is connected to the ground.
2. Handle your POS-478E by its edges. Don’t touch IC chips, leads or circuitry if not
necessary.
3. Do not plug any connector or jumper while the power is on.
4. Do not put your POS-478E unprotected on a flat surface, as the board has
components on both sides.
Jumper Settings
The following table lists the functions of all the jumpers on the 4115T. The following
sections describe how to set jumpers on the POS-478 board.
Table 3-1. Jumper Functions
Label Function
JP1 CMOS State Setting
JP2 LCD Voltage Setting
JP3 LCD 24 bit or 18 bit LCD Setting
JP4 LCD CLK Signal Setting
JP5 LCD Single Pixel or Dual Pixel Setting
JP6 Set pin 9 of COM2 Voltage Setting
JP7 Set pin 9 of COM1 Voltage Setting
JP8 Set pin 9 of COM2 as Signal RI or Voltage Setting
JP9 Set pin 9 of COM1 as Signal RI or Voltage Setting
JP10 COM2 Mode Setting
JP11 COM2 Mode RS-232 or RS-422/RS-485 Setting
JP12 Compact Flash Master/Slave Setting
JP13 Set pin 9 of COM3 Voltage Setting
JP14 Set pin 9 of COM4 Voltage Setting
JP15 Set pin 9 of COM3 as Signal RI or Voltage Setting
JP16 Set pin 9 of COM4 as Signal RI or Voltage Setting
JP18 Keyboard & Mouse Power Source Setting
JP19 Enable or Disable Serial ATA (only for POS-478S)
16 143926(A)
Page 21
4115T Light Duty Industrial PC Chapter 3 – POS-478 CPU Control Board and BIOS Setup
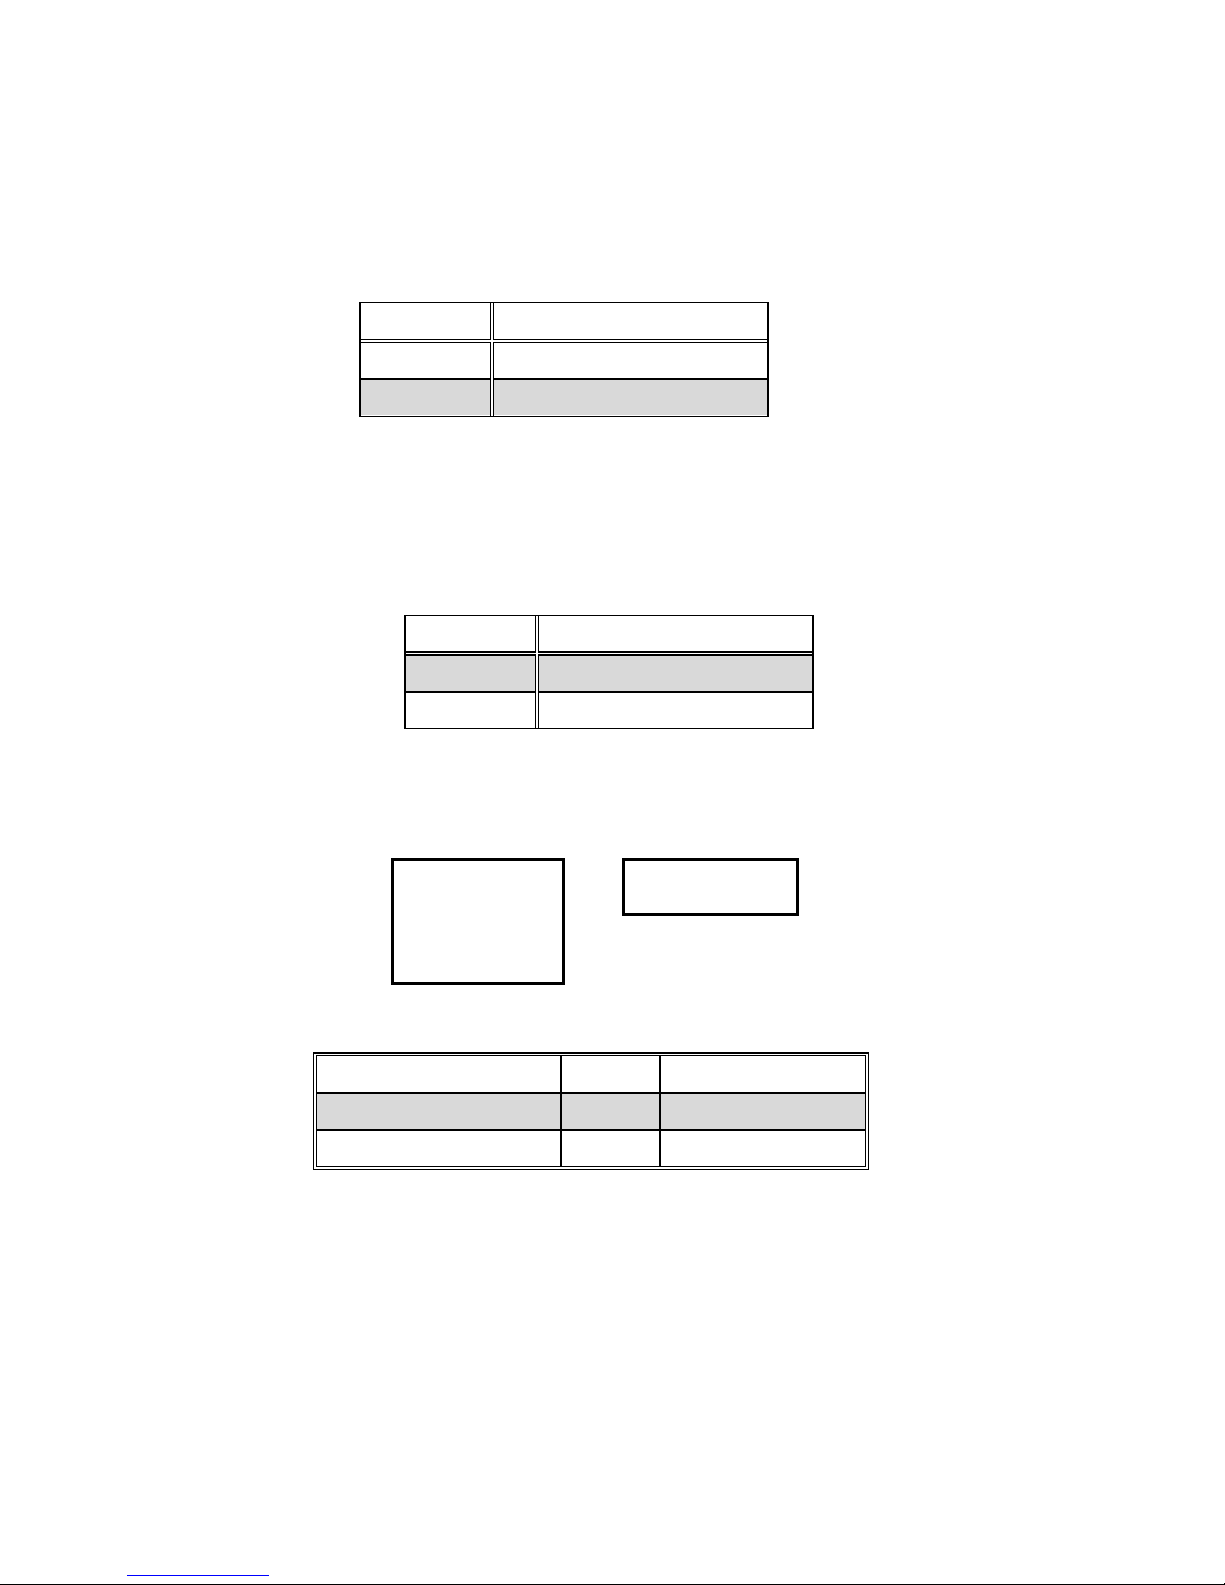
Compact Flash TYPE II Flash Disk Setting
The Compact Flash is 100% compatible to IDE hard disk. It is “plug and play”, easy
to use and reliable. The CompactFlashDisk™ is available from 8MB to 1GB.
JP12: CompactFlashDisk™ IDE Master & Slave Setting
PIN Description
Open Slave
Short Master
Clear CMOS Setup
If you forget the CMOS password, you can clear or reset it by closing the JP1. After
JP1 (2-3) is closed, turn on the power for about 3 seconds then turn it off and open
the JP1 (2-3). Now, the password has been cleared from your CMOS.
JP1: Clear CMOS Setup
PIN Description
1-2 Normal Operation
2-3 Clear CMOS Setup
COM2 RS-232/422/485 Selection
JP10, JP11: COM2 Mode Selection
3 6 9 12
z z z z
z z z z
z z z z
2 5 8 11 (JP11)
1 4 7 10 (JP10)
JP10 JP11 Description
1-2,4-5,7-8,10-11 1-2 RS-232
2-3,5-6,8-9,11-12 2-3 RS-422/485
z z z
1 2 3
17 143926(A)
Page 22

4115T Light Duty Industrial PC Chapter 3 – POS-478 CPU Control Board and BIOS Setup
COM Port RI and Voltage Selection
JP7, JP9: Set pin 9 of COM1 as signal RI or voltage source
JP9 Description
2-3 COM1 RI PIN Use RI
1-2 COM1 RI PIN Use Voltage
JP7 Description
2-3 COM1 RI PIN Use Voltage +12V
1-2 COM1 RI PIN Use Voltage +5V
*The use of JP7 (2-3) or (1-2) will not make any difference when JP9 (2-3) is in use.
JP6, JP8: Set pin 9 of COM2 as signal RI or voltage source
JP8 Description
2-3 COM2 RI PIN Use RI
1-2
COM2 RI PIN Use Voltage
JP6 Description
2-3 COM2 RI PIN Use Voltage +12V
1-2
*The use of JP6 (2-3) or (1-2) will not make any difference when JP8 (2-3) is in use.
COM2 RI PIN Use Voltage +5V
JP13, JP15: Set pin 9 of COM3 as signal RI or voltage source
JP15 Description
2-3 COM3 RI PIN Use RI
1-2
COM3 RI PIN Use Voltage
JP13 Description
2-3 COM3 RI PIN Use Voltage +12V
1-2
*The use of JP13 (2-3) or (1-2) will not make any difference when JP15 (2-3) is in use.
COM3 RI PIN Use Voltage +5V
18 143926(A)
Page 23
4115T Light Duty Industrial PC Chapter 3 – POS-478 CPU Control Board and BIOS Setup
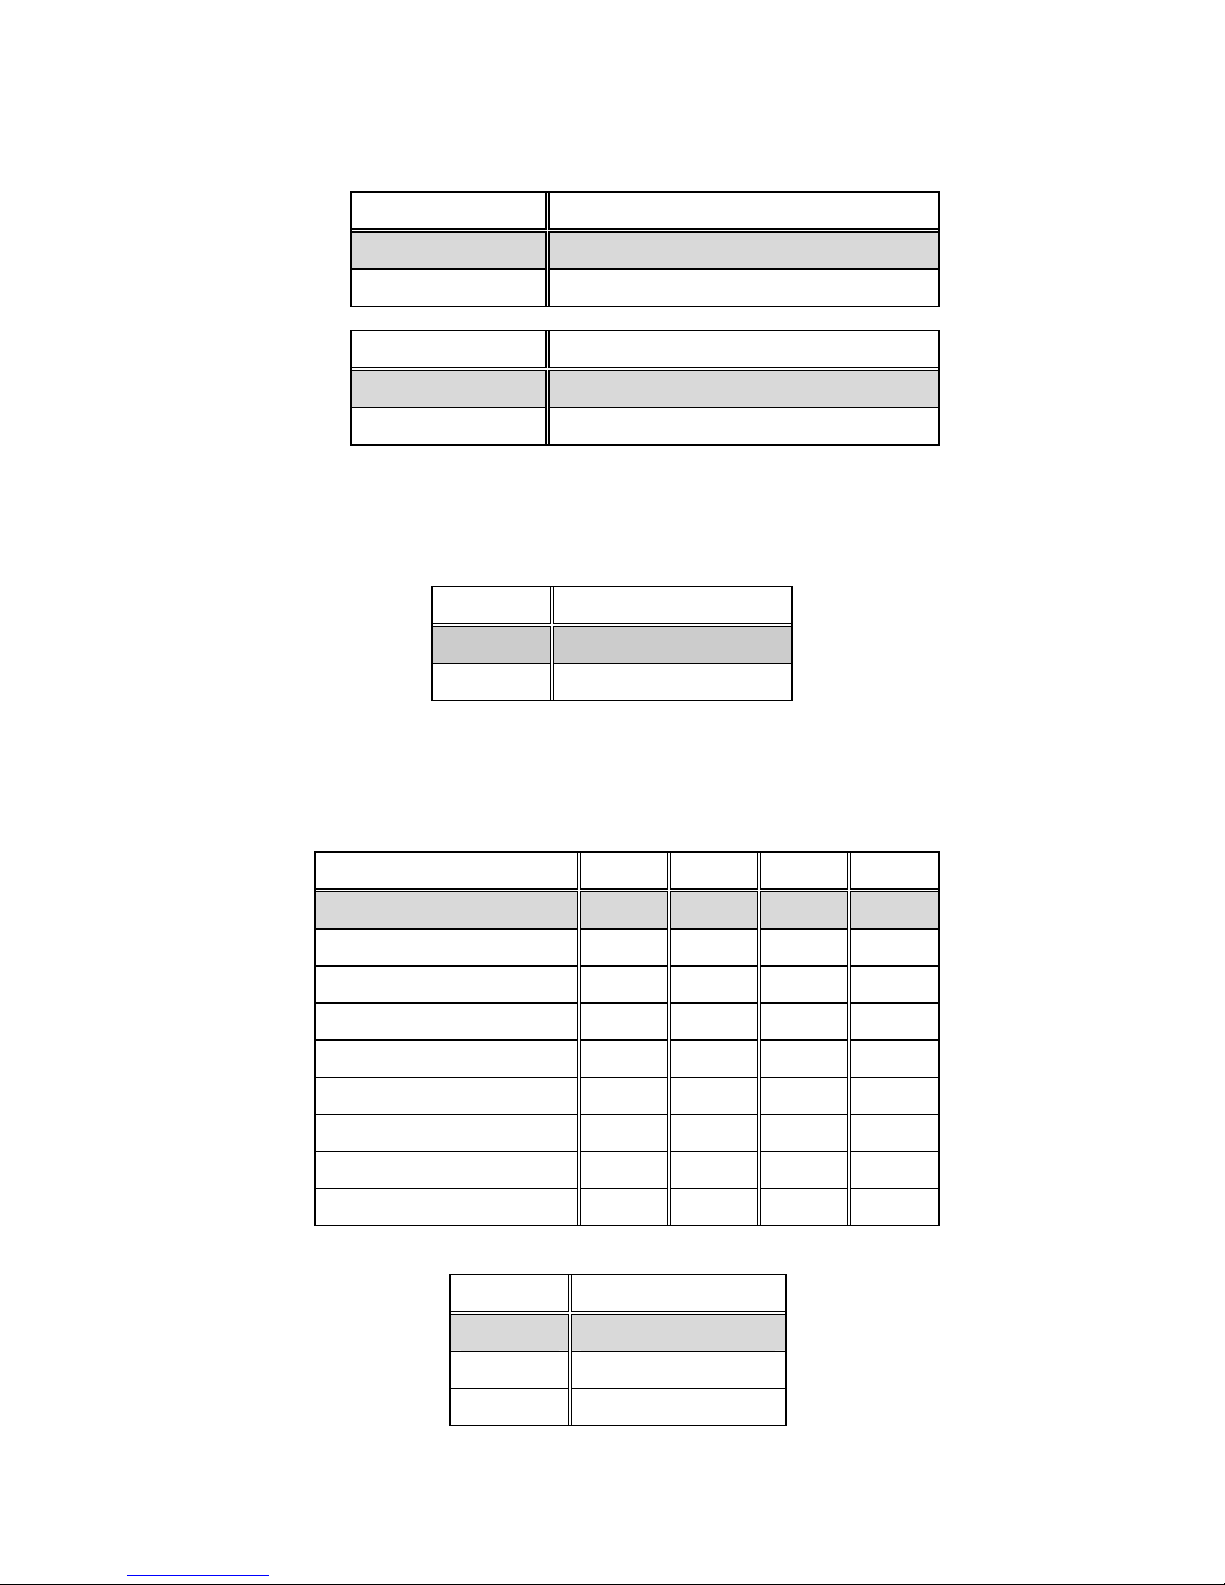
JP14, JP16: Set pin 9 of COM4 as signal RI or voltage source
JP16 Description
2-3 COM4 RI PIN Use RI
1-2
JP14 Description
2-3 COM4 RI PIN Use Voltage +12V
1-2
*The use of JP14 (2-3) or (1-2) will not make any difference when JP16 (2-3) is in use.
COM4 RI PIN Use Voltage
COM4 RI PIN Use Voltage +5V
Keyboard & Mouse Power Source Setting
JP18: Keyboard & Mouse Power Selection
JP18 Description
1-2 VCC
2-3 5VSB
LCD Panel Setup
POS-478 provides a highly integrated scaling IC with LVDS Transmitter with a
scaled resolution up to SXGA for single pixel Input. The transmitter supports up to
48-bit color TFT LCD.
PANEL MODEL JP2 JP3 JP4 JP5
LG LP150X1
ChiMei M170E4
Toshiba LTM15C423S
Torisan TM121XG-02
ChiMei M150X3-L04
LG LM150X06 (A3)
IMES DM121-53DR
UniPac UB104S01
AUO G150XG01 V.0
JP2: LCD Voltage Setting
JP2 Description
1-2 +3.3V
3-4
5-6
1-2 2-3 1-2 1-2
3-4 2-3 1-2 OPEN
1-2 2-3 1-2 OPEN
1-2 2-3 1-2 1-2
1-2 2-3 1-2 1-2
1-2 2-3 1-2 1-2
1-2 2-3 1-2 1-2
1-2 2-3 1-2 1-2
1-2 2-3 1-2 2-3
+5V
+12V
19 143926(A)
Page 24
4115T Light Duty Industrial PC Chapter 3 – POS-478 CPU Control Board and BIOS Setup
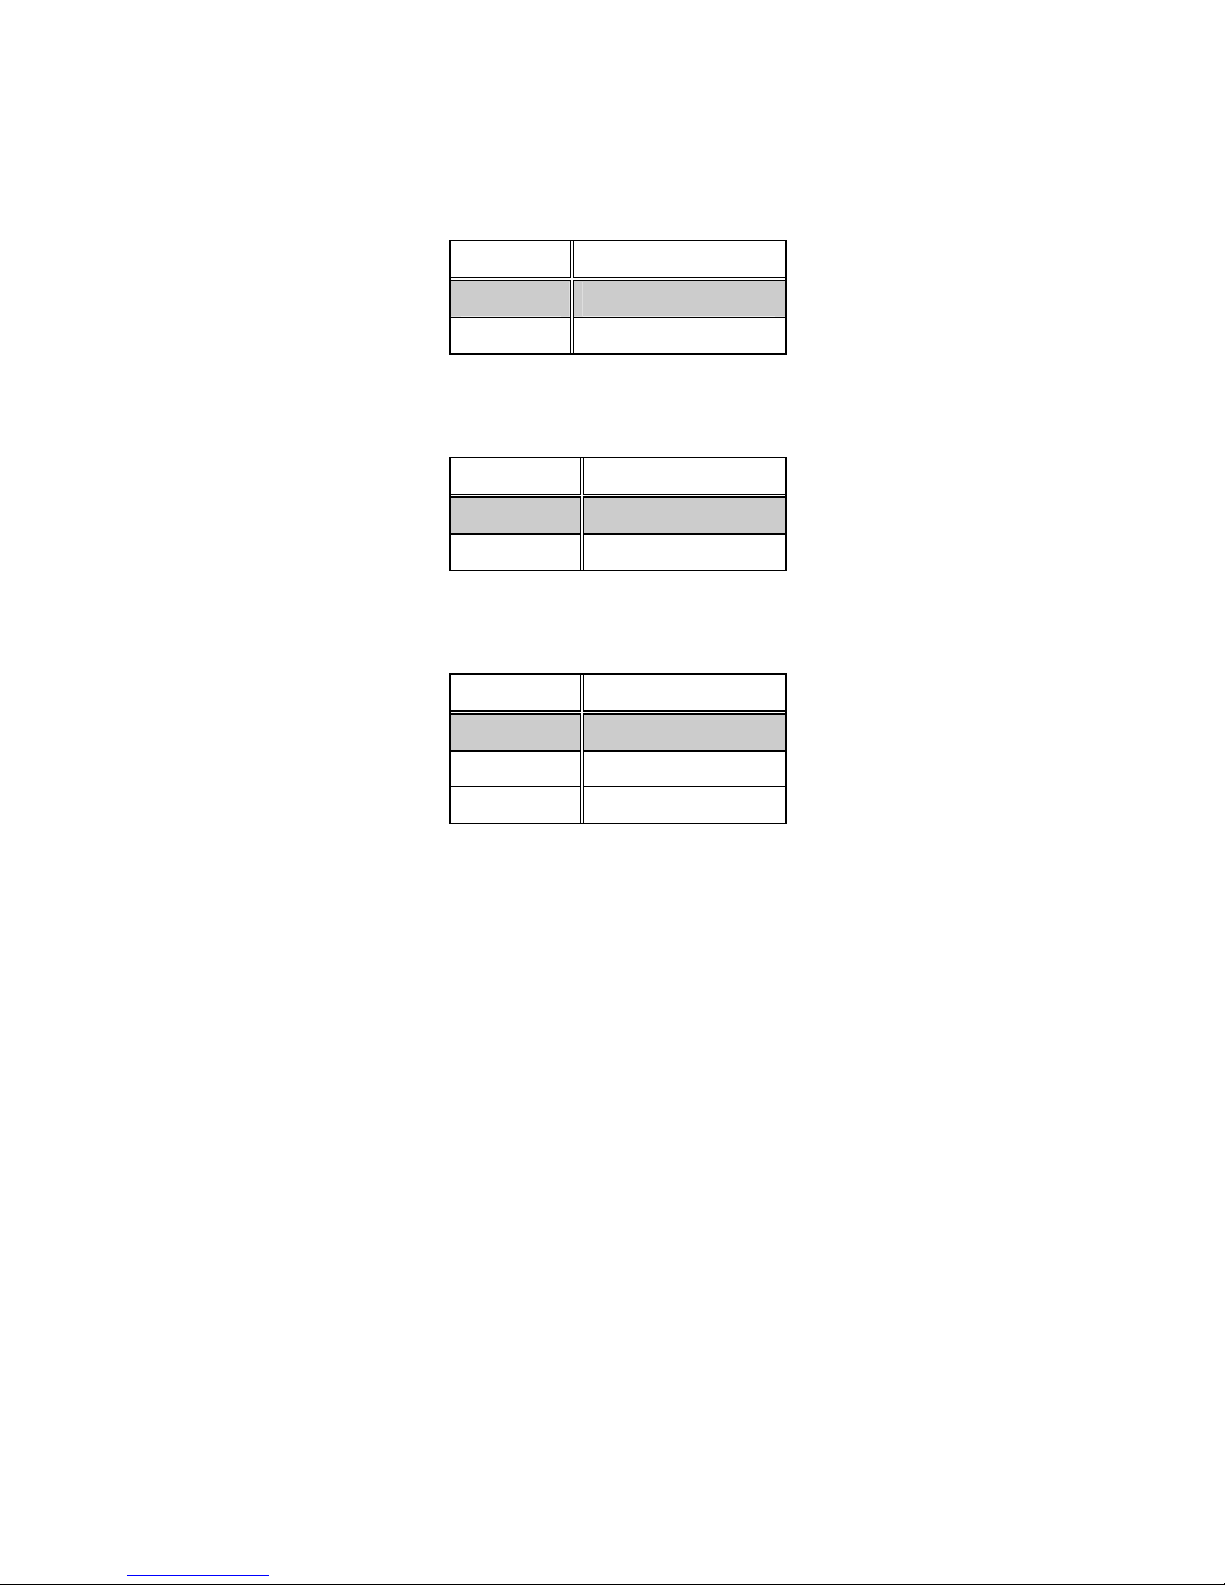
JP3: 24-bit or 18-bit LCD Selection (for one pixel). Tie to DVCC to select nonconventional color mapping 24 bit LCD only. Tie to GND to select 18-bit LCD.
This setting also is for 24-bit LCD with conventional color mapping.
JP3 Description
2-3 GND
1-2 DVCC
JP4: Tie to DVCC, DS90C2501 will invert CLKINP and CLKINM signals internally.
This feature can save PCB layout error by accidentally swap CLKINP and CLKINM
pins. Default setting is DVCC.
JP4 Description
1-2 DVCC
2-3 GND
JP5: Tie DUAL pin to DVCC for single pixel in to single pixel out operation. Tie
DUAL pin to 1/2 DVCC for single pixel in to dual pixel out operation. This is for
LCD requires dual pixel input. Default setting is DVCC.
JP5 Description
1-2 DVCC
2-3
OPEN
GND
1/2 DVCC
20 143926(A)
Page 25

4115T Light Duty Industrial PC Chapter 3 – POS-478 CPU Control Board and BIOS Setup
Connector Pin Outs
The following describes how to connect peripherals, switches and indicators to POS-478 board.
Floppy Disk Drive Connector
POS-478 board is equipped with a 34-pin daisy-chain drive connector cable.
FDD1: FDD Connector
PIN Description PIN Description
1 GROUND 2 REDUCE WRITE
3 GROUND 4 N/C
5 GROUND 6 N/C
7 GROUND 8 INDEX#
9 GROUND 10 MOTOR ENABLE A#
11 GROUND 12 DRIVE SELECT B#
13 GROUND 14 DRIVE SELECT A#
15 GROUND 16 MOTOR ENABLE B#
17 GROUND 18 DIRECTION#
19 GROUND 20 STEP#
21 GROUND 22 WRITE DATA#
23 GROUND 24 WRITE GATE#
25 GROUND 26 TRACK 0#
27 GROUND 28 WRITE PROTECT#
29 GROUND 30 READ DATA#
31 GROUND 32 SIDE 1 SELECT#
33 GROUND 34 DISK CHANGE#
21 143926(A)
Page 26

4115T Light Duty Industrial PC Chapter 3 – POS-478 CPU Control Board and BIOS Setup
PCI E-IDE Disk Drive Connector
You can attach four IDE (Integrated Device Electronics) hard disk drives to POS-478
IDE controller.
IDE1, IDE2: Primary, Secondary IDE Connector
IDE1 (Blue), IDE2 (White): IDE Interface Connector
PIN Description PIN Description
1 RESET# 2 GND
3 DATA 7 4 DATA 8
5 DATA 6 6 DATA 9
7 DATA 5 8 DATA 10
9 DATA 4 10 DATA 11
11 DATA 3 12 DATA 12
13 DATA 2 14 DATA 13
15 DATA 1 16 DATA 14
17 DATA 0 18 DATA 15
19 GND 20 N/C
21 IDE DRQ 22 GND
23 IOW# 24 GND
25 IOR# 26 GND
27 IDE CHRDY 28 GND
29 IDE DACK 30 GND
31 INTERRUPT 32 N/C
33 SA 1 34 N/C
35 SA 0 36 SA 2
37 HDC CS0# 38 HDC CS1#
39 HDD ACTIVE# 40 GND
22 143926(A)
Page 27
4115T Light Duty Industrial PC Chapter 3 – POS-478 CPU Control Board and BIOS Setup
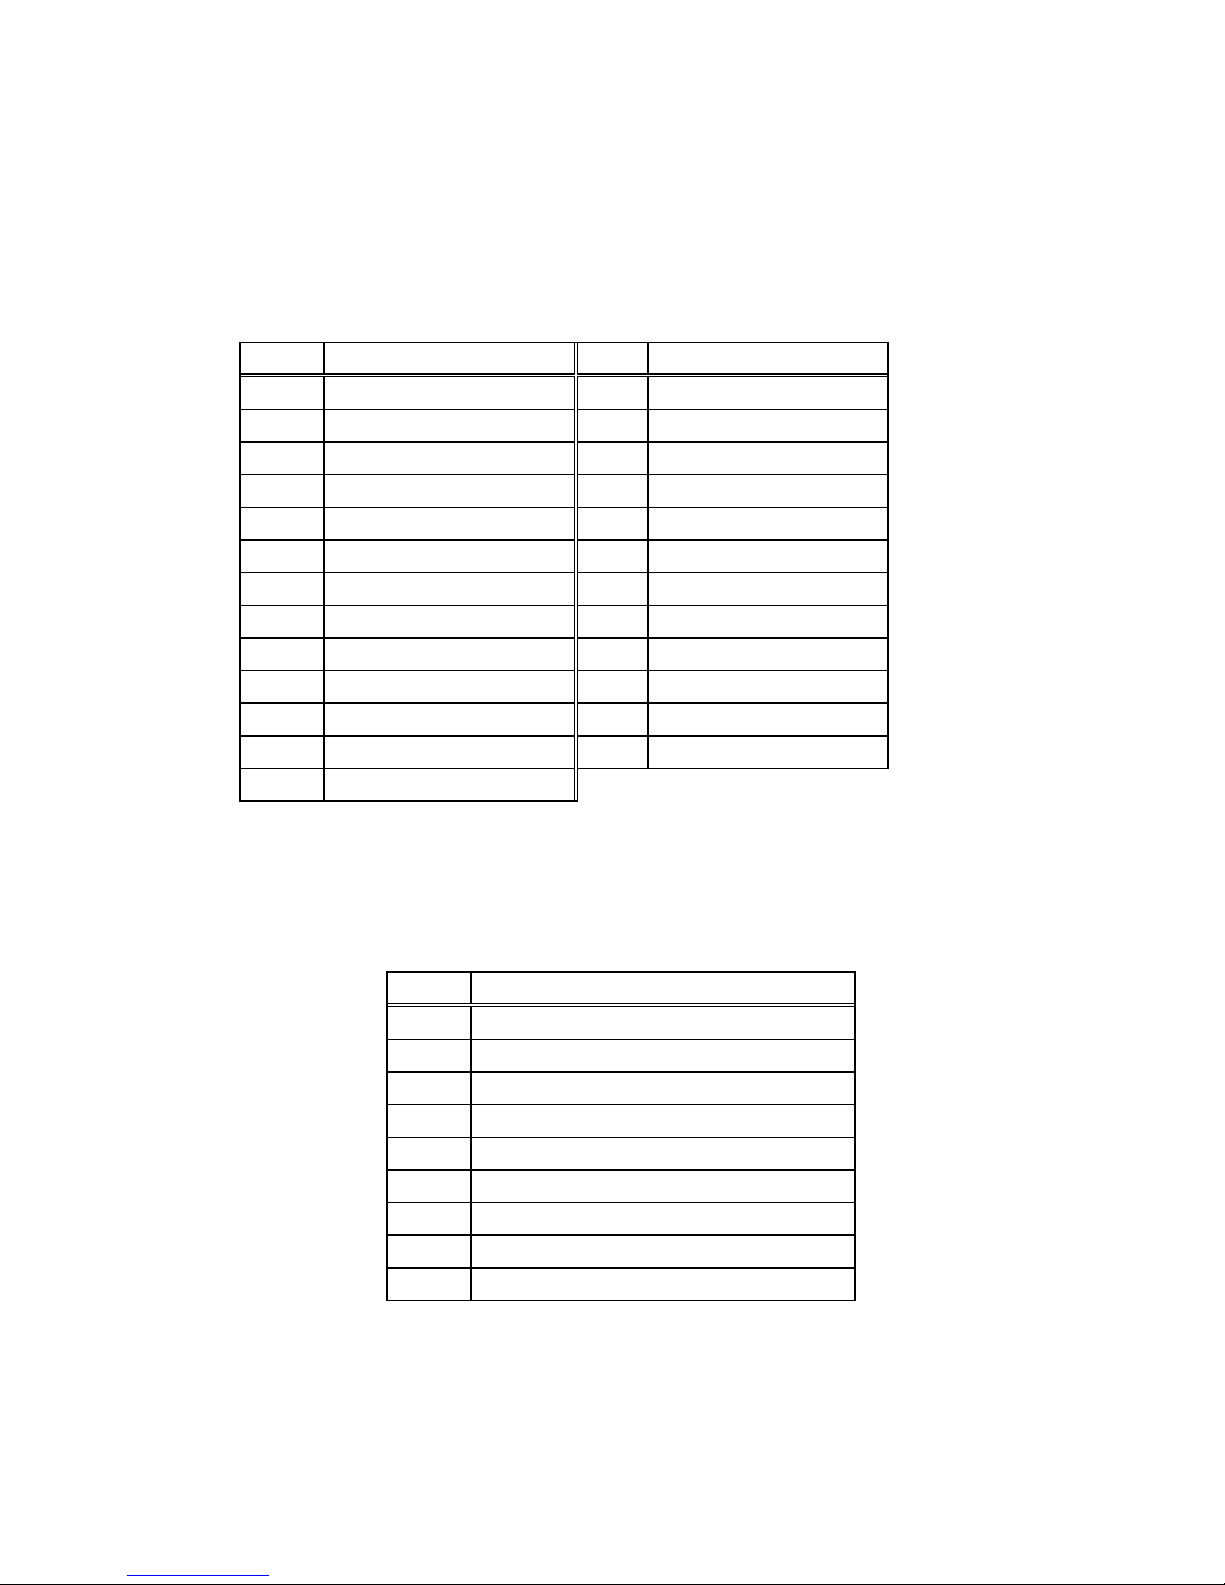
Parallel Port
These ports are usually connected to printer. POS-478 includes two on-board parallel
ports, accessed through one 25-pin D-type female connector LPT1 (LPT1) and one
26-pin flat-cable connector CN13 (LPT2).
LPT1: (LPT1 DB-25 Female) Parallel Port Connector
PIN Description PIN Description
1 STROBE# 2 DATA 0
3 DATA 1 4 DATA 2
5 DATA 3 6 DATA 4
7 DATA 5 8 DATA 6
9 DATA 7 10 ACKNOWLEDGE
11 BUSY 12 PAPER EMPTY
13 PRINTER SELECT 14 AUTO FORM FEED #
15 ERROR# 16 INITIALIZE
17 PRINTER SELECT LN# 18 GND
19 GND 20 GND
21 GND 22 GND
23 GND 24 GND
25 GND
Serial Ports
POS-478 offers four high speed NS16C550 compatible UARTs with Read/Receive
16 byte FIFO serial ports (COM1/COM2/COM3/COM4).
CN20A: Serial Port DB-9 Male Connector (COM1)
PIN Description
1 DATA CARRIER DETECT (DCD)
2 RECEIVE DATA (RXD)
3 TRANSMIT DATA (TXD)
4 DATA TERMINAL READY (DTR)
5 GROUND (GND)
6 DATA SET READY (DSR)
7 REQUEST TO SEND (RTS)
8 CLEAR TO SEND (CTS)
9 RING INDICATOR (RI)
CN20B: Serial Port DB-9 Male Connector (COM2)
23 143926(A)
Page 28
4115T Light Duty Industrial PC Chapter 3 – POS-478 CPU Control Board and BIOS Setup
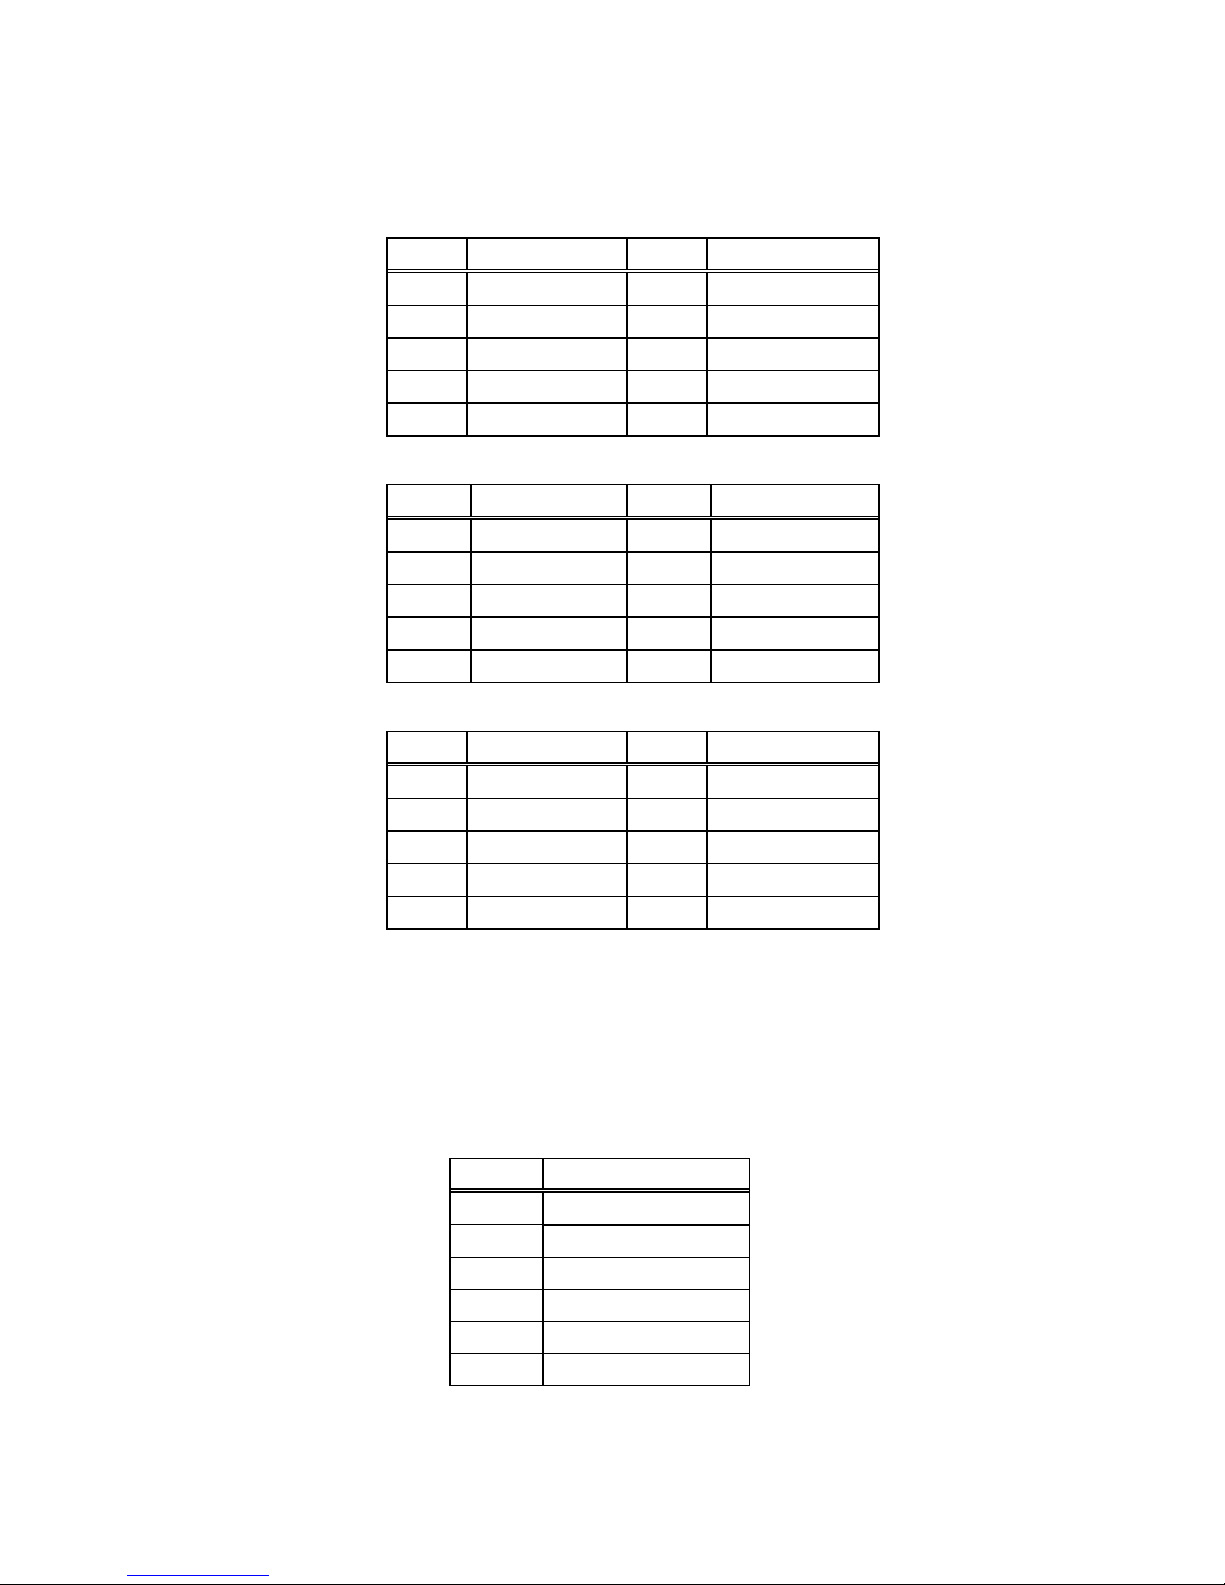
COM2 supports three modes: RS-232, RS-422, RS-485 (For DB-9 Connector)
RS-232 Mode
PIN Description PIN Description
1 DCD 6 DSR
2 RXD 7 RTS
3 TXD 8 CTX
4 DTR 9 RI
5 GND
RS-422 Mode
PIN Description PIN Description
1 TXD- 6 RX2 TXD+ 7 RX+
3 NC 8 NC
4 NC 9 Voltage
5 NC
RS-485 Mode
PIN Description PIN Description
1 RTX- 6 NC
2 RTX+ 7 NC
3 NC 8 NC
4 NC 9 Voltage
5 NC
Keyboard / Mouse Connector
POS-478 provides one keyboard and one mouse header connector, one external
keyboard & Mouse connector.
CN23A (Purple): Extended Keyboard 6-pin Mini Din Connector
PIN Description
1 KB DATA
2 NC
3 GND
4 VCC
5 KB CLOCK
6 NC
24 143926(A)
Page 29
4115T Light Duty Industrial PC Chapter 3 – POS-478 CPU Control Board and BIOS Setup
CN23B (Green): Extended Mouse 6-pin Mini Din Connector
PIN Description
1 MS DATA
2 NC
3 GND
4 VCC
5 MS CLOCK
6 NC
External Switches and Indicators
There are several external switches and indicators for monitoring and controlling
your CPU board. All the functions are in the CN8 connector.
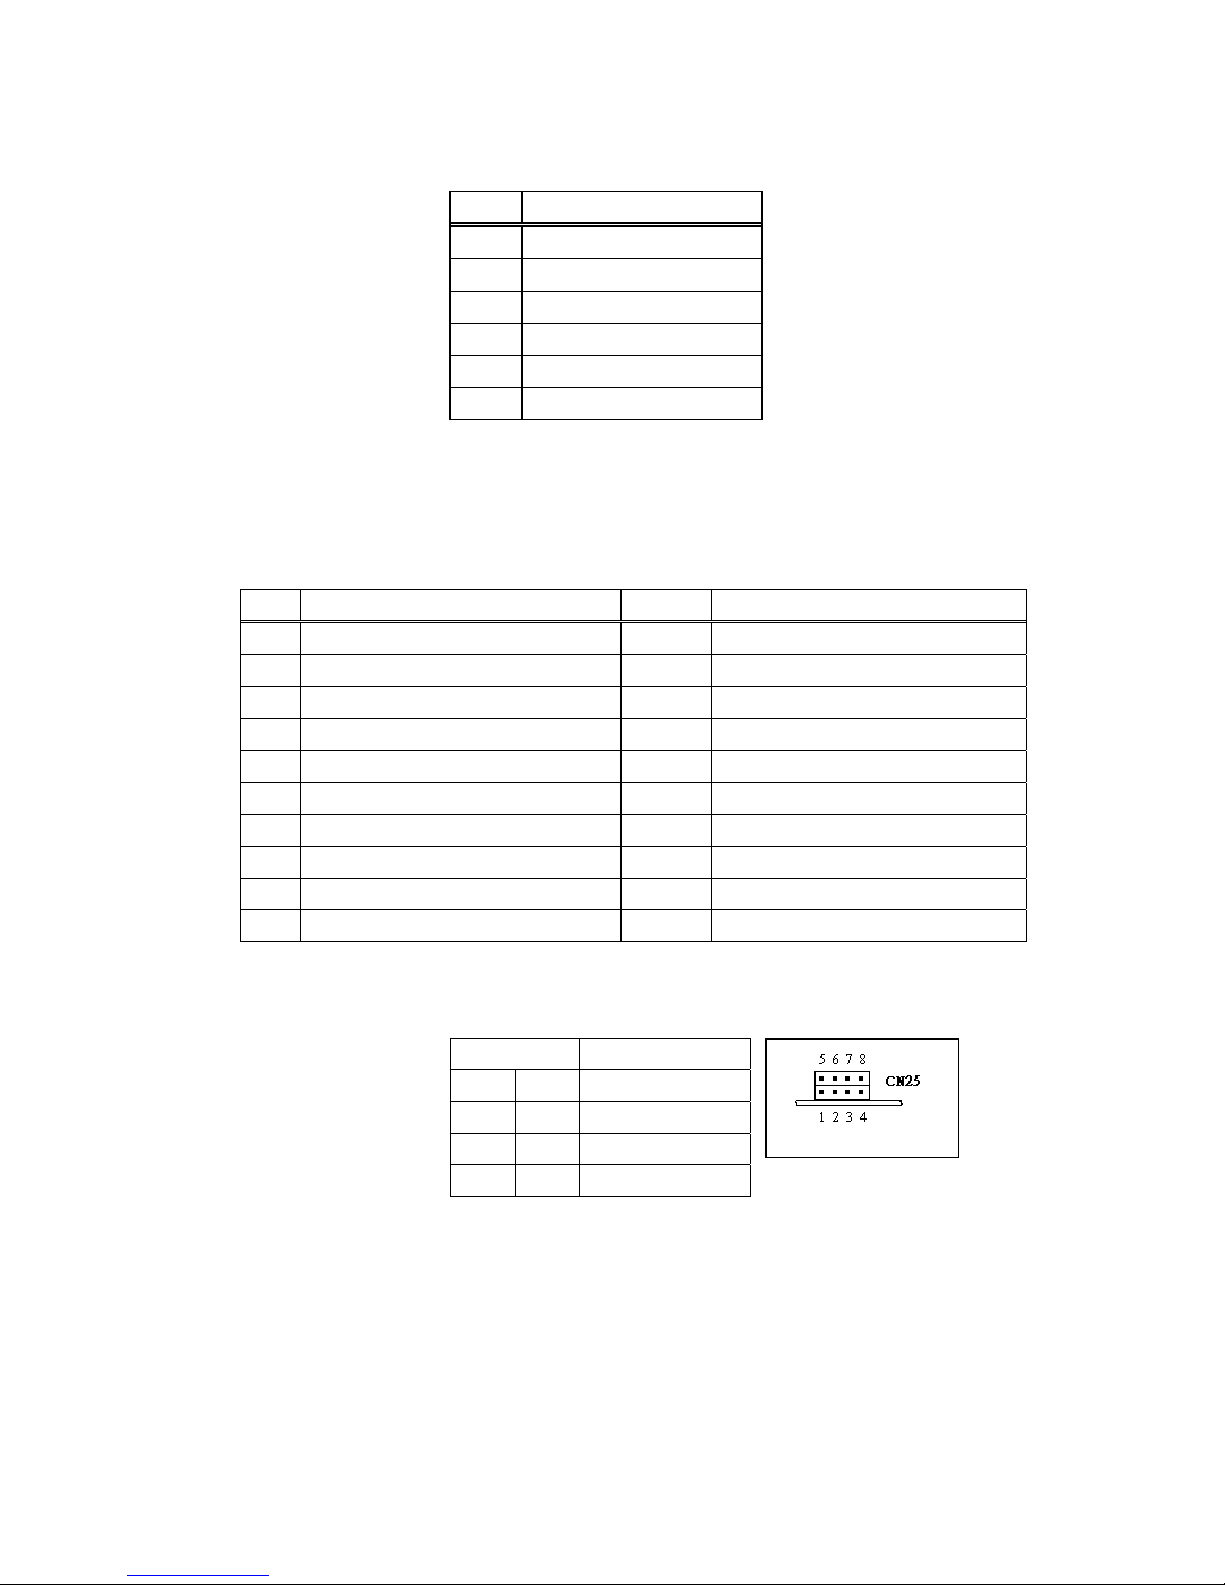
CN8: Multi Panel
PIN Description PIN Description
1 SPEAKER 11 POWER-VCC
2 ACPI LED 12 N/C
3 N/C 13 GND
4 +5V 14 KEYLOCK
5 RESET SW 15 GND
6 GND 16 GND
7 IDE LED - 17 N/C
8 IDE LED+ 18 ATX POWER CONTROL
9 ATX POWER BUTTON 19 ATX 5VSB
10 GND 20 ATX 5VSB
USB Port Connector
N25A: 2 External USB Connectors
PIN Description
1 5 VCC
2 6 USBD03 7 USBD0+
4 8 GND
25 143926(A)
Page 30
4115T Light Duty Industrial PC Chapter 3 – POS-478 CPU Control Board and BIOS Setup
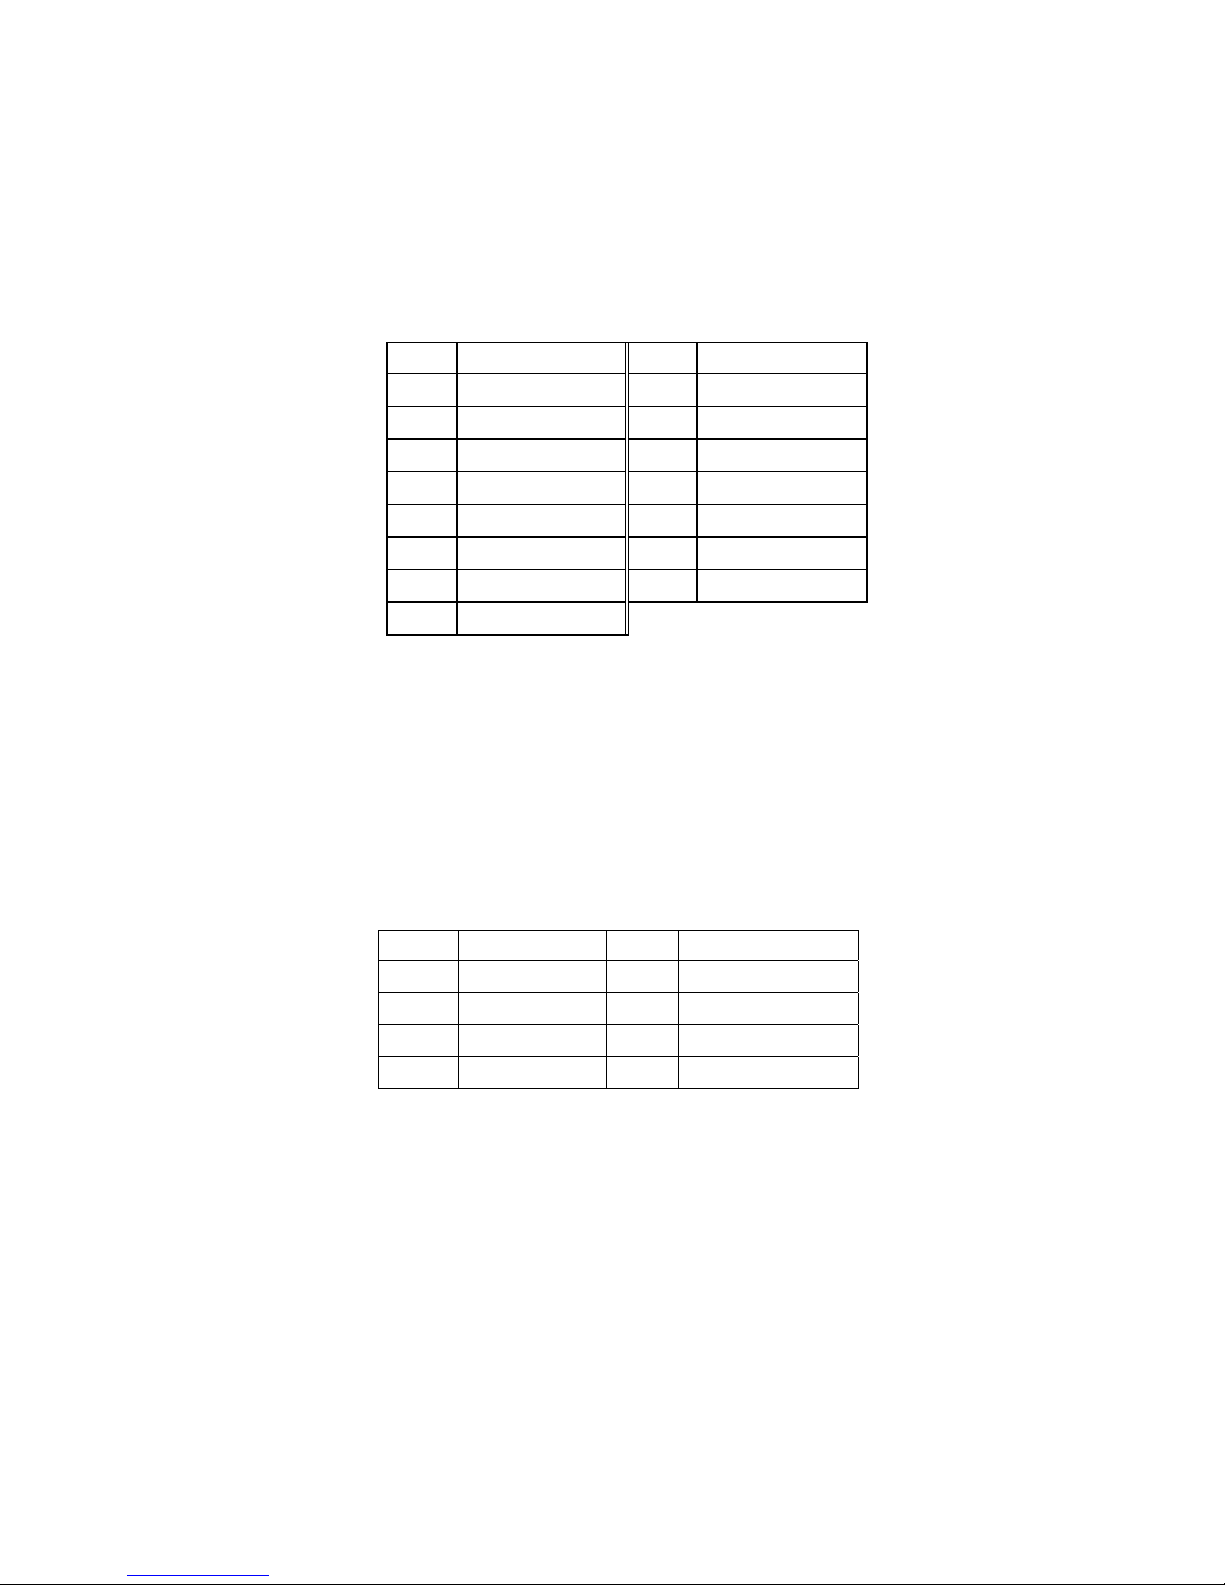
VGA Connector
POS-478 provides one DB-15 female connector and one built-in 10-pin VGA header
connector can be connected directly to your monochrome CRT monitor as well as
high resolution color CRT monitor.
VGA1: DB-15 Female VGA Connector
PIN Description PIN Description
1 RED 2 GREEN
3 BLUE 4 N/C
5 GND 6 GND
7 GND 8 GND
9 VCC 10 GND
11 N/C 12 DDC DAT
13 HSYNC 14 VSYNC
15 DDC CLK
LAN RJ45 Connector
POS-478 is equipped with one 10/100Mbps Ethernet Controller (built in INTEL
ICH4). You can connect it to your LAN through RJ45 LAN connector. The pin
assignments are as follows:
CN17: LAN Link and Active LED Connector
PIN Description PIN Description
1 ICH4_ACT+ 2 ICH4_ACT-
3 ICH4_LINK+ 4 ICH4_LINK5 Intel_ACT+ 6 Intel_ACT7 Intel_LINK+ 8 Intel_LINK-
26 143926(A)
Page 31
4115T Light Duty Industrial PC Chapter 3 – POS-478 CPU Control Board and BIOS Setup
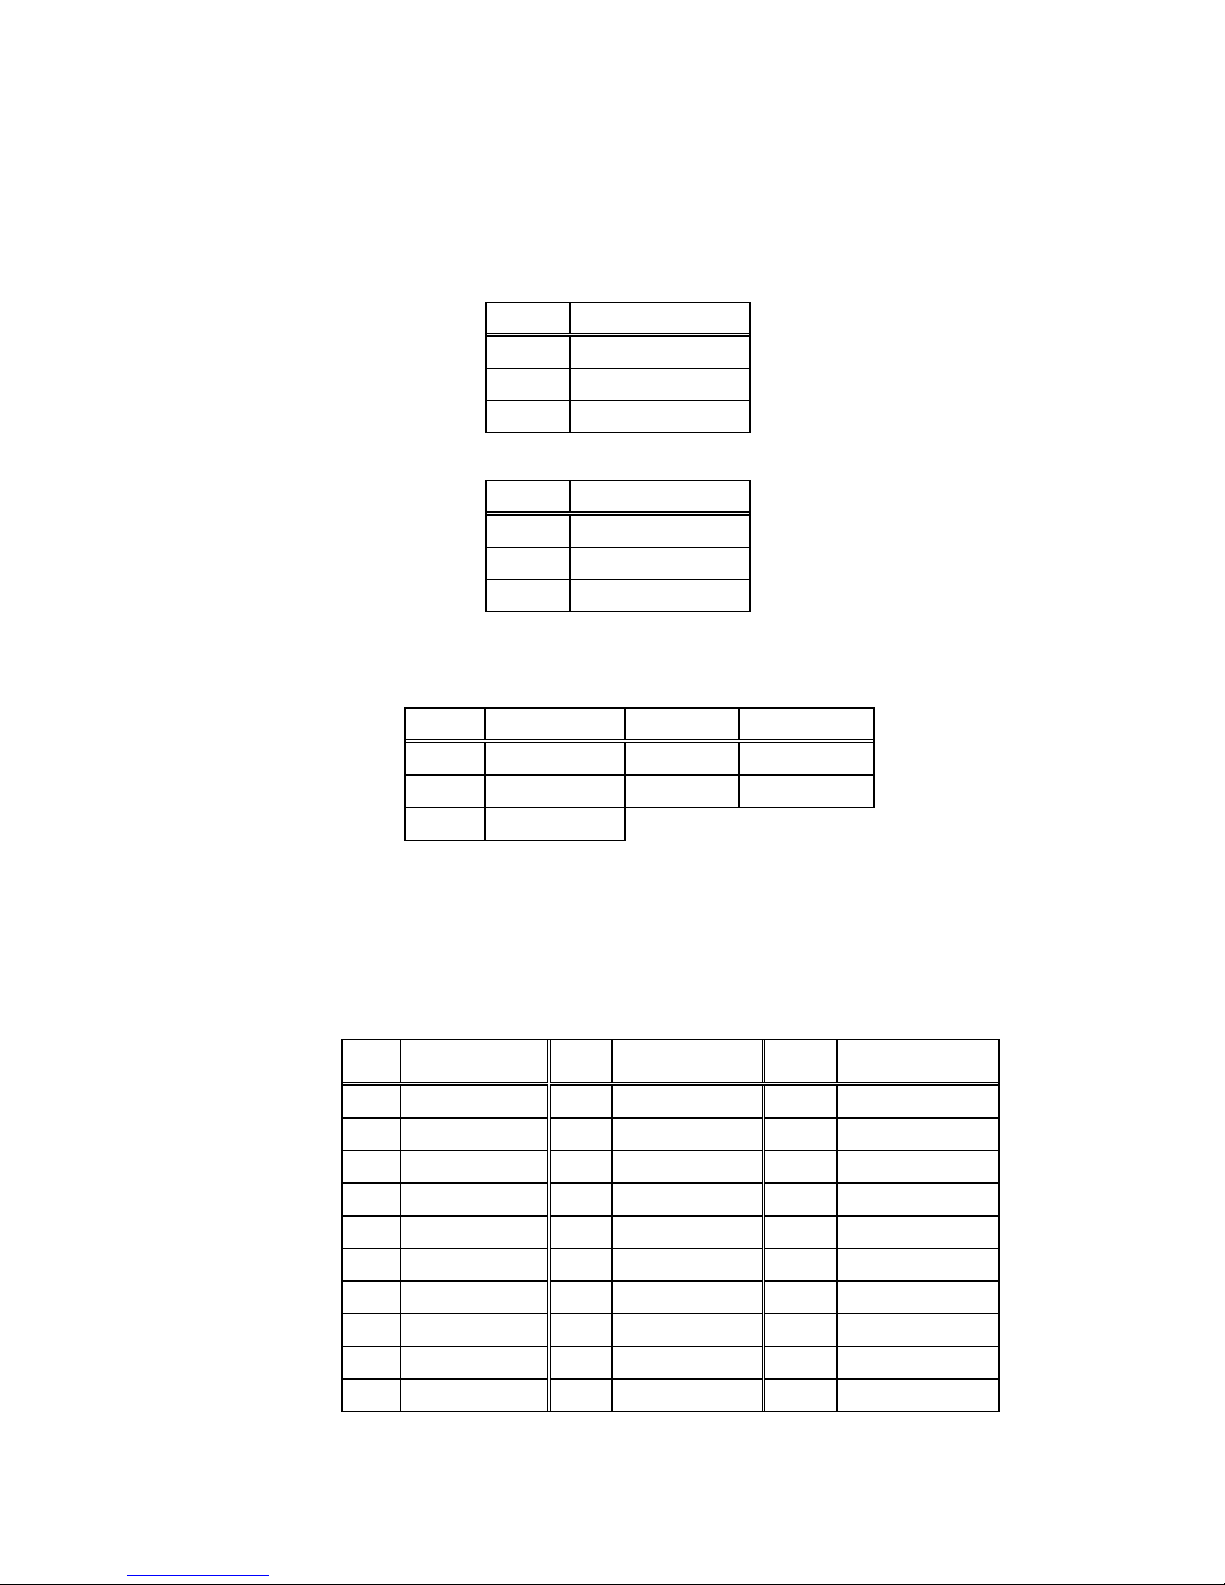
Fan Connector
POS-478 provides CPU cooling and system fan connectors. These connectors can
supply 12V/500mA to the cooling fan.
FAN1: CPU Fan Connector
PIN Description
1 GND
2 +12V
3 Fan Sensor
FAN2: System Fan Connector
PIN Description
1 GND
2 +12V
3 Fan Sensor
LCD Backlight Connector
CN12: LCD Backlight Connector
PIN Description PIN Description
1 NC 2 GND
3 +12V 4 GND
5 ENABKL
LCD Panel LVDS Interface Connector
POS-478 provides a highly integrated scaling IC with LVDS Transmitter with a
scaled resolution up to SXGA for single pixel Input. It supports up to 24-bit color
TFT LCD.
J1: DF14-30F LVDS Interface Connector
PIN Description PIN Description PIN Description
1 GND 2 GND 3 A3P
4 A3M 5 CLK1P 6 CLK1M
7 A2P 8 A2M 9 A1P
10 A1M 11 A0P 12 A0M
13 GND 14 GND 15 A7P
16 A7M 17 CLK2P 18 CLK2M
19 A6P 20 A6M 21 A5P
22 A5M 23 A4P 24 A4M
25 GND 26 GND 27 LCD_VDD
28 LCD_VDD 29 LCD_VDD 30 LCD_VDD
27 143926(A)
Page 32
4115T Light Duty Industrial PC Chapter 3 – POS-478 CPU Control Board and BIOS Setup
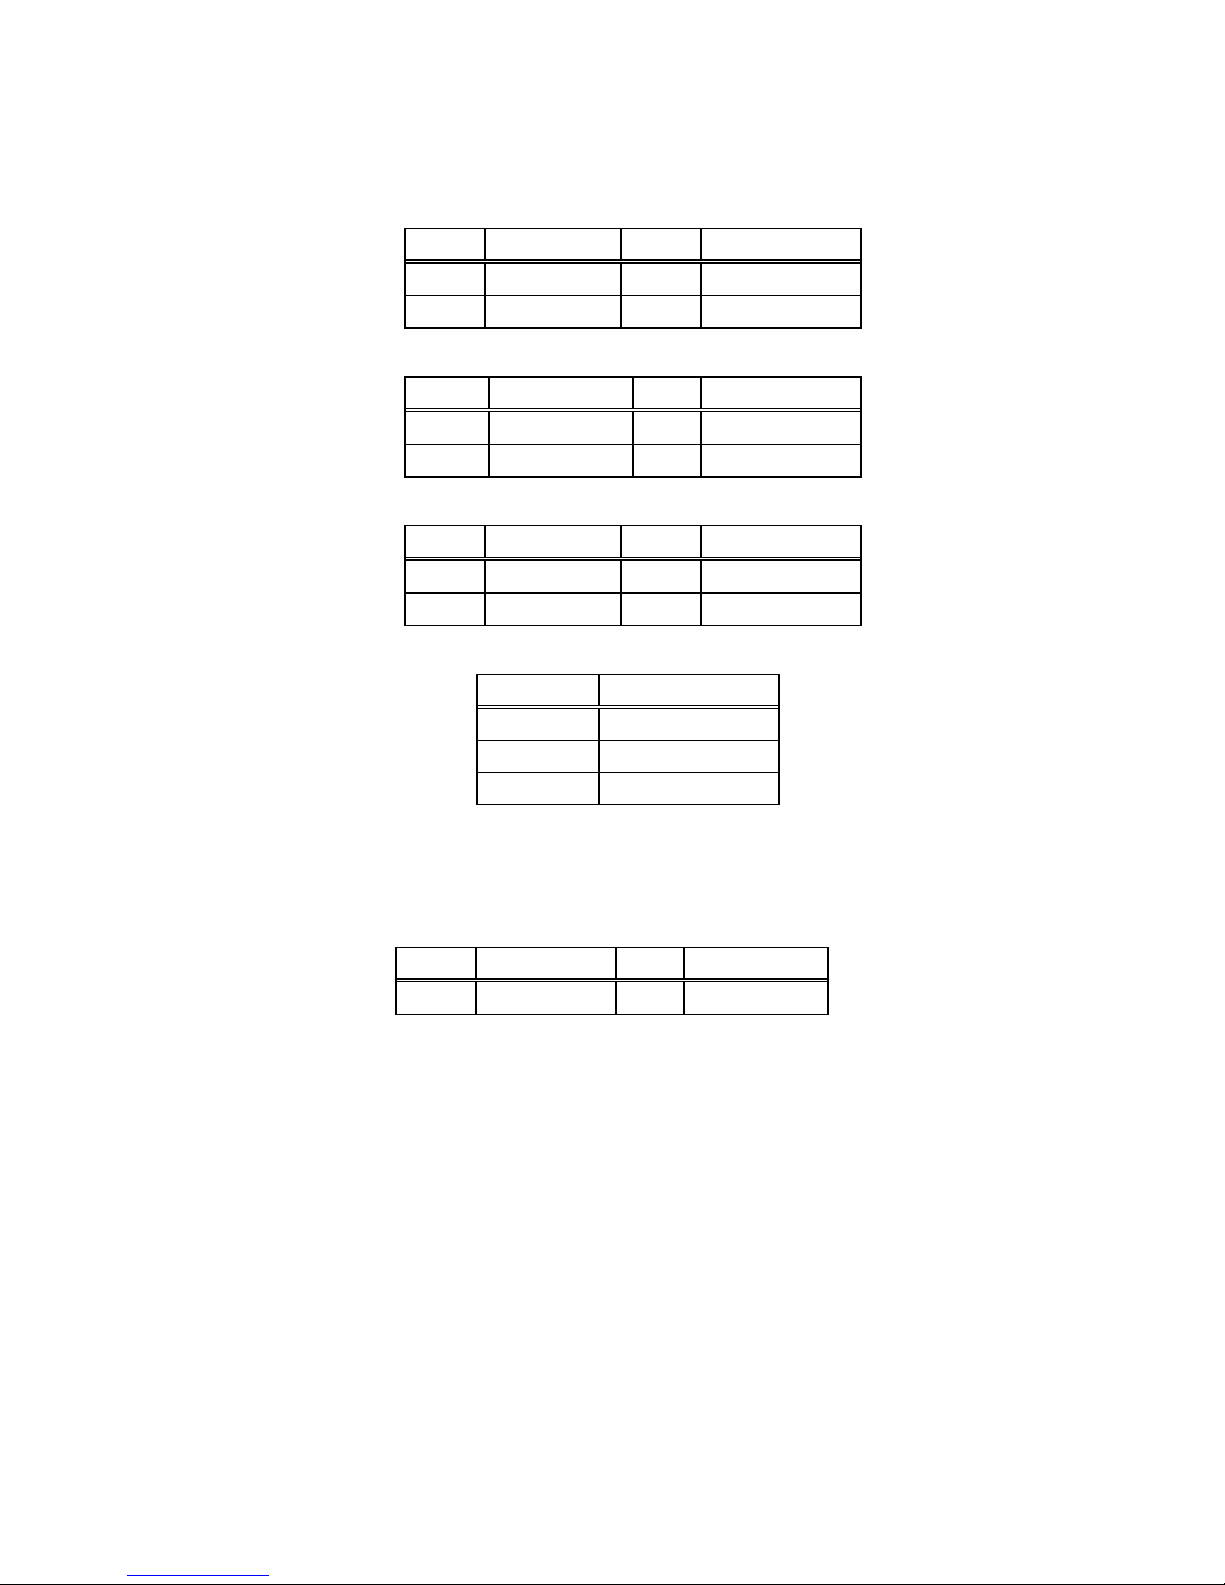
Audio Connector
CN7: Audio CD IN (2.54mm)
PIN Description PIN Description
1 CD IN_L 2 GND
3 GND 4 CD IN_R
CN1: Audio AUX IN (2.54mm)
PIN Description PIN Description
1 AUX IN_L 2 GND
3 GND 4 AUX IN_R
CN2: Audio LINE OUT (2.54mm)
PIN Description PIN Description
1 LINEOUT_L 2 GND
3 GND 4 LINE OUT_R
CN24: Audio Jack
Color Description
RED MIC IN
BLUE LINE IN
GREEN SPEAK OUT
Internal Switches and Indicators
There is one internal switch controlling your CPU board.
S2: Reset Switch
PIN Description PIN Description
1 Reset 2 GND
28 143926(A)
Page 33

4115T Light Duty Industrial PC Chapter 3 – POS-478 CPU Control Board and BIOS Setup
CompactFlash TYPE II Storage Card Socket
POS-478 configures CompactFlash TYPE II Storage Card in IDE Mode.
Note: Type I storage cards are supported.
CFA1: CompactFlash TYPE II Socket PIN Assignment
PIN Description PIN Description
1
2 D3 27 D11
3 D4 28 D12
4 D5 29
5 D6 30 D14
6 D7 31 D15
7 CS1# 32 CS3#
8 N/C 33 N/C
9 GROUND 34 IOR#
10 N/C 35 IOW#
11 N/C 36 OBLIGATORY TO PULL HIGH
12 N/C 37 IRQ15
13 VCC 38 VCC
14 N/C 39 MASTER/SLAVE
15 N/C 40 N/C
16 N/C 41 RESET#
17 N/C 42 IORDY
18 A2 43 N/C
19 A1 44 OBLIGATORY TO PULL HIGH
20 A0 45 ACTIVE#
21 D0 46 PDIAG#
22 D1 47 D8
23 D2 48 D9
24 N/C 49 D10
25 CARD DETECT2 50 GROUND
GROUND
26 CARD DETECT1
D13
29 143926(A)
Page 34
4115T Light Duty Industrial PC Chapter 3 – POS-478 CPU Control Board and BIOS Setup
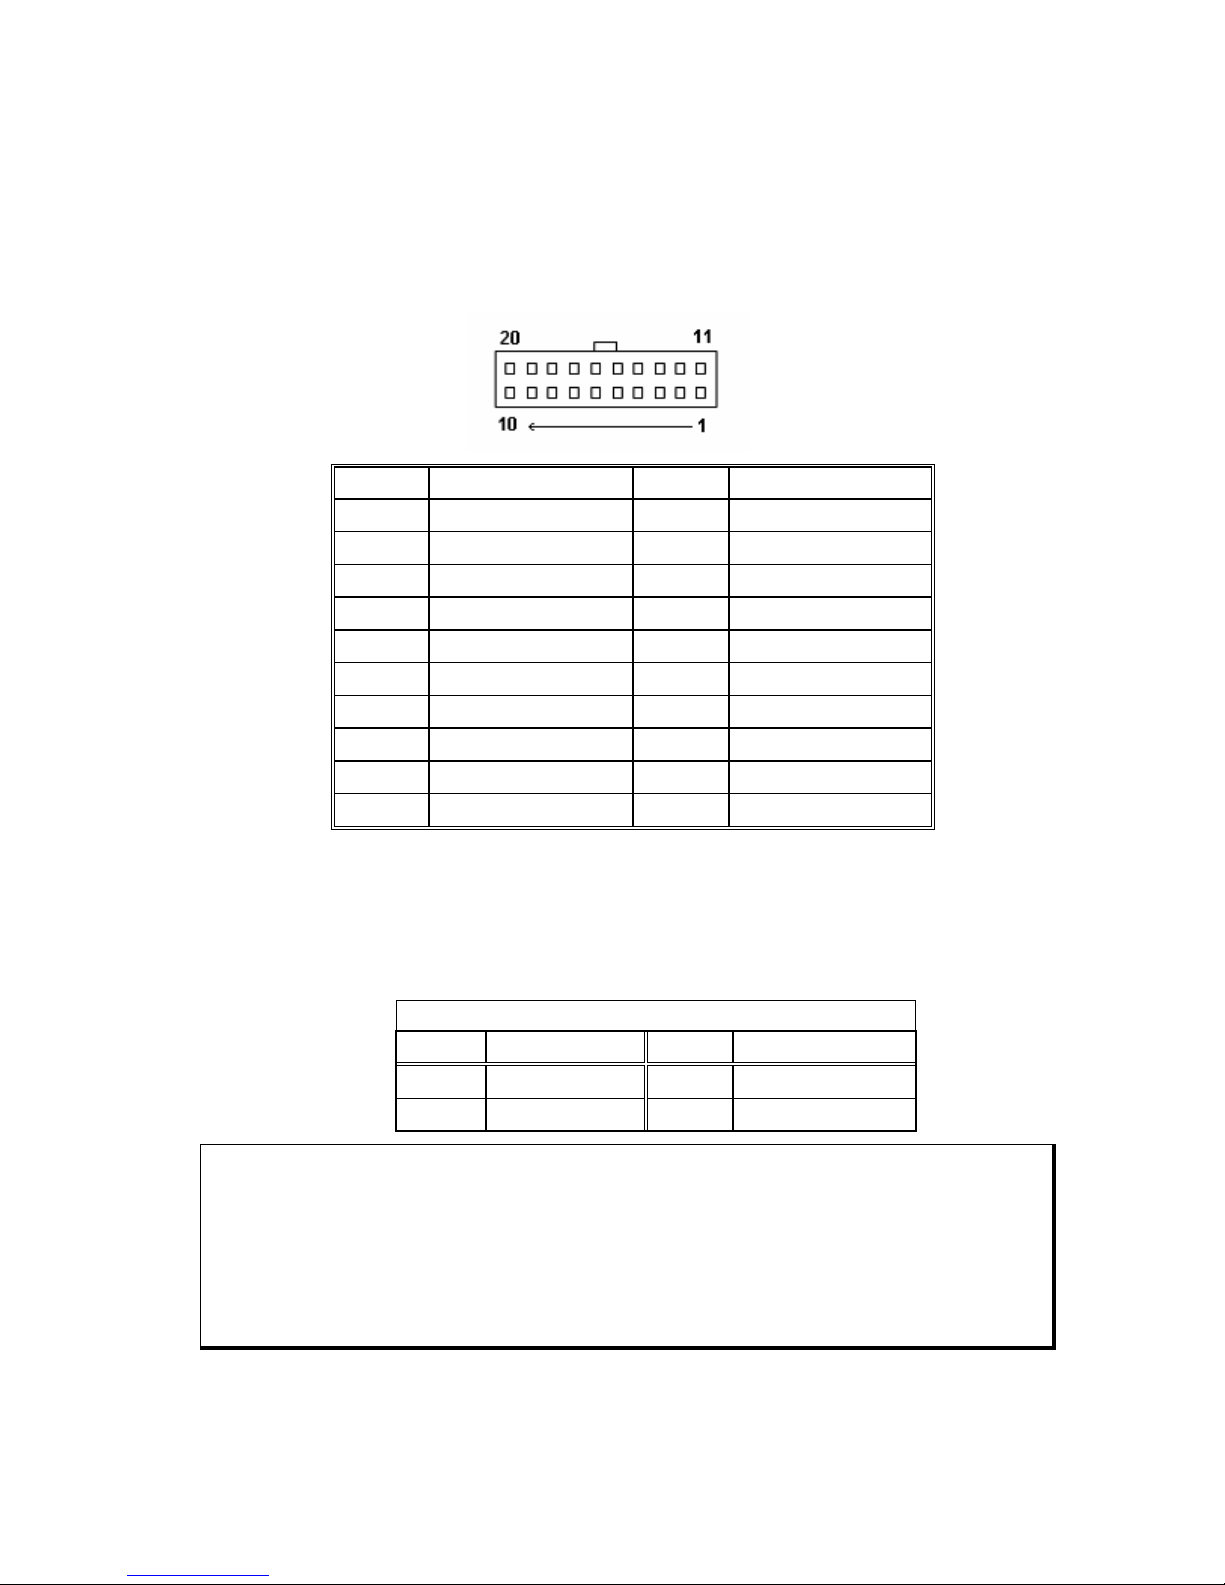
ATX Power Connector
PW2 is a 20-pin ATX Power Supply Connector. Please refer to the following table
for the pin assignments.
PW2: ATX Power Supply Connector
PIN Description PIN Description
11 3.3V 1 3.3V
12 -12V 2 3.3V
13 GND 3 GND
14 PS-ON 4 +5V
15 GND 5 GND
16 GND 6 +5V
17 GND 7 GND
18 -5V 8 Power good
19 +5V 9 5VSB
20 +5V 10 +12V
ATX-12V Power Connector
This connector supports the ATX power, functions such as modem Ring on, and
wake-up LAN and soft power off are supported by mainboard.
PW1: ATX-12V Power Connector
PW1
PIN Description PIN Description
1 GND 2 GND
3 +12V 4 +12V
Note
The power from PW1 should support at least 6.5A current for the use of P4 CPU. If
the power is not enough, the operation of CPU could be abnormal. Be sure the
power from power supply is enough, and don’t share this power with other devices,
such as hard disk etc. You can use ICP’s special cable for connection if your power
supply doesn’t have suitable cable.
30 143926(A)
Page 35

4115T Light Duty Industrial PC Chapter 3 – POS-478 CPU Control Board and BIOS Setup
AMI BIOS Setup
This section describes the AMI Setup program built into the ROM BIOS. The setup
program allows users to modify the basic system configuration. This special
information is then stored in battery-backed RAM so that it retains the Setup
information when the power is turned off.
Starting Setup
The AMI BIOS is immediately activated when you first power on the computer. The
BIOS reads the system information contained in the CMOS and begins the process of
checking out the system and configuring it. When it finishes, the BIOS will seek an
operating system on one of the disks and then launch and turn control over to the
operating system.
While the BIOS is in control, the Setup program can be activated in one of two ways:
1. By pressing <Del> immediately after switching the system on, or
2. By pressing the <Del> key when the following message appears briefly at the
bottom of the screen during the POST (Power On Self Test).
Press DEL to enter SETUP.
If the message disappears before you respond and you still wish to enter Setup, restart
the system to try again by turning it OFF then ON or pressing the "RESET" button on
the system case. You may also restart by simultaneously pressing <Ctrl>, <Alt>, and
<Delete> keys. If you do not press the keys at the correct time and the system does
not boot, an error message will be displayed and you will again be asked to...
PRESS F2 TO CONTINUE, DEL TO ENTER SETUP
31 143926(A)
Page 36

4115T Light Duty Industrial PC Chapter 3 – POS-478 CPU Control Board and BIOS Setup
Using Setup
In general, you use the arrow keys to highlight items, press Enter to select, use the
PgUp and PgDn keys to change entries, press F1 for help and press Esc to quit. The
following table provides more detail about how to navigate in the Setup program
using the keyboard.
Table 3-2. Using Setup
Keys Description
Up arrow Move to previous item
Down arrow Move to next item
Left arrow Move to the item in the left hand
Right arrow Move to the item in the right hand
Esc key Main Menu -- Quit and not save changes into CMOS
Status Page Setup Menu and Option Page Setup Menu --
Exit current page and return to Main Menu
PgDn key Increase the numeric value or make changes
PgUp key Decrease the numeric value or make changes
+ key Increase the numeric value or make changes
- key Decrease the numeric value or make changes
F1 key General help, only for Status Page Setup Menu and Option
Page Setup Menu
F2 /F3 key Change color from total 16 colors. F2 to select color
forward, (Shift) F2 to select color backward
F4 key Reserved
F5 key Reserved
F6 key Reserved
F7 key Reserved
F8 key Reserved
F9 key Reserved
F10 key Save all the CMOS changes, only for Main Menu
Getting Help
Press F1 to pop up a small help window that describes the appropriate keys to use and
the possible selections for the highlighted item. To exit the Help Window press Esc
or the F1 key again. Note: For this BIOS, Help has been disabled.
If, after making and saving system changes with Setup, you discover that your
computer no longer is able to boot, the AMI BIOS supports an override to the CMOS
settings, which resets your system to its defaults.
The best advice is to only alter settings that you thoroughly understand. To this end,
we strongly recommend that you avoid making any changes to the chipset defaults.
32 143926(A)
Page 37
4115T Light Duty Industrial PC Chapter 3 – POS-478 CPU Control Board and BIOS Setup
These defaults have been carefully chosen by both AMI and your systems
manufacturer to provide the absolute maximum performance and reliability. Even a
seemingly small change to the chipset setup has the potential for causing you to use
the override.
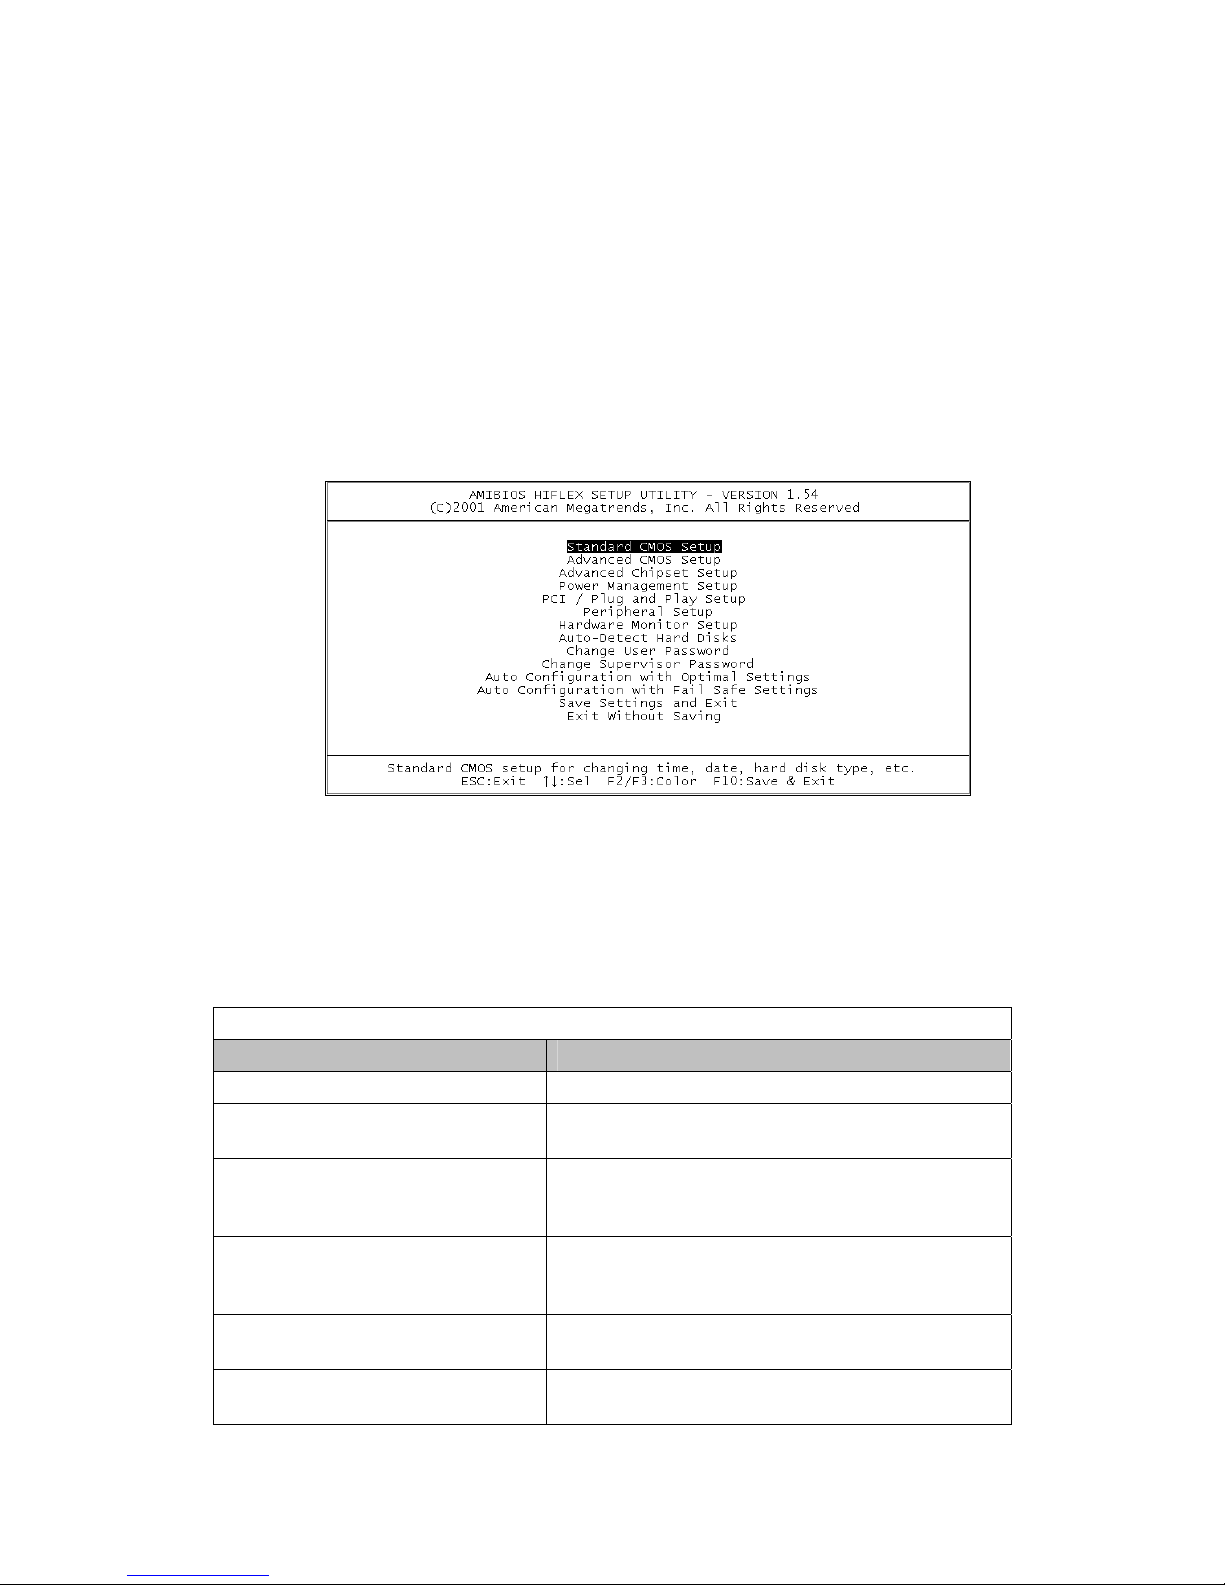
Main Menu
Once you enter the AMIBIOS™ CMOS Setup Utility, the Main Menu will appear on
the screen. The Main Menu allows you to select from several setup functions and two
exit choices. Use the arrow keys to select among the items and press Enter to accept
and enter the sub-menu.
Figure 3-2. AMIBIOS HIFLEX Setup Utility
Note: A brief description of each highlighted selection appears at the bottom of the screen.
Setup Utility Selections
The main menu includes the main setup categories listed in the following table. Note
that some systems may not include all entries.
Table 3-3. Setup Utility Options
Item Description
Standard CMOS Setup Use this menu for basic system configuration.
Advanced CMOS Setup Use this menu to set the Advanced Features
available on your system.
Advanced Chipset Setup Use this menu to change the values in the chipset
registers and optimize your system's
performance.
Power Management Setup When Disabled, SMI will not be initialized, and
complete power management functionality is
removed until this option is set to Enabled.
PCI / Plug and Play Setup This entry appears if your system supports PnP /
PCI.
Peripheral Setup Use this menu to specify your settings for
integrated peripherals.
33 143926(A)
Page 38
4115T Light Duty Industrial PC Chapter 3 – POS-478 CPU Control Board and BIOS Setup
A
Table 3-3. Setup Utility Options
Item Description
Hardware Monitor Setup Use this menu to monitor your hardware.
Auto-detect Hard Disks Use this menu to specify your settings for hard
disks control.
Change User Password Use this menu to set User Password.
Change Supervisor Password Use this menu to set Supervisor Password.
Auto Configuration with Optimal
Settings
Auto Configuration with Fail-Safe
Settings
Save Settings and Exit Save CMOS value changes to CMOS and exit
Exit Without Saving
Use this menu to load the BIOS default values
that are factory settings for optimal performance
system operations. While AMI has designed the
custom BIOS to maximize performance, the
factory has the right to change these defaults to
meet their needs.
Use this menu to load the BIOS default values for
the minimal/stable performance for your system
to operate.
setup.
bandon all CMOS value changes and exit setup.
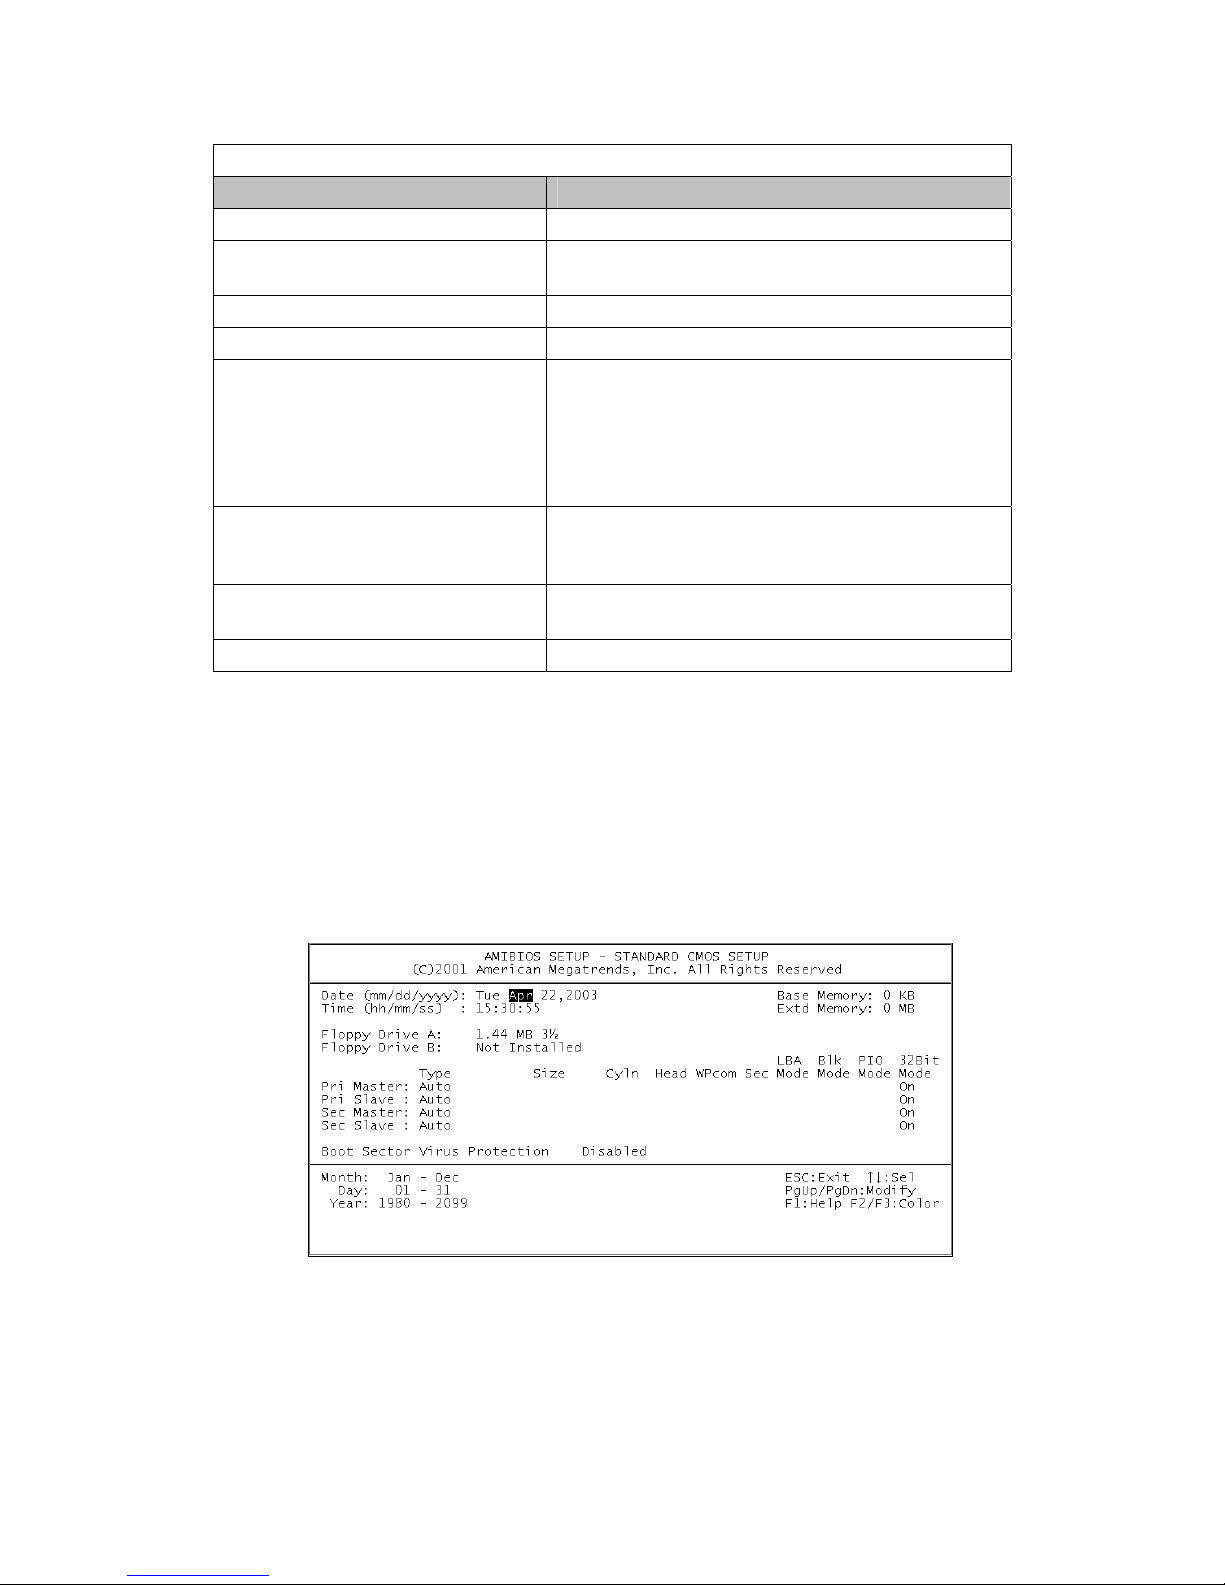
Standard CMOS Setup
The items in Standard CMOS Setup Menu are divided into 12 categories. Each
category includes no, one or more than one setup items. Use the arrow keys to
highlight the item and then use the PgUp or PgDn keys to select the value you want
in each item.
Figure 3-3. Standard CMOS Features
34 143926(A)
Page 39

4115T Light Duty Industrial PC Chapter 3 – POS-478 CPU Control Board and BIOS Setup
Table 3-4. Standard CMOS Setup Items
Item Options Description
Date MM DD YYYY Set the system date.
Time HH : MM : SS Set the system time
IDE Primary
Master
IDE Primary
Slave
IDE Secondary
Master
IDE Secondary
Master
Floppy Drive A
Floppy Drive B
Boot Sector
Virus protection
Base Memory N/A Displays the amount of
Options are in its sub
menu
Options are in its sub
menu
Options are in its sub
menu
Options are in its sub
menu
None
360K, 5.25 in
1.2M, 5.25 in
720K, 3.5 in
1.44M, 3.5 in
2.88M, 3.5 in
Disabled
Enabled
Press <Enter> to enter the
sub menu of detailed options
Press <Enter> to enter the
sub menu of detailed options
Press <Enter> to enter the
sub menu of detailed options
Press <Enter> to enter the
sub menu of detailed options
Select the type of floppy disk
drive installed in your system.
All it does is warn you when
attempts are made to write to
your boot sector or partition
table.
conventional memory
detected during boot up
Extended
Memory
N/A Displays the amount of
extended memory detected
during boot up
35 143926(A)
Page 40
4115T Light Duty Industrial PC Chapter 3 – POS-478 CPU Control Board and BIOS Setup
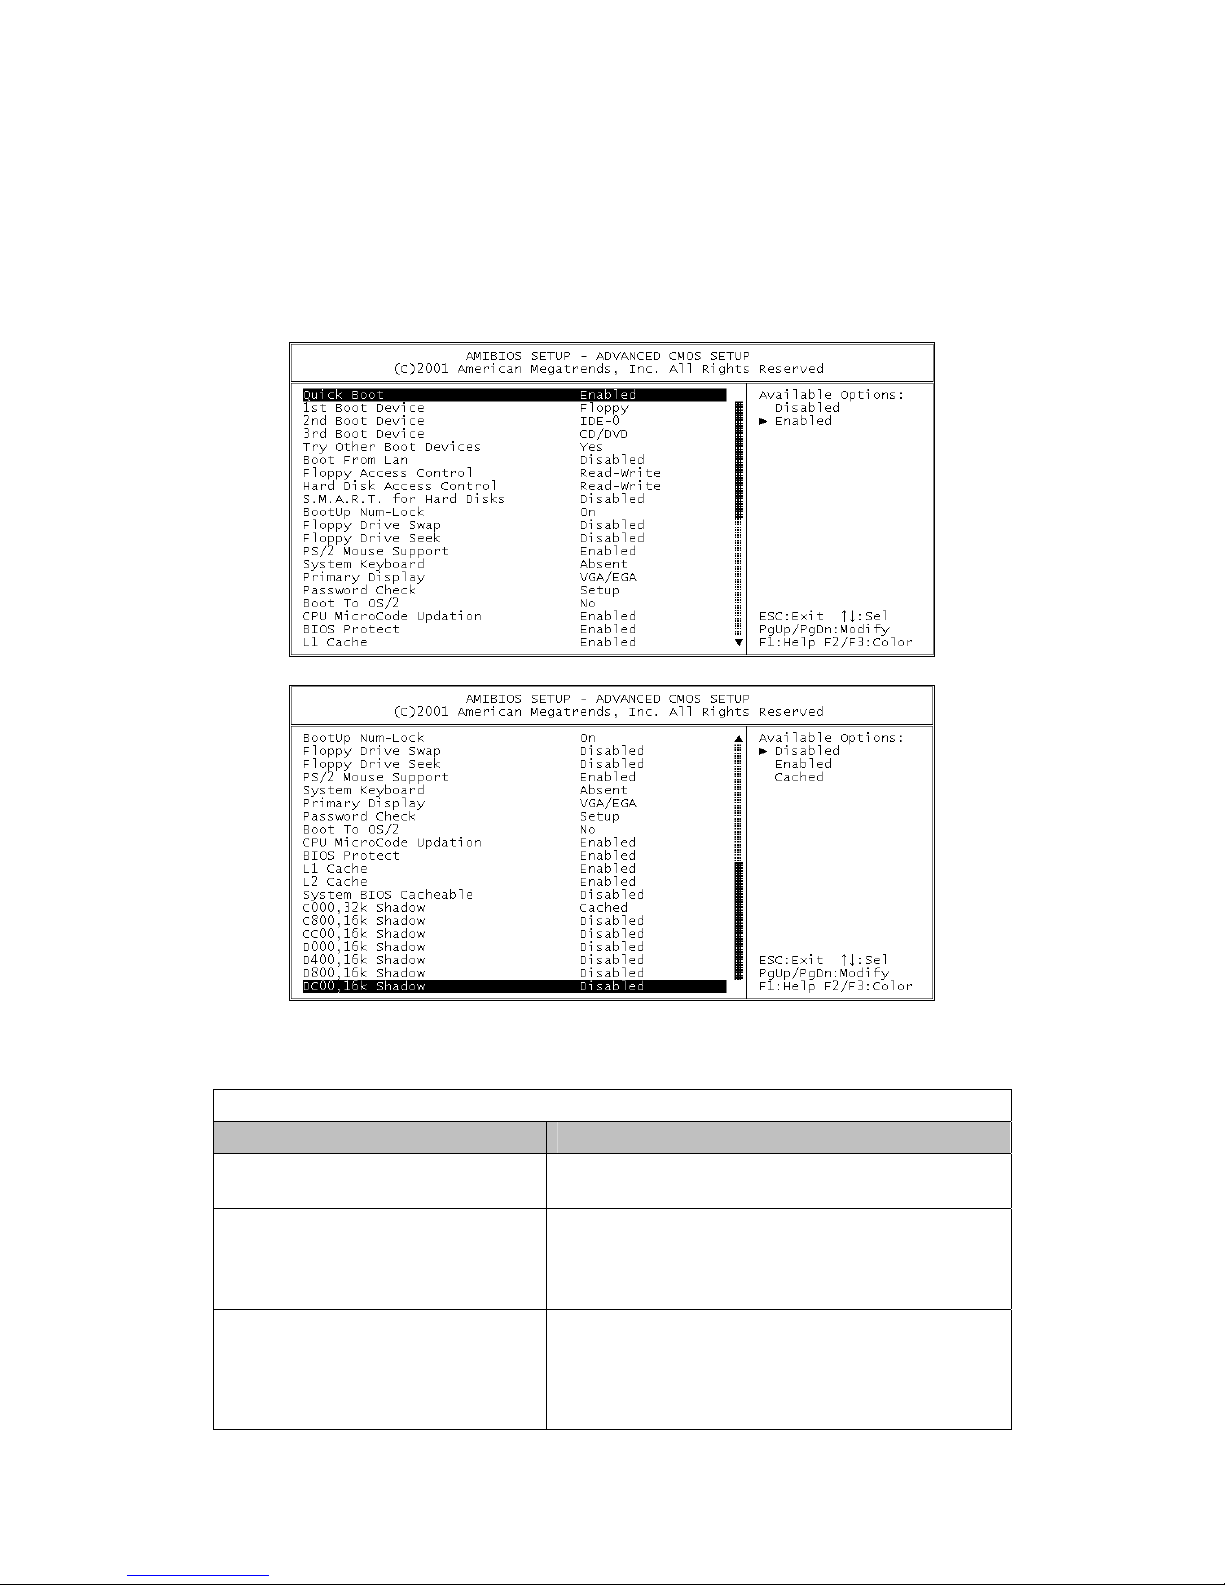
Advanced CMOS Setup
This section allows you to configure your system for basic operation. You have the opportunity to
select the system’s default speed, boot-up sequence, keyboard operation, shadowing and
security.
Note: the second screen capture shows the last 9 items in the Advanced CMOS Setup screen.
Item Description
Quick Boot When set to Enabled, DRAM testing function will
1st /2nd /3rd Boot Device This option sets the type of device for the first
Try Other Boot Devices Set this option to Yes to instruct AMIBIOS to
Figure 3-4. Advanced CMOS Setup
Table 3-5. Advanced CMOS Setup Options
be disabled.
boot drives that the AMIBIOS attempts to boot
from after AMIBIOS POST completes. The
settings are Disabled, IDE-0, Floppy, GD/DVD.
attempt to boot from any other drive in the system
if it cannot find a boot drive among the drives
specified in the 1st Boot Device, 2nd Boot
Device, 3rd Boot Device, 4th Boot Device
36 143926(A)
Page 41

4115T Light Duty Industrial PC Chapter 3 – POS-478 CPU Control Board and BIOS Setup
Table 3-5. Advanced CMOS Setup Options
Item Description
options. The settings are Yes or No.
Boot From LAN Set to Enabled to the system boot from LAN.
Floppy Access Control This option specifies the read/write access that is
set when booting from a floppy drive. The
settings are Read/Write or Read-Only.
Hard Disk Access Control This option specifies the read/write access that is
set when booting from a hard disk drive. The
settings are Read/Write or Read-Only.
S.M.A.R.T. for Hard Disks Self-Monitoring, Analysis and Reporting
Technology. This option can help BIOS to warn
the user of the possible device failure and give
user a chance to back up the device before actual
failure happens. The settings are Disabled,
Enabled.
Boot Up Num-Lock When on, this option turns off Num Lock when
the system is powered on so the end user can
use the arrow keys on both the numeric keypad
and the keyboard
Floppy Drive Swap Set this option to Enabled to permit drives A: and
B: to be swapped. The settings are Enabled or
Disabled.
Floppy Drive Seek Set this option to Enabled to specify that floppy
drives A: will perform a Seek operation at system
boot. The settings are Enabled or Disabled.
PS/2 Mouse Support When this option is enabled, BIOS support a
PS/2- type mouse.
System Keyboard This option does not specify if a keyboard is
attached to the computer. It specifies if error
messages are displayed if a keyboard is not
attached. This option permits you to configure
workstation with no keyboard. The settings are
Absent, Present.
Primary Display Select this option to configure the type of monitor
attached to the computer. The settings are
Monochrome, Color 40x25.Color
80x25,VGA/PGA/EGA, or Not Install.
Password Check This option enables the password check option
every time the system boots or the end user runs
Setup. If always is chosen a user password
prompt appears every time the computer is tuned
on. If setup is chosen, the password prompt
appears if BIOS is executed.
Boot To OS/2 Set this option to Enabled if running OS/2
operating system and using more than 64MB of
system memory on the motherboard. The
settings are YES or NO.
BIOS Protect Set this option to Disabled when you want to flash
BIOS
37 143926(A)
Page 42

4115T Light Duty Industrial PC Chapter 3 – POS-478 CPU Control Board and BIOS Setup
Table 3-5. Advanced CMOS Setup Options
Item Description
L1 Cache The option enabled or disabled the internal cache
memory in the processor
L2 Cache The option enables secondary cache memory.
Select Enabled to enable external cache memory,
vice versa.
System BIOS Cacheable When this option is set to Enabled, the System
ROM area from F0000- FFFFF is copied
(shadowed) to RAM for faster execution.
C000, 32k Shadow When this option is set to Enabled, the Video
ROM area from C0000-
C7FFF is copied (shadowed) to RAM for faster
execution.
Disabled: The contents of the video ROM are not
copied to RAM.
Cached: The contents of the video ROM area
from C0000h - C7FFFh are copied from ROM to
RAM and can be written to or read from cache
memory.
Enabled: The contents of the video ROM area
from C0000h–C7FFFh are copied (shadowed)
from ROM to RAM for faster execution.
C800, 16k Shadow These options enable shadowing of the contents
of the ROM area named in the option title. The
settings are Enable Disable, Cached. The ROM
area that is not used by ISA adapter cards will be
allocated to PCI adapter cards.000, 32k Shadow.
CC00, 16k Shadow These options enable shadowing of the contents
of the ROM area named in the option title. The
settings are Enable Disable, Cached. The ROM
area that is not used by ISA adapter cards will be
allocated to PCI adapter cards.800, 16k Shadow.
D000, 16k Shadow These options enable shadowing of the contents
of the ROM area named in the option title. The
settings are Enable Disable, Cached. The ROM
area that is not used by ISA adapter cards will be
allocated to PCI adapter cards. C00, 16k
Shadow.
D400, 16k Shadow These options enable shadowing of the contents
of the ROM area named in the option title. The
settings are Enable Disable, Cached. The ROM
area that is not used by ISA adapter cards will be
allocated to PCI adapter cards.000, 16k Shadow.
D800, 16k Shadow These options enable shadowing of the contents
of the ROM area named in the option title. The
settings are Enable Disable, Cached. The ROM
area that is not used by ISA adapter cards will be
allocated to PCI adapter cards.400, 16k Shadow.
DC00, 16k Shadow These options enable shadowing of the contents
38 143926(A)
Page 43
4115T Light Duty Industrial PC Chapter 3 – POS-478 CPU Control Board and BIOS Setup
Table 3-5. Advanced CMOS Setup Options
Item Description
of the ROM area named in the option title. The
settings are Enable Disable, Cached. ISA
adapter cards will be allocated to PCI adapter
cards.800, 16k Shadow.
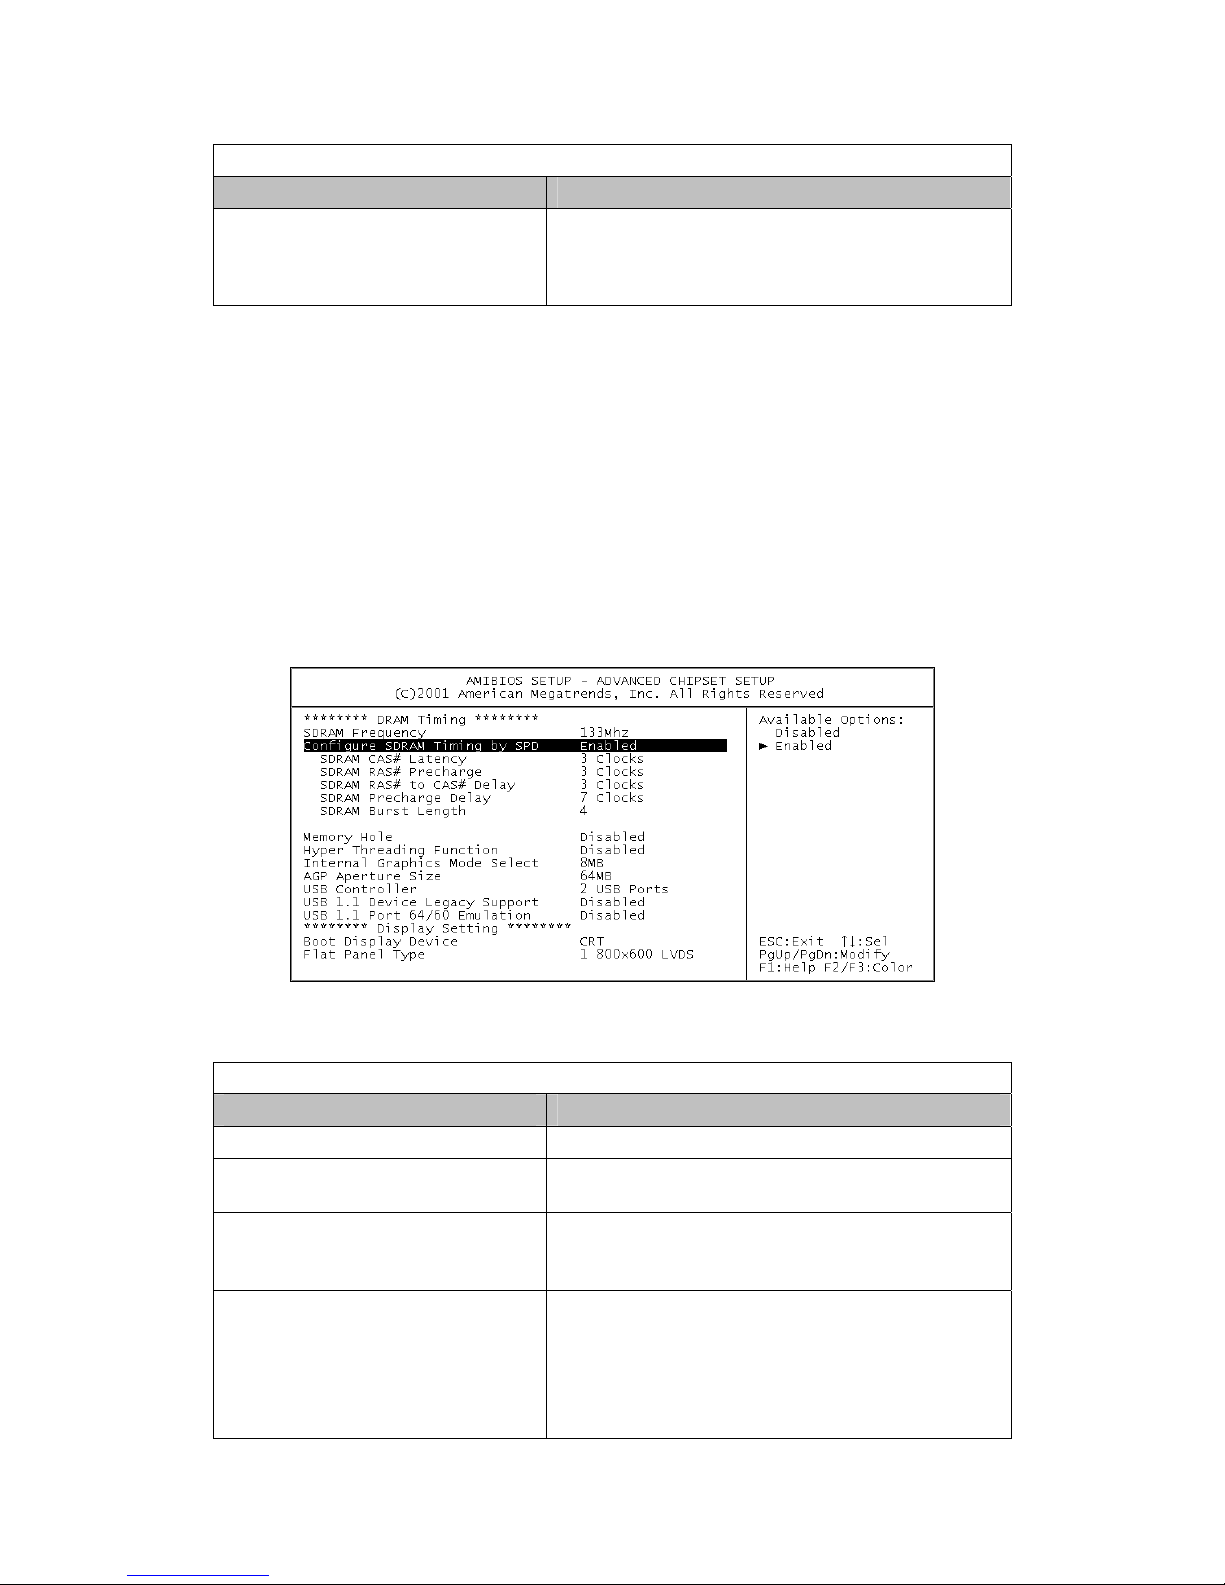
Advanced Chipset Setup
This section allows you to configure the system based on the specific features of the
installed chipset. This chipset manages bus speeds and access to system memory
resources, such as DRAM and the external cache. It also coordinates
communications between the conventional ISA bus and the PCI bus. It must be
stated that these items should never need to be altered. The default settings have been
chosen because they provide the best operating conditions for your system.
Figure 3-5. Advanced Chipset Setup
Table 3-6. Advanced Chipset Setup Options
Item Description
SDRAM Frequency This setting is decided by Memory frequency.
Configure SDRAM Timing by SPD This field detects the capability of the SDRAM
modules that you are using -Enabled or Disabled.
SDRAM CAS# Latency This controls the latency between the SDRAM
read command and the time that the data actually
becomes available.
Memory Hole You can reserve this area of system memory for
ISA adapter ROM. When this area is reserved, it
cannot be cached. The user information of
peripherals that need to use this area of system
memory usually discusses their memory
requirements.
39 143926(A)
Page 44

4115T Light Duty Industrial PC Chapter 3 – POS-478 CPU Control Board and BIOS Setup
Table 3-6. Advanced Chipset Setup Options
Item Description
Hyper Threading Function Set this option to Enabled to use INTEL Hyper
Threading Function.
Internal Graphics Mode Select This option is setting for sharing memory size
from system memory to Video memory.
USB Controller This option is setting for USB 2.0 controller. You
can select 2 USB ports, 4 USB ports, 6 USB ports
and Disabled.
Boot Display Device This option is setting for display output from CRT
or CRT & LFP.
Flat Panel Type This option is setting for panel resolution. The
selections include 800 x 600
LVDS, 1024 x 768 LVDS and 1280 x 1024 LVDS.
USB 1.1 Device Legacy Support
USB 1.1 Port 64/60 Emulation
These parameters are used to enable a USB
keyboard, mouse and floppr at boot time. (Note:
Mouse still needs PS/2 mouse driver).
40 143926(A)
Page 45
4115T Light Duty Industrial PC Chapter 3 – POS-478 CPU Control Board and BIOS Setup
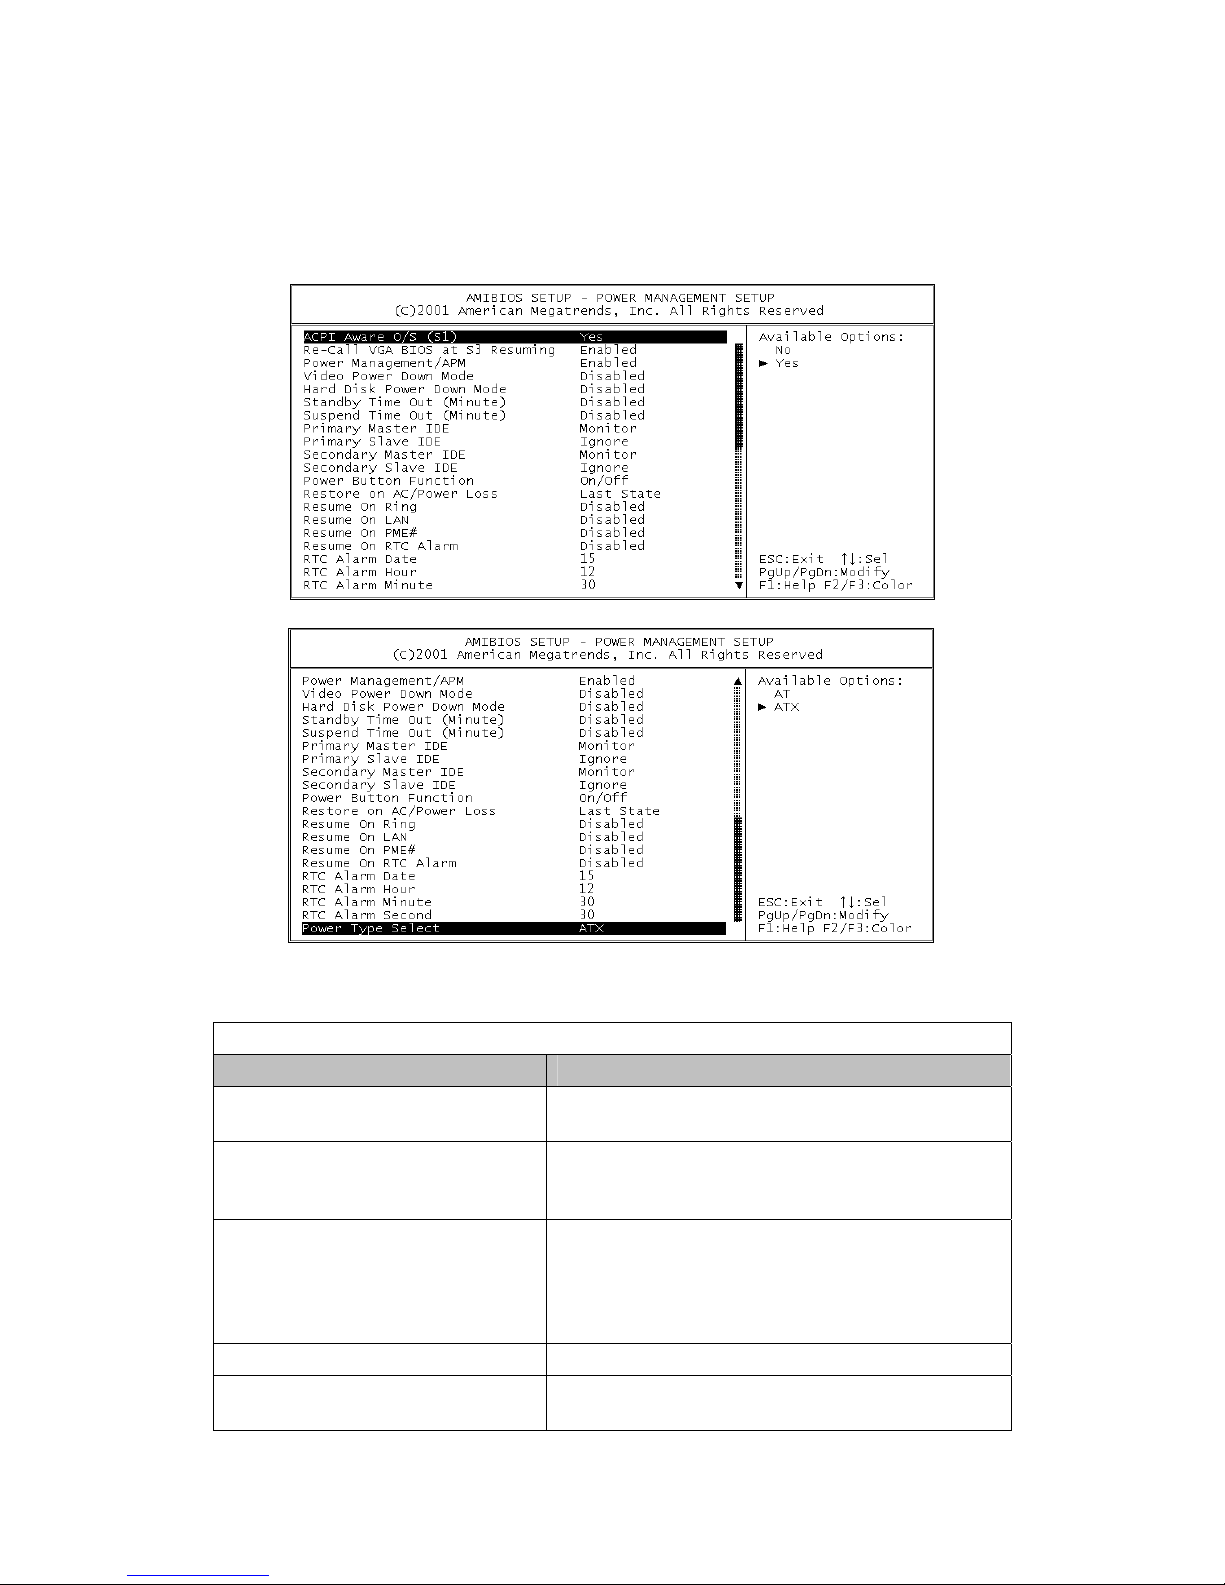
Power Management Setup
Figure 3-6. Power Management Setup
Table 3-7. Power Management Setup Options
Item Description
ACPI Aware O/S This feature is switch of ACPI function.
Configuration option: [Yes] or [No].
Power Management/APM When Disabled, SMI will not be initialized, and
complete power management functionality is
removed until this option is set to Enabled.
Suspend Time Out (Minute) If no activity occurs during this time period, BIOS
will place the system into suspend low power
state. The ''Standby Time Out'' period must
expire first (if enabled) before this time out period
begins.
Resume on Ring Modem ring resumes from soft off.
RTC Alarm Date, Hour, Minute When this option is set enabled, system will wake
up from soft off mode according to your set time.
41 143926(A)
Page 46
4115T Light Duty Industrial PC Chapter 3 – POS-478 CPU Control Board and BIOS Setup
Table 3-7. Power Management Setup Options
Item Description
Power Type Select This feature is switch of Power Type function.
Configuration options: [AT] [ATX]
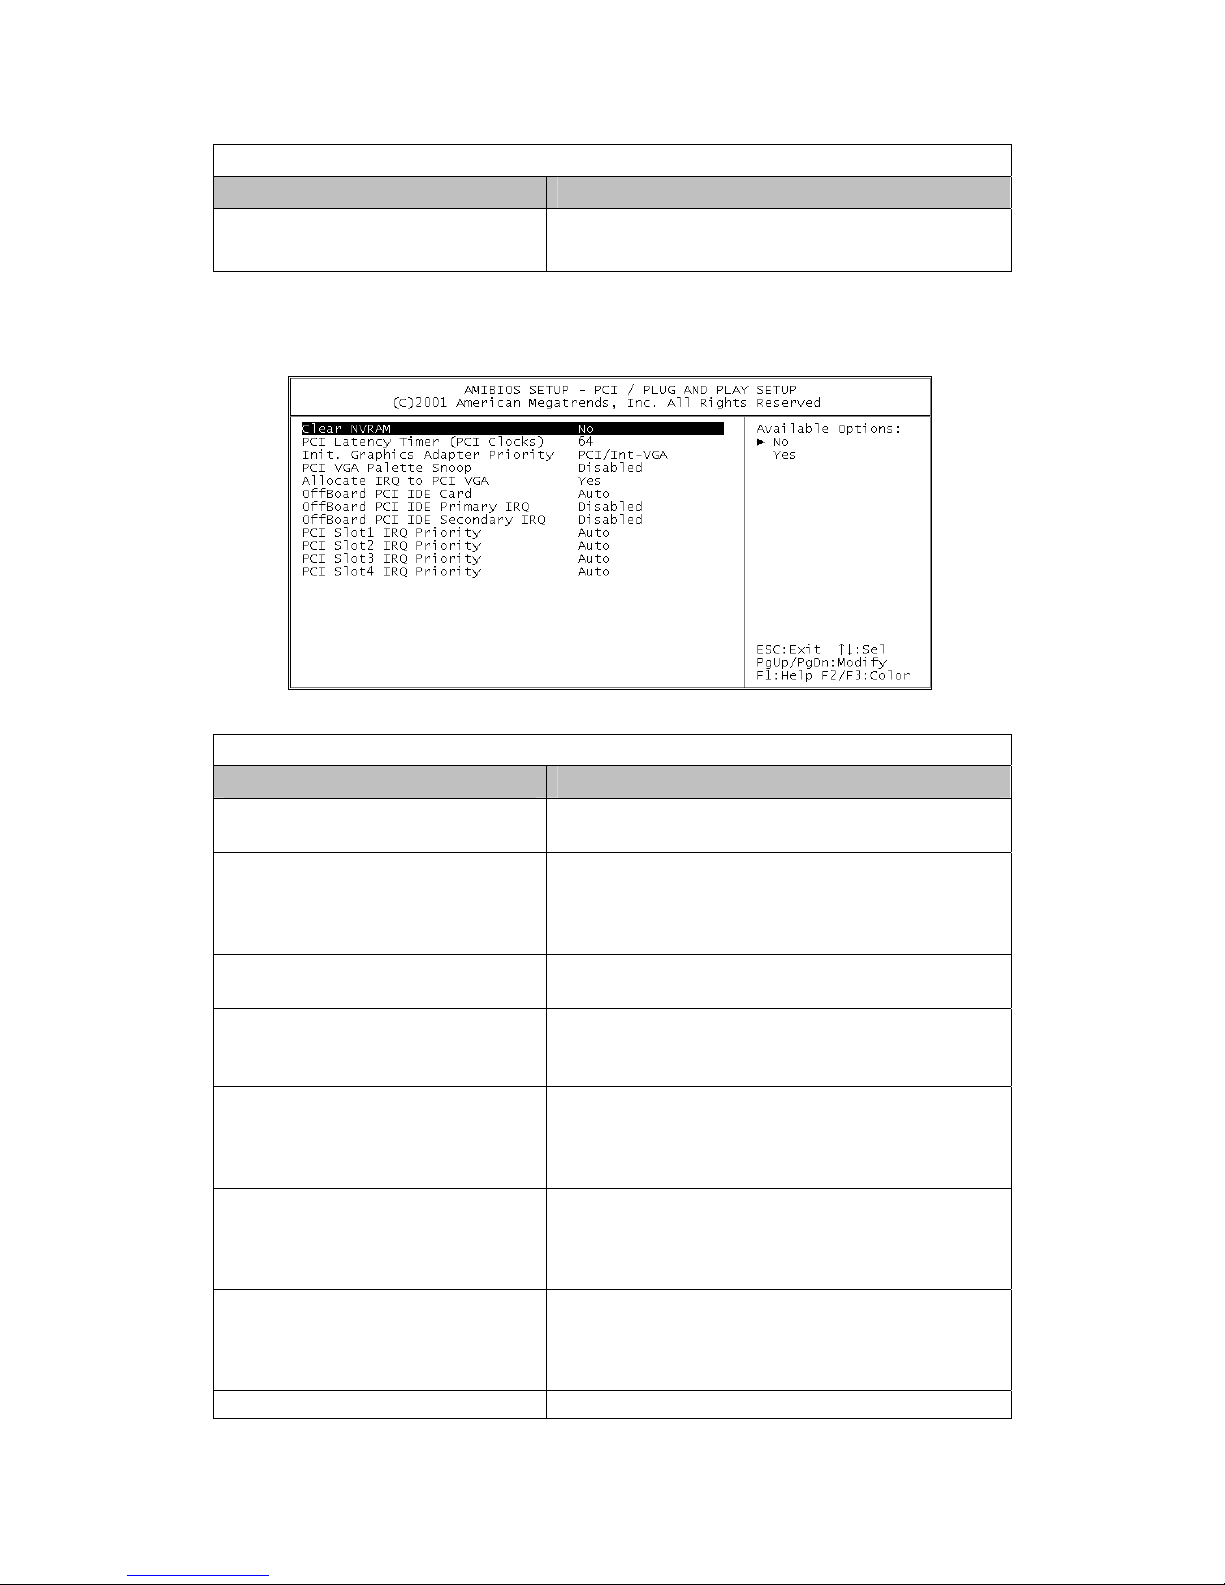
PCI / Plug and Play Setup
Figure 3-7. PCI/Plug and Play Setup
Table 3-8. PCI/Plug and Play Setup Options
Item Description
Clear NVRAM When this option is set to Yes, system can auto
clear NVRAM. The settings are Yes or No.
PCI Latency Timer (PCI Clocks) This option specifies the latency timings (in PCI
clocks) for PCI devices installed in the PCI
expansion slots. The settings are 32, 64, 96,
128, 160, 192, 224, or 248.
Init. Graphics Adapter Priority This setting is to select primary graphic by PCI or
AGP Adapter.
Allocate IRQ to PCI VGA Set this option to Yes to allocate an IRQ to the
VGA device on the PCI bus. The settings are
Yes or No.
OffBoard PCI IDE Card This question is needed for off-board non-
compliant PCI IDE card. If present, BIOS needs
to know which slot it is in and how the IRQ is
used by the card.
OffBoard PCI IDE Primary IRQ This option specifies the PCI interrupt used by the
primary IDE channel on the offboard PCI IDE
controller. The settings are Disabled, Hardwired,
INTA, INTB, INTC, or INTD.
OffBoard PCI IDE Secondary IRQ This option specifies the PCI interrupt used by the
secondary IDE channel on the offboard PCI IDE
controller. The settings are Disabled, Hardwired,
INTA, INTB, INTC, or INTD.
PCI Slot1 / Slot2 / Slot3 / Slot4 IRQ The option specifies the IRQ priority for PCI
42 143926(A)
Page 47
4115T Light Duty Industrial PC Chapter 3 – POS-478 CPU Control Board and BIOS Setup
Table 3-8. PCI/Plug and Play Setup Options
Item Description
Priority device installed in the PCI expansion slot. The
settings are Auto, (IRQ) 3, 4, 5, 7, 9, 10, and 11,
in priority order.
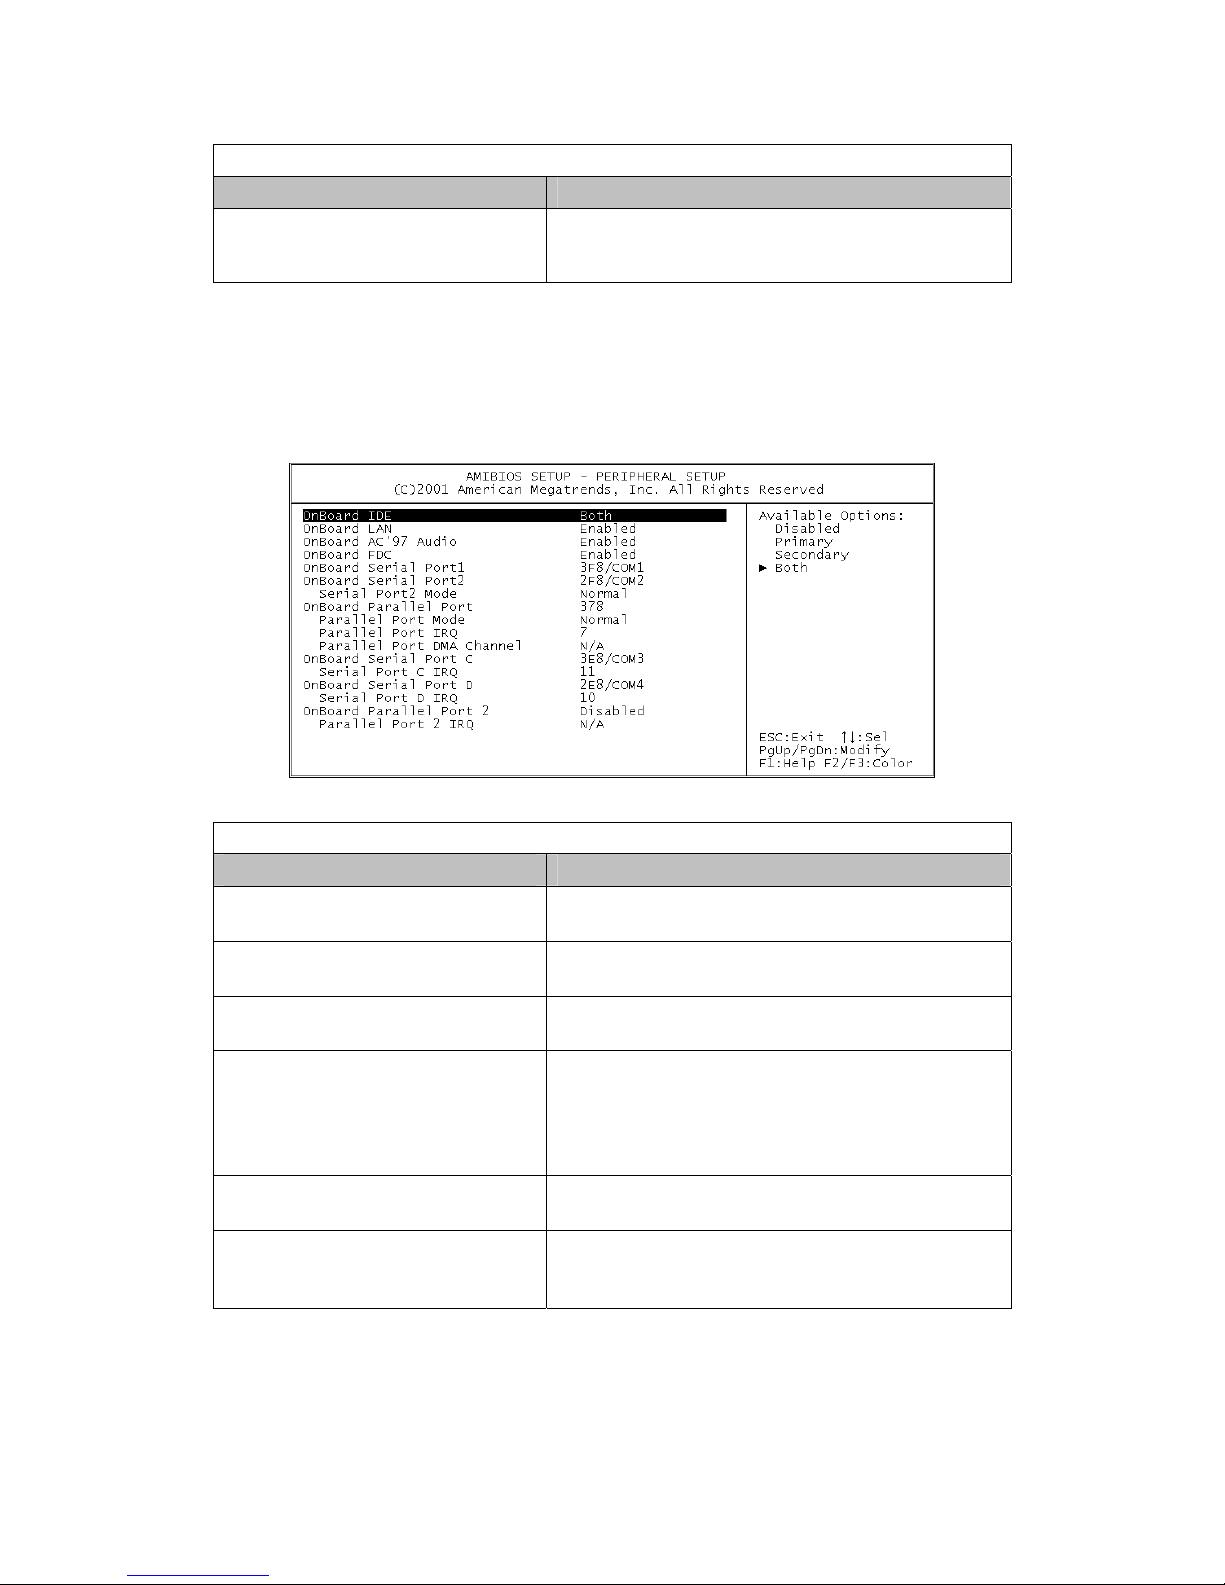
Peripheral Setup
The Peripheral Setup allows you to configure you system to most effectively save
energy while operating in a manner consistent with your own style of computer use.
Figure 3-8. Peripheral Setup Options
Table 3-9. Peripheral Setup Options
Item Description
OnBoard LAN This option is setting to enable or disable
Onboard LAN Function.
OnBoard AC’97 Audio This option is setting to enable or disable
Onboard AC’97 Audio Function
OnBoard FDC. This option is setting to enable or disable
Onboard FDC Function.
OnBoard Serial Port 1 /Port 2 /Port
C /Port D
Serial Port2 Mode This option specifies the IR active pulse or
OnBoard Parallel Port1 /Port2 This option specifies the base I/O port address of
This option specifies the base I/O port address of
serial port 1. The settings are Auto (AMIBIOS
automatically determines the correct base I/O
port address), Disabled, 3F8h, 2F8h, 2E8h, or
3E8h.
inverting clock of serial port B.
parallel port on the motherboard. The settings
are Disabled, 378h, 278h, or 3BCh.
43 143926(A)
Page 48
4115T Light Duty Industrial PC Chapter 3 – POS-478 CPU Control Board and BIOS Setup
Table 3-9. Peripheral Setup Options
Item Description
Parallel Port Mode This option specifies the parallel port mode. The
settings are Normal, Bi-Dir, EPP, and ECP.
Normal: The normal parallel port mode is used.
Bi-Dir: Use this setting to support bi-directional
transfers on the parallel port.
EPP: The parallel port can be used with devices
that adhere to the Enhanced Parallel Port (EPP)
specification. EPP uses the existing parallel port
signals to provide asymmetric bi-directional data
transfer driven by the host device.
ECP: The parallel port can be used with devices
that adhere to the Extended Capabilities Port
(ECP) specification. ECP uses the DMA protocol
to achieve data transfer rates up to 2.5 Megabits
per second. ECP provides symmetric bi-
directional communication.
EPP Version EPP data or address read cycle 1.9 or 1.7
Parallel Port /Port2 IRQ This option specifies the IRQ used by the parallel
port. The settings are Auto, (IRQ) 5, (IRQ) 7.
Parallel Port DMA Channel This option is only available if the setting for the
Parallel Port Mode option is ECP. This option
sets the DMA channel used by the parallel port.
The settings are DMA Channel 0, 1, or 3.
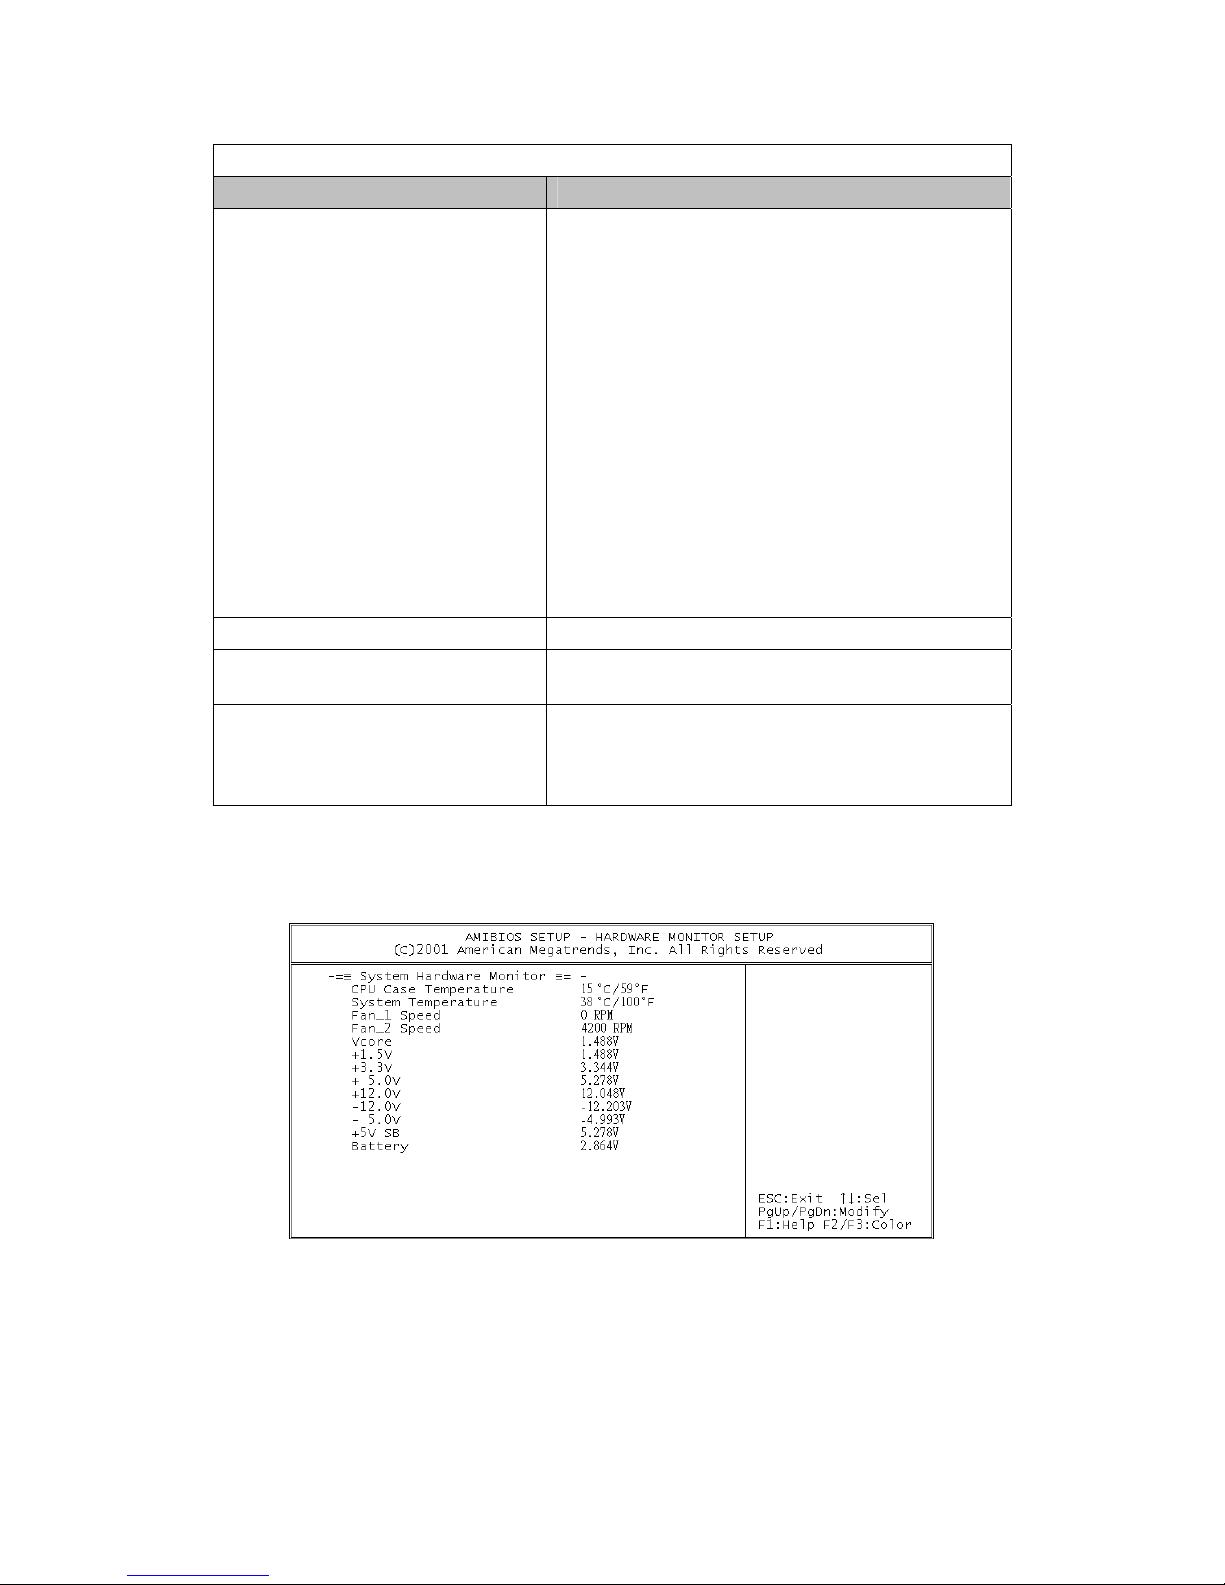
Hardware Monitor Setup
Figure 3-9. Hardware Monitor Setup Options
44 143926(A)
Page 49

4115T Light Duty Industrial PC Chapter 3 – POS-478 CPU Control Board and BIOS Setup
Table 3-10. Hardware Monitor Setup Options
Item Description
Change Supervisor Password You can set either supervisor or user password,
or both of them. The differences between are:
Supervisor password: To enter and change the options of the setup
menus.
User password: To enter the setup menus only but do not have
the right to change the options. When you select
this function, the following message will appear at
the center of the screen to assist you in creating a
password.
Enter Password Type the password, up to eight characters in
length, and press <Enter>. The password typed
now will clear any previously entered password
from CMOS memory. You will be asked to
confirm the password. Type the password again
and press <Enter>. You may also press <Esc> to
abort the selection and not enter a password.
To disable a password, just press <Enter> when
you are prompted to enter the password. A
message will confirm the password will be
disabled. Once the password is disabled, the
system will boot and you can enter Setup freely.
Password Disabled When a password has been enabled, you will be
prompted to enter it every time you try to enter
Setup. This prevents an unauthorized person
from changing any part of your system
configuration. Additionally, when a password is
enabled, you can also require the BIOS to
request a password every time your system is
rebooted. This would prevent unauthorized use
of your computer.
You determine when the password is required
within the BIOS Features Setup Menu and its
Security option (see Section 3). If the Security
option is set to “Always”, password will be
required both at boot and at entry to Setup. If set
to “Setup”, prompting only occurs when trying to
enter Setup.
45 143926(A)
Page 50

Chapter 4 – Maintenance
The 4115T is designed to withstand the harsh environment of the factory floor.
Routine maintenance can help keep your system in good operating condition.
Preventive maintenance consists of several basic procedures that will greatly reduce
the chance of system malfunction. Schedule preventive maintenance along with the
regular equipment maintenance to minimize down time.
General Preventive Maintenance
Here are some preventive measures you can take:
• Clean the monitor screen using a non-residue cleaner such as a mild window
cleaning solution or CRT screen cleaner. Take care not to scratch the screen face.
• Remove dust and dirt from PC components. If dust builds up on heat sinks and
circuitry, an obstruction of heat dissipation could cause the unit to malfunction. If
dust reaches the electronic boards, a short circuit could occur.
• Check the connections to I/O modules, especially in environments where
vibration could loosen the connections. Check to see that all plugs, sockets,
terminal strips, and module connections are solid.
• Remove unnecessary articles, such as drawings or manuals, from the unit. They
can obstruct airflow and create hot spots, which cause the system to malfunction.
• Do not place noise-generating equipment near the 4115T unit.
Fuse Replacement
The 4115T unit has no accessible fuse. Return the unit to the factory for fuse
replacement.
Recommended Hard Drive Preventive Maintenance
Xycom Automation has recognized that hard drive failures may begin to increase an
average of four to five years into the life of most computers used in industrial
applications. Therefore, it is our recommendation as a preventive maintenance
measure that all hard drives used in these types of applications be replaced before the
four to five year time period to avoid any down time related to hard drive failure.
The purpose of this message is to merely bring this to our customer’s attention, to
offer alternative solutions, and to provide all of our customers with the excellent
service they deserve.
46 143926(A)
Page 51

4115T Light Duty Industrial PC Chapter 4 –
Maintenance
Any questions regarding this issue may be directed to our support center at
Please note: Xycom recommends frequent backups of your hard drive, especially before beginning
preventive maintenance procedures.
Product Repair Program / Returning a Unit to Xycom Automation
Xycom Automation’s Product Repair & Customization Department (PR&C) restores
equipment to normal operating condition and implements engineering changes that
enhance operating specifications. Xycom Automation tests products returned to
Xycom with the standard Xycom test diagnostics.
Note
Before sending the unit in for repair, back up the hard drive in case Xycom needs to
restore the hard drive to the factory default O/S load.
Follow the steps below to prepare the unit for shipment:
1. Obtain a Return Merchandise Authorization (RMA) number for your unit by
calling your nearest Xycom Automation Repair Department or Xycom
Automation, Inc. at 734-429-4971.
2. Please have the following information:
• Company name, shipping and billing address
• Type of service desired: product repair or product exchange
• Product model number, part number, quantity, serial number(s), and warranty
status
• Failure mode and failure systems
• Purchase order number or repair order number
3. Make sure the front panel assembly is properly attached to the unit.
4. Attach failure information to the unit to speed processing.
5. Place the unit securely in its original packaging or an equivalent heavy-duty box.
6. Mark the RMA number on your purchase order and on the outside of the box.
7. Send the unit to the address given when you receive your RMA number.
47 143926(A)
Page 52

Chapter 5 – Troubleshooting
Diagnostic Testing
If you suspect that you are having hardware problems with your 4115T, you can use
the Xycom diagnostic utility to check out the PC’s various ports and subsystems. The
diagnostic utility is on the Documentation and Support Library CD that was included
with the your unit.
The first step is to create a diagnostic diskette. The following steps can be done on
any computer with a CD-ROM drive:
1. Create a DOS-bootable diskette
2. Create a temporary folder on the computer hard drive
3. There is a self-extracting zip file on the Documentation and Support Library CD
located in:
DRIVERS\utility\xydiag
Run that program and extract the files to the temporary folder you just created.
4. Copy the extracted files onto the DOS-bootable diskette.
When you have created the diskette, insert it into the 4115T unit’s floppy drive and
re-boot the unit. The menu in Figure 5–2, Main Menu, will appear following boot-up.
Additional information on the tests is included in the .txt files on the diskette.
Perform the following steps before starting the system tests:
1. Place the CPU board jumpers and switches to the factory set positions.
2. Plug the female end of the AC power cable into the side of the unit and the male
end into a properly grounded outlet.
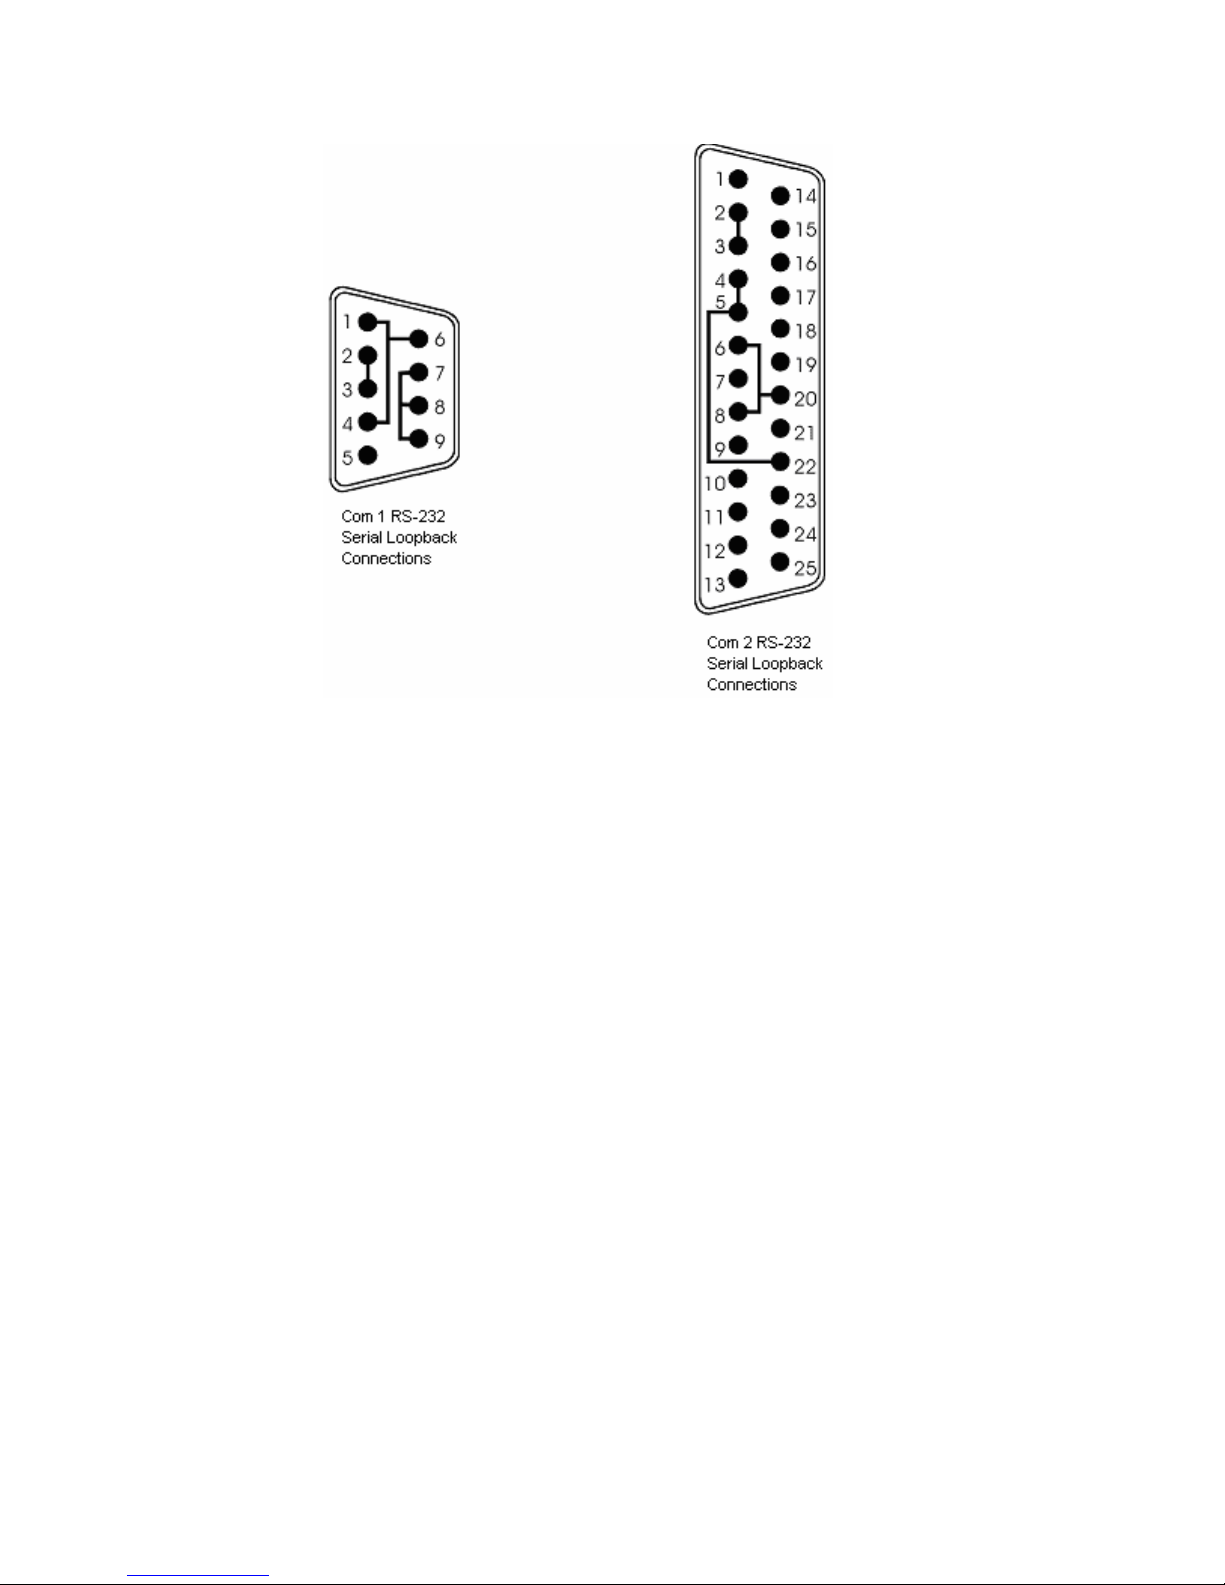
3. Connect the serial loopback connector(s) and the printer cable to the appropriate
connectors, and connect a PC/AT or PS/2 keyboard. Figure 5–1, Serial Loopback
Connections, illustrates the wiring necessary for the loopback connection.
4. Default the CMOS setup to the factory settings.
48 143926(A)
Page 53
4115T Light Duty Industrial PC Chapter 5 – Troubleshooting
Figure 5-1. Serial Loopback Connections
49 143926(A)
Page 54

4115T Light Duty Industrial PC Chapter 5 – Troubleshooting
Running the Tests
To run the test, insert the diagnostics disk into drive A. Turn on the computer (the
diagnostics program will boot-up). Figure 5–2 shows the Main Menu.
Copyright 2002, Xycom, Inc. All rights reserved.
Diagnostic Tests Sequence/Selection Menu (Rel. xx)
1. WILL pause on error
2. SINGLE PASS test mode
3. Save setup to file
4. Extract setup from a file
5. Auto-select tests
6. Deselect all tests
7. Quit and exit to DOS
8. Return to previous screen
A) RAM Test
B) Video RAM Test
C) Extended RAM Test
D) Real Time Clock Test
E) COM1 Serial Port Test
F) COM2 Serial Port Test
G) COM3 Serial Port Test
H) COM4 Serial Port Test
I) Math Coprocessor Test
J) Video Adjustments Test
[ENTER]=START TESTING
Use the letters to move the cursor and select/deselect, or use the arrow
keys to move, then use the [SPACE] key to select/deselect a test or
function.
Figure 5-2. Main Menu
K) Video Interface Test
L) Speaker Port Test
M) LPT1: Printer Port Test
N) LPT2: Printer Port Test
O) C: Hard Drive Interface Test
P) D: Hard Drive Interface Test
Q) A: Floppy Drive Interface Test
R) B: Floppy Drive Interface Test
S) Keyboard, Keypad Tests
≡ = Test Selected
Note
Please read the DIAG.TXT file on the diagnostics disk for detailed information about
the tests.
Avoid repeated running of any hard disk diagnostic utility if you use the Solid State
(Flash) drive option. The Flash drive has a limited number of writes to each logical
sector. Repeated writes from a diagnostic utility will prematurely shorten the life of
the drive.
Note
50 143926(A)
Page 55

4115T Light Duty Industrial PC Chapter 5 – Troubleshooting
Reinstalling Operating Systems
The 4115T CPU ships with Windows 2000 or Windows XP Professional operating
systems installed. If you want to install a different operating system, refer to that
operating system’s manual for directions.
Note
If you need to reinstall the Windows 98, Windows 2000, Windows NT, or Windows
XP Professional operating system, you must have an internal CD-ROM drive or an
external parallel port CD-ROM drive. Windows NT and Windows XP ship only on
CD-ROM.
Windows® 2000 Reinstallation
If you need to reinstall the Windows 2000 operating system, refer to the Xycom
Recovery for Xycom Automation Windows 2000 Workstation (shipped with systems
preinstalled with Windows 2000). This document is devoted to the reinstallation of
your Windows 2000 operating system and drivers utilizing the Recovery Media
provided with your Xycom Automation industrial computer.
Note
This procedure assumes that the computer hard disk drive has been completely
corrupted or replaced.
Warning
This procedure will destroy data that may exist on the hard disk drive.
Windows XP® Reinstallation
If you need to reinstall the Windows XP Professional operating system, refer to the
Windows XP Professional CD-ROM (shipped with systems preinstalled with
Windows XP Professional).
Note
This procedure assumes that the computer hard disk drive has been completely
corrupted or replaced.
51 143926(A)
Page 56

4115T Light Duty Industrial PC Chapter 5 – Troubleshooting
Warning
This procedure will destroy data that may exist on the hard disk drive.
If you want to install a new operating system or reinstall a current operating
system, refer to the operating system’s manual for directions.
Installing Drivers
This section describes how to install the drivers associated with the system.
Note
For further assistance, call Xycom Automation technical support at 734–944-0482.
Video Drivers
Video drivers and the expansion utilities are on the Documentation and Support
Library CD included with the documentation kit.
Choose the video driver for your operating system from the following directory on
the Documentation and Support Library CD:
\DRIVERS\4115R1_VIDEO.EXE
Touch Screen Drivers
If you have a touch screen driver that has been factory installed, you will also receive,
pre-loaded and at no extra charge: Windows 2000, and Windows XP Professional
touch screen drivers.
Note
If you ordered a system pre-loaded with an operating system, the touch screen driver
was pre-installed.
52 143926(A)
Page 57

4115T Light Duty Industrial PC Chapter 5 – Troubleshooting
You must install the corresponding touch screen driver software if you change the
operating system. The touch screen drivers are located on the Document and Support
Library CD under:
\DRIVERS\4115TR1\TOUCHKIT_W2K_XP.EXE
Miscellaneous Drivers
Refer to your operating system and peripheral manuals for information on installing
drivers related to these items.
Note
If you ordered a system with Windows pre-loaded, you may have to purchase and
install an external parallel port CD-ROM drive, or order your system with a CDROM drive pre-installed, to be able to install Windows drivers. The Windows
operating system ships only on CD-ROM.
53 143926(A)
Page 58

Appendix A Technical Specifications
This section contains the hardware and environmental specifications for the 4115T.
Hardware Specifications
The following table lists the hardware specifications for the 4115T.
Table A - 1. Hardware Specifications
Characteristic Specification
Mechanical
Height
Width
Depth
Weight
Electrical
AC
Power Supply 200 watts
Mounting Panel mount or 19” rack mount
Flat Panel 15” TFT active color display
Agency Approvals UL 508 (Listed), E107636
Regulatory
Compliance
12.16” (309 mm)
16.14" (410 mm)
4.25" (108 mm) overall
3.94" (100 mm) behind front panel
0.315" (8 mm) front panel protrusion
21.3 lbs (9.66 kg)
100-240 VAC 50\60 Hz 0.8A 125W *Nominal
cUL CSA C22.2, No. 142 (Listed), E107636
FCC 47 CFR, Part 15, Class A
CE
EMI EN55022, Class A
IMMUNITY EN61000–6-2
SAFETY IEC60950-1
HARMONICS EN61000-3-2, Class A
FLICKER EN61000-3-3
* Nominal Power is measured for a base configuration only. Any additional expansion and/or
devices will increase the input power required.
54 143926(A)
Page 59

4115T Light Duty Industrial PC Appendix A – Technical
Specifications
Environmental Specifications
Table 1-4 lists the environmental and compliance specifications for the 4115T.
Table 1–4. Environmental and Compliance Specifications
Temperature
Operating
Non-operating
Humidity
Operating
Non-operating
Shock1
Operating
Non-operating
Vibration (5-2000 Hz)1
Operating
Non-operating
Altitude2
Operating
Non-operating
1
These values are with solid state hard drives and not rotating media drives.
2
Consistent with internal component specifications.
0˚C to 50˚C (32˚F to 122˚F)
-20˚C to 60˚C (-4˚F to 140˚F)
20% to 80% RH, non-condensing
5% to 95% RH, non-condensing
15g peak acceleration, 11 msec duration
30g peak acceleration, 11 msec duration
0.006” peak to peak displacement
1.0g maximum acceleration
0.015” peak to peak displacement
2.5g maximum acceleration
Sea level to 10,000 ft. (3,000 m)
Sea level to 40,000 ft. (12,000 m)
55 143926(A)
Page 60

Appendix B – Watchdog Timer
The Watchdog Timer is a device to ensure that standalone systems can always
recover from abnormal conditions that cause the system to crash. These conditions
may result from an external EMI or a software bug. When the system stops working,
hardware on the board will perform hardware reset (cold boot) to bring the system
back to a known state.
A BIOS function call (INT 15H) is used to control the Watchdog Timer:
INT 15H:
AH – 6FH
Sub-function:
AL–2: Set the Watchdog Timer’s period
BL: Time-out value (Its unit--second or minute, is dependent
on the item “Watchdog Timer unit select” in CMOS setup).
You have to call sub-function 2 to set the time-out period of Watchdog Timer first. If
the time-out value is not zero, the Watchdog Timer will start counting down. While
the timer value reaches zero, the system will reset. To ensure that this reset condition
does not occur, Watchdog Timer must be periodically refreshed by calling subfunction 2. However, Watchdog timer will be disabled if you set the time-out value
to be zero.
A tolerance of at least 10% must be maintained to avoid unknown routines within the
operating system (DOS), such as disk I/O that can be very time-consuming.
Note
When exiting a program it is necessary to disable Watchdog Timer, otherwise the
system will reset.
56 143926(A)
Page 61

4115T Light Duty Industrial PC Appendix B – Watchdog
Timer
Example assembly program:
; INITIAL TIMER PERIOD COUNTER
;
W_LOOP:
MOV AX, 6F02H ;setting the time-out value
MOV BL, 30 ;time-out value is 48 seconds
INT ;15H
;
; ADD YOUR APPLICATION PROGRAM HERE
;
CMP EXIT_AP, 1 ;is your application over?
JNE W_LOOP ;No, restart your application
MOV AX, 6F02H ;disable Watchdog Timer
MOV BL, 0 ;
INT 15H
;
; EXIT
;
57 143926(A)
Page 62

Appendix C – Power-On Self-Test Messages
POST Messages
During the Power-On Self-Test (POST) if the BIOS detects an error, it will either
sound a beep code or display a message.
If a message is displayed, it will be accompanied by:
PRESS F1 TO CONTINUE, CTRL-ALT-ESC OR DEL TO ENTER SETUP
POST Beep
There are two kinds of beep codes in BIOS:
Single long beep followed by three short beeps—This code indicates that a video
error has occurred and the BIOS cannot initialize the video screen to display any
additional information.
Repeating long beep—This code indicates that a DRAM error has occurred.
Error Messages
One or more of the following messages may be displayed if the BIOS detects an error
during the POST. This list includes messages for both the ISA and the EISA BIOS.
Table B–1. Error Messages
Error Messages Cause/Solution
CMOS BATTERY HAS FAILED
CMOS CHECKSUM ERROR
DISK BOOT FAILURE, INSERT
SYSTEM DISK AND PRESS
ENTER
DISKETTE DRIVES OR TYPES
MISMATCH ERROR - RUN SETUP
DISPLAY SWITCH IS SET
INCORRECTLY
CMOS battery is no longer functional. It should be replaced.
Checksum of CMOS is incorrect. A weak battery may have caused this error;
replace if necessary. It may also indicate that CMOS has become corrupt.
No boot device was found. This could mean that either a boot drive was not
detected or the drive does not contain proper system boot files. Insert a
system disk (formatted as a boot device) into Drive A: and press Enter. If you
assumed the system would boot from the hard drive, make sure the controller
is inserted correctly and all cables are properly attached, then reboot the
system.
Type of diskette drive installed in the system is different from the CMOS
definition. Run Setup to reconfigure the drive type correctly.
The display switch on the motherboard is set to a different setting than
indicated in Setup. Determine which setting is correct and then either turn off
the system and change the jumper, or enter Setup and change the VIDEO
selection.
58 143926(A)
Page 63

4115T Light Duty Industrial PC Appendix C – Power-On Self-Test Messages
Error Messages Cause/Solution
DISPLAY TYPE HAS CHANGED
SINCE LAST BOOT
EISA CONFIGURATION
CHECKSUM ERROR
PLEASE RUN EISA
CONFIGURATION UTILITY
EISA CONFIGURATION IS NOT
COMPLETE
PLEASE RUN EISA
CONFIGURATION UTILITY
ERROR ENCOUNTERED
INITIALIZING HARD DRIVE
ERROR INITIALIZING HARD DISK
CONTROLLER
FLOPPY DISK CNTRLR ERROR
OR NO CNTRLR PRESENT
INVALID EISA CONFIGURATION
PLEASE RUN EISA
CONFIGURATION UTILITY
KEYBOARD ERROR OR NO
KEYBOARD PRESENT
KEYBOARD IS LOCKED OUT UNLOCK THE KEY
MEMORY ADDRESS ERROR AT
...
MEMORY PARITY ERROR AT ... Indicates a memory parity error at a specific location. You can use this location along
MEMORY SIZE HAS CHANGED
SINCE LAST BOOT
MEMORY VERIFY ERROR AT ... Indicates an error verifying a value already written to memory. Use the location along
OFFENDING ADDRESS NOT
FOUND
OFFENDING SEGMENT This message is used in conjunction with the I/O CHANNEL CHECK and RAM PARITY
PRESS A KEY TO REBOOT This will be displayed at the bottom screen when an error occurs that requires you to
PRESS F1 TO DISABLE NMI, F2
TO REBOOT
RAM PARITY ERROR CHECKING FOR SEGMENT
SHOULD BE EMPTY BUT EISA
BOARD FOUND
PLEASE RUN EISA
CONFIGURATION UTILITY
SHOULD HAVE EISA BOARD BUT
NOT FOUND
PLEASE RUN EISA
CONFIGURATION UTILITY
SLOT NOT EMPTY
Since the last powering off the system, the display adapter has been
changed. You must configure the system for the new display type.
The EISA non-volatile RAM checksum is incorrect or cannot correctly read the EISA
slot. This can indicate either the EISA non-volatile memory has become corrupt or the
slot has been configured incorrectly. Verify the card is installed firmly in the slot. When
this error appears, the system will boot in ISA mode allowing you to run the EISA
Configuration Utility.
The slot configuration information stored in the EISA non-volatile memory is
incomplete. When this error appears, the system will boot in ISA mode allowing you to
run the EISA Configuration Utility.
Check that the adapter is installed correctly and all cables are firmly attached. Verify
that the correct hard drive type is selected in Setup.
See the cord is correctly and firmly installed in the bus. Verify the correct hard drive
type is selected in Setup. Check jumper settings on the hard drive.
Make sure the controller is installed correctly and firmly. If there are no floppy drives
installed, be sure the Diskette Drive selection in Setup is set to NONE.
The non-volatile memory containing EISA configuration information was programmed
incorrectly or has become corrupt. The system will boot in ISA mode allowing you to
run the EISA Configuration Utility and correctly program the memory.
Make sure the keyboard is attached correctly and no keys are being pressed during the
boot. If you are purposely configuring the system without a keyboard, set the error halt
condition in Setup to HALT ON ALL, BUT KEYBOARD. This will cause the BIOS to
ignore the missing keyboard and continue the boot.
BIOS detected the keyboard is locked. P17 of keyboard controller is pulled low.
Indicates a memory address error at a specific location. You can use this location along
with the memory map for your system to find and replace the bad memory chips.
with the memory map for your system to find and replace the bad memory chips.
Memory has been added or removed since the last boot. In EISA mode use
Configuration Utility to reconfigure the memory configuration. In ISA mode enter Setup
and enter the new memory size in the memory fields.
with your system's memory map to locate the bad chip.
This message is used in conjunction with the I/O CHANNEL CHECK and RAM PARITY
ERROR messages when the segment that has caused the problem cannot be isolated.
ERROR messages when the segment that has caused the problem has been isolated.
reboot. Press any key to reboot.
When BIOS detects a Non-maskable Interrupt condition during boot, this will allow you
to disable the NMI and continue to boot, or you can reboot the system with the NMI
enabled.
Indicates a parity error in Random Access Memory.
A valid board ID was found in a slot that was configured as having no board
ID. When this error appears, the system will boot in ISA mode allowing you to
run the EISA Configuration Utility.
The board installed is not responding to the ID request, or no board ID has
been found in the indicated slot. When this error appears, the system will boot
in ISA mode allowing you to run the EISA Configuration Utility.
A slot designated as empty by the EISA Configuration Utility actually contains
a board. When this error appears, the system will boot in ISA mode allowing
you to run the EISA Configuration Utility.
59 143926(A)
Page 64

4115T Light Duty Industrial PC Appendix C – Power-On Self-Test Messages
Error Messages Cause/Solution
SYSTEM HALTED, (CTRL-ALTDEL) TO REBOOT ...
WRONG BOARD IN SLOT
PLEASE RUN EISA
CONFIGURATION UTILITY
FLOPPY DISK(S) FAIL (80)
FLOPPY DISK(S) FAIL (40)
HARD DISK(S) FAIL (80)
HARD DISK(S) FAIL (40)
HARD DISK(S) FAIL (20)
HARD DISK(S) FAIL (10)
HARD DISK(S) FAIL (08)
MANUFACTURING POST LOOP.
BIOS ROM CHECKSUM ERROR SYSTEM HALTED.
MEMORY TEST FAIL.
The present boot attempt has been aborted and the system must be
rebooted. Press and hold down the CTRL and ALT keys and press DEL.
The board ID does not match the ID stored in the EISA non-volatile memory.
When this error appears, the system will boot in ISA mode, allowing you to
run the EISA Configuration Utility.
Unable to reset floppy subsystem
Floppy type dismatch
HDD reset failed
HDD controller diagnostics failed
HDD initialization error
Unable to recalibrate fixed disk
Sector Verify failed
System will repeat POST procedure infinitely while the P15 of keyboard
controller is pulled low. This is also used for M/B burn in test.
The checksum of ROM address F0000H-FFFFFH is bad.
BIOS reports the memory test failed if the onboard memory is tested error.
60 143926(A)
Page 65
Appendix D – DMA, IRQ and 1st MB Memory
DMA Channel Assignments
Table C–1. DMA Channel Assignments
Channel Description
0 Available
1 Available
2 Floppy Disk (8-bit transfer)
3 Available
4 Cascade for DMA controller 1
5 Sound
6 Available
7 Available
IRQ Mapping Chart
IRQ0 System Timer IRQ8 RTC Clock
IRQ1 Keyboard IRQ9 AC97 Audio
IRQ2 IRQ Controller IRQ10 IRQ Holder for PCI steering
IRQ3 (COM2) IRQ11 ICH4 USB2.0
IRQ4 (COM1) IRQ12 PS/2 Mouse
IRQ5 Intel ICH4 LAN IRQ13 FPU
IRQ6 FDC IRQ14 Primary IDE
IRQ7 LPT1 IRQ15 Secondary IDE
All IRQs have been assigned to the listed devices, so if you want to add any
additional device interface, you must free the unused IRQ first. For example, if you
don’t use USB K/B or Mouse, then IRQ10 may be set free.
Table C–2. IRQ Mapping
Note
61 143926(A)
Page 66

4115T Light Duty Industrial PC Appendix D – DMA, IRQ and 1st MB Memory
1st MB Memory Address Map
Table C–3. 1st MB Memory Address Map
Memory Address Description
00000-9FFFF System Memory
A0000-BFFFF VGA Buffer
C0000-CFFFF VGA BIOS
E0000-FFFFF System BIOS
100000 Extended Memory
I/O Addresses
Table C–4. I/O Addresses
I/O Address Range Description
000-01F DMA Controller #1
020-021 Interrupt Controller #1, Master
040-05F System Timer
060-06F Standard 101/102 keyboard controller
070-07F Real Time Clock, NMI controller
080-09F DMA Page Register
0A0-0BF Interrupt Controller #2
0C0-0DF DMA Controller #2
0F0-0F0 Clear Math Coprocessor Busy
0F1-0F1 Reset Math Coprocessor
0F8-0FF Math Coprocessor
408-409 Digital Input/Output
170-1F7 Fixed Disk
278-27F Parallel Printer Port (LPT2)
2E8-2EF Serial Port 4 (COM4)
2F8-2FF Serial Port 2 (COM2)
376-376 BUS Master PCI IDE Controller
378-37F Parallel Printer Port 1
3A0-3AF Bisynchronous 1
3B0-3DF Intel 82845G/GL Graphic Controller
3F0-3F7 Floppy Disk Controller
3E8-3EF Serial Port 3 (COM3)
3F0-3F7 Diskette Controller
3E8-3EF Serial Port 3 (COM3)
3F8-3FF Serial Port 1 (COM1)
480-48F PCI BUS
62 143926(A)
Page 67

Appendix E – How to Use the Wake-Up Function
POS-478E provides two kinds of Wake-Up functions: Modem Wake-up and LAN
Wake-up. The Wake-Up function will be activated when ATX power supply is in use.
Wake-Up On Modem (Ring)
Wake-Up On Modem is set in CMOS SETUP. Activating this function allows the
ATX power supply to be switched on when there is a ring signal detected on pin “RI”
of the serial port.
Wake-Up On LAN
When your computer is in power-down status, the LAN Link/Active LED will flash,
indicating that the LAN chip has entered standby mode. The LAN chip is waiting for
a Wake-Up signal to become active. You can use other computers to wake up your
computer by sending an ID to it. An ID is the address of your system LAN; every
LAN chip has a factory-set ID. The LAN ID can be found in the network information
section in Microsoft Windows. The ID format is xxxxxxxxxxxx. (Example ID:
009027388320)
63 143926(A)
Page 68

Appendix F – How to Upgrade a New BIOS
Please contact the Xycom Automation Application Engineering Department at 734944-0482 to obtain the latest BIOS.
BIOS Update Procedure
Notes
A. This procedure will erase any prior data on that floppy, so please proceed
accordingly.
B. Typically four files will be transferred, only COMMAND.COM being visible when
running a simple directory listing.
C. Please leave the diskette un-write protected for the balance of this procedure.
1. Make a boot disk. Go to the DOS command prompt in MS-DOS or Windows 9x
and, with an available floppy disk in "A", type "format A:/s" That will format the
floppy and transfer the needed system files to it.
2. Download the BIOS upgrade file and awdflash.exe utility from an ICP web site
to a temporary directory on your hard drive, or directly to the floppy formatted in
step 1.
3. Copy (BIOS file and awdflash.exe) files to the boot floppy disk.
4. Reboot the system to the DOS command prompt using the boot disk made in the
previous steps.
5. At the DOS command prompt, awdflash filename.xxx, (filename.xxx is the file
name of the upgraded BIOS file), press Enter.
6. The first prompted option is to save the old BIOS. It is recommended that this
option be selected in case it is later decided not to use the new version once it is
installed. To save, enter Y. To not save, enter N.
64 143926(A)
Page 69

4115T Light Duty Industrial PC Appendix F – How to Upgrade to a New BIOS
Notes
A. DO NOT save the old BIOS with the same file name as the new BIOS. If the
same file name is used, the new BIOS will write over the old BIOS with no prompted
warning.
B. If the old BIOS is not saved write down the version number of the old BIOS and
store it with your important computer documents. If not saving old BIOS, enter N (for
"no") and skip to step 9.
7. Enter a NEW name for the old BIOS file, press Enter.
8. The second prompted option will be whether you want to flash your BIOS.
Enter Y for yes, N for no.
Warning
Once the Enter key is pressed, DO NOT touch the keyboard, reset button, or power
switch while flashing is in progress. A progress bar on the screen will show the
progress of the flashing.
9. When the flashing process is complete, you will be asked to reset or
power off the system. Remove the floppy disk from the drive and reset or
power off the system.
10. Reboot the system and note that the BIOS version on the initial boot-up
screen has changed to the new BIOS version. Your BIOS upgrade is now
complete.
Recovering Your Old BIOS
1. Boot the system with the floppy disk that contains the new BIOS. If you do not
have the floppy disk, repeat steps 1, 2, and 3 of the BIOS Upgrade Procedure
above for the version of the BIOS recovering.
2. Complete steps 4 and 5 (filename.xxx is the name of the recovered BIOS file).
Select N for no in step 6, and continue with steps 8, 9, and 10.
65 143926(A)
Page 70
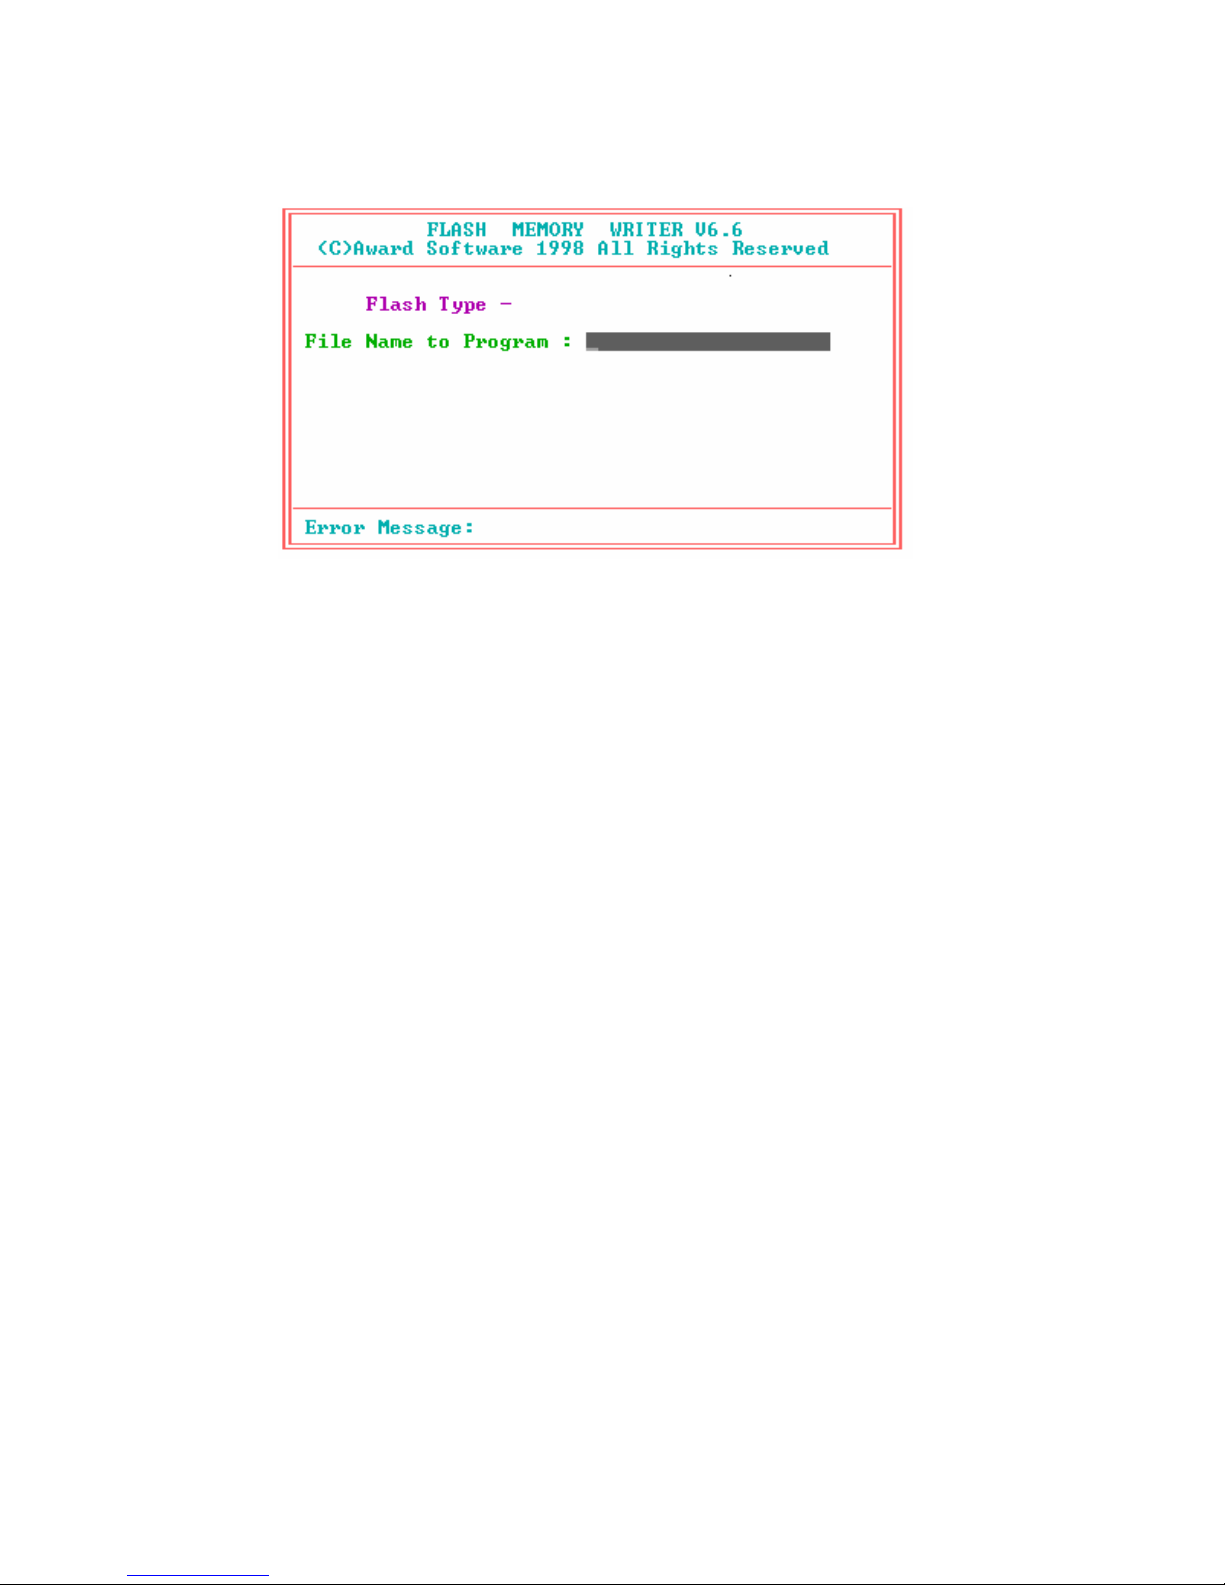
4115T Light Duty Industrial PC Appendix F – How to Upgrade to a New BIOS
Install screen:
Figure D - 1. BIOS Upgrade Screen
66 143926(A)
Page 71

Index
Arm mounting...........................................................13
Award BIOS setup....................................................14
BIOS recovery..........................................................66
BIOS setup...............................................................14
getting help...........................................................32
main menu ...........................................................33
overview...............................................................31
standard CMOS features......................................34
starting.................................................................31
using ....................................................................32
BIOS upgrades.........................................................65
CPU board ...............................................................14
layout....................................................................15
product overview..................................................14
specifications........................................................14
Dimensions
mechanical.............................................................8
DMA channel assignments.......................................62
DMA, IRQ and memory map....................................62
Documentation kit ......................................................5
Drivers
installing...............................................................52
miscellaneous ......................................................53
touch screen.........................................................52
video ....................................................................52
Environmental specifications....................................55
Error messages (power on self test..........................58
Fuse
replacement .........................................................46
General information....................................................1
I/O address map.......................................................63
Input/output address map.........................................63
Installation
driver....................................................................52
operating systems................................................51
IRQ map...................................................................62
LCD display
specifications..........................................................1
Maintenance.............................................................46
general.................................................................46
hard drive.............................................................46
Mechanical diminsions...............................................8
Memory address (1st MB) map.................................63
Memory map............................................................62
Mounting
arm.......................................................................13
panel ......................................................................9
wall.......................................................................11
Operating systems
installation............................................................51
Panel mounting..........................................................9
POST messages......................................................58
Power on self test.....................................................58
error messages....................................................58
POST beep ..........................................................58
POST messages..................................................58
Preventive maintenance...........................................46
general.................................................................46
hard drive.............................................................46
Product information
CPU board ...........................................................14
environmental specifications................................55
general...................................................................1
LCD display............................................................1
mechanical dimensions..........................................8
touch screen...........................................................2
Product specifications
environmental.......................................................55
LCD display............................................................1
touch screen...........................................................2
Recovering the old BIOS..........................................66
Repairs and service .................................................47
Reverse side of unit
system setup......................................................2, 3
67 143926(A)
Page 72

Index
p
Service and repairs..................................................47
Side view of unit
system setup..........................................................4
Specifications
CPU board ...........................................................14
environmental.......................................................55
LCD display............................................................1
touch screen...........................................................2
System setup
arm mounting.......................................................13
panel mounting.......................................................9
reverse side of unit.............................................2, 3
side view of unit......................................................4
wall mounting.......................................................11
Touch screen
specifications..........................................................2
Touch screen drivers................................................52
Unit reverse side....................................................2, 3
Unit side view.............................................................4
Upgrading the BIOS.................................................65
Video drivers............................................................52
Wall mounting ..........................................................11
Watchdog timer........................................................ 56
Xycom Automation, Inc.
734-429-4971
Fax: 734-429-1010
htt
://www.xycom.com
143926(A)
Canada Sales: 905-607-3400
Northern Europe Sales: +44-1604-790-767
Southern Europe Sales: +39-011-770-53-11
 Loading...