

Page 1
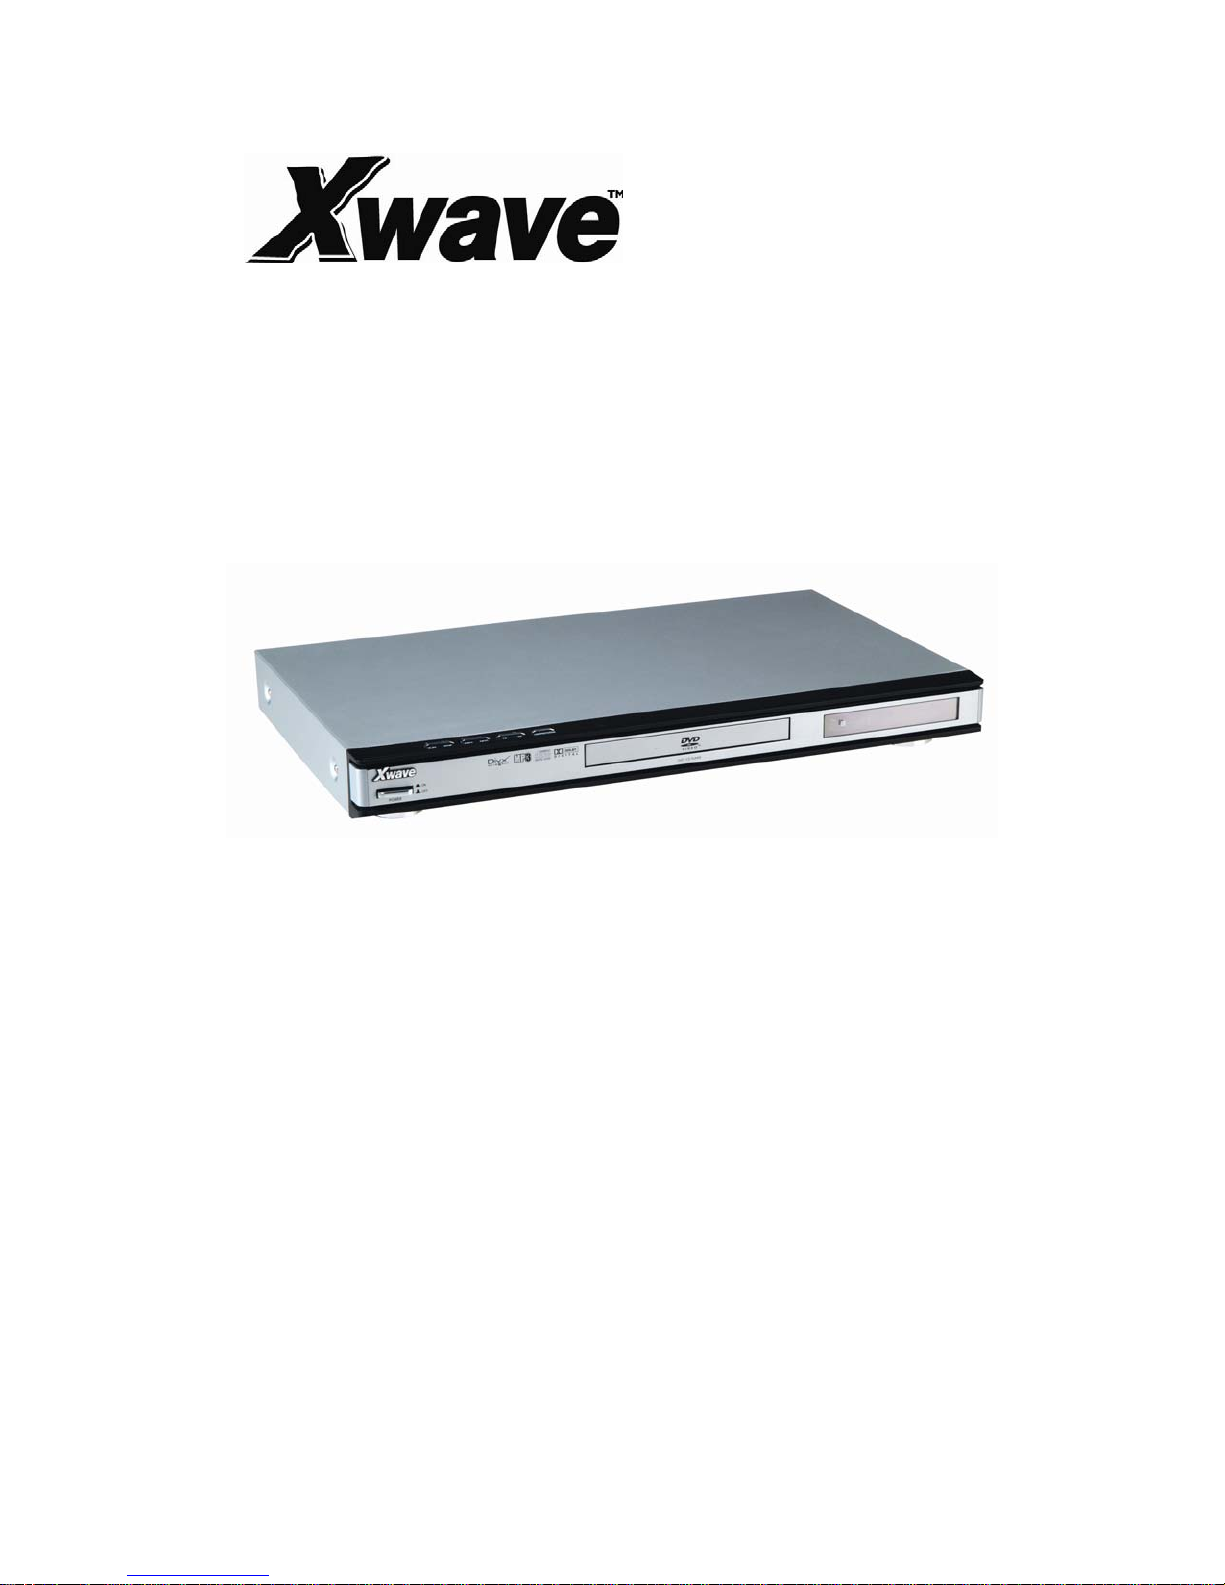
DivX Player
9200
GB - 0
USER’S MANUAL
Page 2

Table of Contents
CHAPTER 1 GETTING STARTED........................................ 2
:: WELCOME ...................................................................................................................... 2
Features....................................................................................................................... 2
Special Features........................................................................................................ 2
Compatible Discs ...................................................................................................... 2
Region code................................................................................................................ 2
:: SAFETY PRECAUTIONS ................................................................................................... 3
:: SAFETY INSTRUCTIONS ................................................................................................. 4
:: TERM.............................................................................................................................. 6
:: PLAYER OVERVIEW ........................................................................................................ 7
CHAPTER 2 CONNECTIONS.......................................9
:: CONNECTING THE PLAYER .............................................................................................9
Step 1 - Connect TV................................................................................................. 9
Step 2 - Connect Audio Components................................................................ 10
CHAPTER 3 SETUP....................................... 11
SETUP MENU CATEG OR IES............................................................................................... 11
CHAPTER 4 BASIC OPERATIONS....................................17
PLAYING DVD, CD OR VCD........................................................................................... 17
ADDITIONAL DISC PLAYBACK OPTIONS........................................................................... 17
CHAPTER 5 ADVANCED FEATURES..................................... 18
USING THE DVD’S MENU................................................................................................ 18
PLAYING VIDEO CDS WITH PBC FUNCTIONS................................................................ 18
MP3 FILE PLAYBACK ........................................................................................................ 18
PHOTO FILE PLAYBACK ..................................................................................................... 19
MPEG-4 FILE PLAYBACK ................................................................................................. 20
MPEG-1/2 FILE PLAYBACK ............................................................................................. 20
:: SPECIAL PLAYBACK FEATURE ....................................................................................... 21
Repeat Play............................................................................................................... 21
A-B Repeat................................................................................................................ 21
Searching for a Particular Point on a Disc....................................................... 21
A-TIME....................................................................................................................... 21
Zoom .......................................................................................................................... 22
Angle .......................................................................................................................... 22
OSD............................................................................................................................. 22
Subtitle Selection.................................................................................................... 22
AUDIO Selection...................................................................................................... 23
Resume Playback.................................................................................................... 23
Program Playback ................................................................................................... 23
CHAPTER 6 HELP.......................................... 25
:: TROUBLESHOOTING..................................................................................................... 25
:: SPECIFICATIONS ......................................................................................................... 26
GB - 1
Page 3

Chapter 1 Getting Started
:: Welcome
Congratulations on your purchase of this MPEG-4 player!
Features
• Full compatibility with DVD, SVCD, VCD, CD, MP3 and Kodak Picture CD.
• Dolby® Digital Decoding Compatible.
• Component Video, SCART Video outputs.
• Digital audio coaxial output.
Special Features
• Support MPEG-4 video disc, including DiVX and XViD.
• Firmware updatable
Compatible Discs
This MPEG-4 player can play discs with the following logos:
• DVD Video (from DVD Disc, and DVD±R/RW)
• MPEG-4 Video (from CD/DVD Disc, DVD±R/RW and CD-R/RW)
• Audio CD (from CD Disc, and CD-R/RW)
• Video CD (from CD Disc, and CD-R/RW)
• MP3 files (from CD/DVD Disc, DVD±R/RW and CD-R/RW)
• Kodak Picture CD (from CD Disc, and CD-R/RW)
Region code
The region number of this unit is 2, if the region number printed on the DVD disc does not
correspond to the region number of this unit, this unit can not play that disc.
DVD labeled “ALL” will also play on this unit
GB - 2
Page 4

:: Safety Precautions
TO REDUCE THE RISK OF ELECTRIC SHOCK, DO NOT REMOVE THE COVER (OR BACK). NO
USER-SERVICEABLE PARTS ARE INSIDE. REFER SERVICING TO QUALIFIED SERVICE
PERSONNEL.
This symbol indicates “dangerous voltage” inside the product that presents a risk of electric
shock or personal injury.
This symbol indicates important instructions accompanying the product.
CAUTION: THE PLAYERS USE AN INVISIBLE LASER BEAM WHICH CAN CAUSE HAZARDOUS RADIATION
EXPOSURE IF DIRECTED. BE SURE TO OPERATE PLAYER CORRECT LY AS INSTRUCTED.
WAR NING
To reduce the risk of fire or shock hazard, do not expose the PLAYER to rain or moisture.
CAUTION
THIS PRODUCT UTILIZES A LASER. ANY USE OF CONTROLS OR ADJUSTMENTS OR PERFORMANCE OF PROCEDUR ES
OTHER THAN THOSE SPECIFIED HEREIN MAY RESULT IN HAZARDOUS RADIATION EXPOSURE. DO NOT OPEN COVER,
AND DO NOT REPAIR YOURSELF. REFER SERVICING TO QUALIFIED PERSONNEL.
Handling Cautions
• Before connecting other components to the PLAYER, be sure to turn them all off.
• Do not move the PLAYER while a disc is being played, as the disc may be scratched or broken and the unit's internal parts may
be damaged.
• Do not put a flower vase filled with water or any small metal object on the PLAYER.
• Be careful not to put your hand in to the disc tray.
• Do not place anything other than t he disc in the disc tray.
• Exterior int erference such as ligh tning and static electricity can affect normal operation of this unit. If this occurs, turn the DVD
PLAYER off and on again with the POW ER button, or disconnect and then reconnec t the AC power cord to the AC power outlet.
Then, the unit will operate normally.
• Be sure to remove the di sc and turn off the PLAYER after use.
• Disconnect t he AC power cord from the AC outlet when you don’t intend to use the PLAYER for long periods of time.
• Clean the disc by wiping in a straight line from the inside to the outside of t he disc.
Disc Storage
Be careful not to harm the disc because the data on these discs is highly vulnerable to the environment.
• Do not keep under direct sunlight.
• Keep in a cool ventilated area.
• Store verticall y.
• Keep in a clean protection jacket.
GB - 3
Page 5

:: Safety Instructions
1. Read Instructions - All the safety and operating instructions should be read before the product is operated.
2. Retain Instructions - The safety and operating instructions should be r etained for future reference.
3. Heed Warnings - All warnings on the product and in the operating instructions should be adhered to.
4. Follow Instructions - All operating and using instructions should be followed.
5. Cleaning - Unplug this product from the wall outlet before cleaning. Do not use liquid cleaners or aerosol cleaners.
Use a damp cloth for cleaning.
6. Attachments - Do not use attachments not recommended by the product manufacturer as they may cause
hazards.
7. Water and M oisture - Do not use this product near water, for example near a bath tub, wash bowl, kitchen sink, or
laundry tub; in a wet basement; or near a swimming pool; and the alike.
8. Accessories - Do not place this product on an unstable cart, stand, tripod, bracket, or table. The product may fall,
causing serious injur y to a child or adult and serious damage to the product. Use only with a cart, stand, tripod,
bracket, or table recommended by the manufacturer or sold with the product. Any mounting of the product should
follow the manufacturer instructions and a mounting accessory recommended by the manufacturer should be used.
9. Cart Usage - A product and cart combination should be moved with care. Quick stops, excessive force, and uneven
surfaces may cause the product and cart combination to overturn.
10. Ventilation - Slots and openings in the cabinet are provided for ventilation and to ensure reliable operation of
the product and to protect it from overheating. These openings must not be blocked or covered.
The openings should never be blocked, for example, by placing the product on a bed, sofa, rug, or other similar
surfac es. This product s hould n ot be plac ed in a b uilt-in installation such as a bookcase or rack u nless proper
ventilation is provided or the manufacture instructions have been adhered to.
11. Power Sources - This produc t shoul d be oper at ed on ly from the typ e of power s ourc e indic ated on the mark ing
label. If you are not sure of the type of power supplied to your home, consult your product dealer or local power
company. For products intended to operate from battery power, or other s ources, refer to the operating instructions.
12. Grounding or Polarization - This product may be equipped with a polarized alternating current line plug (a
plug having one blade wider than the other).
This plug will fit into the power outlet only one way. This is a safety feature. If you are unable to insert the plug fully
into the outlet, try reversing the plug. If the plug should still fail to fit, contact your electrician to replace your obsolete
outlet. Do not defeat the safety purpose of the polarized plug.
13. Power - Cord Protection-Power-supply cords should be routed so that they are not likely to be walked on or
pinched by items placed upon or against them, paying particular attention to cords at plugs, convenience
receptacles, and the point where they exit from the product.
GB - 4
Page 6

14. Lightning - For added protection for this product during a lightning storm or when it is left unattended and unused
for long periods of time, unplug it f rom the wall outlet and disconnect the antenna or cable system. This will prevent
damage to the product due to lightning and power-line surges.
15. Power Lin es - An outside antenna system should not be located in the vicinity of overhead power lines or other
electric light or power circuits, or where it can fall into such power lines or circuits. When installing an outside
antenna system, extreme care should be taken to keep from touching such power lines or circuits as contact with
them might be fatal.
16. Overloading - Do not overload wall outlets, extension cords, or integral convenience receptacles as this can
result in a risk of fire or elec tric s hock.
17. Object and Liquid Entry - Never push objects of any kind into this product through openings as they may touch
dangerous voltag e points or short- out parts that could r esult in a f ire or electric shock. Never spill li quid of any kind
on the product.
18. Servicing - Do not attempt to service this product yourself as opening or removing covers may expose you to
dangerous voltage or other hazards. Refer all servicing to qualified service personnel.
19. Damage Requiring Service - Unplug this product from the wall outlet and refer servicing to qualified service
personnel under the following conditions:
a When the power-supply cord or plug is damaged.
b If liquid has been spilled or objects have fallen into the product.
c If the product has been exposed to rain or water.
d If the product does not op erate n ormall y by following the oper ating instruc tions. Adjust onl y those c ontrol s
that are covered by the operating instructions as an improper adjustment of other controls may result in
damage and will often require extensive work by a qualified technician to restore the product to its normal
operation.
e If the product has been dropped or damaged in any way.
f When th e pr oduct exhi bits a distinct ch ange in perf ormance-this indic ates a n eed for s ervice.
20. Replacement Parts - W hen r epl acement parts ar e req uired, be sur e the servic e techn ician h as used
replac ement p arts specified by the manufacturer or that have th e same characteristics as t he original part.
Unauthorized substitutions may result in fire, electric shock, or other hazards.
21. Safety check - Upon c ompleti on of an y s ervice or repairs to this produc t, as k the s ervice technician to perfor m
safety checks t o determine that the product is in proper operating c ondition.
22. Heat - The product should be situ ated aw ay f rom heat sourc es suc h as radiators, heat regis ter s, stoves, or other
products (including amplifiers) that produce heat.
GB - 5
Page 7
:: Term
What are Title/Chapter and Track?
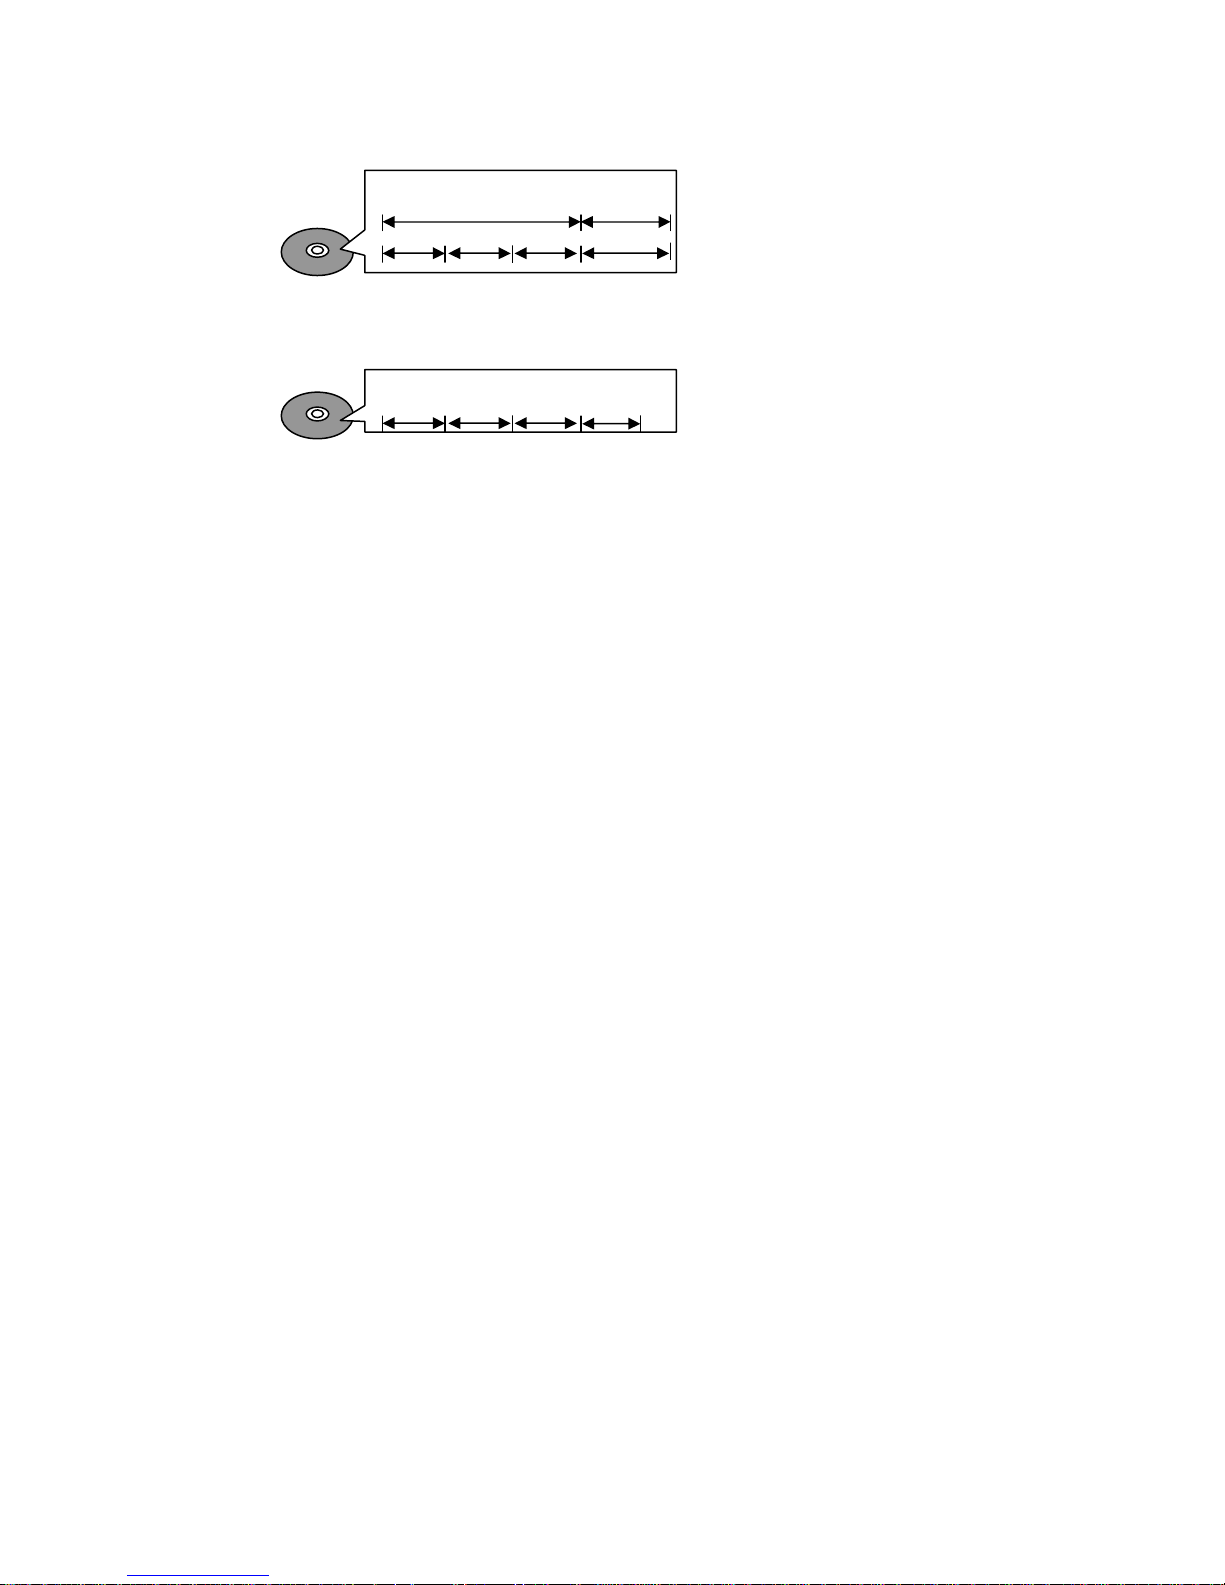
Title/Chapter (DVD)
DVDs are divided up into large sections, titles, and smaller sections, chapters. The numbers alloc ated to
these s ections are called title numbers and chapter numbers.
DVD
Track (VCD/CD)
Video CDs and CDs are divided up int o sections called tracks, and the numbers allocated to these sections
are called track numbers.
VCD/CD
What is MPEG-4?
MPEG-4 is a video compression standard developed by an industrial group called 'Moving Picture Experts
Gr oup' or 'MPEG' for short.
Audio-Visual Coding'.
(International Standards Organization) and are therefore also called ISO-st andards. MPEG-4 is ISO/IEC
standard #14496.
VCD's, DVD 's, mp3's and all sorts of other applications.
To compress a high quality 2 hour video clip to something that can fit on a single CD obviously takes some
serious compression tactics. MPEG-4 does this partly by removing information that we don't notic e and partly
by transforming the raw pixel data int o a mathematical appr oximation of that data. The approximation is clos e
enough f or us mere humans not to notice t he difference between the sourc e and the result ( well, at least in
theory).
What are XViD, DiVX?
Both of them are video codec (encoder/decoder) base on MPEG-4. Each of them can encode a video-file into
a (hopefully) MPEG-4 compliant data stream which can be saved into a container-file like an .avi, .ogm, .mp4
or others. The unit has a built-in MPEG-4 decoder, with it you can play XViD and DiVX video disc.
Exam ple:
Title 1 Title 2
Chapter1 Ch apter2 Chapter3 Chapter 1
Exam ple:
Track1 Track2 Track3 Track4
MPEG-4's official description by the MPEG is 'a standard for Very Low Bitrate
Many of the standards developed by this group ar e accepted standards by the ISO
The MPEG standards are widely acc epted by the media industr y and you c an find them in
GB - 6
Page 8
:: Player Overview
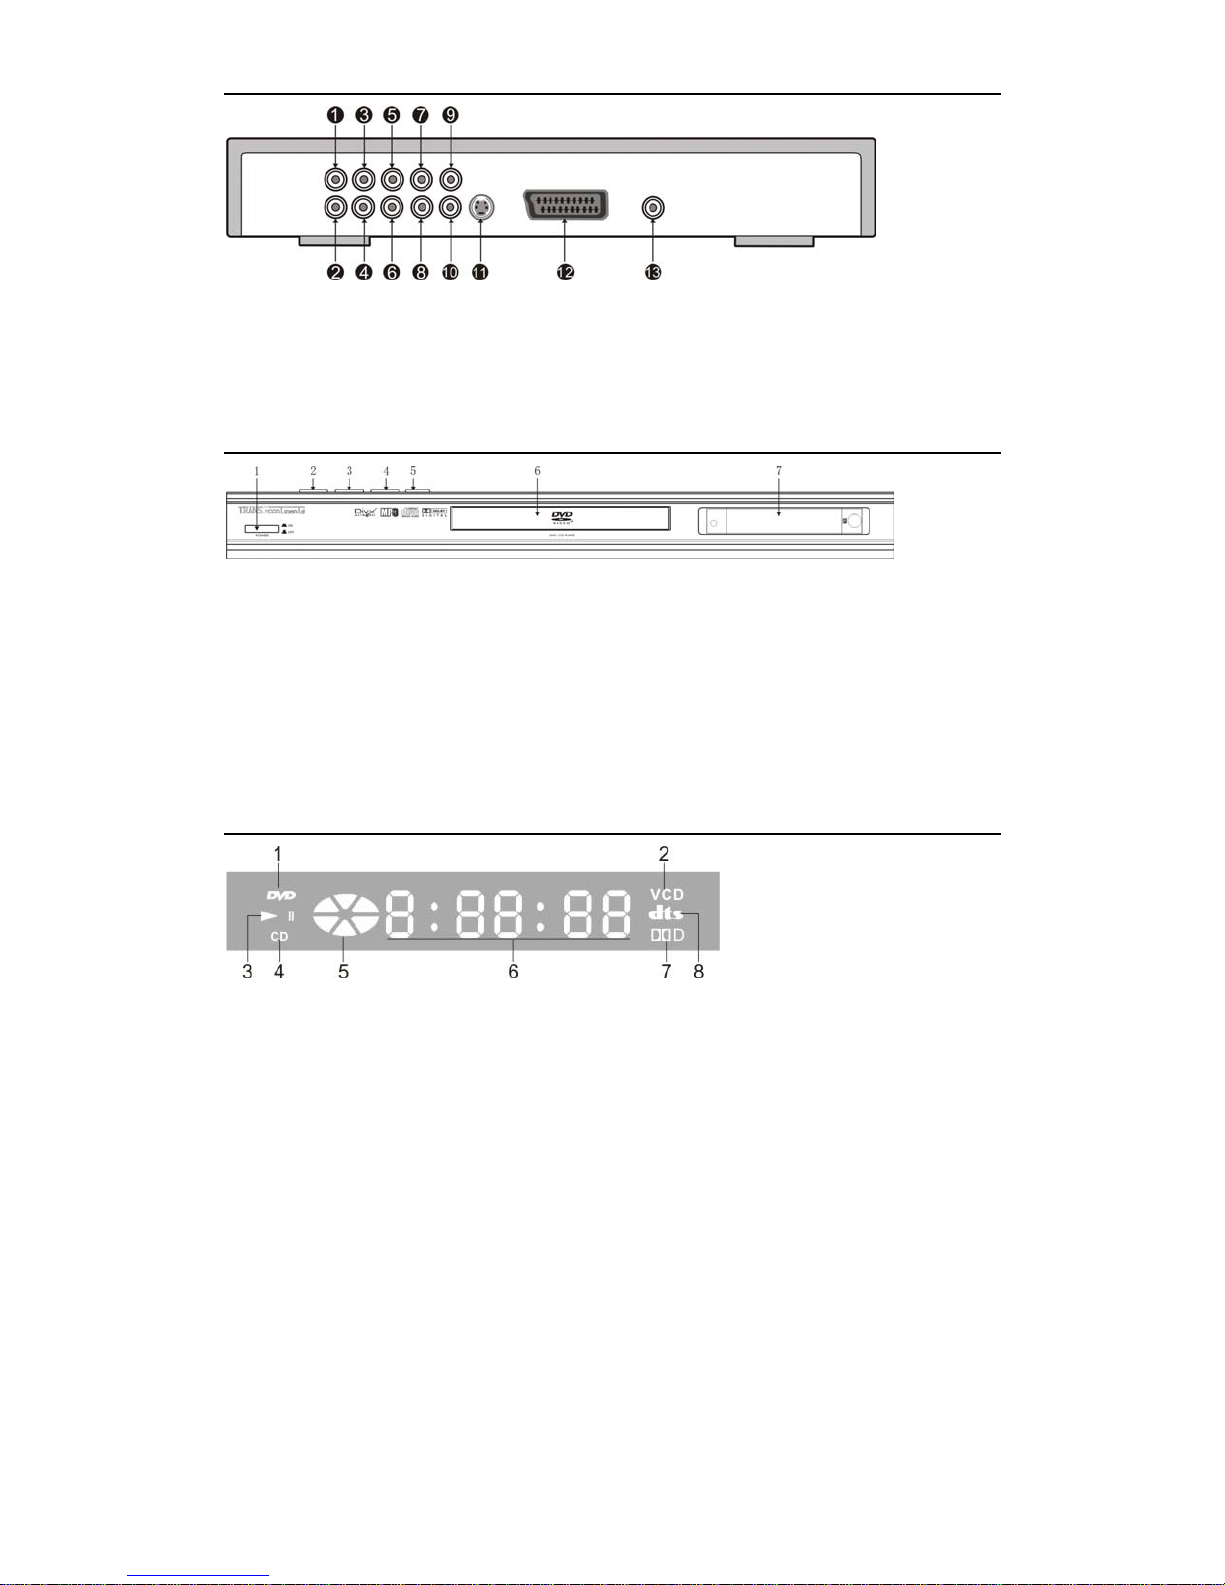
Rear Panel
1. Sub-woofer audio output:
2. Centre audio output
3. Right surround audio output
4. Left surround audio output
5. Right front audio output
6. Left front audio output
7/8/9. Component video output
10. Composite video output
11. S-Video output
12. SCART output
13. Digital coaxial audio output
Front Panel Controls
1. Mains Switch: Switches the unit to Power ON and OFF.
2. PLAY: Start to play back in normal speed.
Stops playback.
STOP:
3. PREV:
4. FAST REWIND:
5. OPEN/CLOSE: Open disc tray or close it.
6. Disc Tray: Please put the disc with label facing up carefully.
7. Front Panel Display: Displays feedback information on player operation.
*Although STANDBY is in off position, the appliance is not completely disconnected from power supply.
Press this to move back to the beginning of the previous chapter/track
NEXT: Press it to move ahead to the beginning of the next chapter/track
Fast reverse play
FAST FORWARD: Fast forward play
FRONT PANEL DISPLAY
1. DVD Disc indicator: when a DVD disc is loaded, the word “DVD” will light up.
2. VCD Disc indicator: when a VCD disc is loaded, the word “VCD” will light up.
3. Working status indicator: the symbol X will light up during playback, when you press the
“PAUSE” button, the symbol || will light up.
4. CD Disc indicator: when a CD disc is loaded, the word “CD” will light up.
5. Dynamic tray indicator: when a disc is loaded and playing it will light up and rotate.
6. Time display: display the elapsed time or remaining time.
7. Dolby Digital audio indicator: light up when Dolby digital format audio is playing.
8. DTS indicator: light up when DTS format audio is playing.
GB - 7
Page 9
Remote Control
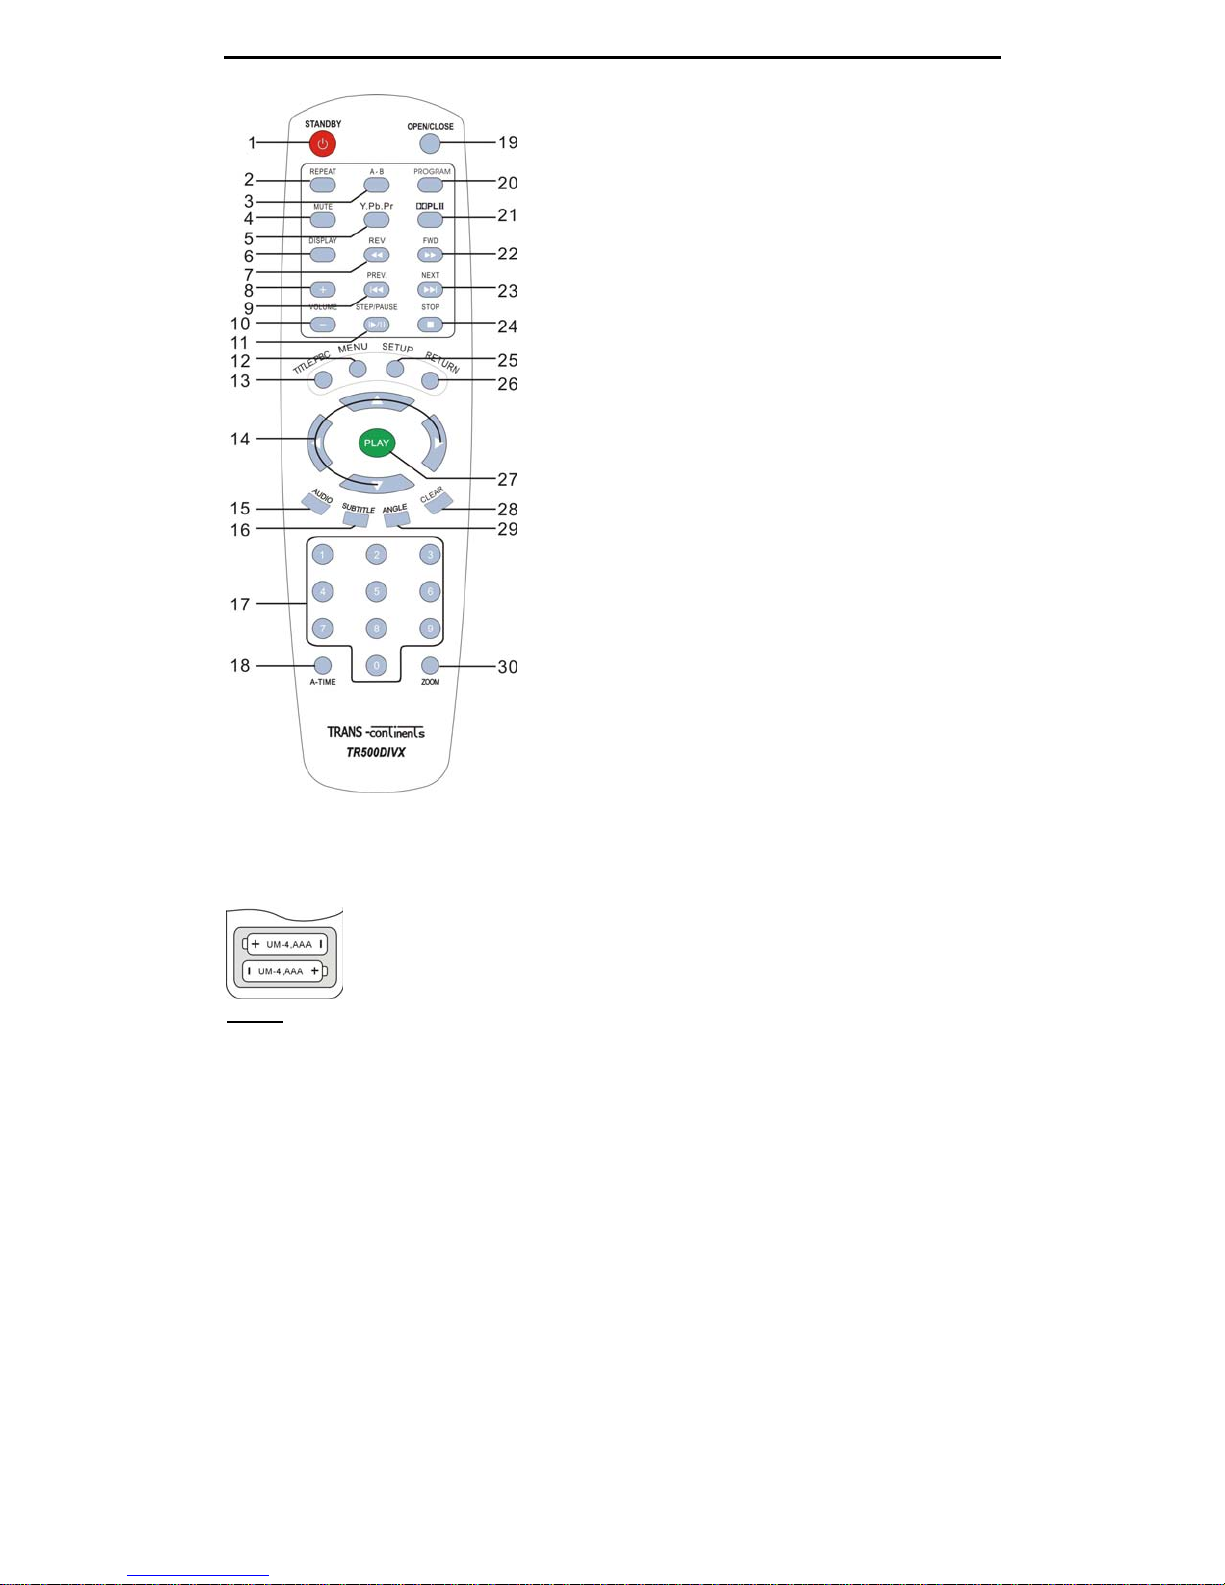
1. STANDBY: Switch the unit standby condition.
2. REPEAT: Repeat titles, chapt ers, songs, etc.
3. A-B: Specify the parts you want to play repeatedly
4. MUTE: Switch sound on and off
5. Y. Pb . P r: Switch progressive scan mode on and off
6. DISPLAY: Display inform ation about playback status on screen.
7. FAST REWIND: Fast reverse play
8. VOLUME +: Increase the sound output level
9. PREV: Press this to move back to the beginning of the previous
chapter/track
10. VOLUME -: Decrease the sound output level
11. STEP/PAUSE: Once press it will stop playback and freeze current
picture, press it repeatedly will play one frame at a time, use
PLAY to resume normal playback
12. MENU: Recall DVD’s ROOT menu or VCD 2.0 menu during
playback
13. TITLE/PBC: Recall DVD’s TITLE menu during playback ;
Enable/Disable PBC function during VCD playback, it can allow
you play VCD interactively by foll owing the menu on the TV
screen
14. g/h/i/j: Use them to navigate on-screen menus
15. AUDIO: C han ge t he status t o m ake Audio c ha nge possible
16. SUBTITLE: Chang e th e st atu s to mak e Subti tl e ch ang e possi ble
17. NUMBERS: Select the chapter or track by pressing number
buttons directly
18. A-TIME: G o to a sp ecific loc ati on on a C D/DVD d isc directly
19. OPEN/CLOSE: Open/Close disc tray
20. PROGR AM: Create your own play lists
21. DOLBY PRO LOGIC II: Swit ches Dol by Pro L ogic II mod e on and
off
22. FAST FORWARD: Fast forward play
23. NEXT: Press it to move ahead to the beginning of the n ext
chapter/track
24. STOP: Stop playback
25. SETUP: Call the screen for Player's initial setting, such as Menu
language, parental level
26. RETURN: Go back to the specified position defined by Contents
provider
27. PLAY (ENTER): Start to play back in normal speed, or activates
the sel ect ed item on int erac tive m enu
28. CLEAR: It is used to clear the play list, or the wrong digit input
29. ANGLE: S witch among available angles i f any
30. ZOOM: Zoom in and zoom out w hen wat ch video
Inserting batteries into the remote control:
The supplied remote control unit can be used to control the player. Insert two
'AAA' type batteries into the compartment, matching + and - as indicated on the
inside of the battery housing. The remote control must be pointed direct to the
unit.
NOTE:
1. Avoid exposing the remote control to extremes of temperature e.g. direct sunlight.
2. Ensure that no foreign objects enter the battery housing, especially metal objects.
3. If the unit's infrared sensor is bathed in strong direct sunlight, or intense artifici al light, then it may not be abl e to
receive signals sent from the handset.
4. If the remote control is not to be used for an extended period’s time then please remove the batteries to avoid
leakage and corrosi on.
GB - 8
Page 10
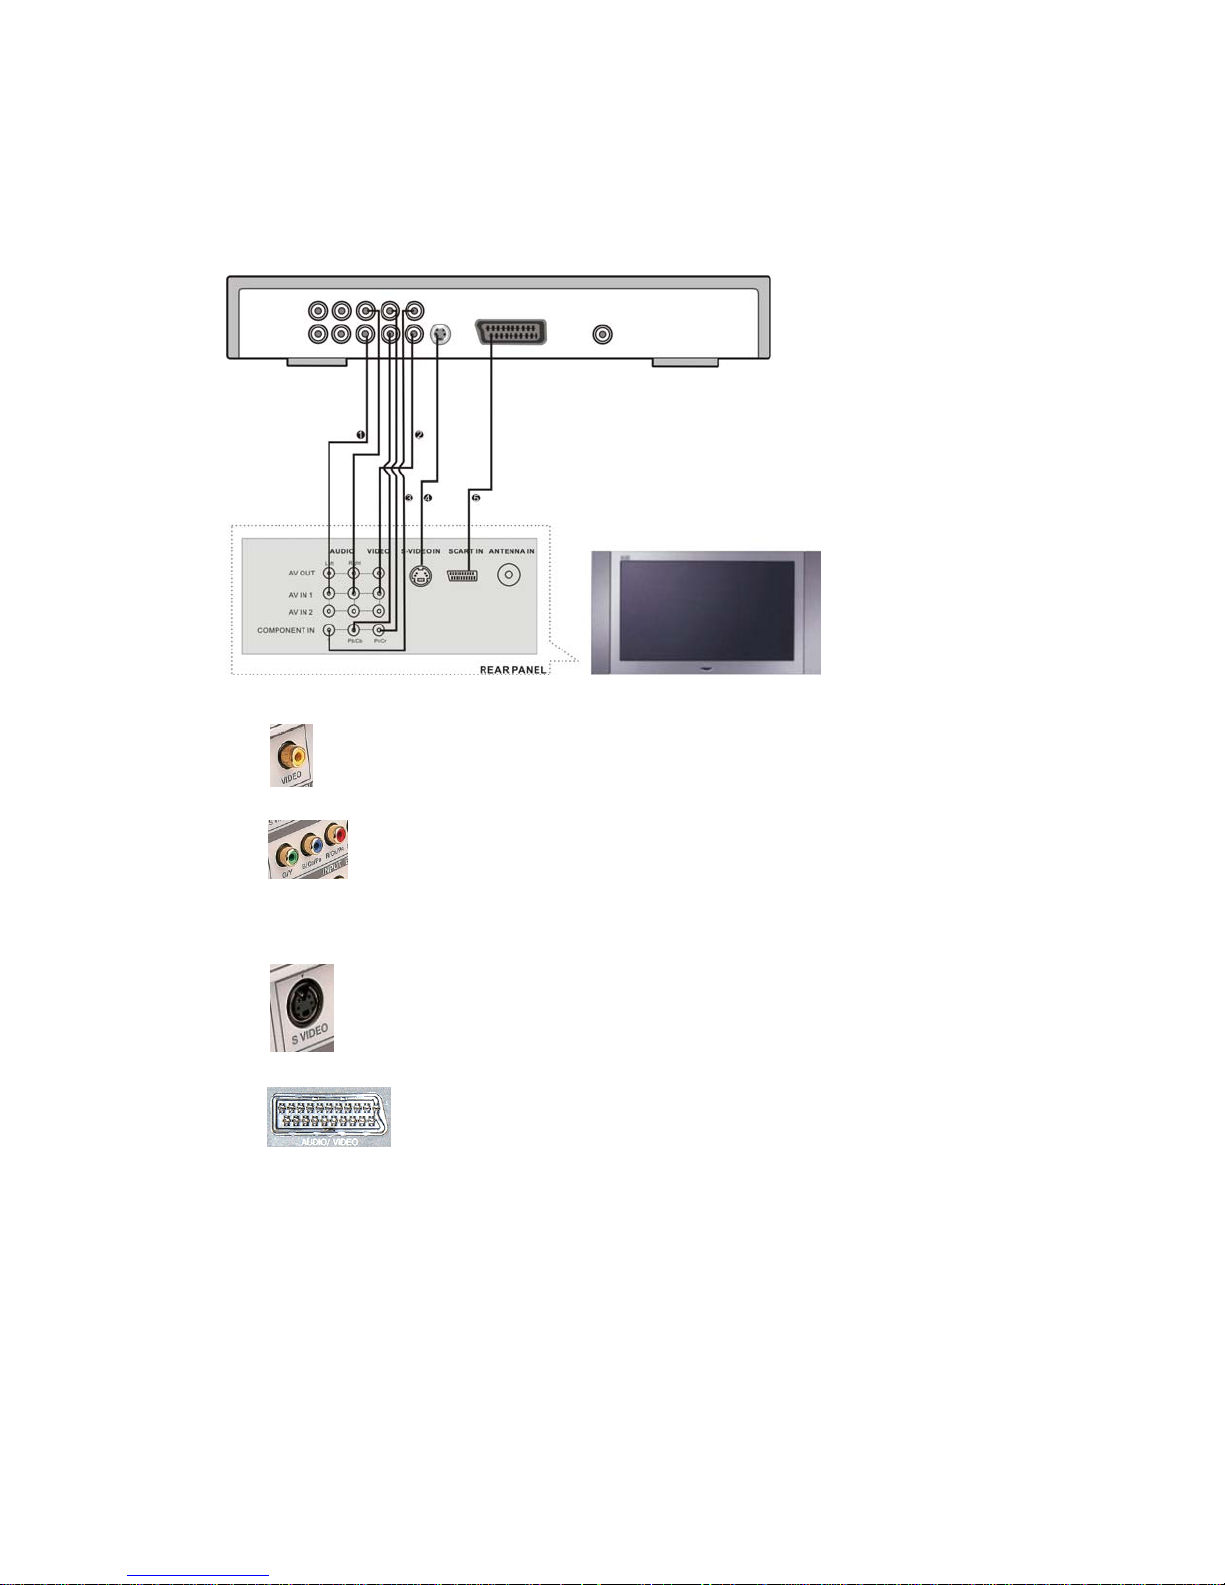
Chapter 2 Connections
:: Connecting the Player
Follow these steps to connect the player to your TV set and audio system. It is
recommended that you turn off power on all components while you are connecting the
player.
Step 1 - Connect TV
Choose one appropriate video connection from ○2 to ○5methods:
1 Stereo Audio: Connect to the left/right audio inputs of your TV set;
○
2 Composite Video: This connection is popular; you can find the composite video input jack
○
on the back panel of most TV set. With this connection, Video Setup should be set to
OFF in the VIDEO menu.
3 Component Video: COMPONENT connector is one of video standard in America and
○
China. It can offer the best picture quality, and it can still transmit progress scan
signal. To finish this connection you must connect the unit and TV set by using three
cables, and each of component video jacks had been marked as Y/Pb/Pr(Y/Cb/Cr),
please connect them one to one correctly. With this connection, Video Setup should be set to
YUV in the VIDEO menu.
4 S-video: A TV set usually support composite video or s-video input, but s-video connection
○
can offer better picture quality than composite video connection. With this connection,
Video Setup should be set to OFF in the VIDEO menu.
5 SCART: SCART connector is one of video standard in Europe; it can transmit both video and
○
audio signals.
GB - 9
Page 11
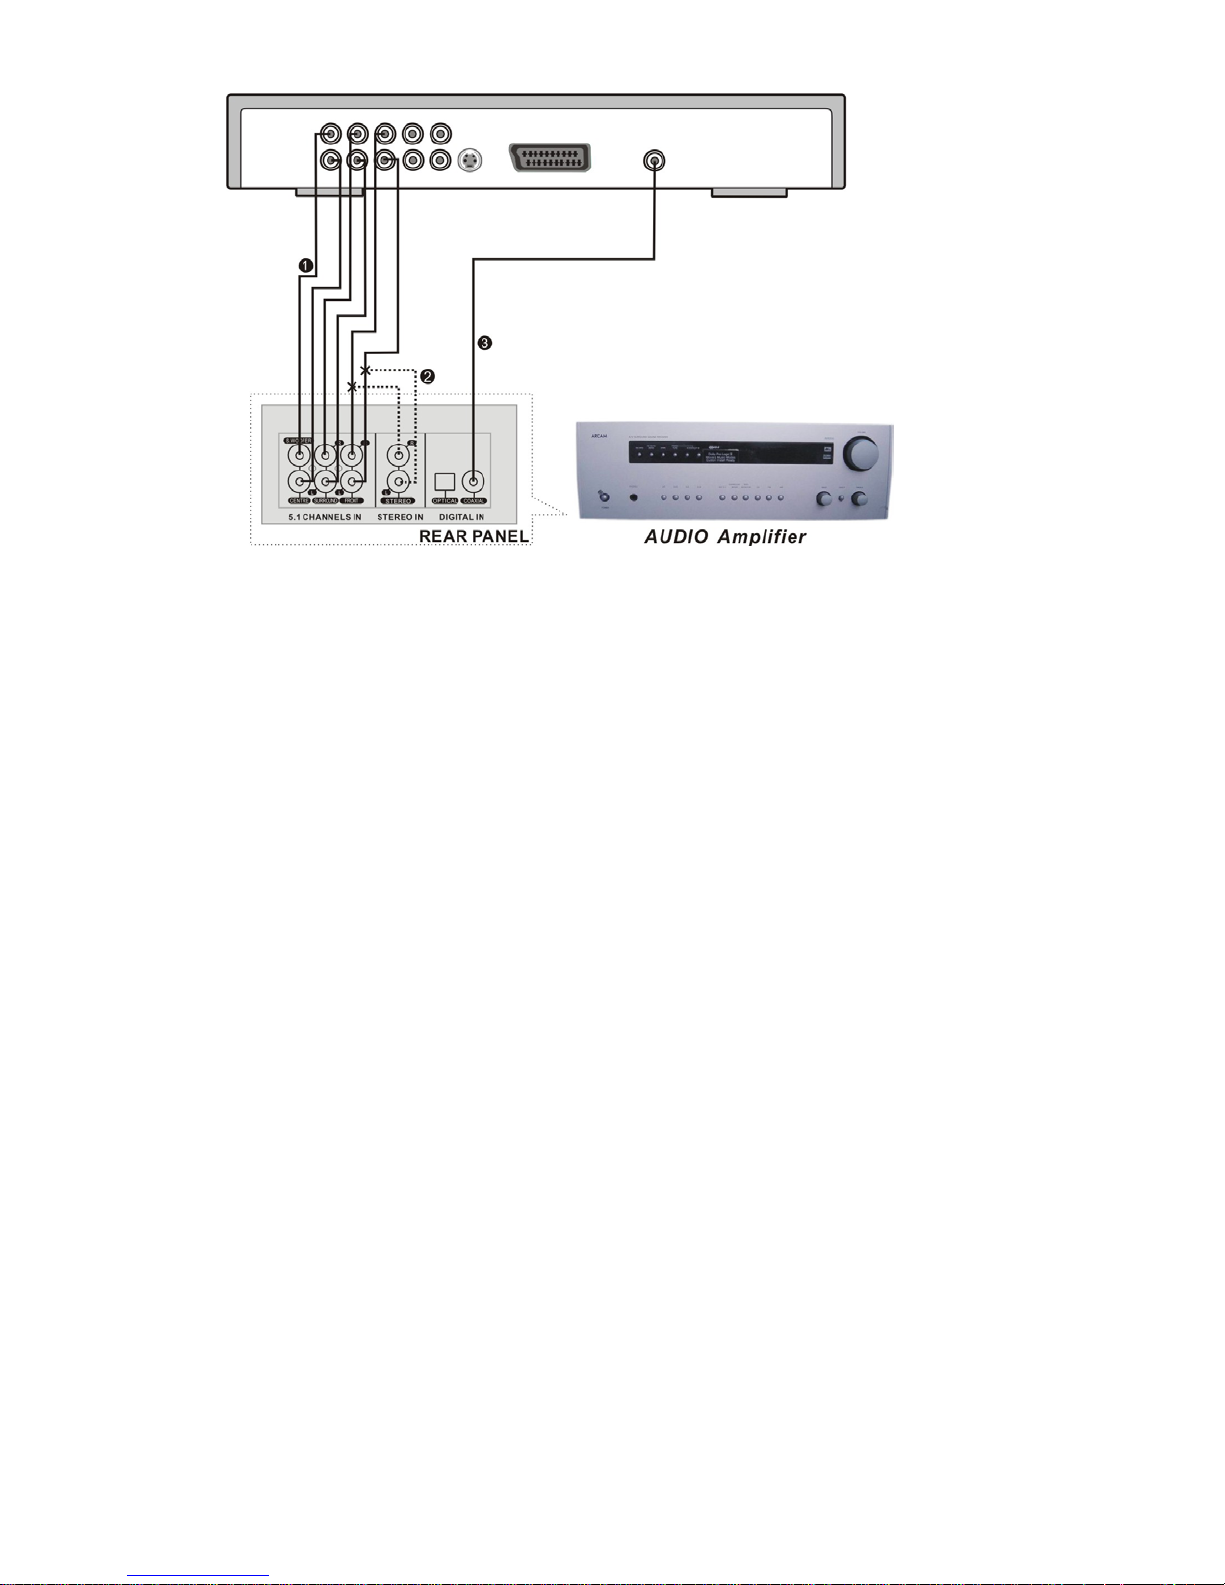
Step 2 - Connect Audio Components
Choose one appropriate audio connection from three methods:
1 5.1 Channels Audio: Connect 5.1 channels audio output of the unit and corresponding
○
input of amplifier by 5.1 channels audio cable, please set “OFF” mode in “speaker setup page”
2 Stereo Audio: Connect to the left/right audio inputs of your TV set, or 2-channel analog
○
amplifier. With this connection, all Analog Out options should be set to 2 channels mode:LT/ RT、
Stereo、V SURR.
3 Digital Audio (Coaxial): Connect to the coaxial digital audio input of your amplifier. With
○
this connection, all SPDIF options should be set to SPDIF/RAW or SPDIF/PCM.
GB - 10
Page 12
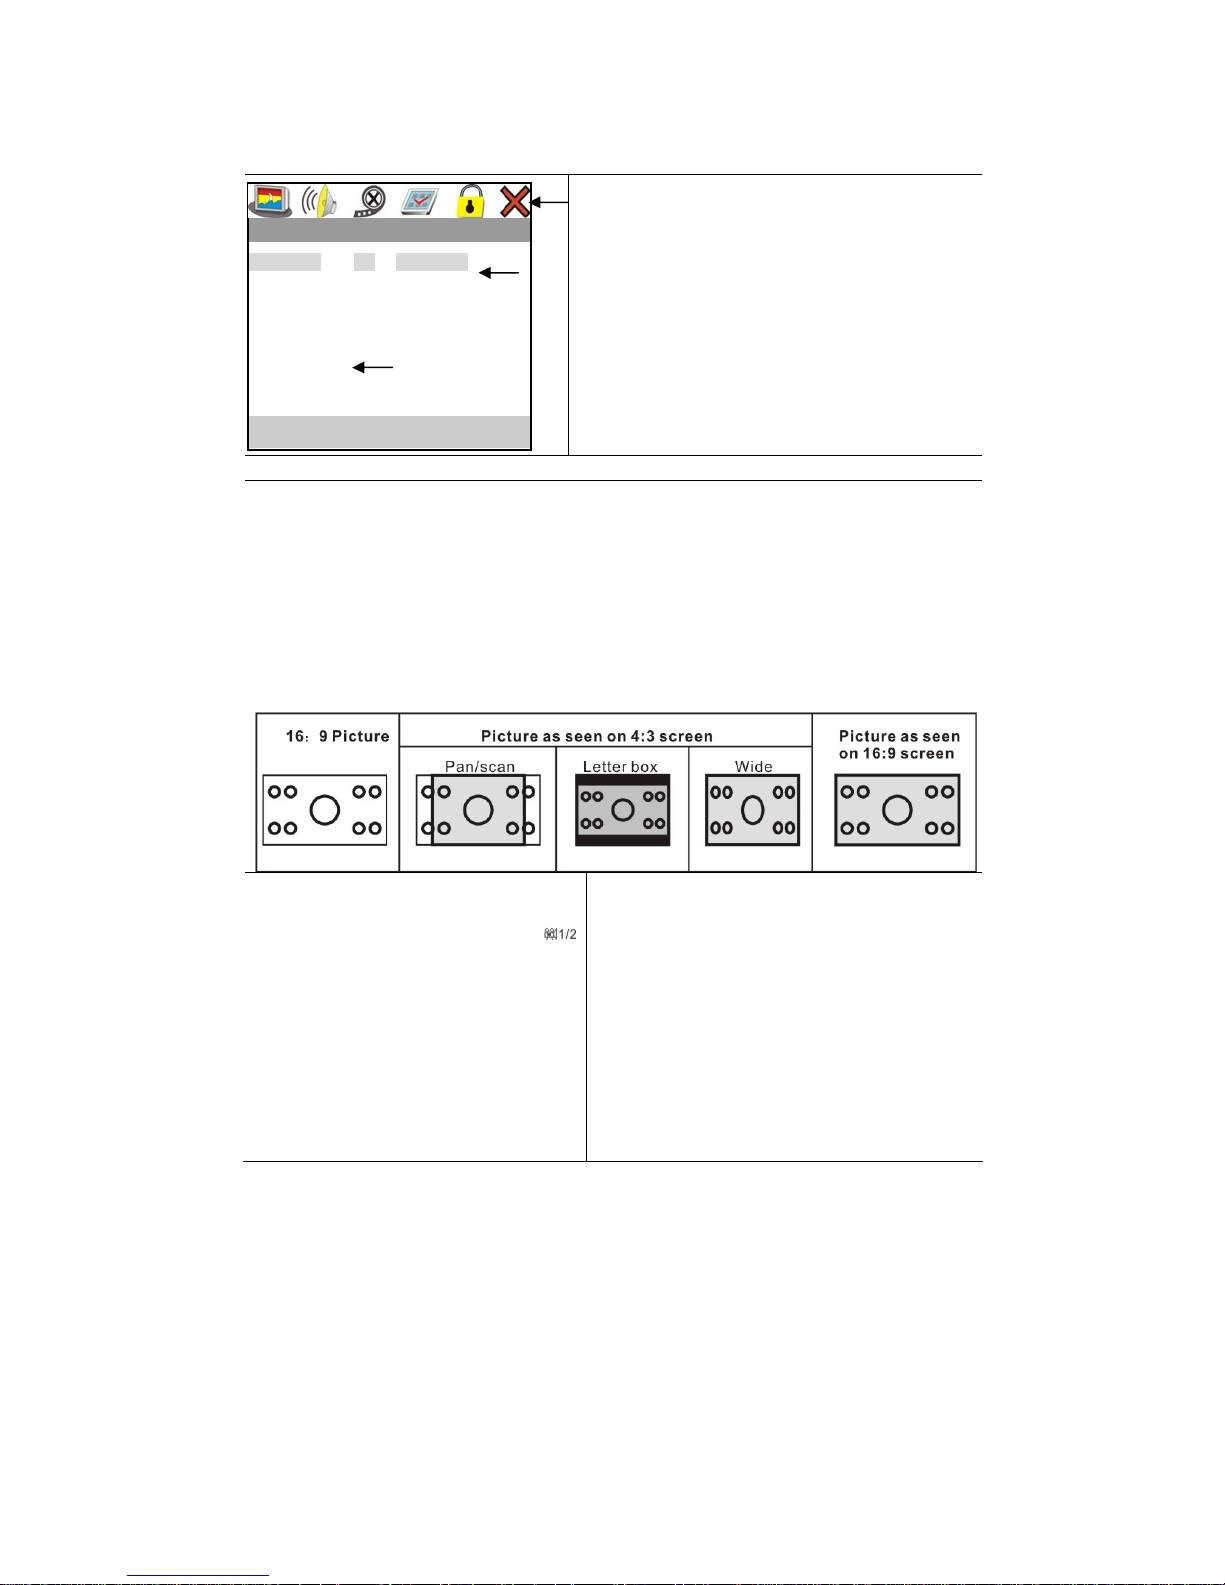
Chapter 3 Setup
Setup Menu Categories
You can adjust player preferences and function on player Setup menu:
Setup menu How to setup?
..General Setup Page..
TV Display PS Normal/PS
Normal/LB
Wide
Angle Mark
OSD Language
Captions
Screen Saver
Last Memory
○2
○
3
Set TV Display Mode
General Setup Page
TV Display
Depending on the type of television you have, you may want to adjust the screen setting
(aspect ratio)
Normal/PS: You can see the central portion of the Anamorphic widescreen picture on 4:3 TV. The extreme left
and right side of movie picture will be cut off.
Normal/LB : You will see the total Anamorphic widescreen picture on 4:3 TV, but black bars will appear at the top
and bottom of the screen
Wide: Sel ect it if you are c onnec ting the pl ayer to a wide screen TV set. However, DVDs recorded with 4: 3 ratio
cannot be viewed as the full 16:9 picture even if you made this setup.
For example:
Press SETUP button to enter setup menu
1 Main menu:
○
1
○
Move cursor to highlight the subm enu heading on m ain menu
by pressing
2 Submenu:
○
Press PL AY button to enter its submenu, The g button can be
used to exit submenu and return to the main menu.
(up or down ) to m ove up or move down selecti on of
submenus
3 Option menu:
○
Select the item you want to setup and press PLAY or h
button to enter the option setup menu, use i/j buttons
select your desired setting and press PLAY to activate it.
Press
g/h (left or right) buttons.
Press i/j
g button to return to the submenu.
Angle Mark
Set it on:
When playing mul ti-angl e DVD disc , a log o like
will be shown automatically on top right TV screen, it
mean that the DVD you are playing has two angle
and you are watching the first angle, you can change
viewing angle by pressing ANGL E button on remote
control.
Set it off:
The player will not display the angle mark, though
you are playing multi-angle DVD disc.
Captions
Set it on:
Make sure that the DVD disc you are playing has a captions
on it, and change your TV color system to NTSC format, then
a capt ion mayb e show on TV screen, or not, becau se a f ew
TV set can support display captions.
Set it off:
Disable the function, caption will not be shown.
Notice:
It is quite different from subtitle, subtitle is used to explain the
vocal, and captions not only expl ain it but also give you more
information about film. It is very useful for deaf man.
GB - 11
Page 13
OSD Lang
Select your desired language for the player’s
on-screen display and setup menu.
Last Memory
Set it on:
The unit can aut omatically start to play t he
disc(DVD/V CD/CD) from the last position
when you enabl e this function.
Set it off:
Set it off the unit will always play it from
beginnin g.
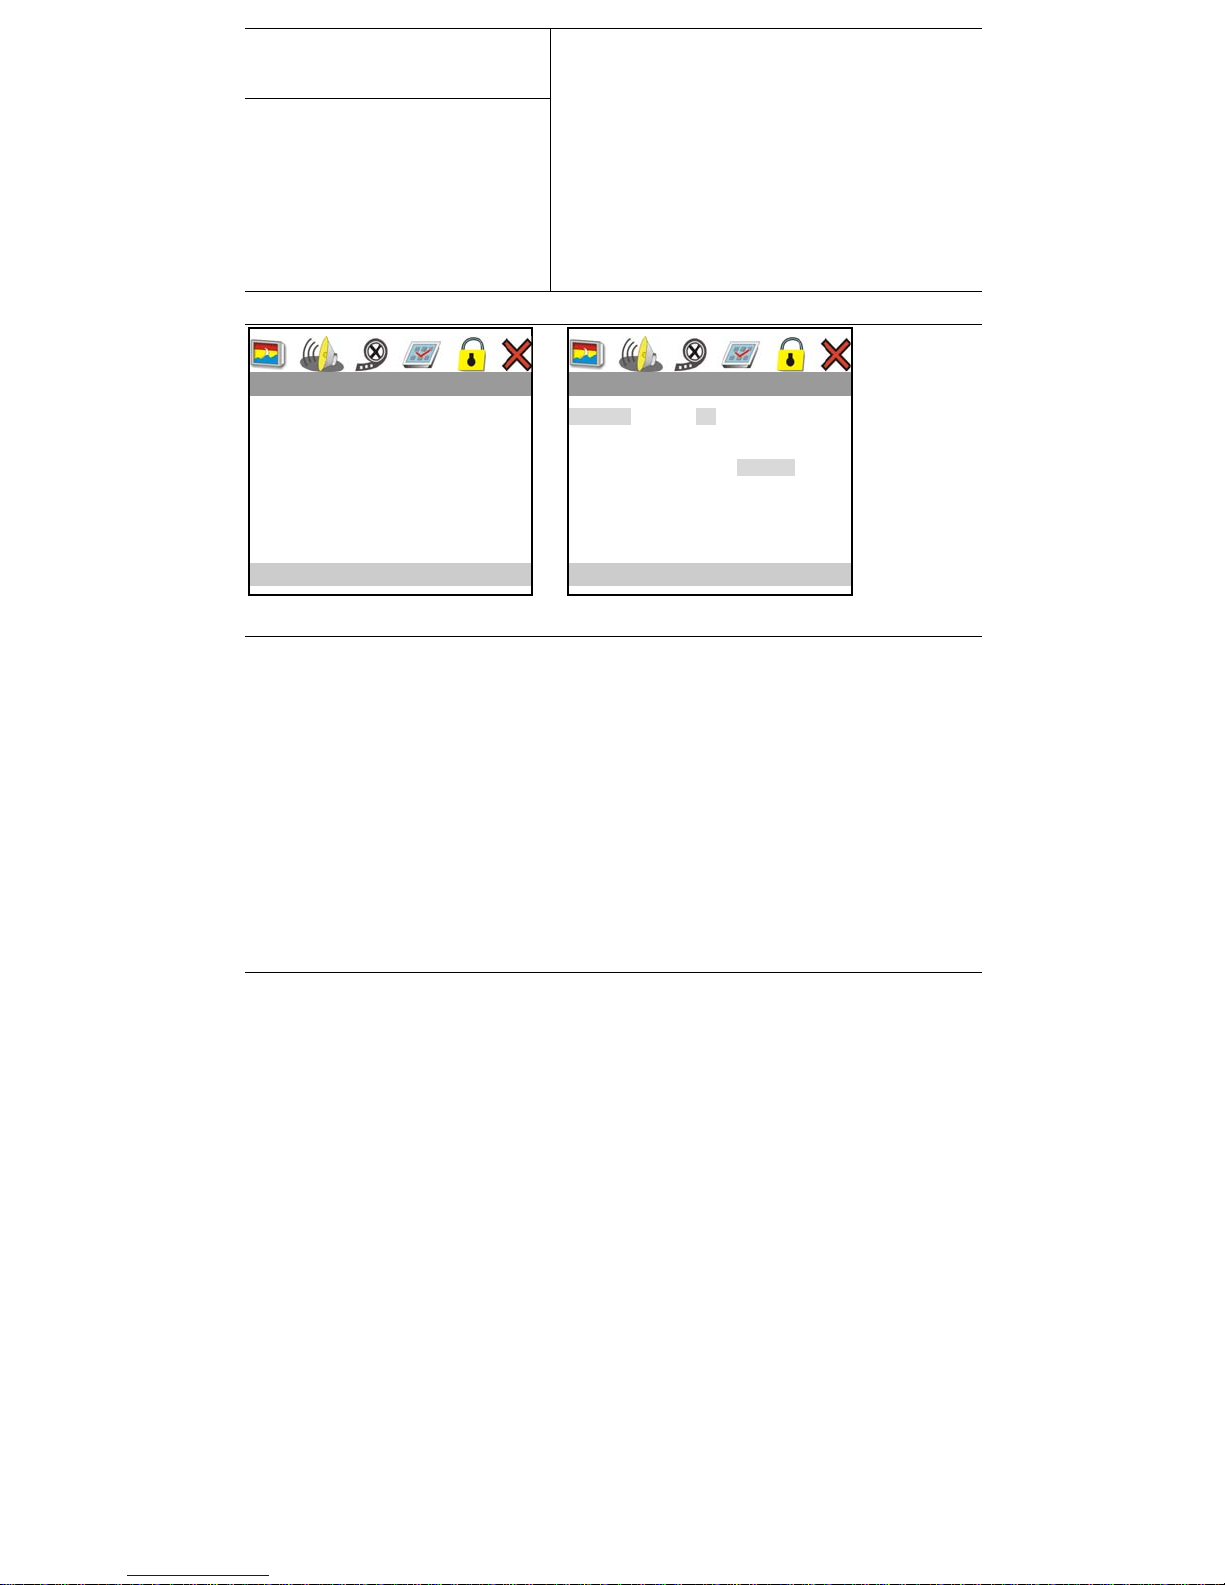
Audio Setup Page
..Audio Setup Page..
Speaker Setup
SPDIF Setup
Dolby Digital Setup
Channel Delay
Equalizer
3D Processing
Go To Audio Setup Page
Speaker Setup
Downmix
The unit c an mix a multi-channel sound to
encode a two-channel sound, it’s called
downmix.
for Dolby P ro Logic Surround stereo
LT /RT:
sound output. It is a matrix encoding process
enabling st ereo soundtracks to carry four
channels of audio inform ation—left, center,
right, and surround.
for analog stereo soun d output. The
Stere o:
unit will send the subwoofer and vocal signal
to your Front Left and Front Right speakers.
for listening t o virtual surround
V SURR:
sound effect. The unit provide audio
virtualization for two-channel speaker
configur ation and created realistic surround
sound from those two speakers.
Off: enabl e 5.1 channel di scret e
surround-sound output
Dialog
When the DOWNMIX is set to LT/RT or
Stereo mode, you can adjust the volum e of
dialogu e sound.
Screen saver
Set it on:
When there is no activity with the player f or sever al m inut es, a
moving picture will be shown on screen to prevent your monitor
from damage, which is call screen saver.
Set it off:
Dis able t his func tion, and screen s aver will not appear al way s.
Notice:
During playback the player will automatically disable screen saver
..Speaker Setup Page..
Downmix Off LT/RT
Front Spea ker Ster eo
Center Speaker V SURR
Rear Speaker Off
Subwoofer
Tes t To ne
Dialog
Post DRC
Set Downmix Mode
Front speaker/Center speaker/Rear
speaker/Subwoofer
If the DOW NMIX m ode is turned OFF, then select how you want
your Front Speakers or Rear Speakers or Center Speaker to be
set; either to sm all (stand ard setting) or to large. Large means
that Bass & Treble audi o is sent t o the speakers. Small means
only Treble audio is sent to the speakers.
You can also switch off the Center Speaker, the Rear L/R
Surround Speakers and subw oofer.
We suggest you switch the subwoofer on in order to hear more
bass sound.
Tes t To n e :
For test only, the unit will generate a full surround sound signal to
test multi-channel speakers connection. First the unit will send a
signal t o Left speak er (you c an chec k the channel information on
information bar), if you connect you speaker correctly then you will
hear the sound from your left side. And th en center, right, right
surround, and left surround will be continue
Post DRC
This function limits the maximum volume setting to avoid
loudspeaker damage.
The standard setting is Auto
ON: Limits the maximum volume.
Off: Switches t his function off, pl ease be aware the volume now
can be set so high that the possibility exists you can dam age the
loudspeakers.
GB - 12
Page 14
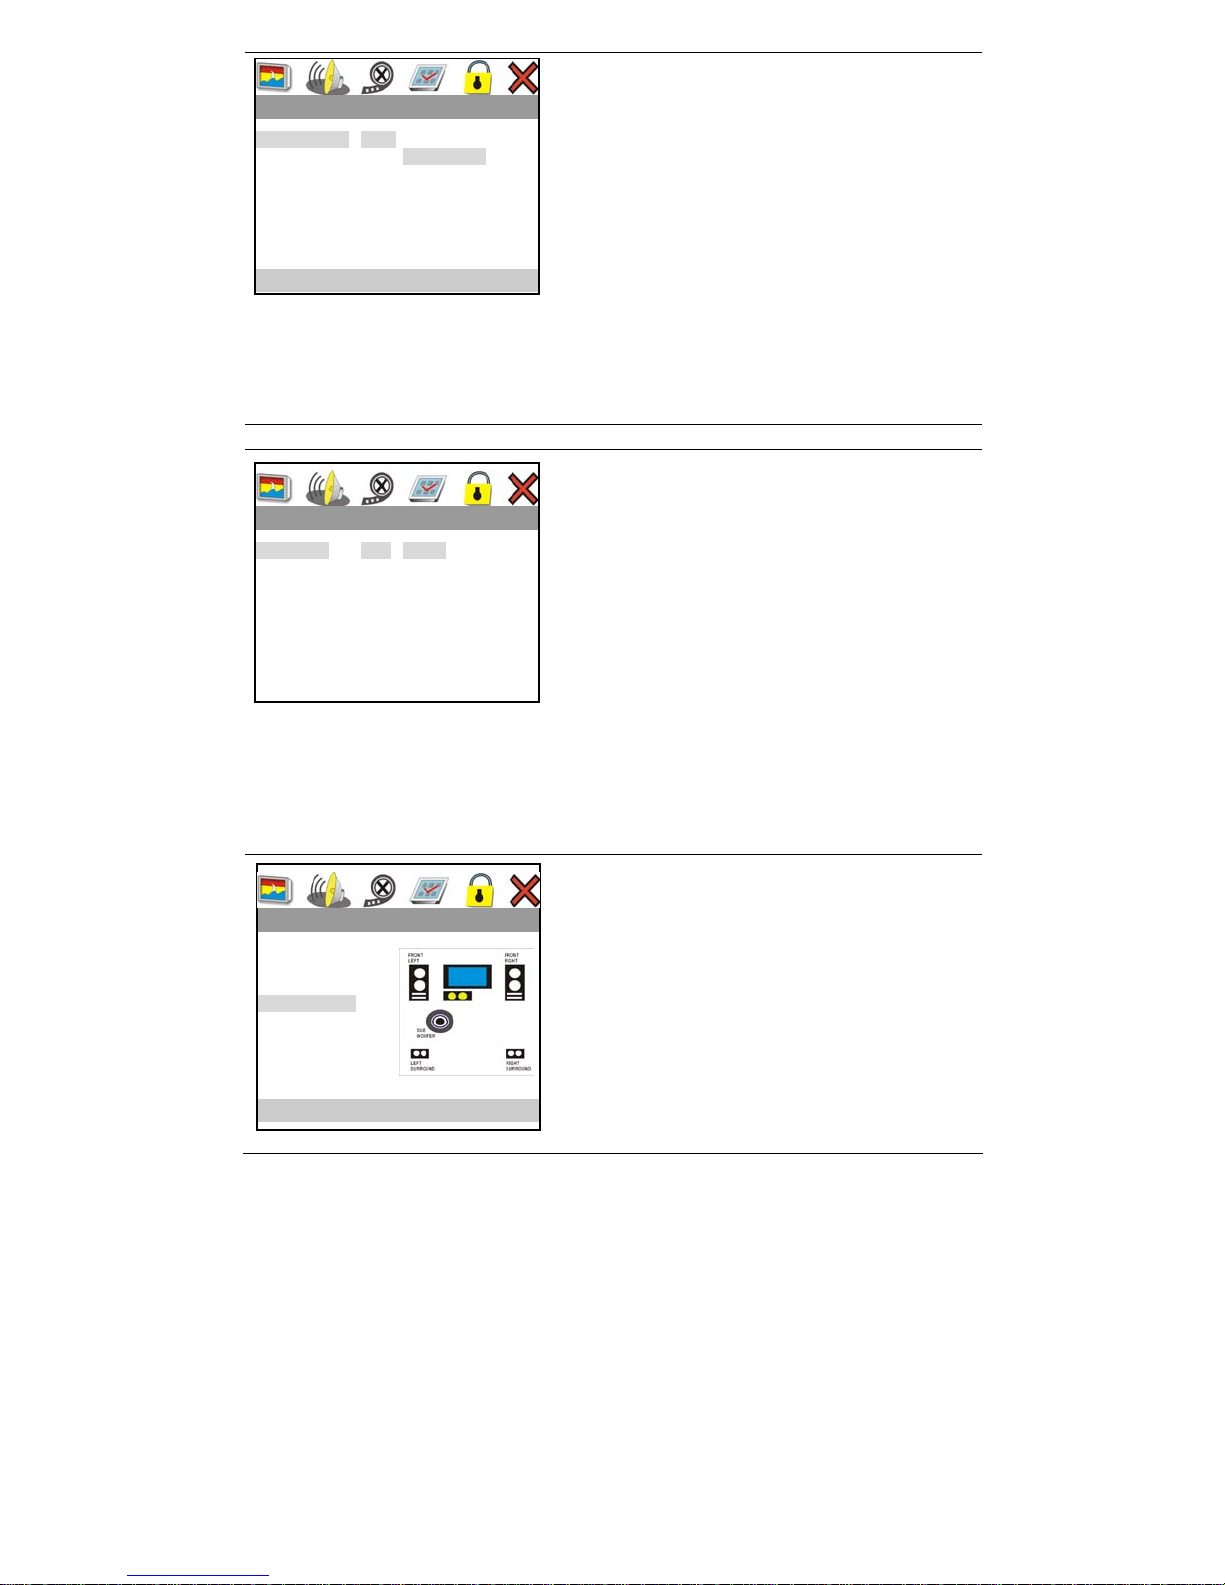
SPDIF Setup Page
..SPDIF Setup Page..
SPDIF Output RAW SPDIF Off
CD SPDIF/RAW
Dolby Digital SPDIF/PCM
DTS Manual
MPEG
LPCM Out
Setup SPDIF
Dolby Digital Setup
..Dolby Digital Setup..
Dual Mono STR Stereo
L-Mono
R-Mono
Mix-Mono
Dynamic
..Audio Setup Page..
Speaker Setup
SPDIF Setup
Dolby Digital Setup
Channel Delay
Equalizer
3D Processing
Center
SPDIF Setup
Select the right SPDIF (Sony Philips Digital Interface) for
coaxial digital audio transmissions.
SPDIF Off: turn off digit al audio tran smission.
SPDIF/RAW: an untouched digital audio signal will be
transmitted.
SPDIF/PCM: for two channels audi o transmissions, a
multi-channel sound will be mixed to reencode a two-channel
sound.
Manual: choose different option for each audio format. It mean
that you can select different digital audio transmission mode
for each of CD/Dolby Digital/DTS/MPEG audio format
manually.
LPCM Out: both “48k” and “96k” are sampli ng frequ ency.
Generally, high sampling frequency can give you a better sound
quality.
Dual Mono:
Select Left an d Right audio output mode.
Stereo: Left channel signal will be sent to left speaker, and
Right channel signal will be sent to right speaker.
L-Mono: Left channel signal will be sent to both left and right
speaker.
R-Mono: Right chann el signal will be sent to both left and
right speaker.
Mix-Mono: both left and rig ht channel audi o will be mixed to
encode a mono sound, you will hear the same sound from
each speaker
Dynamic:
This Dynamic Range Compression section only applies t o
DVD-titles with Dolby Digital technology.
Set it off: low range audio signals will be amplified so that
the audible volume will be increased.
Set it between full and off: Audible effects that fall in the
extreme ranges of Dolby Digit al’s audio spectrum will be
compressed.
Set it full: All audible sound, from low frequency to high
frequency audio effects, will be highly distinctive and fall into
the full dynamic range of Dolby Digital.
Channel Delay
You can enjoy natural, realistic surround sound using this
function.
Move the cursor on “Channel Delay” item and press PLAY
button, and then you c an adjust what distance you want
between you and different speaker (turns yellow) according to
your room layout, press left key will decrease delay value, and
press right key will increase delay value, use up and down key
to select different speaker.
GB - 13
Page 15
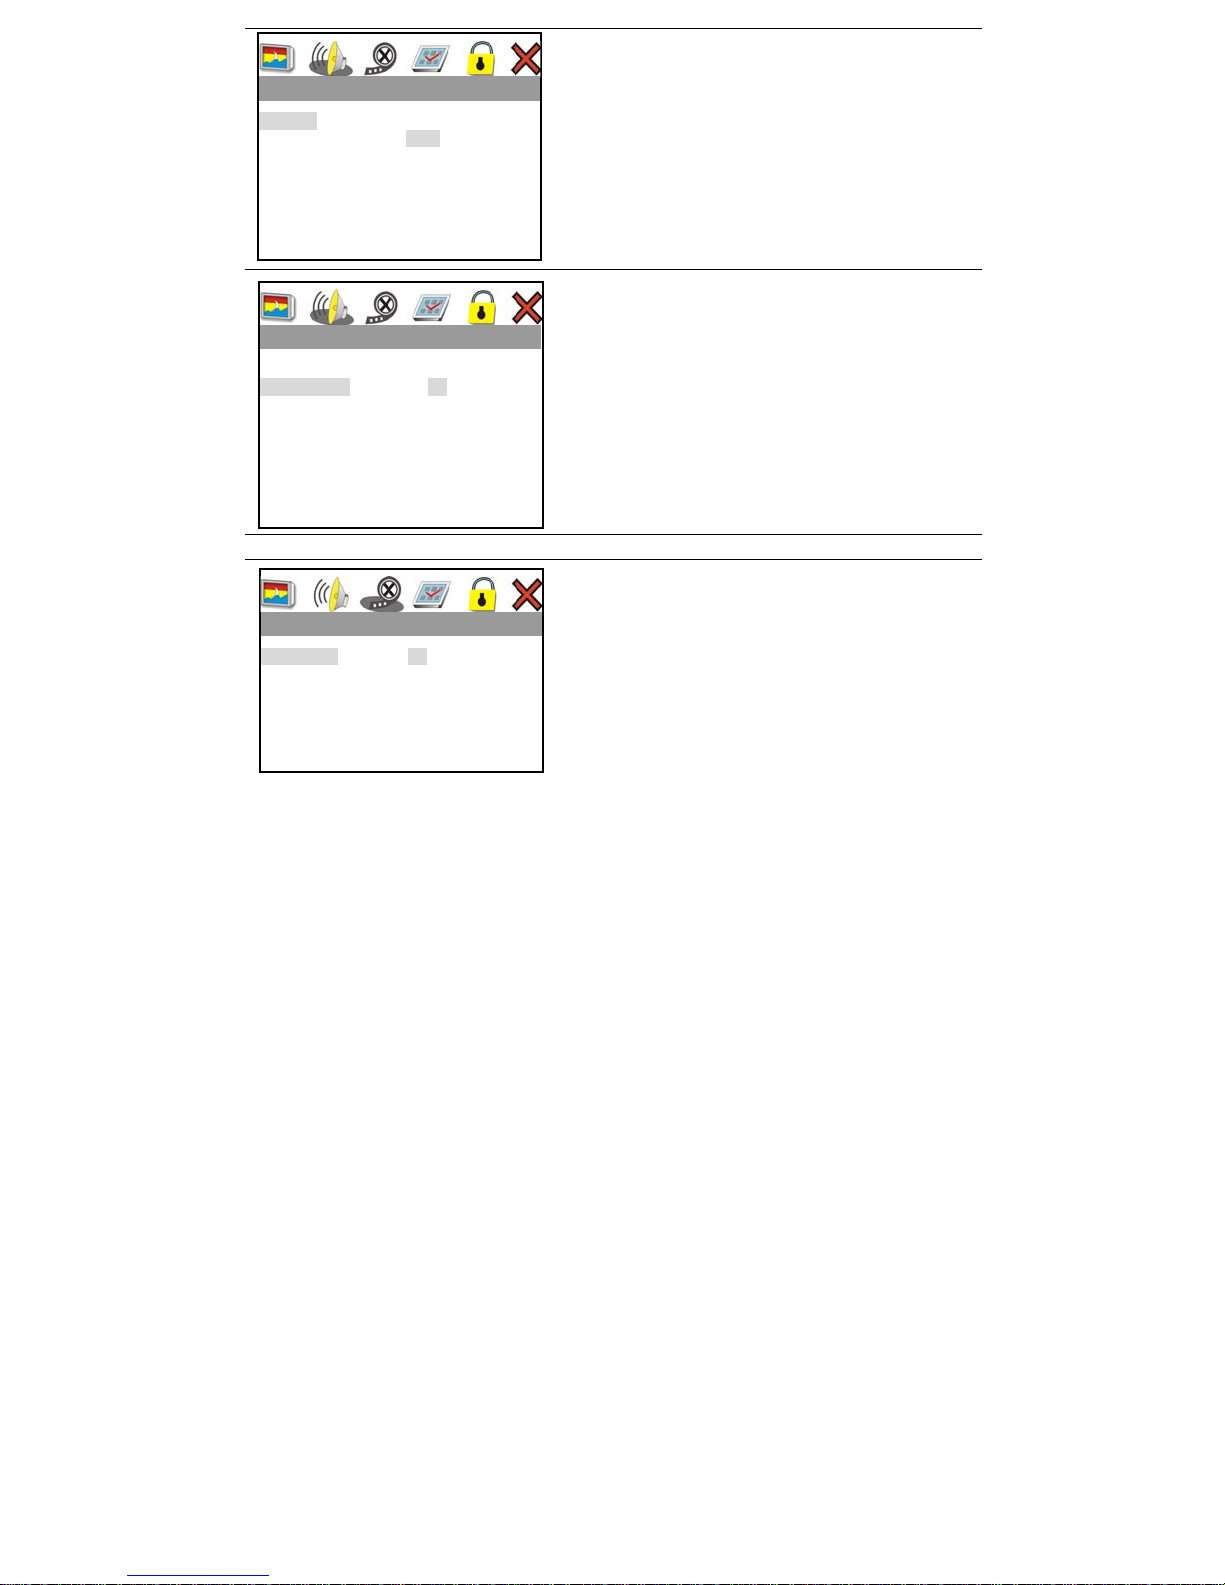
..Equalizer Page..
EQ Type Rock None
Bass Boost R ock
Super Bass Pop
Treble B oost Live
Dance
Techno
Classic
Soft
..3D Processing Page..
Pro Logic II
Reverb Mode Off Off
Concert
Living Room
Hall
Bath Room
Cave
Arena
Church
Video Setup Page
..Video Setup Page..
Component Off Off
YUV
RGB
TV Mode Interlace
P-scan
Quality
Equalizer
The unit has a built-in equalizer; it may be useful when you
are listening t o music.
Pro Logic II
Dolby Pro Logic II technology decodes 2-channel sources
such as Audio CDs, MP3s, VCDs or SVCDs into a
multi-channel surround sound environment
Only you choose multi-channel audio output you c an enable
this function, please set downmix mode to OFF.
Reverb Mode
The unit can imitate following listening environment:
Concert, Living Room, Hall, Bath Room, Cave, Arena,
Church.
Component:
Select appropriate video output option for your
connection.
for Composite video and S-video connection.
Off:
YUV: for component video connection.
RGB: for SCART connection.
TV Mode:
Select Interlace or Progressive Scan signal output
option for your monitor.
Interlace:
P-scan: for TV set supported Progressive Scan signal input,
please choose it carefully, most of TV set c an’t support P-scan
signal, and blank screen will happen.
for common (analog) TV types.
Quality:
Adjust picture quality through sharpness, brightness, contrast,
gamma, hue, saturation, luma delay option.
GB - 14
Page 16
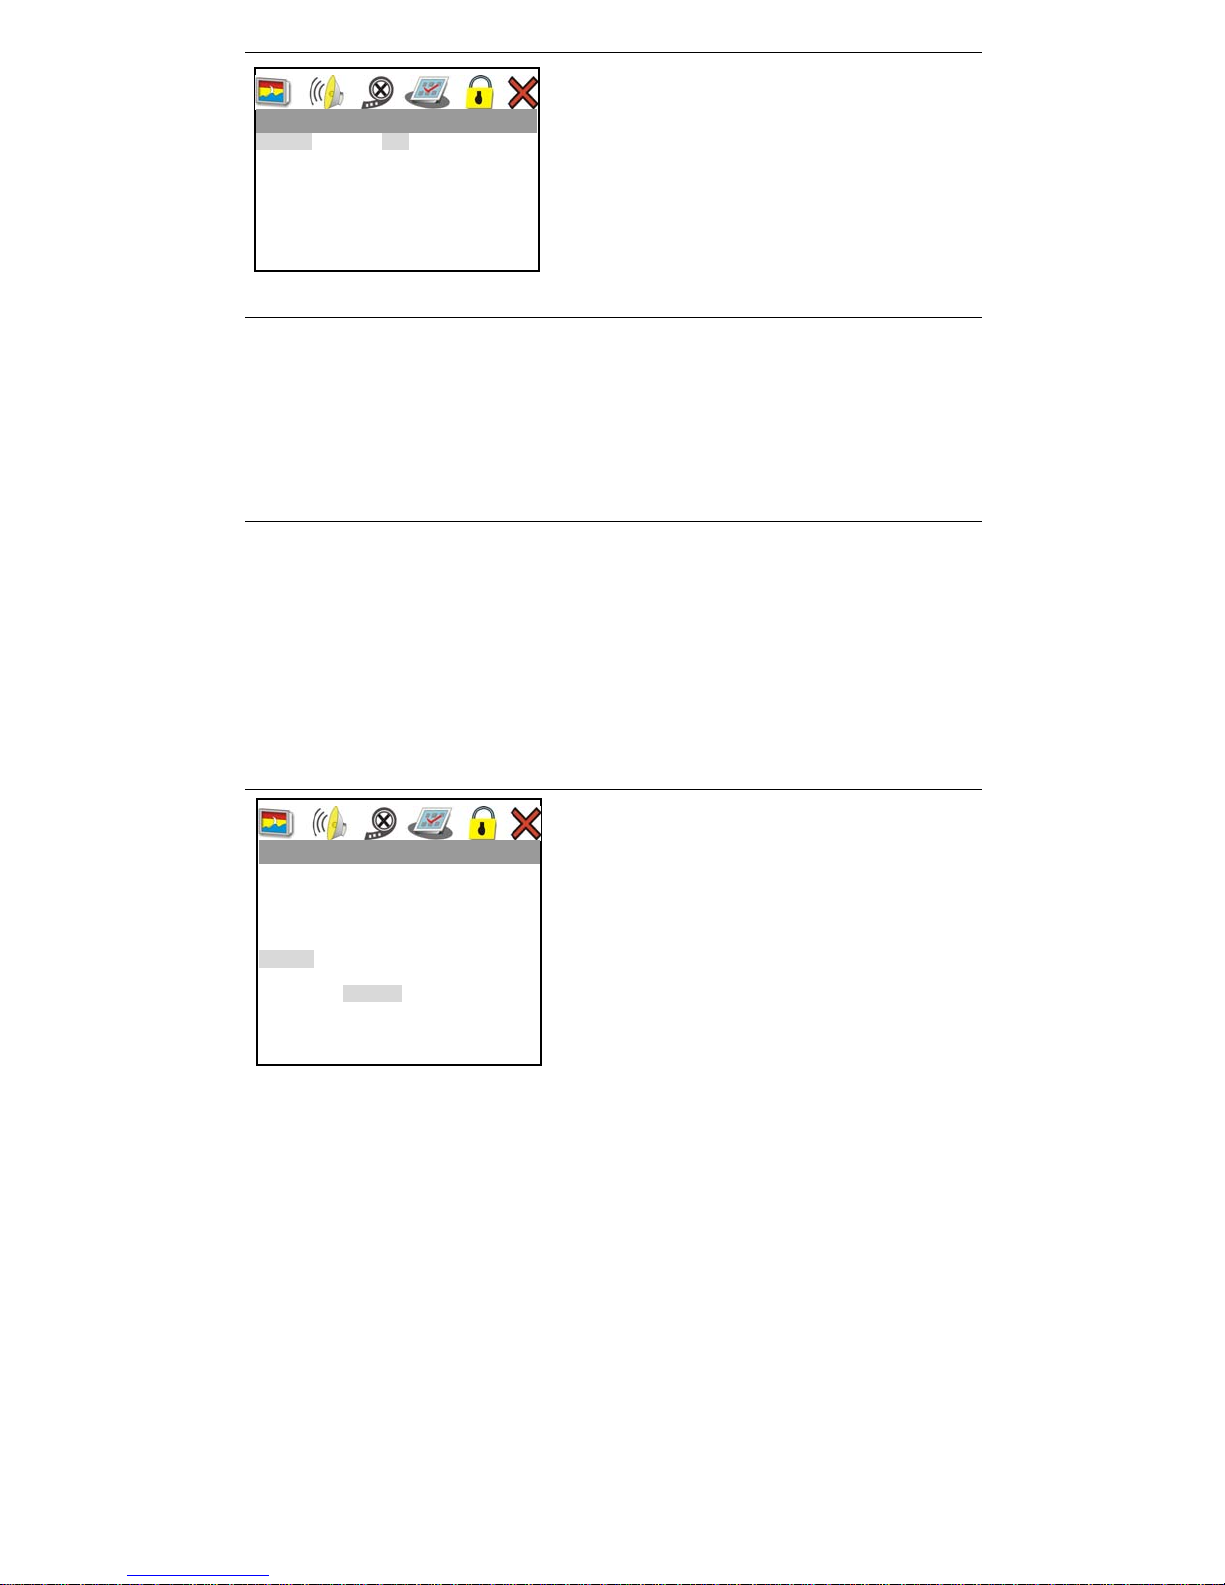
Preference Setup Page
..Preference Page..
TV Type PAL PA L
PBC Multi
Audio NTSC
Subtitle
Disc Menu
Parental
Default
TV Type: To set various color system signal for the
video output.
The TV broadc ast syst em used in UK, Germany and
PAL:
other countries. It will be output to your TV when you select
“PAL”.
Multi: Select it if you have a multi-system TV set compatible
with NTSC and PAL.
NTSC: The TV broadc ast system used in Korea, Japan,
USA, Canada and other countries. Most DVD discs are
recorded in NTSC color system. This will be output to your TV
when you select “NTSC”.
PBC: play back control (for VCD
only)
Set it on: the unit will always automatically
enable this function at begi nning.
Set it off:
disable this function at beginning.
the unit will always automatically
Audio:
Select your preferred language of
audio recorded on DVD.
1) The language you selected will be
given a high pri ority so it can be
automatically pl ayed at beginning.
2) Language varies from disc to disc.
depending on the DV D
You can also select different audio by using
AUDIO button on the remote control.
..Preference Page..
TV Type 1 KID SAF
PBC 2 G
Audio 3 PG
Subtitle 4 PG 13
Disc Menu 5 PGR
Parental 6 R
Default 7 NC17
8 ADULT
Subtitle:
Select your preferred language of subtitles recorded
on DVD.
1) The subtitle you selected will be given a high priority so it
can be autom atically played at beginni ng.
2) Subtitl e varies from disc to disc. depending on the DVD
You can also select different subtitle by using SUBTITLE button
on the rem ote control.
Disc Menu:
Select your preferred language of disc menu recorded
on DVD. It depending on the DVD.
Parental:
Playback of some DVDs can be limited according to a
predetermined l evel such as the age of the user s. Scenes m ay be
blocked or replaced with di fferent scenes. The “PARENTAL”
function allows you to set a playback limitation level. The
password is used for Parental Control.
GB - 15
Page 17
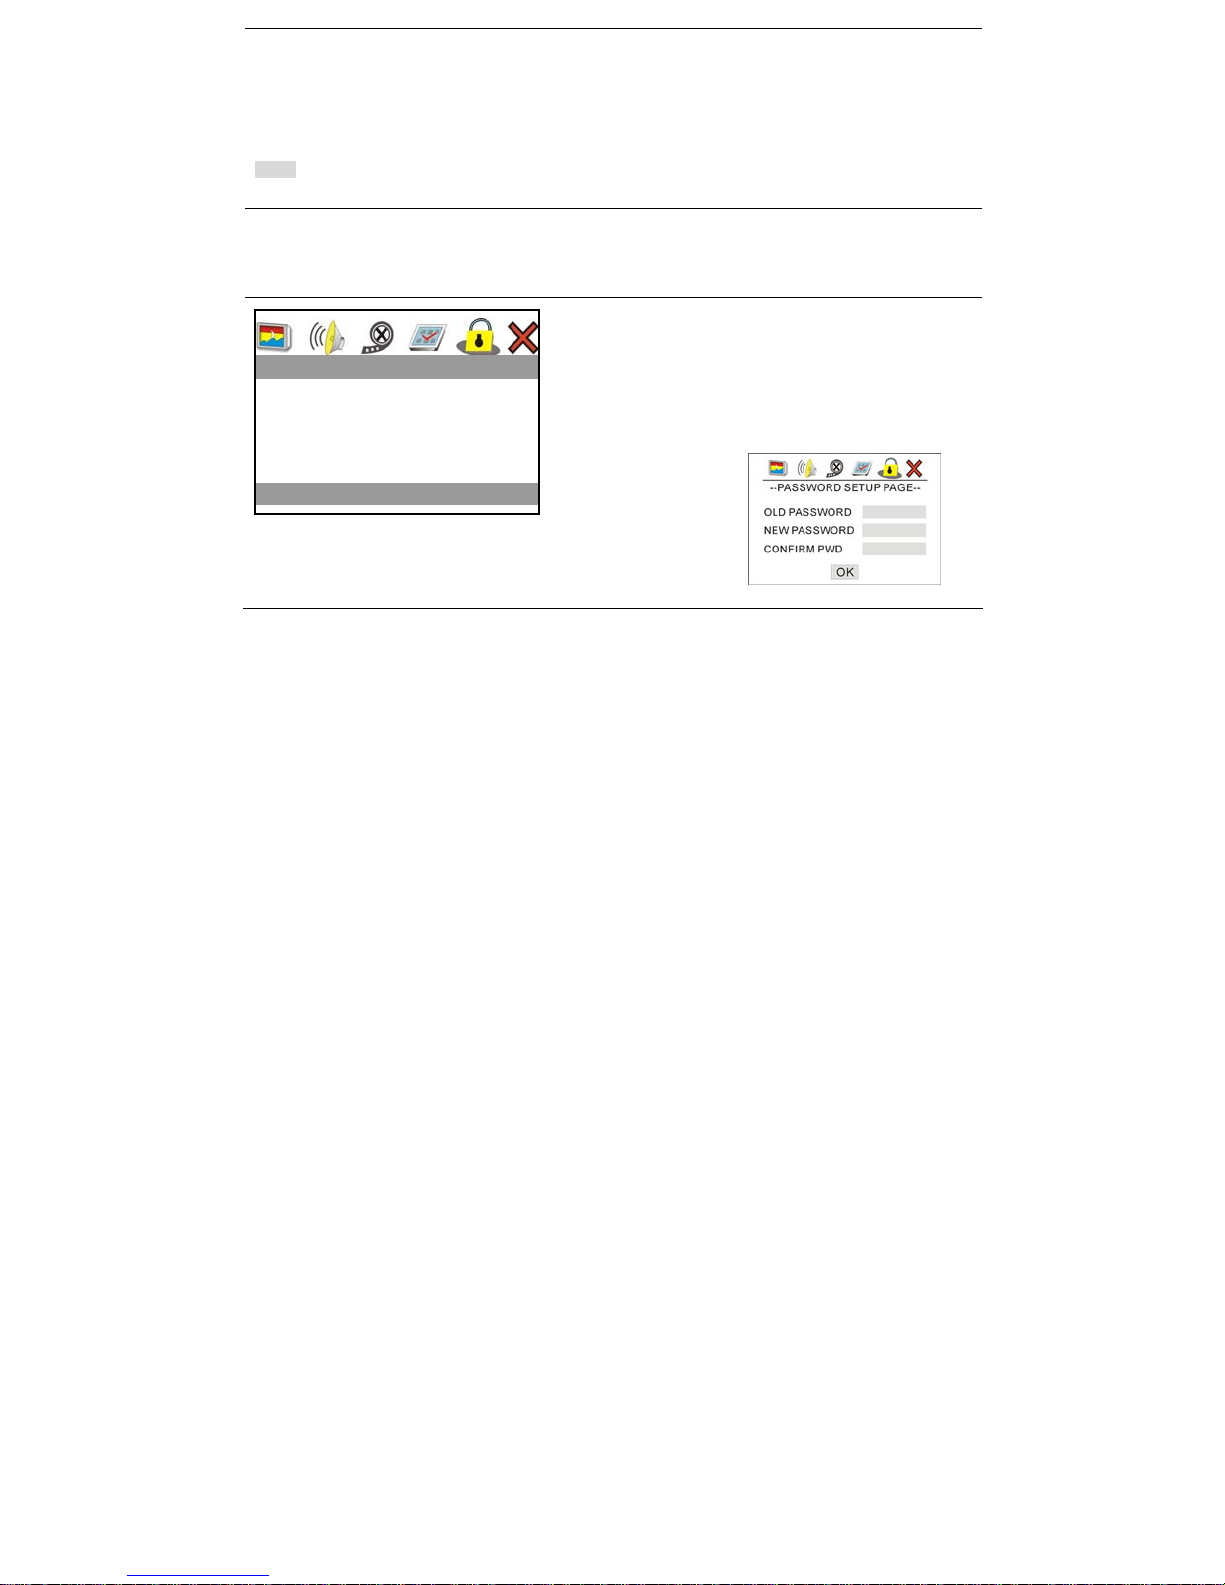
1) Move the cursor on “Parent al”, then current limitation level set menu will be displayed on right side.
2) If you w ant to change it, just press PLAY to enter this opti on menu, using
then press PLAY.
3) And now you m ay be asked for a passw ord if you set “PASSW ORD MODE” on.
4) Enter a 5-digit password using the number buttons, press PLAY to confirm it.
5) Done.
Notes:
When you p lay disc s which don’t have the Parental Control functi on, playback can’t be limited on this unit.
i/j select a different limitation level
Default
Reload factory preset.
Password Setup Page
..Password Setup Page..
Password Mode On
Password Change
Go To Password Setup Page
Password Setup:
Password Mode:
Set it on:
ask you for the password.
Set it off: you can change the parent al level without enter th e
password.
Password Change:
Move the cursor to
“Change” opti on menu;
Press PLAY, a password
change menu appears;
You must enter old
password first (default is
Every time you change the parental level the unit will
49540), if the old
password is correct, then you can change the password.
GB - 16
Page 18

Chapter 4 Basic Operations
Playing DVD, CD or VCD
Follow these steps to play a DVD, CD or VCD disc:
1. Turn on the TV.
2. Set the TV to the AV input connected to the player.
3. Turn down the volume on your amplifier and then power it on.
4. Set the amplifier to the AV input connected to the player.
5. Press mains switch on front panel.
6. Press OPEN/CLOSE on the remote control or front panel to open the disc tray.
7. Place the disc in the tray with the label side facing up and playback side facing down. If the disc
has two sides, place the disc with the desired label facing up.
8. Press OPEN/CLOSE again to close the disc tray.
9. Press PLAY on the remote control or front panel. Many discs will load and begin playing
automatically when the disc tray is closed. If the DVD has a disc menu, or more than one title, the
disc menu may appear.
10. Adjust the volume of the player by pressing the VOLUME button on the remote control.
Additional Disc Playback Options
1. To freeze playback, press PAUSE/STEP.
2. To resume normal playback, press PLAY.
3. To go to the next or previous chapter/track, press NEXT or PREV
4. To scan forward or backward at variable speeds during playback, press F.FWD or F.REW
repeatedly.
5. To stop playback, press STOP once. To resume playback from the same place on the disc, press
PLAY.
6. To stop playback completely and restart the disc, press STOP twice. To restart the disc, press
PLAY.
GB - 17
Page 19
Chapter 5 Advanced Features
Using the DVD’s Menu
A DVD is divided into long sections of a
picture or a music feature called “titles.”
When you play a DVD which contains
several titles, you can select the title you
want using the TITLE button.
When you play DVDs that allow you to
select items such as the language for
the subtitles and the language for the
sound, select these items using the
MENU button.
1) Press TITLE or MENU button
2) The disc’s menu appears on the TV screen.
3) The content of the menu varies from disc to
disc.
4) Pressg/h/i/jor the number buttons to
select the item you want to play or change.
5) Press PLAY button.
Playing VIDEO CDs with
PBC functions
PBC (Playback Control) allows you to play
VIDEO CDs(2.0) interactively by following the
menu on the TV screen.
1) Start playing a VIDEO CD with PBC
functions. The menu for your selection
appears.
2) Select the item number you want by
pressing the number buttons.
3) Press PLAY button.
4) To return to the menu, press RETURN
5) Switch PBC functions On and Off by
pressing PBC button.
MP3 File Playback
You can play back DATA CDs
(CD-ROMs/CD-Rs/CD-RWs) recorded in MP3
format.
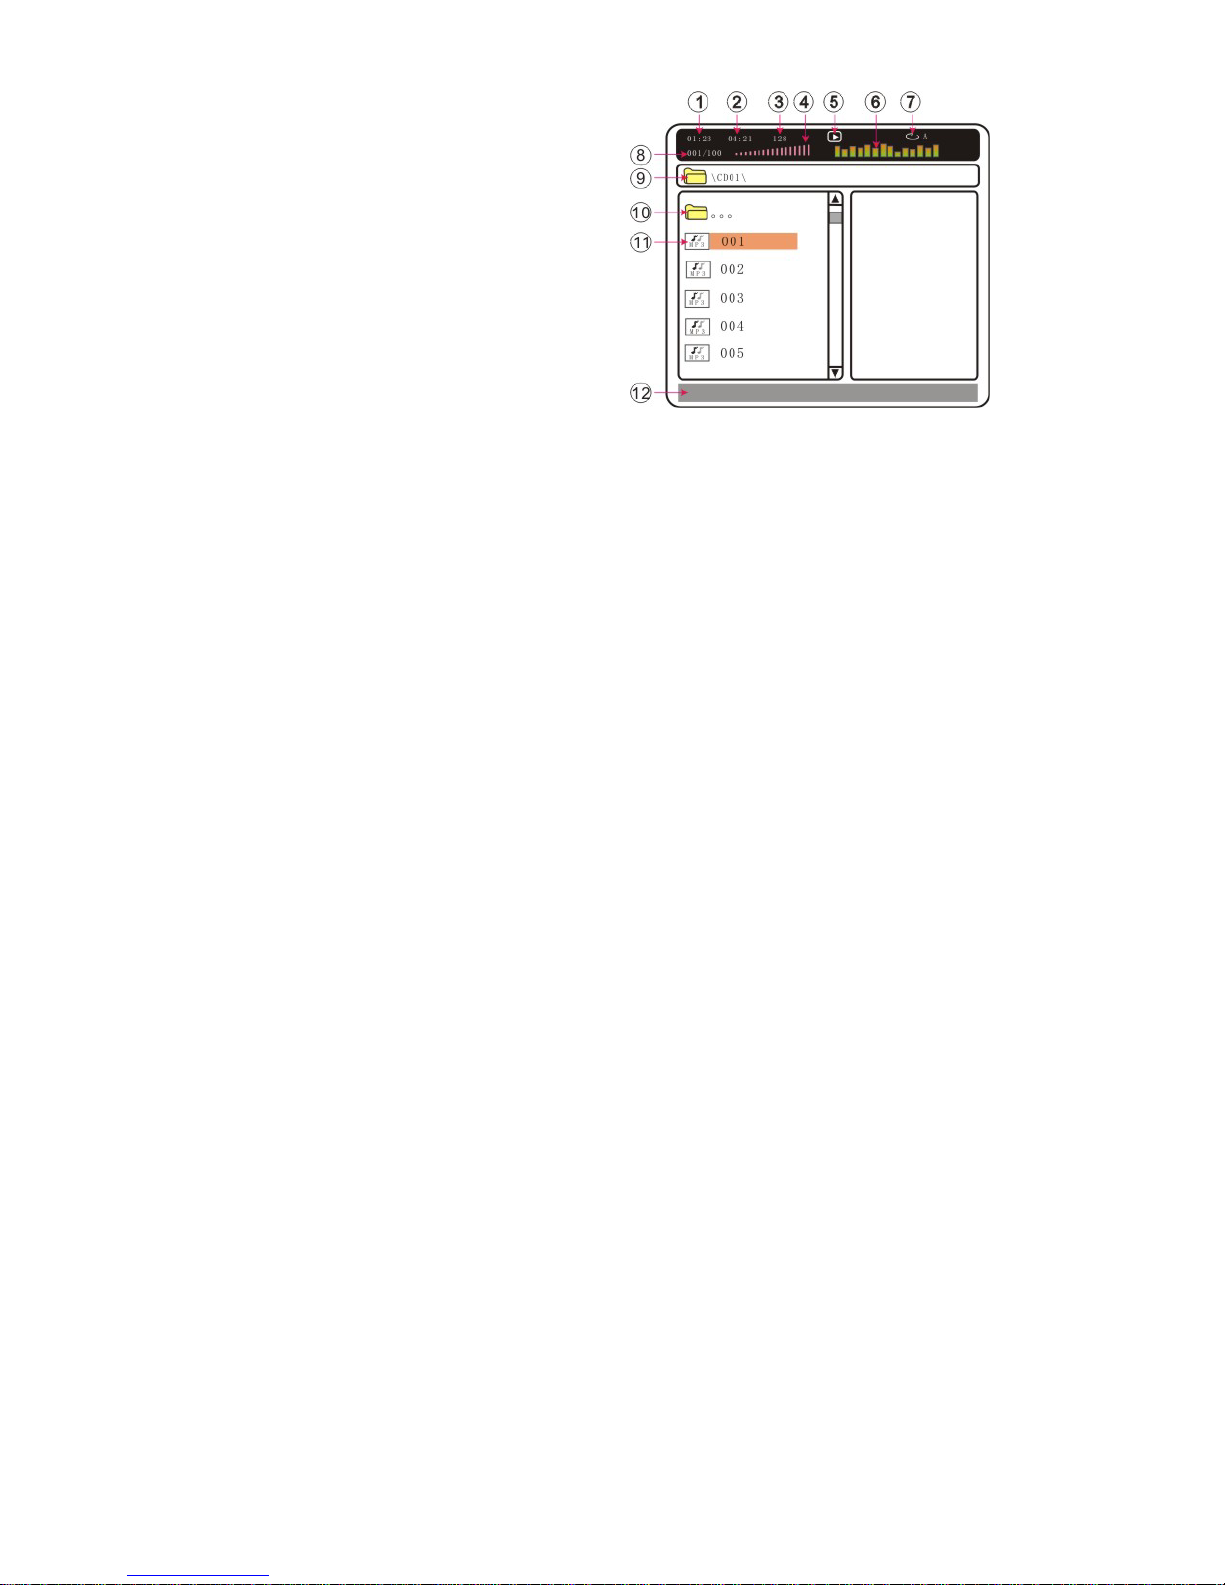
When a MP3 disc is loaded, a browse window
will be shown as follows:
1. Elapsed time of current song.
2. The whole time of current song.
3. Bitrate of this MP3 file
4. Visual volume indicator.
5. Playback status information.
6. Dynamic spectrum.
7. A-B repeat indicator.
8. Selected song sequence/total number
of songs of current folder.
9. Current folder name.
10. Go up parent directory.
11. File list.
12. Operation information.
1) Pressi/jor the number buttons to select
the song you want to play or change.
2) Press PLAY button to start to play it
3) To return to the parent directory please
press g button
4) Using A-TIME button, you can change
current Elapsed time and selected song
sequence, so you can directly go to your
specific point.
GB - 18
Page 20
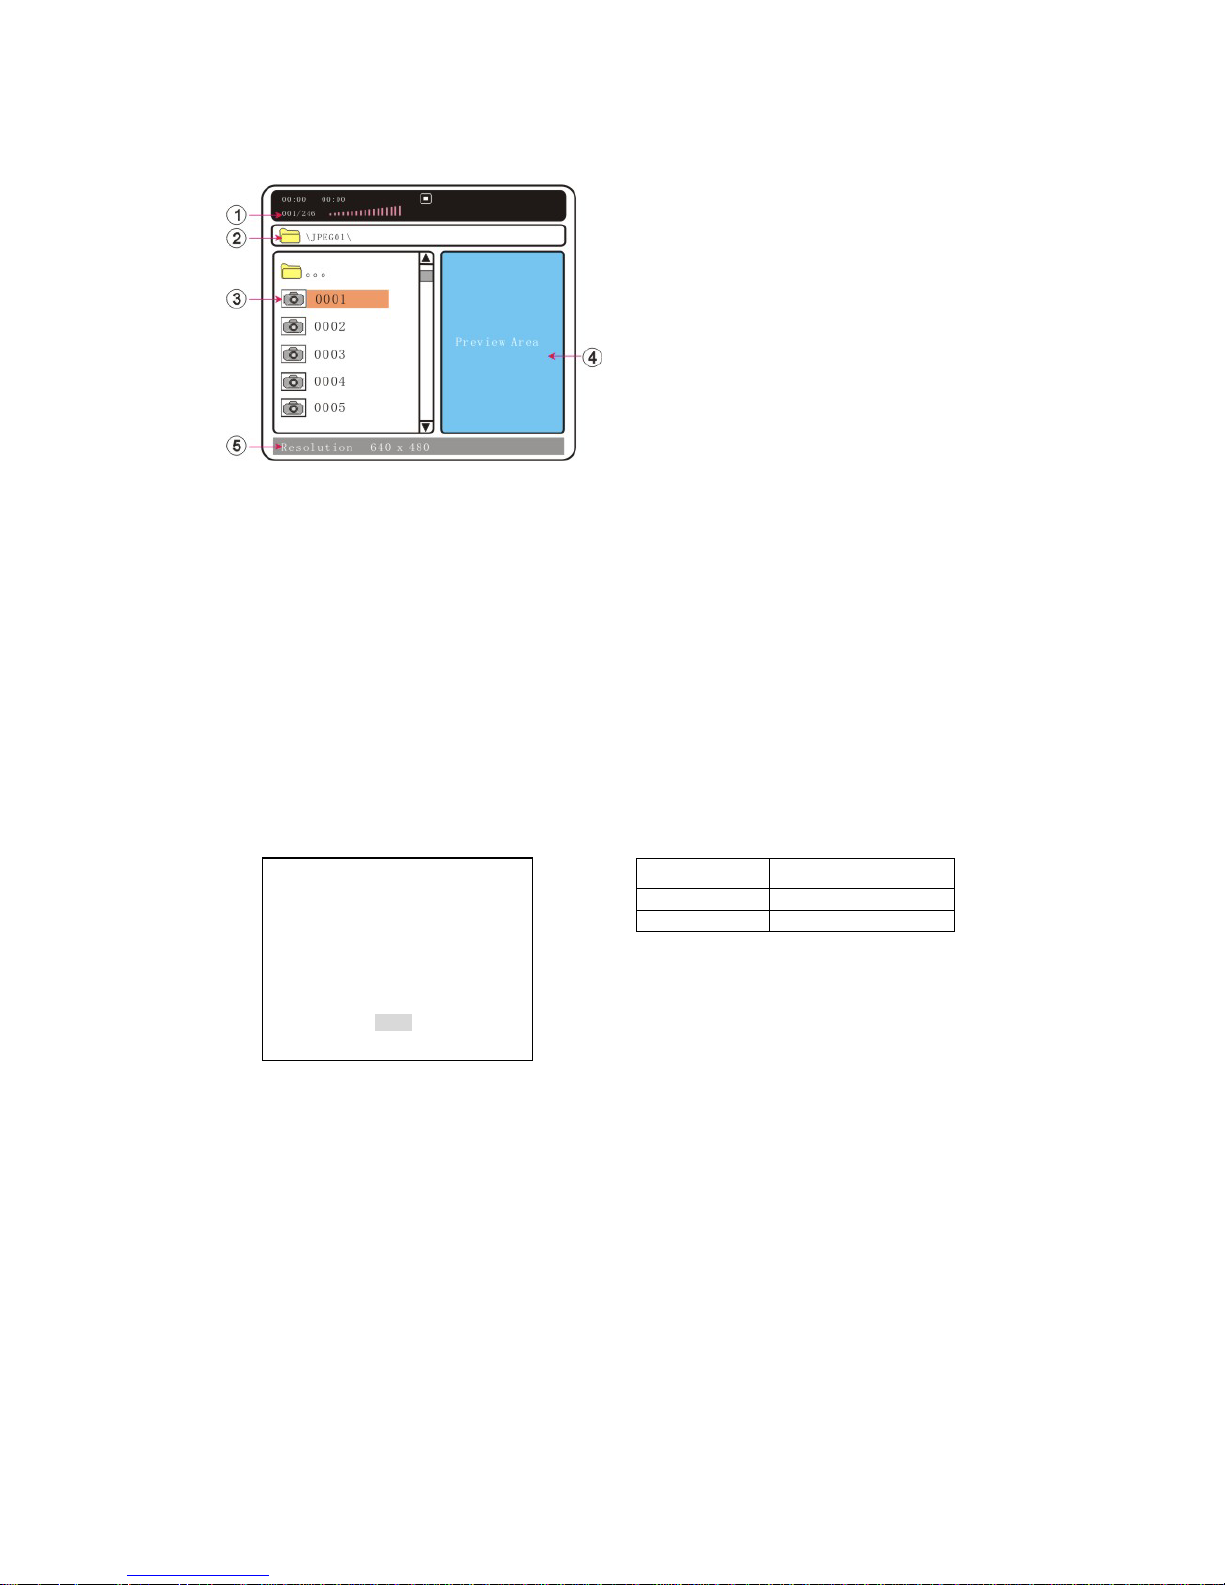
Photo File Playback
Photo CDs, including Kodak Picture CDs, contain
JPEG images that can be viewed on your
television screen easily.
When a photo CD is loaded, a browse window
appears:
1. Selected image sequence/total
number of images of current folder.
2. Current folder name.
3. File list.
4. Preview Area.
5. Resolution of current selected image.
1) Pressi/jor the number buttons to select
the picture you want to play.
2) Press PLAY to view it and go into slide show
mode.
3) During slide show you can freeze current
image by pressing PAUSE button, press
PLAY to resume slide show.
4) Press STOP the unit will stop slide show
and show you a DIGEST screen contain 12
thumbnails:
1 □2 □3 □4
□
5 □6 □7 □8
□
9 □10 □11 □12
□
SlideShow Menu _Prev Next`
5) Select MENU item and activate it will show
you the remote key function description:
Program:Transition Effect*
Stop:Thumbnail Mode
:Next Picture
:Previous Picture
i:Invert
j:Mirror
g:Contrarotate
h:Rotate clockwise
Zoom:Switch Zoom Mode
:Zoom in
:Zoom out
g/h/i/j:Pan In Zoom Mode
* Transition Effect:
The unit supports 16 kinds of Transition Effect:
1. Wipe top
2. Wipe bottom
3. Wipe left
4. Wipe right
5. Diagonal wipe left top
6. Diagonal wipe right top
7. Diagonal wipe left bottom
8. Diagonal wipe right bottom
9. Extend from centre H
10. Extend from centre V
11. Compress to centre H
12. Compress to centre V
13. Window H
14. Window V
15. Wipe from edge to centre
16. Move in from top
17. None
Specifications:
Media Type Supported Format
File .JPG
Disc Kodak Picture CD
GB - 19
Page 21
MPEG-4 File Playback
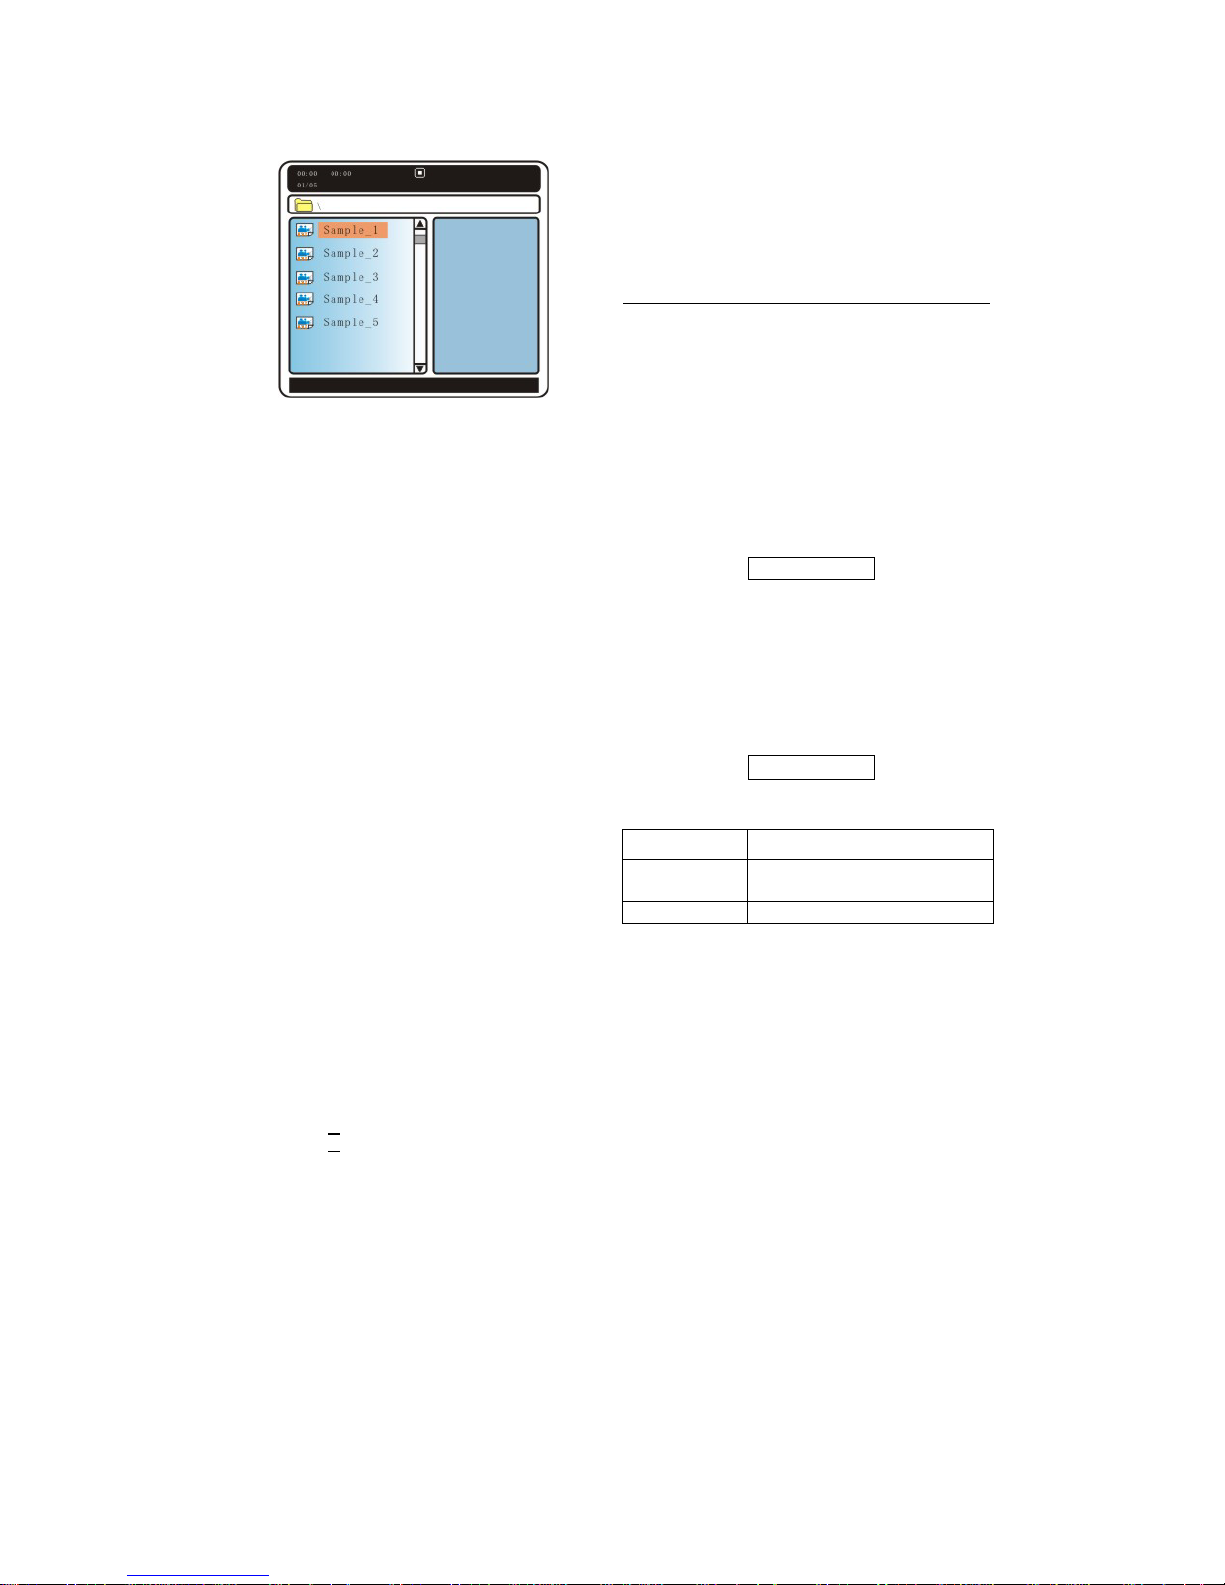
The unit can support most of DiVX(DiVX Pro)
and XViD video file, finish loading the MPEG-4
video disc, a browse window appears:
1) Pressi/jor the number buttons to select
the movie you want to play or change.
2) Press PLAY button to start to play it
3) Press return g button to the parent directory
The unit can recognize .AVI file nam e and
show you a file browser. Because of the
compatibility problem, maybe a trouble will
happen when playing some of the latest
MPEG-4 video release, such as green screen,
blank screen, picture crack, audio and video
aren’t synchronous, a slack playback. Please
change another release or update the unit
firmware.
Subtitle Display:
It is great news that the unit can support
additional subtitles; it seems that the .srt
subtitle can be recognized and works well,
please notice that the movie file and additional
subtitles must be place in the same folder and
the file name must be total same.
In the future the unit maybe supports more
subtitle format.
How can I watch different language
subtitle?
First you must have two or more language
subtitle files.
And the subtitle files name must be exactly the
same as the video file.
The key is renaming the subtitle file extended
name, for example:
TLF-matrix-cd1.avi
TLF-matrix-cd1.1
TLF-matrix-cd1.2
.srt
.srt
Please notice the underline and bold part.
Burn these file into CDR or DVDR in the same
folder, when it has done so you can change the
subtitle display by pressing SUBTITLE button.
Not all language SUBRIP (e.g. srt) format
subtitles have been support!
Audio Selection:
Some of MPEG-4 video file contain one more
audio track, the file name such like this:
Elizabeth.1998.DVDRip.XviD.Dual-Audio.iNT-NewMov
You can change the audio by press AUDIO
button.
The unit support AC3/MP3 audio codec on the
file.
Specify a Particular File on a Disc:
During playback, you can change to another
file you want to play by pressing A-TIME
button.
Press A-TIME button first time, a pop menu will
be displayed on the top left corner of TV screen;
you can type the file list sequence number.
_ _ _
Searching for a Particular Point on a
File:
Press A-TIME twice, the menu change to time
code input mode, you can type your desired
tim e code. For example, you want to play it
from 12minutes and 34 seconds, just enter the
number in turn: 0,1,2,3,4.
0 :12:34
Specifications:
Media Type Supported Format
Video codec DiVX 3.11 alpha, DiVX 4.x,
DiVX 5.x,DiVX Pro, XViD
Audio codec MP3, Dolby AC3
MPEG-1/2 File Playback
The unit still can play DVD/VCD file
(.VOB/.MPG/.DAT) as file playback mode.
If the .VOB file has a multi-track and
multi-subtitle recorded, you also can change
the audio and subtitle by pressing relevant
button, just like playing DVD video disc.
GB - 20
Page 22
:: Special Playback Feature
Repeat Play
You can play all of the titles or tracks on a disc
or a single title, chapter, or track repeatedly.
FOR DVDs:
You can change three repeat modes by
pressing REPEAT button: [CHAPTER] /
[TITLE]/ [ALL]
FOR VCDs/CDs:
You can change two repeat modes by pressing
REPEAT button:
[TRACK] / [ALL]
A-B Repeat
AB repeat function that lets you set your favorite
scenes for instant repeat.
1) Press A-B during DVD/CD playback to
select point A.
2) Press A-B again to select point B.
3) The segment will begin repeating in a
continuous loop.
4) To cancel, press A-B again.
Searching for a
Particular Point on a
Disc
You can quickly locate a particular point
on disc by monitoring the picture or
playing back slowly.
Locating a point directly using
the number buttons.
To select a chapter (DVD) or track (VCD/CD),
just direct press the number button. For example,
you want to play the 23
playback you enter 2 and 3 digit number then the
player will go to play the 23
Locating a point quickly using
the PREV (previous) / NEXT
(next) buttons.
You can search for a particular point on a disc
using / on the remote control. During
playback, press and hold to locate a point in
rd
track on CD, during
rd
track soon.
the playback direction or press and hold to
locate a point in the opposite direction. When
you find the point you want, release the button
to return to normal playback speed.
Locating a point quickly by
playing a disc in fast forward or
fast reverse
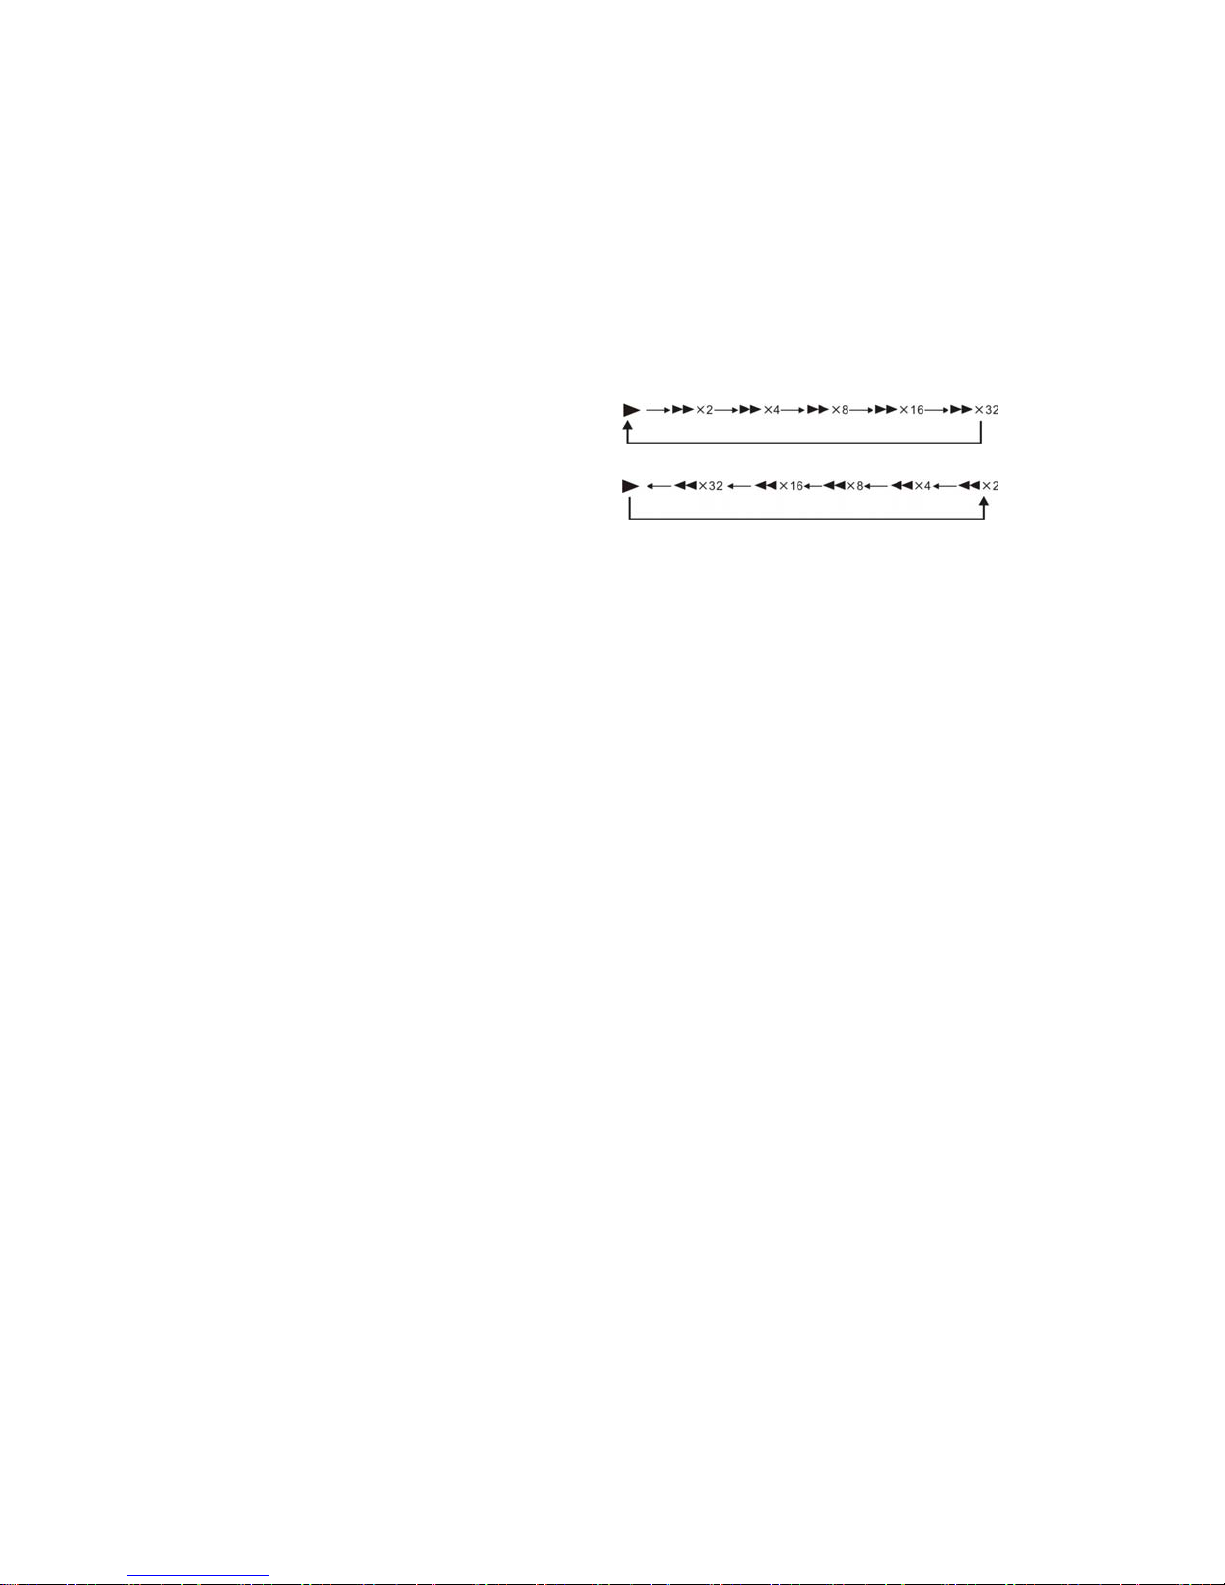
Press or while playing a disc. When you
find the point you want, press X to return to
normal speed. Each time you press or
during scan, the playback speed changes.
With each press the indication changes as
shown below.
Playback direction
Opposite direction
The “×2” playback speed is about twice
the normal speed,
Playing one frame at a time
(Step)
Press STEP during playback to go to next
frame. If you hold the button down, you can
view the frames in succession. To return to
normal playback, pressX
A-TIME
You can search a DVD by title or chapter, and
you can search a VIDEO CD by track. As titles
and tracks are assigned unique numbers on
the disc, you can select the desired one by
entering its number. Or, you can search for a
scene using the time code.
The unit provides a graphic interface for you
call Navigation Menu, you can press A-TIME to
activate it.
etc.
GB - 21
Page 23
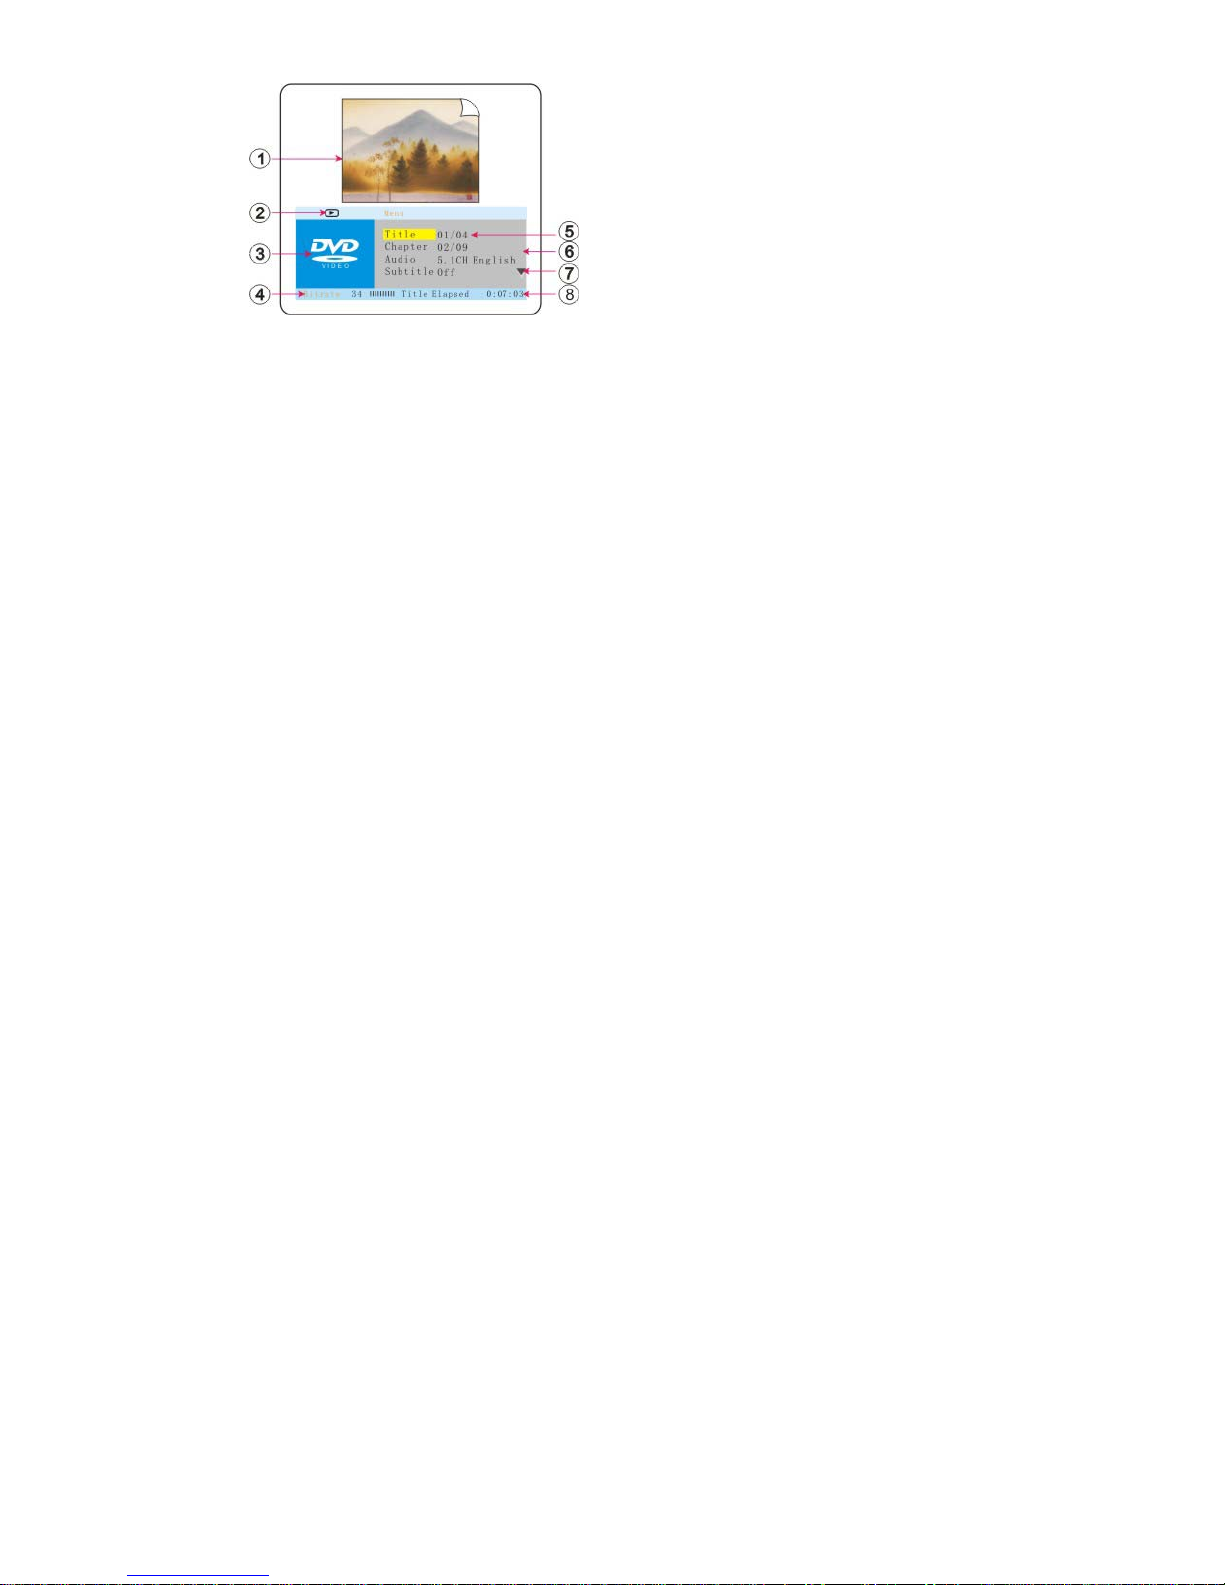
1. Press A-TIME, the navigation menu
appears.
1. Instant preview window
2. Working status
3. Disc type
4. Instant bitrate view
5. Selected item
6. Option window
7. More…
8. Information about selected item
2. Use g/h/i/j keys to select different item:
FOR DVDs:
[Title], [Chapter], [Audio], [Subtitle], [Angle],
[TT Time], [CH Time], [Repeat], [Time Disp].
FOR VCDs:
[Track], [Disc Time], [Track Time], [Repeat],
[Time Disp].
FOR CDS:
The Navigation Menu doesn’t include CD
operation, but you still can type the
number of time:
[Disc Go To: _ _:_ _]
[Track Go To: _ _:_ _]
Or, type the number of tracks:
[Select Track: _ _: total numbers]
On screen by pressing A-TIME button.
3. Use the 0-9 number buttons to enter the
desired time (counter position in hours,
minutes and seconds), title/chapter or track
into the field.
4. Press PLAY to activate it
Zoom
To zoom in and out the image during DVD/VCD
playback:
1. Press ZOOM button when you watching
video.
2. The unit supports 3 levels of zoom in mode
and 3 levels of zoom out mode.
3. Press ZOOM a 7th time to turn off this feature.
Angle
If various angles (multi-angles) for a scene are
recorded on the DVD, you can change the
viewing angle.
1) Press ANGLE when you see the Angle icon
appear on screen during DVD playback.
2) Press ANGLE repeatedly to select all
available angles on the disc.
3) Depending on the DVD, you may not be
able to change the angles even if
multi-angles are recorded on the DVD
OSD
When playing a DVD, press DISPLAY
button repeatedly will show you different
playback information on screen:
[Title Elapsed], [Title Remain], [Chapter
Elapsed], [Chapter Remain]
Press DISPLAY button 5
the OSD display.
th
time will close
Subtitle Selection
If subtitles are recorded on the discs, you can
change the subtitles or turn them on and off
whenev er you want while playing a DVD.
1. Press SUBTITLE during DVD playback.
2. Press SUBTITLE repeatedly to select your
desired language subtitle from all available
on the disc.
3. To turn off the subtitles, switch to “OFF”.
GB - 22
Page 24
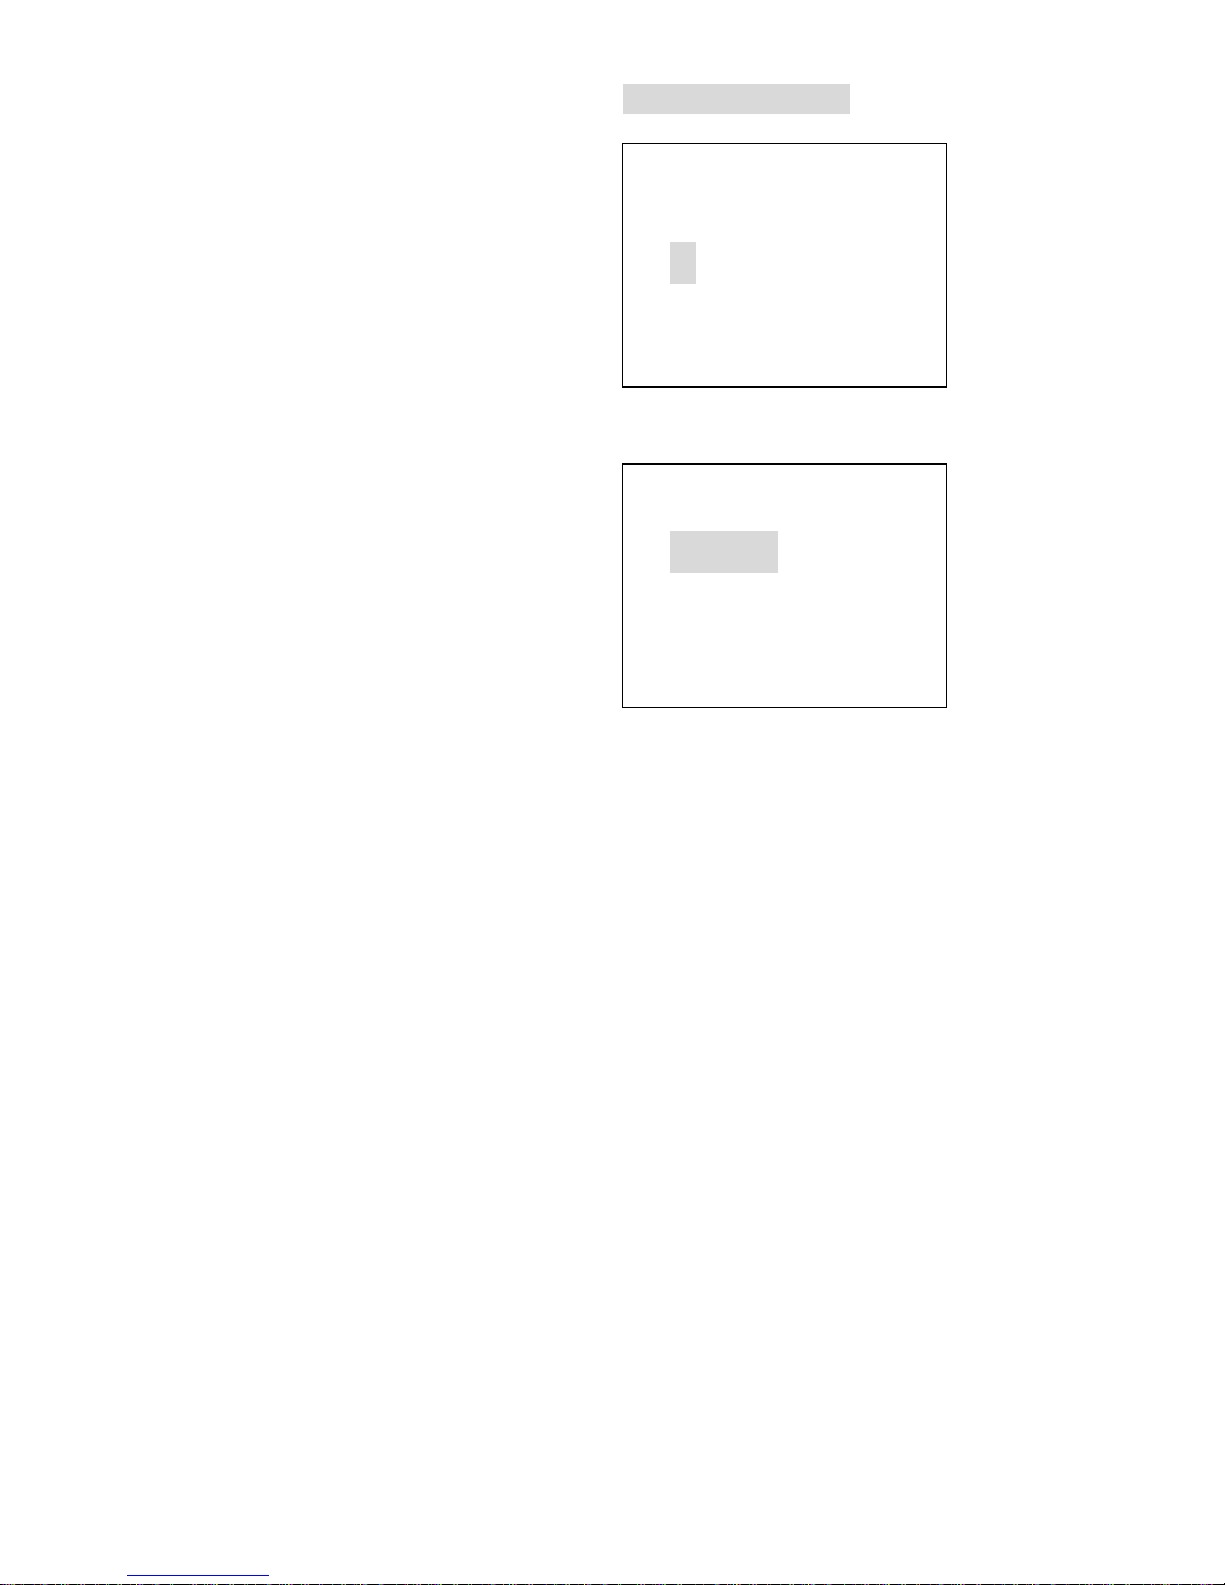
AUDIO Selection
When you are playing a DVD recorded in multiple
audio formats (PCM, Dolby Digital, or DTS), you
can change the audio format. If the DVD is
recorded with multilingual tracks, you can also
change the language.
With CDs, DATA CDs, or VIDEO CDs, you can
select the sound from the right or left channel and
listen to the sound of the selected channel
through both the right and left speakers. For
example, when playing a disc containing a song
with the vocals on the right channel and the
instruments on the left channel, you can hear the
instruments from both speakers by selecting the
left channel.
When playing DVD:
1. Press AUDIO during playback.
2. Press AUDIO repeatedly to select the
desired audio from all available audios.
Depending on the DVD, the choice of
language varies.
When playing VCD, CD:
Press AUDIO repeatedly to select:
STEREO: The standard stereo sound.
Mono-Left:
The sound of the left channel (monaural).
Mono-Right:
The sound of the right channel (monaural).
Mix-mono:
The sound of both channels (monaural)
Resume Playback
The player can store the point from where you
stopped the disc.
1. While playing a disc, press STOP to stop
playback, “Resume stop” appears on the
screen
2. Press PLAY button, the player starts playback
from the point where you stopped the disc in
step 1.
To play from the beginning of the disc, press
“STOP” twice, and then press PLAY.
Program Playback
DISC Playing Mode:
For VCD/CD discs:
Program: Track (01~20)
01 12 □06 _ _
□
02 05 □07 _ _
□
03 _ _ □08 _ _
□
04 _ _ □09 _ _
□
05 _ _ □10 _ _
□
Exit Start Next
Type the number of tracks directly into the field.
For DVD discs:
Program: TT (45)/CH(--)
01 TT:12CH:01□06 TT: CH:
□
02 TT: CH: □07 TT: CH:
□
03 TT: CH: □08 TT: CH:
□
04 TT: CH: □09 TT: CH:
□
05 TT: CH: □10 TT: CH:
□
Exit Start Next
Type the number of titles and chapters directly
into the field.
And then move the cursor on “start” and
activate it, the unit will play your created list.
Modify:
Move the cursor on the item you want to modify,
press PLAY button, current select item will be
reset and you can reenter the digit number.
Clear:
Move the cursor on the item you want to clear,
press CLEAR button, current select item will be
erased.
Exit Program Play:
Press the STOP button twice to exit the
program play mode.
GB - 23
Page 25

FILE Playing Mode:
In normal playing, you can press PROGRAM
button to change FOLDER and FILELIST
browse window, if you have created a play list,
then a PLAYLIST browse window will be
added.
1. In FOLDER or FILELIST browse window,
move the cursor on the item you want to
add to play list, press CLEAR button, the
word “Add To Playlist” will be displayed on
Operation information
2. Continue pressing CLEAR button to add
other files.
3. Now you have created a play list, press
PROGRAM button to enter into PLAYLIST
window.
4. Press CLEAR in PLAYLIST window will
delete current selected item from play list.
This operation is the same with MP3 files,
PHOTO files, MPEG-4 files, MPEG-1/2 files.
GB - 24
Page 26
Chapter 6 Help
:: Troubleshooting
If a fault occurs, first check the points listed below before taking the set for repair.
If you are unable to remedy a problem by following these hints, consult your dealer or service
centre.
WARNING: Under no circumstances should you try to repair the set yourself.
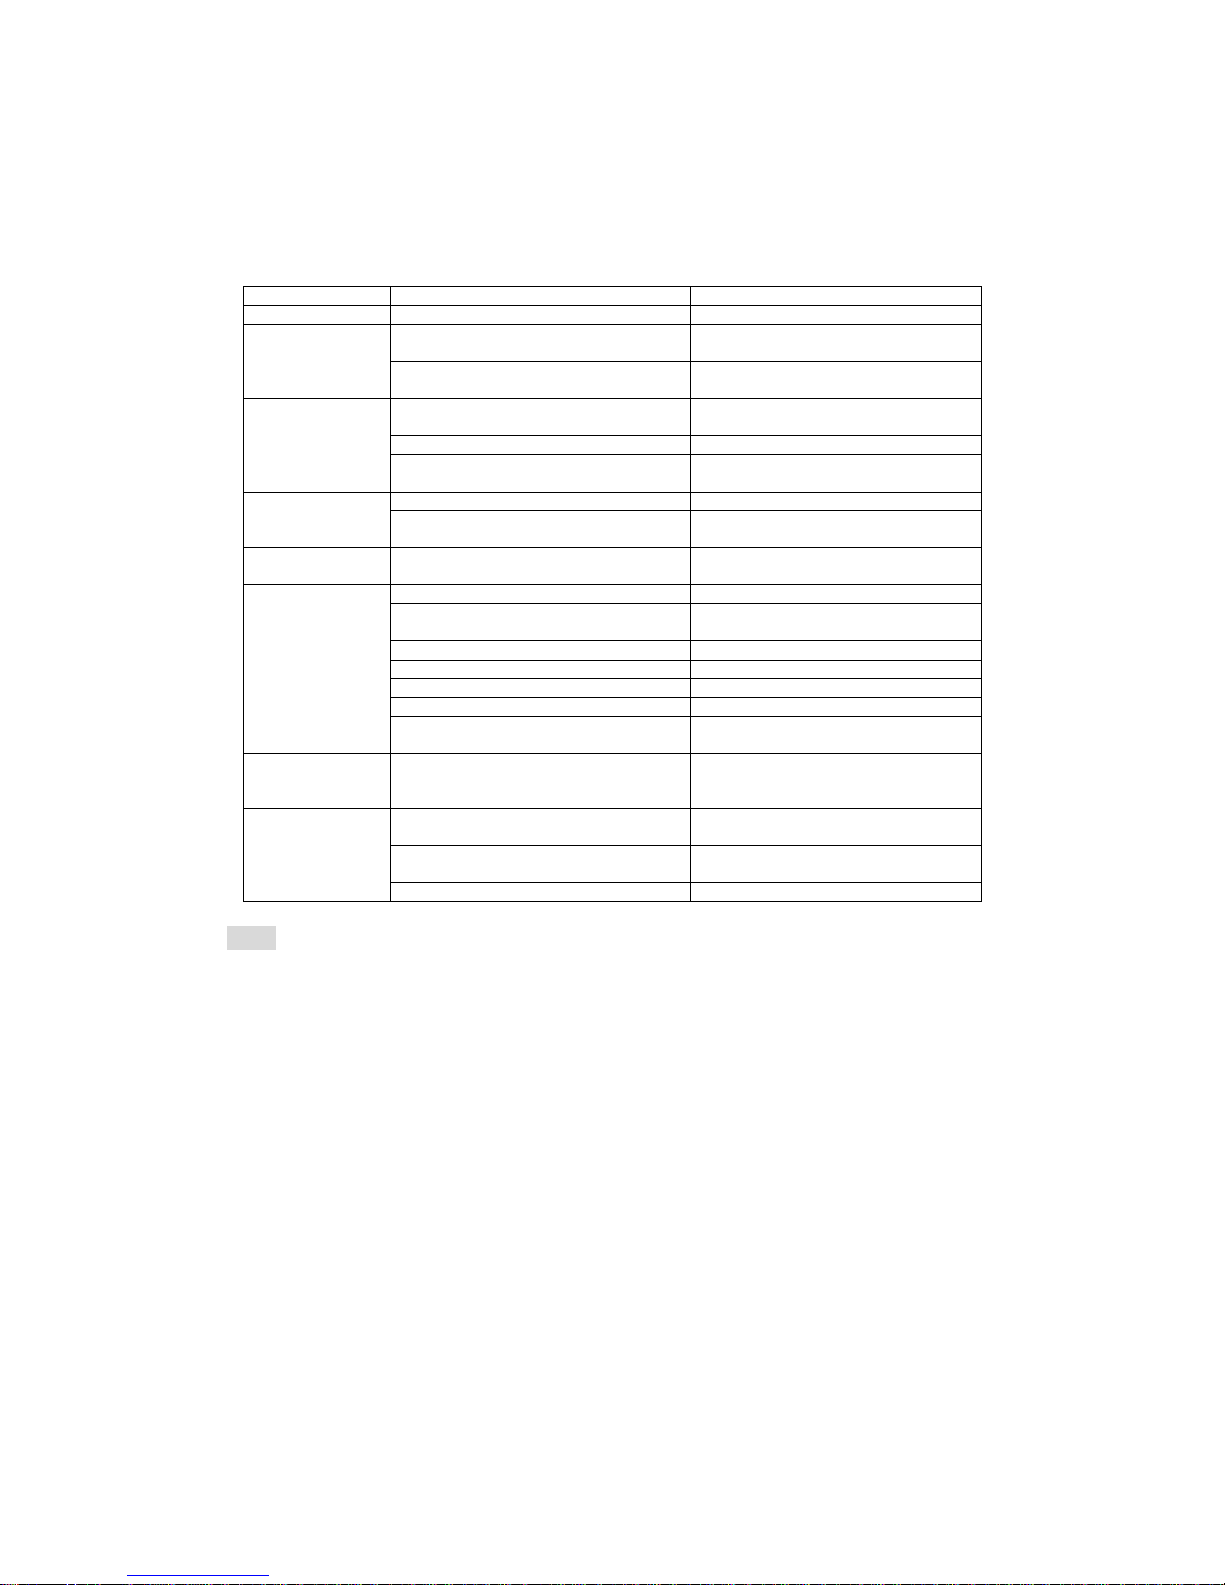
Problems Caus e Solut ion
No power indication Power plug not connected Plug the power cord into the power supply
No picture
No sound
Picture distortion
Brightness unstable
or noisy
The player does not
work
No response to key
press
Remote control
does not work
Note:
This produce incorporates copyright protection technology that is protected by method claims of
certain U.S. patent and other intellectual Property rights owned by Macrovision Corporation and
other rights owners. Use of this copyright protection technology must be authorized by
Macrovision Corporation and is intended for home and other limited viewing users only, unless
otherwise authorized by Macrovision Corporation. Reverse engineering or disassembly is
prohibited.
Depending on the condition of the recording equipment or the CD-R/RW, DVD±R/RW disc
itself, some discs can’t be played on the unit.
TV has not been set to the correct video
input
Video cable not firmly connected.
Audio cable not connected tightly
Power of audio apparatus is off Turn on the power of audio apparatus.
Audio output setting is incorrect
Disc is dirty Take out the disc and clean.
Fast forward/backward is activated
Affected by anti-piracy circuit Connect the player directly to TV.
No disc Load a disc.
Disc not compatible
The disc is placed upside down Check disc if it is put in correctly.
The disc not put in the tray correctly Check disc if it is put in correctly.
Disc is dirty Clean the disc.
Player settings are incorrect Change the setting via the setup menu.
Parental lock is in effect
Interference of power wave or other factors
such as static interference
The remote control not pointed at the remote
sensor on the front panel of the player
The remote control is out of specified range
Battery power exhausted Replace with new batteries.
Set correct TV video input format for
receiving the player’s output signals.
Firmly insert the video cable ends to the
related terminals.
Firmly insert the audio cable ends to the
related terminals.
Setup audio output correctly via the setup
menu.
The picture may be distorted during fast
forward /backward playback.
Load a compatible disc (Check the disc
format and its color system).
Disable this function or reset the rating
level.
Turn off the main switch or pull out the
power plug, plug it in and turn on the power
again.
Point the remote control at the remote
sensor.
Make sure the remote control range within
7 meters to the remote sensor.
GB - 25
Page 27
:: Specifications
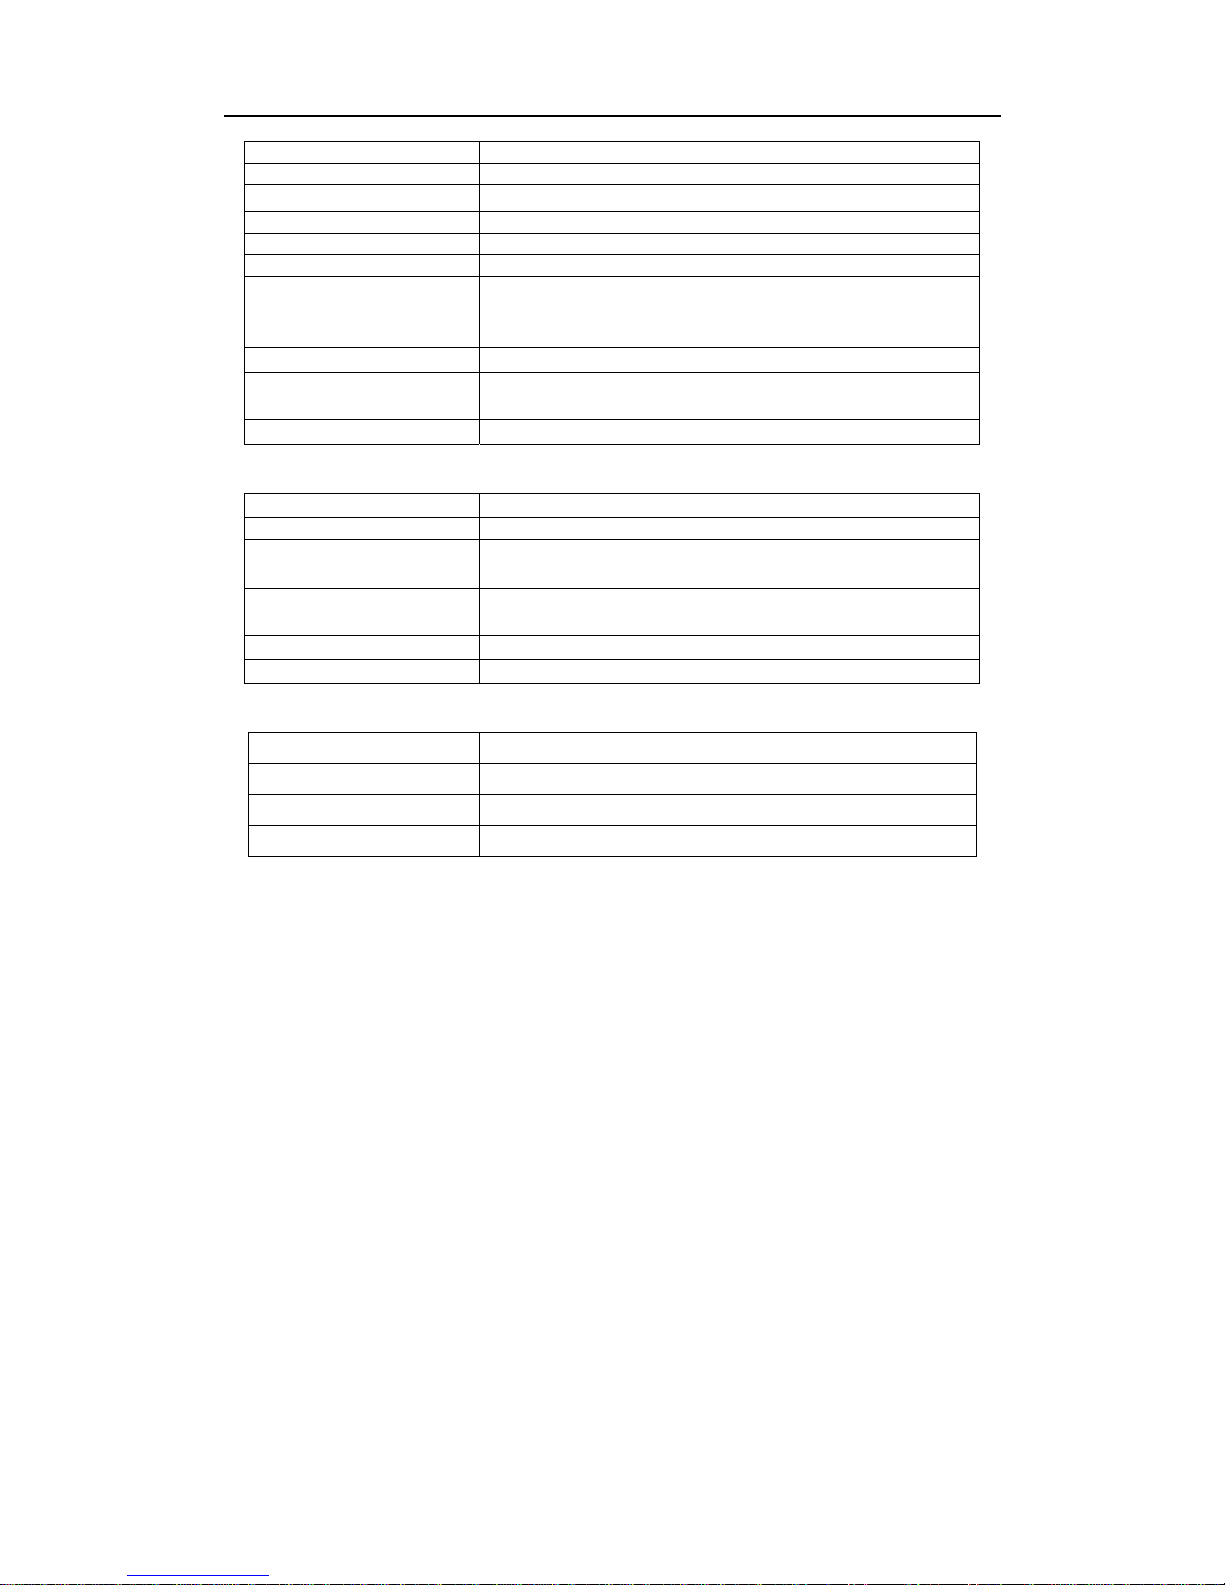
PLAYER/OUTPUT/ACCESSORIES
PLAYER:
Power requirements ~100-250V 50/60Hz
Power consumption 25W
Weight(approx.) 2.6Kg
Dimension(approx.) 430X43X255mm(W/H/D)
Signal format system PAL/NTSC
Laser Semi-conductor laser, wave length 650nm, 780nm
DVD VIDEO (PCM 96KHz) 20Hz~44KHz(±1dB)
Frequency Response
S/N ratio ≥90dB
Audio Dynamic Range
Operation condition Temp: 0℃~40℃, Operation state: Level surface
OUTPUT:
Video output
Analog audio output 2.0V (rms)
S-Video output
Component video output
SCART Video output
COAXIAL Audio output
ACCESSORIES:
User’s Manual ……………………………………………………………….... 1
Audio/Video cable ……………………………………………………………….... 1
Remote Control …………………………………………………………………. 1
Batteries (AAA) ……………………………………………………………….… 2
¾ Designs and specifications are subject to change without notice.
DVD VIDEO (PCM 48KHz) 20Hz~22KHz(±0.5dB)
CD: 20Hz~22KHz(±0.5dB)
DVD VIDEO: ≥90dB
CD: ≥85dB
1.0V (P-P), 75
(Y) 1.0V (P-P), 75
(C) 286mV (P-P), 75
(Y) 1.0V (P-P), 75
0.7V (P-P), 75
0.7V (P-P), 75
Ω
Ω
Ω
Ω
Ω
Ω
0.5V (P-P) 75Ω
GB - 26
Page 28
GB - 27
Page 29

GB - 28
 Loading...