


XVC High Definition Encoder
User Guide
OCT, 2015
Rev 7
Preliminary

Overview
XVTEC
Page 2
Contents
Overview ................................................................................................................. 5
1 Product Description ........................................................................................ 6
1.1 Introduction ...................................................................................................... 6
1.2 Main features of the XVC-Encoder ................................................................. 6
1.3 Single or Dual Input ......................................................................................... 6
1.4 Specifications .................................................................................................... 6
1.5 Front and Back panel ....................................................................................... 8
1.6 Applications/Industries ................................................................................... 9
1.6.1 Broadcast and Live events streaming ............................................. 9
1.6.2 Education .......................................................................................... 9
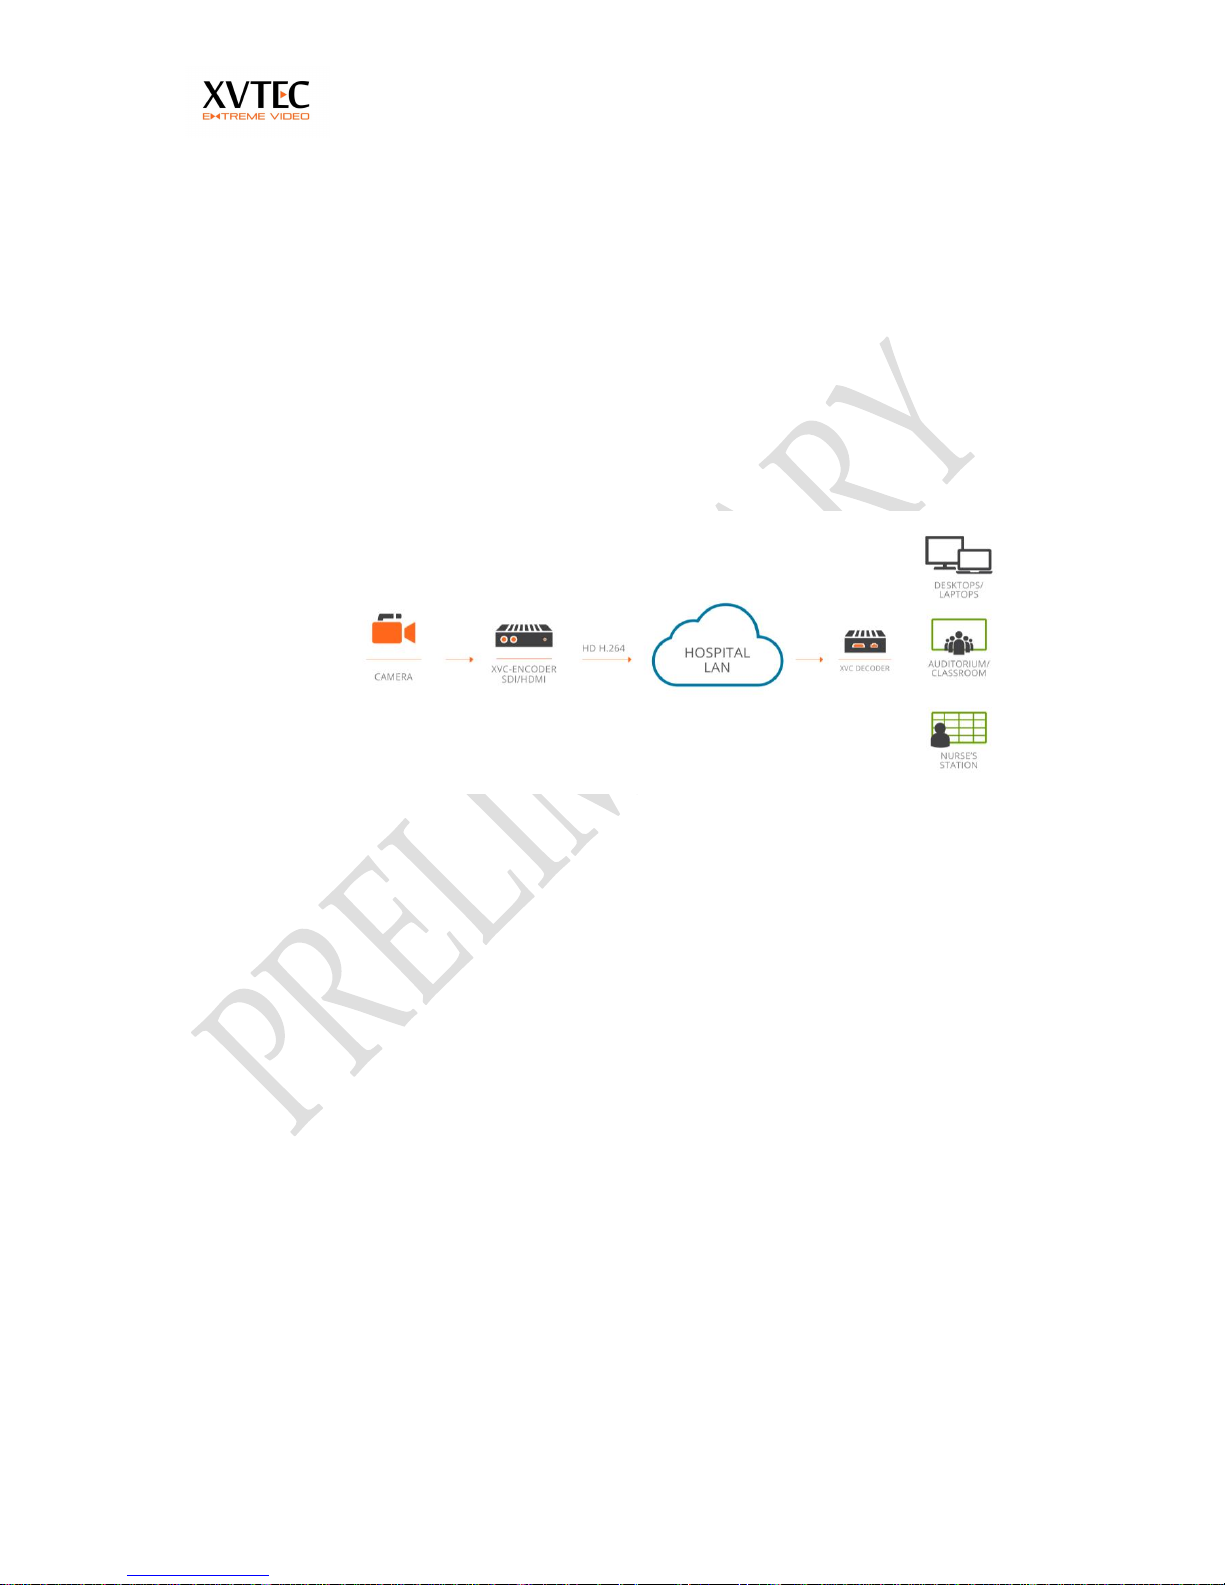
1.6.3 Medical............................................................................................ 10
1.6.4 Defense............................................................................................ 10
2 XVC Management Tool ................................................................................ 12
2.1 XVC management tool overview .................................................................. 12
2.2 Installing the Discovery and Configuration Tool ......................................... 12
2.3 Launching the XVC management tool .......................................................... 13
2.4 Assigning an IP (static/DHCP) address ........................................................ 14
2.5 Configuring the XVC encoder through the WEB interface.......................... 14
2.6 Rebooting the XVC Encoder .......................................................................... 15
3 Web Configuration Interface ....................................................................... 16
3.1 Web Interface Overview ................................................................................ 16
3.2 Configuring the XVC Encoder....................................................................... 17
3.3 Network settings ............................................................................................ 17
3.3.1 Assigning a static IP/DHCP Address ............................................ 17
3.4 Video Input parameters ................................................................................. 19
3.4.1 Video standard detection ............................................................... 19
3.4.2 3D noise reduction ......................................................................... 19
3.5 Channel parameters settings ......................................................................... 21
3.5.1 Go Live button ................................................................................ 21
3.5.2 Encoding Pipe................................................................................. 23
3.5.3 Encoder Bit Rate ............................................................................. 23
3.5.4 Rate Control .................................................................................... 24
3.5.5 Video Frame Rate ........................................................................... 24
3.5.6 Intra Interval ................................................................................... 24
3.5.7 Enabling/Disabling the Video Output of a Channel .................... 24
3.5.8 Forcing an Intra Frame................................................................... 25
3.5.9 Advance Settings ............................................................................ 26

Overview
XVTEC
Page 3
3.6 Audio setting .................................................................................................. 26
3.7 Streaming settings .......................................................................................... 27
3.8 Setting Date and Time .................................................................................... 29
3.8.1 Local time setting ........................................................................... 29
3.8.2 Syncing Date and Time to an NTP Server .................................... 30
3.9 Identifying the XVC Encoder ........................................................................ 31
3.10 Rebooting the XVC Encoder .......................................................................... 31
3.11 Firmware upgrade.......................................................................................... 33
4 License manager ............................................................................................ 34
5 Viewing the Video Stream Using VLC ...................................................... 35
5.1 Streaming to VLC in RTSP protocol .............................................................. 35
5.2 Streaming to VLC in RTP protocol ................................................................ 36
5.3 Streaming to VLC in MP2TS protocol (license required)............................. 37
5.4 Streaming to a CDN in RTMP protocol (license required) .......................... 37
6 Restoring the unit ......................................................................................... 39
7 Performance and limitations ....................................................................... 41

Overview
XVTEC
Page 4
Trademarks
XVTEC Ltd
XVC™
HDMI Licensing LLC
HDMI™
Microsoft Corporation
Microsoft®, Internet Explorer®, Windows®, EDGE
USB Implementers Forum, Inc
USB®
VideoLAN
VLC™
Google Inc.
Chrome , YouTube
Akamai
Akamai wave logo

Overview
XVTEC
Page 5
Overview
This user guide contains information about the XVC encoder as follows:
Product Description
Applications
XVC management tool.
Setting network configuration
Setting the video, audio encoding and streaming parameters
Upgrading the XVC firmware
Enabling additional feature through the license manager
Streaming from the XVC encoder to VLC media player.
Restoring the unit (Maintenance)
Performance and limitations

Product Description
XVTEC
Page 6
1 Product Description
1.1 Introduction
The XVC encoder is a high quality HD H.264 encoder capable of encoding 3GSDI/HDMI content at any resolution up to 1080p60. With low latency and
advanced video pre-processing functionality, the XVC achieves exceptional video
quality while maintaining low bit rates.
1.2 Main features of the XVC-Encoder
1080p60 Blu-Ray quality video
Dual input, 3G-SDI or HDMI
High quality 3D noise reduction
Region based encoding
High quality Up/Down scalar
Multi-protocol streaming including RTP, RTP/RTSP, MPEG2TS*, RTMP*
Low latency encoding
1.3 Single or Dual Input
The XVC encoder is available in two variation single and dual inputs, 3G-SDI or
HDMI. Each video input is in independent and can be compressed with a
different set of encoding parameters. The encoder is capable of encoding a single
channel at 1080p60 or two channels at 1080p30 each.
XVC architecture is scalable, enabling future feature enhancements.
1.4 Specifications
Table 1: XVC Specifications
Type
Specification
Video Inputs
3G/HD/SD-SDI
HDMI 1.4a
Video Pre-processing
Advanced noise filter support
HQ up/down scalar
Codec
Standards
ISO/IEC14496-10 (H.264/AVC), base line, high
and main profile up to level 4.2
Features
All parameters dynamically modified
Configurable GOP size, FPS, BPS Supports force
IDR and IDR frequency
Supports progressive and field based interlaced

Product Description
XVTEC
Page 7
coding with different controls
Supports 8x8 and 4x4 transform size
Bitrates: From 64Kbps to 30Mbps
Dynamic ROI support
Resolution
Input:
1920x1080p 60/59.94/50/30/29.97/25 Hz
1920x1080i 60/59.94/50 Hz
1280x720p 60/59.94/50/30/29.97/25 Hz
Common PC resolutions (HDMI only) up to
WUXGA (1920x1200 60fps)
Output:
Arbitrary resolution from 96x80 to
1920x1200
Performance
Up to a single 1080p60 or a dual 1080p30
Frame rate: Configurable from full frame rate
down to 1 fps
Audio Input
3G-SDI embedded audio
HDMI embedded audio
Audio Compression
Format
AAC-LC
Sample Rate
Extracted from the input (auto-detect)
Bitrates
From 80 Kbps to 320 Kbps
Communication Ethernet
RJ45 connector
10/100 Base-T Ethernet, auto-detect
Network Protocols
Streaming:
RTP/RTSP (unicast/multicast)
RTP streaming (unicast/multicast)
RTMP (licensable)
MP2-TS over UDP (licensable)
Other:
HTTP
IGMP V1/V2
Telnet client and DHCP client
Encoder Control
WEB interface
HTTP API
F/W upgradable
XVC Management tool
External Storage
USB (Recording license required)
Physical/Environmental
Dimensions (LxWxH)
XVC-HDMI: 142x85x38 mm
XVC-SDI: 142x85x38 mm
Weight
XVC-HDMI: 390g
XVC-SDI: 390g
Operational Temperature
Storage Temperature
(0) - (50) C
-30 to 70 C
Humidity
Up to 95% non-condensing
DC Voltage
10 - 12V DC
Power Consumption
8-10W, Depending on the channel count and
video input resolution

Product Description
XVTEC
Page 8
1.5 Front and Back panel
USB - A USB port to connect a storage device for recording (requires license)
ETH - 10/100Mbit Ethernet connection
PWR LED - Multi function LED. Refer to section 6
RST – Multi-function Reset switch. Used also to load factory default to the
unit. Refer to section 6
10-12VDC power jack
Back panel
LCK1, LCK2 - Video lock status for each video input. When the XVC encoder
detects a valid video standard the relevant LED will turn on
ACT1, ACT2 - Activity LED. When the video channel is enabled the LED
blinks
Two HDMI or SDI inputs
GoLive button - configurable button, used to start streaming.

Product Description
XVTEC
Page 9
Front Panel
1.6 Applications/Industries
There are many applications for the XVC encoder, as the following examples
illustrate:
Broadcast
Education
Medical
Defense
1.6.1 Broadcast and Live events streaming
The XVC encoder enables event broadcasting of the highest audio and video
quality, so that your spectators don’t miss a thing. Benefits include:
Portable coverage in real time
RTMP streaming directly to CDN
MP2TS streaming to IP set-top boxes and broadcast equipment
1.6.2 Education
The XVC encoder delivers a rich media experience to the education environment
in a number of different configurations, bringing together teacher and student and
connecting remote classrooms in real time. Possible applications:
Skills assessment, in which a student demonstrates, learned skills to
professionals at a distance.
Distance learning, providing people around the world the opportunity to
study at top-notch institutions.
Product Description
XVTEC
Page 10
1.6.3 Medical
The XVC encoder helps the medical industry by augmenting precision and
collaboration, as in the following ways:
Collaboration of surgeons, with two way, low latency, high quality imaging,
to facilitate reliability in the operating room
Monitoring of one surgeon by others, with low latency to ensure the highest
level of confirmation in high-risk operations
Reviewing procedures for educational purposes, with high quality imaging
for the most accurate learning material
1.6.4 Defense
The XVC encoder is compact, low power consumption, with no moving parts.
Defense applications include:
Intelligence, surveillance, and reconnaissance, with high quality video and
audio required for accurate response
Command and control, with low latency required for quick decision making
Situational awareness, with multi-infrastructure solutions for staying in the
loop

Product Description
XVTEC
Page 11

XVC Management Tool
XVTEC
Page 12
2 XVC Management Tool
2.1 XVC management tool overview
The XVC Management Tool is a GUI utility providing basic discovery and
configuration functionality for the XVC encoders on the network. The utility was
tested on the following operating systems:
Windows 7
Windows 8
Windows 10
With the following browser:
Google Chrome
Microsoft explorer 8 and above
Firefox
Microsoft Edge browser
By default, the XVC encoder is configured with an IPv4 IP address in the
169.254.0.0/16 address block.
The following parameters can be configured with the XVC Management Tool:
Assigning an IP (static/DHCP) address
Rebooting the XVC Encoder
Toggling the power LED for identification
Setting date and time
Setting a user/password for a XVC encoder
2.2 Installing the Discovery and Configuration Tool
To install the Discovery and Configuration Tool:
1. Download the discovery setup tool from http://www.xvtec.com/software-
update/
2. On the network in which the XVC encoders lie, run the setup file, and then
follow the instructions.
3. Disable windows firewall.

XVC Management Tool
XVTEC
Page 13
2.3 Launching the XVC management tool
1. Execute the XVC management tool. The tool will discover units on the same
network and display as shown below.
2. The following fields will appear in the management tool. Some of the fields are
Read Only and some are configurable (Read/Write)
a. Device (RO) – Encoder or Decoder
b. Device Name (RO)– The name assigned to the device through the
WEB page (under Administration/Network Configuration) or the API.
c. IP Method (R/W)– Display IP mode (Static or DHCP)
d. IP Address (R/W)– The IP of the unit
e. Subnet Mask (R/W) – The subnet mask of the unit
f. Default gateway (R/W) – The default gateway of the unit
g. MAC address (RO) – The MAC address of the unit
h. State(RO) – Display the unit’s state, (Online/Offline/Rebooting/FW
upgrading)
i. FW version (RO) - Unit’s firmware version
j. Bitrate (RO) – Display the configured bitrate of each channel in the
encoder

XVC Management Tool
XVTEC
Page 14
2.4 Assigning an IP (static/DHCP) address
1. Select the unit
2. Right click the units, a dialog box will appear. Select Set IP
3. Enter the requested parameters.
4. If DHCP is selected, and a DHCP server is not available, the unit will revert to
its default address (APIPA address – 159.254.x.x)
2.5 Configuring the XVC encoder through the WEB interface
Double click a device in the XVC management tool. A WEB browser will be
launched with the IP of the selected unit. The user will have to enter user name
and password (the defaults are admin/admin)

XVC Management Tool
XVTEC
Page 15
2.6 Rebooting the XVC Encoder
1. Select the unit for reboot
2. Right click and select Reboot

Web Configuration Interface
XVTEC
Page 16
3 Web Configuration Interface
3.1 Web Interface Overview
The Web Interface is the means of configuring the XVC encoder. The web
interface is compatible with the following browsers:
Internet explorer 8 and above
Chrome
Firefox 36 and above
Microsoft EDGE
The following procedures describe how to configure the XVC encoder using the
Web Configuration Interface:
Setting network parameters
Auto detection of video
Setting the 3D Noise Filter parameters
Setting video encoding parameters
Setting audio encoding parameters
Setting streaming parameters
Setting Date and Time
Updating the firmware

Web Configuration Interface
XVTEC
Page 17
3.2 Configuring the XVC Encoder
This procedure describes how to configure the XVC encoder from the Web
Interface.
The order of this procedure, and the inclusion of all the steps, is recommended
but not mandatory.
To configure the XVC encoder:
1. Assign the XVC encoder an IP address, by using the XVC
Management tool or through the WEB interface. Refer to Network
settings
2. Set the video input parameters (optional, video and audio standard
are automatically detected). Refer to video input parameters
3. Set encoding parameters. Refer to Channel parameters settings
4. Set streaming parameters. Refer to Streaming settings
3.3 Network settings
This section describes how to setup the network parameters of the XVC encoder
3.3.1 Assigning a static IP/DHCP Address
This procedure describes how to assign a permanent IP address to the XVC
encoder from the Configuration tool.
To assign a static IP address:
1. From the XVC navigation tree, select the Network Configuration page.
The Network Configuration page appears (Figure 1).

Web Configuration Interface
XVTEC
Page 18
Figure 1: Network Configuration Page (Static IP Method)
a. Set the encoder name (hostname)
b. From the IP Method dropdown list, select Static or DHCP.
c. In the case of STATIC configuration, complete the IP Address, Net mask,
and Default Gateway fields with the correct information.
d. In the case of DHCP, the unit will send a DHCP request. If a DHCP server
is active, the unit will receive all network parameters from the server. If a
DHCP is inactive, the unit will fall back to default IP after approx. 5secs.
e. Select the check box ‘Ignore ICMP Echo’ if ping requests should be ignored
f. Click Save.

Web Configuration Interface
XVTEC
Page 19
Figure 2: Network Configuration Page
3.4 Video Input parameters
This section describes how to setup the video input settings.
3.4.1 Video standard detection
The XVC encoder automatically detects the video and the audio standard.
Refer to fig 3. Note for interlaced sources the height shown is of a field so for 1080i60
the following parameters will be displayed: Width – 1920, Height – 540, Framerate –
60, Scanning mode – Interlace.
3.4.2 3D noise reduction
Noise reduction uses an advance algorithm to clean the image from noise
while maintaining a crisp image. Each video channel can have a separate
noise filter with the following parameters:
a. None - disable noise filter
b. Spatial - 2D noise filter
c. Temporal - Uses previous frames to reduce noise
d. Spatial +Temporal - 3D noise filter

Web Configuration Interface
XVTEC
Page 20
The Video Settings page appears (Figure 3).
Figure 3: Video Settings Page

Web Configuration Interface
XVTEC
Page 21
3.5 Channel parameters settings
This procedure describes how to set:
Go Live button functionality
Video encoding parameters
Audio encoding parameters
Streaming parameters
3.5.1 Go Live button
The GO-LIVE button serves as a Start/Stop streaming control, where the user can
pre-configure the streaming parameters and initiate steaming in the field by
pressing the button.
The button’s function is configurable through the web interface.
Go Live button is active in the following streaming modes
a. RTP
b. MP2TS
c. RTMP
Note: in RTSP Go Live button is always inactive

Web Configuration Interface
XVTEC
Page 22
By default, the button is disabled, pressing it has no affect.
In order to configure the button:
a. In the WEB interface select Channel Settings
b. From the pull down menu select
i. Button disabled – Button has no affect
ii. Channel 1 – Button is enabled and effects only channel 1. Pressing the
button will initiate streaming based on the streaming protocol configured.
The Activity LED of channel 1 will blink indicating streaming is active
iii. Both channels – Button is enabled and effects both channels. Pressing the
button will initiate streaming on both channels based on the streaming
protocol configured. The Activity LEDS will blink indicating streaming is
active
To set video encoding parameters:
1. From the XVC navigation tree, select the channel whose encoding you want
to set.
The Channel Settings page appears for that channel (Figure 4).

Web Configuration Interface
XVTEC
Page 23
Figure 4: Video Encoding Page (Native Encoding Selected)
3.5.2 Encoding Pipe
Encoding pipe selects the pre-processing algorithm applied to the video input.
Select scaling to support scale up or down the video input. The Video Width
and Height field becomes enabled.
Select Native to pass the video source directly to the encoder without scaling
it. The Video Width and Height fields becomes disabled (Refer to figure 4).
3.5.3 Encoder Bit Rate
Encoding bit rate sets the amounts of bits per second allocated for compression in
Kbs. For example, setting this field to 1000Kbps will produce approximately
1000K bit per second. The value selected depends on the application. For high
quality video streaming and complex scenes at a resolution of 720p30 it is
recommended to set the encoding bit rate to 4000-8000Kbps.

Web Configuration Interface
XVTEC
Page 24
Note: A higher value yields better quality and consumes more bandwidth.
3.5.4 Rate Control
Rate control selects the internal algorithm of the encoder to maintain the target bit
rate (Encoder bit rate).
Select CBR (Constant Bit Rate) for encoding the video at a constant bit rate.
The encoder will try to reach the target bit rate at all scenes
Select VBR (Variable Bit Rate) for encoding the video at variable bit rate. The
encoder will allocate more bits for complex scenes and less for static scenes.
The overall bit rate will be equal or less the desired bit rate
3.5.5 Video Frame Rate
The frame rate (target frame rate) selects the encoding (output) frame rate. The
target frame rate is achieved by skipping input frames. For optimal viewing
experience (smooth video movements) the target frame rate should be set to a
divisible value of the input frame rate. For example, for a 60 fps input, target
frame rates such as 30,15,20,10 will work fine. Setting the target frame rate to 50
will produce jaggy video
3.5.6 Intra Interval
Sets the interval in which the encoder will produce an I/IDR (Intra/Instantaneous
Decodable Refresh). Setting this field for example to 20 will send an INTRA frame
every 20 frames. The value selected depends on the application and the network
condition. For low bitrates, the Intra Interval should be high, causing the encoder
to send most of the time P (Predictive) frames.
Note: High values of Intra Interval can cause degraded picture quality in the
decoder side in the event of packet loss due to a non-optimal network
performance
3.5.7 Enabling/Disabling the Video Output of a Channel
This procedure describes how to enable/disable a video channel. When both
channels are enabled, both channels can stream video with a maximum
performance of 1080p60 (e.g. 2x1080p30). In order to reach 1080p60 on a single
channel, the other channels must be disabled.
To enable/disable the video output of a channel:
1. In the Channel settings, check the video enabled check box to enable video, or
un-check it to disable video (refer to figure 4)

Web Configuration Interface
XVTEC
Page 25
3.5.8 Forcing an Intra Frame
This procedure describes how to force the channel to send an Intra frame, which is
helpful if the video stream was disrupted.
To force an Intra frame:
1. In the Channel settings, click the Force Intra button. (figure 4)
The channel sends an Intra frame.

Web Configuration Interface
XVTEC
Page 26
3.5.9 Advance Settings
The user can configure quantizer minimum and maximum values for I and P
frames. These values are used by the encoder’s rate control to produce the target
bit rate. Changing the default values may degrade video quality or may cause the
encoder to exceed the target bit rate
To change the quantizer values:
a. Enter Advanced settings under the desired Channel (1/2)
b. Move the sliders to set the Qmin and Qmax values for I and P frames
c. Press Save or Apply
3.6 Audio setting
Most of the audio parameters are static or automatically detected. The only
configurable field is the audio bitrate.
The audio streaming if enabled is always compressed in AAC-LC.

Web Configuration Interface
XVTEC
Page 27
a. Audio sample rate is detected automatically
b. Set Audio Enable to checked if audio is required
c. Set the audio bit rate (bps), Valid values are between [80,000 .. 320,000] bps.
d. Compression method is always AAC-LC
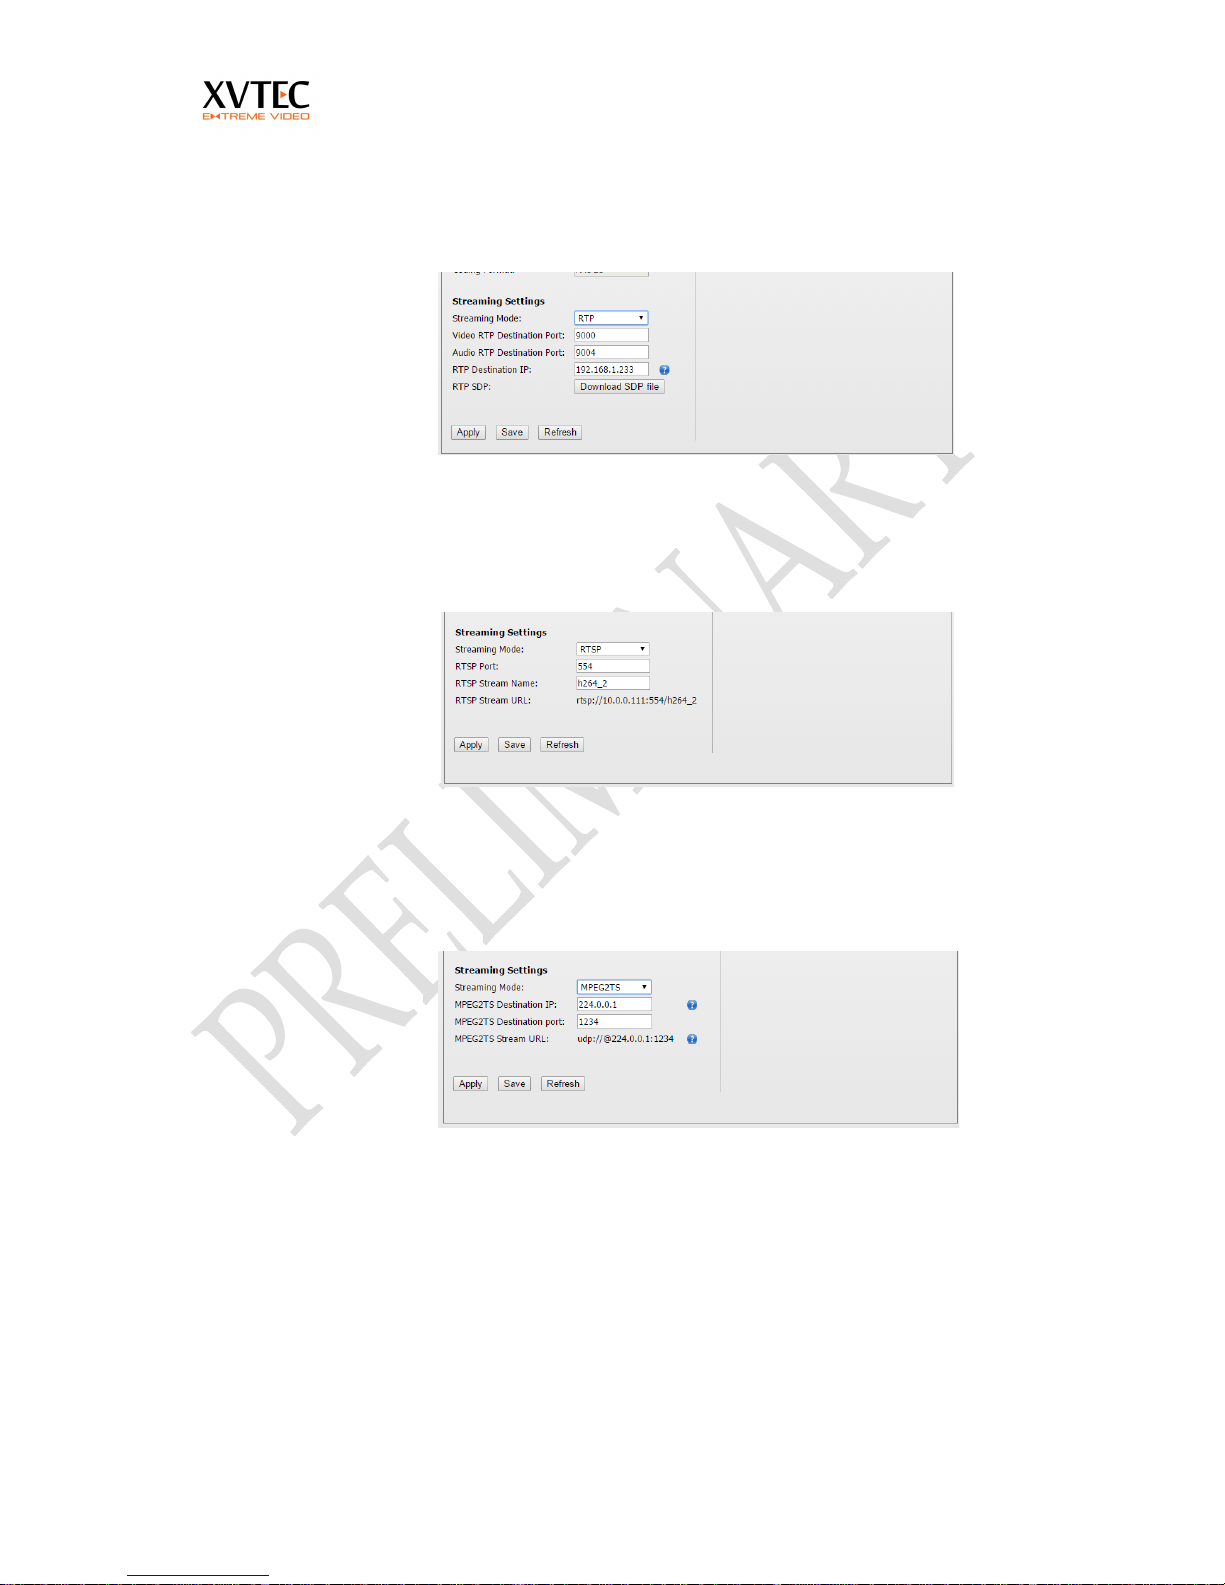
3.7 Streaming settings
The XVC encoder provides streaming settings for using RTSP, RTP, MP2TS and
RTMP streaming protocols.
RTMP is uses to push mainly live streams to, Wowza Media Server, or any of the
popular Content Delivery Networks (CDNs), such as YouTube Live and Ustream.
This procedure describes how to set the streaming parameters. Refer to section 5
(Viewing the Video Stream Using VLC) for detailed examples.
Please note, switching to a different streaming protocol requires to the user to
save the settings and reboot the unit.
Web Configuration Interface
XVTEC
Page 28
RTP - Streams video to an IP, PORT in RTP protocol. Set the
Video RTP port, Audio RTP port and RTP destination IP. No
negotiation/session is required. An SDP file should be
downloaded from the encoder.
RTSP - Stream video through RTSP protocol. Set the RTSP port
and RTSP stream name. A RTSP client such as VLC may be used
to view the video
MP2TS - Stream video in Mpeg2 TS protocol directly to IP set-top
boxes and television broadcast equipment to an IP, PORT. Set the
MP2TS destination port, MP2TS destination IP (License required)
RTMP - Stream video in RTMP protocol, mainly used in web-casting
and pushing content to CDNs such as YouTube live, Akamai and
others (License required).

Web Configuration Interface
XVTEC
Page 29
Your CDN will provide you a RTMP URL, a RTMP Key and optional
a RTMP user name and password.
If all RTMP parameters are correct, the RTMP status will change to
streaming state.
Do one of the following:
Click Apply - the parameters are applied until the next reboot.
Click Save - the parameters are saved.
3.8 Setting Date and Time
This section describes how to set the time locally and through NTP.
3.8.1 Local time setting
1. From the XVC navigation tree, select Administration.
The Administration page appears (Figure 5).

Web Configuration Interface
XVTEC
Page 30
Figure 5: Administration Page (NTP Selected)
In the Time area, clear the NTP option.
The System Time field becomes enabled (Figure 6).
Figure 6: Administration Page (NTP Cleared)
System Time field, will pop-up time/ date selector
Click Save.
The parameters are saved, and the time in the System Time field is enabled.
Related Procedures:
Syncing Date and Time to an NTP Server
Identifying the XVC Encoder
3.8.2 Syncing Date and Time to an NTP Server
This procedure describes how to sync the date and time to an NTP server.
To sync the date and time with the NTP:

Web Configuration Interface
XVTEC
Page 31
1. From the XVC navigation tree, select Administration.
The Administration page appears (see Figure 6).
In the Time area, select the NTP option.
The NTP Server field becomes enabled (see Figure 5).
In the NTP Server field, type the NTP server.
The default NTP server is ntp.pool.org, which is the industry standard.
Click Set.
The parameters are saved, and the time in the System Time field is enabled.
3.9 Identifying the XVC Encoder
This procedure describes how to physically identify the XVC.
To identify the XVC encoder:
1. From the XVC navigation tree, select Administration.
The Administration page appears (see Figure 5).
In the Detect Unit area, click the Toggle Blink State button.
The power LED of the selected XVC encoder blinks.
To stop the blinking, click the Toggle Blink State button again.
3.10 Rebooting the XVC Encoder
This procedure describes how to reboot the XVC encoder from the web page.
Rebooting returns settings to the last time they were saved.
To reboot the XVC encoder:
1. From the XVC navigation tree, select Reboot.
The Reboot page appears along with a confirmation dialog box (Figure 7).

Web Configuration Interface
XVTEC
Page 32
Figure 7: Reboot Page
In the confirmation dialog box, click OK.
The XVC encoder reboots, and in the Administration page, the System
Uptime field resets.
Related Procedures:
Rebooting the XVC Encoder

Web Configuration Interface
XVTEC
Page 33
3.11 Firmware upgrade
This procedure describes how to upgrade the unit's firmware from the web page.
To upgrade the XVC encoder:
1. Under Administration select from the tree Firmware upgrade.
2. Press the select file, and select a FW_xxx.img firmware file
3. Press upload file. A progress bar will appear indicating the percentage
uploaded to the XVC encoder.
4. During the upload process the power led will blink
5. Once the upload is complete
a. The unit will reboot, the power led will turn off
b. After approx 30 sec the LED will continue to blink. This indicates
the unit is updating the F/W.
c. At completion the unit will re-boot and the new F/W will be active
6. The new F/W version can be seen under Administration, Firmware
Version

License manager
XVTEC
Page 34
4 License manager
The license manager is used to enable enhanced features of the XVC encoder.
Below is a screen shot of the license manager. A list of enabled features is
shown.
In order to enable a feature a license file should be uploaded to the unit by
selecting a .lic file from the web interface and uploading it. If the license file is
valid the feature will be enabled.

Viewing the Video Stream Using VLC
XVTEC
Page 35
5 Viewing the Video Stream Using VLC
This procedure describes how to view the video stream encoded by the XVC
encoder directly on your computer, without a decoder, using the VLC media
player.
Note: This procedure was tested on VLC 2.1.5
5.1 Streaming to VLC in RTSP protocol
1. Open the VLC application.
In the menu bar of VLC, select Media > Open Network Stream.
Copy the RTSP Stream URL displayed in the Channel settings (marked in
orange)
Click Play to start previewing the stream in VLC.

Viewing the Video Stream Using VLC
XVTEC
Page 36
5.2 Streaming to VLC in RTP protocol
1. In the WEB interface under channel 1/2, set streaming mode to RTP. Note
switching to different streaming modes, requires saving the parameters and rebooting.
2. Set the video and audio RTP destination streaming port (Marked in red)
3. Set the destination IP (Marked in blue)
4. Press save or apply.
5. download the SDP file and open it in VLC.

Viewing the Video Stream Using VLC
XVTEC
Page 37
5.3 Streaming to VLC in MP2TS protocol (license required)
6. In the WEB interface under channel 1/2, set streaming mode to MPEG2TS. Note
switching to different streaming modes, requires saving the parameters and rebooting.
7. Set the MPEG2TS destination port (Marked in red)
8. Set the MPEG2TS destination IP (Marked in green)
9. Press save or apply.
10. Copy the URL to VLC under "media-> open network stream"
5.4 Streaming to a CDN in RTMP protocol (license required)
RTMP protocol is used mainly to stream live (or recorded) video to CDNs
such as Akamai, Ustream, YouTube live and others.
Typically, the user will have to open an account with a CDN provider. A
URL (Stream Name) and password (Depending on the provider) will be
supplied by the provided which will have to be inserted to the appropriate
field in the WEB interface.

Viewing the Video Stream Using VLC
XVTEC
Page 38

Restoring the unit
XVTEC
Page 39
6 Restoring the unit
The XVC encoder maintains two firmware versions:
FW0- The base version, this version is NOT upgradable.
FW1 - The upgraded version. Only FW1 gets upgraded.
The firmware version and the active firmware bank can be seen in
administration in the WEB interface.
If for some reason FW1 gets corrupted or the unit becomes unstable, execute one
of the following procedures:
Simple reset - Reboot
Procedure
Press reset button - encoder will reboot
Factory defaults - All encoder settings will be deleted including licenses. The
encoder will switch to factory defaults. Network parameters will be lost. Use
the XVC Management tool to setup the network parameters. The active
firmware will still remain FW1

Restoring the unit
XVTEC
Page 40
Procedure
Power off the unit
Apply power while pressing the reset button until the power LED
turns on (Approx. after 10 secs)
Release the reset button. The Unit will boot from FW1, with
factory defaults
Revert to FW0 - All encoder settings will be deleted including licenses. The
encoder will switch to base version firmware FW0. Network parameters will
be lost. Use the XVC management tool to setup the network parameters.
After network parameters are set, the user can upgrade the firmware to a
new version
Procedure
Power off the unit
Apply power while pressing the reset button until the power LED
flashes slowly (Approx after 20 secs)
Release the reset button. The Unit will boot, with FW0 as the active
firmware
Full recovery - please contact support@xvtec.com

Performance and limitations
XVTEC
Page 41
7 Performance and limitations
The XVC encoder is capable of encoding a single channel at 1080p60 or two
channels at 1080p30 or any combination that does not reach the limit of
1920x1080x60.
There are cases where the encoder will not be able to reach the maximum limit
due to pre-processing which uses common resources.
This limitation may appear in several cases, for example:
The video input is set to 720p60, the output resolution (scaling = on) for both
channels is set to 1080p30 (width - 1920, height - 1080)
The video input resolution is set to 1080i60, the output resolution is set to
1080 (width - 1920, height=1080) and the scalar is enabled
In both cases the scalar is working "hard" up-scaling the input signal
 Loading...