

Page 1
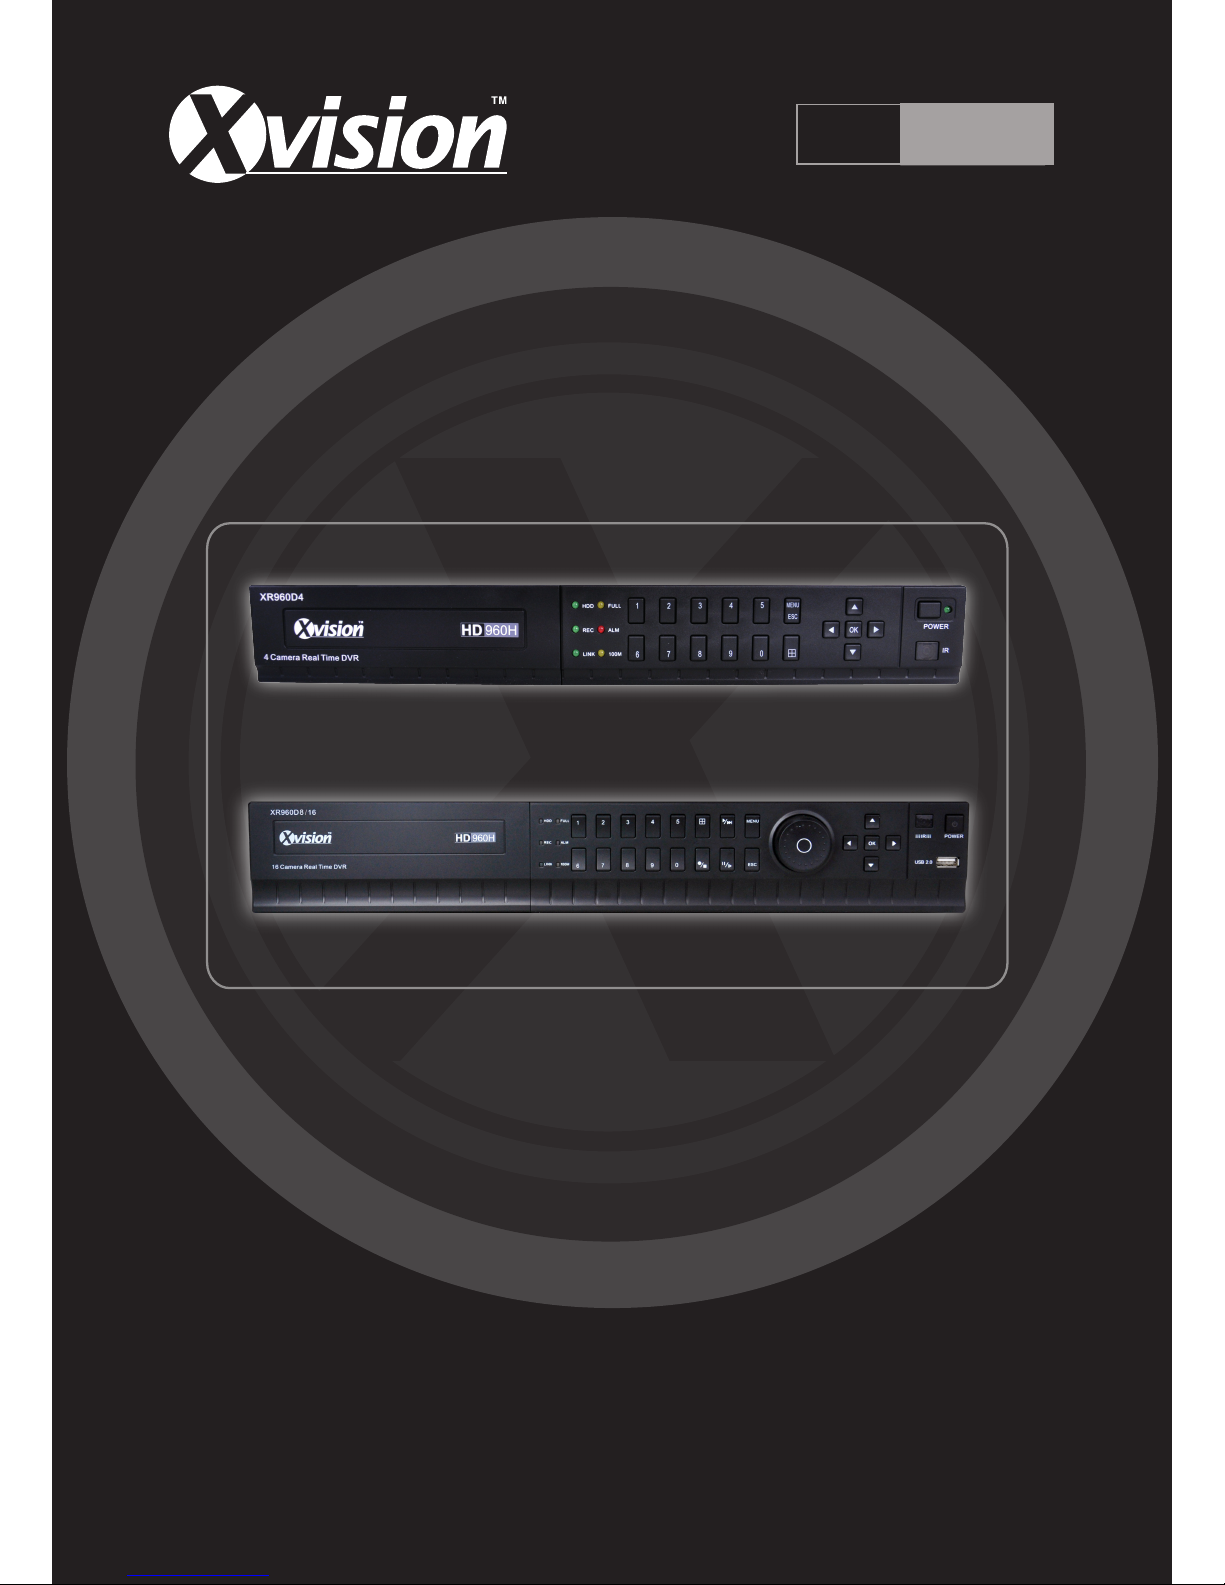
Professional 960H HD DVR
4, 8 & 16 Channel
Quick Guide
Version 1
HD
960H
Thank you for purchasing the XR960 DVR from Xvision.
Please ensure that you read and understand this Quick Guide before operating the DVR.
Please store this Quick Guide in an easily accessible location.
Page 2

Contents
1. System Startup ………………………………………………………………………………………………… 3
2. Setup Wizard …………………………………………………………………………………….…………..… 3
2.1. Wizard Interface …………………………………………………………………….. 3
2.2. Administrator Login Interface …………………………………………………. 3
2.3. Basic Setup …………………………………………………………………………….. 4
2.4. Network Setup ……………………………………………………………………….. 5
2.5. Network Tesng ……………………………………………………………………… 5
2.6. DDNS & Port Setup …………………………………………………………………. 5
2.7. Record Mode & Record Setup …………………………………………………. 6
2.8. HDD Setup ………………………………………………………………………….….. 7
3. User Login …………………………………………………………………………………….………………..… 8
4. Interface Introducon ………………………………………………………………………………………. 9
5. Basic Record Setup …………………………………………………………………………………….…..… 9
6. Record Bit Rate Setup ……………………………………………………………………………………..… 9
7. Schedule …………………………………………………………………………………….…………………..… 10
8. Display …………………………………………………………………………………….……………….………. 11
9. Network Setup …………………………………………………………………………………….…………... 13
10. DDNS Setup …………………………………………………………………………………….………………. 15
11. P.T.Z. Setup …………………………………………………………………………………….…………….…. 16
XR960D Quick Guide
Page 3
3
1!!System!startup! !
Power!on/off! !
Connect!the!power!plug!to!the!power!port!on!the!back!of!the!DVR.!The!system!will!automatically!
run!a!status!check,!and!will!start!after!few!seconds.!You!will!see!a!wizard!interface!after!the!system!
loading.! !
2!!Setup!Wizard!
Setup! Wizard! is! a! quick! way! to! enter! the! DVR’s! basic! settings..! You! can! finish! the! DVR! basic!
settings!according!to!your!requirements.!This!setup!wizard!contains!all!the!basic!settings,!like!time!
setup,!network!setup,!HDD!format!reminder,!etc.!The!DVR!will!be!able!to!perform!basic!functions!
after!the!setup!wizard! has!finished.!If!personali zed! settings! are!desired,!please!login! to! the!main!
menu!and!setup!to!complete!this!function.!
!
2.1!Wizard!interface!
!
Wizard!interface!is!shown! below.! We!recommend!the!initial!user! finishes! the! guide!step!by!step!
for!the!basic!settings.! !
!
!
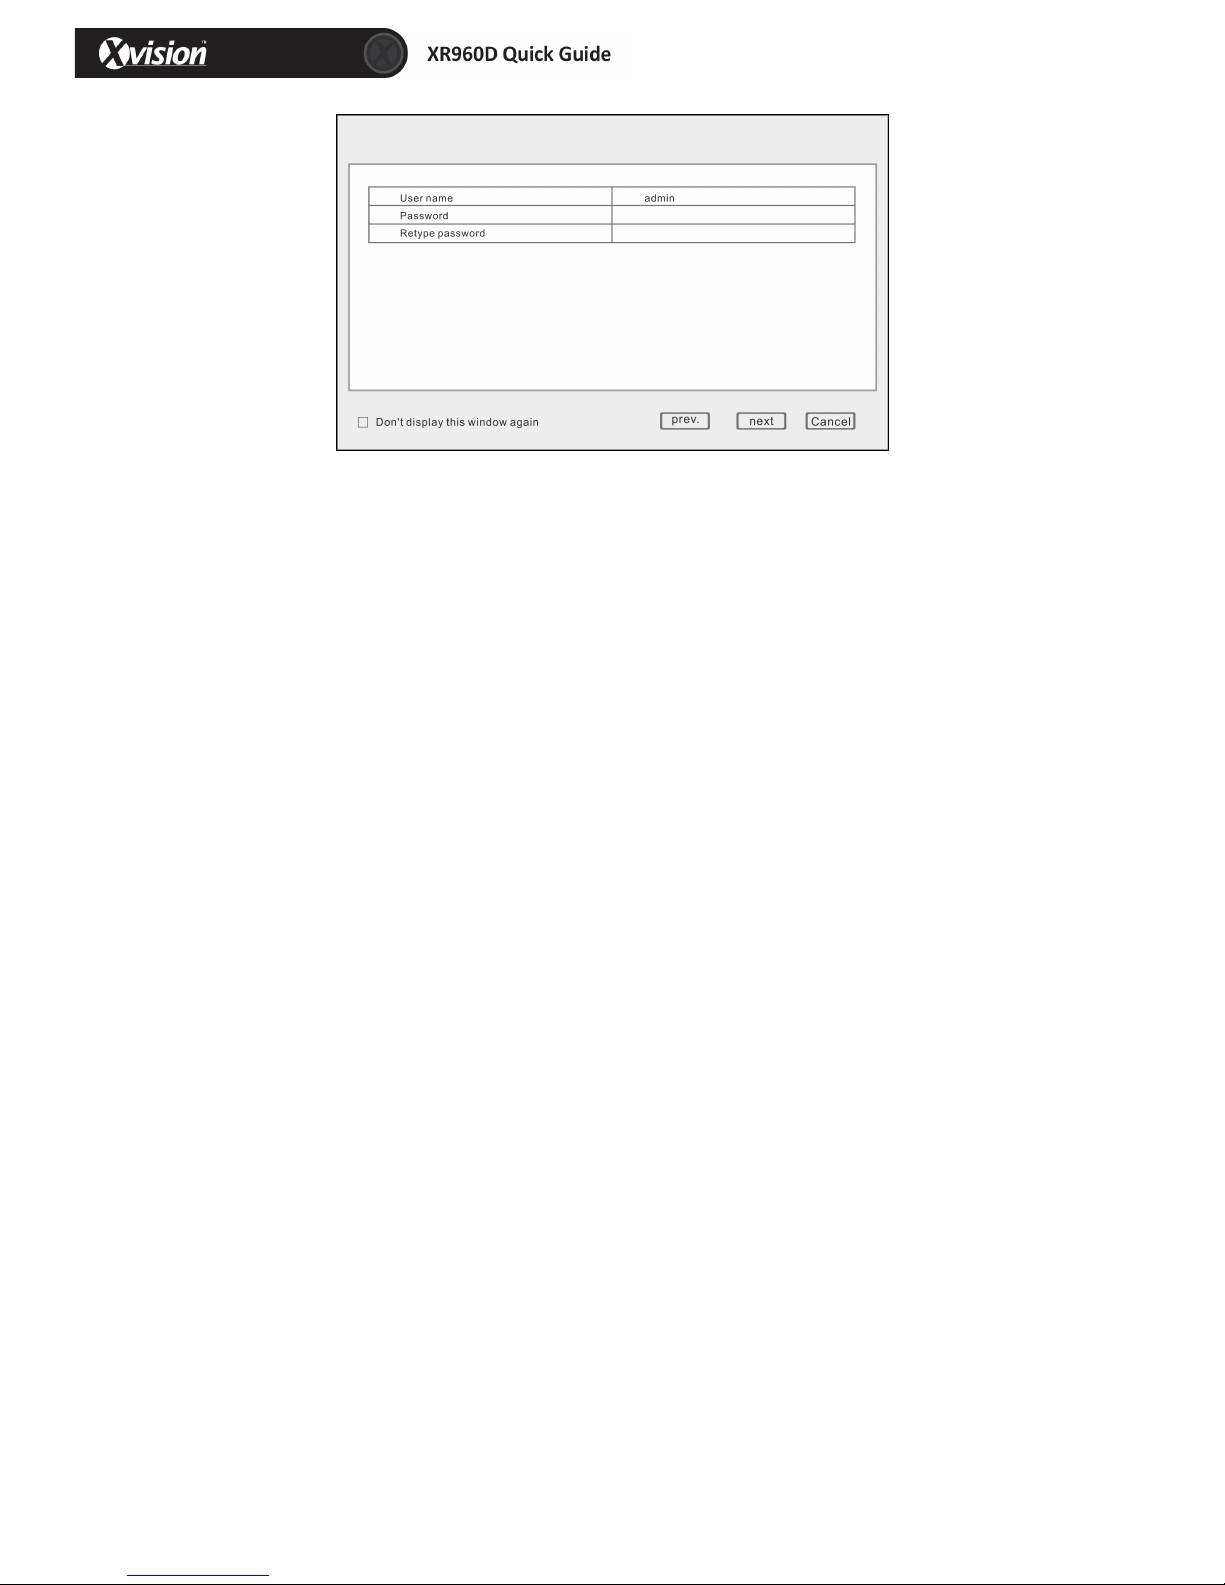
2.2! ! Administrator!Login!Interface! !
Here! we! recommend! you! setup! a! password! for! administrator! an d! then! click! "Next"! for! more!
settings;!if!you!click!"Cancel”,!you!will!enter!directly!into!the!"Main!Menu";!if!you!click!"Prev.",!the!
system!goes!to!the!previous!page.!
!
Note:!By!default,!the! administrator! user! name! is:! admin.! There! is! no! password,! but! we! strongly!
recommend!that!you!setup!a!password!here.! !
!
!
Page 4
4
!
2.3! ! Basic!Setup! !
Date/Time,! date! format,! time! format,! time! zone,! camera! system,! language,! should! be! setup!
according!to!your!needs.!
!
Date/Time! Setup:! Click! calendar! and! choose! the!date;!Click!time,!a!digital!keyboard!will!appear!
and!then!set!to!local!time.!
Date!Format:!Three!format!types:!MM/DD/YYYY,!DD/MM/YYYY,!and!YYYY/MM/DD.!
Time!Format:!24`hour/!12`hour.! !
Time! Zone:! Click! the! down! arrow,! time! zone! options! will! be! displayed,! please! select! your! time!
zone.! !
!
Please!Note:!Once!the!DVR!connects!with!the!internet,!it!wi ll !automatically!adjust!the!time!to!the!
time! zone! you!have!chosen.!Please!make!sure!the!time! zone! you!chosen!is!the!desired!local!time!
zone.!
Camera!System:!PAL/NTSC!optional.!
Language:!Choose!your!local!language!or!the!language!you!want.!
!
!
!
!
!
!
!
!
!
!
!
!
!
!
!
!
Page 5
5
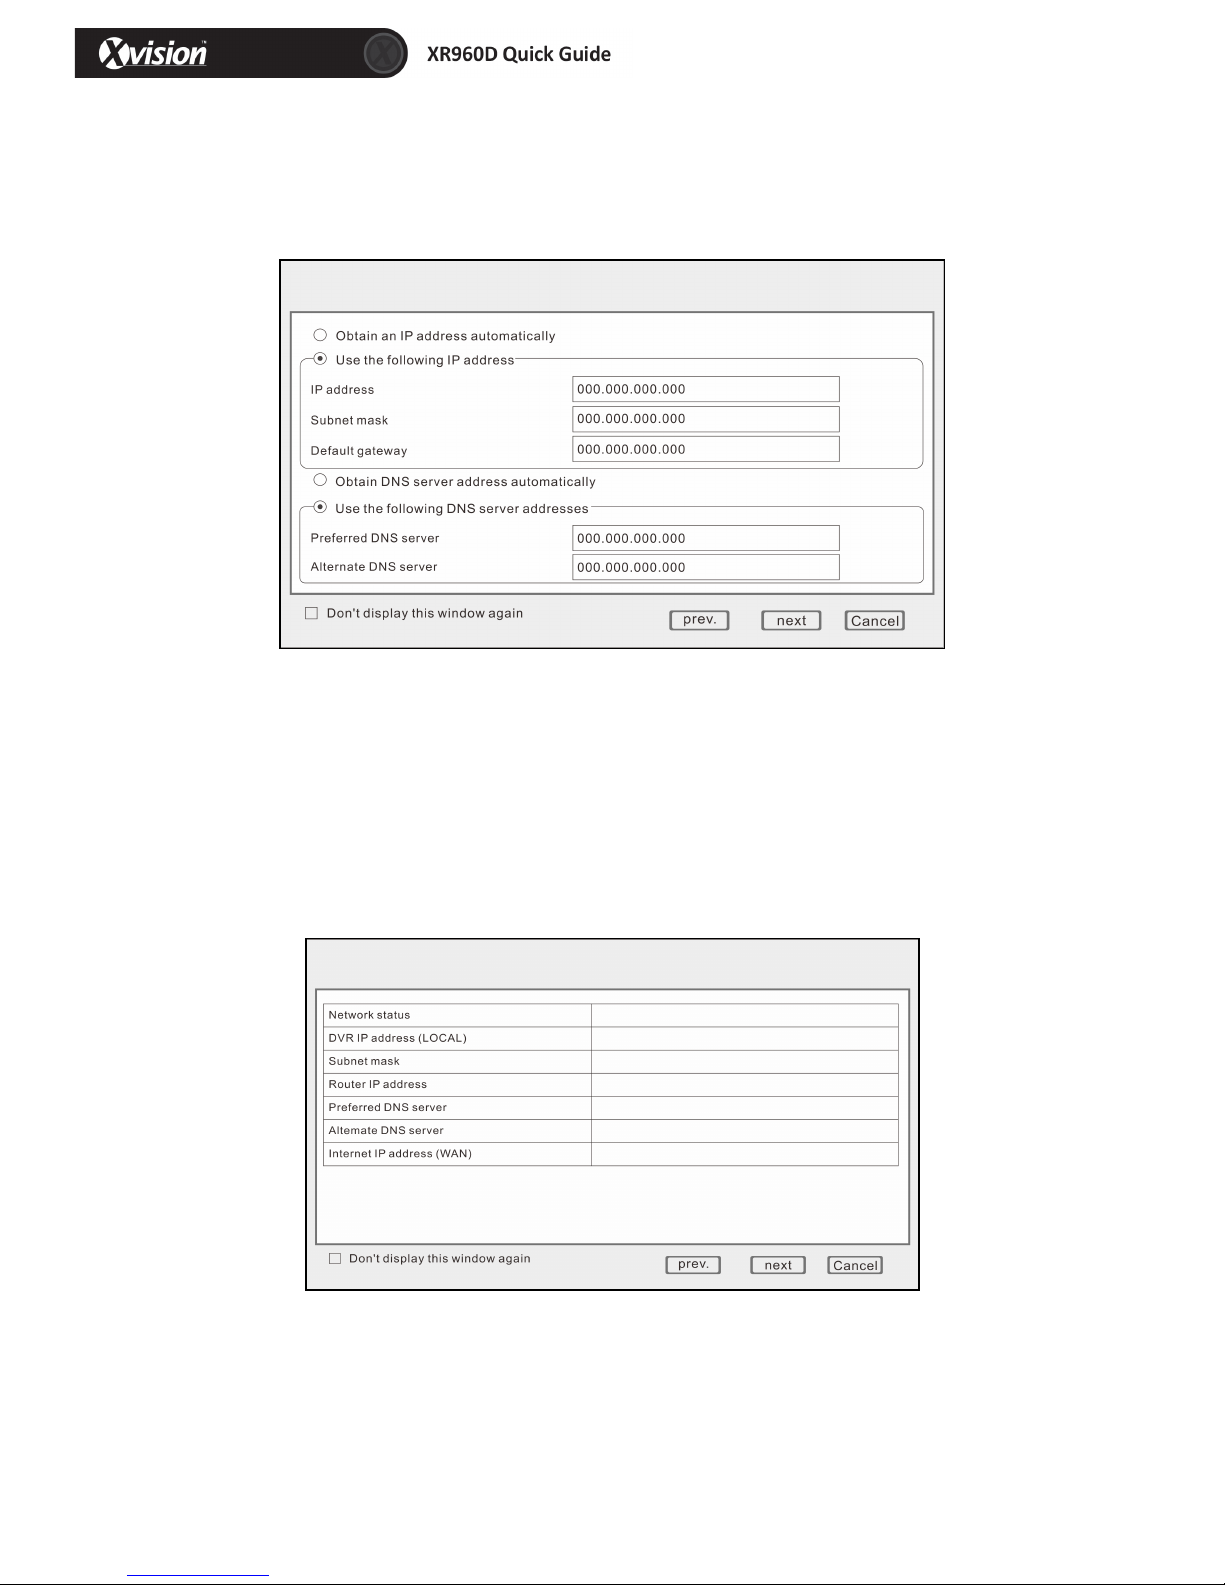
2.4! ! Network!setup! !
There! are! 2! kinds! of! network! setup:! obtain! an! IP! automatically! or! static! IP.! Select! the! type!
according!to!your!network!requirements,!as!displayed!below:!
!
!
!
2.5! ! Network!testing! !
The! system! will! test! your! network! setup! automatically.! If! a! network! connection! is! abnormal,!
please! return! to! the! previous! page! to! correct! the! settings! and! then! click! “Next”.! If! there! is! no!
testing!is!required,!just!click!“Skip”!to!go!to!the!next!page,!as!displayed!below:!
!
!
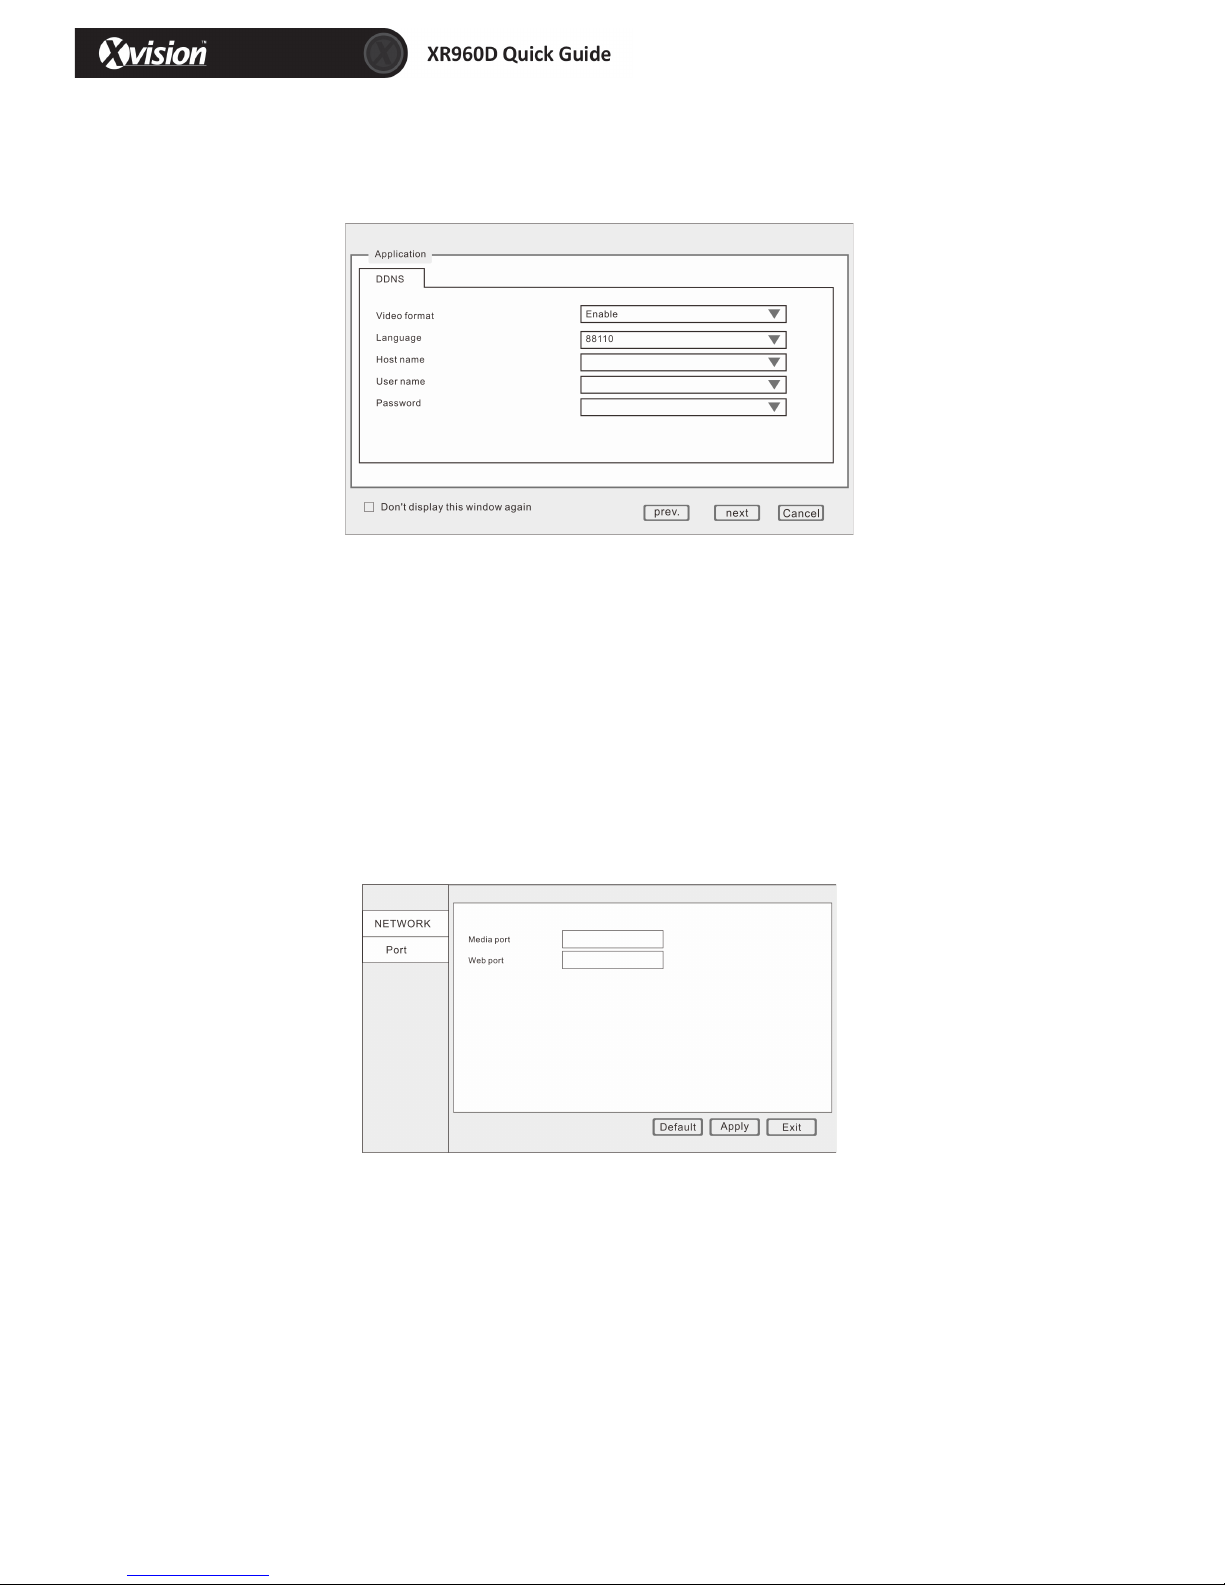
2.6! ! DDNS!&!Port!Setup!
DDNS:!Enable/Disable,!please!enable!the!DDNS!to!use!a!domain!name!server.!
Server:!Choose!your!domain!name!server:!3322,!dyndns,!no!IP,!changip!or!dnsexit.!
Host!Name:!Enter!the!host!name!you!registered!on!the!domain!name!server.! !
Page 6
6
User!Name:!Enter!the!user!name!you!registered!on!the!domain!name!server.!
Password:!Enter!the!password!you!registered!on!the!domain!name!server.!
As!displayed!below:!
!
!
!
!
!
!
!
!
Port!Setup!
!
Media!Port:!one!private!communication!port!that!between!DVR!and!PC,!default:!9000.!If!this!port!
was!occupied!by!other!server!port,!please!change!to!an!idle!port.!
Web!Port:!Http! port,!default:!80,!if!you!change!the!web!port,!for!example:!8088,!when!you!need!
to!access!through!browser,!you!will!need!to!add!the!web!port!after!the!IP!address.! !
E.g.:!http://ip!address:8088!
Please!Note:!port!range:!1`65535,!some!local!ISP’s!may!block!port!“80”.! !
!
!
!
!
!
!
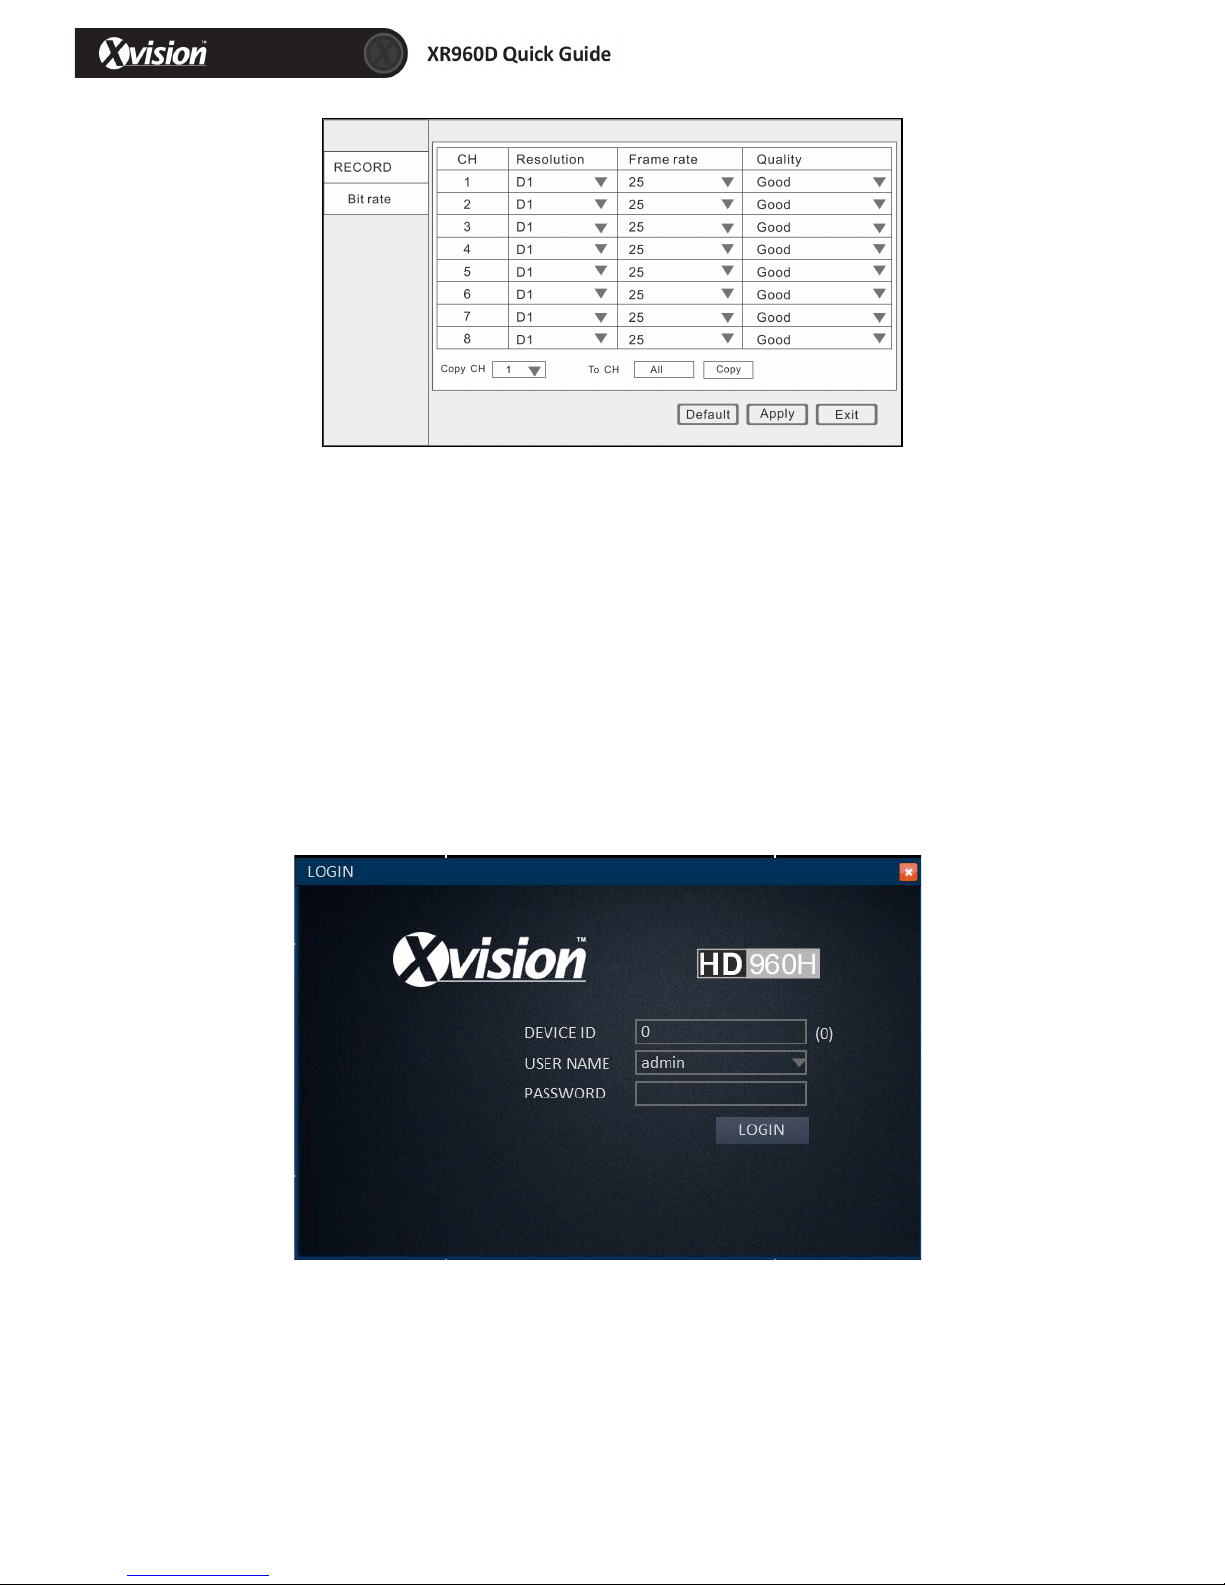
2.7! ! Record!Mode!&!Record!Setup! !
Setup!recording!and!audio!for!each!channel.!There!are!two!record!modes:!Always/Schedule.!
For!ease,!setup!one!channel!and!then!copy!to!the!others,!as!on!the!next!page.!
!
Page 7
7
!
2.8! ! HDD!Setup! !
HDD!Information:!You!can!check!the!HDD!capacity!and!HDD!quantity!in!the!HDD!setup.!
HDD!Format:!tick!'√'!under!format,!and!then!click!“Format”.!
Please!Note:!The!newly!installed!HDD!must!be!formatted!through!our!DVR!before!usage.! ! ! !
Overwrite:!There!are!three!options! to!choose!from;! “by!days”,!“by!capacity”!and!“never”.!Please!
select!the!desired!method.! !
After!the!setup!of!the!disk,!the!save!and!confirm!interface!will! b e!shown!on!screen!and!click!“Save!
to!log!out.! !
After! the! completion! of! setup!wizard,! DVR! can! be! worked!properly.!If! personalized! settings! are!
needed,!you!can!login!to!the!menu!to!setup,!as!explained!below:!
!
!
!
!
!
!
!
!
!
!
!
Page 8
8
3!!User!login!
!
Open!the!main!menu:!
!
Click!“START”!in!the!task!bar,!by!default!the!taskbar!is!at!the!bottom!of!the!screen,!click!and!hold!
the!taskbar,!you!can!then!drag!it!to!any!position.!Iif!the!taskbar!is!not!displayed,!right!click!the!
mouse!button.!
!
!
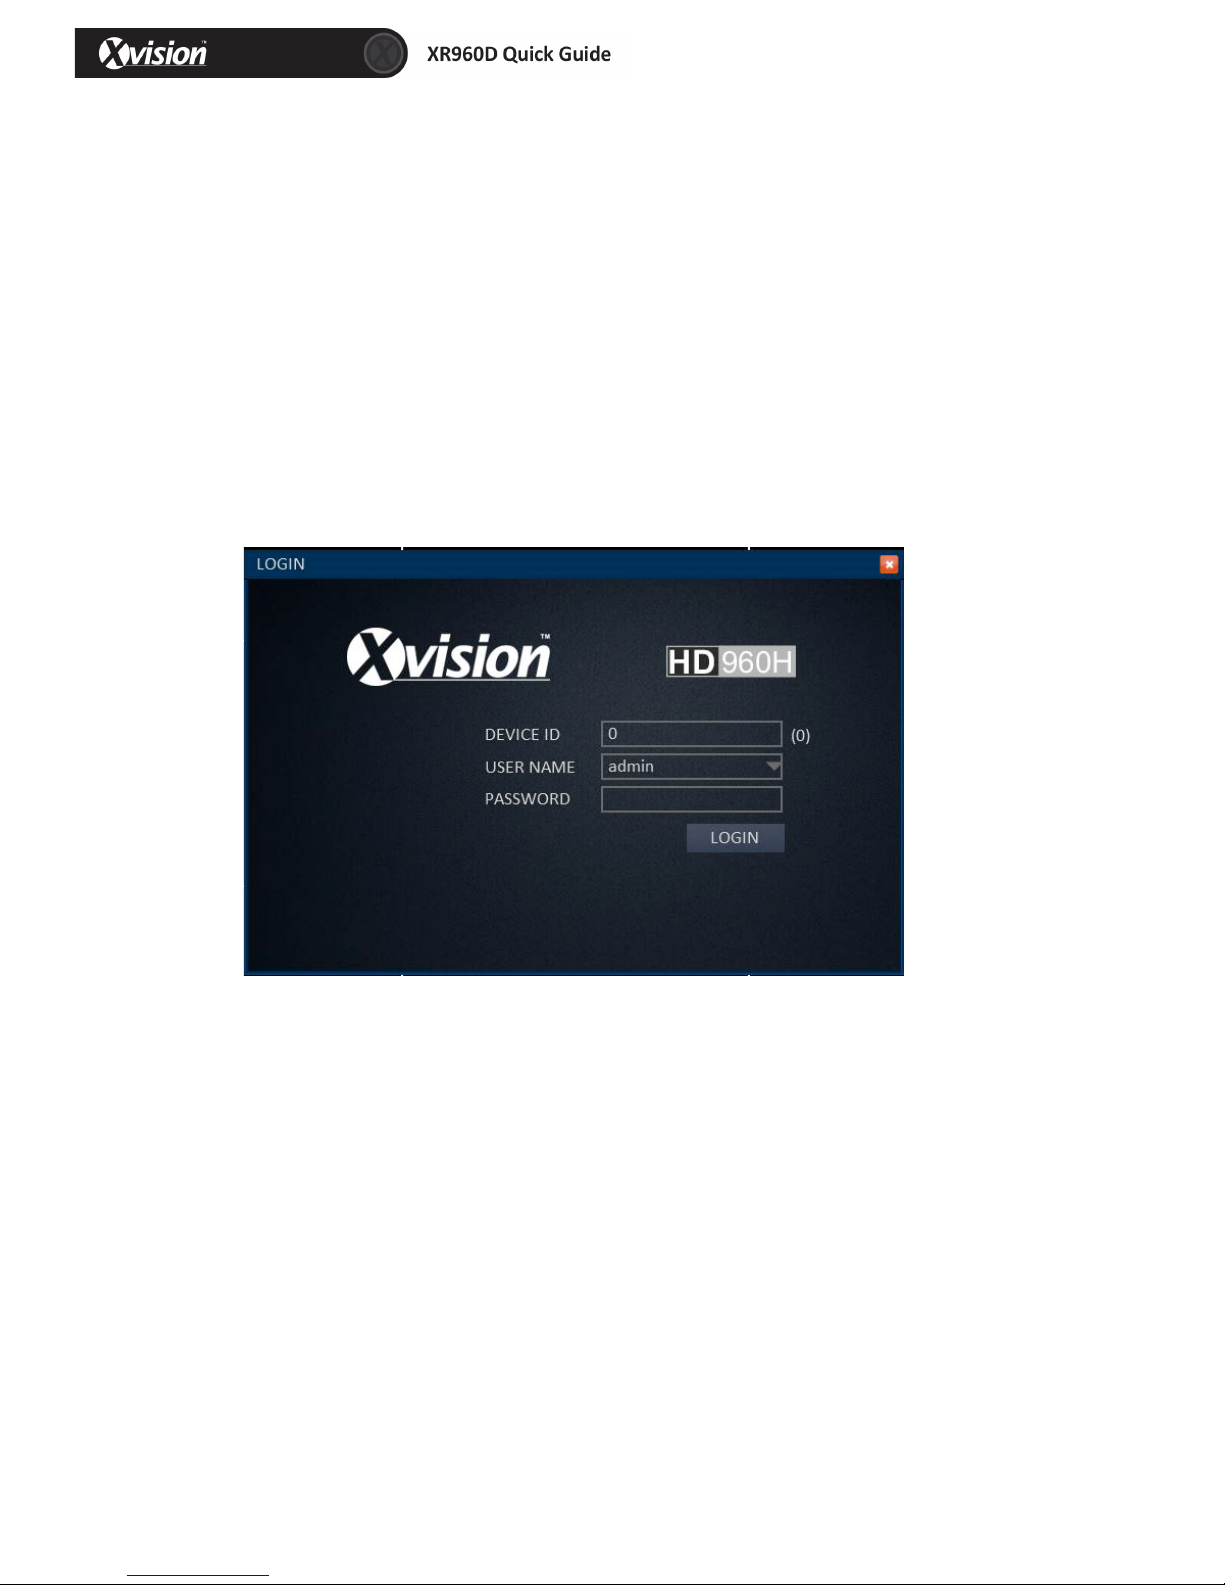
Click!“START”!to!enter!the! login! interface,! insert! the!Device!ID,!the!default!Device! ID! is! “0”.! The!
initial!user!name!is:!admin!with!no!password,!but!if!you!setup!a!password!during!the!setup!wizard,!
you!now!need!to!input!your!password!here.!
!
!
!
!
Page 9
9
4! ! Interface!In t ro d u c tio n!
In!live!view,!“ ”means!normal!recording,!“ ”!means!alarm!recording,!“ ”!means!not!recording.!
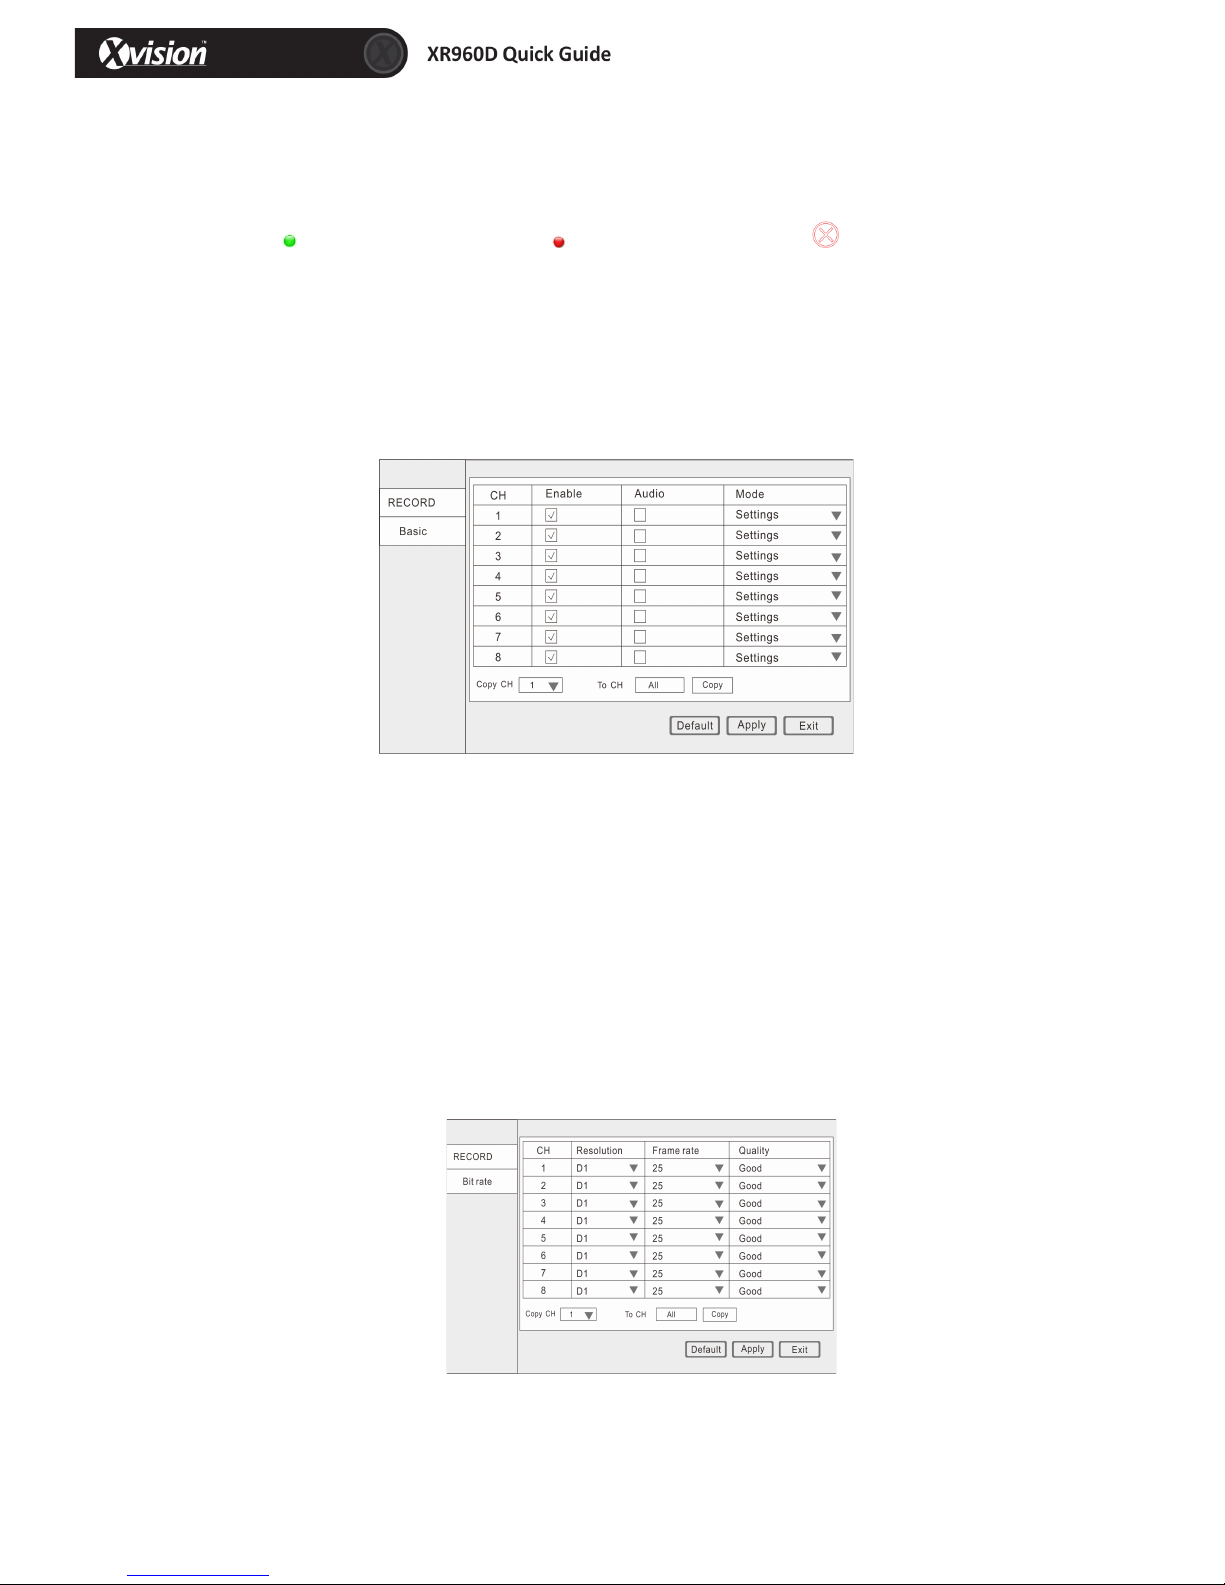
5! ! Basic!Record!Setup!
Login!to!the!Main!Menu,!click!“Basic”,!and!then!click!“RECORD”,!as!displayed!below:! !
!
!
!
!
!
!
!
CH:!Order!of!the!DVR!channel!
Enable:!click!to!enable!the!basic!setting!
Audio:!click!to!enable!audio!recording!
Mode:! Click! “Always”!or! “Time! recording”!to! make! the!DVR! record! when!start! up! or!recording!
according!to!the!set!schedule.!
Copy!CH:!Copy!one!CH!setting!to!another!CH.! !
6! ! Record!Bit!rate!Setup!
Page 10
10
CH:!Order!of!the!DVR!channel!
Resolution:!Click!WCIF,!WHD1,!WD1!to!set!the!recording!resolution.!
Frame!rate:!“1`25”fps!is!for!option.!
Quality:!Best,!Better,!Good,!Normal!
Copy!CH:!Copy!one!CH!setting!to!another!CH.! !
7!!!Schedule!
CH:!Order!of!the!DVR!channel!
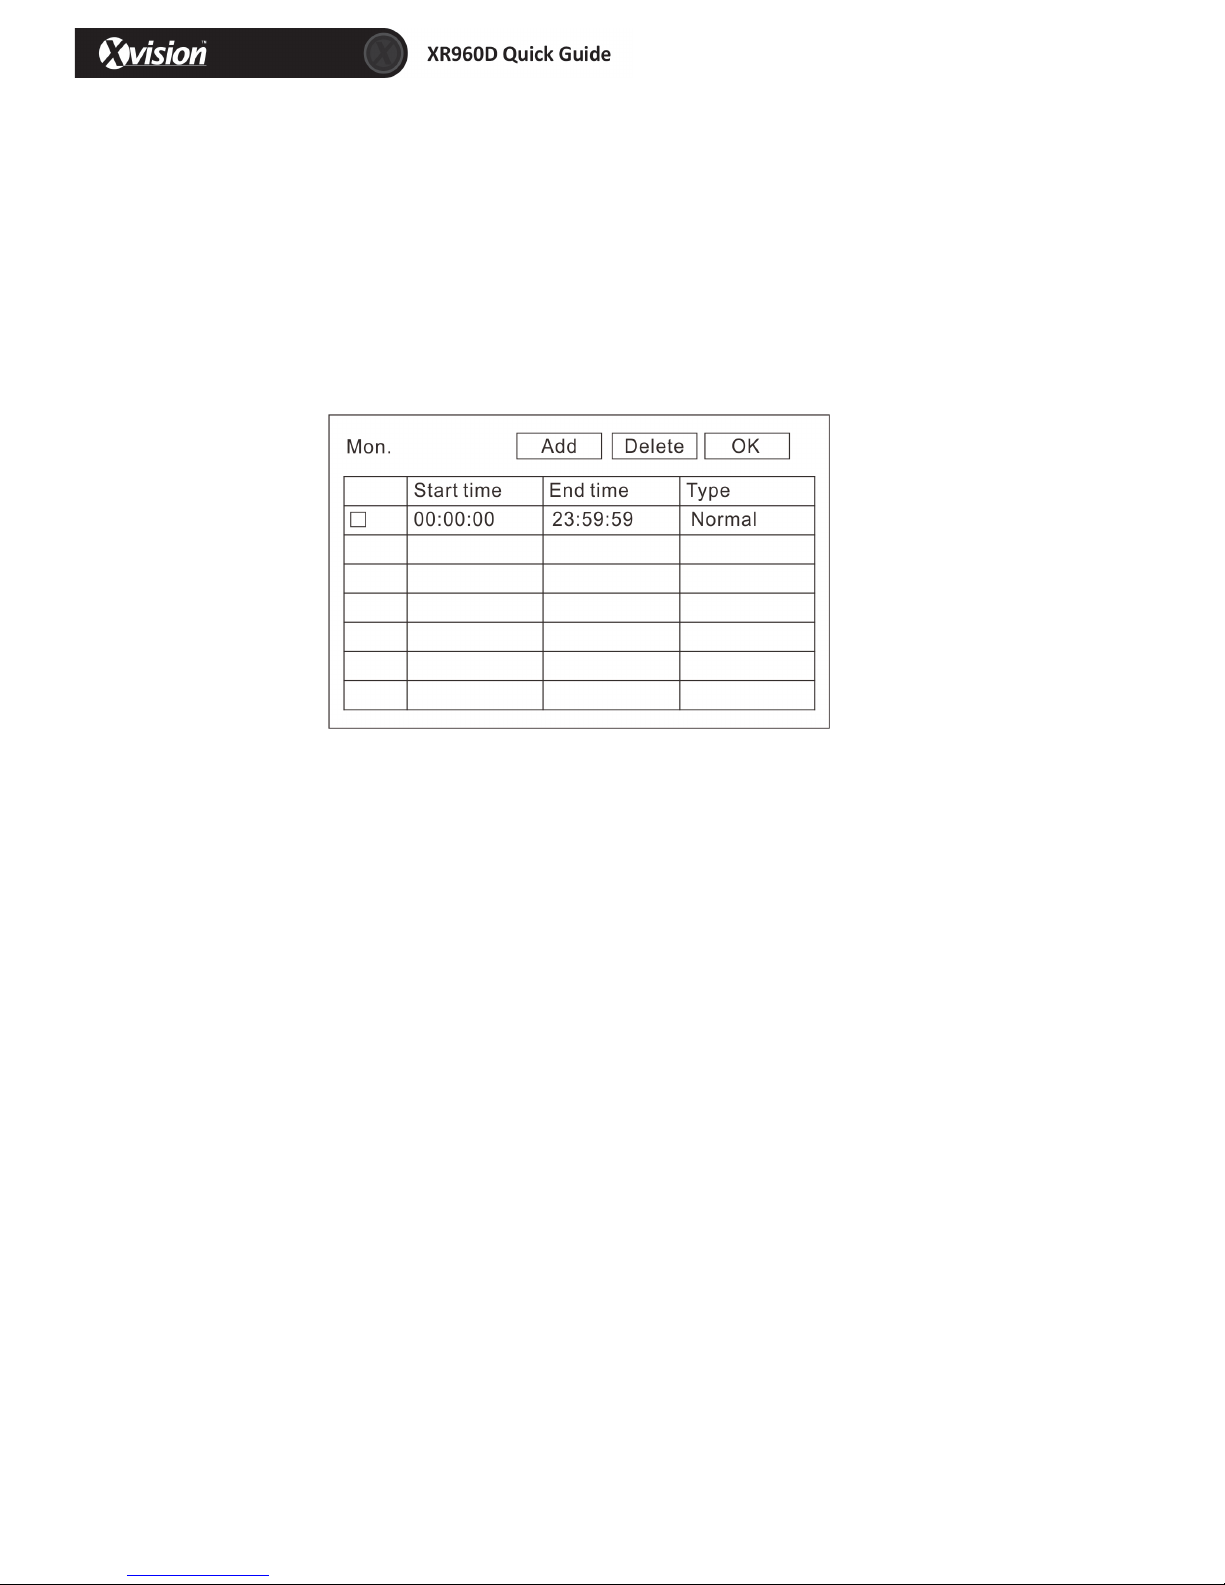
Set!the!mode!of!recording.”Manual”!”Normal”!”Alarm”!
Double!click!the!recording!schedule;!the!“schedule”!window!will!pop!up.!You!can! set!the!recording!
schedule!here.!
!
Copy!CH:!Copy!one!CH!setting!to!another!CH.! !
!
!
!
Page 11
11
8! ! Display! !
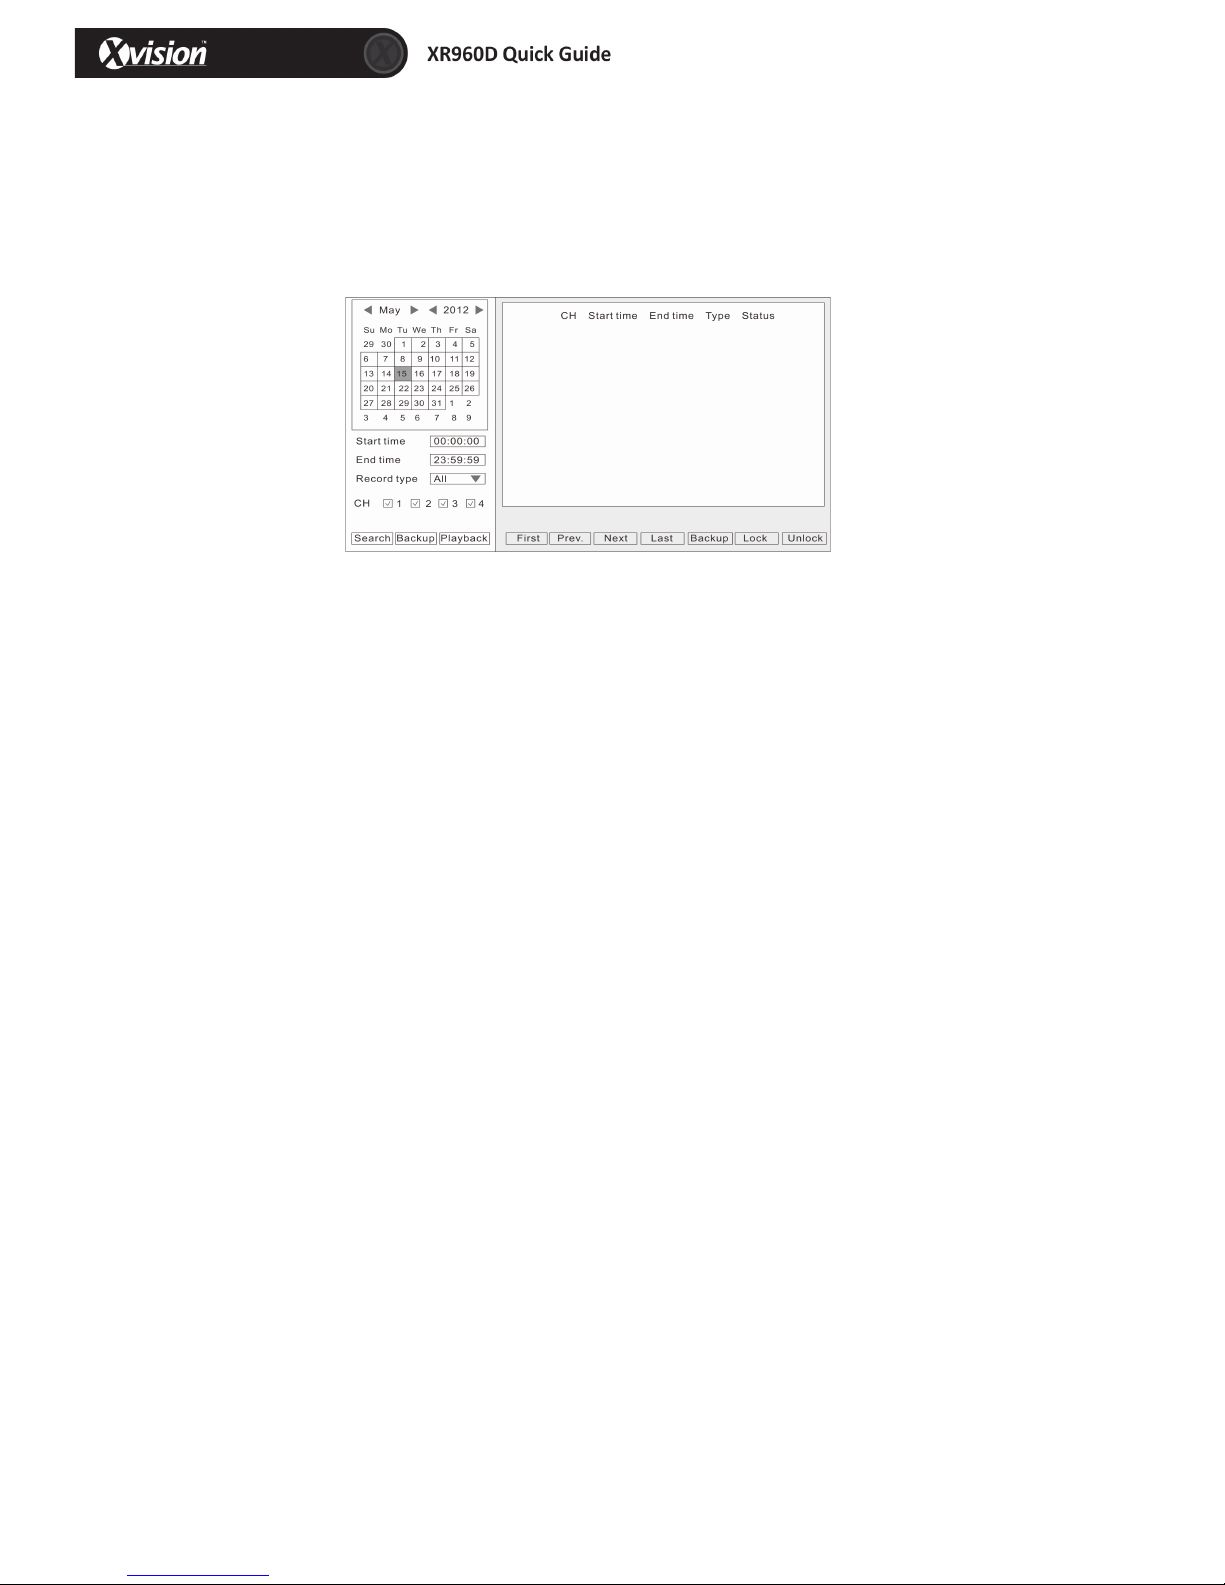
In!the!main!menu,!click!“Search”,!display!as!below.!
!
!
!
!
!
!
!
!
!!!!
!!!!!
1)! ! After! entering! the! playback! interface,! the! DVR! will! automatically! search! the! current! day’s!
(today)!recording!files!and!show!in!the!right!window.!If!there!is!no!recording,!the!right!window!
will!be!empty.!
2)! ! Calendar:! Green! &! red! background! means! there! is! a! recording! that! day,! grey! background!
means!there!is!no!recording!that!day,!blue!back!ground!shows!the!date!you!have!selected.!
!
Please!Note:!When!you!open!the!playback!interface,!the!calendar!displays!the!current!month,!and!
the!blue!background!date!is!the!current!date!(today).!
!
3)! ! Record!Type:!All/Alarm/Normal! ! !
4)! ! CH:!Choose!the!channel!you!want!to!playback.!
5)! ! First,!Prev.,!Next,!Last:!Check!the!recording!page!by!page.!
6)! ! Lock/unlock:!Place!a!check!mark!'√'for!the!recording!you!want!to!lock,!then!click!lock,!after! !
! !locked,!the!recording!cannot!delete!and!overwrite.!
7)! ! If!want!to!unlock,!click!“Unlock”.!
8)! ! Backup:!check!'√'!the!recording!files!that!you!want!to!backup!on!the!right!window,!and!then! !!!!!!!!!
! !click!backup.!If!the!files!capacity!you!select!is!larger!than!your!USB!capacity,!the!system!will!
! !prompt!you!to!change!to!a!bigger!capacity!USB!or!reduce!the!quantity!of!selected!recording!
! !files.!
9)! ! Search:!click!“SEARCH”,!and!the!right!window!will!display!the!recording!files.!
10)!Playback:!click!“PLAYBACK”!to!enter!into!playback!interface.! !
The!left!side!shows! the! calendar,! the! right! side!displays!the!playback!time!zone.! Green! color!
means!normal!recording,!red!color!means!alarm!recording,!and!black!color!(back!ground!color)!
means!no!recording.!On! the! time! line,!there!is!a!time! bar! that!you!can!drag!to! any! time!you!
want!to!playback.!
!
!
!
!
Page 12

12
! !
!
!
!
!
!
!
!
Control!buttons:!
!
Click! “PLAY/STOP”,! “STEP”,! “FAST! FORWARD”,! “FAST! BACKWARD”! and! “SLOW”! to! do!
corresponding!operation.!
Drag!the!slider!to!adjust!volume,!if!you!don’t!need!audio,!click!the!speaker!to!mute.!
Click!“X”!to!exit!playback!interface.!
!
!
!
!
!
!
!
!
!
Page 13
13
9! ! Network!Setup!
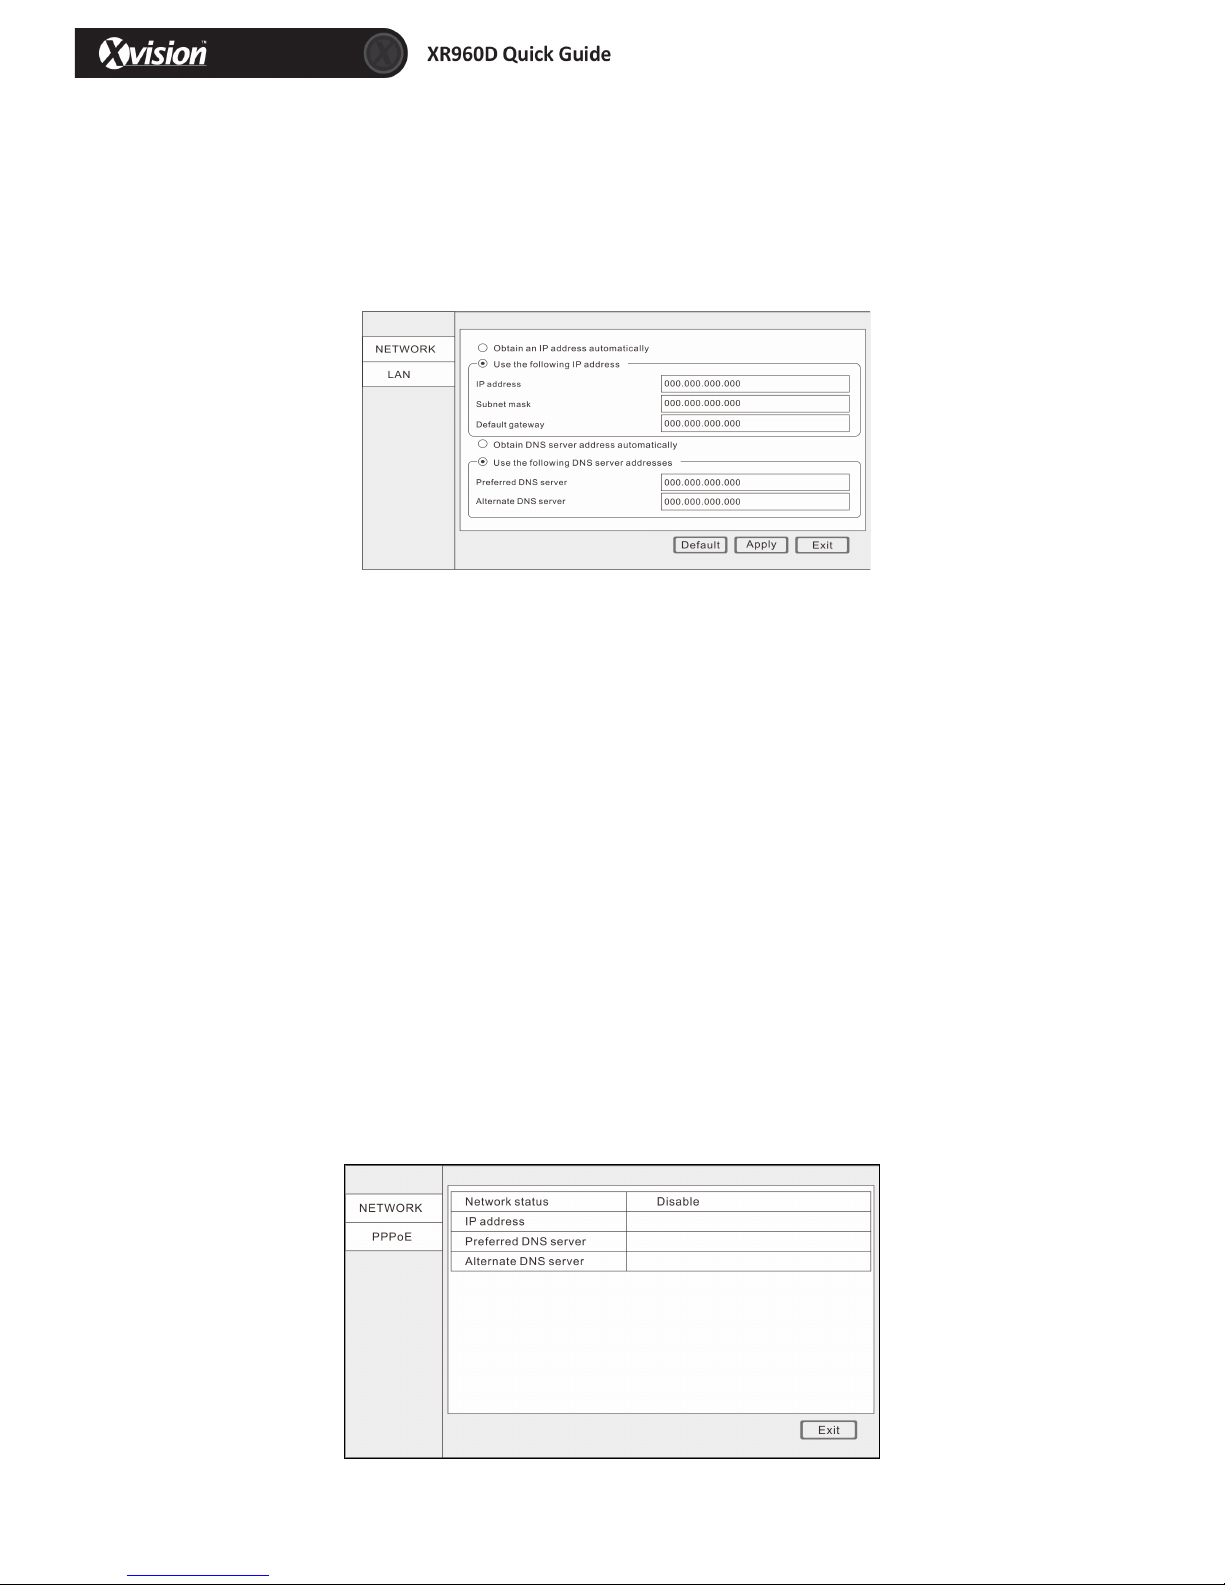
Click!“ADVANCE”!in!main!menu,!and!then!click!“NETWORK”.!
1.! ! Lan! !
!
!
!
!
!
1)! Obtain!an!IP!address!automatically:!this!will!come!from!your!router!or!DHCP!server.!
2)! Use!the!following!IP!address:!
!
IP!address:!Fill!in!the!IP!address!according!to!your!network!settings.!
Subnet!mask:!Fill!in!the!subnet!mask!according!to!your!network!settings.!
Default!gateway:!Fill!in!the!default!gateway!according!to!your!network!settings.! !
If!there!is!no !router!in!your!network,!fill!in!the!IP!you!get!from!your!Internet!Service!Provider!(ISP).!
If!there!is!a!router!in!your!network,!make!sure!you!have!set!the!subnet!mask!and!default!gateway!
correctly.!
!
3)! Obtain!DNS!server!address!automatically.!This!will!come!from!your!router!or!DHCP!server.!
4)! Use!the!following!DNS!sever!addresses.! !
!
Preferred!DNS!server:!fill!in!the!DNS!you!get!from!your!Internet!Service!Provider!(ISP).!
Alternate!DNS!server:!fill!in!the!DNS!you!get!from!your!Internet!Service!Provider!(ISP).!
Attention:!Click!“Apply”!after!setup.! !
!
2. ! ADSL!
Page 14
14
!
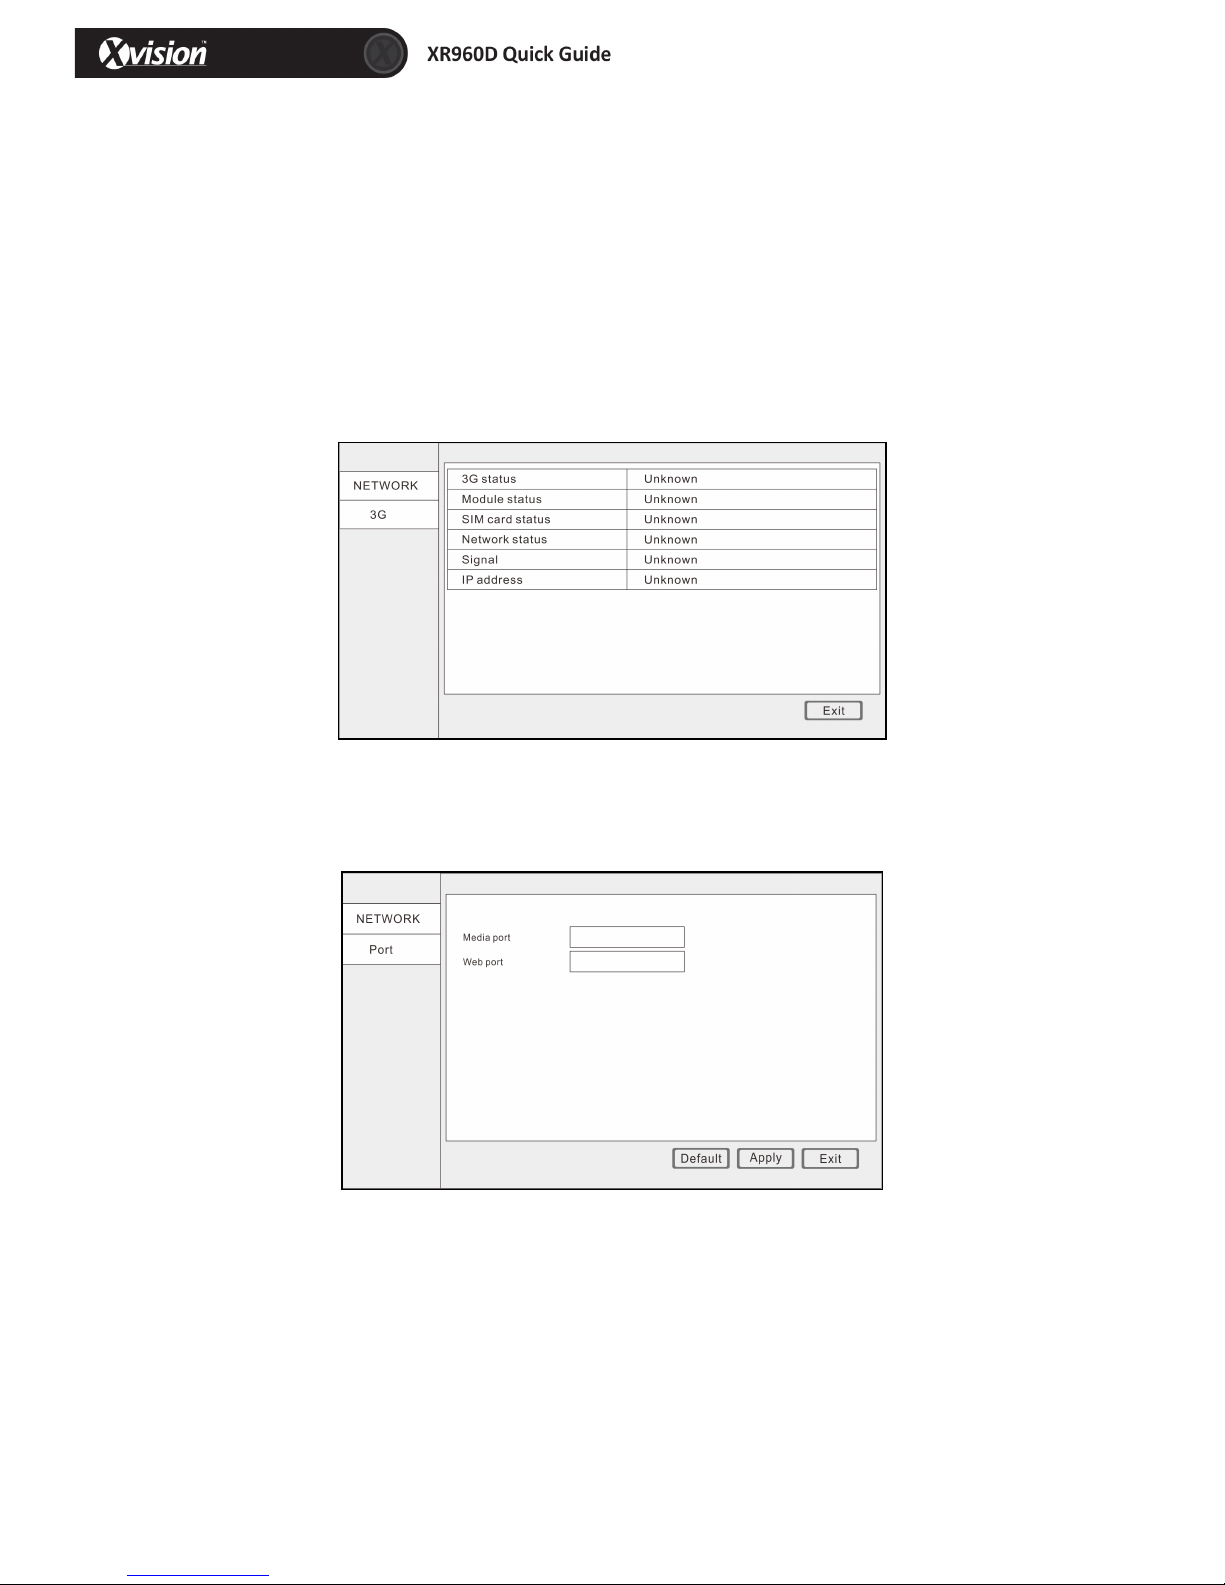
ADSL:!Enable!the!ADSL!
Fill! the! user! name! and! password! of! your! PPPOE! which! is! provided! by! your! Internet! Service!
Provider!(ISP).!The!system!will!restart!after!clicking!OK.!If!the!user!name!and!password!are!correct,!
the!system!will!connect!to!the!network!via!the!PPPOE.!The!IP!address!will!be!filled!automatically.!
!
Click!“Apply”!after!setup!to!save.! !
!
3.! ! 3G!
!
4.! ! Port!
!
1) Media!Port:!One!private!communication!port!is!between!the!DVR!and!PC,!the!default!is!Port:!
9000.!If!this!port!is!occupied!by!another!server!port,!please!change!to!an!idle!port.!
2) Web!Port:!Http!port,!default:!80,!if!you!change!the!web!port,!for!example:!8088,!when!you!
need!to!access!through!browser,!you!will!need!to!add!the!web!port!after!the!IP!address.! !
E.g.:!http://ip!address:8088!
Click!“Apply”!after!setup!to!save.! !
!
Page 15
15
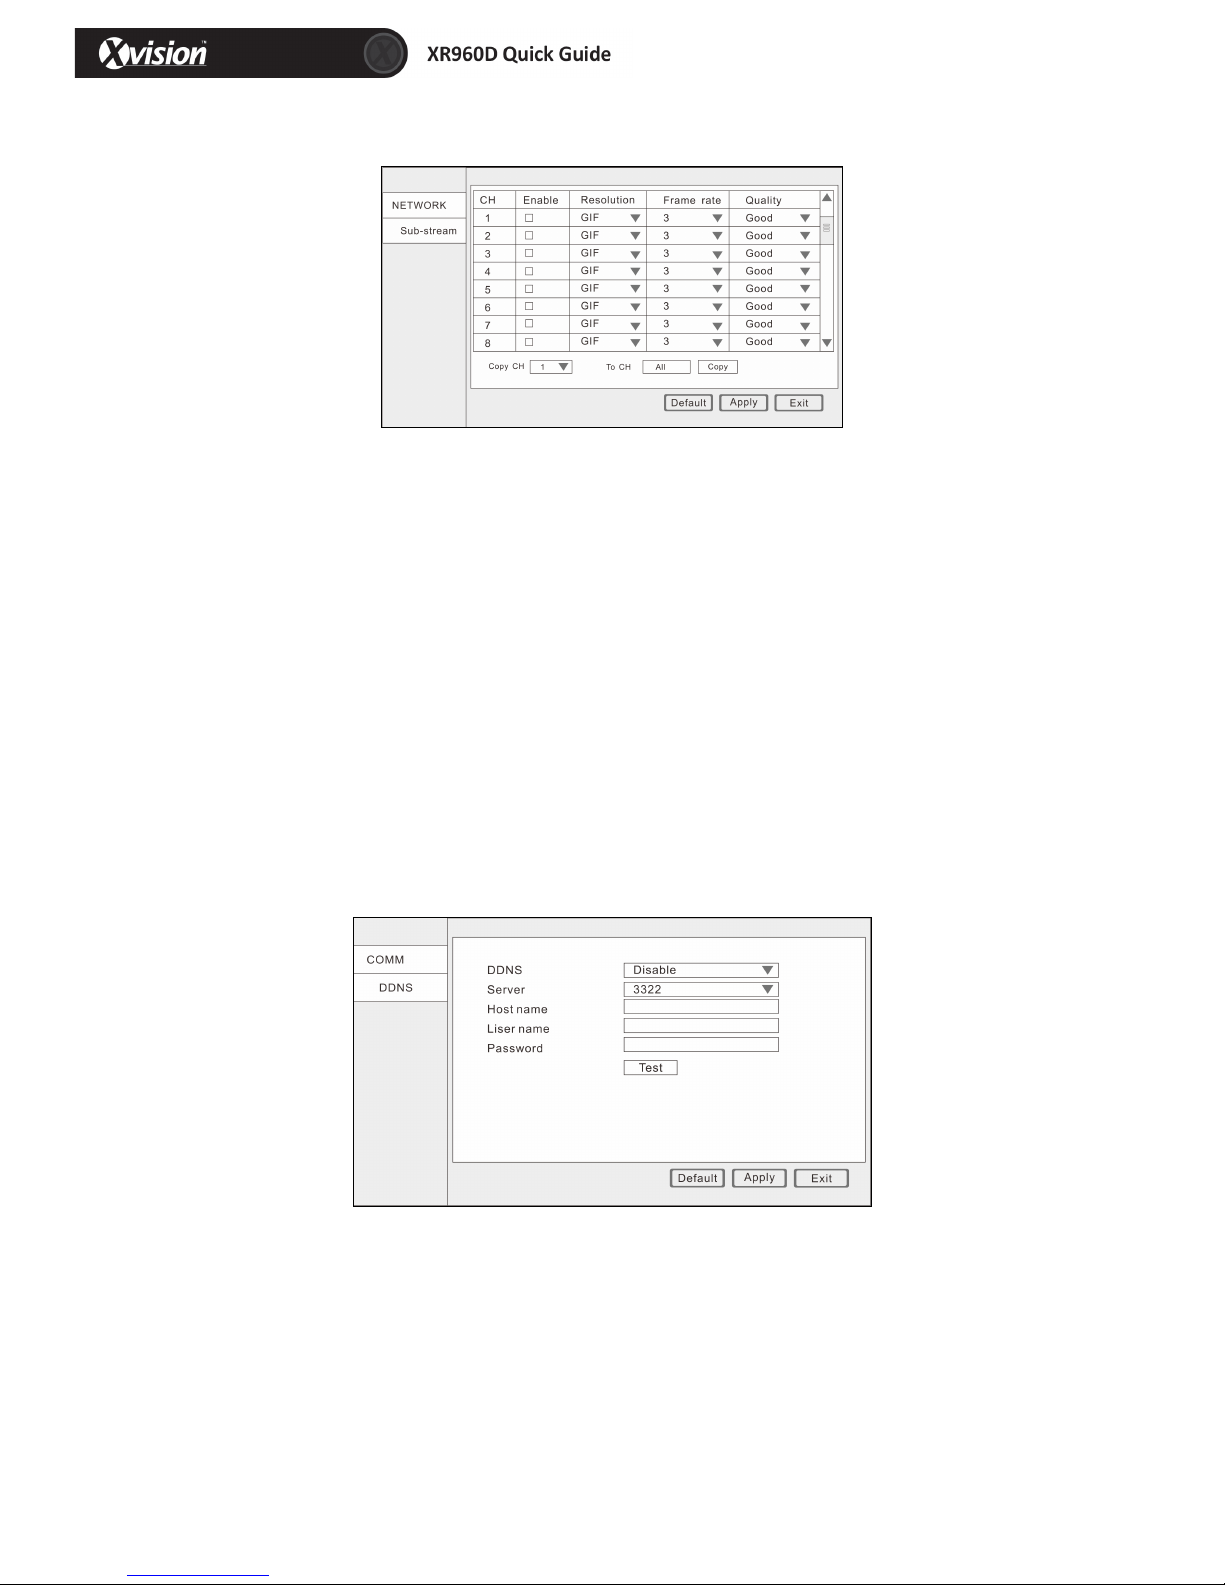
5.! ! Sub]stream!
!
!
Use!the!following!setup!for!network!transfer.!
CH:!All!DVR!channels.! !
Enable:!Place!a!check!mark!'√'!which!means!use!sub`stream!for!network!transfer.!
Resolution:!QCIF/CIF!
Frame!Rate:!PAL!system:!1!to!25;!NTSC!system:!1!to!30.! !
Quality:!Normal/Good/Better/Best!
Copy:!For!ease,!setup!one!channel!and!then!copy!to!the!others.!
Attention:!Click!“Apply”!after!setup.! !
10! ! DDNS!Setup! !
To!enter!the!DDNS!Setup!menu,!click!“ADVANCE”!in!the!main!menu,!and!then!click!“COMM”.!
!
1) DDNS:!Enable/Disable,!please!enable!the!DDNS!when!you!use!domain!name!server.!
2) Server:!Choose!your!domain!name!server:!3322,!dyndns,!no!IP,!changip!or!dnsexit.!
3) Host!name:!The!host!name!you!registered!on!the!domain!name!server.! !
4) User!name:!The!user!name!you!registered!on!the!domain!name!server.!
5) Password:!The!password!you!registered!on!the!domain!name!server.!
6) Test:!After!setup,!click!“Test”!to!check!connected!or!not.!
Click!“Apply”!after!setup!to!save.!
Page 16
16
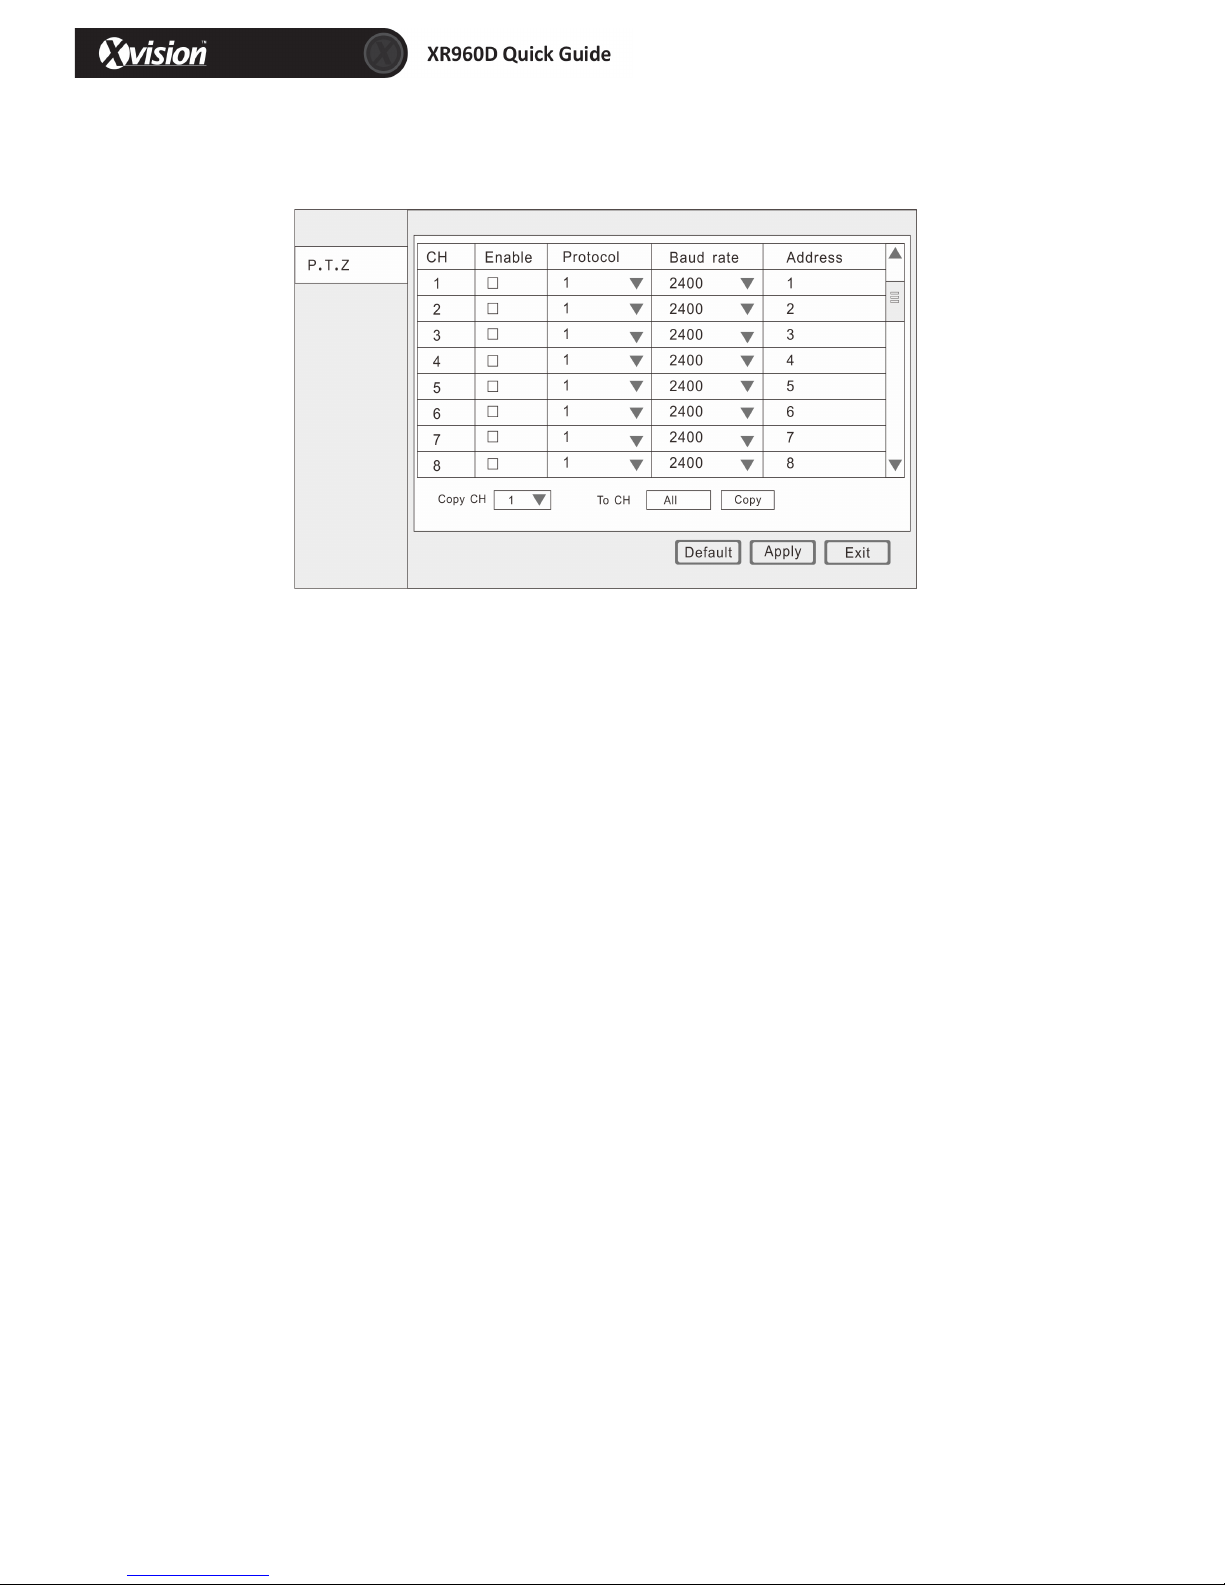
11!P.T.Z!Setup!
!
CH:!All!DVR!channels.!
Enable:!Place!a!check!mark!'√'!when!one!channel!connects!to!PTZ.!
Protocol:!Pelco`D/Pelco`P/!Pansonic/Sony/Samsung/!Philips…etc.! !
Baud!rate:!1200/!2400/!4800/!9600!
Address:!Input!the!address!you!get!from!PTZ!parameters.!
! Copy:!For!ease,!setup!one!channel!and!then!copy!to!the!others.!
!
Click!“Apply”!after!setup!to!save.!
!
!
!
!
!
!
!
For!more!information,!please!consult!the!user!manual,!contact!your!installer!or!place!of!purchase.!
Alternatively,!contact!our!technical!support!team!(details!are!on!the!back!page).!
!
!
Page 17

TECHNICAL SUPPORT
For technical support, please contact your local distributor.
Alternatively, call 0871 222 1430.
LIMITED WARRANTY
This product is supplied with a 12 month warranty. The warranty excludes products
that have been misused (including accidental damage) and damage caused by
normal wear and tear. In the unlikely event that you encounter a problem with this
product, it should be returned to the place of purchase.
Manufactured exclusively for:
Xvision UK, Unit 2 Valley Point, Beddington Farm Road, Croydon, Surrey CR0 4WP
www.xvision.com
www.xvision.com
 Loading...