


CCTV
TECHNICAL SUPPORT:
For Technical Support for any x-vision product please contact your local
distributor.
LIMITED WARRANTY:
This product is supplied with a 2 Year warranty.The Warranty excludes
products that have been misused, (including accidental damage) and
damage caused by normal wear and tear. In the unlikely event that you
encounter a problem with this product, it should be returned to the
place of purchase.
Manufactured exclusively for:
x-vision (Europe) Group,
Head Office: London,U.K.
Email: info@x-vision.co.uk
Web: www.x-vision.co.uk
CCTV
Model: XIR538
Colour Vandal Resistant
20m IR Dome Camera
Before you begin
•Please unpack the box carefully and identify that all the parts are present.
The camera is suitable for indoor or outdoor use.Please bear in mind the following points when
choosing a mounting position.
•The camera must be positioned so that it will not point directly into the sun (sunrise and
sunset) or any bright light, as this may cause damage to the camera.
•Avoid viewing areas where half the area is in bright sunlight and the other half is dark,
such as in the shadow of a building. All types of cameras have difficulty in ‘seeing’ with
such a large lux level variation.
•Do not cut the camera cables, this will void the warranty.
• Make sure you use only the recommended power supply. Damage caused to the camera by
incorrect voltage or wiring is not covered by the warranty.
Model:
XIR538/592
Colour Vandal Resistant Varifocal
Dome Cameras with 20m Nightvision
Model: XIR592
Colour Vandal Resistant
20m IR Dome Camera

Thank you for purchasing this Xvision camera. Before operating this
product, please read this instruction manual carefully.
Specifications
1. Safety Precautions
When in use please avoid direct contact with eyes and do not touch
the camera body as it can get very hot.
When installing the camera, please avoid pointing it directly at
paper or flammable materials.
Please avoid all direct contact with the tempered glass dome cover
to avoid contamination. If you need to clean the dome cover use
cotton wool balls dipped in alcohol or glass wipes.
2. Product Description
The XIR538/XIR592 colour vandal resistant varifocal dome cameras are
designed for high risk applications and are designed to withstand a
blow from a 10 pound sledgehammer. They offer super high resolution
500 TVL images from there Sony 1/3" Super HAD CCD sensors and
will provide images in complete darkness up to 20 metres and beyond
20 metres in light levels above 0.1 lux. They are designed for internal or
external use and have a 3-axis adjustment so they can be wall or ceiling mounted. For optimum angle adjustment they have varifocal lenses.
Model: XIR538/XIR592
Picture Type: Day/Night
(B/W & Colour)
Image Sensor: Sony 1/3” Super HAD CCD
DSP: Xvision IXC1DN
Resolution: 500 TVL
Lens Viewing Angle: XIR538: 23 to 90°
XIR592: 12 to 30°
Infra Red Nightvision: 20 metres
Minimum Illumination: 0.1 Lux
Audio: No
Operating Voltage: 12V DC 750mA
Suggested Power Supply: 12V DC 1250mA
Mounting: Wall/Ceiling
Weatherproofing: Yes
Dimensions (WxHxD): 140x108x140mm
5. When the camera focus adjustments have been completed, use the
L-wrench to fasten the tamper resistant dome housing to the main
body with the three retaining bolts (as shown in Figure 4).
Figure 4
6. Connect the video output to the monitor or other video device
through a 75 Ohms type coaxial cable. Connect the AC/DC terminator
with the power source (as shown in Figure 5).
To Monitor
Figure 5
7. When using the side conduit cabling, we suggest the use of a metal
conduit to prevent damage to the cables.To ensure a weatherproof
installation apply weatherproof tape (PTFE Thread Seal Tape)on to the
thread before screwing it into the housing (as shown in Figure 6).
Figure 6
3. Features
Sony 1/3" Super HAD CCD image sensor for 500 TVL resolution images
and 0.1 lux low light sensitivity
The XIR538 features an Xvision Pixel+ Varifocal 3.3 to 12.0mm lens
with 23° to 90° viewing angle for super sharp images and easy selection of the optimum viewing angle during installation and the XIR592
features an Xvision Pixel+ Varifocal 9.0 to 22.0mm lens
with 12° to 30° viewing angle
Integrated Long Life Infra Red LEDs turn on automatically when the
camera switches to B/W mode and provide up to 20 metres nightvision
Discreet styling for unobtrusive low profile use
Tamper resistant and easy to clean as all moving parts are behind the
dome cover
Vandal resistant for use in areas where the camera is vulnerable to van-
dalism
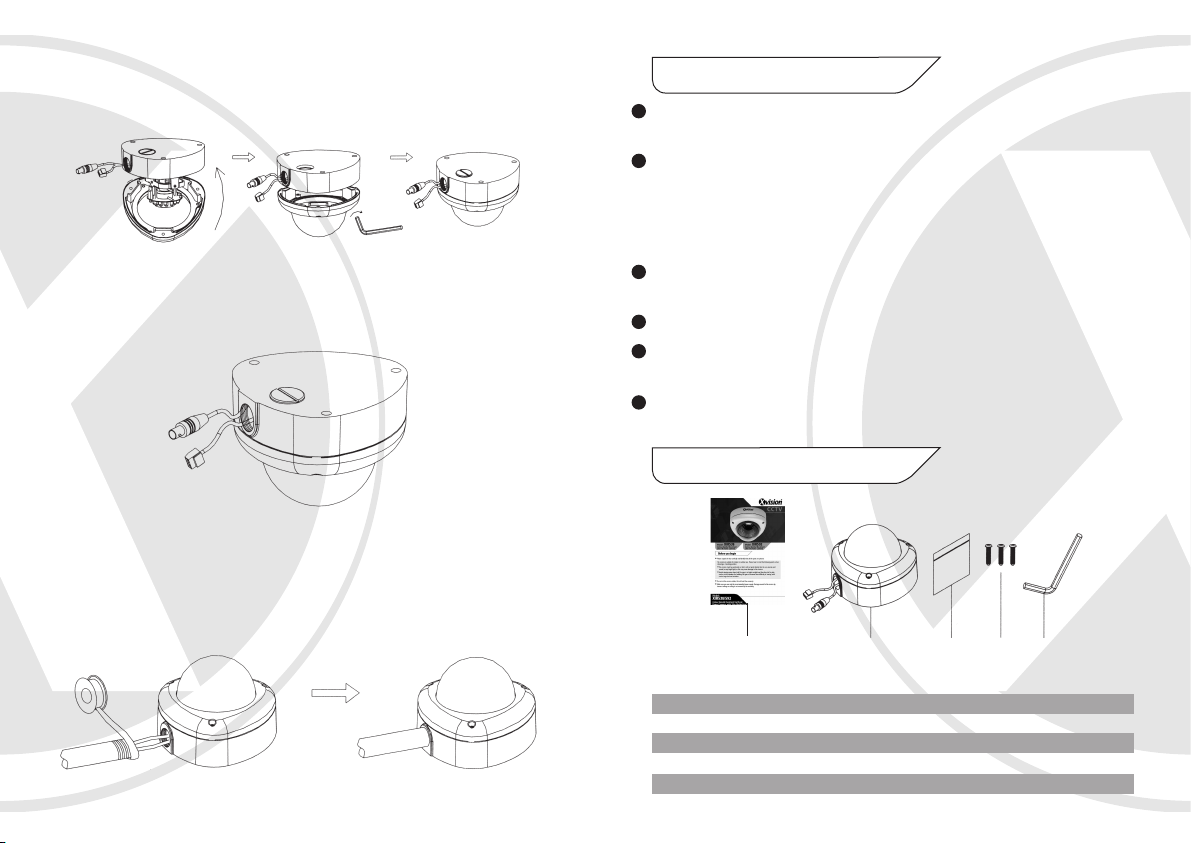
4. Contents
1 2 3 4 5
ITEM NAME OF PART QTY
1 Instruction Manual 1
2 Vandal Resistant Dome Camera 1
3 Plastic Bag 1
4 Fixing Screws 3
5 L Wrench 1
5. Installation & Operation
1. Using the L wrench (supplied), loosen the screws holding the tamper
resistant housing.
Depending on your installation requirements you can either bring the
cables through the side entry or the back entry of the camera housing
(as shown in Figure 1).
Note: The inner parts may differ depending on the camera model type.
Figure 1
2. Set the mounting base against the wall or ceiling and centre it over
the mounting hole, using the three retaining screws for the main body
supplied in the accessories (as shown in Figure 2).
Figure 2
3. Set the final image position by moving the camera body (some
model types limit the PCB board to 180° rotational adjustment) and set
the focus by turning the lens to the left or right.
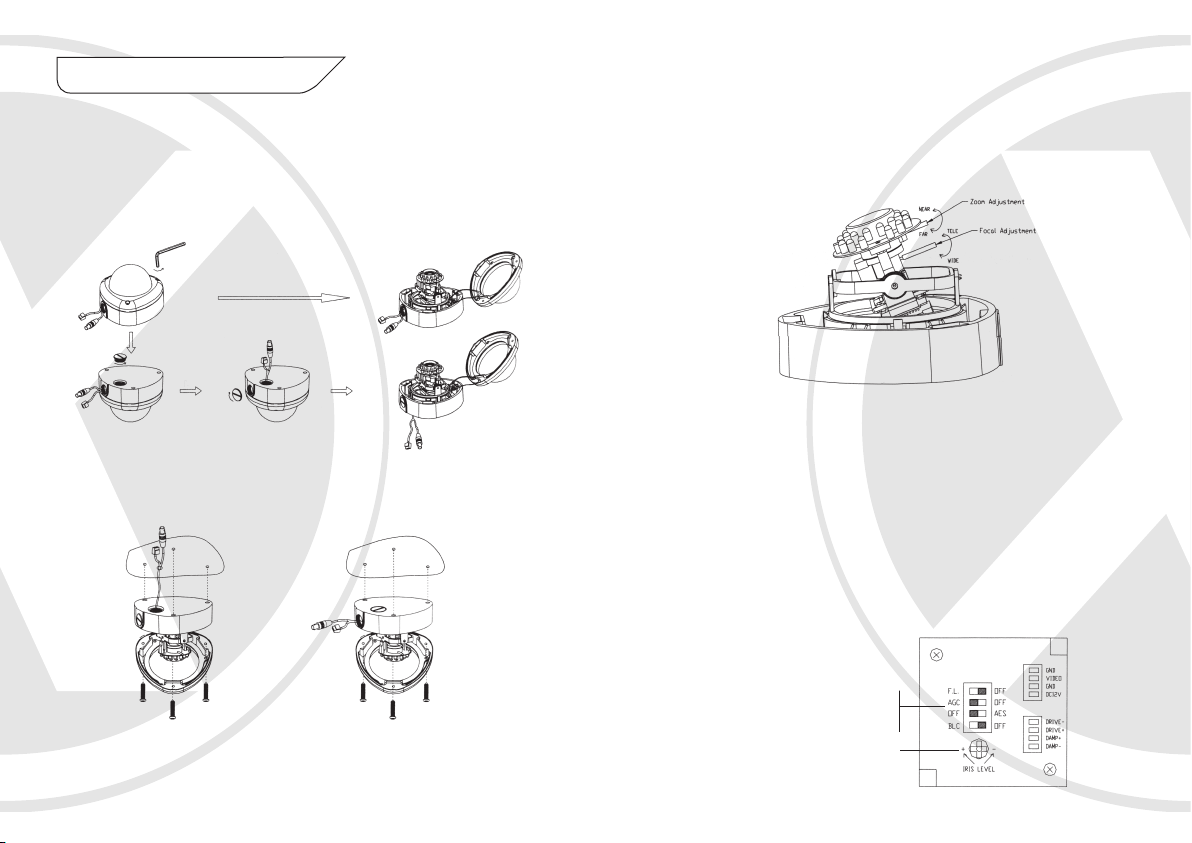
4. Varifocal Dome CCD Camera Adjustments
4.1
Once the picture appears on the monitor, open the cover and make
the Zoom Adjustment by rotating the screw (NEAR-Anti-clockwise,
FAR-Clockwise) until you get the desired view. Next make the Focal
Adjustment by rotating the screw (TELE-Anti-clockwise,WIDEClockwise) until you get the desired view.After adjustment tighten both.
Figure 3
4.2 DIP Switch Setting
4.2.1 Flickerless Function- Set switch -OFF/FL to Flicker to enable flickerless function. In
this mode the switch AES/OFF is auto disabled.
4.2.2 AGC-Hi/AGC-Lo Function- Adjusting the switch to AGC indicates AGC-Hi and in the
OFF position indicates AGC-Low. In AGC-Hi mode, the maximum AGC gain is
approximately 26dB. In AGC-Lo mode,the maximum AGC gain is approximately 16dB.
4.3 Auto Iris Function- When using an Auto Iris lens the switch
AES/OFF should be in the OFF position to disable the AES function.
Adjust the LEVEL with the VR to the proper level.
4.4 BLC Function- Set switch OFF/BLC to BLC position to enable
Back Light Compensation (BLC) function
Inside Control Board
(Colour Normal Resolution)
erless On/OFF
Flick
.L.:
F
AGC: Auto Gain Control High/Low
AES: Auto Electronic Shutter
Back Light Compensation
LLC:
Adjustment Level for DC Drive Lens
VR
 Loading...