

Page 1
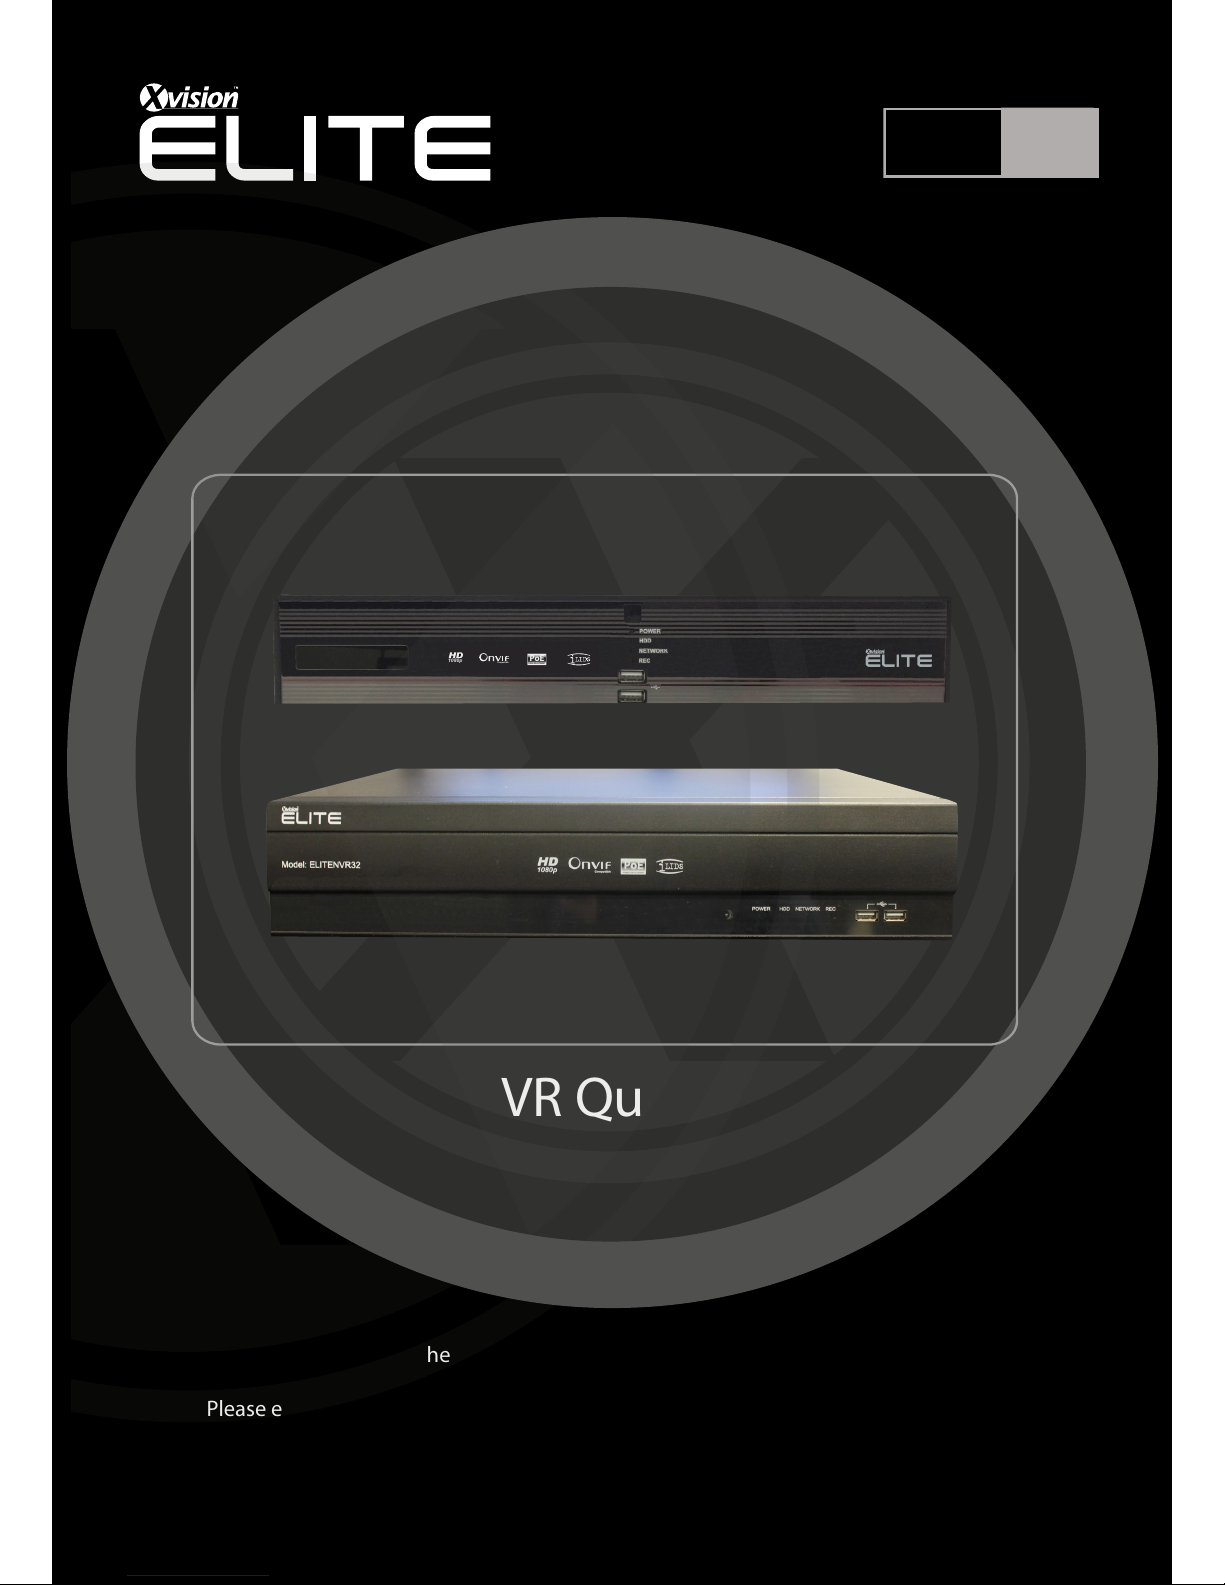
Professional HD IP NVR
Elite NVR Quick Guide
Version 1
Thank you purchasing the ELITE NVR from Xvision.
Please ensure that you read and understand this User Guide before operating the NVR.
Please store this User Guide in an easily accessible location.
IP
HD
1080p
Compatible
POWER OVER ETHERNET
PoE
Page 2
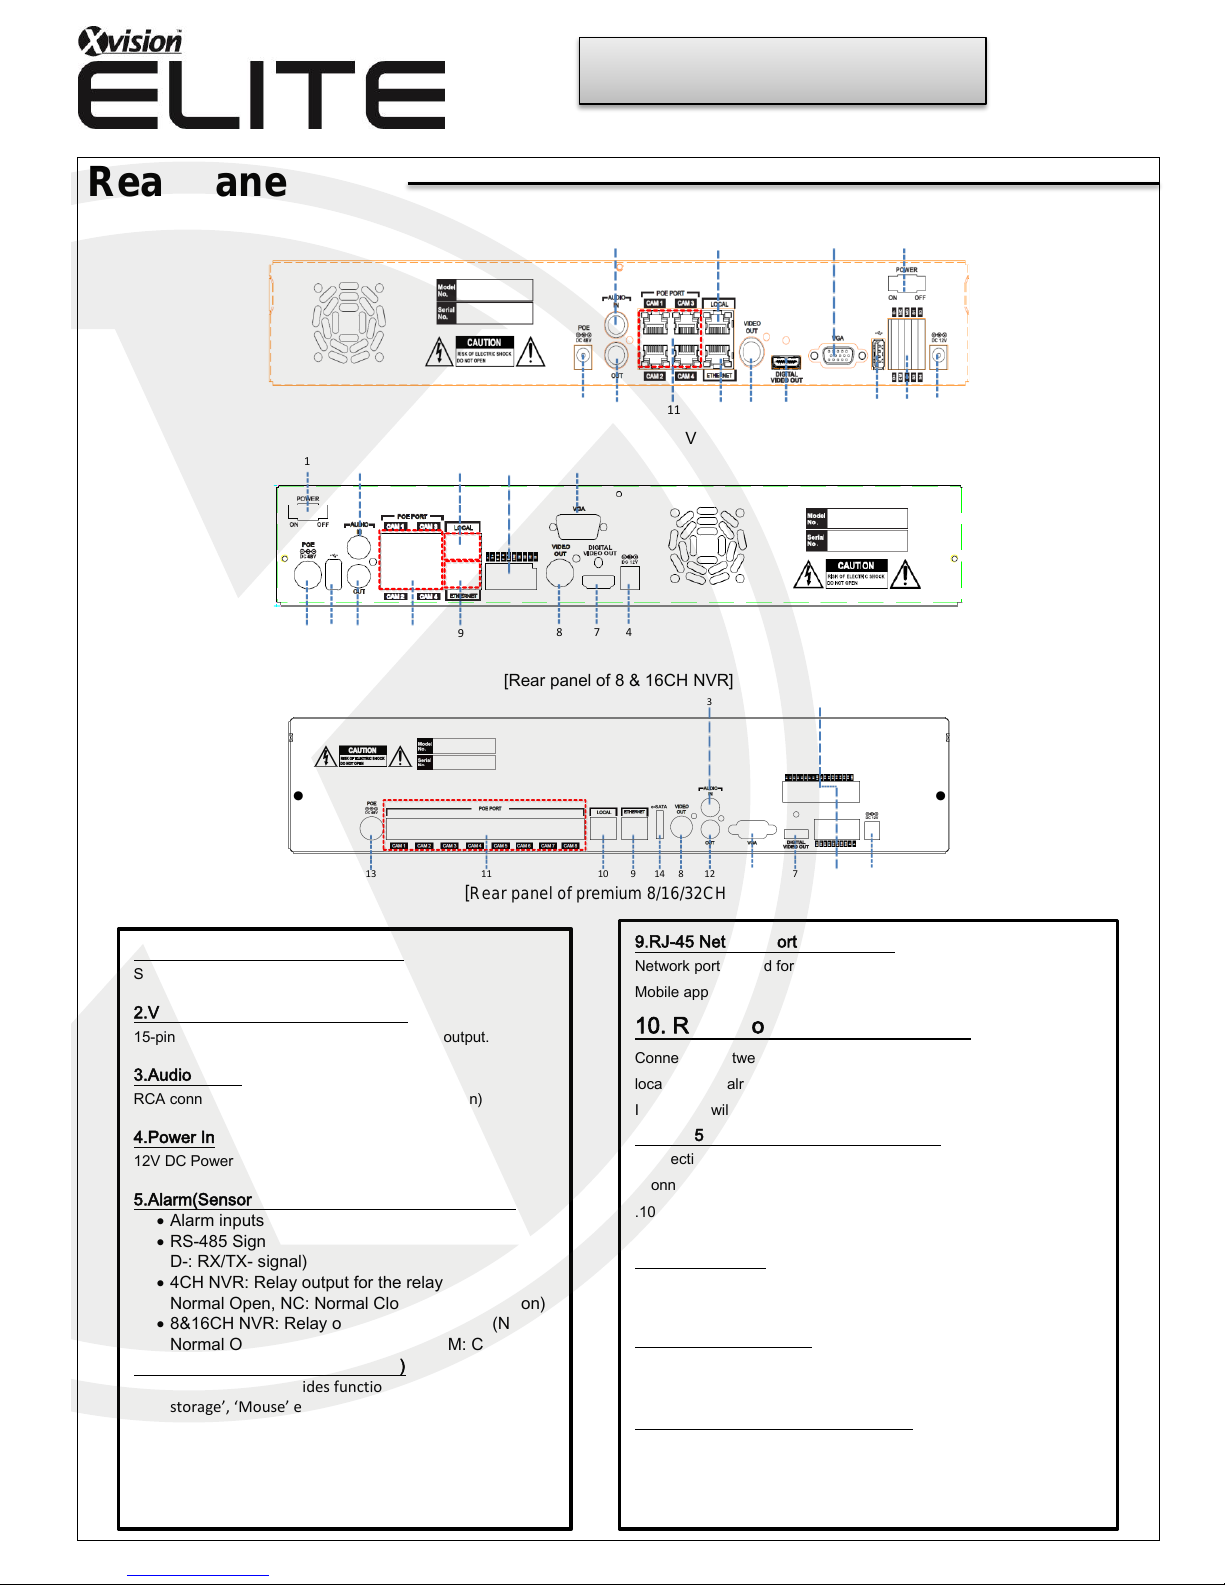
1.Power Switch(Only the 4CH NVR)
Switch to turn the NVR ON & OFF.
2.VGA Output (Video Graphic Array)
15-pin D-sub connector for the analogue VGA output.
3.Audio Inputs
RCA connectors for the audio signal inputs. (Line In)
4.Power In
12V DC Power socket.
5.Alarm(Sensor) Inputs, RS-485, and Relay Output
Alarm inputs x 4
RS-485 Signals. (G: Ground, D+: RX/TX + signal,
D-: RX/TX- signal)
4CH NVR: Relay output for the relay 1 (NO:
Normal Open, NC: Normal Closed, CM: Common)
8&16CH NVR: Relay output for the relay 2 (NO:
Normal Open, NC: Normal Closed, CM: Common)
6.Rear USB 2.0(Only the 4CH NVR)
USB 2.0 ports. Provides functions like ‘Copy to USB
storage’, ‘Mouse’ etc.
7.DIGITAL VIDEO OUT
Digital video output for the main monitor.
8. CVBS Monitor Output
Composite video output for the main live screen or the
spot screen. (BNC)
Rear panel view
89
10 13
4567
2
1112
13
[Rear panel of 4CH NVR]
1
23
4
5
6 78
9
10
111213
[Rear panel of 8 & 16CH NVR]
4
3 5
212
7
8910
11 513 14
[Rear panel of premium 8/16/32CH NVR]
Quick Guide
9.RJ-45 Network Port( 1G Base-T)
Network port is used for 1G base-T, PC application software or
Mobile application.
10. RJ-45 Local Port (1G Base-T)
Connection between IP camera and NVR through this port if using
local network already installed.
IP address will be automatically assigned as 192.168.172.100.
11.RJ-45 Cam(PoE) Port (100M Base-T)
Connection between IP camera and NVR as peer to peer mode (direc
t connection). IP address will be assigned in the range of 192.168.172
.101 ~ 8, automatically. (4CH NVR: 4port / 8&16 NVR: 8port)
12.Audio Outputs
RCA connectors for the audio signal outputs. (Line out)
13.POE Power In (48V)
DC Power socket for POE Power.
14.eSATA Connection Port(Optional)
Connect e-SATA storage to expand HDD
Page 3
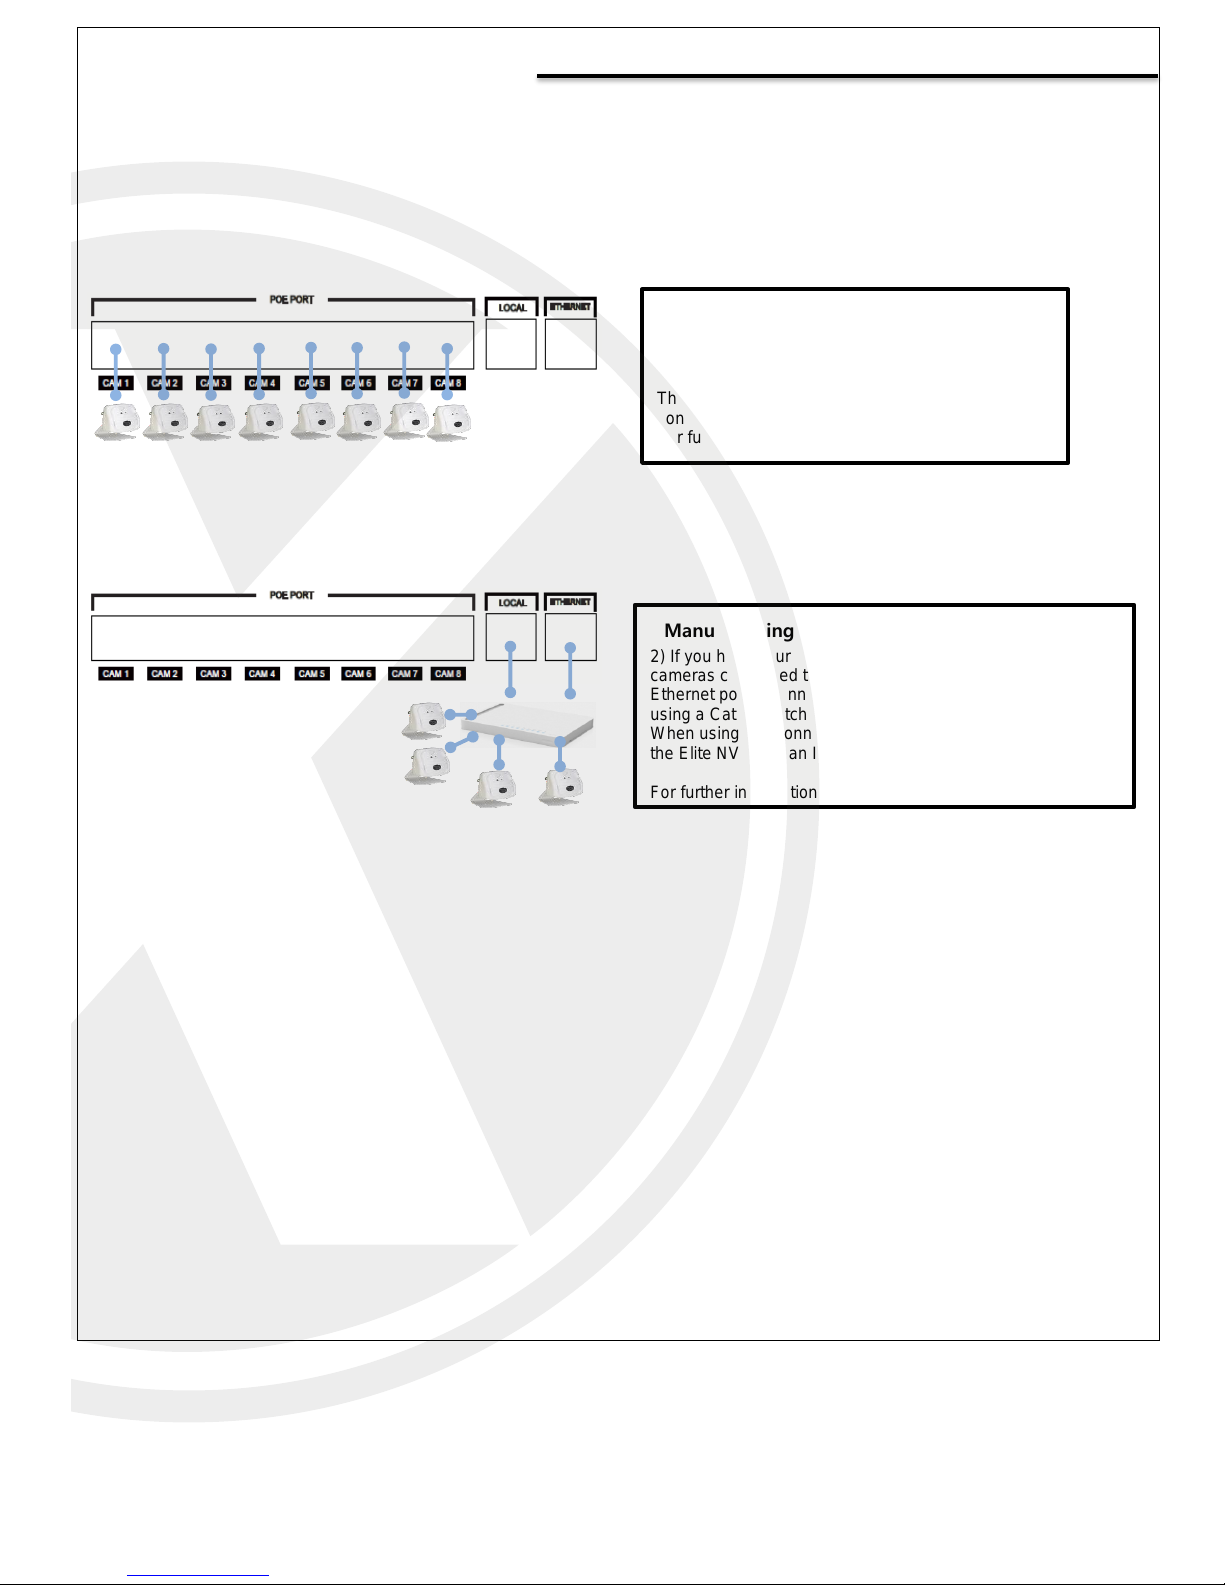
IP Camera Connection
Auto(using the PoE Port) Mode
To two ways to connect IP cameras to the Elite NVR.
1) Connect directly to the rear of the Elite NVR,
using a Cat5/6 Patch cable.
The Elite NVR can Auto IP address the IP cameras
connected to the rear POE ports.
For further information, please refer to the manual.
Manual (Using the local or Ethernet ports) Mode
2) If you have your own Switch/Hub/Router and have IP
cameras connected to it, you can use either the Local or the
Ethernet ports. Connect the Elite NVR from one of these ports
using a Cat5/6 Patch cable into your Switch/Hub or Router.
When using this connection you will need to make sure that
the Elite NVR has an IP address set within your existing LAN.
For further information, please refer to the manual.
Page 4
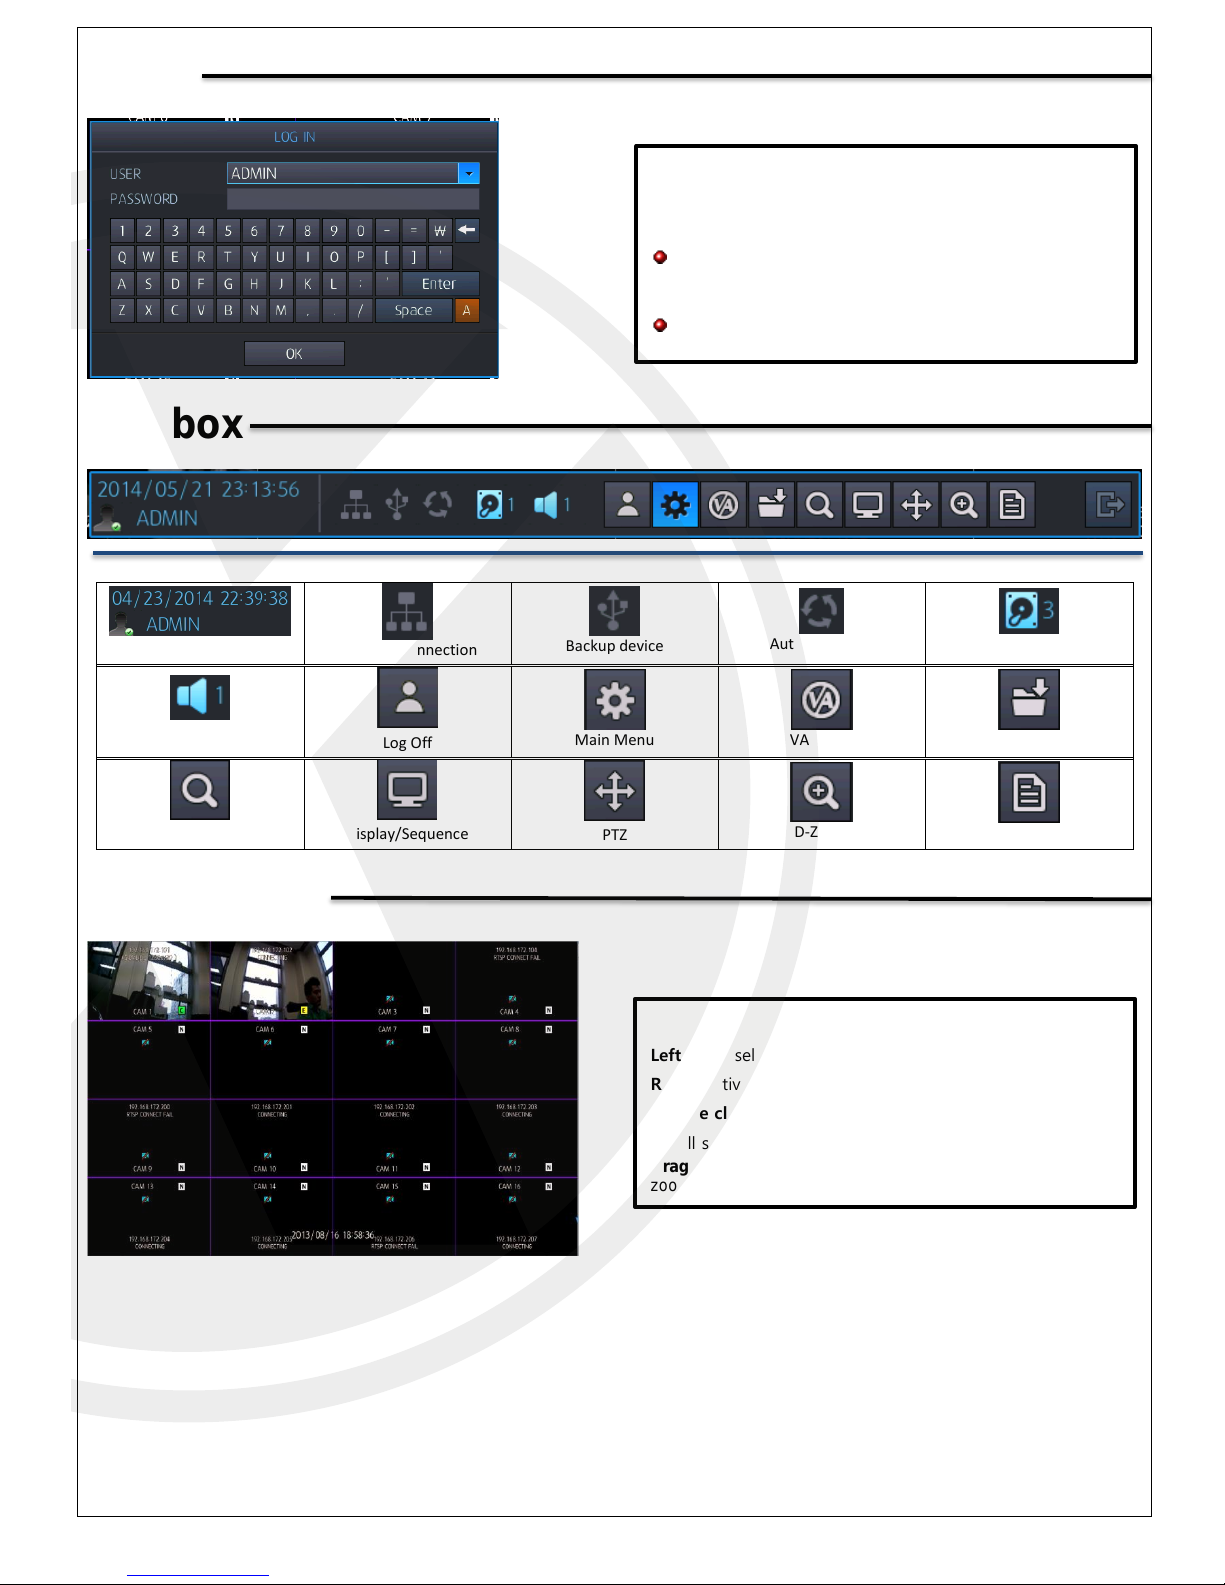
Login
Toolbox
Current date, Time, user ID
Network connection
Backup device
Auto Sequence
HDD Location
Audio Channel
Log Off
Main Menu
VA Menu
Copy
Search/Copy
Display/Sequence
PTZ
D-Zoom
Log List
Live Screen
Login
Once you have booted the Elite NVR, fill in ID, password
then click confirm button.
If auto login was selected already, log in window is
not displayed.
Factory default ID is ADMIN, Password is 1234
Operation
Left Click: select image
Right: Activate Pop-up Menu
Double click: Double click certain screen, will change view
to full screen.
Drag: On full screen, Press left button of mouse and drag, to
zoom in on image.
Page 5
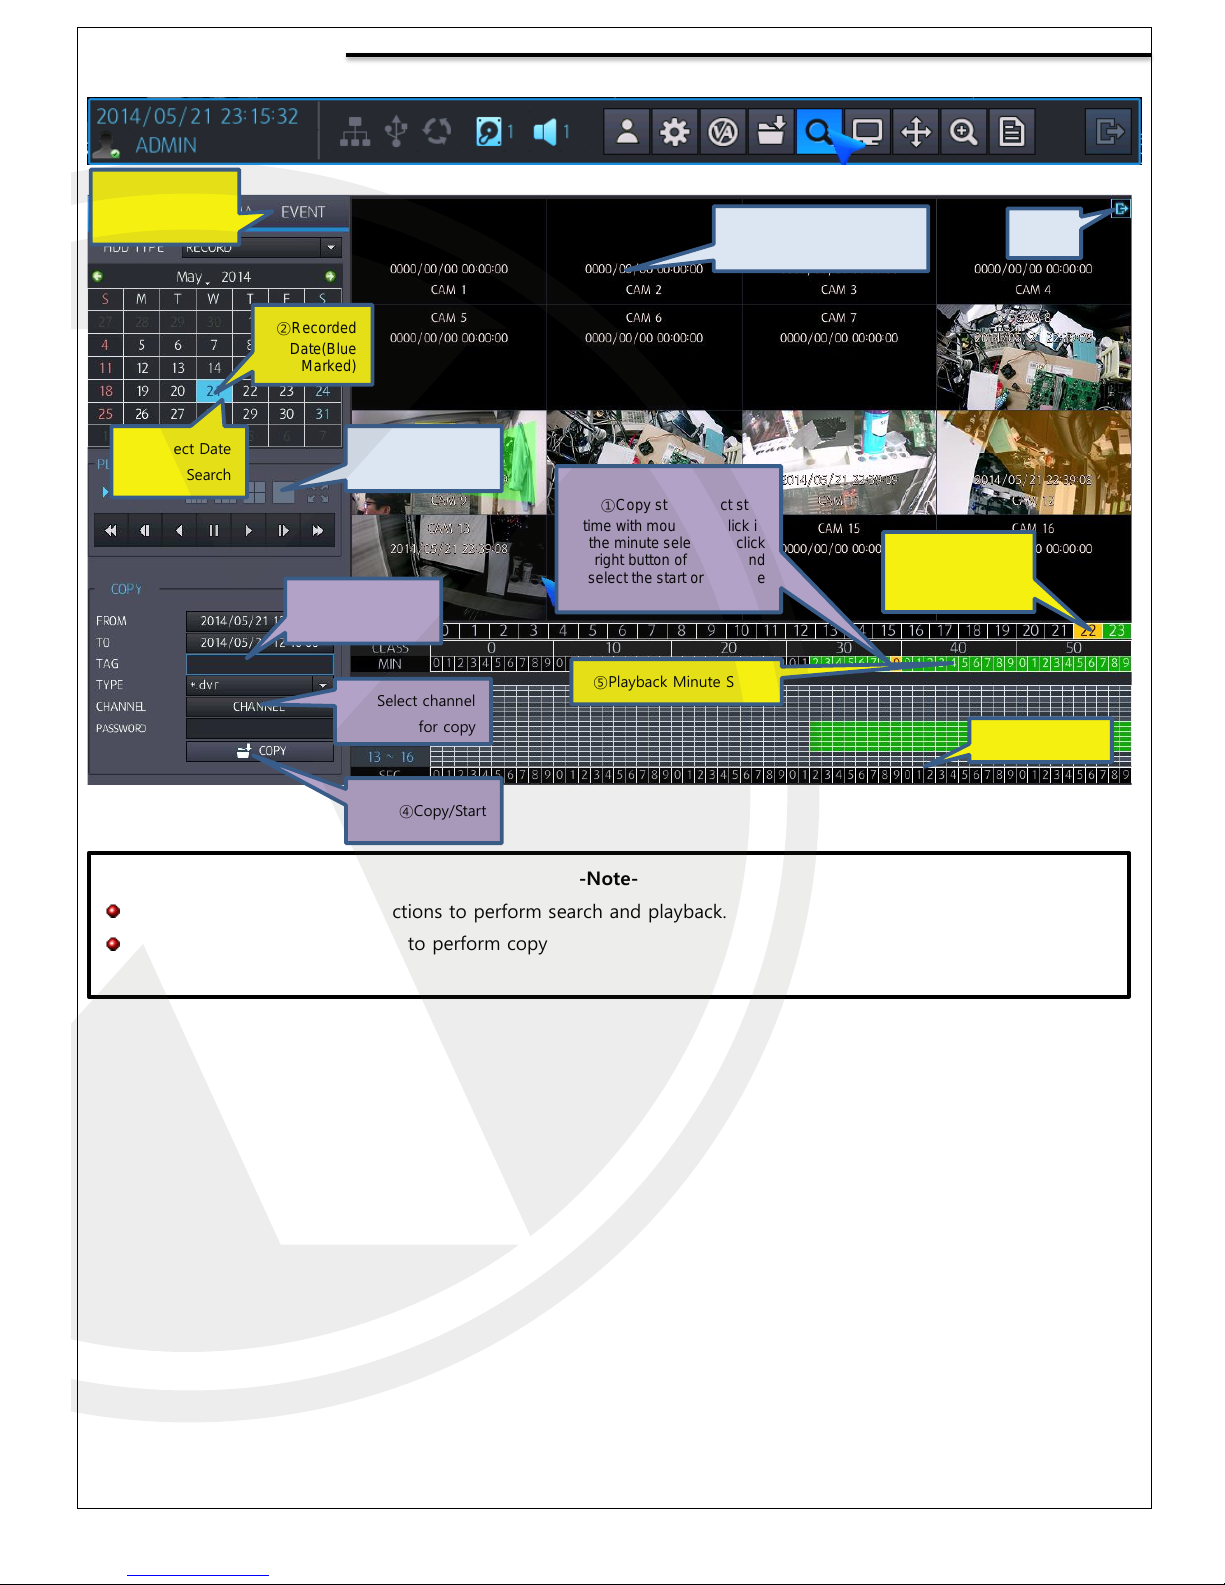
Search/Copy
④Playback Hour
Select
⑤Playback Minute Select
⑥Select Second
Playback time/Camera title
-Note-
Yellow Box: follow the instructions to perform search and playback.
Purple: follow the instructions to perform copy
①Select Search
Condition
②Recorded
Date(Blue
Marked)
③Select Date
for Search
①Copy start: select start
time with mouse left click in
the minute select bar, click
right button of mouse and
select the start or end time
②File name for
copy
③Select channel
for copy
④Copy/Start
Control the Play
mode
Exit
Page 6
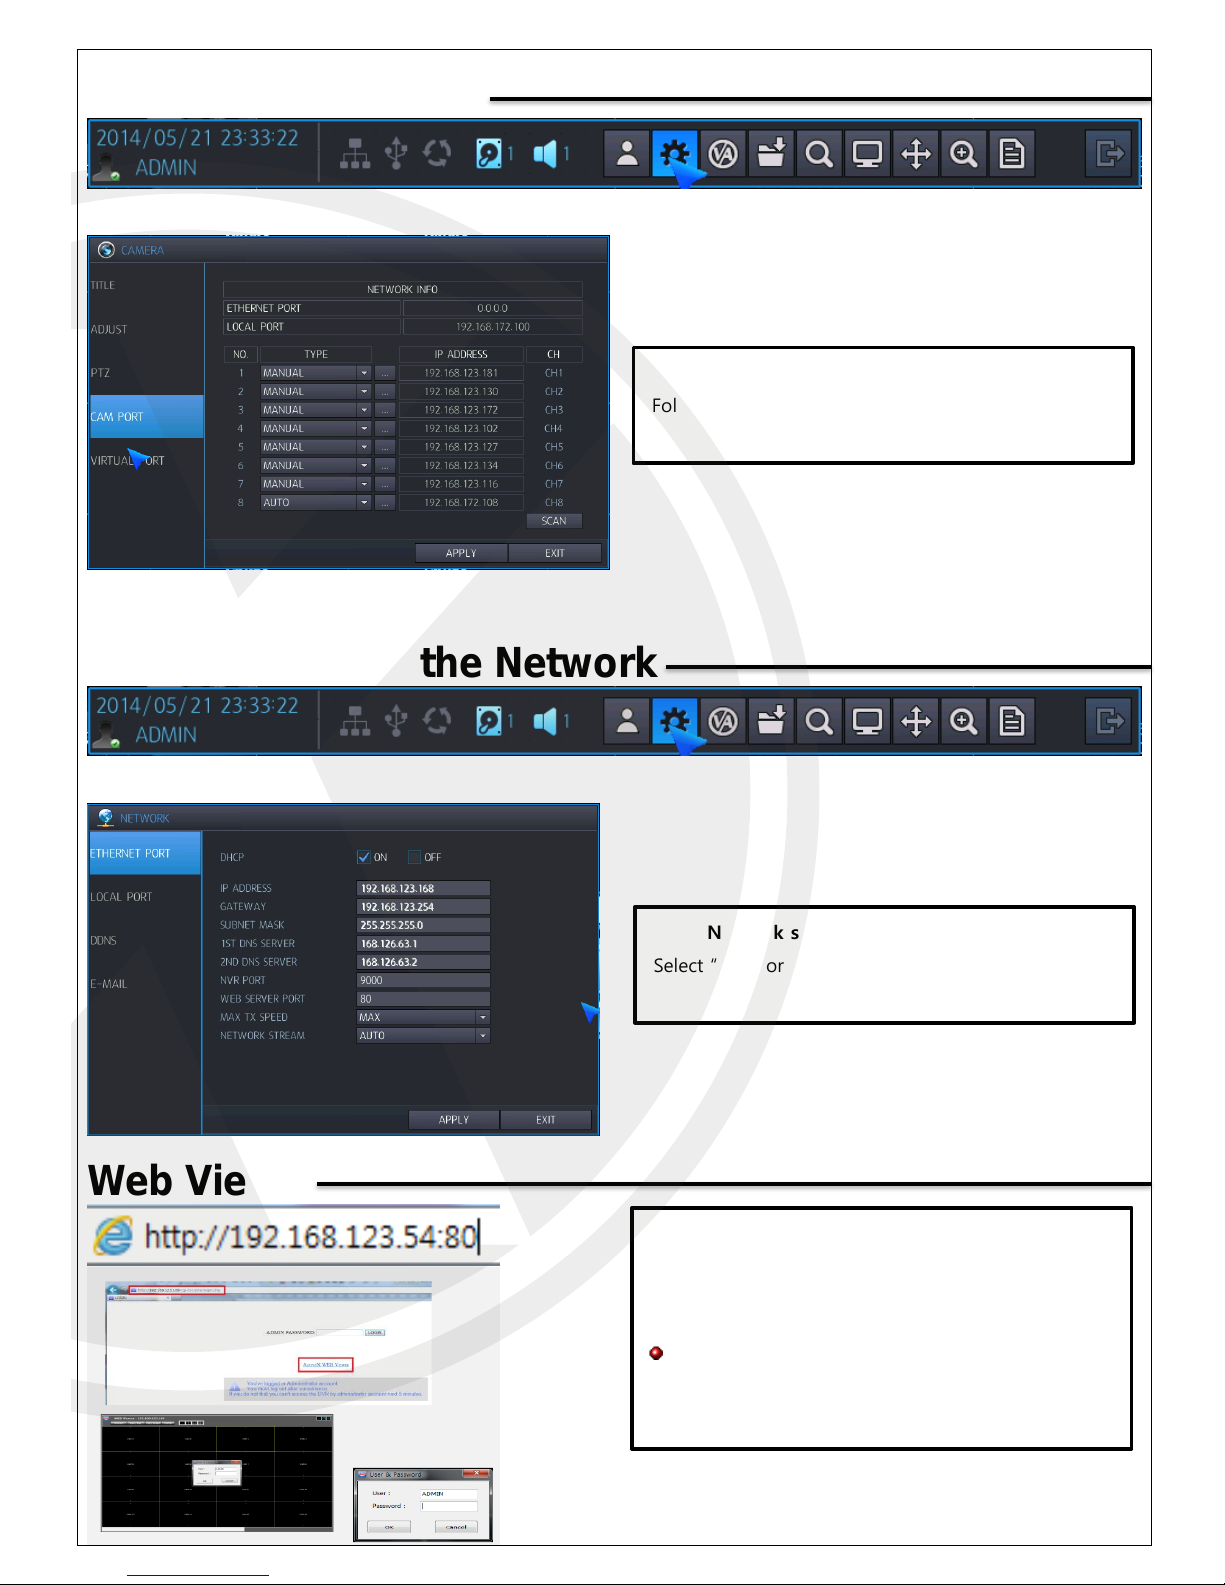
Camera Connection
Configuration of the Network
Web Viewer
Operation
Using Internet explorer, connect to the web-server
including on recorder as below. The Web viewer is
operated by Active-x controls.
If you want other web browser besides Internet
explorer, refer to user manual extra set up is
required.
Connecting a IP Camera
Follow the below steps to add a IP Camera
Network setup with automatic IP setup
Select “ON” for Automatic IP address.
Page 7
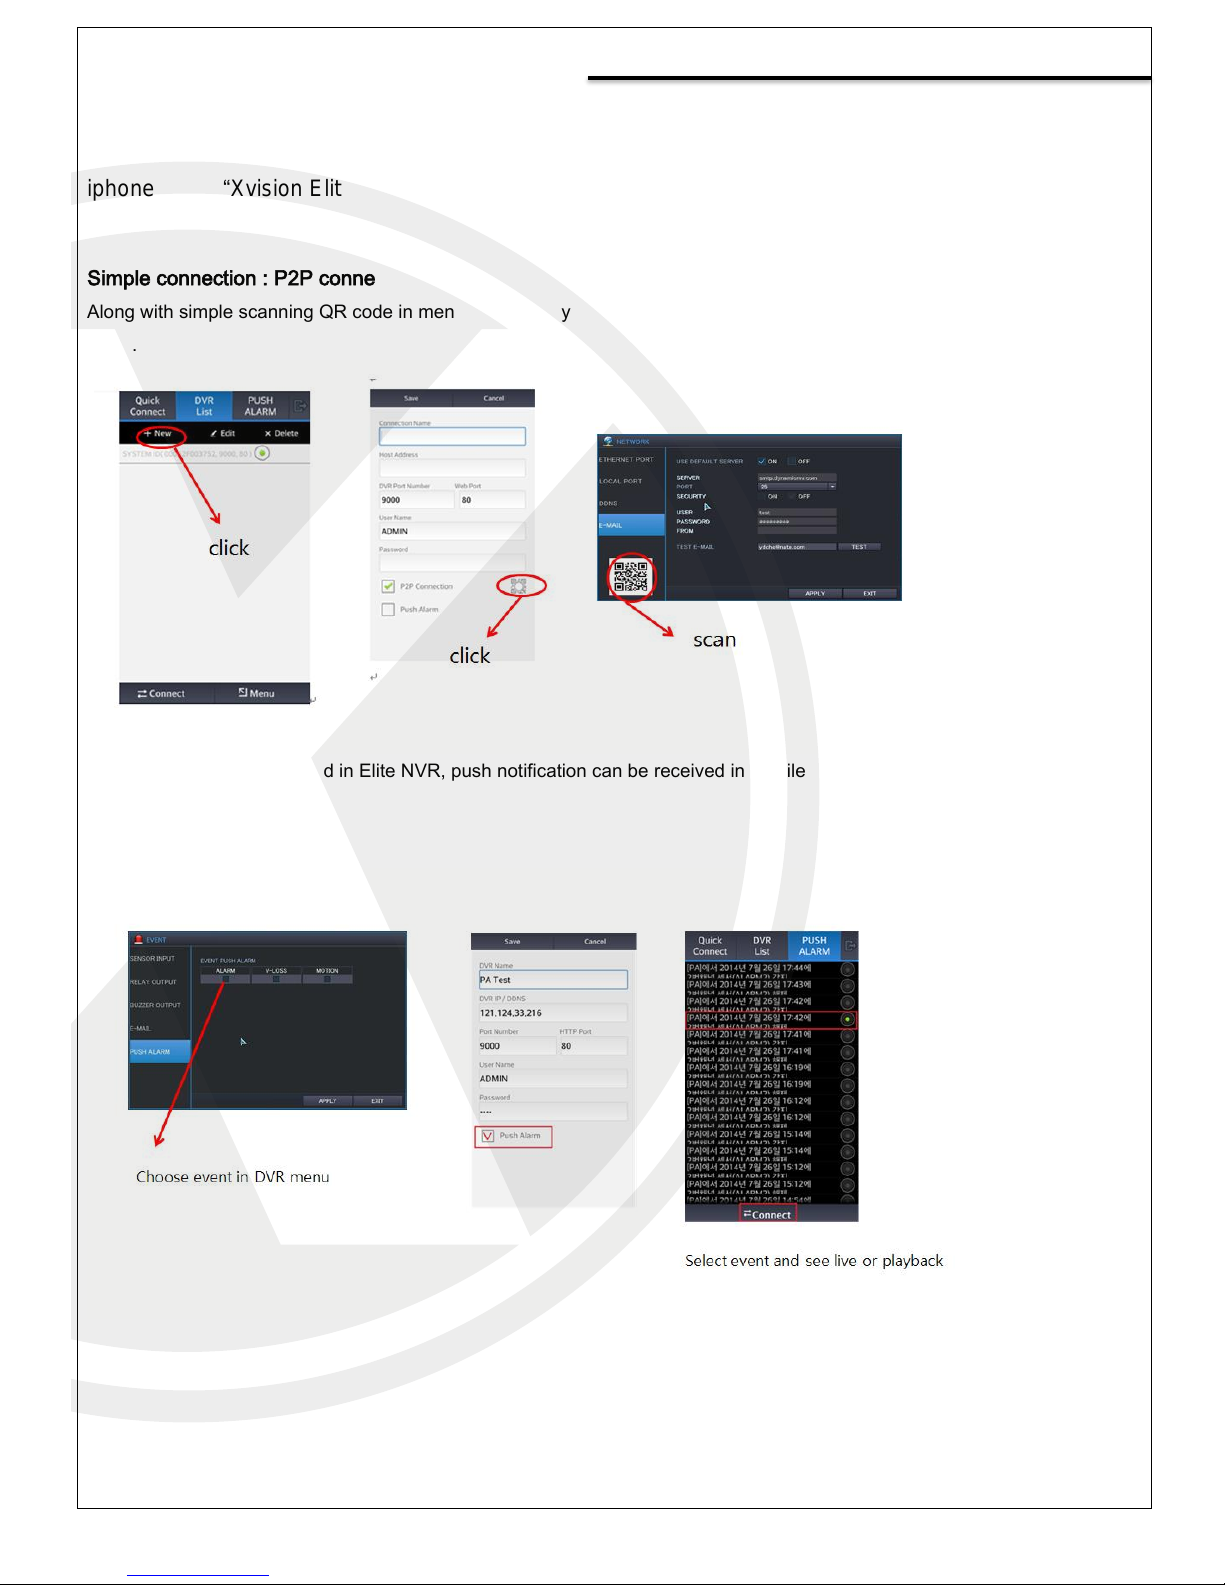
Xvision Elite Mobile CMS
Android phone – find “Xvision Elite Mobile CMS” in market play store and install.
iphone – find “Xvision Elite Mobile CMS” in app store and install.
Simple connection : P2P connection
Along with simple scanning QR code in menu, without any setting for IP, port, IP set up is completed in mobile app. See below
steps.
Push alarm: If event triggered in Elite NVR, push notification can be received in mobile APP, For further information, please
refer to the manual.
Page 8

TECHNICAL SUPPORT
For technical support, please contact your local distributor.
Alternatively, 0871 222 1430
LIMITED WARRANTY
This product is supplied with a 12 month warranty (extendable to 3 years).
The warranty excludes products that have been misused (including accidental damage)
and damage caused by normal wear and tear. In the unlikely event that you encounter a
problem with this product, it should be returned to the place of purchase.
Manufactured exclusively for:
Xvision UK, Unit 2 Valley Point, Beddington Farm Road, Croydon, Surrey CR0 4WP
www.xvision.com
www.xvision.com
 Loading...