


Built-in Electric Oven
Operating Instruction

CONTENTS
Safety Precautions
Suggestion
Product Image Description
How to Install
How to Use the Oven
Main Technical Parameters
Operation Status of Corresponding Device
Cooking Suggestions
Maintenance Recommendations
Electrical Wiring Diagram
SPAFETY RECAUTIONS
1, Before using the oven, read the instructions carefully.
2, When unplugging the plug from the outlet, hold the end of the plug and pull, do not
pull the power cord to avoid electric shock, short circuit, re and other hazards etc.
3, Cut off the power when cleaning the oven. Use a neutral detergent. Scrub the surface
with a soft cloth to prevent scratching.
4, Do not use a loose or poor-contacted outlet. Doing this may cause electric shock,
short circuit or re.
5, Keep the oven away from heat, gas and alcohol and other ammable materials.
6, If the supply cord is damaged, it must be replaced by the manufacturer or its service
agent or a similarly qualied person in order to avoid a hazard.
7, If the oven fails to work, stop using it immediately and do not touch it.
8, The oven shall exclusively use a 16A socket which must be well contacted and shall
not be shared with other appliances.
9, In order to avoid electric shock, disconnect the power supply before changing the
lamp.
10, Take care to avoid contacting the heating units and the glass door of the oven
because the oven will generate heat during at work.
11, This appliance can be used by children aged from 8 years and above and persons
with reduced physical, sensory or mental capabilities or lack of experience and
knowledge if they have been given supervision or instruction concerning use of the
appliance in a safe way and understand the hazards involved.
Children shall not play with the appliance
Cleaning and user maintenance shall not be made by children without supervision.
12, Do not touch the oven with wet hands or barefoot.
13, Do not use a multi-plug socket with multi plugs connecting.
14, Do not clean the oven with steam.
15, Do not place heavy objects on the open door of the oven.
16, Do not clean the glass door of the oven with harsh abrasive cleaners or sharp metal
scrapers. Because they will scratch the surface of the glass, causing the glass to break.
17, The accessible parts of the oven may be hot while at work, children should stay
away from the oven.
18, The socket must be well grounded through a ground wire to ensure safety. Do not
connect the ground wire to gas pipes, water pipes, a lightning rod or a telephone line.
Improper grounding may cause electric shock or other accidents.
19, All repairs and maintenance shall be carried out by professional maintenance
personnel.
20.WARNING: Accessible parts may become hot during use. Young children should be
kept away.
21. Do not use harsh abrasive cleaners or sharp metal scrapers to clean the oven door
glass since they can scratch the surface, which may result in shattering of glass.
22.The oven must be switched off before removing the guard and that, after cleaning,
the guard must be replaced in accordance with the instruction.
23.WARNING: Ensure that the appliance is switched off before replaced the lamp to
avoid the possibility of electric shock.
24.WARNING:The appliance and its accessible parts become hot during use. Care
should be taken to avoid touching heating elements. Children less than 8 years of age
shall be kept away unless continuously supervised.
Page 1 Page 2
2
3
3
5
7
9
10
11
11
12

SUGGESTION
■ When using the oven for the rst time, we recommend that you choose the setting of
" top outside+down+hot air fan", set the thermostat to the highest lever, and turn on the
oven for half an hour (do not put anything into the oven). Then, open the oven's door
and let it air. The smell coming out at the rst operation is produced from evaporation of
the material that protects the oven during storage and installation.
■ Make sure that the function & temperature zone at the display screen of the oven
does not show or turns to be black when not in use.
■ Clean the oven after use every time.
■ Please unplug the oven's power supply when its function appears to be abnormal.
PIDRODUCT MAGE ESCRIPTION
10 Function
8 Function
6 Function
1. Control Panel
2. Baking mode selector
3. Baking end time setting knob
4. Baking temperature selector knob
5. Oven indicator (selected models only) under normal circumstances, the lamp is on
means the oven is heating to the set temperature.
6. Temperature probes (the one installed on different models is slightly different)
7. Hot air fan bafe
8. Bake rack
9. Oven door
10. Bake pan
11. Door seals
12. Pylons layer
13. Oven lamp
14. The electronic program controller: You can select the baking time and the baking
end time to set an appropriate baking mode. It can also be used as a timer (selected
models only)
Key control panel (mechanical timer)
Page 3 Page 4

Key control panel (electronic timer)
Electronic timers Key Display Description
a. alarm key
b. duration key
c. end time key
d. present time key
e. reduction / alarm sound
select key
f. add key
g. alarm icon
h. relay icon
HIOW TO NSTALL
■ The oven should be rmly installed on a level place for ease of operation and
maintenance. Do not tilt the oven.
■ Do not install the oven and the power outlet onto the place where the oven may
expose to moisture or may easily be damped by water.
■ Lift the oven from the bottom or the handle holes when moving to another place.
Handle with care, do not move the oven by dragging the oven's door or its handle.
■ The front clearance of the oven when installed should be more than 80cm. The oven
is embedded in the kitchen cabinet, whose bottom board must be strong to withstand
the weight of more than 60kg;
■ The mains supply line to which the power of oven is connected must have an all-pole
circuit breaker that is able to withstand 20A or above current independently to ensure
that the power supply to the oven may be switch off upon occurrence of repair or
unexpected incidents.
Note: 1, The materials of the cabinet used in the oven installation such as wood or
adhesives must bear the temperature of above 120 .
2, In order to maintain ventilation, keep the clearance of the rear side is greater than
45mm.
3, If there are temperature appliances near by, make sure that the mounting distance is
greater than 80mm.
Removal the outer packing and the lm bag from the oven and place the oven close to
the mounting hole. Connect it to the power outlet (without power), lift the oven at the
holder with one hand and support the bottom of the oven with the other hand, then put
the oven slowly into the cabinet hole. Free one hand and push it gently to the end of the
cabinet. The front side of the oven should be placed onto the bottom board of the
cabinet. Fix the oven onto the cabinet with the cap-tted screws in the accessory
bag(see Schematic of the screws).
Page 5 Page 6

HOW TO USE THE OVEN
This multifunctional oven combines the advantages of a traditional oven and a modern
one.
It allows you to safely and freely choose from a variety of different baking modes. You
can choose the baking mode selector knob on the control panel and the temperature
control knob or thermostat to select your function.
The oven uses electric radiant heat produced by the installed heating pipes to bake a
variety of food what we need. According to the different needs of food to be baked, the
temperature of the oven is adjustable within a range of 60-260 . There is a total of ten
heating modes.
■ Note:
1, When using the oven for the rst time, we recommend that you choose the setting of
" top outside+down+hot air fan", set the temperature to the highest lever, and turn on
the oven to heat for half an hour without any food in the oven, and then open the
oven's door and let the room ventilated. There are always unpleasant odors coming
from the oven when used for the rst time. It is due to the evaporation of the material
that protects the oven during storage during the heating process.
2 When baking food or using a barbecue grill(selected models only), put the grease
collection tray at the bottom of the oven to prevent sauces or grease dripping onto the
bottom base of the oven. For any other baking methods, do not use a bottom shelf nor
can any object placed in the bottom of the oven during the baking process, otherwise
the enamel paint will be damaged. Put your cookware (plate, foil, etc.)on the rack.
3 When manually using the oven (without the use of the baking end time program
controller), the signs must be consistent with the indicator on the control panel.
4 Preheat for 5-10 minutes before baking food to save the baking time.
5 During baking, if you need to open the oven's door, mind your head and body, beware
the opening of the door in order to prevent accidents such as a high-temperature burn.
Do not let children near the oven.
Baking Mode Description
11 kinds of convection mode (except the lamp)
Top inside/outside
Top inside/outside + hot air fan
Top outside + down
Top outside + down+ hot air fan
Down
Top inside
Top inside + hot air fan
Rear + hot air fan
Hot air fan
Rear + down+ hot air fan
Top outside
■ Baking end time setting knob
This model is equipped with a timer to control when to turn off the oven. Timer knob "3"
position: between 10-120 minutes (when reaches the timer's set time, the timer will ring
and automatically turn off the oven) or normally turn on (counter-clockwise the initial
position to " ".
■ Three oven knobs steps description
1. Follow the bake food guide by selecting a reasonable temperature and a settled
time.
2. Clockwise turn the timer to set the time.
3. Clockwise open the baking mode selection knob to select the desired function.
4. Adjust the baking temperature setting knob to set the baking temperature, the oven
begins to work.
■ Six key timer settings baking mode instructions (selected models only)
Before initiating the following functions, rotate the setting switch to the desired
baking mode (non-"F" setting) at rst to power the electronic timer. The electronic
timer will start to self-check and the relay will shortly pick up.
Digital Clock
1. Displays the normal hours (0-24) and minutes.
2. Immediately displays three blinking numbers and a "AUTO" symbol after connecting
to power.
3. To set the correct time, just press key, press the plus or minus keys to increase or
decrease the number of bits until the right time.
Manual set
Just press key to stop the "AUTO" blinking. If "AUTO" keeps lighting up(which means
the Full / semi-automatic procedure has been set), press key to stop the "AUTO", and
it will enter into manual procedures.
Automatic set (set to automatically start and stop the baking time of the oven):
1. Press key and set the length of the baking time.
2. Press key and set the end of the baking time.
3. Use the temperature selector knob to set the temperature.
After completing the above setting, the "AUTO" symbol will light up, indicating that the
oven's baking program has been set.
For example: If you need to bake 30 minutes, and hopes to end the baking at 15:00.
Press key and set the length of the baking time to be 30 minutes;
Press key and set the end of the baking time to be at 15:00.
After completing the above settings, the screen will show the normal clock (hour,
minute) and the "AUTO" symbol will light up, indicating that the baking program has
been automatically set into the memories.
When the clock points to 14:30, the baking function starts automatically.
During the baking, and "AUTO" will be lit continuously.
When the time reaches 14:00, the baking will be automatically stopped, the alarm will
sound, the "AUTO" will blink. After pressing, the alarming sound will disappear.
Semi-automatic set (set to automatically start and stop the baking time of the oven
only):
1. Set the length of baking time (up to 10 hours):
Press key and set the length of the baking time.
The oven starts immediately, the and "AUTO" starts to light up. After baking, the
baking program will automatically shut down. The "AUTO" will blink and the alarm will
sound. After pressing ,the alarming sound will disappear.
2. Baking end time set (up to 23:59):
Press key and set the end of the baking time;
The oven starts immediately, the and "AUTO" starts to light up. When the time
reaches the end of the set time, the baking will be automatically stopped, the "AUTO"
will blink, the alarm will sound. After pressing , the alarming sound will disappear.
You may just press a key at any time and you will see the relevant set of baking
process. Press the key at any time and dial down the time to "0" position or switch
the baking mode selection knob to "F" position, you can cancel the baking setting
procedures.
Page 7 Page 8

Timer alarm clock:
You can set the maximum time to be 23 hours 59 minutes. To set the time, just press
key, then press the plus or minus button until the desired time appears on the display.
After setting, the normal time and the symbol will appear on the display. In addition,
the timing will begin immediately. You may press the key at any time and you can
see the timing; After reaching the set time, the symbol will disappear, the alarm will
sound. After pressing, the alarming sound will disappear.
Note: After pressing the corresponding function key, the key must be set within 5
seconds; in case of power failure or the baking mode selection being switched to zero
(ie, return to "F" position), the settled program as well as the normal time will disappear.
After the power is turned on again or the baking mode is selected, there are three "0"s
and an "AUTO" symbol coming up on the screen, just re-set it.
MT PAIN ECHNICAL ARAMETERS
Lamp 25W/230V~/50Hz
Range of heating temperature 50 -260℃℃
Display LED digital display(selected models only)
Effective volume 52L
Net weight 34Kg
Model
Input Voltage
Rated Input
Mode
KD-60M2-6A
220-240V
2600-3100W
6
KD-60M2-6B
220-240V
2600-3100W
6
KD-60M2-6C
220-240V
2600-3100W
6
KD-60M2-6D
220-240V
2600-3100W
6
KD-60M2-6E
220-240V
2600-3100W
6
KD-60M2-6F
220-240V
2600-3100W
6
KD-60M2-8A
220-240V
2600-3100W
8
KD-60M2-8B
220-240V
2600-3100W
8
KD-60M2-8C
220-240V
2600-3100W
8
KD-60M2-8D
220-240V
2600-3100W
8
KD-60M2-8E
220-240V
2600-3100W
8
KD-60M2-8F
220-240V
2600-3100W
8
KD-60M2-10A
220-240V
2600-3100W
10
KD-60M2-10B
220-240V
2600-3100W
10
KD-60M2-10C
220-240V
2600-3100W
10
KD-60M2-10D
220-240V
2600-3100W
10
KD-60M2-10E
220-240V
2600-3100W
10
KD-60M2-10F
220-240V
2600-3100W
10
Model
Input Voltage
Rated Input
Mode
KD-60M3-6A
220-240V
2600-3100W
6
KD-60M3-6B
220-240V
2600-3100W
6
KD-60M3-6C
220-240V
2600-3100W
6
KD-60M3-6D
220-240V
2600-3100W
6
KD-60M3-6E
220-240V
2600-3100W
6
KD-60M3-6F
220-240V
2600-3100W
6
KD-60M3-8A
220-240V
2600-3100W
8
KD-60M3-8B
220-240V
2600-3100W
8
KD-60M3-8C
220-240V
2600-3100W
8
KD-60M3-8D
220-240V
2600-3100W
8
KD-60M3-8E
220-240V
2600-3100W
8
KD-60M3-8F
220-240V
2600-3100W
8
KD-60M3-10A
220-240V
2600-3100W
10
KD-60M3-10B
220-240V
2600-3100W
10
KD-60M3-10C
220-240V
2600-3100W
10
KD-60M3-10D
220-240V
2600-3100W
10
KD-60M3-10E
220-240V
2600-3100W
10
KD-60M3-10F
220-240V
2600-3100W
10
OSC DPERATION TATUS OF ORRESPONDING EVICE
HMAT EATING ODE
Note:
△means device is working intermittently
▲means device is working continuously.
Power
setting
Icon
Inside
and top
heatin
g pipe
Outside
and top
heating
pipe
Rear
heating
pipe
Lower
heating
pipe
Heat
fan
Cross
-ow
fan
Functional
requirements
descriptions
Remarks
01
▲
▲
▲
It is suitable for the
production of top
heating and an ideal
cooking style for
those are needed to
simply be baked with
golden skin without
baking thoroughly by
the rack, such as
lasagna on dish,
potato and cheese
and a variety of
sausages food.
For the food that
needs high surface
temperature, it is
recommended to use
the highest
temperature directly
when the heating
element at the top is
on power. Place the
racks in position "3"
or "4",then put the
food in the middle
between the racks.
02▲▲
▲
▲
This combination that
bakes lightly the
surface of food while
the food is relatively
wet inside is suitable
for making crispy
foods.
03▲▲
▲
It is suitable for the
production of frozen
food and can maintain
the original avor of
the food during the
baking process. The
time needed is
relatively long but the
food is very tasty.
Setting 40 for℃
thawing meat
04▲▲
▲
Preheat the oven to a
certain temperature
when making a large
volume of food as a
single one(such as a
cak e) and pu t the foo d
in the middle of the
oven.
It is recommended to
use one rack under
this mode. If you use
more, the heat may be
unevenly distributed.
05
▲
▲
It is suitable for the
production of top
heating and an ideal
cooking style for
those are needed to
simply be baked with
golden skin without
baking thoroughly by
the rack, such as
lasagna on dish,
potato and cheese
and a variety of
sausages food.
For the food that
needs high surface
temperature, it is
recommended to use
the highest
temperature directly
when the heating
element at the top is
on power. Place the
racks in position "3"
or "4",then put the
food in the middle
between the racks.
06▲▲
It is suitable for
making pastries and
pizza, but also can be
used for thermal
insulation on food.
Setting 50 for℃
insulation on cooked
food, dough
fermentation and
wine making.
Page 9 Page 10

Power
setting
Icon
Inside
and top
heatin
g pipe
Outside
and top
heating
pipe
Rear
heating
pipe
Lower
heating
pipe
Heat
fan
Cross
-ow
fan
Functional
requirements
descriptions
Remarks
07▲▲▲▲
This combination that
bakes lightly the
surface of food while
the food is relatively
wet inside is suitable
for making crispy
foods.
08
▲▲Thaw function
09
▲
▲
▲
▲
10▲▲
11
▲
▲
▲
CSOOKING UGGESTIONS
Note: Meat can be placed in glass containers when baking. It is recommended to close
the lid when adding oil or cooking vegetable to avoid oil droplet splashing (such as
adding spices into meat for a better avor, ipping the meat during cooking). The
heating with a lid is the same as the heating without the lid.
MCAINTENANCE AND LEANING
Disconnect the power supply when cleaning or repairing the oven.
The enamel surface of the oven shall be cleaned with warm water. Do not use the
material of corrosive and abrasive nature which will cause irreparable damage to the
surface. The stainless steel may be tainted with dirt during daily use, and if it is difcult
to remove, you can buy some exclusive products in the market. After cleaning, the
remaining detergent should be cleaned off and the oven shall be kept clean and dry.
After using, due to the warmth remained inside, it is easy to clean the inside of the oven
which can be cleaned with warm water or detergent. After cleaning, the remaining
detergent should be cleaned off and the oven shall be kept clean and dry. Do not use
powder cleaning materials, nor use abrasive foam materials and acidic materials. These
materials are likely to damage the enamel. If grease and other dirt is difcult to remove,
you can use specialized products and follow the instructions of such products.
If the oven is used for a long time, you can use a soft cloth to wipe off the dirt stuck on.
There is a rubber seal around the mouth of the oven. Check it regularly. It should be
cleaned when necessary, but do not use the material of abrasive nature. If it is
damaged, please contact your local service center. Do not use the oven before repaired.
Do not put any metal object directly onto the bottom of the oven, because it will
accumulate heat which affects the cooking and causes irreparable damage to the
enamel surface.
Note: If the oven does not work, check whether the power cord is plugged. If the power
cord is well plugged and the oven still does not work properly, please contact our local
service center for repair.
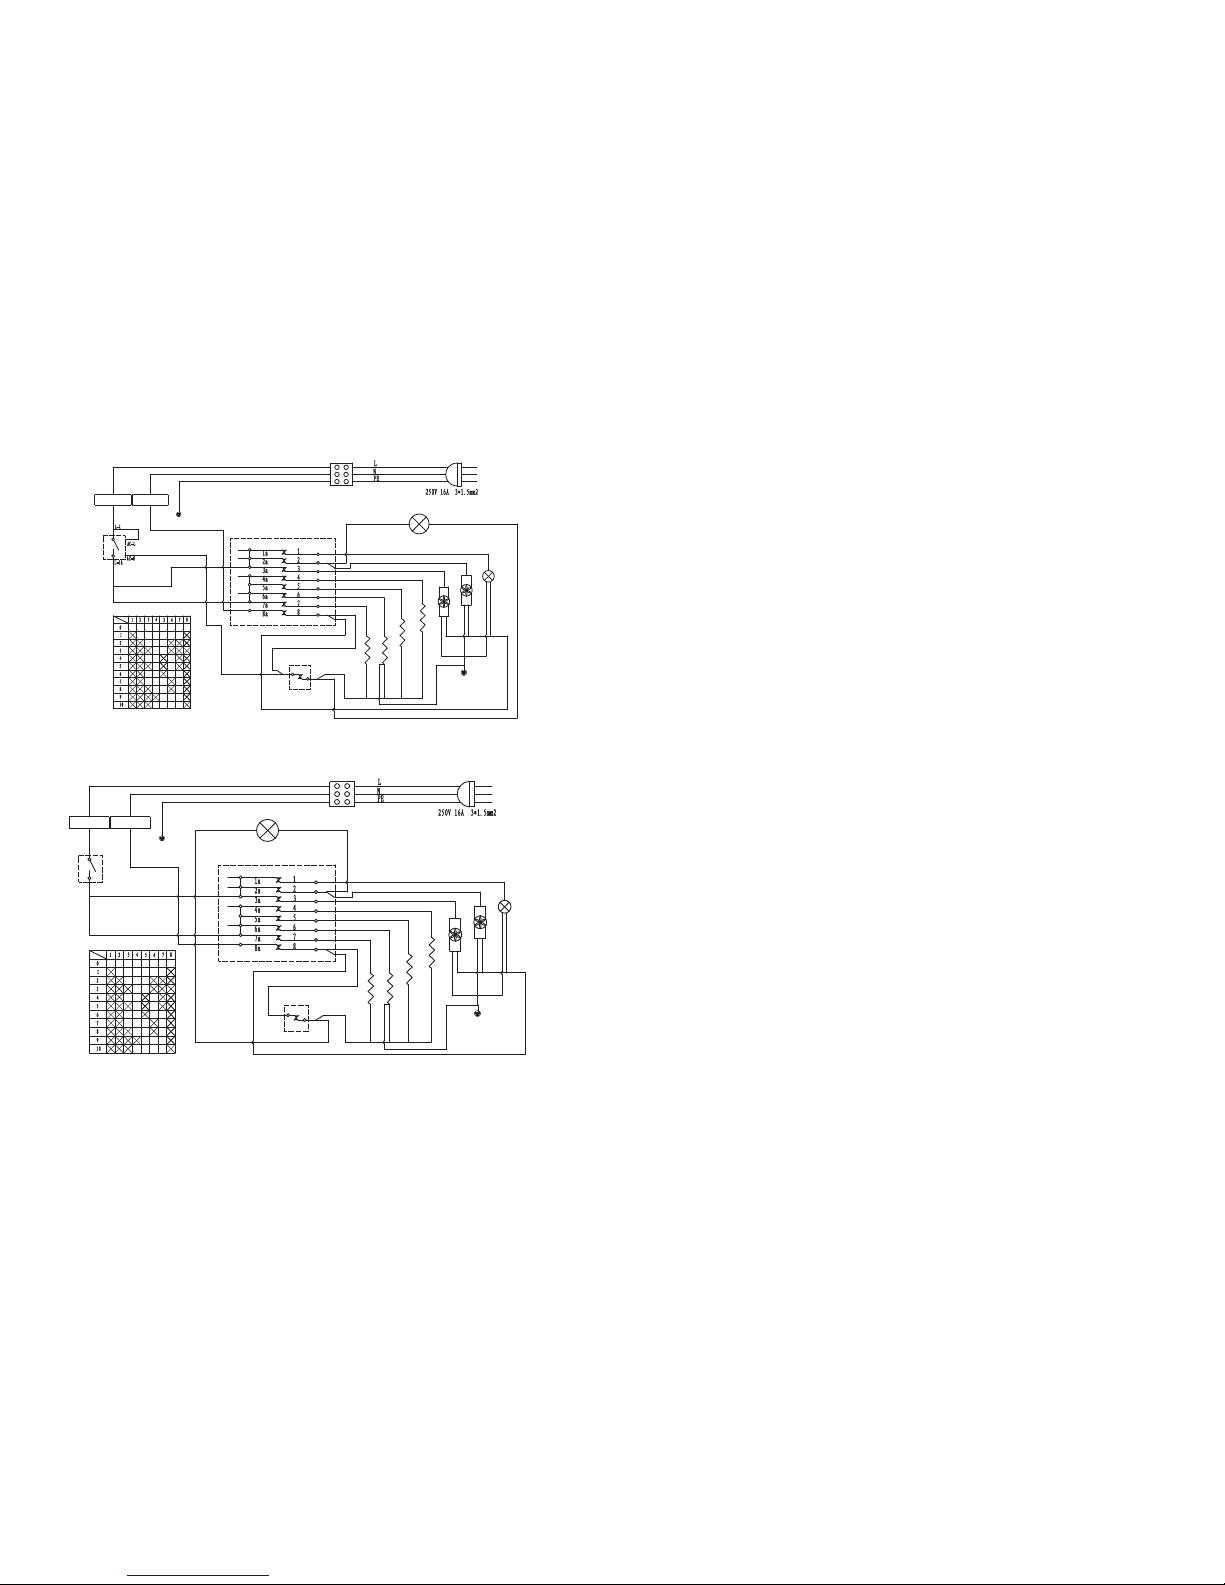
ELECTRICAL WIRING DIAGRAM
6 functions (electronic timer)
Near the lamp
Thermostat Switch
Thermostat Switch
Blue
Red
Electronic timer
Red
Blue
Yellow-Green
Brown
Blue
Yellow-Green
Setting switch
Blue
Blue Blue
Indicator light
Thermostatic switch
Blue
Lamp
Cooling fans
hot air fan
Top inside heating pipe
Top outside heating pipe
Rear heating pipe
Lower heating pipe
Setting
Parts
Blue
Blue
Blue
Blue
Red
Red
Red
Black
Black
Blue
Blue
Blue
Yellow
-Green
Yellow
-Green
Yellow
-Green
Yellow
-Green
Yellow
-Green
BlueBlue
Blue
Blue
Red
Red
6 functions (mechanical timer)
Near the lamp
Thermostat Switch
Thermostat Switch
Blue
Timer
Red
Blue
Yellow-Green
Brown
Blue
Yellow-Green
Setting switch
Blue Blue
Indicator light
Thermostatic switch
Blue
Lamp
Cooling fans
hot air fan
Top inside heating pipe
Top outside heating pipe
Rear heating pipe
Lower heating pipe
Setting
Parts
Blue
Blue
Blue
Blue
Red
Red
Red
Black
Black
Blue
Blue
Blue
Yellow
-Green
Yellow
-Green
Yellow
-Green
Yellow
-Green
Yellow
-Green
BlueBlue
Blue
Blue
Red
Page 11 Page 12
8/10 function (electronic timer)
Red
Blue
Yellow-Green
Brown
Blue
Yellow-Green
Near the lamp
Thermostat Switch
Thermostat Switch
Red
Red
Blue
Electronic timer
Red
Red
Setting switch
Red
Red
Red
Blue
Blue
Blue
Black
Black
Blue
Blue
Indicator light
Lamp
Blue
Blue
Blue
Blue
Blue
Blue
Blue
Blue
Blue
Blue
Yellow
-Green
Yellow
-Green
Yellow
-Green
Yellow
-Green
Yellow
-Green
Thermostat Switch
Cooling fans
hot air fan
Rear heating pipe
Lower heating pipe
Top inside heating pipe
Top outside heating pipe
Setting
Parts
8/10 function (mechanical timer)
Red
Blue
Yellow-Green
Brown
Blue
Yellow-Green
Near the lamp
Thermostat Switch
Thermostat Switch
Timer
Red
Red
Red
Blue
Blue Blue
Indicator light
Setting switch
Blue
Blue
Blue
Red
Red
Red
Black
Black
Lamp
Cooling fans
hot air fan
Rear heating pipe
Lower heating pipe
Top inside heating pipe
Top outside heating pipe
Thermostat Switch
Blue
Blue
Blue
Blue
Blue
Blue
Blue
Blue
Blue
Yellow
-Green
Yellow
-Green
Yellow
-Green
Yellow
-Green
Yellow
-Green
Setting
Parts
Page 13 Page 14
 Loading...