

Page 1

Car Multimedia System
USER MANUAL
Model Number: TD706/ TD706G (GPS optional)
PDF 文件使用 "pdfFactory Pro" 试用版本创建 ÿ www.fineprint.com.cn
Page 2

================================ XTRONS Car DVD Player===============================
I
Acknowledgement
Thanks for purchasing our car DVD player! In order to use
this system properly, please read this manual before using it.
Keep this manual for the future reference.
Warning
Keep the disc entry clean. You should clean it immediately if there is dust. Disc
with dust must be cleaned by clean soft cloth before putting into the machine,
otherwise, the dust will be taken into the machine together with the disc from
the entry, which may influence the drive of the machine, and cause the entrance
problems of the disc. The dust may dirty the laser head resulting in the poor
read or failed read of the disc.
Instructions for Installation
This DVD play is designed for operation on 12V-14V DC negative ground
system only. Make sure your car is fit for this negative ground system before
installation (Detailed instruction for installation, please refer to page 37.
Remove the [-] power supply of the battery ground wire before installing this
DVD, so as to decrease the rate of damaging the machine because of short
circuit.
Follow the wire color on the installation manual to connect the line. Wrong
connection may cause the machine malfunctions or damage the car electrical
system.
Lead wire [-] of speaker must connect to the [-] terminal of the speaker. Do not
connect it to the car or other lines.
Do not block the vent or louver board to avoid the fire caused by the
overheating inside the machine.
When you start to use the DVD after the installation completes (Including after
you have changed the battery), you should use a small round tool to press the
RES button on the panel to restore the system to the initial settings.
PDF 文件使用 "pdfFactory Pro" 试用版本创建 www.fineprint.com.cn
Page 3

================================ XTRONS Car DVD Player===============================
II
Content
Acknowledgement..........................................................................................................................................I
Warning..........................................................................................................................................................I
Instructions for Installation............................................................................................................................I
Content..........................................................................................................................................................II
Detaching/Attaching the Monitor Panel.........................................................................................................1
l Detaching.......................................................................................................................................1
l Attaching........................................................................................................................................1
Connecting Guide...........................................................................................................................................2
Monitor Panel Buttons.................................................................................................................................3
Basic Operation..............................................................................................................................................4
l Power on/off...................................................................................................................................4
l Previous/Next.................................................................................................................................4
l TFT Screen Angle Adjustable........................................................................................................4
l Volume Control..............................................................................................................................4
l Mute...............................................................................................................................................4
l Mode Switch..................................................................................................................................4
l Reset...............................................................................................................................................5
Main Menu.....................................................................................................................................................5
l TFT Screen Angle Adjusting..........................................................................................................6
l Operating Mode Control................................................................................................................6
l Setup...............................................................................................................................................6
General Setup.................................................................................................................................................6
l TFT Screen Angle Adjusting..........................................................................................................7
l Return to menu...............................................................................................................................7
l Individual Setup.............................................................................................................................7
² Picture Setup..........................................................................................................................7
² EQ Setup................................................................................................................................8
² Sound Balance Setup..............................................................................................................8
² Skin Setup..............................................................................................................................9
² Language and Rear-View Video Setup...................................................................................9
² Clock Setup..........................................................................................................................10
Radio Mode..................................................................................................................................................11
l Automatic Scan............................................................................................................................11
l Browse Radio Channels...............................................................................................................11
l Long/Short Distance Switch.........................................................................................................11
l Stereo/Mono Switch.....................................................................................................................11
l RDS (Optional)............................................................................................................................12
l Volume Control............................................................................................................................12
l Band Switch.................................................................................................................................12
l Manual Scan.................................................................................................................................12
l TFT Screen Angle Adjusting........................................................................................................13
l Favorite Radio Channels..............................................................................................................13
PDF 文件使用 "pdfFactory Pro" 试用版本创建 www.fineprint.com.cn
Page 4

================================ XTRONS Car DVD Player===============================
III
l Return to Main Menu...................................................................................................................13
l General Setup...............................................................................................................................13
DVD/ SD/ MMC/ USB Mode......................................................................................................................13
l Enter/Eject....................................................................................................................................14
l Play/Pause....................................................................................................................................14
l Stop...............................................................................................................................................14
l Direction Keys..............................................................................................................................14
l Menu............................................................................................................................................15
l Operation on Selecting the Catalog Functions.............................................................................15
l Track Setup...................................................................................................................................15
l Exit from the Menu......................................................................................................................16
l Volume control/Mute....................................................................................................................16
l Repeat...........................................................................................................................................16
l Fast forward/Fast backward.........................................................................................................16
l Program Selection Setup..............................................................................................................16
l Return to the Main Menu.............................................................................................................17
l General Setup Menu.....................................................................................................................17
TV Mode......................................................................................................................................................18
l TV System Setup..........................................................................................................................19
l Preset the Radio............................................................................................................................19
l Skip Setup....................................................................................................................................19
l Radio Fine-tuning.........................................................................................................................19
l Exit the Menu...............................................................................................................................19
l Volume/Mute Control...................................................................................................................19
l Recent Radio Program Switch.....................................................................................................20
l Channel Selection.........................................................................................................................20
l TA On/Off.....................................................................................................................................20
l Return to Main Menu...................................................................................................................20
l General Setup Menu.....................................................................................................................20
Bluetooth Mode............................................................................................................................................20
l Bluetooth Matching Connection..................................................................................................22
l Giving/Receiving a Call...............................................................................................................22
l Inquiry about the received/missed calls and dialed number.........................................................22
l Music Play of Mobile Phone........................................................................................................23
l Return to the main menu..............................................................................................................23
GPS Mode [Optional]...................................................................................................................................23
l Operations in GPS Mode..............................................................................................................24
² GPS Console........................................................................................................................24
² GPS Setup............................................................................................................................25
² Navigation Setup..................................................................................................................25
² Usual setup...........................................................................................................................26
² GPS Monitor........................................................................................................................26
² Touch Screen........................................................................................................................26
² Screen...................................................................................................................................26
² Time.....................................................................................................................................26
PDF 文件使用 "pdfFactory Pro" 试用版本创建 www.fineprint.com.cn
Page 5

================================ XTRONS Car DVD Player===============================
IV
² Skin......................................................................................................................................26
² System..................................................................................................................................27
l GPS Navigation............................................................................................................................27
AUX Mode...................................................................................................................................................27
l TFT Screen Angle Adjusting........................................................................................................28
l Exit the Menu...............................................................................................................................28
l Volume/Mute control....................................................................................................................28
l TA On/Off.....................................................................................................................................28
l Return to the Main Menu.............................................................................................................28
l General setup menu:.....................................................................................................................28
Back Sight Video Input Mode......................................................................................................................29
iPod Mode [Optional]...................................................................................................................................30
l Main Menu Setup.........................................................................................................................30
l iPod Video Settings......................................................................................................................30
l iPod Interface Settings..................................................................................................................30
l Remote Control Operations..........................................................................................................32
Installation....................................................................................................................................................36
Specifications...............................................................................................................................................37
Troubleshooting...........................................................................................................................................38
PDF 文件使用 "pdfFactory Pro" 试用版本创建 www.fineprint.com.cn
Page 6

================================ XTRONS Car DVD Player===============================
1
Detaching/Attaching the Monitor Panel
Detaching
1. While the unit is turned on, press OPEN on the monitor panel to slide the
panel downward.
2. Press the release button at the bottom of the panel (see picture above).
Note: The panel closes automatically when no operation is done for about a
minute.
3. The monitor panel is released. The attaching plate closes automatically
about 10 seconds after the monitor panel is released.Remove the monitor
panel before this happens.
Attaching
Caution:
Hold the monitor panel securely so as not to drop it accidentally.
Fit the monitor panel onto the attaching plate until it is firmly locked.
PDF 文件使用 "pdfFactory Pro" 试用版本创建 www.fineprint.com.cn
Page 7

================================ XTRONS Car DVD Player===============================
2
Connecting Guide
Radio Antenna
Joint
Video Output 2
Sub-woofer
Rear Video
AUX-R Input
AUX-L Input
AUX Video
iPod Input
Video Input 1
TV- Antenna
PDF 文件使用 "pdfFactory Pro" 试用版本创建 隖 www.fineprint.com.cn
Page 8

================================ XTRONS Car DVD Player===============================
3
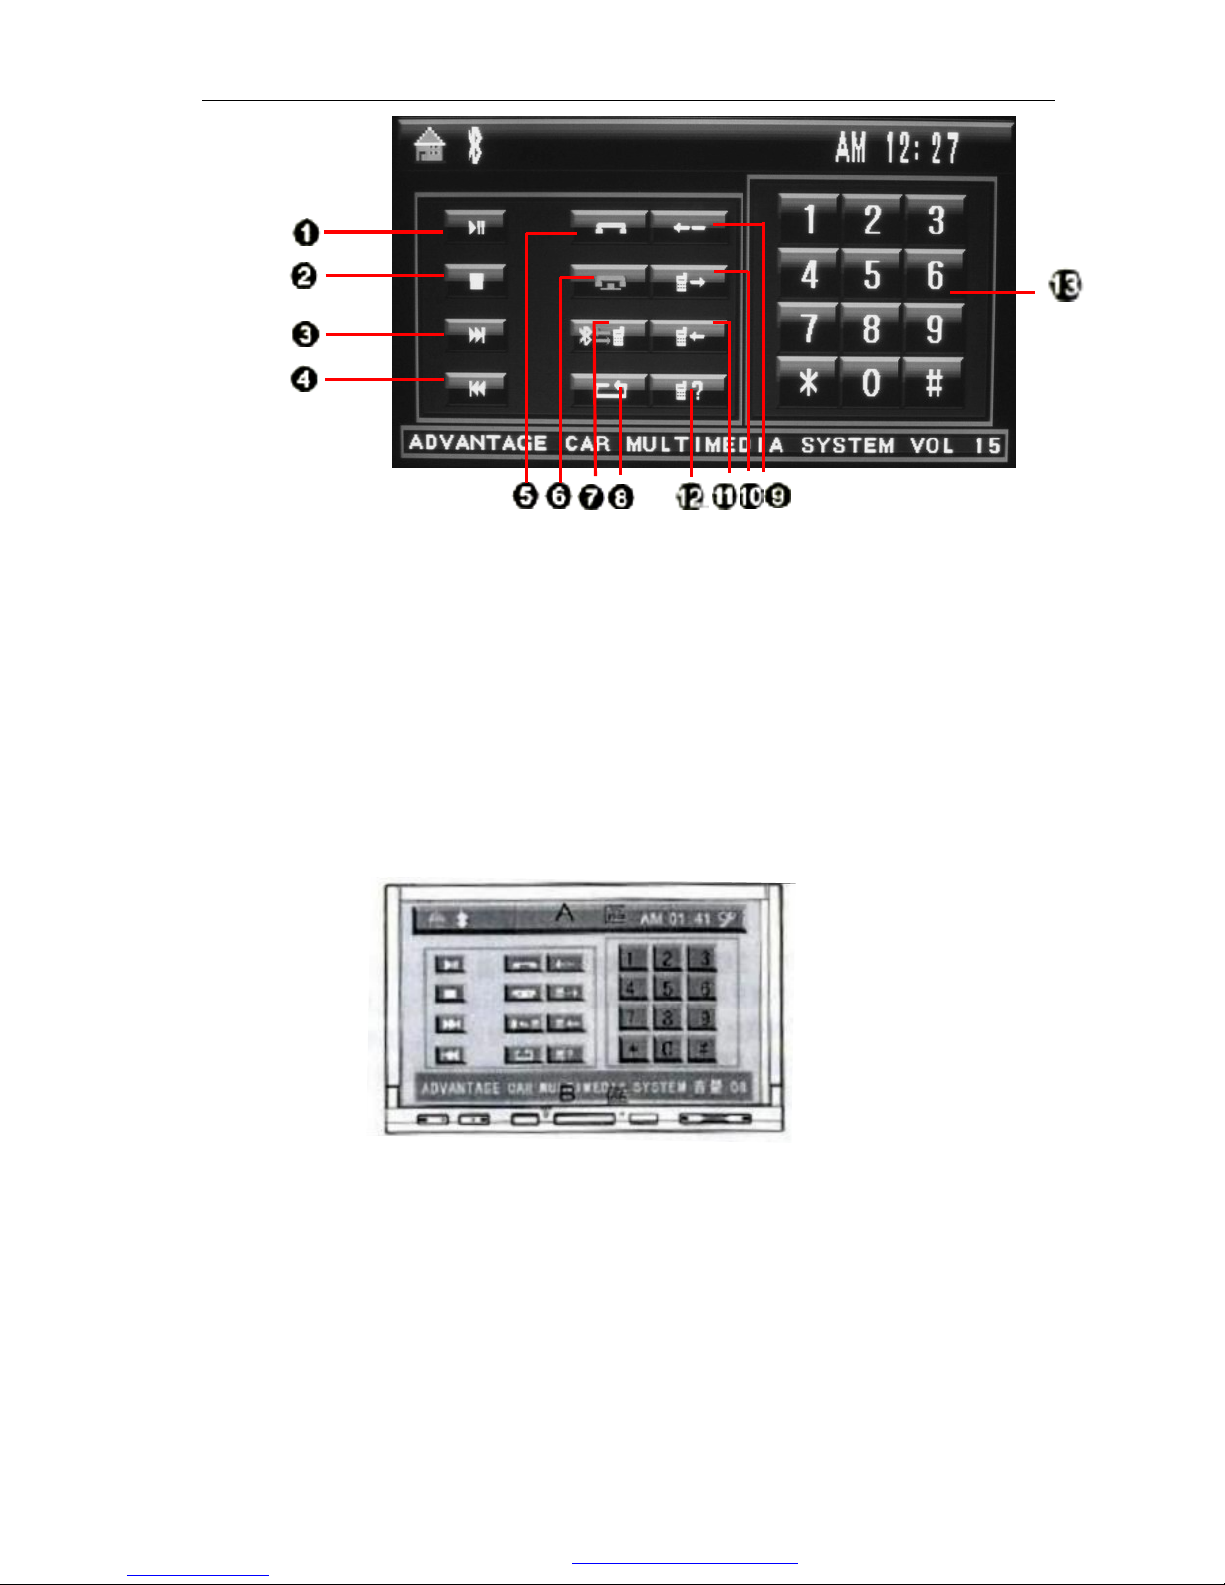
Monitor Panel Buttons
1. Power Switch/Mode Switch 2. TFT Screen Slide Up/Down 3. GPS, Loud On/Off
4. Reset 5. Previous 6. Next
7. Microphone Window 8. Remote Receiver Window 9. Volume -
10. Volume + 11. Disc Entry 12.GPS Card Slot (Optional)
13. SD Card Slot
PDF 文件使用 "pdfFactory Pro" 试用版本创建 www.fineprint.com.cn
Page 9

================================ XTRONS Car DVD Player===============================
4
Basic Operation
Power on/off
Press (1) [SRC] in the standby mode to turn on the DVD player;
Hold this button to turn off the player.
Previous/Next
When searching for radio channels, press (5) [Previous] or (6) [Next] can
select the channels backward or forward respectively. Hold the buttons
will search the forward and backward channels automatically. It will stop
auto-searching when there is a radio channel found.
In DVD/SD/USB mode, press (5) [Previous] and (6) [Next] to select the
programs backward or forward. Hold the button can play fast forward or
fast backward.
TFT Screen Angle Adjustable
Press (2) [OPEN] to slide the screen up or down.
Volume Control
Press (10) [VOL+] to increase the volume, (Max volume=30).
Press (9) [VOL-] to decrease the volume, (Min volume=0).
Mute
In DVD mode, press (3) [NAVI] to enter the mute mode and press again
to cancel.
Mode Switch
Press button (1) [SRC] to switch among different modes. The switching
sequence is as follows:
Note: If there is no disc/USB/SD/MMC card or no iPod is connected, the
Radio DVD SD/MMC Card
USB
Audio/Video Input
Bluetooth GPS (Optional)
iPod (Optional)
TV
PDF 文件使用 "pdfFactory Pro" 试用版本创建 www.fineprint.com.cn
Page 10

================================ XTRONS Car DVD Player===============================
5
DVD/SD /USB or iPod mode cannot be accessed when you press (1)
[SRC]. The switching sequence is as follows:
Reset
You can press (4) [RES] to reset the settings when the machine does not
work normally. All preset settings will be erased and restored to the
default factory settings.
Main Menu
1. Radio 2. DVD 3. SD/MMC Card
4. USB 5. AUX In 6. TV
7. Bluetooth 8. GPS (Optional) 9. iPod
10. Reverse Video In 11. Enter/Eject 12.TFT Down-Sliding Control
13. TFT Screen Control 14. TFT Up-Sliding Control 15. Volume Control
Radio
Audio/Video Input
TV
Bluetooth
GPS (Optional)
PDF 文件使用 "pdfFactory Pro" 试用版本创建 www.fineprint.com.cn
Page 11

================================ XTRONS Car DVD Player===============================
6
TFT Screen Angle Adjusting
You can press (12) and (13) in the main menu to control the screen to slide
up and down. Each click allows you to slide up or down an angle. There are
five angles; you can slide to the bottom if you slide down successively for
five angles.
Note: Turn off the player when there are any wrong angle memories, or
slide to the top, the DVD will recover the angle memory automatically.
Operating Mode Control
Press --- to enter the corresponding operating mode; if there is no disc,
USB, or SD/MMC card, you cannot enter the corresponding mode. For
DVD player without GPS function, GPS mode cannot be accessed.
Setup
Press in any interface except GPS, enter general setup menu.
Note: Long press [TFT] to turn off the TFT screen, and press again to
turn on.
General Setup
PDF 文件使用 "pdfFactory Pro" 试用版本创建 www.fineprint.com.cn
Page 12

================================ XTRONS Car DVD Player===============================
7
TFT Screen Angle Adjusting
Press [ ] and [ ] in the setup menu to control the screen to
slide up and down to a proper view angle.
Return to menu
Press [ ] to return to the main menu.
Individual Setup
Press ~ to enter the corresponding setup menu.
² Picture Setup
Press to [Brightness/Contrast/Color], the corresponding adjusting bar
shows up. Press [ ] to increase or decrease the value.The player will
save it in the self-defined mode automatically.Press to set the picture
mode as follows:
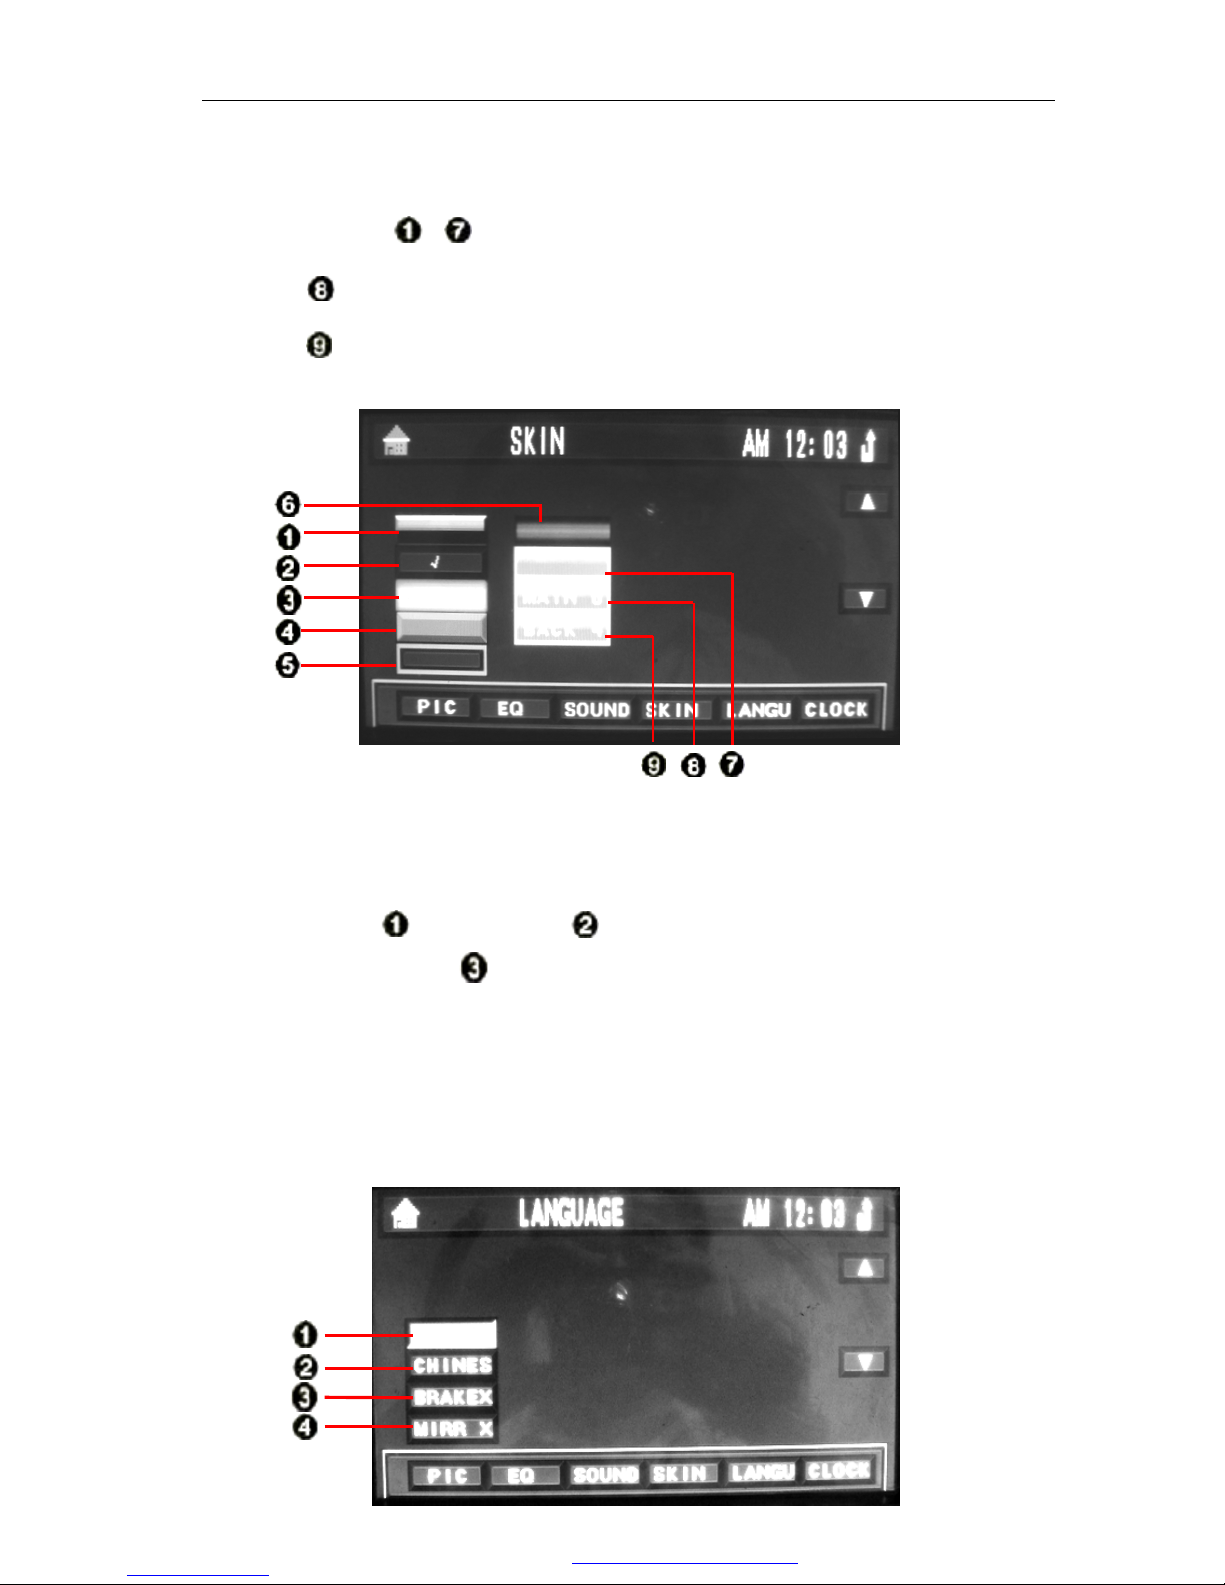
1. TFT screen up-sliding key 2. TFT screen down-sliding key 3. Return to Main Menu
4. Current Status 5. Time 6. Exit the Setup Menu
7. Picture Setup 8. EQ Setup 9. Sound Balance
10. Skin Setup 11. Language Setup 12. Time Setup
Softness
User-defined
Standard
Brightness
PDF 文件使用 "pdfFactory Pro" 试用版本创建 www.fineprint.com.cn
Page 13

================================ XTRONS Car DVD Player===============================
8
² EQ Setup
Press EQ to enter the EQ setup.
Press ~ [FLAT/ROCK/POP/JAZZ/CLASS] respectively to select the
corresponding sound effect.
² Sound Balance Setup
Press BALANCE to enter the balance setup.
Press ~ [BASS/TREBLE/BALANCE/FADER] and the corresponding
bar shows up. Press [ ] to adjust the sound effect.
Press [Equal-loudness switch] to turn on or turn off the equal-loudness.
PDF 文件使用 "pdfFactory Pro" 试用版本创建 www.fineprint.com.cn
Page 14
================================ XTRONS Car DVD Player===============================
9
² Skin Setup
You can press ~ to choose the corresponding style, color and skin.
Press repeatedly to choose the preferred styles.
Press repeatedly to choose four different background colors.
² Language and Rear-View Video Setup
You can press [English] and [Chinese] to set English or Chinese as the
menu language. Press [BRAKEX] to turn on or off the brake cable function.
The default setup for this function is off, so the device can not be controlled
by the brake cable. If you turn on the brake cable function, there will be no
display of pictures in the mode of DVD, SD/MMC, USB, AUX-IN and TV.
Press [MIRR X] to choose the mirror image or normal image for reverse
video.
PDF 文件使用 "pdfFactory Pro" 试用版本创建 www.fineprint.com.cn
Page 15

================================ XTRONS Car DVD Player===============================
10
² Clock Setup
You can press [ ] to turn on/off the beep. Press [TIME SETUP] to
set the time format (12 hours and 24 hours available).
Press [Hour] and [Minute] to adjust the time and minutes by touching
[ or ].
PDF 文件使用 "pdfFactory Pro" 试用版本创建 www.fineprint.com.cn
Page 16

================================ XTRONS Car DVD Player===============================
11
Radio Mode
Automatic Scan
Press [AMS] to scan the radio channel automatically.
Browse Radio Channels
Press [Scan] to browse the program preset in 1-6 of each band; each radio
channel will be played for 10 seconds.
Long/Short Distance Switch
Press [DX] to choose the remote/local searching mode. In Local searching
mode, the player can only receive the local radio with strong signal; in
Remote searching mode, both local and remote radio signals can be searched.
Stereo/Mono Switch
1. Automatic Scan 2. Scan Browse 3. Remote/Local Search Switch
4. MONO/STEREO Switch 5. TA (RDS) (Optional) 6. AF (RDS) (Optional)
7. PTY (RDS) (Optional) 8. Volume + 9. Volume -
10. TFT screen up-sliding key 11. TFT screen down-sliding key 12. Manual +
13 Manual - 14. Band 15. Return to Main Menu
16. General Setup 17. Status and Time 18. Number Key
PDF 文件使用 "pdfFactory Pro" 试用版本创建 www.fineprint.com.cn
Page 17

================================ XTRONS Car DVD Player===============================
12
Press [STER] to choose the stereo or mono radio mode.
RDS (Optional)
[ ~ ] do not work if there is no RDS or RDS is off.
A. Press [TA] to search RDS radio automatically.
B. Press [PTY] to choose your favorite program.The player will search the
programs automatically in 2 seconds.
C. Default setup of [AF] is ON. To close it or to restart, press . If the
current signal is weak, the player will search and play the channel of the
same type with strong signal in 50 seconds.
Volume Control
Press [ ] and [ ] to increase and decrease the volume. The volume
is divided into 30 grades, and the default value is 15. If you turn off the player
(or close the ACC lock), when the volume is set below 20, the player will
come to the previous volume when you restart the player; if the volume is set
above 20, the DVD will restore to default 15 after you restart the DVD.
Band Switch
Press [Band] to switch the radio band. The switching cycle is as follows:
Manual Scan
Press [ ] and [ ] to choose different radio channels upward or
downward. Long press these buttons; the player will search the channels
upward or downward automatically. It will stop scanning when a channel is
found.
FM1
FM2
FM3
AM1
AM2
PDF 文件使用 "pdfFactory Pro" 试用版本创建 www.fineprint.com.cn
Page 18
================================ XTRONS Car DVD Player===============================
13
TFT Screen Angle Adjusting
Press [ ] and [ ] in the setup menu to to slide the screen up
and down to a proper view angle.
Favorite Radio Channels
You can press one of [Number key] for 3 seconds to save the channel as the
preset channel. Press [Number key] to play the preset channel.
Return to Main Menu
Press [ ] to return to the main menu.
General Setup
Press [ ] to enter the general setup menu. For details, please refer to
page 7.
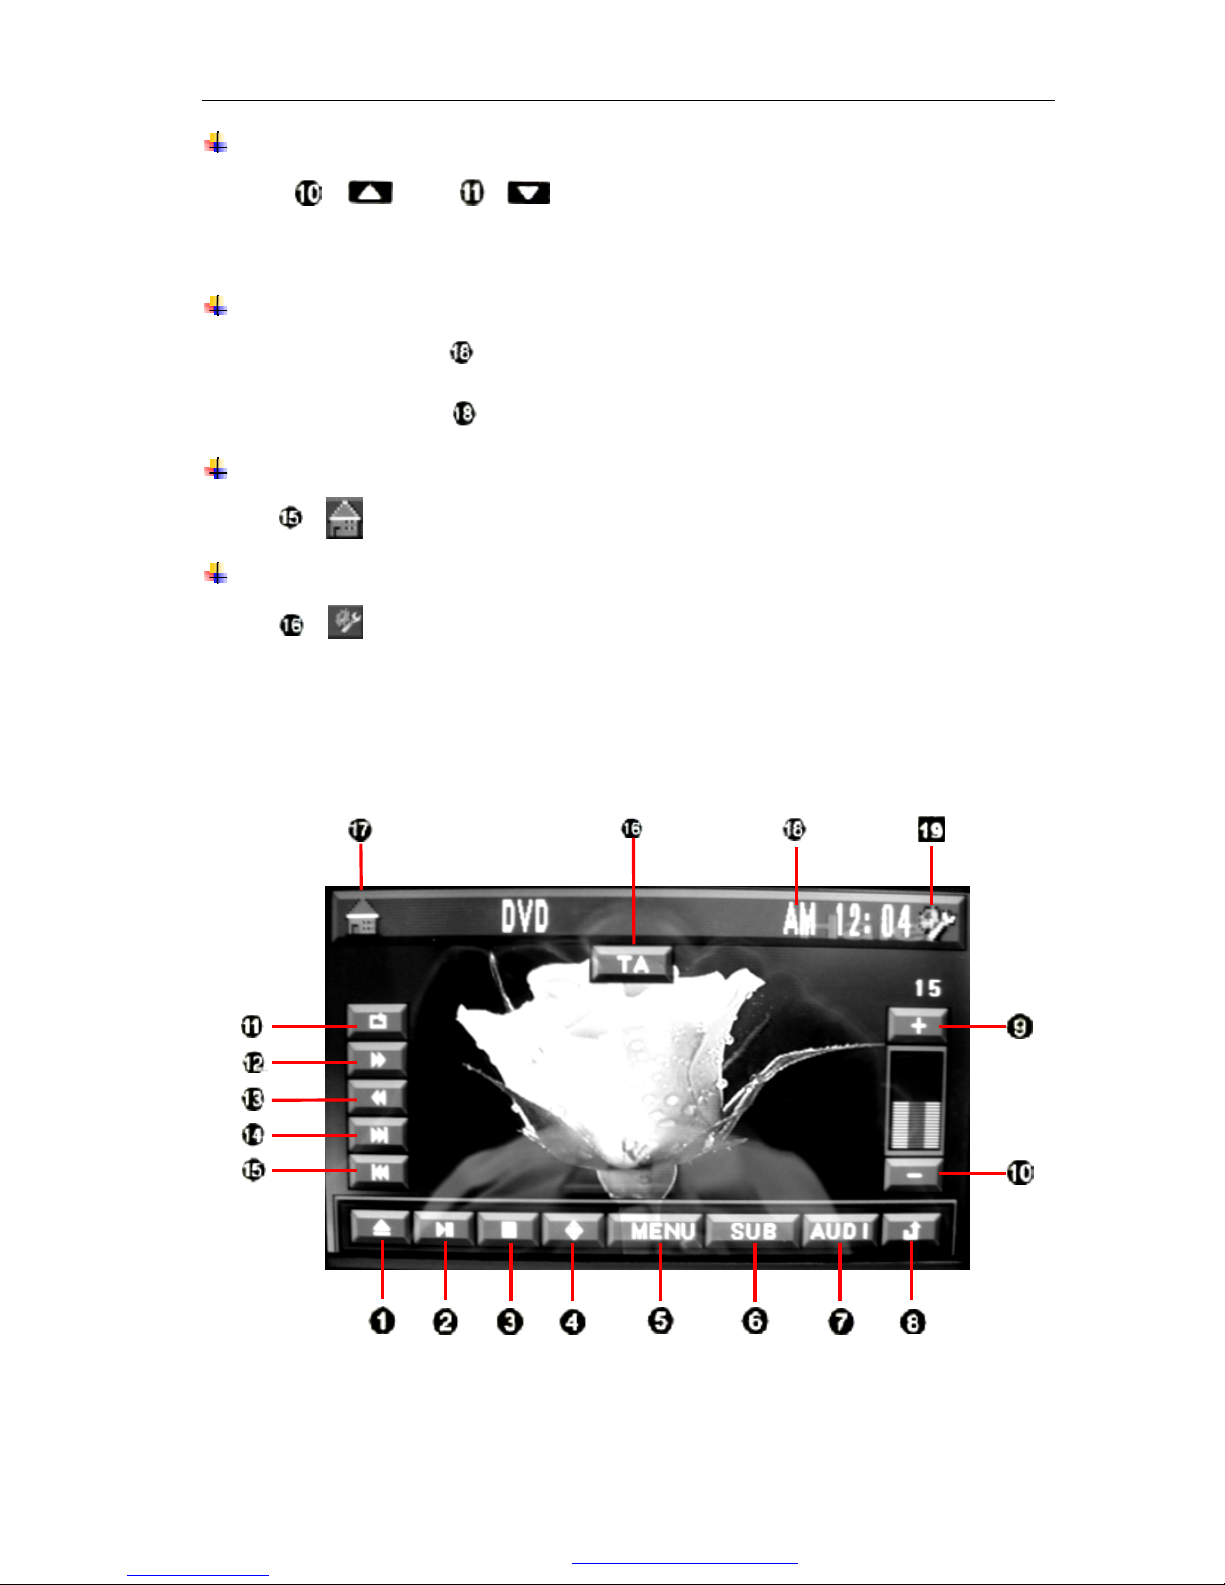
DVD/ SD/ MMC/ USB Mode
PDF 文件使用 "pdfFactory Pro" 试用版本创建 www.fineprint.com.cn
Page 19

================================ XTRONS Car DVD Player===============================
14
The player enters the DVD mode automatically when you insert a disc. If there
is a disc in the disc entry, please touch DISC icon in the main menu.
Enter/Eject
Press [Enter/Eject] to insert or eject a disc.
Play/Pause
In DVD mode, you can press [ ] to pause, and press it again to resume.
Stop
Press [ ] to stop playing.
Press [ ] to play back.
Direction Keys
1. Enter/Eject 2. Play/Pause 3. Stop
4. Direction Key 5. Main Menu 6. Catalog Functions
7. Audio 8. Return 9. Volume +
10. Volume - 11. Repeat 12. Fast Forward
13. Fast Backward 14. Next 15. Previous
16. TA On/Off 17. Return to Menu 18. Status/Time
19. General Setup
PDF 文件使用 "pdfFactory Pro" 试用版本创建 www.fineprint.com.cn
Page 20
================================ XTRONS Car DVD Player===============================
15
1. Left/right/up/down direction key
2. The confirming button
You can press to select the programs and roll the picture when playing the
MP3/MP4/SD/USB. The direction key icon disappears if there is no action on it
in 5 seconds.
Note: The direction key only works when it is in MP3, MP4 and DVD menu.
Menu
Press [Menu] to display the menu.
Note: The disc should be the VCD2.0, which supports the menu play or DVD.
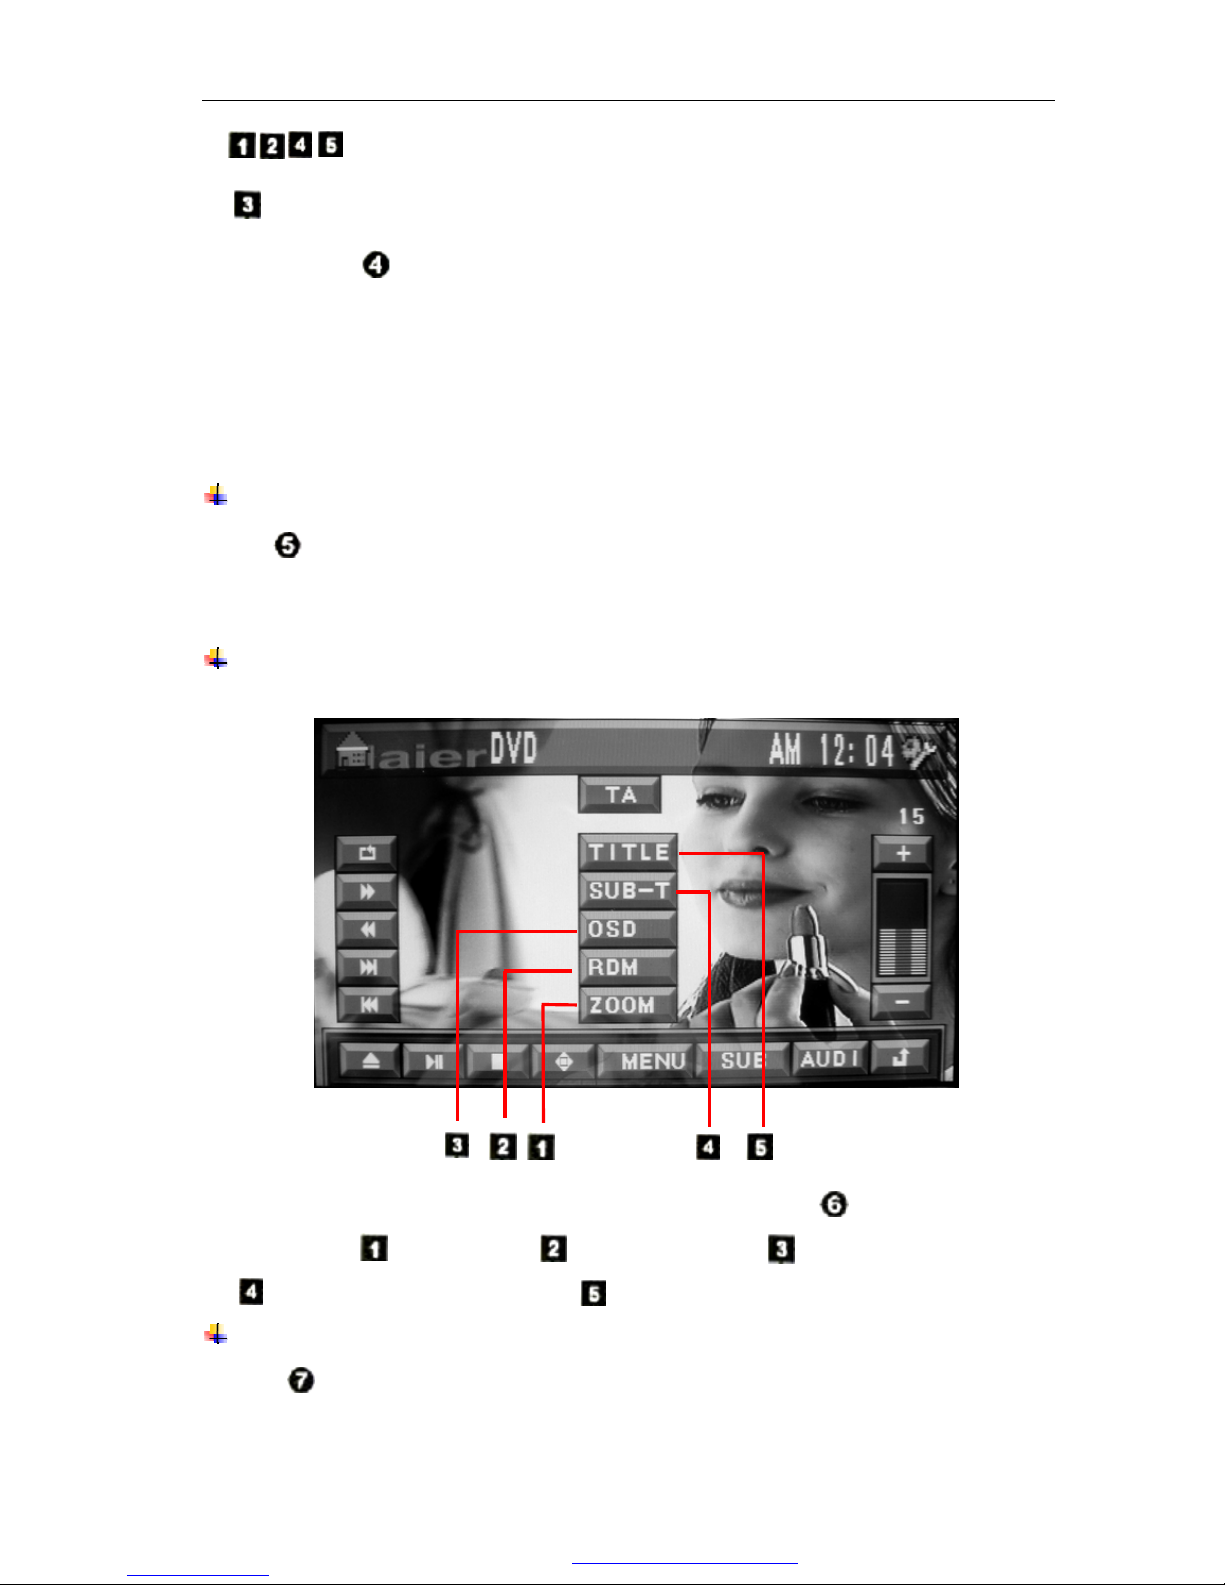
Operation on Selecting the Catalog Functions
You can carry out the following operations by pressing [Catalog functions
selection]: “ Zoom in”, “ Random play”, “ Playing time display”,
“ Title/Language setup” and “ Subtitle/Catalog setup”.
Track Setup
Press [Track setup] to set the left track, right track, stereo and mixed track
mode in the mode of DVD, VCD and CD.
PDF 文件使用 "pdfFactory Pro" 试用版本创建 www.fineprint.com.cn
Page 21

================================ XTRONS Car DVD Player===============================
16
Note: This function can give you a satisfied sound effect when you are
playing the bi-lingual movie or karaoke. You can choose the Chinese
dubbing or English dubbing.
Exit from the Menu
Press [Return] or does not touch the screen, the menu will disappear
automatically.
Volume control/Mute
The volume increase if you touch [Volume +] continuously (Max.
volume=30). Press [Volume -] to decrease the volume (Min. volume=0). It
is mute when you click the area between ~ and the Volume number
becomes . Press it again to cancel the mute.
Repeat
Press [ ] to set the repeat mode and the repeat sequence is as follows:
Note: The default mode is “All Repeat”.
Fast forward/Fast backward
Press [ ] and [ ] to play fast forward and fast backward. Press
the button continuously to play fast forward[X2/X4/X8/X20] or fast backward
[X2/X4/X8/X20]. Then, press [ ] to return to the normal play.
Program Selection Setup
Press [ ] or [ ] to select the next or the previous program.
² TA setup (Optional)
Press [TA on/off] to turn on or off the automatic scan of RDS radio in
DISC status.
Note: TA automatic scan function does not work if the DVD players do not
have RDS function.
All repeat
Single repeat
Repeat off
PDF 文件使用 "pdfFactory Pro" 试用版本创建 www.fineprint.com.cn
Page 22
================================ XTRONS Car DVD Player===============================
17
Return to the Main Menu
Press [ ] to return to the main menu.
General Setup Menu
Press [ ] to show the general setup menu. For details, please refer to
page 7.
Note: Operations on USB, SD and MMC card are the same as that in DVD
mode.
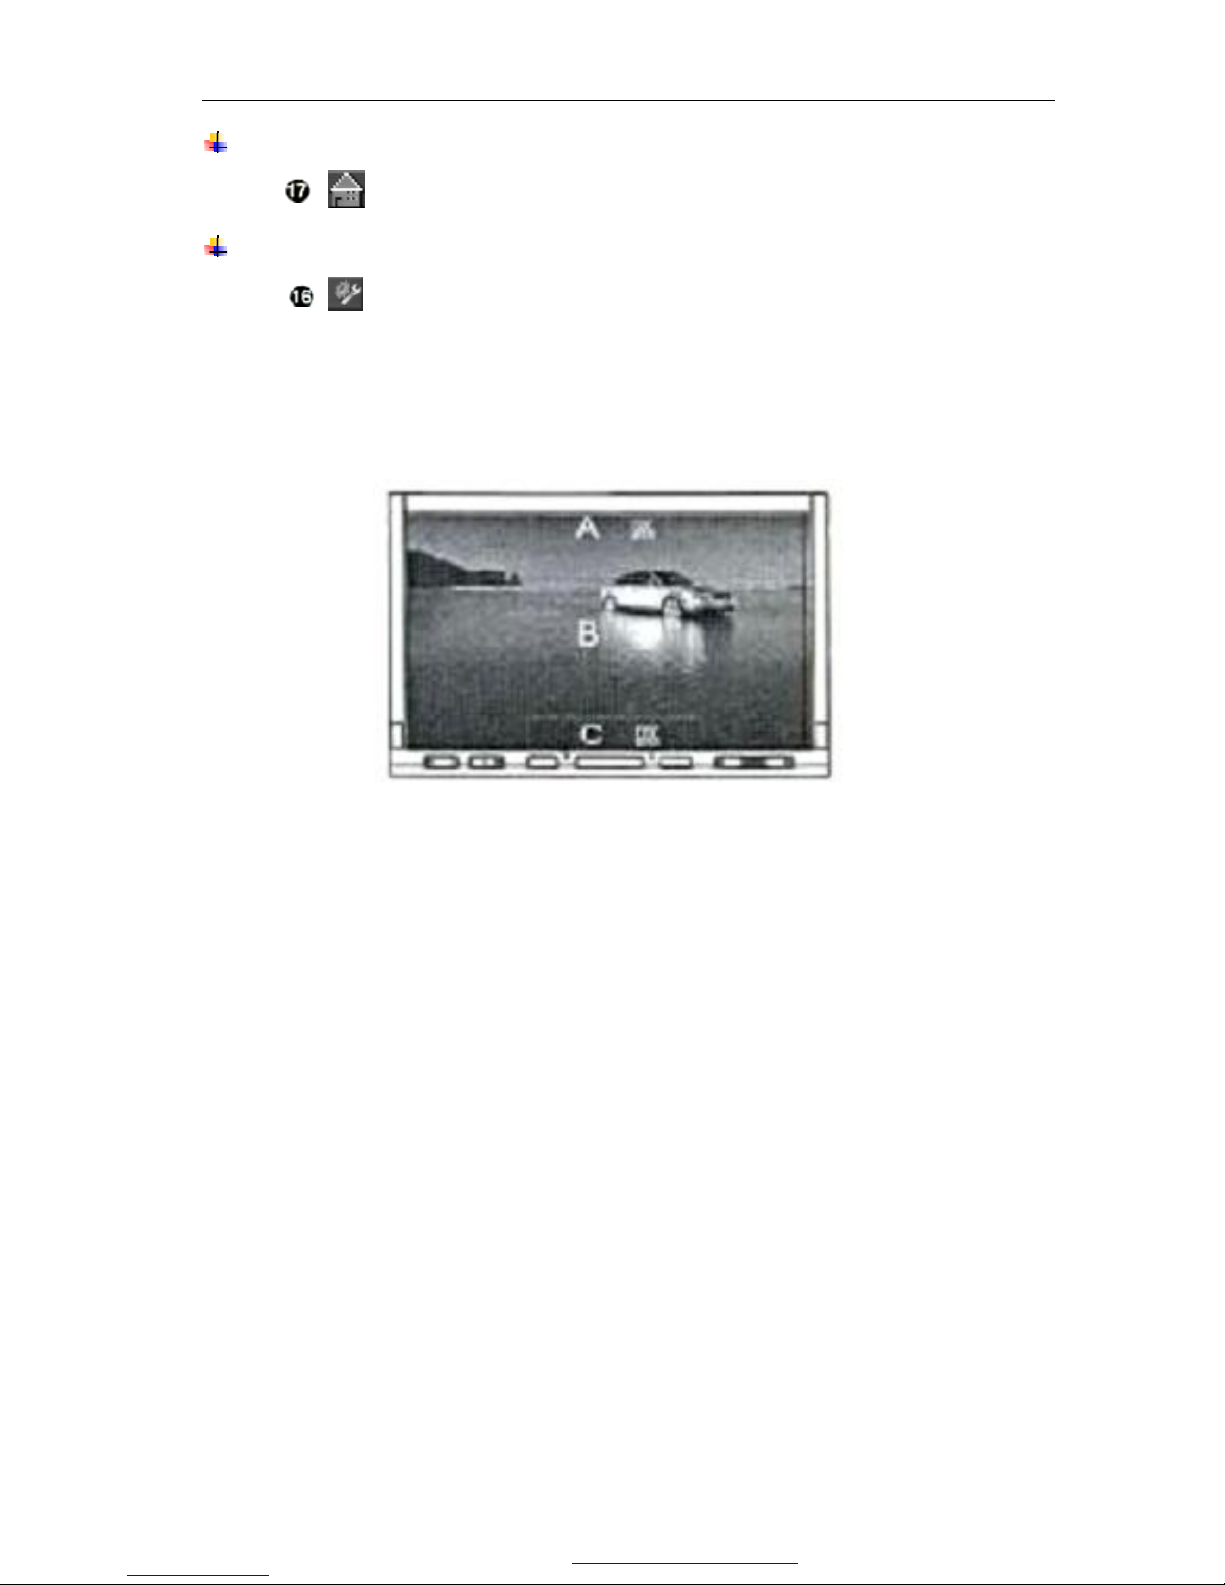
A. TFT screen up-sliding control area.
Click this area when you are not operating the DVD menu and general
setup to slide the TFT screen upward.
B. Menu control area. Click this area to show the DVD control menu.
C. TFT screen down-sliding control area.
Click this area when you are not operating the TV menu and general
setup to slide the TFT screen downward.
PDF 文件使用 "pdfFactory Pro" 试用版本创建 www.fineprint.com.cn
Page 23

================================ XTRONS Car DVD Player===============================
18
TV Mode
Click TV icon in the main menu to enter the TV mode:
A. TFT screen up-sliding control area.
1. TV system 2. Automatic scan 3. Skip
4. Manual fine tuning 5. Return 6. Volume +
7. Volume - 8. Channel return 9. Previous channel
10.Next channel 11. Previous scan by manual fine tuning 12. Next scan by manual fine tuning
13. TA on/off 14. Return to the main menu 15. Status and time
16. General setup menu
PDF 文件使用 "pdfFactory Pro" 试用版本创建 www.fineprint.com.cn
Page 24

================================ XTRONS Car DVD Player===============================
19
Click this area when you are not operating the TV menu and general setup to
slide the TFT screen upward.
B. Menu control area. Click this area to show the TV control menu.
C. TFT screen down-sliding control area.
Click this area when you are not operating the TV menu and general setup to
slide the TFT screen downward.
TV System Setup
Press [TV setup] repeatedly to select the correct TV audio/video system.
The selection sequence is as follows:
Preset the Radio
Press [Automatic scan] to scan and save the radio automatically. It can save
up to 99 radio channels.
Skip Setup
Select a channel and press [Skip] to turn on/off the function. If it is set
to skip channel, then, this channel will be skipped between the previous and
the next one. If you want to receive this channel, you should use the number
key on the remote control to select this channel.
Radio Fine-tuning
If the radio effect is influenced by the car movement or the frequency offset,
please press [Fine-tuning] and [ ] / [ ] to increase or
decrease the frequency until it is applicable to the TV vision and sound. The
player will memorize the new frequency automatically.
Exit the Menu
Press [Return] or do not operate the touch screen in 5 seconds, the menu
will disappear automatically.
Volume/Mute Control
The volume increases if you press [Volume +] continuously (Max.
volume=30). Press [Volume -] to decrease the volume (Min. volume=0).
PAL-I
PAL-DK
PAL-BG
SECAM-L
SECAM-BG SECAM-DK
NTSC-M
PDF 文件使用 "pdfFactory Pro" 试用版本创建 www.fineprint.com.cn
Page 25

================================ XTRONS Car DVD Player===============================
20
It is mute when you click the area between ~ and the Volume number
becomes . Press it again to cancel the mute.
Recent Radio Program Switch
Press to return to the previous channel. Pressing this button
repeatedly allows you to switch between the two recent radio channels.
Channel Selection
Press [ ] and [ ] to select the next and the previous channel
respectively.
Note: if one of the channels is set as the skip channel, this channel cannot be
selected when you press the above key. If you want to turn off the skip
function, you should use the number key on remote control to select this
channel and press [Skip] to turn off the skip function.
TA On/Off
Press [TA on/off] to turn on/off the automatic scan of RDS radio in DISC
status.
Note: TA automatic scan function does not work when the player doesn’t
support RDS function.
Return to Main Menu
Press [ ] to return to the main menu.
General Setup Menu
Press [ ] to show the general setup menu. For details, please refer to
page 7.
Bluetooth Mode
PDF 文件使用 "pdfFactory Pro" 试用版本创建 www.fineprint.com.cn
Page 26
================================ XTRONS Car DVD Player===============================
21
Press Bluetooth icon in the main menu to enter the Bluetooth mode:
A. TFT screen up-sliding control area
Click this area when you are not in the Bluetooth operation menu or general
setup menu, to slide the TFT screen upward.
B. TFT screen down-sliding control area
Click this area when you are not in the Bluetooth operation menu and general
1. Play/Pause 2. Stop 3. Next
4. Previous 5. Call/receiving button 6. Hands-free/Hang-off
7.Bluetooth/Mobile phone switching key 8. Matching button 9. Back-spacing
10. Dialed number 11. Received Calls 12. Missed Calls
13. Number key 14. Return to Main Menu 15. Status and Time
16. General setup menu
PDF 文件使用 "pdfFactory Pro" 试用版本创建 www.fineprint.com.cn
Page 27

================================ XTRONS Car DVD Player===============================
22
setup menu, to slide the TFT screen downward.
Bluetooth Matching Connection
The Bluetooth function is automatically activated when you turn on the
mobile phone. If there is no mobile phone to match the Bluetooth, the color of
icon [ ] in status area is white, in which it shows “SORRY NO LINK”.
Search the matched equipment by the Bluetooth mobile phone when it is
paired for the first time. You will find the Bluetooth device of the mobile
phone named CAR KIT, click “OK”, and input the password “0000” to
confirm. Your mobile phone shows that pairing is successful, then, you can
choose “Connect” to connect the Bluetooth. The color of the icon [ ]
changes from white to green when the connection is ok.
The mobile phone will connect the Bluetooth device automatically next time
if it has been matched.
Note: Operations of different mobile phones may vary. For details, please
refer to the instruction manual of the mobile phone.
Giving/Receiving a Call
The phone number you are going to dial is shown in “Status and time”. You
can press [ ] to clear if the number is wrong. You can also press [ ]
to dial the number or press [ ] to hang off.
The incoming call number is shown in the “Status and time”. You can press
[ ] to answer the call, or press [ ] to refuse.
Inquiry about the received/missed calls and dialed number
You can press [ ] to see up to 10 recent dialed numbers. You can also
PDF 文件使用 "pdfFactory Pro" 试用版本创建 www.fineprint.com.cn
Page 28

================================ XTRONS Car DVD Player===============================
23
choose a number and press [ ] to make a call.
You can press [ ] to check up to 10 recent incoming calls.
You can press [ ] to check up to 10 missed calls. You can also choose
a number and press [ ] to make a call.
Music Play of Mobile Phone
The Bluetooth of this DVD supports A2DP, stereo Bluetooth music play
protocol and automatic control. If the matched mobile phone supports the
functions, you just need to press [ ] in the standby mode under the
A2DP communication protocol, then, the player will control the mobile phone
automatically to play its music. You can press [ ] to pause when
playing the music. The device returns to normal when you press it again. Press
[ ] to stop playing and [ ] to start to play again. Press [ ]
to select the next program and [ ] to select the previous program.
Return to the main menu
Press [ ] to return to the main menu.
GPS Mode [Optional]
GPS enters into the standby mode automatically when the DVD is turned on.
You can press GPS icon in the main menu to enter into the GPS interface. There
are two operating modes for GPS.
GPS1: Voice [Background] Navigation
GPS works together with other modes such as radio or DVD. Radio or DVD
works when GPS does not have sound. The sound output is switched to the GPS
mode once there is sound in the GPS. You can switch the TFT screen picture to
PDF 文件使用 "pdfFactory Pro" 试用版本创建 www.fineprint.com.cn
Page 29
================================ XTRONS Car DVD Player===============================
24
GPS or other mode by pressing "SEL" on the remote control. You can set the
device to the GPS, DVD, or other modes according to your preference.
GPS2: Simple GPS Navigation
Only GPS works, other functions, such as radio/DVD player, do not work.
You can switch between GPS and the main menu of the device by pressing
"SEL" key on the remote control.
The default status is GPS1. You can switch the TFT screen in any mode to
GPS by pressing the GPS key on the remote control; and pressing again to
switch to GPS2, in which all other modes do not work and GPS is in the simple
GPS status. To return to GPS1 status, you can press GPS key on remote control
again.
Operations in GPS Mode
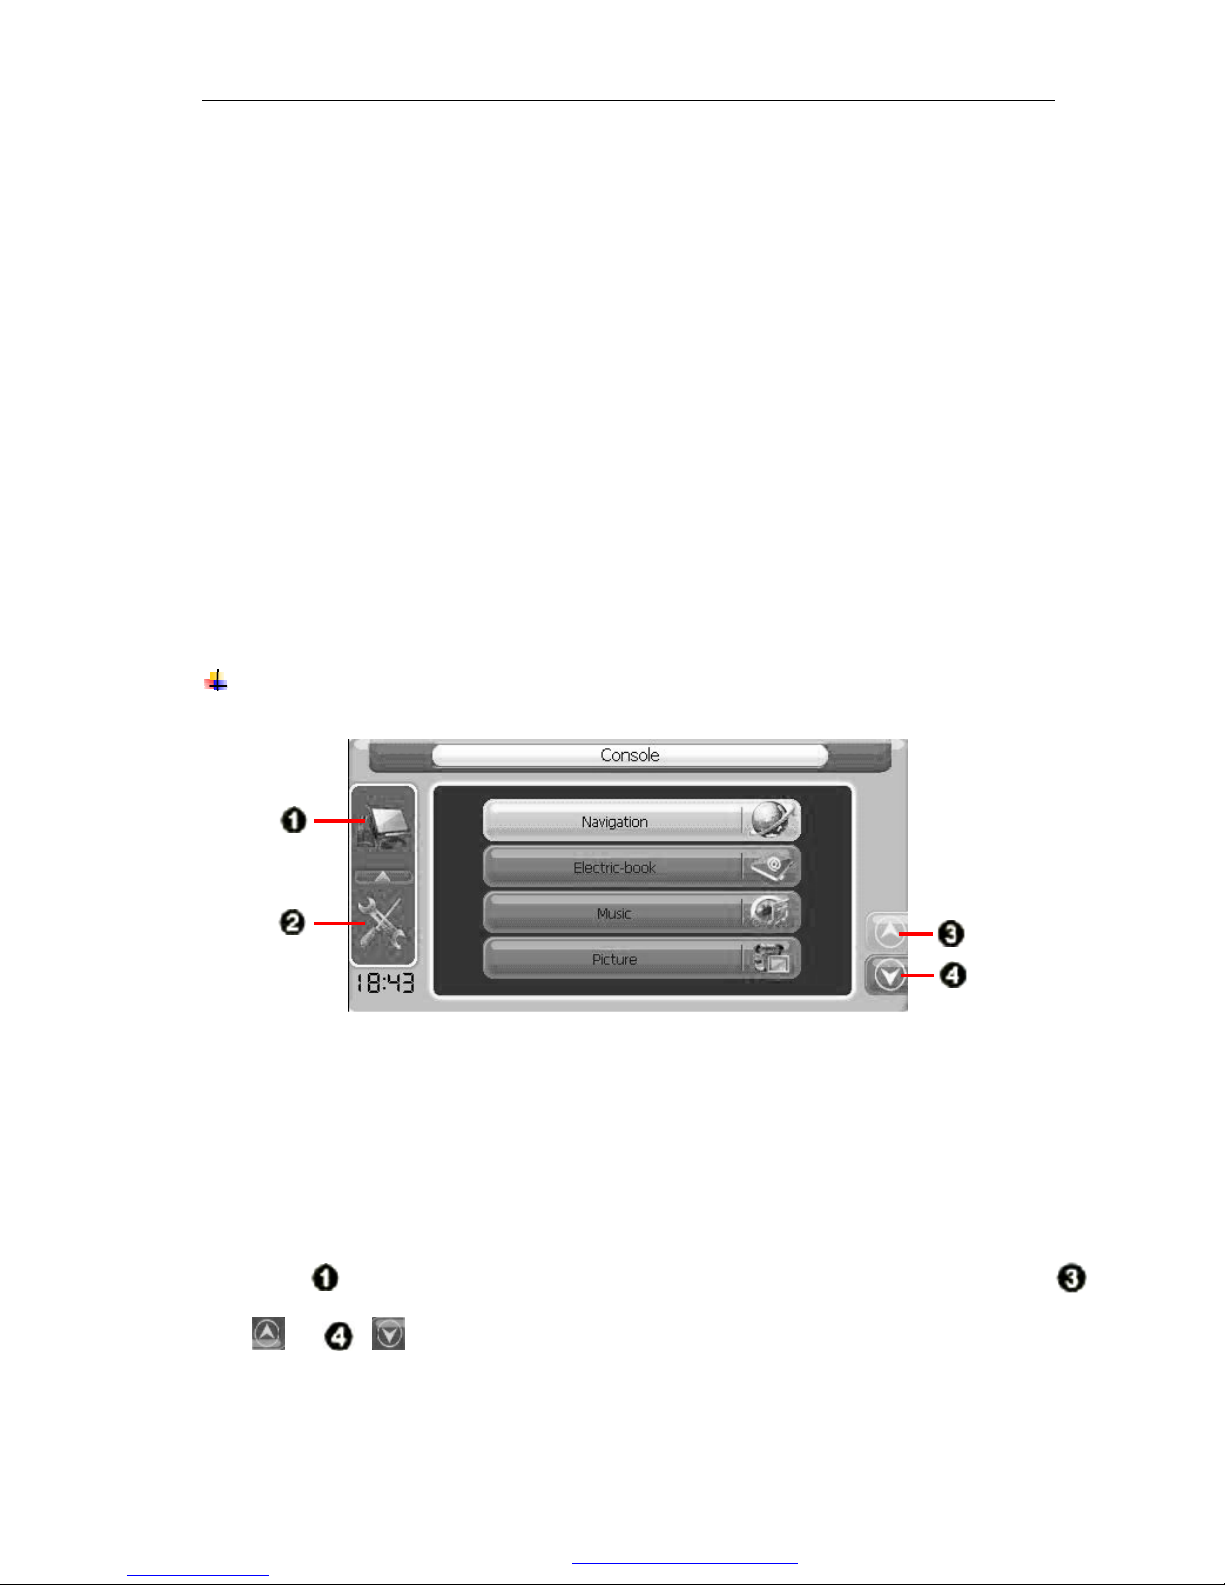
1. GPS control 2. GPS Settings 3. Previous Page 4. Next Page
² GPS Console
Press [Console] in the GPS main menu to enter the GPS console; press
[ ] or [ ] to page up or down. Press Navigation, E-book, Music, and
Movie to go to the corresponding mode.
PDF 文件使用 "pdfFactory Pro" 试用版本创建 www.fineprint.com.cn
Page 30
================================ XTRONS Car DVD Player===============================
25
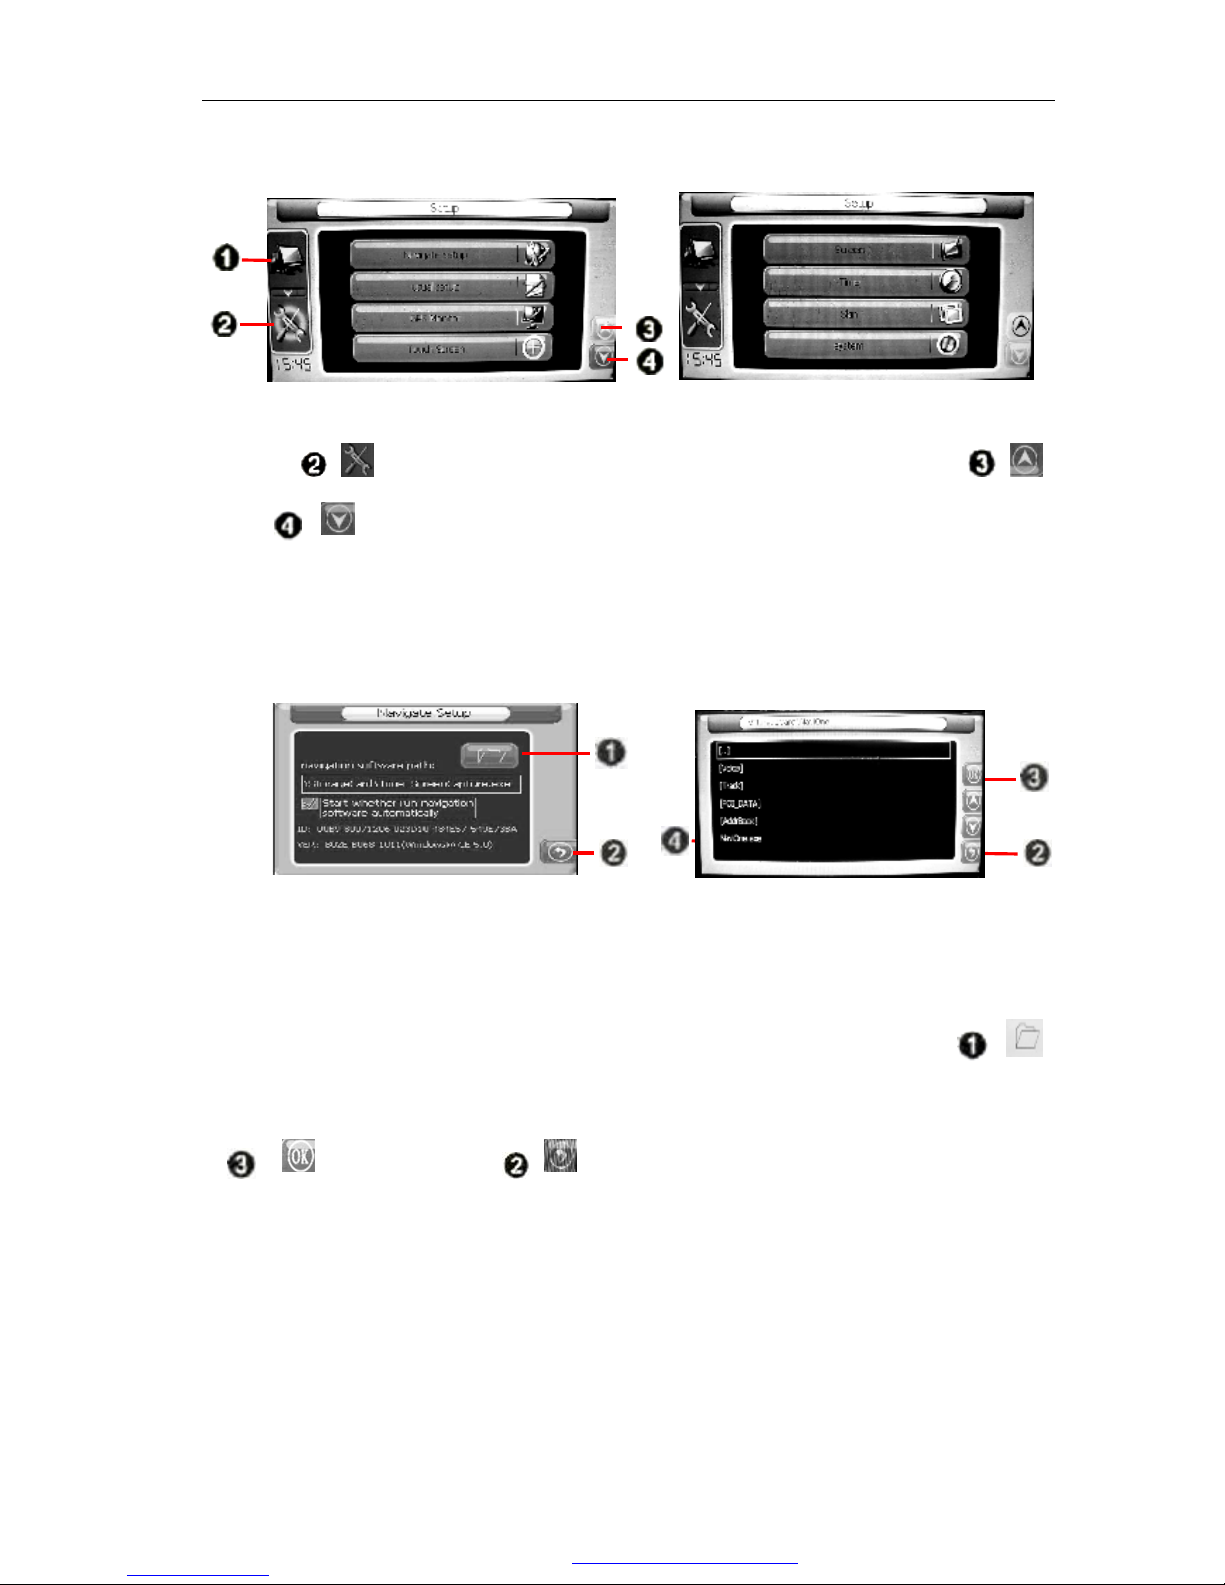
² GPS Setup
Press [ ] in the GPS main menu to enter the setup menu; press [ ]
or [ ] to page up or down. Press Navigation setup, usual setup, GPS
monitor, Touch screen, Screen, Time, Skin, and System to enter the
corresponding interface.
² Navigation Setup
Press “Navigation setup” to enter the map path setup interface, press [ ]
and choose the path of the map, then, find the GPS map file (*.exe) and press
[ ] to save. Press [ ] to return to the GPS menu; press console
icon to enter into the console, then, press navigation icon to start the GPS
operation.
PDF 文件使用 "pdfFactory Pro" 试用版本创建 www.fineprint.com.cn
Page 31

================================ XTRONS Car DVD Player===============================
26
² Usual setup
Press “Usual setup” to enter the setup interface. You can set the volume, key
sound, and language here.
² GPS Monitor
Press “GPS monitor” to enter the GPS monitor interface. You can see the
information about the GPS satellite status.
² Touch Screen
Press “Touch screen” to enter the calibration interface. Use the special pen to
click the five calibration points for 2 seconds in turn. The screen displays “OK”
when the calibration is successful, then, press “OK” to return to the setup menu.
² Screen
Press “Screen” to enter the screen setup interface. You can set the brightness,
color/size/position here.
Note: Recommended screen size is: Level: 0; Vertical: 6.
² Time
Press "Time" to enter the clock setup interface. You can set the clock and time
zone here.
² Skin
Press "Skin" to enter the skin setup interface to choose the different skins and
picture switching effects.
PDF 文件使用 "pdfFactory Pro" 试用版本创建 www.fineprint.com.cn
Page 32

================================ XTRONS Car DVD Player===============================
27
² System
Press "System" to enter the system setup interface.
GPS Navigation
Set the TFT screen to the lowest angle in the menu mode and insert the
authorized map card into the GPS map card slot as shown in picture below:
After the navigation setup, click the navigation icon in the interface of GPS
console to enter the GPS navigation mode.
Note: The navigation interface and functions may vary from different GPS software. For detailed
navigation operations, please refer to the instruction of the map.
AUX Mode
GPS Card Slot
PDF 文件使用 "pdfFactory Pro" 试用版本创建 ÿ www.fineprint.com.cn
Page 33

================================ XTRONS Car DVD Player===============================
28
Press the icon in the main menu to enter the AUX operation mode:
TFT Screen Angle Adjusting
Click [ ] and [ ] in the setup menu to control the screen to
slide up and down to a proper view angle.
Exit the Menu
Click [Return] or do not operate the touch screen in 5 seconds, the
operation menu will disappear automatically.
Volume/Mute control
The volume increase if you press [Volume +] continuously. (Max.
volume=30). Press [Volume -] to decrease the volume. (Min. volume=0). It
is mute when you click the area between ~- and the Volume number
becomes . Press it again to cancel the mute.
TA On/Off
Press [TA on/off] to turn on/off the automatic scan of RDS radio in DISC
status.
Note: TA automatic scan function does not work if some DVD players do not
have RDS function.
Return to the Main Menu
Press [ ] to return to the main menu.
General setup menu:
Press [ ] to show the general setup menu. For details, please refer to
1. TFT screen up-sliding key 2.TFT screen down-sliding key 3.Return
4.Volume- 5.Volume + 6.TA on/off
7.Return to main menu 8.Status and time 9. General setup
PDF 文件使用 "pdfFactory Pro" 试用版本创建 www.fineprint.com.cn
Page 34

================================ XTRONS Car DVD Player===============================
29
the general setup in page 7.
Back Sight Video Input Mode
Press in the main menu to enter the backup video operation mode.
Note: The following menu interface is shown when you click the clock setup in
the general setup menu.
Click [ ] and it changes to [ ].
Exit the usual setup menu and enter the backup video operation interface after the
mirror image. The interface is shown as below. Therefore, the reverse picture of
the backup becomes the normal picture, which is convenient to monitor.
PDF 文件使用 "pdfFactory Pro" 试用版本创建 www.fineprint.com.cn
Page 35

================================ XTRONS Car DVD Player===============================
30
iPod Mode [Optional]
Click in the main menu to enter the iPod operation mode. (Optional)
Main Menu Setup
Click [Menu] to enter the iPod menu setup.
iPod Video Settings
Click [Video] to enter the iPod video play.
Note: 1.You cannot see the iPod picture in TFT screen if iPod does not have
picture output;
2. Detailed operation may vary from different version of iPod.
iPod Interface Settings
The player will paly the iPod automatically when it is connected with the
player. You can click [Hang-off] to disconnect the iPod with the player,
the palyer will release all control from the iPod at the same time.
Note: The player can’t display the track details from iPod when playing music
1. Video 2.Menu 3.Search backward
4.Search forward 5.Enter 6.Hang-up
7. Volume + 8. Volume - 9. TFT screen up-sliding key
10. TFT screen down-sliding key 11. Next 12. Play/Pause
13. Previous 14. Return to main menu 15. TA on/off
16. General setup 17.Status and time
PDF 文件使用 "pdfFactory Pro" 试用版本创建 www.fineprint.com.cn
Page 36

================================ XTRONS Car DVD Player===============================
31
Remote Control
1. Power Supply 11. GPS screen switching 21. Angle selection
2. Play/Pause
12.Repeat/Automatically
save the channel
22.Title/Language settings
3. Enter/Eject
13.Random play/Local &
remote control
23. Main menu setup
4. Direction keys 14. Number keys 24.Title/Catalog settings
5.Band/System switching button 15. Audio settings 25. Zoom in/Zoom out
6. Enter 16. PBC settings 26.GPS shortcut/mode
7. Volume +/- 17. Mute 27.TFT screen up-sliding
8. Select the channel/program/ Fast 18. Desired program 28.TFT screen down-sliding
9. Programming/Stereo 19. Mode switching
29.Compensation of
equal-loudness
10. Playing time display 20. Stop/Return
PDF 文件使用 "pdfFactory Pro" 试用版本创建 www.fineprint.com.cn
Page 37

XTRONS Car DVD Player
32
Remote Control Operations
※※※※※※※※※※※※※※※※※※※※※※※
★ Replace the battery
If the operating distance shortens or the
remote control does not work, please
change a new Lithium battery. Make
sure the specifications and the polarity
before changing.
1. Press the battery box and draw it out
in the arrow direction.
2. Put the button battery into the battery
box with the face printed with “+”
facing up.
3. Insert the battery box into the remote
control. You will hear a “peng” sound
if the battery is fitted in the right
position.
.
※※※※※※※※※※※※※※※※※※※※※※※
※※※※※※※※※※※※※※※※※※※※※※※
★ Power switch
Press to turn on/off the power
supply. The remote control only works
when you have pressed the [POW] on
DVD for the first time or after you
have pressed the [RES] button.
※※※※※※※※※※※※※※※※※※※※※※※
★ TFT screen angle adjusting
Press [ ] and [ ] to slide
up and down the TFT screen. It is
divided into five angles, and every
click can slide up/down an angle.
※※※※※※※※※※※※※※※※※※※※※※※
★ Pause/Play
The DVD, VCD, CD, and MP3 pause
if you press [ ], it returns to
normal if you press it again.
※※※※※※※※※※※※※※※※※※※※※※※
★ Mute
Press [ ] to eliminate the sound
and press again to restore the sound.
※※※※※※※※※※※※※※※※※※※※※※※
★ Menu selection/confirm
You can choose the menu according to
you demand by pressing and press
[ENTER] or [ ] to confirm.
Note: it works only when you are in main menu or
catalog.
※※※※※※※※※※※※※※※※※※※※※※※
PDF 文件使用 "pdfFactory Pro" 试用版本创建 www.fineprint.com.cn
Page 38

XTRONS Car DVD Player
33
Remote control operations
※※※※※※※※※※※※※※※※※※※※※※※
★ Band/System switching
Press [BAND/SYS] to change the radio
band when you are searching the radio
channel.
Press [BAND/SYS] to change to Auto,
PAL, or NTSC system mode when you
are listening to the radio.
※※※※※※※※※※※※※※※※※※※※※※※
★ Volume +/-
Press [VOL+ or VOL-] to increase
or decrease the volume of the radio.
※※※※※※※※※※※※※※※※※※※※※※※
★ Equal-loudness compensation
★ Press [LOUD] to turn on/off the
equal-loudness compensation. This function
can enhance the sound effect of the woofer.
※※※※※※※※※※※※※※※※※※※※※※※
★ Select the station/song/Fast forward/Fast
backward
Press to choose the channel
manually backward or forward when you
are searching the radio channel. If you
press for more than three
seconds, the radio will search the
channel forward automatically.
Press in the mode of DVD,
VCD, CD, and MP3 to choose one of
the songs backward or forward.
Press for three seconds to fast
play backward or forward. You can find
the song you want to play quickly, and
press the play button to play
※※※※※※※※※※※※※※※※※※※※※※※
※※※※※※※※※※※※※※※※※※※※※※※
★ Programming / ST
You can set the play sequence of the song
by this function in the state of VCD or
CD
Press [ST/PROG] in the state of
VCD, programming P00:00 will be shown
on the TFT screen or TV. You can use the
number keys [0-10+] to set the play
sequence of the songs. You can press
[ ] to play after the programming is
complete. Press [ST/PROG] to switch
between mono and stereo radio searching
when you are searching the radio channel.
※※※※※※※※※※※※※※※※※※※※※※※
★ Playing time display
Press [OSD] to display the playing time
of a song in the state of DVD, VCD, and
CD.
※※※※※※※※※※※※※※※※※※※※※※※
★ Repeat/ AMS
Press [AMS/RPT] in the state of
DVD, VCD, CD, and MP3 to repeat
playing the current song, and press again
to cancel the repeat.
When you are searching the radio
channel, press [AMS/RPT] and the
device scans the channels automatically
and saves them in the number keys of
[1-6].
※※※※※※※※※※※※※※※※※※※※※※※
★ Random play/Local &Remote play
Press [LOC/RDM] in the state of
VCD, MP3, and CD to enter the random
play, and press again to cancel. (Play
according to the list)
Note: [LOC/RDM] does not work in DVD mode.
When you are searching the radio
channel, you can press [LOC/RDM] to
switch the mode between local searching
and remote searching.
※※※※※※※※※※※※※※※※※※※※※※※
PDF 文件使用 "pdfFactory Pro" 试用版本创建 www.fineprint.com.cn
Page 39

XTRONS Car DVD Player
34
Remote control operations
※※※※※※※※※※※※※※※※※※※※※※※
★ Number key
Press number key 1-6 when you are
searching the channel to choose the 6 radio
channels saved in each band.
You can use the number key [0-10+]
to choose a song directly in the state of
DVD, VCD, CD, and MP3. For example, if
you want to choose the 15th song, you could
press [10+] once and then, press [5] to play
the 15th song.
Note 1.The first time you press [10+], it is 10; it becomes
20 when you press it in the second time, and 30 in
the third time, and so on.
2. The number key does not work when playing in
PBC state.
※※※※※※※※※※※※※※※※※※※※※※※
★ Left track/Right track/Stereo
adjusting
Press [AUDIO] in succession in the state
of DVD, VCD, and CD to set the mode of
left/right track and stereo.
Note: This function can give you a satisfied sound
effect when you are playing the original movie or karaoke.
For example, you can choose the Chinese dubbing or
English dubbing.
※※※※※※※※※※※※※※※※※※※※※※※
★ PBC play
You can play PBC by pressing [PBC]
when you are playing the VCD 2.0. TFT
screen or TV show all the programs, you
can use the number key [0-10+] to
select the program directly. If you want to
stop to play another program, you can press
[ ] to return to the menu to select
choose the function again. Press [PBC]
for the second time to cancel the PBC
playing.
Note: PBC is not effective when you are playing the DVD,
CD, MP3, or VCD1.1.
※※※※※※※※※※※※※※※※※※※※※※※
★ Subtitle/Language switch
You can change the Subtitle/Language to
Chinese/English by pressing [SUB-T]
in the state of DVD.
Note: This button is only for copying the DVD disc with
subtitle/language; otherwise, the TV shows the subtitle is
cancelled.
※※※※※※※※※※※※※※※※※※※※※※※
★ Set the disc playing time
When you are playing the disc, press
[GOTO] to set the disc to play from the
set time, press and
number keys to set the chapter and
section or the playing time, then, press
[ENTER] to start playing.
※※※※※※※※※※※※※※※※※※※※※※※
★ Mode switching
You can press [MODE] to switch
the playing mode among radio
searching/listening/USB/SD/MMC/AU
X-IN/TV/BLUETOOTH/GPS/IPOD.
Note: If there is no disc, SD card or USB device
inside the DVD and IPOD is not selected, you cannot
use this function by pressing the MODE.
※※※※※※※※※※※※※※※※※※※※※※※
★ GPS mode switching
The device enters the GPS mode
automatically when you press [GPS]
for the first time. You can operate the
GPS by touching the screen. Press
[GPS] again to switch the mode between
GPS1 and GPS2.
Note: GPS1 is voice navigation while GPS2 is
simple GPS navigation. The default mode is
GPS1.
※※※※※※※※※※※※※※※※※※※※※※※
★ GPS picture switching
Press [SEL] to switch the picture
between GPS and DVD mode.
When you are in the mode of GPS1
(Voice navigation; GPS works together
with other modes), press [SEL] to
switch between GPS and other modes.
When you are in the mode of GPS2
(Only GPS works), press [SEL] to
switch between GPS and the main menu
of the device. If you want to switch to
the other mode from the GPS mode, you
can press [SEL] to switch to the
menu, then, click the icon to enter the
corresponding mode.
※※※※※※※※※※※※※※※※※※※※※※※
※※※※※※※※※※※※※※※※※※※※※※※
PDF 文件使用 "pdfFactory Pro" 试用版本创建 www.fineprint.com.cn
Page 40

XTRONS Car DVD Player
35
Remote control operations
※※※※※※※※※※※※※※※※※※※※※※※
★ Stop playing
Press [ ] for the first time to pre-stop
playing when you are playing the DVD, and
the TV shows “Please press Play key to
continue”. It stops playing when you press it
for the second time.
Note: The playing stops when you press it for the first time
in the mode of VCD, MP3, CD, or USB/SD/MMC
card.
※※※※※※※※※※※※※※※※※※※※※※※
★ Angle
Press [ANGLE] when you are playing
the DVD to watch the DVD disc in different
angles.
Note: 1.There is no this function when you are playing
VCD, MP3, and CD.
2. This button only works when you are copying the
DVD with multi-angle content.
※※※※※※※※※※※※※※※※※※※※※※※
★ Enter/Eject
You can withdraw the disc by pressing
[Enter/Eject] if there is a disc inside the
DVD; press it again to read and play the
disc.
Note: You can put the disc into the DVD from the entry
directly when the entry window is open.
※※※※※※※※※※※※※※※※※※※※※※※
★ Title menu
When you press [TITLE] in DVD or
VCD status, the device shows all the
programs of the disc. You can use the
number key [0-10+] to select the
program directly, or press to select your
desired menu and press [ENTER] or
[ ] to play.
Note: 1. TITLE does not work when you are playing MP3
and CD.
2. You can press [TITLE] to select the title/system
language when playing the DVD discs with
multi-title/language.
※※※※※※※※※※※※※※※※※※※※※※※
★ Zoom on/Zoom out
Press [ZOOM] for the first time when
you are playing the DVD or VCD, the
screen will enlarge in the following rules:
2-fold, 3-fold, 4-fold, 1/2-fold, 1/3-fold,
1/4-fold, and 0-fold.
Note: ZOOM key does not work in CD/MP3 mode.
※※※※※※※※※※※※※※※※※※※※※※※
★ System setup
1. Press [SETUP] to enter the DVD
setup menu when you are playing the DVD.
2. System setup menu is shown as
follows:
3. Press to choose the item you want
to enter and press [ENTER]
to confirm it.
A: System setup
Including TV system selection, auto
play, Video output, Screen picture scale,
password, Grade and Default options.
B: Language setup
Including OSD language, Audio
language and Subtitle language
C: Audio setup
Including all audio setup options
D: Video setup
Including the adjustment of Video
brightness, contrast, color and saturation
E:Digital audio output setup
Including the setup of digital audio
output mode, dynamic range and track
Note: Language is subject to the device model.
※※※※※※※※※※※※※※※※※※※※※
System
setup
Language
setup
Audio
setup
Video
setup
Dolby
digital
setup
PDF 文件使用 "pdfFactory Pro" 试用版本创建 ÿ www.fineprint.com.cn
Page 41
XTRONS Car DVD Player
36
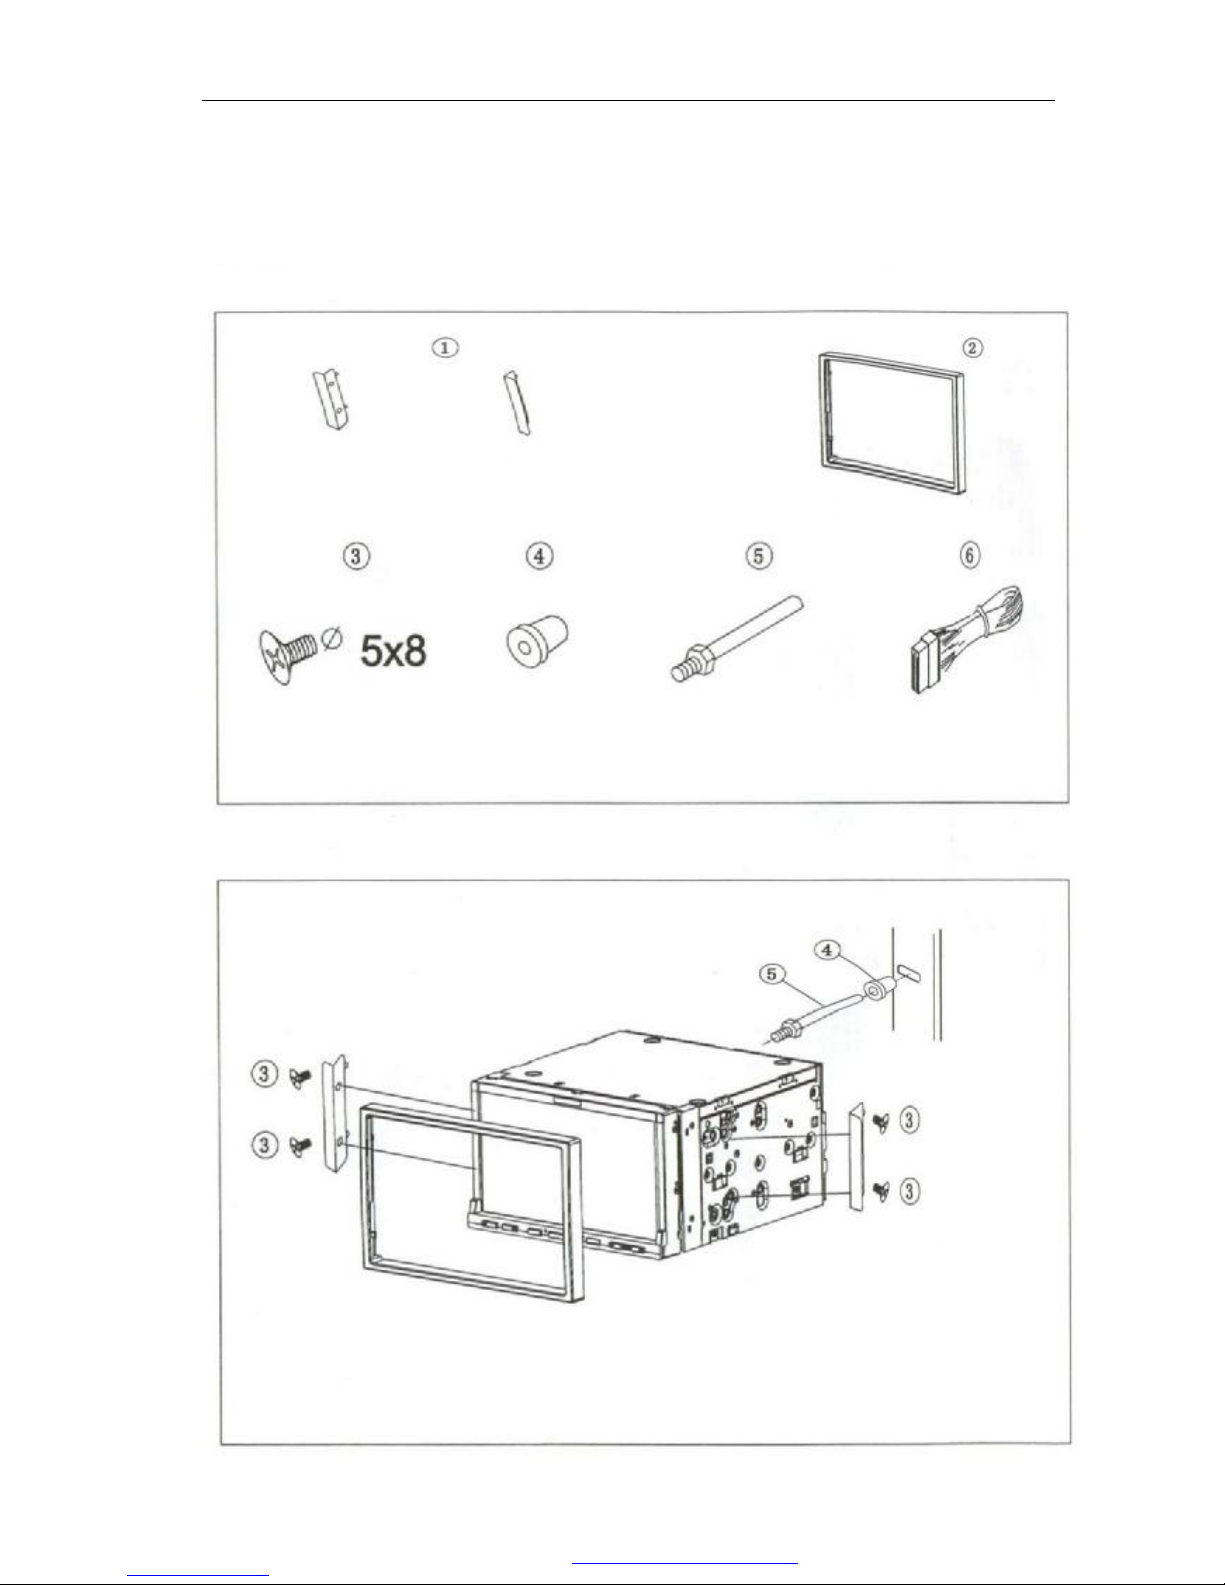
Installation
Installation
Choose the proper fittings according to the car
Note: 1.
please keep the small parts away from the children.
2. Use the attached screws.
3. The installation of attached parts may vary from the ca
rs.
Make sure to be installed by the professional.
PDF 文件使用 "pdfFactory Pro" 试用版本创建 ÿ www.fineprint.com.cn
Page 42

XTRONS Car DVD Player
37
Specifications
General
Power supply 14.4VDC
Load 4 Ω
Max. power output 45W*4
Tone control +/-8db (Bass:100Hz, Treble:10KHz)
Dimensions About 192*178*100mm (D*W*H)
Installation dimension About 169*182*103mm (D*W*H)
Weight About 2.65 Kg
DVD chip
Applicable disc MPEG4. DVD,SUPER VCD, MP3, CD, CD-R,
CD-RW, PICTURE-CD
Video system AUTO, NTSC, PAL
Installation angle 0-+/-300
Video
Video system 4:3 Mail MODE/4:3 FULL SCREEN
Video output 1.0Vp-p.75ohms
Horizontal resolution 500
Audio
Max. output 600 Ω (2.0Vrms)
Frequency scope 20Hz-20KHz
S/N ratio 85db
Resolution 80db
AM tuning
Frequency scope 522-1620 (Europe/China/Russia), 530-1710 (USA)
MF frequency 450KHz
Practical sensitivity (-20db) 25db
FM tuning
Frequency scope 87.5-108 (Europe/China), 65-74; 87.5-108 (Russia);
87.5-107.9 (USA)
MF frequency 10.7MHz
Effective sensitivity (-30db) 15db
S/N ratio 60db
Stereo Channels Crosstalk 30db(1KHz)
Frequency response 30-15000Hz
Note: In order to update the products continuously, this manual does not state the modified
specifications and design.
PDF 文件使用 "pdfFactory Pro" 试用版本创建 www.fineprint.com.cn
Page 43

XTRONS Car DVD Player
38
Troubleshooting
Problems Reasons and settlement
No power ¬ Check whether the fuse of power supply is broken. Change
for another one with a proper capacity if necessary.
LCD display mess-up and the
key does not work
¬ Press Reset key
Cannot receive the radio channel ¬ Check whether the antenna is connected or whether it is well
connected. Connect well the antenna.
Bad effect on receiving the radio ¬ The length of the antenna may not enough. Check whether
the antenna is spread out or broken. Change for a new one if
it is broken.
¬ The broadcasting signal is too weak, change for another one
with a strong signal.
¬ The antenna is not connected to the ground properly. Make
sure whether the antenna is connected well to the ground.
Cannot put the disc into the
DVD
¬ There is a disc inside the DVD. Withdraw the disc to solve it.
Stereo indicator flashes ¬ Perfect the tuning frequency
¬ The broadcasting signal is too weak. Please set it in the
MONO mode (See page 11)
Noise ¬ The disc is broken or dirty. Change for a good disc.
No picture ¬ The video cable between the DVD and TV is not connected
well.
The picture shake ¬ The system color setting is not correct. Set the color system
to “PAT” or “NTSC” according to your TV.
Bluetooth cannot work ¬ Check whether the Bluetooth mobile phone matches the
DVD and whether it is correctly connected to the DVD.
Match and connect it again according to the instruction of the
mobile phone.
Echo is too loud in Bluetooth
talk
¬ The volume is too loud. Turn the DVD down to a proper
volume.
The Bluetooth mobile phone
music and talk is played off and
on
¬ Check whether the Bluetooth mobile phone is placed too far
away from the DVD.
Put the mobile phone to a proper position within 5 meters
from the DVD.
Note: Please ask the local distributor for help if the above settlement do not work. Do not
repair by yourself.
PDF 文件使用 "pdfFactory Pro" 试用版本创建 www.fineprint.com.cn
 Loading...