

Page 1
USER MANUAL
Thank you for buying this XTRONS product. Please read through these instructions so you will
know how to operate this product properly. After you have finished reading the instructions,
keep this document in a safe place for future reference.
Page 2

NOTICES
Installation or servicing of this product by persons without
training and experience in electronic equipment and
automotive accessories may be dangerous and could
expose you to the risk of electric shock, injury or other
hazards.
The navigation features of this product (and the rear view
camera option if purchased) are intended solely to aid you
in the operation of your vehicle. It is not a substitute for
your attentiveness, judgment and care when driving.
To avoid the risk of damage and injury and the potential
violation of applicable laws, this product is not for use
with a video image that is visible to the driver.
XTRONS disclaims any liability for any bodily injury or
property damage that might result from any improper or
unintended use.
Pay close attention to all warnings in this manual and follow the
instructions carefully.
The screens shown in the examples may differ from actual screens,
which may be changed without notice for performance and function
improvements.
Page 3

Contents
1
Precaution ........................................................................................................
Home Screen ...................................................................................................
Radio ..................................................................................................................
Play DVD ...........................................................................................................
USB/SD ..............................................................................................................
AUX Input .........................................................................................................
Bluetooth .........................................................................................................
Screen Mirroring ............................................................................................
Navigation .......................................................................................................
Connect to the Internet ..............................................................................
OBD2 (Optional) ............................................................................................
DVR (Optional) ................................................................................................
DAB+ (Optional) ............................................................................................
2
7
9
10
10
11
11
14
16
16
17
17
17
Settings .............................................................................................................
Troubleshooting ............................................................................................
Appendix ..........................................................................................................
18
25
27
Page 4

Precaution
2
Important safety information
WARNING
XTRONS does not recommend that you install this product yourself. This
product is designed for professional installation only. We recommend that
only those service personnel, who have special training and experience in
mobile electronics, set up and install this product. NEVER SERVICE THIS
PRODUCT YOURSELF. Installing or servicing this product and its connecting
cables may expose you to the risk of electric shock or other hazards, and can
cause damage to this product that is not covered by warranty.
Do not allow this product to come into contact with liquids. Electrical shock could
•
result. Also, damage to the product, smoke and overheating could result from
contact with liquids.
If liquid or foreign matter should get inside this product, park your vehicle in a safe
•
place, turn the ignition switch off (ACC OFF) immediately and consult your dealer.
Do not use this product in this condition because doing so may result in a fire,
electric shock, or other failure.
If you notice smoke, a strange noise or odor from this product, or any other
•
abnormal signs on the screen, turn off the power immediately and consult your
dealer. Using this product in this condition may result in permanent damage to
the system.
Do not disassemble or modify this product, as there are high-voltage components
•
inside which may cause an electric shock. Be sure to consult your dealer for
internal inspection, adjustments or repairs.
Page 5

Before using this product, be sure to read and fully understand the following
3
safety information:
Do not operate this product or any applications if doing so will divert your
•
attention in any way from the safe operation of your vehicle. Always observe
safe driving rules and follow all existing traffic regulations. If you experience
difficulty in operating this product or reading the display, park your vehicle in a
safe location and apply the parking brake before making the necessary
adjustments.
• Never set the volume of this product so high that you cannot hear outside traffic
and emergency vehicles.
To promote safety, certain functions are disabled unless the vehicle is stopped
•
and/or the parking brake is applied.
Keep this manual handy as a reference for operating procedures and safety
•
information.
Do not install this product where it may (i) obstruct the driver’s vision, (ii) impair
•
the performance of any of the vehicle’s operating systems or safety features,
including air bags or hazard lamp buttons or (iii) impair the driver’s ability to
safely operate the vehicle.
Please remember to fasten your seat belt at all times while operating your
•
vehicle. If you are ever in an accident, your injuries can be considerably more
severe if your seat belt is not properly buckled.
• Never use headphones while driving.
Page 6

To ensure safe driving
4
WARNING
• LIGHT GREEN LEAD AT POWER CONNECTOR IS DESIGNED TO DETECT PARKED
STATUS AND MUST BE CONNECTED TO THE POWER SUPPLY SIDE OF THE
PARKING BRAKE SWITCH. IMPROPER CONNECTION OR USE OF THIS LEAD
MAY VIOLATE APPLICABLE LAW AND MAY RESULT IN SERIOUS INJURY OR
DAMAGE.
• Do not take any steps to tamper with or disable the parking brake interlock
system which is in place for your protection. Tampering with or disabling
the parking brake interlock system could result in serious injury or death.
• To avoid the risk of damage and injury and the potential violation of
applicable laws, this product is not for use with a video image that is visible
to the driver.
•
In some countries the viewing of video images on a display inside a vehicle even
by persons other than the driver may be illegal. Where such regulations apply,
they be obeyed.
If you attempt to watch video images while driving, the warning “Viewing of
front seat video source while driving is strictly prohibited.” will appear on the
screen. To watch video image on this display, stop the vehicle in a safe place and
apply the parking brake. Please keep the brake pedal pushed down before
releasing the parking brake.
Before installing this product
Use this unit with a 12-volt battery and negative grounding only. Failure to do so
•
may result in a fire or malfunction.
To avoid shorts in the electrical system, be sure to disconnect the (-) battery cable
•
before installation.
Page 7

To prevent damage
5
WARNING
• The black cable is ground. When installing this product or power amp (if
purchased), make sure to connect the ground wire first. Ensure that the
ground wire is properly connected to metal parts of the car’s body. The
ground wire of the power amp and the one of this product or any other
device must be connected to the car separately with different screws. If the
screw for the ground wire loosens or falls out, it could result in fire
generation of smoke or malfunction.
• When replacing the fuse, be sure to only use a fuse of the rating prescribed
on this product.
To avoid short-circuiting, cover the disconnected lead with insulating tape. It is
•
especially important to insulate all unused speaker leads, which if left uncovered
may cause a short circuit.
Installation notes
Do not install this product in places subject to high temperatures or humidity,
•
such as:
- Places close to a heater, vent or air conditioner.
- Places exposed to direct sunlight, such as on top of the dashboard.
- Places that may be exposed to rain, such as close to the door or on the vehicle’s
floor.
• Install this product in an area strong enough to bear its weight. Choose a position
where this product can be firmly installed, and install it securely. If this product is
not securely installed, the current location of the vehicle cannot be displayed
correctly.
Page 8

Install this product horizontally on a surface within 0 to 20 degrees tolerance
6
•
(within 5 degrees to the left or right). Improper installation of the product with
the surface tilted more than these tolerances increased the potential for errors in
the vehicle’s location display, and might otherwise cause reduced display
performance.
When installing, to ensure proper heat dispersal when using this product, make
•
sure you leave ample space behind the rear panel and wrap any loose cables so
they are not blocking the vents.
In order to prevent interference, set the following items as far as possible from
•
this product, other cables or leads:
- FM, AM antenna and its lead
- GPS antenna and its lead
- DAB+ radio antenna and its lead
- Digital TV antenna and its lead
In addition, you should lay or route each antenna lead as far as possible from
other antenna leads. Do not bind, lay or route them together, or cross them.
Electromagnetic noise will increase the potential for errors in the vehicle’s
location display.
When installing, make sure you remove the two screws on the top of the product
•
(for those models with the disc loading drive). Otherwise the drive cannot accept
discs.
To avoid battery exhaustion
Be sure to run the vehicle engine while using this product. Using this product
without running the engine can drain the battery.
WARNING
Do not install this product in a vehicle that does not have an ACC wire or circuitry
available.
Page 9
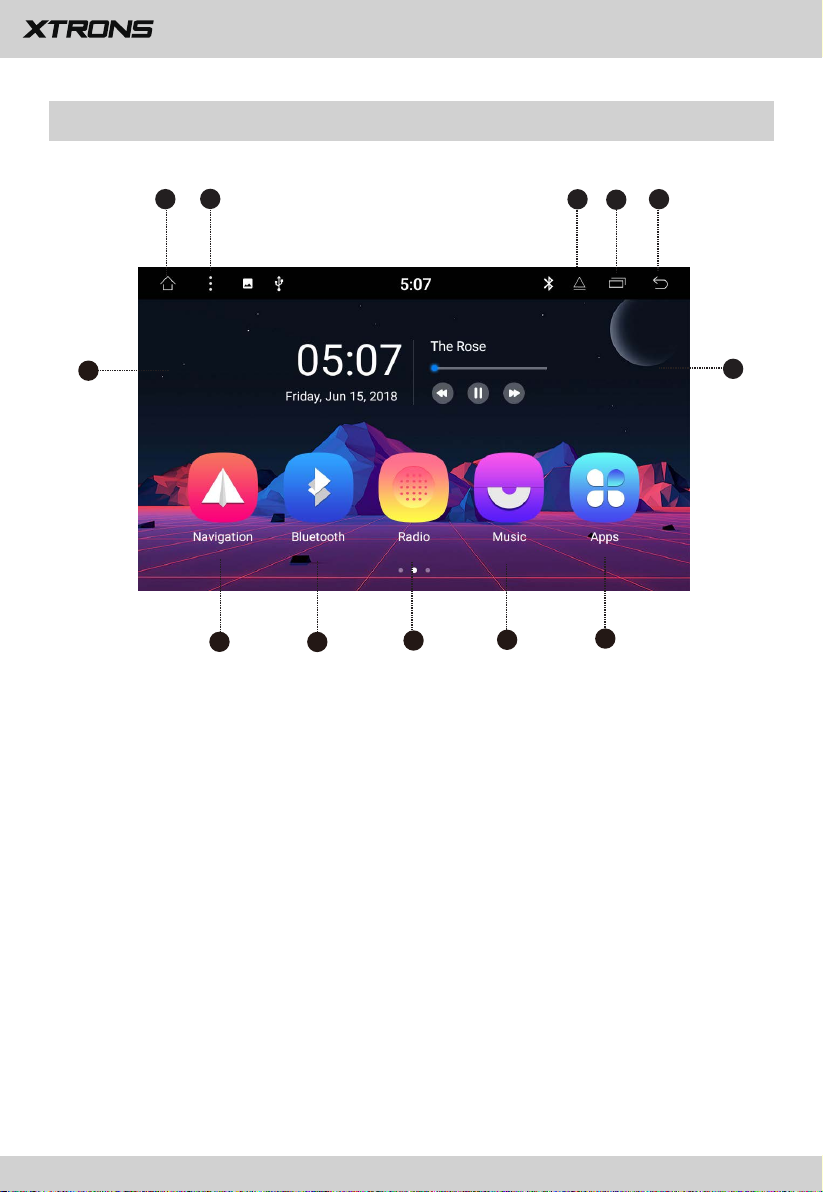
Home Screen
7
2
1
3
4
5
12
1. Home
2. Menu
3. Eject
4. Recent apps
5. Back
6. Audio controls
7. Apps
8. Music
9. Radio
10. Bluetooth
11. Navigation
12. Date and time
6
11
10
9
8
7
Page 10

Use apps
8
Tap an app to open it.
Split-screen mode
Tap
screen, and then drag and drop the app on to the grey area on the left edge of the
screen. Tap the other desired app to enter split-screen mode.
To disable split screen mode, touch and hold the slider in the middle of the screen,
and then swipe left or right.
※
on the status bar. Touch and hold the desired app from the recent apps
Please note a video player app and a music & audio app cannot be both
displayed in split-screen mode. Not all apps are compatible with splitscreen mode.
Customize the unit
Arrange apps
Touch and hold any app on the Home screen, and then drag the app around.
Drag an app to the edge of the screen to move it to a different Home screen.
Swipe left or right to see other screens.
Change the wallpaper
You can set an image or photo as wallpaper for the Home screen. You can choose
from the preset Live Wallpapers (dynamic) and Wallpapers (stills), or choose from
images or photos stored on a USB storage device or an SD memory card.
Change the wallpaper. Go to Settings > Display > Wallpaper.
Page 11

Radio
9
1
2
3
4
5
6
7
8
9
10
11
12
1. Broadcast frequency slider
2. REG (Regional)/TA (Traffic Announcement)/AF (Alternative Frequencies)/PTY
(Program Type)
3. Perform manual tuning
4. Preset channel list
Select a frequency you like and then touch and hold any of preset frequency keys
to store it.
Up to 12 FM stations and 6 AM stations can be stored in memory.
5. Home
6. Perform non-stop seek tuning
7. Perform seek tuning
8. Band (FM1/FM2/AM)
9. Perform seek tuning
10. Distant/Local seek tuning
11. Equalizer adjustment
12. Back
Page 12

Play DVD
10
1
2
3
4
6
5
7
1. Home
2. Previous file
3. Pause/Play
4. Next file
5. Rewind
6. Fast forward
7. Back
CAUTION
For safety reasons, video images cannot be viewed while your vehicle is in
motion. To view video images, stop in a safe place and apply the parking
brake.
USB/SD
Plug a USB storage device or insert an SD memory card and then tap Music on the
Home screen to play music, tap Video to play video files, or tap QuickPic to view
images and photos.
Page 13

AUX Input
11
You can display the video image output by the device connected to this unit.
CAUTION
For safety reasons, video images cannot be viewed while your vehicle is in
motion. To view video images, stop in a safe place and apply the parking
brake.
Bluetooth
Connect your mobile phone to this unit via Bluetooth and use an external
microphone to make and receive hands-free calls.
CAUTION
For your safety, avoid talking on the phone as much as possible while driving.
Connection (Bluetooth pairing)
a.
The Bluetooth device must be within 1 meter of this unit. Turn on Bluetooth on
the device.
b.
You can find this unit in the devices list of your Bluetooth device.
If your Bluetooth device supports SSP (Secure Simple Pairing), a four-digit
c.
number password will be required. The default password is 1234.
Page 14

1. Phone calls
12
Enter the number to make a call. You can also choose a contact from the phone
book to make a call.
2. Recent calls
View recent o
utgoing calls, incoming calls or
3. Phone book
to s
TapTap
ynchronize the contacts from your Bluetooth device.
missed calls
.
Page 15

4. Bluetooth music
13
After the Bluetooth connection is established, you can play music stored in your
Bluetooth device on this unit.
※ At first, you need to operate the music playback on your Bluetooth device.
Then you can operate the Bluetooth music on the unit.
※ Please note that the unit may not support the Bluetooth music function
whilst some mobile phones are not quite compatible with the unit.
5. Devices list
Tap
to view the paired devices list.
to find Bluetooth enabled devices near you.
Tap
to unpair the device.
Tap
Tap
to delete all Bluetooth pairing records.
Page 16

6. Bluetooth settings
14
(1) You can change the Device Name of this unit. Tap to enter a different
name.
(2) You can change the PIN Password (Bluetooth pairing password). The default
password is 1234. Enter another four-digit number and then tap OK to set a
new password.
Screen Mirroring
Tap EasyConnection on the apps menu screen to enter screen mirroring mode.
When you connect a mobile phone with compatible applications installed, you can
control the applications for the mobile phone directly from this unit.
Page 17

For Android smart phone:
15
1. Connect via a USB cable
Go to Settings > About Device, and
a.
Developer options. Turn on USB debugging. A message
will pop up.
Turn on the Always allow from this computer option, and then
then tap Build number 7 times to enable
Allow USB debugging?
tap OK.
b. Connect your Android smart phone to this unit via a USB cable.
2. Connect via Wi-Fi
Go to Settings > Wireless & networks > More > Tethering & portable hotspot,
a.
and then turn Portable Wi-Fi hotspot on or tap Set up Wi-Fi hotspot.
Tap Android WiFi and then select your Android device name from the
b.
hotspot list. Enter the password when prompted.
※ Please note this function is only applicable for the smart phones
equipped with wireless mirroring function, and it only supports
Android versions above 4.0. Audio streaming requires a Bluetooth
connection.
For iPhone:
a. Go to Settings > Personal Hotspot, and then turn Personal Hotspot on.
b.
Tap iPhone WiFi, and then select your iPhone name from the hotspot list.
Enter the password when prompted.
c.
Tap AirPlay in the Control Center on your iPhone. Select EC-Mirror and turn
Mirroring on.
※ On iPhone 4/4s, only photos can be streamed wireless to this unit. On
iPhone 5 and other later iPhone models, both music and photos can be
streamed wireless to this unit. Video streaming requires the
appropriate Apple cable or adapter.
Page 18

Navigation
16
Built-in navigation offers detailed, reliable route guidance information to help you
get where you want to go.
You can actually download a range of GPS Navigation apps via Google Play and
run them on the unit. You can download Sat Nav apps like TomTom, Navigon,
Route 66, Sygic, iGO, Google Maps and many more.
Connect to the Internet
You can connect the unit to the Internet whenever necessary, using a Wi-Fi
connection (if available) or 3G/4G network (the 3G/4G dongle is sold separately).
You can browse the web, download apps via Google Play, play online games, etc.
The possibilities are endless with the Internet in your car.
Page 19

OBD2 (Optional)
17
The unit supports OBD2 (On-Board Diagnostics) car diagnostics. With the OBD2
function available on this unit, you can retrieve real-time data and trouble codes
from your vehicle computer. All the data of your vehicle is displayed to you.
(The OBD2 Bluetooth car diagnostic scanner tool is sold separately).
DVR (Optional)
You can control a car DVR camera (sold separately) on this unit and use it to record
all the events of a journey.
DAB+
With use of a DAB dongle (sold separately), the
tuner lets you enjoy the convenience of digital radio, while Auto DAB+ Tuning
makes sure there are less signal interruptions. DAB+ digital radio brings you highdetail, digital-quality sound with lots of stations, program information and more.
The DAB antenna (sold separately) needs to be positioned on the windscreen of
your vehicle.
(Optional)
DAB+ (Digital audio broadcasting)
Page 20

Settings
18
1. Network & Internet
1.1 Wi-Fi
Turn Wi-Fi on or off.
Choose a network: Tap one of the listed networks and then enter the password if
required.
1.2 Data usage
View the data usage for your apps.
1.3 Portable hotspot
Turn Wi-Fi hotspot on or off.
Set up Wi-Fi hotspot.
1.4 VPN
Tap the + button and provide the VPN’s details. Tap the VPN to connect once you
have set it up. You will be asked to enter a username and password.
2. Apps & notifications
2.1 App info
Manage all the apps downloaded on the unit or on an SD memory card.
2.2 Notifications
Add or change an alert style for notifications from apps.
2.3 Default apps
Change or set default apps.
3. Display
Page 21

3.1 Brightness level
19
Drag the slider to adjust the screen brightness.
3.2 Wallpaper
Set an image or photo as wallpaper for the Home screen.
3.3 Brightness mode
Choose from Auto, Light, and Dark.
3.4 Forced app orientation
Font size
3.5
Drag the slider to adjust the font size.
4. Sound
- Reverse mute
- Speed-compensated volume control
- Sound priority
- Navi audio channel
- Navi volume
- Device ringtone
5. Storage
You can see how much storage space is available on the unit’s internal storage.
You can tap FREE UP SPACE to delete photos, videos, and apps that you haven't
used recently.
6. Memory
You can view the average memory usage. The default time-period is set to 3 hours.
You can switch between 3, 6, 12 hours or 1 day to view average usage.
Page 22

7. Location
20
You can change the location mode, location type, add or remove the location
permission to your apps, and manage the location history.
8. Car settings
8.1 Brake setting
Open: Video images cannot be viewed while your vehicle is in motion.
Close: Video images can be viewed while your vehicle is in motion.
CAUTION
For safety reasons, video images cannot be viewed while your vehicle is in
motion. To view video images, stop in a safe place and apply the parking
brake.
8.2 Reverse trajectory
A separately sold rear view camera is required for utilizing the rear view camera
function.
Open: Displays the trajectory.
Close: Hides the trajectory.
8.3 Reverse line ruler
A separately sold rear view camera is required for utilizing the rear view camera
function.
Open: Displays the ruler line.
Close: Hides the ruler line.
8.4 Steering wheel
This allows you to use the steering wheel control of your vehicle to control the unit.
8.5 Navi application
Choose the application you want to use for the navigation.
Page 23

8.6 Memory start navigation
21
Off: Disables the auto start navigation.
On: Enables the auto start navigation.
8.7 Speech settings
8.8 Shutdown delay
Choose from No delay, Delay 10min, Delay 30min and Delay 1 hour.
8.9 MCU update
8.10 System update
8.11 Reset factory
Enter the password 7890 to reset settings and recorded contents to the factory
settings.
8.12 Extra settings
Enter the password 123456 to go to extra settings.
Panel light setting
Connect the illumination wire to the positive pole of your vehicle headlights. This
makes the dimmer function work.
Open: The unit will dim the panel lights and the display automatically when the
headlights are on.
Close: The unit will not dim the panel lights and the display automatically when
the headlights are on.
Reverse mirror
A separately sold rear view camera is required for utilizing the rear view camera
function.
Open: Reverses the rear view camera images.
Close: Does not reverse the rear view camera images.
Page 24

LOGO setting
22
Select one of the preinstalled car manufacturer logos as your start up screen. You
can also select images imported from an SD memory card. You need to insert the
SD memory card into the GPS card slot. The image size should be 800 pixels x 480
pixels and the image format should be BMP.
9. Google
You can manage Google services in Google Settings.
10. System
10.1 Language & input
10.1.1 Language
Set the language for the unit. Choose from English, French, German, Spanish, and
many more. You can add a language and arrange preferred language order by
dragging them.
Virtual keyboard
10.1.2
The
default keyboard is Android Keyboard.
Page 25

10.1.3 Spell checker
23
Turn Spell checker on or off.
10.2 Date & time
- Automatic date & time
- Automatic time zone
- Set date
- Set time
- Select time zone
- Use 24-hour format
10.3 Developer options
Enter the password 7890 to go to Developer options.
10.4 About tablet
- Android version
- MCU version
- System version
- DVD version
EQ
- Equalizer adjustment
You can choose from Normal, Jazz, Pop, Classical, Rock, News, Urban, and Techno.
Page 26

- Fader adjustment
24
You can select a listening position that you want to make as the center of the sound
effects.
Colorful Chameleon Button
This enables you to change the illumination color of the buttons to your personal
preference. You can choose from a wide variety of colors.
Page 27

Troubleshooting
25
If you have problems operating this product, refer to this section. The most common
problems are listed below, along with likely causes and solutions.
No power
- The car engine has not been started. Start the car engine.
- Incorrect wiring connection. Check the wiring.
- The fuse has been damaged. Replace the fuse.
- The CANBUS box has been damaged. Replace the CANBUS box.
No sound
- The volume is too low. Adjust the volume.
- Incorrect wiring connection. Check the wiring.
The disc does not play
- The disc is inserted upside down. Insert the disc with the label upward.
- The disc is dirty. Clean the disc.
- The disc is cracked or otherwise damaged. Insert a normal, round disc.
- The files on the discs are in an irregular file format. Check the file format.
- The disc format cannot be played back. Replace the disc.
- The loaded disc is a type this product cannot play. Check what type of disc it is.
The screen is covered by a caution message and the video cannot be shown
- The parking brake lead is not connected or applied. Connect the parking brake
lead correctly, and apply the parking brake.
- The parking brake interlock is activated. Park your vehicle in a safe place and apply
the parking brake.
Image flashes or distorted
Image flashes or distorted
- Video DVD settings do not match with the DVD. Adjust video DVD settings.
- Video connection is incorrect.
Preset station lost
- Battery cable is not correctly connected. Connect the battery cable to the terminal
that is always live.
Page 28

Poor radio reception
26
- The antenna connection is incorrect. Check the antenna connection.
- Interference may be introduced. Check for sources of interference.
- Signals are too weak. An additional antenna signal amplifier booster may be
required.
- The antenna has been damaged. Replace the antenna.
- The local seek tuning has been turned off. Turn the local seek tuning on.
A black screen is displayed, and operation is not possible
- Sleep mode is on. Press the POWER button or touch the screen to release the
mode.
- The rear view camera image is displayed with no camera connection and the
wrong camera polarity setting. Install the rear view camera and then change the
camera polarity settings.
GPS positioning is not possible
- GPS positioning is disabled if signals cannot be received from more than two GPS
satellites.
- In some driving conditions, signals from GPS satellites may not reach your vehicle.
In this case, it is impossible for the system to use GPS positioning.
- If a car phone or cellular phone is used near the GPS antenna, GPS reception may
be lost temporarily.
The paired mobile phone connects and disconnects constantly
- The Bluetooth reception is poor. Move the mobile phone closer to the product or
remove any obstacle between the mobile phone and the product.
- Some mobile phones may connect and disconnect constantly when you make or
end calls. This does not indicate any malfunction of the product.
- For some mobile phones, the Bluetooth connection may be deactivated
automatically as a power-saving feature. This does not indicate any malfunction
of the product.
Page 29

Appendix
27
Handling and care of discs
• Use only conventional, fully circular discs. Do not use shaped discs.
• Do not use cracked, chipped, warped, or otherwise damaged discs as they may
damage the built-in drive.
• Use 12-cm discs. Do not use 8-cm discs or an adapter for 8-cm discs.
• When using discs that can be printed on label surfaces, check the instructions and
the warnings of the discs. Depending on the discs, inserting the ejecting may not
be possible. Using such discs may result in damage to this equipment.
• Do not attach labels, write on or apply chemicals to the surface of the discs.
• Do not attach commercially available labels or other materials to the discs.
• To clean a disc, wipe it with a soft cloth, moving outward from the center.
• Condensation may temporarily impair the built-in drive’s performance.
• Playback of discs may not be possible because of disc characteristics, disc format,
recorded application, playback environment, storage conditions and so on.
• Road shocks may interrupt disc playback.
• Read the precautions for discs before using them.
Page 30

When using this product
28
Use this product where the ambient temperature is between -10º and 50º C.
•
Using this product in the conditions outside of its operating range might cause
temporary or permanent damage to the system, and such damage may not be
covered by the manufacturer’s warranty. Store the product where the
temperature is between -20º and 80º C.
• Do not connect a USB storage device via a USB hub.
• Connecting a USB cable of which total length is longer than 5 meters may
result in abnormal playback.
When this product cannot recognize the connected USB storage device,
•
disconnect the device and replace it with another USB storage device.
Do not take out the SD card preloaded with map data when this product is
•
powered on. Take the SD card out when the product is powered off.
• Do not use any software which is not provided by XTRONS to update the
system. If you require the system update, please consult your dealer.
Handling the screen
• When the screen is subjected to direct sunlight for a long period of time, it will
become very hot, resulting in possible damage to the screen. When not using
this product, avoid exposing it to direct sunlight as much as possible.
• Do not use the screen at temperatures higher or lower than the operating
temperature range, because the screen may not operate normally and could
be damaged.
Page 31

• The screen is exposed in order to increase its visibility within the vehicle.
29
Please do not press strongly on it as this may damage it.
• Do not push the screen with excessive force as this may scratch it.
• Never touch the screen with anything besides your finger when operating the
touch panel functions. The screen can scratch easily.
Maintaining the screen
• When removing dust from or cleaning the screen, first turn this product off and
then wipe the screen with a soft dry cloth.
• When wiping the screen, take care not to scratch the surface. Do not use harsh
or abrasive chemical cleaners.
Page 32

30
Page 33

© 2018 XTRONS CORPORATION. All rights reserved.
Page 34

www.xtrons.com
 Loading...