

Page 1

USER MANUAL
Thank you for buying this XTRONS product. Please read through these instructions so you will
know how to operate this unit properly. After you have finished reading the instructions, keep
this document in a safe place for future reference.
Page 2
Contents
1
2
Precaution
Before installing this product
Precaution ........................................................................................................
Main Menu .......................................................................................................
Radio ..................................................................................................................
Play DVD ...........................................................................................................
USB/SD ..............................................................................................................
AUX Input .........................................................................................................
Bluetooth .........................................................................................................
Screen Mirroring ............................................................................................
Navigation .......................................................................................................
DAB+ ..................................................................................................................
Settings .............................................................................................................
Troubleshooting ............................................................................................
2
5
7
8
9
10
11
14
14
15
17
21
- Use this unit with a 12-volt battery and negative grounding only. Failure to do so
may result in a fire or malfunction.
- To avoid shorts in the electrical system, be sure to disconnect the (-) battery cable
before installation.
Important safety information
WARNING
- Do not attempt to install or service this product by yourself. Installation or servicing
of this product by persons without training and experience in electronic
equipment and automotive accessories may be dangerous and could expose you
to the risk of electric shock, injury or other hazards.
- Do not allow this product to come into contact with liquids. Electrical shock could
result. Also, damage to the product , smoke and overheating could result from
contact with liquids.
- If liquid or foreign matter should get inside this product, park your vehicle in a safe
place, turn the ignition switch off (ACC OFF) immediately and consult your dealer.
Do not use this product in this condition because doing so may result in a fire,
electric shock, or other failure.
- If you notice smoke, a strange noise or odor from this product, or any other
abnormal signs on the screen, turn off the power immediately and consult your
dealer. Using this product in this condition may result in permanent damage to
the system.
Page 3

- Do not disassemble or modify this product, as there are high-voltage components
3
4
inside which may cause an electric shock. Be sure to consult your dealer for
internal inspection, adjustments or repairs.
To ensure safe driving
WARNING
Before using this product , be sure to read and fully understand the following
safety information:
- Do not operate this product, any applications, or the rear view camera option (if
purchased) if doing so will divert your attention in any way from the safe
operation of your vehicle. Always observe safe driving rules and follow all
existing traffic regulations. If you experience difficulty in operating this product
or reading the display, park your vehicle in a safe location and apply the parking
brake before making the necessary adjustments.
- Never set the volume of this product so high that you cannot hear outside traffic
and emergency vehicles.
- To promote safety, certain functions are disabled unless the vehicle is stopped
and/or the parking brake is applied.
- Keep this manual handy as a reference for operating procedures and safety
information.
- Do not install this product where it may (i) obstruct the driver’s vision, (ii) impair
the performance of any of the vehicle’s operating systems or safety features,
including air bags or hazard lamp buttons or (iii) impair the driver’s ability to
safely operate the vehicle.
- LIGHT GREEN LEAD AT POWER CONNECTOR IS DESIGNED TO DETECT PARKED
STATUS AND MUST BE CONNECTED TO THE POWER SUPPLY SIDE OF THE
PARKING BRAKE SWITCH. IMPROPER CONNECTION OR USE OF THIS LEAD
MAY VIOLATE APPLICABLE LAW AND MAY RESULT IN SERIOUS INJURY OR
DAMAGE.
- Do not take any steps to tamper with or disable the parking brake interlock
system which is in place for your protection. Tampering with or disabling the
parking brake interlock system could result in serious injury or death.
- To avoid the risk of damage and injury and the potential violation of applicable
laws, this product is not for use with a video image that is visible to the driver.
- In some countries the viewing of video images on a display inside a vehicle even by
persons other than the driver may be illegal. Where such regulations apply, they be
obeyed.
If you attempt to watch video images while driving, the warning “Viewing of front
seat video source while driving is strictly prohibited.” will appear on the screen. To
watch video image on this display, stop the vehicle in a safe place and apply the
parking brake. Please keep the brake pedal pushed down before releasing the parking
brake.
To avoid battery exhaustion
- Please remember to fasten your seat belt at all times while operating your
vehicle. If you are ever in an accident, your injuries can be considerably more
severe if your seat belt is not properly buckled.
Be sure to run the vehicle engine while using this product. Using this product without
running the engine can drain the battery.
WARNING
- Never use headphones while driving.
Do not install this product in a vehicle that does not have an ACC wire or circuitry
available.
Page 4

Main Menu
5
6
1
DAB+
1.
2. USB1
3. USB2
4. SD
5. AUX Input
6
2
3
4
5
10
7
11
8
12
9
6. Date
7. Time
8. Mute
9. Volume
10. Phone Link (Screen Mirroring)
11. TV
12. Game
Page 5
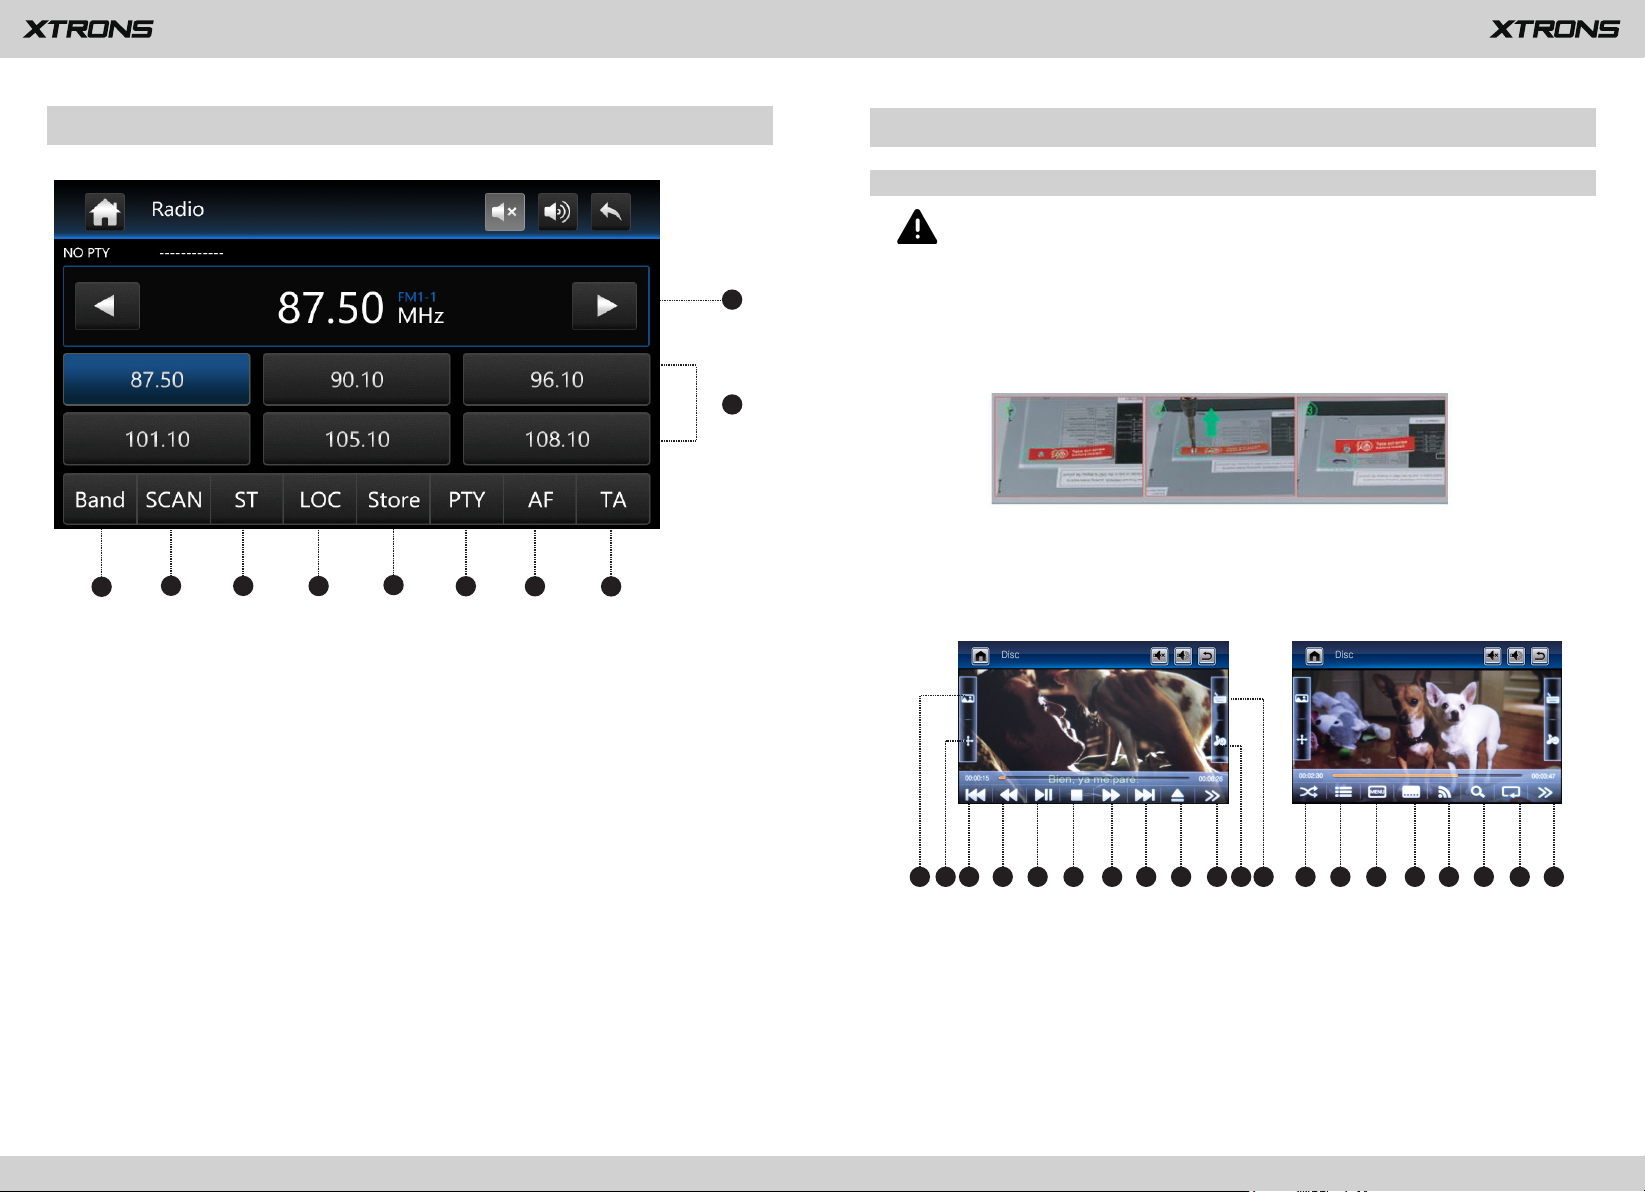
Radio
7
8
___
Play DVD
DVD Player
CAUTION
1. There are two screws on the top face of the unit to protect the disc drive
1
2
in transit. The screws need to be removed first. Otherwise it cannot accept
or
play discs.
3
4
5
6
7
8
9
10
1. Perform manual tuning
2. Preset channel list
3. Band (FM1, FM2, FM3, AM1 or AM2)
4. Perform seek tuning or non-stop seek tuning
5. Mono/Stereo (Works for FM bands)
6. Distant/Local seek tuning
7. Store the current broadcast frequency
Up to 18 FM stations and 12 AM stations can be stored in memory.
8. PTY (Program Type)
9. AF (Alternative Frequencies)
10. TA (Traffic Announcement)
2. For safety reasons, video images
cannot be viewed while your vehicle is
in motion. To view video images, stop in a safe place and apply the
parking brake.
1 2 3 4 5 6 7 8 13 14 15 16 17 18 19 201112109
1. Previous file
2. Rewind
3. Pause/Play
4. Stop
5. Fast forward
6. Next file
Page 6
7. Eject a disc
9
10
8. Next page
9. Display adjustment
Adjust the brightness , contrast, and color of the screen.
10. Viewing angle adjustment (not available)
11. Select files
12. Equalizer adjustment
Choose from Standard, Pop, Cinema, and Rock.
13. Play files in random order
14. Title
15. Menu
16. Language
17. Audio channel
Choose from Mono L, Mono R, and Stereo.
18. Zoom
Choose from 1/4,1/3,1/2, 2, 3, 4, 5, and off.
19. Repeat play
Choose from repeat the current file, repeat the list, and repeat all files.
20. Previous page
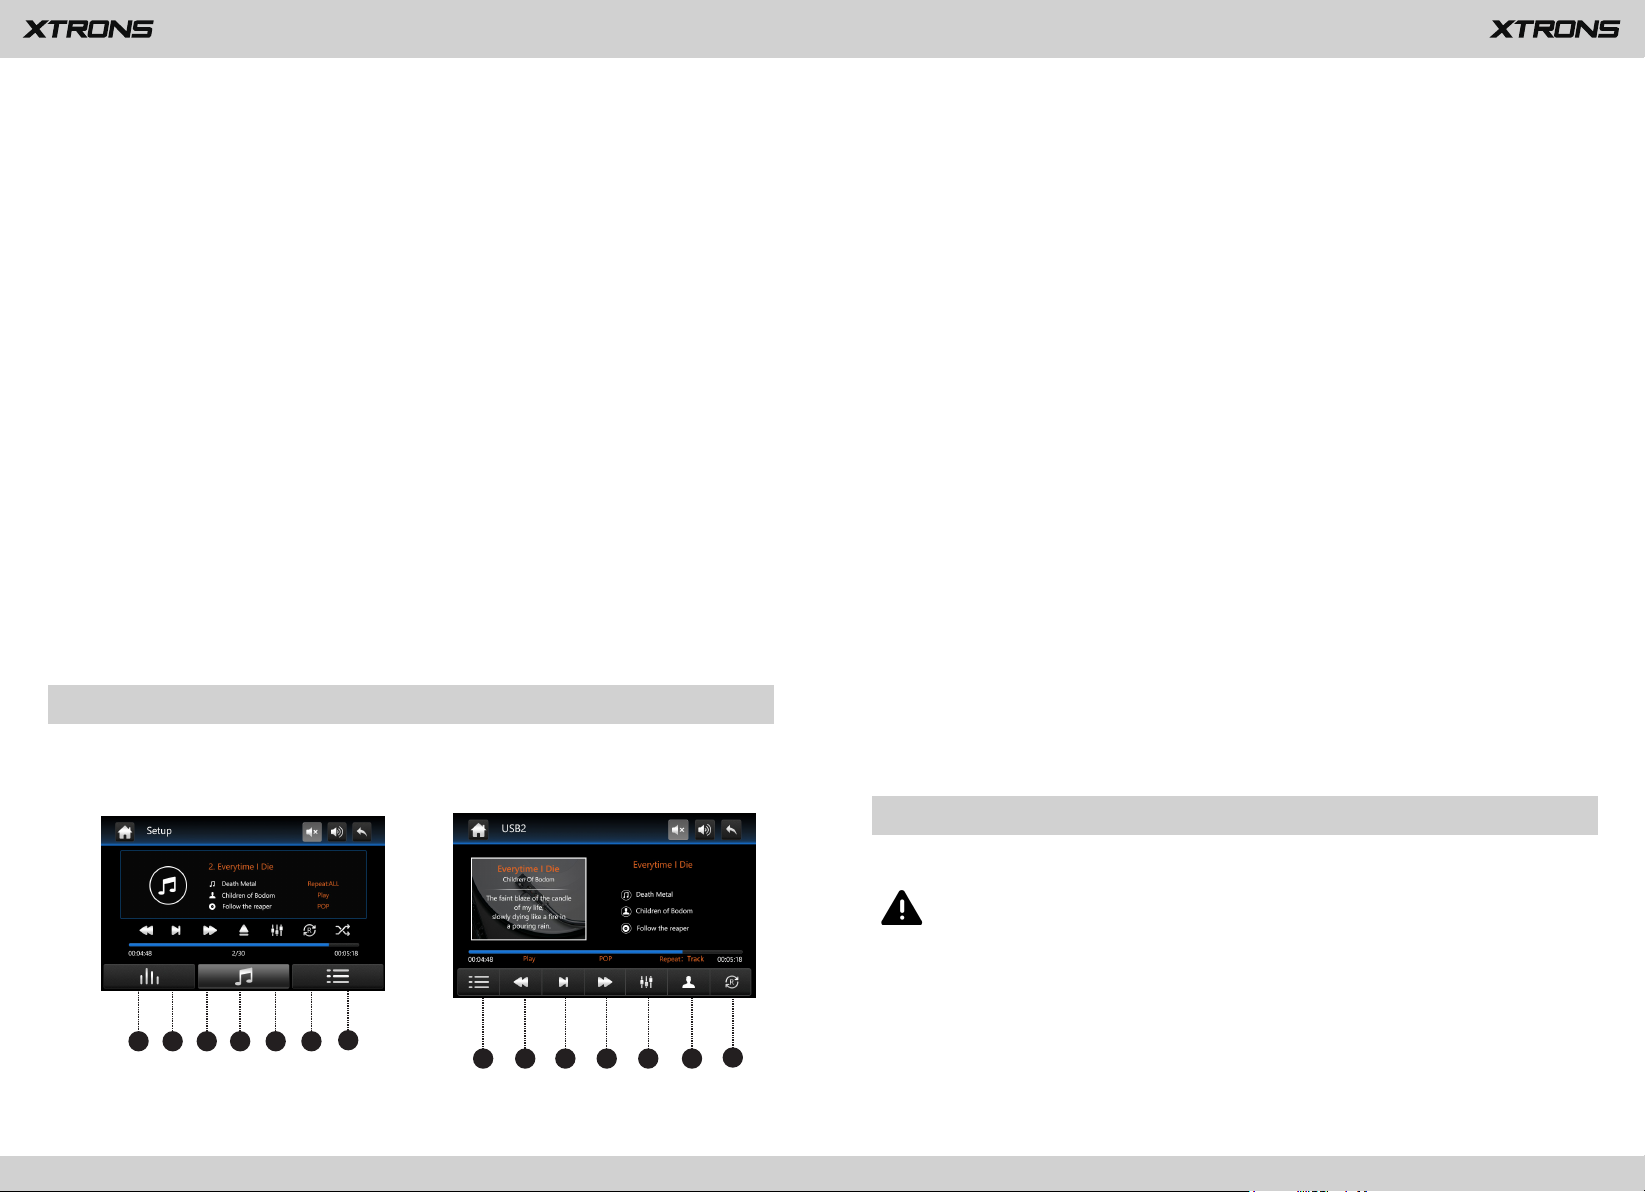
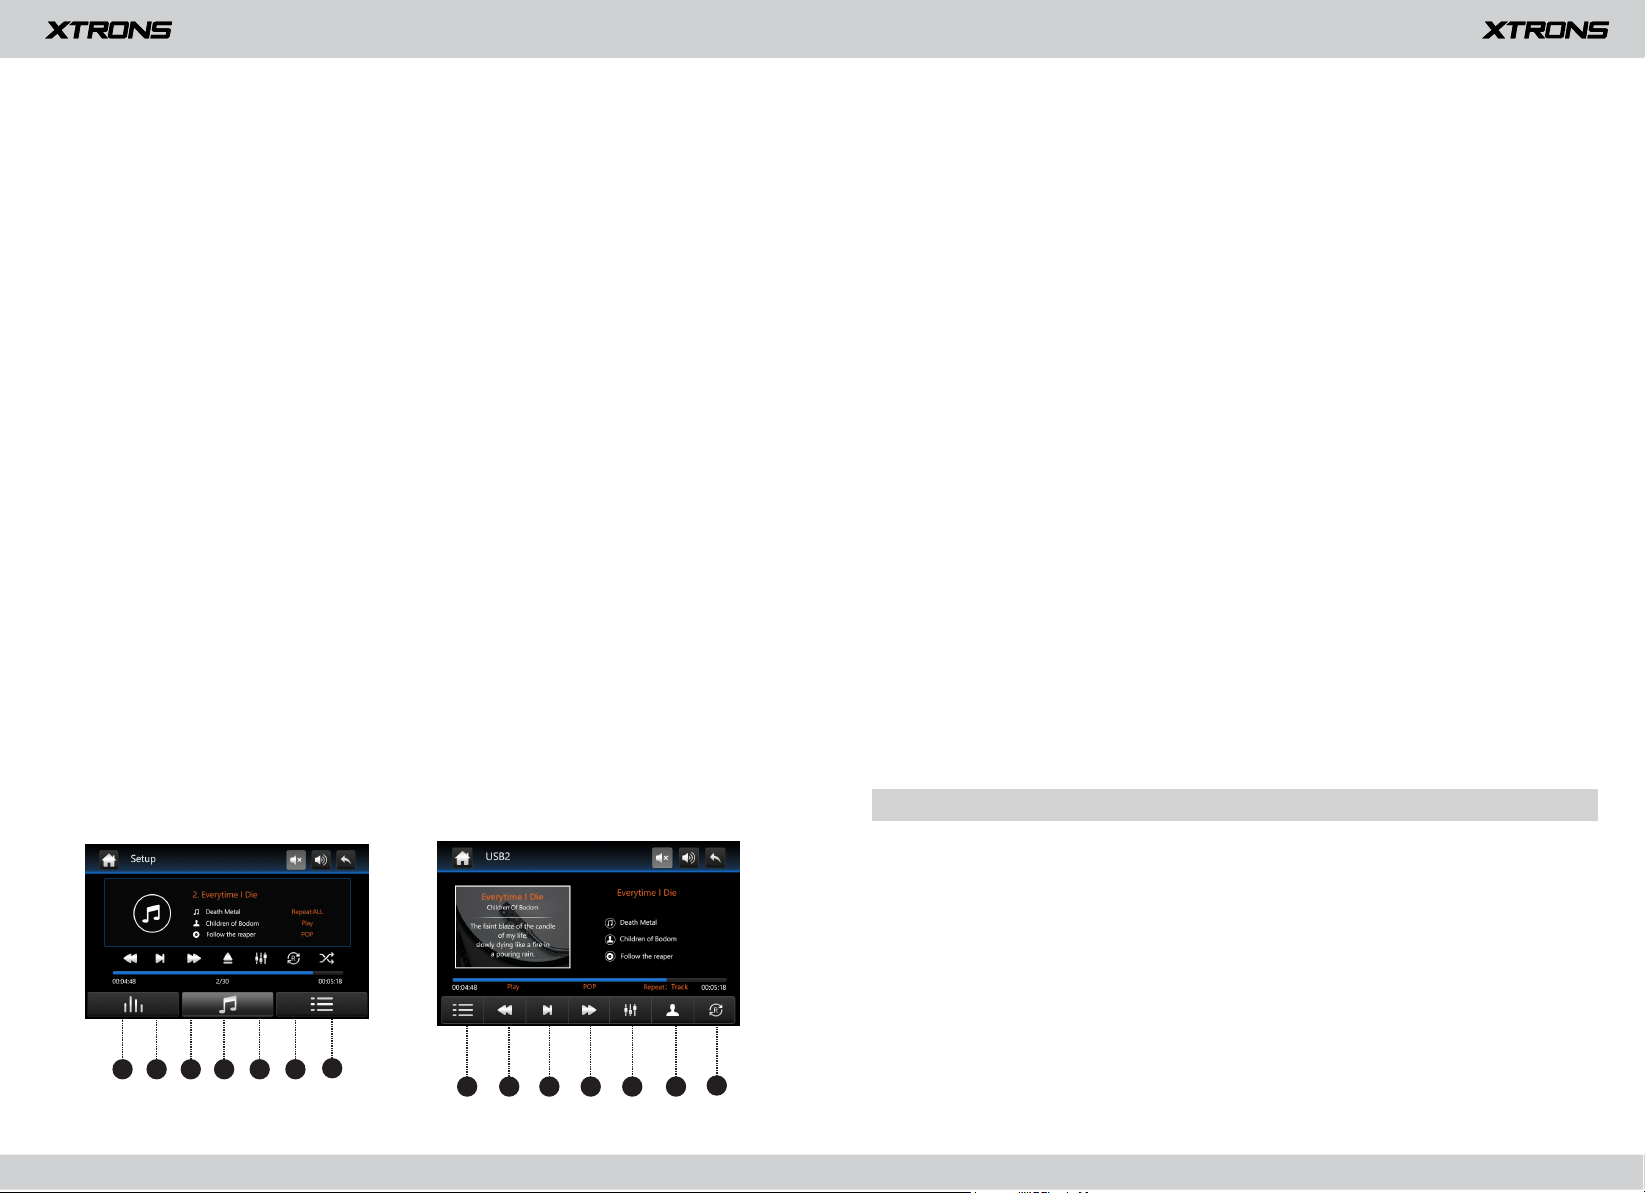
USB/SD
Plug a USB storage device or insert an SD memory card, and then tap USB or SD
on the main menu to enter USB or SD mode.
USB1/SD Mode
1. Previous file
2. Pause/Play
3. Next file
4. Eject (not available)
5. Equalizer adjustment
Choose from Standard, Pop, Soft, Cinema, Heavy Metal, Rock, Classic, Jazz, etc.
6. Repeat play
Choose from repeat the current file, repeat the current folder, repeat all files and off.
7. Random play on/off
USB2 Mode
1. File menu
2. Previous file
3. Pause/Play
4. Next file
5. Equalizer adjustment
Choose from Standard, Pop, Soft, Cinema, Heavy Metal, Rock, Classic, Jazz, etc.
6. Album list
7. Repeat play
Choose from repeat the current file, repeat the current folder, repeat all files and off.
1 2 3 4 5 6
(USB1/SD Mode)
AUX Input
You can display the video image output by the device connected to this unit.
CAUTION
For safety reasons, video images cannot be viewed while your vehicle is in
motion. To view video images, stop in a safe place and apply the parking
brake.
7
1 2 3 4 5 6
7
(USB2 Mode)
Page 7
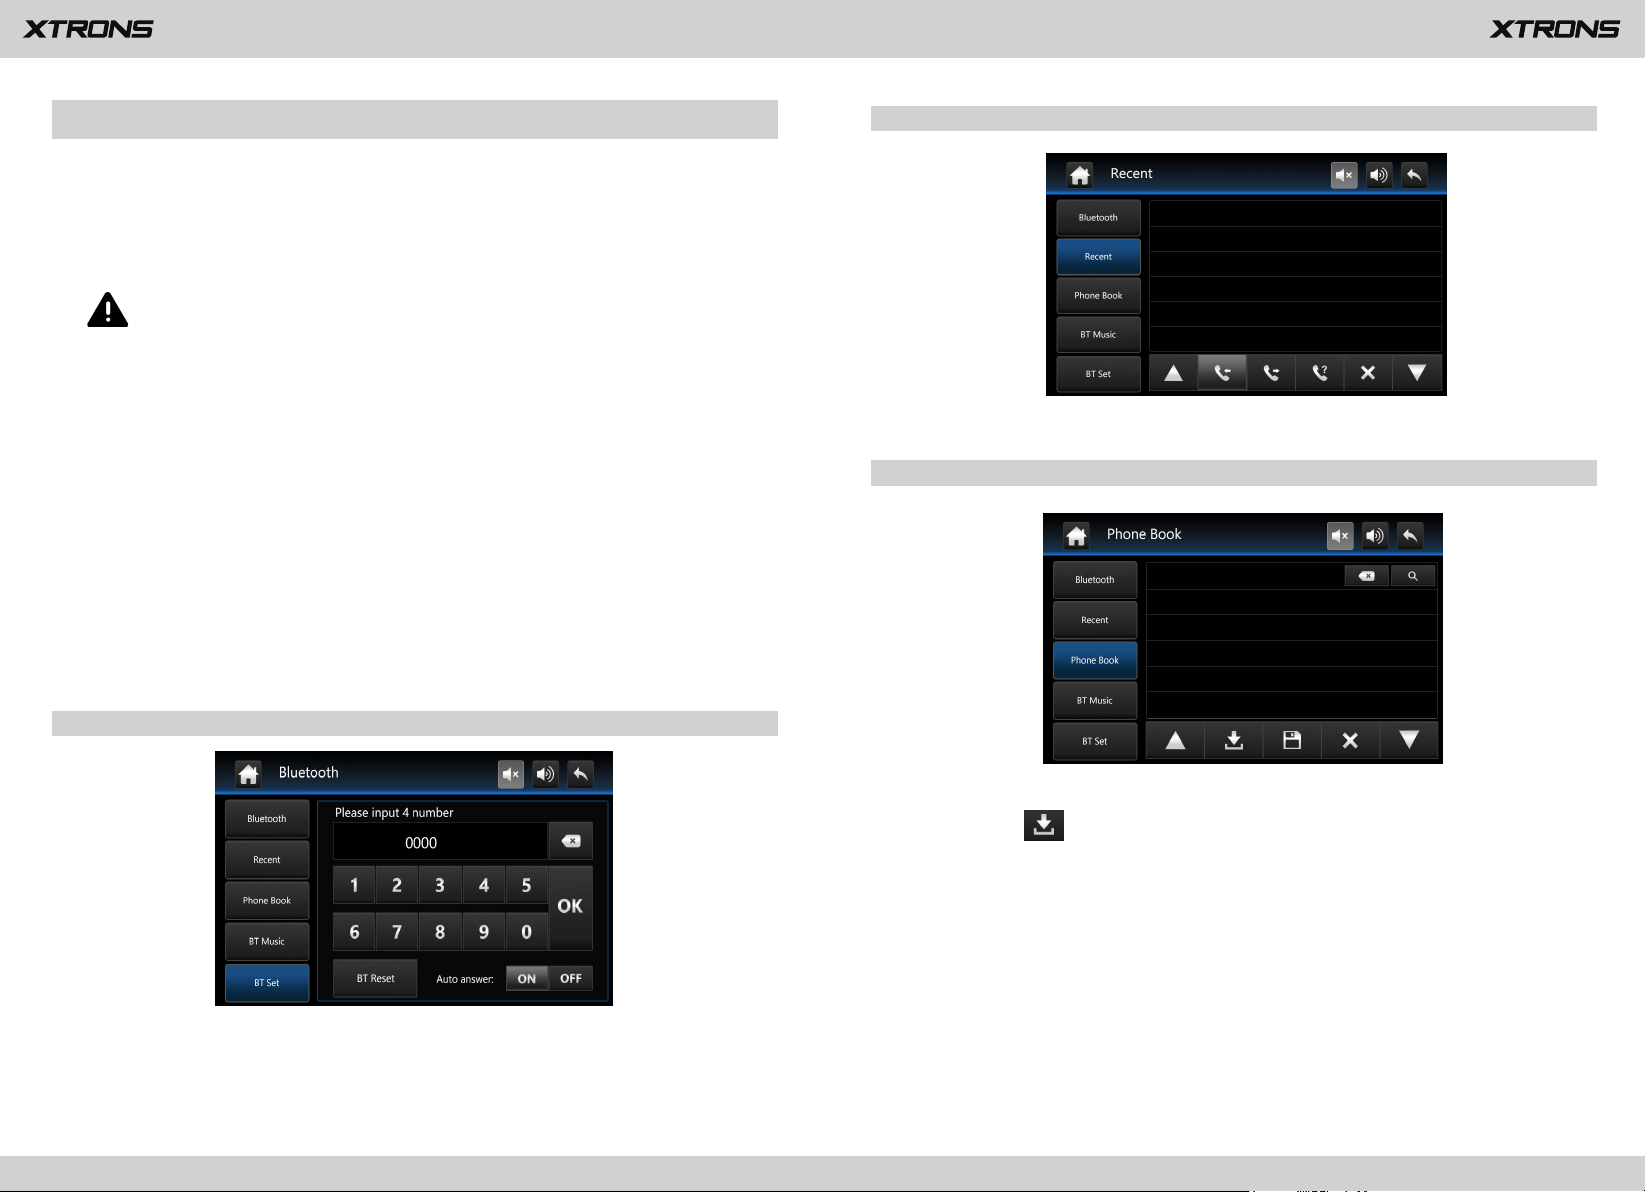
Bluetooth
11
12
Connect your mobile phone to this unit via Bluetooth and use an external
microphone to make and receive hands-free calls.
CAUTION
For your safety, avoid talking on the phone as much as possible while driving.
2. Recent calls
*
Connect to a Bluetooth device
Connection (Bluetooth pairing)
a.
The Bluetooth device must be within 1 meter of this unit. Turn on Bluetooth on
the device.
b.
You can find this unit in the devices list of your Bluetooth device.
If your Bluetooth device supports SSP (Secure Simple Pairing), a four-digit
c.
number password will be required. The default password is 0000.
1. Phone calls
View recent outgoing calls, incoming calls or missed calls.
3. Phone book
After the Bluetooth connection between your mobile phone and the unit is
established, tap on the screen. The contacts from your Bluetooth device will
be synchronized to the unit automatically.
※ Please note that the unit may not support the phone book function whilst
some mobile phones are not quite compatible with the unit.
Enter the number to make a call. You can also choose a contact from the phone
book to make a call.
Page 8

4. Bluetooth music
13
14
After the Bluetooth connection is established, you can play music stored in your
Bluetooth device on this unit.
※ At first, you need to operate the music playback on your Bluetooth device.
Then you can operate the Bluetooth music on the unit.
※ Please note that the unit may not support the Bluetooth music function
whilst some mobile phones are not quite compatible with the unit.
5. Bluetooth settings
Screen Mirroring
Tap Phone Link on the menu screen to enter screen mirroring mode. When
you connect a mobile phone with compatible applications installed, you can
control the applications for the mobile phone directly from this unit.
※ Please note that the screen mirroring function works for Android smart
phones only.
Navigation
Built-in navigation offers detailed, reliable route guidance information to help you
get where you want to go.
You can revise the Bluetooth pairing password. The default password is 0000.
①
Enter another four-digit number, then tap OK to set a new password.
You can turn answer an incoming call automatically on or off.
②
③
BT Rest
If Bluetooth pairing cannot work, please try the BT Reset.
a. Insert an SD card with maps into the GPS card slot.
b. Go to Setup > Navi path, then set up the path for the navigation application.
c. Tap Navigation on the main menu screen to enter navigation mode.
Page 9

DAB+
15
16
DAB+ (Digital audio broadcasting) tuner lets you enjoy the convenience of digital
radio, while Auto DAB+ Tuning makes sure there are less signal interruptions. DAB
+ digital radio brings you high-detail, digital-quality sound with lots of stations,
program information and more.
2. Scratch away some paint from the A pillar to attach the copper grounding lug.
(Please tear out the sticker from the grounding lug surface and ensure the
grounding lug has good conduction with the car’s ground.)
With the professional aerial antenna and the correct installation method, you can
receive the strongest radio signal ever.
1. Remove the A pillar trim from the passenger side.
3. Attach the antenna to the windscreen once the copper grounding lug is secure.
(Please try to keep the antenna away from the metal ground of the car, at a
distance of 60mm at least, and you should place the antenna upward.)
4. Run the cable to the rear of the DAB stereo and connect to test. Refit the A pillar
once completed.
Page 10

Settings
17
18
1. General settings
1.6 Camera Mirror
If you connect a rear view camera (sold separately) to the unit, you can turn this on
to enter mirror imaging mode for rear parking, and turn this off to enter normal
imaging mode for rear parking.
1.1 Any Key Power
On: You can turn on the unit by pressing any button on the panel next time.
Off: You can turn on the unit by pressing the power button only.
1.2 Brake Set
On: Video images cannot be viewed while your vehicle is in motion.
Off: Video images can be viewed while your vehicle is in motion.
CAUTION
For safety reasons, video images cannot be viewed while your vehicle is in
motion. To view video images, stop in a safe place and apply the parking
brake.
1.3 Beep
On: Sounds a beep.
Off: Does not sound a beep.
1.4 Auto Enter GPS
If you turn this on, the navigation will work automatically after the unit is
powered on.
1.5 OSD Time ON
If you turn this on, the time will be displayed on the upper right side of the
screen while you are watching DVD.
1.7 Black Time (Screen Timeout Settings)
Choose from 3 minutes, 5 minutes, 10 minutes, and cancel.
1.8 Backlight Set
Drag the slider to adjust the Day Backlight and the Night Backlight.
1.9 TCH Cali (Touch Calibration)
Tap the center of “+” on the screen, and move along with the center of “+” so as to
calibrate the screen. Tap OK to save the data and exit.
1.10 Steer Key
This allows you to use the steering wheel control of your vehicle to control the unit.
1.11 GPS Info
This displays GPS receiver information. You can set the time zone.
Page 11

1.12 Language
19
20
Set the language for the unit. Choose from English, French, German, Spanish, and
more.
1.13 Factory Set
Enter the password 3368 to go to Factory Settings.
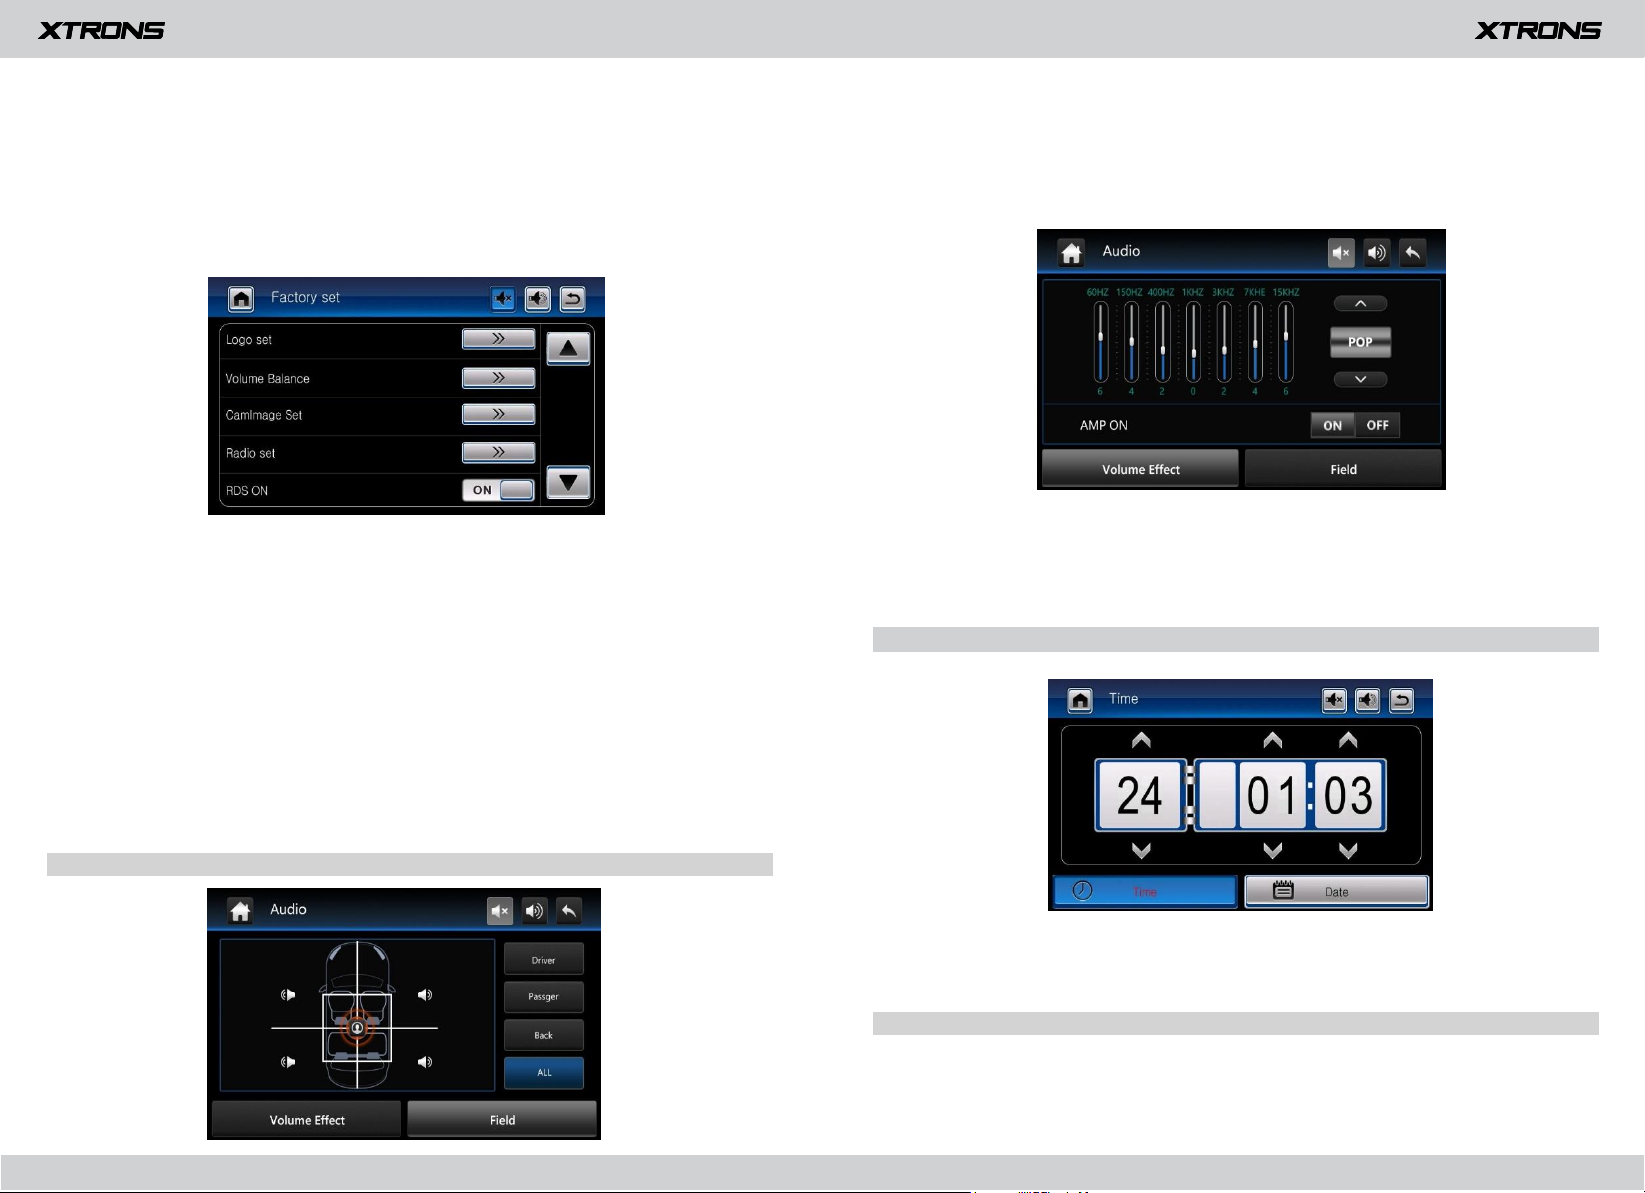
2.1 Fader/Balance Adjustment
You can select a listening position that you want to make as the center of the
sound effects.
Choose from Driver, Passenger, Back, and All.
1.14 Version
1.15 Auto Brightness
Big Light: Connect the illuminationwire to the positive pole of your vehicle
headlights. This makes the dimmer function work. The unit will dim the display
automatically when theheadlights are on.
1.16 GPS Mix
1.17 Key Light Color
This enables you to change the illumination color of the buttons to your personal
preference.
2. Audio settings
2.2 Equalizer Adjustment
You can choose from Standard, Pop, Soft, Cinema, Heavy Metal, Rock, Classic, Jazz,
etc.
3. Time settings
Set the date and time manually.
Select 12-hour format or 24-hour format.
4. GPS settings
Set up the path for the navigation application.
Page 12

Troubleshooting
21
22
If you have problems operating this product, refer to this section. The most common
problems are listed below, along with likely causes and solutions.
Noise in broadcasts
- Signals are too weak. Select other stations with stronger signals.
- Check the connection of the vehicle antenna.
- Change broadcast from stereo to mono.
No power
- Car engine has not been started. Start the car engine.
- Incorrect wiring connection. Check the wiring.
- Fuse has been damaged. Replace fuse.
No sound
- Volume is too low. Adjust volume.
- Incorrect wiring connection. Check the wiring.
No image
- Parking brake wire connect is incorrect. Check the parking wiring.
Disc does not play
- The disc is inserted upside down. Insert the disc with the label upward.
- The disc is dirty. Clean the disc.
- The disc is cracked or otherwise damaged. Insert a normal, round disc.
- The files on the discs are in an irregular file format. Check the file format.
- The disc format cannot be played back. Replace the disc.
- The loaded disc is a type this product cannot play. Check what type of disc it is.
The screen is covered by a caution message and the video cannot be shown
- The parking brake lead is not connected or applied. Connect the parking brake
lead correctly, and apply the parking brake.
- The parking brake interlock is activated. Park your vehicle in a safe place and apply
the parking brake.
Preset station lost
- Battery cable is not correctly connected. Connect the battery cable to the terminal
that is always live.
The paired mobile phone connects and disconnects constantly
- The Bluetooth reception is poor. Move the mobile phone closer to the product or
remove any obstacle between the mobile phone and the product.
- Some mobile phones may connect and disconnect constantly when you make or
end calls. This does not indicate any malfunction of the product.
- For some mobile phones, the Bluetooth connection may be deactivated
automatically as a power-saving feature. This does not indicate any malfunction of
the product.
Image flashes or distorted
- Video DVD settings do not match with the DVD. Adjust video DVD settings.
- Video connection is incorrect.
Page 13

www.xtrons.com
Page 14

GEBRAUCHSANWEISUNG
Vielen Dank, dass Sie sich für dieses XTRONS Produkt entschieden haben. Bitte lesen Sie
diese Anweisungen sorgfältig durch, damit Sie wissen, wie das Produkt ordnungsgemäß
bedient wird. Bitte bewahren Sie dieses Dokument nach dem Lesen für zukünftige Referenz
an einem sicheren Ort auf.
Page 15

Vorsichtsmaßnahmen
1
2
Inhalt
....................................................................2
Vorsichtsmaßnahmen
Bevor Sie dieses Produkt installieren
-
Benutzen Sie diese Einheit nur mit einer 12-Volt Batterie und negativer Erdung.
Andernfalls können Feuer oder Fehlfunktionen hervorgerufen werden.
Hauptmenü
Radio
.................................................................................................. 7
DVD abspielen
USB/SD
AUX-Input
Bluetooth
Screen Mirroring
Navigation
DAB+
..................................................................................... 15
Einstellungen
Fehlerbehebung
...................................................................................5
................................................................................. 8
.............................................................................................. 9
.....................................................................................10
.......................................................................................11
...........................................................................14
.................................................................................... 14
.......................................................................... 17
..................................................................... 21
-
Um Kurzschlüsse im elektrischen System zu verhindern, denken Sie bitte daran,
das (-) Batteriekabel vor der Installation zu trennen.
Wichtige Sicherheitsinformationen
WARNUNG
-
Versuchen Sie nicht, dieses Produkt selbst zu installieren oder zu warten.
Installation oder Wartung dieses Produkts durch Personen ohne entsprechendes
Training und Erfahrung mit elektronischem Equipment und Automobil-Zubehör
birgt Risiken und kann zu Stromschlag, Verletzungen oder anderen Gefahren
führen.
-
Lassen Sie dieses Produkt nicht mit Flüssigkeiten in Kontakt kommen. Dies
könnte zu Stromschlägen führen. Des Weiteren könnte Kontakt mit
Flüssigkeiten Schäden am Produkt, Rauchentwicklung und Überhitzung
hervorrufen.
-
Sollten Flüssigkeiten oder Fremdkörper in dieses Produkt geraten, parken Sie Ihr
Fahrzeug an einem sicheren Ort, schalten Sie unverzüglich die Zündung aus
(ACC OFF) und wenden Sie sich an Ihren Händler. Verwenden Sie das Produkt
nicht in diesem Zustand, da dies zu Brand, Stromschlag oder anderen Störungen
führen könnte.
-
Sollte Sie Rauch, ungewöhnliche Geräusche oder Gerüche von diesem
Produkt bemerken, oder irgendwelche anderen fehlerhaften Zeichen auf dem
Bildschirm, schalten Sie sofort die Stromversorgung ab und kontaktieren Sie
Ihren Verkäufer. Der Gebrauch des Produkts in diesem Zustand kann
permanente Schäden am System zur Folge haben.
Page 16

-
3
4
Bauen Sie dieses Produkt nicht auseinander und modifizieren Sie es nicht, da es
Hochspannungs-Komponenten enthält, die Stromschläge verursachen können.
Bitte wenden Sie sich für interne Inspektionen, Anpassungen oder Reparaturen
an Ihren Händler.
Achten Sie darauf, vor Gebrauch des Produkts die folgenden
Sicherheitshinweise zu lesen und zu verstehen:
-
Bedienen Sie dieses Produkt, seine Anwendungen oder die Rückfahrkamera-
Option (wenn gekauft) auf keinen Fall, wenn dies Ihre Aufmerksamkeit auf
irgendeine Weise vom sicheren Betrieb Ihres Fahrzeugs abhält. Fahren Sie
stets nach den Regeln fürs sichere Fahren und halten Sie sich an alle gültigen
Verkehrsregeln. Sollten Sie Schwierigkeiten bei der Bedienung des Produkts
oder beim Lesen des Bildschirms haben, parken Sie Ihr Fahrzeug an einem
sicheren Ort und ziehen Sie die Handbremse an, bevor Sie die nötigen
Änderungen vornehmen.
-
Stellen Sie die Lautstärke dieses Produkts niemals so laut ein, dass Sie den
Verkehr draußen und Notfallfahrzeuge nicht hören können.
-
Zur Förderung der Sicherheit sind einige Funktionen deaktiviert, solange das
Fahrzeug nicht angehalten und/oder die Handbremse angezogen ist.
-
Bitte behalten Sie dieses Handbuch griffbereit, um darin Bedienungshinweise
und Sicherheitsinformationen nachzuschlagen.
-
Installieren Sie dieses Produkt nicht an Orten wo es (i) dem Fahrer die Sicht
versperrt, (ii) die Leistung der Fahrzeugsysteme oder
Sicherheitseinrichtungen wie Airbags oder Schalter für Warnlampen
beeinträchtigt oder (iii) die Fähigkeit des Fahrers beeinträchtigt, das Fahrzeug
sicher zu steuern.
Zur Gewährleistung sicheren Fahrens
WARNUNG
-
DER HELLGRÜNE DRAHT AM STROMANSCHLUSS DIENT DER ERKENNUNG
DER PARKPOSITION UND MUSS AUF DER DER STROMVERSORGUNG
ZUGEWANDTEN SEITE DES HANDBREMSHEBELS ANGEBRACHT WERDEN.
UNSACHGEMÄSSE VERBINDUNG ODER VERWENDUNG DIESES DRAHTS
KANN GEGEN GELTENDES RECHT VERSTOSSEN UND SCHWERE
VERLETZUNGEN ODER SACHSCHÄDEN VERURSACHEN.
- Versuchen Sie auf keine Weise, das Handbremsverriegelungssystem zu
manipulieren oder zu deaktivieren. Dieses System dient Ihrem Schutz.
Manipulation oder Deaktivierung des Handbremsverriegelungssystems
kann zu schweren Verletzungen oder zum Tod führen.
- Um Risiken wie Schäden und Verletzungen oder den möglichen Verstoß
gegen geltende Gesetze zu verhindern, kann dieses Produkt nicht mit einem
für den Fahrer sichtbaren Videobild verwendet werden.
-
In einigen Ländern kann das Ansehen von Videobildern auf Bildschirmen in einem
Fahrzeug, sogar durch andere Personen als den Fahrer, illegal sein. Wo solche
Vorschriften gelten, müssen sie befolgt werden.
Sollten Sie versuchen, während der Fahrt Videobilder anzusehen, erscheint auf dem
Bildschirm die Warnung "Es ist strengstens verboten, während der Fahrt VordersitzVideoquellen zu betrachten." Um Videobilder auf diesem Bildschirm zu sehen,
halten Sie an einem si cheren Ort und ziehen Sie die Handbremse an. Bitte halten
Sie das Bremspedal gedrückt, wenn Sie die Handbremse lösen.
Zur Vermeidung von Batterieerschöpfung
-
Bitte denken Sie daran, sich beim Betrieb Ihres Fahrzeugs stets
anzuschnallen. Sollten Sie jemals in einen Unfall verwickelt sein, können
Ihre Verletzungen sehr viel schlimmer ausfallen, wenn sie nicht
ordnungsgemäß angeschnallt sind.
-
Tragen Sie niemals beim Fahren Kopfhörer.
Stellen Sie sicher, dass beim Gebrauch dieses Produkts der Fahrzeugmotor
läuft. Der Gebrauch dieses Produkts bei abgeschaltetem Motor kann die
Batterie entladen.
WARNUNG
Installieren Sie das Produkt nicht in einem Fahrzeug ohne verfügbare ACC-Kabel
oder -Schaltung.
Page 17

5
6
Hauptmenü
1
DAB+
1.
2. USB1
3. USB2
4. SD
5.
AUX-Inpu
6
2
t
3
4
5
6.
Datum
7.
Uhrzeit
8.
Stummschaltung
9.
Lautstärke
10.
Phone Link (Screen Mirroring)
11.
TV
12.
Spiel
10
7
11
8
12
9
Page 18

7
8
Radio
DVD abspielen
DVD Player
VORSICHT
3
1.
Manuelle Senderwahl durchführen
2.
Liste der voreingestellten Sender
3.
Frequenzbereich (FM1, FM2, FM3, AM1 oder AM2)
4.
Suchlauf oder ununterbrochenen Sendersuchlauf durchführen
5.
Mono/Stereo (Funktioniert bei FM-Frequenzen)
6.
Fern/Regionaler Sendersuchlauf
7.
Speichern Sie die aktuelle Sendefrequenz
4
5
6
7
8
9
10
Bis zu 18 FM-Sender und 12 AM-Sender können gespeichert werden.
8.
PTY (Programmtyp)
9.
AF (Alternative Frequenzen)
10.
TA (Verkehrsansage)
1
1. Auf der Oberseite der Einheit sind zwei Schrauben angebracht, um das
Laufwerk beim Transport zu schützen. Diese Schrauben müssen zuerst
entfernt werden. Andernfalls kann es keine Disks annehmen oder
___
abspielen.
2
2. Aus Sicherheitsgründen können keine Videobilder angesehen werden,
wenn Ihr Auto sich bewegt. Um Videobilder anzusehen, halten Sie an
einem sicheren Ort und ziehen Sie die Handbremse an.
1 2 3 4 5 6 7 8 12 11 13 14 15 16 17 18 19 20109
1.
Vorherige Datei
2.
Zurückspulen
3.
Pause/Abspielen
111
12
4.
Stop
5.
Vorspulen
6.
Nächste Datei
Page 19
7.
9
10
Eine Disk auswerfen
8.
Nächste Seite
9.
Bildschirmeinstellungen
Passen Sie Helligkeit, Kontast und Farbe des Bildschirms an.
10.
Anpassung des Betrachtungswinkels (nicht verfügbar)
11.
Wählen Sie Datein aus
12.
Einstellung des Equalizers
Wählen Sie zwischen Standard, Pop, Kino und Rock.
13.
Spielen Sie Datein in zufälliger Reihenfolge ab
14.
Titel
15.
Menü
16.
Sprache
17.
Audiokanal
Wählen Sie zwischen Mono L, Mono R und Stereo.
18.
Zoom
Wählen Sie zwischen 1/4, 1/3, 1/2, 2, 3, 4, 5 und aus.
19.
Wiederholt abspielen
Wählen Sie zwischen "die aktuelle Datei wiederholen", "die Liste wiederholen"
und "alle Dateien wiederholen".
20.
Vorherige Seite
USB/SD
Verbinden Sie ein USB-Speichergerät oder stecken Sie eine SD-Speicherkarte ein
und drücken Sie anschließend "USB" oder "SD" im Hauptmenü, um den USBoder SD-Modus zu aktivieren.
USB1/SD-Modus
1.
Vorherige Datei
2.
Pause/Abspielen
3.
Nächste Datei
4.
Auswerfen (nicht verfügbar)
5.
Einstellung des Equalizers
Wählen Sie zwischen Standard, Pop, Soft, Kino, Heavy Metal, Rock, Klassik, Jazz etc.
6.
Wiederholt abspielen
Wählen Sie zwischen "die aktuelle Datei wiederholen", "den aktuellen Ordner
wiederholen", "alle Dateien wiederholen" und aus.
7.
Zufällige Wiedergabe ein/aus
USB2-Modus
1.
Datei-Menü
2.
Vorherige Datei
3.
Pause/Abspielen
4.
Nächste Datei
5.
Einstellung des Equalizers
Wählen Sie zwischen Standard, Pop, Soft, Kino, Heavy Metal, Rock, Klassik, Jazz etc.
6.
Album-Liste
7.
Wiederholt abspielen
Wählen Sie zwischen "die aktuelle Datei wiederholen", "den aktuellen Ordner
wiederholen", "alle Dateien wiederholen" und aus.
AUX-Input
1 2 3 4 5 6
(USB1/SD-Modus)
Sie können den Video-Output eines mit dieser Einheit verbundenen Geräts anzeigen.
VORSICHT
Aus Sicherheitsgründen können keine Videobilder angesehen werden, wenn
Ihr Auto sich bewegt. Um Videobilder anzusehen, halten Sie an einem
sicheren Ort und ziehen Sie die Handbremse an.
7
1 2 3 4 5 6
(USB2-Modus)
7
Page 20

11
12
Bluetooth
Verbinden Sie Ihr Mobiltelefon über Bluetooth mit dieser Einheit und nutzen Sie
ein externes Mikrofon, um Freisprechanrufe zu tätigen und zu empfangen.
Zur Ihrer eigenen Sicherheit sollten Sie auf das Telefonieren beim Fahren so weit
wie möglich verzichten.
VORSICHT
2. Letzte Anrufe
*
Mit einem Bluetooth-Gerät verbinden
Verbindung (Bluetooth-Kopplung)
a.
Das Bluetooth-Gerät muss sich innerhalb eines Meters von dieser Einhei
befinden. Schalten Sie auf dem Gerät Bluetooth ein.
b.
Sie können diese Einheit in der Geräteliste auf Ihrem Bluetooth-Gerät finden.
Wenn Ihr Bluetooth-Gerät SSP (Secure Simple Pairing) unterstützt, wird ein
c.
vierstelliges Nummernpasswort benötigt. Das Standard-Passwort ist 0000.
1. Anrufe
Sehen Sie die letzten ausgehenden, eingehenden oder verpassten Anrufe.
3. Telefonbuch
t
Nachdem die Bluetooth-Verbindung zwischen Ihrem Mobiltelefon und der Einheit
hergestellt ist, tippen Sie
Bluetooth-Gerät werden automatisch mit der Einheit synchronisiert.
*
Bitte beachten Sie, dass die Einheit die Telefonbuch-Funktion eventuell
nicht unterstützt und dass manche Mobiltelefone nicht ganz mit der
Einheit kompatibel sind.
auf dem Bildschirm. Die Kontakte von Ihrem
Geben Sie die Nummer ein, um einen Anruf zu tätigen. Sie können auch einen
Kontakt aus dem Telefonbuch auswählen, um einen Anruf zu machen.
Page 21

4. Bluetooth-Musik
13
14
Screen Mirroring
Tippen Sie "Phone Link" auf dem Menübildschirm, um den Screen Mirroring-Modus
zu aktivieren. Wenn Sie ein Mobiltelefon mit kompatiblen Anwendungen verbinden,
können Sie diese Anwendungen für das Mobiltelefon direkt von dieser Einheit aus
bedienen.
*
Bitte beachten Sie, dass Sie die Screen Mirroring-Funktion nur mit AndroidSmartphones nutzen können.
Nachdem die Bluetooth-Verbindung hergestellt ist, können Sie auf ihrem Bluetooth-
Gerät gespeicherte Musik auf dieser Einheit abspielen.
*
Zunächst müssen Sie die Musikwiedergabe auf Ihrem Bluetooth-Gerät
bedienen. Dann können Sie die Bluetooth-Musik auf dieser Einheit
bedienen.
*
Bitte beachten Sie, dass die Einheit die Bluetooth-Musik-Funktion eventuell
nicht unterstützt und dass manche Mobiltelefone nicht ganz mit der Einheit
kompatibel sind.
5. Bluetooth-Einstellungen
Sie können das Passwort für die Bluetooth-Kopplung ändern. Das Standard-
①
Passwort ist 0000.
dann "OK", um ein neues Passwort festzulegen.
②
Sie können eingehende Anrufe automatisch beantworten ein oder ausschalten.
③
BT-Ruhemodus
Wenn die Bluetooth-Kopplung nicht funktioniert, versuchen Sie bitte das
Zurücksetzen von BT.
Geben Sie eine andere vierstellige Nummer ein und tippen Sie
Navigation
Das integrierte Navigationssystem bietet detaillierte, zuverlässige
Routeninformationen, die Ihnen helfen, dorthin zu kommen, wo Sie hinwollen.
a.
Stecken Sie eine SD-Karte mit Karten in den GPS-Kartenschlitz.
b.
Gehen Sie zu Setup > Pfad des Navigationssystems und stellen Sie dann den
Pfad für die Navigationsanwendung ein.
c.
Tippen Sie "Navigation" auf dem Hauptmenü-Bildschirm, um in den
Navigationsmodus zu gehen.
Page 22

15
16
DAB+
Der DAB+ (Digital Audio Broadcasting) Sendersuchlauf ermöglicht Ihnen den
Genuss der Vorzüge des digitalen Radios, während der automatische DAB+
Sendersuchlauf dafür sorgt, dass es weniger Signal-Unterbrechungen gibt. Das
digitale DAB+ Radio bringt Ihnen detailreiche Klänge in digitaler Qualität mit
unzähligen Stationen, Programminformationen und vielem mehr.
2.
Kratzen Sie etwas Lack von der A-Säule, um die Kupfererdungsöse zu
befestigen. (Bitte entfernen Sie den Aufkleber von der Oberfläche der
Erdungsöse und stellen Sie sicher, dass eine gute Verbindung mit der
Erdung des Fahrzeugs hergestellt wird.)
Mit der professionellen Außenantenne und der korrekten Installationsmethode
können Sie das stärkste Radiosignal aller Zeiten empfangen.
1.
Entfernen Sie die A-Säulenverkleidung von der Passagierseite.
3.
Bringen Sie die Antenne an der Windschutzscheibe scheibe an, sobald die
Kupfererdungsöse gesichert ist. (Bitte halten Sie die Antenne von de
Metallerdung des Fahrzeugs fern, zumindest 60mm, und die Antenne sollte
aufwärts angebracht werden.)
4.
Führen Sie das Kabel zur Rückseite der DAB-Stereoanlage und verbinden Sie
es zum Testen. Verkleiden Sie die A-Säule wieder, sobald Sie fertig sind.
r
Page 23

17
18
Einstellungen
1. Generelle Einstellungen
1.1
Einschalten durch jeden Knopf
Ein: Sie können die Einheit das nächste Mal durch das Drücken eines
beliebigen Knopfes auf dem Bedienfeld einschalten.
Aus: Sie können die Einheit nur durch Drücken des Einschaltknopfs
einschalten.
1.2
Bremseinstellung
Ein: Videobilder können nicht betrachtet werden, wenn Ihr Fahrzeug in Bewegung
ist.
Aus: Videobilder können betrachtet werden, während Ihr Fahrzeug sich bewegt.
1.3
Piepen
Ein: Ein Piepen ertönt.
Aus: Kein Piepen ertönt.
1.6
Kameraspiegel
Wenn Sie eine Rückfahrkamera (separat verkauft) mit dieser Einheit verbinden,
können Sie dies einschalten, um die gespiegelte Bildwiedergabe zum rückwärts
Einparken zu aktivieren und es zur normalen Bildwiedergabe beim rückwärts
Einparken ausschalten.
1.7
Zeit bis zum schwarzen Bildschirm (Einstellung der Zeit für die automatische
Bildschirmausschaltung)
Wählen Sie zwischen 3 Minuten, 5 Minuten, 10 Minuten und abbrechen.
1.8
Einstellung der Hintergrundbeleuchtung
Ziehen Sie den Schieberegler, um die Hintergrundbeleuchtung für Tag und Nacht
anzupassen.
1.9
TCH Cali (Touch-Kalibrierung)
Tippen Sie die Mitte des "+" auf dem Bildschirm und bewegen Sie sich mit der
Mitte des "+", um den Bildschirm zu kalibrieren. Tippen Sie OK, um die Daten zu
speichern und die Einstellungen zu verlassen.
1.10
Lenkrad-Tasten
Dies ermöglicht es Ihnen, die Einheit durch die Lenkrad-Tasten Ihres Fahrzeugs zu
steuern.
1.4
Automatische Aktivierung des GPS
Wenn Sie dies einschalten, wird das Navigationssystem beim Start der Einheit
automatisch aktiviert.
1.5
OSD Zeit EIN
Wenn Sie dies einschalten, wird die Uhrzeit am oberen rechten Bildschirmrand
angezeigt, während Sie eine DVD ansehen.
1.11
GPS-Info
Dies zeigt Informationen über den GPS-Empfänger an. Sie können die Zeitzone
einstellen.
Page 24
1.12
19
20
Sprache
Bestimmen Sie die Sprache der Einheit. Wählen Sie zwischen Englisch,
Französisch, Deutsch, Spanisch und anderen.
1.13
Werkseinstellungen
Geben Sie das Passwort 3368 ein, um zu den Werkseinstellungen
zurückzukehren.
1.14
Version
1.15
Automatische Helligkeitsanpassung
Großes Licht: Verbinden Sie den Beleuchtungsdraht mit dem Plus-Pol Ihrer
Frontscheinwerfer. Dies ermöglicht den Betrieb der Dimmfunktion. Die
Einheit dimmt die Bedienfeldbeleuchtung und den Bildschirm automatisch,
wenn die Frontscheinwerfer an sind.
2.1
Fader/Balance Anpassung
Sie können eine Hörposition auswählen, um Sie zum Zentrum der Soundeffekte
zu machen.
Wählen Sie zwischen Fahrer, Passagier, hinten und alle.
2.2
Einstellung des Equalizers
Sie können zwischen Standard, Pop, Soft, Kino, Heavy Metal, Rock, Klassic, Jazz etc.
wählen.
3. Zeiteinstellungen
1.16
GPS-Lautstärkeverhältnis
1.17
Beleuchtungsfarben der Tasten
Dies ermöglicht es Ihnen, die Beleuchtungsfarbe der Knöpfe nach Ihren
persönlichen Vorlieben anzupassen.
2. Audio Einstellungen
Stellen Sie Datum und Uhrzeit manuell ein.
Wählen Sie zwischen dem 12-Stunden- und dem 24-Stunden-Format.
4. GPS-Einstellungen
Stellen Sie den Pfad der Navigationsanwendung ein.
Page 25

21
22
Fehlerbehebung
Sollten Sie Schwierigkeiten bei der Bedienung dieses Produkts haben, sehen Sie
in diesem Abschnitt nach. Die häufigsten Probleme sind unten aufgeführt,
zusammen mit wahrscheinlichen Ursachen und Lösungen.
Kein Strom
-
Der Fahrzeugmotor ist nicht gestartet. Starten Sie den Fahrzeugmotor.
-
Falsche Verdrahtung. Überprüfen Sie die Verdrahtung.
-
Die Sicherung wurde beschädigt. Ersetzen Sie die Sicherung.
Kein Ton
-
Die Lautstärke ist zu niedrig. Passen Sie die Lautstärke an.
-
Falsche Verdrahtung. Überprüfen Sie die Verdrahtung.
Kein Bild
-
Die Verbindung zur Handbremse ist fehlerhaft. Überprüfen Sie die Verkabelung der
Handbremse.
Die Disk wird nicht wiedergegeben
-
Die Disk ist verkehrt herum eingelegt. Legen Sie die Disk mit der Beschriftung nach
oben ein.
-
Die Disk ist schmutzig. Reinigen Sie die Disk.
-
Die Disk hat Risse oder ist anderweitig beschädigt. Legen Sie eine normale, runde
Disk ein.
-
Die Dateien auf den Disks sind in einem unkorrekten Dateiformat. Überprüfen Sie
das Dateiformat.
-
Das Diskformat kann nicht abgespielt werden. Ersetzen Sie die Disk.
-
Die Art der geladenen Disk wird von diesem Produkt nicht unterstützt. Überprüfen
Sie die Art des Datenträgers.
Rauschen bei Radiosendungen
-
Signale sind zu schwach. Wählen Sie andere Stationen mit stärkeren Signalen.
-
Überprüfen Sie die Verbindung der Fahrzeugantenne.
-
Schalten das Radio von Stereo auf Mono.
Die gespeicherten Sender sind verschwunden
-
Das Batterie-Kabel ist nicht richtig verbunden. Verbinden Sie das Batterie-Kabel
mit einem Anschluss, der immer Strom hat.
Das gekoppelte Mobiltelefon wird ununterbrochen verbunden und getrennt
-
Der Bluetooth-Empfang ist schlecht. Bringen Sie das Mobiltelefon näher an das
Produkt oder entfernen Sie Hindernisse, die sich zwischen dem Mobiltelefon und
dem Produkt befinden.
-
Einige Mobiltelefone verbinden und trennen sich ununterbrochen, wenn Anrufe
getätigt oder beendet werden. Dies ist kein Hinweis auf eine Fehlfunktion des
Produkts.
-
Bei manchen Mobiltelefonen kann die Bluetooth-Verbindung als
Energiesparfunktion automatisch deaktiviert werden. Dies ist kein Hinweis auf
eine Fehlfunktion des Produkts.
Der Bildschirm ist von einer Warnung verdeckt und das Video kann nicht
angezeigt werden
- Der Draht an der Handbremse ist nicht verbunden oder angewendet. Verbinden Sie
den Draht an der Handbremse ordnungsgemäß und ziehen Sie die Handbremse an.
- Die Handbremsverriegelung ist aktiviert. Parken Sie Ihr Fahrzeug an einem
sicheren Ort und ziehen Sie die Handbremse an.
Das Bild flackert oder ist verzerrt
-
Die Einstellungen für Video-DVDs passen nicht zur eingelegten DVD. Passen Sie
die Einstellungen für Video-DVDs an.
-
Die Videoverbindung ist fehlerhaft.
Page 26

 Loading...