

Page 1
USER MANUAL
Thank you for buying this XTRONS product. Please read through these instructions so you will
know how to operate this product properly. After you have finished reading the instructions,
keep this document in a safe place for future reference.
Page 2

NOTICES
Installation or servicing of this product by persons without
training and experience in electronic equipment and
automotive accessories may be dangerous and could
expose you to the risk of electric shock, injury or other
hazards.
The navigation features of this product (and the rear view
camera option if purchased) are intended solely to aid you
in the operation of your vehicle. It is not a substitute for
your attentiveness, judgment and care when driving.
To avoid the risk of damage and injury and the potential
violation of applicable laws, this product is not for use
with a video image that is visible to the driver.
XTRONS disclaims any liability for any bodily injury or
property damage that might result from any improper or
unintended use.
Pay close attention to all warnings in this manual and follow the
instructions carefully.
The screens shown in the examples may differ from actual screens,
which may be changed without notice for performance and function
improvements.
Page 3

Contents
1
Precaution ........................................................................................................
Home Screen ..................................................................................................
Radio ..................................................................................................................
Play DVD ...........................................................................................................
USB/SD ..............................................................................................................
AUX Input .........................................................................................................
Bluetooth .........................................................................................................
Bluetooth Music .............................................................................................
Screen Mirroring ............................................................................................
Navigation .......................................................................................................
Connect to the Internet ..............................................................................
OBD2 (Optional) ............................................................................................
DVR (Optional) ...............................................................................................
2
7
8
9
9
10
10
13
13
15
15
16
16
DAB+ (Optional) ............................................................................................
TV (Optional) ...................................................................................................
TPMS (Optional) .............................................................................................
Settings .............................................................................................................
Troubleshooting ............................................................................................
Appendix ..........................................................................................................
16
17
17
18
27
29
Page 4

Precaution
2
Important safety information
WARNING
XTRONS does not recommend that you install this product yourself. This
product is designed for professional installation only. We recommend that
only those service personnel, who have special training and experience in
mobile electronics, set up and install this product. NEVER SERVICE THIS
PRODUCT YOURSELF. Installing or servicing this product and its connecting
cables may expose you to the risk of electric shock or other hazards, and can
cause damage to this product that is not covered by warranty.
Do not allow this product to come into contact with liquids. Electrical shock could
•
result. Also, damage to the product, smoke and overheating could result from
contact with liquids.
If liquid or foreign matter should get inside this product, park your vehicle in a safe
•
place, turn the ignition switch off (ACC OFF) immediately and consult your dealer.
Do not use this product in this condition because doing so may result in a fire,
electric shock, or other failure.
If you notice smoke, a strange noise or odor from this product, or any other
•
abnormal signs on the screen, turn off the power immediately and consult your
dealer. Using this product in this condition may result in permanent damage to
the system.
Do not disassemble or modify this product, as there are high-voltage components
•
inside which may cause an electric shock. Be sure to consult your dealer for
internal inspection, adjustments or repairs.
Page 5

Before using this product, be sure to read and fully understand the following
3
safety information:
Do not operate this product or any applications if doing so will divert your
•
attention in any way from the safe operation of your vehicle. Always observe
safe driving rules and follow all existing traffic regulations. If you experience
difficulty in operating this product or reading the display, park your vehicle in a
safe location and apply the parking brake before making the necessary
adjustments.
• Never set the volume of this product so high that you cannot hear outside traffic
and emergency vehicles.
To promote safety, certain functions are disabled unless the vehicle is stopped
•
and/or the parking brake is applied.
Keep this manual handy as a reference for operating procedures and safety
•
information.
Do not install this product where it may (i) obstruct the driver’s vision, (ii) impair
•
the performance of any of the vehicle’s operating systems or safety features,
including air bags or hazard lamp buttons or (iii) impair the driver’s ability to
safely operate the vehicle.
Please remember to fasten your seat belt at all times while operating your
•
vehicle. If you are ever in an accident, your injuries can be considerably more
severe if your seat belt is not properly buckled.
• Never use headphones while driving.
Page 6

To ensure safe driving
4
WARNING
• LIGHT GREEN LEAD AT POWER CONNECTOR IS DESIGNED TO DETECT PARKED
STATUS AND MUST BE CONNECTED TO THE POWER SUPPLY SIDE OF THE
PARKING BRAKE SWITCH. IMPROPER CONNECTION OR USE OF THIS LEAD
MAY VIOLATE APPLICABLE LAW AND MAY RESULT IN SERIOUS INJURY OR
DAMAGE.
• Do not take any steps to tamper with or disable the parking brake interlock
system which is in place for your protection. Tampering with or disabling
the parking brake interlock system could result in serious injury or death.
• To avoid the risk of damage and injury and the potential violation of
applicable laws, this product is not for use with a video image that is visible
to the driver.
•
In some countries the viewing of video images on a display inside a vehicle even
by persons other than the driver may be illegal. Where such regulations apply,
they be obeyed.
If you attempt to watch video images while driving, the warning “Viewing of
front seat video source while driving is strictly prohibited.” will appear on the
screen. To watch video image on this display, stop the vehicle in a safe place and
apply the parking brake. Please keep the brake pedal pushed down before
releasing the parking brake.
Before installing this product
Use this unit with a 12-volt battery and negative grounding only. Failure to do so
•
may result in a fire or malfunction.
To avoid shorts in the electrical system, be sure to disconnect the (-) battery cable
•
before installation.
Page 7

To prevent damage
5
WARNING
• The black cable is ground. When installing this product or power amp (if
purchased), make sure to connect the ground wire first. Ensure that the
ground wire is properly connected to metal parts of the car’s body. The
ground wire of the power amp and the one of this product or any other
device must be connected to the car separately with different screws. If the
screw for the ground wire loosens or falls out, it could result in fire
generation of smoke or malfunction.
• When replacing the fuse, be sure to only use a fuse of the rating prescribed
on this product.
To avoid short-circuiting, cover the disconnected lead with insulating tape. It is
•
especially important to insulate all unused speaker leads, which if left uncovered
may cause a short circuit.
Installation notes
Do not install this product in places subject to high temperatures or humidity,
•
such as:
- Places close to a heater, vent or air conditioner.
- Places exposed to direct sunlight, such as on top of the dashboard.
- Places that may be exposed to rain, such as close to the door or on the vehicle’s
floor.
• Install this product in an area strong enough to bear its weight. Choose a position
where this product can be firmly installed, and install it securely. If this product is
not securely installed, the current location of the vehicle cannot be displayed
correctly.
Page 8

Install this product horizontally on a surface within 0 to 20 degrees tolerance
6
•
(within 5 degrees to the left or right). Improper installation of the product with
the surface tilted more than these tolerances increased the potential for errors in
the vehicle’s location display, and might otherwise cause reduced display
performance.
When installing, to ensure proper heat dispersal when using this product, make
•
sure you leave ample space behind the rear panel and wrap any loose cables so
they are not blocking the vents.
In order to prevent interference, set the following items as far as possible from
•
this product, other cables or leads:
- FM, AM antenna and its lead
- GPS antenna and its lead
- DAB+ radio antenna and its lead
- Digital TV antenna and its lead
In addition, you should lay or route each antenna lead as far as possible from
other antenna leads. Do not bind, lay or route them together, or cross them.
Electromagnetic noise will increase the potential for errors in the vehicle’s
location display.
When installing, make sure you remove the two screws on the top of the product
•
(for those models with the disc loading drive). Otherwise the drive cannot accept
discs.
To avoid battery exhaustion
Be sure to run the vehicle engine while using this product. Using this product
without running the engine can drain the battery.
WARNING
Do not install this product in a vehicle that does not have an ACC wire or circuitry
available.
Page 9

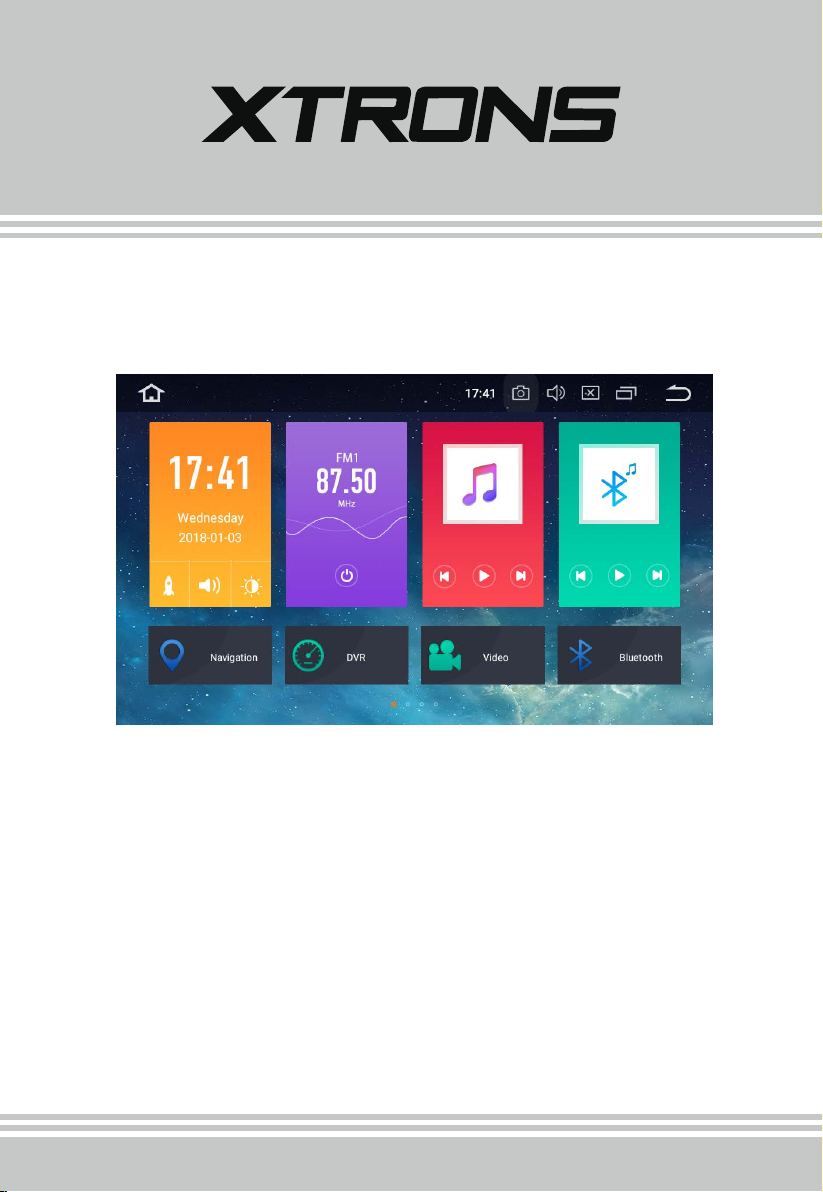
Home Screen
7
1
9
8
1. Home
2. Screenshot
3. Volume
4. Brightness
5. Recent apps
6. Back
7. Apps
8. Shortcuts
9. Date and time
2
3
4
6
5
___
7
11
Page 10
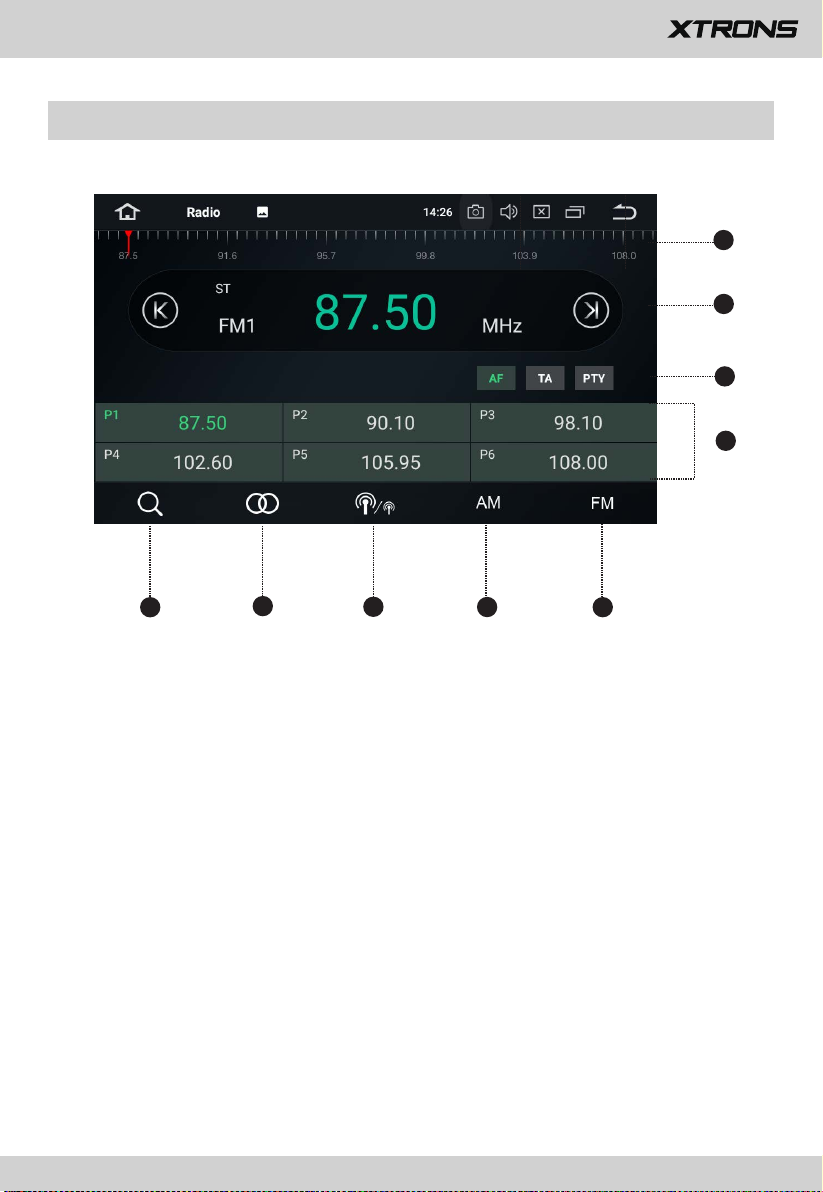
Radio
8
___
1
2
3
4
5
2
5
6
7
8
9
1. Broadcast frequency slider
2. Perform manual tuning
3. AF (Alternative Frequencies)
TA (Traffic Announcement)
PTY (Program Type)
4. Preset channel list
Select a frequency you like and then touch and hold any of preset frequency keys
to store it.
Up to 18 FM stations and 12 AM stations can be stored in memory.
5. Perform seek tuning or non-stop seek tuning
6. Mono/Stereo switch
7. Distant/Local seek tuning
8. AM band (AM1 or AM2)
9. FM band (FM1, FM2 or FM3)
Page 11
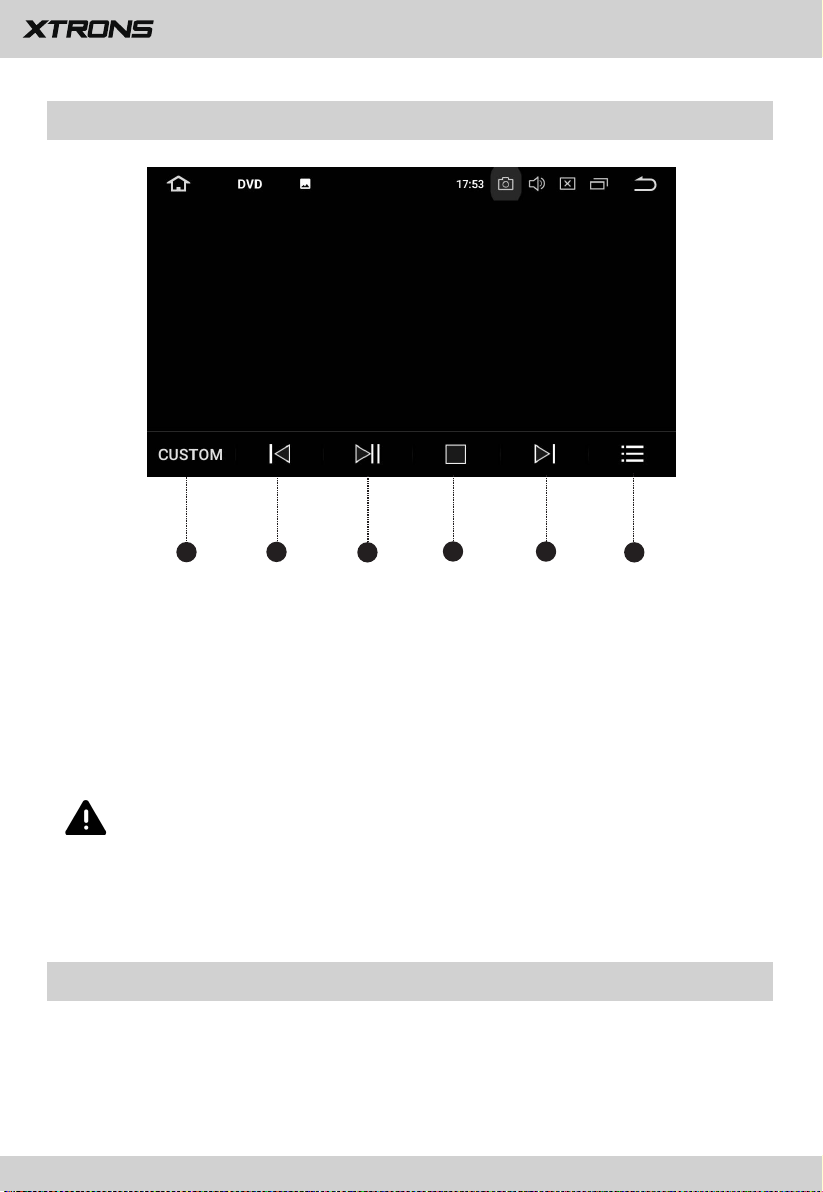
Play DVD
9
1
2
3
4
5
6
1. Equalizer adjustment
Choose from Rock, Pop, Jazz, Classic, Flat, Voice and Custom.
2. Previous file
3. Pause/Play
4. Stop
5. Next file
6. File menu
CAUTION
For safety reasons, video images cannot be viewed while your vehicle is in
motion. To view video images, stop in a safe place and apply the parking
brake.
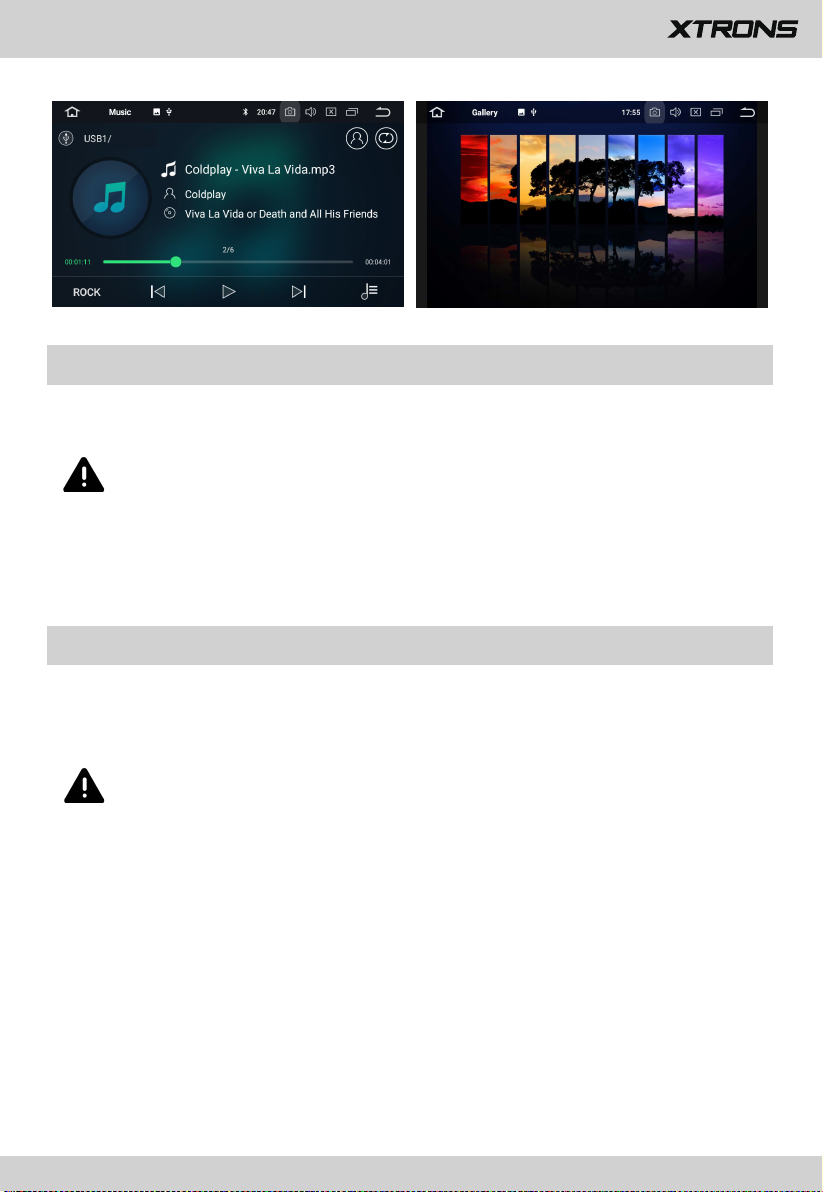
USB/SD
Plug a USB storage device or insert an SD memory card and then tap Music on the
Home screen to play music, tap Video to play video files, or tap Gallery to view
images and photos.
Page 12
AUX Input
10
You can display the video image output by the device connected to this unit.
CAUTION
For safety reasons, video images cannot be viewed while your vehicle is in
motion. To view video images, stop in a safe place and apply the parking
brake.
Bluetooth
Connect your mobile phone to this unit via Bluetooth and use an external
microphone to make and receive hands-free calls.
CAUTION
For your safety, avoid talking on the phone as much as possible while driving.
Connection (Bluetooth pairing)
a.
The Bluetooth device must be within 1 meter of this unit. Turn on Bluetooth on
the device.
b.
You can find this unit in the devices list of your Bluetooth device.
If your Bluetooth device supports SSP (Secure Simple Pairing), a four-digit
c.
number password will be required. The default password is 0000.
Page 13
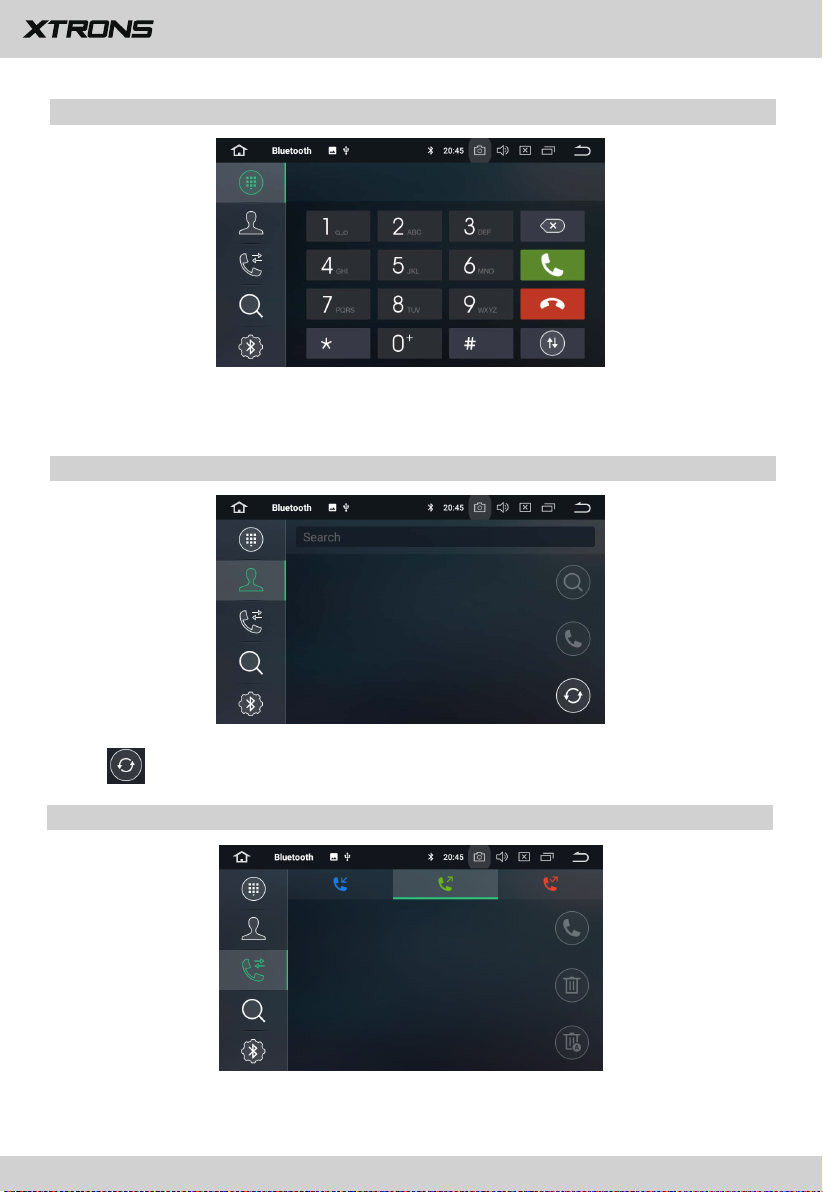
1. Phone calls
11
Enter the number to make a call. You can also choose a contact from the phone
book to make a call.
2. Phone book
3. Recent calls
Tap
View recent o
to s
ynchronize the contacts from your Bluetooth device.
utgoing calls, incoming calls or
missed calls
.
Page 14

4. Devices list
12
Tap a device on the Paired devices or on the Available devices list, and then tap
to pair the device. Tap to unpair the device.
5. Bluetooth settings
(1) You can change the Device Name of this unit. Tap CAR-KIT to enter a different
name.
(2) You can change the PIN Number (Bluetooth pairing password). The default
password is 0000. Enter another four-digit number and then tap Done to set a
new password.
(3) You can turn AutoAnswer/AutoConnect on or off.
Page 15
Bluetooth Music
13
After the Bluetooth connection is established, tap A2DP on the Home screen,
and then you can play music stored in your Bluetooth device on this unit.
※ At first, you need to operate the music playback on your Bluetooth device.
Then you can operate the Bluetooth music on the unit.
※ Please note that the unit may not support the Bluetooth music function
whilst
some mobile phones are not quite compatible with the unit.
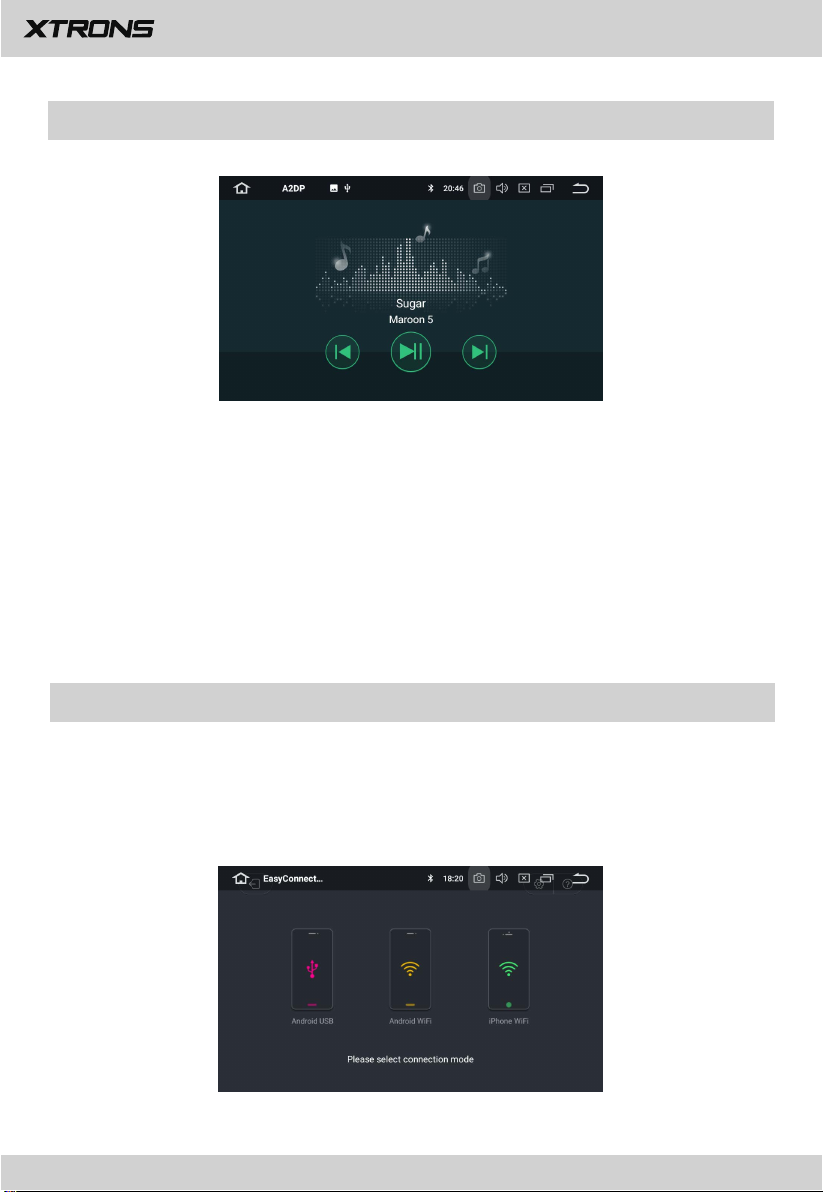
Screen Mirroring
Tap Easy Connected on the apps menu screen to enter screen mirroring mode.
When you connect a mobile phone with compatible applications installed, you can
control the applications for the mobile phone directly from this unit.
Page 16

For Android smart phone:
14
1. Connect via a USB cable
Go to Settings > About Device, and
a.
Developer options. Turn on USB debugging. A message
will pop up.
Turn on the Always allow from this computer option, and then
then tap Build number 7 times to enable
Allow USB debugging?
tap OK.
b. Connect your Android smart phone to this unit via a USB cable.
2. Connect via Wi-Fi
Go to Settings > Wireless & networks > More > Tethering & portable hotspot,
a.
and then turn Portable Wi-Fi hotspot on or tap Set up Wi-Fi hotspot.
Tap Android WiFi and then select your Android device name from the
b.
hotspot list. Enter the password when prompted.
※ Please note this function is only applicable for the smart phones
equipped with wireless mirroring function, and it only supports
Android versions above 4.0. Audio streaming requires a Bluetooth
connection.
For iPhone:
a. Go to Settings > Personal Hotspot, and then turn Personal Hotspot on.
b.
Tap iPhone WiFi, and then select your iPhone name from the hotspot list.
Enter the password when prompted.
c.
Tap AirPlay in the Control Center on your iPhone. Select EC-Mirror and turn
Mirroring on.
※ On iPhone 4/4s, only photos can be streamed wireless to this unit. On
iPhone 5 and other later iPhone models, both music and photos can be
streamed wireless to this unit. Video streaming requires the
appropriate Apple cable or adapter.
Page 17

Navigation
15
Built-in navigation offers detailed, reliable route guidance information to help you
get where you want to go.
You can actually download a range of GPS Navigation apps via Google Play and
run them on the unit. You can download Sat Nav apps like TomTom, Navigon,
Route 66, Sygic, iGO, Google Maps and many more.
Connect to the Internet
You can connect the unit to the Internet whenever necessary, using a Wi-Fi
connection (if available) or 3G/4G network (the 3G/4G dongle is sold separately).
You can browse the web, download apps via Google Play, play online games, etc.
The possibilities are endless with the Internet in your car.
Page 18

OBD2 (Optional)
16
The unit supports OBD2 (On-Board Diagnostics) car diagnostics. With the OBD2
function available on this unit, you can retrieve real-time data and trouble codes
from your vehicle computer. All the data of your vehicle is displayed to you.
(The OBD2 Bluetooth car diagnostic scanner tool is sold separately).
DVR (Optional)
You can control a car DVR camera (sold separately) on this unit and use it to record
all the events of a journey.
DAB+
With use of a DAB dongle (sold separately), the
tuner lets you enjoy the convenience of digital radio, while Auto DAB+ Tuning
makes sure there are less signal interruptions. DAB+ digital radio brings you highdetail, digital-quality sound with lots of stations, program information and more.
The DAB antenna (sold separately) needs to be positioned on the windscreen of
your vehicle.
(Optional)
DAB+ (Digital audio broadcasting)
Page 19

TV (Optional)
17
Built-in MPEG-4 Digital TV tuner enables you to watch DVB-T digital TV on this unit.
Please check to ensure your country supports MPEG-4 DVB-T.
※ Please note this feature is not supported on all models.
TPMS (Optional)
Tire Pressure Monitoring System (TPMS) increases driving safety and provides a
better understanding of your vehicle’s tire conditions. Once you have correctly
installed the TPMS (sold separately), the sensors will automatically monitor the
pressure and the temperature, and transmit real-time statistics to the receiver.
tire
Page 20

Settings
18
1. Network & Internet
1.1 Wi-Fi
Turn Wi-Fi on or off.
Choose a network: Tap one of the listed networks and then enter the password if
required.
1.2 Hotspot & tethering
Turn USB tethering, Portable Wi-Fi hotspot, and Bluetooth tethering on or off.
Customize the Wi-Fi hotspot settings.
1.3 VPN
Tap the + button and provide the VPN’s details. Tap the VPN to connect once you
have set it up. You will be asked to enter a username and password.
1.4 Airplane mode
2. Connected devices
Bluetooth
You can change the Device Name or the PIN Number (Bluetooth pairing password)
of this unit.
You can turn Auto Connect /Auto Answer on or off.
Tap a device on the Paired devices or on the Available devices list to pair or unpair
it.
3. Apps & notifications
3.1 App info
Manage all the apps downloaded on the unit or on an SD memory card.
Page 21

3.2 Notifications
19
Add or change an alert style for notifications from apps.
3.3 App permissions
View and manage all app permissions. You will see a list of different categories of
permissions along with the number of apps installed that have access to that
permission.
3.4 Advanced
Default apps and special app access.
4. Display
4.1 Brightness level
Drag the slider to adjust the screen brightness.
4.2 Wallpaper
Set an image or photo as wallpaper for the Home screen.
4.3 Font size
Drag the slider to adjust the font size.
4.4
Night display
Drag the slider to adjust the display brightness in night mode.
4.5 Touch Assistive
Turn Touch Assistive on or off.
You can use Touch Assistive to find and adjust certain settings on the unit like
Volume, Brightness, Screenshot, and more.
5. Sound
Page 22

- Key tone
20
- Volumes
- Default notification sound
- Default alarm sound
6. Screenshot settings
- Select delay time to capture the screen
- Set the location of screenshot storage
- Show the screenshot button in the status bar
7. Storage
You can see how much storage space is available on the unit’s internal storage.
You can tap FREE UP SPACE to delete photos, videos, and apps that you haven't
used recently:
8. Security & location
- Location
- Device admin apps
- Encryption & credentials
- Trust agents
- Apps with usage access
9. Users & accounts
Add a Google account or other accounts.
10. Accessibility
- Accessibility shortcut
- Text-to-speech output
Page 23

- Font size
21
- Display size
- Magnification
- Large mouse pointer
- High contrast text
- Color correction
- Color inversion
11. Car
11.1 Element
This enables you to change the illumination color of the buttons to your personal
preference. You can choose from a wide variety of colors. Drag the color bars of
red, green and blue to create a favorite color.
※ Please note the multi-colored button illumination feature is not
supported on all models.
11.2 Steering wheel keys
This allows you to use the steering wheel control of your vehicle to control the unit.
11.3 Amplifier
11.3.1 Balance adjustment
You can choose from Rock, Pop, Jazz, Classic, Flat, Voice, and Custom.
Page 24

11.3.2 Fader adjustment
22
You can select a listening position that you want to make as the center of the sound
effects.
Choose from Driver, User, Front, Rear, and All.
11.4
Navigation
11.4
Navigation application options
.1
Choose the application you want to use for the navigation.
11.4.2 Navigation monitoring
11.4.3 Navigation sound mode
11.4.4 Navigation mixing ratio
Page 25

11.4.5 Navigation sound in phone mode
23
11.4.6 GPS monitor
11.5 Driving settings
11.5.1 Watching video
On: Video images can be viewed while your vehicle is in motion.
Off: Video images cannot be viewed while your vehicle is in motion.
CAUTION
For safety reasons, video images cannot be viewed while your vehicle is in
motion. To view video images, stop in a safe place and apply the parking
brake.
11.5.2 Notifications
11.5.3 Network settings for app while driving
11.6 Extra settings
11.6.1 Shutdown delay when ACC OFF
Choose from Auto sleep, 30 seconds, 5 minutes, 10 minutes, 30 minutes, and 1
hour.
11.6.2 Playing music
Turn this on to allow the unit to play music automatically when you plug a USB
storage device or insert an SD memory card.
11.6.3 Reversing X-mirror
A separately sold rear view camera is required for utilizing the rear view camera
function.
On: Reverses the rear view camera images.
Off: Does not reverse the rear view camera images.
Page 26

11.6.4 Reversing volume
24
On: There is warning alert sound while driving in reverse.
Off: There is no warning alert sound while driving in reverse.
11.6.5 Rear view ruler
On: Displays the parking assist guidelines.
Off: Hides the parking assist guidelines.
11.7
Factory settings
Enter the password 126 to go to Factory settings.
11.7
.1 App
Change the options for Bluetooth, DVD, TPMS, Radio, DVR
11.7
.2 Car logo
, and more
.
Select one of the preinstalled car manufacturer logos as your start up screen. You
can also select images imported from an SD memory card. You need to insert the
SD memory card into the GPS card slot. The image size should be 800 pixels x 480
pixels and the image format should be JPEG.
11.7.3 Radio
Select an area for the radio.
11.7.4 Voice
Adjust the volumes of DVD, System, AV Input, Radio, Bluetooth, and more.
Page 27

11.7.5 CanBus
25
Change the options for Canbus.
11.7.6 Key study
- Button panel reset
- Panel key study
- Touch reset
- Touch key study
11.7.7 Other
Change the options for RDS, Front Camera, Panel LED control, and more.
12. Google
Manage services in Google settings.
13. System
3.1
1
Languages & input
.1 Languages
13.1
Set the language for the unit. Choose from English, French, German, Spanish, and
many more.
dragging them.
13.1.2
13.1.3 Physical keyboard
13.1.4 Advanced
13.2 Date & time
- GPS automatic update time
- Automatic date & time
You can add a language and arrange preferred language order by
Virtual keyboard
Page 28

- Automatic time zone
26
- Set date
- Set time
- Select time zone
- Use 24-hour format
13.3 Backup
13.4 MCU updates
13.5 System updates
13.6 Reset
- Network settings reset
- Reset app preferences
- Factory data reset
13.7 About machine
- Model
- Android version
- Android security patch level
- Kernel version
- Build number
- MCU version
- Serial number
- CPU
- Memory
- Legal information
Page 29

Troubleshooting
27
If you have problems operating this product, refer to this section. The most common
problems are listed below, along with likely causes and solutions.
No power
- The car engine has not been started. Start the car engine.
- Incorrect wiring connection. Check the wiring.
- The fuse has been damaged. Replace the fuse.
- The CANBUS box has been damaged. Replace the CANBUS box.
No sound
- The volume is too low. Adjust the volume.
- Incorrect wiring connection. Check the wiring.
The disc does not play
- The disc is inserted upside down. Insert the disc with the label upward.
- The disc is dirty. Clean the disc.
- The disc is cracked or otherwise damaged. Insert a normal, round disc.
- The files on the discs are in an irregular file format. Check the file format.
- The disc format cannot be played back. Replace the disc.
- The loaded disc is a type this product cannot play. Check what type of disc it is.
The screen is covered by a caution message and the video cannot be shown
- The parking brake lead is not connected or applied. Connect the parking brake
lead correctly, and apply the parking brake.
- The parking brake interlock is activated. Park your vehicle in a safe place and apply
the parking brake.
Image flashes or distorted
Image flashes or distorted
- Video DVD settings do not match with the DVD. Adjust video DVD settings.
- Video connection is incorrect.
Preset station lost
- Battery cable is not correctly connected. Connect the battery cable to the terminal
that is always live.
Page 30

Poor radio reception
28
- The antenna connection is incorrect. Check the antenna connection.
- Interference may be introduced. Check for sources of interference.
- Signals are too weak. An additional antenna signal amplifier booster may be
required.
- The antenna has been damaged. Replace the antenna.
- The local seek tuning has been turned off. Turn the local seek tuning on.
A black screen is displayed, and operation is not possible
- Sleep mode is on. Press the POWER button or touch the screen to release the
mode.
- The rear view camera image is displayed with no camera connection and the
wrong camera polarity setting. Install the rear view camera and then change the
camera polarity settings.
GPS positioning is not possible
- GPS positioning is disabled if signals cannot be received from more than two GPS
satellites.
- In some driving conditions, signals from GPS satellites may not reach your vehicle.
In this case, it is impossible for the system to use GPS positioning.
- If a car phone or cellular phone is used near the GPS antenna, GPS reception may
be lost temporarily.
The paired mobile phone connects and disconnects constantly
- The Bluetooth reception is poor. Move the mobile phone closer to the product or
remove any obstacle between the mobile phone and the product.
- Some mobile phones may connect and disconnect constantly when you make or
end calls. This does not indicate any malfunction of the product.
- For some mobile phones, the Bluetooth connection may be deactivated
automatically as a power-saving feature. This does not indicate any malfunction
of the product.
Page 31

Appendix
29
Handling and care of discs
• Use only conventional, fully circular discs. Do not use shaped discs.
• Do not use cracked, chipped, warped, or otherwise damaged discs as they may
damage the built-in drive.
• Use 12-cm discs. Do not use 8-cm discs or an adapter for 8-cm discs.
• When using discs that can be printed on label surfaces, check the instructions and
the warnings of the discs. Depending on the discs, inserting the ejecting may not
be possible. Using such discs may result in damage to this equipment.
• Do not attach labels, write on or apply chemicals to the surface of the discs.
• Do not attach commercially available labels or other materials to the discs.
• To clean a disc, wipe it with a soft cloth, moving outward from the center.
• Condensation may temporarily impair the built-in drive’s performance.
• Playback of discs may not be possible because of disc characteristics, disc format,
recorded application, playback environment, storage conditions and so on.
• Road shocks may interrupt disc playback.
• Read the precautions for discs before using them.
Page 32

When using this product
30
Use this product where the ambient temperature is between -10º and 50º C.
•
Using this product in the conditions outside of its operating range might cause
temporary or permanent damage to the system, and such damage may not be
covered by the manufacturer’s warranty. Store the product where the
temperature is between -20º and 80º C.
• Do not connect a USB storage device via a USB hub.
• Connecting a USB cable of which total length is longer than 5 meters may
result in abnormal playback.
When this product cannot recognize the connected USB storage device,
•
disconnect the device and replace it with another USB storage device.
Do not take out the SD card preloaded with map data when this product is
•
powered on. Take the SD card out when the product is powered off.
• Do not use any software which is not provided by XTRONS to update the
system. If you require the system update, please consult your dealer.
Handling the screen
• When the screen is subjected to direct sunlight for a long period of time, it will
become very hot, resulting in possible damage to the screen. When not using
this product, avoid exposing it to direct sunlight as much as possible.
• Do not use the screen at temperatures higher or lower than the operating
temperature range, because the screen may not operate normally and could
be damaged.
Page 33

• The screen is exposed in order to increase its visibility within the vehicle.
31
Please do not press strongly on it as this may damage it.
• Do not push the screen with excessive force as this may scratch it.
• Never touch the screen with anything besides your finger when operating the
touch panel functions. The screen can scratch easily.
Maintaining the screen
• When removing dust from or cleaning the screen, first turn this product off and
then wipe the screen with a soft dry cloth.
• When wiping the screen, take care not to scratch the surface. Do not use harsh
or abrasive chemical cleaners.
Page 34

32
Page 35

© 2018 XTRONS CORPORATION. All rights reserved.
Page 36

GEBRAUCHSANWEISUNG
Vielen Dank, dass Sie sich für dieses XTRONS Produkt entschieden haben. Bitte lesen Sie
diese Anweisungen sorgfältig durch, damit Sie wissen, wie das Produkt ordnungsgemäß
bedient wird. Bitte bewahren Sie dieses Dokument nach dem Lesen für zukünftige Referenz
an einem sicheren Ort auf.
Page 37

HINWEISE
Installation oder Wartung dieses Produkts durch
Personen ohne entsprechendes Training und Erfahrung
mit elektronischem Equipment und Automobil-Zubehör
birgt Risiken und kann zu Stromschlag, Verletzungen
oder anderen Gefahren führen.
Die Navigationsfunktionen dieses Produkts (und die
Rückfahrkamera-Option, wenn gekauft) sind lediglich als
Hilfe beim Betrieb Ihres Fahrzeugs gedacht. Sie ist kein
Ersatz für Ihre Aufmerksamkeit, Ihr Urteilsvermögen und
Ihre Behutsamkeit beim Fahren.
Um Risiken wie Schäden und Verletzungen oder den
möglichen Verstoß gegen geltende Gesetze zu
verhindern, kann dieses Produkt nicht mit einem für
den Fahrer sichtbaren Videobild verwendet werden.
XTRONS lehnt jede Haftung für körperliche
Verletzungen oder Sachschäden ab, die als Folge von
unangebrachtem oder nicht vorgesehener Verwendung
entstehen könnten.
Bitte beachten Sie alle Warnungen in diesem Handbuch und
folgen Sie den Anweisungen sorgfältig.
Die in den Beispielen abgebildeten Bildschirme können von den
tatsächlichen Bildschirmen abweichen. Es kann ohne
Vorankündigung zu Änderungen im Zuge von Leistungs- und
Funktionsverbesserungen kommen.
Page 38

1
Inhalt
Vorsichtsmaßnahmen
.................................................................... 2
Startbildschirm
.................................................................................................. 8
Radio
DVD abspielen
USB/SD
.............................................................................................. 9
AUX-Input
Bluetooth
Bluetooth-Musik
Screen Mirroring
Navigation
Mit dem Internet verbinden
OBD2 (Optional)
DVR (Optional)
DAB+ (Optional)
................................................................................... 7
................................................................................... 9
..................................................................................... 10
....................................................................................... 10
........................................................................... 13
........................................................................... 13
..................................................................................... 15
.................................................. 15
................................................................................ 16
............................................................................. 16
............................................................................ 16
TV (Optional)
TPMS (Optional)
Einstellungen
Fehlerbehebung
Anhang
................................................................................. 17
........................................................................... 17
................................................................................ 18
............................................................................ 27
.......................................................................................... 29
Page 39

2
Vorsichtsmaßnahmen
Wichtige Sicherheitsinformationen
WARNUNG
XTRONS rät davon ab, dieses Produkt selbst zu installieren. Dieses
Produkt ist nur für professionelle Installation konzipiert. Wir empfehlen,
dass nur Service-Personal mit speziellem Training und Erfahrung in
mobiler Elektronik dieses Produkt einrichtet und installiert. WARTEN SIE
DIESES PRODUKT NIE SELBST. Installation oder Wartung dieses Produkts
und seiner Verbindungskabel birgt Risiken von Stromschlag und anderen
Gefahren und kann Schäden am Produkt verursachen, die nicht durch die
Garantie abgedeckt sind.
Lassen Sie dieses Produkt nicht mit Flüssigkeiten in Kontakt kommen. Dies
•
könnte zu Stromschlägen führen. Des Weiteren könnte Kontakt mit Flüssigkeiten
Schäden am Produkt, Rauchentwicklung und Überhitzung hervorrufen.
Sollten Flüssigkeiten oder Fremdkörper in dieses Produkt geraten, parken Sie Ihr
•
Fahrzeug an einem sicheren Ort, schalten Sie unverzüglich die Zündung aus
(ACC OFF) und wenden Sie sich an Ihren Händler. Verwenden Sie das Produkt
nicht in diesem Zustand, da dies zu Brand, Stromschlag oder anderen Störungen
führen könnte.
Sollte Sie Rauch, ungewöhnliche Geräusche oder Gerüche von diesem
•
Produkt bemerken, oder irgendwelche anderen fehlerhaften Zeichen auf dem
Bildschirm, schalten Sie sofort die Stromversorgung ab und kontaktieren Sie
Ihren Verkäufer. Der Gebrauch des Produkts in diesem Zustand kann
permanente Schäden am System zur Folge haben.
Bauen Sie dieses Produkt nicht auseinander und modifizieren Sie es nicht, da es
•
Hochspannungs-Komponenten enthält, die Stromschläge verursachen können.
Bitte wenden Sie sich für interne Inspektionen, Anpassungen oder Reparaturen
an Ihren Händler.
Page 40

3
Achten Sie darauf, vor Gebrauch des Produkts die folgenden
Sicherheitshinweise zu lesen und zu verstehen:
Bedienen Sie dieses Produkt oder seine Anwendungen auf keinen Fall, wenn
•
dies Ihre Aufmerksamkeit auf irgendeine Weise vom sicheren Betrieb Ihres
Fahrzeugs abhält. Fahren Sie stets nach den Regeln fürs sichere Fahren und
halten Sie sich an alle gültigen Verkehrsregeln. Sollten Sie Schwierigkeiten
bei der Bedienung des Produkts oder beim Lesen des Bildschirms haben,
parken Sie Ihr Fahrzeug an einem sicheren Ort und ziehen Sie die
Handbremse an, bevor Sie die nötigen Änderungen vornehmen.
•
Stellen Sie die Lautstärke dieses Produkts niemals so laut ein, dass Sie den
Verkehr draußen und Notfallfahrzeuge nicht hören können.
Zur Förderung der Sicherheit sind einige Funktionen deaktiviert, solange das
•
Fahrzeug nicht angehalten und/oder die Handbremse angezogen ist.
Bitte behalten Sie dieses Handbuch griffbereit, um darin
•
Bedienungshinweise und Sicherheitsinformationen nachzuschlagen.
Installieren Sie dieses Produkt nicht an Orten wo es (i) dem Fahrer die Sicht
•
versperrt, (ii) die Leistung der Fahrzeugsysteme oder Sicherheitseinrichtungen
wie Airbags oder Schalter für Warnlampen beeinträchtigt oder (iii) die
Fähigkeit des Fahrers beeinträchtigt, das Fahrzeug sicher zu steuern.
Bitte denken Sie daran, sich beim Betrieb Ihres Fahrzeugs stets
•
anzuschnallen. Sollten Sie jemals in einen Unfall verwickelt sein, können
Ihre Verletzungen sehr viel schlimmer ausfallen, wenn sie nicht
ordnungsgemäß angeschnallt sind.
•
Tragen Sie niemals beim Fahren Kopfhörer.
Page 41

4
Zur Gewährleistung sicheren Fahrens
WARNUNG
•
DER HELLGRÜNE DRAHT AM STROMANSCHLUSS DIENT DER ERKENNUNG
DER PARKPOSITION UND MUSS AUF DER DER STROMVERSORGUNG
ZUGEWANDTEN SEITE DES HANDBREMSHEBELS ANGEBRACHT WERDEN.
UNSACHGEMÄSSE VERBINDUNG ODER VERWENDUNG DIESES DRAHTS
KANN GEGEN GELTENDES RECHT VERSTOSSEN UND SCHWERE
VERLETZUNGEN ODER SACHSCHÄDEN VERURSACHEN.
• Versuchen Sie auf keine Weise, das Handbremsverriegelungssystem zu
manipulieren oder zu deaktivieren. Dieses System dient Ihrem Schutz.
Manipulation oder Deaktivierung des Handbremsverriegelungssystems
kann zu schweren Verletzungen oder zum Tod führen.
• Um Risiken wie Schäden und Verletzungen oder den möglichen Verstoß
gegen geltende Gesetze zu verhindern, kann dieses Produkt nicht mit
einem für den Fahrer sichtbaren Videobild verwendet werden.
•
In einigen Ländern kann das Ansehen von Videobildern auf Bildschirmen in
einem Fahrzeug, sogar durch andere Personen als den Fahrer, illegal sein. Wo
solche Vorschriften gelten, müssen sie befolgt werden.
Sollten Sie versuchen, während der Fahrt Videobilder anzusehen, erscheint auf
dem Bildschirm die Warnung
"Es ist strengstens verboten, während der
Fahrt Vordersitz-Videoquellen zu betrachten."
Bildschirm zu sehen, halten Sie an einem sicheren Ort und ziehen Sie die
Handbremse an. Bitte halten Sie das Bremspedal gedrückt, wenn Sie die
Handbremse lösen.
Bevor Sie dieses Produkt installieren
Benutzen Sie diese Einheit nur mit einer 12-Volt Batterie und negativer Erdung.
•
Andernfalls können Feuer oder Fehlfunktionen hervorgerufen werden.
Um Kurzschlüsse im elektrischen System zu verhindern, denken Sie bitte daran,
•
das (-) Batteriekabel vor der Installation zu trennen.
Um Videobilder auf diesem
Page 42

5
Zur Verhinderung von Schäden
WARNUNG
• Das schwarze Kabel ist die Erdung. Denken Sie bei der Installation
dieses Produkts oder der Endstufe (falls gekauft) daran, das
Erdungskabel zuerst zu verbinden. Stellen Sie sicher, dass das
Erdungskabel fachgerecht mit Metallteilen des Fahrzeugkörpers
verbunden ist. Das Erdungskabel der Endstufe und das dieses Produkts
oder anderer Geräte muss mit verschiedenen Schrauben separat mit
dem Auto verbunden werden. Sollte sich die Schraube des
Erdungskabels lockern oder herausfallen, kann das zu Feuer,
Rauchentwicklung oder Fehlfunktionen führen.
• Achten Sie beim Auswechseln der Sicherung darauf, nur Sicherungen
nach den für dieses Produkt vorgeschriebenen Bemessungsdaten zu
verwenden.
Decken Sie den getrennten Draht mit Isolierband ab, um Kurzschlüsse zu
•
vermeiden. Es ist besonders wichtig, alle ungebrauchten Lautsprecherkabel zu
isolieren, da diese aufgedeckt einen Kurzschluss verursachen können.
Installationshinweise
Installieren Sie dieses Produkt nicht an Orten, die höheren Temperaturen
•
oder hoher Luftfeuchtigkeit ausgesetzt sind, wie:
-
Orte in der Nähe von Heizungen, Lüftungsöffnungen oder Klimaanlagen.
-
Orte, die dem direkten Sonnenlicht ausgesetzt sind, wie die Oberseite des
Armaturenbretts.
-
Orte, die dem direkten Sonnenlicht ausgesetzt sind, wie die Oberseite des
Armaturenbretts.
•
Installieren Sie dieses Produkt in einem Bereich, der stark genug ist, um sein
Gewicht zu tragen. Wählen Sie eine Position, in der das Produkt fest installiert
werden kann und bauen Sie es sicher ein. Wenn das Produkt nicht fest
eingebaut wird, kann der aktuelle Standort des Fahrzeugs nicht korrekt
angezeigt werden.
Page 43

6
Installieren Sie dieses Produkt horizontal auf einer Fläche mit 0 bis 20 Grad
•
Toleranz (innerhalb von 5 Grad nach links oder rechts). Unsachgemäße
Installation des Produkts mit einer Oberflächenneigung überhalb dieser
Toleranzen erhöht das Fehlerpotenzial der Standortanzeige des Fahrzeugs
und kann außerdem zu reduzierter Bildschirmleistung führen.
Lassen Sie bei der Installation ausreichend Platz hinter der Rückwand, um
•
eine angemessene Wärmeabführung zu gewährleisten, und wickeln Sie alle
losen Kabel auf, damit sie die Lüftungsöffnungen nicht blockieren.
Um Interferenzen vorzubeugen, verlegen Sie die folgenden Dinge so weit
•
wie möglich von diesem Produkt, anderen Kabeln oder Drähten:
-
FM-, AM-Antenne und ihr Draht
-
GPS-Antenne und ihr Draht
-
DAB+ Radio-Antenne und ihr Draht
-
Antenne für digitales Fernsehen und ihr Draht
Darüber hinaus sollte Sie jeden Antennendraht so weit wie möglich von
anderen Antennendrähten verlegen. Binden Sie diese nicht zusammen, legen
oder trassieren Sie diese nicht gemeinsam und überkreuzen Sie sie nicht.
Elektromagnetisches Rauschen erhöht das Fehlerpotential bei der
Standortanzeige des Fahrzeugs.
Denken Sie daran, bei der Installation die beiden Schrauben oben am Produkt
•
zu entfernen (bei den Modellen mit dem Laufwerk). Andernfalls nimmt das
Laufwerk keine Datenträger an.
Zur Vermeidung von Batterieerschöpfung
Stellen Sie sicher, dass beim Gebrauch dieses Produkts der Fahrzeugmotor
läuft. Der Gebrauch dieses Produkts bei abgeschaltetem Motor kann die
Batterie entladen.
WARNUNG
Installieren Sie das Produkt nicht in einem Fahrzeug ohne verfügbare ACC-Kabel
oder -Schaltung.
Page 44

7
Startbildschirm
1 2 3
4 5
9
8
1.
Start
2.
Screenshot
3.
Lautstärke
4.
Helligkeit
5.
Zuletzt benutzte Apps
6. Zurück
7.
Apps
8.
Verknüpfungen
9.
Datum und Uhrzeit
6
7
Page 45

8
Radio
5
6
1.
Frequenzregler
2.
Manuelle Senderwahl durchführen
3.
AF (Alternative Frequenzen)
TA (Verkehrsansage)
PTY (Programmtyp)
4.
Liste der voreingestellten Sender
Wählen Sie eine Frequenz, die Ihnen gefällt und dann berühren und halten Sie
zum Speichern eine der Tasten für voreingestellte Frequenzen.
Bis zu 18 FM-Sender und 12 AM-Sender können gespeichert werden.
5.
Suchlauf oder ununterbrochenen Sendersuchlauf durchführen
6.
Mono/Stereo-Schalter
7.
Fern/Regionaler Sendersuchlauf
8.
AM-Frequenzbereich (AM1 oder AM2)
9.
FM-Frequenzbereich (FM1, FM2 oder FM3)
7
8 9
1
2
3
4
Page 46

9
DVD abspielen
1 2 3
4
5 6
1.
Einstellung des Equalizers
Wählen Sie zwischen Rock, Pop, Jazz, Klassik, Flat, Stimme oder benutzerdefiniert.
2.
Vorherige Datei
3.
Pause/Abspielen
4.
Stop
5.
Nächste Datei
6.
Datei-Menü
Aus Sicherheitsgründen können keine Videobilder angesehen werden, wenn
Ihr Auto sich bewegt. Um Videobilder anzusehen, halten Sie an einem
VORSICHT
sicheren Ort und ziehen Sie die Handbremse an.
USB/SD
Verbinden Sie ein USB-Speichergerät oder stecken Sie eine SD-Speicherkarte
ein und drücken Sie anschließend "Musik" auf dem Startbildschirm, um Musik
abzuspielen, "Video", um Videodateien abzuspielen oder drücken Sie "Gallerie",
um Bilder und Fotos anzusehen.
Page 47

10
AUX-Input
Sie können den Video-Output eines mit dieser Einheit verbundenen Geräts anzeigen.
VORSICHT
Aus Sicherheitsgründen können keine Videobilder angesehen werden,
wenn Ihr Auto sich bewegt. Um Videobilder anzusehen, halten Sie an
einem sicheren Ort und ziehen Sie die Handbremse an.
Bluetooth
Verbinden Sie Ihr Mobiltelefon über Bluetooth mit dieser Einheit und nutzen Sie
ein externes Mikrofon, um Freisprechanrufe zu tätigen und zu empfangen.
VORSICHT
Zur Ihrer eigenen Sicherheit sollten Sie auf das Telefonieren beim Fahren so weit wie
möglich verzichten.
Verbindung (Bluetooth-Kopplung)
a.
Das Bluetooth-Gerät muss sich innerhalb eines Meters von dieser Einheit
befinden. Schalten Sie auf dem Gerät Bluetooth ein.
b.
Sie können diese Einheit in der Geräteliste auf Ihrem Bluetooth-Gerät finden.
Wenn Ihr Bluetooth-Gerät SSP (Secure Simple Pairing) unterstützt, wird ein
c.
vierstelliges Nummernpasswort benötigt. Das Standard-Passwort ist 0000.
Page 48

11
1. Anrufe
Geben Sie die Nummer ein, um einen Anruf zu tätigen. Sie können auch
einen Kontakt aus dem Telefonbuch auswählen, um einen Anruf zu machen.
2. Telefonbuch
Tippen Sie
3. Letzte Anrufe
um die Kontakte von Ihrem Bluetooth-Gerät zu synchronisieren.
Sehen Sie die letzten ausgehenden, eingehenden oder verpassten Anrufe.
Page 49

12
4. Geräteliste
Tippen Sie auf eines der gekoppelten Geräte oder eines von der Liste der
verfügbaren Geräte und tippen Sie dann
Tippen Sie
5. Bluetooth-Einstellungen
(1)
Sie können den Gerätenamen dieser Einheit ändern. Tippen Sie CAR-KIT,
um einen anderen Namen einzugeben.
(2)
Sie können die PIN-Nummer ändern (Passwort für die Bluetooth-Kopplung).
Das Standard-Passwort ist 0000. Geben Sie eine andere vierstellige
Nummer ein und tippen Sie dann "Fertig", um ein neues Passwort
festzulegen.
(3)
Sie können AutoAnswer/AutoConnect (automatischer Anrufbeantworter/
automatische Anrufannahme) ein oder ausschalten.
um die Kopplung aufzuheben.
um das Gerät zu koppeln.
Page 50

13
Bluetooth-Musik
Nachdem die Bluetooth-Verbindung hergestellt ist, tippen Sie A2DP auf
dem Startbildschirm und Sie können auf ihrem Bluetooth-Gerät
gespeicherte Musik auf dieser Einheit abspielen.
*
Zunächst müssen Sie die Musikwiedergabe auf Ihrem Bluetooth-Gerät
bedienen. Dann können Sie die Bluetooth-Musik auf dieser Einheit
bedienen.
*
Bitte beachten Sie, dass die Einheit die Bluetooth-Musik-Funktion
eventuell nicht unterstützt und dass manche Mobiltelefone nicht ganz
mit der Einheit kompatibel sind.
Screen Mirroring
Tippen Sie Easy Connect auf dem App-Menübildschirm um in den Screen
Mirroring-Modus zu gehen. Wenn Sie ein Mobiltelefon mit kompatiblen
Anwendungen verbinden, können Sie diese Anwendungen für das Mobiltelefon
direkt von dieser Einheit aus bedienen.
Page 51

14
Page 52

15
Für Android-Smartphone:
1.
Verbinden über ein USB-Kabel
a.
Gehen Sie zu Einstellungen > Über das Gerät, und tippen Sie dann
sieben Mal "Build", um die Entwickler-Optionen zu aktivieren. Schalten
Sie USB-Debugging ein. Eine Nachricht
USB-Debugging erlauben?
wird
erscheinen. Aktivieren Sie die "Von diesem Computer immer zulassen"
Option und tippen Sie dann OK.
b.
Verbinden Sie Ihr Android-Smartphone über ein USB-Kabel mit dieser Einheit.
2.
Verbinden über Wi-Fi
a.
Gehen Sie zu Einstellungen > Drahtlos & Netzwerke > Mehr > Tethering &
tragbare Hotspots und dann schalten Sie "Tragbarer Wi-Fi Hotspot" ein
oder tippen Sie "Wi-Fi Hotspot einrichten".
b.
Tippen Sie Android-WiFi und wählen Sie dann den Namen Ihres
Android-Geräts aus der Hotspot-Liste. Geben Sie das Passwort ein,
wenn Sie dazu aufgefordert werden.
*
Bitte beachten Sie, dass diese Funktion nur für Smartphones mit
der Wireless-Mirroring-Funktion verfügbar ist und nur AndroidVersionen über 4.0 unterstützt. Für Audio-Streaming ist eine
Bluetooth-Verbindung notwendig.
Für iPhone:
a.
Gehen Sie zu Einstellungen > Persönlicher Hotspot und dann schalten Sie
"Persönlicher Hotspot" ein.
b.
Tippen Sie auf "iPhone-WiFi" und wählen Sie dann den Namen Ihres
iPhones aus der Hotspot-Liste. Geben Sie das Passwort ein, wenn Sie
dazu aufgefordert werden.
c.
Tippen Sie im Kontrollzentrum Ihres iPhones auf "AirPlay". Wählen Sie
"EC-Mirror" aus und schalten Sie Mirroring ein.
*
Mit dem iPhone 4/4s können nur Fotos drahtlos zu dieser Einheit
gestreamt werden. Mit dem iPhone 5 und anderen späteren iPhoneModellen können sowohl Musik als auch Fotos kabellos zu dieser
Einheit gestreamt werden. Für Video-Streaming ist ein geeignetes
Apple-Kabel oder ein Adapter nötig.
Page 53

16
Navigation
Das integrierte Navigationssystem bietet detaillierte, zuverlässige
Routeninformationen, die Ihnen helfen, dorthin zu kommen, wo Sie hinwollen.
Sie können über Google Play sogar eine Reihe von GPS-Navigations-Apps
herunterladen und auf dieser Einheit verwenden. Sie können Apps zur
Satellitennavigation wie TomTom, Navigon, Route 66, Sygic, iGo, Google Maps
und viele andere herunterladen.
Mit dem Internet verbinden
Sie können die Einheit wann immer nötig mit dem Internet verbinden, über eine
Wi-Fi-Verbindung (falls verfügbar) oder 3G/4G-Netz (der 3G/4G-Dongle wird
separat verkauft). Sie können im Internet surfen, über Google Play Apps
herunterladen, Online-Spiele spielen etc. Die Möglichkeiten mit dem Internet in
Ihrem Auto haben keine Grenzen.
Page 54

17
OBD2 (Optional)
Die Einheit unterstützt OBD2 (On-Board Diagnose) Auto-Diagnose. Durch die
verfügbare OBD2-Funktion in dieser Einheit können Sie in Echtzeit Daten und
Fehlercodes von Ihrem Fahrzeugcomputer abrufen. Alle Daten Ihres Fahrzeugs
werden Ihnen angezeigt.
(Das OBD2-Bluetooth-Auto-Diagnose-Scanner-Tool wird separat verkauft).
DVR (Optional)
Sie können mit dieser Einheit eine Auto-DVR-Kamera (separat verkauft)
kontrollieren und sie verwenden, um alle Ereignisse einer Reise aufzuzeichnen.
DAB+ (Optional)
Mit einem DAB-Dongle (separat verkauft) lässt Sie der DAB+ (Digital Audio
Broadcasting) Tuner den Komfort des digitalen Radios genießen, während das
automatische DAB+ Tuning dafür sorgt, dass es weniger Signal-Unterbrechungen
gibt. Das digitale DAB+ Radio bringt Ihnen detailreiche Klänge in digitaler Qualität
mit unzähligen Stationen, Programminformationen und vielem mehr.
Die DAB-Antenne (separat verkauft) muss auf der Windschutzscheibe Ihres
Fahrzeugs angebracht werden.
Page 55

18
TV (Optional)
Der integrierte MPEG-4 Tuner für digitales Fernsehen ermöglicht es Ihnen, auf dieser
Einheit DVB-T digitales Fernsehen anzuschauen. Bitte überprüfen Sie, ob in Ihrem
Land MPEG-4 DVB-T unterstützt wird.
*
Beachten Sie bitte, dass diese Funktion nicht von
allen Modellen unterstützt wird.
TPMS (Optional)
Das Reifendruckkontrollsystem (TPMS) erhöht die Fahrsicherheit und sorgt für
ein besseres Verständnis der Kondition Ihrer Fahrzeugreifen. Sobald Sie das
TPMS (separat verkauft) korrekt installiert haben, kontrollieren die Sensoren
automatisch den Reifendruck und die Temperatur und übertragen in Echtzeit
Statistiken an den Empfänger.
Page 56

19
Einstellungen
1.
Netzwerk & Internet
1.1
Wi-Fi
Schalten Sie Wi-Fi ein oder aus.
Wählen Sie ein Netzwerk: Tippen Sie eines der aufgelisteten Netzwerke und
geben Sie dann das Passwort ein, falls erforderlich.
1.2
Hotspot & Tethering
Schalten Sie USB-Tethering, tragbarer Wi-Fi-Hotspot und Bluetooth-Tethering
ein oder aus. Passen Sie die Wi-Fi-Hotspot Einstellungen an.
1.3
VPN
Tippen Sie den + Knopf und tragen sie die VPN-Details ein. Nach der Einrichtung
tippen Sie auf den VPN, um eine Verbindung herzustellen. Sie werden dann
gebeten, Benutzernamen und Passwort einzugeben.
1.4
Flugzeugmodus
2.
Verbundene Geräte
Bluetooth
Sie können den Gerätenamen oder die PIN-Nummer (Passwort für die BluetoothKopplung) dieser Einheit ändern.
Sie können den automatischen Anrufbeantworter/die automatische
Anrufannahme ein oder ausschalten.
Tippen Sie auf eines der gekoppelten Geräte oder eines von der Liste der
verfügbaren Geräte, um es zu koppeln oder die Kopplung aufzuheben.
3.
Apps & Benachrichtigungen
3.1
Verwalten Sie alle Apps, die auf diese Einheit oder eine SD-Speicherkarte
heruntergeladen wurden.
App-Info
Page 57

20
3.2
Benachrichtigungen
Fügen Sie einen Benachrichtigungsstil hinzu oder ändern Sie einen vorhandenen
für Benachrichtigungen von Apps.
3.3
App-Berechtigungen
Sehen Sie alle App-Berechtigungen ein und verwalten Sie diese. Sie können
eine Liste verschiedener Berechtigungskategorien sehen, mit der Anzahl
installierter Apps, die über diese Berechtigungen verfügen.
3.4
Erweitert
Standard-Apps und Zugriff auf spezielle Apps.
4.
Bildschirm
4.1
Helligkeitsgrad
Ziehen Sie den Schieberegler, um die Bildschirmhelligkeit anzupassen.
4.2
Hintergrund
Stellen Sie ein Bild oder Foto als Hintergrund für den Startbildschirm ein.
4.3
Schriftgröße
Ziehen Sie den Schieberegler, um die Schriftgröße anzupassen.
4.4
Nacht-Anzeige
Ziehen Sie den Schieberegler, um die Bildschirmhelligkeit im Nachtmodus
anzupassen.
4.5
Assistive Touch
Schalten Sie Assistive Touch ein oder aus.
Sie können Assistive Touch verwenden, um bestimmte Einstellungen der Einheit wie
Lautstärke, Helligkeit, Screenshot und andere anzupassen.
5.
Sound
Page 58

21
-
Tastenton
- Lautstärken
-
Standard-Benachrichtigungsklang
-
Standard-Weckerklang
6.
Screenshot-Einstellungen
-
Wählen Sie die Verzögerungszeit zur Aufzeichnung des Bildschirms
-
Legen Sie fest, wo Screenshots gespeichert werden
-
Lassen Sie den Screenshot-Knopf in der Statusleiste anzeigen
7.
Speicher
Sie können einsehen, wie viel Speicherplatz im internen Speicher ihrer Einheit
verfügbar ist. Sie können auf SPEICHERPLATZ FREIGEBEN tippen, um
Fotos, Videos und Apps zu löschen, die Sie in letzter Zeit nicht verwendet
haben:
8.
-
Standort
-
Geräte-Administrator Apps
-
Verschlüsselung & Anmeldedaten
-
Trust Agents
-
Apps mit Nutzungszugriff
Sicherheit & Standort
9.
Benutzer & Konten
Fügen Sie ein Google-Konto oder andere Benutzerkonten hinzu.
10.
Bedienungshilfen
-
Verknüpfung zur Barrierefreiheit
-
Text-zu-Sprache-Ausgabe
Page 59

22
-
Schriftgröße
-
Bildschirmgröße
-
Vergrößerung
-
Großer Mauszeiger
-
Kontraststarker Text
-
Farbkorrektur
-
Farbumkehrung
11.
Auto
11.1
Dies ermöglicht es Ihnen, die Beleuchtungsfarbe der Knöpfe nach Ihren
persönlichen Vorlieben anzupassen. Sie können aus einer Großzahl von
Farben auswählen. Um eine Lieblingsfarbe zu erzeugen, passen Sie durch
Ziehen die Farbbalken von rot, grün und blau an.
*
Element
Bitte beachten Sie, dass diese Funktion nicht von allen
Modellen unterstützt wird.
11.2
Lenkrad-Tasten
Dies ermöglicht es Ihnen, die Einheit durch die Lenkrad-Tasten Ihres Fahrzeugs zu
steuern.
11.3
Verstärker
11.3.1
Balance-Einstellung
Sie können zwischen Rock, Pop, Jazz, Klassik, Flat, Stimme oder benutzerdefiniert
wählen.
Page 60

23
11.3.2
Fader-Einstellung
Sie können eine Hörposition auswählen, um Sie zum Zentrum der Soundeffekte
zu machen.
Wählen Sie zwischen Fahrer, Benutzer, vorne, hinten oder alle.
11.4
Navigation
11.4.1
Optionen für die Navigationsanwendung
Wählen Sie die Anwendung, die Sie zur Navigation verwenden möchten.
11.4.2
Navig
ation
überwachung
11.4.3
Sound-Modus der Navigation
11.4.4
Lautstärkeverhältnis der Navigation
Page 61

24
11.4.5
Navigationssound im Telefon-Modus
11.4.6
GPS-Monitor
11.5
Fahreinstellungen
11.5.1
Video sehen
Ein: Videobilder können betrachtet werden, während Ihr Fahrzeug sich bewegt.
Aus: Videobilder können nicht betrachtet werden, wenn Ihr Fahrzeug in
Bewegung ist.
VORSICHT
Aus Sicherheitsgründen können keine Videobilder angesehen werden,
wenn Ihr Auto sich bewegt. Um Videobilder anzusehen, halten Sie an
einem sicheren Ort und ziehen Sie die Handbremse an.
11.5.3
11.5.2
11.6
11.6.1
Wählen Sie zwischen automatischem Ruhemodus, 30 Sekunden, 5 Minuten, 10
Minuten, 30 Minuten und einer Stunde.
11.6.2
Aktivieren Sie diese Option, damit die Einheit automatisch Musik abspielt, wenn
Sie ein USB-Speichergerät verbinden oder eine SD-Speicherkarte einstecken.
11.6.3
Um die Rückfahrkamera-Option zu verwenden, ist eine separat verkaufte
Rückfahrkamera nötig.
Ein: Kehrt die Rückfahrkamera-Bilder um.
Aus: Kehrt die Rückfahrkamera-Bilder nicht um.
Benachrichtigungen
Netzwerkeinstellungen für Apps während des Fahrens
Weitere Einstellungen
Ausschalteverzögerung bei ausgeschaltetem Motor
Musik abspielen
Rückfahrspiegel
Page 62

25
11.6.4
Rückfahr-Signal
Ein: Beim Rückwärtsfahren erklingt ein Warnklang. Aus:
Beim Rückwärtsfahren erklingt kein Warnklang.
11.6.5
Rückblick-Hilfslinien
Ein: Zeigt die Hilfslinien zum rückwärts Einparken an.
Aus: Blendet die Hilfslinien zum rückwärts Einparken aus.
11.7
Werkseinstellungen
Geben Sie das Passwort 126 ein, um zu den Werkseinstellungen zurückzukehren.
11.7.1
App
Ändern Sie die Optionen für Bluetooth, DVD, TPMS, Radio, DVR und andere.
11.7.2
Auto-Logo
Wählen Sie eines der vorinstallierten Fahrzeughersteller-Logos als
Startbildschirm aus. Sie können auch von einer SD-Speicherkarte importierte
Bilder auswählen. Sie müssen die SD-Speicherkarte in den GPS-Kartenschlitz
stecken. Die Bildgröße sollte 800 Pixel x 480 Pixel betragen und das Bildformat
sollte JPEG sein.
11.7.3
Radio
Wählen eine Region für das Radio aus.
11.7.4
Stimme
Passen Sie die Lautstärke von DVD, System, AV-Input, Radio, Bluetooth und
anderen an.
Page 63

26
11.7.5
CanBus
Ändern Sie die Optionen für CanBus.
11.7.6
Knöpfe programmieren
-
Zurücksetzen der Bedienknöpfe
-
Programmieren der Bedienknöpfe
-
Touch zurücksetzen
-
Programmieren der Touch-Knöpfe
11.7.7
Anderes
Ändern Sie die Optionen für RDS, Frontkamera, Kontrolle der Bedienfeld-LEDs
und mehr.
12.
Google
Verwalten Sie Dienste in den Google-Einstellungen.
13.
System
13.1
Sprachen & Eingabe
13.1.1
Sprachen
Bestimmen Sie die Sprache der Einheit. Wählen Sie zwischen Englisch,
Französisch, Deutsch, Spanisch und vielen anderen. Sie können eine Sprache
hinzufügen und durch Ziehen die gewünschte Sprachreihenfolge festlegen.
13.1.2
Virtuelle Tastatur
13.1.3
others
13.1.4
Erweitert
13.2
Datum & Uhrzeit
-
Zeit für automatische GPS-Updates
-
Automatisches Datum & automatische Uhrzeit
Page 64

27
-
Automatische Zeitzone
-
Datum einstellen
-
Uhrzeit einstellen
-
Zeitzone auswählen
-
24-Stunden Format wählen
13.3
Backup
13.4
MCU-Updates
13.5
System-Updates
13.6
Einstellungen zurücksetzen
-
Zurücksetzen der Netzwerkeinstellungen
-
Zurücksetzen der App-Einstellungen
-
Zurücksetzen auf Werkseinstellungen
13.7
Über das Gerät
-
Modell
-
Android-Version
-
Android Security-Patch Level
-
Kernel-Version
-
Build-Nummer
-
MCU-Version
-
Seriennummer
-
CPU
-
Speicher
-
Rechtliche Informationen
Page 65

28
Das Bild flackert oder ist verzerrt
Fehlerbehebung
Sollten Sie Schwierigkeiten bei der Bedienung dieses Produkts haben, sehen Sie in
diesem Abschnitt nach. Die häufigsten Probleme sind unten aufgeführt, zusammen
mit wahrscheinlichen Ursachen und Lösungen.
Kein Strom
-
Der Fahrzeugmotor ist nicht gestartet. Starten Sie den Fahrzeugmotor.
-
Falsche Verdrahtung. Überprüfen Sie die Verdrahtung.
-
Die Sicherung wurde beschädigt. Wechseln Sie die Sicherung aus.
-
Die CANBUS-Box wurde beschädigt. Ersetzen Sie die CANBUS-Box.
Kein Ton
-
Die Lautstärke ist zu niedrig. Passen Sie die Lautstärke an.
-
Falsche Verdrahtung. Überprüfen Sie die Verdrahtung.
Die Disk wird nicht wiedergegeben
-
Die Disk ist verkehrt herum eingelegt. Legen Sie die Disk mit der Beschriftung nach
oben ein.
-
Die Disk ist schmutzig. Reinigen Sie die Disk.
-
Die Disk hat Risse oder ist anderweitig beschädigt. Legen Sie eine normale, runde
Disk ein.
-
Die Dateien auf den Disks sind in einem unkorrekten Dateiformat. Überprüfen Sie
das Dateiformat.
-
Das Diskformat kann nicht abgespielt werden. Ersetzen Sie die Disk.
-
Die Art der geladenen Disk wird von diesem Produkt nicht unterstützt. Überprüfen
Sie die Art des Datenträgers.
Der Bildschirm ist von einer Warnung verdeckt und das Video kann nicht
angezeigt werden
-
Der Draht an der Handbremse ist nicht verbunden oder angewendet. Verbinden
Sie den Draht an der Handbremse ordnungsgemäß und ziehen Sie die
Handbremse an.
-
Die Handbremsverriegelung ist aktiviert. Parken Sie Ihr Fahrzeug an einem
sicheren Ort und ziehen Sie die Handbremse an.
Das Bild flackert oder ist verzerrt
-
Die Einstellungen für Video-DVDs passen nicht zur eingelegten DVD. Passen Sie
die Einstellungen für Video-DVDs an.
-
Die Videoverbindung ist fehlerhaft.
Die gespeicherten Sender sind verschwunden
-
Das Batterie-Kabel ist nicht richtig verbunden. Verbinden Sie das Batterie-Kabel
mit einem Anschluss, der immer Strom hat.
Page 66

29
Schlechter Radio-Empfang
-
Die Antenne ist nicht ordentlich verbunden. Überprüfen Sie die Antennenverbindung.
-
Es könnten Störungen resultieren. Suchen Sie nach Störquellen.
-
Signale sind zu schwach. Ein zusätzlicher Antennensignal-Verstärker
könnte erforderlich sein.
-
Die Antenne ist beschädigt. Ersetzen Sie die Antenne.
-
Die regionale Sendersuchlauf wurde ausgeschaltet. Schalten Sie den regionalen
Sendersuchlauf ein.
Ein schwarzer Bildschirm wird angezeigt und der Betrieb ist nicht möglich
-
Der Ruhemodus ist eingeschaltet. Drücken Sie den Einschaltknopf oder
berühren Sie den Bildschirm, um den Modus zu beenden.
-
Das Bild der Rückfahrkamera wird ohne Kameraverbindung und mit falschen
Kamera-Polaritätseinstellungen angezeigt. Installieren Sie die Rückfahrkamera
und ändern Sie dann die Polaritätseinstellungen der Kamera.
GPS-Standortbestimmung ist nicht möglich
-
GPS-Standortbestimmung ist deaktiviert, wenn keine Signale von mehr als zwei
GPS-Satelliten empfangen werden können.
-
In manchen Fahrsituationen können die Signale von GPS-Satelliten Ihr
Fahrzeug möglicherweise nicht erreichen. In solch einem Fall ist er für das
System nicht möglich, die GPS-Standortbestimmung zu verwenden.
-
Wenn ein Autotelefon oder ein Mobiltelefon in der Nähe der GPS-Antenne
verwendet wird, kann der GPS-Empfang vorübergehend unterbrochen sein.
Das gekoppelte Mobiltelefon wird ununterbrochen verbunden und getrennt
-
Der Bluetooth-Empfang ist schlecht. Bringen Sie das Mobiltelefon näher an das
Produkt oder entfernen Sie Hindernisse, die sich zwischen dem Mobiltelefon
und dem Produkt befinden.
-
Einige Mobiltelefone verbinden und trennen sich ununterbrochen, wenn Anrufe
getätigt oder beendet werden. Dies ist kein Hinweis auf eine Fehlfunktion des
Produkts.
-
Bei manchen Mobiltelefonen kann die Bluetooth-Verbindung als
Energiesparfunktion automatisch deaktiviert werden. Dies ist kein Hinweis auf
eine Fehlfunktion des Produkts.
Page 67

30
Anhang
Handhabung und Pflege von Datenträgern
•
Verwenden Sie nur herkömmliche, vollständig runde Disks. Verwenden Sie keine
anders geformten Disks.
•
Verwenden Sie keine rissigen, angeschlagenen, verzogenen oder
anderweitig beschädigten Datenträger, da diese das eingebaute Laufwerk
beschädigen können.
•
Verwenden Sie 12-cm Disks. Verwenden Sie keine 8-cm Disks oder Adapter für
8-cm Disks.
•
Wenn Sie Disks verwenden, die auf Etikettoberflächen bedruckt werden können,
überprüfen Sie die Anweisungen und Warnungen auf den Datenträgern. Einoder Auswurf könnte je nach Disk nicht möglich sein. Der Gebrauch solcher
Disks kann Schäden an diesem Equipment verursachen.
•
Bringen Sie keine Etiketten auf der Oberfläche der Disks an, schreiben Sie nicht
darauf und tragen Sie keine Chemikalien auf.
•
Bringen Sie keine handelsüblichen Etiketten oder andere Materialien auf den
Disks an.
•
Wischen Sie eine Disk zur Reinigung von innen nach außen mit einem
weichen Tuch ab.
•
Kondensation kann die Leistung des eingebauten Laufwerks vorübergehend
beeinträchtigen.
•
Die Wiedergabe von Disks kann aufgrund von Disk-Eigenschaften, Disk-Format,
der aufgezeichneten Anwendung, der Wiedergabeumgebung, SpeicherBedingungen usw. eingeschränkt sein.
•
Straßenstöße können zu Unterbrechungen der Disk-Wiedergabe führen.
•
Lesen Sie vor Gebrauch die Vorsichtsmaßnahmen für Disks.
Page 68

31
Beim Gebrauch dieses Produkts
Verwenden Sie dieses Produkt bei einer Umgebungstemperatur zwischen -10°
•
und 50° C. Die Verwendung dieses Produkts außerhalb des vorgesehenen
Betriebsbereichs kann vorübergehende oder dauerhafte Schäden am System
verursachen, und solche Schäden sind möglicherweise nicht von der
Herstellergarantie gedeckt. Lagern Sie das Produkt an einem Ort, an dem die
Temperatur zwischen -20° und 80° C liegt.
•
Verbinden Sie USB-Speichergerät nicht über einen USB-Hub.
•
Das Anschließen eines USB-Kabels von über 5 Metern Länge kann zu
fehlerhafter Wiedergabe führen.
Wenn dieses Produkt ein angeschlossenes USB-Speichergerät nicht
•
erkennt, trennen Sie das Gerät und ersetzen Sie es durch ein anderes
USB-Speichergerät.
Nehmen Sie die SD-Karte mit vorinstallierten Kartendaten nicht im
•
eingeschalteten Zustand heraus. Nehmen Sie die SD-Karte nur heraus,
wenn das Produkt ausgeschaltet ist.
•
Verwenden Sie keine Software zum Aktualisieren des Systems, die
nicht von XTRONS stammt. Wenn Sie ein System-Update benötigen,
setzen Sie sich mit Ihrem Händler in Verbindung.
Umgang mit dem Bildschirm
•
Wenn der Bildschirm zu lange dem direkten Sonnenlicht ausgesetzt ist, wird
er sehr heiß, was eventuelle Schäden am Bildschirm zur Folge haben kann.
Wenn nicht in Gebrauch, vermeiden Sie so weit wie möglich, dass dieses
Produkt dem direkten Sonnenlicht ausgesetzt wird.
•
Verwenden Sie den Bildschirm nicht bei Temperaturen über- oder unterhalb
der Arbeitstemperatur, da der Bildschirm möglicherweise nicht normal
funktioniert und beschädigt werden könnte.
Page 69

32
•
Der Bildschirm ist freiliegend, um seine Sichtbarkeit im Fahrzeug zu erhöhen.
Drücken Sie nicht stark darauf, da dies ihn schädigen könnte.
•
Drücken Sie den Bildschirm nicht mit übermäßiger Kraft, da dies zu Kratzern
führen könnte.
•
Berühren Sie den Bildschirm mit nichts Anderem als Ihren Fingern, wenn sie
die Funktionen des Touch-Bedienfelds verwenden. Der Bildschirm kann
leicht Kratzer bekommen.
Wartung des Bildschirms
•
Wenn Sie Staub vom Bildschirm entfernen oder ihn reinigen, schalten Sie
das Gerät erst aus und wischen Sie den Bildschirm dann mit einem
weichen, trockenen Tuch ab.
•
Achten Sie beim Abwischen des Bildschirms darauf, die Oberfläche nicht zu
zerkratzen. Verwenden Sie keine scharfen oder scheuernden chemischen
Reinigungsmittel.
Page 70

Page 71

Page 72

 Loading...