

Page 1

AGENT:
User's manual
HD H.264/SD Digital Terrestrial
R eceiver For Car
1TINSE117---001
Printed in China
Page 2

Page 3

DIN Jack for Video Output:
IR Extension Jack:
A/V Output Jack: Video:
Upgrade and Multimedia Port:
A/V Input Jack: Video:
ANT1, ANT2 Input Jack:
Operating Temperature:
Storage Temperature:
Power Supply:
Power Consumption:
Dimension:
Packing Size (GIFT BOX):
125(L)*94(W)*27(H) mm(DTR-1303EU series)
125(L)*94(W)*26(H) mm(DTR-1305EU series)
132(L)*94(W)*27(H) mm(DTR-1307EU series)
For IR Extension Box
DC+12V~24V±10%
Videox2, YPrPbx1, GND
1 RCA Jack, Audio: 2 RCA Jacks(R/L)
1 RCA Jack ,Audio: 2 RCA Jacks (R/L)
IEC169-24, Female F Type
-10 ~ +50
℃℃
-40 ~+65
℃℃
Running : 6W Max.
Standby : 1.5W Max.
206(L)*180 (W) *57(H)mm
USB
Contents
Safety Instruction 2
Main Features 3
Front and rear panel 4
ANT Installation 5
Remote Control Unit (RCU) 6
Remote Control Unit (RCU) 7
Basic Functions 8
Specification 15
…………………………………………………
……………………………………………………
……………………………………………
……………………………………………………
……………………………………
………………………………………
……………………………………… …………
……………………………………………………
Weight:
Accessories:
-16-
DTR-1303/07 N.W.: 0.29Kg±10% ,G.W. 0.71Kg±10%
DTR-1305 N.W.: 0.27Kg±10% ,G.W. 0.7Kg±10%
1.Remote control unit(RCU) x1
2.DC Cable x1
3. Mounting LUG x2 with screw x4
4.Extended R/C box x1
5.AV Wire x1
6.6pins DIN adapt to RCA wires.
7.User's manual x1
8.Active Antenna (Optional)
﹕
﹕
-1-
Page 4

Safety Instruction
Specification
Please read the following instructions carefully
1.The power input is DC+12V~24V+/-10%.
2.Do not expose the receiver to rain , moisture, direct sunlight or
do not place it near a heater.
3.Do not use liquid or aerosol cleaners. Use a light damp cloth for
cleaning.
4.The hole on the bottom of receiver must be left uncovered to
allow proper airflow to the unit.
5. Do not open or remove cover. Refer all servicing to qualified
service personnel.
RF Input:
Input Impedance:
Signal Level
Connector Type
Channel Band Width
Constellation
Guard Interval
FEC
COFDM Carrier Mode
Transport Stream
Video Aspect Ratio
Video System
Video Output
Video Resolution Y Pr Pb Resolution:
720*576@25fps/720*480@30fps
UHF: 470 MHz~862MHz
VHF: 174 MHz~230MHz
75Ω
:
-80dBm~ -10dBm
:
F type terminal x 2
:
QPSK , 16QAM, 64QAM
:
1/32,1/16,1/8.1/4
:
1/2,2/3,3/4,5/6,7/8
MPEG-4 AVC/H.264 HP@L4
:
MPEG-2 MP@HL/ML
:
4:3 /16:9
:
PAL / NTSC
:
1±0.3Vpp
:
6M/7M/8M
:
2K And 8k Non Hierarchical /Hierarchical
/
-2-
HD 1920x1080i/ 1920x720p
Audio Decoder:
Audio Channel:
Audio Output:
Power Cable And Jack:
HD
MPEG-2 / HE_AAC(DD/DD+optional)
R/L/ST
1Vpp 47Kohm Adjustable With E Volume
6Pins:
1.DC+12~24V Input
2.ACC
3.Parking Switch
4.DC+12~24V Output 5~6.GND
-15-
Page 5

16. Software Upgrade
You can update the software of the receiver with USB port.
New software version can improve performance or solve the problem.
(1).copy the upgrade file into USB disk.
(2).Get into music item of USB multimedia function.
(3).Select upgrade file and press “ok” to confirm the update.
During upgrade progress, don't take off the power supply otherwise
the system will fail and can not power on any more.
Main Features
* Fully compliant with MPEG-2,H.264 MPEG4 AVC and DVB-T
standards.
* PIG(Picture In Graphic) support.
* Channel editing function.
* Automatic and manual search.
* Stores over 1000 channels.
* Provide electronic program guide(EPG)(option).
Records programs to USB disk.
*
* OSD Teletext and VBI Teletext support.
* Support language options :
1. English, Deutsche, French, Swedish, Russian, Portuguese,
Czech, Danish, Italian and Spanish total 9 Languages for
Europe version.
2. English, Deutsche, French, Czech, Persian, Arabic, Hebrew,
Danish and Italian total 9 Languages for Middle East version.
* USB Supports the play of JPEG/MP3/MP4 play (AVI/MPG/DAT/
VOB) and software upgrade.
* Remark: Some special USB and MP4 format can not fully support.
-14-
Accessories
The following have been packed in your receiver box:
* User's manual x1
* Remote control unit(RCU)x1
* Extended R/C box x1
* 6pins DIN adapt to RCA wires.
* A/V wire x1
* Power supply wire x1
* Mounting LUG x2 with screw x4
-3-
Page 6

Front and rear panel
Front
IR RECEIVER
USB
POWER LED
4>.Version information
The information included H/W Version, S/W Version, Tuner
Type and Date. Press “EXIT” key to return previous menu.
15. Multimedia Function
There are 4 main functions in USB multimedia function.
V
L
R
They are Music ,Photo ,Movie and PVR.
AUDIO IN
AUDIO R/L INPUT
2.5A FUSE
3.15A FUSE
+12v~24v
L
AUDIO OUT
R
+12v~24v
OUT
IN
ACC
GND
OUT
PARKING
DC
IN /
OUT
Rear
IR IN
USB
EXTENDED
R/C BOX
Output GND, DC output ground (Brown)
DC OUT +12~24VDC, (Blue)2.5Amp output
BATT,+12~24VDC Power supply input (Yellow)
ANT IN
1
2
ACC, Car Engine Key (Red)
GND,Power Supply ground (Black)
Parking,Parking Switch (Green )
VIDEO OUT2 VIDEO OUT3
GND
POWER
IR
VIDEO INPUT
Pb
PrY
VIDEO OUT1
V
VIDEO IN
TV/MONITOR
1.For car use: Connect the BATT wire to car battery and connect ACC
wire to
ACC switch of car.
2.For home use: Put BATT andACC wire together and connect to
B+12~24V DC.
3.GND must connect to ground or battery- .
4.DC output ground, connect to the device GND with which use the
DC +12V~24V
output.
-4-
Multimedia
OK
Select
EXIT
EXIT Move
Figure 7
USB Music
choose USB Music option, Press OK key to confirm.
Press OK key to enter next directory.
Follow the bottom key guide to operation.
USB Photo
choose USB Photo option, Press OK key to confirm.
Press OK key to enter next directory.
Follow the bottom key guide to operation.
USB Movie
choose USB Movie option, Press OK key to confirm.
Press OK key to enter next directory.
Follow the bottom key guide to operation.
PVR Playback
If the pre-recorded file in the USB disk, then you can select the
file and playback.
-13-
Page 7

12. Picture Display
(1).TV Mode can be set as PAL or NTSC.
(2).Aspect Ratio can be set as AUTO/4:3 FULL/ 4:3 Pan Scan/ 4:3
Letter Box/16:9 WIDE.
(3).Resolution:1080i/576i/576p/720p.
ANT Installation
1. ANT-350 /353/355 Structure (optional):
13. Time
In time menu, there are two time modes, one is Auto setting:
the other is Manual setting. The system defaults the setting as
Automatic.
14. language option
(1).The OSD supports multi-language :
1>.English, Deutsche, French, Swedish, Russian, Portuguese,
Czech, Danish, Italian and Spanish total 9 Languages for
Europe version.
2>.English, Deutsche, French, Czech, Persian, Arabic, Hebrew,
Danish and Italian total 9 Languages for Middle East version.
(2). the audio language support 26 kind of language.
1> Parental Guidance
.
enter password to get into age grade setting, you can select
off or setting viewing age like 04 05 06 18years old.
、、……
2>.Parental Lock
You can revise system Password, Enter Parental Lock menu.
A. Press the 0-9 number key on remote controller to input
Old Password, the system defaults Password as “000000”.
Enter new password
.B
Enter new password again.
C.
3>.Factory Default
Press OK to return original factory default setting.
You need enter password (Default password is “000000” )
F-TERMINAL
POWER LED
20dB BOOSTER
ANTENNA(ANT-353F)
2.ANT-350/353/355 Installation:
(1).Tint film (sunshine shield film) will cause poor reception due
to it has on a clear window
a metallic coating. Install antenna
position.
(2).Set the antenna power supply to
"ON" in the setup manual of receiver,
and go channel manager
to
check the signal strength
and quality. Move antenna
a best position.
to
3.The five install locations
are just for your reference.
-12-
-5-
Page 8
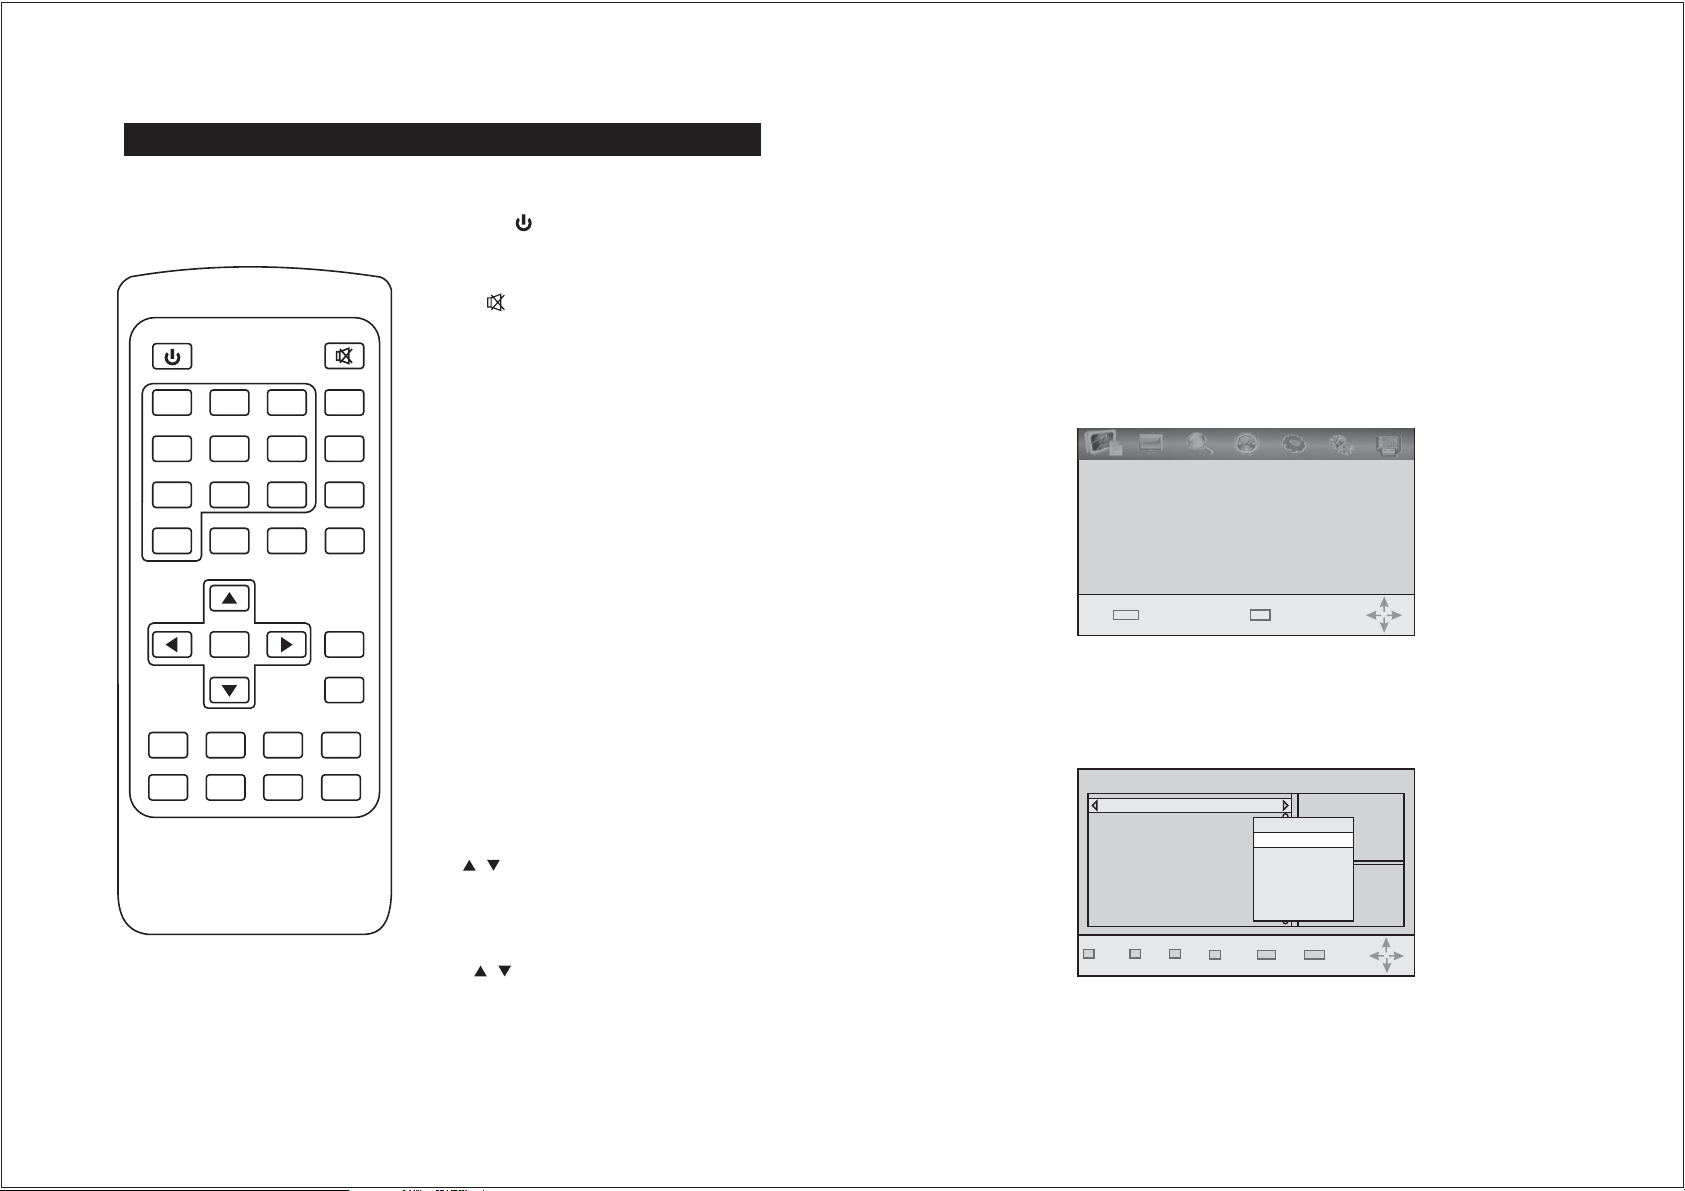
Remote Control Unit (RCU)
- POWER:
Switch the receiver between stand-by
& on modes
-MUTE :
POWER MUTE
ABC DEF
12
GHI JKL MNO
45
PQRS TUV WXYZ
78
TXT
0
CH+
VOL- VOL
LIST
OK
CH-
PGUP PGDW
TV/RADIO RECALL PAUSE
FAV
-6-
3
6
9
SUBTITLE
+
INFO
AUDIO
FASTSCAN
TV/AV
EPG
MENU
REC
EXIT
Mute the audio output
- Numeric Keys(0~9):
For direct entry of channel number or
input of alphanumeric characters
- Audio:
Switch the audio language if
transmitting more then one language
and Select the different audio modes
- Fast scan:
Searching all channel quickly
-TV/AV:
Select between TV andAV mode
- EPG (Electronic Program Guide):
Call up the EPG function
-TXT:
Display on the teletext contents of the
viewed channel, if teletext is transmitted
- Subtitle:
Switch the subtitle on if the subtitle is
transmitted on this channel
- CH( / ):
Change channels sequentially up or
down in viewing mode and move to the
next higher or lower item in the menu
-VOL( / ):
Alter theAudio output level up or down
in viewing mode or move to the left or
right item in the menu
9. Recording
Insert the USB disk to USB port and press “REC” key to record
the current viewing program into USB disk.
TV/AV
Press “TV/AV' key to switch between TV or AV IN function.
10. Main manual
Press “Manu” key to enter the Manu function of the system.
You can set or select all DVB-T functions by this Manu.
The bottom line shown all related key for the operation.
Program
Program Edit
EPG
Sort
LCN
EXIT
Return
By ONID
Off
OK
Confirm
Figure 5
11. program edit
(1).System offer an efficient function of program edit such as
channel move, skip, lock, delete, and rename.Favorite
Program Edit
ALL TV
001 Hi_HD
002 Hi_HD
FAV
Skip Lock
Delete
Favorite Type
Disable
Movie
Newie
News
Sport
Music
MoveTXT
SUB
Rename
Figure 6
(2).Program listing
There are 3 kind of programs listing: channel name, service
id or LCN.
-11-
Page 9

4. P
rogram list
(1).Press “CH+/-” to switch to the previous or next program.
(2).Press “OK” to switch to the speediness program list,
Select different program as you want and Press “OK” to confirm
program Selection.
(3).Press number keys to input program number.
5. Information
press “INFO” to show the information of current programs
key
when it is in normal playing state. Press again to show more detail
information.
6. Program Return
Press “RECALL” key under state of full-screen to return to the
previous program played.
7. Audio language switch and L/R channel switch
Press “AUDIO” key to switch the language of current programs
and switch among stereo Left right .
8.
Electronic programs guide(EPG)(option)
“ ”→“ ”→“ ”
You can press “EPG” key on the remote controller to enter into
the EPG page the bottom Line showshint information for keys,
corresponding to the functions.
Program Guide
002 BBCNEWS 24
17 Jul 10:00-11:00 BBC News BBC News
17 Jul 11:00-12:00 BBC News
Book
OK
INFO
Book list
Thu. 17Jul 2003 10:55
News
The BBC'Srolling news service
with headlinesevery fifteen
minutes
Page Down Page Up
Page 1/4
Remote Control Unit (RCU)
- OK/LIST:
Select an item or confirm a choice.
A list will enter the channel in viewing
POWER MUTE
ABC DEF
12
GHI JKL MNO
45
PQRS TUV WXYZ
78
SUBTITLE
TXT
AUDIO
3
FASTSCAN
6
TV/AV
9
EPG
0
CH+
VOL- VOL
LIST
OK
CH-
PGUP PGDW
TV/RADIO RECALL PAUSE
FAV
INFO
+
MENU
REC
EXIT
mode
- MENU:
Access the main menu
- PgUP/ PgDN:
Move up/down a page in the channel
list. Shown movie playing speed while
playing .
- INFO:
Display information on viewed channel
- EXIT:
To return to previous status or exit
REC
Records the programs to USB disk
- FAV (RED):
Select the favorite or all channels
- TV/RADIO(GREEN):
Switch between TV and radio mode
- RECALL(YELLOW):
Go back to the previously viewed
channel
- PAUSE(BLUE):
Press once to pause the screen
picture, press once again to resume
normal mode
-10-
Figure 4
-7-
Page 10

Basic Functions
1. Enter into system and power on-off
Before start the system, pls check all wiring and ANT installation.
Installation Guide
OSD Language English
Country Germany
Channel Search
EXIT
EXIT
When power on the unit in first time, the picture will show the OSD
language, country and channel search. After language and country
setting. then go channel search to scan all available TV programs.
There are three kinds of scan mode as follow:
(1).Auto Search
Press "OK"key to start.
(2).Manual Search
(3).fast scan.
Auto Search
You can move the cursor to “auto search” and press the “ok” key
to start scan all available programs in the area you are.
Channel Search
Auto Search
Manual Search
Country
Antenna Power
EXIT
Return
OK
Figure 1
Germany
On
OK
Confirm
Confirm
Manual Search
If you know the frequency channel, after set the country.
You can select manual search.
(1).You can move the cursor to“manual search” via press “CH+/-” key
(2).select the country via press “vol+/-” key.
Then you need set antenna power to “on” .
1>.enter channel no. by press key no.0-9.
2>.Press “OK” key after configuration of start manual scan.
Manual Search
Frequency channel 14
Frequency(MHz) 474.0
Bandwidth: 8M
Quality
EXIT
EXIT
OK
Confirm
Figure 3
Fast Search
press “fast scan” key on remote controller to start.
If any program is detected and scanning process is finished,
system will exit the scanning page and to play them in window
automatically.
2. Volume Adjustment and Mute
(1).Press “VOL+/-” to adjust volume when system is in normal
playing mode: and it will show volume bar on the image.
(2).Press “MUTE” to enter into the mode when in normal playing
and repress “MUTE” to back the normal state.
3. TV/RADIO Programs Switch
Press “TV/RADIO” to switch the programs.
-8-
Figure 2
-9-
 Loading...