

Page 1

Atom
Remote Control Quadcopter Instruction Manual
EN
©Xtreem™ RC Fun 2014
MATOMQC090514E
Page 2
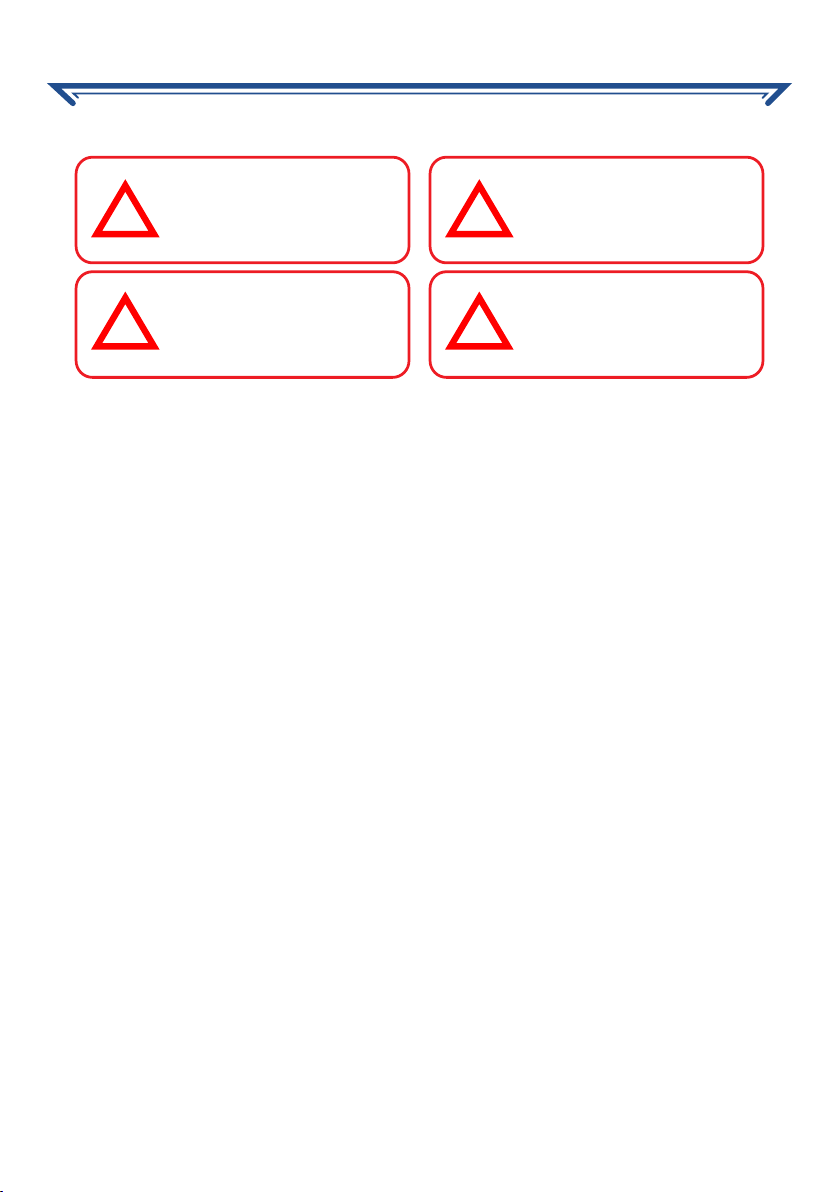
Safety Precautions
BEFORE YOU BEGIN
CHOKING HAZARD - Small
parts, keep out of reach of small
! !
children.
WARNING - Do NOT fly near eyes
or face.
! !
• Keep hands, hair and loose clothing away
from the rotors when the power switch is
turned on.
• Always lift off from a flat surface. Never hold
the flying quadcopter in your hand when
lifting off.
• Stay away from obstacles and electrical
hazards.
• Keep your quadcopter within line of sight - if
line of sight to the controller is lost, you may
lose control of the quadcopter.
• Turn off the controller and quadcopter when
not in use.
Battery Safety Information
• Controller requires 4 x 1.5V AA alkaline
batteries (not included).
• Installing/Replacing batteries must be
undertaken by a competent adult.
• Do not mix new and old batteries or types of
DANGER - Never insert sharp
objects, pins or screws into the
quadcopter
the internal battery.
CAUTION - Do NOT touch
the running rotors or fly over
someone’s head.
• Read and obey all warnings and safety
guidelines in this manual.
• The supplied USB charger is specifically
designed to charge the LiPo batter y. Never
use other charging equipment.
• The quadcopter is not intended for use by
children under fourteen (14) years old. Adult
super vision is required at all times.
• Regularly examine for any damage to the
plugs, enclosure, rotors and other parts.
Replace any damaged or loose parts before
attempting to fly.
batteries (i.e. alkaline/standard).
• Promptly remove exhausted batteries
Battery leakage and corrosion can damage
the controller.
• Dispose of used batteries responsibly.
as this may puncture
LiPo Battery Information
The quadcopter is equipped with a Lithium Polymer battery. These kind of batteries are light and
power ful, as their chemistr y is based on lithium, a light and extremely volatile metal.
• Never completely exhaust the battery. When
the quadcopter starts to lose power, turn it
off and charge it as soon as practicable.
• Never charge battery unattended.
• Charge battery in an isolated, controlled
environment. Keep far away from flammable
materials.
• Do not expose to direct sunlight; there is a
risk that the battery may overheat, ignite
and/or explode.
• Do not disassemble, modify, heat, or short
circuit the battery.
• Do not drop the battery or subject it to strong
2
impacts.
• Do not allow the battery to get wet.
• Only charge the battery with the supplied
charging equipment. Using other charging
equipment will void your warranty, may
damage the battery and poses a risk of fire
or explosion.
• In the unlikely event of leakage or explosion,
use sand or a chemical fire extinguisher to
extinguish the batteries.
• The battery must be disposed of responsibly.
Page 3
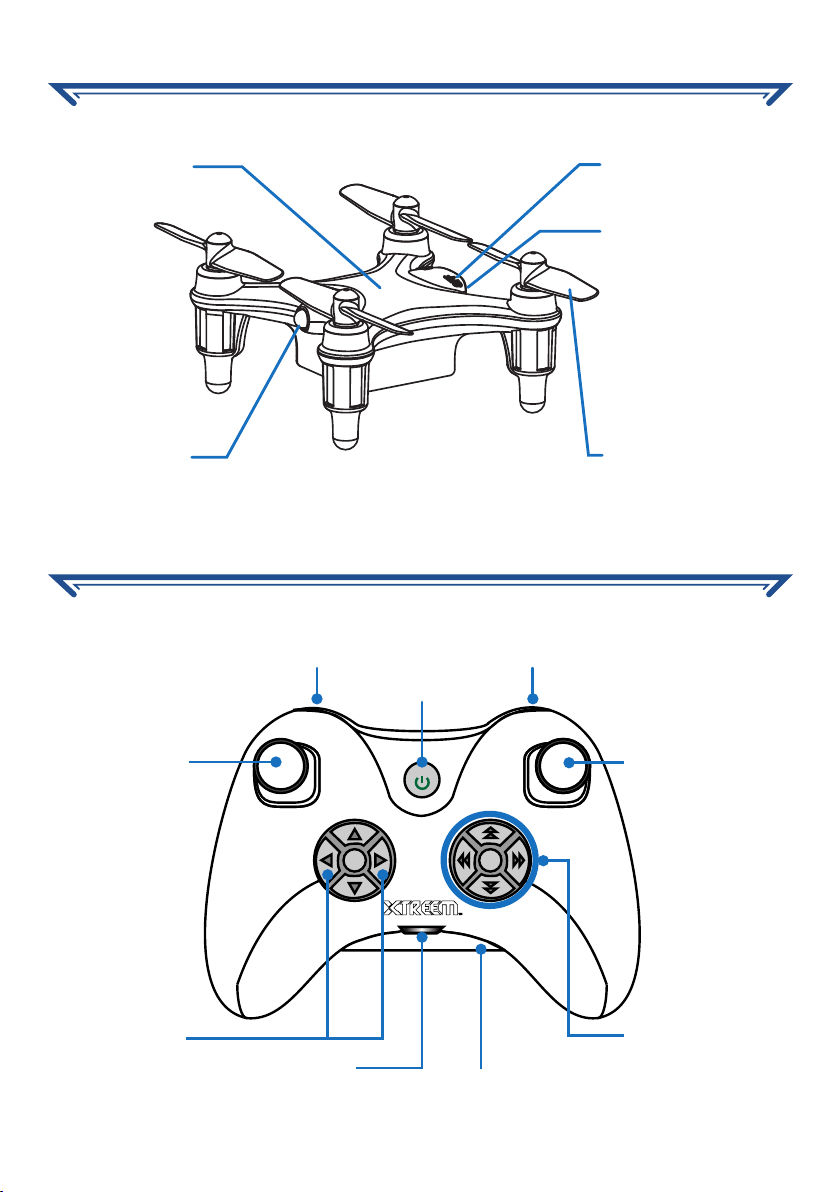
GETTING TO KNOW YOUR ATOM
Status lights
Headlight
GETTING TO KNOW YOUR CONTROLLER
Left Stick
Throttle (Up/Down)
Rotate (Left/Right)
Hi/Low Button
ON/OFF Switch
Charging Port
Rotor Blade
Flip Button
ON/OFF Button
Power Indicator
Right Stick
Direction
(Forward/Backward/
Left/Right)
Rotation
Tri m Butt ons
USB Charging Port
OK
*
Movement/
Sideways Trim
Buttons
Battery
Compartment
3
Page 4
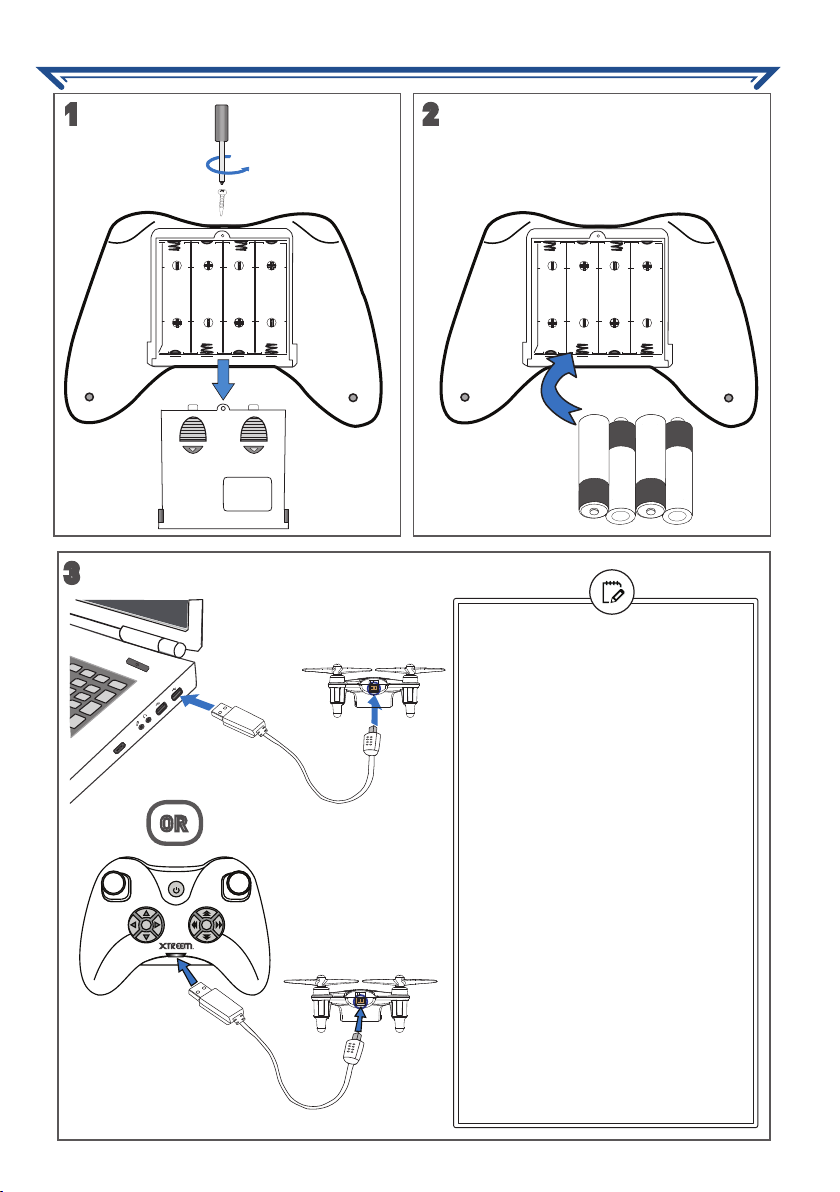
PREPARING FOR FLIGHT
1
2
AA
AA
AA
AA
3
• Before the Atom can be charged, it
must be switched off - make sure the
Atom’s ON/OFF switch is in the OFF
position.
• If charging with the computer, make
HDMI
OR
OK
*
sure it is turned on.
• The charging plug only fits into the
Atom one way. Do not force it in.
• You’ll know the Atom is fully charged
once the red indicator light glows on
the USB connector. Promptly remove
the charging plug from the Atom once
charging is complete.
• Charge time varies depending on the
Atom’s battery conditions. It typically
takes up to 30 minutes to fully charge
the Atom from empty.
• It may take longer to charge the Atom
with the controller. This method relies
on the controller’s remaining battery
power capacity.
• You do not have to fully charge the
Atom to fly. Shorter charge time will
result in reduced flying time.
4
Page 5
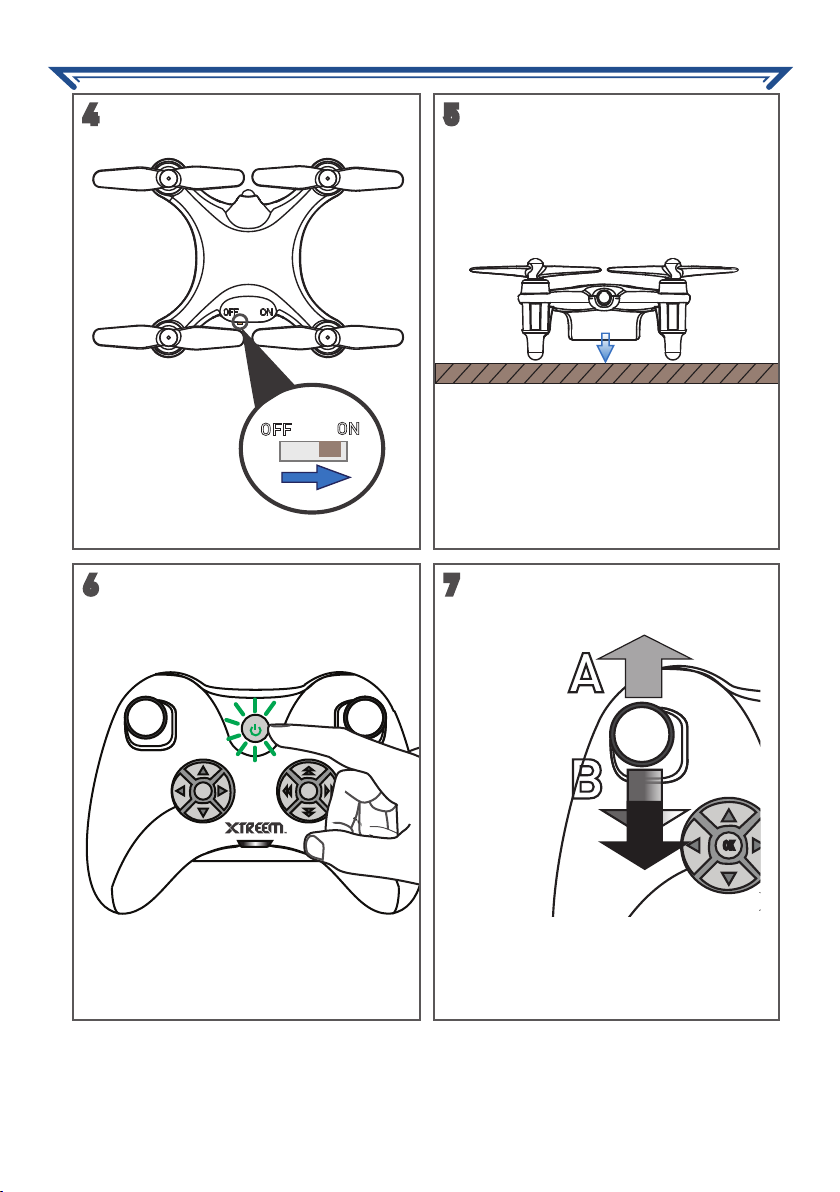
PREPARING FOR FLIGHT
4
OFF
ON
6 7
5
Stable, level s urface
A
OK
*
When the controller and Atom are paired
successfully, the status lights on the Atom
becomes steady. The Atom is ready for take
B
OK
off.
5
Page 6
OK
*
A
B
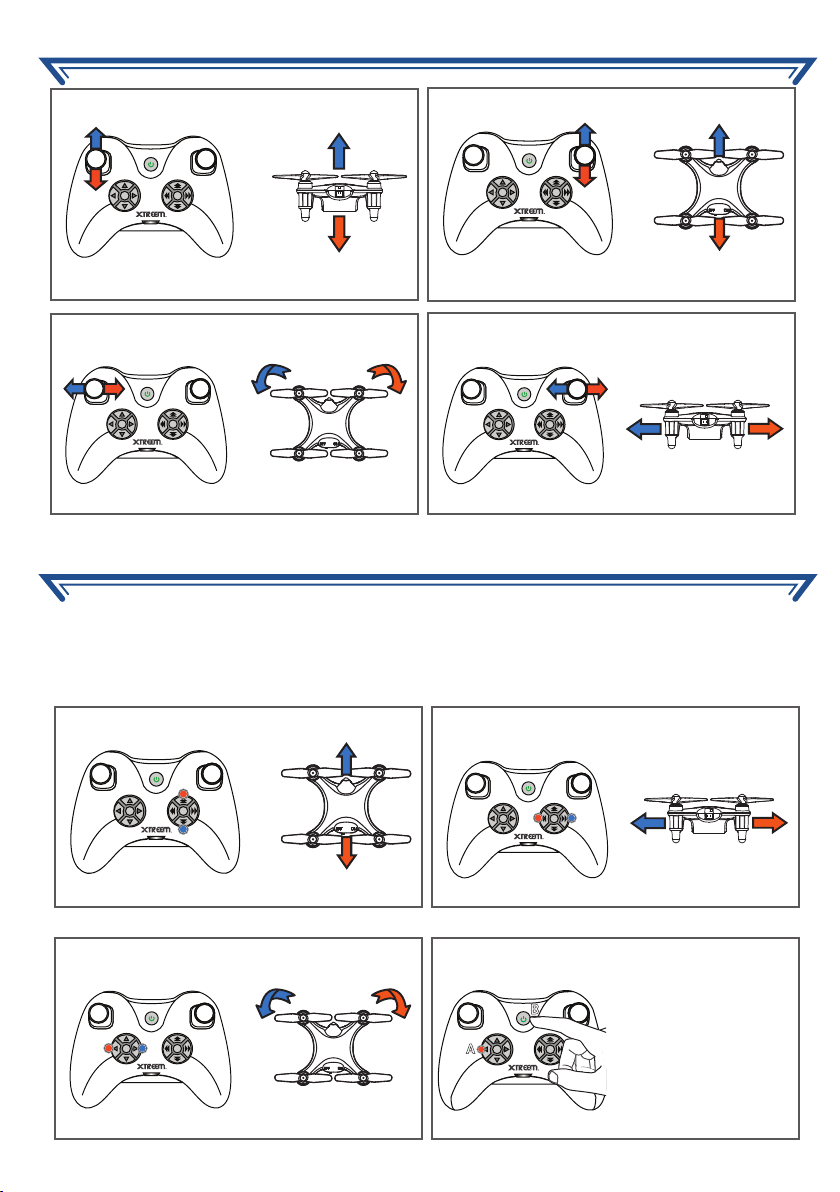
CONTROLLING YOUR ATOM
UP
OK
*
OK
*
DOWN
ROTATE
OK
*
OK
*
FORWARD
BACKWARD
SIDE TO SIDE
CORRECTING NAVIGATIONAL DRIFTS
During flight, it is normal for the Atom to go off-course slightly. But if it drifts constantly without
any input from the controller sticks, you have to adjust the trim controls to compensate for the
drifting. Basically, the trim ‘fine-tunes’ the speed of the rotors. Simply press the appropriate
trim button opposite to the movement repeatedly until the Atom is flying as straight as possible.
FORWARD/BACKWARD TRIM
OK
*
ROTATION TRIM
OK
*
6
SIDEWAYS TRIM
OK
*
RESET TRIM SETTINGS
Make sure the
controller is off. Press
and hold the Trim
Reset Button (A) then
press the ON/OFF
Button to turn on the
controller.
Page 7
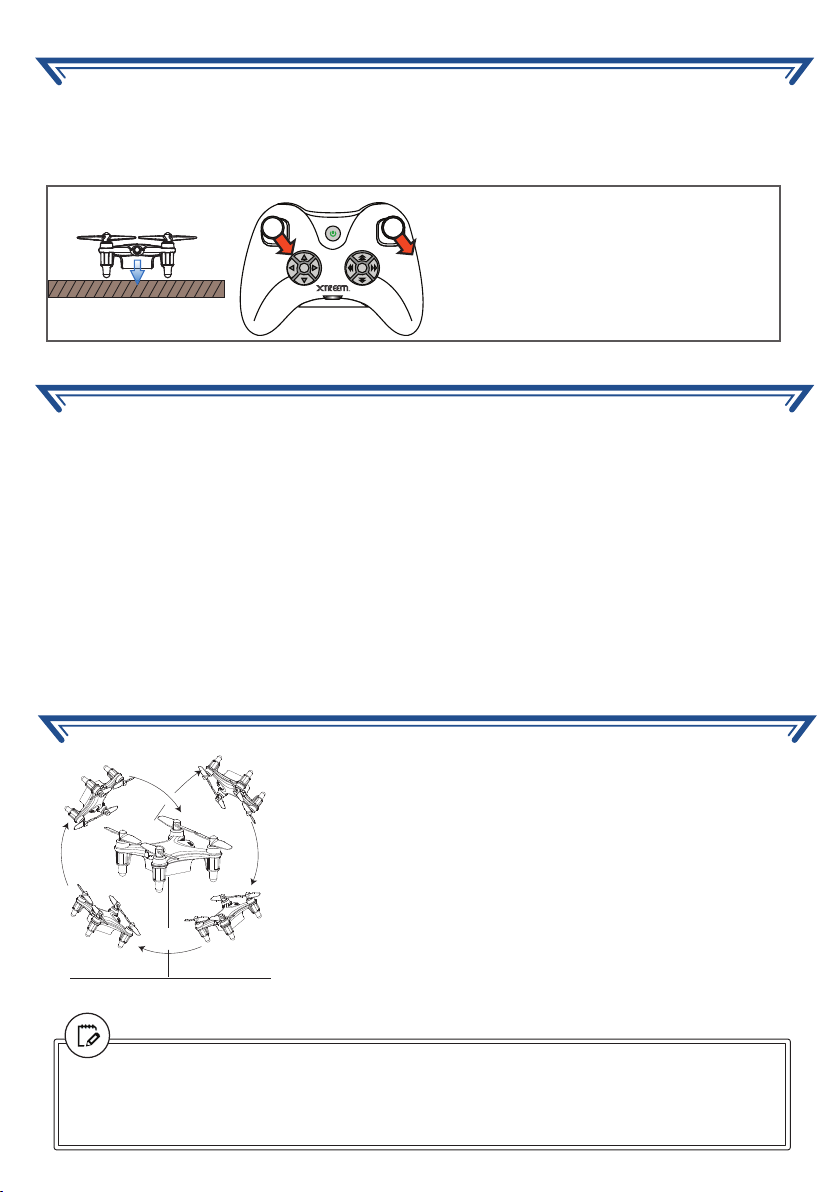
CALIBRATING YOUR ATOM
The Atom can sometimes not respond to the trim adjustments you make if it has experienced
numerous crashes against hard objects. In this situation, a recalibration of the Atom’s gyro
sensor is required. This procedure will usually correct a consistent drifting problem.
Hold the controller’s sticks in this
position until the Atom’s status lights
blink rapidly. Wait a few seconds for the
calibration process to finish. Once the
lights glow solid, you’re ready to fly again.
Stable, level s urface
OK
*
FLYING TIPS & TRICKS
• Small adjustments made slowly and carefully
are the best way to fly well. Be careful when
easing off the throttle – if the Atom stalls, it
will fall to the ground and even if you jam the
throttle back on, it might not be able to recover
in time.
• Use the controller’s left and right sticks at
different angles and positions to design and
execute some graceful, arcing turns.
Quick
thrusts of the stick in different directions can
create some unique tricks or stunts.
PERFORMING THE FLIP
Comfortable with the basic maneuvers? It’s time to progress
to some of the more advanced flying maneuvers like 360° flips.
To perform a 360° flip, bring the Atom to about 3 metres above
the ground. Press and hold the Flip Button on the controller
and then move the right stick in the direction you want to flip.
Immediately after flipping, carefully apply an amount of throttle
with the left stick to restore balance and minimize the loss of
3 meters
altitude.
When attempting flips, the higher up the Atom is from the
ground, the more space it will have to properly recover
afterward. We suggest performing flips in open-spaced places
free of obstructions.
• Perfom “pirouettes” by rotating around 360°
in the air.
• When the battery begins to run low, the Atom
will respond slowly or be unable to maintain
altitude easily. Before power to the motors
is cut off completely, gradually move the left
stick all the way down. This slows the rotors
until the Atom can land safely.
• You’ll know it’s time to recharge the Atom’s
batter y when the Atom is unable to take off
and its indicator starts blinking.
Want to perform thrilling stunts in high speed? The Hi/Low Button on the controller allows
you to toggle between high and low speed modes. Press once (the controller beeps twice) to
fly the Atom in High speed mode. Press again to return to Low speed mode (one beep).
7
Page 8

TROUBLESHOOTING
Q: Atom not responding to stick movements
and its status lights are blinking.
• Recharge the Atom.
Q: Rotors spin but Atom cannot lift off.
• Check the rotor blades for damage. Bent or
broken rotors can be replaced easily with
the spare rotors included in your package.
Simply pull the damaged rotor blade out of
its location on the motor shaft and replace it
with one of the new blades.
Q: Atom flies sideways on its own.
• Check for trapped dirt around the rotors.
Just a little strand of hair can cause the Atom
to fly out of control.
• Use the trim controls on the controller to
correct the drifting.
Q: Controller beeps constantly.
• Replace the batteries.
MAINTAINING YOUR ATOM
• Regularly inspect and clean any dirt trapped
around the rotors using a soft brush.
Accumulation of dirt puts additional stress
on the motor and may cause the rotor to spin
unevenly or even stop spinning completely.
• Wipe the toy clean with a slightly damp cloth
• Do not submerge in water. This will damage
the electronic components.
• Always remove the batteries from the
controller when not being used for extended
durations.
TECHNICAL SUPPORT DETAILS
All Countries E-mail: [email protected]
Telephone Helpdesk
USA Toll Free 1-800-627-2799
USA Parts & Warranty 1-800-627-2799
(M-F, 9am-5pm US PT)
AUSTRALIA 1300 138 324
NEW ZEAL AND Toll Free 0800 479 266
UK 0203 027 0979
FCC COMPLIANCE INFORMATION STATEMENT(FOR U.S.A.)
This device complies with part 15 of the FCC Rules. Operation is subject to the following two conditions:
(1) This device may not cause harmful interference, and
(2) This device must accept any interference received, including interference that may cause undesired
operation.
WARNING
Modifications not approved by the party responsible for compliance could void user’s authority to operate
the equipment.
8
 Loading...