

BATTERIESTARTHILFEGERÄT
BATTERY BOOSTER KIT
MADE IN GERMANY
SO STARTEN PROFIS
Originalbetriebsanleitung
Translation of the original operating instructions
Traduzione delle istruzioni di funzionamento originali
Traduction des instructions de service d’origine
SE
Översättning av bruksanvisningens original
ES
Traducción del manual de instrucciones de servicio original
XPA12/24 -2 | XPA12/24 -4 | XPA12/24 -6 | XPA12/24 -12
Index Stand 02 2018
DE ........................ 4 – 8
GB ........................ 9 – 13
IT ........................ 14 – 18
FR ........................ 19 – 23
ES ........................ 24 – 28
PT ........................ 29 – 33
NL ........................ 34 – 38
DK ........................ 39 – 43
NO ........................ 44 – 48
FI ........................ 49 – 53
SE ........................ 54 – 58
GR ........................ 59 – 63
TR ........................ 64 – 68
PL ........................ 69 – 73
HU ........................ 74 – 78
CZ ........................ 79 – 83
SK ........................ 84 – 88
RO ........................ 89 – 93
SI ........................ 94 – 98
BG ........................ 99 – 103
EE ........................ 104 – 108
LT ........................ 109 – 113
LV ........................ 114 – 118
RU ........................ 119 – 123
DE ........................ 4 – 8
GB ........................ 9 – 13
IT ........................ 14 – 18
FR ........................ 19 – 23
ES ........................ 24 – 28
PT ........................ 29 – 33
NL ........................ 34 – 38
DK ........................ 39 – 43
NO ........................ 44 – 48
FI ........................ 49 – 53
SE ........................ 54 – 58
DE ........................ 4 – 8
GB ........................ 9 – 13
IT ........................ 14 – 18
FR ........................ 19 – 23
ES ........................ 24 – 28
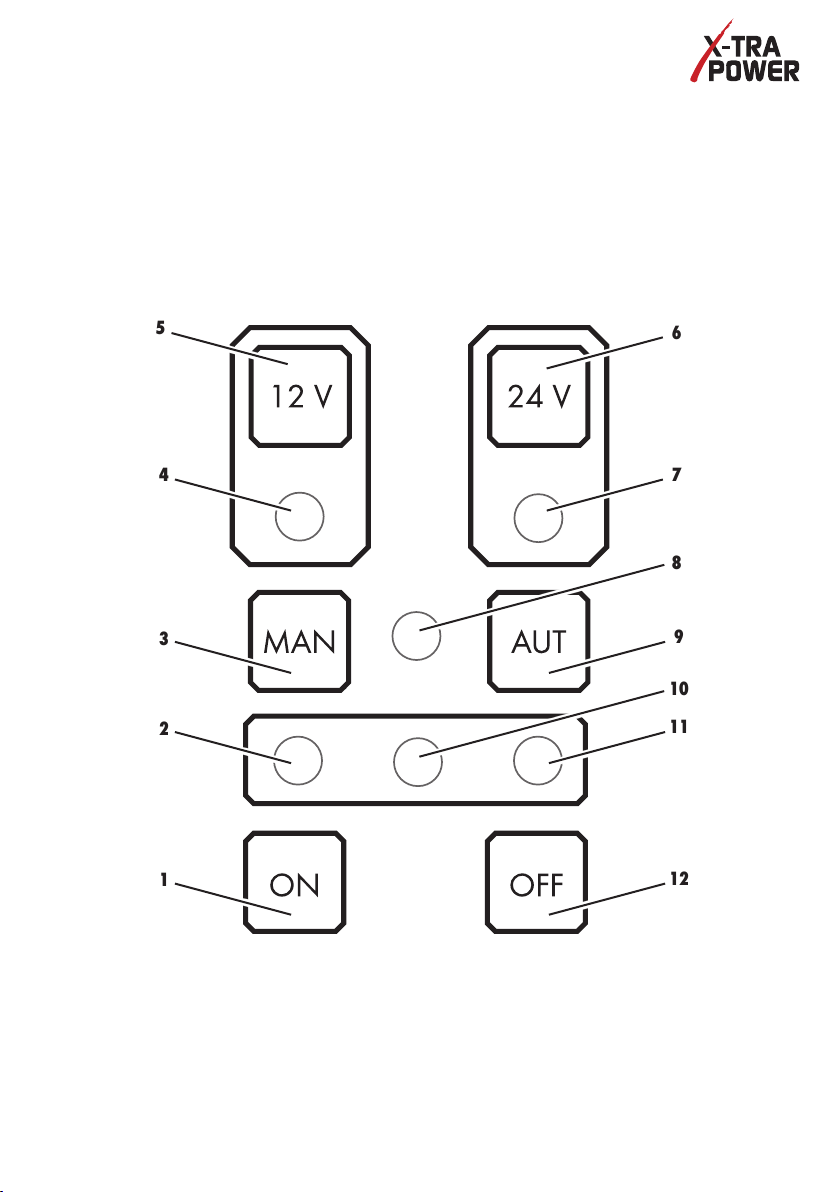
11
9
12
3
2
4
5
1
7
6
8
10

DE
Zu Ihrer Sicherheit
DE
Lesen Sie vor der ersten Benutzung
Ihres Gerätes diese Betriebsanleitung
und handeln Sie danach.
Bewahren Sie diese Betriebsanlei-
tung für den späteren Gebrauch
oder für Nachbesitzer auf.
WARNUNG - Vor erster Inbetrieb-
nahme Sicherheitshinweise
unbedingt lesen!
Bei Nichtbeachtung der Betriebsanleitung und
der Sicherheitshinweise können Schäden am
Gerät und Gefahren für den Bediener und andere
Personen entstehen.
Bei Transportschaden sofort Händler informieren.
Zu Ihrer Sicherheit
Lesen Sie vor der ersten Benutzung
Ihres Gerätes diese Betriebsanlei
tung und handeln Sie danach. Be-
wahren Sie diese Betriebsanleitung
für den späteren Gebrauch oder für
Nachbesitzer auf.
-
Sicherheitshinweise
Sicherheitshinweise
Hinweis
Hinweis
Es ist verboten Veränderungen am
Es ist verboten Veränderungen am
Gerät durchzuführen oder Zusatzge
Gerät durchzuführen oder Zusatzge-
räte herzustellen. Solche Änderungen
räte herzustellen. Solche Änderungen
können zu Personenschäden und
können zu Personenschäden und
Fehlfunktionen führen.
Fehlfunktionen führen.
■ Reparaturen am Gerät dürfen nur von hierzu
■ Reparaturen am Gerät dürfen nur von hierzu
beauftragten und geschulten Personen durchge
beauftragten und geschulten Personen durch-
führt werden. Hierbei stets die Originalersatzteile
geführt werden. Hierbei stets die Originaler-
der GmbH verwenden. Damit wird sichergestellt,
satzteile der Adolf Würth GmbH & Co. KG
dass die Sicherheit des Gerätes erhalten bleibt.
verwenden. Damit wird sichergestellt, dass die
Sicherheit des Gerätes erhalten bleibt.
Das Gerät gehört nicht in Kinderhän-
de und ist nicht geeignet für Personen
Das Gerät gehört nicht in Kinderhände
mit geistiger oder körperlicher
und ist nicht geeignet für Personen
Behinderung!
mit geistiger oder körperlicher Behin
derung!
Gerät nur in gut belüfteten Räumen
stehend laden und stehend
Gerät nur in gut belüfteten Räumen
betreiben!
stehend laden und stehend betreiben!
Feuer, offenes Licht und Funkenbil-
Feuer, oenes Licht und Funkenbil
dung vermeiden.
dung vermeiden.
Schutzbrille tragen.
WARNUNG - Vor erster Inbetrieb-
nahme Sicherheitshinweise
unbedingt lesen!
Bei Nichtbeachtung der Betriebsanleitung und der
Sicherheitshinweise können Schäden am Gerät
und Gefahren für den Bediener und andere Perso
nen entstehen.
Bei Transportschaden sofort Händler informieren.
Gerät nicht abdecken und vor Nässe
Gerät nicht abdecken und vor Nässe
-
schützen.
schützen.
Säurespritzer auf der Haut oder
Säurespritzer auf der Haut oder Klei
Kleidung sofort mit viel Wasser
dung sofort mit viel Wasser entfernen!
-
■ Polzangen niemals kurzschließen!
■ Polzangen niemals während des Startvor-
■ Polzangen niemals kurzschließen!
gangs abklemmen!
■ Polzangen niemals während des Startvor-gangs
■ Wenn anzunehmen ist, dass ein gefahrloser
-
abklemmen!
Betrieb nicht mehr möglich ist, das Gerät
■ Wenn anzunehmen ist, dass ein gefahrloser
unverzüglich außer Betrieb zu setzen und
Betrieb nicht mehr möglich ist, das Gerät un
gegen unbeabsichtigten Betrieb sichern. Ein
verzüglich außer Betrieb zu setzen und gegen
gefahrloser Betrieb ist nicht mehr anzunehmen
unbeabsichtigten Betrieb sichern. Ein gefahr
wenn das Gerät keine Funktion mehr zeigt,
loser Betrieb ist nicht mehr anzunehmen wenn
sichtbare Beschädigungen aufweist und bei
das Gerät keine Funktion mehr zeigt, sichtbare
-
Transportbeschädigungen.
Beschädigungen aufweist und bei Transportbe
■ Bei Verpolung Kurzschluss!
schädigungen.
■ Bei Verpolung Kurzschluss!
■ Nur Original Würth-Zubehör und
entfernen! Gegebenfalls einen Arzt
Gegebenfalls einen Arzt aufsuchen.
aufsuchen.
Das Gerät darf nicht in Umgebung
Das Gerät darf nicht in Umgebung
von brennbaren Gasen und Lö
von brennbaren Gasen und
sungsmitteln betrieben und geladen
Lösungsmitteln betrieben und
werden.
geladen werden.
Ersatzteile verwenden.
-
-
-
-
-
-
4
Bestimmungsgemäße
Verwendung
Das Gerät ist zum Starten von Fahrzeugen mit 12 V
oder 24 V Bordspannung zu verwenden, wenn die
im Fahrzeug eingebauten Batterien über zu wenig
Startleistung verfügen. Es dient weiterhin zum Ersatz
defekter 12 und 24 V Bordbatterien, um damit
einen
Start des Motors durchzuführen!
Jeder darüber hinausgehende Gebrauch gilt als
nicht bestimmungsgemäß.
Für Schäden bei nicht bestimmungsgemäßer
Verwendung haftet der Benutzer.
Bedienung (Abb. I)
Anschluss und Inbetriebnahme
Hinweis
Gerät vor dem ersten Gebrauch 24
Stunden laden!
Vorsicht
Der Verpolungsschutz ist nur bei
einer Batteriespannung > 4 V aktiv.
■ Sicherstellen. dass das Gerät aus ist.
■ Leitungen mit roter Polzange zuerst am Pluspol
anklemmen.
■ Leitung mit schwarzer Polzange an den Mi-nus
pol anklemmen.
■ Beim Anschließen auf guten Kontakt und festen
Sitz der Polzangen achten.
■ Gerät einschalten.
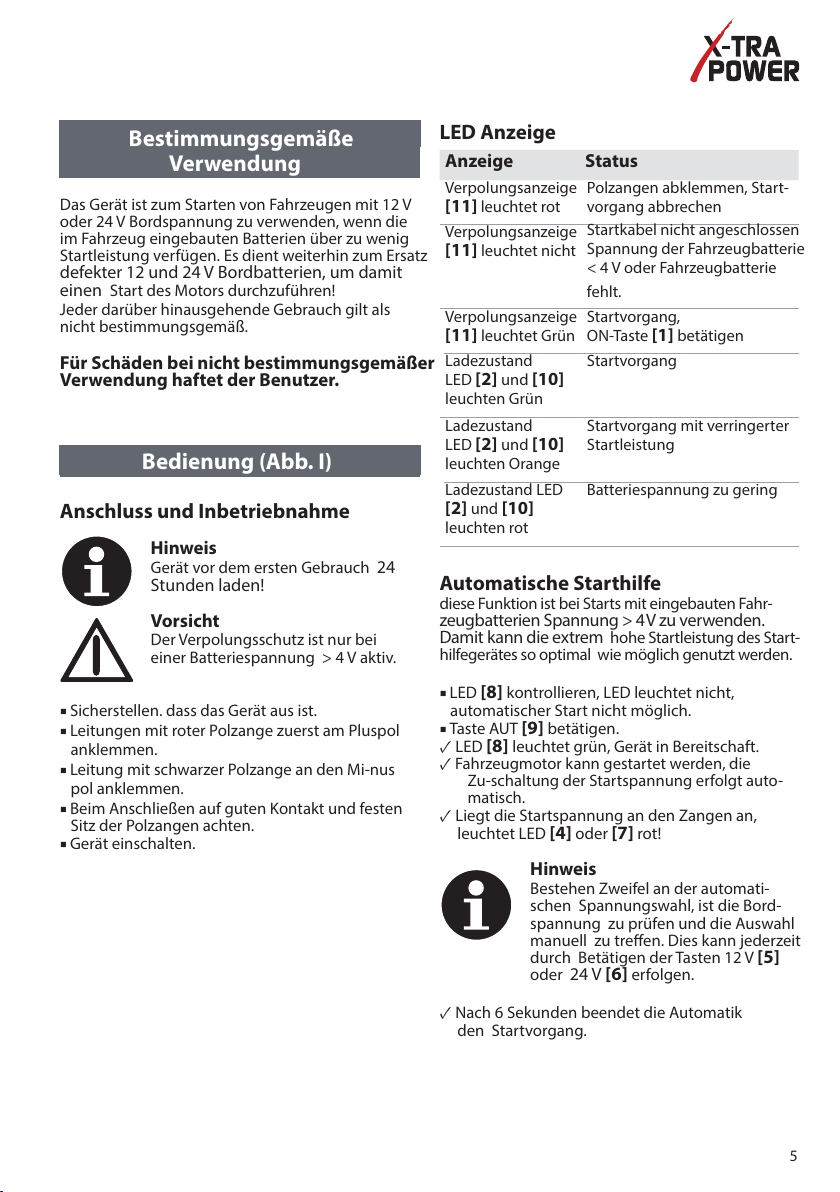
LED Anzeige
Anzeige Status
Verpolungsanzeige
[11] leuchtet rot
Verpolungsanzeige
[11] leuchtet nicht
Verpolungsanzeige
[11] leuchtet Grün
Ladezustand
[2] und [10]
LED
leuchten Grün
Ladezustand
[2] und [10]
LED
leuchten Orange
Ladezustand LED
Polzangen abklemmen, Start-
vorgang abbrechen
Startkabel nicht angeschlossen
Spannung der Fahrzeugbatterie
< 4 V oder Fahrzeugbatterie
fehlt.
Startvorgang,
ON-Taste
Startvorgang
Startvorgang mit verringerter
Startleistung
Batteriespannung zu gering
[1] betätigen
[2] und [10]
leuchten rot
Automatische Starthilfe
diese Funktion ist bei Starts mit eingebauten Fahr-
zeugbatterien Spannung > 4 V zu verwenden.
Damit kann die extrem
hilfegerätes so optimal wie möglich genutzt werden.
■ LED [8] kontrollieren, LED leuchtet nicht,
automatischer Start nicht möglich.
■ Taste AUT [9] betätigen.
✓ LED [8] leuchtet grün, Gerät in Bereitschaft.
✓ Fahrzeugmotor kann gestartet werden, die
Zu-schaltung der Startspannung erfolgt auto
matisch.
✓ Liegt die Startspannung an den Zangen an,
leuchtet LED
[4] oder [7] rot!
Hinweis
Bestehen Zweifel an der automati-
schen Spannungswahl, ist die Bord-
spannung zu prüfen und die Auswahl
manuell zu treen. Dies kann jederzeit
durch Betätigen der Tasten 12 V
oder 24 V [6] erfolgen.
hohe Startleistung des Start-
-
[5]
✓ Nach 6 Sekunden beendet die Automatik
den Startvorgang.
5
Hinweis
Nach einer Wartezeit von ca. 10
Sekunden kann der Startvorgang bis
zu 5 mal wiederholt werden. Danach
ist das Fahrzeug zu überprüfen und die
Gerätebatterie nachzuladen.
Starthilfe ohne Fahrzeugbatterie
Vorsicht
kein Verpolungsschutz bei dieser An-
wendung (Gegenspannung fehlt)!
Fahrzeugmotor läuft
■ Nach ca. 2 Minuten das Gerät ausschalten.
■ Polzangen abklemmen.
Manuelles Zuschalten der 12 V oder
24 V Spannungen
■ LED [8] kontrollieren.
■ Taste MAN [3] betätigen.
Achtung
Spannung an den Polzangen!
Starthilfe
■ Fahrzeugmotor starten.
Vorsicht
Gerät nach dem Starten nicht sofort
abklemmen oder ausschalten, da
die Bordelektronik und/oder die
Licht-maschine dadurch Schaden
nehmen können!
■ Gerät nach ca. 2 Minuten ausschalten.
■ Polzangen abklemmen.
Vorsicht
Läuft Motor nach 6 Sekunden nicht, so
ist der Startvorgang unverzüglich ab
zubrechen, da ansonsten Beschädigen
am Starthilfegerät und am Fahrzeug
auftreten können.
Hinweis
Nach einer Wartezeit von ca. 10
Sekunden kann der Startvorgang bis
zu 5 mal wiederholt werden. Danach
ist das Fahrzeug zu überprüfen und die
Gerätebatterie nachzuladen.
Hinweis
Nach ca. 45 Minuten schaltet die
Elektronik die Spannung ab, um ein
unbeabsichtigtes Entladen der Geräte
batterien zu vermeiden.
■ Anschluss der Polzangen direkt an Polklemmen
des Fahrzeuges.
■ Einschalten (ON-Taste drücken [1]).
■ Spannung auswählen (12V [5] oder 24V [6]).
■ Taste MAN [3] betätigen (deutliches Klicken zu
hören; die Schütze haben eingeschaltet; nun liegt
Strom auf den Klemmen des Starthilfegerätes an).
■ Motor starten (Bitte auf die Warnhinweise hin-
sichtlich max. Startversuchszeit achten – siehe
Anleitung).
■ Nach erfolgreichem Start des Motors das Starthil-
fegerät ausschalten (OFF-Taste drücken [12]).
■ Klemmen in umgedrehter Reihenfolge ab-klem-
men (zuerst schwarze Klemme (-) dann rote
Klemme (+)).
■ Starthilfegerät an das mitgelieferte Ladegerät
anschließen und auaden.
Vorsicht
Gerät nicht abklemmen oder aus-
schalten! Die Bordelektronik und/oder
die Lichtmaschine können dadurch
Schaden nehmen!
Motor läuft
■ Gerät ausschalten
■ Polzangen abklemmen.
Gerät laden
-
■ Gerät vor dem Erstgebrauch 24 Stunden laden.
■ Gerät ist nach jedem Startvorgang ans mitgelie-
ferte Ladegerät anzuschließen.
■ bei Anzeige LED Orange am externen Ladegerät
ist das Starthilfegerät geladen.
✓ Die weitere Verfügbarkeit des Gerätes ist
sichergestellt.
Hinweis
Gerät kann bedenkenlos ständig
an dem mitgelieferten Ladegerät
angeschlossen bleiben.
-
6

Hinweise zur Fehlersuche
Störung Ursache
LED Verpolung [11] leuchtet nicht. – Polzangen nicht angeschlossen.
LED Verpolung [11] leuchtet rot. – Polzangen falsch angeschlossen.
LED [2] und [10] leuchten rot. – Batterieladung der Startgerätebatterien zu
gering, Ladung nicht möglich.
– Spannung der Fahrzeugbatterie < 4 V oder Fahr
zeugbatterie fehlt.
Gerät schaltet sich nach dem Startversuch aus. – Fahrzeugbatterie verursacht Kurzschluss, defekte
Keine Spannung an den Klemmen – Interne Hochstromsicherung defekt
– Relais defekt
Wartung und Reinigung
Achtung!
Reinigung des Gerätes nur bei
gezogenem Netzstecker.
Umwelthinweise
Werfen Sie das Gerät keinesfalls in
den normalen Hausmüll. Entsor-
gen Sie das Gerät über einen
zugelassenen Entsorgungsbe-
trieb oder über Ihre kommunale
Entsorgungseinrichtung. Beach-
ten Sie die aktuell geltenden
Vorschriften. Setzen Sie
sich im Zweifelsfall mit Ihrer Entsorgungseinrich-
tung in Verbindung. Führen Sie alle Verpa-
ckungsmateria-lien einer umweltgerechten
Entsorgung zu.
Akkus/Batterien:
Werfen Sie Akkus/Batterien nicht in den Haus-
müll, ins Feuer oder ins Wasser. Akkus/Batterien
sollen gesammelt, recycelt oder auf umwelt-
freundliche Weise entsorgt werden.
Fahrzeugbatterie entfernen
Gewährleistung
Für dieses X-TRAPOWER-Gerät bieten wir
folgende Garantieleistung:
– Starthilfegerät und Ladegerät: 24 Monate
– Akku im Starthilfegerät: 12 Monate
– Die Ladezangen und Sicherungen sind auf-
grund von Verschleiß ausgeschlossen.
Der Garantieanspruch ist gültig ab Kaufdatum
(Nachweis durch Rechnung oder Lieferschein).
Entstandene Schäden werden durch Ersatz-
lieferung oder Reparatur beseitigt. Schäden,
die auf unsachgemäße Behandlung zurück-
zuführen sind, sind von der Gewährleistung
ausgeschlossen.
Beanstandungen können nur anerkannt wer-
den, wenn das Gerät unzerlegt X-TRAPOWER
oder einer von X-TRAPOWER autorisierten
Kundendienststelle übergeben wird. Techni-
sche Änderungen vorbehalten. Für Druckfehler
übernehmen wir keine Haftung.
Zubehör und Ersatzteile
Sollte das Gerät trotz sorgfältiger Herstell- und
Prüfverfahren einmal ausfallen, ist die Reparatur
von einem X-TRAPOWER Service ausführen zu las-
sen. In Deutschland erreichen Sie den X-TRAPO-
WER Service unter Tel. 09606 92 36 28 0. Bei
allen Rückfragen und Ersatzteilbestellungen bitte
unbedingt die Artikelnummer laut Typenschild
des Gerätes angeben.
7
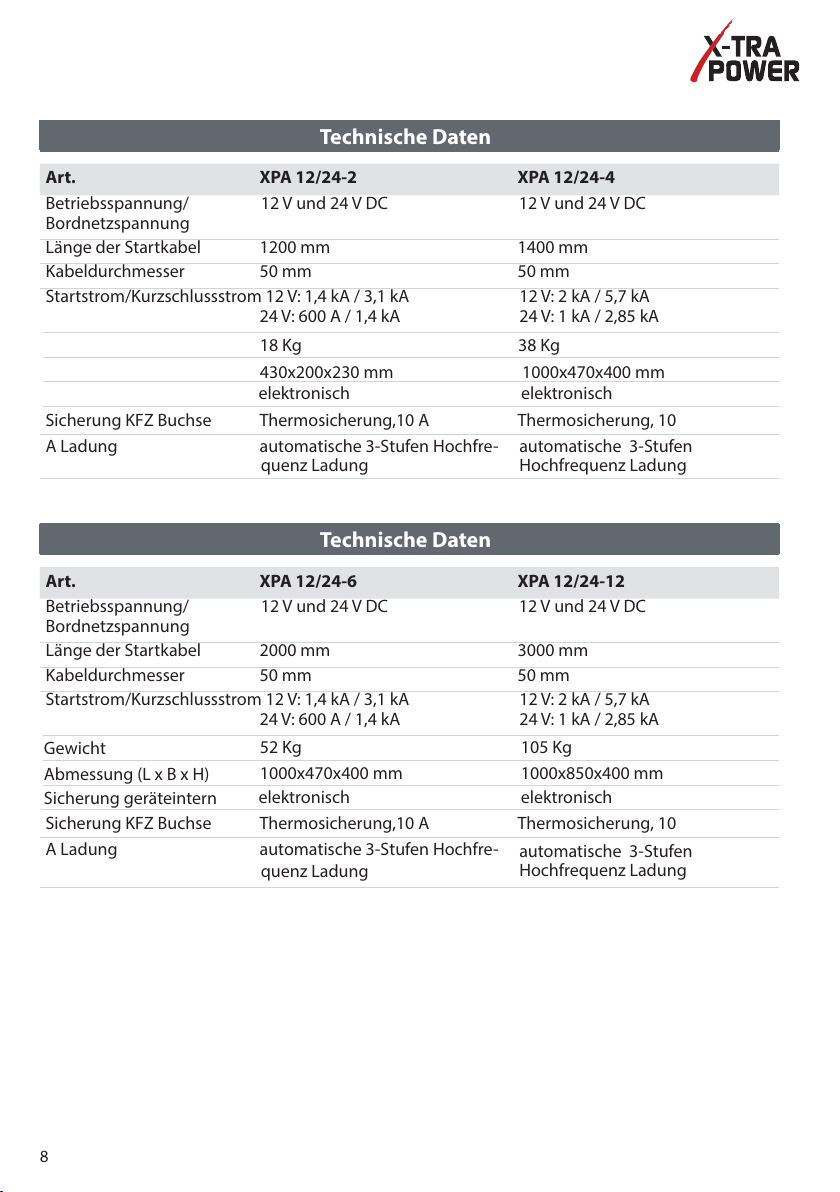
Technische Daten
Art. XPA 12/24-2 XPA 12/24-4
Betriebsspannung/
Bordnetzspannung
Länge der Startkabel 1200 mm 1400 mm
Kabeldurchmesser 50 mm 50 mm
Startstrom/Kurzschlussstrom 12 V: 1,4 kA / 3,1 kA
Gewicht
Abmessung (L x B x H)
Sicherung geräteintern
Sicherung KFZ Buchse Thermosicherung,10 A Thermosicherung, 10
A Ladung automatische 3-Stufen Hochfre-
12 V und 24 V DC 12 V und 24 V DC
24 V: 600 A / 1,4 kA
18 Kg
430x200x230 mm
elektronisch
quenz Ladung
12 V: 2 kA / 5,7 kA
24 V: 1 kA / 2,85 kA
38 Kg
1000x470x400 mm
elektronisch
automatische 3-Stufen
Hochfrequenz Ladung
Technische Daten
Art. XPA 12/24-6 XPA 12/24-12
Betriebsspannung/
Bordnetzspannung
Länge der Startkabel 2000 mm 3000 mm
Kabeldurchmesser 50 mm 50 mm
Startstrom/Kurzschlussstrom 12 V: 1,4 kA / 3,1 kA
Gewicht
Abmessung (L x B x H)
Sicherung geräteintern
Sicherung KFZ Buchse Thermosicherung,10 A Thermosicherung, 10
A Ladung automatische 3-Stufen Hochfre-
12 V und 24 V DC 12 V und 24 V DC
24 V: 600 A / 1,4 kA
52 Kg
1000x470x400 mm
elektronisch
quenz Ladung
12 V: 2 kA / 5,7 kA
24 V: 1 kA / 2,85 kA
105 Kg
1000x850x400 mm
elektronisch
automatische 3-Stufen
Hochfrequenz Ladung
8
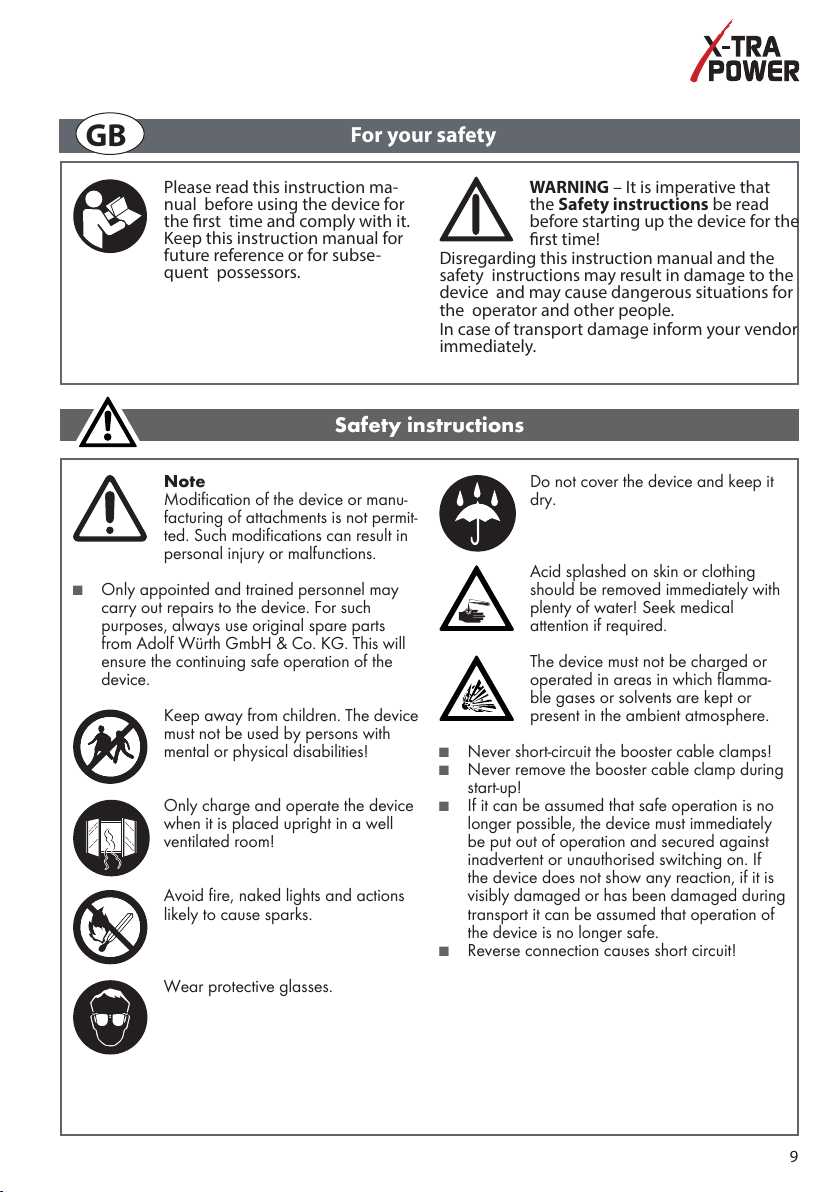
GB
For Your Safety
GB
Please read and comply with this
instruction manual prior to rst use of
your device.
Keep this instruction manual for
future reference or for subsequent
possessors.
WARNING - Prior to rst use
always read the Safety instruc-
tions!
Failure to observe the instruction manual and the
safety instructions could result in damage to the
device and danger for the operator and others.
In case of transport damage, inform your dealer
immediately.
For your safety
■
Only authorised and trained personnel are al-
■ Only appointed and trained personnel may
lowed to repair the device. Only use genuine
carry out repairs to the device. For such
spare parts from X-TRAPOWER GmbH. This is
purposes, always use original spare parts
to ensure and maintain safe operation of the
from Adolf Würth GmbH & Co. KG. This will
device.
ensure the continuing safe operation of the
device.
Please read this instruction ma-
nual before using the device for
the rst time and comply with it.
Keep this instruction manual for
future reference or for subse-
quent possessors.
Note
Note
It is not allowed to modify the de-
Modication of the device or manu-
vice or to manufacture additional
facturing of attachments is not permit-
devices. Such modications can
ted. Such modications can result in
cause injuries and malfunctions.
personal injury or malfunctions.
The device should always be kept
Keep away from children. The device
away from children. Persons with
must not be used by persons with
mental or physical limitations
mental or physical disabilities!
should not use the device!
Only charge and operate the
Only charge and operate the device
device when it is standing upright
when it is placed upright in a well
in a well ventilated room!
ventilated room!
Avoid re, naked lights and actions
Avoid re, naked lights and actions
likely to cause sparks.
likely to cause sparks.
Wear protective glasses.
Safety instructions
Safety instructions
WARNING – It is imperative that
the Safety instructions be read
before starting up the device for the
rst time!
Disregarding this instruction manual and the
safety instructions may result in damage to the
device and may cause dangerous situations for
the operator and other people.
In case of transport damage inform your vendor
immediately.
■ Never short-circuit the booster cable clamps!
■
Never short-circuit the booster cable clamps!
■ Never remove the booster cable clamp during
■
Never remove the booster cable clamp
start-up!
during start-up!
■ If it can be assumed that safe operation is no
■
If it can be assumed that safe operation is no
longer possible, the device must immediately
longer possible, the device must immedi-
be put out of operation and secured against
ately be put out of operation and secured
inadvertent or unauthorised switching on. If
against inadvertent or unauthorised swit-
the device does not show any reaction, if it is
ching on. If the device does not show any
visibly damaged or has been damaged during
reaction, if it is visibly damaged or has
transport it can be assumed that operation of
been damaged during transport it can be
the device is no longer safe.
assumed that operation of the device is
■ Reverse connection causes short circuit!
no longer safe.
■
Reverse connection causes short circuit!
■ Use only genuine Würth accessories
and spare parts.
■ Use only genuine X-TRAPOWER
accessories and spare parts.
Do not cover the device and keep it
dry.
Do not cover the device and keep
it dry.
Acid splashed on skin or clothing
Acid splashed on skin or clothing
should be removed immediately
should be removed immediately with
with plenty of water! Seek medi-
plenty of water! Seek medical
cal attention if required.
attention if required.
The device must not be charged
The device must not be charged or
or operated in areas in which
operated in areas in which amma-
ammable gases or solvents are
ble gases or solvents are kept or
kept or present in the ambient
present in the ambient atmosphere.
atmosphere.
9
Proper use
Proper use
The device is to be used for starting up vehicles
The device is to be used for starting up vehicles with
with an on-board voltage of 12 V or 24 V if
an on-board voltage of 12V or 24V if the start-up
the start-up capacity of the vehicle batteries is
capacity of the vehicle batteries is insufcient. In
insufcient. In addition it can be used to replace
addition it can be used to replace defective on-
defective on-board 12 V and 24 V batteries in
board 12V and 24V batteries in order to start up
order to start up the engine!
the engine!
Any other use is considered improper use.
Any other use is considered improper use.
The user is liable for damage resulting from
The user is liable for damage resulting
improper use.
from improper use.
Operation (g. I)
Operation (g. I)
Connection and taking into service
Connection and taking into service
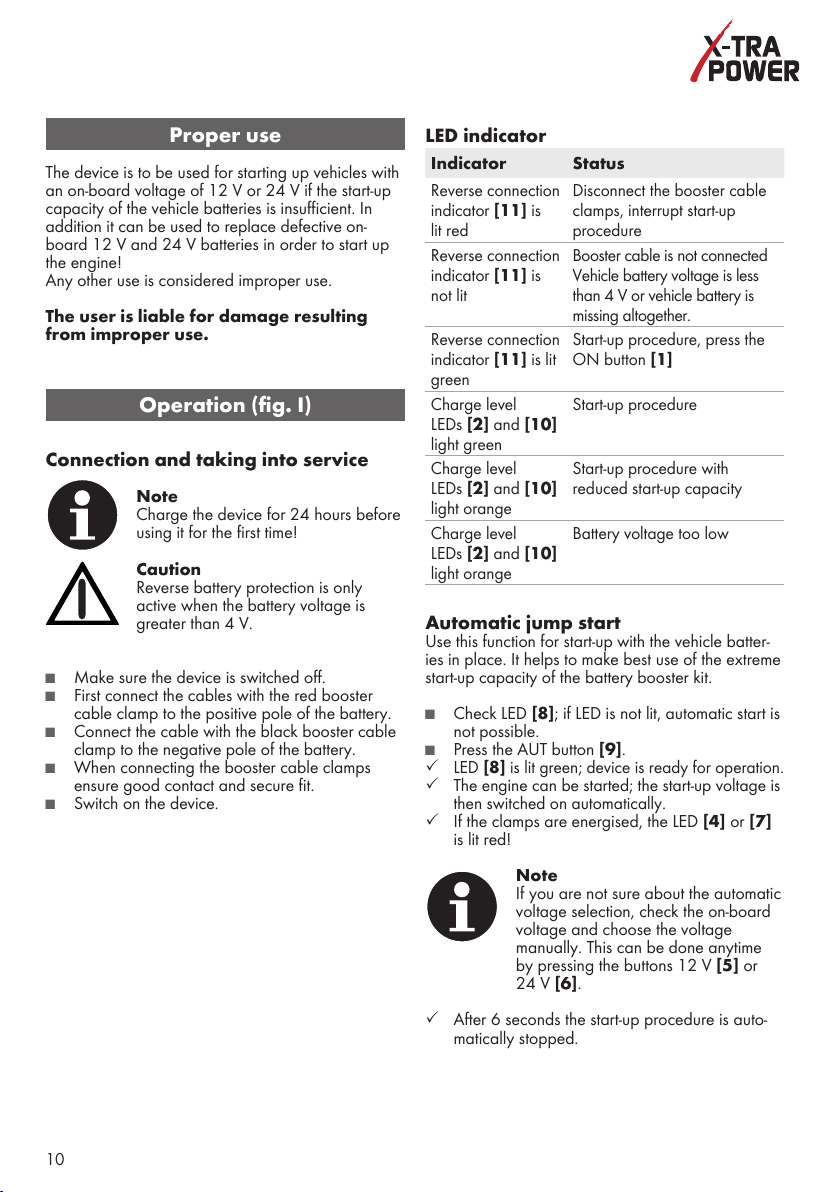
Note
Note
Charge the device for 24 hours befo-
Charge the device for 24hours before
re using it for the rst time!
using it for the rst time!
Caution
Caution
Reverse battery protection is only
Reverse battery protection is only
active when the battery voltage is
active when the battery voltage is
greater than 4 V.
greater than 4V.
■ Make sure the device is switched off.
■ Make sure the device is switched off.
■ First connect the cables with the red booster
■ First connect the cables with the red booster
cable clamp to the positive pole of the
cable clamp to the positive pole of the battery.
battery.
■ Connect the cable with the black booster cable
■ Connect the cable with the black booster cable
clamp to the negative pole of the battery.
clamp to the negative pole of the battery.
■ When connecting the booster cable clamps
■ When connecting the booster cable clamps
ensure good contact and secure t.
ensure good contact and secure t.
■ Switch on the device.
Switch on the device.
■
LED indicator
LED indicator
Indicator Status
Indicator Status
Reverse connection
Reverse connection
indicator [11] is lit
indicator [11] is
red
lit red
Reverse connection
Reverse connection
indicator [11] is
indicator [11] is
not lit
not lit
Reverse connection
Reverse connection
indicator [11] is lit
indicator [11] is lit
green
green
Charge level
Charge level
LEDs [2] and [10]
LEDs [2] and [10]
light green
light green
Charge level
Charge level
LEDs [2] and [10]
LEDs [2] and [10]
light orange
light orange
Charge level
Charge level
LEDs [2] and [10]
LEDs [2] and [10]
light orange
light orange
Automatic jump start
Automatic jump start
Use this function for start-up with the vehicle
Use this function for start-up with the vehicle batter-
batteries in place. It helps to make best use of the
ies in place. It helps to make best use of the extreme
extreme start-up capacity of the battery booster
start-up capacity of the battery booster kit.
kit.
■ Check LED [8]; if LED is not lit, automatic start is
■ Check LED [8]; if LED is not lit, automatic
not possible.
start is not possible.
■ Press the AUT button [9].
■ Press the AUT button [9].
3 LED [8] is lit green; device is ready for operation.
3 LED [8] is lit green; device is ready for opera-
3 The engine can be started; the start-up voltage is
tion.
then switched on automatically.
3 The engine can be started; the start-up voltage
3 If the clamps are energised, the LED [4] or [7]
is then switched on automatically.
is lit red!
3 If the clamps are energised, the LED [4] or [7]
is lit red!
3 After 6 seconds the start-up procedure is auto-
matically stopped.
3 After 6 seconds the start-up procedure is auto-
Disconnect the booster cable
Disconnect the booster cable
clamps, interrupt start-up
clamps, interrupt start-up
procedure
procedure
Booster cable is not connected
Booster cable is not connected
Vehicle battery voltage is less
Vehicle battery voltage is less
than 4 V or vehicle battery is
than 4V or vehicle battery is
missing altogether.
missing altogether.
Start-up procedure, press the
Start-up procedure, press the
ON button [1]
ON button [1]
Start-up procedure
Start-up procedure
Start-up procedure with
Start-up procedure with
reduced start-up capacity
reduced start-up capacity
Battery voltage too low
Battery voltage too low
Note
If you are not sure about the automatic
Note
voltage selection, check the on-board
If you are not sure about the auto-
voltage and choose the voltage
matic voltage selection, check the
manually. This can be done anytime
on-board voltage and choose the
by pressing the buttons 12V [5] or
voltage manually. This can be done
24V [6].
anytime by pressing the buttons 12
V [5] or 24 V [6].
matically stopped.
10
10
Note
Note
After a waiting time of approx. 10
After a waiting time of approx. 10sec-
seconds the start-up procedure can
onds the start-up procedure can be re-
be repeated up to 5 times. Then the
peated up to 5times. Then the vehicle
vehicle must be checked and the bat-
must be checked and the battery of the
tery of the device must be charged.
Engine is running
■Switch off the device after approx. 2 minu-
Engine is running
tes.
■ Switch off the device after approx. 2 minutes.
■ Remove booster cable clamps.
■ Remove booster cable clamps.
Switching on 12 V or 24 V voltage
Switching on 12V or 24V voltage
manually
manually
■ Check LED [8].
■ Check LED [8].
■ Press the MAN button [3].
■ Press the MAN button [3].
device must be charged.
Important
Important
Booster cable clamps are
Booster cable clamps are live!
live!
Jump start
Jump start
■ Start engine of the vehicle.
■ Start engine of the vehicle.
Caution
Caution
Do not disconnect or switch off the
Do not disconnect or switch off the de-
de-
vice directly after start-up as otherwise
vice directly after start-up as other-
the on-board electronics and/or the
wise the on-board electronics and/
generator may be damaged!
■Switch off the device after approx. 2 minutes.
■ Switch off the device after approx. 2 minutes.
■ Remove booster cable clamps.
■ Remove booster cable clamps.
Caution
Caution
If the engine is not running after
If the engine is not running after 6sec-
6 seconds, the start-up procedure
onds, the start-up procedure must be
must be interrupted immediately as
interrupted immediately as otherwise
otherwise the battery booster kit and
the battery booster kit and the vehicle
the vehicle may be damaged.
may be damaged.
Note
Note
After a waiting time of approx. 10
After a waiting time of approx. 10sec-
sec-onds the start-up procedure can
be repeated up to 5 times. Then the
onds the start-up procedure can be re-
vehicle must be checked and the bat-
peated up to 5times. Then the vehicle
tery of the device must be charged.
must be checked and the battery of the
device must be charged.
Note
The electronic control switches off
Note
the voltage after approx. 45 minutes
The electronic control switches off the
in order to avoid unintentional
voltage after approx. 45minutes in
discharge of the device batteries.
order to avoid unintentional discharge
of the device batteries.
Jumpstart without vehicle battery
Jumpstart without vehicle battery
Caution
Caution
Reverse connection protection
Reverse connection protection not
not active with this application
active with this application (inverse
(inverse voltage missing)!
voltage missing)!
■ Connect the booster cable clamps directly to the
■ Connect the booster cable clamps directly to the
vehicle‘s battery terminals.
vehicle's battery terminals.
■ Swith on (press ON button [1].
■ Swith on (press ON button [1].
■ Select the voltage (12V [5] or 24V [6]).
■ Select the voltage (12V [5] or 24V [6]).
■ Press the MAN button [3] (You shoud hear an
■ Press the MAN button [3] (You shoud hear an
audible „click“; the contactors are switched on
audible "click"; the contactors are switched on
and the terminals of the battery booster kit are
and the terminals of the battery booster kit are
live).
live).
■ Start the engine (please pay attention to the
■ Start the engine (please pay attention to the
warnings with regard to the maximum allowed
start-up time - see instructions).
warnings with regard to the maximum allowed
■ After starting up the engine successfully, swich
start-up time - see instructions).
the battery booster kit off (press the OFF
■ After starting up the engine successfully, swich
button [12]).
the battery booster kit off (press the OFF
■Disconnect the terminals in reverse order (at rst
button [12]).
disconnect the black terminal (-) than the red
■ Disconnect the terminals in reverse order (at rst
terminal (+)).
disconnect the black terminal (-) than the red
■ Connect the battery booster kit to the supplied
terminal (+)).
charger and charge it.
■ Connect the battery booster kit to the supplied
charger and charge it.
or the generator may be damaged!
Caution
Caution
Do not disconnect or switch off the
Do not disconnect or switch off the
device! Otherwise the on-board elec-
device! Otherwise the on-board
tronics and/or the generator may be
elec-tronics and/or the generator
damaged!
may be damaged!
Engine is running
Engine is running
■ Switch off the device
■ Switch off the device
■ Remove booster cable clamps.
■ Remove booster cable clamps.
Charging
Charging
■Charge the device for 24 hours before using it
■ Charge the device for 24hours before using it
for the rst time.
for the rst time.
■ Connect the device to the charger provided
■ Connect the device to the charger provided
after each start-up.
after each start-up.
3 This will ensure that the device remains ready
3 This will ensure that the device remains ready
for use.
for use.
Note
Note
It is not a problem to have the
It is not a problem to have the device
device connected to the charger
connected to the charger provided
provided permanently.
permanently.
11
11

Notes on troubleshooting
Malfunction Cause
Reverse connection LED [11] is not lit.
– Booster cable clamps are not connected.
– Vehicle battery voltage is less than 4V or vehicle bat-
tery is missing altogether.
Reverse connection LED [11] is lit red.
LEDs [2] and [10] light red.
Device switches off after start-up attempt. – Vehicle causes a short circuit; remove defective
Cleaning and maintenance
Important!
The device may only be cleaned
with the mains plug disconnec-
ted.
Environmental protection
Do not dispose of the device with
domestic waste. Have the device
disposed of by an authorised waste
management company or your
municipal waste management or-
ganisation. Adhere to the applicab-
le regulations. In case of doubt
contact your waste management organisa-
tion. Recycle all packaging material in an
environmentally friendly manner.
– Booster cable clamps are connected incorrectly.
– Charge of booster kit too low; charging not possible.
vehicle battery
Warranty
For this X-TRAPOWER appliance the following
guarantees apply:
–Battery booster kit and charger: 24 months
–Battery in battery booster kit: 12 months
–Cable clamps and fuses are excluded as they
are wear parts.
The warranty period starts with the date of
purchase (veried by invoice or delivery do-
cument). Faults covered by warranty shall be
eliminated by replacement or repair. Damage
caused by improper operation is not covered by
warranty.
Claims under warranty shall only be considered
if the device is returned fully assembled to a
X-TRAPOWER a customer service workshop for
electrical equipment authorised by X-TRAPO-
WER. Technical changes reserved. We accept no
liability for printing errors.
Batteries:
Do not dispose of batteries with domestic
waste, do not expose to re or water. Collect
and recycle batteries or dispose of with due
care for the environment.
12
Accessories and spare parts
In the unlikely event of a failure or defect, have
the device repaired by a X-TRAPOWER work-shop.
In all your queries and spare part orders, always
quote the product number (see type plate) of
your device.

Technical specications
Item XPA 12/24-2 XPA 12/24-4
Operating voltage/
12 V and 24 V DC 12 V and 24 V DC
On-board voltage
Booster cable length 1,200 mm 1,400 mm
Cable diameter 50 mm 50 mm
Starting current/Short-cir-
cuit current
12 V: 1.4 kA / 3.1 kA
24 V: 600 A / 1.4 kA
12 V: 2 kA / 5,7 kA
24 V: 1 kA / 2.85 kA
Weight 18 kg 38 kg
Dimensions (L x W x H) 430 x 200 x 230 mm 1000 x 470 x 400 mm
Fuse integrated into the device
Fuse of jack at rear side Thermal fuse, 10 A Thermal fuse, 10 A
Charging automatic 3 level high frequency
electronic electronic
charging
automatic 3 level high
frequency charging
Technical specications
Item XPA 12/24-6 XPA 12/24-12
Operating voltage/
On-board voltage
Booster cable length 2000 mm 3000 mm
Cable diameter 50 mm 50 mm
Starting current/Short-cir-
cuit current
Weight 52 kg 105 kg
Dimensions (L x W x H) 1000x470x400 mm 1000x850x400 mm
Fuse integrated into the device
Fuse of jack at rear side Thermal fuse, 10 A Thermal fuse, 10 A
Charging automatic 3 level high frequency
12 V and 24 V DC 12 V and 24 V DC
12 V: 1.4 kA / 3.1 kA
24 V: 600 A / 1.4 kA
12 V: 2 kA / 5,7 kA
24 V: 1 kA / 2.85 kA
electronic electronic
charging
automatic 3 level high frequen-
cy charging
13

IT
Informazioni per la sicurezza
IT
Prima di utilizzare l'apparecchio per
la prima volta, leggere e seguire
queste istruzioni per l'uso.
Conservare le presenti istruzioni per
una futura consultazione o per con-
segnarle ai successivi proprietari.
AVVERTENZA - Prima di mettere in
funzione l'apparecchio per la prima
volta leggere attentamente le
Avvertenze di sicurezza.
La mancata osservanza delle istruzioni d'uso
e delle norme di sicurezza può causare danni
all'apparecchio e presentare pericoli per l'utente e
le altre persone.
Eventuali danni di trasporto vanno comunicati
immediatamente al proprio rivenditore.
Per la Vostra sicurezza
■
I lavori di riparazione sull‘apparecchio posso-
no essere eseguiti solo da personale incari-
■ Ilavori di riparazione sull'apparecchio pos-
cato e con adeguata formazione. Per questi
sono essere eseguiti solo da personale inca-
lavori utilizzare sempre i pezzi di ricambio
ricato e con adeguata formazione. Per questi
originali della X-trapower GmbH. In questo
lavori utilizzare sempre i pezzi di ricambio
modo è garantita la sicurezza dell‘apparec-
originali della Adolf Würth GmbH & Co.
chio elettrico.
KG. In questo modo è garantita la sicurezza
dell'apparecchio.
Prima di utilizzare l‘apparecchio
per la prima volta, leggere e segui-
re queste istruzioni per l‘uso.
Conservare le presenti istruzioni
per una futura consultazione o per
consegnarle ai successivi proprie-
tari.
Nota
È vietato apportare modiche
Nota
all‘apparecchio o realizzare dis-
Èvietato apportare modiche all'ap-
positivi aggiuntivi. Tali modiche
parecchio o realizzare dispositivi
possono portare a danni alle
persone e ad anomalie di funzio-
aggiuntivi! Tali modiche possono
namento.
portare a danni alle persone e ad
anomalie di funzionamento.
Conservare il dispositivo lontano
Conservare il dispositivo lontano
dalla portata dei bambini, si
dalla portata dei bambini, si scon-
sconsiglia l'uso da parte di persone
siglia l‘uso da parte di persone
con disabilità mentale o sica!
con disabilità mentale o sica!
Utilizzare il dispositivo e lasciarlo in
Utilizzare il dispositivo e lasciarlo
carica soltanto in luogo ben
in carica soltanto in luogo ben
ventilato!
ventilato!
Tenere il dispositivo lontano da
Tenere il dispositivo lonta-
fuoco, amme vive e scintille.
no da fuoco, amme vive e
scintille.
Avvertenze di sicurezza
Avvertenze di sicurezza
AVVERTENZA - Prima di mettere
in funzione l‘apparecchio per la
prima volta leggere attentamen-
te le Avvertenze di sicurezza!
La mancata osservanza delle istruzioni d‘uso
e delle norme di sicurezza può causare danni
all‘apparecchio e presentare pericoli per
l‘utente e le altre persone.
Eventuali danni di trasporto vanno comunica-
ti immediatamente al proprio rivenditore.
■
Non cortocircuitare mai le pinze polari!
■
Non scollegare mai le pinze durante
■ Non cortocircuitare mai le pinze polari!
l‘avviamento!
■ Non scollegare mai le pinze durante l'avvia-
■
Se il dispositivo non garantisce un uso in
mento!
sicurezza, metterlo immediatamente fuori
■ Se il dispositivo non garantisce un uso in
servizio e assicurarsi che non venga utilizza-
sicurezza, metterlo immediatamente fuori
to accidentalmente. L‘uso in sicurezza non è
servizio e assicurarsi che non venga utilizzato
garantito quando il dispositivo non funziona
accidentalmente. L'uso in sicurezza non è
correttamente, quando sono presenti danni
garantito quando il dispositivo non funziona
visibili e nel caso di danni durante il trasporto.
correttamente, quando sono presenti danni
visibili e nel caso di danni durante il trasporto.
■
Corto circuito per inversione di polarità!
■ Corto circuito per inversione di polarità!
Utilizzare solo accessori e pezzi di
■
■ Utilizzare solo accessori e pezzi di
ricambio originali X-trapower.
ricambio originali Würth.
Non coprire il dispositivo e
proteggerlo dall‘umidità.
Non coprire il dispositivo e
proteggerlo dall'umidità.
Rimuovere immediatamente, con
abbondante acqua, gli schizzi di
Rimuovere immediatamente, con
acido dalla pelle o dagli indumen-
abbondante acqua, gli schizzi di
ti! Se necessario, consultare un
acido dalla pelle o dagli indumenti!
medico.
Se necessario, consultare un medico.
Il dispositivo non può essere usato
Il dispositivo non può essere usato e
e caricato in prossimità di gas
caricato in prossimità di gas
inammabili e solventi.
inammabili e solventi.
14
Indossare occhiali di protezione.

Uso conforme a destinazione
Uso conforme a destinazione
Il dispositivo deve essere utilizzato per avviare
Il dispositivo deve essere utilizzato per avviare i
i veicoli con tensione di 12 V o di 24 V, se le
veicoli con tensione di 12 V o di 24 V, se le batterie
batterie del veicolo dispongono di una potenza di
del veicolo dispongono di una potenza di avvia-
avvia-mento insufciente. Esso serve anche per
mento insufciente. Esso serve anche per sostituire
sostituire nell‘avviamento del motore le batterie di
nell'avviamento del motore le batterie di 12 e 24 V
12 e 24 V difettose!
difettose!
Qualunque utilizzo diverso da quelli indicati si
Qualunque utilizzo diverso da quelli indicati si
considera utilizzo non conforme.
considera utilizzo non conforme.
La responsabilità per i danni dovuti ad un uti-
La responsabilità per i danni dovuti ad un
lizzo non conforme alle norme è esclusi-vamente
utilizzo non conforme alle norme è esclusi-
dell‘utente.
vamente dell'utente.
Comandi (Imm. I)
Comandi (Imm. I)
Collegamento e messa in funzione
Collegamento e messa in funzione
Nota
Nota
Prima della messa in funzione inizi-
Prima della messa in funzione iniziale
ale mettere sotto carica il dispositi-
mettere sotto carica il dispositivo per
vo per 24 ore!
24 ore!
Attenzione
Attenzione
La protezione contro l‘inversione
La protezione contro l'inversione di
di polarità è attiva solo con una
polarità è attiva solo con una tensione
tensione di > 4 V.
di > 4 V.
■ Assicurarsi che l‘apparecchio sia spento.
■ Assicurarsi che l'apparecchio sia spento.
■ Collegare al polo positivo i cavi con la pinza
■ Collegare al polo positivo i cavi con la pinza
rossa.
rossa.
■ Collegare il cavo con la pinza nera al polo
■ Collegare il cavo con la pinza nera al polo
negativo.
negativo.
■ Durante il collegamento fare attenzione a che
■ Durante il collegamento fare attenzione a che le
le pinze siano collegate correttamente e
pinze siano collegate correttamente e stabil-
stabil-mente.
mente.
■ Accendere l’apparecchio.
■ Accendere l’apparecchio.
Indicatore LED
Indicatore LED
Visualizzazione Stato
Visualizzazione Stato
L‘indicatore di inversione
L'indicatore di inversione di
di polarità [11] emette luce
polarità [11] emette luce
rossa
rossa
L‘indicatore di inversio
L'indicatore di inversione di
ne di polarità [11] non è
polarità [11] non è acceso
acceso
L‘indicatore di inversione
L'indicatore di inversione di
di polarità [11] emette luce
polarità [11] emette luce
verde
verde
Stato di carica
Stato di carica
I LED [2] e [10] emettono
I LED [2] e [10] emettono
luce verdi
luce verdi
Stato di carica
Stato di carica
I LED [2] e [10] emettono
I LED [2] e [10] emettono
luce arancione
luce arancione
Stato di carica
Stato di carica
I LED [2] e [10] emettono
I LED [2] e [10] emettono
luce rossa
luce rossa
Avviatore automatico di emergenza
Avviatore automatico di emergenza
Questa funzione va utilizzata nei casi di avvia-
Questa funzione va utilizzata nei casi di avviamento
mento tramite le batterie dell‘auto. Le prestazioni
tramite le batterie dell'auto. Le prestazioni estrema-
estremamente elevate del dispositivo per l‘avvia-
mente elevate del dispositivo per l'avviamento di
mento di emergenza possono essere utilizzate al
emergenza possono essere utilizzate al meglio.
meglio.
■ Controllare il LED [8] , esso non emette luce,
■ Controllare il LED [8] , esso non emette luce,
l'avviamento automatico non è possibile.
l‘avviamento automatico non è possibile.
■ Premere il tasto AUT [9].
■ Premere il tasto AUT [9].
3 Il LED [8] emette luce verde, dispositivo pronto
3 Il LED [8] emette luce verde, dispositivo
all'uso.
pronto all‘uso.
3 Il motore del veicolo può essere avviato, l'attiva-
3 Il motore del veicolo può essere avviato,
zione della corrente di avviamento è automatica.
l‘attiva-zione della corrente di avviamento è
3 Se la corrente di avviamento è presente nelle
automatica.
pinze, i LED [4] o [7] emettono luce rossa!
3 Se la corrente di avviamento è presente nelle
pinze, i LED [4] o [7] emettono luce rossa!
Nota
Se ci sono dubbi sulla selezione
Nota
automatica della tensione, va vericata
Se ci sono dubbi sulla selezione au-
la tensione di bordo ed effettuata la
tomatica della tensione, va vericata
selezione manuale. Questo è possibile
la tensione di bordo ed effettuata la
in qualsiasi momento premendo i tasti
selezione manuale. Questo è possibi-
12 V [5] o 24 V [6].
le in qualsiasi momento premendo i
3 Dopo 6 secondi il processo di avviamento
termina automaticamente.
3 Dopo 6 secondi il processo di avviamento
tasti 12 V [5] o 24 V [6].
Scollegare le pinze,
Scollegare le pinze,
interrompere l‘avvia
interrompere l'avvia-
mento
mento
-
Cavo di avviamento
Cavo di avviamento
non collegato
non collegato
Tensione della
Tensione della batteria
batteria del veicolo
del veicolo <4 V o
<4 V o
batteria mancante.
batteria mancante.
Avviamento, premere
Avviamento, premere
il pulsante ON [1]
il pulsante ON [1]
Avviamento
Avviamento
Processo di
Processo di avvia-
avvia-mento con
mento con potenza
potenza
ridotta
ridotta
Tensione della batte-
Tensione della bat
ria troppo bassa
te-ria troppo bassa
-
termina automaticamente.
15
15

Nota
Nota
Dopo un tempo di attesa di circa 10
Dopo un tempo di attesa di circa 10
secondi, l‘avviamento può essere
secondi, l'avviamento può essere
ripetuto no a 5 volte. Successiva-
ripetuto no a 5 volte. Successivamen-
men-te va controllato il veicolo e
te va controllato il veicolo e ricaricata
ricaricata la batteria.
la batteria.
Il motore del veicolo è in funzione
Il motore del veicolo è in funzione
■ Spegnere il dispositivo dopo circa 2 minuti.
■ Spegnere il dispositivo dopo circa 2 minuti.
■ scollegare le pinze.
■ scollegare le pinze.
Collegamento manuale delle tensioni a
Collegamento manuale delle tensioni
12 V o a 24 V
a 12 V o a 24 V
■ Controllare il LED [8].
■ Controllare il LED [8].
■ Premere il tasto MAN [3].
■ Premere il tasto MAN [3].
Attenzione
Attenzione
Tensione nelle pinze!
Tensione nelle pinze!
Avviatore d‘emergenza
Avviatore d'emergenza
■ Avviare il motore.
■ Avviare il motore.
Attenzione
Attenzione
Non scollegare o spegnere il dispo-
Non scollegare o spegnere il dispositi-
siti-vo subito dopo l‘avviamento,
vo subito dopo l'avviamento, in quanto
in quanto l‘elettronica di bordo
l'elettronica di bordo e/o l'alternatore
e/o l‘alternatore potrebbero subire
potrebbero subire danni!
■ Spegnere il dispositivo dopo circa 2 minuti.
■ Spegnere il dispositivo dopo circa 2 minuti.
■ scollegare le pinze.
■ scollegare le pinze.
Attenzione
Attenzione
Se il motore non si avvia dopo 6 se-
Se il motore non si avvia dopo 6
condi, l‘avviamento deve essere in-
secondi, l'avviamento deve essere
terrotto immediatamente, per evitare
interrotto immediatamente, per evitare
danni al dispositivo per l‘avviamento
danni al dispositivo per l'avviamento di
di emergenza e al veicolo.
emergenza e al veicolo.
Nota
Nota
Dopo un tempo di attesa di circa 10
Dopo un tempo di attesa di circa 10
secondi, l‘avviamento può essere
secondi, l'avviamento può essere
ripetuto no a 5 volte. Successiva-
ripetuto no a 5 volte. Successivamen-
men-te va controllato il veicolo e
te va controllato il veicolo e ricaricata
ricaricata la batteria.
la batteria.
Nota
Nota
Dopo circa 45 minuti, l‘elettroni-
Dopo circa 45 minuti, l'elettronica
ca disattiva la tensione al ne di
disattiva la tensione al ne di impedire
impedire che le batterie portatili si
che le batterie portatili si scarichino
scarichino accidentalmente.
accidentalmente.
Avviatore d‘emergenza senza batte-ria
Avviatore d'emergenza senza batte-
del veicolo
ria del veicolo
Attenzione
Attenzione
Nessuna protezione contro l‘inversi-
Nessuna protezione contro l'inversione
one di polarità in questa applicazio-
di polarità in questa applicazione
ne (Problema tensione inversa)!
(Problema tensione inversa)!
■ Collegamento delle pinze direttamente ai
■ Collegamento delle pinze direttamente ai mor-
mor-setti del veicolo.
setti del veicolo.
■ Accensione (premere il pulsante ON [1]).
■ Accensione (premere il pulsante ON [1]).
■ Regolare la tensione (12V [5] o 24V [6]).
■ Regolare la tensione (12V [5] o 24V [6]).
■ Azionare il tasto MAN [3] (Si sentirà chia-ra-
■ Azionare il tasto MAN [3] (Si sentirà chia-
mente un „clic“; i giunti vengono attivati; la
ramente un "clic"; i giunti vengono attivati; la
corrente è presente sui terminali del dispositi-
corrente è presente sui terminali del dispositivo
vo per l‘avviamento di emergenza).
per l'avviamento di emergenza).
■ Avviare il motore (Prestare attenzione alle
■ Avviare il motore (Prestare attenzione alle avver-
avver-tenze relative al tempo di avviamento
tenze relative al tempo di avviamento massimo
massimo – consultare le istruzioni).
– consultare le istruzioni).
■ Dopo l‘avviamento corretto del motore,
■ Dopo l'avviamento corretto del motore, spe-
spe-gnere l‘avviatore di emergenze (premere
gnere l'avviatore di emergenze (premere il tasto
il tasto OFF [12]).
OFF [12]).
■ Scollegare i morsetti in ordine inverso (prima il
■ Scollegare i morsetti in ordine inverso (prima il
terminale nero (-) poi il terminale rosso (+)).
terminale nero (-) poi il terminale rosso (+)).
■ Collegare e caricare il dispositivo per l‘av-vi-
■ Collegare e caricare il dispositivo per l'av-
amento di emergenza nel caricabatterie in
viamento di emergenza nel caricabatterie in
dotazione.
dotazione.
danni!
Attenzione
Attenzione
Non scollegare né disattivare il dispo-
Non scollegare né disattivare il
sitivo! L'elettronica di bordo e/o l'alter-
dispo-sitivo! L‘elettronica di bordo
natore possono venire danneggiati!
e/o l‘alter-natore possono venire
Il motore è avviato
■ Spegnere l’apparecchio
Il motore è avviato
■ scollegare le pinze.
■ Spegnere l’apparecchio
■ scollegare le pinze.
Caricare il dispositivo
■ Prima della messa in funzione iniziale mettere
Caricare il dispositivo
■ Prima della messa in funzione iniziale mettere
■ Il dispositivo va collegato al caricatore in dota-
sotto carica il dispositivo per 24 ore.
■ Il dispositivo va collegato al caricatore in do-
3 La disponibilità futura del dispositivo è garantita.
ta-zione dopo ogni processo di avviamento.
3 La disponibilità futura del dispositivo è garan-
tita.
danneggiati!
sotto carica il dispositivo per 24 ore.
zione dopo ogni processo di avviamento.
Nota
Il dispositivo può rimanere perma-
nentemente collegato al caricatore
Nota
in dotazione senza che questo causi
Il dispositivo può rimanere perma-
alcun problema .
nentemente collegato al caricatore
in dotazione senza che questo
causi alcun problema .
16
16

Guida alla localizzazione dei guasti
Guida alla localizzazione dei guasti
Anomalia Causa
Anomalia Causa
Il LED dell‘inversione di polarità [11] emette
Il LED dell'inversione di polarità [11] emette luce
luce rossa.
rossa.
Il LED dell‘inversione di polarità [11] emette
Il LED dell'inversione di polarità [11] emette luce
luce rossa.
rossa.
I LED [2] e [10] emettono luce rossa. –Carica insufciente delle batterie di avviamento
I LED [2] e [10] emettono luce rossa.
I LED [4] e [7] emettono luce rossa. – Nessuna tensione presente nelle pinze, l‘avvia-
men-
Il dispositivo si spegne dopo il tentativo di avvia-
mento.
Il dispositivo si spegne dopo il tentativo di
avvia-mento.
– Le pinze non sono collegate.
– Le pinze non sono collegate.
– Tensione della batteria del veicolo <4 V o
– Tensione della batteria del veicolo <4 V o batteria
batteria mancante.
mancante.
– Corto circuito in una cella della batteria del
veicolo
– Le pinze sono collegate in maniera errata.
– Le pinze sono collegate in maniera errata.
– Carica insufciente delle batterie di avviamento
portatili, la carica non è possibile.
portatili, la carica non è possibile.
– La batteria del veicolo causa un cortocircuito,
to non è possibile.
rimuovere la batteria difettosa
– La carica delle batterie del dispositivo di avviamen-
to è insufciente.
– Fusibile interno danneggiato.
– La batteria del veicolo causa un cortocircuito,
rimuovere la batteria difettosa
Manutenzione e pulizia
Attenzione!
Pulire l‘apparecchio esclusiva-
mente con la spina staccata
dall‘alimentazione.
Avvisi ambientali
Non gettare in nessun caso
l‘apparecchio nei riuti domestici.
Smaltire l‘apparecchio per mezzo
di un’azienda di smaltimento
autorizzata o di un istituto di
smaltimento comunale. Rispettare
le prescrizioni legali attualmente in
vigore. In caso di
dubbi contattare l‘istituto di smaltimento.
Smaltire i materiali d’imballaggio in base alle
normative di protezione dell‘ambiente.
Accumulatori/batterie:
Non gettare accumulatori/batteria tra i riuti
domestici, nel fuoco o nell‘acqua. Gli accumula-
tori/ le batteria devono essere raccolti, riciclati
o smaltiti correttamente nel rispetto dell‘am-
biente.
Garanzia
Per questo dispositivo
seguentegaranzia:
– Avviatore di emergenze e caricatore: 24 mesi
– Accumulatore nel dispositivo per l‘avviamento
di emergenza: 12 mesi
– Le pinze e i fusibili sono esclusi a causa
dell‘usura.
La garanzia è valida dalla data di acquis-
to (da dimostrare con fattura o bolla di
accompagnamento).
Eventuali danni dell‘apparecchio saranno
riparati oppure sarà sostituito l’apparecchio. Si
esclude la garanzia per i danni riconducibili ad
un uso improprio.
Le richieste potranno essere riconosciute sol-
tanto se il dispositivo viene consegnato integro
ad X-TRAPOWER o al servizio di assistenza
clienti autorizzato da X-TRAPOWER. Modiche
tecniche riservate.
Non ci assumiamo alcuna responsabilità per
errori di stampa.
X-TRAPOWER, oriamo la
Accessori e pezzi di ricambio
Se il dispositivo, nonostante l‘accurata procedu-
ra di produzione e controllo dovesse rompersi,
farlo riparare da un Service X-TRAPOWER. Per
qualsiasi domanda od ordinazione di ricambi,
indicare sempre il numero dell’articolo indicato
sulla targhetta identicativa dell’apparecchio.
17

Dati tecnici
Art. 0772 122 42 0772 122 44
Tensione d‘esercizio/
Tensione della rete di bordo
Lunghezza del cavo di
avviamento
Diametro del cavo 50 mm 50 mm
Corrente di avviamento/
Corrente di corto circuito
Peso 18 kg 38 kg
Dimensione (L x L x H) 430 x 200 x 230 mm 1000 x 470 x 400 mm
Fusibile all‘interno
del dispositivo
Fusibile della boccola
dell‘autoveicolo
Carica carica automatica a 3 stadi ad alta
12 V e 24 V DC 12 V e 24 V DC
1200 mm 1400 mm
12 V: 1,4 kA/3,1 kA
24 V: 600 A/1,4 kA
elettronico elettronico
Fusibile termico, 10 A Fusibile termico, 10 A
frequenza
12 V: 2 kA/5,7 kA
24 V: 1 kA/2,85 kA
carica automatica a 3 stadi ad alta
frequenza
Dati tecnici
Art. XPA 12/24-6 XPA 12/24-12
Tensione d‘esercizio/
Tensione della rete di bordo
Lunghezza del cavo di
avviamento
Diametro del cavo 50 mm 50 mm
Corrente di avviamento/
Corrente di corto circuito
Peso
Dimensione (L x L x H)
Fusibile all‘interno
del dispositivo
Fusibile della boccola
dell‘autoveicolo
Carica carica automatica a 3 stadi ad alta
12 V und 24 V DC 12 V und 24 V DC
2000 mm 3000 mm
12 V: 1,4 kA/3,1 kA
24 V: 600 A/1,4 kA
52 Kg
1000x470x400 mm
elettronico
Fusibile termico, 10 A Fusibile termico, 10 A
frequenza
12 V: 2 kA/5,7 kA
24 V: 1 kA/2,85 kA
105 Kg
1000x850x400 mm
elettronico
carica automatica a 3 stadi ad alta
frequenza
18

FR
Pour votre sécurité
FR
Veuillez lire attentivement le présent
mode d’emploi et le respecter à la
lettre avant d’utiliser l’appareil pour
la première fois.
Conservez le présent mode d’emploi
en vue d’une utilisation ultérieure ou
de sa remise à ses éventuels futurs
propriétaires.
AVERTISSEMENT-Avant la
première mise en service, lire
impérativement les consignes de
sécurité!
Un non-respect de ce mode d’emploi et des
consignes de sécurité risque non seulement d’en-
dommager l’appareil, mais également de mettre
en danger l’opérateur et d’autres personnes.
En cas de dommages dus au transport, informer
immédiatement le revendeur.
Pour votre sécurité
Lire attentivement le présent mode
d’emploi et respecter les consignes
y
gurant avant d‘utiliser l‘appareil
pour la première fois.
Conserver ce mode d’emploi pour
toute utilisation ultérieure ou en
vue de le remettre à un éventuel
repreneur.
Consignes de sécurité
Consignes de sécurité
Remarque
Remarque
Il est défendu de modier l‘appa-
Il est interdit de procéder à des
reil ou de fabriquer des appareils
modications sur l’appareil ou de fa-
auxiliaires, utilisés conjointement.
briquer tout équipement additionnel.
De telles modications risquent de
De telles modications pourraient
provoquer des dommages corporels
entraîner des dommages corporels
et des dysfonctionnements.
et être à l’origine de dysfonctionne-
■ Seules les personnes mandatées et formées à
cette n peuvent eectuer des réparations
■ Les réparations sur l’appareil ne doivent être
sur l‘appareil. Toujours employer en l‘occur-rence
effectuées que par des personnesmandatées
les pièces de rechange originales de la société
et formées. Veiller ce faisant à ce que les
X-TRAPOWER GmbH. Il est ainsi garanti que la
pièces de rechange utilisées soient toutes
sécurité de l‘appareil est préservée.
d'origine Adolf Würth GmbH & Co. KG. Ceci
ments.
permet de préserver la sécurité de l’appareil.
AVERTISSEMENT - Avant toute
mise en service, lire impérativement
les
consignes de sécurité !
L‘inobservation de ce mode d‘emploi et des
consignes de sécurité risque de causer des
dommages sur l‘appareil mais aussi de mettre
en danger l‘opérateur et d‘autres personnes.
Contacter immédiatement le distributeur en cas
détériorations dues au transport.
Ne pas recouvrir l'appareil et le
protéger de l'humidité.
Ne pas recouvrir l‘appareil et le
protéger de l‘humidité.
Éliminer immédiatement les
éclaboussures d'acide sur la peau ou
Éliminer immédiatement les écla
les vêtements avec abondamment
boussures d‘acide sur la peau ou
d'eau! Consulter un médecin si
les vêtements avec abondamment
nécessaire.
d‘eau ! Consulter un médecin si
nécessaire.
-
Ne pas charger et faire fonctionner
l'appareil à proximité de gaz et de
Ne pas charger et faire fonctionner
solvants inammables.
l‘appareil à proximité de gaz et de
solvants inammables.
Maintenir l'appareil hors de la
portée des enfants et des personnes
Maintenir l‘appareil hors de la portée
atteintes de handicaps physiques ou
des enfants et des personnes atteintes
mentaux!
de handicaps physiques ou
mentaux !
Charger et faire fonctionner
l'appareil uniquement en position
Charger et faire fonctionner l‘appa-
verticale et dans des pièces bien
reil uniquement en position vertica-
aérées!
le et dans des pièces bien aérées !
Éviter toute exposition au feu, à la
lumière du jour et toute formation
Éviter toute exposition au feu, à la
d'étincelles.
lumière du jour et toute formation
d‘étincelles.
Porter des lunettes de protection.
■
Ne jamais court-circuiter les pinces polaires!
■ Ne jamais court-circuiter les pinces polaires!
■ Ne jamais déconnecter les pinces polaires
■ Ne jamais déconnecter les pinces polaires
durant le démarrage !
durant le démarrage!
■ S'il est à supposer qu'un fonctionnement sans
■
S‘il est à supposer qu‘un fonctionnement
risque n'est plus possible, mettre immédia-
sans risque n‘est plus possible, mettre immé
dia-tement l‘appareil hors service et le sécuriser
tement l'appareil hors service et le sécuriser
contre toute remise en marche involontaire. Un
contre toute remise enmarche involontaire. Un
fonctionnement sans risque est exclu lorsque
fonctionnement sans risque est exclu lorsque
l‘appareil présente des dommages visibles ou a
l'appareil présente des dommages visibles ou
été endommagé lors du transport.
a été endommagé lors du transport.
■ Court-circuit en cas d'inversion des pôles!
■ Court-circuit en cas d‘inversion des pôles !
■ N'utiliser que des accessoires et
■ N‘utiliser que des accessoires et des
pièces de rechange d'origine Würth.
pièces de rechange provenant de
-
X-TRAPOWER.
19

Utilisation conforme aux
Utilisation conforme aux
prescriptions
prescriptions
Utiliser l‘appareil pour le démarrage des véhicules dis-
Utiliser l'appareil pour le démarrage des véhicules
posant d‘une tension de bord de 12 V ou 24 V lorsque
disposant d'une tension de bord de 12 V ou 24 V
la puissance de démarrage des batteries intégrées dans
lorsque la puissance de démarrage des batteries
le véhicule est trop faible. Il sert éga-lement à rempla
intégrées dans le véhicule est trop faible. Il sert éga-
cer les batteries de bord 12 et 24 V défectueuses et
lement à remplacer les batteries de bord 12 et 24 V
démarrer ainsi le moteur !
défectueuses et démarrer ainsi le moteur!
considérée comme non conforme.
Toute autre utilisation est considérée comme non
conforme.
L‘utilisateur est tenu responsable des
dom-mages imputables à une utilisation non
L'utilisateur est tenu responsable des dom-
conforme aux prescriptions.
mages imputables à une utilisation non
Toute autre utilisation est
conforme aux prescriptions.
Utilisation (g. I)
Utilisation (g. I)
Raccordement et mise en service
Raccordement et mise en service
Remarque
Remarque
Charger l‘appareil pendant 24 heures
Charger l'appareil pendant 24 heures
avant de l‘utiliser pour la première
avant de l'utiliser pour la première
fois !
fois!
Attention
Attention
La protection contre les inversions de
La protection contre les inversions de
polarité est uniquement active lorsque
polarité est uniquement active lorsque
la tension de la batterie est > 4 V.
la tension de la batterie est > 4 V.
■ S‘assurer que l‘appareil est éteint.
■ S'assurer que l'appareil est éteint.
■ Connecter d‘abord la pince polaire rouge au pôle
■ Connecter d'abord la pince polaire rouge au
positif.
pôle positif.
■ Connecter la pince polaire noire au pôle négatif.
■ Connecter la pince polaire noire au pôle
■ Lors du raccordement, veiller à ce que les pinces
négatif.
soient parfaitement xées et à ce que le contact
■ Lors du raccordement, veiller à ce que les pinces
soit parfaitement établi. ■ Démarrer l‘appareil.
soient parfaitement xées et à ce que le contact
soit parfaitement établi.
■ Démarrer l'appareil.
20
20
Afchage DEL
Affichage DEL
Afchage Statut
Afchage Statut
La DEL d‘inversion des
La DEL d'inversion des
pôles [11] est allumée
pôles [11] est allumée
en rouge
en rouge
La DEL d‘inversion des
-
La DEL d'inversion des
[11] ne s‘allume
pôles
pôles [11] ne s'allume
pas
pas
La DEL d‘inversion des
La DEL d'inversion des
[11] est allumée
pôles
pôles [11] est allumée
en vert
en vert
État de charge
État de charge
Les DEL [2] et [10] sont
Les DEL
allumées en vert
État de charge
Les DEL
allumées en orange
État de charge
Les DEL
allumées en rouge
Aide au démarrage automatique
Aide au démarrage automatique
utiliser cette fonction en cas de démarrages avec des
utiliser cette fonction en cas de démarrages avec
batteries de véhicules intégrées. Ceci permet
des batteries de véhicules intégrées. Ceci permet
ploiter la puissance de démarrage extrêmement
d'exploiter la puissance de démarrage extrêmement
élevée de l‘auxiliaire de démarrage de manière la
élevée de l'auxiliaire de démarrage de manière la
plus optimale possible.
plus optimale possible.
■ Contrôler la DEL [8] , la DEL ne s‘allume pas,
démarrage automatique impossible.
■ Actionner la touche AUT [9] .
3 La DEL [8] est allumée en vert, l‘appareil est prêt
3 Le moteur du véhicule peut être démarré, la mise
3 En présence de tension de démarrage au niveau des
3 Au terme de 6 secondes, l‘automatique met
[2] et [10] sont
allumées en vert
État de charge
Les DEL [2] et [10] sont
[2] et [10] sont
allumées en orange
État de charge
Les DEL [2] et [10] sont
[2] et [10] sont
allumées en rouge
■ Contrôler la DEL [8] , la DEL ne s'allume pas,
démarrage automatique impossible.
■ Actionner la touche AUT [9] .
3 La DEL [8] est allumée en vert, l'appareil est
à fonctionner.
prêt à fonctionner.
3 Le moteur du véhicule peut être démarré, la mise
en circuit de la tension de démarrage s‘effectue
en circuit de la tension de démarrage s'effectue
automatiquement.
automatiquement.
3 En présence de tension de démarrage au niveau
pinces, la DEL
des pinces, la DEL [4] ou [7] est allumée en rouge!
Remarque
Remarque
En cas de doute concernant la sélec-
En cas de doute concernant la sélec-
tion de tension automatique, contrôler
tion de tension automatique, contrôler
la tension de bord puis effectuer la
la tension de bord puis effectuer la
sélection manuellement. Ceci est pos
sélection manuellement. Ceci est pos-
sible à tout moment en actionnant les
sible à tout moment en actionnant les
touches 12 V
touches 12 V [5] ou 24V [6].
3 Au terme de 6 secondes, l'automatique met
terme au processus de démarrage.
terme au processus de démarrage.
Déconnecter les pinces
Déconnecter les pinces
polaires, interrompre le
polaires, interrompre le
démarrage
démarrage
Le câble de démarrage
Le câble de démarrage
n‘est pas raccordé La
n'est pas raccordé
tension de la batterie du
La tension de la batterie
véhicule est < 4 V ou
du véhicule est < 4 V ou
manquante.
manquante.
Démarrage, actionner la
Démarrage, actionner la
touche ON
touche ON [1]
Démarrage
Démarrage
Démarrage avec une puis
Démarrage avec une
sance de démarrage
puissance de démarrage
réduite
réduite
Tension de la batterie trop
Tension de la batterie
faible
trop faible
[1]
d‘ex-
[4] ou [7] est allumée en rou
[5] ou 24 V [6].
-
-

Remarque
Remarque
Le processus de démarrage peut être
Le processus de démarrage peut être
répété jusqu'à 5 fois après un temps
répété jusqu‘à 5 fois après un temps
d'attente de 10 sec. environ. Vérier
d‘attente de 10 sec. environ. Véri-
er
ensuite le véhicule puis recharger
ensuite le véhicule puis recharger la
la batterie de l‘appareil.
batterie de l'appareil.
Le moteur du véhicule tourne
Le moteur du véhicule tourne
■ Éteindre l'appareil au terme de 2 minutes env.
■ Éteindre l‘appareil au terme de 2 minutes env.
■ déconnecter les pinces polaires.
■ déconnecter les pinces polaires.
Mise en circuit manuelle des tensions
Mise en circuit manuelle des tensions
12 V et 24 V
12 V et 24 V
■ Contrôler la DEL [8].
■ Contrôler la DEL [8].
■ Actionner la touche MAN [3].
■ Actionner la touche MAN [3].
Attention
Attention
Tension au niveau des pinces polaires!
Tension au niveau des pinces
polaires !
Auxiliaire de démarrage
Auxiliaire de démarrage
■ Démarrer le moteur du véhicule.
■ Démarrer le moteur du véhicule.
Attention
Attention
Ne pas débrancher ou éteindre l'appa-
Ne pas débrancher ou éteindre l‘appa-
reil immédiatement après le démarrage
reil immédiatement après le démarrage
au risque de détériorer l'électronique
au risque de détériorer l‘électronique
de bord et/ou la dynamo!
bord et/ou la dynamo !
■ Éteindre l'appareil au terme de 2 minutes env.
■ Éteindre l‘appareil au terme de 2 minutes env.
■ déconnecter les pinces polaires.
■ déconnecter les pinces polaires.
Attention
Attention
Si le moteur ne démarre pas au
Si le moteur ne démarre pas au terme
terme de 6 secondes, interrompre
de 6 secondes, interrompre alors immé
alors immédiatement le processus de
diatement le processus de démarrage
an d‘éviter tout endomma
démarrage an d'éviter tout endomma-
de l‘auxiliaire de démarrage et
gement de l'auxiliaire de démarrage et
véhicule.
du véhicule.
Remarque
Remarque
Le processus de démarrage peut être
Le processus de démarrage peut être
répété jusqu‘à 5 fois après un temps
répété jusqu'à 5 fois après un temps
d‘attente de 10 sec. environ. Vérier
d'attente de 10 sec. environ. Vérier
ensuite le véhicule puis recharger la
ensuite le véhicule puis recharger la
batterie de l‘appareil.
batterie de l'appareil.
Remarque
Remarque
Au terme de 45 min. environ,
Au terme de 45 min. environ, l'élec-
l‘élec-
tronique éteint la tension an
tronique éteint la tension an d'éviter
d‘éviter
un déchargement involontaire des
des batteries de l‘appareil.
batteries de l'appareil.
un déchargement involontaire
-gement
du
Aide au démarrage sans batterie de
Aide au démarrage sans batterie de
véhicule
véhicule
Attention
Attention
Pas de protection contre l'inversion des
Pas de protection contre l‘inversion des
pôles pour cette application (la tension
pôles pour cette application (la tension
opposée fait défaut) !
opposée fait défaut) !
■ Raccorder les pinces polaires directement aux
■Raccorder les pinces polaires directement aux
bornes polaires du véhicule.
bornes polaires du véhicule.
■ Mise en marche (appuyer sur la touche ON [1]).
■ Mise en marche (appuyer sur la touche ON [1]).
■ Sélectionner la tension (12V [5] ou 24V [6]).
■ Sélectionner la tension (12V [5] ou 24V [6]).
■ Activer la touche MAN [3] (clic nettement au-
■ Activer la touche MAN [3] (clic nettement au-dible
dible ; les protections se sont mises en marche;
; les protections se sont mises en marche; le
le courant circule désormais dans les bornes de
courant circule désormais dans les bornes de
l‘auxiliaire de démarrage).
l'auxiliaire de démarrage).
■ Démarrer le moteur (veiller aux avertissements
■Démarrer le moteur (veiller aux avertissements
relatifs à la durée max. de la tentative de
relatifs à la durée max. de la tentative de
marrage - voir instructions).
démarrage - voir instructions).
■Éteindre l‘auxiliaire de démarrage après réus-
■ Éteindre l'auxiliaire de démarrage après
site du démarrage (appuyer sur la touche OFF
réussite du démarrage (appuyer sur la touche
[12]).
OFF [12]).
■ Déconnecter les bornes dans l‘ordre inverse
■ Déconnecter les bornes dans l'ordre inverse
(d‘abord la borne noire (-) puis la borne rouge
(d'abord la borne noire (-) puis la borne
(+)).
rouge (+)).
■Brancher l‘auxiliaire de démarrage au chargeur
■ Brancher l'auxiliaire de démarrage au chargeur
fourni dans le volume de livraison et charger.
fourni dans le volume de livraison et charger.
Attention
de
Attention
Ne pas déconnecter ou arrêter l'appa-
Ne pas déconnecter ou arrêter l‘ap-
reil! Ceci risquerait d'endommager
pa-reil ! Ceci risquerait d‘endom-
l'électronique de bord et la dynamo!
mager l‘électronique de bord et la
dynamo !
Le moteur tourne
■ Mise hors service de l'appareil
■ déconnecter les pinces polaires.
Le moteur tourne
■ Mise hors service de l‘appareil
-
Charger l'appareil
■ déconnecter les pinces polaires.
■ Charger l'appareil pendant 24 heures avant de
l'utiliser pour la première fois.
Charger l‘appareil
■ Après chaque démarrage, relier l'appareil au
■ Charger l‘appareil pendant 24 heures avant de
chargeur fourni.
l‘utiliser pour la première fois.
3 La disponibilité de l'appareil est garantie.
■ Après chaque démarrage, relier l‘appareil au
chargeur fourni.
3 La disponibilité de l‘appareil est garantie.
Remarque
L'appareil peut rester relié en per-
manence au chargeur fourni sans le
Remarque
moindre problème.
L‘appareil peut rester relié en per-
manence au chargeur fourni sans le
moindre problème.
dé-
21
21

Conseils concernant la recherche de défauts
Conseils concernant la recherche de défauts
Panne Cause
Panne Cause
La DEL d‘inversion des pôles [11] ne s‘allume pas. – Les pinces polaires ne sont pas reliées.
La DEL d'inversion des pôles [11] ne s'allume pas.
La DEL d‘inversion des pôles [11] est allumée en
La DEL d'inversion des pôles [11] est allumée en
rouge.
rouge.
Les DEL
[2] et [10] s‘allument en rouge. – Chargement des batteries du démarreur trop
Les DEL [2] et [10] s'allument en rouge.
[4] ou [7] s‘allument en rouge. – Aucune tension au niveau des pinces polaires,
La DEL
L'appareil s'éteint après tentative de démarrage. – La batterie du véhicule entraîne un court-circuit,
L‘appareil s‘éteint après tentative de démarrage. – La batterie du véhicule entraîne un court-circuit,
– Les pinces polaires ne sont pas reliées.
– La tension de la batterie du véhicule est < 4 V ou
– La tension de la batterie du véhicule est < 4 V ou
manquante.
manquante.
– Court-circuit au niveau d‘une cellule d‘accumulateur
de la batterie du véhicule
– Les pinces polaires sont incorrectement raccordées.
– Les pinces polaires sont incorrectement raccordées.
– Chargement des batteries du démarreur trop
faible, chargement impossible.
faible, chargement impossible.
démarrage impossible.
– Chargement des batteries du démarreur trop faible.
retirer la batterie du véhicule défectueuse
–Fusible interne à l‘appareil défectueux.
retirer la batterie du véhicule défectueuse
Maintenance et nettoyage
Attention !
Ne nettoyez l‘appareil que lorsque la
che de secteur est débranchée.
Informations relatives à la
pro-tection de l‘environnement
Ne jetez jamais l’appareil dans les
déchets domestiques. Faites évacuer
l’appareil par une entreprise d‘éli
mination de déchets agréée ou par
votre service communal de gestion
des déchets. Respectez les prescrip-
tions actuellement en vigueur. En cas
de doute, contactez votre service communal de
gestion des déchets. Faites procéder à l‘éliminati
on de tous les matériaux d‘emballage de façon
écologique.
Accus/piles :
Ne jetez pas les accus/piles dans les ordures
ménagères, au feu ou à l‘eau. Il faut collecter, recy
cler ou éliminer les accus/piles dans le respect de
l‘environnement.
-
-
Garantie
Nous accordons la garantie suivante pour cet
appareil X-TRAPOWER:
–Auxiliaire de démarrage et chargeur : 24 mois
–Accumulateur de l‘auxiliaire de démarrage :
12 mois
– Les pinces de chargement et les fusibles sont
exclus en raison d‘usure.
Le droit à la garantie est valable à compter de la
date d‘achat (mentionnée sur la facture ou le bon
de livraison).
Les dommages survenus sont éliminés soit par la
livraison d‘un appareil de remplacement, soit par
leur réparation. Les dommages imputables à une
manipulation incorrecte sont exclus de la garan-
tie.
Les réclamations ne sont reconnues que lorsque
l‘appareil est remis à l‘état non démonté à
X-TRAPOWER
par
X-TRAPOWER. Sous réserve de modications
techniques. Nous déclinons toute
en cas d‘erreurs d‘impression.
, ou un service aprèsvente autorisé
responsabilité
Accessoires et pièces de rechange
Si l‘appareil tombe en panne, malgré les procédés soi-
-
gneux de production et de contrôle, il fau la répara-
tion par un X-TRAPOWER Service. Pour toute question
complémentaire ou commande de pièces de rechange,
indiquer impérativement la référence de l‘appa
rant sur la plaque signalétiqu
reil gu-
22

Caractéristiques techniques
Art. XPA 12/24-2 XPA 12/24-4
Tension de service/ tensi-
on du réseau de bord
Longueur des câbles de
démarrage
Diamètre du câble 50 mm 50 mm
Courant de démarrage/cou-
rant de court-circuit
Poids 18 kg 38 kg
12 V et 24 V CC 12 V et 24 V CC
1200 mm 1400 mm
12 V : 1,4 kA / 3,1 kA
24 V : 600 A / 1,4 kA
12 V : 2 kA / 5,7 kA
24 V : 1 kA / 2,85 kA
Dimensions (L x l x H) 430 x 200 x 230 mm 1000 x 470 x 400 mm
Fusible interne à l‘appareil électronique électronique
Fusible de la douille auto Fusible thermique, 10 A Fusible thermique, 10 A
Chargement chargement haute fréquence
automatique à 3 paliers
chargement haute fréquence
automatique à 3 paliers
Caractéristiques techniques
Art. XPA 12/24-6 XPA 12/24-12
Tension de service/ tensi
on du réseau de bord
Longueur des câbles de
démarrage
Diamètre du câble 50 mm 50 mm
Courant de démarrage/cou-
rant de court-circuit
Poids 52 kg 105 kg
Dimensions (L x l x H) 1000x470x400 mm 1000x850x400 mm
Fusible interne à l‘appareil électronique électronique
Fusible de la douille auto Fusible thermique, 10 A Fusible thermique, 10 A
Chargement chargement haute fréquence
-
12 V et 24 V CC 12 V et 24 V CC
2000 mm 3000 mm
12 V : 1,4 kA / 3,1 kA
24 V : 600 A / 1,4 kA
automatique à 3 paliers
12 V : 2 kA / 5,7 kA
24 V : 1 kA / 2,85 kA
chargement haute fréquence
automatique à 3 paliers
23

SE
För din säkerhet
SE
Läs denna bruksanvisning innan du
börjar använda produkten och följ
anvisningarna.
Denna bruksanvisning ska förvaras
för senare användning eller lämnas
vidare om produkten byter ägare.
VARNING – Läs säkerhetsan-
visningarna innan du tar
produkten i bruk!
Om bruksanvisningen och säkerhetsanvisningarna
inte följs kan produkten skadas och användaren
och andra kan utsättas för risker.
Informera genast leverantören om du upptäcker
transportskador.
För din säkerhet
Läs denna bruksanvisning före första
användning och följ anvisningarna
noggrant.
Denna bruksanvisning ska förvaras
för senare användning eller lämnas
vidare om produkten byter ägare.
Säkerhetsanvisningar
Observera
Det är förbjudet att göra ändringar
på aggregatet eller montera till-
satsanordningar. Sådana ändringar
kan leda till personskador och
funktionsfel.
■ Reparationer får endast utföras av härför
bemyndigad och utbildad personal. Härvid
ska alltid originalreservdelar från Adolf Würth
GmbH & Co. KG användas. Därmed säker-
ställs att säkerheten bibehålls.
Aggregatet ska hållas utom räckhåll
förbarn och bör inte användas av
personer med psykiska eller fysiska
funktionshinder!
Aggregatet fårbara laddas och
användas stående i väl ventilerade
utrymmen!
Undvik eld, öppen låga och
gnistbildning.
VARNING - Läs igenom
säker-hetsanvisningarna före
första idrifttagande!
Om bruksanvisningen och säkerhetsanvisnin-
garna inte följs kan apparaten skadas och faror
uppstå för användaren och andra personer.
Informera inköpsstället omgående vid trans
portskador.
-
Täck inte över aggregatet och
skydda det mot fukt.
Skölj omedelbart bort syrastänk på
hud eller kläder med mycket vatten!
Kontakta läkare vid behov.
Aggregatet får inte användas och
laddas i närheten av brännbara
gaser och lösningsmedel.
■ Kortslut aldrig batteriklämmorna!
■ Lossa aldrig batteriklämmorna under startför-
loppet!
■ Vid förmodan att riskfri användning inte lägre
är möjlig ska apparaten ovillkorligen tas ur
drift och säkras mot oavsiktlig användning.
Riskfri användning kan inte längre förutsättas
om apparaten inte fungerar, uppvisar synliga
skador samt vid transportskador.
■ Felaktig polaritet leder till kortslutning!
■ Användbara Würths originaltill-
behör och reservdelar.
24
Bär skyddsglasögon.

Ändamålsenlig användning
Utilisation conforme aux
Apparaten är avsedd för start av fordon med 12
eller 24 volts spänning när fordonets inbyggda
Utiliser l‘appareil pour le démarrage des véhicules dis-
batteri inte har tillräcklig startkapacitet. Den fung-
posant d‘une tension de bord de 12 V ou 24 V lorsque
erar dessutom som ersättning för defekta 12- och
la puissance de démarrage des batteries intégrées dans
24-voltsbatterier för att möjliggöra start av motorn!
le véhicule est trop faible. Il sert éga-lement à rempla
All annan användning som går därutöver är ej
cer les batteries de bord 12 et 24 V défectueuses et
ändamålsenlig.
démarrer ainsi le moteur !
considérée comme non conforme.
Användaren är ensam ansvarig för ska-
dor som orsakas av felaktig användning.
L‘utilisateur est tenu responsable des
prescriptions
Toute autre utilisation est
dom-mages imputables à une utilisation non
conforme aux prescriptions.
Manövrering (bild I)
Anslutning och användning
Utilisation (g. I)
Märk
Raccordement et mise en service
■ Kontrollera att apparaten är avstängd.
■ Kläm fast kablarna med röd batteriklämma vid
pluspolen.
■ Kläm fast kabeln med svart batteriklämma vid
minuspolen.
■ Kontrollera att batteriklämmorna har god kon-
■ S‘assurer que l‘appareil est éteint.
takt och sitter stadigt.
■ Connecter d‘abord la pince polaire rouge au pôle
■ Starta aggregatet.
positif.
■ Connecter la pince polaire noire au pôle négatif.
■ Lors du raccordement, veiller à ce que les pinces
soient parfaitement xées et à ce que le contact
soit parfaitement établi. ■ Démarrer l‘appareil.
Ladda apparaten under 24 timmar
före första användning!
Remarque
Observera
Charger l‘appareil pendant 24 heures
Polaritetsskyddet är bara aktivt vid en
avant de l‘utiliser pour la première
batterispänning på > 4 V.
fois !
Attention
La protection contre les inversions de
polarité est uniquement active lorsque
la tension de la batterie est > 4 V.
Afchage DEL
LED-indikator
Afchage Statut
Visning Status
La DEL d‘inversion des
Polaritetsindikatorn
pôles [11] est allumée
[11] lyser rött
en rouge
Polaritetsindikatorn
La DEL d‘inversion des
-
[11] lyser inte
[11] ne s‘allume
pôles
pas
Polaritetsindikatorn
[11] lyser grönt
La DEL d‘inversion des
Laddningsstatus
[11] est allumée
pôles
LED [2] och [10]
en vert
lyser grönt
État de charge
Laddningsstatus
Les DEL
allumées en vert
État de charge
Les DEL
allumées en orange
État de charge
Les DEL
allumées en rouge
Aide au démarrage automatique
utiliser cette fonction en cas de démarrages avec des
batteries de véhicules intégrées. Ceci permet
ploiter la puissance de démarrage extrêmement
élevée de l‘auxiliaire de démarrage de manière la
plus optimale possible.
■ Contrôler la DEL [8] , la DEL ne s‘allume pas,
démarrage automatique impossible.
■ Actionner la touche AUT [9] .
3 La DEL [8] est allumée en vert, l‘appareil est prêt
3 Le moteur du véhicule peut être démarré, la mise
3 En présence de tension de démarrage au niveau des
[2] et [10] sont
LED [2] och [10]
lyser orange
Laddningsstatus
[2] et [10] sont
LED [2] och [10]
lyser rött
[2] et [10] sont
Automatisk starthjälp
Denna funktion ska användas vid start med
inbyggda fordonsbatterier. Då så sätt kan den
mycket höga startkapaciteten hos starthjälpsappara-
ten utnyttjas optimalt.
■ Kontrollera LED [8] , LED lyser inte, automatisk
start inte möjlig.
■ Tryck på knappen AUT [9].
3 LED [8] lyser grönt, apparat i beredskapsläge.
3 Fordonets motor kan startas, inkoppling av
startspänning sker automatiskt.
3 Om startspänning ligger an mot klämmorna
lyser LED [4] eller [7] rött!
à fonctionner.
en circuit de la tension de démarrage s‘effectue
automatiquement.
pinces, la DEL
3 Efter 6 sekunder avslutar automatiken startför-
loppet.
Märk
Vid osäkerhet vad gäller val av
automatisk spänning ska fordonets
nätspänning kontrolleras och valet
göras manuellt. Detta kan göras när
som helst via knapparna 12 V [5] eller
Remarque
24V [6] .
En cas de doute concernant la sélec-
tion de tension automatique, contrôler
la tension de bord puis effectuer la
sélection manuellement. Ceci est pos
sible à tout moment en actionnant les
touches 12 V
Déconnecter les pinces
Ta bort batteriklämmorna,
polaires, interrompre le
avbryt startförloppet
démarrage
Startkabel ej ansluten
Le câble de démarrage
Spänningen i fordonets batteri
n‘est pas raccordé La
< 4 V eller så saknas fordons-
tension de la batterie du
batteri.
véhicule est < 4 V ou
Startförlopp, tryck på
manquante.
ON-knappen [1]
Démarrage, actionner la
Startförlopp
touche ON
Démarrage
Startförlopp med minskad
[1]
startkapacitet
Démarrage avec une puis
Batterispänningen för svag
sance de démarrage
réduite
Tension de la batterie trop
faible
d‘ex-
[4] ou [7] est allumée en rou
[5] ou 24 V [6].
-
-
3 Au terme de 6 secondes, l‘automatique met
terme au processus de démarrage.
25

Remarque
Märk
Le processus de démarrage peut être
Efter en väntetid på ca 10 sekunder
répété jusqu‘à 5 fois après un temps
kan startförsöket upprepas upp till 5
d‘attente de 10 sec. environ. Véri-
gånger. Därefter ska fordonet kontrol-
er
ensuite le véhicule puis recharger
leras och apparatens batterier laddas.
la batterie de l‘appareil.
Fordonets motor går
Le moteur du véhicule tourne
■ Stäng av apparaten efter ca 2 minuter.
■ Éteindre l‘appareil au terme de 2 minutes env.
■ Ta bort batteriklämmorna.
■ déconnecter les pinces polaires.
Manuell inkoppling av spänning på
Mise en circuit manuelle des tensions
12 V eller 24 V
12 V et 24 V
■ Kontrollera LED [8] .
■ Contrôler la DEL [8].
■ Tryck på knappen MAN [3].
■ Actionner la touche MAN [3].
Observera
Attention
Spänning i batteriklämmorna!
Tension au niveau des pinces
polaires !
Starthjälp
Auxiliaire de démarrage
■ Starta fordonsmotorn.
■ Démarrer le moteur du véhicule.
Observera
Attention
Ta inte genast bort klämmorna eller
Ne pas débrancher ou éteindre l‘appa-
stäng av apparaten efter start eftersom
reil immédiatement après le démarrage
fordonselektroniken och/eller genera-
au risque de détériorer l‘électronique
torn kan ta skada!
bord et/ou la dynamo !
■ Stäng av apparaten efter ca 2 minuter.
■ Éteindre l‘appareil au terme de 2 minutes env.
■ Ta bort batteriklämmorna.
■ déconnecter les pinces polaires.
Observera
Attention
Om motorn inte går efter 6 sekunder
Si le moteur ne démarre pas au terme
ska startförloppet ovillkorligen avbrytas
de 6 secondes, interrompre alors immé
eftersom starthjälpsapparaten och
diatement le processus de démarrage
fordonet annars kan skadas.
an d‘éviter tout endomma
de l‘auxiliaire de démarrage et
Märk
véhicule.
Efter en väntetid på ca 10 sekunder
kan startförsöket upprepas upp till 5
Remarque
gånger. Därefter ska fordonet kontrol-
Le processus de démarrage peut être
leras och apparatens batterier laddas.
répété jusqu‘à 5 fois après un temps
d‘attente de 10 sec. environ. Vérier
Märk
ensuite le véhicule puis recharger la
Efter ca 45 minuter kopplar elektroni-
batterie de l‘appareil.
ken bort spänningen för att oavsiktlig
urladdning av apparatens batterier ska
Remarque
undvikas.
Au terme de 45 min. environ,
l‘élec-
tronique éteint la tension an
d‘éviter
des batteries de l‘appareil.
un déchargement involontaire
-gement
Aide au démarrage sans batterie de
Starthjälp utan fordonets batteri
véhicule
Observera
Attention
Inget felpolningsskydd vid denna appli-
Pas de protection contre l‘inversion des
kation (motspänning saknas).
pôles pour cette application (la tension
opposée fait défaut) !
■ Anslut batteriklämmorna direkt till fordonets
■Raccorder les pinces polaires directement aux
polklämmor.
bornes polaires du véhicule.
■ Startförlopp (tryck på ON-knappen [1]).
■ Mise en marche (appuyer sur la touche ON [1]).
■ Välj spänning (12V [5] eller 24V [6]).
■ Sélectionner la tension (12V [5] ou 24V [6]).
■ Tryck på knappen MAN [3] (ett tydligt
■ Activer la touche MAN [3] (clic nettement au-dible
klick hörs, reläna har slagit till och nu ligger
; les protections se sont mises en marche; le
strömmen på starthjälpapparatens klämmor).
courant circule désormais dans les bornes de
■ Starta motorn (observera varningarna gällande
l‘auxiliaire de démarrage).
max. startförsökstid - se anvisning).
■Démarrer le moteur (veiller aux avertissements
■ Efter en framgångsrik start av motorn stängs
relatifs à la durée max. de la tentative de
starthjälpapparaten av (tryck på OFF-
marrage - voir instructions).
knappen [12]).
■Éteindre l‘auxiliaire de démarrage après réus-
■ Lossa klämmorna i omvänd ordning (först svart
site du démarrage (appuyer sur la touche OFF
klämma (-) och sedan röd klämma (+)).
[12]).
■ Anslut starthjälpsapparaten till den medföljande
■ Déconnecter les bornes dans l‘ordre inverse
laddaren och ladda upp.
(d‘abord la borne noire (-) puis la borne rouge
(+)).
■Brancher l‘auxiliaire de démarrage au chargeur
de
Motorn går
■ Koppla från aggregatet
■ Ta bort batteriklämmorna.
Observera
Ta inte bort apparatens klämmor och
fourni dans le volume de livraison et charger.
stäng inte av den! Fordonselektroniken
och/eller generatorn kan ta skada!
Attention
Ne pas déconnecter ou arrêter l‘ap-
pa-reil ! Ceci risquerait d‘endom-
mager l‘électronique de bord et la
dynamo !
Ladda apparaten
■ Ladda apparaten under 24 timmar före första
Le moteur tourne
användning.
■ Mise hors service de l‘appareil
-
■ Apparaten ska anslutas till den medföljande
■ déconnecter les pinces polaires.
laddaren efter varje startförlopp.
3 Säkerställande av att apparaten är klart för
du
Charger l‘appareil
användning.
■ Charger l‘appareil pendant 24 heures avant de
l‘utiliser pour la première fois.
■ Après chaque démarrage, relier l‘appareil au
3 La disponibilité de l‘appareil est garantie.
Märk
Apparaten kan utan problem alltid
chargeur fourni.
vara ansluten till den medföljande
laddaren.
Remarque
L‘appareil peut rester relié en per-
manence au chargeur fourni sans le
moindre problème.
dé-
26

Conseils concernant la recherche de défauts
Panne Cause
Störning Orsak
La DEL d‘inversion des pôles [11] ne s‘allume pas. – Les pinces polaires ne sont pas reliées.
LED-polaritetsindikatorn [11] lyser inte.
LED-polaritetsindikatorn [11] lyser rött.
La DEL d‘inversion des pôles [11] est allumée en
LED [2] och [10] lyser rött.
rouge.
Les DEL
[2] et [10] s‘allument en rouge. – Chargement des batteries du démarreur trop
LED [4] eller [7] lyser rött.
La DEL
[4] ou [7] s‘allument en rouge. – Aucune tension au niveau des pinces polaires,
Apparaten stängs av efter startförsöket. – Fordonets batteri orsakar kortslutning, avlägsna det
L‘appareil s‘éteint après tentative de démarrage. – La batterie du véhicule entraîne un court-circuit,
Anvisningar för felsökning
– Batteriklämmorna är inte anslutna.
– La tension de la batterie du véhicule est < 4 V ou
– Spänningen i fordonets batteri < 4 V eller så saknas
manquante.
fordonsbatteri.
– Court-circuit au niveau d‘une cellule d‘accumulateur
– Kortslutning i en battericell i fordonets batteri
de la batterie du véhicule
– Batteriklämmorna är felaktigt anslutna.
– Les pinces polaires sont incorrectement raccordées.
– Startapparatens batterier är för dåligt laddade,
laddning inte möjlig.
– Ingen spänning i batteriklämmorna, startförlopp
faible, chargement impossible.
inte möjligt.
démarrage impossible.
– Startapparatens batterier är för dåligt laddade.
– Chargement des batteries du démarreur trop faible.
– Defekt säkring i apparaten.
–Fusible interne à l‘appareil défectueux.
defekta batteriet
retirer la batterie du véhicule défectueuse
Underhåll och rengöring
Attention !
Ne nettoyez l‘appareil que lorsque la
che de secteur est débranchée.
Miljöanvisningar
Apparaten får inte slängas i det
vanliga hushållsavfallet. Avfallshan
tera apparaten via ett godkänt av-
fallshanteringsföretag eller på den
kommunala avfallshanteringsstati
onen. Beakta de aktuellt gällande
föreskrifterna. Ta i tveksamma fall
kontakt med avfallshanteringsstationen. Avfalls
hantera allt förpackningsmaterial på ett miljövän-
ligt sätt.
Återuppladdningsbara batterier/vanliga
batterier:
Kasta inte återuppladdningsbara batterier/van-
liga batterier i hushållssoporna, eld eller vatten.
Återuppladdningsbara batterier/vanliga batterier
ska lämnas in, återvinnas eller kasseras på ett
Garanti
miljövän-ligt sätt.
Vi erbjuder följande garanti för denna X-TRAPOW
ER-apparat:
– Starthjälpsapparat och laddare: 24 månader
– Batteri i starthjälpsapparaten: 12 månader
– Laddningsklämmorna och säkringarna betraktas
som slitdelar och omfattas inte.
Garantin gäller från inköpsdatum (betalningsunder
lag eller följesedel måste uppvisas).
Uppkomna skador avhjälps genom ersättningsle
verans eller reparation. Skador orsakade av felaktig
hantering omfattas inte av garantin.
-
Reklamationer godtas endast om den icke demon
terade apparaten överlämnas till ett X-TRAPOW-
ER-kontor, eller ett X-TRAPOWER-auktoriserat ser-
-
viceställe. Med reservation för tekniska ändringar. Vi
tar inget ansvar för tryckfel.
-
Tillbehör och reservdelar
Om apparaten, trots noggrant tillverkar- och kont-
rollförfarande någon gång inte skulle fungera kor-
rekt, ska reparationen genomföras av en X-TRAPO-
WER Service.Vid alla frågor och beställningar av
reservdelar ska alltid apparatens artikelnummer som
står på typskylten uppges.
-
-
-
-
27

Art. XPA 12/24-2 XPA 12/24-4
Driftspänning/
fordonets nätspänning
Tekniska data
12 V et 24 V CC 12 V et 24 V CC
Startkabelns längd
1200 mm 1400 mm
Kabeldiameter 50 mm 50 mm
Startström/
kortslutningsström
Vikt
18 kg 38 kg
12 V : 1,4 kA / 3,1 kA
24 V : 600 A / 1,4 kA
12 V : 2 kA / 5,7 kA
24 V : 1 kA / 2,85 kA
Mått (L x B x H) 430 x 200 x 230 mm 1000 x 470 x 400 mm
Säkring i apparaten elektronisk elektronisk
Säkring cigguttag Termosäkring, 10 A Termosäkring, 10 A
Laddning Automatisk 3-stegs
högfrekvensladdning
Automatisk 3-stegs
högfrekvensladdning
Tekniska data
Art. XPA 12/24-6 XPA 12/24-12
Driftspänning/
fordonets nätspänning
Startkabelns längd
Kabeldiameter 50 mm 50 mm
Startström/
kortslutningsström
Vikt 52 kg 105 kg
Mått (L x B x H) 1000x470x400 mm 1000x850x400 mm
Säkring i apparaten elektronisk elektronisk
Säkring cigguttag Termosäkring, 10 A Termosäkring, 10 A
Laddning Automatisk 3-stegs
12 V et 24 V CC 12 V et 24 V CC
2000 mm 3000 mm
12 V : 1,4 kA / 3,1 kA
24 V : 600 A / 1,4 kA
högfrekvensladdning
12 V : 2 kA / 5,7 kA
24 V : 1 kA / 2,85 kA
Automatisk 3-stegs
högfrekvensladdning
28

ES
Para su seguridad
ES
Antes de la primera utilización de su
aparato, lea estas instrucciones de
servicio y actúe en consecuencia.
Guarde estas instrucciones de
servicio para uso posterior o para
propietarios ulteriores.
ADVERTENCIA - Antes de la
primera puesta en servicio, leer
necesariamente las indicaciones
de seguridad !
En caso de inobservancia de las instrucciones
de servicio y las indicaciones de seguridad, se
pueden producir daños en el aparato y riesgos
para el usuario y otras personas.
En caso de daños de transporte, informar inmedia-
tamente al distribuidor.
För din säkerhet
Antes de la primera utilización de su
aparato, lea estas instrucciones de
servicio y actúe en consecuencia.
Guarde estas instrucciones de
servicio para uso posterior o para
propietarios ulteriores.
Indicaciones de seguridad
Indicación
Se prohíbe realizar modicaciones
en el aparato o elaborar aparatos
adicionales. Tales modicaciones
pueden provocar daños personales
y funciones erróneas.
■ Las reparaciones en el aparato sólo deben
efectuarse por personas encargadas para ello
y debidamente formadas. En este caso han
de utilizarse siempre las piezas de repuesto
originales de Adolf Würth GmbH & Co. KG.
Con ello se garantiza que se mantenga la
seguridad del aparato.
El aparato debe mantenerse lejos
del alcance de los niños, y no es
adecuado para personas con
discapacidad mental o física.
El aparato sólo debe cargarse y
funcionar verticalmente en lugares
bien ventilados.
Evitar fuego, luz abierta y formación
de chispas.
ADVERTENCIA - ¡Antes de la
primera puesta en servicio, leer
necesariamente estas indicaci
ones de seguridad!
La inobservancia de las instrucciones de servicio
y las indicaciones de seguridad puede provocar
daños en el aparato y poner en peligro al operario
y a otras personas.
En caso de daños de transporte, informar inmedi
atamente al distribuidor.
No cubrir el aparato y protegerlo
contra humedad.
Las salpicaduras de ácido en la piel
o la ropa deben eliminarse
inmediatamente con agua abundan-
te. Eventualmente ha de consultarse
a un médico.
El aparato no debe funcionar ni
cargarse en un entorno con gases y
disolventes inamables.
■ ¡No cortocircuitar nunca las pinzas de polos!
■ ¡Las pinzas de polos no deben desembor-
narse durante el proceso de arranque!
■ Si se prevé que no es posible un funciona-
miento sin riesgo, el aparato ha de ponerse
fuera de servicio de inmediato y protegerse
contra funcionamiento involuntario. No cabe
prever ningún funcionamiento sin riesgo si
el aparato no muestra ninguna función, si
presenta daños visibles y en caso de daños
de transporte.
■ ¡Cortocircuito en caso de polarización
inversa!
-
-
Usar gafas de protección.
■ Utilizar solamente accesorios y
piezas de repuesto originales Würth.
29

Uso conforme a lo previsto
Utilisation conforme aux
El aparato ha de utilizarse para arrancar vehículos
con tensión de a bordo de 12 ó 24 V cuando
Utiliser l‘appareil pour le démarrage des véhicules dis-
las baterías montadas en el vehículo tengan una
posant d‘une tension de bord de 12 V ou 24 V lorsque
potencia de arranque muy baja, y también sirve
la puissance de démarrage des batteries intégrées dans
para reemplazar baterías de a bordo de 12y 24 V
le véhicule est trop faible. Il sert éga-lement à rempla
defectuosas, y con ello arrancar un motor.
cer les batteries de bord 12 et 24 V défectueuses et
Cualquier otro uso se considera contrario a lo
démarrer ainsi le moteur !
previsto.
considérée comme non conforme.
El usuario es responsable de daños deri-
L‘utilisateur est tenu responsable des
vados del uso contrario a lo previsto.
dom-mages imputables à une utilisation non
prescriptions
Toute autre utilisation est
conforme aux prescriptions.
Manejo (g. I)
Conexión y puesta en servicio
Raccordement et mise en service
■ Procurar que el aparato esté desconectado.
■ Los conductores con la pinza de polos roja
■ S‘assurer que l‘appareil est éteint.
■ Connecter d‘abord la pince polaire rouge au pôle
■ El conductor con la pinza de polos negra tiene
positif.
■ Connecter la pince polaire noire au pôle négatif.
■ En la conexión ha de procurarse un buen con-
■ Lors du raccordement, veiller à ce que les pinces
soient parfaitement xées et à ce que le contact
■ Conectar el aparato.
soit parfaitement établi. ■ Démarrer l‘appareil.
30
Utilisation (g. I)
Indicación
El aparato debe cargarse durante
24horas antes de la primera utiliza-
Remarque
ción.
Charger l‘appareil pendant 24 heures
avant de l‘utiliser pour la première
Atención
fois !
La protección contra polarización
inversa sólo se encuentra activada con
Attention
tensiones de batería > 4 V.
La protection contre les inversions de
polarité est uniquement active lorsque
la tension de la batterie est > 4 V.
tienen que embornarse primero en el polo
positivo.
que embornarse en el polo negativo.
tacto y un rme asiento de las pinzas de polos.
Afchage DEL
Indicador LED
Afchage Statut
Indicador Estado
La DEL d‘inversion des
El indicador de pola-
pôles [11] est allumée
rización inversa [11]
en rouge
está en rojo.
La DEL d‘inversion des
-
El indicador de pola-
[11] ne s‘allume
pôles
rización inversa [11]
pas
no luce.
La DEL d‘inversion des
El indicador de pola-
[11] est allumée
pôles
rización inversa [11]
en vert
está en verde.
État de charge
Estado de carga
Les DEL
allumées en vert
État de charge
Les DEL
allumées en orange
État de charge
Les DEL
allumées en rouge
Aide au démarrage automatique
utiliser cette fonction en cas de démarrages avec des
batteries de véhicules intégrées. Ceci permet
ploiter la puissance de démarrage extrêmement
élevée de l‘auxiliaire de démarrage de manière la
plus optimale possible.
■ Contrôler la DEL [8] , la DEL ne s‘allume pas,
démarrage automatique impossible.
■ Actionner la touche AUT [9] .
3 La DEL [8] est allumée en vert, l‘appareil est prêt
3 Le moteur du véhicule peut être démarré, la mise
3 En présence de tension de démarrage au niveau des
3 Au terme de 6 secondes, l‘automatique met
[2] et [10] sont
Los LEDs [2] y [10]
están en verde
Estado de carga
[2] et [10] sont
Los LEDs [2] y [10]
están en naranja
Estado de carga
[2] et [10] sont
Los LEDs [2] y [10]
están en rojo
Mecanismo de arranque automático
Esta función ha de utilizarse en arranques con
baterías de vehículo montadas. Con ello, la poten-
cia extremadamente alta del aparato auxiliar de
arranque puede utilizarse de forma óptima.
■ Controlar LED [8]; el LED no luce; no es posible
un arranque automático.
■ Accionar la tecla AUT [9].
3 El LED [8] está en verde; aparato disponible.
3 El motor del vehículo no puede arrancarse, la
à fonctionner.
conexión adicional de la tensión de control se
produce automáticamente.
en circuit de la tension de démarrage s‘effectue
3 Si existe la tensión de arranque en las pinzas, el
automatiquement.
LED [4] o [7] se pone rojo.
pinces, la DEL
3 El sistema automático naliza el proceso de
arranque al cabo de 6 segundos.
terme au processus de démarrage.
Indicación
Si existen dudas sobre la selección
Remarque
de tensión automática, la tensión de
En cas de doute concernant la sélec-
a bordo ha de comprobarse y la
tion de tension automatique, contrôler
selección ha de efectuarse manualmen-
la tension de bord puis effectuer la
te. Ello puede realizarse en cualquier
sélection manuellement. Ceci est pos
momento accionando las teclas 12 V
sible à tout moment en actionnant les
[5] o 24V [6].
touches 12 V
Déconnecter les pinces
Desembornar las pinzas
polaires, interrompre le
de polos, interrumpir el
démarrage
proceso de arranque
Le câble de démarrage
El cable de arranque no está
n‘est pas raccordé La
conectado
tension de la batterie du
Tensión en la batería del ve-
véhicule est < 4 V ou
hículo < 4 V o falta la batería
manquante.
del vehículo.
Démarrage, actionner la
Proceso de arranque,
touche ON
accionar la tecla ON [1]
Démarrage
Proceso de arranque
Démarrage avec une puis
Proceso de arranque con
sance de démarrage
potencia reducida
réduite
Tension de la batterie trop
Tensión de batería dema-
faible
siado baja
[1]
d‘ex-
[4] ou [7] est allumée en rou
[5] ou 24 V [6].
-
-

Remarque
baterías del aparato.
Indicación
Le processus de démarrage peut être
Tras un periodo de espera de aprox.
répété jusqu‘à 5 fois après un temps
10 segundos, el proceso de arranque
d‘attente de 10 sec. environ. Véri-
puede repetirse hasta 5 veces. Posterior-
er
ensuite le véhicule puis recharger
mente, el vehículo ha de vericarse y la
la batterie de l‘appareil.
batería del aparato debe recargarse.
Le moteur du véhicule tourne
El motor del vehículo funciona
■ Éteindre l‘appareil au terme de 2 minutes env.
■ Desconectar el aparato al cabo de aprox. 2
■ déconnecter les pinces polaires.
minutos.
■ Desembornar las pinzas de polos.
Mise en circuit manuelle des tensions
12 V et 24 V
Conexión adicional manual de las
■ Contrôler la DEL [8].
tensiones de 12 ó 24V
■ Actionner la touche MAN [3].
■ Controlar el LED [8].
■ Accionar la tecla MAN [3].
Attention
Tension au niveau des pinces
Atención
polaires !
¡Tensión en las pinzas de polos!
Auxiliaire de démarrage
■ Démarrer le moteur du véhicule.
Mecanismo de arranque
■ Arrancar el motor del vehículo.
■ Éteindre l‘appareil au terme de 2 minutes env.
■ déconnecter les pinces polaires.
■ Desconectar el aparato al cabo de aprox. 2
minutos.
■ Desembornar las pinzas de polos.
Attention
Ne pas débrancher ou éteindre l‘appa-
Atención
reil immédiatement après le démarrage
El aparato no debe desembornarse o
au risque de détériorer l‘électronique
desconectarse justo después del arran-
bord et/ou la dynamo !
que, pues la electrónica de a bordo
y/o el alternador podrían sufrir daños.
Attention
Si le moteur ne démarre pas au terme
de 6 secondes, interrompre alors immé
Atención
diatement le processus de démarrage
Si el motor no arranca al cabo de 6
an d‘éviter tout endomma
segundos, el proceso de arranque ha
de l‘auxiliaire de démarrage et
de interrumpirse de inmediato, pues en
véhicule.
otro caso pueden producirse daños en
el aparato auxiliar de arranque y en el
Remarque
vehículo.
Le processus de démarrage peut être
répété jusqu‘à 5 fois après un temps
Indicación
d‘attente de 10 sec. environ. Vérier
Tras un periodo de espera de aprox.
ensuite le véhicule puis recharger la
10 segundos, el proceso de arranque
batterie de l‘appareil.
puede repetirse hasta 5 veces. Posterior-
mente, el vehículo ha de vericarse y la
Remarque
batería del aparato debe recargarse.
Au terme de 45 min. environ,
l‘élec-
Indicación
La electrónica desconecta la tensión
al cabo de aprox. 45 minutos, para
tronique éteint la tension an
d‘éviter
des batteries de l‘appareil.
un déchargement involontaire
evitar una descarga involuntaria de las
-gement
du
Aide au démarrage sans batterie de
Mecanismo de arranque sin batería
véhicule
del vehículo
Attention
Atención
Pas de protection contre l‘inversion des
Ninguna protección contra polari-
pôles pour cette application (la tension
zación en esta aplicación (falta la
opposée fait défaut) !
contratensión).
■Raccorder les pinces polaires directement aux
bornes polaires du véhicule.
■ Conexión de las pinzas de polos directamente
■ Mise en marche (appuyer sur la touche ON [1]).
en los bornes de polos del vehículo.
■ Sélectionner la tension (12V [5] ou 24V [6]).
■ Conectar (presionar la tecla ON [1]).
■ Activer la touche MAN [3] (clic nettement au-dible
■ Seleccionar tensión (12V [5] o 24V [6]).
; les protections se sont mises en marche; le
■ Accionar la tecla MAN [3] (se oye un clic
courant circule désormais dans les bornes de
inequívoco; los contactores se conectan;
l‘auxiliaire de démarrage).
posteriormente existe tensión en los bornes del
■Démarrer le moteur (veiller aux avertissements
aparato auxiliar de arranque).
relatifs à la durée max. de la tentative de
■ Arrancar el motor (controlar las indicaciones de
marrage - voir instructions).
advertencia sobre el máx. tiempo de intento de
■Éteindre l‘auxiliaire de démarrage après réus-
arranque – véase las instrucciones).
site du démarrage (appuyer sur la touche OFF
■ Tras un arranque exitoso del motor, desconectar
[12]).
el aparato auxiliar de arranque (presionar la
■ Déconnecter les bornes dans l‘ordre inverse
tecla OFF [12]).
(d‘abord la borne noire (-) puis la borne rouge
■ Desembornar los bornes en orden inverso (pri-
(+)).
mero el borne negro (-) y luego el borne rojo (+)).
■Brancher l‘auxiliaire de démarrage au chargeur
■ Conectar el aparato auxiliar de arranque en el
fourni dans le volume de livraison et charger.
cargador suministrado y cargarlo.
de
Attention
Atención
Ne pas déconnecter ou arrêter l‘ap-
¡No desembornar o desconectar el
pa-reil ! Ceci risquerait d‘endom-
aparato! La electrónica de a bordo
mager l‘électronique de bord et la
y/o el alternador podrían sufrir daños.
dynamo !
Motor en marcha
■ Desconexión del aparato
Le moteur tourne
■ Desembornar las pinzas de polos.
■ Mise hors service de l‘appareil
-
■ déconnecter les pinces polaires.
Cargar el aparato
■ El aparato debe cargarse durante 24horas
Charger l‘appareil
antes de la primera utilización.
■ Charger l‘appareil pendant 24 heures avant de
■ Tras cada proceso de arranque, el aparato
l‘utiliser pour la première fois.
debe conectarse al cargador suministrado.
■ Après chaque démarrage, relier l‘appareil au
3 Se garantiza la disponibilidad adicional del
chargeur fourni.
aparato.
3 La disponibilité de l‘appareil est garantie.
Indicación
Remarque
El aparato puede permanecer conec-
L‘appareil peut rester relié en per-
tado en el cargador suministrado sin
manence au chargeur fourni sans le
ningún problema.
moindre problème.
dé-
31

Indicaciones sobre búsqueda de fallos
Conseils concernant la recherche de défauts
Panne Cause
Anomalía Causa
La DEL d‘inversion des pôles [11] ne s‘allume pas. – Les pinces polaires ne sont pas reliées.
El LED de polarización inversa [11] no luce.
El LED de polarización inversa [11] está en rojo.
La DEL d‘inversion des pôles [11] est allumée en
rouge.
Los LEDs [2] y [10] están en rojo.
Les DEL
[2] et [10] s‘allument en rouge. – Chargement des batteries du démarreur trop
La DEL
[4] ou [7] s‘allument en rouge. – Aucune tension au niveau des pinces polaires,
Los LEDs [4] o [7] están en rojo.
L‘appareil s‘éteint après tentative de démarrage. – La batterie du véhicule entraîne un court-circuit,
El aparato se desconecta tras el intento de arranque.
– Las pinzas de polos no están conectadas
– La tension de la batterie du véhicule est < 4 V ou
– Tensión en la batería del vehículo < 4 V o falta la
manquante.
batería del vehículo.
– Court-circuit au niveau d‘une cellule d‘accumulateur
– Cortocircuito en un elemento de la batería del vehículo
de la batterie du véhicule
– Las pinzas de polos están conectadas errónea-
– Les pinces polaires sont incorrectement raccordées.
mente.
– La carga de la batería del aparato de arranque es
demasiado baja; no es posible la carga.
faible, chargement impossible.
– Ninguna tensión en las pinzas de polos; no es
démarrage impossible.
posible el proceso de arranque.
– Chargement des batteries du démarreur trop faible.
– La carga de las baterías del aparato de arranque
–Fusible interne à l‘appareil défectueux.
es demasiado baja.
– Fusible interno del aparato defectuoso.
retirer la batterie du véhicule défectueuse
– La batería del vehículo genera un cortocircuito;
retirar batería de vehículo defectuosa
Mantenimiento y limpieza
¡Atención!
El aparato sólo debe limpiarse con el
enchufe de red extraído.
Indicaciones sobre el medio
ambiente
El aparato no debe tirarse en
ningún caso a la basura normal.
Elimine el aparato a través de un
centro de recogida autorizado o de
su centro de recogida municipal.
Respete las normas vigentes en la
actualidad. En caso de duda, cont
Los materiales de embalaje han de entregarse a
un centro de recogida respetuoso con el medio
ambiente.
Baterías/acumuladores:
No tire baterías/acumuladores a la basura domés-
tica, al fuego o al agua. Las baterías/acumuladores
deben recogerse, reciclarse o eliminarse respetan
do el medio ambiente.
acte con su centro de recogida. l
Garantía
Para este aparato X-TRAPOWER ofrecemos la sigu
iente potencia:
–Aparato auxiliar de arranque y cargador:
24 meses
–Acumulador en el aparato auxiliar de arranque: 12
meses
– Las pinzas de carga y los fusibles están des
co-nectados debido al desgaste. El derecho de
garantía es válido a partir de la fecha de compra
(demostración con factura o albarán de entre
ga). Los daños originados se subsanan mediante
suministros de reposición o reparación. Los daños
achacables a un tratamiento inadecuado están
excludos de las prestaciones de garantía.
Las objeciones sólo pueden admitirse si el aparato
se entrega sin desarmar do X-TRAPOWER o a un
centro de servicio postventa autorizado X-TRAPO
-
WER. Se reserva el derecho de realizar modicaci-
ones técnicas. No asumimos ninguna responsabili-
dad por fallos de impresión.
Accesorios y piezas de repuesto
Si fallara el aparato, a pesar de haberse realiza-
do pro-cedimientos cuidadosos de fabricación y
comprobación, su reparación debe encargarse a
-
un X-TRAPOWER Service. Para cualquier consulta y
pedidos de piezas de repuesto es imprescindible
indicar el número de artículo que gura en la placa
de características del aparato.
-
-
-
32

Datos técnicos
Art. XPA 12/24-2 XPA 12/24-4
Tensión de servicio/ ten-
sión de a bordo
Longitud del cable de
arranque
12 V et 24 V CC 12 V et 24 V CC
1200 mm 1400 mm
Diámetro del cable 50 mm 50 mm
Corriente de arranque/
cor-tocircuito
Peso
18 kg 38 kg
12 V : 1,4 kA / 3,1 kA
24 V : 600 A / 1,4 kA
12 V : 2 kA / 5,7 kA
24 V : 1 kA / 2,85 kA
Dimensiones (L x An x Al) 430 x 200 x 230 mm 1000 x 470 x 400 mm
Fusible interno del aparato electrónico electrónico
Fusible, casquillo KFZ Termofusible, 10 A Termofusible, 10 A
Carga Carga automática de alta
högfrekvensladdning
Carga automática de alta
frecuencia y 3 niveles
Datos técnicos
Art. XPA 12/24-6 XPA 12/24-12
Tensión de servicio/ ten
sión de a bordo
Longitud del cable de
arranque
Diámetro del cable 50 mm 50 mm
Corriente de arranque/
cor-tocircuito
Peso 52 kg 105 kg
Dimensiones (L x An x Al) 1000x470x400 mm 1000x850x400 mm
Fusible interno del aparato electrónico electrónico
Fusible, casquillo KFZ Termofusible, 10 A Termofusible, 10 A
Carga Carga automática de alta
-
12 V et 24 V CC 12 V et 24 V CC
2000 mm 3000 mm
12 V : 1,4 kA / 3,1 kA
24 V : 600 A / 1,4 kA
frecuencia y 3 niveles
12 V : 2 kA / 5,7 kA
24 V : 1 kA / 2,85 kA
Carga automática de alta
frecuencia y 3 niveles
33

ES
Para su seguridad
Antes de la primera utilización de su
aparato, lea estas instrucciones de
servicio y actúe en consecuencia. Gu
arde estas instrucciones de servicio
para uso posterior o para propieta
rios ulteriores.
Indicaciones de seguridad
Indicación
Se prohíbe realizar modicaciones
en el aparato o elaborar aparatos
adicionales. Tales modicaciones
pueden ocasionar daños personales
y funciones erróneas.
■ Las reparaciones en el aparato sólo deben reali-
zarse por personas formadas y en-cargadas para
ello. A este respecto han de utilizarse siempre
piezas de repuesto originales de
GmbH. Ello garantiza que se mantenga la segu-
ridad en el aparato.
El aparato debe mantenerse lejos
del alcance de los niños y no
es adecuado para personas con
discapacidad mental o corporal.
El aparato sólo debe cargarse y
funcionar verticalmente en lugares
bien ventilados.
Se debe evitar la luz abierta y la
formación de chispas.
X-TRAPOWER
ADVERTENCIA - ¡Antes de la
-
-
La inobservancia de las instrucciones de servicio
y las indicaciones de seguridad puede provocar
daños en el aparato y poner en peligro al ope
ra-rio y a otras personas.
En caso de daños de transporte, informar inme
dia-tamente al distribuidor.
primera puesta en servicio,
necesariamente estas
ones de seguridad!
No cubrir el aparato y protegerlo
contra humedad.
Las salpicaduras de ácido en la piel
o la ropa deben eliminarse inme
diatamente con agua abundan-te.
Eventualmente ha de consultarse a
un médico.
El aparato no debe funcionar ni
cargarse en un entorno con gases y
disolventes inamables.
¡No cortocircuitar nunca las pinzas de polos!
■
■ ¡Las pinzas de polos no deben desembor-narse
durante el proceso de arranque!
■ Si se prevé que no es posible un funciona-mien-
to sin riesgo, el aparato ha de ponerse fuera
de servicio de inmediato y protegerse contra
funcionamiento involuntario. No cabe prever
ningún funcionamiento sin riesgo si el aparato
no muestra ninguna función, si presenta daños
visibles y en caso de daños de transporte.
■ ¡Cortocircuito en caso de polarización inversa!
■ Utilizar solamente accesorios y re-
cambios originales X-TRAPOWER.
Bahnhofstr. 26
92536 Pfreimd
Tel. 09606 / 92 36 28 - 0
leer
indicaci-
-
-
-
24
SO STARTEN PROFIS
www.x-trapower.de
 Loading...