

Page 1
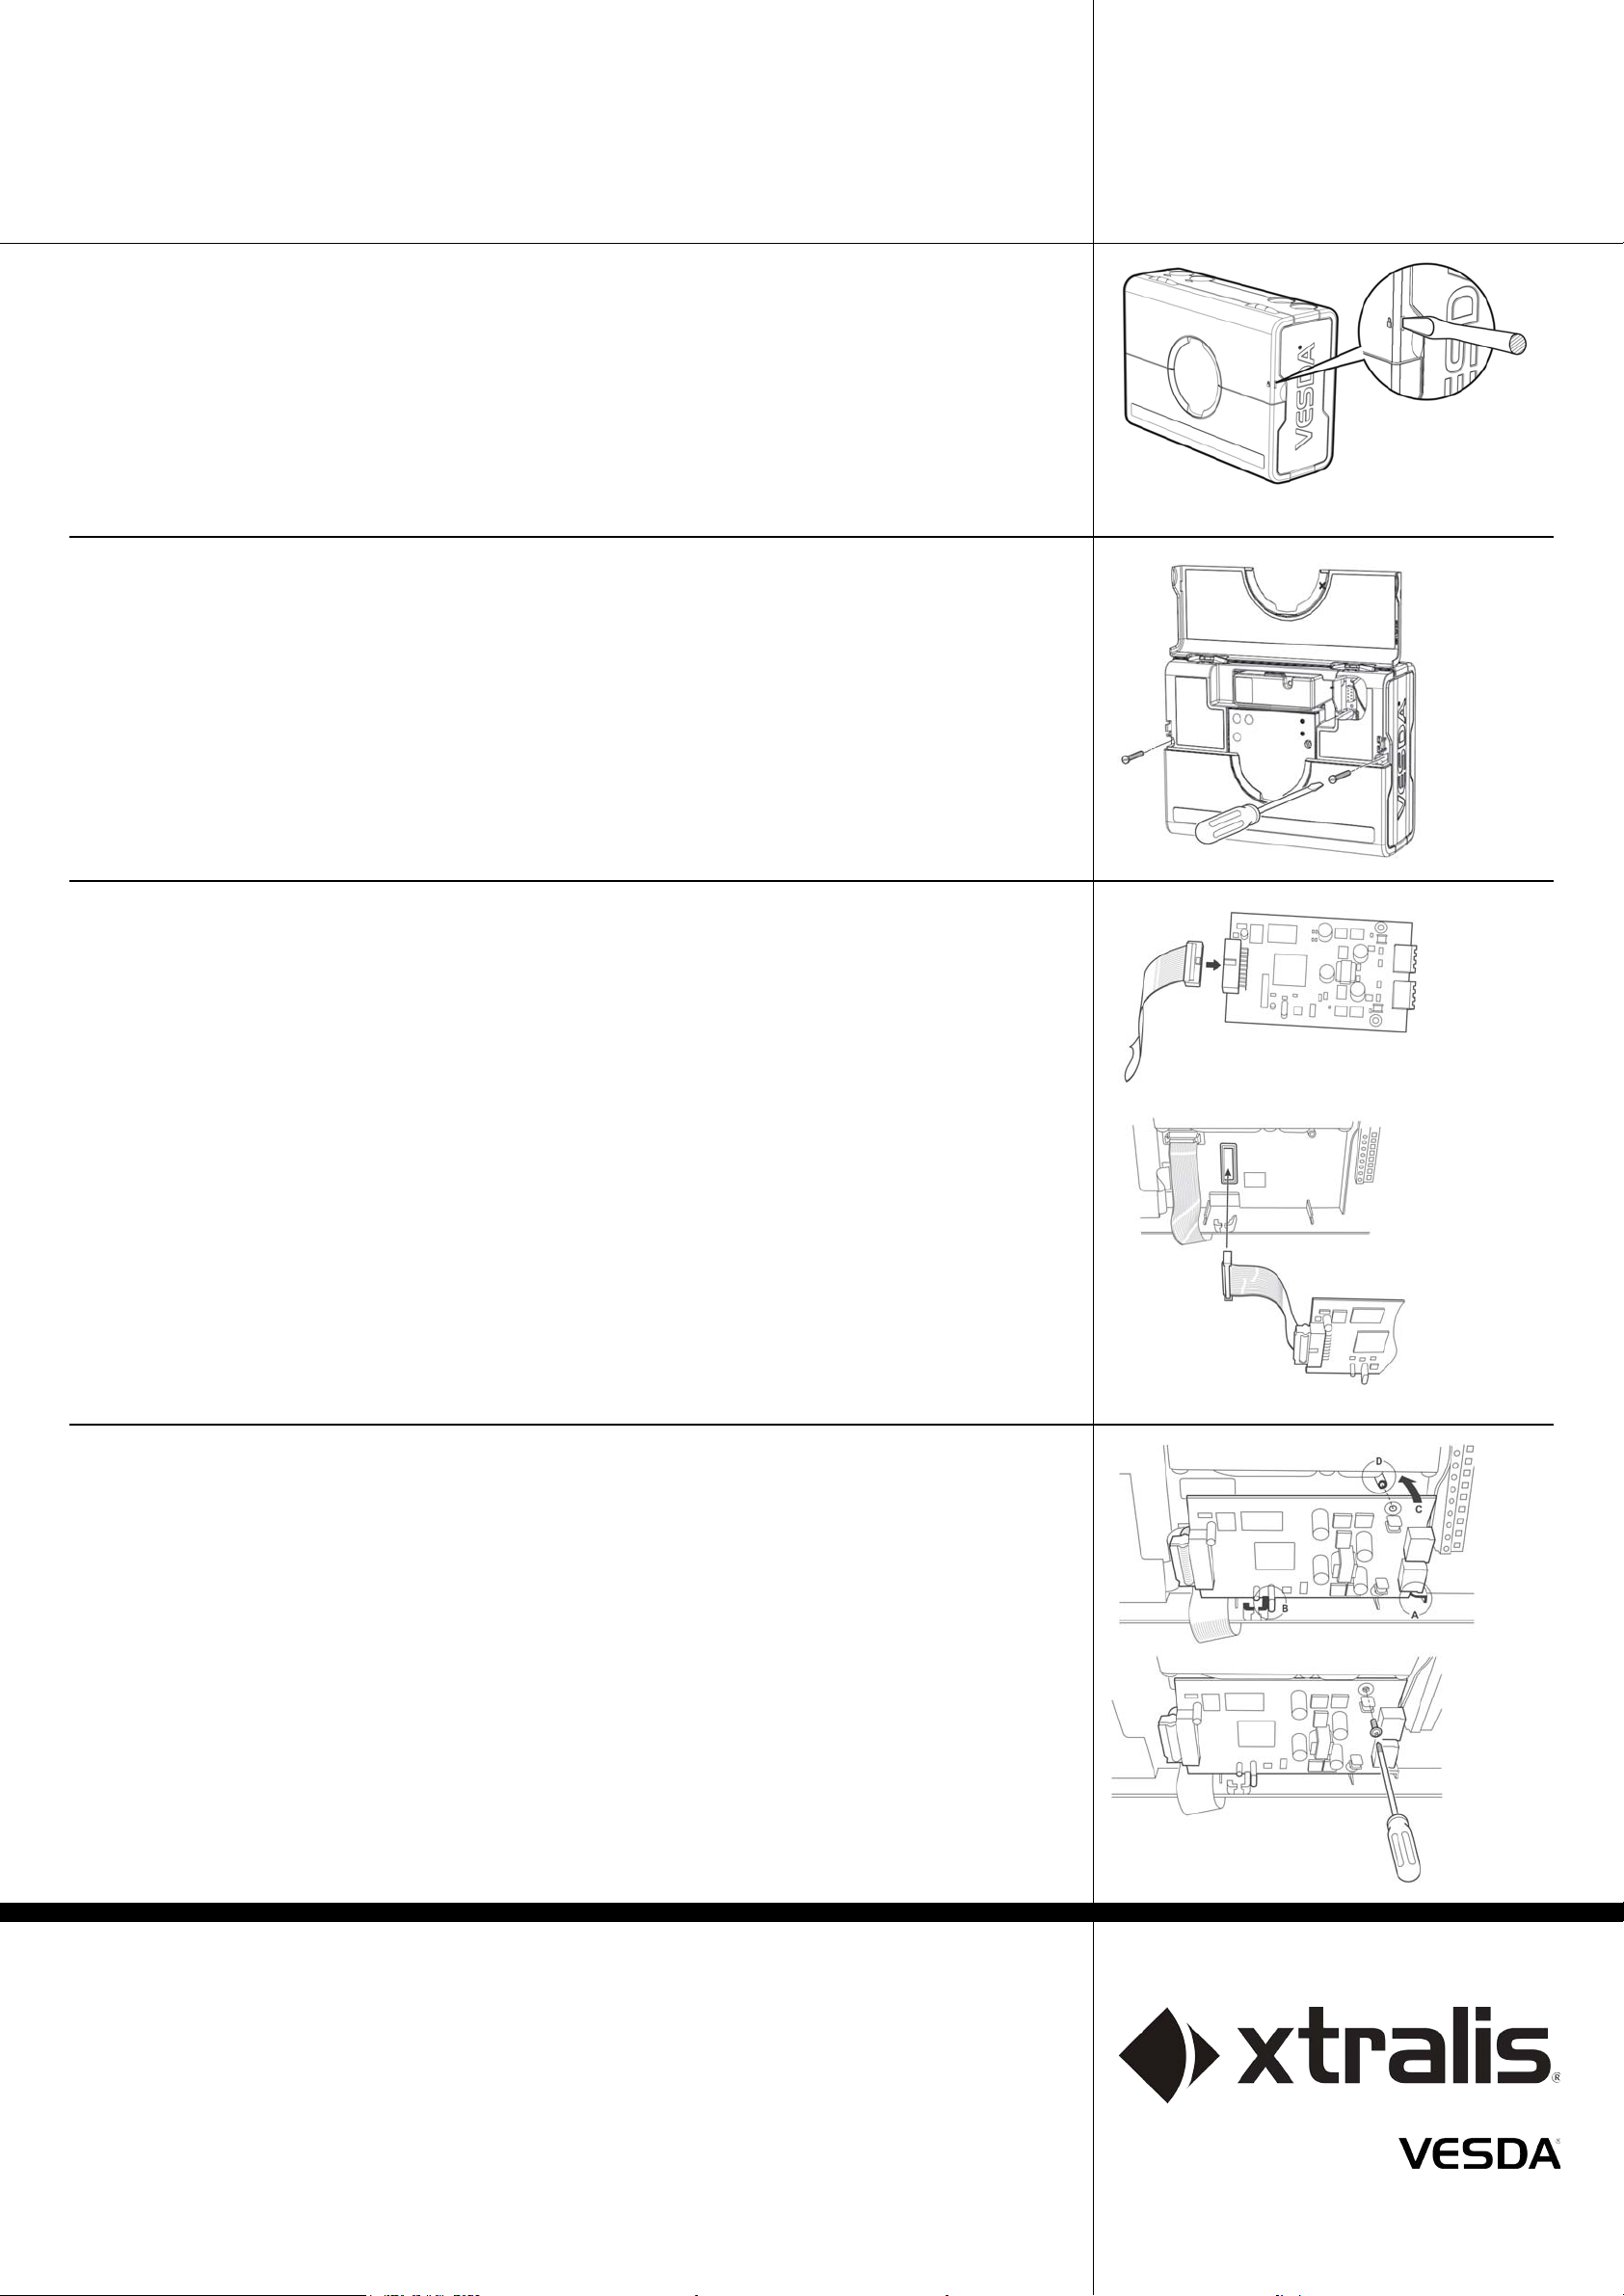
Installing the VN interface card into an Xtralis VESDA VLF detector
Installation de la carte interface VN dans un détecteur Xtralis VESDA VLF
Installation der VN Schnittstellenkarte in einen Xtralis VESDA VLF Detektor
Instalación de la Tarjeta de Interfaz VN en el detector Xtralis VESDA VLF
在Xtralis VESDA VLF 探测器上安装VN联网接口卡
Depress the security tab with a at blade screw driver and lift the eld service access door.
1
Pour retirer le couvercle de la face avant, poussez sur la languette de sécurité et soulevez le capot d’accès pour la
maintenance.
Drücken Sie die Sicherheitslasche mit der achen Klinge eines Schraubendrehers herunter und heben Sie die
Wartungstür für den Kundendienst an.
Liberar la lengüeta de seguridad con un destornillador plano y levantar la puerta de acceso a los controles.
使用一字螺丝刀,按下弹簧安全卡,抬起现场检修门。
Unscrew the two front cover retaining screws, lift and swing down the front cover.
Unplug the detector’s incoming power connection.
2
Dévisser les 2 vis, soulever et basculer la face avant vers vous.
Couper le VLF en retirant le connecteur de l’alimentation 24v
Lösen Sie die beiden Halterungsschrauben der Frontabdeckung, heben Sie die Frontabdeckung an und klappen Sie
sie nach unten. Trennen Sie den Stromanschluss des Detektors
Desatornillar los dos tornillos que jan la tapa frontal, levantarla y girarla hacia abajo. Desconectar la conexión de
entrada de energía eléctrica al detector.
拧开前面板上的二个螺钉,抬起并向下旋转前面板.
拔掉探测器的电源线。
Plug the interface cable into the card, then plug the other end of the cable into the socket inside the detector.
3
Connecter le câble d’interface à la carte et connecter l’autre partie du câble au connecteur à l’intérieur du détecteur.
Stecken Sie das Schnittstellenkabel in die Karte und das andere Ende des Kabels in die Buchse im Detektor.
Conectar el cabe de interfaz a la tarjeta y seguidamente conectar el otro extremo en el enchufe dentro del detector.
将连接电缆插入接口卡,再将电缆的另一端插入探测器内的插槽。
Fold the cable under the card. Insert the card, lower-edge rst, and swing the card inside the detector.
Ensure the screw hole at the top of the card aligns with the hole underneath and that the raised ridge inside the case
4
ts in the other hole. Secure the card with the screw.
Plier le câble sous la carte. Insérer d’abord les ancs inférieurs de la carte et ajuster son positionnement.
Assurer vous que le trou de passage de la vis situé sur la carte coïncide avec l’entretoise letée située dans le
détecteur. Utiliser la vis pour bloquer la carte.
Falten Sie das Kabel unterhalb der Karte zusammen. Nun führen Sie die Karte mit der Unterkante zuerst hinein und
schieben Sie sie in den Detektor.
Stellen Sie sicher, dass sich die Öffnung für die Schraube an der Oberseite der Karte genau über der
darunterliegenden Öffnung bendet und dass die erhöhte Kante im Gehäuse in die andere Öffnung passt. Befestigen
Sie nun die Karte mit der Schraube.
Plegar el cable bajo la tarjeta. Insertar la tarjeta, primero el borde inferior, y situarla dentro del detector.
Asegurarse de que el oricio de tornillo en la parte superior de la tarjeta queda alineado con el oricio situado debajo
y que el saliente de la caja se ajusta al otro oricio. Fijar la tarjeta con el tornillo.
电缆叠放在接口卡下面,先从下缘插入接口卡,旋转接口卡使其进入探测器。
确保接口卡顶端的螺孔与下面的孔对正,使突起的螺钉头能够与另一个孔相配合。用螺钉固定接口卡。
Attention:
Xtralis VESDA VLF-250 units manufactured prior to March 2005 must be upgraded to be compatible with the VESDAnet Interface Card. Please refer to the
Technical Tip on www.xtralis.com or your local Xtralis ofce or distributor for more information.
Attention :
Pour les détecteurs Xtralis VESDA VLF-250 fabriqués avant Mars 2005, il faut effectuer une mise à jour logicielle pour les rendre compatibles avec la carte
interface VESDAnet. Se référer à la section technique du site www.xtralis.com ou contacter le bureau Xtralis le plus proche ou votre interlocuteur pour plus
d’information.
Achtung:
Alle Xtralis VESDA VLF-250 Geräte, die vor März 2005 hergestellt wurden, müssen aufgerüstet werden, damit sie mit der VESDAnet Schnittstellenkarte
kompatibel sind. Technischen Tipps erhalten Sie unter www.xtralis.com, bei Ihrem lokalen Büro von Vision Systems oder Ihrem VESDA Händler.
Atención:
Las unidades VESDA LaserFOCUS VLF-250 fabricadas antes de Marzo de 2.005 deben actualizarse para ser compatibles con la Tarjeta de interfaz VESDAnet.
Por favor ver más información en la Indicación Técnica en www.vision-fs.com, o en la Delegación de Xtralis, o Distribuidor más próximo.
注意:
必须对2005年3月前生产的Xtralis VESDA VLF-250 型探测器进 行升级,使之能够与VESDAnet网络接口卡相兼容。如需更多信息,请参看
www.xtralis.com 上的技术提示, 或联系当地的Xtralis办事机 构或代理商。
Page 2
3Hs
!ns
!s
3Hs
"ns
"s
VESDAnet A
VESDAnet B
3Hs
!ns
!s
3Hs
"ns
"s
VESDAnet A
VESDAnet B
3Hs
!ns
!s
3Hs
"ns
"s
VESDAnet A
VESDAnet B
3Hs
!ns
!s
3Hs
"ns
"s
VESDAnet A
VESDAnet B
3Hs
!ns
!s
3Hs
"ns
"s
VESDAnet A
VESDAnet B
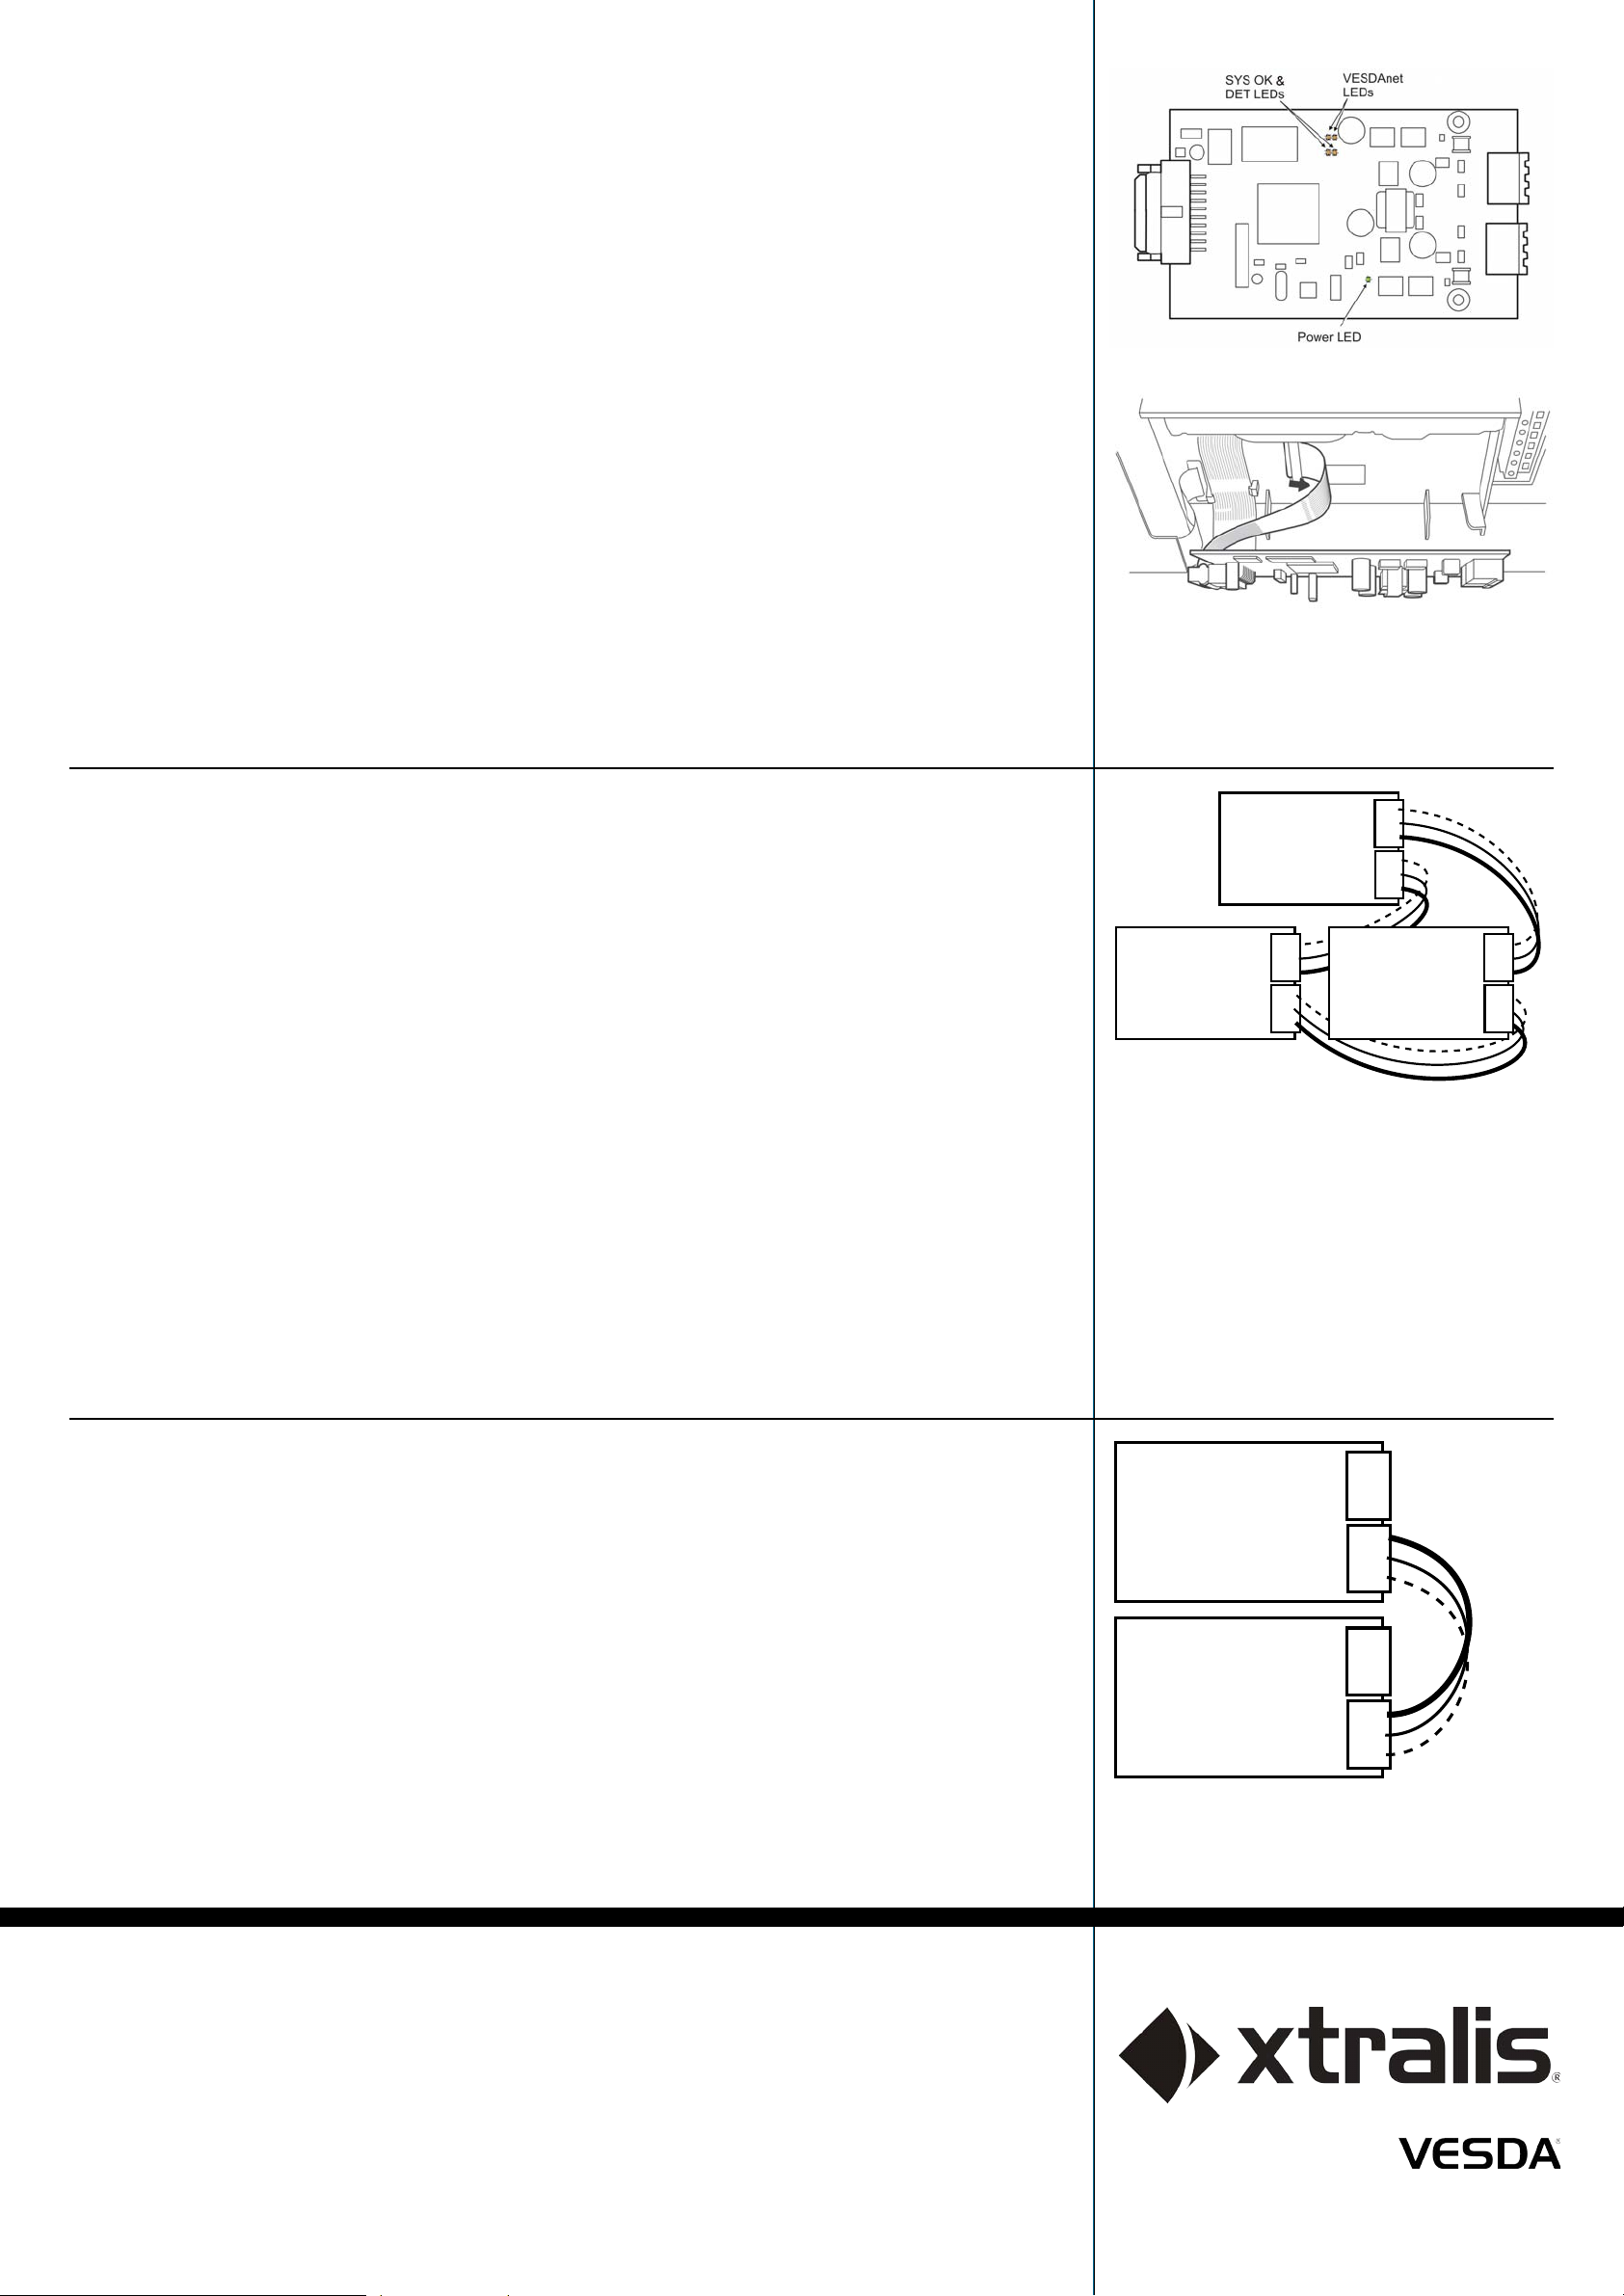
Test the card by:
a. Plugging in the VLF power connector.
5
b. Checking that the green Power LED, the amber ashing SYS OK LED and the amber DET LED are alight.
c. Connect to a VESDAnet.
d. Check that the amber LEDs for connected VESDAnet ports - either A or B or both are alight.
Test de la carte :
a. Mettre sous tension le VLF en connectant l’alimentation
b. Vérier que le voyant d’alimentation vert est allumé, le voyant SYS OK LED clignote et que DET LED s’est
également allumé.
c. Raccorder les câbles du réseau VESDAnet des autres appareils VESDA.
d. Regarder l’état des voyants des ports utilisés VESDAnet - A ou B, ou tous les deux
Testen Sie die Karte, indem Sie:
a. Den VLF Stromanschluss einstecken.
b. Die grüne LED für die Stromzufuhr, die bernsteinfarbene blinkende SYS OK LED sowie die bernsteinfarbene DET
LED müssen leuchten.
c. Schließen Sie das Gerät nun an ein VESDAnet an.
d. Prüfen Sie, dass die bernsteinfarbenen LEDs für die angeschlossenen VESDAnet Anschlüsse, entweder A, B
oder beide, aueuchten.
Probar la tarjeta:
a. Enchufar el conector de energía de la VLF.
b. Comprobar que están activados el LED verde de Alimentación de Energía, el LED de destellos ámbar SYS OK, y el
LED ámbar DET.
c. Conectar a la red VESDAnet.
d. Comprobar que los LED ámbar de conexión de los puertos VESDAnet - ya sea el A o el B o ambos están encendidos.
按照下列步骤对接口卡进行测试
a. 插入VLF探测器的电源线。
b. 查看绿色“电源”LED指示灯、琥珀色“系统正常”闪光指示灯以及琥珀色DETLED指示灯是否亮起。
c. 连接VESDAnet网络。
d. 查看用于指示VESDAnet端口已连接的LED指示灯是否亮起,端口A或端口B,或全部二个端口。
VESDAnet cabling
VESDAnet is a fault tolerant data communication network between Xtralis VESDA devices. VESDAnet cables are
6
terminated at the VESDAnet A and B Terminals on the VN card. Communications from another Xtralis VESDA device is
brought into the VN Card at one terminal and looped out to another device on VESDAnet from the other terminal. It is
recommended that (Belden 9841 - 120 Ohm) twisted pair cables, or similar cables be used.
Câblage du réseau VESDAnet
Le réseau de communication VESDAnet est un bus conçu pour raccorder les différents appareils Xtralis VESDA entre
eux. Les points de raccordement des câbles VESDAnet sont deux borniers VESDAnet A et B situés sur la carte VN.
Le réseau de communication provenant d’un autre appareil Xtralis VESDA est ramené à la carte VN sur un connecteur
et rebouclé vers un autre appareil sur VESDAnet grâce à l’autre connecteur.
Il est recommandé d’utiliser un câble 1 paire torsadée 6/10ème 120 ohms avec écran de type Belden 9841 ou similaire.
VESDAnet Verkabelung
VESDAnet ist ein fehlertolerantes Netzwerk zur Datenkommunikation zwischen Xtralis VESDA Geräten. Die VESDAnet
Kabel werden an die VESDAnet Anschlüsse A und B auf der VN Karte eingesteckt. Von einem anderen Xtralis VESDA
Gerät kommunizierte Daten werden über den einen Anschluss auf die VN Karte geleitet und über den anderen
Anschluss zu einem anderen Gerät im VESDAnet übertragen. Wir empfehlen die Verwendung von (Belden 9841 - 120
Ohm) Twisted-Pairkabeln oder ähnliche Kabeln.
Cableado VESDAnet
VESDAnet es una red de comunicación de datos a prueba de fallos entre dispositivos Xtralis VESDA . Los cables VESDAnet
tienen tiene su nal en los terminales A y B de la tarjeta VN de la red VESDAnet . Las comunicaciones desde otro
dispositivo Xtralis VESDA llegan a un terminal de la Tarjeta VN y el bucle continúa hacia otro dispositivo de la red VESDAnet
desde el otro terminal. Se recomienda utilizar cable de dos conductores trenzados (modelo Belden 9841 - 120 Ohm), o
VESDAnet网络的电缆连接
VESDAnet是Xtralis VESDA 设备之间的 容错数据通讯网络,VESDAnet电缆接在VN网络接口卡的VESDAnet端口A和端口B
上。与某个Xtralis VESDA设备 的通讯从其中一个端口接入,再从另一个端口向另外一台 VESDAnet 上的设备进行环路
输出。建议使用(Belden 9841 -120ohm)双绞线或 类似的电缆。
When wiring a VESDAnet card into a VESDAnet loop, do not switch the polarity, + must be wired to + and - to - when
connecting detectors.
7
It makes no difference if you connect A to A, B to A, B to B, only the polarity is important.
Lorsqu’une une carte VESDAnet est raccordée à une boucle VESDAnet, ne pas inverser les polarités,+ doit être
raccordé au + et – au – lorsque vous raccordez les appareils entre eux.
Les modules peuvent être raccordés indifféremment A vers A, A vers B,B vers A ou encore B vers B, mais il est
important de respecter les polarités
Wenn Sie eine VESDAnet Karte in ein VESDAnet Netzwerk einbringen, verändern Sie bitte nicht die Polarität. Wenn
Sie die Detektoren anschließen, muss + an + und - an - angeschlossen werden.Es ist egal, ob Sie A an A, B an A oder
B an B anschließen, nur die Polarität ist wichtig.
Cuando se proceda al cableado de una tarjeta VESDAnet a un bucle de la red VESDAnet, no cambian la polaridad, al
conectar los detectores, el + debe conectarse al + y el - al -.Es indiferente si se conecta A a A, B a A, B a B, solamente
es importante la polaridad.
将VESDAnet接口卡接入VESDAnet网络时,不能转换极性。在连接探测器时,正极(+) 必须 与正极(+) 相连,负极
(-)与负极(-)相连。端口之间如何连接并不会有什么不同,A连A,B连A,B连B都可以,仅仅极性不能接错,这非常重要,
Replace the detector cover. Troubleshooting information is available in the VESDAnet card product manual.
Une fois terminé, replacer le couvercle du détecteur. Consulter la section dépannage dans la notice de la carte
8
VESDAnet si nécessaire.
Bringen Sie die Detektorabdeckung wieder an. Informationen zur Fehlersuche nden Sie im Produkthandbuch der
VESDAnet Karte.
Volver a colocar la tapa del detector. En el manual de producto de la tarjeta VESDAnet está disponible la información
para resolver posibles dicultades.
更换探测器的面板。故障诊断信息可以用于VESDAnet接口卡产品手册。
Document 10673_03
Part: 30072
 Loading...