

Page 1
LEAP ASSEMBLY MANUAL
Rev 1A
Page 2
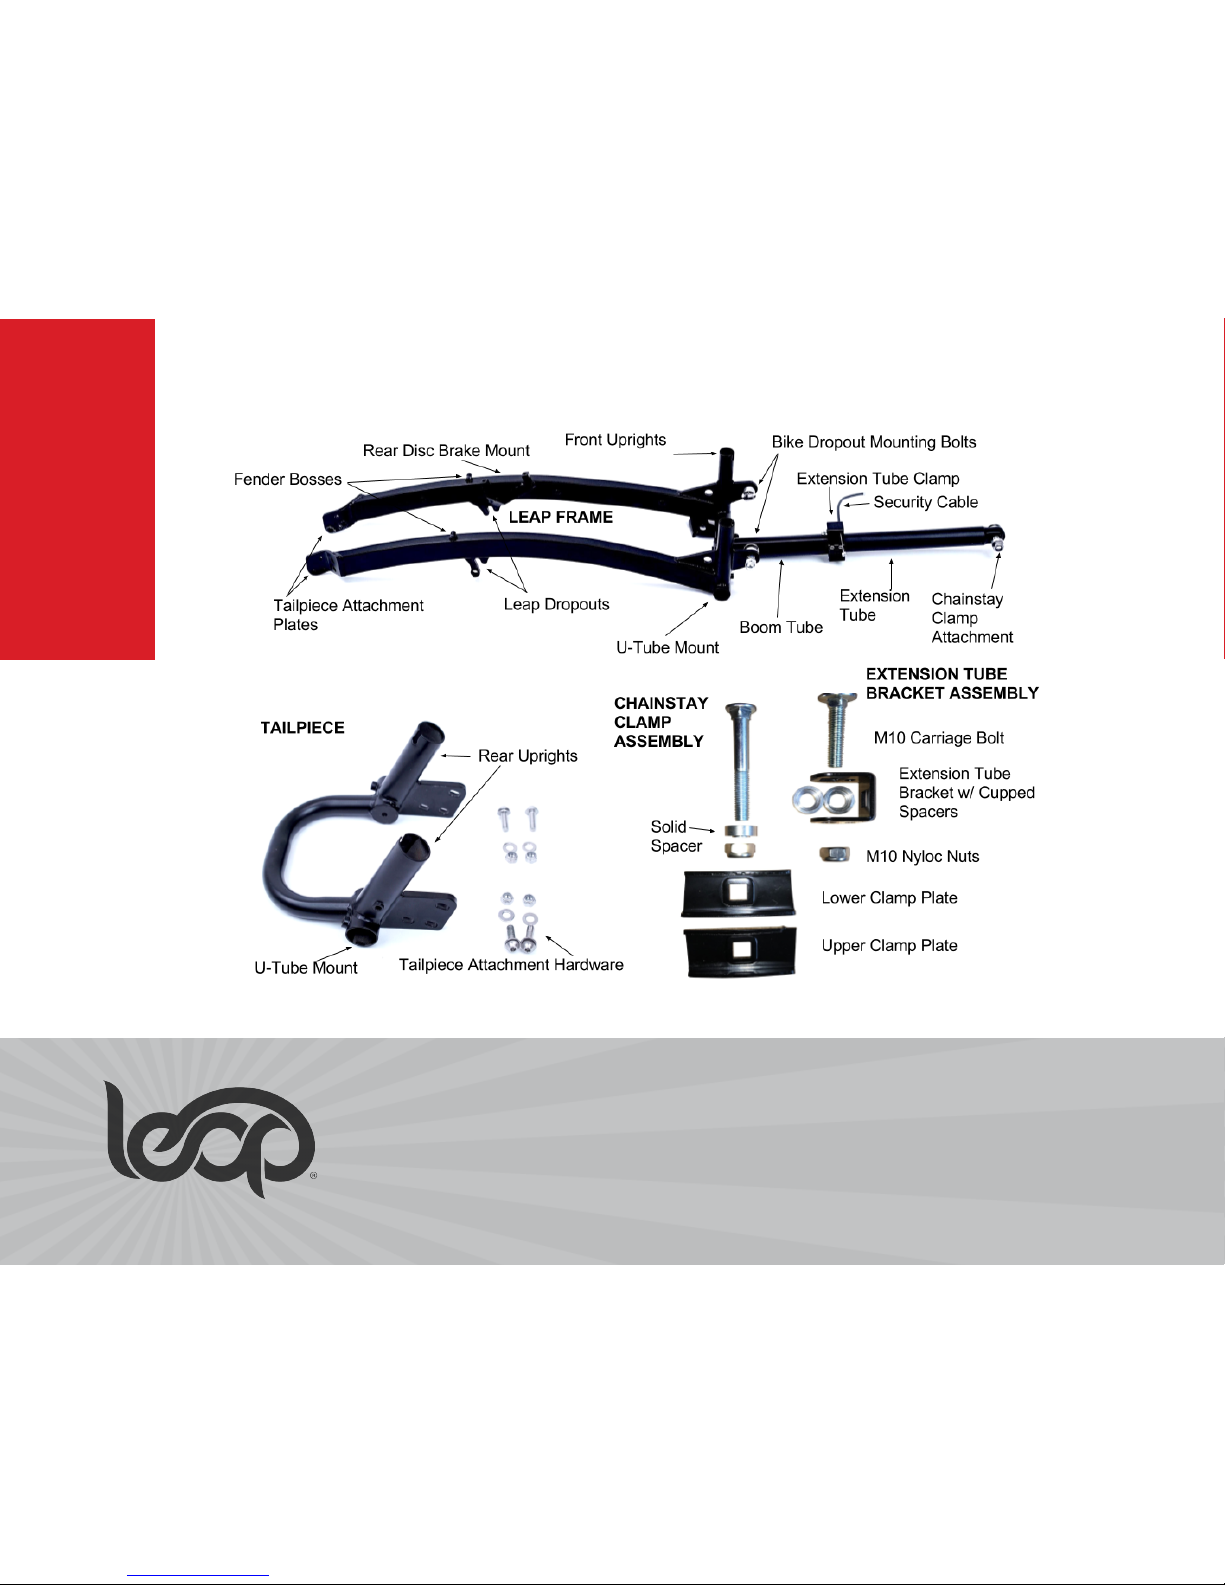
in the box
BE MOVED
Congratulations on purchasing an Xtracycle Leap DIY Cargo Bike Kit, and being one of
the visionaries using the Leap to create your dream cargo- or passenger hauling bicycle.
This guide well help you set up the Leap on your bicycle safely and easily.
Page 3
For Attaching the LEAP:
• Metric open-end or
box wrenches: 10, 17mm
• Metric allen wrenches: 3, 4, 5, 6mm
• Cable + housing cutters
• Needle nose pliers
• Bicycle grease
(Park Tool PPL-1 or similar)
• Medium strength thread locking
compound (Blue Loctite or similar)
TOOLS & MATERIALS REQUIRED
Other Tools Required:
You will need all of the tools and
materials required to:
• Remove and install your rear wheel
• Remove, install, and adjust your rear
derailleur (if present)
• Remove, install, and adjust your rear
disc brake
• Separate your chain
• Install a new, longer rear derailleur
cable and housing
• Install a new, longer rear brake
cable and housing (mechanical) or
hose (hydraulic)
Please refer to the component’s
manufacturer instructions for the
tools needed for each operation.
BICYCLE PREPARATION
Bicycle Inspection
Before undertaking the LEAP
conversion, check to make sure that
your bicycle is in good working order.
Make sure that the frame is sound and
has no damage, cracks, or
misalignment. Check all components
for damage or wear and replace worn
out components as needed.
•
Disassembly
• Remove the rear wheel from the bike.
Separate the chain and remove it from
the bike.
• Disconnect the rear derailleur cable
and rear brake cable (if present).
• Remove rear derailleur and rear brake
from the bike.
get ready
Page 4
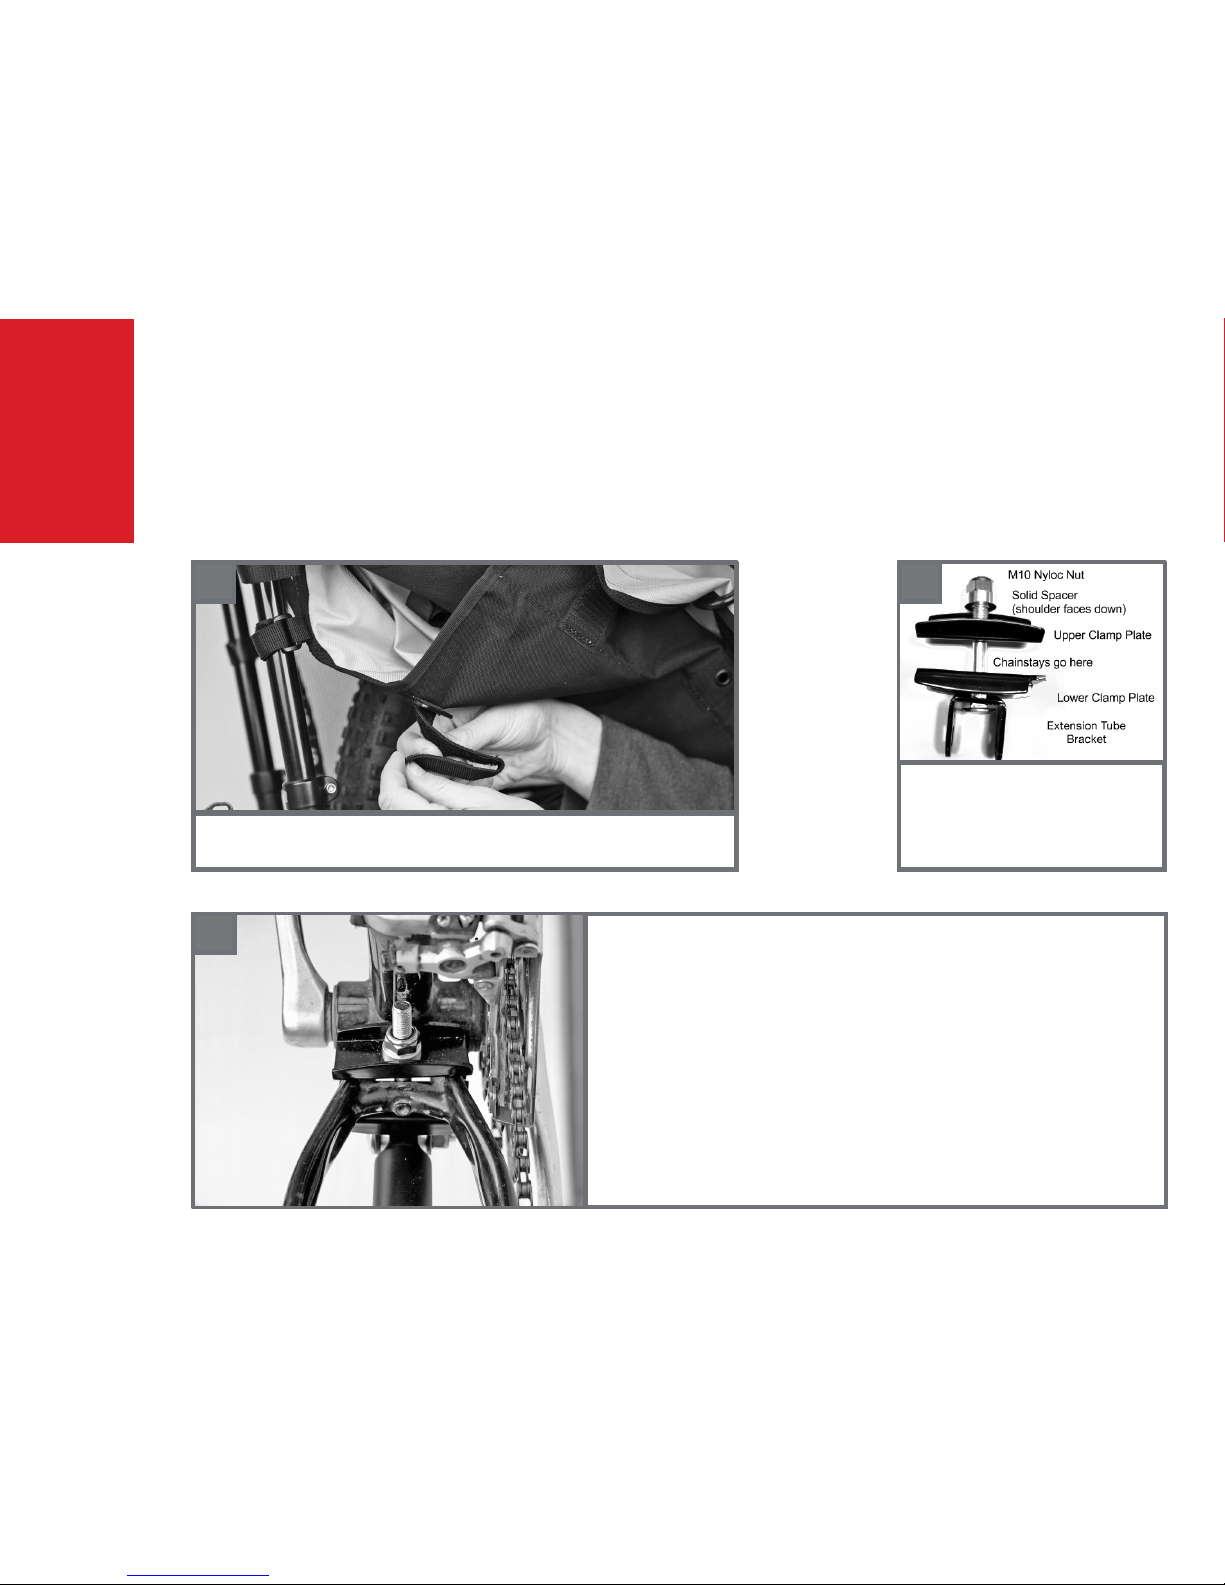
Install chainstay clamping plates
step 1
1A: Decide where you are going to place the extension tube clamping
plates on the chainstays.
1B: Once you have decided on
proper placement, assemble the
clamping hardware on the longer
M10 carriage bolt as shown.
1A
1B
1C: Install the chainstay clamping plates with the wider side facing the rear
dropouts. This puts the notched lower piece correctly toward the drive side of
the bike. Tighten the nut to 15-20 N-m using a 17mm wrench. As you tighten,
check two things:
• That the square head of the carriage bolt is fully seated in the square
hole on the extension tube bracket
• That the chainstay clamping plates are centered and clamp straight across
the chain stays, and the extension tube bracket is lined up with the
centerline of the bike.
If your front derailleur cable rubs the plate, you may mount the plate as far
back as possible while avoiding cable rub. Alternately, place a section of thin
plastic tube over the cable to avoid rubbing. Jagwire housing liner would work.
1C
Page 5
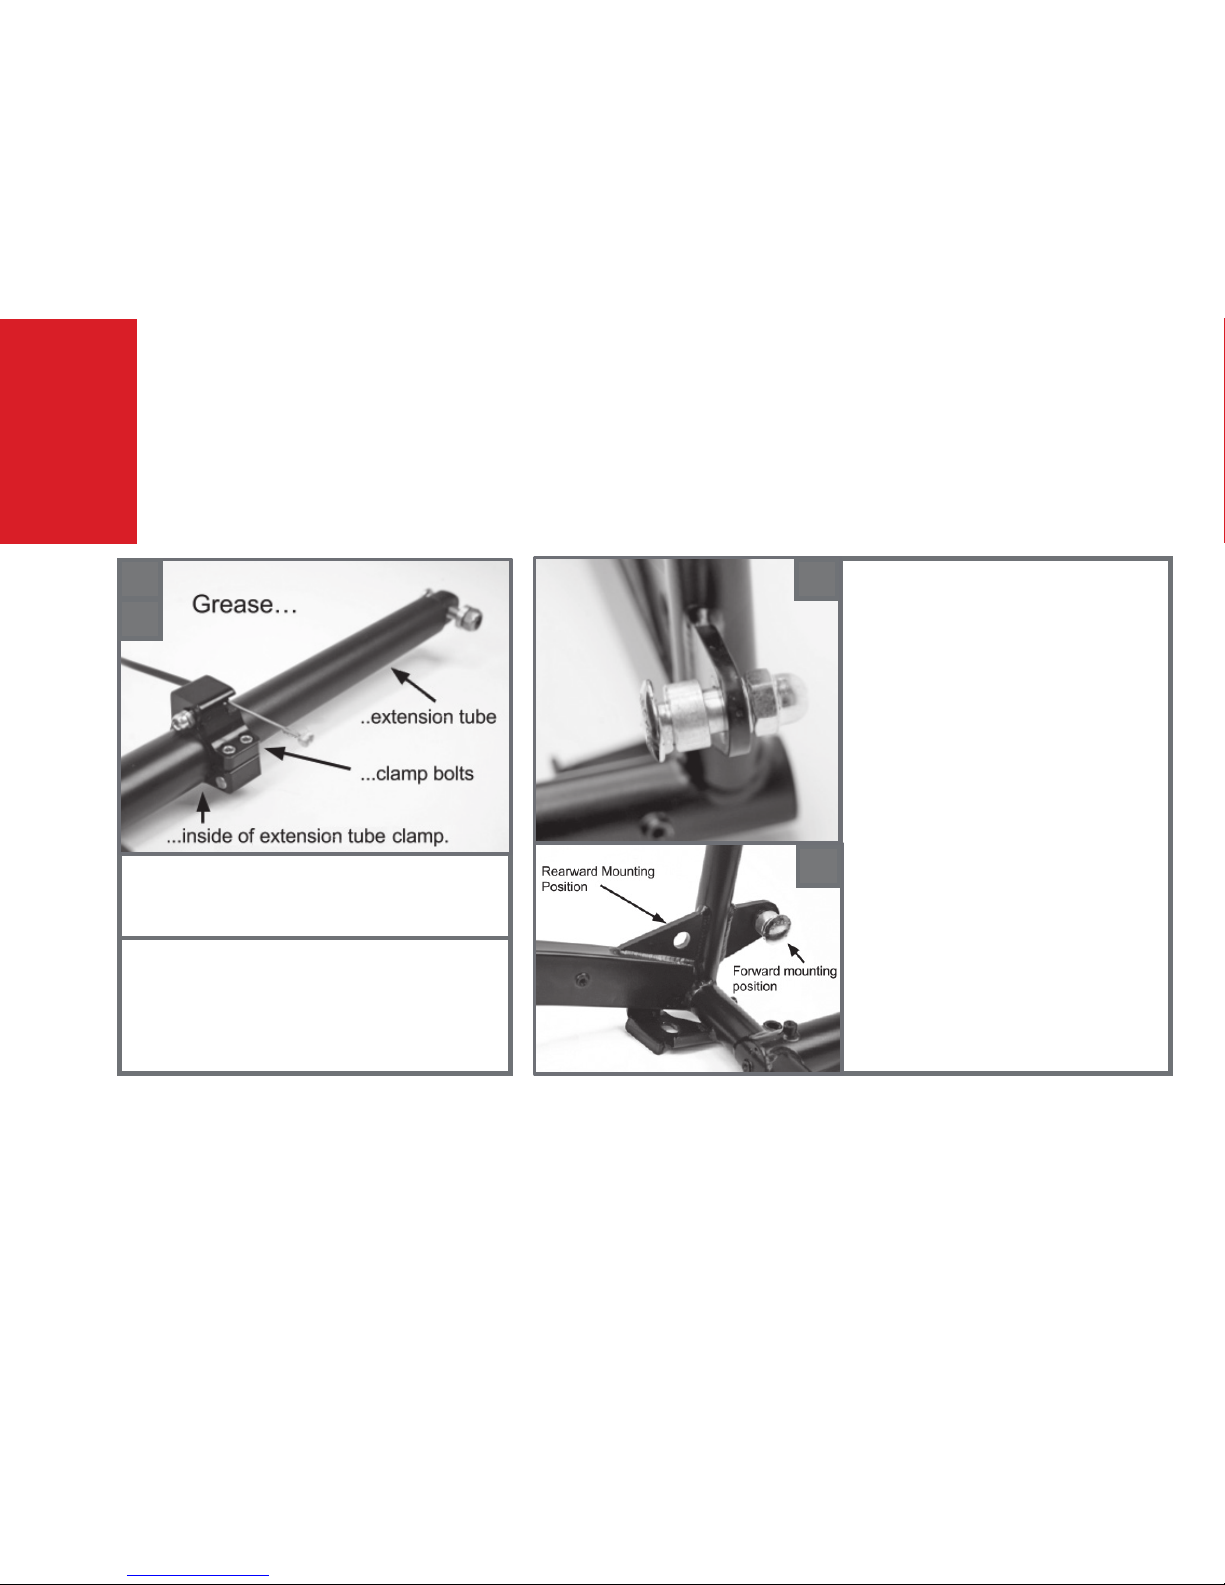
Assemble Leap Frame
step 2
2A: Lightly grease the extension tube where it inserts
into the boom tube, the extension tube clamp bolts,
and the inside face of the extension tube clamp.
2A
2B
2B: Assemble as shown.
• Check that the clamp is fully seated onto the
extension tube and that the security cable
attachment faces up.
• Do not tighten the bolts yet.
2C: Insert the dropout xing bolts into the
holes on the Leap frame, with the dome
nuts and lock washers facing outwards,
and the dropout spacer on the inside of the
frame.
Note: There are two mounting positions for
the dropout xing bolts on the Leap frame.
The forward position will give the nished
bike a longer overall wheelbase for more
stability, greater clearance between the
rider and passengers/cargo on bikes with
short chainstays, and less potential for
interference between the bike frame and
Leap frame.
The rearward position will give the nished
bike a shorter overall wheelbase for more
maneuverability/ease of parking, will move
the passengers/cargo closer to the rider
on bikes that have long chainstays, and
will provide even greater stiffness to the
already-stiff Leap mounting.
2C
2C
Page 6
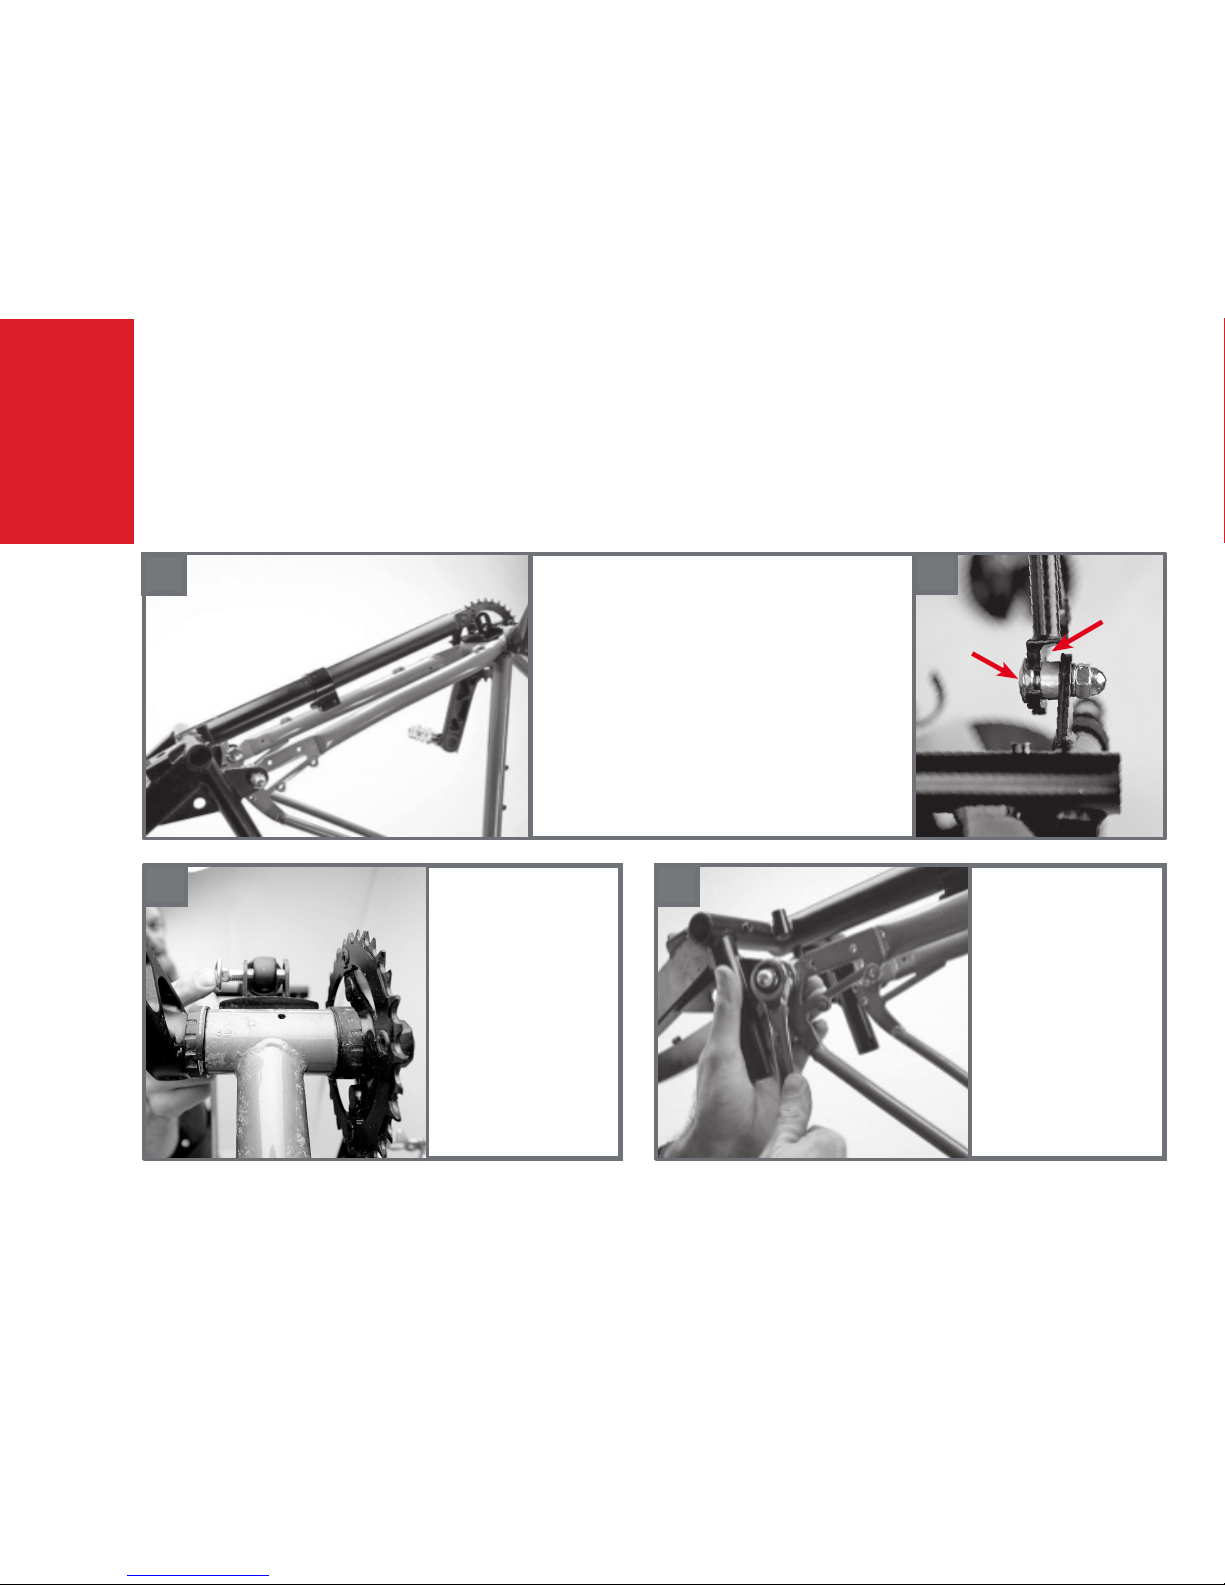
Install dropout xing bolts
step 3
3A: Attach the Leap frame to the bike frame, by
inserting the dropout xing bolts into the rear
dropouts of the bicycle as shown.
The curved side of the dropout insertion tab needs
to be placed into the dropout. You can get it to sit
the opposite way but it will not seat fully causing
issues.
• Check that the tabs on the dropout xing bolt
heads can fully seat into the dropout.
Note: This step may be easiest to accomplish with
the bike upside down.
3A
3A
3B: Adjust the length
of the extension tube
until it aligns with the
extension tube bracket
on the clamping plates.
• Temporarily place
the shorter M10
carriage bolt through
the bracket and
extension tube as a
pin to hold in place.
3B
3C: Use a 17mm
wrench to tighten both
dropout xing bolts to
30-40 N-m.
Note: If you turned the
bicycle upside down,
you may now turn it
right side up again.
3C
Dropout
Carriage
Bolt
Page 7

Cont’d: Install dropout xing bolts
step 3
3D: Remove and re-assemble
the shorter M10 carriage bolt
on the extension tube bracket.
• Insert the cupped spacers
between the extension tube
and the inside of the
extension tube bracket. The
cups should face outwards.
• Slide the M10 carriage bolt
back through the bracket,
spacers, and extension tube,
checking to make sure that
the head of the carriage bolt
fully seats in the square hole
on the bracket.
• Thread the other M10 nyloc
nut onto the carriage bolt
and use a 17mm wrench to
tighten it to 30-40 N-m.
3D
3D
3E: Use a 4mm allen wrench to
tighten the bolts on the extension
tube clamp to 6 N-m.
3E
After a caterpillar buries itself inside its cocoon, it waits to morph into a buttery. The caterpillar doesn’t simply shrink a bit
and sprout wings. Instead, it sort of disintegrates into a puddle of ooze within the cocoon. New cells are called imaginal
cells start popping up and they are so completely different from the original ooze cells that they are thought to be a virus or
some other form of enemy so the ooze cells begin attacking the imaginal cells. However, even though the imaginal cells are
being killed off for not tting in, they still keep showing up, more and more of them. Eventually, the imaginal cells begin to
nd each other and cluster together. Like attracts like, and the clusters begin to join up with other clusters. Eventually, the
imaginal cells get to be a large enough community and they switch gears from simply being a group of like-minded cells into
the programming cells of the buttery. Some imaginal cells start changing into wing cells, some start changing into antenna
cells, some start changing into digestive tract cells, and so on. Imaginal cells transform into buttery anatomy cells. As we all
know, if left alone to do his thing, the buttery eventually emerges as a completely new entity from the original caterpillar.
Page 8
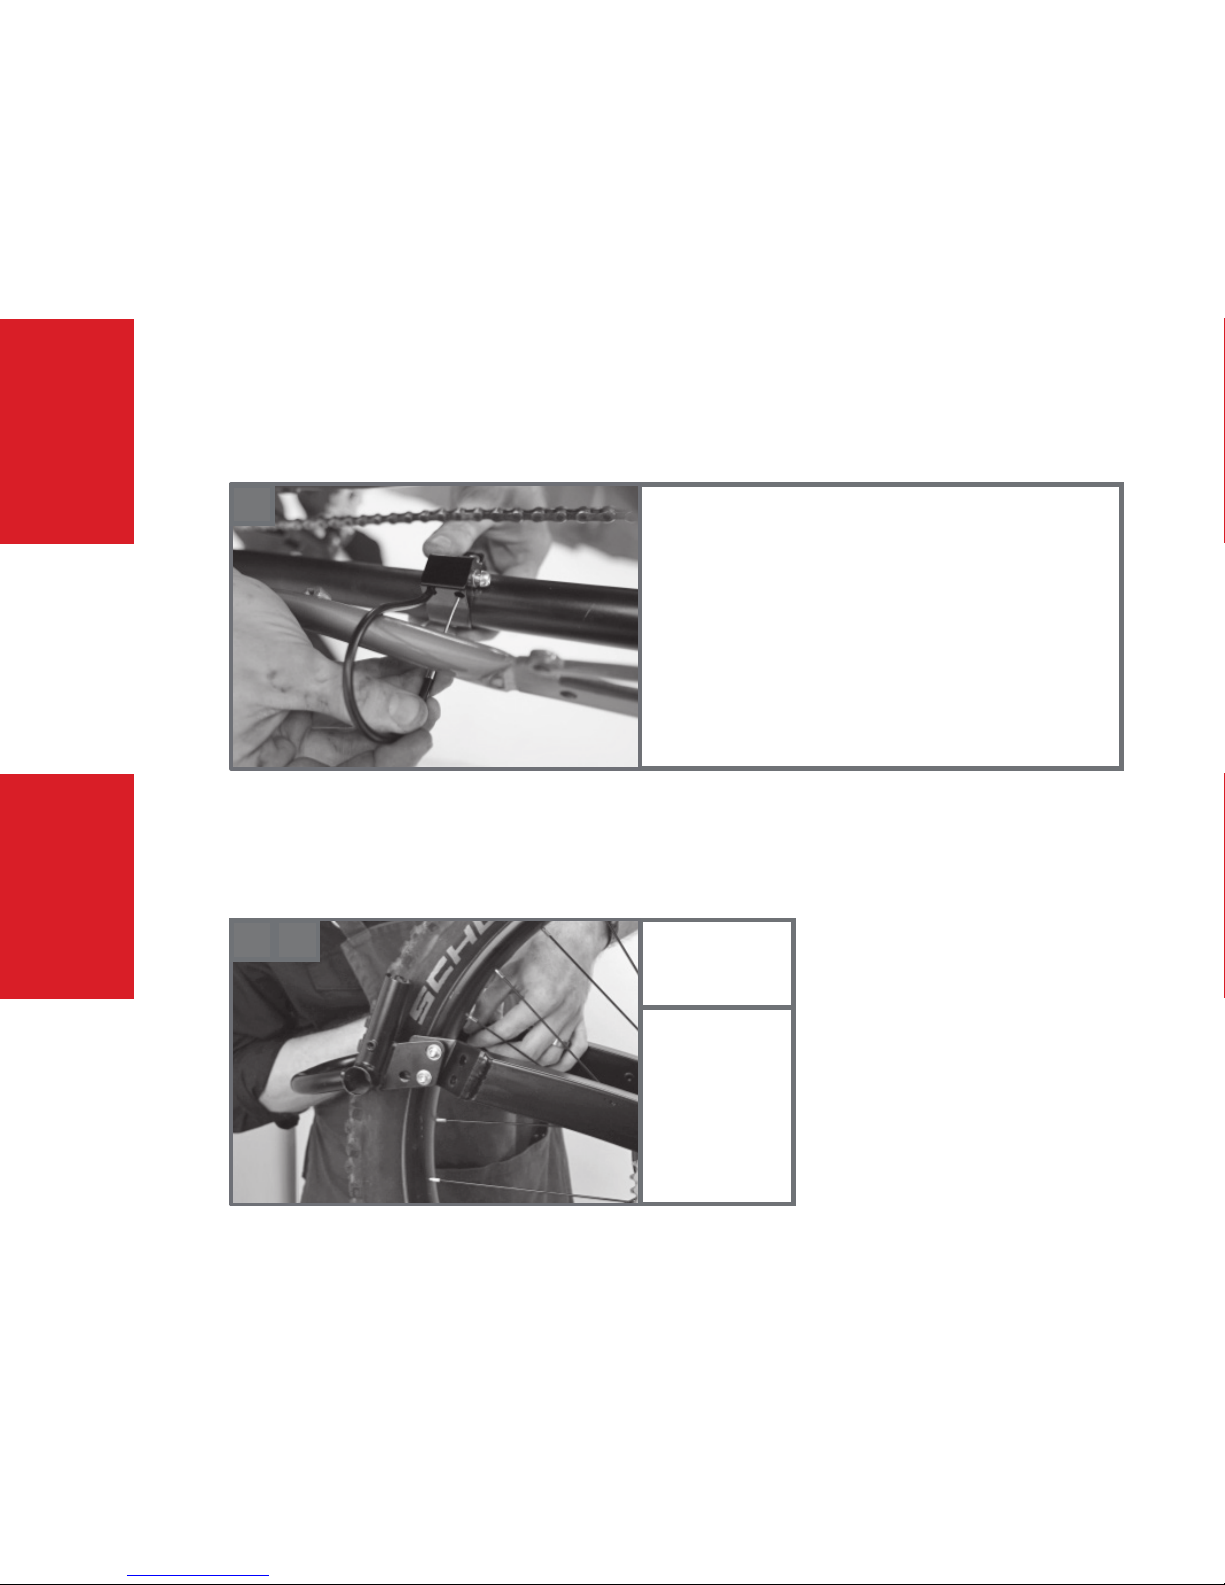
Assemble Security Cable
step 4
4: Assemble the security cable on the extension tube clamp.
• The security cable is similar to a brake cable, with a short
length of housing.
• Cut security cable housing to length such that it loops around
the left chainstay as tightly as possible and fully seats into
stops on extension tube clamp.
• Place a ferrule on the cut end.
• Pass security cable through extension tube clamp, through
housing, around left chainstay, and back through extension
tube clamp.
• Pull tight and clamp with the M5 bolt.
• Cut off excess cable and crimp on a cable end cap.
4A
Assemble Rest of LEAP Frame
5A: Install the
rear wheel in the
Leap Frame.
5A
step 5
5B
5B: Attach the
tailpiece with 4
M6 bolts, washers, and nyloc
nuts.
Do not tighten
the bolts yet.
Page 9
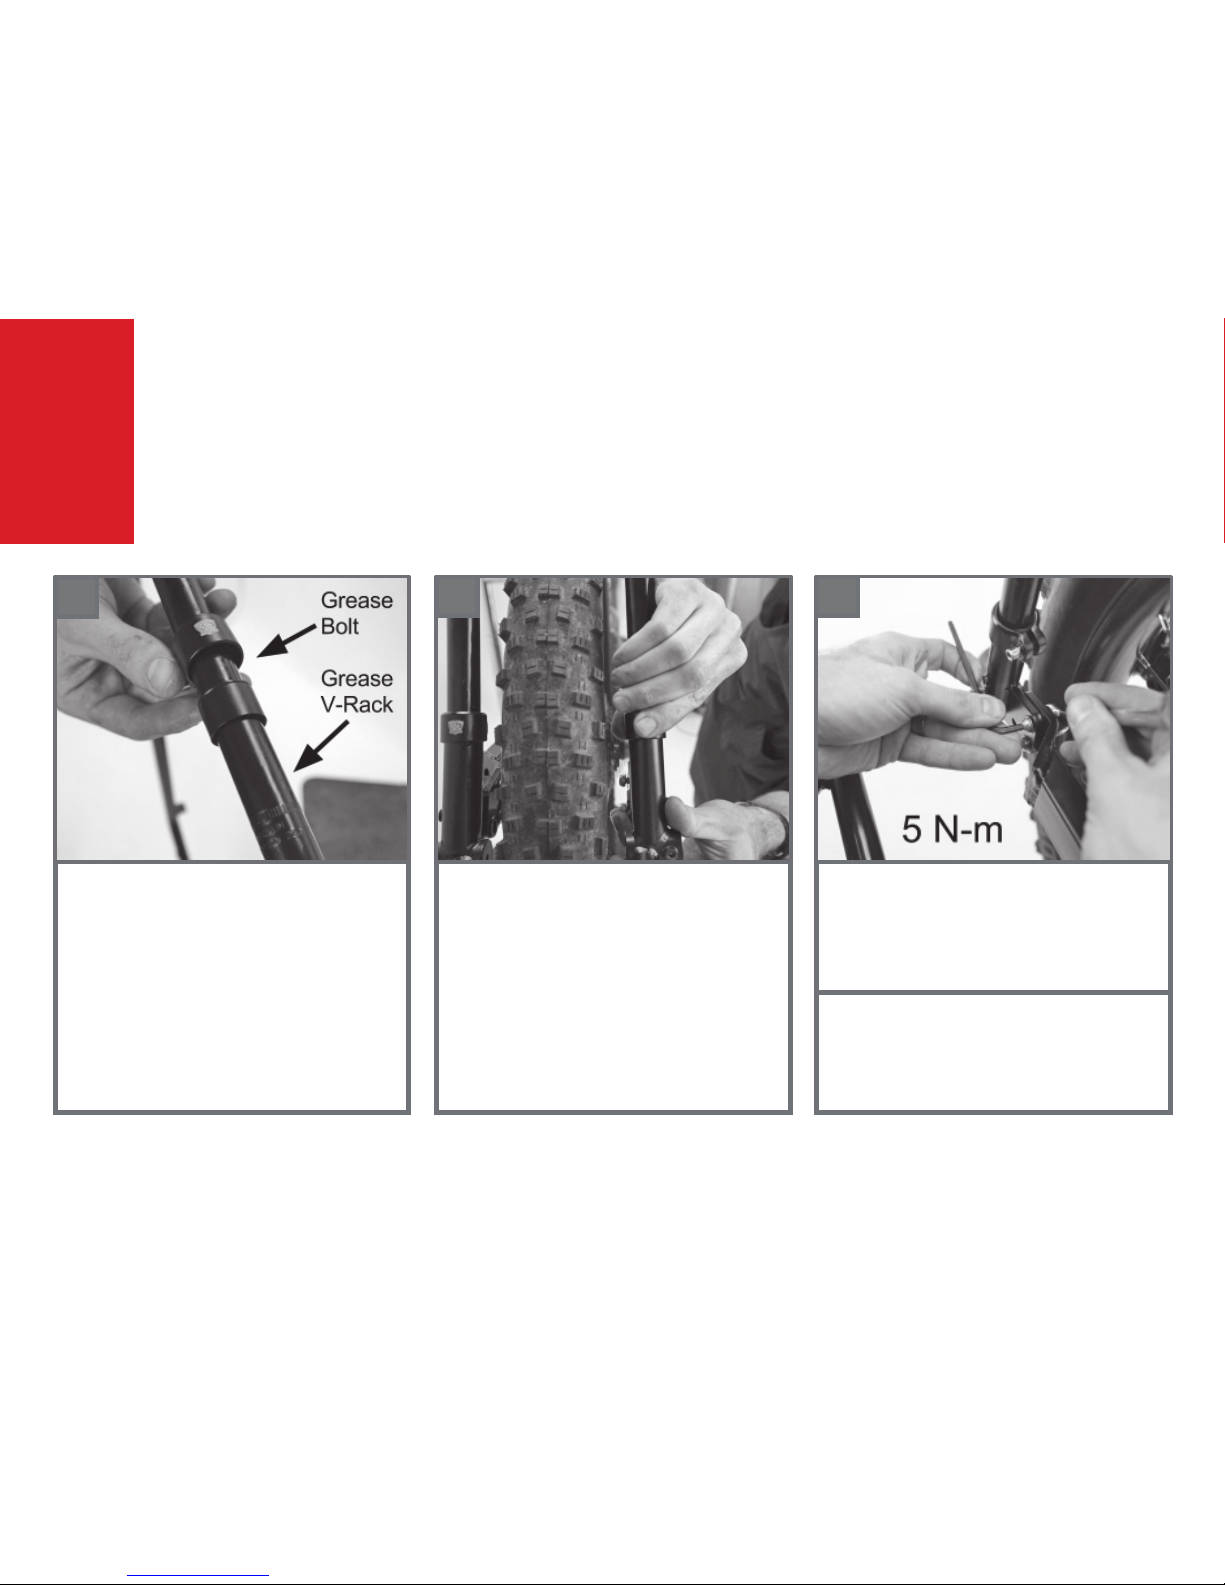
Cont’d: Assemble Rest of LEAP Frame
step 5
5C: Prep the V-Racks and RackLocks
• Grease the M4 bolts on the RackLocks,
and the ends of the V-Racks where they
insert into the Leap Frame.
• RackLocks have 3 pieces: outer collar,
o-ring, and inner collar. Slide them onto the
ends of the V-racks in this order.
5C
5D: Install V-Racks
• Insert the V-Racks into the Leap Frame
and check that they are fully seated.
• Slide the RackLocks down the V-Racks
until the bottom edge of the outer collar
is even with the bottom edge of the inner
collar and both are fully seated on the
Leap Frame.
• Tighten the RackLock bolts to 4 N-m.
5D
5F: With V-Racks and U-Tubes (if present) installed, tighten the 4 M5 bolts on the tailpiece
to 5 N-m, by holding the bolt head with a
4mm allen wrench and tightening the nut on
the backside with a 10mm wrench.
5F
5E: If U-Tubes are being installed, install them
now. See the U-Tube LT2 Assembly Guide for
more information.
Note: Leap U-Tubes are Leap-specic and are
not width adjustable.
Page 10
Reassemble Drivetrain and Rear Brake
step 6
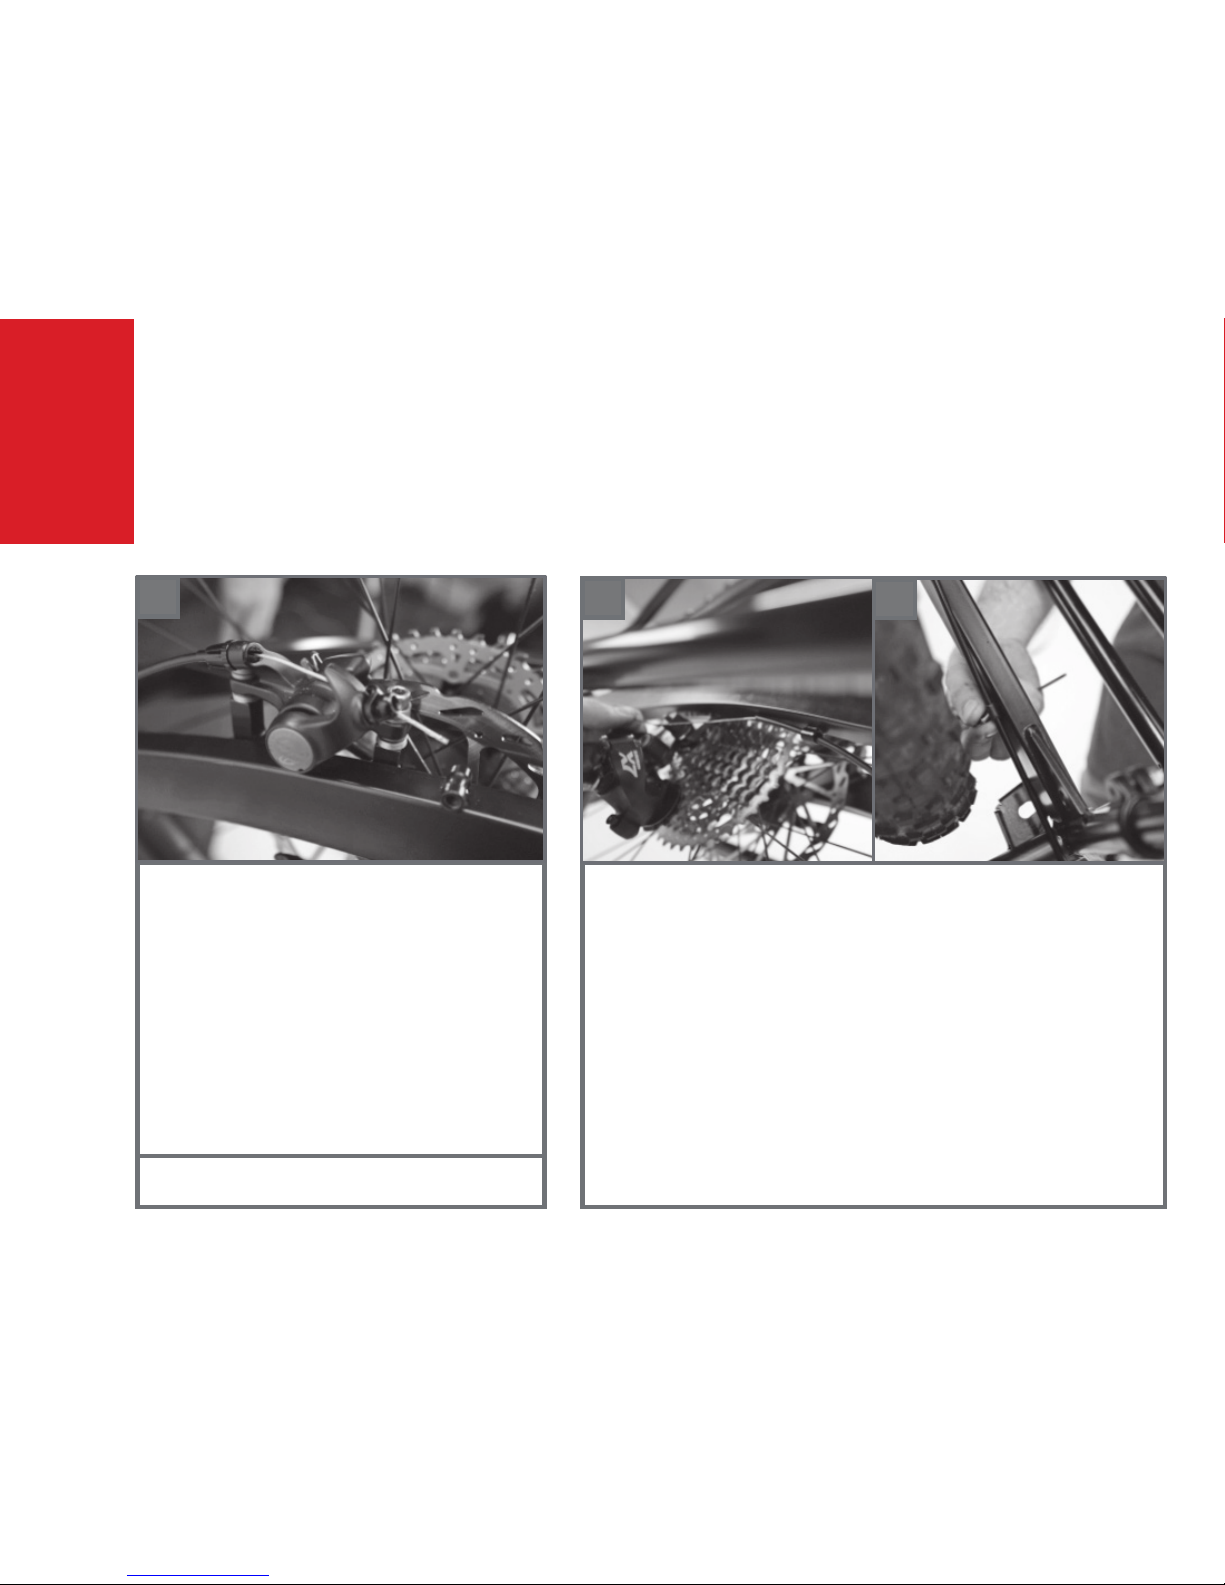
6A: Install the rear brake caliper on the Leap frame.
Check that the rear brake caliper is properly spaced for
the rear rotor being used (minimum rotor size is 180mm).
For some disk brakes, the shape/size of the caliper
body causes intereference with the leap frame when
using a 160mm rotor. Take note when installing. You
must switch to 180mm rotor and post mount adapter
if your caliper touches the frame. Do not risk lowering
the braking capacity by adding spacers to make the
160mm rotor work. Also, with cargo bikes, your braking
needs increase signicantly and thus it is highly
recommended that you use 180mm rotors minimum.
6A
6C: Install longer rear derailleur and brake cable and housing (if rear brake is
mechanical). If rear brake is hydraulic, refer to manufacturer instructions for
running a longer hose to the brake.
Notes:
• The housing can run continuously from the rearmost housing stop on the
bike frame to the derailleur or brake, or the full length from the lever if no
stops are present on the frame.
• The derailleur housing should be run under the forward bar of the Leap
frame to avoid interference with the chain. There is a welded-on cable guide
for the derailleur cable ahead of the dropout.
• There are three bolt-on cable guides for the rear brake cable or hose
included. Use as many as you need to secure the rear brake cable while also
providing for a smooth cable path into the rear caliper.
6C
6B: Install the derailleur on the Leap frame.
6C
Page 11
Cont’d: Re-Assemble Drivetrain and Rear Brake
step 6
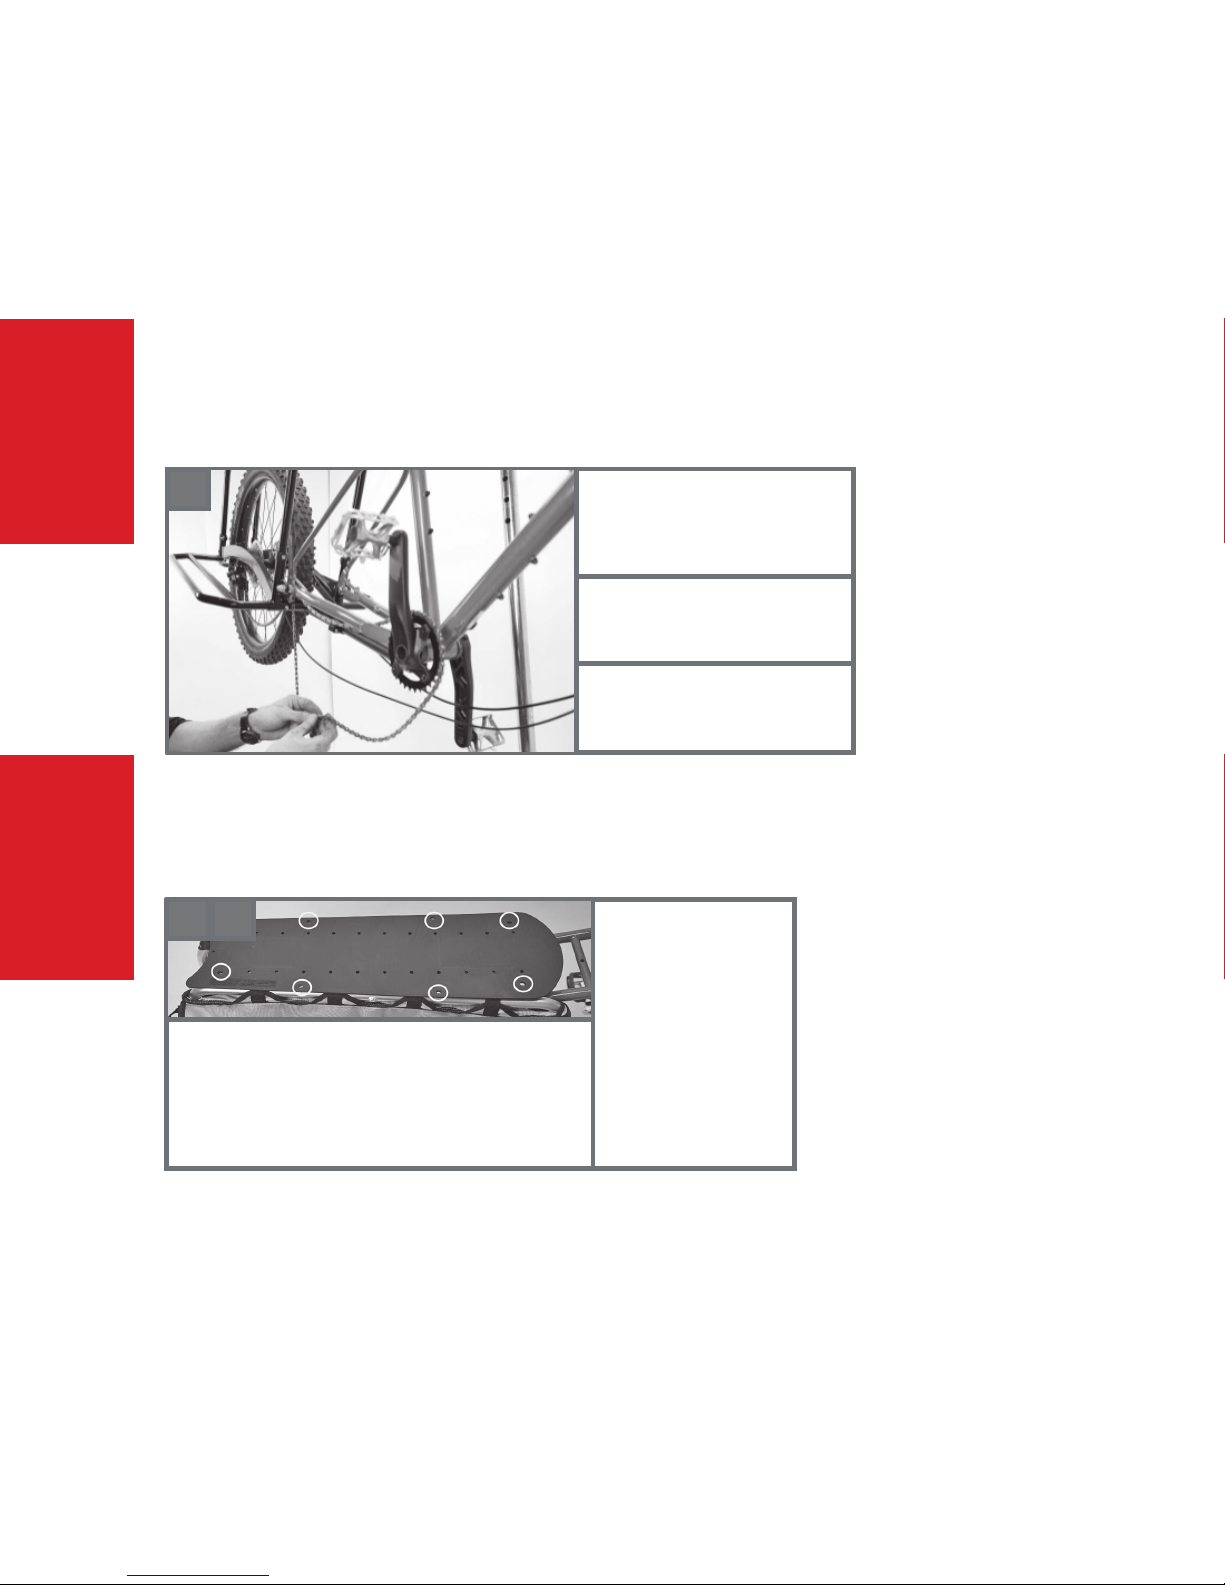
6D: If you are using the Chain Roller
(recommend for protecting your
LEAP frame and riding off-road),
now is a good time to install it.
6E
6E: Then, install the chain, using
the chain extension and included
master links to extend it, if present.
6F: Adjust the rear derailleur and
brake according the manufacturer’s
instructions.
Install remaining accessories
step 7
7A
7A: CarryAll Bags, CargoBays, WheelSkirts, Hoopties
and Yepp Seat Adapters should be installed before the
FlightDeck is installed. If you’re going to install a Yepp
Maxi EasyFit, you will want to cut out the front or rear
rectangular window and mount the seat adapter at the
same time that you install the deck.
7B
7B: Place the FlightDeck
on top of the V-racks with
the logo side up and the
wide end facing forwards.
• Line the 8 mounting
holes on the FlightDeck
with their corresponding mounting points on
the V-Racks.
Page 12
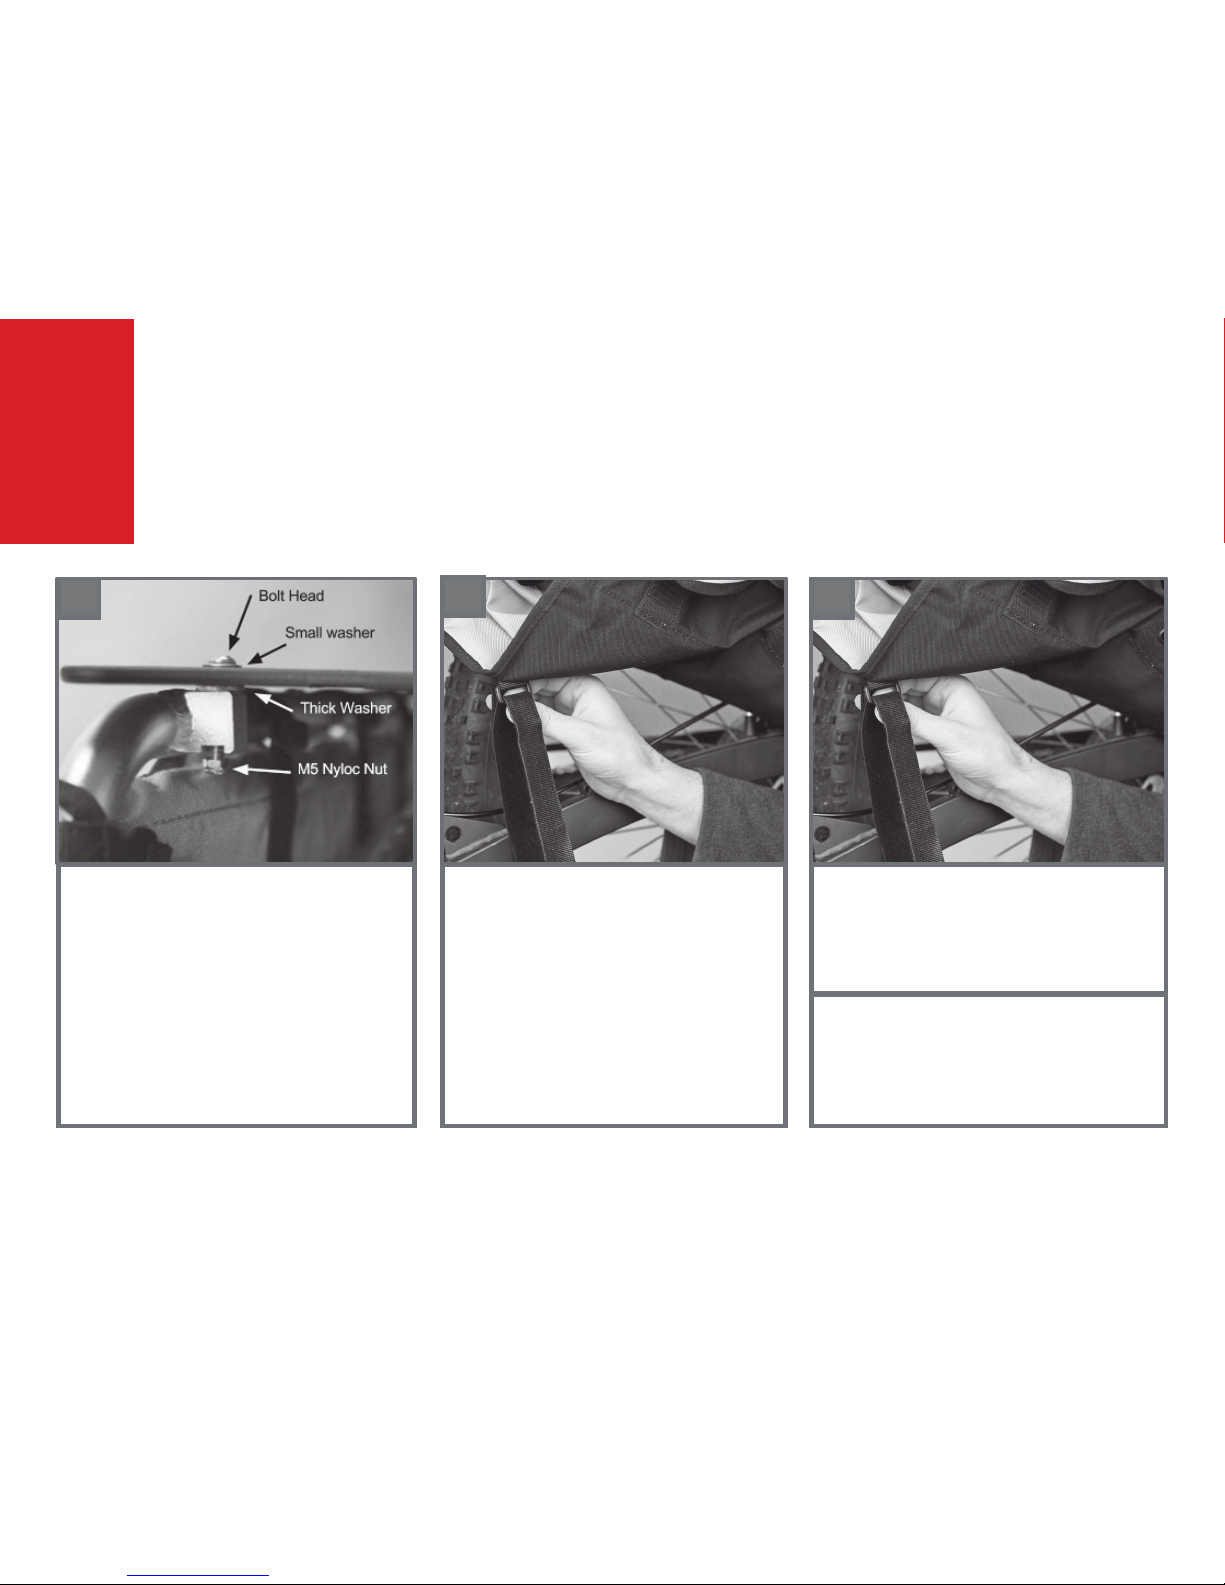
7C: The holes at either end of the deck use
the longer M5x35mm bolts.
• Insert one of the 35mm bolts into each
hole with one small washer and one thick
washer as shown.
• Thread a M5 Nyloc nut onto each bolt.
Note: No washer is needed under the
nut; it will be captured by the notch in the
underside of the block, and a washer will
interfere with that t.
7C
Cont’d: Install remaining accessories
step 7
7D: Thread the shorter 15mm bolts into
the V-Rack bosses under the middle
mounting holes.
• Use a small washer under the head of
each bolt.
NOTE: it is a good idea to start the bolt
into the aluminum rack boss with your
ngers to make sure that it doesn’t crossthread.
7D
7E
7E: Once all bolts are installed, tighten the
bolts to 3-4Nm.
7F: Install KickBack, if present.
Refer to KickBack instructions.
Page 13
Test Ride and Enjoy!
step 8
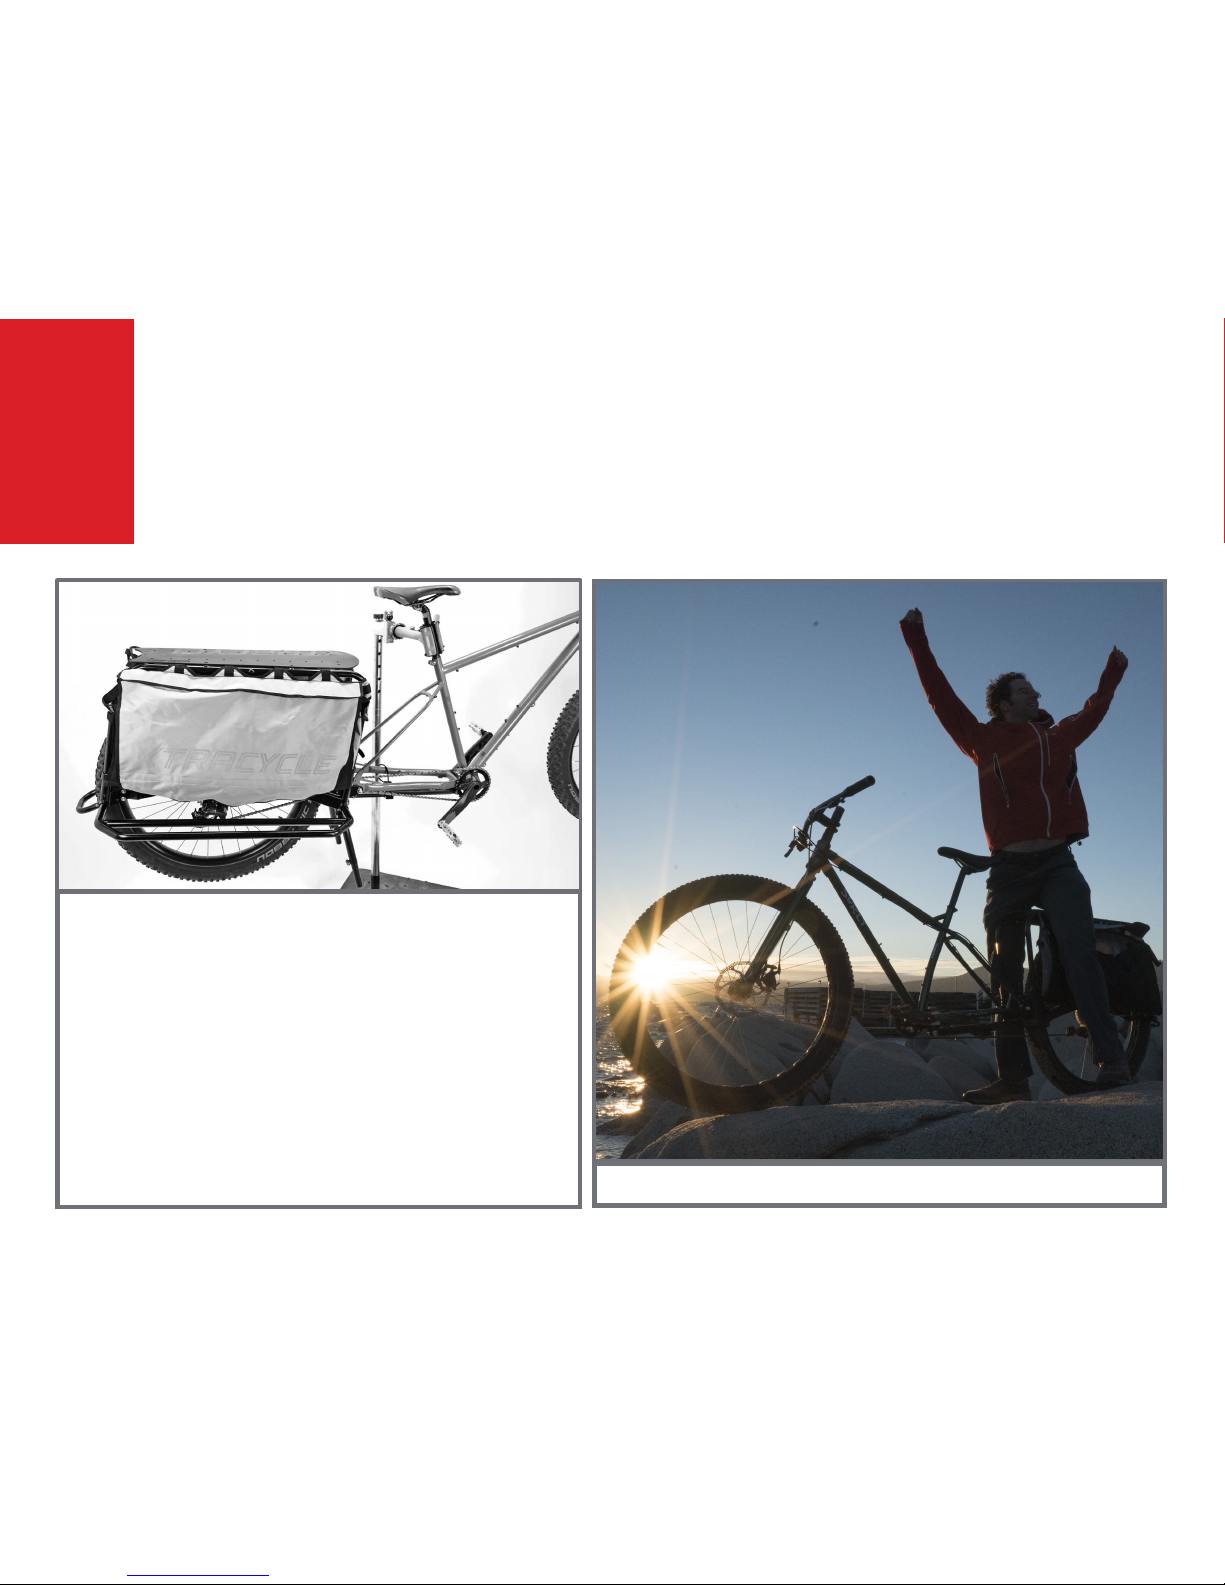
Test ride time! Congratulations on transforming your bike into an
Xtracycle.
• Before hauling your first big load, test ride your bike in a safe,
car-free area to check brakes, shifting, and the Leap attachment points.
• Use caution on your first few rides with a load--it’ll take some time
to get used to how the new bike handles, but you’ll soon get the
hang of it.
• After a week of normal riding, check that all of the attachment
bolts are still tight, and check them on a regular basis after that.
• If anything doesn’t feel or work right, bring it to a local bike shop
and have a professional mechanic check it out.
• Warning: Never carry passengers without WheelSkirts,
CarryAll Bags, or CargoBays.
Yep - That’s how excited we are!
Our mission:
To empower people with
transformational tools that
move the body and spirit.
 Loading...