

Page 1
Page 2

Copyright Notice
Any relevant media (images, photographs, animations, video, audio,
music, text, and applets) incorporated into the Software Product the accompanying manuals and other documents, and
on-line/electronic documents if any, (collectively called “Software
Product”) are owned by Xtore – Extreme Storage (Xtore). Unless
otherwise expressly licensed by Xtore in writing, any provision of the
Software Product does not represent any license of any of the above
rights.
Copyright © 2001 Xtore – Extreme Storage, All rights reserved.
Trademark Notice
Xtore, NASolution and other names of Xtore products are
trademarks or registered trademark of Xtore – Extreme Storage.
Microsoft, Windows, Windows NT and Internet Explorer are
trademarks of Microsoft Corporat ion.
Netscape is a trademark of Netscape Communications Corporation.
Novell and NetWare are trademarks of Novell Inc.
Apple and Macintosh are trademarks of Apple Computer Inc.
Other products and company names mentioned herein may be the
trademarks of their respective owners.
Revisions
Xtore – Extreme Storage reserves the right to revise this publication
and to make changes in the content hereof without the obligation of
notifying any party of such revision or changes.
Page 3

END -USER LICENSE AGREEMENT FOR USE OF
“Network Filer Plus Storage Manager” AND
ACCOMPANYING “Network Filer Plus Setup
Assistant” , “Network Filer Plus Backup Utility”, AND
“ Network Filer Plus Data Replicator”.
1. Ownership and Copyright. NASolution “Network Filer Plus
(NFP) Setup Assistant” (Setup Utility), “NFP Backup Utility”,
“NFP Data Replicator” (Backup Utilities), and the system
software “NFP Storage Manager” (Embedded Software)
preinstalled in the NP1040 server are all proprietary software
belonging to Xtore – Extreme Storage, and are protected by
United States copyright and other Federal and State laws.
Your use of Setup Utility, Backup Utilities, and
Embedded Software implies:
I. Agreement to the terms and conditions of this license.
II. You are entering into a binding contract with Xtore –
Extreme Storage
2. Grant of License. Setup Utility, Backup Utilities, and
Embedded Software are licensed, NOT SOLD, to you for use
only under the terms of this Agreement. You are given a
non-exclusive license to use Setup Utility, Backup Utilities,
and Embedded Software in conjunction with the NASolution
NP1040. Xtore reserves any rights not expressly granted to
you. Copying of Setup Utility, Backup Utilities, and
Embedded Software is prohibited by law, unless otherwise
expressly provided under this Agreement, or specifically
authorized in writing by Xtore.
Under this license, you MAY:
Make no more than one (1) copy of the Embedded Software in
machine-readable form and solely for archival backup purposes,
ii
Page 4

iii
provided that such copy is labeled with the Xtore. Copyright
notice and other proprietary legends can be found on the original
media.
You MAY NOT:
install the Embedded Software on any computer, workstation
or other equipment other than your NP1040 server;
install the Setup Utility and Backup Utilities on any computer,
workstation, or other equipment other than you or your
company’s own;
reverse-engineer, decompile, disassemble, or create derivative
works based on the Setup Utility, Backup Utilities, or
Embedded Software;
duplicate (except to create one backup copy) the Setup Utility,
Backup Utilities, or Embedded Software;
modify or translate the Setup Utility, Backup Utilities, or
Embedded Software;
remove any proprietary notices, labels, or marks from the Setup
Utility, Backup Utilities, or Embedded Software;
rent, lend, transfer, or distribute the Setup Utility, Backup
Utilities, or Embedded Software separately from NP1040
server to any person without the written consent of Xtore.
3. Disclaimer of Warranty. Xtore DISCLAIMS ANY AND ALL
WARRANTIES AND CONDITIONS OF ANY KIND
WHATSOEVER WITH REGARDS TO THE SETUP UTILITY,
BACKUP UTILITIES, AND EMBEDDED SOFTWARE
PROVIDED HEREUNDER, WHETHER EXPRESS, IMPLIED,
STATUTORY, OR OTHERWISE, INCLUDING THOSE FOR
MERCHANTABILITY, SATISFACTORY QUALITY, AND/OR
FITNESS FOR A PARTICULAR PURPOSE, WHICH ARE
EXPRESSLY EXCLUDED.
Page 5

iv
4. Termination. This Agreement is effective until terminated. You
may terminate this Agreement at any time by destroying the
Setup Utility, Backup Utilities, and Embedded Software, and
all back-up copies thereof. Unauthorized duplicating of the
Setup Utility, Backup Utilities, or the Embedded Software or
otherwise failing to comply with the terms and conditions of this
Agreement will result in automatic termination of this Agreement
and will make available to Xtore all other legal remedies. Upon
termination of this Agreement, the license granted herein will
terminate and you must immediately destroy the Setup Utility,
Backup Utilities, and Embedded Software, and all backup
copies thereof.
5. Government End-Users. The Setup Utility, Backup Utilities,
and Embedded Software, and any accompanying
documentation, are deemed to be “commercial computer
software” and “commercial computer software documentation,”
respectively, pursuant to DFAR Section 227.7202 and FAR
Section 12.212, as applicable. Any use modification,
reproduction release, performance, display or disclosure of the
Setup Utility, Backup Utilities, or Embedded Software and
accompanying documentation by the U.S. Government shall be
governed solely by the terms of this Agreement, and shall be
prohibited except as expressly permitted by the terms of this
Agreement.
6. Unlawful Provision(s). If any provision of the Agreement is held
to be unenforceable for any reason, all other provisions of this
Agreement shall nevertheless be deemed valid and enforceable
to the full extent possible.
7. Applicable Law. This Agreement will be governed by the laws of
the State of California and the United States, including U.S.
Copyright laws.
8. Entire Agreement. This Agreement constitutes the sole and
exclusive agreement between the parties concerning the subject
matter hereof.
Page 6

NFP Storage Manager 1.1 User’s Manual
Table of Contents
Chapter 1 NASolution NFP Storage Manager
Version 1.1 ------------------------- 4
Specifications .........................................................4
Resources...............................................................6
NFP Utility CD ........................................................……..3
NFP Storage Manager User’s Manual………………………...4
Chapter 2 Setting up NP1040 NAS Server ---10
Before you start..................................................... 10
Setup .................................................................... 11
Chapter 3 Quick Configuration -----------------16
Enter the root password ........................................ 17
Server Configuration ............................................. 18
Basic Server Configuration.............................................. 18
Enter the system date and time....................................... 20
Select a language........................................................... 21
Enter a recipient for notification ....................................... 22
Completing Quick Configu ration....................................... 23
Chapter 4 Using NFP Storage Manager 1.1--24
Server Information ................................................. 24
Server Configuration ............................................. 28
Basic Configuration .........................................................28
Date Setup ..................................................................... 31
Language Setup.............................................................. 32
Event Notification Setup .................................................. 33
Security Setup....................................................... 33
Shared Folder Setup....................................................... 34
Account Setup ................................................................ 45
Group Setup................................................................... 54
User Quota Setup ........................................................... 58
Security Options ............................................................. 62
Network Setup....................................................... 63
Windows Domain/Workgroup Setup ................................. 64
UNIX NIS Domain Setup.................................................. 69
Apple Network................................................................ 70
Novell Network............................................................... 72
Volume Management.............................................. 73
Volume Setting............................................................... 74
Chapter 1. NASolution NFP Storage Manager 1.1
1
Page 7

NFP Storage Manager 1.1 User’s Manual
Volume Layout.................................................................. 81
RAID 5 Cache................................................................. 82
Disk Write Cache............................................................ 83
Home Setup.................................................................... 84
Toolkit................................................................... 85
LED Management ........................................................... 85
SNMP Configuration........................................................ 86
UPS Management........................................................... 88
Restore defaults ............................................................. 91
Shutdown/ Restart.......................................................... 92
System Update............................................................... 93
File Browser.......................................................... 94
Logout .................................................................. 95
Chapter 5 NFP Backup Utility: Backing up and
restoring data on the server ---98
Backing up data................................................... 100
Restoring data back onto the server .................... 102
Chapter 6 NFP Data Replicator - Automatic
backup from Windows clients to
NP1040 NAS server -------------107
Before you begin ................................................. 108
Set up NFP Storage Manager........................................ 108
NFP Data Replicator Basic Requirements ...................... 110
Setup NFP Data Replicator................................... 111
Start Using NFP Data Replicator .......................... 111
Backup Windows client d ata to NP1040 NAS server
First-Time Use - Run Complete Backup.......................... 111
Recover files from the server to Windows client ............. 118
Tag Management.......................................................... 120
User Preferences.......................................................... 124
Chapter 7 Troubleshooting --------------------127
NP1040 NAS Server Installation Problems............ 127
System Problems................................................. 129
Problems about the Hard Disks on NP1040........... 130
Problems about Windows Clients’ Access to
NP1040…............................................................. 132
Problems about Novell Clients’ Access to NP1040.135
Problems about Apple Clients’ Access to NP1040 137
Problems about NFS Clients’ Access to NP1040 ... 141
2 Chapter 1. NASolution NFP Storage Manager 1.1
Page 8

NFP Storage Manager 1.1 User’s Manual
Problems about Setting Up NFP Storage Manager 141
Problems about Backing up/Restoring Data ......... 143
General Problems................................................ 145
AppendIx 1 What is RAID?---------------------146
RAID 0 (striping) .................................................. 147
RAID 1 (mirroring) ............................................... 148
RAID 5................................................................. 148
RAID 5 with hot spare.......................................... 148
AppendIx 2 Windows access to NP1040 ----151
AppendIx 3 UNIX access to NP1040----------152
AppendIx 4 Apple access to NP1040 ---------156
AppendIx 5 Novell access to NP1040 --------158
AppendIx 6 Email notification list ------------160
AppendIx 7 System Default Configurat ion--176
Chapter 1. NASolution NFP Storage Manager 1.1
3
Page 9
NFP Storage Manager 1.1 User’s Manual
Windows 95, 98, ME, NT
Red Hat Linux, Solaris,
Chapter 1
NASolution NFP Storage Manager Version
1.1
With rapid expansions of networking and ever increasing number of
Internet users, the requirements for storage space are also multiplying
exponentially. NASolution NP1040 offers a stable and efficient storage
solution with an easy-to-use interface. Even non-technical staff will
have no trouble installing and configuring the server.
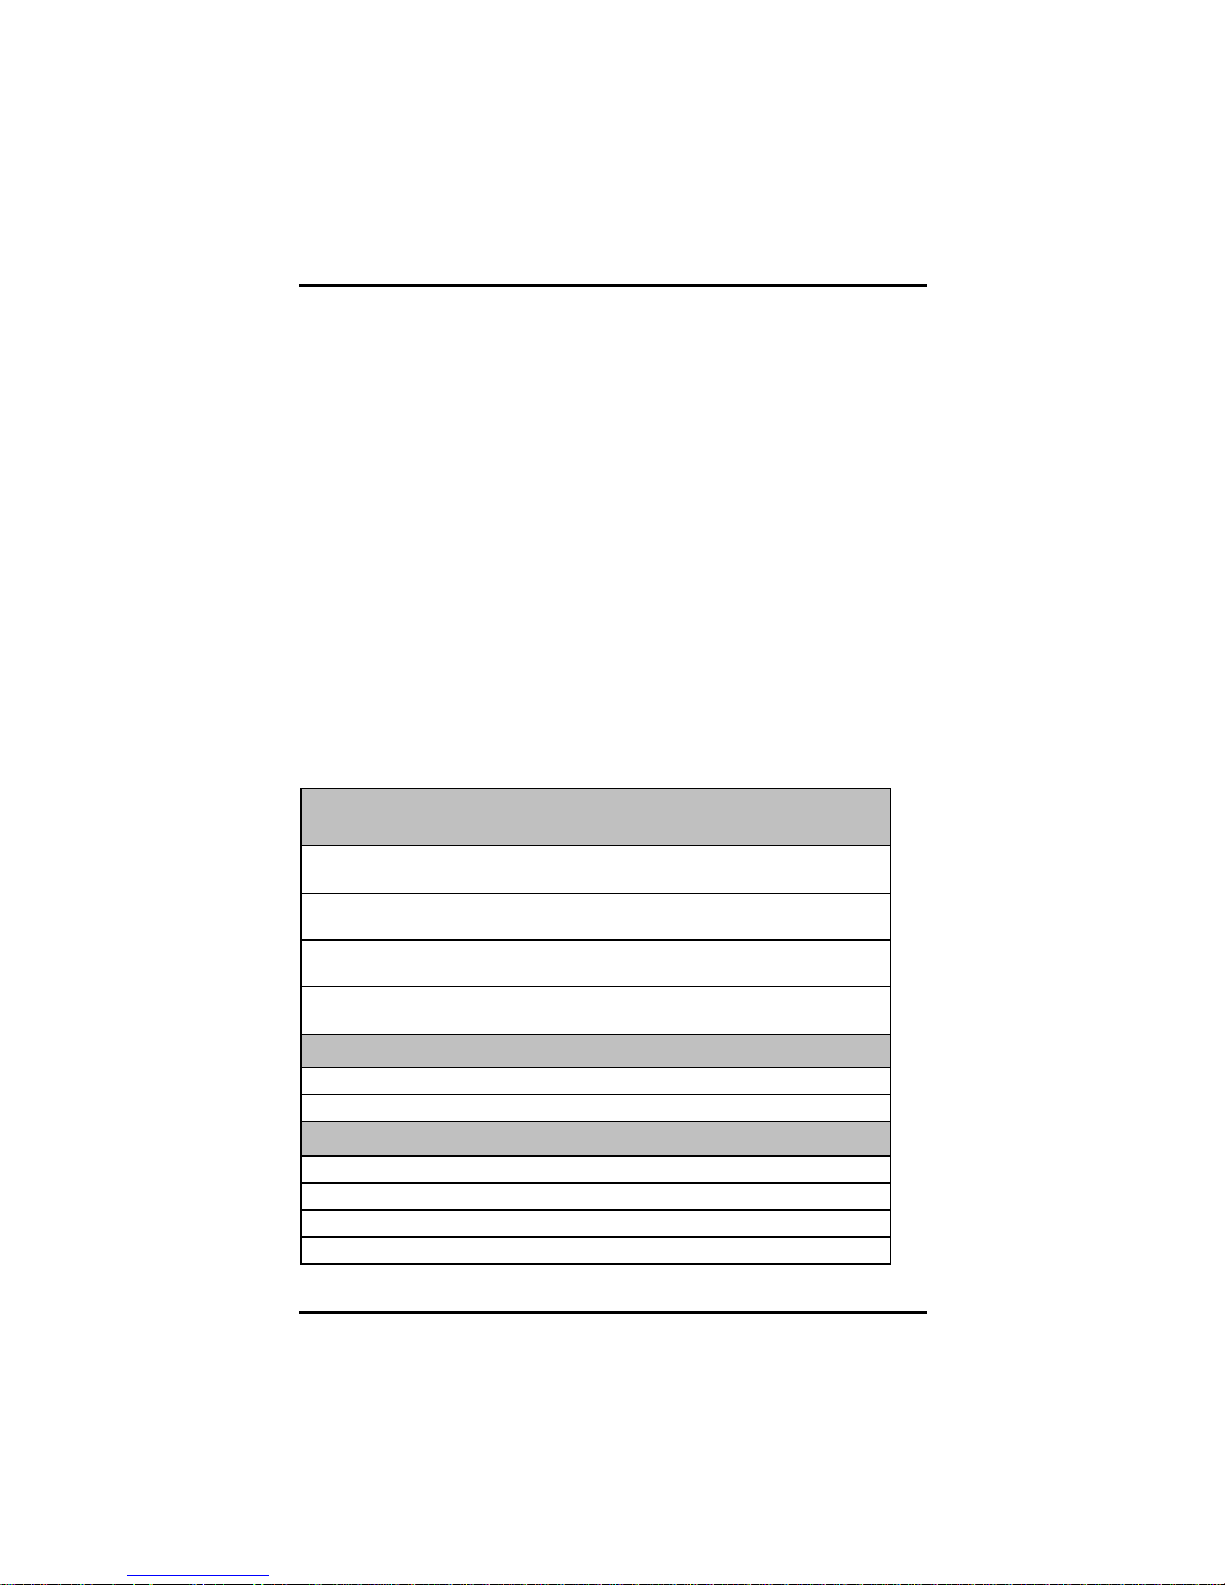
Specifications
Compatibility: Network Types / Network File Systems /
Protocols / Clients
Microsoft Network/CIFS, SMB/TCP/IP/
4.0, 2000
UNIX Network/NFS v2.0 & v3.0/TCP/IP/
FreeBSD
Novell network/NCP/IPX/Novell IntraNetWare Clients for
Windows
Apple Macintosh Network/AFP/AppleTalk, TCP/IP/Apple
Macintosh 7.x, 8.x, 9.x, OS X
Integratable Domains
Microsoft NT 4.0 /2000 Domain
NIS Domain
Software- RAID
RAID 0
RAID 1
RAID 5
RAID 5 with hot spare
4 Chapter 1. NASolution NFP Storage Manager 1.1
Page 10
NFP Storage Manager 1.1 User’s Manual
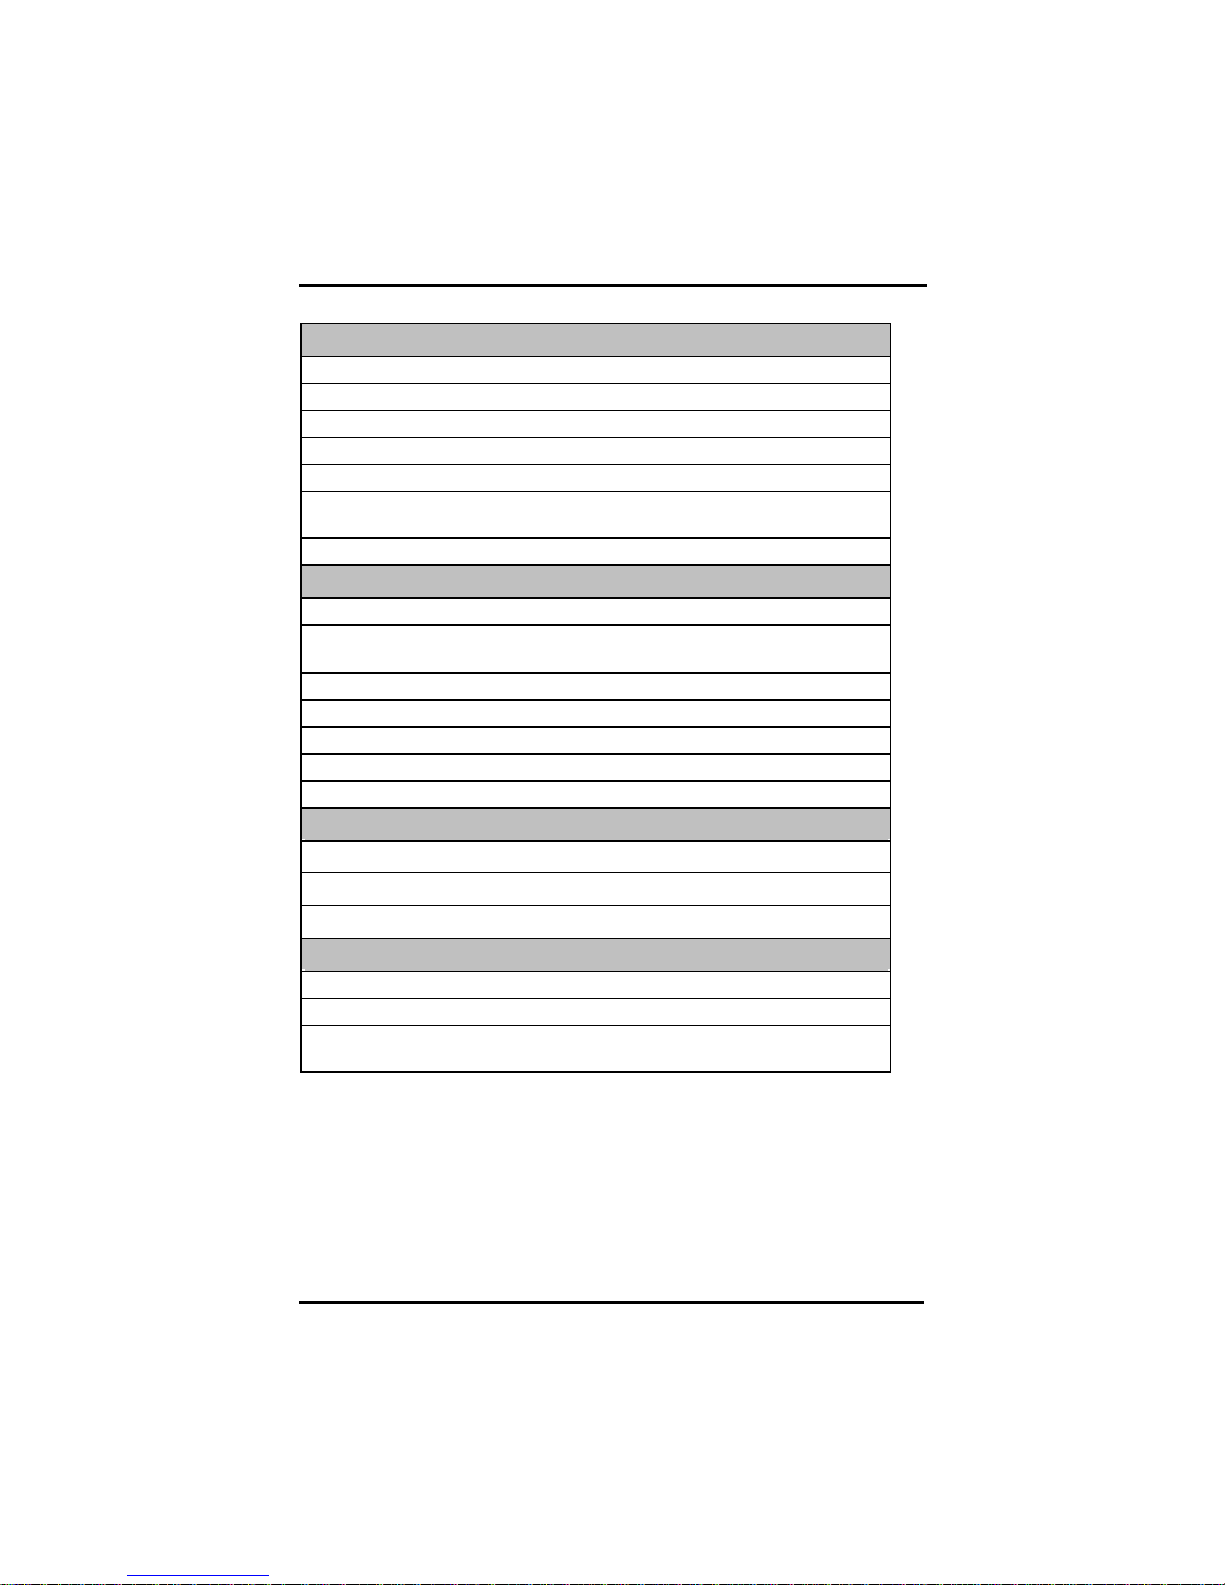
Availability/ Reliability
DOC/DOM/CF Support
Boot From Any Drive (for Disk Version)
IDE Hard Disk Hot Swapping & On -line Rebuilding
Power Supply Fail-over Support
System Fan Fail-over Support
Hardware (thermal, ECC, HDD, Fan…) Monitoring,
Auto -notifications, and Logging
UPS support (Through Serial Port & SNMP Trap)
Manageability
Volume Manager
Web-based Management (NFP Storage Manager)- For
Microsoft IE 5.5 or above
SNMP MIB II Support
NFP Setup Assistant
NFP Backup Utility (network backup)
NFP Data Replicator
LED Management
Performance
RAID 5 Device Layer Cache Support
1 Gibabit Ethernet Support
10/100 Mb Ethernet Teaming/ Fail-over Support
Other Features
Browser-based Software Update
Restore Default Settings
German, Spanish, Simplified Chinese, Japanese, Korean
Language Versions
Chapter 1. NASolution NFP Storage Manager 1.1
5
Page 11
NFP Storage Manager 1.1 User’s Manual
Resources
NFP Utility CD
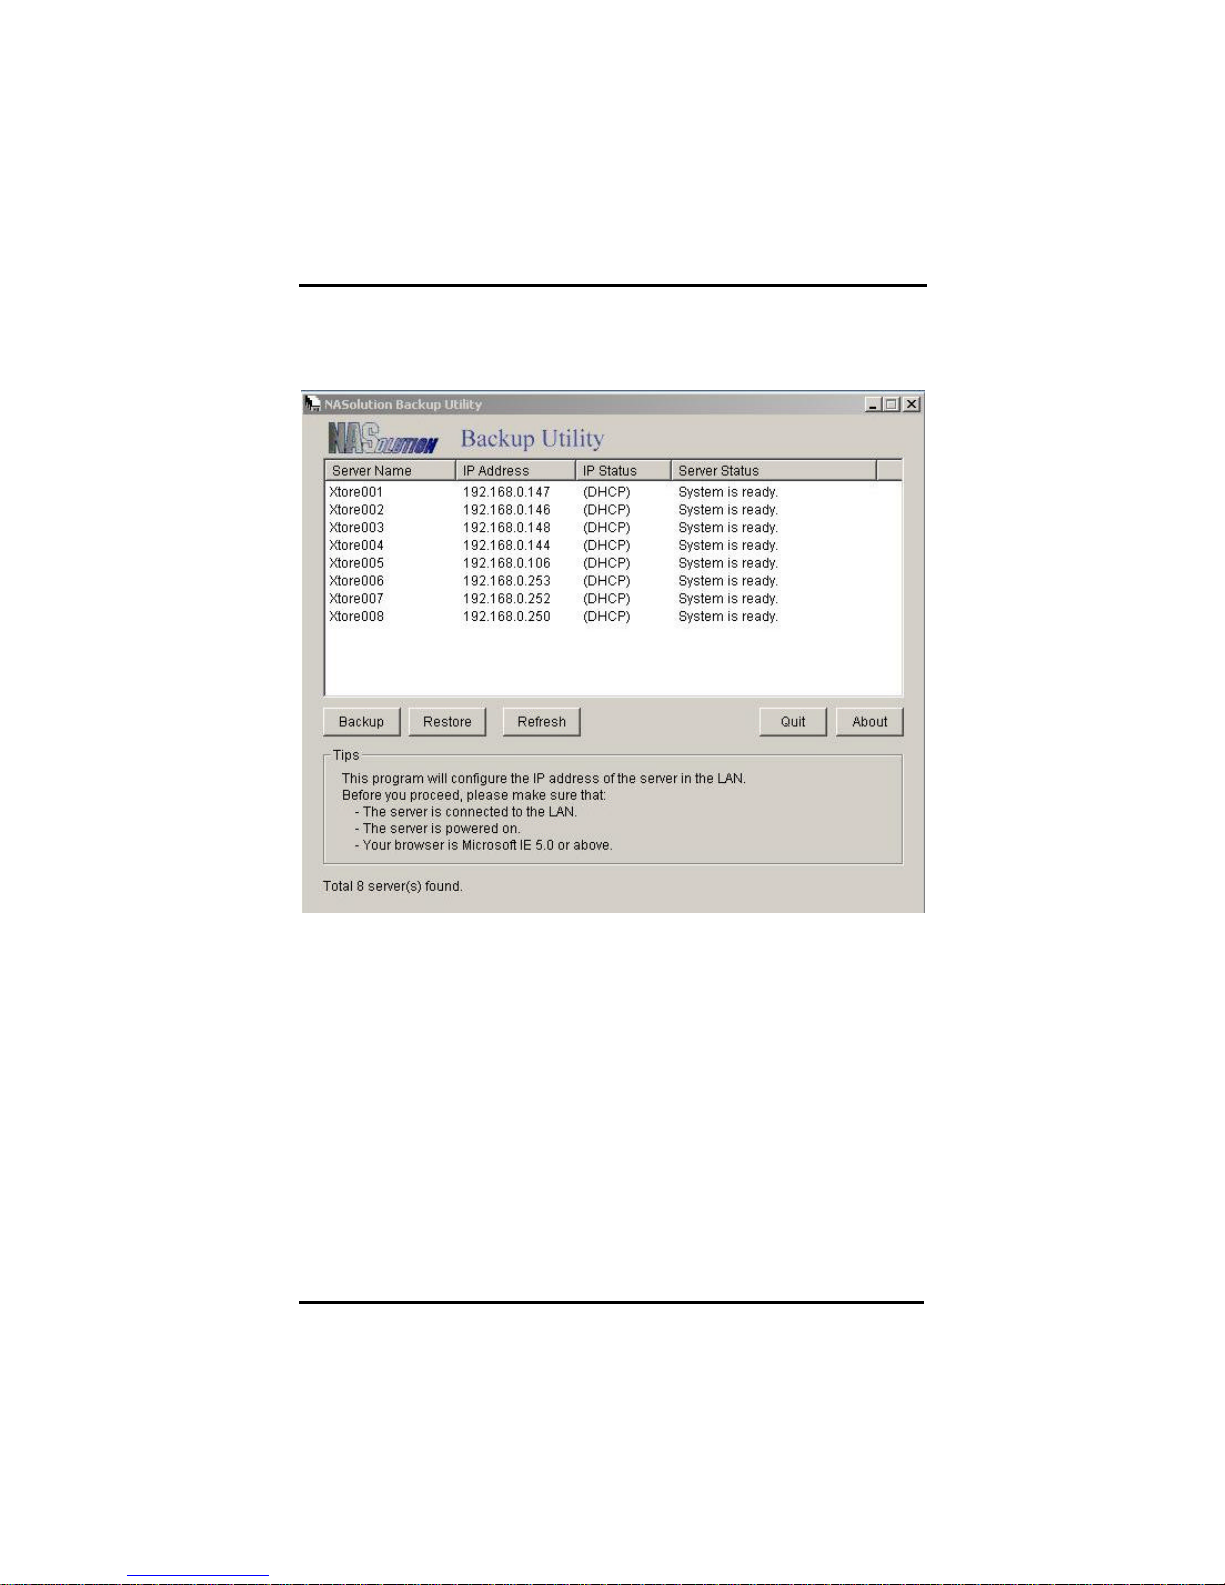
This CD provides three utility programs: NFP Setup Assistant, NFP
Backup Utility, and NFP Data Replicator.
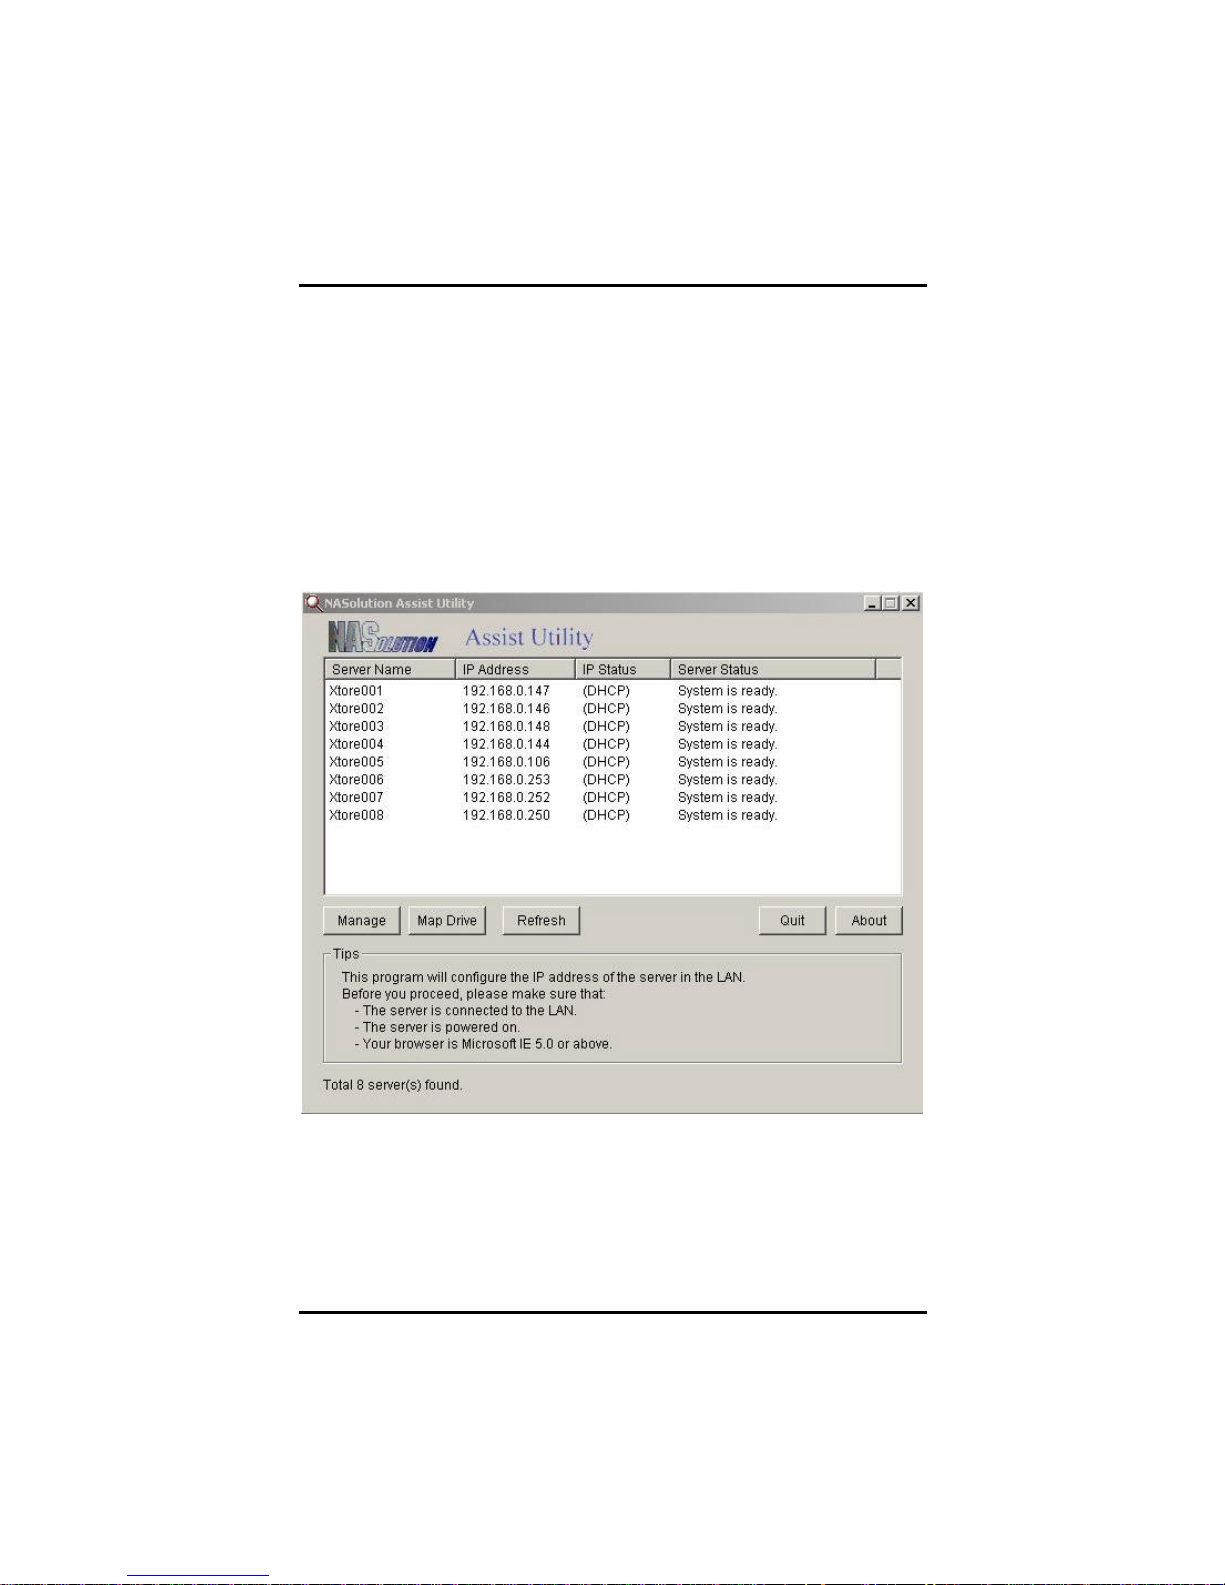
NASolution NFP Setup Assistant
NFP Setup Assistant is designed for the System Administrator and
all Windows clients on the Local Area Network (LAN).
System Administrator uses NFP Setup Assistant to search and setup
IP addresses of all NP1040 NAS servers running NFP Setup
Assistant on the LAN. Windows clients can also install this program
on the desktop, so that they can easily login to NFP Storage
6 Chapter 1. NASolution NFP Storage Manager 1.1
Page 12
NFP Storage Manager 1.1 User’s Manual
Manager to change personal information, and to connect all privileged
shared folders on NP1040 NAS server as network drives.
NFP Backup Utility
NFP Backup Utility is specifically designed for the System
Administrator.
System Administrator can utilize this Windows -based backup program
to backup data from the NP1040 NAS server to other storage devices
on the LAN, or to restore data back onto the NP1040 NAS server.
Chapter 1. NASolution NFP Storage Manager 1.1
7
Page 13
NFP Storage Manager 1.1 User’s Manual
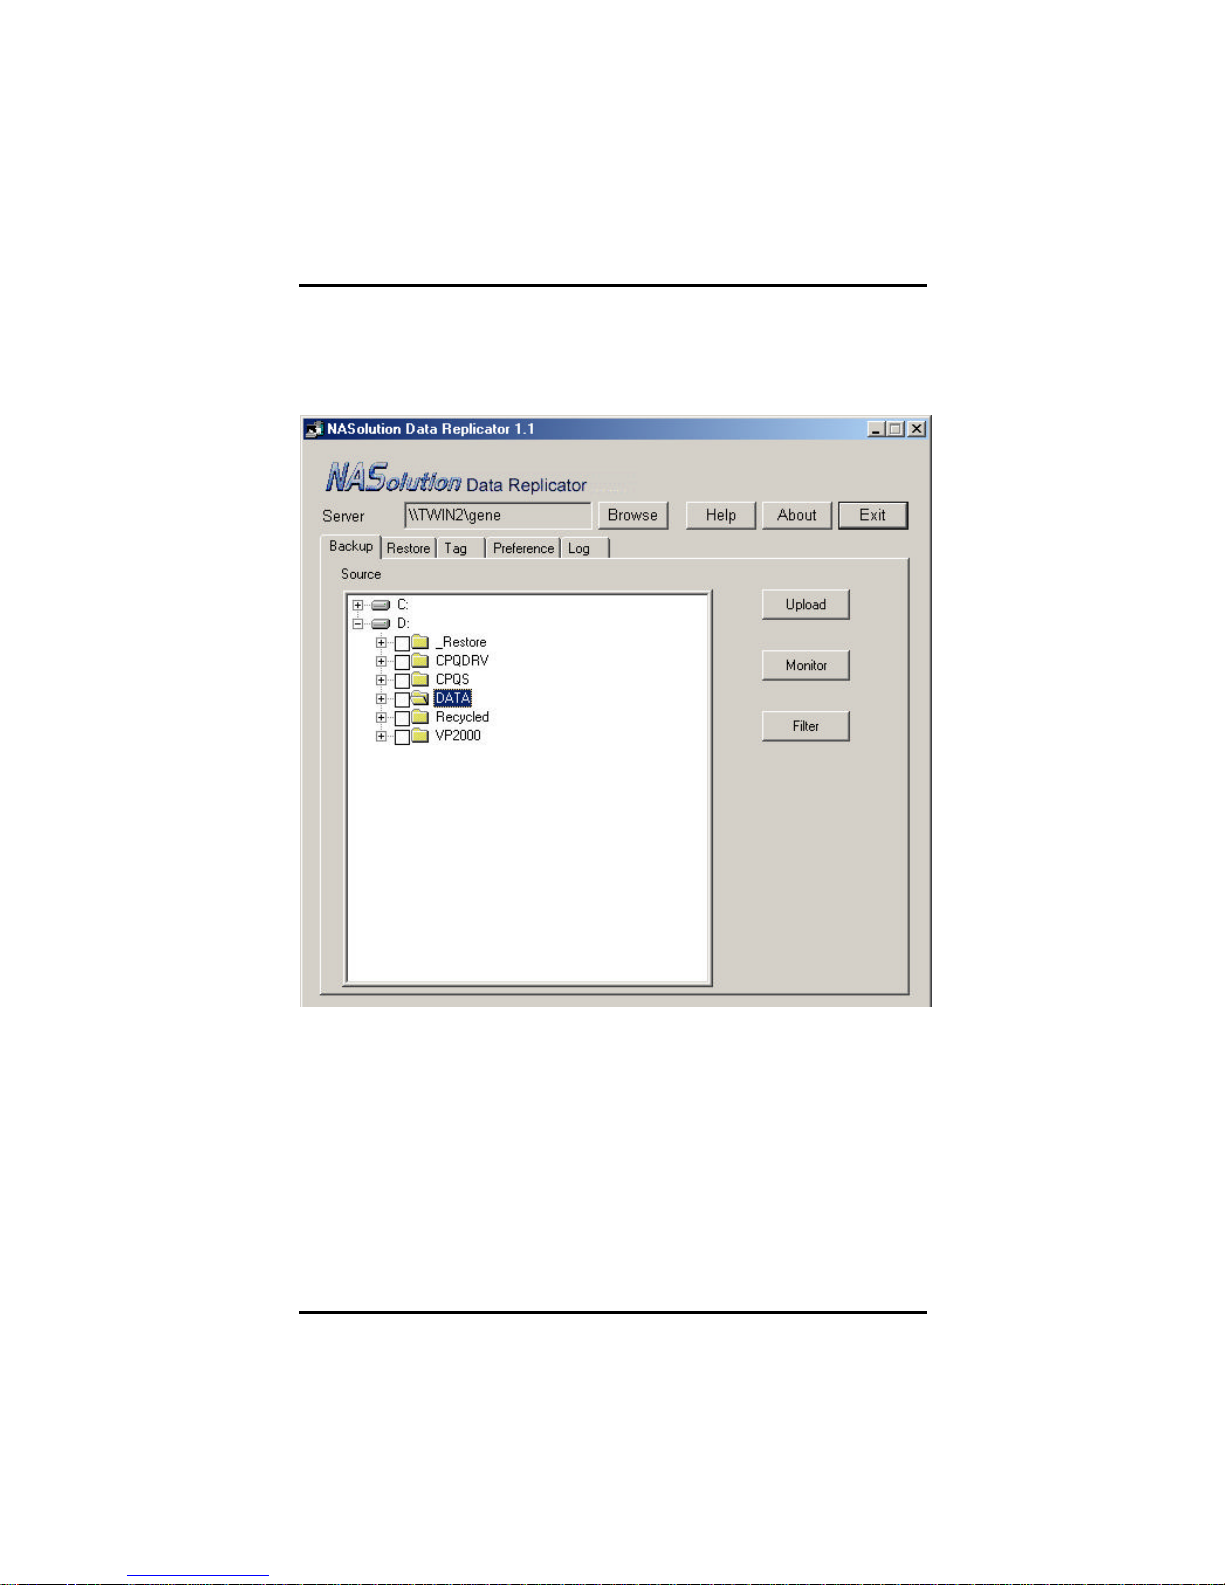
NFP Data Replicator
NFP Data Replicator is designed for the use of all Windows clients
on the LAN.
Windows clients can use NFP Data Replicator to monitor file folders
on computer, make immediate backup of specified file folders to
NP1040 NAS server. Making it easy for restoration of backup files
from server to client computers, files backup, management and
protection.
8 Chapter 1. NASolution NFP Storage Manager 1.1
Page 14

NFP Storage Manager 1.1 User’s Manual
NFP Storage Manager User’s Manual
NFP Storage Manager User’s Manual contains a description of the
product and step-by-step instructions on how to use NFP Storage
Manager Version 1.1 to configure your NP1040 server. Please read
this manual carefully before proceeding.
Chapter 1. NASolution NFP Storage Manager 1.1
9
Page 15

NFP Storage Manager 1.1 User’s Manual
Make sure all internal components and hard disk drives (HDD)
are properly installed. (Please refer to the Hardware Installation
turn it
terminal on the
s IP address. Once
will be opened automatically,
to configure
to configure the details of the
server, such as system configuration, user privileges, and
Chapter 2
Setting up NP1040 NAS Server
After connecting your NP1040 NAS server to a power source and
LAN, power it up and use NFP Setup Assistant to locate the server
and configure its IP address.
TIP
Setup procedure for the NP1040 NAS server:
1.
Guide for detailed instructions)
2. Connect NP1040 to LAN and power source, and then
on.
3. Run NFP Setup Assistant from any Windows
LAN to locate and configure NP1040 server’
this is done a browser window
and you are connected to NFP Storage Manager on NP1040
Server (See details below).
4. Use NFP Storage Manager’s Quick Configuration
the basic options of the server (see Chapter 3).
5. Use NFP Storage Manager
network and hard disks management (see Chapter 4).
Before you start
1. Please install HDD into NP1040 NAS server.
When purchasing diskless model that supports DOC/DOM,
please install at least one HDD before turning on the server.
10 Chapter 2. Setting Up NP1040 NAS Server
Page 16

NFP Storage Manager 1.1 User’s Manual
2. Connect NP1040 server to LAN. Turn on the server.
3. Make sure the client terminal used to configure NP1040 server
is installed with Microsoft Internet Explorer 5.5 or higher, and
make sure this computer and NP1040 server can be connected
through physical network medium (e.g. hub, switch, etc.).
4. Set the resolution of the client terminal screen to 800*600 or
higher.
Setup
1. Choose a computer with a network connection running
Microsoft Windows 98/ ME/NT/ 2000 and a browser version
above IE5.5 installed.
2. Insert the NASolution NFP Utility CD into your CD-ROM drive.
In most systems, NFP Setup Assistant starts automatically. If it
doesn’t start, please run “SFAssistant.exe“ program manually.
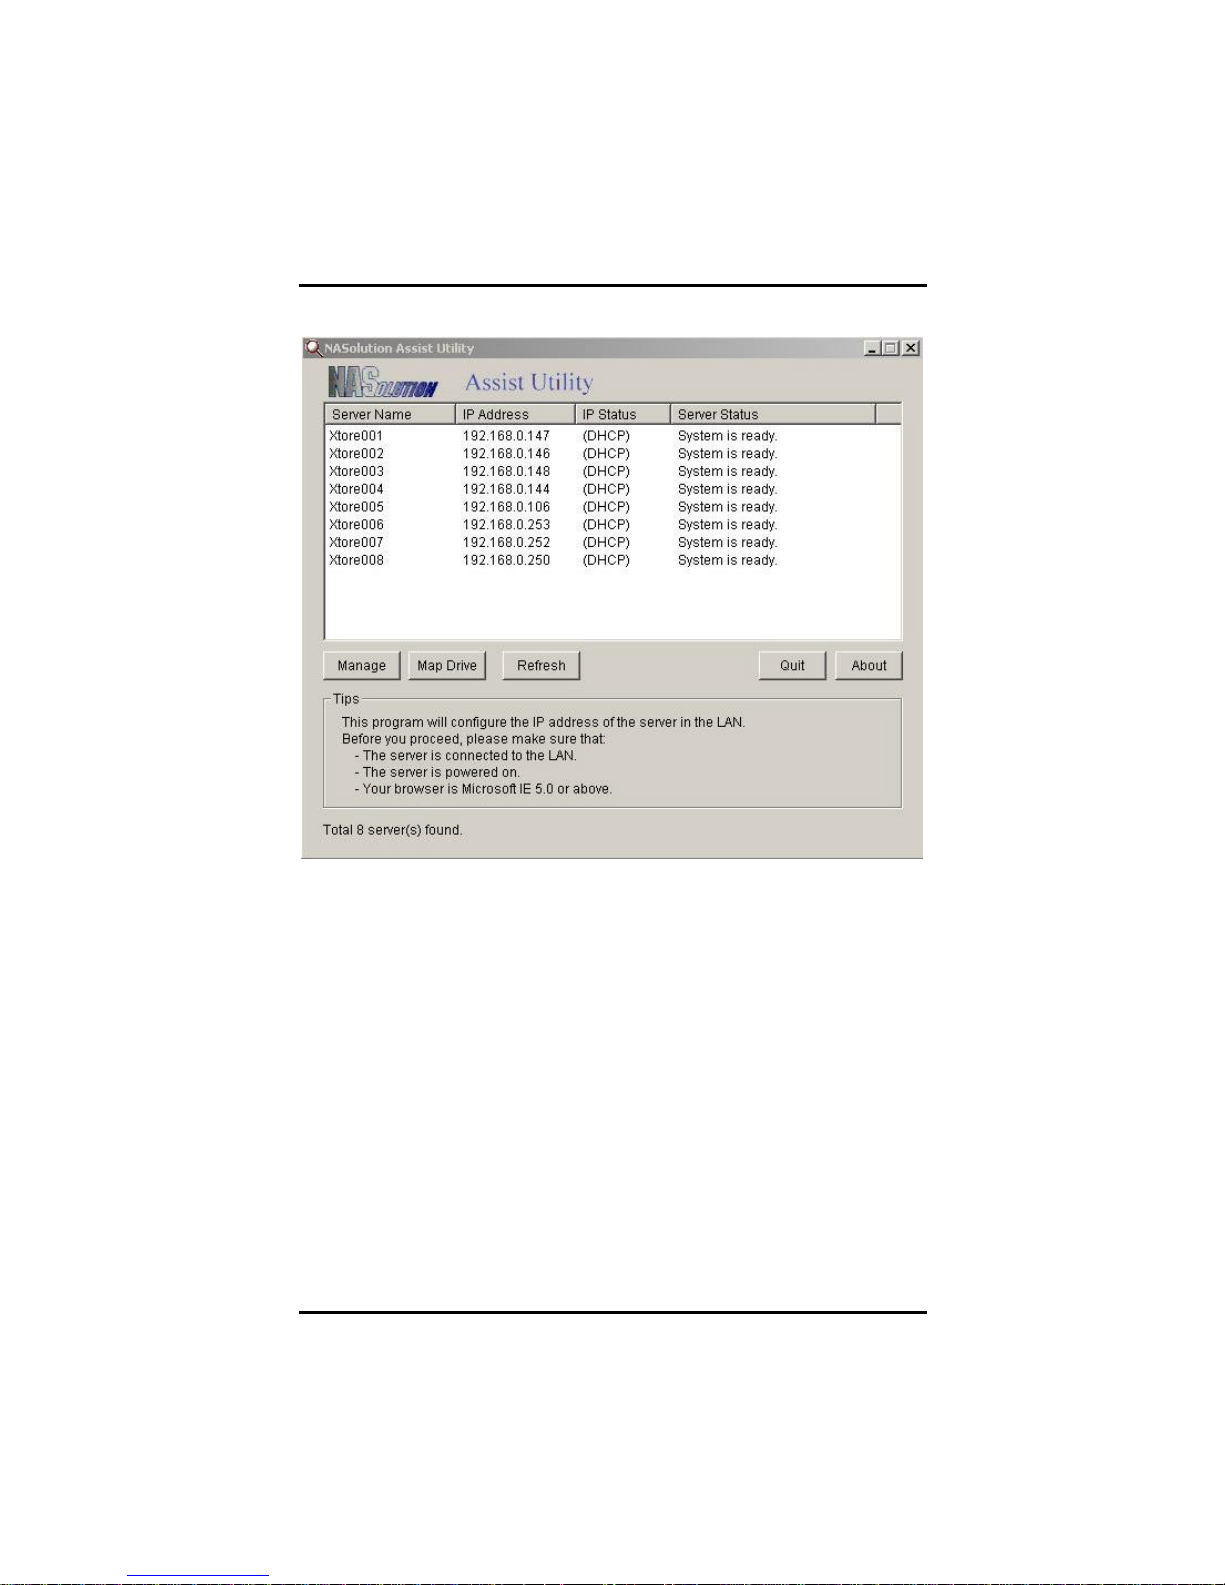
3. NFP Setup Assistant will automatically locate and list all
NP1040 servers running Network Filer Plus on the LAN. The
Server Status column will show current status of the server.
When the message System is ready is shown in this column,
you may begin your setup.
4. Double-click on the server name NAS001 to open the network
configuration screen.
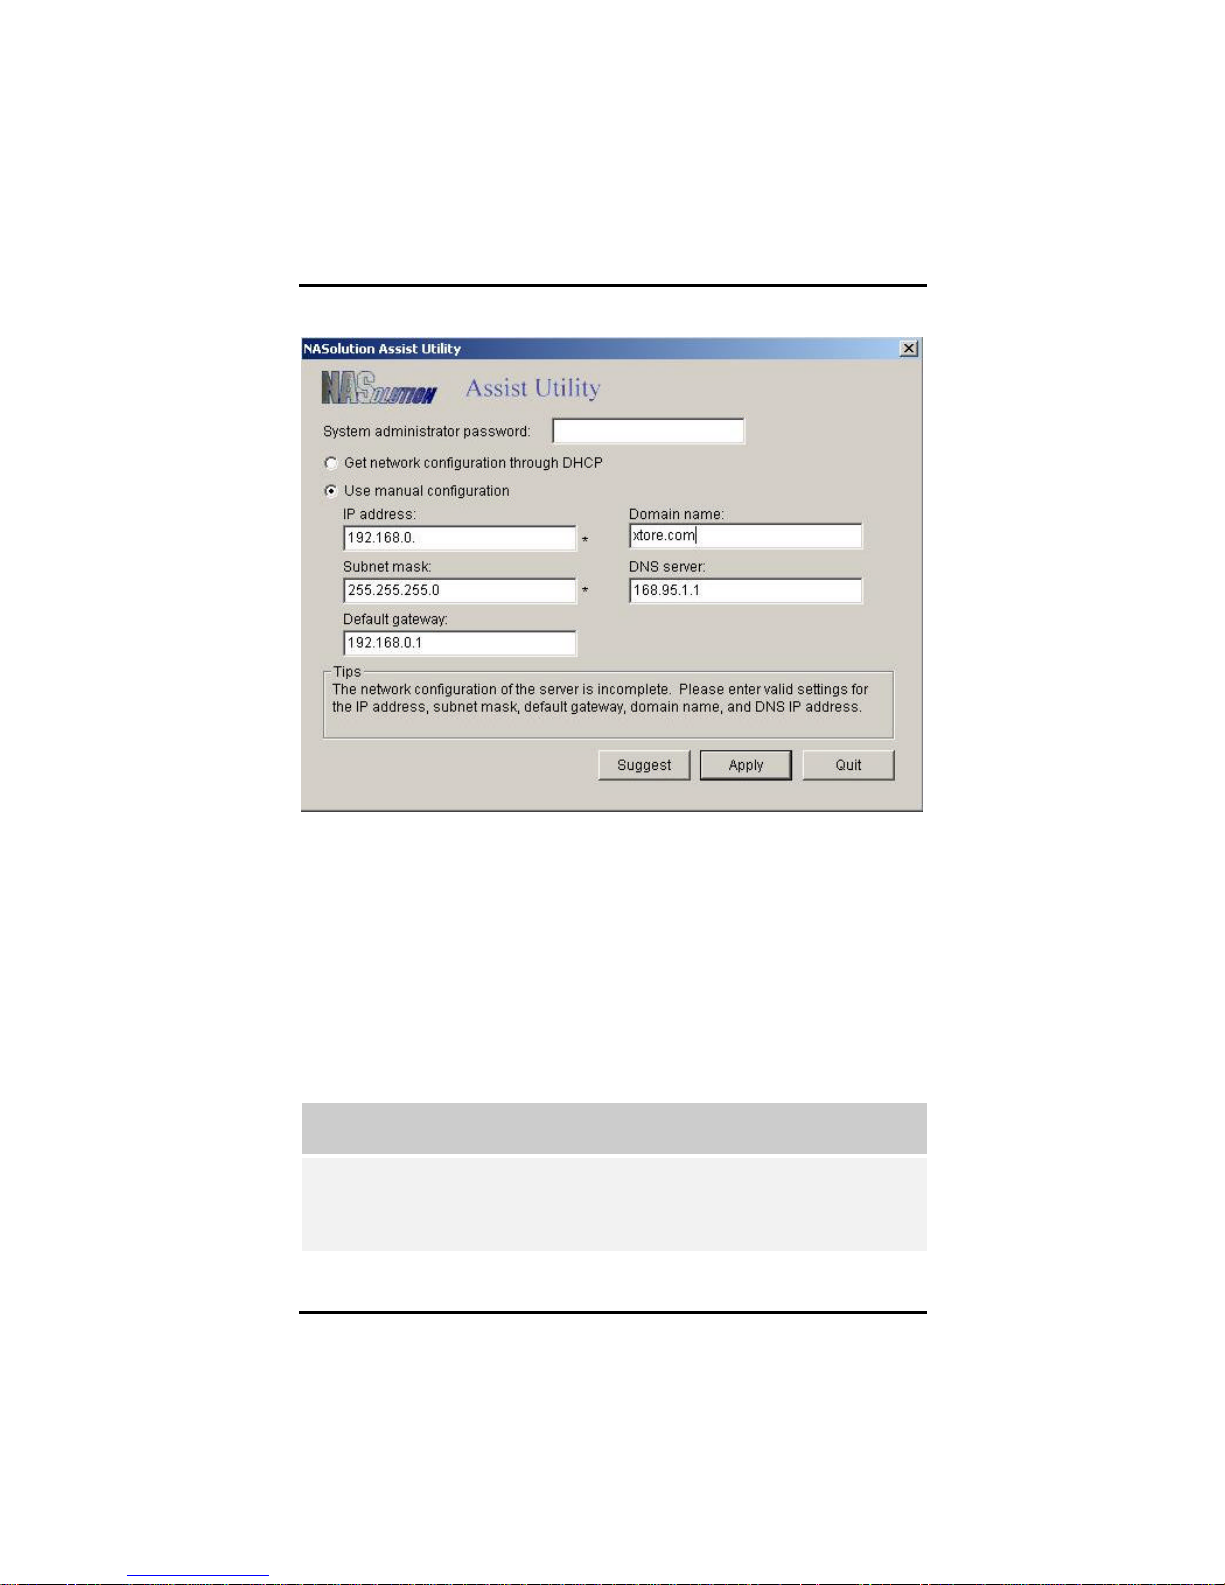
5. If your LAN includes a DHCP server, select Get Network
Configuration through DHCP to automatically configure the
network through the DHCP server. If no DHCP server is present,
or if you prefer manual configuration, choose Use Manual
Configuration and enter an IP address, domain name, subnet
mask, gateway, and DNS server. The setup program will grab
the network configuration of the client for administrator’s
reference. If this information is not enough, choose Suggestion
option; the setup program will check available IP’s on the LAN
and provide a suggested IP address.
Continued
Chapter 2. Setting Up NP1040 NAS Server
11
Page 17
NFP Storage Manager 1.1 User’s Manual
Suppose you want to set up a server name NAS001 for the first time.
By default the system obtains the network configuration information
through the DHCP server. If the DHCP server does exist on the LAN,
its IP Status will show DHCP. NP1040 server has correctly received IP
from the DHCP server. Please use your mouse to double click
server NAS001 or click the Manage button. NFP Setup Assistant will
automatically invoke the browser, connect to the server’s IP address,
and then start the Quick Configuration option of NFP Storage
Manager for the system administrator to setup basic information such
as, server group, system access, and network group, etc. (for details
please refer to Chapter 3).
If there is no DHCP server on the LAN, or the client that executes
NFP Setup Assistant and NP1040 server does not belong to the
same subnet, the IP Status column will show Unknown instead.
12 Chapter 2. Setting Up NP1040 NAS Server
Page 18

NFP Storage Manager 1.1 User’s Manual
NP1040 server supports two network ports. NFP Setup
Assistant will show only one of the network ports for system
administrator to setup first. To continue setting up the other
network port, system administrator must perform further setup in
NFP Storage Manager.
NFP Setup Assistant display rules are as follows:
• The first time you setup the NP1040 server, NFP Setup
Assistant will display the first network port of the server.
If there is a DHCP server the IP Status will show DHCP.
If there is no DHCP server, then the IP Status is Unknown.
• If system administrator has already used NFP Storage
Manager to assign IP addresses to both network ports on
the server and made them belong to different subnets,
then NFP Setup Assistant will show the network port that
belongs to the same subnet with the client computer that
runs NFP Setup Assistant.
• If none of the network ports in NP1040 server belongs to
the same subnet as the client computer that runs NFP
Setup Assistant, then Network Filer Plus will show the
first network port of the server and the IP Status will show
Unknown.
TIP
Chapter 2. Setting Up NP1040 NAS Server
13
Page 19
NFP Storage Manager 1.1 User’s Manual
is a network protocol
for automatic IP assignment. If your network does not include a
6. Input System administrator password. The first time a password
is requested, enter the default password; if none exists leave
this field blank.
7. Click Apply to confirm. The program will automatically invoke
the browser and connect to the server’s IP address, then start
the Quick Configuration option of NFP Storage Manager (see
Chapter 3).
DHCP (Dynamic Host Configuration Protocol)
DHCP server, you must enter the network configuration manually.
14 Chapter 2. Setting Up NP1040 NAS Server
TIP
Page 20

NFP Storage Manager 1.1 User’s Manual
If the search or configuration fails, please verify the following
details before trying again:
1. Make sure you have selected the correct server.
2. Make sure the server is connected to the LAN. Please make
sure that the network status displayed by the LAN LED on the
panel of the server is normal.
3. Make sure the server is connected to a power source and is
turned on.
4. Make sure the LAN still has free IP addresses.
5. Make sure the manually entered network settings are correct.
6. Make sure the client terminal you are using has successfully
installed/set the TCP/IP protocol, and is running Microsoft
Internet Explorer 5.5 or higher.
7. Make sure NP1040 server and the client computer that runs
NFP Setup Assistant can be connected through physical
network medium (e.g. hub, switch, etc.).
8. NFP Setup Assistant 1.0 cannot search for and setup NFP
Setup Assistant 1.1. Please make sure you are using NFP
Setup Assistant 1.1.
Chapter 2. Setting Up NP1040 NAS Server
15
Page 21

NFP Storage Manager 1.1 User’s Manual
on the right hand side of
the browser window, or refer to this user‘s guide for more
This system only supports Microsoft IE 5.5 browsers or
Chapter 3
Quick Configuration
NASolution NP1040 provides a simple and easy-to-use approach to
NAS administration called NFP Storage Manager. Use this program
to configure the server, system and network parameters, including
Windows, UNIX, Novell and Apple Macintosh network settings, as well
as the hard disk configuration.
When you first install NP1040 server, NFP Setup Assistant will
complete the IP configuration of the server, and then automatically
open a browser window to connect to the server. The Quick
Configuration page with basic configuration options will appear.
TIP
• During setup, watch for the Tips
16 Chapter 3. Quick Configuration
information.
•
above. Netscape browsers are not supported.
Page 22
NFP Storage Manager 1.1 User’s Manual
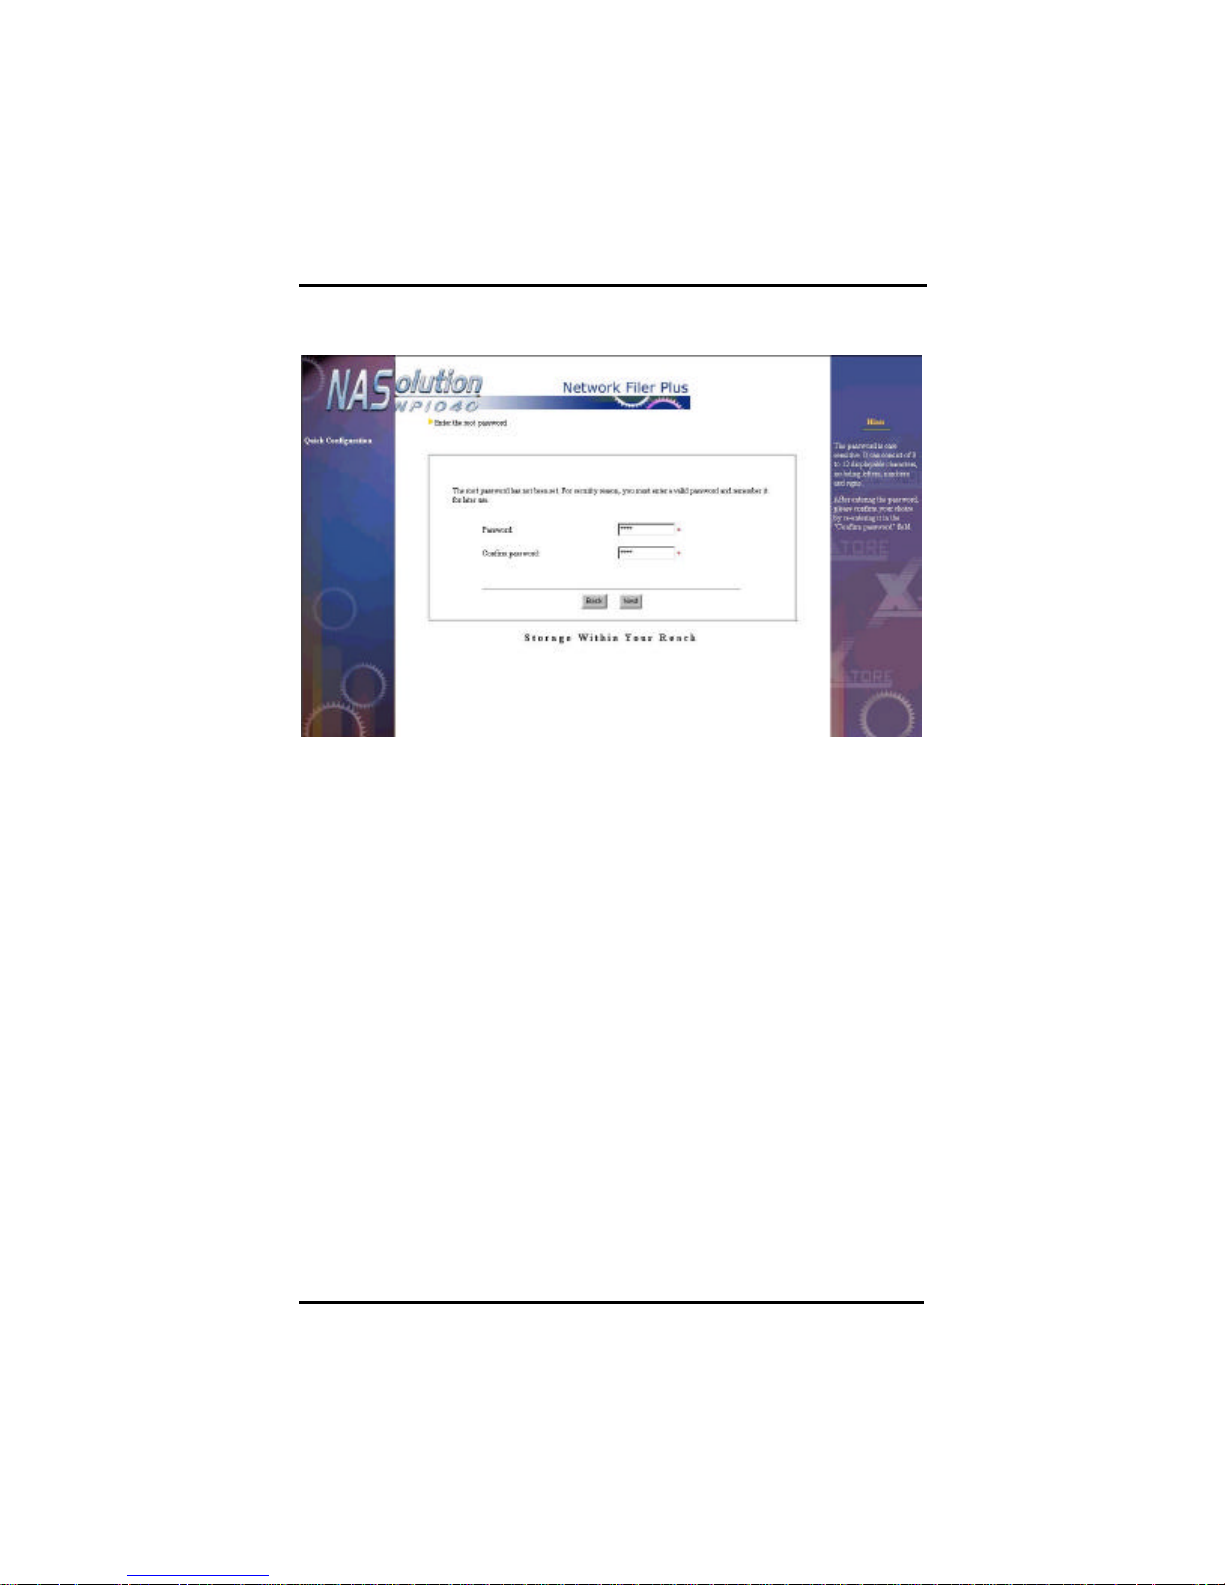
Enter th e root password
Since this is the first time using this NP1040 system, the system will
prompt for changing the default root (system administrator) password.
Make sure to keep a record of this password for future access to the
NP1040 NAS server.
Password is case-sensitive and can consist of 0 to 12 displayable
characters, including letters, numbers, and signs. After entering the
password, please confirm your choice by re-entering it in the Confirm
password field.
Chapter 3. Quick Configuration
17
Page 23
NFP Storage Manager 1.1 User’s Manual
Server Configuration
Basic Server Config uration
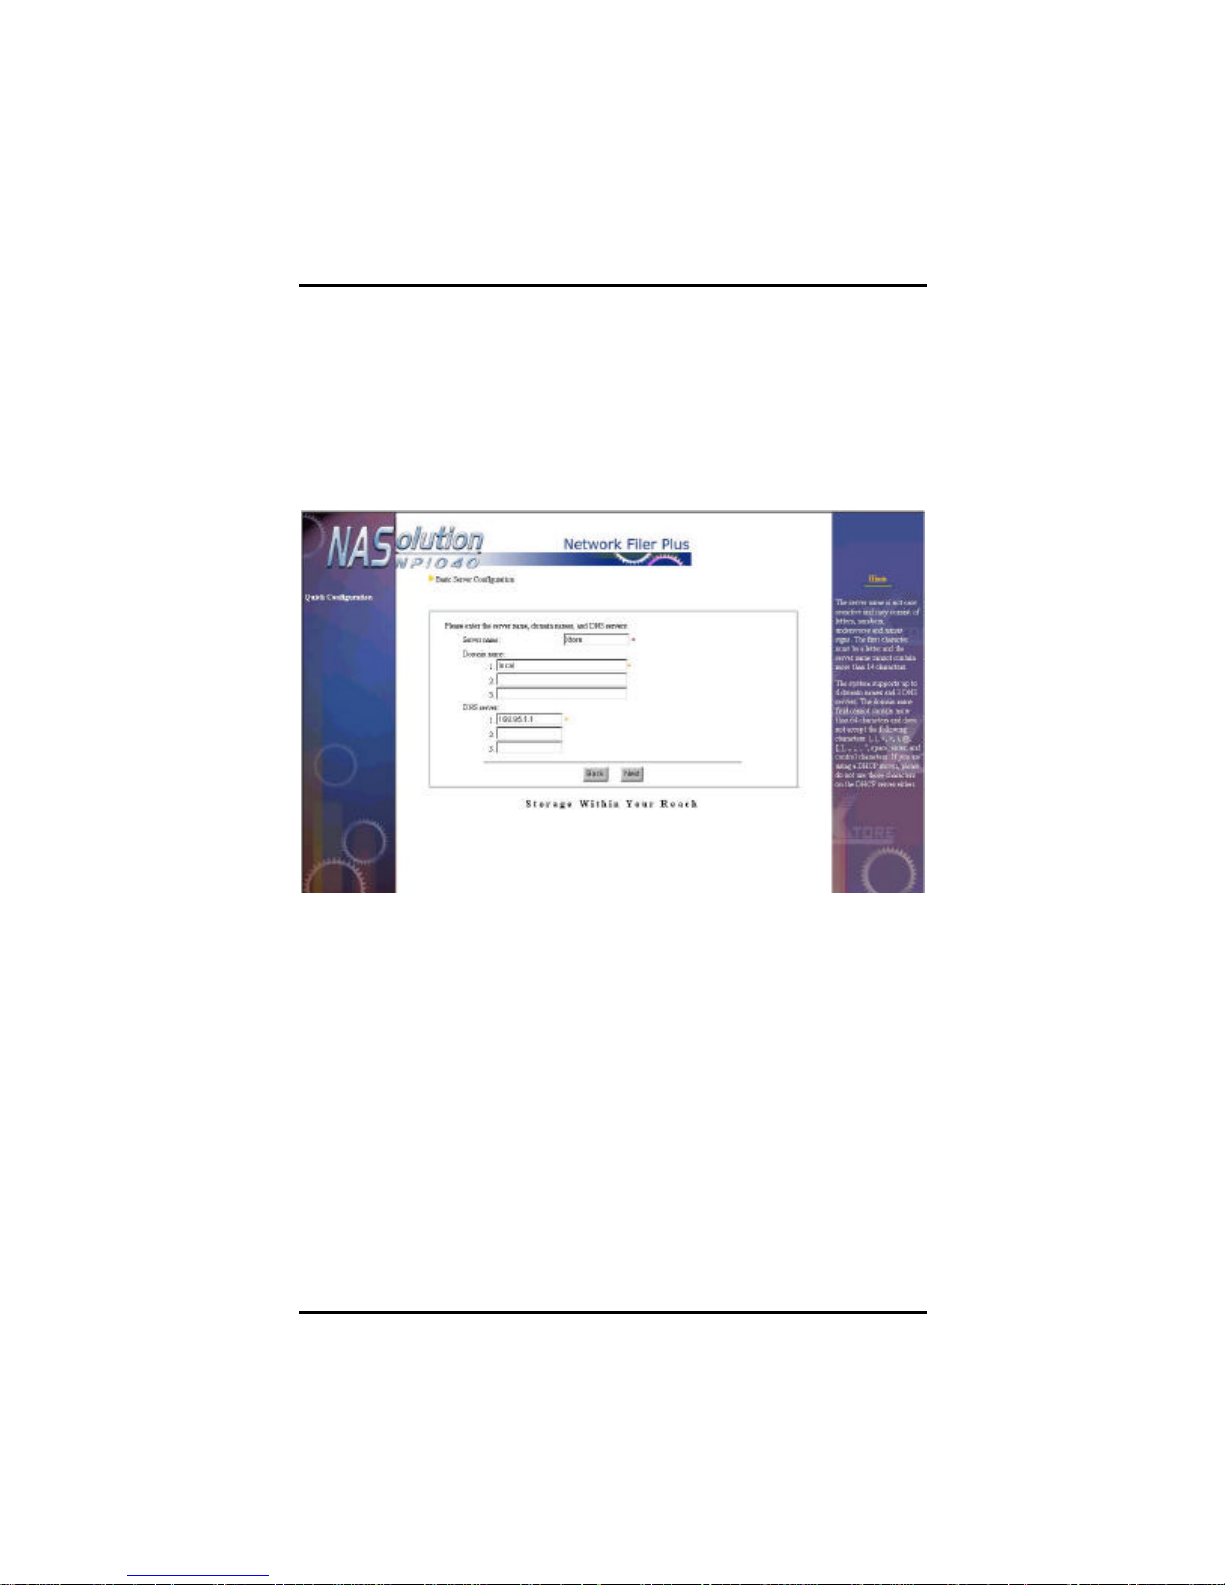
System administrator can change the default server name here and
further configure the network settings.
First you have a chance to change the preset server name. Please
note that the server name must be unique, meaning that no other
server in the network should have the same name. The name is not
case-sensitive and cannot exceed 15 characters. The first character
must be a letter; the other characters can be letters, numbers, and
“underscore” or “minus” sign.
This system supports up to four Domain names and three DNS
servers. The length of the Domain name cannot exceed sixty-four
characters. When getting network configuration through DHCP
server, if DHCP server has already created multiple Domain names
and DNS server setup, this page will capture the first item from the
DHCP server. The system administrator must specify other items
manually.
18 Chapter 3. Quick Configuration
Page 24
NFP Storage Manager 1.1 User’s Manual
The domain name field does not accept the following characters. If
you are using a DHCP server, do not use these characters on the
TIP
DHCP server either:
(, ), <, >, @, \, [, ], , , ;, :, “, space, enter (/n) and control characters.
LAN Port
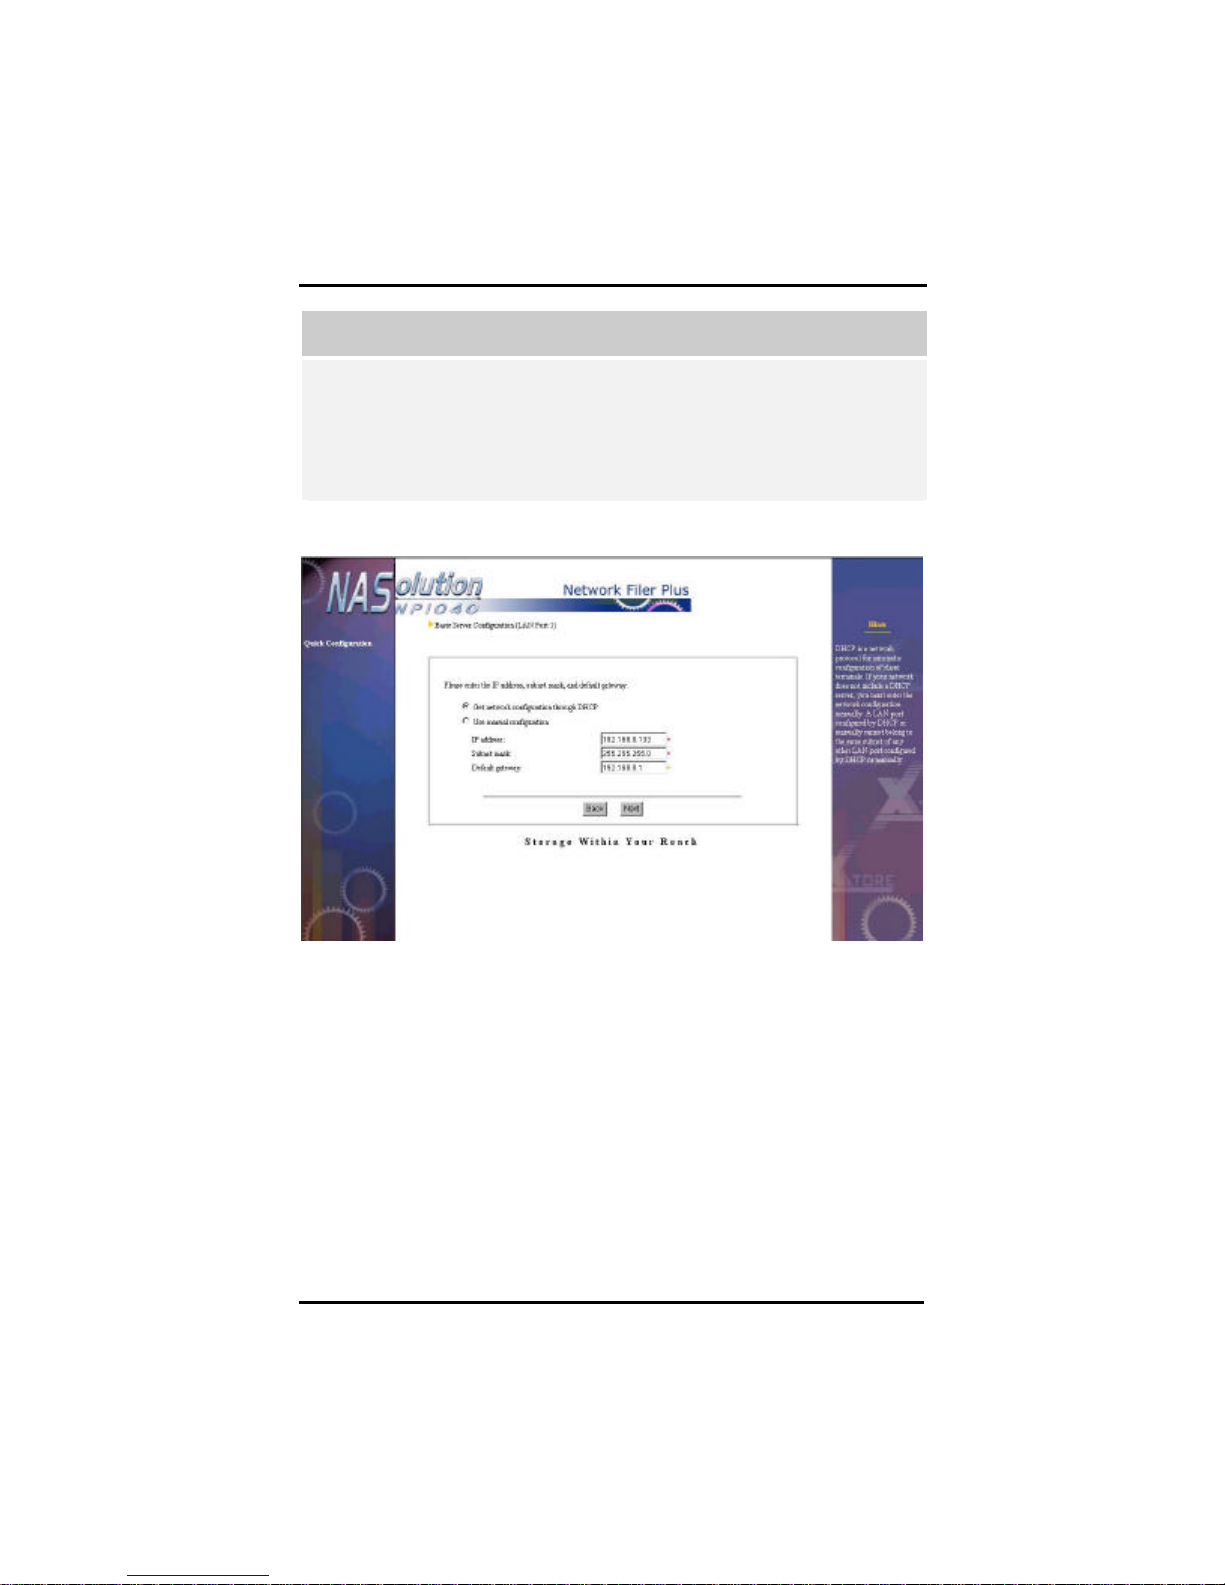
Next, please setup the IP address of the first network port. This
page will show the setup information previously defined in NFP Setup
Assistant, and system administrator can make additional changes
here.
If your LAN includes a DHCP server, click Get network configuration
through DHCP. Otherwise, choose Use manual configuration. Filling
out the column with a “red star sign” on the right is mandatory, while
filling out the column with the “orange star” is recommend by the
system.
Your NP1040 NAS server supports two network ports. You must go to
Server ConfigurationàBasic Configuration after completion of Quick
Configuration to continue setup of other network port .
Chapter 3. Quick Configuration
19
Page 25
NFP Storage Manager 1.1 User’s Manual
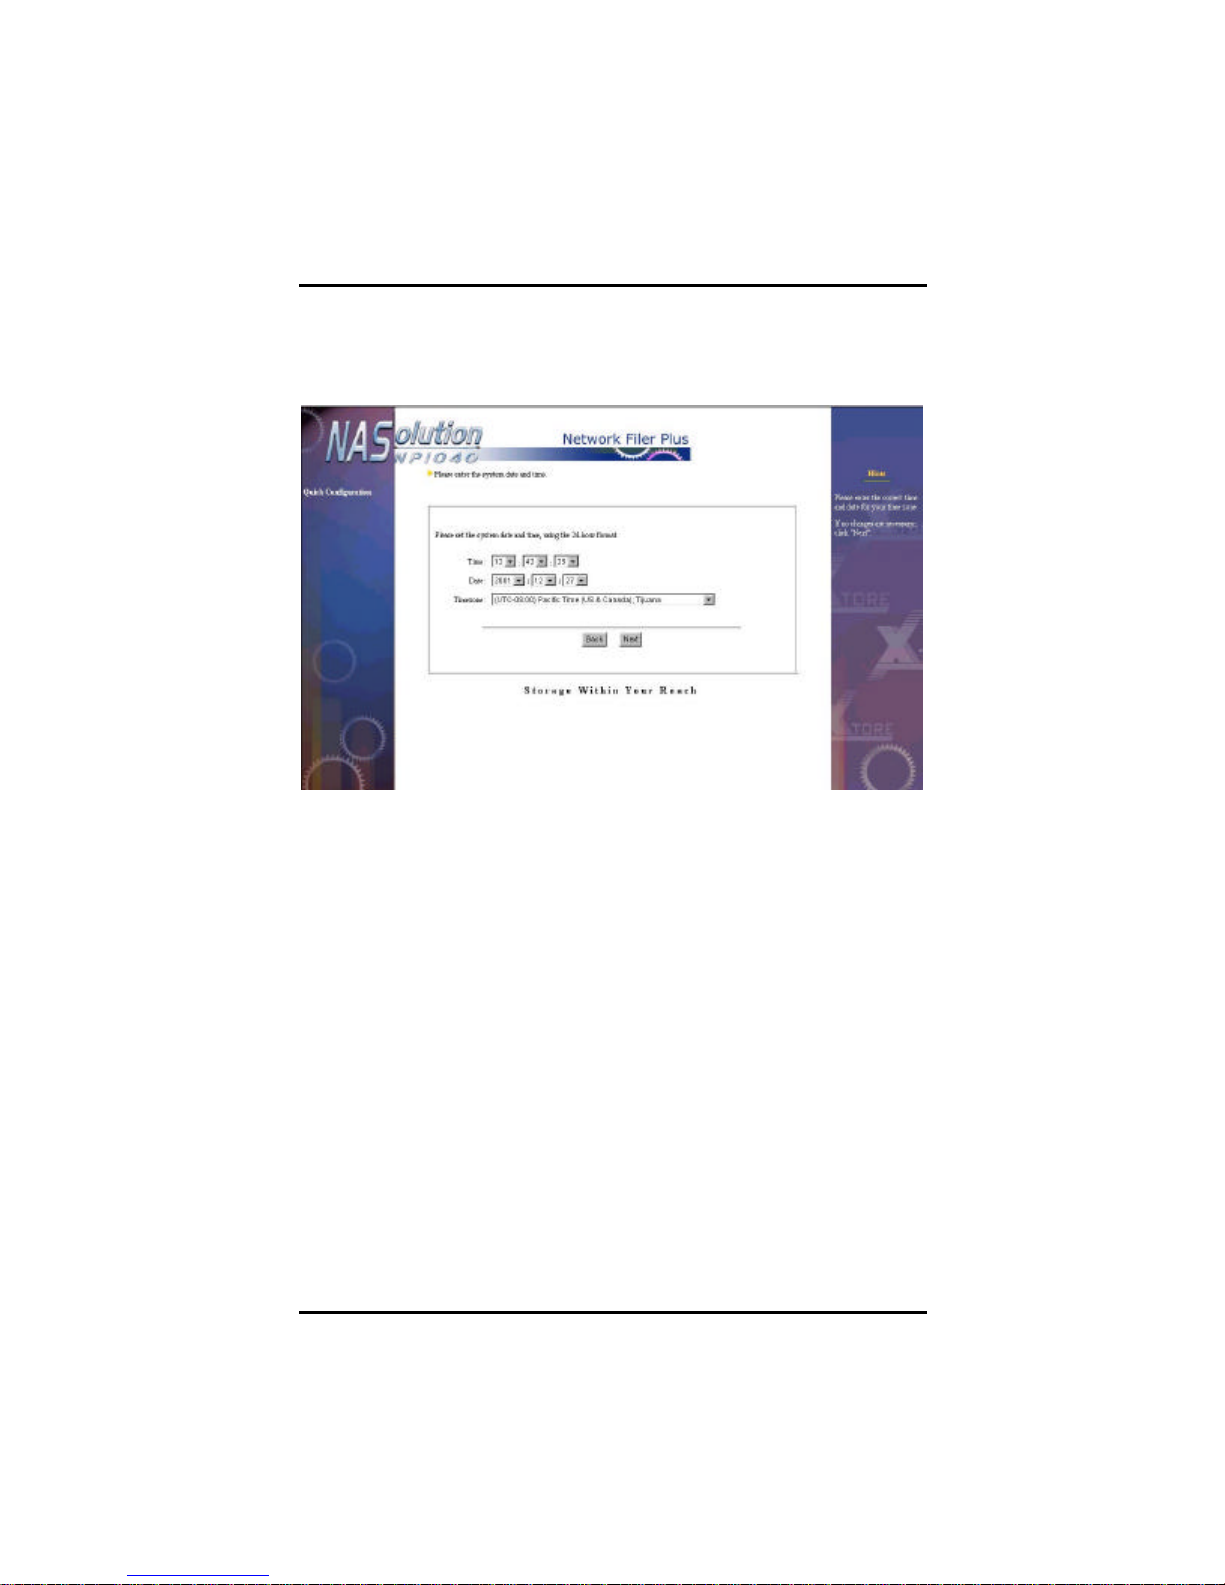
Enter the system date and time
Use a 24-hour format to enter the system date and time. Please
enter the correct time zone.
20 Chapter 3. Quick Configuration
Page 26
NFP Storage Manager 1.1 User’s Manual
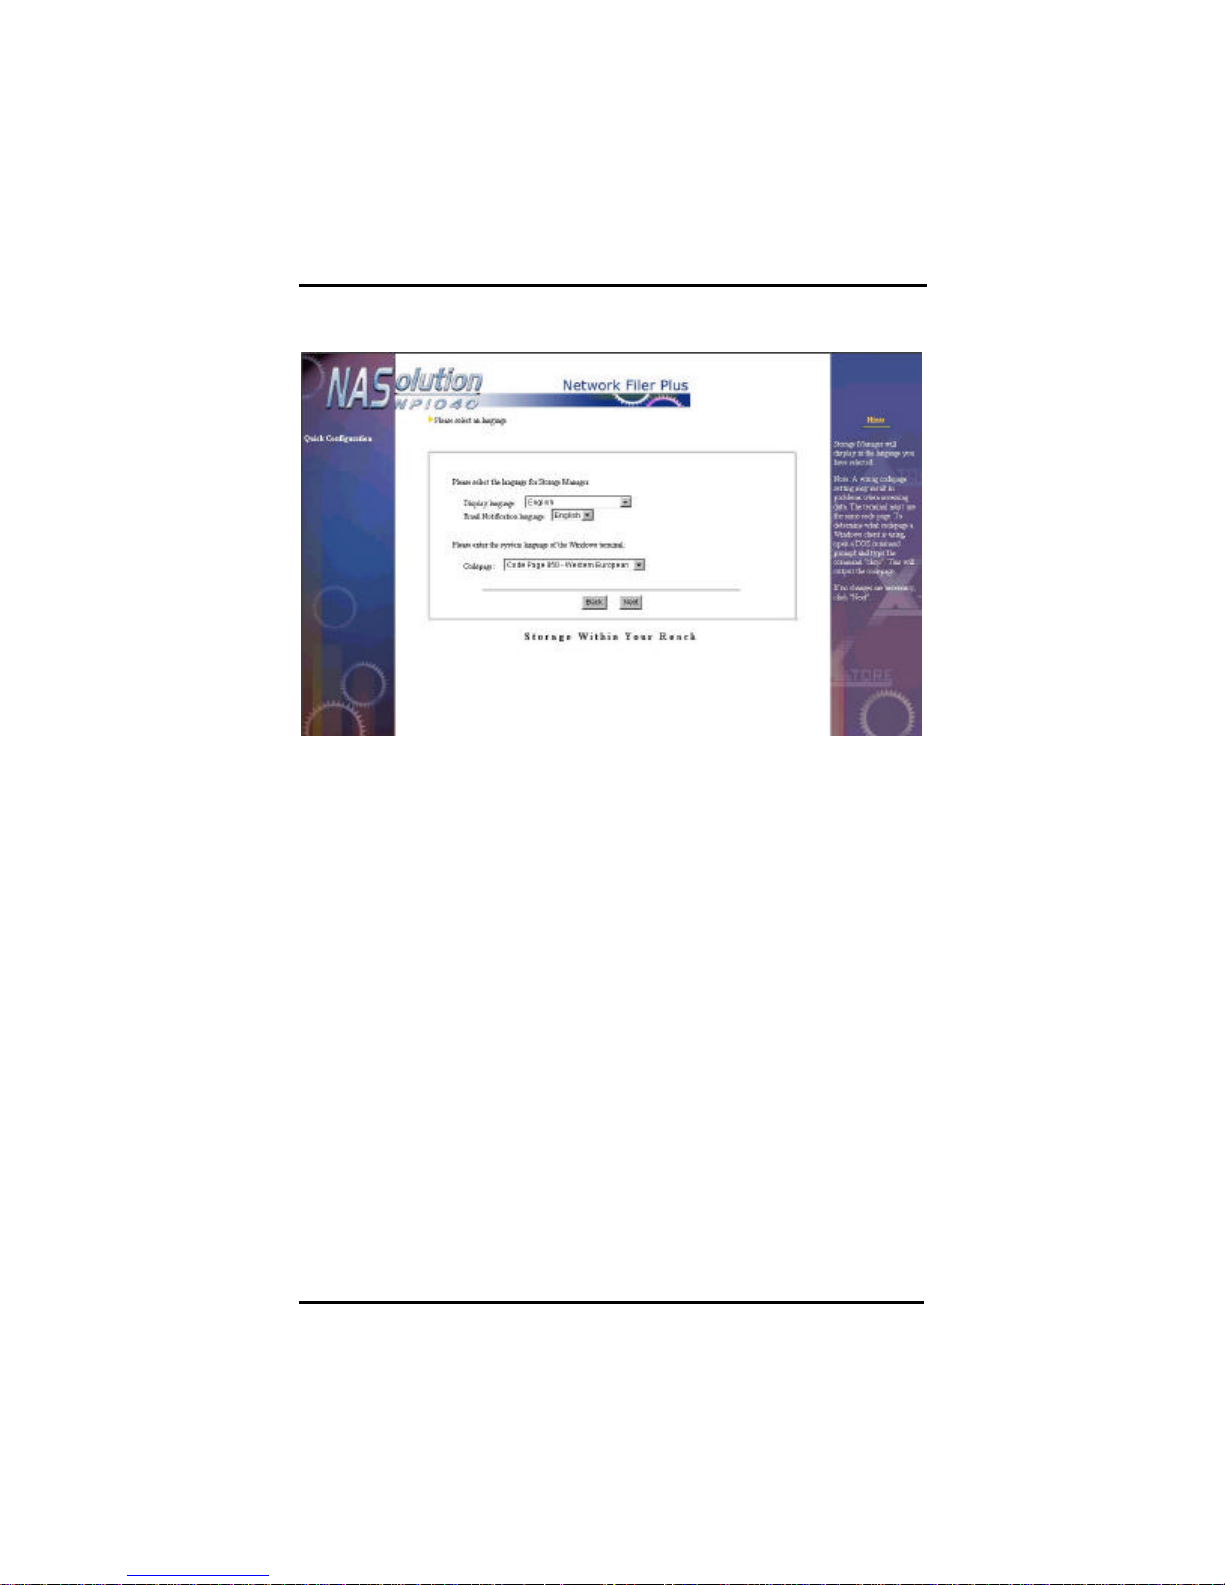
Select a language
Please choose a display language for NFP Storage Manager, event
notification emails, and the code page for Windows client terminals.
In Display Language column, when selecting Browser Default
Language, NFP Storage Manager will automatically display the same
language as the IE browser of the client when system administrator or
general user is connected to NFP Storage Manager.
Once Quick Configuration is complete, NFP Storage Manager will
use that language. If you do not know the correct code page of your
Windows client, enter the command “chcp” in the DOS Windows and
press Enter to retrieve the correct code page information.
Note: A wrong code page setting may result in problems when
accessing data. All terminals must use the same code page.
Chapter 3. Quick Configuration
21
Page 27
NFP Storage Manager 1.1 User’s Manual
byte language (code page), such as
ents, an error will occur when
or folder names (e.g.
NAS server, and some files cannot
be deleted once saved. In this case, the system administrator must
to change the code
byte encoding; only then can the file be properly
TIP
If the administrator set a single English or Multilingual for Windows cli
the client attempts to save double-byte files
Traditional Chinese) on NP1040
use the Server Configurat ionàLanguage Setup
page to doubleaccessed and deleted.
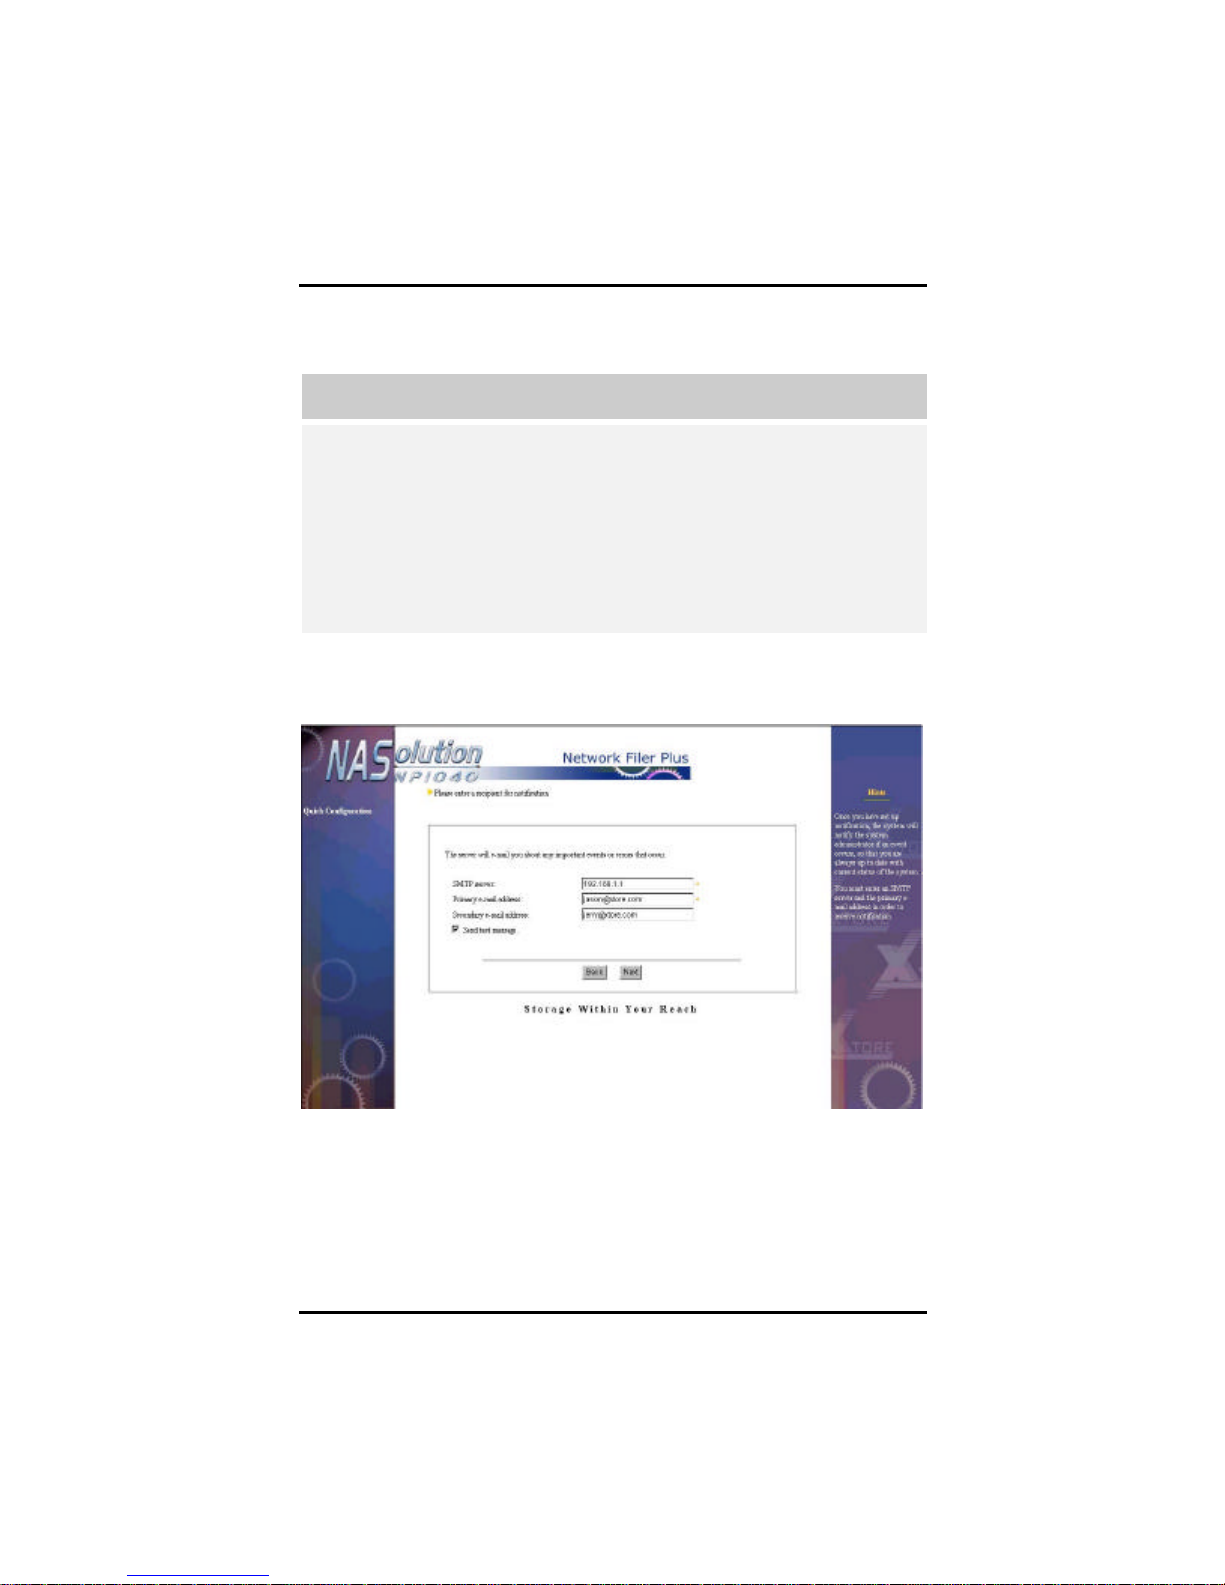
Enter a recipient for notification
NASolution NP1040 can notify the system administrator of important
events via e-mail. Enter a SMTP server and the primary e-mail
address. When an important event occurs, such as a HDD failure, the
system administrators will be informed via e-mail and can respond
immediately, thus ensuring system safety and availability. You have
the option to send a test message after setup to make sure you have
entered a valid configuration.
22 Chapter 3. Quick Configuration
Page 28
NFP Storage Manager 1.1 User’s Manual
Due to the excessive amount of junk mail pervading the Internet,
many providers do not allow their SMTP servers to be used by outside
users. We therefore strongly recommend using the SMTP server of
your e-mail Domain (the primary and secondary e-mail address). For
example, if you use [email protected], select the SMTP server belonging
to this provider, e.g., mail.abc.com.
Note: if you enter the host name (e.g. mail.abc.com) of the SMTP
server, instead of the IP address (e.g. 192.168.1.1), please also enter
the DNS address.
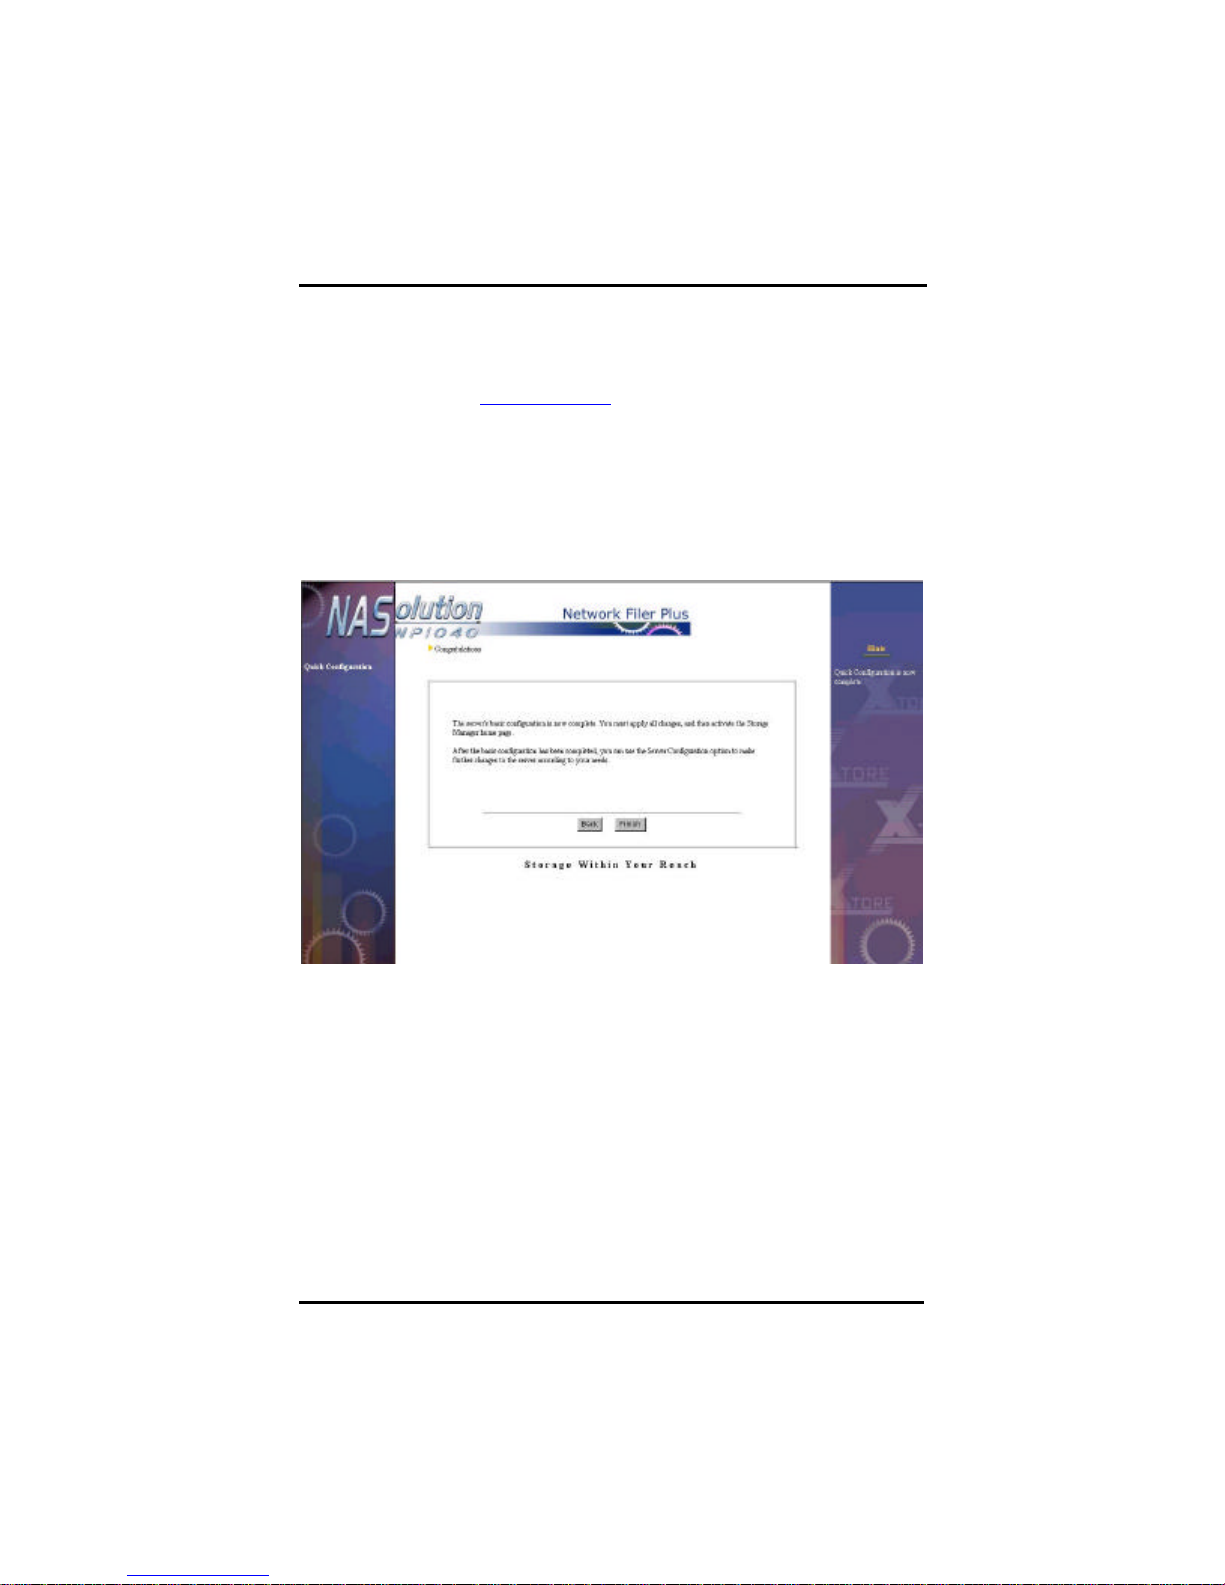
Completing Quick Configuration
Once you have completed the Quick Configuration, the server should
operate properly. Click Finish to apply all settings and open NFP
Storage Manager. If you need to make further modifications after
you have completed Quick Configuration, use the Server
Configuration option described in Chapter 4.
Chapter 3. Quick Configuration
23
Page 29

NFP Storage Manager 1.1 User’s Manual
option,
hand
. When you are done
NFP Storage
for 15 minutes, you will automatically be logged out,
Chapter 4
Using NFP Storage Manager 1.1
After the Quick Configuration is complete, NASolution NP1040 will
open the web-based NFP Storage Manager program, where the
system administrator can further edit the settings of NP1040 NAS
server.
TIP
1. NFP Storage Manager does not include a Back
however a list of all of the configurable items on the left side of the browser window is provided
with one screen, simply select the next item you wish to
configure from the list on the left.
• If no entries occur in
Manager
and will have to log in again to continue.
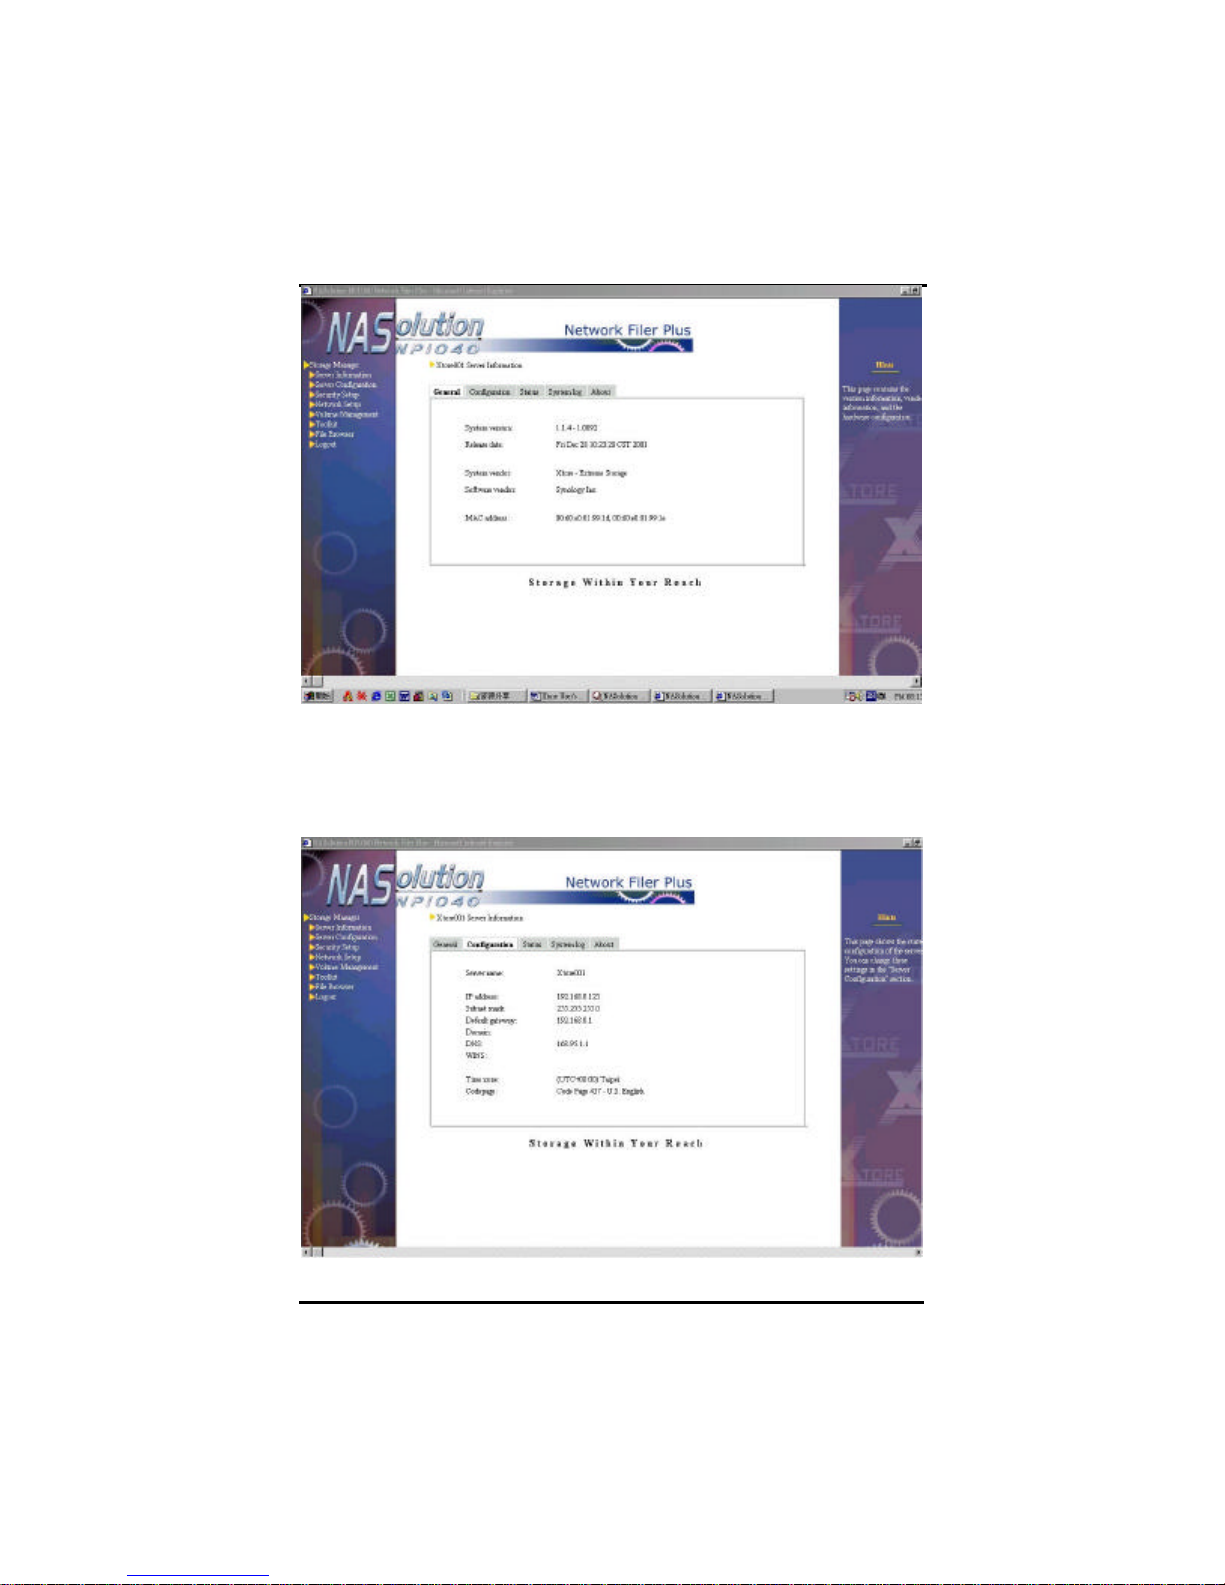
Server Information
Here you find information about your server:
ll General: Shows system version and manufacturer information.
24 Chapter 4. Using NFP Storage Manager 1.1
Page 30
NFP Storage Manager 1.1 User’s Manual
ll Configuration : This page shows the current configuration of the
server. You can change these settings under Server
Configuration.
Chapter 4. Using NFP Storage Manager 1.1
25
Page 31
NFP Storage Manager 1.1 User’s Manual
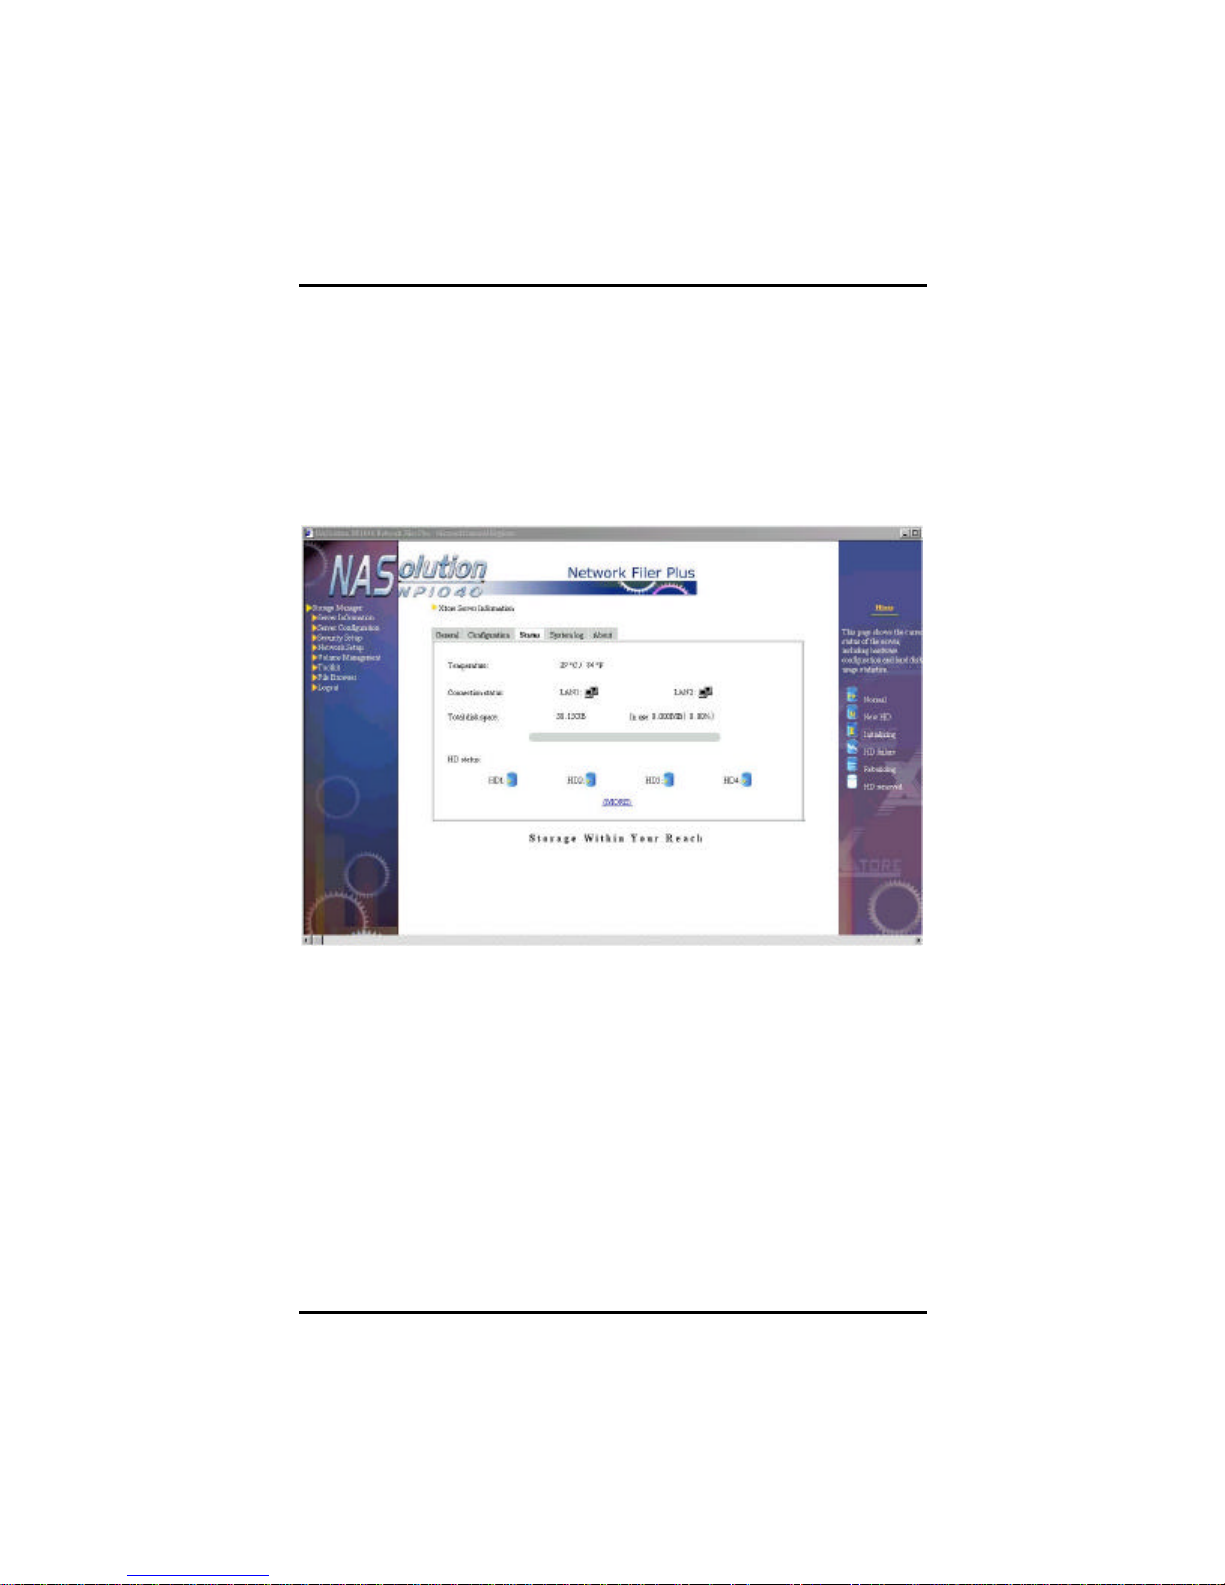
ll Status: This page shows the current operation status of the
server, including ECC memory, temperature, network port (s),
fans, power supplies, and hard disk space usage. If an error
occurs on the server, such as a memory error, high
temperature, network card malfunction, fan malfunction, power
supply malfunction , or hard disk failure, the information on this
page will be immediately updated, and a notification message
will be sent via e -mail to the system administrator.
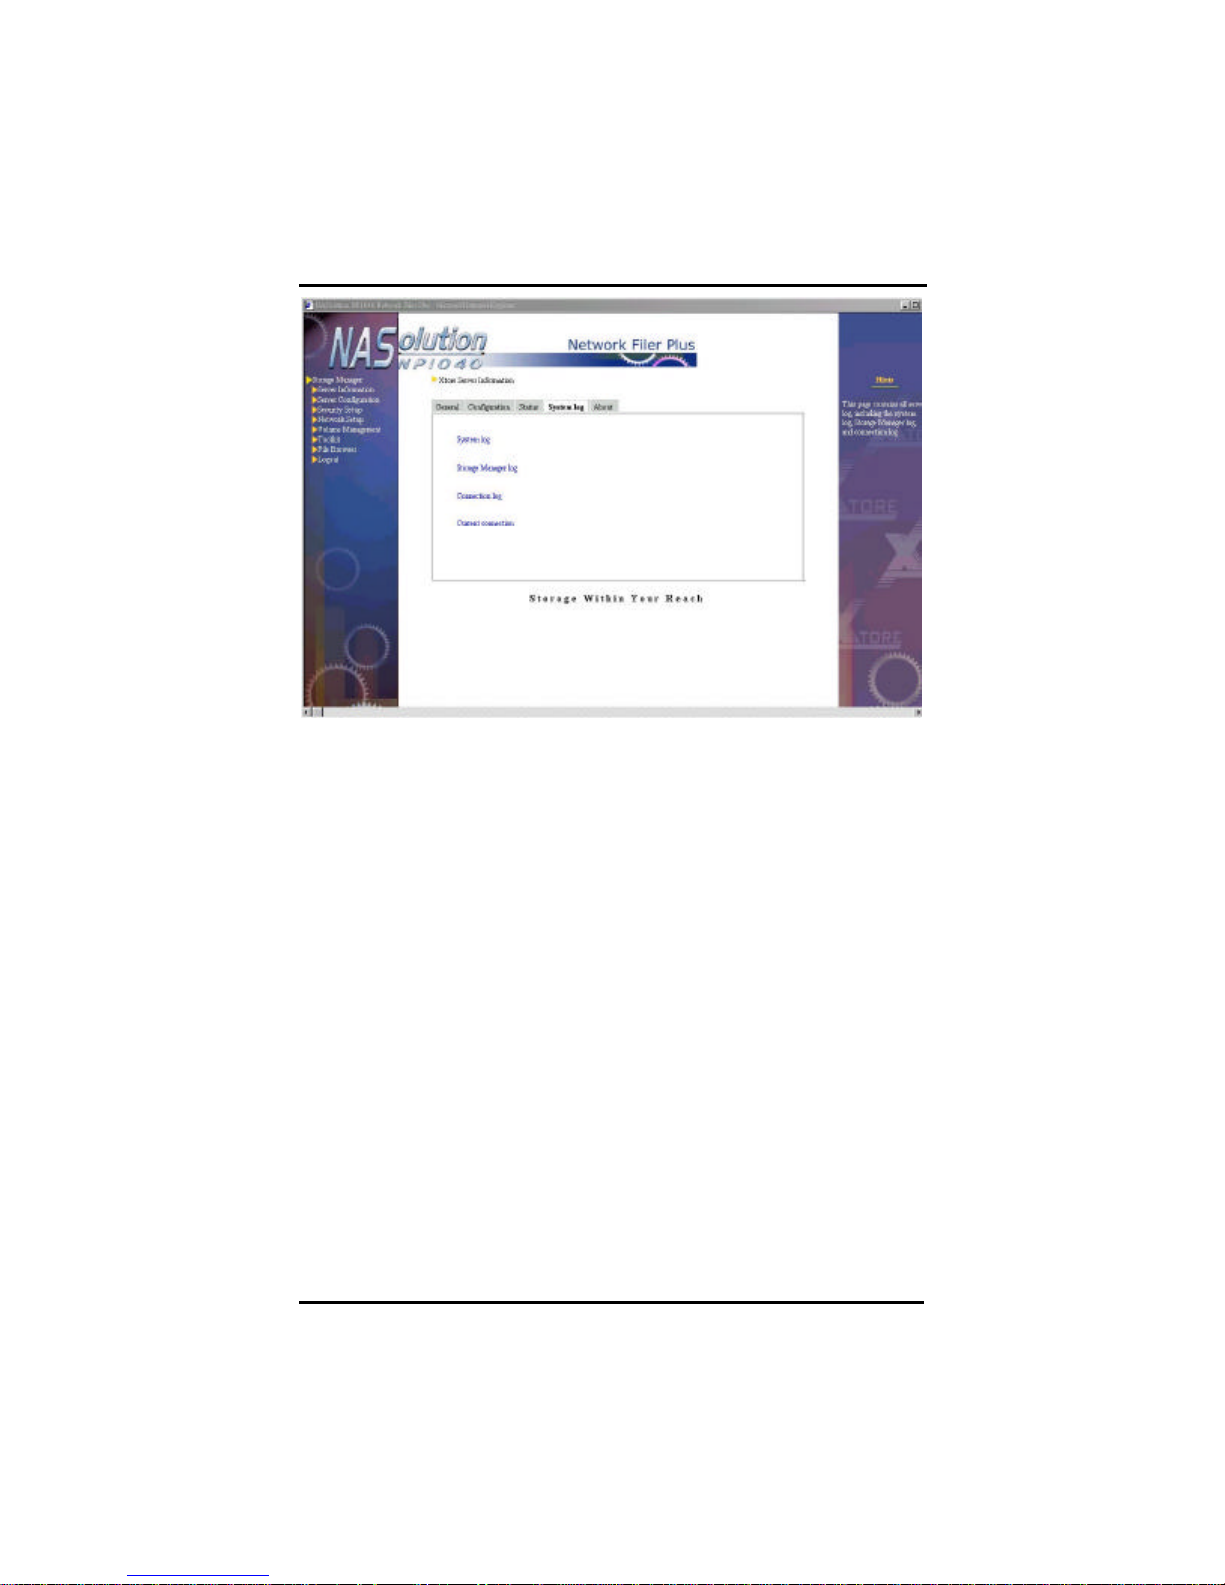
ll System log: This page shows the system log NFP Storage
Manager log, and the connection status of Windows and NFS
clients.
26 Chapter 4. Using NFP Storage Manager 1.1
Page 32
NFP Storage Manager 1.1 User’s Manual
Chapter 4. Using NFP Storage Manager 1.1
27
Page 33
NFP Storage Manager 1.1 User’s Manual
Server Configuration
Basic Configuration
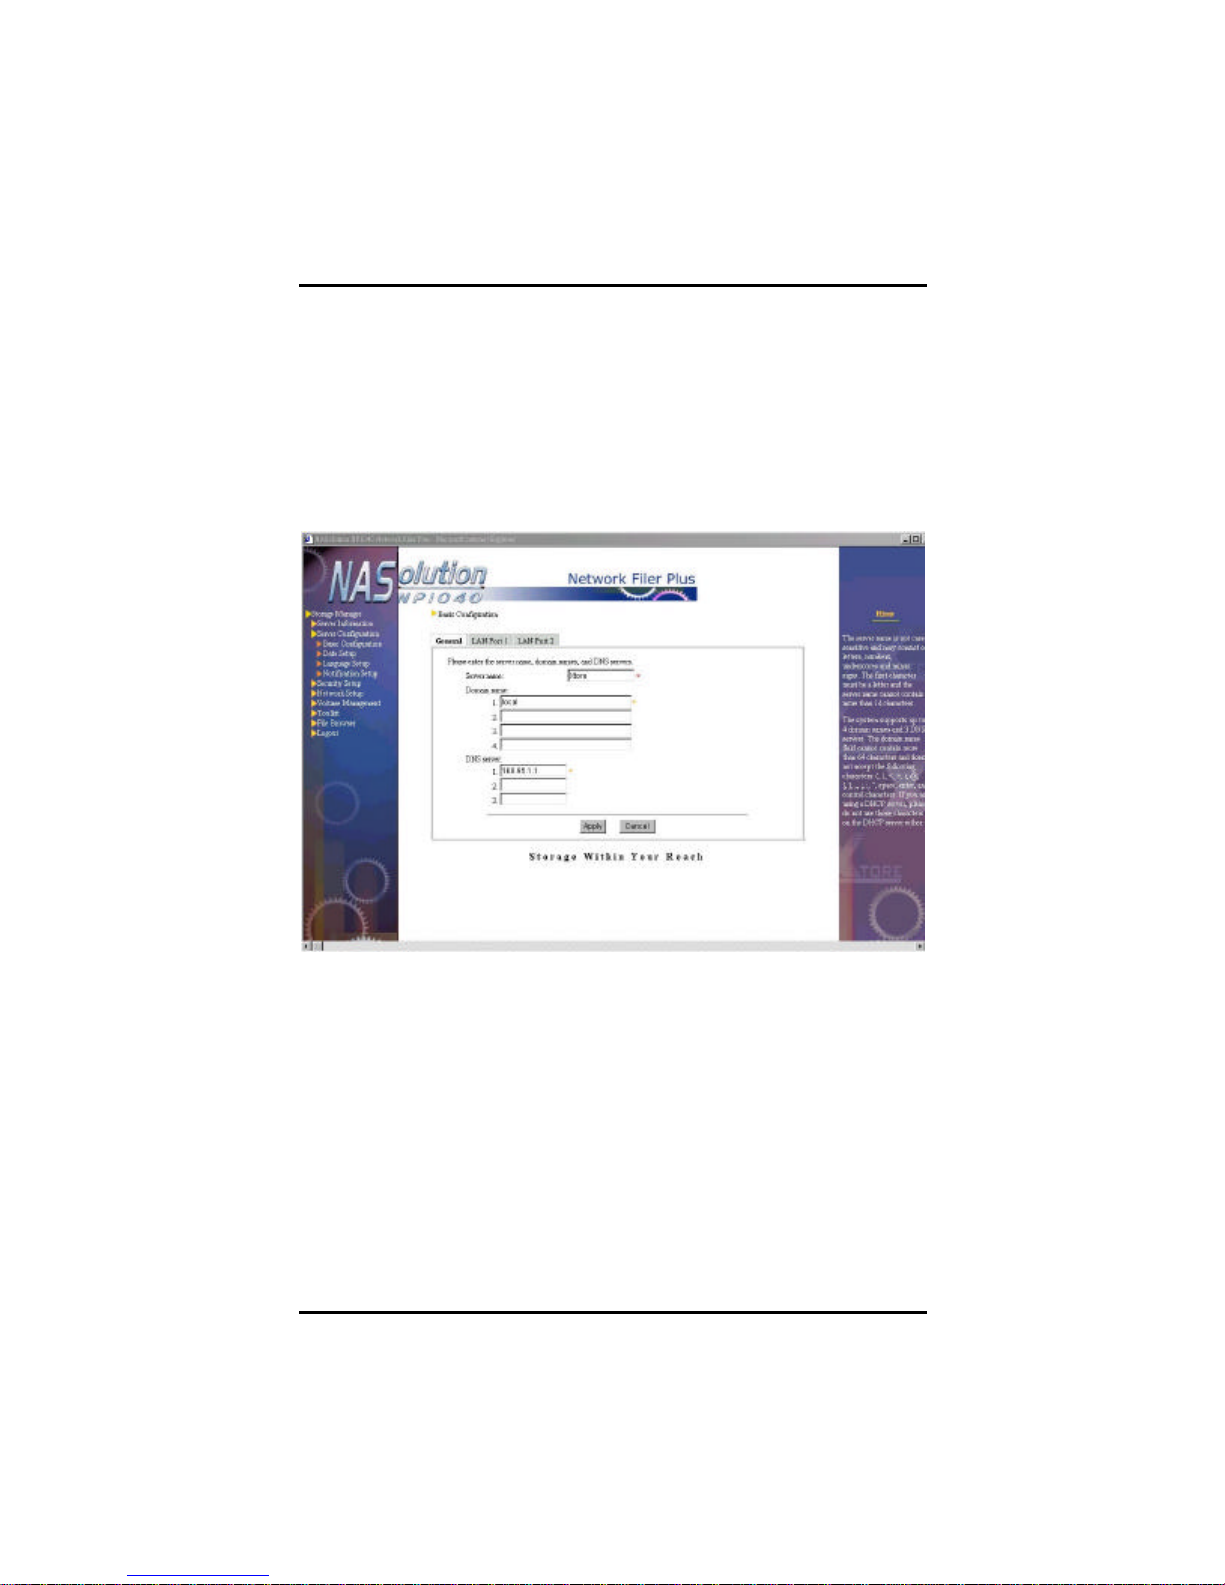
General
System administrator can change general server information such as
server name and network settings. Please refer to the Server
ConfigurationàBasic Server Configuration unit of Chapter 3 for setup
methods.
28 Chapter 4. Using NFP Storage Manager 1.1
Page 34
NFP Storage Manager 1.1 User’s Manual
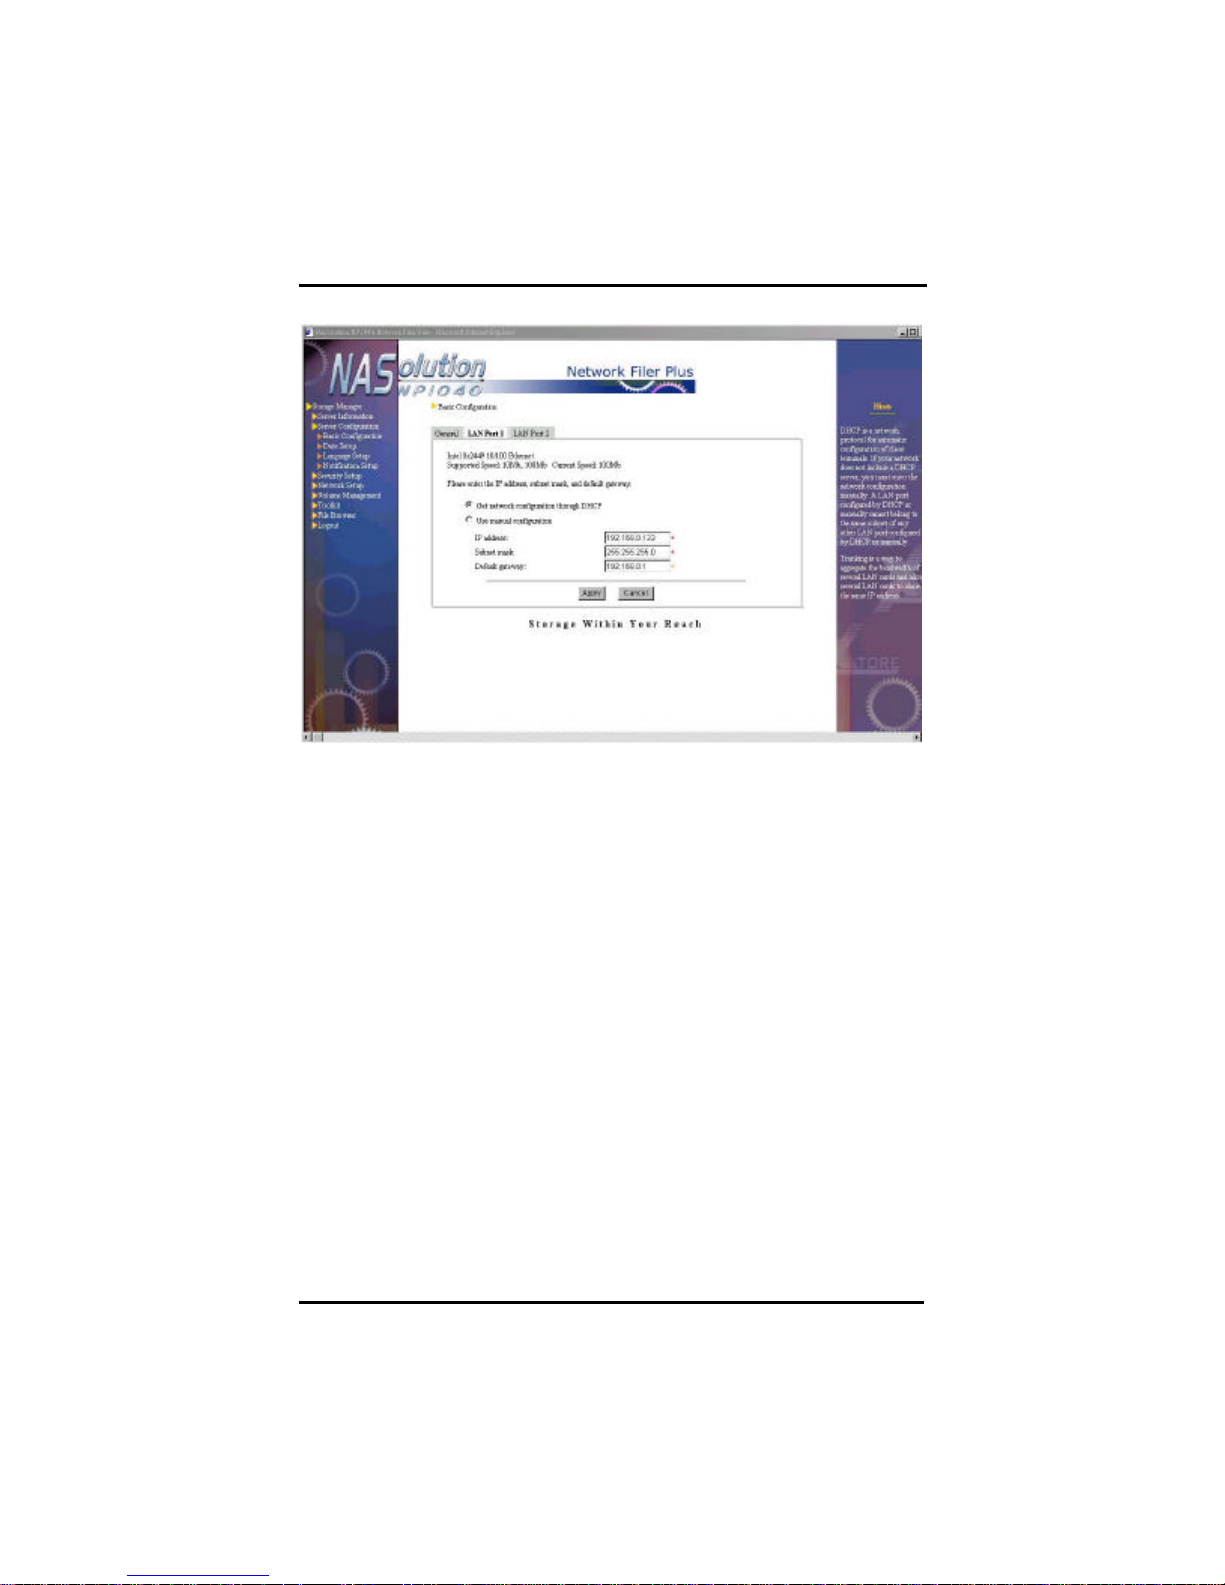
LAN Port 1
System administrator can change the setup of the LAN port 1. For
ways of setting up, please refer to Server ConfigurationàBasic Server
Configurationà LAN Port 1 of Chapter 3.
Chapter 4. Using NFP Storage Manager 1.1
29
Page 35
NFP Storage Manager 1.1 User’s Manual
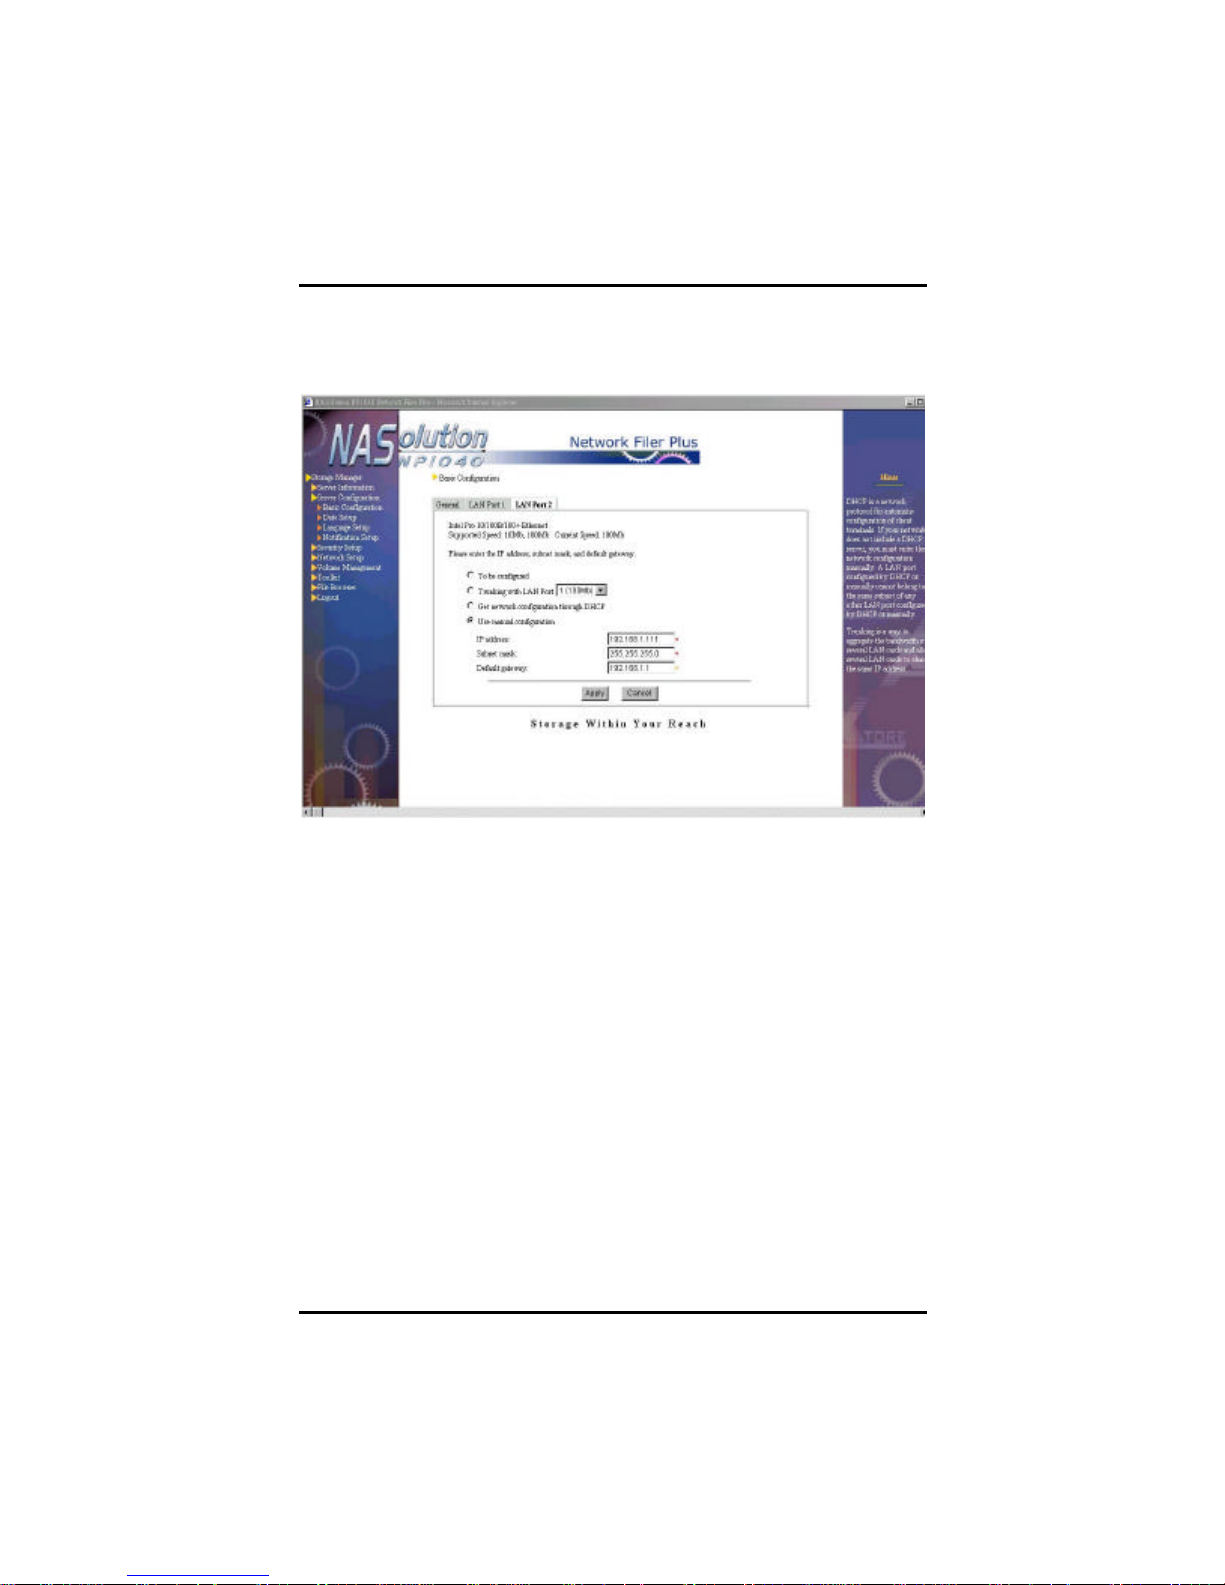
LAN Port 2
If system detects more than one network card in NP1040 NAS server,
this page will automatically display LAN Port N tab to enable setup.
"N" represents the id number of the LAN port in the NAS server.
System administrator can “trunk” this LAN port with other LAN port(s),
i.e. “trunking” or "Link Aggregation", to simulate multiple ports into a
large-scale network port thus multiplying the overall network
bandwidth. For example, if a NAS server shares two 100 Mbps Fast
Ethernet LAN cards, through trunking the two cards into one, the
bandwidth will expand to 200 Mbps and both cards will share the
same IP.
Or , if a network has more than two subnets, system administrator can
setup each network card separately into different subnet IP address to
achieve the "Load Balancing" effect.
Please note:
1. NFP Storage Manager will support up to four network cards
and four subnets.
2. In this system, each network card IP address must be in
30 Chapter 4. Using NFP Storage Manager 1.1
Page 36
NFP Storage Manager 1.1 User’s Manual
different subnet, thus when choosing network type through
DHCP please make sure if the subnet has any DHCP server
available to use.
3. Please use a switch with “Trunking/Fail-over” support to make
sure the “Trunking/Fail-over” feature can be fully supported by
NASolution NP1040.
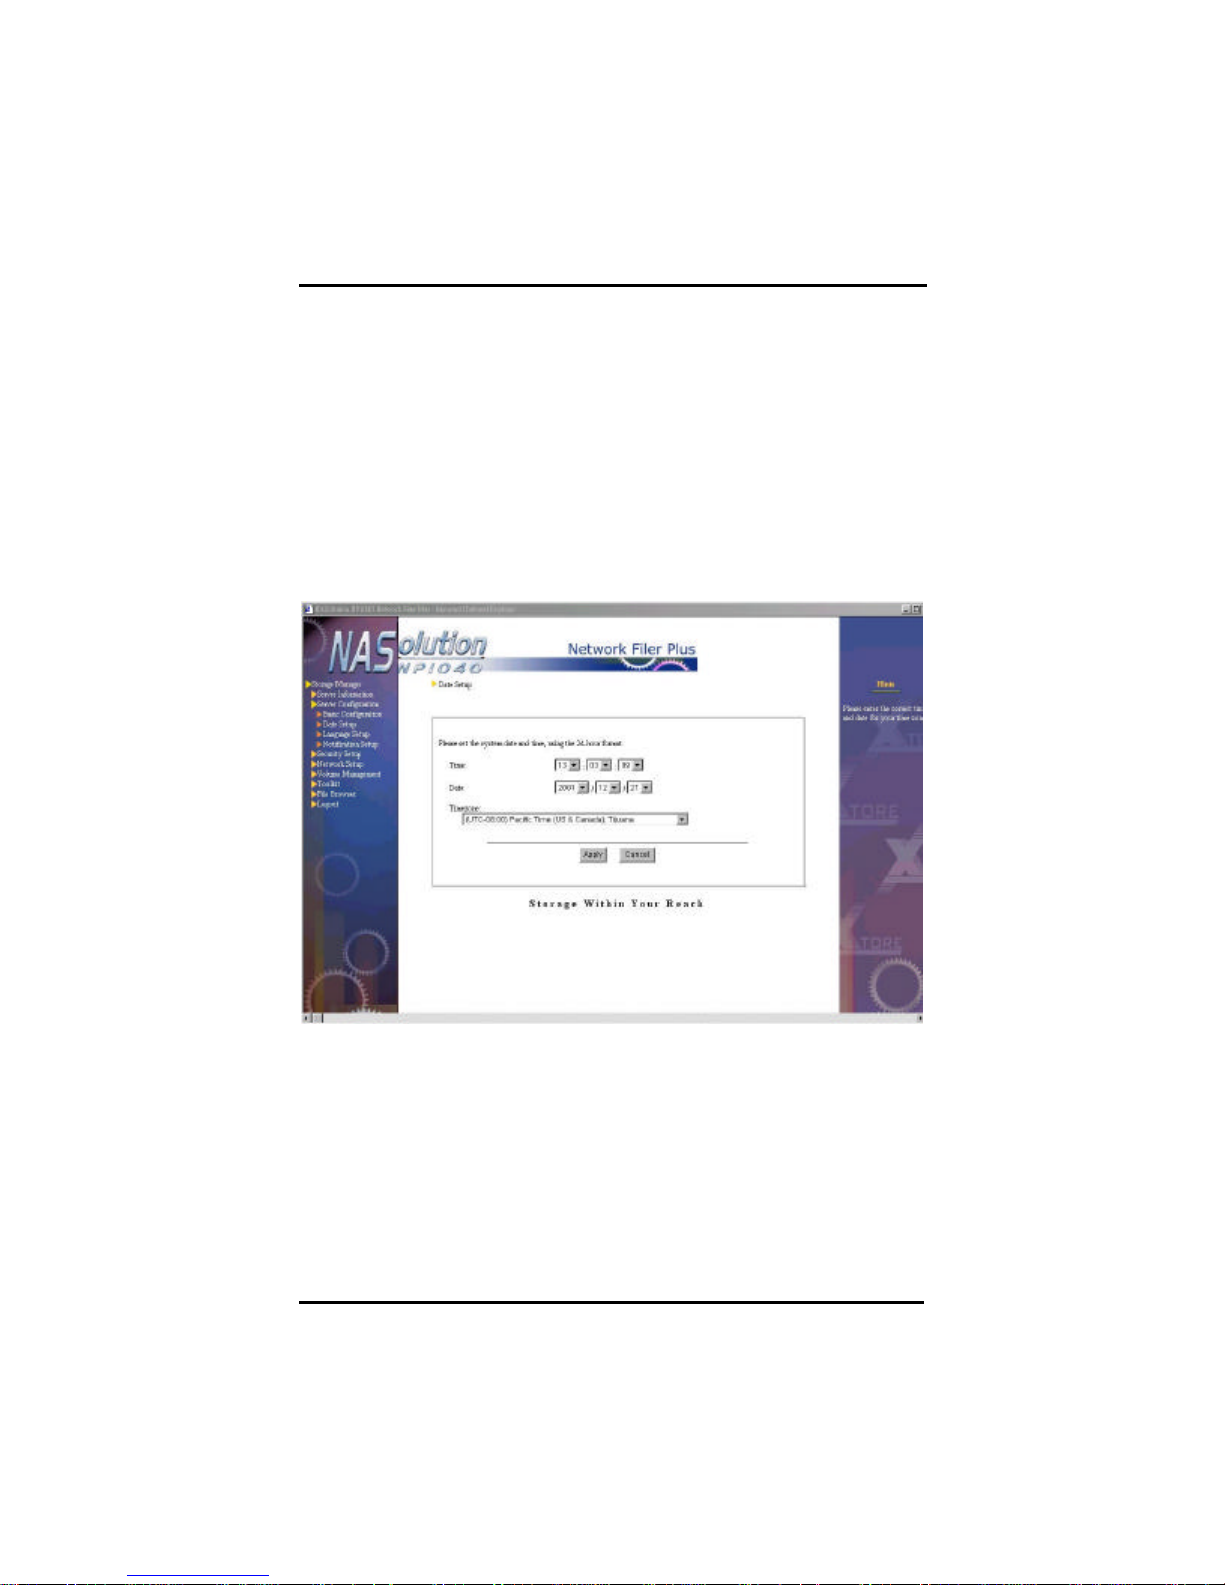
Date Setup
System administrator can change the time, date and time zone of
NP1040 NAS server. Please refer to Server ConfigurationàBasic
Server ConfigurationàEnter the system date and time unit of Chapter
3 for ways to setup.
Chapter 4. Using NFP Storage Manager 1.1
31
Page 37
NFP Storage Manager 1.1 User’s Manual
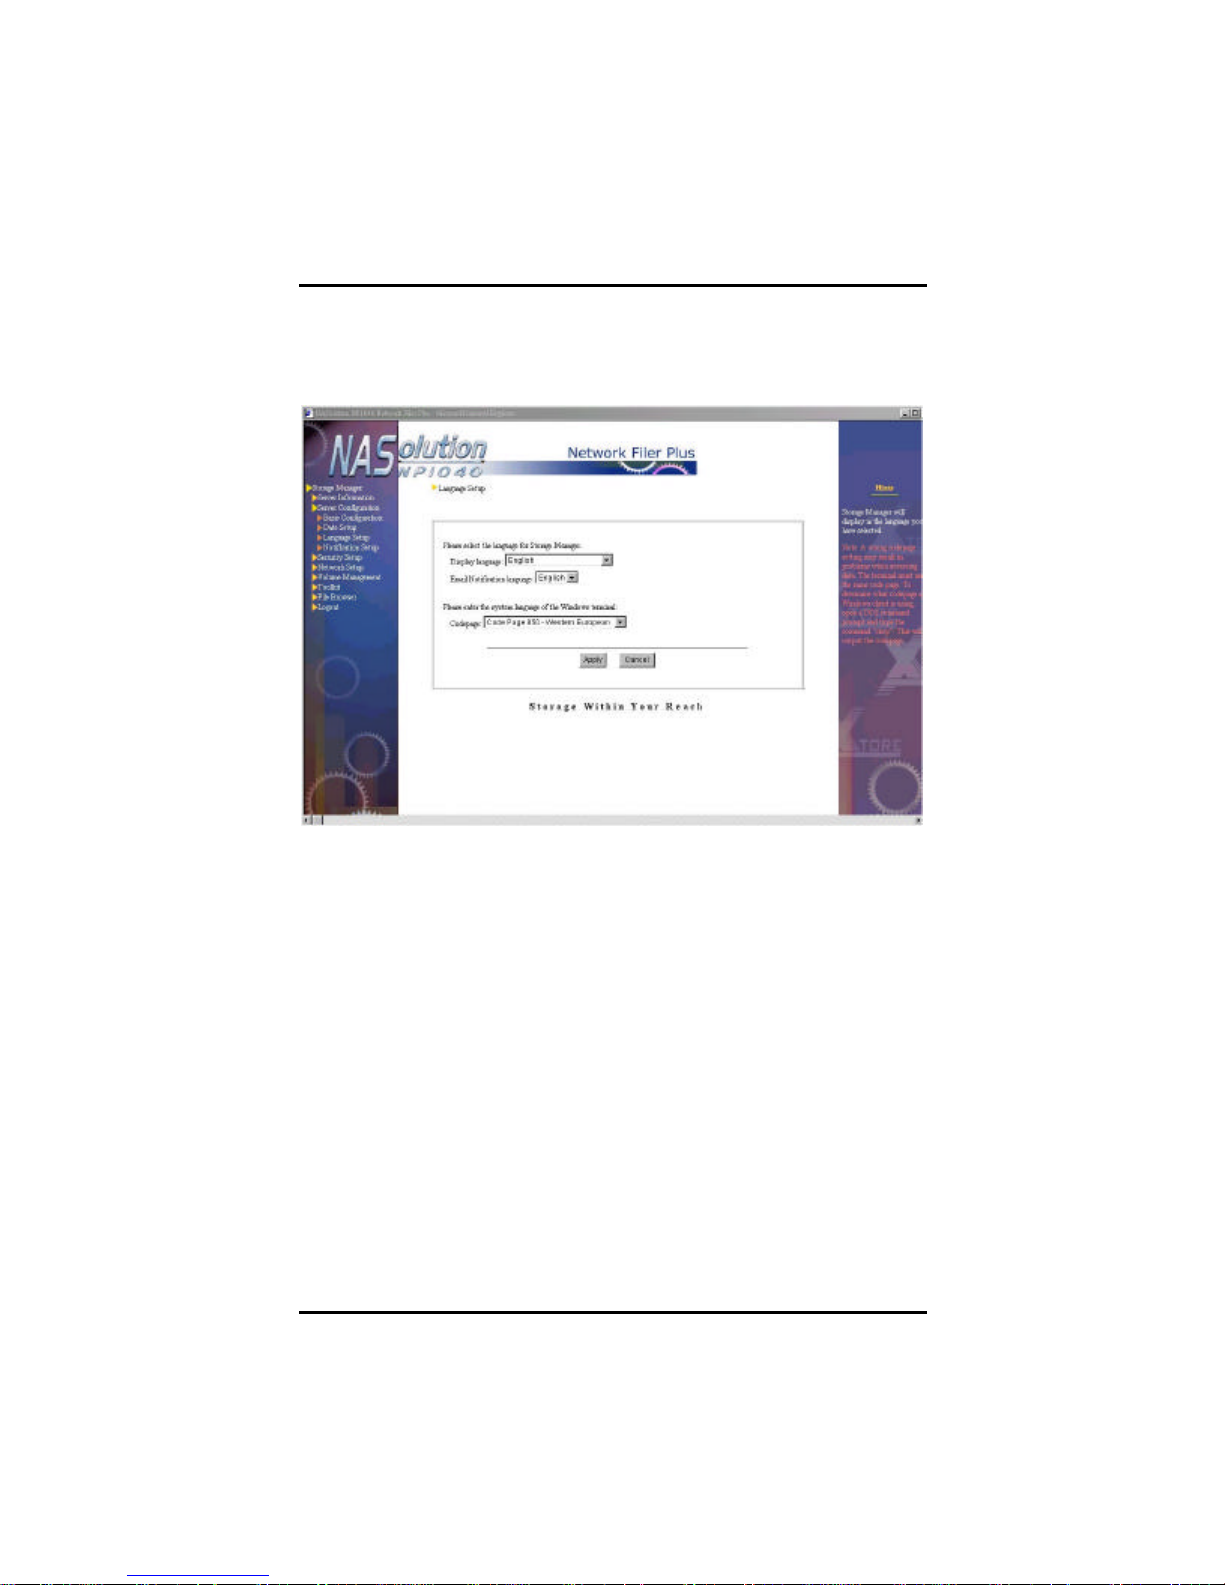
Language Setup
System administrator can change language of NFP Storage Manager,
email notification, and code page used by the client. For ways of
language setup, please refer to Server ConfigurationàBasic Server
ConfigurationàSelect a language of Chapter 3.
32 Chapter 4. Using NFP Storage Manager 1.1
Page 38
NFP Storage Manager 1.1 User’s Manual
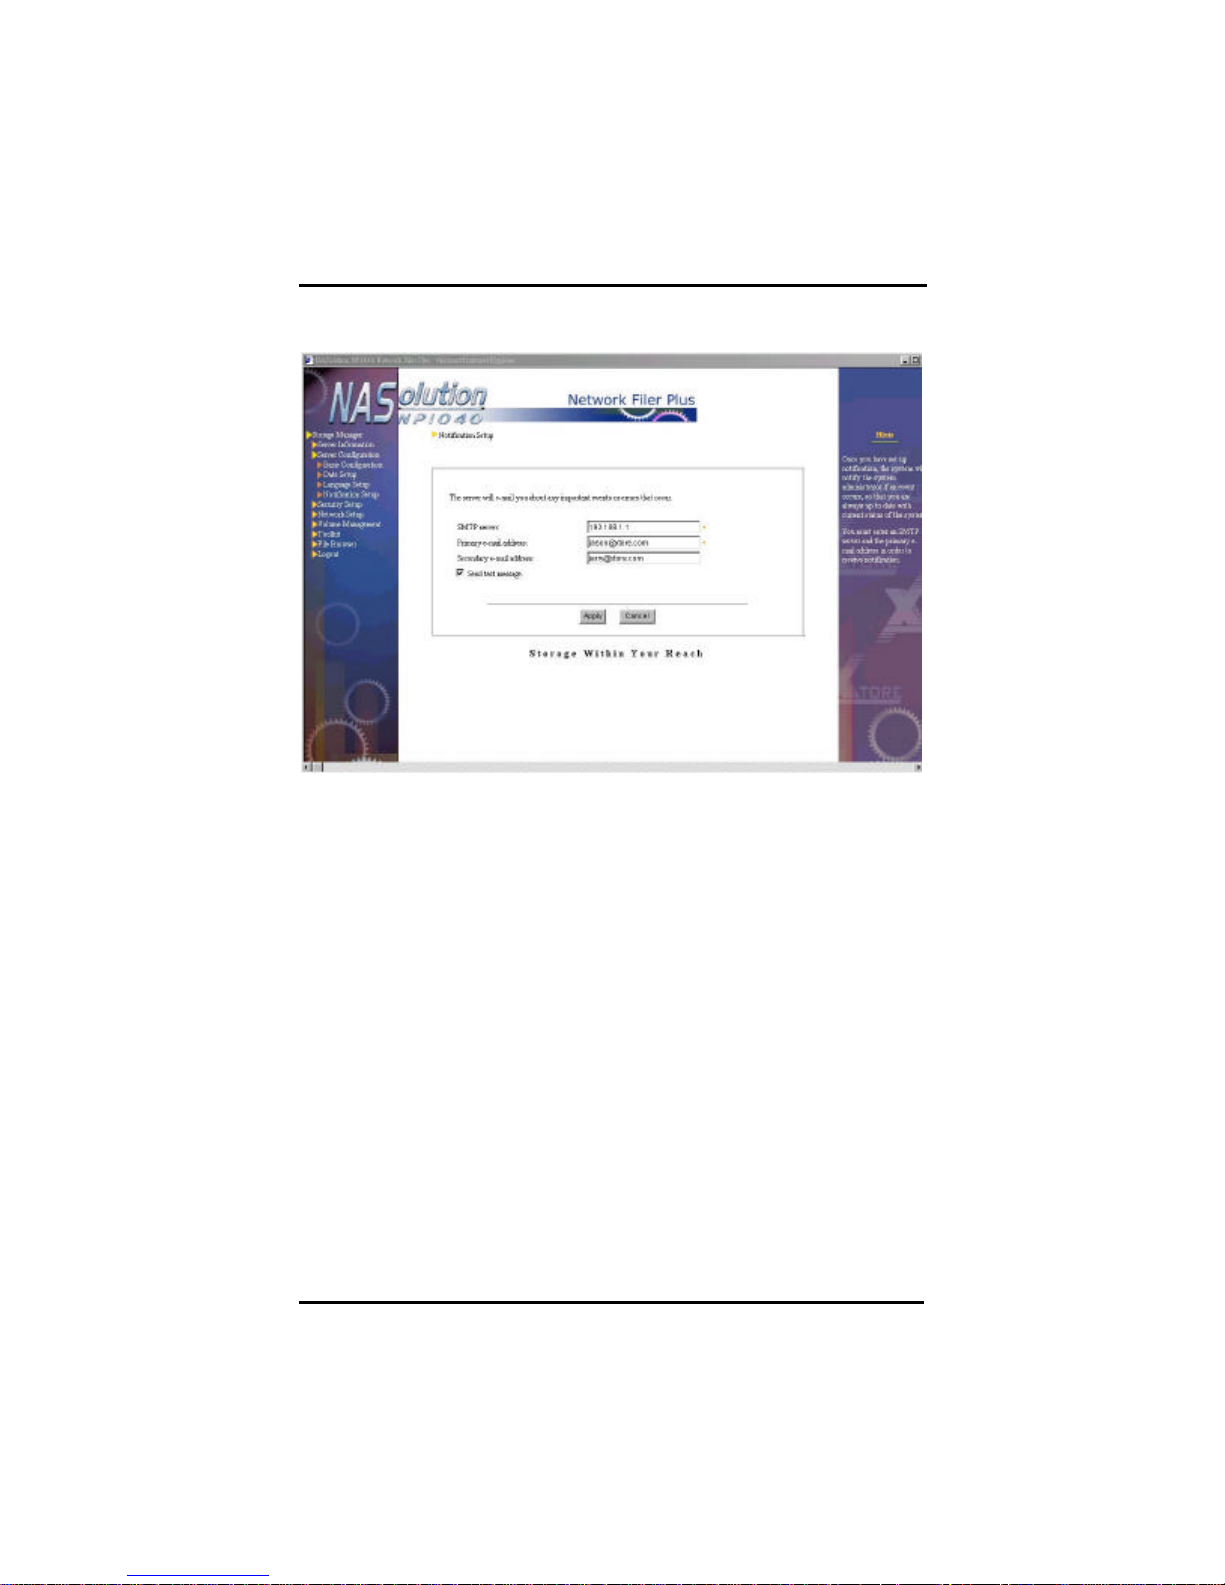
Event Notification Setup
System administrator can change setup of event notification. For
ways of setting up, please refer to Server ConfigurationàBasic Server
ConfigurationàEnter a recipient for notification of Chapter 3.
Security Setup
In this section the administrator can define users and user groups to
access certain files and folders on NP1040 NAS server.
Chapter 4. Using NFP Storage Manager 1.1
33
Page 39
NFP Storage Manager 1.1 User’s Manual
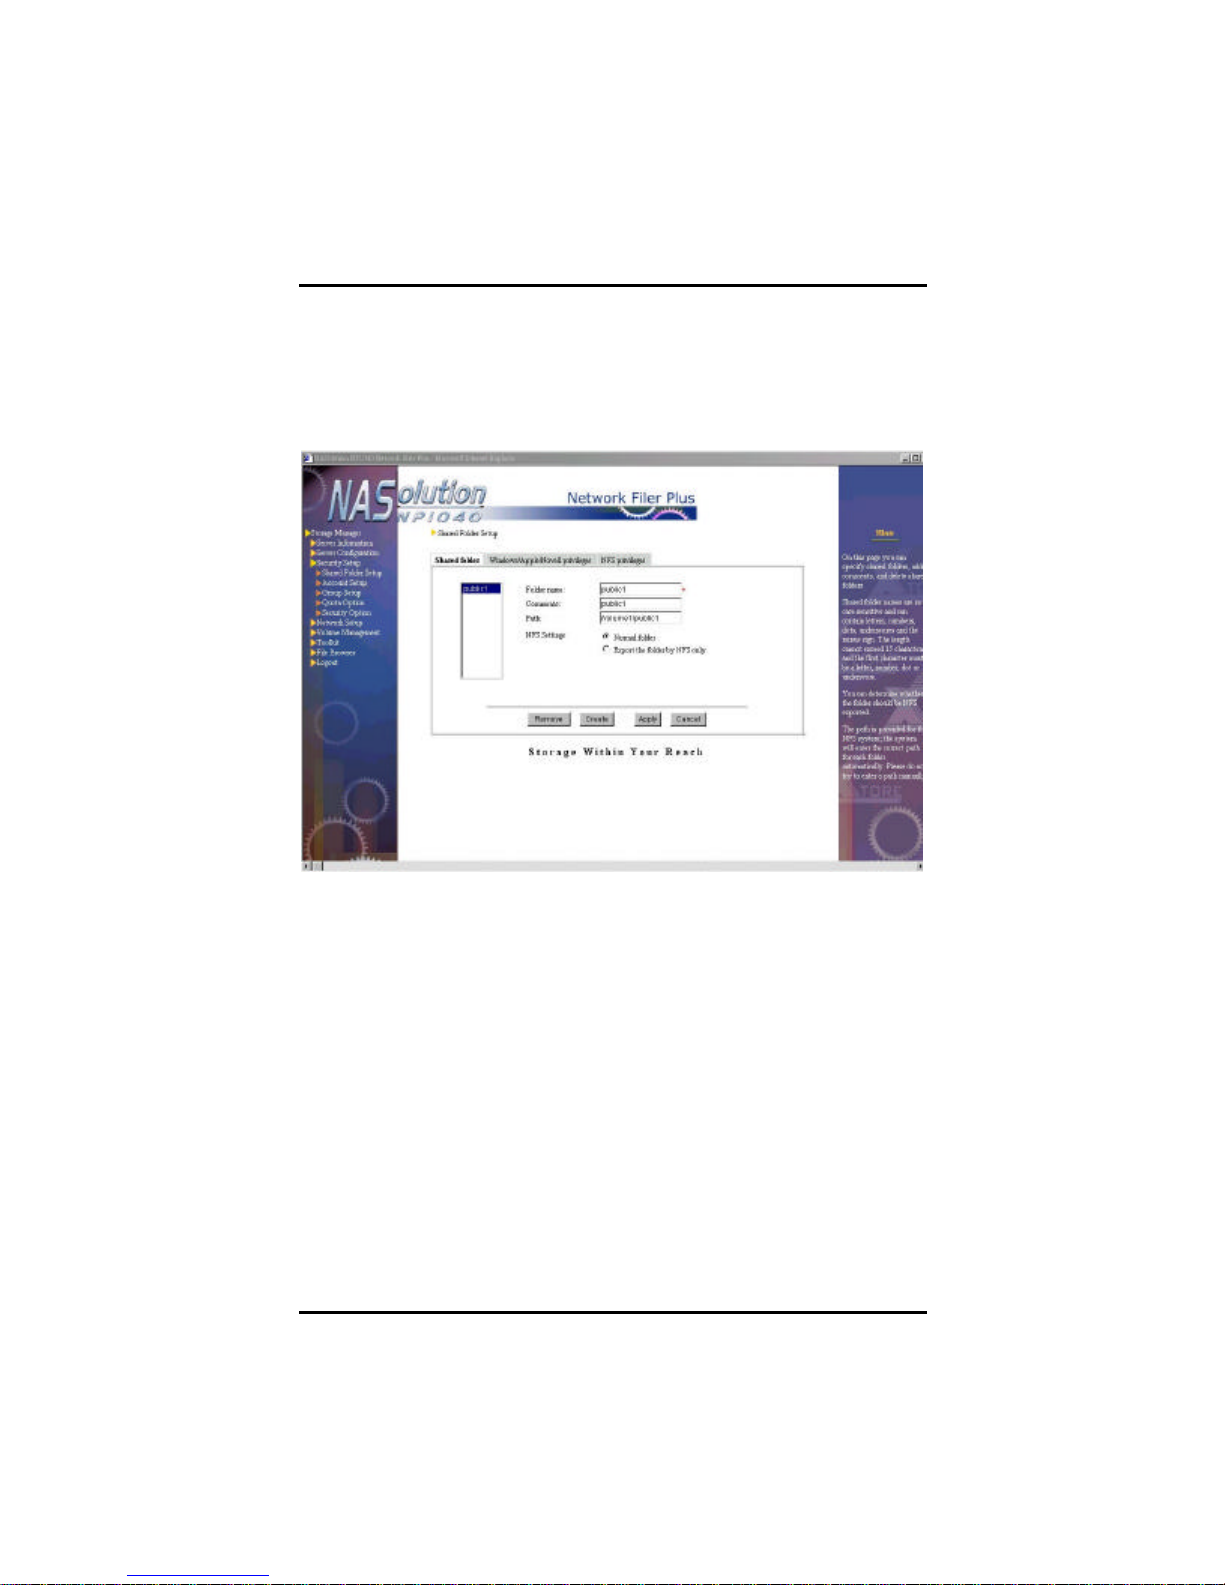
Shared Folder Setup
Shared Folder
Use this option to add, modify or delete shared folders. The
administrator can select whether folders can be exported via NFS to
allow UNIX access only.
The name of the shared folder cannot exceed 15 characters. The
name can be formed by double-byte character languages, the same
as the language of the NFP Storage Manager interface, such as
Traditional Chinese, Simplified Chinese, Japanese or Korean, etc.,
single-byte languages such as English, German, Spanish, etc.,
numbers, decimal point, “underscore”, and “minus” sign. The first
character however cannot be “minus sign”. The name is not case
sensitive.
Please note:
When naming a shared folder using language other than English,
please input the same language as the NFP Storage Manager
interface to ensure correct language encoding. Thus, when NFP
34 Chapter 4. Using NFP Storage Manager 1.1
Page 40

NFP Storage Manager 1.1 User’s Manual
Storage Manager language is Japanese, the shared folder name can
only be both Japanese and English. Similarly, if the interface
language is German, then the shared folder name can only be
German and English. The same principle can be applied to other
languages.
NASolution NP1040 allows up to sixty-four (64) shared folders, not
including the home folders of users group accounts.
Default shared folders
On each individual volume, NASolution NP1040 installs a shared
folder called publicn, whereas n represents the disk volume. On a
non-RAID configuration with four (4) HDD’s, for example, the folders
will be named public1, public2, public3, and public4 respectively. A
four-disk RAID5 configuration on the other hand will be treated as a
single volume, and only one public1 folder will be created. However, if
system administrator segments the NAS storage space into multiple
volumes through Volume ManagementàVolume Setting of NFP
Storage Manager, then the system will automatically create a publicn
shared folder for each volume.
The name, description, and path of this folder (/ volumen/publicn)
cannot be changed by the administrator. By default, any user logged
into NP1040 NAS server has full read/write access privileges to this
public folder. System administrator can change the user access
rights of this shared folder through Windows/Apple/Novell privileges or
NFS privileges tabs.
Modifying a shared folder
On the left side you find the existing shared folders. Click on a folder
name to display the information pertaining to this folder on the right
windowpane. To rename the folder or modify its description, make the
necessary changes on the right and then click Apply.
Chapter 4. Using NFP Storage Manager 1.1
35
Page 41
NFP Storage Manager 1.1 User’s Manual
system, Win 95/98 clients can only
display folder names with a maximum of 13 characters, and
s NT clients can only display folder names with a maximum
of 12 characters. Therefore, when sharing folders with
Win95/98/NT clients, please pay attention to the length of the folder
names, otherwise clients may not be able to access these folders
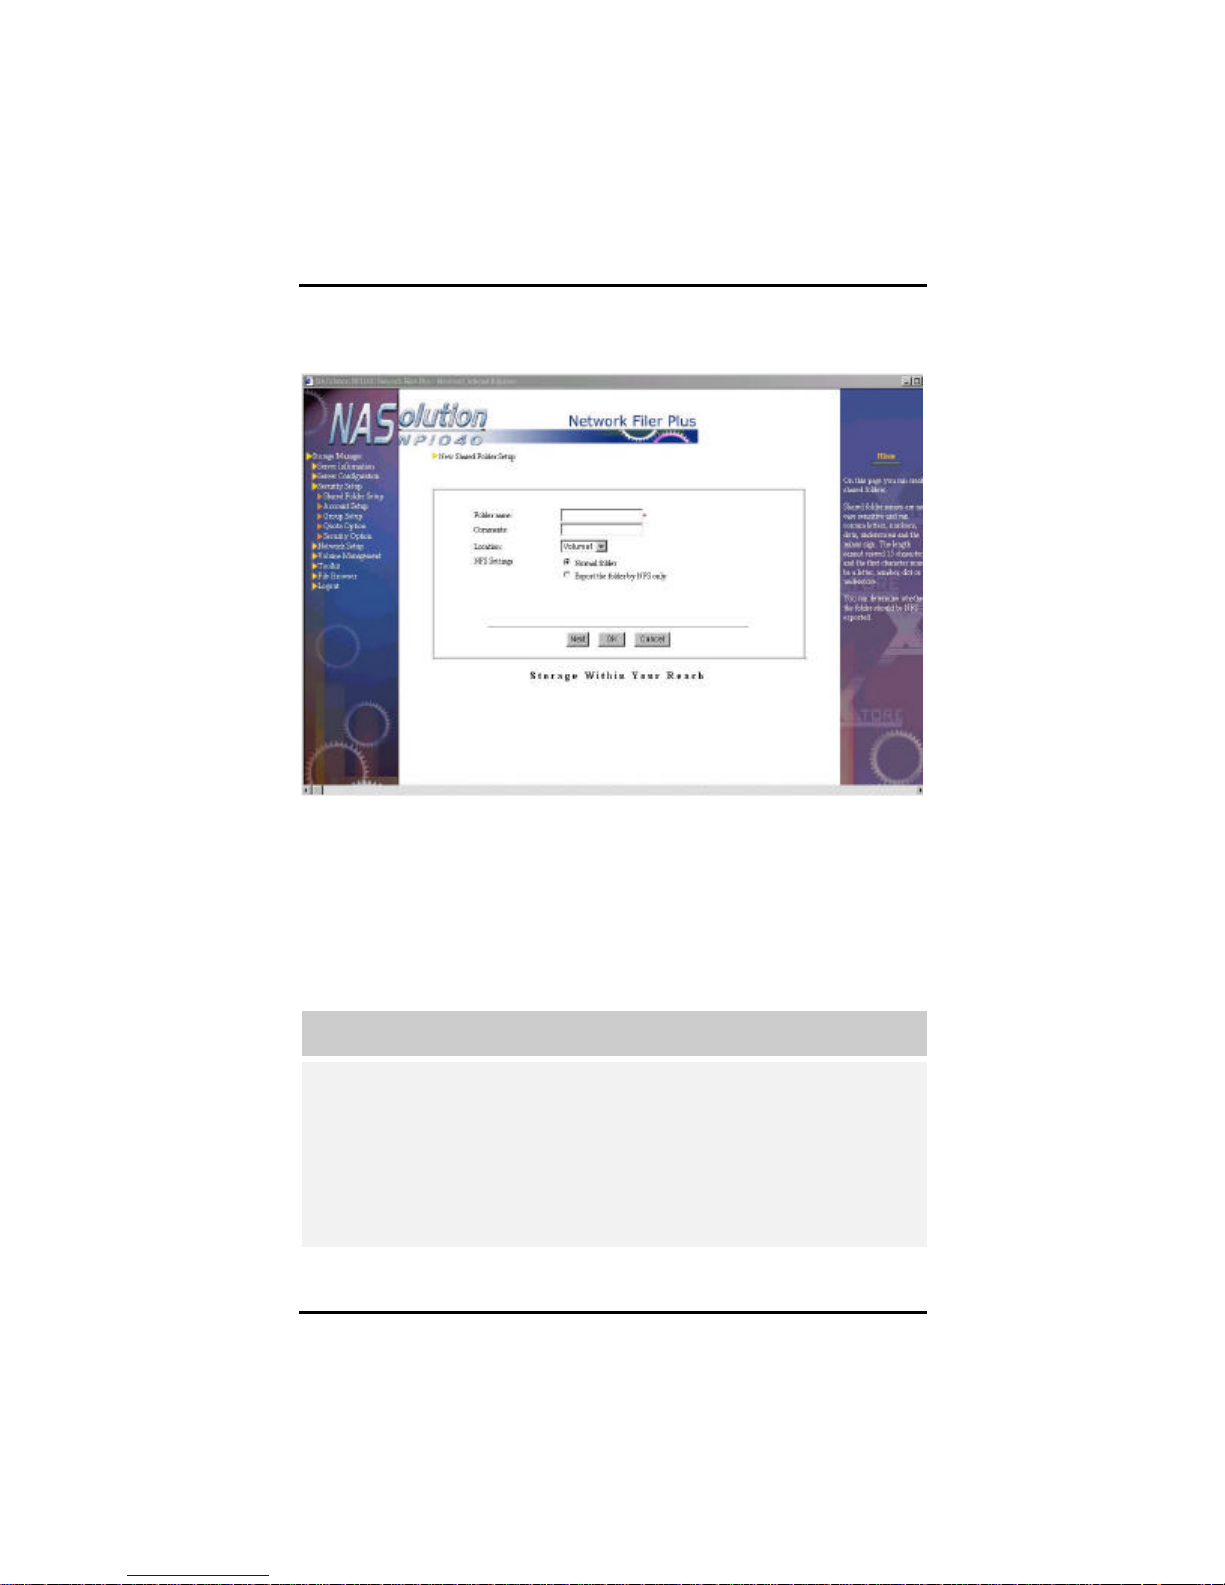
Adding a shared folder
To add a folder, click on Create. The New Shared Folder Setup page
will appear. Enter a name and description for the folder. If the system
includes more than one volume, select a volume under Folder
Location. If the folder is to be shared between normal users (Windows,
Apple, Novell) and NFS users, select Normal folder. If the folder is to
be used only by NFS users, select Export the folder by NFS only.
Click OK to finish or Next to add another folder.
When using this NP1040
Window
through network neighborhood.
36 Chapter 4. Using NFP Storage Manager 1.1
TIP
Page 42
NFP Storage Manager 1.1 User’s Manual
Deleting a shared folder
To delete a shared folder, select the desired folder (use Ctrl for
multiple and Shift for continuous selection) in the list on the left
windowpane, then click Remove. The default shared folders publicn
cannot be deleted.
Shared folder paths
The option Path is only available for NFS and cannot be edited
manually. The system will automatically enter the path
“/volumen/Shared_Folder_Name ” for each shared folder on NP1040
NAS server . For example, i f you create a shared folder called test on
the first volume of NP1040 NAS server, the system will automatically
assign the path / volume1/test. This default value cannot be changed
by the administrator.
Once the shared folder is created, the system administrator must use
the Windows/Apple/Novell Privileges or NFS Privileges tabs to choose
users and their access privileges. All files stored in the shared folder
will have the same privileges.
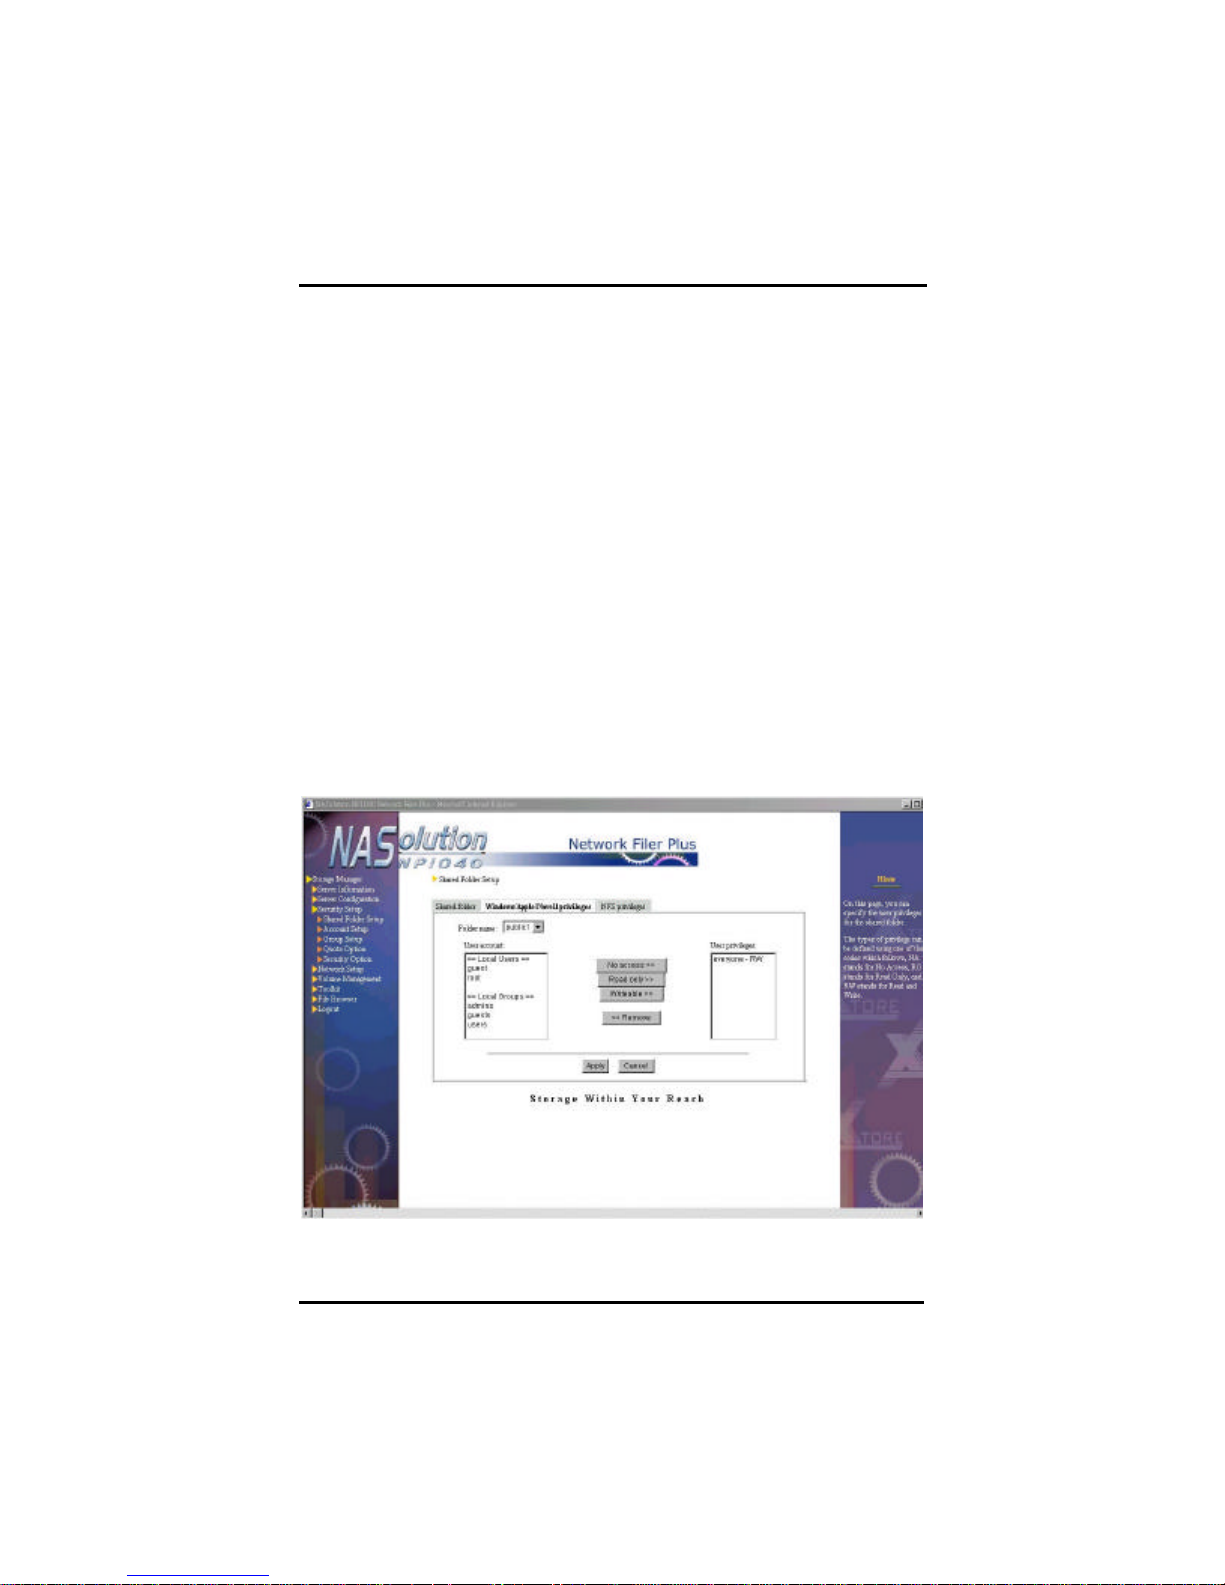
Windows/ Apple/ Novell User Privileges
The system administrator can use this setting to assign access
privileges for local users/groups (i.e. Windows/Apple/Novell clients
Chapter 4. Using NFP Storage Manager 1.1
37
Page 43

NFP Storage Manager 1.1 User’s Manual
with accounts on NP1040 NAS server) and Windows domain
users/groups. Use your mouse to choose a folder in the Folder name
list, the User privileges column will show all the users or groups
entitled to access the selected folder.
38 Chapter 4. Using NFP Storage Manager 1.1
Page 44

NFP Storage Manager 1.1 User’s Manual
TIP
Apple and Windows clients can share the same folder.
However, since Apple and Windows systems handle file
associates in different ways, access to the files supported by
both Apple and Windows systems such as “pdf” and “html” may
be restricted.
For example, when a Windows client saves an html file to
NP1040 NAS server, an Apple client cannot double -click this file
on the server (to open the file) to automatically launch the web
browser. Because the way Windows system saves “Associated
file type” differs from that of Apple, Apple system does not know
with what program can it open the html file created in Windows.
There are two solutions:
1. Re-establish the associate of this file on the Apple client.
2. Launch the program used for executing the file on the Apple
client first. In this case launch IE or Netscape and then
open the file with the browser. Alternatively, use “save as”
to save the file on the Apple client so that the new file will be
saved in the Apple format. To open the file, simply
double-click it.
The same solution can be applied to the problem appearing
when the Windows client cannot directly execute files saved by
the Apple client to NP1040 NAS server.
Modifying User Pr ivileges
To change existing user privileges, e.g. from Writeable to Read only,
select the user whose privileges you wish to change in the User
privileges column, then select Read only in the center column, and
click Apply to confirm your selection.
Adding user privileges
To add user or group privileges, use your mouse to select a user in
Chapter 4. Using NFP Storage Manager 1.1
39
Page 45

NFP Storage Manager 1.1 User’s Manual
the User account column (use Ctrl for multiple and Shift for continuous
selection), then click on No access, Read Only or Writeable.
Please note, if this NP1040 NAS server is added to the Windows
NT/2000 Domain, and (1) system administrator has previously added
certain Windows PDC user account to Local account, or (2) there is
an account in both NP1040 NAS server and Windows PDC with the
same name, then the User account list on the left will not show the
account number in NT Domain Users, but only in Local Users to
prevent system administrator from confusion-caused repeated setup
of access rights for the same user.
Deleting User Privileges
To delete user or group privileges, use your mouse to select a user in
the User privileges column (use Ctrl for multiple and Shift for
continuous selection), then click Remove.
40 Chapter 4. Using NFP Storage Manager 1.1
Page 46

NFP Storage Manager 1.1 User’s Manual
users cannot click the right
TIP
1. When setting Windows/Novell/Apple user privileges for the
shared folders, make sure to avoid possible conflicts. Root,
for example, is a member of the admins group. To avoid
conflicts, you must not set the privileges for root to read only,
while admins is set to writeable.
2. In the event of conflicts in access privileges, the system
will authorize users/groups in the following order: no
access (N/A), readable and writeable (RW) and read -only
(RO). For example, if the access privilege of the root
account (belonging to the admins group) is set as “N/A”
and that of the admins groups is “RW,” the access
privilege of root for this folder will be “N/A.” If the privilege
for everyone is set to writeable and the user root to read
only, the system will assign writeable privileges to
everyone as soon as you click Apply.
3. NASolution NP1040 does not support Windows NT/2000
ACL (Access Control List), i.e.,
mouse button on a file and set the access privilege. The
system administrator can use NFP Storage Manager’s
Security SetupàShared Folder Setup page to set the access
privileges for every shared folder.
Chapter 4. Using NFP Storage Manager 1.1
41
Page 47
NFP Storage Manager 1.1 User’s Manual
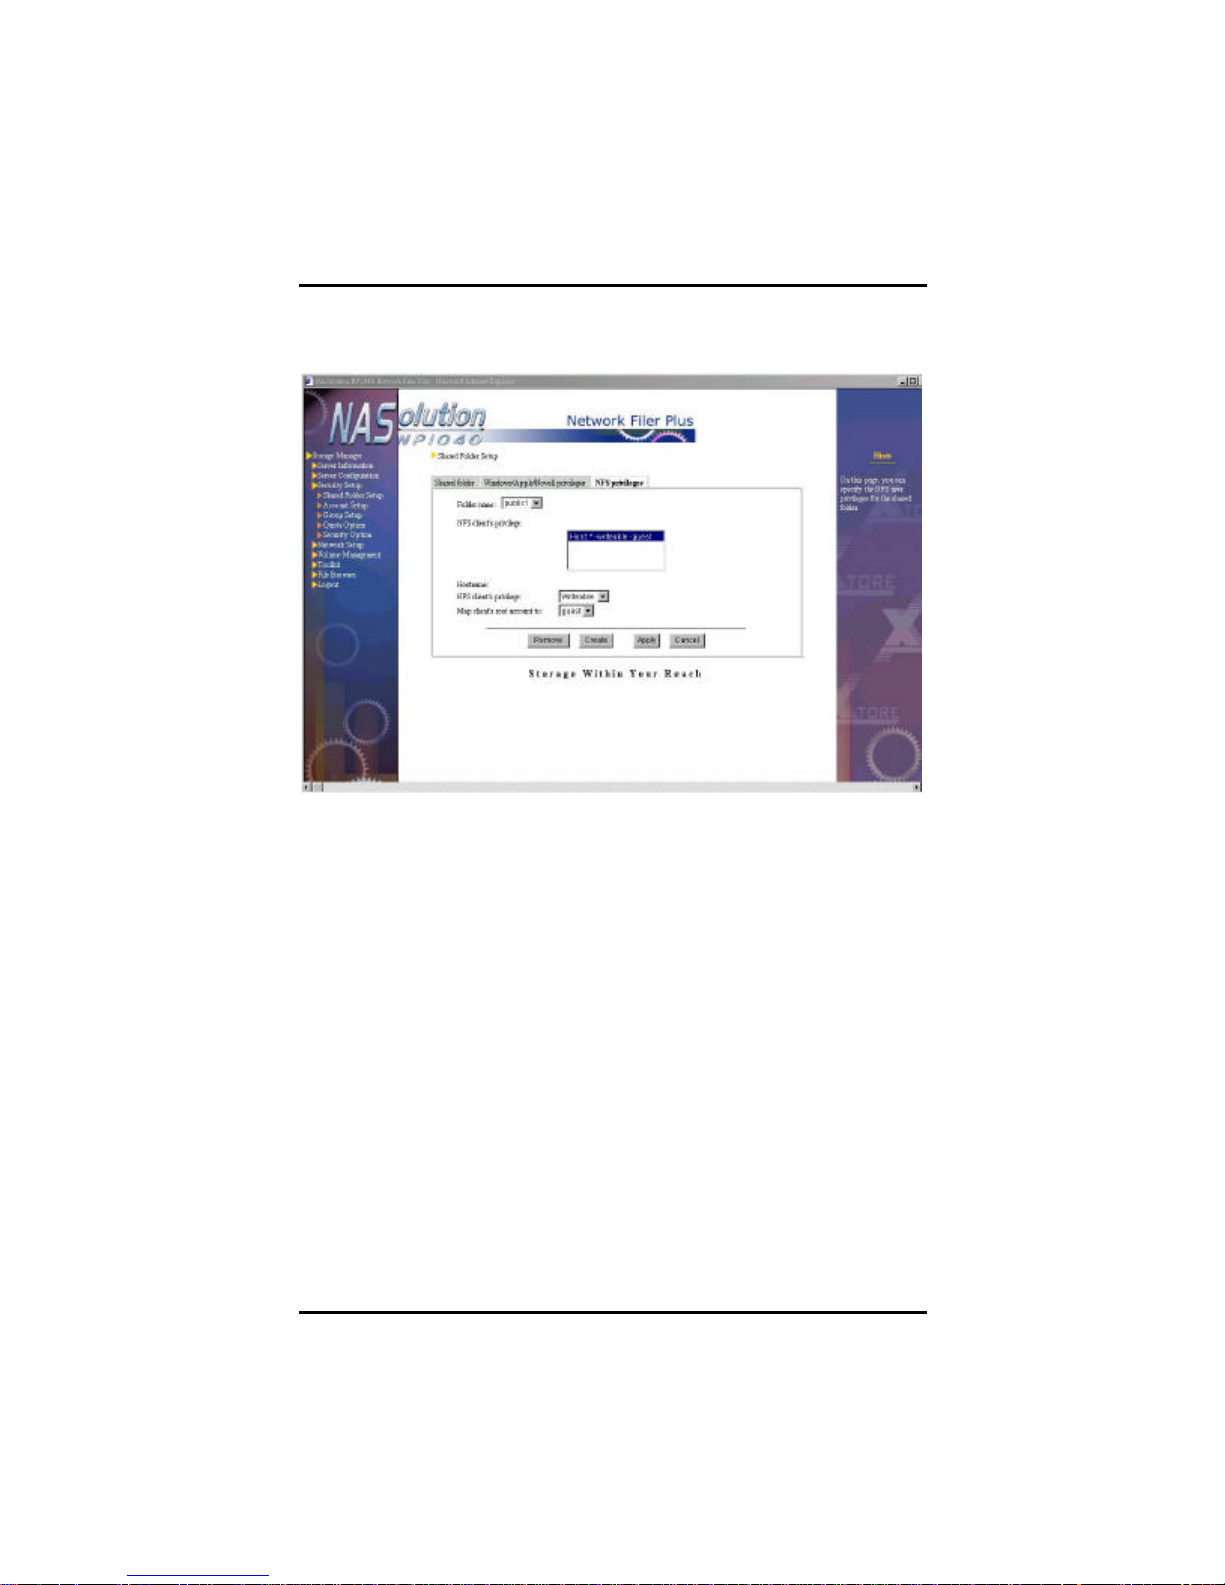
NFS Privileges
Use this option to set NFS (Solaris, FreeBSD or Linux and other UNIX
family client s) access privileges for shared folders.
Enter the Shared Folder SetupàNFS Privileges page, and select the
desired shared folder in the Folder name column. The NFS client’s
privilege column below will show the hosts and subnets or net groups
with access privileges and the type of permission granted.
NFS client’s privilege consists of three components:
1. The first component is the subject sharing a folder, either a host,
subnet, or a net group. The entry Host:* means the folder is
shared between all hosts.
2. The second component is the share mode, such as read only or
writeable.
3. The third element is a local user name. The administrator root of
a NFS client can only access the folder with this ID.
The root of some clients and NP1040 NAS root can be owned
by different users. Unless you wish to manage a shared folder
from a client terminal as root, you should for security reasons
42 Chapter 4. Using NFP Storage Manager 1.1
Page 48
NFP Storage Manager 1.1 User’s Manual
always assign the terminal root to a non-root ID.
Adding NFS user privileges
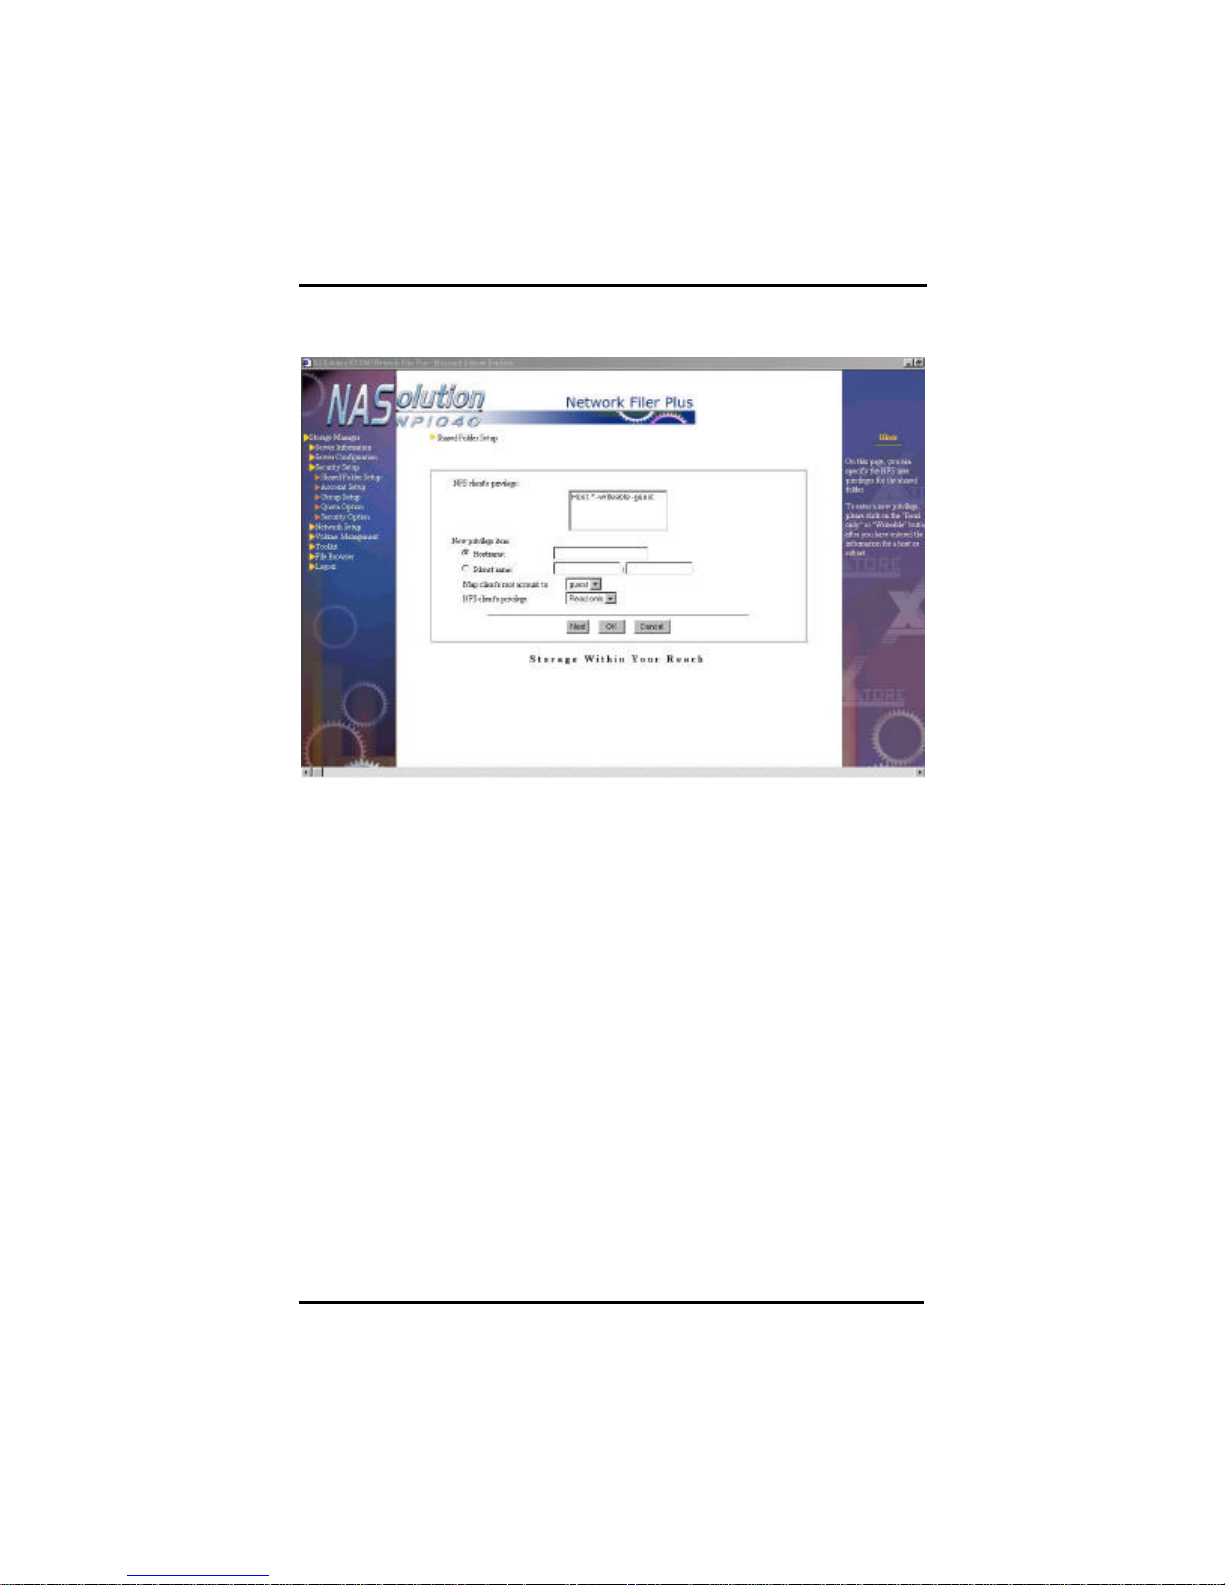
To add NFS user privilege settings, click on Create. A new page will
appear. Enter the hostname, subnet (format : subnet/subnet mask, e.g.
192.168.1.0 / 255.255.255.0), or net group (only available if NP1040
NAS server joins the NIS domain). Under Map client’s root account to
column, choose a local user, and then set the NFS client’s privilege to
read only or writeable. Click OK to confirm your selection and return to
the previous page, or click Next to add another client.
Chapter 4. Using NFP Storage Manager 1.1
43
Page 49

NFP Storage Manager 1.1 User’s Manual
,
net
,
, the single host
If a single host setting conflicts with the subnet setting, the
gle host setting conflicts with a net group, the entity
net
, you cannot later
TIP
When setting user privileges for NFS hosts, subnets or net groups
try to avoid possible conflicts. For example, if host A belongs to
group AAA, do not set the access privilege of host A to read only
while setting AAA to writeable.
Conflicts will be dealt with in the following manner:
If a single host setting conflicts with Host*
setting is used.
single host setting is used.
When a sin
which first received its user privileges has priority. If the
group AAA has already been set to writeable
set the single host A to read only.
Deleting NFS User Privileges
To delete the user privileges of a NFS client, select the desired item
on NFS client’s privilege column (use Ctrl for multiple and Shift for
continuous selection), and click Remove.
Modifying NFS User Privileges
To modify existing privileges, select the desir ed item on NFS client’s
privilege column, remove it and add a new privilege.
44 Chapter 4. Using NFP Storage Manager 1.1
Page 50

NFP Storage Manager 1.1 User’s Manual
This system software does not support “Telnet”. The system
command to point
is the IP address of NP1040 NAS server;
is the folder to be shared with the NFS client,
), and
NAS server is 192.168.1.8, the
TIP
administrator of NFS client must use the mount
to NP1040 NAS server:
mount IP:/Shared_Folder_Path Mount_Point
Whereby IP
Shared_Folder_Path
set to /volumen/Shared_Folder_Name by default, and Mount_Point
is set by the UNIX administrator.
For example, if the syst em administrator wants to link /user1 to the
public1 folder of NP1040 NAS server (i.e. /volume1/public1
the IP address of the NP1040
command would be:
mount 192.168.1.8:/volume1/public1 /user1
Account Setup
NASolution NP1040 supports up to 512 user accounts (Including
accounts on the local machine, Windows PDC, and NIS server).
Three types of users can access a NAS server:
1. Local users with account s on the local machine.
2. Users with Windows NT/2000 PDC (Primary Domain Controller)
accounts
3. Users with accounts on a UNIX NIS server
Chapter 4. Using NFP Storage Manager 1.1
45
Page 51
NFP Storage Manager 1.1 User’s Manual
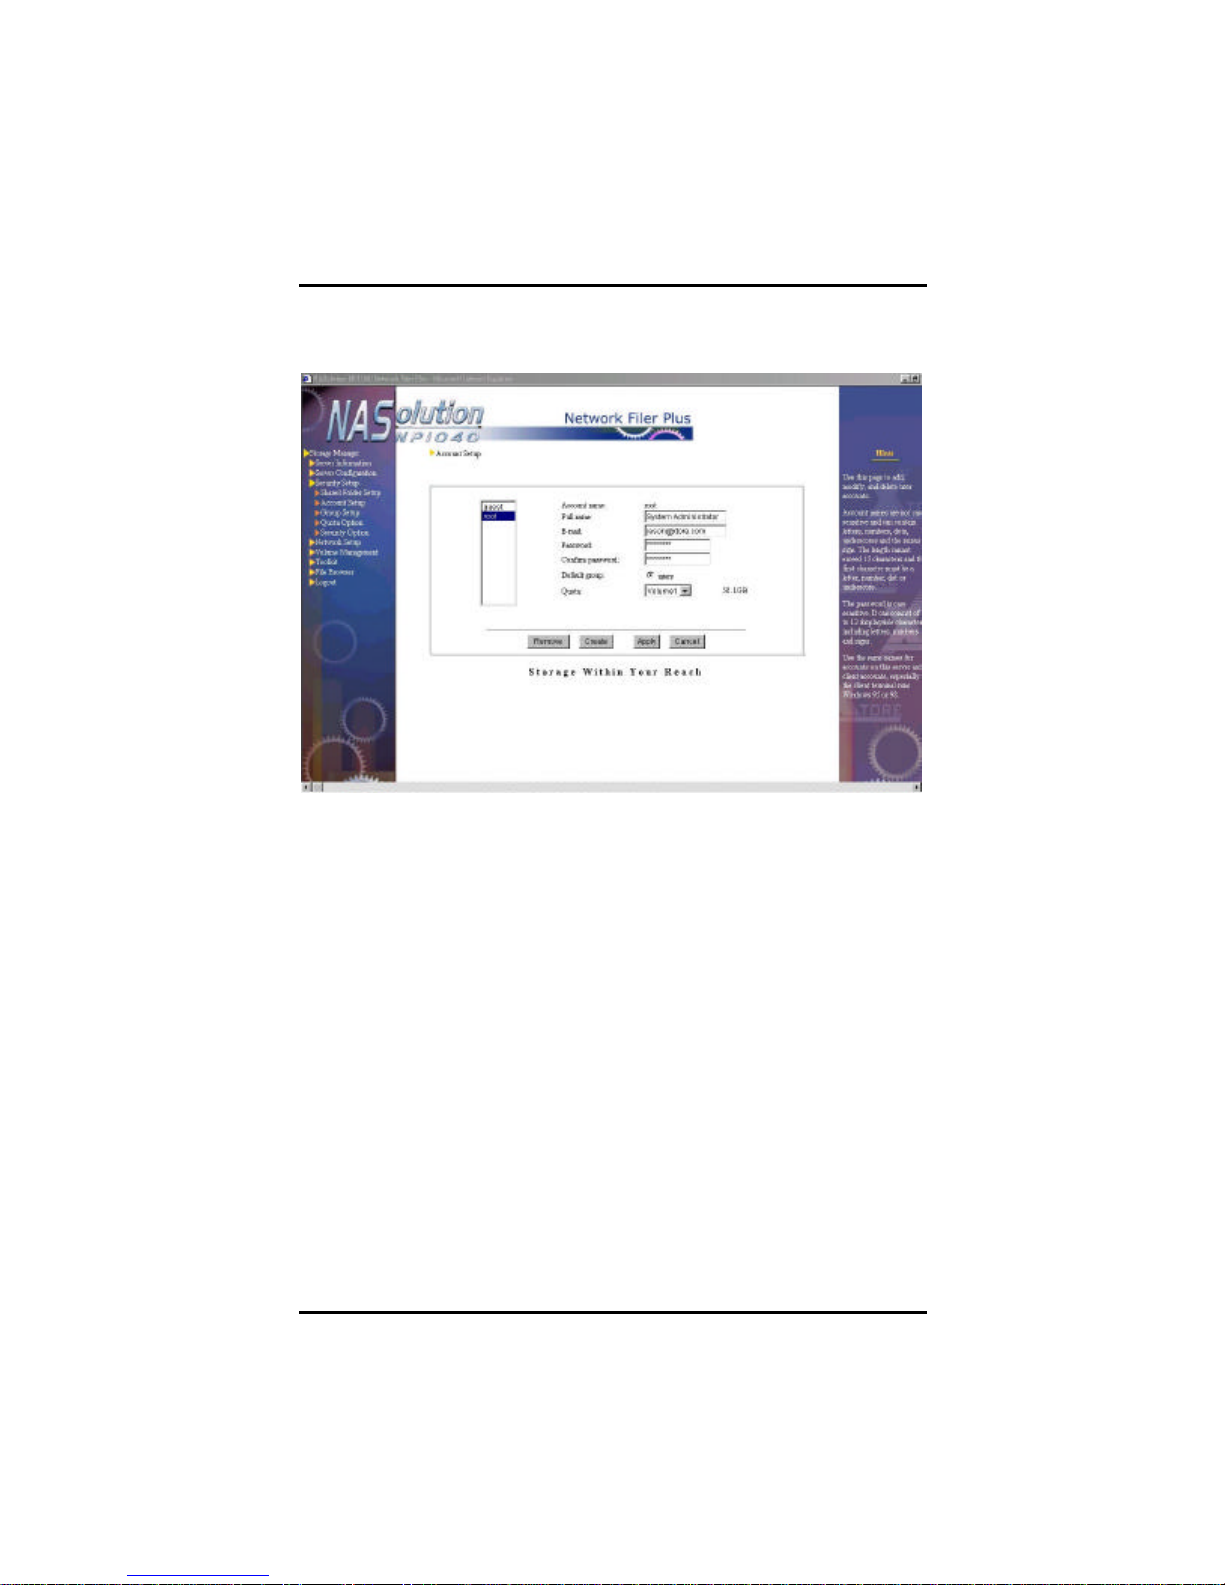
Local Accounts
System administrator can setup accounts for Windows, Apple and
Novell users on NP1040 NAS server (the local machine). When these
clients attempt to access NP1040 NAS server, they only need to enter
their account name and password to gain access.
System administrator can add, modify and delete user accounts.
The name of an account cannot exceed 15 characters. The name
can be formed by double-byte character languages same as the NFP
Storage Manager language, such as Traditional Chinese, Simplified
Chinese, Japanese or Korean, etc., single-byte languages such as
English, German, Spanish, etc., numbers, decimal point, “underscore”,
and “minus sign”. The first character however cannot be “minus
sign”. The name is not case sensitive.
Please note:
When naming an account using a language other than English, please
input the same language as the NFP Storage Manager interface to
ensure correct coding. Thus, when NFP Storage Manager
language is Japanese, account names can only be both Japanese
and English. Similarly, if NFP Storage Manager language is
46 Chapter 4. Using NFP Storage Manager 1.1
Page 52

NFP Storage Manager 1.1 User’s Manual
The passwords for some clients, such as Win 95/98 clients
sensitive, while the
T/2000, UNIX, and
Apple Macintosh clients are. Therefore, please make sure the
sensitive,
Apple clients only allow passwords of up to 8 characters.
etting passwords for Apple clients on NP1040
NAS server, please limit the length of passwords to 8
German, then account names can only be German and English. The
same principle can be applied to other languages. Password is
case-sensitive and can consist of 0 to 12 displayable characters,
including letters, numbers, and signs.
TIP
1.
Default local accounts
There are two preset accounts on the server: root and guest.
and Novell clients, are not casepasswords for other clients, such as Win N
account passwords for the local machines are caseso that they will be suitable for all clients
2.
Thus, when s
characters or less.
1. root: This is the default account for the system administrator
and belongs to both the admins and users group. As a first step
in the server setup, please setup a password for this account.
2. guest: This open account belongs to the guests group and has
no password and quota restriction by default. Its purpose is to
give access to all users on the LAN, so that they may access
NP1040 NAS server’s guest folders, such as public1.
Unauthorized users on the LAN will automatically be granted
access via the guest account. For reasons of safety, the system
administrator might not want all unauthorized users to access
(For example, users without accounts on NP1040 NAS server,
or with accounts on other account servers* on the same LAN).
By adding a password to the guest account, unrestricted
access is disabled.
Chapter 4. Using NFP Storage Manager 1.1
47
Page 53
NFP Storage Manager 1.1 User’s Manual
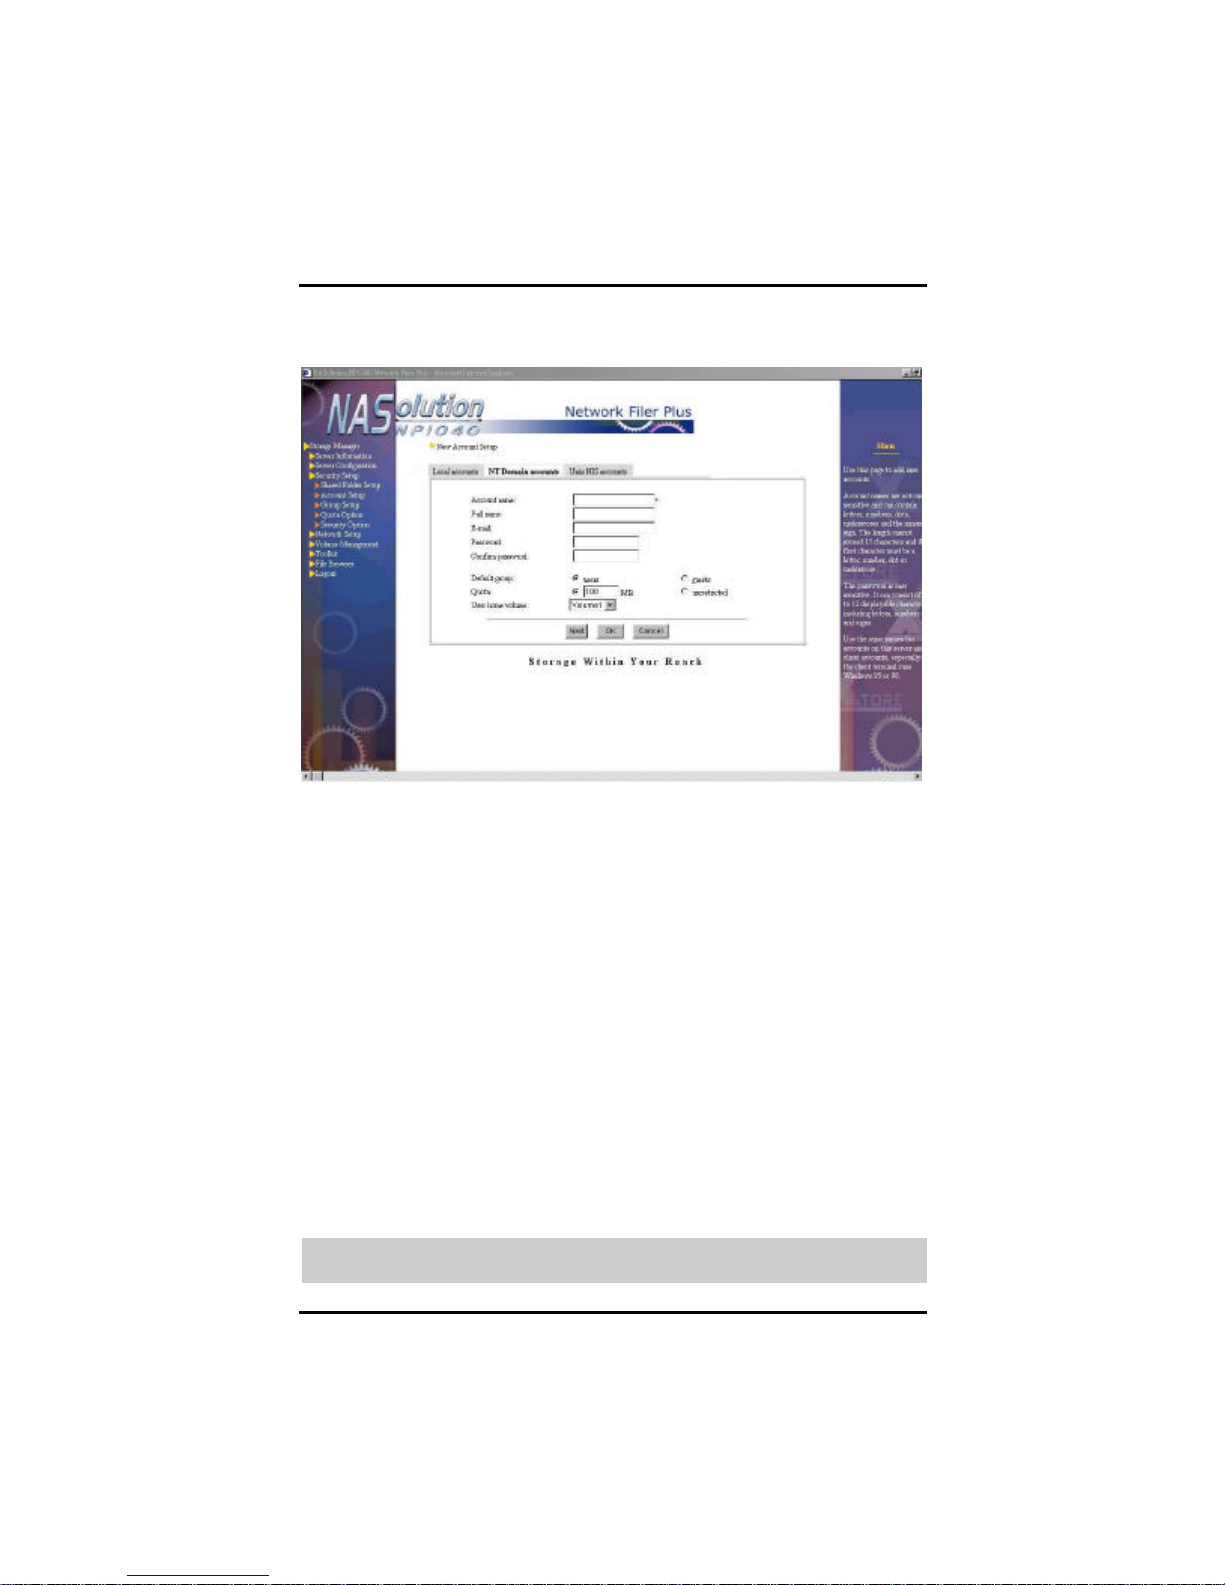
Adding user accounts
To add a new local user, click Create. The New Account Setup dialog
appears. Enter the account name, the full name of the user, an e-mail
address, and a password. Under Default group, select whether the
user will receive his or her own home folder. If yes, select the users
group; if no, select guests.
After a new account has been created under users group, the system
will set up a home folder named “home” for this account. Only the
user can access his home folder. If a Windows client accesses
NP1040 NAS server through the Network Neighborhood, he will see a
folder named “home.” User has full read and write privileges to that
folder. When the system has more than one volume, system
administrator must specify in which volume to store the home folder of
this account in the User home volume. The default location can be
setup in the Security Option page. System administrator can also
change it.
TIP
48 Chapter 4. Using NFP Storage Manager 1.1
Page 54

NFP Storage Manager 1.1 User’s Manual
nt with all its contents
group, but there is
no home folder to be used. System administrator cannot
account belongs
strator cannot change
1. Be careful when moving an account from users to guests
group, for the home folder of that accou
will be erased.
2. Account root can only belong to the users
change root into guests group. And guest
only to the guests group. System admini
it to users group.
System administrator can proceed to setup the disk drive space quota
for each account. The default quota for newly created user specified
in the Security Option page will be displayed here. Please change
according to your own need. Please note the disk quota will be
applied to every volume. This means that if there are three volumes in
NP1040 NAS server and system administrator grants 100MB quota to
a user, this user will have 100MB quota of storage space in each
volume totally 300 MB quota on NP1040 NAS server.
The preset value for the guest and root accounts is unrestricted. If, for
security reasons, the administrator wishes to restrict disk quota for
guest users without proper accounts on NP1040 NAS server or any
account server, simply setup a quota for the guest account in the
Security SetupàQuota Option page. System administrator can also
use this page to change the quota of each account, or specify a quota
in each volume of a user in a flexible way. .
When a Windows NT 4.0/2000, Novell, or Apple Macintosh user
accesses NP1040 NAS server, Windows operating system will ask for
NP1040 NAS server or Windows PDC account and password to
confirm his or her identity. In the case of Windows 95/98, Windows will
automatically retrieve the identity of the client and only would request
a password. If the Windows user account is not the same as the
account on NP1040 NAS server, the client cannot log in onto NP1040
NAS server. System administrator must therefore keep NP1040 NAS
server accounts and Windows accounts synchronized.
Deleting local users
To delete a local user, simple select the account on the left side (use
Ctrl for multiple and Shift for continuous selection), then click Remove.
Chapter 4. Using NFP Storage Manager 1.1
49
Page 55
NFP Storage Manager 1.1 User’s Manual
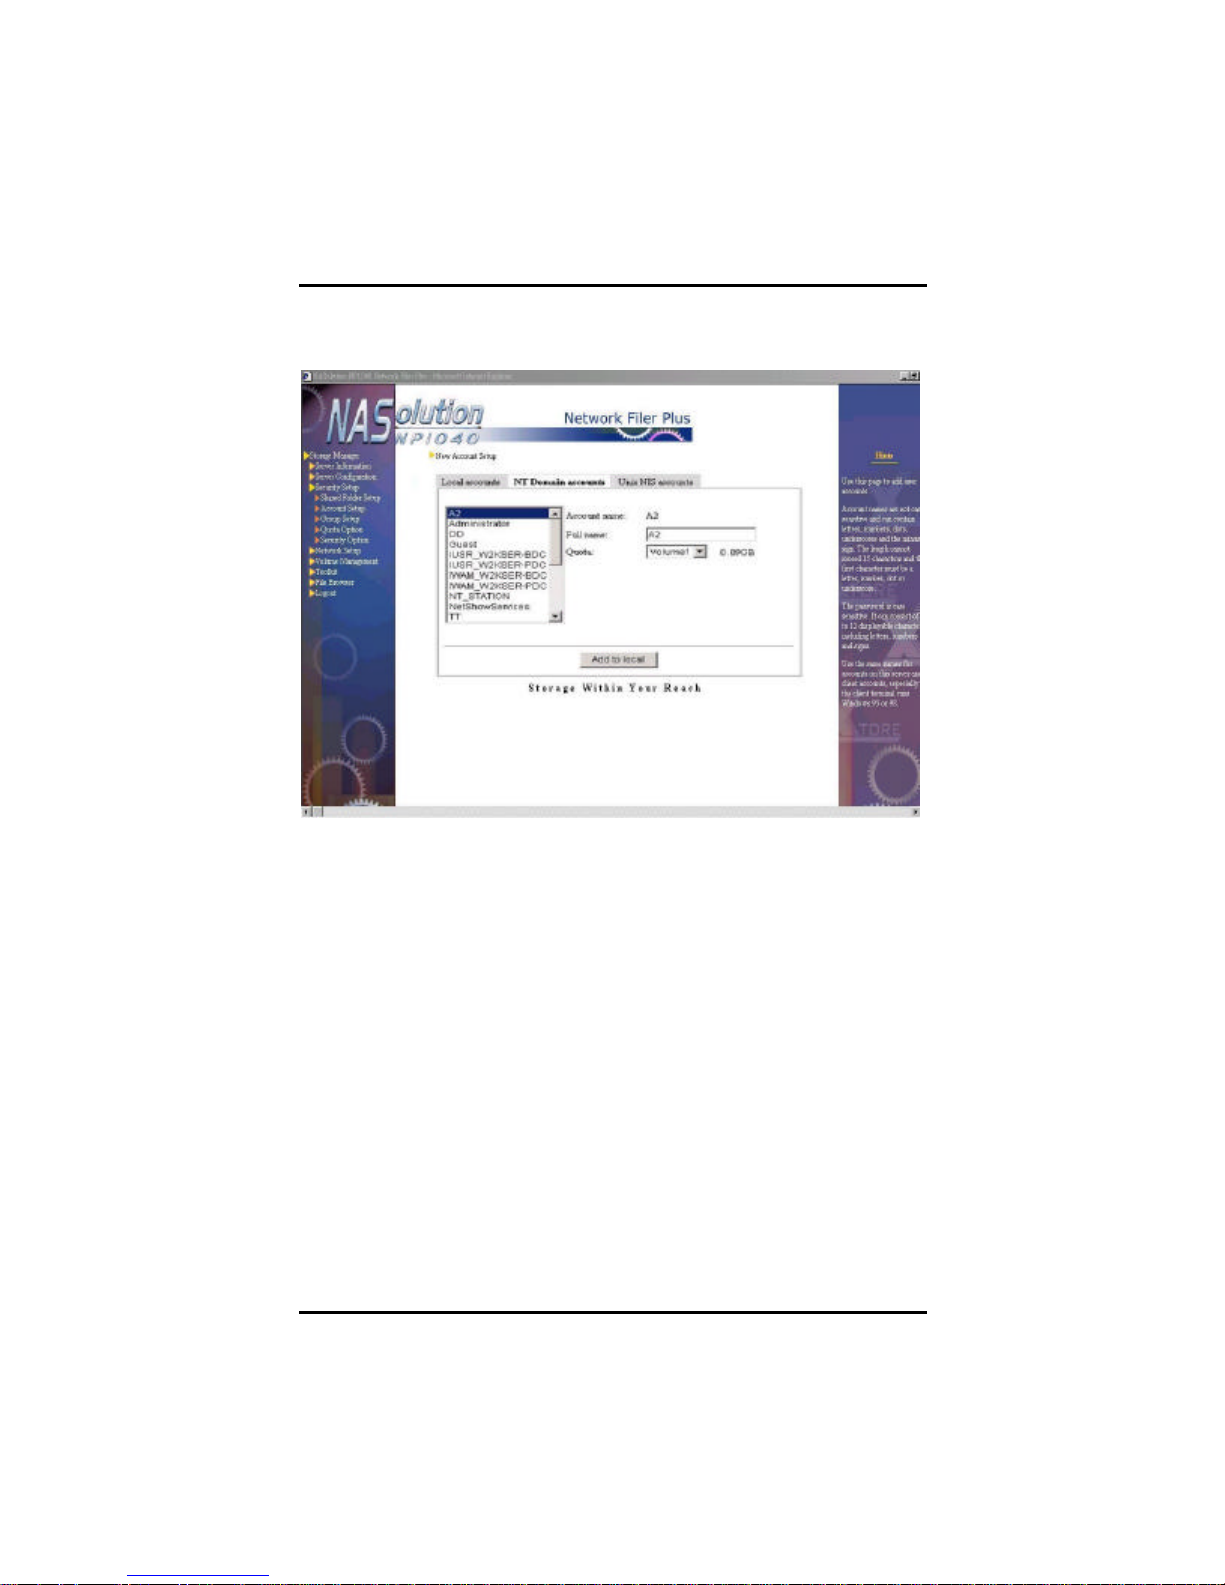
Windows Domain Accounts
If a Windows NT or a Windows 2000 Domain exists in the network,
system administrator only has to add NP1040 NAS server to the
Windows domain, to take advantage of the PDC privilege settings and
grant all accounts on the PDC access to NP1040 NAS server’s
storage space. When these clients need to access the server, they
can do so by entering their Windows NT/2000 PDC account name
and password.
Once NP1040 NAS server is part of a Windows NT/2000 Domain, a
new tab called NT domain accounts will become available on this
page, containing a copy of all user accounts. Only the account names
will be copied here, without passwords and other information. When a
client attempts to access NP1040 NAS server, it will forward the
account and password information to Windows PDC server for
verification. If the result is positive access will be granted. If the PDC
server does not authorize the user, the account is verified against the
list of local users. Access is granted, if the login data corresponds to a
local user. If a user has an account user1 on each the PDC and
NP1040 NAS server but with different passwords, access is granted if
50 Chapter 4. Using NFP Storage Manager 1.1
Page 56

NFP Storage Manager 1.1 User’s Manual
either one of the two passwords is provided. System administrator
should, however, avoid allowing accounts existing on the Windows
PDC to be created on NP1040 NAS server. Having different users
sharing the same account name should also be avoided.
NASolution NP1040 will read the Windows PDC account list every 15
minutes; any changes on the PDC will also appear on NP1040 NAS
server.
By default Windows Domain accounts do not have home folders. If
you wish to assign a home folder to this type of account, simply select
the desired account on the left (use Ctrl for multiple and Shift for
continuous selection), then click on Add to local. The selected
accounts will appear in the list of local users. By default, they are part
of the guests group. First setup the passwords for the accounts, then
transfer these accounts from the guests group to the users group, and
select the User home volume location.
Additionally, Windows Domain account will directly apply the default
settings for all newly created users defined in Security Option. System
administrator can setup hard disk quota for each individual NT
Domain account in Quota Option.
Chapter 4. Using NFP Storage Manager 1.1
51
Page 57

NFP Storage Manager 1.1 User’s Manual
system and
are different, when the account information
,
system will not be able to duplicate the user passwords on
hine. System
administrator will have to add passwords for these accounts on
tab manually. Therefore, please set the same
allows account/group names with a maximum of 15
Domain, any accounts/group name on Windows PDC with more
NAS server. Only one warning message will be shown
NAS server is part of the Windows Domain, system
administrator has to avoid adding any account/group on the
Windows PDC with a name exceeding 15 characters. Otherwise
p to
TIP
1. Because the password formats between Windows
NASolution NP1040
in the NT Domain accounts tab are added to the local accounts
Windows PDC directly to the local mac
the Local accounts
passwords here as the ones on PDC.
2. NP1040
displayable characters. After having been added to a Windows
than 15 characters will not be duplicated by the system onto the
NP1040
to inform system administrator of all unduplicated accounts.
3. If NP1040
the system will not be able to duplicate this account/grou
your NP1040 NAS server, nor will a warning message appear.
52 Chapter 4. Using NFP Storage Manager 1.1
Page 58
NFP Storage Manager 1.1 User’s Manual
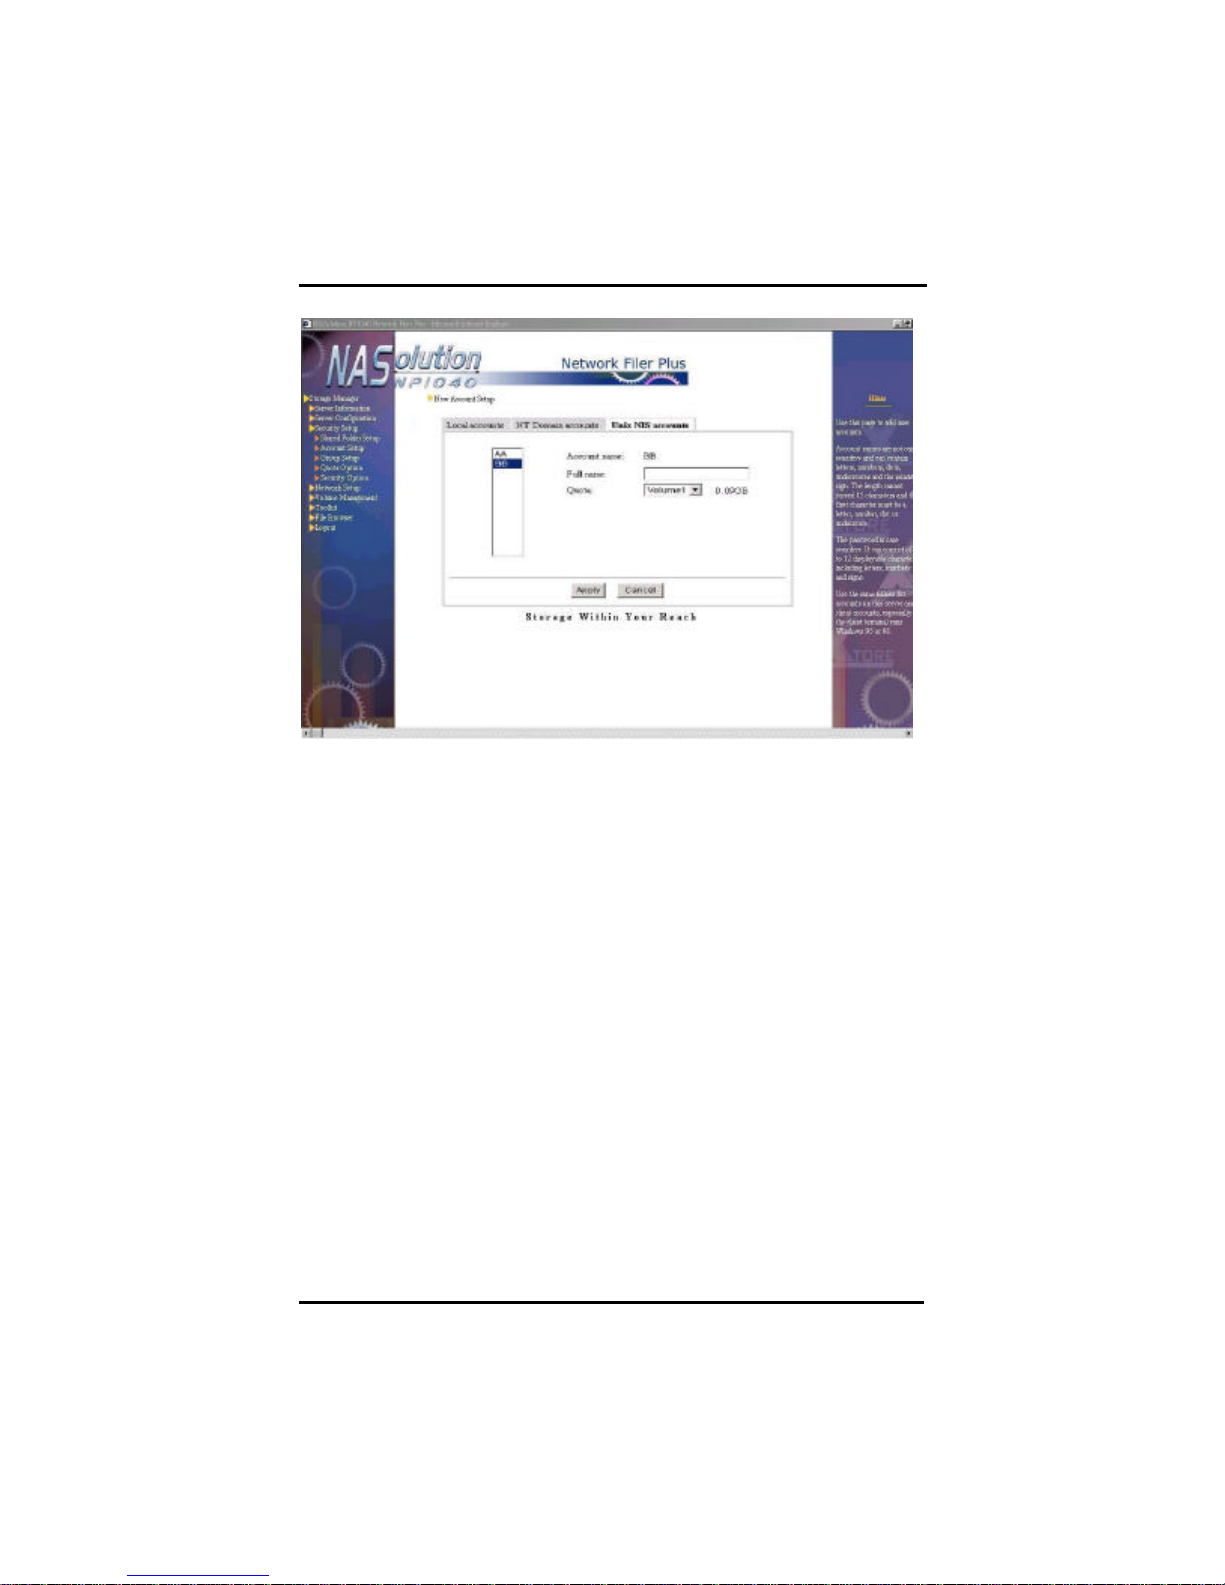
UNIX NIS Accounts
If the network already contains a UNIX NIS Domain, system
administrator can simply add NP1040 NAS to the UNIX NIS domain,
to retrieve access settings from the NIS server.
Once system administrator adds NP1040 NAS server to a UNIX NIS
Domain (see Network SetupàUnix NIS), a new tab entitled UNIX NIS
Accounts will appear on this page, containing all the users retrieved
from the NIS server. These accounts will directly apply the default
quota set up for a new user in the Security Option page. System
administrator can also set hard disk quota individually for each NIS
Domain account in the Quota Option page.
When adding new accounts on NFS clients, some NFS clients
automatically generate a corresponding group for each account.
System administrator is recommended to disable this function, since
Network Filer Plus only supports a maximum of 128 user groups,
and NP1040 NAS server would therefore not be able to be integrated
into the NIS domain if there are more than 128 user groups.
Chapter 4. Using NFP Storage Manager 1.1
53
Page 59
NFP Storage Manager 1.1 User’s Manual
Group Setup
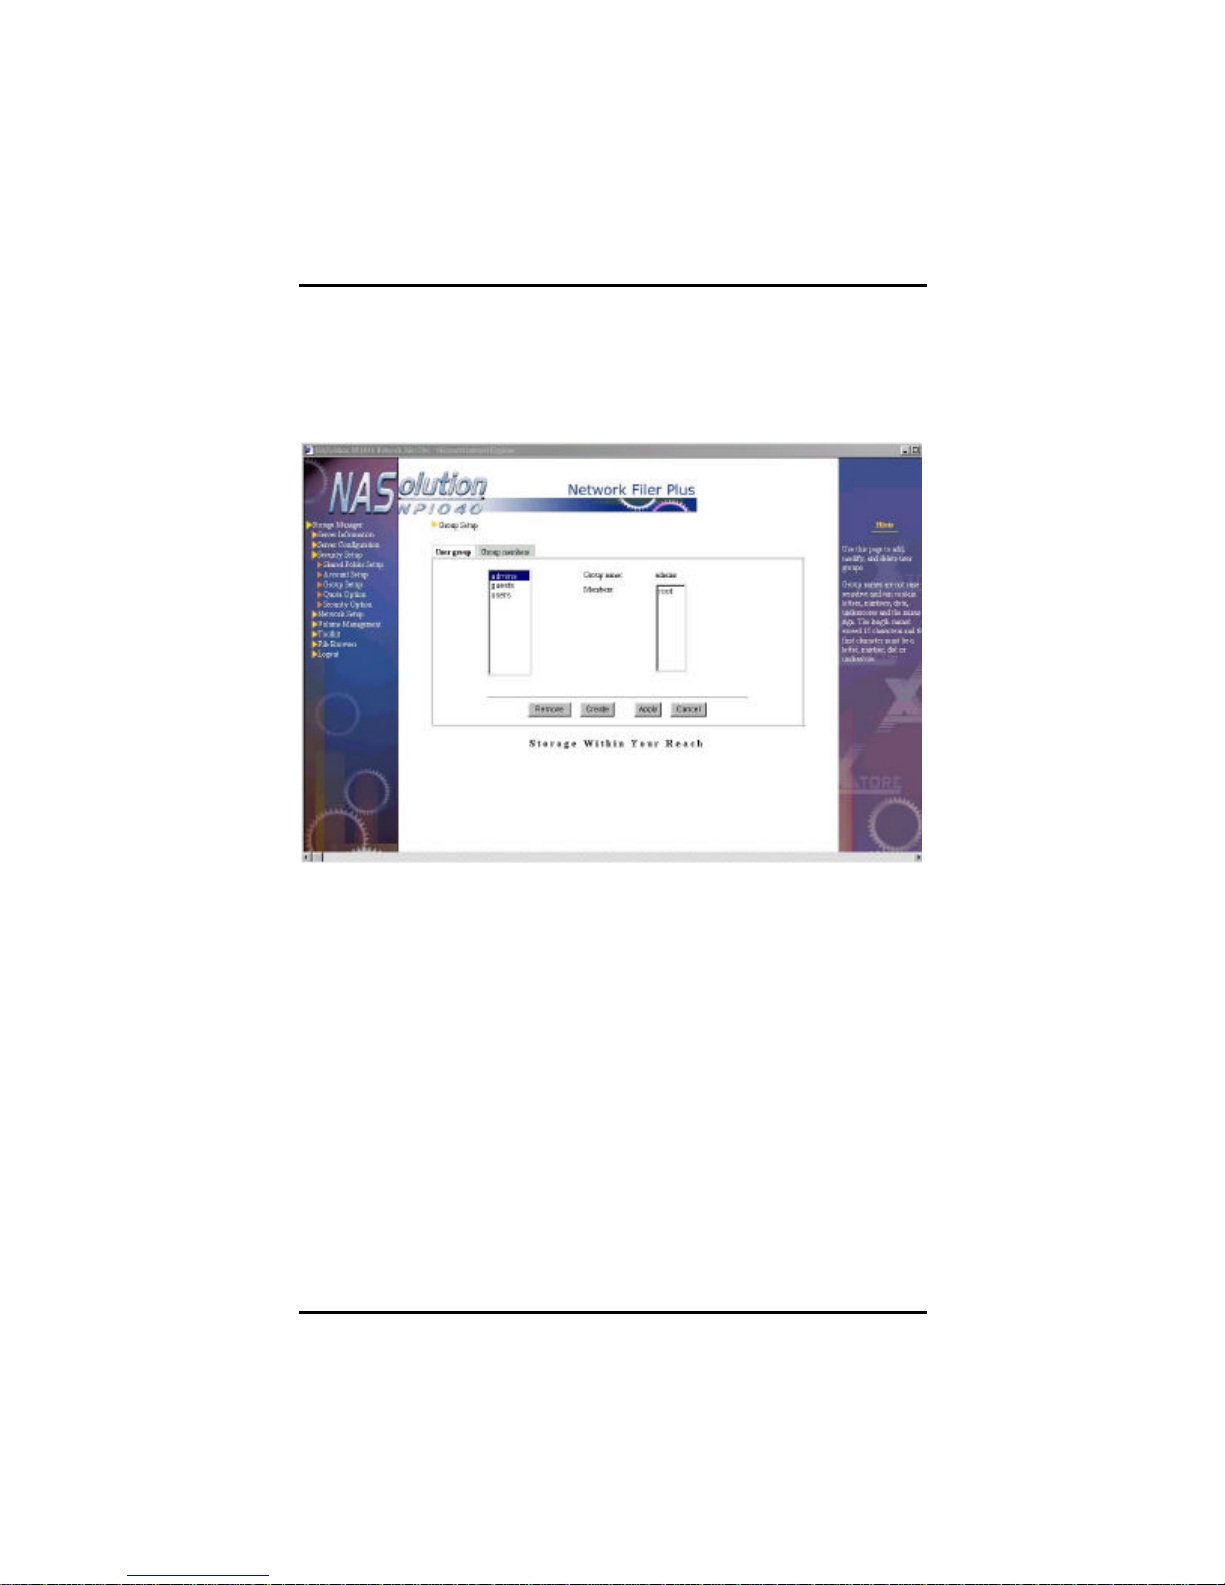
User Group
Use this page to add, modify or delete user groups. Network Filer
Plus allows up to 128 user groups (including user groups on the local
machine, Windows PDC, and NIS server).
The name of a group cannot exceed 15 characters. The name can
be formed by double-byte character languages, the same as the
language of the NFP Storage Manager interface, such as Traditional
Chinese, Simplified Chinese, Japanese or Korean, etc., single-byte
languages such as English, German, Spanish, etc., numbers, decimal
point, “underscore”, and “minus sign”. The first character however
cannot be “minus sign”. The name is not case sensitive.
Please note:
When naming a group in languages other than English, please input
the same language as the NFP Storage Manager interface to ensure
correct coding. Thus, when interface language is Japanese, group
names can only be both Japanese and English. Similarly, if the
interface language is German, then group names can only be German
54 Chapter 4. Using NFP Storage Manager 1.1
Page 60

NFP Storage Manager 1.1 User’s Manual
group, not
both. Suppose a company has two departments A and B.
store and share information. Part of the space should be made
n this case, system administrator can
setup accounts for each member of department A and B, then
and the members of
. That way the employees of department
rs, while the members of
department B will be able to access only those folders for which
and English. The same principle cab be applied to other languages.
Default user groups
The system includes three default groups, admins (the group of
administrators with root as the default member), users (normal users
with their own home folders, with root as the default member), and
guests (normal users without their own home folders, with guest as
the default members).
admins this is the system administrator group. Only members of
this group can change system settings. Root is a member
of this group by default.
users this is the user group to which all users belong. Each
member of this group can access his own folder named
after his account and other folders to which he has
access privileges. Root is a member of this group by
default.
guests unlike the members of the users group, guests will not
have their own home folders. They will however have
access to the public folders on NP1040 NAS server. The
account guest is a member of this group by default.
TIP
Users can only belong to either the users or the guests
Department A has purchased a NAS server for their employees to
available to department B. I
group the department A accounts under users
department B under guests
A will have their own home folde
they have access privileges.
Modifying user groups
In the left pane, you will find a list of existing groups: use your mouse
Chapter 4. Using NFP Storage Manager 1.1
55
Page 61
NFP Storage Manager 1.1 User’s Manual
to select a group. The group name and members will appear on the
right side. To rename a group, click directly on the group name
column and change it; then click Apply. You can add or delete
members on the Group members page.
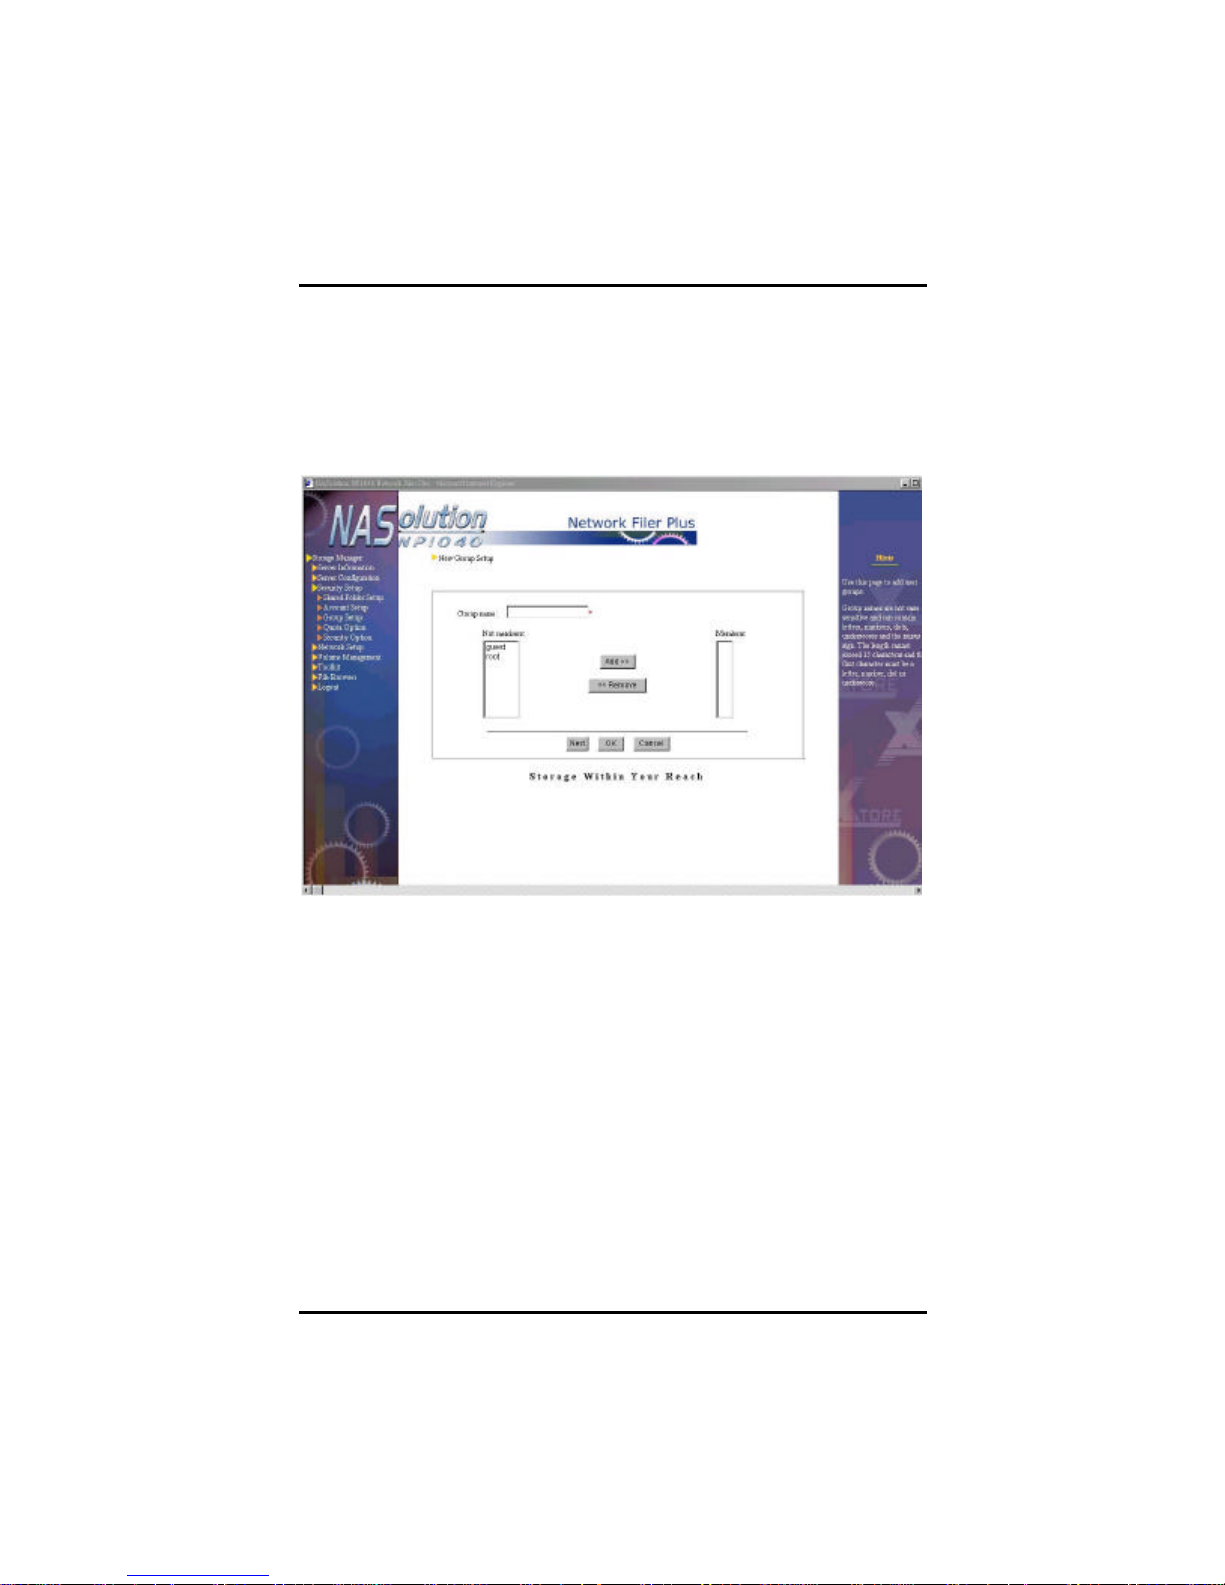
Adding user groups
To add a new group, click Create. The New Group Setup page
appears. Enter a name for the group, and select the members of the
group in the Not members list (use Ctrl for multiple and Shift for
continuous selection). Click on Add to add the selected members.
Select OK to confirm the operation, or Next to add more groups.
Deleting User Groups
To delete a group, select the group in the list (use Ctrl for multiple and
Shift for continuous selection), and then click Remove.
56 Chapter 4. Using NFP Storage Manager 1.1
Page 62
NFP Storage Manager 1.1 User’s Manual
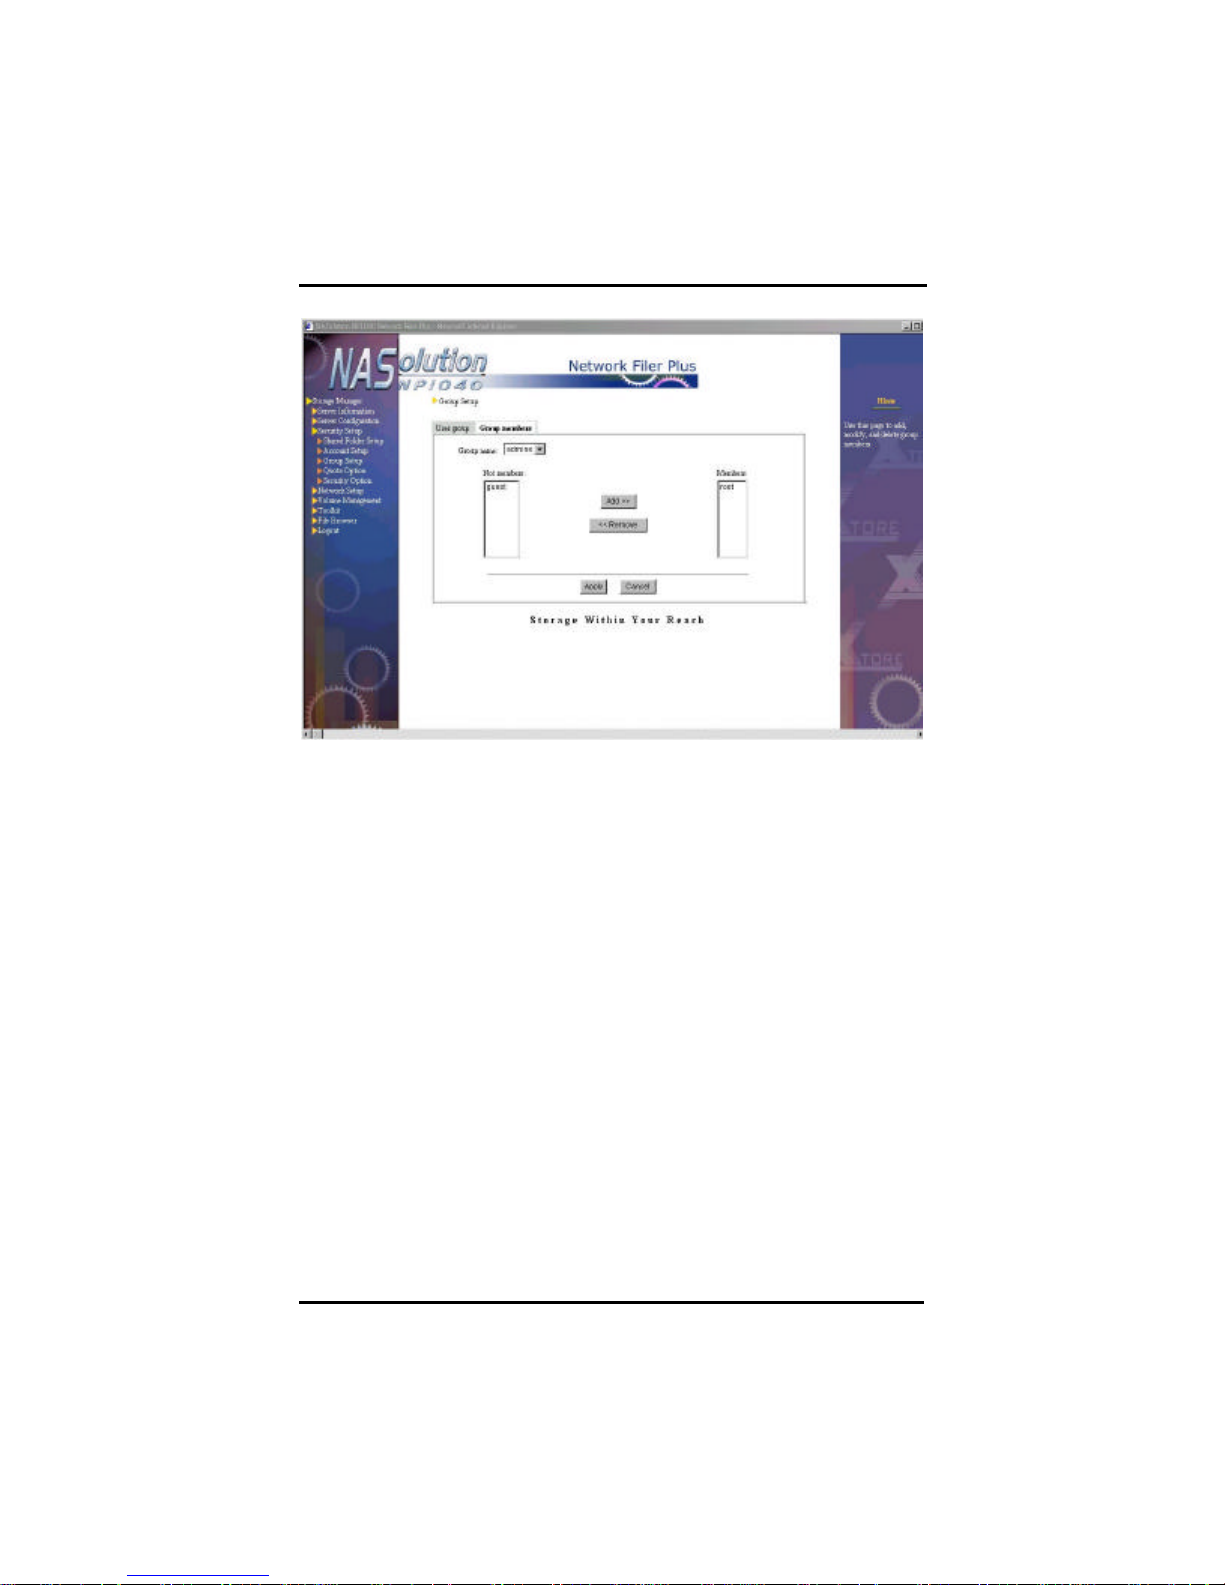
Group members
Use this page to add, modify, and delete group members. The
Members field contains existing members. Users not belonging to this
group are listed on the left Not members field.
If this NAS server belongs to a Windows NT/2000 Domain and, (1)
system administrator has previously moved Windows PDC users in
the Account Setup page to the local accounts, or (2) both NAS server
and Windows PDC have the account with the same name, those
Windows domain users will NOT appear in the list of members.
Instead, only local users will be shown to avoid multiple selection and
assignment to a group of the same user.
Adding group members
To add a new group member, select the target group from the list, and
then select the members you wish to add in the Not members list (use
Ctrl for multiple and Shift for continuous selection). Then click Add.
Note that all users must belong either to the users or the guests group.
If system administrator uses this page to move a member from the
guests group to the users group, the account will automatically be
removed from the guests group, and vice versa. However, accounts
belonging to guests or users group can be assigned to other groups,
including the predefined admins group, or any other group set up by
Chapter 4. Using NFP Storage Manager 1.1
57
Page 63

NFP Storage Manager 1.1 User’s Manual
If a user is connected to the server while the administrator is
the administrator.
Deleting group members
To remove a member from a group, select the name from the list of
members (use Ctrl for multiple and Shift for continuous selection),
then click Remove.
TIP
modifying the user’s security settings, these changes will not be
activated immediately, but only after the user logs out and back in
again.
User Quota Setup
There are two ways a system administrator can view and modify
quota setup in NP1040 NAS server: by user or by volume.
58 Chapter 4. Using NFP Storage Manager 1.1
Page 64
NFP Storage Manager 1.1 User’s Manual
User Quota
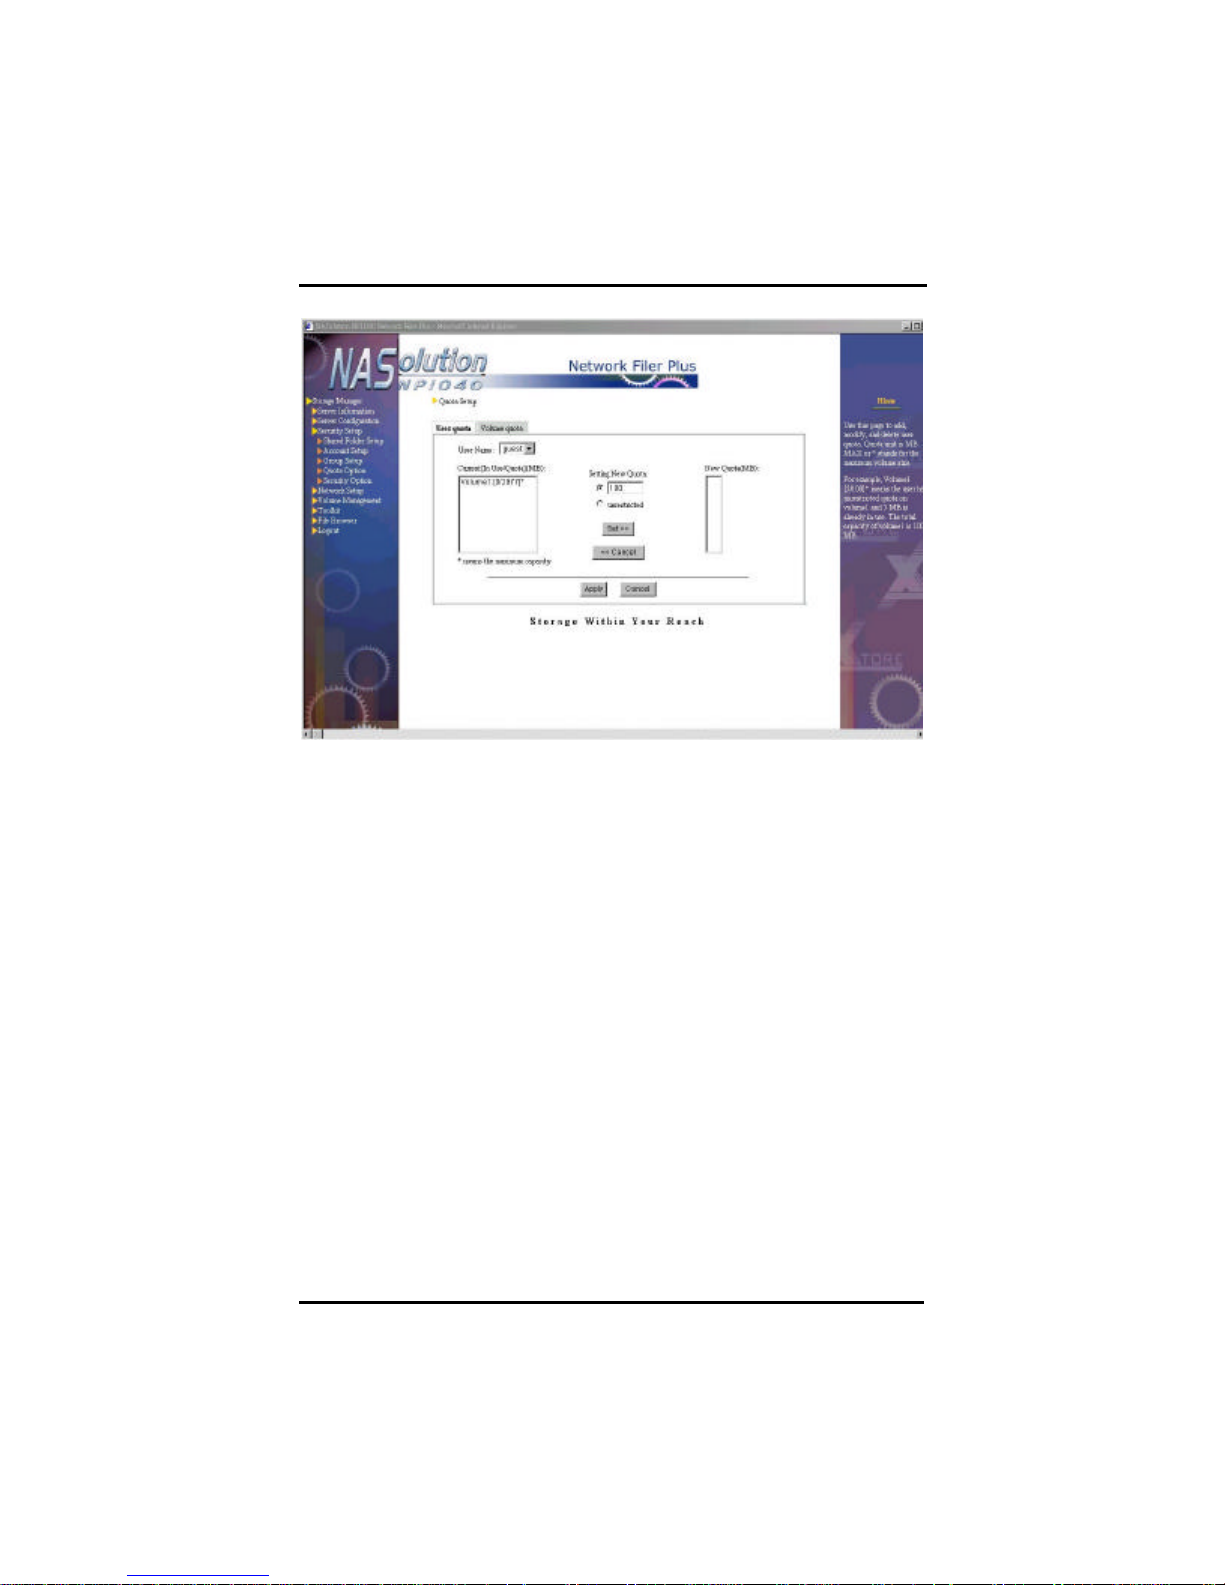
System administrator can add, modify or delete user quota through
this screen.
Current [In Use / Quota] (MB) column indicates the quota and
amounts of space used in each volume by the current account. The
symbol "*" in this column means the account is assigned the
maximum quota. For example, Volume1: [200/500] means that
volume1 has 500MB quota available and of which 200MB has already
been used. Additionally, Volume2: [200/1000] means the current
account has the maximum space available in volume2, i.e. 1000MB,
of which 200MB has already been used.
To change user quota, please select either Local, Windows Domain or
NIS domain account in User Name. Then select the item to be
changed in the Current [In Use/Quota](MB) column, setup new quota
in Setting New Quota and click Set>> button. Repeat these steps if
quotas for more than one volume require modification. The new
quota amount will be displayed in the New Quota column to be
applied. Make sure the new quotas are correct. Click the Apply
button to update the values in the Current [In-Use/Quota](MB) column.
To cancel setup for a specific volume, please select an individual item
and then click the <<Cancel button. To cancel all the modification,
click the Cancel button.
Chapter 4. Using NFP Storage Manager 1.1
59
Page 65
NFP Storage Manager 1.1 User’s Manual
Please note if NP1040 NAS server is added to the Windows NT/2000
domain and, (1) system administrator has previously added certain
Windows PDC user account to Local account in the Account Setup
page, or (2) there is an account in both NAS server and Windows
PDC with the same name, then this account will not be displayed in
columns NT Domain Users or NIS Domain Users in the User Name
List at the top of this page, and will only be listed in Local Users to
prevent system administrator from being confused due to the
repeated quota setup for the same user account.
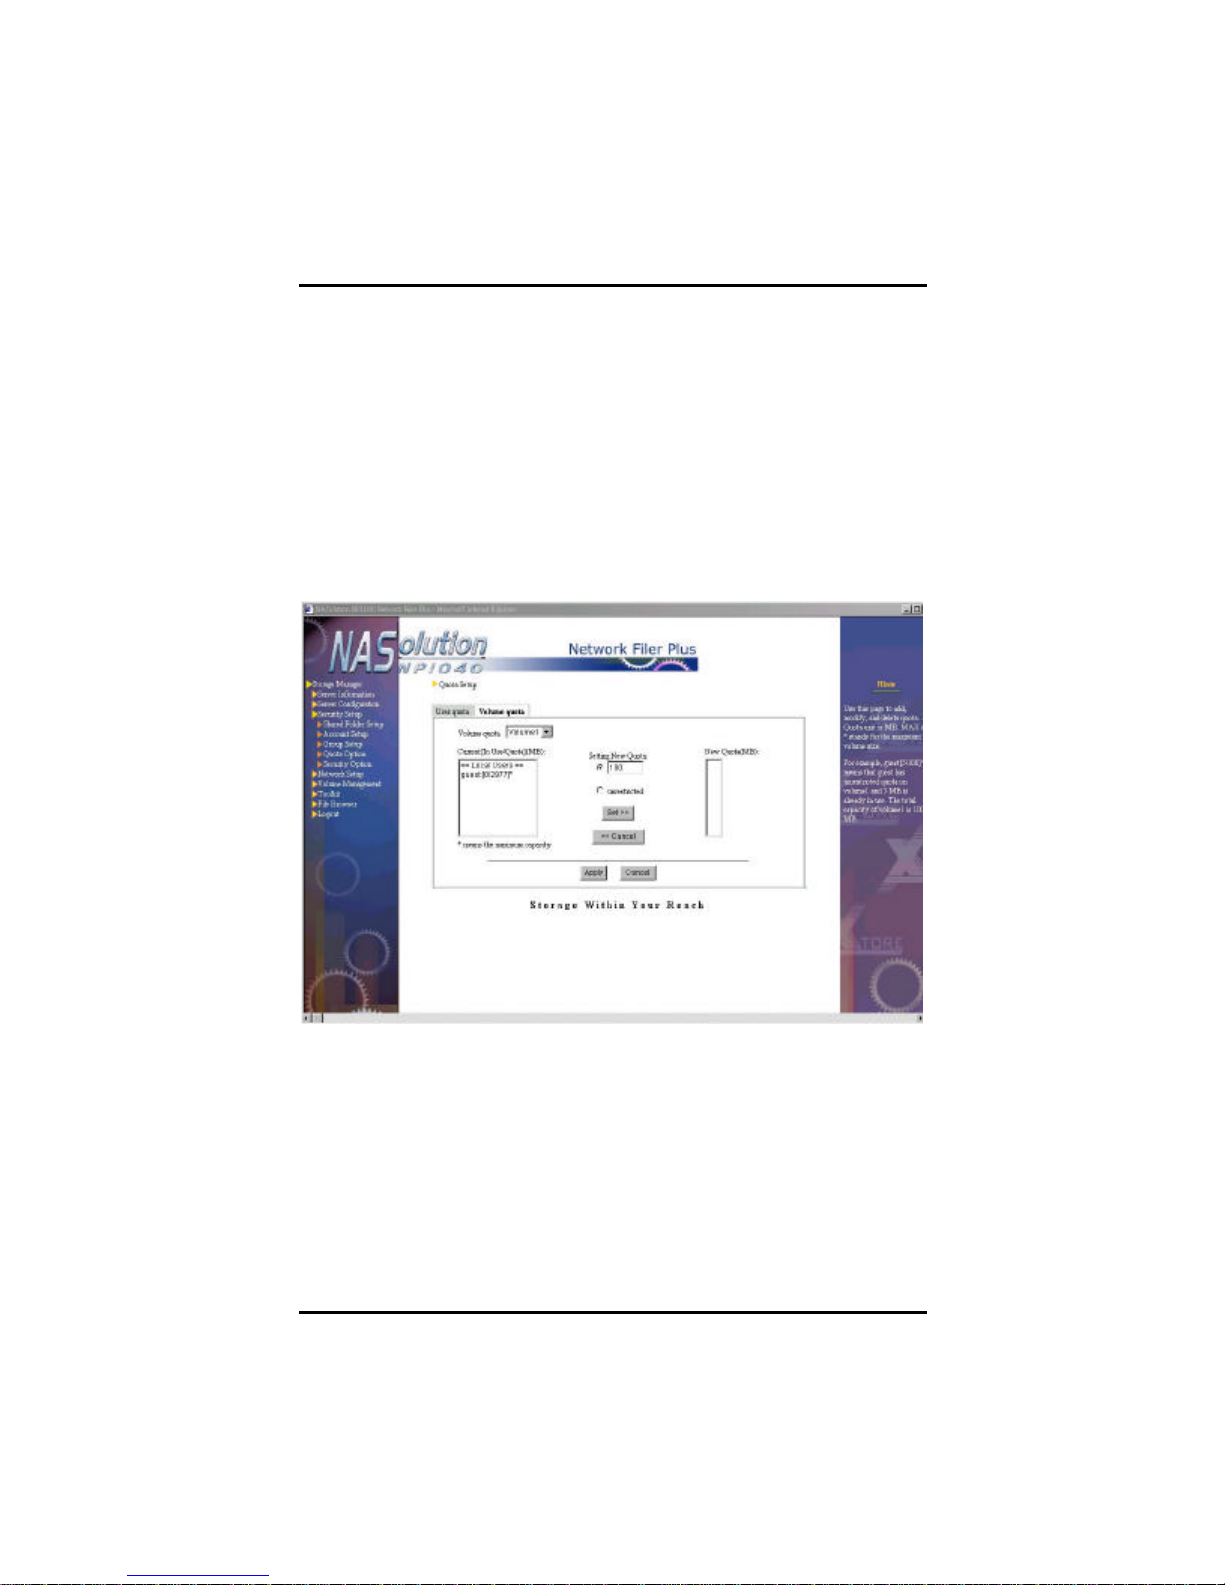
Volume Quota
System administrator can add, modify or delete user quota in every
volume through this page.
Current [In Use / Quota] (MB) column indicates the quota and
amounts of space used for all the users in the current volume. The
symbol "*" in this column means the account is assigned the
maximum quota. For example, User1: [200/500] means that User1
has 500MB quota available and of which 200MB has already been
used. Additionally, User2: [200/1000]* means User2 has the
maximum space available in the current volume, i.e. 1000MB, of
which 200MB has already been used.
60 Chapter 4. Using NFP Storage Manager 1.1
Page 66

NFP Storage Manager 1.1 User’s Manual
To change volume quota, please select a volume in Volume quota.
Then select the account to be changed in the Current [In
Use/Quota](MB) column, setup new quota in Setting New Quota and
click Set>> button. Repeat these steps if quotas for more than one
account require modification. The new quota amount will be
displayed in the New Quota (MB) column to be applied. Make sure
the new quotas are correct. Click the Apply button to update the
values in the Current [In-Use/Quota](MB) column. To cancel setup
for a specific account, please select an individual setup column and
then click the <<Cancel button. To cancel all the modification, click
the Cancel button.
Please note if NP1040 NAS server is added to the Windows NT/2000
domain, and (1) system administrator has previously added certain
Windows PDC user account to Local account in the Account Setup
page, or (2) there is an account in both NAS server and Windows
PDC with the same name, then this account will not be displayed in
columns NT Domain Users or NIS Domain Users in the Current
[In-Use/Quota](MB) List at the left side of this page, and will only be
listed in Local Users to prevent system administrator from being
confused due to repeated quota setup for the same user account.
Chapter 4. Using NFP Storage Manager 1.1
61
Page 67
NFP Storage Manager 1.1 User’s Manual
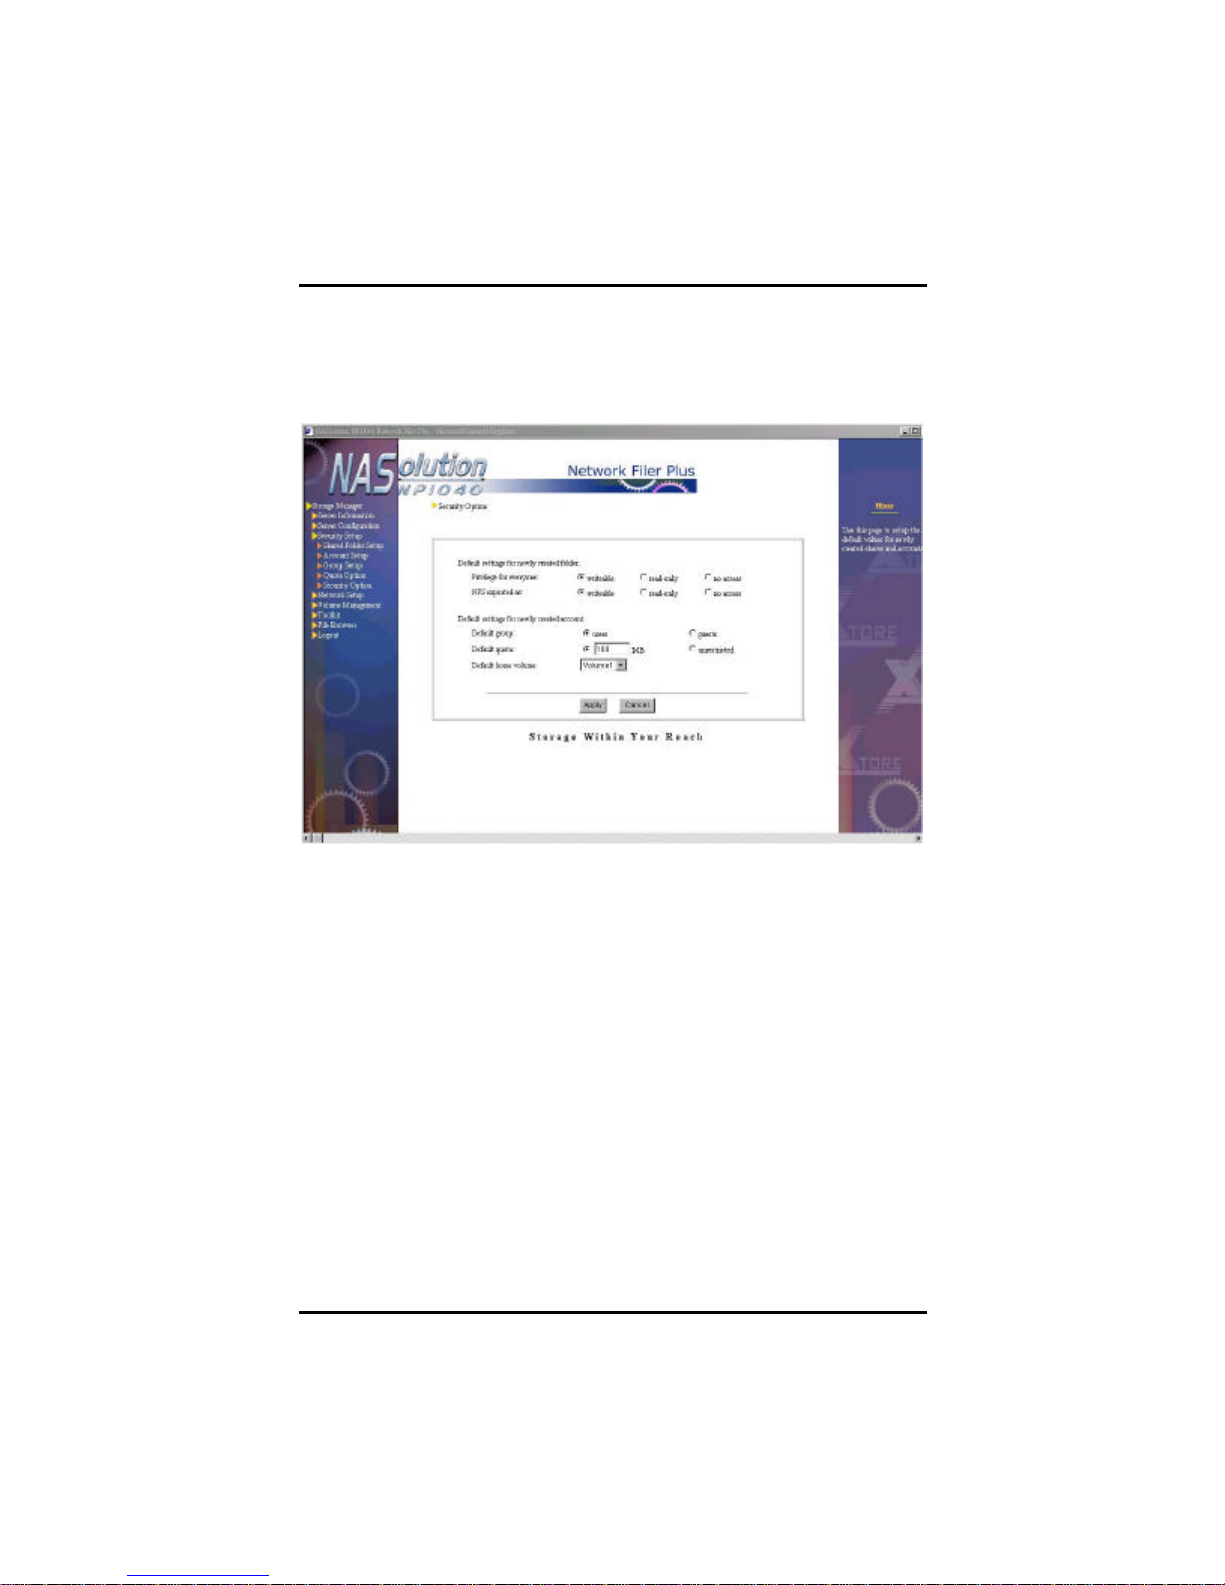
Security Options
System administrator can use this page to modify the preferences of
newly created shared folders and user accounts.
Default settings for newly created folders
1. NFS exported as: writeable read-only
New folders can be exported either with full read and write
permissions, i.e. writeable, or with write protection, i.e.
read-only.
2. Privileges for everyone: writeable read-only
This setting determines whether Windows, Apple, and Novell
users have by default full read and write permissions, i.e.
writeable, or can only read newly created folders, i.e. read-only.
62 Chapter 4. Using NFP Storage Manager 1.1
Page 68

NFP Storage Manager 1.1 User’s Manual
Default settings for newly created accounts
1. Default group: users guests
Here you can choose to which group newly created users
belong by default. If you want new accounts to automatically
have a home folder, choose users, otherwise, choose guests.
2. Default quota: _____MB unrestricted
With this setting you can limit the amount of storage space
allotted to new users, or choose not to attach any restrictions , i.e.
unrestricted.
3. Default home volume: Volume__
If the newly created account belongs to Users group, please
select the volume in which its home folder will be saved.
Network Setup
Use Network Setup to set the network types supported by NP1040
NAS server. The default setting allows for simultaneous use of
Windows, UNIX, and Apple networks. You may change the defaults
according to your needs.
Chapter 4. Using NFP Storage Manager 1.1
63
Page 69
NFP Storage Manager 1.1 User’s Manual
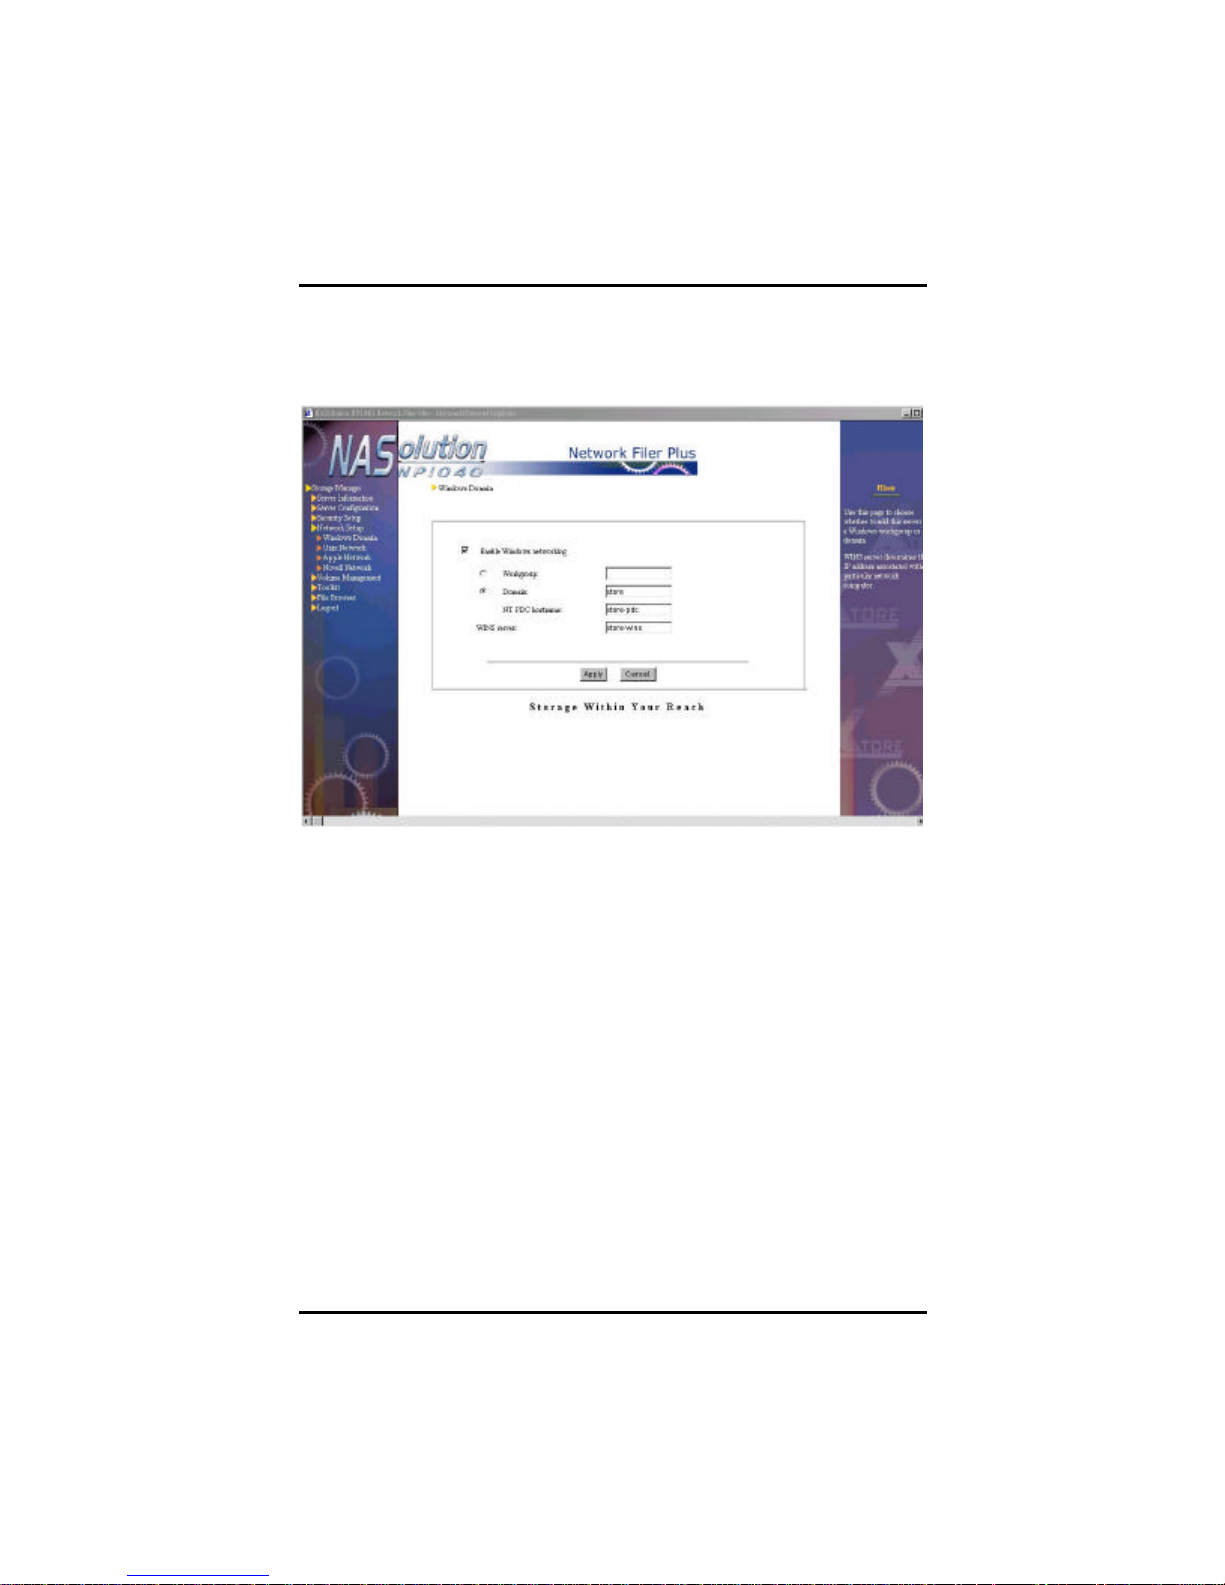
Windows Domain/Workgroup Setup
It is up to the system administrator whether or not to open NP1040
NAS for access by Windows clients. Select Enable Windows
networking if you want to allow Windows clients, and then select a
Workgroup or Domain for the server.
If you choose a workgroup, you only have to select the workgroup in
the NFP Storage Manager.
If you choose to add NP1040 NAS server to a Windows Domain, you
need to add NP1040 NAS server account to the PDC, i.e. a Windows
NT/2000 Server, and then enter the Windows Domain information in
the Network SetupàWindows Domain page of NFP Storage
Manager.
Settings on Windows NT PDC
1. From the Start menu, select ProgramsàAdministrative Tools,
then Server Manager.
2. Open the Server Manager and select ComputeràAdd to
Domain.
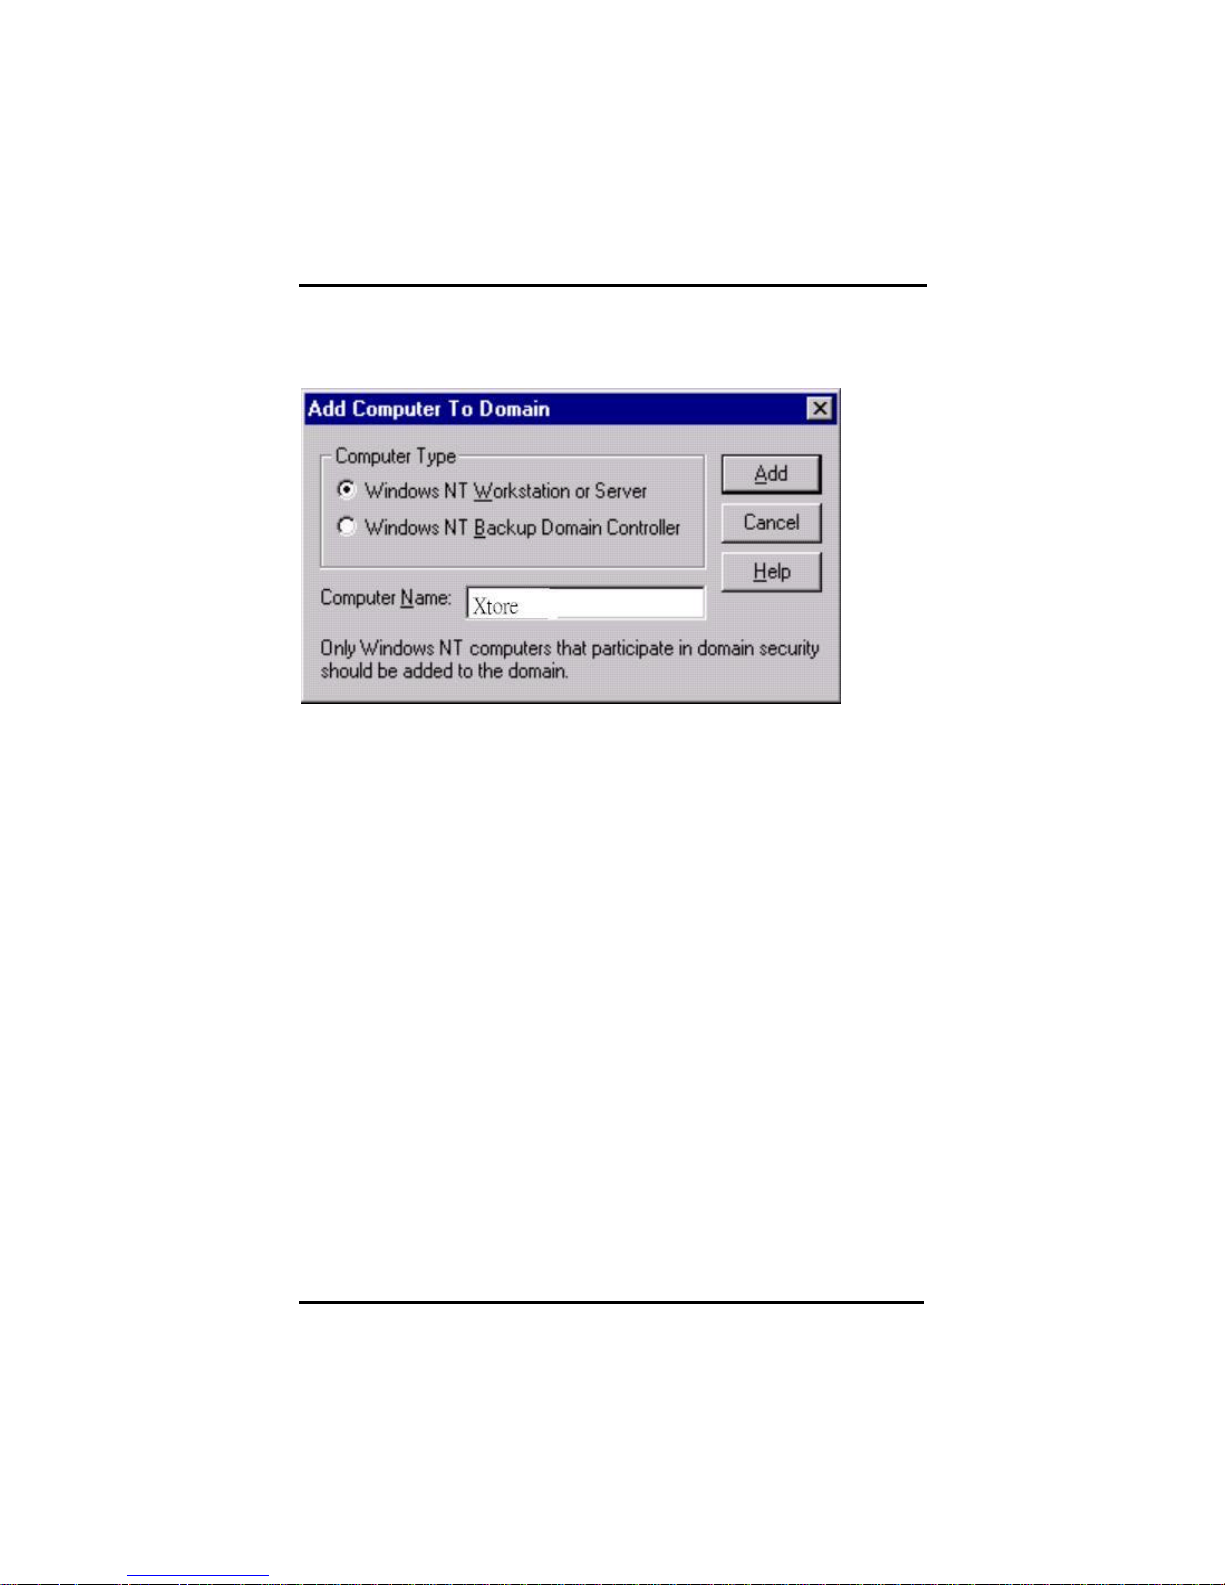
3. In the column Computer Type, select Windows NT Workstation
64 Chapter 4. Using NFP Storage Manager 1.1
Page 70
NFP Storage Manager 1.1 User’s Manual
or Server, under Computer Name, enter NP1040 NAS server
name (that is the name you see in the Server
ConfigurationàBasic Configuration). Press Add to complete the
operation.
Settings on Windows 2000 PDC
1. From the Start menu, select ProgramsàAdministrative Tools,
then Active Directory Users and Computers.
2. If you choose to join a Windows 2000 PDC Domain, make sure
the Domain mode is set to mixed mode. Mixed mode is a
special Windows 2000 mode for downward compatibility,
sacrificing certain Windows 2000 features while preserving full
operability.
3. Return to the Active Directory Users and Computers screen.
Select Computer, click the right mouse button, and select New
ObjectàComputer.
4. Under Computer Name, enter NP1040 NAS server’s name.
Because the operating system of Network Filer Plus is not
Windows 2000, to be compatible with pre-Windows 2000
operating systems please select Allow pre-Windows 2000
computers to use this account , and then click OK.
Chapter 4. Using NFP Storage Manager 1.1
65
Page 71
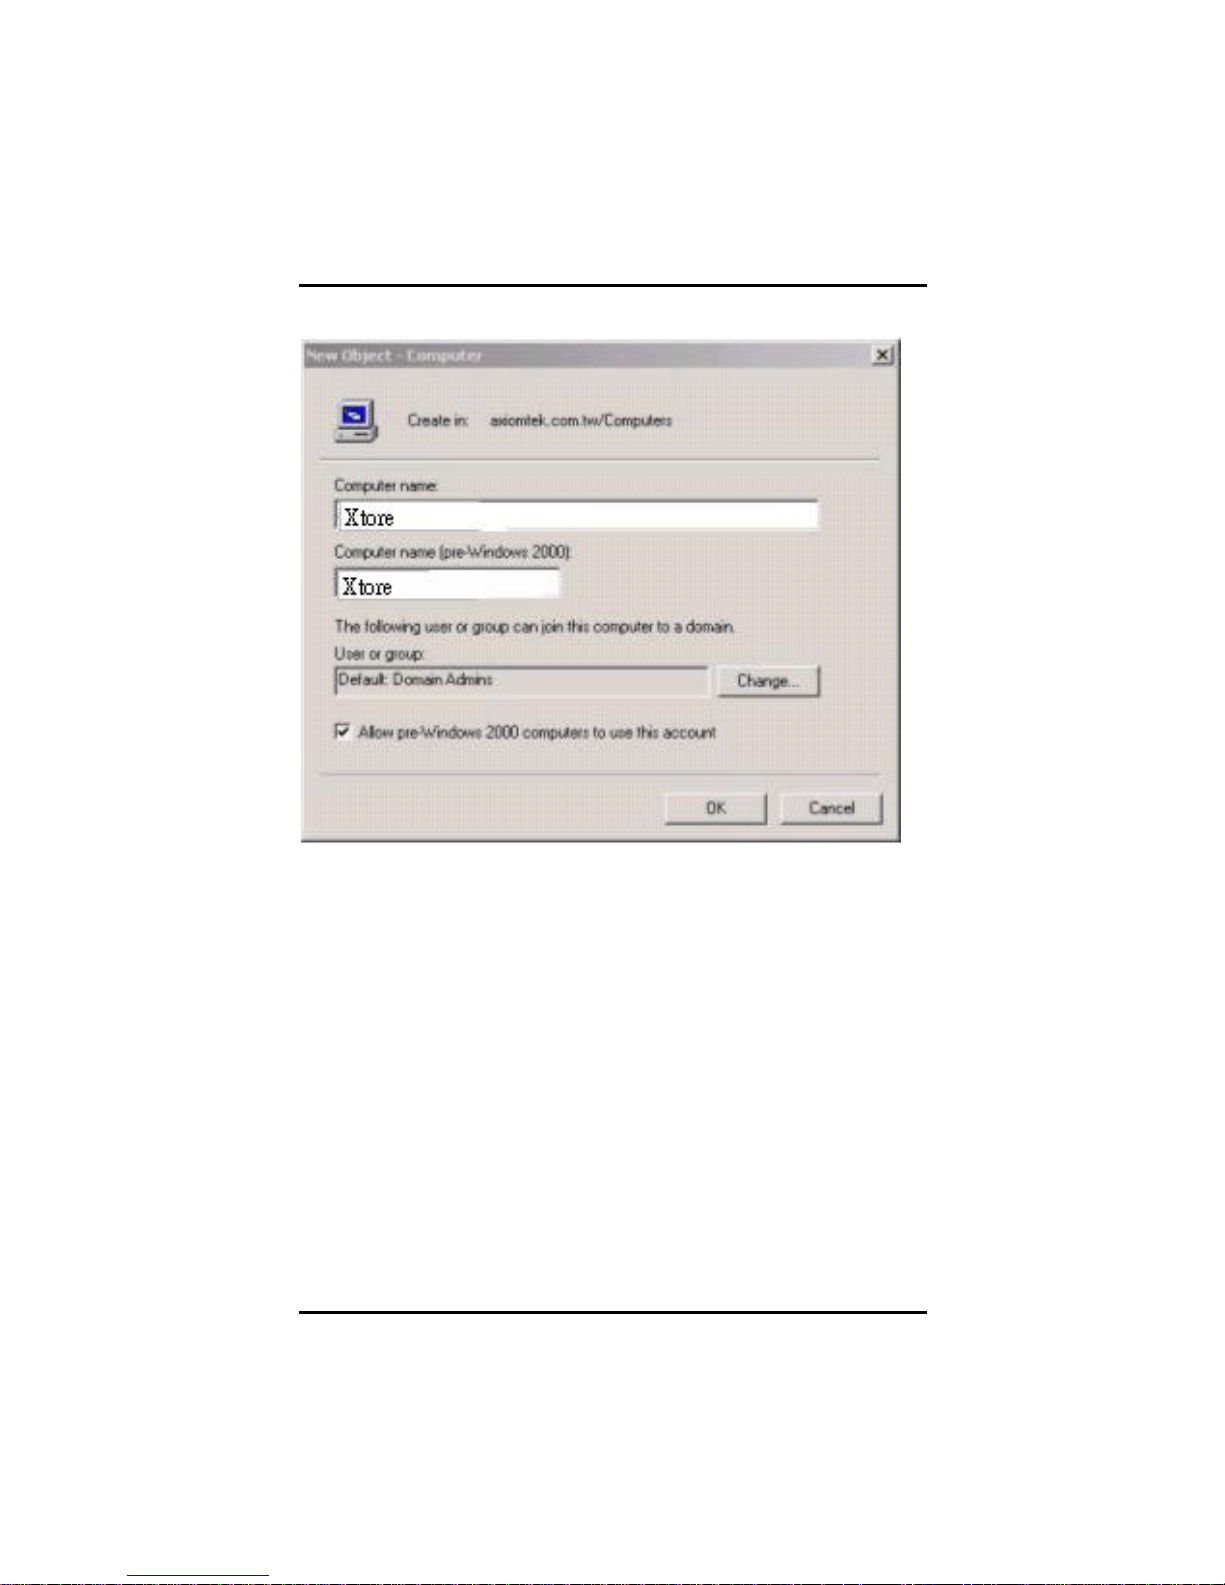
NFP Storage Manager 1.1 User’s Manual
Settings on the NAS server
You must enter the Windows Domain and PDC hostname in the NFP
Storage Manager’s Network SetupàWindows domain screen. If
there is also one or more than one separate BDC (Backup Domain
Controller), Network Filer Plus will make a record of this BDC to be
the backup support for the Windows PDC.
Applying Windows PDC Privilege Settings
After the server has successfully joined a Windows Domain, a new
tab will appear on the Security SetupàAccount Setup screen, called
NT Domain Accounts, containing a copy of all user accounts. (For
setup instructions, see Security SetupàAccount Setup àNT Domain
Accounts). When a client attempts to access NP1040 NAS server, it
will forward the account and password information to Windows PDC
server for verification. If the result is positive, access will be granted. If
the PDC server does not authorize the user, the account is verified
against the list of local users. Access is granted if the login data
66 Chapter 4. Using NFP Storage Manager 1.1
Page 72

NFP Storage Manager 1.1 User’s Manual
corresponds to a local user.
Note that accounts with the same name on both PDC and NP1040
NAS server will be merged automatically. For example, if an account
user1 exists on both the PDC and NP1040 NAS server but with
different passwords, access is granted if either one of the two
passwords is provided. System administrator should, however, avoid
allowing accounts existing on the Windows PDC to be created on
NP1040 NAS server. Having different users sharing the same account
name should also be avoided.
4
Chapter 4. Using NFP Storage Manager 1.1
67
Page 73

NFP Storage Manager 1.1 User’s Manual
at the
Filer
NAS. In other words, if a
to
TIP
Notes on working with a Windows Domain:
1. If an NAS server NAS001 owns an account NAS001 on the PDC and
logs in to a Windows domain and out again, it is possible th
server cannot log back in. In this case, delete the NAS001 account on
the PDC, create a new account, and enter the domain name and PDC
hostname in NFP Storage Manager.
2. After moving a NAS server from a Windows Domain or workgroup to
another domain or workgroup, NP1040 NAS server may still appear in
the original domain or group in the Windows clients’ Network
Neighborhood. This is a restriction of the Network Neighborhood
module itself and does not involve a breach of security: the server
does in fact not exist any longer in the original domain or workgroup.
3. If the PDC fails in a Windows Domain, Windows clients will no longer
be able to access NP1040 NAS server. This is an intrinsic limitation of
the Windows networking environment. NASolution Network
Plus also supports BDC, thus offering a useful remedy for this kind of
situation.
4. For security reasons, an existing root account on the PDC will not be
merged with the root account of NP1040
client attempts to log into the NAS server with the root account, he
must enter the NAS root password to gain access as system
administrator.
5. Once NP1040 NAS server is part of a domain, only users in the same
Windows Domain can access NP1040 NAS server. Members of other
domains or workgroup cannot access the server. For example, if your
NP1040 is part of a Windows Domain A, and the PDC in this domain
knows an account user1 with the password 123. If the client of this
account belongs to another domain B, the client will still not be able
access to NP1040 NAS server, even when providing the correct login
information on the PDC account.
68 Chapter 4. Using NFP Storage Manager 1.1
Page 74
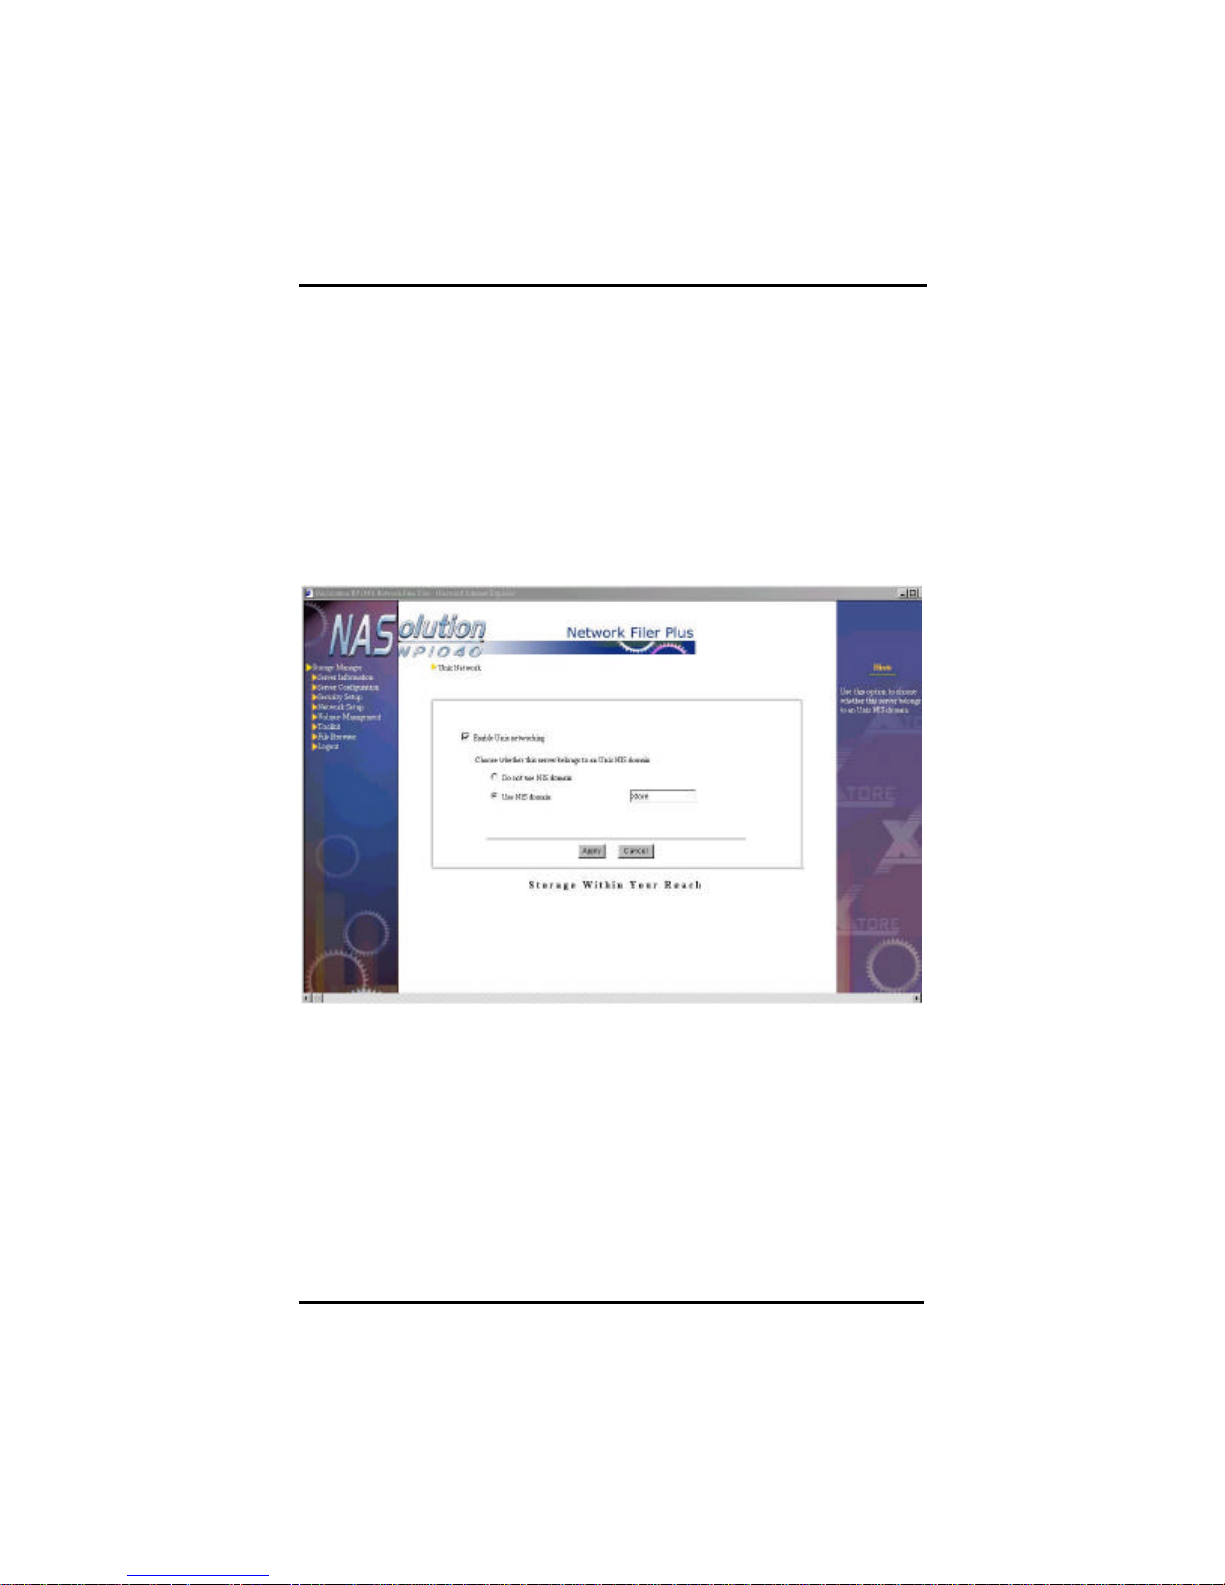
NFP Storage Manager 1.1 User’s Manual
WINS Server
If there is a WINS server in the Windows network, please fill in the IP
address of the WINS server.
UNIX NIS Domain Setup
System administrator can decide whether to make NP1040 NAS
server available to NFS client. If yes, please select Enable Unix
Networking.
If there is a NIS server on the Unix network , use this option to select
whether the server should be part of a NIS Domain. If yes, you must
enter a domain name.
After joining a NIS Domain, a new tab called UNIX NIS Accounts will
appear under Security SetupàAccount Setup, showing all available
user accounts on the NIS server. System administrator can setup hard
disk quota for these users in the Security Setupà Quota Option page.
Chapter 4. Using NFP Storage Manager 1.1
69
Page 75
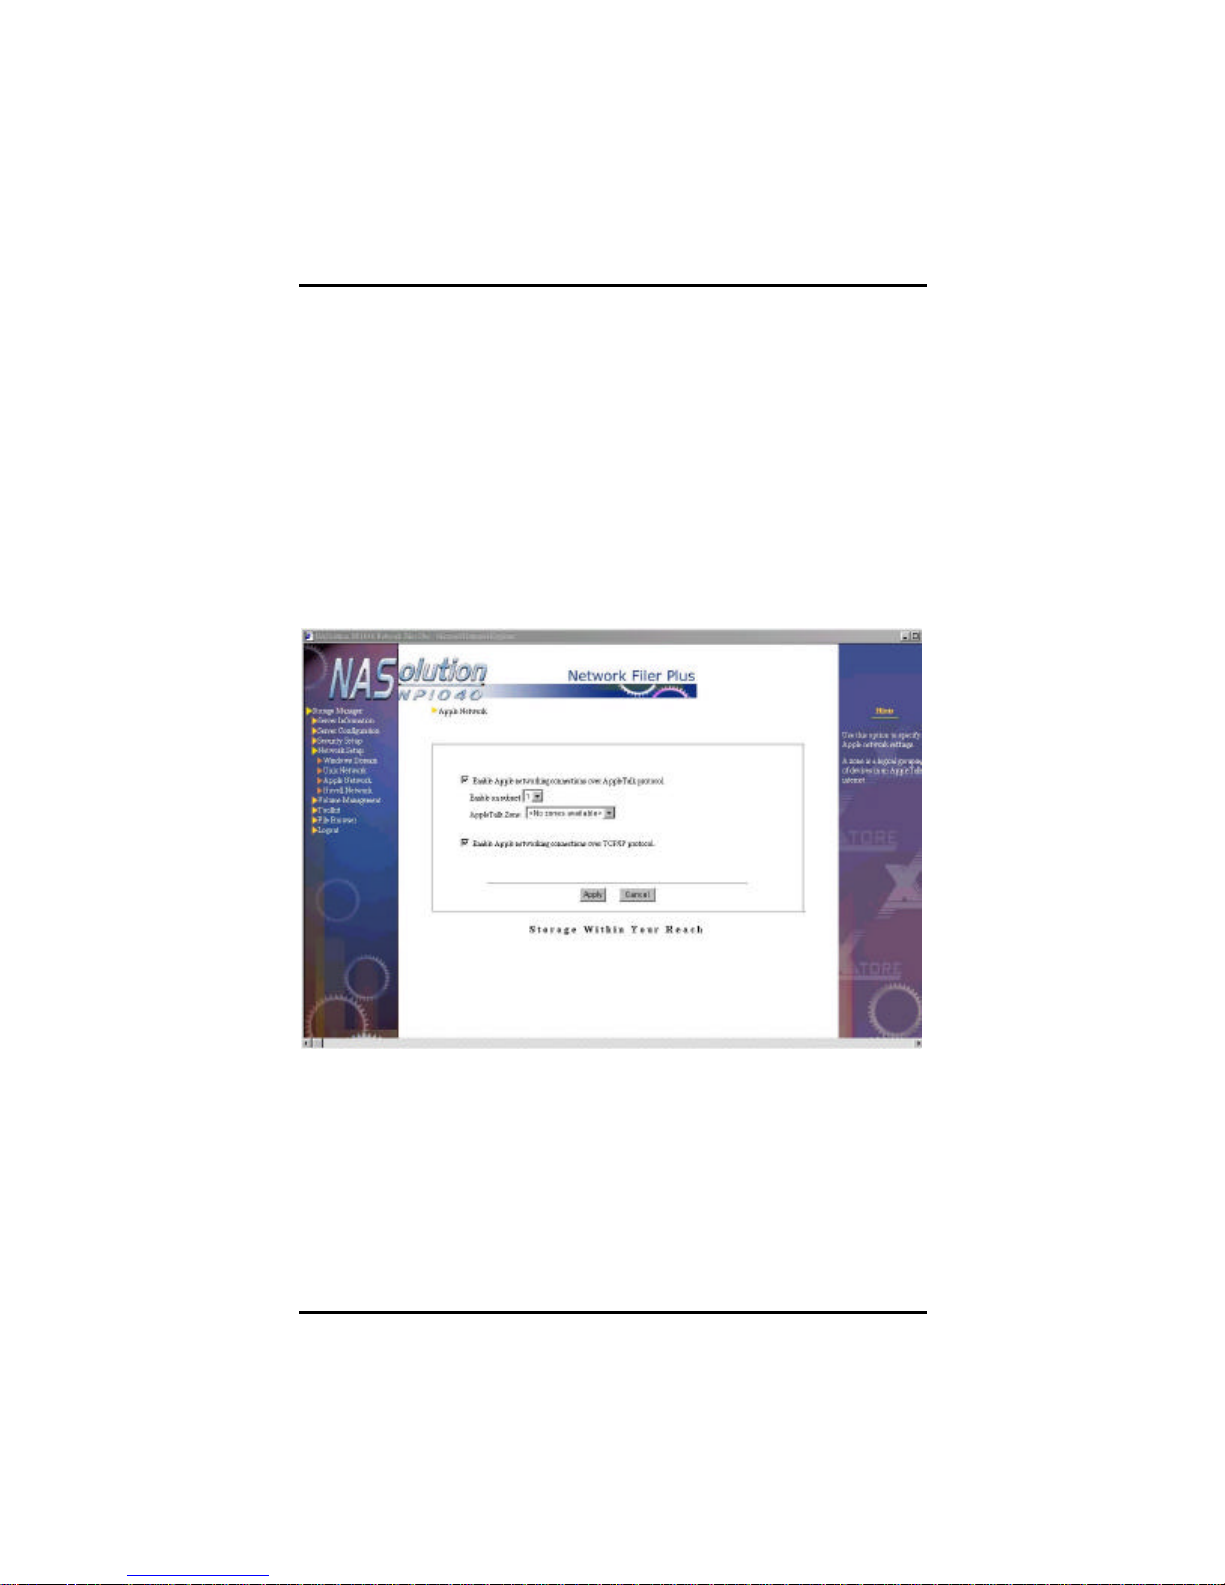
NFP Storage Manager 1.1 User’s Manual
Note: if system administrator has ever added NP1040 NAS
server into a NIS Domain before, it will not be able to
reboot if the NIS server is not available. Please make sure
the NIS server is available before you restart/power on
NP1040 NAS server.
Apple Network
Use this option to select whether the server should use AppleTalk or
TCP/IP, thus allowing or preventing Apple clients from accessing
NP1040 NAS server.
This system also supports "Zone", a logical group of devices in an
AppleTalk network. When system detects the first subnet that has an
AppleTalk Zone, it will display these zones on this page. System
administrator can then add NP1040 NAS server to these Zones.
Please Note:
70 Chapter 4. Using NFP Storage Manager 1.1
Page 76

NFP Storage Manager 1.1 User’s Manual
When an Apple client, for example, a Mac OS 9.0.2 client, is
to access the server
group
ple clients will not be able to save any single file larger than
NAS server, the
file is not actually deleted so the available HDD space shown
is not enlarged. To
When there are more than one network ports in NP1040 NAS server,
and the server is set up as having multiple subnets, this system only
supports Apple client in a single subnet to read/write from the server
through AppleTalk or TCP/IP protocol. Apple clients in other
subnet(s) can only read/write through TCP/IP protocol. Due to this
limitation, this system can only support the Zone in a single subnet.
TIP
1.
trying to browse an English web site and sees many “cross”
marks appear, please close Smartview from the Control Panel.
2. Apple clients cannot access NP1040 NAS server with the root
account. For system administrator root
from an Apple client, please create another admins
account on the server.
3. Ap
4GB onto NP1040 NAS server.
4. When an Apple client deletes a file on NP1040
on the “Server Information/Status” page
release the space, use “Empty Trash” on the Apple client.
Chapter 4. Using NFP Storage Manager 1.1
71
Page 77
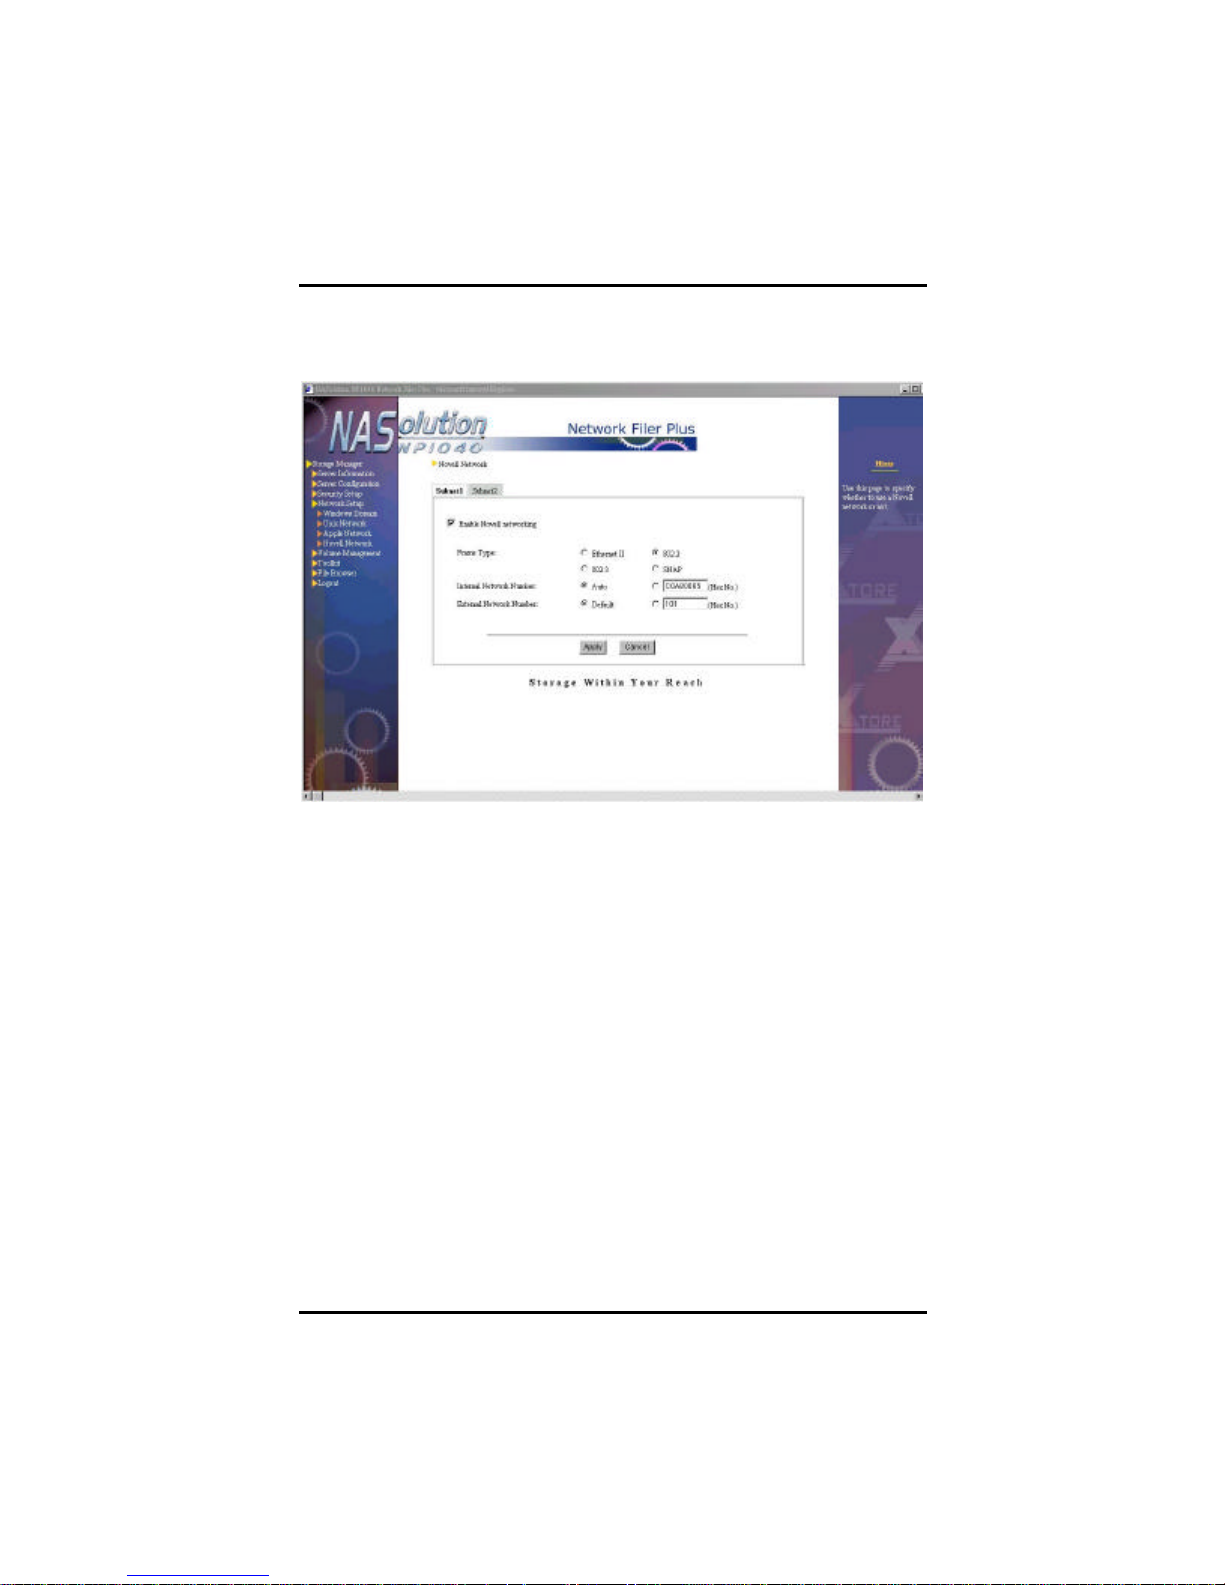
NFP Storage Manager 1.1 User’s Manual
Novell Network
Use this page to specify whether to support a Novell Network or not.
When there are more than one network ports in NP1040 NAS server,
and the server is set up as having multiple subnets, this page will
display multiple tabs such as Subnet 1, Subnet 2, etc., allowing
system administrator to setup Novell environment within each subnet.
If you want to allow access by Novell clients, enter the correct values
for Frame Type and Network Number. The Internal network number
must be unique and should be set automatically to avoid conflicts.
Note:
1. When selecting automatic configuration of the Internal Network
Number, make sure the server’s IP address is not in conflict
with other servers.
2. When adding NP1040 to a network where a Novell server is
already set up, you have to make sure the Novell server has the
same External Network Number and Frame Type settings with
NP1040. Auto-detect settings on the Novell server is not
recommended.
72 Chapter 4. Using NFP Storage Manager 1.1
Page 78

NFP Storage Manager 1.1 User’s Manual
The Windows Client service for Netware will automatically
cause errors with some double byte characters. However, this
cur with Novell client 4.8 for Windows
TIP
1. In the Netware Services network, the system will automatically
add _NW to the original server name.
2. Novell clients cannot use the root account to access NP1040
NAS server. For system administrator root to access the server
from Novell clients, please use the “supervisor” account and the
root password of NP1040 NAS server to log in (there’s no need
to create this account on the NAS server), or create another
admins group account on the server.
3. Novell clients will not be able to save any single file larger than
4GB onto NP1040 NAS server.
4.
change small letters into capitals in the background, which can
problem will not oc
NT/2000, or 3.3 for Windows 95/98.
Volume Management
NASolution Network Filer Plus preset a default of 3GB space in each
hard disk as a RAID 5 volume. System administrator can add or
delete volumes in the system ac cording to his/her own needs.
Chapter 4. Using NFP Storage Manager 1.1
73
Page 79
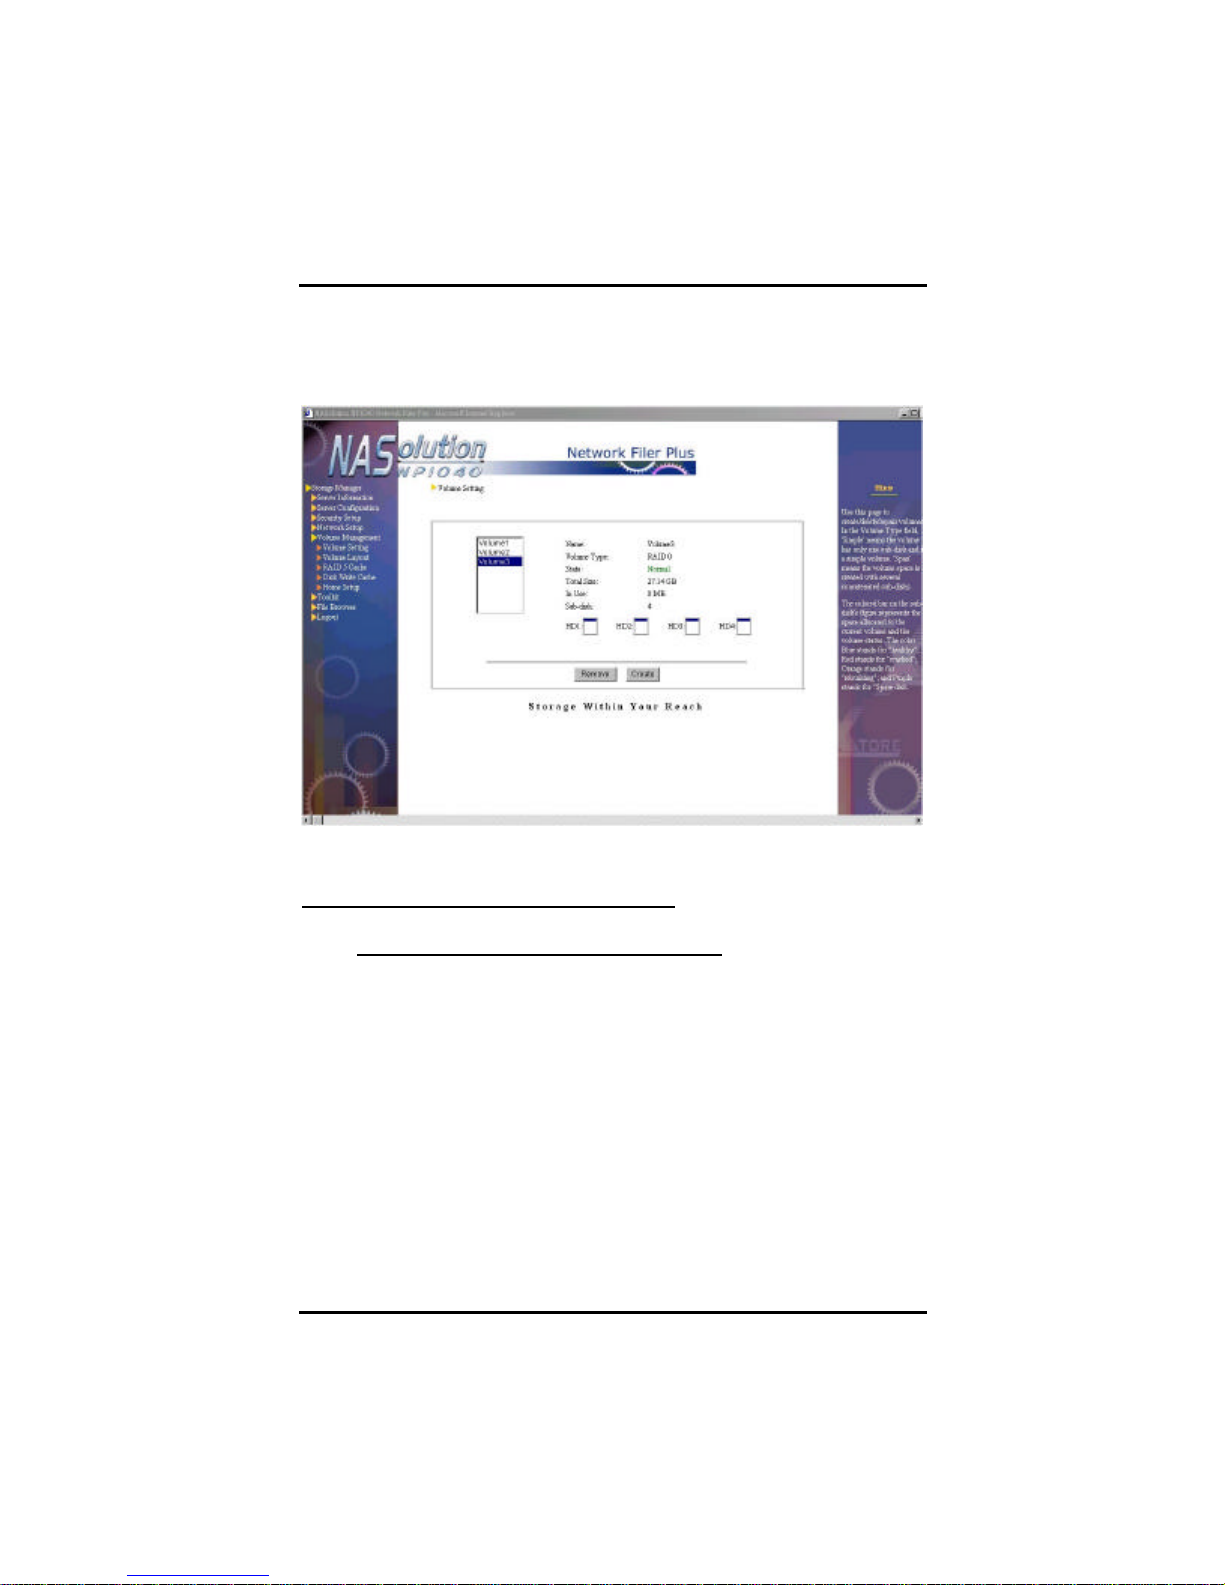
NFP Storage Manager 1.1 User’s Manual
Volume Setting
System administrator can create/remove/repair volume through this
page. The maximum number of volumes this system can support is
1.5 times of the total number of hard disks. Thus in a model with four
hard disks, the system can create at the most six volumes, i.e. (4*1.5),
etc. There is no need to restart the server for volume creation,
removal or repair to take effect.
74 Chapter 4. Using NFP Storage Manager 1.1
Page 80
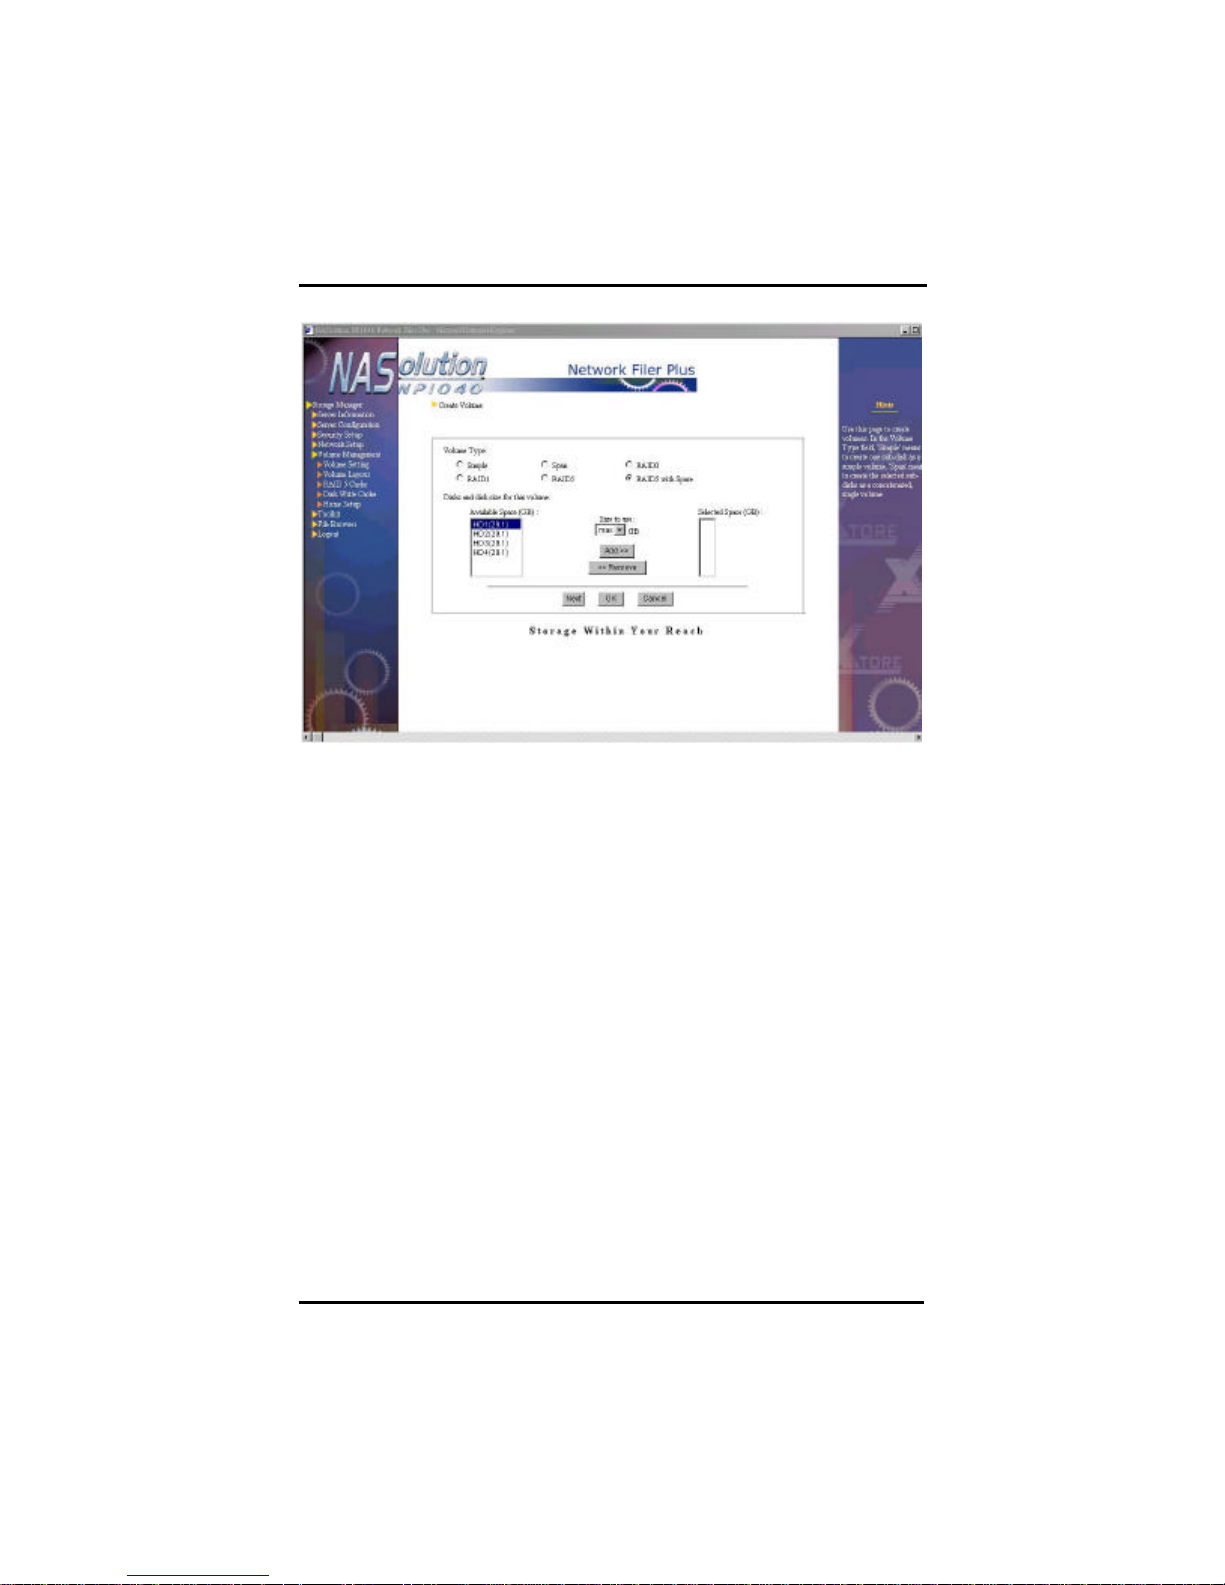
NFP Storage Manager 1.1 User’s Manual
Create New Volume
To create a new volume, click Create button to enter into the Create
Volume page.
First, click Volume Type. This system supports six volume types:
Simple, Span, RAID 0, RAID 1, RAID 5, and RAID 5 with hot spare.
Next, determine which hard disk storage space will make up the
volume. The Available Space column indicates space in each hard
disk that has not yet been allocated. After hard disk is selected,
setup Size to use, click Add to add to the volume. This step is similar
to the utility that allows for segmentation of a large hard disk into
smaller segments to achieve more flexible hard disk space utilization.
The Selected Space column will display all disk space to be added to
the volume. After confirmation, click OK to start creating the new
volume. System administrator can display Creating Process Status
to check the progress of volume creation.
After a volume is created, system will return to main page of the
Volume Setting. At this time, the newly created volume should be in
normal working condition. The default publicn shared folder will also
be created. System administrator can also add other shared folders
in this volume and make available for clients to use.
Chapter 4. Using NFP Storage Manager 1.1
75
Page 81

NFP Storage Manager 1.1 User’s Manual
is measured in the unit of GB or gigabyte. The smallest
unit depends on the size of the hard disk. The current system will
e hard disk space by 20 and take the nearest whole number
as the smallest unit. For example, when the disk total volume is
less than 40 GB, the smallest unit is 1GB. Or when hard disk total
volume is greater than or equal to 40GB and less than 60GB, the
TIP
Size to use
divide th
smallest unit will be 2 GB, etc.
Please Note:
While creating non-RAID 1 or non-RAID 5 volume, when system
returns to Volume Setting page, you will see "Normal” in the State
column for the volume. But when creating RAID 1, RAID 5 or RAID 5
with hot spare volume, the State column will display Built (Building
percentage: xx%). This is because when creating RAID 1 or RAID 5
volume, though the volume is created and client is able to perform
save or retrieve function, since the system is still performing
necessary processes in the background (e.g. building RAID 1
consistency or RAID 5 parity) to ensure proper working of the system,
please make sure not to hot -swap the hard disk until the State column
shows the message: Normal.
Simple
A simple volume must be created in contiguous space of the same
hard disk, and the selected space will be created as independent and
with non-RAID mechanism hard disk. In creating a simple volume,
you can select only one hard disk at a time.
Span
A span volume can be created by combing space from two or more
hard disks. The selected disks will be created as one large,
contiguous volume. The selected space in each hard disk does not
need to be equal in size.
RAID 0
RAID 0 will consider all the selected space as one large hard disk.
Since it will however perform parallel and multiple read/write, thus it
has better performance efficiency than Simple or Span volume.
76 Chapter 4. Using NFP Storage Manager 1.1
Page 82

NFP Storage Manager 1.1 User’s Manual
RAID 1
RAID 1 will use half of the volume as one-to-one data mirroring, i.e.
duplicate the same set of data from A to B to ensure data security and
integrity. Thus, the actual available space is only half of the total
space. This level of RAID can ensure high level of data security, but
because it only has 50% utilization rate, the cost is relatively higher
than ot her volume types. The use of RAID 1 indicates high priority of
data security over cost consideration. There must be the selection of
two hard disks with the same size in creating a RAID 1 volume.
RAID 5
In addition to consolidating multiple (at least 3) hard disk space of the
same size to a large virtual hard disk to enhance store/retrieval speed,
RAID 5 utilizes one of the multiple storage space to store redundancy
(parity) to enable data reconstruction in the future. Thus if there is n
hard disk space, the actual storage space for a RAID 5 is only n-1
disk space. This volume type can ensure high level of data integrity
and is more cost effective than RAID 1 because of higher actual disk
space availability. It is suggested to select RAID 5 in situation where
there is a need for high level of data integrity. Creating a RAID 5
volume requires selection of at least three hard disks of the same disk
space.
RAID 5 with hot spare
In RAID 5 with hot spare volume type, a spare hard disk is added to a
RAID 5 volume. This volume type will use one hard disk space to
store redundancy and keep a disk as a spare. Thus if n hard disk
space is selected, the actual space available is n-2 hard disk space.
When any hard disk is malfunctioned, the spare hard disk space will
be on-line and replace the malfunctioned disk automatically. This
volume type can provide timely data reconstruction better than RAID
5.
Remove volume
To remove a volume, please select the volume and click Remove.
Chapter 4. Using NFP Storage Manager 1.1
77
Page 83
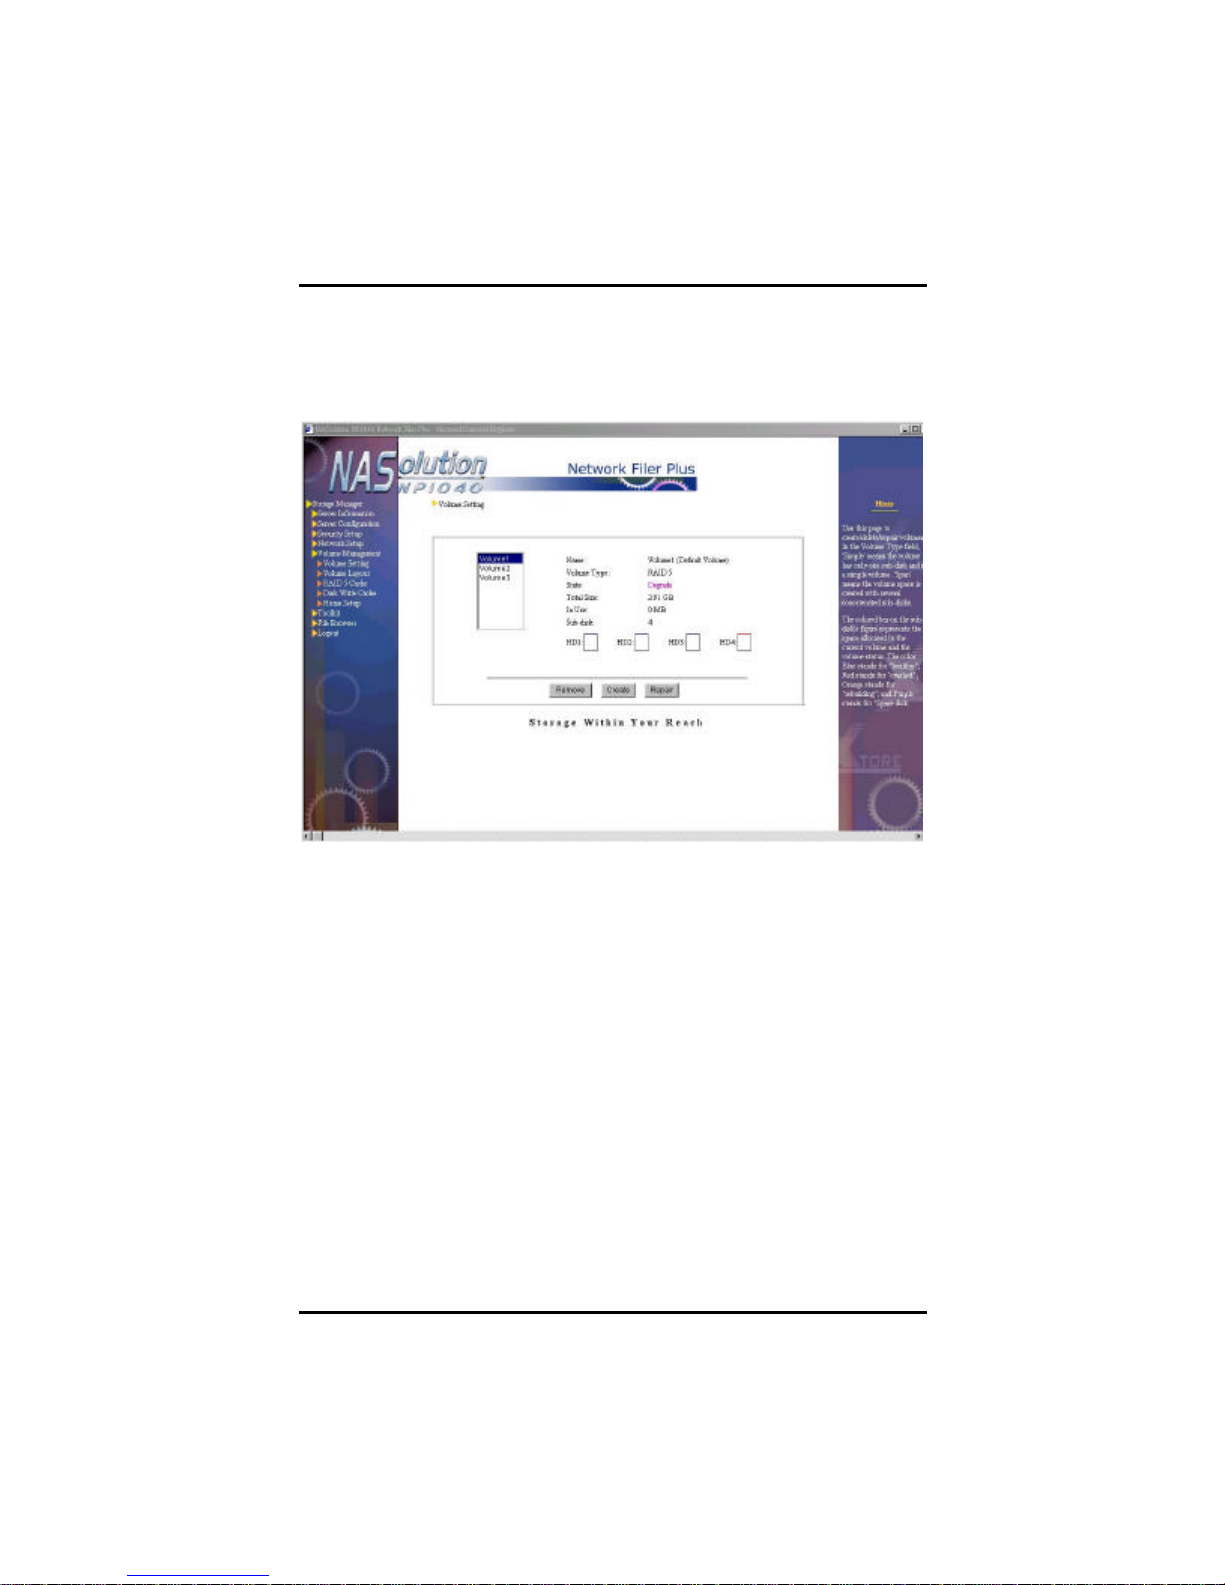
NFP Storage Manager 1.1 User’s Manual
Re-create volume
If a volume is crashed due to any failed disk, the volume structure
could be recovered by clicking the Re-create button.
The re-creating function can only re-create the original structure of the
crashed volume: share folders and users’ home folders, and set it as
the de fault volume if it originally was setup as such. It cannot restore
any lost data in these shared folders.
Before you start recreating, please make sure the failed disk is
replaced with a new one.
78 Chapter 4. Using NFP Storage Manager 1.1
Page 84
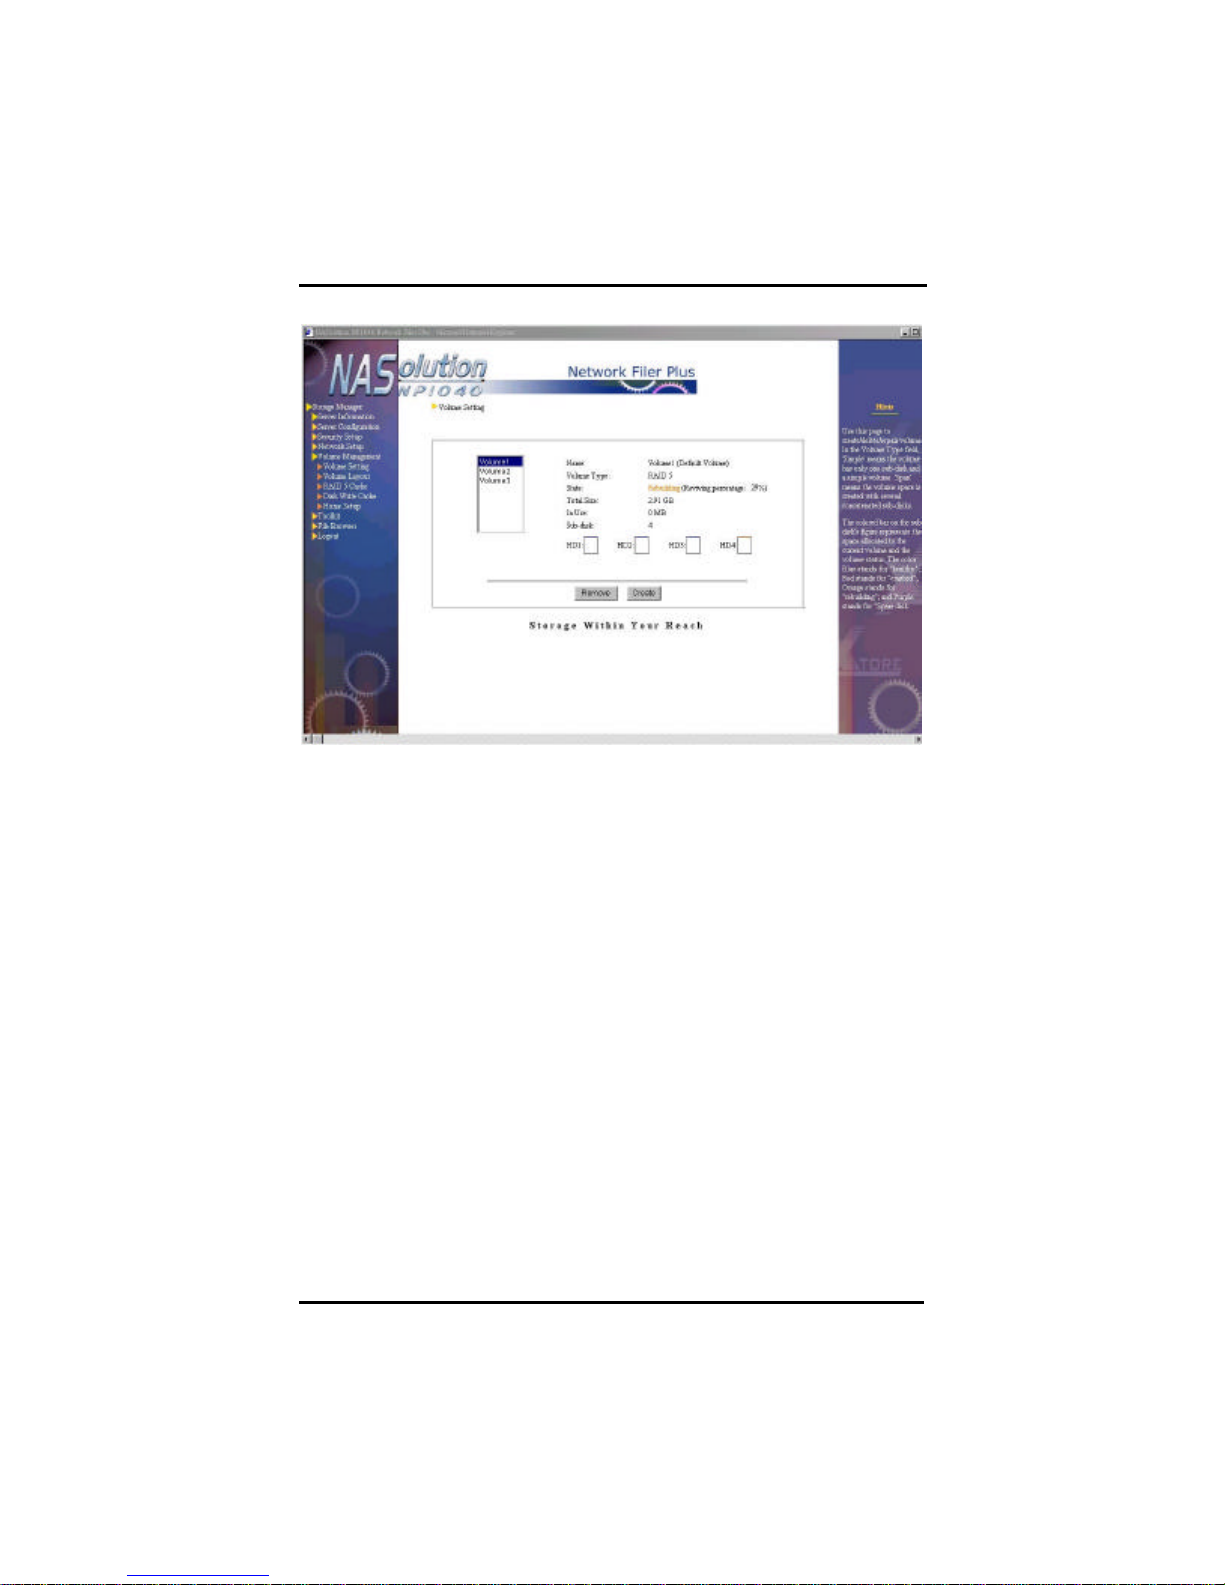
NFP Storage Manager 1.1 User’s Manual
Repair volume
This function can help repair volume types with data protection
mechanism such as RAID 1, RAID 5 or RAID 5 with hot spare.
When any segment in a volume is damaged, system administrator
can use the repair functions in this system to search for other
available hard disk space in the server to fill up the damaged
segment.
Chapter 4. Using NFP Storage Manager 1.1
79
Page 85
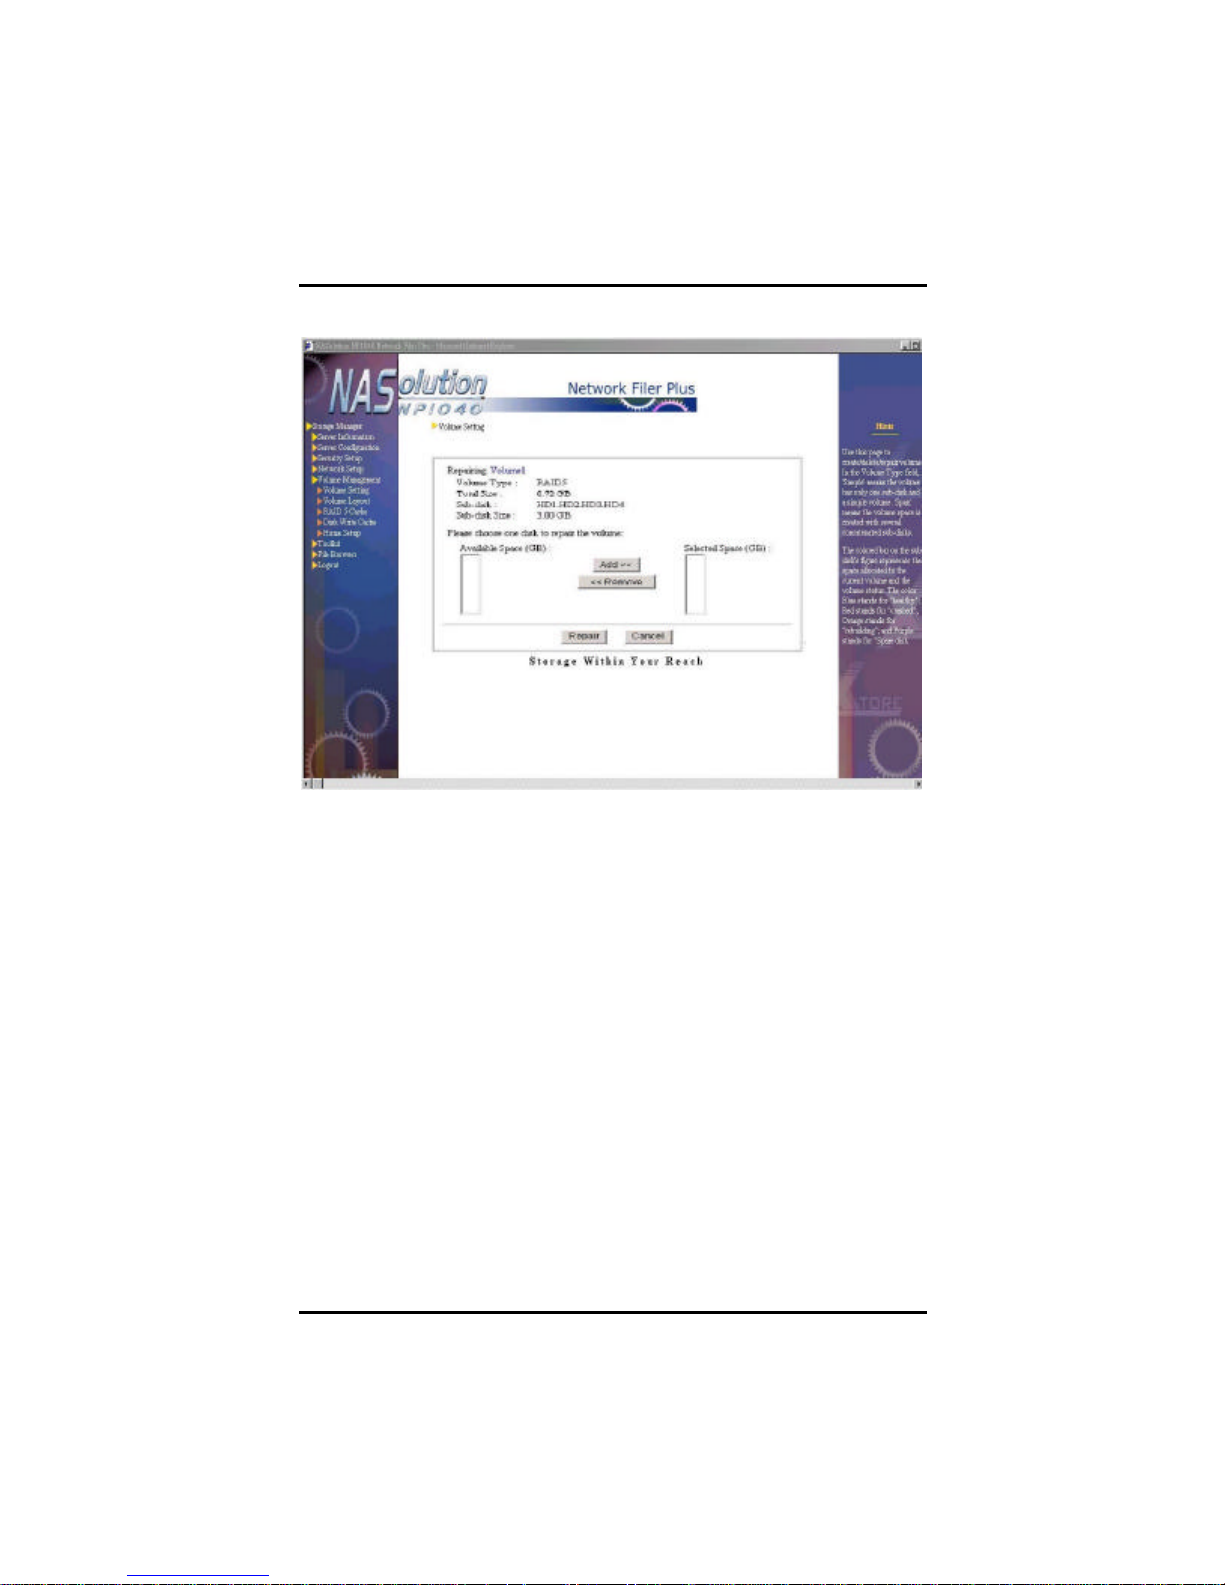
NFP Storage Manager 1.1 User’s Manual
For example, assume volume2 is a volume of RAID 5, which is
created from hard disks 1, 2 and 3, each with 10GB disk space. When
disk 2 is damaged, the State column in Volume Setting page will
display degrade indicating though this volume can still be accessed
but it is supporting these tasks with less than normal working
condition. Click the Repair button at the bottom to start the Repair
Volume page. The Available Space column will display all the hard
disk space currently available to repair the damaged disk. Please
select the hard disk, for example, disk 4, and click Add. After
confirmation, then click Repair for the system to start data
reconstruction from data stored in the second disk to the fourth disk.
When this is complete, volume2 is composed from disks 1, 3 and 4,
each with 10GB space.
Please note, you cannot select the hard disk in which the volume is
created while repairing volume space. In the previous example,
because volume2 is created from hard disks 1, 2 and 3, thus repair of
this volume can only be performed with disk other than these 3 hard
disks.
80 Chapter 4. Using NFP Storage Manager 1.1
Page 86
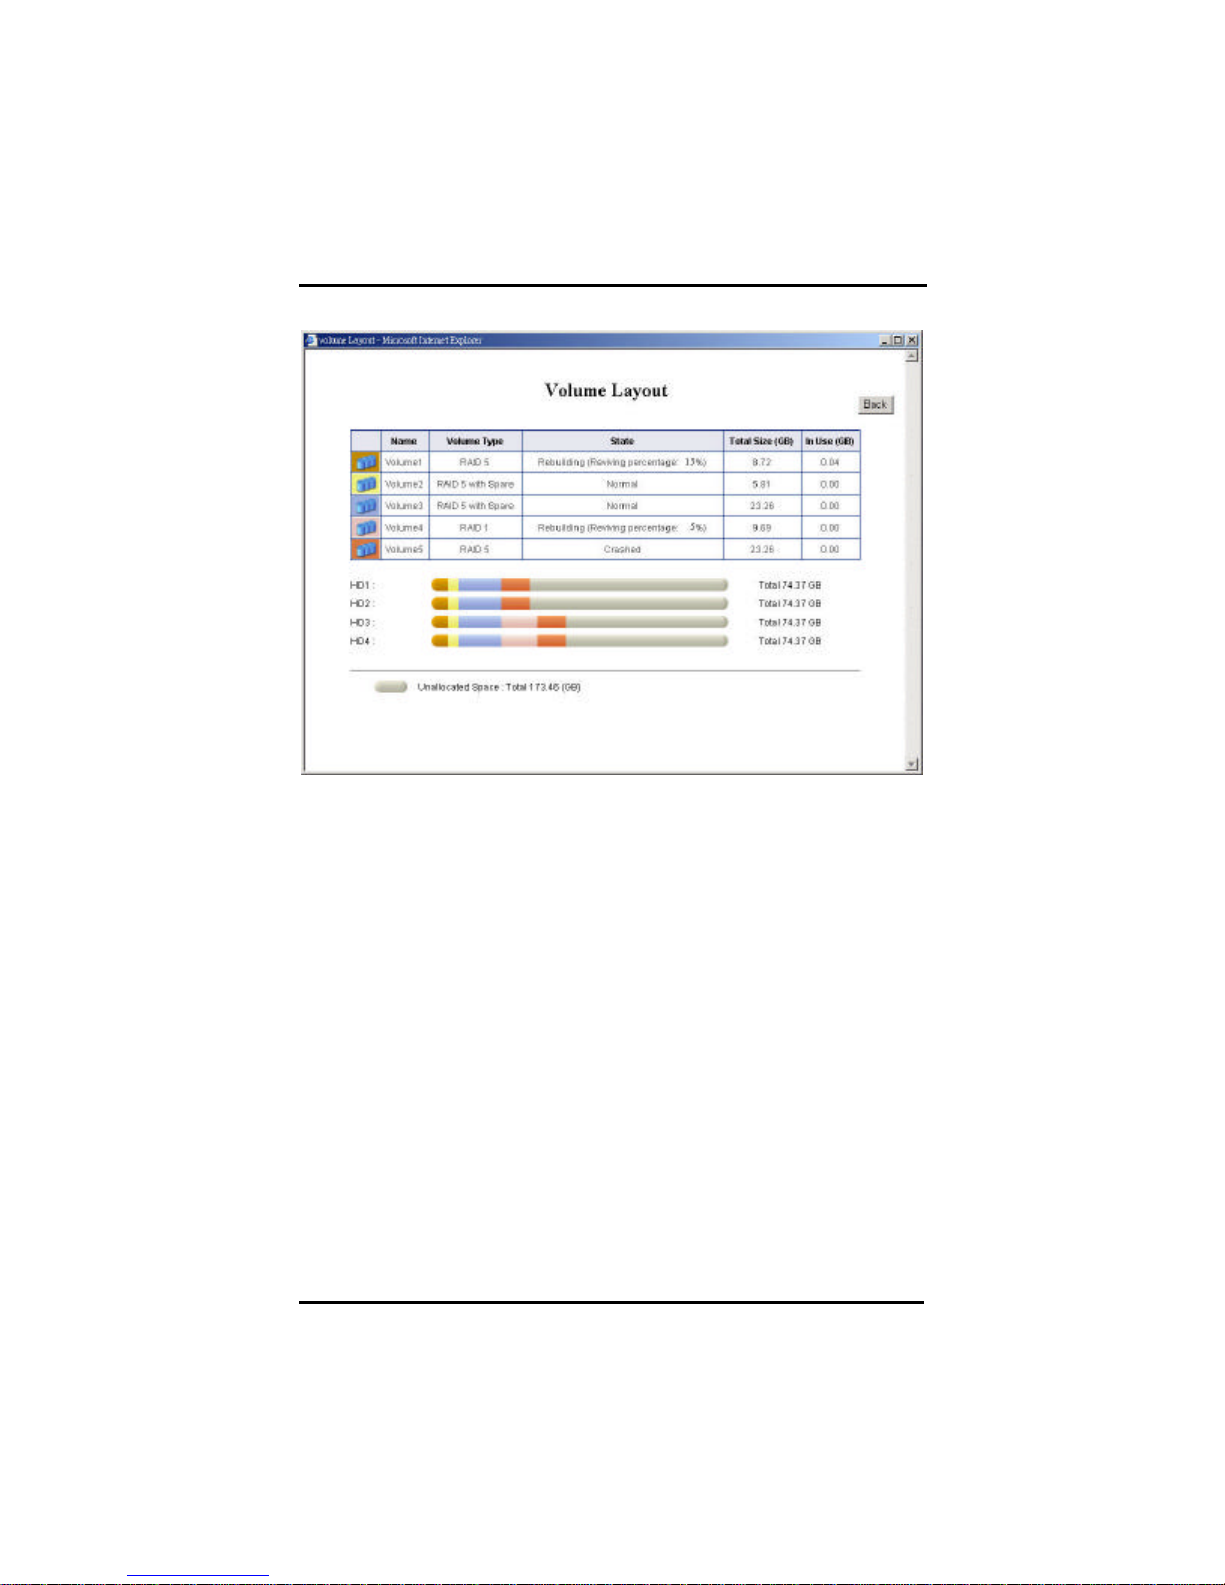
NFP Storage Manager 1.1 User’s Manual
Volume Layout
This page shows the status of volume layout in NP1040 NAS server.
Chapter 4. Using NFP Storage Manager 1.1
81
Page 87
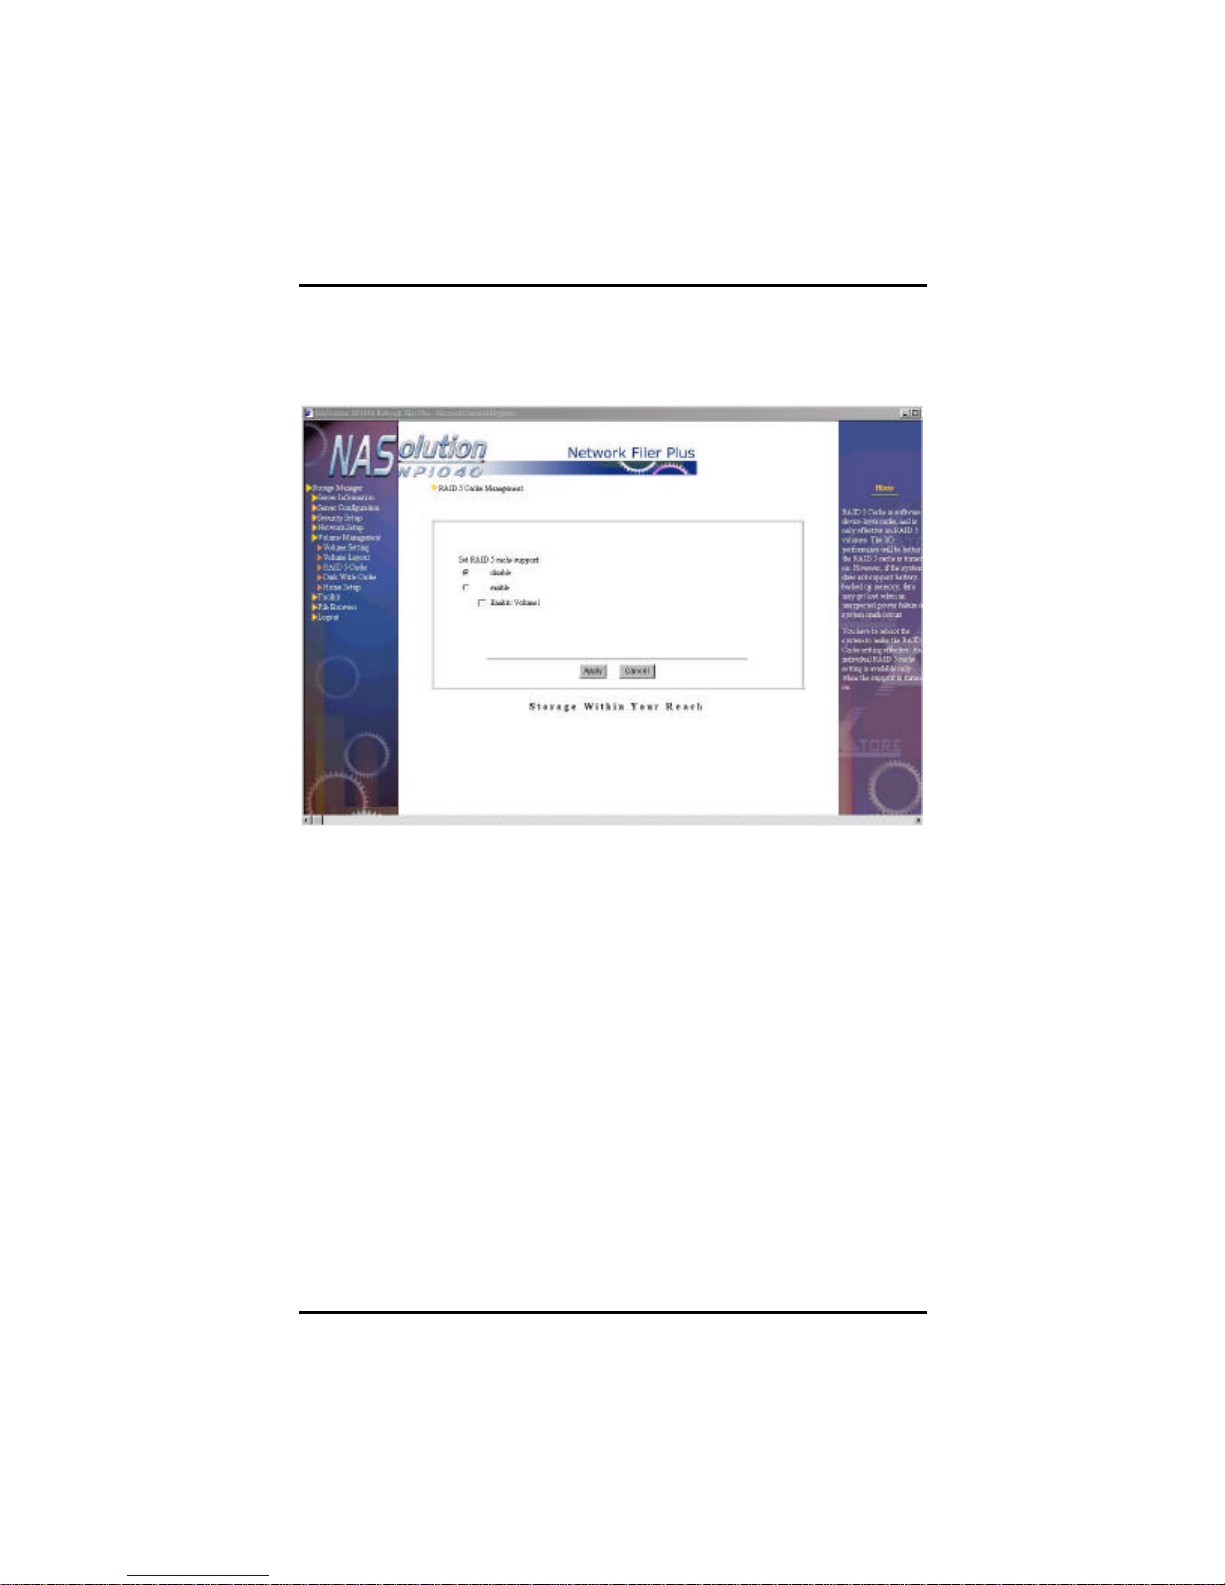
NFP Storage Manager 1.1 User’s Manual
RAID 5 Cache
In supporting RAID 5, save/retrieval activity requires data in multiple
hard disk read/write to compute parity to maintain data security. To
improve read/write performance, NASolution Network Filer Plus
supports RAID 5 device-layer cache and data can be stored in
memory temporarily, thus is much faster than hard disk read/write
activity. However, this function requires battery-backup memory
(SDRM or NVRAM) or UPS to be effective for any unanticipated
power failure that may result in data loss.
System administrator has to reboot NP1040 system to make RAID 5
Cache setting effective, and it will be applied only to the selected
volume(s).
82 Chapter 4. Using NFP Storage Manager 1.1
Page 88
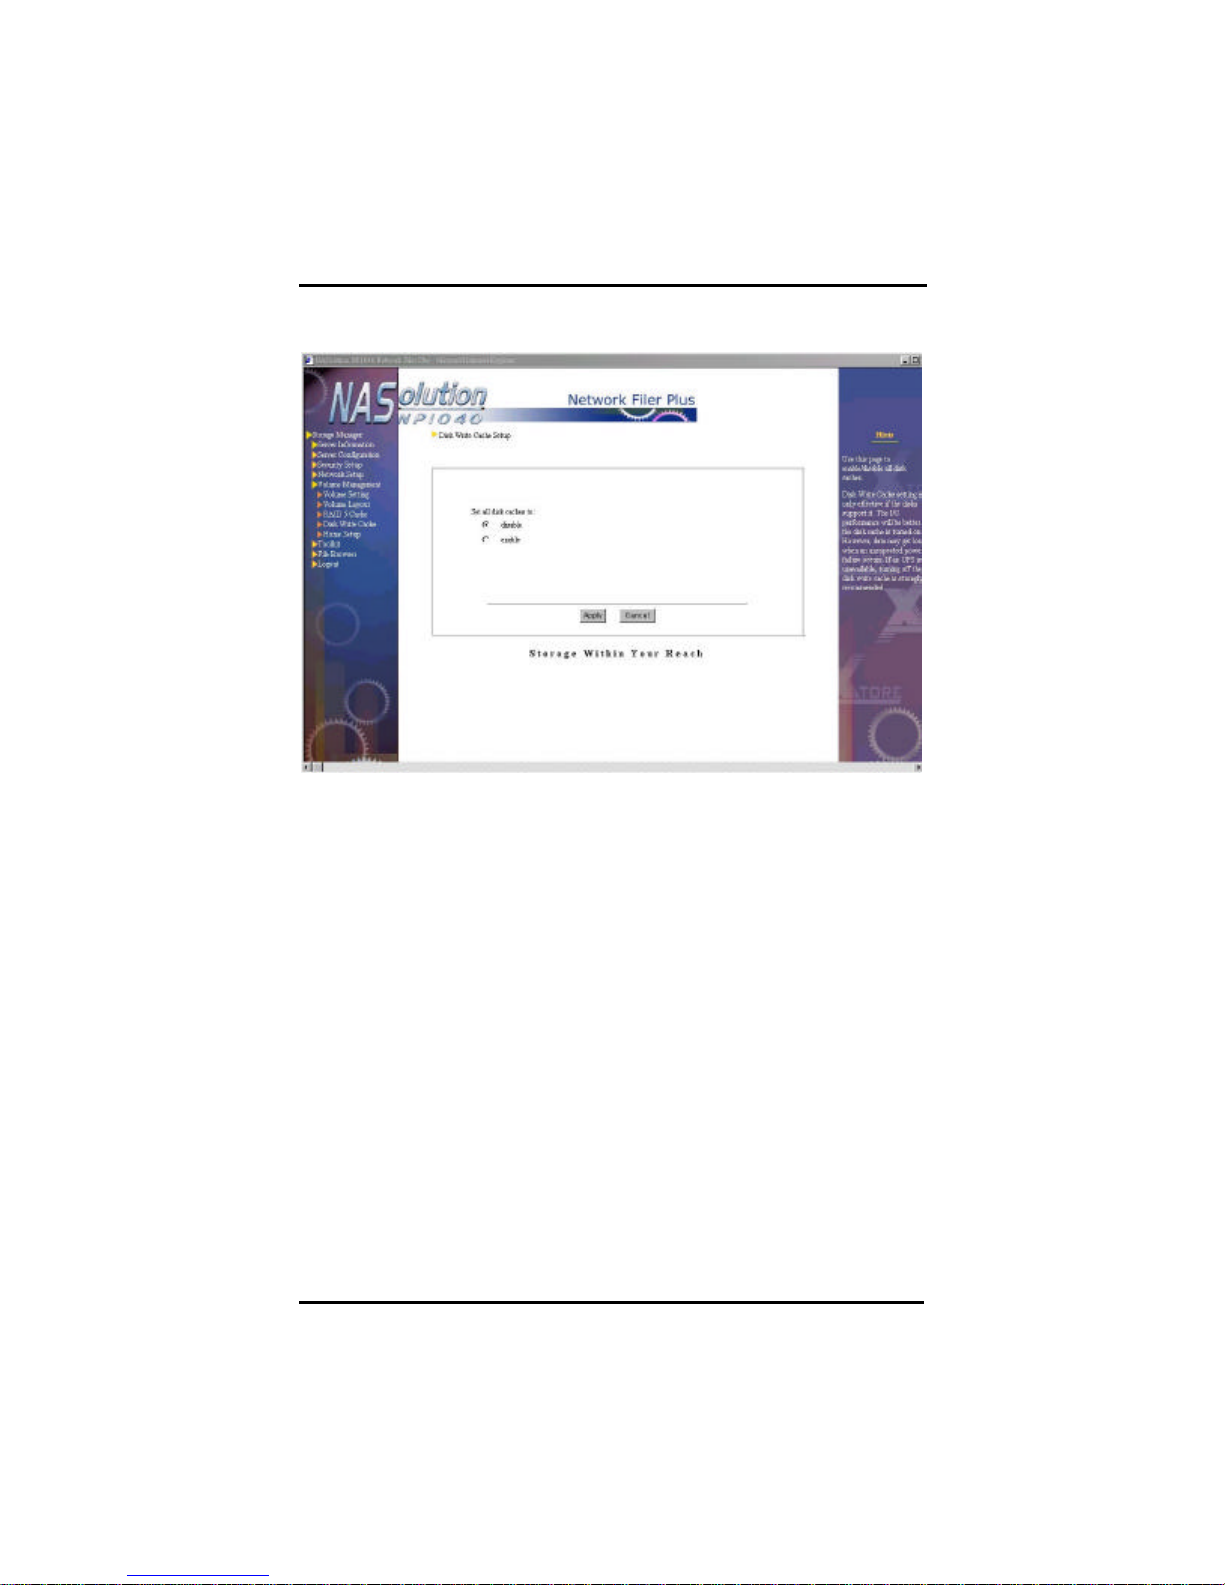
NFP Storage Manager 1.1 User’s Manual
Disk Write Cache
System administrator can turn on or off all the hard disk write cache
on this page.
This setup will take effect only if the server hard disk supports cache
memory. If hard disk Write Cache option is turned on, the system
read/write performance will improve. However, it may result in data
loss if any unanticipated power failure occurs. If the system utilizes
UPS, then we suggest that you turn on this selection.
Chapter 4. Using NFP Storage Manager 1.1
83
Page 89
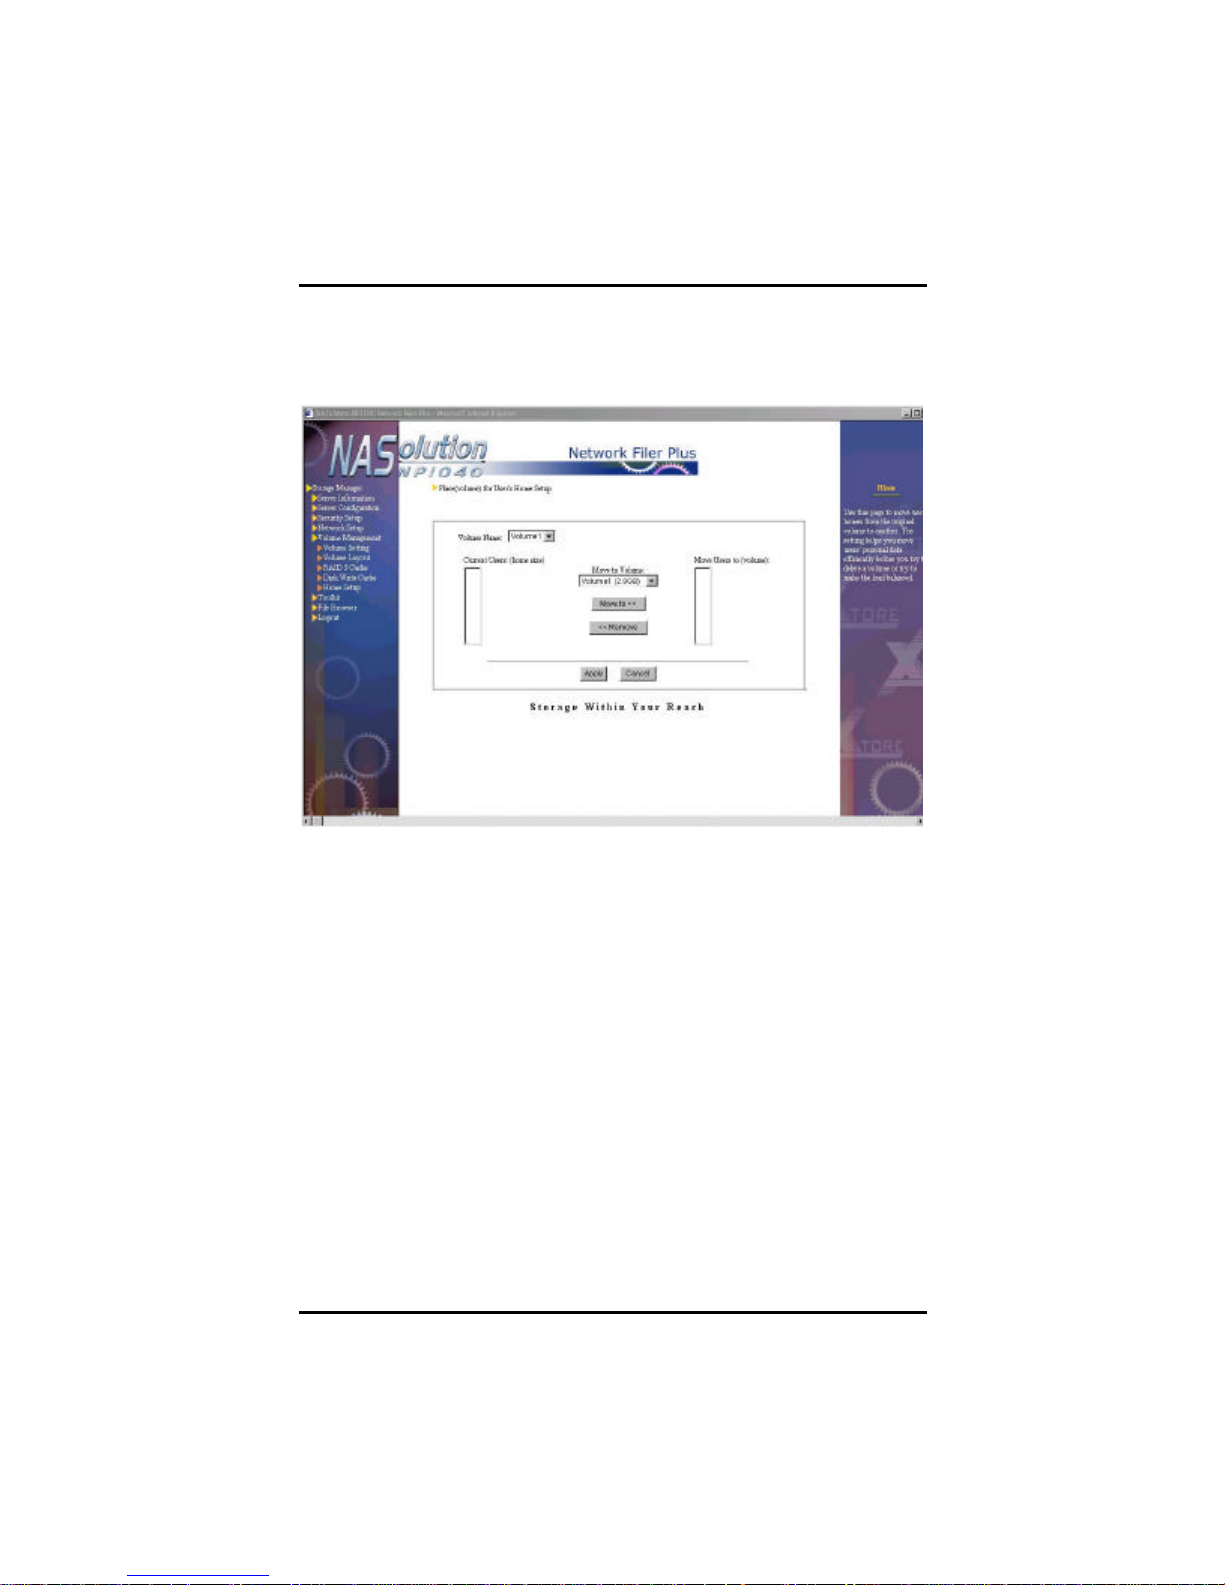
NFP Storage Manager 1.1 User’s Manual
Home Set up
When adding a new account into the Users group, the system will
automatically create a home folder for this account. System
administrator must specify the volume to store the home folder. But
it is possible to save many accounts into certain volume, causing the
volume to carry heavy load or have inadequate space. This Home
Setup page enables system administrator to easily manage user
home folders.
After selecting a volume in Volume Name, the system will display
accounts’ home folders in the selected volume in the Current User
(home size) column. To select accounts that require moving of home
folders, select destination in Move to Volume and click Move to.
After confirmation then click Apply. Please note, if the user account
is accessing its home folder, file access will be interrupted until home
folder move is completed.
84 Chapter 4. Using NFP Storage Manager 1.1
Page 90
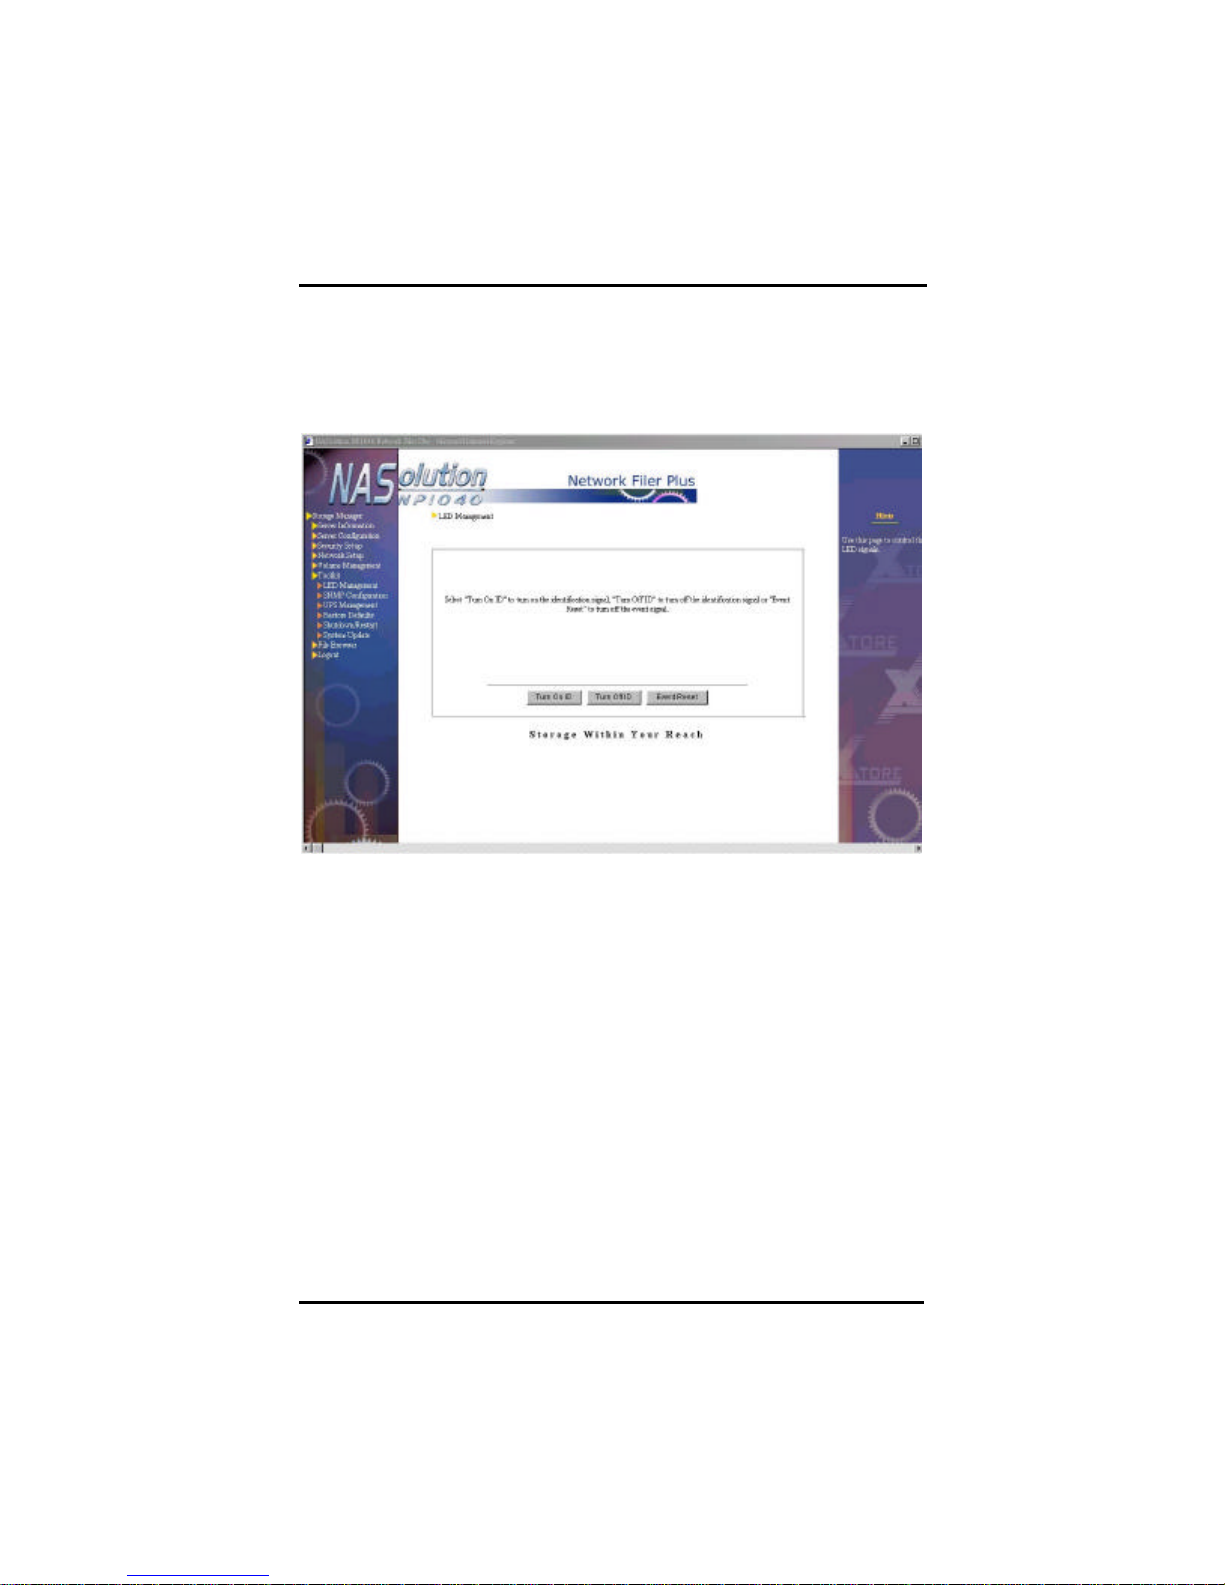
NFP Storage Manager 1.1 User’s Manual
Toolkit
LED Management
System administrator can control the LED indicators from here.
The ID indicator is located on the front panel of your NP1040 NAS
server. In the event of an emergency, system administrator needs only
to click the Turn on ID button on this page to turn on the ID indicator.
Once the light is on, system administrator can easily distinguish the
problematic server in the group and quickly resolve the problem(s).
Once the problem(s) has/have been resolved, make sure to click the
Turn off ID button.
There is another emergency LED light on the front panel of NP1040
server. When an error occurs in the memory, system fan, HDD, or the
system temperature, this light will be turned on. This emergency light
will only be turned off once the problem has been resolved and the
server has been restarted. However, in the event that the system
temperature is too high and later returns to normal, the over-heating
warning indicator will not automatically be turned off. System
administrator must manually click the Event Reset button on this page
Chapter 4. Using NFP Storage Manager 1.1
85
Page 91
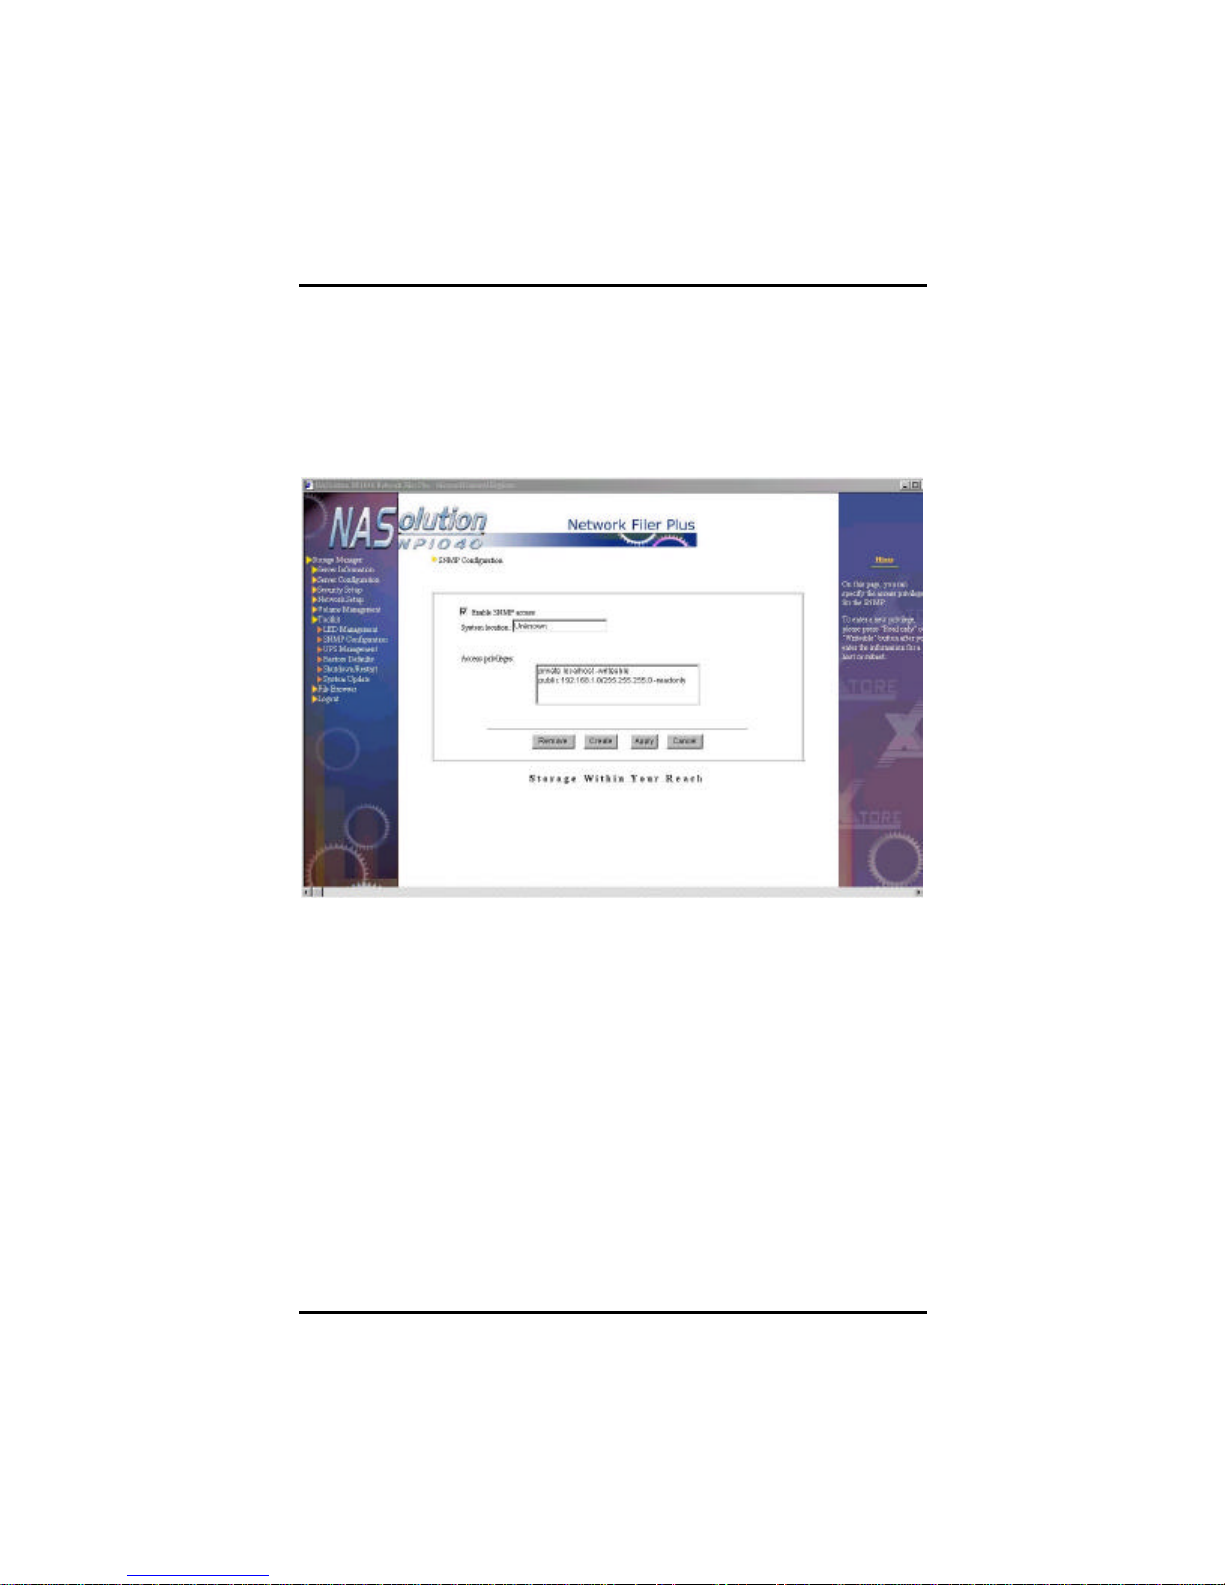
NFP Storage Manager 1.1 User’s Manual
to clear the LED indicator when he/she receives an email notice
stating, “temperature restored to normal”.
SNMP Configuration
Use this option to enable SNMP access. To do this, select Enable
SNMP access, and in the column System location enter the
geographical location of NP1040 NAS server; then click Apply.
Each entry in Access privileges consists of three elements:
1. The first component is the community NP1040 NAS server
belongs to - to be chosen by system administrator.
2. The second component is the host or subnet of this community
3. The third element is NP1040 NAS server’s access privileges of
the community’s host or subnet through SNMP
86 Chapter 4. Using NFP Storage Manager 1.1
Page 92
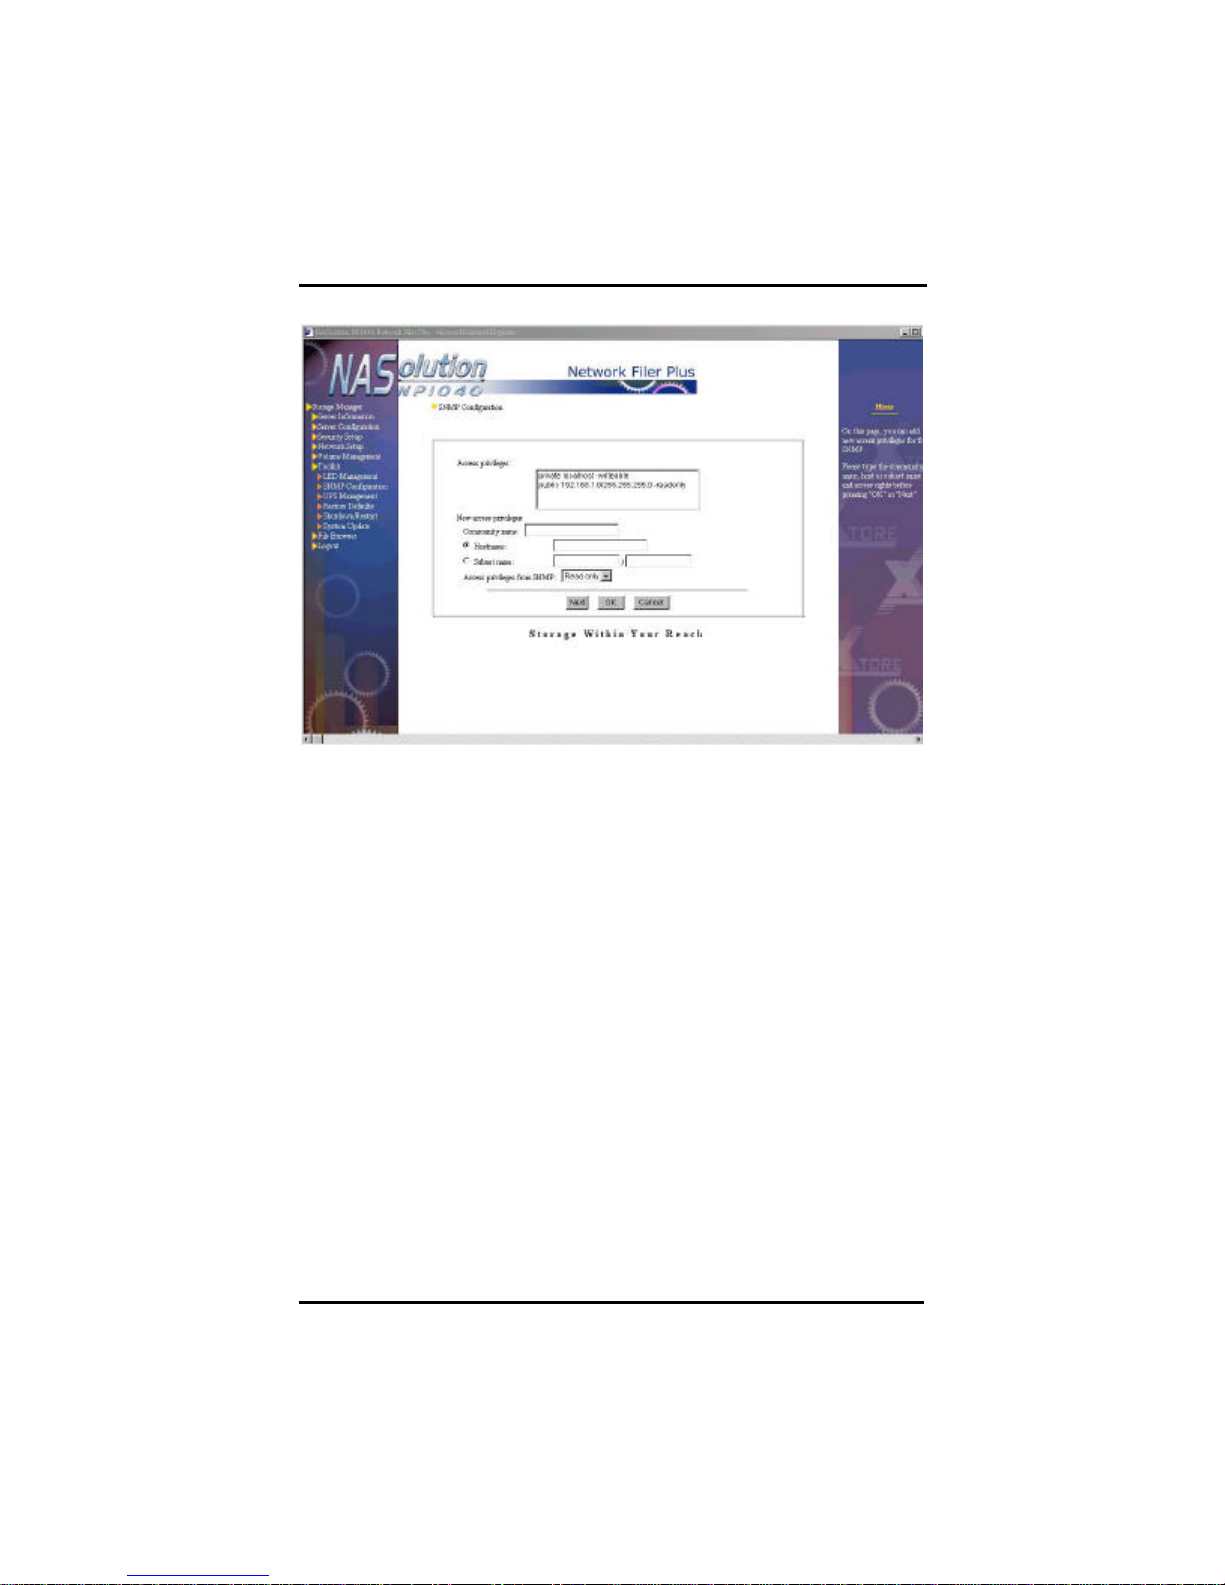
NFP Storage Manager 1.1 User’s Manual
Adding SNMP Access Privileges
To add SNMP access privileges, click on Create. A new dialog will
appear, where you can select a community name along with the host
and subnet (in the format subnet/subnet mask, e.g.
192.168.1.0/255.255.255.0) belonging to this community. Then select
the Access privileges from SNMP : either read only, or writeable. Read
only means the community hosts can only read information through
SNMP, writeable means the community’s hosts can also modify some
read and write fields. Click OK to confirm or Next to add more
privileges.
Removing SNMP Access Privileges
To remove SNMP access, select an option under Access privileges
(use Ctrl for multiple and Shift for continuous selection), and then click
Remove.
Modifying SNMP Access Privileges
To modify existing privileges, select an option under Access Privileges,
remove it and add a new privilege.
Chapter 4. Using NFP Storage Manager 1.1
87
Page 93
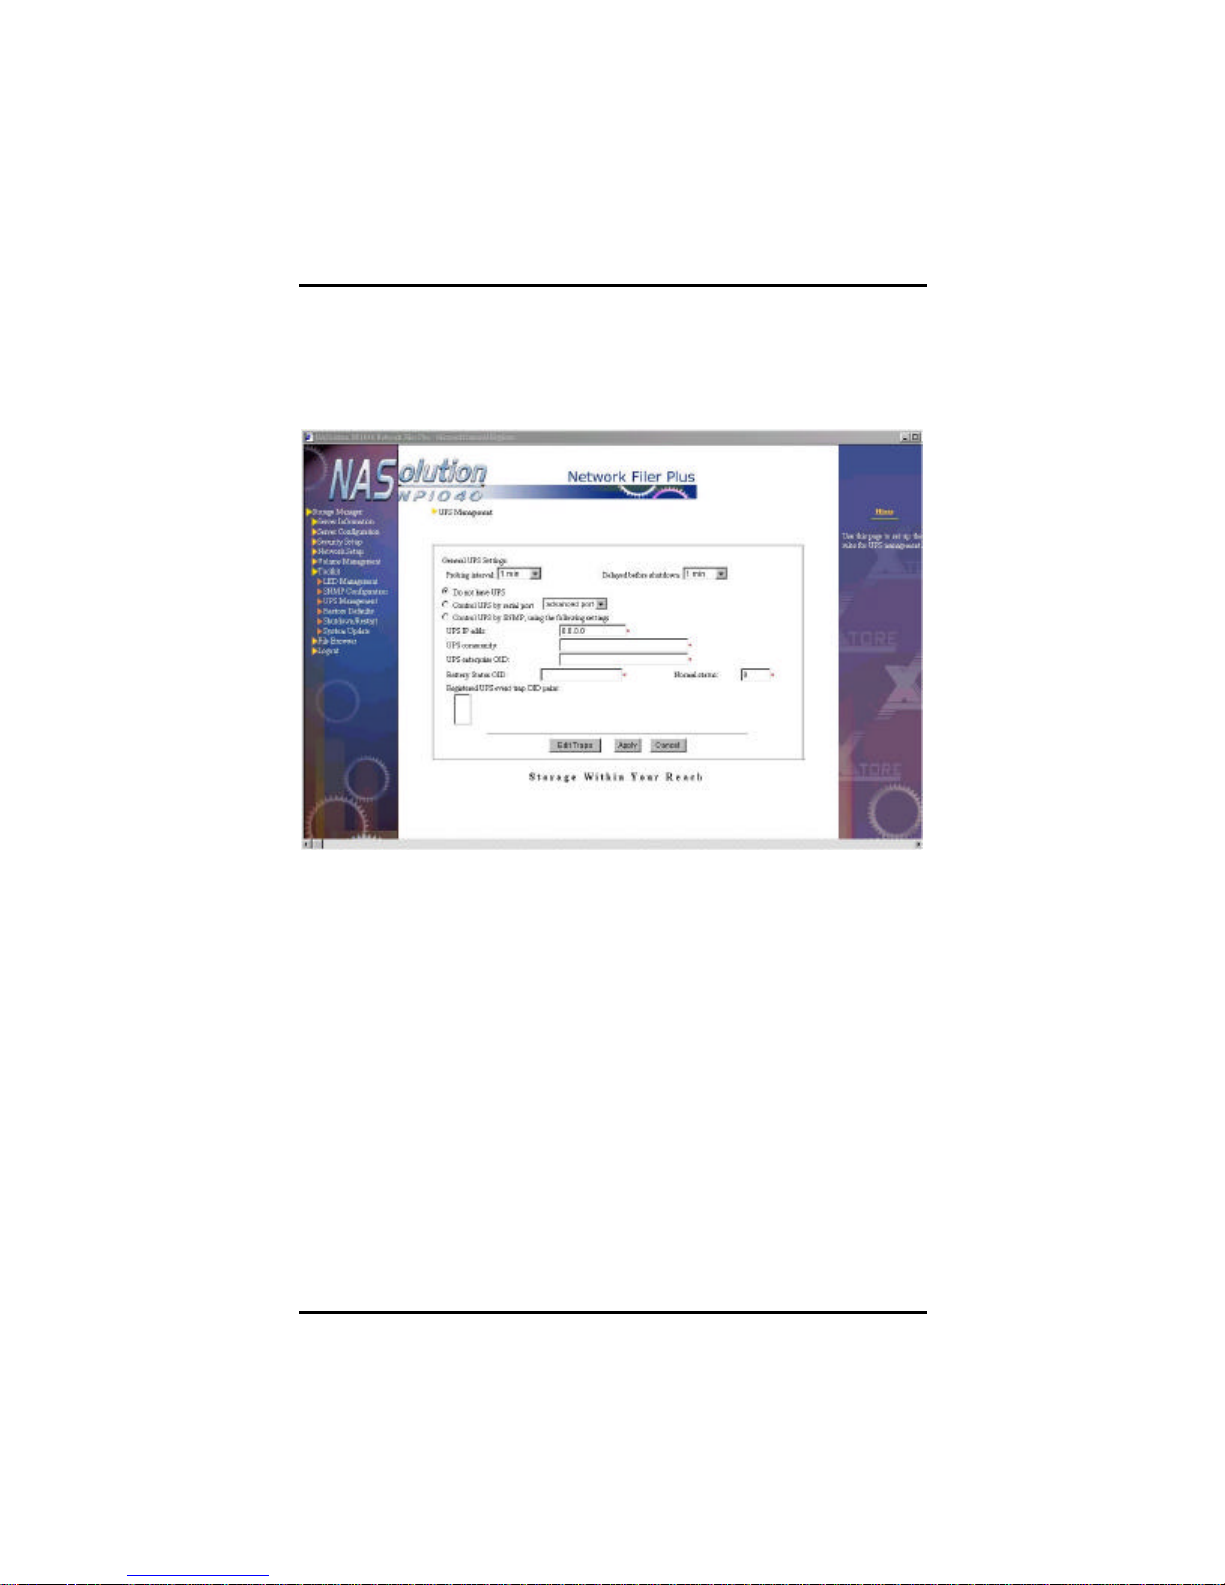
NFP Storage Manager 1.1 User’s Manual
UPS Management
NASolution Network Filer Plus currently supports only APC Smart
Series UPS, both via serial connection or SNMP.
Control UPS by serial port
Connect NP1040 NAS server’s power cords to UPS, and the APC
RS-232 cable (part number 940-0024C or 940-0020B) to COM1 port
of NP1040 NAS server. In NFP Storage Manager, go to ToolkitàUPS
Management, and select Control UPS by serial port, then select the
time for Probing interval and Delayed before shutdown. The system
will use the time interval set for Probing interval to check the status of
the UPS. If an AC power failure or a low battery warning occurs, the
system will wait for the time entered un der Delayed before shutdown
before shutting down, unless the problem is remedied during that
time.
Control UPS by SNMP
Connect NP1040 NAS server’s power cords to the UPS and the UPS
88 Chapter 4. Using NFP Storage Manager 1.1
Page 94

NFP Storage Manager 1.1 User’s Manual
to the network. In NFP Storage Manager, go to ToolkitàUPS
Management, and select Control UPS by SNMP, using the following
settings:
1. Probing interval and Delayed before shutdown
The system will use the time interval set for Probing interval to check
the status of the UPS. If an AC power failure or a low battery warning
occurs, the system will wait for the time entered under Delayed before
shutdown before shutting down, unless the problem is remedied during
that time.
2. UPS IP address and UPS community
UPS equipped with SNMP faculties will be assigned an IP address.
Enter this IP address in the respective column. In the SNMP user
interface of the UPS terminal certain communities will be registered,
each community containing one or more host names and IP addresses.
These hosts can be trusted and can read information from the UPS. If
you want to control the UPS via SNMP, you must register NASolution
Network Filer Plus in one of the communities listed, then enter the
name of the community in the UPS community field.
3. UPS enterprise OID
This setting can be found in the MIB file of the UPS. If UPS supports
SNMP access, the manufacturer has added an MIB file to the
documentation. Download the file from the manufacturer’s web site if
necessary. Look in the file for the Private Enterprise Number. APC’s
Private Enterprise Number is 318, so th e value of this field should read
1.3.6.1.4.1.318, whereby 1.3.6.1.4.1 is static and must not be changed.
You can also use an SNMP program such as HP OpenView to browse
through the MIB file and retrieve the Private Enterprise Number.
4. Battery Status OID
This setting refers to the battery status OID in the MIB file. The value
for the APC UPS is 1.3.6.1.4.1.318.1.1.1.2.1.1. Enter this value, or the
short form 1.1.1.2.1.1, if you are using an APC product.
5. Normal status
The battery status OID (see above) obtained from the MIB file
represents a number of states, e.g., 2 for battery normal , 1 and 3 for
unknown or battery low respectively.
Chapter 4. Using NFP Storage Manager 1.1
89
Page 95
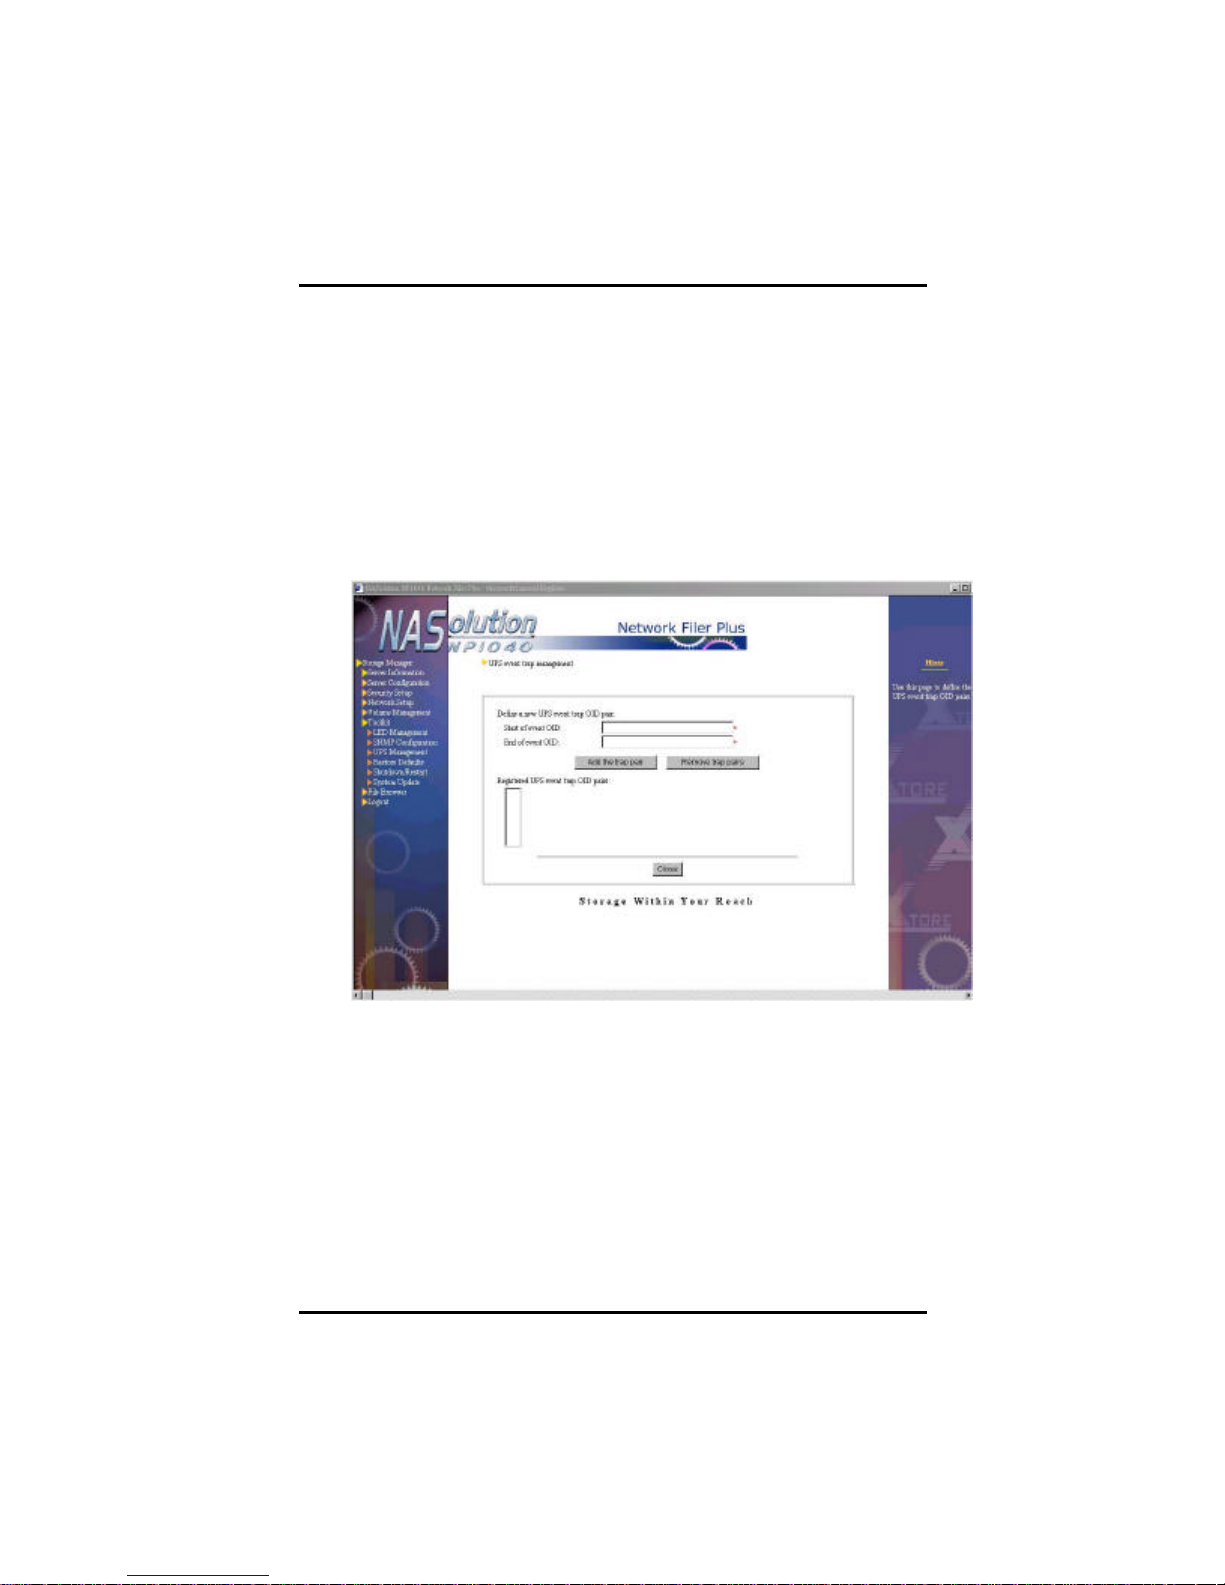
NFP Storage Manager 1.1 User’s Manual
If you have entered values for items 4 and 5, the system will probe the
UPS in the interval chosen above and, if irregularities in the
battery status are detected, shut down after the delay value
entered.
6. Registered UPS event trap OID pairs
An UPS with SNMP faculties usually has a trap function, used to detect
abnormalities in the UPS status without waiting for the scheduled
probing signal. Click Edit trap to add or delete event trap OIDs for your
UPS.
In Start of event OID, enter the critical event trap OID. Alternatively,
use an SNMP program such as HP OpenView to browse through the
MIB file and obtain the trap OID. The value 1.3.6.1.4.1.318.0.5 for
example stands for A/C power failed, switching to battery.
In the field End of event OID, enter the informational trap OID, e.g.
1.3.6.1.4.1.318.0.9 for A/C power restored. This field is optional, since
many critical events do not permit resuming and require a system
shutdown. Retrieve both values for Start of event OID and End of
event OID for the MIB documentation of your UPS manufacturer.
90 Chapter 4. Using NFP Storage Manager 1.1
Page 96
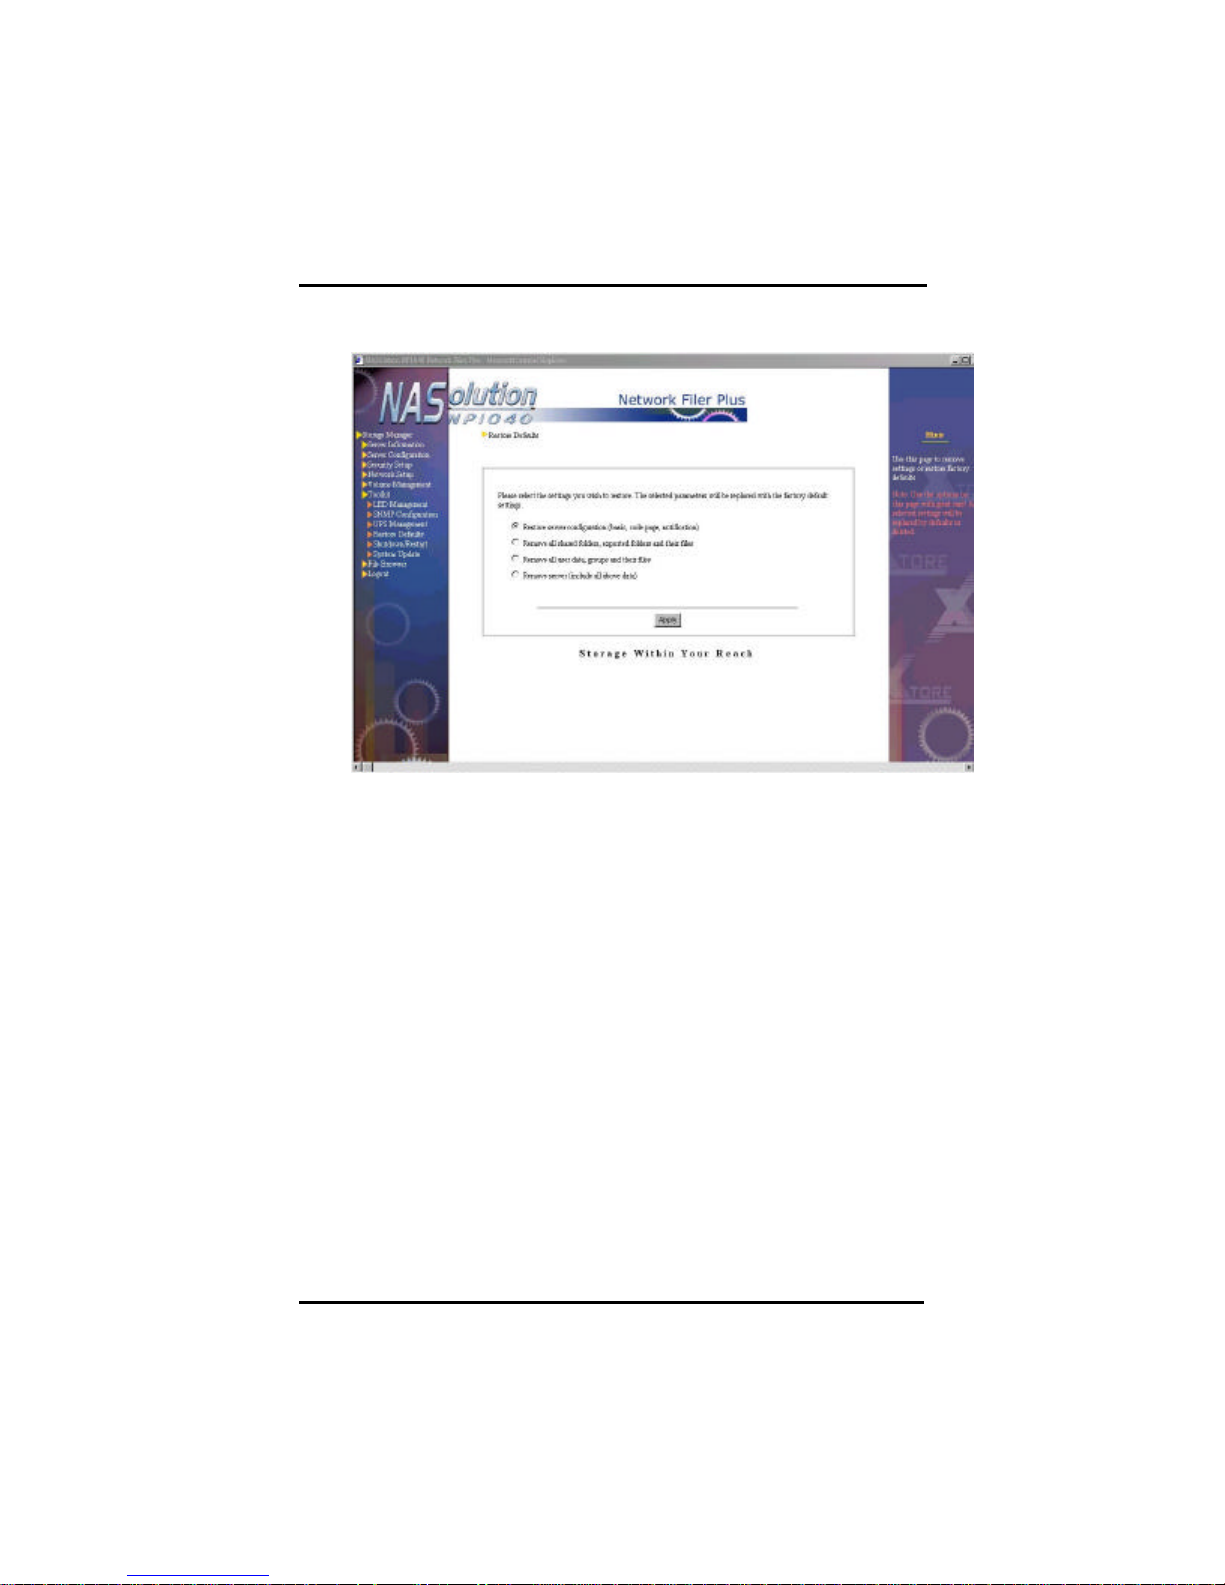
NFP Storage Manager 1.1 User’s Manual
Restore defaults
System administrator has the option to restore factory defaults for all
settings, or remove all user settings in the system. Four options are
available:
1. Restore Server Configuration (basic, code page, notification): NFP
Storage Manager’s Server Configuration will be reset to factory
defaults.
2. Remove all shared folders, exported folders, and their files.
3. Remove all user data, groups, and their files.
4. Remove server (include all above data).
Note: Use the options on this page with great care! All selected
settings will be replaced by defaults or deleted.
Chapter 4. Using NFP Storage Manager 1.1
91
Page 97
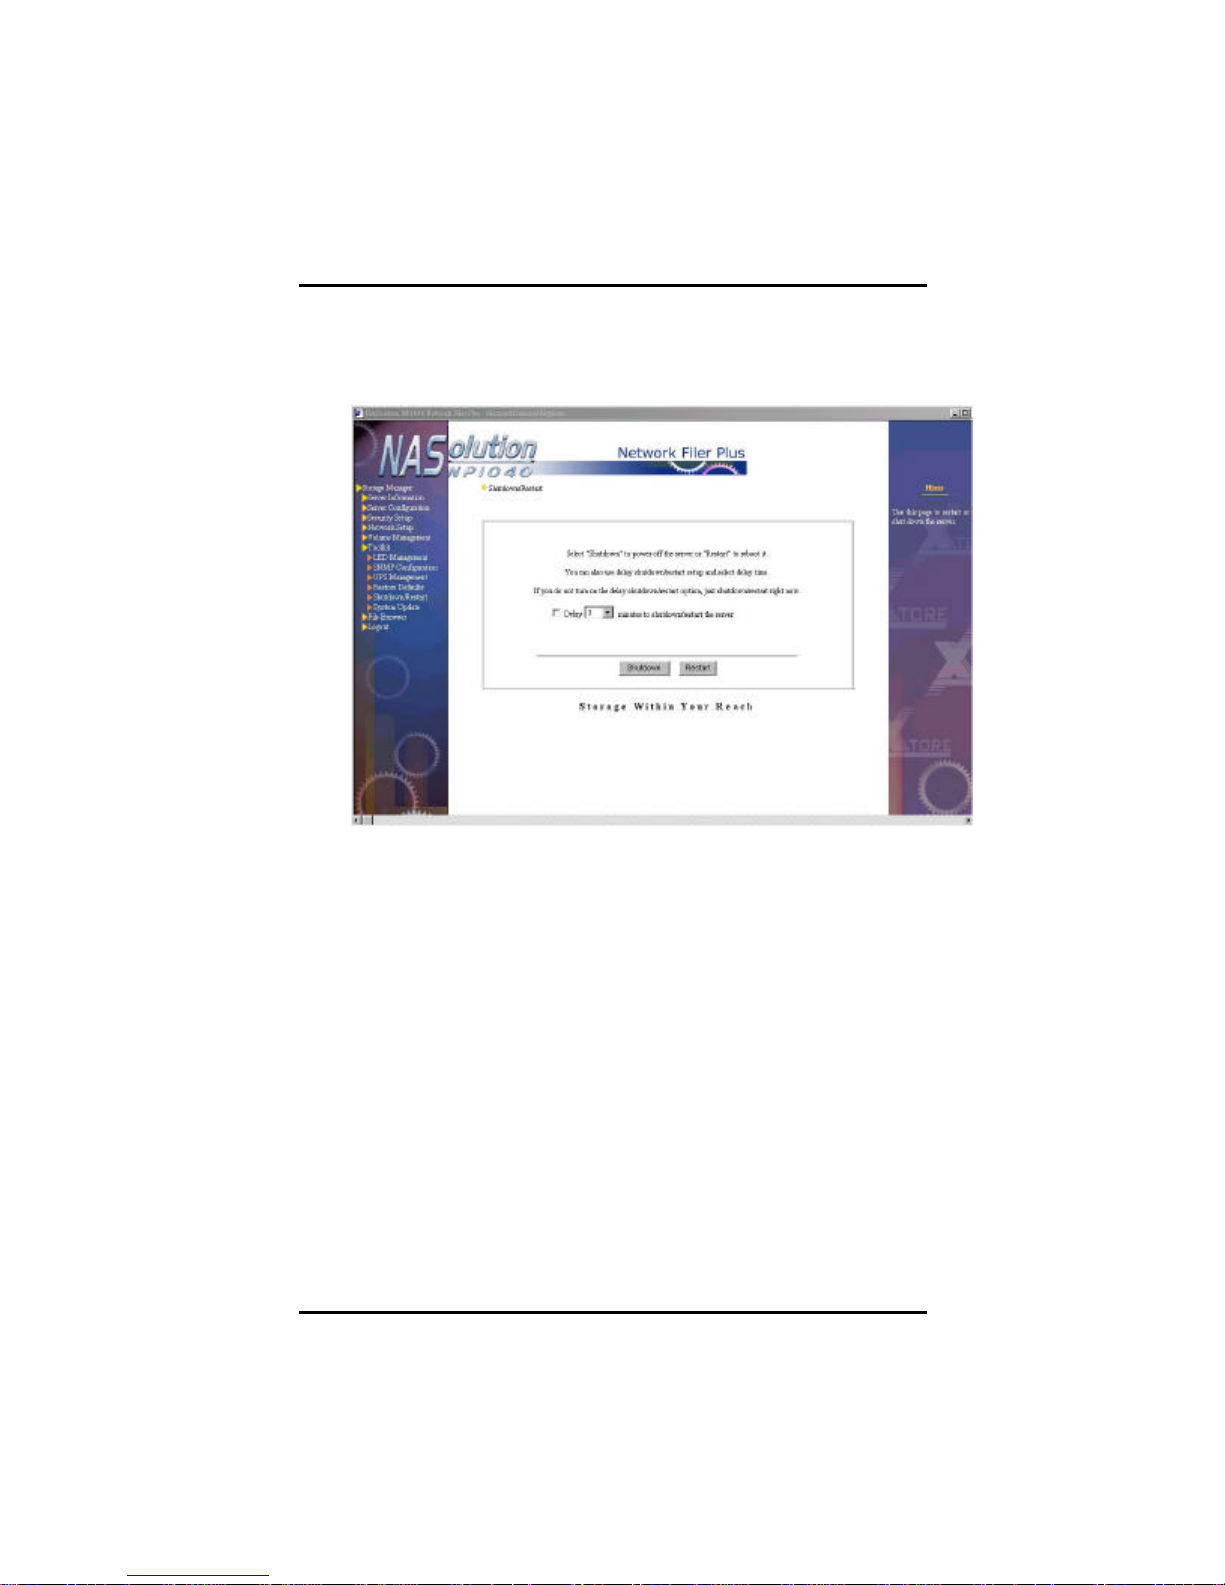
NFP Storage Manager 1.1 User’s Manual
Shutdown/ Restart
Use this page to Shutdown or Restart the server. You can also use the
power switch on NP1040 NAS server. To preserve data integrity,
never unplug the server before it has been properly shut down.
System administrator can select the option Delay xxx minutes to
shutdown/restart the server and the setup will be executed after the
time specified.
Wait for the power LED to go off and the server to halt operation
completely before unplugging and moving your NP1040 unit.
92 Chapter 4. Using NFP Storage Manager 1.1
Page 98
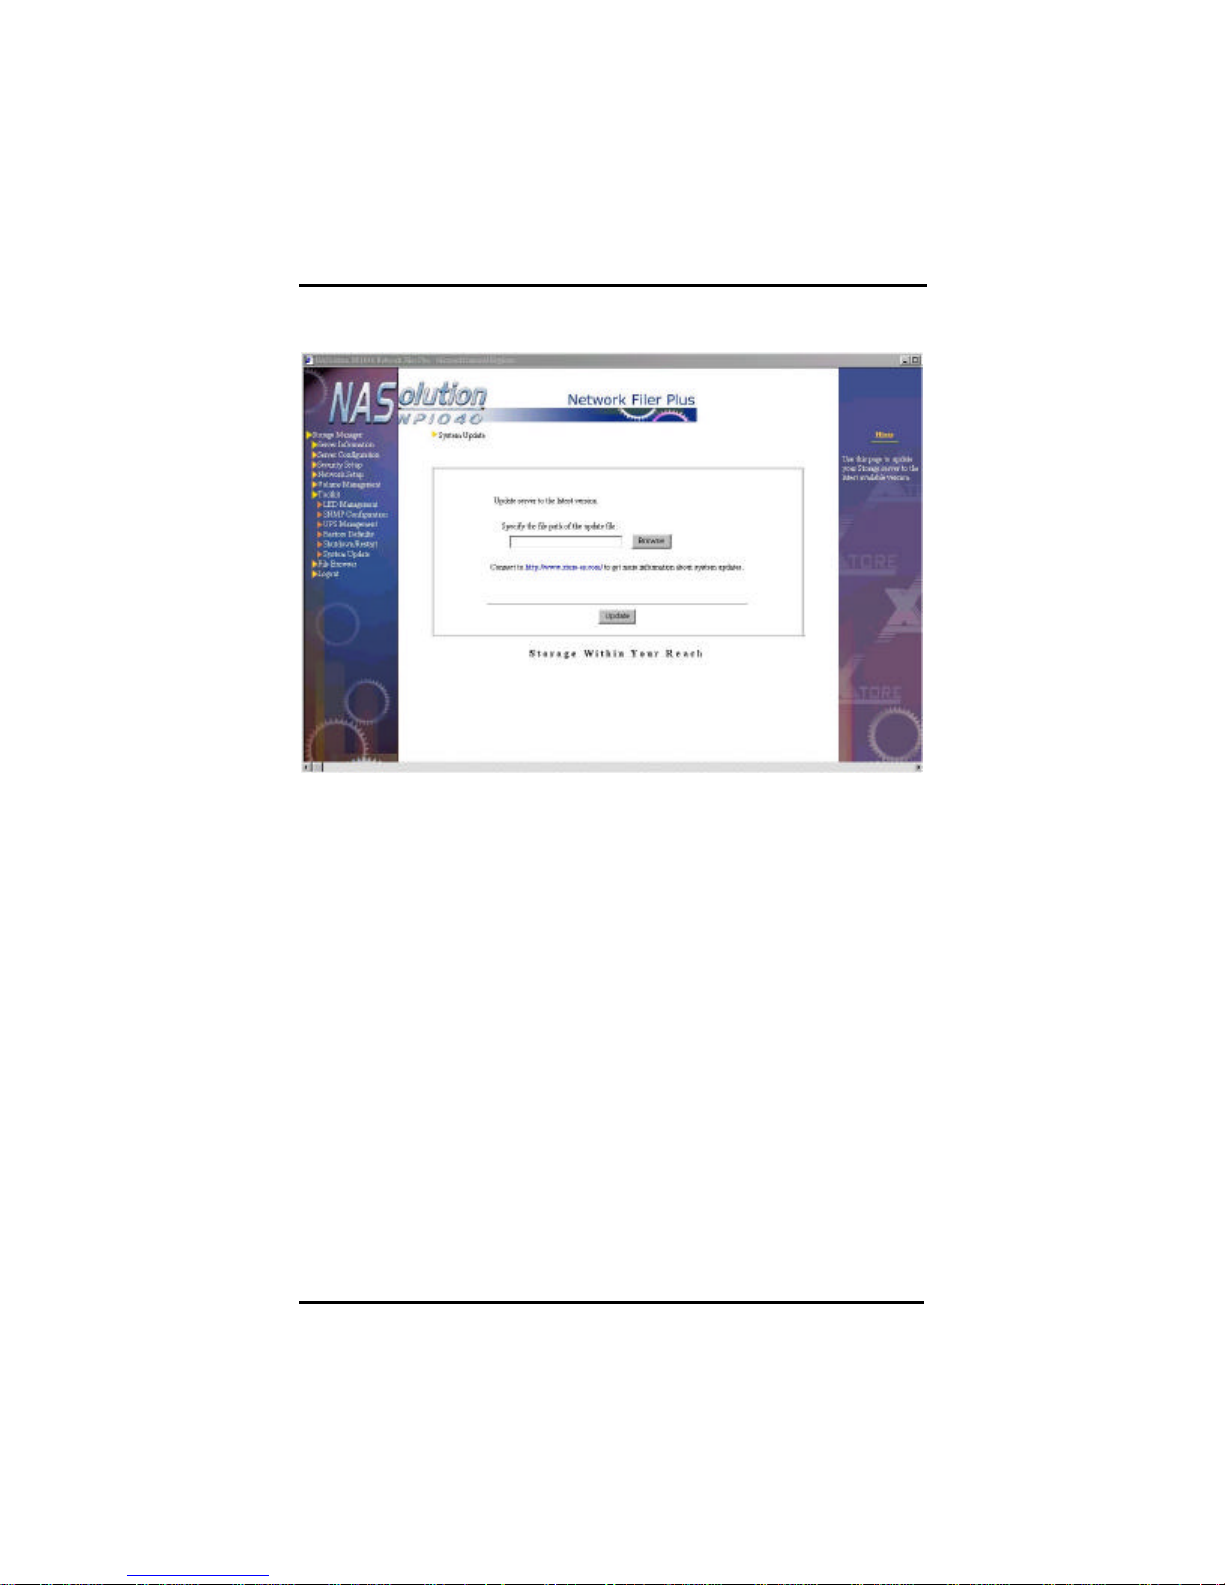
NFP Storage Manager 1.1 User’s Manual
System Update
Once you have obtained the OS upgrade, follow these steps to
update your system:
1. Copy the update file (assume its name as update.pat) from any client
computer to any shared folder on NP1040 NAS server.
2. Open NFP Storage Manager, and go to ToolkitàSystem Update
section.
3. Click Browse to select name and path of system update file.
4. Click on Update. The update process will start immediately and the
system will restart automatically upon completion.
When upgrading the system, note the following:
1. System update will not affect the files saved on the server. However,
we strongly recommend that the administrator backup all the files on
the server before updating the system.
2. The server cannot be accessed while the upgrade is running.
3. When the system is being updated, do not turn off the server or remove
the AC power, or it will cause errors in the system operation.
4. The upgrade patch file must be placed on the shared folder
SYSUPDATE on NP1040 NAS server, and cannot be run from the
client terminal.
Chapter 4. Using NFP Storage Manager 1.1
93
Page 99
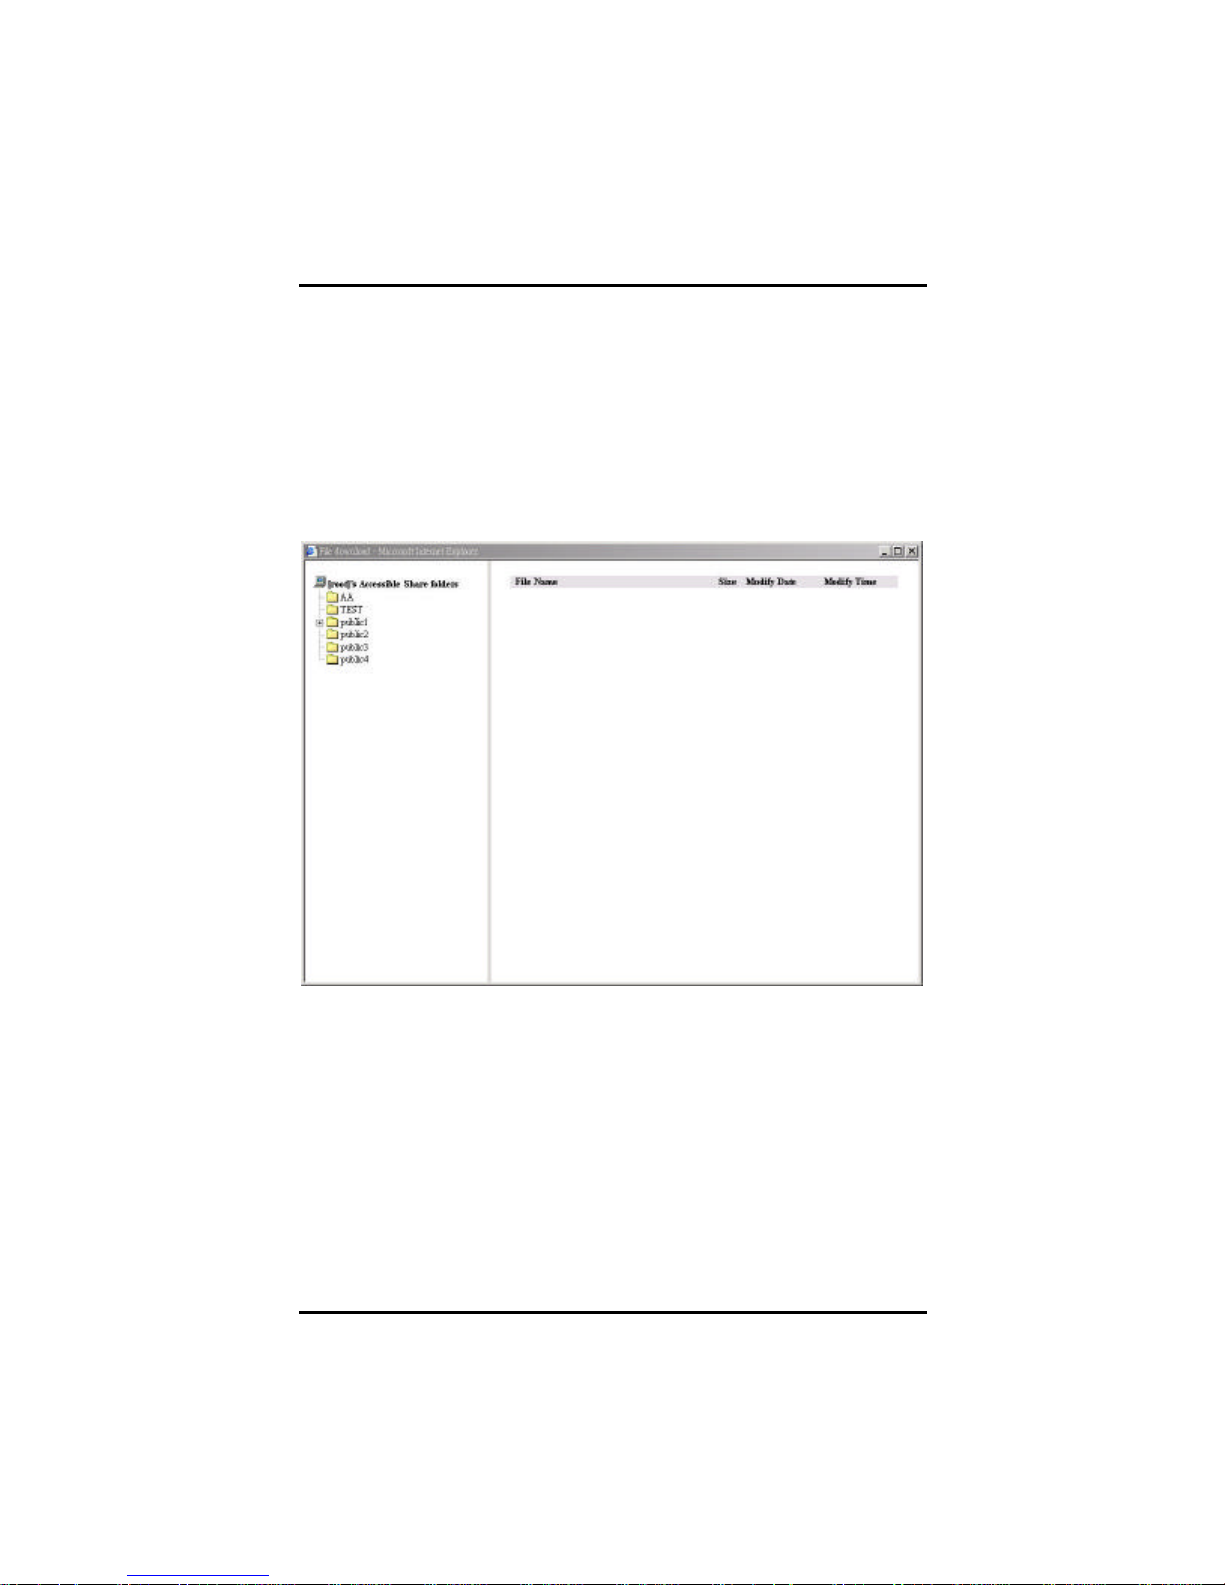
NFP Storage Manager 1.1 User’s Manual
5. During the upgrade, the browser on the client te rminal will loose the
connection to the system. Close the browser and wait for the upgrade
to complete before re-connecting to NFP Storage Manager. (The
system will send an e-mail message informing the administrator that
the server is back on line).
File Browser
This function allows users to have remote access to files in the server
through the Internet (http protocol). The user can login to NFP
Storage Manager, enter the File Browser section and browse all the
folders and files in each shared folder the user has access rights.
Please note:
To make sure files/folders on NP1040 NAS server can be displayed
correctly on this page, please upgrade the IE browser version to 5.5
or above.
94 Chapter 4. Using NFP Storage Manager 1.1
Page 100
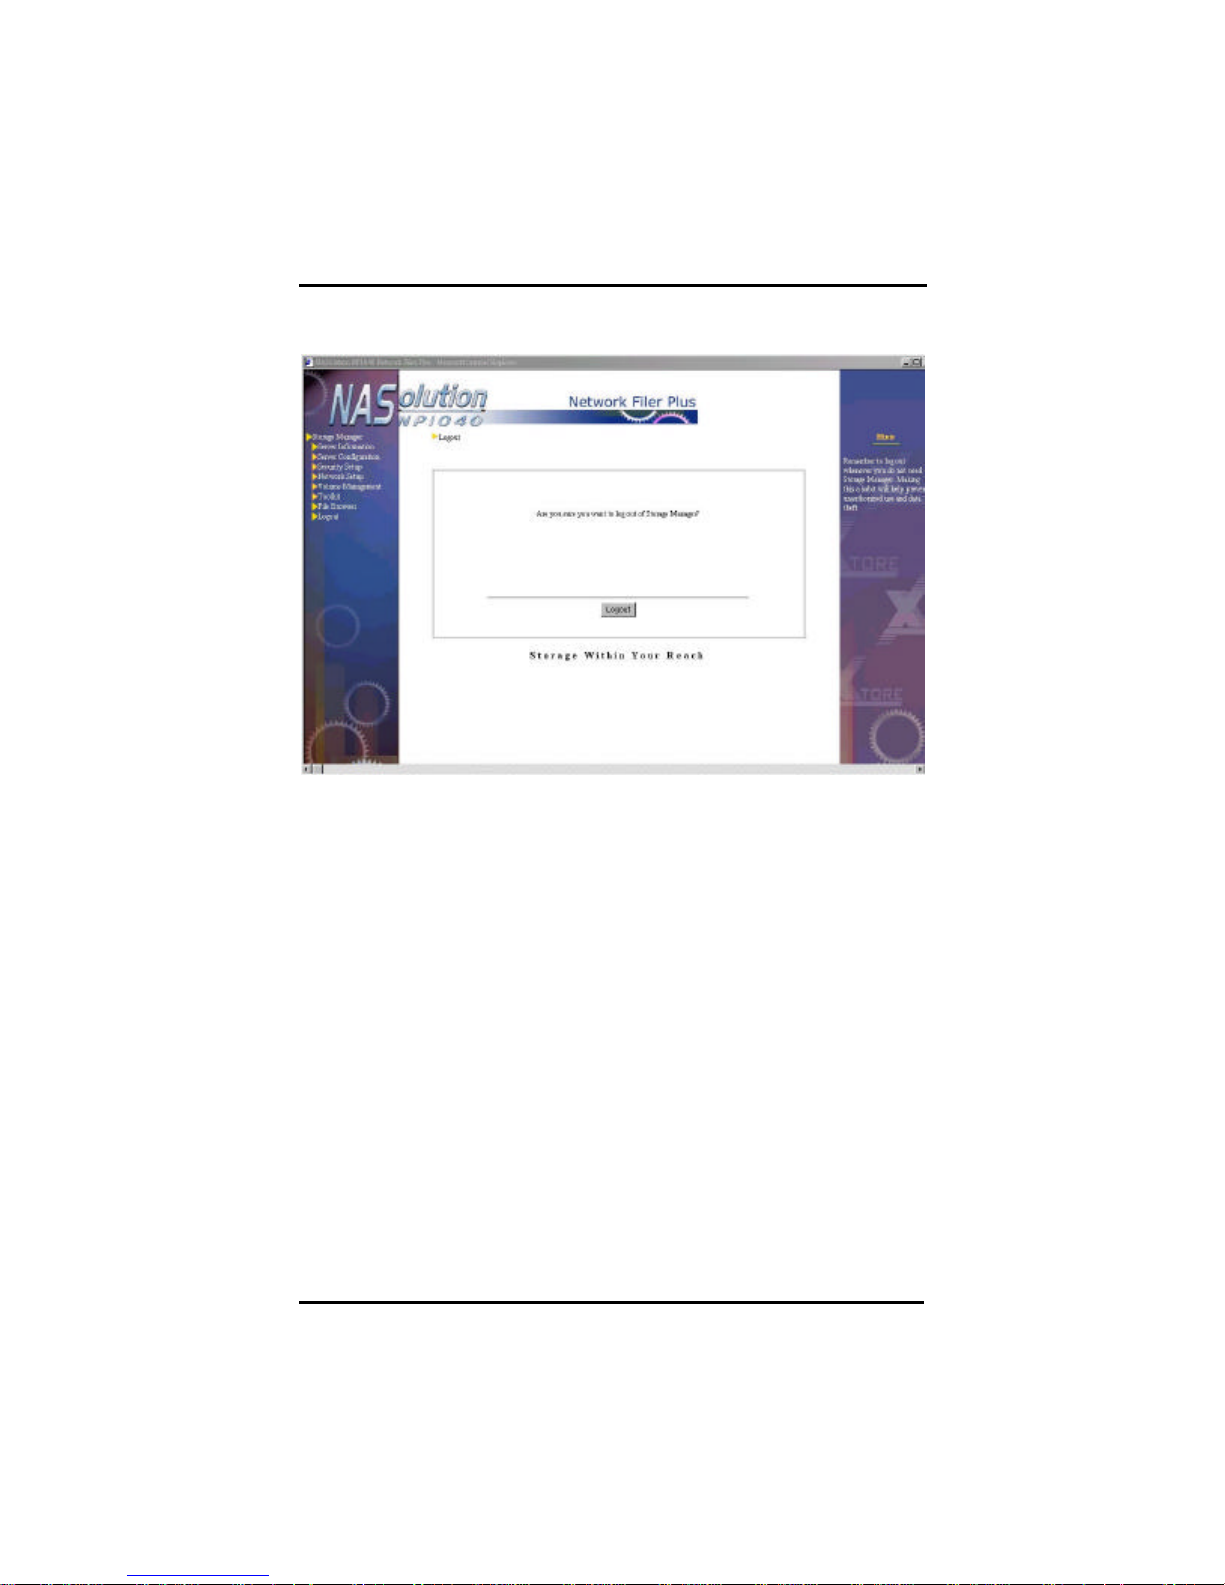
NFP Storage Manager 1.1 User’s Manual
Logout
For safety reasons, remember to log out whenever you do not need
NFP Storage Manager.
Besides during the initial configurations, system administrators and
other users have three other options to further configure the server in
the future:
1. Us ing a browser to connect to the server’s IP address.
2. Running NFP Setup Assistant to locate NP1040 servers, then
double-clicking on a server’s name to start Storage Manager.
3. On Windows clients with NetBEUI support you can enter the server
name directly into the address bar of the browser window.
If the user is not the system administrator (root) but a normal user
(local account), only that particular user’s personal data can be
modified. In NFP Storage Manager, only Personal Information and
Personal Settings, File Browser, along with the Logout option will
appear. Users can set up their own e-mail address and password, and
access file.
Chapter 4. Using NFP Storage Manager 1.1
95
 Loading...