

Page 1
Page 2

1
Check your system requirementsCheck your system requirements
Check your system requirementsCheck your system requirements
Check your system requirements
1. USB port x 1 (USB 1.0 or 2.0*)
2. System Requirements:
a. PC – Windows 7, Vista, XP
b. Mac - OS X 10.5 and above
CPUCPU
CPUCPU
CPU 1GHz Pentium or above
Hard DiskHard Disk
Hard DiskHard Disk
Hard Disk 20GB or above
RAMRAM
RAMRAM
RAM 512M or above
DisplayDisplay
DisplayDisplay
Display 800 x 600 minimum
3. You need to have
AA
AA
A
dministrdministr
dministrdministr
dministr
atorator
atorator
ator rights to install and run
the software
4. We suggest you switch off your anti-virus software before
installing the USB modem. In some cases protection software
can prevent automatic installation. It is possible to start the
installation process manually by clicking the Autorun icon
when it appears.
TipsTips
TipsTips
Tips
*USB 2.0 ports are preferred because they are much faster.
Identify the type of port on your PC and use the version 2 ports.
Use the USB extender cable to obtain optimum reception.
Page 3
2
Get to know yGet to know y
Get to know yGet to know y
Get to know y
our our
our our
our
TT
TT
T
elecom MF626 USBelecom MF626 USB
elecom MF626 USBelecom MF626 USB
elecom MF626 USB
ModemModem
ModemModem
Modem
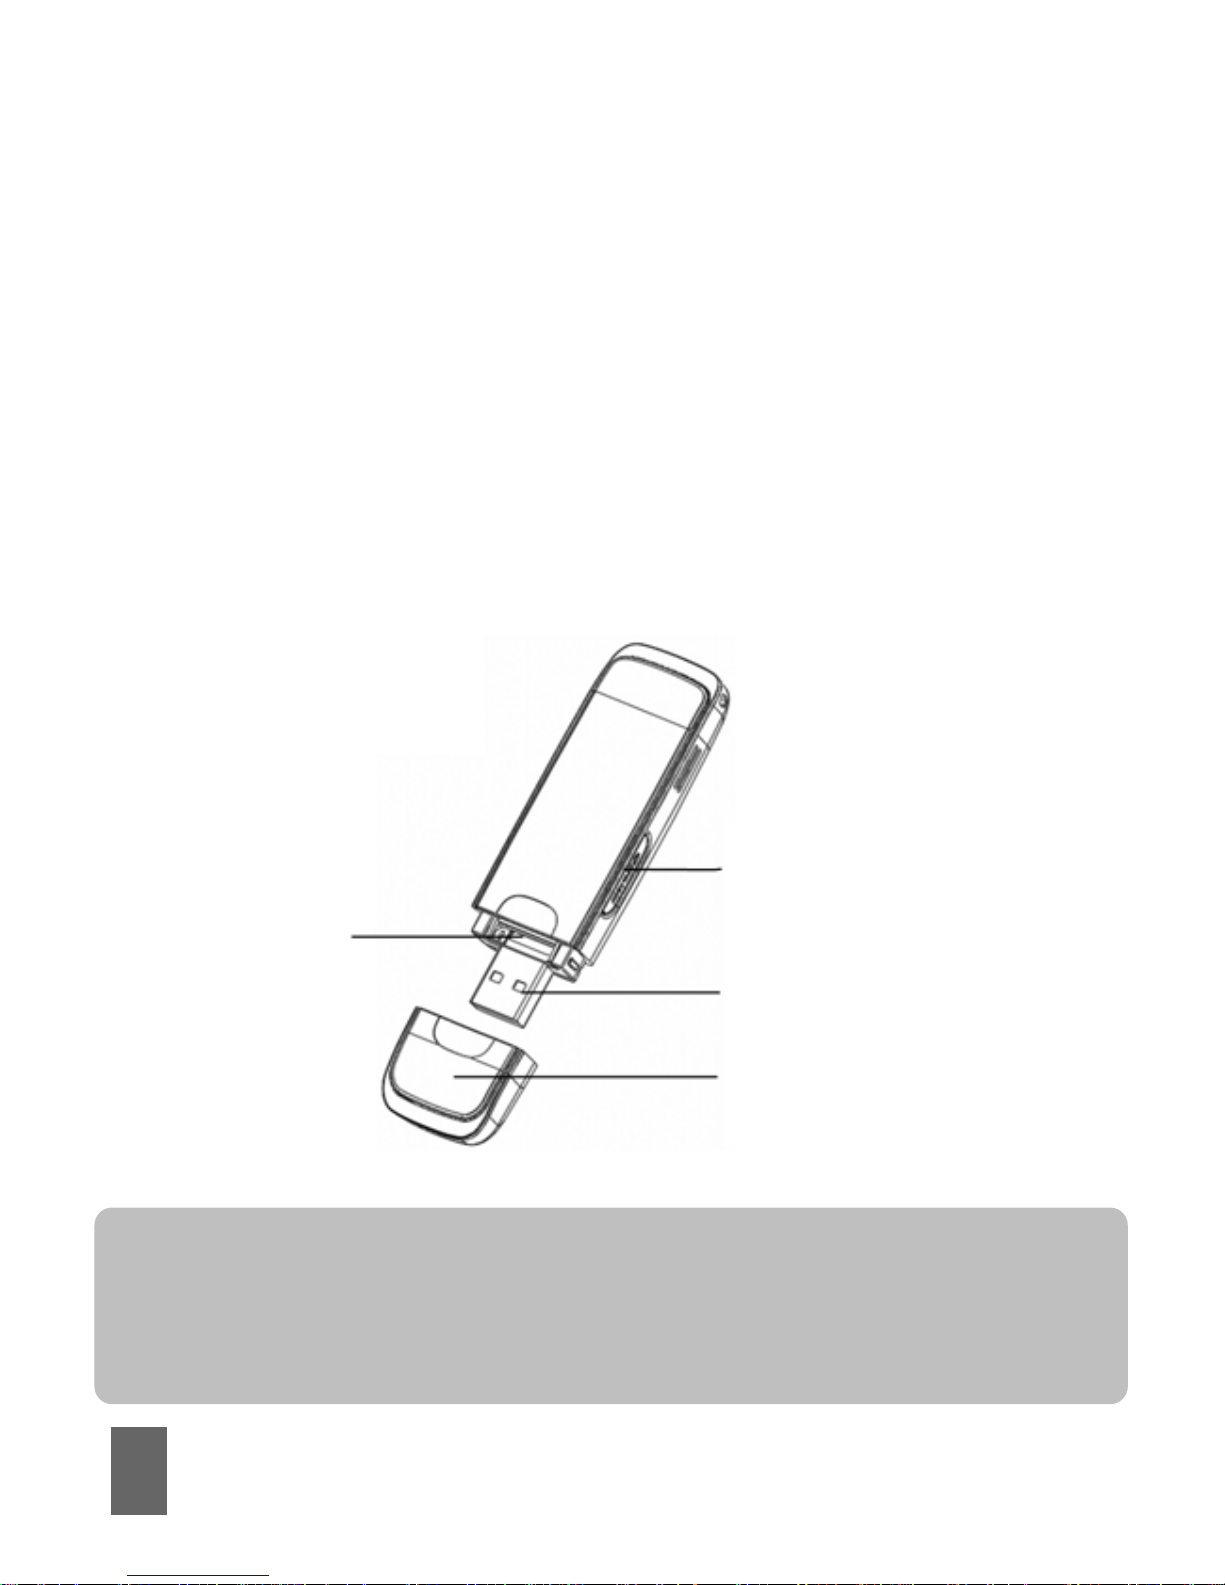
1. USIM Holder (thumb catch to open the tray)
2. MicroSDTMHC Card Slot
3. USB Connector
4 . Modem Cover
TipTip
TipTip
Tip
Before inserting the modem into your computer, please power
on your computer and wait until the operating system is fully
loaded.
1
4
3
2
Page 4
3
InserInser
InserInser
Inser
t yt y
t yt y
t y
our SIM our SIM
our SIM our SIM
our SIM
CarCar
CarCar
Car
dd
dd
d
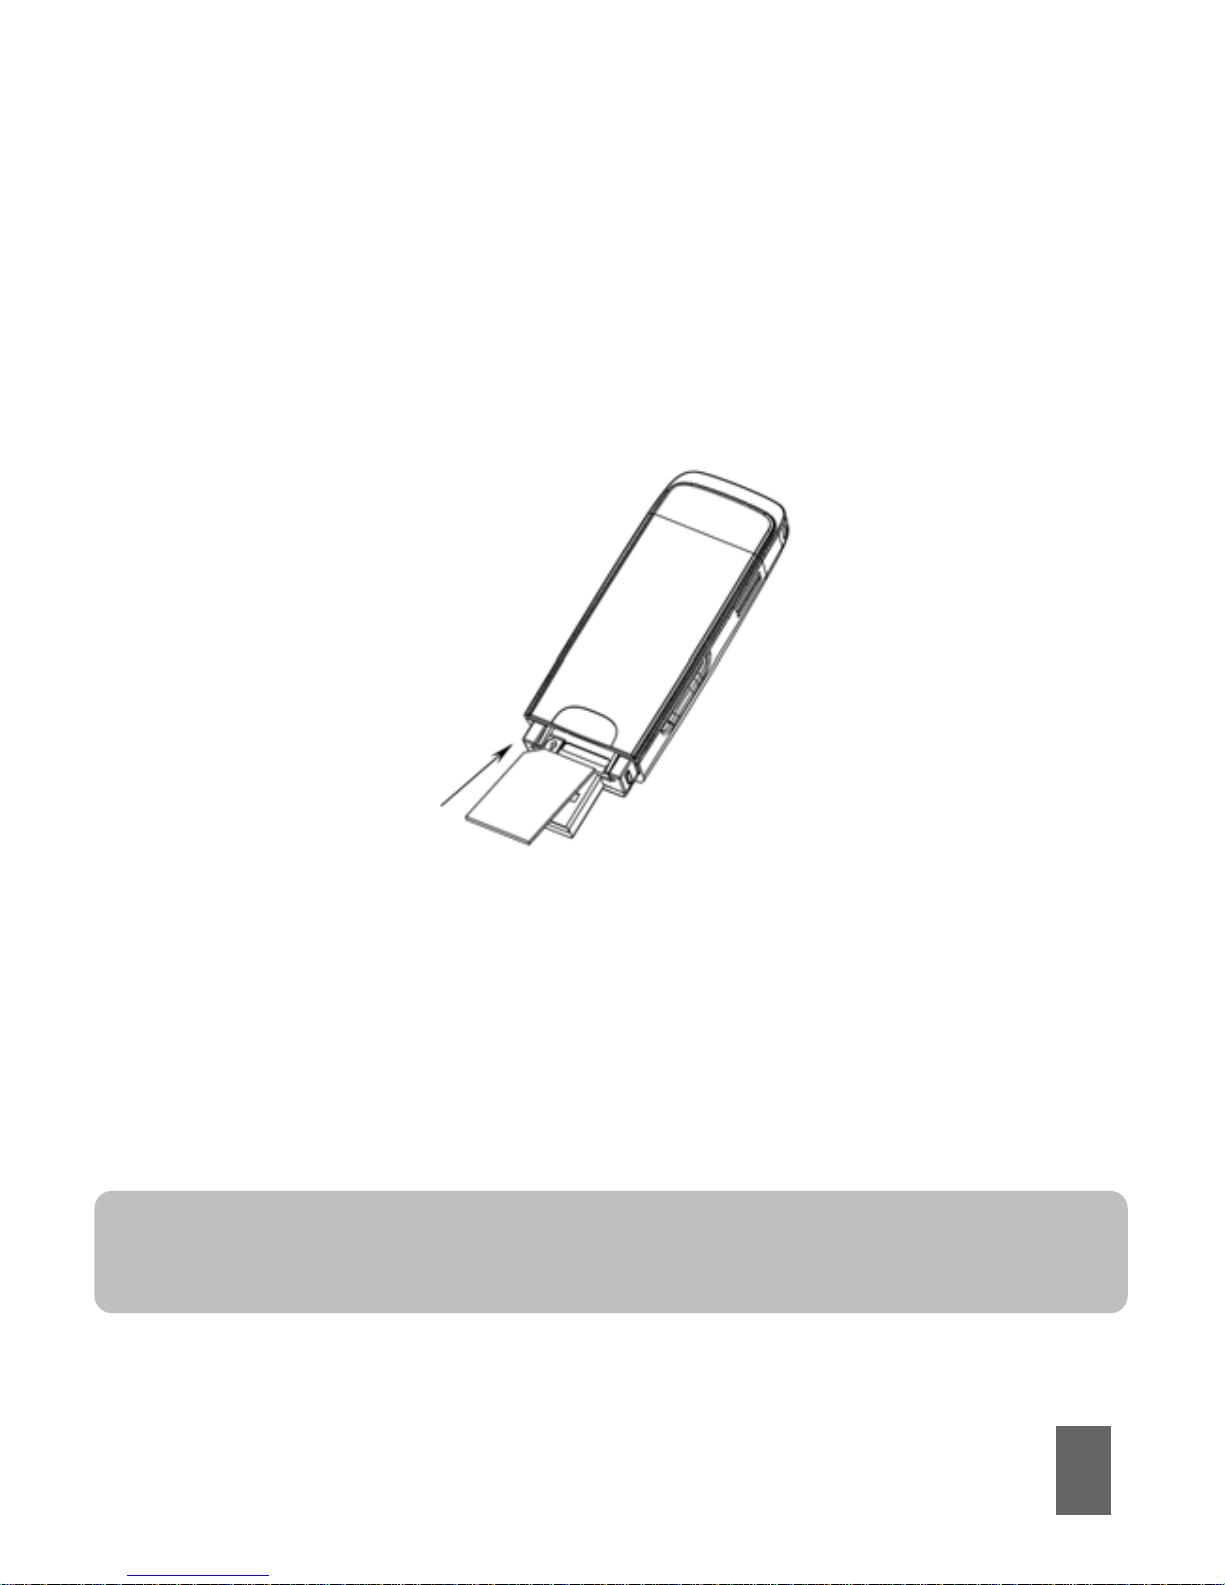
1. Open the modem cover and slide out the SIM tray using the
thumb catch.
2. Insert the SIM card as shown with the gold contacts facing
down and the bevelled edge on the left hand side.
3. Push the SIM card in
as far as it will goas far as it will go
as far as it will goas far as it will go
as far as it will go. Replacing the
modem cover will fully push the SIM tray home.
Note:Note:
Note:Note:
Note:
When
corrcorr
corrcorr
corr
ectlectl
ectlectl
ectl
y insery inser
y insery inser
y inser
tedted
tedted
ted the thumb catch on the SIM
tray is visible and not covered by the SIM card.
Page 5

4
Insert the modem into your computer toInsert the modem into your computer to
Insert the modem into your computer toInsert the modem into your computer to
Insert the modem into your computer to
start automatic installstart automatic install
start automatic installstart automatic install
start automatic install
The installation and management software is pre-loaded onto
your USB modem. Simply insert the modem into your computer
and follow the instructions on-screen. You’ll be up and connected
in about 5 minutes.
The USB modem is a Plug and Play device. Once inserted your
system will automatically detect the new hardware and start to
install the software. Be patient as it may take some time for
your computer to recognise the modem and complete the
installation.
If nothing happens your system configuration may be preventing
Autorun.
Manual installation tipsManual installation tips
Manual installation tipsManual installation tips
Manual installation tips
•
WW
WW
W
indows userindows user
indows userindows user
indows user
s:s:
s:s:
s: Double click the Autorun icon to start
the software installation. (Start > My Computer >
TelecomModem > Autorun.exe)
•
MAMA
MAMA
MA
C userC user
C userC user
C user
s:s:
s:s:
s:
Go to Go to
Go to Go to
Go to
CC
CC
C
omputer omputer
omputer omputer
omputer open the CD-ROM named
Telecom Modem, and double click the Telecom Connection
Manager icon.
Page 6
5
• If the installation process does not launch you can also
download the install files from our website at www.zte.co.nz
SS
SS
S
tep btep b
tep btep b
tep b
y Sy S
y Sy S
y S
tep Installation tep Installation
tep Installation tep Installation
tep Installation
GuideGuide
GuideGuide
Guide
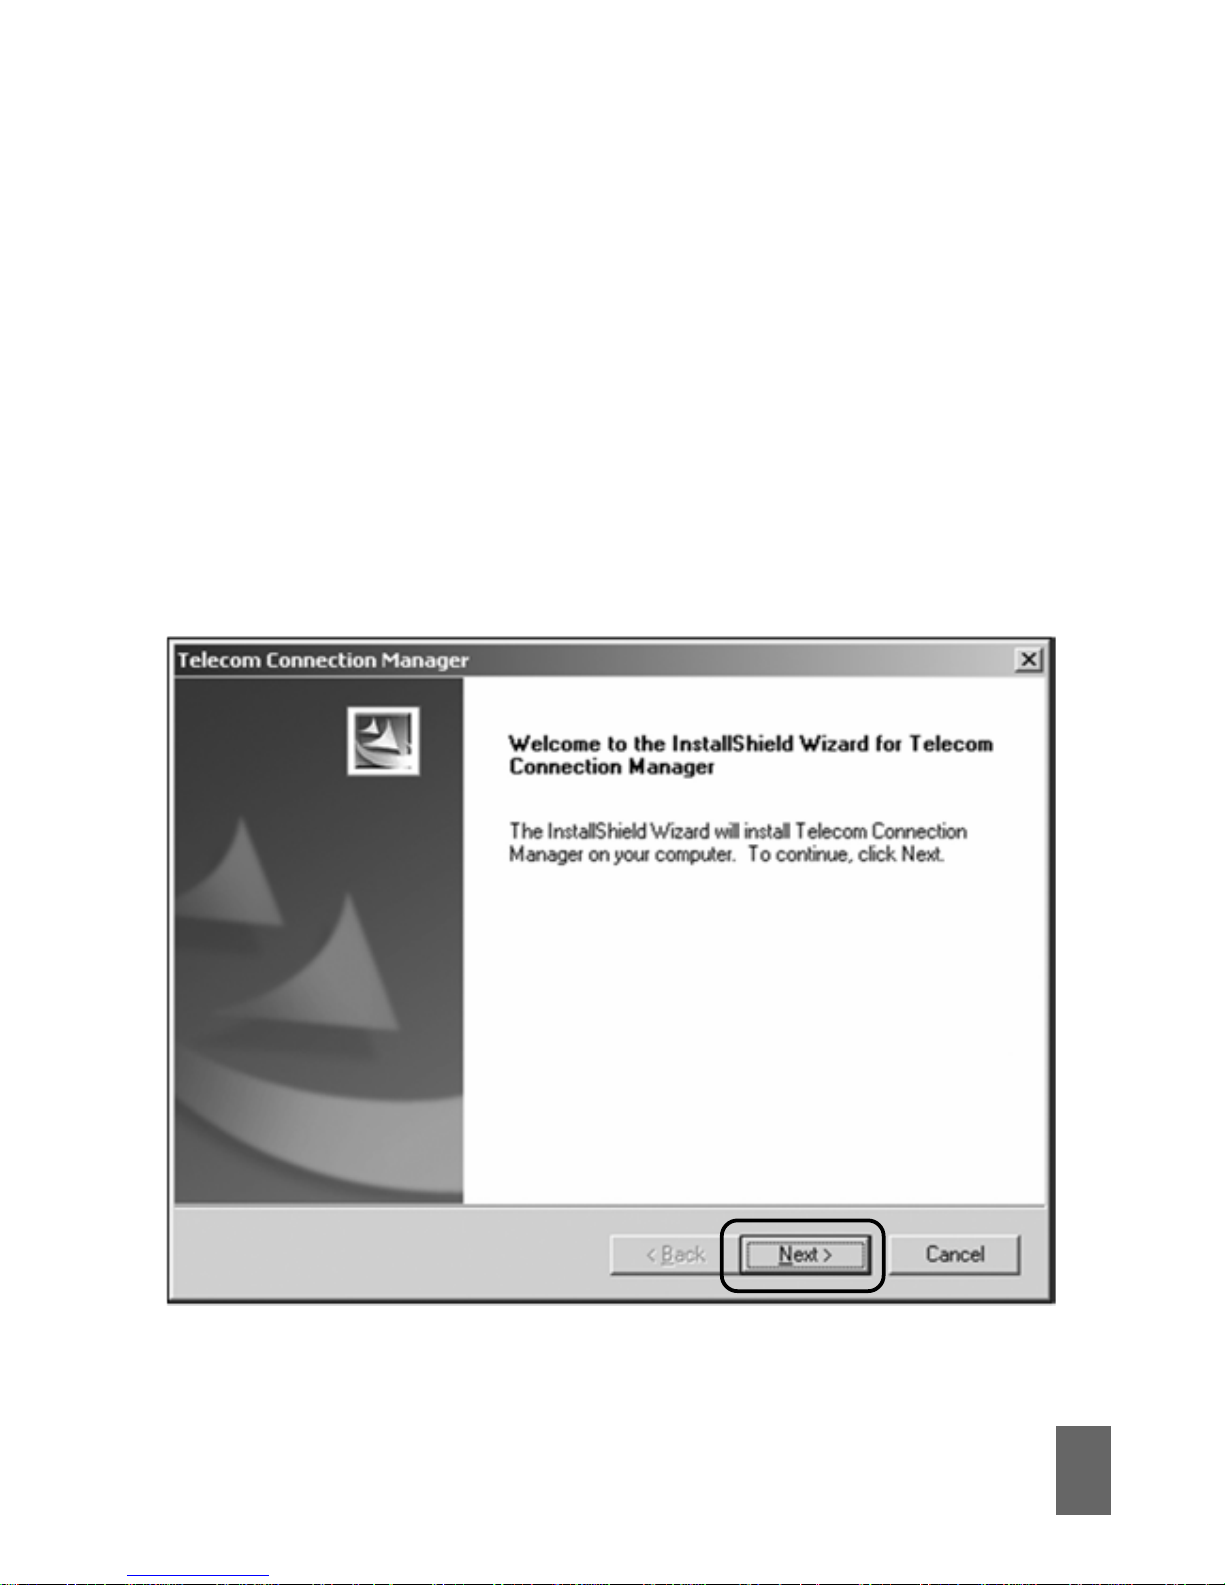
The installation method shown below is for Windows XP. Other
operating systems will follow a similar but not necessarily
identical installation process:
Page 7
6
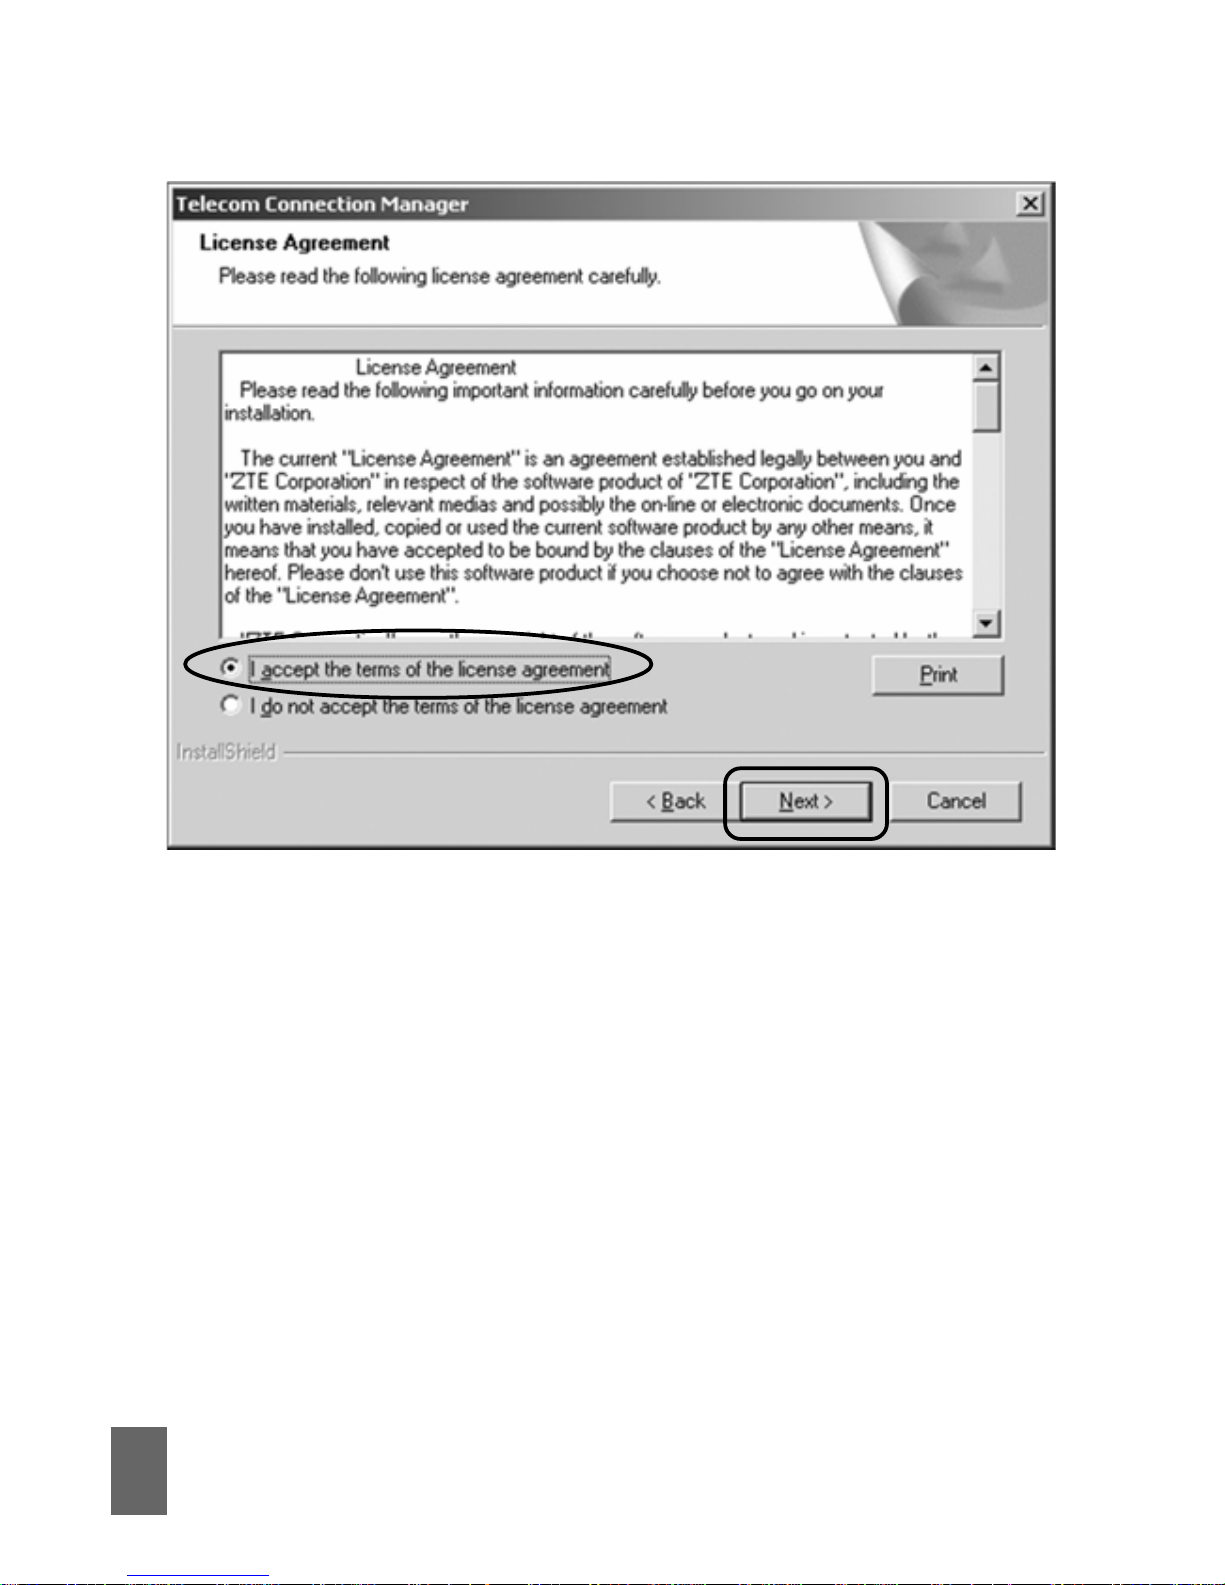
Read the license agreement, choose ‘I accept….’, then click
NextNext
NextNext
Next
to continue…
Page 8
7
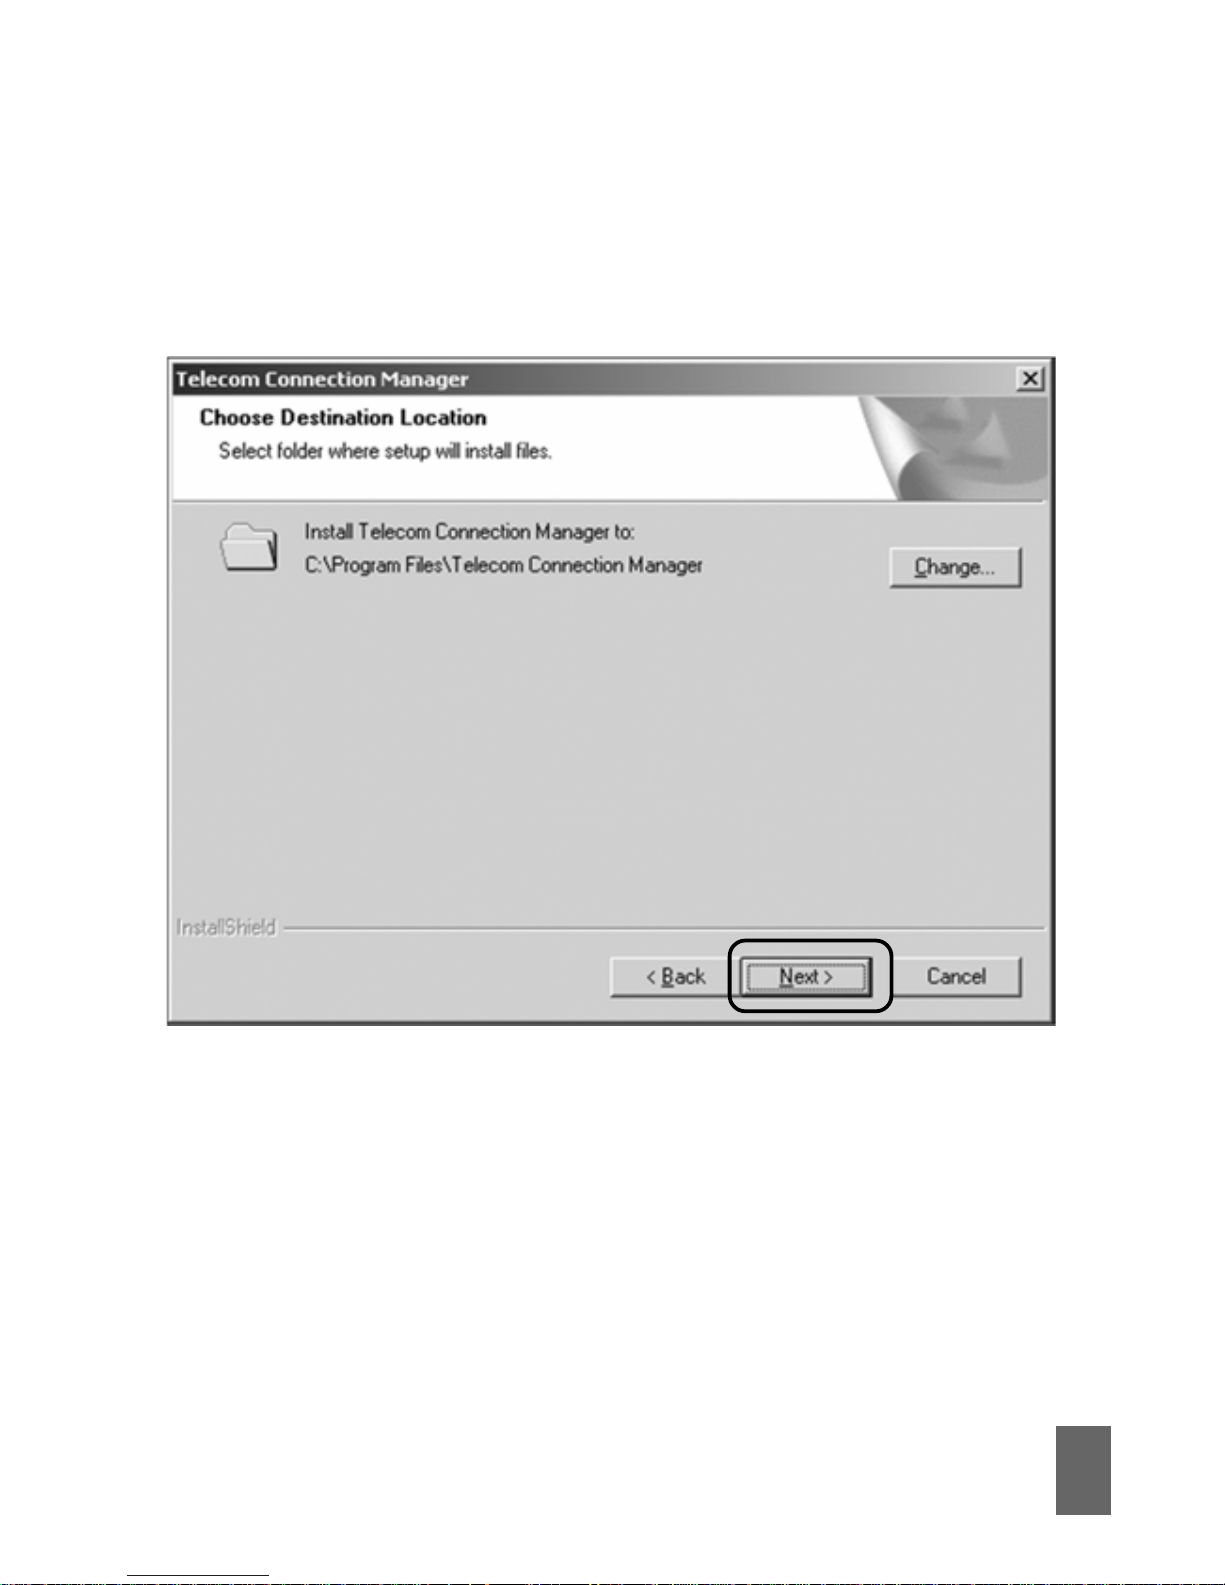
Press
NextNext
NextNext
Next to accept the default folder location, or press
ChangeChange
ChangeChange
Change to define your own path.
Page 9
8
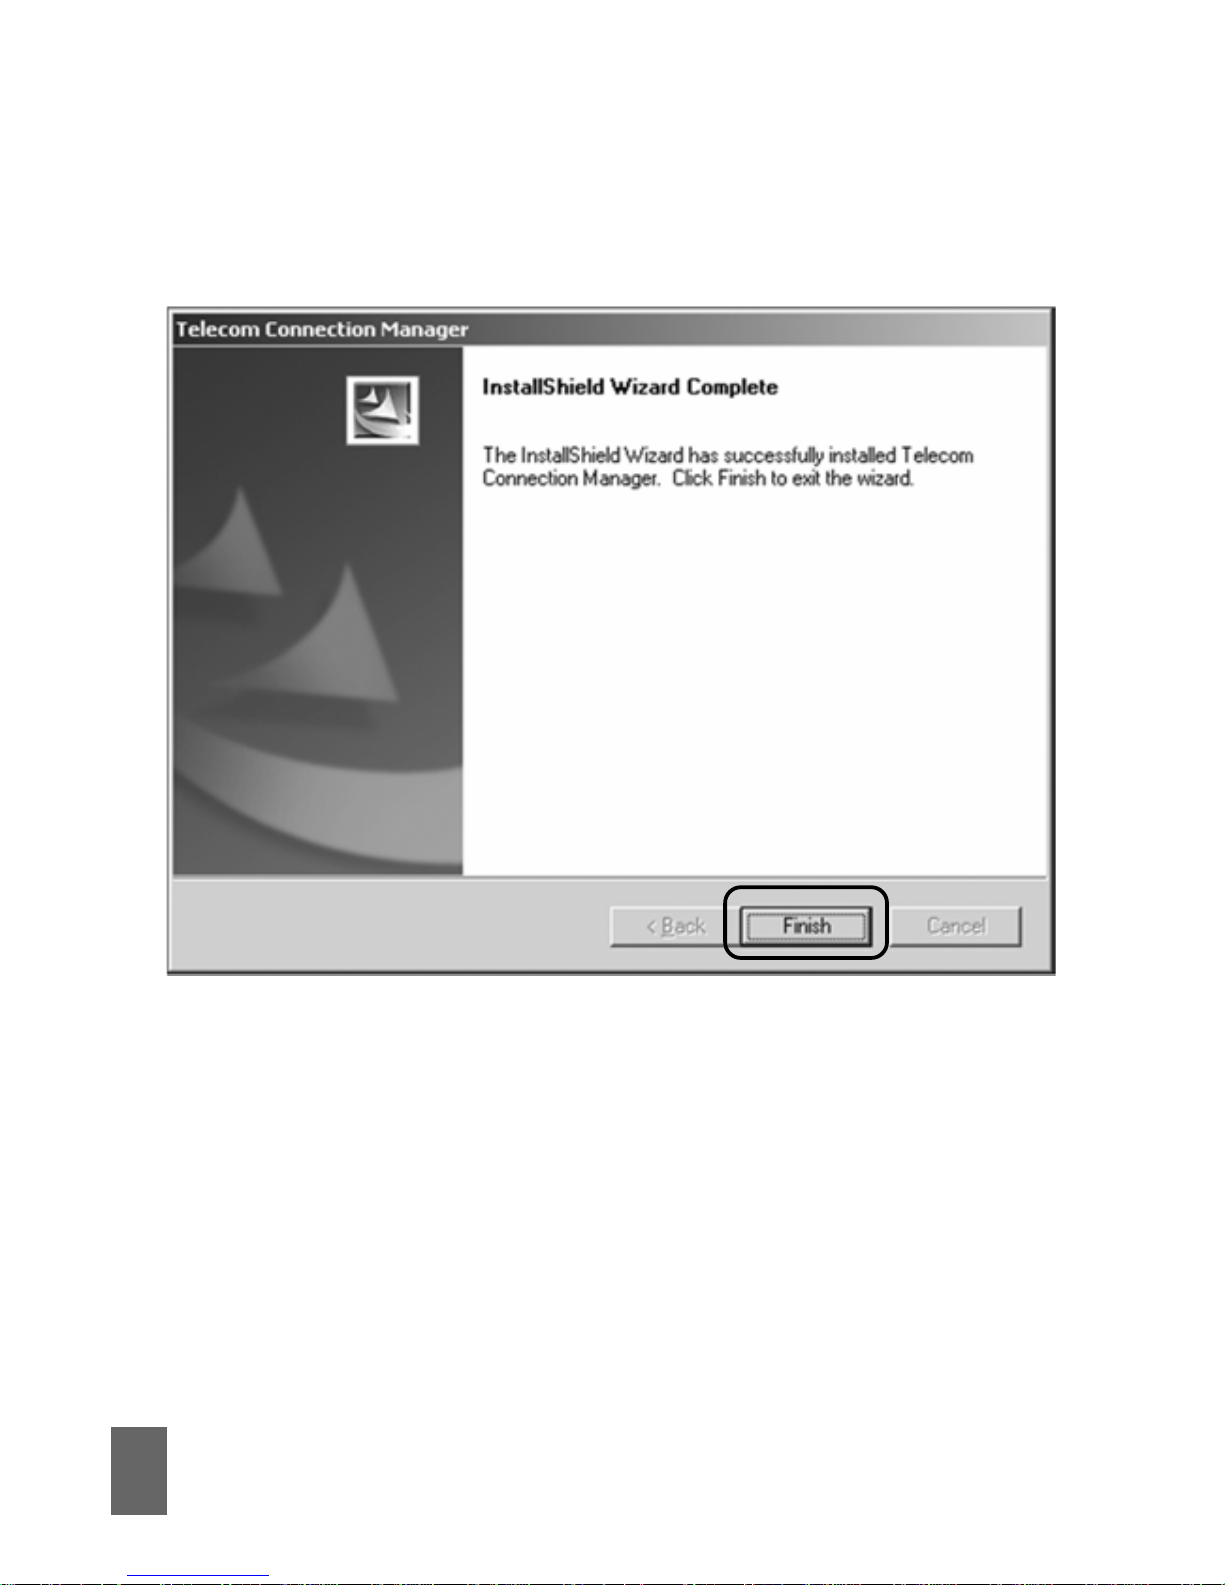
Please wait a few seconds for the installation to proceed…
Click
FinishFinish
FinishFinish
Finish to complete the installation.
Page 10
9
CC
CC
C
onnect to the internetonnect to the internet
onnect to the internetonnect to the internet
onnect to the internet
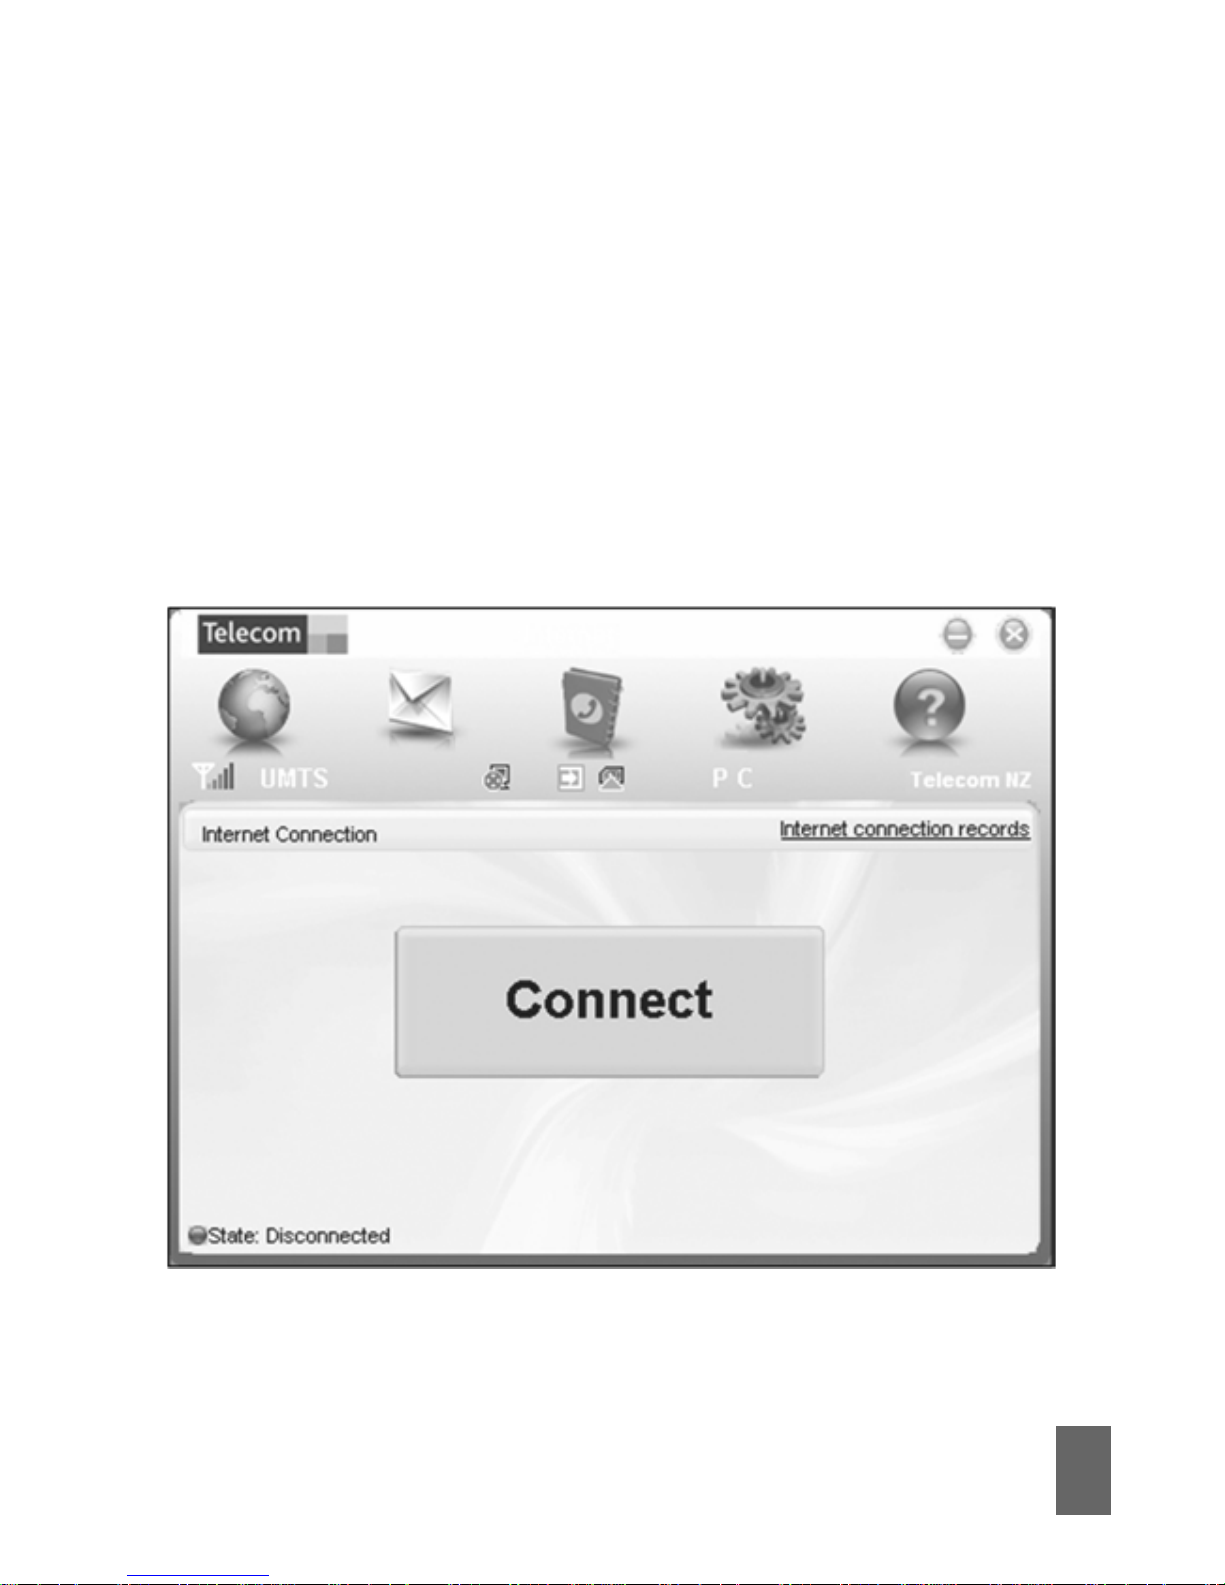
After installation the Telecom Connection Manager will launch
automatically. Your modem will continue installing the drivers
for a couple of minutes. Initializing indicates the drivers are still
installing . You’ll be ready to go as soon as you see the
CC
CC
C
onnectonnect
onnectonnect
onnect
button.
Page 11
10
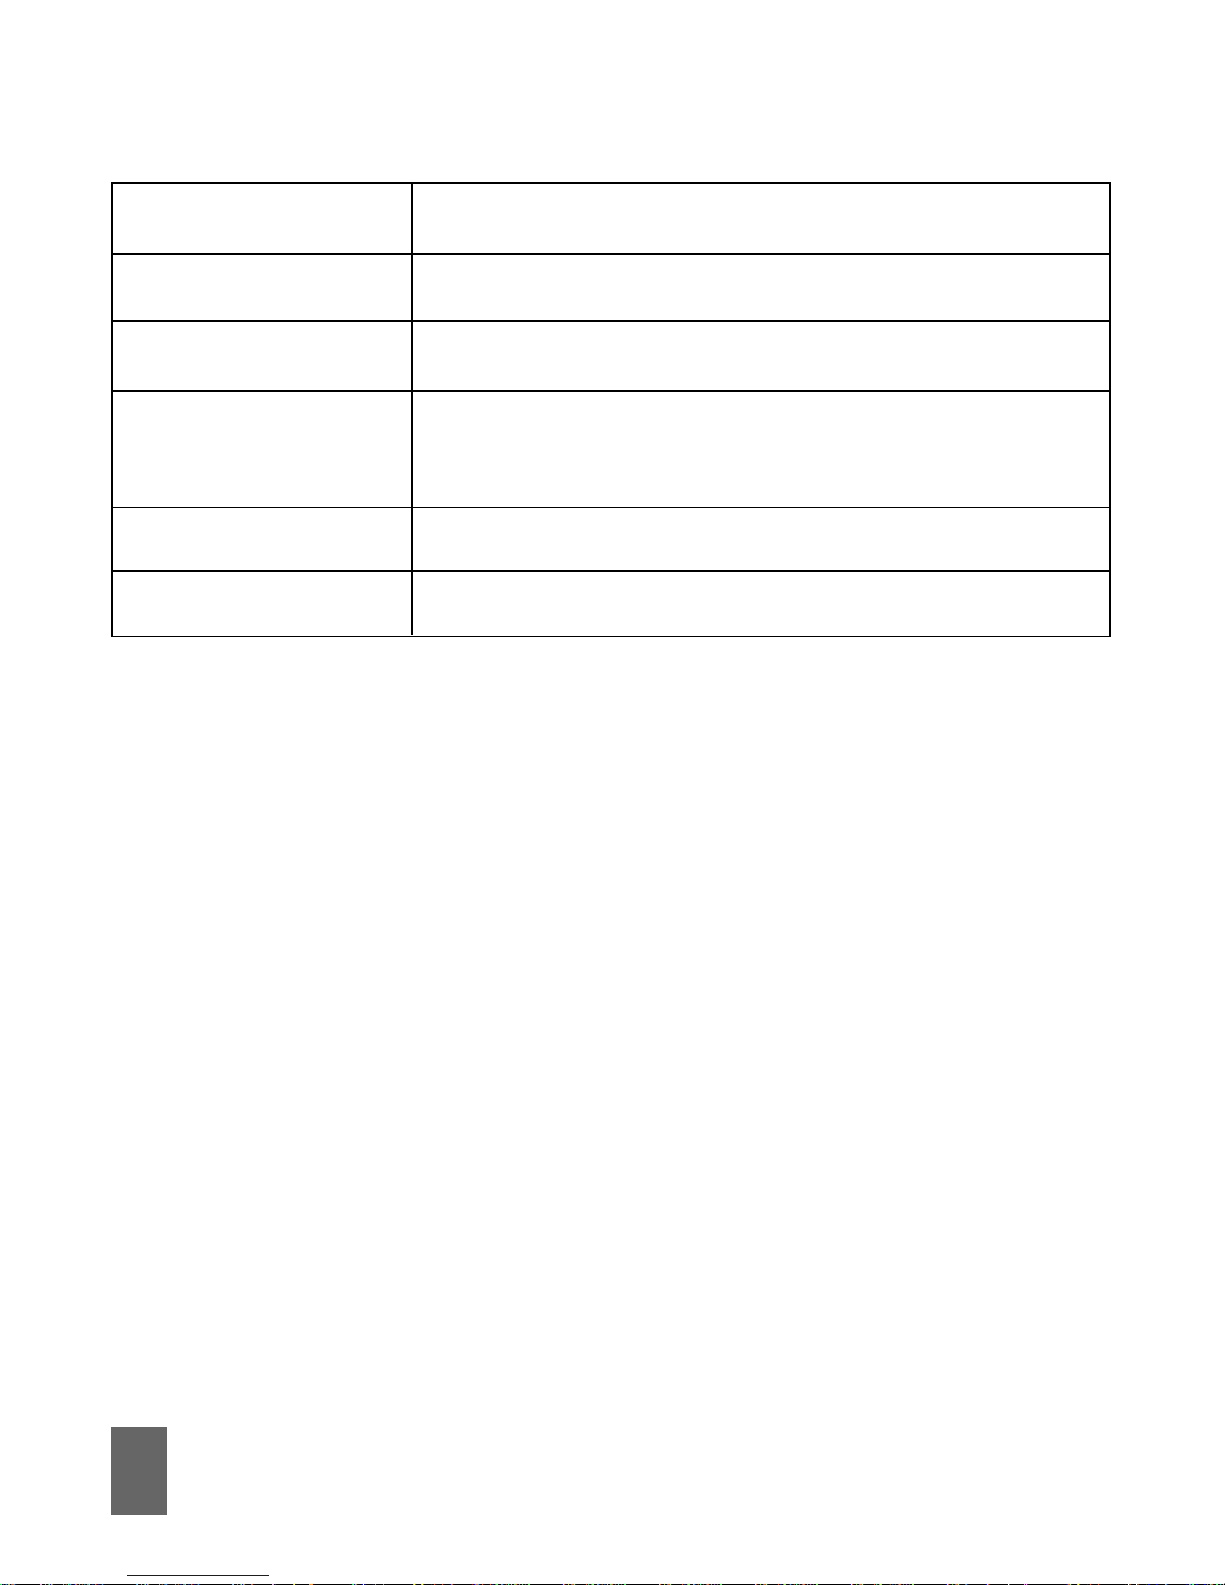
LED indicatorLED indicator
LED indicatorLED indicator
LED indicator
Modem StatusModem Status
Modem StatusModem Status
Modem Status
Red Offline. Not registered on any networks
Green solid Registered on the 2G network (Roaming)
Green blinking Active data transfer on the 2G
network (Roaming)
Blue solid Registered on the 3G network
Blue blinking Active data transfer on the 3G network
• The installation will create a new shortcut on your desktop
and a new program listing under Start-Programs
• You may have to r eboot your PC or MAC after installation is
complete
• If you have problems with the installation please contact
your supplier or see our website, www.zte.co.nz/ for more
assistance and FAQ’s
• If you can’t connect to the internet check your SIM card is
inserted correctly.
• Advanced users should check device manager to see if the
drivers are fully installed. See our website for details www.
zte.co.nz
Page 12

11
Using your MF626 USB ModemUsing your MF626 USB Modem
Using your MF626 USB ModemUsing your MF626 USB Modem
Using your MF626 USB Modem
• Press
CC
CC
C
onnectonnect
onnectonnect
onnect to establish a data connection using your
USB modem
• Launch your intended application, eg web browser, Email
etc.
• When you have finished your internet or email connection
remember to return to the software interface and press
DisconnectDisconnect
DisconnectDisconnect
Disconnect to end your session
• When the software is minimized double click the icon on
the task bar to re-open the Connection Manager. See the
taskbar icon descriptions on Page 15.
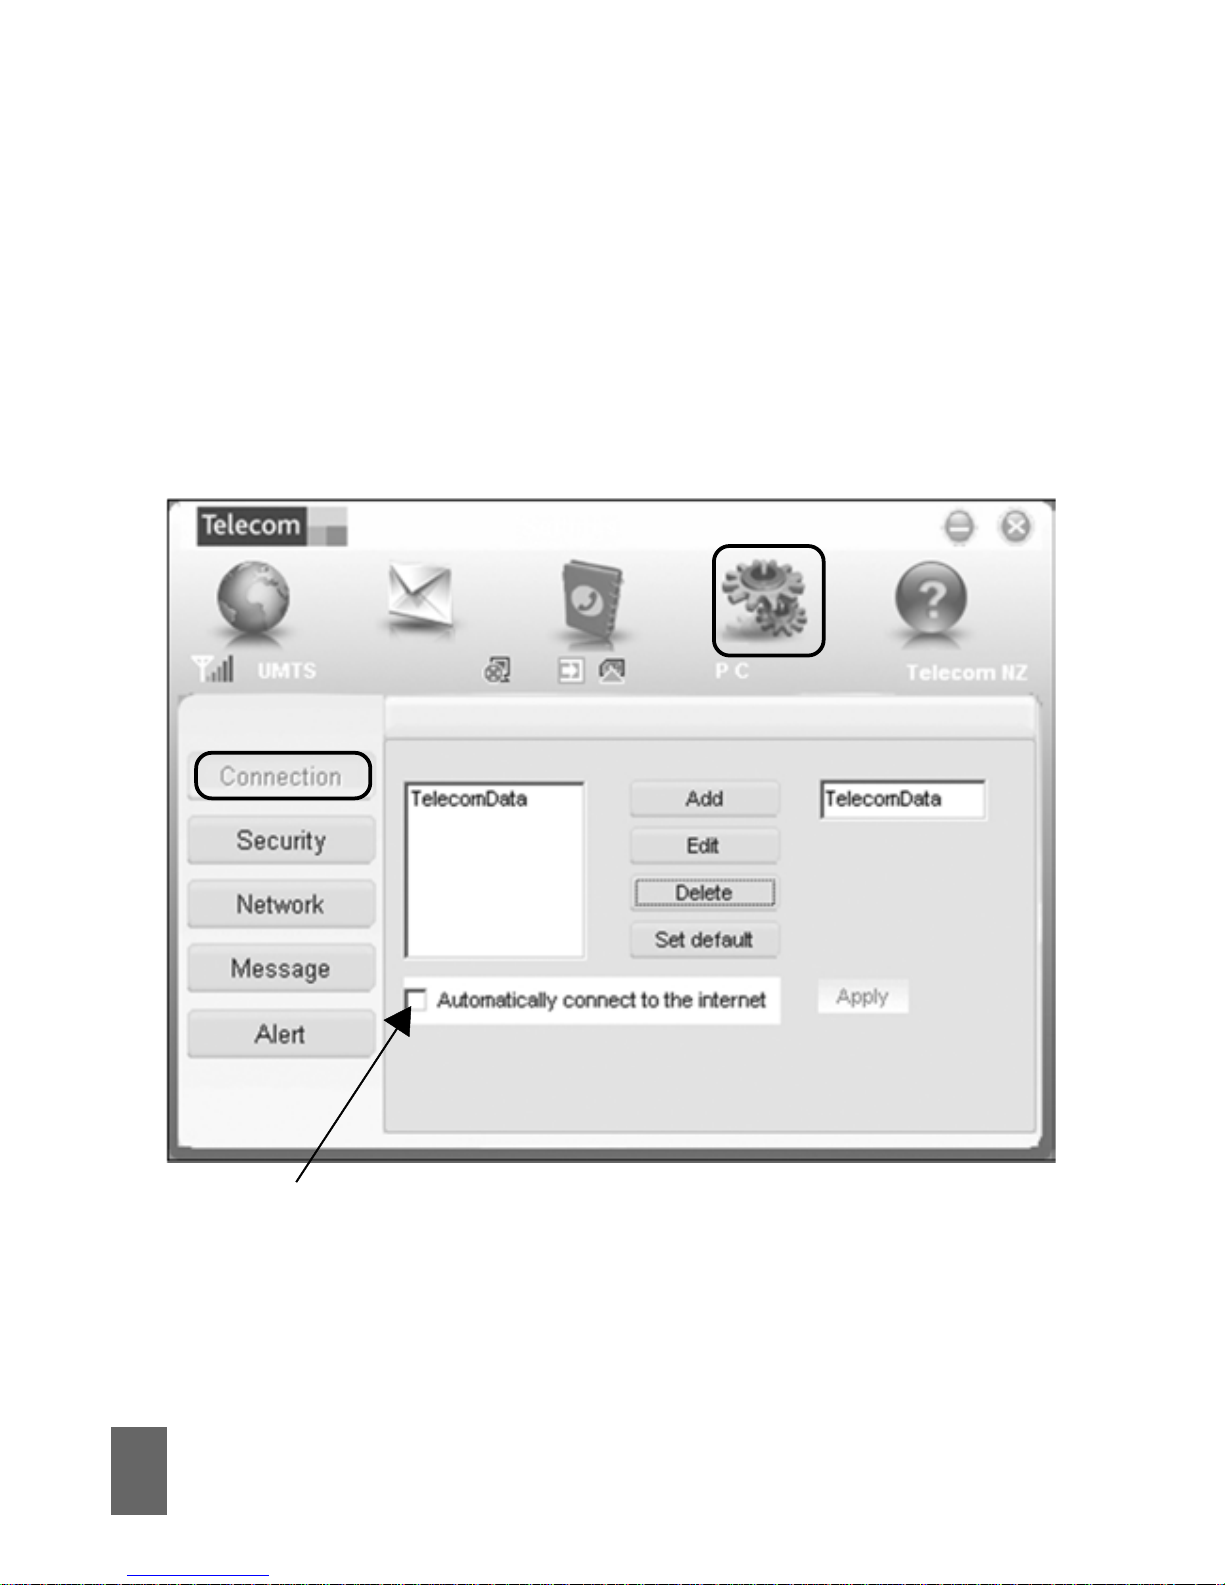
• You can set the modem to automatically Connect to the
internet. Click the
SettingsSettings
SettingsSettings
Settings tab and select ‘
AA
AA
A
utomaticallutomaticall
utomaticallutomaticall
utomaticall
yy
yy
y
connect to the internetconnect to the internet
connect to the internetconnect to the internet
connect to the internet’. See image on Page 26.
TIPTIP
TIPTIP
TIP
After the computer wakes from hibernation or standby mode
you may need to remove and insert the modem.
Page 13
12
CC
CC
C
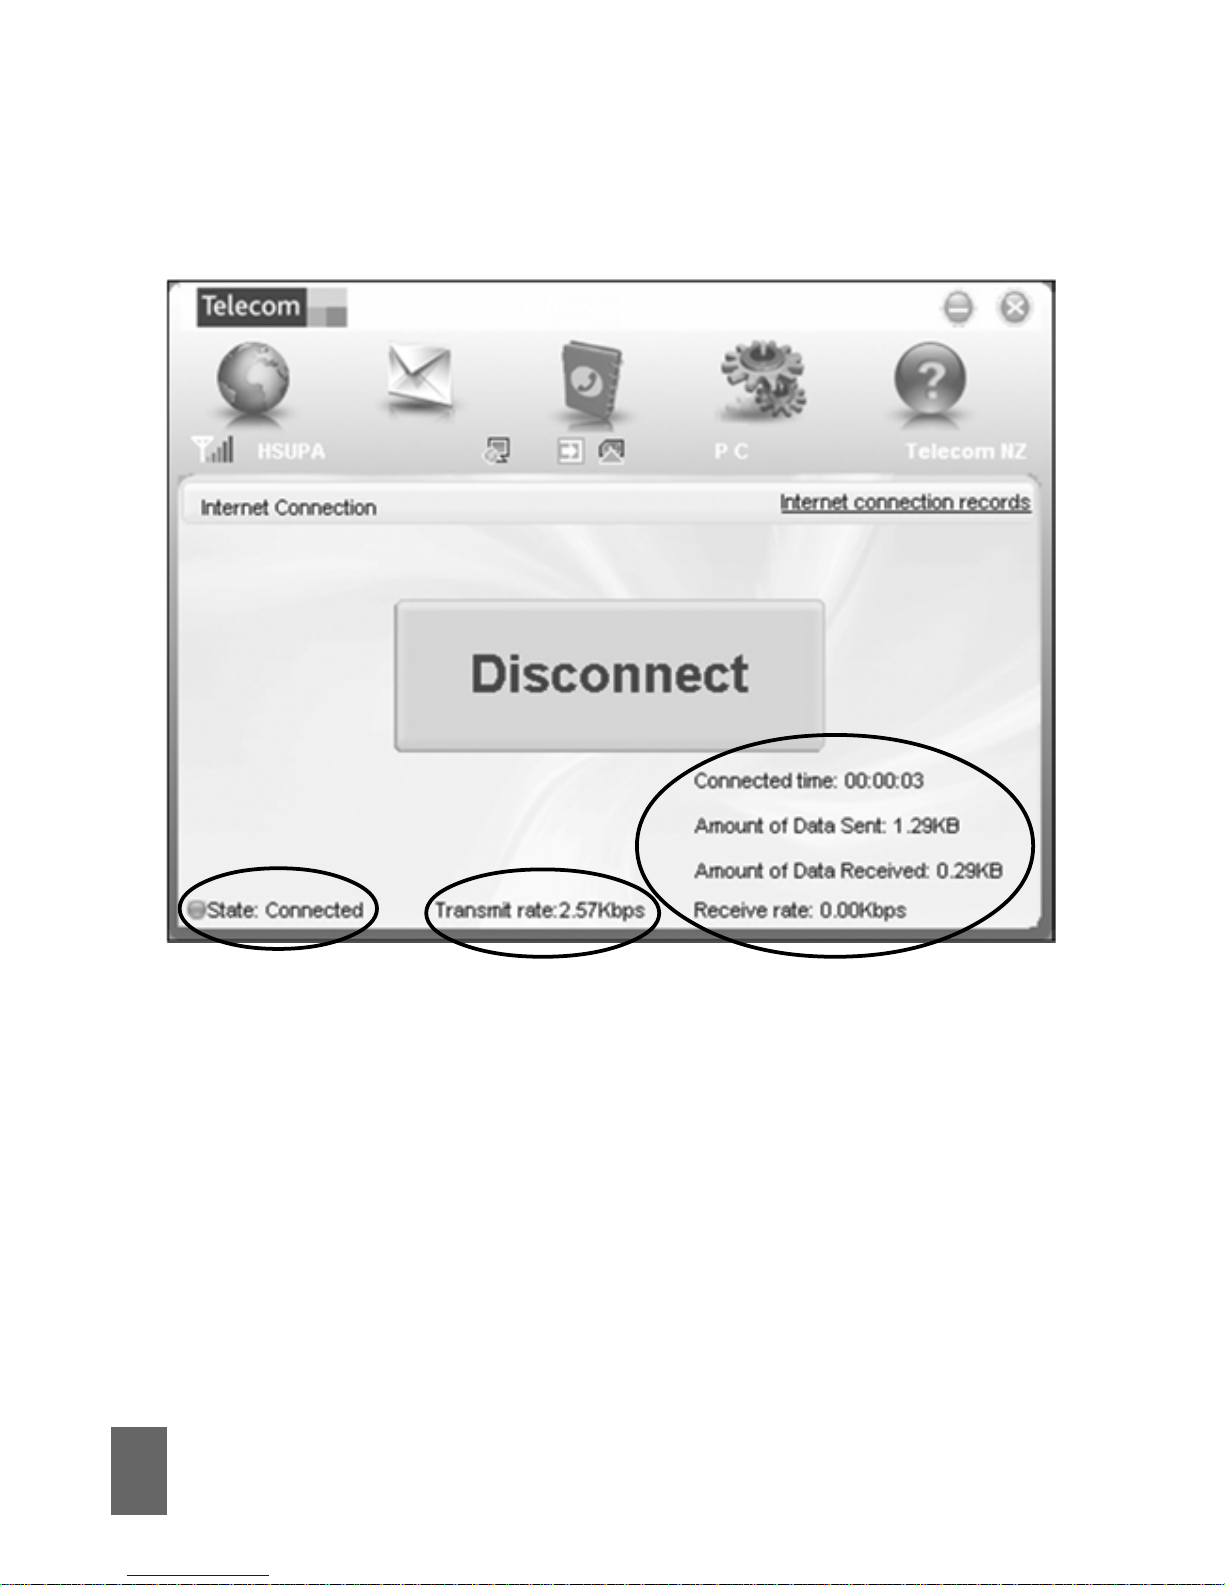
onnected Sonnected S
onnected Sonnected S
onnected S
tatetate
tatetate
tate
Various connection details are shown on the window above.
Press
Disconnect Disconnect
Disconnect Disconnect
Disconnect to end your session
when finished.
Page 14
13
Safe Removal of HardwareSafe Removal of Hardware
Safe Removal of HardwareSafe Removal of Hardware
Safe Removal of Hardware
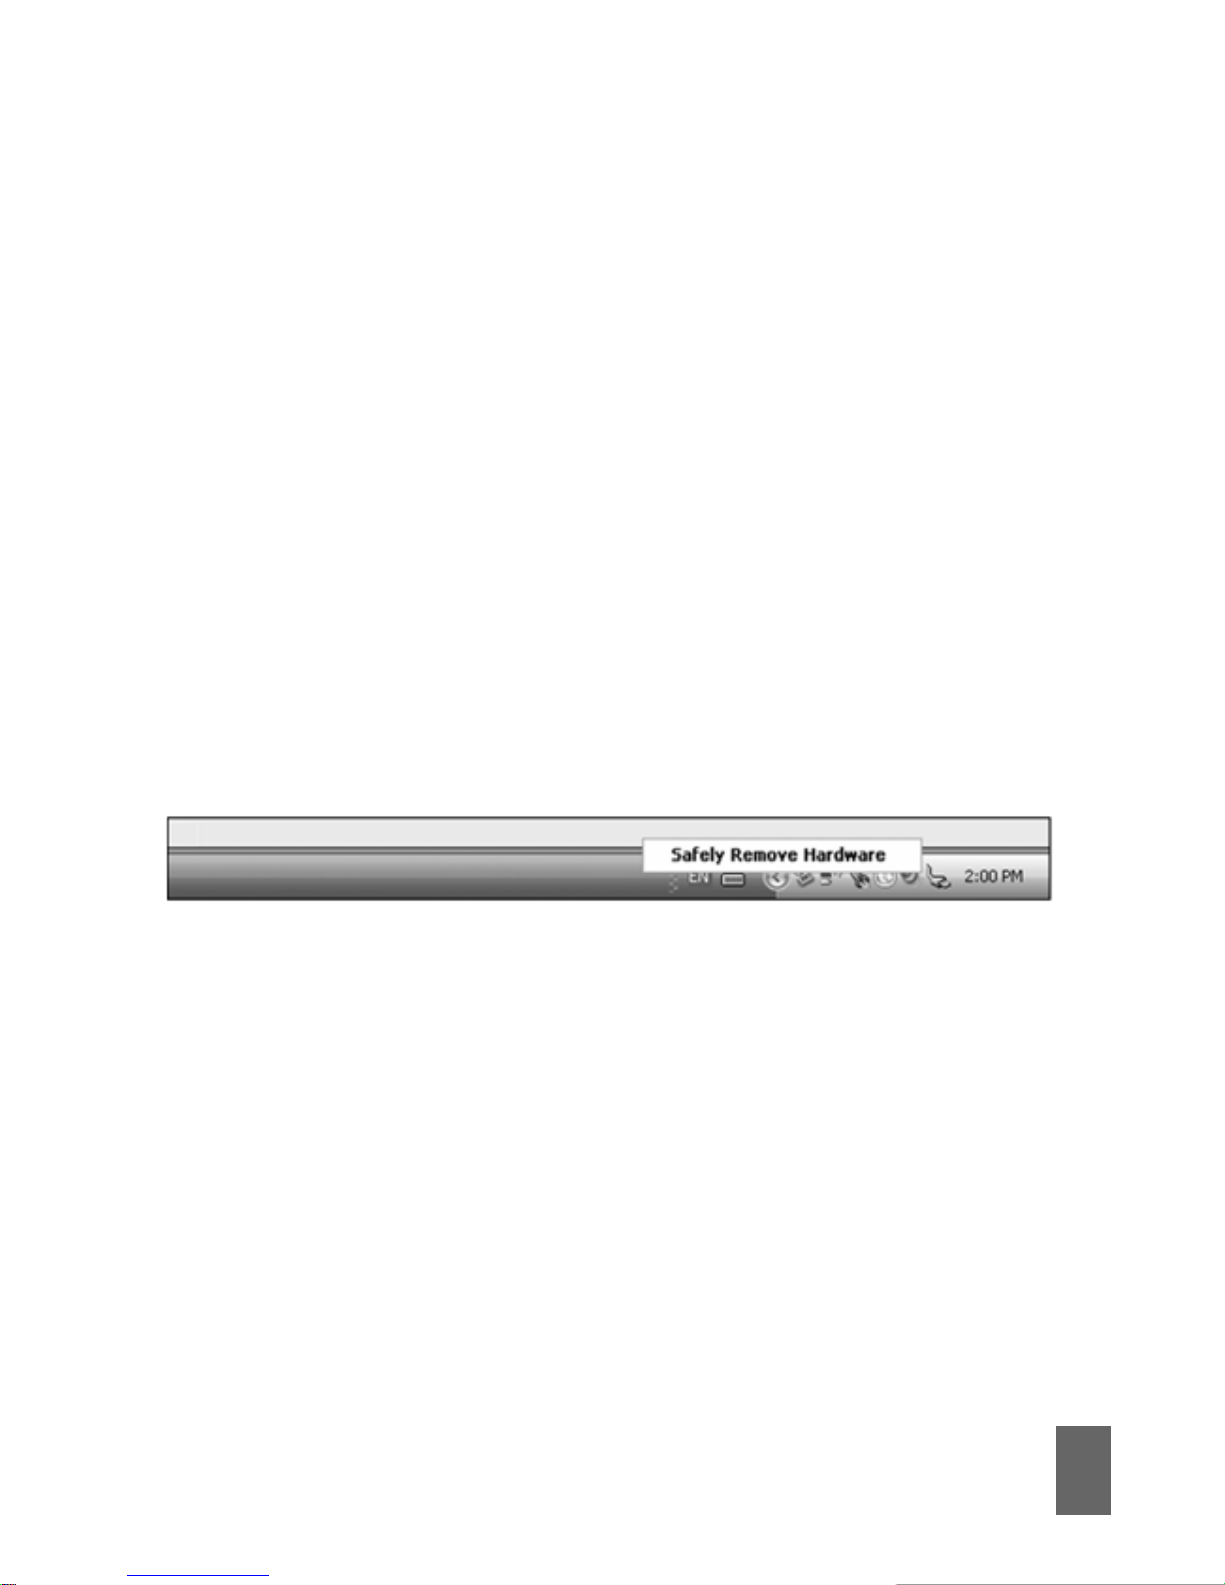
To remove your USB modem from the computer first close the
Telecom Connection Manager then use the safe removal of
hardware process. If you remove the USB modem when it is
active the modem software and related information (eg
Phonebook records) may become corrupted.
Safely remove the modemSafely remove the modem
Safely remove the modemSafely remove the modem
Safely remove the modem
• Eg in Windows XP, left click the icon on the Windows taskbar
• Click on Safely Remove Hardware
• Remove the USB modem.
Page 15
14
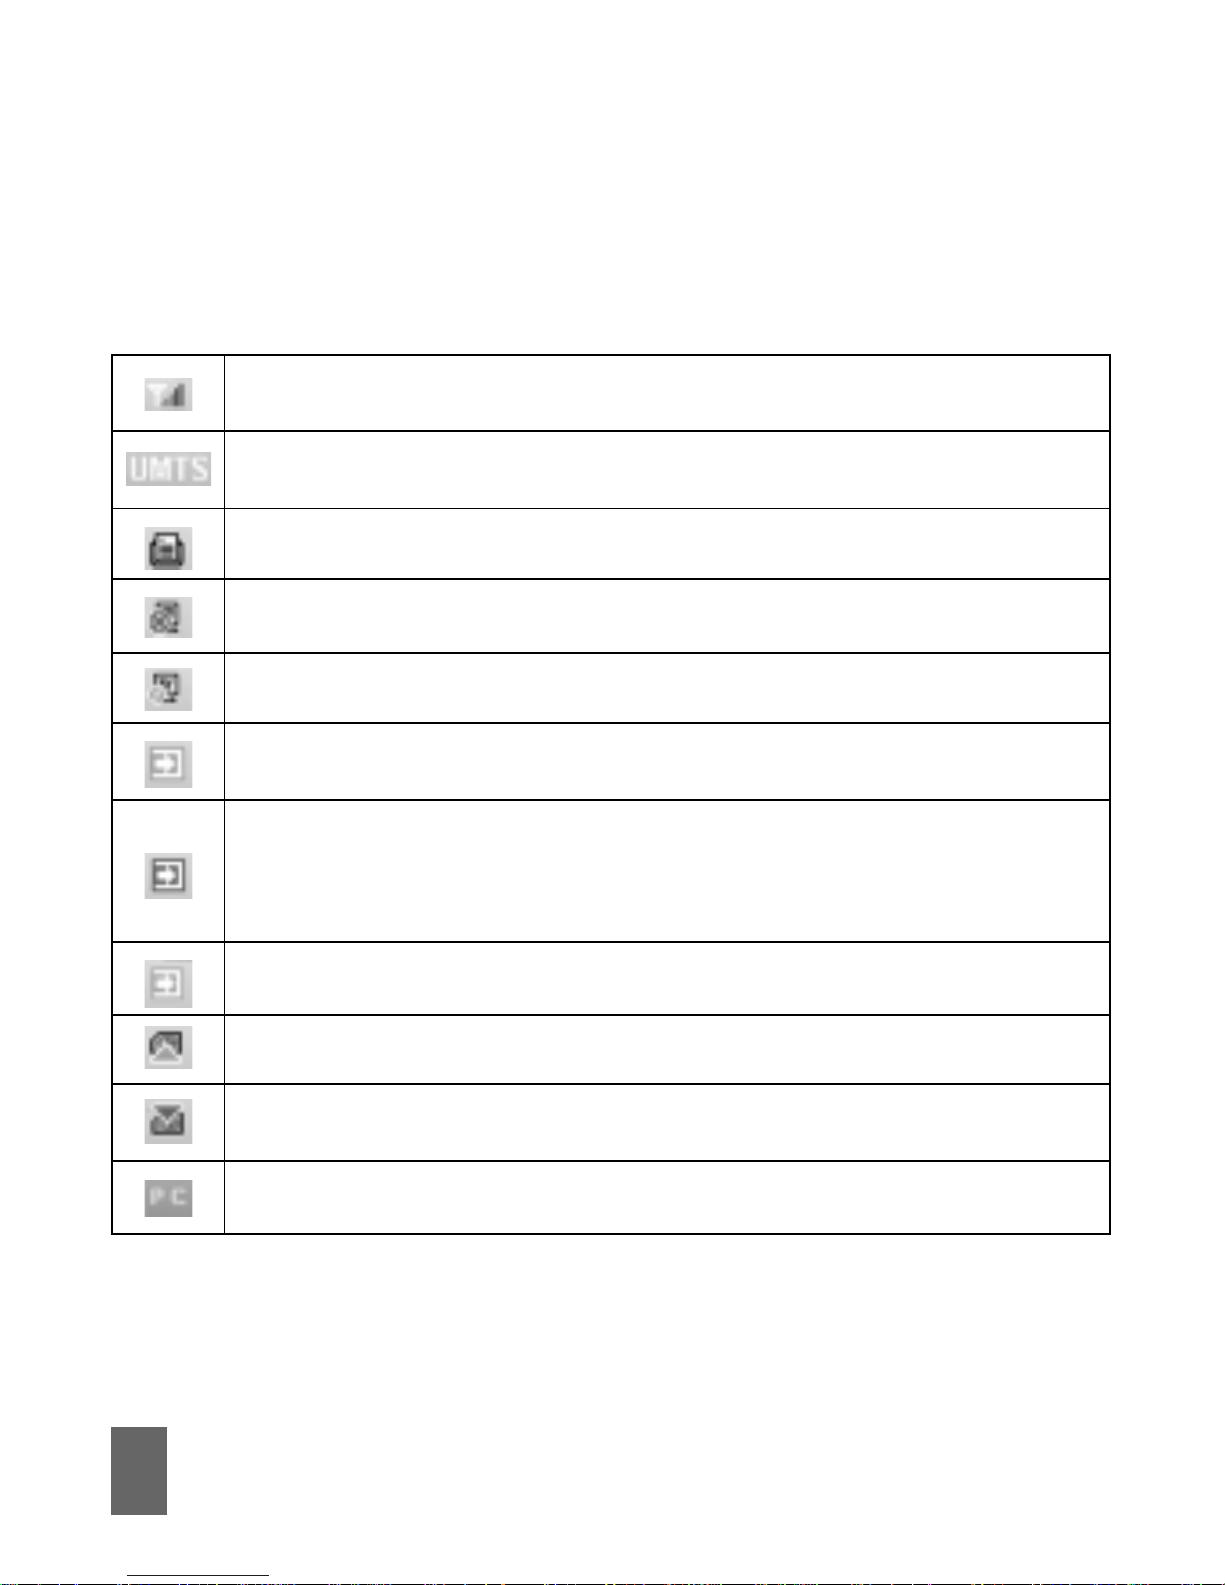
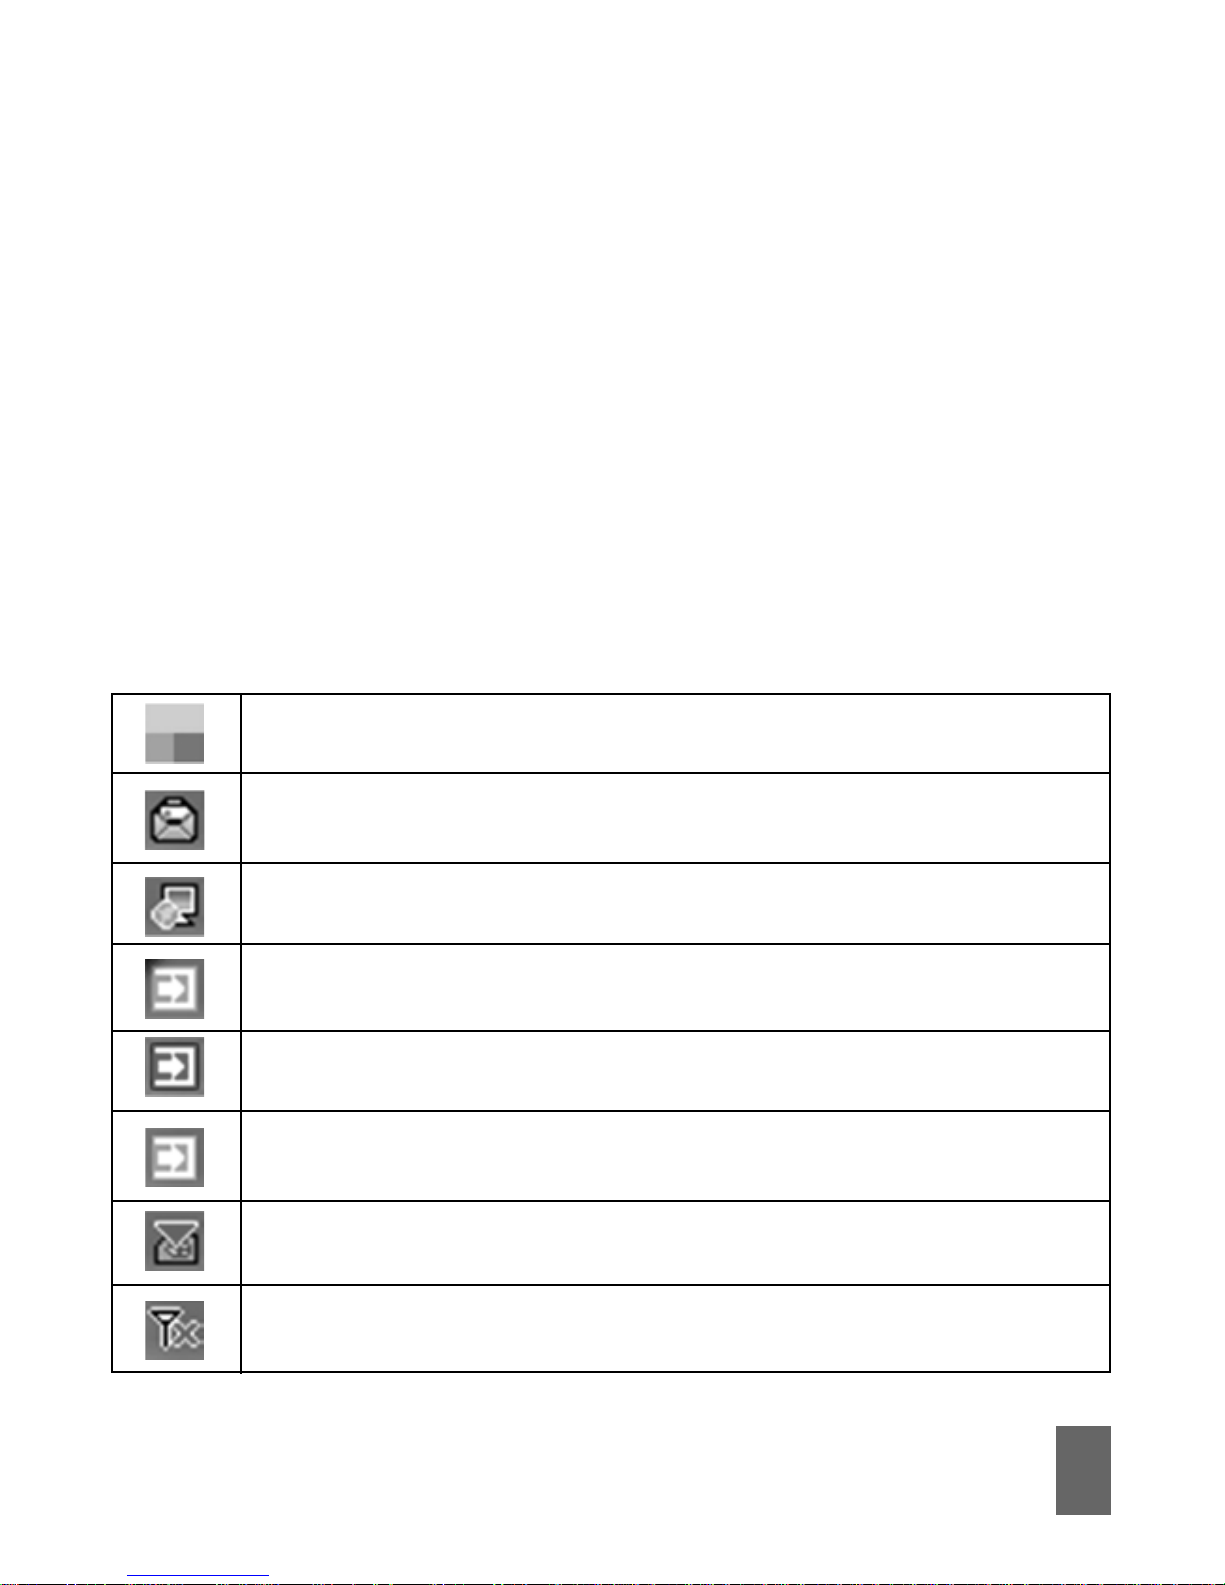
Network signal strength
Current network connection type
New SMS message
Red Computer icon - internet Not Connected
Green Computer icon - internet Connected
Green arrow icon - modem inserted into the computer
Red arrow icon - modem not inserted into the
computer
Orange arrow icon - modem is offline
Green SIM icon – SIM card is inserted
Red SIM icon – SIM card is
notnot
notnot
not inserted
Connection - P is packet switched, C is circuit switched
Using the Using the
Using the Using the
Using the
CarCar
CarCar
Car
d Managd Manag
d Managd Manag
d Manag
er Soer So
er Soer So
er So
ftwftw
ftwftw
ftw
arar
arar
ar
ee
ee
e
System IconsSystem Icons
System IconsSystem Icons
System Icons
Page 16
15
Modem is ready to connect to Internet
There is a new SMS message
Green - Internet is Connected
Green - Modem is inserted into the computer
Red - Modem is not inserted into the computer
Orange - Modem is Offline
Red – SIM card is not inserted
No network signal
TT
TT
T
ask Bar Infask Bar Inf
ask Bar Infask Bar Inf
ask Bar Inf
ormationormation
ormationormation
ormation
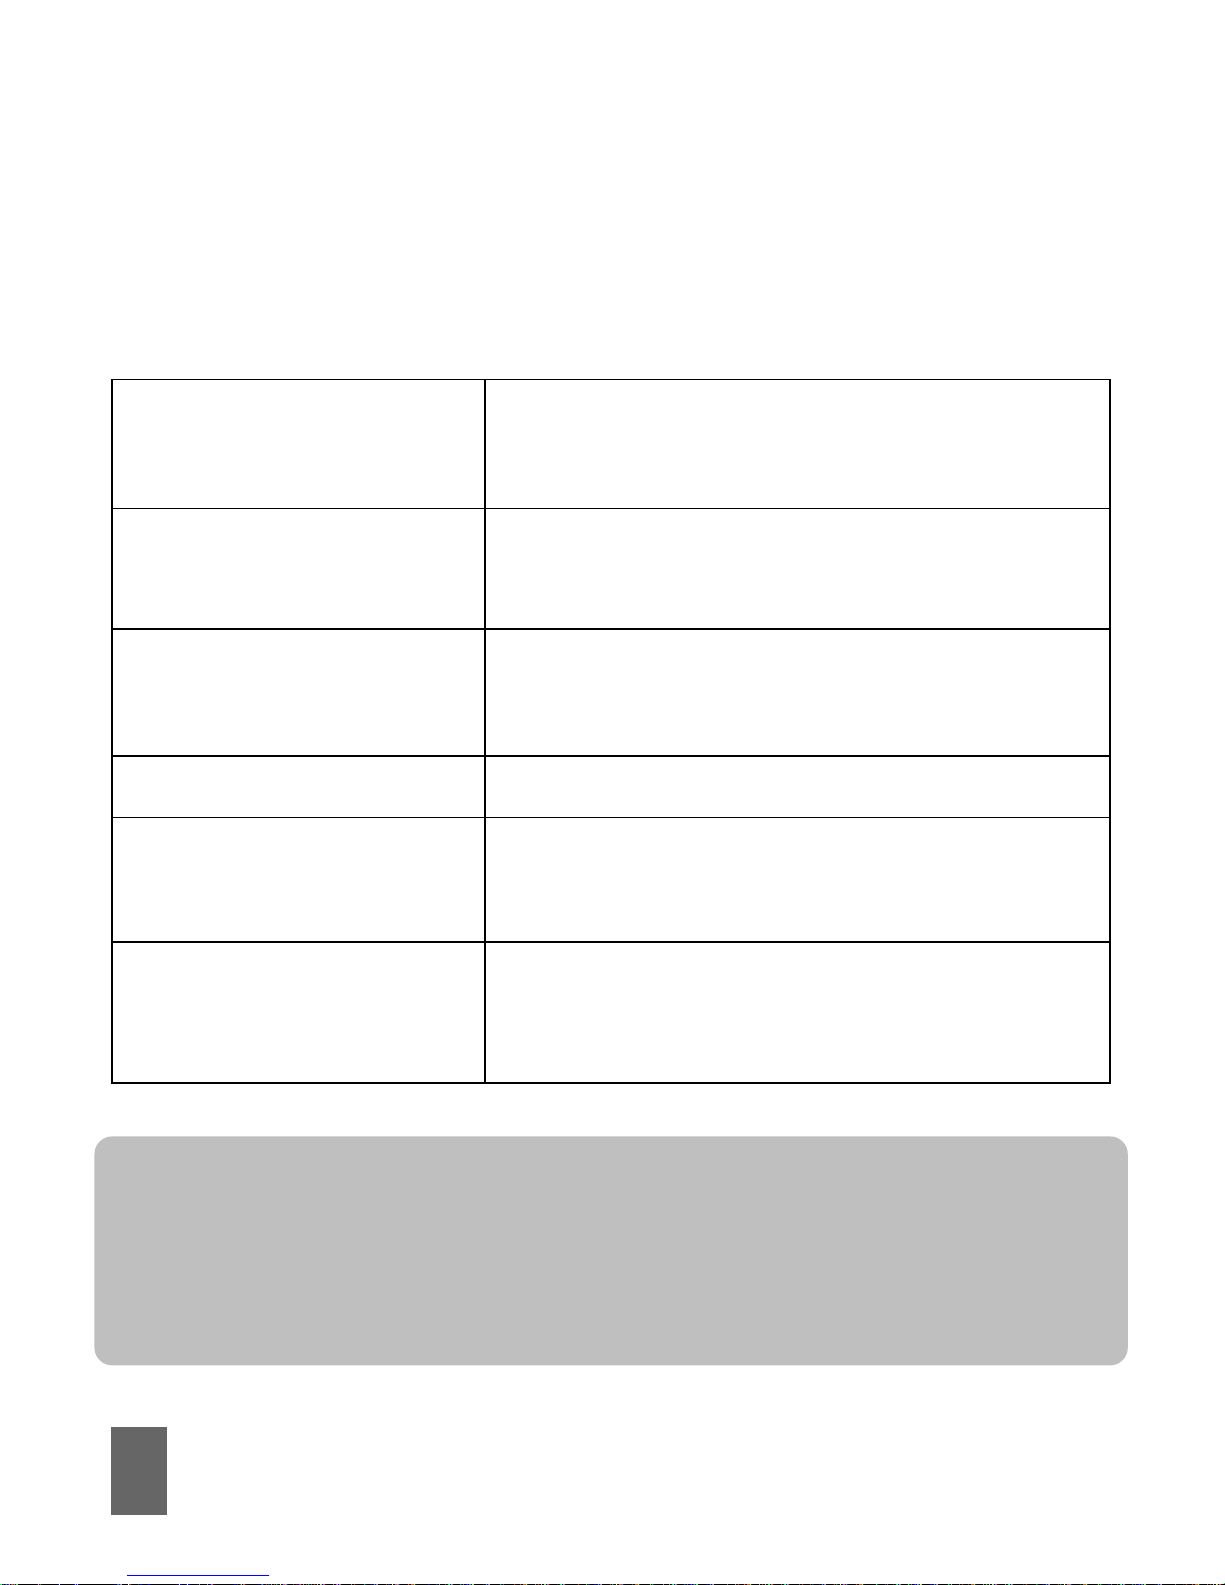
When you minimize the software the window will minimize to
an icon on the system tray. The program is still active in the
background but disappears to free your normal Windows space.
Double click the task bar icon to restore the T elecom C onnection
Manager.
The current status is also shown on the taskbar icons:
TT
TT
T
ask bar iconsask bar icons
ask bar iconsask bar icons
ask bar icons
Page 17
16
Device offlineDevice offline
Device offlineDevice offline
Device offline Disconnect the modem from the
network
Device onlineDevice online
Device onlineDevice online
Device online Connect the modem to the network
FF
FF
F
actory Settingsactory Settings
actory Settingsactory Settings
actory Settings Restore the modem settings to
their original values
HelpHelp
HelpHelp
Help Enter the Help interface
AboutAbout
AboutAbout
About View software and hardware
versions
ExitExit
ExitExit
Exit Close the software and switch off
the modem
TT
TT
T
ask bar menask bar men
ask bar menask bar men
ask bar men
uu
uu
u
Right Right
Right Right
Right
ClicClic
ClicClic
Clic
kk
kk
k the task bar icon to access the following menu:
TipTip
TipTip
Tip
Use F actory Settings to r estore your modem to def aul t settings.
This is useful if you have changed any settings and can no longer
connect.
Page 18
17
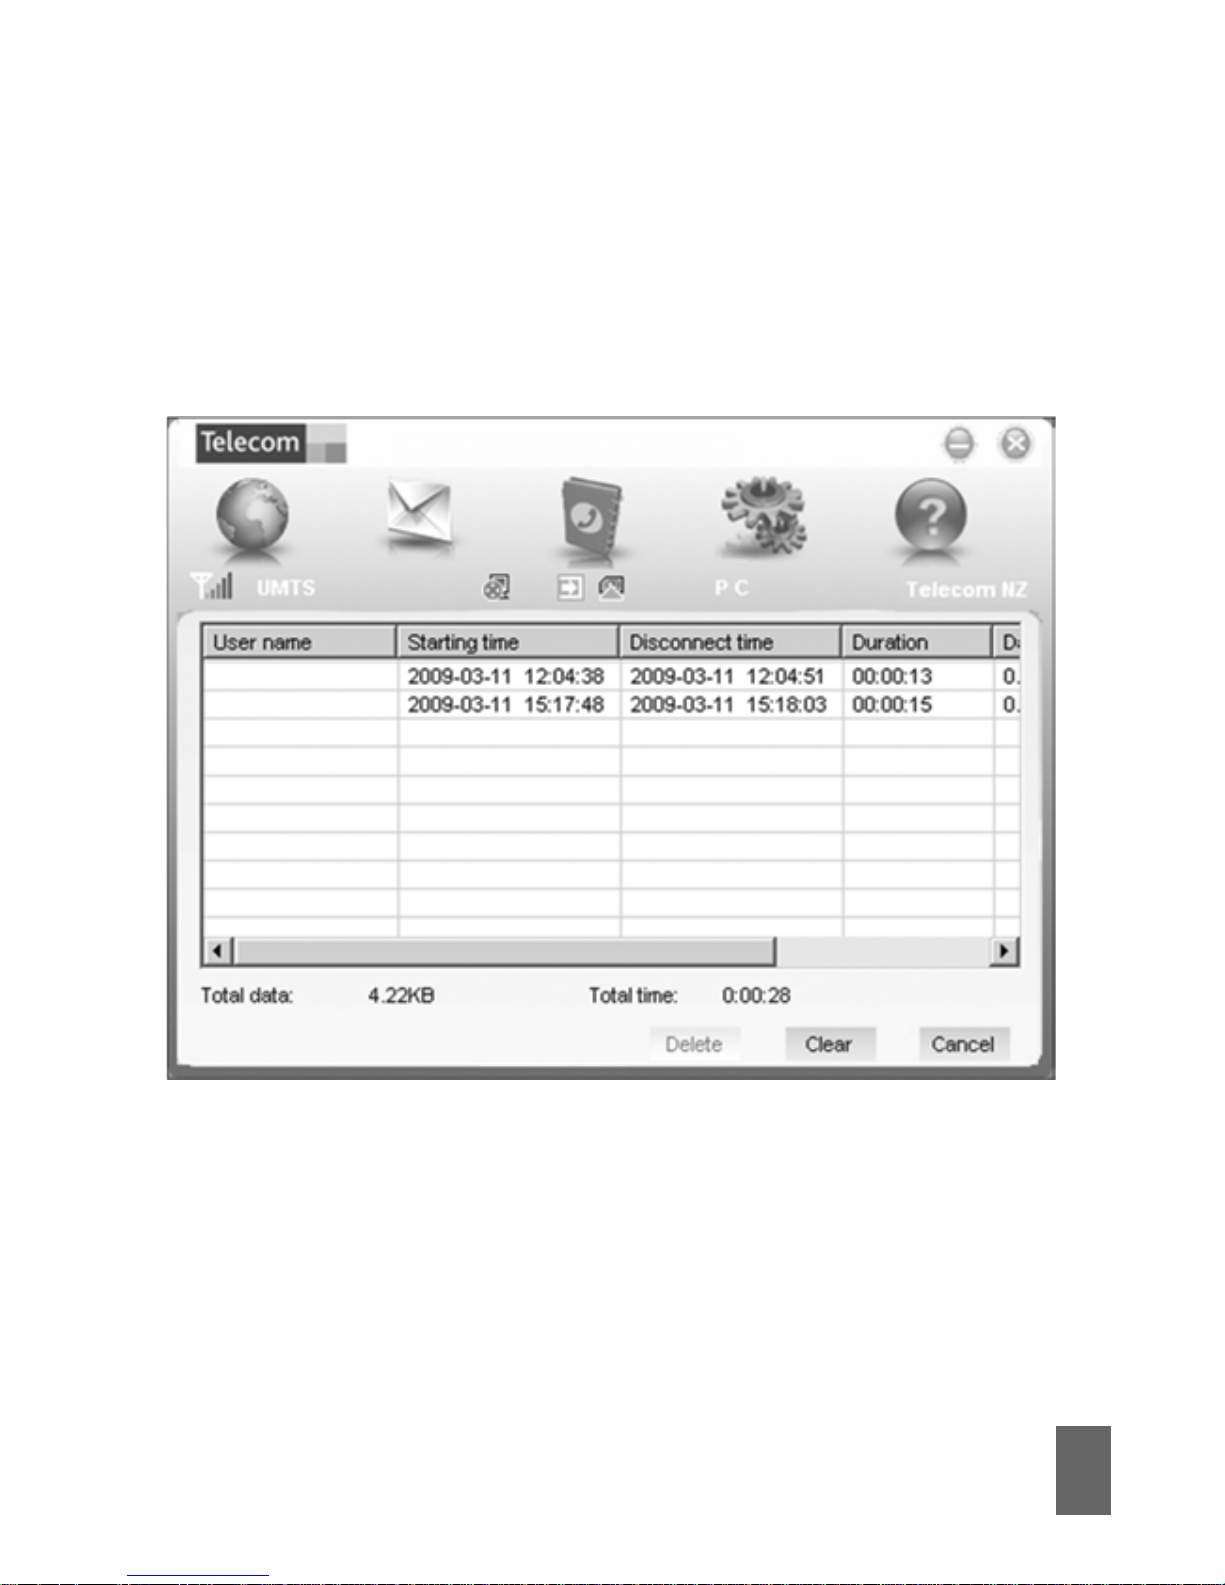
Internet connection recordsInternet connection records
Internet connection recordsInternet connection records
Internet connection records
From the
CC
CC
C
onnectonnect
onnectonnect
onnect screen press
Internet Internet
Internet Internet
Internet
CC
CC
C
onnectiononnection
onnectiononnection
onnection
RecordsRecords
RecordsRecords
Records to show your connection history:
The internet connection records are for information only.
Page 19
18
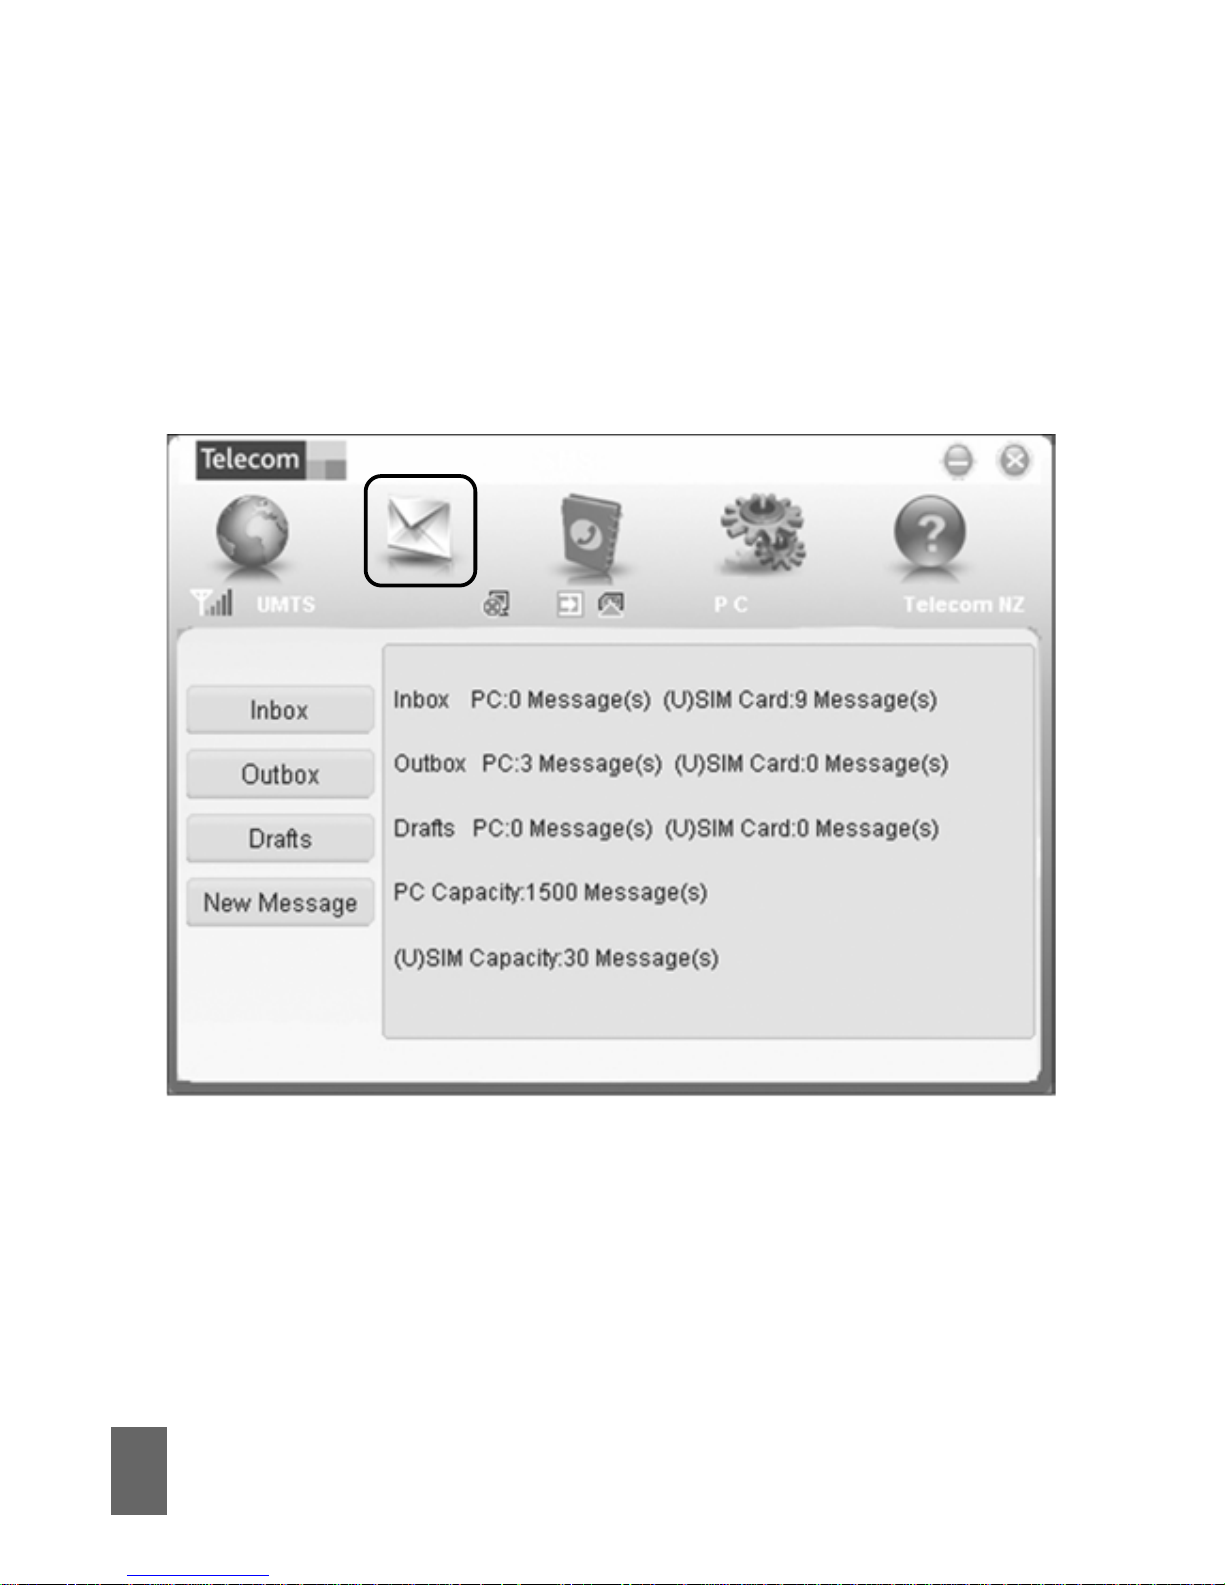
SMS InterfaceSMS Interface
SMS InterfaceSMS Interface
SMS Interface
Click the
SMSSMS
SMSSMS
SMS icon to use the SMS Interface:
Page 20
19
Read Incoming MessagesRead Incoming Messages
Read Incoming MessagesRead Incoming Messages
Read Incoming Messages
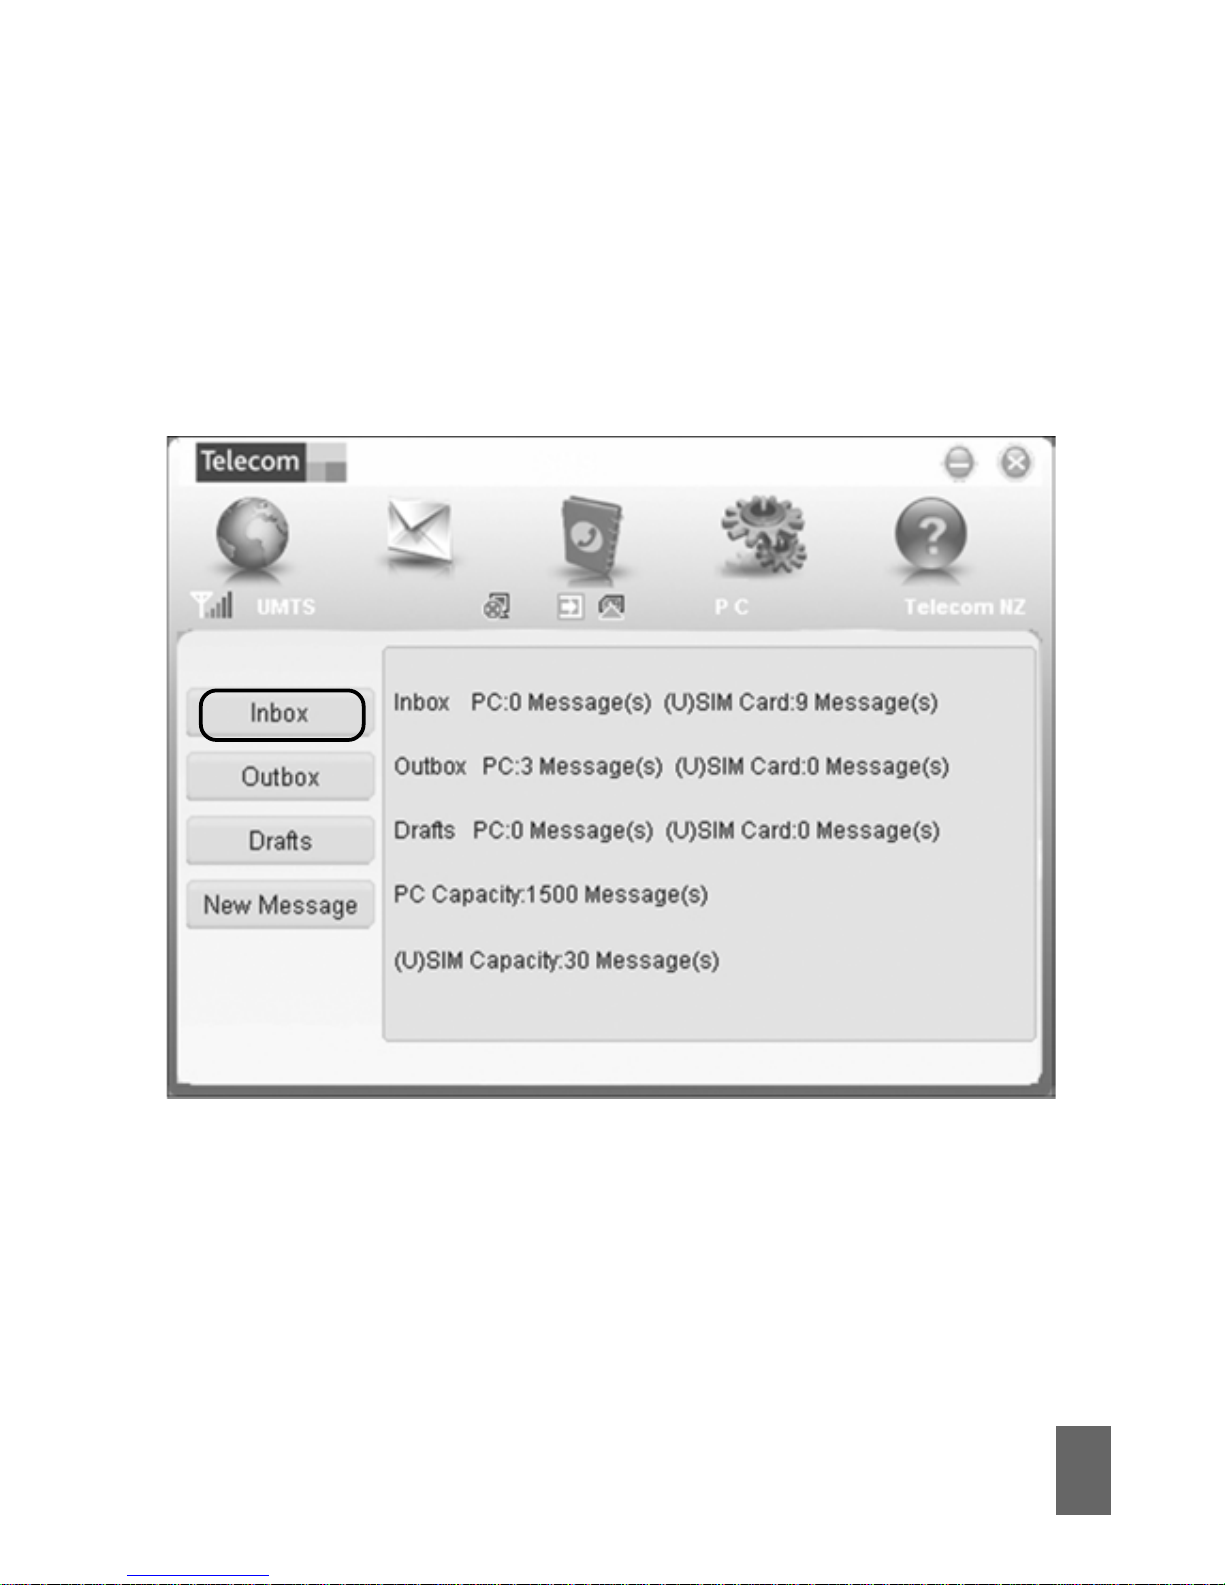
Click the
InboxInbox
InboxInbox
Inbox button to read your received messages.
Page 21
20
Create a new messageCreate a new message
Create a new messageCreate a new message
Create a new message
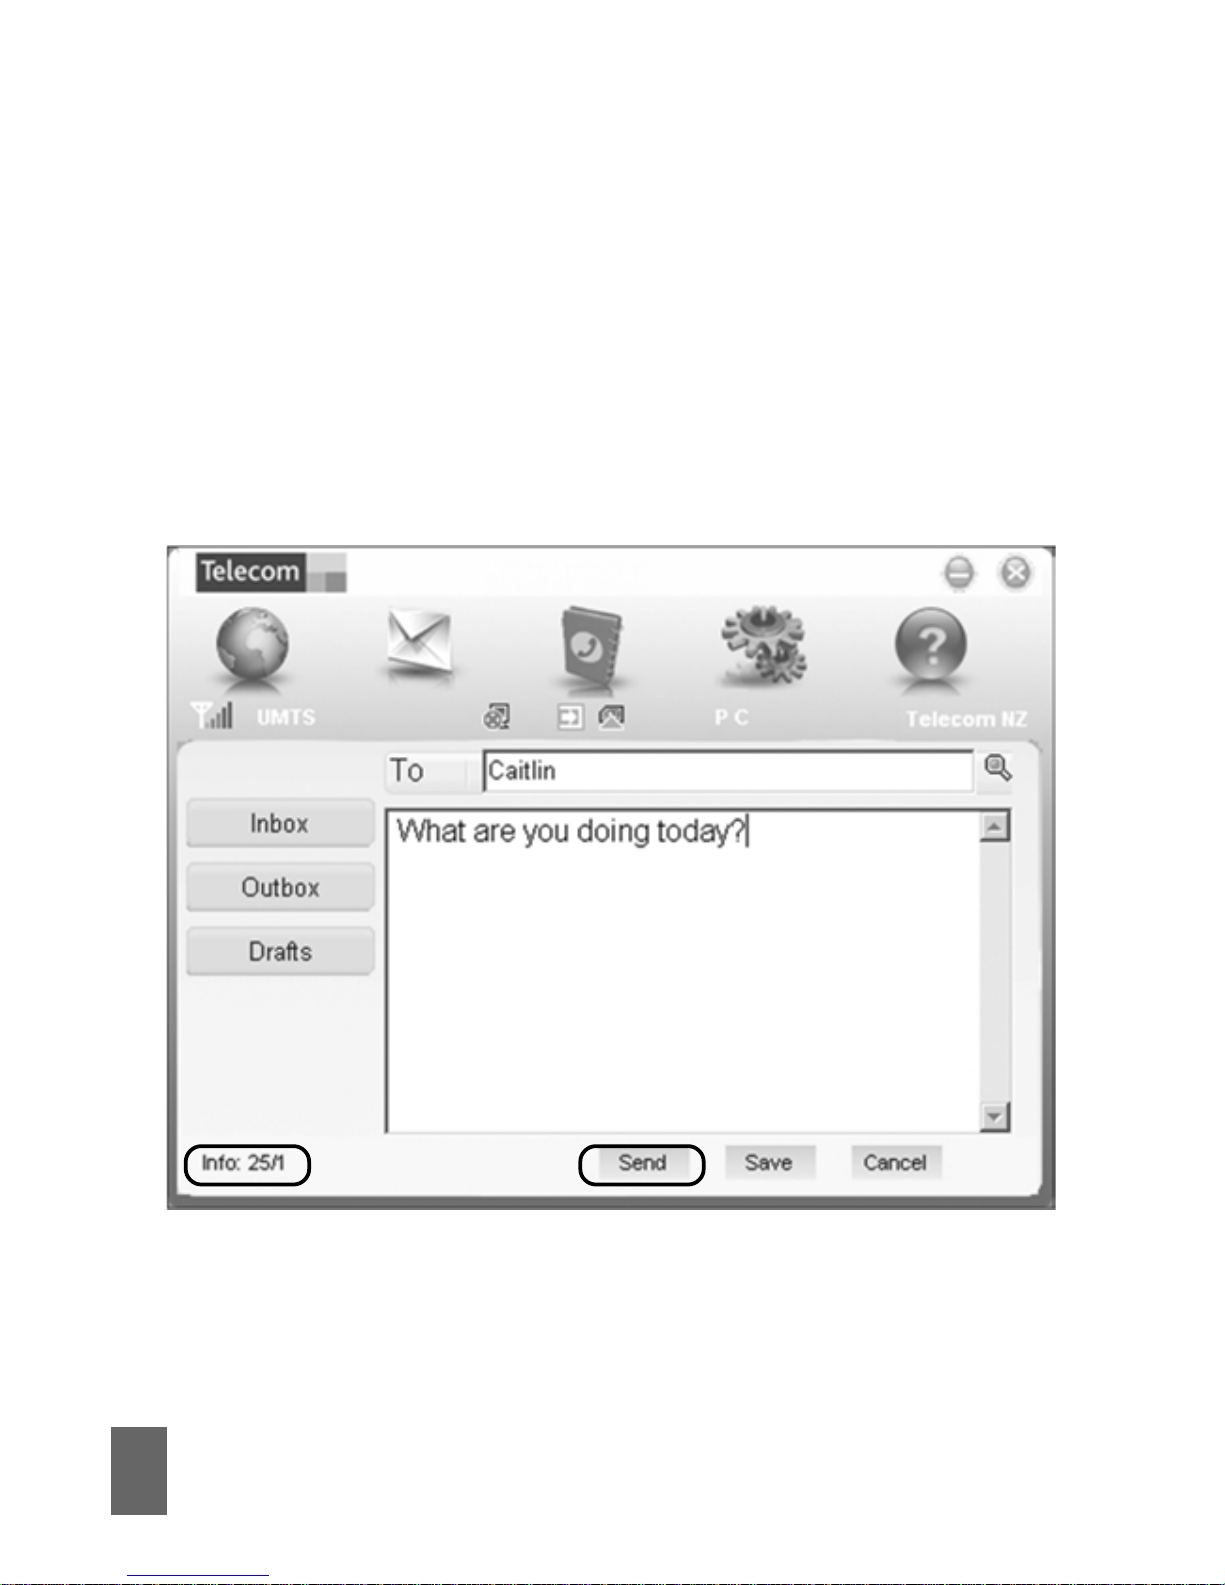
• Click
New MessageNew Message
New MessageNew Message
New Message and enter the recipient’s number
• The recipient’s number can be entered directly or by
selecting entries from the Phonebook. Use ‘;’ to separate
multiple recipients
• Click into the text field to enter text
• The interface shows the character and message count (eg
25 characters, 1 SMS message)
• Click
SendSend
SendSend
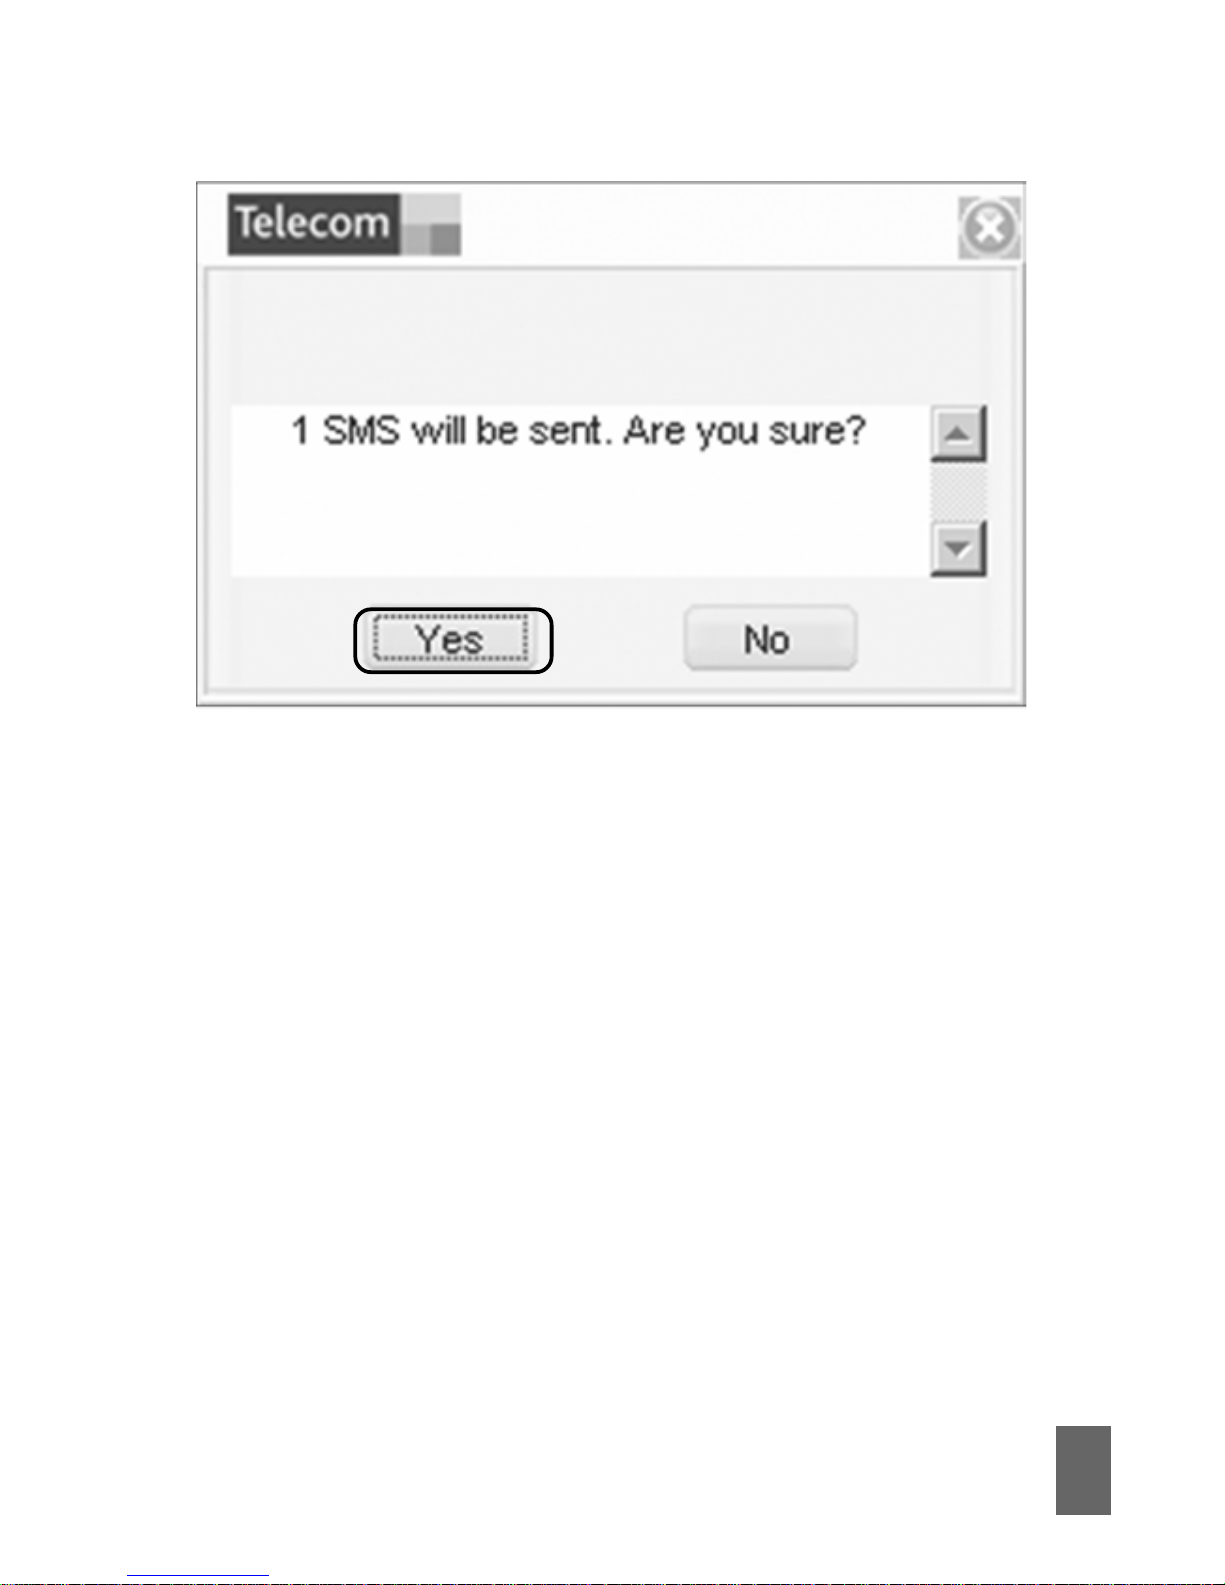
Send to send the message. The prompt below is shown:
Page 22
21
• Select
YY
YY
Y
eses
eses
es to confirm
• After the message is sent successfully it is saved in the
OutboxOutbox
OutboxOutbox
Outbox
• If the message fails to send it is saved in
Drafts.Drafts.
Drafts.Drafts.
Drafts.
Page 23
22
SMS SMS
SMS SMS
SMS
GenerGener
GenerGener
Gener
al Fal F
al Fal F
al F
eatureatur
eatureatur
eatur
eses
eses
es
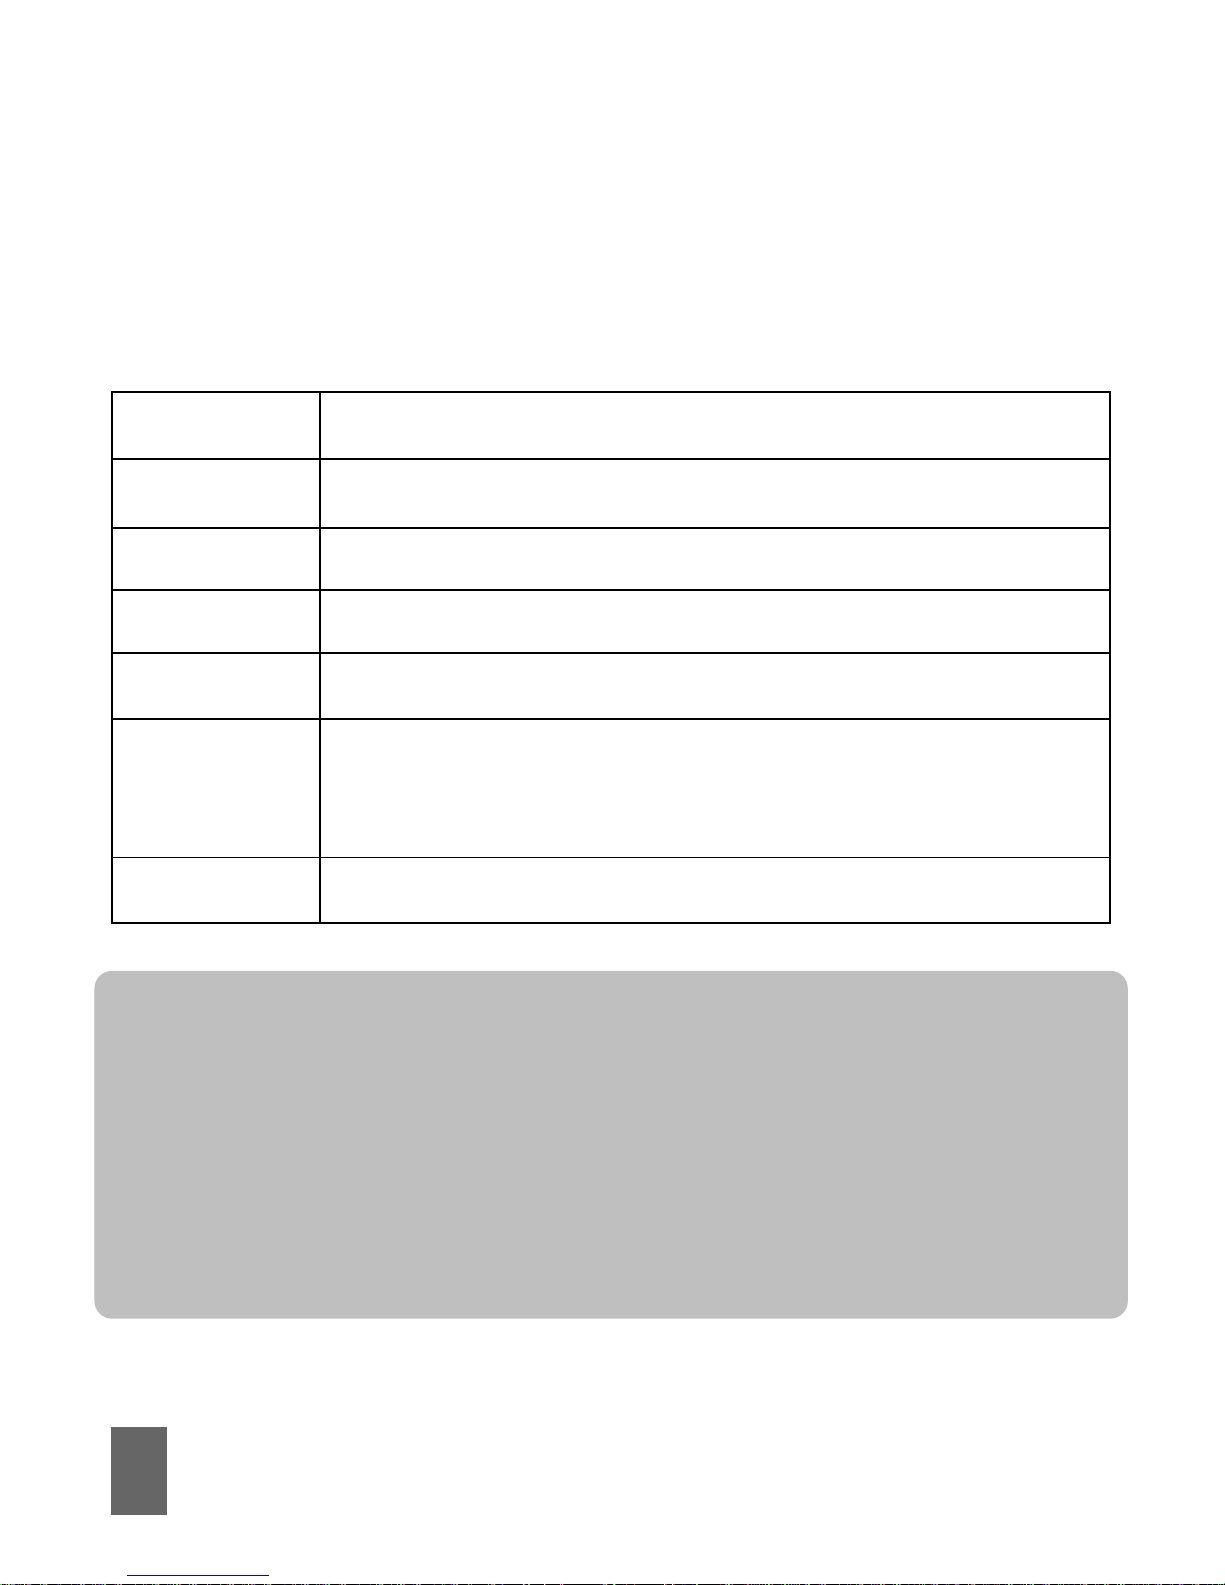
Enter any of the
InboInbo
InboInbo
Inbo
xx
xx
x /
OutboOutbo
OutboOutbo
Outbo
xx
xx
x /
DrDr
DrDr
Dr
aftsafts
aftsafts
afts to use the tabs at
the bottom of the window:
ReadRead
ReadRead
Read Read the selected SMS
ReplyReply
ReplyReply
Reply Reply to the selected SMS
ForwardForward
ForwardForward
Forward Forward the SMS to other recipients
MoveMove
MoveMove
Move Save the SMS on the PC or SIM card
DeleteDelete
DeleteDelete
Delete Delete the selected SMS
SaveSave
SaveSave
Save Save the phone number from the message to
the contacts phonebook
CancelCancel
CancelCancel
Cancel Return to the SMS interface
NotesNotes
NotesNotes
Notes
• If you want to select several messages, you can use the
CtrlCtrl
CtrlCtrl
Ctrl
or
ShiftShift
ShiftShift
Shift keys (Windows)
• New messages cannot be received when the SIM card is full
• The system will indicate the SIM card is full. Messages cannot
be saved until some are deleted by the user.
Page 24
23
PhoneBookPhoneBook
PhoneBookPhoneBook
PhoneBook
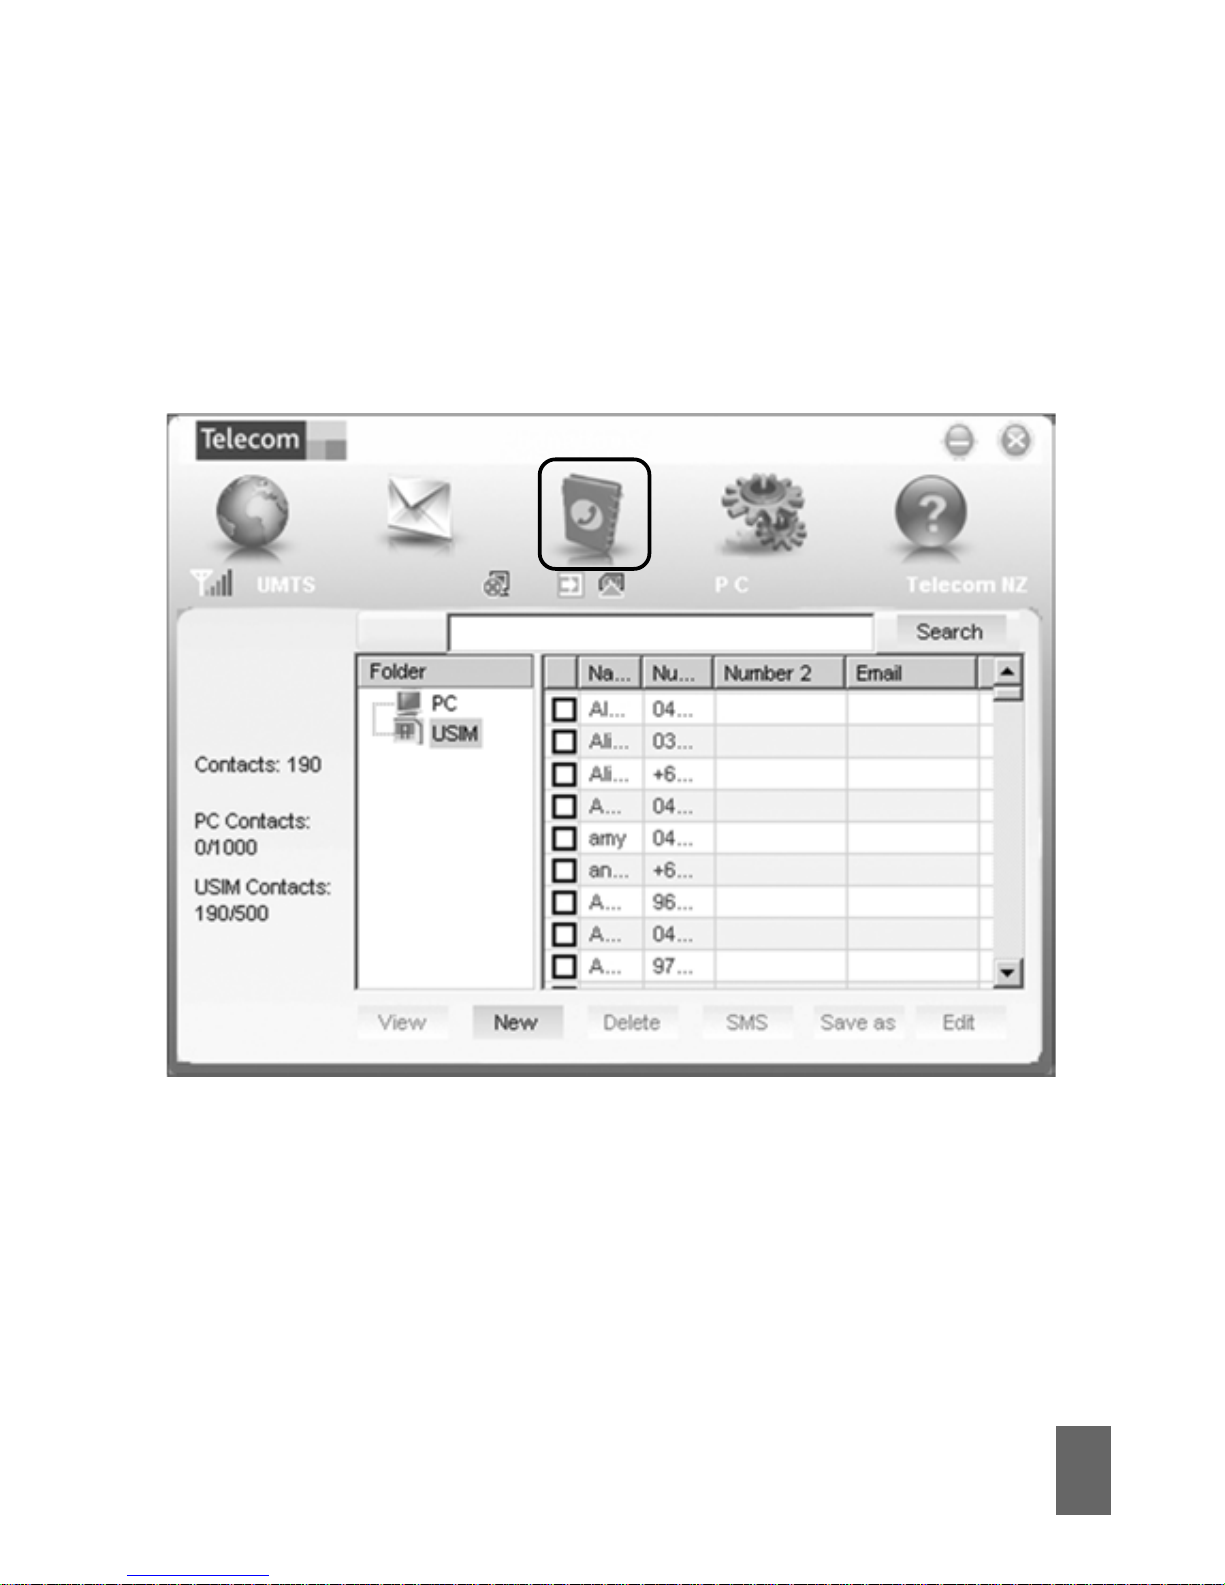
Click the
PhoneBook PhoneBook
PhoneBook PhoneBook
PhoneBook button to select the phonebook interface.
To create a new contact click
NewNew
NewNew
New t
New New
New New
New
CC
CC
C
ontactontact
ontactontact
ontact, enter the
details and select
OKOK
OKOK
OK to finish.
Page 25
24
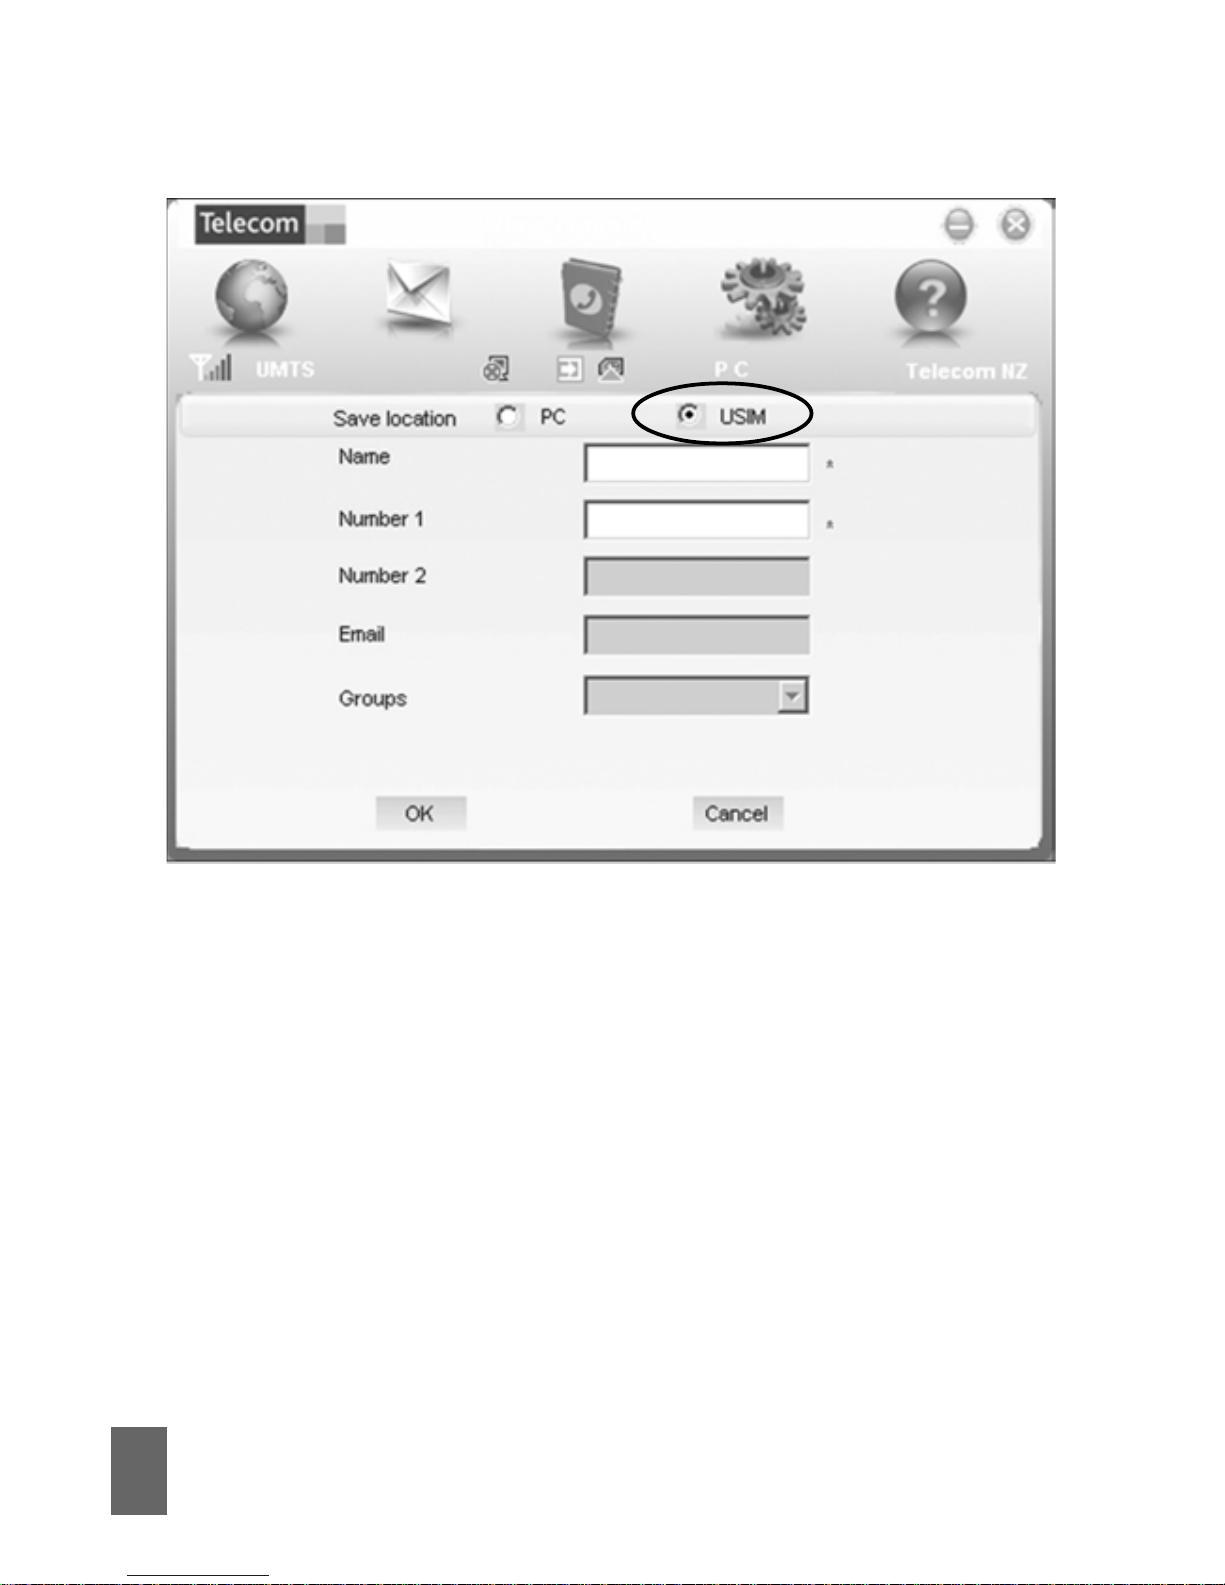
You can choose the
SaSa
SaSa
Sa
vv
vv
v
e locatione location
e locatione location
e location as the PC or the USIM card.
The default location is on the SIM Card.
Page 26
25
PhoneBook Notes:PhoneBook Notes:
PhoneBook Notes:PhoneBook Notes:
PhoneBook Notes:
• If your stored location (Folder) is PC then you can also create
a new Gr oup
• To create a new group: Click
NewNew
NewNew
New t
New New
New New
New
GrGr
GrGr
Gr
oupoup
oupoup
oup and enter
the group name
• Select contacts from the list on the right and drag them to
the group location.
If a contact is selected, you can carry out the following additional
steps using the tabs on the bottom of the screen:
ViewView
ViewView
View View the selected contact’s information
DeleteDelete
DeleteDelete
Delete Delete contacts or groups
SMSSMS
SMSSMS
S M S Send messages to the mobile phone
number selected
Save asSave as
Save asSave as
Save as Save the contact information to a TXT file on
your PC
EditEdit
EditEdit
Edit Edit the contact information
TipTip
TipTip
Tip
To avoid corrupting the phonebook file wait for the connection
manager to close before removing the modem.
Page 27
26
SettingsSettings
SettingsSettings
Settings
Click the
SettingsSettings
SettingsSettings
Settings button to select the settings interface.
CC
CC
C
onnection Settings:onnection Settings:
onnection Settings:onnection Settings:
onnection Settings:
Select this if you want to
AA
AA
A
utomaticallutomaticall
utomaticallutomaticall
utomaticall
y connect to they connect to the
y connect to they connect to the
y connect to the
internet.internet.
internet.internet.
internet.
Page 28
27
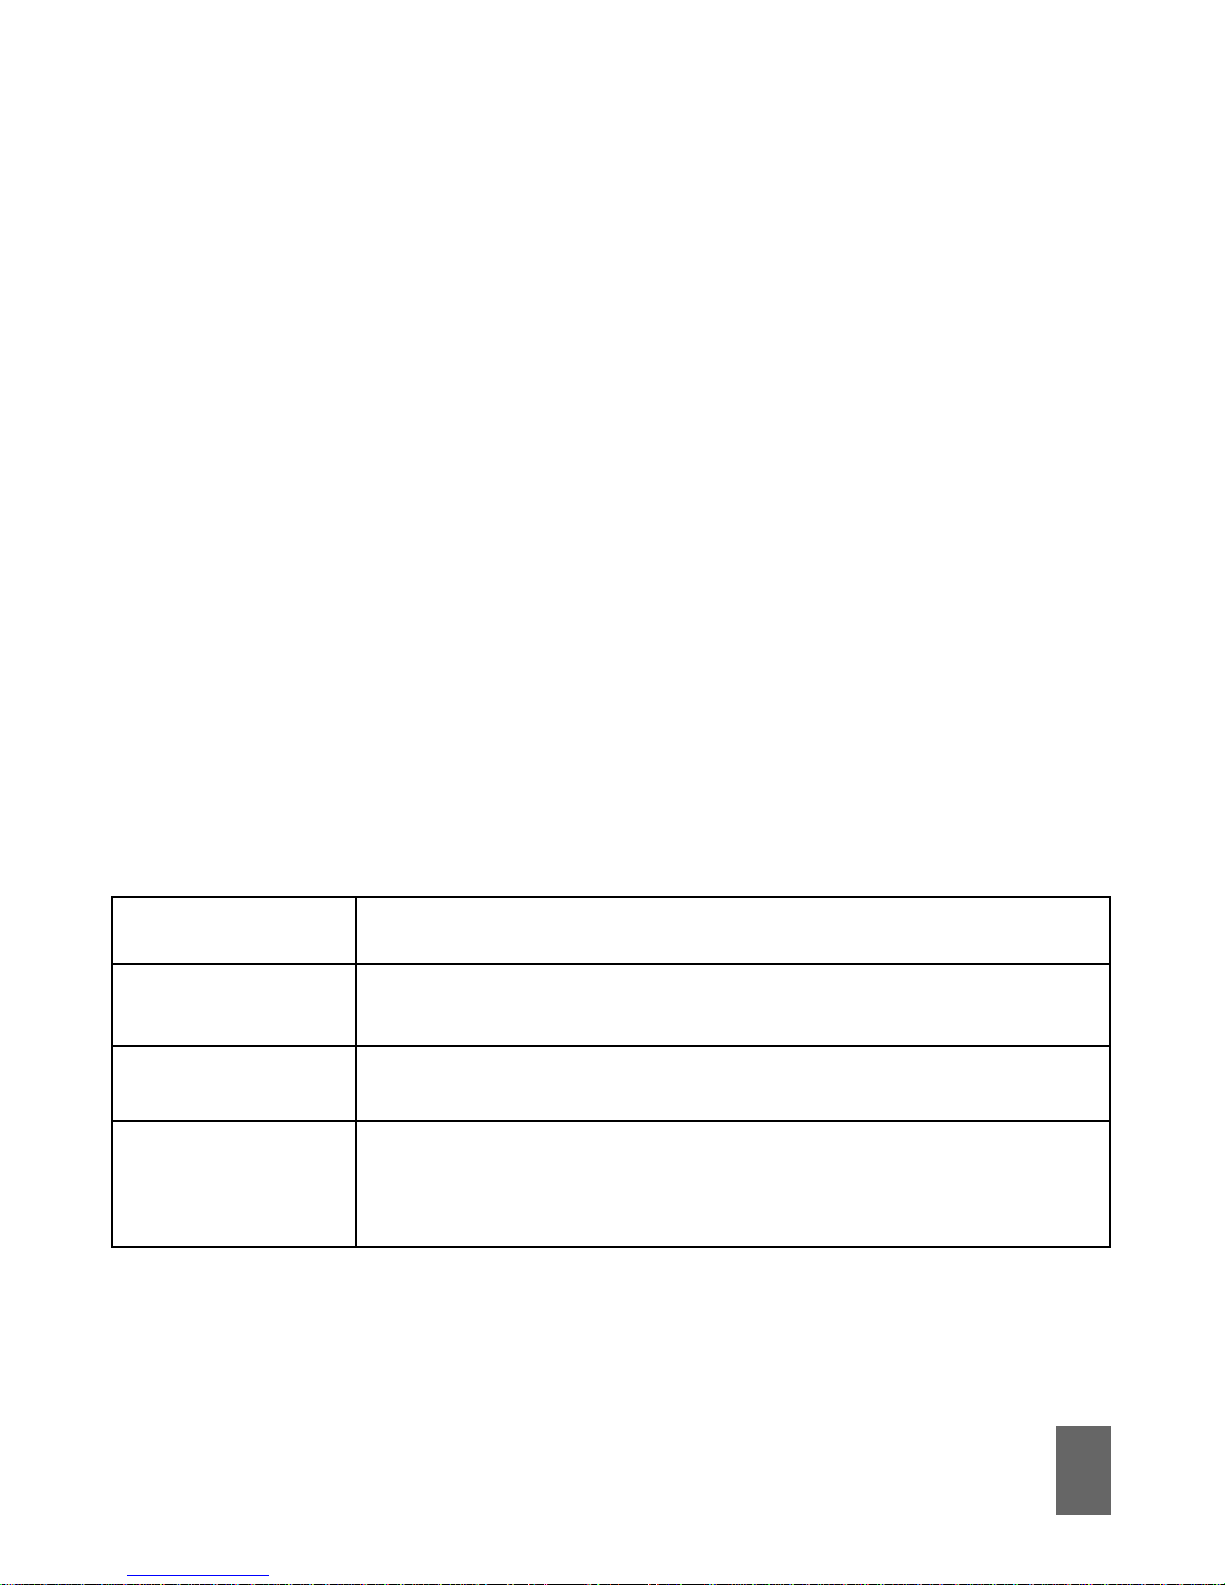
These settings are pre-configured for your network. If you change
networks or are roaming you may need to modify some settings.
Consult your service provider for more information.
New New
New New
New
CC
CC
C
onnection fonnection f
onnection fonnection f
onnection f
or or
or or
or
CC
CC
C
oror
oror
or
porpor
porpor
por
ate Userate User
ate Userate User
ate User
s ands and
s ands and
s and
IT IT
IT IT
IT
AA
AA
A
dministrdministr
dministrdministr
dministr
atorator
atorator
ator
ss
ss
s
If yIf y
If yIf y
If y
ou haou ha
ou haou ha
ou ha
vv
vv
v
e a pre a pr
e a pre a pr
e a pr
iviv
iviv
iv
ate ate
ate ate
ate
VPN yVPN y
VPN yVPN y
VPN y
ou maou ma
ou maou ma
ou ma
y need to cry need to cr
y need to cry need to cr
y need to cr
eate aeate a
eate aeate a
eate a
new connection configurnew connection configur
new connection configurnew connection configur
new connection configur
ation.ation.
ation.ation.
ation.
This fThis f
This fThis f
This f
eatureatur
eatureatur
eatur
e is designede is designed
e is designede is designed
e is designed
ff
ff
f
or IT or IT
or IT or IT
or IT
AA
AA
A
dministrdministr
dministrdministr
dministr
atorator
atorator
ator
s in a cors in a cor
s in a cors in a cor
s in a cor
porpor
porpor
por
ate enate en
ate enate en
ate en
virvir
virvir
vir
onment andonment and
onment andonment and
onment and
is generally not required to be changed by end users.is generally not required to be changed by end users.
is generally not required to be changed by end users.is generally not required to be changed by end users.
is generally not required to be changed by end users.
AddAdd
AddAdd
Add Add new configuration files
DeleteDelete
DeleteDelete
Delete Delete the selected configuration file
EditEdit
EditEdit
Edit Edit the selected configuration file
Set DefaultSet Default
Set DefaultSet Default
Set Default Set the selected profile as your
default connection
Page 29
28
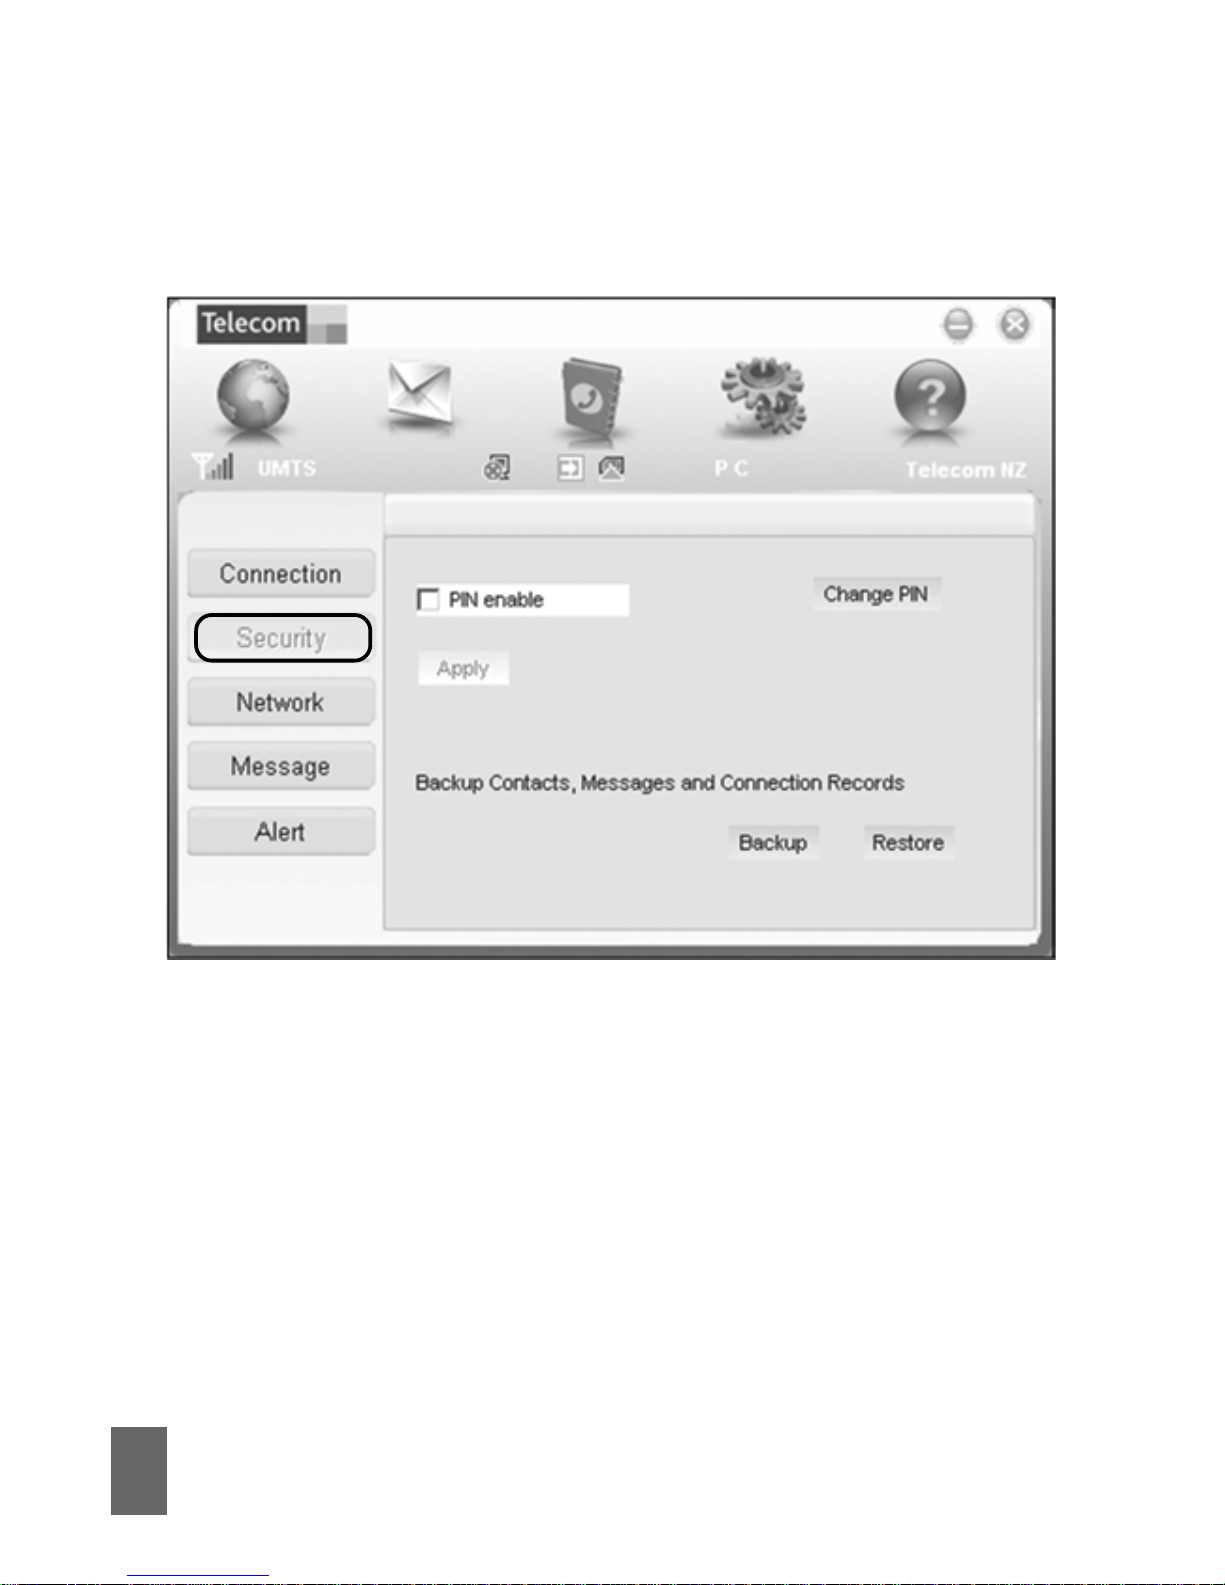
Security SettingsSecurity Settings
Security SettingsSecurity Settings
Security Settings
PIN enablePIN enable
PIN enablePIN enable
PIN enable - The PIN code is pr ovided with your SIM card. Consul t
your service provider if you forget your PIN.
BacBac
BacBac
Bac
kup kup
kup kup
kup
CC
CC
C
ontacts,ontacts,
ontacts,ontacts,
ontacts,
Messag Messag
Messag Messag
Messag
es and es and
es and es and
es and
CC
CC
C
onnection Ronnection R
onnection Ronnection R
onnection R
ecorecor
ecorecor
ecor
ds -ds -
ds -ds -
ds -
Create a local backup of Phonebook and SMS.
Page 30
29
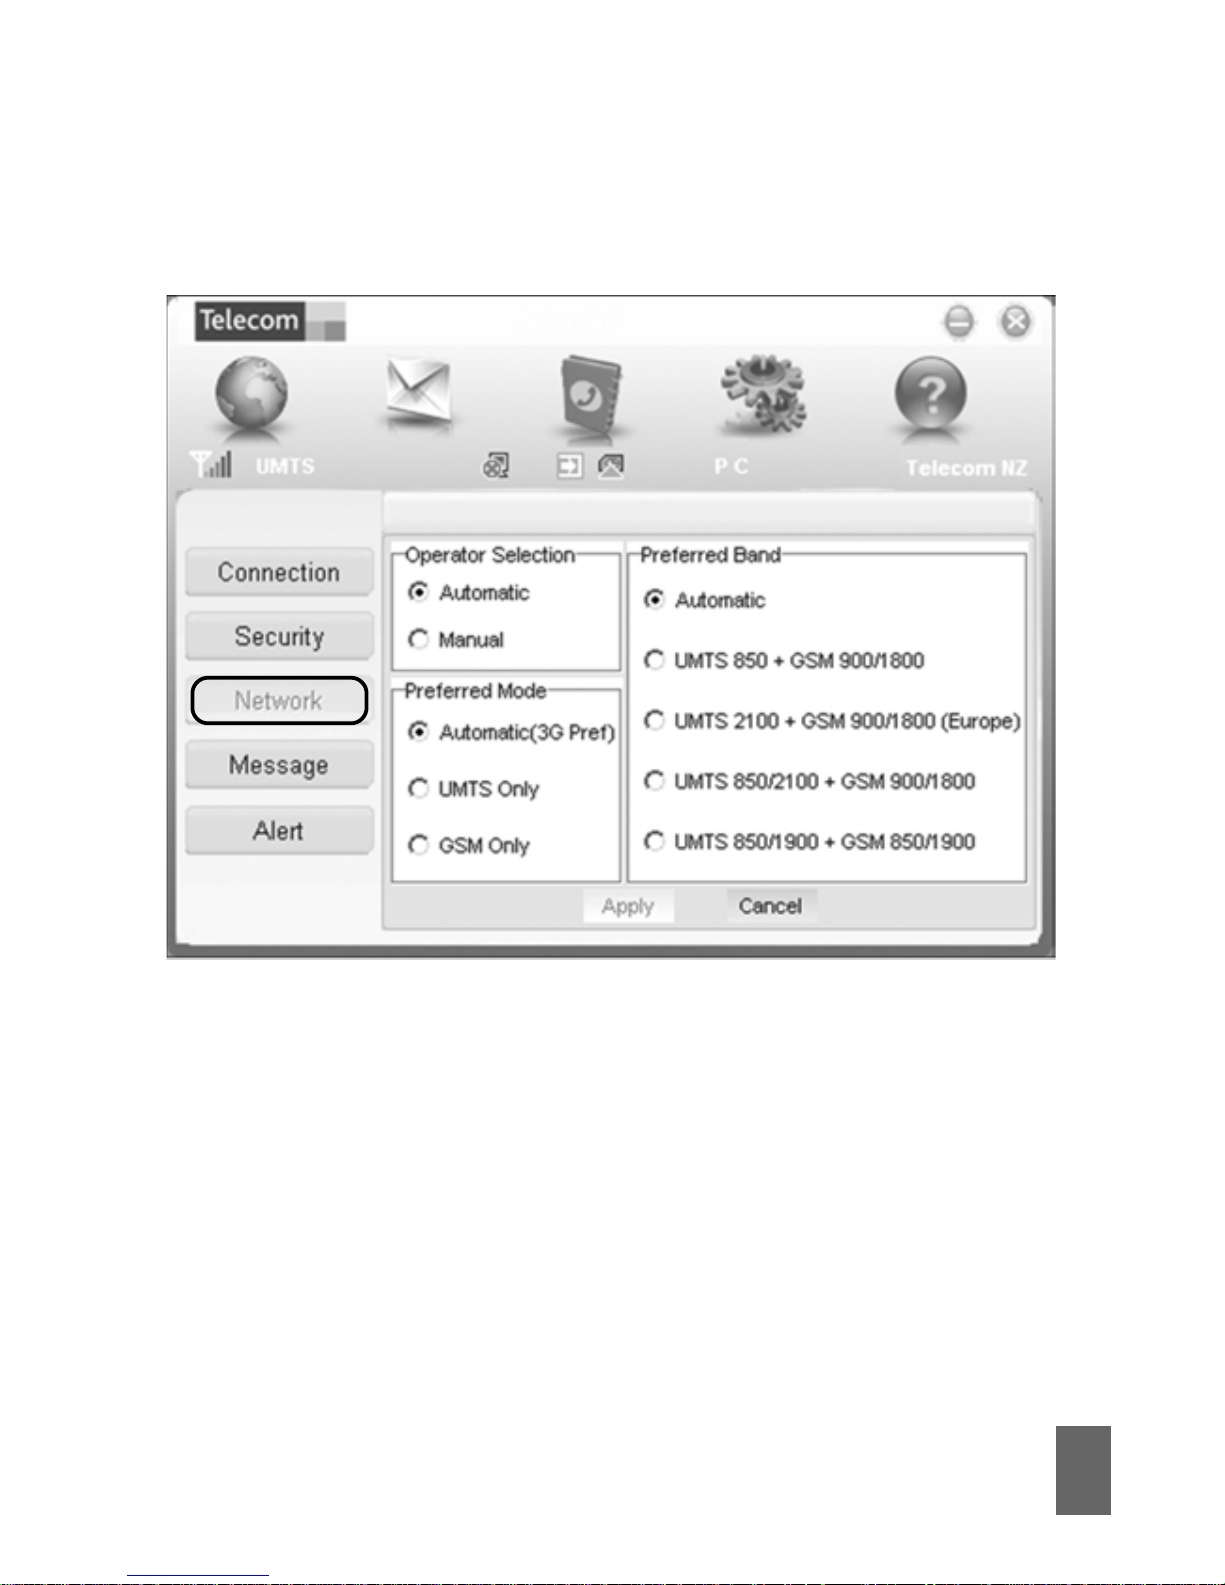
Network SettingsNetwork Settings
Network SettingsNetwork Settings
Network Settings
These settings are pre-configured for your network. There is no
need to change any of these settings. Consult your service
provider for more information.
Page 31
30
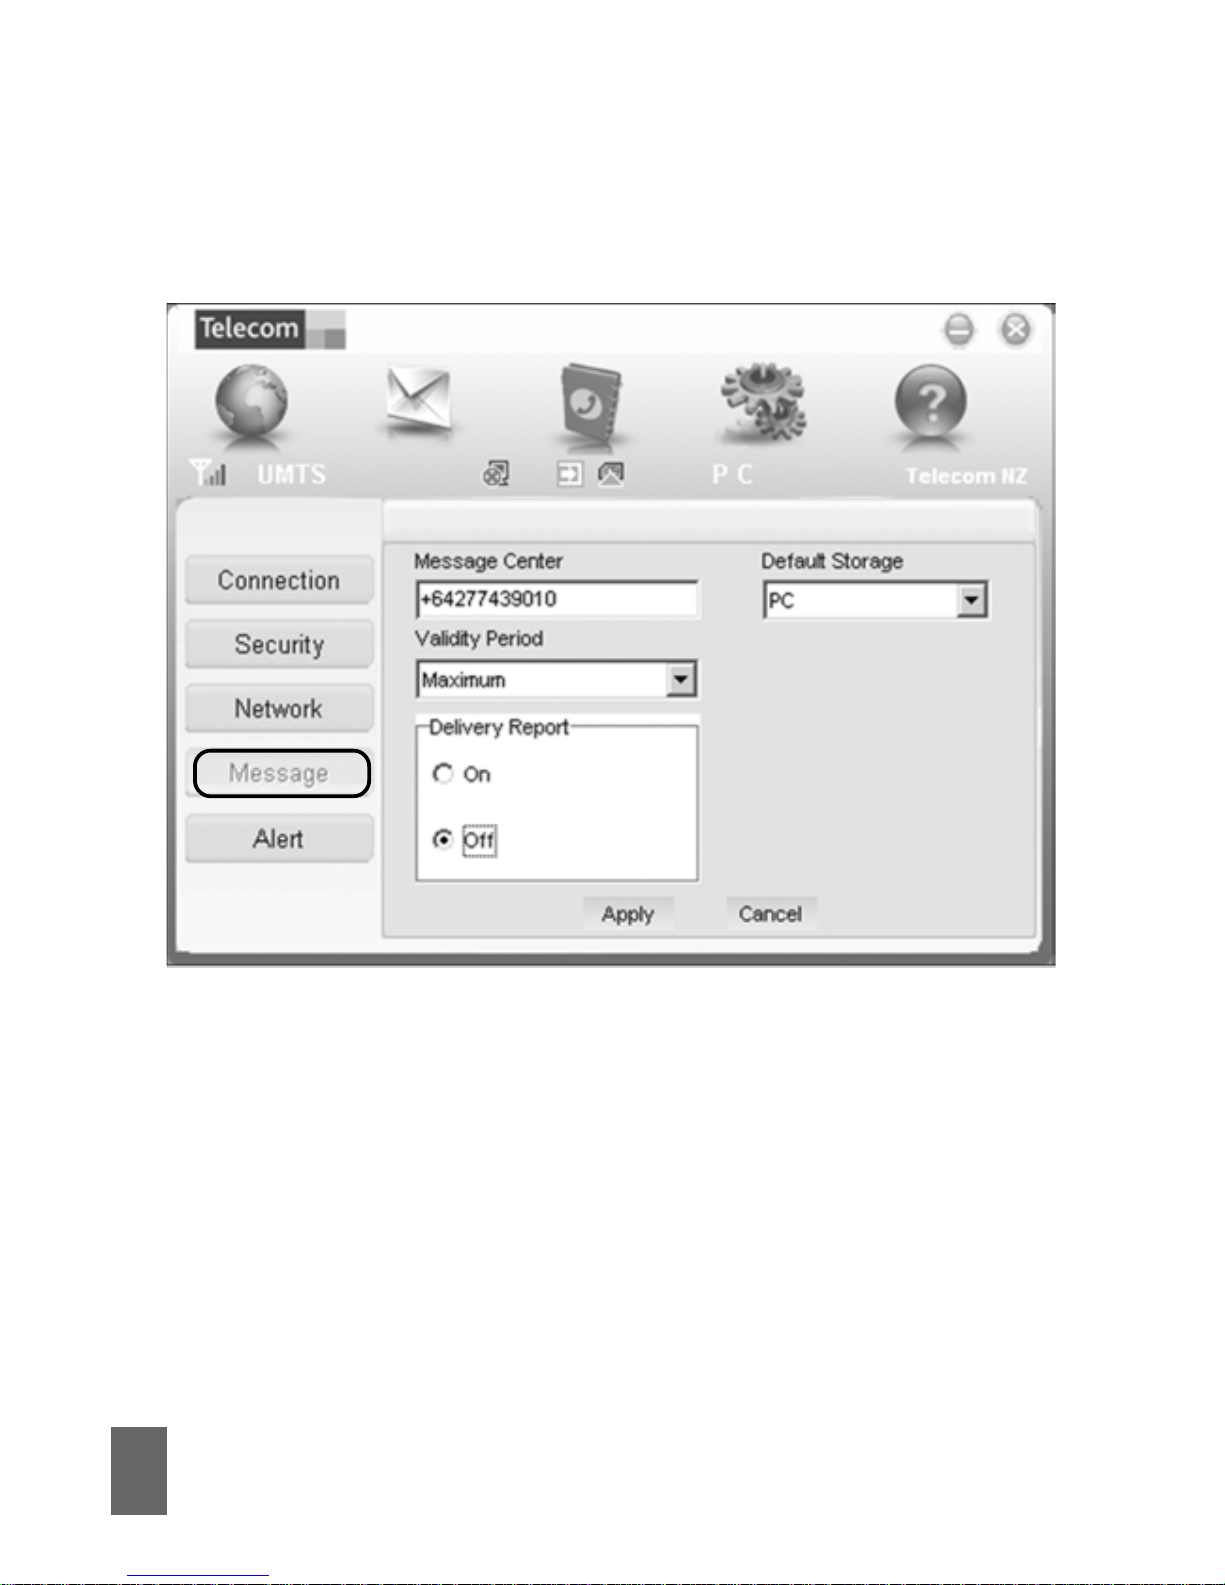
Message SettingsMessage Settings
Message SettingsMessage Settings
Message Settings
These settings are pre-configured for your network. There is no
need to change any of these settings. Consult your service
provider for more information.
Page 32

31
Insert a MicroSDInsert a MicroSD
Insert a MicroSDInsert a MicroSD
Insert a MicroSD
TMTM
TMTM
TM
card for USB External card for USB External
card for USB External card for USB External
card for USB External
StorageStorage
StorageStorage
Storage
You can use the modem as an external storage device to store
and transfer files. Insert a MicroSDTM card into the side port
shown on page 2.
MicroSDTM cards supported to 2GB are FAT 16 format.
MicroSDTM HC cards supported to 8GB are FAT 32 format.
If you want to remove the modem please use the Safe Removal
of Hardware to stop the removable disk first. For more details
see the Safe Removal of Hardware process.
HelpHelp
HelpHelp
Help
Click
HelpHelp
HelpHelp
Help button to access the system help and user
guide.
Page 33

32
ProblemProblem
ProblemProblem
Problem
The user interface
doesn’t start or
stays ‘Initializing’
after the modem
is plugged in.
The modem has
no signal.
Possible CausesPossible Causes
Possible CausesPossible Causes
Possible Causes
PC configuration is
not correct.
(No autorun)
The antenna is at
the wrong angle or
position.
You have no
network coverage.
You have not entered
your PIN number at
start up.
Suggested SolutionSuggested Solution
Suggested SolutionSuggested Solution
Suggested Solution
Start the program manually
by going Start > Program
Files or use the shortcut on
the desktop. Check the
drivers, try Safe Mode.
Adjust the angle and
position of the USB modem.
Try moving location until
you get good reception. Try
the extension cable.
Restart the application and
enter your PIN number. If
the PIN is invalid you
cannot connect to the
network.
TT
TT
T
rr
rr
r
oubleshootingoubleshooting
oubleshootingoubleshooting
oubleshooting
If you have any problems with your modem please check this
section. If the problem still exists test on an alternate PC and
contact your service provider. Check for more details and FAQ’s
at www.zte.co.nz
Page 34

33
PrPr
PrPr
Pr
obleoble
obleoble
oble
mm
mm
m
Message sent
failed.
Data connection
failed.
The modem
cannot connect
to the internet
abroad.
Possible CausesPossible Causes
Possible CausesPossible Causes
Possible Causes
The SMS centre
number isn’t
correct.
You have no
network coverage.
The APN
configuration is
wrong
The manual network
selection is wrong.
You are using the
wrong APN.
You don’t have
roaming enabled on
your plan.
Suggested Suggested
Suggested Suggested
Suggested
SolutionSolution
SolutionSolution
Solution
Enter the correct number
in the Message settings.
Restore Factory Settings.
Try moving location until
you get good reception. Try
the extender cable
Check with your service
provider and set the APN in
the configuration settings.
Restore Factory Settings.
Select the correct network
for your service provider.
Restore
AA
AA
A
utomatic utomatic
utomatic utomatic
utomatic mode.
Restore Factory Settings.
Consult your service
provider.
Restore Factory Settings.
Contact your service
provider to enable roaming.
Page 35
34
PrPr
PrPr
Pr
obleoble
obleoble
oble
mm
mm
m
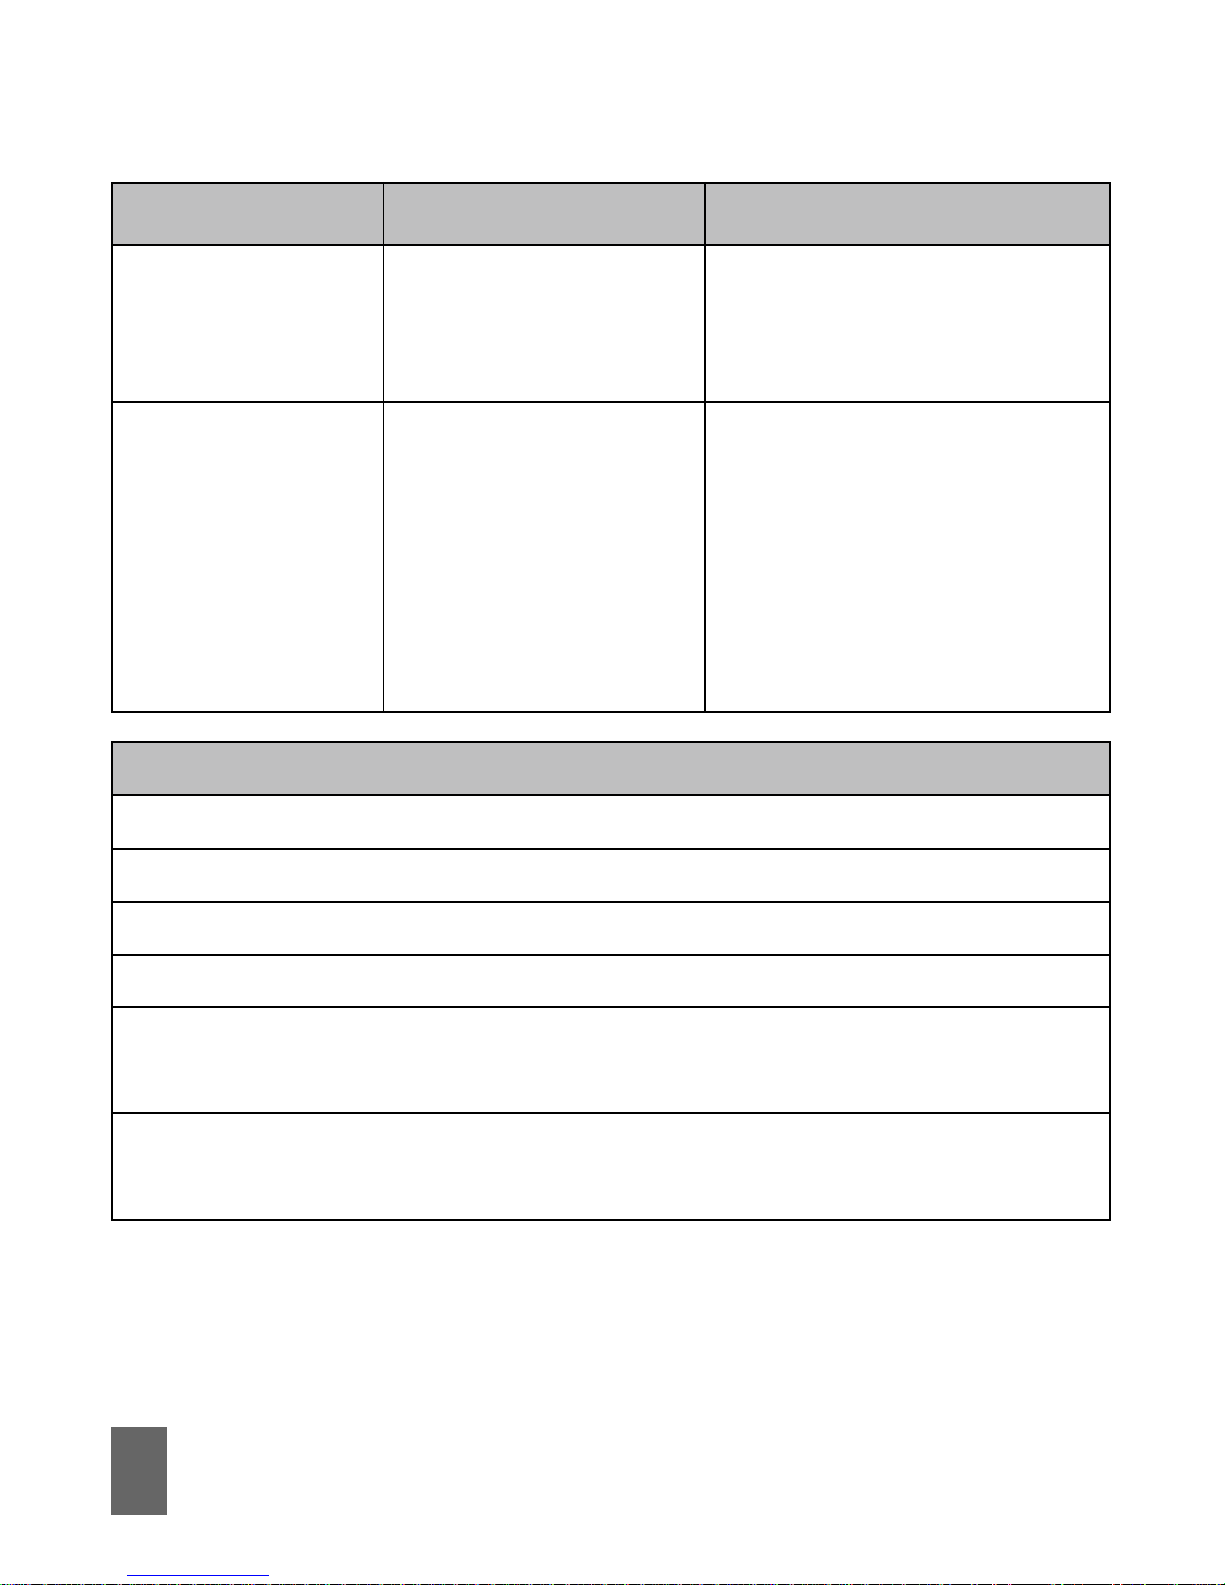
No warning tone.
The MicroSD
TM
card cannot be
read or is not
found.
Possible Possible
Possible Possible
Possible
CausesCauses
CausesCauses
Causes
The PC soundcard is
disabled or on low
volume.
Re-insert the
MicroSD
TM
card. The
maximum capacity
is 8GB. The card is not
formatted correctly.
SuSu
SuSu
Su
gggg
gggg
gg
ested Solutionested Solution
ested Solutionested Solution
ested Solution
Check the audio card and
adjust the volume.
Try another MicroSD
TM
card and make sure the
capacity and format is
correct.
2GB is FAT16 format
8GB is FAT32 format
TT
TT
T
rr
rr
r
oubleshooting oubleshooting
oubleshooting oubleshooting
oubleshooting
TT
TT
T
ipsips
ipsips
ips
1. Install and test the modem in another computer
2. Check your SIM is working in another device – eg mobile phone
3. Insert a known working SIM card into your modem
4. Confirm your account is active – contact your service provider
5. Uninstall the modem and re-install using ‘Safe Mode’. Consult a
PC technician if required. Check the drivers in Device Manager
6. If the software installation does not start or has failed try
downloading the current version from our website
www.zte.co.nzwww.zte.co.nz
www.zte.co.nzwww.zte.co.nz
www.zte.co.nz
Page 36

35
Precautions and Safety InformationPrecautions and Safety Information
Precautions and Safety InformationPrecautions and Safety Information
Precautions and Safety Information
Some electronic devices are susceptible to electromagnetic
interference. The modem is a transmitting device and may
cause interference to sensitive electronic equipment such
as audio systems, vehicle systems and medical equipment.
Please consult the manufacturer of the other device before
using the modem.
Operating of laptop or desktop PCs with the modem may
interfere with medical devices like hearing aids and
pacemakers. Please keep the modem more than 20
centimetres away from such medical devices. Turn the
modem off if necessary. Consult a physician or the
manufacturer of the medical device before using the modem
near such devices.
Be aware of the regulations when using the modem at places
such as oil refineries or chemical factories, where there are
explosive gases or explosive products being processed. Turn
off your modem as instructed.
Don’t touch the antenna area unnecessarily whilst
connected. This can affect your modem performance and
reduce the signal quality.
Page 37

36
Store the modem out of the reac h of children. The modem
may cause injury or get damaged.
The modem contains sensitive electronic circuitry. Do not
expose the modem to any liquids, high temperatures or
shock.
Only use original accessories or accessories that are
authorized by the manufacturer. Using unauthorized
accessories may affect your modem’s performance, damage
your modem and violate related national regulations.
Avoid using the modem in areas that emit electromagnetic
waves or in enclosed metallic structures eg lifts.
The modem is not waterproof. Please keep it dry and store it
in a cool, dry place.
Don’t use the modem immediately after a sudden
temperature change eg from an air conditioned environment
to high temperature and humidity outside. In such cases
there could be condensing moisture inside the modem which
can cause internal damage. Unplug the modem and leave it
for 30 minutes before use.
Always handle the modem with care. Be careful not to drop
or bend the modem.
There are no user serviceable parts inside the modem.
Unauthorised dismantling or repair will void the warranty.
Page 38

37
Radiation from Electronic DevicesRadiation from Electronic Devices
Radiation from Electronic DevicesRadiation from Electronic Devices
Radiation from Electronic Devices
The USB Wireless modem is a transmitting device with similar
output power to a mobile phone. It uses an internal antenna to
connect to the mobile network . To get the best performance
from your device do not cover or shield the device in any way as
this will lead to increased output power. Always leave a clear
space around the device to allow the transmit and receive
signals to propagate. SAR tests have been completed and comply
with the Australia and New Zealand regulatory requirements.
DeclarDeclar
DeclarDeclar
Declar
ation oation o
ation oation o
ation o
f f
f f
f
CC
CC
C
onfonf
onfonf
onf
ormityormity
ormityormity
ormity
We declare under our sole responsibility that the product(s)
detailed in this manual, and in combination with our accessories,
conform with the essential requirements of The Radio
Communications Standard (Electro-magnetic Radiation Human
Exposure) 2003 and the Australian Communications and Media
Authority Section 376 of the Telecommunications Act 1997.
Z1196
Page 39
38
TT
TT
T
ecec
ecec
ec
hnical Specificationshnical Specifications
hnical Specificationshnical Specifications
hnical Specifications
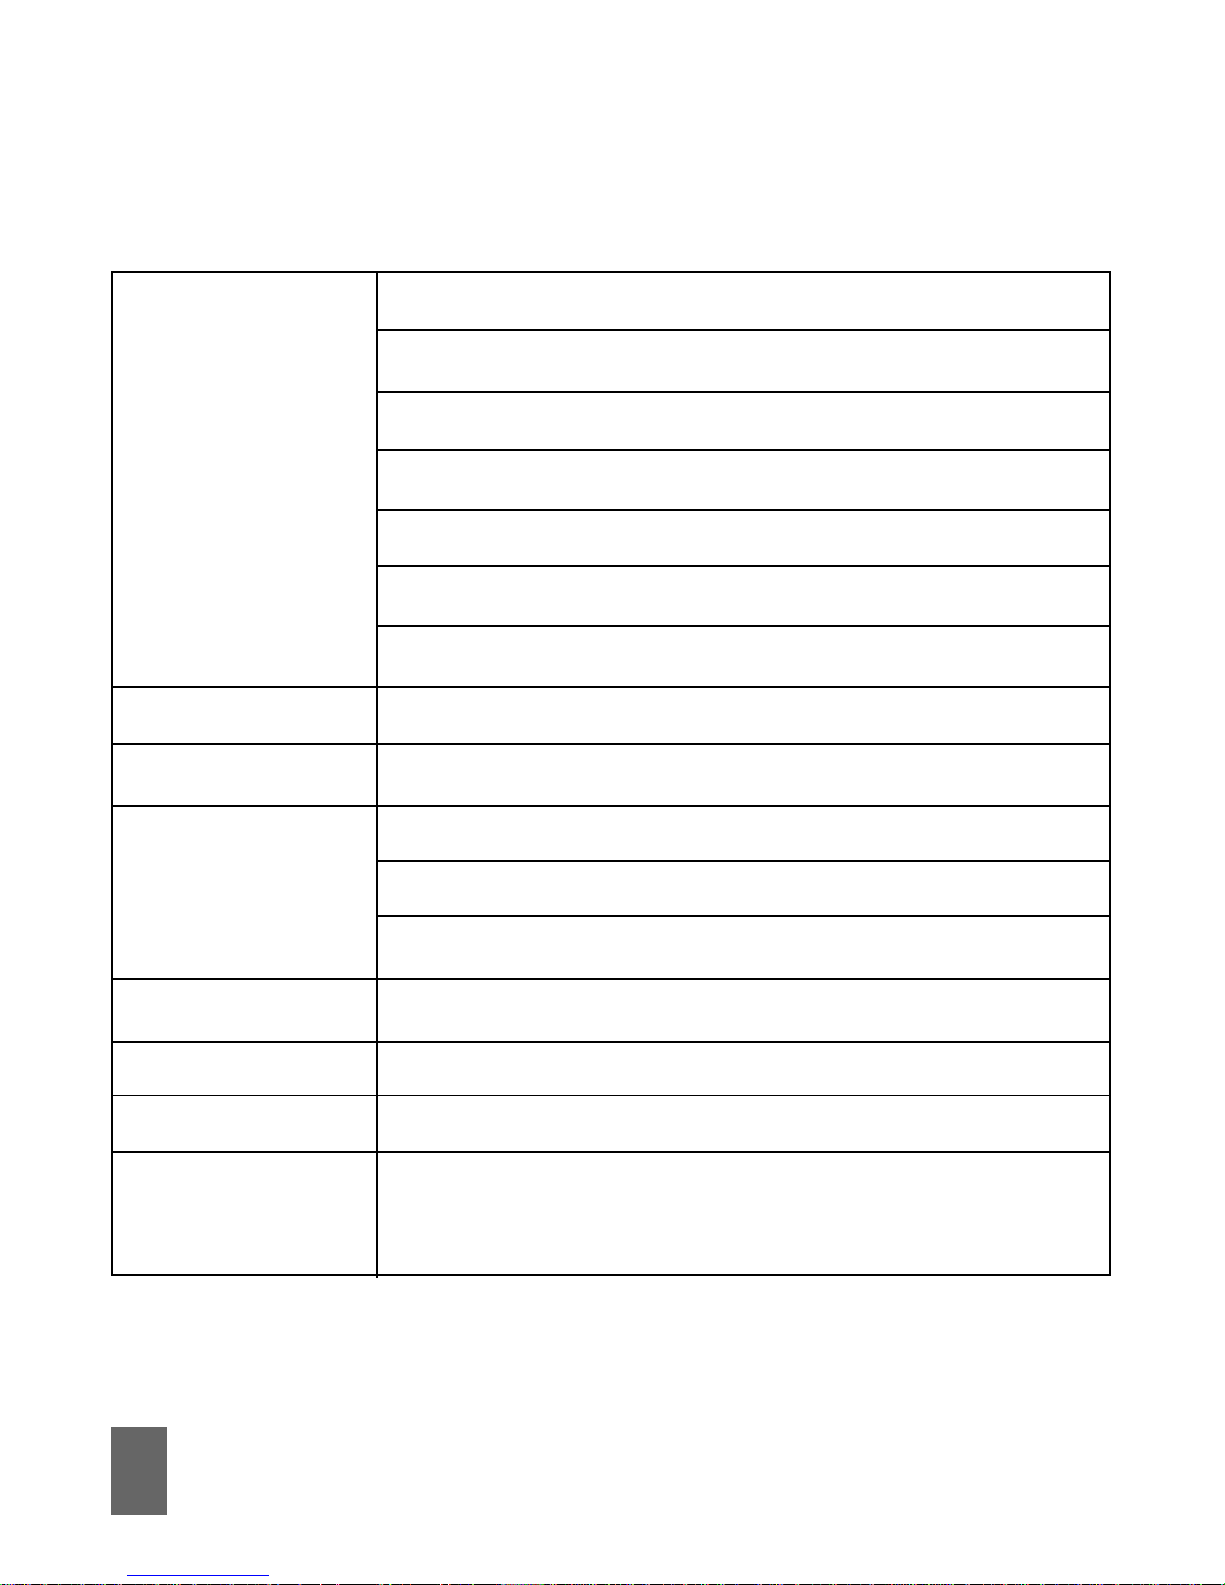
Network and
Band compatibility
Dimensions
Weight
Data Rate
Voltage
Current
Consumption
Max Emitted
Power
HSUP A/HSDPA/UMTS 850 MHz
HSUP A/HSDPA/UMTS 1900 MHz
HSUP A/HSDPA/UMTS 2100 MHz
GSM/GPRS/EDGE 850 MHz
GSM/GPRS/EDGE 900 MHz
GSM/GPRS/EDGE 1800 MHz
GSM/GPRS/EDGE 1900 MHz
69mm x 26.5mm x 12mm
Approx. 30g
HSDPA Mode up to 3.6 Mbps*
UMTS Mode up to 384 Kbps*
EDGE Mode up to 236.8 Kbps*
5V
Resting: 100mA rms
Max: 450mA rms
In 3G WCDMA Mode: 250mW
In 2G GSM/GPRS Mode: 2W
Page 40
39
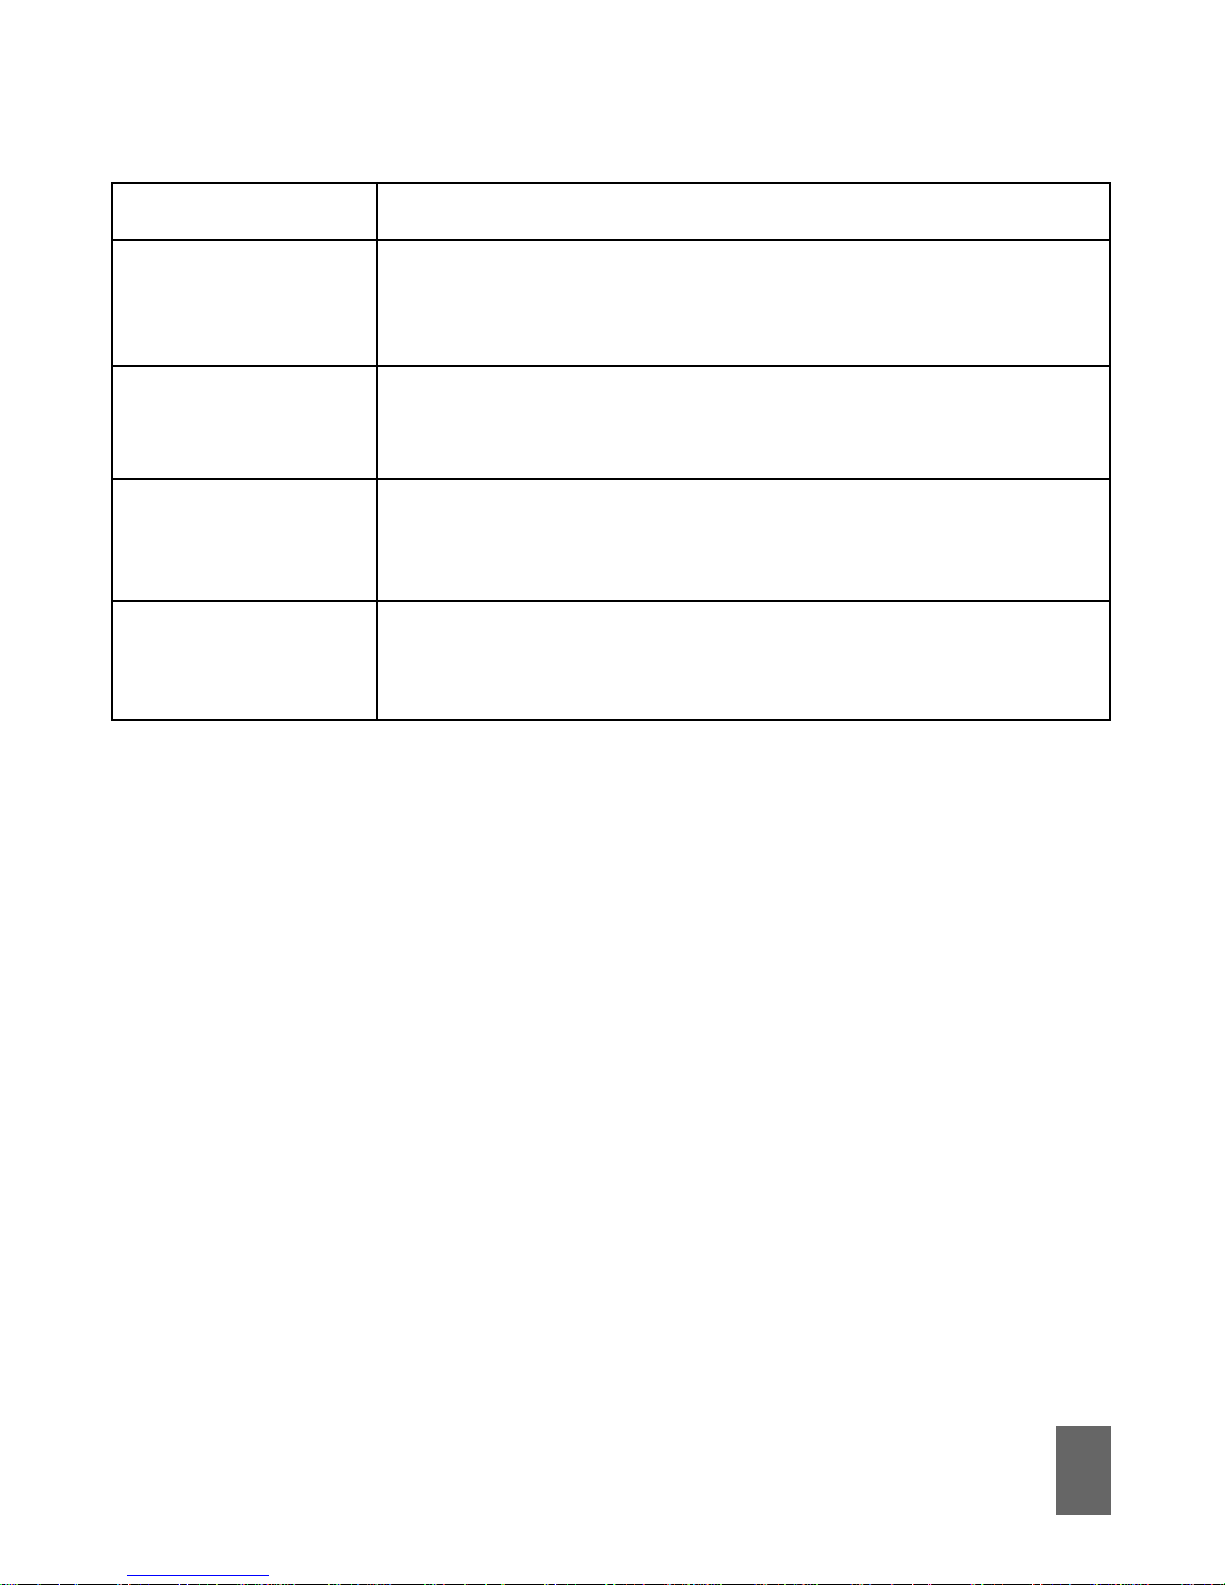
Interface
Operating
systems
Functions
MicroSDHC
memory card
Temperature
Range
USB 2.0
Windows 7, Vista & XP SP2 & SP3
Apple Mac OS X 10.5 and above
High speed wireless data, internet,
MicroSDHC card, SMS
8GB MicroSDTMHC
2GB MicroSD
TM
-5ºC to +45ºC
* Actual speeds will be less. Speeds may v ary due to congestion,
distance from the cell, local conditions, hardware, software and
other factors.
Page 41

40
Software RemovalSoftware Removal
Software RemovalSoftware Removal
Software Removal
If you wish to uninstall the application please follow the
procedure below:
SS
SS
S
tartar
tartar
tar
t t
t t
t t
PrPr
PrPr
Pr
oo
oo
o
grgr
grgr
gr
ams ams
ams ams
ams t
TT
TT
T
elecom elecom
elecom elecom
elecom
CC
CC
C
onnection Managonnection Manag
onnection Managonnection Manag
onnection Manag
er er
er er
er t
UninstallUninstall
UninstallUninstall
Uninstall
Follow the prompts and press
YY
YY
Y
eses
eses
es to continue.
MAMA
MAMA
MA
C UserC User
C UserC User
C User
s – drs – dr
s – drs – dr
s – dr
ag the application fag the application f
ag the application fag the application f
ag the application f
older to the older to the
older to the older to the
older to the
TT
TT
T
rr
rr
r
ashash
ashash
ash
bin.bin.
bin.bin.
bin.
Page 42

 Loading...