

Page 1
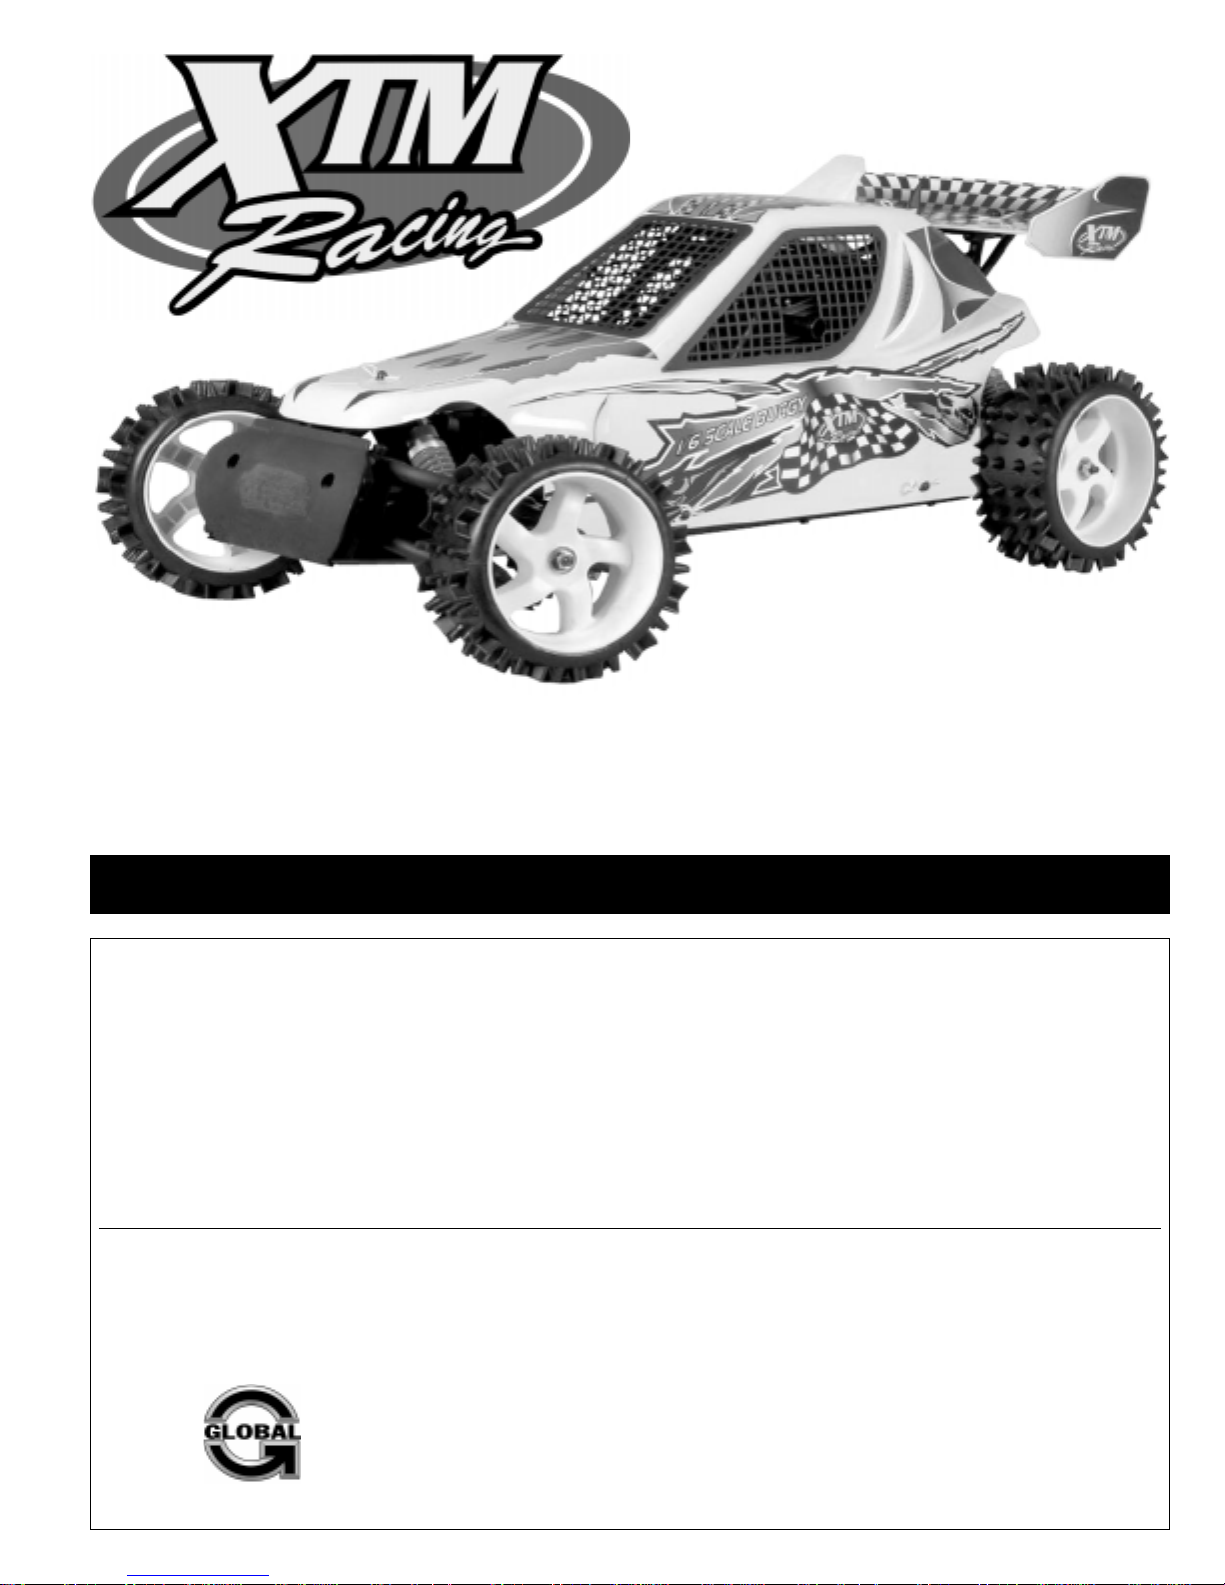
1/6 GAS-POWERED 2WD BUGGY
ASSEMBLY AND OPERATING INSTRUCTIONS
Features of Your New XTM Racing 1/6 Gas-Powered 2WD Buggy:
●
Incredible 1/6 Scale Size!
●
Includes 23cc Gasoline Engine with Pull-Starter
●
Steel Differential
●
Full Ball Bearings
●
Huge Front Bumper
●
Factory-Trimmed Body
●
Double Epoxy Brake Discs
●
Strong 7mm Thick Dogbones
●
Heavy-Duty Side Dust Guards
●
Factory-Glued Tires with Inserts
Thank you for purchasing the XTM Racing 1/6 Gas-Powered 2WD Buggy. These Assembly and Operating Instructions are provided to help you enjoy
your new 1/6 Gas-Powered 2WD Buggy without any of the hassles you might expect. Please read through all of the literature that is provided in the box.
✦✦
✦IMPORTANT
✦✦
✦✦
✦ Before operating your new 1/6 Gas-Powered 2WD Buggy, please read and understand the warnings listed on the next page. Failure
✦✦
to do so could lead to bodily harm and/or injury. The XTM Racing 1/6 Gas-Powered 2WD Buggy is not intended for persons under 12 years of age,
unless closely supervised by an adult.
●
Internal Roll Cage for Protection
●
Massive Servo Saver for Steering
●
Fully Threaded, Oil-Filled Aluminum Shocks
●
Dust Cover to Protect the Pinion and Spur Gears
●
Adjustable Camber, Castor and Toe-In Front and Rear
●
4mm Aluminum Chassis with Curved Edges for More Strength
●
Uses Regular Unleaded Gasoline with 2-Stroke Oil Added
●
Water-Resistant Receiver and Battery Boxes
●
Large Fuel Tank with Ventilation Lines
●
Large Pull-Starter for Easy Starting
The XTM Racing 1/6 Gas-Powered 2WD Buggy is distributed exclusively in the U.S.A.by
All contents copyright © 2004, Global Hobby Distributors Version V1.0 July 2004
Global Hobby Distributors
18480 Bandilier Circle
Fountain Valley, CA 92708
Kit Product # 146300
1
Page 2
FOR YOUR SAFETY - PLEASE READ THESE WARNINGS FIRST!
ENGINE WARNINGS
●
Never use any fuel in your engine other than regular unleaded
gasoline with 2-stroke oil added. Use of any other types of fuel,
such as glow fuels for nitro-powered engines and diesel fuel
should never be used.
●
Never operate your model on any public streets. This could
cause traffic accidents, personal injury or property damage.
●
Gas engines emit exhaust vapors that are poisonous and can
be dangerous to your health. It is important that you operate
your engine in a very well-ventilated area, preferably outdoors.
●
Before starting your engine, make sure that the throttle trim is
set to the idle position. Starting your engine at any setting above
idle can cause the model to lurch out of your hands.
●
When your engine is running, there are certain parts that
rotate at high speeds. Be careful not to touch the drive shafts,
gears, clutch assembly or any other moving parts. Otherwise,
serious injury could result.
●
It is normal for your engine and muffler to get very hot during
operation. Never touch these parts while they are hot or you
might be burned.
●
Model car engines produce vibration when they are running. It
is important to periodically check the engine mounting screws
and other assemblies to ensure they are tight. Running your
engine with the engine mounting screws loose can lead to
severe engine and/or chassis damage.
FUEL WARNINGS
●
The gasoline used in your 1/6 Gas-Powered 2WD Buggy is
poisonous. Follow all safety precautions and keep gasoline in a
tightly sealed container specifically for this purpose.
●
Keep fuel out of the reach of children.
●
Gasoline and its vapors are extremely flammable. Keep away
from high heat, sparks and flame.
GENERAL WARNINGS
●
Under no circumstances should you operate your model in
crowds of people. Serious injury could result.
●
Never operate your model on busy streets or if there are cars
around.
●
Do not use your model to chase pets or other animals.
●
The receiver and battery boxes are not waterproof; therefore,
do not drive through water, wet grass, mud or snow.
●
Because your model is operated by radio control, it is important
to make sure you always are using fresh and/or fully charged
batteries. Never allow the batteries to run low or you could lose
control of the model.
●
If your model becomes stuck, allow the engine to idle, then
retrieve your model by hand.
●
To prevent excessive r.p.m.'s from damaging your engine and/or
drivetrain components, we suggest reducing throttle while in the
air during jumps.
CUSTOMER INFORMATION
If you should have trouble with any of the steps listed in these Assembly and Operating Instructions, or if you find a missing or damaged
part in your kit, please contact us at the address below:
Global Services
18480 Bandilier Circle
Fountain Valley, CA 92708
Phone: (714) 963-0329 Fax: (714) 964-6236 Email: [email protected]
CHECK IT OUT! We urge you to come check out our website at http://globalservices.globalhobby.com. There you will find public message boards
frequented by other XTM Racing product owners and the XTM Racing support staff. This is a great place to learn about new XTM Racing products,
get help and suggestions for your current XTM Racing products or just simply hang out and chat with people that share your same interests.
To allow us to serve your needs better, please include your email address with any correspondence you send to us. Your email address will be added to our Customer
Service Database so you will automatically receive free updates and tech notices for your particular product. You will also receive repair status updates (if applicable) and
other important information about your product as it becomes available.
IMPORTANT INFORMATION ABOUT YOUR EMAIL ADDRESS
Global Hobby Distributors will not disclose the information it collects to outside parties. Global Hobby Distributors does not sell, trade, or rent
your personal information to others . Your privacy is important to us.
Check out our website for more information on
this and other exciting XTM Racing products!
http://xtm.globalhobby.com
2
Page 3
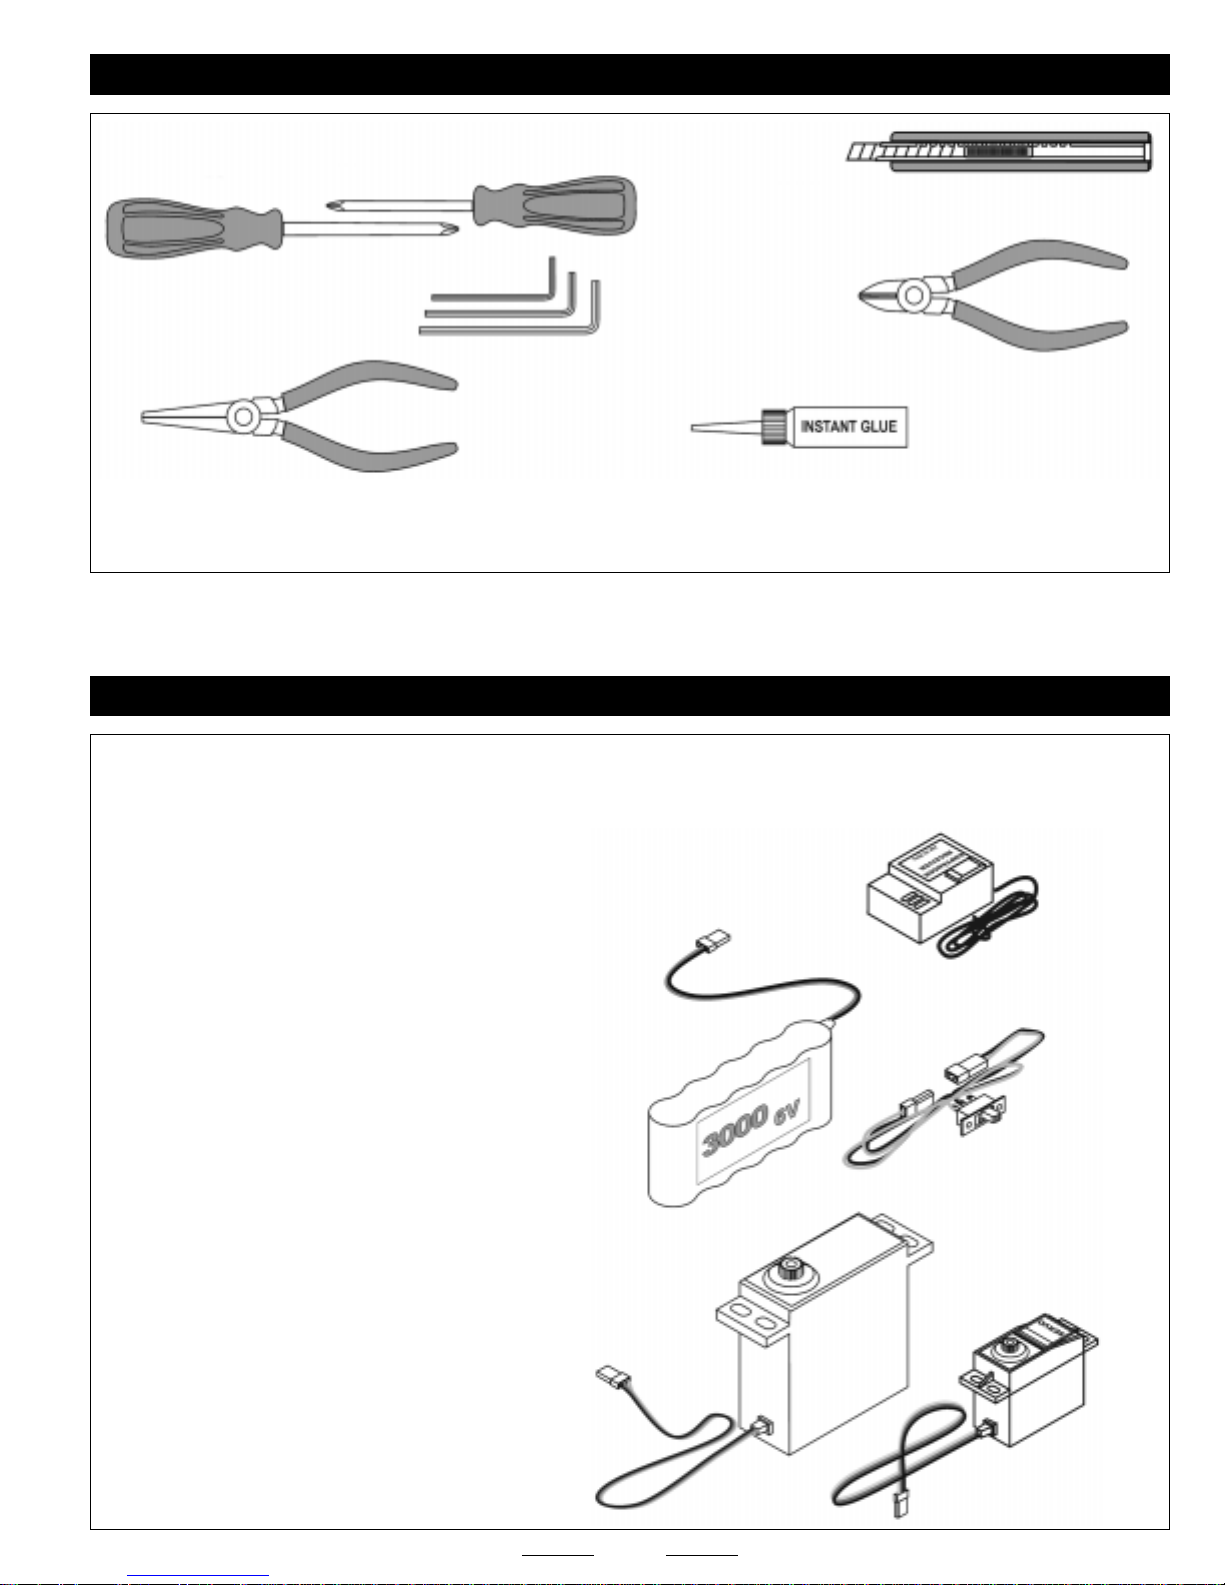
TOOLS NEEDED FOR ASSEMBLY
PHILLIPS HEAD SCREWDRIVERS
(# 1 AND # 2 SIZES)
1.5MM, 2MM AND 2.5MM
HEX WRENCHES
NEEDLE NOSE
PLIERS
MODELING KNIFE
WIRE CUTTERS
C/A GLUE
YOU WILL ALSO NEED HIGH-QUALITY 2-STROKE ENGINE OIL TO MIX WITH THE REGULAR UNLEADED GASOLINE USED
IN THE ENGINE. THE OIL SHOULD BE MIXED AT A RATIO OF 32:1 (i.e. 32 PARTS GASOLINE TO 1 PART 2-STROKE OIL).
RADIO CONTROL SYSTEM REQUIRED
PLEASE READ AND UNDERSTAND THE INSTRUCTIONS PROVIDED WITH YOUR RADIO CONTROL SYSTEM
BEFORE INSTALLING IT INTO YOUR 1/6 GAS-POWERED 2WD BUGGY.
RECEIVER
Although an AM radio control system can be used, we
recommend using an FM radio control system.
We suggest using a Sub-C size 6 volt battery
pack with a minimum capacity of 2000mAH.
Before installing the servos, the servo output
shafts must be centered. To set the center
position, turn on the transmitter and receiver. Set
the trim levers on the transmitter to the center
position and turn off the receiver, then the
transmitter. At this point, the servo output shafts
will be in the centered position and are ready for
installation.
SUB-C 6V
RECEIVER
BATTERY PACK
SWITCH
HARNESS
STEERING
SERVO
For the steering servo, we strongly recommend
using a 1/4 scale servo that has a minimum of
200 oz./in. torque at 6 volts.
For the throttle/brake servo, we suggest using a
high-quality standard servo with a minimum of
60 oz./in. torque at 6 volts.
THROTTLE/BRAKE
SERVO
3
Page 4
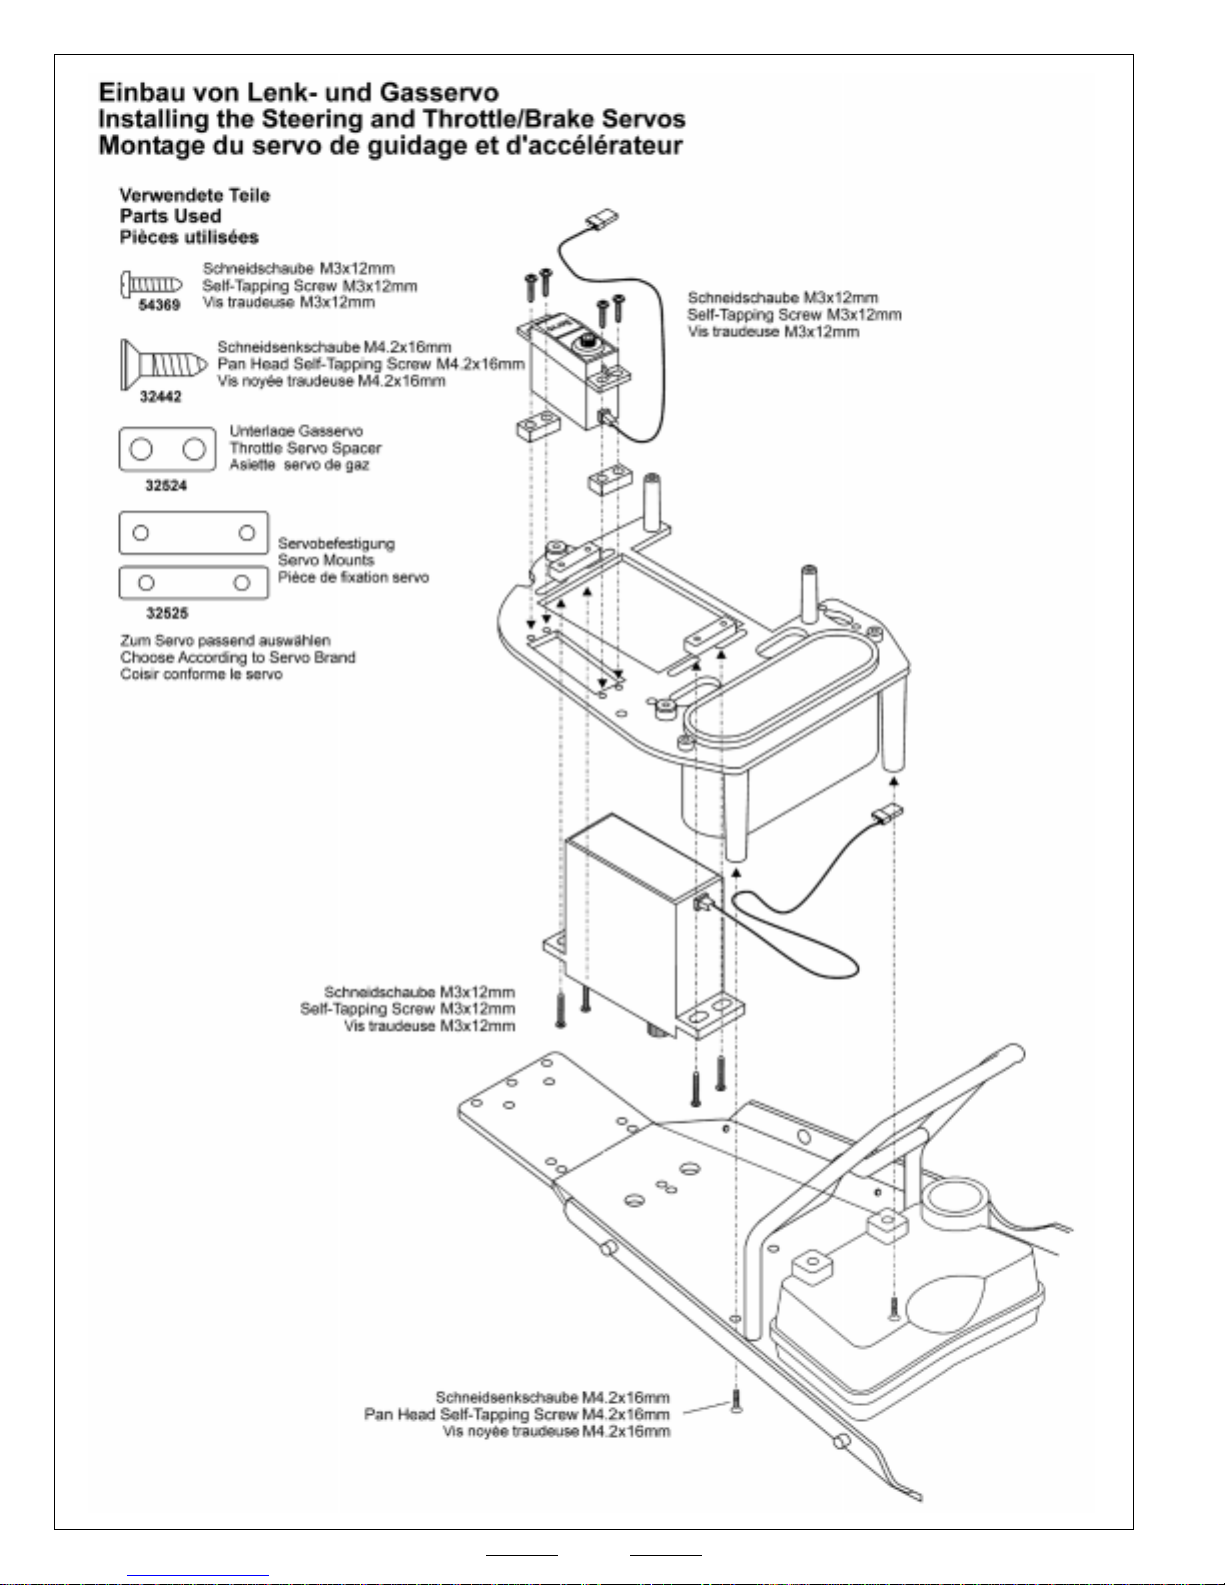
Certain servos may require the use of the
included spacers to mount properly. This
will be dependent on brand and type, and
may not be required for all servos.
When installing the servos, both servos'
output shafts should be toward the REAR
of the chassis.
4
Page 5
5
Page 6
6
Page 7
7
Page 8
8
Page 9
9
Page 10
10
Page 11
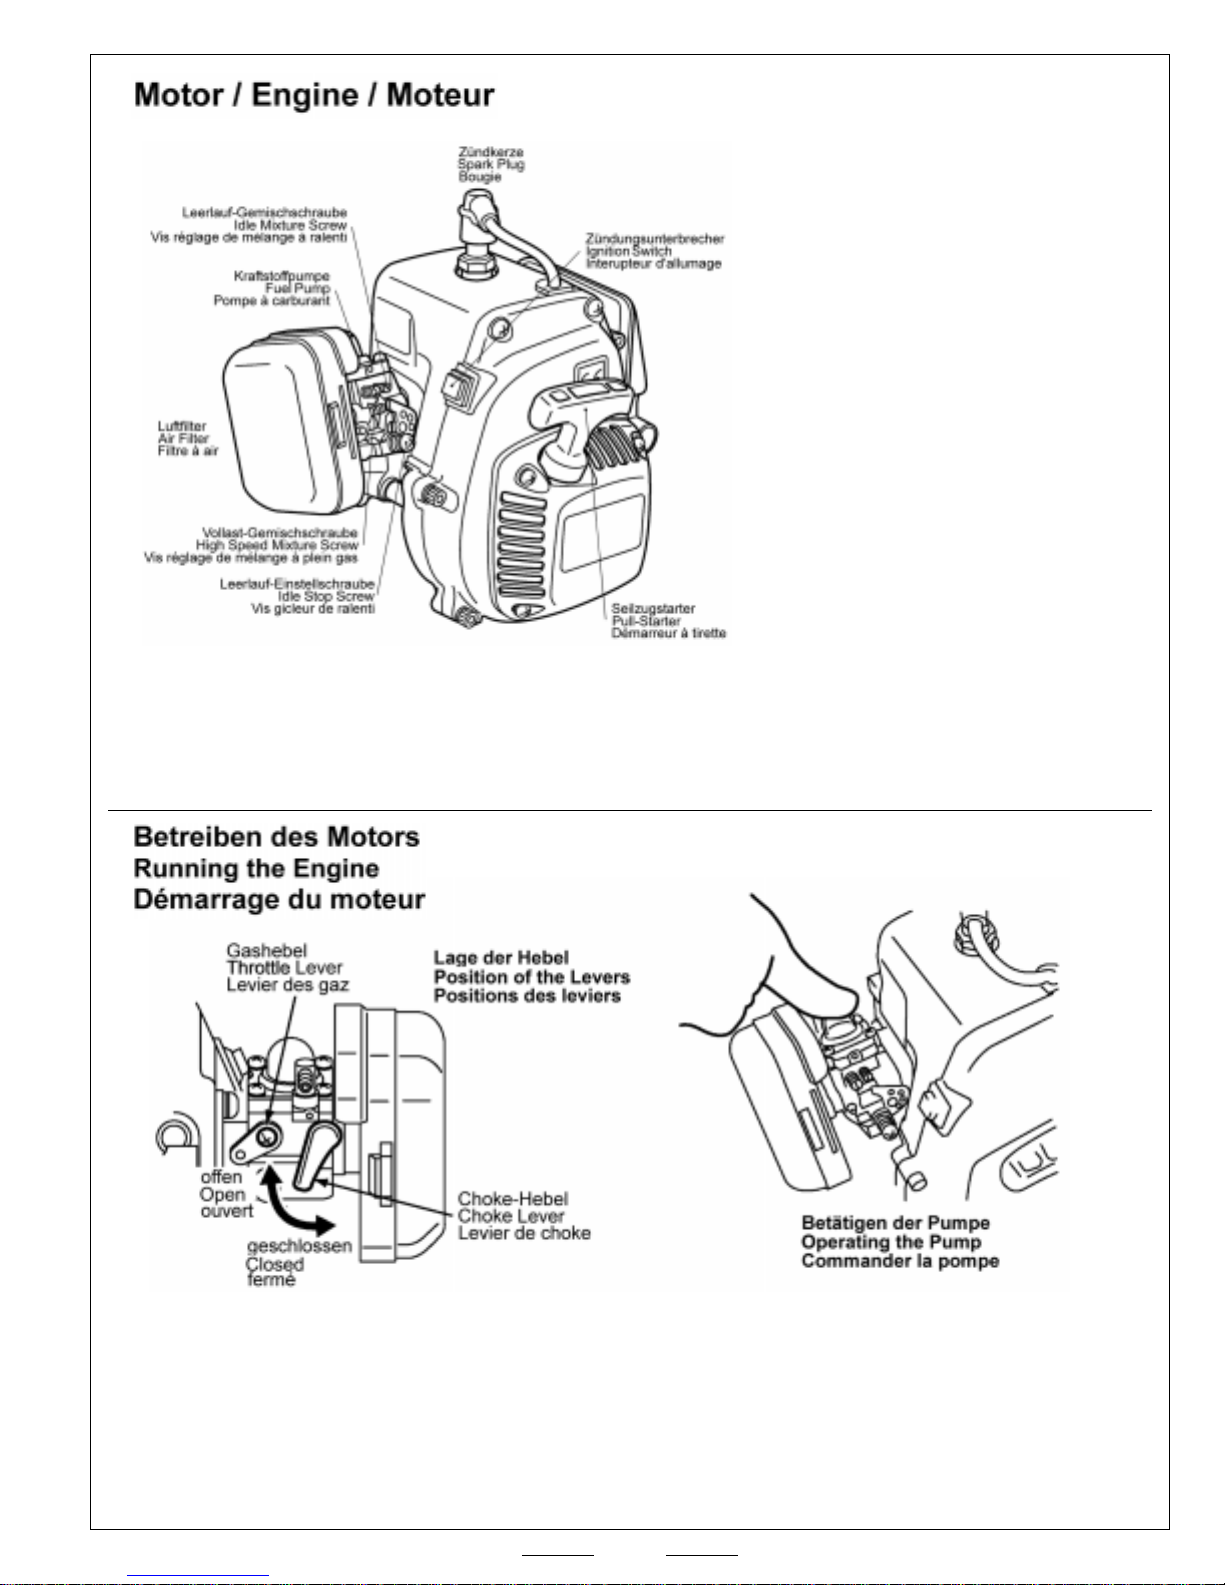
Spark plug gap should be set to 0.7mm - 0.8mm
OEM replacement spark plug part # 32730
Your engine comes equipped with a
standard air filter that includes a foam
filter element. As a precaution, we
recommend that you change or clean
the air filter element on a regular basis.
To ensure the long life of your engine,
we strongly suggest "wetting" the air filter element with Air Filter Oil after you
clean or replace the air filter element.
The high and low speed mixture screws
come preset from the factory for initial
starting and running. Do not adjust them
at this time.
Use only Regular Unleaded gasoline with an Octane rating of 89 to 91 in your engine. It's very important to add a
high-quality 2-stroke engine oil to the gasoline at a ratio of 32:1 (i.e. 32 parts gasoline to 1 part 2-stroke oil).
When it's time to replace the spark plug, we strongly suggest using only the OEM brand spark plug designed specifically
for the engine. Use of any other type of spark plug may result in engine damage and/or poor engine performance.
Starting a Cold Engine:
Set the carburetor throttle lever to the idle position, then choke the engine by closing the choke lever. Press the primer
pump until it is filled with fuel. Slowly pull out the pull-start cord until you begin to feel resistance, then pull strongly on
the pull-start cord until you hear the engine ignite. Normally, the engine will immediately stop after this first ignition. Now,
open the choke lever and pull the pull-start cord firmly until the engine starts. To stop the engine, press and hold the
ignition switch until the engine stops.
Hold the model firmly with your free hand when pulling on the pull-start cord.
☞☞
☞
☞☞
11
Page 12
Starting a Warm Engine:
Set the carburetor throttle lever to the idle position, but leave the choke lever
open. Press the primer pump until it is filled with fuel. Pull the pull-start cord
firmly until the engine starts. To stop the engine, press and hold the ignition
switch until the engine stops.
Hold the model firmly with your free hand when pulling on the pull-start cord.
☞☞
☞
☞☞
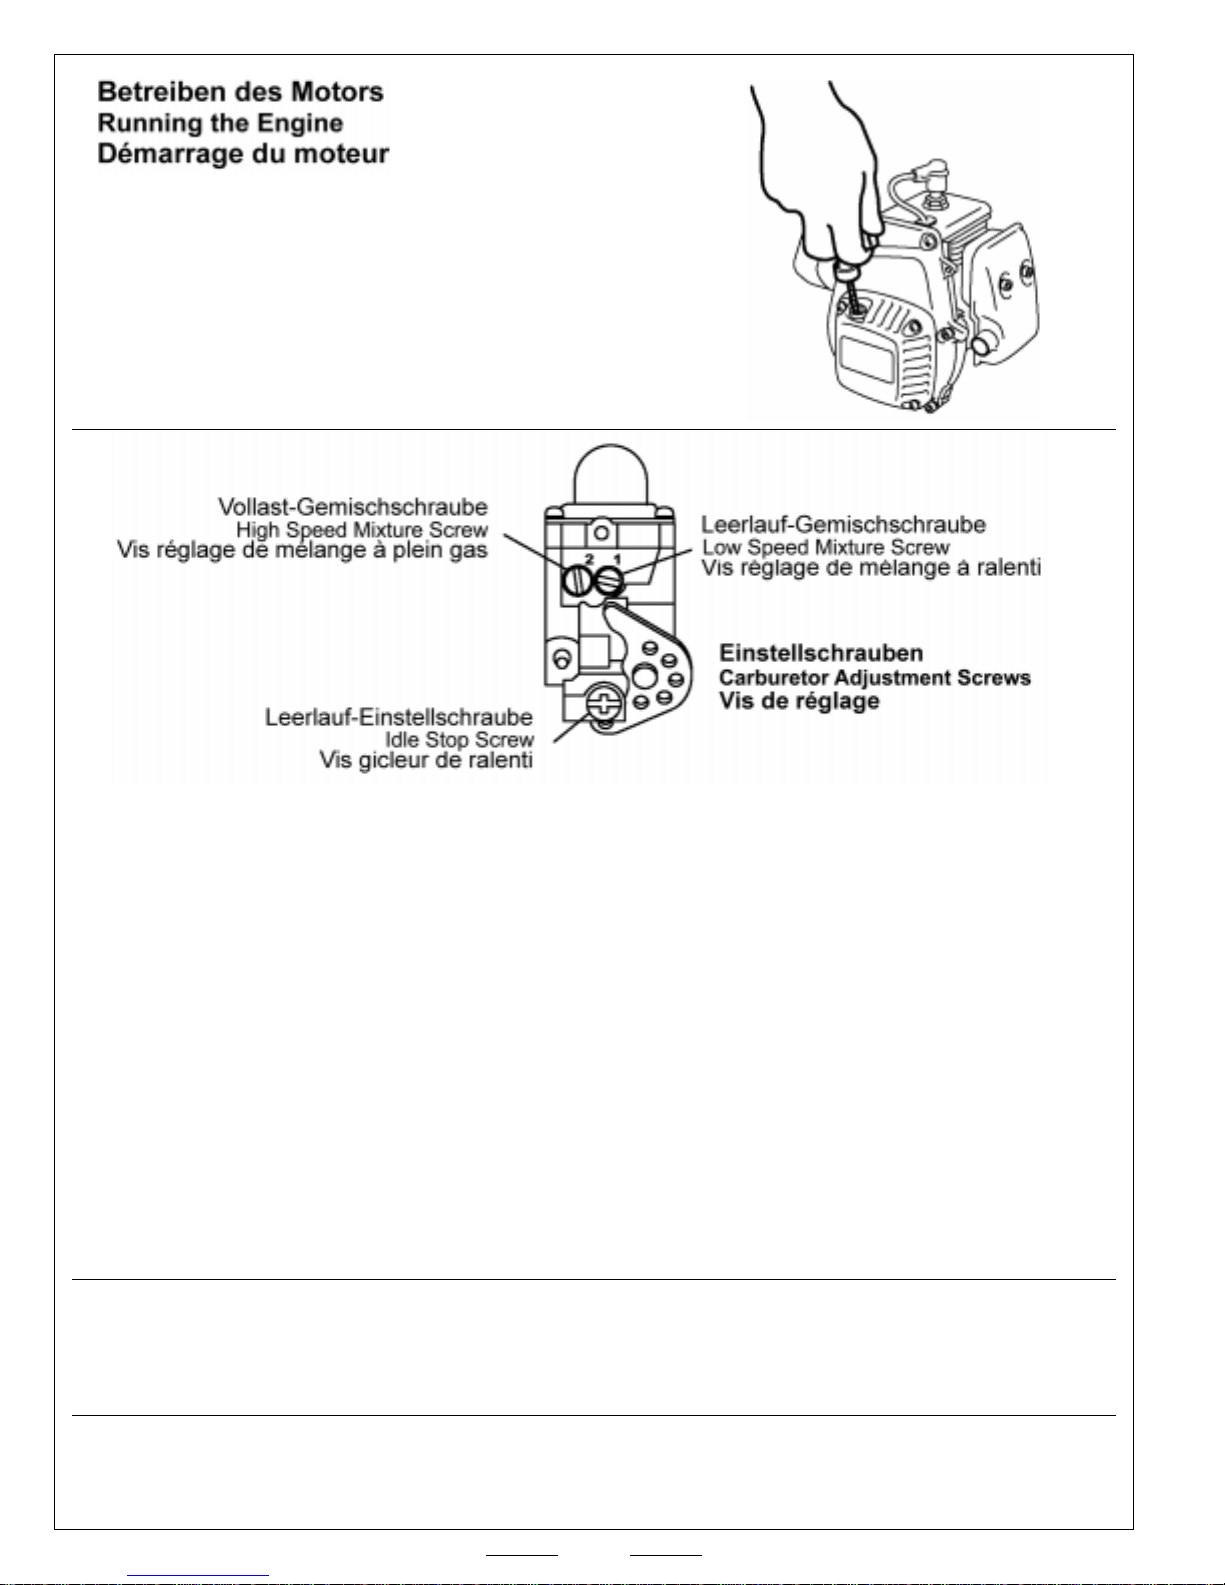
Adjusting the Carburetor (Low Speed):
The carburetor adjustment screws are preset from the factory for initial running. Depending on many factors, such as
local weather conditions, air filter and muffler, the carburetor settings may need to be changed. Drive the car at medium
RPM until the engine has reached normal operating temperature. If after the engine is warmed up the engine decelerates
a little during acceleration, the engine is too lean. In this case, turn the Low Speed Mixture Screw counterclockwise
(richen). If the engine stutters and lots of smoke comes from the exhaust during acceleration, the engine is too rich. In
this case, turn the Low Speed Mixture Screw clockwise (lean). When set properly, the engine should accelerate without
hesitation from idle to full power.
Adjusting the Carburetor (High Speed):
To adjust the engine for maximum RPM, carefully lift the car so that the rear wheels are off the ground. With the engine
warmed up to normal operating temperature, hold the throttle wide open for a short time. If the engine is running rich, turn
the High Speed Mixture Screw clockwise (lean) until full power is achieved. If the engine is running lean, turn the High
Speed Mixture Screw counterclockwise (richen) until full power is achieved. After adjusting the High Speed Mixture
Screw, it may be necessary to readjust the Low Speed Mixture Screw, since they interact with each other.
✦✦
✦WARNING
✦✦
ground. Running the engine for too long without a load can cause severe engine damage.
✦✦
✦ Don't keep the engine running at full power for any longer than necessary with the rear wheels off the
✦✦
Resetting the Mixture Screws to the Factory Settings:
To reset the mixture screws to the factory settings, first close both mixture screws by turning them clockwise GENTLY. To
reset the Low Speed Mixture Screw, turn the screw counterclockwise from the fully closed position 1.25 turns. To reset
the High Speed Mixture Screw, turn the screw counterclockwise from the fully closed position 1.5 turns.
✦✦
✦WARNING
✦✦
will keep the engine from getting too hot during the short break-in period. You should also range check your radio system
while the engine is running to ensure there is no interference caused by the ignition system and/or vibration.
✦✦
✦ For the first two tanks of fuel, you should avoid running the engine at full RPM for any length of time. This
✦✦
12
Page 13

ENGINE TROUBLESHOOTING GUIDE
This troubleshooting guide has been provided to help you diagnose and solve most problems that you may encounter with the engine in
your 1/6 Gas-Powered 2WD Buggy. Most problems encountered can be solved by carefully following the problem-cause-solution
sections. If you cannot solve the problem using this troubleshooting guide, please feel free to contact us at the address, phone number
or email address shown on the second page of these Assembly and Operating Instructions.
ENGINE DOES NOT START
PROBLEM CAUSE SOLUTION
1) Spark plug A) Spark plug electrode wet A) Remove spark plug and dry electrode
B) Carbon deposits on electrode B) Remove spark plug and clean electrode
C) Spark plug insulator damaged C) Replace spark plug
D) Incorrect gap setting D) Reset gap to 0.7mm - 0.8mm
E) Spark plug electrode damaged E) Replace spark plug
2) Magneto A) Ignition coil failure A) Replace ignition coil
B) Damaged spark plug cable B) Replace spark plug cable
C) Loose or disconnected spark plug cable C) Push spark plug cable firmly onto spark plug
3) Switch A) Switch is off A) Turn switch on
B) Switch has failed B) Replace switch
C) Wiring damaged C) Repair wiring
ENGINE DOES NOT RUN
PROBLEM CAUSE SOLUTION
1) Engine not drawing fuel A) Clogged breather air hole A) Clean breather air hole
B) Clogged carburetor B) Clean carburetor
C) Clogged fuel filter C) Clean and/or replace fuel filter
2) Poor compression A) Worn cylinder, piston and/or piston ring A) Check and replace as needed
B) Leak between cylinder head and crankcase B) Replace cylinder head gasket
3) Engine will not run A) Engine is flooded A) Purge excess fuel from crankcase
B) Carburetor settings too rich B) Readjust carburetor settings
C) Clogged air cleaner C) Clean air cleaner filter element
D) Old and/or contaminated fuel D) Use new fresh fuel
ENGINE RUNS POORLY AND/OR HAS LACK OF POWER
PROBLEM CAUSE SOLUTION
1) Engine Overheats A) Carburetor adjustments too lean A) Readjust carburetor
B) Incorrect fuel/oil mixture B) Mix fuel and oil at a ratio of 32:1
C) Spark plug faulty or failed C) Replace spark plug
D) Cylinder head cooling fins blocked D) Clean debris from between cooling fins
E) Inadequate airflow over engine E) Increase airflow over engine
2) Engine has lack of power A) Air leak in engine and/or fuel system A) Tighten all engine bolts and fuel system joints
B) Old and/or contaminated fuel B) Use new fresh fuel
C) Piston begins to seize C) Replace piston, cylinder and ring
D) Muffler has accumulated carbon deposits D) Clean muffler
E) Carburetor settings out of adjustment E) Readjust carburetor
F) Clogged air cleaner F) Clean air cleaner filter element
G) Engine is overloaded G) Reduce engine load
13
Page 14
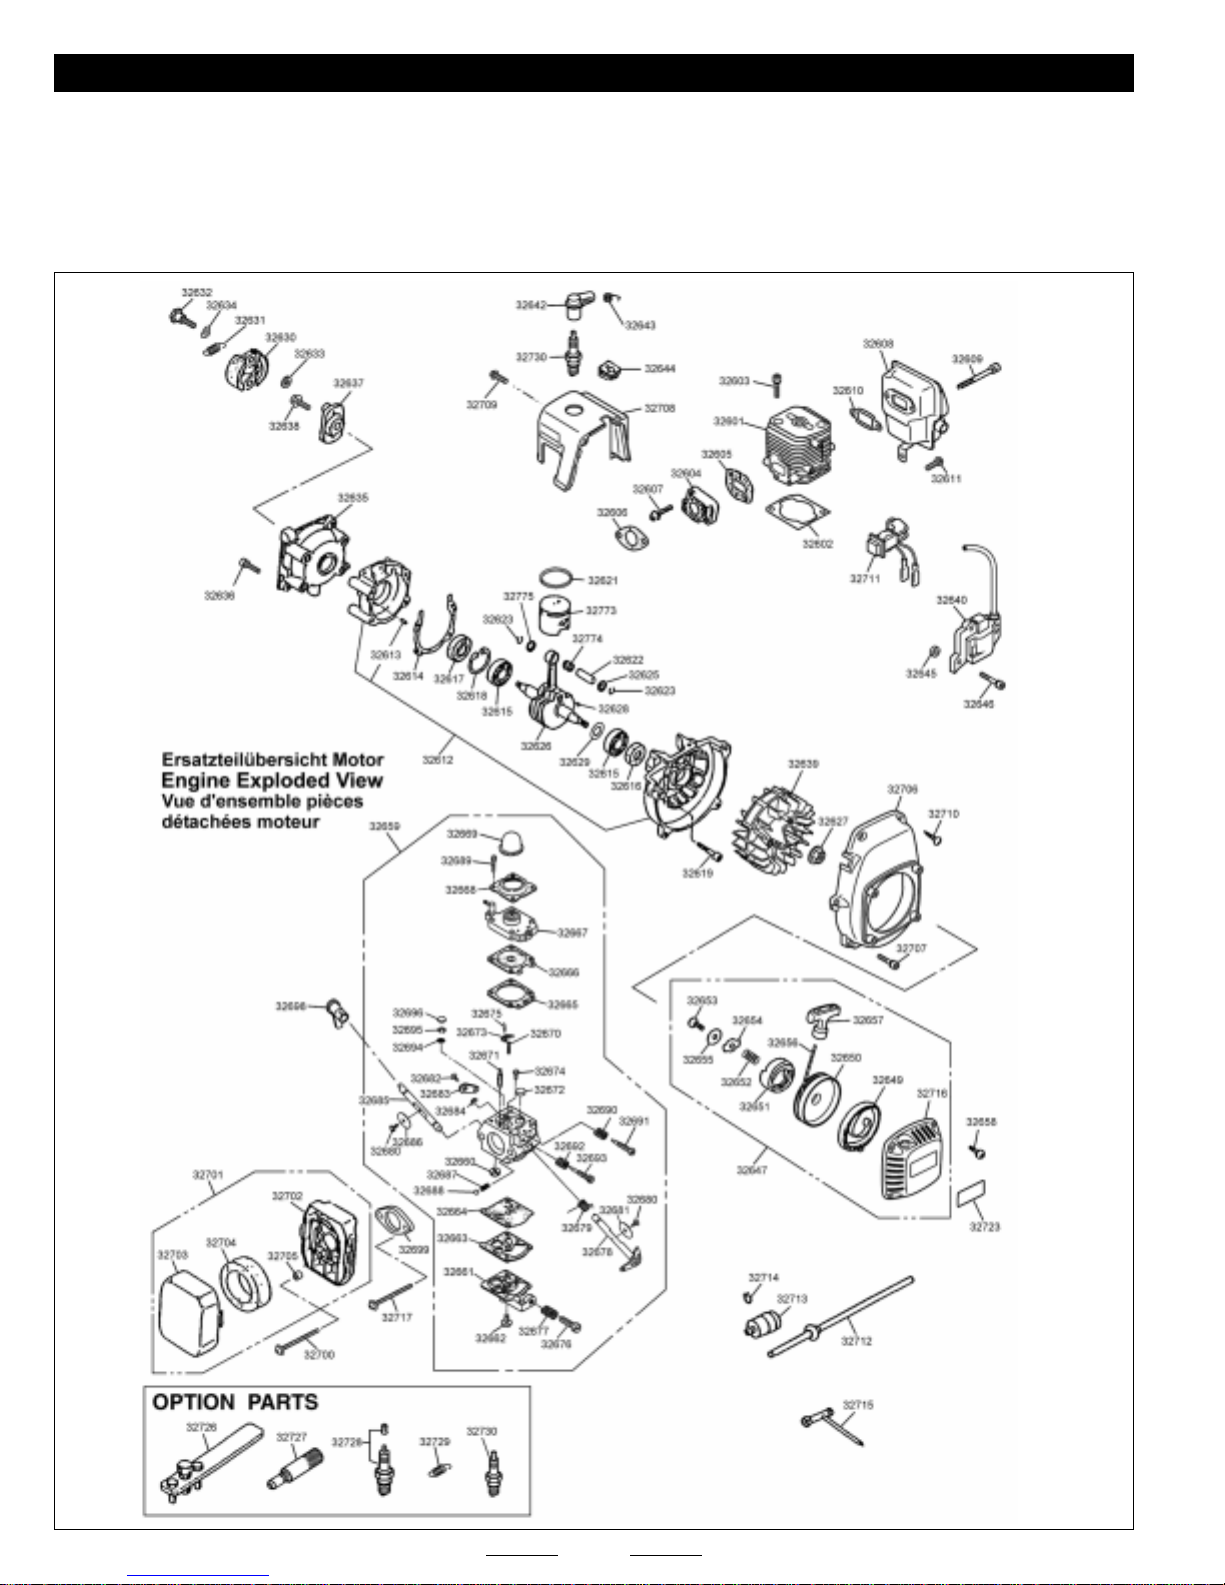
SPARE PARTS LIST
XTM Racing stocks a complete line of replacement parts for your 1/6 Gas-Powered 2WD Buggy and 23cc Gasoline Engine. Listed on
the next few pages are the replacement parts that are available along with their respective part numbers for easy ordering convenience.
We suggest ordering directly from your local XTM Racing dealer. If your local dealer does
not stock XTM Racing or Global products, you can order directly from us at the phone
number or address shown on page # 2.
14
Page 15
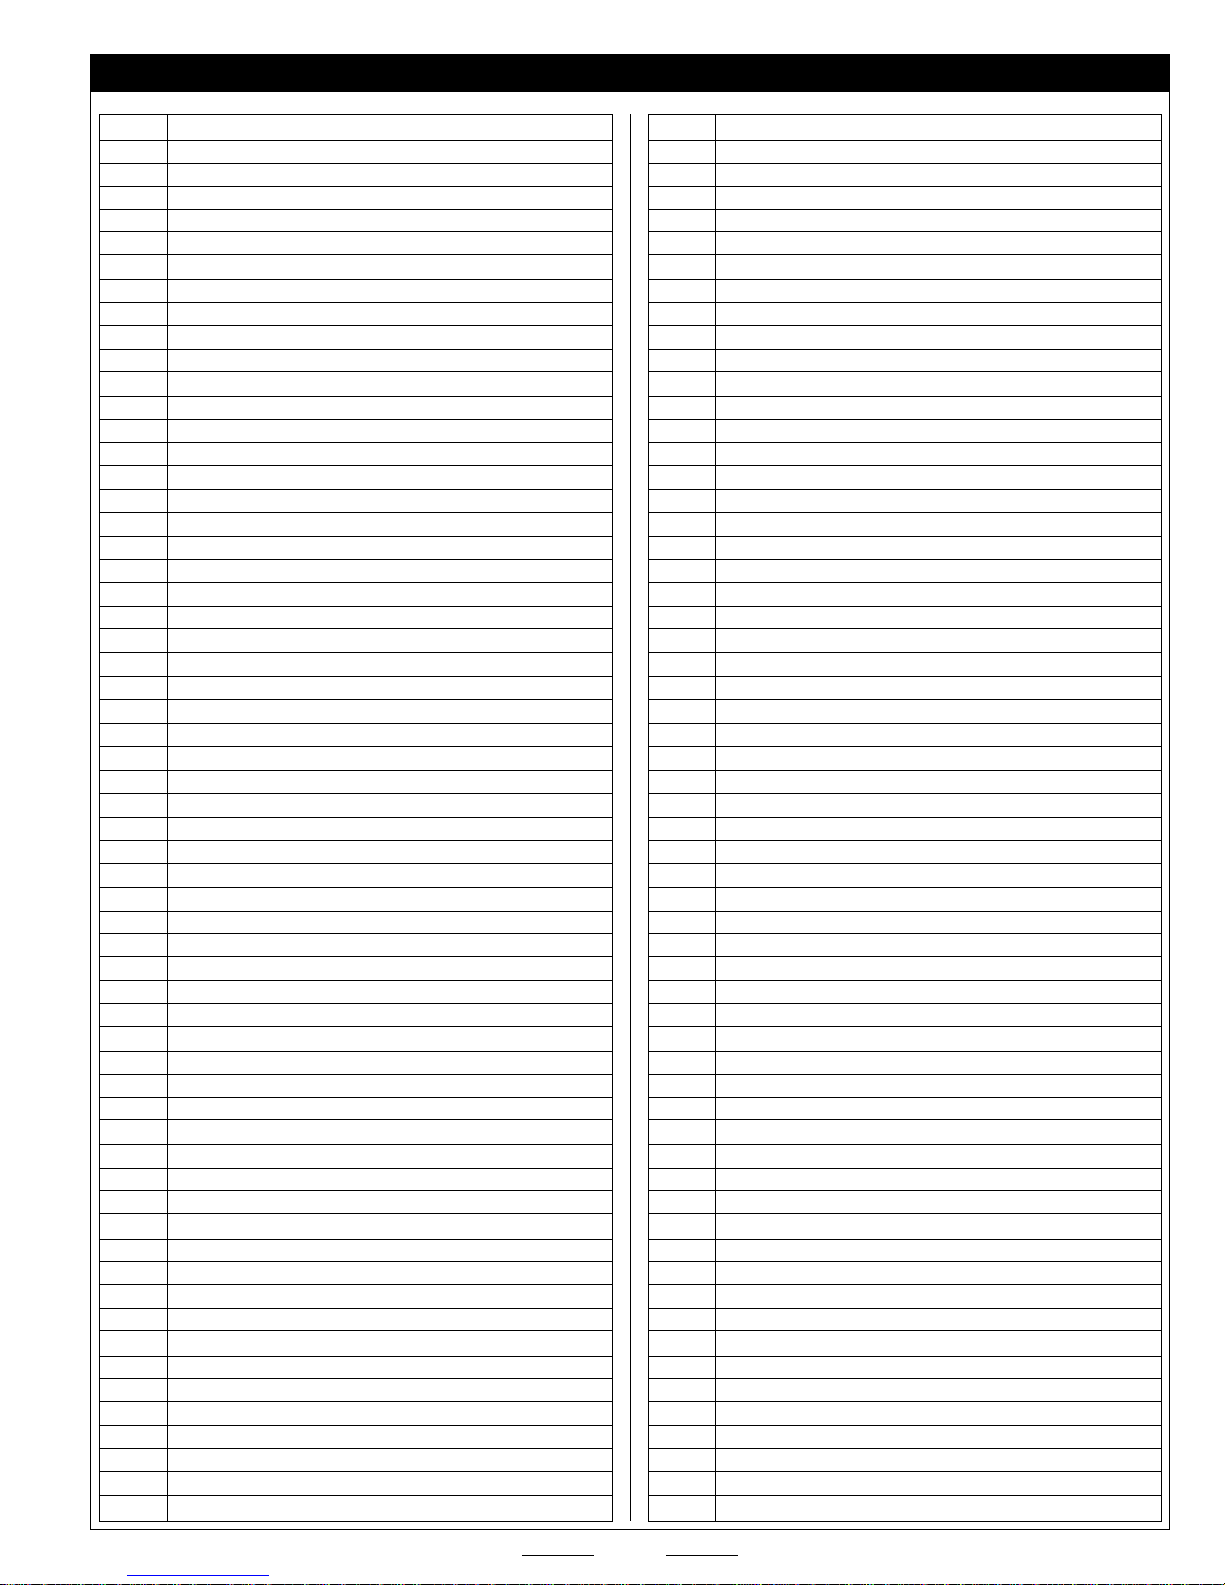
SPARE PARTS LIST, CONTINUED...
32601 Cylinder Head
32602 Cylinder Head Gasket
32603 Cylinder Head Screw Set M5x22
32604 Carburetor Mounting Insulator
32605 Carburetor Mounting Insulator Gasket
32606 Carburetor Gasket
32607 Carburetor Mounting Screw Set M5x20
32608 Muffler Assembly
32609 Muffler Mounting Screw Set
32610 Muffler Gasket
32611 Screw M4x12
32612 Crankcase
32613 Alignment Pin
32614 Crankcase Gasket
32615 Ball Bearing
32616 Rear Shaft Seal
32617 Front Shaft Seal
32618 E-Ring
32619 Crankcase Screw Set M5x30
32773 Piston
32621 Piston Ring
32622 Wrist Pin
32623 Wrist Pin Retaining Ring
32774 Wrist Pin Bearing
32775 Wrist Pin Washer
32626 Crankshaft
32627 Crankshaft Nut
32628 Woodruff Key
32629 Crankshaft Shim
32630 Clutch Shoes
32631 Clutch Spring
32632 Clutch Retaining Screw M6x22
32633 Clutch Washer-Rear
32634 Clutch Washer-Front
32635 Clutch Housing
32636 Clutch Housing Screw M5x16
32637 Clutch Driver
32638 Washer Head Screw M6x14
32639 Rotor
32640 Ignition Coil
32642 Spark Plug Cap
32643 Spark Plug Cap Spring
32644 Rubber Socket
32645 Ignition Coil Mounting Spacer
32646 Ignition Coil Mounting Screw M4x20
32647 Pull-Start Assembly
32649 Recoil Spring
32650 Cord Spool
32651 Ratchet
32652 Spring
32653 Screw
32654 Retainer
32655 Washer
32656 Pull-Start Cord
32657 Pull-Start Handle
32658 Pull-Start Mounting Screw Set M4x16
32659 Carburetor Assembly
32660 Screen
32661 Lower Cover
32662 Lower Cover Mounting Screw
32663 Lower Gasket
32664 Diaphragm-Lower
32665 Upper Gasket
32666 Diaphragm-Upper
32667 Carburetor Body-Upper
32668 Carburetor Upper Cover
32669 Bulb Pump
32670 Spring
32671 Valve Inlet
32672 Plug
32673 Lever
32674 Screw
32675 Pin
32676 Screw
32677 Spring
32678 Throttle Shaft
32679 Spring
32680 Screw
32681 Throttle Valve
32682 Screw
32683 Throttle Lever
32684 Ring
32685 Choke Shaft
32686 Choke Lever
32687 Spring
32688 Ball
32689 Screw
32690 Spring
32691 Idle Needle
32692 Spring
32693 High Speed Needle
32694 Small Screen
32695 Ring
32696 Plug
32698 Choke Lever
32699 Spacer
32700 Screw M5x60
32701 Air Filter A
32702 Housing
32703 Cover
32704 Filter
32705 Sleeve
32706 Fan Cover
32707 Screw M5x20
32708 Cylinder Head Cover
32709 Screw M4x12
32710 Screw TP4.5x18L
32711 Switch A
32712 Fuel Pipe
32713 Fuel Filter
32714 Clip
32715 Socket
32716 Case
32717 Screw M5x50
32723 Pull-Starter Label
32726 Puller (Option)
32727 Piston Stop (Option)
32728 Spark Plug (Option)
32729 Spring (Option)
32730 Spark Plug
15
Page 16
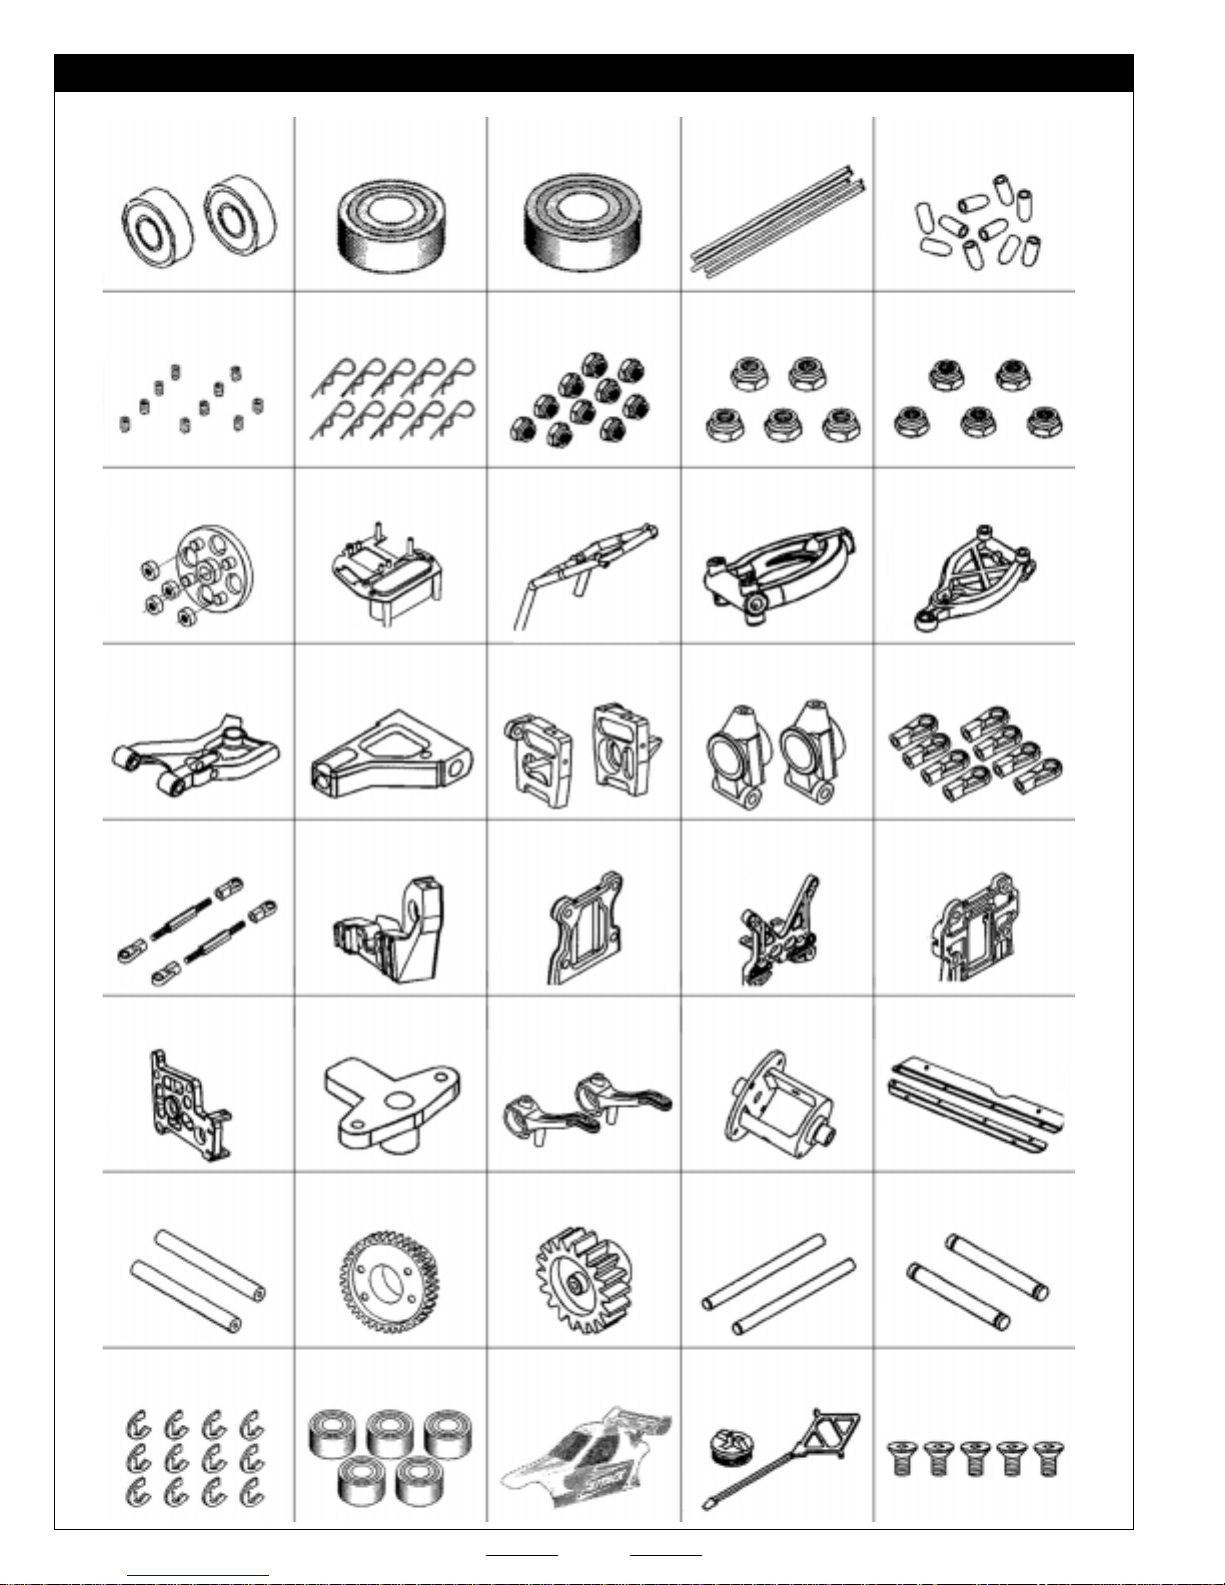
SPARE PARTS LIST, CONTINUED...
146310 (002159)
Ball Bearing 8x22x7(2)
146315 (11333)
M3 Set Screws (10)
146320 (32400)
Spur Gear Mount-Nylon
146325 (32405)
RR Lower Susp Arm-Left
146311 (002160)
Ball Bearing 10x22x6
146316 (11399)
Body Pins (10)
146321 (32401)
Servo Tray
146326 (32406)
RR Upper Susp Arm-Left
146312 (002161)
Ball Bearing 12x28x7
146317 (11447)
M3 Lock Nuts (10)
146322 (32402)
Roll Cage-Front (A)
146327 (32407)
Rear Bulkheads for Diff
146313 (11310)
Antenna Tubes (5)
146318 (11922)
M5 Lock Nuts (5)
146323 (32403)
FR Upper Susp Arm-Left
146328 (32408)
Rear Axle Hubs
146314 (11311)
Antenna Caps (10)
146319 (11923)
M4 Lock Nuts (5)
146324 (32404)
FR Lower Susp Arm-Left
146329 (32409)
Ball Ends "B" (8)
146330 (32410)
RR Upper Turnbuckles
146335 (32415)
Side Gear Plate
146340 (32420)
Roll Cage Tubes (C)
146345 (32425)
M5 E-Rings (12)
146331 (32411)
Engine Mount-Left
146336 (32416)
Upper Steering Bellcrank
146341 (32421)
Spur Gear 46T
146346 (32426)
Ball Bearings 10x19x7 (5)
146332 (32412)
Front Bulkhead-Plate 2
146337 (32417)
FR Steering Arms (L&R)
146342 (32422)
Pinion Gear 18T-Nylon
146347 (32427-1)
Body Set w/Decals
146333 (32413)
Rear Shock Tower
146338 (32418)
Differential Housing
146343 (32423)
Upper Hinge Pins
146348 (32428)
Fuel Tank Cap Assembly
146334 (32414)
Front Bulkhead-Plate1
146339 (32419-1)
Side Dust Guards (L&R)
146344 (32424)
RR Inner Upper Hinge Pins
146349 (32430)
M4x8 Flat Head Screws (5)
16
Page 17
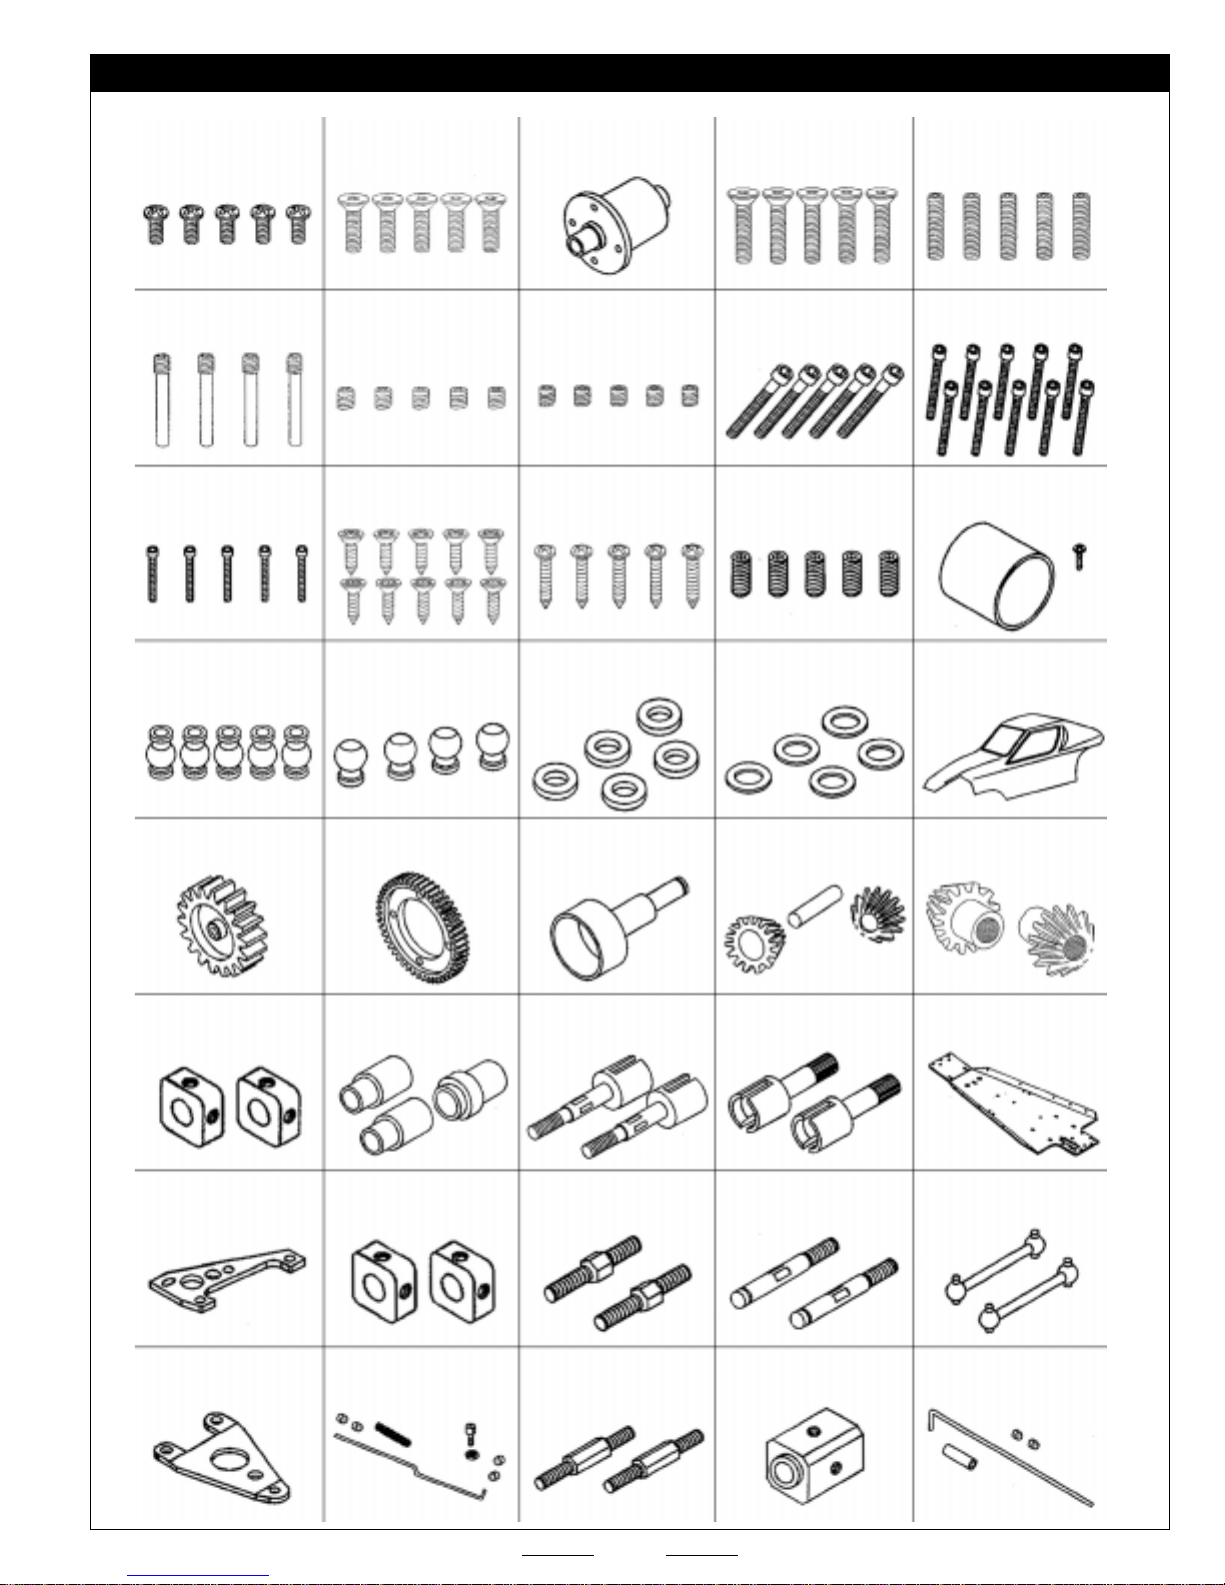
SPARE PARTS LIST, CONTINUED...
146350 (32431)
M4x8 R.H. Screws (5)
146355 (32436)
Lower Shock Mounts (2)
146360 (32441)
M3x23 C.H. Screws (5)
146365 (32446)
5x10 Ball Ends (5)
146351 (32432)
M4x16 F.H. Screws (5)
146356 (32437)
M5x4 Set Screws (5)
146361 (32442)
M4.2x16 S.T. Screws (10)
146366 (32447)
4x10 Ball Ends (4)
146352 (32433)
Differential - Complete
146357 (32438)
M4x4 Set Screws (5)
146362 (32443)
M4.2x25 S.T. Screws (5)
146367 (32448)
6.5x12x1.5 Washers (5)
146353 (32434)
M5x25 F.H. Screws (5)
146358 (32439)
M5x41 C.H. Screws (5)
146363 (32444)
M5x10 Set Screws (5)
146368 (32449)
8.4x117x1 Washers (5)
146354 (32435)
M5x25 Set Screws (5)
146359 (32440)
M4x24 C.H. Screws (10)
146364 (32445)
Diff Housing Sleeve
146369 (32450)
Body Only
146370 (32451)
16T Layshaft Gear
146375 (32456)
Front Square Hub
146380 (32461)
Rear Brace Plate
146385 (32466)
Front Brace Plate
146371 (32452)
Main Diff Gear-48T
146376 (32457)
Spacer Sleeves (3)
146381 (32462)
Rear Square Hub
146386 (32467)
Throttle Linkage
146372 (32453)
Clutch Bell
146377 (32458)
Rear Wheel Axles (2)
146382 (32463)
FT Upper Turnbuckles (2)
146387 (32468)
Turnbuckles/RR Lower Arms
146373 (32454)
Diff Spider Gears w/Shaft (2)
146378 (32459)
Diff Output Shafts (2)
146383 (32464)
Front Axles (2)
146388 (32469)
Brake Hub
146374 (32455)
Diff Bevel Gears (2)
146379 (32460)
Chassis-4mm
146384 (32465)
Rear Drive Shafts (2)
146389 (32470)
Brake Rod
17
Page 18
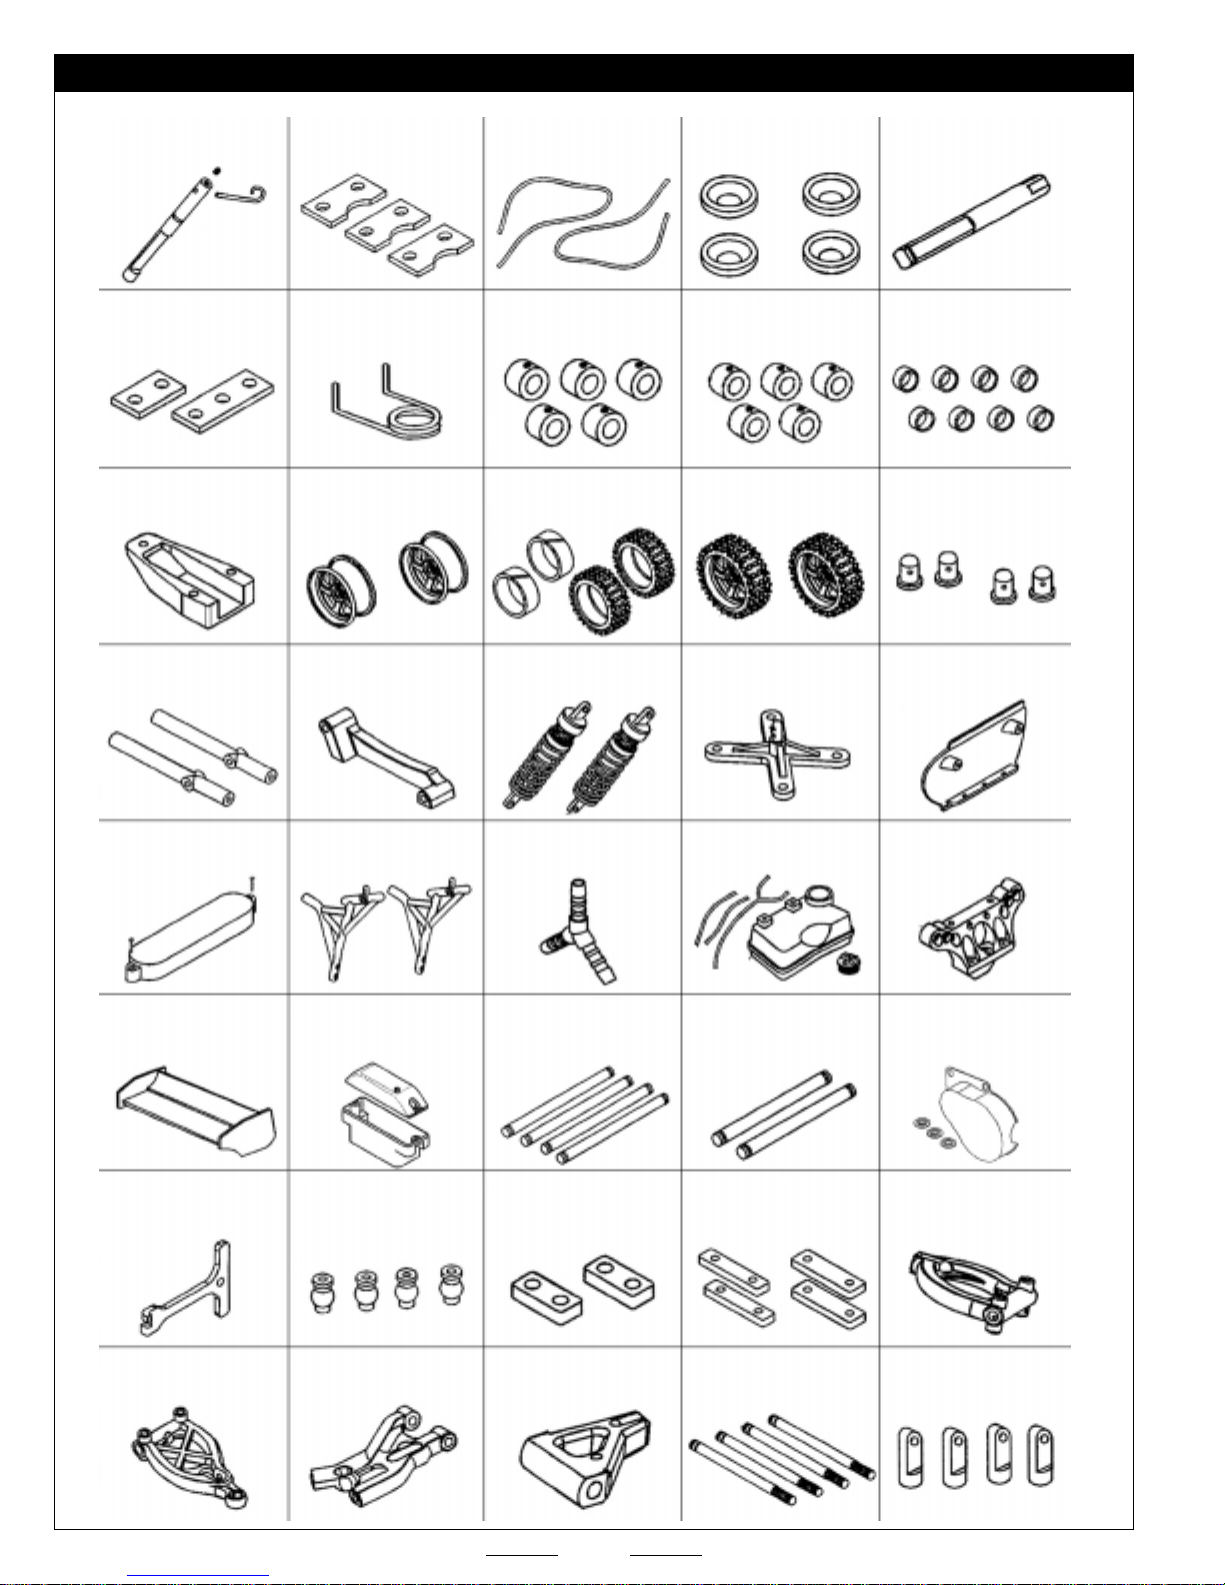
SPARE PARTS LIST, CONTINUED...
146390 (32471)
Brake Cam & Lever
146395 (32476)
Spacers/Brakes
146400 (32481)
Rear Chassis Guard
146405 (32486)
Roll Cage Tubes
146391 (32472)
Brake Pads
146396 (32477)
Spring/Servo Saver
146401 (32482)
Wheels (1 PR)
146406 (32487)
Engine Mount-Right
146392 (32473)
Fuel Line
146397 (32478)
M4 Collars (5)
146402 (32483)
Tires w/Inserts (1 PR)
146407 (32488)
FR Shocks w/Springs
146393 (32474)
Engine Mount Washers (4)
146398 (32479)
M2 Collars (5)
146403 (32484)
Mounted Tires (1 PR)
146408 (32489)
Front Body Post
146394 (32475)
Rear Layshaft
146399 (32480)
Bearing Spacers (8)
146404 (32485)
Side Body Posts (4)
146409 (32490-1)
Front Bumper
146410 (32491-1)
Battery Cover
146415 (32496)
Rear Wing
146421 (32522)
Fuel Tank Key
146426 (32546)
FR Lower Susp. Arm-Right
146411 (32492)
Roll Cage Rear Section
146416 (32497-1)
Receiver Case
146422 (32523)
M6 Ball Ends (4)
146427 (32547)
RR Lower Susp. Arm-Right
146412 (32493)
Vent Line "Y" Connector
146417 (32498)
FR Hinge Pins (4)
146423 (32524)
Servo Spacers
146428 (32548)
RR Upper Susp. Arm-Right
146413 (32494-1)
Fuel Tank Assembly
146418 (32499)
RR Lower Hinge Pins (2)
146424 (32525)
Servo Plates (2 Pair)
146429 (32549)
Shock Shafts (4)
146414 (32495)
Front Shock Towers (2)
146420 (32521-1)
Main Gear Cover
146425 (35545)
FR Upper Susp. Arm-Right
146430 (32550)
Lower Shock Mounts (4)
18
Page 19
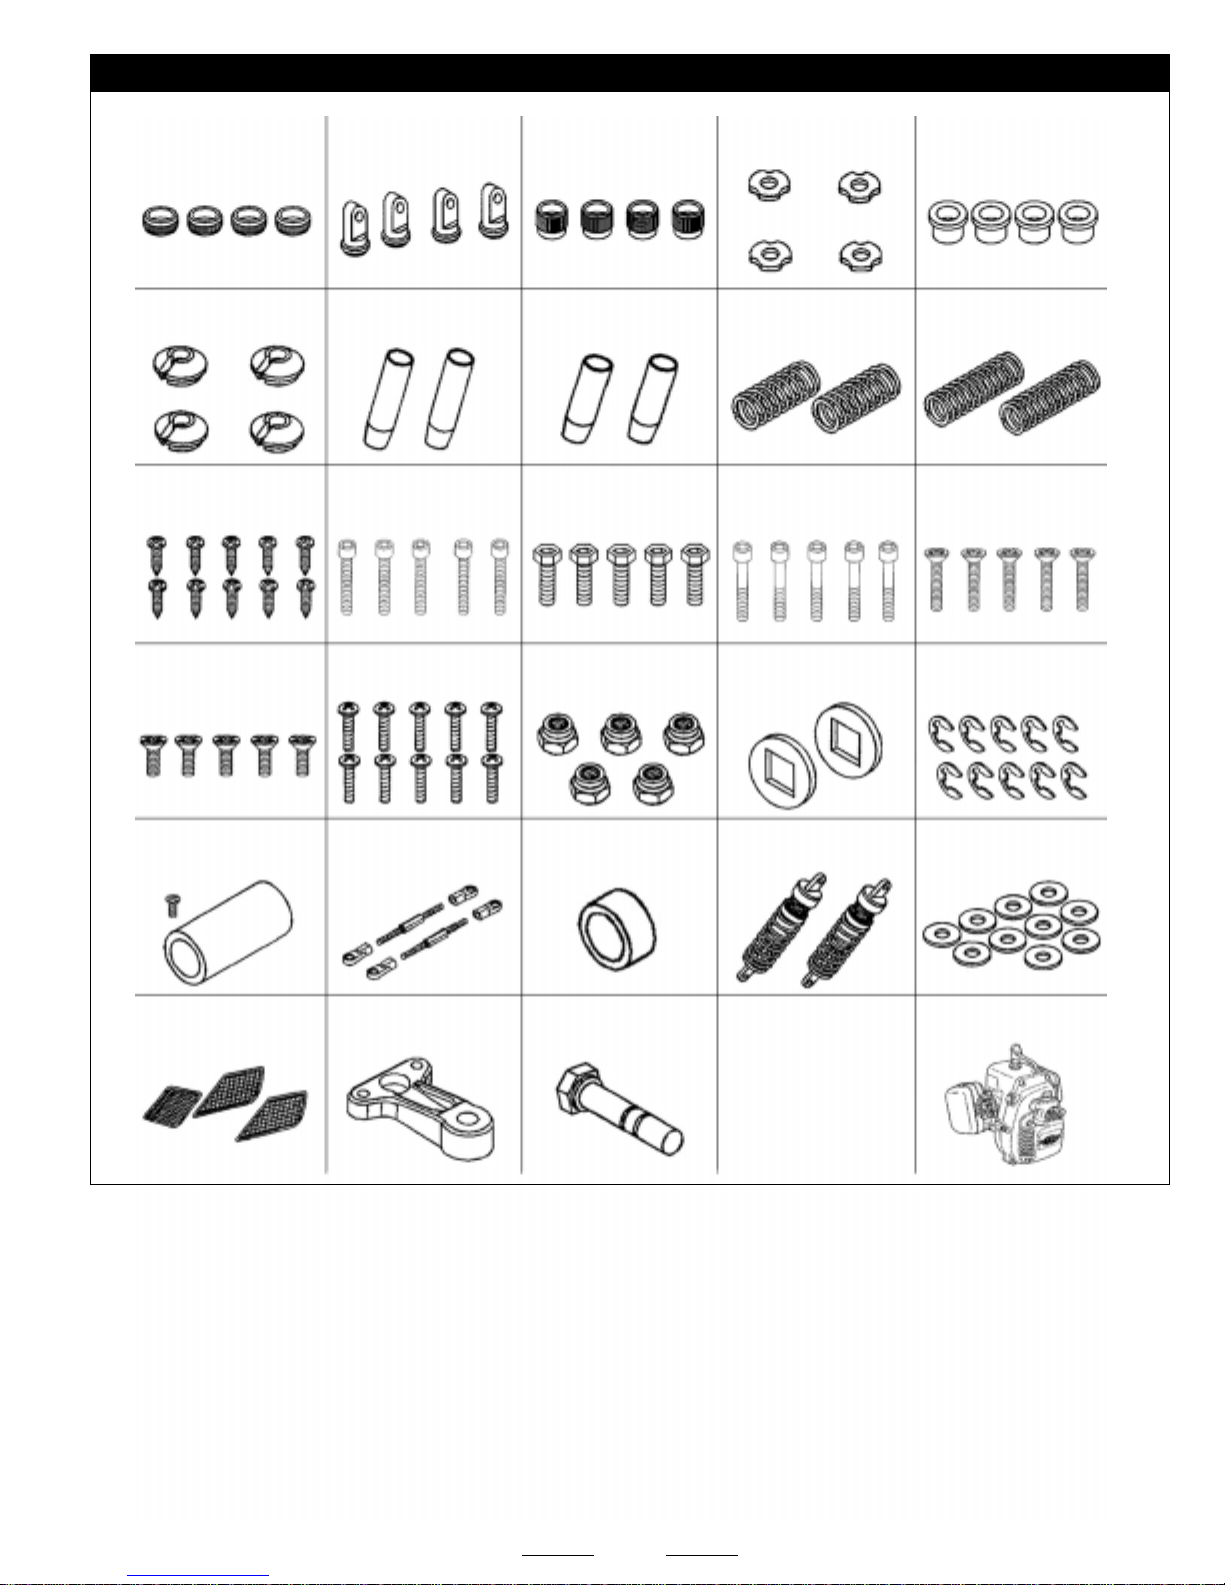
SPARE PARTS LIST, CONTINUED...
146431 (32551)
Shock Adjusting Rings (4)
146436 (32556)
Shock Spring Retainers
146441 (32561)
M4.2x16 R.H. S.T. Screws (10)
146446 (32566)
M5x10 F.H. Screws (5)
146432 (32552)
Upper Shock Mounts (4)
146437 (32557)
Shock Body-Rear (2)
146442 (32562)
M4x30 C.H. Screws (5)
146447 (32567)
M3x12 R.H. Screws (10)
146433 (32553)
Shock Caps (4)
146438 (32558)
Shock Body-Front (2)
146443 (32563)
M6x16 Hex Screws (5)
146448 (32568)
M6 Lock Nuts (5)
146434 (32554)
Shock Pistons (4)
146439 (32559)
Shock Spring-Front (2)
146444 (32564)
M4x43 C.H. Screws (5)
146449 (32569)
Brake Discs (2)
146435 (32555)
Shock Cap Seals (4)
146440 (32560)
Shock Spring-Rear (2)
146445 (32565)
M5x30 F.H. Screws (5)
146450 (32570)
M7 E-Rings (10)
146451 (32571)
Exhaust Pipe
146457 (32577)
Window Net Set
146452 (32572)
Steering Turnbuckles
146458 (32578)
Servo Saver
146453 (32573)
Gear Bushing
146459 (32579)
Steering Post
146454 (32574)
Rear Shocks w/Springs
146460 (32580-1)
Decal Sheet
No Photo
Available
146419 (32520-1)
Instruction Manual
146456 (32576)
4.4x11x1 Washers (10)
146461 (32900)
23cc Gas Engine
19
Page 20
IMPORTANT WARRANTY INFORMATION - PLEASE READ!
Your XTM Racing 1/6 Gas-Powered 2WD Buggy is warranted against manufacturer defects in materials and workmanship for a period
of 90 days from the date of purchase. This does not cover any component parts damaged by use, misuse or modification. In no case
shall XTM Racing's liability exceed the original cost of the purchased kit. Warranty service will be provided within 90 days of the
date of purchase only if you are able to provide the original or a copy of the original dated sales receipt.
In that XTM Racing has no control over the final assembly or material used for final assembly, no liability shall be assumed for any
damage resulting from the use by the user of the final user-assembled product. By the act of using the final user-assembled
product, the user accepts all resulting liability.
IMPORTANT WARRANTY SERVICE INFORMATION
Before returning your 1/6 Gas-Powered 2WD Buggy for warranty consideration, the status of the unit must be within the guarantee as
stated above. Do not return your 1/6 Gas-Powered 2WD Buggy to the place of purchase. They are not authorized or equipped to
perform warranty work on XTM Racing products. When requesting warranty service, please observe the following:
●
Crash damage will not be covered under warranty. Do not request warranty service for a crash-damaged product.
●
This warranty only covers the XTM Racing 1/6 Gas-Powered 2WD Buggy and the factory-installed 23cc gas engine. It does not
cover after-market engines or your radio control system and other electronics. Wear items, such as spark plug, clutch shoes, tires and
brake discs are not covered under warranty. Please remove radio control system from the chassis before sending the product to us.
●
Include a note detailing the problem or service you are requesting. Service cannot be provided without this information. Include
your daytime phone number, shipping address and/or email address in the event we need more details pertaining to the service
requested.
●
If your vehicle is out of the warranty period you may request an estimate of services at the time you return your vehicle for service.
An omission of this request implies permission for Global Services to service your vehicle at our discretion.
●
Include a method of payment for any service charges.
●
Send the unit to us by United Parcel Service, Federal Express or by Insured Mail. Postage is non-refundable. Send your
package to:
Global Services
18480 Bandilier Circle
http://globalservices.globalhobby.com
Visit Our Website
Fountain Valley CA 92708
Phone: (714) 963-0329 Fax: (714) 964-6236 Email: [email protected]
20
 Loading...