

Page 1

1
SOHO-RAID
Realtime Hi-Speed Data
Backup Storage System
(Model : LBA-48)
SOHO -RAID User’s Manual
Page 2

2
CCoonntteennttss
Chapter 1:Introduction 3
1-1 Function & Features 3
1-2 Data Spec ifications 4
1-3 General Specifications
Chapter 2:Installation 5
2-1 Device Descriptions 5
2-2 How to plug in/Pull out HDD Tray 7
2-3 Install HDD to the HDD TRAY 8
2-4 Install SOHO-RAID in to the Computer 8
Chapter 3: How to use SOHO-RAID 10
3-1 Jumper Setting configurations 10
3-2Operation Instructio ns 11
Chapter 4: HDD Auto Rebuild Function (A.R.F.) 13
4-2 Auto rebuild function 14
Chapter 5: PCB Dimensions and IC Parts 16
4
5-1 Control Board 16
5-2 IC Parts 16
SOHO -RAID User’s Manual
Page 3

3
CHAPTER 1.
IInnttrroodduuccttiioonn
SOHO-RAID, which supports RAID (Redundant of Array Independent Drives)
level 1 mirroring and level 0 striping function, is an internal device especially
designed for the professional PC and PC server users. This device will be
greatly appreciated by the serious users of small and medium-sized office
servers, who wish to update their backups instantly and easily.
SOHO-RAID is a low cost, high efficiency Real-time Data Backup System. It
offers an alternative to the potential users of expensive SCSI RAID Level 5 or
low efficiency magnetic tape backup system.
The housing of SOHO- RAID is 146mm(w) and 84mm(h), which will fit into
the opening of two consecutive bays for 5.25” HDD. There are two removable
trays for two identical hard disk drives in the housing. These trays are now
empty. No Hard disk drives are supplied with SOHO-RAID. The users
themselves must buy the hard disk drives according to their own needs.
The installation will be divided into two parts. The first part is to install the
housing of SOHO -RAID into your computer or server. The second is to install
the HDD into the tray and then the tray into the housing, which is now a part of
your computer or server.
1-1 Function & Features
??Simultaneous writing to both drives in RAID level 1 function.
Automatically rebuilding data in the replacement HDD in RAID level 1
??
function.
??Drives are hot swappable without turning the system off in RAID level
1 function.
??Support IDE interface.
??Audible alarm and LCD display on drive failure.
System still works normally with failure in one drive in RAID level 1
??
function.
Direct connections to host IDE interface. No add-on card needed. Just
??
plug-N- play.
Compatible to most leading brand Hard Drives.
??
With built -in cooling fan for high-speed HDD.
??
No software driver required.
??
SOHO -RAID User’s Manual
Page 4

4
1-2 Data Specifications
1. Support RAID level 1 (data mirror), and RAID level 0 (data striping)
Two hard disks always maintain same contents concurrently in RAID
level 1 function.
2. Support bad sector recovery in RAID level 1 function.
3. Hot-Swap supported in RAID level 1 function.
Provide easy remove and install connector for each disk
4. Auto-Rebuild supported in RAID level 1 function. (Rebuild function and
flag handle details please refer to Chapter 4)
5. LCD Display “RAID 0” when setting system to RAID 0.
6. Support PIO/UDMA/33/66/100/133
7. Device Drive independent
a. DOS/Windows Series
b. UNIX Series
c. Linux Series
d. Netware Series
8. Support Plug and Play
9. Directly connects to host IDE interface
10. Compatible with leading brand hard disk drives
11. Buzzer: To indicate any HDD is fail or empty, the buzzer will be alarming
12. Setting Jumper
1-3 General Specifications
Host Interface Ultra ATA
RAID level 1, 0
HDD Select Mode Master/Slave
Cooling Fan 5x5x1.5cm Ball Bearing
Operating temperature 0℃~55 ℃
Non-Operating temperature -20℃~70℃
Supply Voltages +5V, +12V
MTBF >250,000 Hr
Size (mm) 146(W) x 232-( D) X84 (H)
Weight (Kg) 1.6Kg (without drives)
System certification CE
SOHO -RAID User’s Manual
Page 5

5
TRAY
TRAY
status of RAID system
CHAPTER 2.
2-1 Device Descriptions
??The front panel
There is a LCD Display on the front panel and inner with a LCD display
module to display the status of RAID system.
LCD Display
LCD display the
Upper HDD
Lower HDD
SOHO -RAID User’s Manual
Page 6
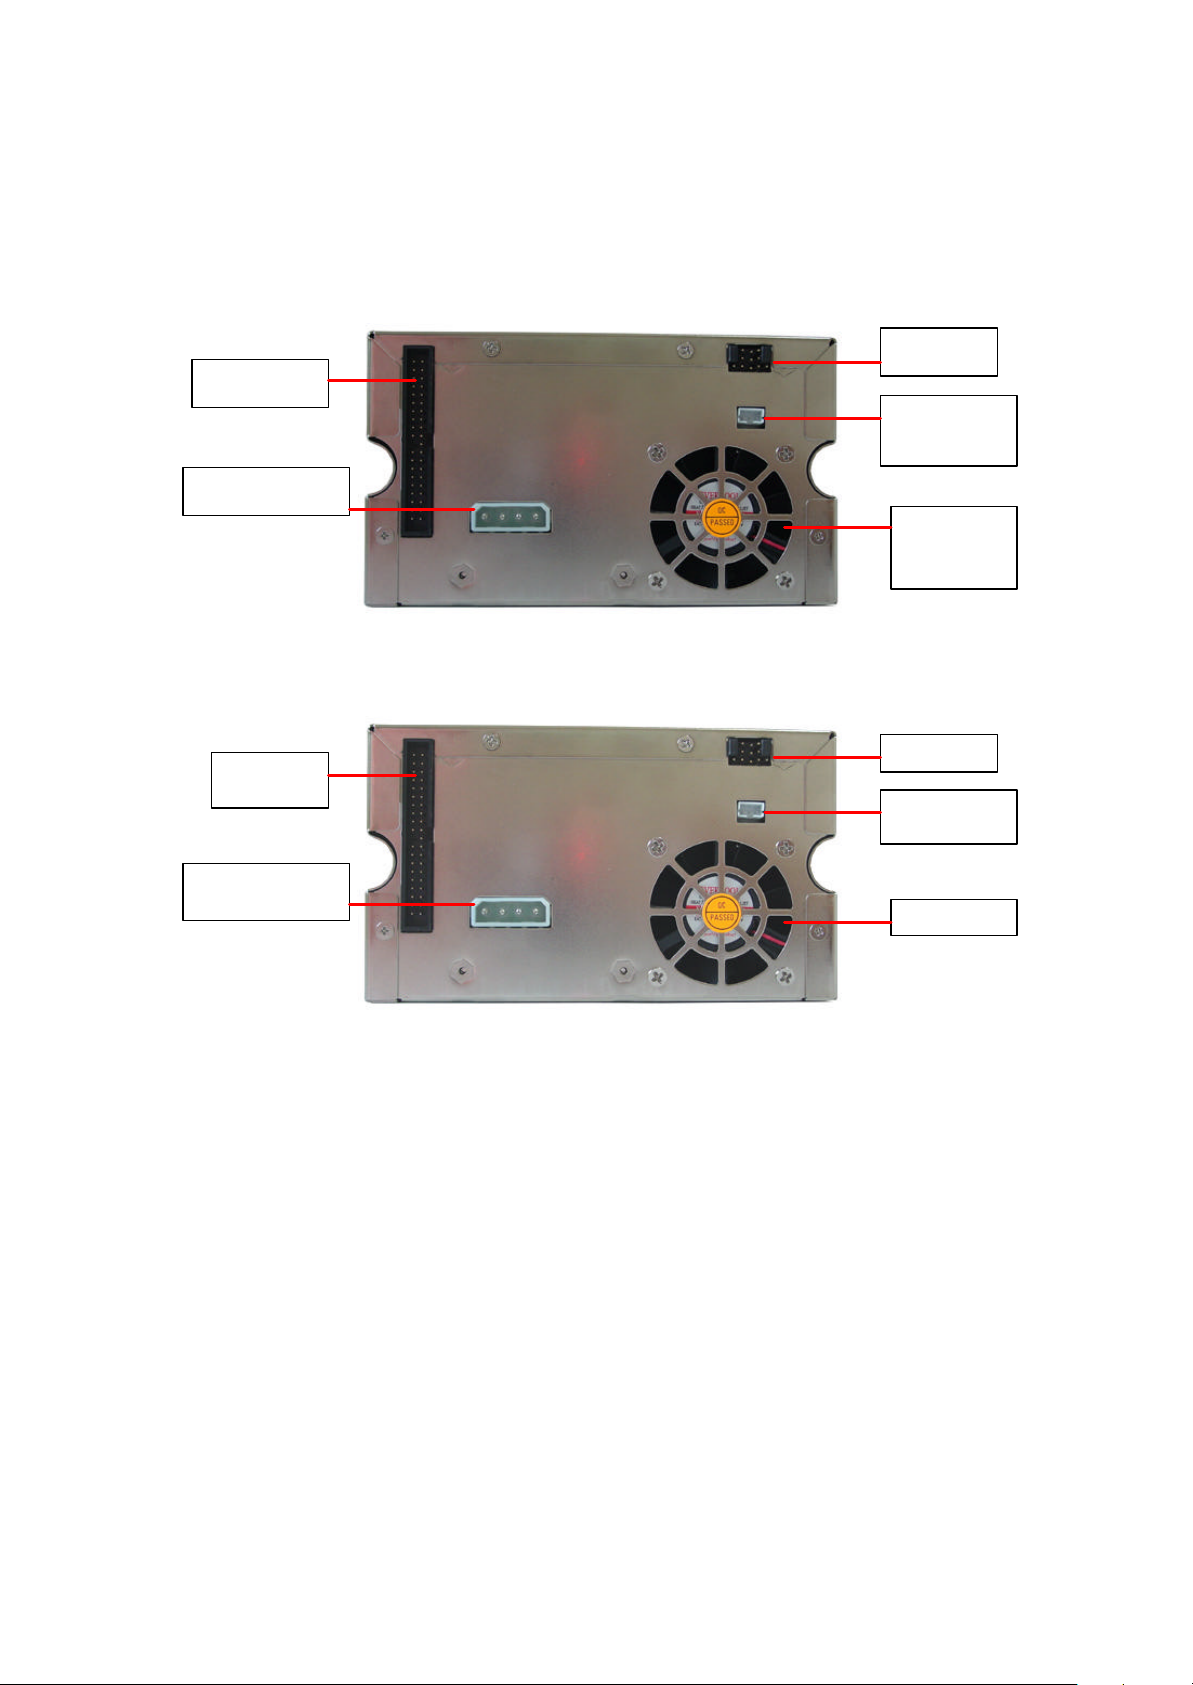
6
4P DC power
Jumper
Cooling fan
connector
4P DC power
??The Rear Panel
40-pin IDE
supply socket
??Rear Panel
40-pin IDE
connector
supply socket
Jumper
3- pin RS-232
port
Cooling fan
3- pin RS-232
port
SOHO -RAID User’s Manual
Page 7

7
2-2 How to Plug in and Pull out the HDD TRAY
˙Pull out the HDD TRAY
1. After open the front panel, pull the handle of HDD Tray.
2. The HDD TRAY will slide out of the housing. Take out the HDD TRAY.
˙Plug in the HDD TRAY
1.Plug the HDD TRAY into the upper/lower tracks and push it to the base.
2. Push back the HDD TRAY handles until luck it. (Indicator by pictures as followed)
(step 1) (step 2)
(finished)
SOHO -RAID User’s Manual
Page 8

8
2-3 Install Hard Drives to HDD Trays
??Set the hard disk drives to the MASTER mode only .
??Connect the 4-pin power socket and the 40-pin EIDE/IDE socket of Hard disk
drive to the connectors on the HDD tray of SOHO-RAID.
??Install the Hard Drive into the HDD tray
??Fix the Hard Drive on the HDD tray with the furnished screws, and then
put the power lines and EIDE/IDE cable in place, such as not to be in the
way when you push the HDD Tray in.
Furnish
Screws
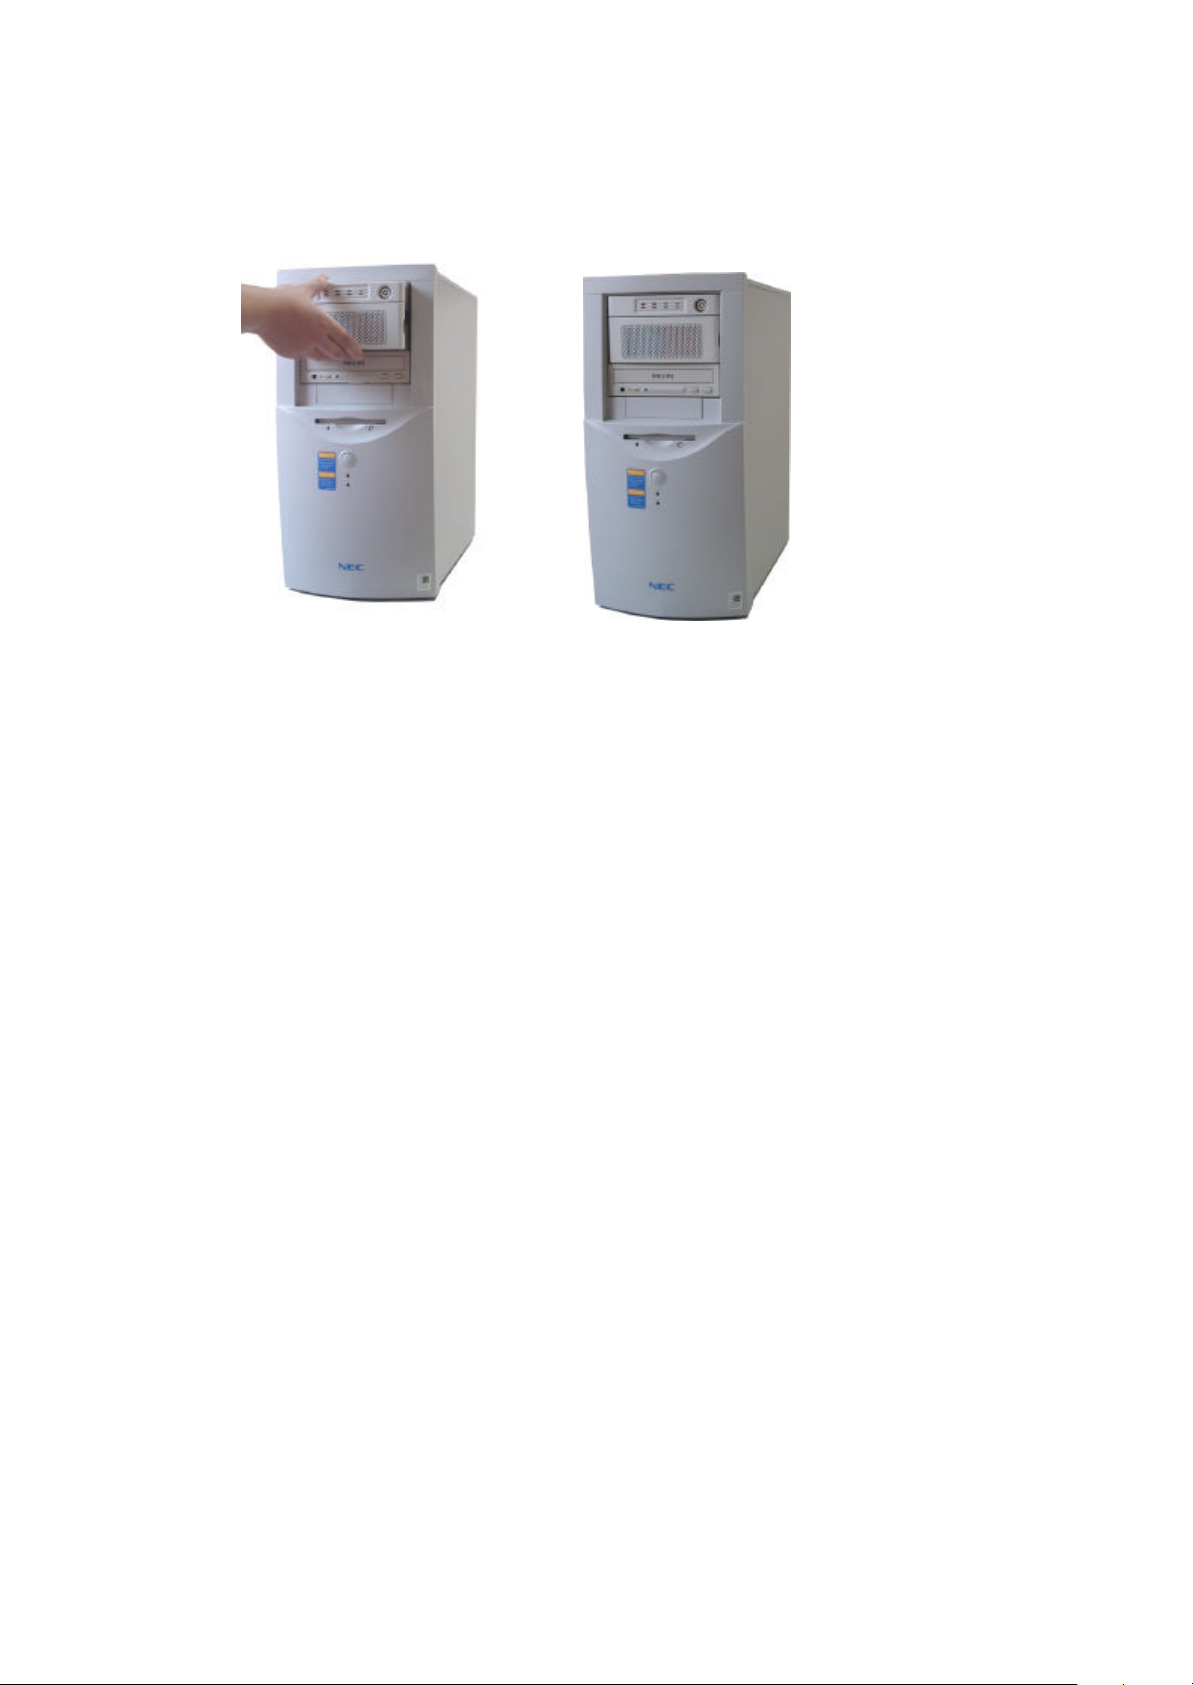
2-4 Install SOHO-RAID into the Computer (Server)
Turn the computer off and pull off the power plug.
??
It takes the space of 5.25” Bay x 2 to install the SOHO-RAID into the
??
computer.
The SOHO-RAID can be set as MASTER (DEFAUT) or SLAVE Mode.
??
You can change the SOHO-RAID as SLAVE Mode by set up the Jumper.
(Refer to 3-1 SOHO -RAID configuration)
Remove the Computer case and mount the SOHO-RAID unit into the
??
computer.
Connect the power line and EIDE/IDE cable to the PCB on the back of
??
the SOHO-RAID. Fix the SOHO -RAID on the computer with screw.
Put back the cover(s) of the computer’s metal case and fix it.
??
((IInnddiiccaattoorr bbyy ppiiccttuurreess aass nneexxtt ppaaggee::))
SOHO -RAID User’s Manual
Page 9
9
There are two different cases to install the HDD on the SOHO-RAID.
??
1. Install 2 brand-new Hard Drives into SOHO-RAID.
??After installing the two brand -new and identical Hard Drives into the
HDD Tray, plug the HDD Trays in the SOHO-RAID, and push the
trays all the way in. Then close the HDD Tray’s handle and the front
panel.
??If the two drives are different in capacity, put the smaller one at
first and follow the step as “Install an original Hard Drive which
contains the system software and data, and also a new Hard Drive
into SOHO-RAID” (see next paragraph). The SOHO-RAID will
limit its capacity to that of the smaller hard disk drive.
2. Install an original Hard Drive which contains the system software
and data, and also a new Hard Drive into SOHO-RAID
??Install the tray with the original Hard Drive into either tracks of the
SOHO-RAID.
??Then install the other tray follow the Operation Instruction in
Chapter 3.
SOHO -RAID User’s Manual
Page 10
10
CHAPTER 3.
HHooww ttoo uussee SSOOHHOO--RRAAIIDD
As a matter of fact, the two hard disk drives in the SOHO-RAID start working
simultaneously as one right after the installation. Not only all commands from
FORMAT, and FDISK will be performed on the two hard drives simultaneously,
but all things including the booting system you will install from the CD ROM,
are also written on the two hard disk drives at the same time, if you choose the
SOHO-RAID as MASTER. (If you choose it to be SLAVE, the two hard disk
drives will act together exactly like a “D:”
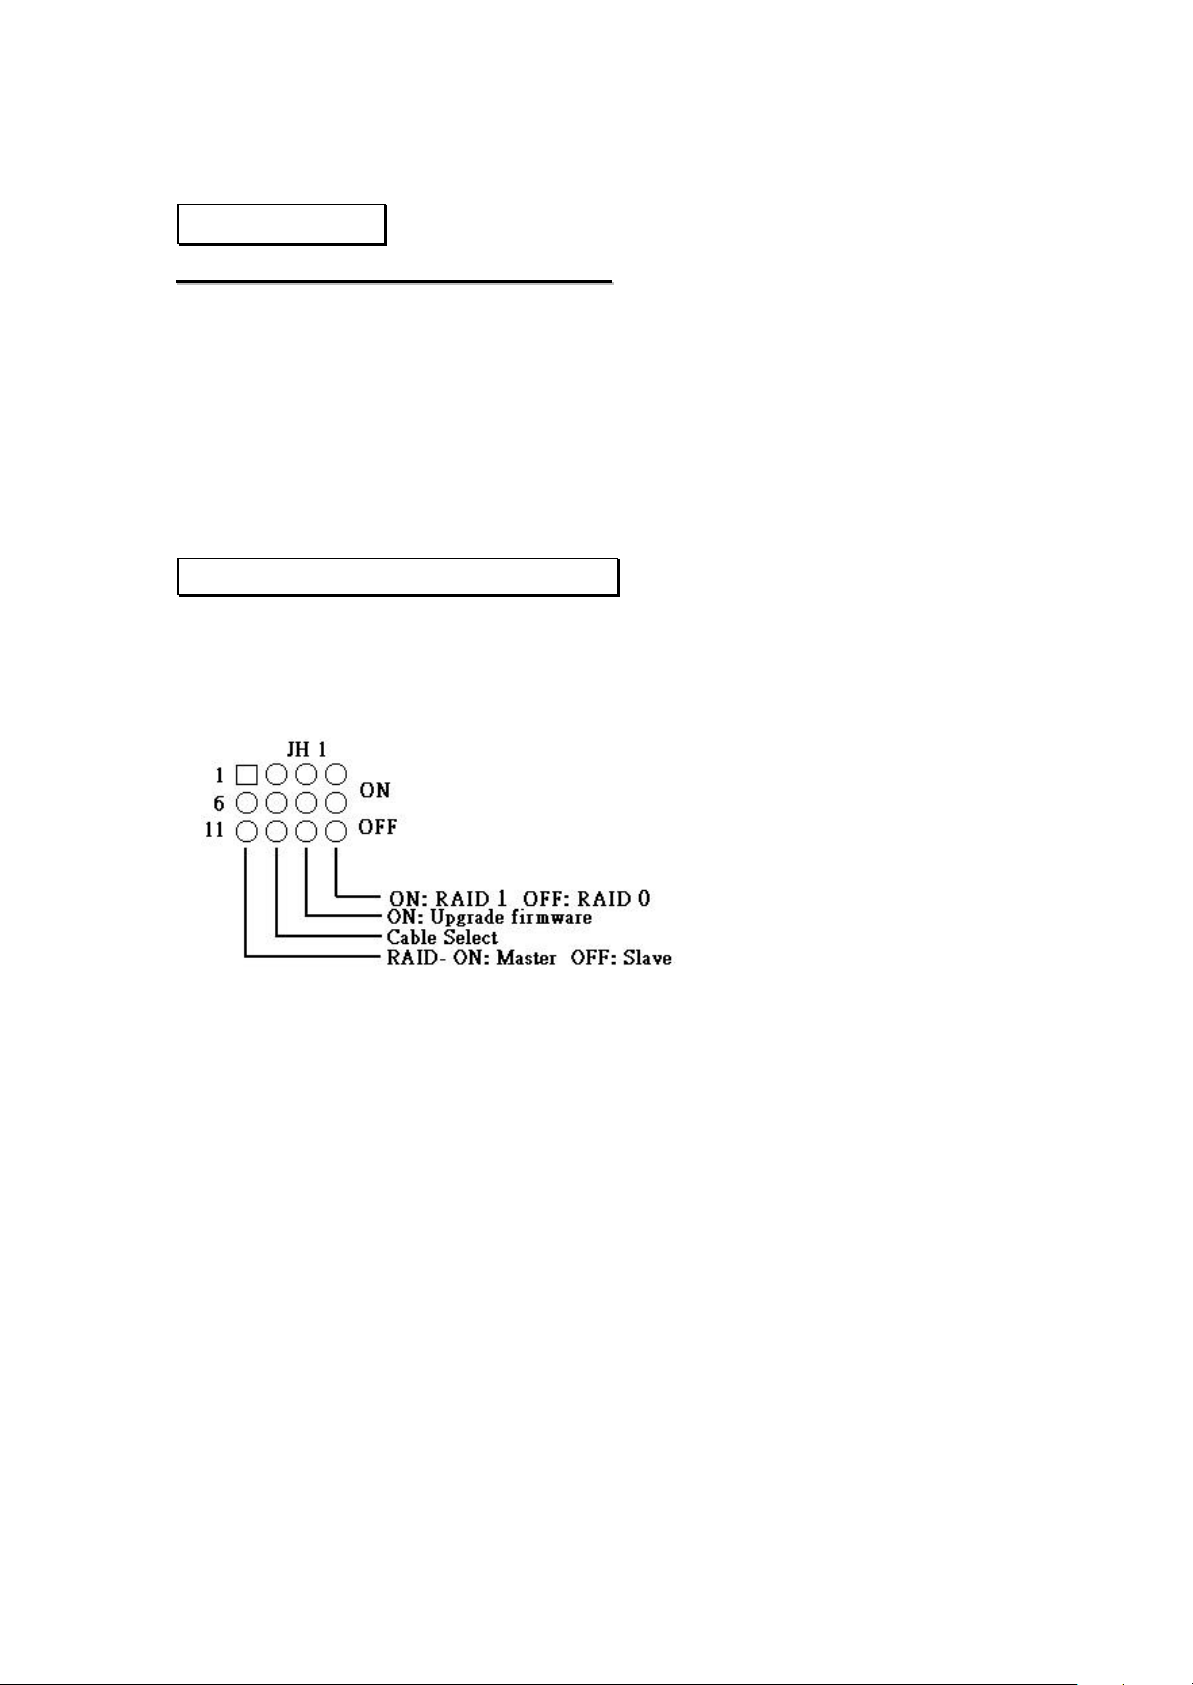
3-1 Jumper setting Configurations
Except support RAID 1 mirroring and RAID 0 striping function by setting
different jumper configuration on its Rear Panel. You can configure the
SOHO- RAID by setting the jumpers as below.
How to set up the jumpers
??
The definitions of the jumper on the rear panel of SOHO-RAID:
SOHO -RAID User’s Manual
Page 11

11
3-2 Operation Instruction
Install 2 brand-new Hard Drives into SOHO-RAID
??
1. Switch on the Computer. Go to the BIOS Setup and enter the Standard
CMOS Setup. Set the HDD (the position of the SOHO-RAID) type on
AUTO, save and exit. The system will automatically detect the
SOHO-RAID.
2. After the boot-up is through, SOHO-RAID will start formatting and
Fdisk the Hard Drives.
SOHO -RAID User’s Manual
Page 12

12
3. The next step will be the installation of the operation system and other
software required.
Install an original Hard Disk Drive which contains the system
??
software and data, and also a new Hard Drive into SOHO-RAID
1. Install a HDD tray with Hard Disk Drive, which contain system
software and data into either upper or lower HDD tray track of
SOHO-RAID before switch on the computer. The computer is bootable
now and the SOHO-RAID will work without the back-up function.
2. Then install a HDD tray containing a new Hard Disk Drive or a bigger
capacity Hard Disk Drive which with Data into another HDD tray track.
(Please notice the original data will be rewrite.) The SOHO-RAID will
start rebuilding and copying the contents of the original drive. When this
step is done, the SOHO-RAID is ready with the back -up function.
On-line Hot swap and Data Real-time automatic rebuilding
??
1. The SOHO-RAID alarm will sound when either Hard Drive fails. Pull
out the tray containing the defective hard disk drive and take it out.
2. The alarm will be stop, but the computer will keep on working with the
functional Hard Drive. Hence no data is lost.
3. Replace the defective hard disk drive (right away if the user has one at
hand) and plug the tray back.
4. All the above process can be done with the running continuously. A few
seconds later, the SOHO-RAID will start rebuilding data automatically.
(Please refer to INSTALLATION in Chapter 2, and also HDD Auto
Rebuild Function in Chapter 4.) Everything contained in the hard disk
drive will automatically be copied to the new hard disk drive.
SOHO -RAID User’s Manual
Page 13
13
CHAPTER 4.
44--11 HHDDDD AAuuttoo RReebbuuiilldd FFuunnccttiioonn ((AA..RR..FF..))
SOHO-RAID (LBA-48) Module will provide auto rebuild function. For
handle the rebuild function, a HDD flag will be put in the HDD to record
different condition. Please references following for detail rebuild function and
flag handle.
Case 1: When system power on
a. Only one HDD in RAID Module
?? LCD Display “ PRI HDD: OK”
“SEC HDD: Fail”
?? LED Display “PRI HDD: In Use & Good”
“SEC HDD: Fail”
b. Two HDD in RAID 1 Module -> Check rebuild flag
X-Drive Y-Drive Active LCD display LED display
S (Source) S (Source) System Failed Rebuild Flag ERR
S (Source) T (Target) Rebuilding Rebuilding ...
S (Source) N (No Flag) Rebuilding
Y-Drive be Target
S (Source) U (Unknown) System Failed Rebuild Flag ERR
T (Target)) S (Source) Rebuilding
T (Target) T (Target) System Failed Rebuild Flag ERR
T (Target) N (No Flag) System Failed Rebuild Flag ERR
T (Target) U (Unknown) System Failed Rebuild Flag ERR
N (No Flag) S (Source) Rebuilding
X-Drive be Target
N (No Flag) T (Target) System Failed Rebuild Flag ERR
N (No Flag) N (No Flag) Normal operation PRI HDD: OK
N (No Flag) U (Unknown) System Failed Rebuild Flag ERR
U (Unknown) S (Source) System Failed Rebuild Flag ERR
U (Unknown) T (Target) System Failed Rebuild Flag ERR PRI: Fail
PRI: S SEC: S
PRI => SEC ??%
Rebuilding ...
PRI => SEC 00%
PRI: S SEC: X
Rebuilding...
SEC => PRI ??%
PRI: T SEC: T
PRI: T SEC: N
PRI: T SEC: X
Rebuilding...
SEC => PRI 00%
PRI: N SEC: T
SEC HDD: OK
Unknown Flag
PRI: X SEC: S
PRI: Fail
SEC: Fail
PRI: In Use, Good
=> SEC: In Use, Good,
Rebuilding
PRI: In Use, Good
=> SEC: In Use, Good,
Rebuilding
PRI: Fail
SEC: Fail
PRI: In Use, Good,
Rebuilding
<= SEC: Good
PRI: Fail
SEC: Fail
PRI: Fail
SEC: Fail
PRI: Fail
SEC: Fail
PRI: In Use, Good,
Rebuilding
<= SEC: In Use, Good
PRI: Fail
SEC: Fail
PRI HDD: Good
SEC HDD: Good
PRI: Fail
SEC: Fail
PRI: Fail
SEC: Fail
SOHO -RAID User’s Manual
Page 14

14
PRI: X SEC: T SEC: Fail
U (Unknown) N (No Flag) System Failed Rebuild Flag ERR
Unknown Flag
U (Unknown) U (Unknown) System Failed Rebuild Flag ERR
Unknown Flag
Case 2: HDD Swap Out or Failed
Set another HDD flag to “Rebuild-Source” and “Rebuild-Percentage” = 0
?? LCD Display “PRI HDD: OK”
“SEC HDD: Fail”
?? LED Display “PRI HDD: Good”
“SEC HDD: Fail”
Case 3: New Swap in
Set new HDD flag to “Rebuild-Target” and Rebuilding
?? LCD Display “ Rebuilding… ”
“PRI => SEC HDD: 00%”
?? LED Display “PRI HDD: In Use, Good”
“SEC HDD: In Use, Good, Rebuilding”
Case 4: After Rebuild finish:
After rebuild finish, both HDD flag set to “No Flag”
?? LCD Display “PRI HDD: OK”
“SEC HDD: OK”
?? LED Display “PRI HDD: Good”
“SEC HDD: Good”
4-2 LCD Message List when Hard Drive Auto Rebuild
PRI: Fail
SEC: Fail
PRI: Fail
SEC: Fail
LCD Message List :
" PRI HDD : OK ";
" SEC HDD : OK "; When both HDD are good.
" PRI HDD : OK ";
" SEC HDD : Fail "; When Secondary HDD is fail.
" PRI HDD : Fail ";
" SEC HDD : OK " When Primary HDD is fail.
" PRI HDD : Fail ";
" SEC HDD : Fail "; When both HDD are fail.
" Rebuilding ... "; When rebuilding from Primary to Secondary
" PRI => SEC 00%"; finished percentage.
SOHO -RAID User’s Manual
Page 15

15
" Rebuilding ... "; When rebuilding from Secondary to Primary
" SEC => PRI 00%"; finished percentage.
" Wrong Capacity "; When source HDD is Secondary,
" PRI > SEC "; Primary capacity larger than Secondary.
" Wrong Capacity "; When source HDD is Primary,
" SEC > PRI "; Secondary capacity larger than Primary.
" Source Fail "; When source HDD is Primary,
" PRI > SEC "; Source data fail during rebuilding.
" Source Fail "; When source HDD is Secondary,
" SEC > PRI "; Source data fail during rebuilding.
"Rebuild Flag ERR ";
" PRI:S SEC:S "; Both HDD are marked “Source”.
"Rebuild Flag ERR ";
" PRI: T SEC:T "; Both HDD are marked “Target”.
SOHO -RAID User’s Manual
Page 16

16
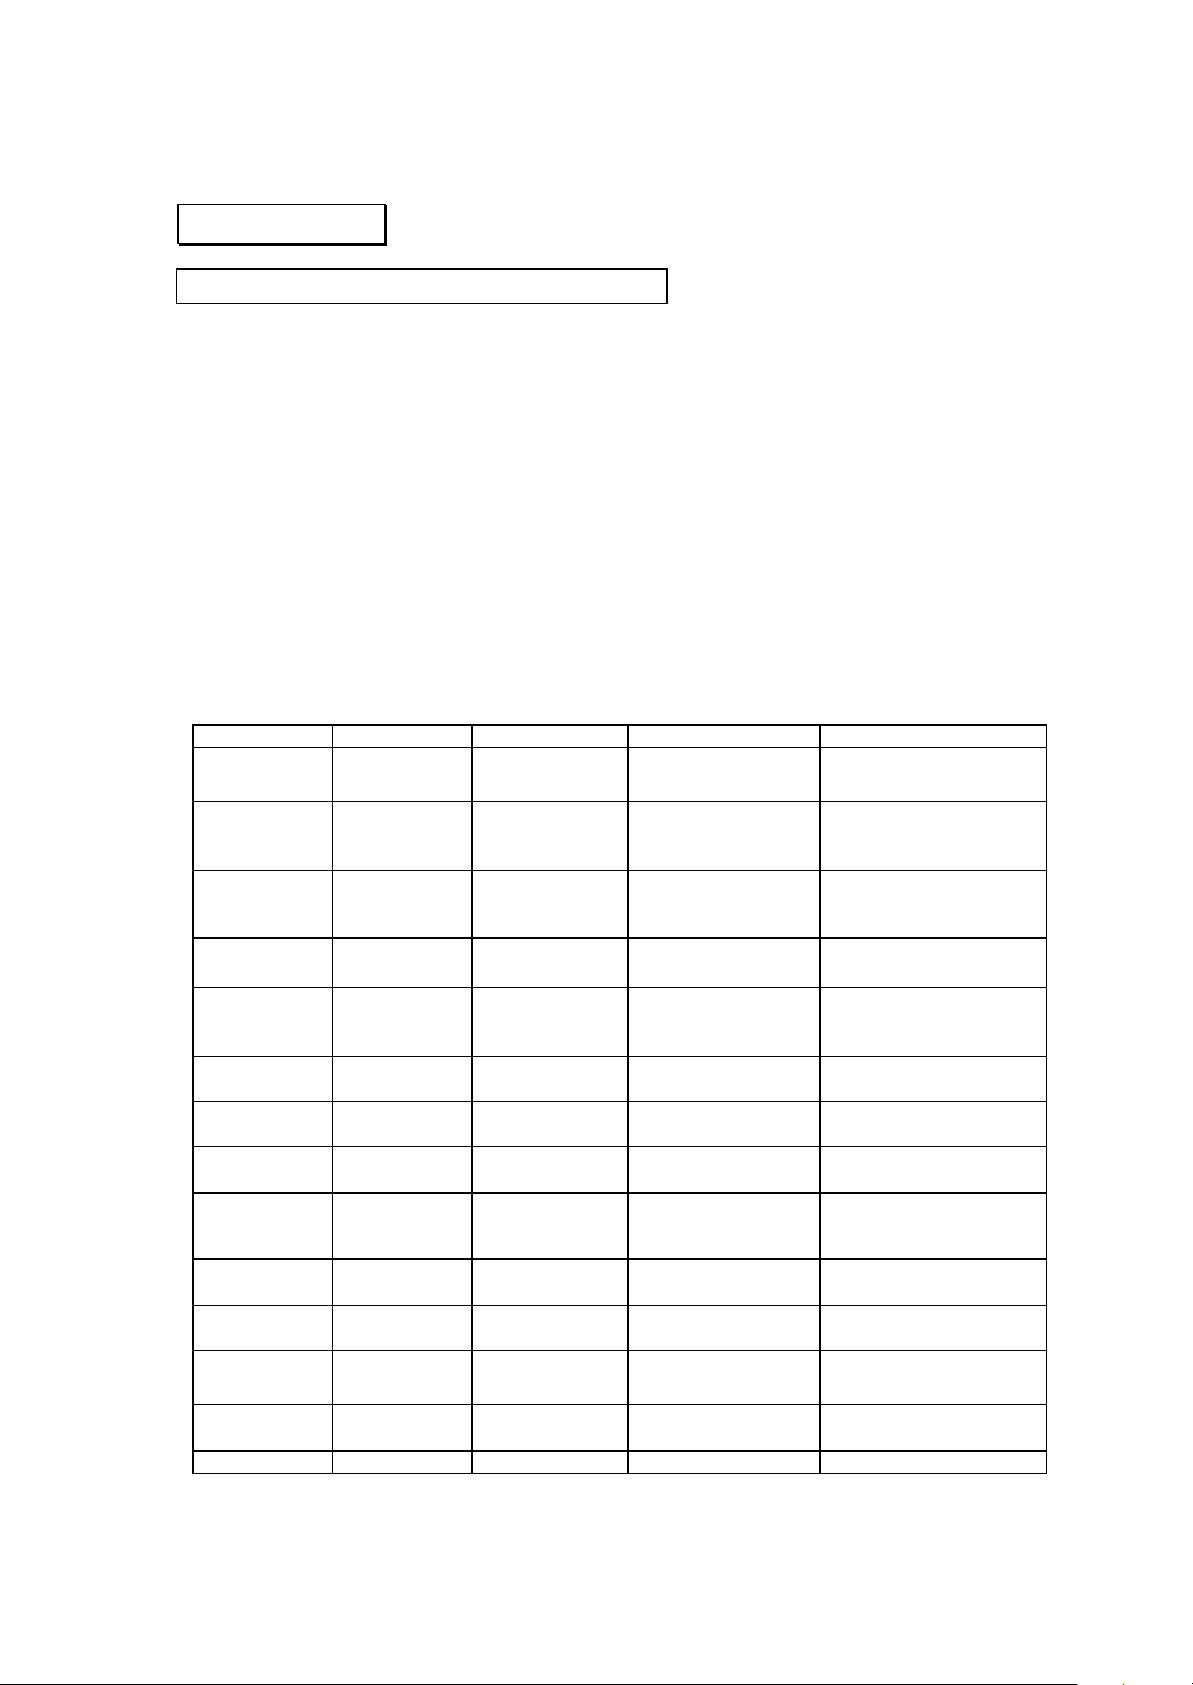
CHAPTER 5.
PCB Dimension and Version
Control Board
IC List
Item Description Brand Name
1. Flash ROM/PLCC32 1M Winbond & SST & ICE
a) Winbond:
W29C011AP-15
b) SST: SST29EE010
c) ICE: ICE28LF010
2. Microprocessor/8032 PLCC44 40MHZ Winbond &ICSI
a) Winbond: W78C32CP-40
b) ICSI: IS80C32-40
3. SRAM/64K*16 SOJ44 ICSI & G-Link & Eureka
a) ICSI: IS61C6416-12T
b) G -Link: GLT710016-15J4
c) Eureka: EK681016J-15
SOHO -RAID User’s Manual
 Loading...