

Page 1

Optical power meter
XL-FM141
Optical power meter User’s Manual
Fiber tester
Page 2

2
CONTENTS
1. Overview-----------------------------------------------------------------------3
2. Features------------------------------------------------------------------------3
3. Specifications------------------------------------------------------------------4
4. Front Pa n e l & F u n c tio n ---------------------------------------5
5. Operation-----------------------------------------------------------------------7
6. Standard Package-------------------------------------------------------------9
7. Maintenance--------------------------------------------------------------------9
8. Trouble-shooting--------------------------------------------------------------10
9. Supplementary----------------------------------------------------------------10
Page 3

3
Overview
The handheld power meter XL-FM141 is designed specifically for installation
and maintenance fiber optic network. Which is durable, accurate, low power
consumption, small, light weight and easy to carry. It can be widely use in single
mode, Multi mode fibers of LAN、FDDI、WAN、FTTH、CATV、CCTV and fields
of construction, maintenance, surveillance, direct measurement of optical power
and relative measurement of optical link loss etc.
Features
Simple appearance, beautiful professionally designed with shock
absorbing gum case,More effectively protect the optical power meter
uses two AA batteries,Power supply for up to 72 hours
linear(mW)& nonlinear(dBm)displaying function
measured value display lock,Lock measured values of display
FC / SC / ST interchangeable optical connector,be used for normal optical
fiber
Calibrated Wavelength (nm):850nm、1300nm、1310nm、1490nm、1550nm、
1625nm
Backlight display automatically or manually optional, automatically off can
be set.
Page 4

4
Model
XL-FM141
Power Range (dBm)
-70~+10
Detector Type
InGaAs
Wavelength Range(nm)
800~1700
Uncertainly
±5%
Calibrated Wavelength (nm)
850、1300、1310、1490、1550、1625
Display Resolution
Linear:0.1% Nonlinear:0.01dBm
Operating
Temperature(℃)
-10~+60
Storage Temperature(℃)
-25~+70
Auto off Time(min)
10-120,OFF
Battery operating Time (h)
72
Dimensions (mm)
190×100×48
Power
Two AA battery
Weight(g)
400
Specifications
Page 5

5
Front Panel
Function
LCD screen::
LCD screen display the data in dB,dBm,mW,uW,nW units,
Display the wavelength: 850/1300/1310/1490/1550/1625 nm。
Value of optical power: Absolute measurement, display the
current value of the measured optical power. Relative measurement
shows the difference value between current measured value and
reference value.
Page 6

6
Optical power units: Absolute measurement using mW, UW, NW, dBm
display, Relative measurement using dB display.
Optical wavelength: Optional 850/1300/1310/1490/1550/1625nm;
Relative measurement: in a state of relative measurements Show
"difference value", this is used to measure fiber loss, etc;
Automatic off: Battery on the left shows“ ”, indicates the
state of automatic off. If not, it means disabled.
Battery level: Real-time display battery level, when flashes,
indicates the battery is low, it is necessary to change the
battery.
1. Press and hold the key turns on the device. When power is
on, press and hold this key will turn off power.
2. Press this key , it has six wavelength can be
choose:850nm、1300nm、1310nm、1490nm、1550nm、
1625nm ,which is also display on LCD.
3. Press the key Choose a different display units convert of
optical power measurement.
4. Press the key to set absolute and relative measurement of
the switching state of the reference value.
5. Press the key to Lock screen display of measured values, Press
again the lock be canceled.
Page 7

7
6. Press the key to turn on or off the LCD backlight press and
hold the key will Enter the system setting status,Setting menu
language, auto shutdown time, backlight manually or automatically
switch.
Operation
Switch on/off
1. Press and hold the key in the panel, the optical power meter
turn on.
2. Press and hold the key in the panel again, the optical power
meter turn off and no display on LCD.
Absolute optical power measurement
1. Switch on the optical Power Meter.
2. Insert the fiber to be test.
3. Set the Wavelength by pressing the key , to choose the
wavelength to be tested, the default wavelength is 1310nm.
4. Screen shows the current measured value, press the key to show
absolute power values of the linear and nonlinear.
Relative optical power measurement
1. Set the wavelength for measurement
Page 8

8
2. When in the absolute optical power measurement mode, insert the optical
fiber to be measured, measuring the current optical power value.
3. Press the key , and then the current optical power value is
stored as the base reference value. (In dBm units)
4. Insert another fiber to be test, display the relative values of optical power.
Set the parameters of the optical power meter
Language: English Select language of menu.
Shut down: 20Min Setting the time of auto shut-down.(10-120Min,OFF)
OFF: Disable the “Auto power off” function. 20Min means the Optical
Power Meter will power off after 20 minutes when there is no any
operation.
Backlight: Auto Setting the backlight auto off or manual turn on.
Auto: Press any key ,backlight is on and auto off after 8 seconds.
Manual: Press , backlight is on, and press again,
backlight is off.
Page 9

9
Standard Package
The package includes the following components:
1) A handle power meter
2) Two AA batteries
3) Operating Manual
4) Toolkit
5) QC label
Maintenance
1) It is important to keep the sensor clean, all optical connectors
and surfaces free from oil, dirt, or other contamination to
ensure proper operation.
2) Keep using one type of adapter to avoid excess loss from
different connectors.
3) Please use dust-proof cap to avoid Measurement error or
contaminated exposed to the air long time when the meter not
in use.
4) Please carefully plug in or pull out the connector, to avoid
being scratched.
5) Please use lens paper with cleaning liquid for sensor’s surface
cleaning periodically, do it in clockwise direction carefully.
6) If not using a long time, please take out the battery.
Page 10

10
Description
Possible cause
Method
Can not be Switch on
Battery low
Change battery
switch on but no
display
Battery low
Change battery
Faint LCD display
Battery low
Change battery
Value do not change or
Slight changes
Light interface is polluted
/Display is locked
Check light interface
and clean sensor’s
interface
Trouble-shooting
Supplementary
Making an Optical Loss Measurement
Step1.Set standard (reference) value
1) Turn on the optical power meter and select the proper wavelength by the
key .
2) Turn on the optical light source and select the proper wavelength.(it takes
1-2miniutes to stabilize)
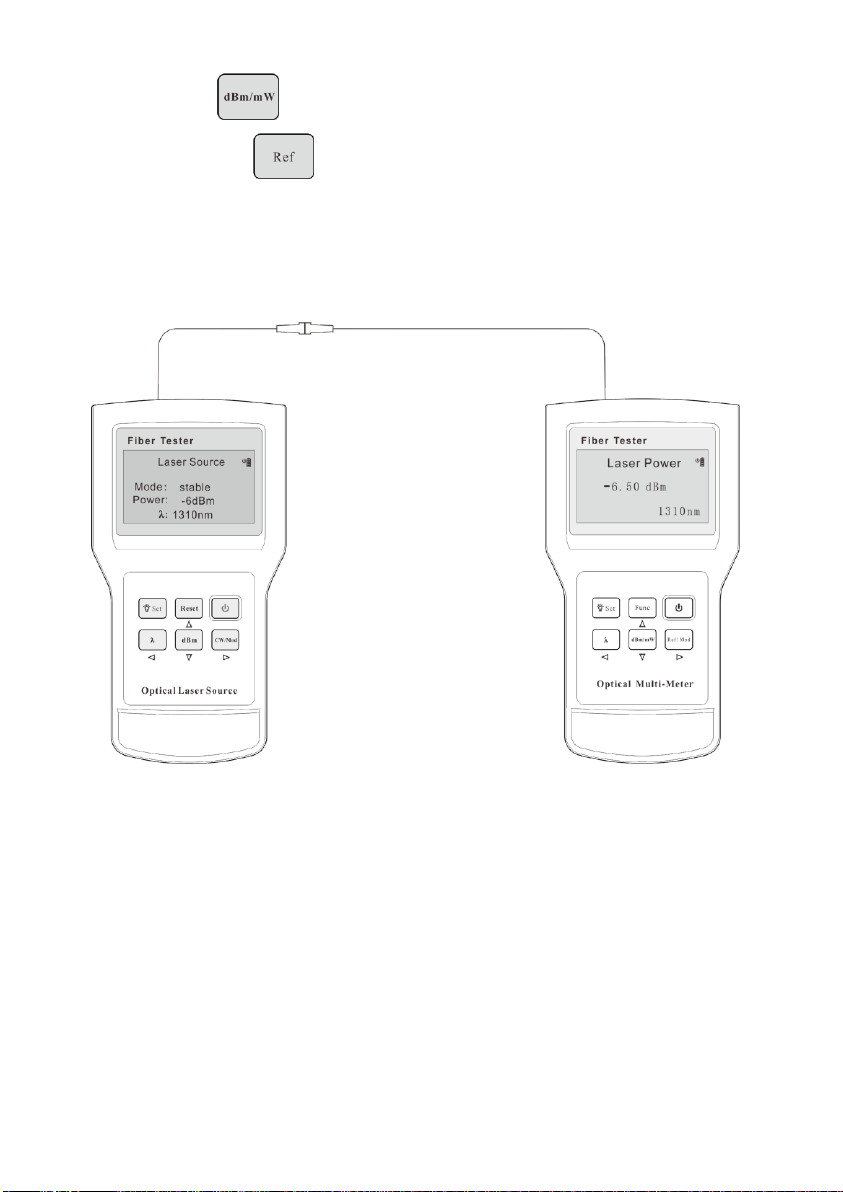
3) )Connect the optical power meter to the light source meter using a fiber. Ref.
Figure 1.
4) You can read the linear power value and nonlinear power value by
Page 11
11
pressing key to change the unit to dBm or nW.
5) Pressing the key ,set the current power value as reference
value, the display data turn into a 0.00 (in dB units shown)
Figure 1.
Page 12

12
Step 2 Optical Loss Measurements
1) Without removing the launch jumper from the optical light
source ,connect the optical light source and the optical power
meter to the fiber under test.(Ref. Figure 2.)
2) The optical power meter displays the end-end loss of the fiber
under test , the unit of loss value must be dB.
Figure 2.
 Loading...