

Page 1

TC-961/962/963/964
Embedded MiniPC
User’s guide
Page 2

2.3.4 Audio(SPK OUT,MIC)............................................................................... 9
Contents
Chapter 1 Product Introduction ................................................................................. 1
1.1 Brief Introduction................................................................................................. 1
1.2 Features.............................................................................................................. 1
1.3 Hardware Specification ....................................................................................... 2
1.4 Product Dimension.............................................................................................. 7
Chapter 2 Hardware Functions ................................................................................. 5
2.1 External Interface Direction................................................................................. 5
2.2 Jumper Setting.................................................................................................... 5
2.2.1 CMOS Content Clearing and Saving Settings(JCC) ................................... 6
2.2.2 COM2 Jumper Function Setting(J1、J2、J3) ............................................. 7
2.3 Interface Instruction ............................................................................................ 8
2.3.1 CF Card Slot(CF) ........................................................................................ 8
2.3.2 SD Reader Slot(SD) .................................................................................... 8
2.3.3 USB Port(USB1,USB2,USB3)................................................................ 8
Page 3

2.3.5 Ethernet Port(LAN)...................................................................................... 9
3.5 Power Connection ........................................................................................... 16
2.3.6 Keyboard & Mouse Interface(Ms/Kb) ........................................................ 10
2.3.7Power Interface(DC 12V) ........................................................................... 11
2.3.8 SATA Port(SATA) ..................................................................................... 12
2.4 TC-961 Expansion board interface ................................................................... 12
2.4.1 VGA port(VGA) ......................................................................................... 12
2.4.2 SVIDEO Port(SVIDEO) ............................................................................. 13
2.5 TC-962Expansion board interface ................................................................... 14
2.5.1 DVI interface(DVI) ..................................................................................... 14
2.5.2 Serial Port(COM)....................................................................................... 15
Chapter 3 Hardware installation.............................................................................. 13
3.1 Remove machine upper cover .......................................................................... 13
3.2 Memory Module Replacement/Installation ........................................................ 13
3.3 Hard drive replacement/installation................................................................... 14
3.4 Wall mounting/Displayer installtion.................................................................. 15
Page 4

Chapter 4 BIOS Setup ............................................................................................ 17
4.6.1 North Bridge Configuration ............................................................................ 41
4.1 Main Menu ........................................................................................................ 18
4.2 Advanced .......................................................................................................... 19
4.2.1 CPU Configuration ......................................................................................... 20
4.2.2 IDE Configuration........................................................................................... 22
4.2.3 Hardware Health Configuration...................................................................... 23
4.2.4 ACPI Configuration ........................................................................................ 24
4.2.5 MPS Configuration......................................................................................... 27
4.2.6 PCI Express Configuration............................................................................. 28
4.2.7 Smbios Configuration..................................................................................... 29
4.2.8 USB Configuration ......................................................................................... 30
4.3 PCI PnP ............................................................................................................ 34
4.4 Boot .................................................................................................................. 36
4.5 Security ............................................................................................................. 38
4.6 Chipset.............................................................................................................. 41
Page 5

4.6.2 South Bridge Configuration ............................................................................ 43
4.7 Exit.................................................................................................................... 45
Appendix................................................................................................................. 45
Appendix 1: Driver Installation ................................................................................ 45
Appendix 2: Embed SATA HDD Drivers into Windows XP Installation Disc ........... 47
Appendix 3: Watchdog Programing Instruction ....................................................... 50
Appendix 4: Glossary.............................................................................................. 53
Page 6

Packing List
Thank you very much for choosing our products. Please check your package
completely as the following item checklist first, if you find any components lost or
damaged, please contact your retailer.
■ TC-96x
■User’s Manual
■Drive Disk
■Power Cord
■Power Adapter
■1 to 4 serial port(optional)
■Screw
1pcs
1pcs
1pcs
1pcs
1set
1pcs
1bag
Page 7

Chapter 1
Product Introduction
Page 8

TC-961/962/963/964 Fanless Embedded Mini Box PC
1
Chapter 1 Product Introduction
1.1 Brief Introduction
TC-96x is a compact thin client pc based on Intel Menlow platform which
combines powerful logical abilities with low power consumption of 5.5W. The various
storage modes including SATA, SD and CF card and diverse display terminals
provide customers with more choices. Besides, the customized expansion slots
make it’s an easy-to-expand product.
TC-96x can be effectively applied to digital signage system, high-definition
media player, advertising machine, LCD large screen controller, set-top boxes,
medical instruments, finance, education and other terminal markets and industrial
solutions.
1.2 Features
● Mini-size, ultra-low noise, fanless radiating system
TC-96x is designed with fanless radiating system which makes it possible to
reduce the noise to 30db when it operates. It is fixed in 120mm×120mm×40mm---
tiny and compact enough to operate in tight space.
Page 9

TC-961/962/963/964 Fanless Embedded Mini Box PC
2
System
Model
TC-961
TC-962
TC-963
TC-964
Motherboard
BPC-7652+AFC-4
40V
BPC-7652+AFC
-340
BPC-7652+
AFC-341V
BPC-7652+
AFC-450H
● Onboard Intel Atom processor
The onboard Intel Atom Z5XX processor with a lower-power-consumption of
2.5W and high-performance can be effectively combined with the Poulsbo SCH
chipset to form an excellent solution for embedded platform.
● Multiple Interfaces
TC-96x I/O ports include:Line-out ,Mic-out,USB2.0 port,RJ-45 network
ports。TC-96x also provide VGA+S-Video or DVI+4COM output (VGA & DVI is
optional)
●Convenient Installation
TC-96x meets VESA MOUNT MIS-D standard which makes it convenient to be
installed on the back of liquid crystal equipment or placed on the desk.
1.3 Hardware Specification
Page 10

TC-961/962/963/964 Fanless Embedded Mini Box PC
3
Processor
Intel Atom Z510(1.1GHz FSB400MHz)/Z530(1.6GHz FSB400MHz)
Chipset
Intel poulsbo SCH
Display
Interface
VGA+
S-VID
EO
DVI
VGA
HDMI
Controller
Intel Poulsbo Integrated GMA500
Memory Dynamic sharing 256MB as video memory
System
Memory
Onboard 1x200Pin SO-DIMM supports DDRII up to 2GB
Remark:SO-DIMM can support 2 Rank,the capacity is 512Mb,1Gb
&2Gb,suggest use RAM of x16 memory chips
Storage
SSD
1x CF slot supports Type II CompactFlash,1x SD socket
HDD
1x1.8” HDD tray supports Ultra DMA 100/66/33&SATA II
HDD
I/O
Chip
Winbond W83627DHG
PS/2
1x MS/KB
Page 11

TC-961/962/963/964 Fanless Embedded Mini Box PC
4
COM
-- 4xCOM
4xCOM
--
USB
4x
USB2
.0 (2
on
front
panel
)
2x USB2.0 (front
panel)
4x USB2.0(2
on front panel)
5x USB2.0(2
on front panel)
Audio
1x Mic-in, 1x Line-out
LPT
---
Ethernet Realtek RTL8111C, 10/100/1000Mbps, 1x RJ45
WIFI
USB mode
Extension
interface
--
System
Control
Switch Button
Page 12

TC-961/962/963/964 Fanless Embedded Mini Box PC
5
LED Indicator
Power supply , hard disk LED
Power supply
DC +12V
Cooling
System
Fanless
OS
Windows Vista/XP/CE/XPE,Linux
Mechanical &
Environmenta
l
Operating
Temperature
0℃~60℃
Storage
Temperature
-40℃~85℃
Relative
Humidity
5%~95%, 40℃, no-condensation
Vibration 0.5g rms/5~500Hz/ random assignment
EMC
CE/FCC Class B
Page 13

TC-961/962/963/964 Fanless Embedded Mini Box PC
6
Product
Dimension
120mm×120mm×40mm (W×D×H)
Package
Dimension
275mm×255mm×115mm (W×D×H)
Net Weight
0.7KG
Gross Weight
1.5KG
Material
High-tensile steel
Surface
Treatment
Sand blast and oxidation
Installation
Wall-mount or Desktop
Color
Silver gray/Black
Page 14

TC-961/962/963/964 Fanless Embedded Mini Box PC
7
1.4 Product Dimension
Dimension:120mmx120mmx40mm(WxDxH)
Page 15

Chapter 2
Hardware Functions
Page 16

5
2.1 External Interface Direction
1:TC-96x Front View
2:TC-96x Back View
TC-961:
TC-962:
2.2 Jumper Setting
Before the hardware installation, please follow the jumper setting guide.
Chapter 2 Hardware Functions
Page 17

6
Setting
JCC
1-2
Clear CMOS contents and reset all the
Tips:How to identify jumper, PIN 1 of interface, observation the word mark of plug
socket ,will use “1” or bold lines or triangular symbols;Take a look at the back of
PAD square pad as the first PIN 1; all of jumper PIN 1 has a white arrow guide.
2.2.1 CMOS Content Clearing and Saving Settings(JCC)
CMOS is powered by onboard button battery. Clean CMOS will lead to a
permanent elimination of the previous system setting and restoration of default
values.
Steps:
(1)Power off the computer
(2)Use jumper cap short JCC Pin 1 and Pin 2,then restore the default setting of
Pin2 and Pin 3.
(3)Start the computer and press Del to enter into BIOS setup interface; you also
can use optional load optimized defaults.
(4)Save and exit.
Page 18

7
BIOS values as the default setting.
2-3
Normal working state, the default setting
COM2 RS232
(default)
COM2 RS422
COM2 RS485
J1
3-5 4-6
J1
1-3 2-4
J1
1-3 2-4
J2
3-5 4-6
J2
1-3
2-4
J2
1-3 2-4
J3 1-2 J3 3-4 J3
5-6 7-8
Please do not clear CMOS when computer boots up so as not to damage the
motherboard.
2.2.2 COM2 Jumper Function Setting(J1、J2、J3)
TC-962 has COM2 jumper which is fixed on the motherboard of AFC-340. J1、
J2、J3 are used to set the transmission modes including RS 232/RS 422/RS 485.
Users can set the value according to requirements. The default mode is RS232.
Page 19

8
Pin Signal
1
VCC
2
USB_D-
3
USB_D+
4
GND
5
GND
2.3 Interface Instruction
2.3.1 CF Card Slot(CF)
TC-961/II provides 1x 50Pin standard CF card slot supports TypeI/II CF card.
2.3.2 SD Reader Slot(SD)
TC-961/II provides 1x SD card slot supports standard SD/MMC card.
2.3.3 USB Port(USB1,USB2,USB3)
The motherboard provides two standard USB ports(USB1,2) and one 4Pin
USB port(USB3) which are compatible with USB2.0 specification and support plug
and play function. USB3 port can be used for optional WIFI adapter.
USB1,2 interface defination
Page 20

9
Pin Signale
1
VCC
2
USB3-
3
USB3+
4
GND
6 GND
2.3.4 Audio(SPK OUT,MIC)
TC-96x is based on ALC888 Audio decorder chip which supports one
audio-out and one MIC jack on the panel.
2.3.5 Ethernet Port(LAN)
TC-96x utilizes the Realtek RTL8111C/D chip supporting one RJ-45 Gigabit
Ethernet interface. The Green LILED and Yellow ACTLED show the status of LAN.
Status Desription of RJ45 LAN LED
Page 21

10
Function
Light
Greeen
(100Mbps)
Network has been
Invalid link
or close
connection or no
LILED(Green)Status
up
2.3.6 Keyboard & Mouse Interface(Ms/Kb)
TC-96x provides one PS/2 interface for keyboard and mouse connection.
Please get it from our accessories box.
Yellow
(1000Mbps)
Off
Effective
links
ACTLED(Yellow)
Status
Blink
Off
Function
connected, the
ongoing data
transmission
No network
Ms/Kb:
data transfer
Page 22

11
Signal
Pin KB_DATA
1
MS_DATA
2
GND
3
VCC
4
KB_CLK
5
MS_CLK
6
Pin Signal
1
+12V
2
GND
3
NC
2.3.7Power Interface(DC 12V)
+12 V single power supply
Page 23

12
Pin
Signal
1
GND
2
SATA_TXP
3
SATA_TXN
4
GND
5
SATA_RXN
6
SATA_RXP
7
GND
2.3.8 SATA Port(SATA)
The one SerialATA interface has a transmission rate up to 300MB/s.
2.4 TC-961 Expansion board interface
2.4.1 VGA port(VGA)
Standard 15Pin VGA port is suitable for all of VGA displays。
Page 24

13
Pin
Signal
Pin Signal
Pin Signal
1
Red 6 GND
11 NC
2
Green
7
GND
12 SDA
3
Blue 8 GND
13 HSYNC
4
NC 9 +5V 14 VSYNC
5
GND
10 GND
15 SLC
Signal
Pin
s_video_y
1
s_video_cvbs
2
GND
3
s_video_pr
4
2.4.2 SVIDEO Port(SVIDEO)
TC-961 provides one S-VIDEO port for connecting LCD device, which on the
realization of video playback.
Page 25

14
GND
5
GND
6
GND
7
Signal Pin Signal
TDC2#
1 2
TDC2
Remark:It can support TV-OUT,S-VIDEO and Analog HDTV modes,We can
provide different types of wire under your needs. The specific allocation is:
TV-OUT====== s_video_cvbs
S-VIDEO==== s_video-y, s_video_pr
Analog HDTV======= s_video-y(Y), s_video_cvb (Pb), s_video_pr (Pr)
2.5 TC-962Expansion board interface
2.5.1 DVI interface(DVI)
TC-96xⅡProvides a DVI-D interface for connecting LCD displays.
Page 26

15
GND
3 4
NC NC
5 6
SC-DDC
SD-DDC
7 8
NC
TDC1#
9
10 TDC1
GND
11 12 NC
NC
13 14 VCC
GND
15 16 HP-DETECT
TDC0#
17 18 TDC0
GND
19 20 NC NC
21 22 GND
TLC
23 24 TLC#
GND
25 26 GND
NC
27 28 NC
2.5.2 Serial Port(COM)
TC-962 provides serial port,expansion board of AFC-340 be with one DB44
Page 27

16
Pin
Controller
Defination
Pin
Controller
Defination
1
A-1 DCD3
23 C-3 TXD5
2
A-2 RXD3
24 C-4 DTR5
3
A-3 TXD3
25 C-5 GND
4
A-4 DTR3
26 C-6 DSR5
5
A-5 GND
27 C-7 RTS5
6
A-6 DSR3
28 C-8 CTS5
7
A-7 RTS3
29 C-9 RI5
8
A-8 CTS3
30 NC GND
9
A-9 RI3
31 D-1 DCD6
10 NC GND
32 D-2 RXD6
interface, which can be extented 4 serial ports,There is one adapter of 1 to 4 DB9
COM in the accoreies box
Page 28

17
11 B-1 DCD4
33 D-3 TXD6
12 B-2 RXD4
34 D-4 DTR6
13 B-3 TXD4
35 D-5 GND
14 B-4 DTR4
36 D-6 DSR6
15 B-5 GND
37 D-7 RTS6
16 B-6 DSR4
38 D-8 CTS6
17 B-7 RTS4
39 D-9 RI6
18 B-8 CTS4
40 NC GND
19 B-9 RI4
41
NC
20 NC GND
42
NC
21 C-1 DCD5
43
NC
22 C-2 RXD5
44
NC
Page 29

Chapter 3
Hardware Installation
Page 30

13
Chapter 3 Hardware
Before the computer installation, we should
Follow the safety principles, which will prevent the computer from potential damage and
ensure our personal safety.
1:Make sure the computer is not connected power supply
2:Better to wear anti-static gloves when we contact motherboard or components (such as
RAM.)
3:Prepare a small cross screwdriver
3.1
Remove machine
1:Use a screwdriver to open the bottom of TC-96x
upper
cover
installation
2:Seize the host cover of both sides and force up to mention.Then the lid be removed.
3.2
Me m ory
TC-96x provides one 200Pin DDRⅡ SO-DIMM
533MHz RAM. Max.up to 2GB. You can choose the suitable one. The installation procedure as
follows:
Module
Replacem e nt/Installation
slot
, and supports
DDRⅡ400
/
Page 31

14
1:Open the console lid.
3:Remove the motherboard and expansion board separately.
4:Choose the suitable memory.
5:Make sure the memory into the right SO-DIMM slot.
6:And then push the memory down slowly until you hear the “click” sound.
3.3 Hard drive
The machine provide a 1.8” HDD bays, the expension board provides one SATA ports. You
can choose the suitable HDD. The steps of installation as follows:
1:Turn off the power, unplug the power cable.
2:Using the screwdriver to open and remove the chassis cover
3:Please take down the HDD drive bay.
replace ment/installation
Page 32

15
4:Choose the suitable 1.8” HDD, and inset HDD to the SATA interface of expansion board.
5:Install the finished expansion board into chassis and fix HDD with the drive bays.
3.4 Wall mounting/Displa
TC-96x meets VESA MOUNT 100 specifications with international standard mounting
holes. It can be used for rackmount, wall mounting and matched with LCD and other devices.
1:Diagram below shows the Wallmount of machine in accordance with screw holes
yer installtion
Page 33

16
2:The following diagram shows machine of screw holes will be installed hehind the display.
Back panel of displayer installation
3.5 Po wer Co
1:Connect the power code to the socket of the back end of the power connector
2:Connect the power cord plug to the 3-slot power supply plug rafts.
nnection
Page 34

BIOS Setup
Chapter 4
Page 35

Chapter 4 BIOS Setup
AMI BIOS upgrade:
It is true that hardware and software are upgrading all the time. When your IPC can not
support the newest processor (for example), you should upgrade the BIOS to try to keep up
with the latest technology. Upgrading (or flashing) the BIOS is not an easy attempt. To make
sure upgrade succeed, please follow the instruction below:
Set jumper JAV as open
AFUDOS.EXE is the program for BIOS to modify and upgrade,need to be run in DOS
mode.
Flash IC.
Remarks:
1. Upgrading BISO may cause your system crash, so please operate carefully.
2. Please use the upgrading program in the CD-ROM provided by us
3. Please do not power off or reboot the system when upgrading, otherwise, the BIOS maybe
4. Please backup your BIOS before upgrading.
AMI BIOS Description:
configuration. This type of information is stored in battery-backed memory (CMOS RAM) so
that it retains the setup information when the power is turned off
AMI BIOS Setup
please press “DEL”, then it will enter BIOS setup interface.
1. Power on or Reset computer.
Use boot disk load DOS, run Amiflash.exe and write the newest file:XXXX.ROM into the
Order format:A:\ Afudos XXXX.rom
If you need to add other parameters, please add <space>/? after the order format.
Example: Afudos 7652I100.rom /P /B /C /N /X
be damaged.
AMI BIOS ROM has a built-in setup program that allows users to modify the basic system
Power on your computer, when this information display in your screen: Del->SETUP
Page 36

2. When "Press <Del> to enter setup" in screen, please press <Del>.
3. Use the “←↑→↓”to choose the option which your want to modify, press <Enter> and show
the sub-menu.
4. Use the “←↑→↓”and <Enter> to modify the value.
5. At any time, press<Esc> can back to the father-menu
Note!The default BIOS settings for this motherboard apply for most conditions to ensure
optimum performance. If the system becomes unstable after changing any BIOS settings, load
the default settings to ensure system compatibility and stability。The BIOS setup screens
shown in this section are for reference purposes only, and may not exactly match what you see
on your screen。
When the SETUP program starts, you can see the CMOS Setup Utility Main screens are
as follows:
4.1 Main Menu
AMI BIOS
It displays the BIOS version, update date, identification numbers, which cannot be
modified by users, for they are options for reading only.
Page 37

Processor
It displays the processor CPU types, tempos, quantity you are using, and they are all
options for reading only.
System Memory
It displays the memory size. options for reading only.
System Time
Select this option, and use < + > / < - > to set the current tine. And it represents in a format
of hour/minute/second. The rational range of all options is: Hour (00-23), Minute (00-59) and
Second (00-59).
System Date
Select this option, and use < + > / < - > to set the current date in a format of
month/date/year. The rational range of all options is: Month (Jan - Dec), Date (01-31), Year (to
2099 maximum) and Week (Mon --Sun).
4.2
Advanced
Page 38

WARNING: Setting wrong values in below sections may cause system to malfunction:
4.2.1 CPU Configuration
Page 39

This sub menu includes CPU particular information, such as manufacturer, type, frequency,
FSB speed, cache L1, and cache L2 etc.
Max CPUID Value Limit
When you are using the operating system which doesn't support extended CPU ID
function, please set this project to [Enabled]. The settings are [Disabled] [Enabled]。
Intel(R) Venderpool Technology
VT also named Intel Virtualization Technology, a system imaging technology used in Intel
CPU. It can run more than one OS in one PC, one processor runs one OS.
Execute Disable Bit Capability
This item specifies the Execute Disable Bit Feature of new generation of CPU, which
enables self-. The settings are Enabled and Disabled. The Optimal and Fail-Safe default
setting is Enabled. If Disabled is selected, the BIOS forces the XD feature flag to always return
to 0.
Hyper-Threading Technology
That is to open Intel P4-C processor with Hyper-Threading functions, which is based on
CPU, chipset. BIOS and OS can support this technology. When you open Hyper Threading, we
suggest you use WinXP or Linux 2.4 version。If you use some OS that cannot support Hyper
Threading or supporting is not enough good, your system performance will degradation when
you open Hyper-Threading Technology.
Intel(R) Speedstep (tm) tech
Whether the computer is powered on AC or battery, Intel(R) speedstep allows you to set
the performance standards of Microprocessor technology. And it will be achieved after you
installed CPU of speedstep technology. Setting option is: [Enabled],[Disabled].
Intel(R) C-State tech
C1 config/Hard C4 Config
CPU C status selection. Options:
<Disable(default)>,<C2>,<C3>,<C4>,<Deep
C4>,<C6>.
Page 40

4.2.2 IDE Configuration
ATA/ IDE Configuration
Move the cursor to this option, and press <Enter> key to appear four options: Disabled, PATA Only (parallel IDE interface), S-ATA Only (serial IDE interface), P-ATA &
S-ATA (parallel
and serial hard disk coexisting mode, and either of the modes can be used). The user
may select the parallel or serial IDE interface according the configuration of
the hard disk.
1. In P-ATA Only: S-ATA Running Enhanced Mode helps open or close serial disk support in
P-ATA Only state, in which Yes means support while No means not support. P-ATA Channel
Selection is the support for parallel hard disks, Primary is to support two devices of IDE1
channel, Secondary is to support two devices of IDE2 channel, Both is to support four devices
of both IDE1 and IDE2. S-ATA Ports Definition is to define which is master and which is slave.
Therefore, in this mode, it can support 6 ATA devices maximum.
2. In S-ATA Only: It only supports S-ATA device. Now do not connect the P-ATA device.
Otherwise, it may lead to the system misstatement. It can support 2 serial equipment maximum.
Similarly, S-ATA Ports Definition is also to select the relationship between the master and the
slave.
3. In P-ATA & S-ATA: Combined Mode Option is the selection in a combined manner. When
Page 41

23
the 1st channel of P-ATA is selected, IDE1 is the master channel, IDE2 will be mapped as
S-ATA channel, and IDE2 will be unable to be used. Instead, it supports two parallel and
two serial devices of IDE1. When S-ATA 1st Channel is selected, S-ATA device will be mapped
to IDE1. Now, IDE1 cannot be connected to devices, but IDE2 can be used, and it still supports
4ATA devices. The S-ATA Ports Definition is also the selection of relationship between the
master and the slave.
Primary/ Secondary IDE Master/ Slave
This four options use to choose IDE device‟s type etc. include Type, LBA/Large Mode,
Block (Multi-Sector Transfer), PIO Mode, DMA Mode, S.M.A.R.T(.
Reporting Technology), 32Bit Data Transfer these seven option, we suggest you choose Auto,
the system will auto-search devices, if you want Config by yourself, make sure all parameter of
the HDD support this mode first.
Self-Monitoring,
Analysis and
Hard Disk Write Protect
Setup HDD Write Protect function: <Enabled> Write Protect, HDD read only: <Disabled>
HDD can write or read.
IDE Detect Time Out(Sec)
This option for BIOS searching IDE device in appointed time (by seconds).
ATA(PI)80Pin Cable Detection
Setup detect ATA(PI)80pin cable: 80pin ATA cable is for Ultra ATA/66,Ultra ATA/100 and
Ultra ATA/133 .Standard cable is 40pin , can not support high transfer rate. These two cables is
pin compatible.
<Host & Device> will reference the cable type both IDE controller and IDE device. Also it is
default value.<Host> use the cable type used by IDE controller;<Device> use the cable type
used by IDE device.
4.2.3 Hardware Health Configuration
Page 42

24
H/W Health Condiguration
Enable/Disable the onboard hardware monitor controller. If this option is enabled, the
BIOS and OBS utility can get the system board‟s health information from hardware monitor
controller.
4.2.4 ACPI Configuration
Page 43

Suspend mode
25
(1) General ACPI Configuration
Page 44
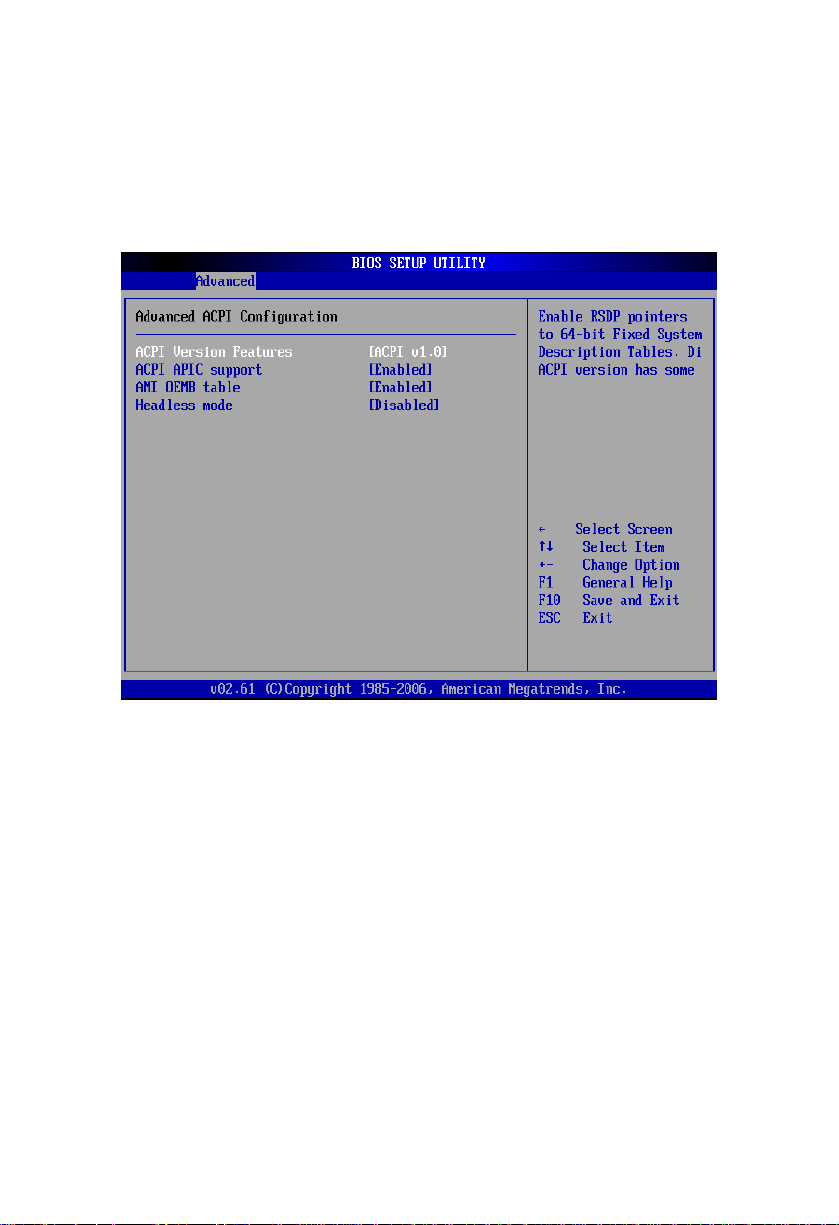
26
Enter into power-saving mode after selecting system into sleep. The model is not the same,
nor is the level of system function consumption. S1(pos):CPU stops working, other devices
remain normal power supply.
(2) Advanced ACPI Configuration
ACPI Version Features
Select ACPI version number, different versions support different characteristics, more
often downward compatible.
ACPI APIC support
Select whether to open ACPI (Advanced programmed Intermit controller) ,enlargeable
system can make use of IRQ resource
AMI OEMB table
Select whether to support OEMB table, option item: Disabled / Enabled.
Headless mode
Select whether to support Headless (not display facilities, not mouse, not keyboard) mode.
(3) Chipset ACPI Configuration
Page 45

4.2.5 MPS Configuration
27
Energy Lake Feature
Whether support energy Lake power-save technology .option item :Disabled / Enabled.
APIC ACPI SCI IRQ
Enabled/Disabled interior I/O
multiprocessor list.
APIC
( Advanced programmed Intermit
controller
) and
Page 46

4.2.6 PCI Express Configuration
28
MPS Revision
This is a multi-processor standard version option. This option allows the user to select
multi-processor standard version according to the operation system being used. And this option
can function only when there are two or more than two physical or logical processors.
Page 47

4.2.7 Smbios Configuration
29
Active State Power-Management
This option allows you to use/non-use PCI- express 1 and 2 to connect power supply,
setting item:[Enabled ],[Disabled].
Page 48

4.2.8 USB Configuration
30
Smbios Smi support
If support SMBIOS PnP Function 50-54h by SMI.
NO-Support]。
Optional:[Enabled:support
],[Disabled:
Page 49

31
Module Version (Read Only)
This option shows USB module version.
USB Devices Enabled (Read Only)
This option shows USB device which is connected with this board
USB Function
This option uses 4 of them supporting 4 USB devices.
USB2.0 Controller
This entry is used to disable/enable the USB 2.0 controller only. The BIOS itself may or
may not have high-speed USB support. If the BIOS has high speed USB support built in, the
support will automatically turn on when a high speed device is attached. The choices are
<Enabled> or <Disabled>.
USB Client Controller
The USB is used to set whether to open the client program controller, [Enabled] to open,
[Disabled] is off.
Page 50

32
SDIO Controller
The SDIO interface is used to set it to open, [Enabled] to open, [Disabled] is off.
Legacy USB Support
If need support USB device in DOS mode: such as USB Flash Disk, USB keyboard, then
select<Enabled> or<Auto>.If not :< disabled>.
USB 2.0 Controller Mode
This option for choose USB2.0 port mode, Available after “USB2.0 Controller” -- <Enable>:
<FullSpeed>: USB port 2.0 (480Mbps).
<HiSpeed>: USB port 1.1 (12Mbps).
BIOS EHCI Hand-off
<Enabled>: When enter OS, BIOS auto close.
<Disabled>:When enter OS, BIOS closed by OS.
Move the cursor to”USB Mass Storage Device Configuration”, and press <Enter> key to
appear the frame as below:
Page 51

33
Emulation Type
Emulation Type,setting for [Auto].
Page 52

34
4.3
PCI
Pn P
WARNING: Setting wrong values in below sections may cause system to malfunction:
Clear NVRAM
Set this value to force the BIOS to clear the Non-Volatile Random Access Memory
(NVRAM). The Optimal and Fail-Safe default setting is No.
Plug & Play O/S
This option is used to decide whether to select operation system of BIOS or Plug-and-play
function to configure the interrupt resources for the system peripheral devices. If this option
setting is YES, the operation system will automatically distribute the interrupt resources. If there
is no plug-and-play function in your operation system, or in order to prevent resetting interrupt,
please set this option as NO.
PCI Latency Timer
This option can be used to select the corresponding setup values to give full play to the
optimal performance of PCI.
Allocate IRQ to PCI VGA
Page 53

35
Set this value to allow or stop the system from giving the VGA adapter card an interrupt
address. The Optimal and Fail-Safe default setting is yes.
PCI IDE BusMaster
The default setup for this option is “Disabled”, that is, not to allow the main board to use
the Bus Master interface (also called “DMA/33 interface”). If the main board supports PCI IDE
Bus Master interface, then this option may be set as “Enabled”.
OffBoard PCI/ISA IDE Card
If the PCI/ISA IDE interface on the main board is damaged, you may add another function
card to the main board to use the PCI/ISA IDE interface on this card. Now, you will have to set
this option as Auto.
IRQ3-15
This option is used to designate whether the IRQ interrupt can be used or reserved.
DMA Channel 0-7
This option is used to designate whether the DMA channel is available or reserved.
Page 54

36
4.4 Boot
Move the cursor to Boot Settings Configuration, and press <Enter> key to appear the
frame as below:
Page 55

37
Quick Boot
Allows the BIOS to skip certain tests while booting. This will decrease the time needed to
boot the system.
Quiet Boot
If this option is set to Disabled, the BIOS display normal POST messages. If Enabled, an
OEM Logo is shown instead of POST messages.
AddOn ROM Display Mode
For choosing Option ROM display mode, Default:[Force BIOS].
Boot Up Num-Lock
Select the Power-on state for Num-lock.
PS/2 Mouse Support
This option is used to enable or disable the operation of PS/2 mouse port.
Wait For “F1” If Error
In the case of any errors found in the system self-detection, it is waiting for the user to
press F1 key. While the system is activating self-detection, if the issue found is not fatal
(unlikely to cause lockup or gross consequences), then the system will go on operation, but the
prompt information such as “Press „F1‟ to resume” or “Press „F1‟ to Set up” will be displayed.
Now, press F1 key to resume operation.
Hit “DEL” Message Display
Displays “Press DEL to run Setup” in POST
Interrupt 19 Capture
If BIOS start-up can be captured by special outside insert card.
<Enabled>: Yes, here BIOS will start-up by inserted card setting in its ROM,
<Disabled>: No, here BIOS start-up by the influence of inserted card.
Boot Device Priority
Press “Enter” will show sub-menu:
1st Boot Device
2nd Boot Device
Page 56

38
3rd Boot Device
System will detect device after this priority until find an available boot device then boot
from it.
(Boot device support Removable Drive or Hard Disk Drive)
Hard Disk Drives
Boot device set for HDD, if has multi- HDD, must set up priority. The Highest Priority HDD
will display in “Boot Device Priority”.
Removable Drives
Boot device set for Removable Drives, If has multi- Removable Drives, must set up priority.
The Highest Priority Removable Drives will display in “Boot Device Priority”.
CD/DVD Drives
Boot device set for CD/DVD Drives, If has multi- CD/DVD Drives, must set up priority. The
Highest Priority CD/DVD Drives will display in “Boot Device Priority”.
4.5 Security
Page 57

39
Supervisor Password
This item is used to note the user whether the supervisor password has been set or
not. The options are [Installed] and [Not Installed].
User Password
This item is used to note the user whether the user password has been set or not.
The options are [Installed] and [Not Installed].
Change Supervisor Password
This item is used to change the supervisor password. Select this item and press
Enter and load into the menu to change the supervisor password.
Page 58

40
Change User Password
This item is used to change the user password. Select this item and press Enter and
load into the menu to change the user password.
Clear User Password
This item is used to clear user password. Select this item and press Enter and load
into the menu to clear the user password.
Boot Sector Virus Protection
This item is used to operate the anti-virus function of BIOS. Select Enabled to
activate boot sector protection. In this state, BIOS warns when formatting of writing
command emerges.
eg. When write into the boot sector, the following information will be displayed. To
skip it, press N.
Boot Sector Write!
Possible VIRUS: Continue (Y/N)? _
When format hard disk through BIOS INT13, the following information will be
displayed.
Page 59

41
Format!!!
Possible VIRUS: Continue (Y/N)? _
Select Disabled to forbid the command.
4.6 Chipset
4.6.1 North Bridge Configuration
Move the cursor to NorthBridge Configuration and press <Enter>, and the
following interface will appear:
Page 60

42
Initate Graphic Adapter
This item is used to select preffered graphic. Options includes
1.PEG PCI Express Graphics, PCIE,
2. IGD Integrated Graphics Device,
3. PCI.
Internal Graphics Mode Select
This part is used to set graphic apertures. The small pore us one part of the PCI
address range used for graphic memory address space. The main cycle within the
pore range needs no conversion to AGP. You may select 4M, 8M, 16M, 32M, 64M or
Page 61

43
128M. The default value is 64M.
Boot Display Device
This item allows the user to decide that display mode. The options includ
[Auto(default)]、[LCD]、CRT] and [Both(CRT+LVDS)].
TV Standard
TV output format options settings.
4.6.2 South Bridge Configuration
Move the cursor to SouthBridge Configuration and press <Enter> ; the following
Page 62

44
interface will emerge.
AC’97 Controller Codec
Select <Disabled> if you do not want to operate AC-97 audio. The choices: <
Auto> <Disabled>.
SLP_S4# Assertion Width
This item allows user to set the SLP_S4# Assertion Width. The choices:<4---5
Sec(default)>,<3 to 4 Sec>,<2 to 3 Sec>,<1 to 2Sec>。
PCIE Ports Configuration
PCIE Port1-2
Page 63

45
Set whether use PCI-E 1-2 port. The choices :< Auto
(default)>,<Disabled>,<Enabled>.
4.7 Exit
Save Changes and Exit
Press <Enter> two times and save BIOS change and reboot system.
Discard Changes and Exit
Press <Enter> two times to quit BIOS change and reboot system.
Discard Changes
Press <Enter> two times and stay at BIOS setting interface to continue BIOS
Page 64

46
setting.
Load Optimal Defaults
Selecting this item before BIOS setting is preferable for this could ensure
system to effectively operate. User can revise the items according to requirements.
Load Failsafe Defaults
This item is effective when malfunction happens
Page 65

Appendix
Page 66

45
Appendix
Appendix 1: Driver Installation
Please install the driver as the following steps:
Plug programmed disk into CD-ROM and install the driver automatically or
manually.
The manually installation instructions are given as below:
1) Multiple manual installation modes are available in Device Manager.
2) Click right mouse button to operate “my computer ", select "management", and
enter into “Device Manager"
3) Right click "display controller” in the menu of graphic card, select “Properties " and
click “Driver", then select “update driver".
4) Select “Show the list of all drivers which are designated locations so the choices
can be made from it ", then select "next."
5) Select the location of display driver, click “ok"
6) Restart on implementing the installation.
Proceed with the installation of other drivers after restarting the system, till all
Page 67

46
installations are implemented. The user can check the device in Device Manager
Page 68

47
Appendix 2: Embed SATA HDD Drivers into Windows XP Installation Disc
1. Software Preparation
(1). nLite:nLite can integrate Service Pack and Windows Security Update for
customized Windows installation files. Besides, it can integrate normal application
software(DirectX、.Net Framework、software integration package、desktop themes
and driver etc.), support Windows unattended installation and create Bootable ISO
CD image etc. Download link:http://dl.21tx.com/2005/11/07/10756.html
2. SATA driver:It could be downloaded it from the Hard Driver manufacture’s official
website or here
ftp://ftpdrivers@ftp.asm.cz/XtendLan/TC-
961,962,963,964/Drivers/3132_x86_1.0.22.0xl.zip
3. WindowsXP System installation disk.
2. Embeding Procedure
1. Uppack SATA driver file 3132_x86_1.0.22.0_logo.zip to “d:\SATADriver” directory.
Remark: User can unpack multiple different SATA HDD drivers to d:\SATADriver
directory to enable the installation disk to be suitable for different SATA HDD.
2. Insert Windows XP installation disk into CD-ROM and creat folder “XpSp3” at D
Page 69

48
disk. Bootup nLite driver,select “English” langaue and enter into next step. Click
“Browse” when the “ Please select the WINDOWS installation files location”
interface emerges,and select the letter of CD in. On the tips of the chart 1 emerges,
choose the folder“d:\ XpSp3” and enter into system copy phase; then enter into the
next stage after the complementation of copy.
3. Don’t set “Default” value and directly enter into the “ Task selection” phase, then
select” Driver” and “Bootable ISO image” and click “Forward” to enter into the next
step.
4. Click”Insert” button in the “Integrated the driver to install the file” interface. Then
select”single driver”in the pop-up list. And then select and unfold file “SI3132.inf”
from d:\SATADriver”,At this point will appear” Driver integration Optionsl” interface,
and select” Text- mode driver” key,then select “SiI 3132 controller on Windows
XP/Server 2003” in the list. Click” ok”
5. Click “Forward” and select “Yes” when the tip “application to change it?” emerges
and then enter into the ISO image process.
6.Insert a blank CD burner, select” Direct Burn” in the “bootable ISO image” interface
Page 70

49
of the “Mode” drop down list.Click” Burn” button to start burning. In order to ensure
recording quality, and recommend you select” Create inagamge” and then make a
boot disk under the image.
7. After finish CD-ROM burning, it can be used as a system installation disk, and has
SATA HDD drivers.
Page 71

50
Appendix 3: Watchdog Programing Instruction
Watchdog Reference Code(ASM)
--------------------------------------------------------------------------------------------------------------
Under the command of DEBUG, the port which could be controlled by written data
can control the watchdog.
Port instruction:
2EH: Address Port
2FH: Data Port
Example:Set Watchdog Timer for 30 Seconds;
Set DEBUG in DOS
C:\>debug
-o 2e 87
-o 2e 87 ; Unlock
-o 2e 2d
-o 2f 20 ; bit0=0, set pin as watchdog func
Page 72

51
-o 2e 07
-o 2f 08 ; Choose logical devices
-o 2e 30
-o 2f 01 ; Activate logical devices
-o 2e f5
-o 2f 00 ; Set timer units as second / (set as min: o 2f 08)
-o 2e f6
-o 2f 30 ; Set the Timer Count 30h=48sec
-o 2e aa ; locked register
-q
C:\>
-----------------------------------------------------------------
The system will automatically restart after 48sec on inputting the last line.
===========================================================
watchdog reference code(c++ language):
----------------------------------------------------------------------------------------------------
Page 73

52
outputb (0x2e, 0x87)
outputb (0x2e, 0x87) // Open SUPER IO register
outputb (0x2e, 0x2B)
outputb (0x2f, 0xE0) //bit4=0 ,set pin as watchdog func
outputb (0x2E, 0x07)
outputb (0x2F, 0x08) //select logical device
outputb (0x2e, 0x30)
outputb (0x2f, 0x01) //active the device
outputb (0x2e, 0xF5)
outputb (0x2f, 0x00) // Set timer units as second (/ Set timer units as minute: outputb
(0x2f, 0x08))
outputb (0x2e, 0xF6)
outputb (0x2f, 0xIE) // Set Timer Count to 30 sec
outputb (0x2E, 0xAA) // locked register
//------- code end ---------------------------------
Page 74

53
Appendix 4: Glossary
ACPI
ACPI (Advanced Configuration and Power Management Interface) is a kind of
specification allowing the OS to control power of computer and devices.
ATX
AT extended, a motherboard layout according with modern standard replaced
BabyAT. It changes disposal of many components, and do some new high efficiency
design, so it is widely used now.
ATX is a modern motherboard layout which has replaced the Baby AT structure. It
has improved the arrangement of components and has been widely applied.
BIOS
BIO (Basic Input/Output System) is software installed in a ROM chip for input/output
code control. It tests hardware state and starts OS in the process of system booting.
BUS
BUS is a set of hardware lines for data exchange among devices in computer
system. BUS here means local lines of CPU and host memory.
Page 75

54
Chipset
Chipset is the integrated chips for executing function. The computer chipset of
system level is constructed with Southbridge & Northbridge; it’s the core of
motherboard’s structure and main functions.
CMOS
CMOS (Complementary Metal-Oxide Semiconductor) has been widely used for its
high speed and low power consumption. The computer COMS is space for data
saving, ie date, time, system information and parameter setting.COM
COM (Computer-Output Microfilm) is the universal serial communication interface
which connects devices with the DB 9 standard
DRAM
DRAM (Dynamic Random Access Memory) is a universal memory mode storing 1 bit
with 1 transistor and 1 capacitance. With the development of the technology, more
and more mode of DRAM emerges. Nowadays, the SDRAM, DDR SDRAM and
RDRAM are the common modes.
Page 76

55
IDE:
It is a driver specification for integrated device electronics,for connecting HDD /
CD-ROM device.
IRDA:
IRDA is the abbreviation of Infrared Data Association. It here means infrared
transmit interface connecting infrared transmit devices. This sort of device transmits
data by infrared light-wave without connecting any cables .It have been developed a
standard now.
LAN
LAN is a type of network interface. Usually, the local area network is buildup by
sever, workstation, some communications links, Network grouped by correlative
computers in a small area, generally in a company or a building. Local area network
is buildup by sever, workstation, some communications links, as a rule. Terminals
can access data and devices anywhere through cables, so, many users can share
costly device and resource.
Page 77

56
LED
POST is the abbreviation of power-on self-check. During the booting phase, the
BIOS initializes and identifies system devices such as the RAM, video display card,
keyboard and mouse, hard disk, CD/DVD drive and other hardware
LPT
Line print terminal.The denomination reserved by DOS, is used to denote universal
parallel interface, and connect printer in a general way.
POST
POST is the abbreviation of power-on self-check. During the booting phase, the
BIOS initializes and identifies system devices such as the RAM, video display card,
keyboard and mouse, hard disk, CD/DVD drive and other hardware
PS/2
The PS/2 is a keyboard & mouse connective interface specification developed by
IBM. The interface fitting the PS/2 is a DIN interface with only 6PIN. Except for
keyboard & mouse, it can connect other devices like modem.
Page 78

USB
USB is the abbreviation of Universal Serial Bus. It’s a type of a hardware
interface adapting to low speed external devices such as keyboard,
mouse etc. A PC can connect up to 127 USB devices with a transmit
bandwidth of 12Mbit/s; The USB supports multi-data stream and hot
swap which allows user to plug USB devices while system is running. At
the same time, the system can automatically detect the plugged USB
devices and drive it to operate.
 Loading...