

Page 1

Trail Camera
HCA-315M12
USER‟S
M
ANUAL
Page 2

1
TABLE OF
CONTENTS
General Information .............................................................2
1.1 Introduction .............................................................2
1.2 Application.............................................................. .3
1.3 Illustration................................................................3
Quick
Start
............................................................................5
2.1 Load
Batteries
..........................................................5
2.2 Insert SD Card .........................................................5
2.3 Enter Test Mode.......................................................5
2.4 Shortcut Key ……………………………………….8
Advanced Settings .................................................................8
3.1 Parameter Settings ...................................................8
3.2 Camera Mode.......................................................... .11
Page 3

2
GENERAL INFORMATION
1.1 Introduction
The HCA-315M12 trail camera (also called game camera/trail
camera) is a scouting device. It can be triggered by sudden
change of ambient temperature caused by moving game in a
region of interest, which is detected by a highly sensitive Passive
Infra-Red (PIR) sensor, and then take pictures or video clips
automatically.
The Feature:
*
5/8/12 Mega Pixels CMOS sensor.
*
Sharp and bright color pictures in daytime and clear
black/white pictures at night
*
Ultra low standby power consumption .Extremely long
in- field life(in standby mode ,up to 1 months with 4 x
AA batteries and 2 Months with 8 x AA batteries)
*
Unique side Prep Sensor design provides wider
sensing angle and enhances camera‟s response speed
*
Perform in the most extreme temperatures from -22℉
to 158℉
*
Compact size. Well designed to deploy covertly
*
Impressively quick trigger time (1 second)
*
Backpack-looking tree grabber makes mounting and
aiming a snap
*
Date ,time can be stamped in the pictures
*
Lockable and password protected
Page 4

3
1.2 A
pp
lication
. Trail camera for hunting
. Animal or event observations
. Motion-Triggered security camera, for home, office and
community
. All other indoor/outdoor surveillance where invasion evidence
needed
1.3 Illustration
Page 5

4
The camera provides the following connections for external
devices: USB port, SD card slot, TV out jack, and external DC
power in jack .The 3-way Power/Mode Switch is used to select the
main operation modes : OFF , ON and TEST.
To supply power, it is recommended to use four new
high-performance alkaline AA batteries or low self-discharge
Ni-MH chargeable AA batteries. To achieve longer in- field time,
install the additional battery box which contains four more AA
batteries.
Page 6

5
Quick Start
2.1 Load Batter
ies
Install 4 AA batteries or 8 AA batteries.
2.2
Insert
SD Card
The camera comes with 32M internal memory.
Before inserting the SD card into the card slot, please make sure
the write-protect switch on the side of the SD card is “off”(NOT in
the “Lock ” position).The supported memory capacity is up to
32GB . If you use a card capable of above 32GB, make sure you
test it before putting the camera in use.
CAUTION: ALWAYS SWITCH THE CAMERA TO OFF MODE
BEFORE YOU INSTALL OR REMOVE THE BATTERIES OR
THE SD CARD.
Function Switch
There are three positions for the switch: OFF, ON and TEST. They
each correspond to three different modes of the camera. When
batteries need to be changed or when the device is not in used, it
should be at the OFF mode.
2.3
Enter
Test
Mod
e
Moving the switch to the TEST position would set camera to the
preview testing mode. When the device is in this mode, you can
manually take pictures, videotape, view existing photos and videos,
and adjust the parameters just like using an ordinary camera.
Page 7

6
There are three scenarios in the testing mode, and they are: 1) the
preview mode, where you can see the scenes directly in front of
the camera lens from the TFT LCD screen or the TV, 2) the setting
mode, where the menu is shown, and 3) the playback mode, where
you can view existing photos and videos that are stored in SD card
from the TFT LCD screen or the TV. The camera automatically
enters into the preview mode when it is first set in the preview
testing mode.
Switch to the TEST position to enter the TEST mode. In this mod
you can take pictures or video clips like a regular digital camera,
or enter the Menu to set up parameters. On the keypad there are
four “Shortcut ” function keys working as below :
Press the key to manually trigger the shutter.
A photo or video (depending on the camera setting) will be taken
and saved to the SD card. If the display shows “CARD
PROTECTED” when you press the SHOT key , switch the power
OFF , remove the SD card and slide its write-protect switch to off
Press the key to review/ playback photos / videos on the
LCD screen, or a connected TV monitor. Use and
key to
navigate.
There is another key, MENU, on the keypad that allows you to
program the camera to work the way you want. Please make
reference to 3.1 Parameter Settings in the Advanced Operation
section.
Page 8

7
2.4
Enter
ON Mode (Automatic
Infrared
Shooting Mode)
Moving the switch to the ON position would set the device in the
Automatic Infrared Shooting Mode. There is a waiting time of
about 30 seconds before the system adjusts to this mode, and
during this period the red LED indicator light will keep flashing.
After that the light extinguishes and the camera can start taking
pictures by infrared inducement. Once the device is in this mode,
there would be no need for any manual operations, and the camera
will function automatically by taking pictures or videotaping the
subjects such as animals, persons that enters a certain range.
The time interval, the record time can be set before the camera is
put to work. The camera will automatically turn on when subjects
(animals, persons) enters the area covered by the
“
PIR” on the
left and right sides. Then it will take pictures or start videotaping
once the subjects are in the range of the
“
PIR”o. If the subjects
enter the range of the
“
PIR”directly,
the camera will be in
operation immediately. If the subjects leave the range of the
“
PIR”,
the camera would automatically shut down after a while.
PIR the advantages: General infrared camera to save power,
usually only PIR part is working, photographic part is closed,
when PIR detect the animals, it begin opens photographic parts
supply, Then from the start photographic parts power to start take
photo needs certain time, Our camera need 1 second. When an
animal is fast across, will pass over the
camera„s
shoot range,
which will have to take a photograph of no animal.
Our preparation PIR can solve the problem. Our camera have
Page 9

8
prepared PIR, its scope of induction is
100-120° Angle, a very
wide range of induction, far outweigh
50° Angle of the camera
lens, when the animals into the PIR is detecting range,
photographic parts began power on and ready to shoot after 1
second, if animals go in
“
PIR” range (less the camera lens
Angle), will soon, this time is almost negligible, rapidly across the
animal able to photograph.
2.5
shortcut k
ey
SHOT : Under the TEST mode, press SHOT can take photo or
video
MENU : Under the TEST mode, Press MENU, can set menu
OK: Under the TEST mode, Press OK can reply
Advanced
Operations
Compared with ordinary cameras, our camera has more
professional functions. The user can change the settings according
to specific needs under the preview test mode.
3.1
Parameter Settin
gs
Page 10

9
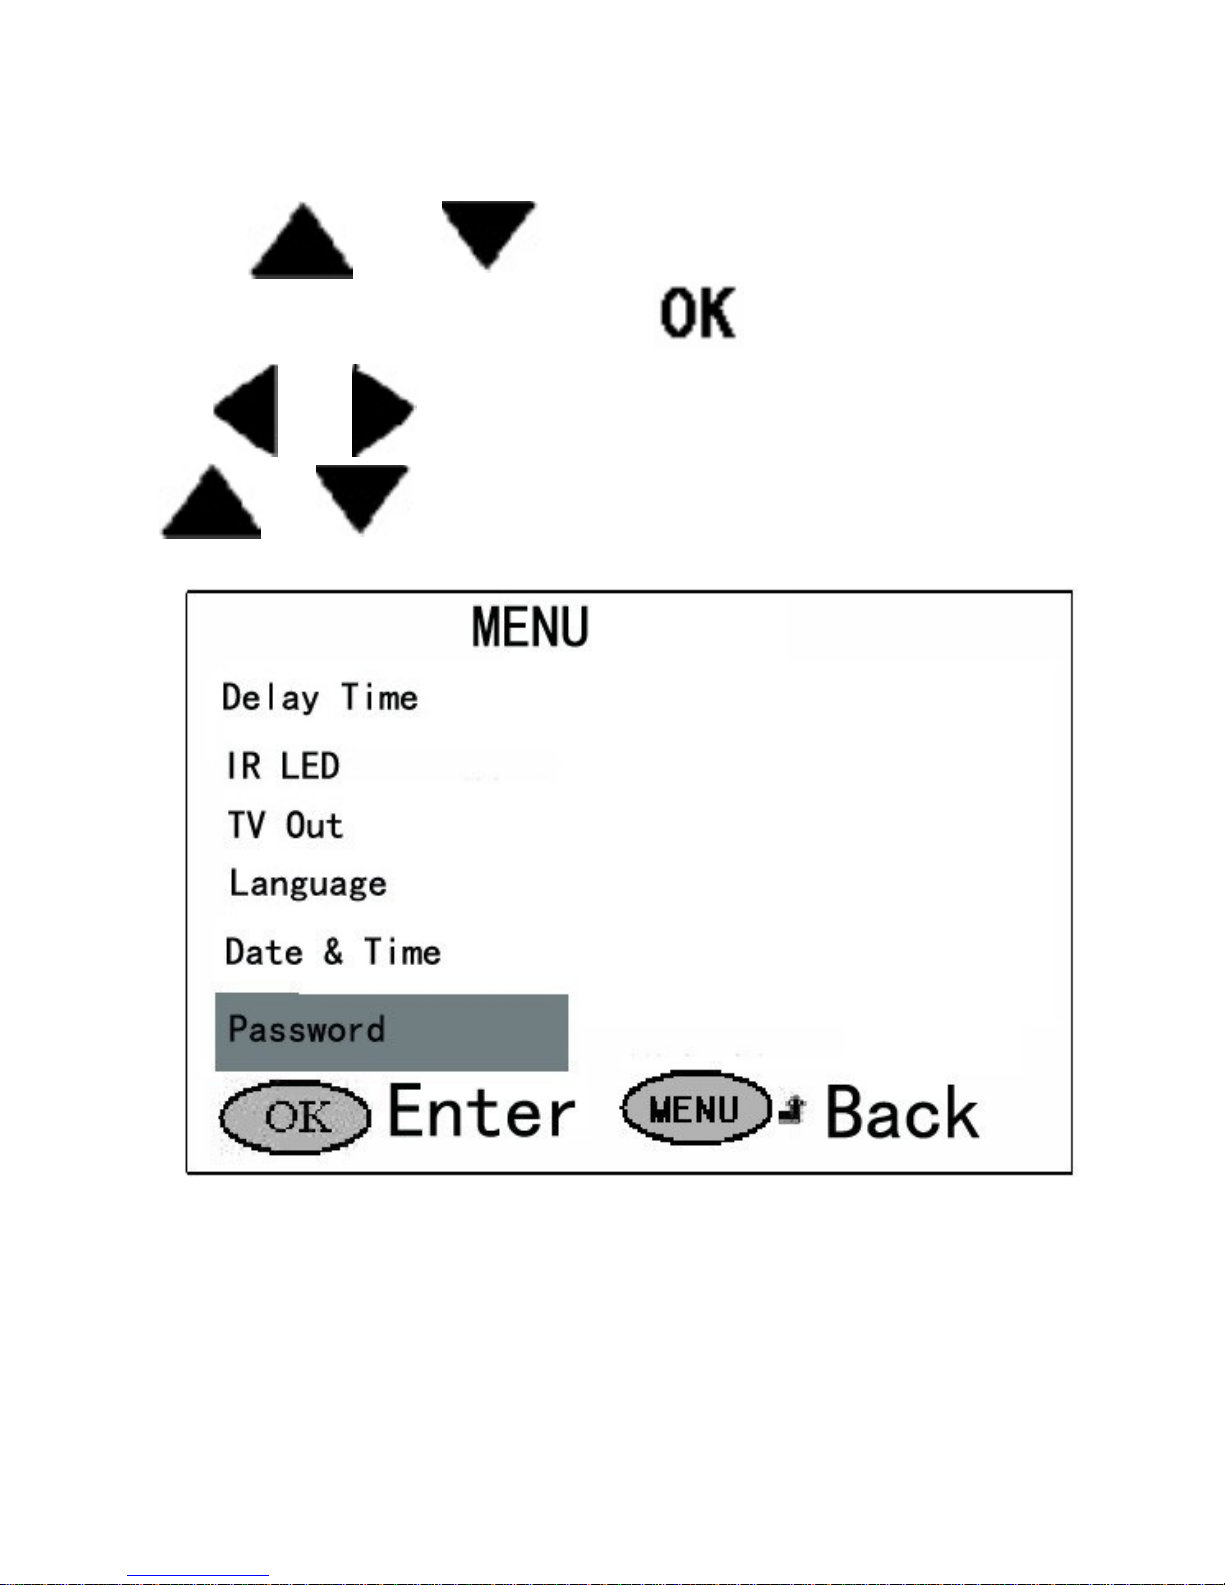
The 7 keys from left to right are: “MENU” , “LEFT”, “UP”,
“DOWN”, “Right”, “OK” and “SHOT”. The key “SHOT”
symbolize “SHOT”, and they are shortcut keys. when the key
“
SHOT” is pressed, a photo or video is take, and “OK” is
pressed, photos and videos can be reviewed.
Parameter
Settings(Bold=
default)
Description
Mode
Camera, video
Select whether still photos
or video clips are taken.
Format
Enter
All files will be deleted
after formatting the SD
card. Highly recommend
you format the SD card if
it has been used previously
in other devices. Caution:
make sure wanted files on
the SD card have been
backed up first!
Photo
size(affects
still photos
only)
5MP,8MP,12MP
Select desired resolutions
for still photos from 5 to
12 megapixels. Higher
resolution produces better
quality photos, but creates
larger files that take more
of the SD card capacity.
Besides, larger files require
longer time to write to the
SD card , which will
slightly slow the shutter
Page 11

10
speed.5MP is
recommended.
Video
Size(affects
video clips
only)
640*480, 320*240
Select video resolution
(Pixels per frame). Higher
resolution produces better
quality videos, but creates
larger files that take more
of the SD card
capacity.640*480 is VGA
mode in standard 4:3
format.
Video Length
(affects video
clips only)
Avi 15s , optional
from 15s to 120S
Videos are in AVI format
that can be played back on
most video players
Delay time
1s, optional from
1s to 24h
Select the shortest length
of time that the camera will
wait until it responds to
any subsequent triggers
from the PIR sensor after a
game is first detected.
During the selected
interval, the camera will
not take pictures/videos.
This prevents the SD card
from filling up with too
many redundant images.
Password Set
Off , On
Set up a password to
protect your camera from
unauthorized users.
Page 12
11
3.2
Camera Mode
There are two modes for the camera, the “Camera” mode, and the
“Video” mode. Just choose “Camera” or “Video” button.
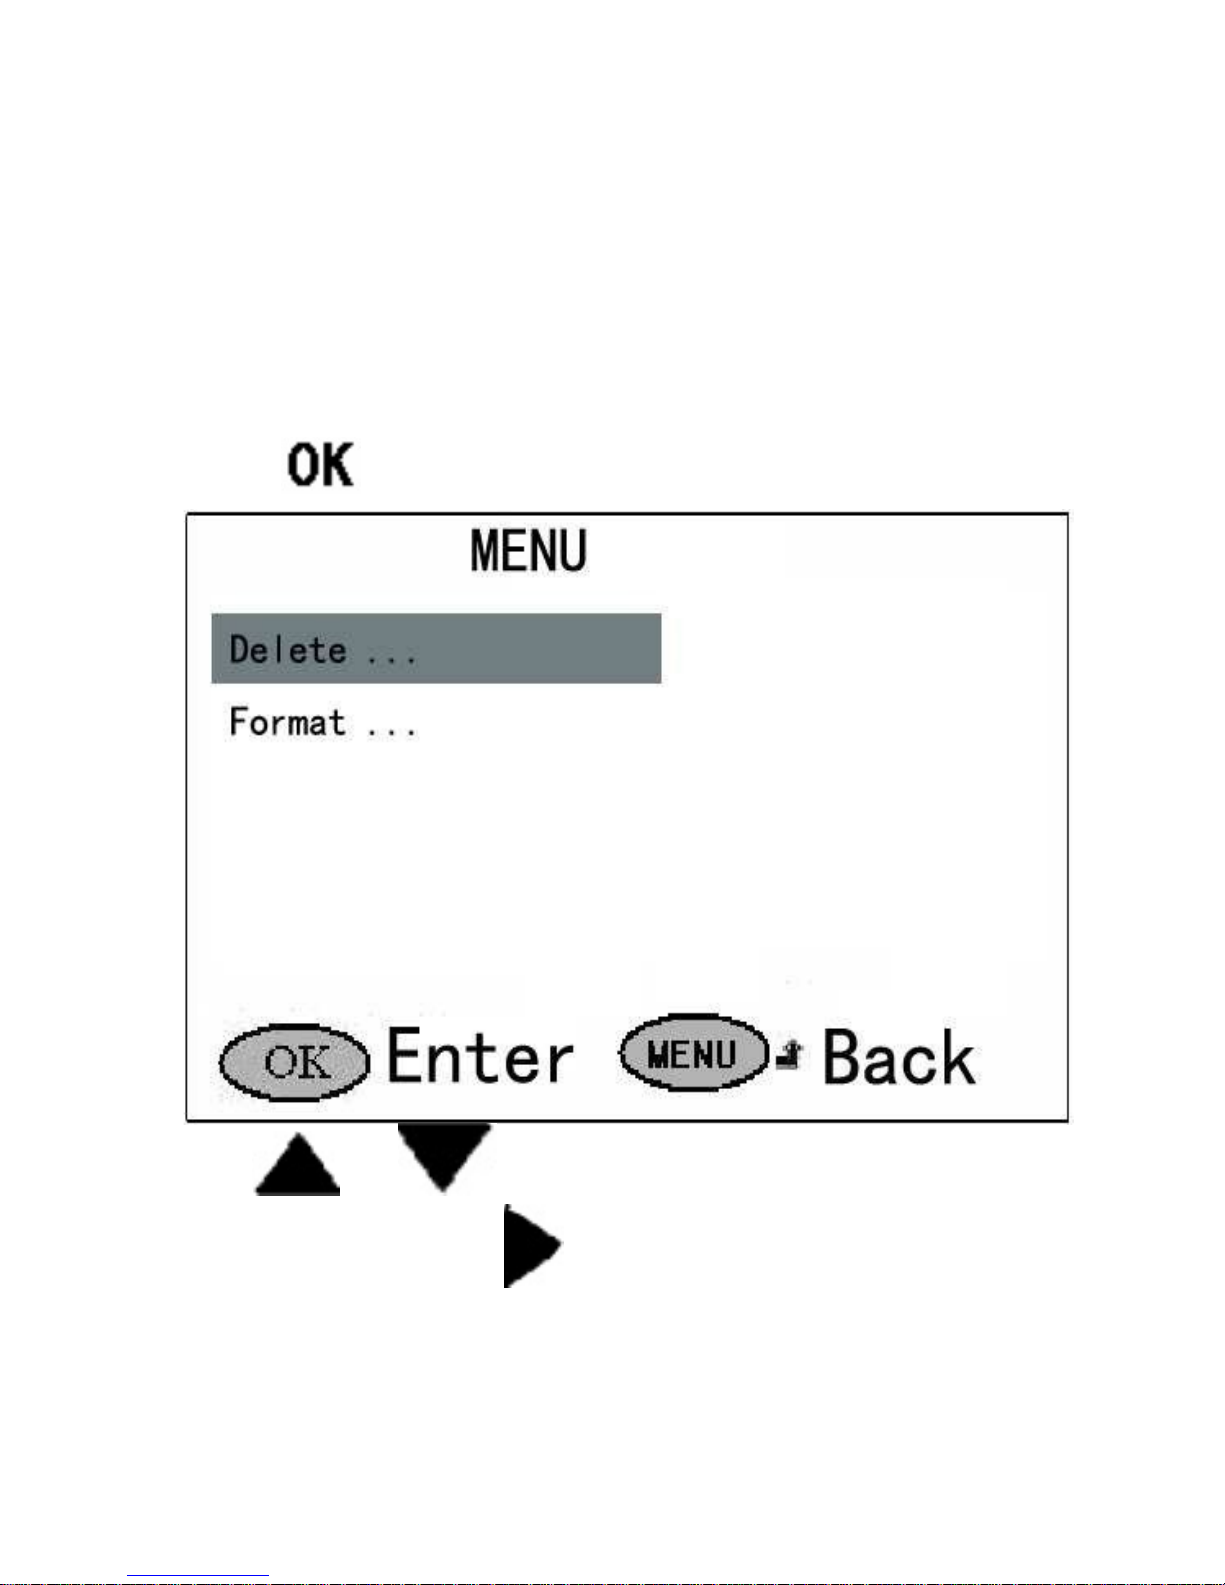
3.2.1 Format SD Card
Press
“
”
to enter the screen below
Press and to shift between
“
Delete ”
and
“
Format
”
, press to enter “Format”, then Press
Page 13
12
and to shift between
“
Yes” and
“
NO” press
to confirm and exit the
screeno
Please note that if you choose “Yes” and
press
“OK”, all
information
in the SD
card
will be deleted.
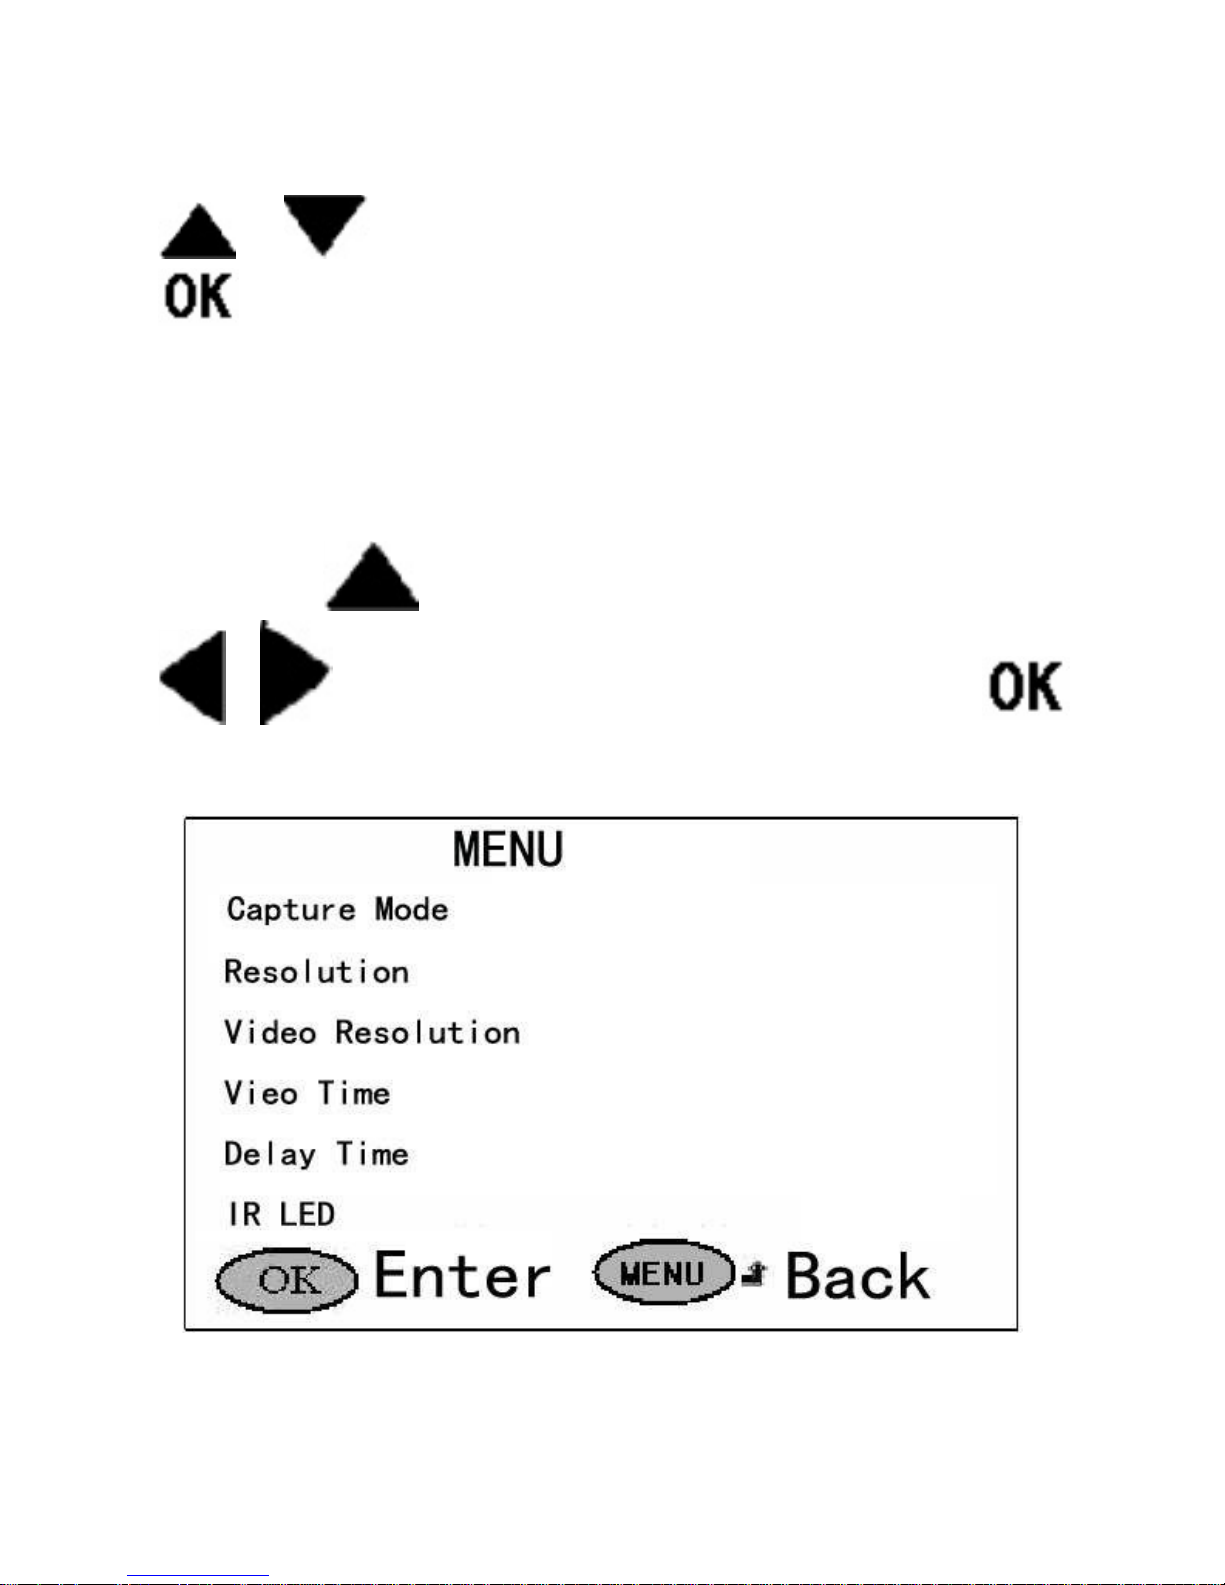
3.2.2 Menu Functions
You can access the menu of functions by pressing the “MENU”
key. Press
,
to
move through each option, and press
,
to change the settings. When done, press the
button to confirm the changes made to the settings. and press
“MENU” to exit the menu
Page 14

13
3.2.3 Capture Mode
Under the TEST mode, you need to set the number of pictures you
want the camera to take automatically. When this parameter is set
at1~9, it means one to nine photos will be taken every time the
camera is triggered. Press and to find
“
Capture
Mode.“,
and us to view
“Single“,
“3
Pictures”, “6
Pictures”, “9 Pictures” . press
“ ”
to confirm and exit the
screeno
Page 15

14
3.2.4 Resolution
Under the TEST mode, Press ,Press and
to find “Resolution” in the menu, and then us to shift
between “4000*3000 12M”,”3264*2448
8M” and “2592*1944
5M”.
,press and to choose . Then press “OK” to
confirm and exit.
Page 16

15
3.2.5 Video Resolution
Under the TEST mode, Press ,Press and to
find “Video Resolution” in the menu, and then us to shift
between
“
6400*480”,”320*240
”. ,press and to
choose . Then press
“
OK” to confir and exit.
Page 17

16
Page 18

17
3.2.6 Video Time
Under the TEST mode, Press
,Press
and
to find
“
video
time
”
in the menu, and then us to
shift
between “15 sec”, “
30 sec” , “60
sec”, “
120
sec”
,press
and to choose . Then press
“
OK” to confirm
and
exit the screen.
Page 19

18
3.2.7 Delay Time
This time parameter is relevant when the camera takes pictures or
shoots videos automatically under the ON Mode. The delay is
defined as the length of time the camera will wait to restart PIR
and function again after a picture is taken or a video clip is
recorded. The system can only sense the subjects (animals, or
persons) when the PIR is turned on.
NOTE: Under the ON Mode, LED will first flash for about 10
seconds, and then start PIR sensing. At that moment the camera
will be triggered and takes pictures if people or animals come into
the induction area.
The interval parameter has from 0 to 59 seconds , 1 to 60
minute , and 1 to 24 hours
Page 20

19
Under the TEST mode, Press ,Press and
to
find “
Delay
Time
”
in the menu, To change this interval value,
press and to to choose a value between
“
01S~
59
”“
01min~
60min”and “1H~24H” .
Press “OK” to confirm
and exit the screen
Page 21

20
3.2.8 IR LED
Under the TEST mode, Press ,Press and
to find “IR
LED
”
in the menu, and then us to shift
between
“
Day
”
,
“
Night
”
, and
“
24H
”
,press
and to choose . Then press
“
OK” to confir and
exit
the screen
.
Page 22

21
Page 23
22
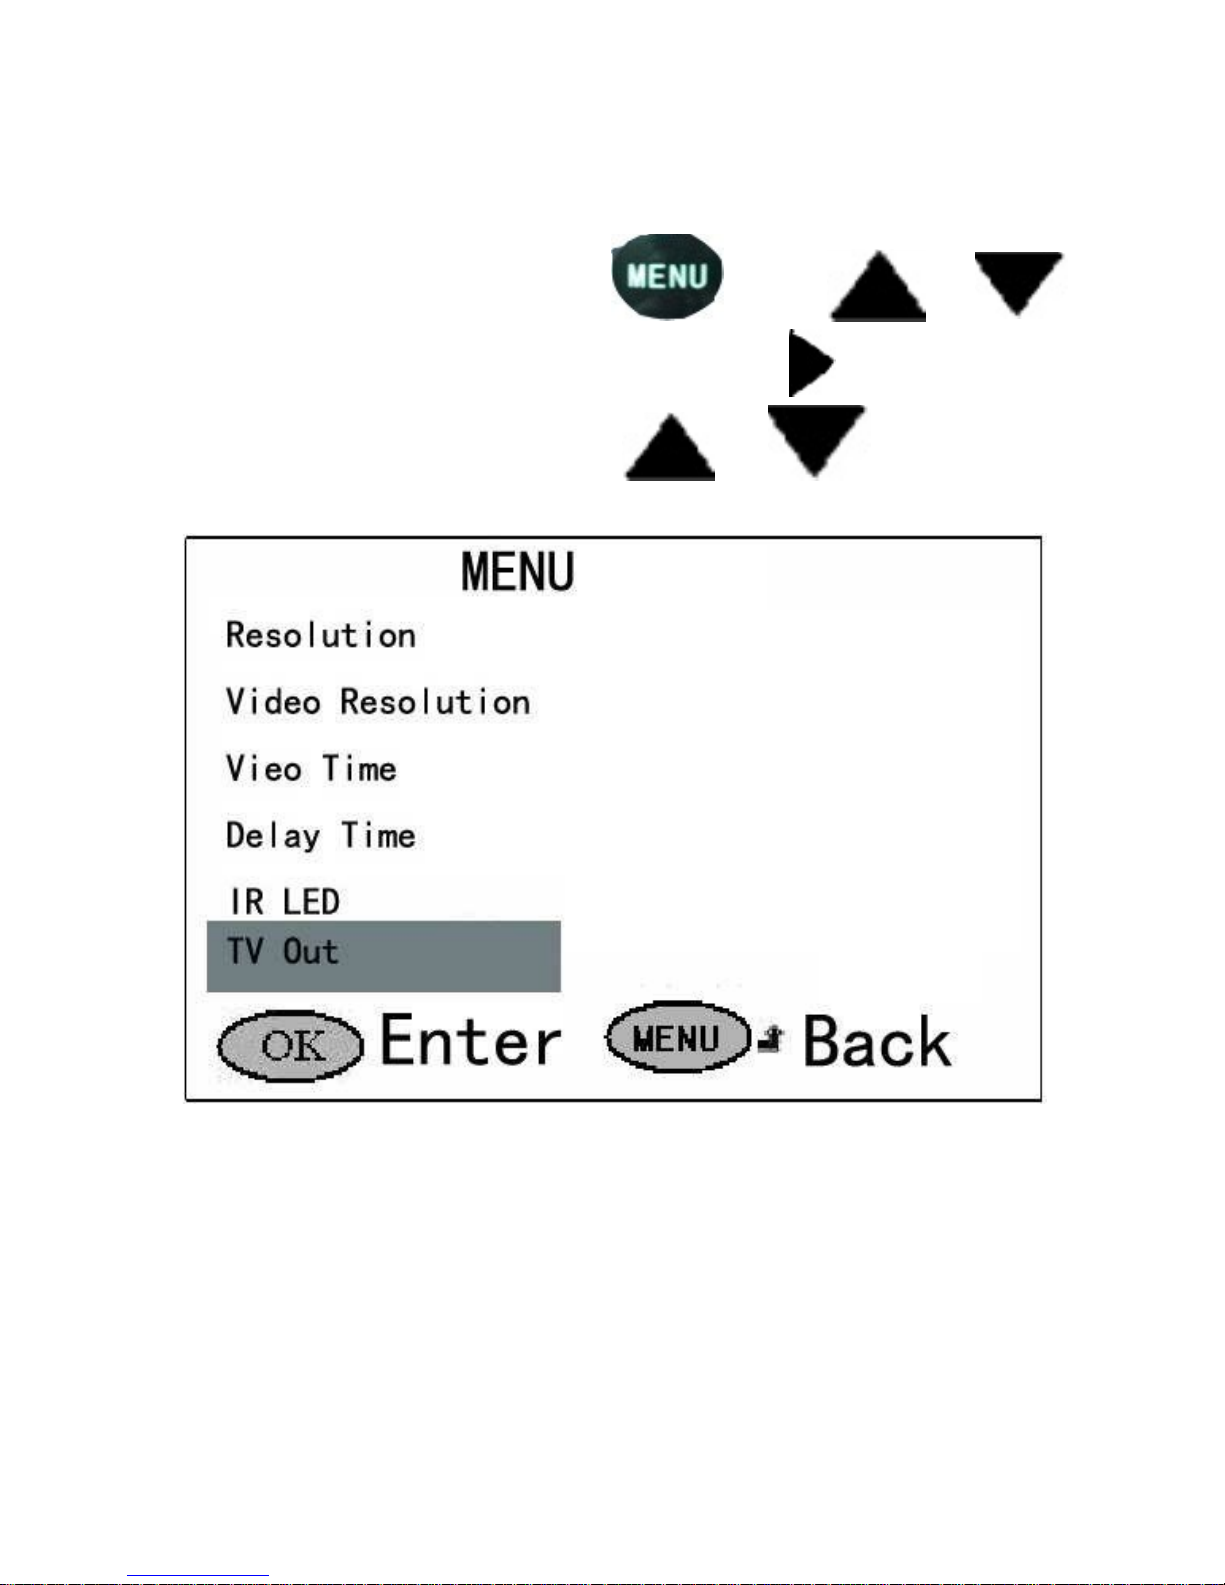
3.2.9 TV Out
Under the TEST mode, Press ,Press and
to
find“TV Out”in
the menu, and then us to shift between
“
NTSC”and “
PAL” ,press and to choose .
Then press
“
OK” to confirm and exit the screen .
Page 24

23
3.2.10 Language
Under the TEST mode, Press ,Press and
to find
“
Language” in the menu, and then us to shift
between
“
English”,
“French”,
“Deutsch”,“Svenska”
and
“
Suomen”press
and to choose . Then
press“OK
”
to confirm and exit the screen .
Page 25

24
Page 26
25
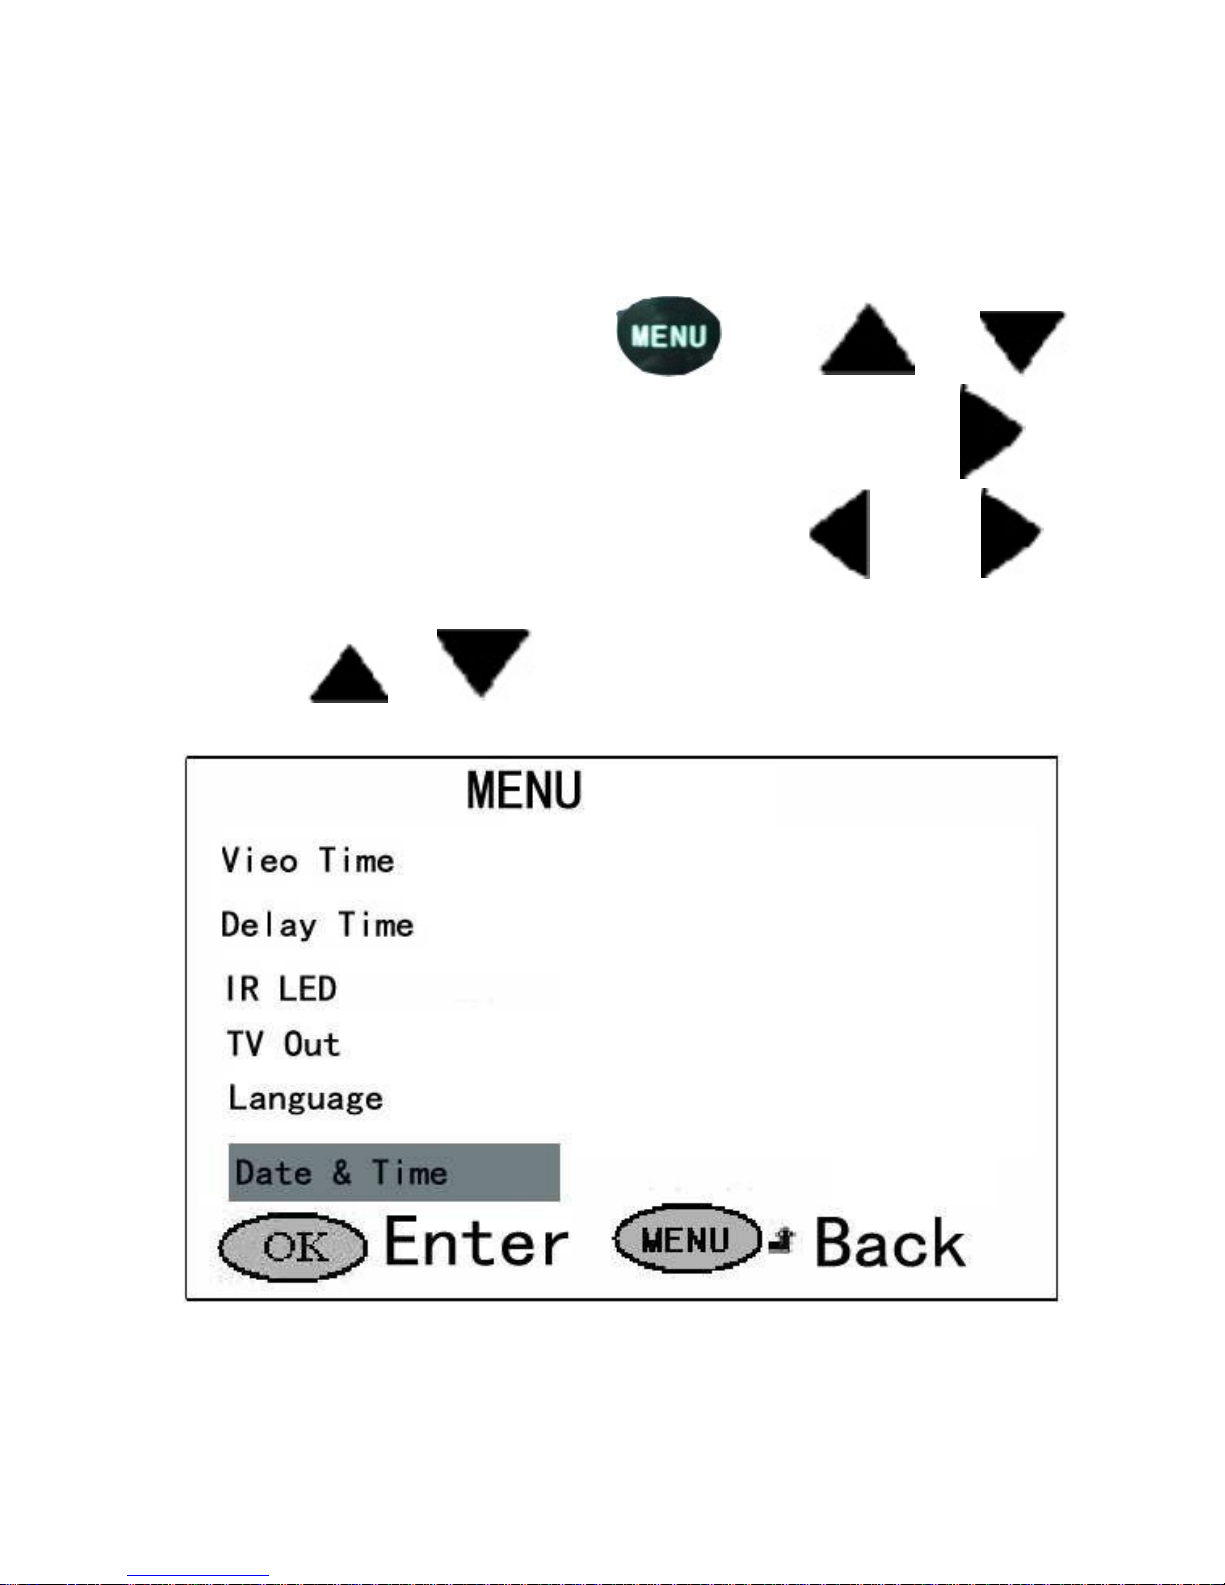
3.2.11 Date & Time
Under the TEST mode, Press ,Press and
to find “Date &Time” in the menu, and then us to
access the
“
Date &Time” submenu. Use and to
switch among “month”, “
day”,“year”, “
hour”, “
minute”.
Then use and to set the date and time, then press
“
OK”
to confirm and exit the screen.
Page 27

26
3.2.12 Password
If the system password is set, the device can be protected from
non-users, since it cannot enter the Test mode without the
password and thus cannot be used.
Under the TEST mode, Press ,Press and
to find “Password” in the menu, and then us to access
the
“
Password” submenu.
Page 28
27
press and to choose either “On” or
“
Off”.
Once function is turned on, press
“ ”
and set the password.
Use
and
to alternate between each data slot, and use
and to
change the
number. Select
“
OK” to
coirm the changes, and exit the screen.
Page 29

28
Page 30

29
3.2.13 Replay
Under the TEST mode, pressing “OK” will display the last photos or
videos. Use and to playback the photos or video
clips. If it is a video clip, you can press to play, then
press to stop playing.
When in 12MP camera, Photos can 16 times zoom playback, press
zoom in and press zoom out, press view
right photo and press view left photo;
In this playback mode, pressing
“
MENU” will enter into the
deletion menu, in which you have the options to delete the current
picture/video or to delete all.
Select “OK” and then “Yes” to confirm deletes the file, or select
“No” to keep it.
 Loading...