

Page 1
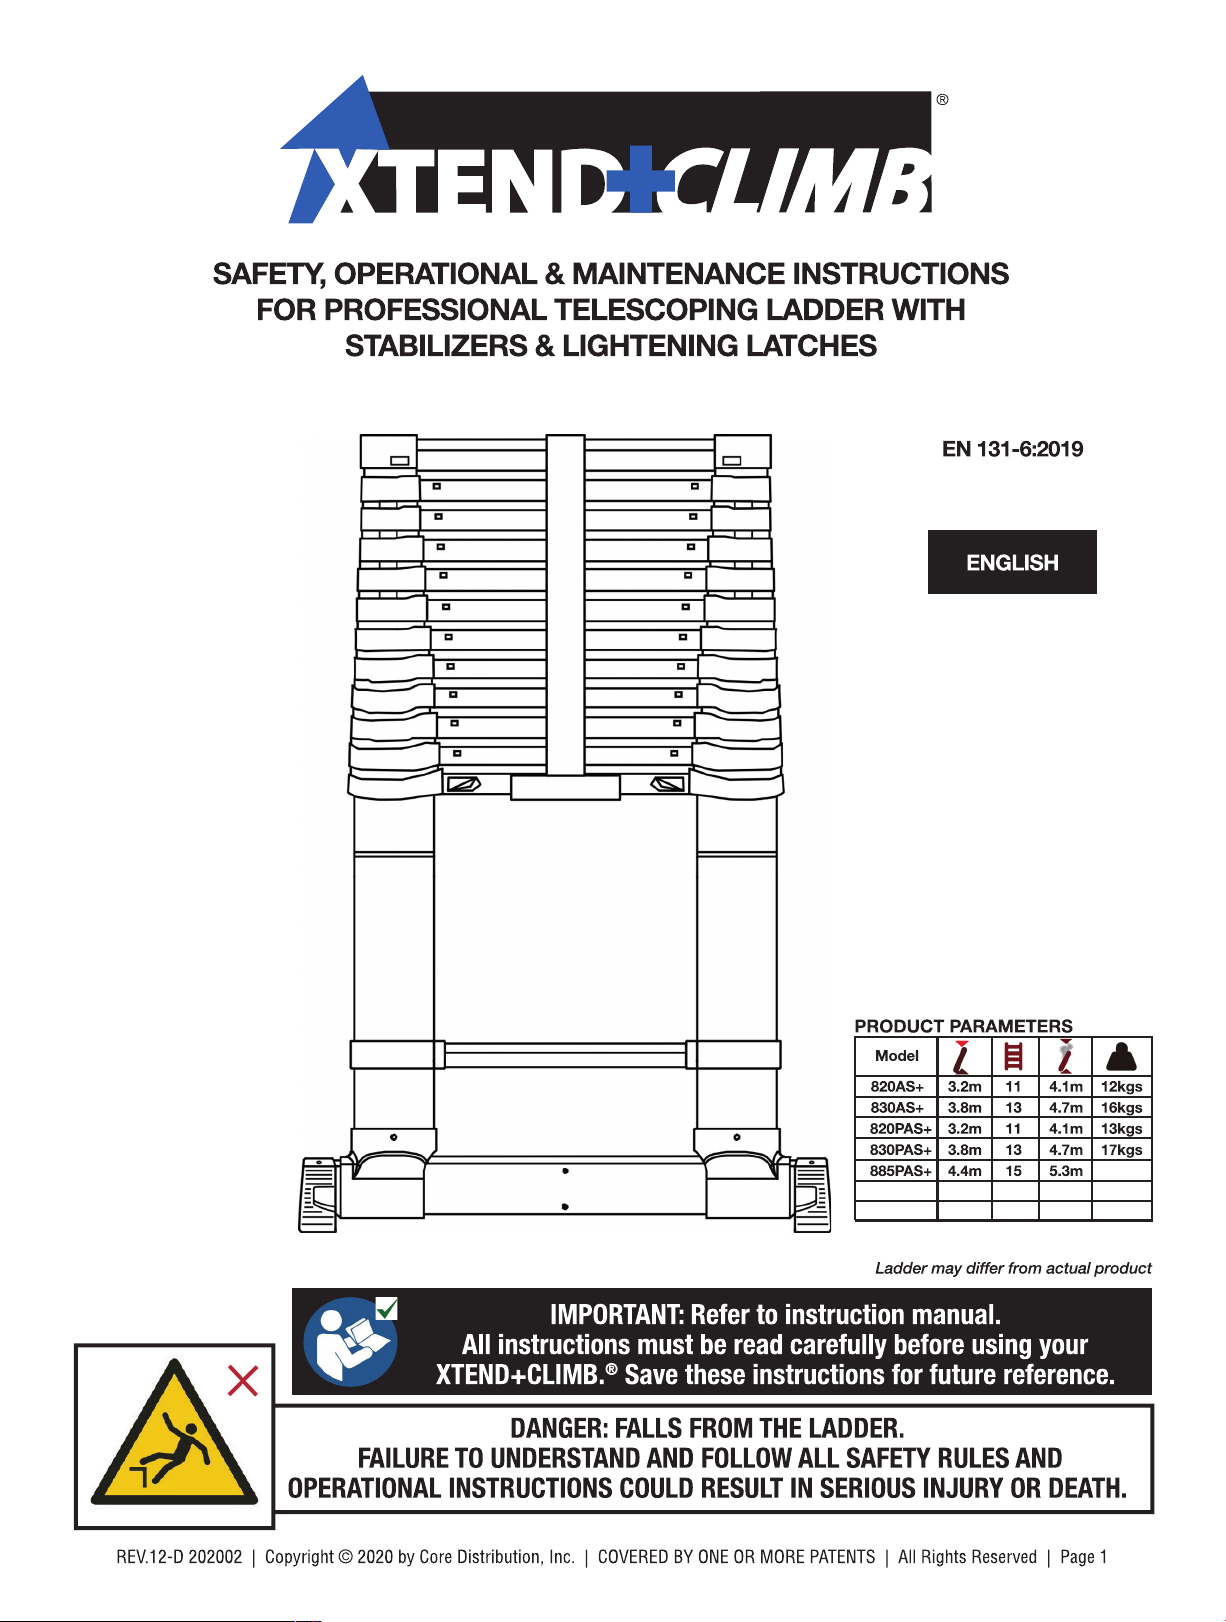
MODEL: 820AS+, 830AS+, 820PAS+, 830PAS+, 885PAS+, 920PAS+, 930PAS+
920PAS+
930PAS+
3.2m 18 4.1m
3.8m 13 4.7m
20kgs
13kgs
15kgs
Page 2
OPERATIONAL AND SAFETY INSTRUCTIONS
1m
DANGER: FAILURE TO UNDERSTAND AND FOLLOW ALL SAFETY RULES AND OPERATIONAL
INSTRUCTIONS COULD RESULT IN SERIOUS INJURY OR DEATH
WARNING: ELECTRICITY HAZARD: Identify any electrical risks in the work area,
such as overhead lines or other exposed electrical equipment and do not use
the ladder where electrical risks occur.
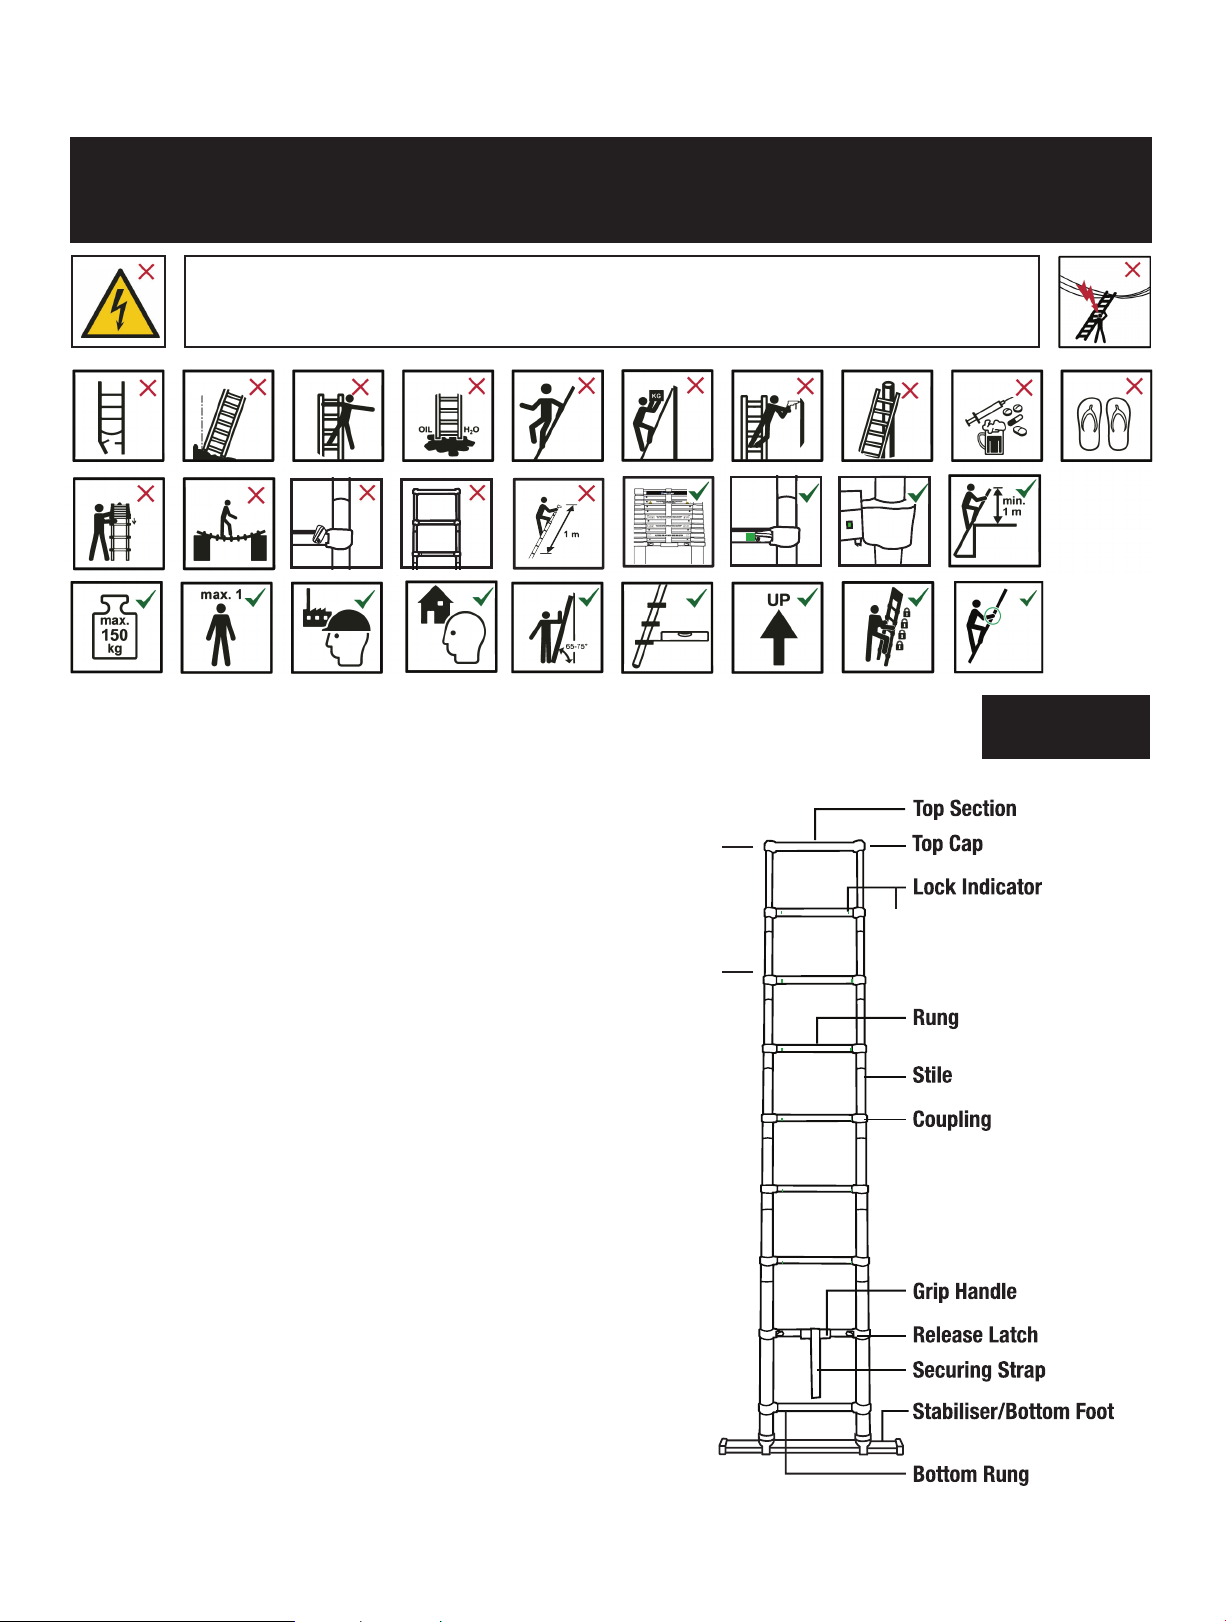
COMPONENTS OF A TELESCOPIC LADDER
Top Section - Upper horizontal section of the ladder.
Top Cap - Top section of the ladder that encloses the upper stile.
Lock Indicator - Green/Red indicator that alerts the user when
the section is locked or unlocked.
Only Climb this Side of Ladder
and Lock Indicator Window with a sticker on rung.
Rung - Horizontal section used for climbing the ladder.
Stile - Vertical member used to support the rungs and the
ladder structure.
Coupling - The section that connects the rung to the stile of the
ladder.
Grip Handle - Ergonomic pad on the bottom of the second rung
from the bottom that the user uses to comfortably
transport the ladder.
Lightning Release Latch - Mechanical button or switch that
allows the user to unlock the section at the bottom to start the
closing process.
Securing Strap - Nylon strap with hook and loop fasteners, which
holds the ladder together during transportation and
storage.
- Climbing Side has release latches
Do Not
Climb The
Last Meter
& Do Not
Climb The
Last Three
Rungs
ENGLISH
Only Climb This Side Of Ladder
Climbing Side has release latches
& Lock Indicator Window with a
sticker on rung.
Stabiliser/Bottom Foot - Ladder base with anti-slip design that
supports the ladder during use.
Bottom Rung - Lower horizontal section used for climbing the
ladder.
MAX.LOAD:150KGS
REV.12-D 202002 | Copyright © 2020 by Core Distribution, Inc. | COVERED BY ONE OR MORE PATENTS | All Rights Reserved | Page 2
Page 3
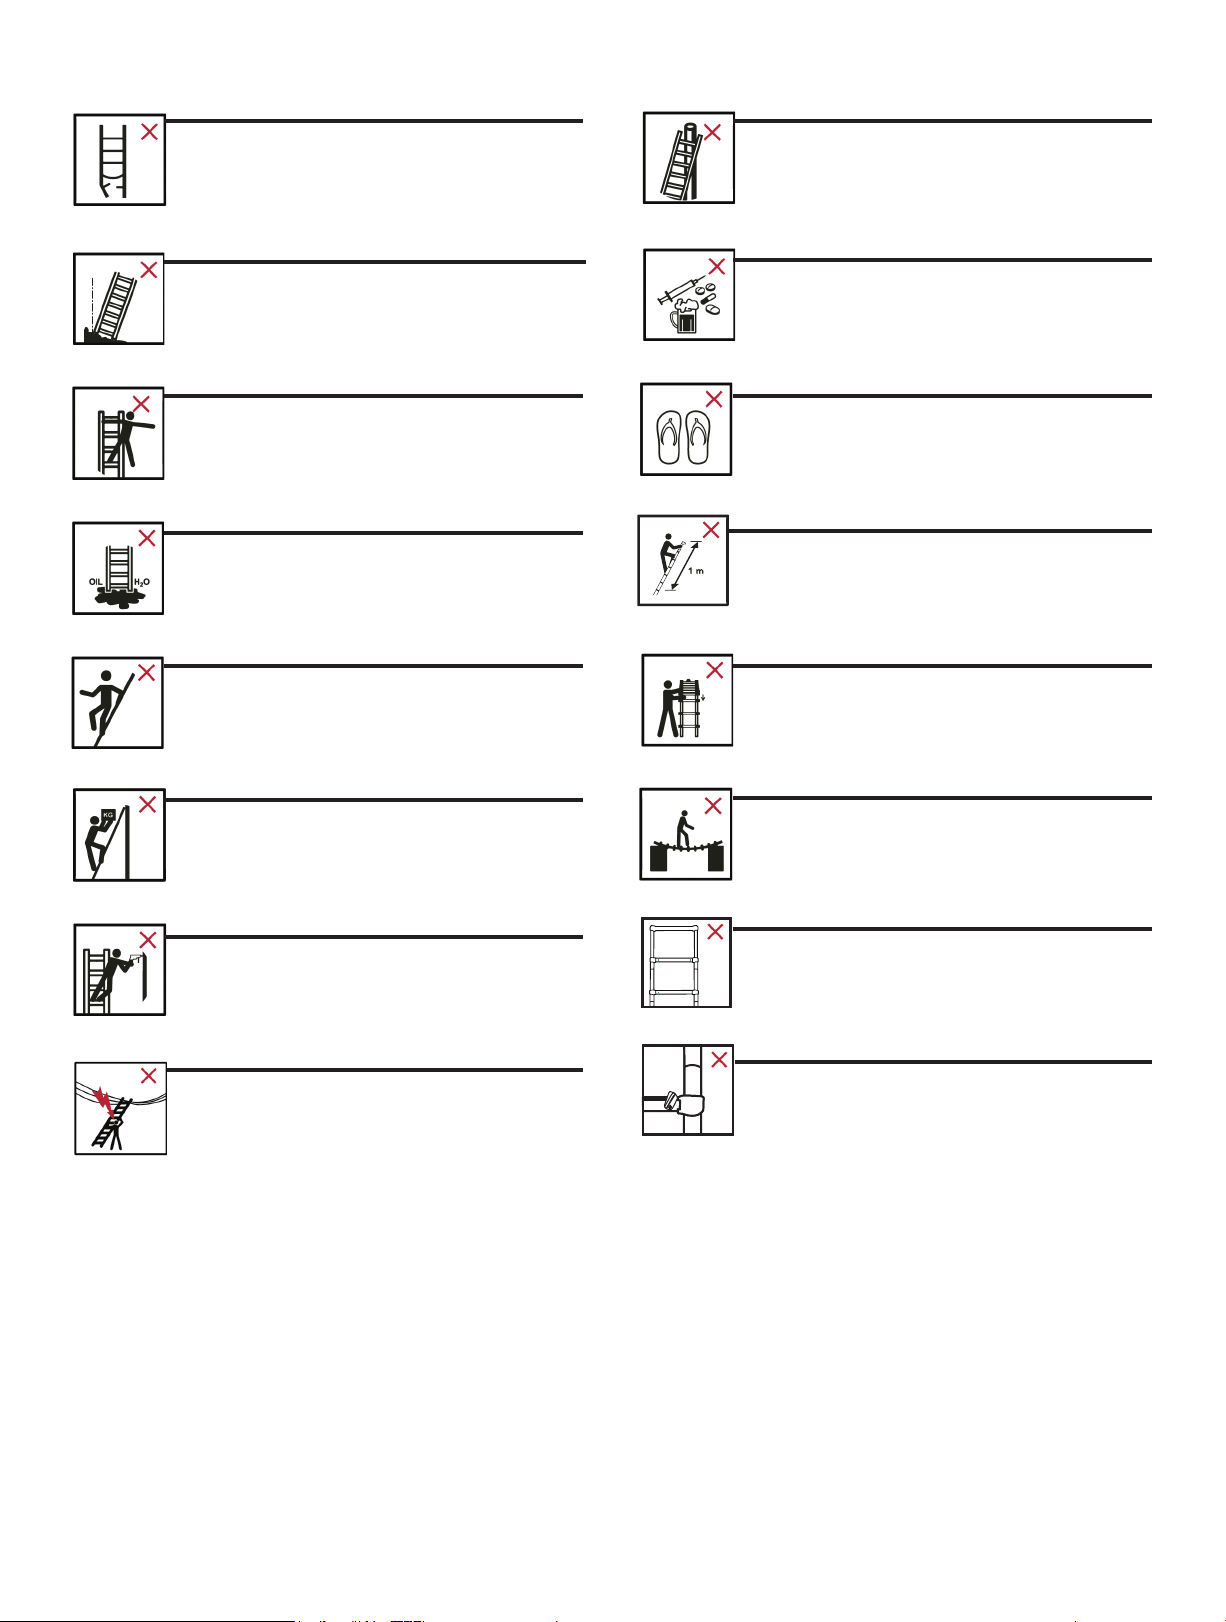
Inspect the ladder after delivery. Before every
use visually check the ladder is not damaged
and is safe to use. Do not use a damaged ladder.
Do not lean the ladder against
unsuitable surfaces.
Do not use the ladder on a unlevel or
Do not overreach.
Do not erect ladder on contaminated ground.
Do not ascend or descend unless you are
facing the ladder.
Do not carry equipment which is heavy or
Certain medical conditions or medication, alcohol
or drug abuse could make ladder use unsafe.
Do not wear unsuitable footwear when
climbing a ladder.
Do not climb on the last meter of a telescopic
ladder.
(area of shearing) when bringing the ladder in to
its possible positions of use.
Do not use the ladder as a bridge.
Avoid work that imposes a sideways load on
adders, such as side-on drilling through solid
materials.
Avoid work that imposes a sideways load on
adders, such as side-on drilling through solid
materials.
Do not climb on top 3 rungs.
Un-locked lightning latch
REV.12-D 202002 | Copyright © 2020 by Core Distribution, Inc. | COVERED BY ONE OR MORE PATENTS | All Rights Reserved | Page 3
Page 4
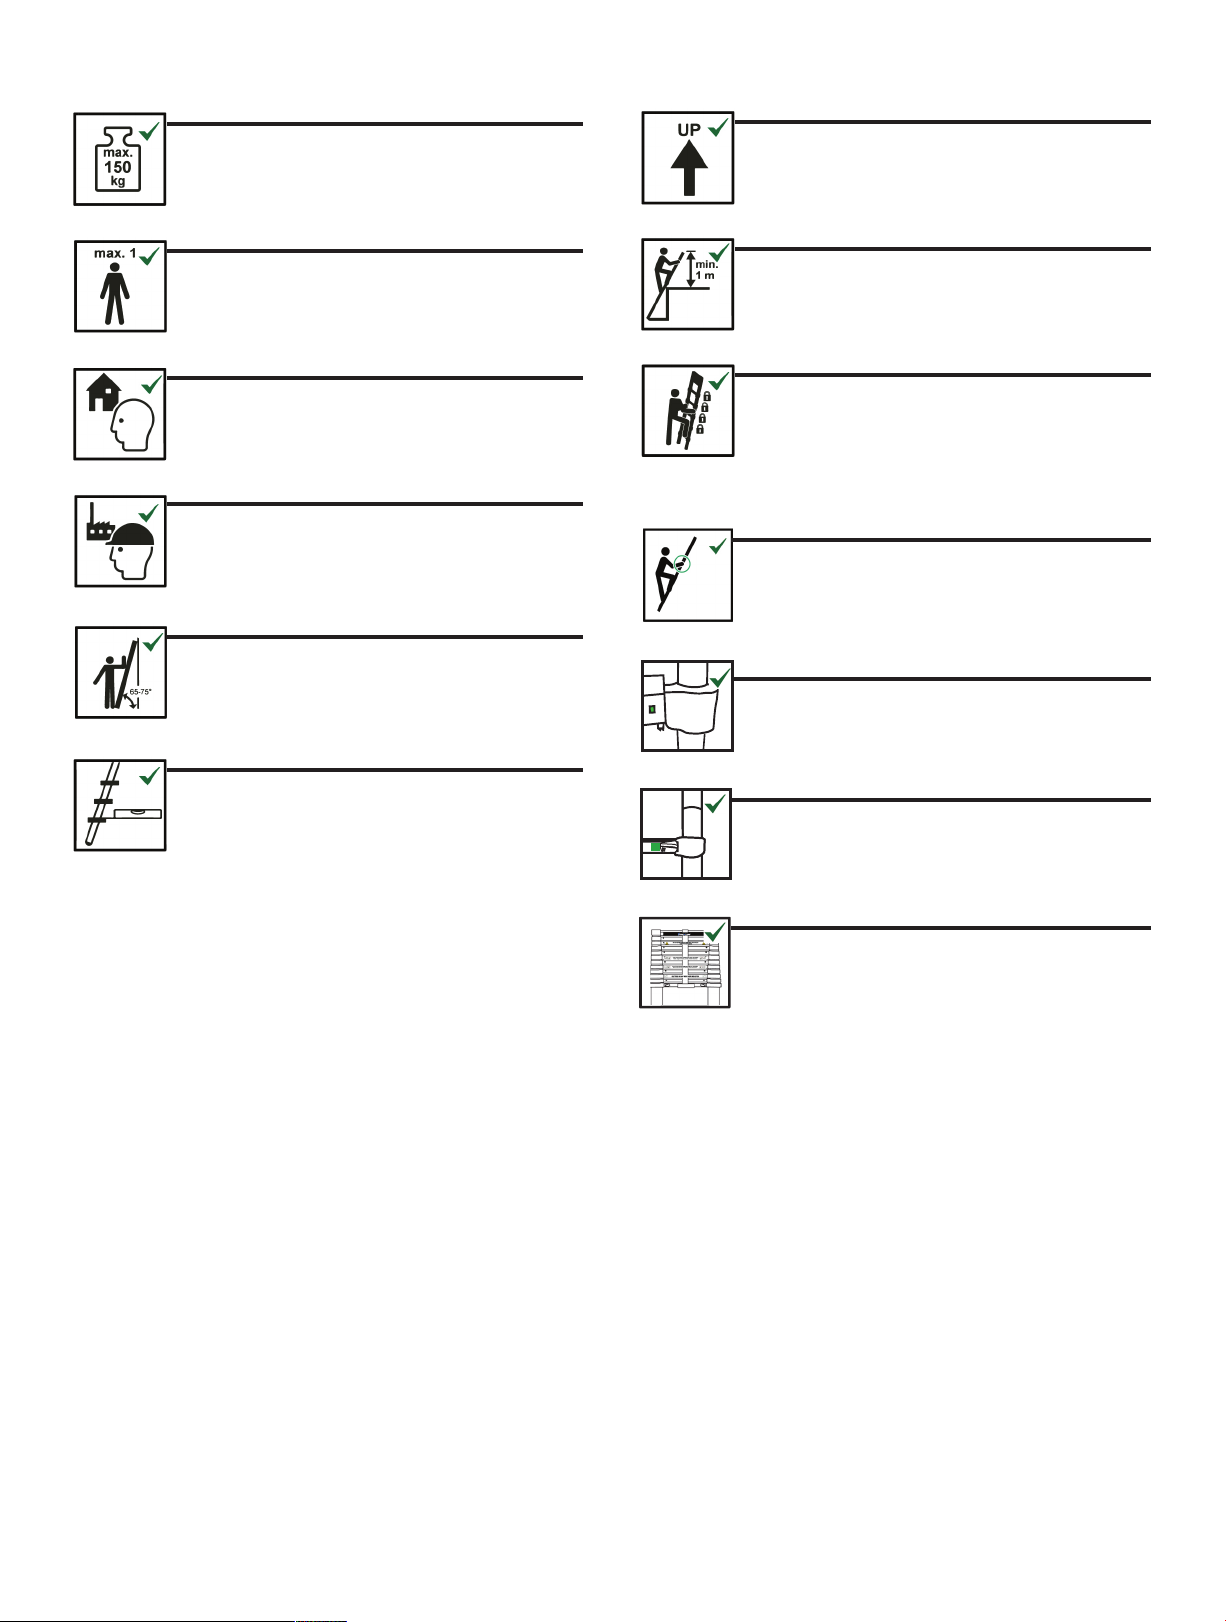
Maximum total load.
Only use the ladder in the direction as indicated,
only if necessary due to design of ladder.
Maximum number of users.
Ladder for homeowner use or non professional.
Ladder for professional use.
Leaning ladders with rungs shall be used at the
correct angle.
Leaning ladders with steps shall be used that
the steps are in a horizontal position.
Ladders used for access to a higher level shall
be extended at least 1m above the landing point
and secured, if necessary.
Locking mechanisms for all extended rungs
shall be checked & locked before use.
Keep a secure grip on the ladder when ascending and descending. Maintain a handhold whilst
working from a ladder or take additional safety
precautions if you cannot.
When locked indicator window is green it
is safe to climb.
Locked lightning release latch.
Only Climb this Side of Ladder
Side has release latches and Lock Indicator
Window with a sticker on rung.
- Climbing
REV.12-D 202002 | Copyright © 2020 by Core Distribution, Inc. | COVERED BY ONE OR MORE PATENTS | All Rights Reserved | Page 4
Page 5

LIST OF ITEMS TO BE INSPECTED
For regular inspection, the following items shall be taken into account:
• Check the ladder on purchase and prior to each usage.
• Check that the stiles/legs (uprights) are not bent, bowed, twisted, dented, cracked, corroded or rotten.
• Check that the hinges between front and rear sections are not damaged, lose or corroded.
• Check that the locking stays horizontal, back rails and corner braces are not missing, bent, loose,
corroded or damaged.
• Check that the rung hooks are not missing, damaged, lose or corroded and engage properly on the rungs.
• Check that guide brackets are not missing, damaged, lose or corroded and engage properly on the mating stile.
• Check that the entire ladder is free from contaminants (e.g. dirt, mud, paint, oil, grease, wet paint or snow).
Do not use ladder if contaminated.
• Check that the ladder is suitable for the task. Use a ladder only for the tasks for which it has been designed.
• Check your surroundings when erecting the ladder. Take the necessary precautions to ensure your own safety and
that of others when erecting and using a ladder at entrances, in passageways, etc.
All checkpoints according to EN131-6: 2019, Annex A shall be mentioned when applicable.
Futhermore the following checkpoints shall be added:
• Check the brackets on cracks and other failures, such as:
• For professional use a risk assessment shall be carried out respecting the legislation in the country of use.
• Do not modify the ladder design.
• For outdoor use caution to the wind.
• Only climb the side of the ladder that has lighting latches, lock indicator windows and stickers.
• Do not spend long periods on a ladder without regular breaks (tiredness is a risk).
REV.12-D 202002 | Copyright © 2020 by Core Distribution, Inc. | COVERED BY ONE OR MORE PATENTS | All Rights Reserved | Page 5
Page 6
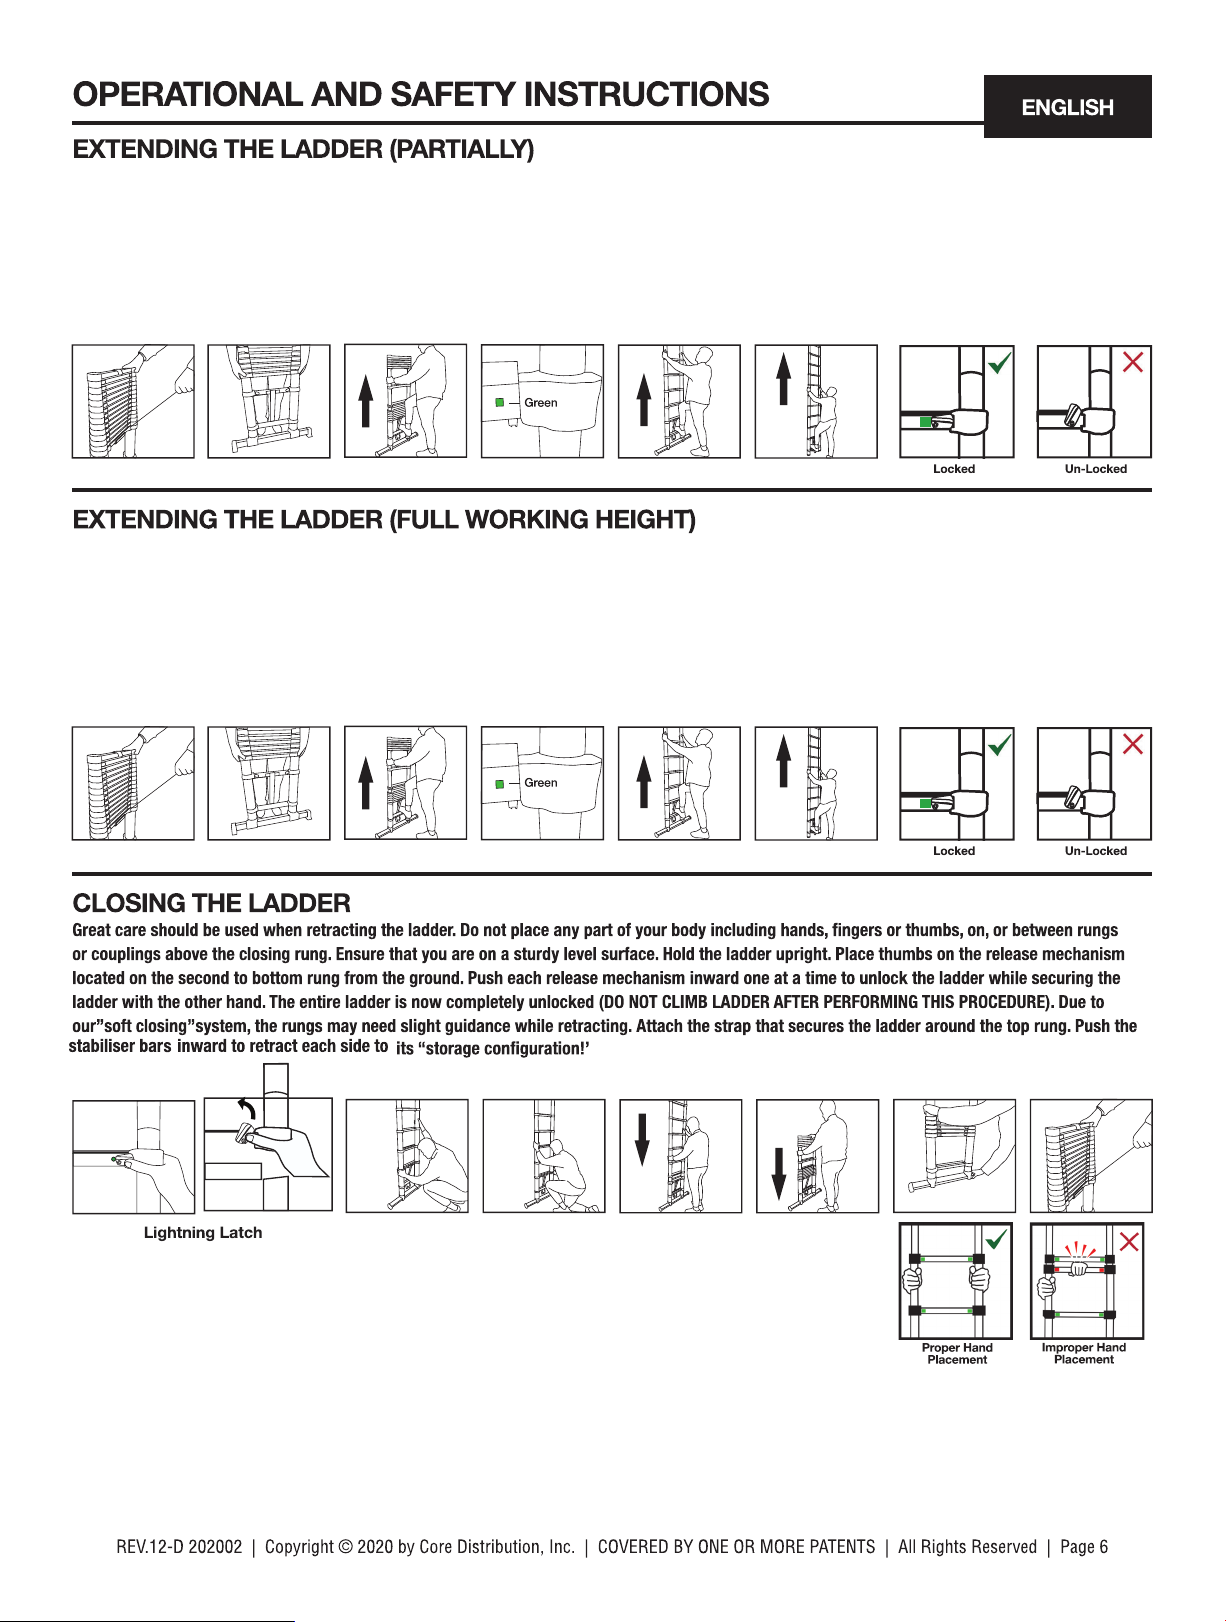
Place the ladder on a sturdy, level surface suitable on which to use the ladder. Release the strap that secures the ladder in the “storage
configuration”. Place your foot on the bottom rung (closest to the ground). With both hands, pull up the 3rd rung – counting from the ground.
Lift ladder off the ground very slightly – stabilizers will automatically telescope out to the correct extension. Please confirm the stabilizers are
firmly locked in place. Place your foot on the bottom rung to hold the ladder in place. With both hands pull up on the rung that you determine
will be the highest point to which you would like to extend the ladder. Extend each rung until it is locked in place. You will hear an audible click
and see a green indicator on the rung below confirming that section is fully extended and locked.Continue extending the ladder all the way up.
Once fully extended, each section should show a green lock indicator.Visually inspect the ladder for any damage, debris and ensure that all
open sections are locked.
Place the ladder on a sturdy, level surface suitable on which to use the ladder. Release the strap that secures the ladder in the “storage
configuration”. Place your foot on the bottom rung (closest to the ground). With both hands, pull up the 3rd rung – counting from the ground.
Lift ladder off the ground very slightly – stabilizers will automatically telescope out to the correct extension. Please confirm the stabilizers are
firmly locked in place. Place your foot on the bottom rung to hold the ladder in place. With both hands pull up on the rung that you determine
will be the highest point to which you would like to extend the ladder. Extend each rung until it is locked in place. You will hear an audible click
and see a green indicator on the rung below confirming that section is fully extended and locked.Continue extending the ladder all the way up.
Once fully extended, each section should show a green lock indicator.Visually inspect the ladder for any damage, debris and ensure that all
open sections are locked.
〞
〞
Page 7
MAINTENANCE TIPS
ENGLISH
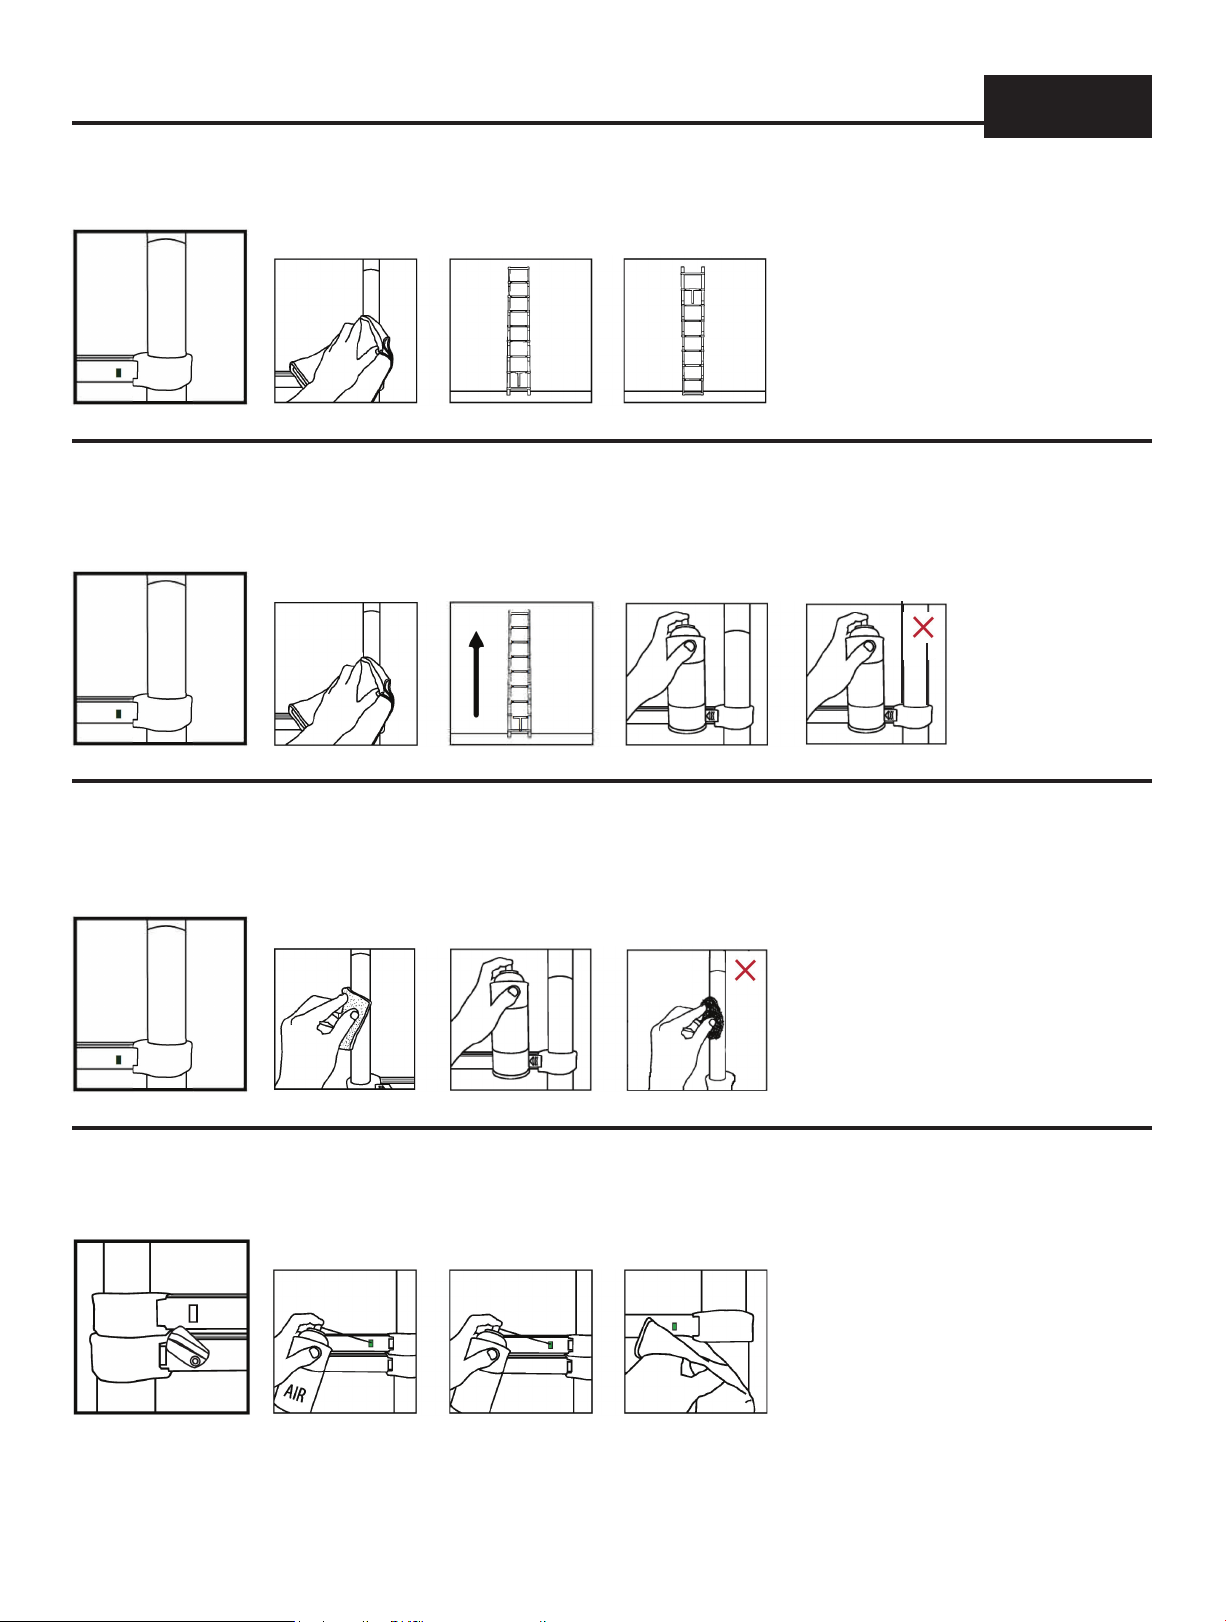
WET LADDER
If the ladder is wet or if there is water on the ladder, open the ladder to the maximum and, with a dry cloth, absorb the water. It is recommended to let
the ladder dry fully opened, on one side and then on the other, with the ladder leaning against a wall.
DRY
LET DRY
TURN
OXIDISED LADDER
If the ladder is oxidised (due to previous poor drying), there will be white residue on the stiles. First, remove the spots with a dry cloth. Then, to ensure
the ladder deploys and retracts correctly, use a silicone based spray or a non-petroleum based furniture polish wipe once the ladder is fully opened and
dry it correctly. Wait a few minutes and close the ladder. Never use a petroleum based product- it will damage the internal mechanism of your ladder.
CLEAN
EXTEND
MAINTAIN PETROLEUM
PAIN T OR O T HER S UBS TAN C ES S T ICKI N G TO STIL E S
If paint residues were left on the ladder, they must be removed using a sponge. Do not use steel wool since it might damage the opening/closing
mechanism. After all residues have been removed from the stiles, apply a silicone based spray or a non-petroleum based furniture polish wipe as
CLEAN
MAINTAIN
STEEL WOOL
HARD TO MOVE LATCHES
If the latches are hard to push, use a compressor or compressed air duster to properly clean the latches. Then perform maintainenceon the latches
(with a silicone based spray or a non-petroleum based furniture polish wipe) with a forward/backward movement. Dry excess spray with a dry cloth.
CLEAN
REV.12-D 202002 | Copyright © 2020 by Core Distribution, Inc. | COVERED BY ONE OR MORE PATENTS | All Rights Reserved | Page 7
MAINTAIN
DRY
Page 8
Page 9

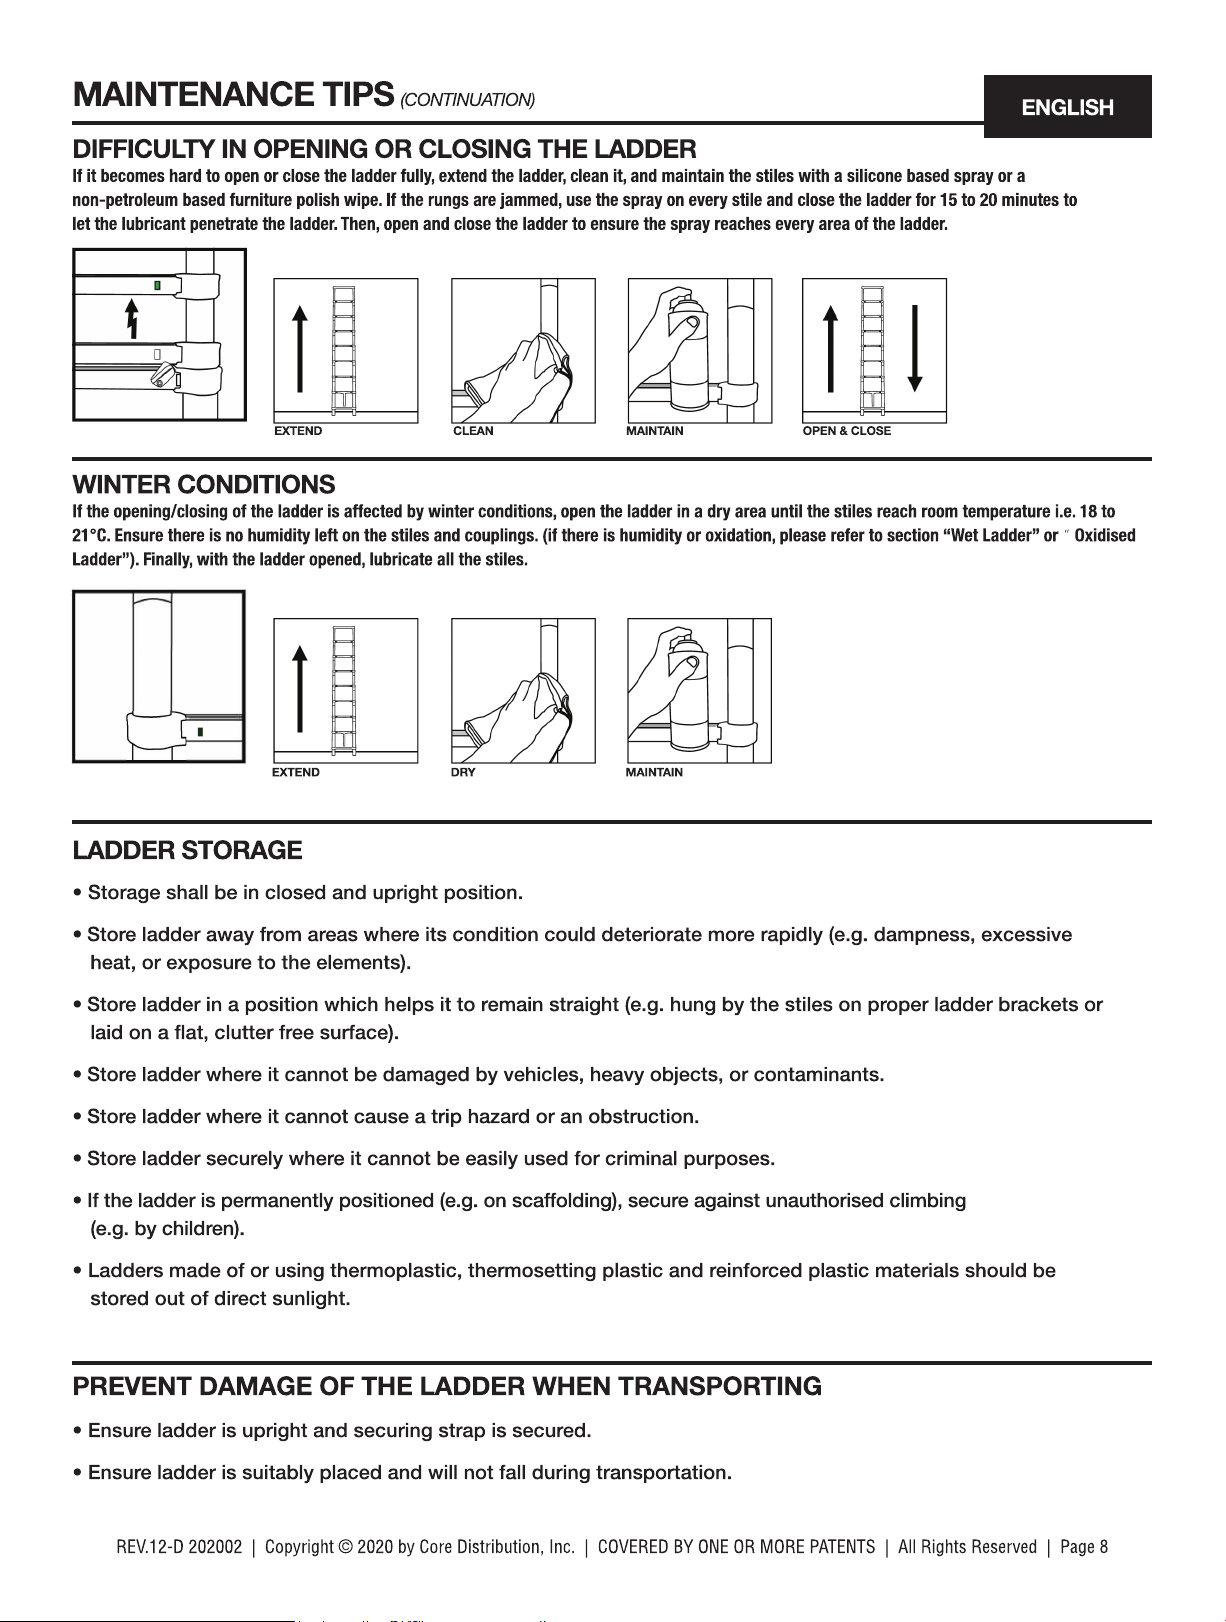
MAINTENANCE TIPS (CONTINUATION)
LADDER INSPECTION
WARNING: BEFORE USE, A THOROUGH INSPECTION OF THE LADDER MUST BE MADE.
IF ANY OF THE CHECKS CANNOT BE FULLY SATISFIED, DO NOT USE THE LADDER.
• Check that the stiles/legs (uprights) are not bent, bowed, twisted, dented, cracked, or corroded.
• Check that the stabilisers are not damaged, loose or corroded.
• Check that the locking mechanisms are not missing, damaged, loose or corroded and engage properly.
• Check that guide brackets are not missing, damaged, loose or corroded and engage properly on
the mating stile.
ENGLISH
• Check that the entire ladder is free from contaminants (e.g. dirt, mud, paint, oil or grease.)
• Check that the locking mechanisms for the stabiliser are not damaged or corroded and function
and lock correctly.
REPAIRS AND MAINTENANCE
• Shall be carried out by a competent person.
• NOTE: A competent person is someone who has the skills to carry out repairs or maintenance,
trainined by the manufacturer or authorised distributor.
• For repair and replacement of parts, if necessary, contact the authorised distributor.
or for any other information about this product.
KEEP DOCUMENTS
• Keep manual for future reference.
REV.12-D 202002 | Copyright © 2020 by Core Distribution, Inc. | COVERED BY ONE OR MORE PATENTS | All Rights Reserved | Page 9
Page 10
Page 11
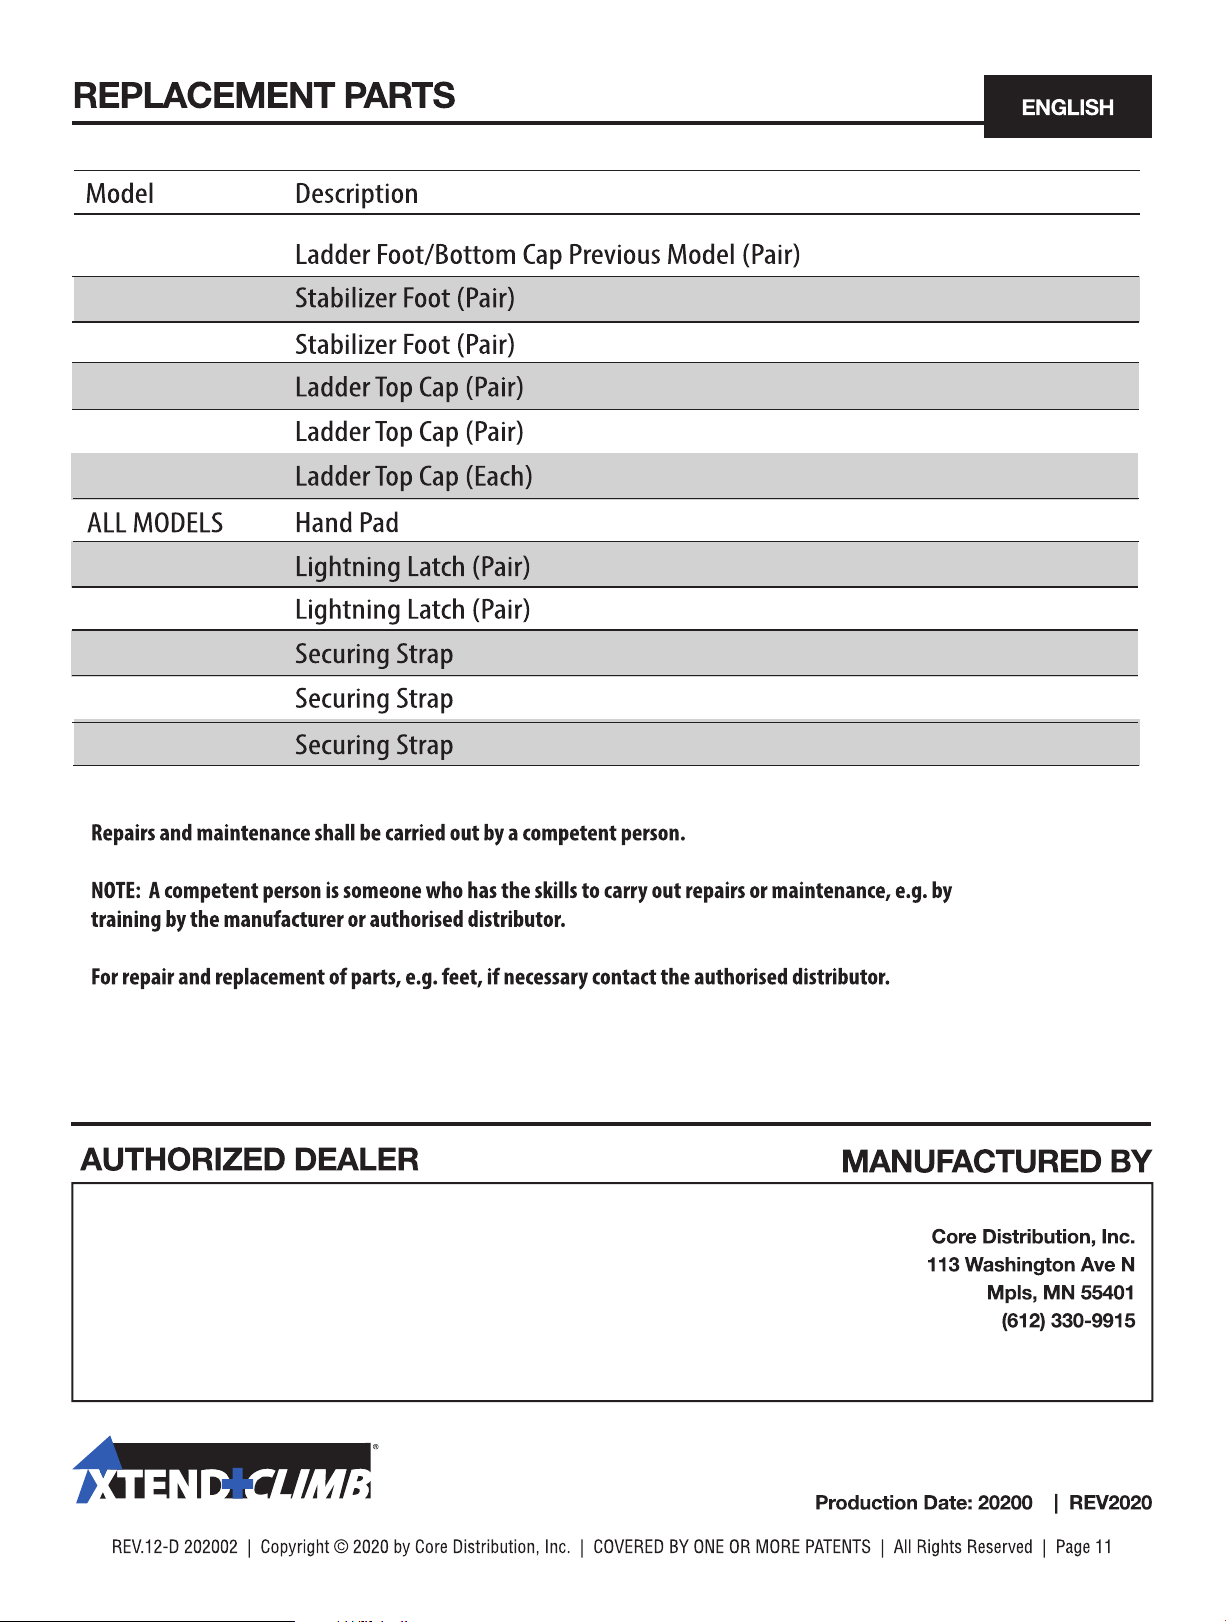
885PAS+
920PAS+ & 930PAS
885PAS+
920PAS+
930PAS
+
885PAS+
920PAS+ & 930PAS
885PAS+
885PAS+
930PAS
+
920PAS+
+
+
TB Davies(Cardiff) Ltd
Lewis Road,
Cardiff,
CF24 5EB,
Wales,UK
+44(0)2921320000
www.tbdavies.co.uk
6
 Loading...