

Page 1

Xtatix Shooter
Instruction Manual
©Xtatix LLC, 2005
WWW.XTATIX.COM
-1-
Page 2
Precautions
1. Player is not meant to be operated in hot, cold, dusty, wet, or dry environments.
2. Avoid dropping the player.
3. The life span of the battery may vary accordingly dependent on the conditions under
which the player is used, the manufacturer who produced the battery, and dates under
which the battery was produced.
4. Please recharge the battery under following conditions:
A. When the battery icon shows as:
B. The system turns off automatically and turns off again soon after it is turned on.
C. No reaction from the operation buttons.
D. When the display reads: Low Battery
5. Do not disconnect abruptly when the player is under format, upload, or download
modes; this may cause player program malfunction.
6. When player is used as a removable hard disk, please save and output the files
according to the correct file management procedures. Xtatix will not be responsible for
any file loss due to improper operation.
7. Do not conduct recovery/upgrading operations when the battery is low.
8. The player is a precise high-tech electronic product. Please do not operate player
without following proper instructions.
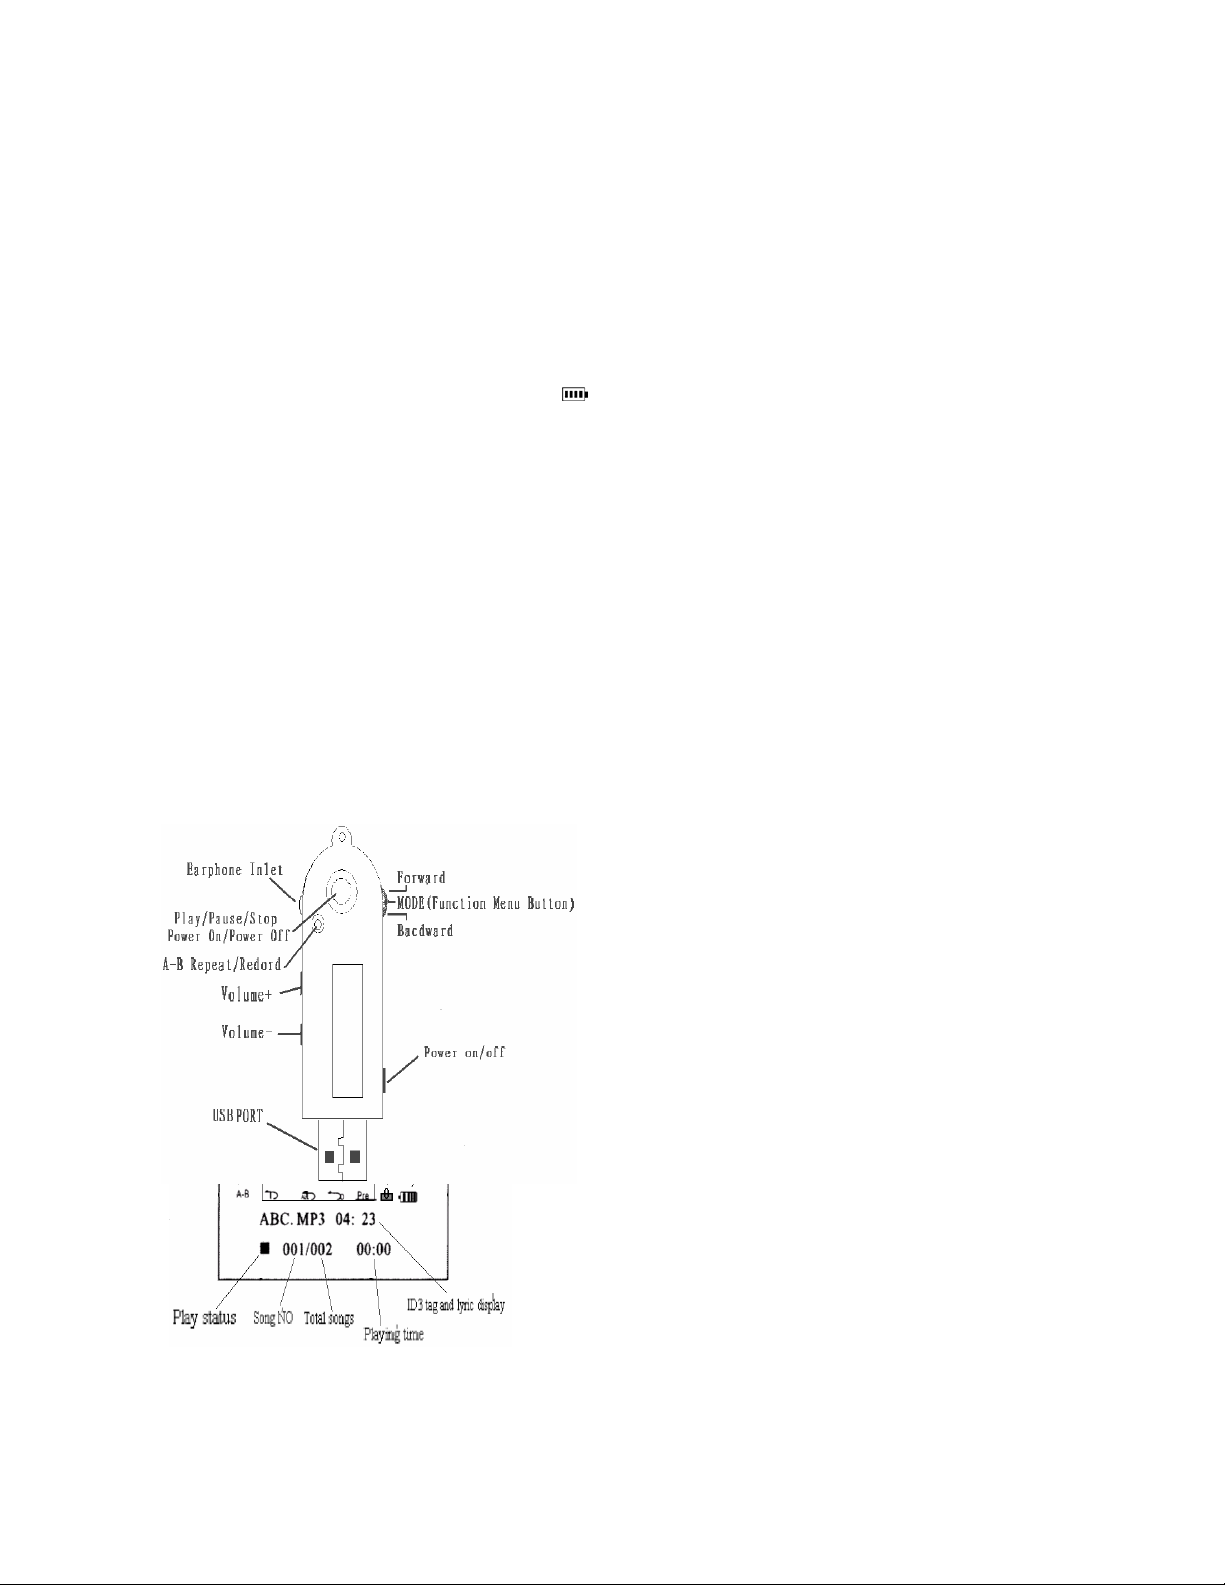
Shooter Diagram
LCD Display
-2-
Page 3
General Functions
To Turn Player On:
Make sure the POWER switch is positioned in the on position. The on position is
obtained when the POWER switch is slid fully in its track towards the “ MODE ”
toggle/button. When POWER switch is in on position, hold down the PLAY button until
background light turns on.
To Turn Player Off
Under status of Playing or Stop, press the PLAY button and hold until a “BYEBYE”
is shown on the display; this signifies the player is set to turn off. You may also slide the
POWER switch to the off position. The off position is obtained when the POWER switch
is slid fully in its track away from the “ MODE ” toggle/button.
Menu Operation
While in stop mode, press in the “ MODE ” toggle/button to enter into menu
mode.
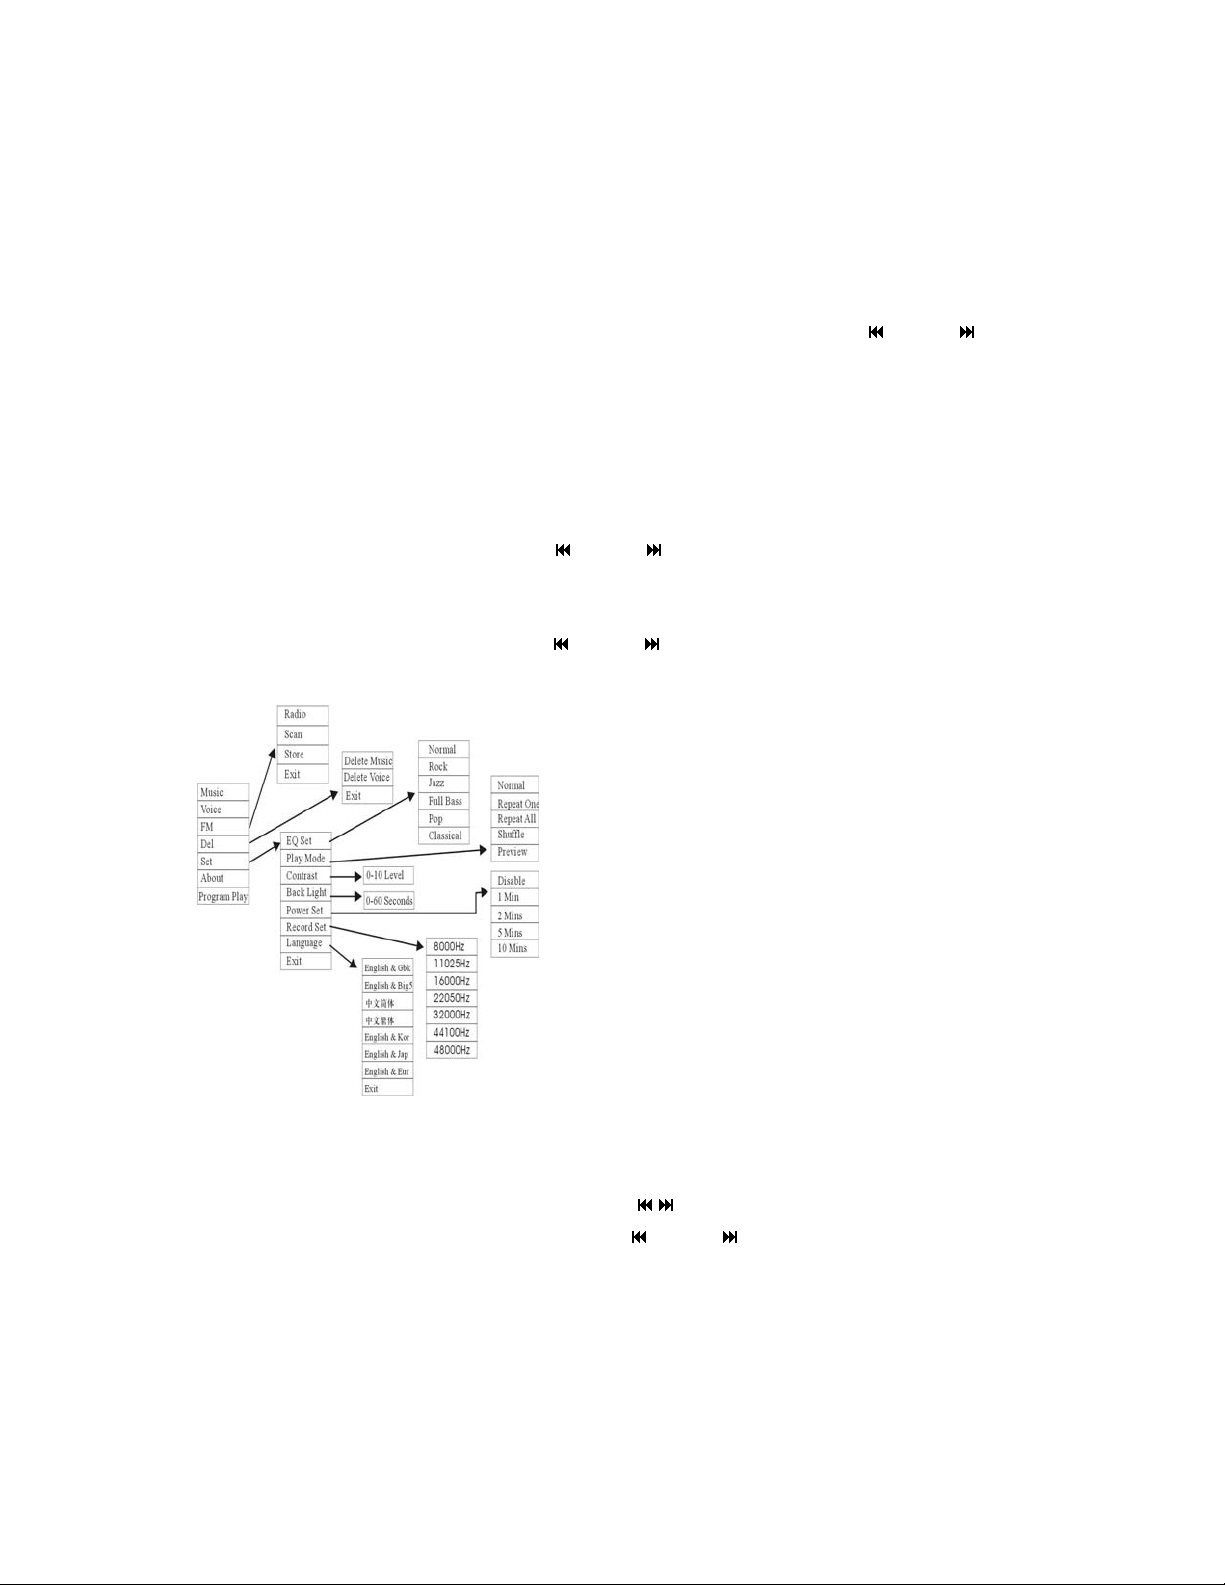
All the option choices of this player’s menu are listed in the table above. You can
choose among the option choices by using the “ / ” toggle until desired choice is
displayed. To select desired choice press the “ MODE ” toggle/button in.
-3-
Page 4

1. Music
Press in “ MODE ” toggle/button and use the “ / ” toggle to select Music mode,
then press the “PLAY” button to initiate playing.
2. Voice
Press in “ MODE ” toggle/button and select Voice mode. Press the “PLAY” button
to begin to play speech; press “A-B” button to setup repeat of segment.
3. Deleting Files
Enter into the main menu mode by pressing in the “
sort through to DEL. Press the in “
MODE ” toggle/button again to select DEL. You
MODE ” toggle/button then
are now in the delete file options.
In the DEL menu, you can select the files that you want to delete. Press in the
“ MODE ” toggle/button to select the specific file that you want to delete. Then press
in the “ MODE ” toggle/button again to confirm deletion.
4. Setting of the Player
Press in the “ MODE ” toggle/button to enter the SETTINGS menu on the player.
In this menu, you can select each of the options by using the “ / ” toggle, then
press in the “ MODE ” toggle/button again to confirm selection.
4.1 Under Equalizer Settings mode
Scroll through the options by using the “ / ” toggle to change the sound effect mode to
be set for the current song, and press in the “ MODE ” toggle/button to confirm and
return to the upper menu.
4.2 Under Playing mode
You can choose different music recycle modes by scroll through the options by using
the “
/ ” toggle. Then when the desired choice is shown in the display, push in the
“ MODE ” toggle/button to select the mode.
4.3 Under Contrast mode
Use the “
/ ” toggle to adjust the brightness display. To confirm selection and return
to upper menu press in the “ MODE ” toggle/button.
-4-
Page 5

4.4 Under Backlight setting
This function allows you to set the time of the background light from 00 to 60 seconds.
Use the “ / ” toggle to change the time. To confirm selection and return to upper menu
press in the “ MODE ” toggle/button.
4.5 Power off setting
This option allows the user to set the duration of time after which the player will
automatically turn its self off if left idle. The following choices are provided: disabled, 1
minute, 2 minutes, 5 minutes and 10 minutes.
Disabled: Under stop status, the player will stay at stop status without automatic turning
off unless the Turn off button is pressed.
x minutes: Under stop status, if there is no other button pressed, the player will be
automatically powered off after x minutes, the player will turn itself off to conserve
power.
Use the “ / ” toggle to change the time. To confirm selection and return to upper menu
press in the “ MODE ” toggle/button.
4.6 Under Record setting
Use the “ / ” toggle to select the options, then press in the “ MODE ”
toggle/button to confirm and set the selected option. Select Exit option and press
“ MODE ” toggle/button in to return to upper menu. The record settings are as follows
(the higher the rate the more memory is used, the lower the rate the longer the recording):
Source MIC
Encoder
MS
ADPCM
PCM
IN
ADPCM
Channels MONO
Device Internal
32000HZ 44100HZ
Rate
48000HZ 8000HZ
11025HZ 16000HZ
22050HZ
Exit
-5-
Page 6

4.7 Language
Change languages shown on the player.
5. About
From the main menu you can enter the “About” screen which shows information
about player memory and components.
Features
A-B Repeat
The A-B feature allows the listener to select a specific portion of the audio to repeat.
Under file playing (music or voice) status, press “A-B Repeat/REC” button and A- will
appear at the top left corner of the LCD. Press the “A-B Repeat/REC” button again to
signal when to end the portion of audio which will be repeated. Look for A-B to appear
in the top left corner of the LCD screen. The player will repeat this section until the A-B
button is pressed again to clear the selection.
FM Radio Reception
Press in the “ MODE ” toggle/button while player is in STOP status and enter FM
mode. Under radio reception mode, press in the “ MODE ” toggle/button to operate
channel searching, channel saving, recording, radio receiving and exiting.
(1) You can conduct manual or automatic channel searching. Using “ / ” toggle to
change the frequency manually or press “PLAY” to automatically search the frequency
range from FM 87.6 to 108.
(2) To save the channels detected, press in the “ MODE ” toggle/button and then
press “PLAY” button. Even after the player is turned off saved stations will remain
stored in memory.
Note: To make the preset channels changes permanent, be sure to turn off the player
according to the normal procedure.
(3) To conduct Live FM Recording enter radio mode and press “REC” button. Press
the “REC” button again to stop the recording.
(4) You can always jump between Radio mode and other listening modes.
-6-
Page 7

Line-In Function
The line-in function allows direct digital recording from any other audio device with
an earphone jack. For example you can record directly from your CD player or stereo.
(1) While player is in Stop status, go into the main menu and choose Setting menu.
(2) From the setting menu choose “Recordset” by pressing down the “MODE” button.
(3) In the Recordset screen the first option is “source.” In order to use the line in
recording make sure that the source is set to Line In.
(4) Press the play button twice to get back to the main menu.
(5) From the main menu select Record by pressing in the “MODE” button while
Record is highlighted.
(6) Recording will start automatically.
(7) To stop recording press in the “MODE” button. To pause recording press the
“PLAY” button.
USB connection
1. Connect the USB port of the player to the computer through USB plug or data
cable.
2. After connecting the USB port, press “ MODE ” toggle/button and a symbol of
connection will appear on the player.
Note: If you are using Win XP or Mac OS x or newer, there is no need to install any
drivers.
File transmission
When connected to the computer the MP3 player will appear as “removable disk.” The
upload/download of content is very simple. Open the file “removable disk” and drag
whatever files you want to store on the player into the “removable disk” window, and
drop them in the “removable disk” window. All files that are dropped in the “removable
disk” window will now be on the player.
Formatting the player
If you choose to format the player use the “FAT” setting.
-7-
Page 8

Technical Specifications
Memory
Capacity
128M/256M/512/1GB(inside)
Size 88m X28mmX15mm
LCD 96X26Dot Matrix
Power Built-in chargeable lithium
battery
Memory Built –in flash memory
Music
MP3、WMA、WAV
Fm radio 87.5~108MHz
Zip speed
support
Earphone
output
Signal/Noise
Radio
32kbps-32kbps
5mw+5mw
90dB
-8-
 Loading...