

Page 1

Xtatix Roq Box
Instruction Manual
©Xtatix LLC, 2005
WWW.XTATIX.COM
1
Page 2

Precautions
1. Player is not meant to be operated in extremes of hot, cold, dusty, wet, or dry
environments.
2. Avoid dropping the player.
3. Do not disconnect abruptly when the player is under format, upload, or
download modes; this may cause player program malfunction.
4. When player is used as a removable hard disk, please save and output the files
according to the correct file management procedures. Xtatix will not be
responsible for any file loss due to improper operation.
5. The player is a precise high-tech electronic product. Please do not operate
player without following proper instructions.
6. Operating system requirements without needing to install drivers: for Windows
at least Windows 2000, for Mac at least OS 10.3, for
earlier versions will require additional drivers to be installed before unit can be attached.
Linux at least Redhat 8.0. All
Features of the Xtatix Roq Box:
●Plays Multiple Music Formats
o MP3、WMA、ASF、WAV
● Internal Digital FM Stereo Radio
● Radio Record Function
●USB Storage Drive
●Voice Recording
●7 EQ modes
o Normal/Rock/Pop/Classical/Soft/Jazz/DBB
●7 Color Backlit LCD Display
●Multiple Play Modes
o Normal、Repeat Single Track、Repeat All、Repeat Tracks、Shuffle、Browse play.
●Auto Power Off
●Multi-Language
2
Page 3
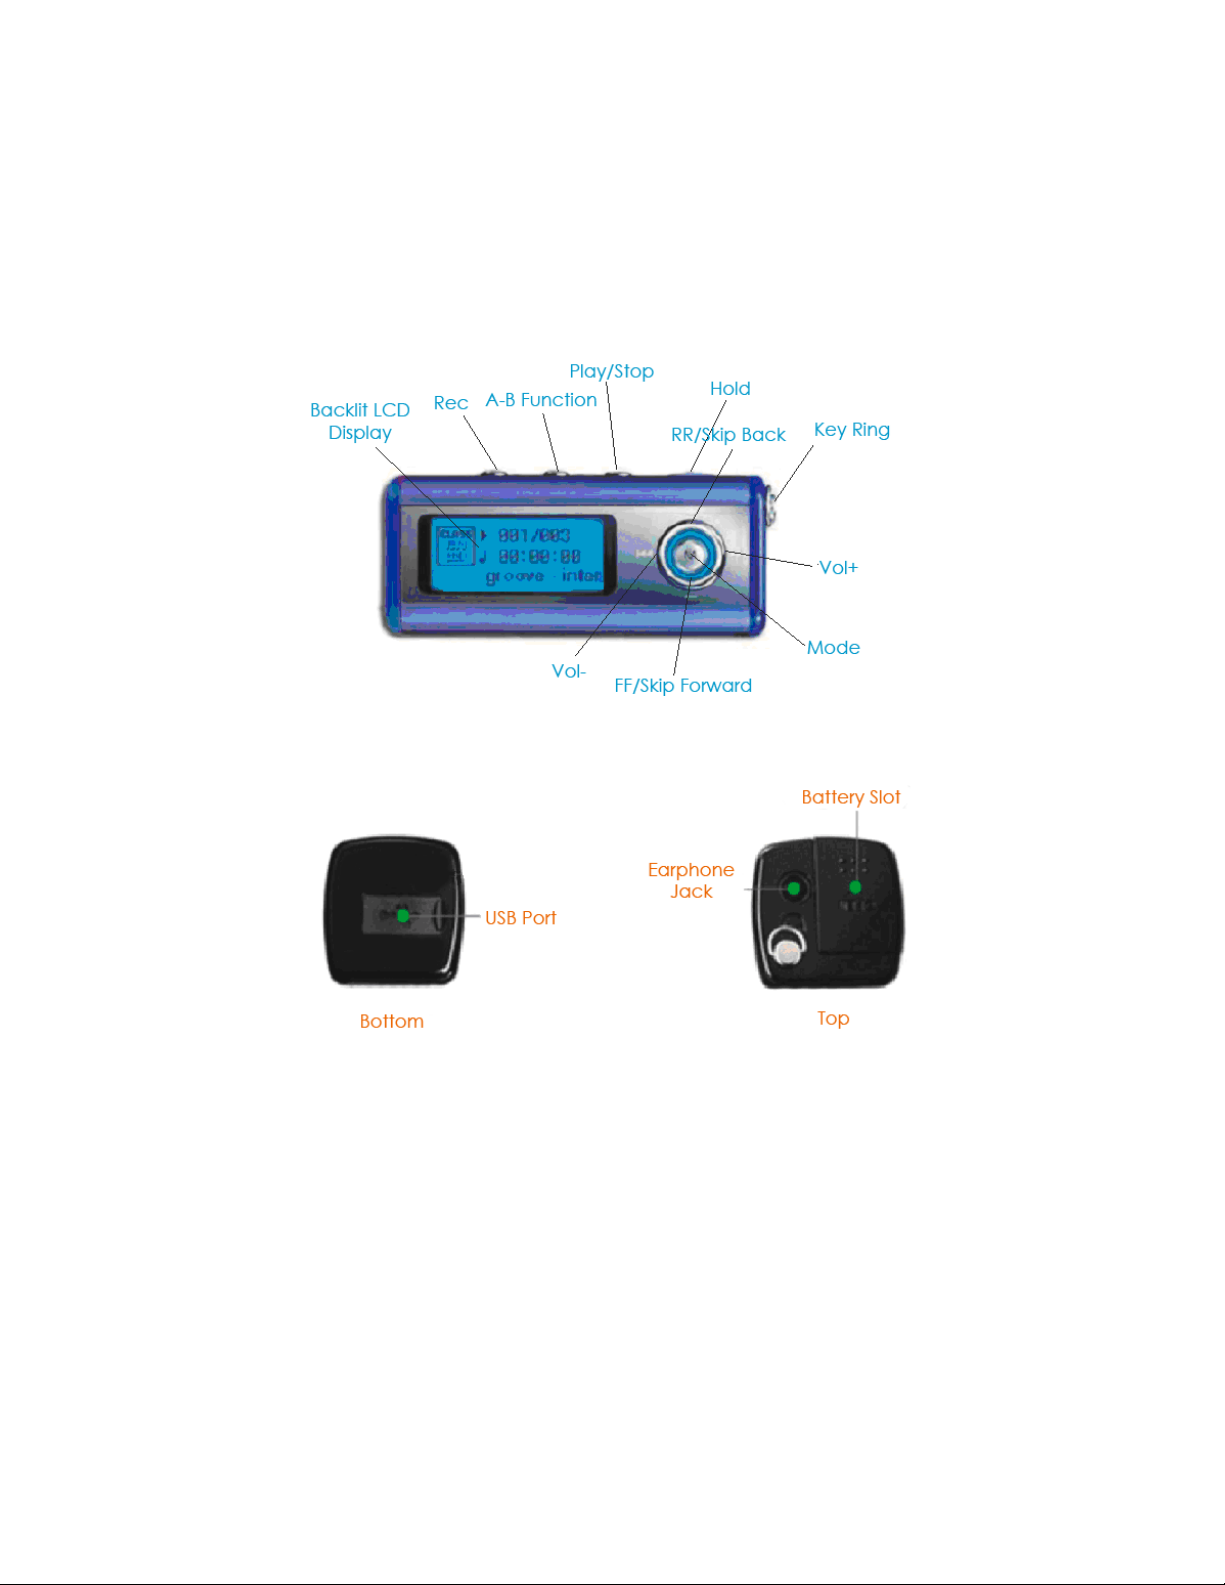
Roq Box Diagram
2. Button Functions
1. “PLAY” On/Play/Stop/Off
2. “VOL+, VOL-” Adjust volume
3. “NEXT” Next track、FF
4. “LAST” Previous track、RR
5. “REC” Enter into record mode
6. “A-B” Used for A-B repeat function
7. “HOLD” lock button operation
8. “USB” Connect to USB cord
9. “Earphone hole” Insert earphones
3
Page 4
3. Basic Functions
z Main Menu
While stopped, you can enter the main menu by pressing the “Mode” button. In the main
menu are numerous sub-menus which control the different functions of the Roq Box.
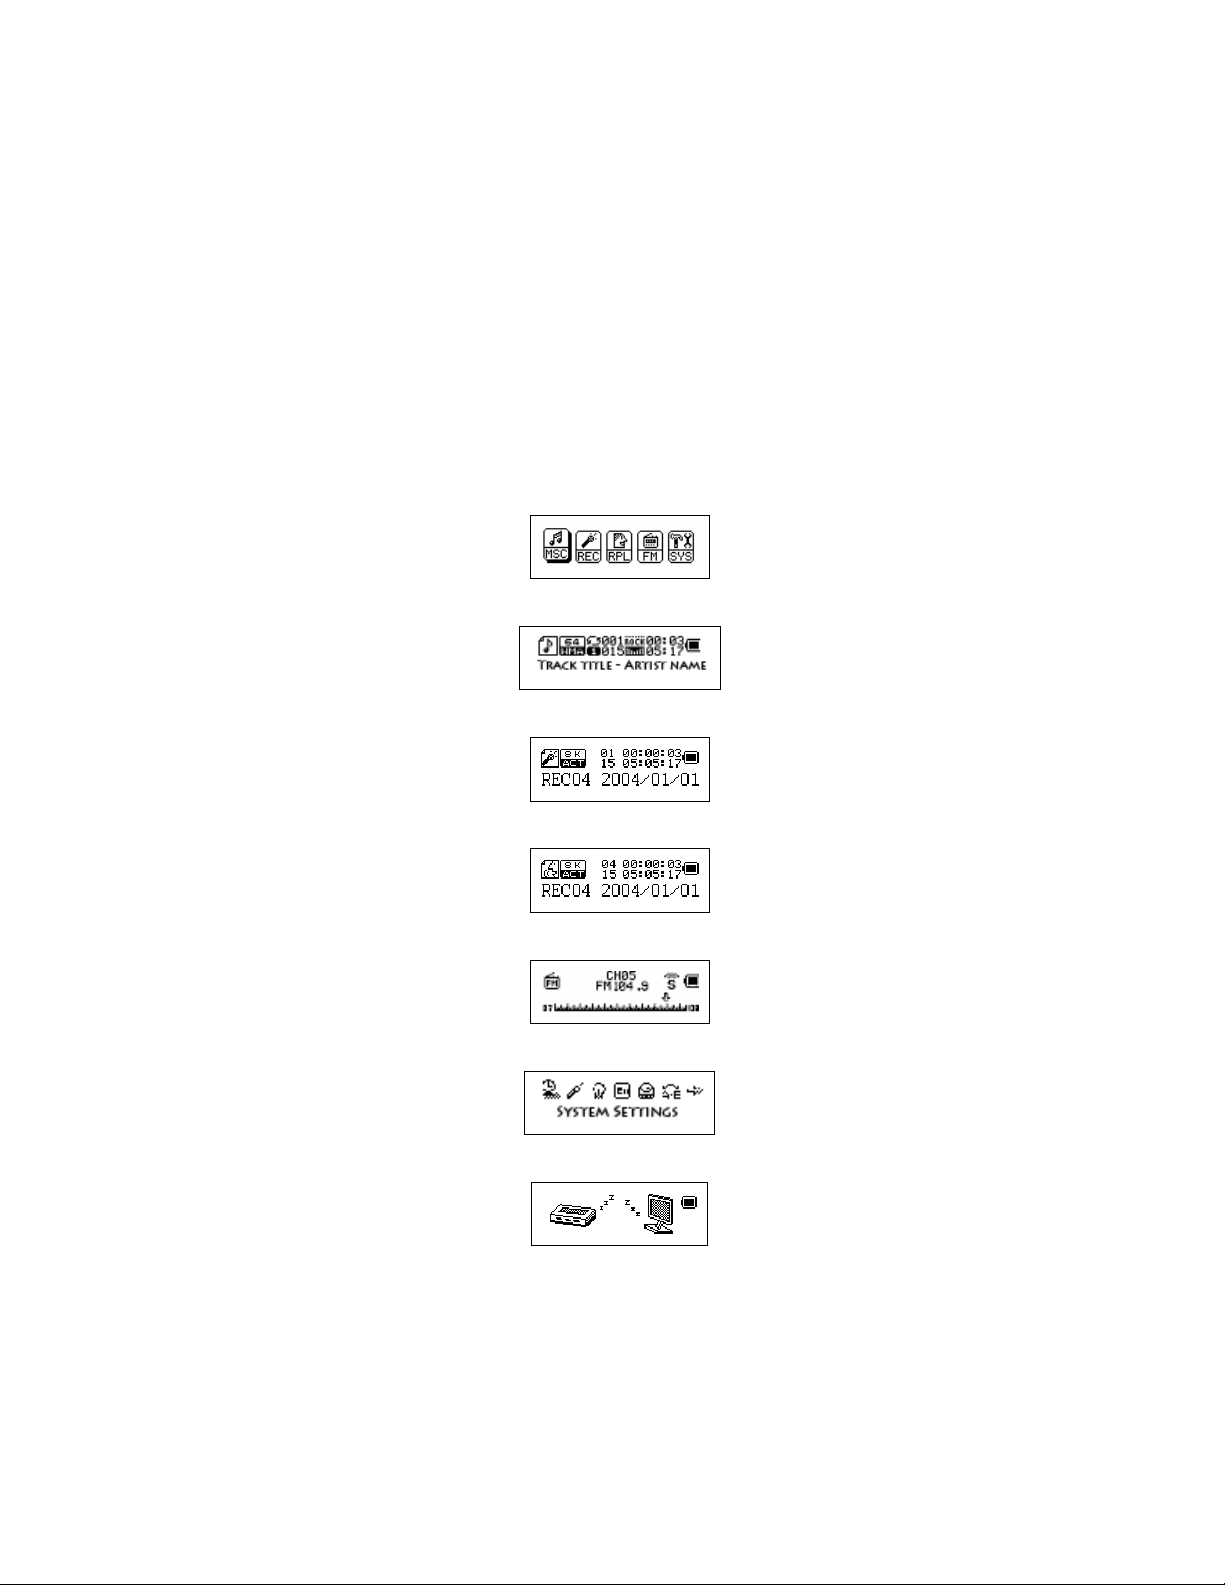
z Menu Displays
Main menu: There are five options to choose from in main menu. Those are music
mode, record mode, record playback, FM mode, and System settings mode,
Music mode:
Recording mode:
Recording Playback mode:
FM mode:
System set:
While Connected with Computer:
4
Page 5

4. Play music
z Simple operation
1. Insert the earphone in the earphone hole
2. Hold down the “Play” button to turn on player. Confirm that player is in music mode then
tap “Play” button to begin playing music.
3. Select music: “Last” button: to select the last one
“Next” button: to select the next one
4. Volume control: VOL+: turn up the volume VOL-: turn down the volume
z Equalizer (EQ) mode
1. While the music is playing tap the “Mode” button to enter into the playing submenu.
2. Press the “Next” button to select “sound mode” menu.
3. Tap the “Mode” button to enter into the “EQ mode” and select the menu.
Sound mode selection:
4. EQ modes:
Natural
Rock
Pop
Classical
Soft
Jazz
DBB
5. Press the “Next” or “Last” button to scroll through EQ options.
z Synchronize lyrics display
The player will display “*.LRC” lyrics files as text on the LCD display. The words displayed on the
screen are synchronous with the song.
How to use lyrics files?
Be sure the file name for lyrics are the same as the song file. For example:
Song file name is:tearing night.mp3
5
Page 6

Lyrics file name is:tearing night.lrc
How to know if there is lyrics or not?
If the current song has a lyrics file installed, then the top left corner icon “
change to “
¾ How to toggle the lyrics display:
”.
1. Hold the “Mode” button to enter into the lyrics interface.
2. Tap the “Mode” button to return to song mode.
5. Voice recording
Please check the battery indicator to make sure there is enough energy recording.
The Roq Box supports the storage of 99 recorded files under each directory.
z Record in “recording mode”
1. Enter the main menu:
2. Press the “Next” button to select the record mode.
3. Tap “Mode” to enter into the record mode.
4. Tap the “Play” button to start recording.
(The above operation can also be done by simply pressing the “REC” button)
” of music mode will
If the screen displays “space full”,it means there is no memory left to store new files. Old files
must be deleted in order to create space.
If the screen shows “directory full”, it means this directory already has 99 recorded files. A new
directory must be chosen or created.
“Play” is the only active button during while player is recording.
z Select record type
1. Tap “Mode” to enter into record submenu.
Record submenu:
2. Tap “Next“ to select “record type” submenu, then tap “Mode” to enter into it.
Record type selection interface:
6
Page 7

3. Tap “Next” to select the suitable record type, and tap “Mode” to confirm the selected type.
● Record type:
:High quality record,wav format,excellent timbre.
:Long time record, act format, ordinary timbre.
:High quality sound control, wav format (auto pause if there is no sound).
:Super long record time.
5. Press “Play” button to start recording.
6. To exit record mode hold the “Mode” button down.
6. Play the recorded files
1. Open the main menu
2. Press the “Next” button to select “sound mode”
3. Tap “Mode” button to enter into the playing mode interface
4. Then press “Play” to start playing
5. Select recording files with the “Next/Last” buttons
7. FM radio
1. Enter the main menu
2. Press the “Next” button to select “FM mode”
3. Tap the “Mode” button to enter “FM mode”
4. Search radio stations
Hold “Last/Next” button for 2 seconds, the player will scan through all stations. The player will
automatically save the 20 stations with the best reception. If want to stop the scan, just press the
“Last/Next” button.
5. Manual station search
Tap the “Next/Last” buttons.
6. Save the searched frequency.
Tap “Mode” button to enter into the FM submenu.
Then Tap “Mode” to store this station.
7. Retrieving saved stations
If there is one or more saved stations, you can change through them by pressing the “Play” button.
8. FM record function
You can instantly record FM Radio while listening to the actual broadcast.
Tap the “Mode” button and enter into the FM submenu, select high quality record or long-time
recording. Tap the “Mode” button to stop recording.
7
Page 8

8. System setting
z Important settings information about your Roq Box
1. Enter main menu
2. Press “Next” to select “System setting”
3. Tap “Mode” button to enter into “System setting”
z Different Settings
(recording time)
(backlight time)
(backlight mode)
(language choice)
(shutdown setting)
(reread setting)
(balance adjust)
(exit)
z Detailed Settings Instruction
“Recording time” setting
1. System setting interface
2. Tap mode and enter the “Recording time” window
Recording time:
3. Use the VOL buttons to change year and time.
4. Press the “Next” button and “Last” button to adjust the numbers.
5. Press “Mode” to exit after finished adjusting.
“Backlight time” setting
1. System setting interface
Configure the recording time
Set how long the backlight stays illuminated for
Choose color of backlight
Choose language
Set time limit for auto-shutdown
Configure the A-B function setting
Change the brightness of the screen
Exiting the current interface
2. Press “Next” to select “Backlight
time”:
8
Page 9
3. Tap “Mode” to enter into backlight
time change window:
Note:To quickly exit any of the settings menus press the “Play” button.
4. Press Next/Last to adjust the time
5. Exit after finished adjustment
9. General Data Storage
The data storage function works similar to any removable USB mass storage device. Connect
the player to the computer via the USB cable and allow the computer to recognize the presents of the
player. This product can receive power via the USB connection, and does not need a battery when
connected to a computer supplying power. When the player is connected to a computer the player will
automatically be in transfer mode, to utilize other functionalities of the player while connected to a
computer, press and hold the “Mode” button until main menu appears.
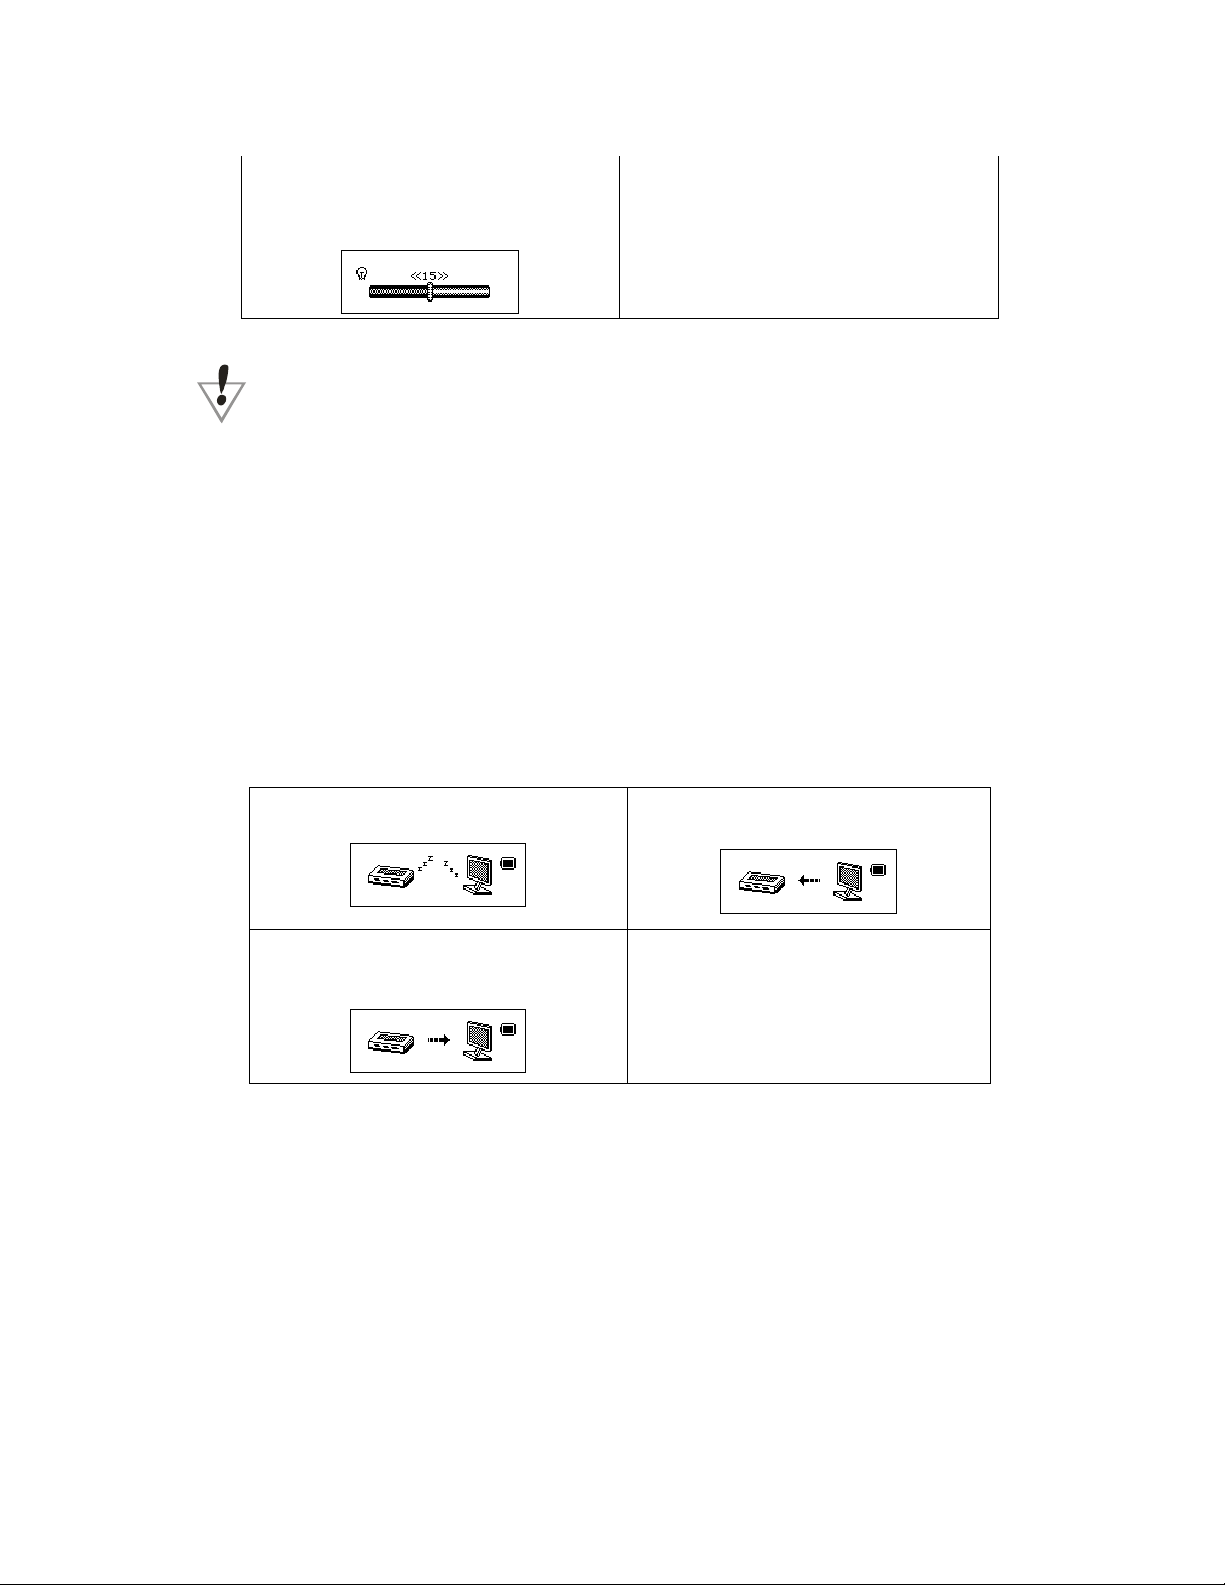
There are three displays when player is connected to a computer in transfer mode:
1.waiting
2.downloading
3.uplodoading
Other setting
z Select different directory(Stop submenu)
The player offers the user the ability to organize files on player by using
subdirectories. The directories should be created on the computer before they
are implemented on the player. The Roq Box has nine different one-class subdirectory.
9
Page 10
1. Choose an interface (the below
example is for sound mode),
2. Press Mode button once to enter
into submenu mode
3. Choose “Local Folder” and press
Mode button to enter into folder
selecting interface
5. Press the Mode button to select
highlighted folder.
Note: Music, record, and play mode all have their own folders and directories. Each mode may
only use it respected directory.
4. Press Next /Last button to
highlight a folder from the directory.
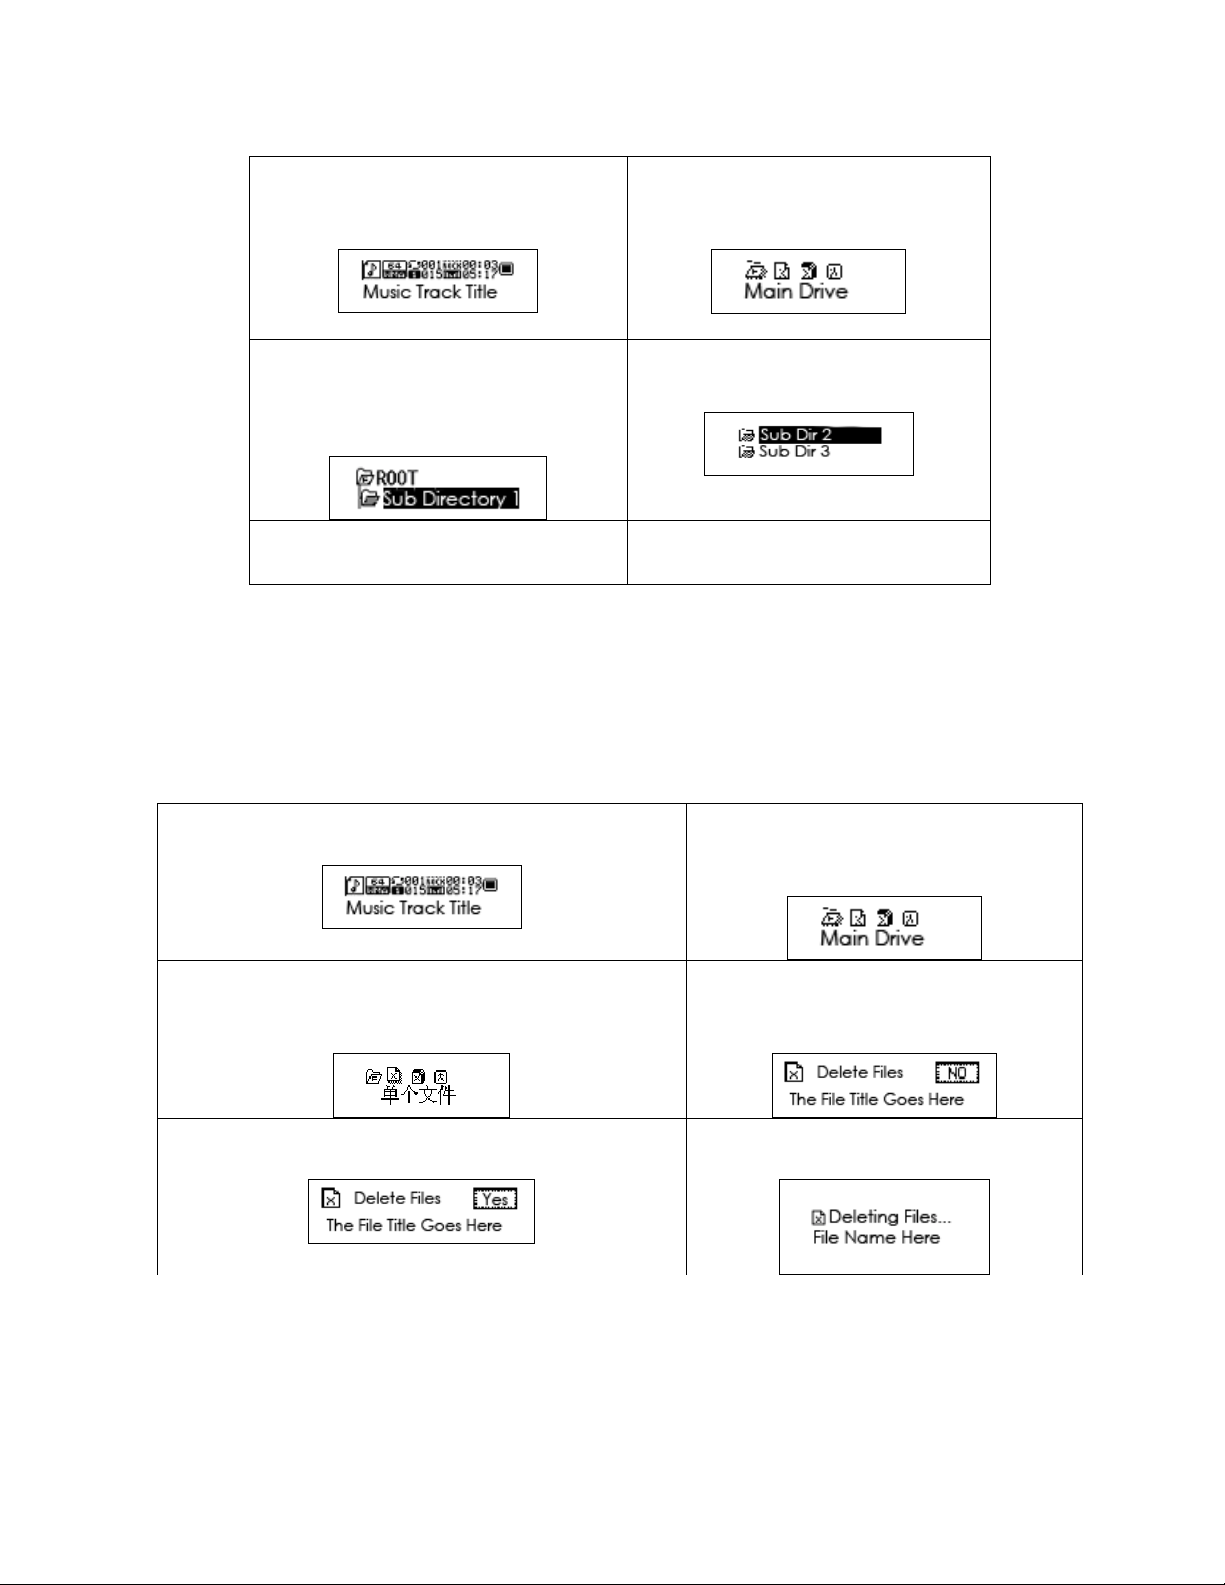
z Delete files(Stop submenu)
Under music mode, play mode, and FM mode, you can delete the files and saved station.
1.Under stop interface(FM mode does not have a stop
interface)
2. Press Mode button to enter into
submenu.
3. Press the Next or Last button to select the “delete”
or “delete all” in the menu.
5.Press Next key turn “NO” to “YES”.
“Delete All” will delete all the files under the current directory in the current mode. For example if
you choose to “Delete All” when in music mode, this will not affect files under Record mode. Delete in
FM mode only deletes the saved radio stations.
10
4.Tap Mode key enter the delete
interface
6.Press Mode key confirm ,begin to
delete.
Page 11

When deleting items on the player through the computer interface. Please make sure, when
disconnecting the player, that the player is disconnected from the USB cable and only after the player is
disconnected, is the cord to be disconnected from the computer. Otherwise the files may not be
deleted properly.
z Play mode(Playing submenu)
There are a number of playing modes you may choose from when you want to start playing
music. The modes are as follows: Repeat, Shuffle, and Intro.
○ Repeat
Plays each song once, and then moves on to
( Normal )
( Repeat One ) Plays one song repeatedly
( Folder )
( Repeat Folder )
( Repeat All )
○ SHUFFLE
( Random ) Plays songs chosen at random.
○ INTRO
(Intro)
next song. The player will stop playing when
it has reached the end of play list.
Plays only music in selected fold, under
normal setting.
Plays music in a selected folder, in order of
arrangement, under a continuous cycle.
Plays all music in respective order, under a
continuous cycle.
Plays only first 10 seconds of songs, and then
moves on to next song.
z Play speed(playing submenu)
When playing music files (such as MP3 files) you can choose different speeds (as in quick or
slow) to play music at.
1. When playing, tap “Mode” button to enter into playing submenu
2. Press “Next” button to select “ playing speed “ menu
3. Tap “Mode” to enter into “playing speed” menu.
4. Press “Next” for quicker play, Press Last for slower play.
Note: All songs are affected by the speed setting.
11
Page 12
z Reread mode(playing submenu)
■ Directly press “REC/A-B” to enter into.
Please refer to the following operation.
■ Enter into through the playing submenu.
○A-B Reread – This function allows you to repeat a segment of audio between points A
and B.
1. A-B Reread can only be used for digital audio files that are stored on the player.
Due to the limitation of this function it can only be used in Music mode or in Play
mode, because that is where you can get access to those types of files.
2. Under Music or Play mode, tap the “Mode” button to enter into the submenu for that
mode.
3. Press “Next” to select the Reread icon.
4. Tap “Mode” button to enter into the Reread mode. Now that you are in the Reread
mode the letter “A” will be flashing in the Playback icon
starting point in the play back segment, and when it is flashing it means that the player is ready
for you to confirm the starting point.
5. To confirm starting point press the “Next” button. Now you will notice that the “B” in
the Playback icon
confirm the ending point of the play back segment.
6. To confirm the ending point press the “Next” button.
is flashing. This indicates that the player is ready for you to
. The “A” represents the
Under reread mode, you can set the “Play speed “ by directly pressing VOL+ or VOL-
●Troubleshooting
No power If the battery install correctly
No voice in the earphone
Strange words on the screen Please insure you select the correct language
FM not getting reception
Download music abnormal Check to see if player is correctly connected to the
Please make sure the unit is not on hold.
Please insure the volume is not on the “0” state and
the earphones are connected correctly.
Please keep the earphone clean
Adjust station and check you location. Any device
which emits a energy field may disrupt reception.
Please note that the earphones function as an
antenna.
computer via USB cord. Check to see if operating
system requires additional drivers. Check to see if
there is sufficient memory free to transfer file.
12
Page 13

Specification
Dimension 31mm×70mm×17mm
Weight
Display
Connect PC
Memory
Power 10 hours playing time
Recording
MP3、WMA、WMV、ASF
FM radio
Music format
Use temperature -5 to 40
Chinese/English display
System requirement
Note: The design and specification of this product are subject to change without any prior notice.
25g(not include battery)
lattice(132×32)LCD、EL backlight
High speed USB1.1 (read 1000K Byte,write 800K Byte)
Flash memory:128M-256M
Sampling rate 8KHz
Recording format
Recording time
Earphone max output
MP3 bit rate 8K bps – 320K bps
WMA、WMV、ASF bit rate
Frequency respond 20Hz to 20KHz
SNR 85dB
Distortion degree
Frequency range 76MHz – 96MHz / 87MHz – 108MHz
Storage Station Q’TY
Earphone max output
SNR 45dB
MP1、MP2、MP3、WMA、WMV、ASF、WAV
Simplify Chinese、English、Traditional Chinese
Windows98/SE/ME/2K/XP、Mac OS 10、Linux 2.4.2
WAV(32K bps)、ACT(8K bps)
35 hours(ACT,128M Flash)
(L)10mW+(R)10mW(32Ohm)
5K bps – 384K bps
20+20
(L)10mW+(R)10mW(32Ohm)
13
 Loading...