

Page 1

Page 2
2
High Power Indoor PAR, 18x RGB 3W
User Manual
Page 3
3
CAUTION! READ BEFORE USE!
For your own safety, please read this user manual carefully before you
initially power up your xture.
● Examine packaging to ensure all parts included
● Disconnect all power and other cables prior to servicing
● Always make sure to provide adequate ventilation
● Keep this device away from rain and moisture!
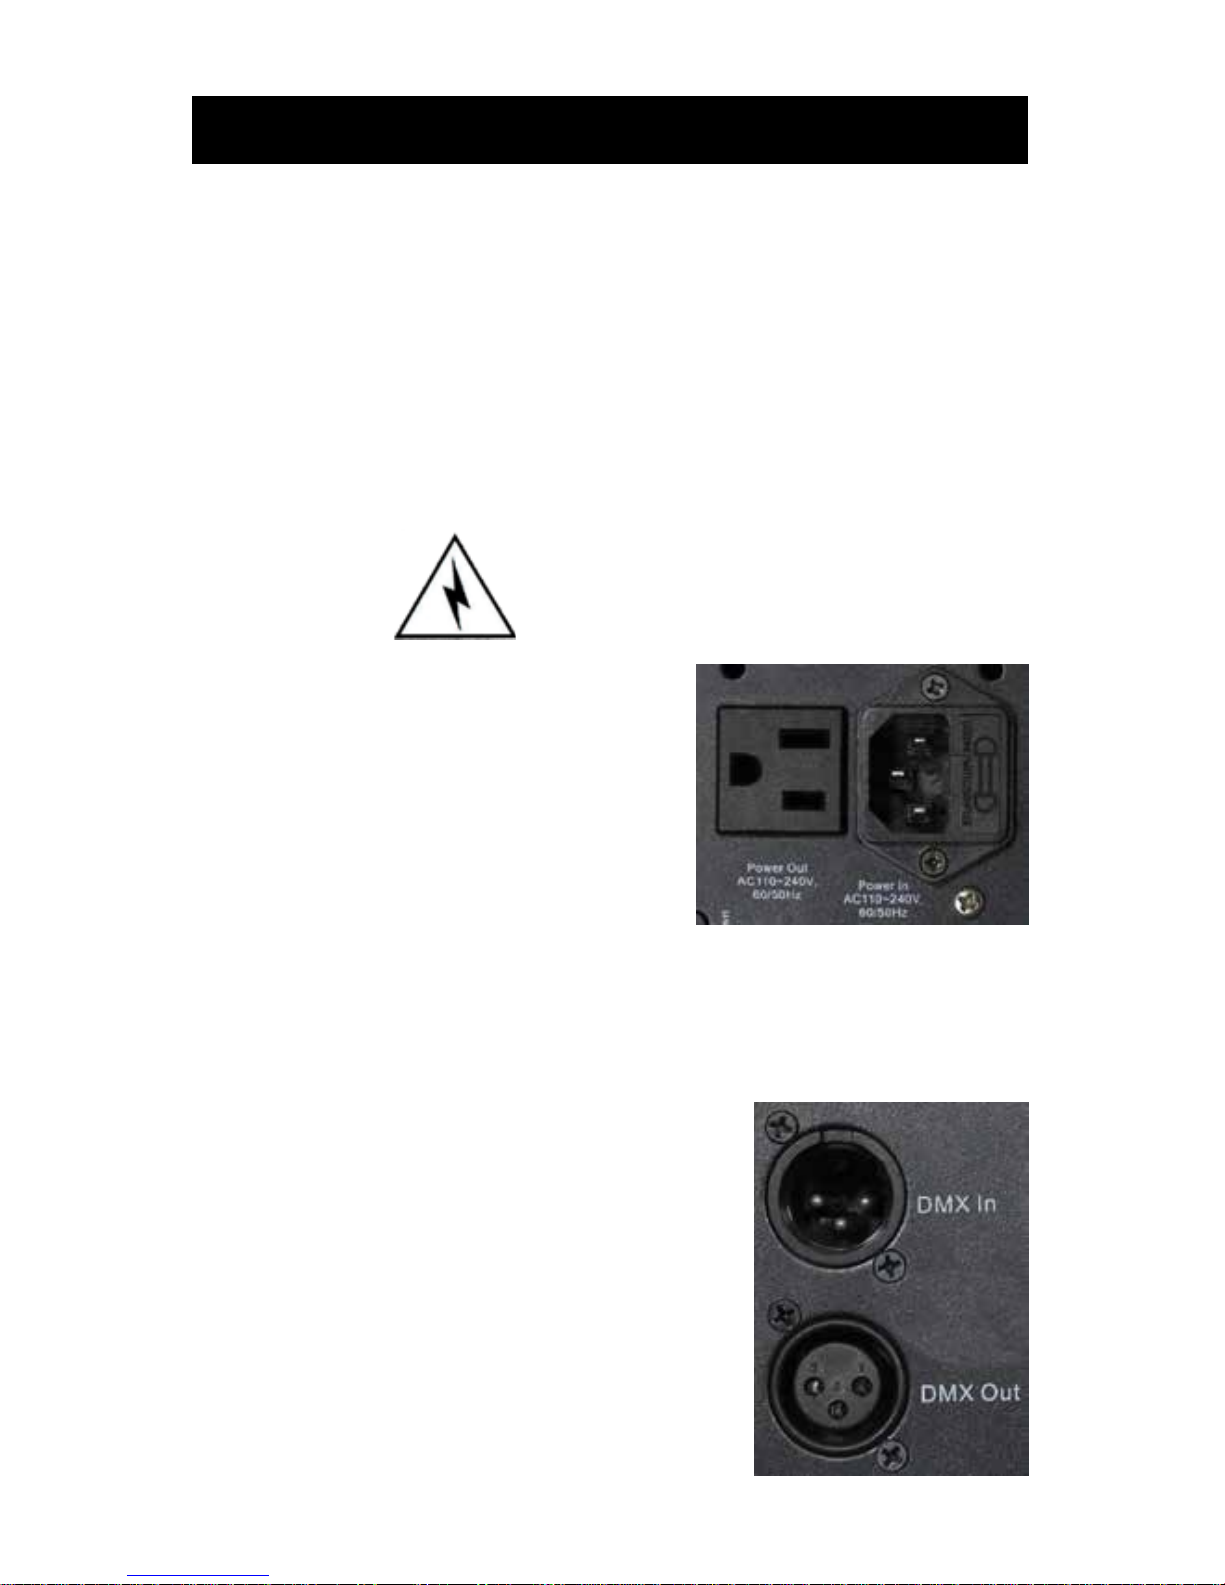
POWER
Be sure you have the proper power
cables for the xture. A 120v cable with a
Standard PC Power connector is required,
and included with the unit. If the xture
expereiences a power failure, check the fuse
located on the power input port.
There is also a power Output plug available
for daisy chaining located next to the power
switch.
CONNECTIONS
Remote control and linking is available via
four operation modes: DMX 512 Control, Auto
and Master/Slave, and Sound Active modes to
form different led effects, and DMX-512
connection to connection between xtures.
(Input and Output Ports seen here. See the DMX
page for cabling details and Daisy-chaining
specics on Page 10).
SAFETY INSTRUCTIONS:
Page 4

4
FEATURES:
● RGB Color Mixing
● Color Strobe Effect
● Color Mix Effect
● LED Chases (Adjustable Speeds)
● Electronic Dimming 0-100%
● Operating Modes: Sound Active, Master /
Slave, or DMX Control
● DMX-512 Protocol Compatible (3, 6 & 7
DMX Channels)
● Digital Display for Address and Function
Settings
● IR Remote Control
Please Note: Specications and improvements in
the design of this unit and this manual are subject
to change without any prior written notice.
Page 5

5
DMX Control and Chain Connections:
You can connect the DMX-output of a controller directly to the DMX-input of
the xture. If connecting mulitple units, be sure to use the proper cabling.
TERMINATION NOTE: These units are not self terminating. If the last xture
in the DMX chain will need to be terminated with a Terminator. (page 9)
● Voltage: 100V~240V, 50Hz~60Hz
● LEDs: 18 x 3W RGB LEDs
● Power Consumption: 65W
● Weight: 2Kgs.
● Dimensions: 257 x 91 x 294mm
● Colors: RGB Color Mixing
● DMX In and Out
● Chainable power ports
● LCD Control Screen
● Beam Angle: 28 degrees
TECHNICAL SPECIFICATIONS:
Page 6
6
MENU / CONTROLS:
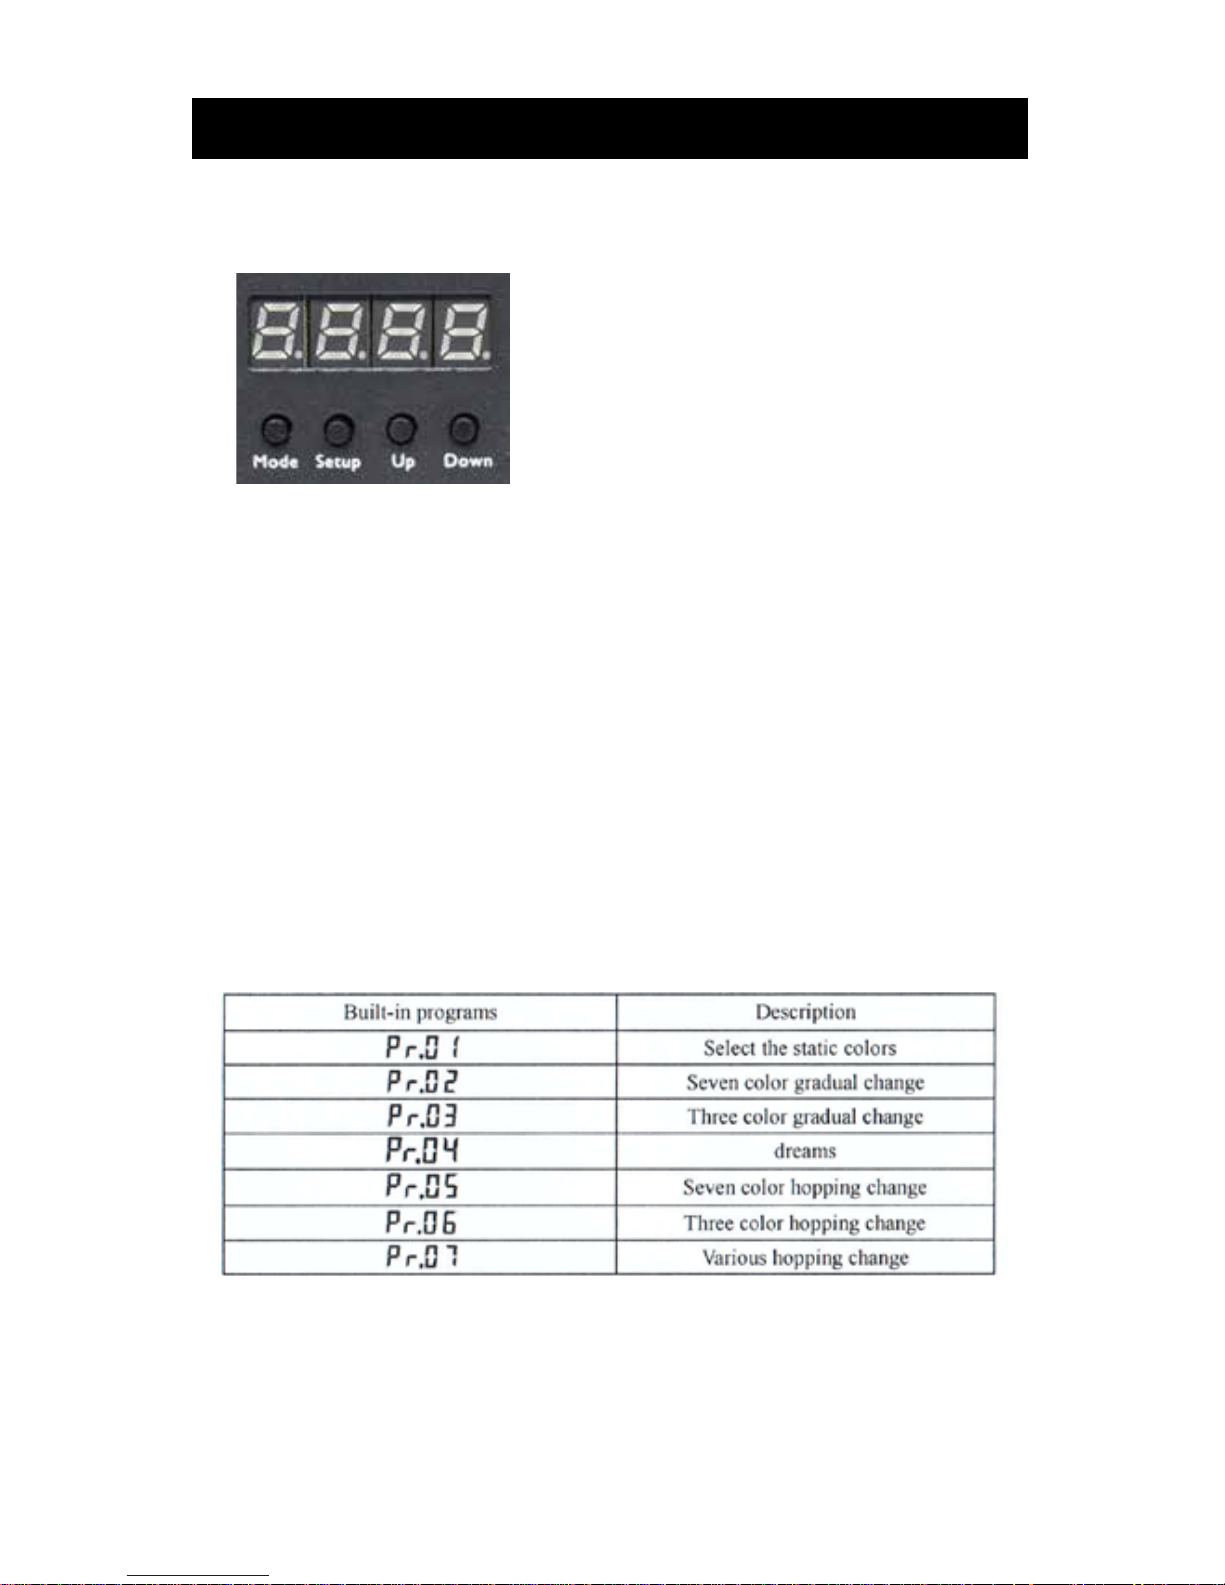
SETUP MENU: You can easily setup and control your X-PARTRI18 RGB
LED Par from the on-board LCD screen. Using the MENU, SETUP, UP and
DOWN, buttons, you will nd the following options to select and modify:
LED DISPLAY OPERATION - These instructions will provide access to the
setup and control of the DMX light.
1. AUTO MODE
Press the MODE button until
AUTO displays on the Menu screen. The xture
comes with six built-in programs titled
Pr.02 - pr.07. where the user can
set the operation speed and strobe speed. The presets will run in loop until
stopped.
2. BUILT-IN PROGRAM SELECTION
You can access several levels of programs and different styles by setting
the program number, then pressing SETUP button to select programming
options.
To acces the pre-saved programs, press the MODE button until you
see
Pr.0 1. Then use UP or DOWN buttons to choose betwen programs.
Select
Pr.02 - pr.07 and then press SETUP. The UP and DOWN buttons
now navigate within these Program’s choices and settings. You can now
scroll through the following options: Now press SETUP and you will now see
F500 in the display eld indicating the program speed. Press UP or DOWN to
select a setting from
f500 to f599.
The Control Screen with MENU,
SETUP, UP, and DOWN, and
ENTER Navigation buttons.
Page 7
7
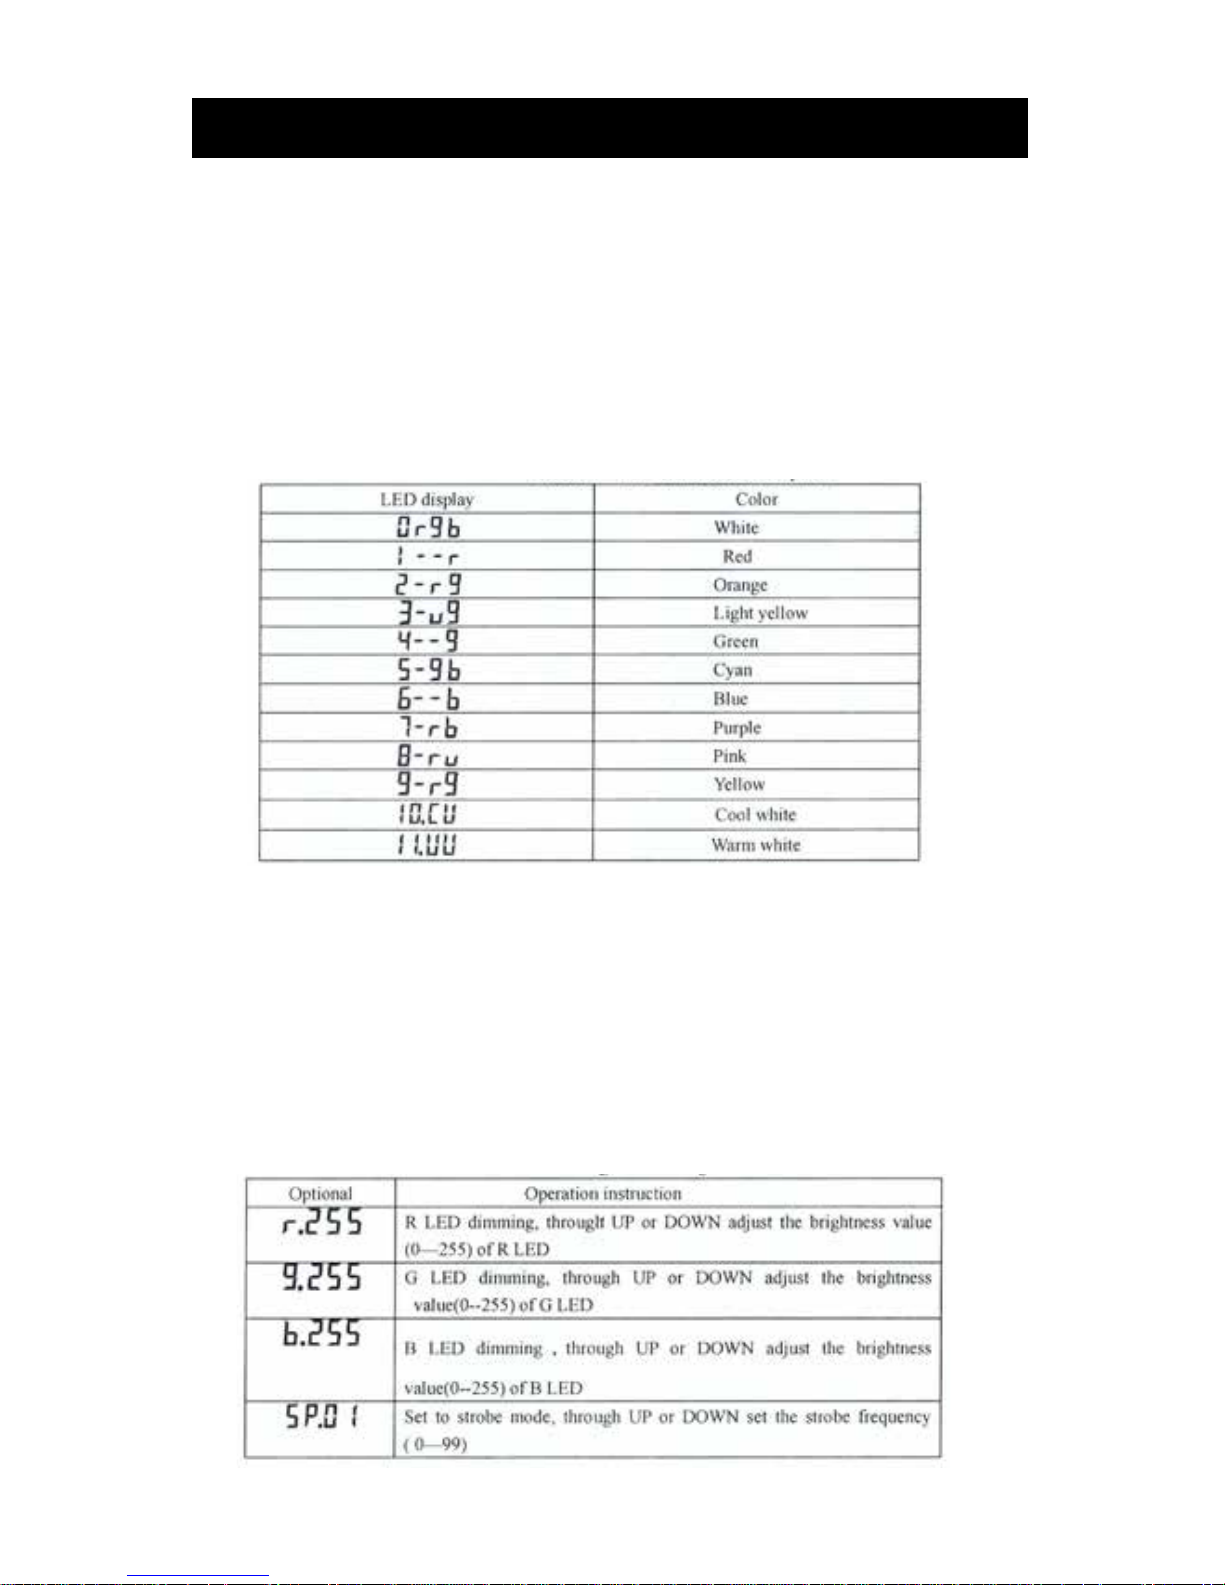
3. DIMMING MODE
Press the MODE button until
COLR displays on the Menu screen. Then re-
peatedly pressing the SETUP button will scroll through 4 selections, RED (
R),
GREEN (
G), BLUE (B), and STROBE (SP). Each of the R, G, and B selec-
tions have 0-255 levels of dimmer, and the Strobe has speed settings from
0-99.
MENU OPTIONS CONT’D:
For setting the Operation Speed you can scroll through SP.0 1 to the
highest speed at
Sp.fl (1-100). Press SETUP again to control the Strobe
Speed as before from
f500 to f599.
CHOOSING COLORS:
To select a Static Color, press the MODE button until you see Pr.0 1.
Then use UP or DOWN buttons to choose betwen colors.
They are listed as:
Page 8

8
MENU OPTION CONT’D:
6. MASTER/SLAVE MODE
Press the MODE button until
SLAV displays on the Menu screen. The xture
will be slaved to which ever lead device is being controlled.
7. RESTORE FACTORY SETTINGS
When xture is off, press the MODE and SETUP buttons at the same time
and hold while turning the xture power on. Hold the buttons until
rSEt
displays and ashes on the Menu screen.
FROM IR REMOTE: Pressing BLACK OUT, then 9, 8, and 7 will also reset
the xture to default factory settings.
Note that this xture has DMX Auto Detection, so regardless of any other Mode
setting, if there is DMX signal present, it will automatically turn on it’s DMX Mode.
When DMX is no longer present, the xture returns to previous Mode setting
(infrared remote control also disabled when in DMX Mode).
4. SOUND MODE - This menu will let you select your desired Sound Mode
Setting.
Press the MODE button until
SUND displays on the Menu screen. The menu
will display the parameters
SU.00 - SU.3 1. where the user can set the level of
Sound sensitivity the xture.
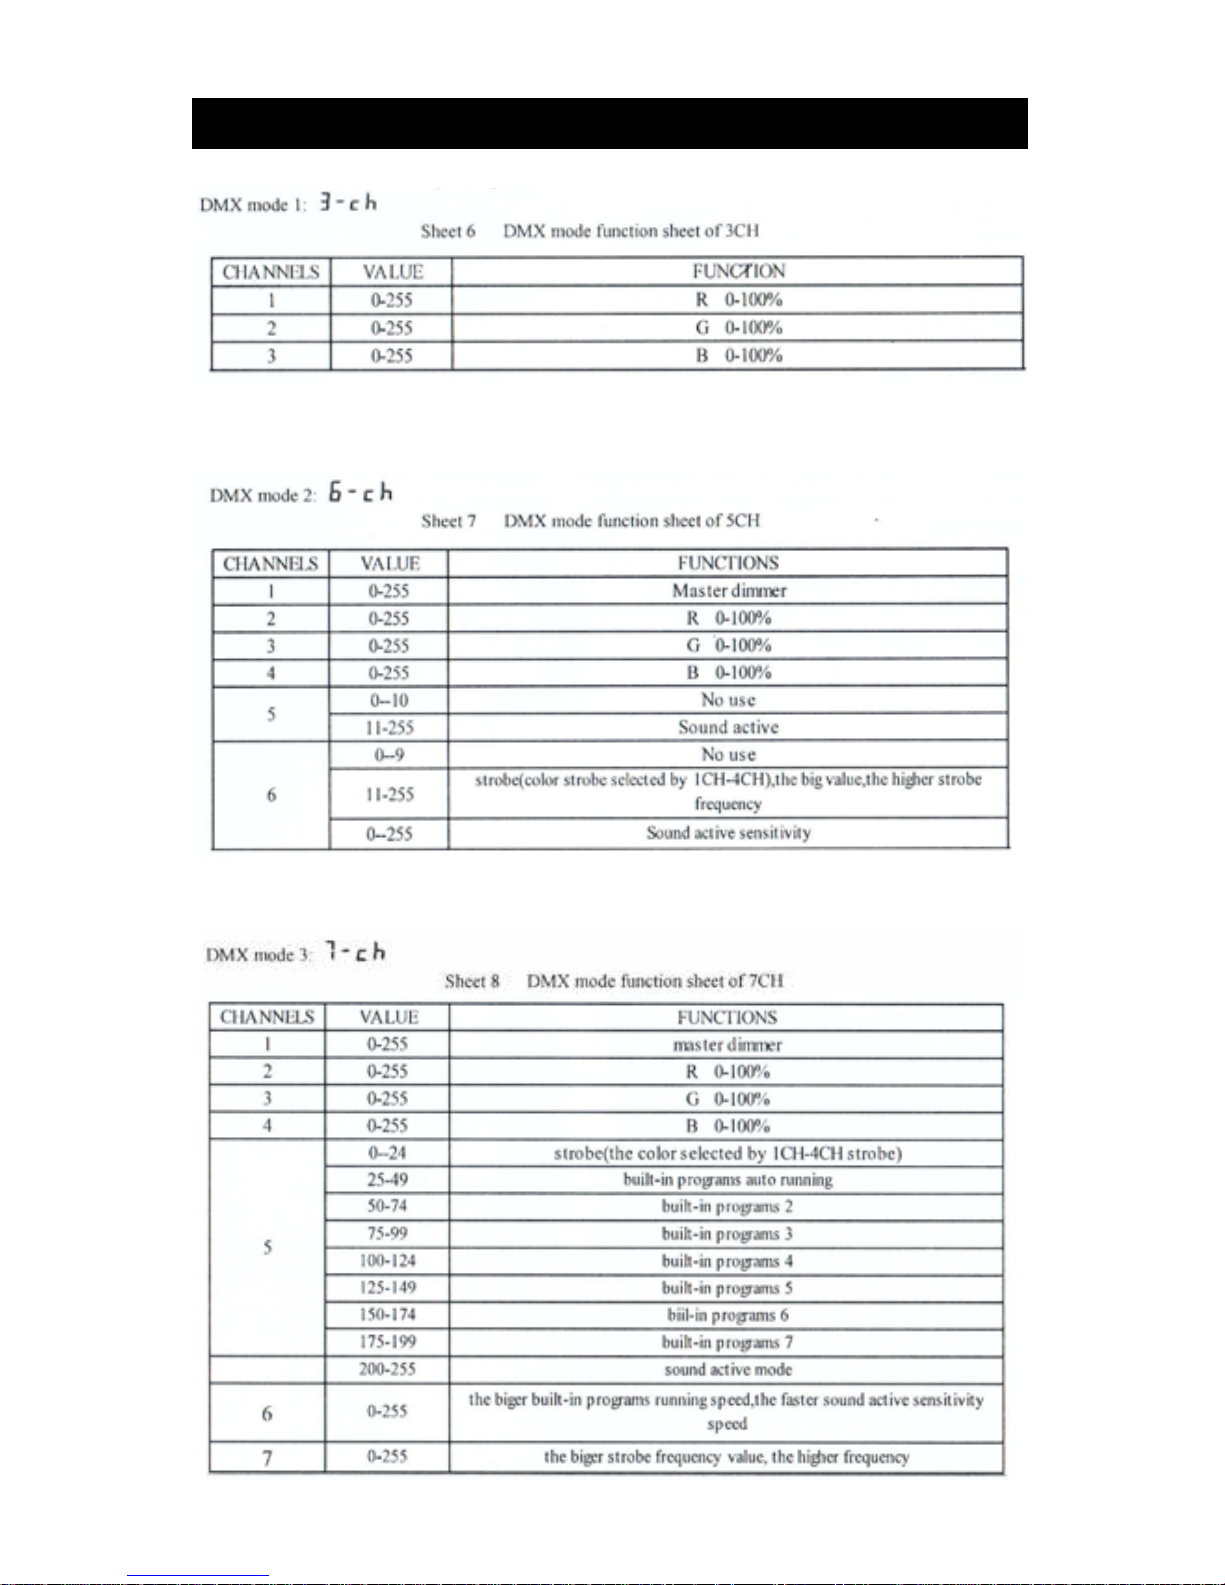
5. DMX MODE
This menu will let you select the DMX mode.
For Manual selection, press the MODE button until
d
.
001
displays on the
Menu screen.
The DMX Channel can be selected by pressing the UP and DOWN buttons
and selecting
d
.
001
- d.
512
.
More Channels can be used by pressing the SETUP button and selecting
either
3-ch
,
6
-ch
,
or
7-ch
.
Page 9
9
DMX SETUP
Page 10
10
DMX SETUP CONT’D:
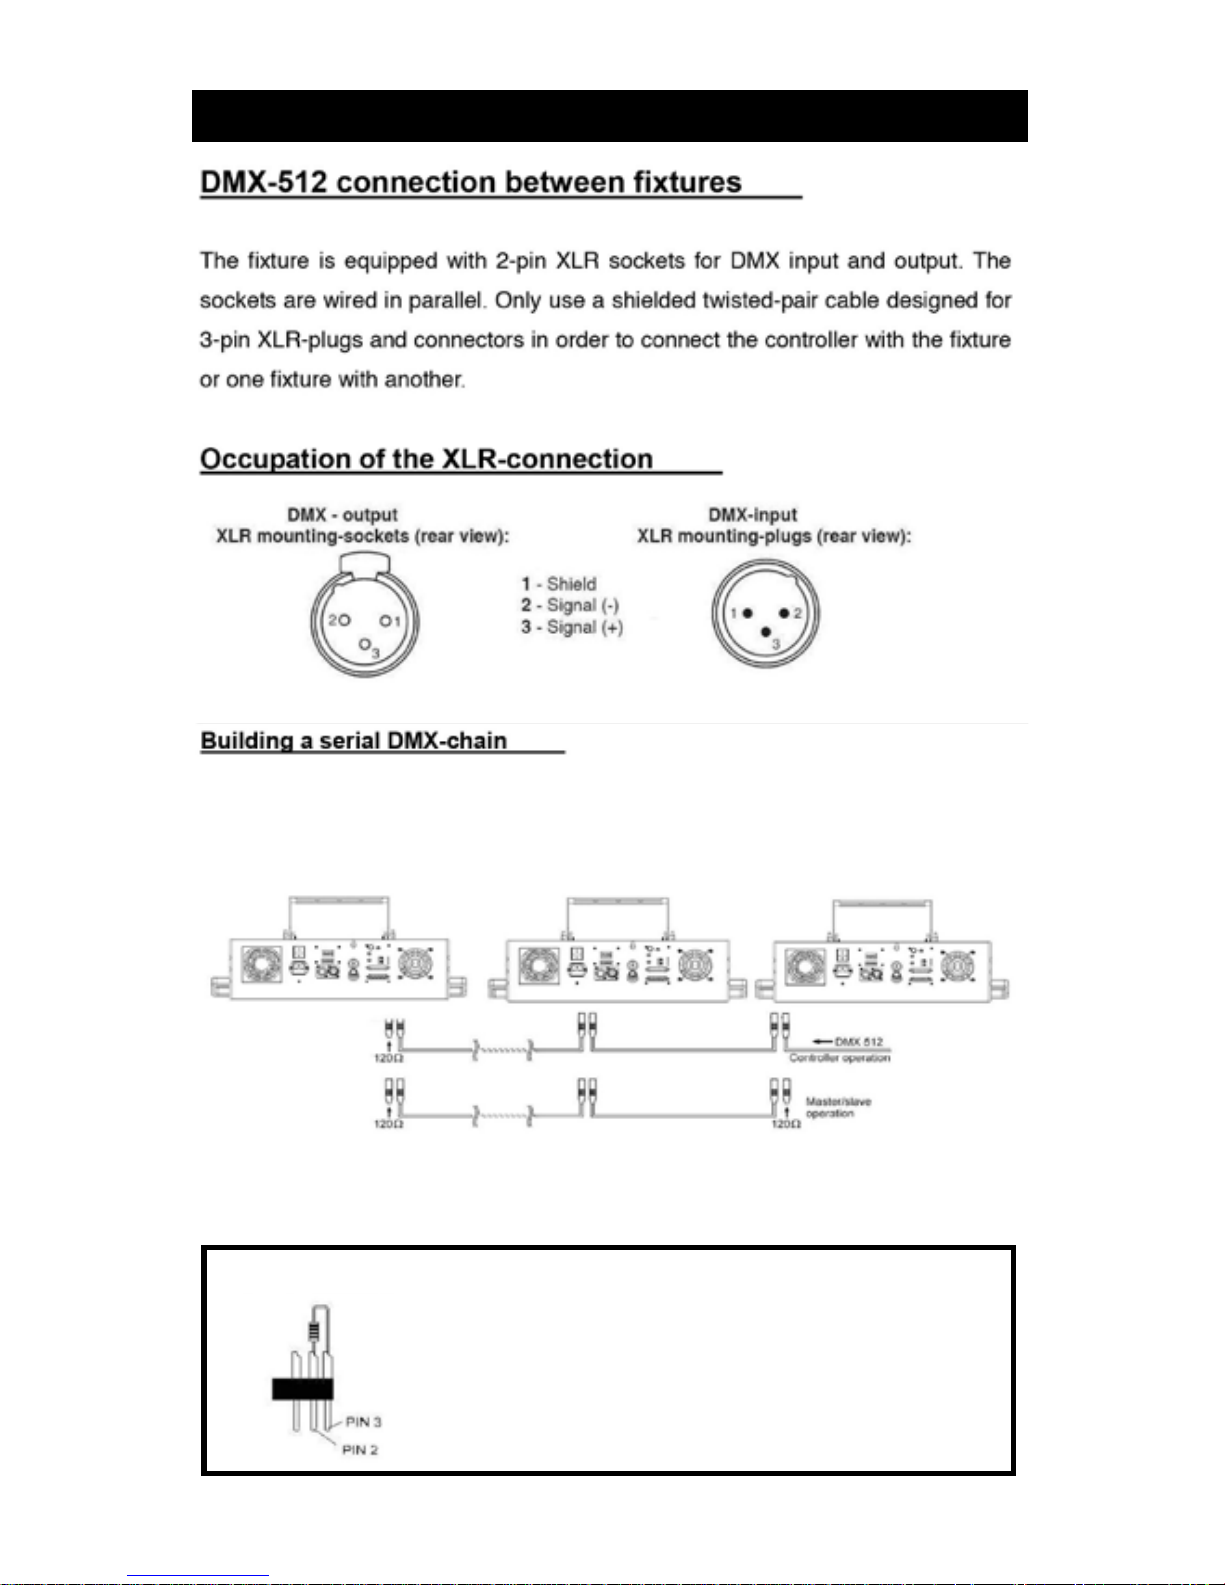
[To make Terminator; solder a 120 resistor between
Signal (–) and Signal (+) into a 3-pin XLR-plug and
plug it in the DMX-output of the last xture.]
NOTE: The last or nal xture in the DMX chain MUST have a terminator
plug. A terminator is an XLR type plug that does not connect to a cable.
Assembling a DMX Chain is as simple as connecting two more more
xtures with DMX In/Outs with the proper DMX specic 3-pin XLR-style
cables.
MAKE A TERMINATOR:
Page 11
11
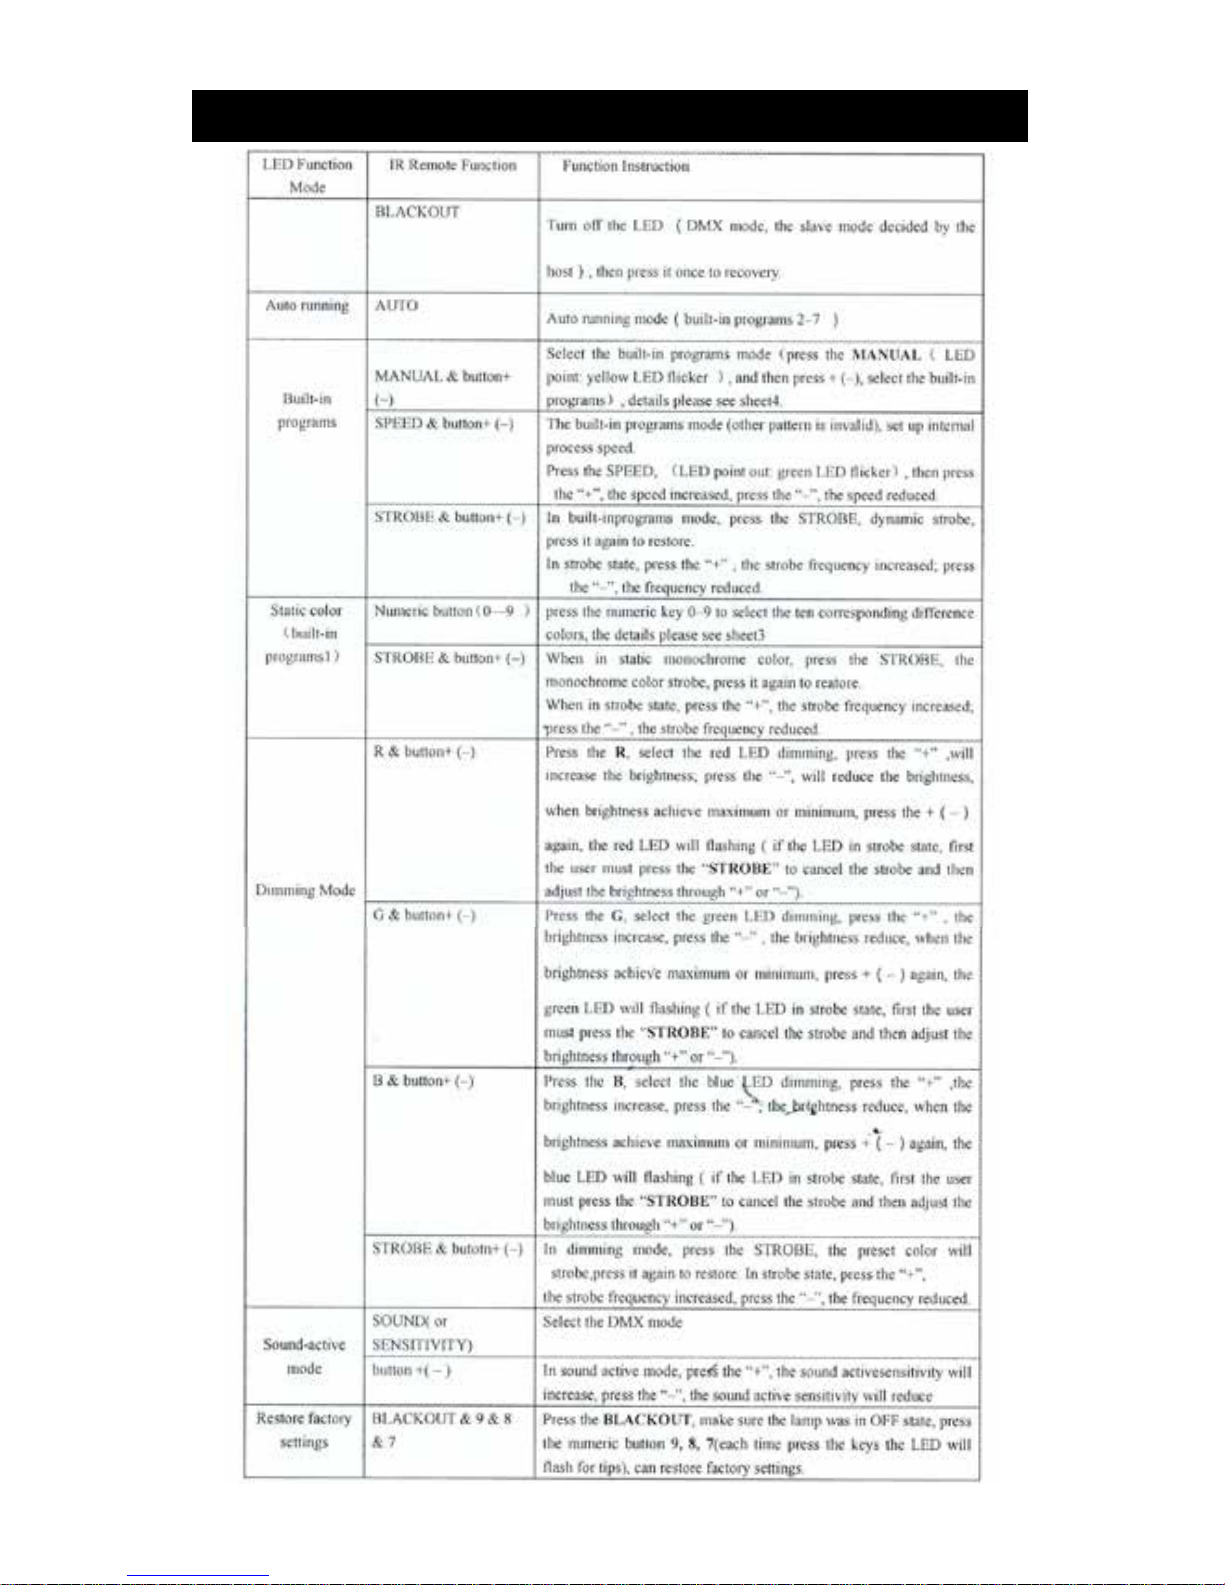
INFRARED REMOTE FUNCTIONS:
Page 12

12
(NO DIRECT SALES, DEALERS AND DISTRIBUTORS ONLY)
Please Register your product warranty on ProXDirect.com,
submit your testimonials and setup photos to our website,
& Tag us on your social media websites.
#proxdirect
 Loading...