

Page 1
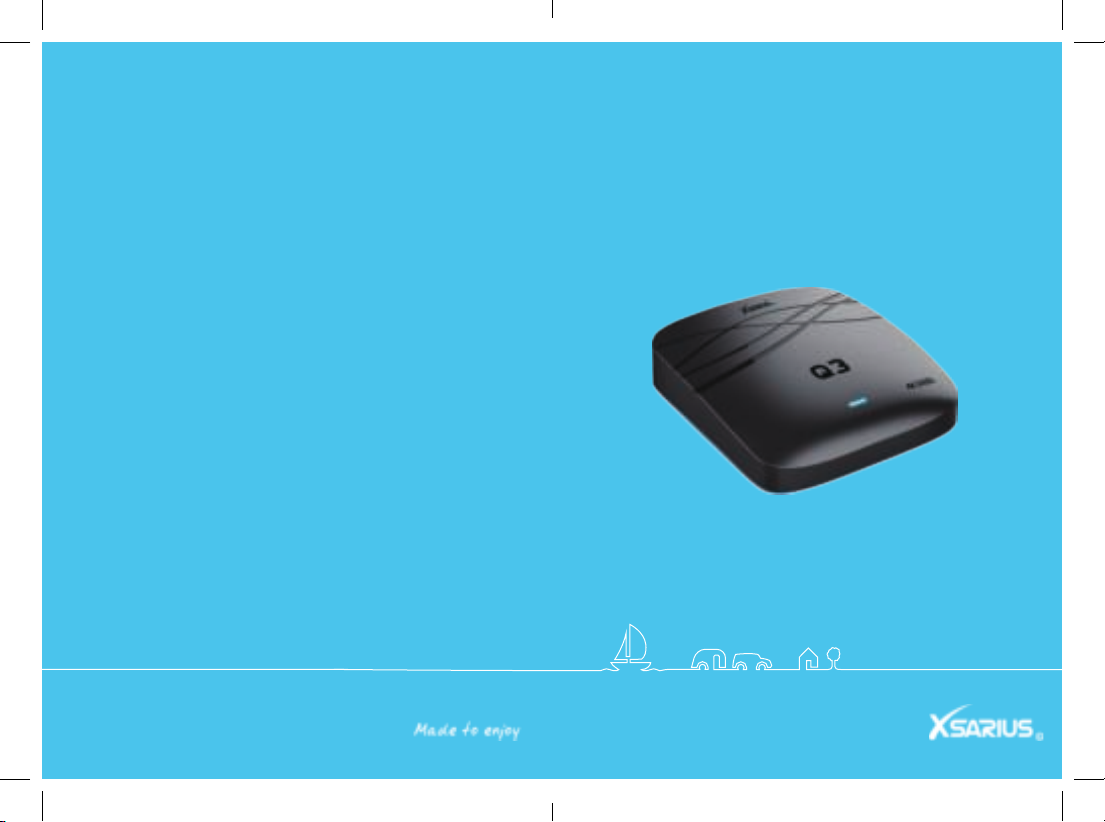
Q3
User manual
Handleiding
Anweisung
Manuel d'instructions
www.xsarius.com
2
Page 2
© Copyright 2021 AD B.V.
I. Reference 6
1.1 Safety Instructions 6
1.2 Disposal instructions 6
7
II. Product Overview 7
2.1 Front Panel 7
2.2 Rear Panel 8
2.3 Bottom plate 9
2.4 Remote Control Unit (RCU) 10
III. Main Menu 12
3.1 Premium TV 12
3.2 YouTube 12
3.3 KODI 12
3.4 Play Store 12
3.5 FileBrowser 12
12
VI. APPS 13
4.1 App-installer & Applications 13
4.2 Gallery 13
4.3 UPDATE 13
4.4 MoviePlayer 13
4.5 Media Center 13
V. Setting 15
5.1 Advanced Setup 15
5.2 Display 15
5.3 Update 15
5.4 Factory Default 15
5.5 Language 15
5.6 Time 15
5.7 Uninstall App 15
5.8 System Info 15
Content
4
Page 3
© Copyright 2021 AD B.V.
Safety Instructions
Please read the safety instructions carefully before using the
Xsarius Q3. The manufacturer takes no responsibility for incorrect handeling of the Xsarius Q3.
*
*Equipment should not be exposed to liquids or placed or placed
*Avoid any type of physical impact.
*Protect device from damp, excessive heat or smoke environment.
*Do not open or disassemble this device
Reference Reference
Disposal Instructions
Separate the product from other types of waste and recycle the
product. This procedure protects the environment and avoid
damages to our health.
1. When the crossed-out wheeled bin symbol is attached to a product it
means the product is covered by the European Directive 2002/96/EC.
2. All the electircal and electronic products should be disposed of
separately from the municipal waste stream via designated collection
facilities appointed by the goverment or the local authorities.
3. The correct disposal of your old appliance will help prevent potential
negative consequences for the environment and human health.
4. For more detailed information about disposal of your old appliance,
you purchased the product.
6
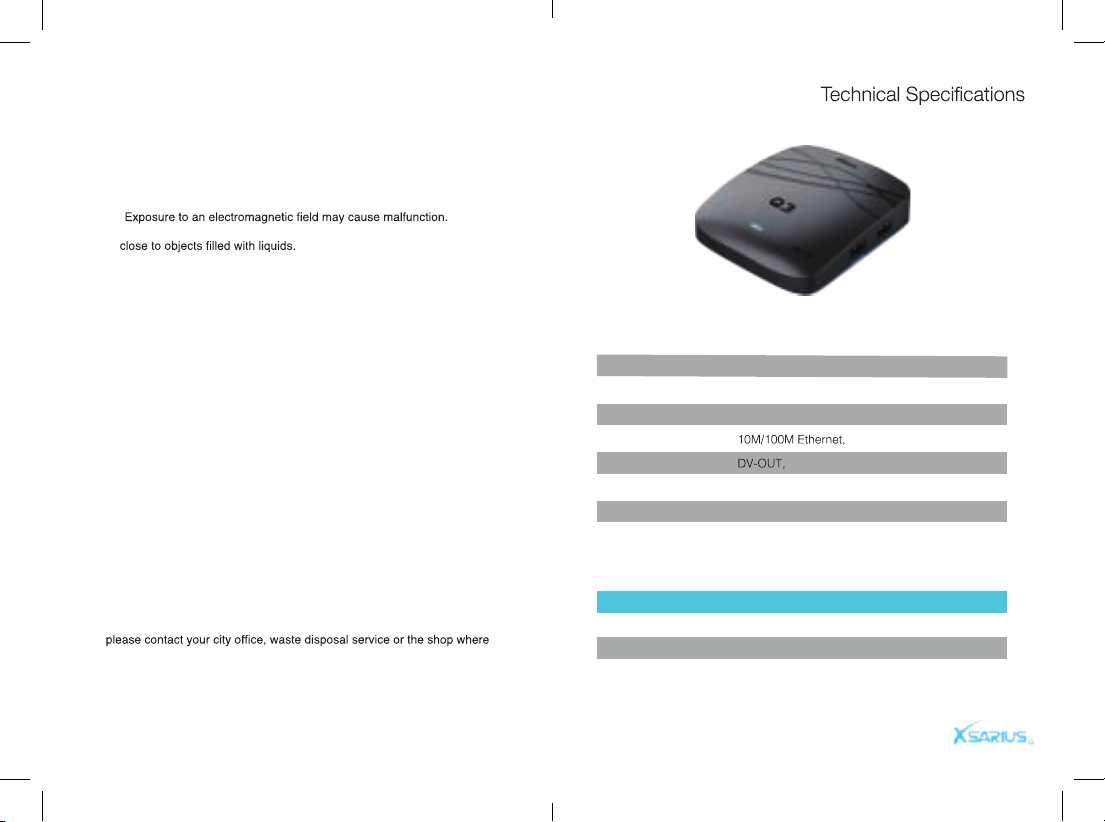
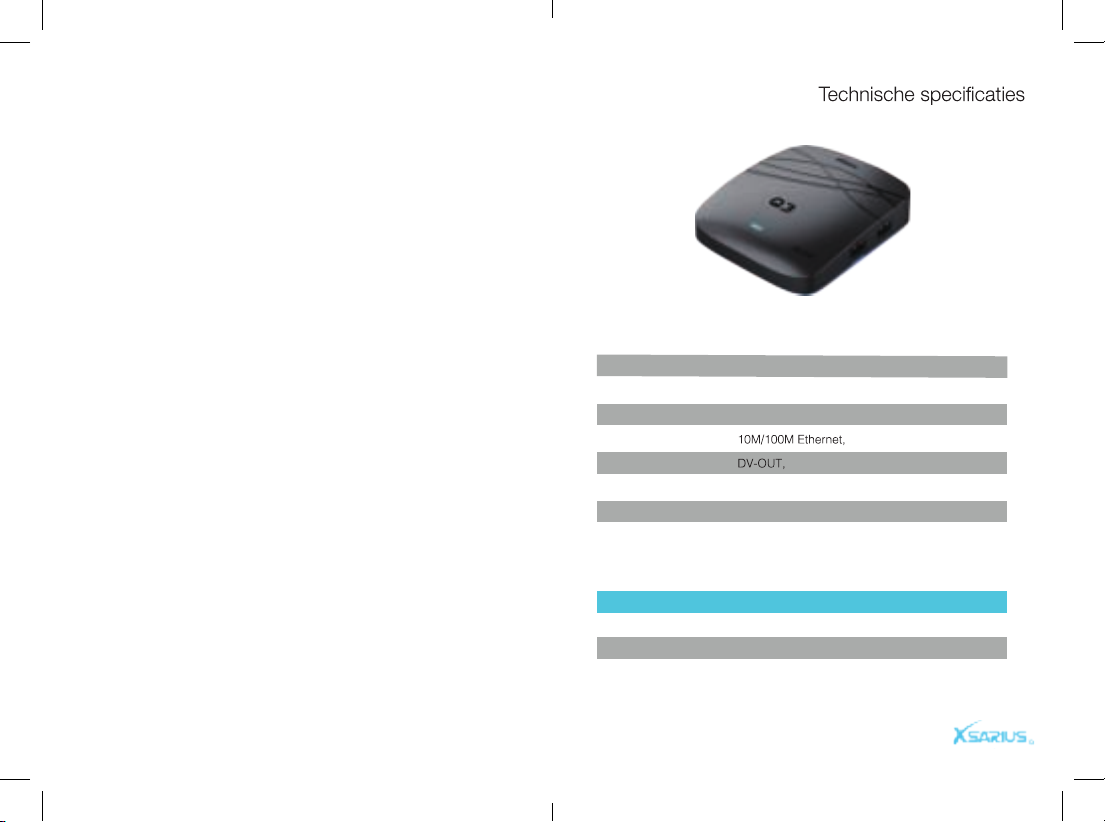
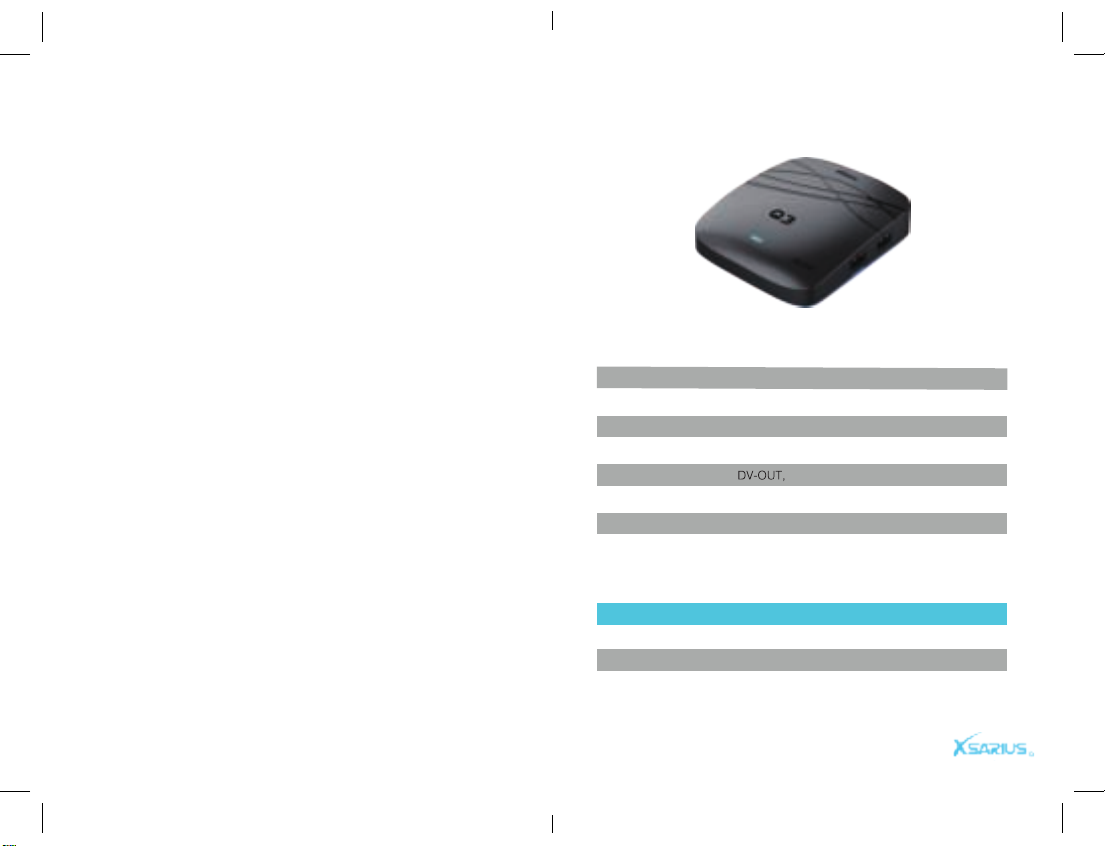
CPU
RAM
FLASH
USB Interface
Network input
Audio output
Video output
Operation system
Power consumption
Mode
Working
Standby
Shutdown
Quad-Core Cortex-A55
1GB DDR4
8GB
USB 2.0*1 USB3.0*1
Built-in WiFi Module 2.4G
Left and Right output, SPDIF
HDMI 2.1
Android 9.0
12W
Status
Blue Light
Red light
Off
Page 4
© Copyright 2021 AD B.V.
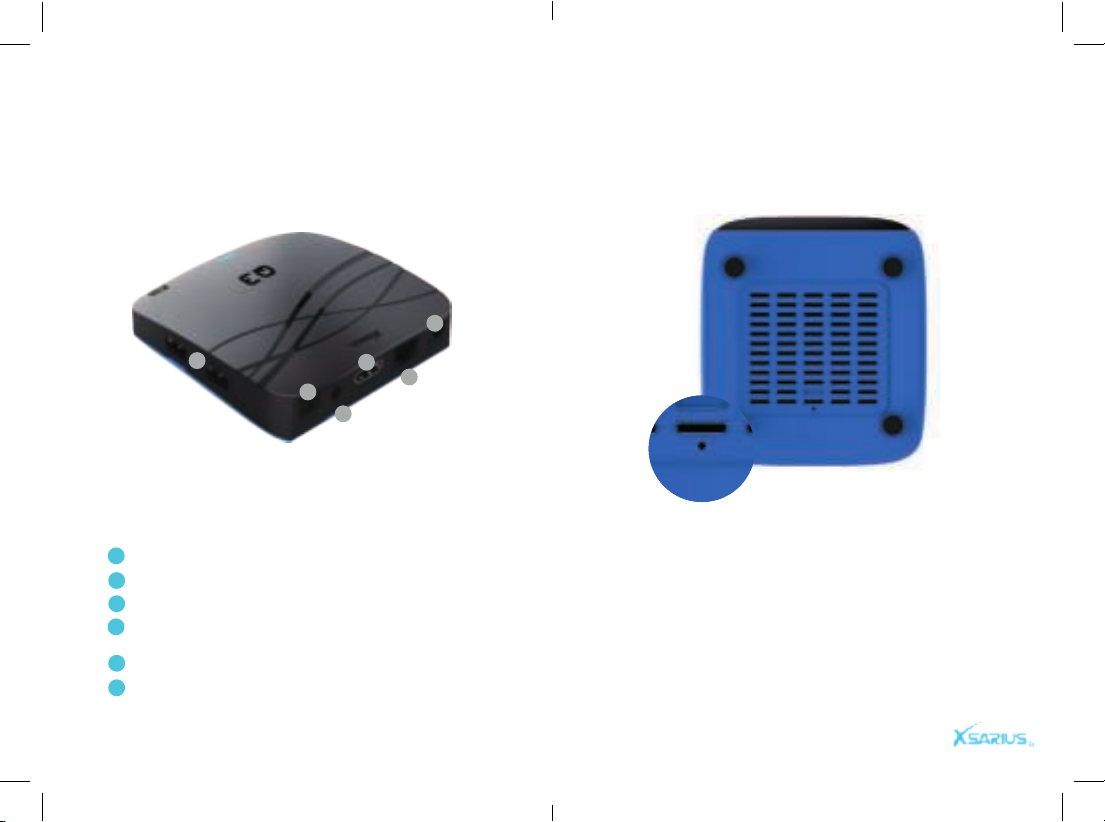
Rear Panel Bottom plate
Product overview Product overview
1
1
2
3
4
5
6
8
6
3
5
4
2
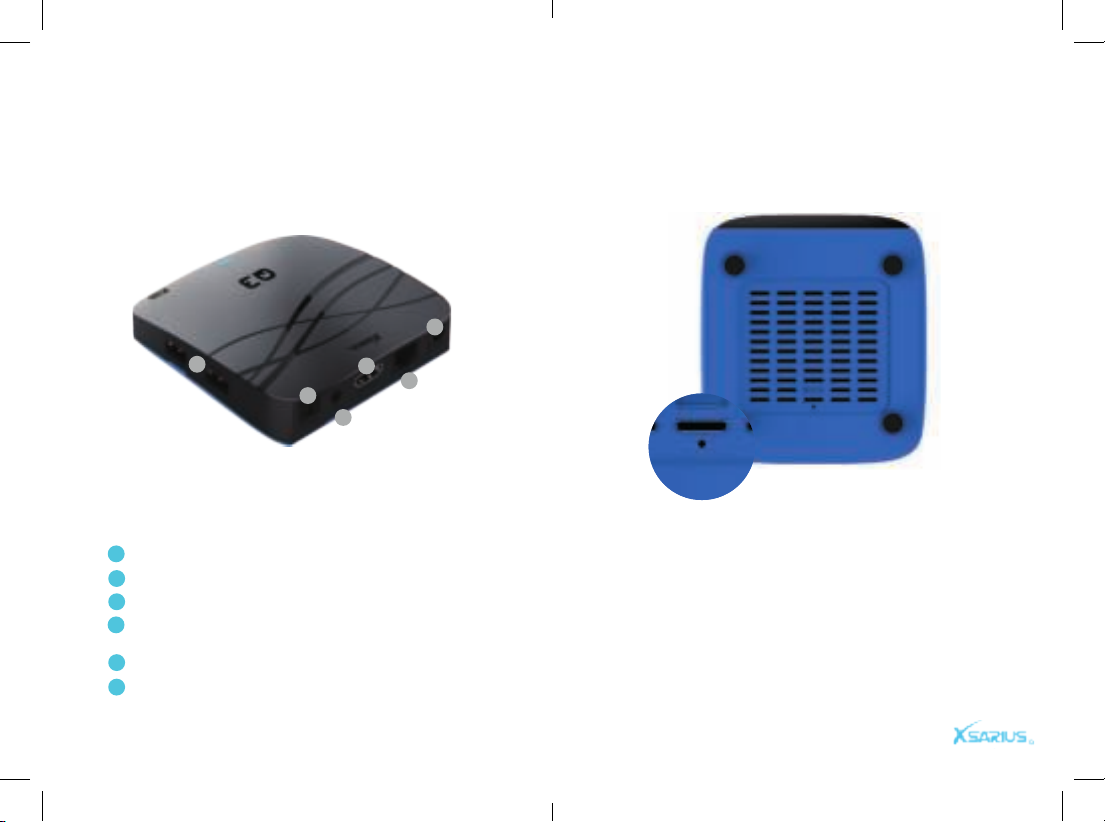
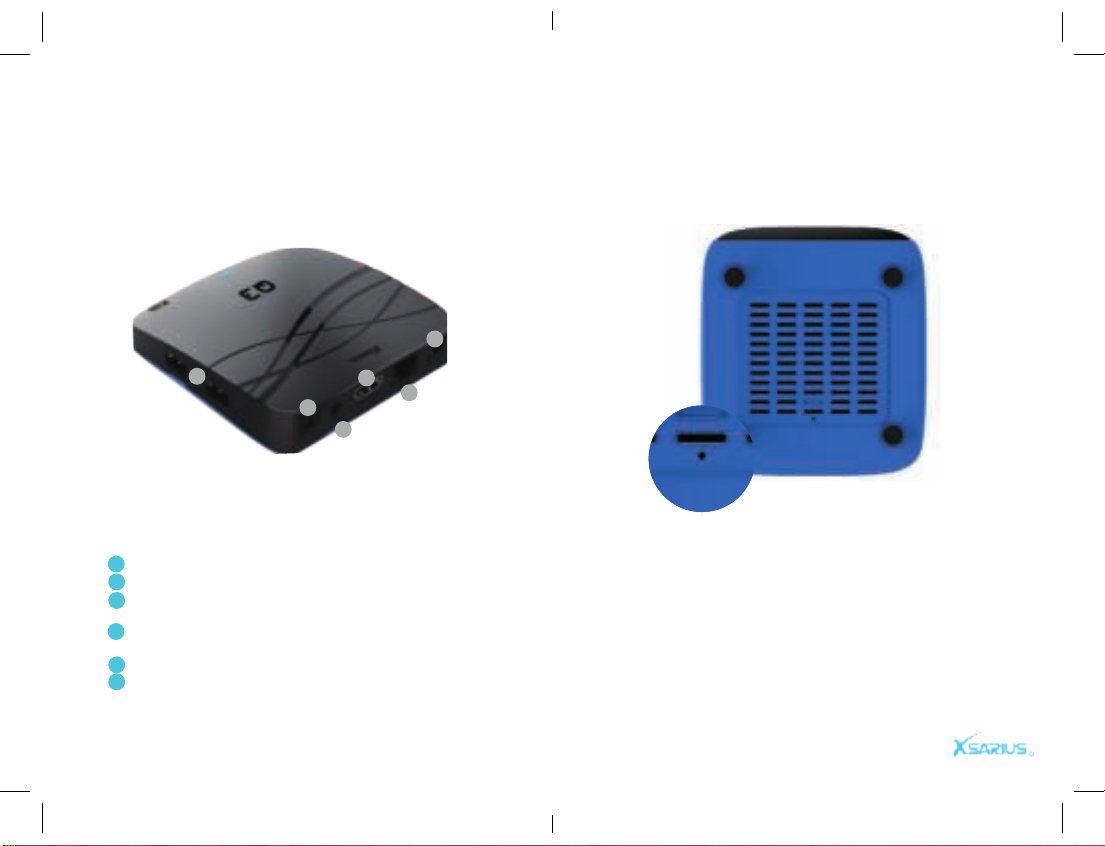
DC Connect to the 12V power adapter.
LAN Connect to internet using an Ethernet cable.
DV-OUT Connect to TV using HDMI cable.
IR-EX Connect the Front Panel, to receive the signal
from remote control.
S/PDIF Digital Audio output.
USB/ Micro SD Connect to external storage device.
While you shut the system down, press and hold the
recovery button with a needle. Reconnect the power and you will see blue lights. The box begins to
re-install the system. Release the needle. The entire recovery process will last for about 15 minutes.
Do not turn off the power during system recovery.
Page 5
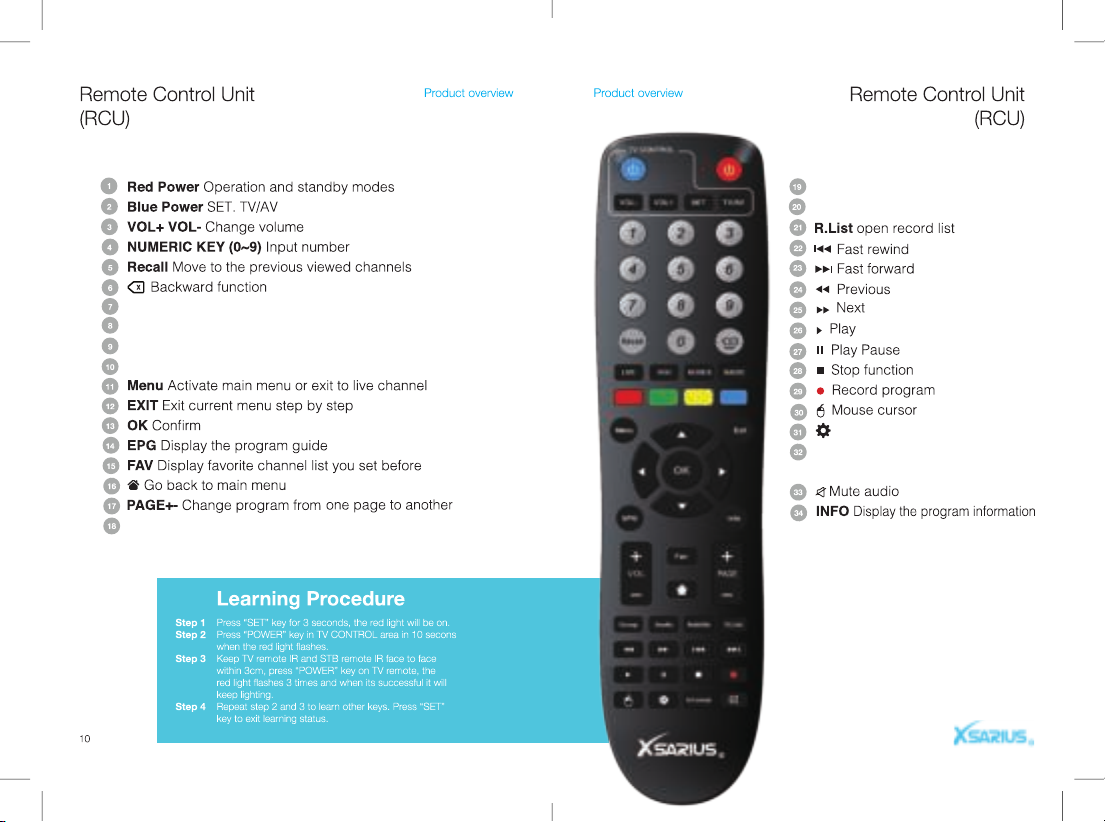
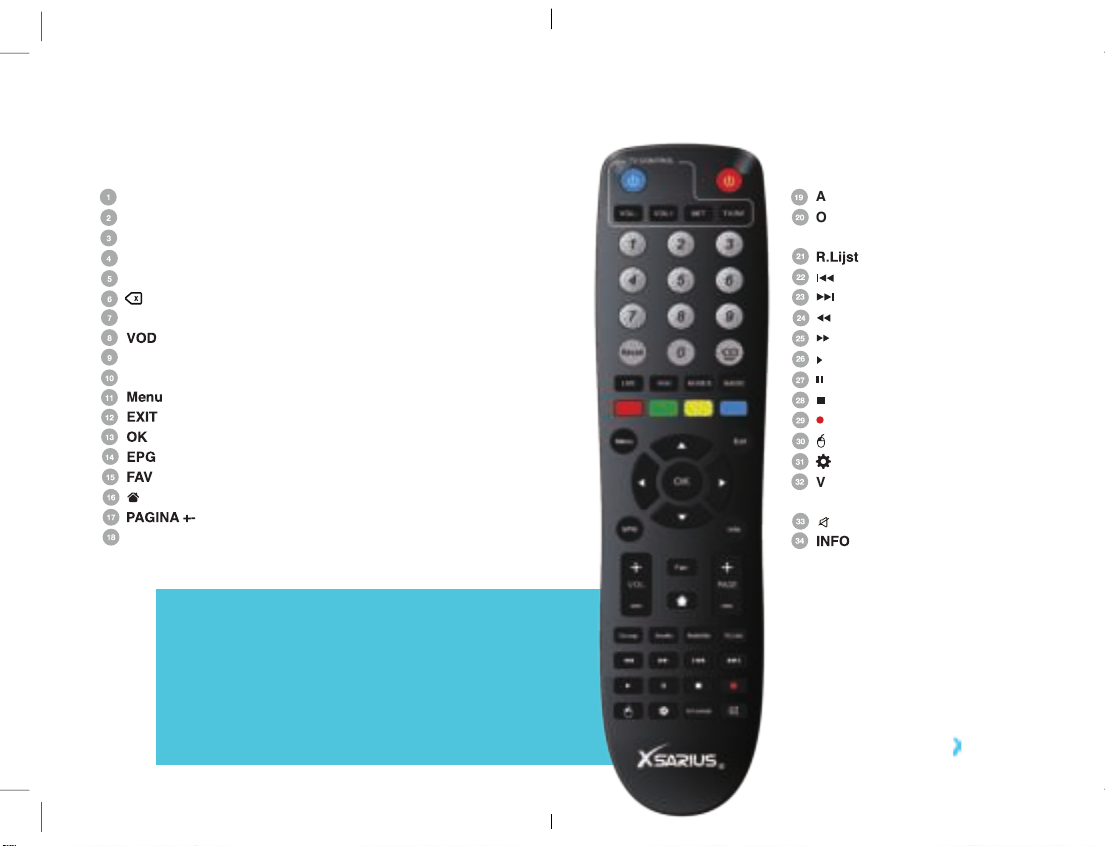
LIVE Open LiveTV
VOD Open VOD
SERIES Open TVseries
RADIO Open Radio
GROUP Group
AUDIO Select audio track
SUBTITLE Select subtitles
Open settings
V.FORMAT Select the video
display ratio
Page 6
© Copyright 2021 AD B.V.
Main Menu
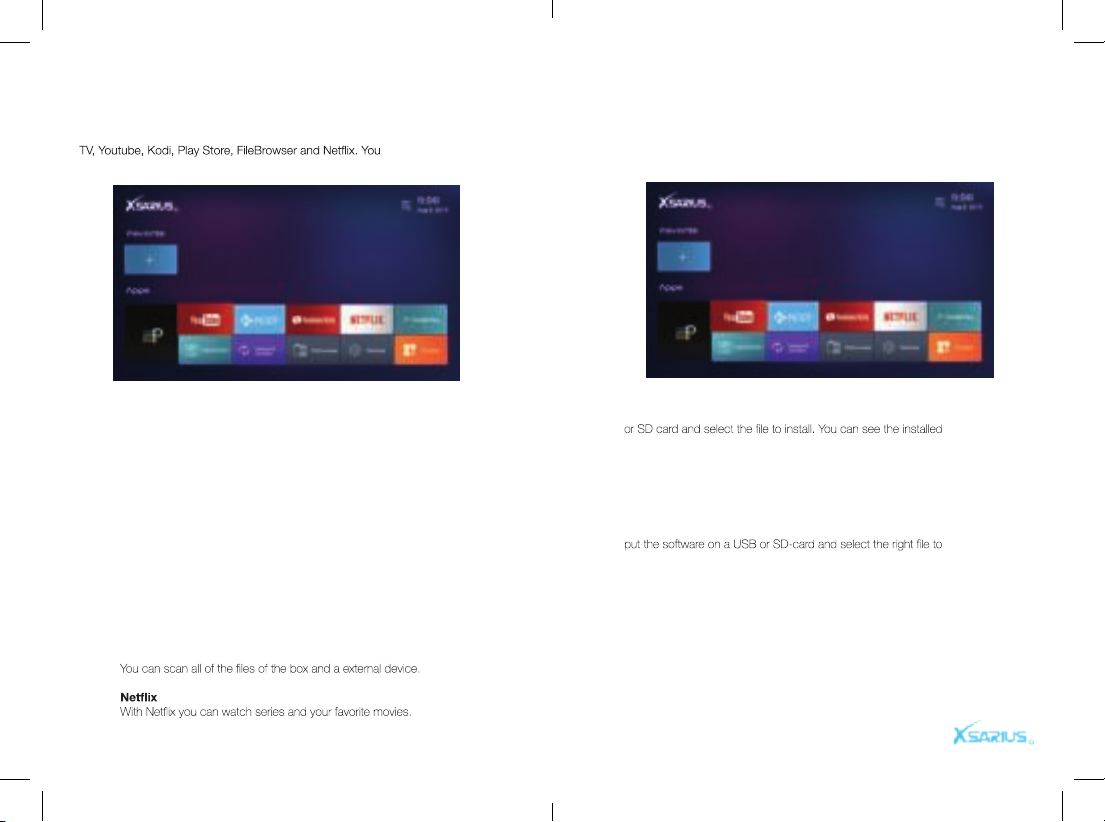
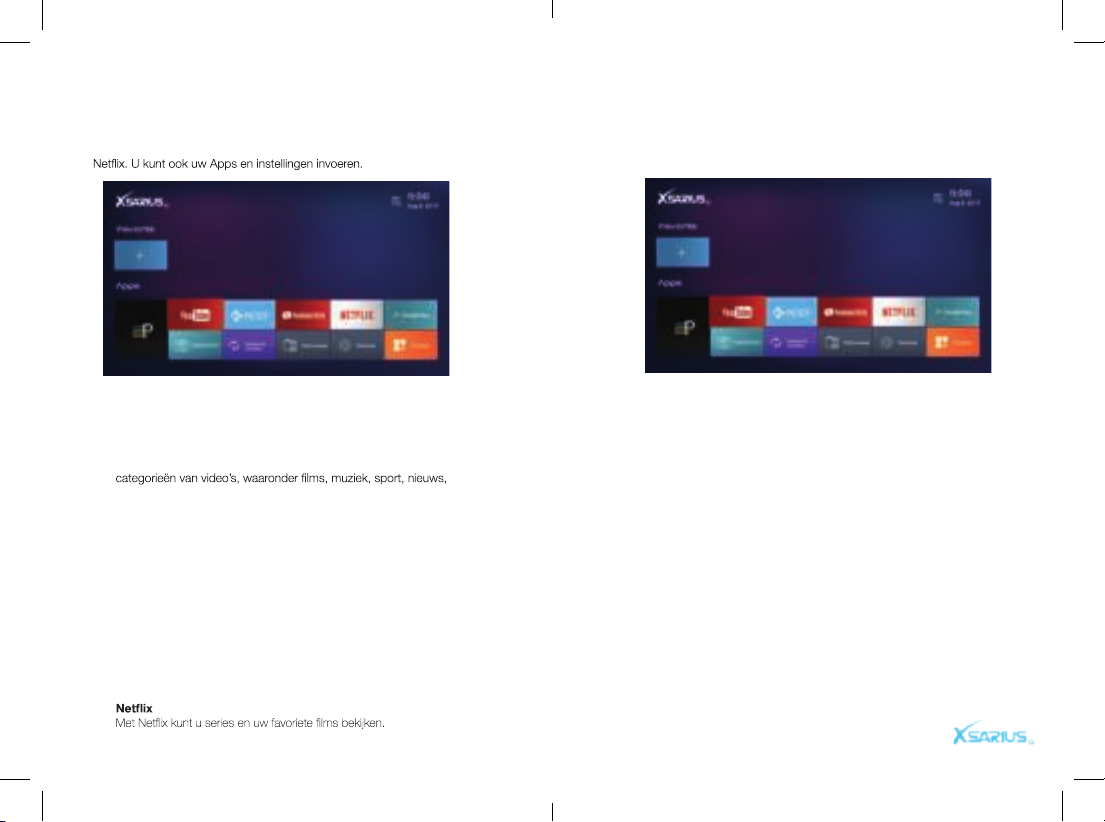
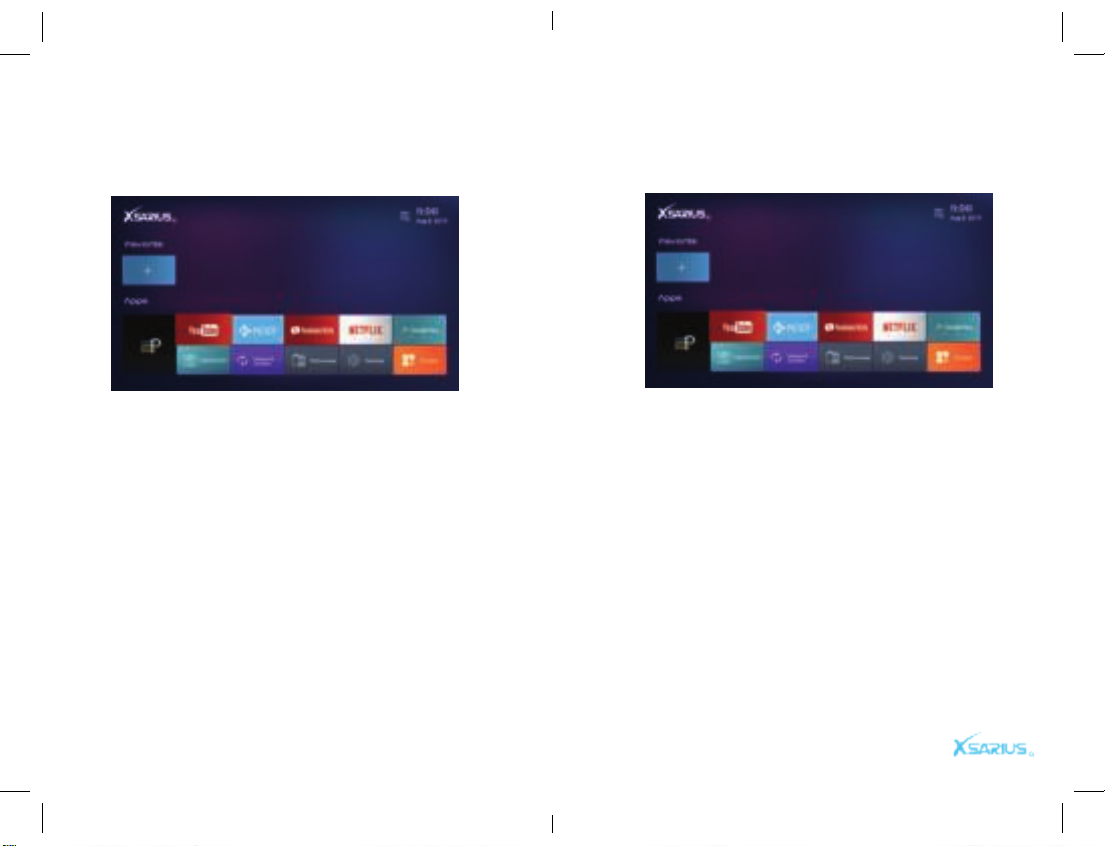
In this menu you can see the weather, time, status of the
network and use the search function. Easy acces to Premium
can also enter your Apps and settings
Product overview
Product overview
Apps
This part contains App-installer, Applications,
Gallery, UPDATE, MoviePlayer, and Media
Center.
12
Premium TV
You can use Premium-TV to watch your media content and surf
the web.
YouTube
With YouTube, you can watch online videos. It has nine categories
of videos, including Movies, Music, Sports, News, Gaming, Comedy, Education, Autos and All. You can use the Search, History,
Settings and Download function.
KODI
Advanced Multimedia Player to stream Movies, Music, Pictures
and other Media.
Play Store
You can download applications from the Play Store, a wide range of
applications to use!
FileBrowser
App-installer & Applications
Install Apps from an external device, you can put an APK on a USB
application back in the menu once the installation is done.
Gallery
You can view pictures from your external device or USB on the box.
UPDATE
Update your software from an external device or USB. You can
update.
MoviePlayer
You can play all kind of videos formats from your external device.
Media Center
If the network is ok, you can enter this part. In this menu, you
can use DLNA_DMP, DLNA_DMR,AirPlayer,and Settings about
network player.
Page 7
© Copyright 2021 AD B.V.
Product overview
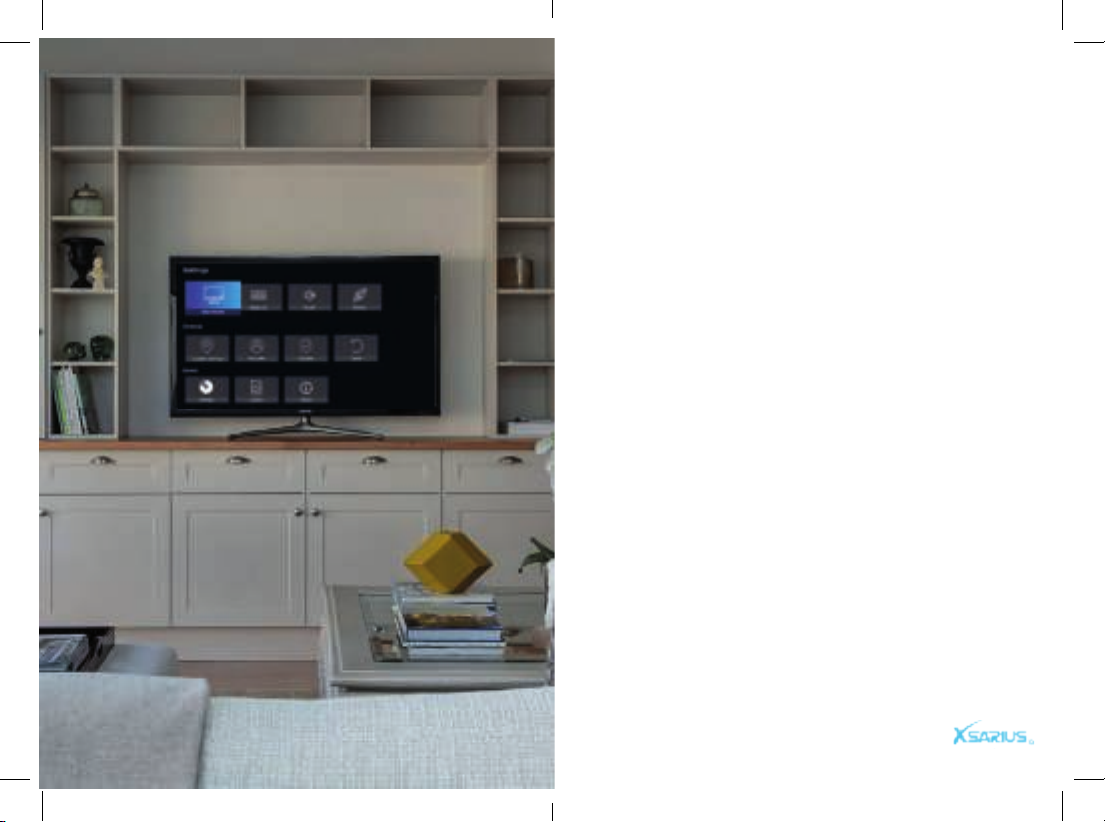
This part contains Advanced Setup, Display,
Update, Factory Default, Language, Time,
Uninstall App and System Info.
Advanced Setup
Advance setup is an Android system setting. In the More menu,
you can set up many preferences like WiFi-hotspot, you can also
use a VPN.
Display
Here you can set the size and resolution.
Update
You can chose between a network update or USB update. Insert
the USB with the update package, select it and press OK button to
update your software.
Factory Default
You can restore the product to the factory default and you can also
setup it according to the wizard.
Language
Change the launcher language.
Time
Here you can set the way to get the time by network or manual.
Besides, you can set the format of the time.
Uninstall App
You can uninstall apps from the box.
System Info
You can get the information about STB, such as launcher version,
model info and software version.
Settings
14
Page 8
© Copyright 2021 AD B.V.
I. Referentie 18
1.1 Veiligheidinstucties 18
1.2 Instructies voor verwijdering 18
19
II. Productoverzicht 19
2.1 Voorpaneel 19
2.2 Achterpaneel 20
2.3 Bodemplaat 21
2.4 Afstandsbediening (RCU) 22
III. Hoofdmenu 24
3.1 Premium TV 24
3.2 YouTube 24
3.3 KODI 24
3.4 Play Store 24
3.5 FileBrowser 24
24
VI. APPS 25
4.1 App-installer en toepassingen 25
4.2 Galerij 25
4.3 UPDATE 25
4.4 Movie Speler 25
4.5 Media Center 25
V. Instellingen 27
5.1 Geavanceerde instellingen 27
5.2 Display 27
5.3 Update 27
5.4 Fabrieksinstellingen 27
5.5 Taal 27
5.6 Tijd 27
5.7 App verwjideren 27
5.8 Systeeminformatie 27
Inhoud
16
Page 9
© Copyright 2021 AD B.V.
Veiligheidsinstructies
Please read the safety instructions carefully before using the
Xsarius Q3. The manufacturer takes no responsibility for incorrect handeling of the Xsarius Q3.
*Blootstelling aan een elektromagnetisch veld kan een storing
veroorzaken.
*Apparatuur mag niet worden blootgesteld aan vloeistoffen of worden
geplaatst of geplaatst in de buurt van voorwerpen gevuld met
vloeistoffen.
*Vermijd elke vorm van fysieke impact.
*Bescherm het apparaat tegen vocht, extreme hitte of rook.
*Open of demonteer dit apparaat niet.
Instructies voor verwijdering
Scheid het product van andere soorten afval en recycle het
product. Deze procedure beschermt het milieu en voorkomt
schade aan uw gezondheid.
1. Wanneer het symbool met de doorgekruiste verrijdbare afvalbak op
een product is bevestigd, betekent dit dat het product valt onder de
Europese Richtlijn 2002/96 / EG.
2. Alle elecktrische producten moeten gescheiden van de gemeentelijke afvalstroom worden verwijderd via aangewezen inzamelingsfaciliteiten die door de overheid of de lokale autoriteiten zijn aangewezen.
3. De juiste verwijdering van uw oude apparaat helpt mogelijke negatieve gevolgen voor het milieu en de volksgezondheid te voorkomen.
4. Neem voor meer informatie over het weggooien van uw oude apparaat contact op met uw gemeente, de afvalophaaldienst of de winkel
waar u het product hebt gekocht.
Referentie Referentie
CPU
RAM
FLASH
USB
Netwerk input
Audio output
Video output
Operation system
Power consumptie
Mode
Werkend
Slaapstand
Uit
Quad-Core Cortex-A55
1GB DDR4
8GB
USB 2.0*1 USB 3.0*1
Built-in WiFi Module 2.4G
Links and Rechts output, SPDIF
HDMI2.1
Android 9.0
12W
Status
Blauw Licht
Rood licht
Off
18
Page 10
© Copyright 2021 AD B.V.
Achterpaneel Bodemplaat
Productoverzicht Productoverzicht
1
1
2
3
4
5
6
20
6
3
5
4
2
DC Aansluiten op de 12V-voedingsadapter.
LAN verbinding maken met internet via een Ethernet-kabel.
DV-OUT maak verbinding met tv via de HDMI-kabel.
IR-EX sluit het voorpaneel aan om het signaal van de afstands-
bediening te ontvangen.
S / PDIF digitale audio-uitvoer.
USB / Micro SD verbinding maken met een extern
opslagapparaat.
Terwijl u het systeem afsluit, houdt u de herstelknop ingedrukt met een naald. Sluit de stroom weer aan en
je ziet blauwe lichten. De doos begint het systeem
opnieuw te installeren. Laat de naald los. Het volledige herstelproces duurt ongeveer 15 minuten.
Scha-
kel de stroom niet uit tijdens systeemherstel.
Page 11
Open LiveTV
LIVE
Open VOD
Open TVseries
SERIE
Open Radio
RADIO
GROEP Groep
AUDIO
Selecteer audiotrack
ONDERTITELING
ondertitels
Open instellingen
V.FORMAT Selecteer de
videoweergaveverhouding
Selecteer
Page 12
© Copyright 2021 AD B.V.
Hoofdmenu
In dit menu kunt u het weer, de tijd, de status van het netwerk
zien en de zoekfunctie gebruiken. Gemakkelijke toegang
tot Premium TV, YouTube, Kodi, Play Store, FileBrowser en
Productoverzicht Productoverzicht
Apps
Dit deel bevat App-installer, Toepassingen, Gale-
rij, UPDATE, MovieSpeler en Media Center.
Premium tv
U kunt Premium-TV gebruiken om uw media-inhoud te bekijken
en op internet te surfen.
YouTube
Met YouTube kun je online video’s bekijken. Het heeft negen
games, comedy, onderwijs, auto’s etc. U kunt de functie; Zoeken, Geschiedenis, Instellingen en Download gebruiken.
KODI
Geavanceerde multimediaspeler om films, muziek, afbeeldingen
en andere media te streamen.
Play Store
Je kunt applicaties downloaden van de Play Store, een breed
scala aan applicaties om te gebruiken!
FileBrowser
U kunt alle bestanden van de box en een extern apparaat
scannen.
24
App-installer en toepassingen
Installeer apps vanaf een extern apparaat, u kunt een APK op een
USB- of SD-kaart plaatsen en het te installeren bestand selecteren.
U kunt de geïnstalleerde toepassing terug in het menu zien zodra
de installatie is voltooid.
Galerij
U kunt foto’s van uw externe apparaat of USB op de box bekijken.
UPDATE
Update uw software vanaf een extern apparaat of USB. U kunt de
software op een USB- of SD-kaart plaatsen en het juiste bestand
selecteren om bij te werken.
MoviePlayer
U kunt allerlei soorten video-indelingen afspelen vanaf uw externe
apparaat.
Media Center
Als het netwerk in orde is, kunt u dit onderdeel invoeren. In dit menu
kunt u gebruiken DLNA_DMP, DLNA_DMR, AirPlayer en Instellingen
over netwerkspeler.
Page 13
© Copyright 2021 AD B.V.
Productoverzicht
Dit deel bevat geavanceerde instellingen,
weergave, update, fabrieksinstellingen, taal,
tijd, app verwijderen en systeeminformatie.
Geavanceerde instellingen
Geavanceerd instellen is een Android systeem instelling. In het
Meer-menu kun je onder andere een WiFi-hotspot instellen, je
kunt ook een VPN gebruiken.
Display
Hier kunt u de grootte en resolutie instellen.
Update
U kunt kiezen tussen een netwerkupdate of een USB-update.
Plaats de USB met het update pakket, selecteer het en druk op
de knop OK om uw software bij te werken.
Fabrieksinstelling
U kunt het product terugzetten naar de fabrieksinstellingen en u
kunt het ook instellen volgens de wizard.
Taal
Wijzig de opstart-taal..
Tijd
Hier kun je de manier instellen om de tijd te krijgen per netwerk
of u kunt het handmatig instellen. Bovendien kunt u het formaat
van de tijd instellen.
App verwijderen
U kunt gemakkelijk apps van de box verwijderen.
Systeeminformatie
U kunt de informatie over STB krijgen, zoals de versie van de
starter, model-informatie en softwareversie.
Instellingen
26
Page 14
© Copyright 2021 AD B.V.
I. Referenz 30
1.1 Sicherheitshinweise 30
1.2 Hinweise zur Entsorgung 30
1.3 Technische Daten 31
II. Produktübersicht 31
2.1 Frontplatte 31
2.2 Rückseite 32
2.3 Bodenplatte 33
2.4 Fernbedienung (RCU) 34
III. Hauptmenü 36
3.1 Premium-TV 36
3.2 YouTube 36
3.3 KODI 36
3.4 Play Store 36
3.5 File Browser 36
36
VI. APPS 37
4.1 App-Installer und Anwendungen 37
4.2 Galerie 37
4.3 UPDATE 37
4.4 MoviePlayer 37
4.5 Media Center 37
V. Einstellung 39
5.1 Erweiterte Einstellungen 39
5.2 Anzeige 39
5.3 Update 39
5.4 Werkseinstellung 39
5.5 Sprache 39
5.6 Zeit 39
5.7 Deinstallations-App 39
5.8 System Info 39
Inhalt
28
Page 15
© Copyright 2021 AD B.V.
Sicherheitshinweise
Please read the safety instructions carefully before using the
Xsarius Q3. The manufacturer takes no responsibility for incorrect handeling of the Xsarius Q3.
* Die Einwirkung elektromagnetischer Felder kann zu Fehlfunkti
onen führen.
* Das Gerät darf nicht auf mit Natrium gefüllten Gegenständen
platziert werden.
* Vermeiden Sie jede Art von körperlicher Belastung.
* Schützen Sie das Gerät vor Feuchtigkeit, extremer Hitze oder
Rauch.
* Öffnen oder zerlegen Sie dieses Gerät nicht
Hinweise zur Entsorgun
Scheid het product van andere soorten afval en recycle het
product. Deze procedure beschermt het milieu en voorkomt
schade aan uw gezondheid.
1. Wenn das Symbol eines durchgestrichenen Abfalleimers an einem
Produkt angebracht ist, bedeutet dies, dass das Produkt unter die
europäische Richtlinie 2002/96 / EG fällt.
2. Alle Elektro- und Elektronikprodukte sollten getrennt vom kommunalen Abfallstrom über ausgewiesene Sammelstellen entsorgt werden,
die von der Regierung oder den örtlichen Behörden eingesetzt werden.
3. Die korrekte Entsorgung Ihres alten Geräts trägt dazu bei, mögliche
negative Auswirkungen auf die Umwelt und die menschliche Gesundheit zu vermeiden.
4. Nähere Informationen zur Entsorgung Ihres Altgeräts erhalten Sie
von Ihrer Stadtverwaltung, Ihrem Entsorgungsdienst oder dem Geschäft, in dem Sie das Produkt erworben haben.
Referenz Referenz
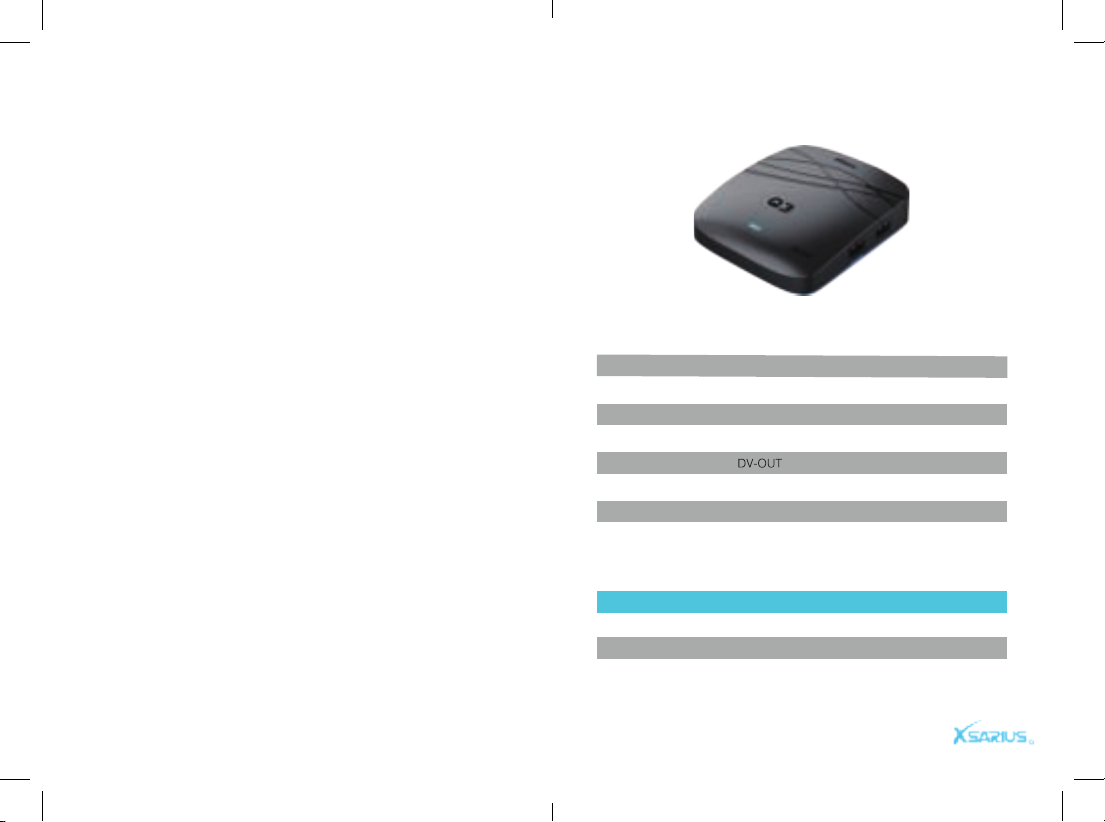
Zentralprozessor
RAM
BLITZ
USB
Netzeingang
Audioausgang
Video-Ausgang
Betriebssystem
Stromverbrauch
Mode
Arbeiten
Schlafmodus
Aus
Technische Daten
Quad-Core Cortex-A55
1GB DDR4
8GB
USB 2.0*1, USB 3.0*1
10M/100M Ethernet, eingebautes WLAN-Modul (2.4G)
, linker und rechter Ausgang, SPDIF
HDMI2.1
Android 9.0
12W
Status
Blaues Licht
Rotes Licht
Aus
30
Page 16
© Copyright 2021 AD B.V.
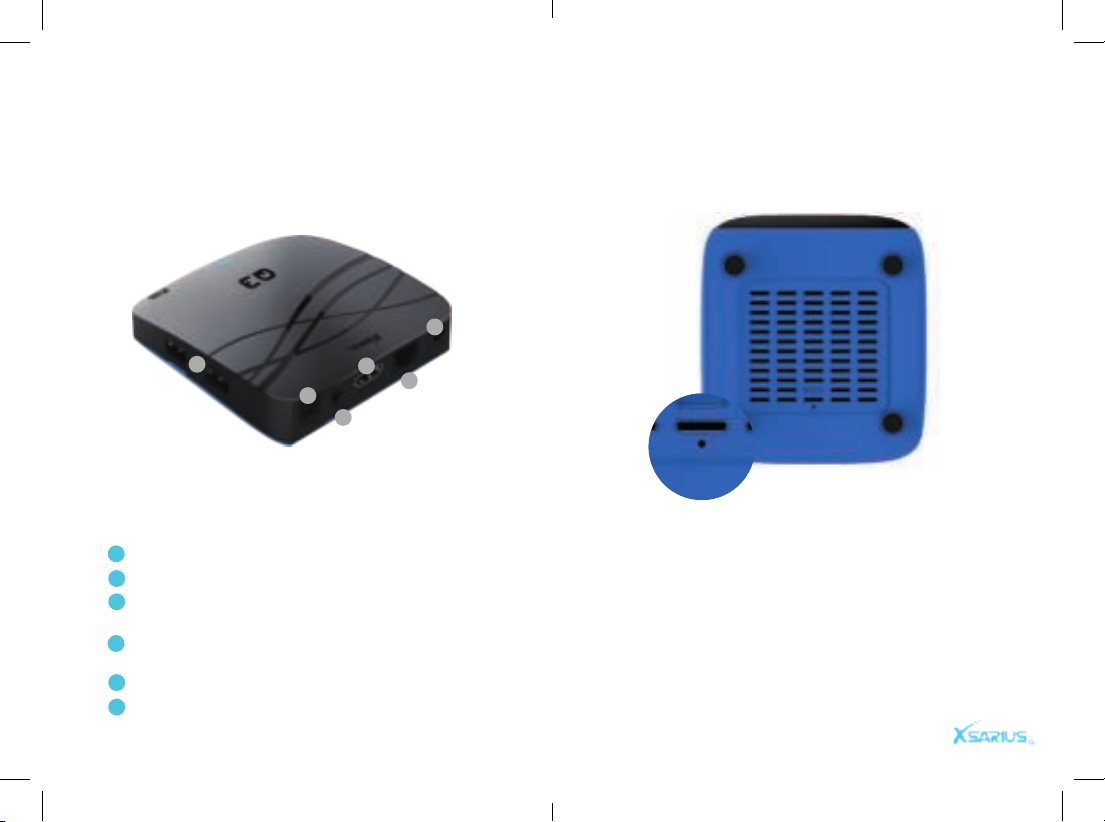
Rückseite Bodenplatte
Produktübersicht Produktübersicht
1
1
2
3
4
5
6
32
6
3
5
4
2
DC An das 12V-Netzteil anschließen
LAN
Verbinden Sie sich über ein Ethernet-Kabel mit dem Internet
DV-OUT
Mit einem HDMI-Kabel an das Fernsehgerät
anschließen.
IR-EX
Fernbedienung zu empfangen.in deinem Inneren zu verstecken.
Schließen Sie die Frontplatte an, um das Signal von der
S / PDIF Digitale Audioausgabe
USB / Micro SD
Zum Anschließen an ein externes Speichergerät.
Während Sie das System herunterfahren, halten Sie
die Wiederherstellungstaste mit einer Nadel gedrückt.
Schließen Sie die Stromversorgung wieder an und Sie
sehen blaue Lichter. Die Box beginnt mit der Neuinstallation des Systems. Lassen Sie die Nadel los. Der
gesamte Wiederherstellungsvorgang dauert etwa
15 Minuten.
Schalten Sie die Stromversorgung
während der Systemwiederherstellung nicht aus.
Page 17
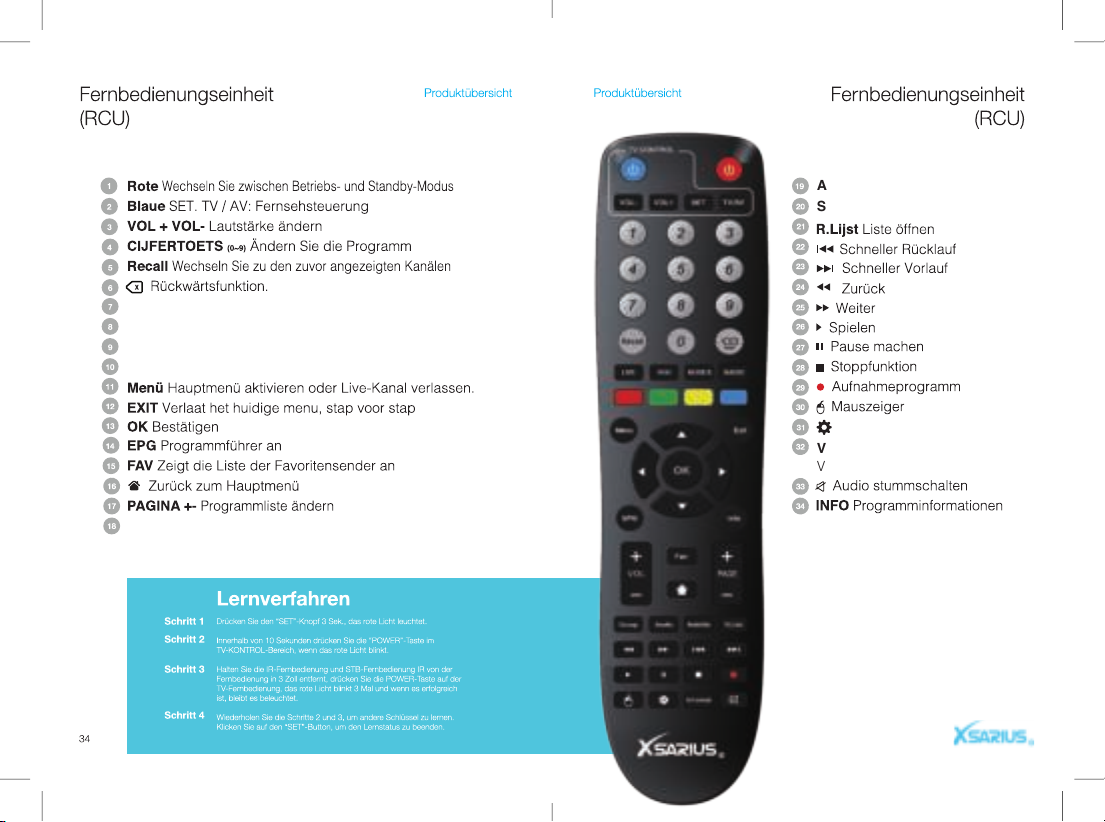
LIVE Öffnen Sie LiveTV
VOD Öffnen Sie VOD
SERIE Öffnen Sie TVSeries
RADIO Öffnen Sie Radio
GRUPPE Gruppe
AUDIO Wählen Sie die Audiospur
SUBTITEL Wählen Sie Untertitel
Einstellungen öffnen
V.FORMAT Wählen Sie das
Videoanzeigeverhältnis
Page 18
© Copyright 2021 AD B.V.
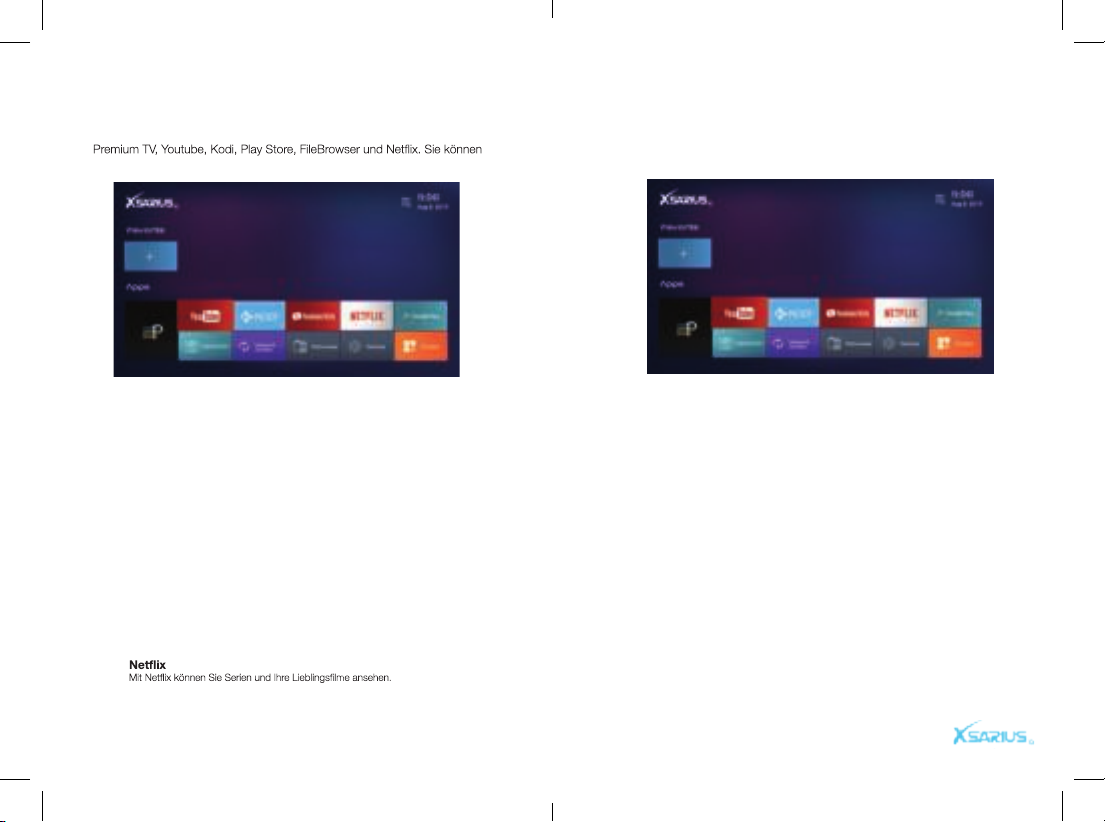
Hauptmenü
In diesem Menü können Sie das Wetter, die Uhrzeit und den Status des
Netzwerks anzeigen und die Suchfunktion verwenden. Einfacher Zugang zu
Produktübersicht Produktübersicht
auch Ihre Apps und Einstellungen eingeben.
Apps
Dieser Teil enthält App-Installer, Anwendungen,
Galerie, UPDATE, MoviePlayer und Media Center.
36
Premium-TV
Mit Premium-TV können Sie Ihre Medieninhalte ansehen und im Internet
surfen.
YouTube
Mit YouTube können Sie Online-Videos ansehen. Es gibt neun Kategorien von
Videos, darunter Filme, Musik, Sport, Nachrichten, Spiele, Comedy, Bildung,
Autos und alle. Sie können die Funktionen Suchen, Verlauf, Einstellungen und
Herunterladen verwenden.
KODI
Mit Kodi können Sie Filme ansehen, Musics hören und Ihre Bilder ansehen.
Play Store
Sie können Anwendungen aus dem Play Store herunterladen, um eine Vielzahl
von Anwendungen zu verwenden!
FileBrowser
Sie können alle Dateien der Box und eines externen Geräts prüfen.
App-Installer & Anwendungen
Wenn Sie Apps von einem externen Gerät installieren, können Sie einen APK
auf eine USB- oder SD-Karte legen und die zu installierende Datei auswählen.
Sie können die installierte Anwendung nach Abschluss der Installation wieder im
Menü anzeigen.
Galerie
Sie können Bilder von Ihrem externen Gerät oder von USB auf der Box anzeigen.
UPDATE
Aktualisieren Sie Ihre Software von einem externen Gerät oder USB. Sie können
die Software auf eine USB- oder SD-Karte stecken und die zu aktualisierende
Datei auswählen.
MoviePlayer
Sie können alle Arten von Videoformaten von Ihrem externen Gerät abspielen.
Media Center
Wenn das Netzwerk in Ordnung ist, können Sie diesen Teil eingeben. In diesem
Menü können Sie verwenden DLNA_DMP, DLNA_DMR, AirPlayer und Einstellungen zum Netzwerkplayer.
Page 19
© Copyright 2021 AD B.V.
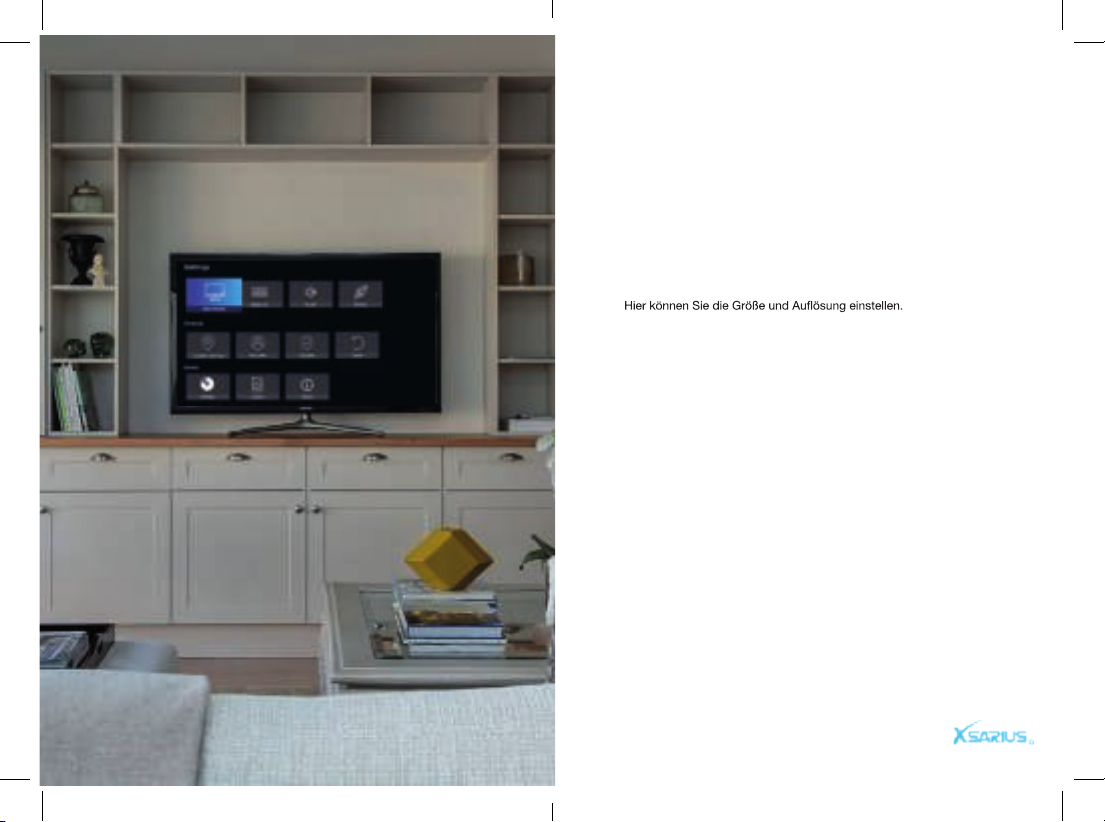
Produktübersicht
Dieser Teil enthält erweiterte Einstellungen, Anzeige,
Update, Werkseinstellung, Sprache, Zeit, Deinstallationsan-
Erweitertes Setup
Das Vorab-Setup ist eine Android-Systemeinstellung. Im Menü
können Sie einen WLAN-Hotspot einrichten, Sie können auch
ein VPN verwenden.
Anzeige
Update
Sie können zwischen einem Netzwerk-Update oder einem
USB-Update wählen. Stecken Sie den USB mit dem
Update-Paket ein, wählen Sie es aus und drücken Sie die
OK-Taste, um die Software zu aktualisieren.
Werkseinstellung
Sie können das Produkt auf die Werkseinstellungen zurücksetzen und es entsprechend dem Assistenten einrichten.
Sprache
Ändern Sie die Startersprache.
Zeit
Hier können Sie den Weg einstellen, um die Uhrzeit per
Netzwerk oder manuell zu erhalten. Außerdem können Sie das
Format der Uhrzeit einstellen.
App deinstallieren
Sie können Apps über die Box deinstallieren.
Systeminfo
Sie können Informationen über STB wie Software-Version,
Modellinformationen und Softwareversion abrufen.
wendung und Systeminformationen.
Einstellung
38
Page 20
© Copyright 2021 AD B.V.
I. Référence 42
1.1 Consignes de sécurité 42
1.2 Instructions de mise au rebut 42
1.3 Spécifications techniques
II. Présentation du produit 44
2.1 Panneau avant 44
2.2 Panneau arrière 45
2.3 Plaque inférieure 46
2.4 Télécommande (RCU) 47
III. Menu principal 48
3.1 Premium TV 48
3.2 YouTube 48
3.3 KODI 48
3.4 Play Store 48
3.5 FileBrowser 48
48
VI. APPS 49
4.1 Installateur d'applications 49
4.2 Galerie 49
4.3 Mettre à jour 49
4.4 Lecteur de film 49
4.5 Centre des médias 49
V. Réglages 51
5.1 Réglages avancés 51
5.2 Afficher 51
5.3 Mettre à jour 51
5.4 Réglages d'usine 51
5.5 Langue 51
5.6 Temps 51
5.7 Supprimer l’application 51
5.8 Informations système 51
Contenu
43
16
Page 21
© Copyright 2021 AD B.V.
Consignes de sécurité
Référentie
Veuillez lire attentivement les instructions de sécurité avant d'utiliser
le Xsarius Q3. Le fabricant décline toute responsabilité en cas de
mauvaise manipulation du Xsarius Q3.
* L'exposition à un champ électromagnétique peut provoquer
un dysfonctionnement.
* L'équipement ne doit pas être exposé à des liquides ou
placé ou placé à proximité d'objets remplis de liquides.
* Évitez tout type d'impact physique.
* Protégez l'appareil de l'humidité, de la chaleur extrême ou
de la fumée.
* N'ouvrez pas et ne démontez pas cet appareil.
Instructions de mise au rebut
Séparez le produit des autres types de déchets et recyclez le
produit. Cette procédure protège l'environnement et prévient les
dommages à votre santé.
1. Lorsque le symbole avec la poubelle sur roues barrée
d'une croix est attaché à un produit, cela signifie que le
produit est couvert par la directive européenne 2002/96 /
CE.
2. Tous les produits électriques doivent être séparés du flux
de déchets municipaux par des installations de collecte
désignées par le gouvernement ou les autorités locales.
3. La mise au rebut correcte de votre ancien appareil aidera
à prévenir les conséquences potentiellement négatives pour
l'environnement et la santé humaine.
4. Pour plus d'informations sur la mise au rebut de votre
ancien appareil, veuillez contacter votre mairie, le service
d'élimination des déchets ou le magasin où vous avez
acheté le produit.
Référentie
CPU
RAM
ÉCLAT
USB
Entrée réseau
Sortie audio
Sortie vidéo
Le système
Consommation d'énergie
Mode
Travail
Etre prêt
Fermer
Spécifications techniquesa
Quad-Core Cortex-A55
1GB DDR4
8GB
USB 2.0*1 USB3.0*1
10/100M Ethernet, Module WiFi intégré 2.4G
Sortie Liens et Rechts, SPDIF
HDMI2.1
Android 9.0
12W
Statut
lumière bleue
lumière rouge
de
42
Page 22
© Copyright 2021 AD B.V.
Panneau arrière Plaque inférieure
1
1
2
3
4
5
6
44
6
3
5
4
2
DC: connectez à l'adaptateur secteur 12V.
LAN: connectez-vous à Internet à l'aide d'un câble Ethernet.
HDMI: connectez-vous au téléviseur à l'aide d'un câble
HDMI.
IR-EX: connectez le panneau avant pour recevoir le signal
de la télécommande.
S/PDIF: sortie audio numérique.
USB / Micro SD: connexion à un périphérique de stockage
externe
En état d'arrêt, appuyez et maintenez le bouton de récupération avec l'aiguille. Ensuite, connectez l'alimentation et vous
verrez les lumières bleues. La boîte commence à réinstaller le
système. Puis relâchez l'aiguille. L'ensemble du processus de
récupération durera jusqu'à environ 15 minutes.
Ne coupez
pas l'alimentation pendant la restauration du système.
Page 23
LIVE
SERIE
RADIO
accédez à la télévision en direct.
GROEP
AUDIO
ONDERTITELING
V.FORMAT
entrez VOD.
entrez SÉRIE TV.
entrez la radio.
Unité de contrôle Remote
Unité de contrôle Remote
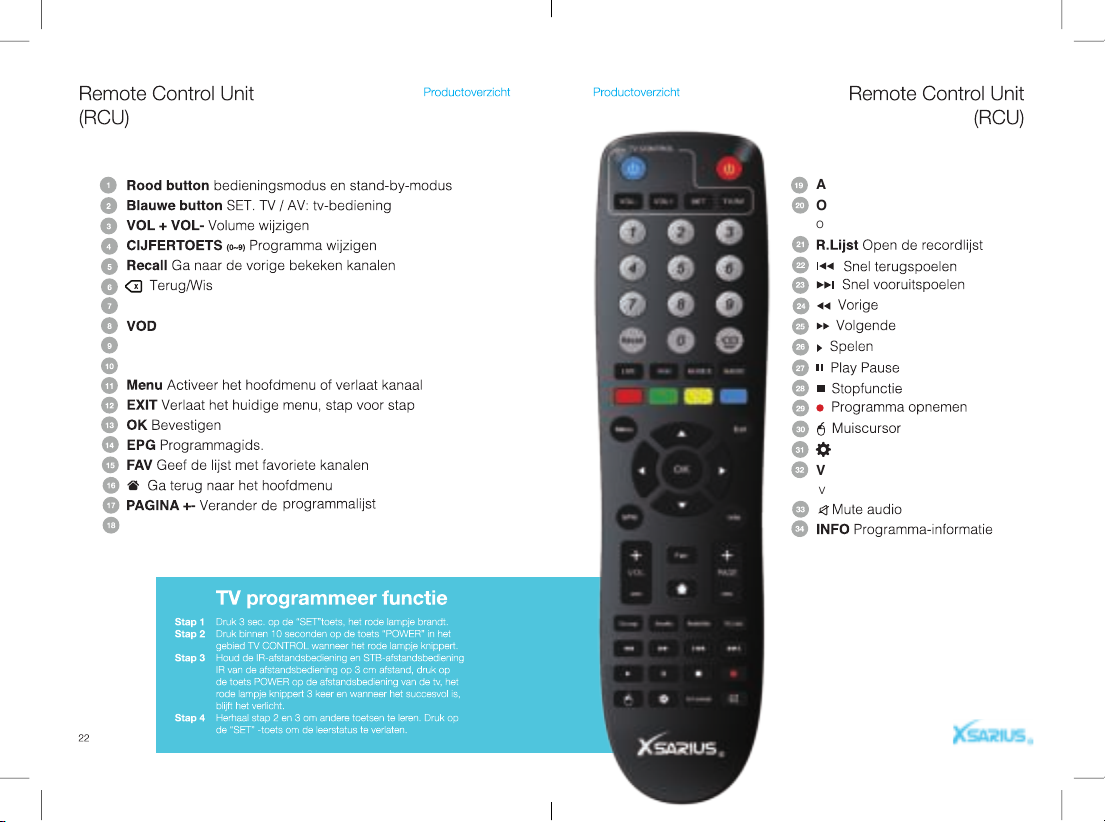
Alimentation rouge: bascule entre les modes de fonctionnement et de veille.
Blue Power. TV / AV: commande TV.
VOL + VOL-: changer le volume en mode de visualisation.
TOUCHE NUMÉRIQUE (0 ~ 9): Changer de programme ou saisir le numéro.
Rappel: permet de revenir aux chaînes visionnées précédentes.
Fonction arrière.
activer le menu principal ou quitter la chaîne en direct.
Quitter le menu actuel pas à pas.
Confirmez l'opération sélectionnée.
affiche le guide des programmes.
affiche la liste des chaînes favorites que vous avez définie auparavant.
Revenir au menu principal.
Déplacez-vous à gauche et à droite dans le menu.
groupe
affichez la liste audio.
liste des enregistrements ouverts.ipsum
retour rapide.
Avance rapide.
Précédente.
Suivant.
Lecture.
Pause de lecture.
Fonction d'arrêt.
Enregistrer un programme
Curseur de la souris.
Informations sur le programme
Coupez le son.
Réglez le mode TV.
Informations sur le programme
affiche la liste des
langues des sous-titres.
Fonction de programmation TV
Étape 1 Appuyez sur la touche "SET" pendant 3 secondes, le voyant
rouge est allumé.
Étape 2 Appuyez sur la touche «POWER» dans la zone TV CONTROL
dans les 10 secondes lorsque la lumière rouge a été affichée.
Étape 3 Tenez la télécommande IR et la télécommande STB IR à 3 cm,
appuyez sur le bouton POWER de la télécommande du téléviseur, le
voyant rouge s'affichera 3 fois et quand il réussira, maintenez-le allumé.
Étape 4 Répétez les étapes 2 et 3 pour apprendre d'autres touches.
46
Appuyez sur le bouton "Set" pour quitter l'état d'apprentissage.
Page 24
© Copyright 2021 AD B.V.
Menu principal
Dans cette interface, vous pouvez utiliser la météo, l'heure,
l'état du réseau et rechercher. Vous pouvez utiliser Premium
TV, YouTube, Kodi, Play Store, FileBrowser et Netflix.Vous
pouvez également entrer APPS et Paramètres
Télévision premium
Vous pouvez utiliser Premium TV pour surfer sur Internet Entrez la télévision en
direct, la VOD, la SÉRIE TV
et naviguez sur le Web.
YouTube
Sur YouTube, vous pouvez regarder les vidéos. Il comprend neuf catégories de
vidéos, notamment les films, la musique, les sports, les actualités, les jeux, la
comédie, l'éducation, les automobiles et tout. Vous pouvez utiliser la fonction
Recherche, Historique et Paramètres et Télécharger.
KODI
Dans le Kodi, vous pouvez regarder les films / musiques / images.
Play Store
Vous trouverez ici une large gamme d'applications à utiliser et vous pouvez
télécharger des applications à partir du Play Store.
FileBrowser
Vous pouvez analyser tous les fichiers de la boîte et du périphérique externe.
Netflix
Dans Netflix, vous pouvez regarder les films / TV.
Présentation du produit Présentation du produit
Applnstaller et applications
Installez l'APP à partir d'un périphérique externe, vous pouvez mettre Apk sur le
disque U ou la carte SD et sélectionnez ici pour les installer.Ensuite, dans le
menu Installé, vous pouvez voir les applications installées.
Galerie
Vous pouvez afficher toutes les images de la boîte et du périphérique externe.
MISE À JOUR
Mettre à jour le logiciel à partir d'un périphérique externe, vous pouvez mettre le
logiciel sur le disque U ou la carte SD et sélectionnez ici pour mettre à jour.
MoviePlayer
Vous pouvez lire toutes les vidéos et tous les périphériques externes.
Centre des médias
Si le réseau est correct, vous pouvez entrer cette partie. Dans ce menu, vous
pouvez utiliser DLNA_DMP, DLNA_DMR, AirPlayer et Paramètres sur le lecteur
réseau.
Applications
Cette partie contient Applnstaller, Applications, Gallery,
UPDATE, MoviePlayer et Media Center.
48
Page 25
© Copyright 2021 AD B.V.
Présentation du produit
Cette partie contient la configuration avancée,
l'affichage, la mise à jour, les paramètres d'usine,
la langue, l'heure, la désinstallation de l'application
Configuration avancée
La configuration avancée est un paramètre système Android traditionnel. Dans
le menu Plus, vous pouvez définir le point d'accès Wi-Fi, vous pouvez
également utiliser le VPN.
Affichage
Ici, vous pouvez définir la taille et la résolution des nefs.
Mise à jour
Vous avez le choix entre une mise à jour USB et une mise à jour réseau.
Insérez le périphérique USB avec le package de mise à jour, sélectionnez-le et
appuyez sur le bouton OK pour mettre à jour.
Paramètres d'usine
Vous pouvez restaurer le produit aux paramètres d'usine par défaut et vous
pouvez également le configurer en fonction de l'assistant.
Langue
Changez la langue du lanceur en anglais et chinois.
Heure
Ici, vous pouvez définir la manière d'obtenir l'heure par réseau ou manuellement. En outre, vous pouvez définir le format de l'heure.
Désinstaller l'application
Vous pouvez désinstaller l'application de la boîte.
Informations système
Vous pouvez obtenir les informations sur STB, la version du lanceur, les
informations sur le modèle, la version du logiciel
Réglage
26
 Loading...