

Page 1
RM200QC
Quick Start Guide
Kurzanleitung
用戸指南
入門指南
Page 2

Page 3

RM200QC
1
EN
CE Declaration
Manufacturer's Name/Authorized Representative:
X-Rite, Incorporated • Siemensstraße 12b • 63263 Neu-Isenburg • Germany
Phone: +49 (0) 61 02-79 57-0 • Fax: +49 (0) 61 02 -79 57-57
Model Name: RM200QC
Model No.: RM200
Directive(s) Conformance: EMC 2004/108/EC LVD 2006/95/EC
Federal Communications Commission Notice
NOTE: This equipment has been tested and found to comply with the limits for a Class B
digital device, pursuant to Part 15 of the FCC Rules. These limits are designed to provide
reasonable protection against harmful interference in a residential installation. This
equipment generates, uses and can radiate radio frequency energy and, if not installed and
used in accordance with the instructions, may cause harmful interference to radio
communications. However, there is no guarantee that interference will not occur in a
particular installation. If this equipment does cause harmful interference to radio or
television reception, which can be determined by turning the equipment off and on, the
user is encouraged to try to correct the interference by one or more of the following
measures:
• Reorient or relocate the receiving antenna.
• Increase the separation between the equipment and receiver.
• Connect the equipment into an outlet on a circuit different from that to which the
receiver is connected.
• Consult the dealer or an experienced radio/TV technician for help.
Industry Canada Compliance Statement
This Class A digital apparatus complies with Canadian ICES-003.
Cet appareil numérique de la classe A est conforme à la norme NMB-003 du Canada.
Equipment Information
U
se of this equipment in a manner other than that specified by X-Rite, Incorporated may
compromise design integrity and become unsafe.
WARNING: This instrument is not for use in explosive environments.
Page 4

RM200QC
2
EN
This document is intended to familiarize you with the X-Rite RM200QC
instrument. For additional information, please refer to the Operator’s Manual
in PDF format located on the CD shipped with the instrument. The operator's
manual contains additional regulatory, warning, operation, installation, and
cleaning information.
Table of Contents
1.
Packaging Contents 2
2. Instrument Description 3
3. Getting Started 4
Installing the Software 4
Charging the Battery 4
Powering On and Off (battery operation only) 4
Language Selection 5
Instrument Calibration 5
Sample Measurement and Preview 5
4. Function Screens 6
5. Creating Standards 7
6. Color QC 8
Measuring Samples 8
Saving a Tag with a Measurement 8
7. Outputting Reports 10
Mass Storage Mode 10
8. Quick Check Menu 11
9. Sample Records Menu 11
10. Appendices 12
Troubleshooting 12
Screen Messages 12
1. Packaging Contents
• RM200QC instrument • Protective carry case
• Lanyard • Software and manuals CD
• USB interface cabling
Page 5
RM200QC
3
EN
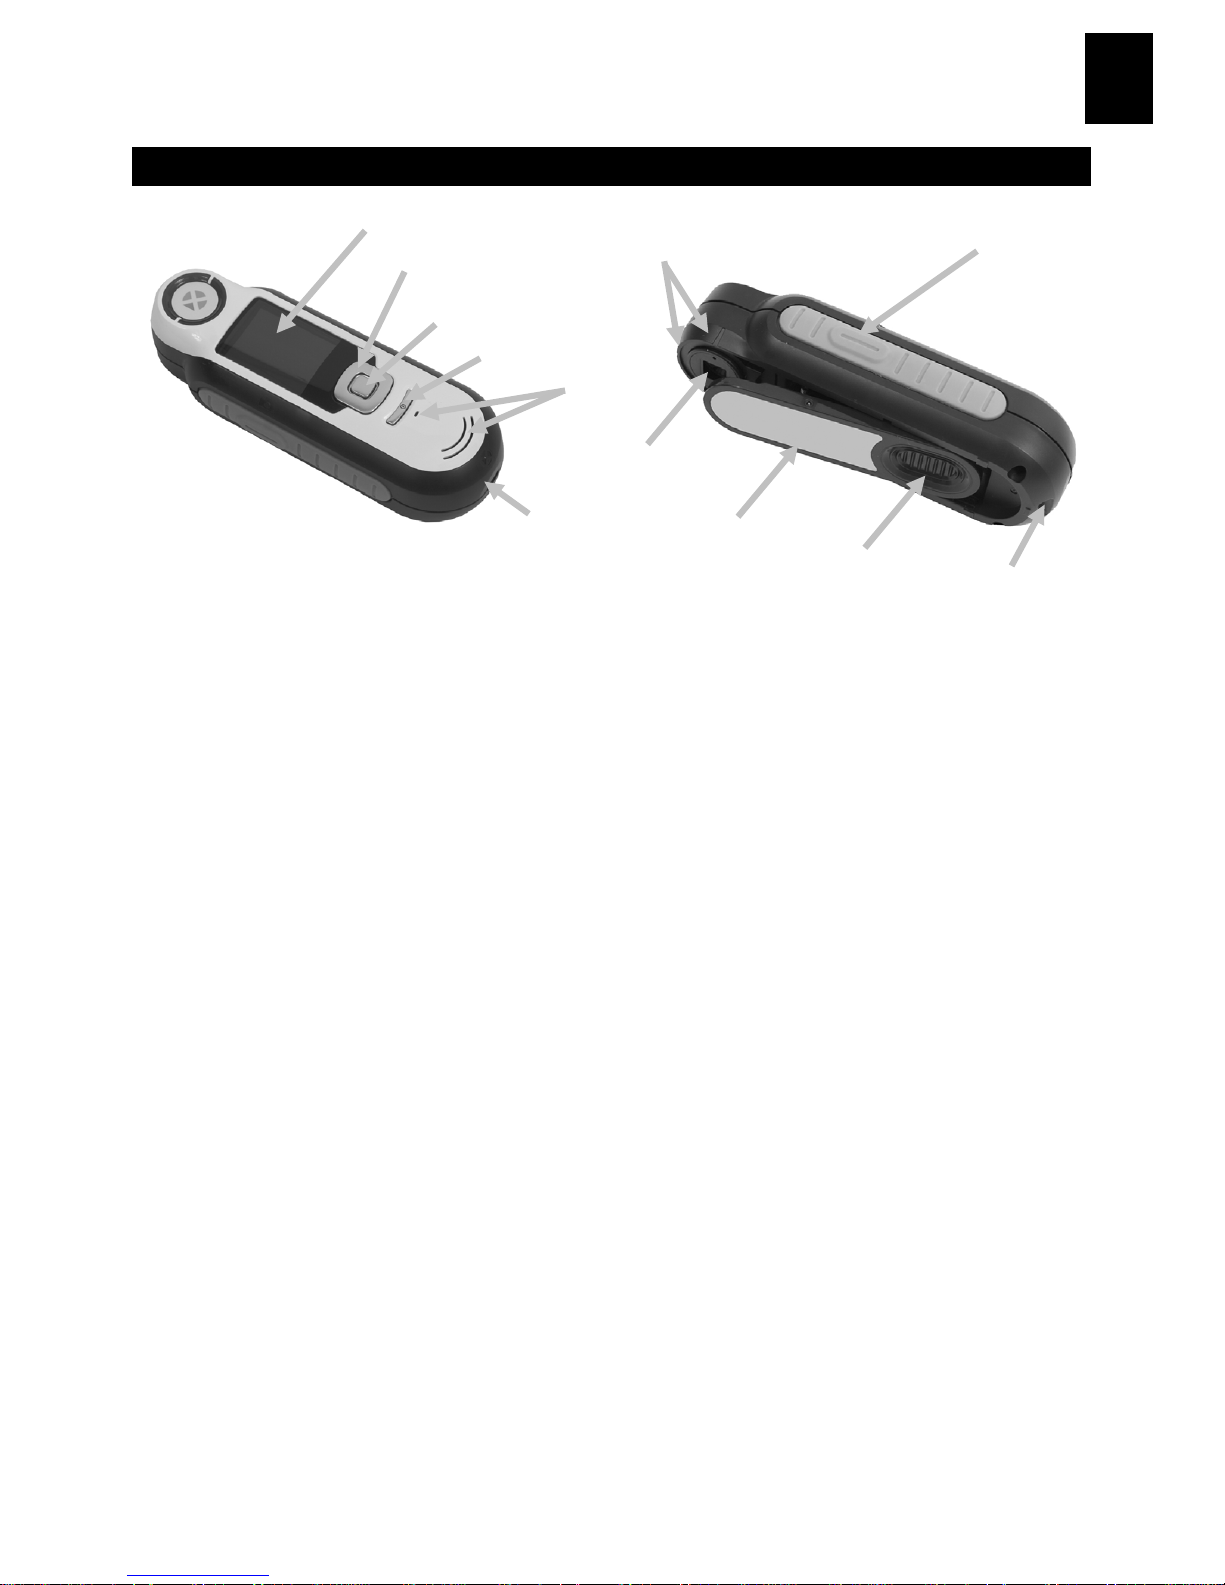
2. Instrument Description
1. Lanyard loop: Provides a secure way to carry your device.
2. Power on/off: Used to turn the instrument on and off.
3. Measure button: Two stage button; press lightly to start preview and firmly
to measure. Lightly pressing this button always returns you to the Color QC
screen.
4. Navigation control: Navigates the on screen menus and function bar in four
directions. Pressing on the left side moves the focus to the next available item to
the left. Pressing on the right side moves the focus to the next available item to
the right. The top and bottom sides perform the same function, only in an up and
down direction.
5. Enter button: Selects menu items and opens tag menu.
6. USB connection: For charging the battery and interface to the software.
7. Speaker and Microphone: For recording and playback of voice tags.
8. Display: Communicates color information, instrument status, and option.
9. Targeting marks: Allows for easy positioning on samples.
10. White Reference slider: Positions the calibration tile for measurement or
calibration/storage.
11. Measurement optics: Area that illuminates and measures the color.
12. Information label: Provides compliance, serial number and other information.
(8)
(4)
(5)
(2)
(7)
(6)
(3)
(9)
(1)
(10)
(12)
(11)
Page 6
RM200QC
4
EN
3. Getting Started
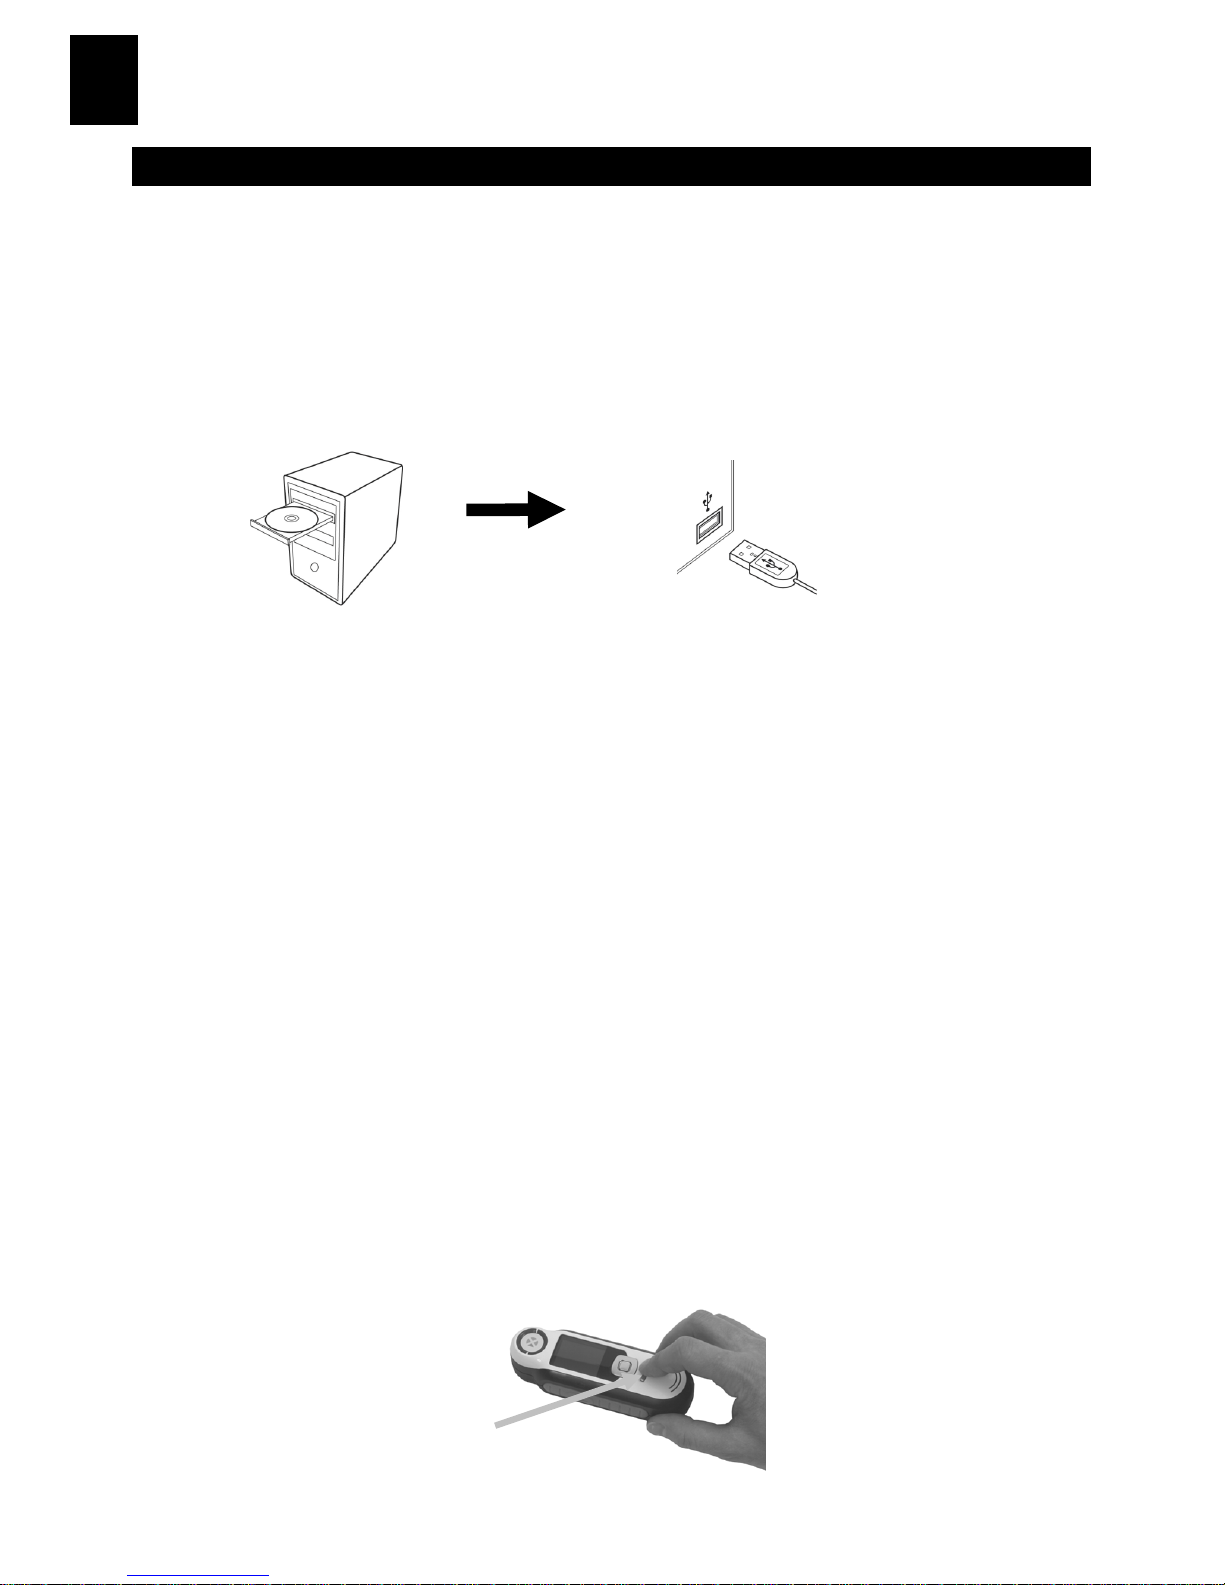
Installing the Software
The software that is included with your instrument must be installed before
plugging the USB cable into the computer. The software installs the required
USB drivers for the instrument and application.
1. Insert the CD into the CD drive. If the CD does not autorun, double-click
the Setup.exe file on the CD.
2. The setup program guides you through the rest of the installation
process. Follow the instructions on each setup screen to complete the
installation. When finished, remove the CD and store in a safe location.
Charging the Battery
Connect the USB cable to the RM200QC and your computer’s USB port. A
battery charging screen momentarily appears. For the first time connection, a
language selection screen also appears. Refer to the Initial Startup section on
the following page for first time operation.
Note: Some computers have low power USB ports which are typically located
at the front. It is recommended that RM200QC is ONLY connected to high
power ports.
During charging, the instrument switches on and indicates charging with a
“lightning bolt” in the battery icon. The RM200QC will not power off while
plugged into the computer USB port. A full charge from empty will take 6
hours connected to a computer USB port.
Powering On and Off (battery operation only)
Turn the instrument on by pressing and releasing the Power button.
Power button
Page 7
RM200QC
5
EN
Language Selection
Select the language from the list by pressing the up and down sides of the
Navigation control. Refer to the Introduction section for button locations.
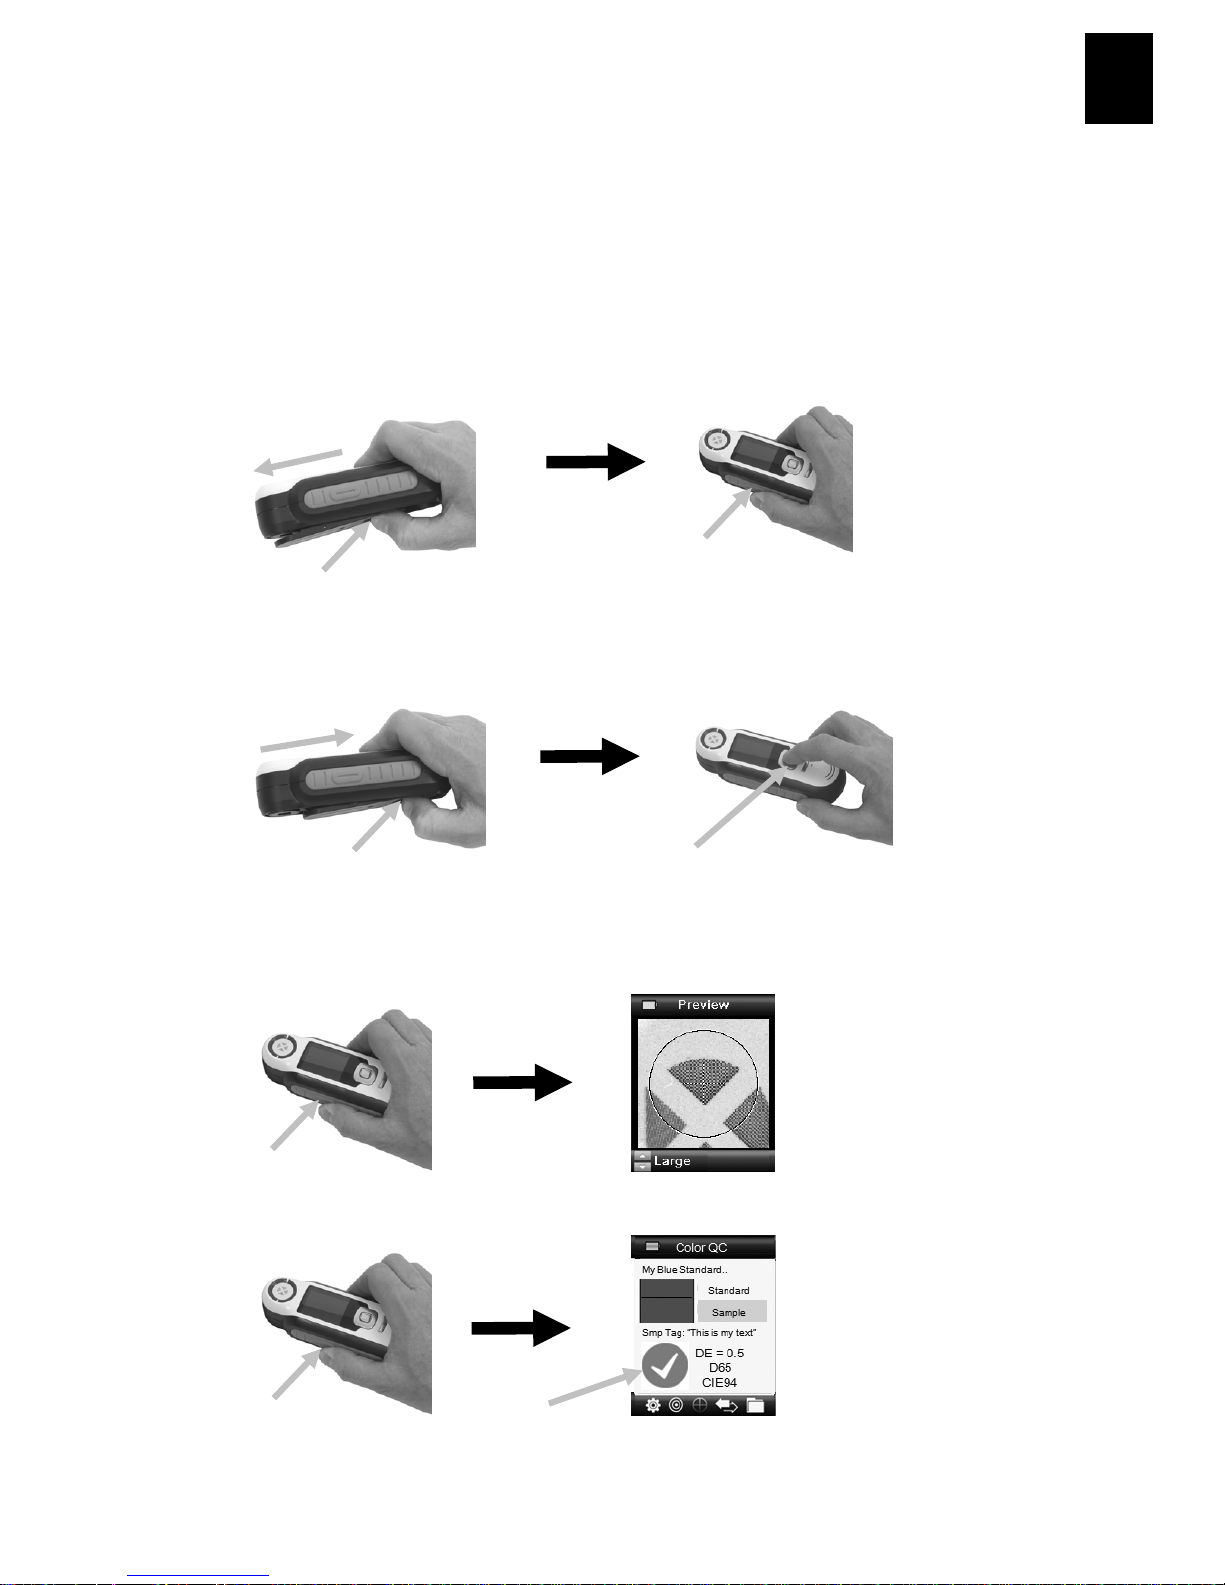
Instrument Calibration
1. To calibrate, position reference slider (10) over optics and press
Measure (3).
2. When finished, position reference slider (10) back to storage location
and press Enter (5).
Sample Measurement and Preview
1. To measure, lightly press and hold Measure button (3) and position
instrument on sample.
2. Press Measure firmly (3) to take measurement. View results (8).
(10)
(3)
(10)
(5)
(3)
(3)
(8)
Page 8
RM200QC
6
EN
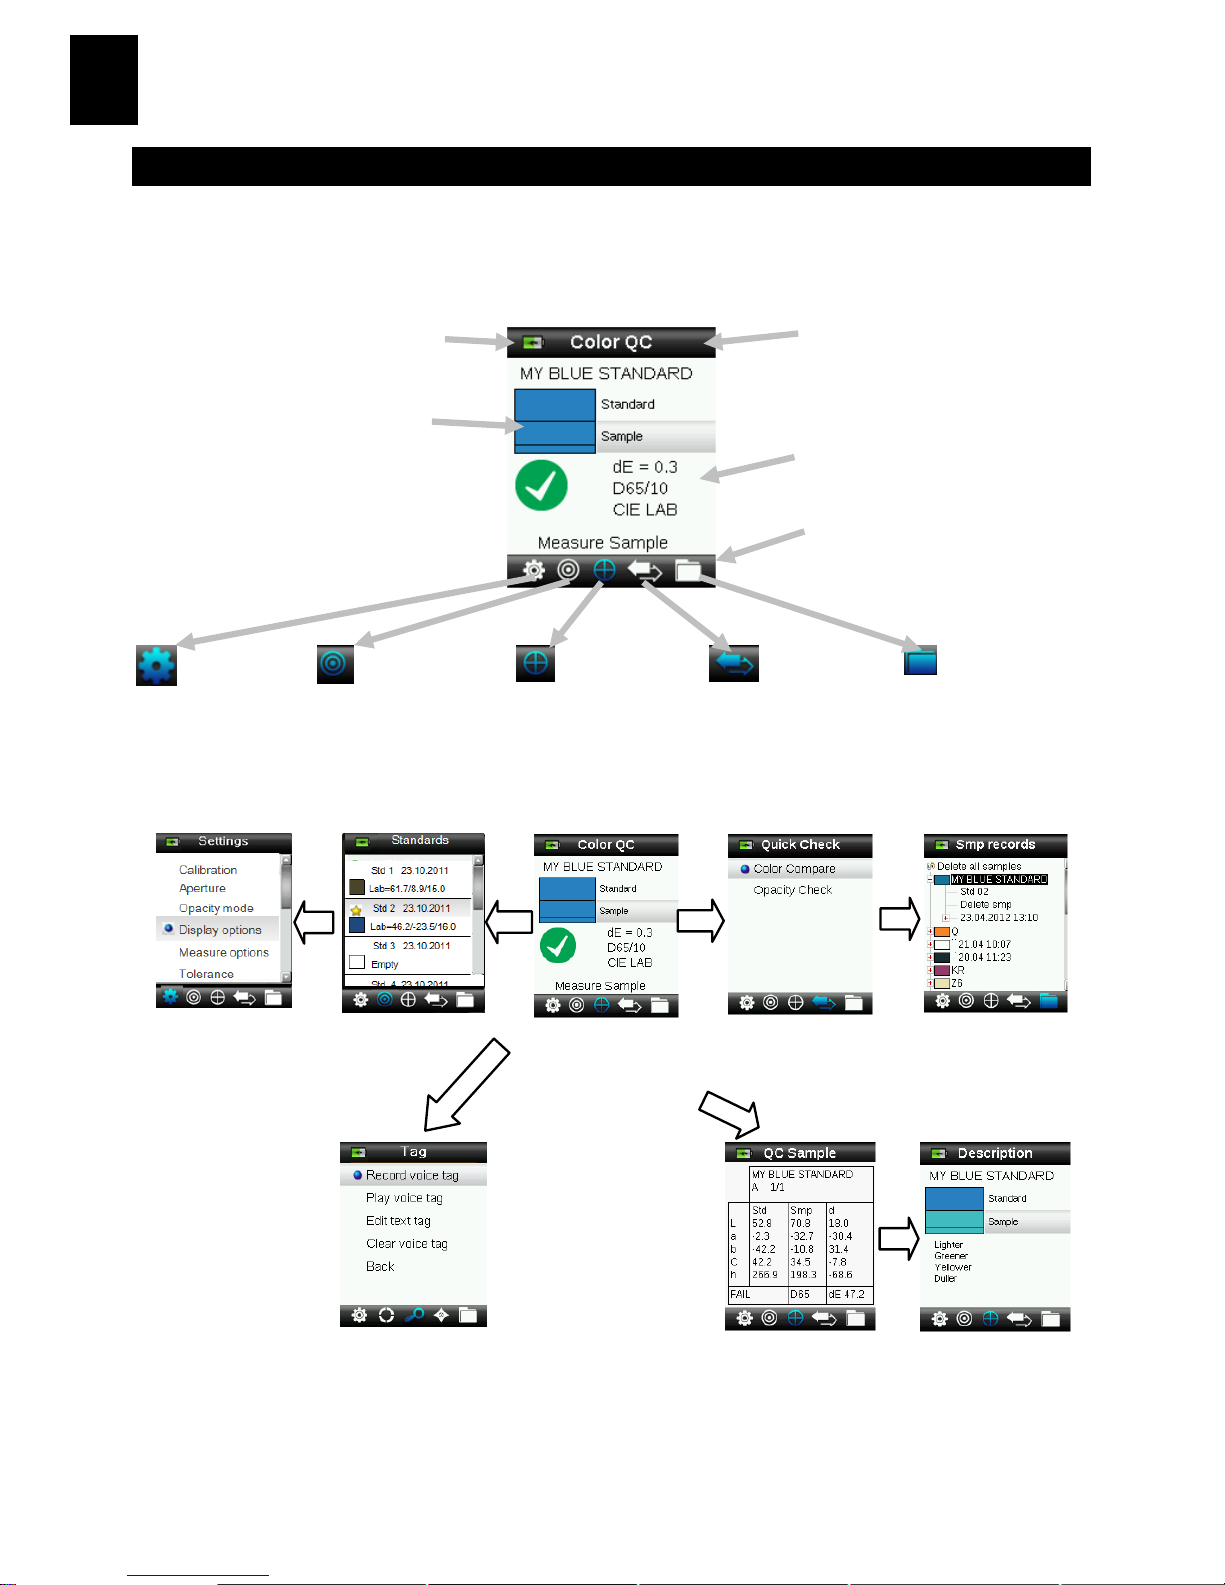
4. Function Screens
Functions are selected by pressing the left or right sides of the Navigation
control. The active function is indicated by the highlighted icon on the
function bar and the title of the window.
Settings
Standards
Color QC
Quick Check
Smp Records
Configure the
instrument.
Select from a list or
measure a new
standard.
Color QC sample
measurements to
stored standards.
Perform Color
Compare and
Opacity
measurements.
View saved sample
records and create
reports.
Press Ente
r
(tag
highlighted) Press
Navigation control
(bottom)
Tag menu is for
adding notes to a
sample
measurement.
Sample image, Color plot, and Indices
views are also available.
Battery indicator gauge
Approximate standard
and sample colors
Active function
Measurement information
Function bar (active function
is highlighted)
Page 9
RM200QC
7
EN
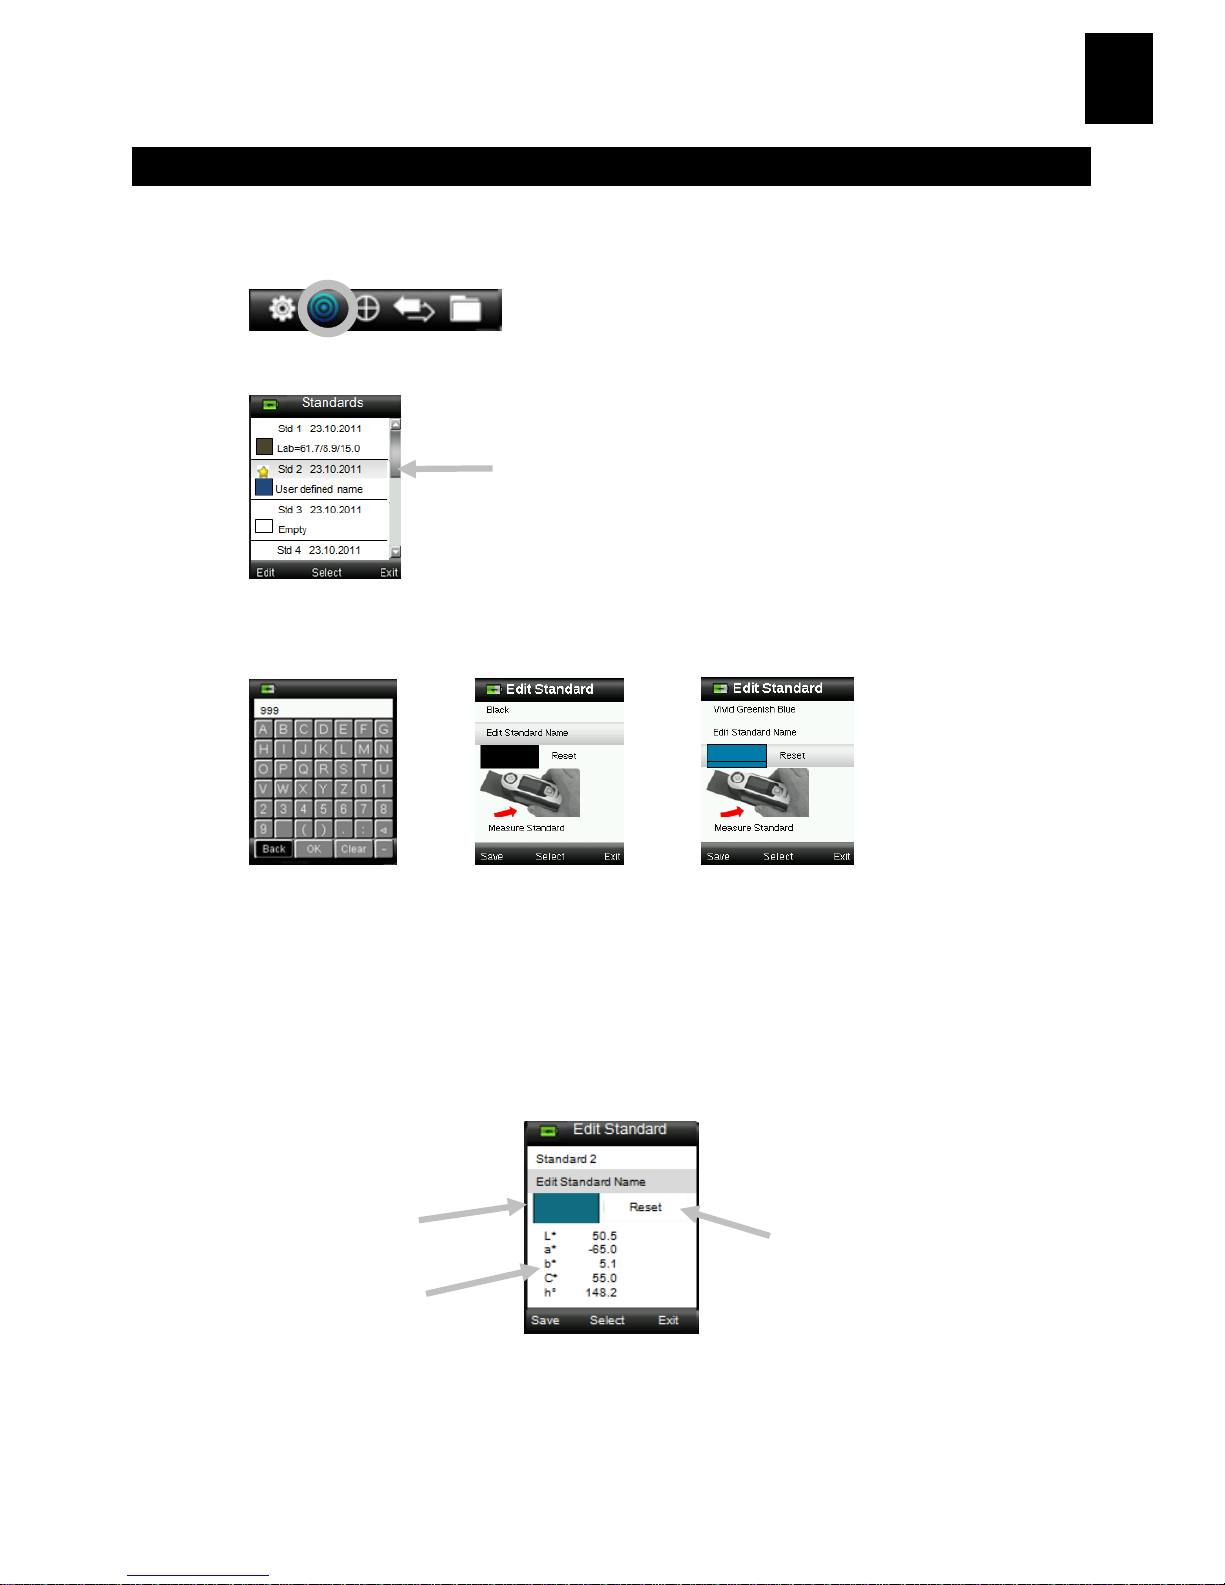
5. Creating Standards
1.
Select the Standard icon in the function bar by pressing on the right or
left side of the Navigation control.
2. Press the Edit button to open the selected standard slot.
3. By default the security function will be switched on, to create or edit
your standard enter the password “999” and select OK.
4. To enter a name for the standard, use the up or down sides of the
Navigation control to select “Enter name…” and then press the Enter
(Select) button.
5. Preview your sample by lightly pressing then firmly to Measure.
Note: If you do not want the current measurement to be used, use the
Navigation control to select Reset and press the Enter (Select) button.
6. Continue with additional measurements to obtain an average value if
standard averaging is activated in the Settings (default setting is 3).
Simulated color
Standard values
Star indicates select standard for
QC measurements
Reset
Page 10
RM200QC
8
EN
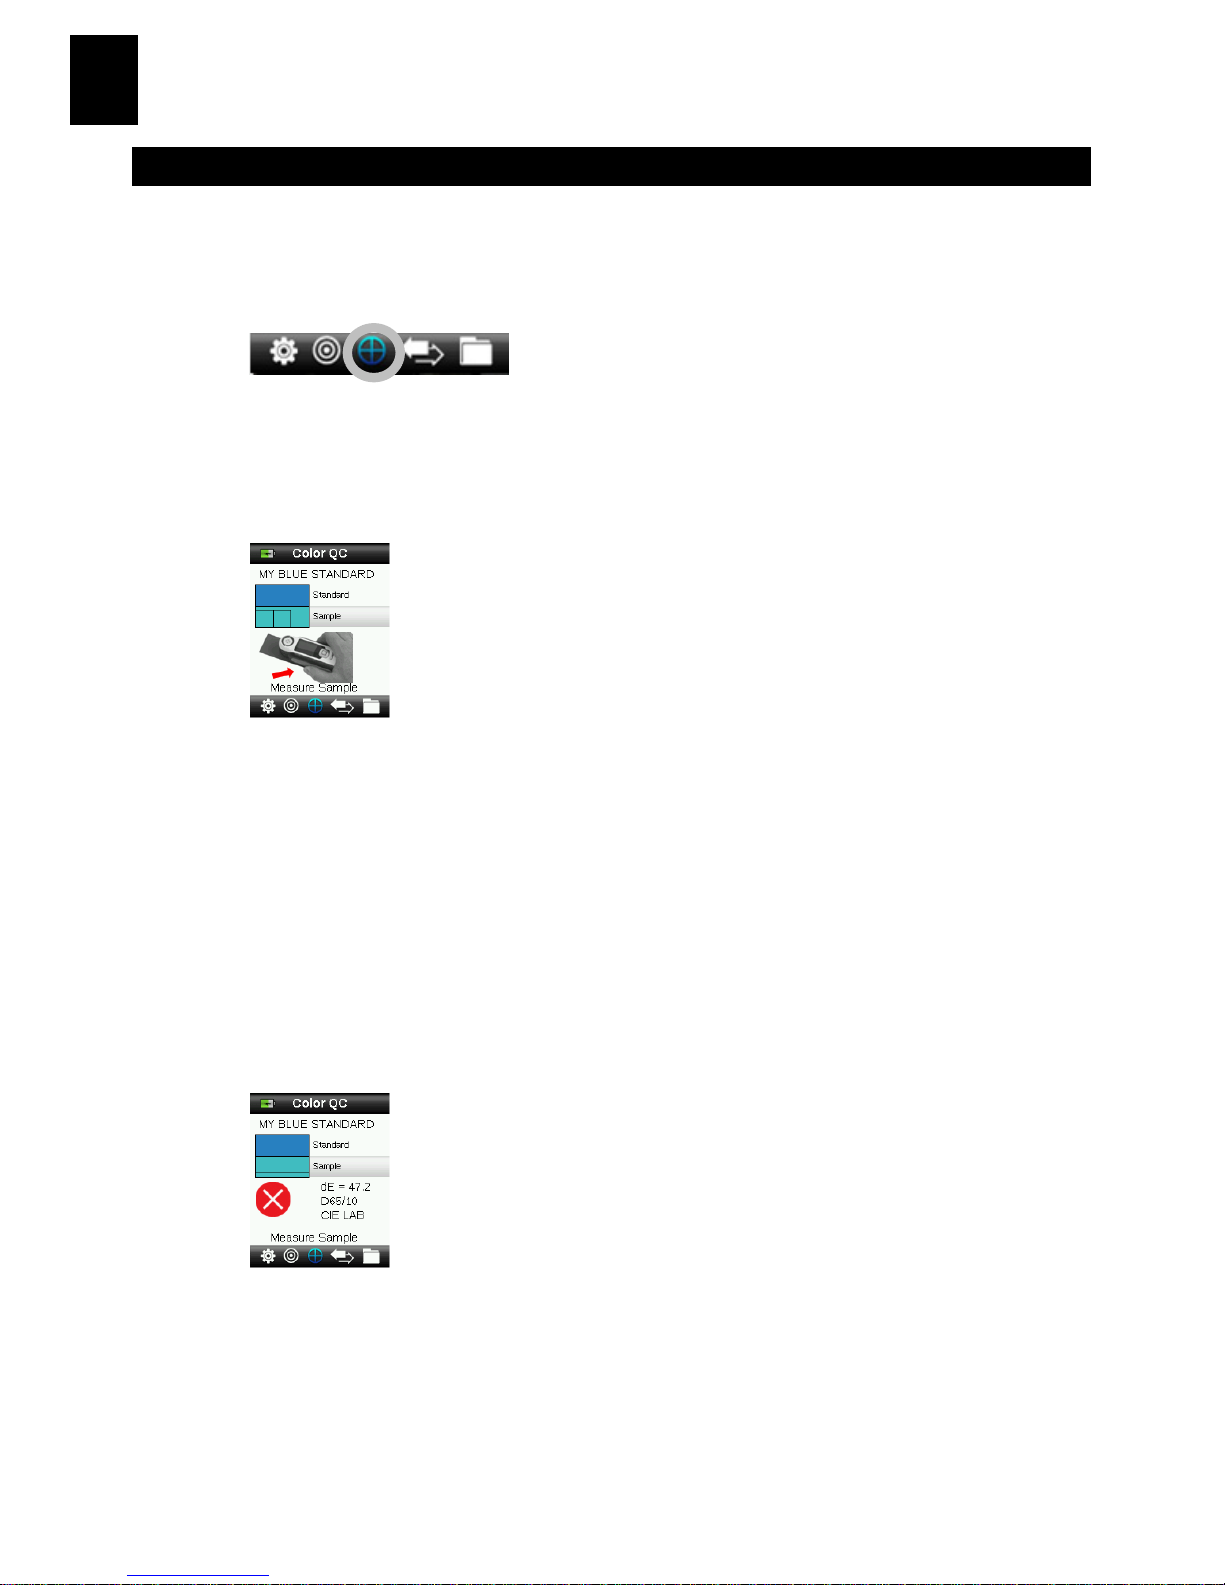
6. Color QC
Measuring Samples
1. Select the Standard icon in the function bar by pressing on the right or
left side of the Navigation control.
2. If the displayed standard is not the one required for sample
comparisons, press the down side of the Navigation control and select
the current standard. Press the Enter button to advance to the Standard
menu and select the required standard.
3. Lightly press and hold the Measure button to activate the preview. The
area to be measured is indicated in the preview by the circle.
4. When you have located the area you wish to measure, press the
Measure button firmly.
5. Continue with additional measurements to obtain an average value if
sample averaging is activated in the Settings.
6. After the measurement, a simulated color patch of the sample appears
along with the Pass/Fail indication. The sample below would indicate
that the sample failed based on the tolerance set in the Setting menu.
7. Press the down side of the Navigation control to advance to the QC
Sample data screens.
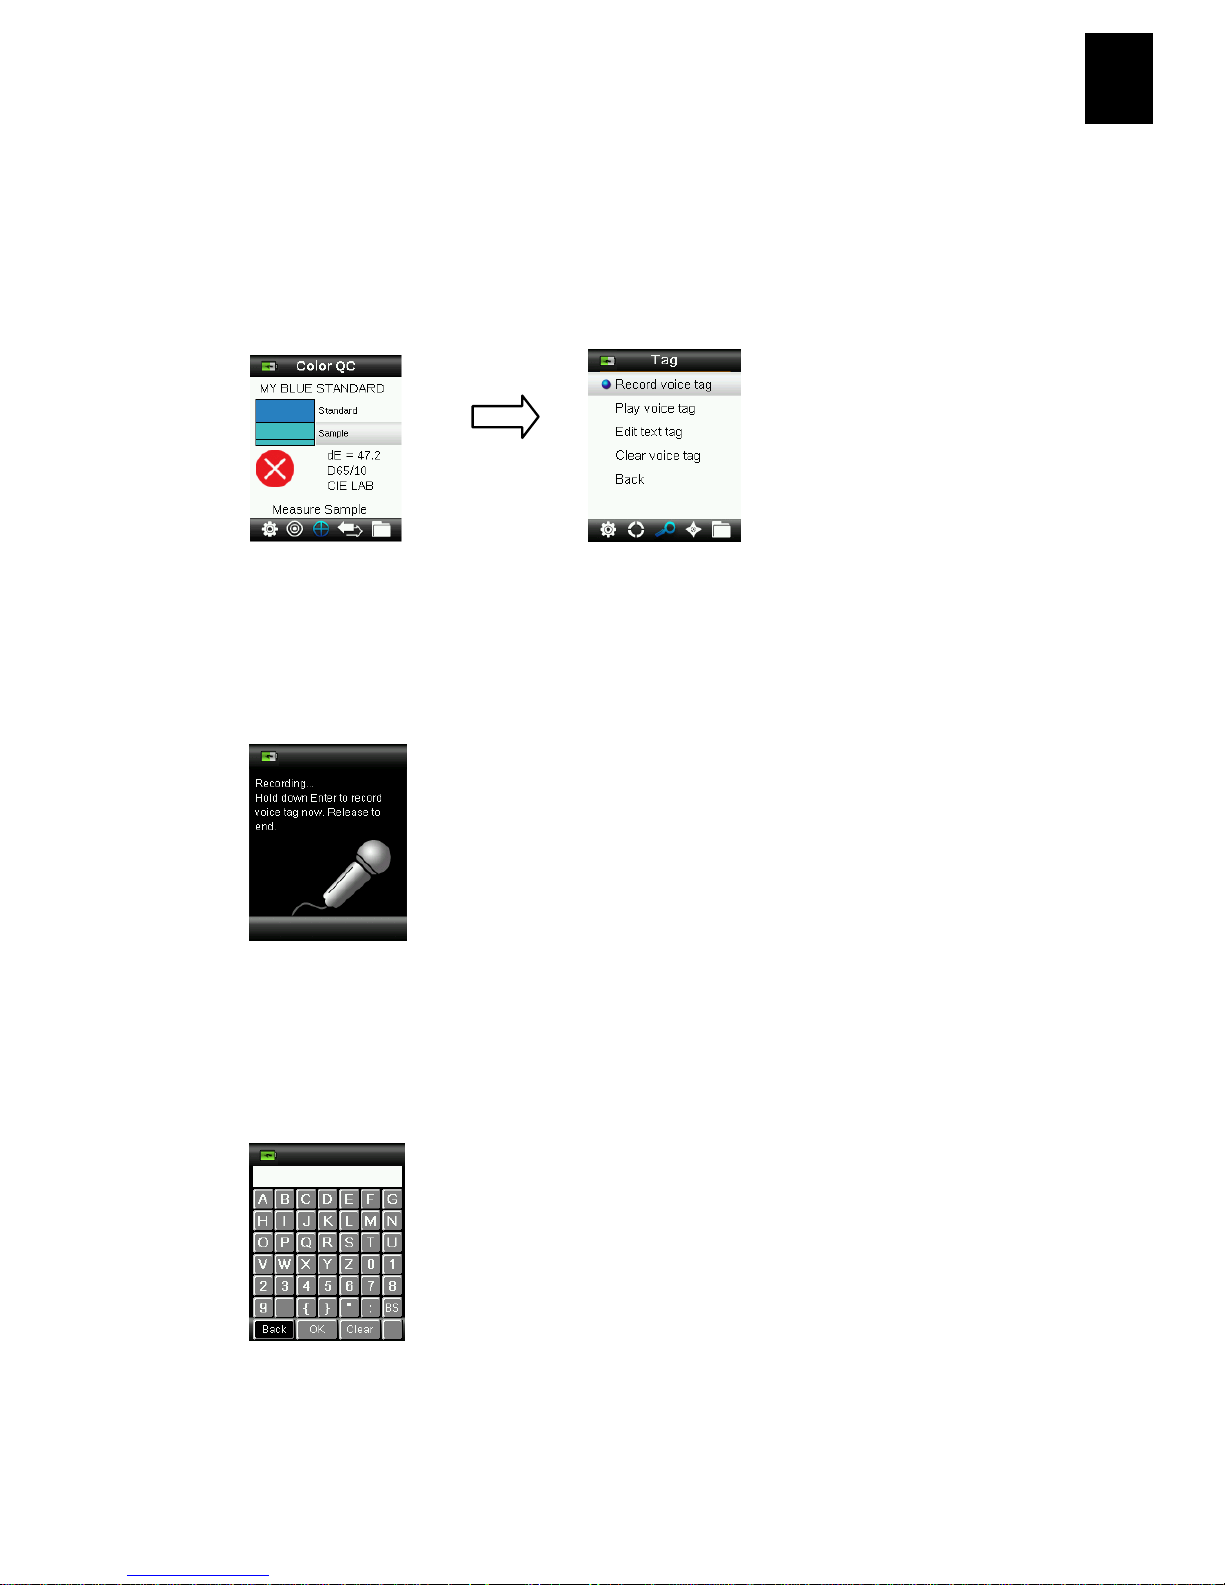
Saving a Tag with a Measurement
Each measurement is automatically saved in the sample record. A voice tag or
text tag can be saved with each sample measurement.
Page 11
RM200QC
9
EN
RM200QC can store a maximum of 350 sample measurements which are
stored in date & time order. When the limit of 350 stored records is reached
the oldest record is automatically deleted.
1. From the Color QC window, press the Enter button to display the Tag
window.
2. Voice Tag
To record a voice tag for the active color, select Record voice tag from
the list and press and hold the Enter button down. Speak into the
microphone located below the power button. When finished, release
the Enter button.
3. Text Tag
To add a text tag for the current sample, select Edit text tag from the list
and press Enter. Add your note with the virtual keyboard using the
Navigation control and Enter button. When finished, highlight OK on the
virtual keyboard and press the Enter Button.
4. Exit the Tag window by selecting Back from the list and pressing the
Enter button.
Enter
button
Page 12
RM200QC
10
EN
7. Outputting Reports
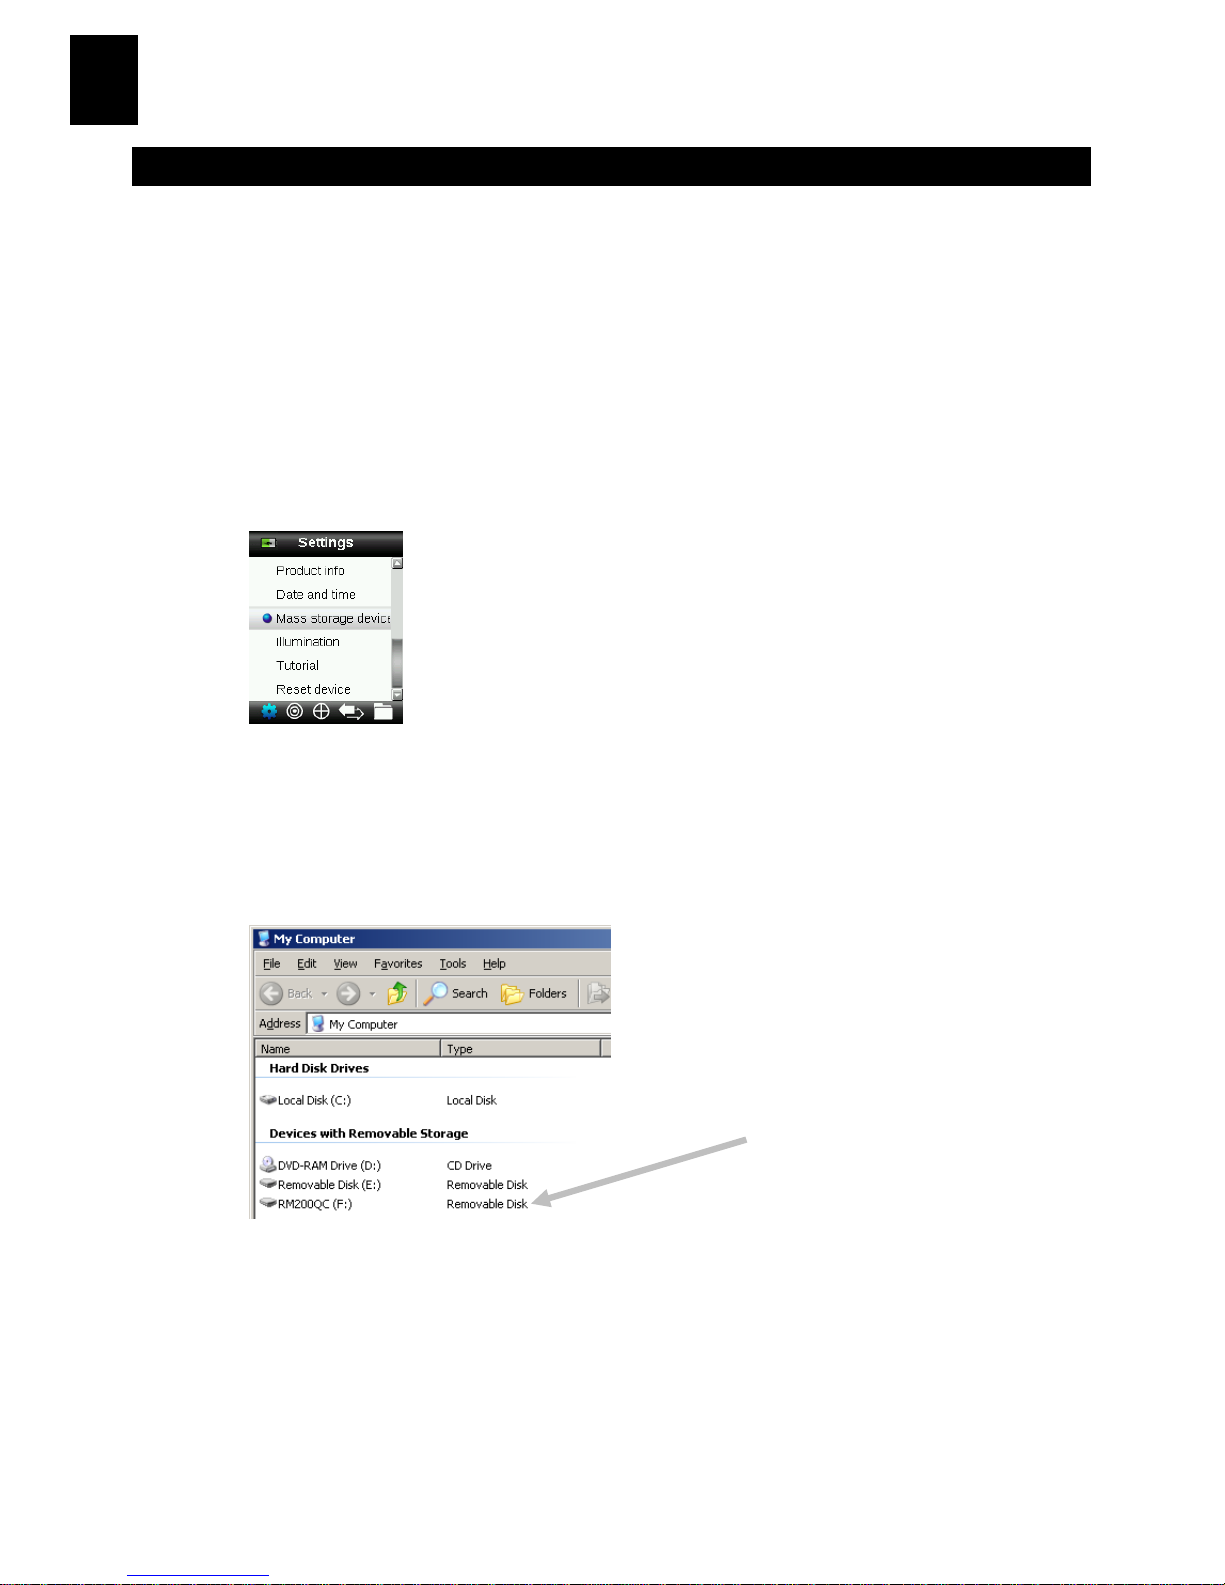
Mass Storage Mode
The mass storage option is used to set the device USB mode for output of
reports to computer. When the device is in this mode it will work with your
computer with similar function to a USB Memory stick.
1. Select the Standard icon in the function bar by pressing on the right or
left side of the Navigation control.
2. Press the Enter button to switch the device in to the Mass storage
device.
3. The device will now be recognized on your computer as a removable
disk “RM200QC”. If this is the first time you have plugged in your device
running in the USB Mass storage mode, the new device installation
prompt will be seen and the required drivers will automatically be
installed.
4. Two report options are provided:
a. QCREPORT.PDF – This provides a multipage formatted report ready
for you to use directly for your quality records.
b. DATA.CSV – This provides data for the measured standards and
samples that can be easily manipulated in Excel to a format of your
preference or for more advanced data collection and analysis.
Page 13
RM200QC
11
EN
8. Quick Check Menu
The Quick Check menu contains functions which allow you to make quick
comparison measurements that are not stored to the instrument. The
following functions can be selected from the menu.
• Color Compare is a quick function to measure a standard and then a
sample and display results.
• Opacity Check displays the percent opacity of a drawn down sample on
an opacity card.
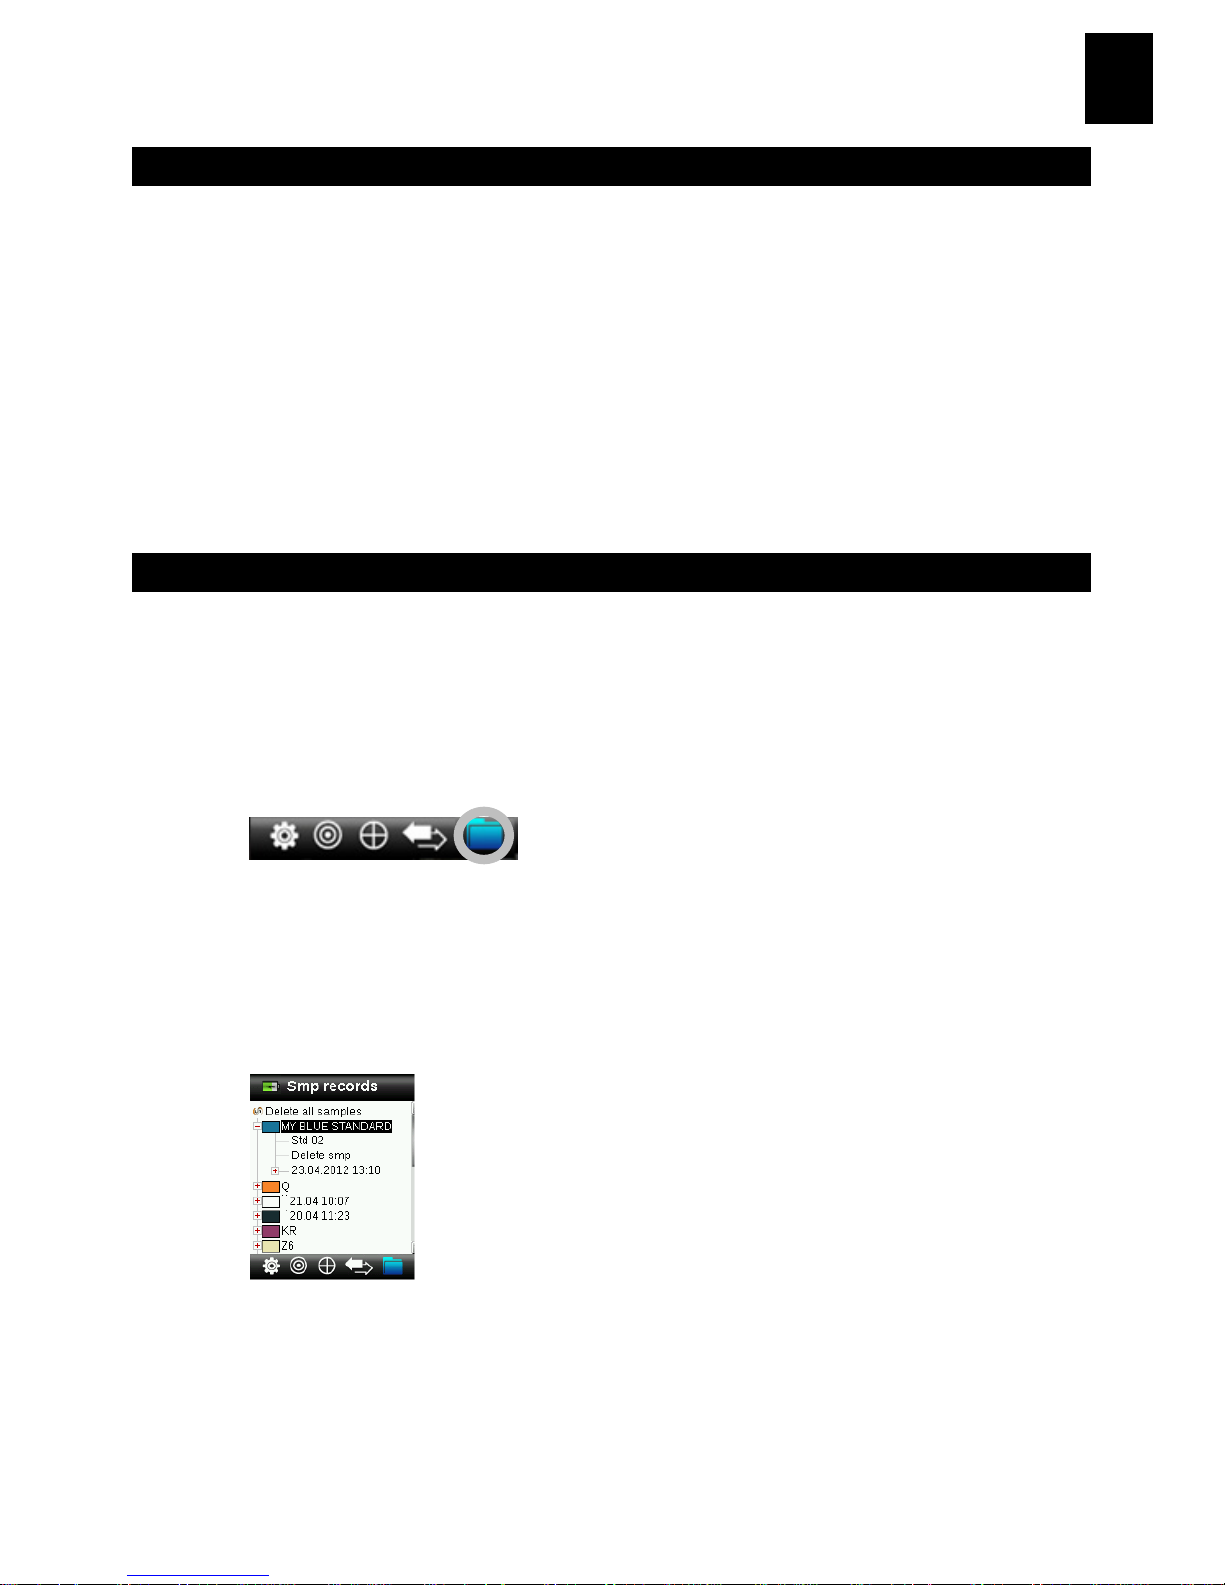
9. Sample Records Menu
The Sample Records function enables you to retrieve a stored sample from the
instruments database, delete an individual sample, delete all stored samples,
or create a report.
1. Select the Sample Records icon in the function bar by pressing on the
right side of the Navigation control.
2. Scroll through the stored records by pressing the up and down sides of
the Navigation control.
3. Samples are stored under the standard that was used for measurement.
Select the desired standard and press the Enter button to view stored
sample measurements.
Page 14
RM200QC
12
EN
10. Appendices
Troubleshooting
Symptom Action
Will not turn on Press and hold the Power button.
Charge battery / plug in to USB port.
Instrument not responding Hold down on/off button 10 seconds to turn off
then restart.
Instrument will not switch off Remove the USB connection.
Hold down on/off button 10 seconds to turn off
then restart.
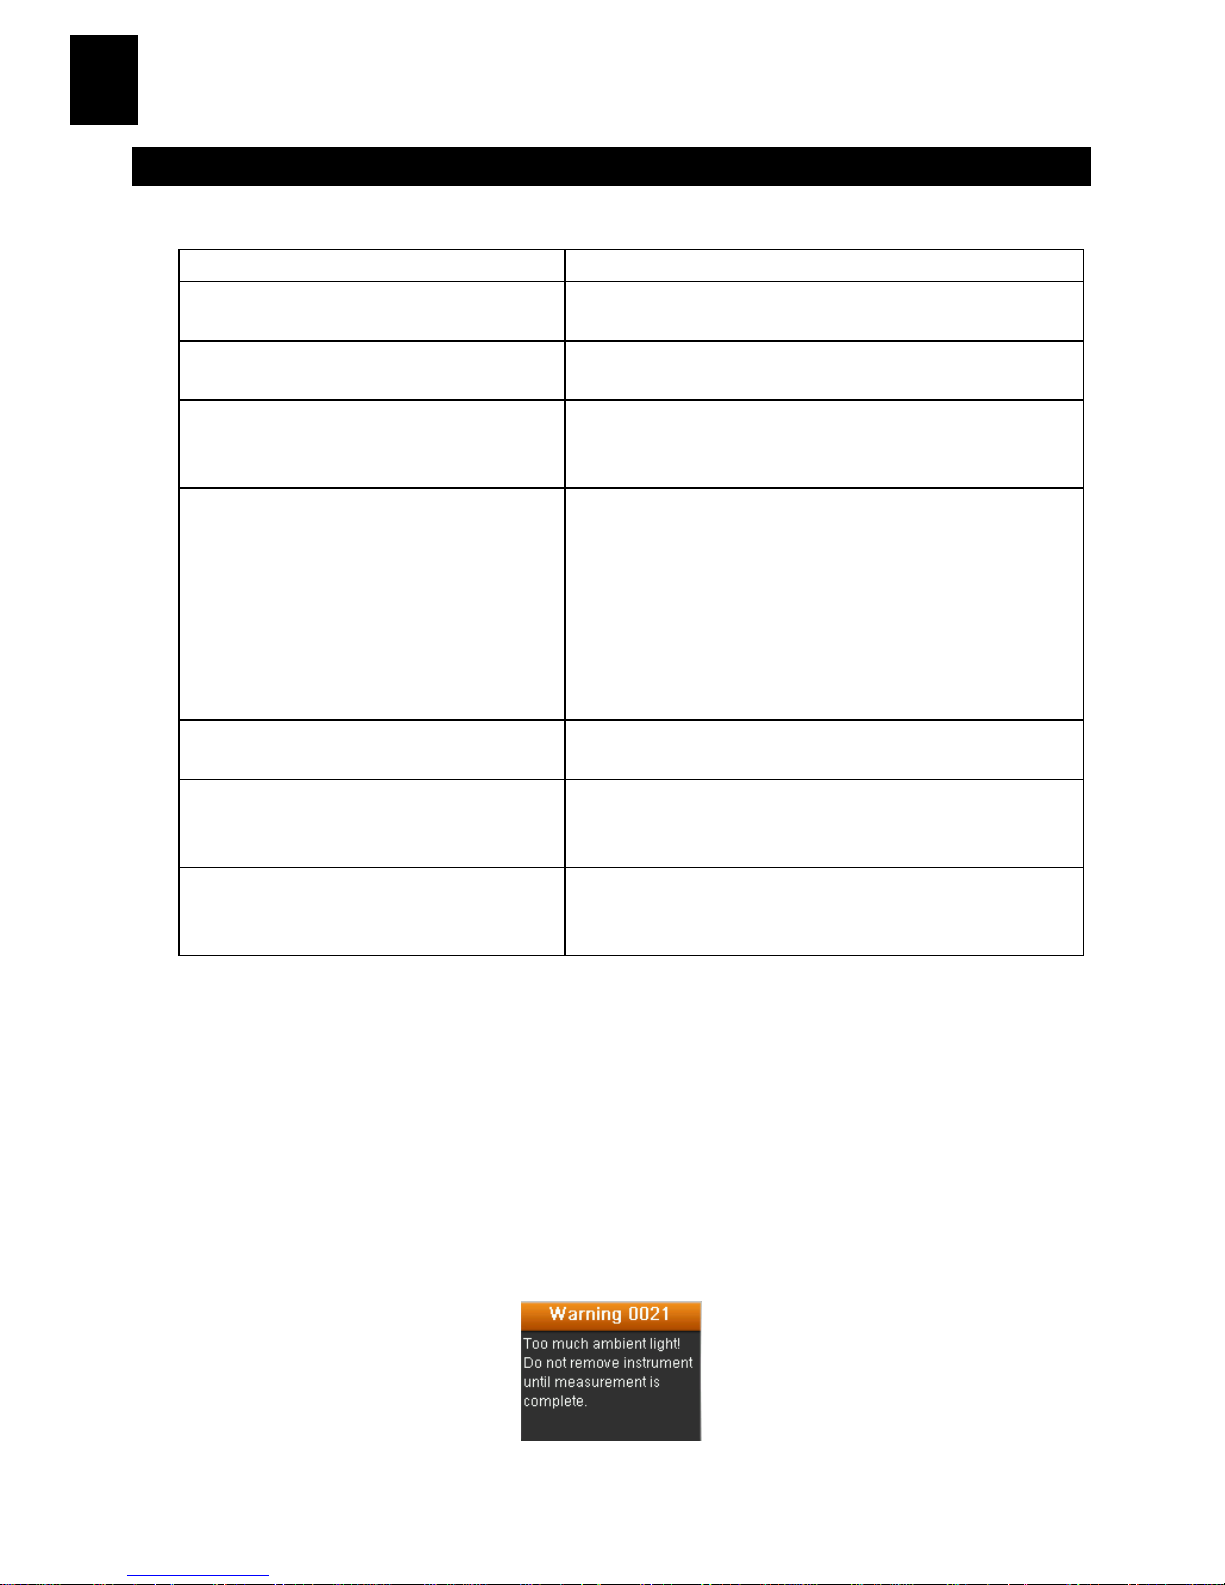
Too much ambient light detected Make sure you keep the instrument on the
sample until the end of the measurement.
Shield the sample to keep light from entering the
optics during a measurement on very rough or
curved samples.
On transparent samples try to prevent light from
entering the samples from sides or back. Place
sample on a white background.
Instrument requests a “Recalibrate” Recalibrate the instrument using the Calibrate
function in the Settings menu.
“Reference slider not closed!”
continually displays after calibrating
more than once.
You will need to perform seven calibration
procedures in a row. This will set a new reference
point and correct the problem.
I cannot hear the voice recording. Increase the volume in the Settings menu.
Make sure you hold down the Enter button during
recording.
Screen Messages
Screen messages can appear in the display during error conditions or for
informational purposes. Some messages are cleared from the instrument
screen by pressing the Enter button.
Messages may also be accompanied by a number to indicate a specific
condition. If an error condition persists, contact technical support at
800.248.9748 or visit www.xrite.com.
Sample Error
Message
Page 15

RM200QC
1
DE
CE-Bescheinigung
Name des Herstellers/Vertragshändler:
X-Rite, Incorporated • Siemensstraße 12b • 63263 Neu-Isenburg • Deutschland
Telefon: +49 (0) 61 02-79 57-0 • Telefax: +49 (0) 61 02 -79 57-57
Modellbezeichnung: RM200QC
Modellnummer: RM200
Konformitätsrichtlinien: EMC 2004/108/EG LVD 2006/95/EG
FCC-Hinweise (nur für die USA)
HINWEIS: This equipment has been tested and found to comply with the limits for a Class B
digital device, pursuant to Part 15 of the FCC Rules. These limits are designed to provide
reasonable protection against harmful interference in a residential installation. This
equipment generates, uses and can radiate radio frequency energy and, if not installed and
used in accordance with the instructions, may cause harmful interference to radio
communications. However, there is no guarantee that interference will not occur in a
particular installation. If this equipment does cause harmful interference to radio or
television reception, which can be determined by turning the equipment off and on, the
user is encouraged to try to correct the interference by one or more of the following
measures:
• Reorient or relocate the receiving antenna.
• Increase the separation between the equipment and receiver.
• Connect the equipment into an outlet on a circuit different from that to which the
receiver is connected.
• Consult the dealer or an experienced radio/TV technician for help.
Industry Canada Compliance Statement (nur Kanada)
This Class A digital apparatus complies with Canadian ICES-003.
Cet appareil numérique de la classe A est conforme à la norme NMB-003 du Canada.
Geräteinformationen
Die Benutzung dieses Geräts auf eine Art und Weise, anders als von X-Rite, Incorporated
empfohlen kann die Entwurfsintegrität und die Gerätesicherheit gefährden.
WARNUNG: Dieses Gerät darf nicht in explosionsgefährdeten Bereichen verwendet
werden.
Page 16

RM200QC
2
DE
Dieses Dokument hilft Ihnen dabei, sich mit Ihrem X-Rite RM200QC vertraut
zu machen. Weitere Informationen finden Sie im Benutzerhandbuch. Das
Benutzerhandbuch finden Sie auf der CD im PDF-Format. Das
Benutzerhandbuch enthält zusätzliche Richtlinien, Warnungen, Funktionen
und Informationen zur Installation und Reinigung des Geräts.
Inhaltsverzeichnis
1.
Lieferumfang 2
2. Gerätebeschreibung 3
3. Der Einstieg 4
Installieren der Software 4
Akku laden 4
Gerät ein- und ausschalten (nur im Akkubetrieb) 4
Sprache wählen 5
Gerätekalibrierung 5
Probenmessung und -vorschau 5
4. Funktionen 6
5. Standards erstellen 6
6. Farb-QS 8
Proben messen 8
Messung mit Notiz speichern 9
7. Berichte erstellen 10
Modus Massenspeicher 10
8. Menü Kurzcheck 11
9. Menü Probenverlauf 11
10. Anhang 12
Fehlerbehebung 12
Meldungen 12
1. Lieferumfang
• RM200QC-Gerät • Schutztasche
• Kordel • Software und Benutzerhandbuch-CD
• USB-Kabel
Page 17

RM200QC
3
DE
2. Gerätebeschreibung
1. Öse mit Kordel: Verwendbar als Handschlaufe und zum Umhängen für den
sicheren Transport des Geräts.
2. Ein-/Ausschalter: Schaltet das Gerät ein und aus.
3. Messtaste: Zweistufige Taste: leichter Druck startet die Vorschau, fester Druck
leitet die Messung ein. Ein leichter Druck auf die Messtaste bringt Sie außerdem
immer wieder zur Farb-QS-Anzeige zurück.
4. Navigationstaste: Ermöglicht die Navigation in 4 Richtungen durch die Menüs.
Drücken Sie auf die linke Tastenseite, und Sie gelangen zum nächsten Element
oder zur nächsten Funktion dort zurück. Drücken Sie auf die rechte Tastenseite,
und Sie gelangen zum nächsten Element oder zur nächsten Funktion dort hin.
Entsprechend verhalten sich die Tasten beim Druck auf die obere oder untere
Seite der Navigationstaste.
5. Eingabetaste: Wahl von Menüs und Funktionen, und öffnet das
Kennzeichenmenü.
6. USB-Anschluss: Aufladen des Geräts und Schnittstelle zum Computer.
7. Lautsprecher und Mikrofon: Aufnehmen und Abspielen von Sprachnotizen.
8. Display: Anzeige von Farbdaten, Gerätestatus und Optionen.
9. Zielhilfe: Problemlose Positionierung auf Proben.
10. Schieber mit Weißreferenz: Bewegt die Weißreferenz für die Messung,
Kalibrierung und Aufbewahrung.
11. Messoptik: Bereich durch den die Oberfläche beleuchtet und gemessen wird.
12. Infoetikett: Seriennummer, Standards und andere Informationen.
(8)
(4)
(5)
(2)
(7)
(6)
(3)
(9)
(1)
(10)
(12)
(11)
Page 18

RM200QC
4
DE
3. Der Einstieg
Installieren der Software
Bitte installieren Sie zuerst die Software, die Sie mit dem Gerät erhalten
haben, ehe Sie das Gerät per USB an Ihren Computer anschließen. Es werden
die erforderlichen USB-Treiber für das Gerät und ein Programm installiert.
1. Legen Sie die CD in Ihr Laufwerk ein. Doppelklicken Sie die Setup.exe,
falls das Installationsprogramm nicht automatisch von der CD startet.
2. Das Installationsprogramm leitet Sie weiter durch den
Installationsvorgang. Folgen Sie den Anweisungen, um die Installation
fertigzustellen. Entfernen Sie anschließend die CD und bewahren Sie an
einem geeigneten Ort auf.
Akku laden
Schließen Sie das RM200QC per USB an Ihren Computer an. Ein Akkuladesymbol erscheint kurzzeitig. Bei der ersten Verwendung erscheint jetzt ein
Menü, in dem Sie die gewünschte Sprache auswählen können. Weitere
Informationen dazu finden Sie im Abschnitt Erstmalige Verwendung auf den
nachfolgenden Seiten.
Hinweis: Einige Computer verfügen auch über passive USB-Ports. Diese
befinden sich normalerweise an der Vorderseite Ihres Computers. Bitte
verbinden Sie das RM200QC wenn möglich nur mit einem aktiven USB-Port.
Das Gerät schaltet sich für den Ladevorgang ein, und zeigt den Fortschritt im
Batteriesymbol an. Das RM200QC bleibt eingeschaltet solange es mit dem
Computer verbunden ist. Ein kompletter Ladevorgang über USB dauert ca. 6
Stunden.
Gerät ein- und ausschalten (nur im Akkubetrieb)
Drücken Sie den Ein-/Ausschalter, um das Gerät einzuschalten.
Ein-/Ausschalter
Page 19

RM200QC
5
DE
Sprache wählen
Verwenden Sie die Navigationstaste, um die Sprache aus der Liste
auszuwählen. Weitere Informationen zu den Tasten finden Sie in der
Einleitung.
Gerätekalibrierung
1. Kalibrierung: Referenzschieber (10) über Optik schieben und Messtaste
(3) drücken.
2. Anschließend Referenzschieber (10) in Ausgangsposition schieben und
Eingabetaste (5) drücken.
Probenmessung und -vorschau
1. Messung: Messtaste (3) leicht andrücken und halten. Gerät dabei auf
Probe platzieren.
2. Messtaste (3) für Messung durchdrücken. Ergebnisse (8) werden angezeigt.
(10)
(3)
(10)
(5)
(3)
(3)
(8)
Page 20

RM200QC
6
DE
4. Funktionen
Verwenden Sie die Navigationstaste, um die gewünschten Funktionen zu
wählen. Die aktive Funktion wird durch ein markiertes Symbol auf der
Funktionsleiste und in der Titelzeile angezeigt.
Einstellungen
Standard
Farb-QS
Kurzcheck
Prb.-Eintrag
Gerätekonfiguration Neuen Standard
aus Liste wählen
oder einmessen
Messung von Probe
gegen Standard für
Farb-QS.
Messung für Farbvergleich und Opazität durchführen.
Gespeicherte Proben anzeigen und
Bericht erstellen.
Eingabetaste (markiert) drücken, Navigationstaste (nach unten)
drücken
Eingabe von Kennzeichen für die
Probenmessung
A
nzeige von Probenbild, Farbplot und
Indizes auch möglich.
5. Standards erstellen
1.
Wählen Sie in der Funktionsleiste das Symbol Standard, indem Sie rechts
oder links auf die Navigationstaste drücken.
Akkuanzeige
Ungefähre Standard- und
Probenfarbe
Aktive Funktion
Messinformationen
Funktionsleiste (aktive
Funktion ist markiert)
Page 21

RM200QC
7
DE
2. Drücken Sie die Eingabetaste, um den gewählten Standard zu öffnen.
3. Standardmäßig ist die Sicherheitsfunktion aktiviert. Geben Sie das
Kennwort “999” ein, um einen Standard zu erstellen oder bearbeiten
und, wählen Sie dann OK.
4. Drücken Sie die Navigationstaste nach oben oder unten, um "Namen
eingeben" zu wählen und einen Namen für den Standard einzugeben.
Drücken Sie dann die Eingabetaste.
5. Drücken Sie die Taste leicht, um eine Vorschau zu sehen und dann fest,
um zu Messen.
Hinweis: Wenn Sie die aktuelle Messung nicht verwenden möchten,
dann wählen Sie mit der Navigation die Funktion Zurücksetzen, und
drücken Sie die Eingabetaste.
6. Fahren Sie mit weiteren Messungen fort, um einen Mittelwert zu
ermitteln wenn die Mittelwertbildung in den Einstellungen gewählt
wurde (Standardeinstellung: 3 Messungen).
Simulierte Farbe
Standardwerte
Stern zeigt an, dass der Standard
für QS gewählt wurde
Zurücksetzen
Page 22

RM200QC
8
DE
6. Farb-QS
Proben messen
1. Wählen Sie in der Funktionsleiste das Symbol Standard, indem Sie rechts
oder links auf die Navigationstaste drücken.
2. Wenn der angezeigte Standard nicht der ist, der für die Probenmessung
erforderlich ist, dann drücken Sie bitte unten auf die Navigationstaste,
und wählen Sie den gewünschten Standard. Drücken Sie die
Eingabetaste, um mit dem Standardmenü fortzufahren. Wählen Sie dort
den gewünschten Standard.
3. Drücken Sie die Messtaste an, um die Vorschau zu aktivieren. Der
Messfleck wird in der Vorschau durch den Kreis gekennzeichnet.
4. Wenn Sie den gewünschten Bereich visiert haben, dann drücken Sie nun
die Messtaste fest an.
5. Fahren Sie mit weiteren Messungen fort, um einen Mittelwert zu ermitteln,
wenn die Mittelwertbildung in den Einstellungen gewählt wurde.
6. Nach der Messung wird ein Farbmuster der Probe zusammen mit dem
Pas/Fail-Status angezeigt. Im Beispiel unten wird angezeigt, dass die
Probe den Status Fail hat. Der Status wird gemäß der Toleranzen in den
Einstellungen vergeben.
7. Drücken Sie unten auf die Navigationtaste, um zum Datenfenster QS-
Probe zu gelangen.
Page 23

RM200QC
9
DE
Messung mit Notiz speichern
Alle Messungen werden automatisch im Probenverlauf gespeichert. Sie
können eine Sprach- oder Textnotiz mit Ihren Proben speichern.
RM200QC kann bis zu 350 Probenmessungen nach Datum und Uhrzeit
geordnet speichern. Wenn mehr als 350 Messungen gespeichert wurden,
dann werden mit jeder neuen Messung die ältesten Einträge gelöscht.
1. Wenn in der Anzeige die Farb-QS angezeigt wird, dann drücken Sie die
Eingabetaste, und das Menü Notizen wird angezeigt.
2. Sprachnotizen
Wählen Sie aus der Liste Sprache aufnehmen, und drücken und halten Sie
die Eingabetaste, um eine Sprachnotiz für die aktive Farbe aufzunehmen.
Sprechen Sie in das Mikrofon, das sich unter dem Ein-/Ausschalter
befindet. Lassen Sie anschließend die Eingabetaste wieder los.
3. Textnotizen
Wählen Sie aus der Liste Textnotiz bearbeiten, und drücken Sie die
Eingabetaste, um eine Textnotiz für die aktuelle Probe einzugeben.
Geben Sie Ihre Notiz mit der virtuellen Tastatur ein. Verwenden Sie die
Navigationstaste, um die Buchstaben zu markieren und die
Eingabetaste, um diese einzugeben. Markieren Sie anschließend OK auf
der virtuellen Tastatur und drücken Sie die Eingabetaste.
Eingabeta
ste
Page 24

RM200QC
10
DE
4. Wählen Sie aus der Liste Zurück, und drücken Sie dann die Eingabetaste,
um das Notizfenster zu verlassen.
7. Berichte erstellen
Modus Massenspeicher
Mit der Option Massenspeicher können Berichte an den Computer per USB
ausgegeben werden. In diesem Modus verhält sich das Gerät an Ihrem
Computer wie ein USB-Stick.
1. Wählen Sie in der Funktionsleiste das Symbol Standard, indem Sie rechts
oder links auf die Navigationstaste drücken.
2. Drücken Sie die Eingabetaste, um das Gerät in den Modus
Massenspeicher zu wechseln.
3. Das Gerät wird von Ihrem Computer als Wechseldatenträger
“RM200QC” erkannt. Wenn Sie dieses Gerät zum ersten Mal an den
Computer im Modus Massenspeicher anschließen, dann erkennt der
Computer das neue Gerät und meldet, dass neue Treiber installiert
werden müssen.
Page 25

RM200QC
11
DE
4. Es stehen zwei Berichtsoptionen zur Verfügung:
a. QCREPORT.PDF: Mehrseitig formatierter Bericht, der direkt für
Qualitätskontrolle verwendet werden kann.
b. DATA.CSV: Bericht mit Daten für gemessene Standards und Proben,
die problemlos in Excel nach Ihren Einstellungen formatiert werden
oder für die Datenerfassung und -analyse aufbereitet werden können.
8. Menü Kurzcheck
Das Menü Kurzcheck enthält Funktionen, mit denen Sie schnell
Vergleichsmessungen anstellen können. Die Werte werden nicht im Gerät
gespeichert. Die folgenden Funktionen stehen im Menü zur Verfügung:
• Farbvergleich: Funktion mit der schnell ein Standard und eine Probe
eingemessen werden können. Die Ergebnisse werden direkt angezeigt.
• Opazitätscheck: Anzeige der Opazität einer Probenfarbe auf einer
Opazitätskarte in Prozent.
9. Menü Probenverlauf
Im Probenverlauf können Sie auf gespeicherte Messungen in der
Gerätedatenbank zugreifen, einzelne oder alle Messungen löschen und
Berichte erstellen.
1. Wählen Sie in der Funktionsleiste das Symbol Probenverlauf, indem Sie
rechts auf die Navigationstaste drücken.
2. Verwenden Sie die Navigationstaste, um durch die gespeicherten
Messungen zu blättern.
3. Proben werden jeweils mit dem Standard gespeichert, gegen den sie
gemessen wurden. Wählen Sie den gewünschten Standard, und drücken
Sie die Eingabetaste, um die gespeicherten Probenmessungen anzuzeigen.
Page 26

RM200QC
12
DE
10. Anhang
Fehlerbehebung
Symptome Vorgehensweise
Gerät lässt sich nicht einschalten. Dr ücken und halten Sie den Ein-/Ausschalter.
Laden Sie den Akku, indem Sie das Gerät per USB
anschließen.
Gerät reagiert nicht Halten Sie den Ein-/Ausschalter für 10 Sekunden gedrückt, um
das Gerät auszuschalten, und starten Sie es anschließend
neu.
Gerät lässt sich nicht
ausschalten.
Trennen Sie die USB-Verbindung.
Halten Sie den Ein-/Ausschalter für 10 Sekunden gedrückt, um
das Gerät auszuschalten, und starten Sie es anschließend
neu.
Zuviel Umgebungslicht bei der
Messung.
A
chten Sie darauf, dass das Gerät bis zum Ende der Messung
auf der Probe aufliegt.
Schützen Sie das Gerät während der Messung vor Lichteinfall,
wenn Sie sehr unebene oder gewölbte Proben messen.
Versuchen Sie bei transparenten Proben den Lichteinfall von
allen Seiten und unten zu unterbinden. Platzieren Sie zum
Beispiel die Probe auf einem weißen Untergrund.
Gerät verlangt erneute
Kalibrierung
Kalibrieren Sie das Gerät manuell mit der Kalibrierfunktion aus
den Einstellungen.
In der Anzeige erscheint
"Schieber offen!" nach mehreren
Kalibrierungen.
Führen Sie sieben Kalibrierungen hintereinander durch.
Dadurch wird ein neuer Referenzpunkt gewählt, der das
Problem korrigiert.
Ich kann meine Aufnahme nicht
hören.
Stellen Sie im Menü Einstellungen die Lautstärke höher.
Achten Sie darauf, dass Sie die Eingabetaste während der
Aufnahme gedrückt halten.
Meldungen
In der Anzeige erscheinen Meldungen, die Informationen oder Fehler anzeigen.
Drücken Sie die Eingabetaste, um die Meldung zu bestätigen und zu schließen.
Es kann vorkommen, dass mit der Meldung eine Fehlermeldung angezeigt
wird. Sollte der Fehler weiterhin bestehen, dann wenden Sie sich bitte an den
Kundendienst unter 800.248.9748 oder besuchen Sie uns im Internet unter
www.xrite.com.
Beispiele für
Fehlermeldungen
Page 27

RM200QC
1
CS
CE 声明
制造商名称/授权代表:
X-Rite, Incorporated • Siemensstraße 12b • 63263 Neu-Isenburg • Germany
电话:+49 (0) 61 02-79 57-0 • 传真:+49 (0) 61 02 -79 57-57
产品名称: RM200QC
产品型号: RM200
指令符合性: EMC 2004/108/EC LVD 2006/95/EC
美国联邦通讯委员会通知
注意:本设备经测试符合 FCC 规则第 15 部分关于 B 类数字设备的限制。这些限制
是专门用于在居住区安装时适当防止有害干扰的。本设备会产生、使用及辐射无线电
射频能量,如未按照说明安装及使用,可能会对无线通信产生有害干扰。但无法保证
在具体使用场合中不产生干扰。如果本设备确实对无线电或电视接收产生了有害干扰
(可通过开、关设备来判断),建议用户采取以下一项或几项措施,削弱干扰:
• 调整接收天线的方向或位置。
• 增加设备与接收机之间的距离。
• 将设备与接收机电源插头分别插到不同的电源插座上。
• 向经销商或经验丰富的无线电/电视技术人员咨询,求得帮助。
加拿大工业一致性声明
本 A 类数字设备符合加拿大 ICES-003 的所有要求。
Cet appareil numérique de la classe A est conforme à la norme NMB-003 du Canada.
设备信息
按非 X-Rite, Incorporated 指定的方式使用本设备可能会损坏其设计一体性,并且导
致不安全。
警告:本仪器不得用于有爆炸性危险的环境中。
Page 28

RM200QC
2
CS
此文档旨在使您熟悉爱色丽 RM200QC 仪器。关于其它信息,请参阅位
于仪器随附光盘内的 PDF 版《操作员手册》。操作员手册包括其它校
准、警告、操作、安装和清洁信息。
目录
1.
包装内容 2
2. 仪器描述 3
3. 快速入门 4
安装软件 4
电池充电 4
电源开关(仅限电池操作) 4
语言选择 5
仪器校准 5
样本测量和预览 5
4. 功能屏幕 6
5. 创建标准 7
6. 颜色 QC 8
测量样本 8
保存带测量值的标签 9
7. 输出报告 10
大容量存储模式 10
8. 快速检查菜单 11
9. 样本记录菜单 11
10. 附录 12
故障排除 12
屏幕消息 12
1. 包装内容
• RM200QC 仪器 • 便携保护箱
• 系索 • 软件及手册光盘
• USB 接口缆线
Page 29

RM200QC
3
CS
2. 仪器描述
1.系索环:有助于安全地携带仪器。
2.电源 on/off(开/关):用于打开和关闭仪器。
3.测量按钮:双级按钮;轻按开始预览,紧按开始测量。轻按该按钮通常可
返回色彩 QC 屏幕。
4.导航控件: 导航屏幕菜单及功能栏的四个方向。按下左侧,将光标移至左
边的下一个可用项目。按下右侧,将光标移至右边的下一个可用项目。上下
侧的功能相同,仅以上下方向执行。
5.Enter 按钮: 选择菜单项目并打开标签菜单。
6.USB 连接:用于电池充电和软件接口。
7.扬声器和麦克风: 用于记录和播放语音标签。
8.显示屏:显示颜色信息、仪器状态和选项。
9.目标导向标记: 可轻松定位样本。
10.白色基准滑块: 定位校准片,进行测量或校准/存储。
11.测量光学元件:照亮并测量颜色的区域。
12.信息标签:提供符合性信息、序列号及其他信息。
(8)
(4)
(5)
(2)
(7)
(6)
(3)
(9)
(1)
(10)
(12)
(11)
Page 30

RM200QC
4
CS
3. 快速入门
安装软件
在计算机上插入 USB 电缆前,必须安装仪器随附的软件。软件为仪器和
应用程序安装必需的 USB 驱动程序。
1. 将光盘插入光盘驱动器。如果光盘没有自动运行,请双击光盘上的
Setup.exe 文件。
2. 安装程序将引导您执行安装程序的剩余步骤。请按每个设置窗口
上的说明完成安装。完成安装后,取出光盘并将其存放在安全的
地方。
电池充电
用 USB 电缆将 RM200QC 连接至计算机的 USB 端口。随即会显示电池充电
屏幕。首次连接时,还会出现语言选择屏幕。首次操作时,请参阅以下页
面的“初始启动”部分。
注意:有些计算机配备小功率的 USB 端口(通常位于机箱正面)。建议
只将 RM200QC 连接到大功率端口。
充电期间,仪器开启,电池图标上出现“闪电”,表示正在充电。
RM200QC 在插入计算机 USB 端口期间不会关闭。电量用尽的电池连接计
算机 USB 端口后 6 小时可充满电。
电源开关(仅限电池操作)
按下后松开电源按钮,开启仪器。
电源按钮
Page 31

RM200QC
5
CS
语言选择
按导航控件的上侧和下侧,从列表中选择语言。按钮位置请参阅“简
介”部分。
仪器校准
1. 要进行校准,请将参考滑块 (10) 置于光学器件之上,然后按测量
(3)。
2. 完成后,请将参考滑块 (10) 放回到存储位置,然后按 Enter (5)。
样本测量和预览
1. 要进行测量,请轻轻按住测量按钮 (3) 并将仪器置于样本上。
2. 紧按测量 (3) 开始测量。查看结果(8)。
(10)
(3)
(10)
(5)
(3)
(3)
(8)
Page 32

RM200QC
6
CS
4. 功能屏幕
按导航控件的左侧或右侧按钮,便可选择功能。有效的功能在功能栏和
窗口标题中显示为突出显示图标。
设置
标准
颜色 QC
快速检查
样本记录
配置仪器。 从列表中选择或
测量一个新标
准。
对比已存储的标
准执行颜色 QC
样本测量。
执行色彩比较和
遮盖度测量。
查看已保存的样
本记录并创建报
告。
按 Enter(突出
显示的标签)按
导航控件(底
部)
标签菜单可用来
添加附注至样本
测量。
还可使用样本图像、颜色图和参数
视图。
电池电量指示计
近似于标准和样本颜色
有效的功能
测量信息
功能栏(突出显示有效的
功能)
Page 33

RM200QC
7
CS
5. 创建标准
1.
按导航控件的右侧或左侧,在功能栏中选择“标准”图标。
2. 按下编辑按钮,打开所选的标准槽。
3. 默认情况下将开启安全功能,以便创建或编辑标准,输入密码
“999”并选择确定。
4. 为标准输入一个名称,使用导航控件的上侧或下侧选择“输入名
称...”,并按下 Enter(选择)按钮。
5. 只需将其紧按至测量便可预览样本。
注意:如果您不想使用当前测量值,使用导航控件选择重置并按
Enter(选择)按钮。
6. 如果在“设置”中激活标准平均值(默认设置为 3),继续使用附
加测量值可获取平均值。
模拟色彩
标准值
星状图指示为 QC 测量选择的
标准
重置
Page 34

RM200QC
8
CS
6. 颜色 QC
测量样本
1. 按导航控件的右侧或左侧,在功能栏中选择“标准”图标。
2. 如果所显示的标准并非样本比较所需的标准,按下导航控件下侧,
然后选择当前标准。按下 Enter 按钮进至“标准”菜单,选择所需
的标准。
3. 轻轻按住测量按钮,激活预览。要测量的区域在预览中以圆圈表
示。
4. 确定要测量的区域后,紧按测量按钮。
5. 如果在“设置”中激活标准平均值,继续使用附加测量值可获取平
均值。
6. 测量后,样本的模拟色砖将与“合格/失败”指示一并显示。样本将
会根据预设的容许量数值与标准进行对比。如果样本并未处在定义
值以内,测量将会失败。
7. 按下导航控件的下侧进至“QC 样本”数据屏幕。
Page 35

RM200QC
9
CS
保存带测量值的标签
每次测量都将自动保存在样本记录中。语音标签或文本标签可与每次样本
测量一同保存。
RM200QC 可按日期和时间顺序最多储存 350 次样本测量。到达 350 次
存储记录限制时,最早的记录将自动删除。
1. 在“颜色 QC”窗口中,按 Enter 按钮显示“标签”窗口。
2. 语音标签
要为有效颜色记录语音标签,请从列表中选择记录语音标签,并按
下 Enter 按钮。对准电源按钮下方的麦克风说话。完成后,松开
Enter 按钮。
3. 文本标签
要为当前样本添加文本标签,请从列表中选择编辑文本标签并按
Enter。使用导航控件和 Enter 按钮,用虚拟键盘添加附注。完成
后,在虚拟键盘上突出显示确定,并按 Enter 按钮。
4. 从列表中选择返回并按 Enter 按钮,退出“标签”窗口。
Enter 按钮
Page 36

RM200QC
10
CS
7. 输出报告
大容量存储模式
大容量存储选项可用来设置设备向计算机输出报告的 USB 模式。设备在
该模式下具有与 USB 记忆棒相似的功能,可与计算机搭配使用。
1. 按住导航控件的右侧或左侧,在功能栏中选择“标准”图标。
2. 按下 Enter 按钮将设备切换为大容量存储设备。
3. 该设备现可在计算机上被识别为可移动磁盘“RM200QC”。如果这
是您首次在 USB 大容量存储模式下插入运行的设备,将会出现新设
备安装提示,并将自动安装所需的驱动程序。
4. 提供两个报告选项:
a. QCREPORT.PDF – 提供可直接用于质量记录的多页格式报告。
b. DATA.CSV – 该文件提供了用于测量标准和样本的数据,便于
在 Excel 中进行处理,制作成您所需要的格式,或进行更加高
级的数据收集和分析。
Page 37

RM200QC
11
CS
8. 快速检查菜单
“快速检查”菜单包含可让您对测量值执行快速比较的功能。该
等测量值不会存储于仪器上。
可从菜单中选择以下功能。
• “色彩比较”是测量标准及样本并显示结果的快速功能。
• “遮盖度检查”显示遮盖度卡片上的遮盖度百分比梯度。
9. 样本记录菜单
“样本记录”功能可让您从仪器数据库中检索储存的样本,删除单个记
录,删除所有已储存的样本,或创建报告。
1. 按“导航”控件的右侧,在功能栏中选择“样本记录”图标。
2. 按“导航”控件的上侧和下侧滚动已存储的记录。
3. 样本按照用于测量的标准进行存储。选择所需的标准,按 Enter 按
钮查看存储的样本测量值。
Page 38

RM200QC
12
CS
10. 附录
故障排除
征兆 操作
无法开启 按住“电源”按钮。
给电池充电/插入 USB 端口。
仪器无反应 按住开/关按钮 10 秒,关闭后再重启。
仪器无法关闭 卸除 USB 连接。
按住开/关按钮 10 秒,关闭后再重启。
检测到过多环境光照 确保将仪器放在样本上,直至测量结束。
测量粗糙或弯曲样本时,用手遮住样本,
不要让光线进入光学元件。
在透明样本上,要尽量避免光线从侧面或
背面进入样本。将样本放在白色背景上。
仪器要求“重新校准” 使用“设置”菜单中的“校准”功能,重
新校准仪器。
多次校准后,将持续显示“标
准参考滑块未关闭!”。
需要在一行中执行七个校准步骤。这将设
置新的参考点并解决问题。
听不到语音录音。 在“设置”菜单上增大音量。
确保在录音过程中按住 Enter 按钮。
屏幕消息
出现错误时,显示屏上会显示屏幕消息,以警示出现错误。按 Enter 按
钮可清除仪器屏幕上的一些消息。
消息可能也会带有一个数字,用来指示特定条件。如果错误继续存在,请
致电 800.248.9748 联系技术支持部门,或访问 www.xrite.com
。
错误消息样本
Page 39

RM200QC
1
CT
CE 聲明
製造商名稱/授權代表:
X-Rite, Incorporated • Siemensstraße 12b • 63263 Neu-Isenburg • Germany
電話:+49 (0) 61 02-79 57-0 • 傳真:+49 (0) 61 02 -79 57-57
產品名稱: RM200QC
產品型號: RM200
指令符合性: EMC 2004/108/EC LVD 2006/95/EC
美國聯邦通訊委員會通知
注意:本設備經測試符合 FCC 規則第 15 部分關於 B 類數字設備的限制。這些限制是
專門用於在居住區安裝時適當防止有害干擾的。本設備會產生、使用及輻射無線電射
頻能量,如未按照說明安裝及使用,可能會對無線通信產生有害干擾。但無法保證在
具體使用場合中不產生干擾。如果本設備確實對無線電或電視接收產生了有害干擾
(可通過開、關設備來判斷),建議用戶採取以下一項或幾項措施,削弱干擾:
• 調整接收天線的方向或位置。
• 增加設備與接收機之間的距離。
• 將設備與接收機電源插頭分別插到不同的電源插座上。
• 向經銷商或經驗豐富的無線電/電視技術人員諮詢,求得幫助。
加拿大工業一致性聲明
本 A 類數字設備符合加拿大 ICES-003 的所有要求。
Cet appareil numérique de la classe A est conforme à la norme NMB-003 du Canada.
設備信息
按非 X-Rite, Incorporated 指定的方式使用本設備可能會損壞其設計一體性,並且導致
不安全。
警告:本儀器不得用於有爆炸性危險的環境中。
Page 40

RM200QC
2
CT
此文檔旨在使您熟悉愛色麗 RM200QC 儀器。關於其它信息,請參閱位
於儀器隨附光盤內的 PDF 版《操作員手冊》。操作員手冊包括其它校
準、警告、操作、安裝和清潔信息。
目录
1.
包裝內容 2
2. 儀器描述 3
3. 快速入門 4
安裝軟件 4
電池充電 4
語言選擇 5
儀器校準 5
樣本測量和預覽 5
4. 功能屏幕 6
5. 創建標準 7
6. 顏色 QC 8
測量樣本 8
保存帶測量值的標籤 9
7. 輸出報告 10
大容量存儲模式 10
8. 快速檢查菜單 11
9. 樣本記錄菜單 11
10. 附錄 12
故障排除 12
屏幕消息 12
1. 包裝內容
• RM200QC 儀器 • 便攜保護箱
• 系索 • 軟件及手冊光盤
• USB 接口纜線
Page 41

RM200QC
3
CT
2. 儀器描述
1. 系索環:有助於安全地攜帶儀器。
2. 電源 on/off(開/關):用於打開和關閉儀器。
3. 測量按鈕:雙級按鈕;輕按開始預覽,緊按開始測量。輕按該按鈕通常
可返回色彩 QC 屏幕。
4. 導航控件: 導航屏幕菜單及功能欄的四個方向。按下左側,將光標移至
左邊的下一個可用項目。按下右側,將光標移至右邊的下一個可用項
目。上下側的功能相同,僅以上下方向執行。
5. Enter 按鈕: 選擇菜單項目並打開標籤菜單。
6. USB 連接:用於電池充電和軟件接口。
7. 揚聲器和麥克風: 用於記錄和播放語音標籤。
8. 顯示屏:顯示顏色信息、儀器狀態和選項。
9. 目標導向標記: 可輕鬆定位樣本。
10. 白色基準滑塊: 定位校準片,進行測量或校準/存儲。
11. 測量光學元件:照亮並測量顏色的區域。
12. 信息標籤:提供符合性信息、序列號及其他信息。
(8)
(4)
(5)
(2)
(7)
(6)
(3)
(9)
(1)
(10)
(12)
(11)
Page 42

RM200QC
4
CT
3. 快速入門
安裝軟件
在計算機上插入 USB 電纜前,必須安裝儀器隨附的軟件。軟件為儀器和
應用程序安裝必需的 USB 驅動程序。
1. 將光盤插入光盤驅動器。如果光盤沒有自動運行,請雙擊光盤上的
Setup.exe 文件。
2. 安裝程序將引導您執行安裝程序的剩餘步驟。請按每個設置窗口上
的說明完成安裝。完成安裝後,取出光盤並將其存放在安全的地
方。
電池充電
用 USB 電纜將 RM200QC 連接至計算機的 USB 端口。隨即會顯示電池充
電屏幕。首次連接時,還會出現語言選擇屏幕。首次操作時,請參閱以下
頁面的「初始啟動」部分。
注意:有些計算機配備小功率的 USB 端口(通常位於機箱正面)。建議
只將 RM200QC 連接到大功率端口。
充電期間,儀器開啟,電池圖標上出現「閃電」,表示正在充電。
RM200QC 在插入計算機 USB 端口期間不會關閉。電量用盡的電池連接計
算機 USB 端口後 6 小時可充滿電。
電源開關(僅限電池操作)
按下後鬆開電源按鈕,開啟儀器。
電源按鈕
Page 43

RM200QC
5
CT
語言選擇
按導航控件的上側和下側,從列表中選擇語言。按鈕位置請參閱「簡介」
部分。
儀器校準
1. 要進行校準,請將參考滑塊 (10) 置於光學器件之上,然後按測量
(3)。
2. 完成後,請將參考滑塊 (10) 放回到存儲位置,然後按 Enter (5)。
樣本測量和預覽
1. 要進行測量,請輕輕按住測量按鈕 (3) 並將儀器置於樣本上。
2. 緊按測量 (3) 開始測量。查看結果(8)。
(10)
(3)
(10)
(5)
(3)
(3)
(8)
Page 44

RM200QC
6
CT
4. 功能屏幕
按導航控件的左側或右側按鈕,便可選擇功能。有效的功能在功能欄和窗
口標題中顯示為突出顯示圖標。
設置
標準
顏色 QC 快速檢查
樣本記錄
配置儀器。 從列表中選擇或
測量一個新標
準。
對比已存儲的標
準執行顏色 QC
樣本測量。
執行色彩比較和
遮蓋度測量。
查看已保存的樣
本記錄並創建報
告。
按 Enter(突出
顯示的標籤)按
導航控件(底
部)
標籤菜單可用來
添加附註至樣本
測量。
還可使用樣本圖像、顏色圖和參數
視圖。
電池電量指示
近似於標準和樣本顏色
有效的功能
測量信息
功能欄(突出顯示有效的
功能)
Page 45

RM200QC
7
CT
5. 創建標準
1.
按導航控件的右側或左側,在功能欄中選擇「標準」圖標。
2. 按下編輯按鈕,打開所選的標準槽。
3. 默認情況下將開啟安全功能,以便創建或編輯標準,輸入密碼
「999」並選擇確定。
4. 為標準輸入一個名稱,使用導航控件的上側或下側選擇「輸入名
稱...」,並按下 Enter(選擇)按鈕。
5. 只需將其緊按至測量便可預覽樣本。
注意:如果您不想使用當前測量值,使用導航控件選擇重置並按
Enter(選擇)按鈕。
6. 如果在「設置」中激活標準平均值(默認設置為 3),繼續使用附
加測量值可獲取平均值。
模擬色彩
標準值
星狀圖指示為 QC 測量選擇的
標準
重置
Page 46

RM200QC
8
CT
6. 顏色 QC
測量樣本
1. 按導航控件的右側或左側,在功能欄中選擇「標準」圖標。
2. 如果所顯示的標準並非樣本比較所需的標準,按下導航控件下側,
然後選擇當前標準。按下 Enter 按鈕進至「標準」菜單,選擇所需的
標準。
3. 輕輕按住測量按鈕,激活預覽。要測量的區域在預覽中以圓圈表
示。
4. 確定要測量的區域後,緊按測量按鈕。
5. 如果在「設置」中激活標準平均值,繼續使用附加測量值可獲取平
均值。
6. 測量後,樣本的模擬色磚將與「合格/失敗」指示一併顯示。樣本將
會根據預設的容許量數值與標準進行對比。如果樣本並未處在定義
值以內,測量將會失敗。
7. 按下導航控件的下側進至「QC 樣本」數據屏幕。
Page 47

RM200QC
9
CT
保存帶測量值的標籤
每次測量都將自動保存在樣本記錄中。語音標籤或文本標籤可與每次樣本
測量一同保存。
RM200QC 可按日期和時間順序最多儲存 350 次樣本測量。到達 350 次存
儲記錄限制時,最早的記錄將自動刪除。
1. 在「顏色 QC」窗口中,按 Enter 按鈕顯示「標籤」窗口。
2. 語音標籤
要為有效顏色記錄語音標籤,請從列表中選擇記錄語音標籤,並按
下 Enter 按鈕。對準電源按鈕下方的麥克風說話。完成後,鬆開
Enter 按鈕。
3. 文本標籤
要為當前樣本添加文本標籤,請從列表中選擇編輯文本標籤並按
Enter。使用導航控件和 Enter 按鈕,用虛擬鍵盤添加附註。完成
後,在虛擬鍵盤上突出顯示確定,並按 Enter 按鈕。
4. 從列表中選擇返回並按 Enter 按鈕,退出「標籤」窗口。
Enter 按钮
Page 48

RM200QC
10
CT
7. 輸出報告
大容量存儲模式
大容量存儲選項可用來設置設備向計算機輸出報告的 USB 模式。設備在
該模式下具有與 USB 記憶棒相似的功能,可與計算機搭配使用。
1. 按住導航控件的右側或左側,在功能欄中選擇「標準」圖標。
2. 按下 Enter 按鈕將設備切換為大容量存儲設備。
3. 該設備現可在計算機上被識別為可移動磁盤「RM200QC」。如果這
是您首次在 USB 大容量存儲模式下插入運行的設備,將會出現新設
備安裝提示,並將自動安裝所需的驅動程序。
4. 提供兩個報告選項:
a. QCREPORT.PDF – 提供可直接用於質量記錄的多頁格式報告。
b. DATA.CSV – 該文件提供了用於測量標準和樣本的數據,便於
在 Excel 中進行處理,製作成您所需要的格式,或進行更加高
級的數據收集和分析。
Page 49

RM200QC
11
CT
8. 快速檢查菜單
「快速檢查」菜單包含可讓您對測量值執行快速比較的功能。該等測量值
不會存儲於儀器上。可從菜單中選擇以下功能。
• 「色彩比較」是測量標準及樣本並顯示結果的快速功能。
• 「遮蓋度檢查」顯示遮蓋度卡片上的遮蓋度百分比梯度。
9. 樣本記錄菜單
「樣本記錄」功能可讓您從儀器數據庫中檢索儲存的樣本,刪除單個記
錄,刪除所有已儲存的樣本,或創建報告。
1. 按“導航”控件的右側,在功能欄中選擇「樣本記錄」圖標。
2. 按「導航」控件的上側和下側滾動已存儲的記錄。
3. 樣本按照用於測量的標準進行存儲。選擇所需的標準,按 Enter 按鈕
查看存儲的樣本測量值。
Page 50

RM200QC
12
CT
10. 附錄
故障排除
徵兆 操作
無法開啟 按住「電源」按鈕。
給電池充電/插入 USB 端口。
儀器無反應 按住開/關按鈕 10 秒,關閉後再重啟。
儀器無法關閉 卸除 USB 連接。
按住開/關按鈕 10 秒,關閉後再重啟。
檢測到過多環境光照 確保將儀器放在樣本上,直至測量結束。
測量粗糙或彎曲樣本時,用手遮住樣本,
不要讓光線進入光學元件。
在透明樣本上,要盡量避免光線從側面或
背面進入樣本。將樣本放在白色背景上。
儀器要求「重新校準」 使用「設置」菜單中的「校準」功能,重
新校準儀器。
多次校準後,將持續顯示「標
準參考滑塊未關閉!」。
需要在一行中執行七個校準步驟。這將設
置新的參考點並解決問題。
聽不到語音錄音。 在「設置」菜單上增大音量。
確保在錄音過程中按住 Enter 按鈕。
屏幕消息
出現錯誤時,顯示屏上會顯示屏幕消息,以警示出現錯誤。按 Enter 按鈕
可清除儀器屏幕上的一些消息。
消息可能也會帶有一個數字,用來指示特定條件。如果錯誤繼續存在,請
致電 800.248.9748 聯繫技術支持部門,或訪問 www.xrite.com。
錯誤消息樣本
Page 51

Page 52

Corporate Headquarters - USA
4300 44th Street SE
Grand Rapids, Michigan 49512
Phone 1 800 248 9748 or 1 616 803 2100
Fax 1 800 292 4437 or 1 616 803 2705
Corporate Headquarters - Europe
Althardstrasse 70
8105 Regensdorf
Switzerland
Phone (+41) 44 842 24 00
Fax (+41) 44 842 22 22
Corporate Headquarters - Asia
36th Floor, No. 169 Electric Road
Hong Kong, China
Phone (852)2568-6283
Fax (852)2885 8610
Please visit www.xrite.com
for a local office near you.
P/N RM200-552
 Loading...