

Page 1
FlexoDot
Operator’s
Manual
Page 2

X-RITEDOT®
i
Federal Communications Commission Conformity
This equipment has been tested and found to comply with the limits for a
Class A digital device, pursuant to Part 15 of the FCC Rules. These limits are
designed to provide reasonable protection against harmful interference when
the equipment is operated in a commercial environment. This equipment
generates, uses, and can radiate radio frequency energy, and if it is not
installed and used in accordance with the instruction manual, it may cause
harmful interference to radio communications. Operation of this equipment in
a residential area is likely to cause harmful interference, in which case the
user will be required to correct the interference at his own expense.
NOTE: Shielded interface cables must be used in order to maintain
compliance with the desired FCC and European emission requirements
Industry Canada Compliance Statement
This Class A digital apparatus meets all requirements of the Canadian
Interference-Causing Equipment Regulations.
Cet appareil numérique de la classe A respecte toutes les exigences du
Réglement sur le matériel brouilleur du Canada.
CE DECLARATION
Manufacturer's Name:
Barric Ltd.
Manufacturer's Address:
Vinces Road
Diss, Norfolk IP22 4WY
U.K.
Model Name: X-RiteDot
Model No.: CTP50
Directive(s) Conformance: EMC 89/336/EEC LVD 73/23/EEC
Warning:
This is a class A product. In a domestic environment this product may cause
radio interference in which case the user may be required to take adequate
measures.
Page 3
X-RITEDOT®
ii
CAUTION: Operational hazard exists if battery charger other than X-Rite
SE30-102 (100-240V) is used. Use only X-Rite battery pack SE15-34, other
types may burst causing personal injury.
VORSICHT: Betriebs- und Verletzungsgefahr besteht bei Gebrauch von
anderen Adaptern als X-Rite SE30-102 (100-240 V). Verwenden Sie nur den
X-Rite Akkupack SE15-34.
ADVERTENCIA: No use otro cargador de las pilas que no sea la pieza
X-Rite SE30-102 (100-240V), por el riesgo de mal funcionamiento del equipo.
Use solamente las pilas SE15-34 de X-Rite, es posible que los otros tipos
puedan estallar y causar daños corporales.
ATTENTION: Ne pas utiliser d’adaptateur autre que SE30-102 (100-240V)
de X-Rite au risque de mauvais fonctionnement de l’appareil. Utiliser
seulement le bloc de batteries SE15-34 de X-Rite, il y a danger d’explosion et
de blessures avec les autres types.
AVVERTENZA: Non usare un altro caricabatterie che non è del pezzo X-Rite
SE30-102 (100-240V), per il rischio di malfunzionamento dell'apparecchio.
Usare solamente gli accumulatori SE15-34 di X-Rite, è possibile che altri tipi
possano scoppiare e causare danno personale.
WARNING: This instrument is not for use in explosive environment.
WARNUNG: Das Gerät darf in einer explosiven Umgebung NICHT verwendet
werden.
ADVERTENCIA - NO use este aparato en los ambientes explosivos.
ATTENTION: Cet instrument NE DOIT PAS être utilisé dans un
environnement explosif.
AVVERTIMENTO - NON usare questo apparecchio in ambienti esplosivi.
CAUTION: When using the PosiDot solution, avoid contact with eyes and
mouth. Keep away from children. Stains cloth.
In case of contact with eyes, rinse immediately with plenty of water until
irritation subsides.
Page 4

X-RITEDOT®
iii
Proprietary Notice
The contents of this manual are the property of X-Rite, Incorporated and are
copyrighted. Any reproduction in whole or part is strictly prohibited.
Publication of this information does not imply any rights to reproduce or use this
manual for any purpose other than installing, operating, or maintaining this
instrument. No part of this manual may be reproduced, transcribed, transmitted,
stored in a retrieval system, or translated into any language or computer language, in
any form or by any means, electronic, magnetic, mechanical, optical, manual, or
otherwise, without the prior written permission of an officer of X-Rite, Incorporated.
This instrument may be covered by one or more patents. Refer to the instrument for
actual patent numbers.
Copyright © 2004 by X-Rite, Incorporated
“ALL RIGHTS RESERVED”
X-Rite® and X-RiteDot® are registered trademarks of X-Rite, Incorporated. All other logos,
brand names, and product names mentioned are the properties of their respective holders.
Warranty Information
X-Rite, Incorporated warrants each instrument manufactured to be free of
defects in material and workmanship (excluding battery pack) for a period of
twelve months. If the fault has been caused by misuse or abnormal
conditions of operation, repairs will be billed at a nominal cost. In this case,
an estimate will be submitted before work is started, if requested. The unit
shall be returned with transportation charges prepaid.
THERE ARE NO WARRANTIES OF MERCHANTABILITY OR FITNESS. THIS
WARRANTY OBLIGATION IS LIMITED TO SERVICING THE UNIT
RETURNED TO X-RITE, INCORPORATED OR AN AUTHORIZED SERVICE
DEALER FOR THAT PURPOSE.
X-Rite, Incorporated offers a repair program for instruments out of warranty. For
more information, contact X-Rite Customer Service Department.
Always include serial number in any correspondence concerning the unit. The serial
number is located on the bottom of the instrument housing.
This agreement shall be interpreted in accordance with the laws of the State of
Michigan and jurisdiction and venue shall lie with the courts of Michigan as selected
by X-Rite, Incorporated.
Page 5

X-RITEDOT®
iv
Table of Contents
Section 1: Overview and Setup ................................................ 1-1
Instrument Description....................................................................................1-1
Unpack and Inspect.........................................................................................1-1
Apply Power ...................................................................................................1-2
Charging/Discharging the Battery ..................................................................1-2
Charging Conditions ...................................................................................1-2
Battery Indicator Status...............................................................................1-3
Attaching the AC Adapter ..........................................................................1-3
Instrument I/O Serial Interface .......................................................................1-3
Section 2: User Interface........................................................... 2-1
Operation Keys ...............................................................................................2-1
Left Side key...............................................................................................2-1
Right Side key.............................................................................................2-1
Center key...................................................................................................2-1
Instrument Screens..........................................................................................2-1
Key Icons ....................................................................................................2-2
Primary Screen Icons..................................................................................2-2
Secondary Screen Icons ..............................................................................2-3
Typical Measurement Screen......................................................................2-4
Measurement Options .....................................................................................2-4
Setting Measurement Options.....................................................................2-5
Adjusting the Screen Contrast.....................................................................2-5
Setting the Measurement Type ...................................................................2-5
Setting Substrate Type................................................................................2-6
Section 3: Editing Instrument Utilities..................................... 3-1
Fast Charge Mode...........................................................................................3-2
Screen Ruling Units........................................................................................3-2
Screen Saver Timeout.....................................................................................3-2
Local Electrical Supply Frequency.................................................................3-3
Feature Upgrade..............................................................................................3-3
Time & Date ...................................................................................................3-4
Section 4: Operation.................................................................. 4-1
Film % Dot Measurement...............................................................................4-1
Flexo Plate % Dot Measurement ....................................................................4-3
Zoom Mode ....................................................................................................4-5
Page 6

X-RITEDOT®
v
Image (frame) Storage and Transfer ...............................................................4-7
Storing Images ............................................................................................4-7
Transferring Images....................................................................................4-8
Percentage (%) Dot Storage..........................................................................4-10
Storing % Dot Samples.............................................................................4-10
Download Stored % Dot Samples.............................................................4-12
Erasing Stored % Dot Measurements .......................................................4-12
Section 5: Service and General Maintenance ......................... 5-1
Repair Information..........................................................................................5-1
Cleaning the Instrument..................................................................................5-1
General Cleaning ........................................................................................5-1
Cleaning the Target Glass...........................................................................5-1
Replacing the Battery Pack.............................................................................5-2
Troubleshooting ..............................................................................................5-3
Accessory Items..............................................................................................5-4
Instrument Upgrades.......................................................................................5-5
Instrument Specifications................................................................................5-6
Page 7

X-RITEDOT®
vi
Page 8
X-RITEDOT®
1-1
1. Section 1: Overview and Setup
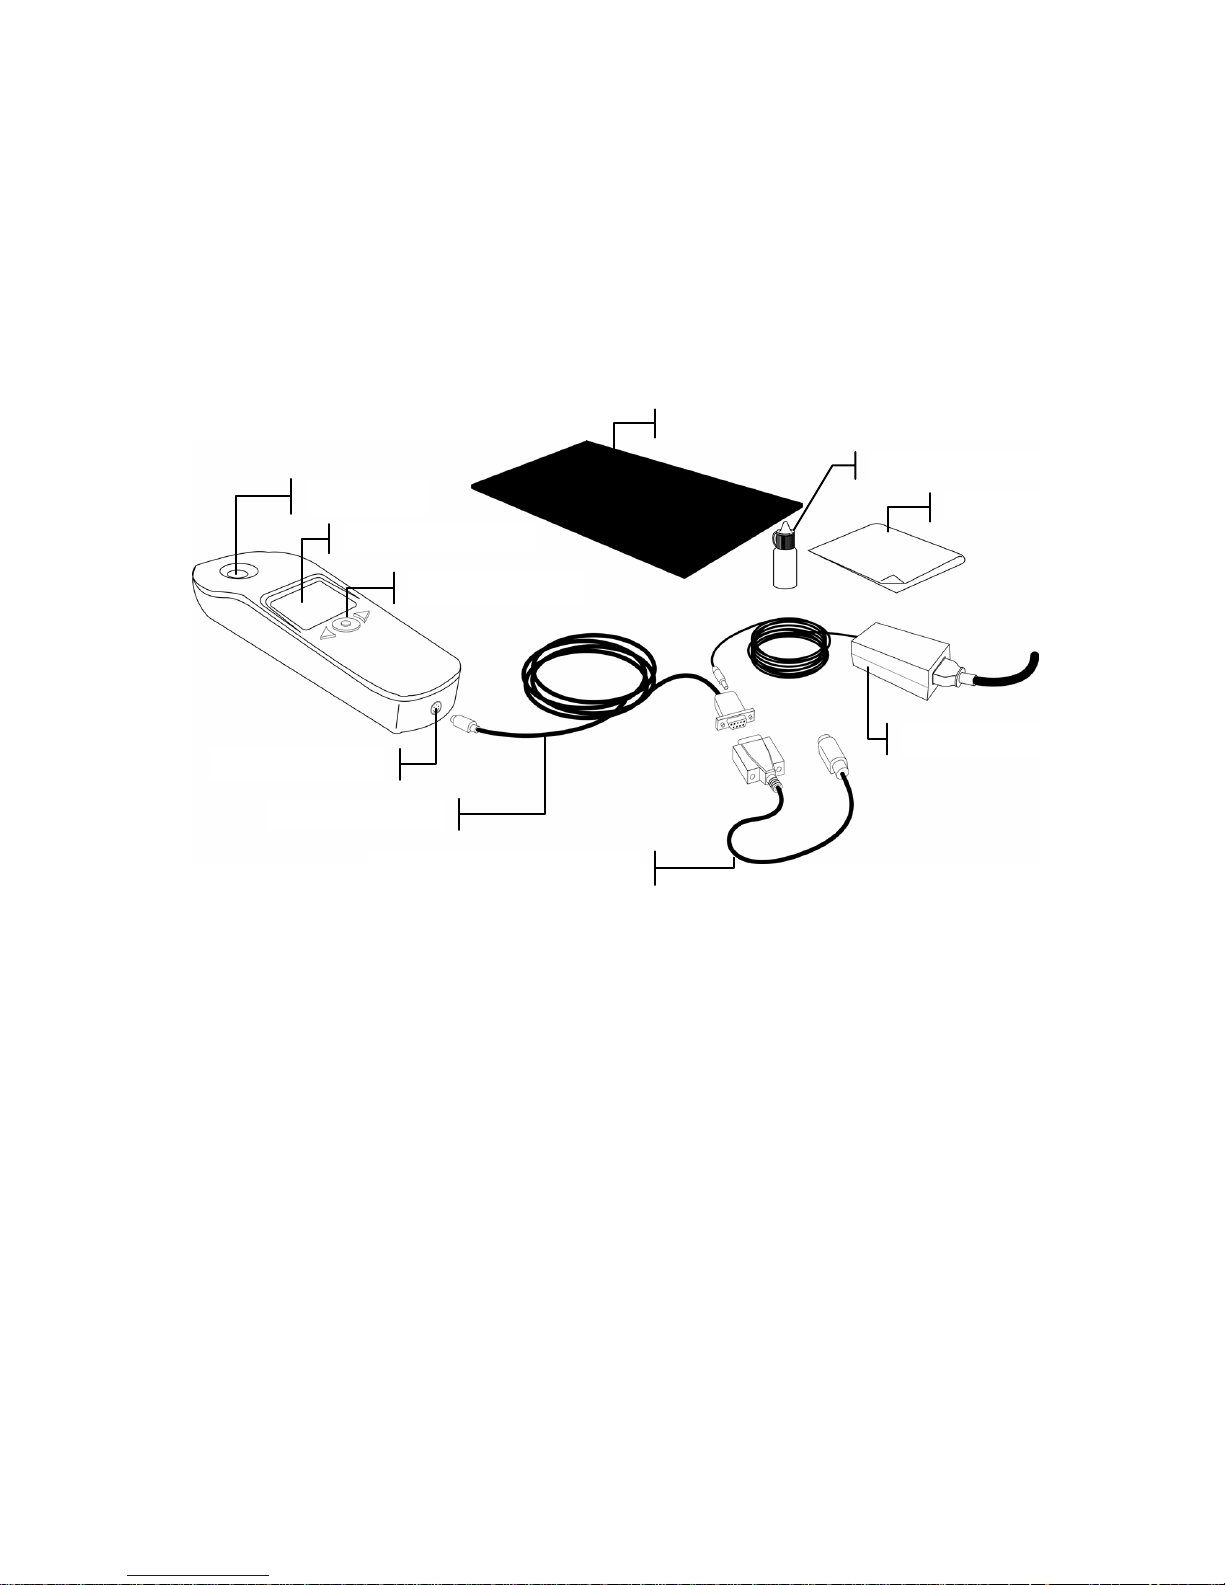
Instrument Description
FlexoDot brings the ability to measure exact dot sizes and
screen rulings on CTP and conventional flexo printing plates.
Unpack and Inspect
After removing the instrument from the shipping carton,
inspect it for damage. If any damage has occurred during
shipping, immediately contact the transportation company. Do
not proceed with operation until the carrier’s agent has
inspected the damage.
Your instrument was packaged in a specially designed rigid
case and carton to assure against damage. If shipment is
necessary, the instrument should be packaged in the original
case and carton. If the original packaging materials are not
available, contact X-Rite to have replacements shipped to you.
Graphical Display
Viewer
Operation Keys
Serial/Power Port
Interface Cable
Mac Connector (optional)
AC Adapter
Black Mat
PosiDot Solution
Wipes
Page 9

SECTION ONE
1-2
Apply Power
The Center key is used to turn the instrument on. The
instrument automatically powers itself down after approx. one
minute of nonuse.
NOTE: To start the instrument when either ”fast charging” or ”trickle
charging“ message is displayed, press and hold the Center key for
approx. two seconds.
Charging/Discharging the Battery
Only use the AC Adapter supplied to charge the battery pack. The
battery pack must remain in the instrument at all times to operate.
Your new X-RiteDot battery comes in a discharged condition
and must be charged before use (up to 14 hours for full charge).
Upon initial use (or after a prolonged storage period), the
battery may require three to four charge/discharge cycles before
achieving maximum capacity. It is normal for a battery to
become warm during charging and discharging.
It is important to condition (fully discharge and then fully
charge) the battery every two to three months. Failure to do so
may significantly shorten the battery's life. To discharge,
simply operate your instrument under the battery's power until
it shuts down or until you get a low battery warning. Then
recharge the battery for up to 14 hours.
A charged battery will eventually lose its charge if unused. It
may therefore be necessary to recharge the battery after a
storage period.
Charging Conditions
No battery charging will take place when the instrument is
connected to the AC adapter after it is already powered down.
You must turn on the instrument to initiate charging.
After the instrument powers down (when connected to the AC
adapter), the following charge conditions occur:
• If the battery is charged, the instrument will automatically
go into trickle charge and the message “trickle charging”
will be displayed.
• If the battery charge is low, the instrument will charge in
the following sequence: “discharging” followed by “fast
charging”, followed (after about three hours) by “trickle
charging.”
Page 10
OVERVIEW AND SETUP
1-3
NOTE: A fast charge may be manually invoked if desired. Refer to
Fast Charge Mode in Section 3 for additional information.
Battery Indicator Status
The battery icon located in the status bar displays the following
conditions.
Indicates the battery is fully charged.
Indicates the battery has sufficient charge for a substantial
number of measurements.
Indicates the battery is low and will provide approximately
50 additional measurements.
(icon flashing) Indicates the battery is extremely low and
must be charged immediately.
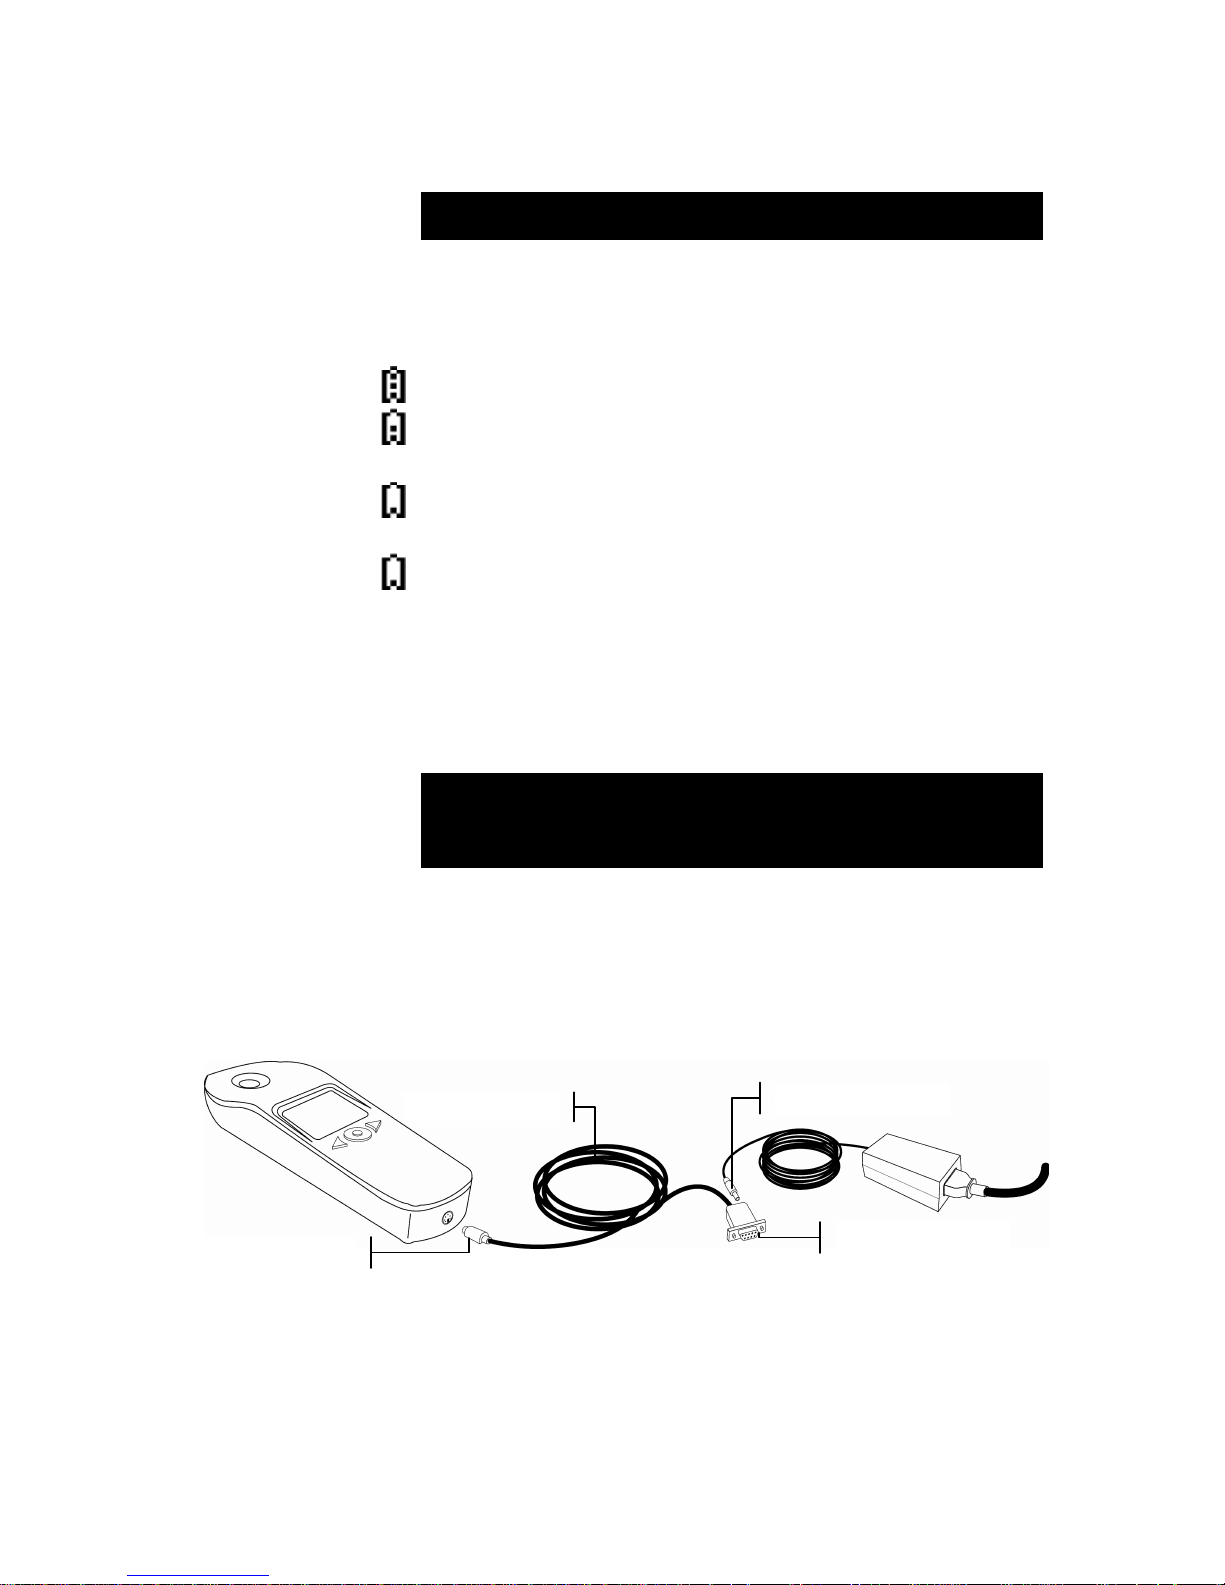
Attaching the AC Adapter
1. Verify that the voltage indicated on the adapter complies
with the AC line voltage in your area. If not, contact
X-Rite or an authorized representative.
NOTE: Older X-RiteDot models, labeled ccDot4 and earlier use a
different AC adapter than the newer ccDot5 and X-RiteDot models.
Never use your X-RiteDot power supply with an older ccDot4
model or you will permanently damage the ccDot 4 instrument.
2. Insert the mini-DIN plug from the interface cable into the
back of the instrument.
3. Insert the small plug from the adapter into the power-input
of the DB9 plug on the interface cable.
4. Plug the appropriate detachable line cord into the adapter
and then plug the line cord into an AC wall receptacle.
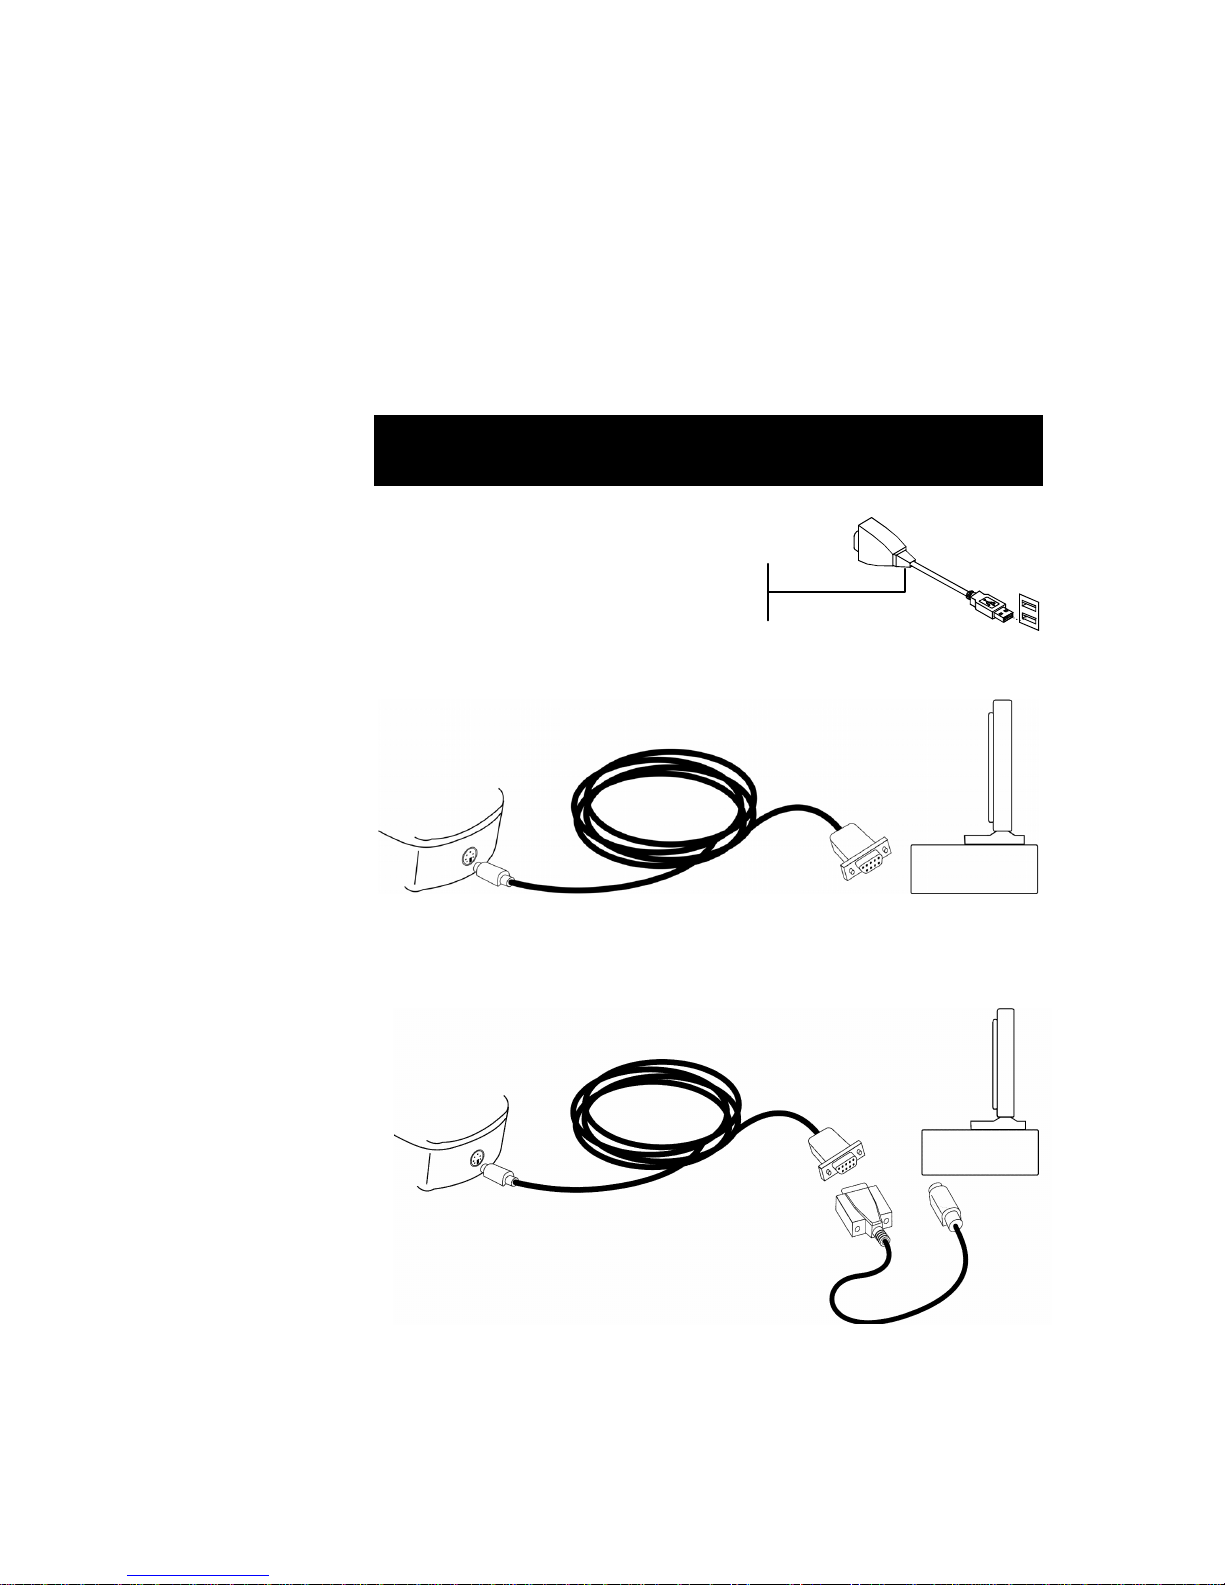
Instrument I/O Serial Interface
Your instrument connects to a PC or Mac computer using a
serial RS-232 interface cable. To connect to a Mac, you will
need to purchase an optional serial adapter or USB converter.
Mini-DIN
Interface Cable
DB9 Plug
AC Adapter Plug
Page 11
SECTION ONE
1-4
To install the interface cable:
1. Insert the mini-DIN end of the interface cable into the I/O
port located on the back of the instrument.
2. For a PC, attach the DB9 plug to an available COM port.
For a Mac, attach the optional Mac serial adapter (P/N
SE108-DB9PA) to the DB9 plug. Then plug the other end
into a modem port.
NOTE: An optional USB to Serial converter is available from X-Rite. The
converter is plugged into the DB9 connector and then into the
computer’s USB port. Order P/N SE108-USBSERADB9.
PC Connection Diagram
MAC (legacy) Connection Diagram
Optional USB to serial converter
(P/N SE108-USBSERADB9)
Page 12

X-RITEDOT®
2-1
2. Section 2: User Interface
Operation Keys
Perform measurements and screen/option navigation with the
three keys located below the display screen.
Left Side key
Use to navigate through the available options. Each time the
key is pressed, the highlighted square (reverse image) moves to
the next option. Navigation generally follows a left-to-right and
top-to-bottom sequence. Press this key to decrease numeric
values when editing.
Right Side key
Use to toggle an option’s status or access a screen where
additional options exist. Press this key to increase numeric
values when editing.
Center key
Use to turn the instrument on and take measurements. Press this
key to return the instrument to the main screen when at the
primary or secondary screens.
Instrument Screens
When the instrument is powered-up, the main screen appears.
The startup screen contains the status bar and firmware version.
The status bar displays the current settings for the instrument.
You can edit the measurement setup functions from the
Primary screen. The Secondary screen contains additional
options you can use in conjunction with the software packages.
Status Bar
Right Key
Center Key
Left Key
Firmware Version
Page 13
SECTION TWO
2-2
Press the Left key to see the primary screen option icons. Press
the Right key to see the secondary screen option icons.
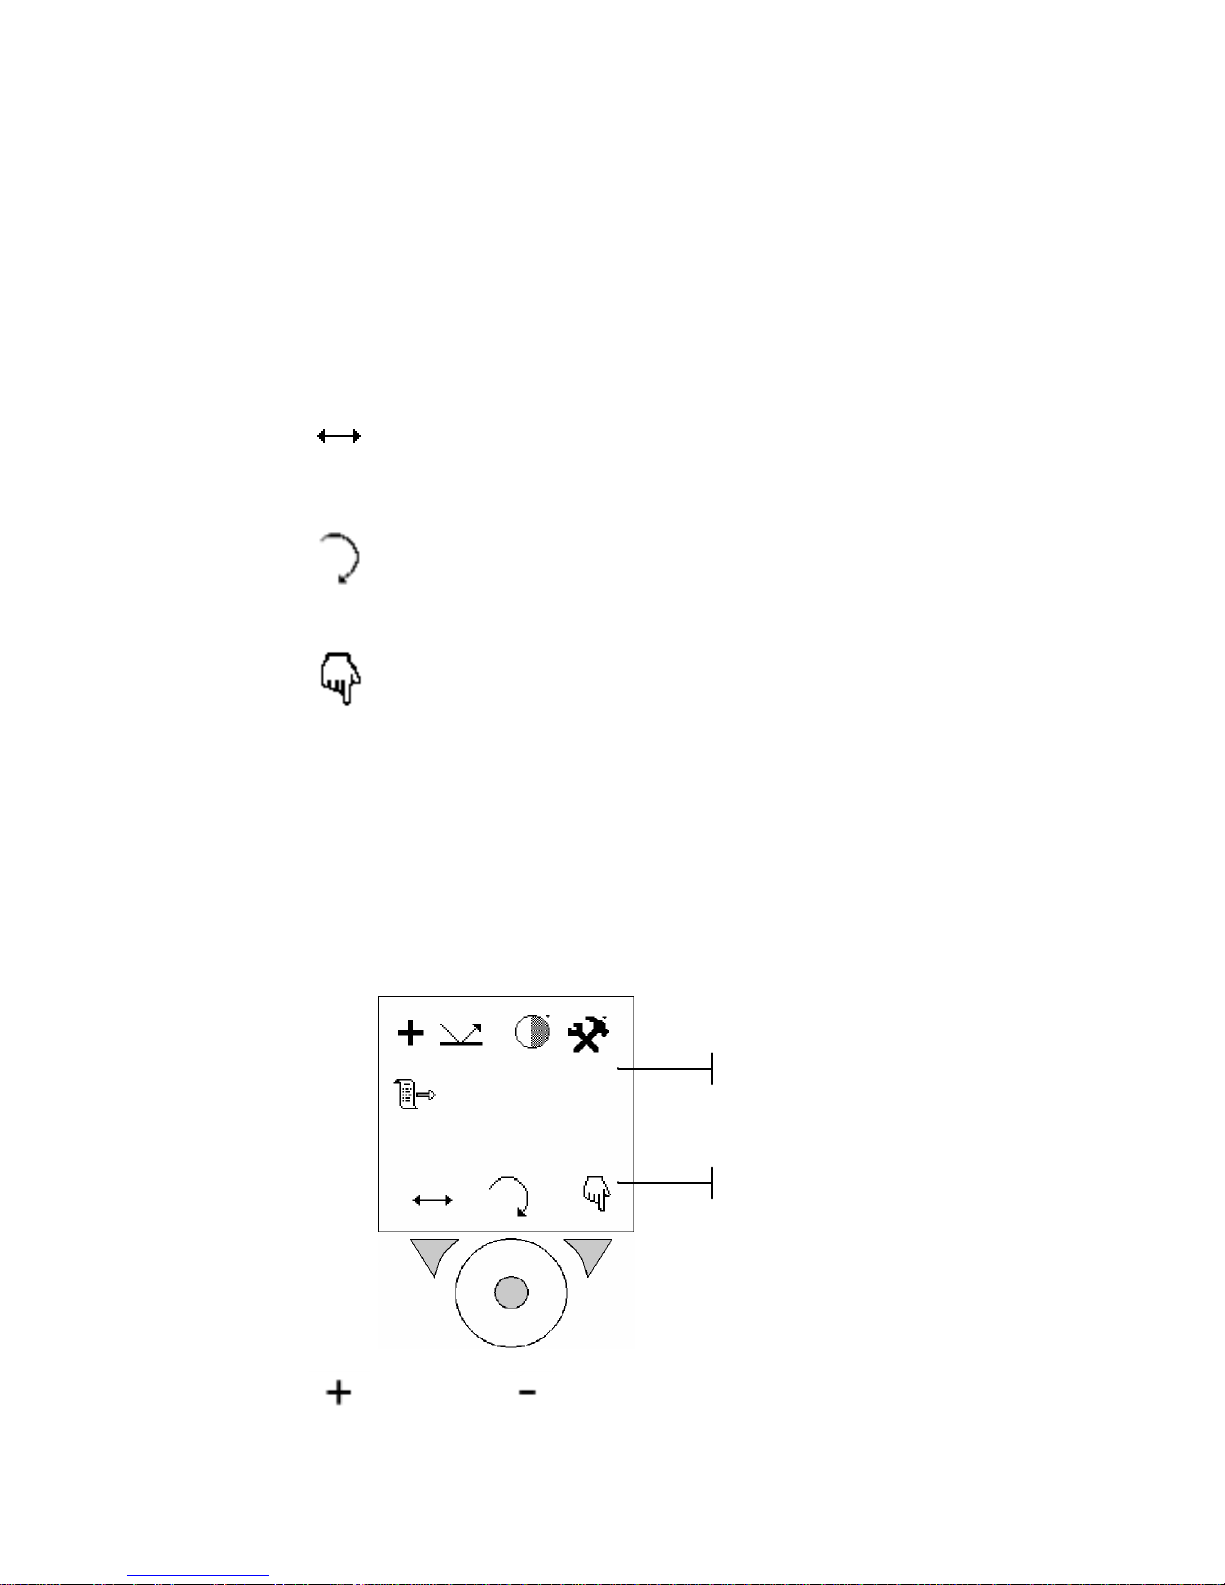
Key Icons
The icons located above the keys indicate a specific action
when the key below it is pressed. See Operation keys later in
this section for additional information on the keys.
Navigate icon. Moves the highlighted square to the next option
when the key (left) below this icon is pressed.
Return icon. Returns the instrument screen to the previous
screen when the key (center) below this icon is pressed.
Select/Toggle icon. Toggles an option’s status or accesses a
screen where additional options exist when the key (right)
below this icon is pressed.
Primary Screen Icons
The upper portion of the screen displays the available options
of the instrument. Depending on the instrument model, all
options shown may not appear. The key icons along the bottom
of the screen are used to describe the actions of the instrument
buttons below.
Positive or Negative material (negative film). Indicates
the measurement type.
Option Icons
Key Icons
Page 14

USER INTERFACE
2-3
Flexo Plate (reflectance) or Film (transmission).
Indicates the substrate used during a measurement.
Contrast icon. Used to access the contrast adjustment screen.
Utilities icon. Used to access the utilities screen where
instrument parameters are set. See Setting Instrument Utilities,
Section 3.
Switch menu icon. Used to access the Secondary screen.
Secondary Screen Icons
The secondary screen is similar to the primary screen. The
remaining options are displayed on this screen. The icons along
the bottom are also used to navigate, return and select/toggle.
Depending on the instrument you have, all options may not
appear.
Two times, Four times, or , Eight times.
Indicates the level of zoom set to display sample dots when the
zoom tool is activated.
Zoom tool icon. Activates the zoom mode.
1st film roll, 2nd film roll, 3rd film roll, or
4th film roll. Indicates the number of image storage locations
set. Refer to Image Transfer and Storage in Section Four.
Option Icons
Key Icons
Page 15

SECTION TWO
2-4
Frame store enabled or Frame store disabled.
Indicates the status of the image storage option. See Image
Transfer and Storage in Section Four.
Percentage dot store. Used to store percentage dot
measurements (1-64) in the instrument. This function is also used
to download the stored measurements to a computer using the
KeyMagic software. See Percentage Dot Storage in Section Four.
Switch menu icon. Used to return to the Primary screen.
Typical Measurement Screen
A typical measurement screen displays the instrument status at
the top with the measurement results below it. In this example,
dot value and size is displayed along with screen angle and
ruling.
Screen angle and ruling (LPI) and dot size is automatically
calculated each time a dot measurement is taken, in the range of
approx. 20-40% and 85-95%. For “chain” dots, the range is 1530%. These ranges are used as they generally represent dot
structures where the elements can be evaluated as non-
touching, individual points. The calculation is performed after
the measurement is taken. Therefore, if you do not wish to view
the ruling/angle/size, you can take additional dot measurements
immediately without having to wait for the calculation.
Measurement Options
Before you take any measurements, set the measurement
options. The options will remain as set until changed. The status
bar on the measurement screen displays the current settings.
Status Bar
Dot Value
Screen Angle and Ruling
Status Bar
Dot Size (microns)
Page 16

USER INTERFACE
2-5
Setting Measurement Options
All measurement options are located in the Primary screen.
To set options:
1. Press the Center key to turn on the instrument.
NOTE: Hold the Center key down for 2 seconds if a charging
message is displayed.
2. Press the Left key to advance to the primary screen.
3. See the following procedures to edit options.
4. After setting options in the primary screen, press the
Center key
to return to the measurement screen.
Adjusting the Screen Contrast
The contrast of the instrument screen can be adjusted to
accommodate varying lighting conditions.
1. Using the Left key
, move the flashing highlight to the
Contrast icon
.
2. Press the Right key
to access the contrast adjustment
screen.
3. Press the Left key
↓ to decrease contrast and the Right key
↑ to increase contrast. The contrast can be adjusted in 10%
increments.
Setting the Measurement Type
The instrument can be set to measure on positive or negative
(negative film) material.
Page 17

SECTION TWO
2-6
1. Using the Left key
, move the flashing highlight to the
Measurement Type icon
or .
2. Press the Right key to toggle between the two
options.
Setting Substrate Type
The instrument can be set to measure on flexo plate
(reflectance) or film (transmission).
1. Using the Left key
, move the flashing highlight to the
Substrate Type icon
or .
2. Press the Right key
to page through the two options.
Page 18

X-RITEDOT®
3-1
3. Section 3: Editing Instrument Utilities
The Utilities screen consists of six configurable settings that are
used to customize your instrument.
To access the utilities screen:
1. Press the Center key to turn on the instrument.
NOTE: Hold the Center key down for 2 seconds if a charging
message is displayed.
2. Press the Left key to advance to the primary screen.
3. Using the Left key
, move the flashing highlight to the
Utilities icon
.
4. Press the Right key
to access the utilities screen.
5. See the following procedures to edit the utilities.
6. After setting options in the utilities screen, press the
Center key
to return to the primary screen.
Page 19

SECTION THREE
3-2
Fast Charge Mode
The instrument can be forced into a fast charge mode if desired.
After the instrument has reached a sufficient charge, it will
automatically change to trickle charge mode.
1. Using the Left key
, move the flashing highlight to the
Fast Charge icon
.
2. Press the Right key
to activate the fast charge. The
instrument will display “Fast Charging” on the instrument
display.
NOTE: To exit the fast charge mode, press and hold the Center key for
2 seconds to enter the main measurement screen.
Screen Ruling Units
The screen ruling displayed during a % dot measurement can
be set as inches or centimeters.
1. Using the Left key
, move the flashing highlight to the
Screen Ruling icon
or .
2. Press the Right key
to toggle between the two
options.
Screen Saver Timeout
You can adjust the time that it takes the instrument’s screen to
automatically return to the main measurement screen to meet
your requirements.
1. Using the Left key
, move the flashing highlight to the
Timeout icon
, , , , , or .
2. Press the Right key to page through the six timeout
options.
Page 20

EDITING INSTRUMENT UTILITIES
3-3
Local Electrical Supply Frequency
The instrument’s electrical supply can be set at 50 hertz or 60
hertz line frequency.
NOTE: This setting is used to “synchronize” the instrument with the
frequency of “flicker” when a light table is used for transmission
measurements from film. Setting this option to the incorrect level will
make transmission dot measurements inaccurate, but will not damage
your instrument.
1. Using the Left key , move the flashing highlight to the
Frequency icon
or .
2. Press the Right key
to toggle between the two
options.
Feature Upgrade
Your instrument can be upgraded with new features by entering
a new key code obtained from X-Rite.
1. Using the Left key
, move the flashing highlight to the
Key icon
.
2. Press the Right key
to access the key code entry
screen. Make a note of the existing key code number in
case it needs to be entered at a later time.
3. Enter the first digit/character of the new key code number
obtained from X-Rite by pressing the Right key
to
advance to the correct digit/character.
Existing key code
Page 21

SECTION THREE
3-4
4. Press the Left key
to move the cursor to the next
location. Press the Right key
to advance the
digit/character.
5. Repeat steps 3 and 4 to enter all 12 digit/character.
6. After completion, press the Center key
to activate the
new key code.
If key code was entered successfully, “KEY ACCEPTED” is
displayed on the screen. If “KEY REJECTED” appears, try
reentering the key code again. If a problem still exists, contact
X-Rite or an X-Rite representative.
Time & Date
You can adjust the internal time and date of the instrument.
1. Using the Left key
, move the flashing highlight to the
Calendar icon
.
2. Press the Right key
to access the time/date
adjustment.
3. Press the Left key
to move the cursor (flashing
number) to the desired time or date location. Press the
Right key
to advance the digit. Note: Holding down
the key will also advance the digit.
Page 22

X-RITEDOT®
4-1
4. Section 4: Operation
IMPORTANT:
The instrument algorithms are established to give the best possible
results in the 1% to 99% measurement range. Therefore, any sample
measurement of 0% or 100% may not be correct and is not an indication
that the instrument is malfunctioning.
Film % Dot Measurement
The instrument is designed to measure percentage values on
film using a standard light table. For best instrument
performance, the light table should operate in the range of 100
lux (min.) to 1500 lux (max.). Because the instrument
automatically calibrates for every measurement, it is not
necessary to have a calibrated light source or use the same spot
for every measurement.
NOTE: For accurate % dot measurements, ensure you have set the
appropriate electrical supply frequency. Refer to Section 3.
To take a % film dot measurement:
1. Press the Center key to turn on the instrument.
NOTE: Hold the Center key down for 2 seconds if a charging
message is displayed.
2. Set measurement type (
+ or -) and transmission ( )
measurement options.
NOTE: Refer to Section 2, Measurement Options for additional
information on selecting options.
3. Place film on the light table emulsion side up.
4. Position the instrument on the film sample. Make sure the
sample is flat and the instrument is making good contact.
Page 23

SECTION FOUR
4-2
5. Use the viewer window to position to desired area on the
sample.
6. At the main menu screen, hold the instrument steady and
press the Center key to take the measurement.
Measurement results are displayed on the instrument
screen.
7. Press the Right key to see a magnified view of the
measurement area. Pressing the Right key again returns
the display to the main measurement screen.
Viewer Window
Page 24

OPERATION
4-3
Flexo Plate % Dot Measurement
The instrument is designed for measuring % dot in flexo plates
(e.g., polymer). For best results, the first measurement of a new
sample should always be taken in the mid-tone area.
To take a flexo plate % dot measurement:
1. Press the Center key to turn on the instrument.
NOTE: Hold the Center key down for 2 seconds if a charging
message is displayed.
2. Set measurement type (
+ or -) and reflectance ( )
measurement options.
NOTE: Refer to Section 2, Measurement Options for additional
information on selecting options.
3. Place the black mat supplied on a flat surface and position
the flexographic plate “image side up” on the black mat.
Apply one drop of PosiDot to the area to be measured. An
amount of approximately 3mm (1/8”) in diameter is
desirable.
4. Active the instrument so that the blue illumination lights are
on without flashing. This will help to find the area to be
measured.
NOTE: Do not exert any downward pressure on the instrument
before or during a measurement. Pressing the instrument down on
the plate with force distorts the natural shape of the dots and
subsequent measurements will be inaccurate.
5. Using the viewer window, carefully position the instrument
on the sample where the drop was applied. Make sure the
drop of liquid fills the center of the glass target, and there
are no air bubbles or foreign materials in the sample area.
Black Mat
Flexo Plate
Page 25

SECTION FOUR
4-4
6. At the main menu screen, hold the instrument steady and
press the Center key to take the measurement.
Measurement results are displayed on the instrument
screen.
7. Press the Right key to see a magnified view of the
measurement area. Pressing the Right key again returns
the display to the main measurement screen.
8. After the measurement, clean both the instrument and the
flexo plate with the cloths provided.
Additional cloths and PosiDot liquid can be ordered from
X-Rite. Refer to Accessories in Section 5.
Viewer
Window
Page 26

OPERATION
4-5
Zoom Mode
The graphical dot image can be zoomed for easier viewing. The
image that can be zoomed is the last dot measurement taken
with the instrument. Because the zoomed image is larger than
the display screen, you can use the left and right keys to scroll
the image to the correct viewing position. The instrument
supports two times (x2), four times (x4) and eight times (x8)
zoom modes.
To zoom on a dot measurement:
1. Press the Center key to turn on the instrument.
NOTE: Hold the Center key down for 2 seconds if a charging
message is displayed.
2. Take a dot measurement.
3. Press the Left key to advance to the secondary screen.
4. Make sure the flashing highlight is on the zoom factor
icon (x2, x4 or x8) and press the Right key
to select
desired zoom factor.
5. Using the Left key
, move the flashing highlight to the
zoom tool icon
.
Page 27

SECTION FOUR
4-6
6. Press the Right key
to access the zoomed image.
7. Press the Left key to scroll the image from left to right.
Press the Right key to scroll the image from top to bottom.
8. Press the Center key to exit out of the zoom mode and
return to the secondary screen.
Scroll Bar
Page 28

OPERATION
4-7
Image (frame) Storage and Transfer
Images can be stored in the instrument for later transfer to a
computer, or instantaneously transferred to a computer after a
measurement. Images are transferred to the computer using the
ImageLink software supplied with your instrument. Refer to the
on-line guide for the transfer procedure.
Storing Images
A standard instrument can store a total of 32 images in 4 film
rolls (8 images per roll). The instrument can be upgraded to 32
film rolls for a total of 256 images stored.
IMPORTANT: A new film roll must be selected after 8 images are
stored. If not, all 8 previously stored images will be erased when a new
measurement is taken.
To store images in a film roll:
1. Press the Center key to turn on the instrument.
NOTE: Hold the Center key down for 2 seconds if a charging
message is displayed.
2. Press the Right key to advance to the secondary screen.
3. Using the Left key
, move the flashing highlight to the
film roll icon
.
4. Press the Right key
to select desired film roll (1, 2, 3
or 4) storage location.
Page 29

SECTION FOUR
4-8
5. Using the Left key
, move the flashing highlight to the
frame store icon
.
6. Press the Right key
to activate storage.
(storage on) (storage off)
7. Press the Center key
to return to the measurement
screen.
8. Take a measurement as normal. Calibrating, Checking,
Reading and Saving Frame are momentarily displayed
followed by the measurement data.
9. To view the storage location, press the Right key to access
the magnified view. The storage location and images
stored are displayed at the top of the screen.
10. Press the Right key again to return the display to the main
measurement screen.
Transferring Images
The instrument can transfer images instantaneously after a
measurement. To instantly transfer images, the frame store
option must be enabled and the ImageLink software running on
the computer. Images will also be simultaneously stored in the
Film roll location (1)
Images stored (4)
Page 30

OPERATION
4-9
instrument’s film roll location. For additional information on
transferring stored images, refer to the ImageLink on-line guide
for details.
To instantaneously transfer images:
1. Make sure the instrument is interfaced to the computer (see
section 1 for connections) and the software connection is
activated.
2. Press the Center key to turn on the instrument.
3. Enable Frame Store option as previously explained in
Storing Images.
The status bar should show the connection icon as active.
(active connection) (inactive connection)
If active image does not appear, refer to the ImageLink on-line
guide for troubleshooting tips.
4. Take a measurement as normal. Image data is transferred
to the computer.
Page 31

SECTION FOUR
4-10
Percentage (%) Dot Storage
The instrument can store up to 64 % dot measurements for later
downloading to a computer using the KeyMagic software
supplied with your instrument. This storage feature is useful
where a large number of measurements need to be taken and a
direct interface to a computer is not readily available.
Storing % Dot Samples
To store % dot measurement:
1. Press the Center key to turn on the instrument.
NOTE: Hold the Center key down for 2 seconds if a charging
message is displayed.
2. Press the Right key to advance to the secondary screen.
3. Using the Left key
, move the flashing highlight to the
% dot store icon
to access the store and download
feature.
Page 32

OPERATION
4-11
4. Position the instrument on the first sample to store and
press the Center key
to take a measurement. The
percentage value of the measurement is displayed along
with the storage location. If you would like to retake the
measurement or take a measurement at a different area
without changing the storage location, reposition the
instrument and press the Center key
again. The old
measurement will be overridden.
5. To store the current measurement to the location displayed
and move on to the next measurement, press the Right key
. The percentage storage location increments to the
next location.
6. Position the instrument on next location and press the
Center key
to take the measurement. Press the
Right key
to store the measurement.
7. Continue with additional measurements.
8. After storing all required measurement, press the Left key
to return to the main % dot screen.
9. Use the Left key
to move the highlight to the Exit
icon
and then press the Right key to return to the
main measurement screen.
Page 33

SECTION FOUR
4-12
Download Stored % Dot Samples
The instrument can download stored % dot measurements to a
computer that has the KeyMagic software activated. Refer to
the KeyMagic on-line document supplied with your instrument.
To download stored samples:
1. Make sure the instrument is interfaced to the computer (see
section 1 for connections) and the software connection is
activated.
2. Press the Center key to turn on the instrument.
3. Access the % dot storage and download feature as
previously explained in Storing % Dot Samples.
4. Using the Left key
, move the flashing highlight to the
% dot download icon
.
5. Press the Right key
. Sending is momentarily
displayed and the samples are sent to the computer.
Erasing Stored % Dot Measurements
To erase stored samples from the instrument:
1. Press the Center key to turn on the instrument.
2. Access the % dot storage and download feature as
previously explained in Storing % Dot Samples.
3. Using the Left key
, move the flashing highlight to the
% dot erase icon
.
4. Press the Right key
. Erasing Store is momentarily
displayed and the samples are deleted from the instrument.
Page 34

X-RITEDOT®
5-1
5. Section 5: Service and General
Maintenance
Repair Information
The FlexoDot instrument is covered by a one-year limited
warranty—excluding battery pack—and should be referred to
X-Rite or an authorized service center for repairs within the
warranty period. Attempts to make repairs within this time
frame may void the warranty.
X-Rite provides a factory repair service to their customers.
Because of the complexity of the circuitry, all repairs should be
referred to the factory or an authorized service center.
Contact information for all X-Rite locations is listed on the last
page of this document.
X-Rite will repair any instrument past warranty. The customer
shall pay shipping cost to the factory or authorized service
center and repair cost. The instrument shall be submitted in the
original case and carton, as a complete unaltered unit.
Cleaning the Instrument
Your instrument requires very little maintenance to achieve
years of reliable operation. However, to protect your
investment and maintain measurement accuracy, a few simple
cleaning procedures should be performed from time to time.
General Cleaning
The exterior of the instrument can be wiped clean with a cloth
dampened in water or mild cleaner whenever required.
NOTE: DO NOT use any solvents to clean the instrument; this causes
damage to the housing.
Cleaning the Target Glass
The target glass can be cleaned using a solvent applied with a
small cotton swab. Use caution not to allow the solvent to come
into contacted with the instrument housing.
Page 35

SECTION FIVE
5-2
Replacing the Battery Pack
1. Unplug the interface cable from the instrument.
2. Carefully turn the instrument over and rest it on its top.
3. Remove the screw securing the battery cover in place and
remove the cover.
4. Remove the old pack battery and unplug the connector.
5. Plug in the connector from the new battery pack and install
the battery into the compartment.
6. Replace the battery cover and secure with screw.
7. Charge the new battery for 14 hours for full charge.
Battery Cover
Battery Pack
Connector
Page 36

SERVICE AND GENERAL MAINTENANCE
5-3
Troubleshooting
No Power
Are the batteries fully charged? If the battery power is low, the
"battery icon" will flash in the display screen.
Connect the instrument to the power supply using supplied
cable and press the Center key. If the instrument does not
power up, check power supply. If the power supply is working,
the battery pack or instrument may have failed. Return the
instrument for repair.
Measurements appear inaccurate or erratic
The FlexoDot is sensitive to bright light reflected into its
viewer. Make sure there is no light (including sunlight) shining
directly into the viewer window.
If measurements still appear inaccurate, shield the FlexoDot
viewer window with your hand. Be careful not to apply any
downward pressure on the instrument when doing this).
If you are measuring a flexographic plate, ensure that you do
not apply any overdue pressure to the instrument when taking a
measurement. Doing so can provide inaccurate results as the
natural shape of the dots will have distorted. All that is required
is a gently, even press of the Center key.
Page 37

SECTION FIVE
5-4
Accessory Items
P/N SE108-102
Integrated interface cable supplies serial and power from power
supply
P/N SE108-SBSERDB9
Keyspan Adapter option for USB connection to Windows or
Macintosh computers
P/N SE108-DB9PA
Adapter to allow serial communication with a legacy
Macintosh computer
P/N SD67-CTP50-01
Large plastic travel case for FlexoDot
P/N CTP50-200
PosiDot Fluid Refill Kit (includes wipes)
P/N CTP10-500-CD
CD containing ImageLink (video) and KeyMagic (data)
software, X-RiteDot operator manuals, and software manuals
P/N SE30-103
Power supply (7.5vdc) for CCDot4
P/N SE30-102
Power supply (9.0vdc) for X-RiteDot and CCDot5
P/N SE15-34
Battery Pack for X-RiteDot and CCDot5, CCDot4
Page 38

SERVICE AND GENERAL MAINTENANCE
5-5
Instrument Upgrades
P/N CTP-UP-P
Upgrade to add “Data to PC/Mac” option
P/N CTP-UP-V
Upgrade to add “Video to PC/Mac” option
P/N CTP-UP-P-V
Upgrade to add “Video to PC/Mac” option to a FlexoDot model
that already contains the “Data to PC/Mac” option
Page 39

SECTION FIVE
5-6
Instrument Specifications
Technology
7,000 DPI CCD array
Measurement Area
1 mm
Optical Range
85-175 lpi
Illumination
Intense Blue LED
Data Storage
32 values with data option
Measurement Time
2 seconds
Warm-up Time
None
Accuracy
+/- 1% dot
Display
Numeric display
Graphical display with image view and zoom
Data Connection
Serial connection
Mini-DIN Mac serial adapter optional
USB adapter optional
Power Source
Rechargeable battery pack
Switching power supply (100-240
~)
Charge Time
Up to 14 hours for full charge
Physical Dimensions
Height: 5.4cm (2.125in)
Width: 9.5cm (3.75in)
Length: 26cm (10.25in)
Weight
540g (1.2 lbs.)
Page 40

SERVICE AND GENERAL MAINTENANCE
5-7
Page 41

X-Rite, Incorporated - World Headquarters
3100 44th Street S.W. • Grandville, Michigan 49418 • USA
www.x-rite.com
For questions on product use and operation, contact Applications Support using the following e-mail
address or the numbers provided below
gisupport@x-rite.com
For repairs and service, contact Customer Service using the following web link or the numbers
provided below
http://www.xrite.com/contact_us.aspx
Tel: 1-888-826-3059 • Fax: 1-888-826-3061 or (616) 534-0726
International Numbers
Tel: 1-888-826-3039 or (616) 534-7663 • Fax: (616) 534-0723
X-Rite GmbH
Stollwerckstraße 32 • 51149 Köln • Germany
Tel: (49) 22 03 – 91 45-0 • Fax: (49) 22 03 – 91 45-19
X-Rite GmbH
Sochorova 705 • CZ-682 • 11 Vyskov • Czech Republic
Tel: (420) 507-328197 • Fax: (420) 507-328138
X-Rite Asia Pacific Ltd.
Room 808-10 • Kornhill Metro Tower • 1 Kornhill Road • Quarry Bay
Hong Kong • Tel: (852) 2-568-6283 • Fax: (852) 2-885-8610
X-Rite Ltd.
The Acumen Centre • First Avenue
Poynton, Cheshire • England
Tel: 44-0-1625-871100 • Fax: 44-0-1625-871444
X-Rite Méditerranée
Parc du moulin de Massy • 35, rue du Saule Trapu • 91300 Massy • France
Tel: 33-1-69.53.66.20 • FAX 33-1-69.53.00.52
X-Rite Italy Srl
Via per Caronno, 35
21040 Origgio (Va) • Italy
Tel. 0039 02 96734266 • Fax. 0039 02 96730681
X-Rite K.K
4F, 3-19-18 Shibaura, Minato-ku
Tokyo • 108-0023 Japan
Tel: +81-3-5439-5971 • Fax: +81-3-5439-5972
X-Rite Asia Pacific Ltd. - Singapore Representative Office
14 Science Park Drive • #02-04 The Maxwell
Singapore Science Park • Singapore 118226
Tel: + 65 7788-773 • Fax: + 65 7788-645
P/N CTP50-500 Rev. C-9/21/04
 Loading...