

Page 1

i1Display Pro PLUS
i1Display Pro
i1Display Studio
Quick Start Guide
Kurzanleitung
Manuel de démarrage
Guida introduttiva
Guía de inicio rápido
クィックスタートガイド
快速入门指南
Page 2
Important Notices Safety Information
EN
CE DECLARATION
Hereby, X-Rite, Incorporated, declares that this device is in compliance with the essential requirements and other
relevant provisions of Directives 2014/35/EU (LVD), 2014/30/EU (EMC), and RoHS 2015/863.
FEDERAL COMMUNICATIONS COMMISSION NOTICE
NOTE: This equipment has been tested and found to comply with the limits for a Class B digital device, pursuant to Part 15
of the FCC Rules. These limits are designed to provide reasonable protection against harmful interference in a residential
installation. This equipment generates, uses and can radiate radio frequency energy and, if not installed and used in
accordance with the instructions, may cause harmful interference to radio communications. However, there is no guarantee
that interference will not occur in a particular installation. If this equipment does cause harmful interference to radio or
television reception, which can be determined by turning the equipment off and on, the user is encouraged to try to correct the
interference by one or more of the following measures:
• Reorient or relocate the receiving antenna.
• Increase the separation between the equipment and receiver.
• Connect the equipment into an outlet on a circuit different from that to which the receiver is connected.
• Consult the dealer or an experienced radio/TV technician for help.
INDUSTRY CANADA COMPLIANCE STATEMENT
CAN ICES-003 (B) / NMB-003 (B)
EQUIPMENT INFORMATION
Use of this equipment in a manner other than that specified by X-Rite, Incorporated may compromise
design integrity and become unsafe.
!
WARNING: This instrument is not for use in explosive environments.
ADVERTENCIA – NO use este aparato en los ambientes explosivos.
AVVERTIMENTO – NON usare questo apparecchio in ambienti esplosivi.
WARNUNG: Das Gerät darf in einer explosiven Umgebung NICHT verwendet werden.
AVERTISSEMENT: Cet instrument ne doit pas être utilisé dans un environnement explosif.
Instructions for disposal: Please dispose of Waste Electrical and Electronic Equipment (WEEE) at designated collection points for the recycling of such equipment.
If this product is used in a manner not specified by the instruction, the safety protection provided by the device may be
impaired or become inoperable.
Unauthorized dismantling of the device will void all warranty claims.
Page 3
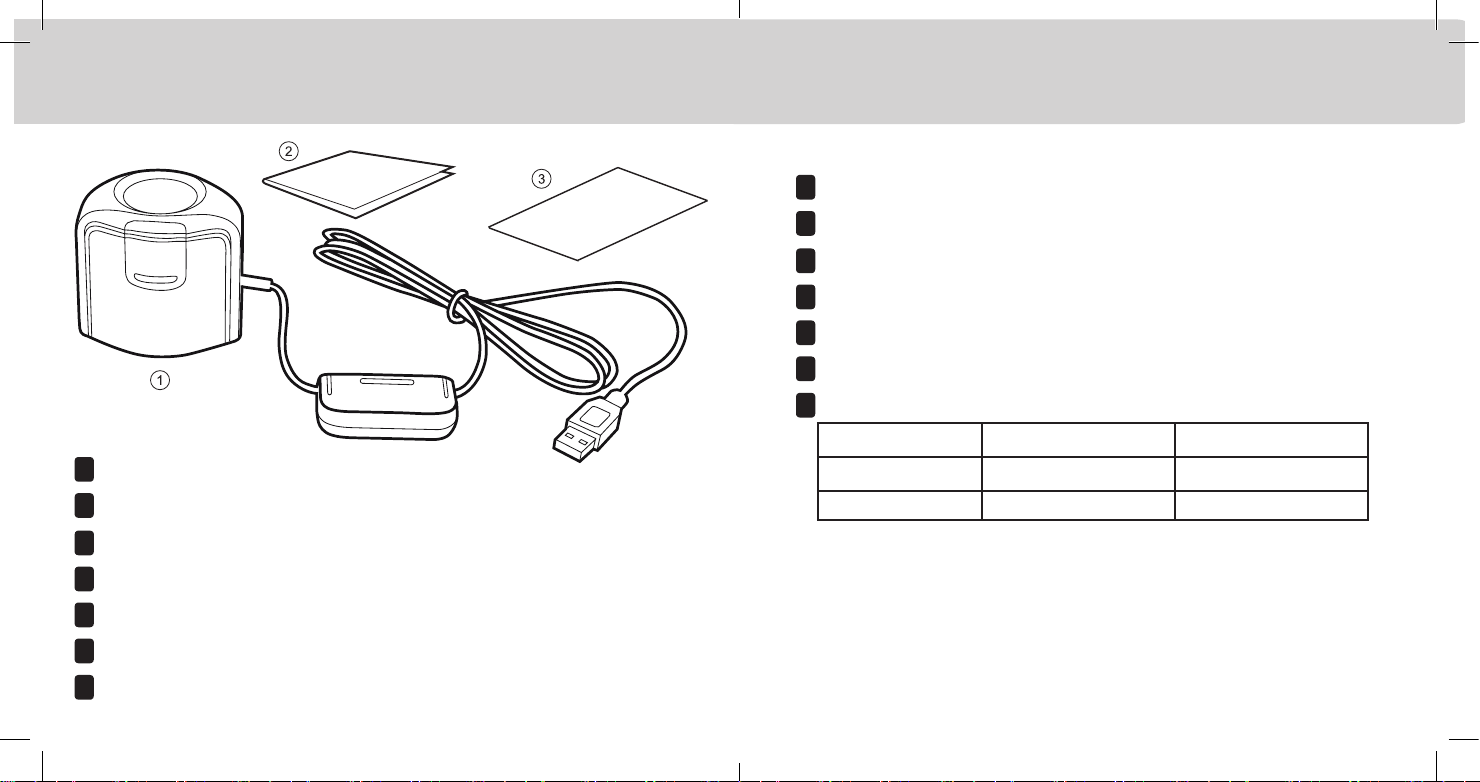
Package Contents Lieferumfang Contenu du coffret Contenuto della confezione
Contenido del paquete パッケージ内容 包装内容
Software Information Softwareinformationen Informations sur le logiciel
Informazioni sul software Información del software ソフトウェア情報 软件信息
1. i1Display 2. Quick Start Guide 3. Software download instructions
EN
1. i1Display 2. Kurzanleitung 3. Softwaredownloadanweisungen
DE
1. Instrument i1Display 2. Guide de démarrage 3. Instructions de téléchargement du logiciel
FR
1. i1Display 2. Guida introduttiva 3. Istruzioni per scaricare il software
IT
1. i1Display 2. Guía de inicio rápido 3. Instrucciones para descargar el software
ES
1. i1Display ディスプレイ 2. 基本操作の手引き 3. ソフトウェアのダウンロード手順書
JP
1. i1Display 显示器 2. 快速入门指南 3. 软件下载说明
CN
EN
Device
DE
Gerät
Périphérique
FR
Dispositivo
IT
Dispositivo
ES
装置
JP
设备
CN
Software Application
Software
Application logicielle
Applicazione software
Aplicación del software
ソフトウェア
软件应用程序
Download URL
Download-URL
URL de téléchargement
URL di download
URL de descarga
ダウンロード リンク
下载 URL
i1Display Studio i1Studio xrite.com/geti1Studio
i1Display Pro i1Proler xrite.com/geti1Proler
i1Display Pro PLUS i1Proler xrite.com/geti1Proler
Page 4

Installation 1 Installation 1 Installation 1 Installazione 1 Instalación 1 インストール 1 安装 1
Before you can use your device, you will need to install the software application onto your computer.
EN
Please do not plug in the instrument USB cable to your computer until after you have installed the software application.
1. For the i1Display Pro and i1Display Pro PLUS devices, visit www.xrite.com/geti1Profiler to download the i1Profiler
application and install the software application on your computer.
For the i1Display Studio device, visit www.xrite.com/geti1Studio to download the i1Studio application and install the software
application on your computer.
2. Review all of the instructions in this Quick Start Guide before you start using your new device. For more detailed
information, please visit www.xrite.com.
Sie müssne vor der Verwendung des Geräts die Software auf Ihrem Computer installieren.
DE
Bitte schließen Sie das USB-Kabel erst an den Computer an, nachdem Sie die Software installiert haben.
1. Gerät i1Display Pro und i1Display Pro PLUS: Laden Sie i1Profiler von www.xrite.com/geti1Profiler herunter, und installieren
Sie die Software auf Ihrem Computer.
Gerät i1Display Studio: Laden Sie i1Studio von www.xrite.com/geti1Studio herunter, und installieren Sie die Software auf
Ihrem Computer.
2. Lesen Sie diese Kurzanleitung sorgfältig, ehe Sie Ihr neues Gerät erstmalig verwenden. Weitere Informationen finden Sie
unter www.xrite.com.
Avant de pouvoir utiliser votre périphérique, vous devez installer l‘application logicielle sur votre ordinateur.
FR
Veillez à installer l‘application logicielle AVANT de connecter le câble USB de l‘instrument à votre ordinateur.
1. Pour les périphériques i1Display Pro et i1Display Pro PLUS, visitez www.xrite.com/geti1Profiler pour télécharger l‘application
i1Profiler et installez-la sur votre ordinateur.
Pour le périphérique i1Display Studio, visitez www.xrite.com/geti1Studio pour télécharger l‘application i1Studio et installez-la
sur votre ordinateur.
2. Passez en revue toutes les instructions de ce guide de démarrage rapide avant de commencer à utiliser votre nouveau
périphérique. Pour obtenir des informations plus détaillées, visitez www.xrite.com.
Prima di poter utilizzare il dispositivo, è necessario installare l‘applicazione software sul computer.
IT
Non collegare il cavo USB dello strumento al computer finché non è stata installata l‘applicazione software.
1. Per i dispositivi i1Display Pro e i1Display Pro PLUS, visitare www.xrite.com/geti1Profiler per scaricare l‘applicazione
software i1Profiler e installarla sul tuo computer.
Per il dispositivo i1Display Studio, visitare www.xrite.com/geti1Studio per scaricare l‘applicazione software i1Studio e
installarla sul tuo computer.
2. Leggere tutte le istruzioni di questa Guida introduttiva prima di iniziare a utilizzare il nuovo dispositivo. Per maggiori
informazioni, visitare il sito Web all‘indirizzo: www.xrite.com.
Antes de poder utilizar el dispositivo, es necesario instalar la aplicación del software en la computadora.
ES
No conecte el cable USB del instrumento a la computadora antes de instalar la aplicación del software.
1. En el caso de los dispositivos i1Display Pro y i1Display Pro PLUS, vaya a www.xrite.com/geti1Profiler para
descargar la aplicación del software i1Profiler e instalarla en su computadora.
En el caso del dispositivo i1Display Studio, vaya a www.xrite.com/geti1Studio para descargar la aplicación del
software i1Studio e instalarla en su computadora.
2. Revise todas las instrucciones de esta guía de inicio rápido antes de empezar a usar su nuevo dispositivo. Para
obtener más información, consulte el sitio Web www.xrite.com.
装置を使用する前に、ソフトウェアをコンピューターにインストールする必要があります。
JP
ソフトウェアをインストールするまで、装置の USB ケーブルはコンピューターに挿入しないでください。
1. i1Display Pro および i1Display Pro PLUS 装置には、i1Profiler ソフトウェアをダウンロードし、コンピ
ューターにインストールしてください。(ダウンロードリンク → https://www.xrite.com/geti1Profiler)
i1Display Studio 装置には、i1Studio ソフトウェアをダウンロードし、コンピューターにインストールしてくださ
い。(ダウンロードリンク → https://www.xrite.com/geti1Studio)
2. 新しい装置を使用する前に、本取扱説明書の手順をお読みください。詳細は https://www.xrite.co.jp
をご覧ください。
需要将软件应用程序安装到计算机上,然后才能使用设备。
CN
在安装了软件应用程序之前,请不要将仪器的 USB 电缆插入计算机。
1. 对于 i1Display Pro 和 i1Display Pro PLUS 设备,请访问 www.xrite.com/geti1Profiler 下载
i1Profiler 应用程序,然后在计算机上安装软件应用程序。对于 i1Display Studio 设备,请访问
www.xrite.com/geti1Studio 下载 i1Studio 应用程序,然后在计算机上安装软件应用程序。
2. 在开始使用新设备请前,请先阅读本《快速入门指南》中的所有说明。请访问 www.xrite.cn,了
解有关详细信息。
Page 5
Installation 2 Installation 2 Installation 2 Installazione 2 Instalación 2 インストール 2 安装 2
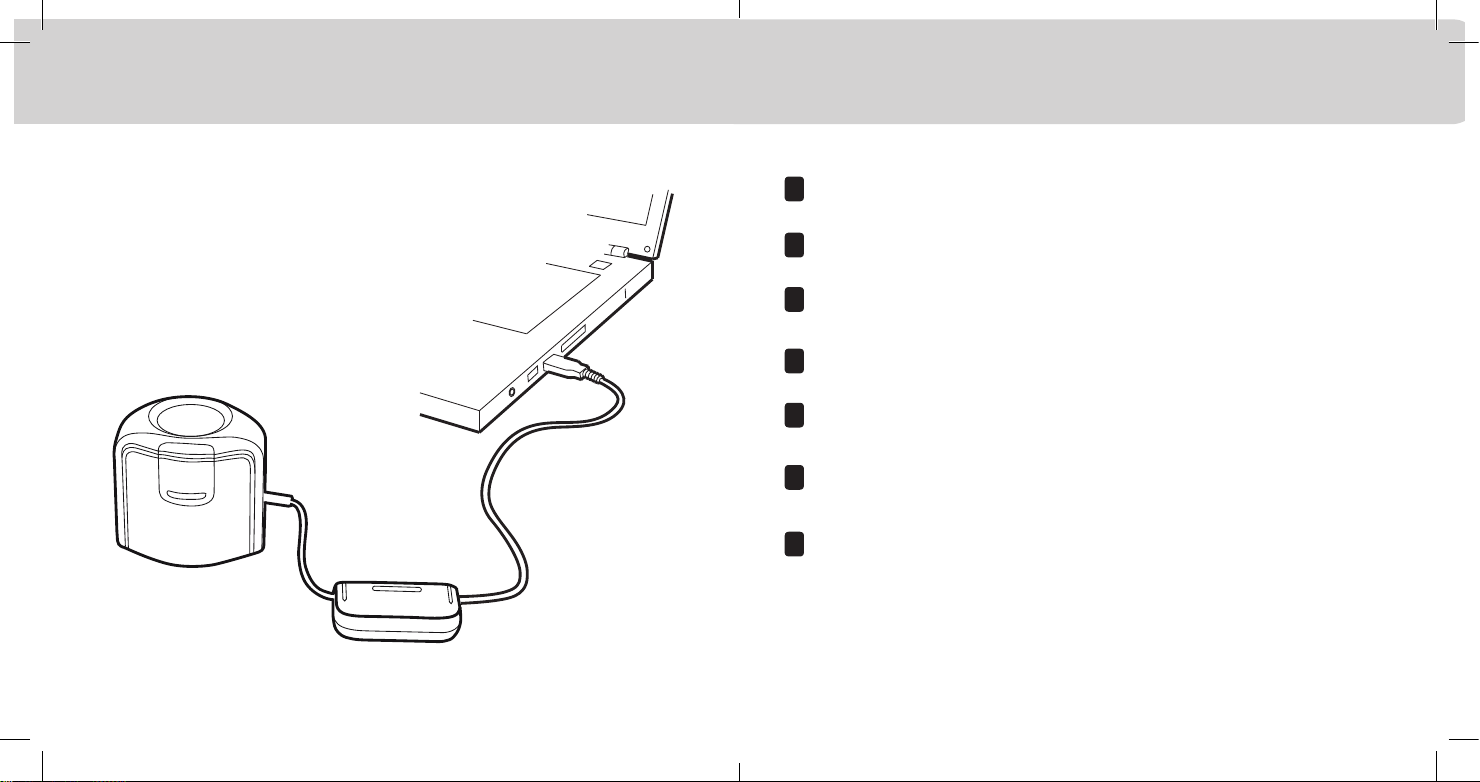
After you have completed the software installation process, attach the device to your computer’s USB port.
EN
Bitte schließen Sie nach Abschluss der Installation das Gerät an den USB-Anschluss Ihres Computers an.
DE
FR
Une fois le processus d’installation du logiciel terminé, connectez le périphérique au port USB de votre ordinateur.
Dopo aver completato il processo d’installazione del software, collegare il dispositivo alla porta USB del computer.
IT
Luego de completar el proceso de instalación del software, conecte el dispositivo al puerto USB de su computadora.
ES
ソフトウェアのインストールが終了後、装置をコンピューターの USB ポートに接続してください。
JP
完成软件应用程序安装过程后,将设备连接到计算机的 USB 端口。
CN
Page 6
Overview 1 Übersicht 1 Présentation 1 Cenni generali 1 Visión general 1 概要 1 概览 1
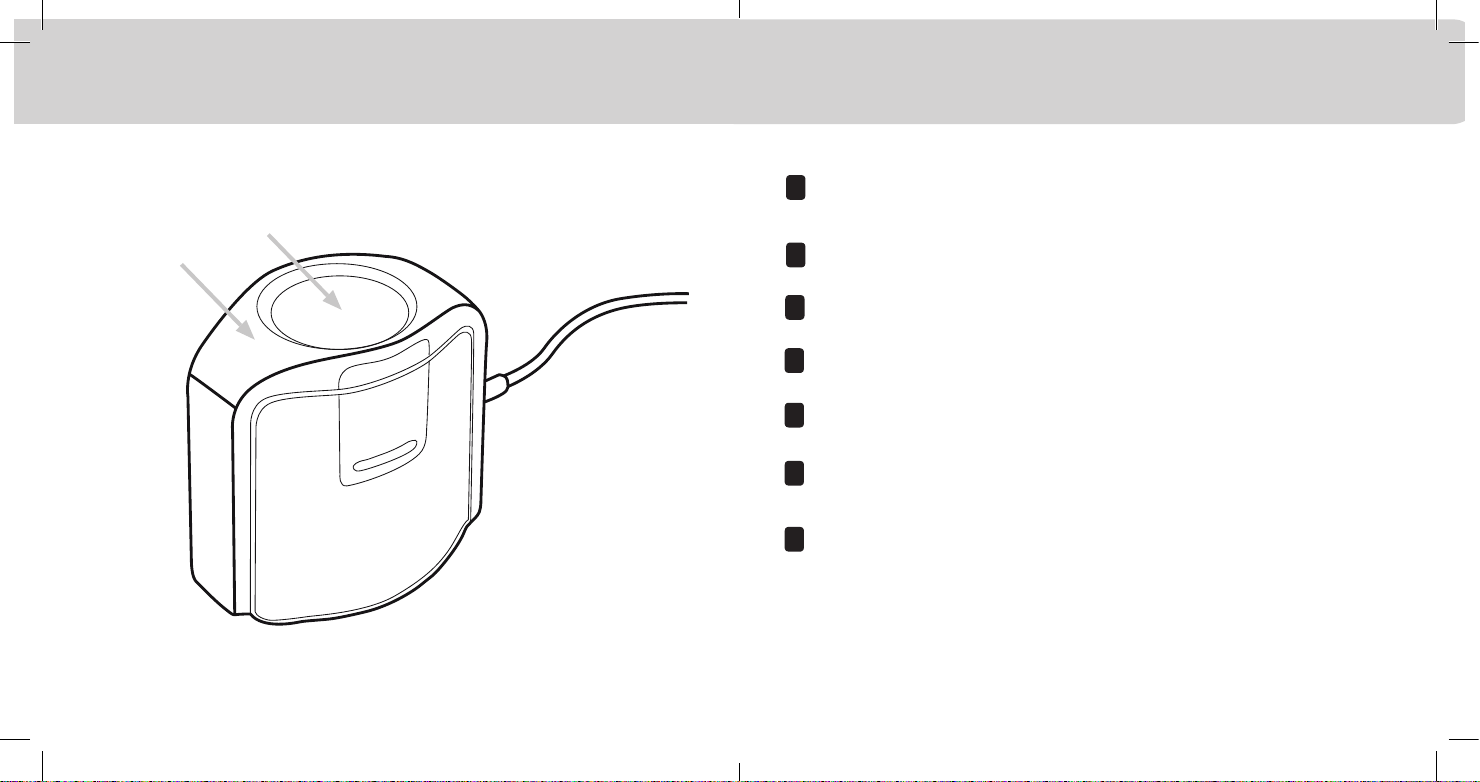
1. Ambient Diffuser Arm. 2. Ambient Diffuser
EN
2
1
1. Lichtdiffuserhalter 2. Lichtdiffuser
DE
1. Bras du diffuseur ambiant 2. Diffuseur ambiant
FR
1. Braccio del diffusore della luce ambientale 2. Diffusore della luce ambientale
IT
1. Brazo del difusor de la luz ambiente 2. Difusor de la luz ambiente
ES
1. 環境光拡散アーム 2. 環境光拡散
JP
1. 周围光源扩散器机臂 2. 周围光源扩散器
CN
Page 7

Overview 2 Übersicht 2 Présentation 2 Cenni generali 2 Visión general 2 概要 2 概览 2
Ambient diffuser arm snaps into place over measurement optics. Be sure to lift up on ambient diffuser arm before
EN
attempting to rotate into different measurement positions.
Lichtdiffuserhalter rastet über der Messoptik ein. Lichtdiffuserhalter muss angehoben werden, ehe er in die
DE
verschiedenen Messpositionen gebracht werden kann.
Le bras du diffuseur ambiant s‘enclenche sur l‘optique de mesure. Veillez à soulever le bras du diffuseur ambiant avant
FR
de tenter de le faire pivoter dans d‘autres positions de mesure.
Il braccio del diffusore della luce ambientale si aggancia in posizione sopra le ottiche di misurazione. Prima di ruotare lo
IT
strumento in posizioni di misurazione differenti assicurarsi di aver sollevato il braccio del diffusore della luce ambientale.
El brazo del difusor de la luz ambiente se encaja en su lugar sobre la óptica de medición. Asegúrese de levantar el
ES
brazo difusor de la luz ambiente antes de intentar girarlo en sus posiciones de medición distintas.
環境光拡散アームは、測定オプチクス上にカチッとはまるように取り付けます。環境光拡散アームを他の測定位置
JP
に回転する際は、必ず上に持ち上げてから回転してください。
周围光源扩散器机臂扣在测量镜头之上。尝试旋转周围光源扩散器的位置前,请确保向上提起周围
CN
光源扩散器机臂。
Page 8

Overview 3 Übersicht 3 Présentation 3 Cenni generali 3 Visión general 3 概要 3 概览 3
Measuring Modes
EN
1. Ambient Light Measurement 2. Emissive Light Measurement 3. Projector Measurement
Messmodi
DE
1. Umgebungslichtmessung 2. Emissionslichtmessung 3. Projektormessung
Modes de mesure
FR
1. Mesure de la lumière ambiante 2. Mesure de la lumière émissive 3. Mesure du projecteur
Modalità di misurazione
IT
1 2
1. Misurazione Luce ambientale 2. Misurazione Luce d‘emissione 3. Misurazione Proiettore
Modos de medición
ES
1. Medición de la luz ambiente 2. Medición de la luz emisiva 3. Medición del proyector
測定モード
JP
1. 環境光の測定 2. ディスプレイ放射光の測定 3. プロジェクターの測定
测量模式
CN
1. 周围光源测量 2. 放射光测量 3. 放映机测量
3
Page 9

Monitor measurement 1 Monitormessung 1 Mesure de moniteur 1 Misurazione del monitor 1 Medición del monitor 1 モニタ測定 1 显示器测量 1
For display measurements: 1. Lift up on ambient diffuser arm. 2. Rotate ambient diffuser arm to rear
EN
1
position. 3. Ambient diffuser arm will snap into place when located in rear position.
3
2
Monitormessung: 1. Lichtdiffuserhalter anheben. 2. Lichtdiffuserhalter nach hinten drehen.
DE
3. Lichtdiffuserhalter rastet ein, wenn er richtig positioniert ist.
Pour les mesures d‘écran : 1. Soulevez le bras du diffuseur ambiant. 2. Faites pivoter le bras du diffuseur ambiant en
FR
position arrière. 3. Le bras du diffuseur ambiant s‘enclenche lorsqu‘il se trouve en position arrière.
Per misurazioni di uno schermo: 1. Sollevare il braccio del diffusore della luce ambientale. 2. Ruotare il braccio del
IT
diffusore della luce ambientale in posizione posteriore. 3. Il braccio del diffusore della luce ambientale si aggancia
quando collocato in posizione posteriore.
En el caso de las mediciones de pantallas: 1. Levante el brazo del difusor de la luz ambiente. 2. Gire el brazo del
ES
difusor de la luz ambiente a su posición trasera. 3. El brazo del difusor de la luz ambiente se encaja en su lugar cuando
se encuentra en su posición trasera.
ディスプレイ測定: 1. 環境光拡散アームを持ち上げます。 2. 環境光拡散アームを後方位置に回転させます。
JP
3. 環境光拡散アームは、後方位置にカチッとはまるように取り付けます。
对于显示器测量: 1. 提起周围光源扩散器机臂。 2. 旋转周围光源扩散器机臂至后端位置。
CN
3. 周围光源扩散器机臂将卡入后端位置。
Page 10

Monitor measurement 2 Monitormessung 2 Mesure de moniteur 2 Misurazione del monitor 2 Medición del monitor 2 モニタ測定 2 显示器测量 2
To adjust the position of the counter weight, depress the button on the counter weight and slide counter weight
EN
simultaneously to desired location.
Position kann mit Taste auf dem Gegengewicht angepasst werden. Taste drücken und halten, und Gegengewicht in
DE
gewünschte Position schieben.
Pour régler la position du contrepoids, appuyez sur le bouton situé sur le contrepoids tout en faisant coulisser le
FR
contrepoids à l‘emplacement désiré.
2
1
Per regolare la posizione del contrappeso, premere il pulsante sul contrappeso e contemporaneamente farlo scorrere
IT
nella posizione desiderata.
Para ajustar la posición del contrapeso, oprima el botón en el contrapeso y deslícelo al mismo tiempo a la ubicación
ES
deseada.
バランスウェイト(錘)の位置を調整するには、バランスウェイトのボタンを押しながら同時にバランスウェイトを動
JP
かします。
要调整平衡锤的位置,请下压平衡锤上的按钮并同时将平衡锤滑动至所需位置。
CN
Page 11

Monitor measurement 3 Monitormessung 3 Mesure de moniteur 3 Misurazione del monitor 3 Medición del monitor 3 モニタ測定 3 显示器测量 3
To mount the device on your display, position the optics in contact with the center of your display. Then position the
EN
USB cable and counter weight behind your display.
Gerät auf Monitorschirm befestigen, Optik muss sich in der Mitte des Schirms befinden. USB-Kabel und Gegengewicht
DE
hinter dem Monitor platzieren.
Pour monter le périphérique sur votre écran, placez l‘optique en contact avec le centre de votre écran. Positionnez
FR
ensuite le câble USB et le contrepoids derrière votre écran.
Per montare il dispositivo sullo schermo, posizionare le ottiche in modo che siano a contatto con il centro dello
IT
schermo. Sistemare quindi il cavo USB e il contrappeso dietro lo schermo.
Para montar el dispositivo sobre la pantalla, posicione la óptica en contacto con el centro de la pantalla. A
ES
continuación, coloque el cable USB y el contrapeso detrás de la pantalla.
ディスプレイに装置を取り付けるには、測定口レンズがディスプレイ中央に接触するようセットしてください。その
JP
後、USBケーブルおよびバランスウェイトがディスプレイの裏側にくるように設置してください。
要将设备摆放在显示器上,请将镜头紧贴于显示器的中间部位。再将 USB 电缆和平衡锤放置于显
CN
示器之后。
Page 12

Monitor measurement 4 Monitormessung 4 Mesure de moniteur 4 Misurazione del monitor 4 Medición del monitor 4 モニタ測定 4 显示器测量 4
Adjust the position of the counter weight according to the size of your display. Be sure the foam pad on the front of the
EN
device sits flat on your display.
Position des Gegengewichts muss für die Monitorgröße angepasst werden. Schaumstoff vorn am Gerät muss flach auf
DE
dem Monitor aufliegen.
Réglez la position du contrepoids en fonction de la taille de votre écran. Assurez-vous que le coussin en mousse situé
FR
à l‘avant du périphérique repose bien à plat sur votre écran.
Regolare la posizione del contrappeso in base alle dimensioni dello schermo. Assicurarsi che il cuscinetto spugnoso
IT
sulla parte anteriore del dispositivo aderisca allo schermo e vi sia appoggiato correttamente e in piano.
Ajuste la posición del contrapeso en función del tamaño de la pantalla. Asegúrese de que la almohadilla de espuma en
ES
la parte frontal del dispositivo se asiente completamente sobre la pantalla.
ディスプレイのサイズに合わせてバランスウェイトの位置を調整してください。装置のフォームパッドがディスプレイに対し
JP
て平らになるように調整してください。
根据显示器尺寸调整平衡锤的位置。确保设备前部的泡沫护垫平整贴在显示器上。
CN
Page 13

Ambient light measurement Umgebungslichtmessung Mesure de la lumière ambiante Misurazione Luce ambientale Medición de la luz ambiente 環境光の測定 周围光源测量
For ambient light measurements: 1. Rotate the ambient diffuser arm until the diffuser is positioned over the optics.
EN
2. Press down on the ambient diffuser arm until it snaps into place over the optics.
1
Umgebungslichtmessung: 1. Lichtdiffuserhalter nach vorn drehen, Halter muss sich über der Optik befinden.
DE
2. Lichtdiffuserhalter andrücken, bis er über der Optik einrastet.
2
Pour les mesures de la lumière ambiante : 1. Faites pivoter le bras du diffuseur ambiant jusqu‘à ce que le diffuseur
FR
soit positionné sur l‘optique. 2. Appuyez sur le bras du diffuseur ambiant jusqu‘à ce qu‘il s‘enclenche sur l‘optique.
Per misurazioni della luce ambientale: 1. Ruotare il braccio del diffusore della luce ambientale finché non si
IT
posiziona sopra le ottiche. 2. Premere il braccio del diffusore della luce ambientale finché non scatta in posizione
sopra le ottiche.
En el caso de las mediciones de la luz ambiente: 1. Gire el brazo difusor de la luz ambiente hasta que el difusor se
ES
coloque sobre la óptica. 2. Presione hacia abajo el brazo difusor de la luz ambiente hasta que se encaje en su lugar
sobre la óptica.
環境光測定: 1. 環境光拡散アームが測定口レンズ上にくるまで回転させます。 2. 環境光拡散アームが測
JP
定口レンズ上でカチッとはまるまで押し下げます。
对于周围光源测量: 1. 旋转周围光源扩散器机臂直至扩散器置于镜头之上。 2. 向下按周围光源扩
CN
散器机臂直至其在镜头上方卡入就位。
Page 14

Ambient light measurement Umgebungslichtmessung Mesure de la lumière ambiante Misurazione Luce ambientale Medición de la luz ambiente 環境光の測定 周围光源测量
Position the device on your work surface next to your display with ambient diffuser pointing upwards.
EN
Gerät neben Monitor platzieren, Lichtdiffuser muss nach oben zeigen.
DE
Placez le périphérique sur le votre plan de travail à côté de votre écran avec le diffuseur ambiant pointé vers le haut.
FR
Collocare il dispositivo sulla superficie di lavoro nelle vicinanze dello schermo, con il diffusore ambientale che punta
IT
verso l‘alto.
Coloque el dispositivo sobre la superficie de trabajo al lado de la pantalla con el difusor de la luz ambiente apuntando
ES
hacia arriba.
装置を環境光拡散が上向きの状態にしてディスプレイ横の作業面に設置します。
JP
将设备置于工作台表面上临近显示器的位置,将周围光源扩散器朝上。
CN
Page 15

Projector Measurement 1 Projektormessung Mesure de projecteur Misurazione Proiettore Medición del proyector プロジェクタの測定 放映机测量
For projector measurements: 1. Lift up on ambient diffuser arm. 2. Rotate ambient diffuser arm halfway towards
EN
rear position. 3. Use the ambient diffuser arm as a stand for the device and position the device on a table in front the
projector screen. (A threaded tripod mount is also available on the bottom of the device for use with a tripod.)
Projektormessung: 1. Lichtdiffuserhalter anheben. 2. Lichtdiffuserhalter halb nach hinten drehen. 3. Lichtdiffuserhalter
DE
kann als Geräteständer verwendet werden. Gerät muss auf einem Tisch vor der Projektionsfläche platziert werden. Gerät
1
2
kann auch mit Stativ verwendet werden (Gewinde unter dem Gerät).
Pour les mesures de projecteur : 1. Soulevez le bras du diffuseur ambiant. 2. Faites pivoter le bras du diffuseur
FR
ambiant à mi-chemin en position arrière. 3. Utilisez le bras du diffuseur ambiant comme pied pour le périphérique et
positionnez le périphérique sur une table devant l‘écran du projecteur (si vous souhaitez utiliser un trépied, un support
fileté se trouve sous le périphérique).
Per misurazioni del proiettore: 1. Sollevare il braccio del diffusore della luce ambientale. 2. Ruotare il braccio del
IT
diffusore della luce ambientale a metà corsa della posizione posteriore. 3. Utilizzare il braccio del diffusore della luce
ambientale come supporto per il dispositivo e posizionare quest‘ultimo su una scrivania davanti al proiettore (è possibile
utilizzare anche un cavalletto sfruttando l‘apposito montaggio disponibile sotto il dispositivo).
En el caso de las mediciones de proyectores: 1. Levante el brazo del difusor de la luz ambiente. 2. Gire el brazo del
ES
difusor de la luz ambiente a medio camino hacia la posición trasera. 3. Utilice el brazo difusor de la luz ambiente como
soporte para el dispositivo y coloque el dispositivo sobre una mesa frente a la pantalla del proyector. (Hay un encaje
roscado también disponible en la parte inferior del dispositivo para su uso con un trípode.)
プロジェクターの測定: 1. 環境光拡散アームを持ち上げます。 2. 環境光拡散アームを後方位置の半分まで回
JP
転させます。 3. 環境光拡散アームを装置のスタンドとして使用し、プロジェクターのスクリーン前のテーブルに装置を
設置します。(ネジ式の三脚マウント穴は装置の底にあります。)
对于放映机测量: 1. 提起周围光源扩散器机臂。 2. 将周围光源扩散器机臂朝后端旋转至中间位置。
CN
3. 利用周围光源扩散器机臂支撑设备,并将设备置于投影机屏幕前方的桌面上。(设备底部配有供安
装螺纹三角架的位置,方便与三角架配合使用。)
3
Page 16

Projector Measurement 2 Projektormessung Mesure de projecteur Misurazione Proiettore Medición del proyector プロジェクタの測定 放映机测量
Rotate the device up or down and pivot left or right until the device optics are pointing towards the
EN
center on the projector screen. For best results, position the device as close to the projector screen as
possible and set room lighting to intended viewing conditions.
Gerät nach oben, unten, rechts oder links drehen, bis die Optik mittig auf die Projektionsfläche zeigt. Gerät muss
DE
so nahe wie möglich vor der Projektionsfläche platziert werden. Licht muss wie für geplante Betrachtung eingestellt
werden.
Faites pivoter le périphérique vers le haut ou vers le bas et vers la gauche ou vers la droite jusqu‘à ce que l‘optique
FR
du périphérique pointe vers le centre de l‘écran du projecteur. Pour de meilleurs résultats, positionnez le périphérique
le plus près possible de l‘écran et définissez l‘éclairage de la pièce selon les conditions de visualisation désirées.
Capovolgere il dispositivo e ruotarlo su sé stesso verso sinistra o destra finché le sue ottiche non sono puntate verso
IT
il centro dello schermo del proiettore. Per ottenere il miglior risultato, posizionare il dispositivo il più vicino possibile al
proiettore e utilizzare le stesse condizioni d‘illuminazione che si intende impiegare per lavorare.
Gire el dispositivo hacia arriba o hacia abajo y a la izquierda o la derecha del pivote hasta que la óptica del
ES
dispositivo apunte hacia el centro de la pantalla del proyector. Para obtener mejores resultados, coloque el dispositivo
lo más cercano posible a la pantalla del proyector y ajuste la iluminación de la sala en función de las condiciones de
visualización pretendidas.
装置の測定口レンズがプロジェクターのスクリーン中央を指すまで、装置を上下および左右に回転させます。装置
JP
をプロジェクターのスクリーンにできるだけ近くセットし、室内照明を観察条件に合わせてください。
向上或向下旋转设备,并绕轴向左或向右旋转,直至设备镜头位置朝向投影机屏幕的中心。尽量使
CN
设备靠近投影机屏幕,并将室内照明设置为所需查看条件,可获得最佳效果。
Page 17

Care, Support, & ServiceWarranty Conditions
EN
Warranty Conditions
X-Rite warrants this product against defects in material and workmanship for a period of twelve (12) months from the date of
sale, unless different local regulations apply. During the warranty period, X-Rite will either replace or repair at its discretion
defective parts free of charge.
This warranty shall not apply to any goods supplied hereunder which after shipment are damaged, altered in any respect, or
subjected to negligent treatment. X-Rite`s sole and exclusive obligation for breach of the above warranties shall be the repair
or replacement of any part, without charge, which within the warranty period is proven to X-Rite`s reasonable satisfaction
to have been defective. Repairs or replacement by X-Rite shall not revive an otherwise expired warranty, nor shall the
same extend the duration of a warranty. X-Rite shall in no event be liable for losses or costs to Buyer in manufacturing, or
for Buyer`s overhead, other expenses, lost profits, goodwill, or any other special, indirect, consequential, incidental or other
damages to people or property resulting from a breach of any of the foregoing warranties. There are no other warranties,
either express or implied, which extend beyond the warranties set forth herein. The express warranties contained herein are in
lieu of all other warranties, express or implied, including, but not limited warranty or merchantability and fitness for a particular
purpose or application. No representations, conversations or statements not expressly set forth herein shall be binding upon
X-Rite as a warranty, guarantee or any other form of assurance. To obtain warranty service, you must take the product, or
deliver the product freight prepaid, in either its original packaging or packaging affording an equal degree of protection, to an
authorized X-Rite service center. Proof of purchase in the form of a bill of sale or receipted invoice which is evidence that the
unit is within the Warranty period must be presented to obtain warranty service.
Care
Keep the ambient diffuser in place over the optics when not in use. The ambient diffuser will prevent dust or dirt from
accumulating on the lens.
If cleaning is needed, first use a lens blower brush to remove loose dust. If necessary, wipe the lens gently with a soft lint
free cloth.
NOTE - Never use water, solvents, or detergents to clean the lens or body of the device, as these may cause damage or
deformation.
Always use and store the device between 10° C to 35° C at 20% to 80% relative humidity (non-condensing).
Service
Do not try to dismantle the device for any reason. Unauthorized dismantling of the equipment will void all warranty claims.
Contact the X-Rite support or the nearest X-Rite Service Center, if you believe that the unit does not work anymore or
does not work correctly.
Service Center
Visit www.xrite.com to locate the nearest X-Rite Service Center or contact your X-Rite dealer for more information.
Page 18

有毒有害物质或元素名称及其标识 Toxic/Hazardous Substances and Elements Table
WPP
部件名称 有毒有害物质或元素
铅(Pb) 汞(Hg) 镉(Cd) 六价 (Cr(VI)) 多溴联苯(PBB) 多溴二苯 (PBDE)
印刷电路板
Diffuser Plastic and
Polymeric Parts
被动电子件
Optics and Optical
Components
焊接金属
Circuit Modules
连接器,线材
USB A Cable and
Cable Assemblies
结构件及附件
Cable WeightPlastic and Metal
Components
○: 表示该有毒有害物质在该部件所有均质材料中的含量均在SJ/T11363-2014规定的限量要求以下。
○: Indicates that the content of the toxic and hazardous substance in all the homogenous material
of the part is below the concentration limit requirement as described in SJ/T 11363-2014.
X: 表示该有毒有害物质至少在该部件的某一均质材料中的含量超出SJ/T11363-2014规定的限量要求。
X: Indicates that the content of the toxic and hazardous substance in at least one homogenous material
of the part exceeds the concentration limit requirement as described in SJ/T 11363-2014.
○ ○ ○ ○ ○ ○
X ○ ○ ○ ○ ○
X ○ ○ ○ ○ ○
○ ○ ○ ○ ○ ○
X ○ ○ ○ ○ ○
CN
20
Page 19

Corporate Headquarters X-Rite, Incorporated
4300 44th Street SE, Grand Rapids, Michigan 49512
Phone 1 800 248 9748 or 1 616 803 2100
Fax 1 800 292 4437 or 1 616 803 2705
European Headquarters X-Rite Europe GmbH
Althardstrasse 70, 8105 Regensdorf, Switzerland
Phone (+41) 44 842 24 00, Fax (+41) 44 842 22 22
Asia Pacific Headquarters X-Rite Asia Pacific Limited
Suite 2801, 28th Floor, AXA Tower
Landmark East, 100 How Ming Street, Kwun Tong, Kowloon, Hong Kong
Phone (+852) 2 568 6283, Fax (+852) 2 885 8610
Please visit www.xrite.com for a local office near you.
TM Trademark of X-Rite. Part No. EODIS3-550 (09/19)
 Loading...