

Page 1
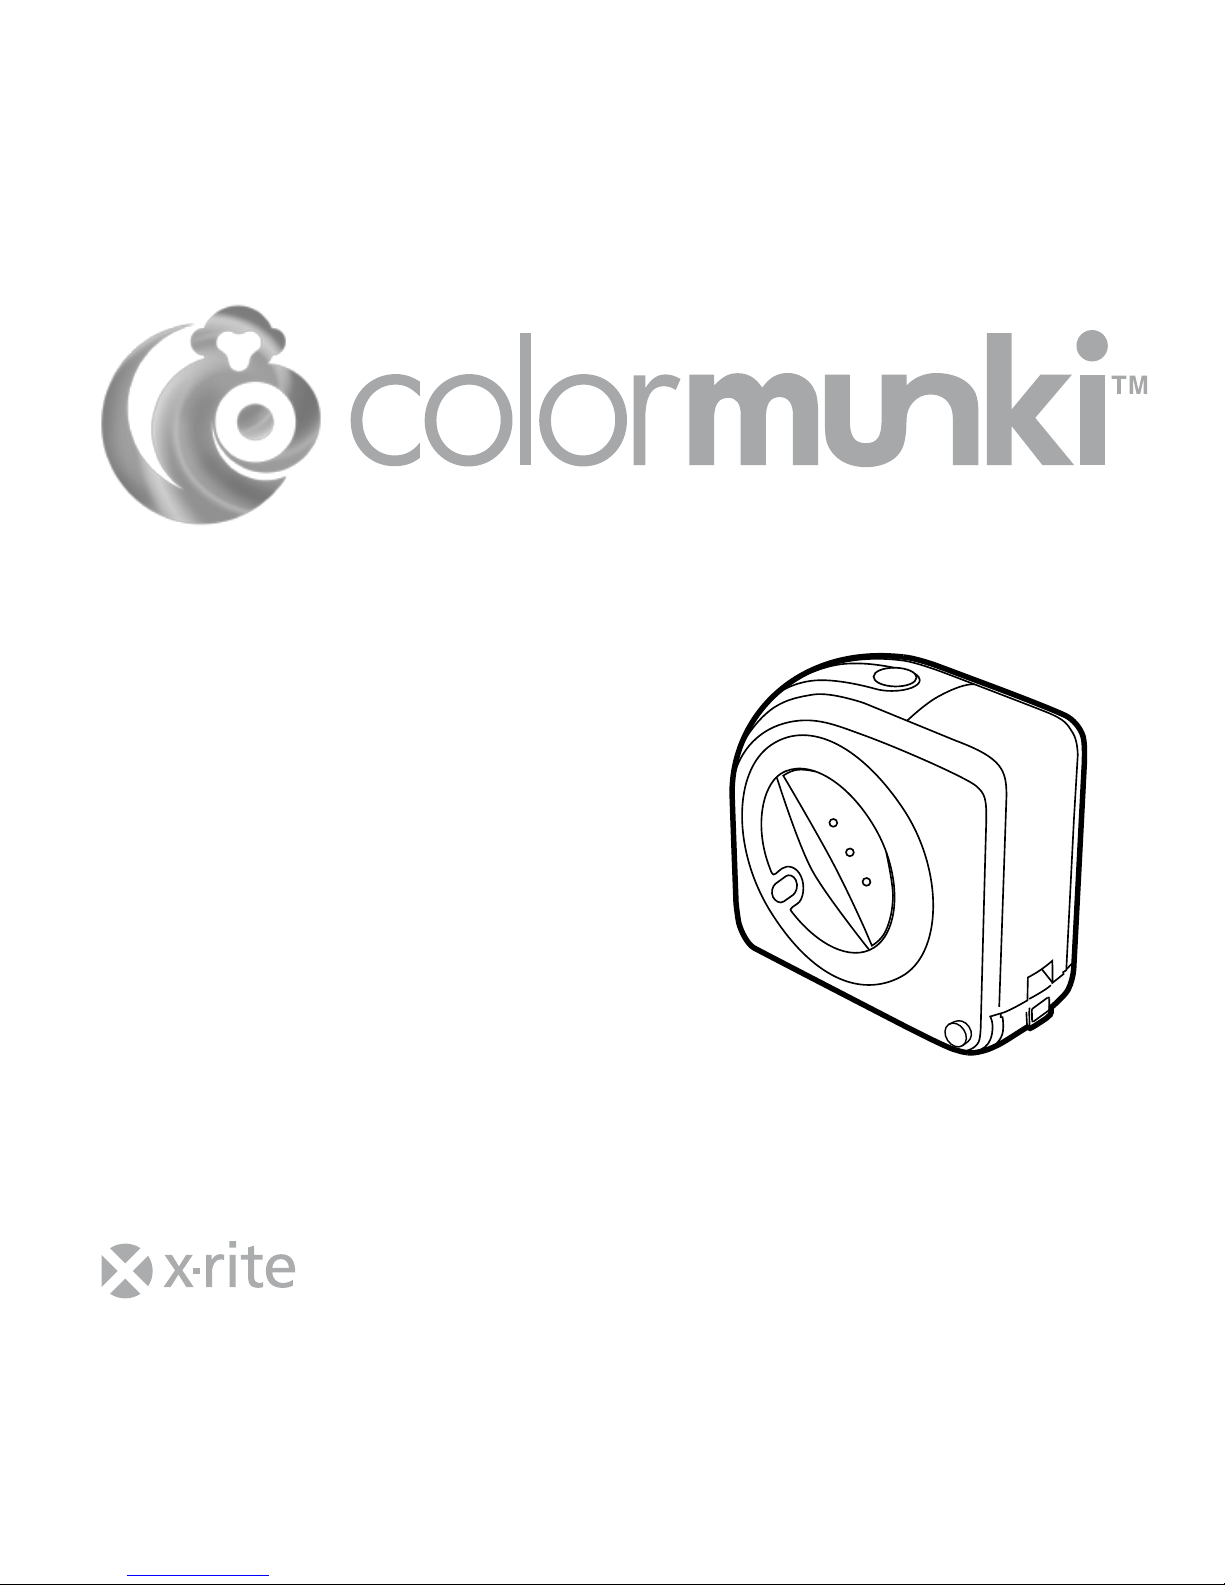
Quick Start Guide
Kurzanleitung
Guide de démarrage rapide
Guida rapida all’uso
Guía de Inicio Rápido
基本操作の手引き
快速入门指南
Page 2

Important Notices
CE Declaration
Manufacturer’s Name: X-Rite, Incorporated
Authorized Representative: X-Rite, Incorporated • Siemensstraße 12b • 63263 Neu-Isenburg • Germany
Phone:+49 (0) 61 02-79 57-0 • Fax: +49 (0) 61 02 -79 57-57
Model Name: colormunki
Directive(s) Conformance: EMC 89/336/EEC LVD 73/23/EEC
FEDERAL COMMUNICATIONS COMMISSION NOTICE
NOTE: This equipment has been tested and found to comply with the limits for a Class B digital device, pursuant to
Part 15 of the FCC Rules. These limits are designed to provide reasonable protection against harmful interference in a
residential installation. This equipment generates, uses and can radiate radio frequency energy and, if not installed and
used in accordance with the instructions, may cause harmful interference to radio communications. However, there is no
guarantee that interference will not occur in a particular installation. If this equipment does cause harmful interference to
radio or television reception, which can be determined by turning the equipment off and on, the user is encouraged to try
to correct the interference by one or more of the following measures:
• Reorient or relocate the receiving antenna.
• Increase the separation between the equipment and receiver.
• Connect the equipment into an outlet on a circuit different from that to which the receiver is connected.
• Consult the dealer or an experienced radio/TV technician for help.
INDUSTRY CANADA COMPLIANCE STATEMENT
This Class B digital apparatus complies with Canadian ICES-003.
Cet appareil numérique de la classe B est conforme à la norme NMB-003 du Canada.
NOTE: USB interface cable (1.8m) shipped with this device must be used in order to maintain compliance with
the desired CE mark requirements, FCC Part 15 Rules, and Canadian ICES-003.
Page 3
Caution, risk of danger. LED RADIATION - DO NOT VIEW DIRECTLY WITH OPTICAL INSTRUMENTS
CLASS 1M LED PRODUCT - Viewing the LED output with instruments (for example, eye loupes, magnifiers and
microscopes) within a distance of 100 mm may pose an eye hazard.
EQUIPMENT INFORMATION
Use of this equipment in a manner other than that specified by X-Rite, Incorporated may compromise
design integrity and become unsafe.
WARNING: This instrument is not for use in explosive environments.
ADVERTENCIA – NO use este aparato en los ambientes explosivos.
AVVERTIMENTO – NON usare questo apparecchio in ambienti esplosivi.
WARNUNG: Das Gerät darf in einer explosiven Umgebung NICHT verwendet werden.
AVERTISSEMENT: Cet instrument ne doit pas être utilisé dans un environnement explosif.
RoHS/WEEE
X-Rite products meet the Restriction of Hazardous Substances (RoHS) Directive 2002/95/EC and
European Union – Waste Electrical and Electronic Equipment (WEEE) Directive 2002/96/EC. Please refer
to www.xrite.com for more information on X-Rite’s compliance with the RoHS/WEEE directives.
If this product is used in a manner not specified by the instruction, the safety protection provided by the device
may be impaired or become inoperable.
Unauthorized dismantling of the ColorMunki will void all warranty claims.
EN
!
Safety Information
!
Page 4
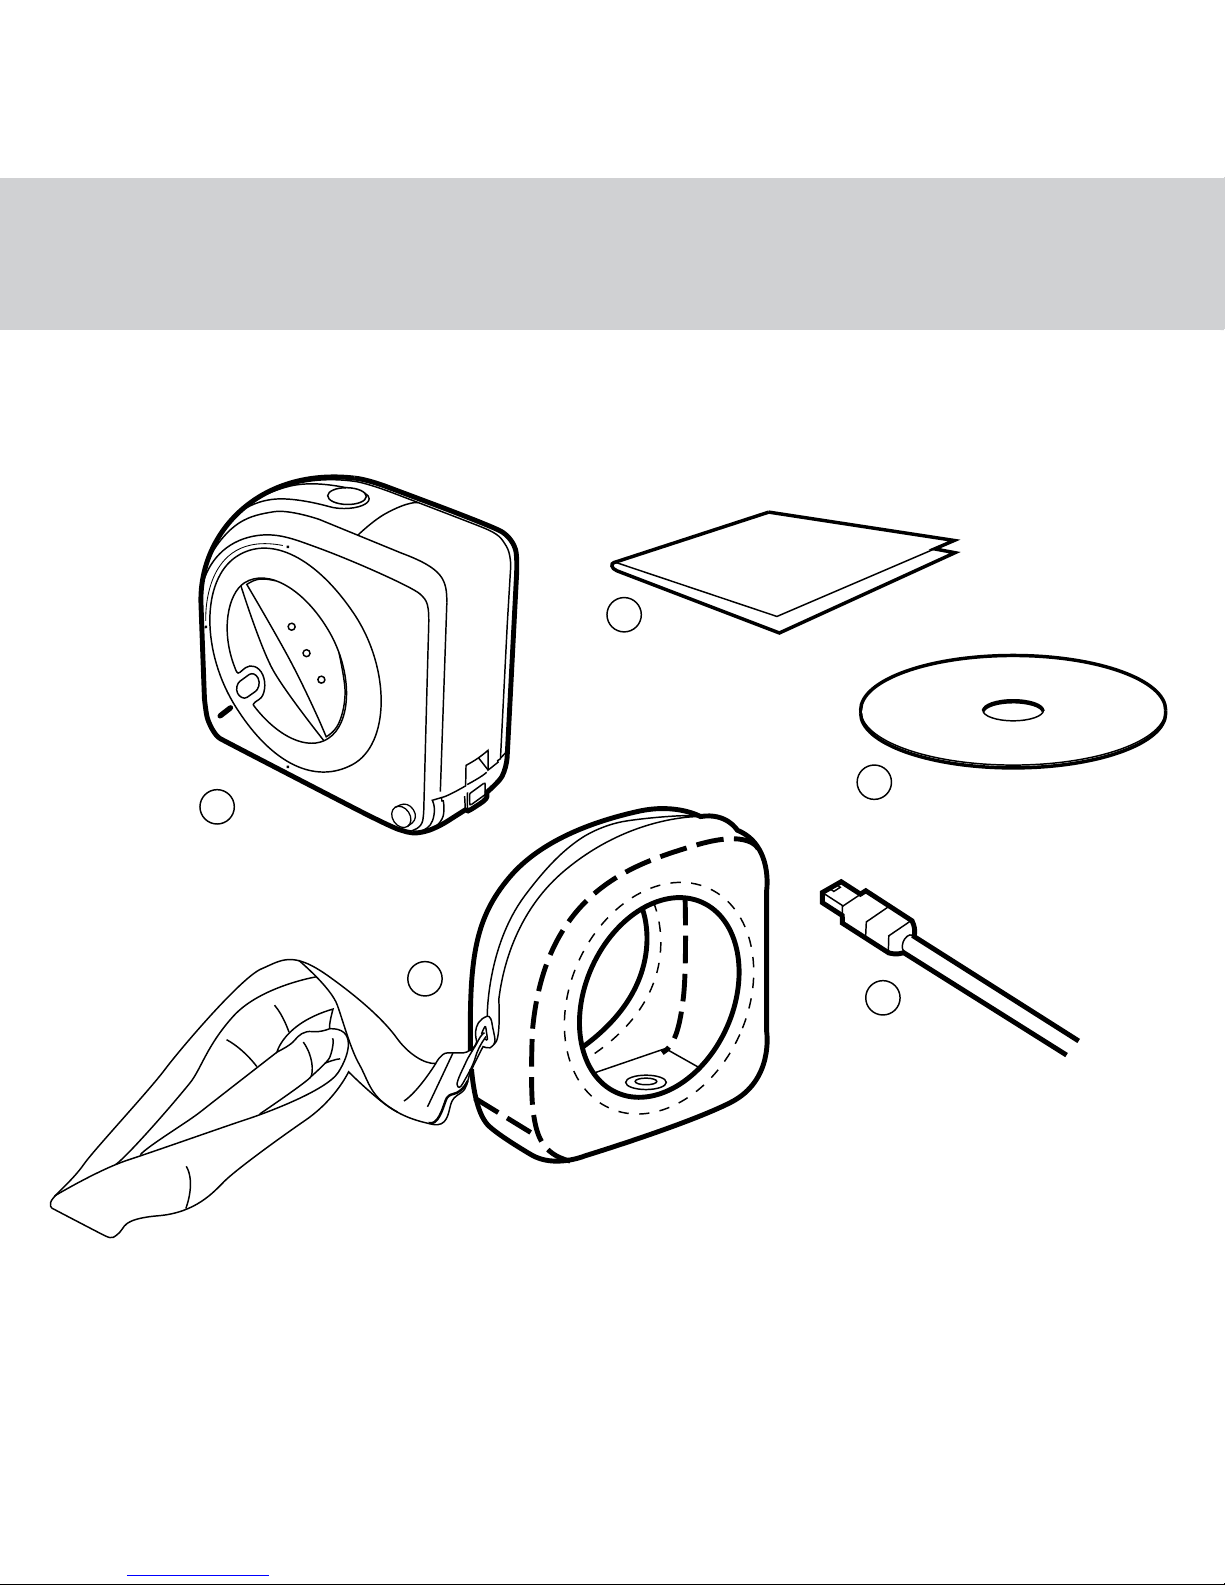
Package Contents Lieferumfang Contenu du coffret Contenuto della confezione
2
3
5
4
1
Page 5

Contenido del paquete パッケージ内容 包装内容
ES
JP
CN
1. ColorMunki. 2. Monitor holder and protection bag. 3. USB cable. 4. Quick Start Guide. 5. Software CD.
1. ColorMunki 2. Monitorhalterung und Schutztasche 3. USB-Kabel 4. Kurzanleitung 5. Software-CD
1. Instrument ColorMunki 2. Support pour moniteur et sac de protection 3. Câble USB
4. Guide de démarrage rapide 5. CD du logiciel
1. ColorMunki, 2. Supporto per il monitor e custodia protettiva, 3. Cavo USB, 4. Guida rapida all‘uso,
5. CD contenente il software
1. ColorMunki 2. Soporte para monitor y bolsa de protección 3. Cable USB 4. Guía de Inicio Rápido
5. CD del software
1. ColorMunki(カラーモンキー)2. モニタ専用ホルダー 3. USB ケーブル 4. 基本操作の手引き
5. ソフトウェアCD
1. ColorMunki,2. 显示器支架和保护袋,3. USB 电缆,4.《快速入门指南》,5. 软件光盘。
EN
DE
FR
IT
Page 6
Installation 1 Installation 1 Installation 1 Installazione 1 Instalación 1 インストール 1 安装 1
Page 7

ES
JP
CN
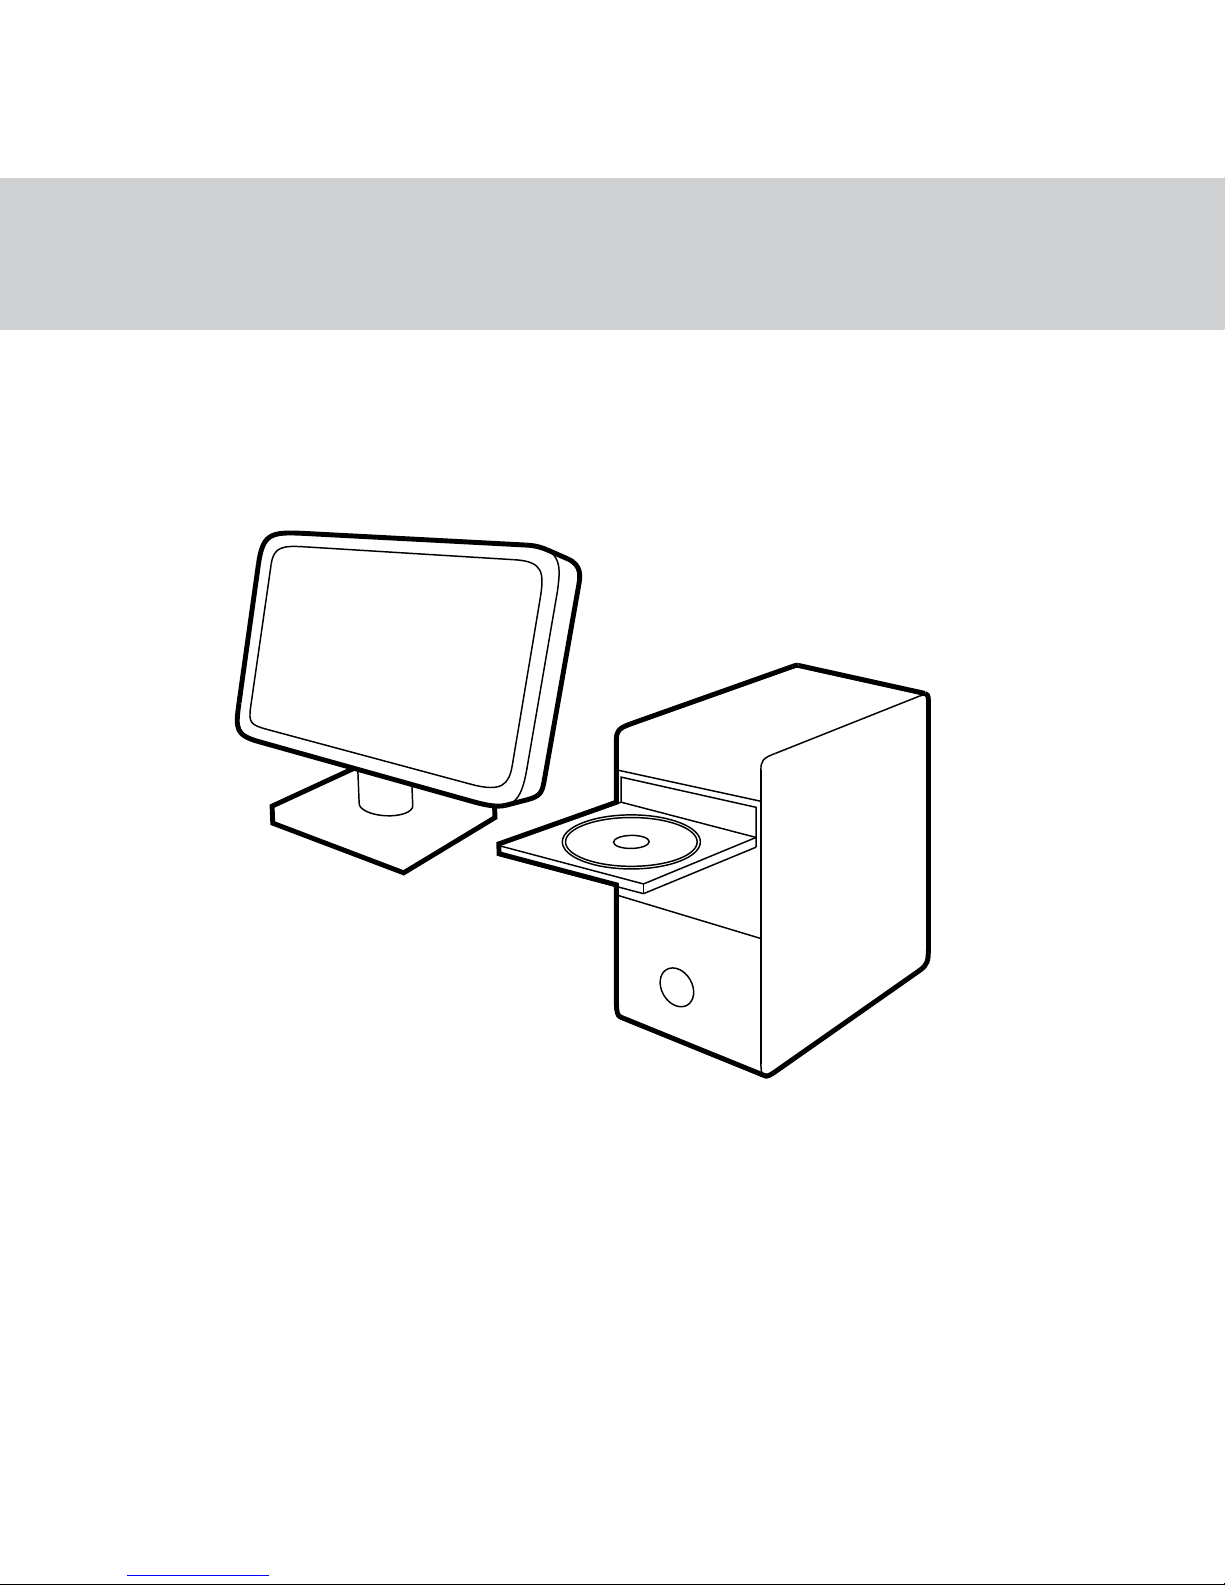
Please read these instructions before you start using your ColorMunki.
For more detailed information, please refer to contents on CD.
Install the ColorMunki application from the CD onto your PC or Macintosh
®
.
Bitte lesen Sie zuerst diese Anweisungen, ehe Sie ColorMunki benutzen.
Weitere Informationen finden Sie in der Dokumentation auf der CD.
Installieren Sie ColorMunki von der CD auf Ihren PC oder Macintosh®.
Veuillez lire attentivement ces instructions avant de commencer à utiliser votre ColorMunki.
Pour de plus amples informations, reportez-vous au contenu sur le CD.
Installez l’application ColorMunki à partir du CD sur votre PC ou votre Macintosh
®
.
Leggere attentamente queste istruzioni prima di utilizzare ColorMunki per la prima volta.
Per informazioni più dettagliate vedere il contenuto del CD.
Inserire il CD e installare l‘applicazione ColorMunki sul PC o sul Macintosh
®
.
Lea las instrucciones a continuación antes de empezar a usar su ColorMunki.
Para obtener información más detallada, consulte el contenido del CD.
Instale la aplicación ColorMunki del CD en su PC o Macintosh
®
.
ColorMunki を使用する前にこの手順書を必ずお読みください. 詳細は同梱CDをご参照ください。
CD から ColorMunki のアプリケーション を PC または Macintosh
®
にインストールします.
开始使用 ColorMunki 前,请阅读本指南。若需更多详细信息,请参阅光盘内容。
通过光盘将 ColorMunki 应用程序安装至 PC 或 Macintosh
®
。
EN
DE
FR
IT
Page 8
Installation 2 Installation 2 Installation 2 Installazione 2 Instalación 2 インストール 2 安装 2
Page 9

ES
JP
CN
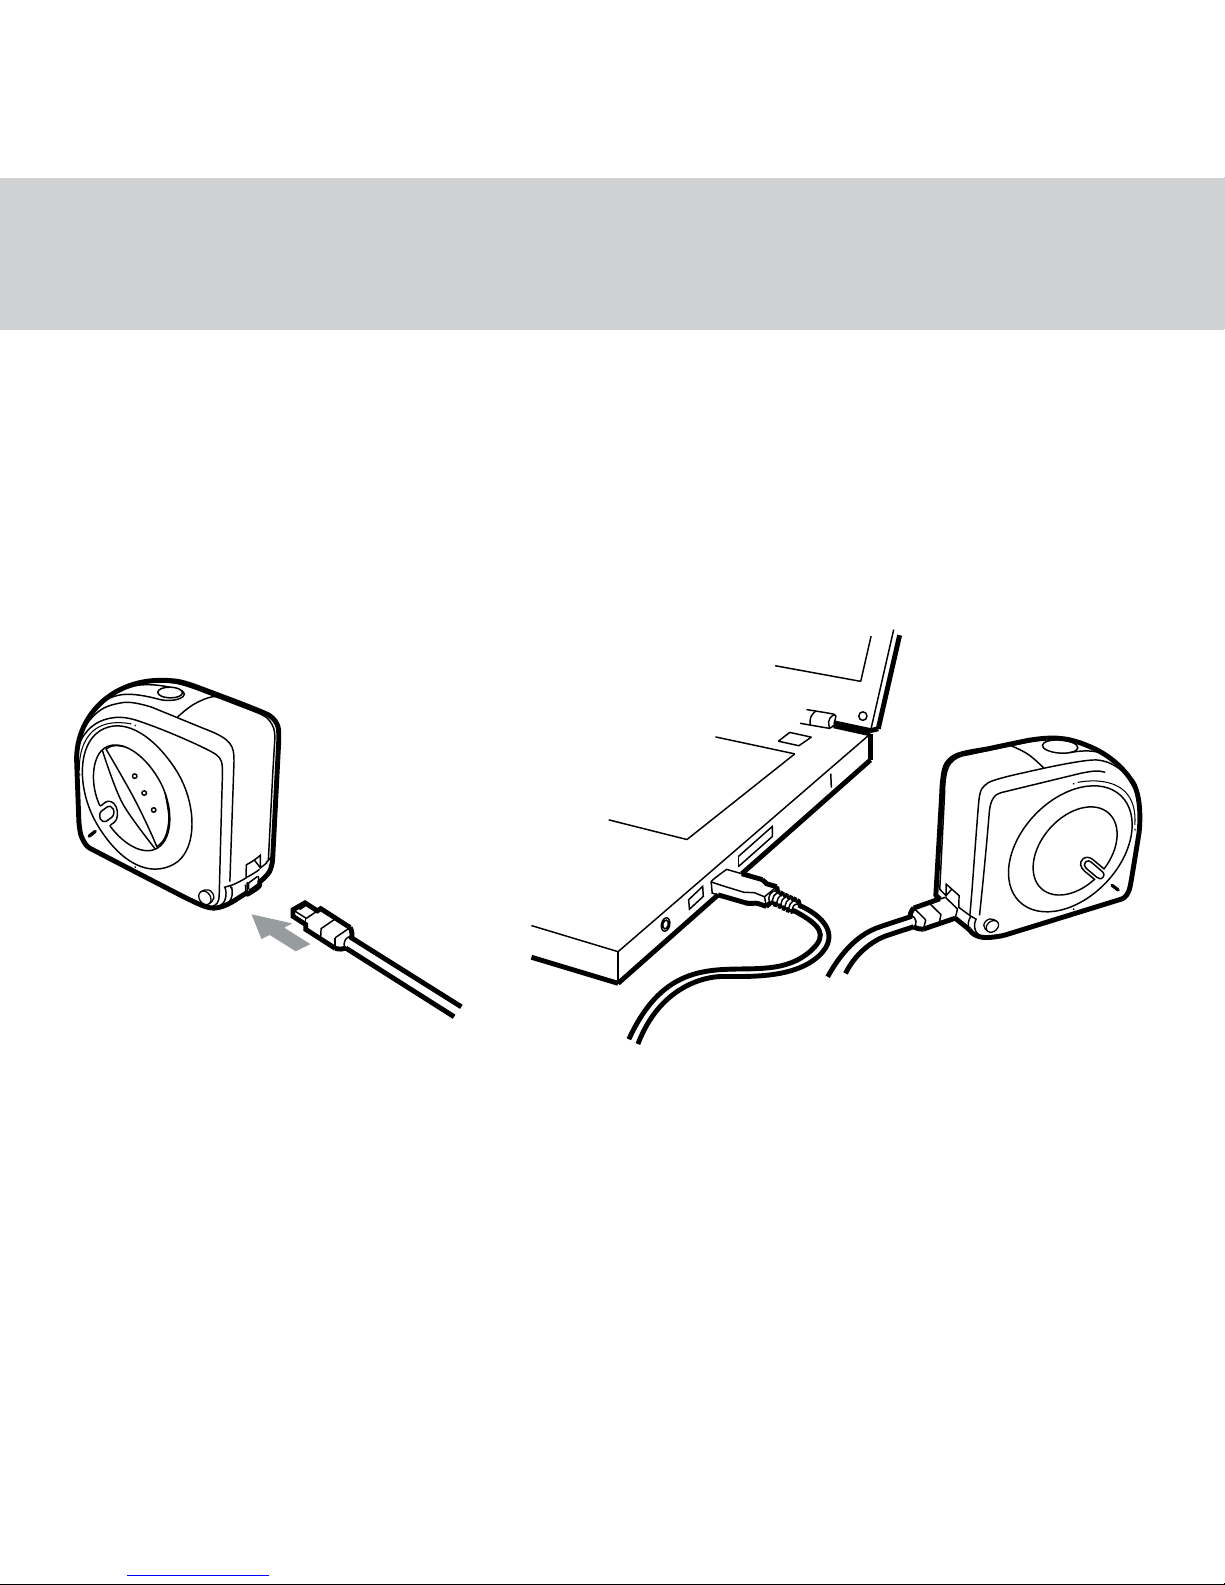
Make sure the software is installed before you attach the USB cable to the backside
of your ColorMunki and plug it into your computer.
Die Software muss installiert werden ehe das Gerät per USB-Kabel an Ihren Computer
angeschlossen werden darf.
Installez le logiciel avant de brancher le câble USB à l’arrière du ColorMunki et de le connecter à
votre ordinateur.
Il software deve essere installato prima di collegare il cavo USB al ColorMunki e al computer.
Asegúrese de que el software esté instalado antes de enchufar el cable USB en la parte trasera de su
ColorMunki y conectarlo a su computadora.
ColorMunki 後方に USB ケーブルを接続し、コンピュータに挿入する前にソフトウェアがインストール
されていることを確認してください。
请确保将 USB 电缆连接至 ColorMunki 背部并将其插入个人计算机前已安装软件。
EN
DE
FR
IT
Page 10
1
423
Overview 1 Übersicht 1 Présentation 1 Cenni generali 1 Visión general 1 概要 1 概览 1
Page 11

ES
JP
CN
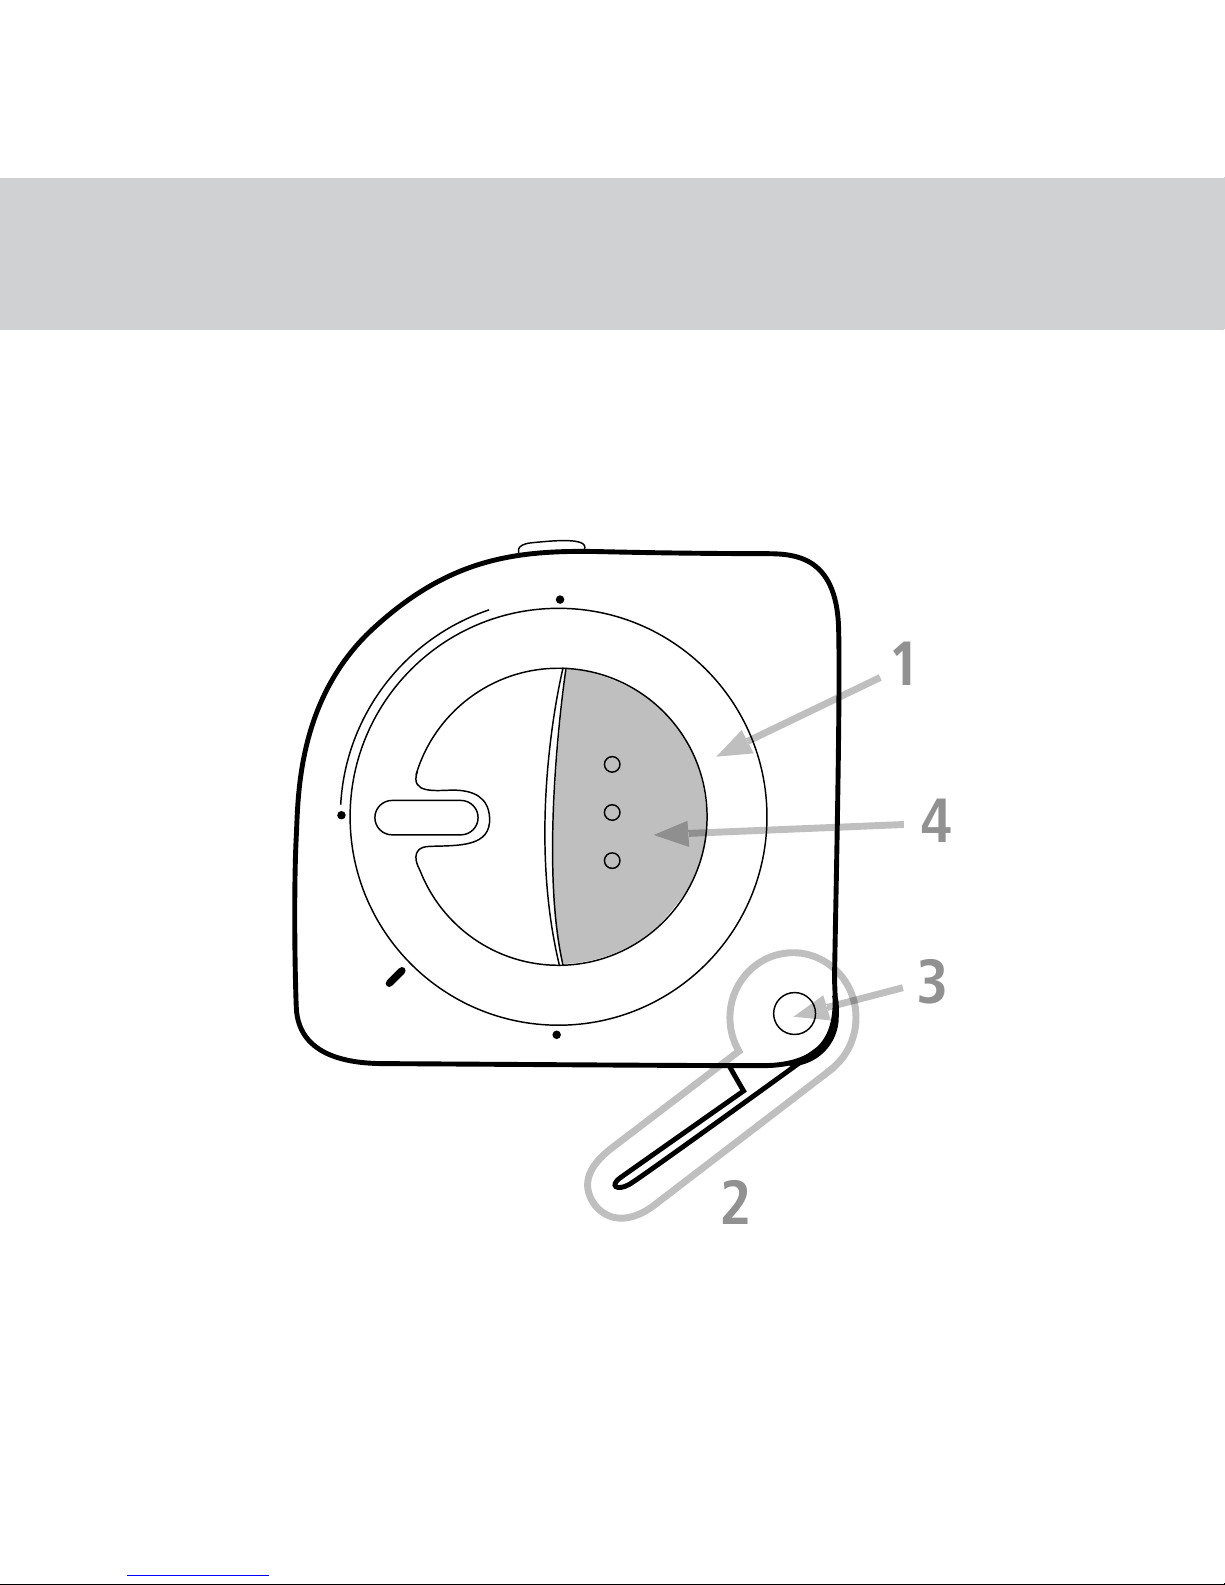
1. Rotary Disk to set measurement mode. 2. Target Flag to measure small color patches.
3. Target Lock to unlock and lock Target Flag. 4. Button to trigger measurements.
1. Wahlscheibe zur Auswahl des Messmodus 2. Zielhilfe zur Messung kleiner Felder
3. Schalter zum Sperren und Entsperren der Zielhilfe 4. Messtaste
1. Disque rotatif servant à définir le mode de mesure. 2. Guide servant à mesurer les patchs de
couleur de petite taille sur un nuancier. 3. Bouton d’ouverture/fermeture du guide. 4. Bouton servant
à prendre une mesure.
1. Selettore rotante per impostare la modalità di misurazione. 2. Indicatore target per misurare piccoli patch
di colori. 3. Blocco target per bloccare/sbloccare l‘Indicatore target. 4. Pulsante per avviare le misurazioni.
1. Disco Rotativo (para configurar el modo de medición). 2. Marca de Objetivo (para medir los parches
de color pequeños). 3. Bloque de Objetivo (para desbloquear y bloquear la Marca de Objetivo).
4. Botón para hacer mediciones.
1. 測定モードを設定するロータリーディスク 2. 小さなカラーパッチを測定するターゲット
3. ターゲットをロックおよびロック解除するターゲットロック 4. 測定開始ボタン
1. 设置测量模式的转盘。 2. 测量小色块的目标标志。
3. 解锁或锁定目标标志的目标锁。 4. 触发测量的按钮。
EN
DE
FR
IT
Page 12
Overview 2 Übersicht 2 Présentation 2 Cenni generali 2 Visión general 2 概要 2 概览 2
Page 13

ES
JP
CN
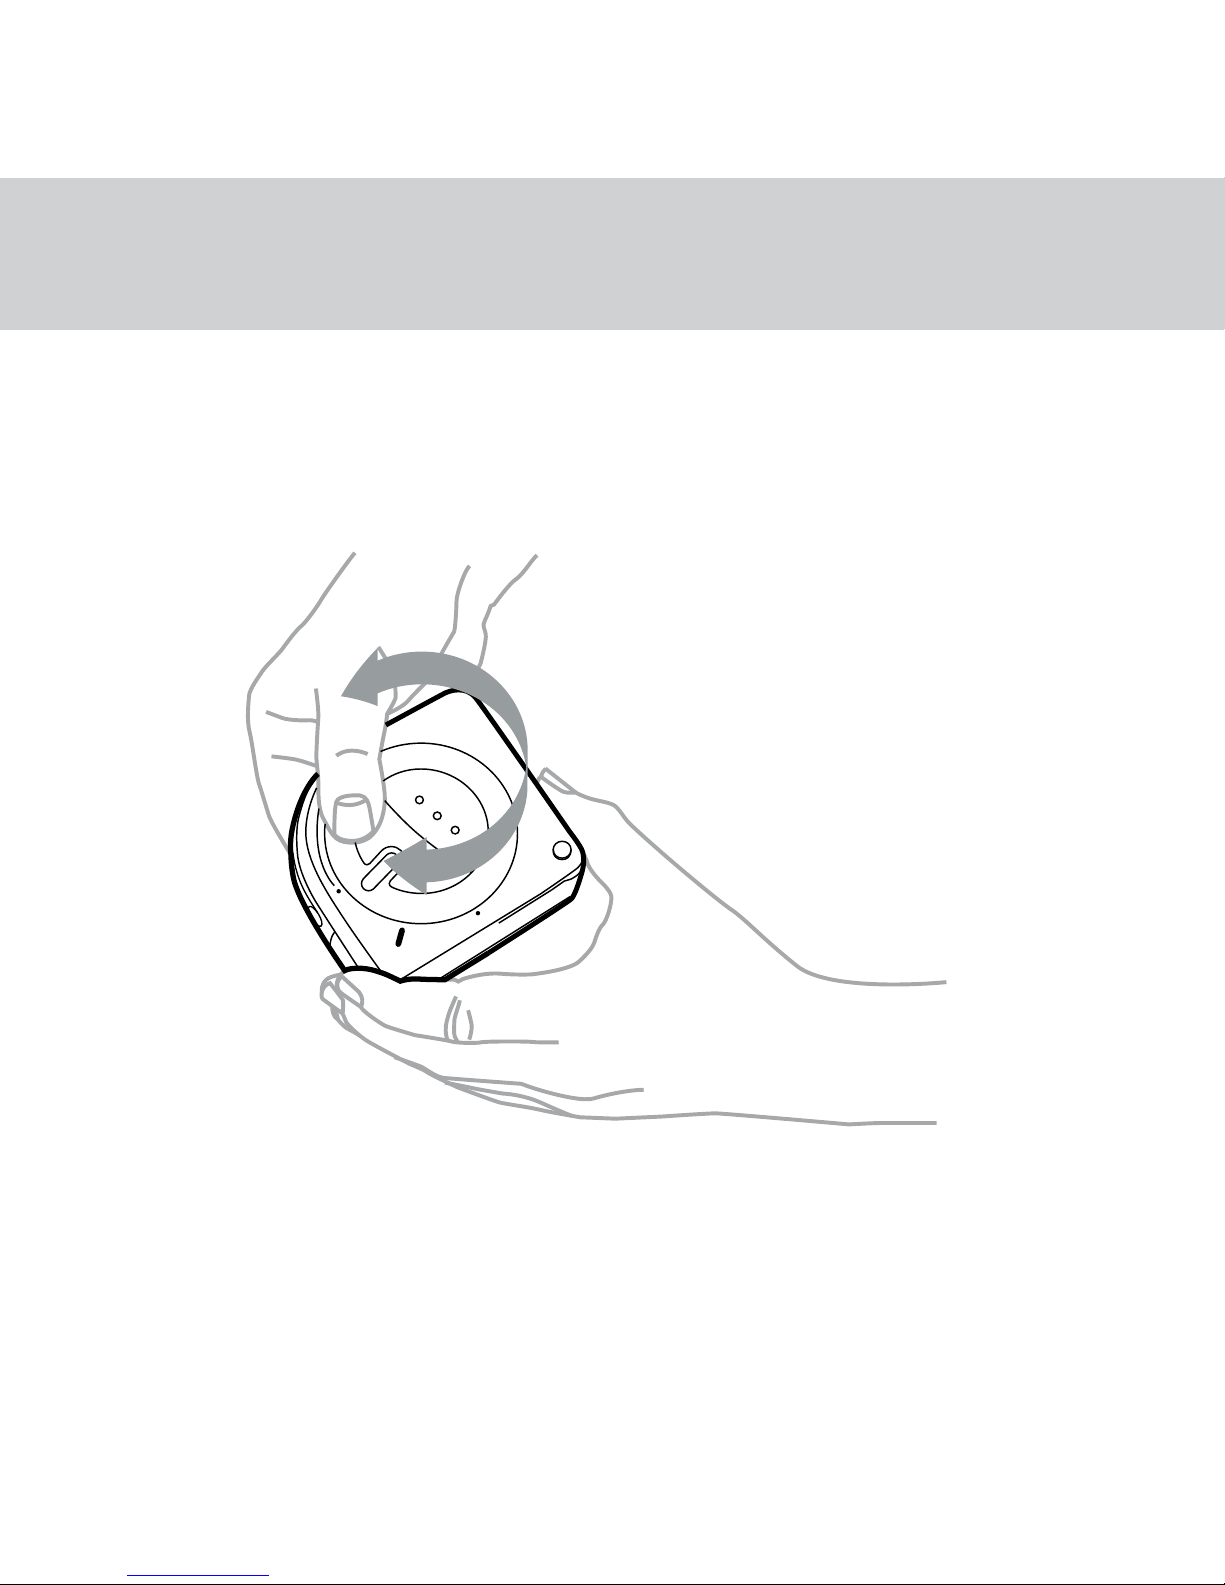
Choose the measurement mode you want to work with by easily turning the Rotary Disk.
Wählen Sie mit der Wahlscheibe den Messmodus, den Sie verwenden möchten.
Sélectionnez le mode de mesure à utiliser en faisant simplement tourner le disque rotatif.
Per scegliere la modalità di misurazione con cui lavorare è sufficiente girare il Selettore rotante.
Gire el Disco Rotativo para seleccionar el modo de medición que desea usar.
ロータリーディスクを回して使用する測定モードを選択します。
轻松旋转转盘,选择要使用的测量模式。
EN
DE
FR
IT
Page 14
A
B
C
D
Overview 3 Übersicht 3 Présentation 3 Cenni generali 3 Visión general 3 概要 3 概览 3
Page 15

ES
JP
CN
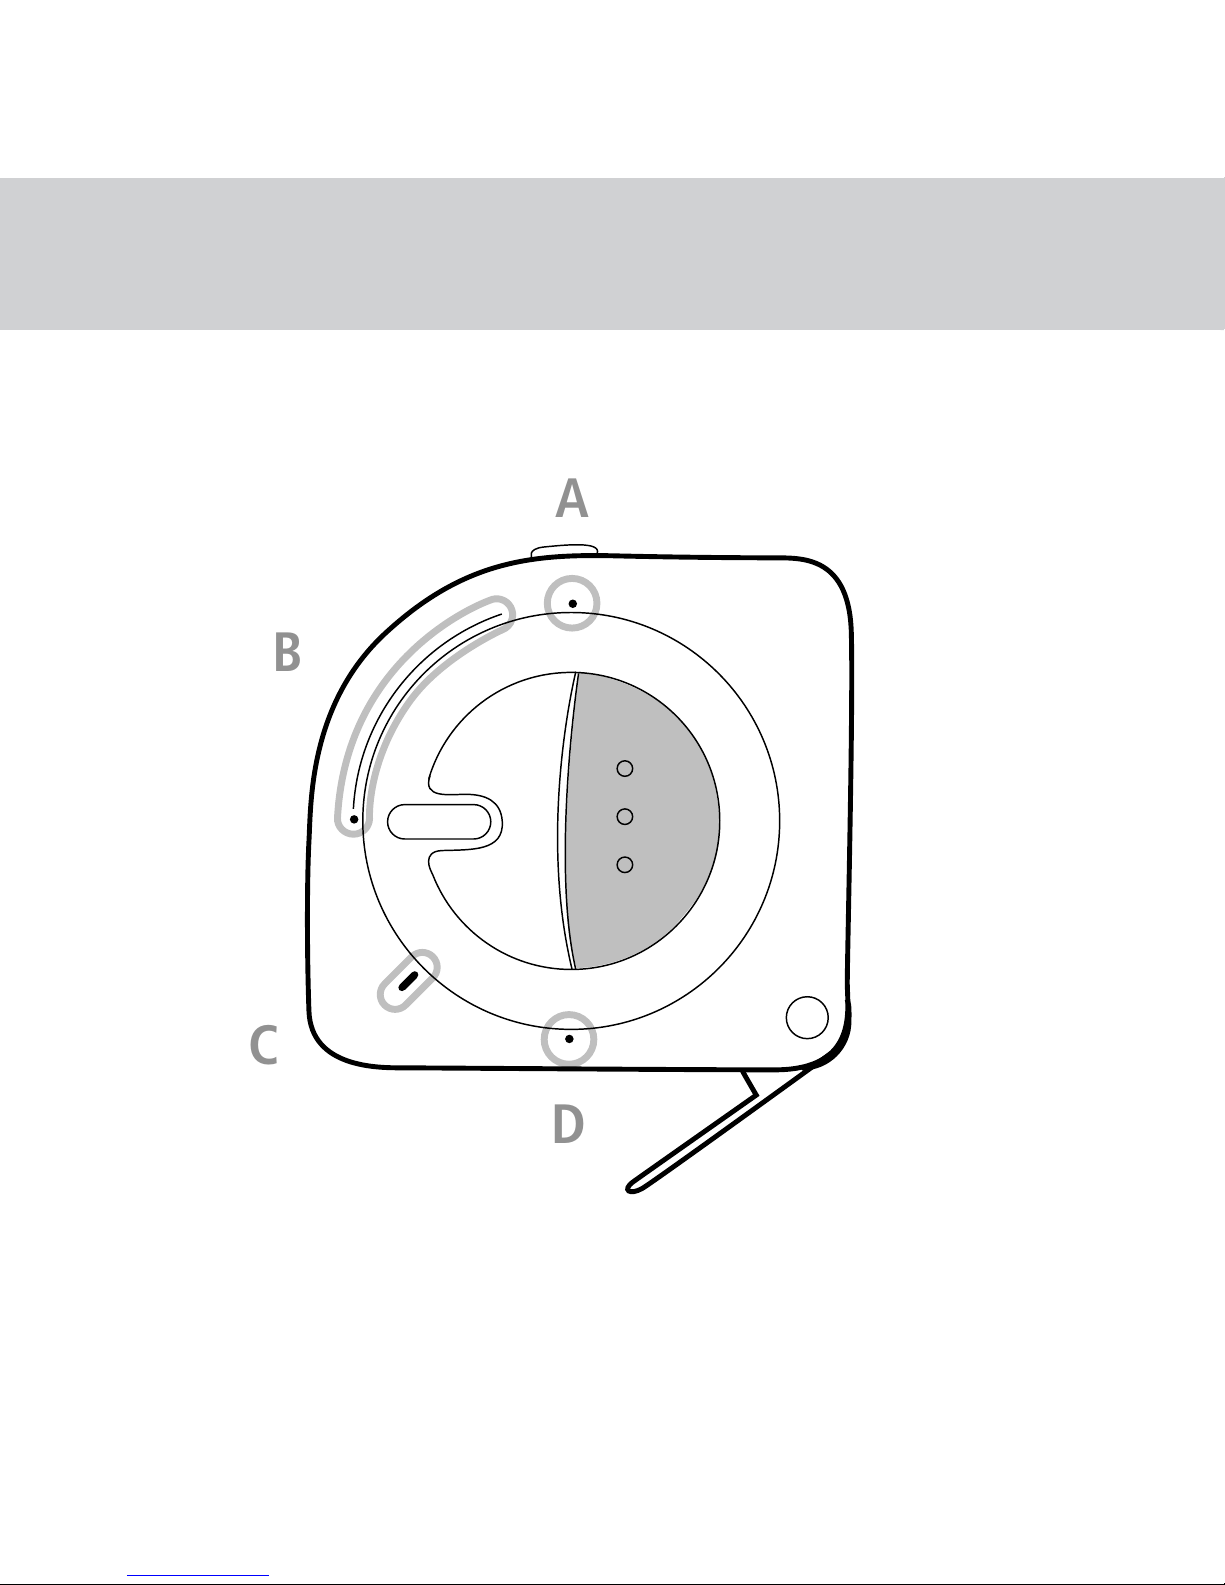
Turn Rotary Disk to access desired mode:
A. Ambient Light measurement mode. B. Projector measurement mode.
C. Instrument Calibration mode. D. Monitor, Chart Scanning & Spot measurement mode.
Drehen Sie die Wahlscheibe, um den gewünschten Modus zu wählen:
A. Messmodus Umgebungslicht B. Messmodus Projektor
C. Gerätekalibriermodus D. Messmodus Monitor, Target und Einzelmessung
Faites tourner le disque rotatif pour accéder au mode désiré :
A. Mesure de la lumière ambiante B. Mesure de projecteurs
C. Étalonnage de l’instrument D. Mesure de moniteurs, de nuanciers et mesures ponctuelles
Utilizzare il Selettore rotante per accedere alla modalità desiderata:
A. Modalità di misurazione Luce ambientale. B. Modalità di misurazione Proiettore.
C. Modalità Calibrazione Strumento. D. Modalità di misurazione Monitor, Acquisizione diagramma
e Punto campione
Gire el Disco Rotativo para tener acceso al modo de medición deseado.
A. Modo de medición Luz Ambiente. B. Modo de medición Proyector.
C. Modo de Calibración del Instrumento. D. Modo de medición Monitor, Escaneo de Gráfico y Color Especial.
ロータリーディスクを回し、使用するモードにアクセスします。
A. 環境光の測定モード B. プロジェクタの測定モード
C. 装置のキャリブレーションモード D. モニタ、チャートのスキャンおよびスポット測定モード
旋转转盘选择所需模式:
A. 周围光源测量模式。B. 放映机测量模式。
C. 仪器校准模式。D. 显示器、图表扫描和专色测量模式。
EN
DE
FR
IT
Page 16

C
Calibrate Kalibrieren Étalonnage Calibrazione Calibrar キャリブレーション 校准
Page 17

ES
JP
CN
Before you start measuring, please calibrate the device. Turn the Rotary Disk to the position C, and trigger
the measurement by pushing the Measurement Button. Allow ColorMunki a few seconds to calibrate.
Bitte kalibrieren sie zuerst Ihr Gerät, ehe Sie anfangen zu messen. Drehen Sie die Wahlscheibe auf Position C.
Drücken Sie die Messtaste, um eine Messung durchzuführen. ColorMunki führt eine Kalibrierung durch.
Avant de commencer à prendre des mesures, vous devez étalonner votre instrument. Faites tourner le disque
rotatif jusqu’à la position C et prenez une mesure en appuyant sur le bouton. L’étalonnage de ColorMunki
nécessite quelques secondes.
Prima di iniziare la misurazione è necessario calibrare lo strumento. Girare il Selettore rotante nella posizione
C e avviare la misurazione premendo il pulsante di misurazione. Attendere qualche secondo che la procedura
di calibrazione del ColorMunki termini.
Antes de comenzar, debe calibrar el dispositivo. Gire el Disco Rotativo a la posición C y pulse el botón
Medición. Puede tardar unos segundos hasta que ColorMunki complete la calibración.
測定を開始する前に、装置のキャリブレーションを実行してください。 ロータリーディスクを C の位
置に回し、測定ボタンを押して測定を開始します。ColorMunki のキャリブレーションには2、3秒かか
ります。
开始测量前,请校准设备。将转盘转至 C 处,按“测量”按钮
触发测量。ColorMunki 将进行几秒钟的校准。
EN
DE
FR
IT
Page 18

D
Spot measurement 1 Einzelmessung 1 Mesure ponctuelle 1 Misurazione punto campione 1 Medición de color especial 1 スポット測定 1 专色测量 1
Page 19

ES
JP
CN
Measure the color of a single patch. Choose the measurement mode D. Unlock the Target Flag
by pressing the Lock Button.
Messen Sie die Farbe eines einzelnen Messfeldes. Wählen Sie den Messmodus D. Drücken Sie den Schalter,
um die Zielhilfe zu entsperren.
Mesurez la couleur d’un patch unique. Sélectionnez le mode de mesure D. Sortez le guide en appuyant sur
le bouton d’ouverture/fermeture.
Misurare il colore di un patch singolo. Scegliere la modalità di misurazione D. Sbloccare l‘Indicatore target
premendo il pulsante di blocco.
Mida el color de un parche individual. Elija el modo de medición D. Pulse el botón Bloque para desbloquear
la Marca de Objetivo.
単独パッチの測定。 測定モード「D」を選択します。 ロックボタンを押してターゲットをロック解除
します。
测量单个色块的色彩。选择测量模式 D。按“锁”按钮解锁目标标志。
EN
DE
FR
IT
Page 20

Spot measurement 2 Einzelmessung 2 Mesure ponctuelle 2 Misurazione punto campione 2 Medición de color especial 2 スポット測定 2 专色测量 2
Page 21

ES
JP
CN
The unlocked Target Flag helps you to precisely position ColorMunki over color patch.
Lower ColorMunki to the patch, and trigger the measurement with pressing the Button.
Mit der Zielhilfe können Sie so ColorMunki genau über einem Messfeld ausrichten.
Drücken Sie ColorMunki an, und lösen Sie die Messung mit der Messtaste aus.
Une fois sorti, le guide vous permet de positionner avec précision le ColorMunki sur le patch de couleur à
mesurer. Abaissez le ColorMunki sur le patch, puis prenez une mesure en appuyant sur le bouton.
L‘indicatore target sbloccato consente di posizionare con precisione il ColorMunki sul patch di colore.
Abbassare il ColorMunki sul patch e avviare l‘operazione premendo il pulsante di misurazione.
La Marca de Objetivo desbloqueada es para ayudarle a posicionar el instrumento ColorMunki correctamente
sobre el parche de color. Baje el instrumento ColorMunki sobre el parche y pulse el Botón para hacer la
medición.
ロック解除されたターゲットは、ColorMunki をカラーパッチ上に正確に設定する際に便利です。
ColorMunki をパッチ上にセットし、装置を押し下げてから、ボタンを押して測定を開始します。
已解锁的目标标志可帮助您将 ColorMunki 准确放置于色块上。
将 ColorMunki 向色块处降低,按按钮触发测量。
EN
DE
FR
IT
Page 22

Spot measurement 3 Einzelmessung 3 Mesure ponctuelle 3 Misurazione punto campione 3 Medición de color especial 3 スポット測定 3 专色测量 3
Page 23

ES
JP
CN
Lock Target Flag after spot measurement by pushing the Target Lock button in the opposite direction.
Sperren Sie die Zielhilfe nach der Einzelmessung wieder, indem Sie den Schalter wieder in die
Sperrposition schieben.
Rentrez le guide une fois la mesure ponctuelle terminée en appuyant sur le bouton
d’ouverture/fermeture dans le sens inverse.
Dopo aver eseguito la misurazione, bloccare l‘Indicatore target premendo il pulsante di Blocco
target nella direzione opposta.
Pulse el botón Bloque en dirección opuesta para bloquear la Marca de Objetivo después de medir
el color especial.
スポット測定後は、ターゲットロックのボタンを反対方向に押してターゲットをロックしてください。
专色测量完成后,反方向按下“目标锁”按钮锁定目标标志。
EN
DE
FR
IT
Page 24

Scan measurement 1 Scan 1 Mesure de nuancier 1 Misurazione di acquisizione 1 Medición de escaneo 1 スキャン測定 1 扫描测量 1
Page 25

Follow these steps for successful scanning of patches on color chart:
1. Make sure Target Flag is locked while scanning. 2. Start by placing the device on the test chart. Make
sure the measurement aperture (indicated through indicator lamp ) is positioned on white area of the paper
at the beginning of the row. 3. Press the Button. 4. Start scan by gliding along row using gentle pressure.
5. Release the Button at the end of the measured row in white area.
So scannen Sie die Messfelder erfolgreich auf einem Farbtarget:
1. Drücken Sie den Schalter, um die Zielhilfe zu entsperren. 2. Positionieren Sie das Gerät auf dem Target.
Achten Sie darauf, dass die Messöffnung (gekennzeichnet durch den optischen Anzeiger) vor der Reihe über
dem Papierweiß platziert ist. 3. Drücken Sie die Taste. 4. Scannen Sie die Reihe, indem Sie das Gerät mit
leichtem Druck entlang der Reihe schieben. 5. Lassen Sie die Messtaste über dem Papierweiß am Ende der
Reihe wieder los.
Procédez comme suit pour mesurer les patchs d’un nuancier :
1. Assurez-vous que le guide est rentré pendant la mesure. 2. Commencez par placer l’instrument sur le
nuancier. Veillez à ce que l’ouverture de mesure de l’instrument (indiquée par le voyant) se trouve sur la
partie blanche du papier au début de la rangée. 3. Appuyez sur le bouton. 4. Commencez la mesure du
nuancier en faisant glisser l’instrument sur la rangée de patchs tout en exerçant une légère pression sur
l’instrument. 5. Relâchez le bouton à la fin de la rangée lorsque l’instrument se trouve dans la partie
blanche du papier.
La procedura seguente spiega come ottenere un‘acquisizione ottimale di patch su un diagramma di colori:
1. Durante l‘acquisizione verificare che l‘Indicatore target sia bloccato. 2. Iniziare col posizionare lo
strumento sul diagramma di test. Assicurarsi che l‘apertura di misurazione (indicata dalla spia indicatrice) sia
posizionata sull‘area bianca del foglio, all‘inizio della riga. 3. Premere il pulsante di misurazione. 4. Iniziare
l‘acquisizione scorrendo lo strumento sulla riga con una leggera pressione. 5. Rilasciare il pulsante alla fine
della riga misurata, nell‘area bianca.
EN
DE
FR
IT
Page 26

Scan measurement 1 Scan 1 Mesure de nuancier 1 Misurazione di acquisizione 1 Medición de escaneo 1 スキャン測定 1 扫描测量 1
Page 27

ES
JP
CN
Siga estos pasos para escanear correctamente los parches en un gráfico de colores:
1. Asegúrese de que la Marca de Objetivo esté bloqueada durante el escaneo. 2. Empiece posicionando el
dispositivo sobre el gráfico de prueba. Asegúrese de que la abertura de medición (que se indica por medio de
la lámpara indicadora) esté posicionada sobre el área blanca del papel al inicio de la fila. 3. Pulse el Botón.
4. Empiece el escaneo deslizándose a lo largo de la fila usando una presión suave. 5. Suelte el Botón al final
de la fila medida en el área blanca.
カラーチャートのパッチ測定を正しく行うため次の手順に従ってください。
1. 測定中にターゲットがロックされていることを確認してください。 2. テストチャートに装置を設置
してください。 測定アパーチャー(インジケータランプで表示)がパッチ列の先頭部にある用紙白色エ
リアにセットされていることを確認してください。 3. ボタンを押します。 4. 圧力を少々かけて移動さ
せながら、列を測定します。 5. パッチ列の終端部の用紙白色エリアでボタンを離します。
遵循以下步骤,成功扫描色彩图表上的色块:
1. 确保扫描时目标标志已锁定。2. 将设备置于测试图表上开始测量。确保测量孔(由指示灯指示)置于
扫描行起始端纸张的白色区域。3. 按按钮。4. 轻按并沿行滑动,开始扫描。 5. 到达白色区域内的测量行
末端时释放按钮。
Page 28

Monitor measurement 1 Monitormessung 1 Mesure de moniteur 1 Misurazione del monitor 1 Medición del monitor 1 モニタ測定 1 显示器测量 1
Page 29

ES
JP
CN
The bag allows you to fix ColorMunki to your monitor.
It also protects ColorMunki and serves as transport bag.
Das Gerät wird mit der Schutztasche an Ihrem Monitor befestigt.
Die Tasche wird zusätzlich zum Schutz und Transport des Geräts verwendet.
Le sac fourni vous permet de fixer le ColorMunki à un moniteur.
Il protège également l’appareil et sert de sac de transport.
La custodia consente di fissare il ColorMunki sul monitor.
Essa inoltre serve da protezione e da custodia per trasportarlo.
La bolsa le permite fijar el dispositivo ColorMunki en su monitor.
También protege ColorMunki y sirve como bolsa de transporte.
付属ホルダーを使用して ColorMunki をモニタに固定させます。
またこのホルダーは ColorMunki を持ち運ぶ際に保存バッグとして使用します。
保护袋可让您将 ColorMunki 固定至显示器。
它还可保护 ColorMunki 并用作运输袋。
EN
DE
FR
IT
Page 30

Monitor measurement 2 Monitormessung 2 Mesure de moniteur 2 Misurazione del monitor 2 Medición del monitor 2 モニタ測定 2 显示器测量 2
Page 31

ES
JP
CN
Open the zipper of the bag and insert ColorMunki. Be sure to insert correctly, matching shape of
bag to shape of device.
Öffnen Sie den Reißverschluss der Tasche, und stecken Sie ColorMunki in die Tasche. Achten Sie darauf,
dass Sie das Gerät richtig herum in die Tasche stecken. Die Tasche passt formgenau.
Ouvrez la fermeture à glissière du sac et placez le ColorMunki à l’intérieur en vous assurant de faire
correspondre la forme du sac à celle de l’appareil.
Aprire la cerniera della custodia e inserirvi il ColorMunki. Fare attenzione a inserirlo correttamente,
facendo corrispondere la forma della custodia a quella dello strumento.
Abra la cremallera de la bolsa e inserte ColorMunki. Asegúrese de insertarlo correctamente, igualando
la forma de la bolsa a la forma del dispositivo.
ホルダーのチャックを開き ColorMunki を挿入します。 ホルダーと装置の形状が一致するように正しく
挿入してください。
打开保护袋拉链并插入 ColorMunki。请确保准确插入,使袋的形状与仪器形状吻合。
EN
DE
FR
IT
Page 32

5
!
Monitor measurement 3 Monitormessung 3 Mesure de moniteur 3 Misurazione del monitor 3 Medición del monitor 3 モニタ測定 3 显示器测量 3
Page 33

ES
JP
CN
Connect ColorMunki with the USB cable. Close the zipper of the bag.
Before you start the screen calibration, please make sure you have opened the closure at the bottom
of the bag.
Schließen Sie ColorMunki mit dem USB-Kabel an. Schließen Sie den Reißverschluss der Tasche.
Prüfen Sie, ob die Öffnung unten an der Tasche geöffnet ist, ehe Sie versuchen, Ihren Monitor zu kalibrieren.
Connectez le ColorMunki à l’aide du câble USB. Fermez la fermeture à glissière du sac.
Avant d’étalonner l’écran, vérifiez que vous avez bien ouvert le volet au-dessous du sac.
Collegare il ColorMunki con il cavo USB. Chiudere la cerniera della custodia.
Prima di iniziare la calibrazione dello schermo, assicurarsi di aver aperto la chiusura sotto alla custodia.
Conecte ColorMunki con el cable USB. Cierre la cremallera de la bolsa.
Antes de empezar la calibración de la pantalla, asegúrese de abrir el cierre en la parte inferior de la bolsa.
ColorMunki を USB ケーブルで接続します。 ホルダーのチャックを閉じます。
モニタのキャリブレーションを実行する前に、必ずホルダー底のファスナーを開けてください。
使用 USB 电缆连接 ColorMunki。拉上保护袋拉链。
开始屏幕校准前,请确保已打开保护袋底部的盖板。
EN
DE
FR
IT
Page 34

Monitor measurement 4 Monitormessung 4 Mesure de moniteur 4 Misurazione del monitor 4 Medición del monitor 4 モニタ測定 4 显示器测量 4
Page 35

ES
JP
CN
Use the Velcro patches on the strap of the Bag to best accommodate your screen model.
Smaller screens may require strap to be folded.
Verwenden Sie den Klettverschluss an der Taschenschlaufe, um das Gerät an Ihrem Monitor zu befestigen.
Für kleinere Bildschirme muss die Schlaufe eventuell umgeschlagen werden.
Utilisez les bandes velcro situées sur la sangle du sac pour régler la sangle en fonction de la taille de votre
écran. Pour les écrans de petite taille, il peut être nécessaire de replier la sangle.
Utilizzare le toppe in Velcro sulla cinghia della custodia per adattarla allo schermo.
Per gli schermi più piccoli può essere necessario ripiegare la cinghia
Use los parches de Velcro en la correa de la Bolsa para mejor encajar el modelo de la pantalla.
Quizá se necesite plegar las correas en el caso de pantallas más pequeñas.
モニタのサイズに合わせて、ホルダーのひものマジックテープを調整します。
小さめのモニタにはひもを折り重ねる必要があります。
使用保护袋腕带上的自粘搭扣,最大限度地适应您的屏幕模式。
对于较小的屏幕可能需要将腕带折叠。
EN
DE
FR
IT
Page 36

Monitor measurement 5 Monitormessung 5 Mesure de moniteur 5 Misurazione del monitor 5 Medición del monitor 5 モニタ測定 5 显示器测量 5
Page 37

ES
JP
CN
Fix ColorMunki in the middle of your display and start calibration by triggering from the software application.
Befestigen Sie ColorMunki in der Mitte Ihres Monitors, und starten Sie die Kalibrierung aus Ihrer
Software heraus.
Fixez le ColorMunki au centre de votre écran et démarrez la procédure d’étalonnage depuis l’application.
Fissare il ColorMunki nel mezzo dello schermo e avviare la calibrazione operando dall‘applicazione software.
Fije ColorMunki sobre el medio de la pantalla y empiece la calibración activándola en la aplicación
del software.
ColorMunki をモニタ中央にセットし、ソフトウェア内の機能からキャリブレーションを開始します。
将 ColorMunki 固定于显示屏中央,触发软件应用程序开始校准。
EN
DE
FR
IT
Page 38

Projector measurement Projektormessung Mesure de projecteur Misurazione Proiettore Medición del proyector プロジェクタの測定 放映机测量
Page 39

ES
JP
CN
Please follow the application which guides you to properly aim ColorMunki towards the middle of the
projected image. Set room lighting to intended viewing environment, minimizing external light. For best
results, ColorMunki should be placed the width of the projected image away from the screen.
Bitte folgen Sie den Anweisungen in der Software, die die Ausrichtung des Geräts auf die Projektion
ausführlich beschreiben. Ändern Sie die Lichtverhältnisse, so dass diese der geplanten Raumbeleuchtung
beim Betrieb des Projektors entsprechen. Die Entfernung von ColorMunki zum projizierten Bild sollte in
etwa der Breite des Bildes entsprechen.
Suivez les instructions fournies par l’application pour positionner correctement le ColorMunki vers le
centre de l’image projetée. Réglez l’éclairage de la pièce selon l’environnement de visionnement voulu
en minimisant la lumière externe. Pour obtenir de meilleurs résultats, il est recommandé de placer le
ColorMunki à une distance de l’écran égale à la largeur de l’image projetée.
Attenersi alle istruzioni dell‘applicazione che guida l‘utente nel muovere correttamente il ColorMunki
verso il centro dell‘immagine proiettata. Usare la stessa illuminazione che si intende utilizzare nella visione
delle immagini proiettate, riducendo al minimo qualsiasi luce esterna. Per ottenere il risultato migliore è
consigliabile posizionare il ColorMunki di traverso all‘immagine proiettata, lontano dallo schermo.
Siga la aplicación que lo guía a apuntar correctamente ColorMunki hacia el medio de la imagen proyectada.
Configure la iluminación para el ambiente de visualización deseado minimizando la luz externa. Para obtener
mejores resultados, la distancia de ColorMunki de la pantalla debe ser igual al ancho de la imagen proyectada.
プロジェクタ画像の中央に ColorMunki を正しくターゲットするために、アプリケーションの手順に沿
ってください。 外部の照明を最小限度に抑えながら、室内照明を目的の観察環境に合わせます。 最良
の結果を得るには、ColorMunki を映し出された画像の幅と同じ距離だけ画面から離して設置してくだ
さい。
请遵循应用程序,它会引导您将 ColorMunki 准确置于放映图像的中央。为准备使用的查看环境设置室内
照明,将外部光线降至最低。为获得最佳效果,ColorMunki 应按照所放映图像距离屏幕的宽度放置。
EN
DE
FR
IT
Page 40

A
Ambient light measurement Umgebungslichtmessung Mesure de la lumière ambiante Misurazione Luce ambientale Medición de la luz ambiente 環境光の測定 周围光源测量
Page 41

ES
JP
CN
To measure the ambient light, turn the Rotary Disk to the Ambient Light mode position A. Trigger the
measurement by pushing the Button (indicated by arrow) or through the software application.
Drehen Sie die Wahlscheibe auf Position A, um das Umgebungslicht zu messen. Drücken Sie die Messtaste, um
eine Messung durchzuführen, oder lösen Sie die Messung durch die Software aus.
Pour mesurer la lumière ambiante, faites tourner le disque rotatif jusqu’à la position A. Prenez une mesure en
appuyant sur le bouton (indiqué par une flèche) ou depuis l’application.
Per misurare la luce ambientale, girare il Selettore rotante nella modalità Luce ambientale.
A. Avviare la misurazione premendo il pulsante (indicato dalla freccia) oppure tramite l‘applicazione software.
Para medir la luz ambiente, gire el Disco Rotativo para la posición A (modo Luz Ambiente). Pulse el Botón
(indicado por la flecha) o utilice la aplicación del software para hacer la medición.
環境光を測定するにはロータリーディスクを環境光モードの「A」位置まで回します。 ボタン(矢印で
表示)を押して、あるいはソフトウェア内の機能を実行して測定を開始します。
若要测量周围光源,请将转盘旋至周围光源模式 A 处。按按钮(标有箭头)
或通过软件应用程序触发测量。
EN
DE
FR
IT
Page 42

Page 43

Minimum System Requirements PC / Macintosh
Windows: PC with 300 MHz,128 MB RAM, USB port, Windows 2000, Windows XP
Macintosh: Power Mac G3 with 300 MHz,128 MB RAM, USB port, Mac OS X (10.3 or higher)
The ColorMunki will not work if it is connected to the USB port on your keyboard or to a USB-Hub without
external power supply. Power rating: 5VDC, 500mA.
Warranty Registration
To receive technical support, obtain warranty service, and get the latest software updates and product news, you
need to register your new ColorMunki: www.xrite.com
System Requirements
EN
Page 44

Warranty Conditions
ColorMunki Warranty Conditions
X-Rite warrants this product against defects in material and workmanship for a period of twelve (12) months from the
date of sale, unless different local regulations apply. During the warranty period, X-Rite will either replace or repair at its
discretion defective parts free of charge.
This warranty shall not apply to any goods supplied hereunder which after shipment are damaged, altered in any respect,
or subjected to negligent treatment. X-Rite`s sole and exclusive obligation for breach of the above warranties shall be
the repair or replacement of any part, without charge, which within the warranty period is proven to X-Rite`s reasonable
satisfaction to have been defective. Repairs or replacement by X-Rite shall not revive an otherwise expired warranty,
nor shall the same extend the duration of a warranty. X-Rite shall in no event be liable for losses or costs to Buyer in
manufacturing, or for Buyer`s overhead, other expenses, lost profits, goodwill, or any other special, indirect, consequential, incidental or other damages to people or property resulting from a breach of any of the foregoing warranties. There
are no other warranties, either express or implied, which extend beyond the warranties set forth herein. The express
warranties contained herein are in lieu of all other warranties, express or implied, including, but not limited warranty or
merchantability and fitness for a particular purpose or application. No representations, conversations or statements not
expressly set forth herein shall be binding upon X-Rite as a warranty, guarantee or any other form of assurance. To obtain
warranty service, you must take the product, or deliver the product freight prepaid, in either its original packaging or
packaging affording an equal degree of protection, to an authorized X-Rite service center. Proof of purchase in the form
of a bill of sale or receipted invoice which is evidence that the unit is within the Warranty period must be presented to
obtain warranty service.
Page 45

Diagnostic Software
Use the Diagnostic Software if you believe that ColorMunki does not work anymore or does not work correctly.
In this case please perform the following steps:
– Install the Diagnostic Software from the Software CD.
– Perform the functionality check by following the Diagnostic Software.
– If Diagnostic reports an error, store the test report and contact your nearest X-Rite Support Center for further
investigations. You can also contact X-Rite Support from www.XRITE.com
Service
Do not try to dismantle the ColorMunki for any reason. Unauthorized dismantling of the equipment will void all
warranty claims. Contact the X-Rite support or the nearest X-Rite Service Center, if you believe that the unit does not
work anymore or does not work correctly.
Service Center
Visit www.XRITE.com to locate the nearest X-Rite Service Center or contact your X-Rite dealer for more information.
EN
Support & Service
Page 46

Page 47

有毒有害物质或元素名称及其标识 Toxic/Hazardous Substances and Elements Table
CN
○: 表示该有毒有害物质在该部件所有均质材料中的含量均在SJ/T11363-2006规定的限量要求以下。
○: Indicates that the content of the toxic and hazardous substance in all the homogenous material
of the part is below the concentration limit requirement as described in SJ/T 11363-2006.
X: 表示该有毒有害物质至少在该部件的某一均质材料中的含量超出SJ/T11363-2006规定的限量要求。
X: Indicates that the content of the toxic and hazardous substance in at least one homogenous material
of the part exceeds the concentration limit requirement as described in SJ/T 11363-2006.
部件名称 有毒有害物质或元素
铅(Pb) 汞(Hg) 镉(Cd) 六价 (Cr(VI)) 多溴联苯(PBB) 多溴二苯 (PBDE)
印刷电路板
PCB Board
○ ○ ○ ○ ○ ○
主动电子件
Active electrical
part
X ○ ○ ○ ○ ○
被动电子件
Passive electrical
part
X ○ ○ ○ ○ ○
焊接金属
Solder metal
○ ○ ○ ○ ○ ○
连接器,线材
Connector, cable
○ ○ ○ ○ ○ ○
结构件及附件
Mechanical part
and accessory
X ○ ○ ○ ○ ○
包装材
Packaging
material
○ ○ ○ ○ ○ ○
Page 48

Corporate Headquarters 4300 44th Street SE, Grand Rapids, Michigan 49512
Phone 1 800 248 9748 or 1 616 803 2100
Fax 1 800 292 4437 or 1 616 803 2705
Corporate Headquarters Althardstrasse 70, 8105 Regensdorf, Switzerland
Europe Phone (+41) 44 842 24 00, Fax (+41) 44 842 22 22
Corporate Headquarters Room 808-810, Kornhill Metro Tower, 1 Kornhill Road, Quarry Bay, Hong Kong, China
Asia Phone (+852) 2 568 6283, Fax (+852) 2 885 8610
Please visit www.xrite.com for a local office near you.
TM Trademark of X-Rite. Part No. 42.13.94 (01/2008)
 Loading...