

Page 1
Page 2

2
CONTENTS
Safety first 3
Parts and equipment 5
Installation 8
Starting the engine 9
Operating the engine 12
Engine break-in 13
Carburetor adjustment – overview 14
Carburetor adjustment – before putting the car on the track 16
Carburetor adjustment – at the track 18
Fine-tuning the carburetor 19
Engine troubleshooting 19
Engine care 21
Warranty 22
Servicing the engine 23
NT18 Engine parts 24
Congratulations on your purchase of the high-performance NT18 0.8cc nitro-powered engine.
Developed for highest performance and excellent reliability, this engine represents the perfect combination of manufacturing
quality and race-winning experience.
The XRAY NT18 0.8cc engine has the following features:
• uses standard model car fuel
• standard glowplug design
• durable construction
• adjustable, dual-needle, slide carburetor (aluminum)
• large, blue-anodized billet aluminum heatsink cooling head
Internal combustion (or "nitro-powered") engines require some basic knowledge and understanding, as well as important
safety considerations.
Page 3

3
CONTENTS
!! READ & UNDERSTAND BEFORE OPERATING THE ENGINE !!
!! READ & UNDERSTAND BEFORE OPERATING THE ENGINE !!
SAFETY FIRST
This engine is NOT A TOY, it is a precision-manufactured machine. This machine can injure to you or other nearby, and can
also damage property. It is very important to pay attention as indicated in this manual. Improper use of the machine can be
very dangerous.
You alone are responsible for operating your engine safely; act with discretion and pay special attention at all times.
• Carefully read and fully understand all of the safety instructions and engine operation instructions before you operate
your engine.
• Keep these manuals in a place so you know where they are at all times.
• Follow the instructions carefully.
The information in this manual will help to prevent injuries to users and other as well as protecting objects from damage.
Page 4
4
Example of graphic indications:
Warning or caution
The illustration indicates the contents of the warning or cautions.
This graphic means be careful of high temperatures.
Actions are prohibited
The actions prohibited are indicated in or near the illustration.
This graphic means do not touch.
Compels or instructs
certain actions
You must follow the instruction carefully.
This graphic means "compulsory."
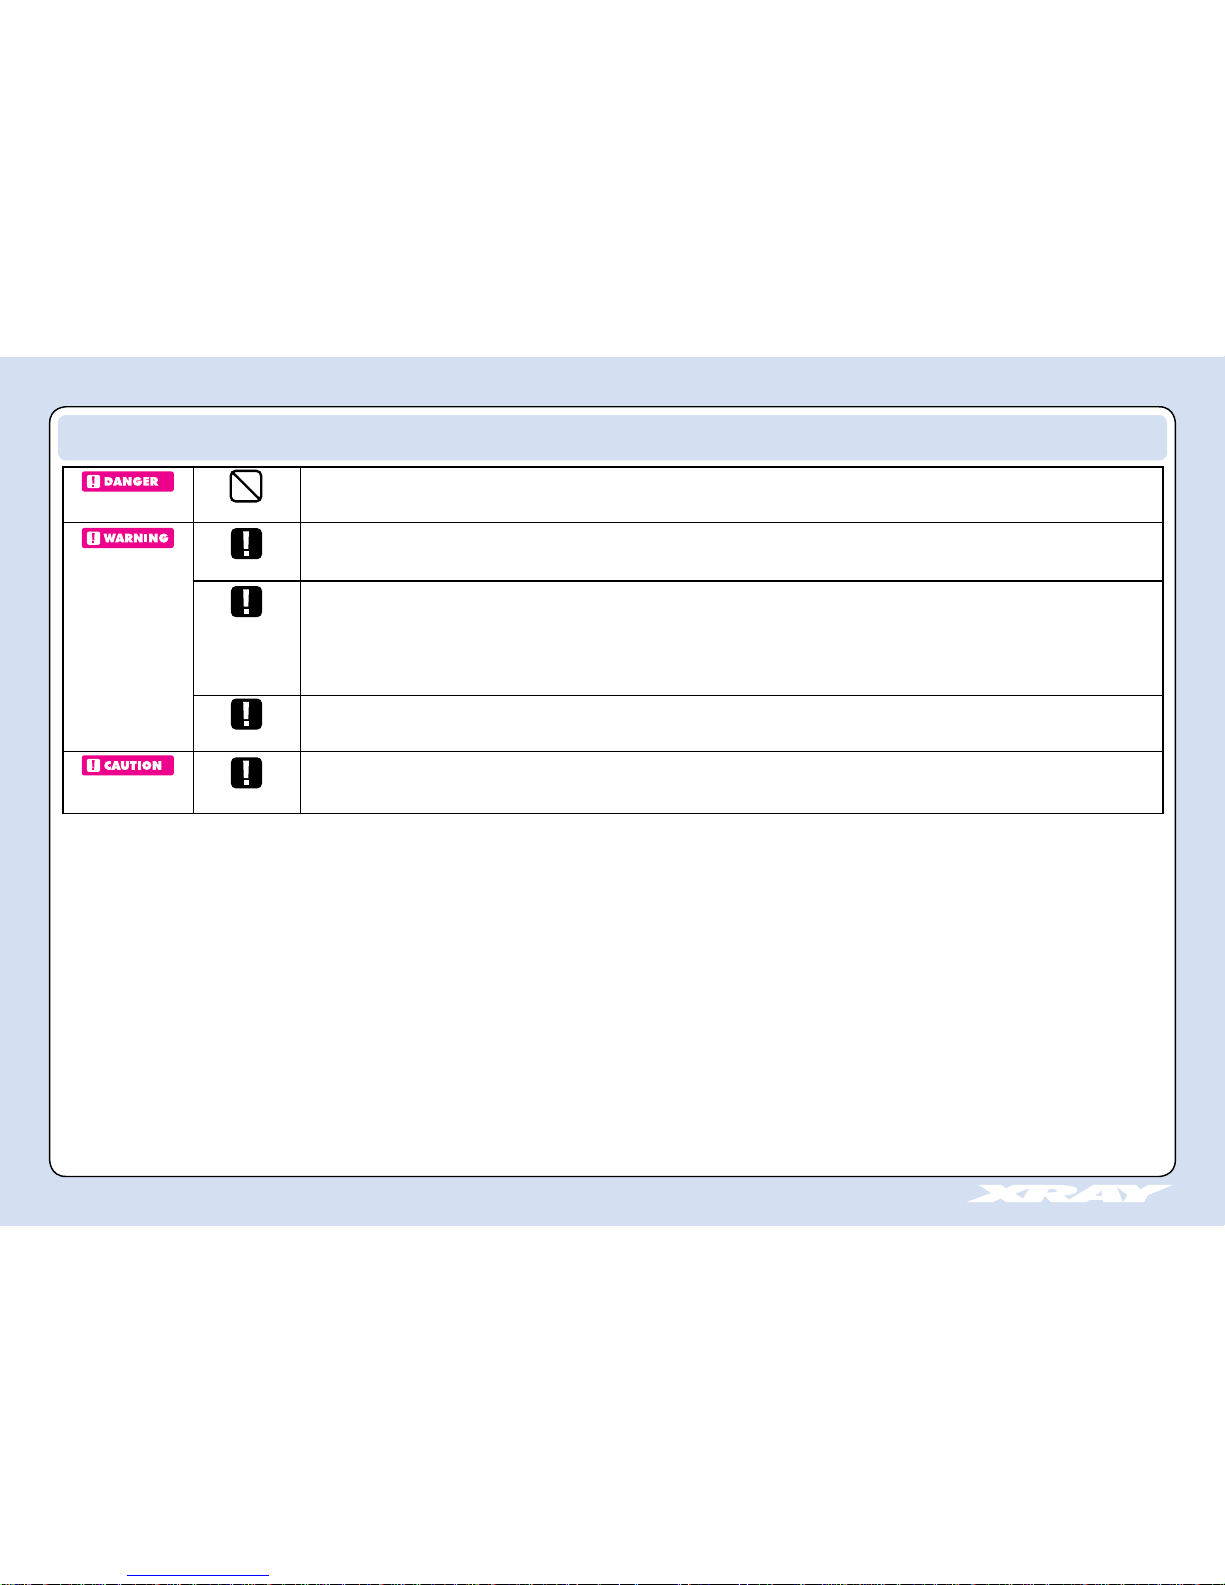
GRAPHIC INDICATIONS
The following words and graphic indications are used throughout this manuals.
Be sure you fully understand these meanings before reading the text.
Indicates an imminently hazardous situation which, if not avoided, will result in death or serious injury.
Indicates a potentially hazardous situation which, if not avoided, could result in death or serious injury.
Indicates a potentially hazardous situation which, if not avoided, may result in minor or moderated injury,
or damage of objects nearby.
DO NOT TOUCH
COMPULSORY
Page 5

5
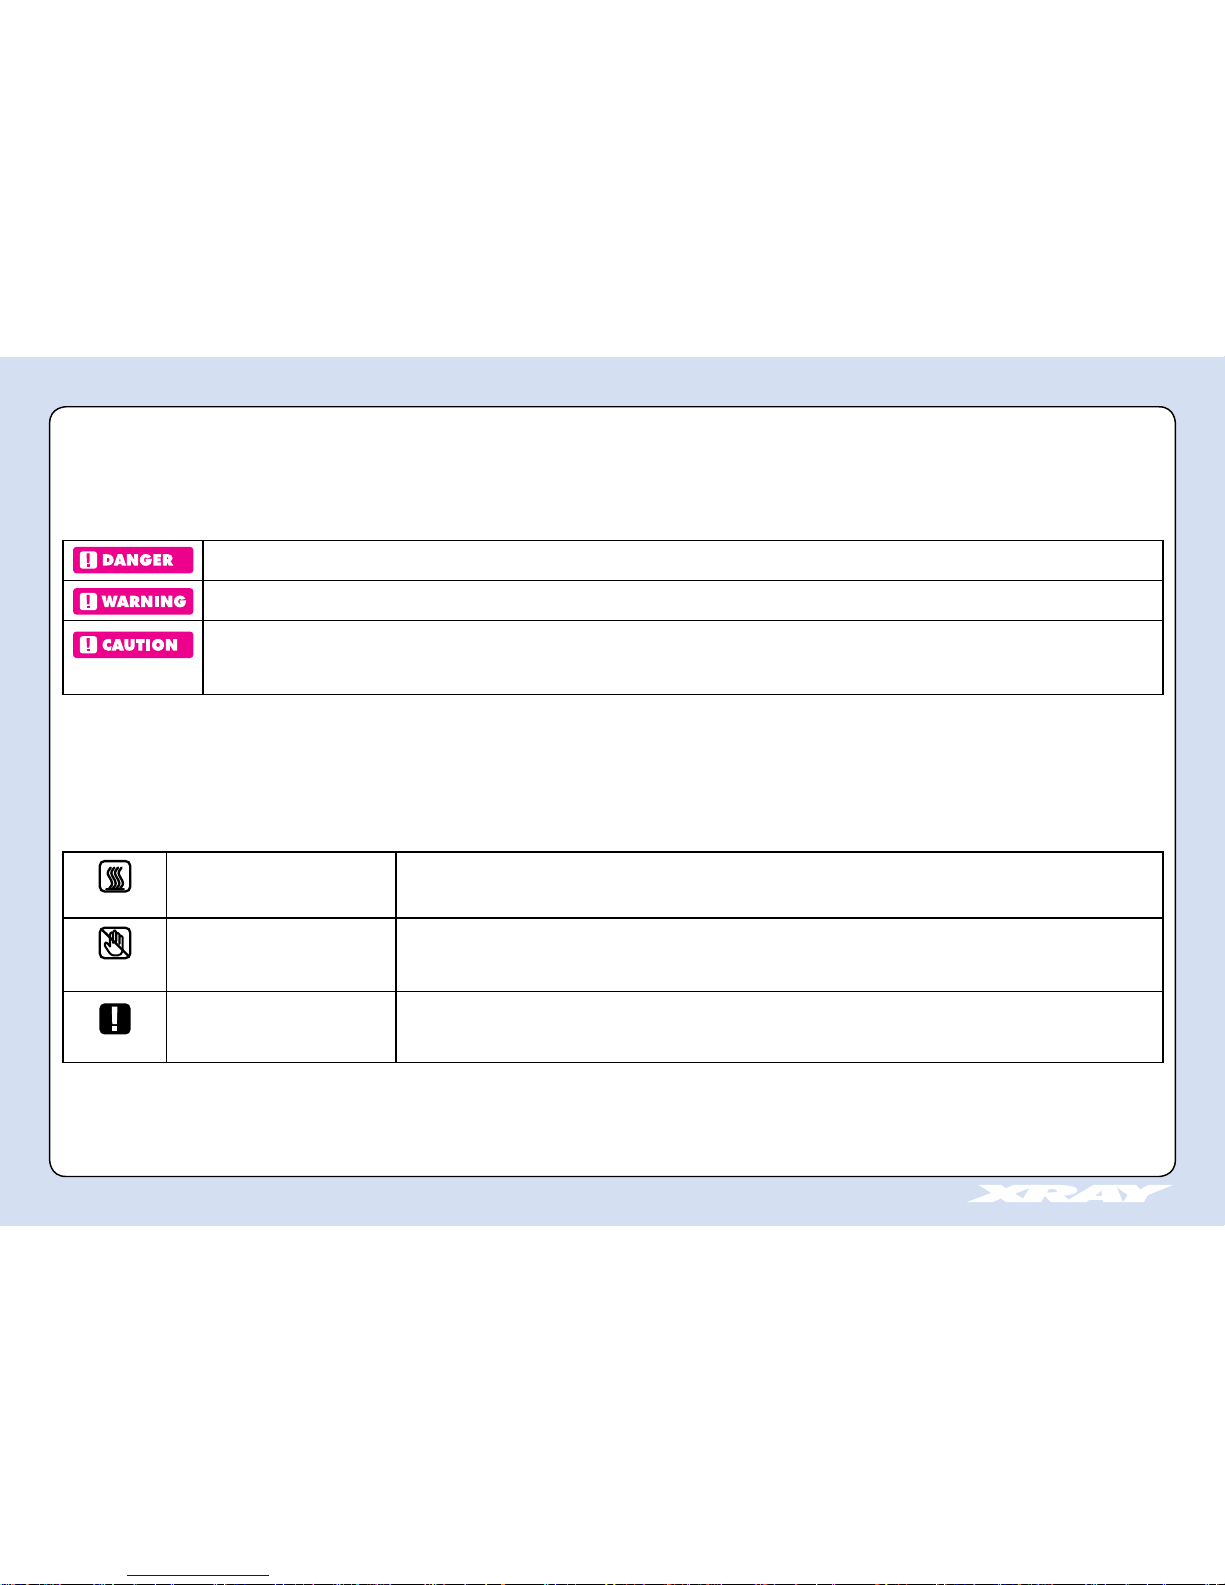
This section illustrates the parts of the NT18 engine, and also describes fuel, glowplug, and air filter that you will use in the
operation of this nitro-powered engine.
PARTS AND EQUIPMENT
Air Filter
Fuel Inlet
Main Needle Valve
Idle Speed Screw
Flywheel
Clutch Bell
Crankshaft
Crankcase
Low-speed Needle
Throttle
Head (Cylinder Head)
Glowplug
Air Intake
Page 6
6
Air Filter
Do not run engine without an air filter!
The air filter protects the engine from the intake of dust and other contaminants. A properly maintained air
filter is essential to the life and performance of the engine. Use proper air filter oil with your air filter. The oil
softens the foam element and traps dirt more easily. We strongly recommend that you clean and re-oil the air
filter after every 1 hour of runtime (even if the filter looks clean) to maintain proper engine performance and
avoid engine damage. To clean the air filter parts (including the foam filter element), wash the parts in hot
soapy water, and rinse thoroughly with clean water. Dry the parts with a clean towel or compressed air (use
safety eyewear). Oil the foam element with proper air filter oil.
Exhaust System
We recommending using only the XRAY-supplied exhaust system for best performance.
Fuel
For break-in and general running, use high-quality, market-available model car fuel containing 20%
lubricant and 15~30% nitromethane by volume ratio.
Although you can obtain more power by increasing the nitromethane content, it will shorten engine
life.
Glowplug
The type and quality of glowplug used for your engine has a substantial impact on overall performance
and reliability. We strongly recommend glowplugs by XRAY. Glowplugs are consumables and the life of
plug depends on several factors and manners of use.
Page 7
7
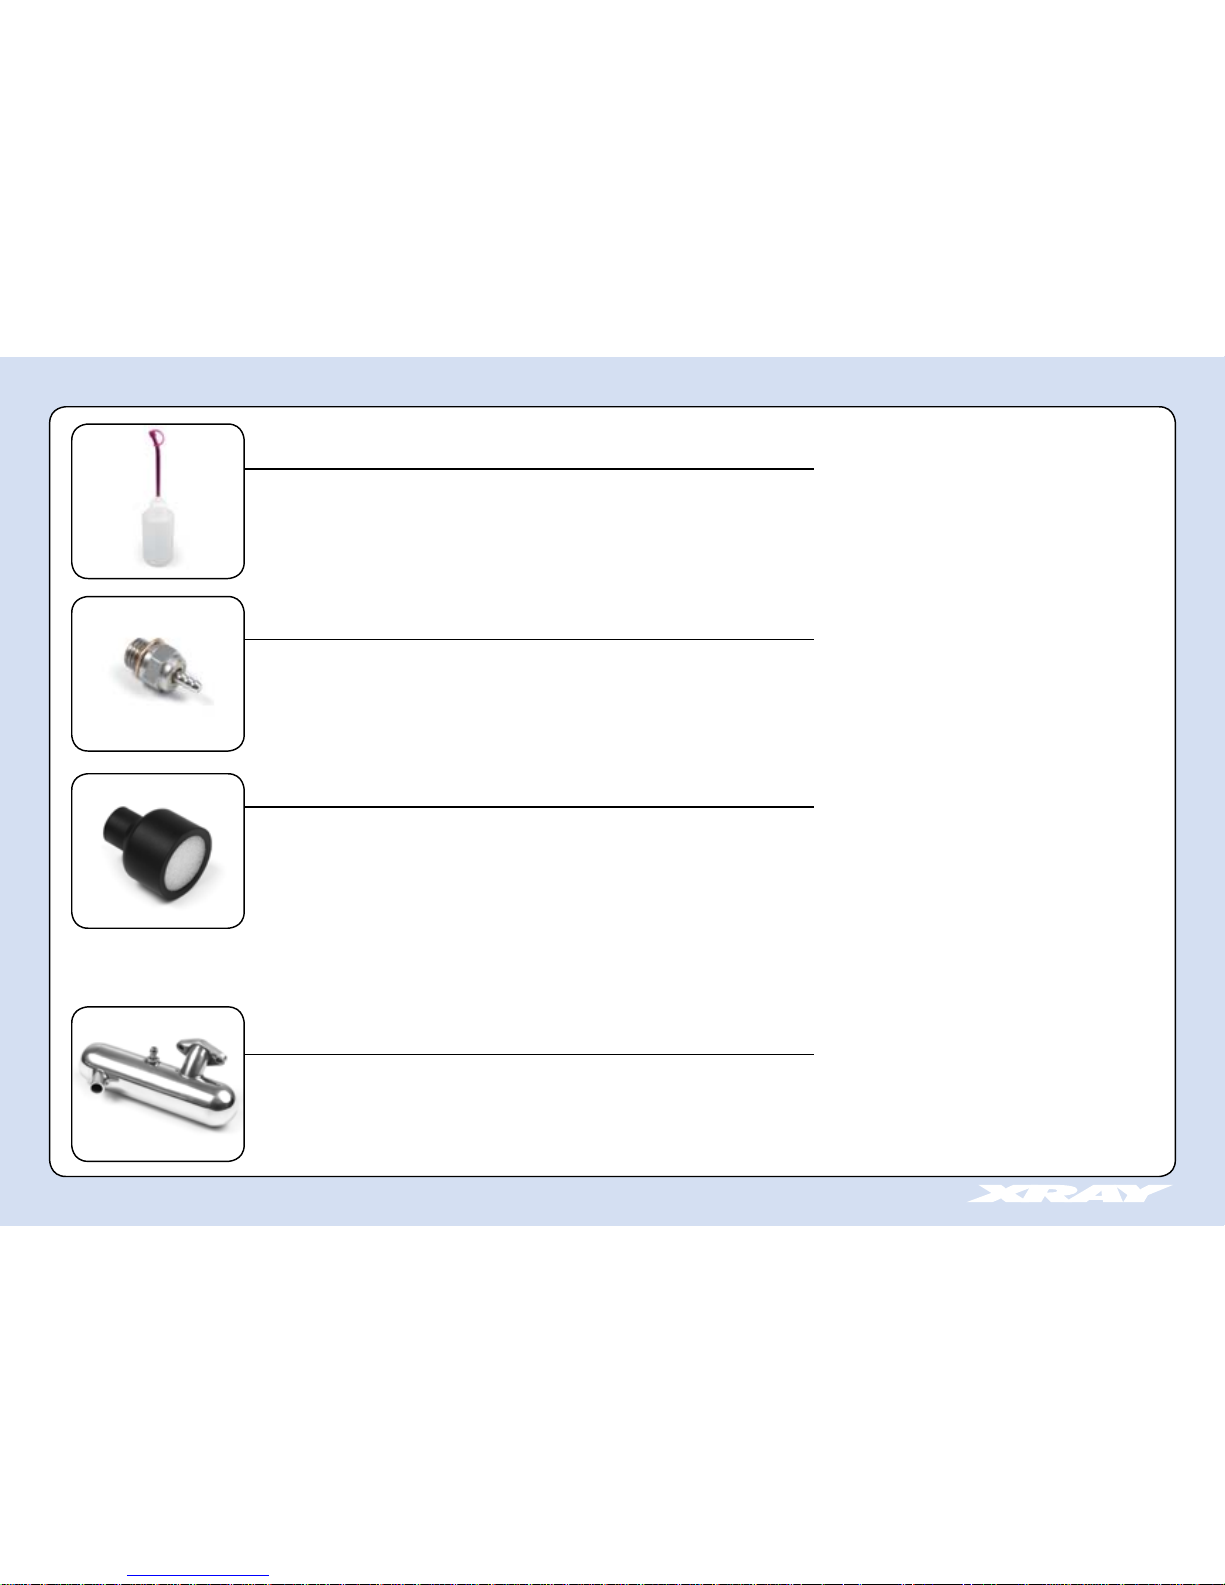
Starter Box
You must start the engine by first spinning the clutch flywheel. We strongly recommend using the
#104300 HUDY Micro Start-Box, which is specifically designed for starting the NT18 engine.
STARTING & SUPPORT EQUIPMENT
Glowplug Starter
A glowplug starter is required to ignite the glowplug for starting. We recommending using a highquality, battery-operated glowplug starter from a reputable manufacturer.
Glowplug Wrench
A glowplug wrench is required for removing/installing the engine glowplug. We recommend using a
high-quality glowplug wrench such as the #107581 HUDY Wrench-Glowplug.
Screwdriver
A small flat-blade screwdriver is required for adjusting the carburetor. We recommend using highquality tools such as those offered by HUDY.
Page 8
8
If you break in your engine by using a propeller, never use a propeller that has any cracks, scratches, or even
the slightest signs of breakage.
This model engine is designed exclusively for installation into model cars.
Never use it for any other purpose. It may cause personal injury or mechanical failure.
Fix the engine firmly to the model, using tough bolts/nuts or screws with locking components/features that will
prevent them from loosening. Do not clamp the engine in a vise.
To test the engine, use a durable engine test stand available from hobby sources such as model shops.
If not affixed properly, the engine may jump off the stand during operation and cause personal injury or
mechanical failure.
In order to avoid ear damage, use an effective silencer (muffler) for sound reduction.
Exhaust gas emits annoying noise to surrounding people.
Pay attention to location and time of use.
Before mounting the engine into the chassis, check that the bottom surfaces of the engine mounts blocks are flat. This is
important to avoid any distortion of the crankcase, and to optimize heat dissipation through the chassis.
Hint: To flatten the bottom part of the mounted engine mounts, attach the engine mounts to the engine, then rub the
bottom of the mounts on a piece of sandpaper until there is full-surface contact.
Mount the engine on the chassis and align the clutch pinion(s) with the gear(s). Adjust the gear mesh.
Hint: Use a piece of paper between the pinion and the gear, tighten the engine mounting screws and remove the paper. This
should give you approximately 0.1mm of play in the gear mesh.
After connecting the fuel and pressure lines and hooking up the throttle linkage to the carburetor, check that the carburetor
opens and closes smoothly without binding. If there is any restriction of movement, adjust the throttle linkage or the position
of the carburetor on the engine.
If your transmitter has throttle servo trim adjustment (a.k.a. "end point adjustment"), adjust the range of motion of the throttle
linkage for full throttle and full brake.
INSTALLATION
PROHIBITION
COMPULSORY
COMPULSORY
COMPULSORY
COMPULSORY
Page 9

9
This section describes proper starting techniques and some troubleshooting information.
Safety Information
Keep loose objects such as shirt sleeves, neckties, and scarves away from the spinning tires, flywheel, and
gears. Be careful not to drop utensils such as screwdrivers and pencils into the spinning tires, flywheel, and
gears. If these objects contact moving engine or transmission parts, it may cause mechanical breakage and
personal injury.
When you operate an engine, keep children and others away from you and the engine.
Anyone who is not operating the engine must be at least 6 meters away from the engine. If the engine comes
off, it may cause injury.
Never operate the engine in an enclosed area such as a basement or a garage. Model engines, like
automobiles, emit poisonous exhaust fumes during operation. Only operate the engines outdoors where there
is good ventilation.
Make certain the glowplug clip is not in the way of the spinning tires, flywheel and gears. Damage may be
caused if it contacts the spinning tires, flywheel or gears.
Check the throttle linkage connections before starting and running the model car.
If any connections fail, it may cause personal injury.
We strongly recommend wearing safety eyeglasses or safety shields when you operate an engine.
Model engine fuel is highly flammable and must be handled with the extreme caution. Keep objects that create
fire risks (such as cigarettes) away from the engine and fuel supply system. No-one should be smoking nearby
the engine or fuel.
STARTING THE ENGINE
FLAMMABLE
DO NOT TOUCH
PROHIBITION
COMPULSORY
PROHIBITION
PROHIBITION
COMPULSORY
Page 10

10
Starting Procedure
Fill up the fuel tank and "dry-start" the engine for 2-3
seconds without applying the glowplug starter, and with
the carburetor in "idle" position; this primes the fuel lines
and allows the fuel to reach the engine. Then apply the
glowplug starter and start the engine. The engine should
fire up immediately.
If the engine does not fire up immediately, check the fuel
line to see if fuel is reaching the carburetor. If fuel is not
reaching the carburetor, remove the glowplug starter,
cover the exhaust tailpipe and "dry-start" the engine for 2
seconds. This will build up extra pressure in the pipe and
in the pressure line to the fuel tank, causing the fuel to be
pushed to the carburetor.
Apply the glowplug starter, and start the engine.
Once the engine has started, apply a little throttle and
allow the engine to warm up to operating temperature.
This is an important routine that you should always
follow. The internal parts need to receive lubrication and
reach operating temperature before the engine can have
a load applied to it.
If your transmitter has throttle servo trim adjustment (a.k.a.
"end point adjustment"), adjust the range of motion of the
throttle linkage for full throttle and full brake.
Page 11

11
Flooding & Hydraulic Lockup
Excess fuel in the cylinder may cause the engine to flood (by extinguishing the glowplug), or it may cause a hydraulic lockup
(when excess fuel fills the cylinder above the piston, preventing the piston from moving upward). If this happens, DO NOT try
to start the engine, or severe engine damage may result.
1. Remove the glowplug, open the throttle fully, cover the glowplug hole with a cloth, then turn over the engine. The excess
fuel will be ejected through the glowplug hole.
2. Check the operation of glowplug with the glowplug starter before screwing the glowplug back in again.
Restart the engine.
Page 12

12
This section contains important engine safety operation information.
Safety Information – ENGINE OPERATION & RELATED MATTERS
Fuel is highly flammable. Always store fuel in a safe place away from any danger of sparks, excessive heat, or
anything which could ignite the fuel. Mishandling fuel and fuel containers may cause fires.
Fuel for model engines contains highly-volatile and poisonous ingredients such as methanol. Store the fuel where
children cannot reach it. If someone‘s skin or face has been splashed with fuel, first wash it away with soap
and water, then immediately consult a physician. If you swallow fuel, it is imperative to seek immediate medical
treatment. Failure to undergo such treatment may endanger your life.
When possible, do not operate the engine-equipped model alone.
Airplanes, helicopters, boats, or automobiles powered by model engines may harm other persons or objects if you
v control. Remember that operating any model with your engine requires skill and continuous safety precautions.
When you operate a model, you should ask for the assistance of an experienced person who can accompany you,
recognize emergency situations nearby, and has enough experience in avoiding possible dangers.
Never touch any part of the engine while it is running, or immediately after the engine has stopped. Some portions
of model engines become considerably hot during operation and remain so for a long time after shutdown. If you
touch those components, you may get burned.
Keep your face, hands, and body away from the spinning tires, flywheel and gears to prevent injury. If the tires,
flywheel or gears break, flying pieces may result in personal injury.
When checking the electric conduction to the plug, use a tool or clamp to handle.
Never touch the plug or cable directly by hand. In this event, keep your face away from the heated portion. Seething
fuel may spout out and cause a skin burn.
After the engine has stopped, it may restart if turned over even without plug heating. Be cautious to avoid such
situations may cause personal injury or equipment failure.
When you handle your model car with the engine running, be especially careful about keeping it away from you
and others.
To stop the engine, reduce the e ngine RPM to idle and pinch the fuel line to stop fuel flowing to the engine. Pay close
attention not to touch rotating parts; carelessness around rotating parts may cause personal injury.
OPERATING THE ENGINE
FLAMMABLE
COMPULSORY
DO NOT TOUCH
PROHIBITION
PROHIBITION
PROHIBITION
PROHIBITION
COMPULSORY
COMPULSORY
Page 13

13
Each engine is shipped from the factory with all carburetor settings set to a standard position.
A nitro-powered engine requires careful break-in the first time the engine is used to allow the internal parts to achieve proper
operating clearances. This is especially true of the piston/cylinder, crankshaft, and conrod. Pay close attention during the initial
break-in period; this process is very important to achieve the best engine performance, reliability, and lifespan.
The proper way to break in this nitro engine is to "heat cycle" the engine with short periods of running followed by cooling down
periods. Heat cycling allows the engine to heat up to its optimum operating temperature, allowing the components to "wear in" to
each other properly. During the running time, the engines should be run only SLIGHTLY rich at the top end; overly rich mixtures
and cold temperature break-in will lead to premature wear and failure of the piston & sleeve and other engine components.
First, install the engine in the car, then break in the engine by performing the following steps:
1. Keep the carburetor factory settings; do not adjust.
2. Fill the fuel tank and "dry-start" the engine for 2-3 seconds without applying the glowplug starter, and with the carburetor
in the "idle" position. This primes the fuel lines and allows the fuel to reach the engine.
3. Apply the glowplug starter and start the engine with a starter. We strongly recommend using the #104300 HUDY Micro Start-Box.
4. Allow the engine to idle for a short time so the engine warms up.
5. Run the engine for 5~8 minutes, varying the throttle setting, without exceeding 1/2 throttle.
The engine should run cleanly, and only SLIGHTLY rich at the top (noted by a very slight "burbling"). If the engine runs
very crisply with high temperature and hard acceleration, it is probably running too lean; turn the main needle CCW
slightly to richen the mixture very slightly at the top.
6. Stop the engine and allow it to cool down completely. Make sure the piston does not get stuck at top of the cylinder
(TDC); rotate the flywheel to move the piston to the bottom of the cylinder (BDC).
7. Run the engine for several more heat cycles:
• 5~8 minutes up to 2/3 throttle, then complete cool-down.
• 5~8 minutes up to 3/4 throttle, then complete cool-down. (During the running, start to lean the main needle so it
runs only very slightly rich – less than before – on top.)
• Run through a full tank of fuel up to full throttle, adjusting the main needle so the engine runs cleanly at high RPM.
Do not run the engine at high RPM without load; that is, don’t pick the car off the ground and run the engine hard. The
engine will overheat without the airflow over its cooling head, damaging the engine components.
ENGINE BREAK-IN
Page 14

14
CARBURETOR ADJUSTMENT – OVERVIEW
The "Golden Rule of Carburetor Adjustment" is to make only small adjustments at one time, maximum 1/8
turn (45°), especially when fine tuning. The engine is very responsible to small changes in mixture settings.
The carburetor on the NT18 engine is preset at the factory, meaning that the original settings are close to where they should
be for normal operation.
The engine carburetor has 3 adjustments:
Main needle valve
Low-speed needle
Idle adjustment screw
The carburetor has three settings that may be adjusted. Note that the initial position of each setting has been adjusted by
the air gauge before shipping from our factory.
Throttle
Linkage Ball
Air Intake
Main Needle Valve
Fuel Inlet
Idle Adjustment Screw
Low-speed
Needle
Page 15

15
1. Main Needle Valve
The main needle valve controls the overall fuel flow to the carburetor, though its effects are
particularly noticeable between ¼ and full throttle.
In the situation where this setting has not been adjusted, or if you get lost with your setup,
put the main needle valve to the factory setting:
• Turn the needle CW until it barely stops (do not tighten it further or you will damage
the carburetor).
• Turn the needle CCW by 3-4 turns from the fully-closed position.
2. Low-speed Needle
The low-end needle controls the amount of fuel at idle and low RPM (up to approximately
¼ throttle).
3. Idle Adjustment Screw
The idle screw controls the idle RPM when the carburetor is fully closed. We strongly
recommend that the initial, factory-default setting be used for normal operation.
Page 16

16
Main Needle Adjustment
When the main needle is properly adjusted, the engine immediately responds to the throttle operation with clean, hard
acceleration without hesitation.
To check if the engine is running at a proper setting, pinch the fuel line to the carburetor and observe the results:
• At a proper setting, the engine RPM increases instantly then the engine dies out.
• If engine dies out immediately without increasing RPM, the main needle setting is too lean.
Low-End Needle Adjustment
The most difficult thing to adjust is the low-speed adjustment. Keep the following principles in mind when doing this:
• Use the idle adjustment screw to adjust the idle RPM immediately after closing the carburetor.
• Use the low-speed needle to adjust the fuel mixture 2-5 seconds after closing the carburetor.
• Use only a ½ turn each way.
The low-end needle of each individual engine is precisely adjusted at the factory. The low-end needle adjusts the performance
of the engine between idle up to approximately ¼ throttle. Above ¼ throttle the main needle has the most effect on engine
performance.
CARBURETOR ADJUSTMENT – BEFORE PUTTING THE CAR ON THE TRACK
After the engine is running and has come up to operating temperature (within 15-20 seconds) proceed as follows:
Stage 1: Setting the Main Needle Slightly Rich
Take the car off the ground, and open the throttle fully. The engine should run cleanly until it
reaches 80% of top RPM, after which it should start to run slightly rich (4-stroking):
• If the engine runs cleanly all the way up to top RPM, richen the main needle (counterclockwise) until it starts to 4-stroke at approximately 80% of its top RPM
• If the engine runs too rich (4-stroking all the way) lean the main needle (clockwise) until
it only starts to 4-stroke at approximately 80% of its top RPM
Adjust main
needle valve
Page 17

17
Stage 3: Setting the Low-speed Needle
Open the carburetor for 2-3 seconds and let the engine clean out. Close the carburetor and
let the engine idle.
• If the engine idles for 2-5 seconds and then the idle RPM decreases, the engine is
running too rich during idle. Lean the low speed needle (clockwise) to remedy this
condition. Repeat this step until the engine idles reliably at a constant RPM for at least
20-30 seconds after the carburetor has been opened for 2-3 seconds.
• If the engine idles for 2-5 seconds and then the idle RPM increases, the engine is
running too lean during idle. Richen the low speed needle (counter-clockwise) to
remedy this situation.
• If the engine will not idle at all, rich the low speed needle (counter-clockwise), or turn
the idle adjustment screw clockwise to increase the idle RPM.
NOTE: Because adjusting the low speed needle affects the idle RPM, use the idle adjustment screw to get the engine to idle
at the right RPM.
Once you are satisfied that you have achieved reliable carburetor settings, you are ready to put your car on the track.
Stage 2: Setting the Idle Speed
Take the car off the ground, and open the throttle fully for 2-3 seconds. Close the carburetor
and check the idle speed that occurs immediately after.
• If the engine stops almost immediately, turn the idle adjustment screw clockwise to
increase the idle RPM.
• If the idle RPM is too high, turn the idle adjustment screw counter-clockwise to reduce
the idle RPM.
Adjust idle speed RPM
Adjust low-speed needle
Page 18

18
CARBURETOR ADJUSTMENT – AT THE TRACK
You can only fine-tune the main needle setting at the track. Initially, the main needle should still be set a little rich. Fill the fuel
tank, run the car up to maximum speed for a few laps, and check if it reaches top RPM without running rich towards the end
(4-stroking). Lean the main needle by small increments (1/12 of a turn, like 1 hour on a clock) and run the car again. Repeat
these small adjustments until the engine accelerates well and reaches maximum speed without running rich. It is advised to
then richen the main needle 1/8 of a turn (counter-clockwise).
Running the engine too lean will cause the engine to overheat, resulting in excessive engine wear and possibly breakdown.
A fast, simple way to check the engine temperature is to apply a few drops of water to the cylinder head. The drops should
evaporate only after 3-5 seconds. If they evaporate immediately the engine is too hot; richen the main needle 1/8 of a turn
(counter-clockwise). Check engine temperature regularly and often.
The idle RPM and low-speed needle settings may require a little fine tuning after the main needle has been set properly. Once
properly adjusted, the engine should produce a strong, high-pitched sound at maximum speed, and a thin trail of smoke
should be visible from the exhaust tailpipe.
For more information about setting the idle and low-speed needle settings, see section Carburetor Adjustment – Before
Putting the Car on the Track.
NOTE: The carburetor settings may change with changes in weather conditions, fuel, glowplug, or exhaust system. After
changing any of these, always richen the main needle (counter-clockwise) ¼ to ½-turn and then re-adjust the main needle
again on the track.
Page 19

19
FINE-TUNING THE CARBURETOR
After your engine has been properly broken in and tuned at the track, be aware that changes in weather (temperature,
humidity, barometric pressure), altitude, and fuel nitro content will affect the performance of the engine. See the table below
for guidelines on how to adjust your engine’s carburetor settings to compensate for these various changes.
When… does this… change main needle setting…
Temperature decreases richer
increases leaner
Humidity decreases slightly richer
increases slightly leaner
Barometric pressure decreases leaner
increases richer
Altitude lower richer
higher leaner
Fuel nitro content (%) lower leaner
higher richer
ENGINE TROUBLESHOOTING
Engine spins but will not start:
• Make sure your glowplug starter is fully charged and is properly connected to the glowplug. If the starter is fully charged,
replace the glowplug.
• Verify that fuel is getting to the carburetor. Remove the fuel line from the carburetor and see if there is fuel in it.
• Check your carb settings. It may be necessary to adjust the carb settings if the weather has significantly changed since
the last time you ran the engine.
Page 20

20
• The engine’s compression may be low due to wear. This will make the engine difficult to start when it is warm, and may
tend to stall when running and when the throttle is closed suddenly.
Engine will not spin (starter box will not turn the engine):
• The engine may be flooded and hydraulically locked. Refer to section "Flooding & Hydraulic Lockup".
• Check for binding at the engine flywheel. If you are not able to turn the engine by hand, the engine could be flooded,
there could be binding in the clutch system, the piston may be stuck at the top of the cylinder (TDC), or there could be
internal engine damage. (Note: During engine break-in, it is normal for the engine to be extremely tight and hard to
turn when the piston reaches the top of the cylinder.)
Engine is very sluggish, hard to start, and will not idle during initial break in:
• The factory default break-in settings (on the carburetor) may be too rich for your location, weather conditions, or fuel
brand. Extremes in temperature, humidity, barometric pressure, and altitude cannot always be accounted for by the
factory default settings. These symptoms may occur when air density is very low (such as in high mountains or extremely
cold temperatures. Under these conditions, lean the main needle valve slightly (1/8 turn CW), and check if there is any
improvement in starting and idling. Only lean the main needle until the engine runs and idles reliably, then continue the
break-in process.
• Different fuel brands/types – in combination with extreme weather conditions – can also make the factory default breakin settings too rich and cause these symptoms. Try leaning the fuel mixture slightly (1/8 turn CW), and check if there is
any improvement in starting and idling.
Engine performance is sluggish:
• Engine performance depends on the carb settings and how they compensate for the weather & atmospheric conditions.
Before suspecting other issues, richen the main needle by at least 1/4 turn CCW, then retune the engine.
• Try installing a new glowplug.
• If carb settings are proper, ensure the fuel is fresh. Old fuel, or fuel that has been left uncapped for a long period, may
cause sluggish performance.
• Verify that there is no drivetrain binding.
Page 21

21
ENGINE CARE
Cleanliness
Always keep the outside of your engine clean.
Fuel
Use clean, fresh fuel and keep your fuel can, pump, and fuel system free from dirt.
Model fuel contains alcohol, which is hydrophilic (it attracts moisture from the atmosphere). If the fuel container is kept open
it will absorb water from the air, contaminating the fuel and possibly causing corrosion of the internal engine parts.
After-run Oil
After each running session, run the engine until all fuel is used up, and then disconnect the fuel line from the carburetor. Put
4-5 drops of after-run oil (Marvel Mystery Oil, Prather, Pacer, etc.) into the carburetor and turn the engine by hand several
times to coat the internal engine parts with oil. This will protect the engine bearings and internal parts from corrosion.
The use of after-run oil is also important during periods of prolonged storage (such as winter):
• Remove the engine from the model.
• Liberally apply oil into the carburetor and glowplug hole.
• Wrap your engine in a soft cloth and store it in a sealed plastic bag.
Engine Disassembly
Do not dismantle your engine unnecessarily as this may upset precision fits such as piston/cylinder and crank pin/connecting
rod assembly.
Piston Stuck at top of cylinder – Top Dead Center (TDC):
A brand new engine that has not had a lot of break-in will typically have a very tight fit between the piston and the top of
the cylinder (known as "pinch"), since the cylinder has a tapered fit. The fit should not be so tight that then engine cannot be
started. If the piston gets stuck at TDC, use a pair of pliers to grasp the flywheel from the bottom of the engine. Rotate the
flywheel CCW (viewed from the front of the engine) until the flywheel turns; you should feel the piston become unstuck from
the top of the cylinder.
Page 22

22
WARRANTY
If it is necessary to clean your engine completely (such as after a crash), remove only the following:
• Carburetor (do not disassemble)
• Exhaust pipe
• Crankcase backplate
• Cylinder head
Flush the entire engine with fresh fuel and reassemble. Apply after-run oil to the engine and store it or re-install the engine
in the model.
Do not disassemble your engine further than described above, or your warranty may be voided!
Our warranty covers only workmanship and manufacturing defects of the original, unmodified, and unused engine and parts,
for a period 1 year from the original date of purchase. Neither the engine nor any of its individual parts and components
are covered by warranty after the engine has been started or used. Claims for damage caused by customer disassembly,
use of improper or substandard fuel, use of improper accessories (such as muffler, glowplug, etc.), crashes, abuse, improper
operation, improper mounting, improper adjustment, or lack of or improper maintenance will not be covered by this warranty.
Any use of the product for other than its specific intended use will automatically void this warranty. Use only authentic XRAY
spare parts, use of any other products will void this warranty. Claims must be accompanied by a dated proof of purchase
(registered receipt, credit card invoice, etc.).
Things to Know About your Engine
High-performance competition engines can sometimes fail; no guarantee for these types of failures exist, and we are not
responsible for the use and treatment of an engine. These engines can make extremely high RPMs and build up incredible
loads inside. It is extremely important that you check frequently for excess play in any components (especially the conrod/bigend) and also engine compression. Most failures occur because of low-quality fuel or mixtures, bad carburetor settings, bad
functioning of the air filter, or excessive wear of moving parts. Please take note that it is suggested not to modify any parts
of the engine.
Page 23

SERVICING THE ENGINE
Should your engine require service, please follow the following guidelines. Do not return the engine to the place of purchase,
as they are not authorized or equipped to perform service.
1. Remove the engine from the model. We cannot accept equipment for service other than the engine.
2. Along with your engine and proof of purchase, enclose a complete written explanation of the problem(s) with as much
detail as possible.
3. Be sure to include your complete and proper name, address, and daytime telephone number(s).
The charges for repairs will be billed to you C.O.D. Please mention if you wish to have an estimation of repair charges prior
to us beginning service. (This may cause a slight delay in your repair.) Contact your national distributor who will advise you
how to proceed.
If you want to repair the engine yourself, take care of the following:
• Clean the outside of the engine thoroughly before you open it, work on a clean spot, use proper tools. Any dust or dirt
that enters the engine will make considerable damage.
• All moving parts inside the engine are subject to wear. If a piston/liner has worn out, or if the big-end/conrod connection
has worn, you must replace these parts. If the engine has broken you must check that all other moving parts are still in
good shape. If you only change one part and other parts are not in good shape, it is highly likely that your engine will
suffer another failure shortly thereafter.
• If you want to replace the conrod, be sure the big-end of your crankshaft is still round and at a good size, if not replace
the crankshaft. If you do not replace the crankshaft and re-use the engine, a failure may occur such as conrod or piston
breakage.
• If you replace the piston and liner, be sure to check the big-end on the crankshaft.
• These high-technology engines need to be treated with precision. If you are not sure how to modify or repair your engine,
ask your local dealer to do it for you or return the engine to us.
23
Page 24

24
388820 AIR FILTER BODY
388840 AIR FILTER FOAM
610001 XRAY NT18 0.8cc ENGINE
611001 CRANKCASE WITH BEARINGS + CARBURETOR RETAINER
611201 REAR COVER & GASKET
611401 CRANKSHAFT
611601 BLUE HEATSINK HEAD - CNC MACHINED + HEAD SHIM
612001 PISTON & SLEEVE SET & CONNECTING ROD SET
616001 CARBURETOR
681001 XRAY NT18 MUFFLER
681801 MUFFLER GASKET
681901 GLOWPLUG
908275 HEX SCREW SOCKET HEAD CAP M2.5x25 (10)
960025 NUT M2.5 (10)
24
Page 25

612001
681801
616001
388820
388840
960025
681901
611601
611201
681001
611001
908275
611001
611401
NT18 ENGINE PARTS
25
Page 26

XRAY MODEL RACING CARS
XRAY MODEL RACING CARS
P.O.BOX 103, 911 50 TRENČÍN, SLOVAKIA, EUROPE
P.O.BOX 103, 911 50 TRENČÍN, SLOVAKIA, EUROPE
PHONE: ++421 905 402724
PHONE: ++421 905 402724
support@teamxray.com
support@teamxray.com
XRAY MODEL RACING CARS
P.O.BOX 103, 911 50 TRENČÍN, SLOVAKIA, EUROPE
PHONE: ++421 905 402724
support@teamxray.com
 Loading...